

Page 1
Instruction Manual
EN
Page 2

Congratulations on the purchase of your ECOVACS ROBOTICS DEEBOT!
We hope it brings you many years of satisfaction. We trust the purchase of your
new robot will help keep your home clean and provide you more quality time to
do other things.
Live Smart. Enjoy Life.
Should you encounter situations that have not been properly addressed in
this Instruction Manual, please contact our Customer Service Center where a
technician can address your specic problem or question.
For more information, please visit the ECOVACS ROBOTICS official website:
www.ecovacs.com
The company reserves the right to make technological and/or design changes
to this product for continuous improvement.
Thank you for choosing DEEBOT!
Page 3

EN
1. Important Safety Instructions........................................................................................................2
2. Package Contents and Technical Specications......................................................................4
2.1 Package Contents........................................................................................................................4
2.2 Specications................................................................................................................................4
2.3 Product Diagram..........................................................................................................................5
3. Operating and Programming.........................................................................................................7
3.1 Notes Before Cleaning................................................................................................................7
3.2 Quick Start......................................................................................................................................8
3.3 Cleaning Mode Selection........................................................................................................11
3.4 Programming the Robot.........................................................................................................13
3.5 Optional Advanced Wet/Dry Mopping System..............................................................15
4. Maintenance......................................................................................................................................17
4.1 Dust Bin and Filters...................................................................................................................17
4.2 Advanced Wet/Dry Cleaning Cloth, Advanced Wet/Dry Reservoir...........................18
4.3 Main Brush and Side Brushes................................................................................................19
4.4 Other Components...................................................................................................................20
5. Troubleshooting...............................................................................................................................21
Contents
Page 4

EN
2
When using an electrical appliance, basic precautions should always be followed, including
the following:
READ ALL INSTRUCTIONS BEFORE USING THIS APPLIANCE.
SAVE THESE INSTRUCTIONS
1. This Appliance is not intended to be used by children under 8 or anyone lacking knowledge
on proper use. Supervision may be necessary. Do not allow children to sit on or play with
the Appliance.
2. Clear the area to be cleaned. Remove power cords and small objects from the floor that could
entangle the Appliance. Tuck rug fringe under the rug base, and lift items such as curtains and
tablecloths o the oor.
3. If there is a drop off in the cleaning area due to a step or stairs, you should operate the
Appliance to ensure that it can detect the step without falling over the edge. It may become
necessary to place a physical barrier at the edge to keep the unit from falling. Make sure
the physical barrier is not a trip hazard.
4. Only use as described in this manual. Only use attachments recommended or sold by the
manufacturer.
5. Please make sure your power supply voltage matches the power voltage marked on the
Charging Dock.
6. For INDOOR household use ONLY. Do not use the Appliance in outdoor, commercial or
industrial environments.
7. Use only the original rechargeable battery and Charging Dock provided with the Appliance
from the manufacturer. Non-rechargeable batteries are prohibited. For battery information,
please refer to Specications section.
8. Do not use without dust bin and/or lters in place.
9. Do not operate the Appliance in an area where there are lit candles or fragile objects.
10. Do not use in extremely hot or cold environments (below -5˚C/23˚F or above 40˚C/104˚F).
11.
Keep hair, loose clothing, ngers, and all parts of body away from any openings and moving parts.
12. Do not operate the Appliance in a room where an infant or child is sleeping.
13. Do not use Appliance on wet surfaces or surfaces with standing water.
14. Do not allow the Appliance to pick up large objects like stones, large pieces of paper or any
item that may clog the Appliance.
15. Do not use Appliance to pick up flammable or combustible materials such as gasoline, printer
or copier toner, or use in areas where they may be present.
16. Do not use Appliance to pick up anything that is burning or smoking, such as cigarettes,
matches, hot ashes, or anything that could cause a re.
17.
Do not put objects into the suction intake. Do not use if the suction intake is blocked. Keep the
intake clear of dust, lint, hair, or anything that may reduce air ow.
18.
Take care not to damage the power cord. Do not pull on or carry the Appliance or Charging
Dock by the power cord, use the power cord as a handle, close a door on the power cord, or
pull power cord around sharp edges or corners. Do not run Appliance over the power cord.
Keep power cord away from hot surfaces.
19. If the power cord is damaged, it must be replaced by the manufacturer or its service agent
in order to avoid a hazard.
20. Do not use the Charging Dock if it is damaged.
21.
Do not use with a damaged power cord or receptacle. Do not use the Appliance or Charging
Dock if it is not working properly, has been dropped, damaged, left outdoors, or come in
contact with water. It must be repaired by the manufacturer or its service agent in order to
avoid a hazard.
1. Important Safety Instructions
Page 5

EN
3
22. Turn OFF the power switch before cleaning or maintaining the Appliance.
23. The plug must be removed from the receptacle before cleaning or maintaining the Charging
Dock.
24.
Remove the Appliance from the Charging Dock, and turn OFF the power switch to the Appliance
before removing the battery for disposal of the Appliance.
25.
The battery must be removed and discarded according to local laws and regulations before
disposal of the Appliance.
26. Please dispose of used batteries according to local laws and regulations.
27. Do not incinerate the Appliance even if it is severely damaged. The batteries can explode
in a re.
28. When not using the Charging Dock for a long period of time, please unplug it.
29. The Appliance must be used in accordance with the directions in this Instruction Manual.
ECOVACS ROBOTICS cannot be held liable or responsible for any damages or injuries
caused by improper use.
1. Important Safety Instructions
Page 6
EN
4
2. Package Contents and Technical Specications
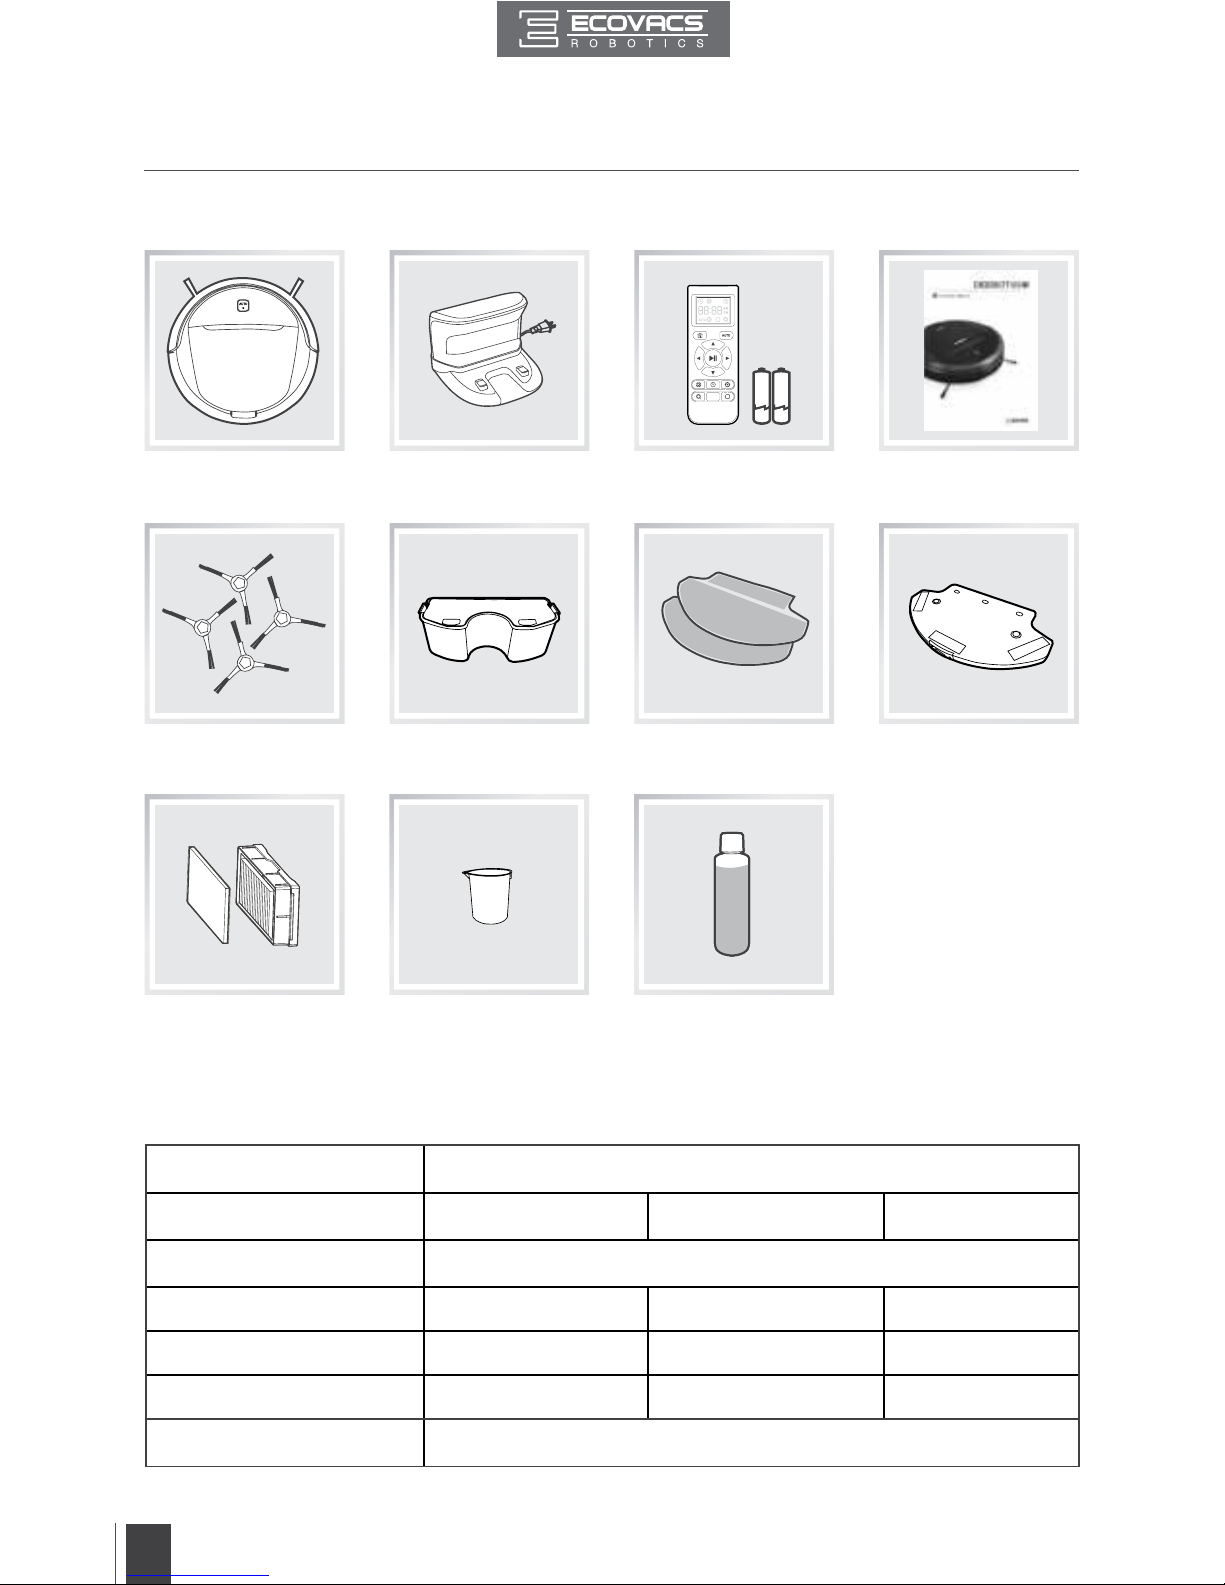
2.1 Package Contents
Robot
(4) Side Brushes
Sponge Filter and
High Eciency Filter
Battery Pack (2) Advanced Wet/Dry
Cleaning Cloths
Advanced Wet/Dry
Reservoir
Charging Dock Remote Control
(with batteries)
Instruction Manual
Model DM81
Working Voltage 12V DC
Rated Power
40W
Charging Dock Model CH1465A
Rated Input Voltage 100-240V AC Rated Output Voltage
20V DC
Rated Output Current 1A Rated Power 20W
Remote Control Model RC1507 Input Voltage 3V DC
Battery Ni-MH 3000mAh
2.2 Specications
*
Technical and design specications may be changed in the course of continuous product improvement.
Measuring Cup Reservoir Cleaning
Solution
Page 7
EN
5
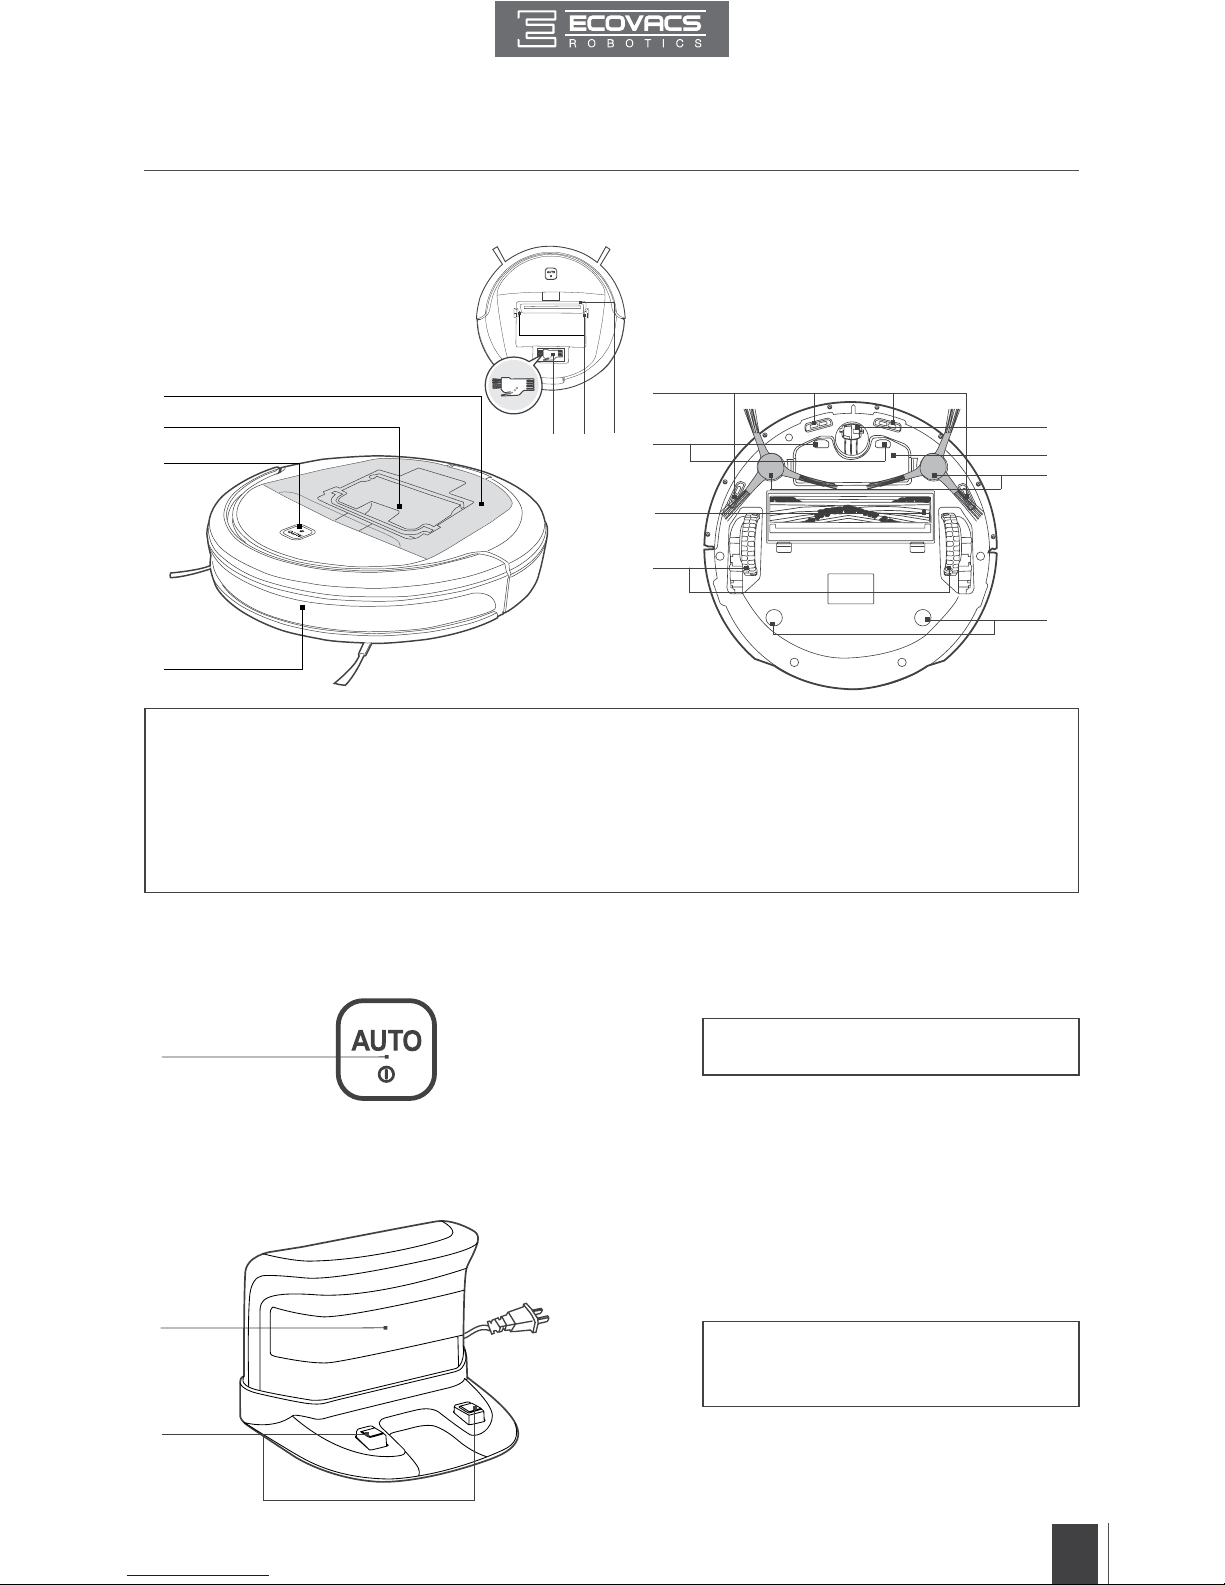
2.3 Product Diagram
Robot
1. Top Cover
2. Dust Bin
3. AUTO Mode Button
4. Anti-Collision Sensors
5. Anti-Drop Sensors
6. Charging Contacts
7. Main Brush
8. Driving Wheels
9. Universal Wheel
10. Battery Pack
11. Side Brushes
12. Advanced Wet/Dry Reservoir Slots
13. Multi-Function Cleaning Tool
14. Upgrade Port(for Customer Service only)
15. Infrared Receiver for the Remote Control
1
3
2
4
5
6
7
8
13 1514
9
10
11
12
2. Package Contents and Technical Specications
Charging Dock
1
1. Infrared Signal Generators
2. Charging Dock Pins
1. AUTO Mode Button
Control Panel
1
2
Page 8
EN
6
2. Package Contents and Technical Specications
2
1
3
4
7
8
10
11
5
6
9
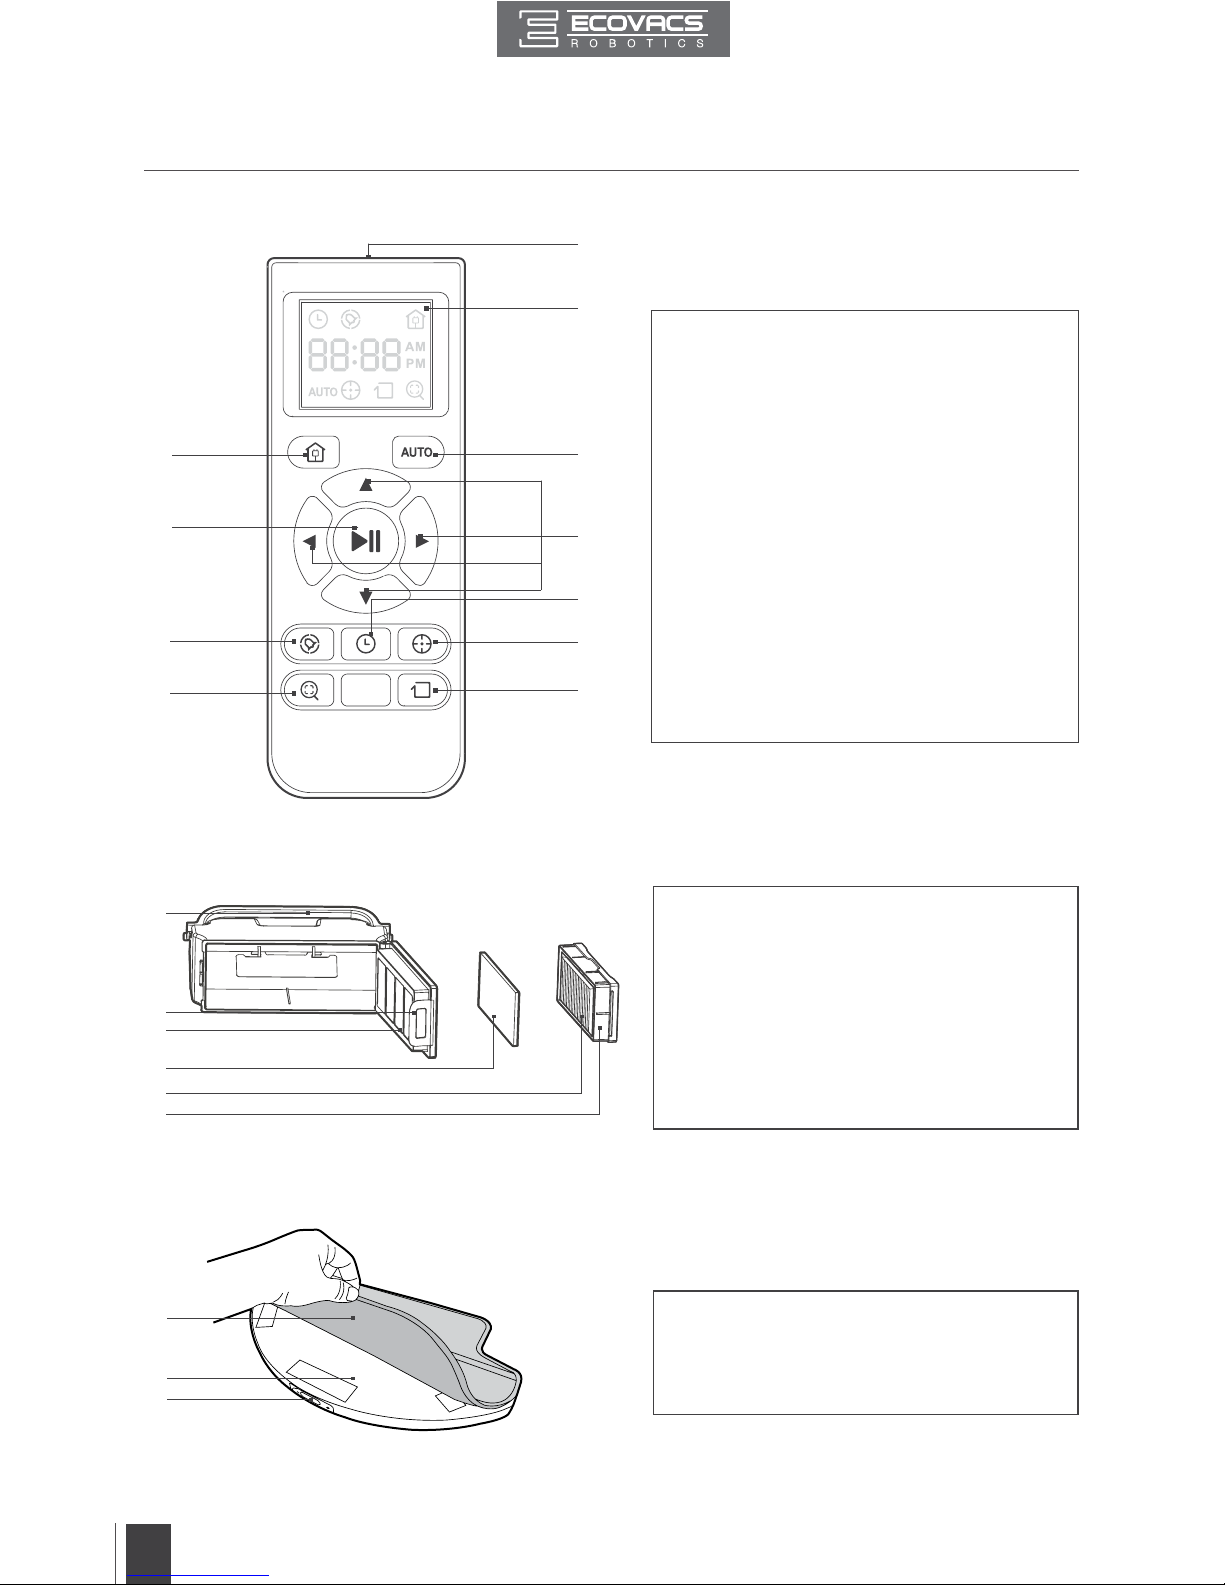
Remote Control
1. LCD Screen
2. Return to Charger Mode Button
3. AUTO Mode Button
4. Direction Control Buttons
5. START/PAUSE Button
6. Time Scheduling Button
7. Set Current Time Button
8. Spot Cleaning Mode Button
9. Intensive Cleaning Mode Button
10. Edge Cleaning Mode Button
11. Infrared Emitter
Dust Bin
Advanced Wet/Dry Reservoir
1. Dust Bin Handle
2. Dust Bin Lock
3. Filter Net
4. Sponge Filter
5. High Eciency Filter
6. Dust Bin Cover
1. Advanced Wet/Dry Cleaning Cloth
2. Advanced Wet/Dry Reservoir
3. Water Inlet
4
5
6
1
2
3
1
2
3
Page 9
EN
7
3.1 Notes Before Cleaning
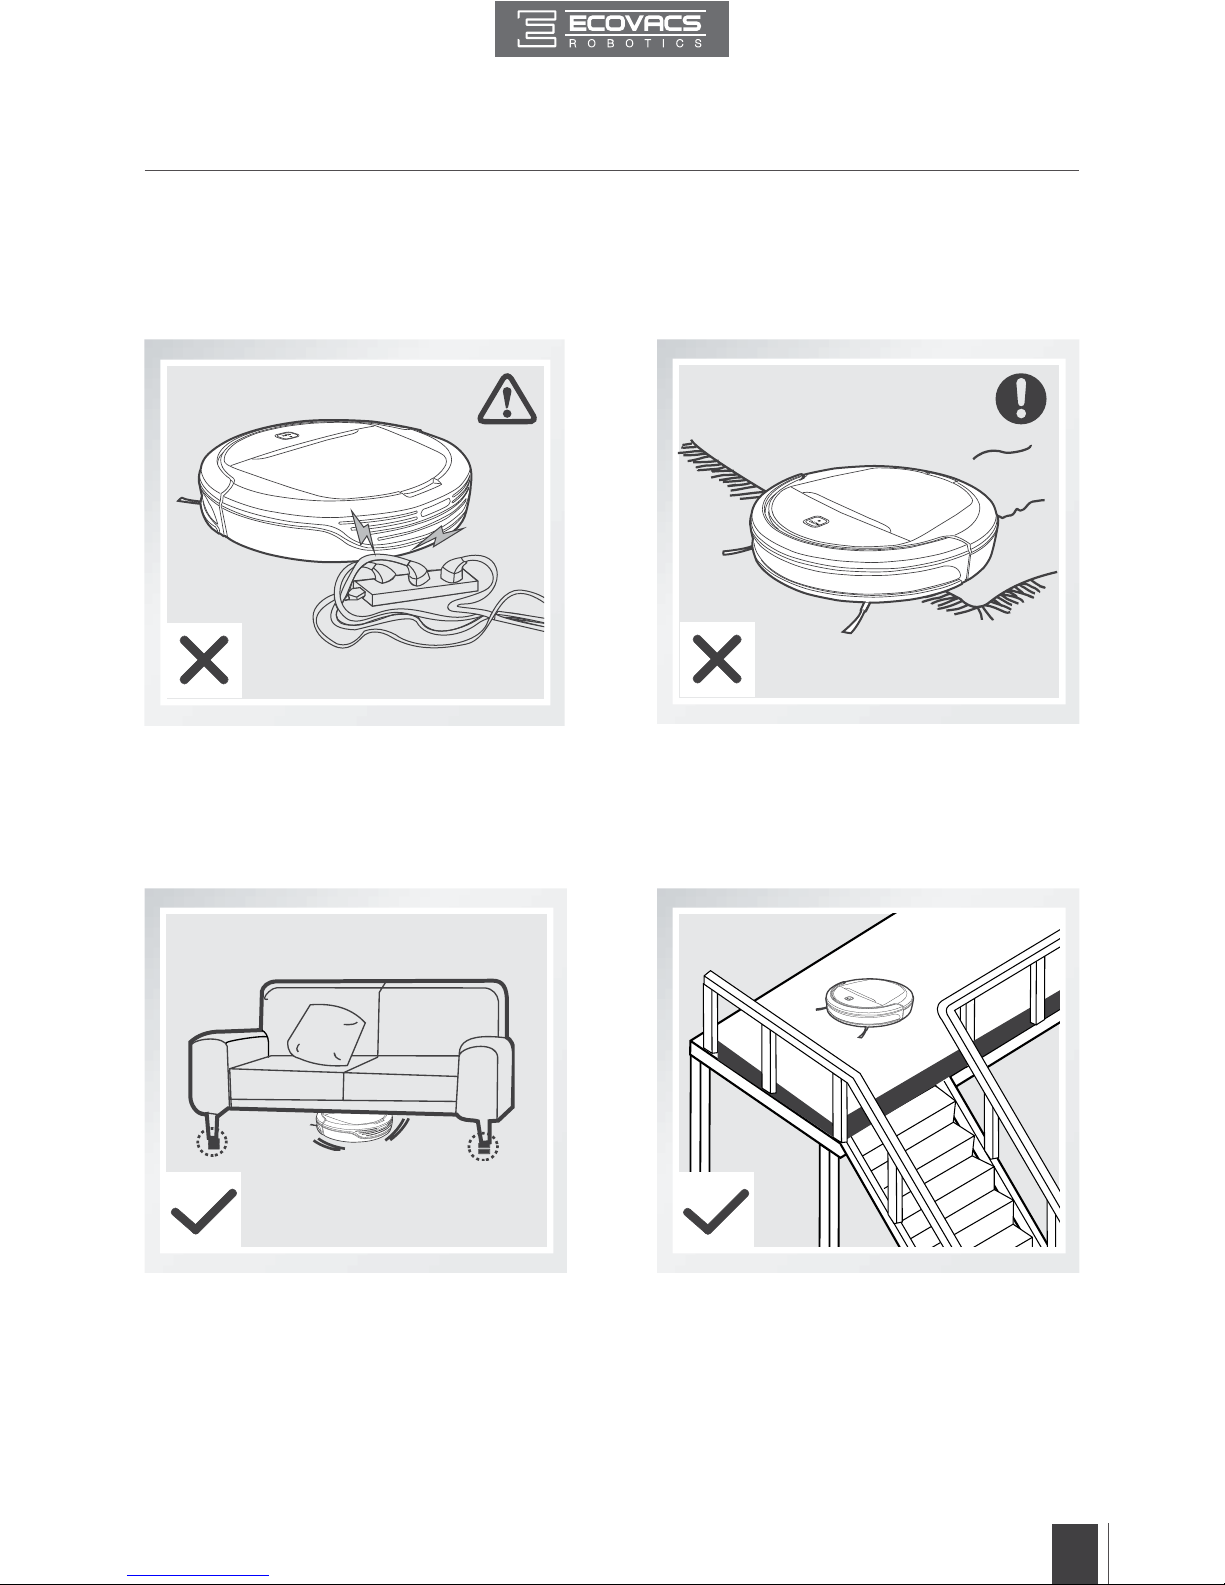
Before operating DEEBOT, take a few moments to survey the area to be
cleaned and remove any obstacles.
Remove power cords and small objects from
the oor that could entangle the product.
Please be aware that the robot needs at
least an 8 cm (3”) clearance to clean under
furniture without complications.
The product is not suitable for use on long-pile
carpet. Before using the product near an area
rug or on a short-pile area rug with tasseled
edges, please fold area rug edges under
themselves.
If there is a step or stairs in the cleaning area,
please operate DEEBOT to ensure its AntiDrop Sensors can detect the drop off. It may
be necessary to place a physical barrier at the
edge of the drop o to keep the unit from falling
over the edge.
3. Operating and Programming
Page 10
EN
8
3.2 Quick Start
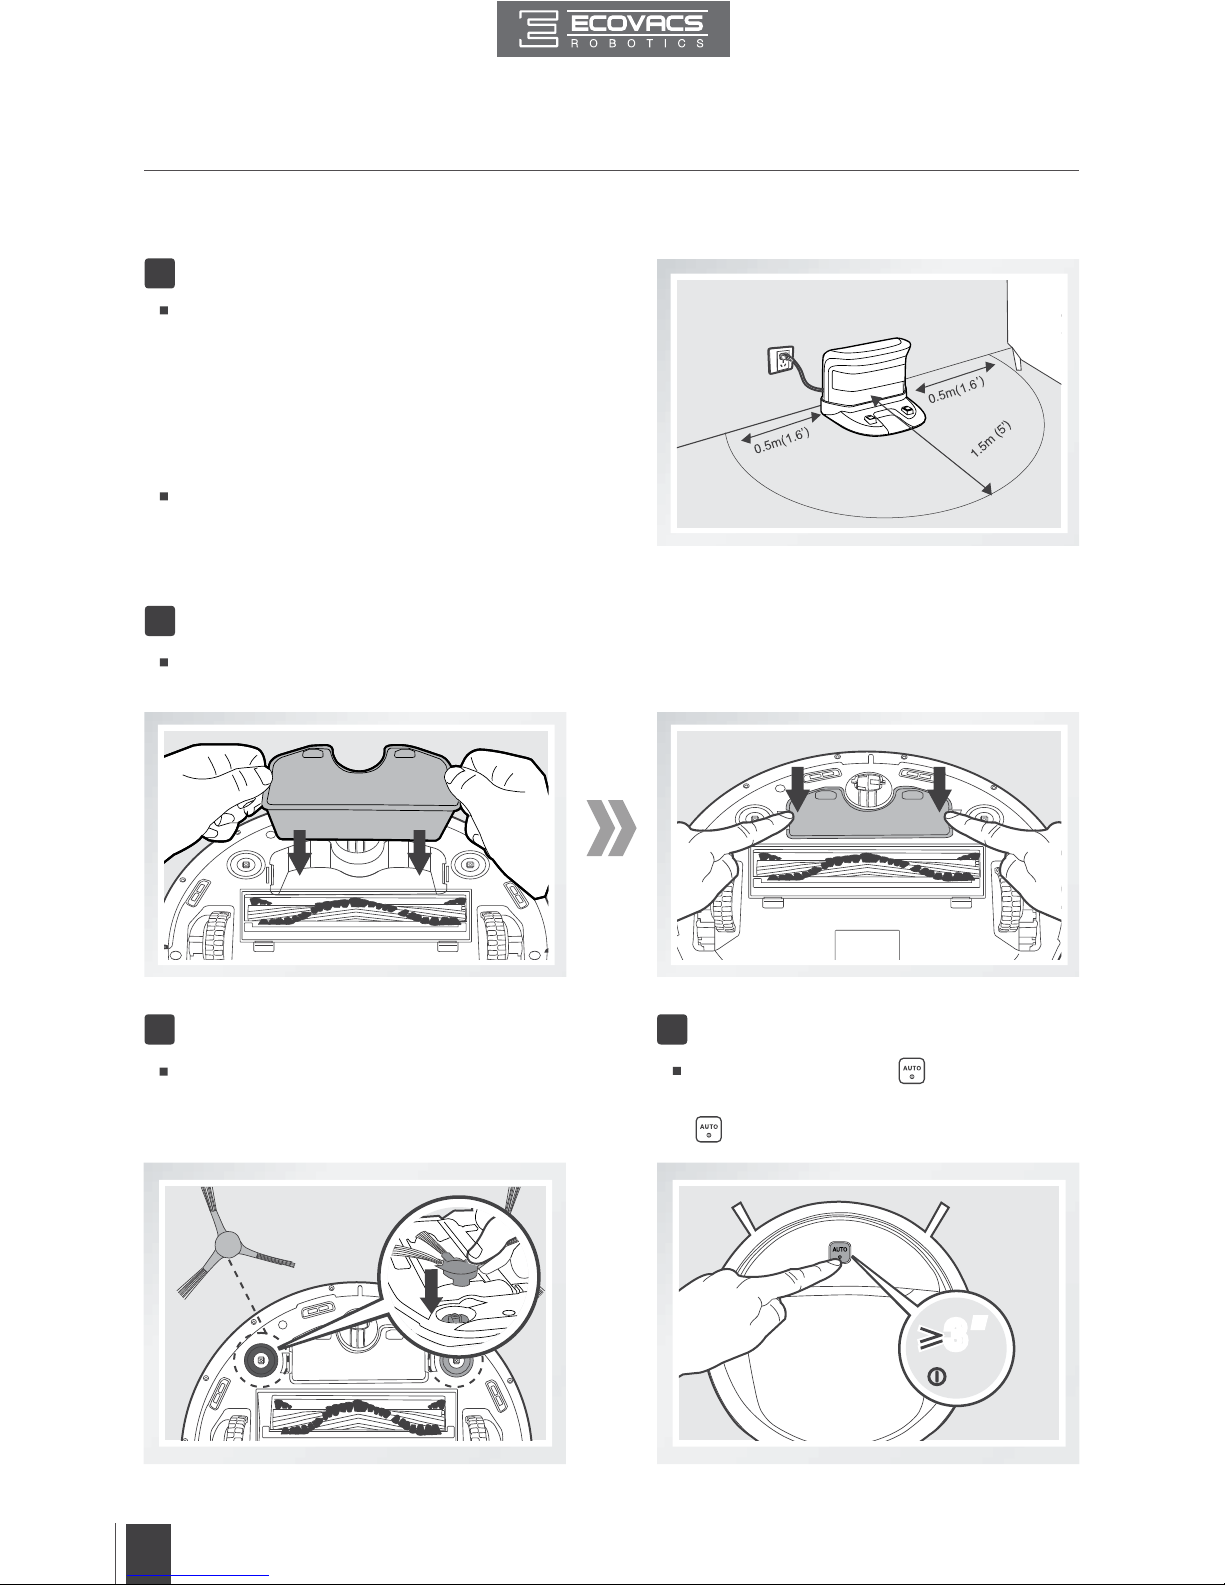
Charging Dock Placement
Place the Charging Dock on a level
floor surface against the wall with the
base perpendicular to the ground. Keep
the immediate area 1.5m (5’) in front
of the charger and 0.5m (1.6’) on both
sides of the charger clear of objects and
reective surfaces.
Plug the Charging Dock in.
1
Install the Battery Pack
Place the Battery Pack into the battery slot on the bottom of DEEBOT. Press the Battery Pack
into the slot until it clicks.
2
Install Side Brushes
Attach Side Brushes to the bottom of
DEEBOT by pressing a brush into each
slot with the matching color until it clicks.
3
Power ON
Press and hold the button on the
robot. DEEBOT is powered ON when the
glows a continuous BLUE.
4
3. Operating and Programming
Ő3Ƞ
Ő3Ƞ
ON
Page 11
EN
9
3. Operating and Programming
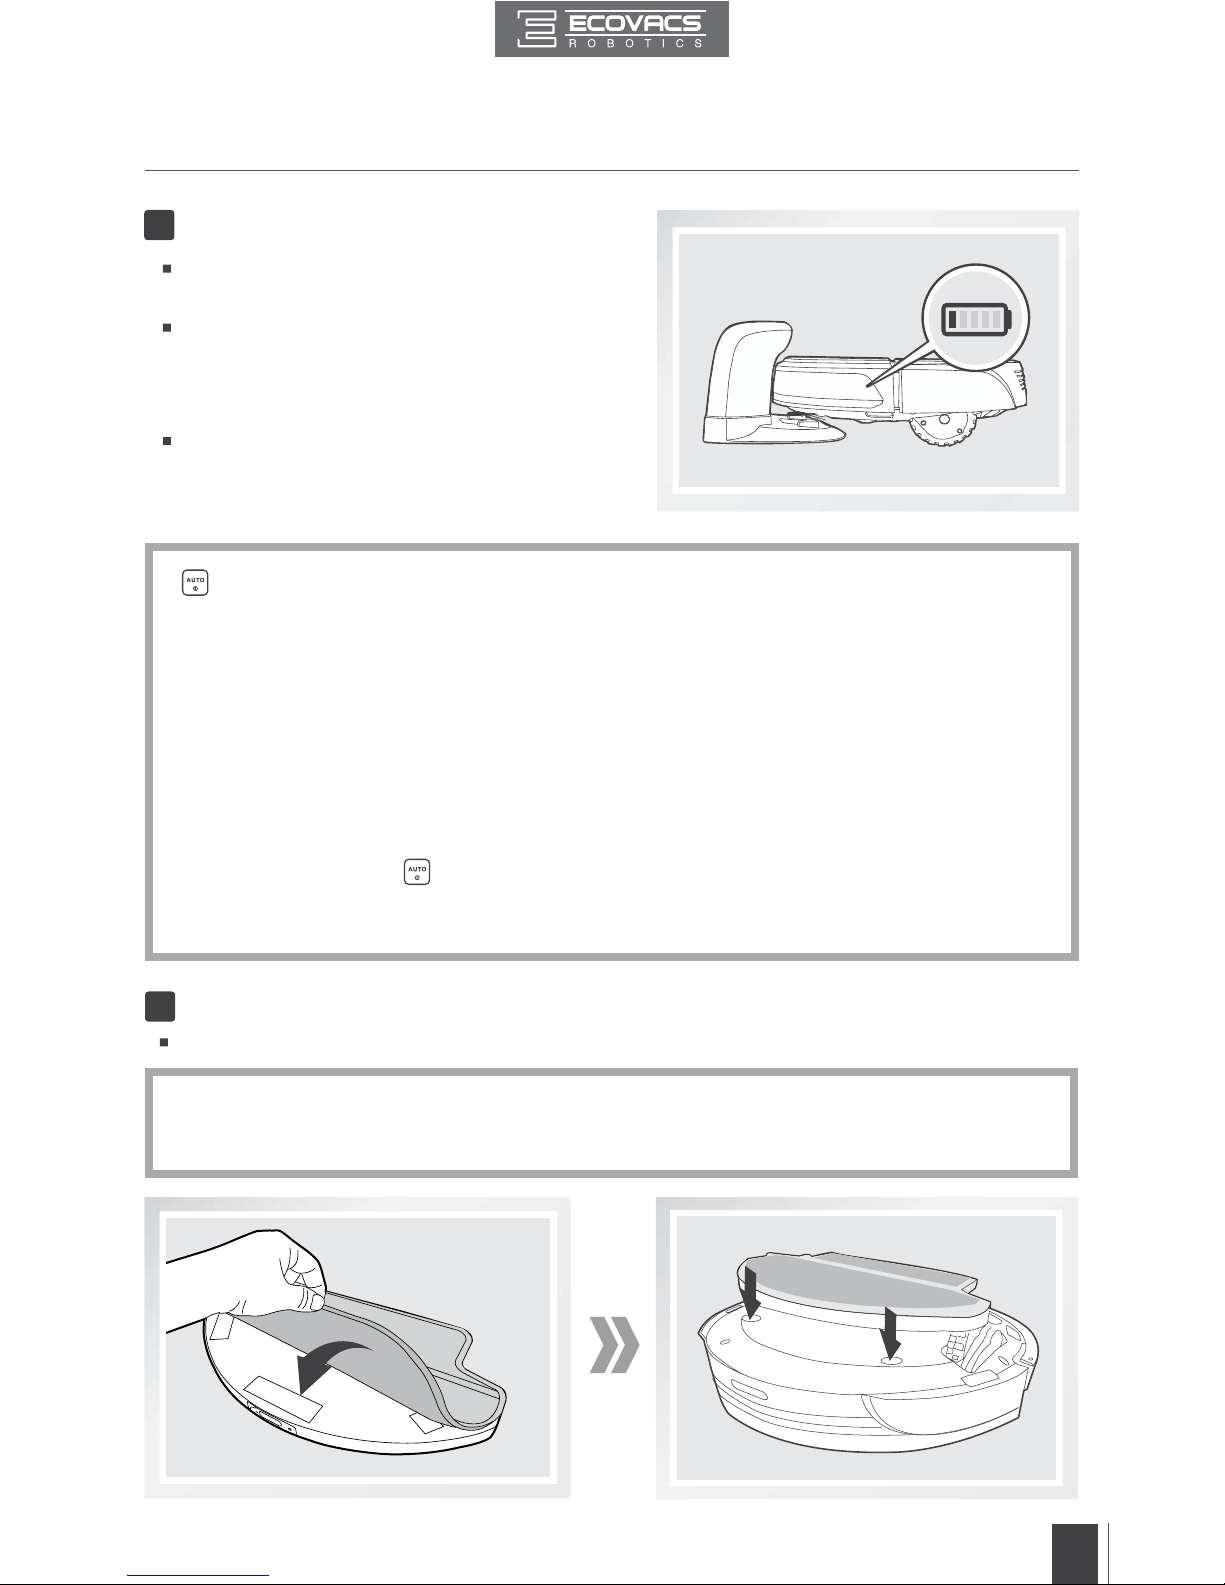
Remove the Advanced Wet/Dry Reservoir
before charging DEEBOT.
Place DEEBOT on the Charging Dock
making sure the Charging Contacts on
DEEBOT and the Charging Dock Pins make
a connection.
Charge DEEBOT for at least 4 hours before
the rst use.
5
Charge DEEBOT
button blinks when DEEBOT is charging and stops glowing when DEEBOT is fully charged.
Remove the robot’s battery if the robot will not be used for a long time. In case of battery
leakage, please remove the battery and wipe the battery slot clean while wearing protective
gloves.
If the robot’s battery is fully discharged or not used for a long time, its capacity may decrease
and need to be reactivated.
To reactivate the battery: Place the robot on the Charging Dock by hand, remove after charging
for 3 minutes; repeat 3 times, then charge normally for 3-5 hours.
DEEBOT uses a long life battery and does not require frequent replacement. To replace the
battery, contact Customer Service or follow the below instructions:
a. Press and hold the
button on the robot until it stops glowing to power OFF the robot.
Remove the Battery Pack.
b. Insert new Battery Pack into battery slot and press until it clicks into place.
*
*
*
*
*
6
Attach a Cleaning Cloth, if Desired
To use DEEBOT’s Optional Advanced Mopping System, attach the provided Cleaning Cloth.
*
When using the optional mopping feature, fold area rug edges under themselves so DEEBOT will
avoid the rug.
* Please see section 3.5 Optional Advanced Wet/Dry Mopping System for complete instructions.
Page 12
EN
10
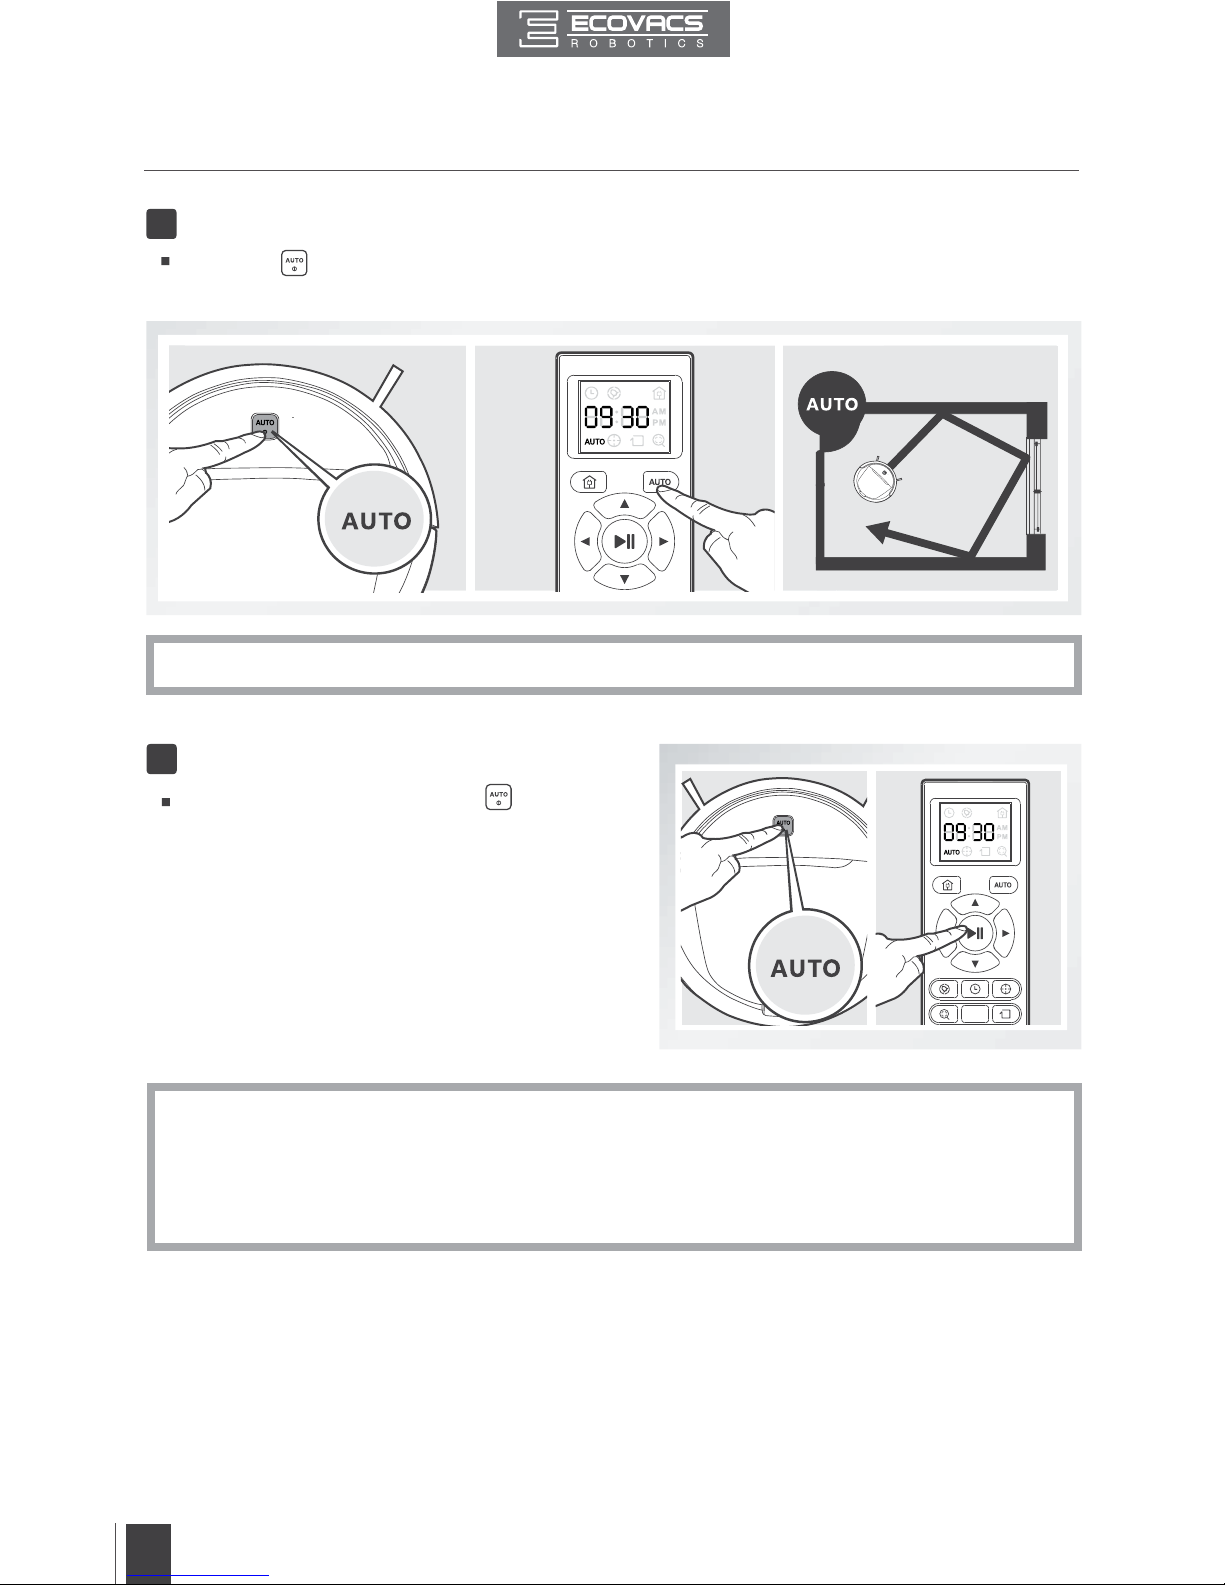
Pause DEEBOT by pressing the button on
DEEBOT or the START/PAUSE Button on the
Remote Control.
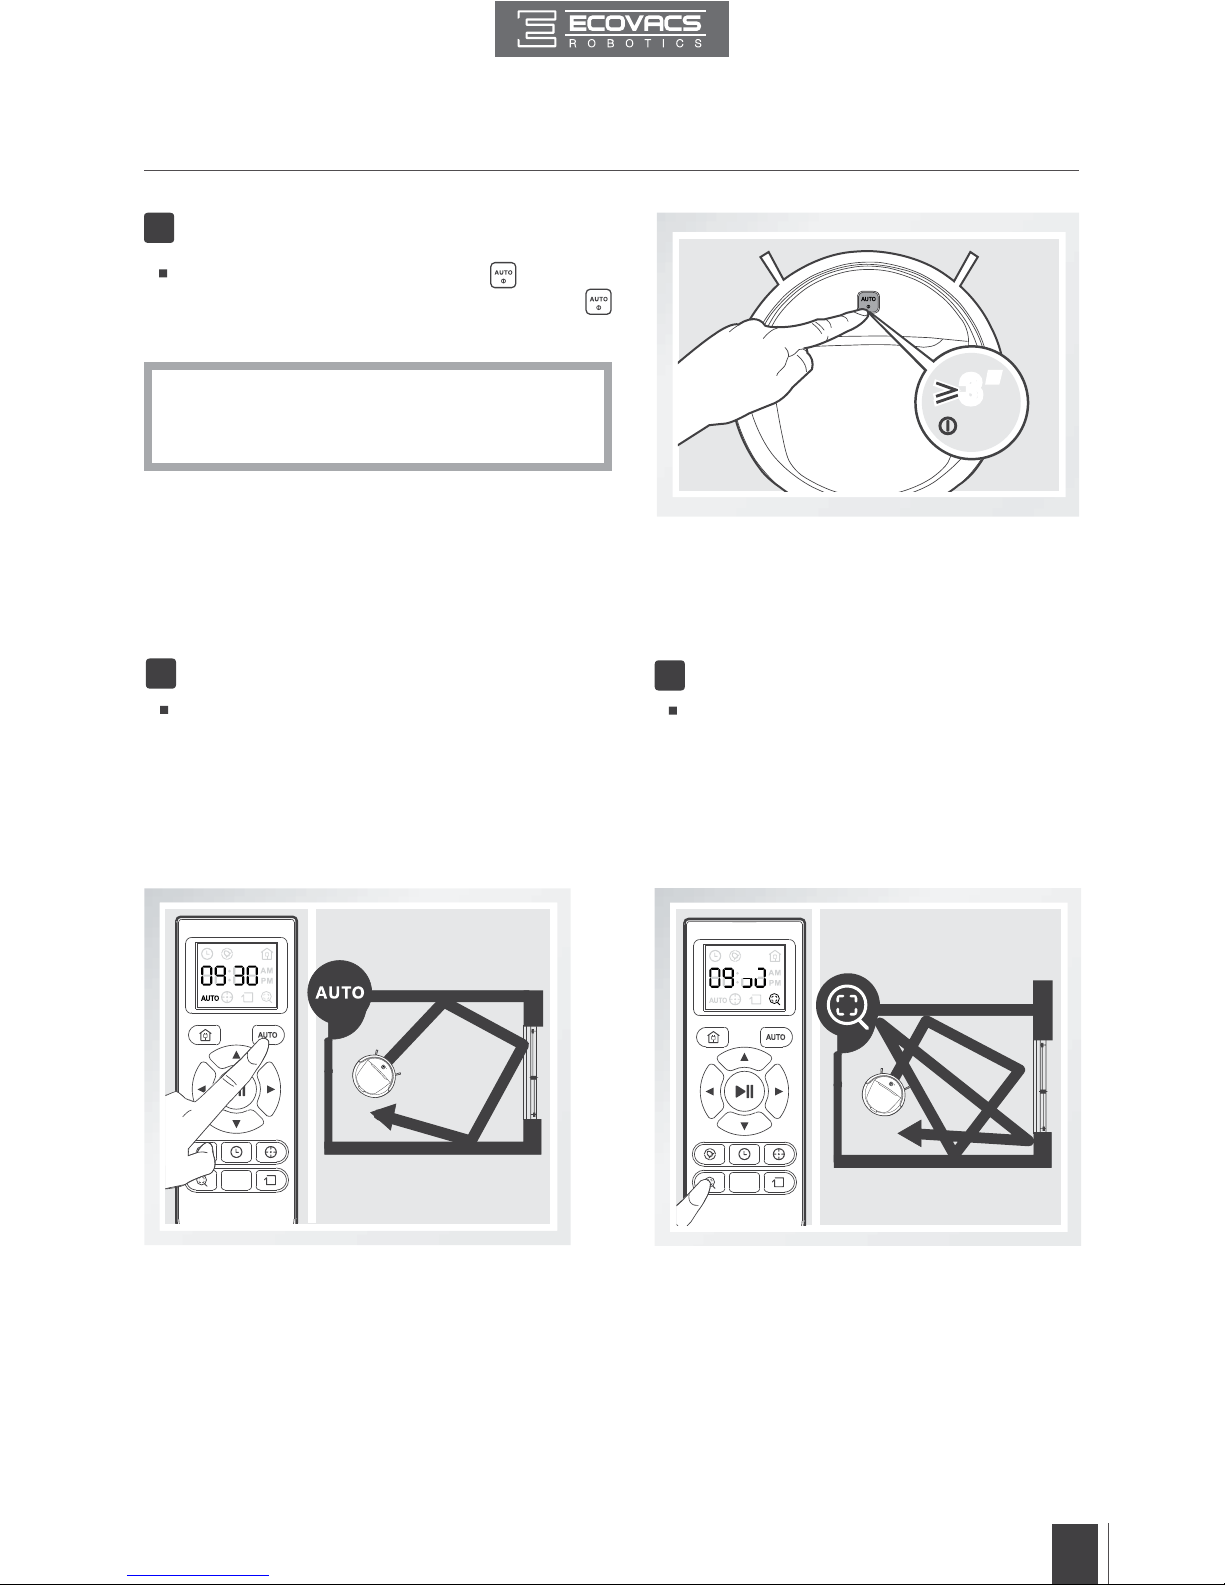
*
DEEBOT can be directed to move forward, backward, left and right by using the Direction Control
Buttons on the Remote Control when it is paused. DEEBOT does not clean when Paused.
*
The AUTO Mode Button on the robot's Control Panel stops glowing when the robot is paused for
more than 5 minutes. Press AUTO Mode Button on the robot to wake up the robot, or press any
button on the Remote Control to start the DEEBOT immediately.
8
Pause
7
Start
Press the button on DEEBOT or the AUTO Mode Button on the Remote Control. DEEBOT
starts to work immediately in AUTO Cleaning Mode.
*
To choose another Cleaning Mode, please refer to section 3.3 Cleaning Mode Selection for details.
3. Operating and Programming
Page 13
EN
11
3. Operating and Programming
Pause DEEBOT. Press and hold the button on
the robot. DEEBOT is powered OFF when the
button stops glowing.
*
When DEEBOT is not cleaning, it is suggested
to keep it powered ON and charging instead of
powered OFF.
9
Power OFF
Ő3Ƞ
Ő3Ƞ
OFF
3.3 Cleaning Mode Selection
DEEBOT has several cleaning modes to choose from to effectively clean different floors. Cleaning
modes are selected using the Remote Control.
AUTO Cleaning Mode
This is the most commonly used mode. In
AUTO Cleaning Mode, DEEBOT cleans
in a straight line and changes direction
when it meets an obstacle.
1
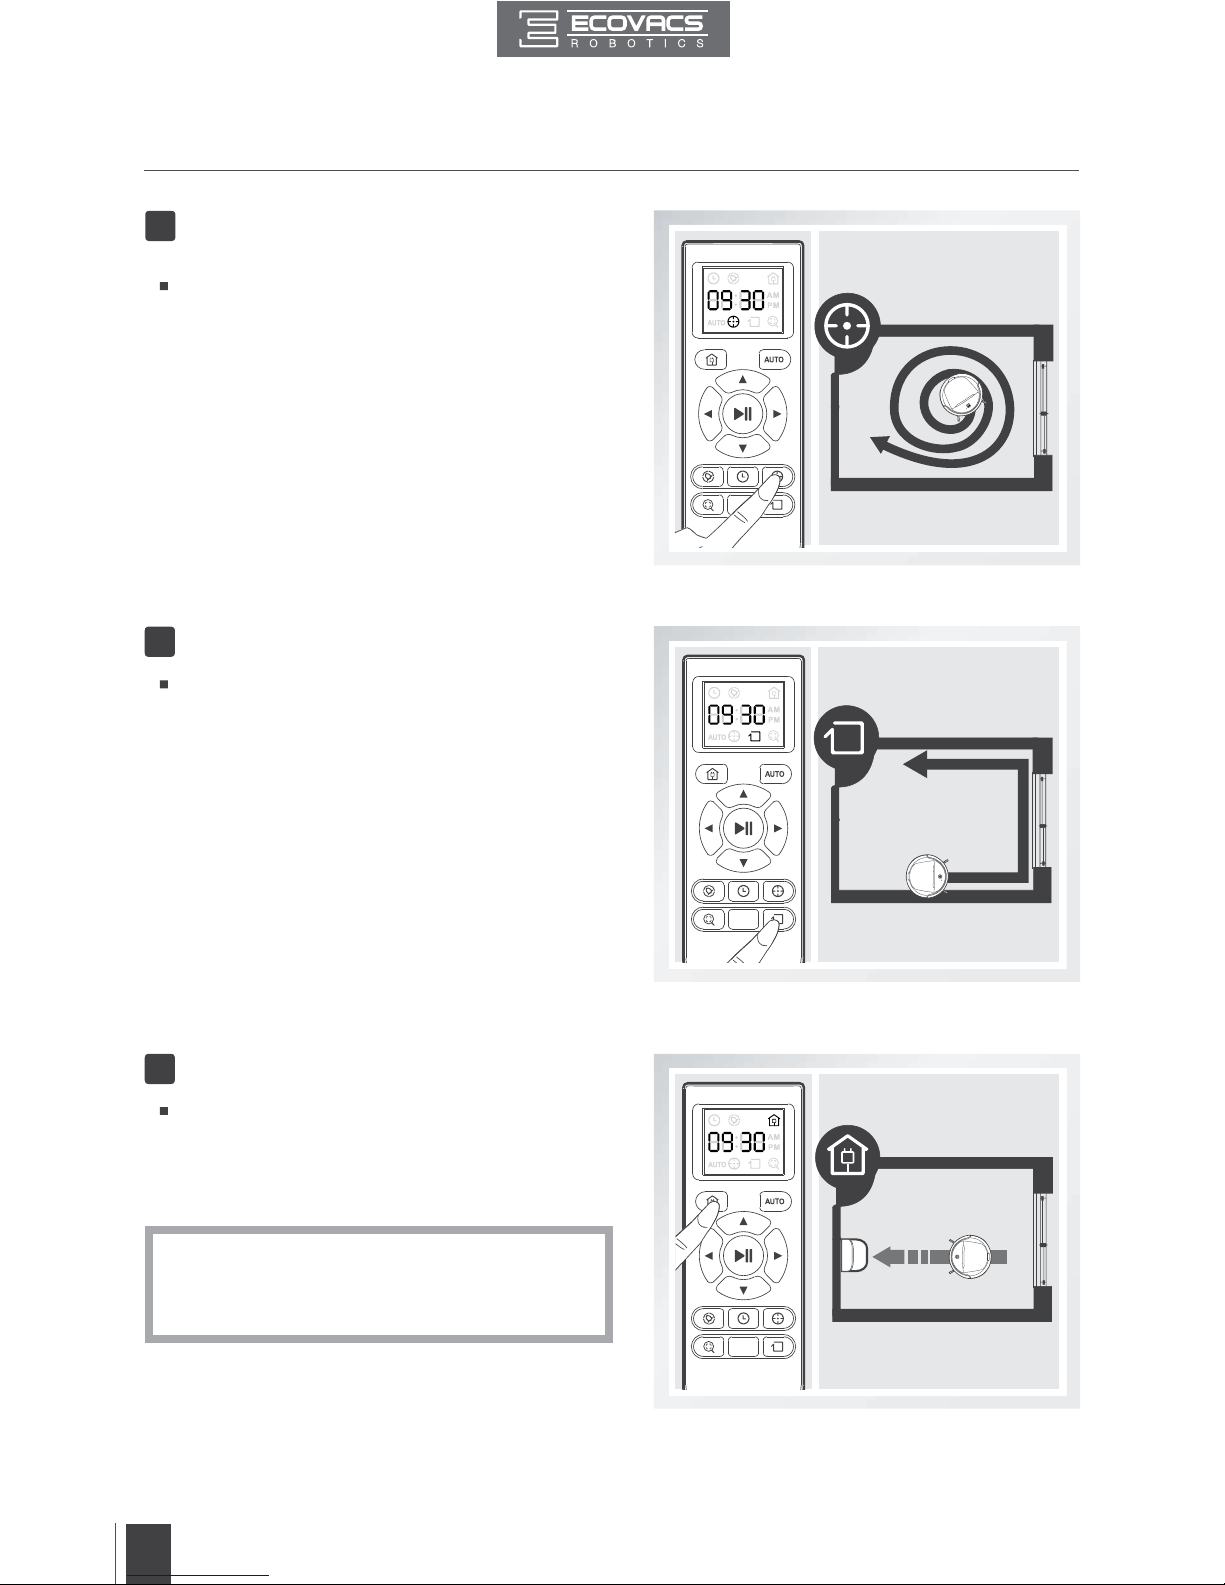
Intensive Cleaning Mode
This mode is good for aggressive cleaning
or for extremely dirty or dusty floors. In this
mode, DEEBOT follows the same cleaning
pattern as Automatic Cleaning Mode, but
with stronger suction power and higher
Main Brush rotating speed and performs a
more thorough cleaning.
2
Page 14
EN
12
Spot Cleaning Mode
(2-5 minutes)
This mode is applicable for an area of highly
concentrated dirt or dust. In Spot Cleaning
Mode, DEEBOT focuses on a specific area
to clean. DEEBOT cleans the area in a spiral
pattern and stops when it completes Spot
Cleaning.
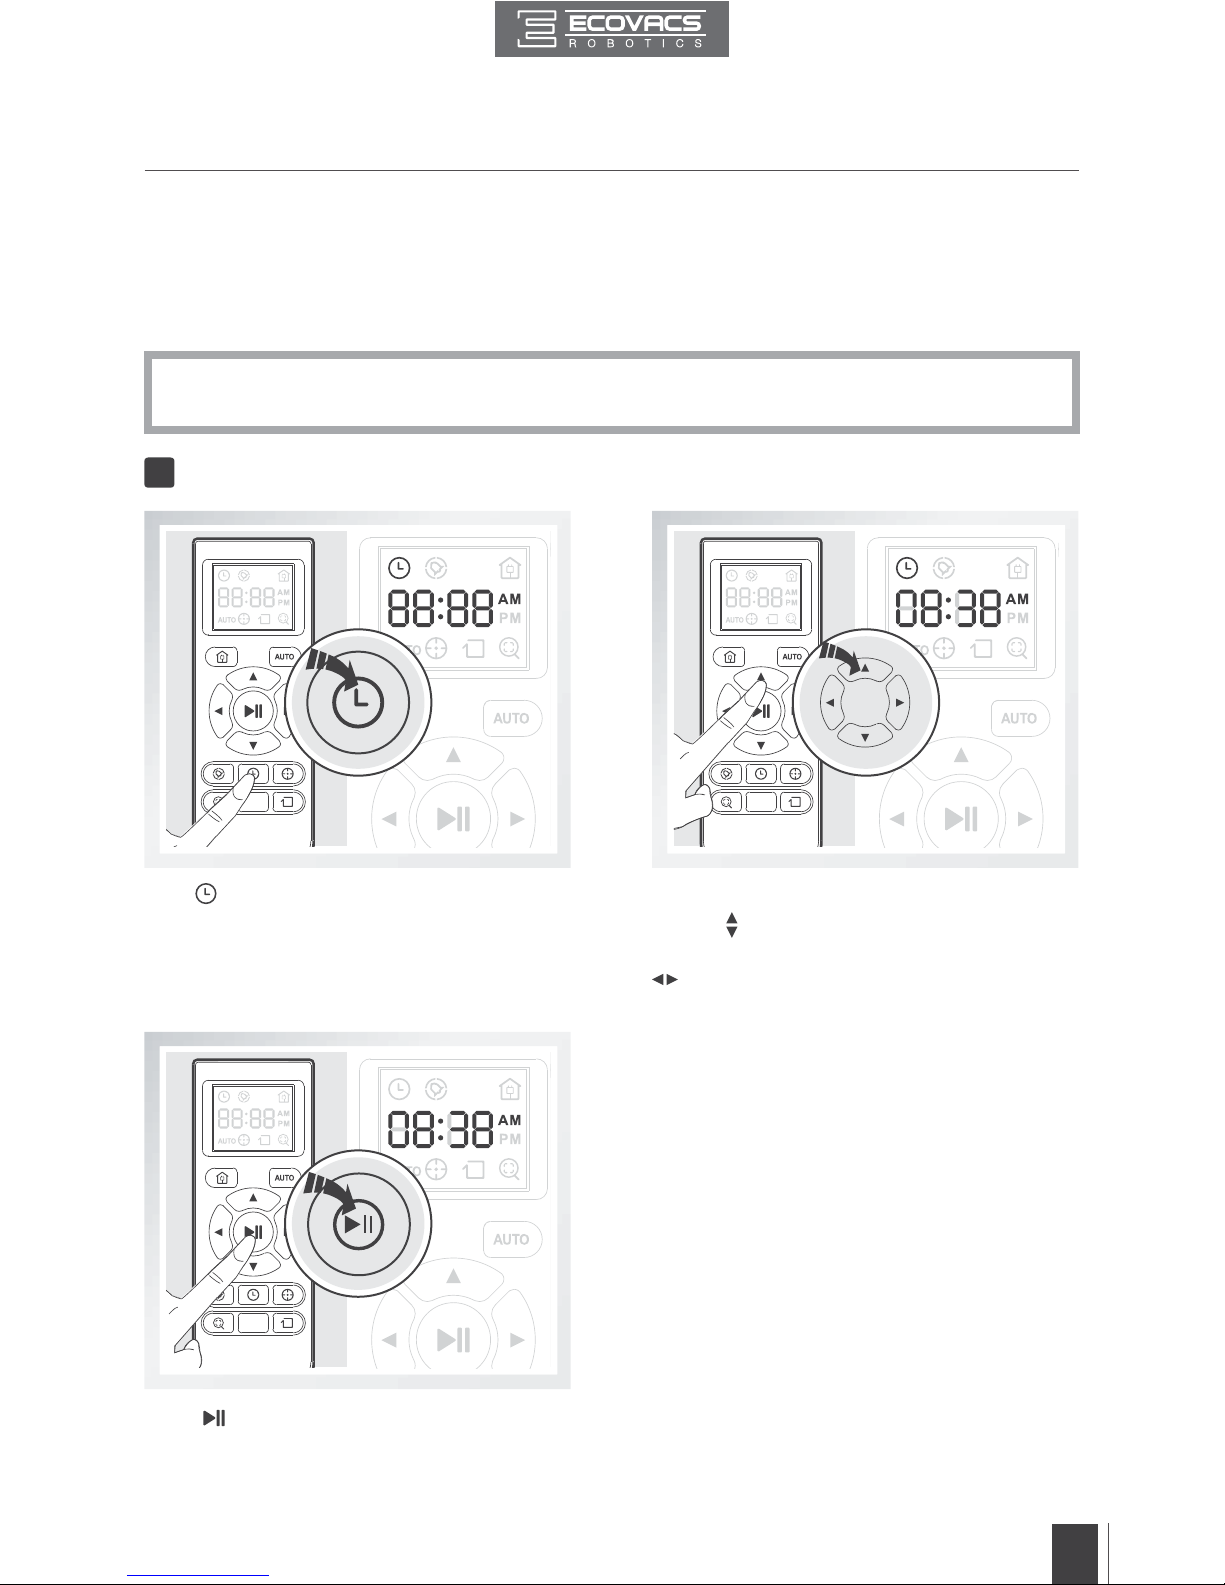
3
This mode is good for cleaning the edges and
corners of a room. In Edge Cleaning Mode,
DEEBOT cleans along a border (e.g. wall).
Edge Cleaning Mode
Return to Charger Mode
4
5
When battery power gets low, DEEBOT
automatically switches to Return to Charger
Mode and returns to the Charging Dock to
recharge itself.
*
DEEBOT can also be sent back to the Charging
Dock at any time by pressing the Return to
Charger Button on the Remote Control.
3. Operating and Programming
Page 15
EN
13
3. Operating and Programming
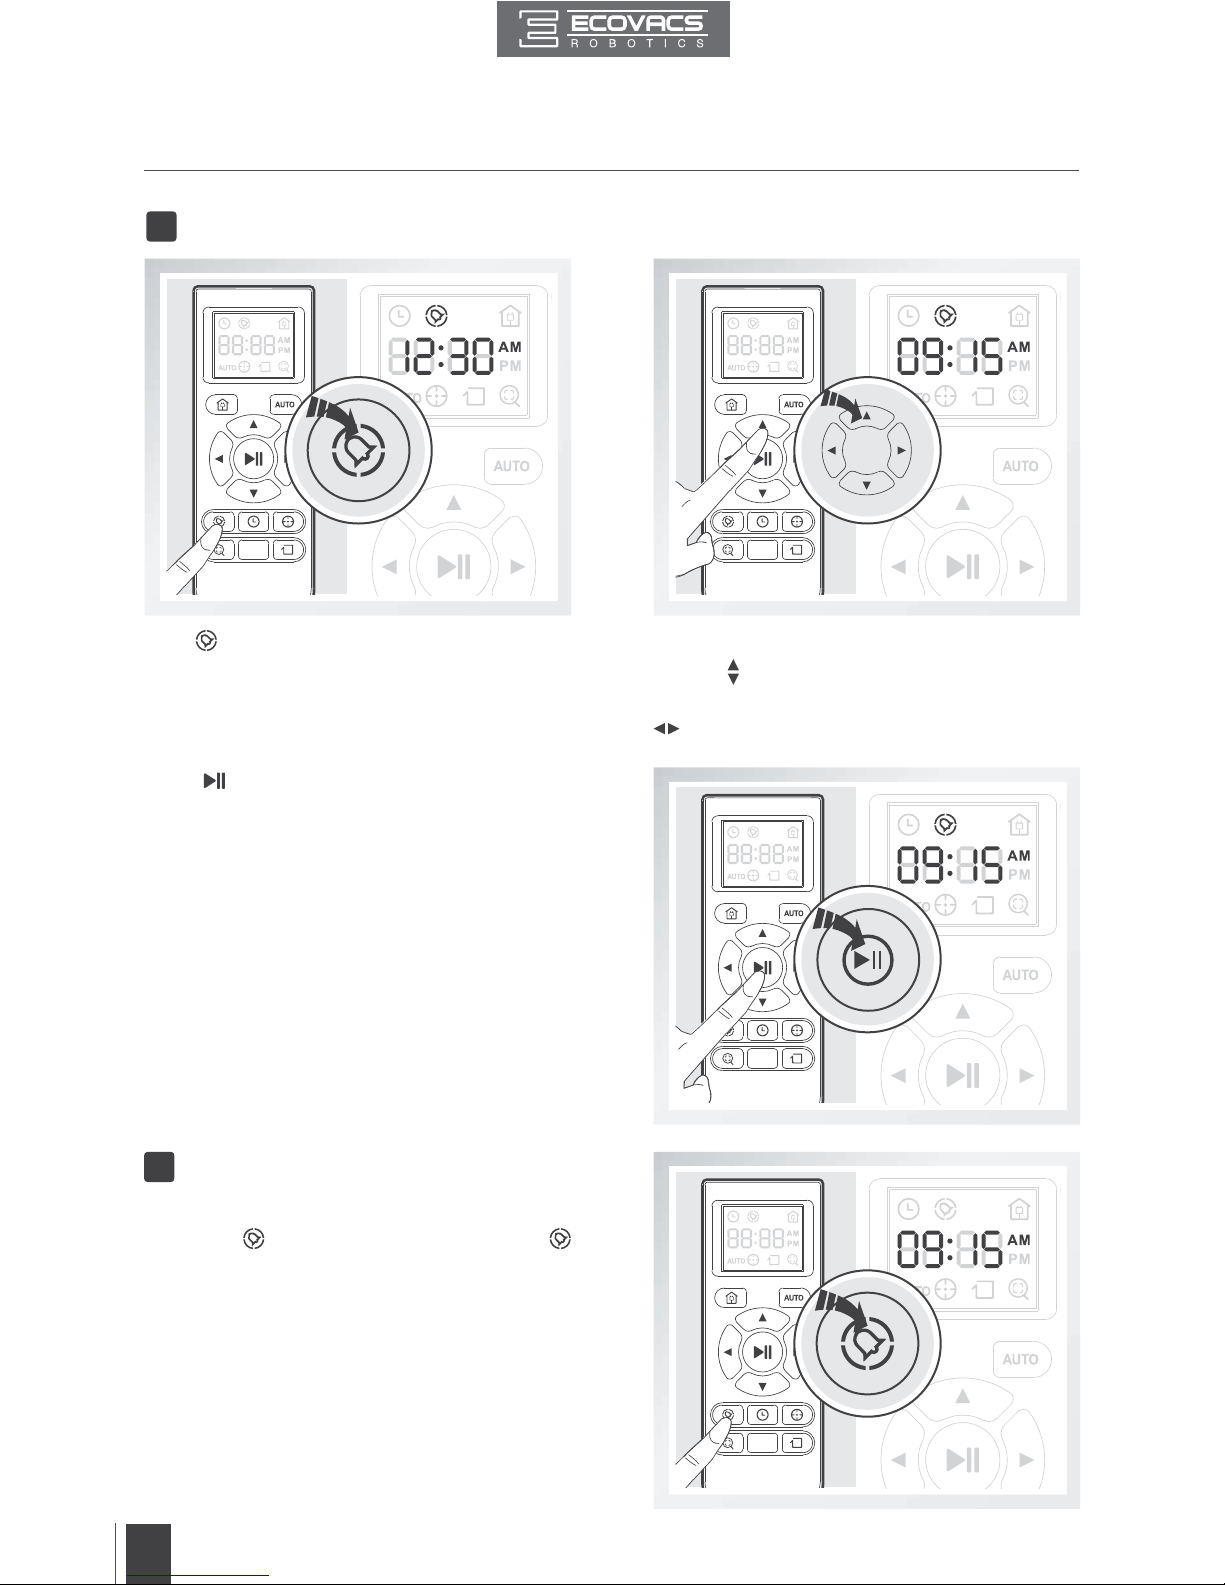
Set the Current Time of Day
1
*
All scheduled cleanings are performed in AUTO Cleaning Mode.
*
The Remote Control uses a 12-hour clock with “AM” and “PM” indicators.
3.4 Programming the Robot
DEEBOT has a Time Scheduling function. DEEBOT can be programmed to automatically clean
once per day, at a specific time, even if nobody is at home. The current time of day and the
cleaning times are scheduled using the Remote Control.
Press
button on the Remote Control to
conrm and save the current time of day.
Press the up and down Direction Control
Buttons
to adjust “hour” and “minute” number.
Press the left and right Direction Control Buttons
to switch between “hour” and “minute.”
Press button on the Remote Control and the
“hour" (first two digits) flashes on the Remote
Control LCD Screen.
Page 16
EN
14
3. Operating and Programming
Press button on the Remote Control and the
“hour” (first two digits) flashes on the Remote
Control Screen.
Press
button on the Remote Control to
confirm and save the scheduled cleaning
time. DEEBOT emits two beeps. DEEBOT
automatically cleans at the scheduled cleaning
time every day.
To cancel the scheduled cleaning time, press
and hold
button for 3 seconds until
disappears from the Remote Control LED
Screen and the robot emits three beeps. The
scheduled cleaning time is cancelled.
Press the up and down Direction Control
Buttons
to adjust “hour” and “minute” number.
Press the left and right Direction Control Buttons
to switch between “hour” and “minute.”
Schedule the Cleaning Time
Cancel Scheduled Cleaning Time
2
3
Page 17
EN
15
DEEBOT has an Optional Advanced Mopping System using an Advanced Wet/Dry Cleaning
Cloth attached to a proprietary Advanced Wet/Dry Reservoir. The washable/reusable
Cleaning Cloth automatically damp mops and then dries the oor to a spotless clean.
*
Do not use the mopping system on carpet.
*
When using the mopping system, fold area rug edges under themselves so DDEEBOT will
avoid the rug.
*
When using the mopping system, do not stop the robot and allow it to stand still. This prevents
the Advanced Wet/Dry Cleaning Cloth from leaving water on the oor.
*
Remove the Advanced Wet/Dry Reservoir before charging DEEBOT.
3.5 Optional Advanced Wet/Dry Mopping System
Attach Advanced Wet/Dry Cleaning
Cloth
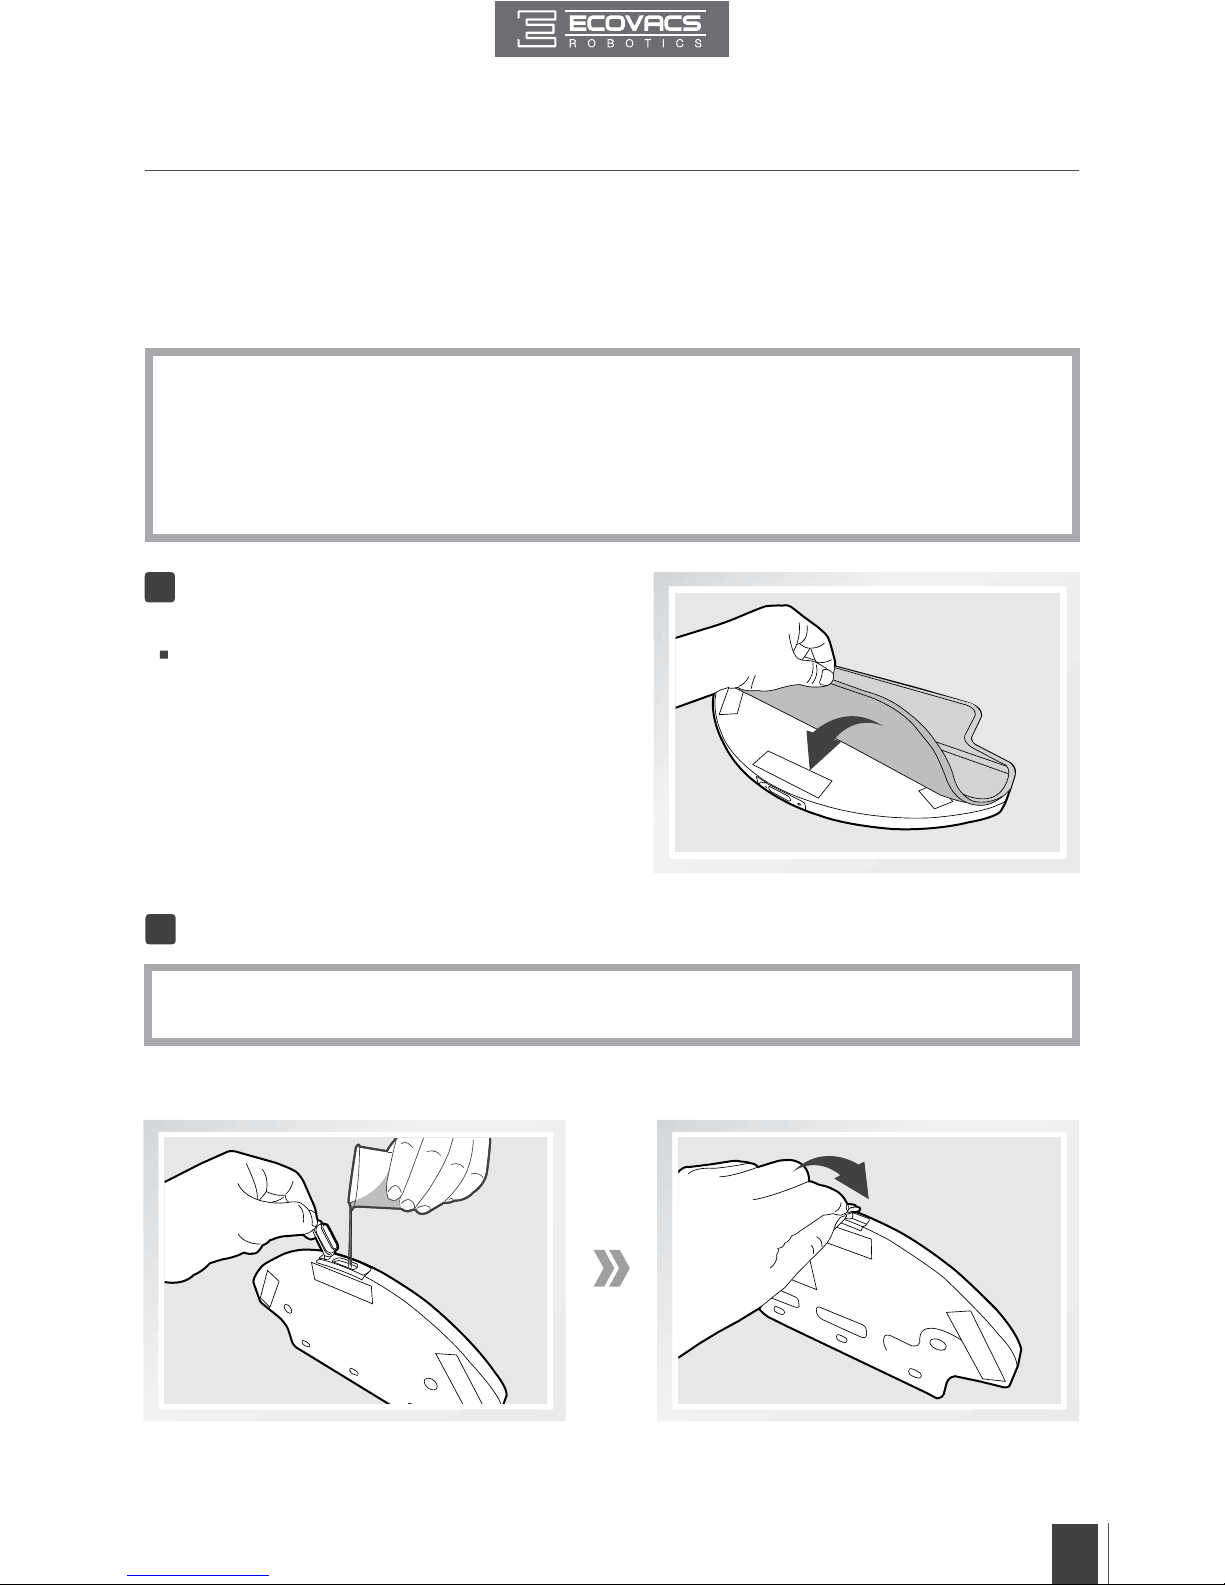
Attach the Advanced Wet/Dry Cleaning Cloth to
the Advanced Wet/Dry Reservoir.
1
Fill the provided Measuring Cup with water. Open the lid of the Water Inlet on the Advanced Wet/Dry
Reservoir and slowly pour water from the Measuring Cup into the Reservoir. Close the Water Inlet lid.
Add Water to the Advanced Wet/Dry Reservoir
*
Before adding water to the Advanced Wet/Dry Reservoir, remove the Advanced Wet/Dry
Reservoir from the bottom of the robot.
2
Page 18
EN
16
Start
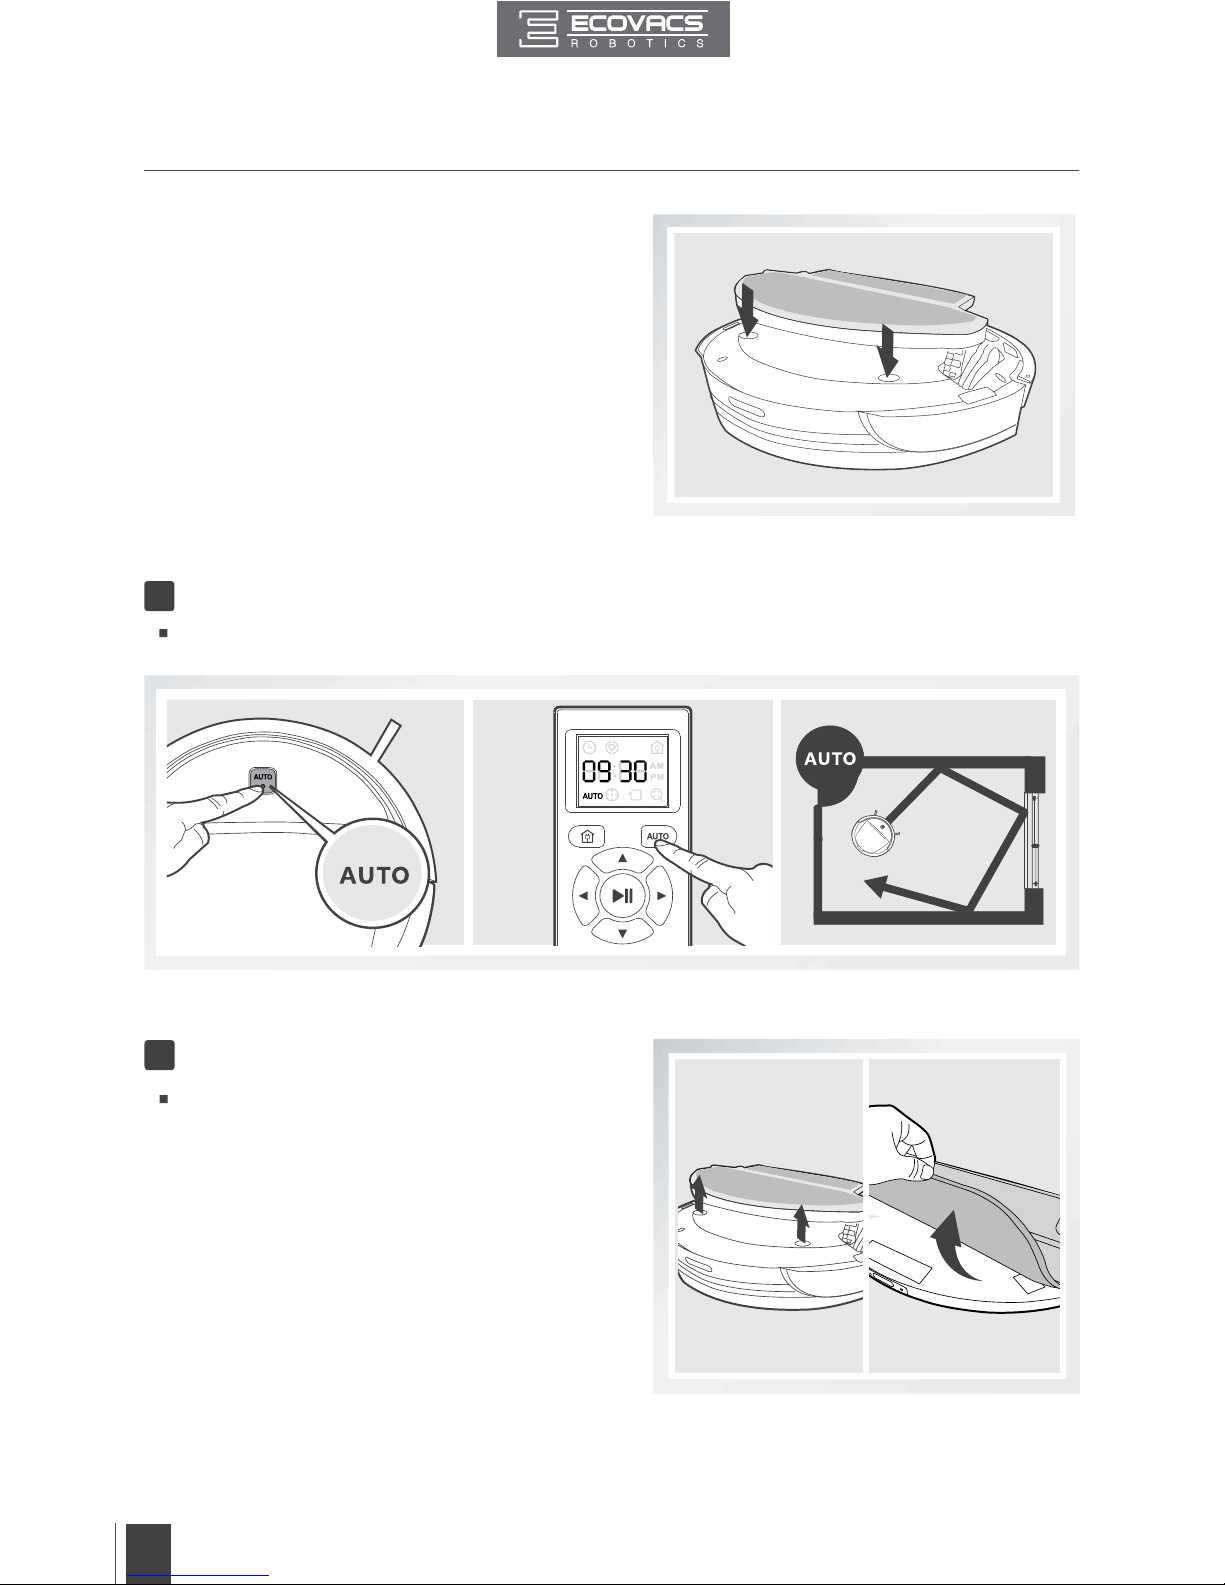
Select the desired Cleaning Mode. DEEBOT sweeps, lifts, vacuums, mops and dries in the
selected mode.
3
Attach the Advanced Wet/Dry Reservoir to the
bottom of the robot. Insert the tabs on the Advanced
Wet/Dry Reservoir into the Advanced Wet/Dry
Reservoir Slots on the bottom of the robot until you
hear a click.
Remove
After DEEBOT finishes cleaning, remove the
Advanced Wet/Dry Reservoir from DEEBOT,
empty any remaining water from the Reservoir,
and remove the Advanced Wet/Dry Cleaning
Cloth.
4
Page 19
EN
17
4. Maintenance
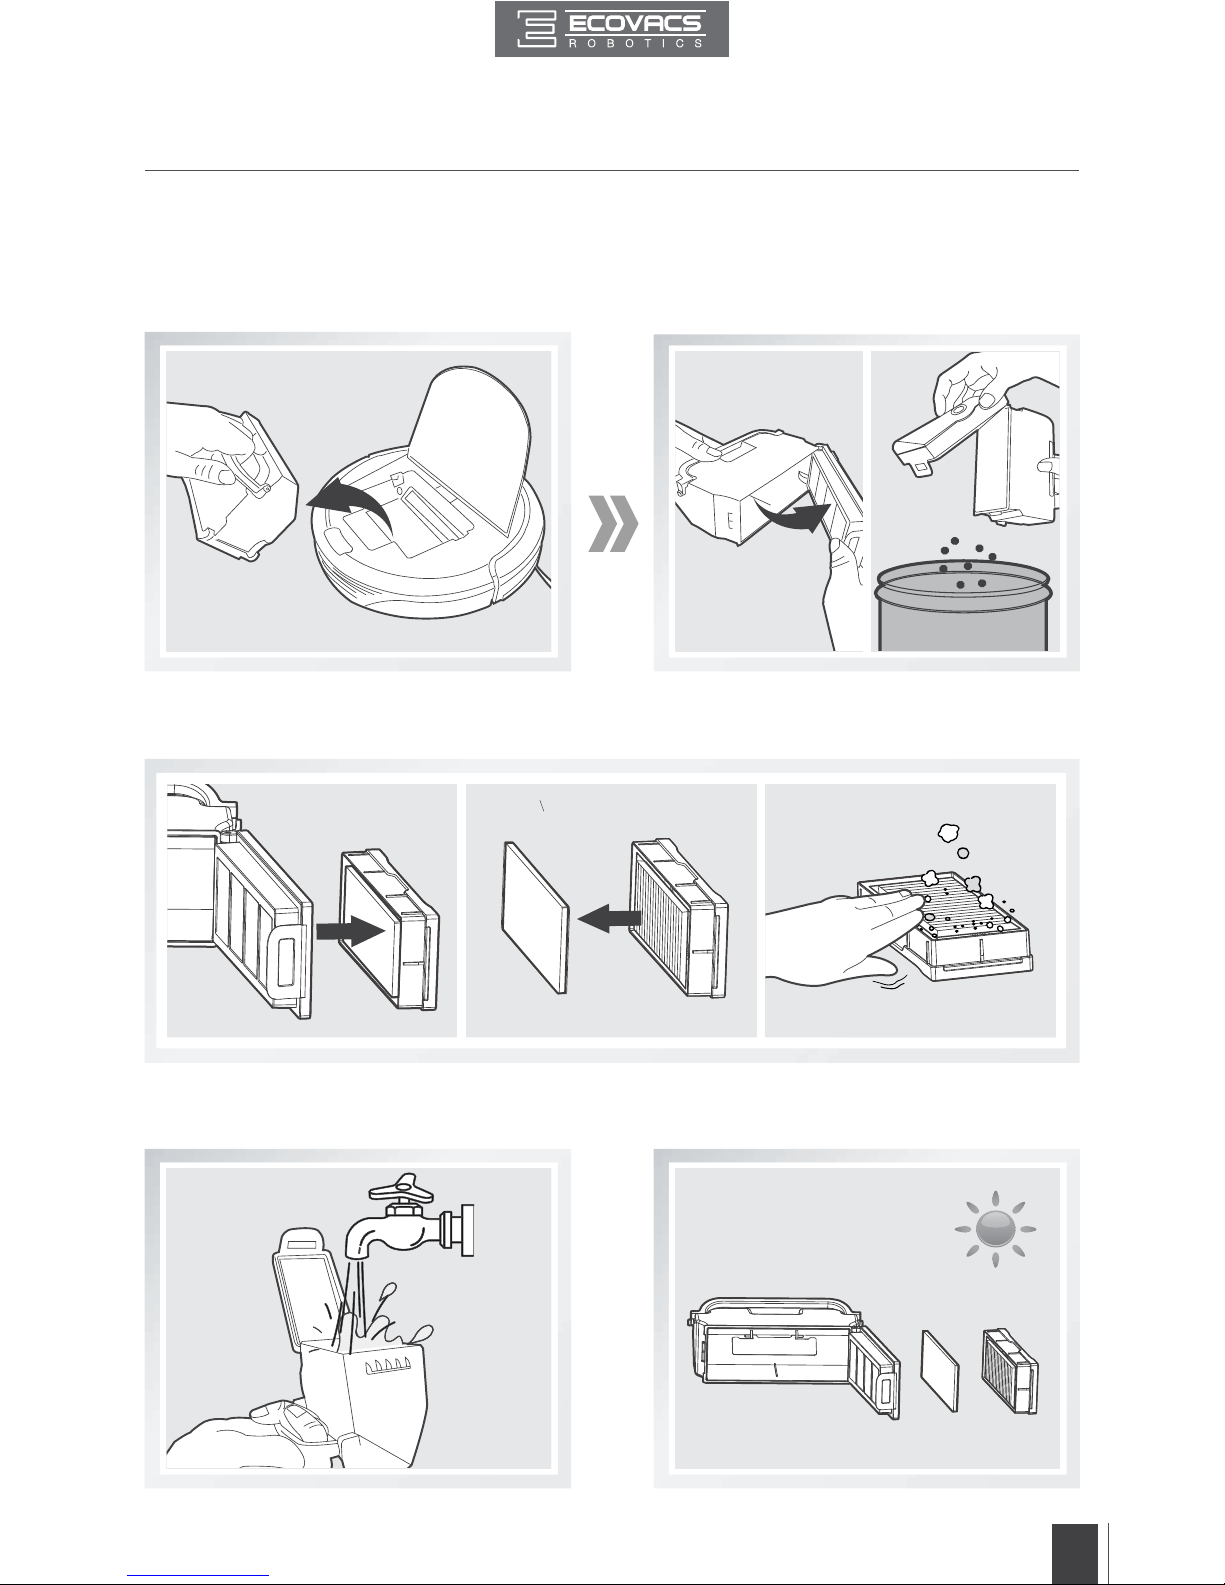
Open DEEBOT’s Top Cover and remove the Dust Bin. Open the Dust Bin Cover and empty the Dust Bin.
Remove the Sponge Filter and High Efficiency Filter. Pat the High Efficiency Filter clean. Do not rinse the
High Eciency Filter under water.
4.1 Dust Bin and Filters
Rinse the Sponge Filter, Dust Bin and Filter Net
under running water.
Dry the Sponge Filter, Dust Bin and Filter Net
completely before reinstalling.
Before performing cleaning and maintenance, power OFF DEEBOT and unplug the Charging Dock.
Page 20
EN
18
4. Maintenance
Cleaning the Advanced Wet/Dry Cleaning Cloth
Cleaning the Advanced Wet/Dry Reservoir
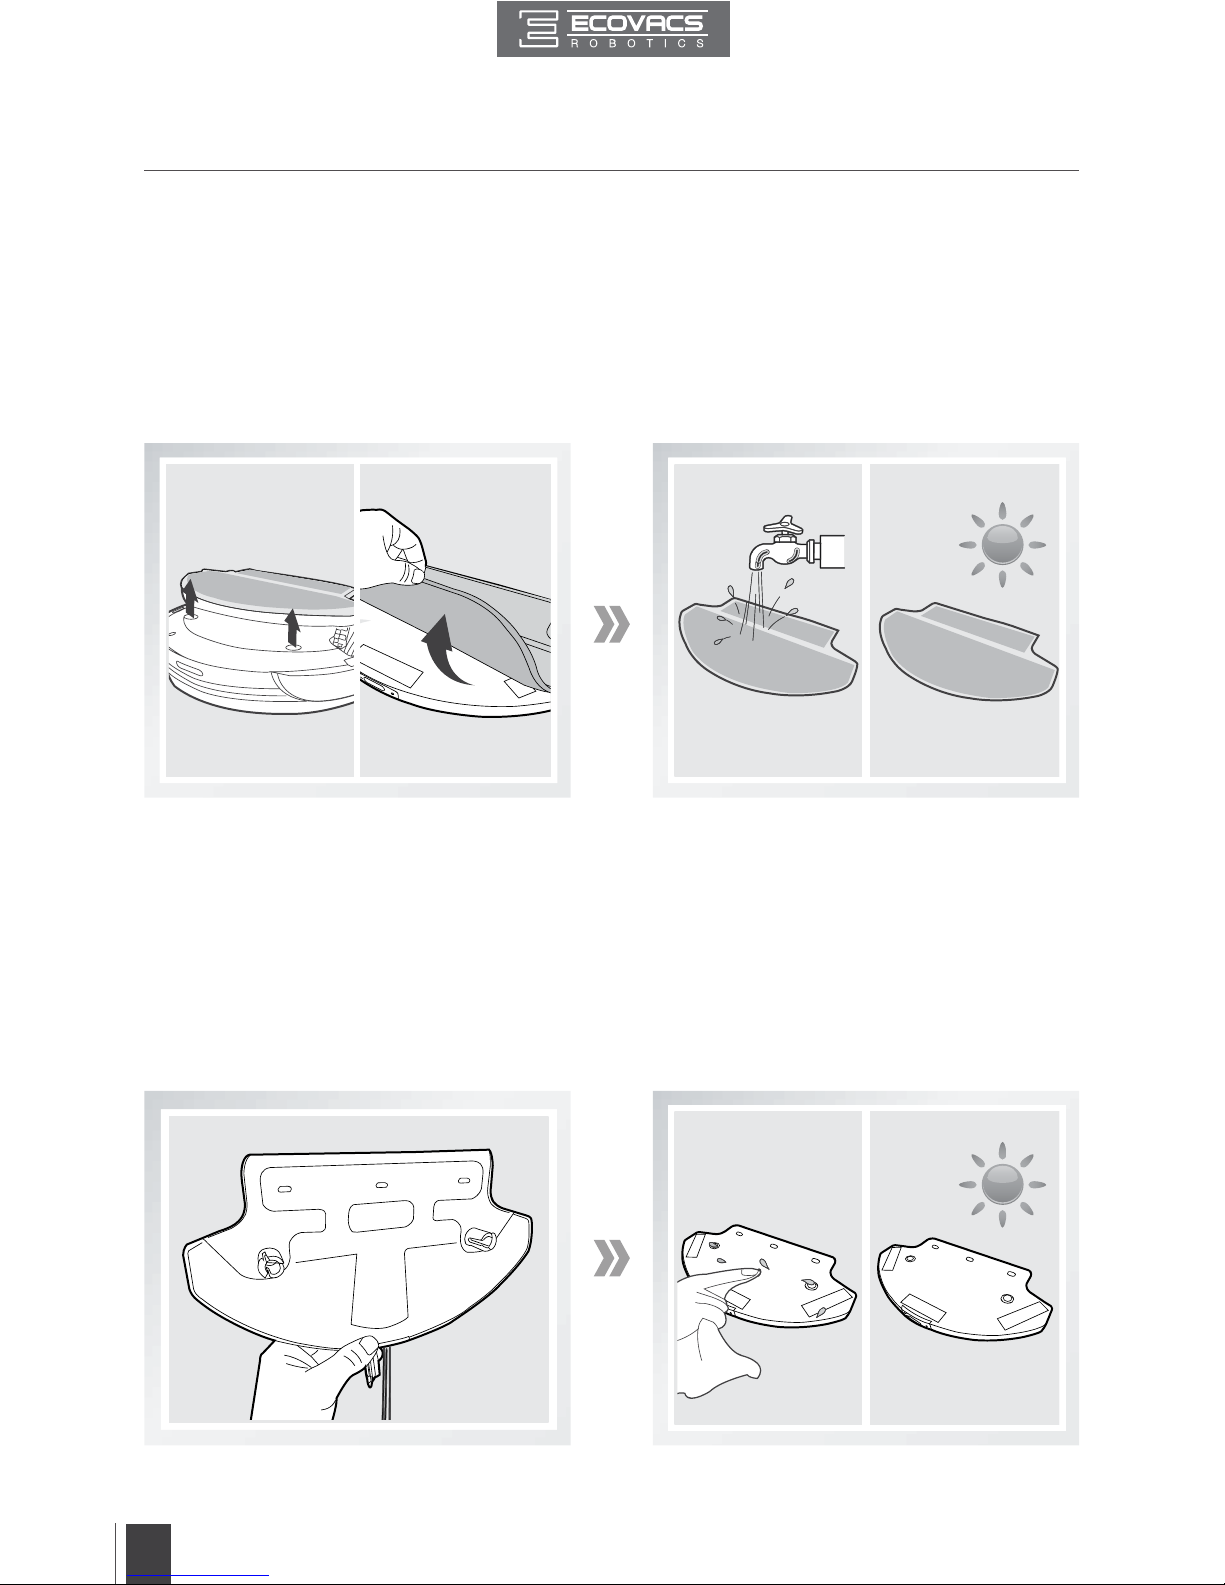
If the mopping system was used, remove the Advanced Wet/Dry Reservoir from the bottom of DEEBOT and
remove the Cleaning Cloth.
Empty any remaining water from the Reservoir.
Wash the Advanced Wet/Dry Cleaning Cloth by hand or in the washing machine, and lay at to dry.
If the mopping system was used, remove the Advanced Wet/Dry Reservoir from the bottom of
DEEBOT.
Empty any remaining water from the Reservoir and set out to dry.
Wipe the outside of the Advanced Wet/Dry Reservoir with a dry cloth.
If the Advanced Wet/Dry Reservoir does not run out of water after DEEBOT cleans for 60 minutes,
the water outlets on the Reservoir are clogged. Clean the Reservoir with the ECOVACS Reservoir
Cleaning Solution according to the instructions on the bottle of the solution.
4.2 Advanced Wet/Dry Cleaning Cloth, Advanced Wet/Dry Reservoir
Page 21
EN
19
4. Maintenance
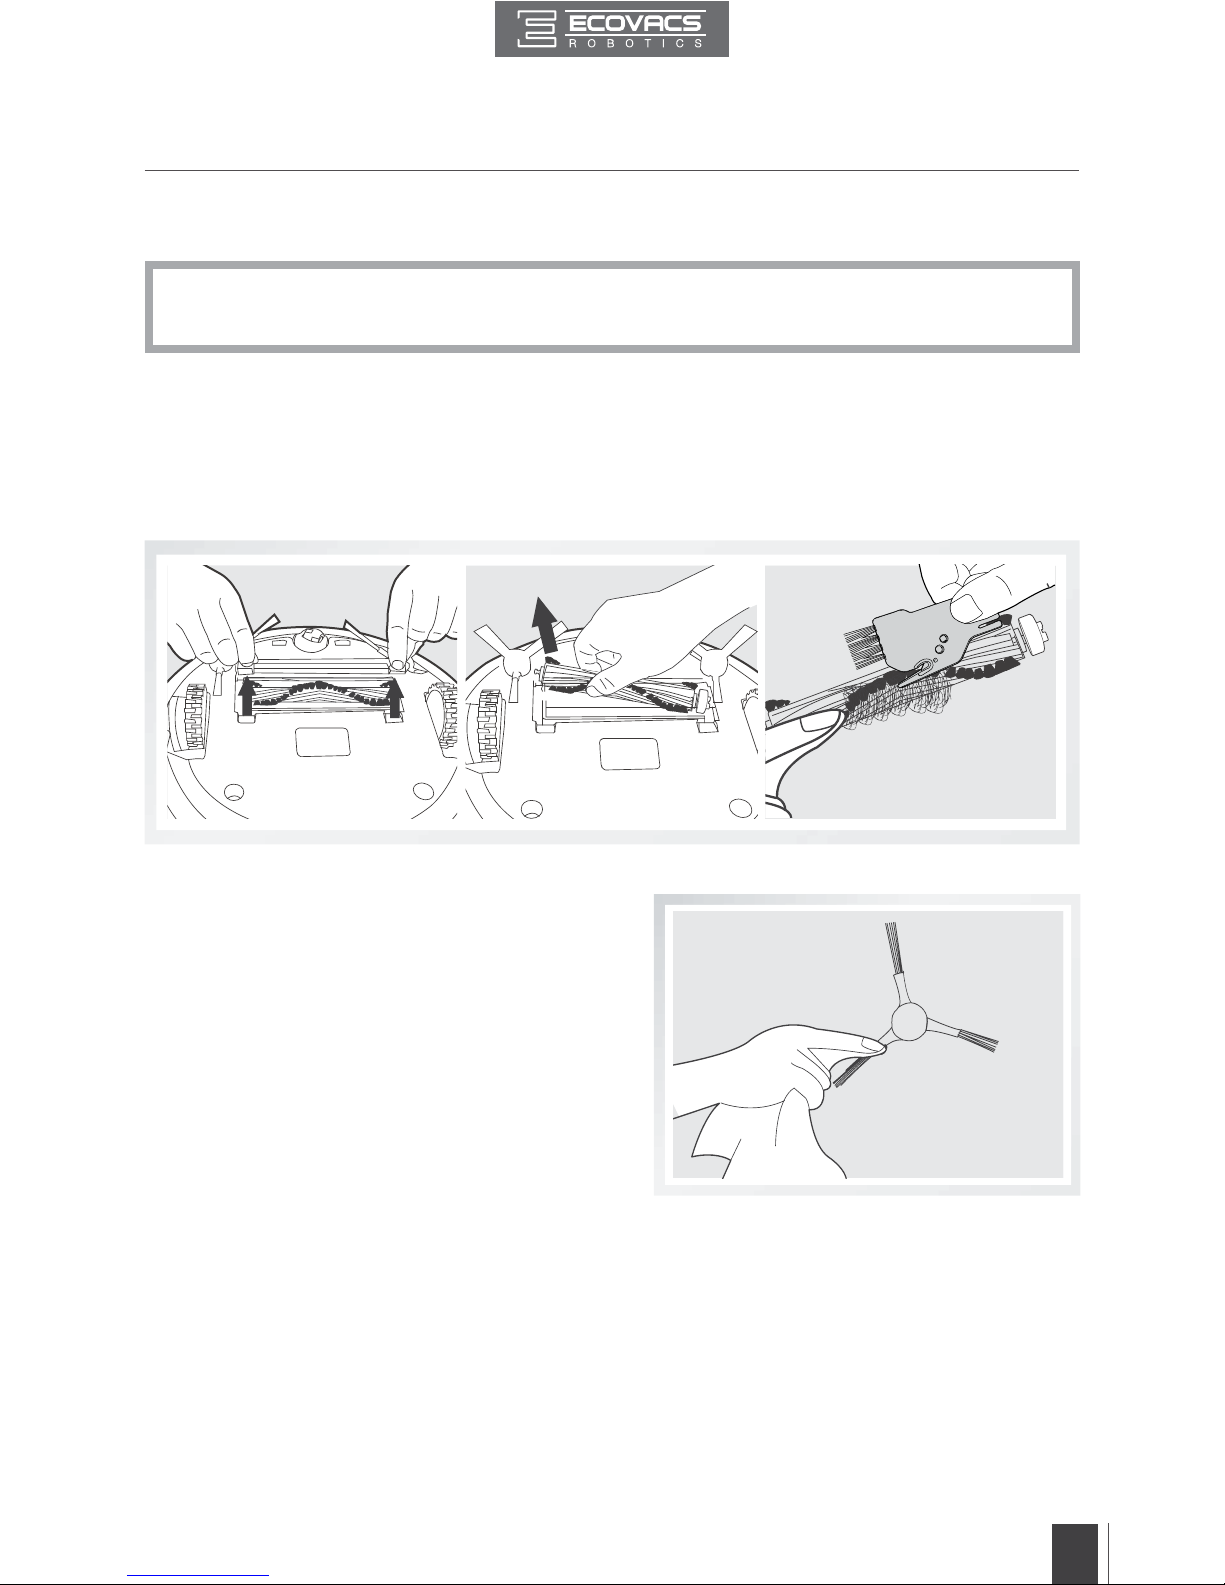
Cleaning the Main Brush
Turn the robot over. Push both buttons on the Main Brush Cover and remove it.
Remove the Main Brush.
Use the Multi-Function Cleaning Tool to cut off and remove any hair tangled around the Main
Brush.
4.3 Main Brush and Side Brushes
Cleaning the Side Brushes
Remove the Side Brushes. Wipe the Side Brushes
and their slots with a dry cloth.
*
A Multi-Function Cleaning Tool is provided for easy maintenance. Handle with care, this
cleaning tool has sharp edges.
Page 22
EN
20
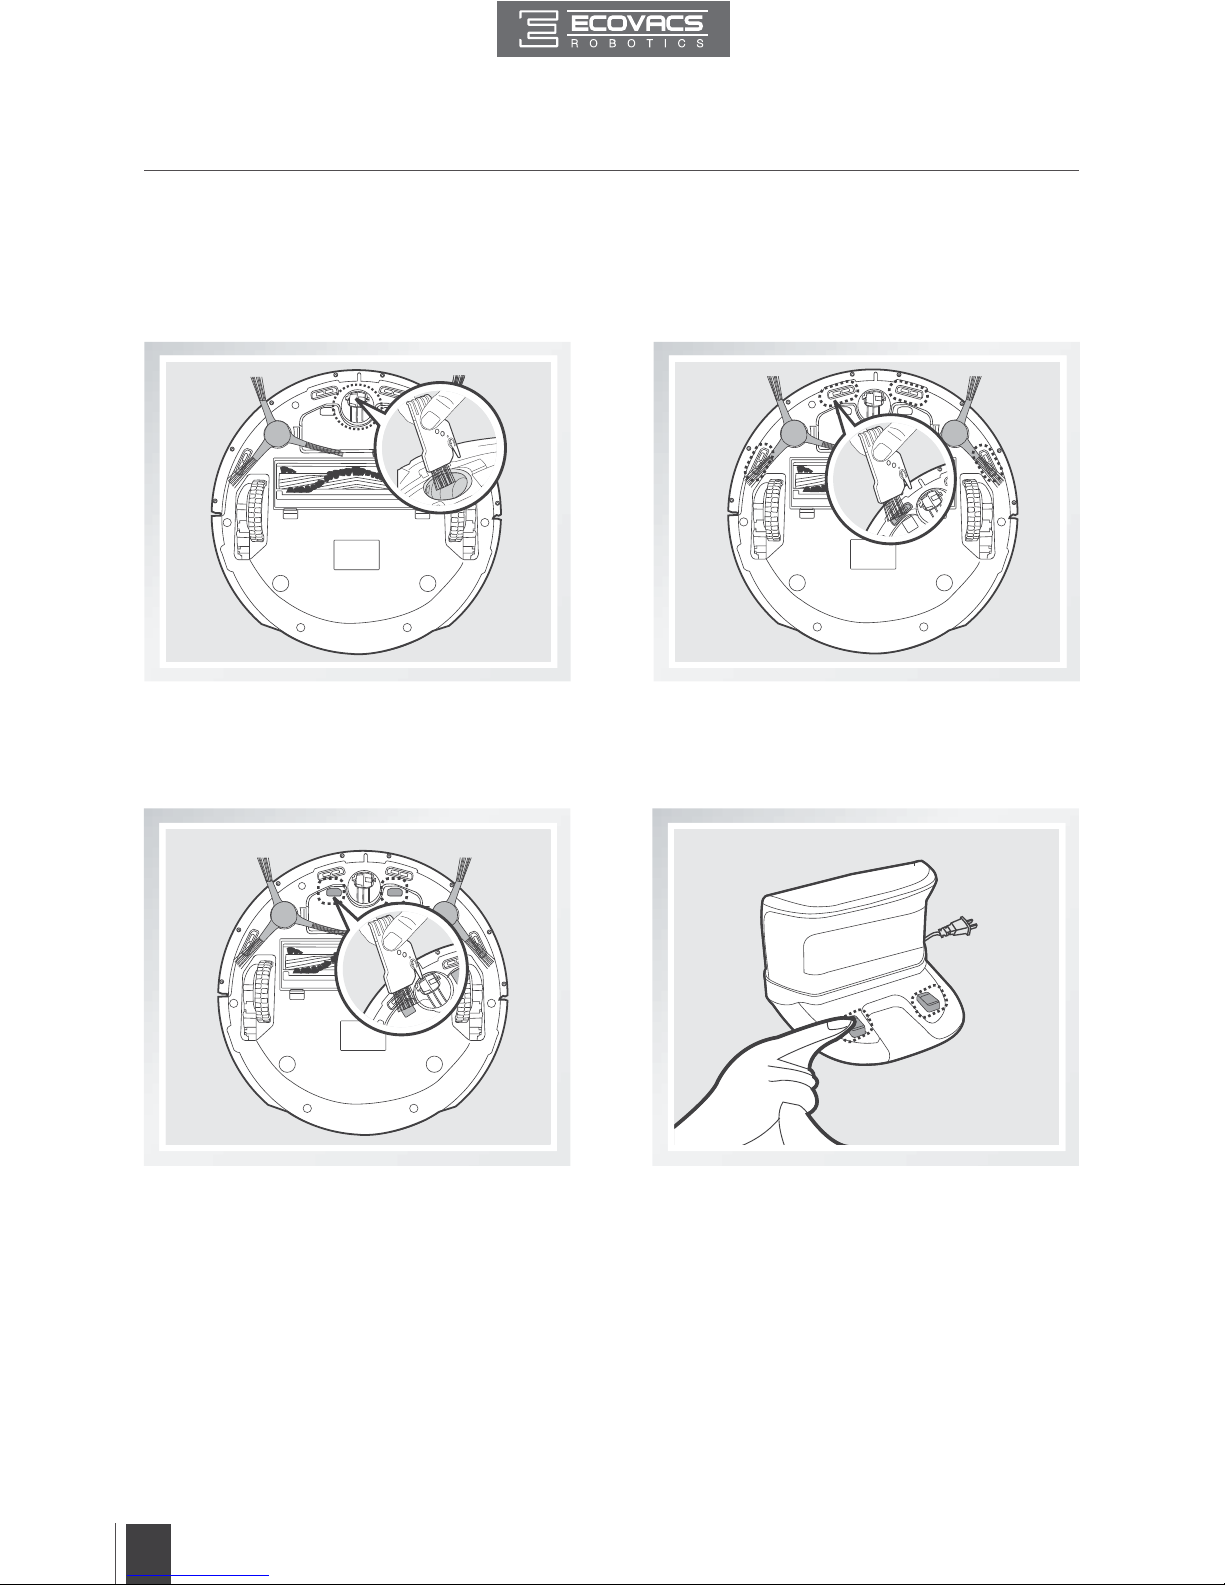
Wipe the Charging Contacts and Charging Dock Pins with the brush of the Multi-Function Cleaning Tool
or a dry clean cloth to maintain their eectiveness.
4. Maintenance
4.4 Other Components
Wipe the Anti-Drop Sensors with the brush
or the felt side of the Multi-Function Cleaning
Tool to maintain their eectiveness.
Use the Multi-Function Cleaning Tool to cut
off and remove any hair tangled around the
Universal Wheel.
Page 23
EN
21
5.
Troubleshooting
Please use this chart to troubleshoot common problems using DEEBOT.
No. Malfunction Possible Causes Solutions
1
DEEBOT will not
charge.
DEEBOT is not powered
ON.
Press and hold AUTO Mode Button on
DEEBOT to power ON.
DEEBOT has not made a
connection with the Charging
Dock.
Be sure that DEEBOT’s Charging
Contacts have made a connection
with the Charging Dock Pins. You may
move the robot manually to make the
connection if necessary.
Charging Dock is unplugged
while DEEBOT is powered
ON, which causes battery
consumption.
Plug in the Charging Dock and ensure
DEEBOT is powered ON. Keep
DEEBOT on the Charging Dock to
make sure it has a full battery to work
at any time.
The battery is completely
discharged.
Re-activate the battery. Place DEEBOT
on the Charging Dock by hand, remove
after charging for 3 minutes, repeat 3
times; then charge normally.
2
DEEBOT gets into
trouble while working
and stops.
DEEBOT is tangled with
something on the oor
(electrical cords, drooping
curtains, carpet fringe etc.).
DEEBOT will try various ways
to get itself out of trouble. If it is
unsuccessful, manually remove the
obstacles and restart.
Side Brush is stuck or the
rotation speed of the Side
Brush decreases.
Remove the debris tangled around the
Side Brush. If the Side Brush still rotates
slowly, contact Customer Service.
Main Brush is stuck or the
rotation speed of the Main
Brush decreases.
Remove the debris tangled around the
Main Brush with the provided MultiFunction Cleaning Tool. If the Main
Brush still rotates slowly, contact
Customer Service.
3
DEEBOT returns to
the Charging Dock
before it nishes clea
ning.
When battery power gets
low, DEEBOT automatically
switches to Return to
Charger Mode and returns
to the Charging Dock to
recharge itself.
This is normal. No solution necessary.
Working time varies
according to oor surface,
room complexity and the
selected Cleaning Mode.
This is normal. No solution necessary.
Page 24

EN
22
5.
Troubleshooting
No. Malfunction Possible Causes Solutions
4
DEEBOT will not
clean automatically at
scheduled time.
Time Scheduling function is
cancelled.
Set Time Scheduling function as
described in section 3.4.
DEEBOT is powered OFF. Power ON DEEBOT.
The robot’s battery is low.
Keep DEEBOT powered ON and on
the Charging Dock to make sure it has
a full battery to work at any time.
The robot’s components are
tangled with debris.
Power OFF DEEBOT, clean the
Dust Bin, and invert the robot. Clean
Side Brushes and the Main Brush as
described in section 4.
5
Remote Control failure
(eective control range
of Remote Control is
5m (16’).
The batteries in the Remote
Control need to be replaced.
Replace with new batteries making
sure they are installed correctly.
DEEBOT is powered OFF or
DEEBOT’s battery is low.
Make sure DEEBOT is powered ON
and fully charged.
The infrared signal cannot
be transmitted because
the Infrared Emitter on
the Remote Control or
DEEBOT’s Infrared Receiver
on DEEBOT is dirty.
Use a dry cloth or the Multi-Function
Cleaning Tool to wipe the Infrared
Emitter on Remote Control and the
Infrared Receiver on DEEBOT.
There is other equipment
interfering with the infrared
signal to DEEBOT.
Avoid using the Remote Control near
other equipment using infrared signals.
Page 25
DM81-039-IM2016R00
 Loading...