

Welland ME747AK-SI User Manual
USER MANUAL
MEDIA LAN Disk
ME747AK-SI

FCC COMPLIANCE STATEMENTS
This equipment has been tested and found to comply with the limits for a Class B digital device, pursuant to
Part 15 of the FCC Rules. These limits are designed to provide reasonable protection against harmful
interference in a residential installation. This equipment generates, uses and can radiate radio frequency energy
and, if not installed and used in accordance with the instructions, there is no guarantee that interference will not
occur in a particular installation. If this equipment does cause harmful interference to equipment off and on, the
user is encouraged to try to correct the interference by one or more of the following measures:
Reorient or relocate the receiving antenna.
Increase the Distance between the equipment and receiver.
Connect the equipment into an outlet on a circuit different from that to which the receiver is connected.
Consult the dealer or an experienced radio/TV technician for help.
2

TRADEMARKS
MS-DOS, Windows, Windows 95/98/NT/2000/me/XP are trademarks of Microsoft Corporation.
Macintosh and Mac are trademarks of Apple Computer
*All of the third-party brands and names are the property of their respective owners.
3

CONTENTS
1. Before You Get Started ................................................................................................................... 9
1.1 Introduction ........................................................................................................................ 9
1.2 Safety Instruction ............................................................................................................... 9
1.3 Take a look to the ME747AK-SI ..................................................................................... 10
2. Easy Installation Guide ................................................................................................................. 12
2.1 What is in the Package ..................................................................................................... 12
2.2 Specifications ..................................................................................................................... 12
2.3 Supported Hard Disk Formats ........................................................................................ 13
2.4 Minimum System Requirements ..................................................................................... 13
2.5 Supported Media Playback Formats ............................................................................... 14
2.6 Start To Assemble ............................................................................................................. 15
3. Using Media LAN Disk ................................................................................................................. 16
4

3.1 As a USB2.0 Storage Disk ................................................................................................ 16
3.2 Use USB Mode .................................................................................................................. 16
3.2.1 Windows Vista 64、Windows Vista X86、Windows 2000、Windows XP and
Windows ME ...................................................................................................... 16
3.2.2 Windows 98SE ..................................................................................................... 16
3.3 Formatting Media Lan Disk in FAT32 file system of fully capacity ............................. 20
3.4 OTB software program installation – One Touch Backup Function ............................ 21
3.5 As a Media Player machine .............................................................................................. 23
3.5.1 Firmware Upgrade procedures of Media LAN ................................................. 24
3.5.2 TV Lock Function ............................................................................................... 25
3.6 As a Network Storage Disk ............................................................................................... 25
3.7 Switching between Media File Playback Mode and Network Storage Mode ............... 27
4. Remote Control Introduce ............................................................................................................ 27
5

5. Starting Quick Media Play ........................................................................................................... 30
5.1 PHOTO PLAY MODE ..................................................................................................... 31
5.2 MUSIC PLAY MODE ...................................................................................................... 39
5.3 VIDEO PLAY MODE ...................................................................................................... 42
5.4 FILE LIBRARY ................................................................................................................ 44
5.5 OTHER SETUP ................................................................................................................ 46
6. Use Network Mode in Windows System ...................................................................................... 48
6.1 Install application tool of Network mode –MiniSAN Management .............................. 48
6.2 Mound your Media LAN Disk in Network mode ........................................................... 49
6.2.1 Discover miniSAN Disks in local network. ........................................................ 52
6.2.2 Mount a miniSAN Device Disk using the miniSAN Application Tool ............. 52
6.2.3 Display miniSAN Disk used capacity status. ..................................................... 58
6.2.4 miniSAN disk connection Status Modes ............................................................ 59
6

6.2.5 Disk Description information. ............................................................................ 61
6.2.6 Simple disk volume information ........................................................................ 62
6.2.7 Reload Disk function ........................................................................................... 63
6.2.8 Unmount miniSAN Disk ..................................................................................... 63
6.3 miniSAN Target Disk Administration functions ............................................................ 64
6.3.1 Disk information page ......................................................................................... 64
6.3.2 Disk Access Key Lock page ................................................................................ 66
6.3.3 Disk transmission traffic Bandwidth checking ................................................. 69
6.3.4 Advanced function for target disk ...................................................................... 71
6.4 miniSAN Disk Tool Option functions .............................................................................. 79
6.4.1 General function description .............................................................................. 79
6.4.2 Network function description ............................................................................. 82
6.4.3 GUI function description .................................................................................... 83
7

6.5 Uninstall miniSAN Driver ................................................................................................ 84
6.6 miniSAN Disk Tool About function. ................................................................................ 84
6.7 miniSAN Disk Manager Application Notes on Windows OS. ....................................... 86
7. FAQ ................................................................................................................................................ 91
8

1. Before You Get Started
1.1 Introduction
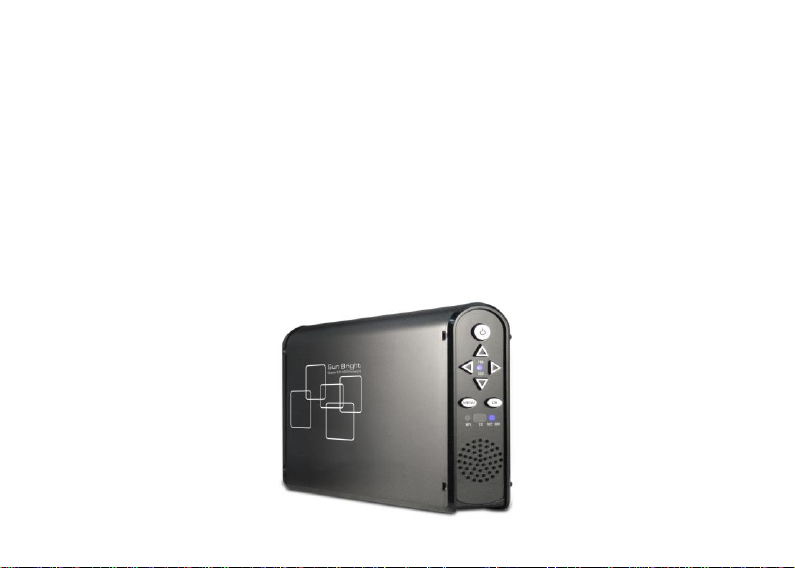
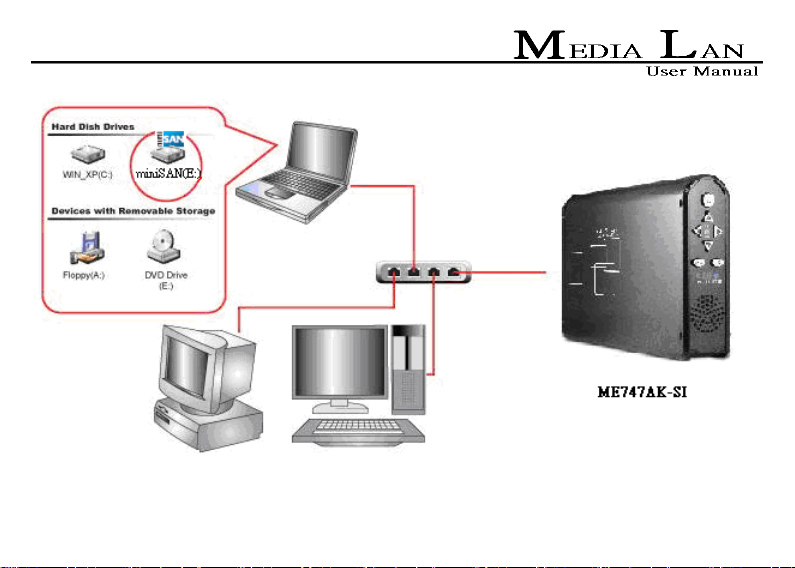
Media Lan Disk (ME747AK-SI) is a multiple-functions product:USB2.0 PNP storage device & 10/100
network storage device & MP4 player. With user friendly configuration setting (No any TCP/IP)、enjoy
Movies、Photos and Music、one touch backup fast copy functions and supports both IDE & SATA HDD at the
same time. LAN Share disk is a best home network backup & entertainment center for your need.
1.2 Safety Instruction
1. Always unplug the power cord before inserting Hard Drive.
2. Using a power supply with a different voltage rating will damage and make void of this product warranty.
3. Keep this equipment away from humidity or any type of moisture.
4. Do not drop or shack the device.
5. Do not press or put any weight on the device.
6. Do not clean the device with alcohol, thinner or benzene.
9
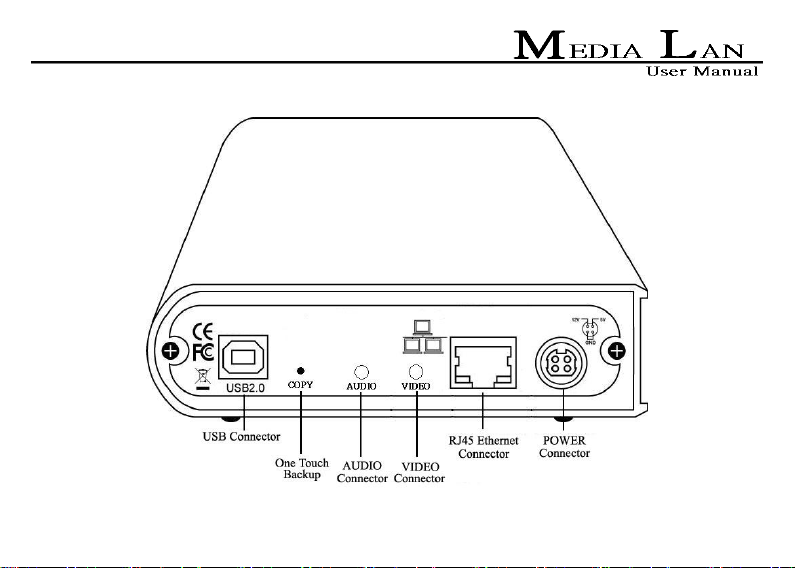
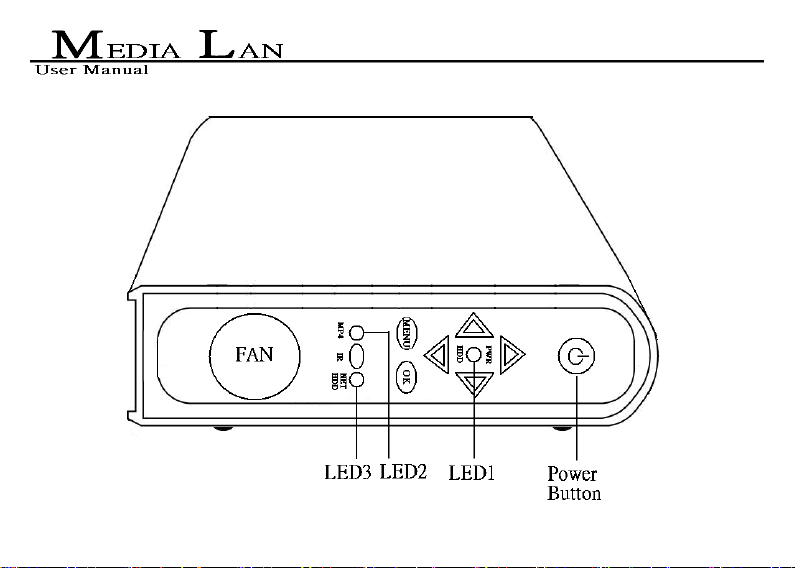
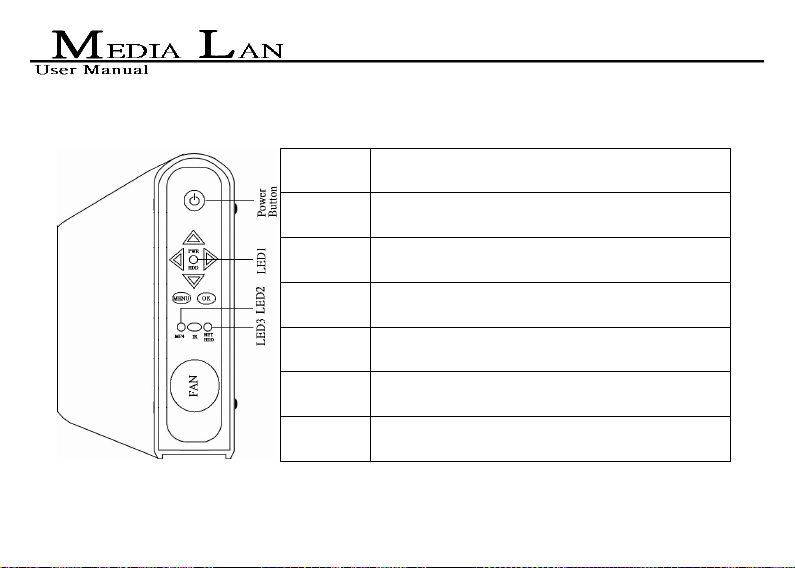
1.3 Take a look to the ME747AK-SI
10
11

2. Easy Installation Guide
2.1 What is in the Package
Media Bank x 1
Power Adapter x 1、Power Adapter Cable x 1
Audio cable x 1、Video cable x 1
USB cable x 1、Ethernet Cable x 1
Remote control
User Manual x 1、Software Install CD x 1
2.2 Specifications
Application:Any 3.5 inch hard disk (IDE interface)
Output Port:Composite video(NTSC/PAL)、S-video(NTSC/PAL)、Stereo Audio jack
12

2.3 Supported Hard Disk Formats
USB Enclosure:FAT32、NTFS
Media File Playback Mode:Only FAT32
LanShare Mode:FAT32、NTFS
2.4 Minimum System Requirements
USB Mode:
Windows® 98SE / ME / 2000 / XP / Server 2003(32bit) / Vista X86 / Vista 64 bit
233 MHz Pentium® II or higher
128 MB RAM (256 MB recommended)
USB 1.1 Port (USB 2.0 recommended)
CD-ROM drive for installation
Mac OS:Mac OS 9 or above
13

Networt storage mode Mode:
Windows® Win2000, Win Server 2000, WinXP, WinXP 64, Win Server 2003, Win Vista, Win Vista64
233 MHz Pentium® II or higher
128 MB RAM (256 MB recommended)
USB 1.1 Port (USB 2.0 recommended)
CD-ROM drive for installation
100Base-T full duplex switch
2.5 Supported Media Playback Formats
Video:MPEG1(VCD、SVCD、DAT)、 MPEG2(AVI、VOB)、MPEG4(AVI、DivX、XviD)
Subtitle:ass、psb、smi、ssa、srt、sub-txt
Music:MP3
Photo:JPEG
14

2.6 Start To Assemble
Step1 Step2
Step3 Step4
15

3. Using Media LAN Disk
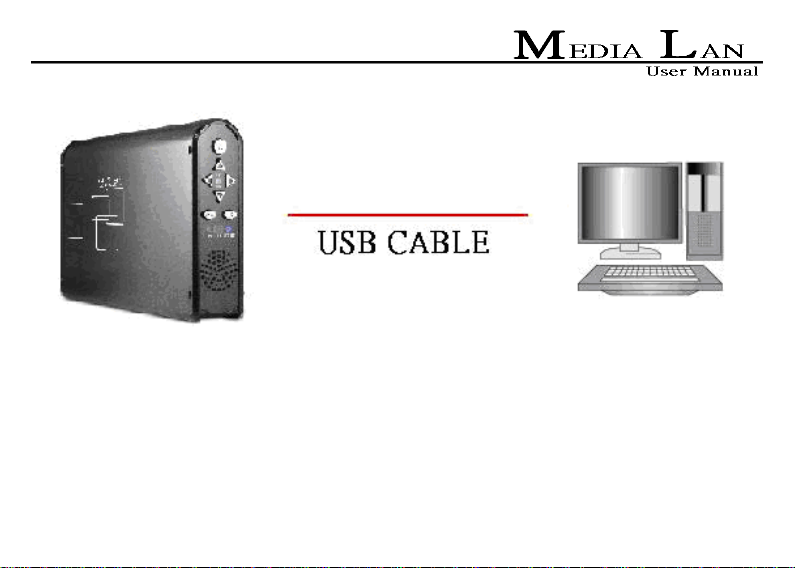
3.1 As a USB2.0 Storage Disk
1. Connect the power cable then power on it( push the power button 2~4 second).
2. Connect the USB cable in your computer.
3. When your hard disk is detected by your computer, LED1 is bright
3.2 Use USB Mode
3.2.1 Windows Vista 64、Windows Vista X86、Windows 2000、Windows XP and Windows ME
1. Connect the LAN Share and your computer with USB Cable.
2. Connect the power cable then power on it.
3.2.2 Windows 98SE
Install USB Win98 Driver
1. Find OP-9210 Win98 Driver in the install CD and execute OP9210_Disk_Remove.
2. InstallShield Wizard will appear, click Next.
16
3. Choose I accept the terms of the license agreement and click Next.
4. Click Finish to complete driver installation.
5. Connect the LAN Share and your computer with USB Cable.
6. Connect the power cable then power on it.
7. System will install the USB driver automatically.
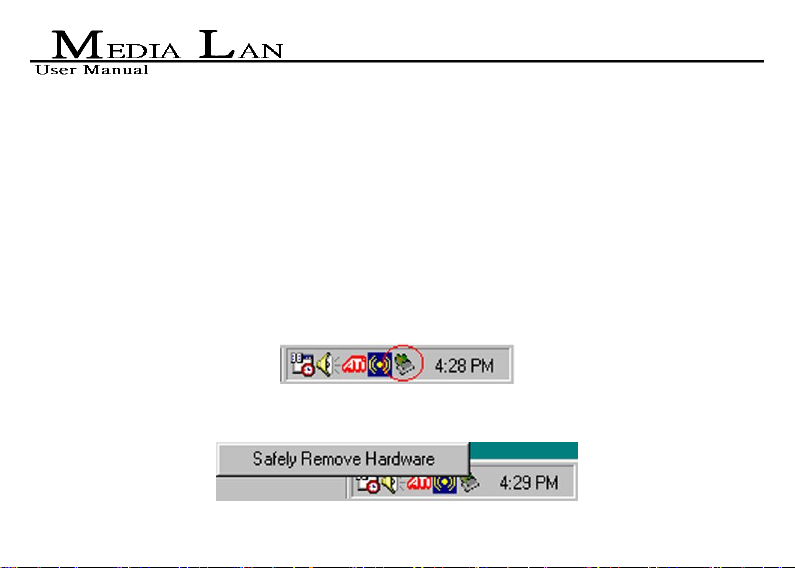
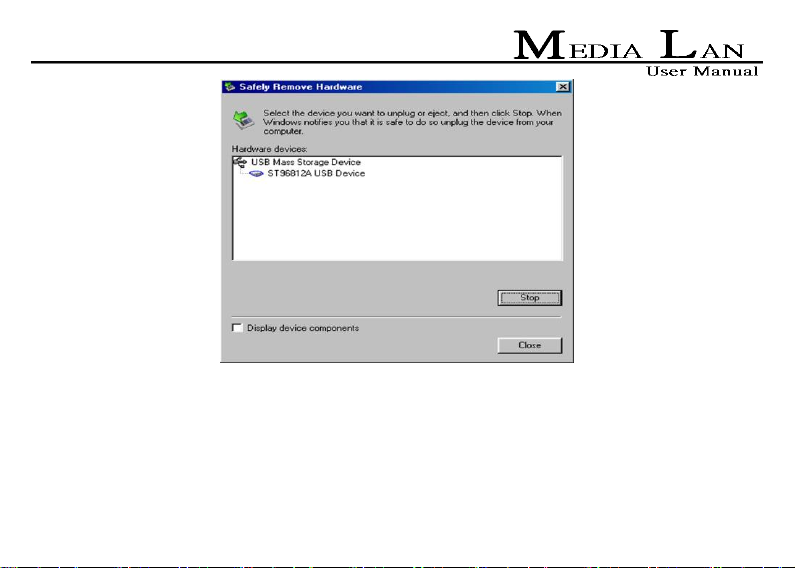
Safely Remove Disk
1. Find USB icon in the system tray.
2. Right click icon and choose Safely Remove Hardware.
3. Click Stop.
17
4. Choose USB Mass Storage Device then click OK.
18
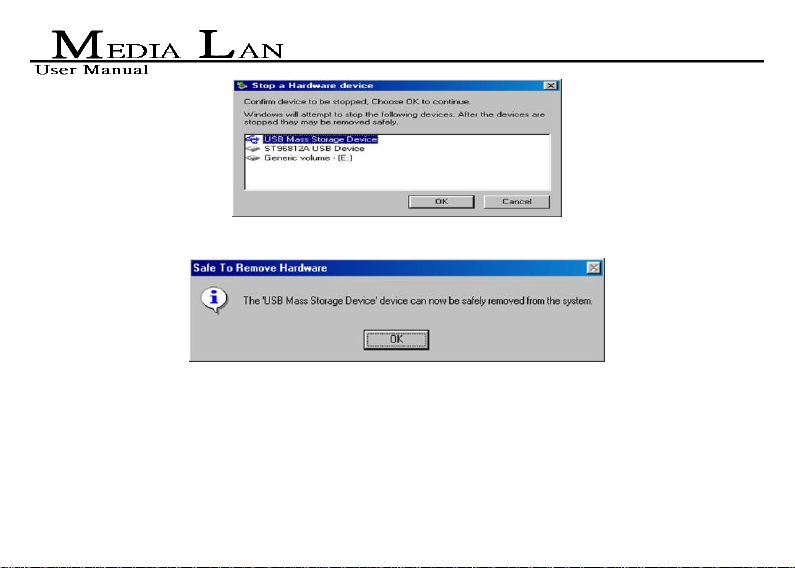
5. Click OK to complete safely remove hardware.
Remove Win98 USB Driver
1. Click Start / Settings / Control Panel then execute Add/Remove Programs.
2. Choose OP-9210 USB 98 Driver and click Add/Remove…to remove it.
19

3.3 Formatting Media Lan Disk in FAT32 file system of fully capacity
1. Right click My Computer and select Manage.
2. Computer Management window will appear. Click Disk Management under Storage.
Computer Management window will list all the disks in the computer.
3. Right click on partition disk and click New Partition.
4. New Partition Wizard will appear, click Next.
5. Select Primary partition or Extended partition which you want, click Next.
6. Enter the capacity that you want to partition, click Next.
Note:
1. Through the Disk Management tool providing by Windows systems, the maximum
formattable capacity of FAT32 is 32GB.
2. Customer who desires to have a FAT32 partition more than 32GB can be satisfied by
implementing our “Format Transfer Tool”. Please refer to the manual of our “Format
20

Transfer Tool” for more comprehensive information about format issue.
7. Select Assign the following drive letter, click Next.
8. Select Format this partition with the following settings and choose the File system which you want.
You can enter the Volume label what you want. Choose Perform a quick format, click Next.
9. Click Next.
10. You can see a new partition in the Disk Management.
11. The new disk will appear in your computer.
3.4 OTB software program installation – One Touch Backup Function
1. Please find the OTB Tool in the CD.
2. Install OTB.
3. After installing, please refer to user guide from One Touch Backup in the start menu.
21
Notes:
If you plug the ME747AK-SI into computer with USB, media file playback and network will not work.
22
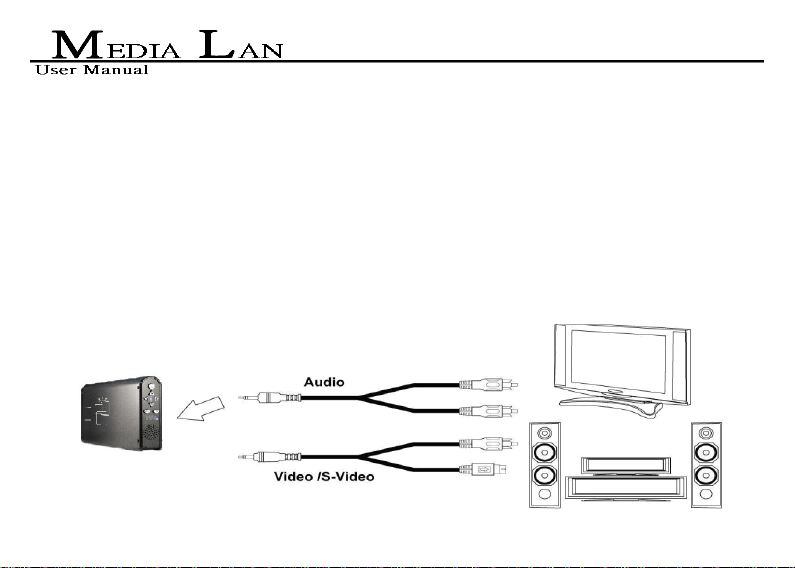
3.5 As a Media Player machine
1. Please connect the Audio and Video cables between Media Bank and TV as shown as below figure.
2. Please plug in the power adaptor and power on your TV.
3. Please change your TV mode to AV mode.
4. Push the POWER button 2~4 second.
5. Now, you can enjoy it.
23

※ Notes:
If your image and subtitle are separated, please put them in the same folder, then copy to your ME-747AK
; and remember, the file name of the image and subtitle must be same.
3.5.1 Firmware Upgrade procedures of Media LAN
1. Please copy the new firmware file that you want to update from CD to your first partition of the hard disk.
(Please confirm the first partition is FAT32)
2. Please connect the Video and power cable, and power on the Media Bank.
3. Enter the TV mode, and move your cursor on the new firmware “ Bank30.rom”.
4. Push the “OK” key to enable the upgrade procedure.
※Attention:Do not turn off the power when firmware upgrade procedures are under processing. It will
cause upgrade procedures failed and Media Bank damage on the situation.
5. When the upgrade screen is gone, it means firmware upgrade has already finished.
24

3.5.2 TV Lock Function
1. This function will only lock the second partition if there are several partitions in your hard disk. You
cannot enter the partition unless input correct password.
2. The screen will display a keyboard when you want to enter locked partition, Please input the default
password (the default password is 0000)when you first time use this function.
3. Please use the up、down、left、right and play key on the remote control to move or execute input function.
4. If you want to change the password, please choose the change key in the keyboard. Input the old
password and then input the new password, then press OK. Now the new password is that you want
3.6 As a Network Storage Disk
1. Connect the included Ethernet cable from the Ethernet port on LAN Share to a switch (100 Base-T).
2. Make sure the power connector is firmly attached to the LAN Share and connect the power adapter to
a power source.
25
26
3.7 Switching between Media File Playback Mode and Network Storage Mode
Key
Function Description
OK
Takes you to play or execute the current selection.
UP
Direction button to move cursor on the screen.
DOWN
Direction button to move cursor on the screen.
LEFT
Direction button to move cursor on the screen.
RIGHT
Direction button to move cursor on the screen.
PHOTO
PHOTO Mode.
MUSIC
MUSIC Mode.
VIDEO
VIDEO Mode.
FILE
FILE Mode.
MAIN MENU
Go to the main menu.
SETUP
Setup and customize the settings of Media Bank.
Push the “Power” button on the media bank or the remote control, then the LED will lighted up between “MP4”
and “NET HDD“. When the “MP4” LED lighted on, Media File Playback mode is active. When the
“ NET HDD” LED lighted on, NDAS mode is active.
4. Remote Control Introduce
27
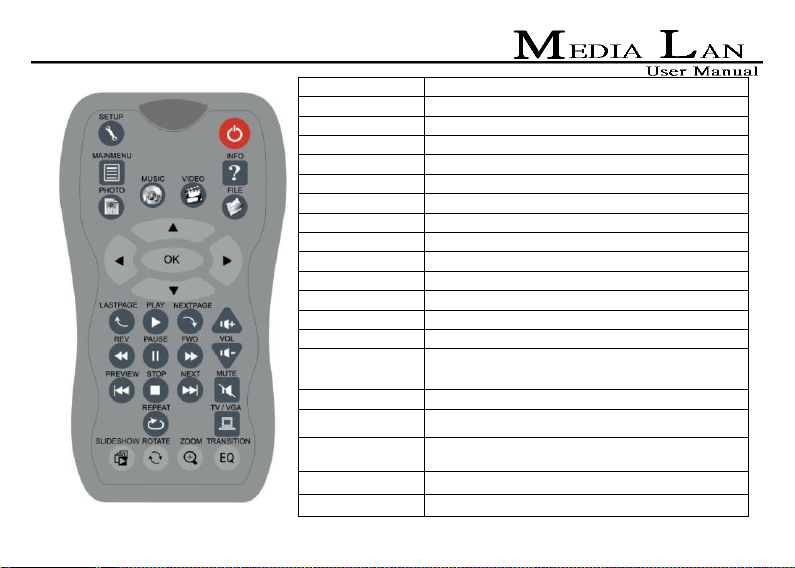
INFO
See the information of the file.
REV
Previous section in Music or Video.
PAUSE
Interrupts file playback.
FWD
Next section in Music or Video.
LASTPAGE
Jump to last page.
PLAY
Continue play back.
NEXTPAGE
Jump to next page.
PREVIEW
Previous file.
STOP
Terminate the selected mode.
NEXT
Next file.
VOL+
Increase the volume.
VOL -
Decrease the volume.
MUTE
Turn off the sound.
AUDIO
Choose the sound channel.
REPEAT
Repeat setup when photo、music and video are
playing.
SLIDESHOW
Playback music under slideshow with photo.
ROTATE
Rotate the photo.
ZOOM
Zoom out the photo.
TRANSITION
Allows you to choose the sound mode.
TV/VGA
Change display between VGA and TV
28
PLAY/OK
Takes you to play or execute the current selection.
UP
Direction button to move cursor on the screen.
DOWN
Direction button to move cursor on the screen.
LEFT
Direction button to move cursor on the screen.
RIGHT
Direction button to move cursor on the screen.
MAIN
MENU
Takes you to the main menu.
POWER
Power switch
29
 Loading...