

Page 1

JOYCE ČR, s.r.o., Venhudova 6, 614 00 Brno, ČR, IČ: 25317571, DIČ: CZ25317571, Tel.: +420 539 088 010
Fax: +420 5
39 088
000, E-mail: [email protected]
, Web: www.joyce.cz, www.joyce
-
energie.cz
Verze 1.0, FW: V21
Video telefon WELL VP-2009
Page 2

About This Guide
VP-2009 is an H.264 based broadband videophone supporting Video and Voice
applications. Its major functions include IP Telephony, IP Camera Viewer (SIP based)
and Photo frame. It can satisfy the demanding requirements of the next generation
of IP broadband communication applications and open the door to the world of
multimedia.
VP-2009 is an innovative IP media phone equipped with the most advanced video
compression technology. It offers unrivalled super voice and picture quality,
innovative functional richness, friendly user interface, stylish and elegant design,
enhancing the instant, face-to-face communication experience even at low
bandwidth.
Meanwhile it supports Voice Mail, Screen Saver, Advertisement, etc. Which make it
not only a video phone but also a media phone for entertainment. It is definitely
ideal for multimedia communication, virtual office and all IP video conversation for
business or family users.
In this User Guide, you will find everything you need to quickly use your IP Video
Phone. Be sure to verify with your system administrator that your network is
prepared for configuring your IP phone. As well, be sure to read the Packing List
section in this guide before you set up and use the phone.
Declaration of Conformity
Hereby, it’s declared that this phone is in conformity with the
essential requirements and other relevant provisions of the CE, FCC.
CE Mark Warning
This is a class B device, in a domestic environment; this product may cause radio
interference
, in
which case the user may be required to take adequate measures.
WEEE Warning
To avoid the potential effects on the environment and human health
as a result of the presence of hazardous substances in electrical and
electronic equipment, end users of electrical and electronic equipment
should understand the meaning of the crossed-out wheeled bin
symbol. Do not dispose of WEEE as unsorted municipal waste and
have to collect such WEEE separately.
Page 3

Tables of Contents
Getting Started .................................................................................. - 1 -
Packing List ............................................................................................................................... - 1 -
Assembling the Phone ................................................................................................................ - 3 -
Configuration and Registration .................................................................................................. - 4 -
Configuring via Web Page ................................................................................................. - 5 -
Configuring via keypad ...................................................................................................... - 6 -
Overview ............................................................................................ - 7 -
Keypad Instruction ..................................................................................................................... - 7 -
LED Instruction.......................................................................................................................... - 9 -
Icon Instruction .......................................................................................................................... - 9 -
User Interface ............................................................................................................................ - 11 -
Customizing Your Phone ................................................................ - 13 -
Powering Up the Videophone .................................................................................................. - 13 -
The Idle Interface ..................................................................................................................... - 13 -
Check the Status ....................................................................................................................... - 13 -
Basic Settings ........................................................................................................................... - 14 -
Personalize ....................................................................................................................... - 14 -
Sound ............................................................................................................................... - 17 -
Date & Time ..................................................................................................................... - 19 -
Security ............................................................................................................................ - 20 -
Screen Saver ..................................................................................................................... - 21 -
Wallpaper Manage ........................................................................................................... - 22 -
Call Feature .............................................................................................................................. - 23 -
Forward ............................................................................................................................ - 23 -
Call Waiting ..................................................................................................................... - 23 -
Auto Answer .................................................................................................................... - 24 -
Dial Plan ........................................................................................................................... - 25 -
Speed Dial ........................................................................................................................ - 27 -
Key As Send ..................................................................................................................... - 28 -
Directory .................................................................................................................................. - 29 -
Add Contact ..................................................................................................................... - 29 -
Search Contact ................................................................................................................. - 31 -
Edit Contact...................................................................................................................... - 32 -
Delete Contact .................................................................................................................. - 34 -
Clear Phonebook .............................................................................................................. - 35 -
Group Manage .................................................................................................................. - 35 -
Export Contact list ........................................................................................................... - 37 -
Call Out ............................................................................................................................ - 38 -
Page 4

Call History .............................................................................................................................. - 39 -
View the call history......................................................................................................... - 39 -
Dial back from the call history ......................................................................................... - 39 -
Add a record from call history ......................................................................................... - 39 -
Delete the call history....................................................................................................... - 40 -
Clear the call history ........................................................................................................ - 41 -
Media ....................................................................................................................................... - 41 -
Photo ................................................................................................................................ - 42 -
Video ................................................................................................................................ - 43 -
Using the Basic Call Functions ...................................................... - 45 -
Making a call ............................................................................................................................ - 45 -
Call Devices ..................................................................................................................... - 45 -
Call Methods .................................................................................................................... - 45 -
Answering a call....................................................................................................................... - 45 -
Answering an incoming call ............................................................................................. - 45 -
Refuse a call ..................................................................................................................... - 46 -
DND ................................................................................................................................. - 46 -
During an Active Call .............................................................................................................. - 46 -
Audio/Video Switch ......................................................................................................... - 46 -
Mute ................................................................................................................................. - 47 -
Call Hold .......................................................................................................................... - 47 -
Call Transfer ..................................................................................................................... - 47 -
Call Statistics .................................................................................................................... - 48 -
Message .................................................................................................................................... - 49 -
Using the Advanced Phone Functions .......................................... - 51 -
Account Settings ...................................................................................................................... - 51 -
Basic Settings ................................................................................................................... - 51 -
Audio codecs .................................................................................................................... - 51 -
Video codecs .................................................................................................................... - 52 -
Advanced Settings ............................................................................................................ - 53 -
Network Setting ....................................................................................................................... - 54 -
WAN ................................................................................................................................ - 54 -
BandWidth ....................................................................................................................... - 54 -
Maintenance Tasks ................................................................................................................... - 55 -
Administrator Mode ......................................................................................................... - 55 -
Administrator/User Password .......................................................................................... - 55 -
Factory ............................................................................................................................. - 56 -
Firmware Update .............................................................................................................. - 56 -
Auto provision .................................................................................................................. - 57 -
Reboot .............................................................................................................................. - 58 -
System Log Export ........................................................................................................... - 59 -
Trouble Shooting ............................................................................. - 60 -
Page 5

Page 6

IP Video Phone Getting Started
- 1 -
Getting Started
Packing List
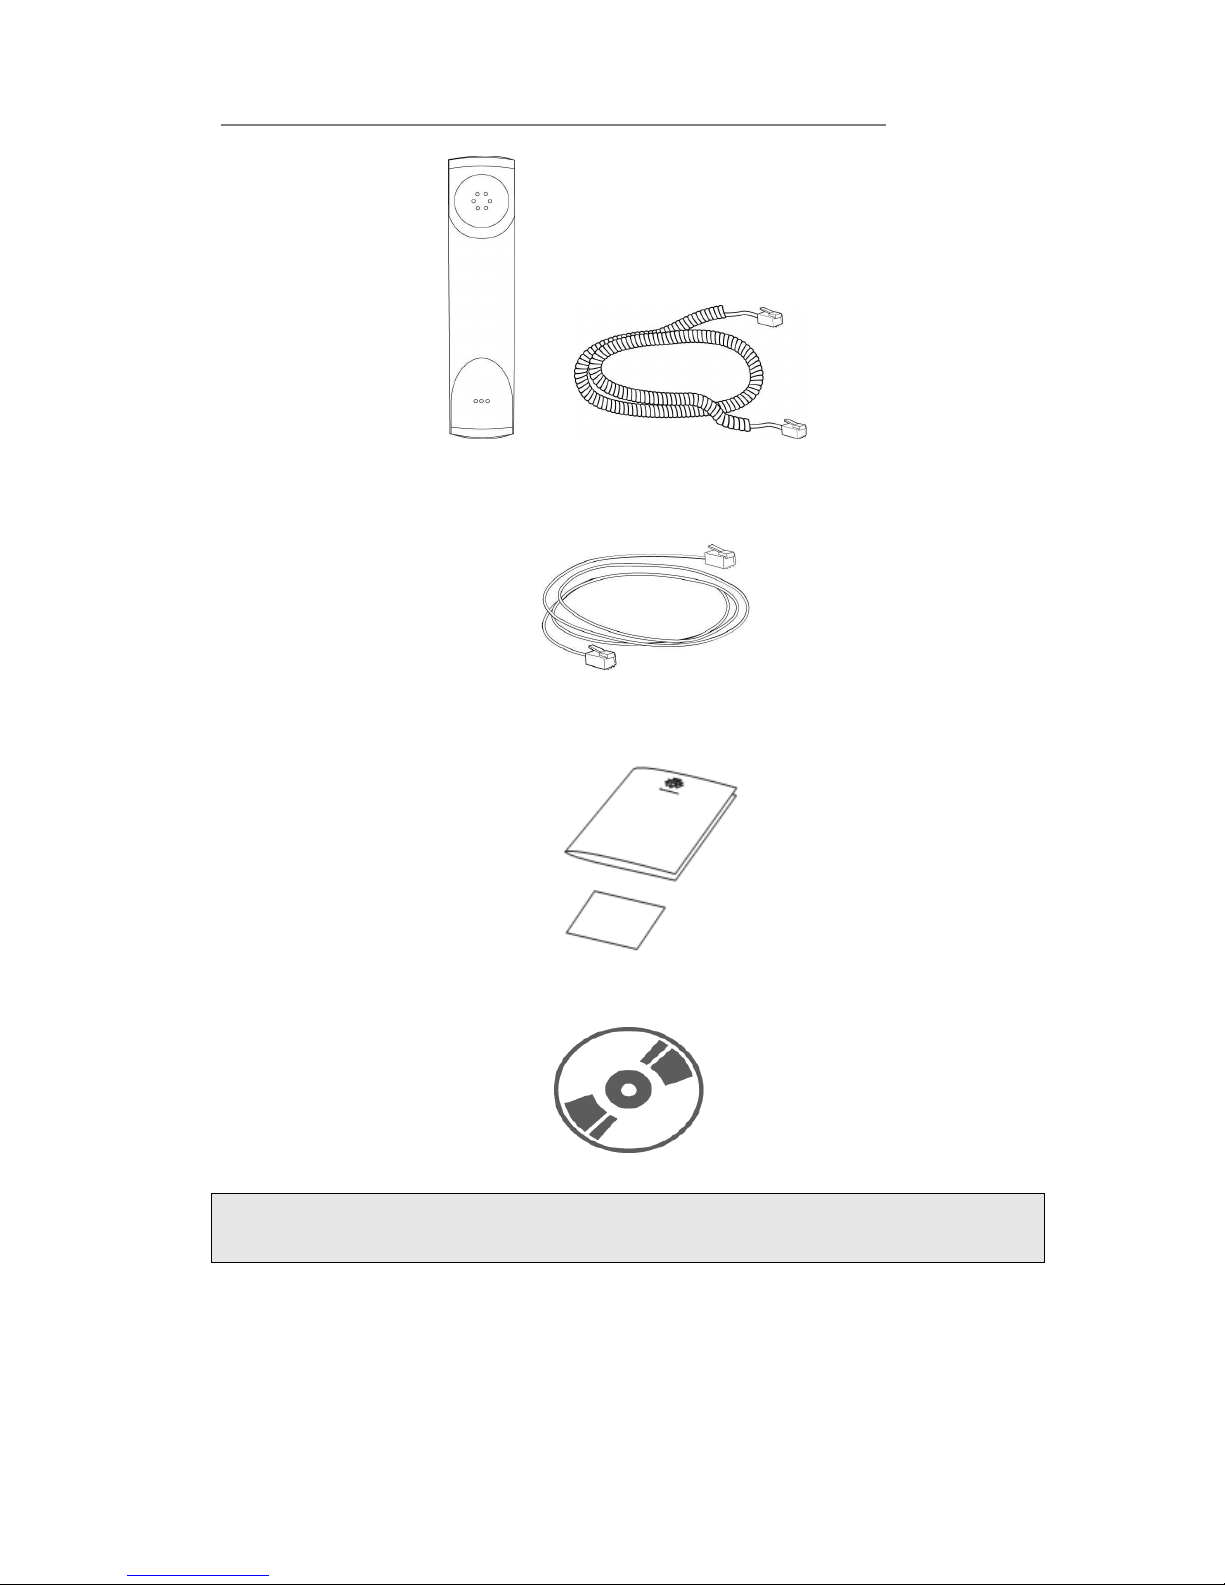
The following components are included in your package:
IP Video Phone VP-2009
Power Adapter
Handset & Handset Cable
Page 7
IP Video Phone Getting Started
- 2 -
Ethernet Cable
Quick Installation Guide & Quick Reference
CD Content
Note:
The telephone line cord is only available for the model VP-2009 with PSTN
connectivity.
Please unpack the product package with caution; inspect the items closely. If you
find any damaged item, please contact your IP Video phone reseller immediately.
Also, please keep the box and packing material for future use in the event of future
shipments.
Page 8
IP Video Phone Getting Started
- 3 -
Assembling the Phone
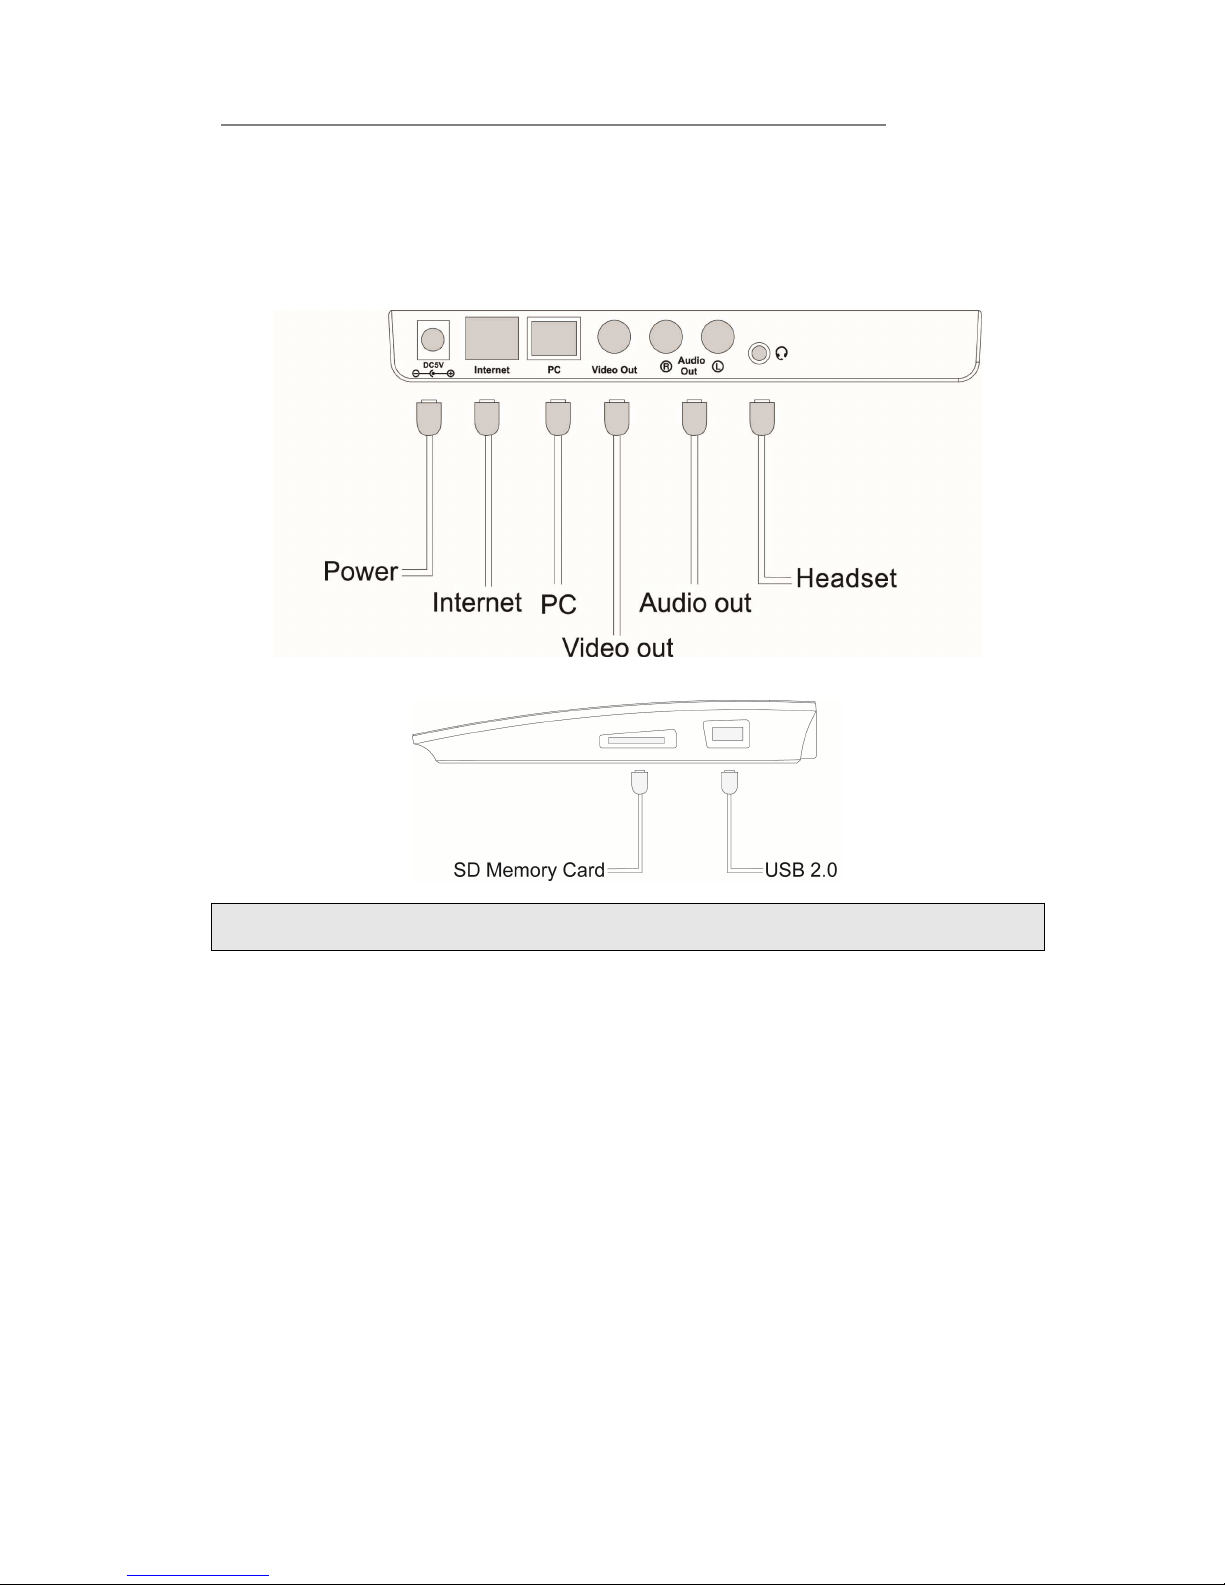
This section introduce how to assemble the phone.
1) Connect the IP video phone shown as below:
Note:
Headset is not included in the packing list. Should be purchased separately.
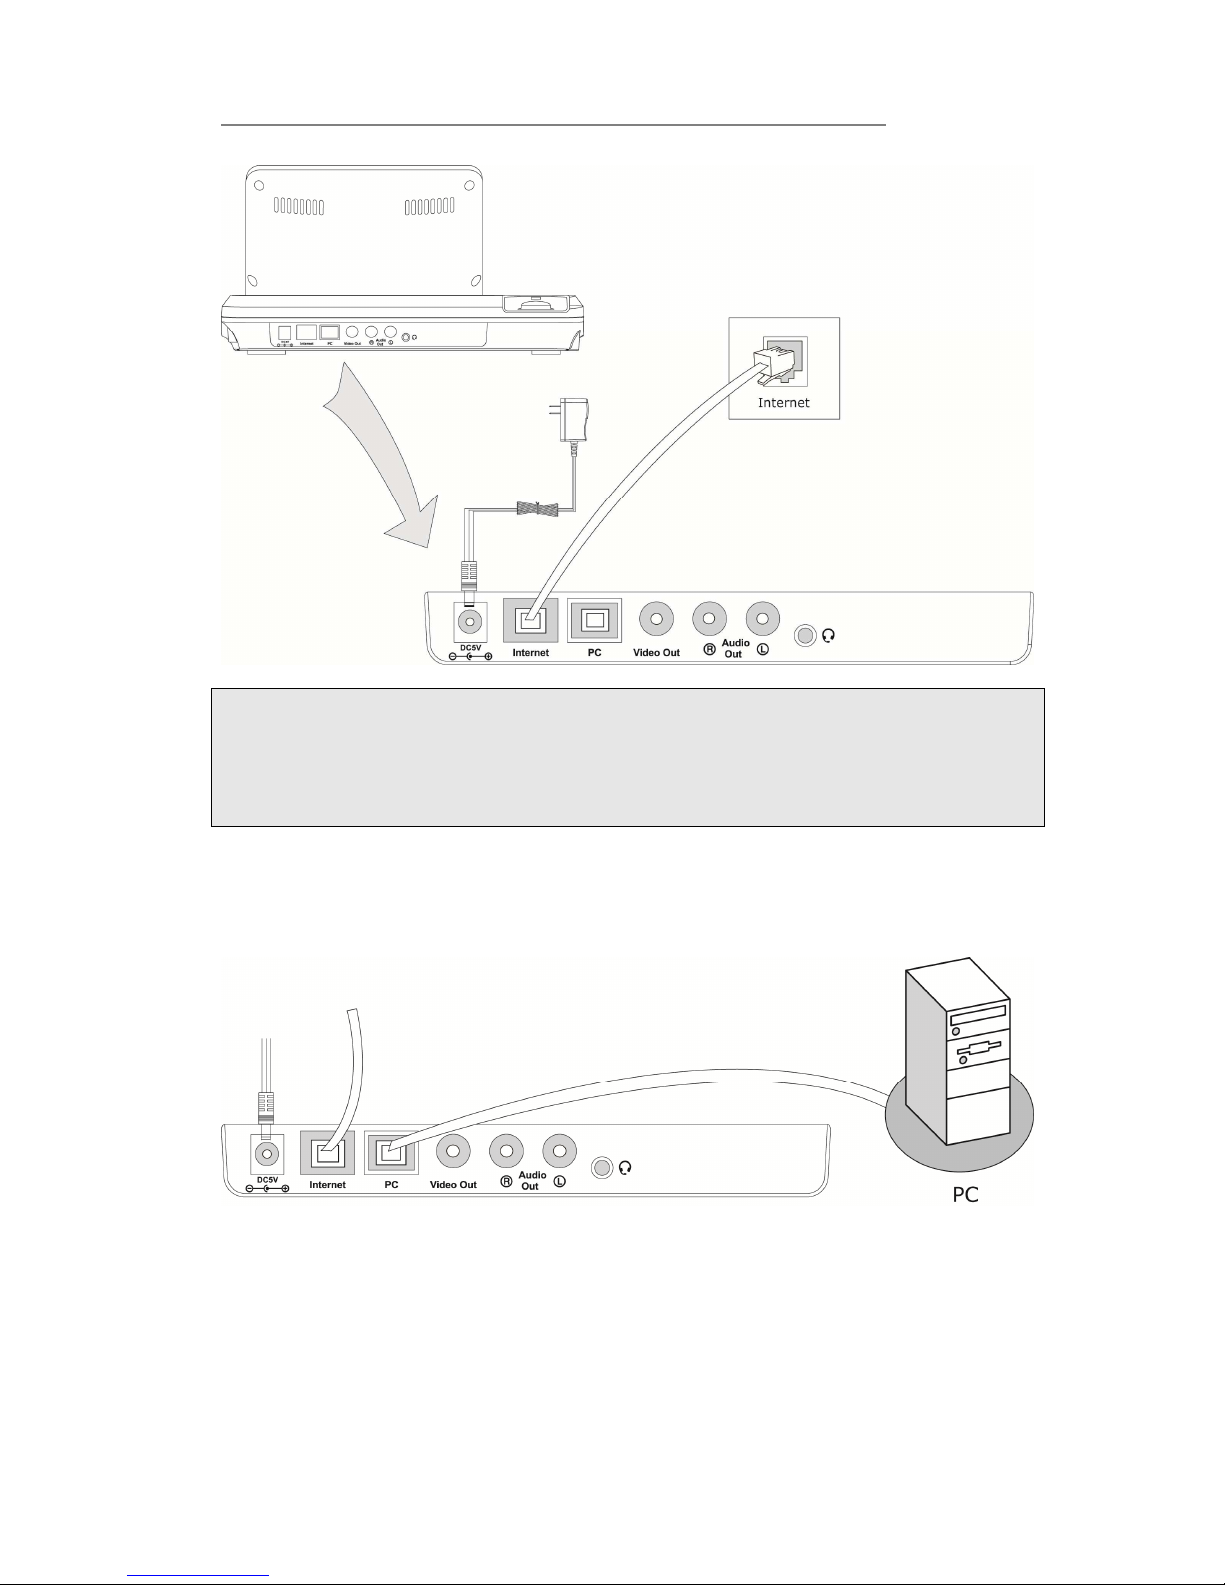
2) Connect Network and Power
There are two ways for network and power source connections. You can connect the
phone to the AC Power directly using the power adapter or to a PoE compliant switch
or hub. Your system administrator will advise you on which one to use.
Page 9
IP Video Phone Getting Started
- 4 -
Note:
1. If inline power is provided, do not install AC adapter. Make sure the Ethernet
cable and switch/hub is PoE compliant.
2. The Internet Port can be also connected to Hub/Switch/IP PBX or other internet
devices.
3. Please contact your administrator for more information.
The phone can also share the network connection with other network devices such as
PC. Connect the phone’s PC port and computer’s Network Port together using an
Ethernet cable, shown as below:
Configuration and Registration
If you are administrator, you need to do some simple configuration to make the
phone work. If not, please contact your internet administrator or service provider for
more details.
Page 10
IP Video Phone Getting Started
- 5 -
Configuring via Web Page
Press <OK> button on the keypad of the phone to enter the status page and find out
the IP address of the IP video phone. Enter the IP (for example http://10.1.3.204)
into the address bar of web browser. The default login name and password are
admin/admin.
Note:
Please locate your PC in the same network segment of IP phone (10.1.3.X) to access
the web configuration page. Please consult your system administrator for help.
Network Settings
Choose Network->Internet Port (WAN).
DHCP: By default the phone attempts to contact a DHCP Server in your network in
order to obtain its valid network settings, e.g. IP address, sub mask, gateway, DNS
server, etc.
Static IP Address: If your phone cannot contact a DHCP Server for any reason,
you need to enter the network settings manually via Static IP Address. Please
contact your internet administrator for more details.
PPPoE: If you are using the xDSL Modem, you can connect your phone to the
internet via PPPoE mode. Please contact your ISP for the User Name and Password
for internet access.
Note:
Using the wrong network parameters may result in inaccessibility of your phone and
may also have an impact on your network performance. Please contact your network
administrator.
Account Settings
The phone attempts to register to the SIP server using the account/register data
provided by the automatic or manual initialization.
Choose Account, you will find the following parameters:
Field Description
Account Active You can choose enable/disable to set the account respectively.
Display Name It is shown as Caller ID when making a phone call.
User Name User account information, provided by VoIP service provider.
Register Name It is authenticated ID for authentication, provided by ISP.
Password It is provided by ISP for registration.
SIP Server Server for registration, provided by ISP.
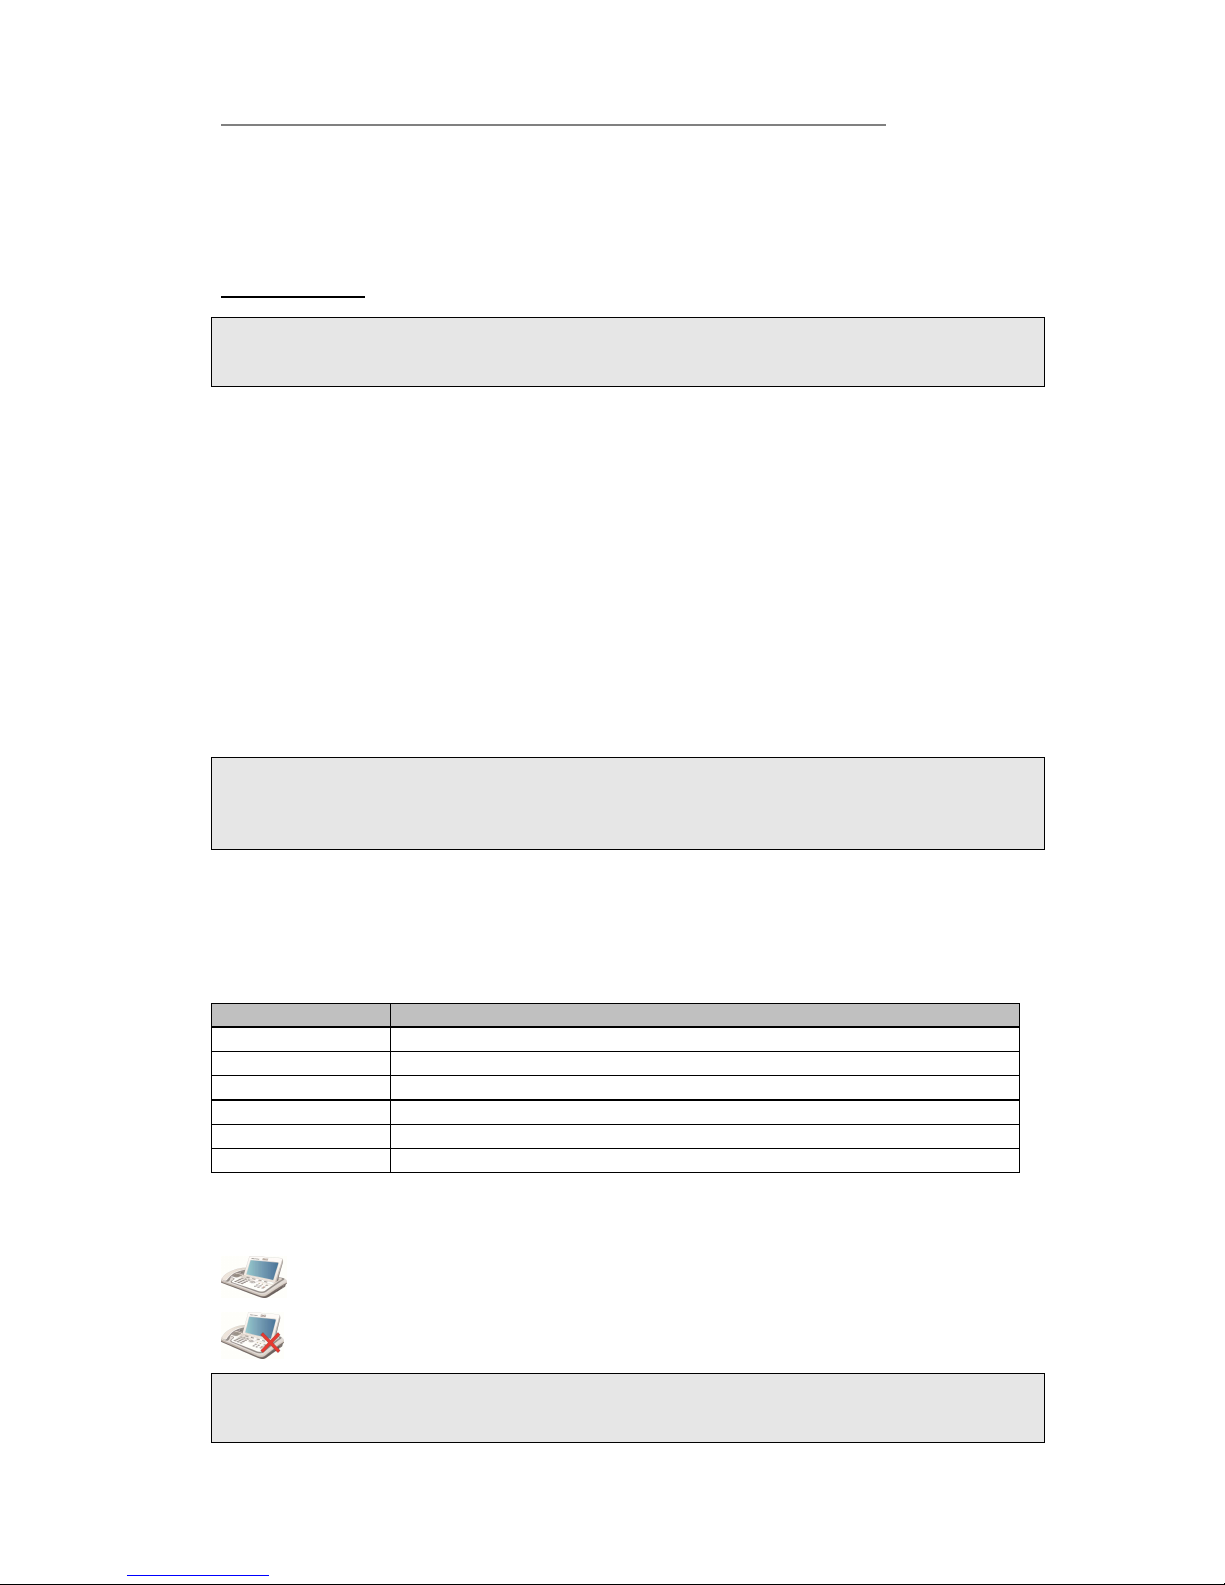
When you have finished the Network and Account Setting configuration, the Register
Status Icons will be shown in the idle screen:
Register successfully
Register failed
Note:
Should the IP PBX (SIP register) require an authentication, you will be prompted to
enter the correct password. Make sure you are using the appropriate input method or
Page 11

IP Video Phone Getting Started
- 6 -
enter the password via the web user interface.
Configuring via keypad
Network Settings: Click Setting->WAN Option to enter the internet relating
configuration page.
Account Settings: Click Setting->Account to configure the account.
You can refer to the above “Configuring via Web Page” for the parameter details.
Page 12

IP Video Phone Overview
- 7 -
Overview
Keypad Instruction
You can check the following list which introduces the IP phone’s keypad in detail:
Event Indication LED
It will show the event status of the video phone. It will blink when registration failed,
the network is unavailable, there is a missed call or voicemail to the extension or
hold/ mute the call or firmware Update.
Power Indication LED
It will show the power status, it will be on if the phone is powered, off if the phone is
power off.
Video Camera
Used for electronic motion picture acquisition.
Context-sensitive Soft keys
There are four soft keys: F1, F2, F3 and F4. Each key performs a specific function
indicated by a corresponding icon displayed near the bottom edge of the screen. The
specific function is assigned by the internal logic of the videophone and varies from
menu to menu. For example, pressing a soft key corresponding to the Directory
function will to enter the Contacts menu directly.
Page 13

IP Video Phone Overview
- 8 -
DTMF Keypad
The DTMF keypad is used for entering numbers, letters and symbols. In a situation
where only numbers are expected, for example, when dialing a phone number,
pressing a key will enter the corresponding digit. For example, pressing will
enter the number 2. In a situation where alphabet or symbol or both are allowed -
when entering a URL address for example - you will need to press the same key
repeatedly to reach the character you want. For example, pressing two times
will enter the letter a, followed by b, c and A, B, C in order. To enter alphabets in
lower or upper case, you need to be in lower case mode or upper case mode,
respectively. The current mode is indicated by one of the following icons shown on
the LCD screen.
: All letters and numbers.
: Numeric.
: Letters in lower case.
: Letters in upper case.
Navigation Keys
Use the navigation keys to navigate in the display menus and confirm or cancel
actions.
:1.Move to select a menu item or a menu entry.
:1. Move to select a menu item or a menu entry.
: 1.Move to select a menu item.
2. During a call, increase the speakerphone volume.
:1. Move to select a menu item.
2. During a call, decrease the speakerphone volume.
:1. Confirm a selection.
2. Press this key at the idle page to check the status
3. During a call, press this key to put the active call on hold.
Hard Feature Keys
The feature keys provide a quick way to invoke a feature or a function.
Page 14

IP Video Phone Overview
- 9 -
: Press to turn on video privacy, the videophone start to send your
video to the recipient. Press again to turn off video privacy;
: Mute audio transmission locally during calls;
: Allow users to access the Contacts page directly;
: 1. To active the DND mode.
: 1. Allow users to access the dialed list directly ;
2. In the Dialed list, press this button to dial out the chosen record;
Speakerphone Key
: This button is to let you make/answer a call in speakerphone mode,
or switch between the speakerphone mode and handset mode during
a call.
LED Instruction
Table 1 Event Indication LED
LED Status Description
Blinking green Power is on but there are some problems: registration
failure, the network is unavailable or there is a missed call
or message to the extension or hold/ mute the call or
firmware Update. The detail will be displayed on the
display (LCD or external display).
Off There is no any abnormal status
Table 2 Power Indication LED
LED Status Description
Steady green Power on
Off Power off
Icon Instruction
The IP Phone displays different kinds of icons on its LCD; you can refer to the
following table for their meanings:
Icon Description
Network Status: Available
Page 15

IP Video Phone Overview
- 10 -
Network Status: Unavailable
Network Status: Limited
Account register successful
Account register failed
Missed calls
Call in
Call out
In handset mode
In speaker mode
In headset mode
USB flash device detected
SD memory card detected
SD memory card is write-protect
Call mute
Call hold
Voicemail
Always forward
Busy forward
NO answer forward
DND(Do not Disturb)
Default 1
Default 2
Default 3
Default 4
Page 16
IP Video Phone Overview
- 11 -
User Interface
There are two ways to customize specific options on your phones:
1. Using keypad and display on the phone;
2. Using web user interface in an Internet browser from your PC; please refer to
“Configuration and Registration” to get into the web interface.
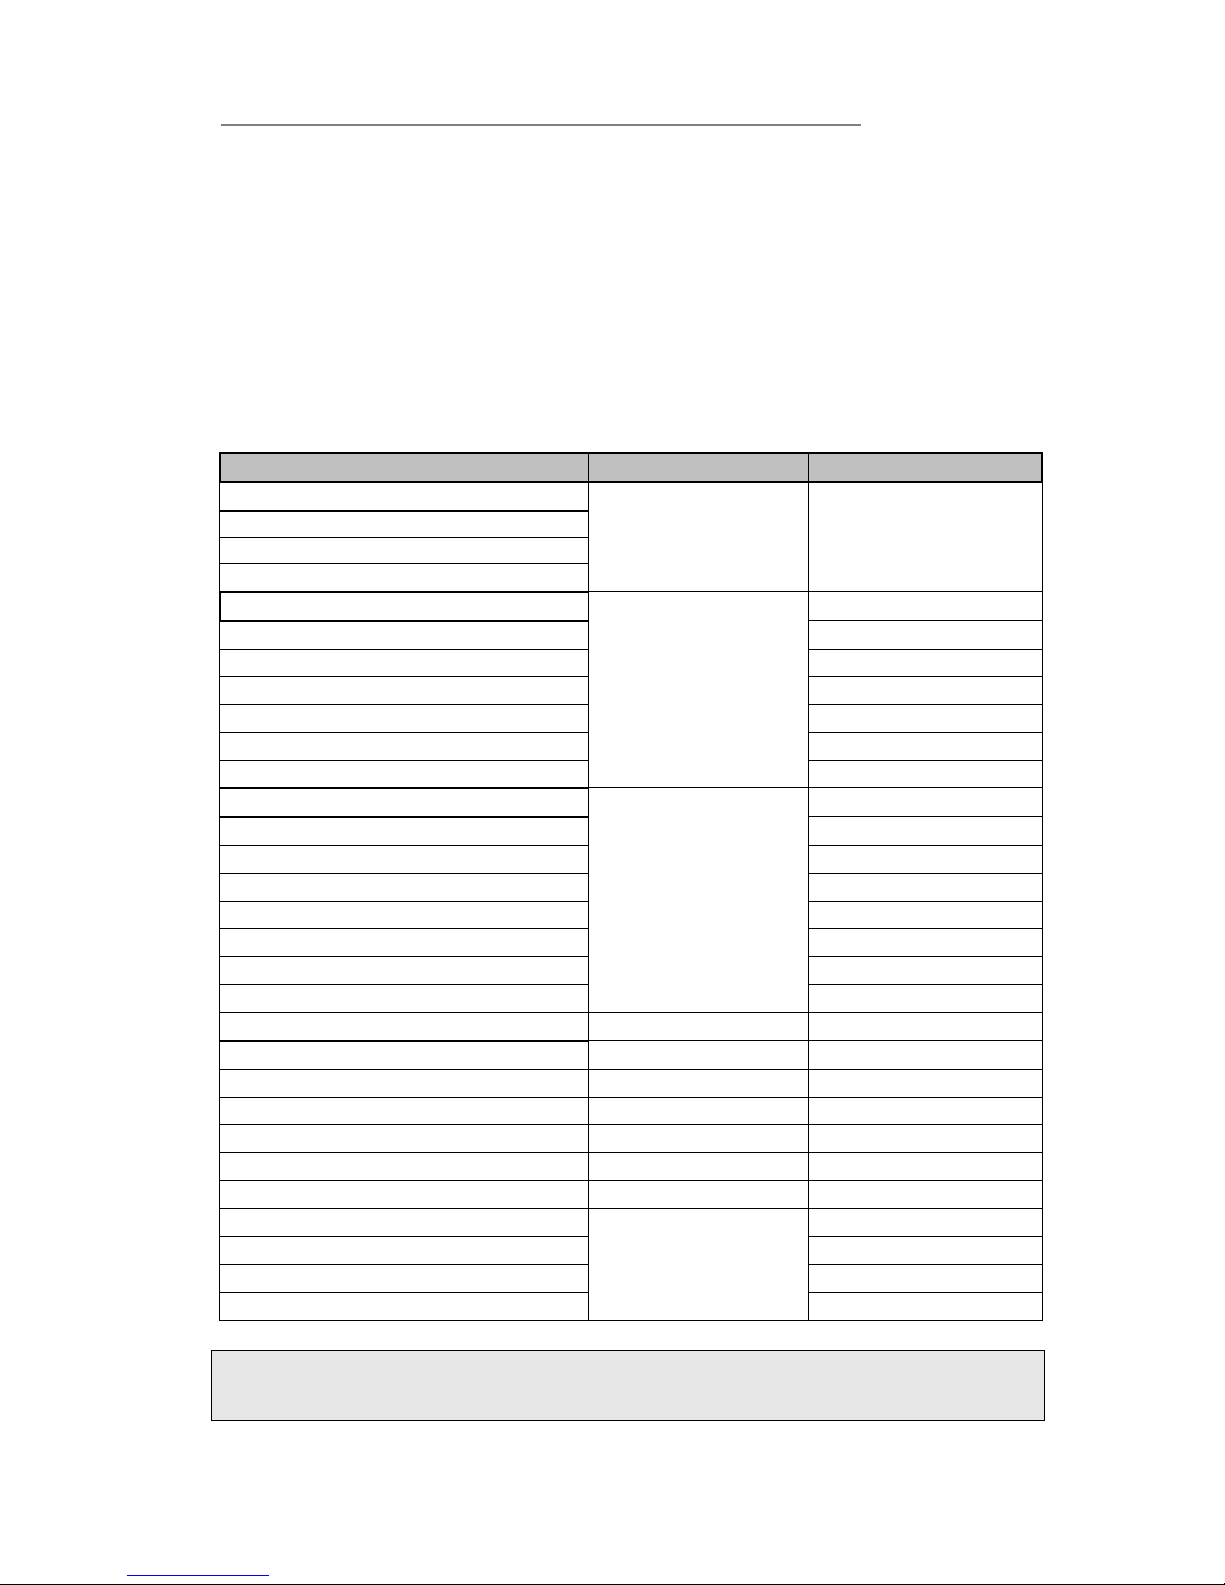
In many instances, it is possible to use both the user interfaces to operate the phone
and change settings; some, however, are only possible via a phone or web user
interface. Please refer to the following table for differences:
Phone Options Phone UI Web UI
Status
√√√√ √√√√
--Version
--Network
--Account
Call Features
√√√√
--Forward
√√√√
--Call Waiting
√√√√
--Auto Answer
√√√√
--Dial Plan
√√√√
--Speed Dial
--Key as Send
√√√√
Basic Phone Functions
√√√√
--Language
√√√√
--Date & Time
√√√√
--Call Option
√√√√
--Local Video
√√√√
--Screen Saver
--Sound
--Security
√√√√
Advanced Phone Functions
--Account
√√√√ √√√√
--Network
√√√√ √√√√
--Upgrade
√√√√
--Factory
√√√√ √√√√
--Reboot
√√√√
--Auto provision
√√√√
Other Features
√√√√
--Call History
--Directory
√√√√
--Message
√√√√
Note:
The above table only indicates most of phone functions rather than all of them.
Please refer to the relating parts for more details.
Page 17

IP Video Phone Overview
- 12 -
User and Administrator Mode
Your phone can be used in user or administrator mode. Administrator mode is the
default setting with full configuration rights. The default administrator password is
admin.
Page 18

IP Video Phone Customizing Your Phone
- 13 -
Customizing Your Phone
Powering Up the Videophone
1) Plug a Network cable into the network port.
2) Plug in power.
3) It takes about 2 minutes to boot up the videophone. During this period, please
do not touch any keys or turn off the videophone.
The Idle Interface
Check the Status
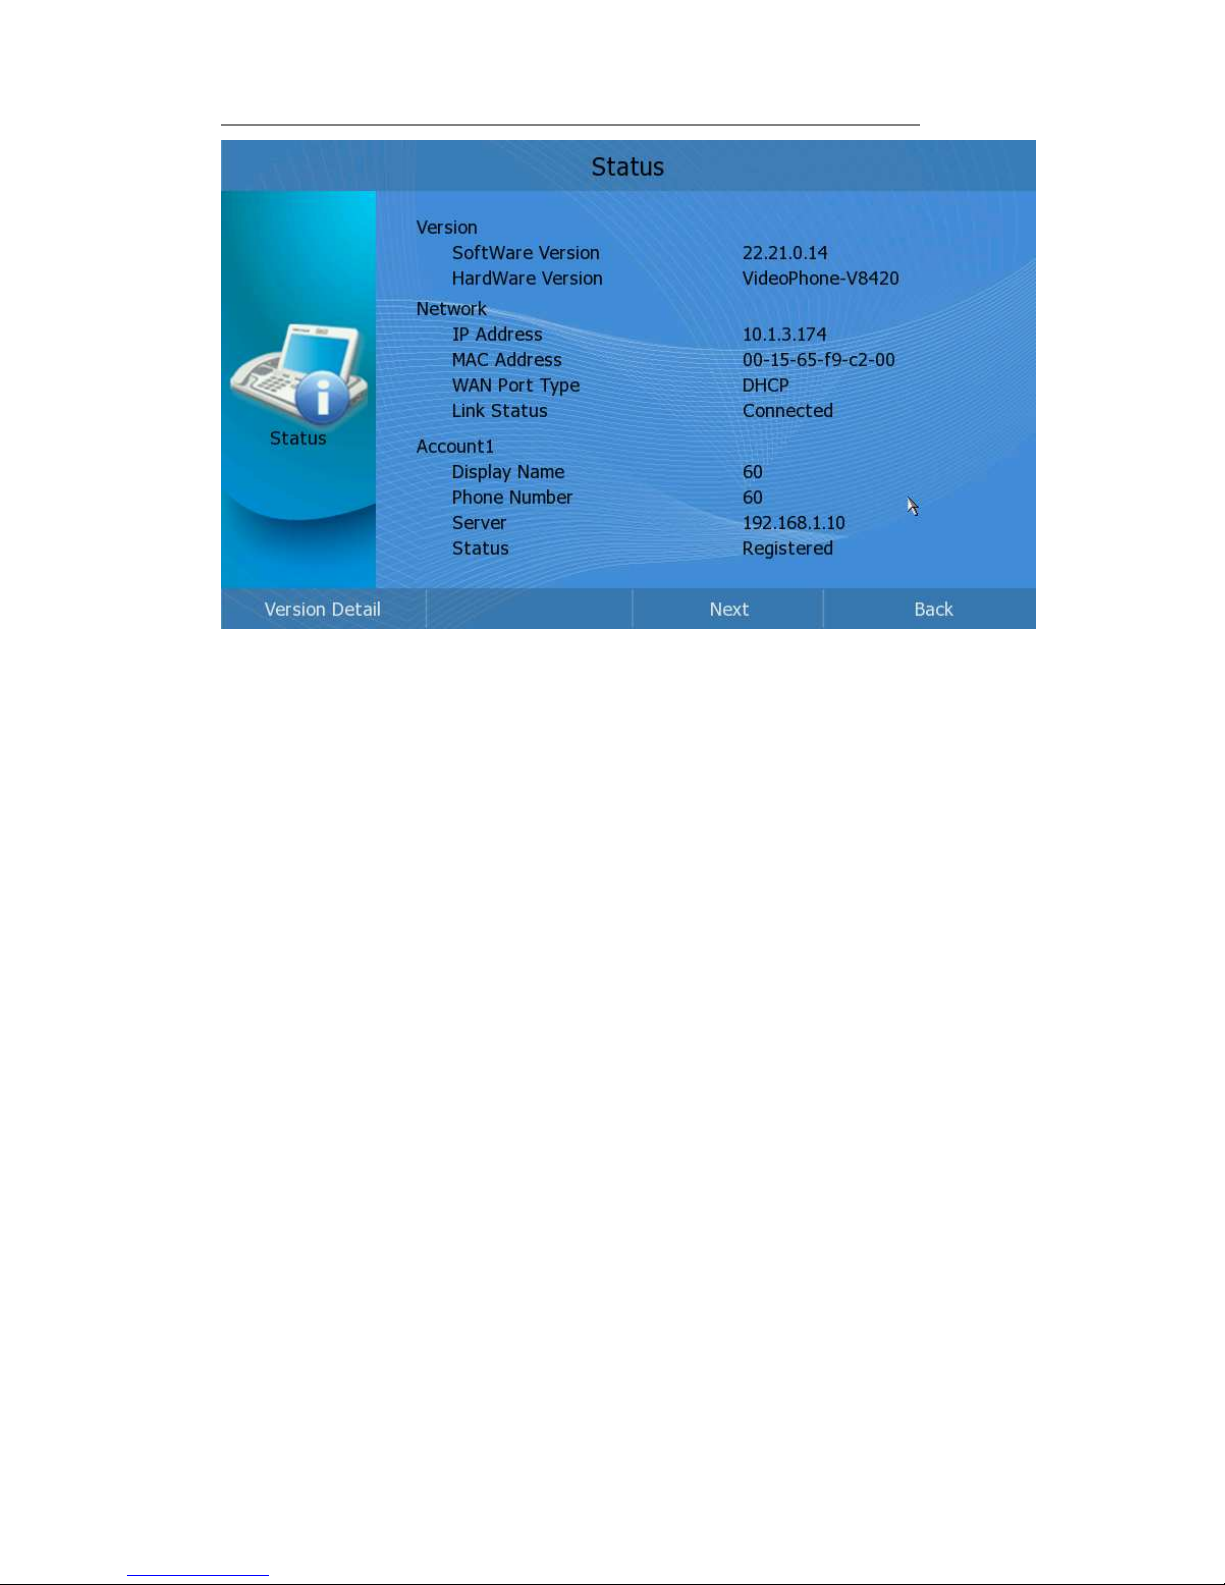
You can view the status of your phone using the phone interface or the web
interface.
You can review the following options:
Version: Software Version, Hardware Version;
Network: IP Address, Mac Address, WAN Port Type and Link Status;
Accounts: Display Name, Phone Number, Server and Status;
To check the Phone Status via phone interface:
1) Click the Status option under the idle.
Page 19
IP Video Phone Customizing Your Phone
- 14 -
2) Press the Next soft key to check the status of other accounts.
3) Press the Version Detail soft key to check the details of your version.
To view the Phone Status via web interface:
Open the web browsers and input the IP Address http://WAN-ip-address; Enter the
account and password (default account and password are “admin/admin”); choose
Status directly to check the status.
Basic Settings
Personalize
This option includes the following parameters:
Language: English, Simplified Chinese, Turkish, Korean and Russian, ect;
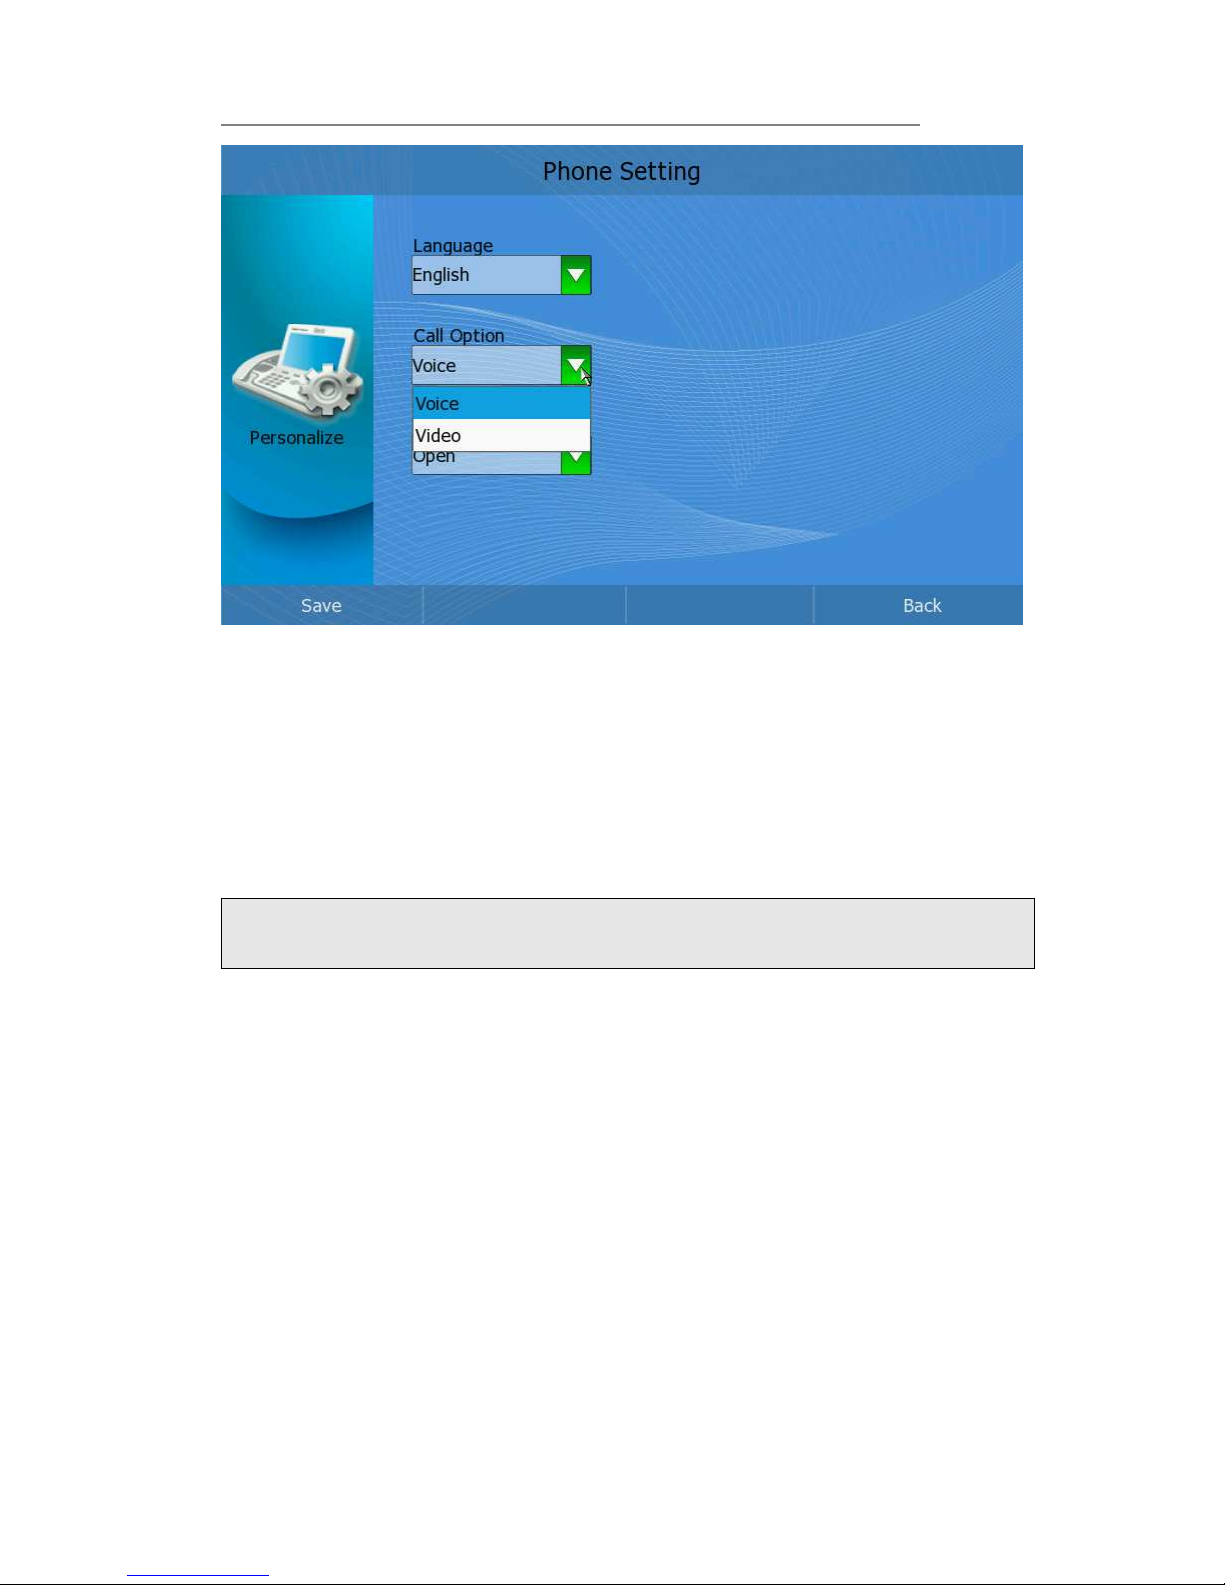
Call Option: Voice or Video.
Local Video: Open or Close.
Page 20

IP Video Phone Customizing Your Phone
- 15 -
Language
The default language is English.
It can support English, Korean, etc. You can change the language for the phone user
interface and the web user interface independently.
Note:
The available languages depend on the language packs currently loaded to the IP
phone. Please contact with your system administrator for more information about
loading language packs.
To change the language via phone interface:
1) Click Setting->Personalize->Language.
2) Scroll through the list of available languages.
3) Press the Save soft key when the desired language is highlighted. The language
appears on the graphic display will be changed to the one you chose.
Page 21

IP Video Phone Customizing Your Phone
- 16 -
4) Press Exit soft key to return to the previous screen.
Note:
The settings of【Call Option】and【Local Video】are the same as【language】.
To change the language via web interface:
Choose Phone->Preference->language to do the relating changes. Please refer to the
instruction above for the parameters’ detail.
Note:
If you choose the different language, you need to reboot the phone.
Call Option
Define the mode of calling out.
To change the call option via phone interface:
1) Click Setting->Personalize->Call Option.
2) Press <OK> to pop up the pull-down menu, choose Voice or Video as the
default call mode;
3) Press Save to confirm the change;
Page 22
IP Video Phone Customizing Your Phone
- 17 -
Local Video
Define whether to open the local video.
To change the call option via phone interface:
1) Click Setting->Personalize->Local Video.
2) Press <OK> to pop up the pull-down menu, choose Open or Close the Local
Video.
3) Press Save to confirm the change;
Note:
When you close the local video, other cannot see you but you can see the other
side during the call.
Sound
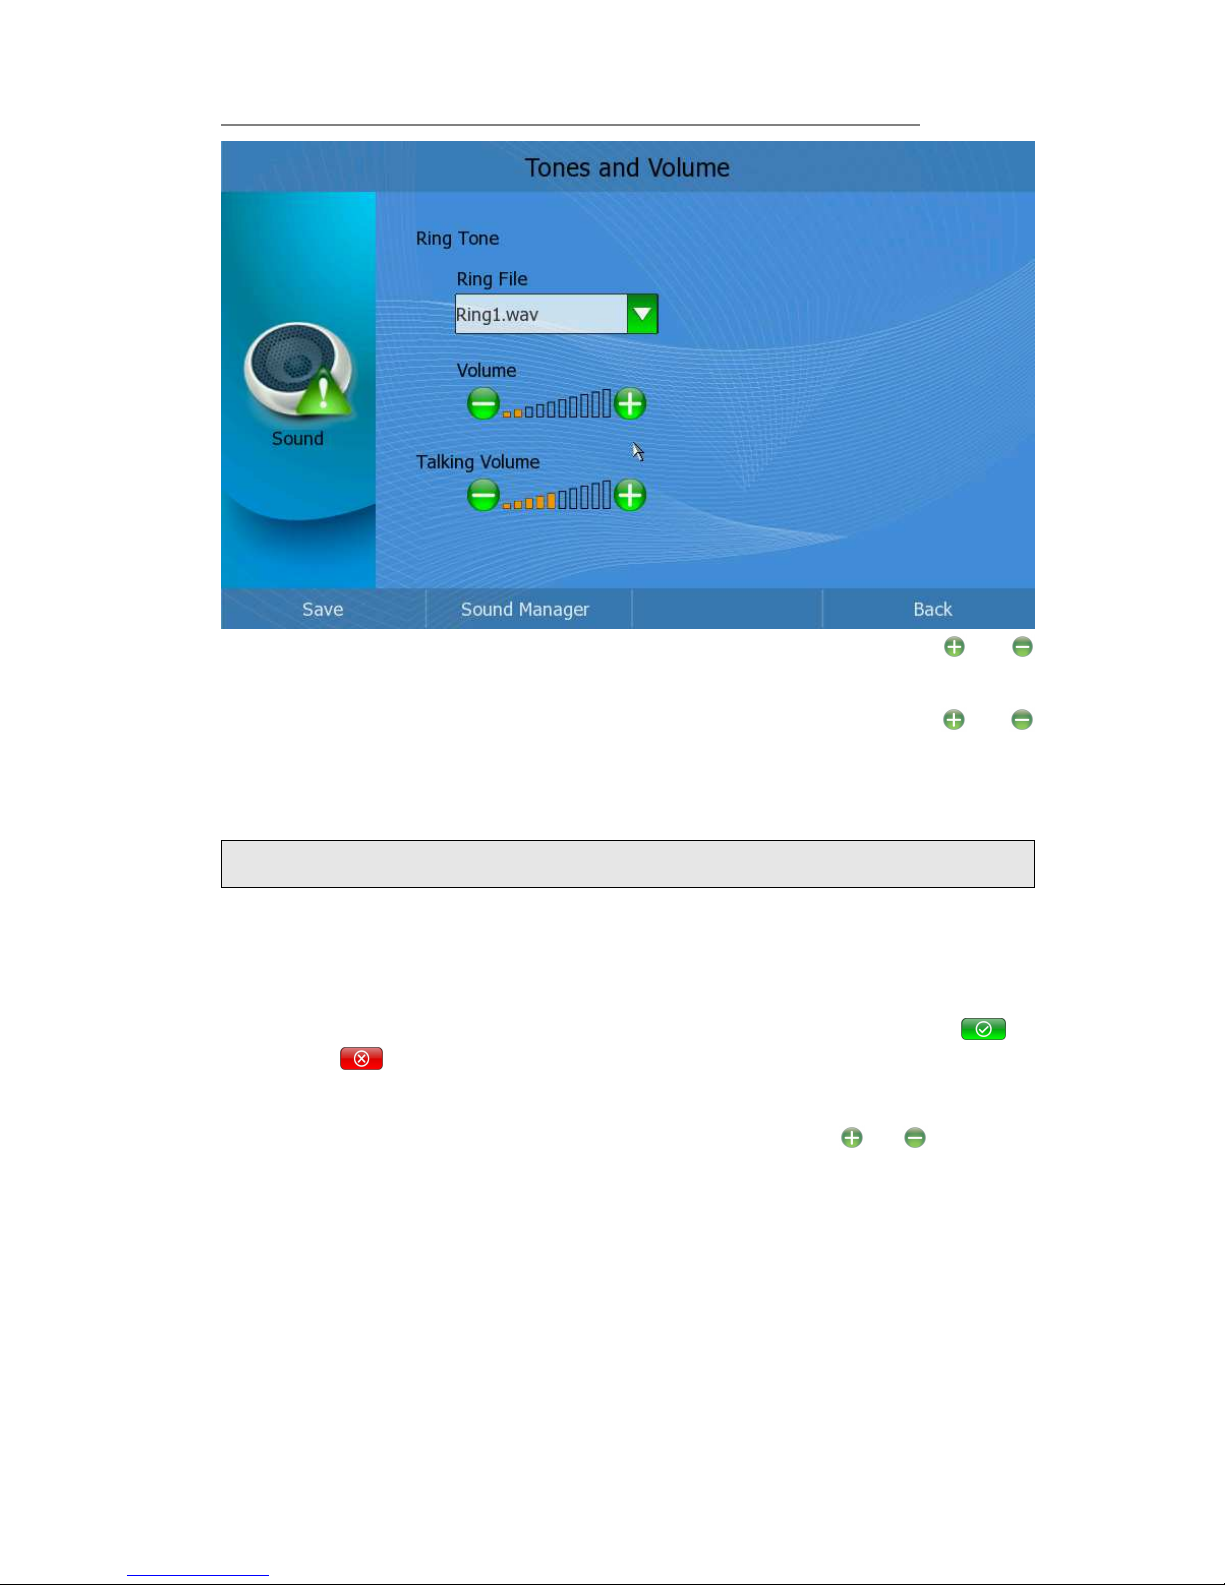
You can set the ring tone and volume in this option
.
Configure ring tone and volume via phone interface
:
1) Click Setting->Sound option to enter.
2) Ring File: Click【Ring File】option to pop up the pull-down menu, press Up/Down
to choose a preferred ring tone, then press <OK> to confirm the change;
Page 23
IP Video Phone Customizing Your Phone
- 18 -
3) Ring Volume: Choose【Ring Tone】->【Volume】 option, then click or
button to adjust the ring volume;
4) Talking Volume: Choose 【Volume】->【Talking】 option, then click or
button to adjust the talking volume;
5) Press Sava softkey to save the changes, and get back to Setting page.
Note:
The ring tones also have priority. The priority is contact>group>phone default.
And you can manage the sound when you click the <Sound Manager>.
Enter the manage interface. You can upload the ring from the USB device. And you
can also delete the rings if you have sufficient permissions, Click the <Delete>
button, it will pop up a warning frame, asking whether to delete it. Click to
delete, click to cancel and return to the Manage frame
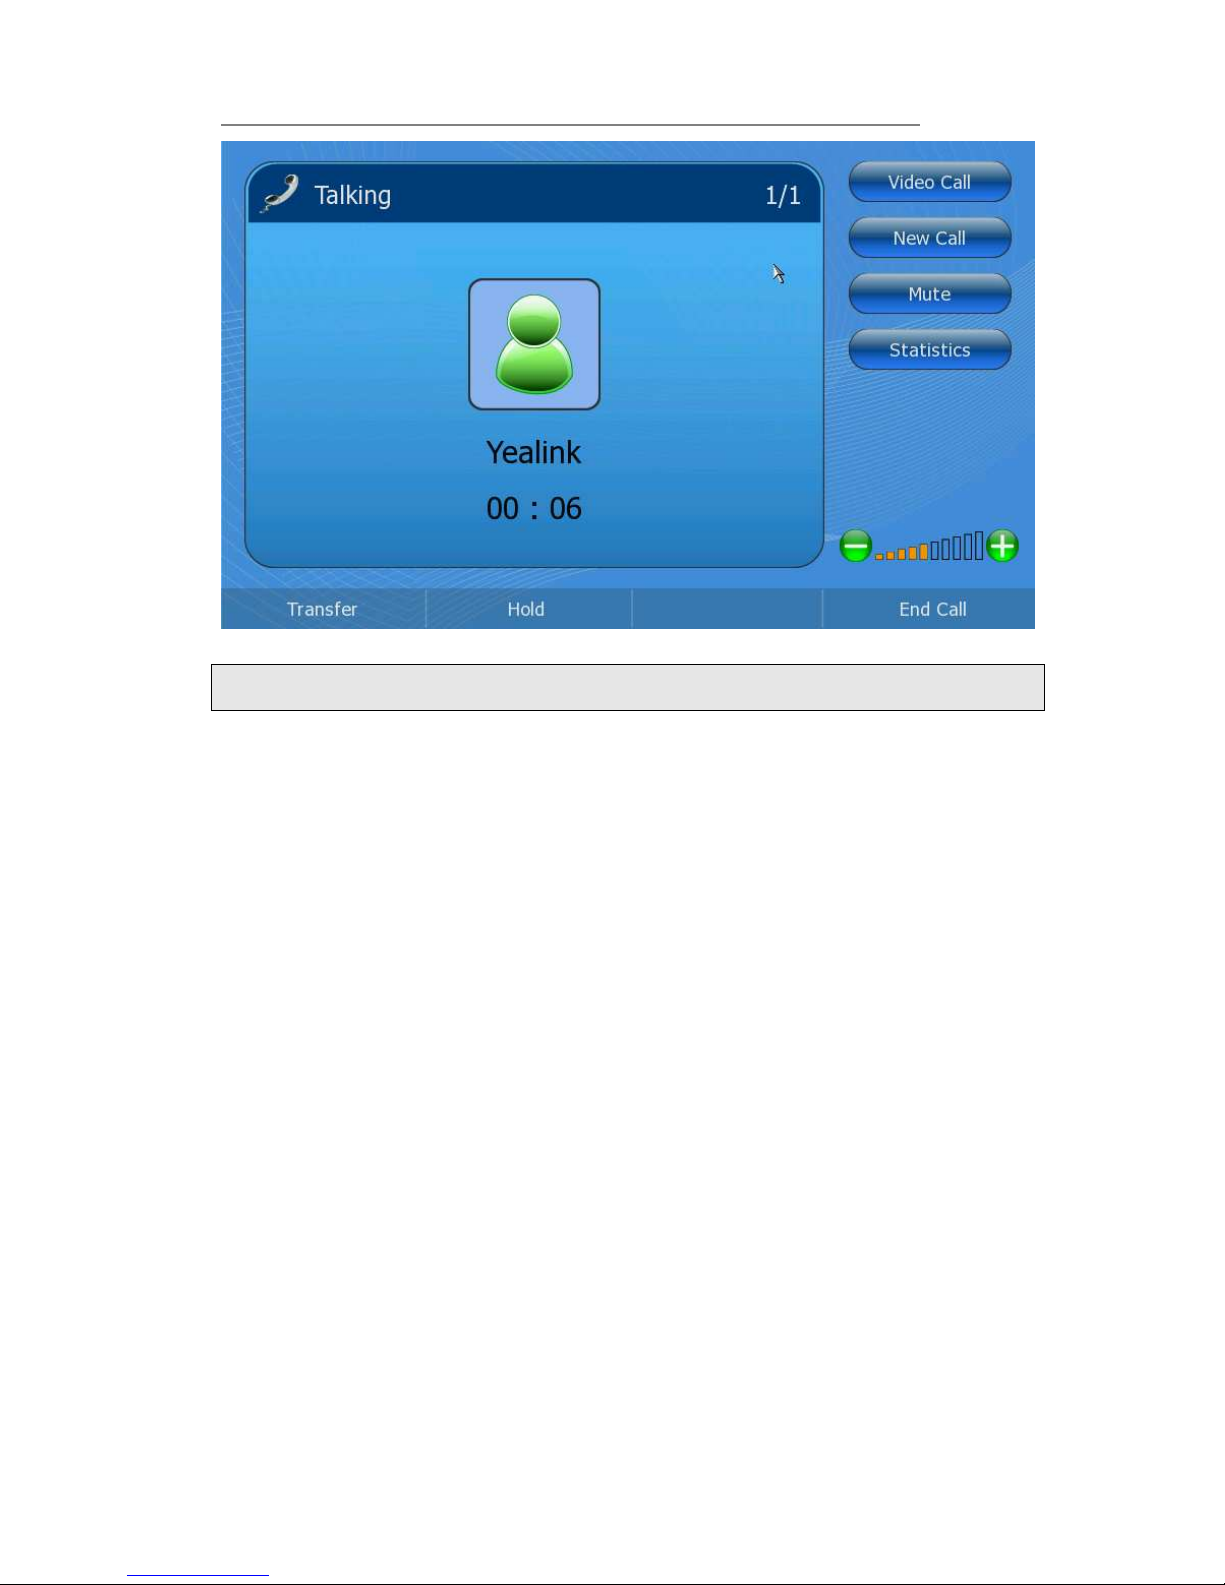
To adjust the volume when you are in an active call:
When Handset/Headset/Speakerphone mode is activated, click or button, or
press the Left/Right navigation key to adjust to a comfortable level.
Page 24
IP Video Phone Customizing Your Phone
- 19 -
Note:
The volume can only be adjusted via phone interface.
Date & Time
The time and date appears on the idle screen of the IP video phone. If the phone
cannot obtain the time and date from the time server, please contact your system
administrator to check whether the date and time server are correct. You can set the
time manually or via the NTP server which is used to synchronize the time.
Configure Date and Time via phone interface:
1) Click Setting->Date & Time option to enter the configuration page.
Page 25

IP Video Phone Customizing Your Phone
- 20 -
2) Click the 【Time Zone】 option to pop up the pull-down menu, then choose the
correct Time Zone in the list; Press Save button to save the changes;
Note:
You can follow the above steps to set Time Format.
3) Click the【NTP Mode】option, then choose and fill in the【Time Server】input
box.
4) You can also set the date and time manually. Choose the【Manual Mode】option,
then choose and fill in the【Date】and【Time】option.
5) Press Save soft key to save the changes, and get back to Setting page.
To change Time and Date via web interface:
Choose Phone->Preference to do the relating changes. You can also change the NTP
Interval which specifies the time frequency that the phone refreshes the time
automatically. Please refer to the instruction above for the parameters’ detail.
Note:
By default the time zone is +8 China((((Beijing)))), Daylight Saving Time is disabled.
Security
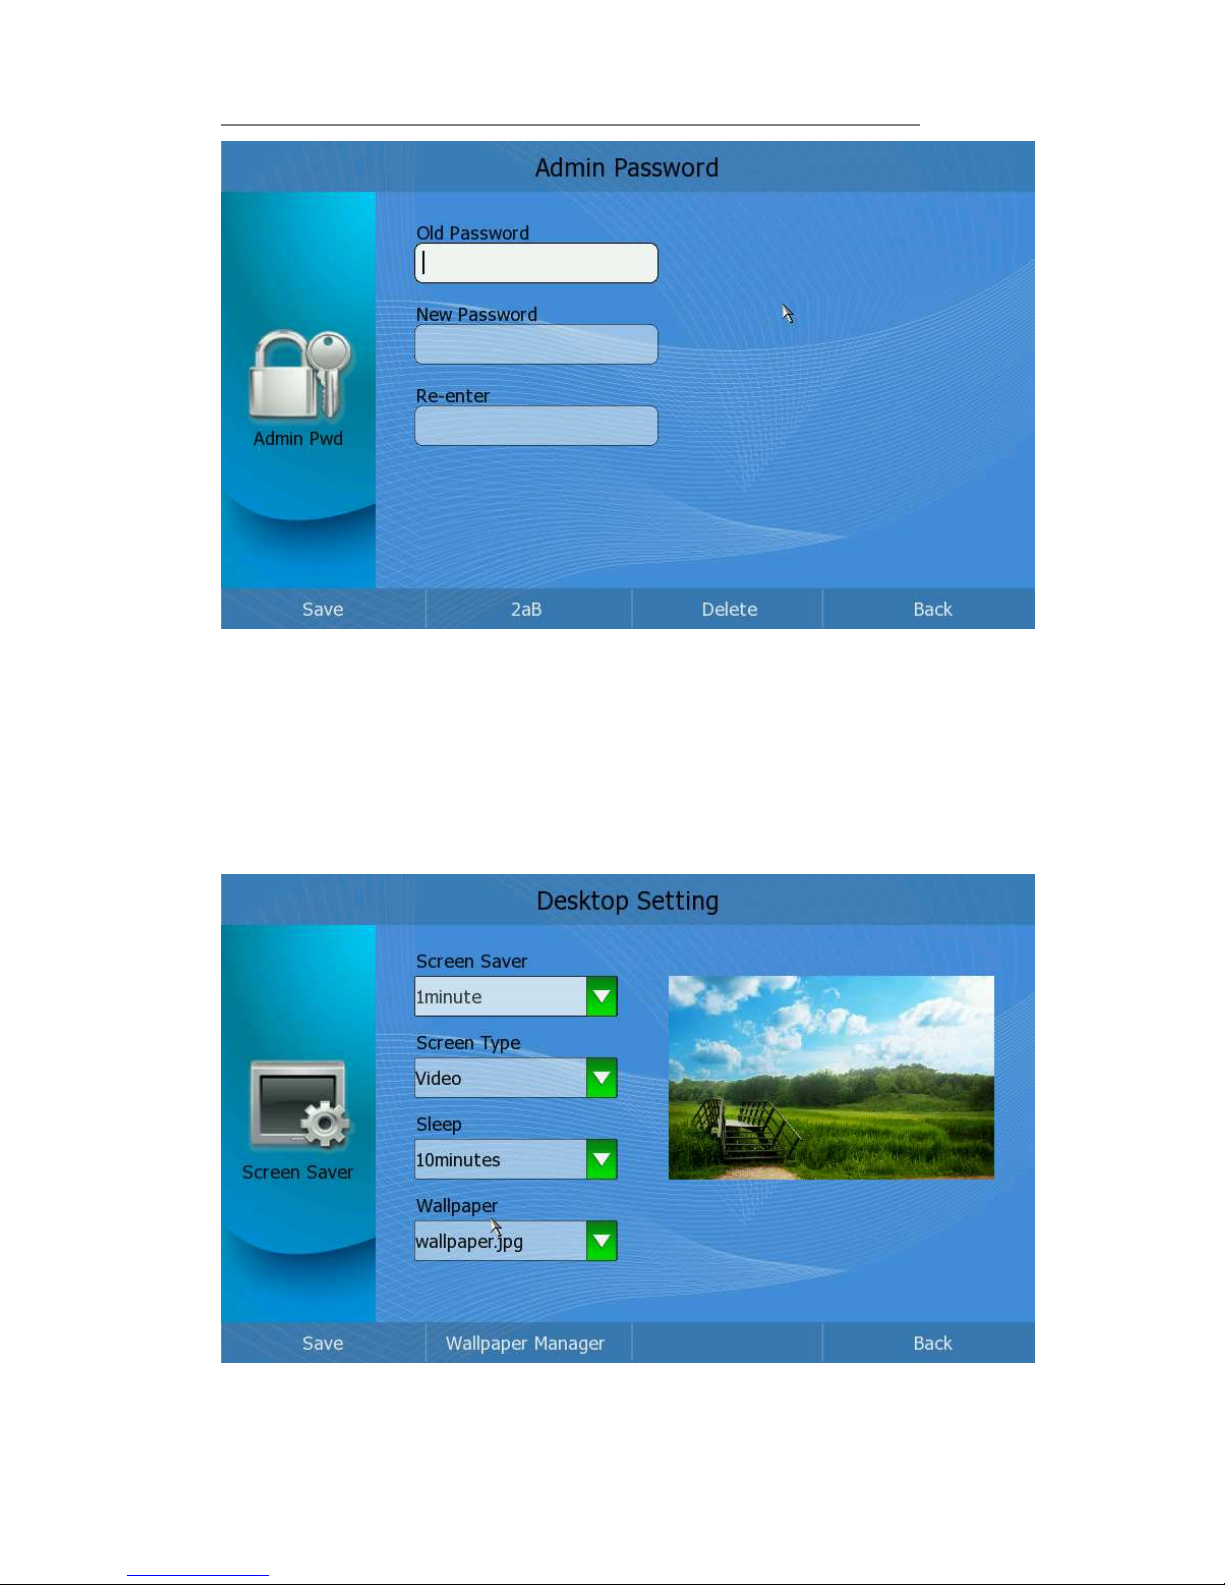
Configure Security via phone interface:
1) Click Setting->Security option to enter the configuration page.
Page 26
IP Video Phone Customizing Your Phone
- 21 -
2) Choose and fill in the【Old Password】,【New Password】and【Re-enter】. The
default password is Admin.
3) Press Save to save the change, or press Back to cancel the operation and return
to the “Setting Page”.
Screen Saver
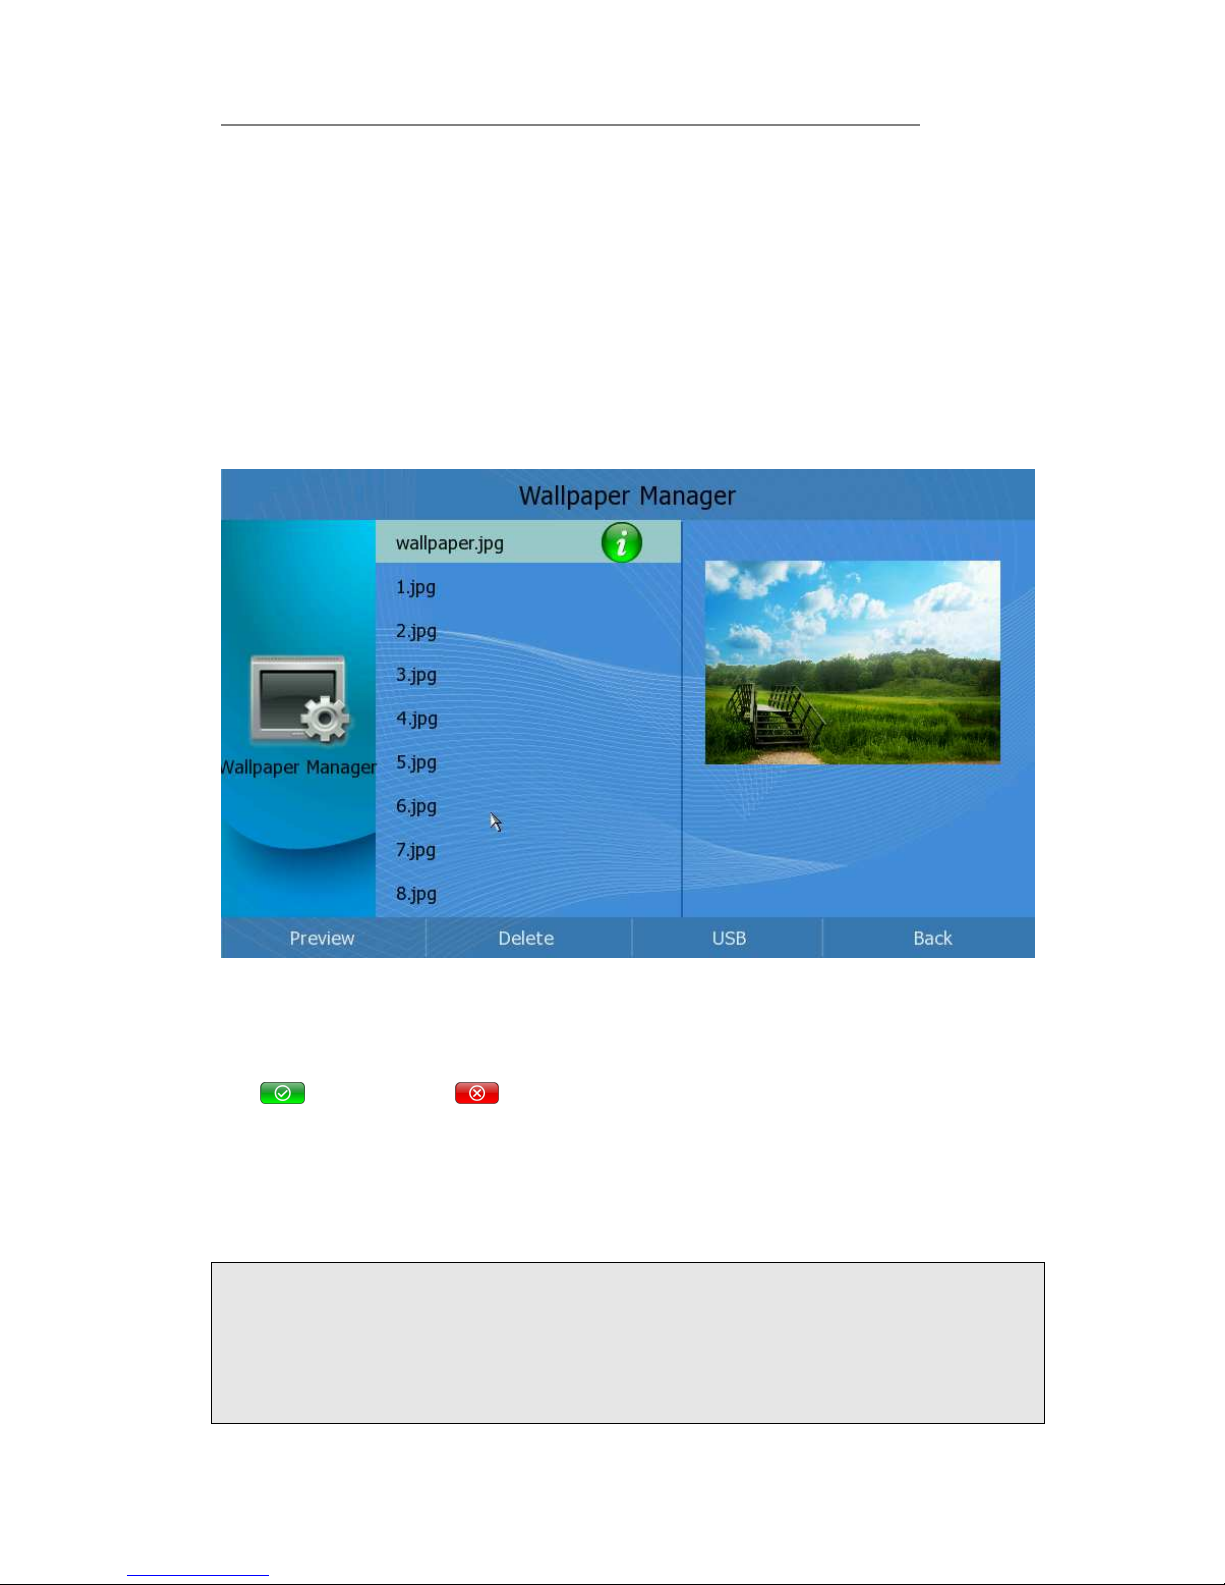
Configure Screen Saver via phone interface:
1) Click Setting-> Screen Saver option to enter the configuration page.
2) Click the Screen Saver option, and choose the Screen Saver time in the pull
down menu, then click the Save button to save your changes.
Page 27
IP Video Phone Customizing Your Phone
- 22 -
3) Follow the same way to choose and set the Screen Type and Sleep options.
4) Click the Wallpaper Manage option, and make your choice in the pull-down
menu, the chosen picture will be shown on the right side for you. Then click the
<OK> button to confirm your choice.
5) Press the Save soft key to save your changes.
Wallpaper Manage
To manage the wallpaper via phone interface:
1) In Screen save page, Click Screen Saver option->Wallpaper Manage soft key to
get into the Wallpaper Manage page;
2) Press <Up>/<Down> to preview the pictures.
3) <Preview>:To preview the selected picture full screen.
4) <Delete>:To delete the selected picture. If you have sufficient permissions,
click this button, it will pop up a warning frame, asking whether to delete it. Click
to delete, click to cancel and return to the e-Photo Manage frame.
5) <USB >: If there is USB flash device plugged into the USB Port, the pictures
stored in the USB flash device will be listed when you press the USB softkey;
Press <F1> to preview, <F2> to import, <F3> to delete.
6) <Back>:To exit and return to Desktop Setting page.
Note:
1. If there is USB flash device plugged into the USB port, and there is a AD folder
under the root, and the folder of video files that meet the conditions, it will
automatically play the video files in the USB after you opened the video screen saver,
or manually play it.
2. In the Screen Type, it have video and photo type option, it will display the video
file when you chosen the video type, else display the photo.
Page 28

IP Video Phone Customizing Your Phone
- 23 -
Call Feature
Forward
Call forward is a feature that redirects your incoming calls to another phone number
when your phone is unavailable or you are inconvenient to answer it.
This feature allows you to forward an incoming call to another phone number .e.g., a
cell phone or voice mailbox.
The IP video phone supports 3 kinds call forward options:
Always Forward: Incoming calls are immediately forwarded.
Busy Forward: Incoming calls are immediately forwarded when the phone is
busy or refuse the call.
No Answer Forward: Incoming calls are forwarded when the phone is not
answered after a specific period.
To configure Call Forward via phone interface:
1) Click the following options to enter: Call Feature-> Forward.
2) There are 3 options: Always Forward, Busy Forward and No Answer Forward.
3) Choose one option, enter the phone number you want to forward to. And then
press Save key to save the changes.
To configure Call Forward via web interface:
Choose Phone->Feature to do the relating changes. Please refer the above
configuration information.
Call Waiting
Call Waiting lets you know who is calling you when you are busy. Don't feel like
Page 29
IP Video Phone Customizing Your Phone
- 24 -
answering the other line? Don't worry, just let the call go to voicemail and respond at
your convenience. With Call Waiting, you will never miss an important call.
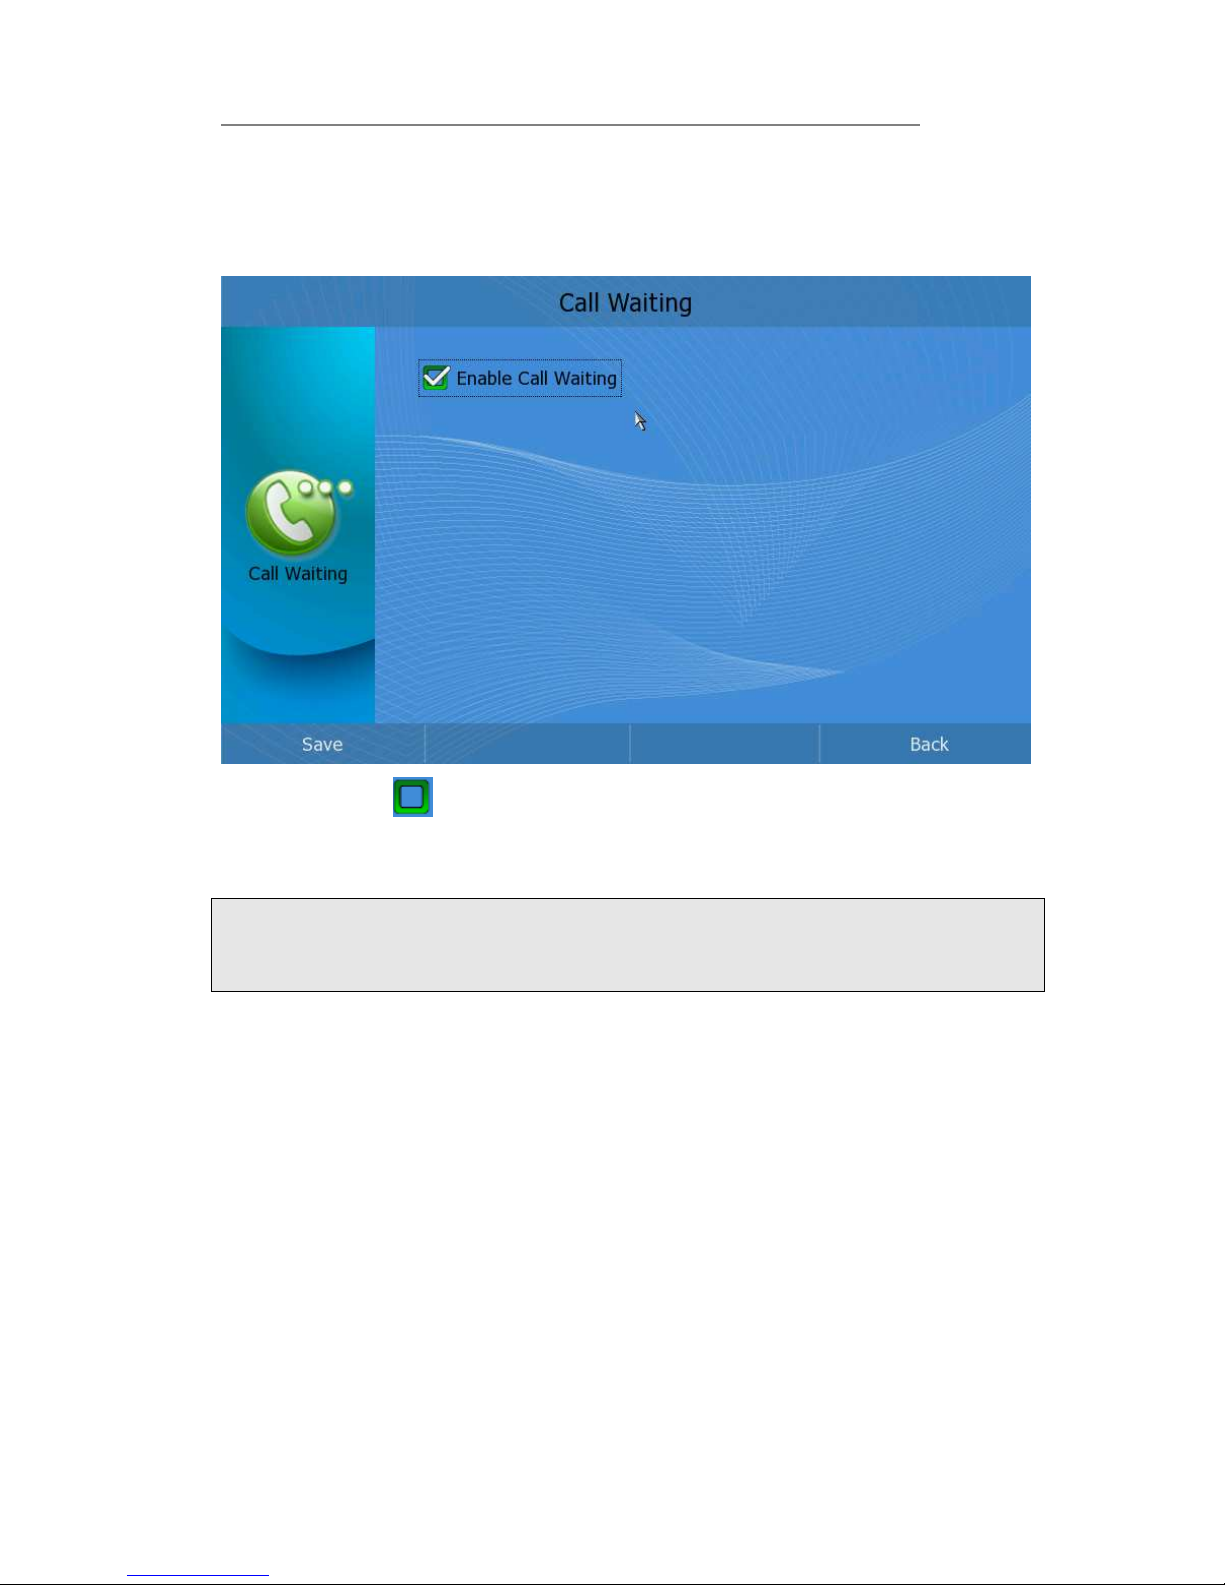
To set call waiting function via phone interface:
1) In desktop status, click Call Feature->Call Waiting option to enter;
2) Click the icon to enable/disable Call Waiting function;
3)
Press <OK> to confirm the change;
4) Press Save to save the changes and get back to the “Call Features” page.
Note:
If Call Waiting is enabled by the called extension, when a new call is coming during
an active call, the device will sound a “Du…”, and the LCD indicates the incoming call,
the caller will hear the ring back tone.
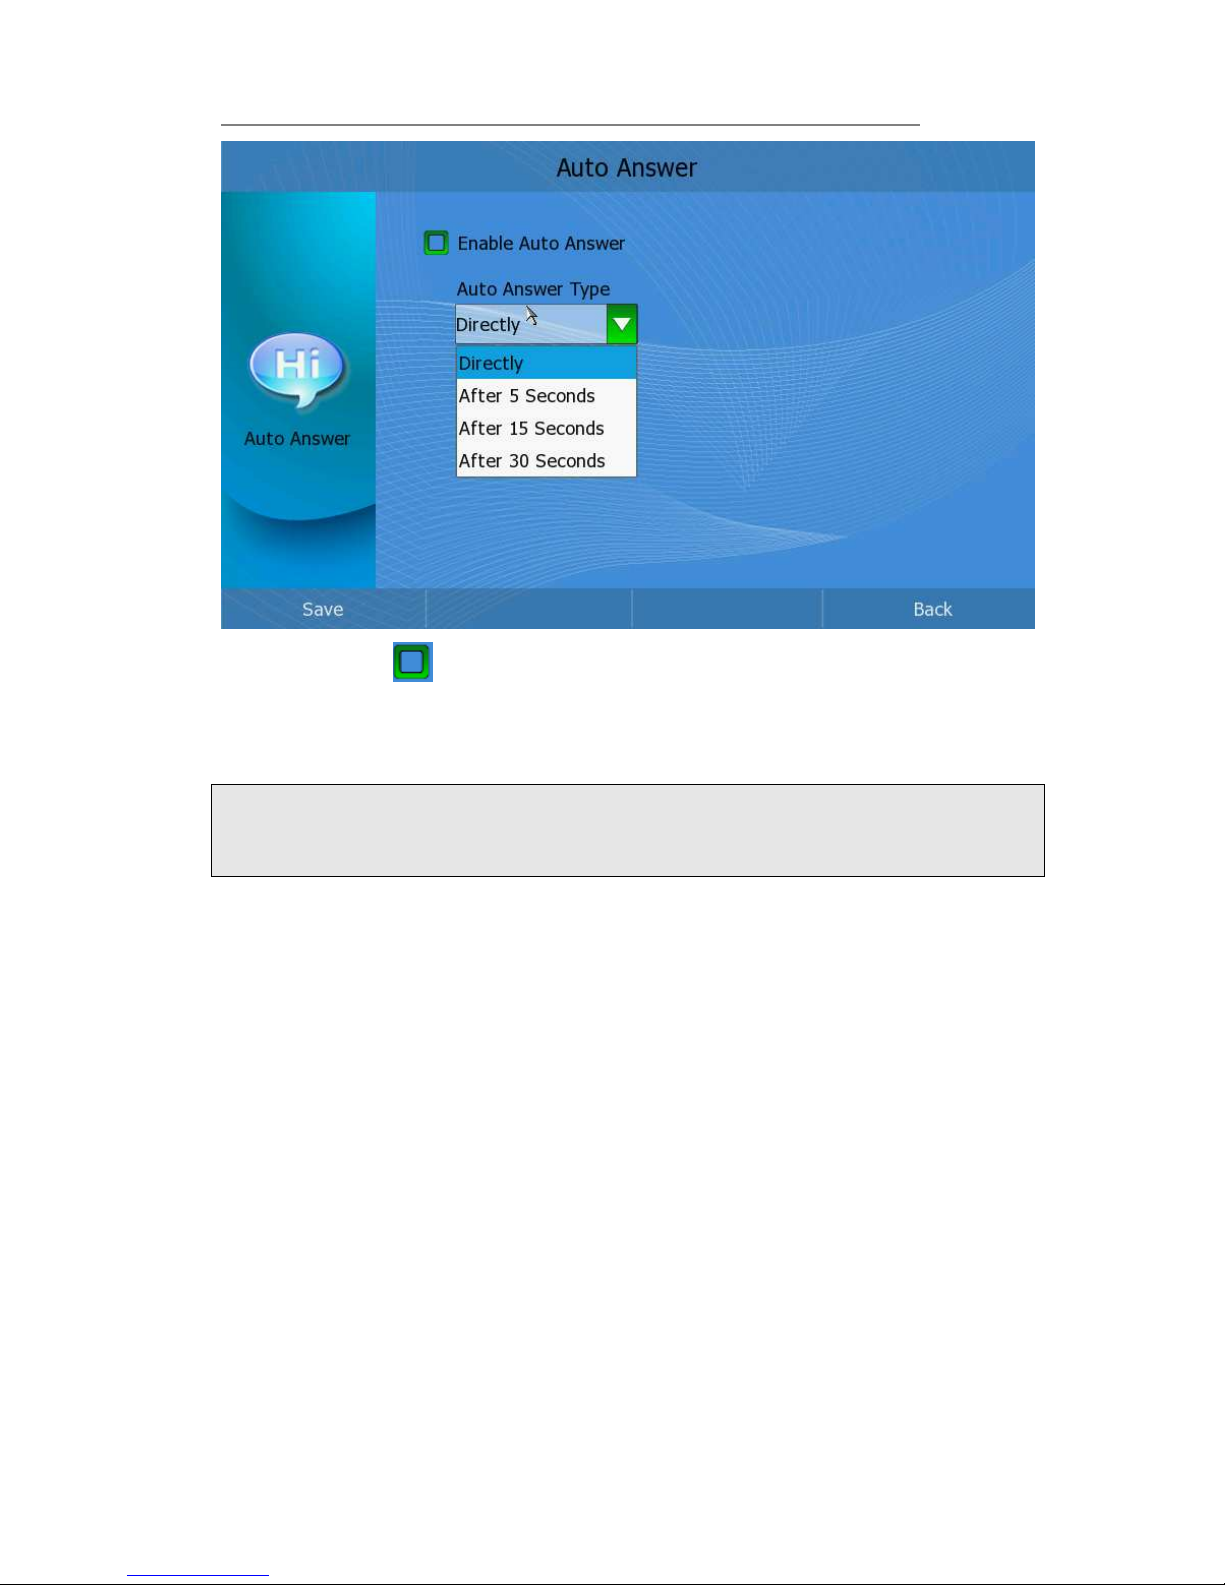
Auto Answer
A feature that enables your phone to accept incoming calls even if you are
inconvenient. In auto-answer mode, it will establish a call whenever the telephone
rings.
To set auto answer function via phone interface:
1) In desktop status, click Call Feature->Auto Answer option to enter;
Page 30
IP Video Phone Customizing Your Phone
- 25 -
2) Click the icon to enable/disable auto answer function;
3) If auto answer is enabled, users can choose different types. Click the Auto
Answer Type to pop up the pull-down menu and choose a proper type.
4) Press save key to save the changes and get back to the “Call Feature” page.
Note:
If the Auto Answer is enabled by the called party, when a new call comes in, the
device will auto answer it after the specific period which is set in the Auto Answer
Type.
Dial Plan
A dial plan establishes the expected number and pattern of digits for a telephone
number. This includes country codes, access codes, area codes and all combinations
of digits dialed. For example if you set the Prefix as 0 and Replace as 0086 (Chinese
country code), when you dial 05702000 out, the number will be replaced by
00865702000 automatically.
To set dial plan rules via phone interface:
1) In desktop status, click Call Features->Dial Plan option to enter;
Page 31

IP Video Phone Customizing Your Phone
- 26 -
2) Press <F1> to add a record, enter “Prefix” and “Replace” parameters on the
right, the click to save the changes; Then the record will appear in the dial
plan list on the left.
3) In the dial plan list, press Up/Down button to choose a dial plan record to edit,
press <F3> to delete the record, and press <F4> to return to the “Call Feature”
page.
To set dial plan rules via web interface:
1) Choose Phone->Dial Replace.
2) Enter the desired Prefix and Replace.
3) Press Insert button to add the rule .
4) Then click the confirm key to save the changes.
5) You can also delete a specific one from the Dial Replace list by clicking the Delete
button.
Page 32
IP Video Phone Customizing Your Phone
- 27 -
Speed Dial
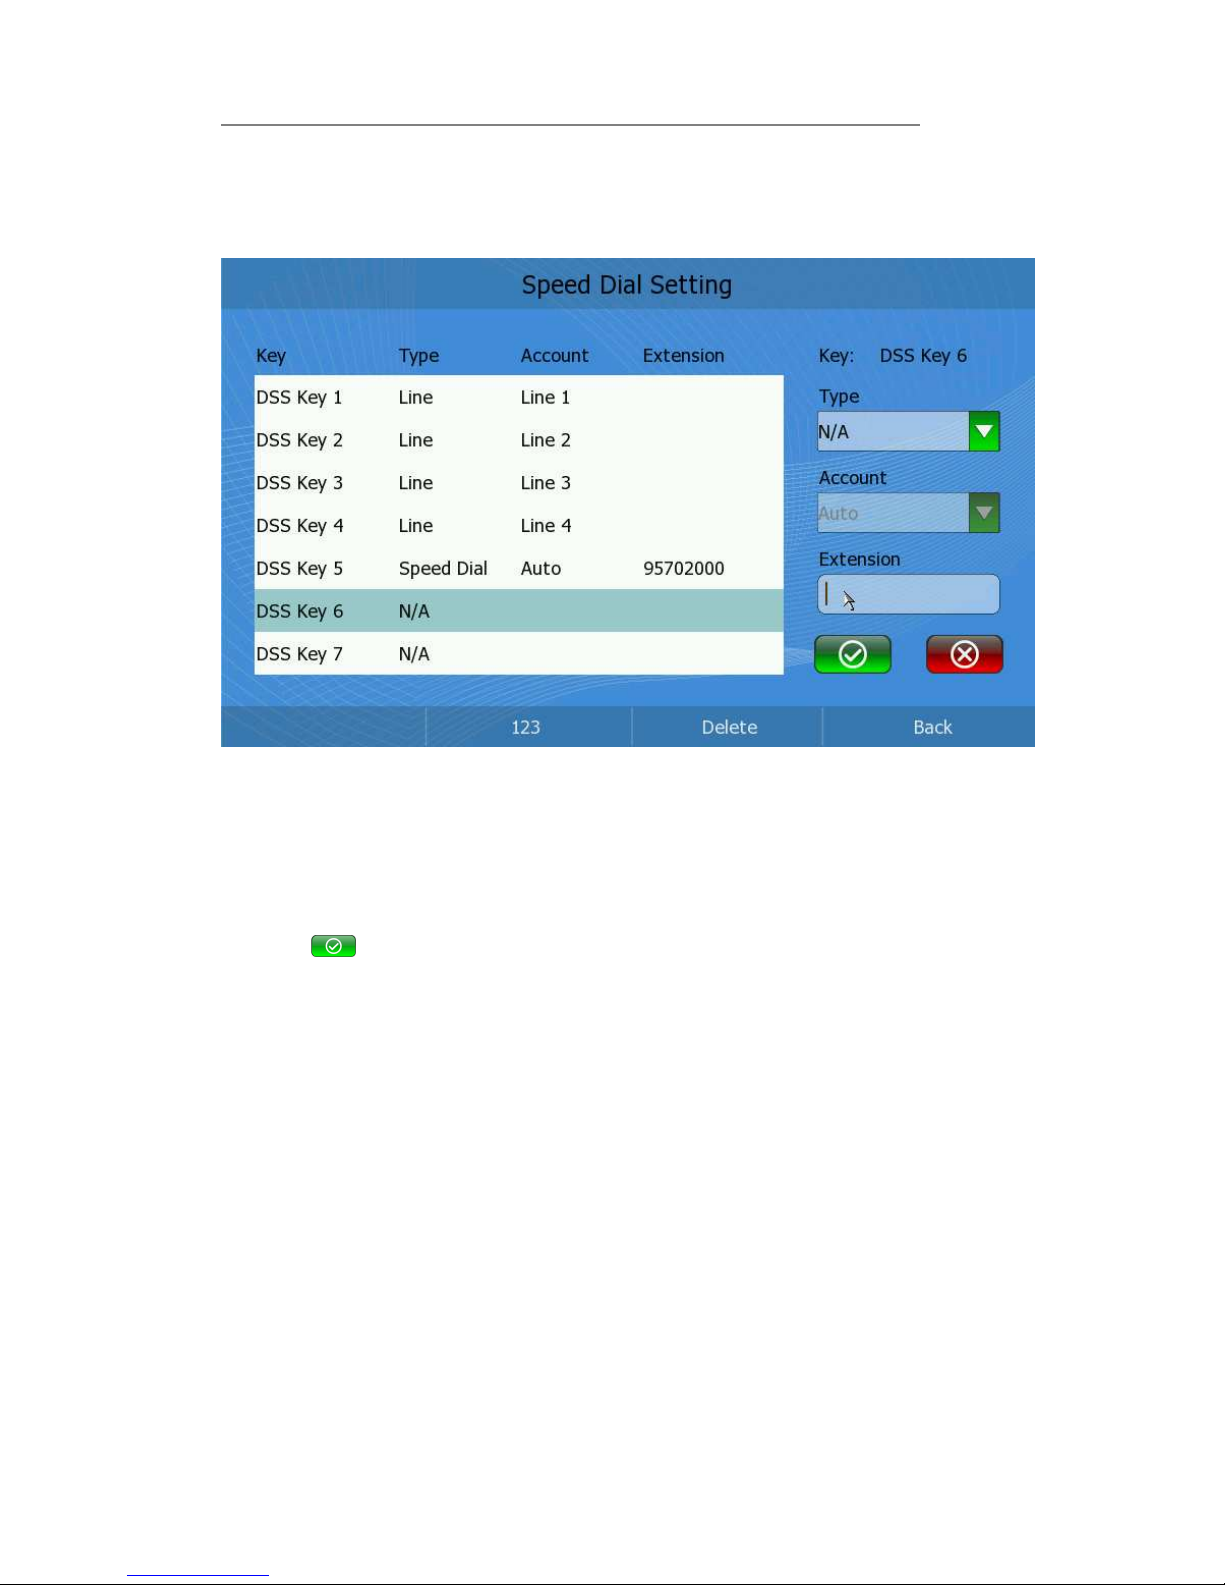
To set the speed dial via phone interface:
1) In desktop status, click Call Feature->Speed Dial to enter;
2) On the left, there are 20 DSS keys available, make your choice in the list.
3) On the right, set the Type, account and extension for the chosen DSS key.
4) For the Type option, Line and Speed Dial options are available for choose. The
default configuration for each key is N/A which means the key hasn’t been set
for any functions.
5) This Video phone can support up to 4 accounts in the pull-down menu.
6) Click to save your changes.
7) Return to the idle status, and press the Left/Right navigation keys to the DSS
keys page to check your configuration.
Page 33

IP Video Phone Customizing Your Phone
- 28 -
8) Click the corresponding Speed Dial Key to dial out directly. For example, click the
81 button to call out directly.
9) Click the corresponding line key (for example 60) to enter the
dial-up interface
;
enter the number to dial out.
Key As Send
Users can set a specific button (“#” or “*”) to active as the send button.
To set the send key via phone interface:
1) In desktop status, click Call Feature->Key As Send to enter;
2) press <OK> to pop up the pull-down menu, and choose a preferred option, then
Page 34
IP Video Phone Customizing Your Phone
- 29 -
click the Save soft key to confirm the change;
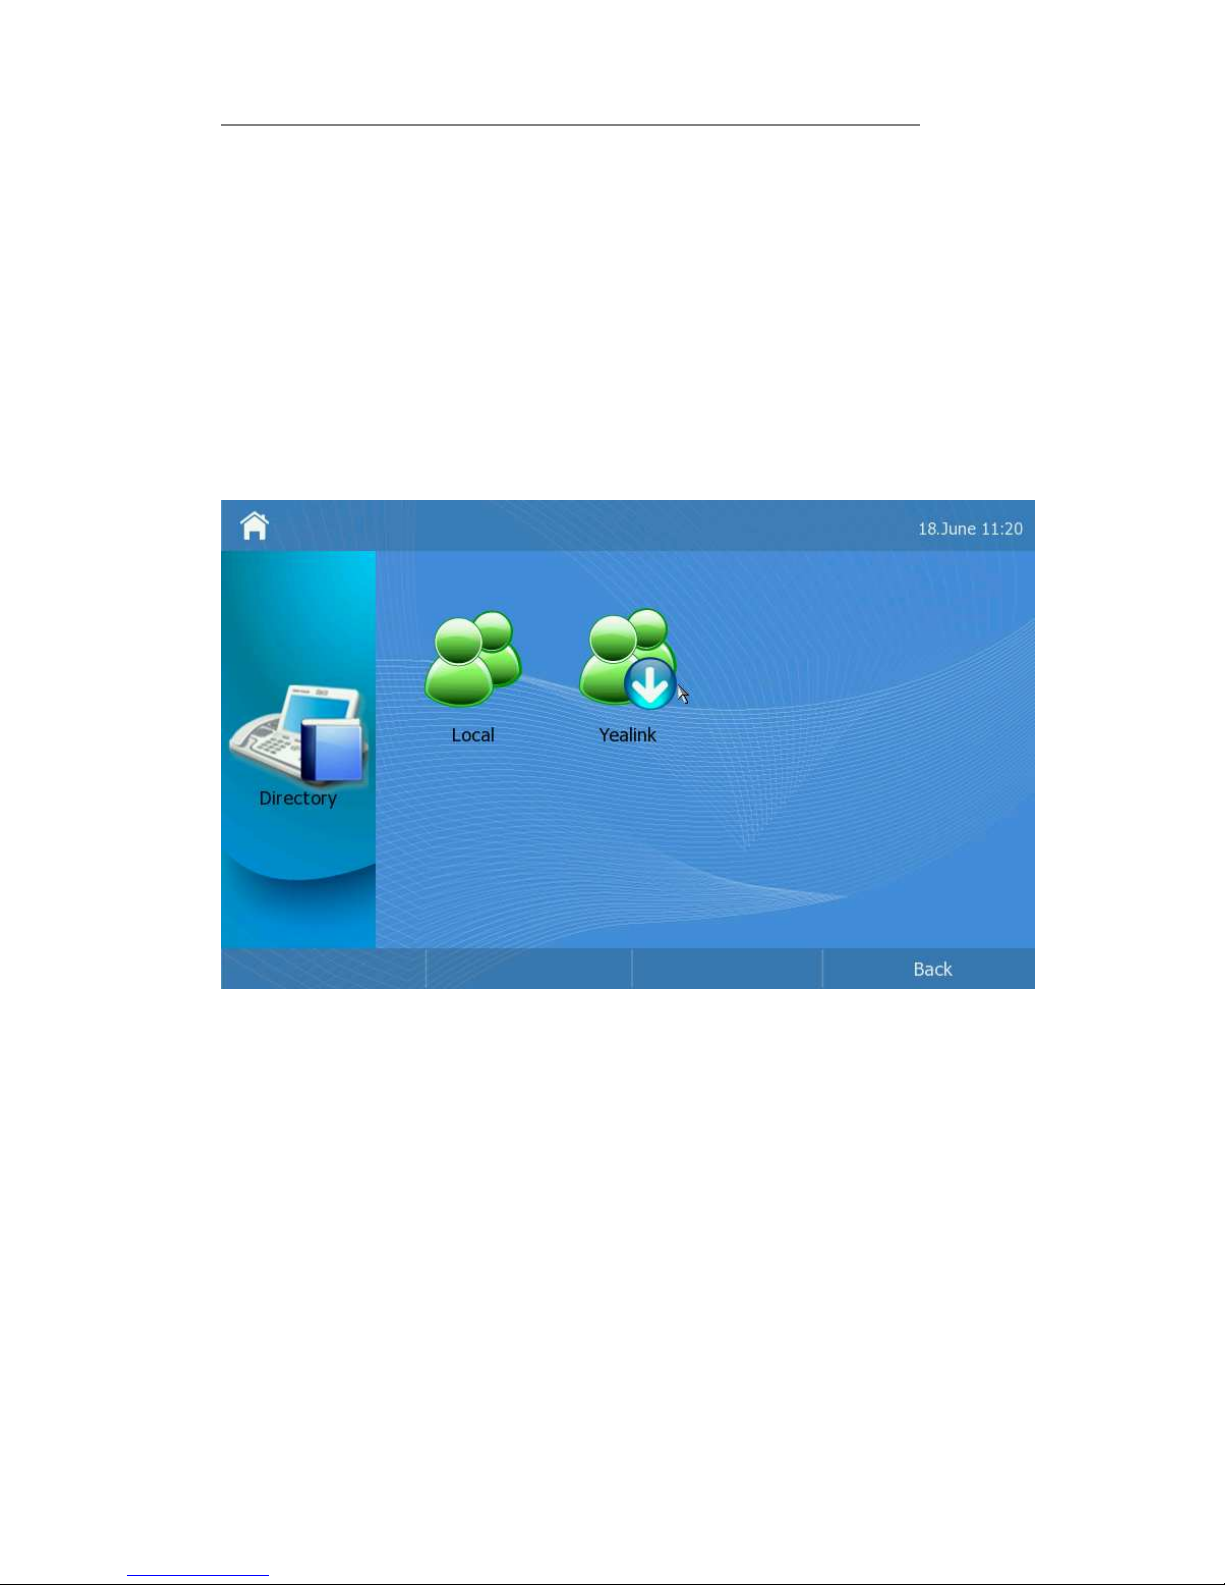
Directory
You can store a large number of contacts in the directory of your video phone. The
default directory is local phonebook, but when you add the xml phonebook , the
phone will display both Local Directory and XML phonebook.
Add a XML phonebook via web interface:
1) Choose Contacts -> Remote Phonebook
2) Enter the Phonebook URL and Phonebook Name, then click the Insert button to
add the record.
3) Click the Save button to save the changes.
When you click the XML phonebook the phone will download the directory
automatically from the URL.
Then you can add, edit, delete, dial, or search for a contact in the directory.
Add Contact
Search a contact via phone interface:
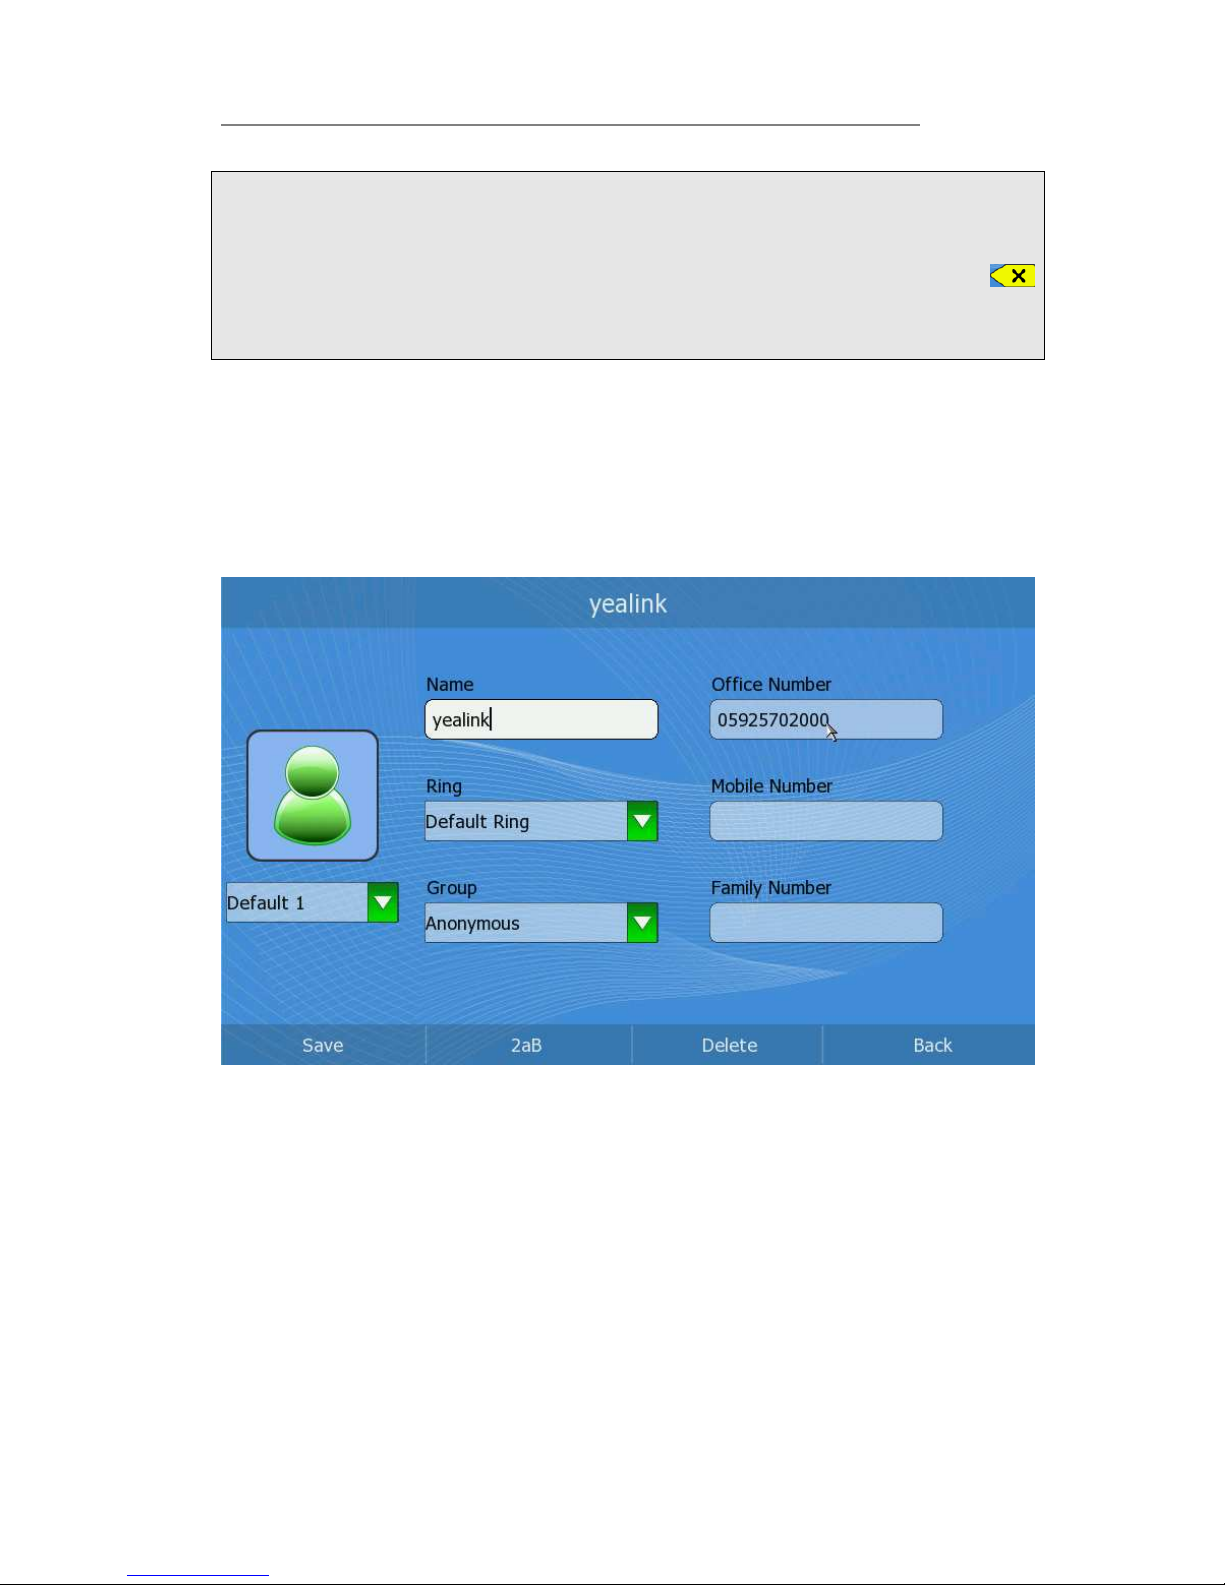
1) Click【Directory】->【Options】->【Add】option to enter the configuration page.
Page 35

IP Video Phone Customizing Your Phone
- 30 -
2) Press Up/Down button to choose and fill in different options, in the 【Ring】
and【Group】options, press <OK> to pop up the pull-down menu, choose your
preferred options, then press <OK> to confirm.
3) Select an image for the contact.
4) After the edition, press <F1>to save the changes and get back to the previous
page.
Note:
You can not save a record when all of the input frame is empty.
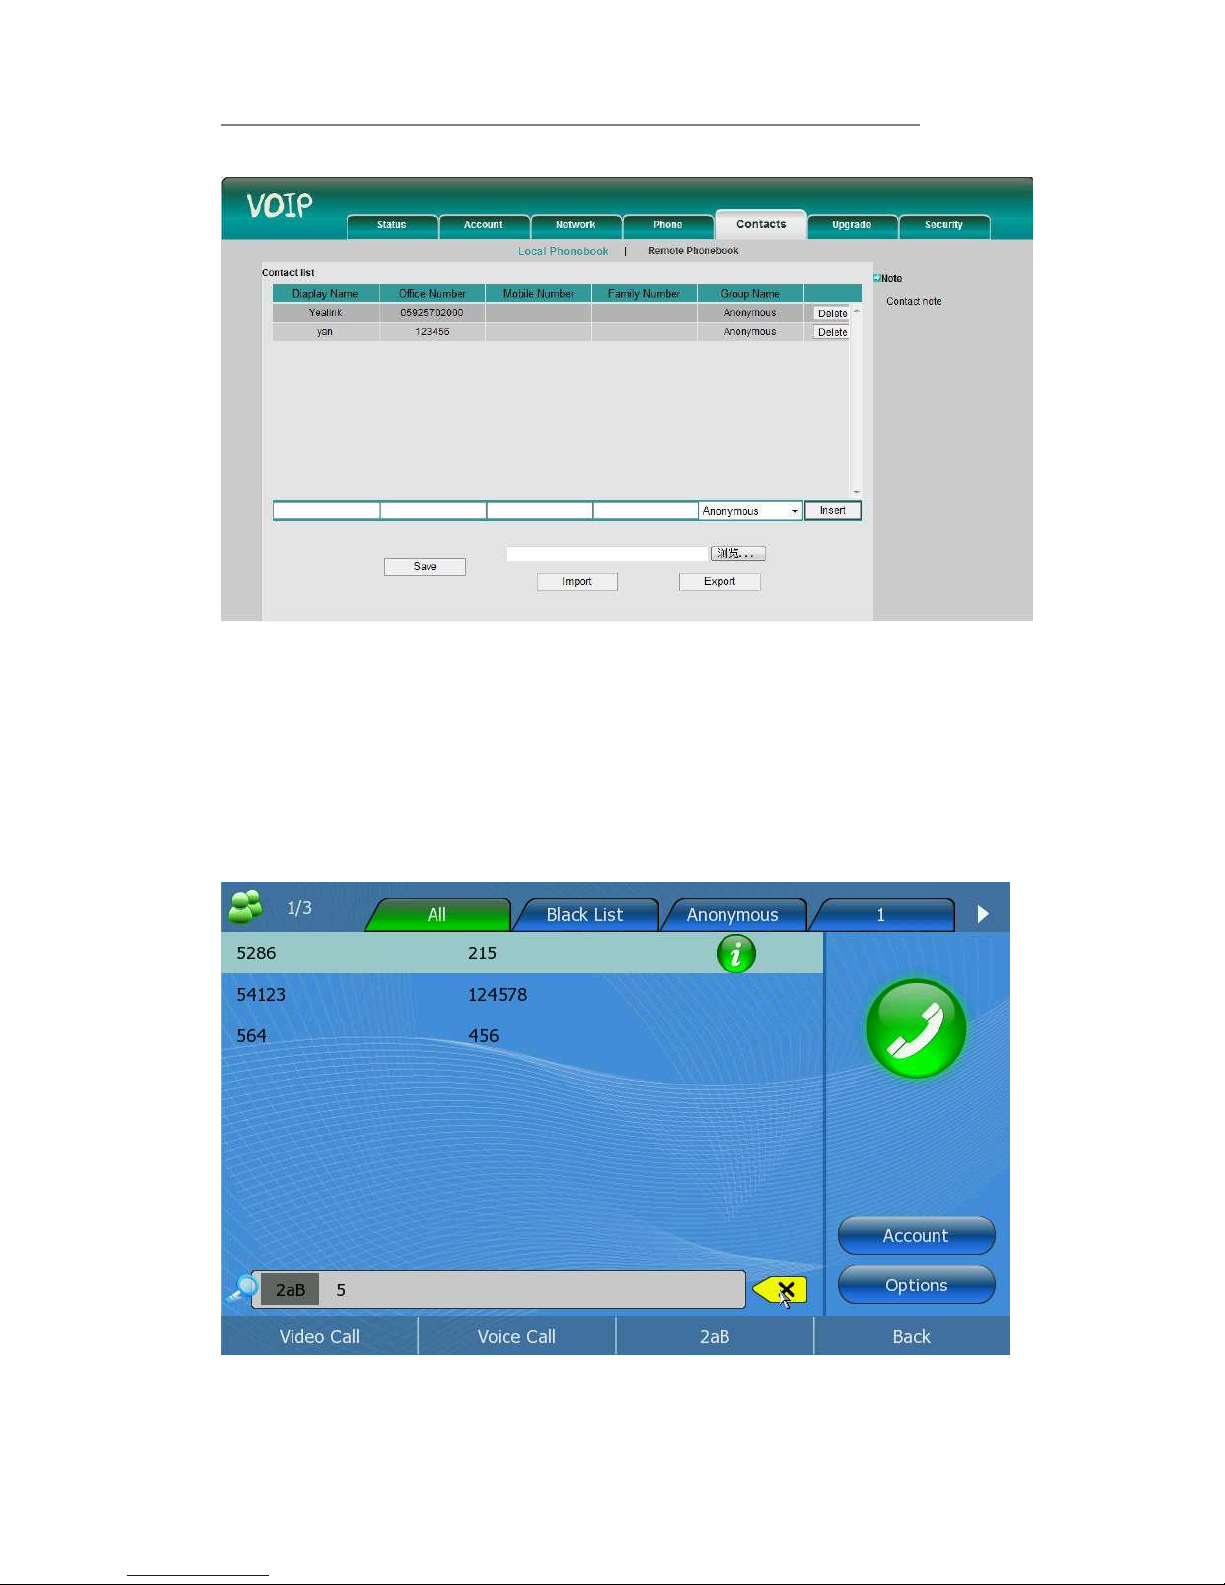
Add a contact via web interface:
Page 36
IP Video Phone Customizing Your Phone
- 31 -
1) Choose Contacts.
2) Enter the Display Name, Office Number, Mobile Number, Family Number and
Group Name, then click the Insert button to add the record.
3) Click the Save button to save the changes.
Search Contact
Search a contact via phone interface:
1) Click 【Directory】option to enter the Contacts page.
2) Enter the contact name by the keypad, for example “5”, then the screen will
show all the contacts whose name begins with “5”.
Page 37
IP Video Phone Customizing Your Phone
- 32 -
3) Press Back button to get back to Contacts page.
Note:
1. Users can click the 【2aB】 key to switch the input methods. For example,
pressing the number button 2 once, you can enter the number 2 and double-click
it, it will change to the letter ”a”. With the clicking time increase, corresponding
letters of b, c and A, B, C will be typed, so do the other DTMF keys; Pressing
key, you can delete the input letters or numbers.
2. In the Search page, if you press the function keys, (for example, press the
options button), it will turn to the related function pages.
Edit Contact
Edit a contact via phone interface:
1) Click 【Directory】to enter the configuration page.
2) Use the Up/Down navigation keys to choose a record, then press【OK】-> <F1>
button to enter the edition page.
3) Press Up/Down button to choose and fill in different options, in
the【Ring】and【Group】options, press <OK> to pop up the pull-down menu,
choose your preferred options, then press <OK> button to confirm.
4) After the edition, press the Save soft key to save your changes.
Edit a contact via web interface:
1) Click Contacts option to enter the configuration page.
2) Choose a record, and then click the option you want to change. For example, if
you want to change the display name of contact 789, just the click it and input
the right name.
Page 38

IP Video Phone Customizing Your Phone
- 33 -
3)
Click the Save button to save your changes.
Move a contact to the blacklist via phone interface:
1) Click 【Directory】, then use the Up/Down navigation keys to choose a record
you want to move to the blacklist and press the <OK> button to enter.
2) Press the <F1> button to enter the edition page.
3) Click the Group option to open the pull-down menu and choose Black List option.
4) Press the <F1> to save your changes.
Note:
If a contact has been moved to the blacklist, then the call from this contact will not
get
through.
Page 39

IP Video Phone Customizing Your Phone
- 34 -
Move a contact to the blacklist via web interface:
1) Click Contacts option to enter the configuration page.
2) Choose a record and click the Group Name option, then choose Black List in the
pull-down menu.
3)
Click the Save button to save your changes.
Delete Contact
Delete a contact record via phone interface:
1) Click【Directory】->【Options】, then use the Up/Down navigation keys to
choose a record you want to delete.
2) Click【Delete】option to pop up the dialog reminding “Delete the contact?”.
Page 40
IP Video Phone Customizing Your Phone
- 35 -
3)
Click to confirm the operation, or click to cancel the operation.
Delete a contact via web interface:
1) Click Contacts option to enter the configuration page.
2) Choose a contact, then click the Delete button to delete it.
3) Click the Save button to save your changes.
Clear Phonebook
Clear the phonebook via phone interface:
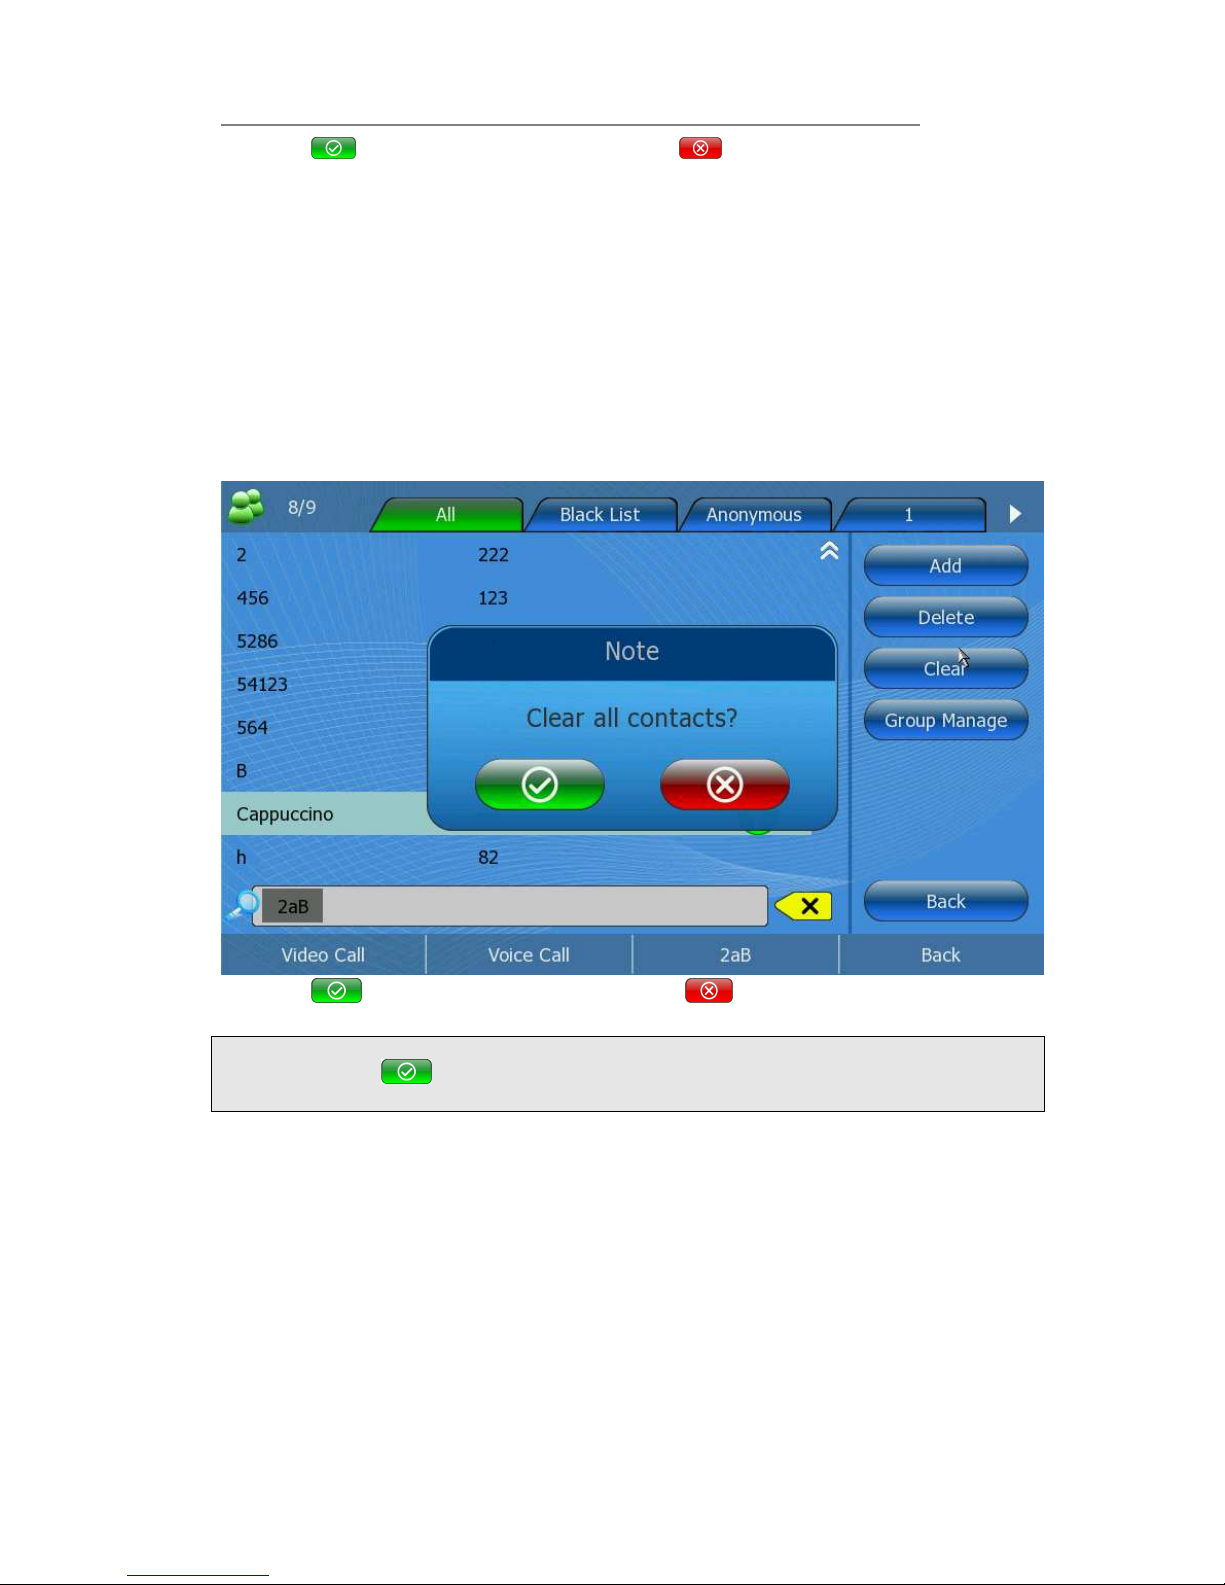
1) Click 【Directory】->【Options】->【Clear】option to pop up the dialog
reminding “Clear all contacts?”.
2) Click to confirm the operation, or click to cancel the operation.
Note:
When you click to confirm clear all contacts ,the phone default is clear the
current group.
Group Manage
Add group
Add groups via phone interface:
1) Click 【Directory】->【Options】->【Group Manager】->【Add】option to enter
the configuration page.
Page 41

IP Video Phone Customizing Your Phone
- 36 -
2) Enter the Group Name and choose the Group Ring of the new group. Then click
to confirm the operation, or click to cancel.
Edit group
Edit a group via phone interface:
1) Click 【Directory】->【Options】->【Group Manager】 option to enter the
configuration page.
2) Press the Up/Down navigation keys to choose a group you want to edit in the left
side, then the input box on the right will show the corresponding Group Name
Page 42

IP Video Phone Customizing Your Phone
- 37 -
and Group ring information.
3) Click the input box of Group Name, then press <F3> to delete the original name,
then input the new name by keypad.
4) Click the Group ring option, and then choose your preferred ring tone in the pull-
down menu.
5) After the edition, click to confirm the changes, or click to cancel the
operation.
Note:
Cannot modify the key groups: the "blacklist" and "Anonymous".
Delete Group
Delete a group via phone interface:
1) Click 【Directory】->【Options】->【Group Manager】 option to enter the
configuration page.
2) Press the Up/Down navigation keys to choose a group you want to delete.
3) Press <Delete> soft key to pop up the dialog reminding”Delete Group-.XX?”.
4) Click to confirm the changes, or click to cancel the operation.
Note:
Can not delete the key groups: the "blacklist" and "Anonymous".
Export Contact list
Export Contact List via web interface:
1) Choose Contacts.
Page 43

IP Video Phone Customizing Your Phone
- 38 -
2)
Click the Export button to export the contact list.
Note:
Export Contact List can only be set via web interface.
Call Out
1) Click【Directory】->【Account】option to enter the configuration page.
2) The registered accounts will be shown on the right side, clicking the
corresponding one to dial out the chosen contact directly by this account.
In the list,if there are too many records, the screen will display the icon or .
Then you can click the icon to show the following records.
Page 44

IP Video Phone Customizing Your Phone
- 39 -
Call History
View the call history
1) Click Call History option to review the call list.
2) Use the Left/Right navigation keys to highlight a group.
3) Use the Up/Down navigation keys to highlight a record.
4) Clicking the icon behind, you can review the details of the chosen record.
5) Press <F1> to make a video call, press <F2> to make a voice call, <F3> to add
this record to contact, and <F4> to exit.
Dial back from the call history
1) Click Call History option to enter the call list interface.
2) Use the Left/Right navigation keys to highlight a group.
3) Use the Up/Down navigation keys to highlight a record you want to dial back.
4) Clicking the account icon on the right, you can dial back the chosen contact
directly in the default call mode. Also, you can press the <Video Call> or <Audio
Call> soft key to call out in the specified call mode.
Add a record from call history
1) Click Call History option to enter the call list interface.
2) Choose a record you want to edit and click Add button to enter the edition
interface.
Page 45

IP Video Phone Customizing Your Phone
- 40 -
3) Press Up/Down button to choose and fill in different options, in
the【Ring】and【Group】options, press <OK> button to pop up the pull-down
menu, choose your preferred options, then press <OK> to confirm.
4) After the edition, press the Save softkey to save your changes.
Delete the call history
Users can choose to delete the record(s) in the call list by the phone UI.
1) Click Call History option to enter the call list interface.
2) Choose a record you want to delete.
3) Click Delete option, it will pop up a frame shown as:
Page 46

IP Video Phone Customizing Your Phone
- 41 -
4) Click【 】to confirm the delete operation, or click【 】to cancel.
Clear the call history
Clear the call history via phone interface:
1) Click 【Call History】->【Options】->【Clear】option to pop up the dialog
reminding “Clear All Records?”.
2) Click to confirm the operation, or click to cancel the operation.
Note:
When you click to confirm clear all records , the phone default is clear the
current group.
Media
In the idle status, click Media option to enter the menu interface.
There are two operations for users choose to use. One is Photo, another is Video. You
can manage the photo and video.
Page 47

IP Video Phone Using the Basic Call Functions
- 42 -
Photo
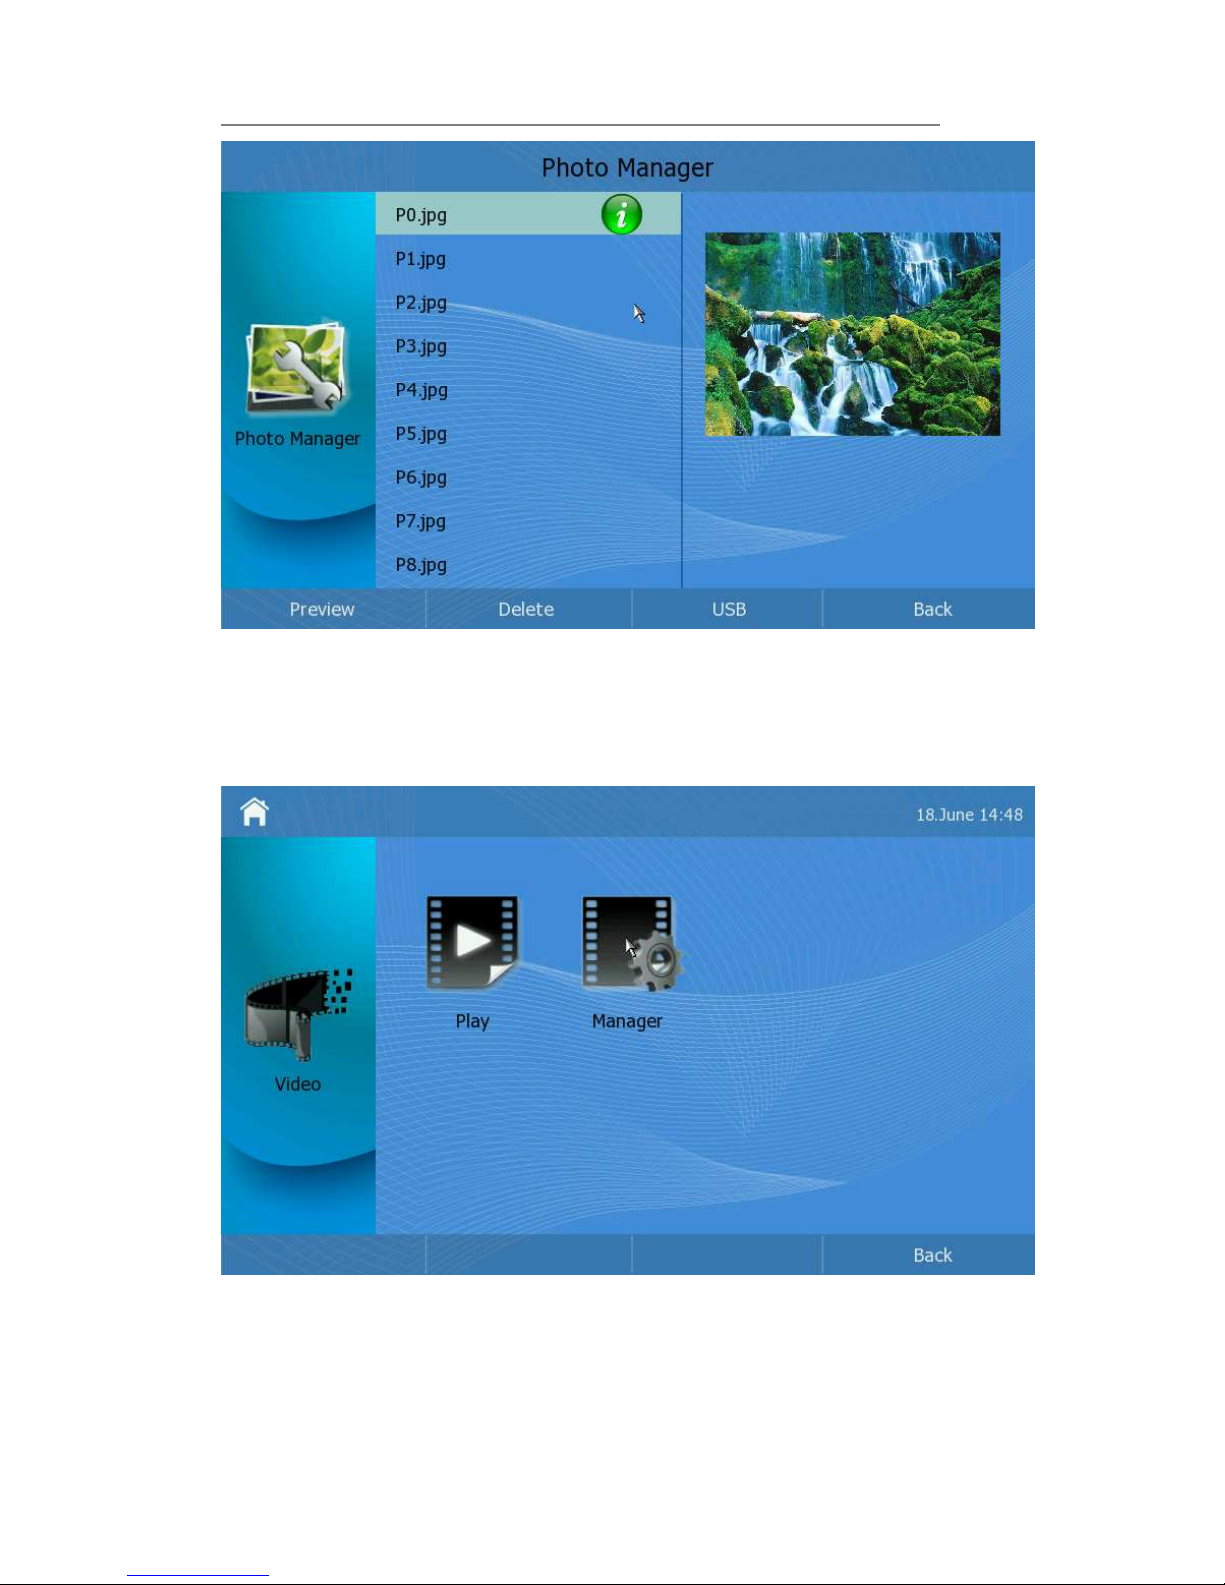
Enter the photo, the phone can play or manage the photo.
1) Click 【play】 it will automatically
play the corresponding photos.
2) Click 【Manager】enter the manage interface. Then you can upload the photo
from the USB device. And you can also delete the photos if you have sufficient
permissions.
3) Click the <Delete> this button, it will pop up a warning frame, asking whether to
delete it. Click to delete, click to cancel and return to the Manage frame.
Page 48
IP Video Phone Using the Basic Call Functions
- 43 -
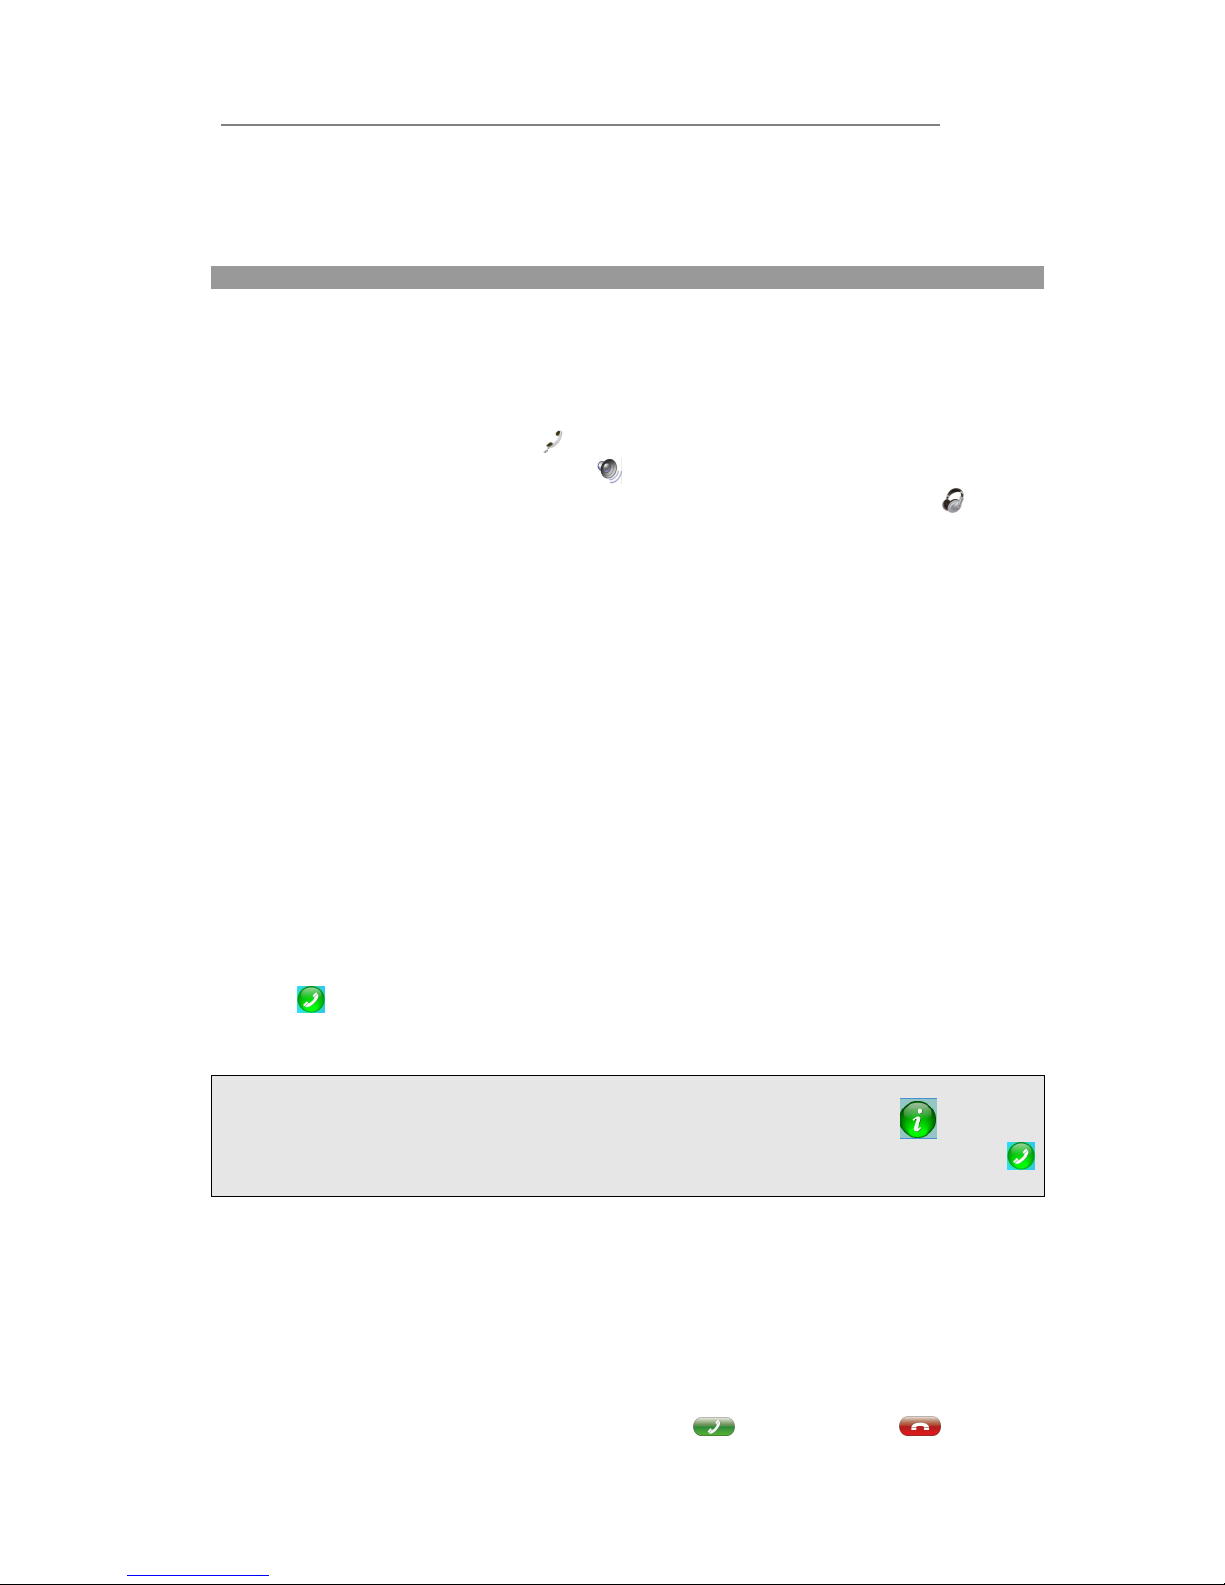
Video
The operation of video is the same as photo
Page 49

IP Video Phone Using the Basic Call Functions
- 44 -
Page 50
IP Video Phone Using the Basic Call Functions
- 45 -
Using the Basic Call Functions
Making a call
Call Devices
You can make a phone call via the following devices:
1) Pick up the handset, the icon will be shown in the Dial-up interface.
2) Press the Speaker button, the icon will be shown in the Dial-up interface.
3) If the headset is connected to the Headset port in advance. The
icon will be
shown in the Dial-up interface.
You can also dial the number first, and then choose the method you will use to speak
to the other party.
Call Methods
1) Pick
up the handset or press the <Speaker> button,
dial the number you want
to call, or
2) Click the Directory option, use the navigation button to highlight your choice, or
3) Click the History option, use the navigation button to highlight your choice or
Then
●
Press <F4> to switch between the SIP video call and SIP voice call;
●
Press <F1> to choose a account to call out;
●
Press <OK> to call out in the default call method
●
Press button to dial out.
Note:
When the contact has more than one phone number, clicking the icon , you can
review the details of the chosen record, choose the phone number and click the
behind to dial out.
Answering a call
Answering an incoming call
1) If you are not on an active call, lift the handset to answer it using the handset,
or press the Speaker button to answer it using the speakerphone, or inset the
headset to answer it using the headset.
2) If you are on an active call, click the button
to answer it, or to refuse
Page 51

IP Video Phone Using the Basic Call Functions
- 46 -
it, or to forward the incoming call.
3) During a conversation, you can alternate between Headset, Handset and
Speaker phone by pressing the corresponding buttons, picking up the handset or
inset the headset.
Refuse a call
Press to refuse the incoming call directly.
DND
Press to active DND Mode when the phone is idle. The display will show the icon
and further incoming calls will be rejected. Press it again to deactivate DND
mode.
During an Active Call
Audio/Video Switch
There are several ways to operate the current audio/video conversation:
1) Shift between audio and video: During a call, click 【Voice Call】or 【Video Call】
to shift between Voice call and Video call;
2) Close local video: press to close the local video, press it again to reopen the
local video;
Page 52
IP Video Phone Using the Basic Call Functions
- 47 -
Mute
Press to mute your audio. It will not be able to hear anything on other side. To
turn off mute, press the same key again.
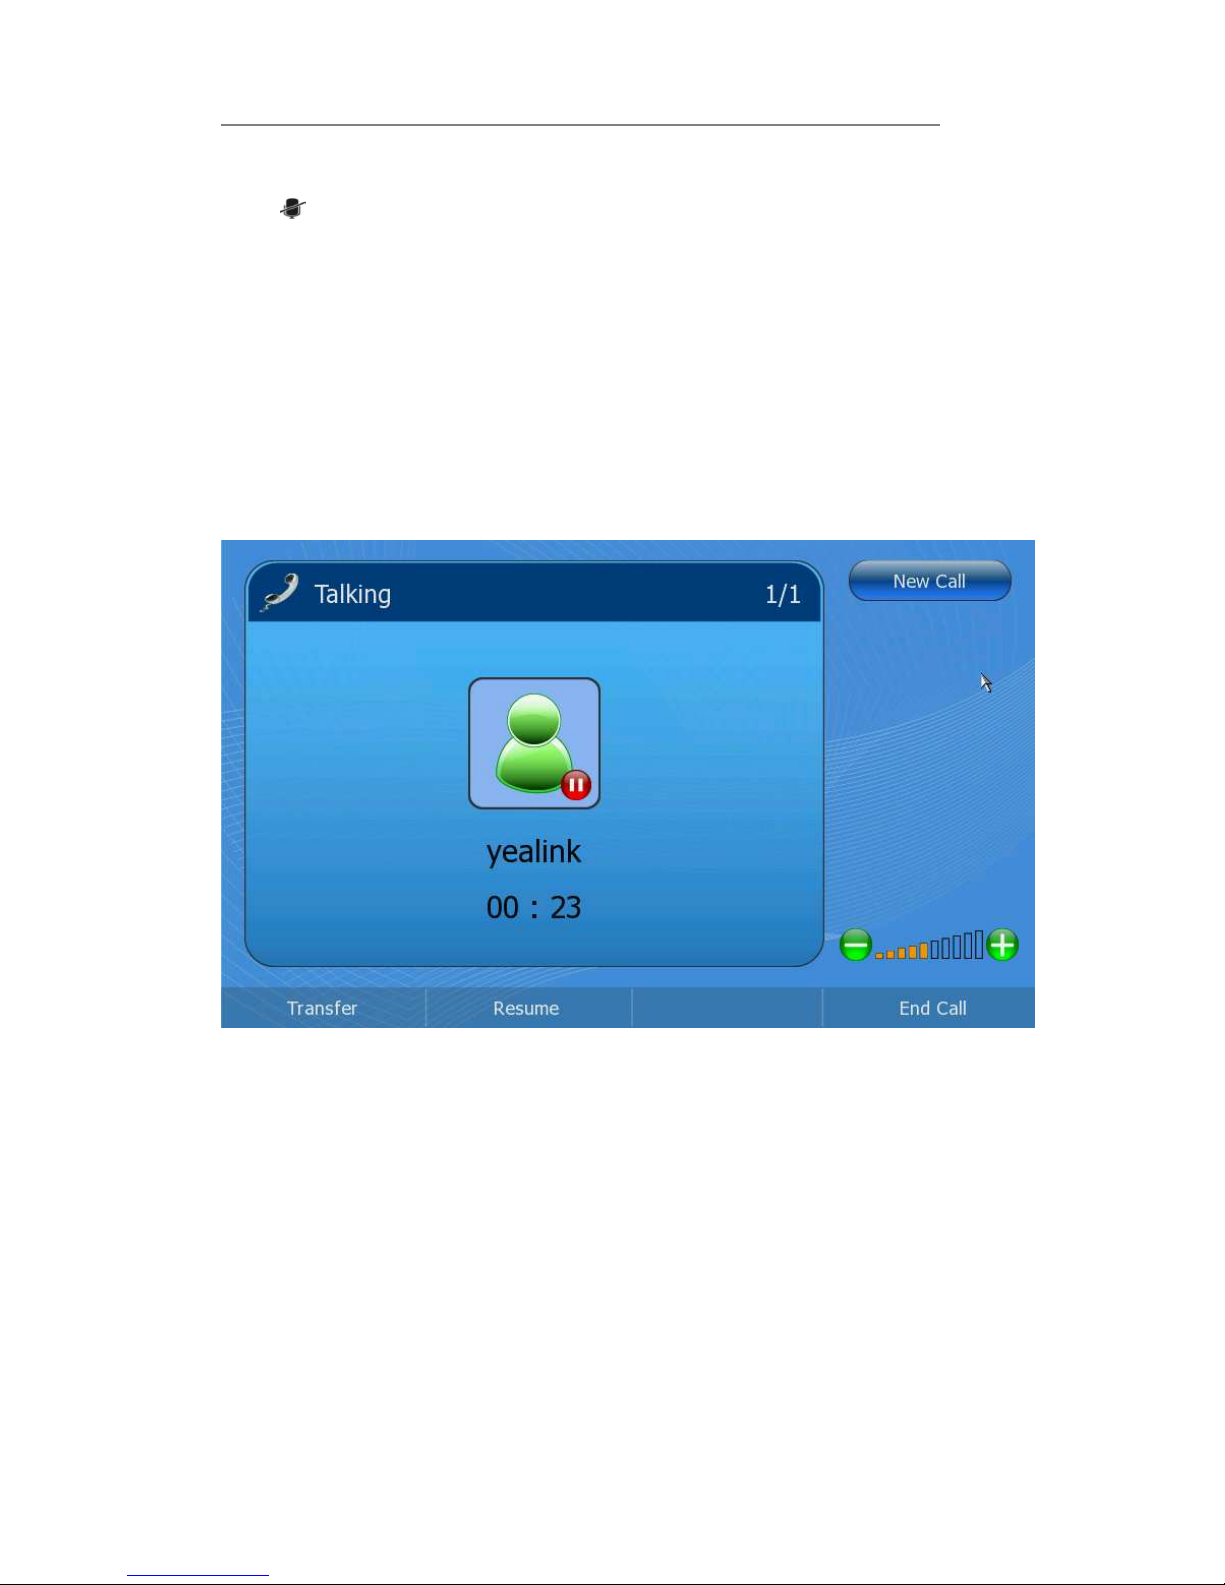
Call Hold
This call function allows you to place an active call on hold. In this case your IP PBX
might play a melody or message to the other party while waiting. Other calls can be
received and made while having a call on hold.
To hold/resume a call:
1) Press the Hold soft key to put your active call on hold.
2) Press the Resume soft key to retrieve the call.
Call Transfer
You can click Transfer button to customize your phone on an conversation is
transferred to the third party such as another extension, mobile phone number, etc.
There are three ways to transfer the call: Blind Transfer, Attended Transfer and Semi-
Attend Transfer.
To Blind Transfer via phone interface:
1)
A and B is on an conversation, A press the Transfer hot key to put B on hold,
then A can dial the third telephone number C and press the Transfer hot key to
call out. A will turn to hold status, and the LCD will display as Transferred.
2) After C answered it, or A press the End Call hot key to complete the transfer.
3) A will be disconnected from the call. B can talk to C.
Page 53

IP Video Phone Using the Basic Call Functions
- 48 -
To Attended Transfer via phone interface:
1) A and B is on an conversation, A press the Transfer hot key to put B on hold,
then A can dial the third telephone number C and press the OK/SEND button or
click button to call out.
2) After C answered it, A and C can have a private conversation without B hearing
it, then A press the transfer hot key to complete the transfer.
3) A will be disconnected from the call. B can talk to C.
To Semi-Attend Transfer via phone interface:
1) A and B is on an conversation, A press the transfer hot key to put B on hold,
then A can dial a new number C and press the OK/SEND button or click
button to call out.
2) While C is ringing, A hang up or press the Transfer hot key. Then A will turn to
hold status, and the LCD will display as Transferred.
3) You will be disconnected from the call, when C pick up, B can talk to C.
Note:
Make sure that the SIP server you have registered supports this function.
Call Statistics
You can inquiry the call statistics during the conversation. The statistics include
Codec, Video Format, Tx/Rx Video Frame Rate(fps), Tx/Rx Video Bit Rate(kbps) and
Lost Pavkets(%) etc.
To inquiry statistics via phone interface:
1) During a video call, press More softkey.
2) And then click the statistics to enter the Media Statistics interface.
3) you can press the Back softkey to back.
If you has a voice call, you can directly press the statistics button to enter the Media
Statistics interface.
Page 54

IP Video Phone Using the Basic Call Functions
- 49 -
Message
Your voice mailbox messages, which are usually stored on a media server of your
local
or hosted VoIP telephony system, can be accessed from your phone.
New voice messages can be indicated both acoustically and visually as described
below:
The idle screen indicates a new voice messages coming.
Note:
Please contact your system administrator for the connecting code. Different systems
Page 55

IP Video Phone Using the Basic Call Functions
- 50 -
have different codes.
To retrieve the new voicemail via phone interface:
1) Click the Message icon directly.
2) You may be prompted to enter the password which is needed to connect to your
VoIP telephony system. It depends on your system.
3) Your voice mailbox is called and you are able to listen to your new and old
messages.
To configure Voicemail Number via phone interface:
1) In desktop status, click Call Feature->Voice Mail to enter; You can also click the
Message icon to enter the configuration page directly when the phone is idle.
2) Users can check the register status of each account, and the number of received
voice mail in this page.
3) Choose an account, and enter the voicemail
concatenated code then press <F1> to
save your changes, or press the icon behind to connect to the server.
Note:
Before retrieving the new voicemail, please make sure that the connecting code has
been set on the phone.
Page 56

IP Video Phone Using the Advanced Phone Functions
- 51 -
Using the Advanced Phone Functions
Account Settings
Basic Settings
Configure account information via phone interface:
1) Click Setting->Account option, choose a account to enter the configuration page.
2) Click the icon on the left to enable this line;
3) Choose and fill in different options.
4) Press <F1> button to save the changes.
Note:
Please contact your ISP for exact information.
Configure account information via web interface:
1) Choose Account->Account page to do the relating settings.
2) Please reference to “Configuration and Registration” section for more details of
the parameters.
Audio codecs
Select Account->Voice to set the audio codecs via web interface:
Page 57

IP Video Phone Using the Advanced Phone Functions
- 52 -
There are 8 voice codecs, press the Up/Down button to choose the right priority.
Video codecs
Select Account->Video page to set the video codecs via web interface:
Please check the following table for more information about video configuration.
1) Video Codecs: there are 3 video codecs, press the Up/Down button to choose the
right priority.
2) Bandwidth and Frame Rate: To set the Bandwidth and Frame Rate parameters.
The default value of Bandwidth is Auto, and the Frame Rate is 30fps.
Page 58

IP Video Phone Using the Advanced Phone Functions
- 53 -
Advanced Settings
Select Account->Advanced page to set the advanced information via web interface:
The following table lists the instruction of the field about the advanced Account
Setting.
Field Name Description
UDP Keep-alive
Message
Defines whether to active the phone UDP Keep-alive
mechanism. The default is Enabled.
UDP Keep-alive
Interval
This parameter specifies how often the phone will send a packet
to the SIP server. Default is 30 seconds.
Login Expire This parameter specifies the time frequency that phone
refreshes its registration. The default interval is 3600 seconds.
Local SIP Port Local SIP port. The default value is 5060.
RPort The parameter allows you configuring the proxy to send
responses back to a particular address and port. The default is
disabled.
SIP Session Timer This document defines an extension to the Session Initiation
Protocol (SIP). This extension allows for a periodic refresh of SIP
sessions through a re-INVITE or UPDATE request. The refresh
allows both user agents and proxies to determine if the SIP
session is still active.
DTMF Type Select the DTMF type.
You can only configure these settings via web interface.
Page 59

IP Video Phone Using the Advanced Phone Functions
- 54 -
1) Choose Account.
2) Choose Advanced to do the relating settings.
You can consult your system administrator for more information.
Network Setting
WAN
Configure WAN information via phone interface:
1) Click Setting-> WAN option to enter configuration page;
2) Click the corresponding icon to active the proper IP assignment type.
3) If you choose【DHCP】type, Press <F1> to save the changes;
4) If you choose【PPPoE】type, you should also configure the corresponding “User
Name” and “Password”. Then press <F1> to save the changes.
5) If you choose【Static IP】, please choose and configure “IP Address”, “MASK”,
“Gateway”, “DNS1” and “DNS2”, then press <F1> to save the changes.
Configure WAN information via web interface:
1) Choose Network.
2) Choose Internet Port (WAN) option to do the relating settings.
BandWidth
Configure Bandwidth and Frame Rate via web interface:
1) Choose Account->Video.
2) Choose Bandwidth and Frame Rate option to do the relating settings.
Page 60
IP Video Phone Using the Advanced Phone Functions
- 55 -
Maintenance Tasks
Administrator Mode
The phone allows two modes to configure the phone:
User Mode
Administrator Mode
Administrator mode grants unlimited access to the phone configuration on both web
and phone interface. User Mode can not set the parameters such as: Accounts,
Network, Factory , Reboot and some other phone settings by the Phone interface.
Administrator/User Password
Administrator mode grants unlimited access to the phone configuration on both web
and phone user interface. The administrator/user password is used to access:
Web interface along with user name.
The advance settings such as Network, Account, reboot, Factory Settings via
phone interface.
The default administrator password is admin. Meanwhile the user name for web
interface access is admin.
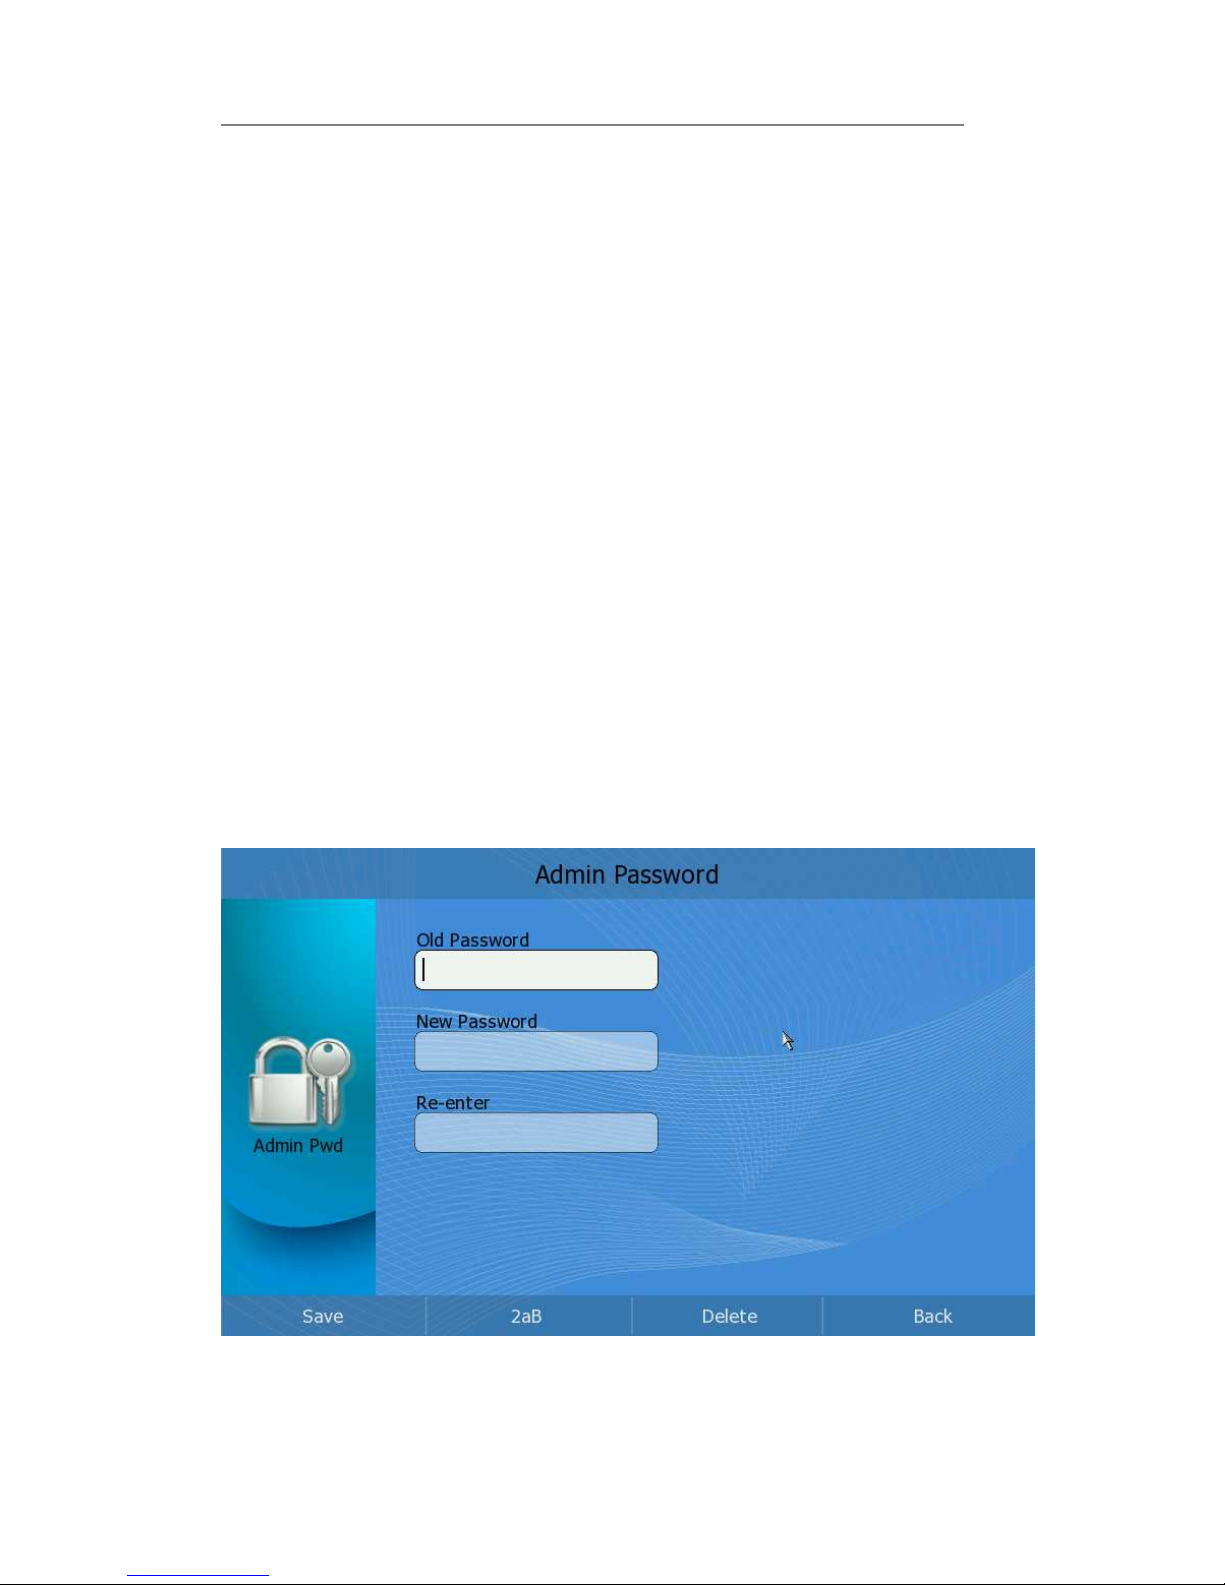
To change the administrator password via phone interface:
1) Click Setting->Security option to enter.
2) Choose and fill in the 【Old Password】, 【New Password】and【Re-enter】 input
frame.
3) Press <F1> to save the change, or press <F4> to cancel the operation and
Page 61
IP Video Phone Using the Advanced Phone Functions
- 56 -
return to the “Setting” page.
To change the administrator password via web interface:
Enter Security page, choose user type in the pull-down menu of User Type option,
enter the old password, new password and confirm password, then click Confirm
button to save the changes, or Cancel button to cancel the operation.
Factory
You should reset the phone only in this case: the phone configuration was changed
and the phone is not functioning anymore. To maintain the configuration of the
phone, you need your system administrator or service provider’s advice.
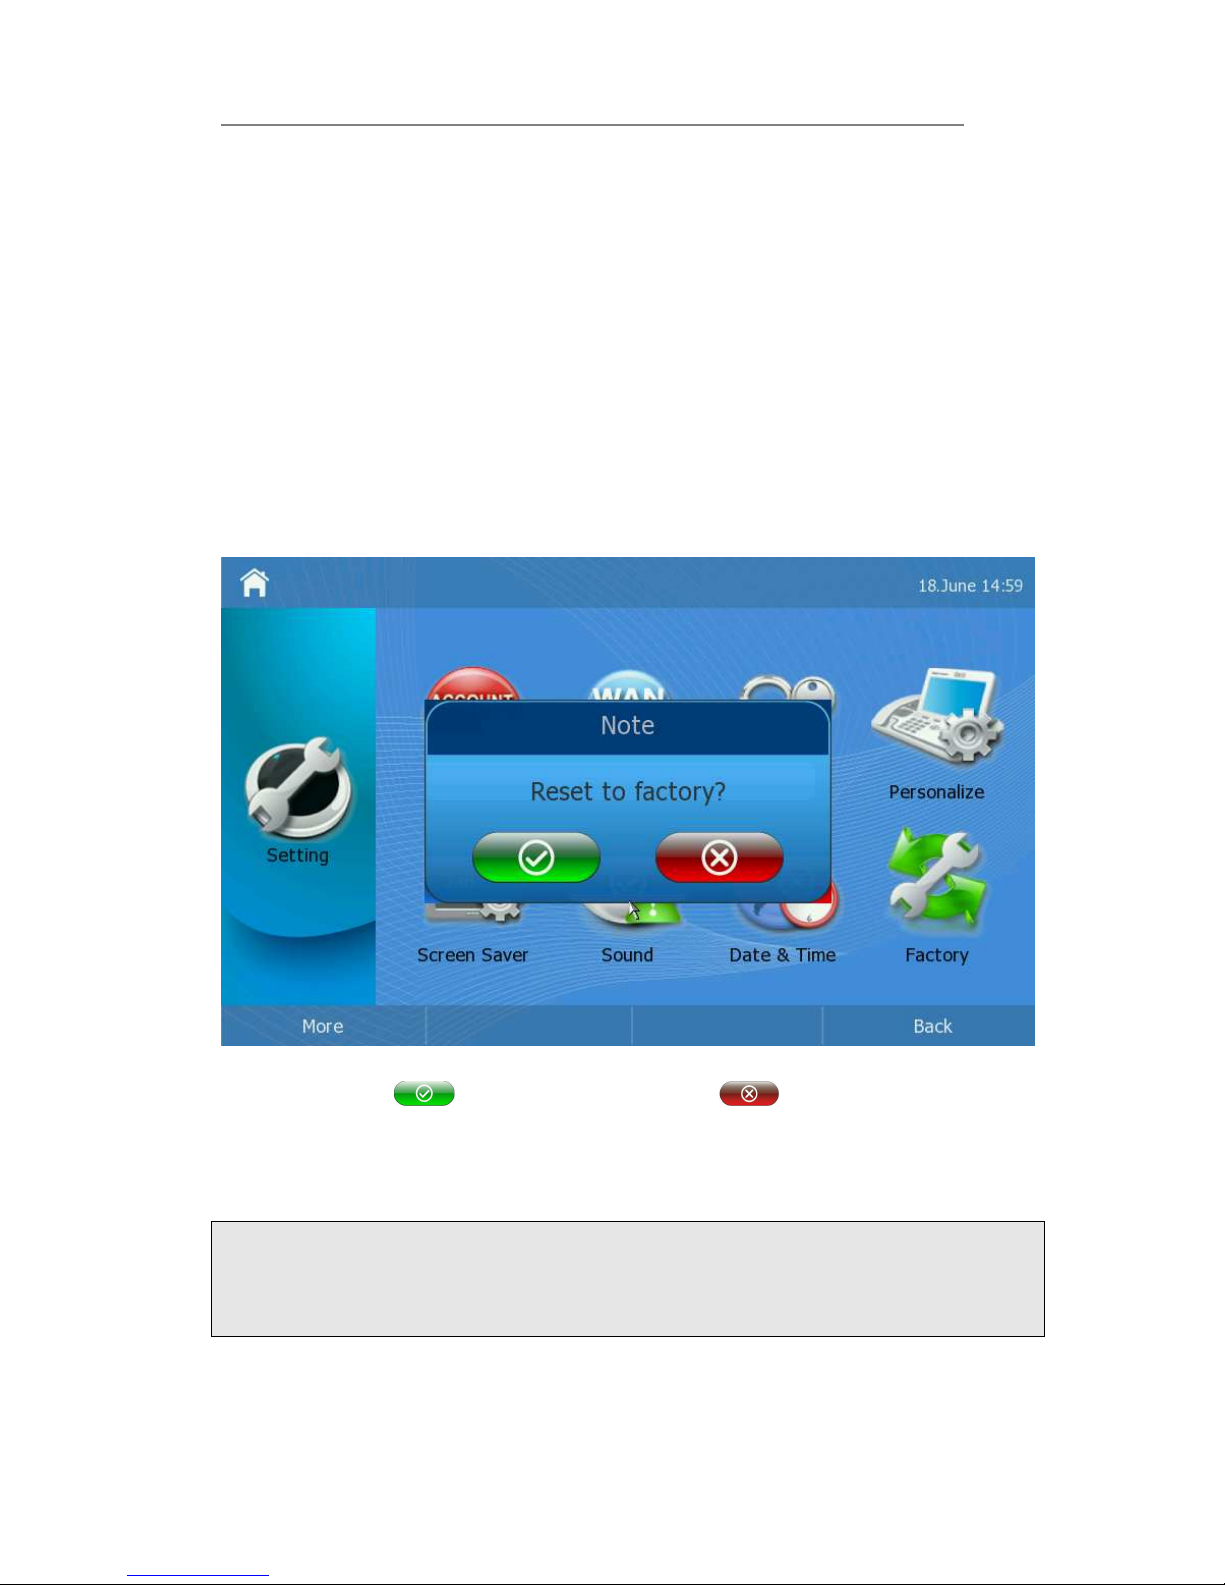
Reset to factory via phone interface:
1) Click Setting->Factory option to enter the configuration page.
2) It will pop up a warning frame asking whether confirm to reset to factory
settings. Click to confirm the changes, or to cancel the operation.
To reset to factory via web interface:
1) Choose Upgrade page.
2) Click Reset to Factory button.
Note:
If you confirm all current setting changes including contact list, call history, account
settings, etc will be lost, you need to export the configuration first if you still want to
import the old configurations after reset. Or your phone must be configured a new
manually unless mass provisioning is used!
Firmware Update
The phone is delivered with pre-installed firmware which allows operating your phone
Page 62
IP Video Phone Using the Advanced Phone Functions
- 57 -
flawlessly. If you require updating the phone’s firmware please contact your system
administrator.
To update the firmware manually via web interface:
1) Choose Upgrade->Basic–>Browse, select the firmware file in your local
computer.
2) Click Upgrade button to update the new firmware.
3) Please do not power off during the updating.
Note:
1. Any power interruption during the following process will most likely lead to a
flash memory error. As a result the system cannot boot up anymore. The
procedure can only be conducted in Administrator Mode.
2. If the updating is failed, you can re-plug the power adaptor, and press the <F2>
key for a few seconds, then it will show the Firmware Update, Please Wait…
Auto provision
To setting auto provision via Web interface:
1) Choose Upgrade->Advanced, configure the relating settings, It supports three
upgrade methods: PNP、 DHCP、URL . PNP include
PNP Active
; DHCP include
DHCP Active
and
Custom Option
; URL include
Server URL、Common AES
Key、MAC-Oriented AES Key
.
2) If you choose Power On is On, it will update when the phone is on . And also you
can choose the fixed time to update , for example :
Interval , Weekly , Time ,
Day of week , ect
3) Click Confirm button, when configuration files are not automatically updated at
the same time.
4) You can also update immediately by pressing Autoprovision Now button.
Page 63

IP Video Phone Using the Advanced Phone Functions
- 58 -
The parameters of the Auto-provision:
Parameter Description
Update Protocol The phone can be updated via TFTP, FTP ,HTTP or HTTPS.
TFTP Server If you choose TFTP as protocol TFTP, you need to enter the
TFTP server IP address and port.
Check new config You can specific the period that your phone checks the new
firmware from the server: Power on, Repeatedly, Weekly, Power
on + Repeatedly, Power on + Weekly and Disabled.
Scheduling You can specific the period in days which the phone checks and
updates the new firmware, the range is 1-30 days.
Note:
1. Any power interruption during the following process will most likely lead to a
flash memory error. As a result the system cannot boot up anymore. The
procedure can only be conducted in Administrator Mode.
2. If you choose DHCP method , make sure your phone is also chosen DHCP.
3. If you choose the DHCP and URL On , it will choose DHCP at first .
Reboot
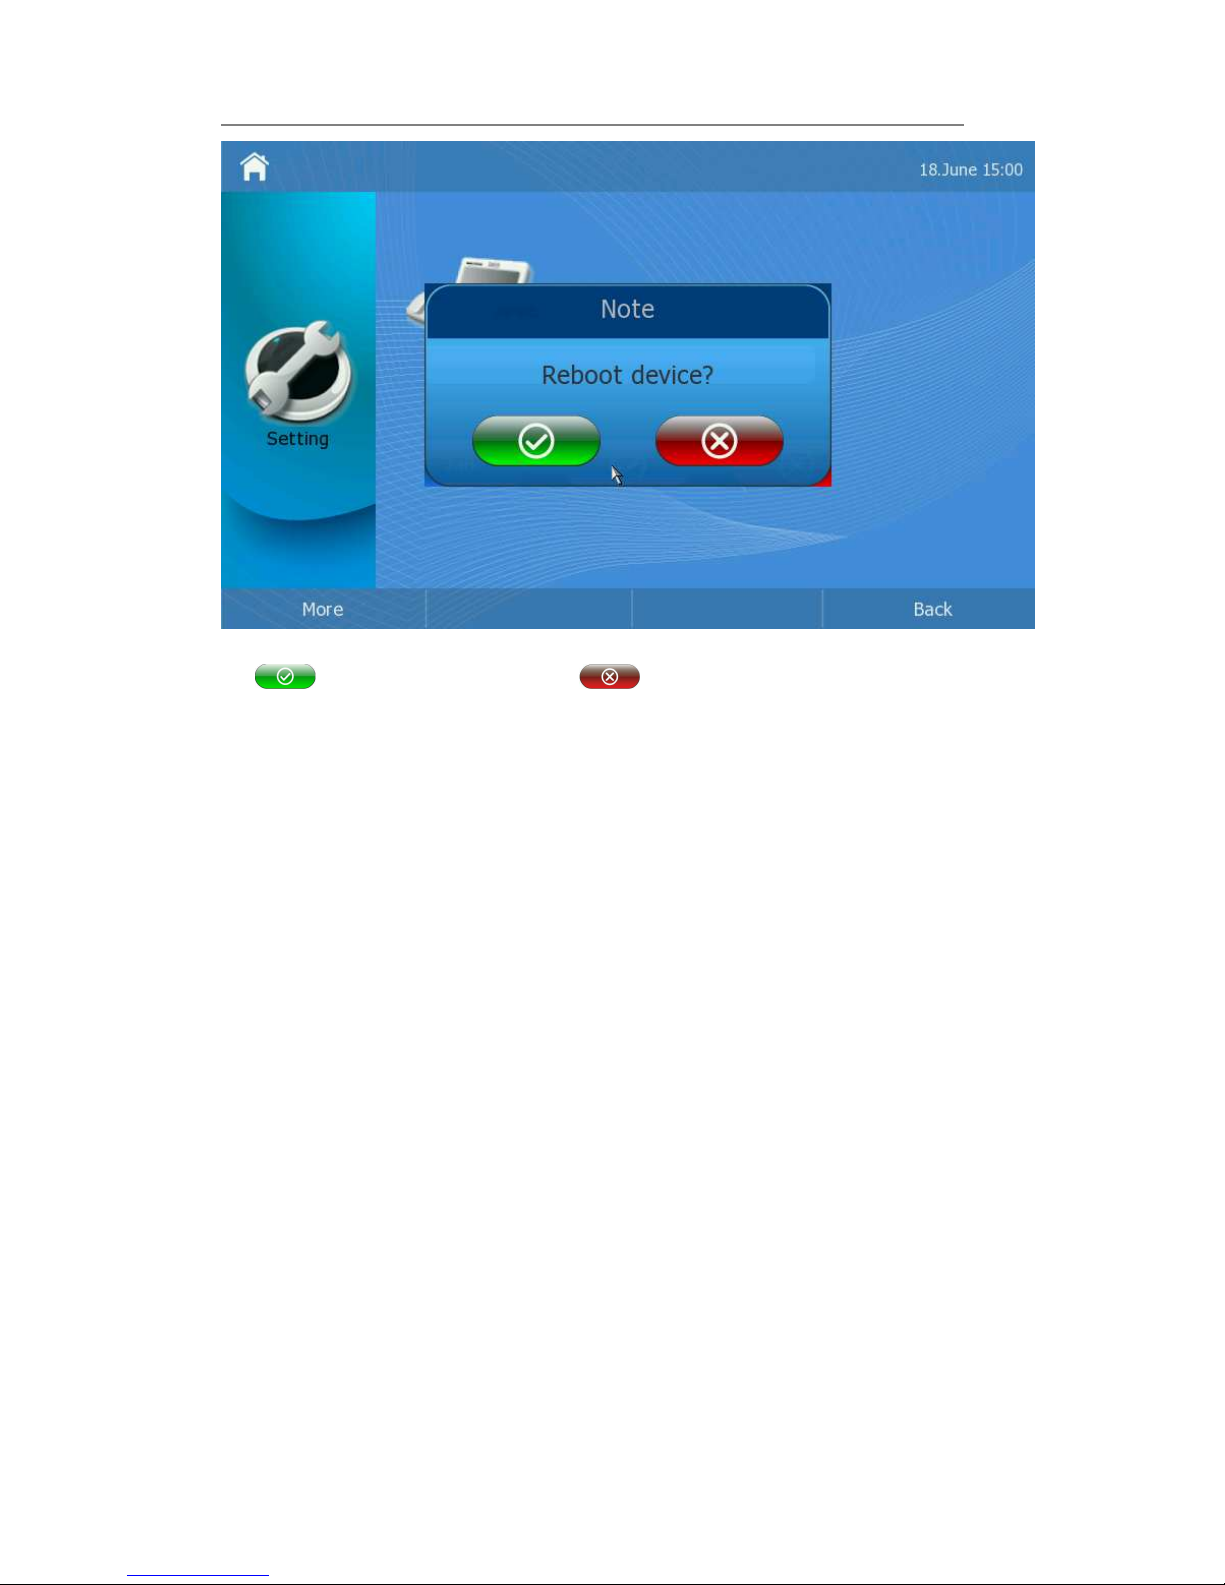
To reboot your device via phone interface:
1) Click Setting->Reboot option to enter configuration page.
Page 64
IP Video Phone Using the Advanced Phone Functions
- 59 -
2) It will pop up a warning frame asking you whether to reboot your device. Click
to confirm the changes, or to cancel the operation.
System Log Export
If there are any errors happened in your phone, you can export the system log and
send to your system administrator for diagnosis.
To Export the old configuration file via web interface:
1) Choose Upgrade, click Export syslog button to export the file to your local
computer.
2) It will take a few minutes to reset, please do not power off during resetting, or it
will cause flash memory error.
Page 65

IP Video Phone Trouble Shooting
- 60 -
Trouble Shooting
Network Link Status shown as unavailable?
1) If the internet cable doesn’t plug into the Internet port. Please connect the cable
first.
2) If the WAN port’s type is DHCP, the server has been shut down, or there is no
available IP address. You can contact with the network administrator for a
solution.
3) If the WAN port’s type is PPPoE, the user name and password may be wrong.
Please contact with the ISP.
I can not register to the server????
1) Check the IP address. If you set your WAN port in DHCP mode, please make sure
that your DHCP server is on.
2) Check your gateway.
3) Check your DNS server.
4) Make sure your account information is the same as you have got from your ISP.
5) Check whether the SIP server is on.
6) Check the SIP register port, the default value is 5060.
I can’t get the IP address?
1) Make sure you have plugged the Ethernet cable into the WAN port.
2) Make sure that the DHCP server is on, and there are available IP addresses in
the server.
3) Try to set your WAN port to static IP client mode.
Can not make a phone call?
Confirm the user name and password of the account provided by ISP are right.
No ring tone when there is an incoming call?
The volume is turned off or to the lowest. Please turn up the volume.
The volume is very low during the conversation?
The volume is too low, try to turn up the volume.
When the AV out mode is TV, there is no video?
1) The voltage is not stable. Please replace with a stable power adapter.
2) Loose of Power plug. Try to re-plug the power.
3) Wrong port. Connect to the right port.
Page 66

IP Video Phone Trouble Shooting
- 61 -
During a call, I can not hear any voice?
1) Make sure your handset is tightly connected with the phone.
2) Check whether you have muted the conversation or not.
3) Consult the outbound server details with your ISP.
Have DTMF problem?
1) Check which kind of DTMF you are using, and whether it is compatible with the
server.
2) Consult the payload value with your ISP.
How to change the time?
Select the time zone or enter the time information manually on the webpage or the
phone.
How to answer the incoming calls during a call?
If a call comes in when you are in a conversation, press the Answer key to answer
the incoming call.
How to refuse incoming calls during a call?
You can turn off the function of call waiting, and then our phone will refuse all the
incoming calls when you are in a conversation.
Blank screen?
The device is in Sleep status. Please press any keys to active the screen.
How to update the firmware?
1) Enter the webpage of your phone, go to Upgrade, then you can find the option
”Select and Upgrade Firmware” at the bottom of the page.
2) Select the file to update, and then click the Upgrade button.
Note:
Make sure the firmware you choose is provided by your service provider, or the
device will probably crash after the update.
The manual is only for reference, please take the object as the standard.
We reserve the right to improve or change the product and the user guide without
notice.
V21.0
2010-6-25
Page 67

IP Video Phone Trouble Shooting
- 62 -
 Loading...