

Page 1
User Manual Internet Phon
e
www.well.cz
W
i-F
i
ST100
Page 2

Page 3
1
Please read and follow these safety rules, which are for preventing any accident or
dangers beforehand, and keep it where you can see easily even after you finish reading
the user manual.
Caution and Notice for Safety
Warning
Violation of these instructions can possibly cause serious injury or even death.
Warning
Violation of these instructions can possibly cause the slight injury or product damage.
Page 4
2
Notices for safety
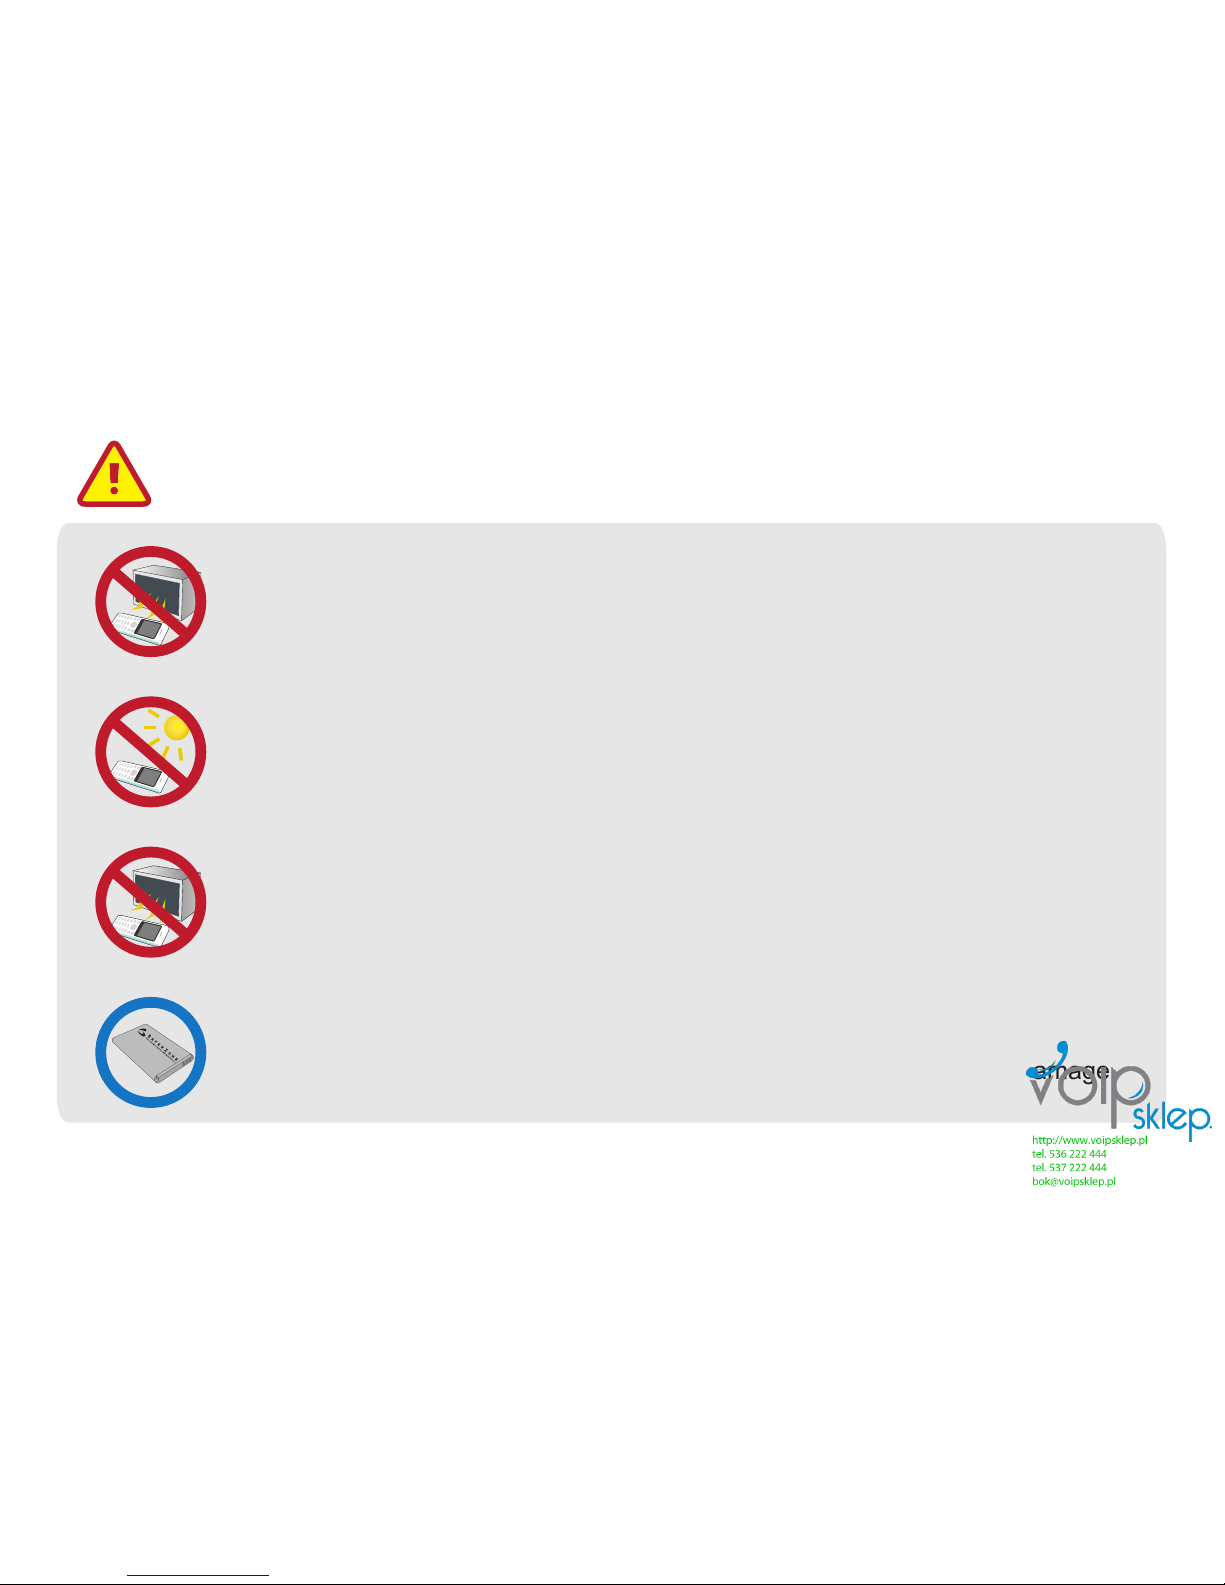
Only use the battery or accessories that are appointed to Wi-Fi phone, and do
not use them for other uses. Use of improper battery or accessories can cause
reduction of the lifetime of the product and explosion, and it also can damage
Wi-Fi Phone. In this case, free warranty is unavailable.
Keep the product out of direct sunlight and places that are very humid.
(0~+50 Celsius keep interior) Using the product in high temperature or high
humidity
and getting wet can cause the battery explosion or change in exterior appearance.
Do not keep the battery around the fire or heating product (microwave,
heater, etc) or shock the battery by throwing it. It can cause leak of lachrymal
fluid or explosion.
Do not put the product in any heating product (microwave, heater, etc) to dry
the product when it gets wet.
Page 5
3
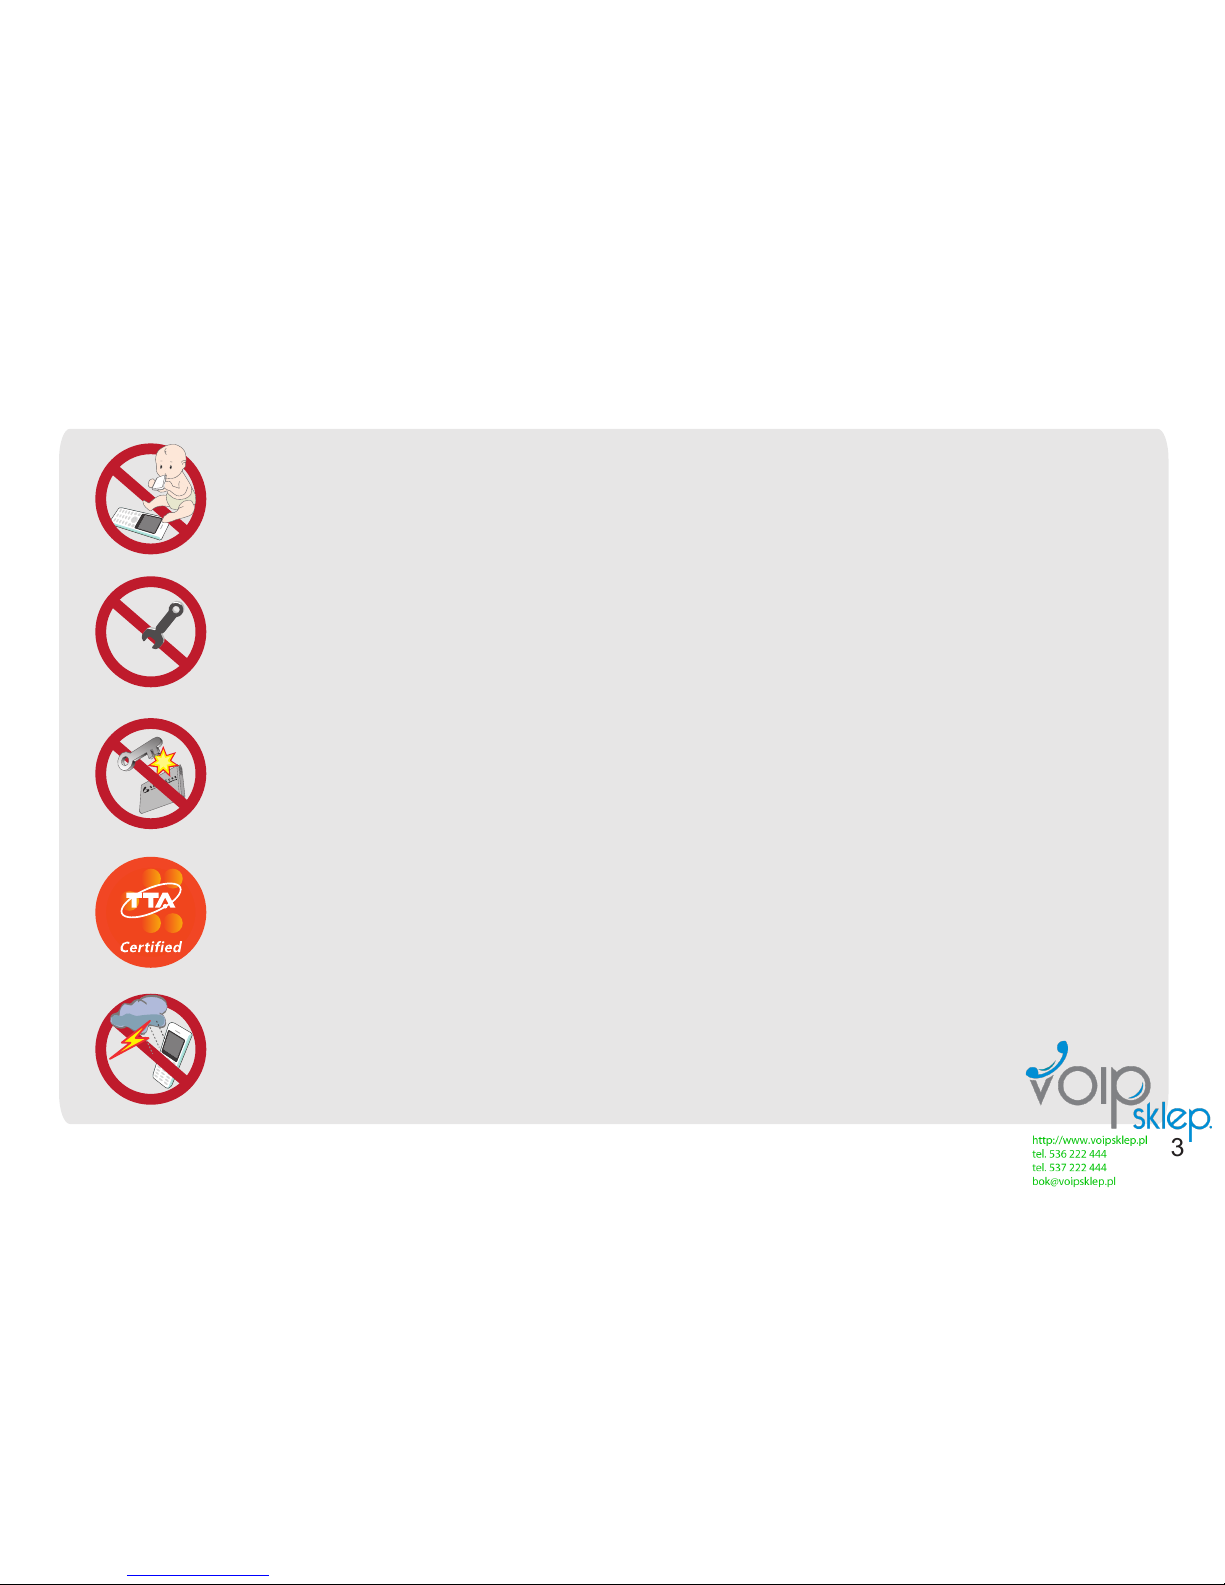
Keep the Wi-Fi Phone and recharger away from children or pets. Use of damaged
battery and putting battery into one’s mouth can affect their body, and it has
dangers to occur electric shock.
Do not hit or take the product apart.
Free warranty is unavailable for damages from shock or disassembling.
Keep the terminal (metal part) of the battery away from necklace, key, coin and
something electrified. A short circuit can cause explosion. In this case, free
warranty is unavailable.
Use of recharger that has no TTA certification can cause reduction of battery
lifetime, explosion and damage to the Wi-Fi phone. In this case, free warranty is
unavailable.
Disconnect the recharger from socket and avoid using Wi-Fi phone under serious
thunder or lightning. Fire or serious harm can be caused from the falling of a
thunderbolt.
Page 6
4
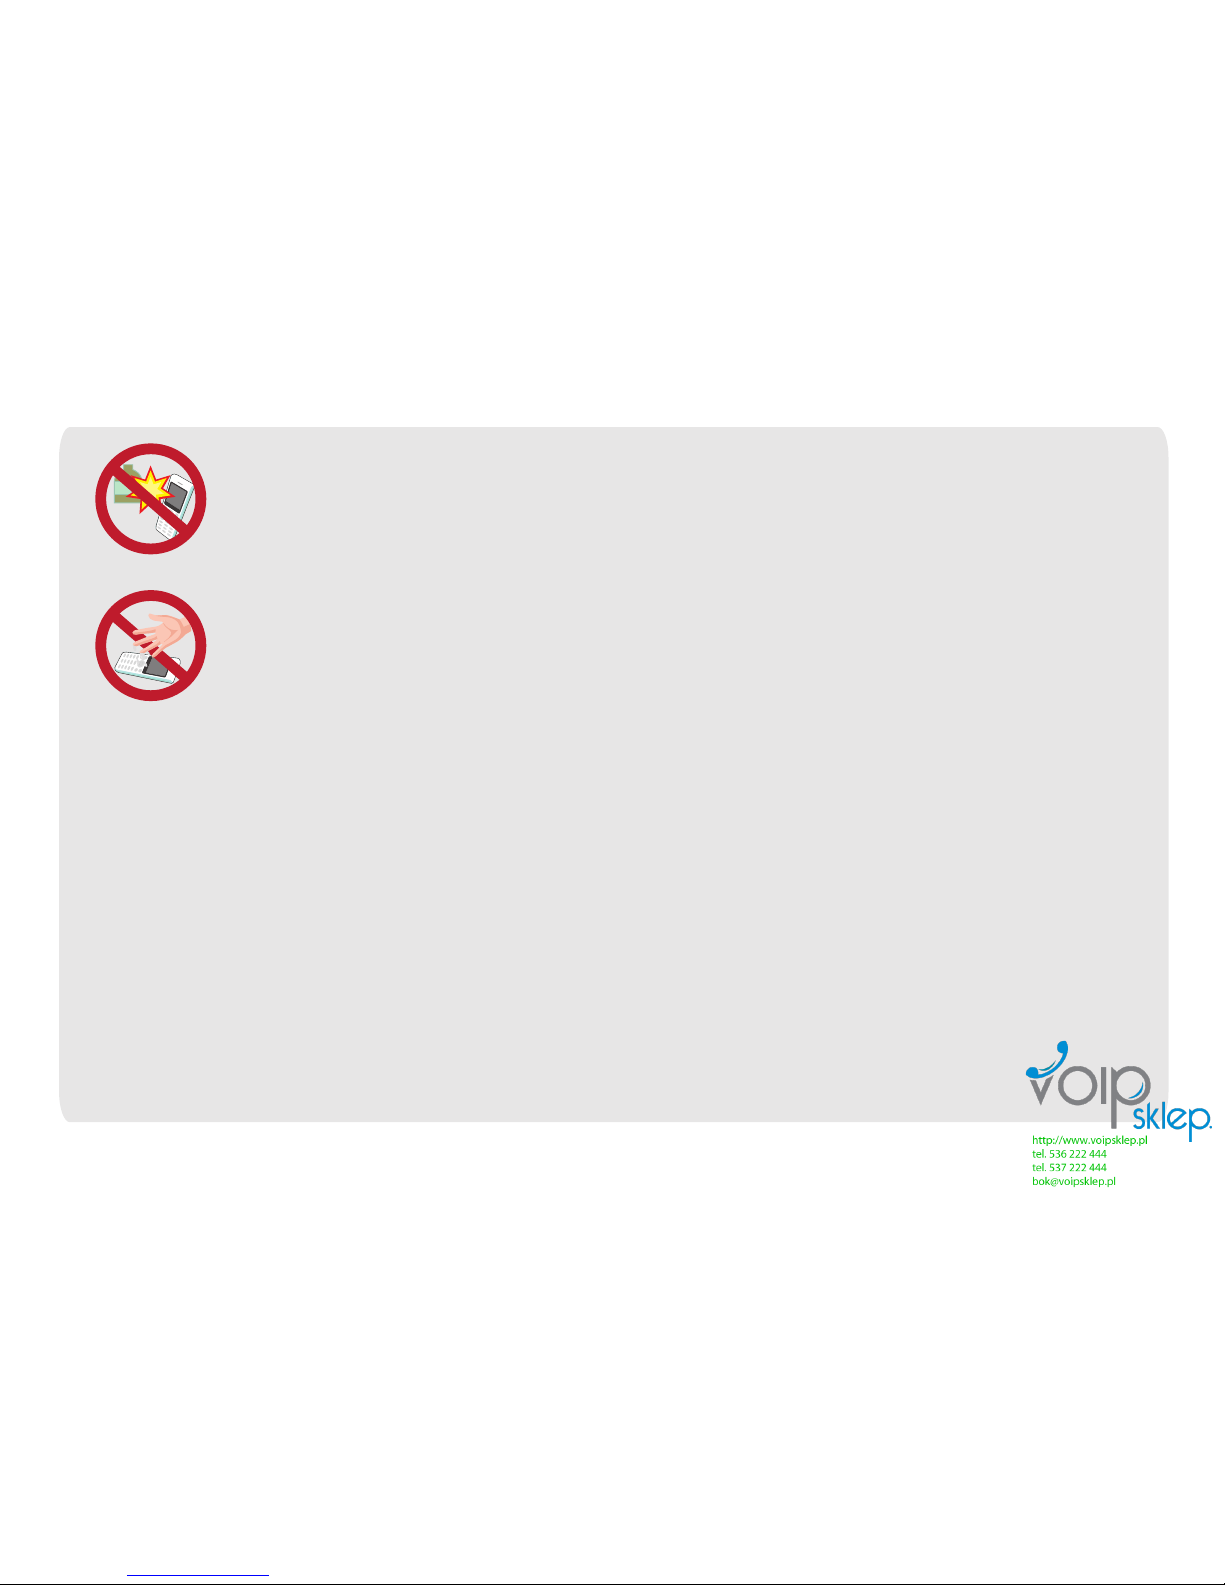
Keep the phone away from volatile substance (alcohol, benzene, thinner, etc). It
can cause fire and change in appearance and color.
Do not use the Wi-Fi phone and touch recharger or socket with wet hands. It can
cause fire or electronic shock.
Page 7
Notices for safety
5
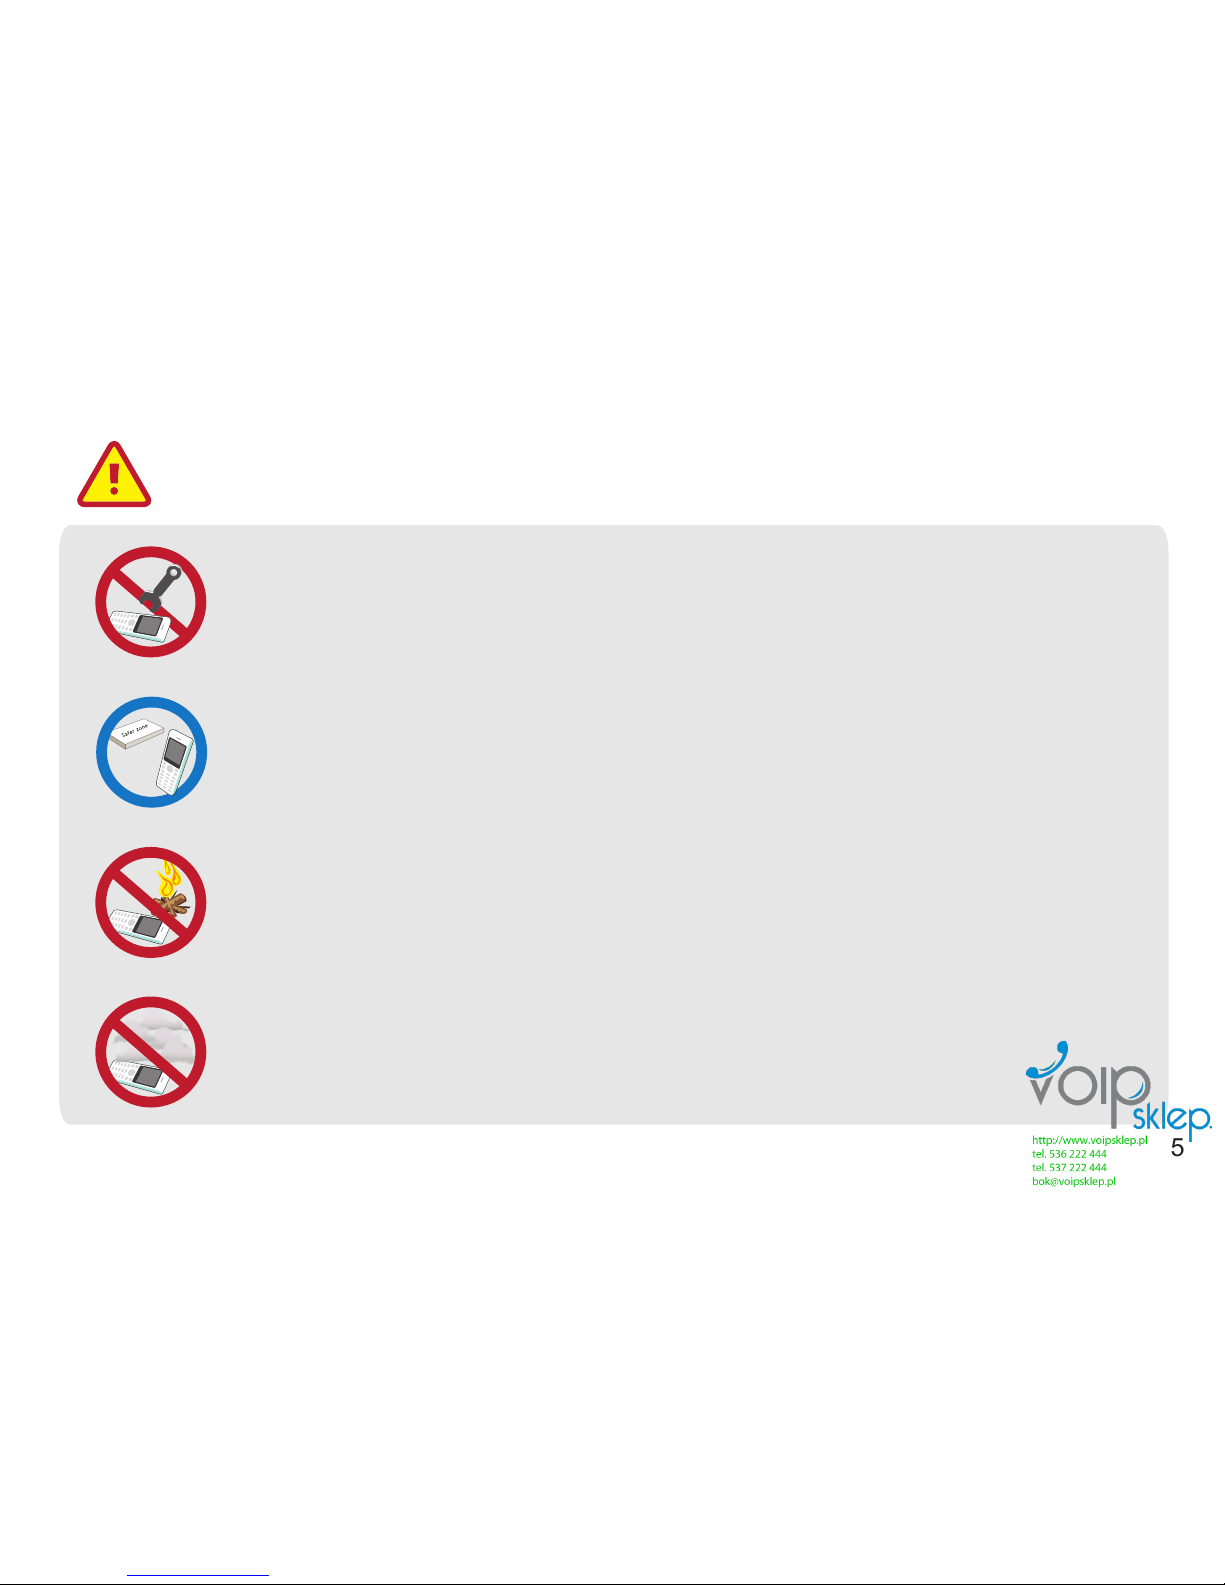
Except for millwright, do not disassemble the product or remodel. For repair or
checking, see customer counseling counter. Free warranty is unavailable for
disassembling or shocking the product.
Do not install the product around the fire or in small place with bad ventilation.
It can cause fire or breakdown.
Do not install the product in somewhere very dusty.
It can cause breakdown or reduction of lifetime of the product.
Please follow the installation steps on this manual properly.
Otherwise, reduction or working problem of the product can be caused.
Page 8
6
Check whether the call is available or not beforehand because emergency call is
only available in coverage area.
Be caution about possibility of interference. Because our wireless installation has
possibility of interference, there is no service about safety of life.
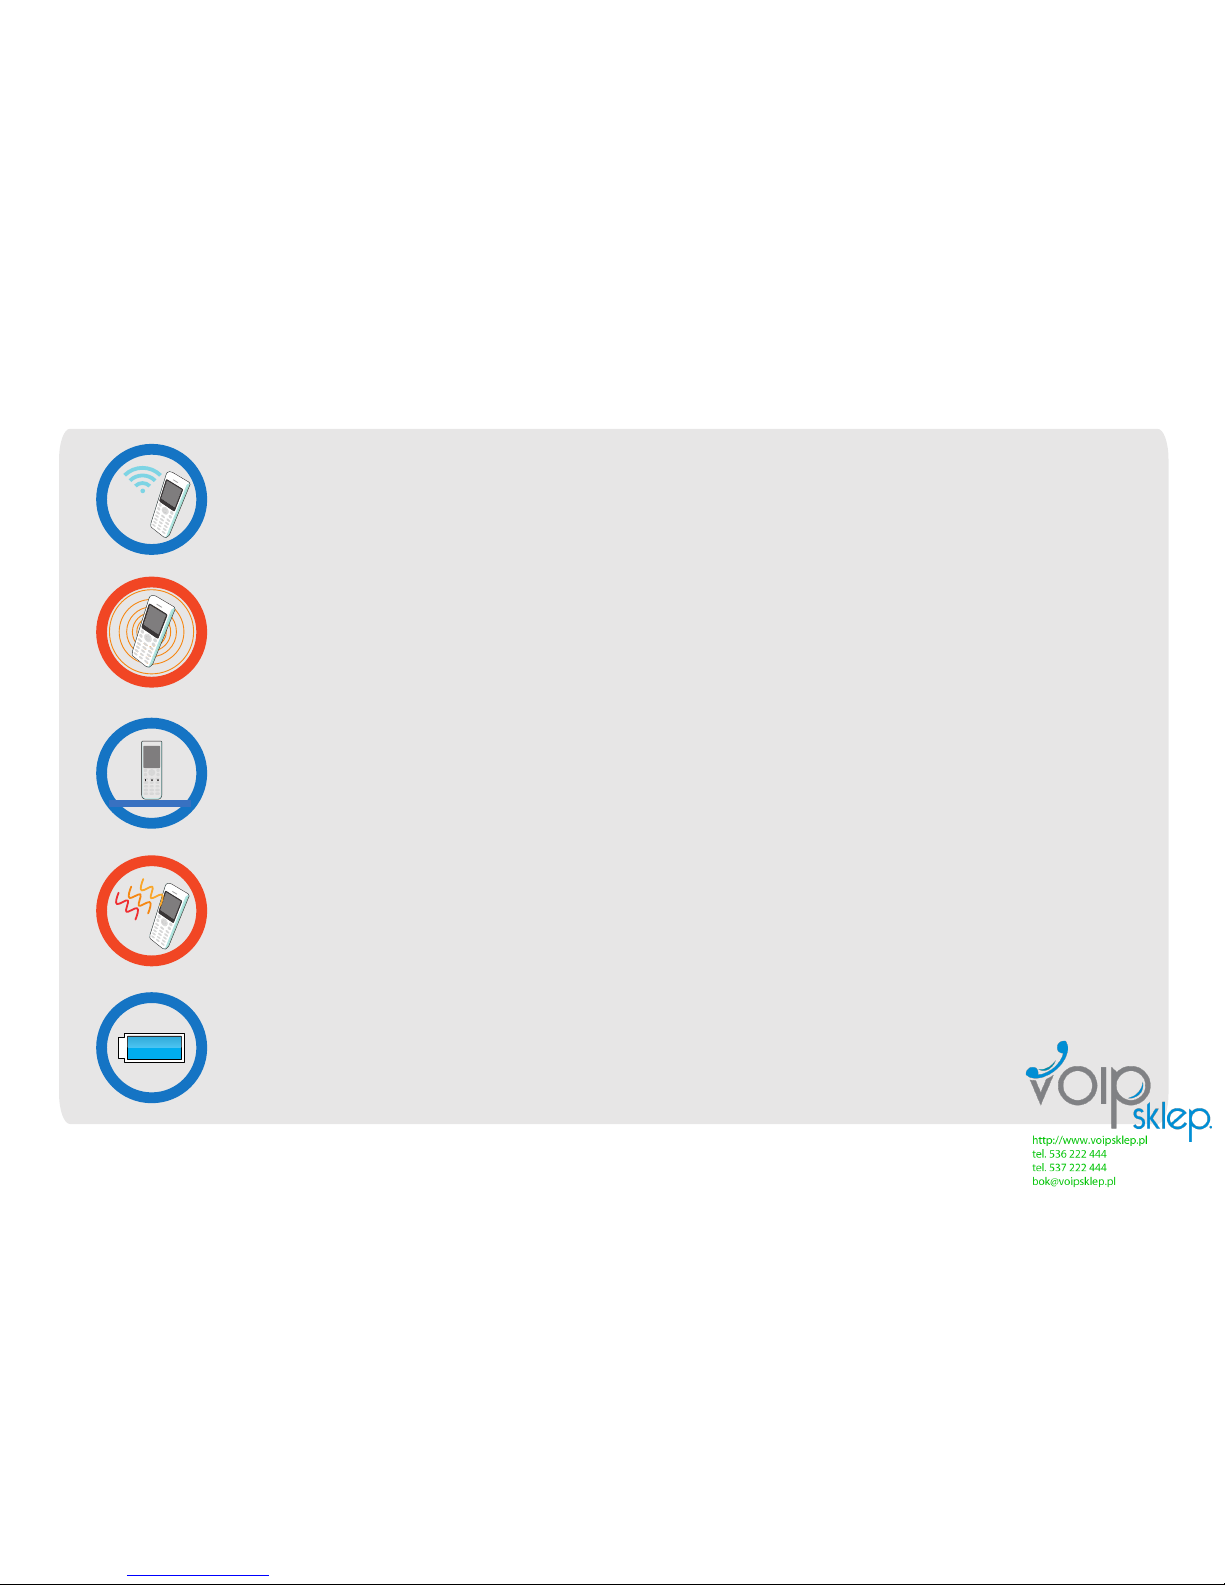
Install the product at somewhere horizontal, and avoid the shelf or place where is
inclined. Injury or breakdown can be caused from fall.
Be caution about that Wi-Fi phone can produce a lot of heat after being used for
long time.
After being left alone for long time, the product should be completely charged for
the use.
Page 9
7
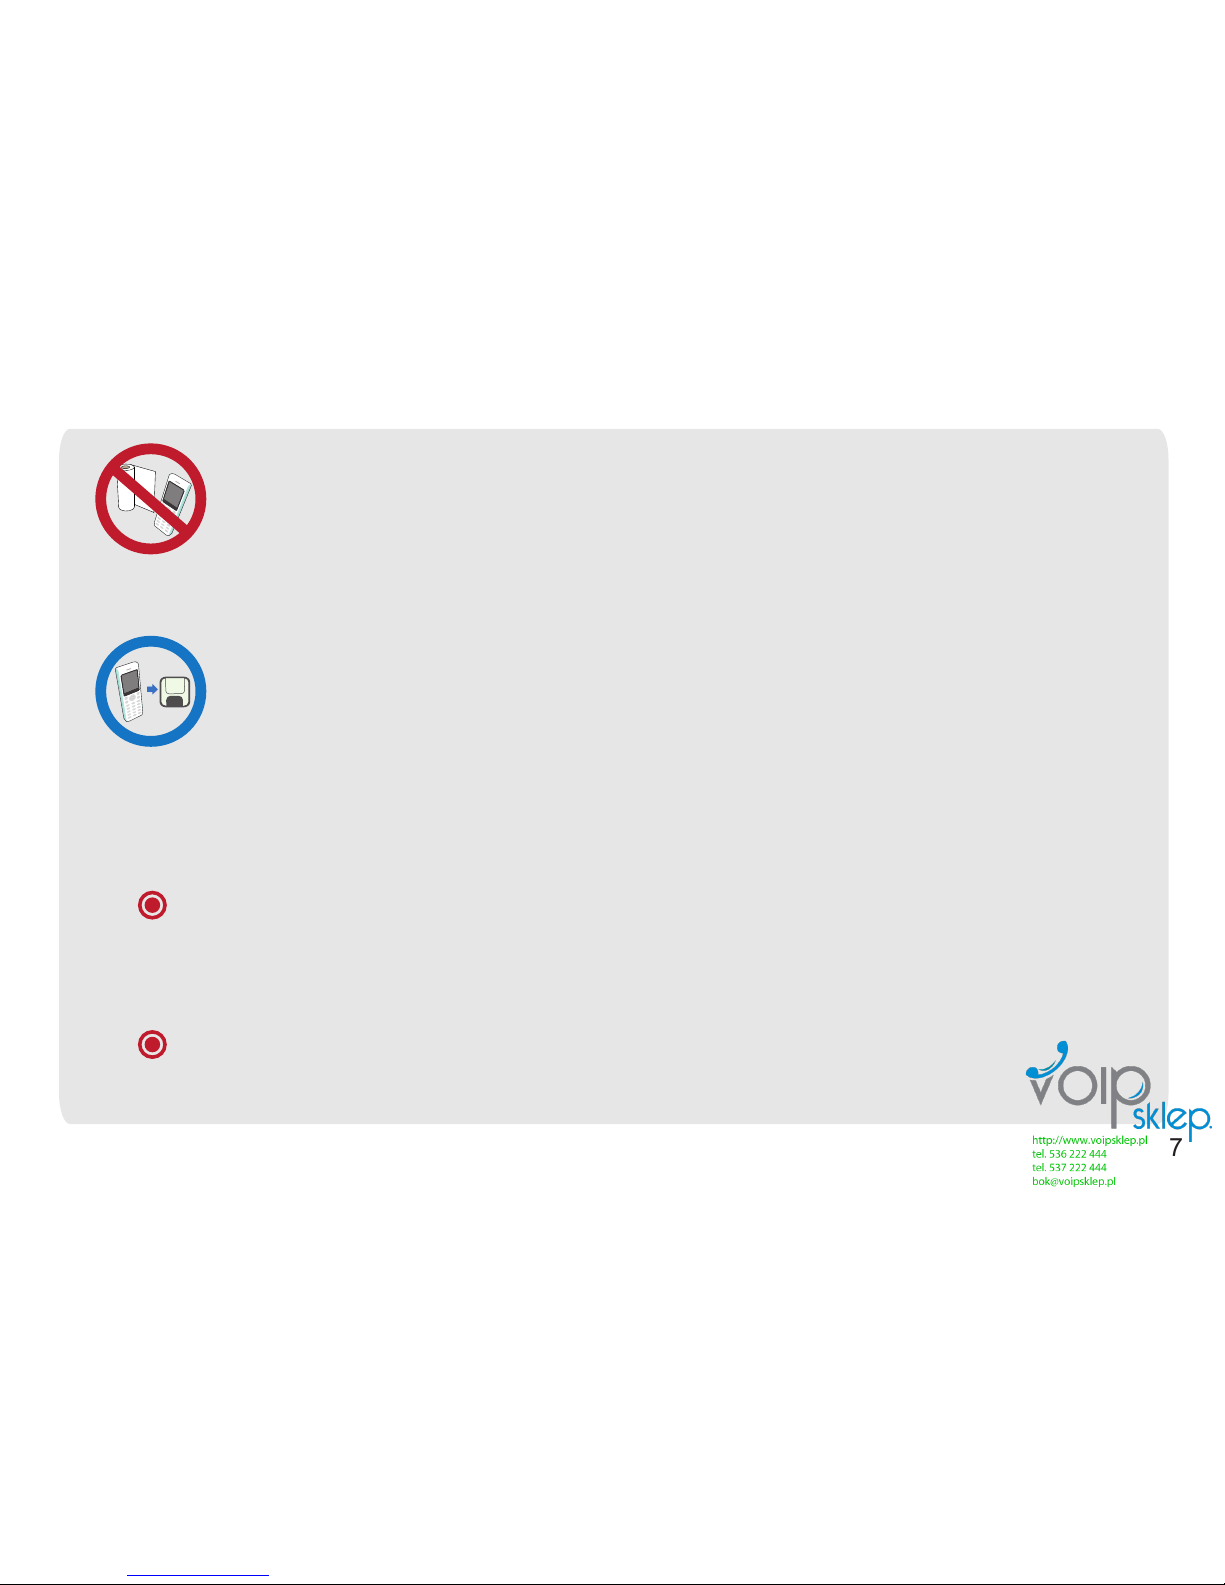
Do not cover the Wi-Fi Phone with the plastic wrap.
The coating of the phone can be taken off.
Keep the Wi-Fi Phone data separately. Data in Wi-Fi phone can be erased in case
of upgrade or repair. Be caution about that manufacturer does not take responsibility for any damage from data loss.
Leaving the phone for too long from recharger or AP can make the phone stop
from the dead battery.
Keep the battery in room temperature after recharging completely in case of
neglect of battery without using.
Page 10

Contents
8
Phone book
Call history
Basic compenents
Title for each part
Using battery
Recharging battery
Typing text messeage
Explanation for button function
VoIP setting
Standby status
Flight mode
Go to flight mode
Main menu
Keyboard shortcut
10
11
12
13
14
17
20
20
20
21
21
21
22
22
23
23
23
23
23
24
24
25
25
26
26
26
27
27
27
28
28
29
Phone instructionBasic compenents
Power on, Power off
Making a call
Calling to recent number
Calling by speed dial
Regulating ear speaker volume during phone call
Muting transmission sound during phone call
Swiching to speaker phone during phone call
Receiving call
Missed call
Phone book
Save numbers
Set speed dial
Delete speed dial
Calling by speed dial
Group management
Group creation
The amount of used
Call history
View call history
Call duration
Page 11

30
30
31
31
31
32
33
33
34
35
35
36
36
37
37
38
39
41
70
42
43
43
44
45
45
46
47
47
48
55
55
56
57
57
57
58
58
58
59
59
60
Text Message
9
Diary
Sound Mode
Appendix
Text Message
Inbox
Sent message
Draft
Outbox
New message
Before contact to service center
diary
Alarm
Setting alarm
Invitalize, delete, edit Alarm
Calender
Creat new event
Manage calender
Calender setting
World time
Calculator
Sound mode
Setting
Wallpaper setting
Light setting
Time setting
Time and date
Time server and world time
Language
Input time out
Automatic key lock
WiFi setting
AP setting
Add new AP
Call setting
Change receipt
Call lock
Change code for call lock
Block sending or receiving
Reception
Sending
Security setting
Activate phone lock function
Change password for lock
Initialize all the setting
Phone information
Wi - Fi phone to register on the web
site
Firmware upgrade of Wi - Fi phone
on the web site
61
65
Page 12
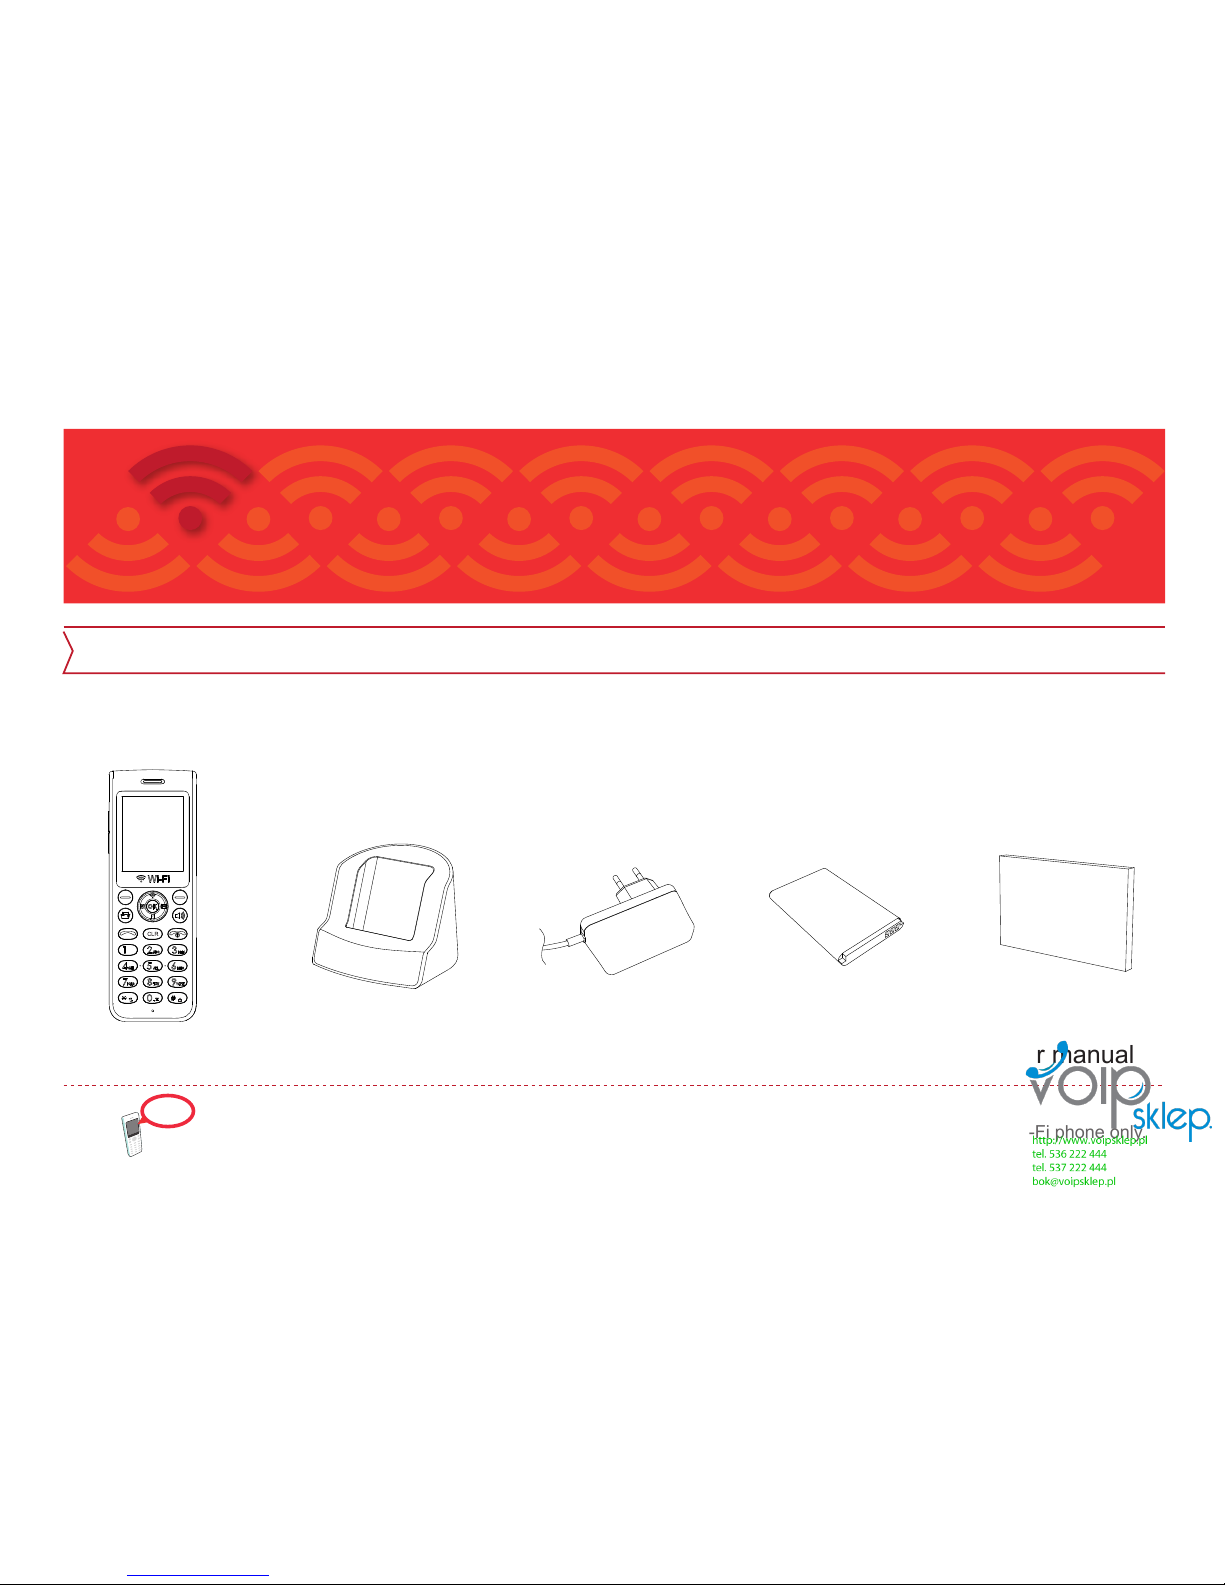
Basic components
Basic components
Check if the product contains all the components on the picture after purchase, and please inquire
where you purchase the product with any problem.
Caution: Exclusive AP is needed for using Wi-Fi phone, and we suggest you to use AP that comes with Wi-Fi phone only.
10
Battery User manual
Caution
Recharge rack AdaptorWi-Fi Phone
Page 13
11
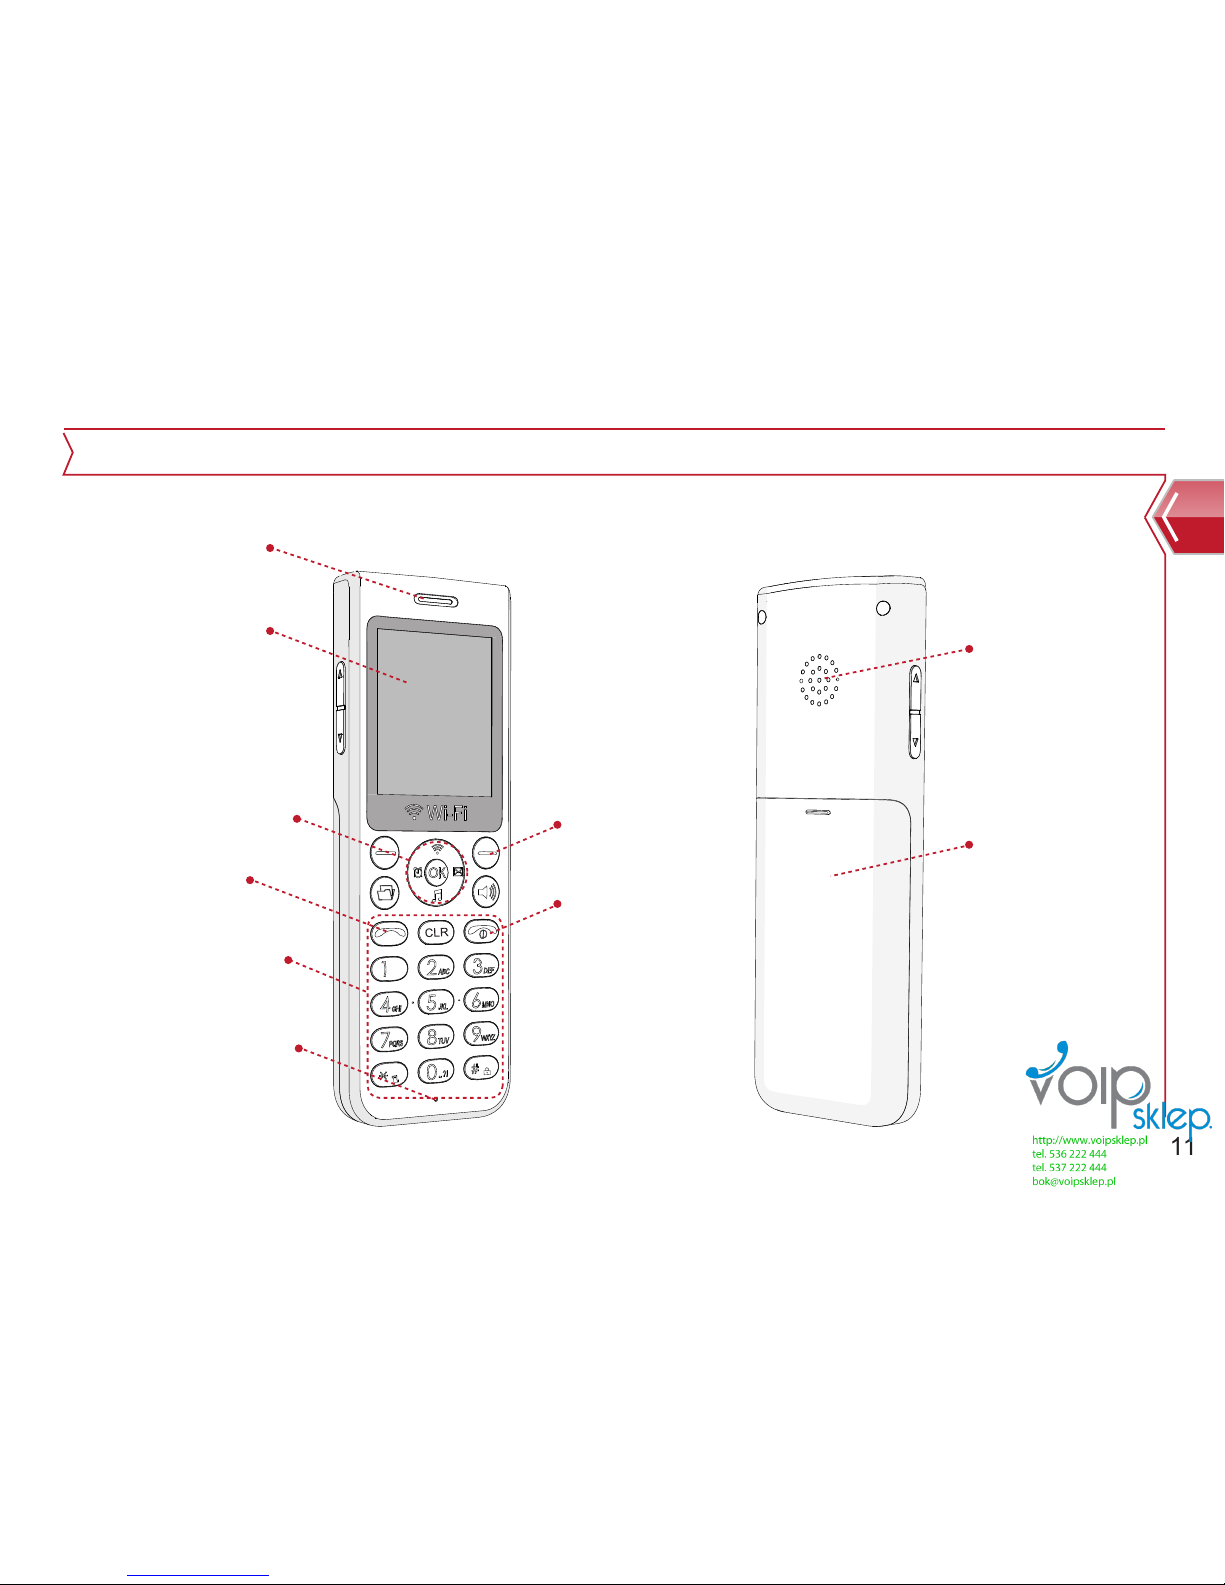
Title for each part
Basic compenents
Dial/Call/End Keypad
Earphone speaker
LCD screen
Direction/OK Key
Send Key
Microphone
Phonebook
/clear
Power on
/off Key
Speaker phone
Battery cover
Page 14
12
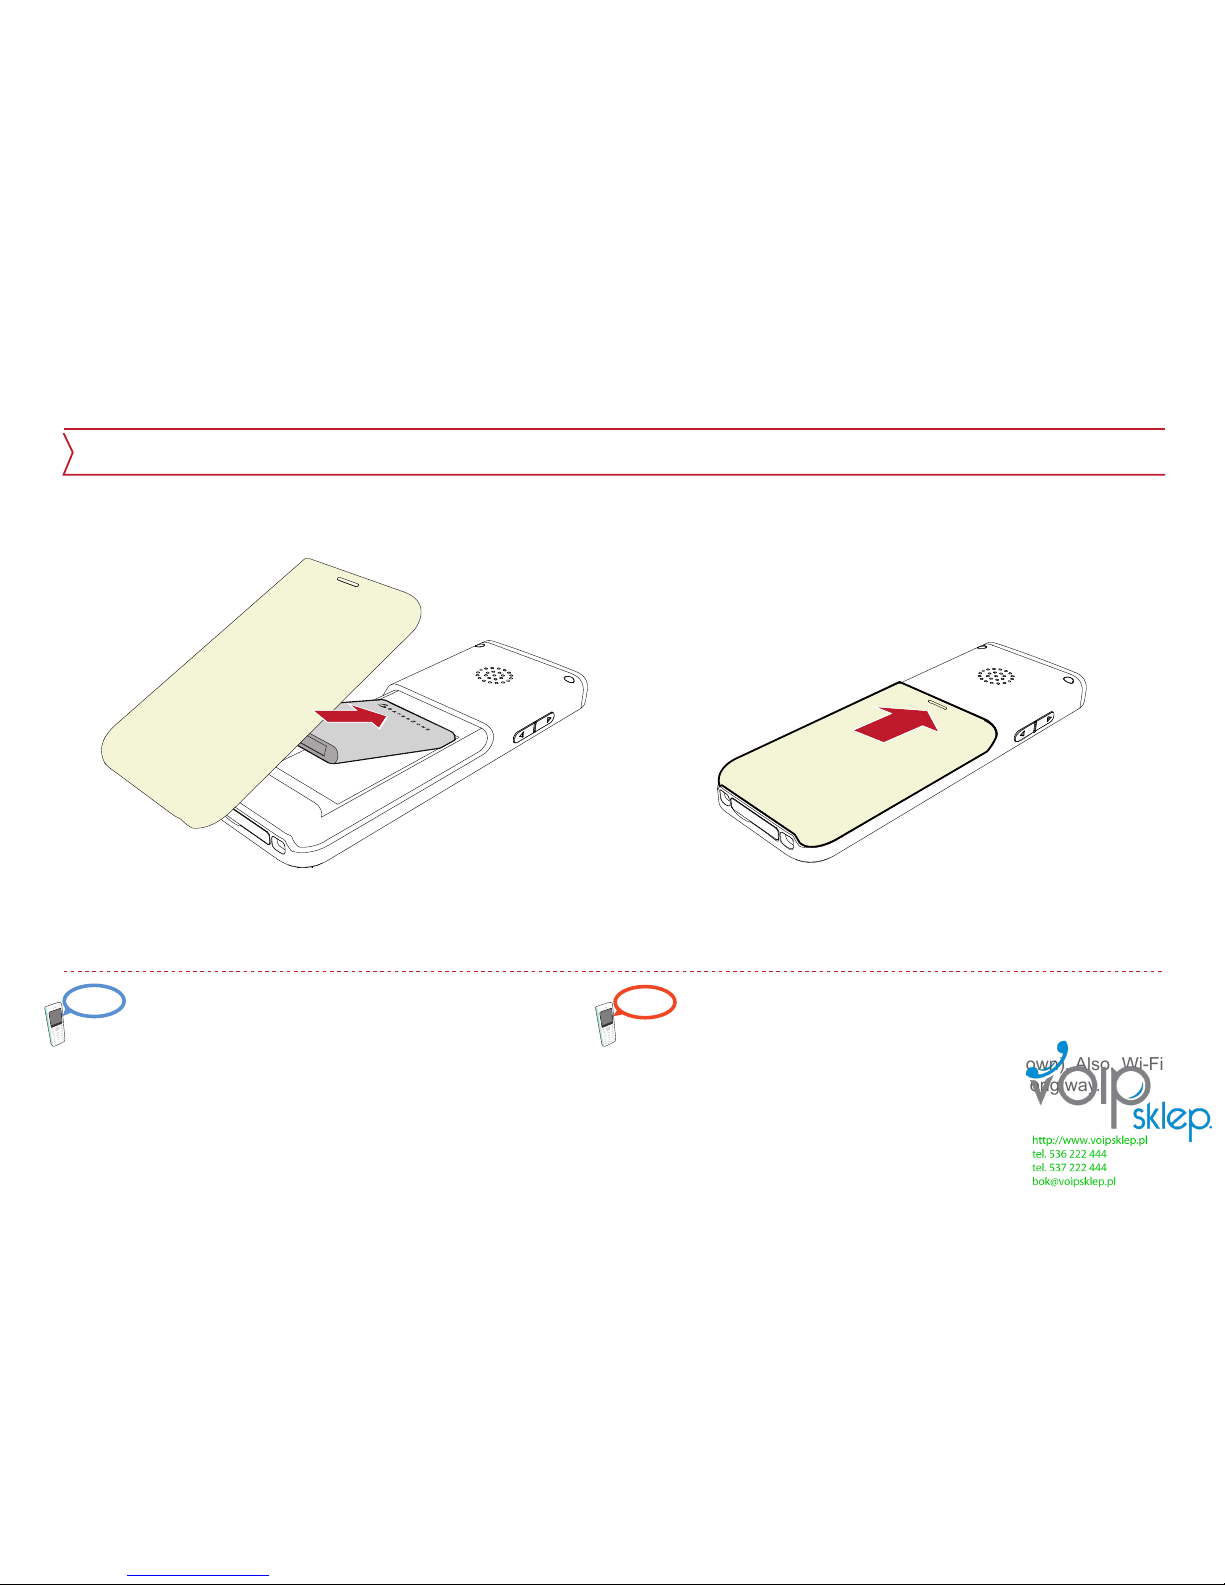
Using Battery
Battery is consumables, and the term of free guarantee is
6 months from purchase. Replace to new battery when
performance of battery gets debased rapidly. Recharge
the phone frequently for efficient battery use. Turning off
the phone when it is not being used for long time can
prevent the dead battery.
Use the battery from our company only. Use of other
batteries can cause explosion or breakdown of the product.
Please turn the power off before the removal of battery
(sudden power shut off can cause breakdown). Also, Wi-Fi
phone does not work if the battery is put wrong way.
Reference
Warning
Battery must be inserted before the use of Wi-Fi
1. Open the battery cover, and insert battery in
battery pack with labels to be upper surface.
2. Close the cover for installation of battery.
Page 15
Reference
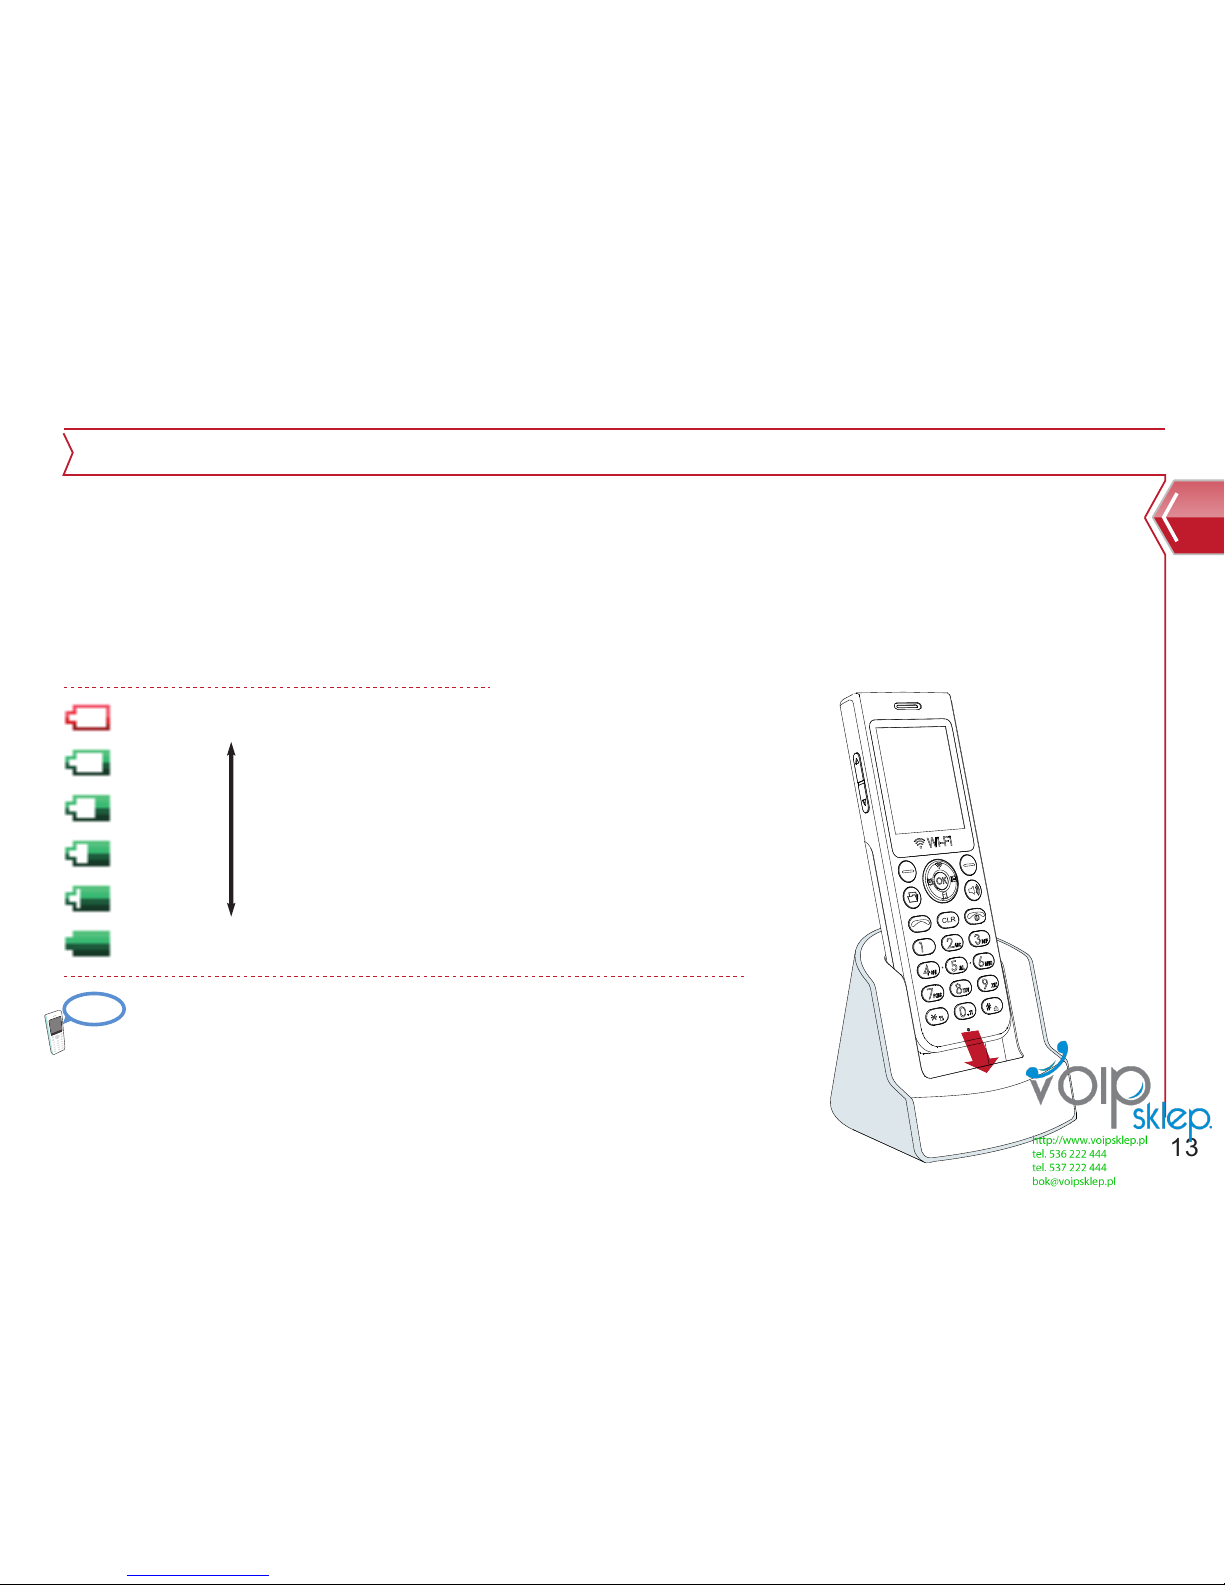
Recharge with the rack
Recharge without the rack
At the time of purchase, the product is not fully charged, so please recharge it before using for
the first time. Battery will be fully recharged around 4 hours after connected to recharger.
Using Wi-Fi phone during recharge, it will take longer time. Recharging status is available on
the LCD screen if the phone is on during recharge.
Generally, Wi-Fi phone can become very hot after recharged for a long time.
Turning off the phone when it is not being used for long time in case of
blackout or move can prevent the dead battery.
Existing cell phone recharger (TTA standard 24 pin recharger) also works for
Wi-Fi phone. Inquire at customer center for additional purchase.
13
Recharging Battery
Basic compenents
Page 16
14
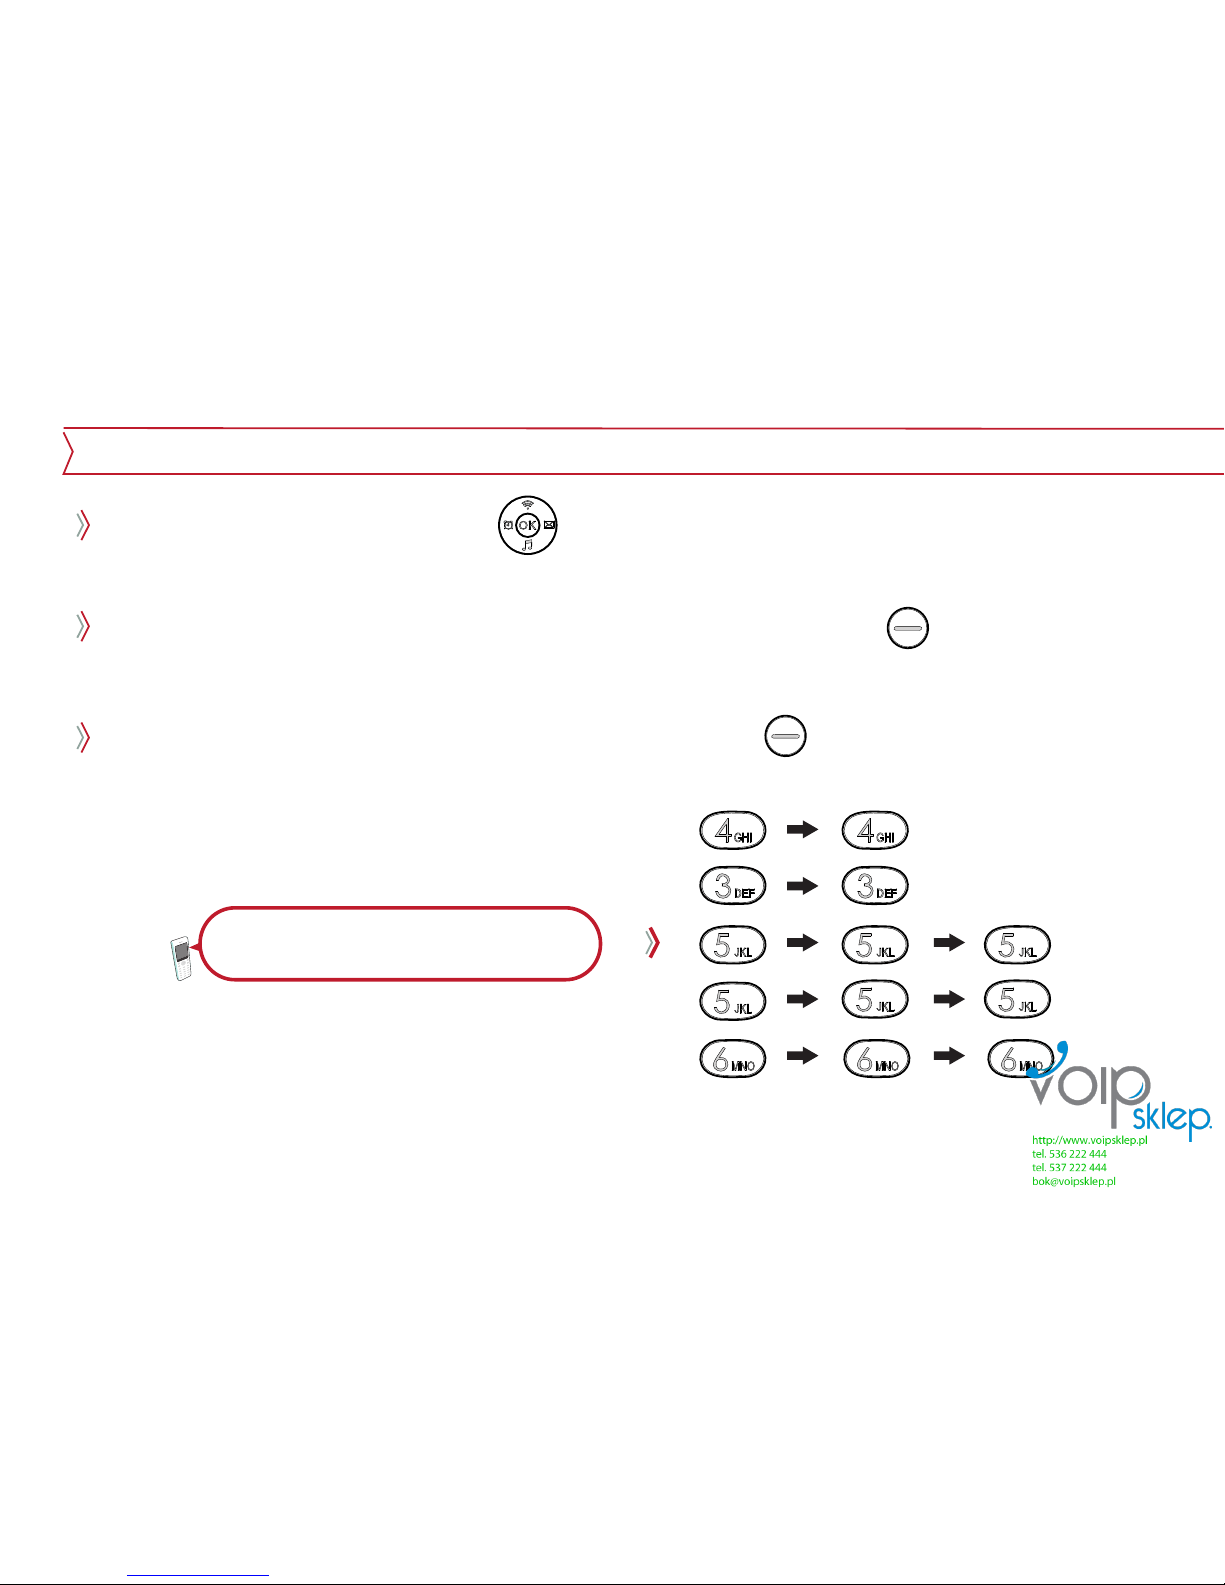
How to type text message
During typing message, by using button, user can move cursor up/down/left/right. And
characters can be edited or inserted.
Characters in front of cursor get erased one by one when right soft key is pressed. And when
it gets pressed for a few second, all the character gets erased.
Users can use the numeric mode by pressing right soft key .
Typing text message
For example, to type “Hello”
Page 17
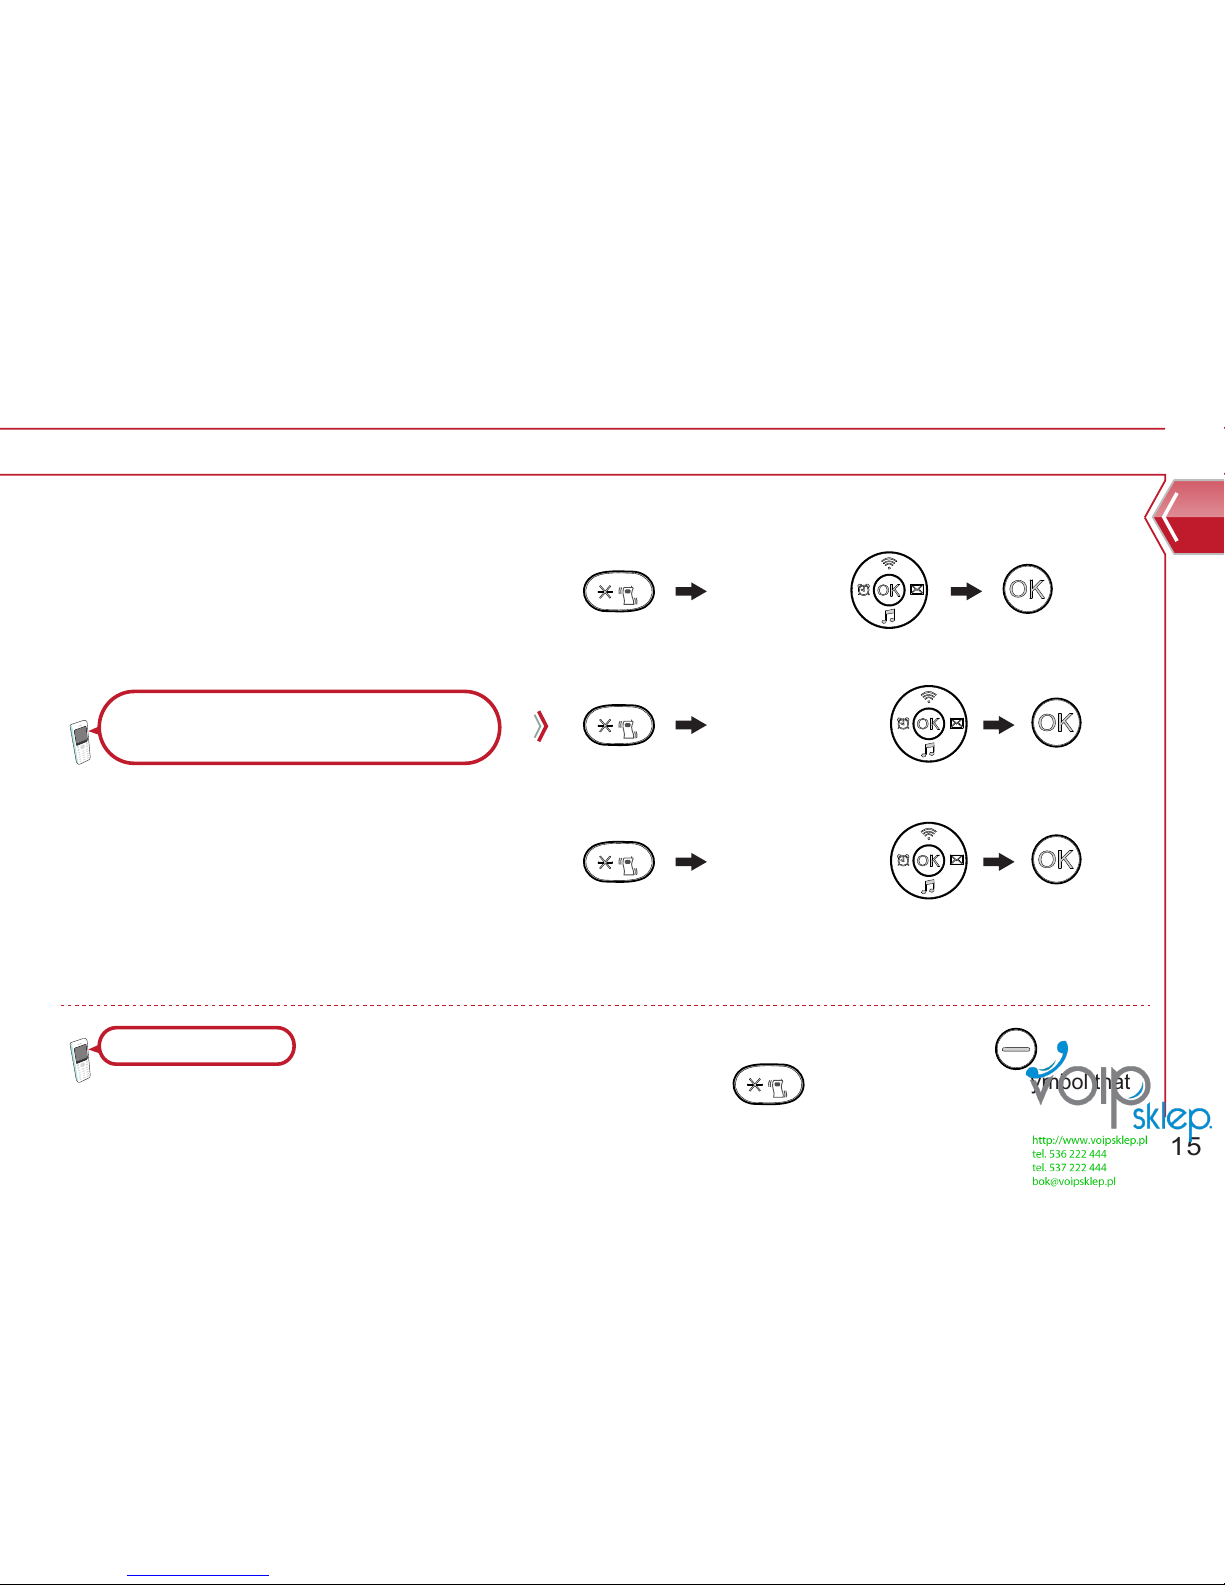
Typing symbol
At new message, select the numeric mode by pressing right soft key button.
And open the symbol screen by presssing button and select the symbol that
user wants.
Typing text message
For example, to type “@%+”
15
Basic compenents
upper 1 time
at Navi key
upper 1 time
and right 2 times
at Navi key
upper 2 times
and left 3 times
at Navi key
Page 18
16
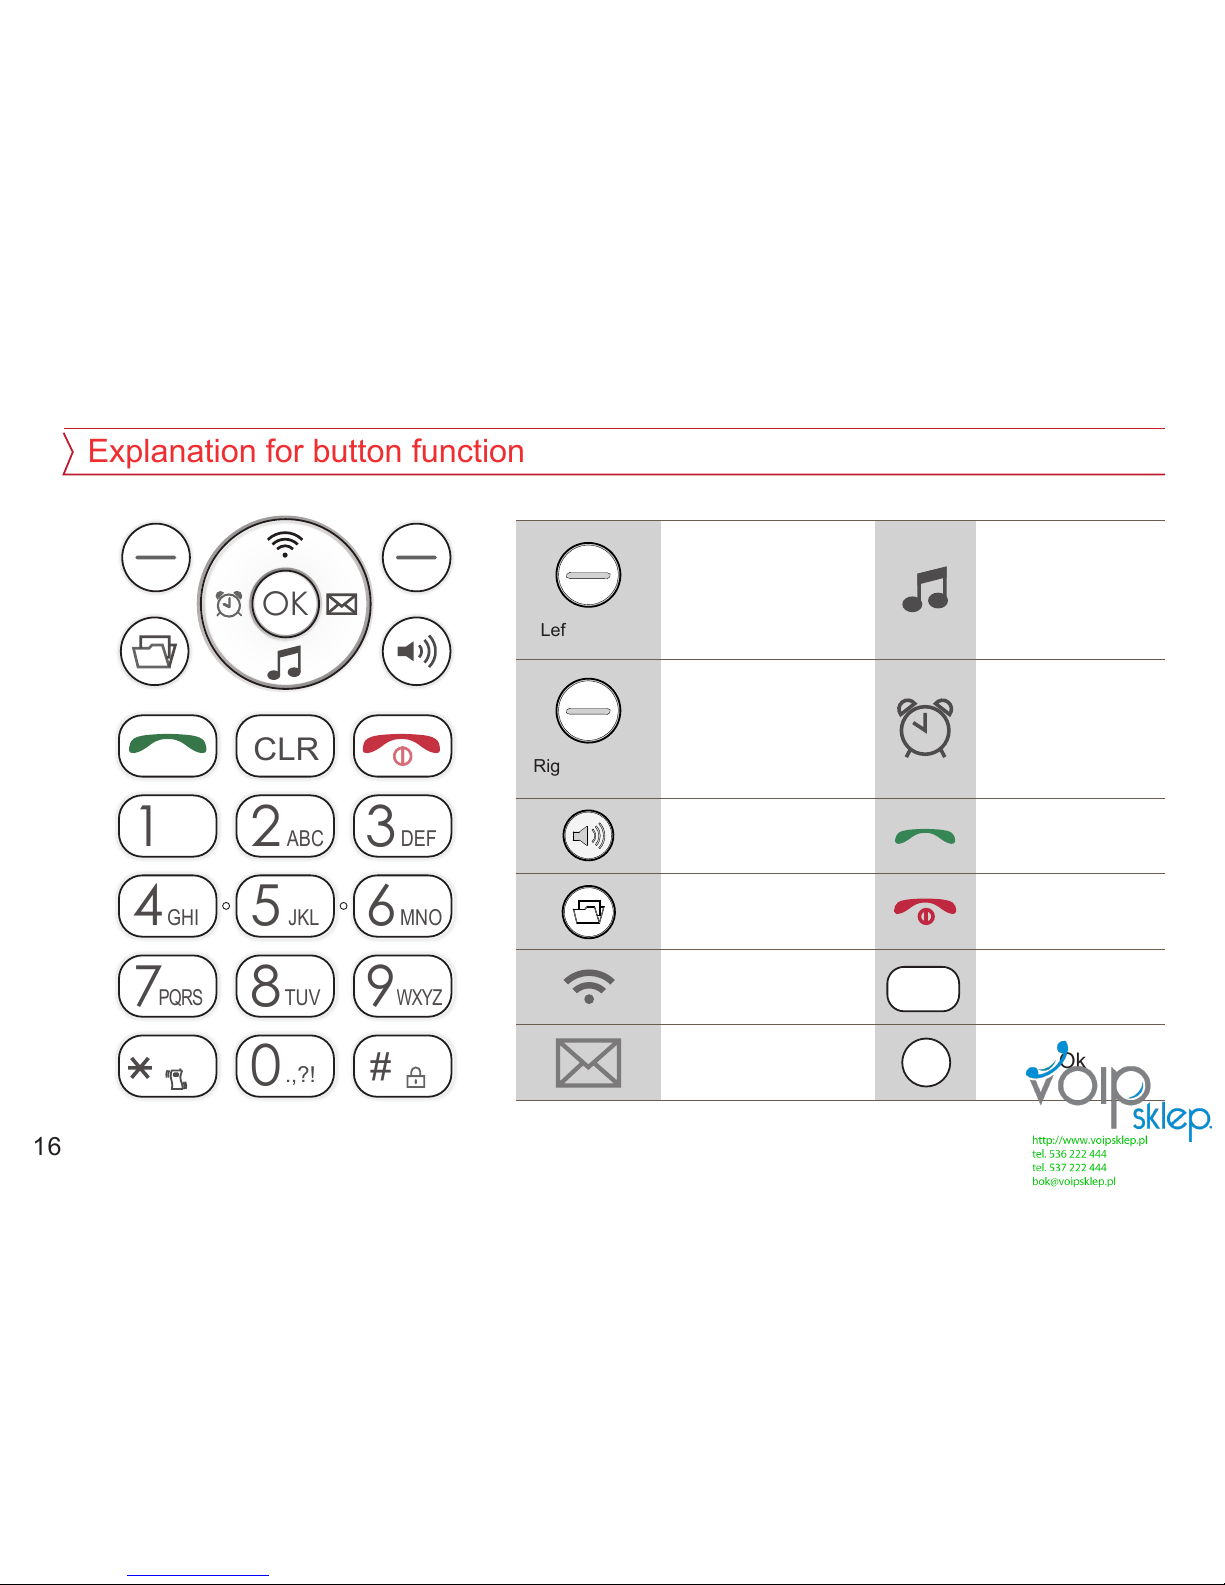
Explanation for button function
Left soft key
Menu
Phone book
Speaker phone
My menu
AP search
Text message
Phone mode
Alarm
Call
End
Clear/Cancel
Ok
Right soft key
OK
1 3
DEF
4
GHI
5
JKL
0
.,?!
6
MNO
8
TUV
7
PQRS
9
WXYZ
CLR
#
2
ABC
OK
CLR
Page 19
17
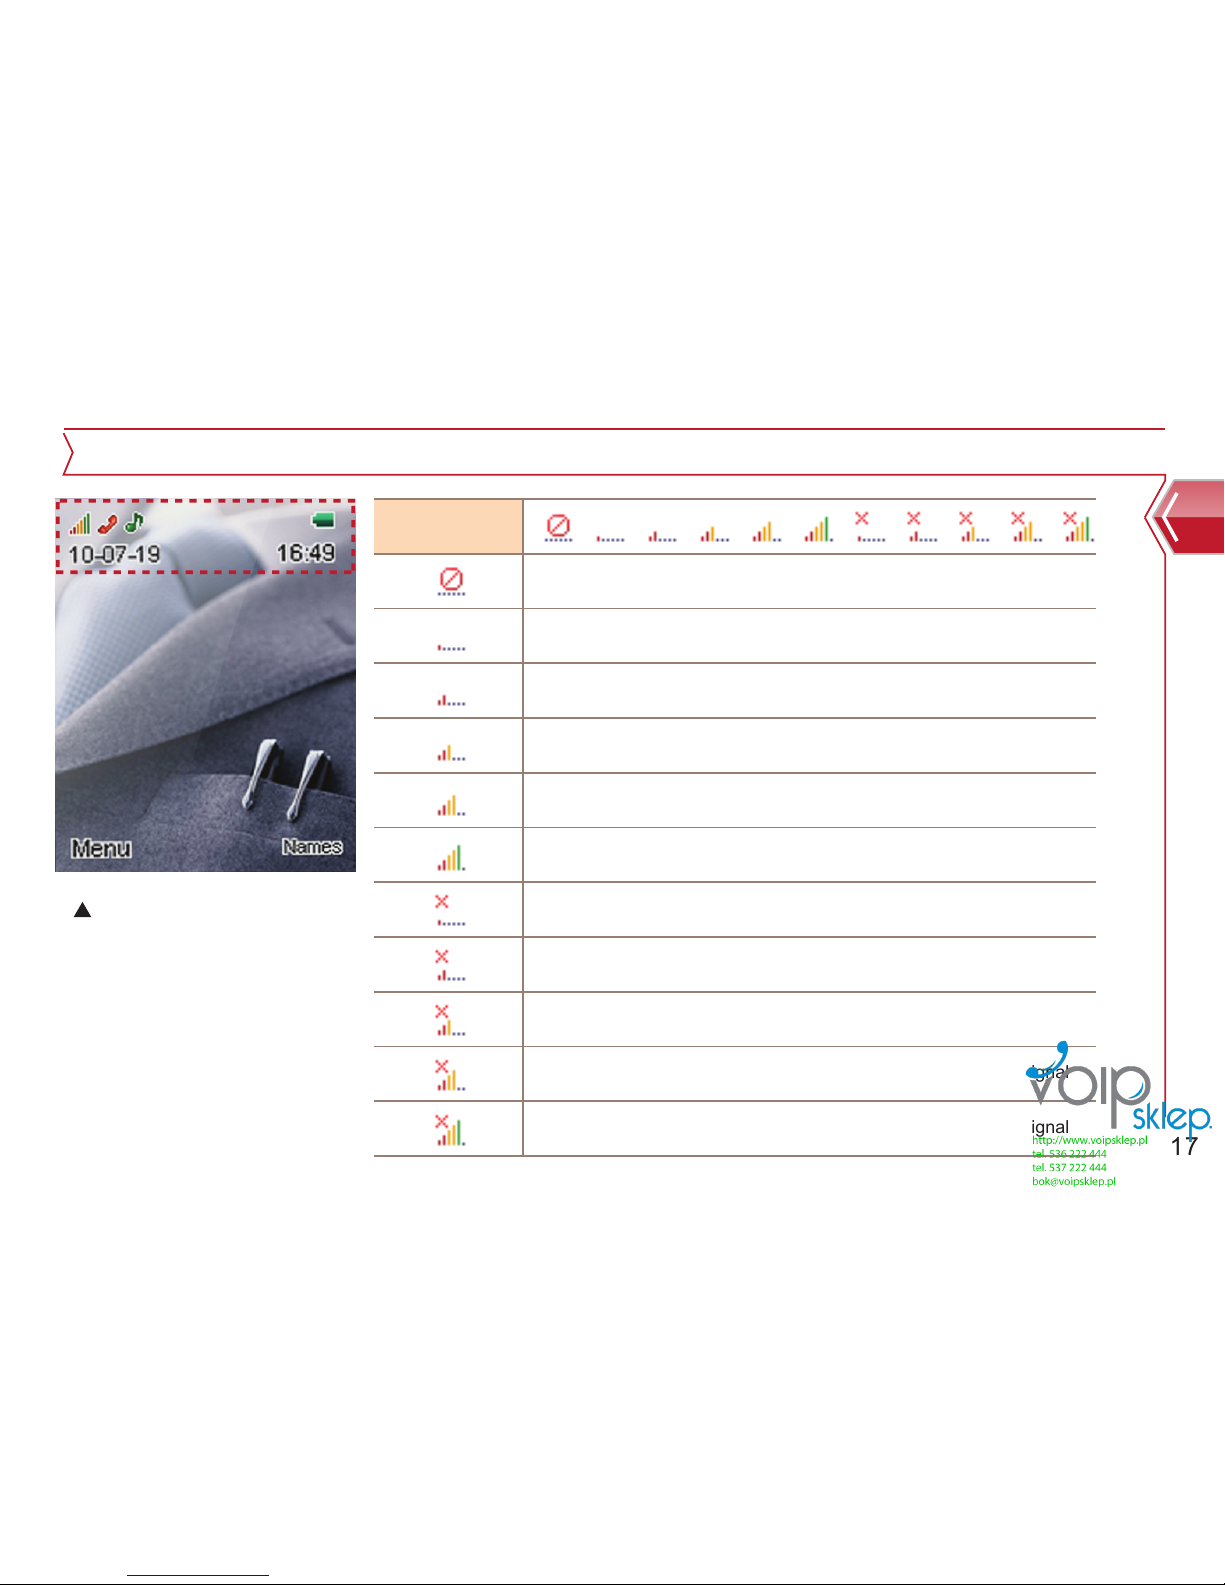
Icon sign
Basic compenents
Wait condition
Group 1
Wi-Fi network does not exist.
Wi-Fi network is connected successfully for this much of signal.
Wi-Fi network is connected successfully for this much of signal
Wi-Fi network is not connected successfully for this much of signal
Wi-Fi network is not connected successfully for this much of signal
Wi-Fi network is not connected successfully for this much of signal
Wi-Fi network is not connected successfully for this much of signal
Wi-Fi network is not connected successfully for this much of signal
Wi-Fi network is connected successfully for this much of signal.
Wi-Fi network is connected successfully for this much of signal
Wi-Fi network is connected successfully for this much of signal
Page 20
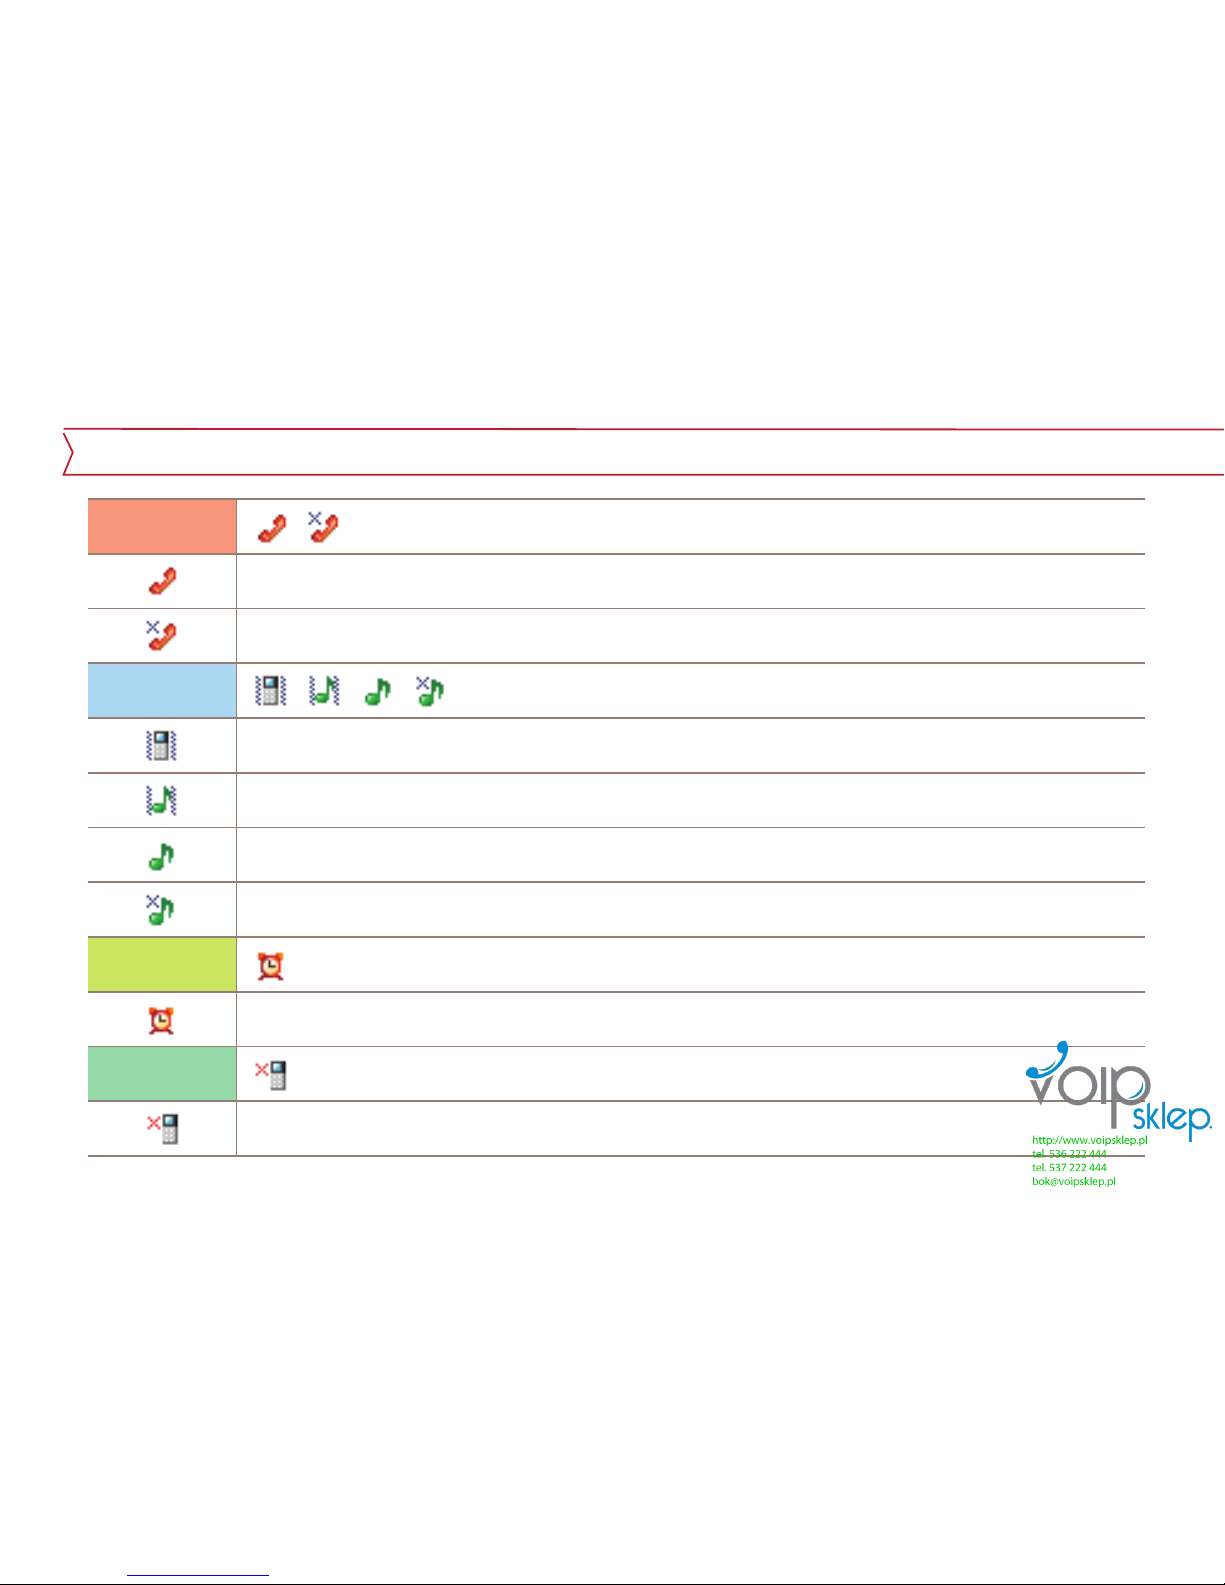
Icon sign
18
Group 2
Group 3
Group 4
Group 5
Phone is registered successfully to SIP server of service offerer.
Phone is not registered successfully to SIP server of service offerer.
Sound mode
Silent ringer mode
Alarm indication
Missed call sign
Sound/Vibration Mode
Vibration mode
Page 21
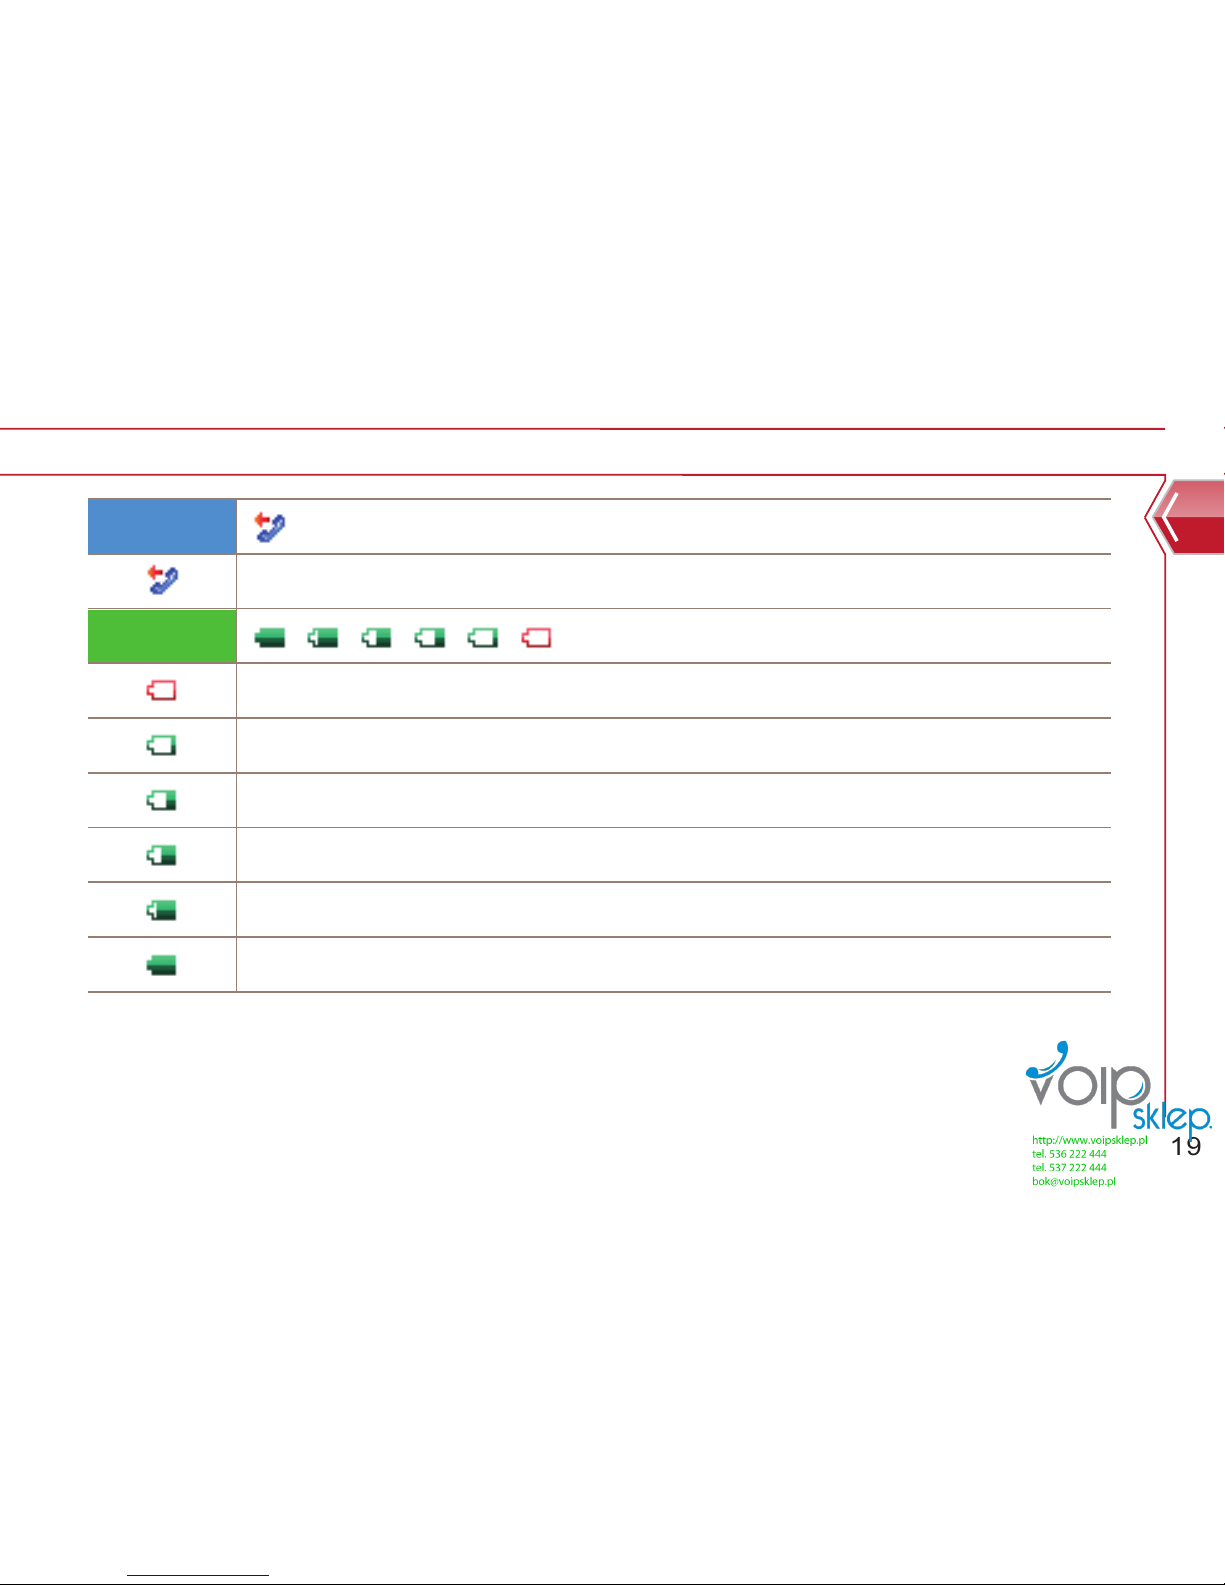
19
Basic compenents
Group 6
Group 7
Change of call sign
Battery capacity indication
Battery capacity indication
Battery capacity indication
Battery capacity indication
Battery capacity indication
Battery capacity indication
Page 22

20
VoIP Setting
Wi-Fi phone offers VoIP setting as a basic setting based on information of service provider. User will
receive service provider’s setting from service provider that is already set at Wi-Fi phone or an
arbitrary text message. Of course, passive VoIP setting addition is available. Please refer to “Setting
VoIP” section for details.
Standby status
Wi-Fi phone becomes standby status, which is able to make a call, after service information is
appeared after getting power on.
Flight Mode
When the phone gets turned on, user can choose to use whether general mode, which allows user
to use full functions, or flight mode, which restricts some functions. To prevent breakdown of Wi-Fi
phone, network can be disconnected, and Please follow the rules and instructions of the crew
member.
Page 23
21
Go to flight mode
Basic compenents
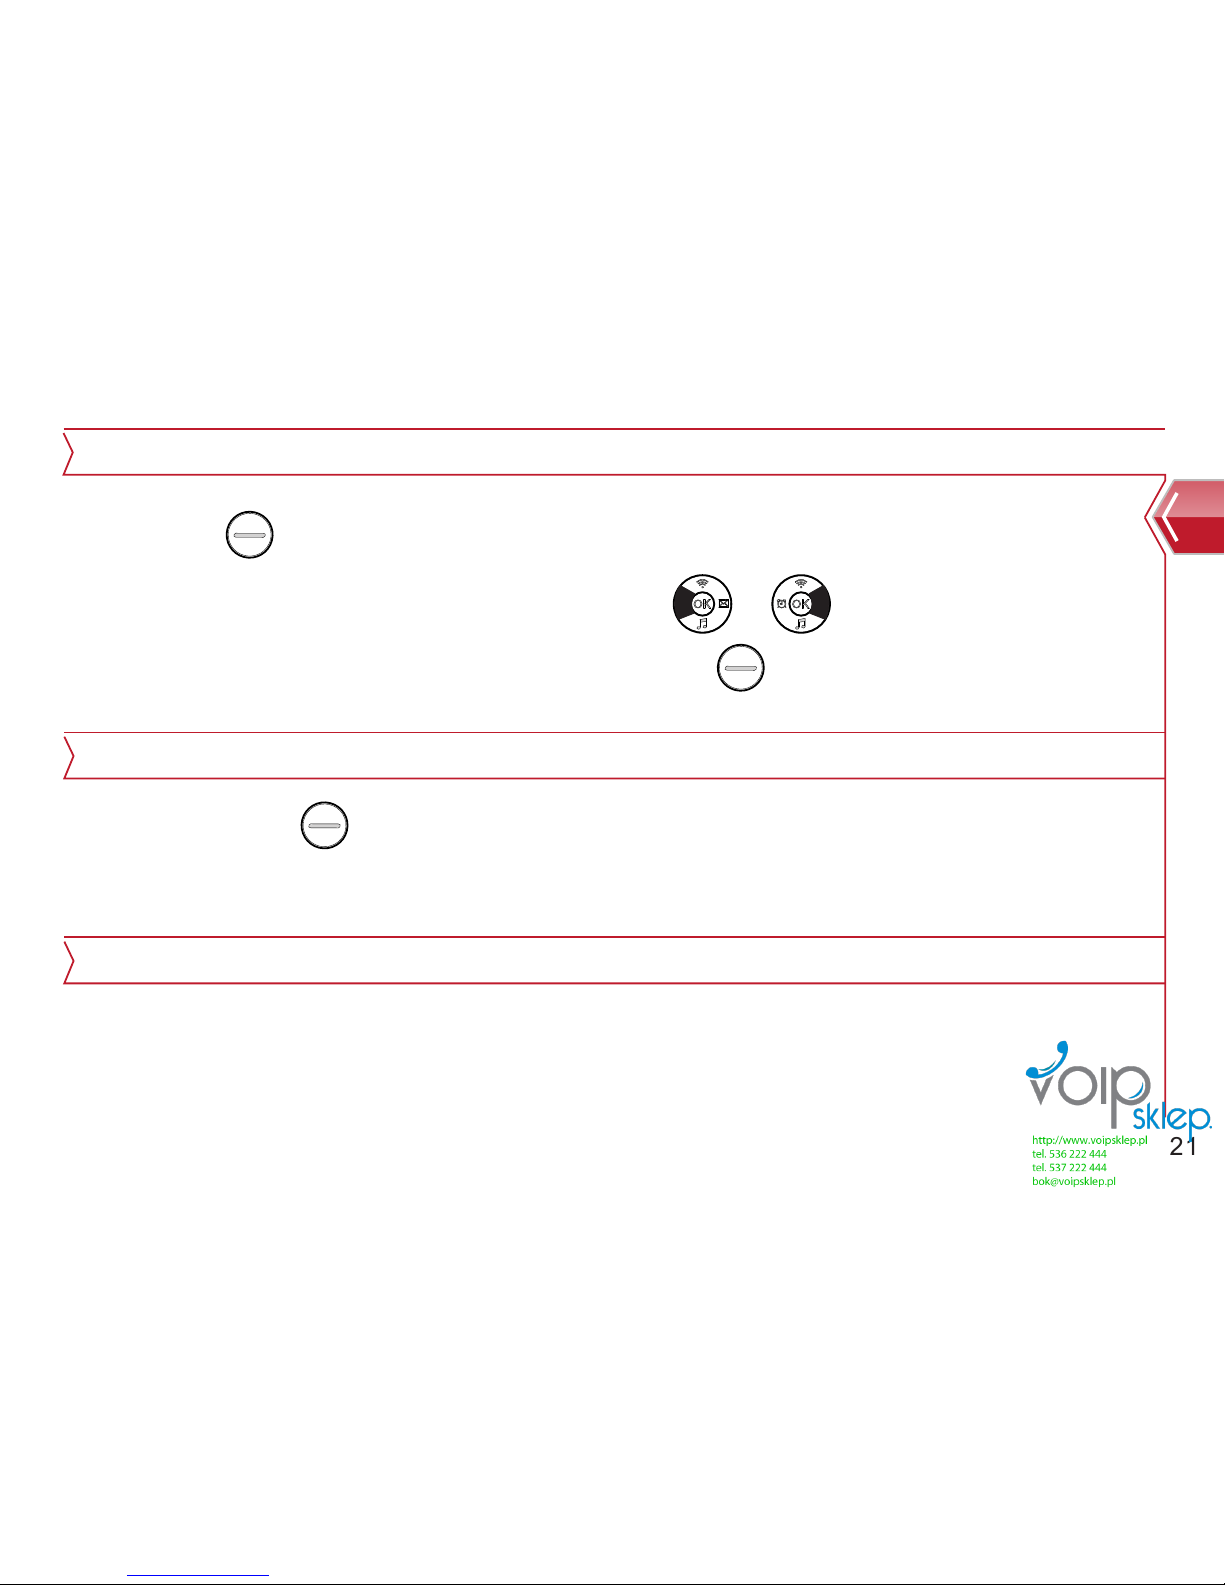
1. Left soft key at standby status -> Setting -> Wi-Fi setting-> flight mode
2. Turn on/off the flight mode by using direction key or
3. Save the current flight mode status by using left soft key.
Main menu
1. Press left soft key at standby status.
2. Use direction key to move to main menu and detail menu.
Shortcut Key
Shortcut key is available to move to some menu or tools.
Page 24
Power on, Power off
Phone instruction
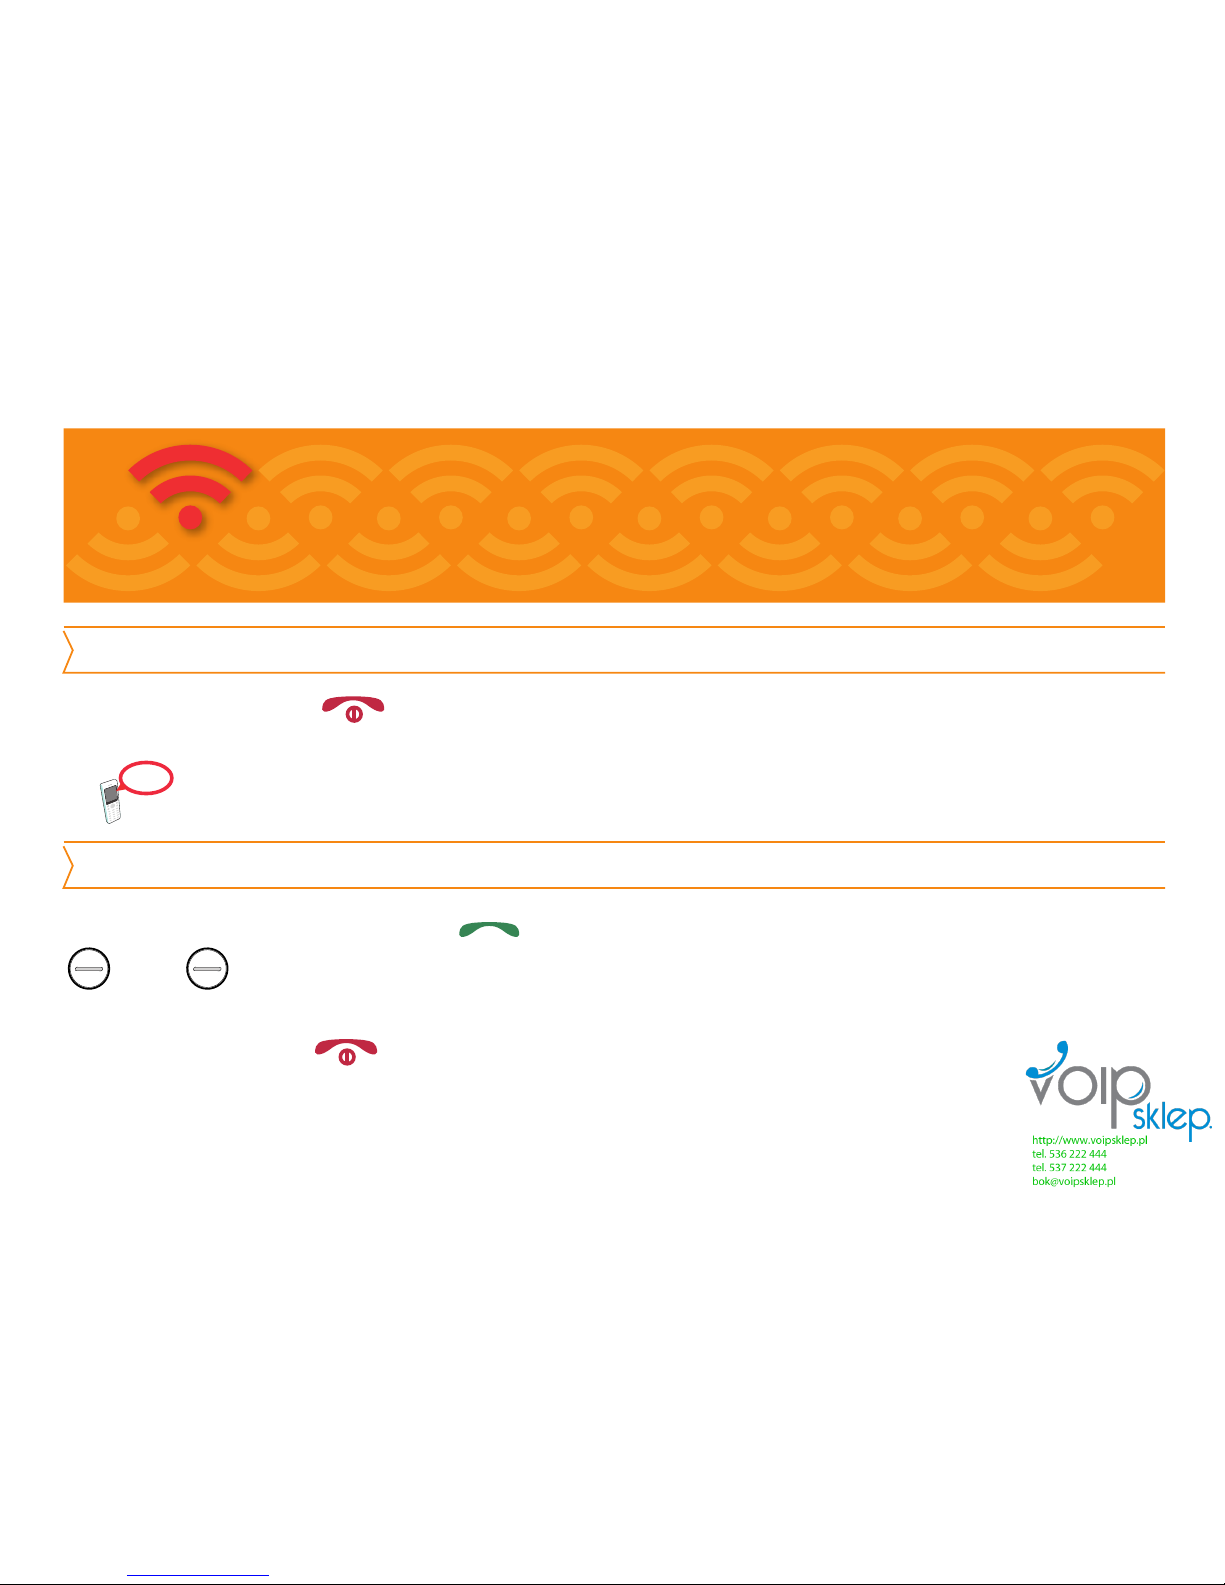
Press the button with sign for a few seconds. Then, the phone will be turned on or off.
After you put phone number, press key. When you put wrong phone number, press right soft
key. If key is pressed shortly, it deletes digits one by one. If this key is pressed for long time,
it deletes all the digits at the same time and returns to standby screen.
To end the call, press
22
Making a call
When breakdown of the product is occurred or when phone doesn`t get turned on, turn on Wi-Fi phone after take off and
re-connect the battery. Please wait about 5 seconds before you try to turn on the power.
Caution
Page 25
23
Calling to recent number
Phone instruction
Calling by speed dial
Regulating ear speaker volume during phone call
Muting transmission sound during phone call
Switching to speaker phone during phone call
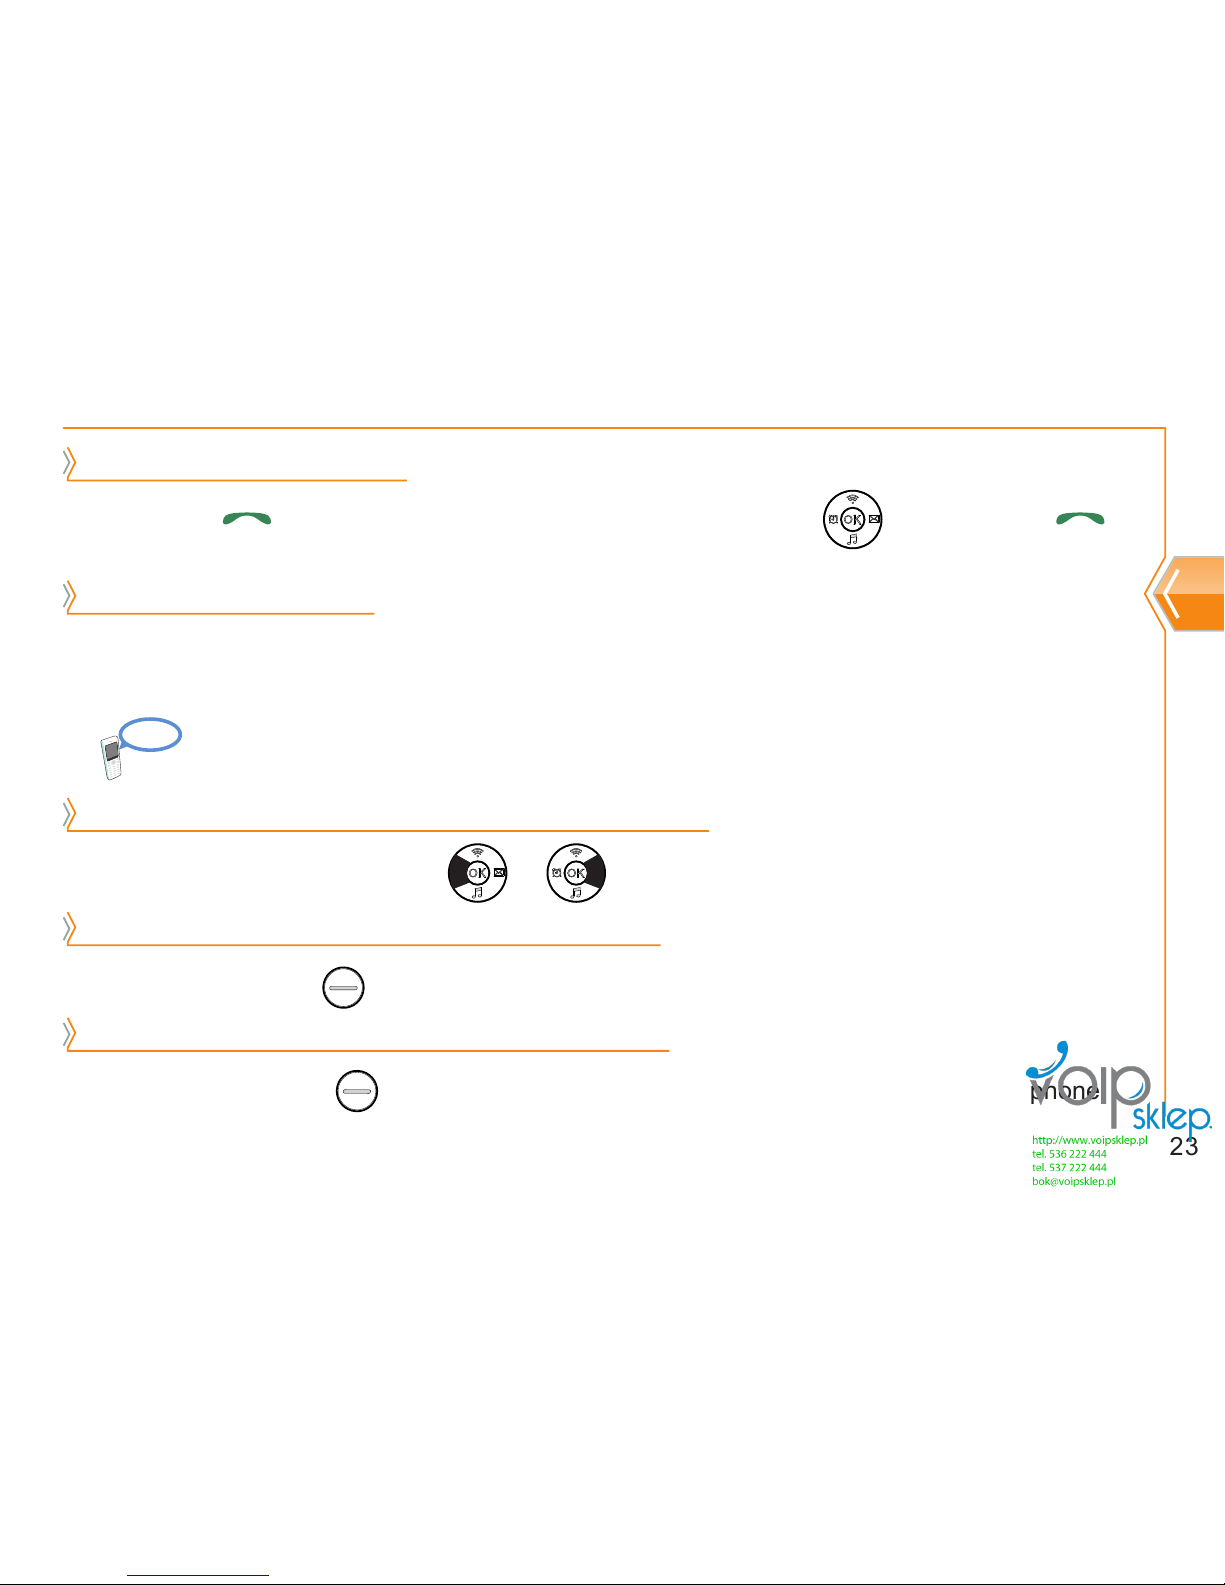
After pressing at standby screen, select phone number by using key, and press
again.
Press short cut number for a few seconds. However, if shortcut number is more than 2 digits, press
the last digit of the shortcut number for a few seconds.
Regulate phone volume by using or during phone call.
Be close to designated AP during phone call because distance from the AP can cause noise.
By using right soft key , transmission sound can be blocked during phone call.
By pressing left soft key , user can switch from serve menu to speaker phone or earphone
during phone call.
Reference
Page 26
Receiving call
When the phone rings, press to receive phone call.
To end the phone call, press
24
Missed call
When the phone rings, press to receive call, and press to end the call.
Page 27
Caution
Phone book
User can search saved number during phone call by pressing menu button.
25
Name, Phone number, personal information can be saved or searched at Wi-Fi phone memory.
Save numbers
1. menu → phone number search is available by selecting phone book.
2. After pressing phone book button, user can search phone number directly.
User can add a new number in phone book during phone call by pressing menu, pressing
phonebook, then, pressing new contact.
Page 28
26
Set speed dial
Speed dial can call from 0 to 99 (100 dials) easily.
1. At standby status, Select menu → phonebook → speed dial.
2. Select the number by using direction key, press menu button. Then, user can put the
number directly. When number input is done, press button. Then it will be saved.
Delete speed dial
1. At standby status, select menu → phonebook → speed dial.
2. Select number that needs to be deleted by using direction key, and press menu
button. And when Delete menu comes up, press button.
Calling by speed dial
1. At standby status, speed dial call is available by pressing one button between 0 to 99
dials for a few seconds.
2. To end the call, press end button.
OK
Page 29
27
Phone book
The amount of used
It shows the amount of used that is saved in phonebook. Phonebook can
save maximum 500 phone numbers. At standby status, select menu →
phonebook → the amount of used
Group management
Function that can manage phone numbers by groups. It offers basic groups like black list, friends,
family, customer, work.
Group creation
1. At standby status, select menu → phonebook → group management.
2. Press direction key or to see group lists.
3. To create group, press menu button and press new group.
4. Enter the name of new group.
5. Save it by pressing menu button.
Page 30

Reference
28
Call history
View call history
1. At standby status, select menu → call history.
2. Check total call history, missed call, sent call, received call and call used duration by
pressing direction key or
If menu button is pressed on call history screen, serve menu below will come up.
View detail shows detail of the call history.
If you press Send, you can make a call.
When you press Add number, you can save at
New contact or Existed contact.
When you press Delete, it gets deleted from the call history.
When you press Delete all, all the call history gets deleted.
Page 31
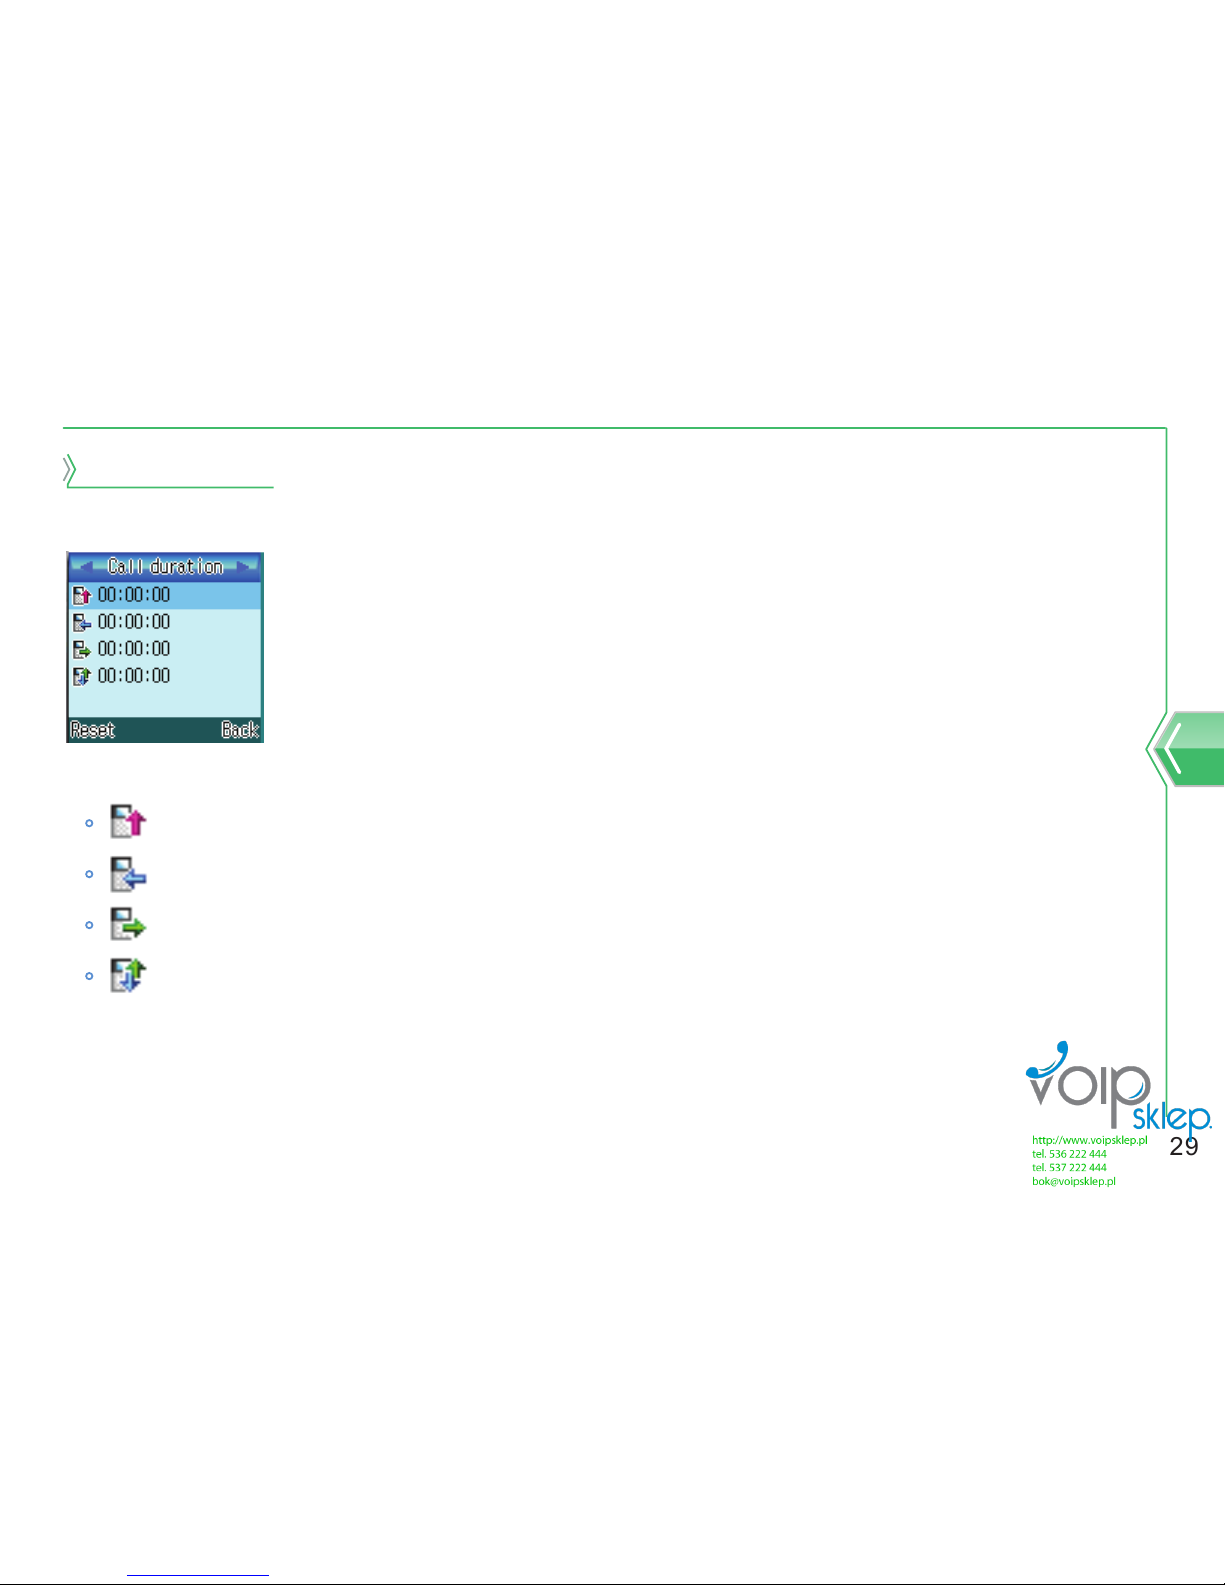
Call duration
It shows last call, received call, sent call and call time.
1. At standby screen, select menu → call history → call duration.
represents last call duration.
represents received call duration.
represents sent call duration.
represents all call duration.
2. When you press menu button after selecting call duration, time initialization screen will
come up.
To reset the time, select yes or no to not reset the time.
Call history
29
Page 32
Reference
Text message
User can delete, respond, forward, lock, view and save message by selecting menu at inbox screen.
When new message is received, it notices user with reception notice screen, user can check the
contents by selecting menu → Text Message → Inbox. Inbox can storage maximum 100
messages. And when it gets over 100 messages, it erases the oldest message one by one.
Inbox
30
Page 33

31
Sent message
Sent message can store maximum 100 messages, and only messages that are sent successfully get
stored.
User can check the content by selecting menu → text message → sent message. User can delete,
respond, forward, lock, view, save message or save number by selecting menu on the sent message
screen.
Drafts can save maximum 100 messages.
User can check draft by selecting menu → text message → Draft.
Draft
Outbox can save maximum 100 messages.
User can check Outbox by selecting menu → text message → outbox.
Outbox
Text message
Page 34

32
At standby screen, user can select new message by pressing key.
Or by selecting menu → text message → new message.
Message will be sent when user press after typing message and entering receiving number.
New message
OK
Page 35
Diary
33
Diary
Page 36
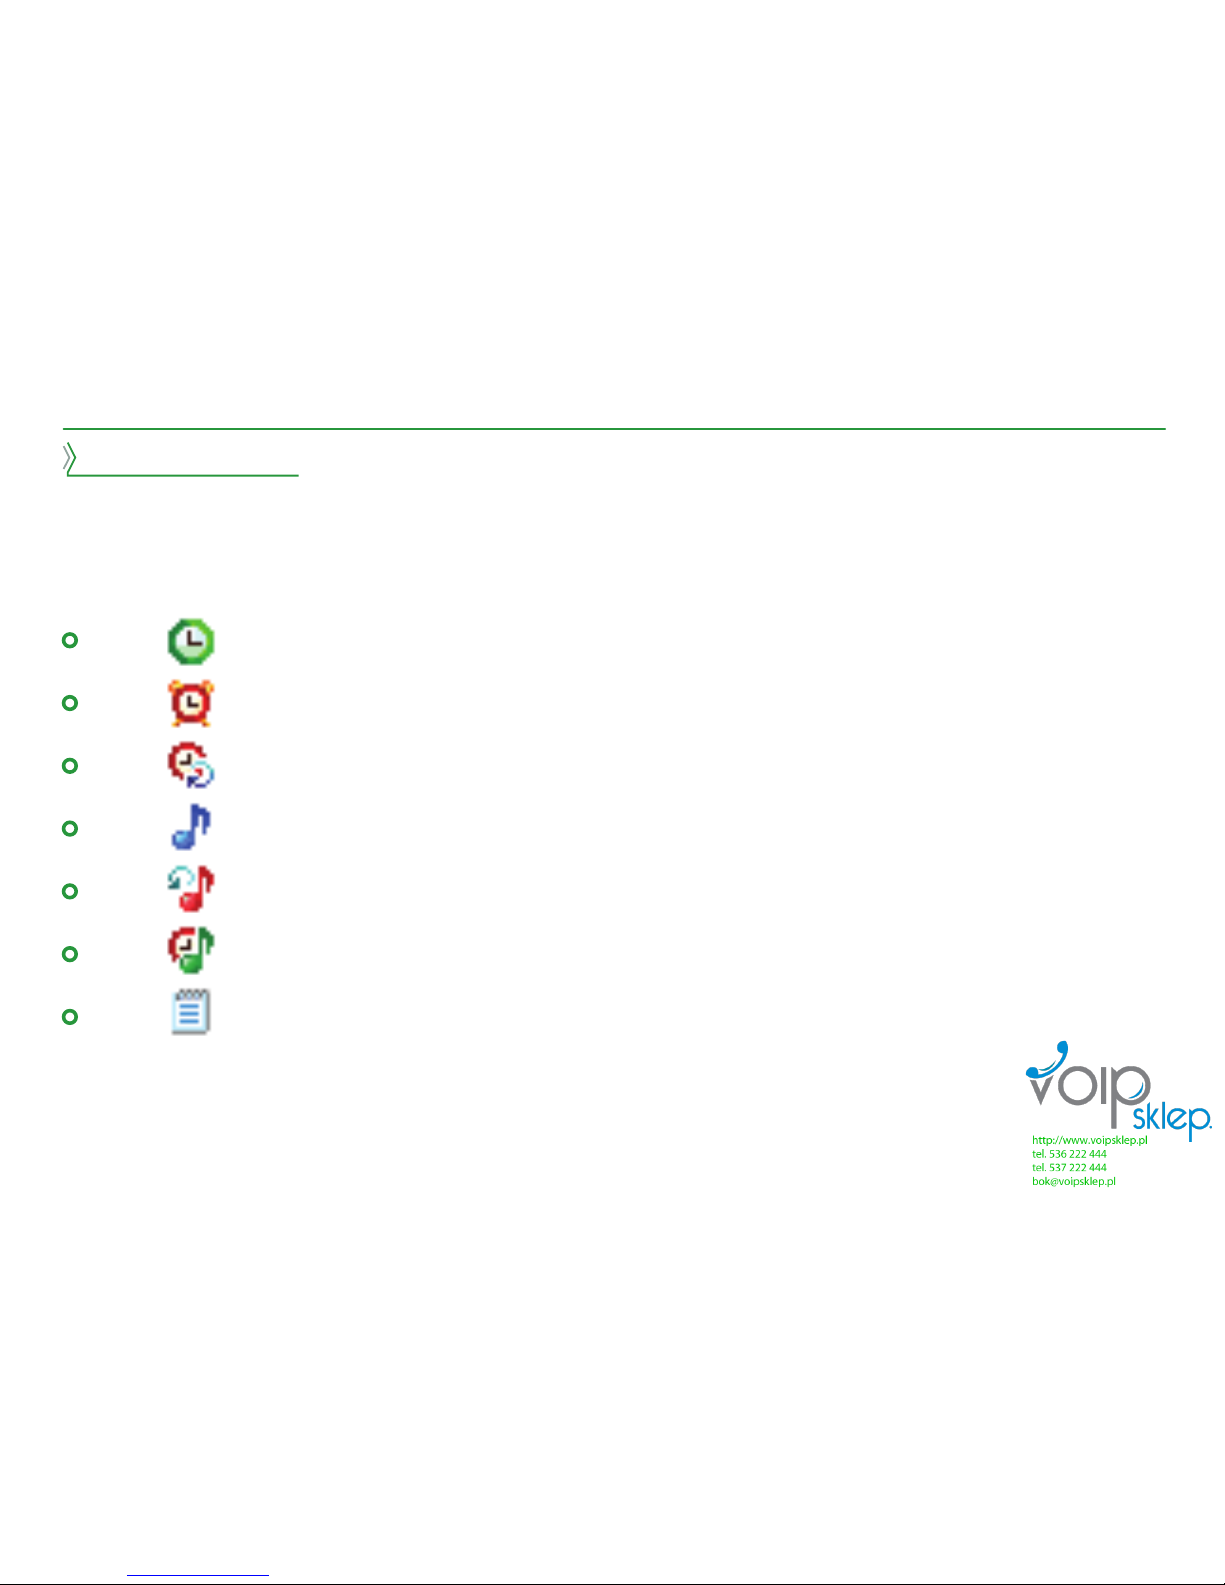
Setting alarm
Current time
Time of a day that alarm gets vitalized
Day of a week that alarm gets vitalized
Alarm sound
Alarm repeat counts
Alarm interval
Alarm note
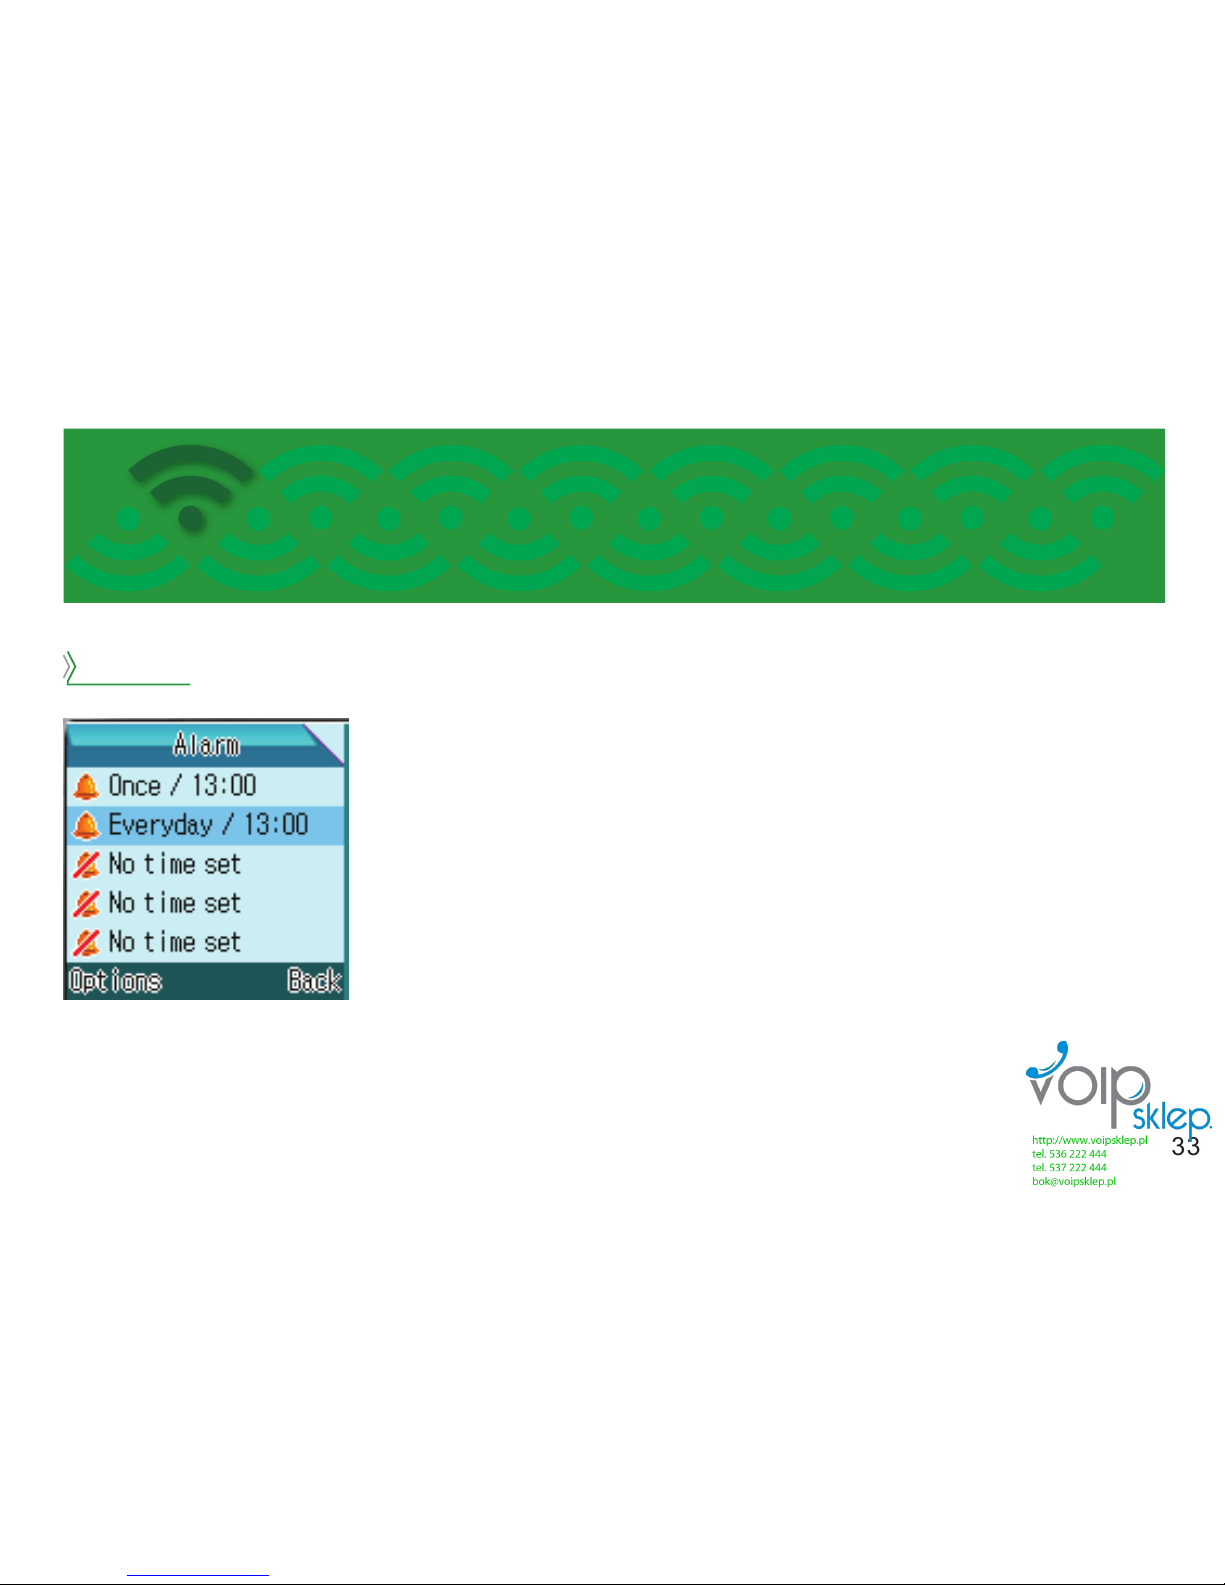
1. Select menu → dairy → alarm.
2. User can set the alarm time by selecting Edit in menu.
3. Save the alarm setting by pressing menu button.
34
Page 37
Reference
35
Dairy
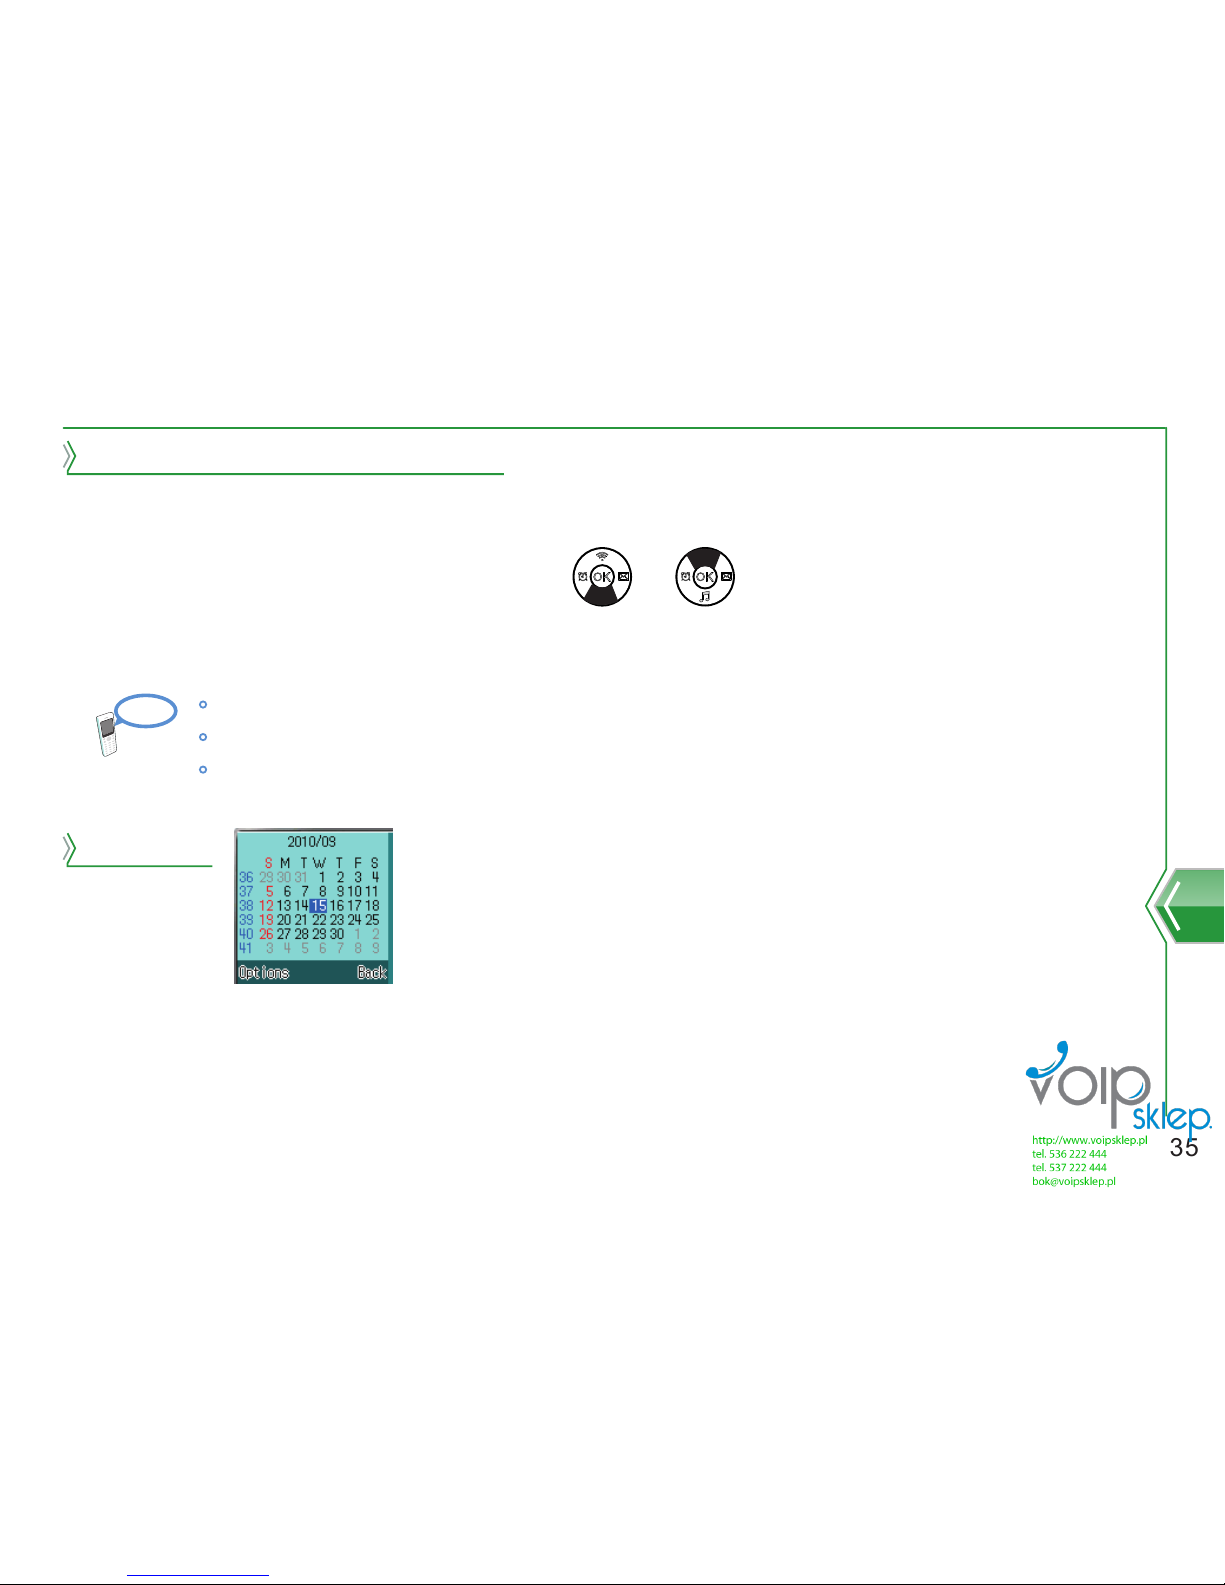
1. Select menu → tool → alarm time.
2. Select alarm by pressing direction key or
3. When menu button is pressed, serve menu below will show up.
Invitalize, delete, edit alarm time
Invitalization: Invitalize alarm setting.
Delete: Delete alarm setting.
Edit: Edit alarm setting.
Calendar
Page 38
Reference
36
Create new event
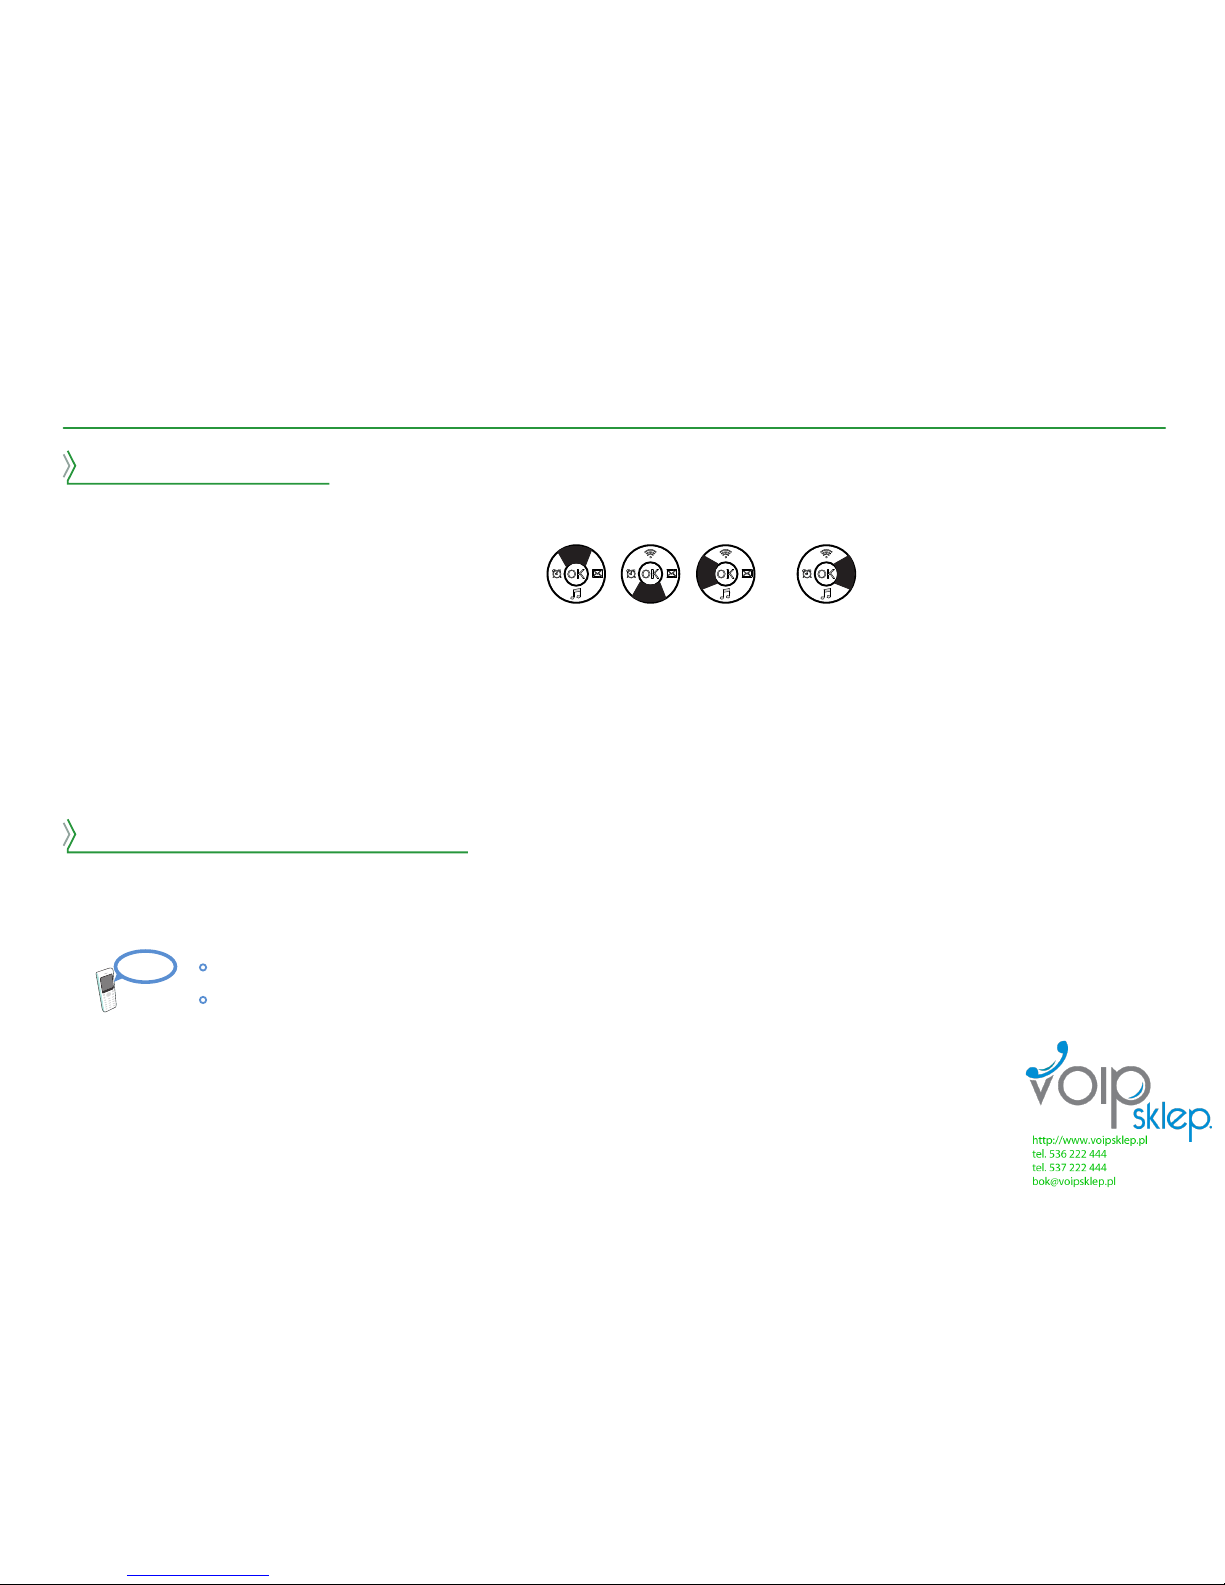
1. Select menu → dairy → calendar.
2. Choose date by using direction key , , or
3. When menu button is pressed, serve menu below will show up.
4. Select Name, place, date, time, duration, notification after selecting type of event at
New event.
5. Save new event setting by using menu button.
Calendar event management
Select Delete event after pressing menu button.
To delete previous event, select previous event.
To delete all events. Select all events.
Page 39
37
Dairy
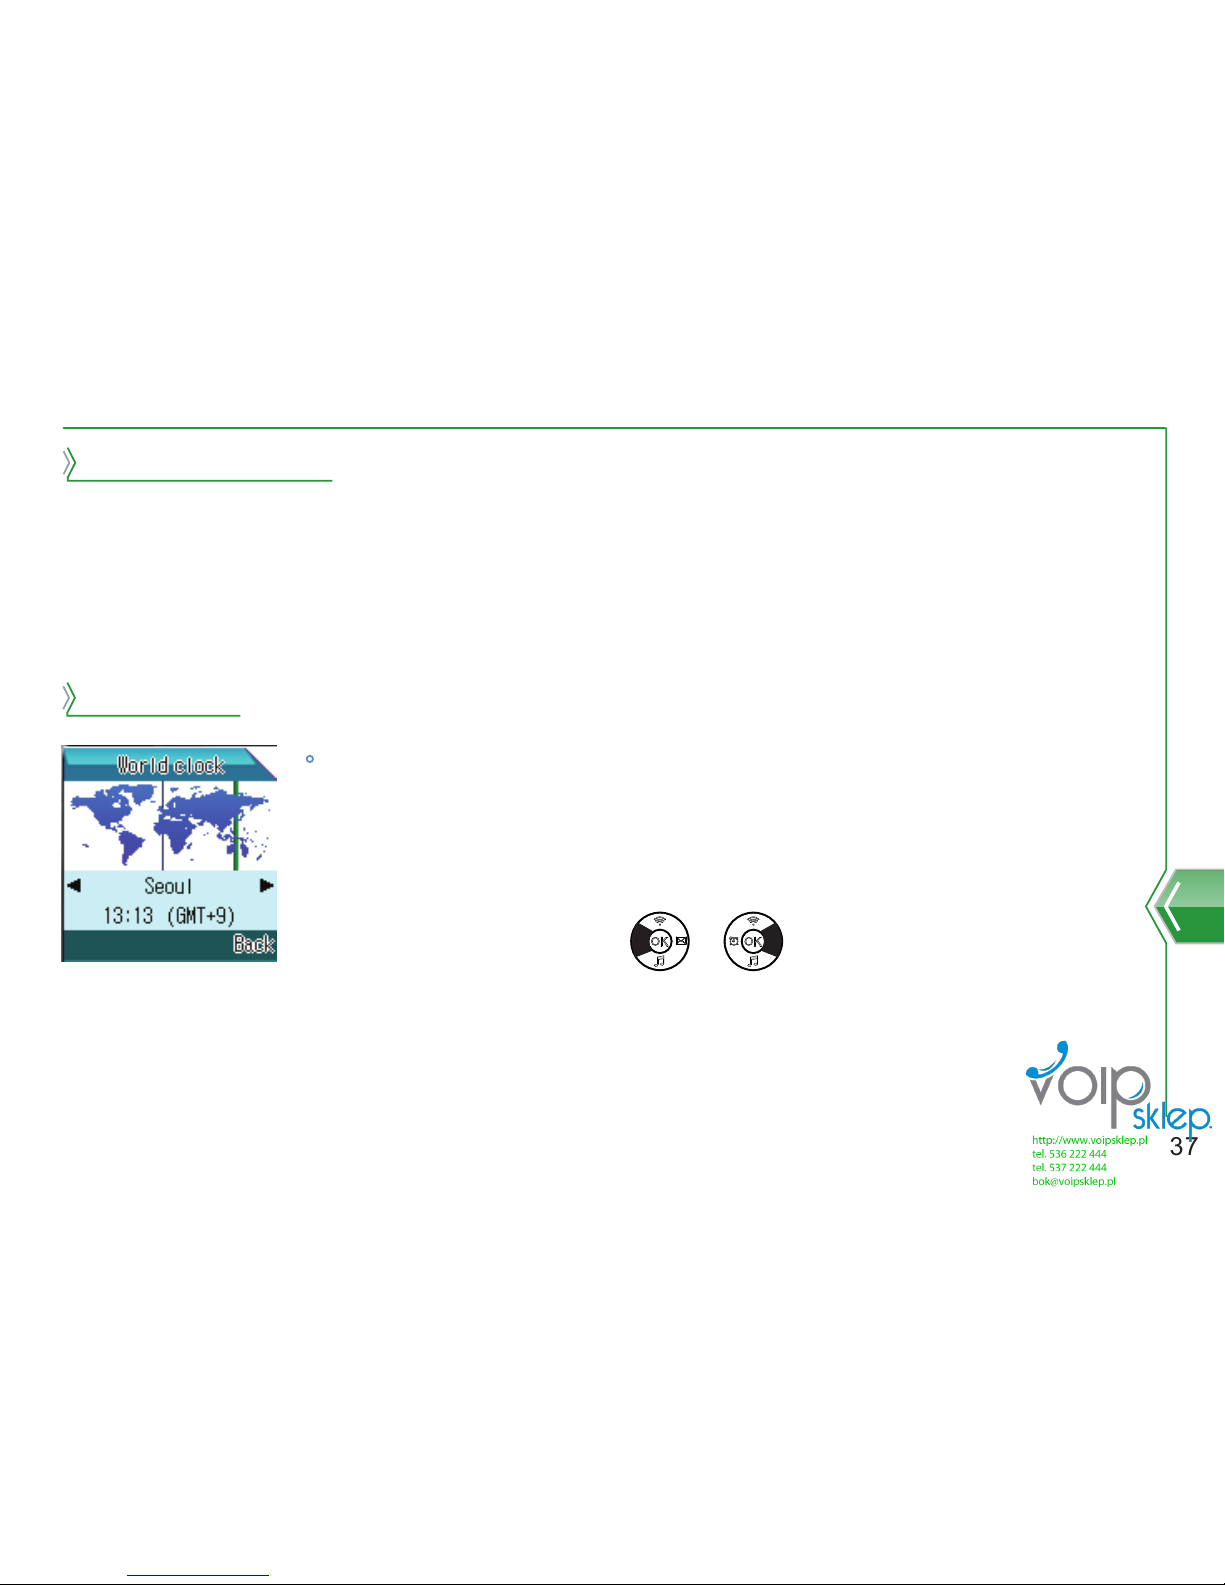
1. Select menu → dairy → world time.
2. User can check current time of chosen city after choosing city
by using direction key or
1. Select menu → dairy → Calendar.
2. Select setting after pressing menu button. Then user can edit duration, notification, date,
starting time.
Calendar setting
World time shows current time of area of time zone.
World time
Page 40
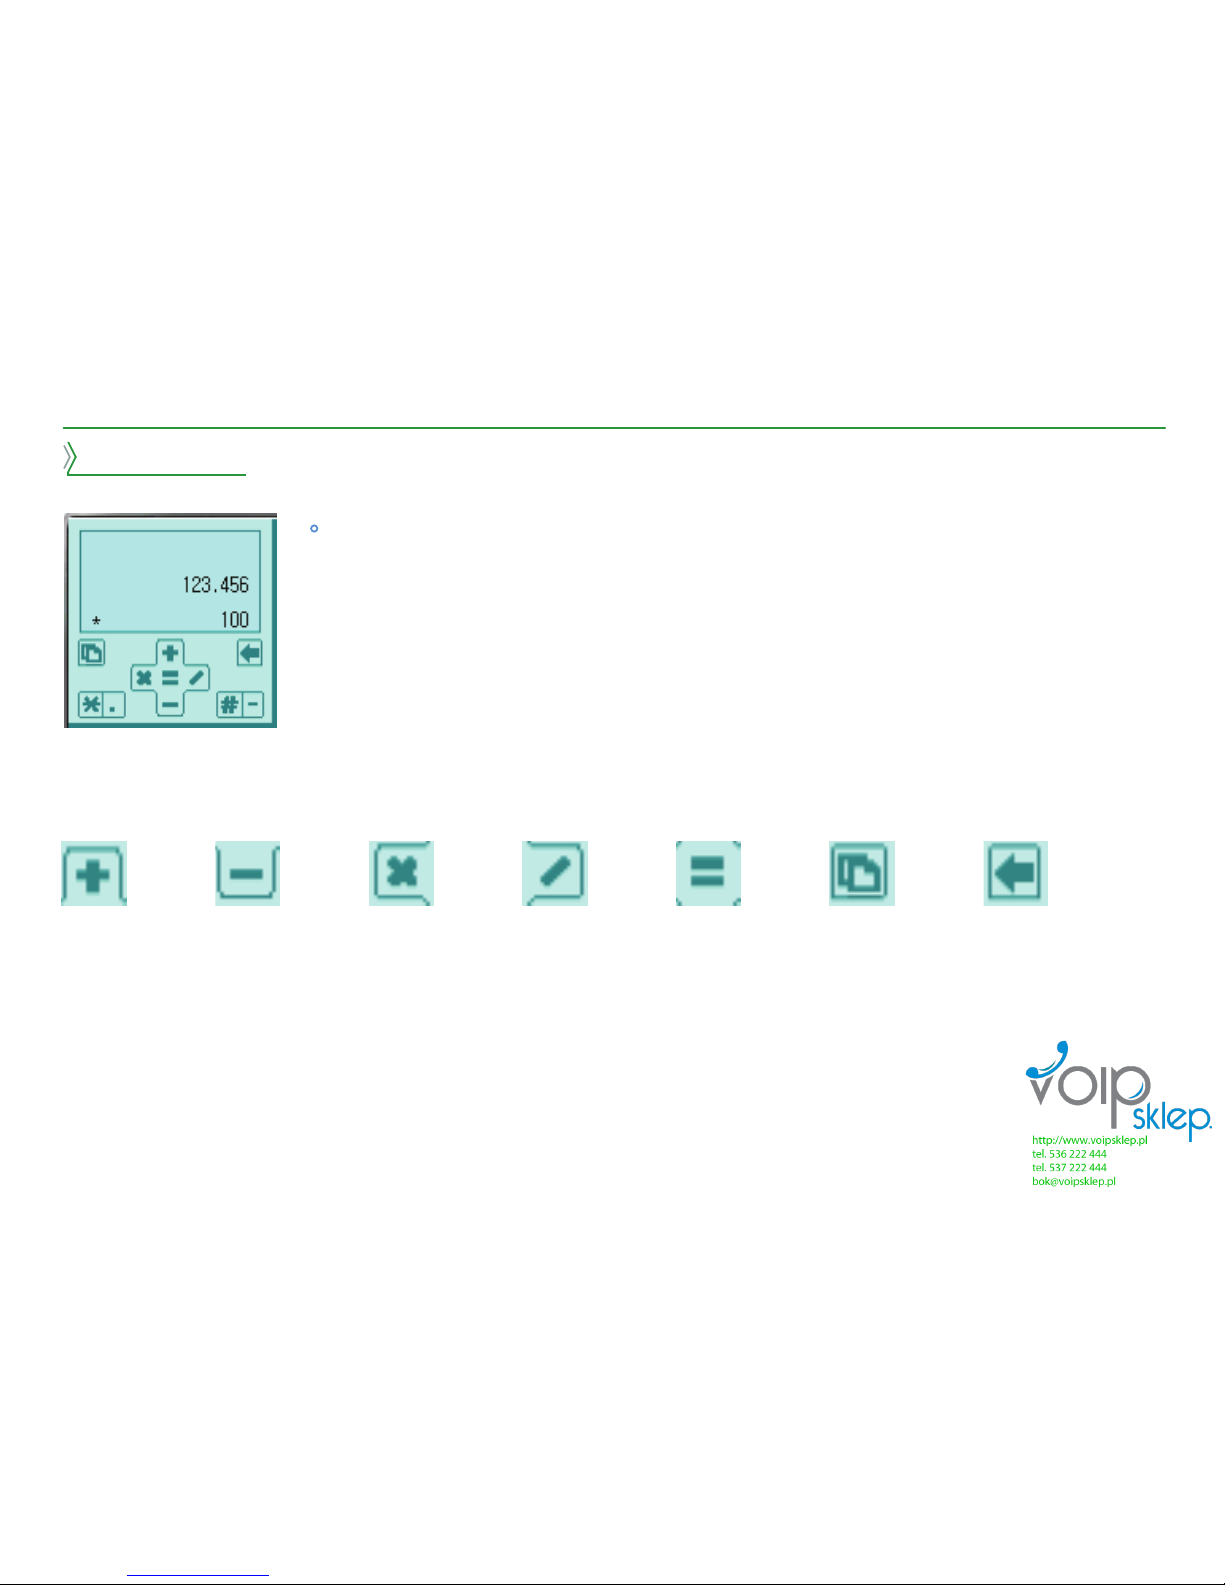
38
Calculator
addition subtraction multiplication division Calculation result Delete all
or help
Erase one digit
by digit
Select menu → dairy → calculator.
It offers basic calculation of addition, subtraction, multiplication,
and division.
Page 41
Sound mode
User can set different ringtone of the phone for different situations.
1. Select menu → Sound mode.
2. User can select wishing phone mode by using direction key or
3. For mode vitalization, press menu and select vitalization.
4. To change setting, select setting after pressing menu button.
Ringtone types Ringtone volume Vibration setting Button sound
Keypad sound Keypad volume Message sound Sound on/off Setting name
39
Page 42

40
5. User can change setting by using direction key or
6. Save it by pressing menu button.
Page 43
41
User can set the many personal settings like wallpaper, light, time, language, automatic
key password of the phone.
1. At standby screen select menu → setting → display setting → Wallpaper.
2. Select by using direction key or , and user can check the wallpaper
by pressing menu button.
3. When user presses menu button, selected wallpaper will be set as standby screen.
Setting
Wallpaper setting
Page 44

42
1. At standby screen, select menu → setting → Display setting → Light setting.
2. Select item by using or
3. Control the brightness of the screen by using or
4. Save the light setting by pressing menu button.
Light setting
Page 45
Reference
43
1. At standby screen, select menu → setting → Display setting → Time setting →
Change time.
2. Select item by using or key.
Setting
Time and Date
Time setting
By using ~ buttons, enter the current time.
By using ~ buttons, enter the current date.
Adjust the time form by using or key.
Adjust the date form by using or key.
3. Save the time and date setting by pressing menu button.
Page 46

1. At standby screen, select menu → setting → display setting → time setting → World
time.
2. Select the city by using or key.
3. Save the world time setting by pressing menu button.
44
Time server and World time
When time server starts, the time and date will be different depend on place where user sets
the time. So, before to set the world time, user mush set the server. User doesn’t need to
set the time server because it gets set when the phone gets released from the factory.
World time setting is like the following.
Page 47
1. At standby screen, Select Menu → Setting → Display setting → Language setting.
2. Select wished Language setting by using or key.
Language setting
User can select the language.
3. Select language by using or key.
4. Save language setting by pressing menu button.
45
Setting
1. At standby screen, select Menu → Setting → Display setting → Language setting.
2. Select Input timeout that needs to be set by using or key.
3. Select wishing setting by using or key.
Input timeout
User can adjust respond time of keypad when typing text message.
Page 48

Reference
46
4. Save input timeout setting by pressing menu button.
Expert: Keypad response is short.
Commoner: Keypad response is average.
Beginner: Keypad response is long.
1. At standby screen, select Menu → Setting → Display setting → Automatic key lock.
2. Select wishing setting by using or key.
3. Save Automatic key lock setting by pressing menu button.
Automatic key lock
Automatic keypad lock is available.
Off 15 seconds 30 seconds 1 minute 5 minutes
Page 49
Reference
47
Setting
WiFi setting
User can set or add a new Wi-Fi network.
1. At standby screen, select Menu → Setting → WiFi setting → AP setting.
2. Select AP that needs to be set by using or key.
3. When menu button is pressed, following serve menu will come up.
AP setting
Down: Move down the selected SSID.
View : View SSID, security setting, IP/DNS mode information.
Add : Add a new AP
Edit : Edit select AP information.
Delete : Delete selected AP information.
Page 50

48
Reference
1. At standby screen, select Menu → Setting → WiFi setting → AP search.
2. Select wished AP by using or key.
Add a new AP
3. When menu button is pressed, following serve menu will come up.
Refer to AP connection setting order for details before connecting AP.
Up : This will be used to move selected AP up among the already appointed AP.
Down : This will be used to move selected AP down among the already appointed AP.
Re-search : Re-search the Wi-Fi network.
Connect or disconnect : Connect to or Disconnect from selected AP.
View : View SSID, Security setting, IP/DNS mode information.
Add : Add a new Wi-Fi AP setting.
Edit : Edit selected Wi-Fi AP setting.
Page 51
49
Setting
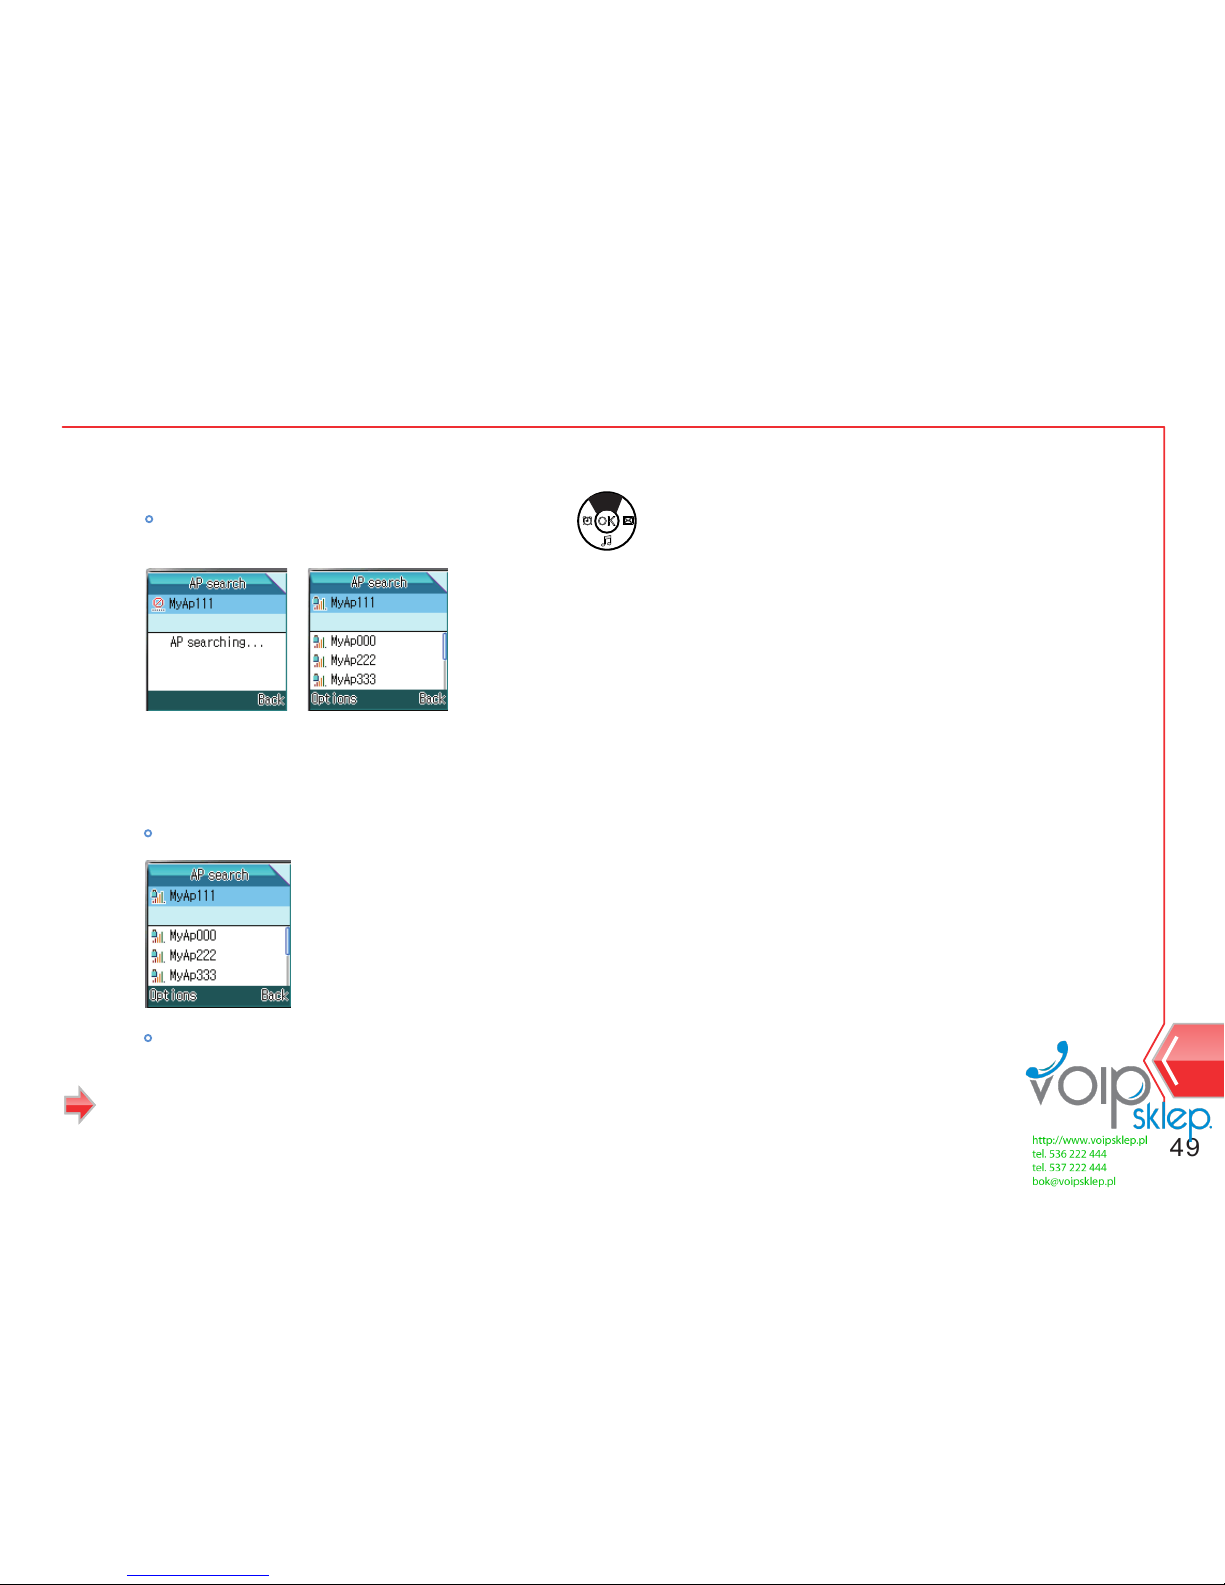
Step 1 : Search for valid Wi-Fi network
AP search message will show up when user press button at standby screen.
Step 2 : Select proper AP at the list, and if selected AP is not in user’s network composition list, user
must register.
Select AP that is on the list and Connect Wi-Fi phone and AP by pressing menu button.
If selected AP is not on user`s network composition list, user must set the information about security form and IP form.
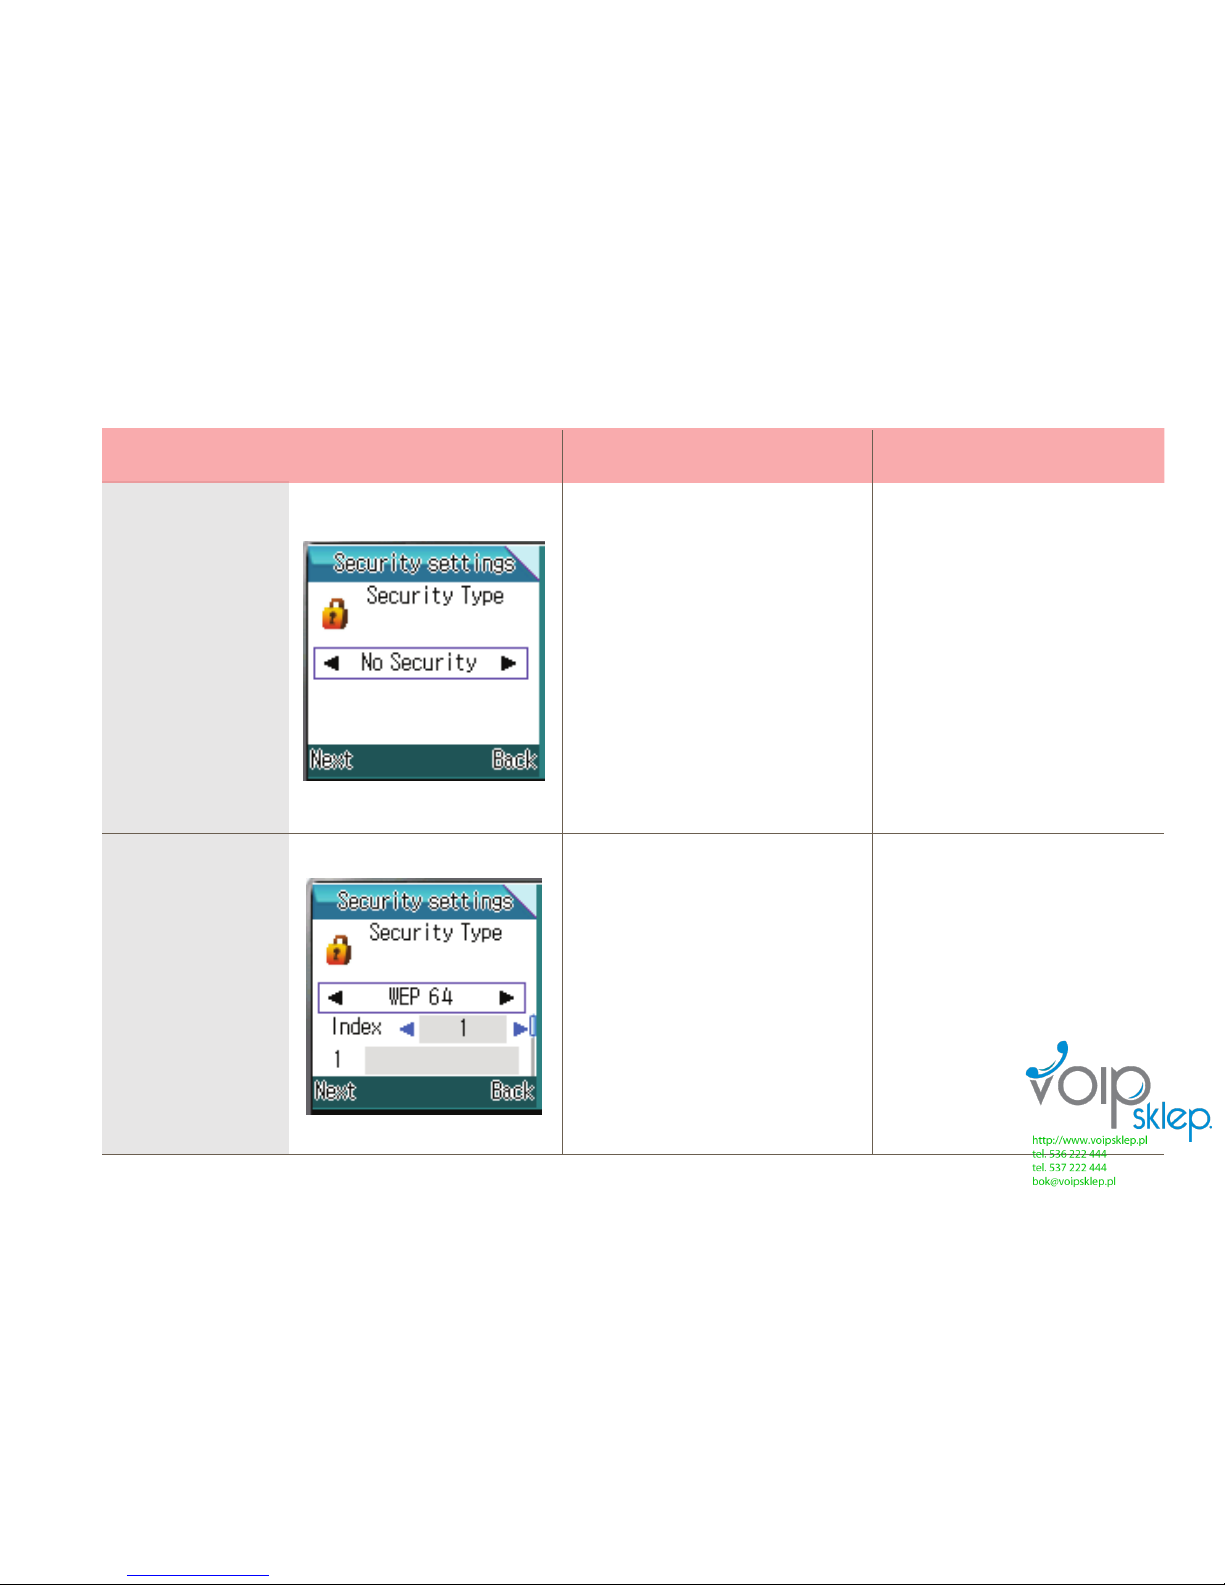
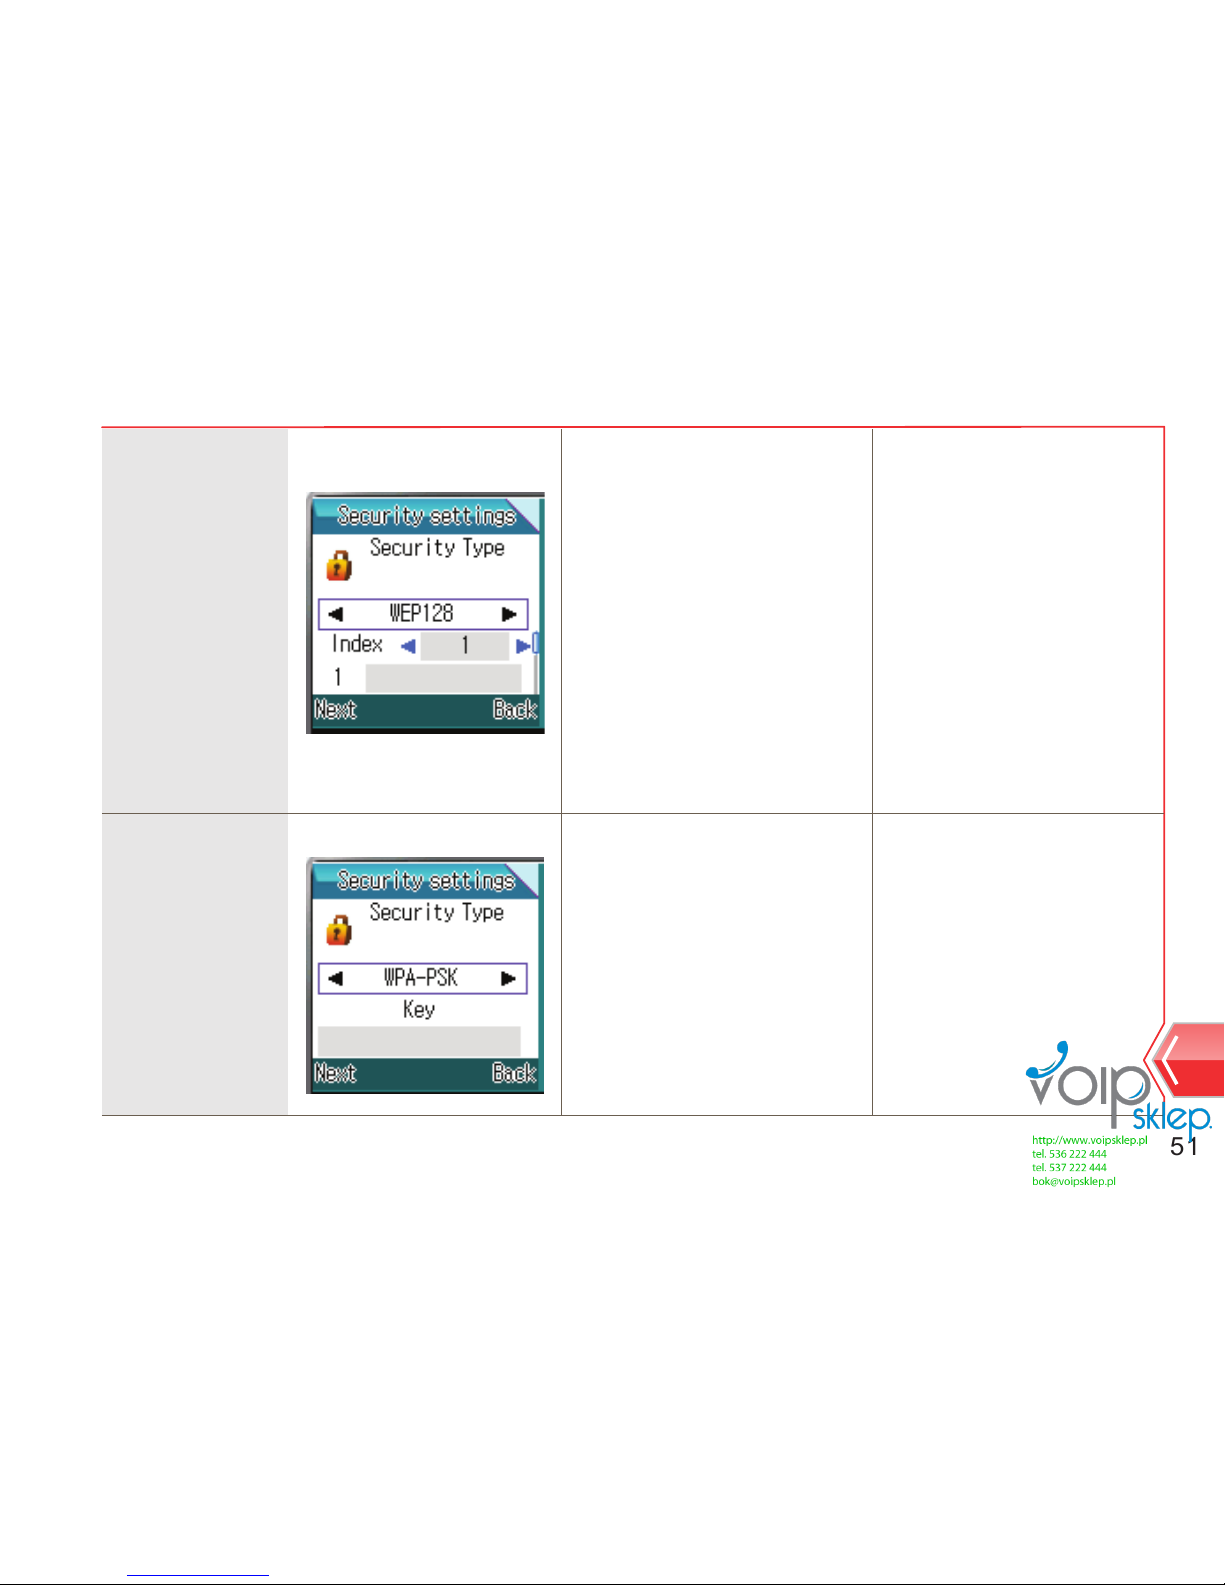
Security setting
Page 52
50
Security Type
No Security
WEP 64
X
Index
X
Please input Index No
and Password
Further Setting InfoFurther Setting
Page 53
51
Setting
Please input Index No
and Password
WEP 128
WPA-PSK
Index
Key Please input Password
Page 54
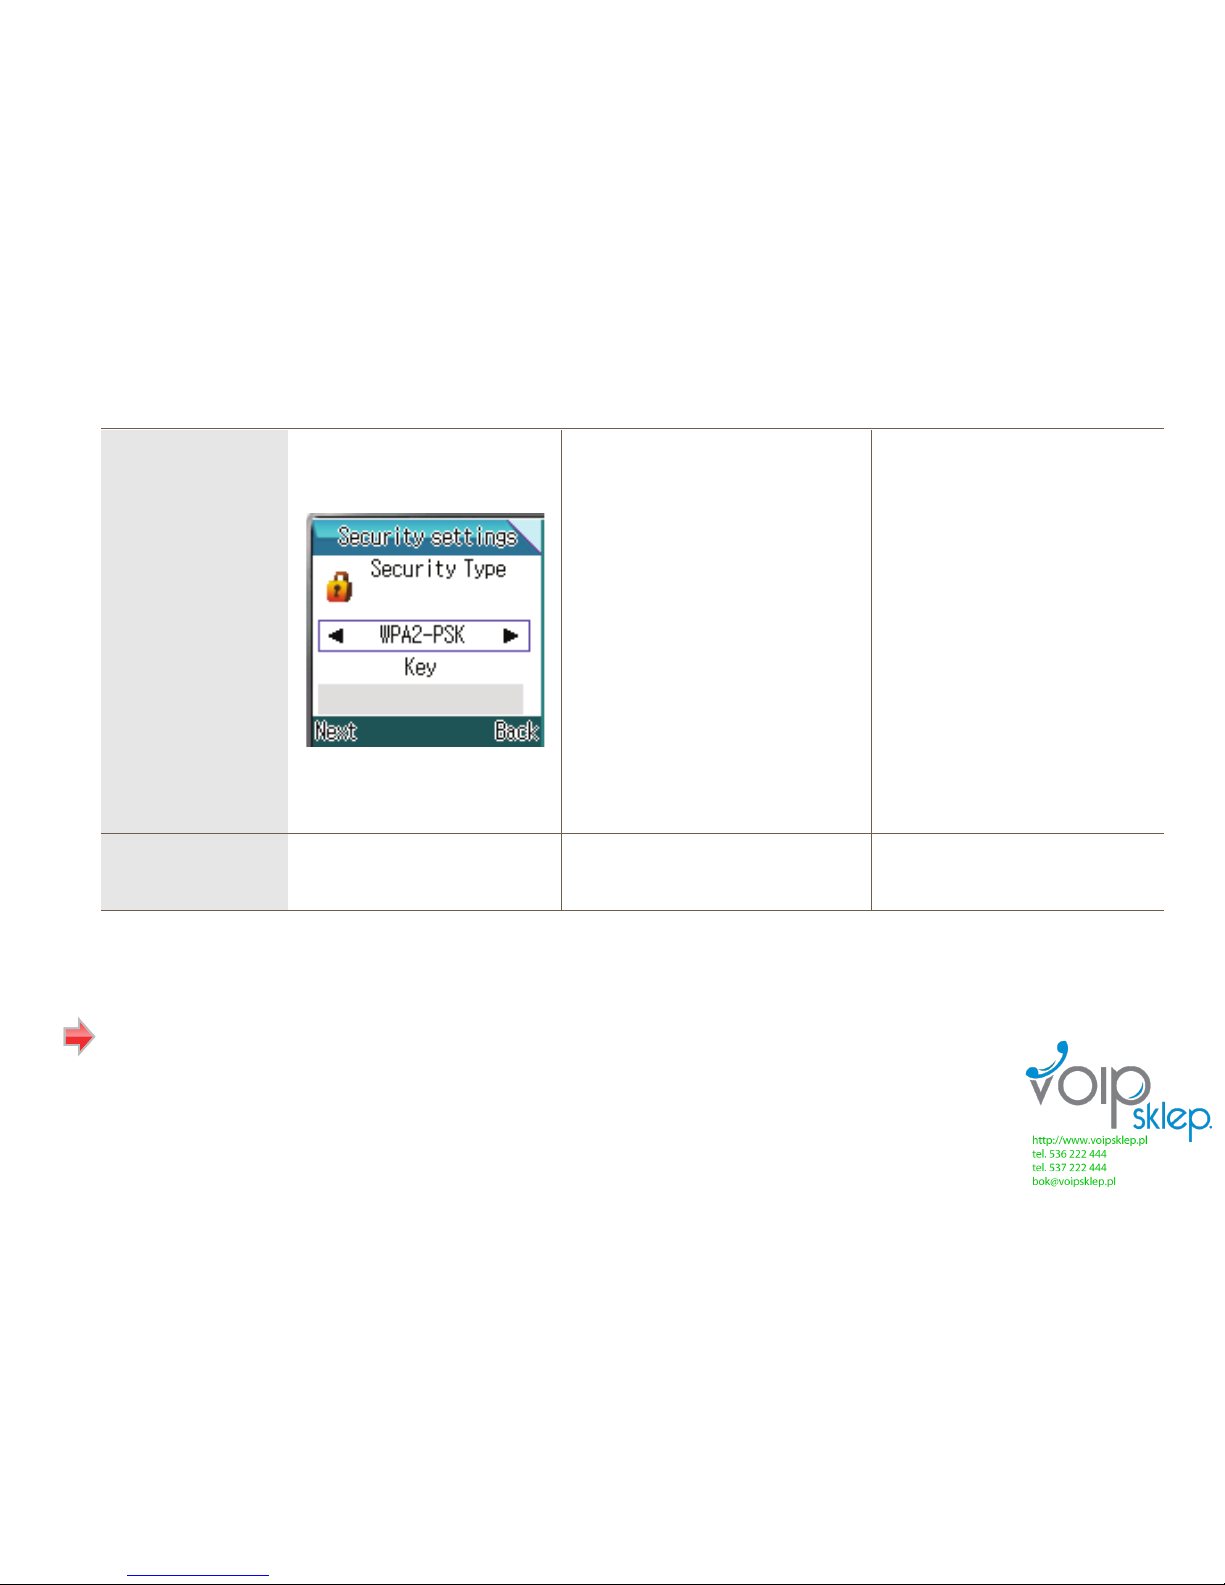
IP Type Settings
52
WPA2-PSK
802.1X
Key
Key
Please input Password
Please input Password
Page 55
53
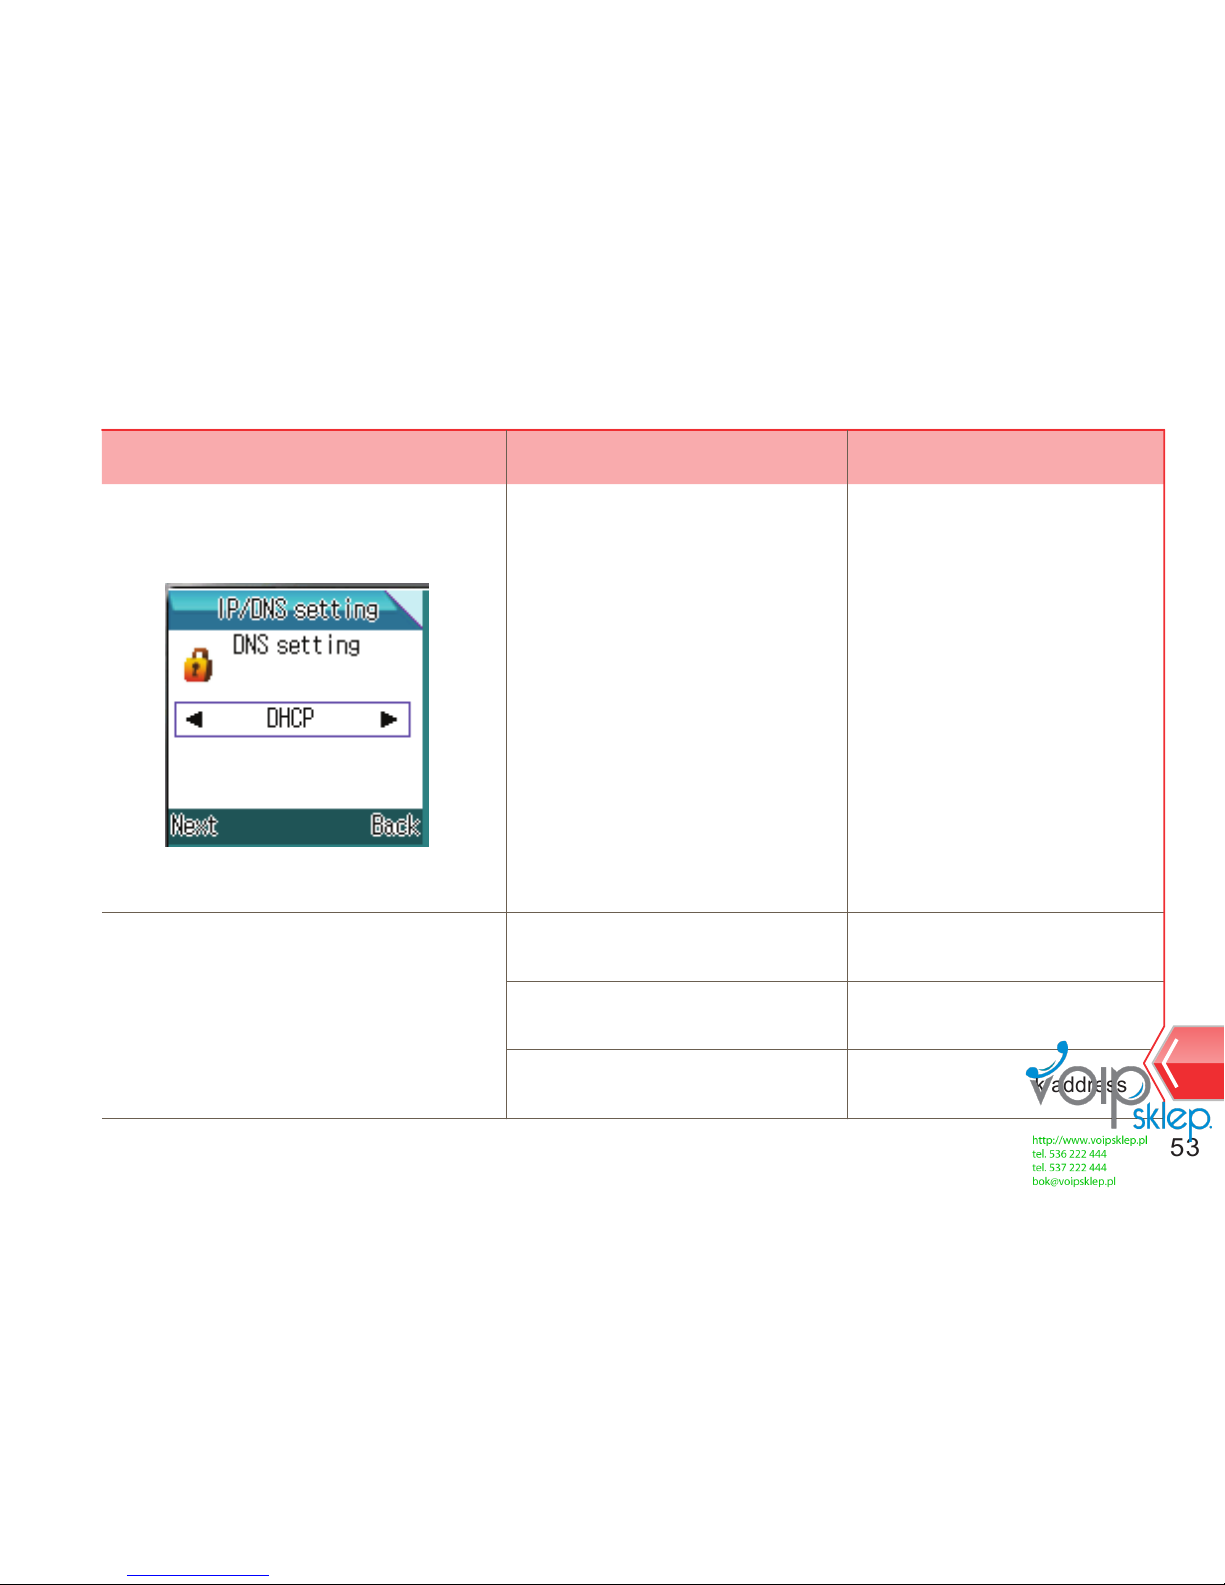
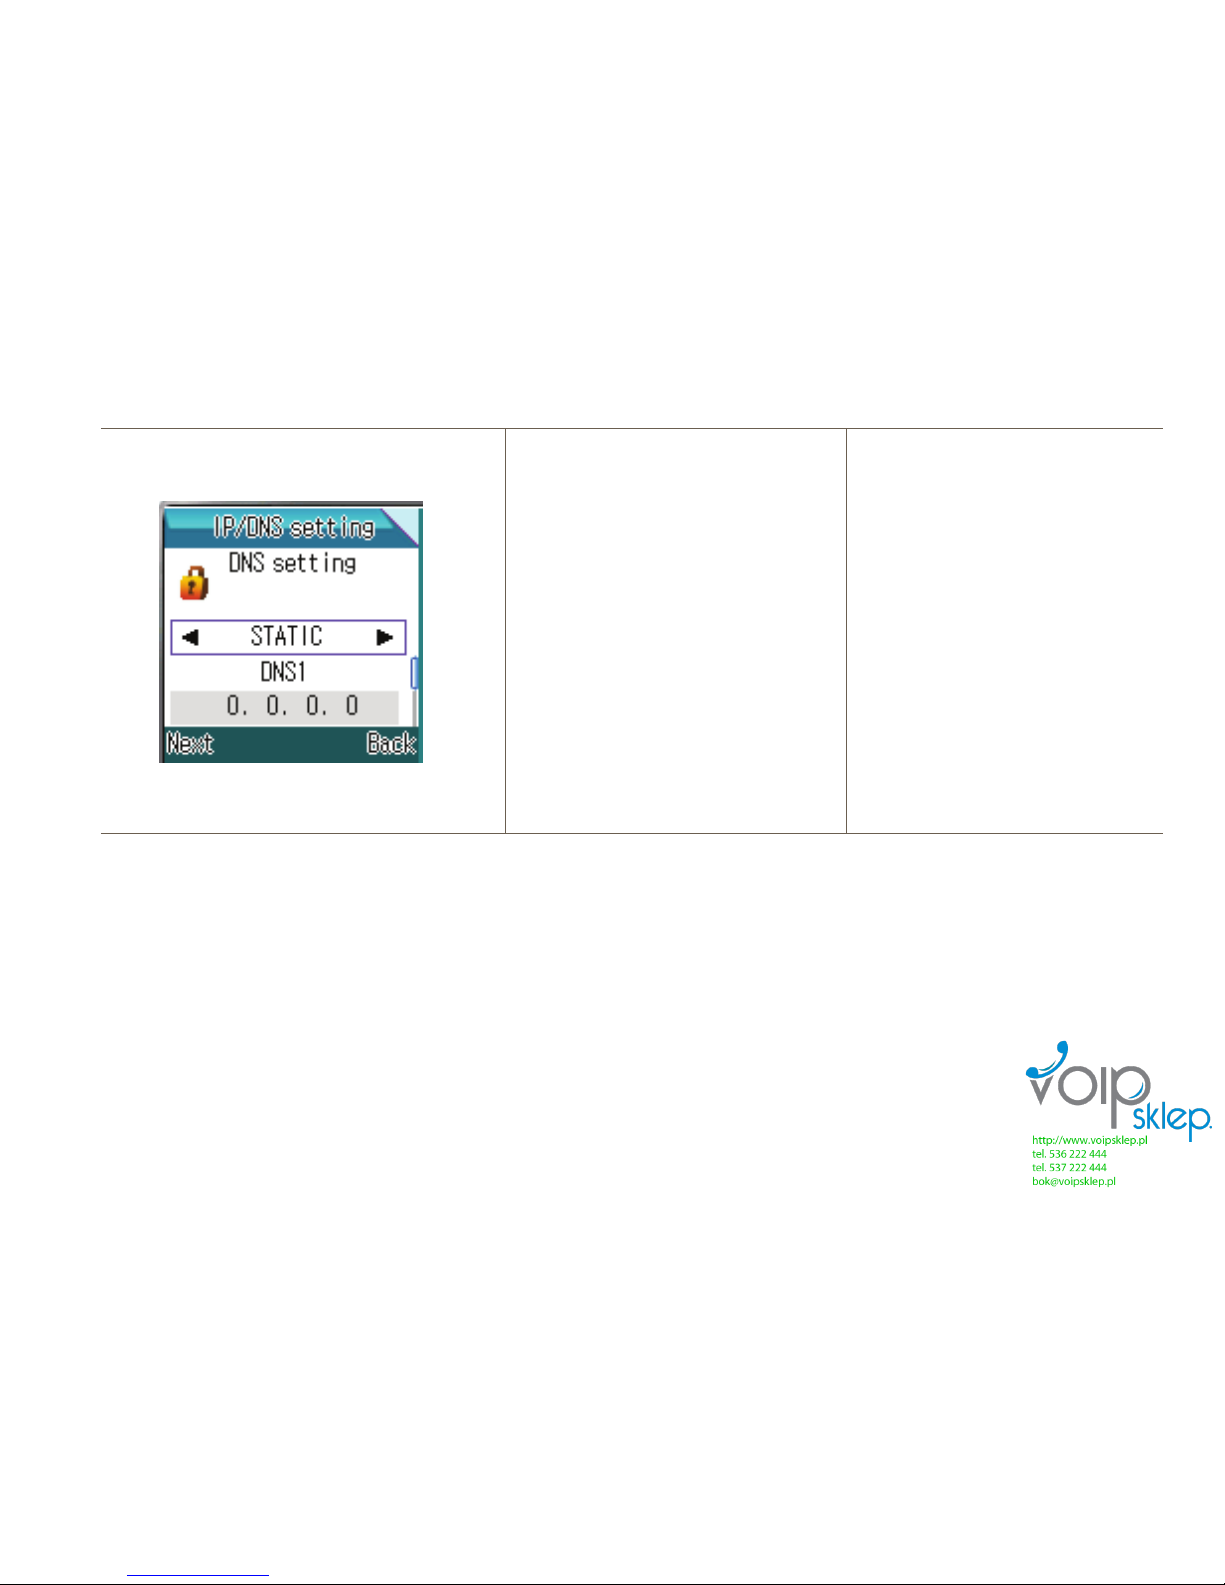
Setting
IP Type
DHCP
STATIC IP
X
IP
Gateway
Mask
Please input IP address
Please input Gateway address
Please input Mask address
X
Further Setting InfoFurther Setting
Page 56
54
Page 57
Reference
55
Setting
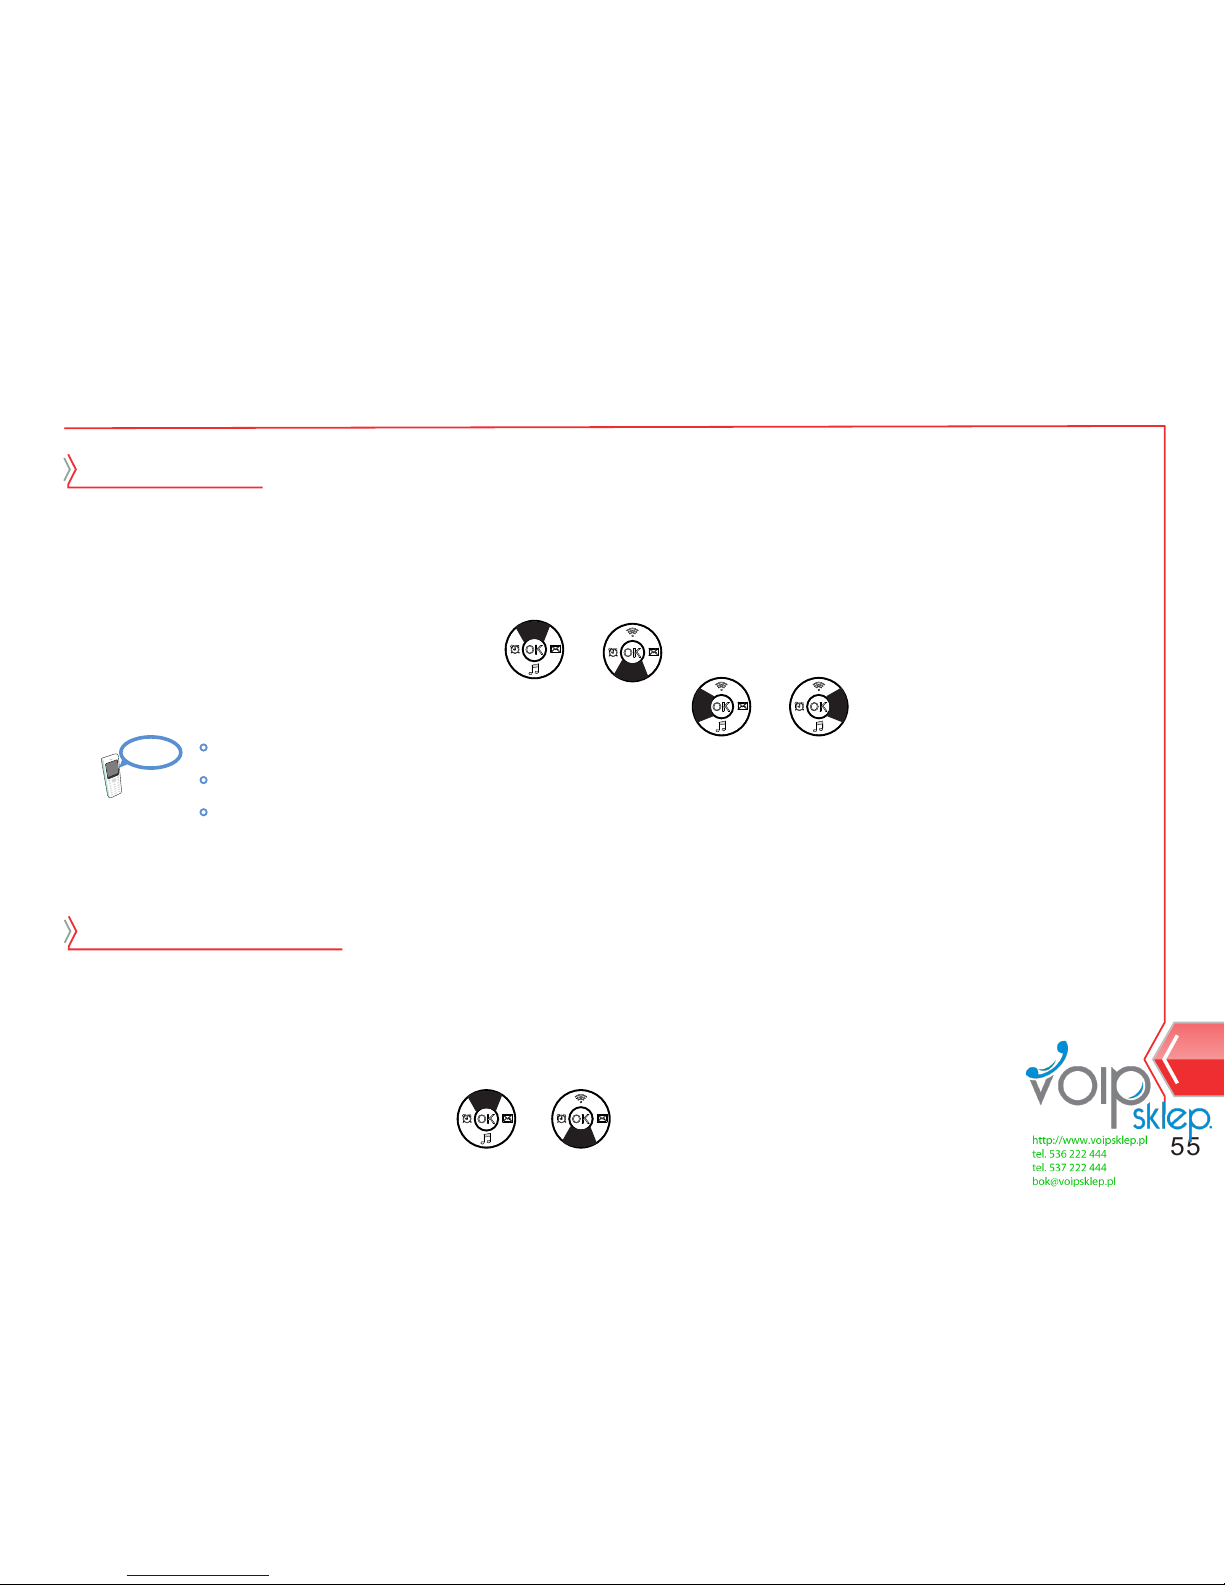
1. At standby screen, select Menu → Setting → Reception switch.
2. Select option item by using or button.
When call is received, user can switch to other number.
Reception switch
1. At standby screen, select Menu → Setting → Call setting.
2. Select response mode by using or key.
3. Select response mode, that user wants, by using or button.
4. Save call setting by pressing menu button.
Call setting
Call setting for responding for the calls.
Call key : Call reception is available by only call key.
All key : Call reception is available by all key.
Automatic response : Automatic response function when the phone receives a call.
Page 58

56
Reference
Reference
3. To use reception switch function, user must set Activate or Inactivate.
Unconditional : Switch all the call unconditionally.
During phone call : Switch only during the phone call.
No response : Switch when the call doesn’t respond.
1. At standby screen, select Menu → Setting → Call lock.
2. Select call lock by using or button.
3. Save the setting by pressing menu button.
Call lock
Select activate or inactivate of call lock.
Page 59

Reference
57
Setting
1. At standby screen, select Menu → Setting → Call lock.
2. Select call lock code change by using or button.
Change code for call lock
3. Save the setting by pressing menu button.
Enter the current password.
Enter the new password.
Re-enter the new password for verifying.
1. At standby screen, select Menu → Setting → Block sending/receiving → receiving.
2. Select option by using or button.
3. Save the setting by pressing menu button.
Block sending/receiving
Receiving
Off ALL 060 070
Page 60

58
Sending
1. At standby screen, select Menu → Setting → Block sending/receiving → Sending.
2. Select option by using or button.
3. Save the setting by pressing menu button.
Off ALL Internationally call Mobile number 060/070
1. At standby screen, select Menu → Setting → Security setting → Phone lock.
2. Select activate by using or button.
Security setting
Activate the phone lock
When security setting is on, user must enter the password when turning on the phone.
Page 61

59
Setting
Phone can be initialized as manufacturer`s setting.
Setting initialization
1. At standby screen, select Menu → Setting → Setting initialization.
3. Password input screen will show up when user press menu button.
4. It gets activated after menu button gets pressed.
1. At standby screen, select Menu → Setting → Security setting → Change password.
To prevent disapproved user, security number for phone lock is used, and manufacture`s initial
password is 0000. To prevent disapproved user, please change the password.
Change password for phone lock
Enter the current password.
Enter the new password.
Re-enter the new password for verifying.
Reference
Page 62

60
2. Enter the password
3. Re-enter the password for verifying.
Be cautious about that all the user information including phone numbers, call history will be erased.
1. At stand-by screen, select menu → setting → phone information.
2. Select serve menu by using or key.
My number Firmware information MAC address
Caution
Page 63
CAUTION!!
Wi-Fi Phone and a desktop or laptop computer must be connected to the same AP(Access
Point)
STEP 1: You can see the IP address of the phone in the menu(Phone Setting→My phone
info →Network info)
STEP 2: Please, write the IP and Port(8080) the following in the URL of Explore
(example: http://192.168.200.11:8080)
STEP 3 : Login ID : admin, PW : 9999
61
Setting
Wi-Fi phone to register on the web site
Page 64
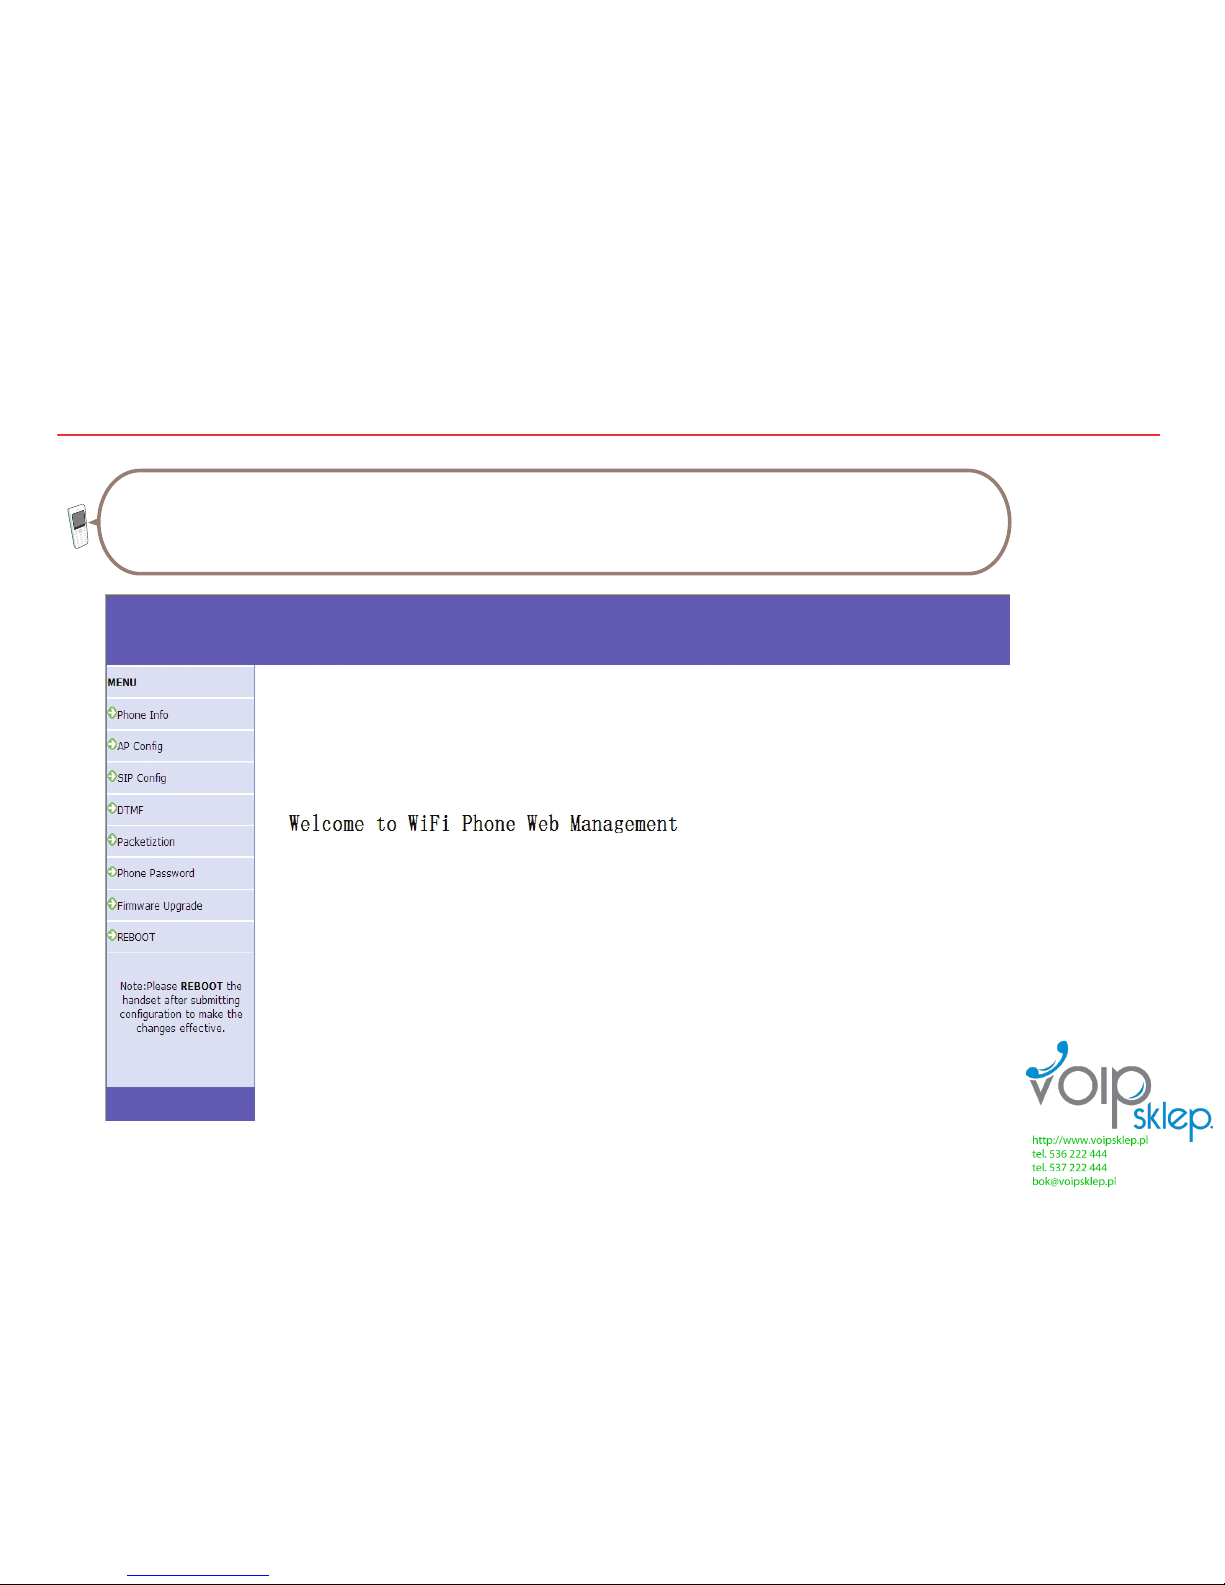
STEP 4: Click the “MENU” at the top-left in the web page then you can confirm menus
for administration as below.
62
Page 65
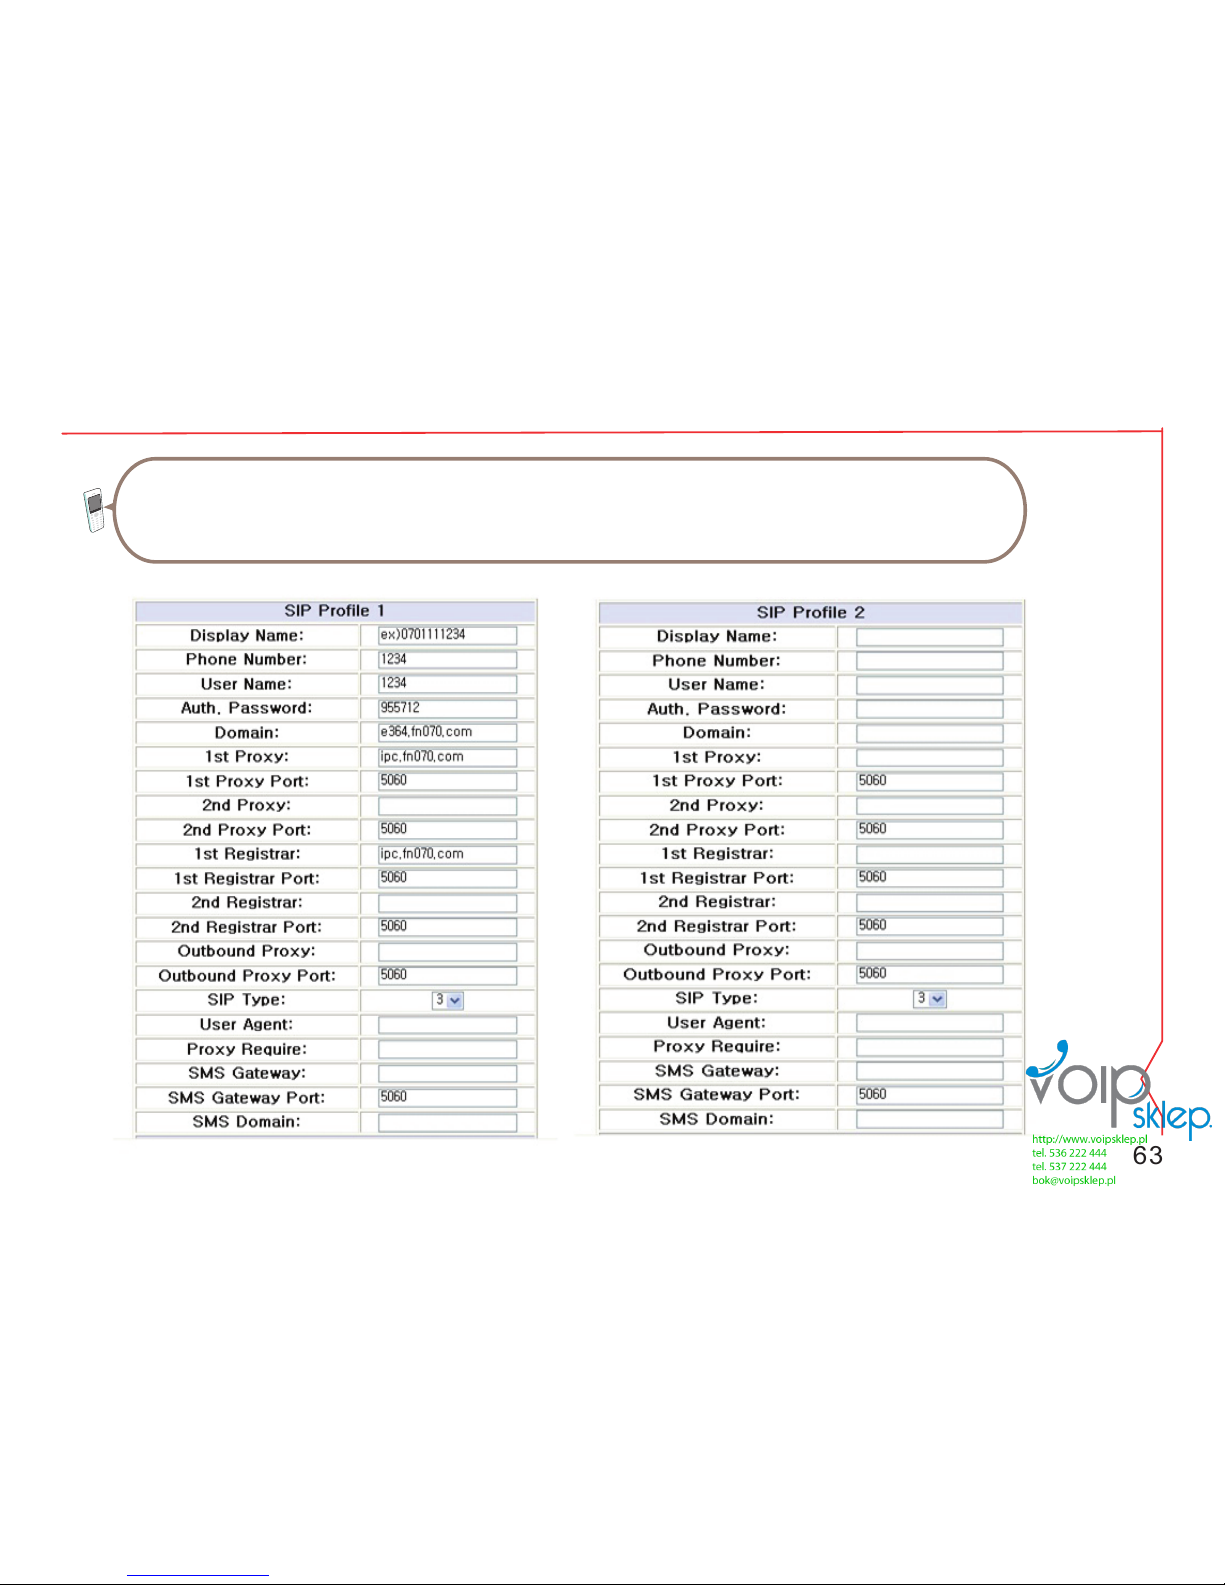
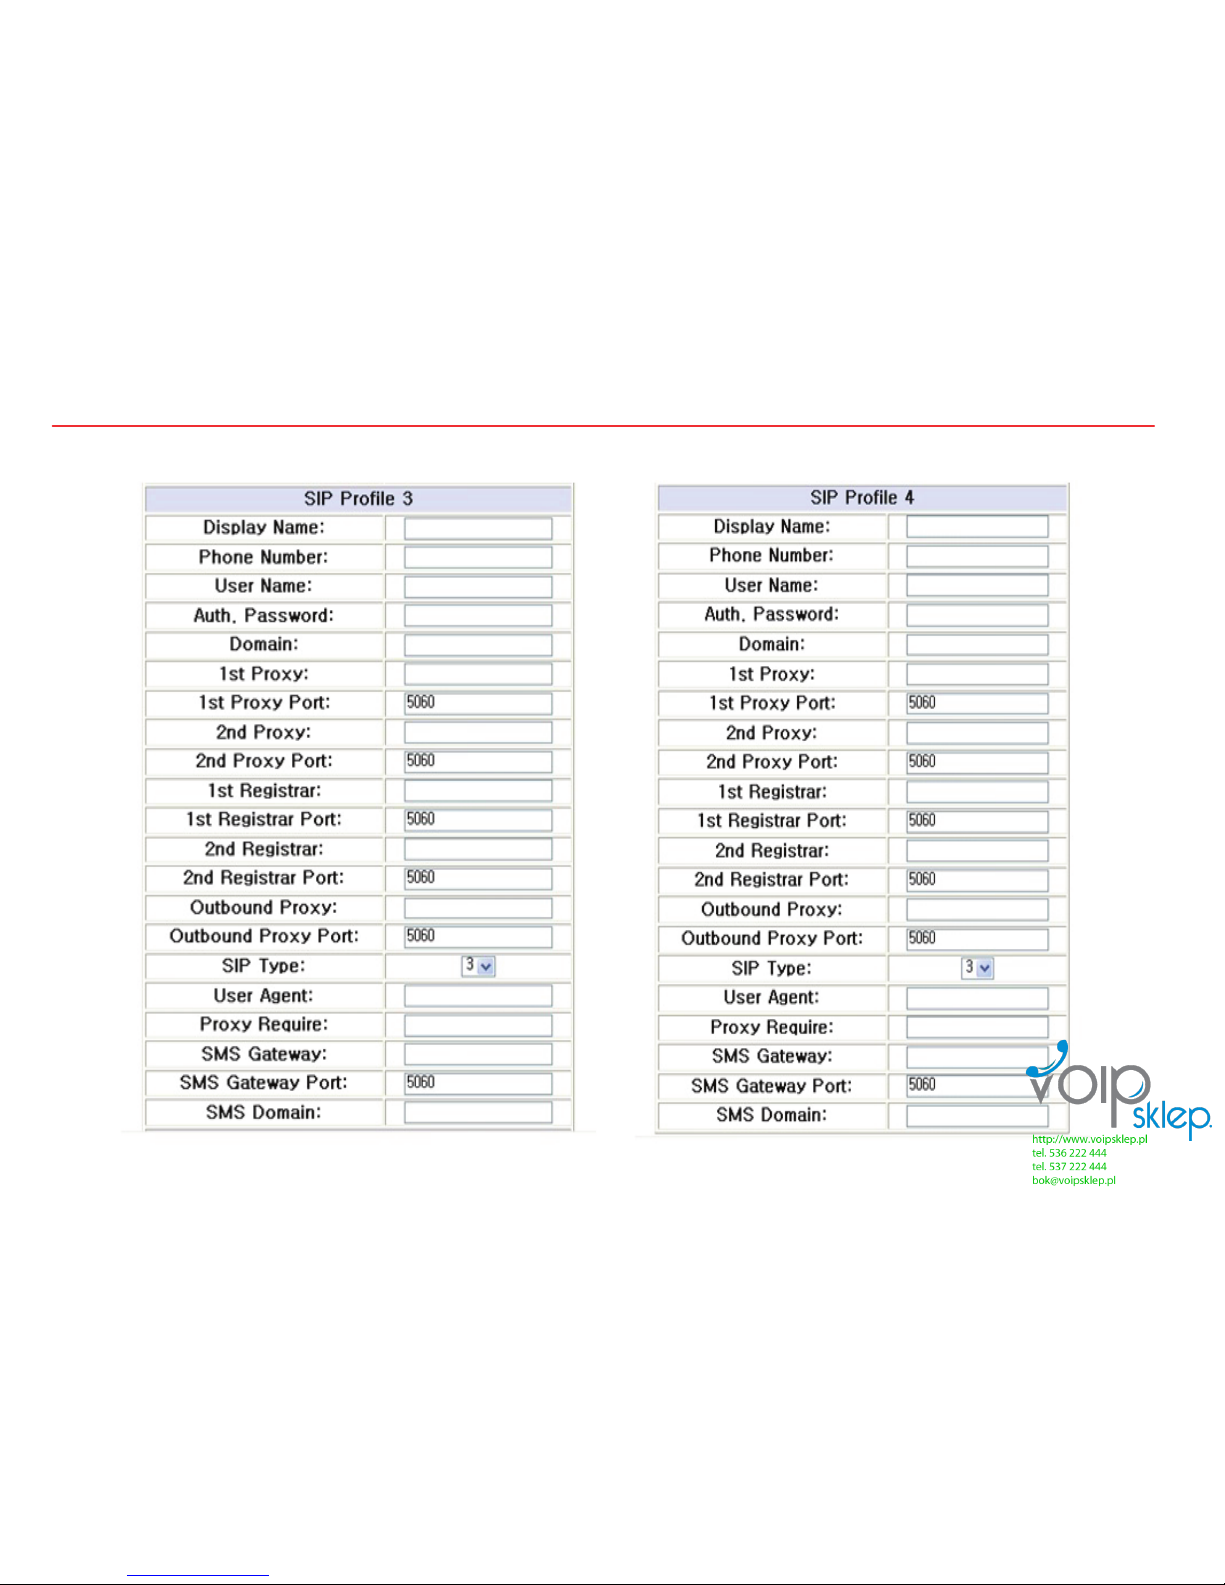
STEP 5: Click the “SIP Config” and then you can see SIP Profile 1, SIP Profile 2,
SIP Profile 3, SIP Profile4 .→ input as below.
63
Setting
Setting
63
63
Page 66
64
Page 67
CAUTION!!
Wi-Fi Phone and a desktop or laptop computer must be connected to the same AP(Access
Point)
STEP 1: You can see the IP address of the phone in the menu(Phone Setting→My phone
info →Network info)
STEP 2: Please, write the IP and Port(8080) the following in the URL of Explore
(example: http://192.168.200.11:8080)
STEP 3 : Login ID : admin, PW : 9999
65
Setting
Firmware upgrade of Wi-Fi phone on the web site.
Page 68
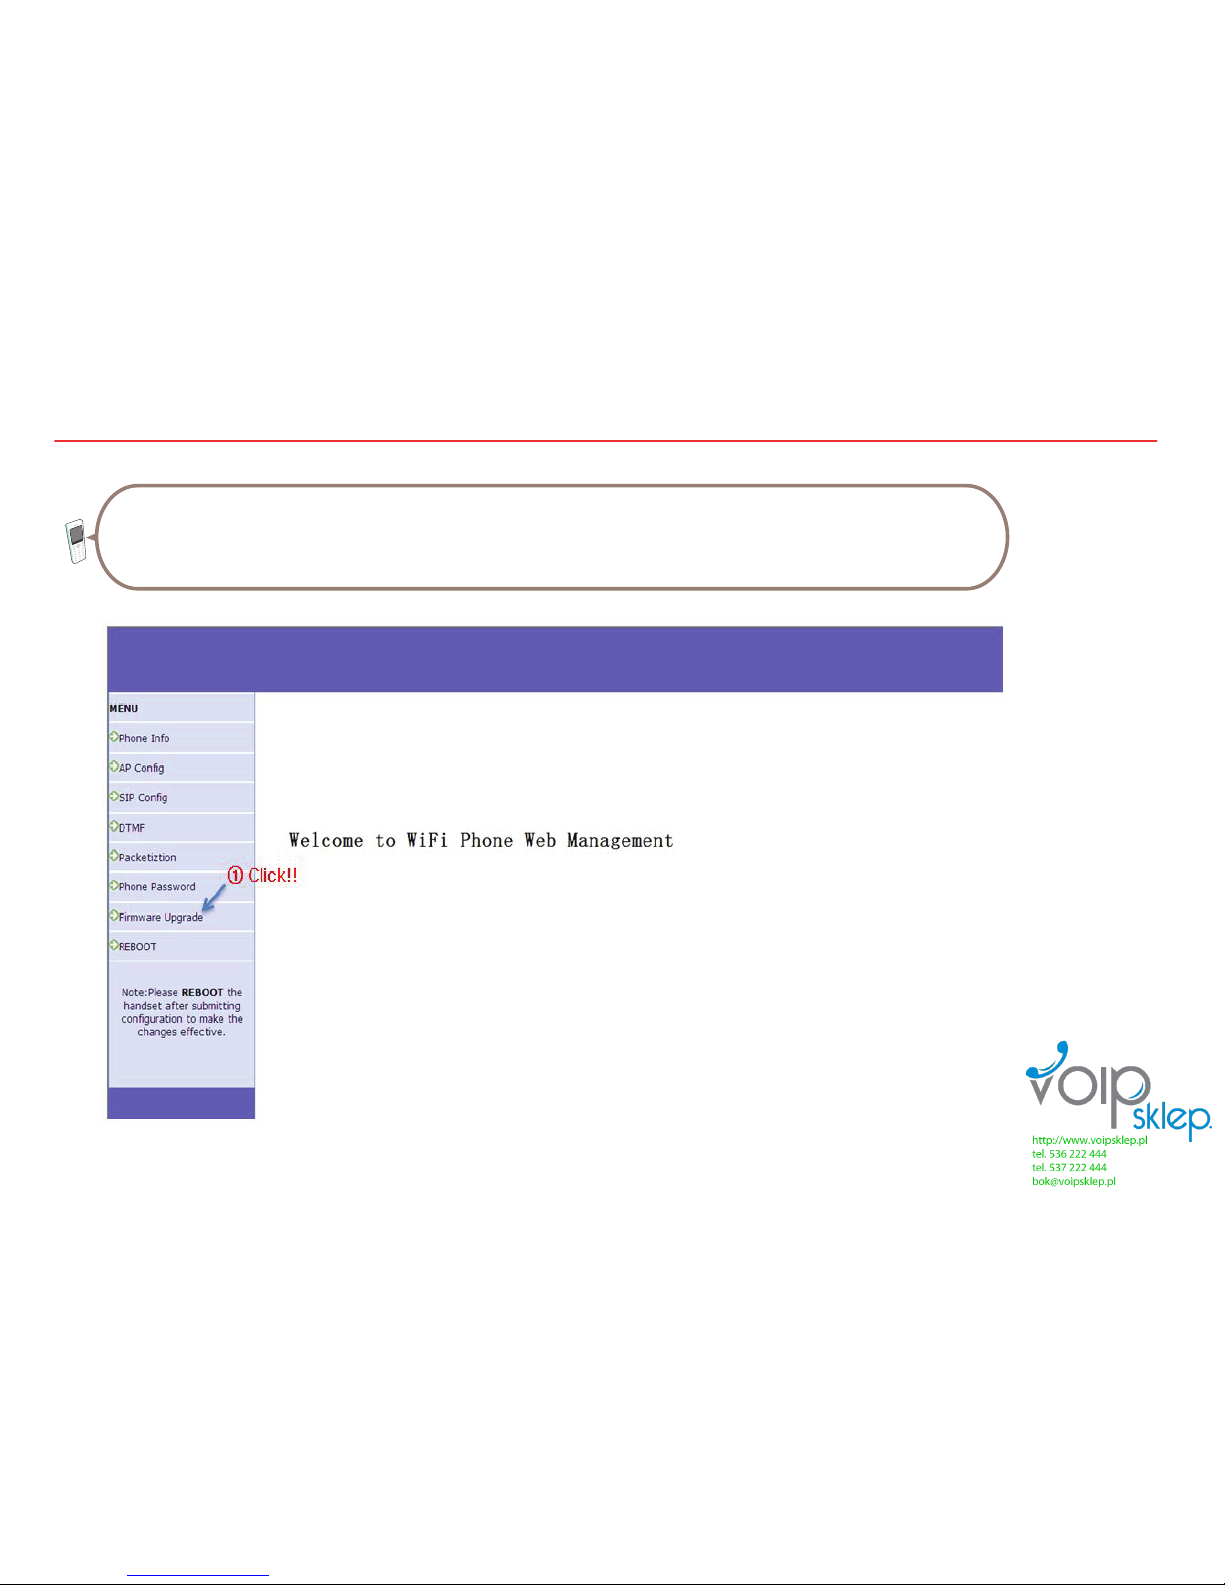
STEP 4: Click the “MENU” at the top-left in the web page then you can confirm menus
for administration as below.
66
Page 69
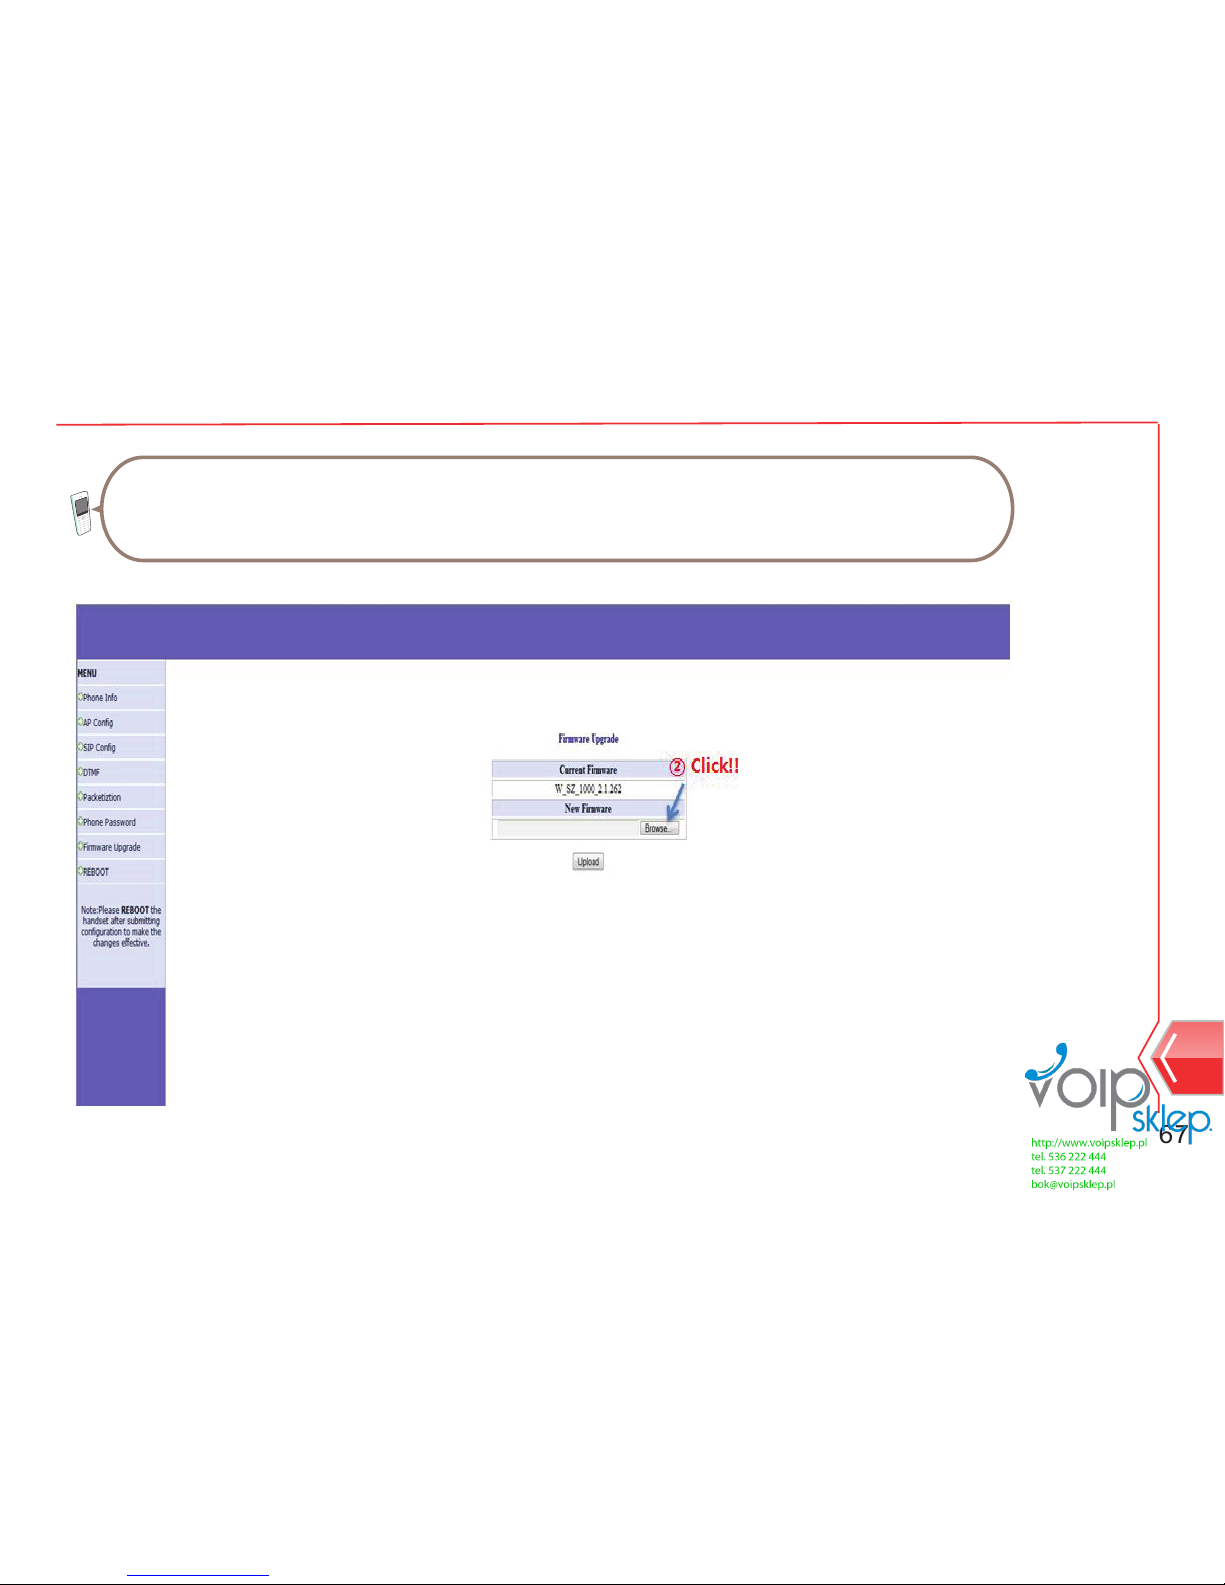
STEP 5: Click the “Firmware upgrade” and then you can see the “Current Firmware” and
“New Firmware”.
67
Setting
Page 70
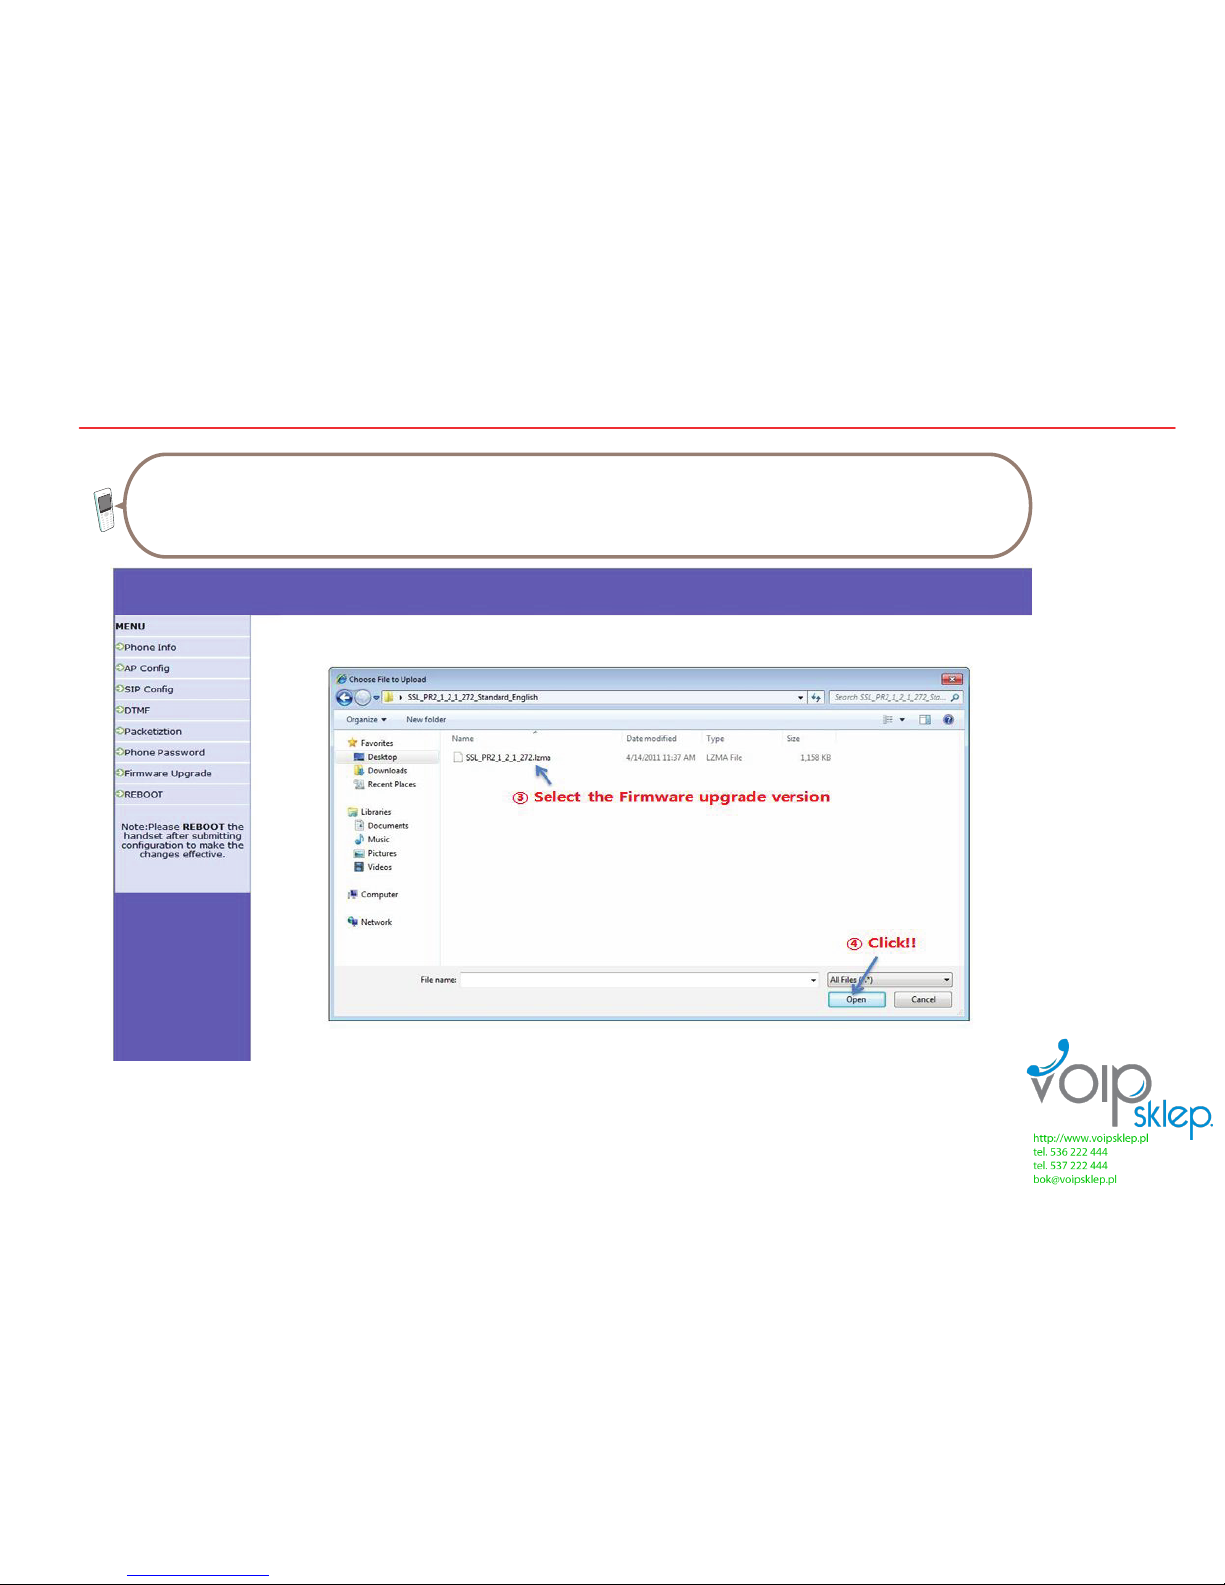
STEP 6: When you upgrade the firmware on the web .lzma file selection.
68
Page 71
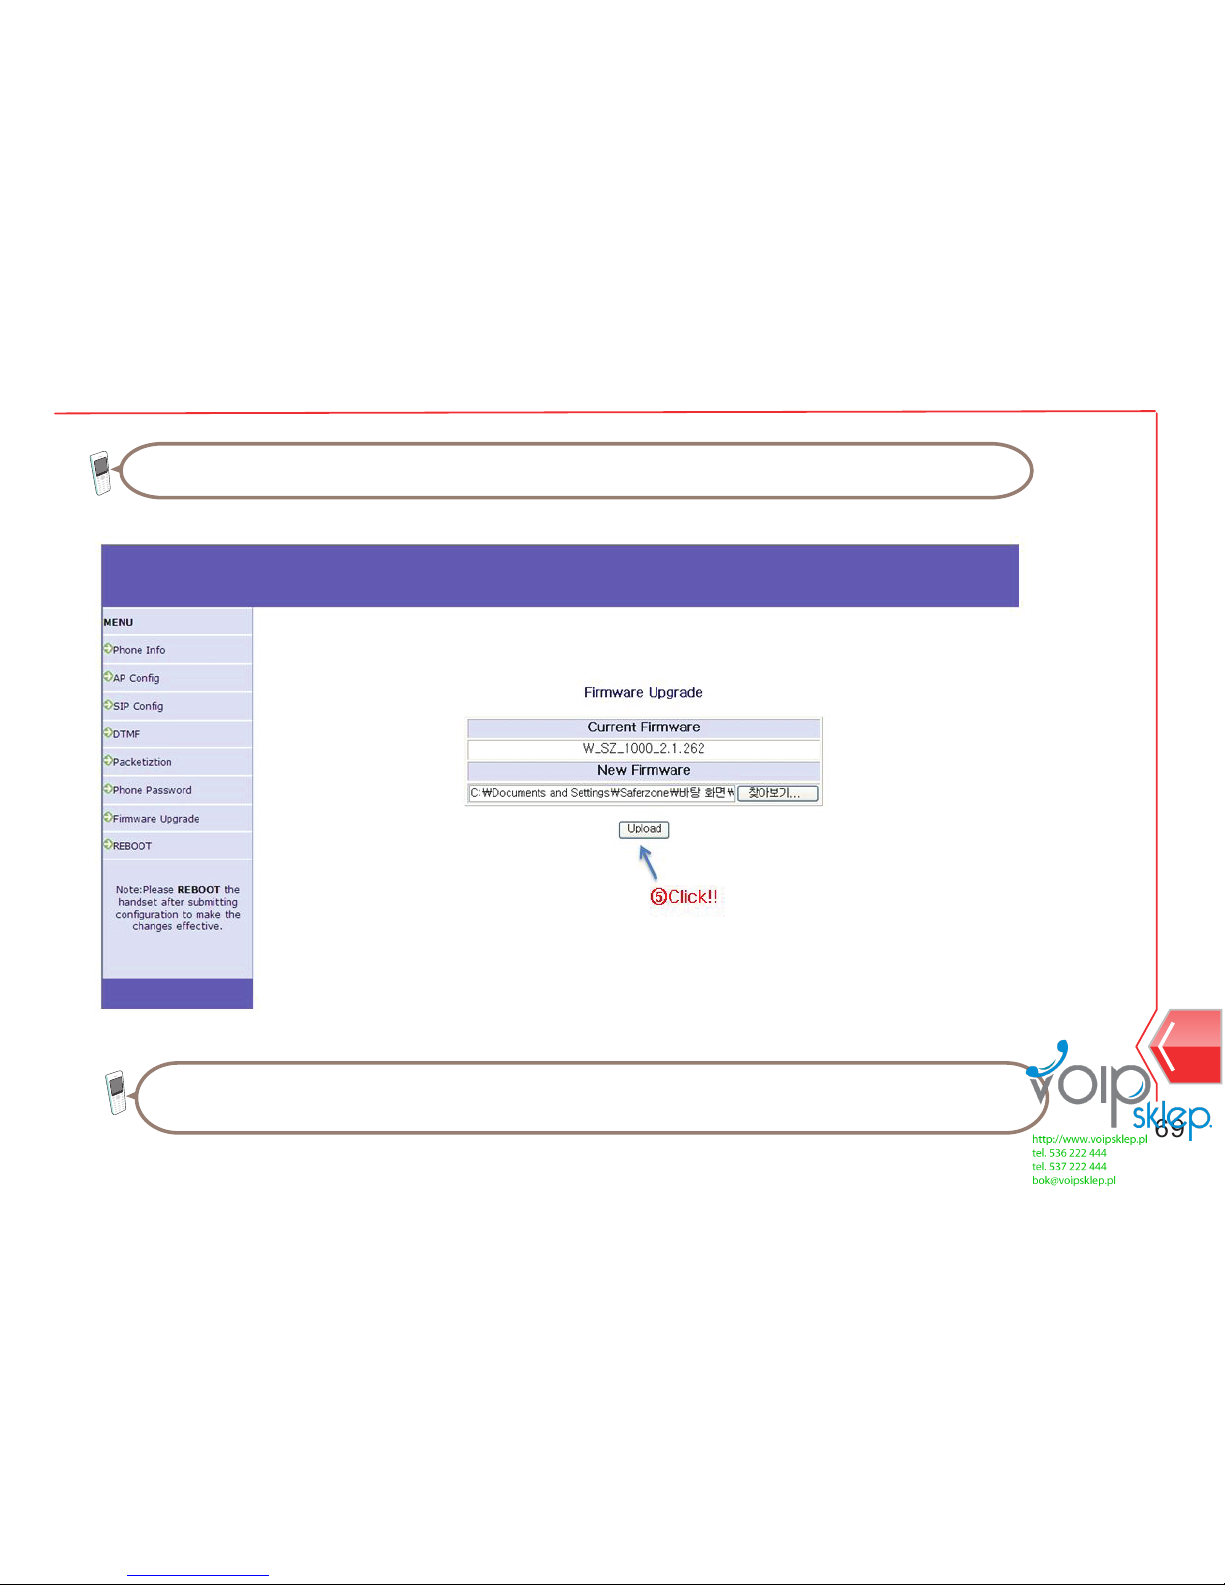
STEP 7: Click upload.
STEP 8:You can see “Prepare to download ...%” on the lcd screen.
69
Setting
Page 72
70
When the Wi-Fi phone doesn`t get turned on
When the phone call doesn`t work even after purchase of additional Wi-Fi phone.
Before contact to service center
Check that if the phone is properly installed.
Check that if the battery is recharged enough.
Press the power button of Wi-Fi phone.
Take off the battery and re-insert it when the phone is not working as the power is turned
Check that if the phone is properly installed.
Check that if the Wi-Fi phone is connected to AP.
In order to check, go to Wi-Fi phone menu, then setting → WiFi setting → AP search.
Check that if error message comes up after turning on/off the Wi-Fi phone.
Check that if the battery of the Wi-Fi phone got recharged enough.
Check that if the power of the Wi-Fi phone is on.
 Loading...