

Page 1
JOYCE ČR, s.r.o., Venhudova 6, 614 00 Brno, ČR, IČ: 25317571, DIČ: CZ25317571, Tel.: +420 539 088 010
Fax: +420 539 088 000, E-mail: [email protected], Web: www.joyce.cz, www.joyce-energie.cz
Released for firmware versions V61
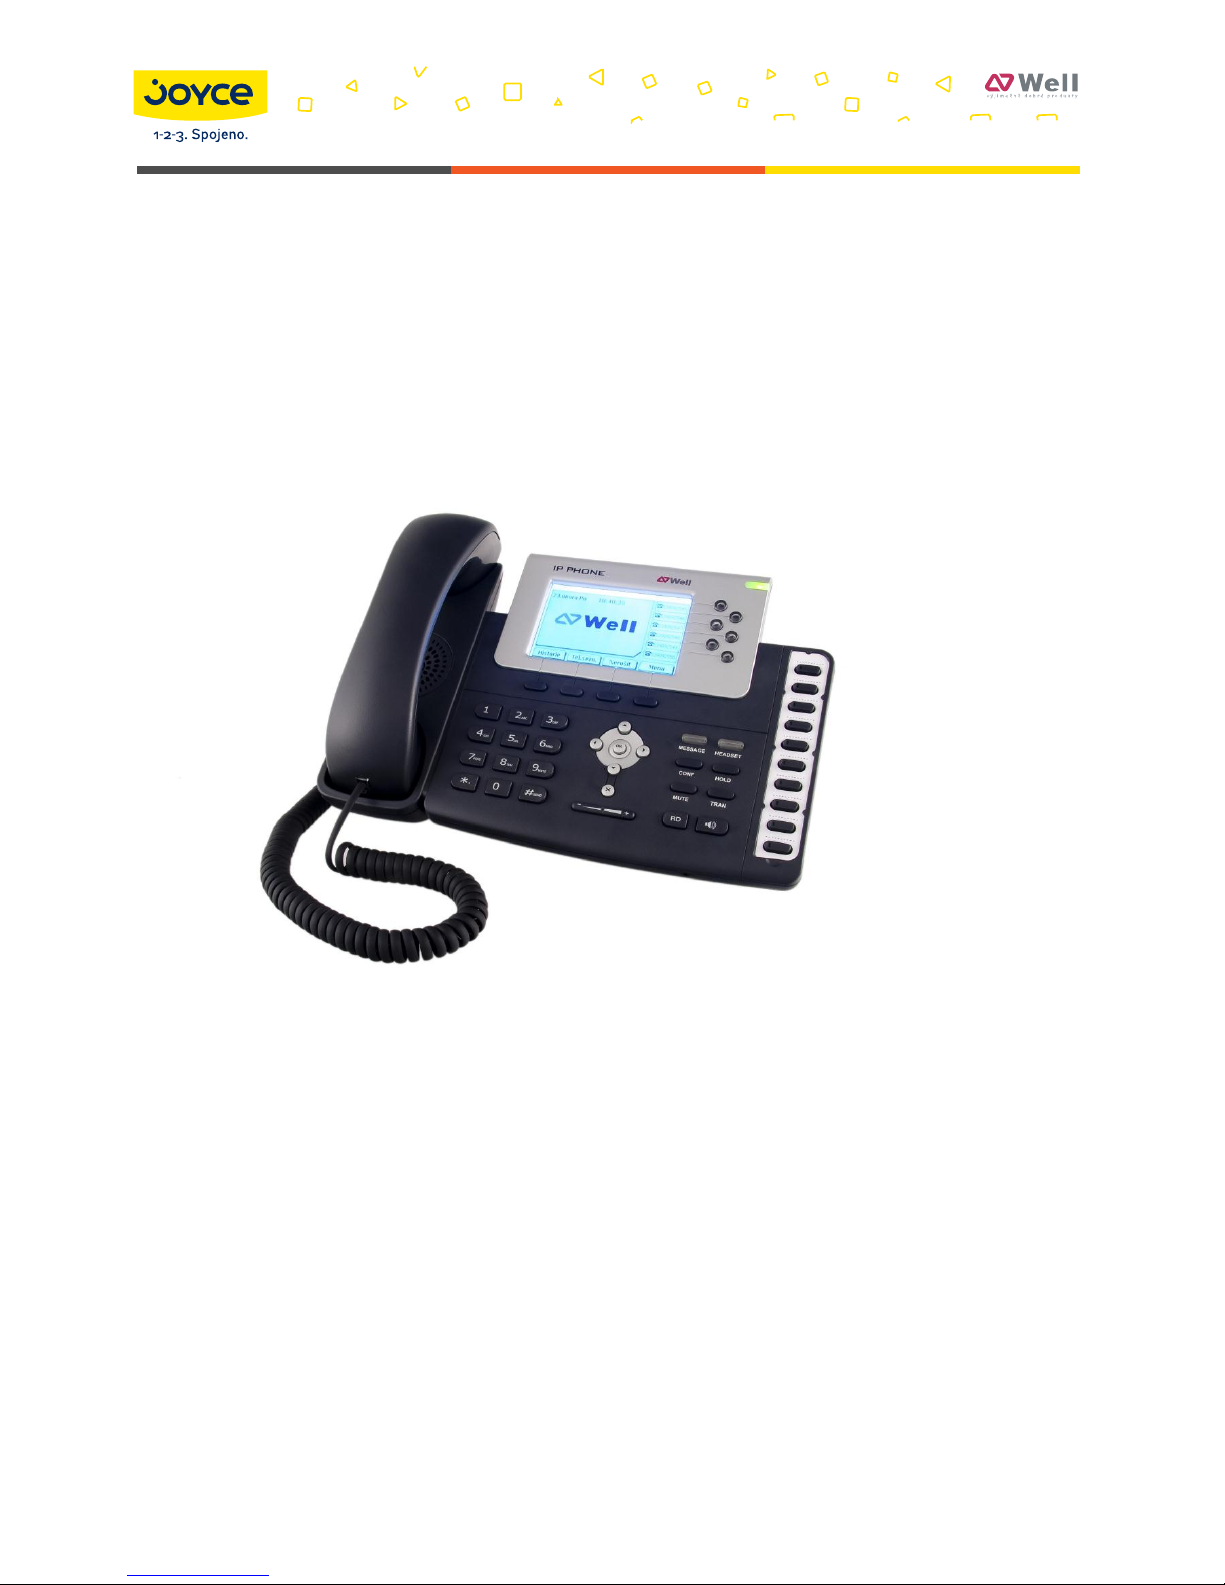
WELL SIP-T28P User manual
Page 2

Released for firmware versions V61
About This Guide
Thank you for choosing this Enterprise IP Phone which is especially designed for
power users in the office environment. It features fashionable and sleek design,
abundant telephony applications, broad interoperability with the popular 3rd party
VoIP products, fulfilling the VoIP deployment needs from enterprise and ITSP.
In this User Guide, you will find everything you need to quickly use your new phone.
Be sure to verify with your system administrator that your network is prepared for
configuring your IP phone. As well, be sure to read the Packing List section in this
guide before you set up and use the phone.
Declaration of Conformity
Hereby, it’s declared that this phone is in conformity with the
essential requirements and other relevant provisions of the CE, FCC.
CE Mark Warning
This is a class B device, in a domestic environment; this product may cause radio
interference, in which case the user may be required to take adequate measures.
WEEE Warning
To avoid the potential effects on the environment and human health
as a result of the presence of hazardous substances in electrical and
electronic equipment, end users of electrical and electronic equipment
should understand the meaning of the crossed-out wheeled bin
symbol. Do not dispose of WEEE as unsorted municipal waste and
have to collect such WEEE separately.
Page 3

Contents
_Toc301357893
Getting Started ..................................................... 1
Packing List................................................................................................ 1
Assembling the Phone ................................................................................. 3
Configuration and Registration ..................................................................... 5
Configuring via Web Page ....................................................................... 5
Configuring via keypad .......................................................................... 6
Overview .............................................................. 7
Keypad Instruction ...................................................................................... 7
LED Instruction .......................................................................................... 9
Icon Instruction ........................................................................................ 10
User Interface .......................................................................................... 11
Customizing Your Phone ..................................... 14
General Settings ....................................................................................... 14
Phone Status ...................................................................................... 14
Language ........................................................................................... 14
Time and Date .................................................................................... 15
Keypad Lock ....................................................................................... 17
Audio Settings .......................................................................................... 19
Volume .............................................................................................. 19
Ring Tones ......................................................................................... 20
Codec Selection .................................................................................. 21
Contact Management ................................................................................ 22
Edit/Add/Delete Contact ....................................................................... 22
Import/Export Contact list .................................................................... 27
BlackList ............................................................................................ 27
Remote Phone Book ............................................................................ 28
Broadsoft ........................................................................................... 30
LDAP ................................................................................................. 31
Other Settings .......................................................................................... 32
Key as Send ....................................................................................... 32
Hot Line ............................................................................................. 32
Headset Prior ...................................................................................... 33
Dual Headset ...................................................................................... 34
Anonymous call .................................................................................. 34
Auto Redial ......................................................................................... 35
Auto Answer ....................................................................................... 36
Page 4

Missed call log .................................................................................... 38
Broadsoft Call Log ............................................................................... 38
Logo Customization ............................................................................. 39
Programmable Key .............................................................................. 40
Softkey Layout.................................................................................... 41
Live Dialpad ....................................................................................... 42
Replace Rule ....................................................................................... 43
Dial Now ............................................................................................ 44
Area Code .......................................................................................... 45
Block Out ........................................................................................... 46
Feature Synchronisation ....................................................................... 47
Push XML ........................................................................................... 47
WatchDog .......................................................................................... 49
Basic Call Functions ............................................ 50
Making a call ............................................................................................ 50
Call Devices ........................................................................................ 50
Call Methods ....................................................................................... 50
Password dial ..................................................................................... 52
Call Completion................................................................................... 53
Answering a call ....................................................................................... 54
Answering an incoming call .................................................................. 54
Denying an incoming call ..................................................................... 54
DND .................................................................................................. 54
Intercom ............................................................................................ 54
Call Forward ....................................................................................... 55
Active Call ............................................................................................... 57
Mute .................................................................................................. 57
Call Hold ............................................................................................ 57
Call Waiting ........................................................................................ 57
Call Transfer ....................................................................................... 58
3-way Conference ............................................................................... 59
Network Conference ............................................................................ 60
HuaWei ATS Conference ....................................................................... 61
Message .................................................................................................. 62
Voicemail ........................................................................................... 62
SMS .................................................................................................. 64
Advanced Phone Functions ................................. 67
Account Settings ...................................................................................... 67
TLS ................................................................................................... 68
DNS-SRV ........................................................................................... 69
Network Setting ....................................................................................... 70
PC Port Setting ................................................................................... 70
Page 5

VLAN Setting ...................................................................................... 72
LLDP.................................................................................................. 73
HTTPS ............................................................................................... 74
Maintenance Tasks .................................................................................... 76
Administrator Mode ............................................................................. 76
Administrator/User Password ................................................................ 76
Reboot ............................................................................................... 77
Reset to Factory .................................................................................. 77
Firmware Update ................................................................................. 79
Zero-sp-touch ..................................................................................... 82
System Log Export .............................................................................. 83
PCAP Trace Export ............................................................................... 83
802.1X .............................................................................................. 84
DSS key Configuration .............................................................................. 84
Line ................................................................................................... 85
Speed Dial ......................................................................................... 85
BLF ................................................................................................... 86
BLF List .............................................................................................. 86
Voice Mail ........................................................................................... 86
Pick Up .............................................................................................. 87
Group Pick up ..................................................................................... 87
Call Park ............................................................................................ 87
Intercom ............................................................................................ 88
DTMF ................................................................................................. 88
Prefix................................................................................................. 88
Local Group ........................................................................................ 89
XML Group ......................................................................................... 89
XML Browser ...................................................................................... 89
LDAP ................................................................................................. 89
Broadsoft Group .................................................................................. 90
Conference ......................................................................................... 90
Forward ............................................................................................. 90
Transfer ............................................................................................. 90
Hold .................................................................................................. 91
DND .................................................................................................. 91
Redial ................................................................................................ 91
Call Return ......................................................................................... 91
SMS .................................................................................................. 91
Record ............................................................................................... 92
URL Record ........................................................................................ 92
Multicast Paging .................................................................................. 92
Group Listening .................................................................................. 94
Public Hold ......................................................................................... 94
Private Hold ........................................................................................ 94
Page 6

Shared Line ........................................................................................ 94
Hot Desking ....................................................................................... 95
Automatic Call Distribution (ACD) .......................................................... 95
Zero-sp-touch ..................................................................................... 97
URL ................................................................................................... 97
SNMP ...................................................................................................... 97
Action URL ............................................................................................... 99
Action URI ............................................................................................. 100
Music on Hold......................................................................................... 100
SIP Diversion Display .............................................................................. 101
Suppress DTMF Display ........................................................................... 102
Tone Settings ......................................................................................... 102
Voice ..................................................................................................... 103
Ring ...................................................................................................... 104
Trouble Shooting .............................................. 106
Page 7
Enterprise IP Phone Getting Started
1
Getting Started
Packing List
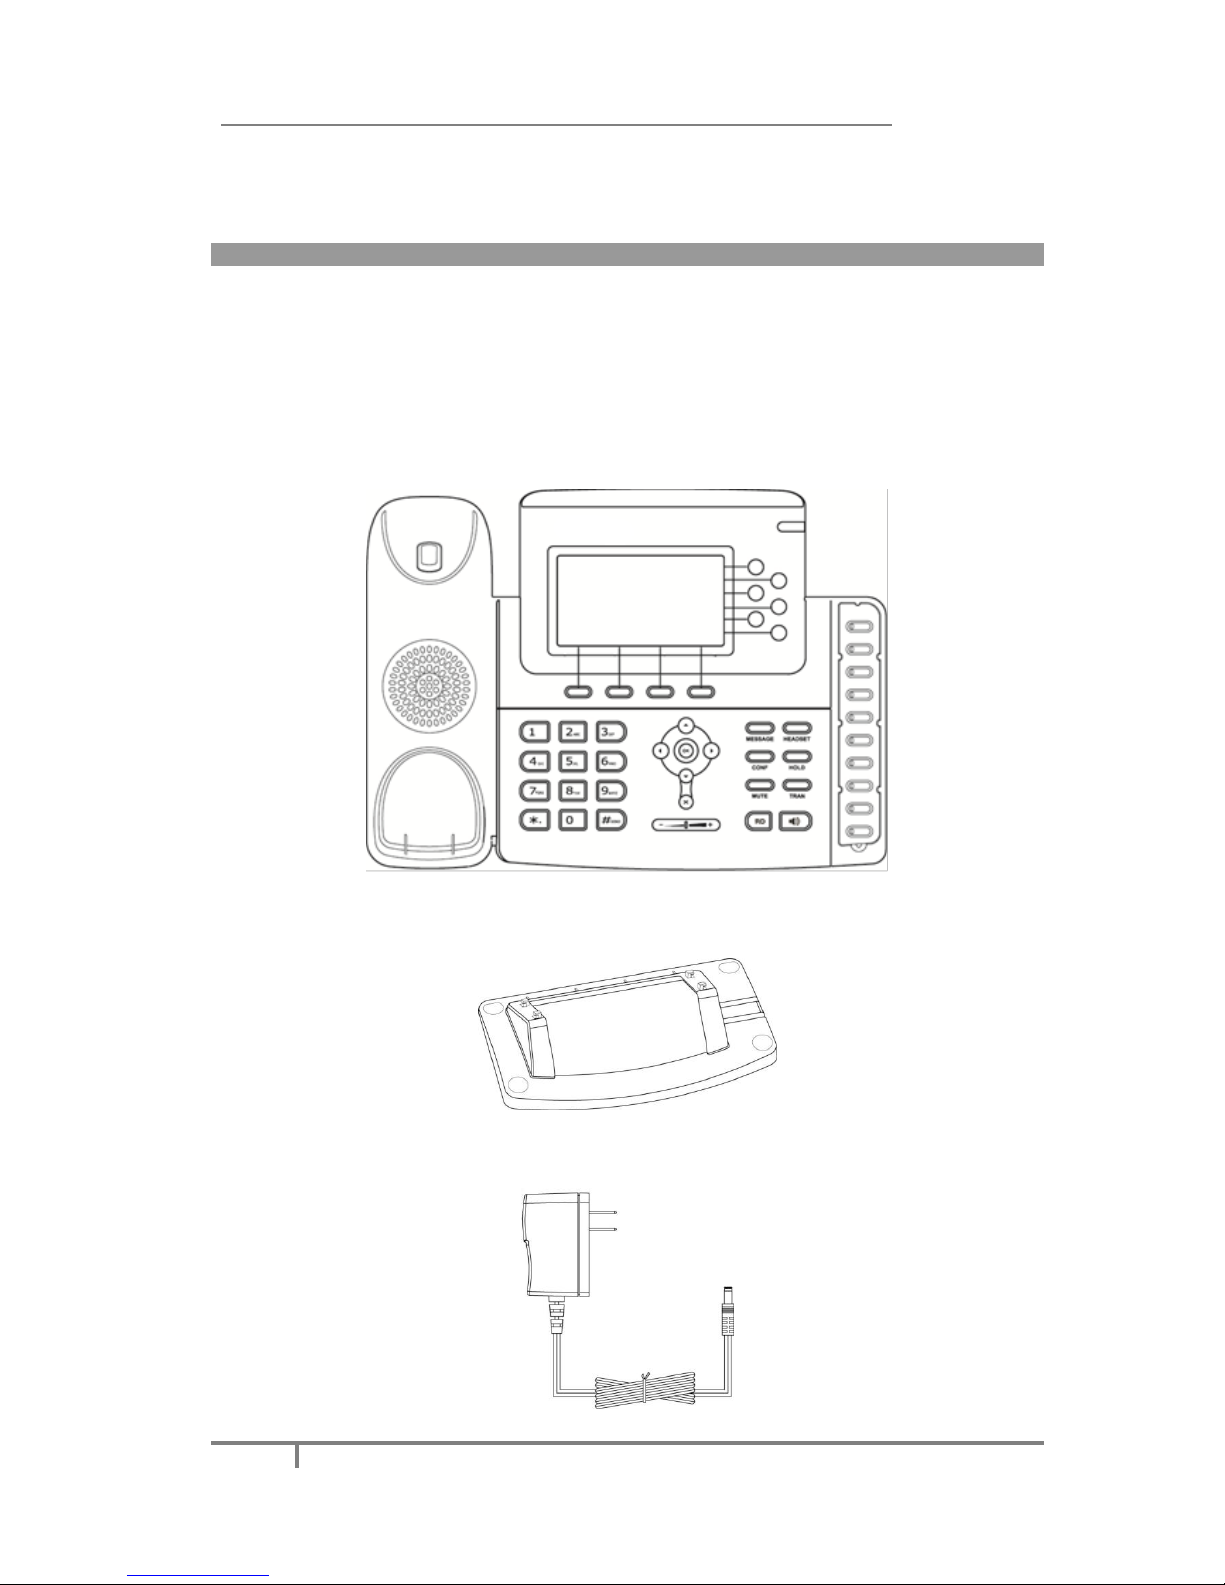
The following components are included in your package:
Enterprise IP Phone
Phone Stand
Power Adapter
Page 8

Enterprise IP Phone Getting Started
2
Handset & Handset Cord
Ethernet Cable
Quick Installation Guide & Quick Reference
CD Content
Check this list before installation to ensure that you have received each item. If you
are missing any items, contact your IP phone reseller.
Page 9
Enterprise IP Phone Getting Started
3
Assembling the Phone
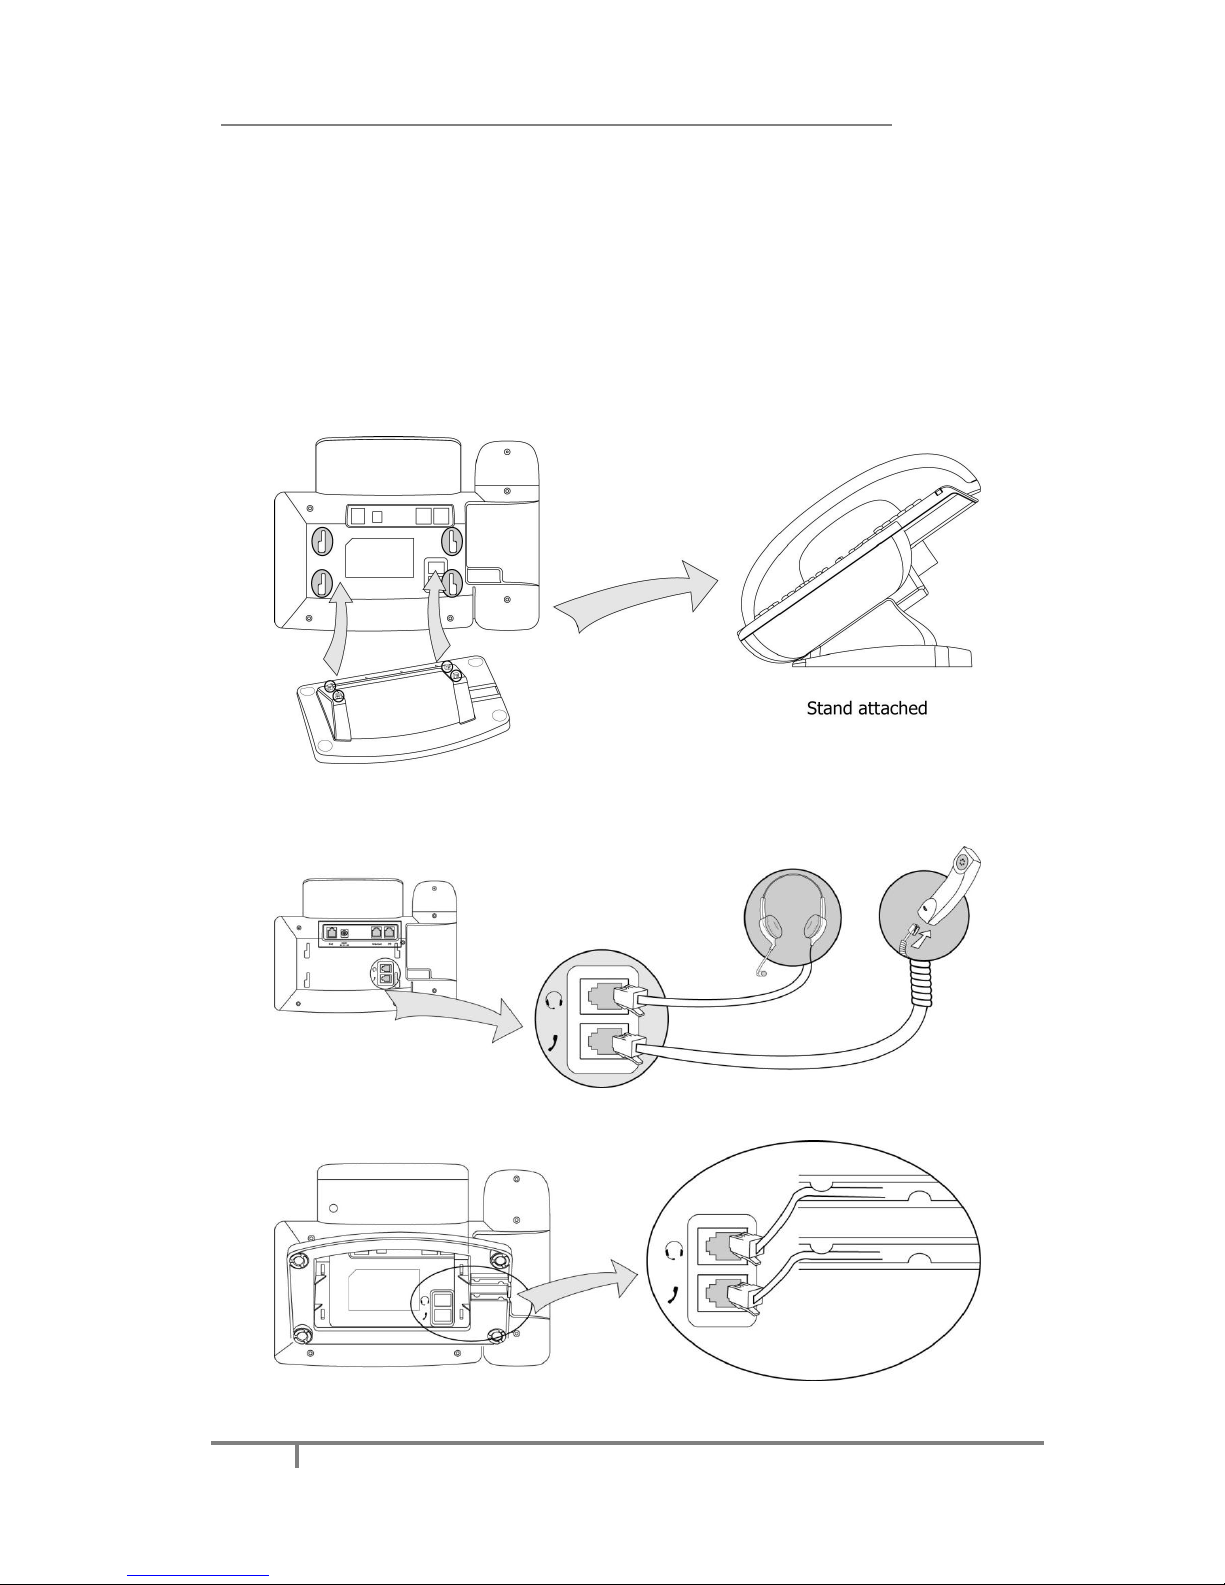
This section introduces how to assemble the phone with the components in the
packing list:
Attach the stand;
Connect Handset and Headset;
Connect Network and Power.
1) Attach the Stand, as shown below:
2) Connect Handset and Headset, as shown below:
Page 10
Enterprise IP Phone Getting Started
4
Note:
Headset is not provided in the packing list. Please contact your distributor for more
information.
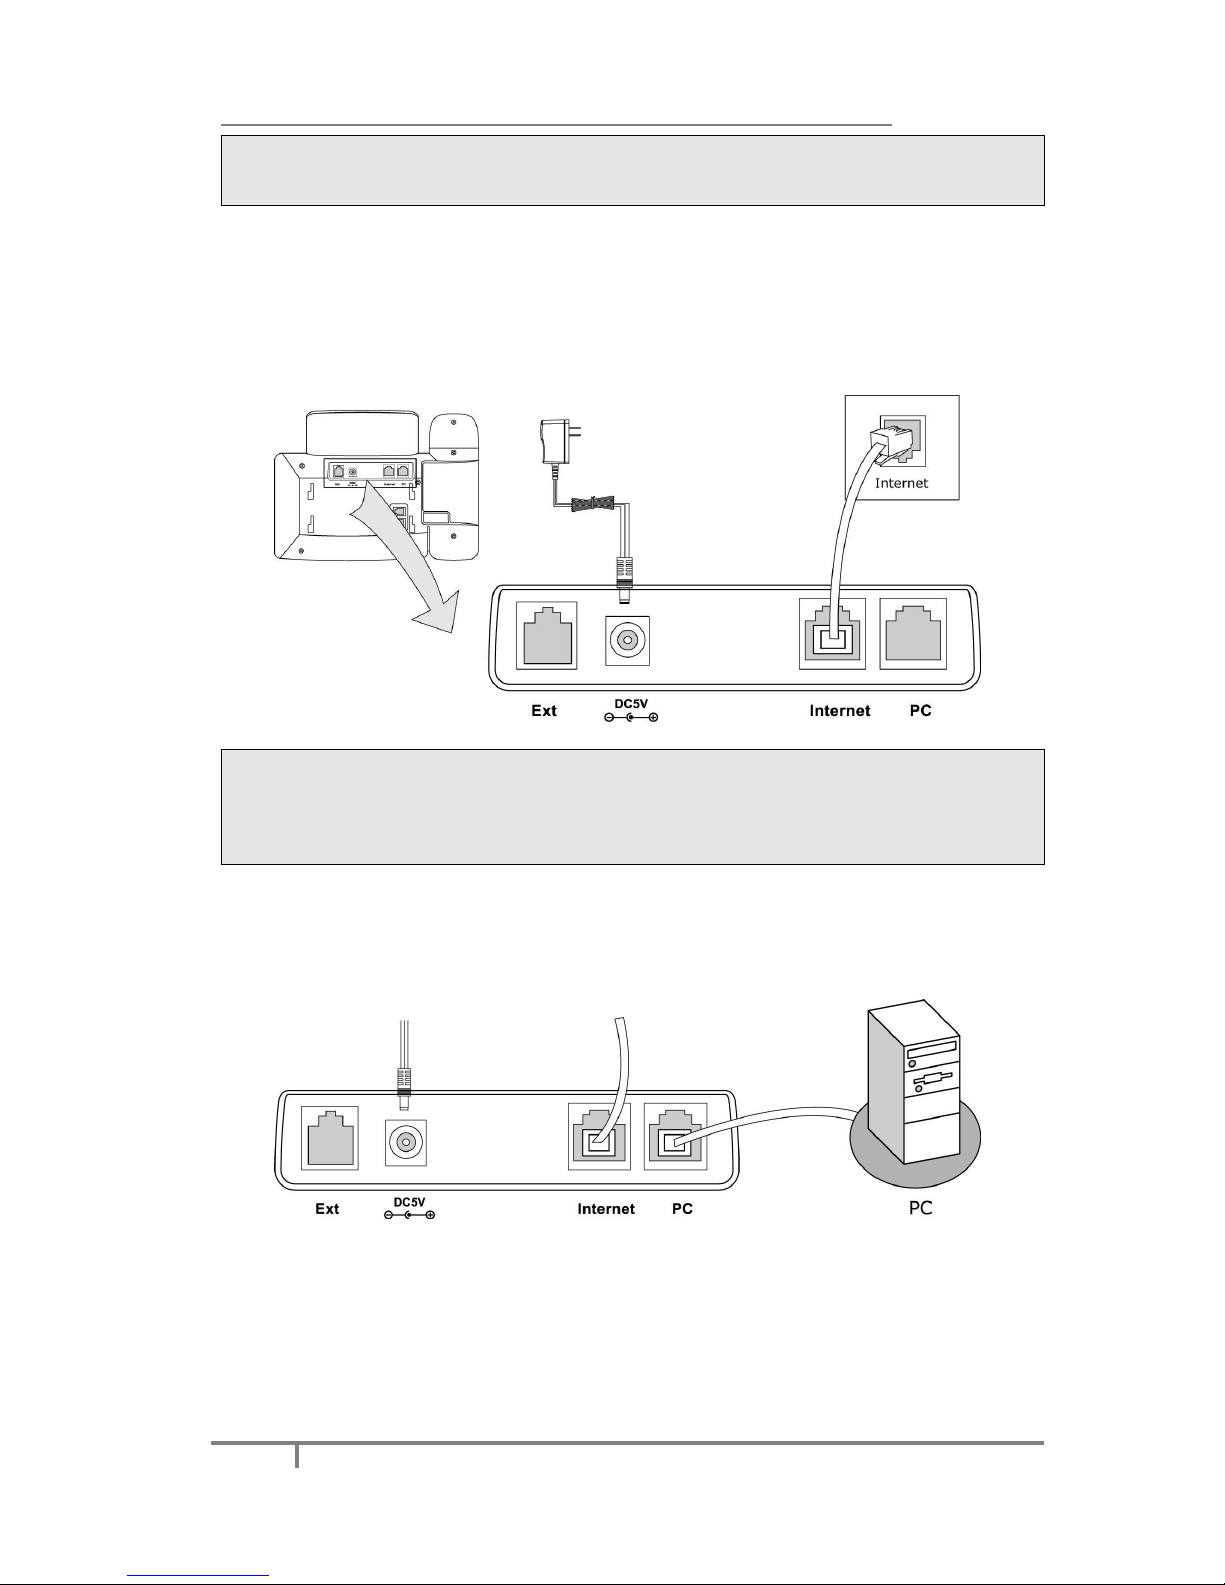
3) Connect Network and Power
There are two ways for network and power source connections. You can either
connect the phone to the AC Power directly using the power adapter or to a PoE
compliant switch or hub. Your system administrator will advise you on which one to
use.
Note:
1. If inline power is provided, do not install AC adapter. Make sure the Ethernet
cable and switch/hub is PoE compliant.
2. The Internet Port can be also connected to Hub/Switch/IP PBX or other internet
devices.
The phone can also share the network connection with other network devices such as
PC. Connect the phone’s PC port and computer’s Network Port together using an
Ethernet cable, shown as below:
Page 11

Enterprise IP Phone Getting Started
5
Configuration and Registration
If you are administrator, you need to do some simple configuration to make the
phone work. If not, please contact your system administrator or service provider for
more details.
Configuring via Web Page
Press OK button on the keypad of the phone to enter the status page and find out
the IP address of IP phone. Enter it (for example http://192.168.3.35) into the
address bar of web browser. The default administrator’s login name and password
are admin/admin. The default user’s login name and password are user/user.
Note:
Please locate your PC in the same network segment of IP phone (192.168.3.X) to
access the web configuration page. Please consult your system administrator for
help.
Network Settings
Click on Network-> Internet Port (WAN)
DHCP: Under the default situation, the phone attempts to connect a DHCP Server in
your network in order to obtain its valid network settings, e.g. IP address, sub mask,
gateway, DNS server, etc.
Static IP Address: If your phone can not connect a DHCP Server for any reason,
you need to enter the network settings manually via Static IP Address. Please
contact your system administrator for more details.
PPPoE: If you are using the xDSL Modem, you can connect your phone to the
internet via PPPoE mode. Please contact your ITSP for the User Name and
Password for internet access.
Note:
Using the wrong network parameters may result in inaccessibility of your phone and
may also have an impact on your network performance. Please contact your system
administrator.
Account Settings
The phone attempts to register the SIP server using the account data produced by
the automatic or manual initialization.
Click on Account, you will find the following parameters:
Field
Description
Register Status
It shows the register status of the phone.
Account Active
You can choose on/off to enable/disable the account
respectively.
Label
The name showing on the LCD of current device.
Display Name
The local phone name showing on the other phone when
calling.
Field
Description
Page 12
Enterprise IP Phone Getting Started
6
Register Name
Register name provided by ITSP.
User Name
User account information, provided by ITSP.
Password
Account password provided by ITSP.
SIP Server
SIP server address provided by ITSP.
When you have finished the Network and Account Setting configuration, the Register
Status Icons will be shown in the idle screen:
Register successfully
Register failed
Registering
When all accounts register fail, phone will display "No Service" by default.
When the phone reboot, it will register automatically. If many phones register at the
same time, this will affect the server, users can set the register power up time so
that the phone will random register automatically within the set time.
Setting the power up time via web interface:
Click on Network->Advanced-> Registration random, enter the time in the
field.
Note:
Should the IP PBX (SIP registrar) require an authentication, you will be prompted to
enter the correct password. Make sure you are using the appropriate input method
or enter the password via the web interface.
Configuring via keypad
Network Settings: Press Menu->Settings->Advanced Settings, enter the
password, and select Network ->WAN Port /PC Port /VLAN/Webserver
Type/802.1x Settings/VPN option to enter the internet relating configuration page.
Account Settings: Press Menu->Settings->Advanced Settings, enter the
password, and select Accounts to configure the account settings.
You can refer to the above “Configuring via Web Page” for the parameter details.
Page 13
Enterprise IP Phone Overview
7
Overview
Keypad Instruction
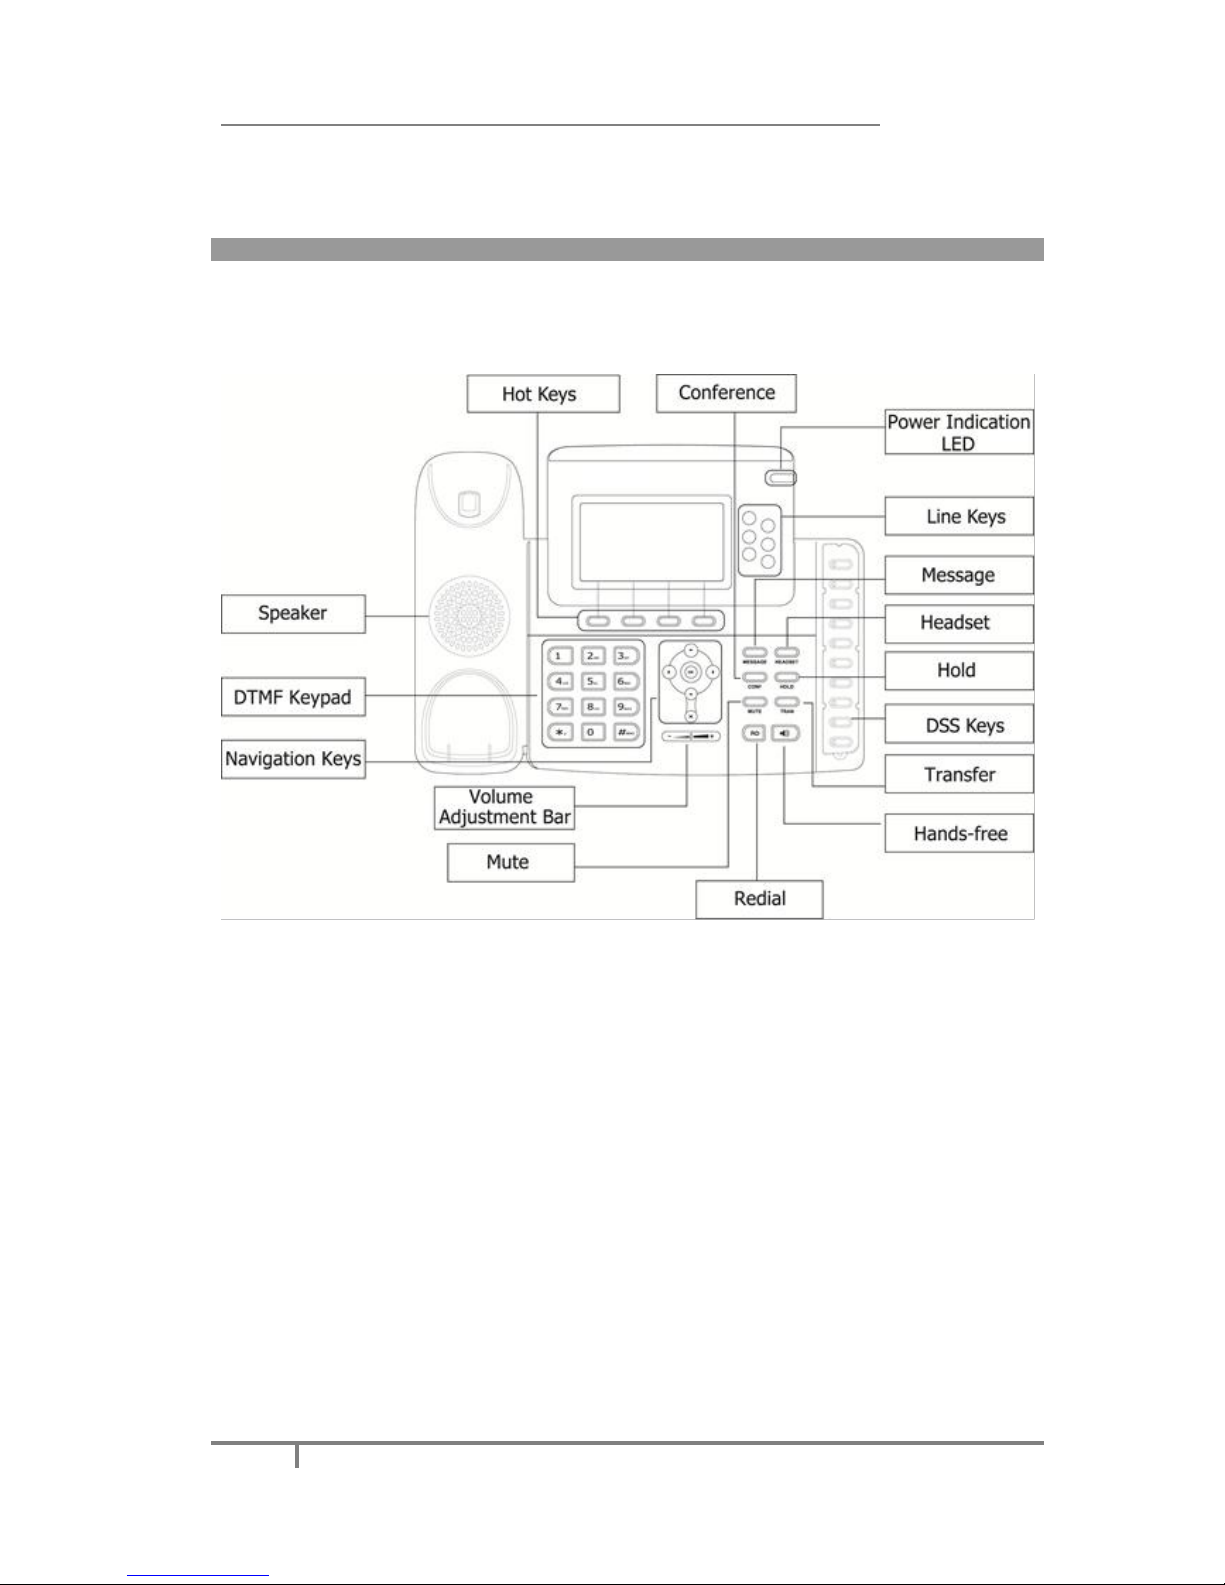
You can check the following list which introduces the IP phone’s keypad in details:
Power Indication LED
It will show the power status, it will be on if the phone is powered, off if the phone is
not powered,and blink when someone calls in or there is a call on mute.
Hot Keys
The screen will display labels for these keys, to identify their context-sensitive
functions, and you can custom hot keys under different status.
Line Keys
These buttons are used to active up to the six user accounts.
DSS Keys
These keys are used for various functionalities such as call /Line appearance Button,
Speed dial, Intercom, Pickup, Hold, Transfer, etc. When the assigned function is
enabled, the corresponding LED will be on.
Page 14
Enterprise IP Phone Overview
8
DTMF Keypad
Use the DTMF hard keys to enter numbers, letters and special characters. Depending
on the selected input mode, you can enter digits, lower / upper case or special
characters.
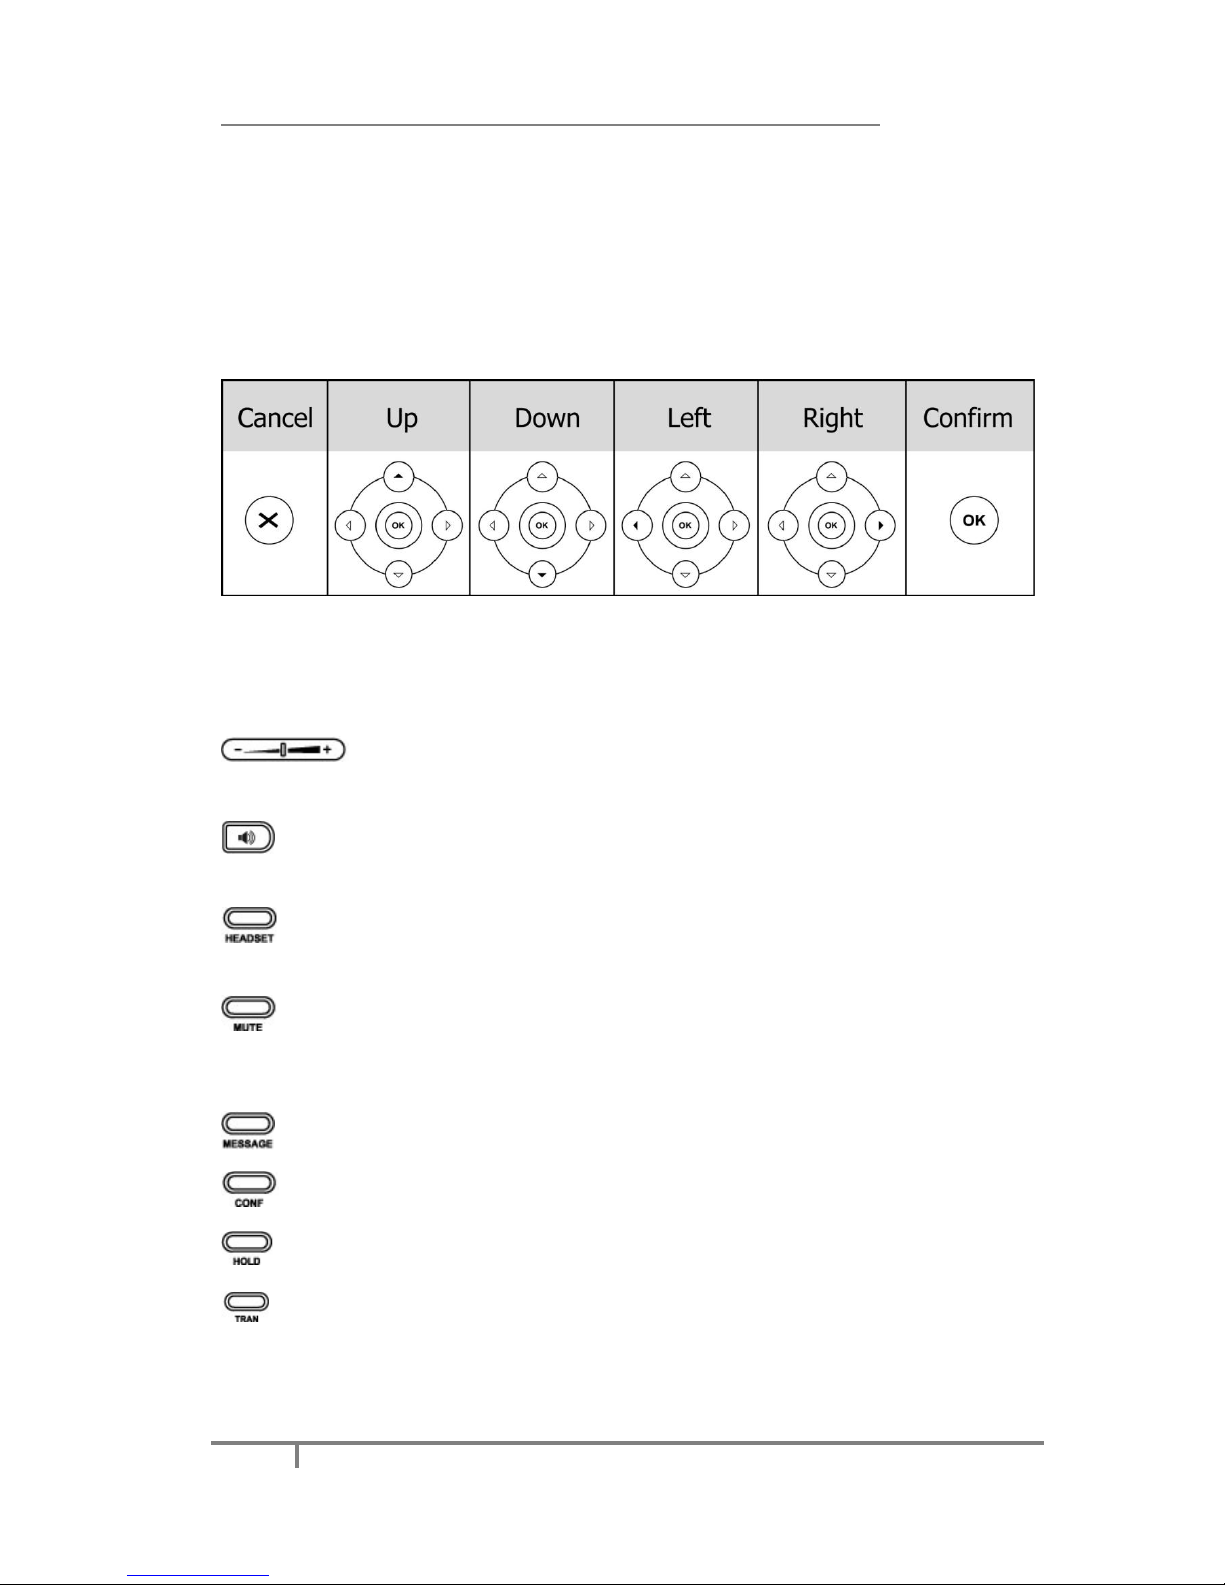
Navigation Keys
Use the navigation keys to navigate in the display menus and confirm or cancel
actions.
Audio Device Control Keys
Use the audio device control keys to perform the following actions depending on your
phone type:
: Adjust the volume of the handset, headset, speaker, ring tone and
signal tone;
: Allow hands-free communication during calls;
Press it again to switch to the Group Listening mode;
: Place and receive calls through an optionally connected headset. The LED
will be on when the phone is in Headset mode;
: Mute audio transmission locally during calls;
Hard Feature Keys
: Allow users to access the voicemail interface directly;
: Enable a setup of Conference;
: Place a call on hold or resume it;
: During a call, press it to transfer the current call to the third party;
When the phone in the idle status, press it to enter the forward configuration
page;
Page 15

Enterprise IP Phone Overview
9
: Press it to enter the Dialed Calls interface and choose a record to dial out;
LED Instruction
Table 1 DSS Keys set as BLF
LED Status
Description
Steady green
The monitored account is active
Blinking red
There is an incoming call to the monitored account
Steady red
The monitored account is on a conversation
Off
It is not active as BLF
Table 2 DSS Keys set as BLA (Bridged Line Appearances)
LED Status
Description
Steady green
All of the members are in idle status
Steady red
Some part(s)is seizing the line
Blinking green 300ms
Some part(s) is ring-back
Blinking red 300ms
Some part(s) is ringing
Steady orange
Some part(s) is on the phone
Blinking Orange
500ms
Some part(s) is under the public hold status, and all of the
members can retrieve the call
Blinking green 500ms
Some part(s) is under the private hold status, and only the
initiator can retrieve the call
Blinking red 500ms
In three way conference, all of the parts press hold.
Off
It is not active as BLA
Table 3 Line Keys set as BLF
LED Status
Description
Steady green
The monitored account is in idle status
Fast blinking green
There is an incoming call to the monitored account
Slow blinking green
The monitored account is on an conversation
Off
It is not active as BLF
Table 4 Line Keys set as BLA
LED Status
Description
Steady green
All of the members are in idle status
Slow blinking green
Some part(s)is seizing the line/ ring-back/ under the
private hold status.
Fast blinking green
Some part(s) is ringing/on the phone / under the public
hold status or all of the parts press hold.
Off
It is not active as BLA
Table 5 Line Keys
Page 16
Enterprise IP Phone Overview
10
LED Status
Description
Steady green
The account is active
Blinking green
There is an incoming call to the account, or there is a call
on hold.
Off
The phone is in idle status whatever registered
/unregistered
Table 6 Power Indication LED
LED Status
Description
Steady green
Power on
Blinking green
There is an incoming call, or there is a call on mute
Off
Power off
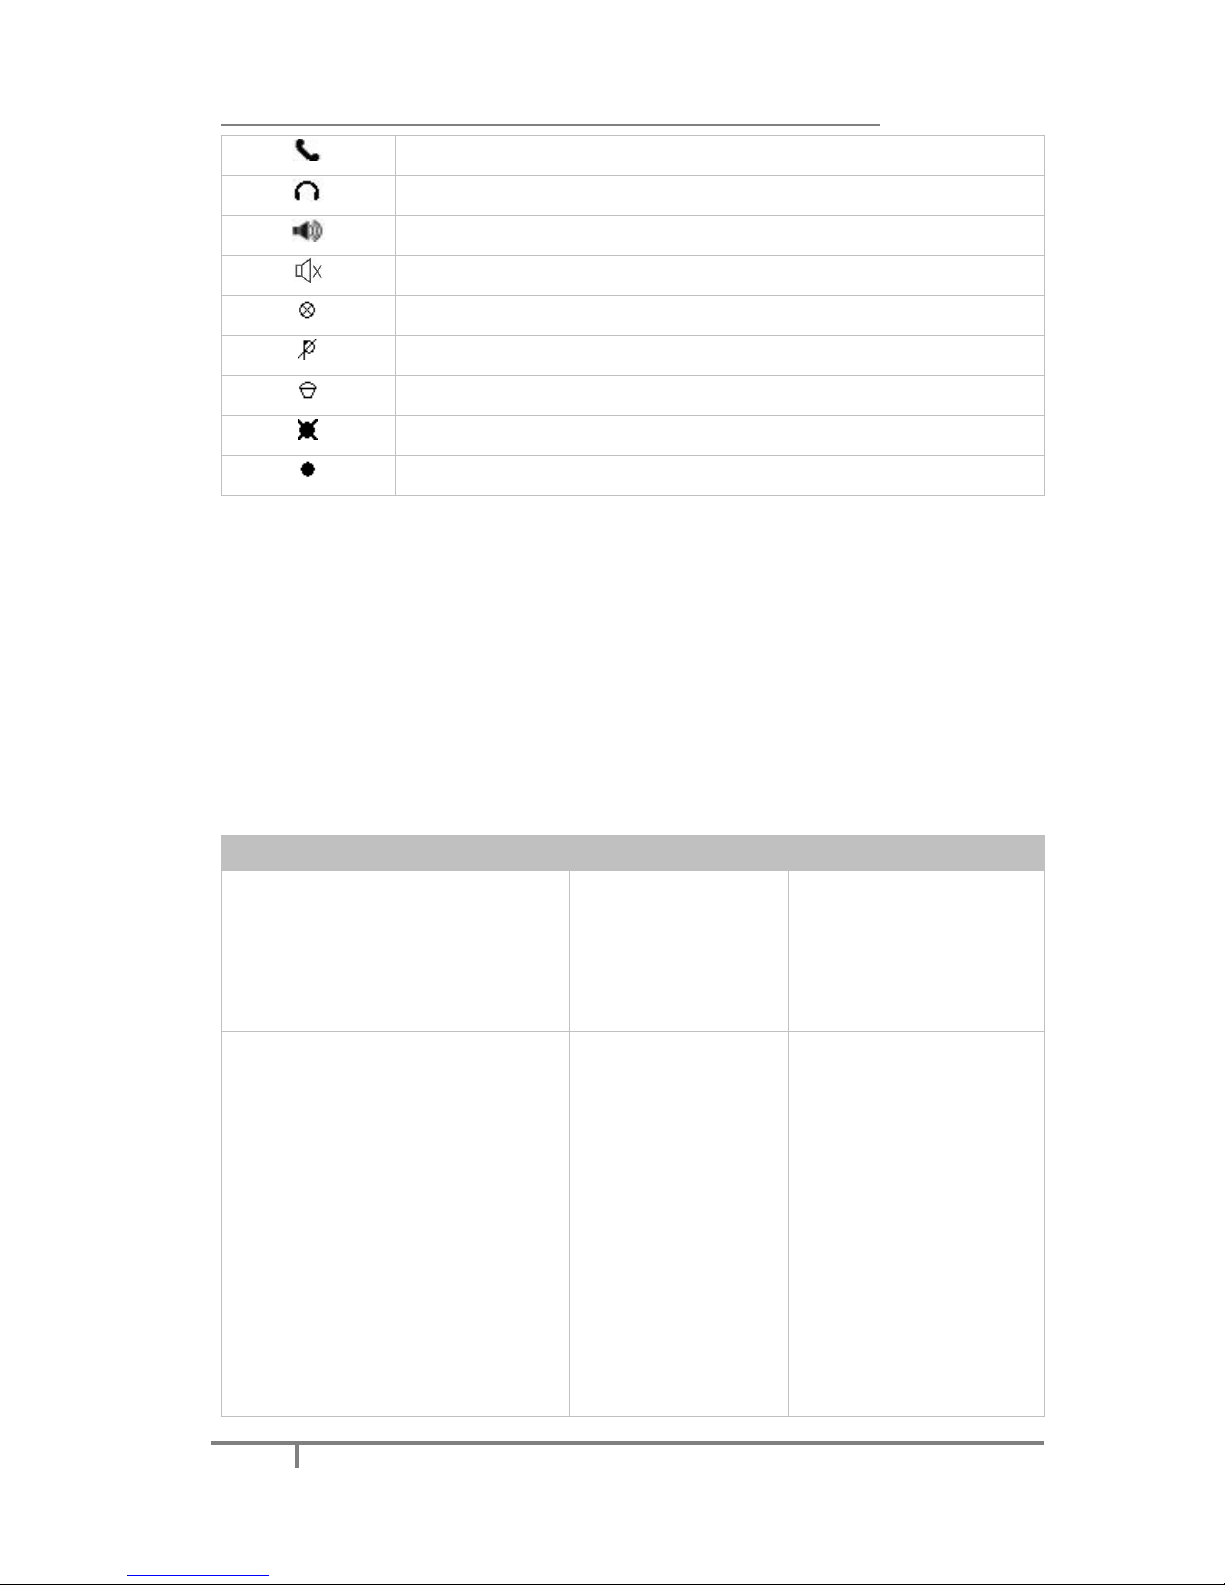
Icon Instruction
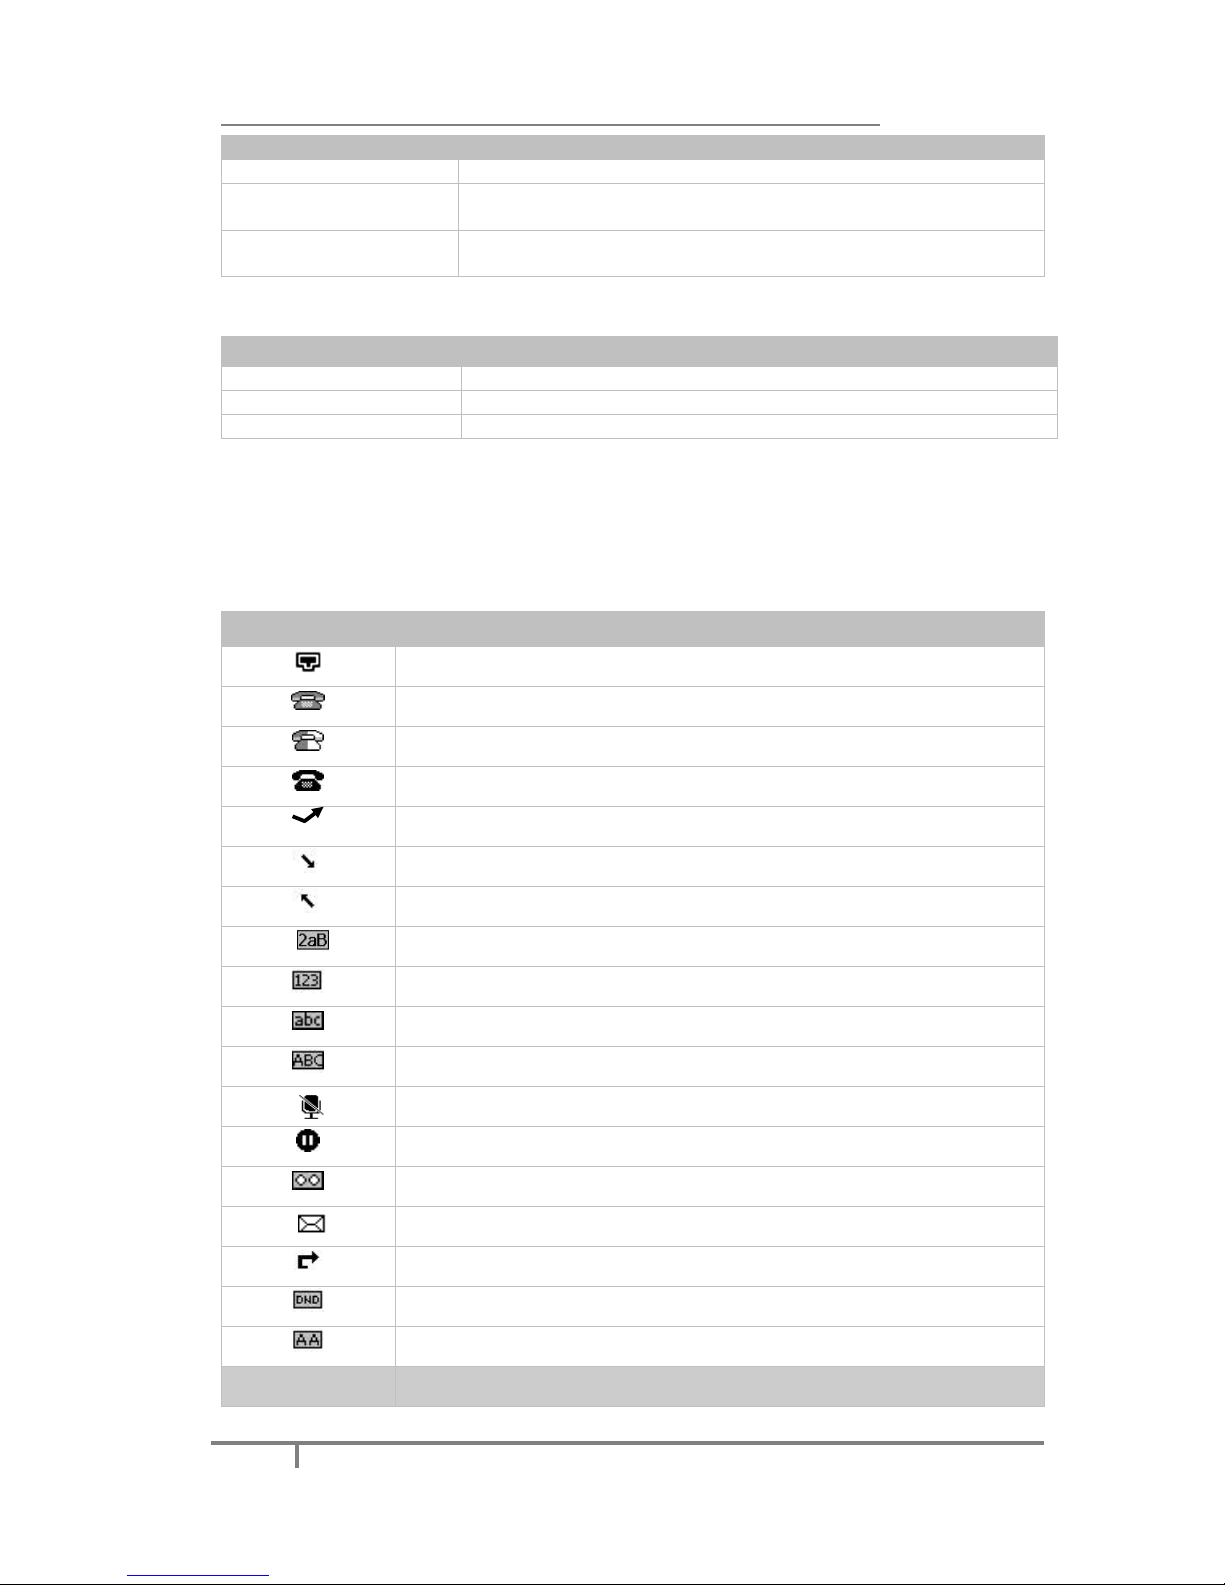
The IP Phone displays different kinds of icons on its LCD, you can refer to the
following table for their meanings:
Icon
Description
Flashes when the internet is disconnected
Account register failed
Account registering
Account register successful
Missed calls
Call in
Call out
Input Method: all letters and numbers
Input Method: numbers
Input Method: multi-lingual letters in lower case
Input Method: multi-lingual letters in upper case
Call mute
Call hold
Voicemail
SMS
Call forward
DND(Do Not Disturb)
Auto answer
Icon
Description
Page 17
Enterprise IP Phone Overview
11
In handset mode
In headset mode
In speaker mode
Ring volume is 0
The recording feature cannot be started
The recording cannot be stopped
The recording box is full
This call cannot be recorded
The recording session is successfully started
User Interface
There are two ways to customize specific options on your phones:
1. Using keypad and display on the phone;
2. Using Web user interface in an Internet browser from your PC; please refer to
“Configuration and Registration” to get into the Web interface.
In many instances, it is feasible to configure the phone via both Phone and Web
interfaces; however, some features can only be configured via either Phone or Web
interface. Please refer to the following table for differences:
Phone Options
Phone UI
Web UI
Status
--IP
--MAC
--Firmware
--Network
--Phone
--Accounts
√
√
Features
--Call Forward
--Call Waiting
--DSS Keys
--Key as Send
--Hot Line
--Anonymous Call
--Auto Redial Settings
--DND Code
--ReDialTone
--Emergency
--BusyToneDelay
--Return code when refuse
--Return code when DND
--Intercom
--Call Completion
√
√
√
√
√
√
√
√
√
√
√
Page 18

Enterprise IP Phone Overview
12
Basic Phone Functions
--Language
--Time & Date
--Ring Tone
--Phone Volume
--Logo Customization
√
√
√
√
√
√
√
√
Advanced Phone Functions
--Accounts
--Network
--Voice
--Codecs
--Echo Cancellation etc
--Phone Setting
--Backlight
--Contrast
--Lock
--Reset to factory
--Set admin password
--Set AES Key
--Auto Provision
√
√
√
√
√
√
√
√
√
√
√
SIP Account
--User Option
--Account Active
--Label
--Display Name
--Register Name
--User Name
--Password
--SIP Server
--Register Status
--Server Option
--Registrar Server
--Registrar Port
--Outbound Proxy Server
--Backup Outbound Proxy
Server
--OutBound Status
--NAT Traversal
--STUN Server
--STUN Status
--Missed call log
--Auto Answer
√
√
√
√
√
√
√
√
√
√
√
√
√
√
√
√
√
Other Features
--Messages
--History
--Directory
--Contacts
--Blacklist
--Remote Phonebook
√
√
√
√
√
√
√
√
√
√
√
√
Page 19

Enterprise IP Phone Overview
13
--Broadsoft
√
Note:
The above table only indicates most of phone functions rather than all of them.
Please refer to the relating parts for more details.
The default administrator password is admin.
Page 20

Enterprise IP Phone Customizing Your Phone
14
Customizing Your Phone
General Settings
Phone Status
You can view the status of your phone using the Phone interface or the Web
interface.
This option allows you to review:
Network status: IP, Mac, WAN/LAN, Gateway and DNS;
Phone status: Model, Hardware, Firmware, Product ID and MAC;
Accounts: The 6 SIP accounts status;
To check the Phone Status via Phone interface:
1) Press OK button directly or Menu hot key, select the Status option.
2) Use the navigation keys to scroll through the list and check the specific one.
To view the Phone Status via Web interface:
Open the web browsers and input the IP Address http://WAN-ip-address; Enter the
account and password (default account and password are both “admin”); Click
Status directly to check the status.
Language
The default Phone interface language is English. The Web interface language will
depend on your computer Operation System. It will automatically match the
language with your computer and browser.
It also supports Simplified Chinese, Traditional Chinese, French, German, Italian,
Portuguese, Spanish, etc. You can change the language for the phone user interface
and the web user interface independently from each other.
Note:
All languages may not be available for selection. The available languages depend
on the language packs currently loaded to the IP phone. Please contact with your
system administrator for more information about loading language packs.
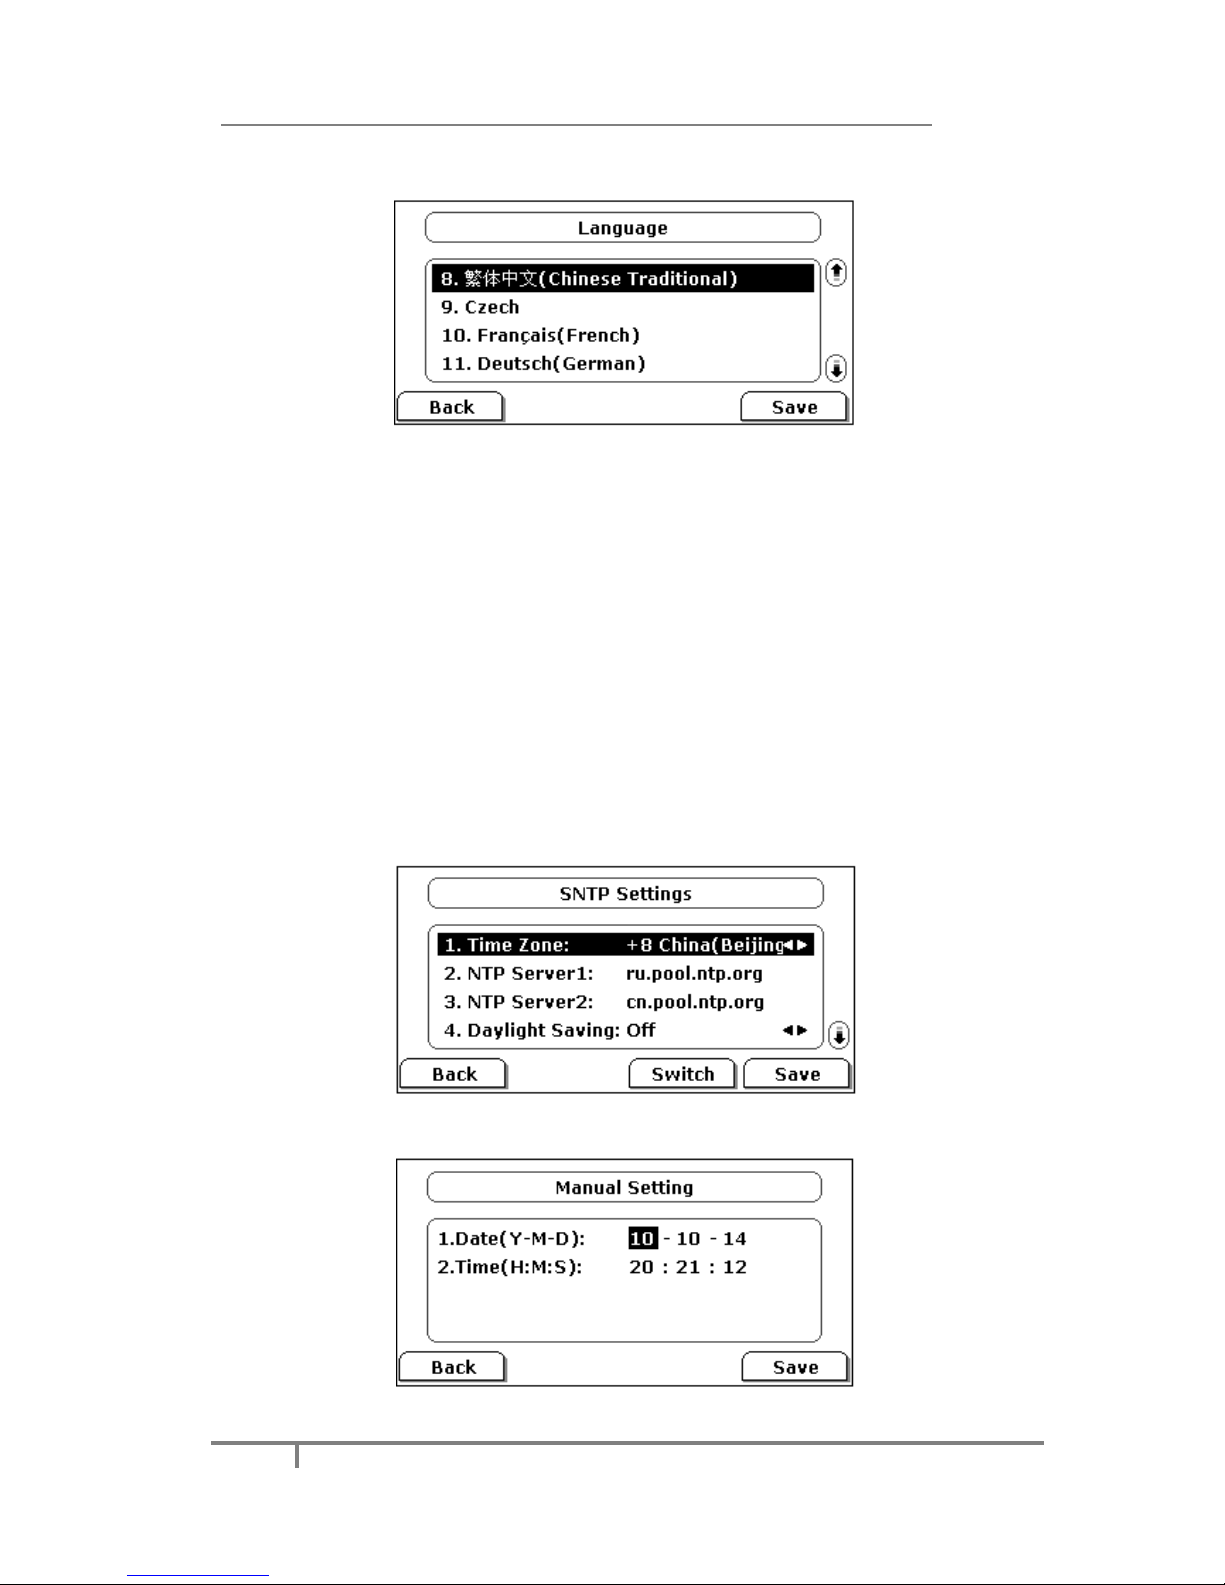
To change the language via Phone interface:
1) Press Menu->Settings->Basic Settings->Language.
2) Scroll through the list of available languages.
Page 21
Enterprise IP Phone Customizing Your Phone
15
3) Press the Save hot key when the desired language is highlighted. The language
appears on the graphic display will be changed to the one you chose.
4) Press Save hot key to save the changes.
5) Press Back hot key to return to the previous screen.
Time and Date
The time and date appears on the idle screen of the IP phone. If the phone cannot
obtain a time and date from the SIP server, please contact your system administrator
if the time or date is incorrect. You can set the time manually or via the SNTP server
which is used to synchronize the time.
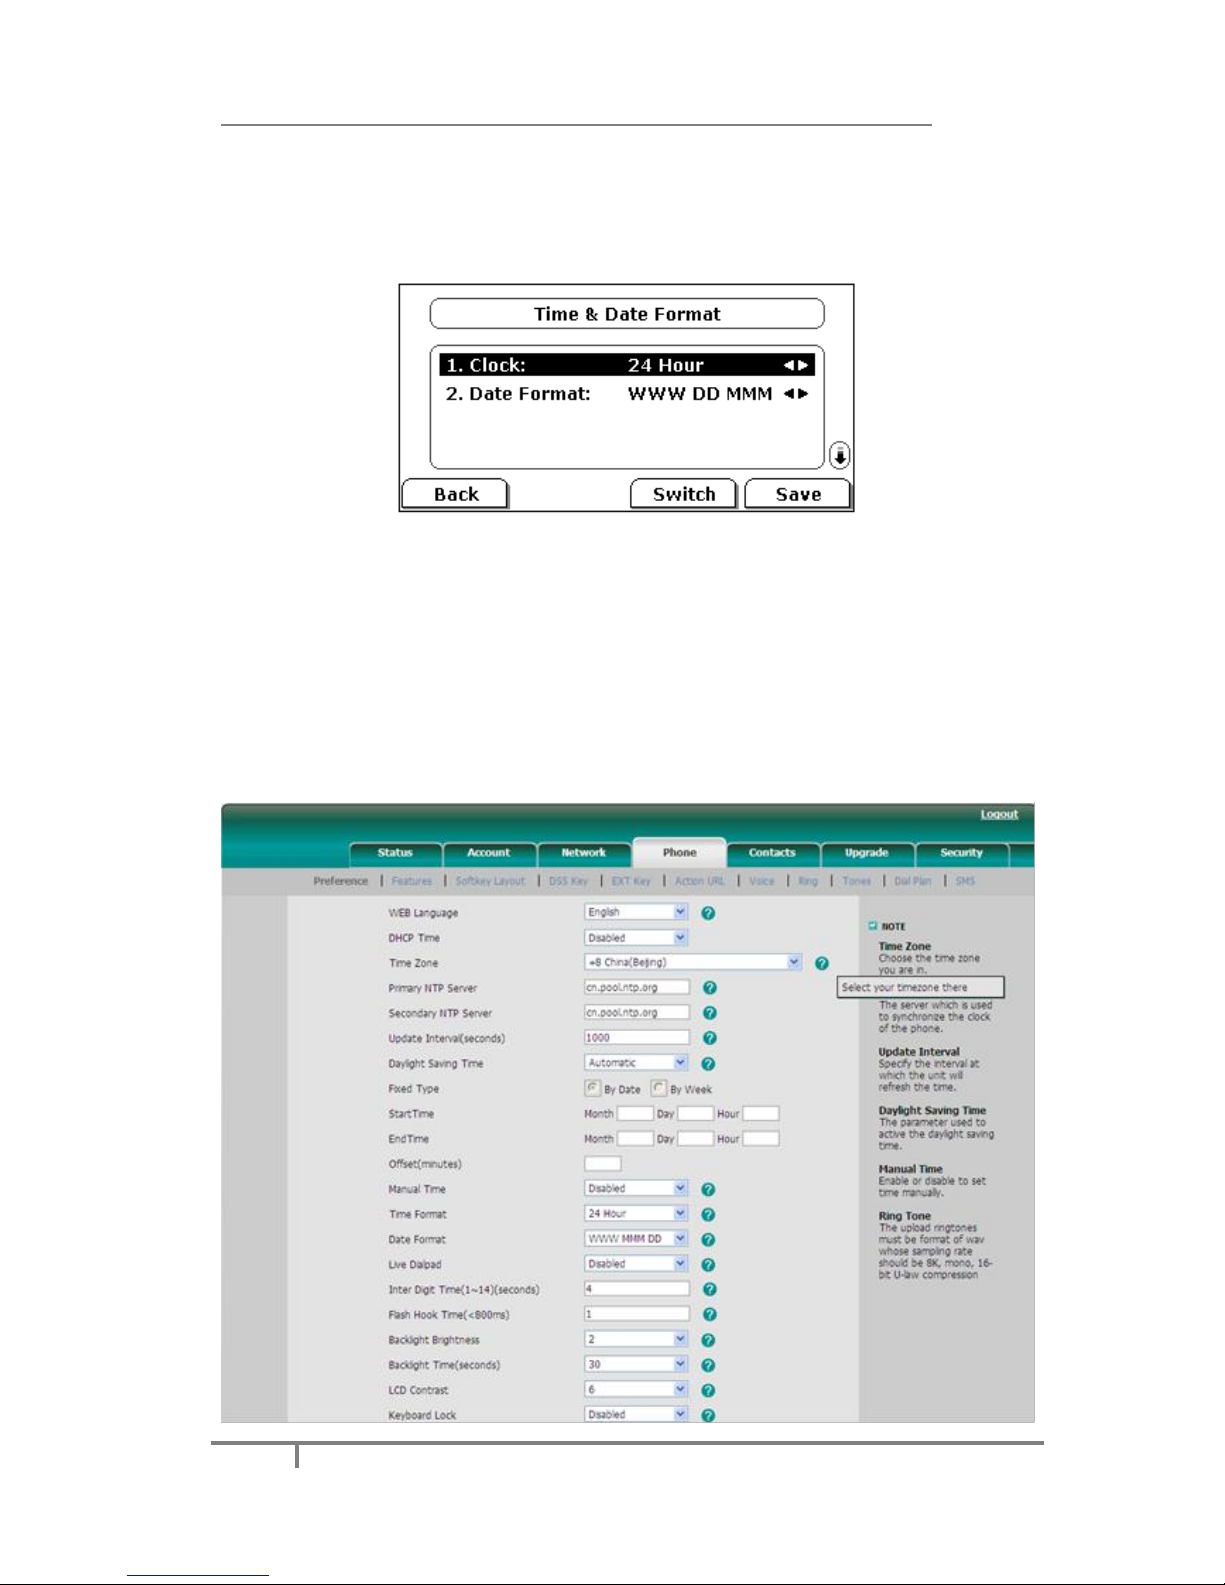
To change the Time and Date via the Phone interface:
1) Press Menu->Settings->Basic Settings->Time & Date.
2) If SNTP Settings is selected, the phone will automatically get the time from the
specific NTP Server. Use the navigation keys to highlight the specific option and
the relating changes. You can set the Time Zone, NTP Server1/Server2, and
Daylight Saving respectively.
3) If Manual Setting is selected, the time can be set manually. Use the navigation
keys to highlight the option and enter the specific date and time.
4) Press Save hot key, the time appears on the idle screen will be changed. Press
Page 22
Enterprise IP Phone Customizing Your Phone
16
Back hot key to return to the previous screen.
To set the time format via phone interface:
1) Press Menu->Settings->Basic Settings->Time & Date->Time & Date
Format.
2) Use the Switch hot key to choose a preferred time format: 12 hour or 24 hour.
3) Use the Switch hot key to choose a preferred date format, the IP phone can
support 7 kind of date display format.
4) Press the Save hot key to save the changes and return to the previous screen.
To change the Time and Date via the Web interface:
Click on Phone->Preference to do the relating changes. You can also change the
Update Interval which specifies the time frequency that the phone refreshes the
time automatically. Please refer to the instruction above for the parameters’ detail.
Page 23
Enterprise IP Phone Customizing Your Phone
17
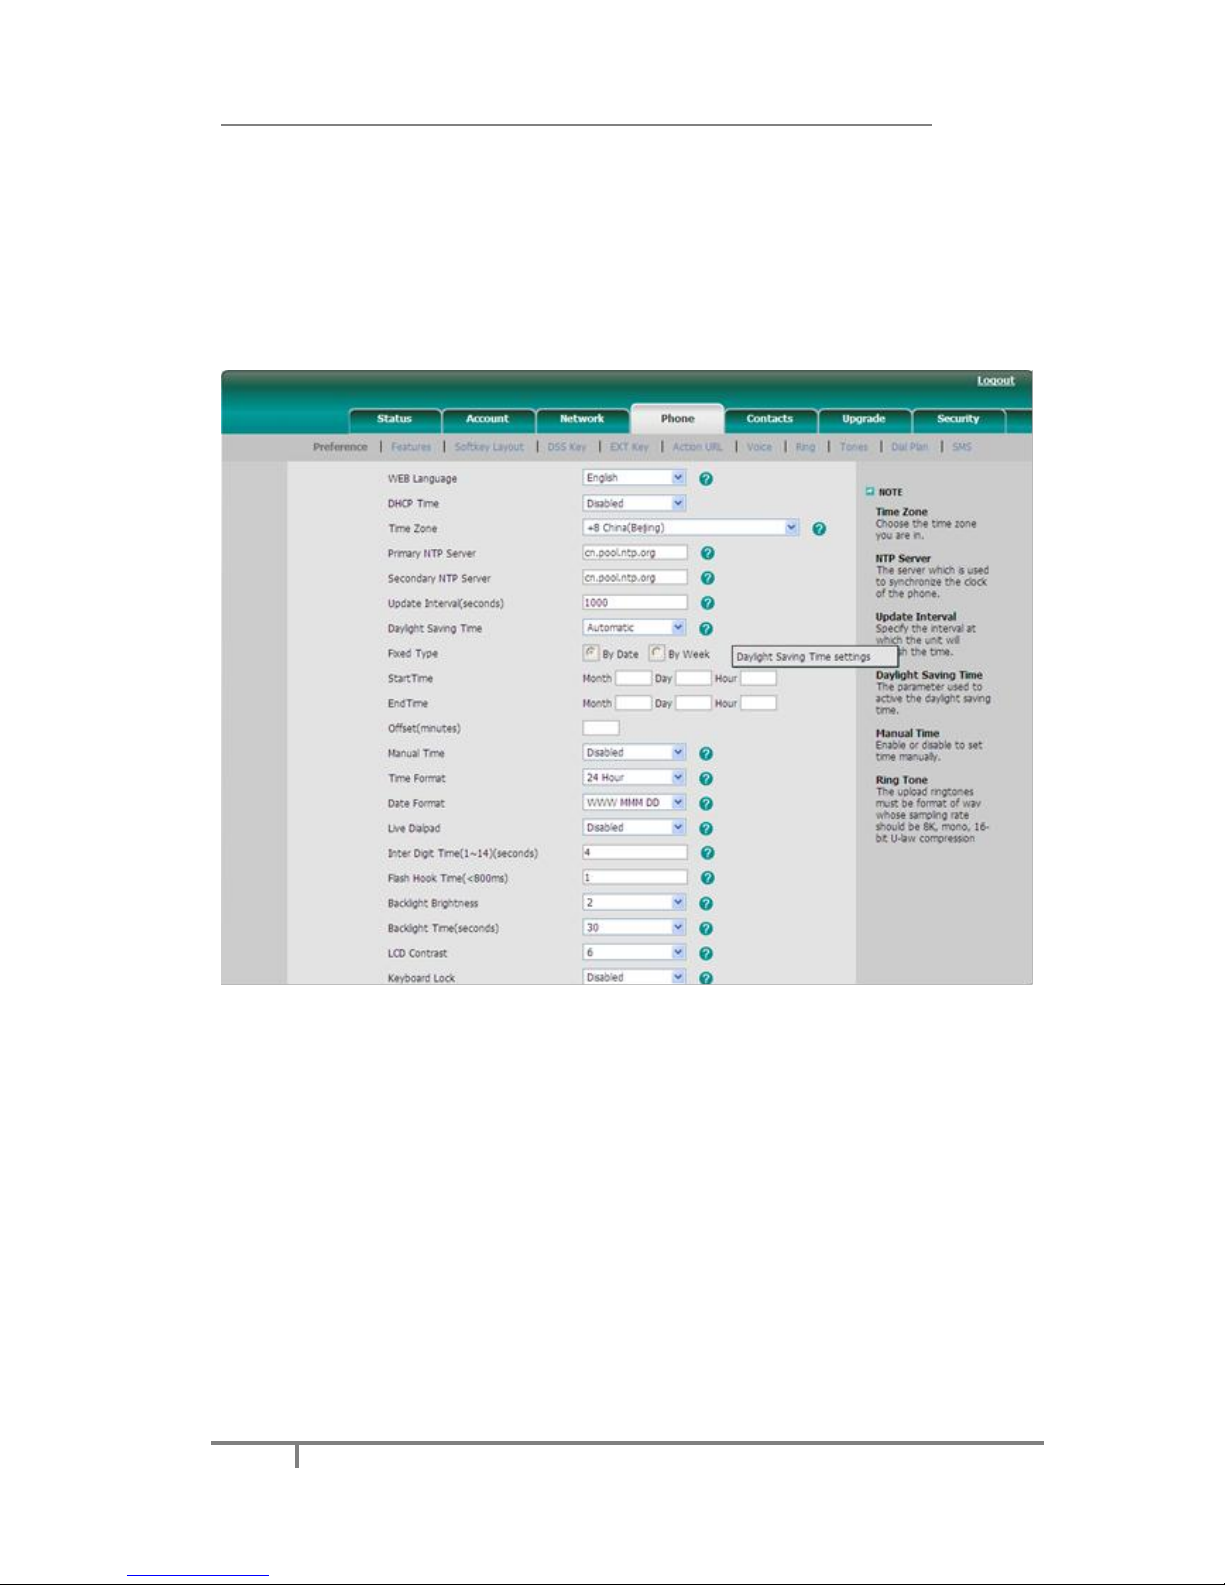
To change the Daylight Saving Time Settings via the Web interface:
1) Click on Phone->Preference->Daylight Saving Time to do the relating
changes.
2) Select Enable option, then you can set the Daylight Saving Time.
3) Select Automatic. There is a table named as AutoDST.xml has been saved in the
configuration file, if the table includes daylight saving time of your time zone, it
will show the Fixed Type: By Date or By Week. And the daylight saving time is
unchangeable, unless to update the AutoDST.xml via auto provision.
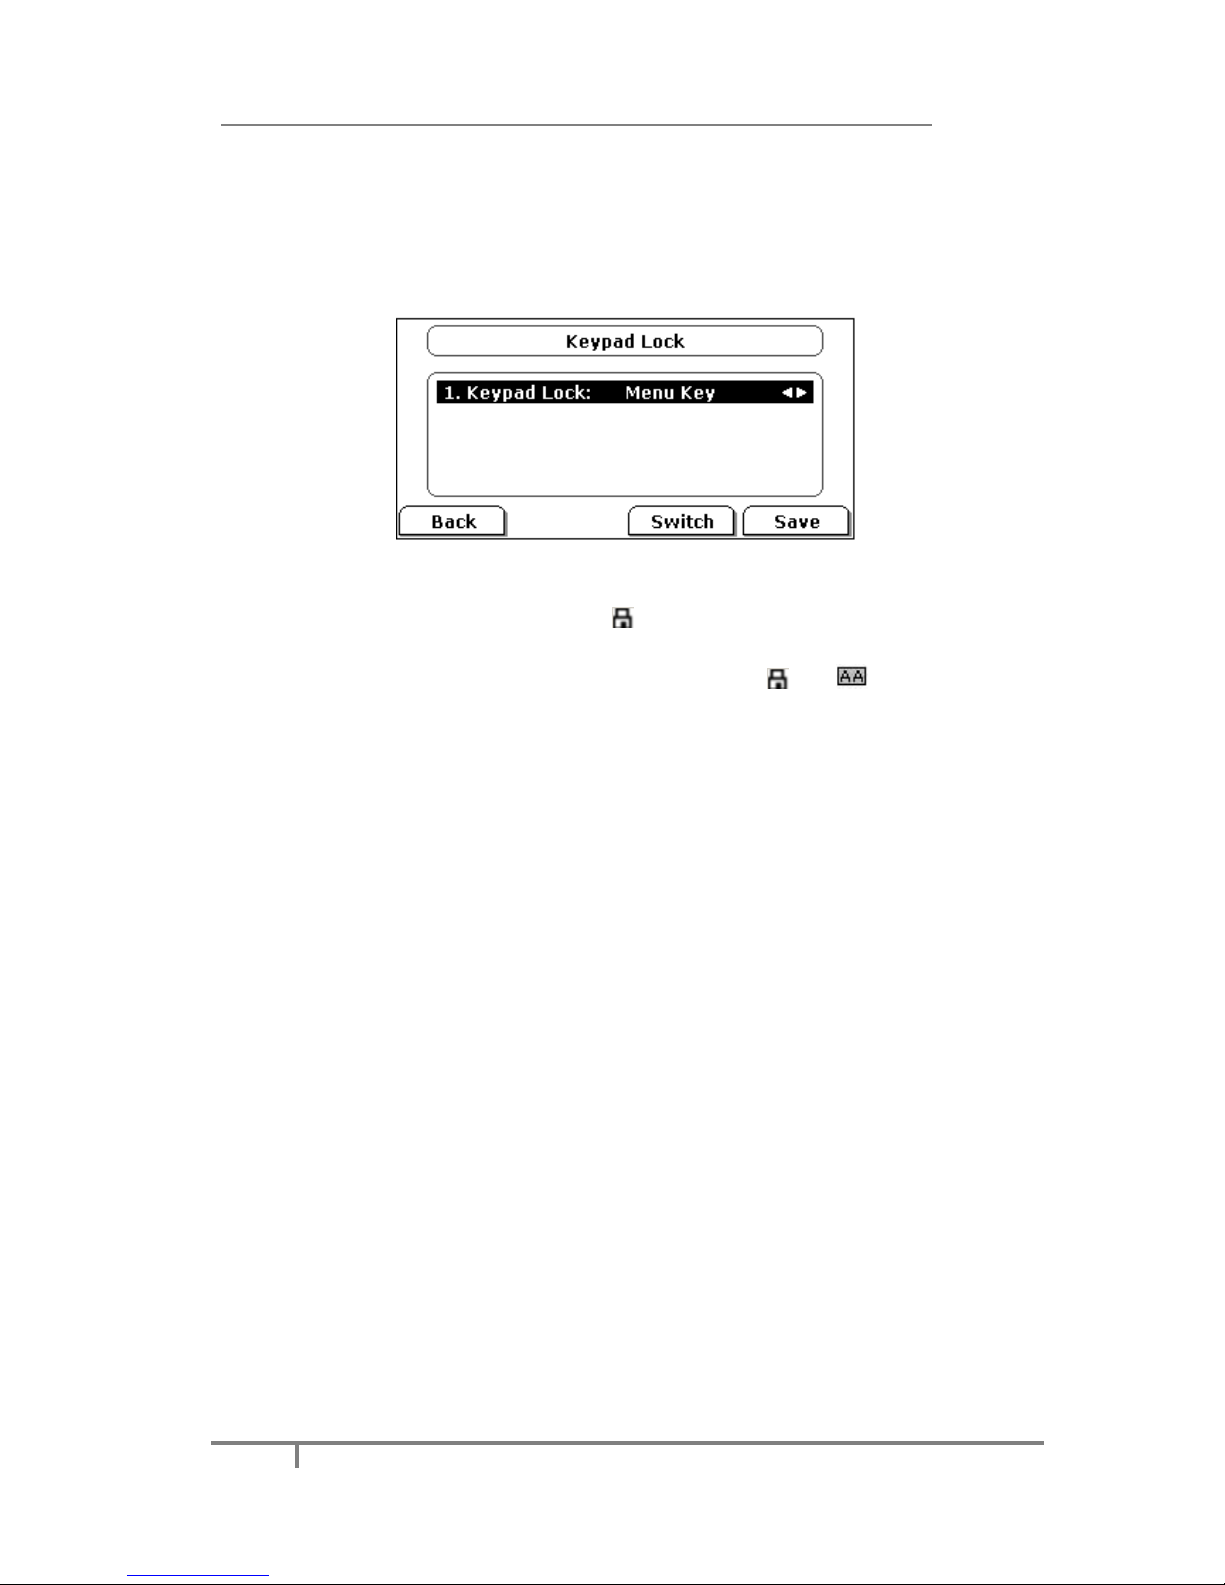
Keypad Lock
You can lock the keypad of your phone when you are temporarily not using it. This
function helps you to protect your phone from unauthorized use. You can lock the
following specific keys:
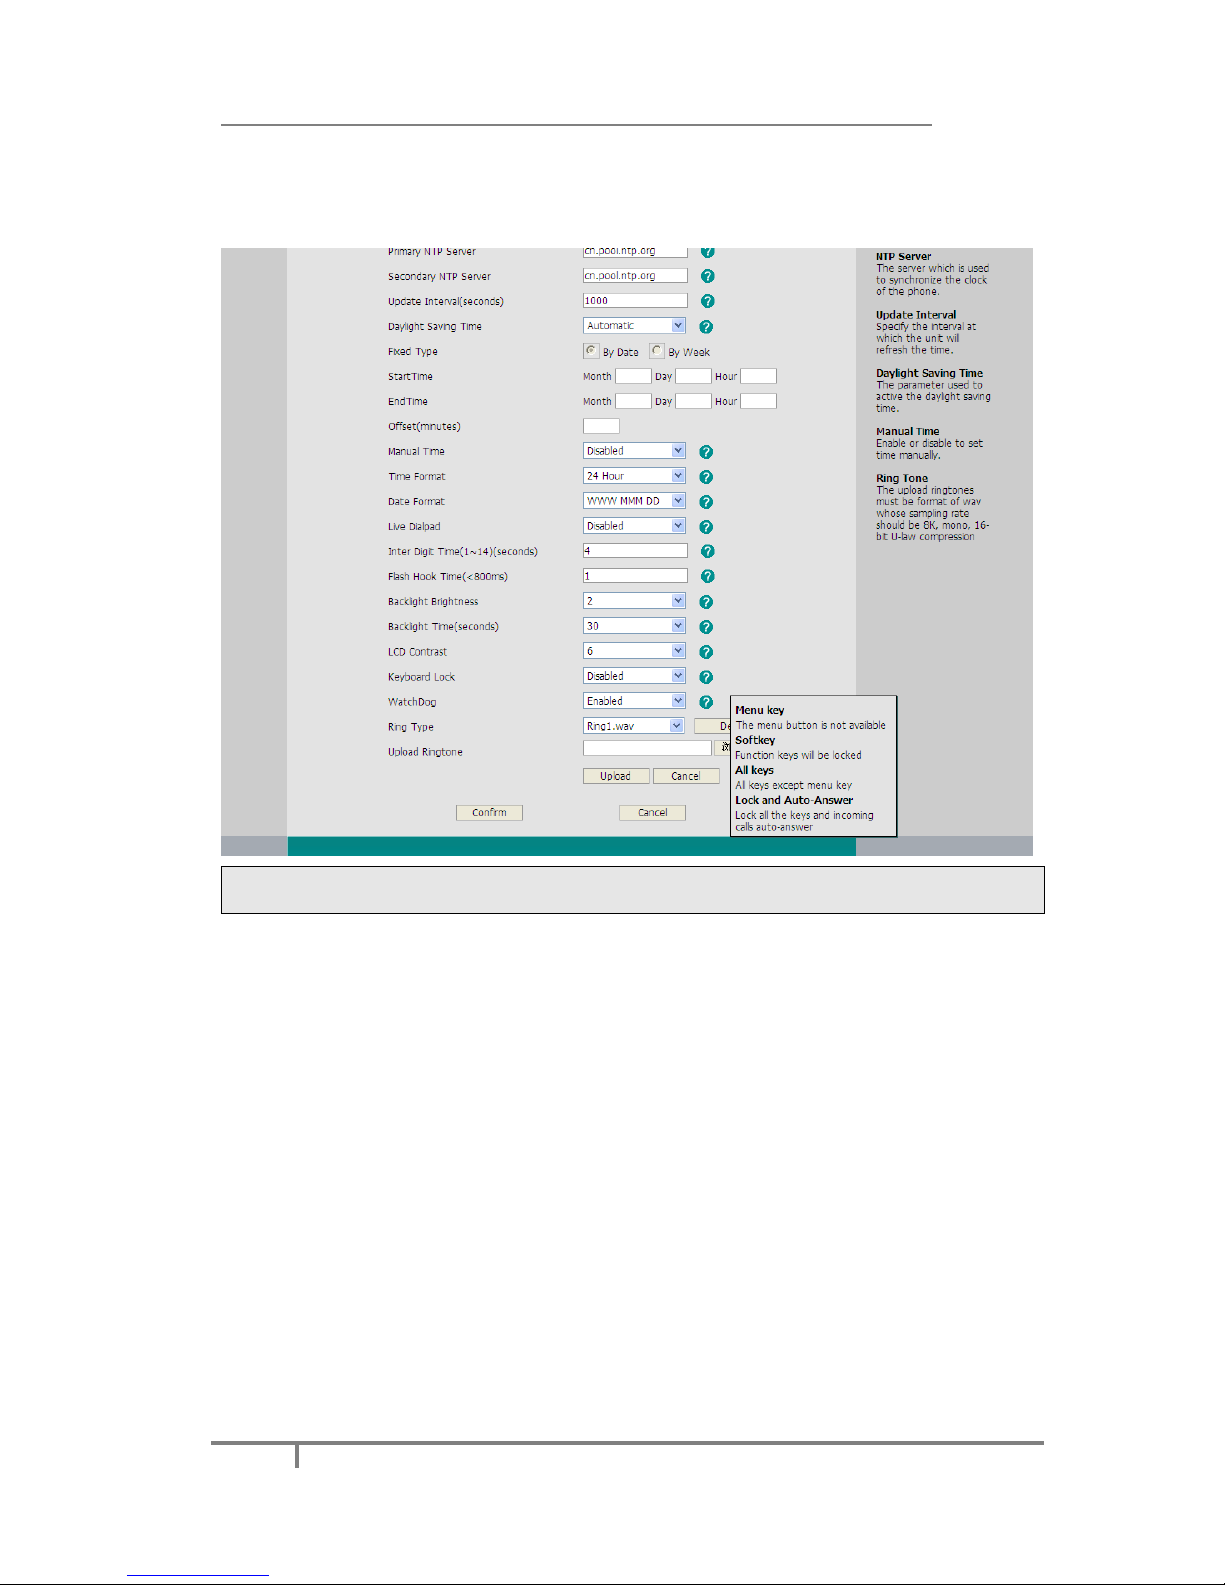
Menu Key: The Menu hot key cannot be used until unlocked. You cannot access
the menu of the phone.
Function Keys: The hard function keys cannot be used until unlocked. You cannot
access the MESSAGE, CONF, HOLD, MUTE, TRAN, RD, History,
Directory, DND, OK, X, navigation Keys, etc.
All Keys: All of the keys can not be used until unlocked. You can only use the
phone to answer the incoming calls.
Lock&Answer: All the incoming calls will be put through automatically (Auto
Answer), but can not be hung up by your party.
Page 24
Enterprise IP Phone Customizing Your Phone
18
To enable keypad lock via Phone interface:
1) Press Menu->Settings->Advanced Settings, enter the password, and then
press Confirm hot key.
2) Press Phone Setting->Lock.
3) Use the navigation key(or press the Switch hot key)to highlight the one you
want to lock.
4) Press Save hot key to save the change, or Back hot key to return to the
previous screen.
5) If Keypad Lock is enabled, the icon will be displayed on the top right corner
of the idle screen.
6) If you choose LOCK&ANSWER, it will show the icon and on the user
interface.
To unlock the phone via Phone interface:
1) Press Menu hot key, you are prompted for the password.
2) Enter the password, and then press Enter hot key, the phone will be unlocked.
3) The icon will be disappearing from the idle screen.
4) If you select Lock&Answer, you have to press Menu->Settings->Advanced
Settings, enter the password, and then press Phone Setting->Lock to disable
this option.
Page 25
Enterprise IP Phone Customizing Your Phone
19
To enable keypad lock via Web interface:
Click on Phone->Preference-> Keyboard Lock to do the relating changes. Please
refer to the instruction above for the parameters’ detail.
Note:
The default password for unlock is admin.
Audio Settings
Volume
You can adjust the volume of handset/speaker/headset/Ring.
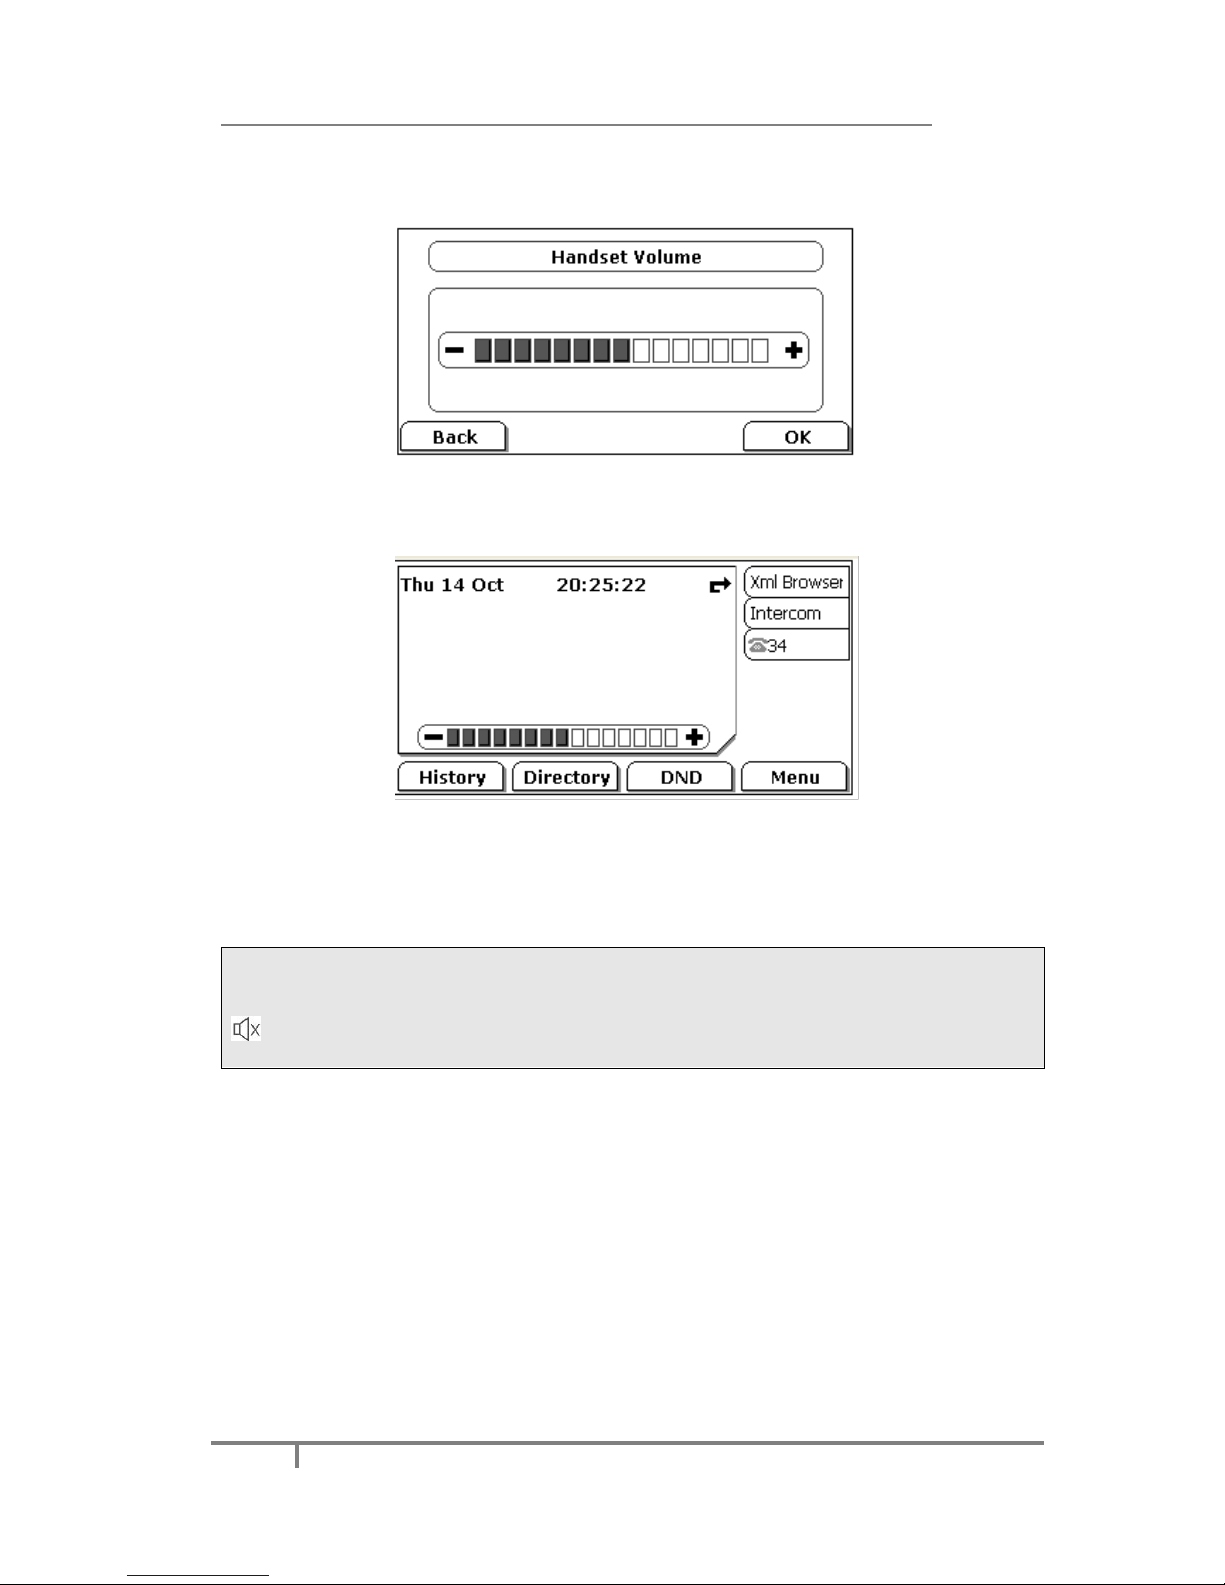
To adjust the volume when you are not in an active call:
1) Press Menu->Settings->Basic Settings.
Page 26
Enterprise IP Phone Customizing Your Phone
20
2) Scroll to Phone Volume, and press Enter hot key, highlight the one you want to
adjust the volume, use the Volume Adjustment Bar or navigation keys to
adjust the volume.
3) Press OK hot key to save the change or Back hot key to cancel.
4) And you can also press the Volume Adjustment Bar to adjust the ring volume
when the phone is in idle status.
To adjust the volume when you are in an active call:
When Handset/Headset/Hands-free mode is activated, press the Volume
Adjustment Bar to a comfortable level.
Note:
The volume can only be adjusted via Phone interface. When you adjust the ring
volume to 0, or press the Silence hot key when there is an incoming call, the icon
will be shown on the LCD. Press the Volume Adjustment Bar to adjust the
volume, and the icon will disappear.
Ring Tones
You can adjust the type and volume of the ring tone.
To adjust the Ring Tone Type via Phone interface:
1) Press Menu->Settings->Basic Settings.
2) Select Ring Tone, and press Enter hot key.
3) Use the navigation keys to highlight the specific one.
4) Press Save hot key to save the change or Back hot key to cancel.
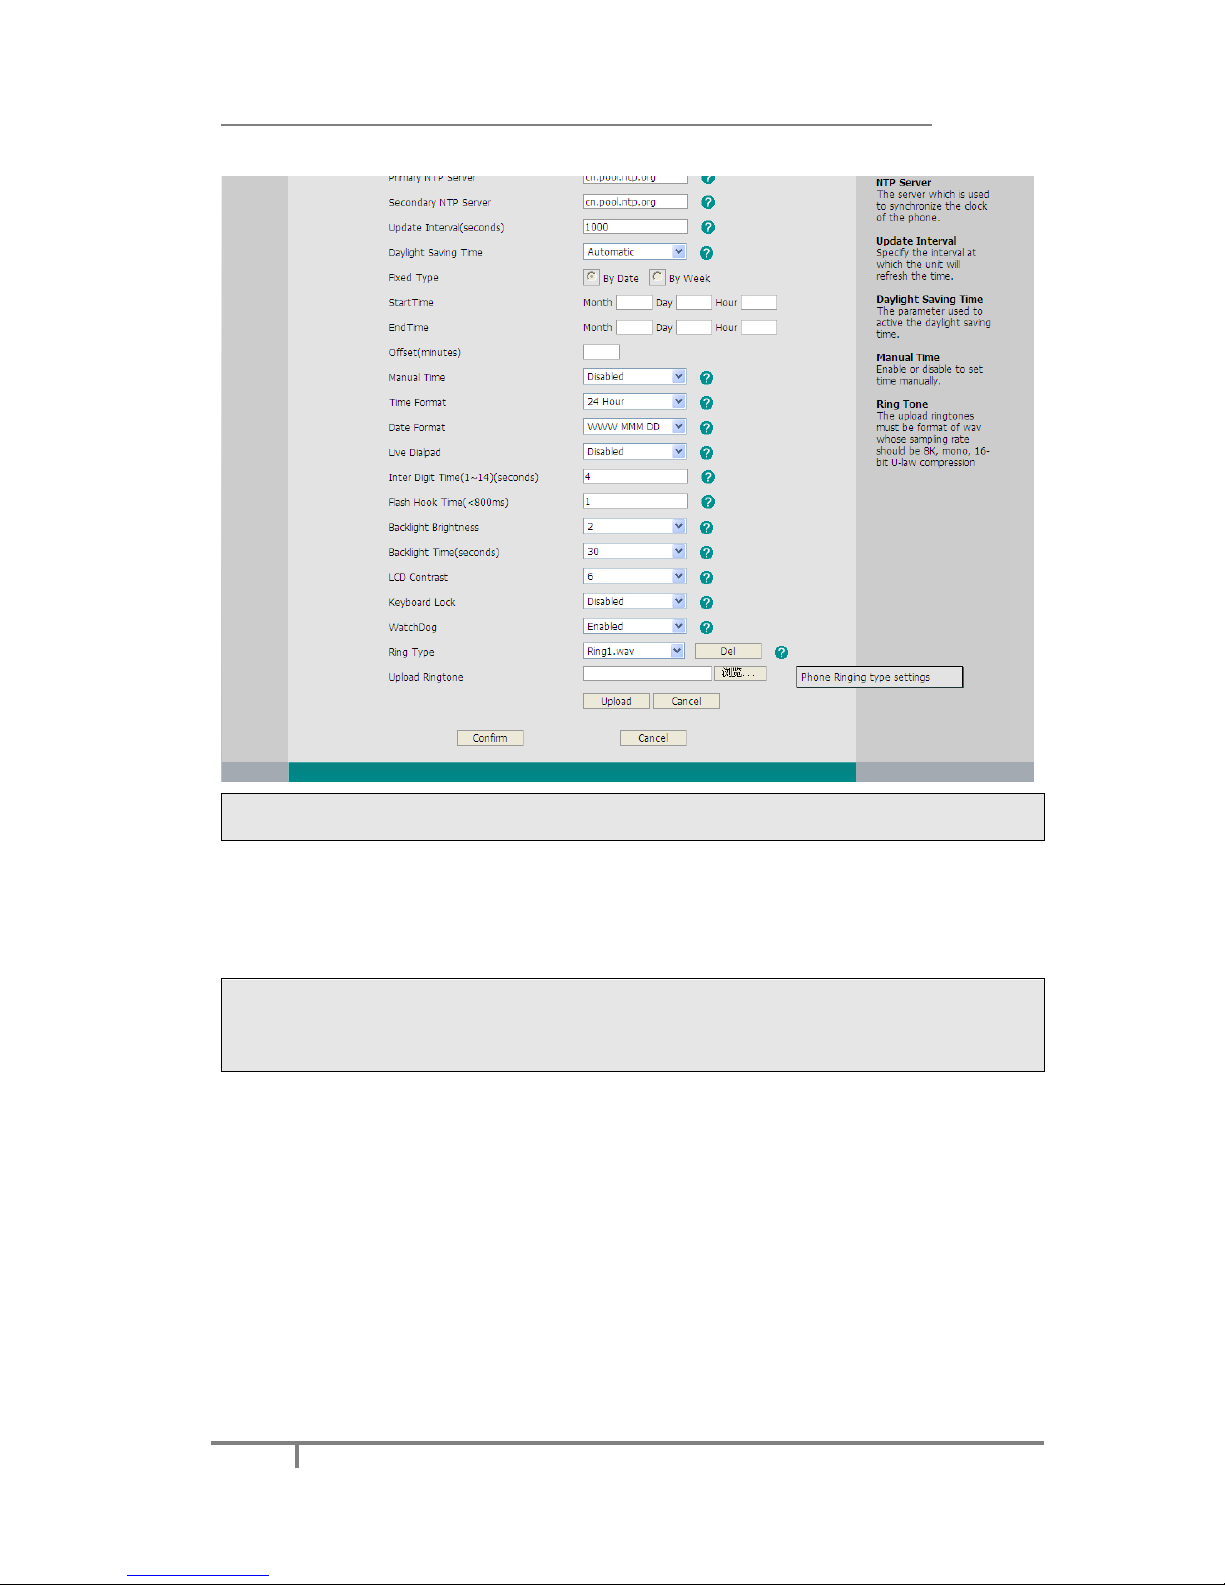
To change the Ring Tone Type via Web interface:
Click on Phone->Preference->Ring Type, highlight the specific one in the scrolldown menu, click on Confirm button to save the changes. You can also delete the
Page 27
Enterprise IP Phone Customizing Your Phone
21
specific one by click the Del button.
Note:
The ring tone file of system cannot be deleted.
To upload the new Ring Tone via Web interface:
1) Click on Phone->Preference->Upload Ringtone.
2) Click on Browse button to choose the specific ring tone file.
3) Click on Upload button to upload the file.
Note:
The ring tone file format must be in 16bits WAV format (via Ulaw Compression), 8K
sample rate (monophony). Blank or other special characters cannot be included in
the file name.
To specify ring tones for a specific account via Web interface:
Click on Account->Basic->Ring Type option, and highlight the preferred one for
the chosen account in the scroll-down menu, then click on Confirm button to save
the changes.
Codec Selection
The IP phone supports the following audio codecs:
G723_63, G722, G726-16, G726-24, G726-32, G726-40, PCMA, G729, PCMU and
G723_53
You can enable/disable the desired codecs via Web interface. Please contact your
System Administrator for more details about the codecs.
Page 28
Enterprise IP Phone Customizing Your Phone
22
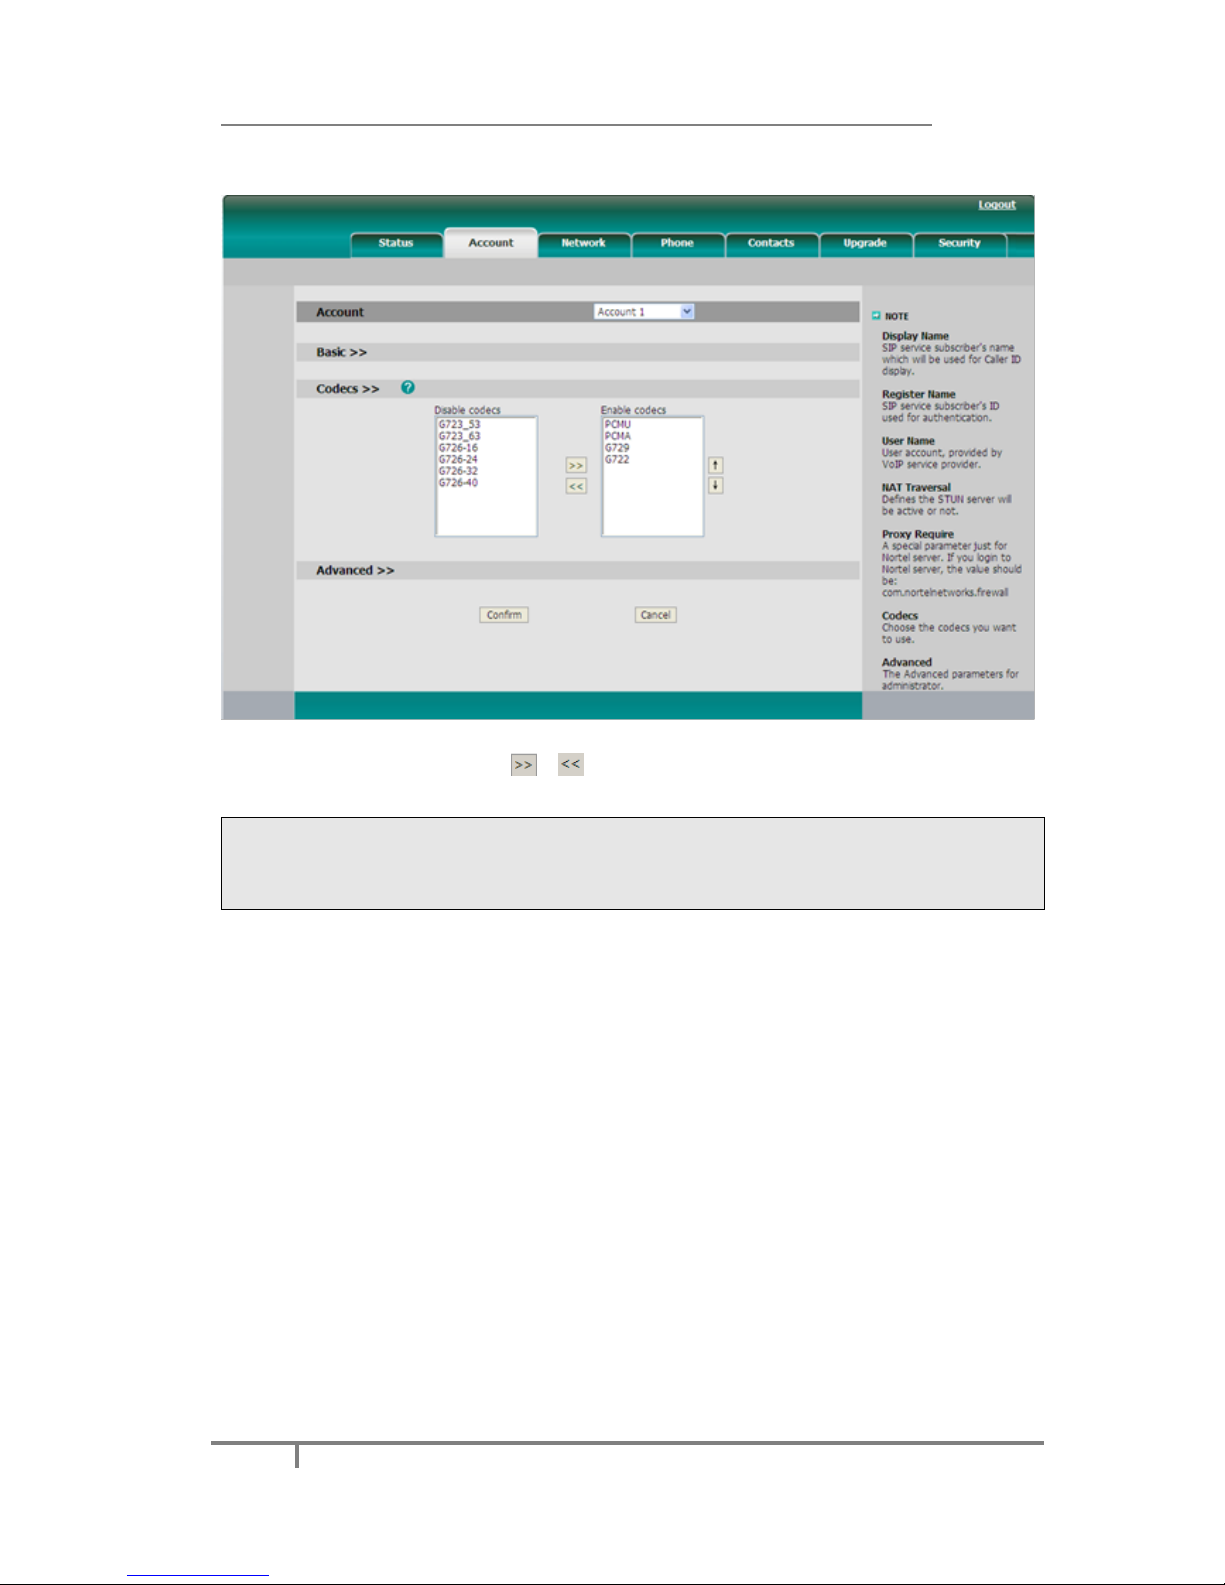
To enable/disable the codecs:
1) Click on Account->Codecs.
2) Use the navigation keys to highlight the desired one in the Enable/Disable
Codecs list, and press the / to move to the other list.
3) Click on Confirm to save the change.
Note:
1. Codec selection can only be configured via Web interface.
2. If codec G722 is negotiated, the LCD screen prompts call in process with HD
voice.
Contact Management
Edit/Add/Delete Contact
You can store a large number of contacts in your phone's directory. You can add,
edit, delete, dial, or search for a contact in this directory.
Page 29
Enterprise IP Phone Customizing Your Phone
23
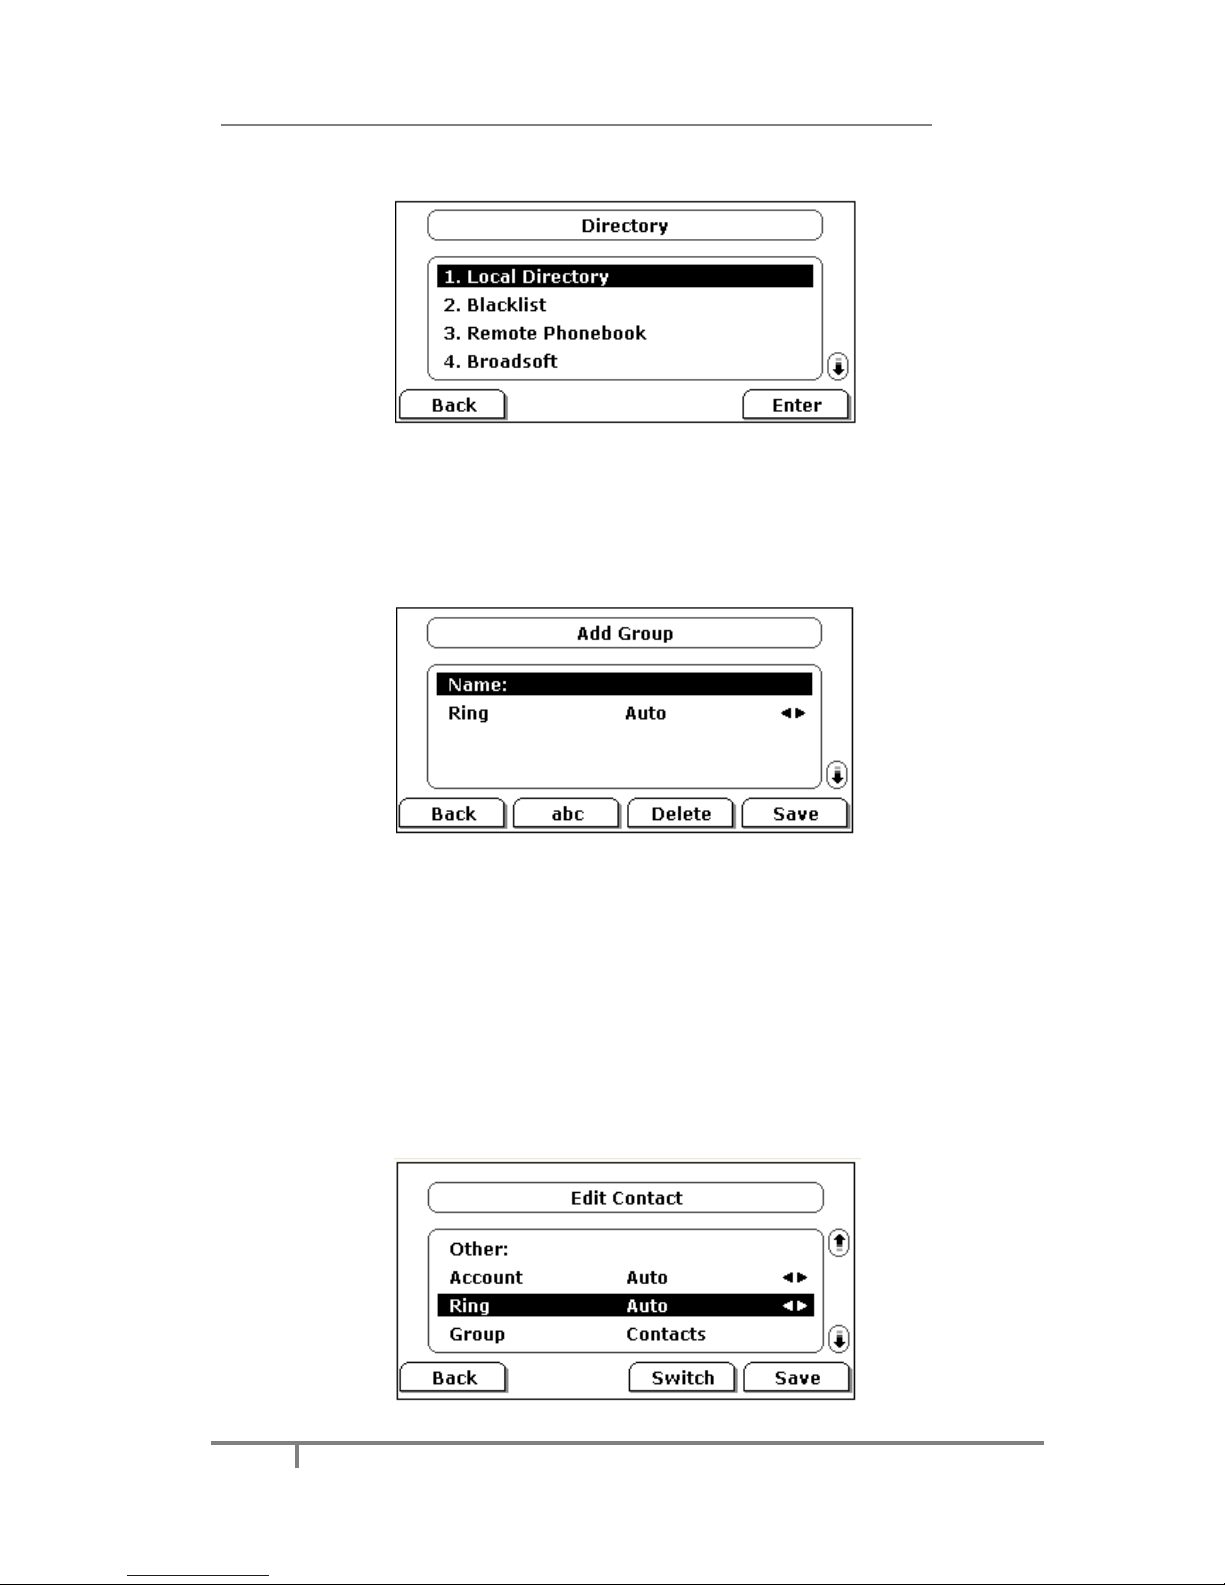
The directory includes Local Directory, Blacklist, Remote Phonebook and Broadsoft.
To add a Group via Phone interface:
1) Press Directory->Local Directory
2) Press Group hot key to enter to the Add Group page.
3) Enter the group name and choose the ring.
4) Press the Save hot key to save.
To add a contact via Phone interface:
1) Press Directory->Local Directory
2) Choose a group, and press the Enter hot key.
3) Press Add hot key, enter Name, Office, Mobile, Other and Account options of the
contact by the keypad. Use the abc hot key to select between numeric and
upper/lower case alphanumeric modes.
4) Use the navigation keys to select the desired account as Line if you want to
assign the contact to a specific account.
5) Choose and set a special ring tone for the contact.
6) Use the navigation keys to select the group which you want to assign.
7) Press Save hot key to add the record to contacts or Back hot key to cancel.
Page 30
Enterprise IP Phone Customizing Your Phone
24
To edit a contact via Phone interface:
1) Press Directory->Local Directory
2) Choose a group, and press the Enter hot key.
3) Use the navigation key to highlight the one you want to edit, press Option-
>Detail, and enter to the edit interface.
4) And then make the changes, press Save hot key to save the changes, or press
Back hot key to return to the directory.
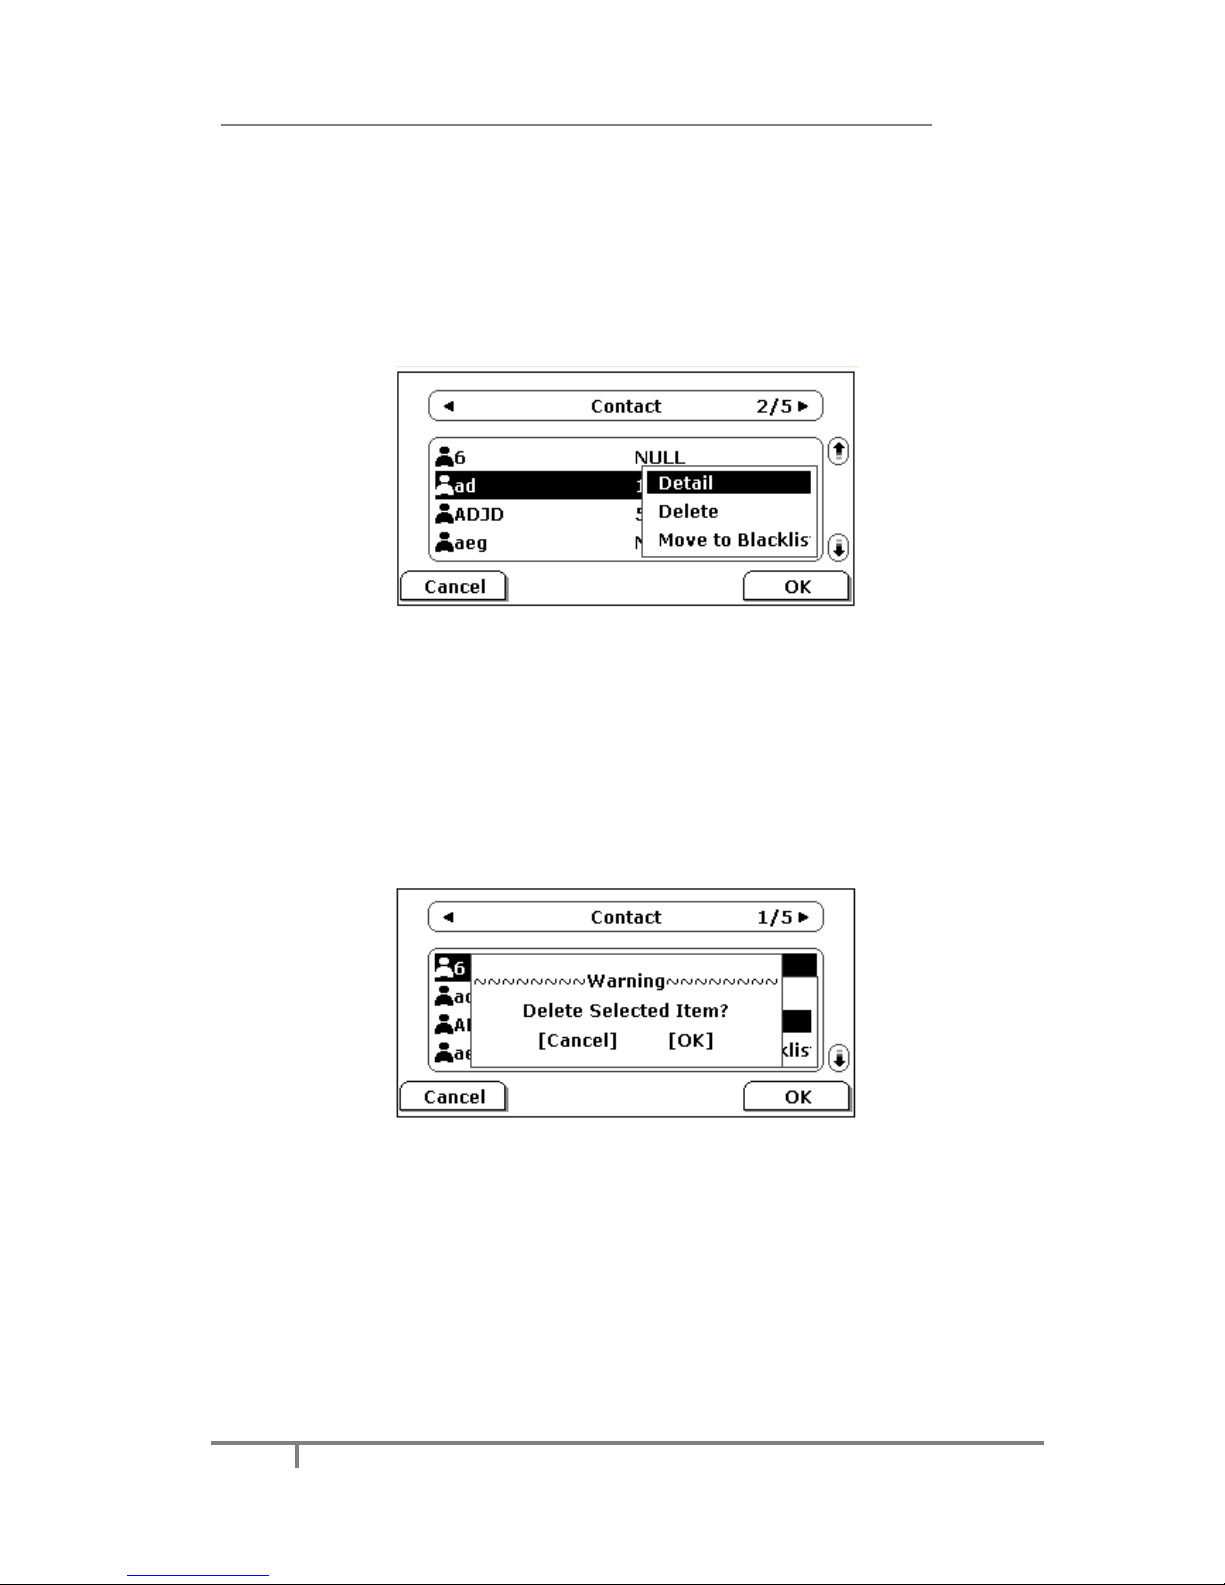
To delete a contact via Phone interface:
1) Press Directory->Local Directory
2) Select a group, and press the Enter hot key.
3) Use the navigation key to highlight the one you want to delete, press Option hot
key, and scroll to Delete, press OK hot key.
4) It will pop up a warning frame asking whether confirm to delete the contact.
5) Press OK hot key to confirm the operation, or press the Cancel hot key to return
to the directory.
To move a contact to the Blacklist via Phone interface:
1) Press Directory->Local Directory
2) Select a group, and press the Enter hot key.
3) Use the navigation key to highlight the one you want to move, press Option hot
key, and scroll to Move to Blacklist, press OK hot key.
4) It will pop up a warning frame asking whether confirm to move the contact.
Page 31
Enterprise IP Phone Customizing Your Phone
25
5) Press OK hot key to confirm the operation, or press the Cancel hot key to return
to the directory.
Note:
If a contact is moved to the blacklist, then the call from this contact cannot get
through.
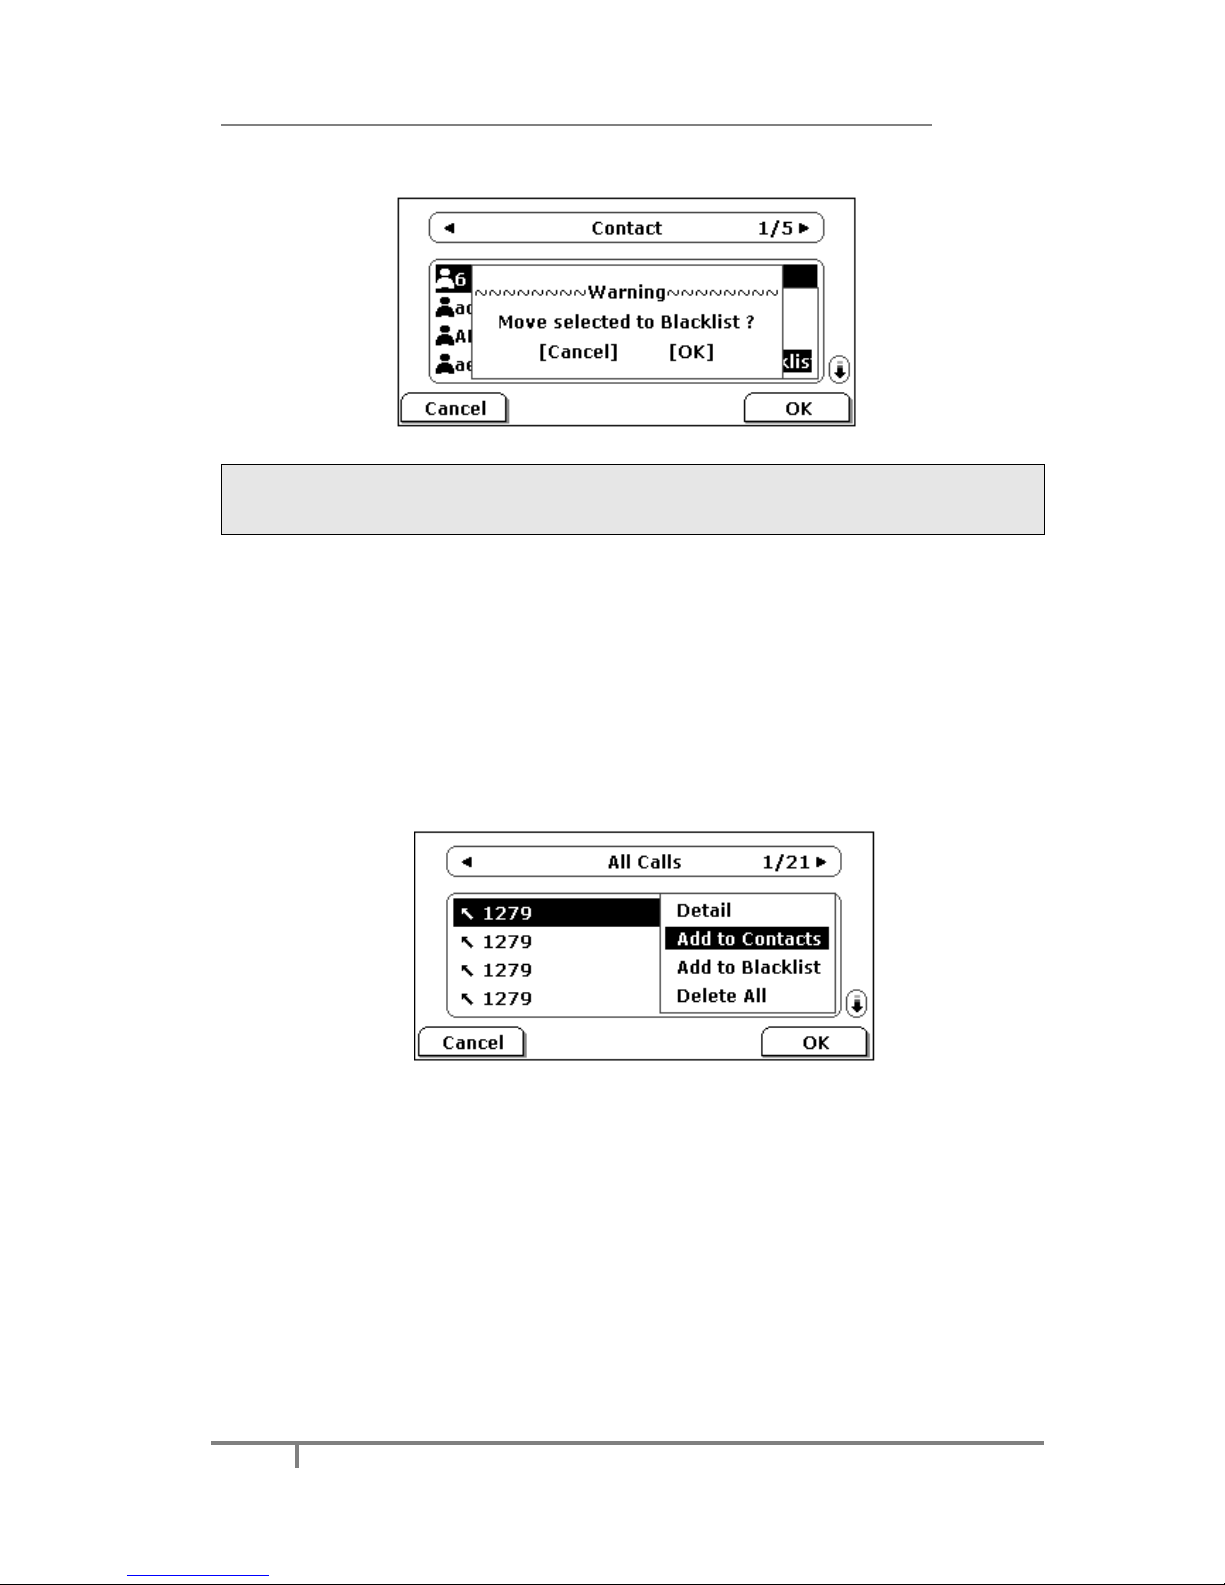
To move a contact in History to Contacts via Phone interface:
1) Press History hot key to enter the local call history list.
2) Use the navigation keys to highlight a record, and then press the Option hot key
to pop up the field, highlight Add to Contacts option, then press the OK hot
key to enter the edit interface.
3) Press the abc hot key to switch the input mode.
4) After the edition, press the Save hot key to save the change. Then you can go to
Contacts interface to check the record.
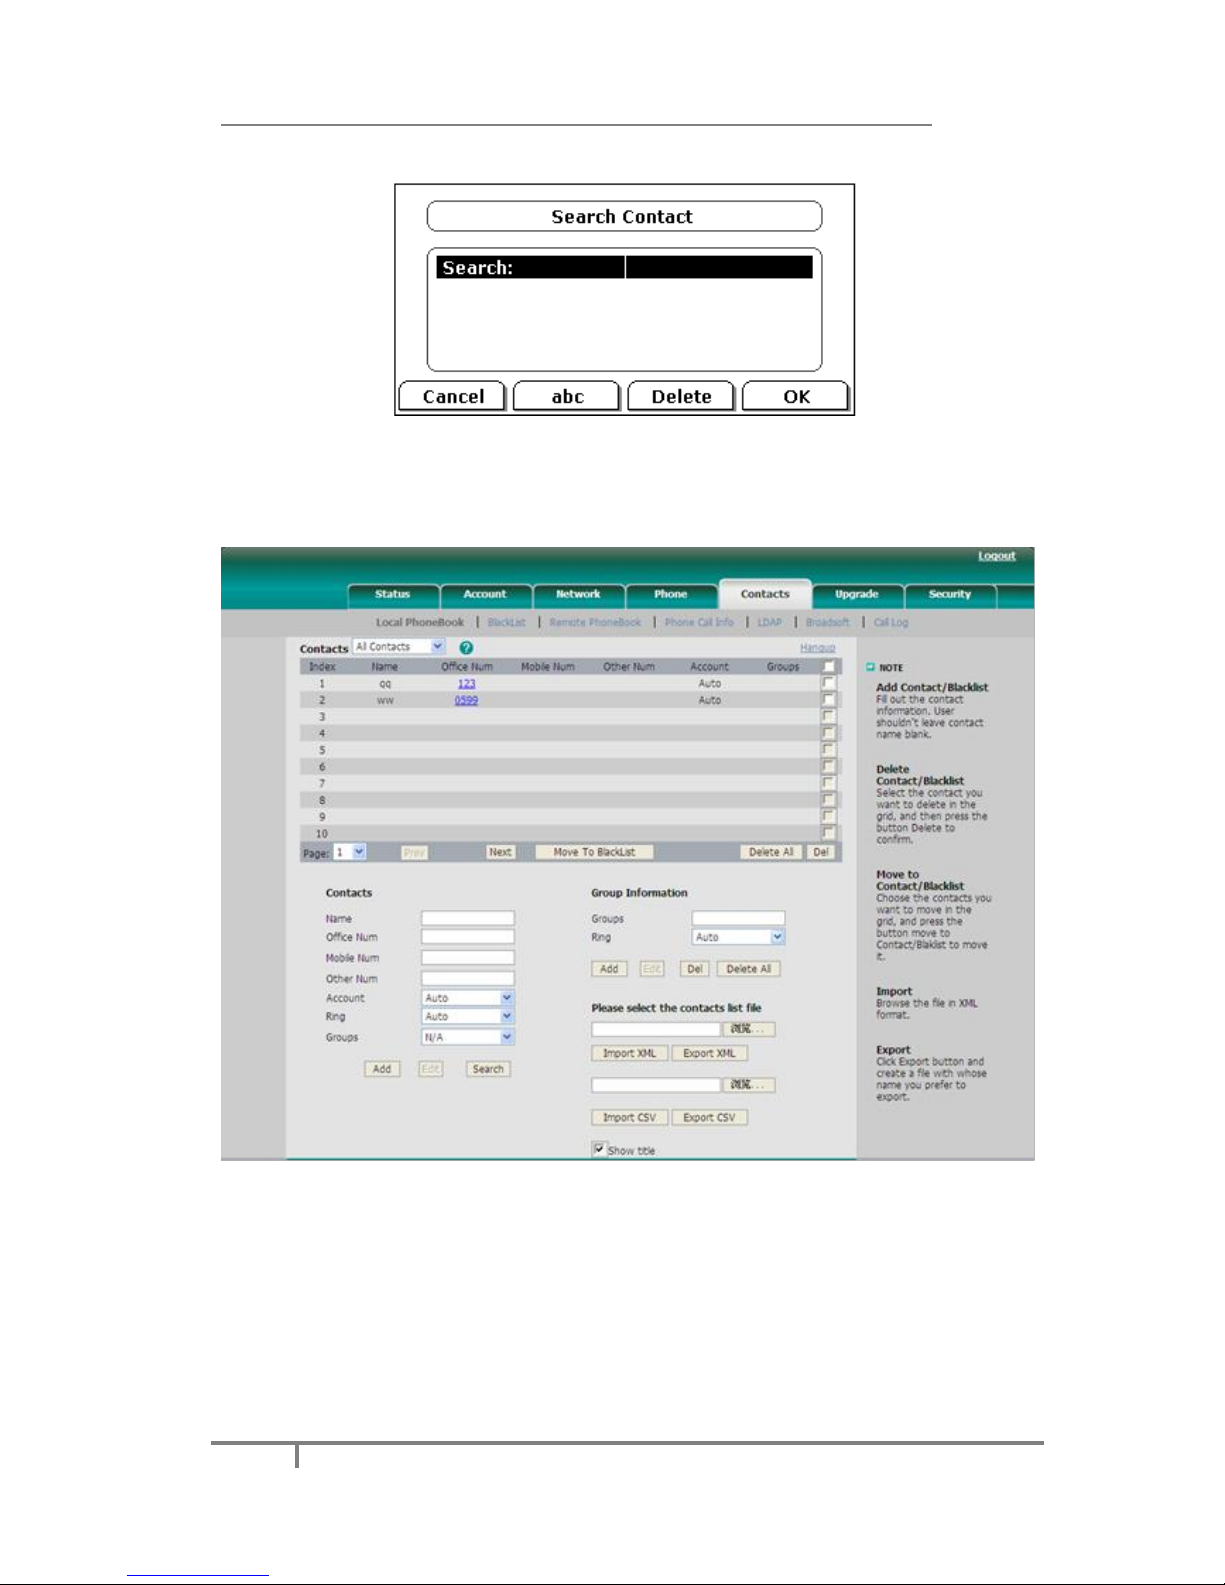
To search a contact via Phone interface:
1) Press Directory->Local Directory->Search.
2) It will turn to the Search interface, and then you can enter the query condition,
press the OK hot key.
Page 32
Enterprise IP Phone Customizing Your Phone
26
3) Then the phone will show the record which qualified.
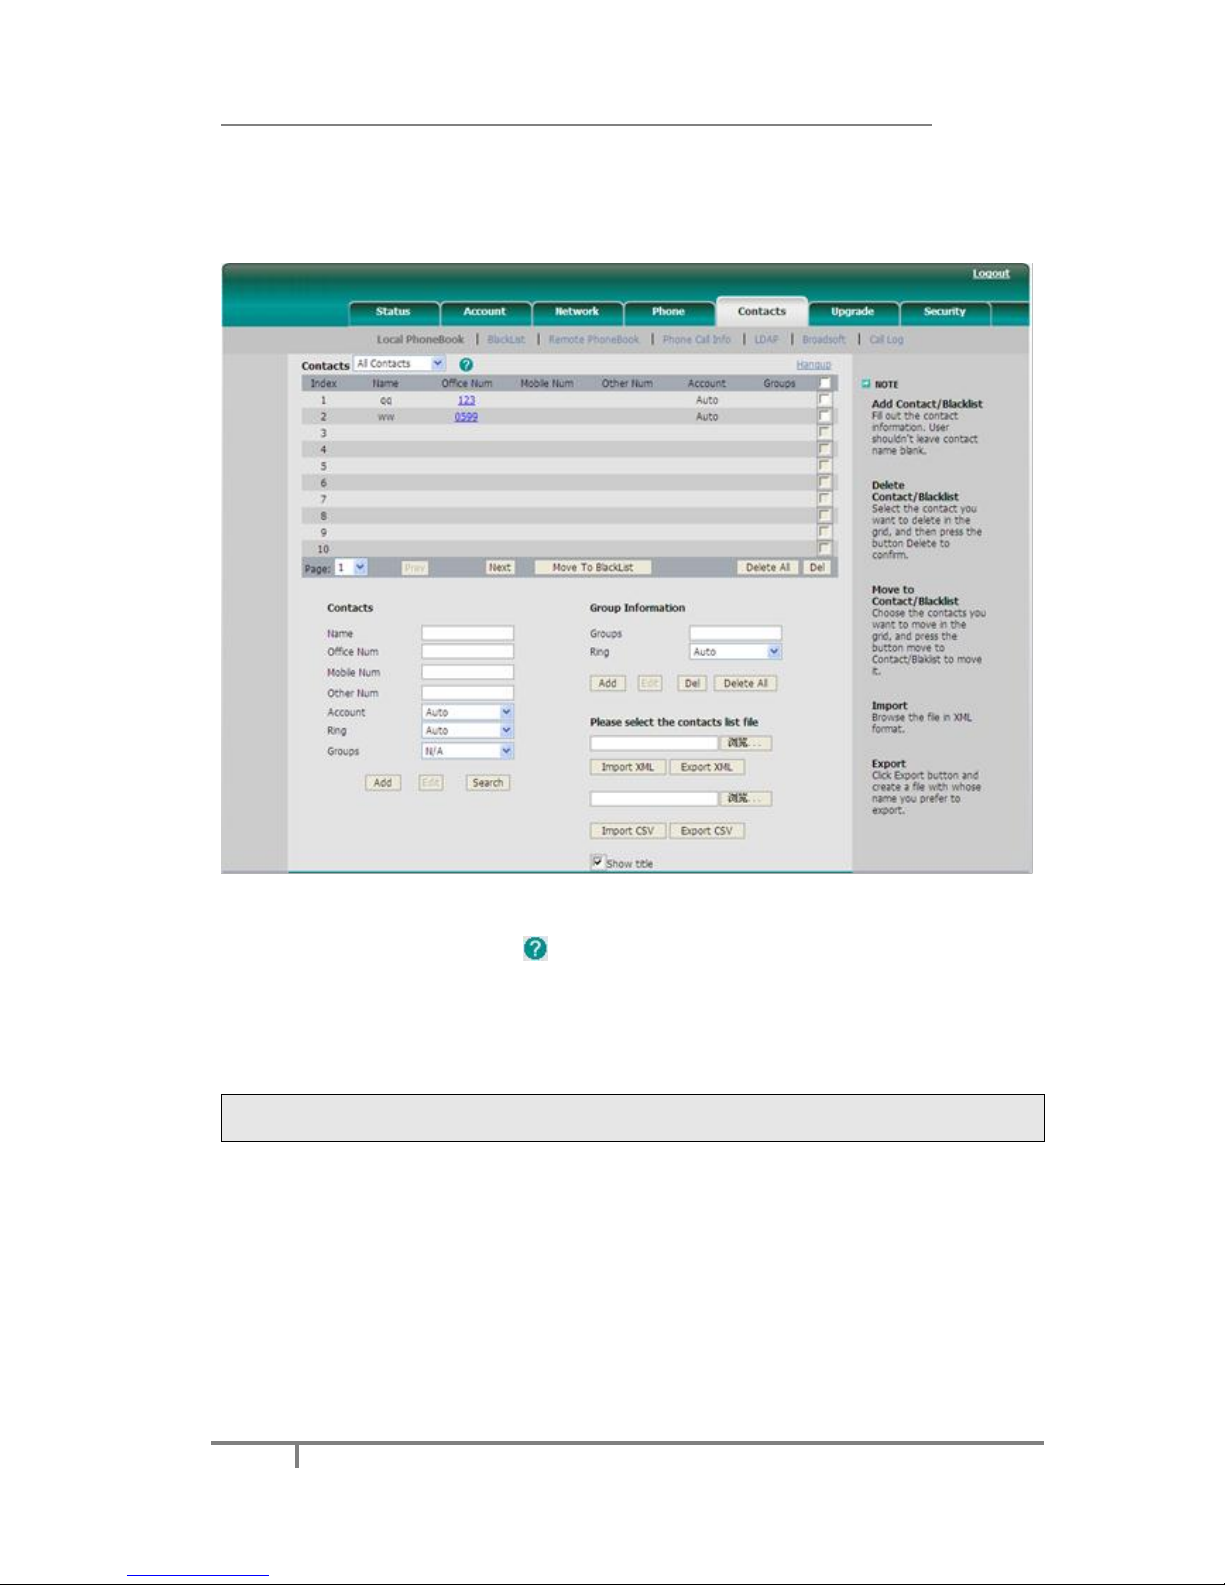
To add/delete/edit/move the contacts via the Web interface:
Click on Contacts->Local Phone Book. Please refer to the instruction above for the
parameters’ detail.
Page 33
Enterprise IP Phone Customizing Your Phone
27
Import/Export Contact list
Import/Export Contact List via Web interface:
1) Click on Contacts->Local Phone Book.
2) Browse the specific contact list file in .XML format or .csv format, and then click
on Import button. The imported contact lists will be shown in the directory.
3) Move the mouse to the icon ; you will see the notes for parameters. The
meanings of this icon on other pages is the same, we will not elaborate it one by
one.
4) Click on the Export button to export the contact list.
Note:
Import/Export Contact List can only be set via Web interface.
BlackList
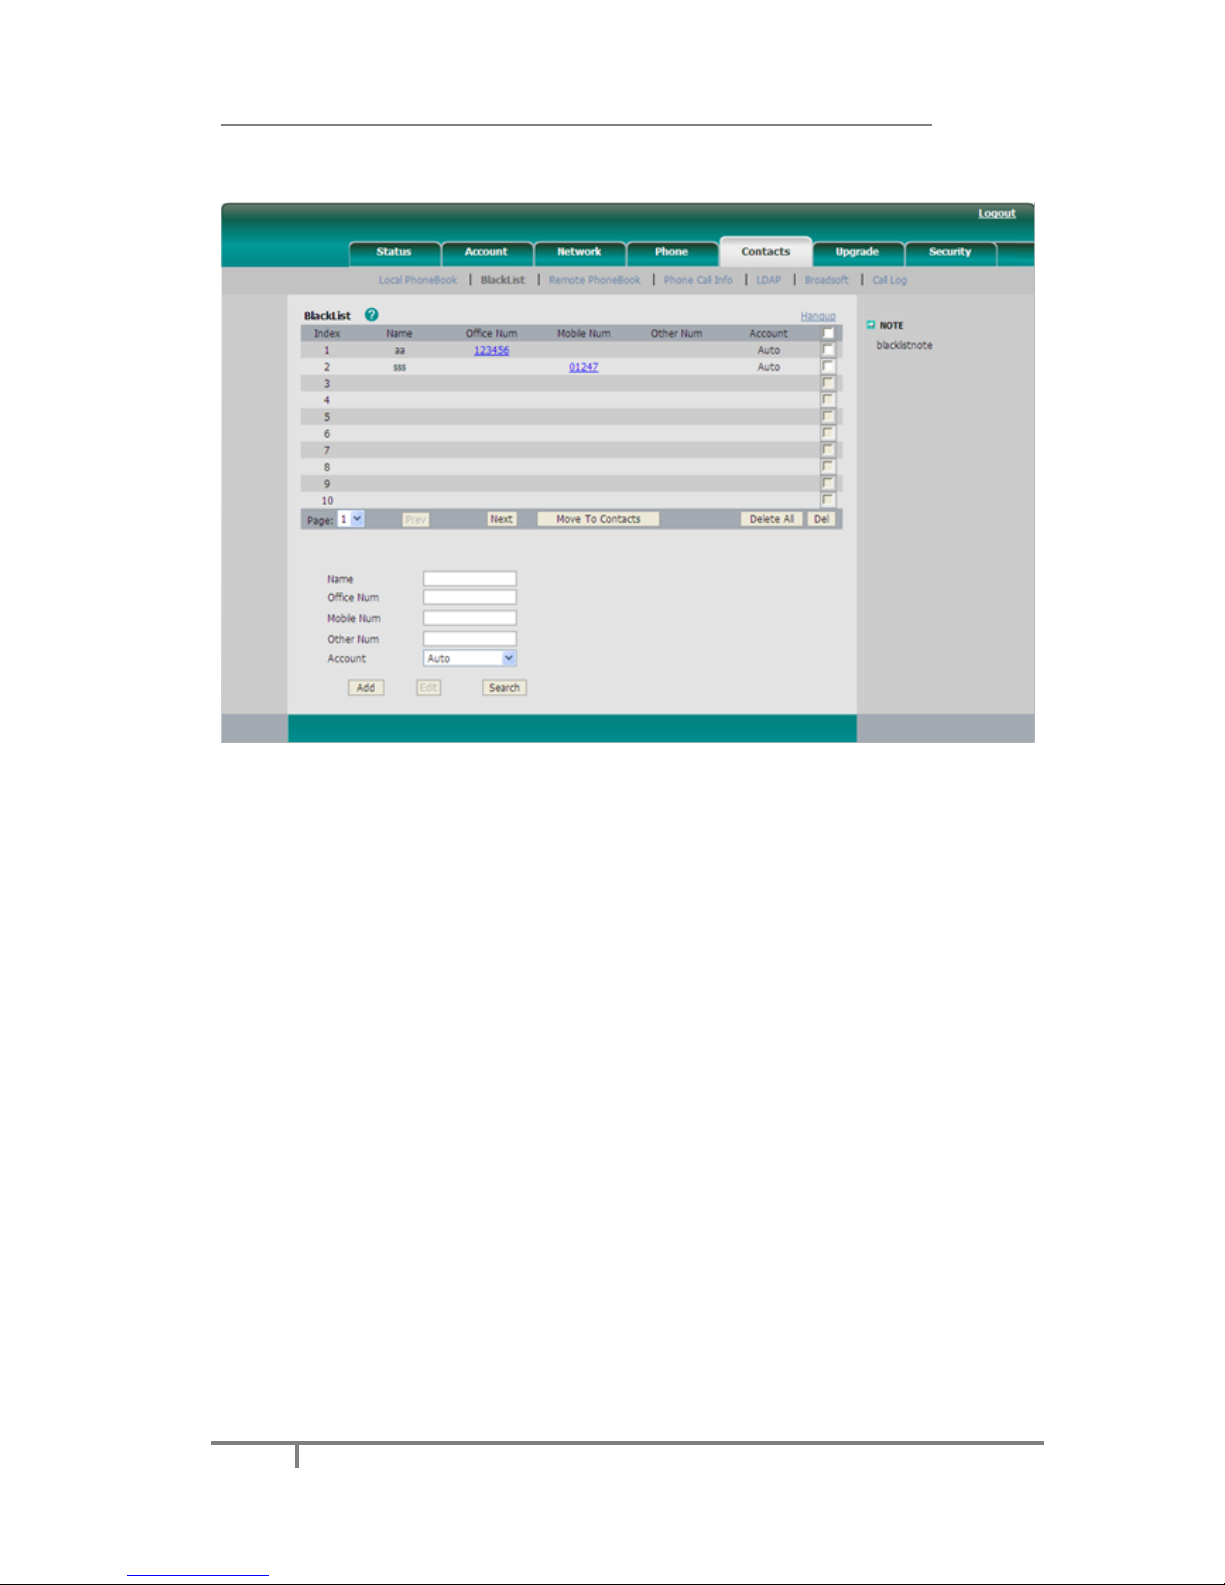
If you add a contact to blacklist, then the call from this contact cannot get through.
To add contacts to Blacklist via the Web interface:
1) Click on Contacts->Blacklist to enter the Blacklist interface.
2) Enter Name, Office Num, Mobile Number, Other Num of the contact and
select an account.
3) Click Add key to add the contact to the blacklist.
Page 34
Enterprise IP Phone Customizing Your Phone
28
You can refer to the configuration of Contact for more information.
Remote Phone Book
The IP phone has directory itself, but in the enterprise applications where there is a
need for a common phone book. For the maintenance and the update of it, the
common phone book is usually carried out on the server or IPPBX to maintain up-todate public phone book, terminal users need to have remote phone book function.
When the users browse the remote phone book, the terminal will check and
download the latest information released on the server in time, and display on the
terminal for the user.
Page 35
Enterprise IP Phone Customizing Your Phone
29
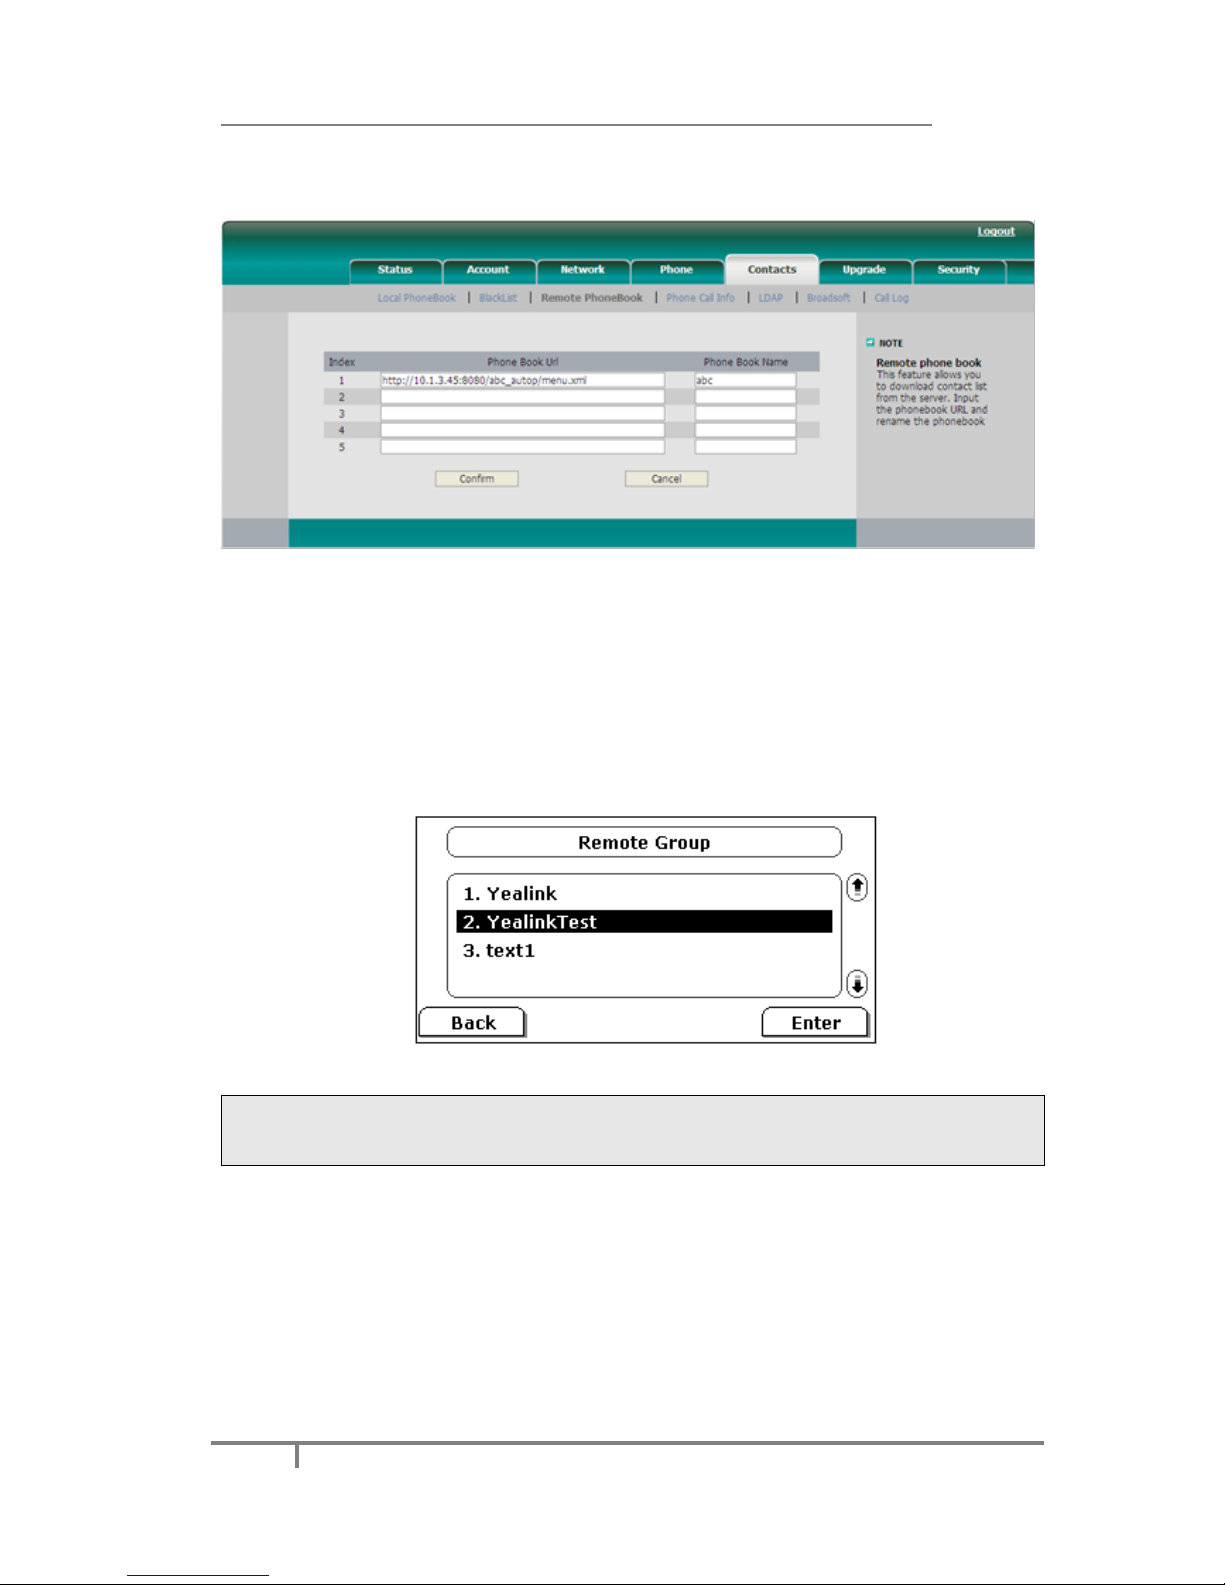
To set the Remote Phone Book via Web interface:
1) Click on Contacts->Remote Phone Book.
2) Input the Phone book URL and the Phone Book Name, and then click on the
Confirm button to save the change.
To check the Remote Phone Book via Phone interface:
1) Press Directory->Remote phonebook.
2) Enter the Remote Group page, choose a special one, and press the Enter hot
key, it will go to the corresponding URL address to download the contact
information for you.
Note:
1. This IP phone can support 5 remote phone books at most.
2. Every contact in the remote phone book can set several phone numbers.
In addition, you can enable or disable
the
search remote phonebook for caller ID
feature
via web interface. If it’s enabled, the phone displays the name of the caller
stored in Remote Phone Book when there is an incoming call.
To enable search remote phone book via Web interface:
1) Click on Phone -> Features
Page 36
Enterprise IP Phone Customizing Your Phone
30
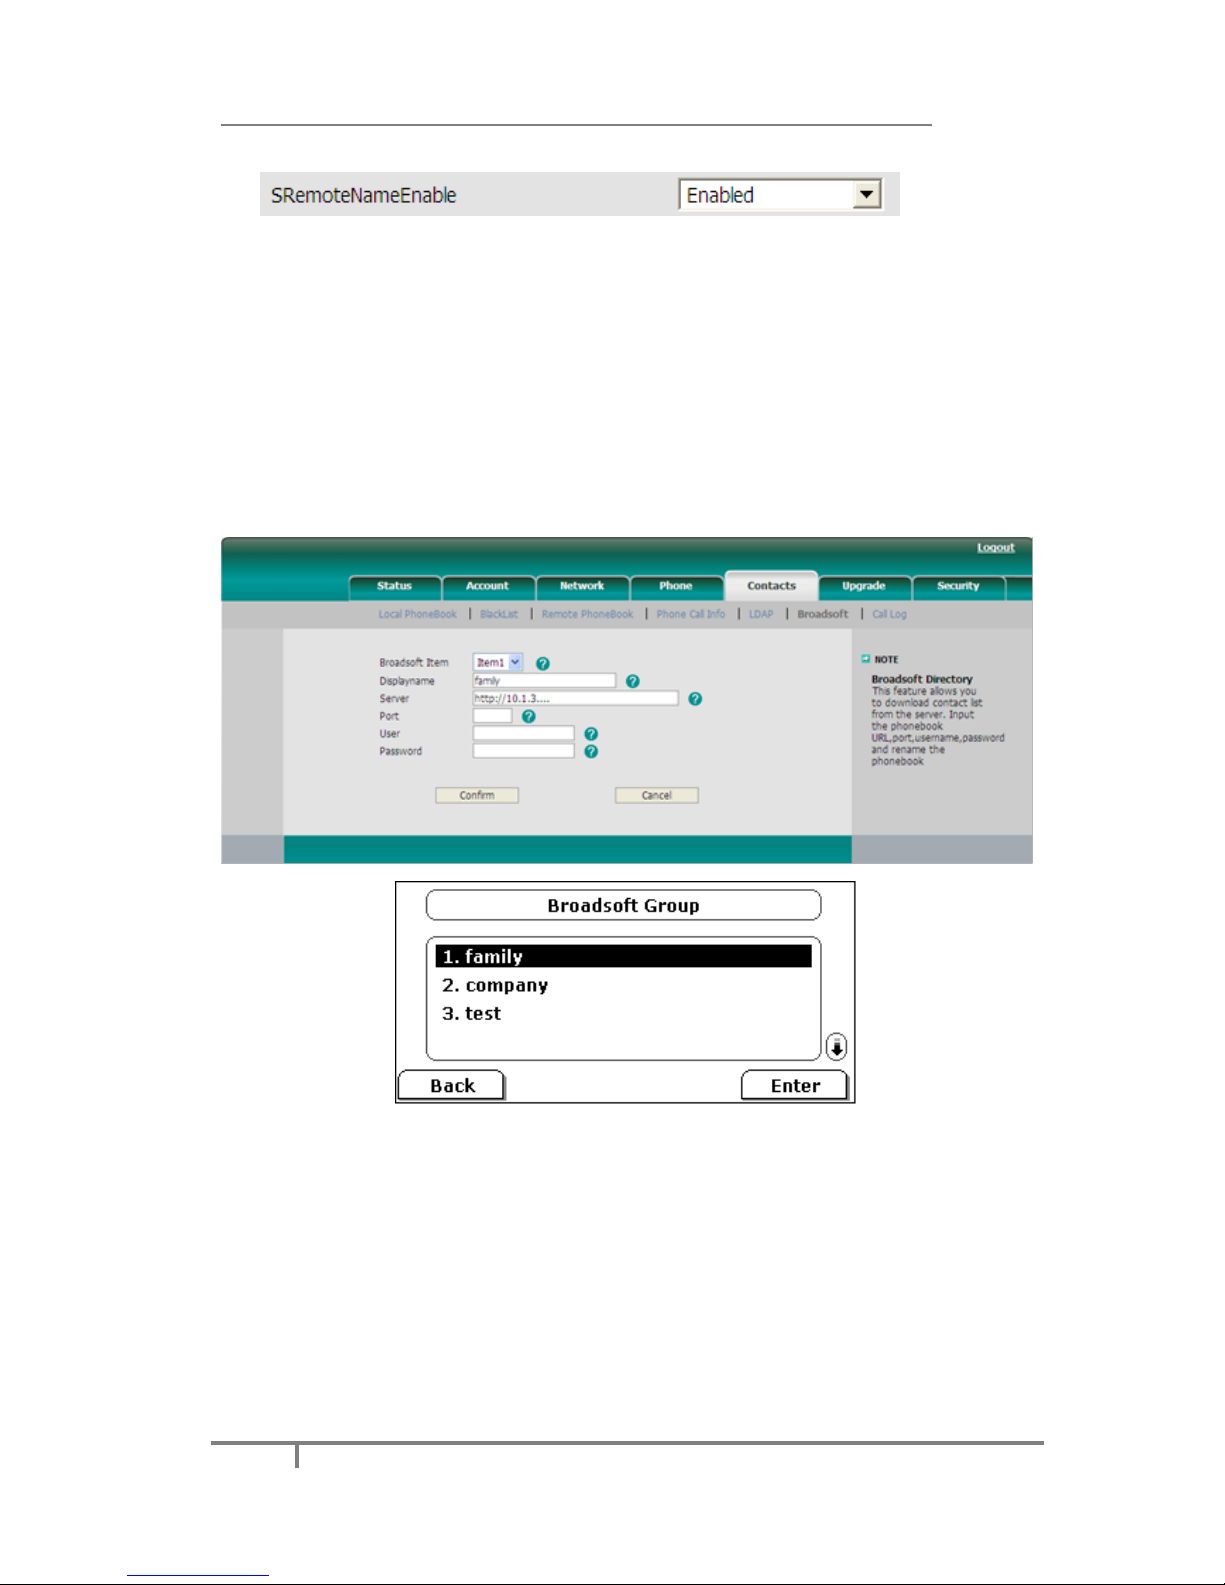
2) Select Enabled in the pull-down menu of SRemoteNameEnable
3) Click Confirm to save the configuration.
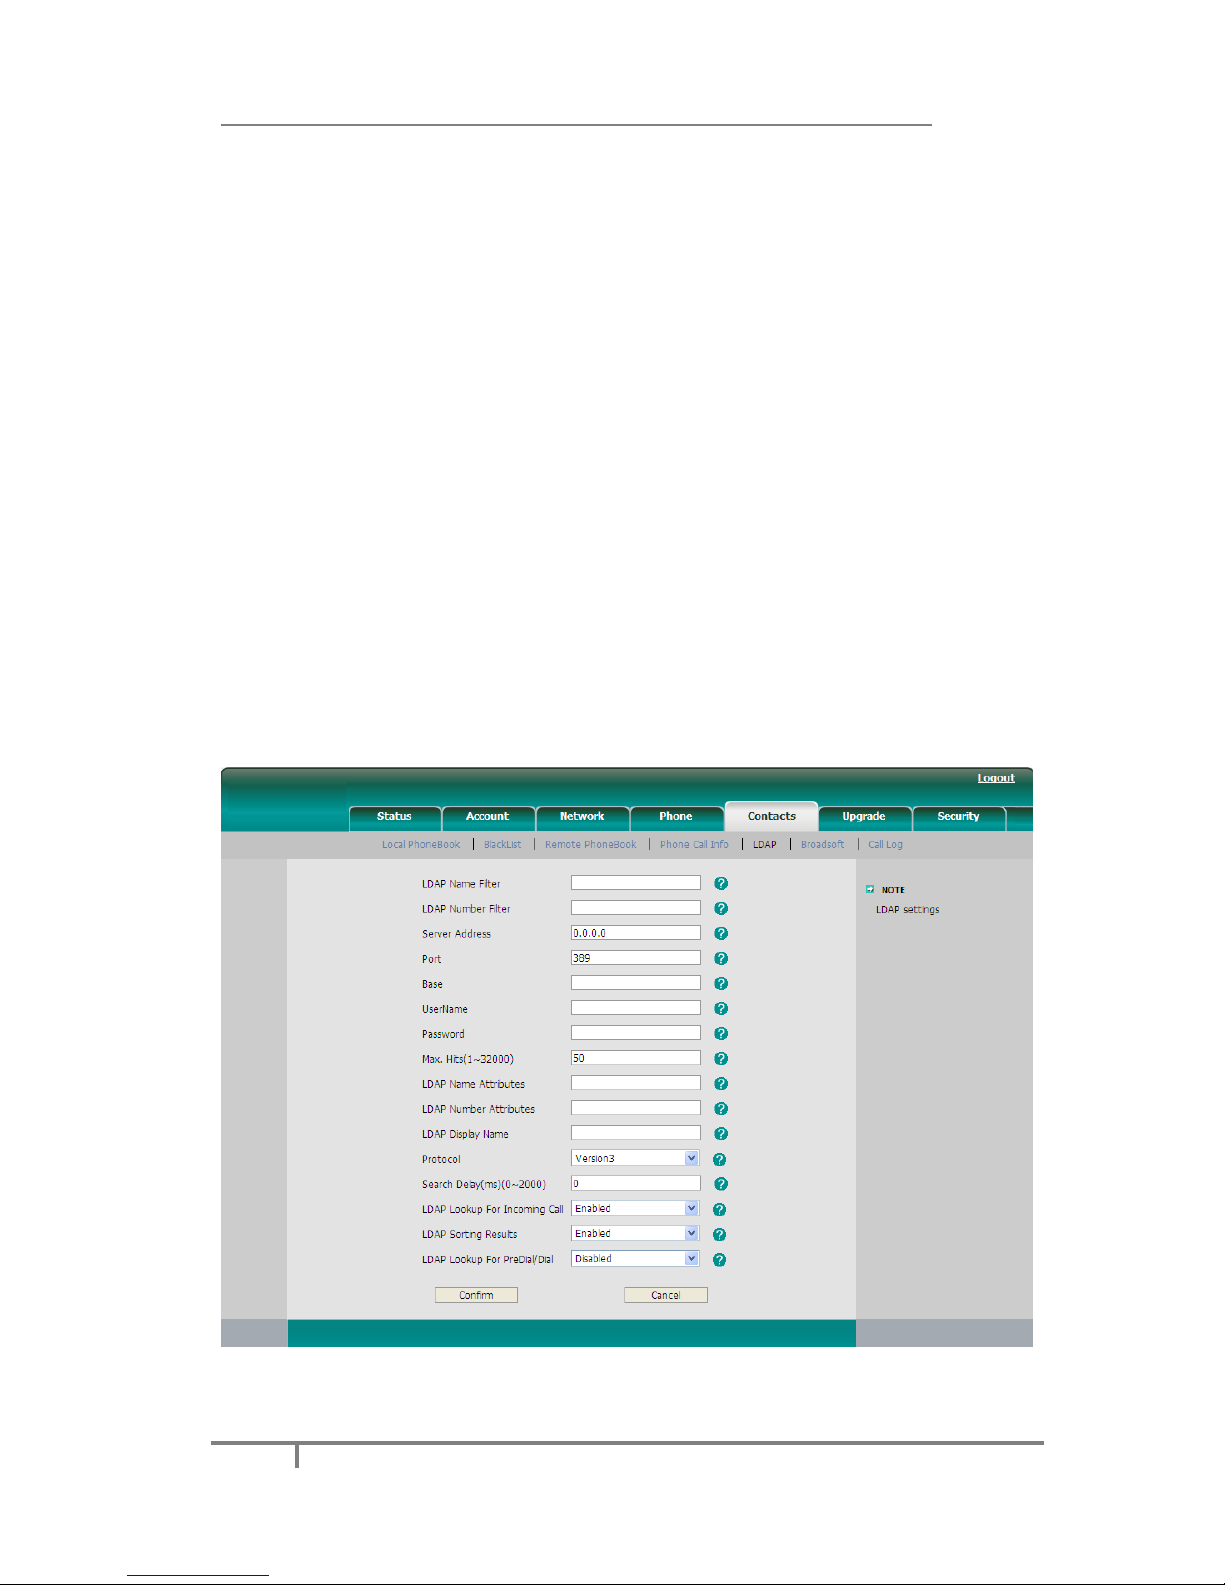
Broadsoft
Broadsoft phone book is the same as the Remote Phone Book. This feature allows
you to download contact list from the server.
Configure Broadsoft via web interface:
Click on Contacts->Broadsoft, choose the Broadsoft Item, and then enter the
Server, Port, Username, Password and rename the phonebook.
Configure Broadsoft via phone interface:
1) Press Menu->Features->Broadsoft Settings Menu->Broadsoft Dir Settings
2) Select Broadsoft Item, enter the Display Name, Server, Port, User Name
and Password.
3) Press the Save soft key to save the changes.
Page 37
Enterprise IP Phone Customizing Your Phone
31
LDAP
LDAP can support these functions:
1. Search the contact: Press the DSS key which is set up as LDAP, input a number or
letter in the new interface, the phone will search the contact in LDAP server which
follows certain rules, and show it in the LCD, user can choose the contact to call out.
2. Search the incoming call: the phone will search the local directory when there is a
coming call. If they can’t find the contact in the local directory, it will search them
through LDAP server, and show the contact name in the LCD. The LDAP Lookup For
Incoming Call option can be configured to enable or disable this function via web
interface.
3. The function of Dial-up directory: under the dial interface, each time you press a
key there are inquiring for a number. It will show on the LCD and let the user to
choose. The LDAP Lookup for PreDial/Dial option can be configured to enable or
disable this function via web interface.
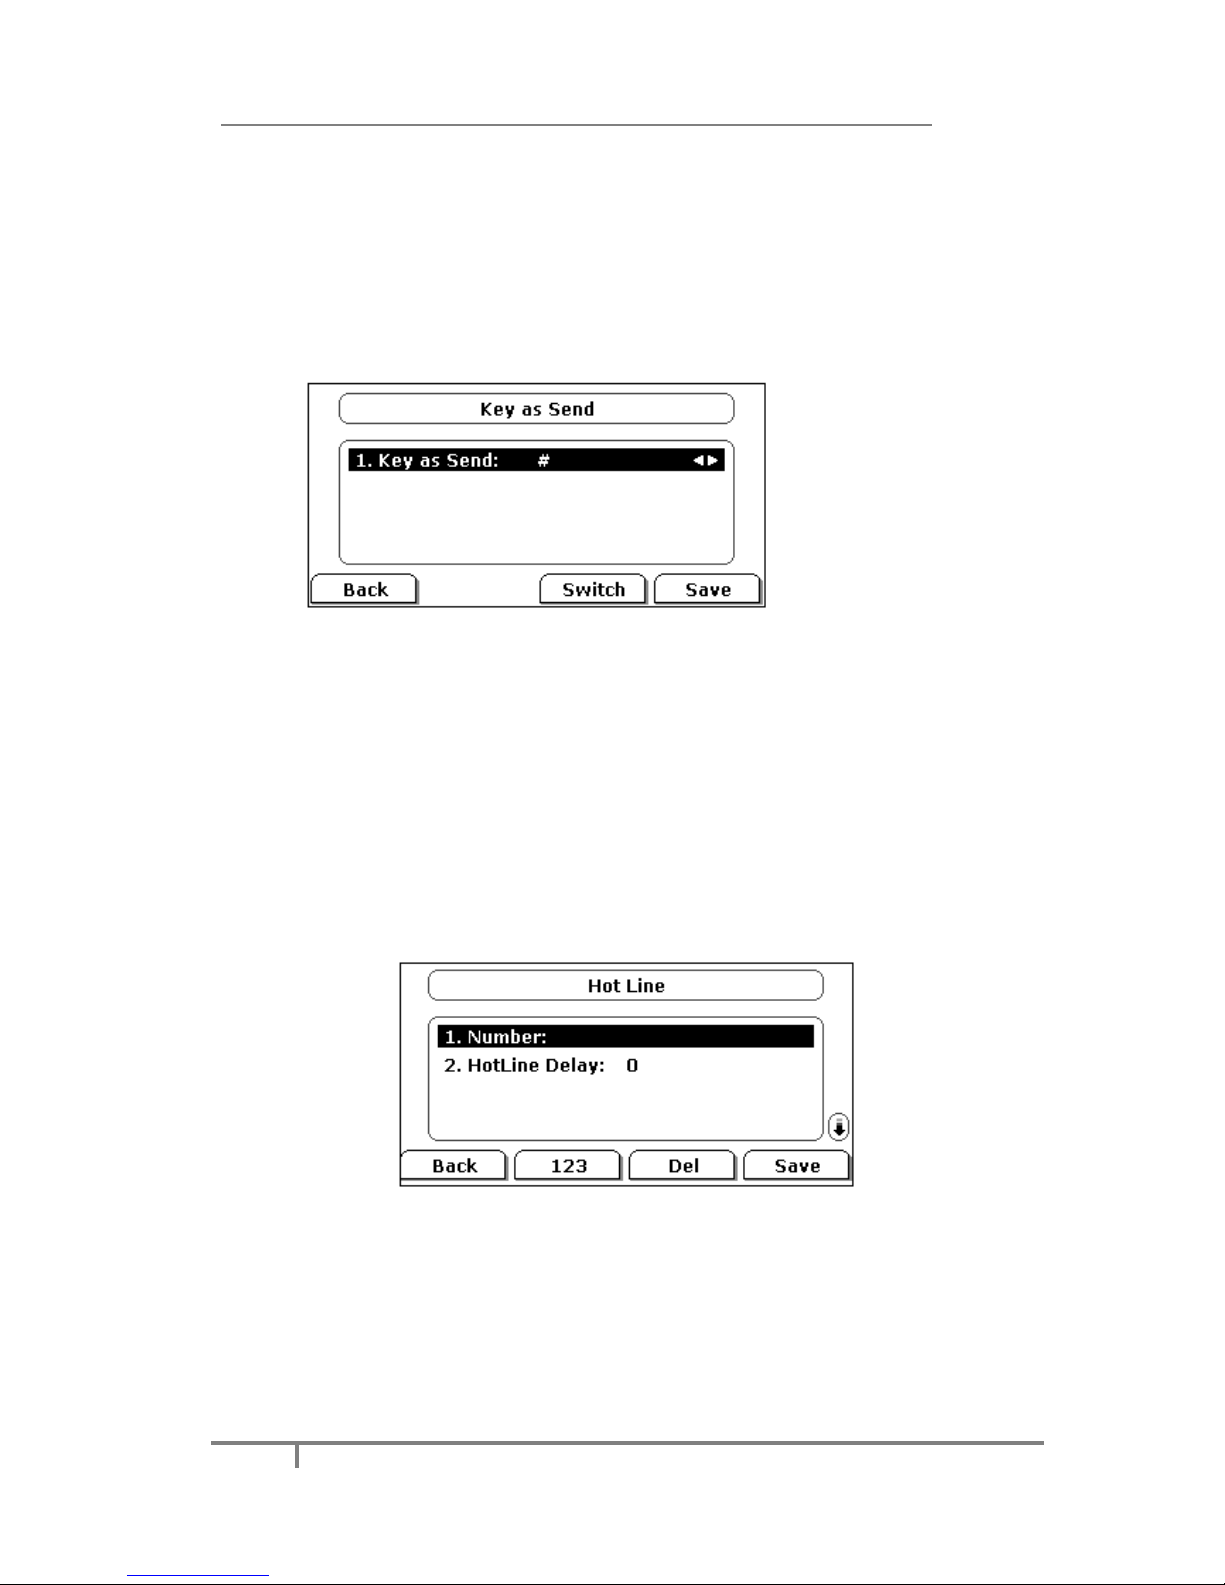
To set the LDAP via the Web interface:
1) Click on Contacts->LDAP.
2) Configure the corresponding options.
3) Click on Confirm to save the change.
Page 38
Enterprise IP Phone Customizing Your Phone
32
Other Settings
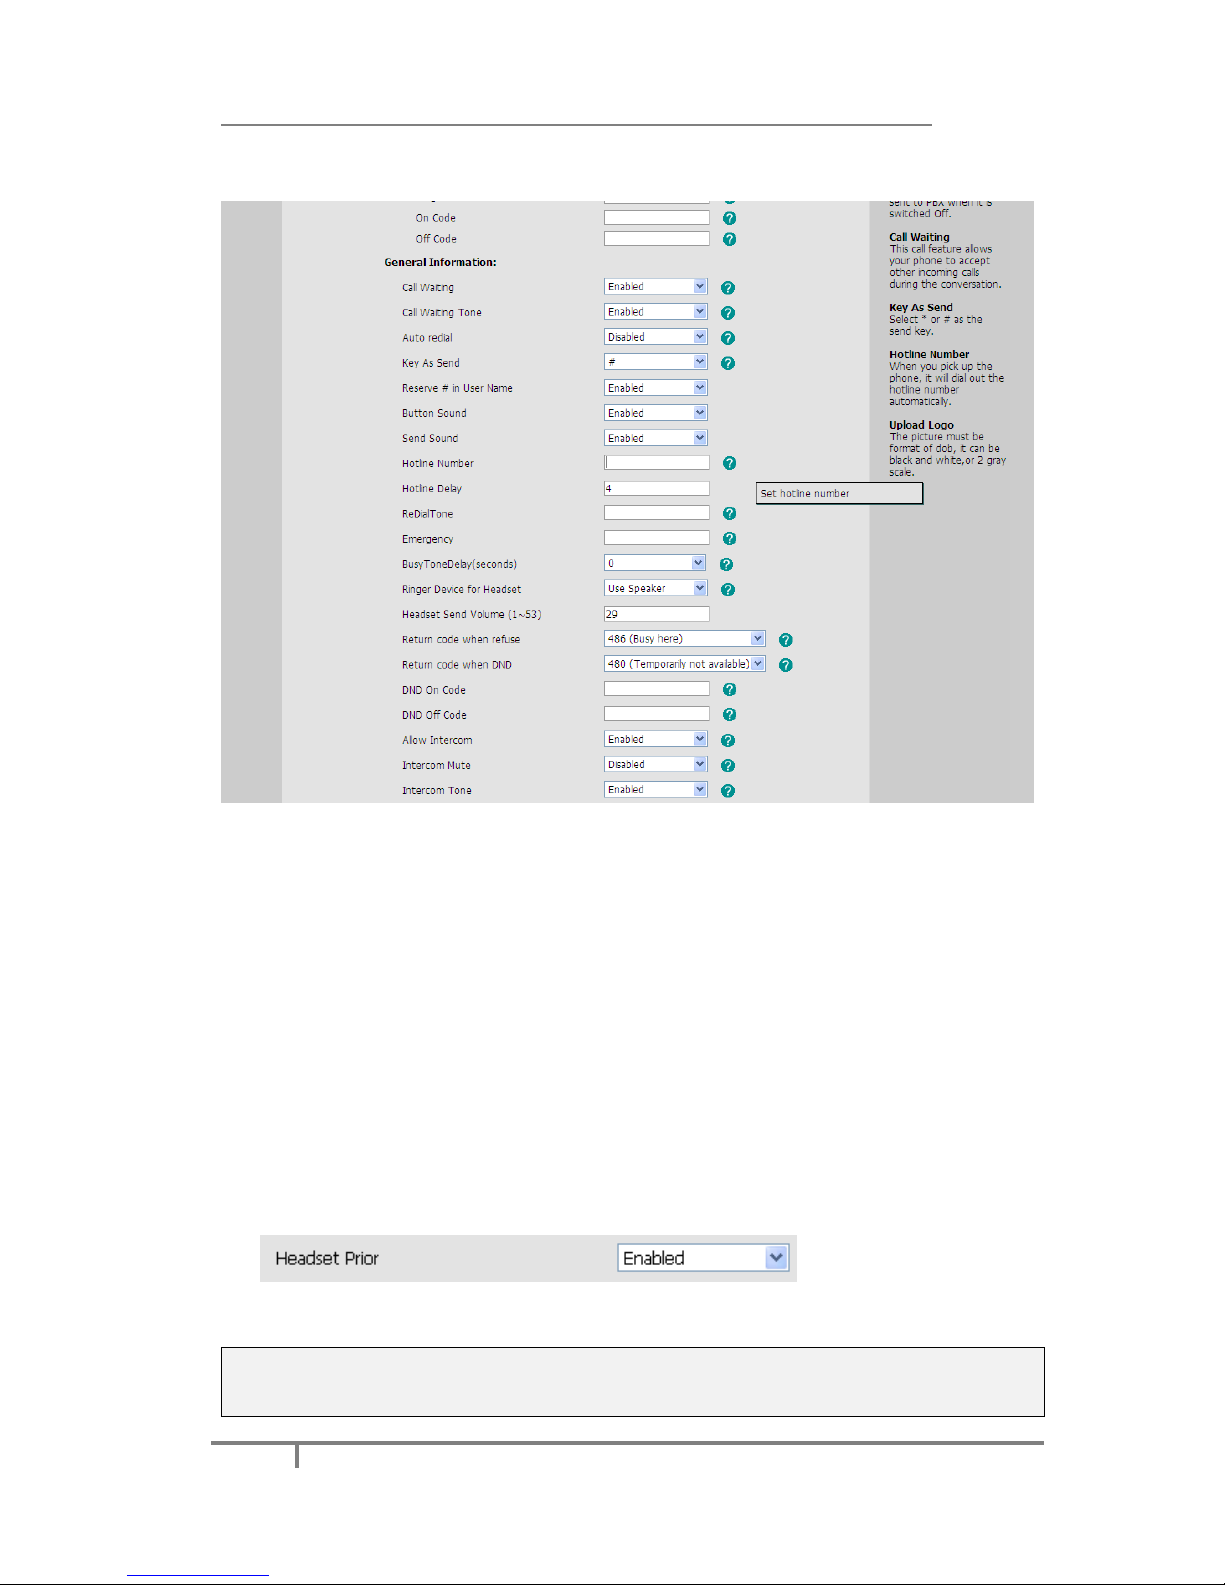
Key as Send
Users can set a specific button (“#” or “*”) to active as the send button.
To set the send key via the IP phone interface:
1) Press Menu->Features->Key as Send->Enter to enter the configuration page.
2) Press the Switch hot key to choose a button that you want to use as the send
key: “#”, “*”, or disable this option.
3) Press the Save hot key to save the changes.
To set the send key via the Web interface:
1) Click on Phone->Features->Key As Send.
2) Highlight the specific one in the pull-down menu, then click on Confirm button
to save the change.
Hot Line
To set the hot line number via the IP phone interface:
1) Press Menu->Features->Hot Line->Enter to enter the configuration page.
2) Enter the Hot Line Number and HotLine Delay time (for example, 20 seconds),
then press the Save hot key to save the changes.
3) When you pick up the handset or press the speaker button, it will dial out the
number automatically if you do not press any keys for 20 seconds.
To set the Hot Line via the Web interface:
1) Click on Phone->Features.
Page 39
Enterprise IP Phone Customizing Your Phone
33
2) Input the Hotline Number and Hotline Delay, and then click on the Confirm
button to save the change.
Headset Prior
Headset prior allows the phone to use headset in priority.
To place a call using Headset Prior, enable the Headset Prior feature, physically
connect your headset and press the HEADSET button to activate it for use. Press the
desired numeric keys to place a call will now connect to the headset automatically.
To receive a call using Headset Prior, enable Headset Prior feature, physically connect
your headset and press the HEADSET button to activate it for use, press the Line
key or the Answer soft key to receive a call will now connect to the headset
automatically.
To enable Headset Prior via Web interface:
1) Click on Phone -> Features;
2) Select Enabled in the pull-down menu of Headset Prior;
3) Click Confirm to save the configuration.
Note:
The headset icon on the LCD screen or a headset button in steady green indicates
that the headset mode is activated.
Page 40
Enterprise IP Phone Customizing Your Phone
34
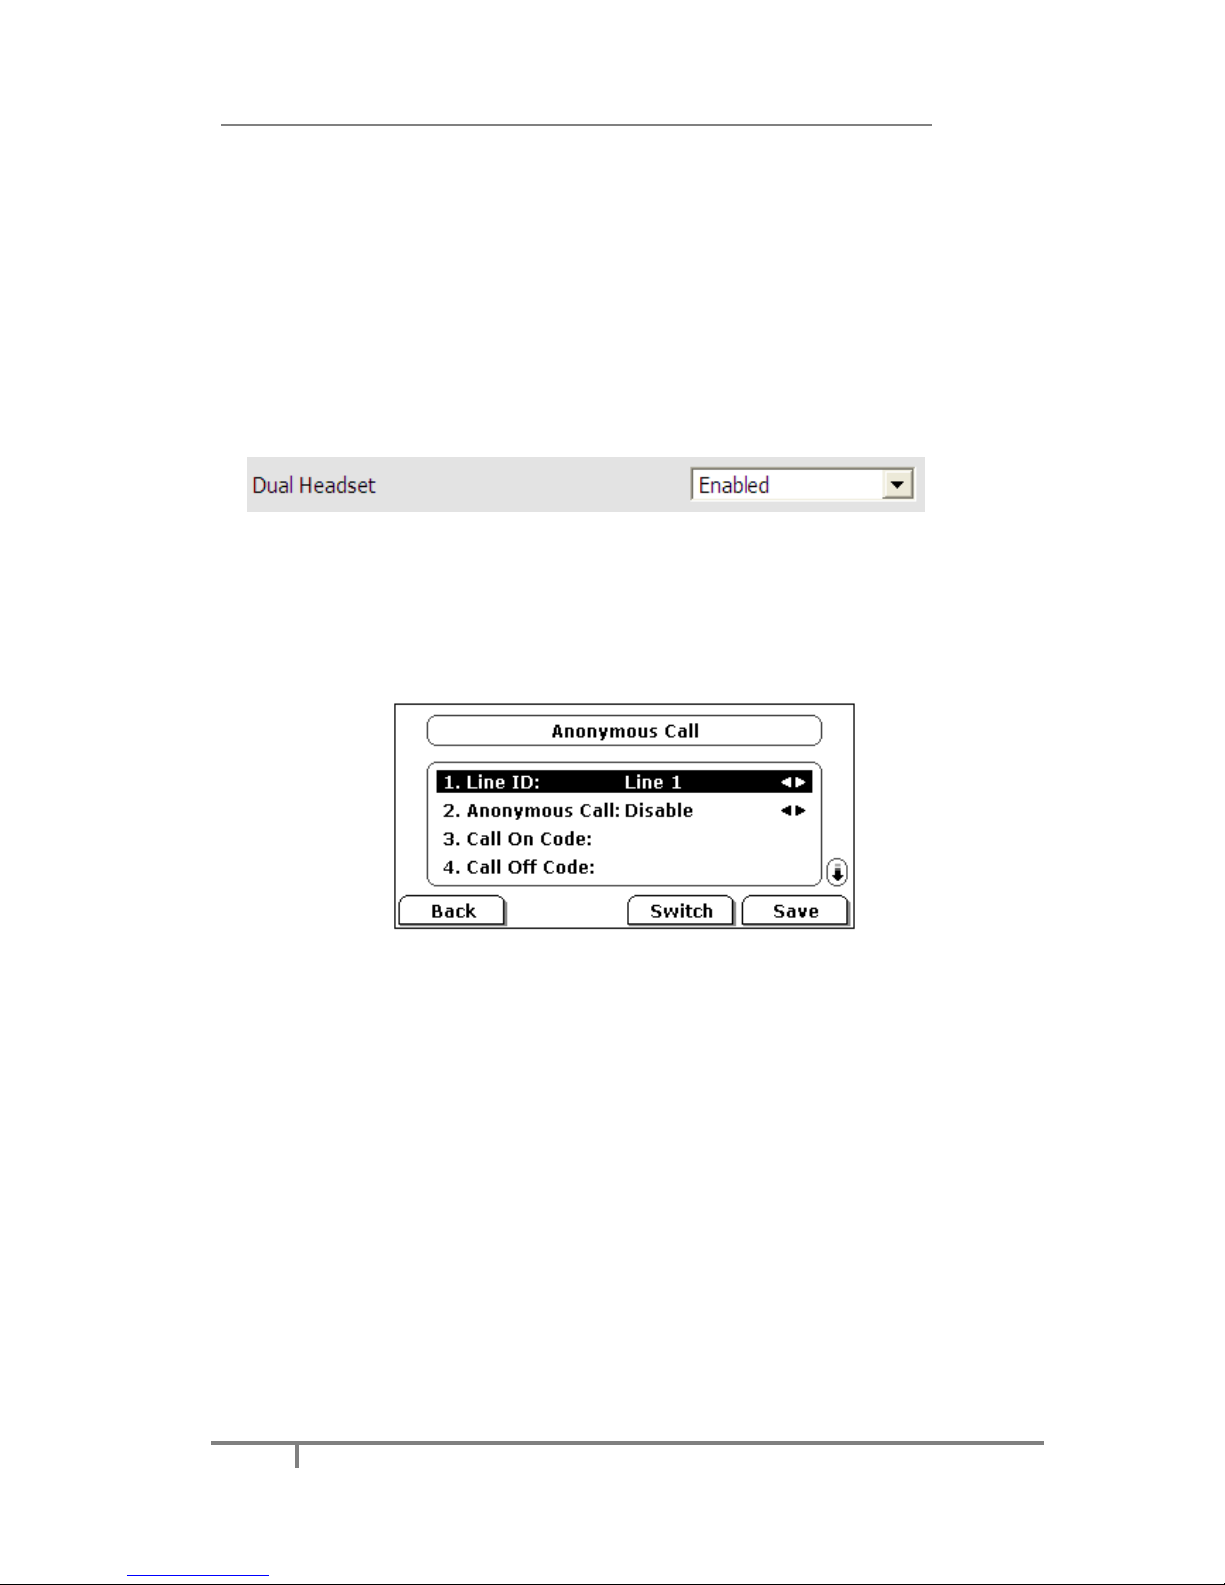
Dual Headset
Dual headset allows users to use two headsets. To use this feature, you must
connect your headsets to headset jack and handset jack respectively. Once the
phone joins in a call, people with the Headset connected to the headset jack has a
full-duplex conversation, another people with the headset connected to the handset
jack is only allowed listening.
To enable Dual Headset via Web interface:
1) Click on Phone -> Features;
2) Select Enabled in the pull-down menu of Headset Training;
3) Click Confirm to save the configuration.
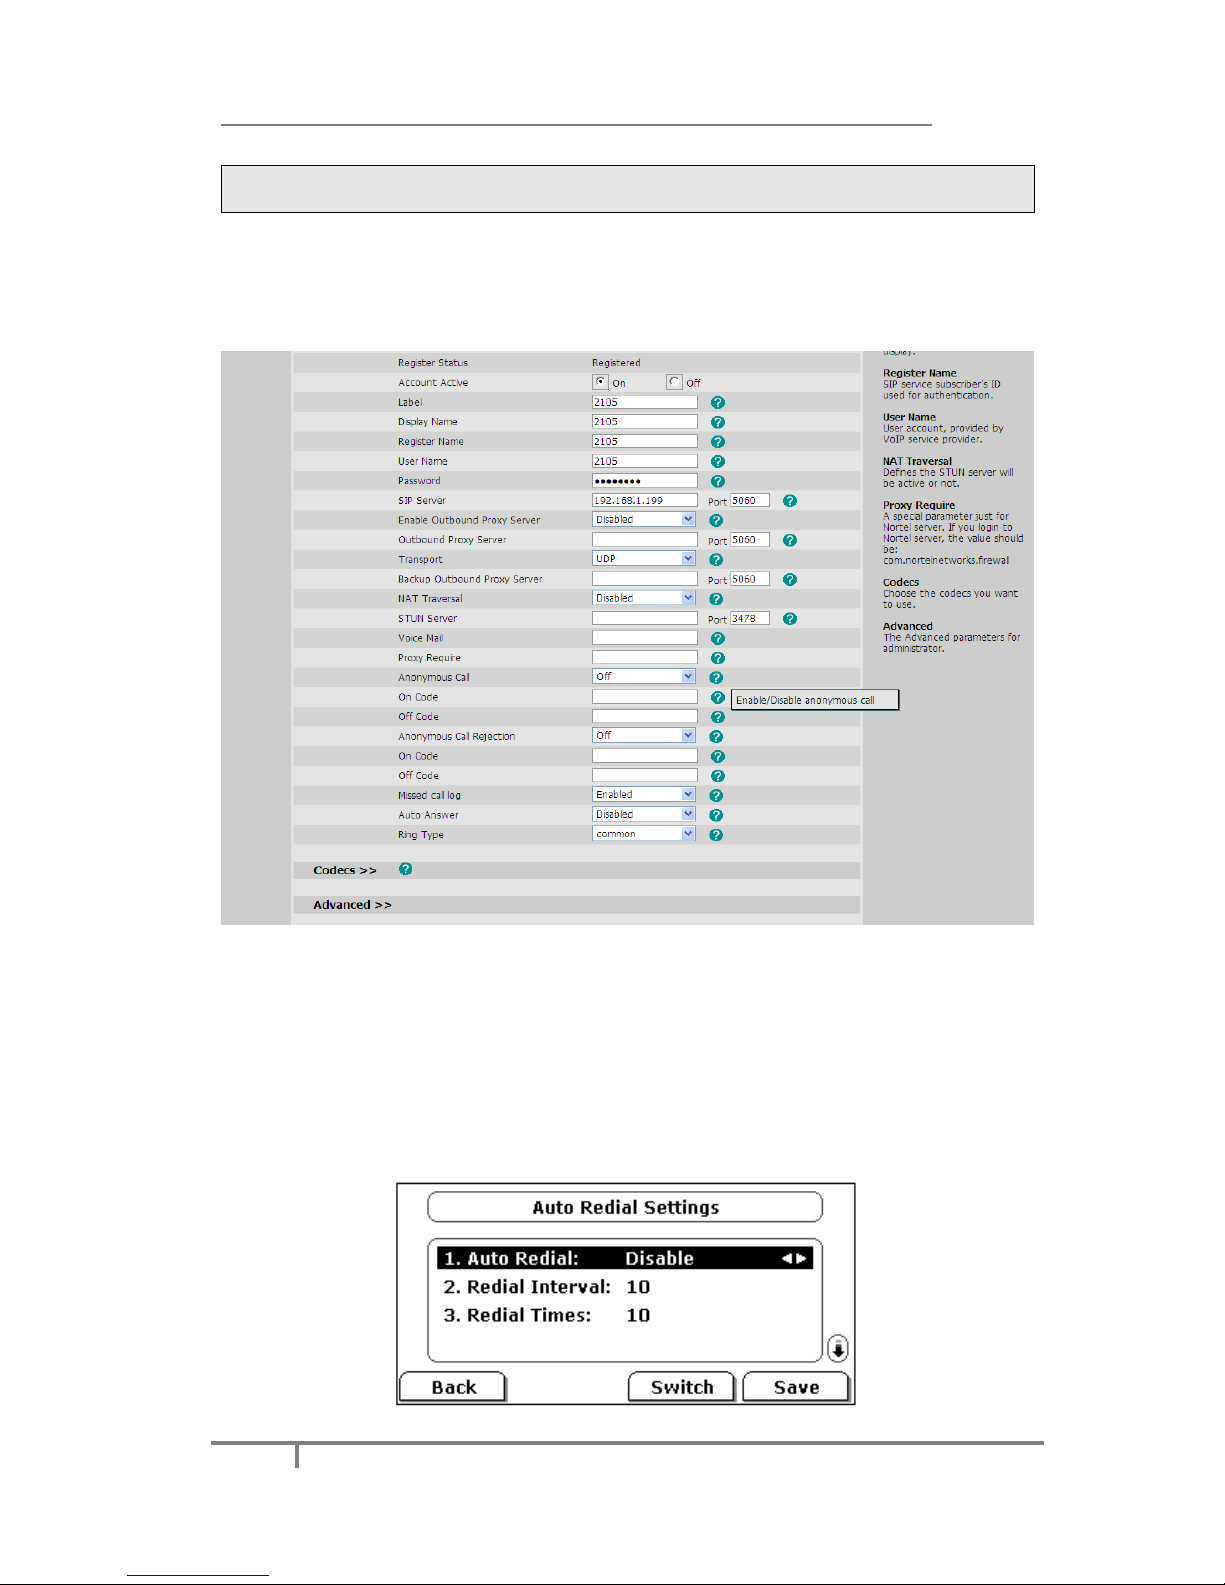
Anonymous call
To set the anonymous call via the IP phone interface:
1) Press Menu ->Features->Anonymous Call->Enter to enter the configuration
page.
2) By the Switch hot key, you can choose the Line ID.
3) Press the navigation keys to enter and choose whether to enable the
anonymous call function. This feature allows making a call with the display of call
identification information which has been blocked.
4) If you want to realize this function by server, please choose and enter the Call
On Code and Call Off Code. When you choose to enable the Anonymous Call
function on your IP phone, it will send information to the server, and the server
will enable/ disable the anonymous call function for your IP phone automatically.
5) Press the navigation keys to enter and choose whether to enable the anonymous
Rejection function. The feature allows rejecting all calls from callers who have
blocked the display of their calling identification information (calling number and
calling name).
6) If you want to realize this function by server, please choose and enter the Reject
On Code and Reject Off Code. When you choose to enable the Rejection option
on your IP phone, it will send information to the server, and the server will
enable/ disable the rejection anonymous call function for your IP phone
automatically.
Page 41
Enterprise IP Phone Customizing Your Phone
35
7) Press the Save hot key to save the changes.
Note:
The feature is only available for the current default account.
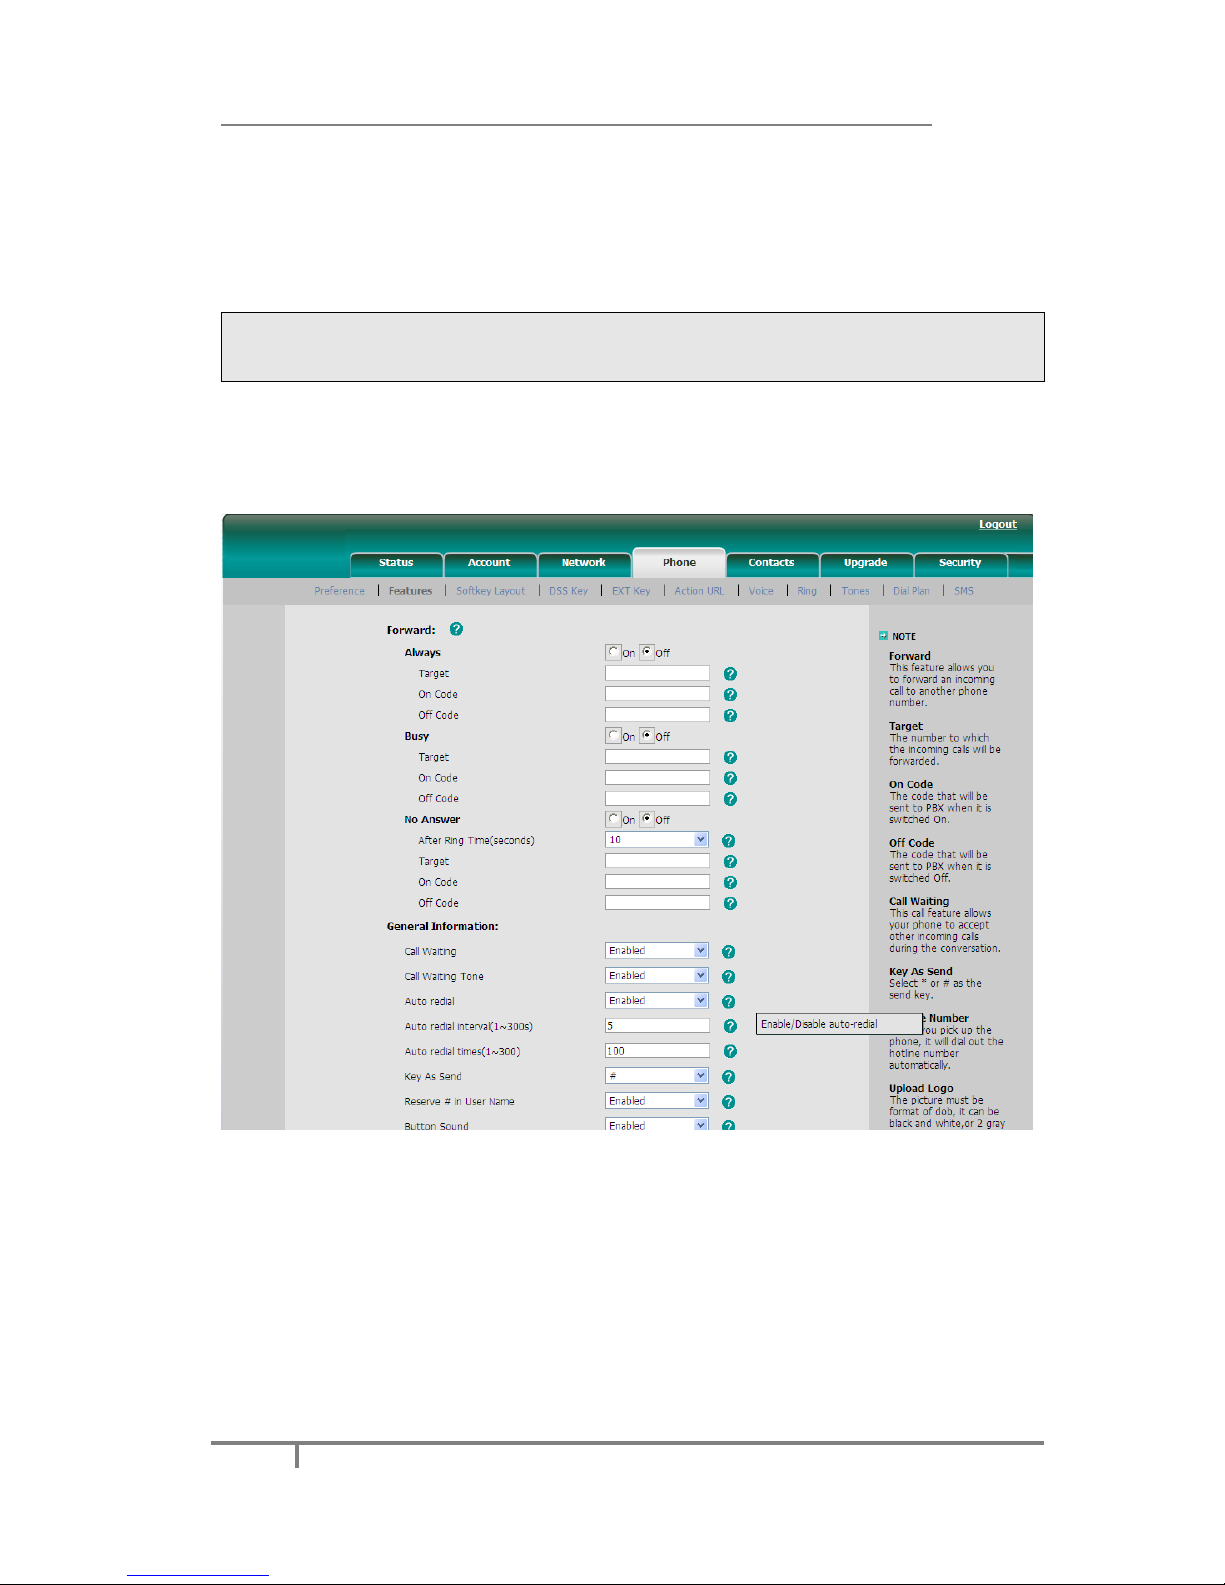
To set the anonymous call via the Web interface:
1) Click on Account-> Basic-> Anonymous Call to do the relating changes.
Please refer to the instruction above for the parameters’ detail.
2) Then click on the Confirm button to save the changes.
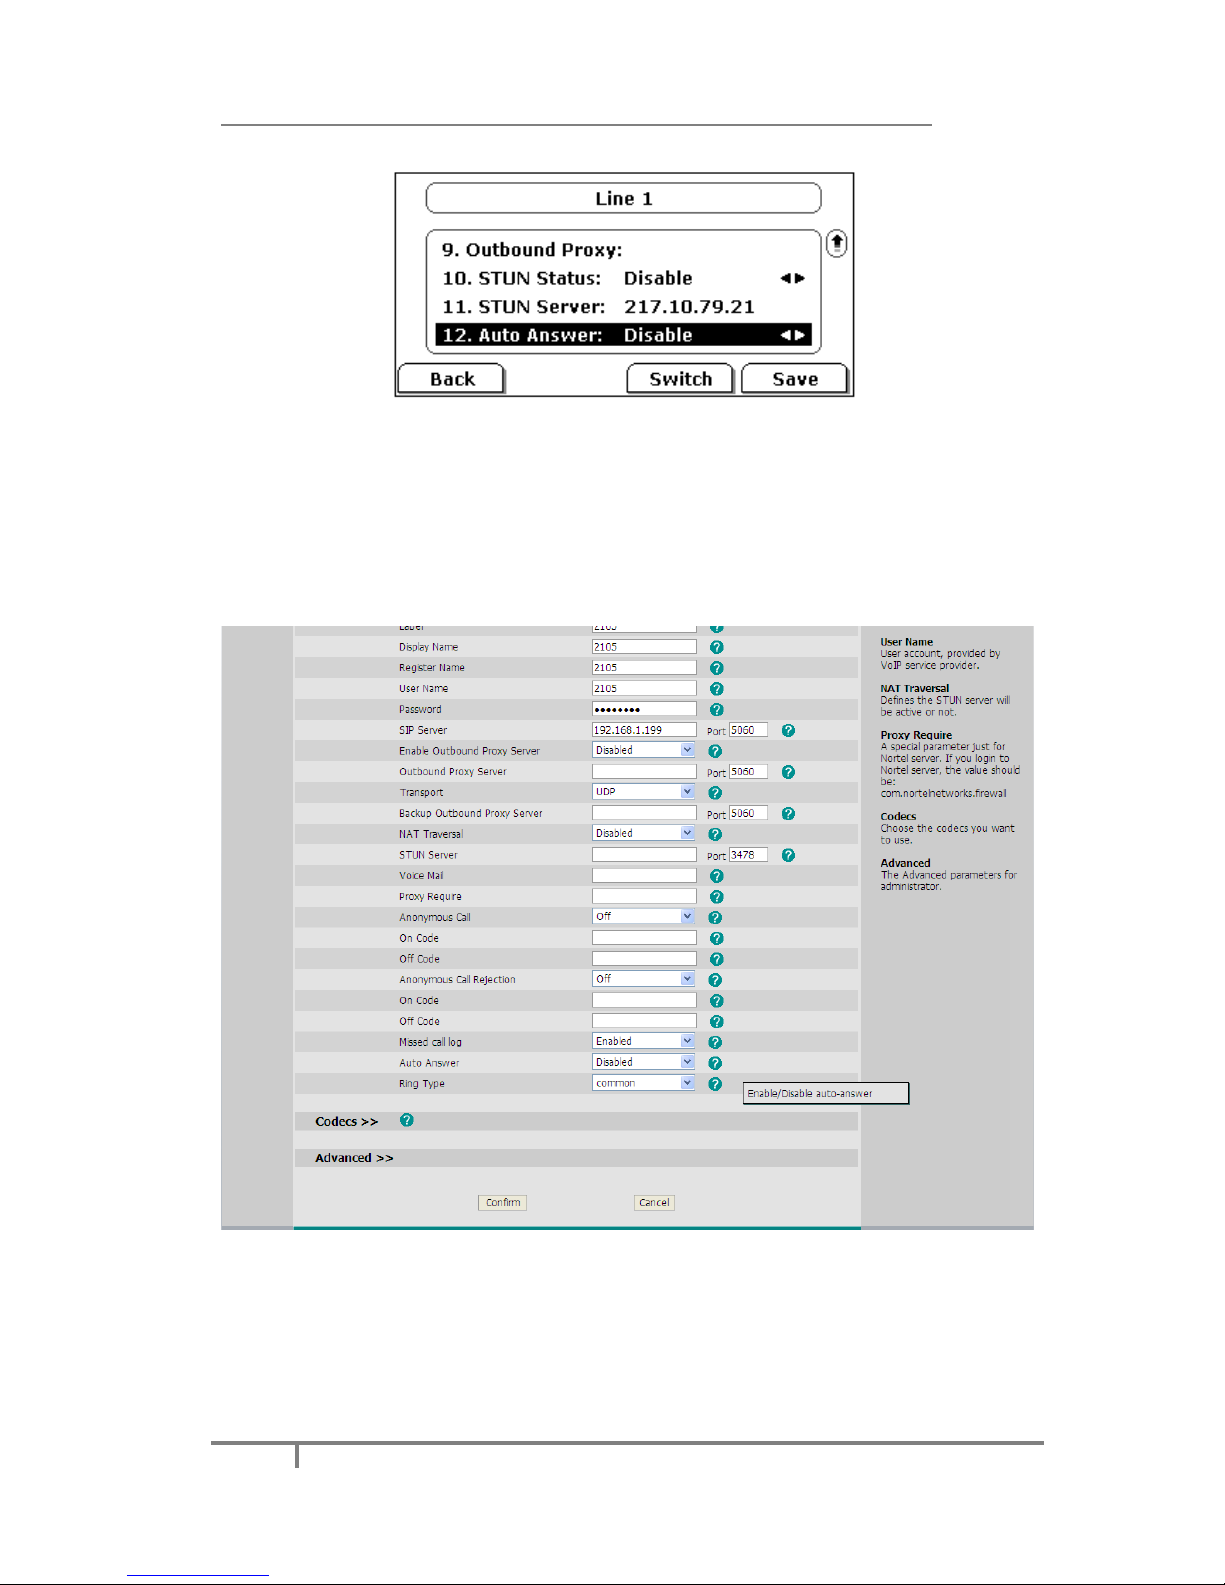
Auto Redial
Auto redial is a telephone feature that redials a busy number in a fixed number of
times before giving up.
To set auto redial via the IP phone interface:
1) Press Menu->Features->Auto Redial Settings->Enter to enter the
configuration page.
Page 42
Enterprise IP Phone Customizing Your Phone
36
2) By the Switch hot key, you can choose whether to enable the Auto Redial
function.
3) Press the navigation keys to choose and set the Redial Interval. It is measured
by seconds.
4) Press the navigation keys to choose and set the Redial Times.
5) Press Save hot key to save the changes.
Note:
If you enable the auto redial function, after no operations for 5 seconds in the auto
redial interface, it will turn to the idle interface automatically.
To set auto redial via the Web interface:
1) Click on Phone-> Features-> Auto Redial.
2) Select Enabled or Disabled in the pull-down menu, then click on Confirm
button to save the change.
Auto Answer
Auto-answer allows an incoming call to be answered without requiring any action by
the user. This is a useful feature for people who have difficulty in using their hands or
fingers, who have a visual impairment, or who have a cognitive impairment. You can
set this function to a special account.
To set Auto Answer via the IP phone interface:
1) Press Menu->Settings->Advanced Settings, enter the password and press
Enter hot key.
2) Then press Accounts->Line X to enter the configuration page, use the
Page 43
Enterprise IP Phone Customizing Your Phone
37
navigation keys to choose Auto Answer option.
3) Press the Switch hot key to Enable or Disable the auto answer function. The
default is Disable.
4) Press the Save hot key to save the changes.
To set Auto Answer via Web interface:
1) Click on Account-> Basic-> Auto Answer.
2) Select Enabled or Disabled in the pull-down menu, click on Confirm button to
save the change.
Page 44
Enterprise IP Phone Customizing Your Phone
38
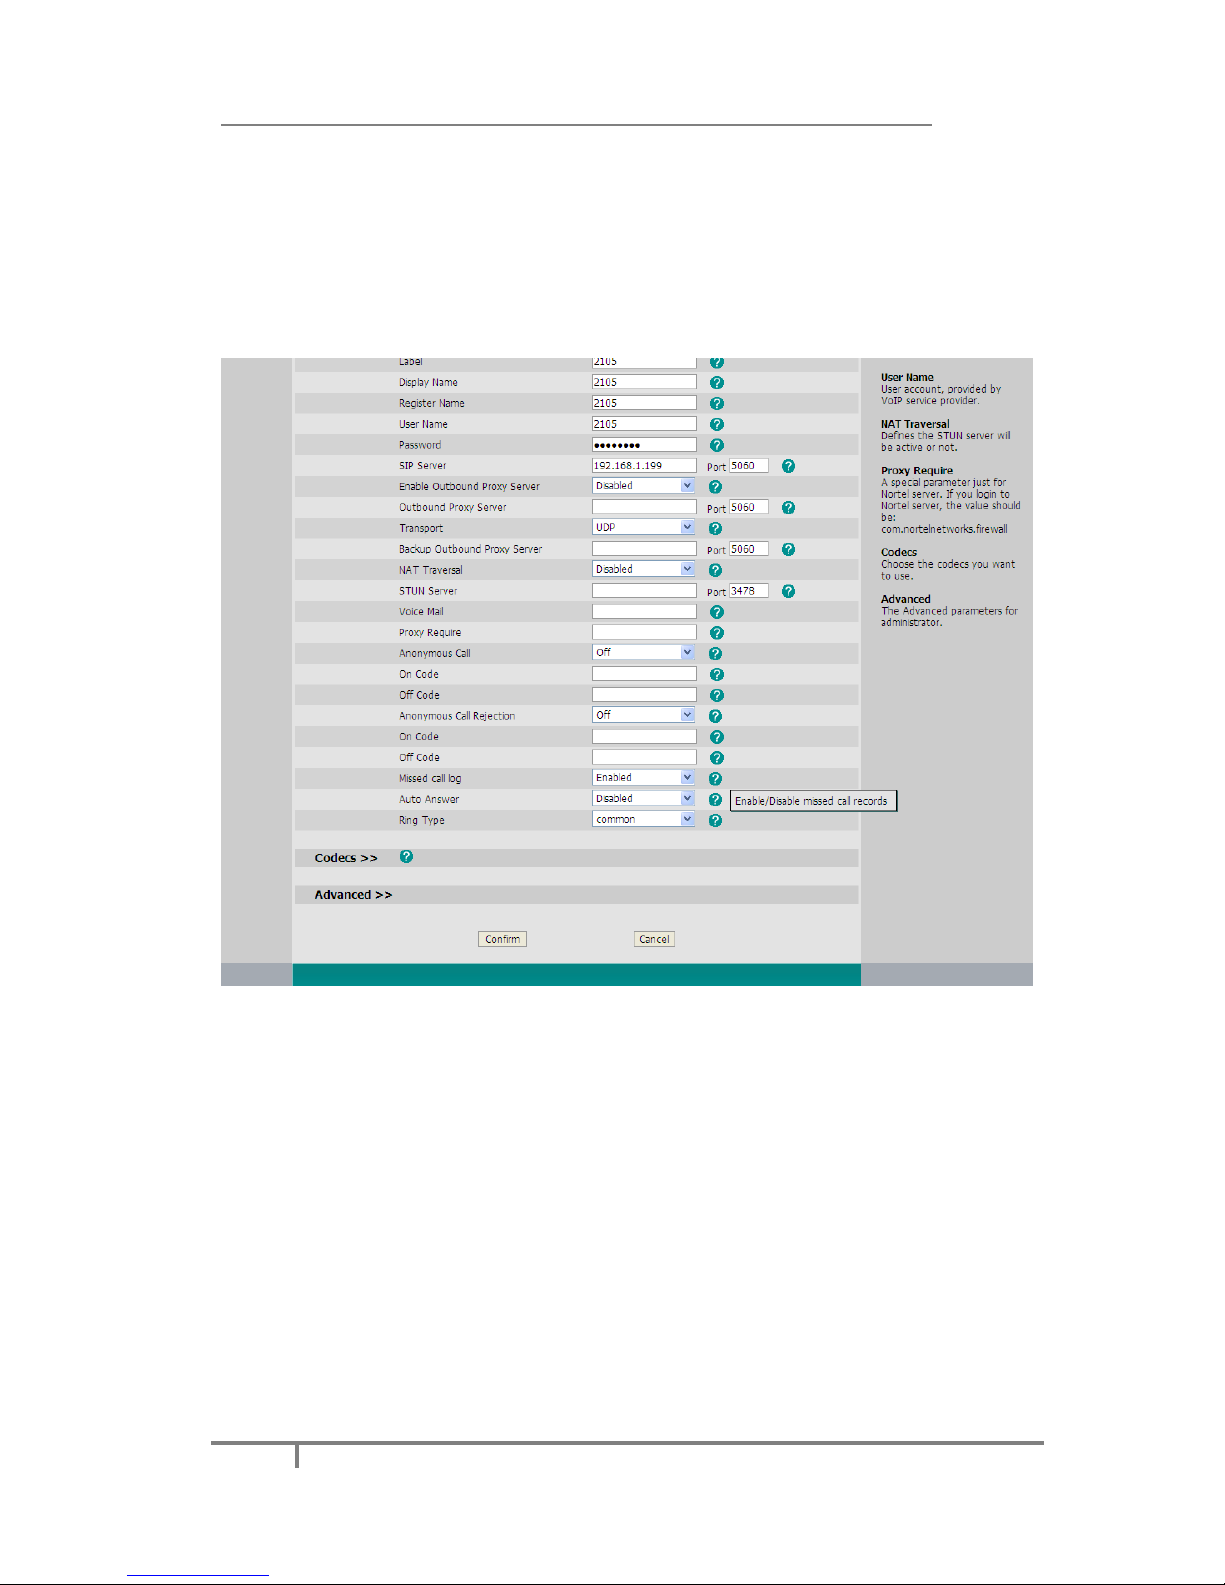
Missed call log
Defines whether to save the missed calls to the call history record. This function can
only be set via the Web interface:
1) Click on Account-> Basic->Missed call log.
2) Select Enabled or Disabled in the pull-down menu, click on Confirm button to
save the change.
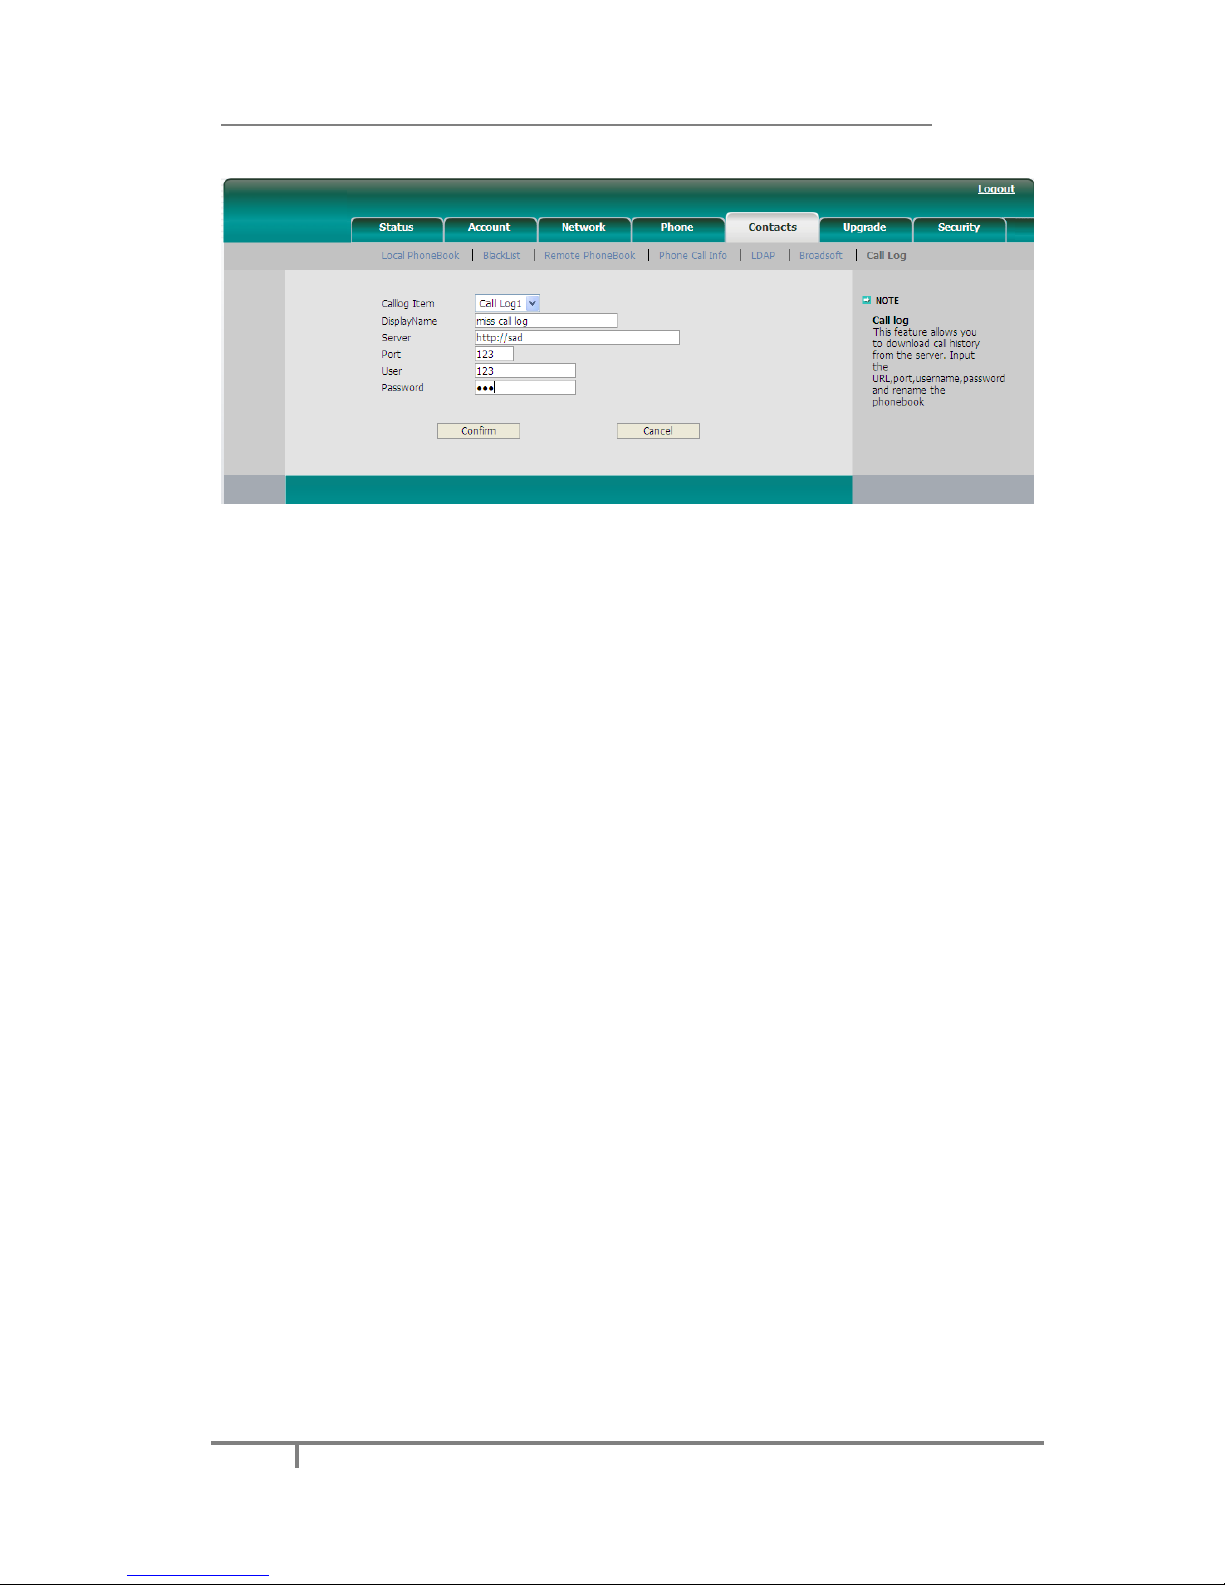
Broadsoft Call Log
This feature allows you to download call history from the server. Input the URL, port,
username, password and rename the phonebook
Configure Call Log via web interface:
1) Click on Contacts->Call Log
2) Select the Call log Item.
3) Input the Display Name, URL, Port, Username and Password.
Page 45
Enterprise IP Phone Customizing Your Phone
39
4) Click on the confirm button to save the changes.
Configure Broadsoft Call Log via phone interface:
1) Press Menu->Features->Broadsoft Settings Menu->Call Log Settings
2) Select Call Log Item, enter the Display Name, Server, Port, User Name and
Password.
3) Press the Save soft key to save the changes.
Check Call Log via phone interface:
1) Press Menu->History Type->Network Call Log
2) Select the Call log Item, press Enter to download the call log.
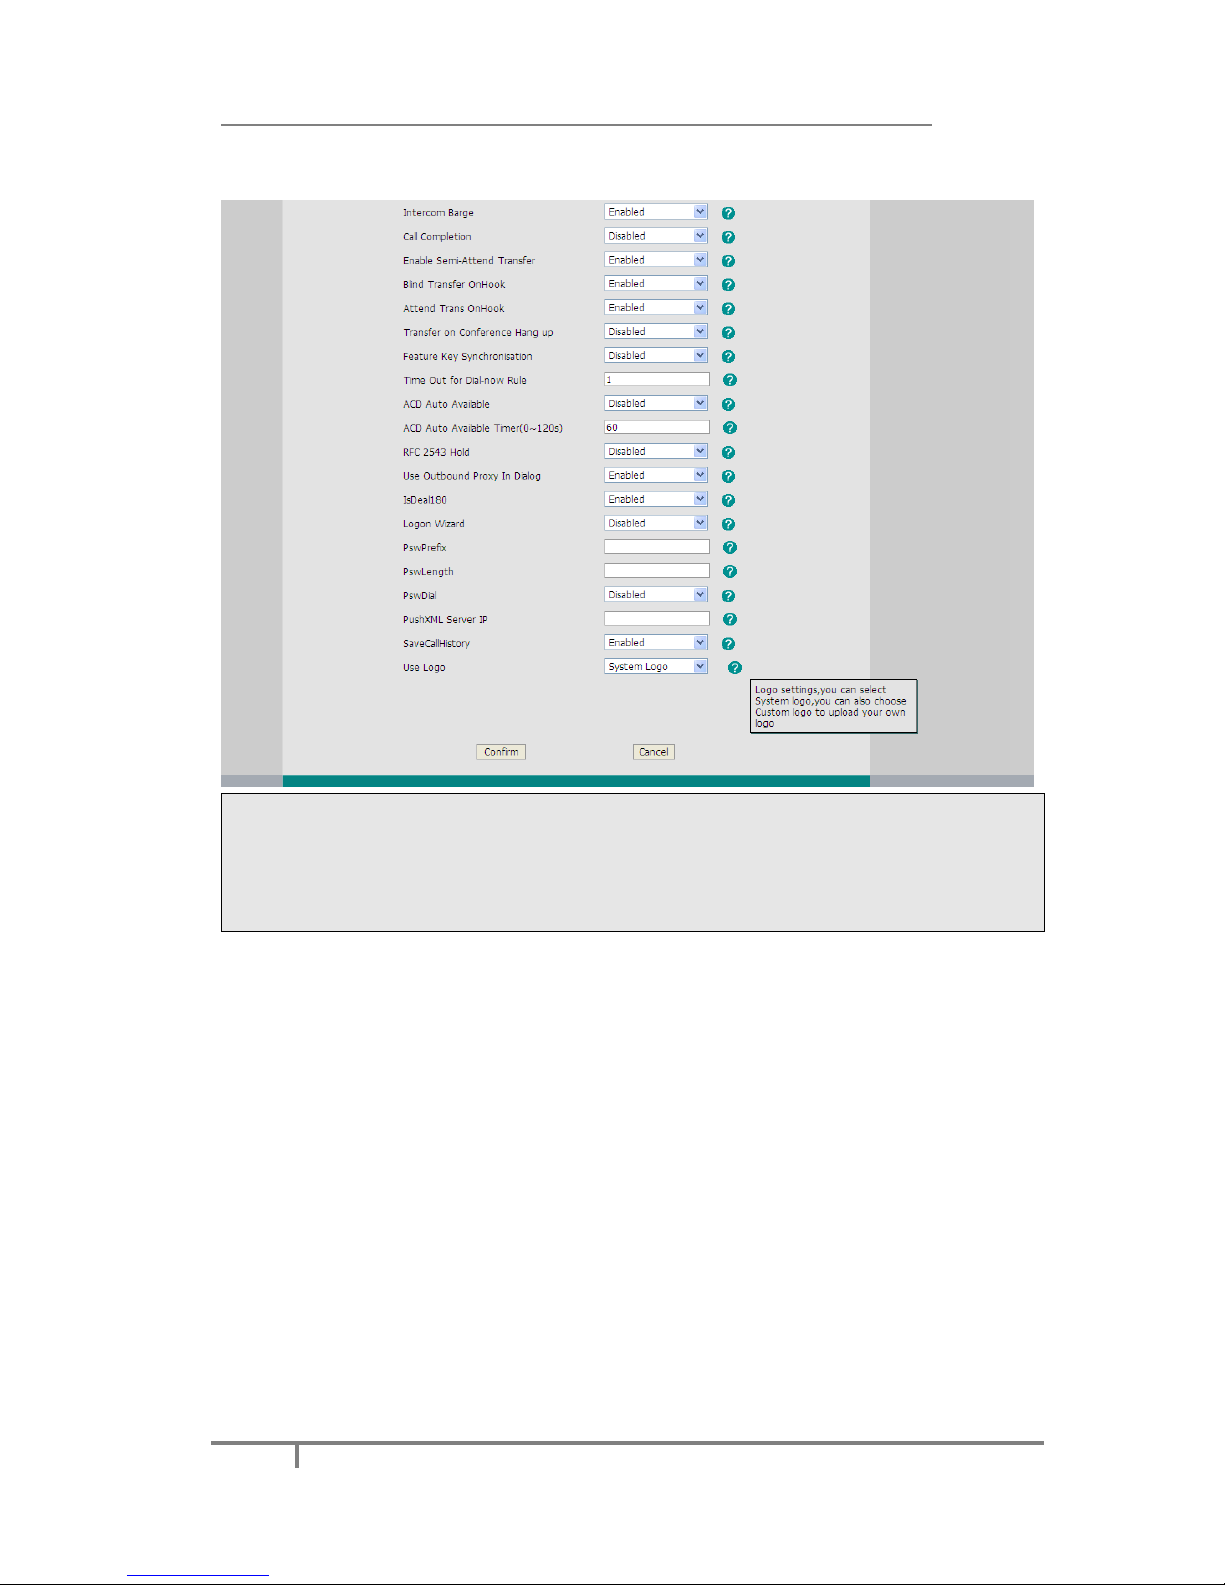
Logo Customization
You can upload your own logo which would be shown in the idle screen.
Upload the logo via web interface:
1) Click on Phone-> Features-> Use Logo->Custom Logo via the Web interface,
click on Browse button, and choose the corresponding file.
Page 46
Enterprise IP Phone Customizing Your Phone
40
2) Click on Upload button to complete the logo customization. You will find the
desired logo shown on the idle screen.
Note:
1. You can also upload the Logo by AUTO PROVISION.
2. By the Web interface, users can set a logo to be a System Logo or a Custom
Logo, and the Custom Logo can be deleted.
3. Only support DOB format file, For more information please contact the system
administrator.
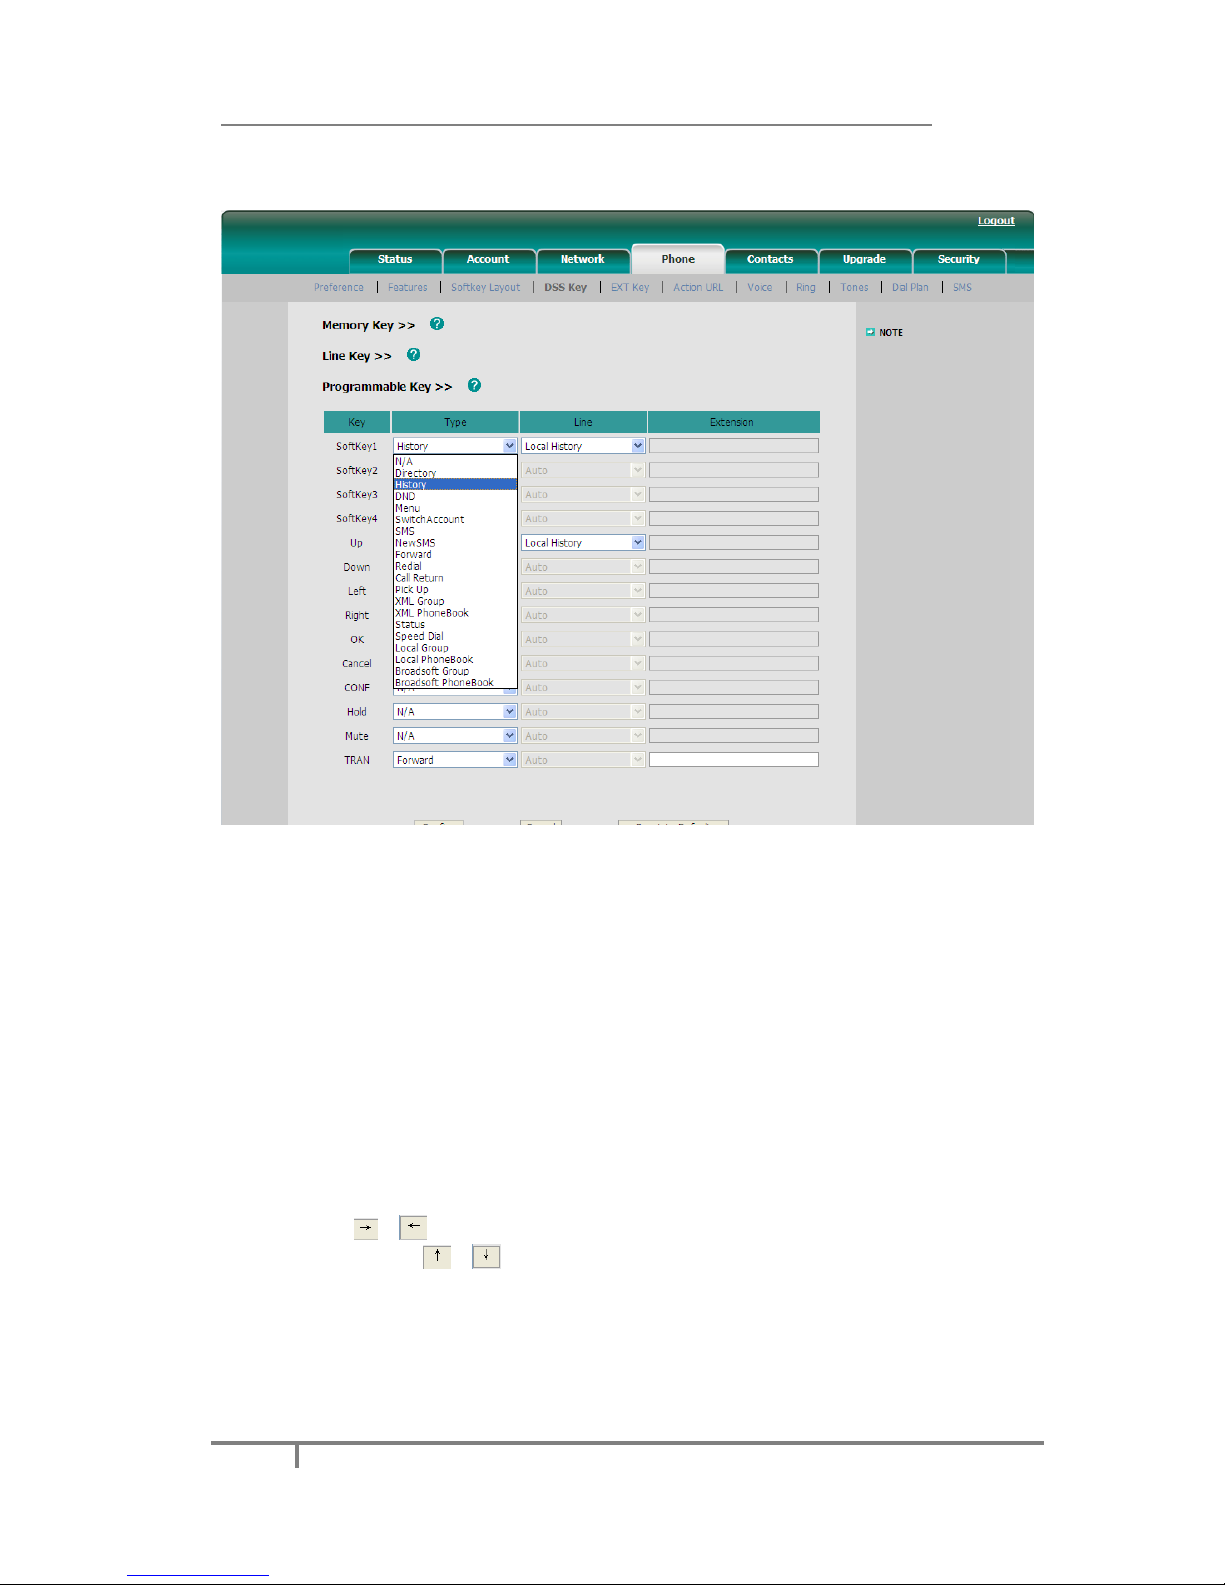
Programmable Key
The hot-key, navigation keys and function keys on the keypad are editable. Users
can customize specific features for these keys according to their actual needs.
Page 47
Enterprise IP Phone Customizing Your Phone
41
This function can only be set via the Web interface:
1) Click on Phone->DSS Key->Programmable Key.
2) Choose and customize specific features for these keys.
3) Click on Confirm button to save the changes.
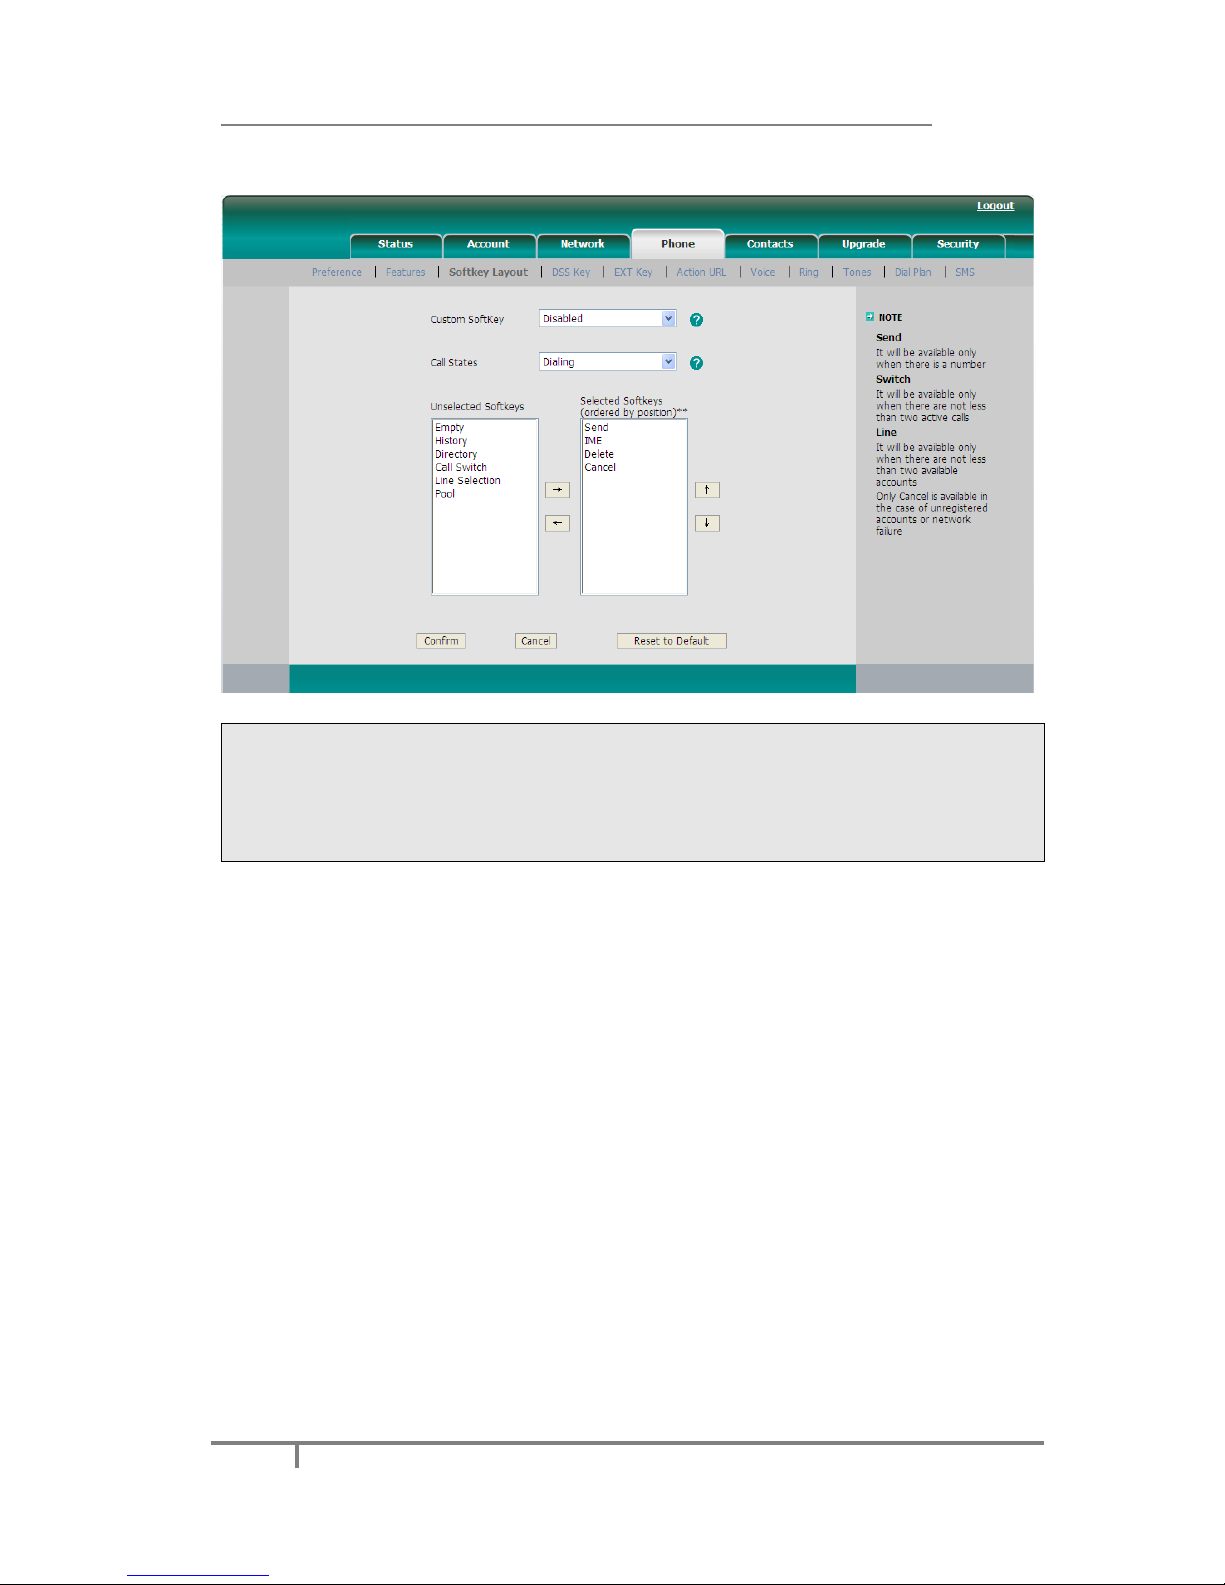
Softkey Layout
The phone can support 12 kinds of call interface to set up softkey, user can setup
different function key according to his/her own requirement or habit.
To set up softkey via web interface:
1) Click on Phone->Softkey Layout.
2) In the Custom Softkey field, select Enable in the pull-down menu.
3) You can choose the corresponding call states which you want to set up the
softkey in the Call States field.
4) Highlight the desired one in the Unselect Softkeys/Select Softkeys list, and
press the / to move to the other list.
5) And you can use / to choose the order how to display in the call states.
6) Click on Confirm to save the changes.
Page 48
Enterprise IP Phone Customizing Your Phone
42
7) You can also click on the Reset to Default button to reset the softkeys
interface.
Note:
We can add the Empty key more than once, but other keys can be only chosen
once, and can’t be repeat. when you set up the Selected Softkeys key more than 4
options, the LCD of phone will transfer the forth key with "More" automatically,
which can be use to switch to the next page, and continue to show up the other
key.
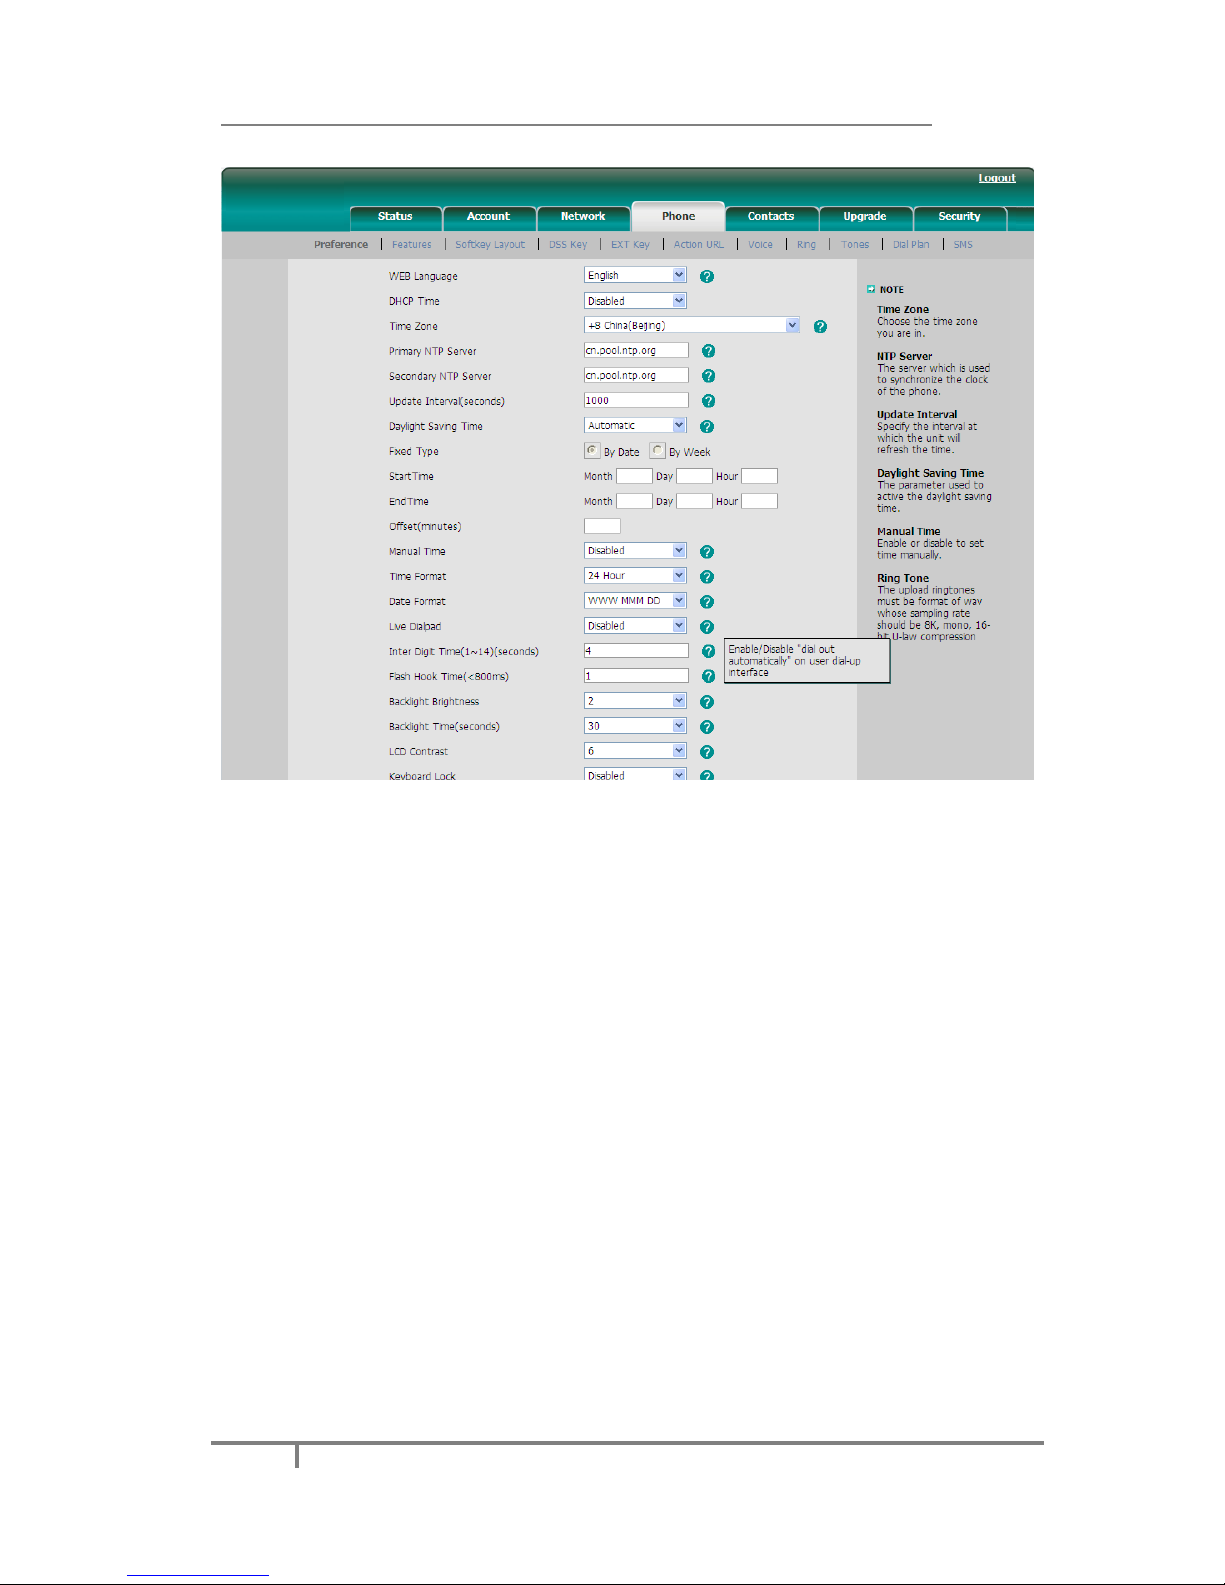
Live Dialpad
The feature defines whether to dial out the dialed number automatically.
This function can only be set via the Web interface:
1) Click on Phone->Preference->Live Dialpad.
2) Enable or disable it in the pull-down menu.
Page 49
Enterprise IP Phone Customizing Your Phone
43
3) Click on Confirm button to save the change.
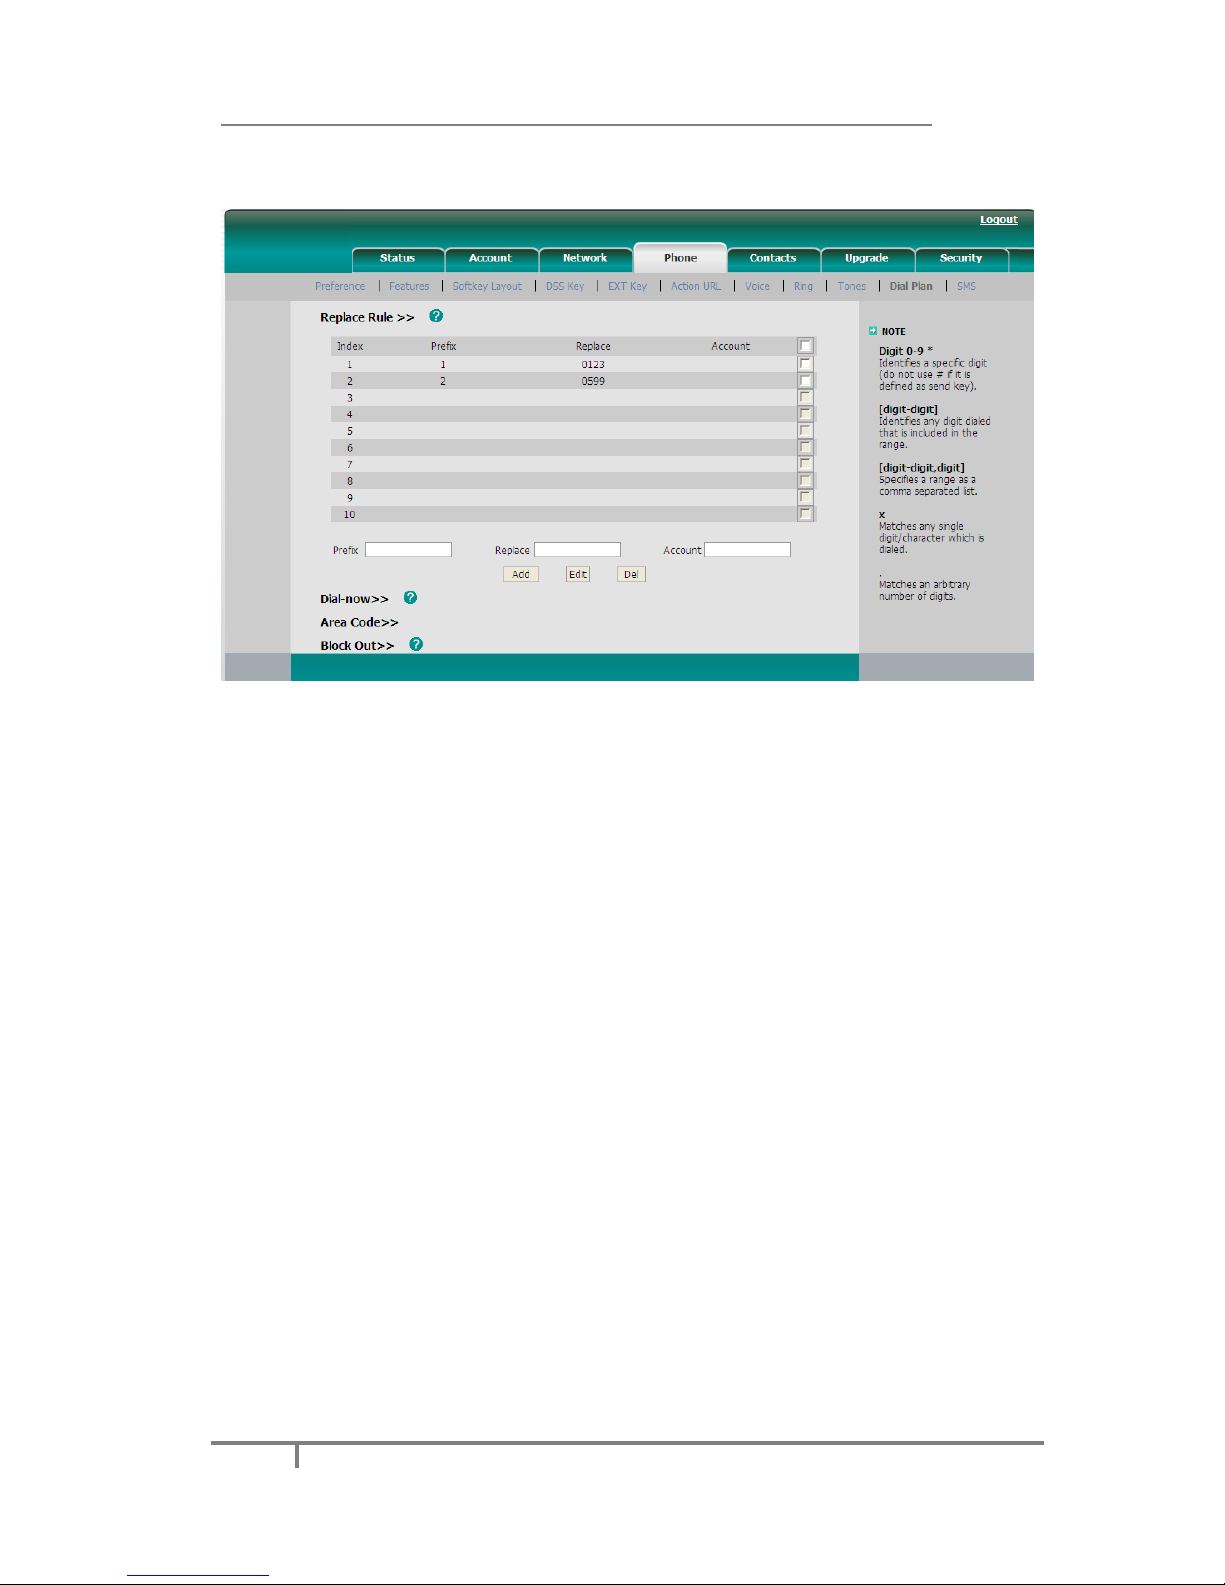
Replace Rule
A dial plan establishes the expected number. This includes country codes, access
codes, area codes and all combinations of digits dialed. For example if you set the
Prefix as 0 and Replace as 0086 (Chinese country code), when you dial 0 out, the
number will be replaced by 0086 automatically.
To set a Replace Rule via the Web interface:
1) Click on Phone->Dial Plan->Replace Rule.
2) Enter the desired Prefix, Replace and Account.
3) Press Add button to save the changes.
4) You can also delete a specific one from the dial plan list.
Page 50
Enterprise IP Phone Customizing Your Phone
44
5) You can select a record to modify, then click on Edit button to submit.
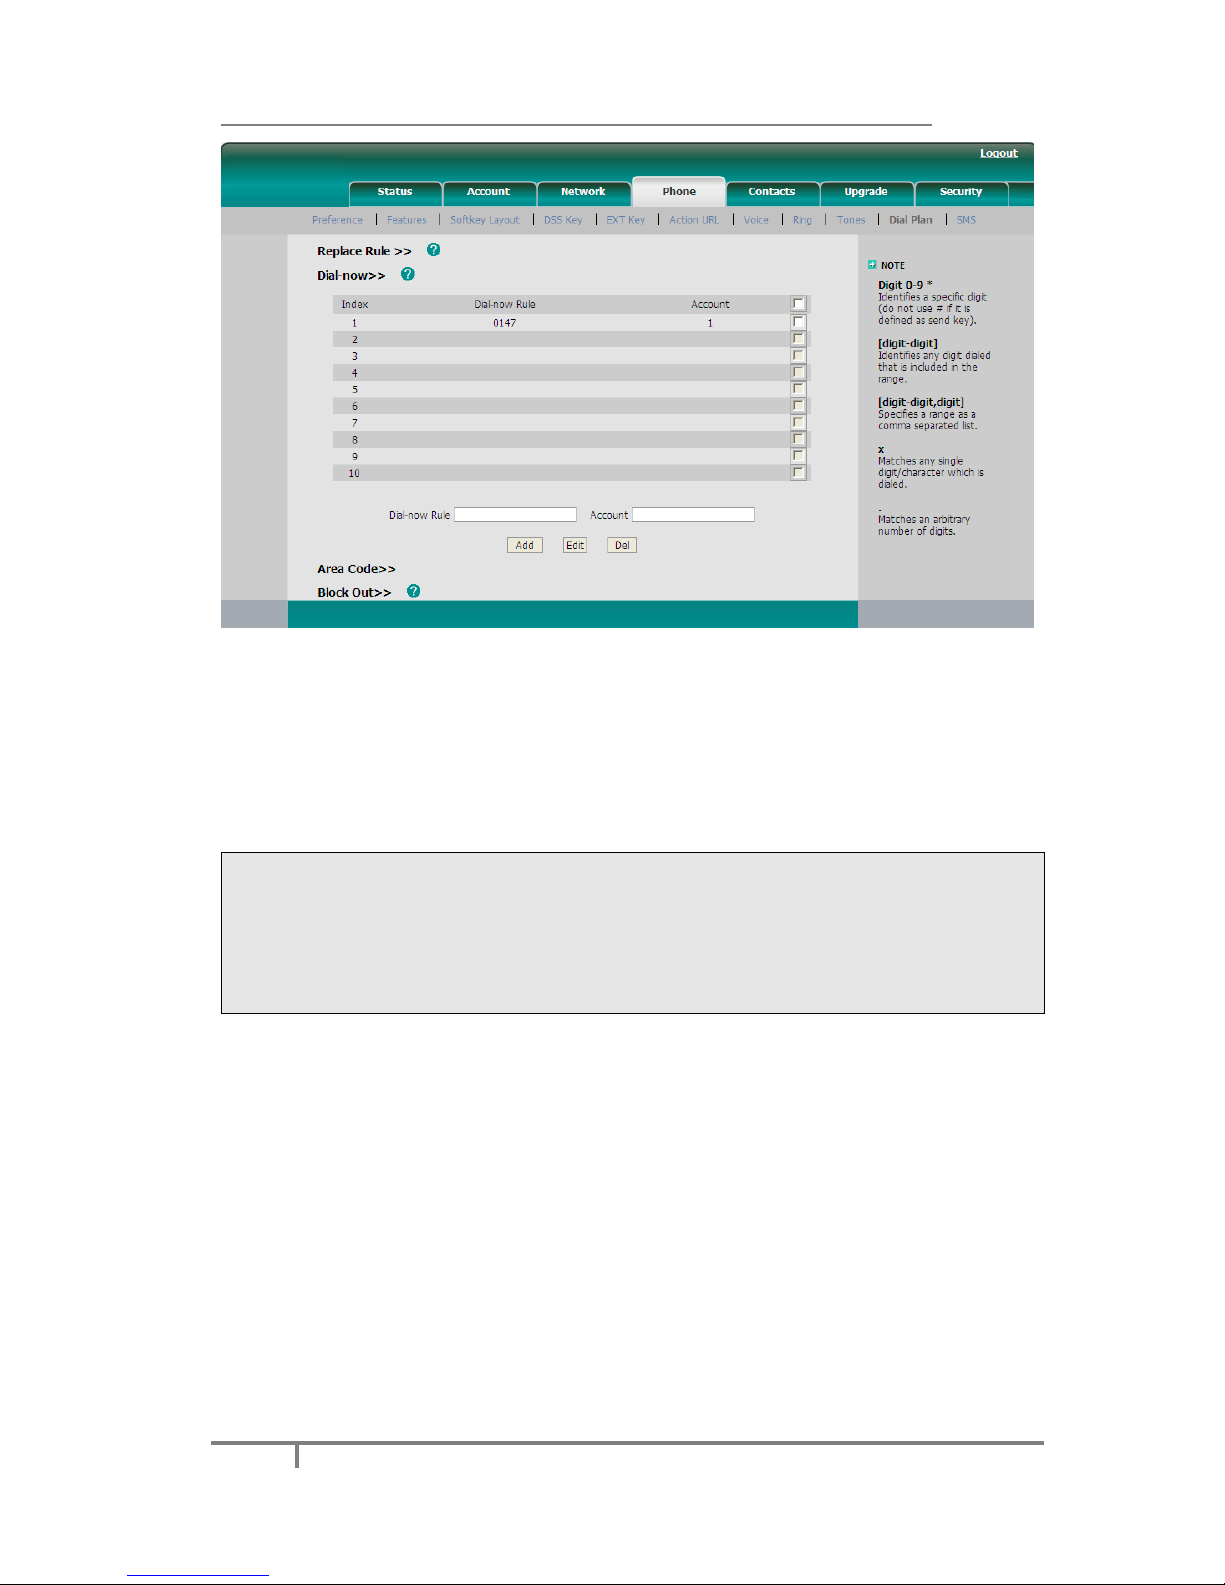
Dial Now
Dial-now enables you to define the specific length of any number/letter in
advance(for example xxx), next time when users dial 123 whose length matches the
Dial-now rule, the phone will dial out 123 in one second without pressing Send
button.
To set a Dial Plan via the Web interface:
1) Click on Phone->Dial Plan->Dial now.
Page 51
Enterprise IP Phone Customizing Your Phone
45
2) Enter the number in Dial-now Rule and Account.
3) Press Add button to save the changes.
4) You can select a record to modify, then click on Edit button to save.
5) You can also delete a specific one from the dial plan list by clicking on Del
button.
6) You can also set the Time Out for Dial-now Rule via web interface. Click on
Phone->Features->Time Out for Dial-now Rule, enter the time.
Note:
If need to replace the unknown contents, then you can use (.) or (x), “.” stand for a
string of char, “x” stand for any one char. The content in () stand for a variable, the
first variable is expressed by $ 1, the second variable is expressed by $ 2, the rest
can be done in the same manner. For example: if you want to replace the any input
content with the content beginning with 8. Input (.) in Prefix box, and input 8$1 in
Replace box.
Area Code
Area codes are also known as Numbering Plan Areas (NPAs). These are necessary
(for the most part) only when dialed from outside the code area and from mobile
phones. Area codes usually indicate geographical areas within one country, although
the correlation to geographical area is becoming obsolete. For non-geographical
numbers, as well as mobile telephones outside of the United States and Canada, the
"area code" does not correlate to a particular geographic area.
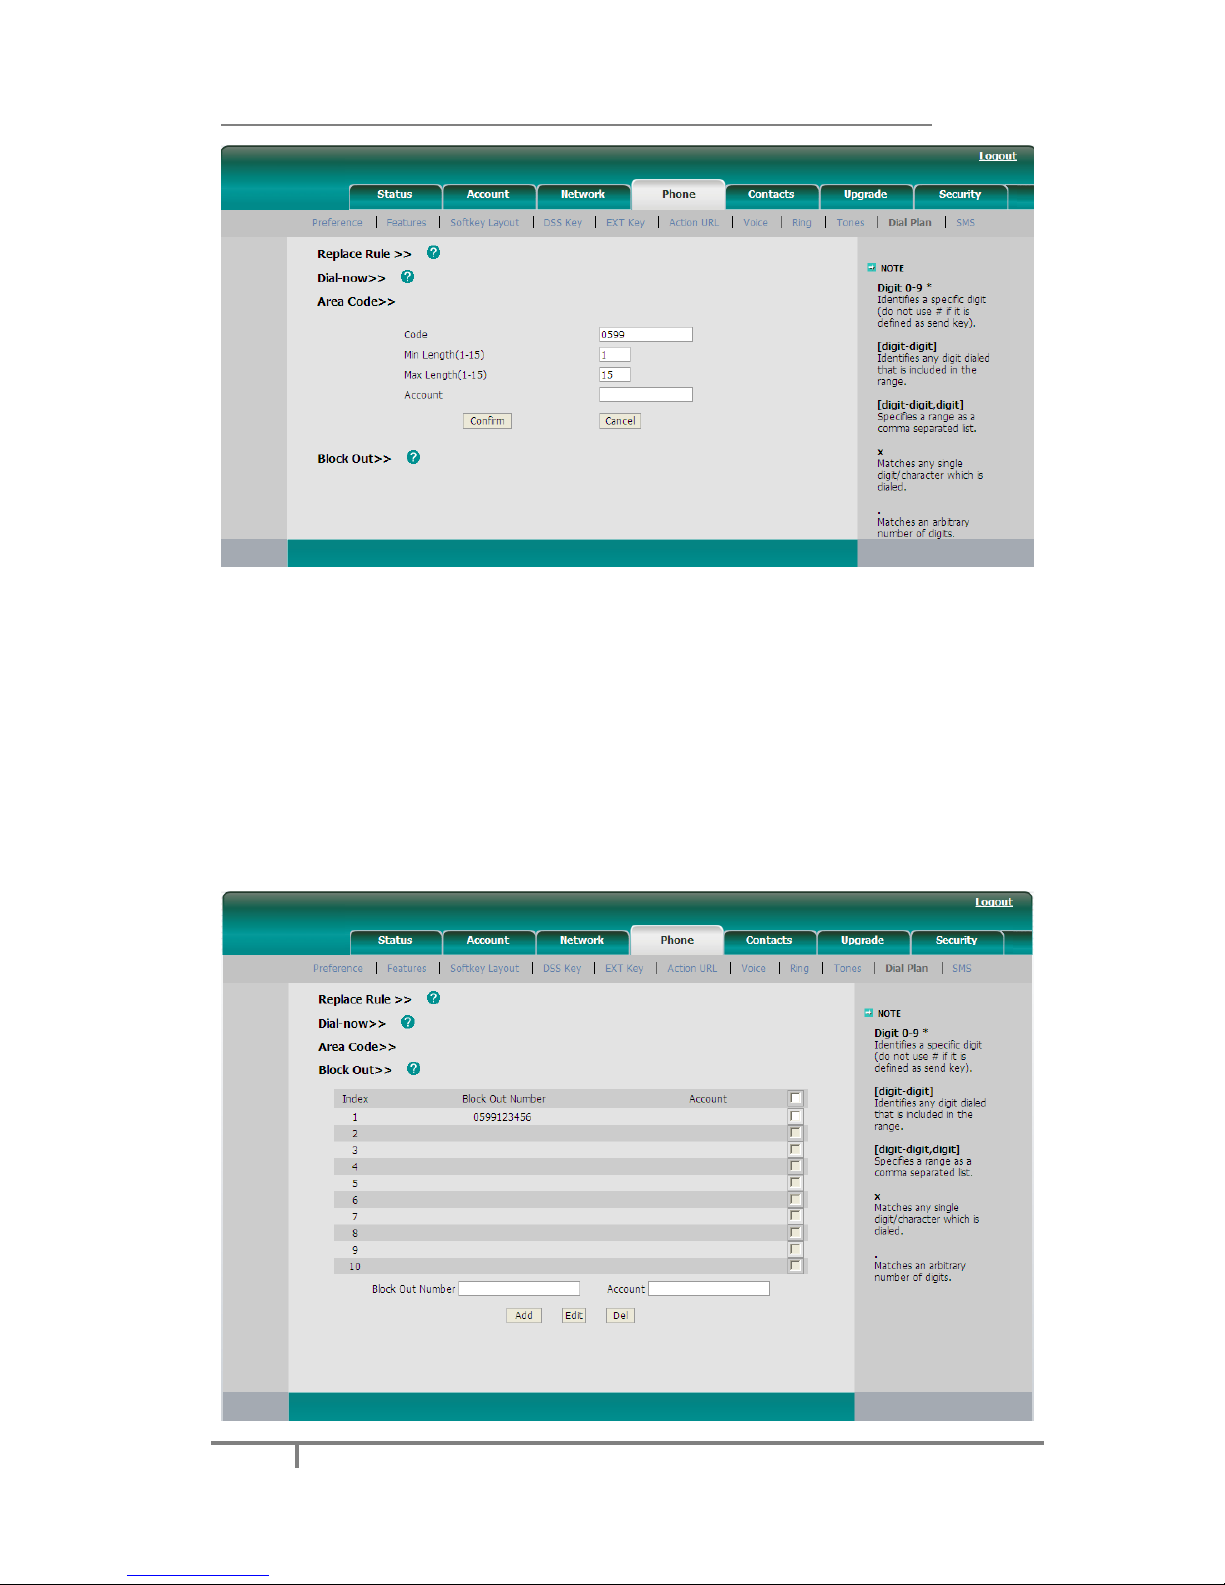
To add the area code via the Web interface:
1) Click on Phone->Dial Plan->Area Code.
2) Enter the Code and Account, set the Min Length and the Max Length option,
and then click on the Confirm button to save.
Page 52
Enterprise IP Phone Customizing Your Phone
46
Block Out
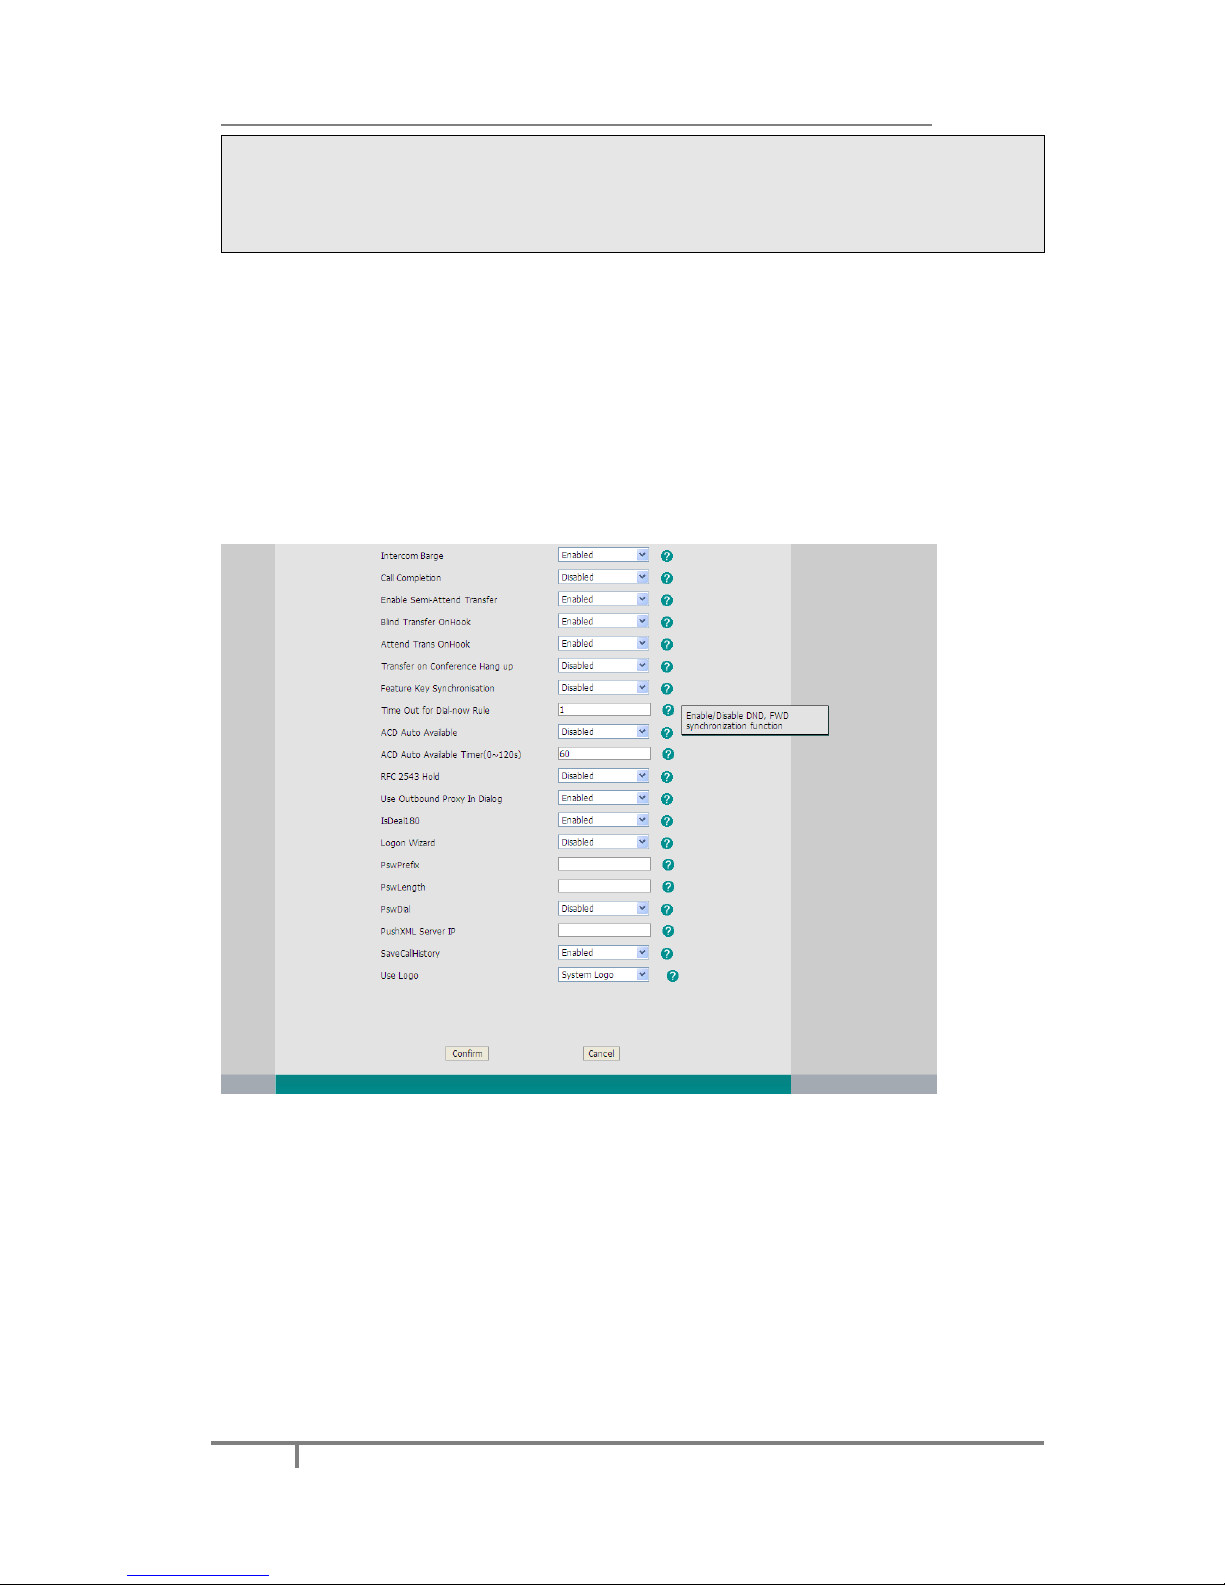
The specific phone numbers can be forbidden to be call out from your IP phone.
1) Click on Phone->Dial Plan->Block Out.
2) Enter Block Out Number and Account, click on Add button to save the
changes, or choose the specific one in the list, click on Delete button to delete
the record.
3) You can select a record to modify, then click on Edit button to submit.
4) You cannot dial out the number from your IP phone unless it is removed from
the forbidden list.
Page 53
Enterprise IP Phone Customizing Your Phone
47
Note:
1. The numbers set in Emergency cannot use the Dial Plan.
2. In the Account field, you can enter 1,2,3…, “1” represents Account 1, “2”
represents Account 2 ……, if the account box is empty, it mean this rule works
for all accounts .
Feature Synchronisation
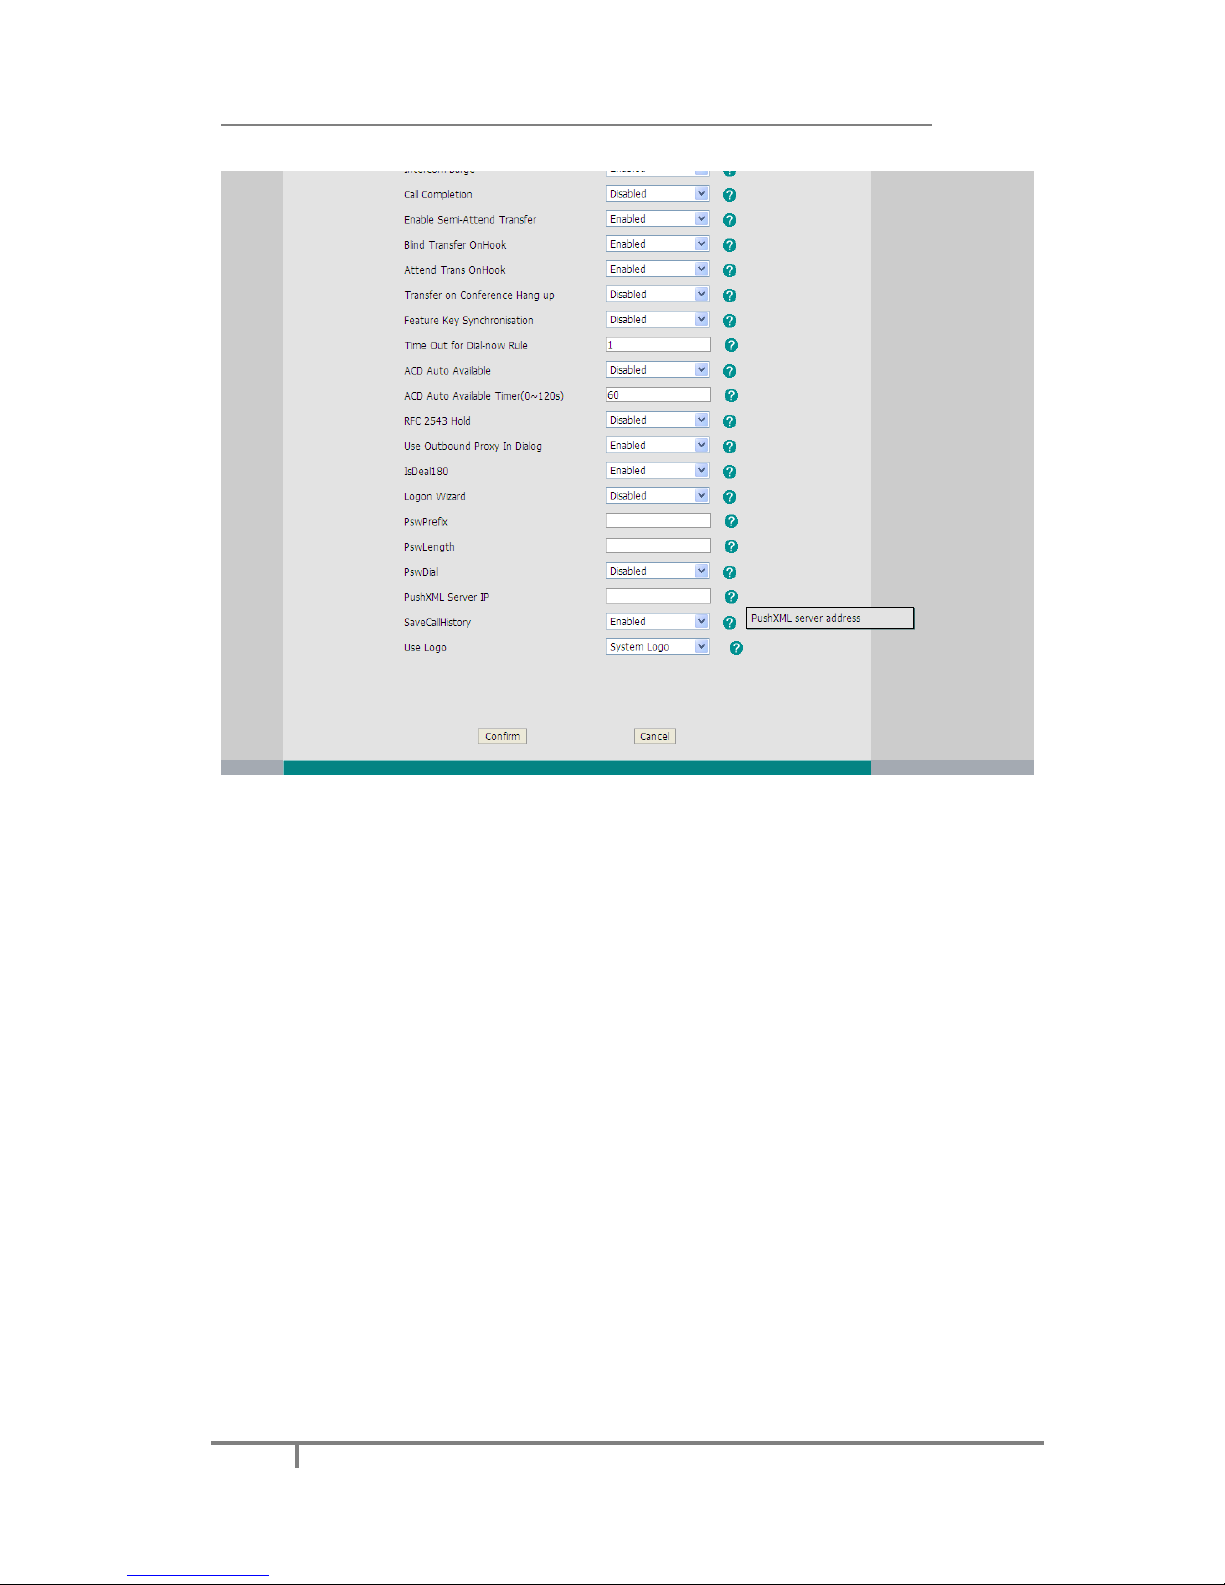
When enabled the synchronize function, configure the DND/FWD function on device
or server, DND/FWD status on device and server will be in correspondence.
To set Feature Key Synchronisation via the Web interface:
1) Click on Phone->Features-> Feature Key Synchronisation
2) Choose whether to enable this function from the pull-down menu.
3) Click on the Confirm to save the change.
Push XML
Users configure the server's IP address on Web page, when phone receives request,
it will determine whether to display corresponding content on the phone which sent
by the specified server or not.
To set Push XML via Web interface:
1) Click on Phone->Features-> PushXML Server IP, enter the server IP in the
field.
Page 54
Enterprise IP Phone Customizing Your Phone
48
2) Click on the Confirm button to save the change.
Page 55
Enterprise IP Phone Customizing Your Phone
49
WatchDog
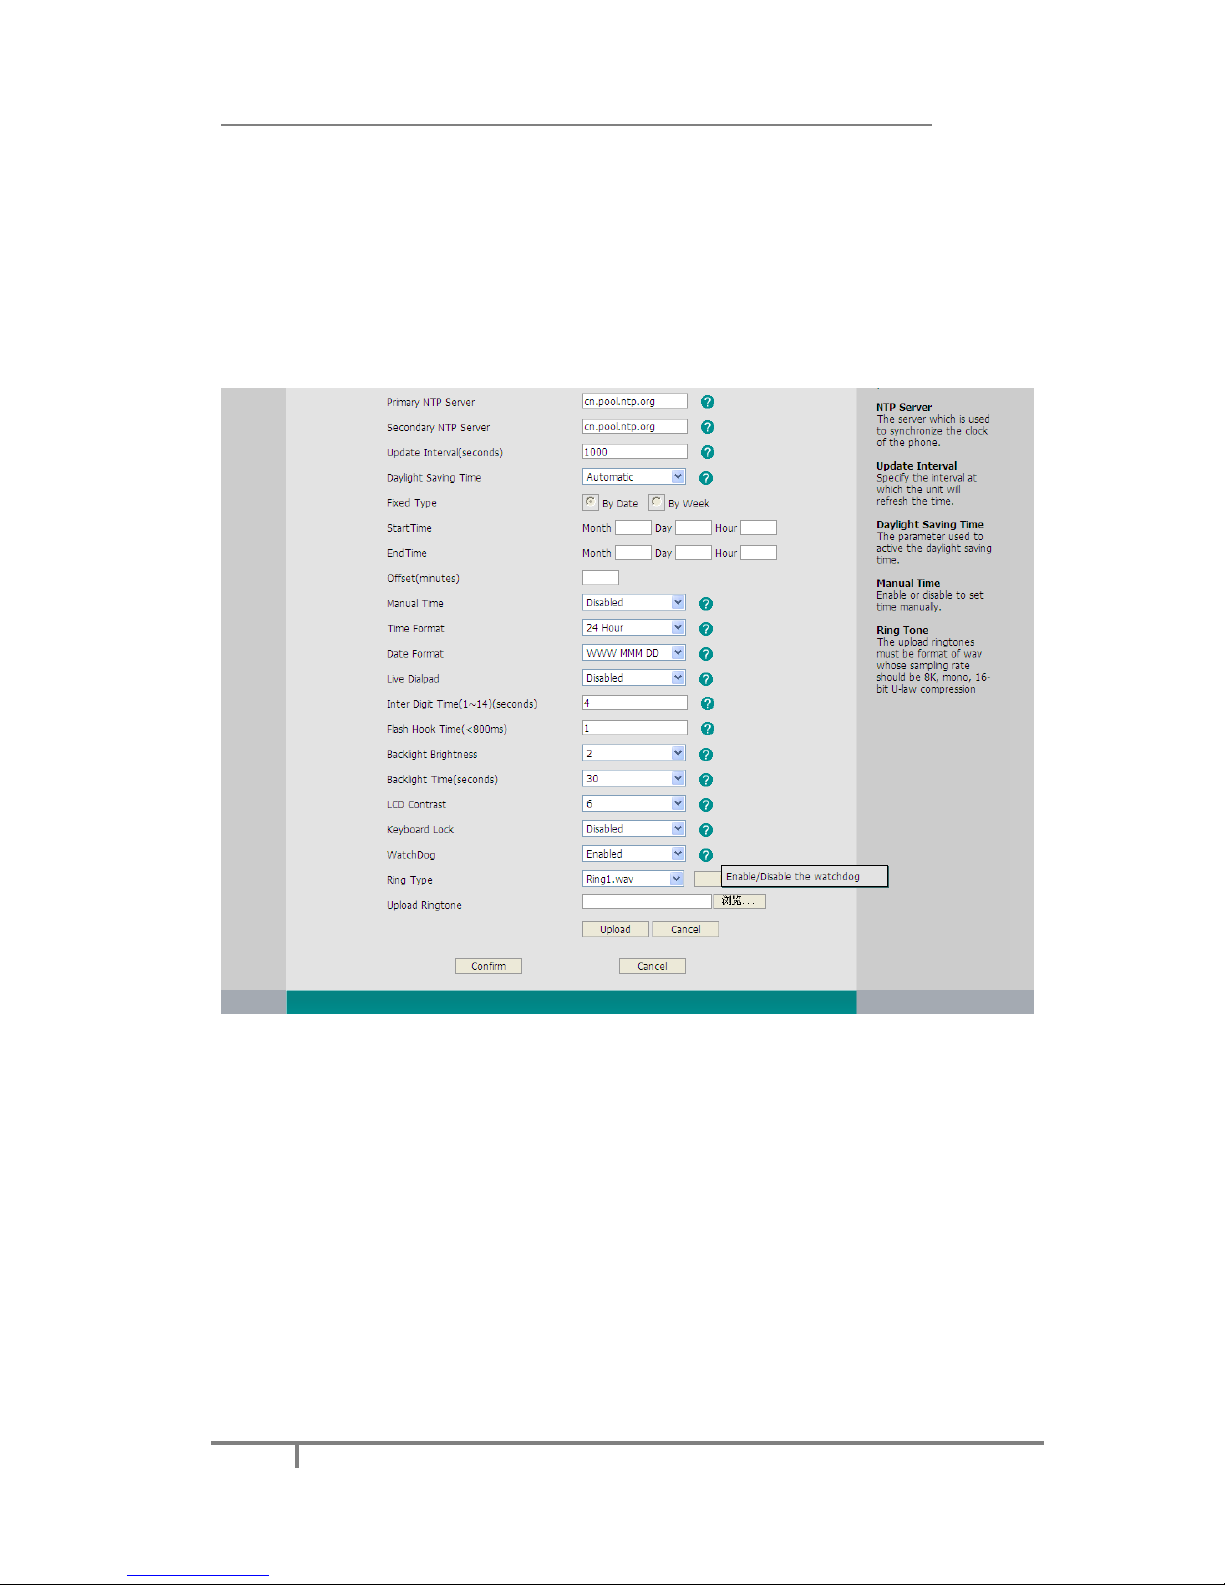
When 'WatchDog' function is 'Enabled', phone will auto reboot after 10 seconds if
some important process of phone crash. When disable the function, the phone will
not reboot.
Configure watchdog via web interface:
Click on Phone-> Preference->WatchDog, in the pull-down menu, choose enable
or disable this function.
Page 56

Enterprise IP Phone Basic Call Functions
50
Basic Call Functions
Making a call
Call Devices
You can make a phone call via the following devices:
1) Pick up the handset, icon will be shown in the idle screen.
2) Press the Speaker button, icon will be shown in the idle screen.
3) Press the Headset button if the headset is connected to the Headset port in
advance. In the dial-up interface, the icon will be shown in the idle screen.
You can also dial the number first, and then choose the method you will use to speak
to the other party.
Call Methods
You can dial the number directly by filling the SIP Server in the registered interface.
But the number which you dialed must be in accordance with SIP server.
If you have registered more than one account, you can choose a certain account to
make your call:
1) Press the Right navigation key to choose a default account when your phone is
in idle status.
2) In the dial-up interface, press the Line hot key to choose an account. Then press
the Select hot key to confirm.
3) Press the six line keys on the keypad to active the chosen account.
Then
1) Dial the number you want to call, or
2) In dial-up interface, press Pool hot key, use the navigation button to highlight
your choice, enter into the corresponding option or
3) Press the RD button to enter the Dialed Calls interface, then use the Up/Down
navigation keys to choose a record.
4) Press the DSS keys which have been set as speed dial button.
Then press the Send button or Send hot key to make the call out if necessary.
Page 57
Enterprise IP Phone Basic Call Functions
51
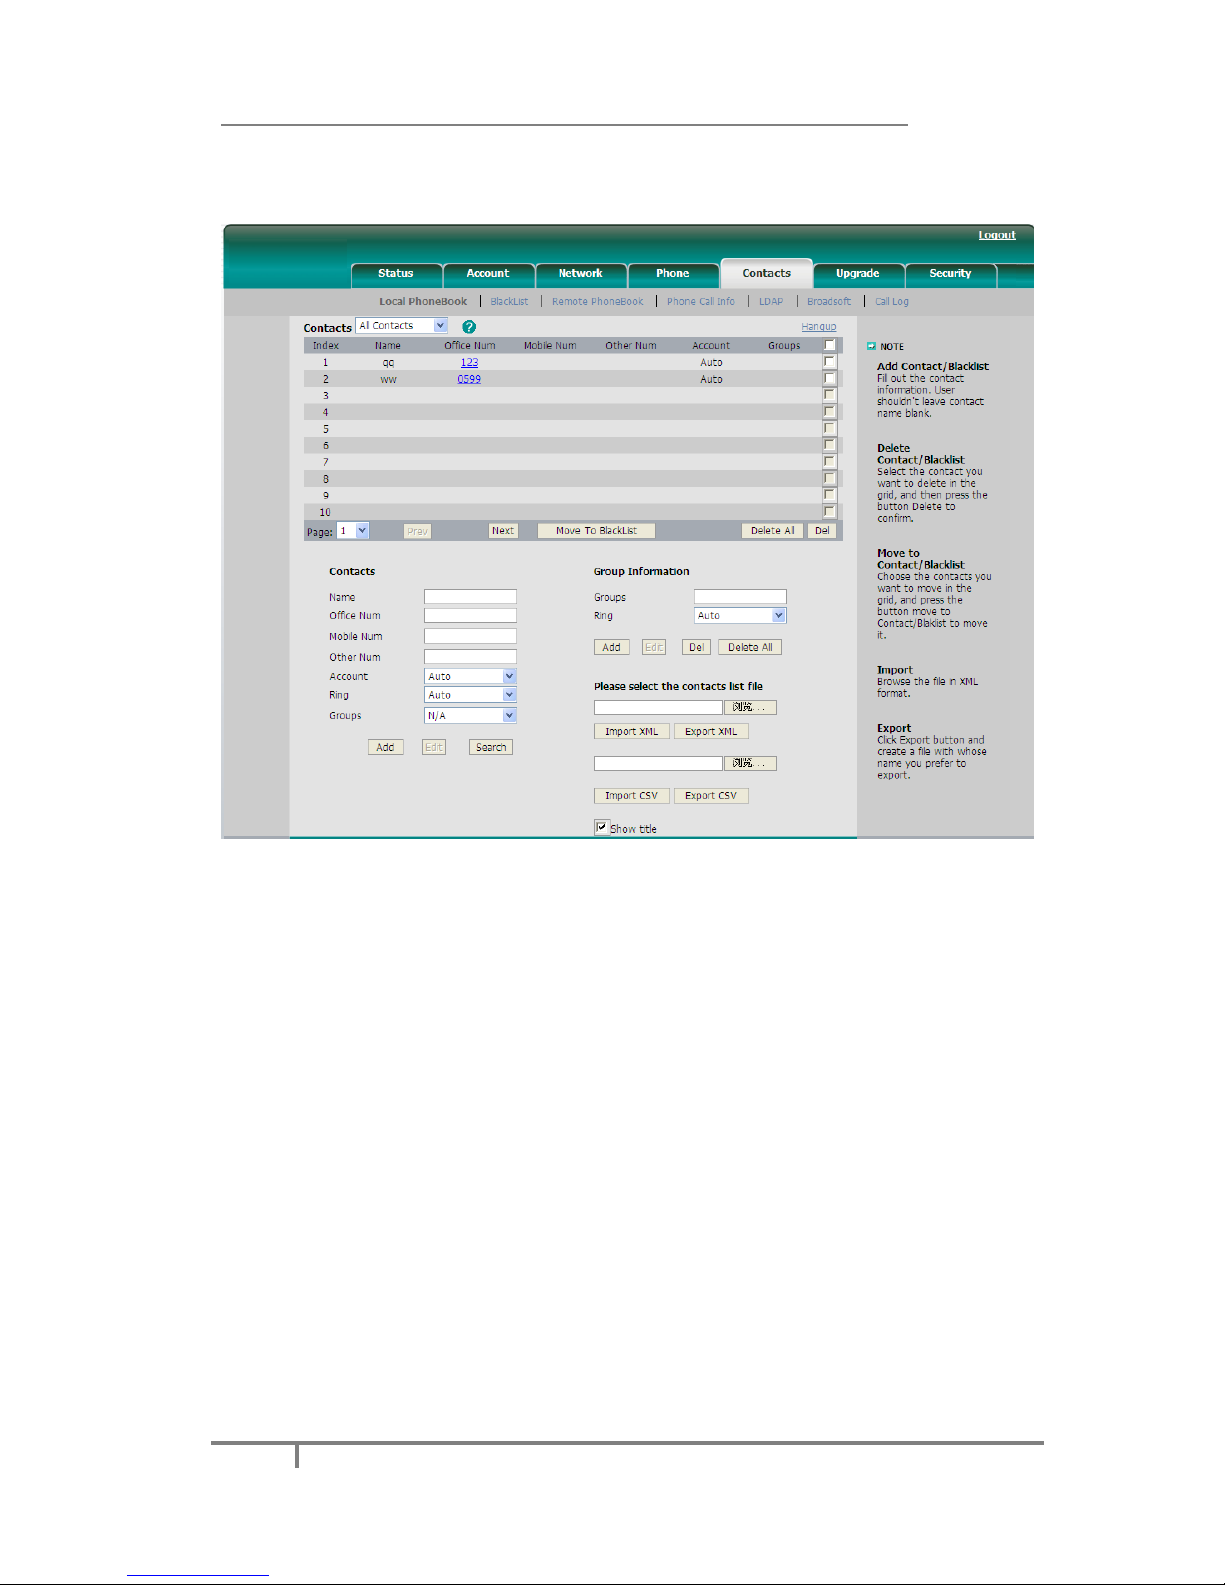
And you can also dial-up via web interface:
1) Click on Contact->Local Phone Book/BlackList, click on the number which
you want to dial out, and then the phone will dial out by default account.
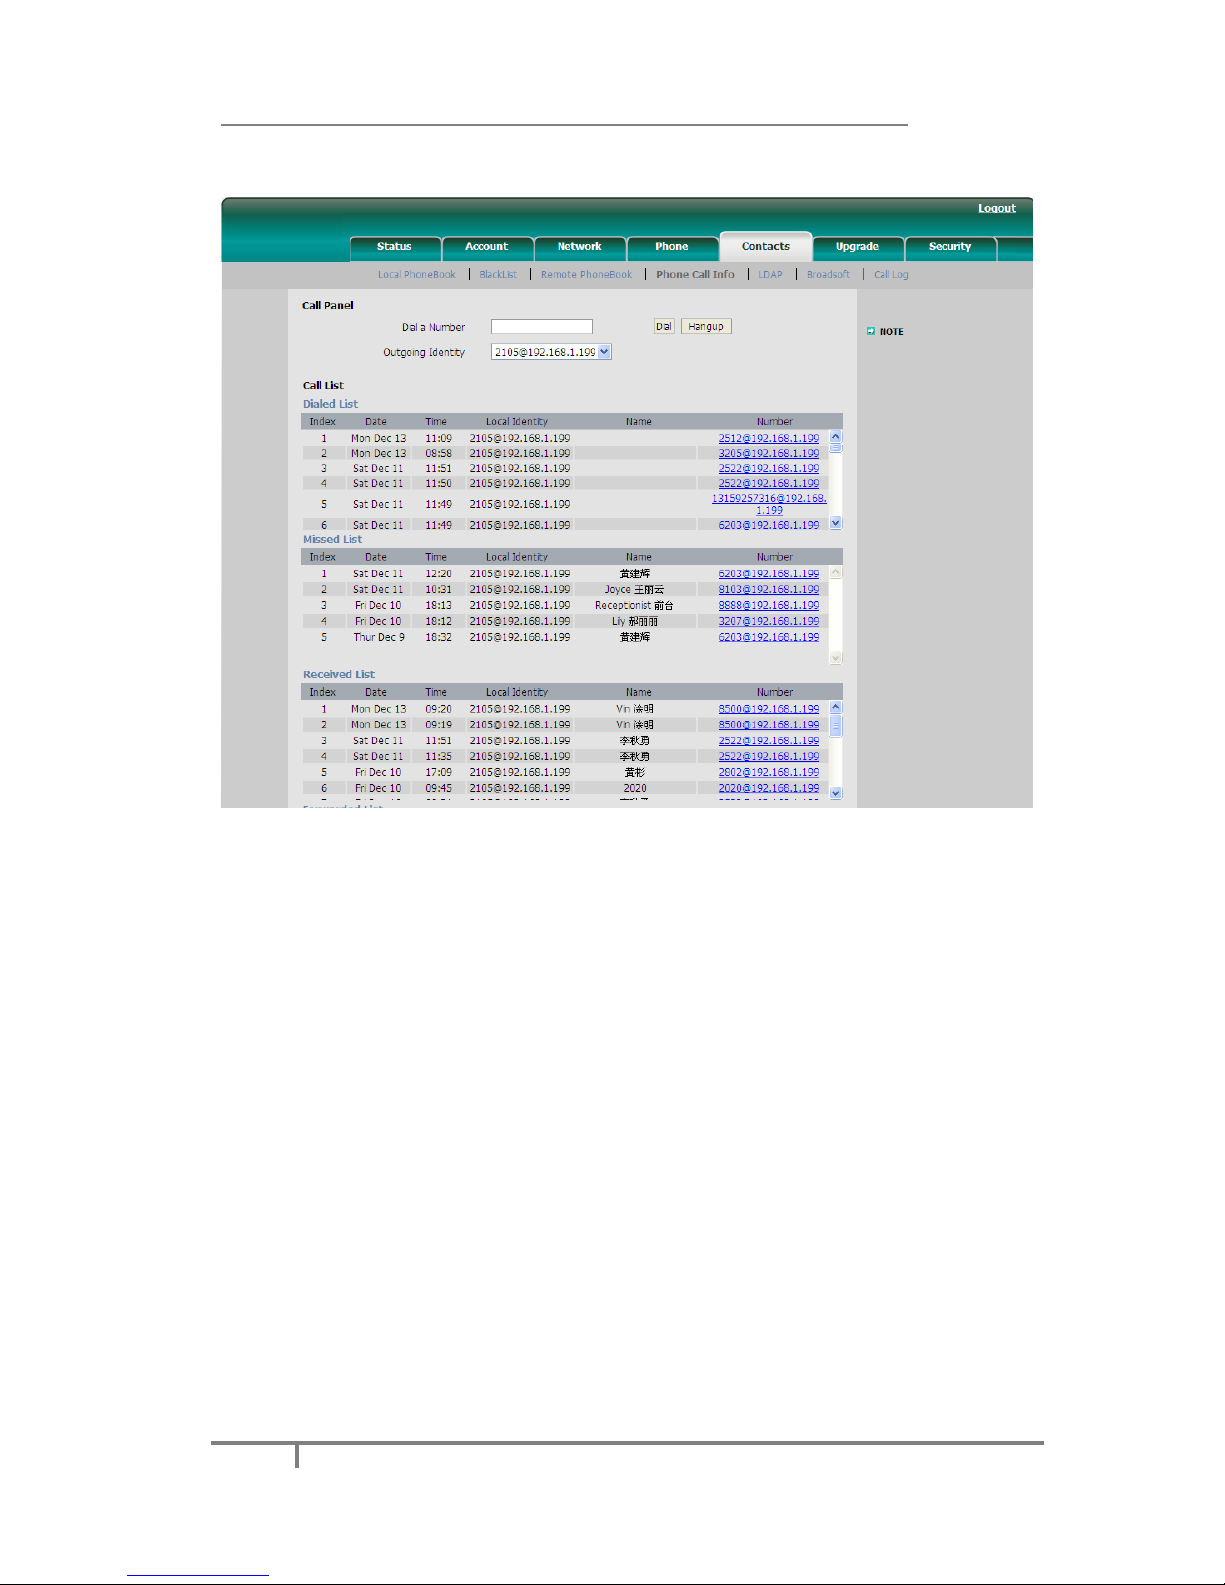
2) Or click on Contact->Phone Call Info, enter the number in Dial a Number,
select the line from the Outgoing Identity list. Then click on the Dial button to
call out.
Page 58
Enterprise IP Phone Basic Call Functions
52
3) Or click on Contact->Phone Call Info, click on the number which you want to
dial out from the call list, the phone will dial out by corresponding account.
4) You can click on the Hangup button to end the call in the web page.
Password dial
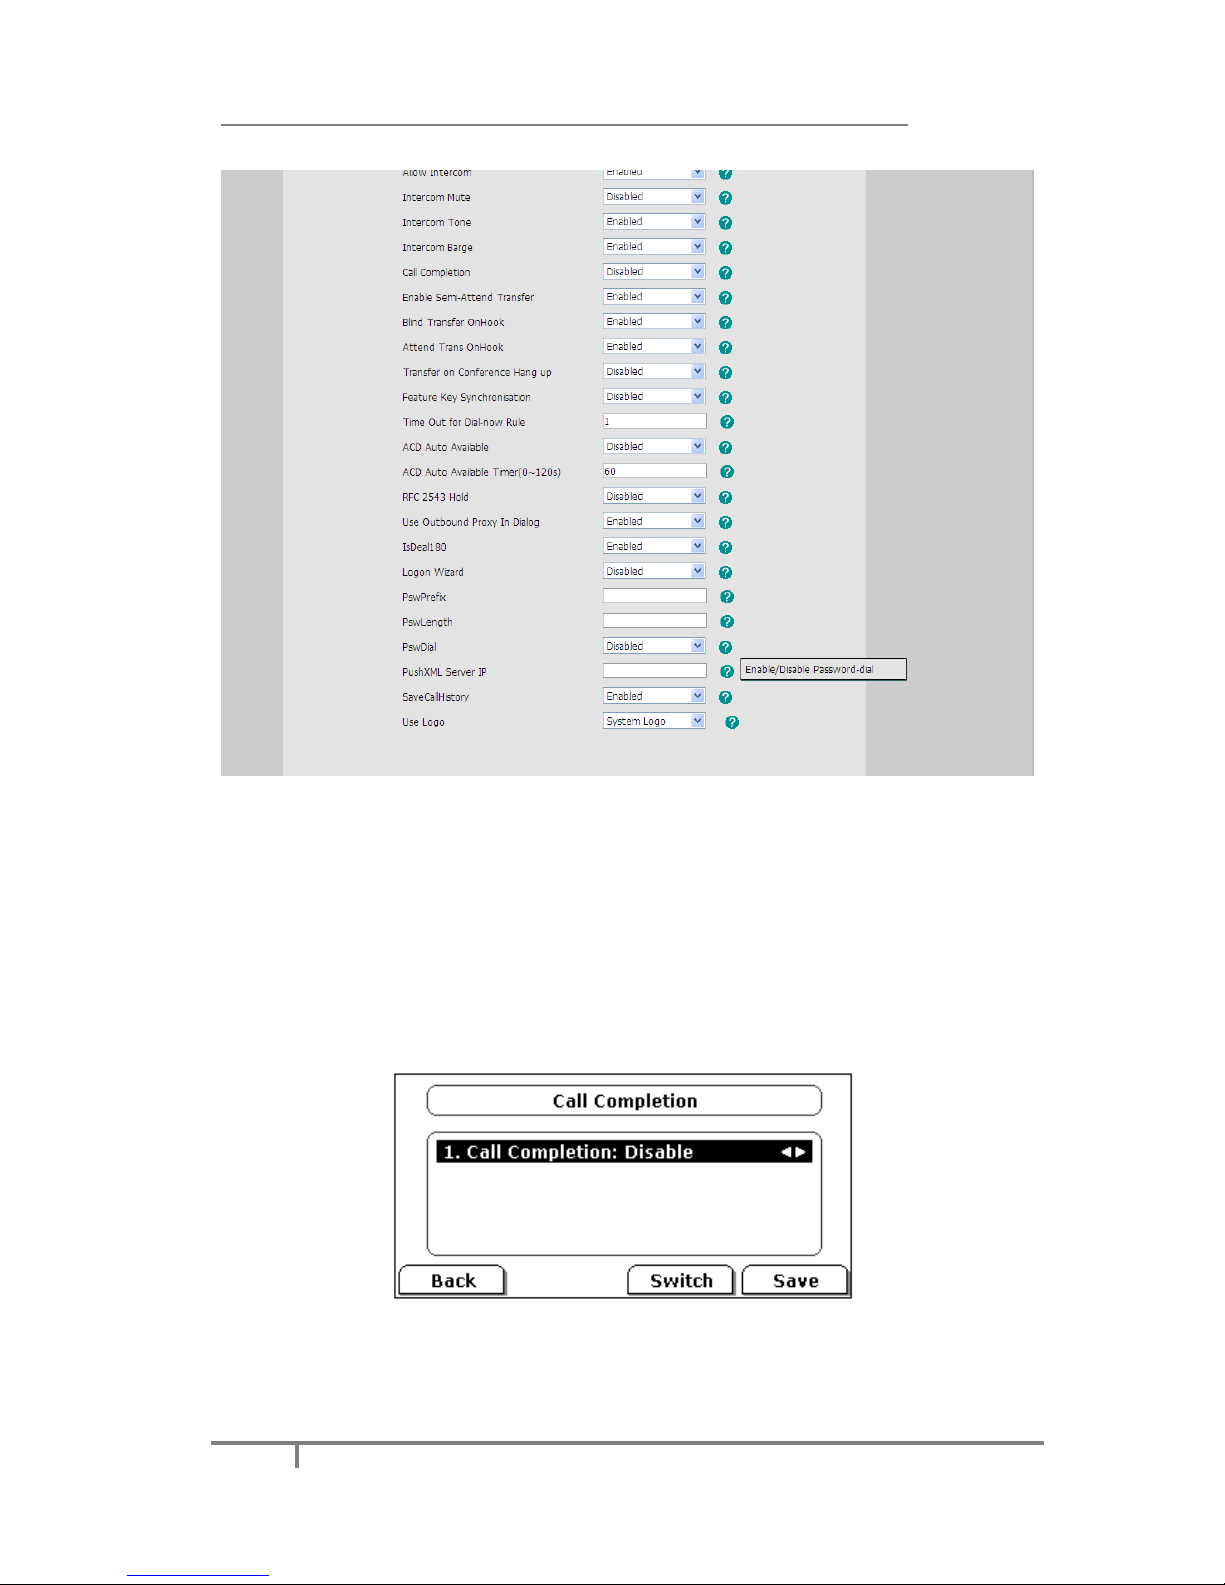
When number entered is beginning with the password prefix, the following N
numbers after the password prefix will be hidden as *, N stand for the value which
you enter in the PswLength field. For example: you set the password prefix is 3,
enter the PswLength is 2, then you enter the number 34567, it will display 3**67 on
the phone.
Set password dial via web interface:
1) Click on Phone->Features->PswDial, in the pull-down menu, choose Enable.
2) Enter the Password prefix in the PswPrefix field
3) Enter the Length in the PswLength field.
Page 59
Enterprise IP Phone Basic Call Functions
53
4) Click on Confirm button to save the changes.
Call Completion
Have you encountered such a situation? When you call a contact, but the other side
is busy on a call. Do you want the server to inform you immediately when the
contact ends the call in order to establish a conversation in time? Call Completion
can help you to solve this problem.
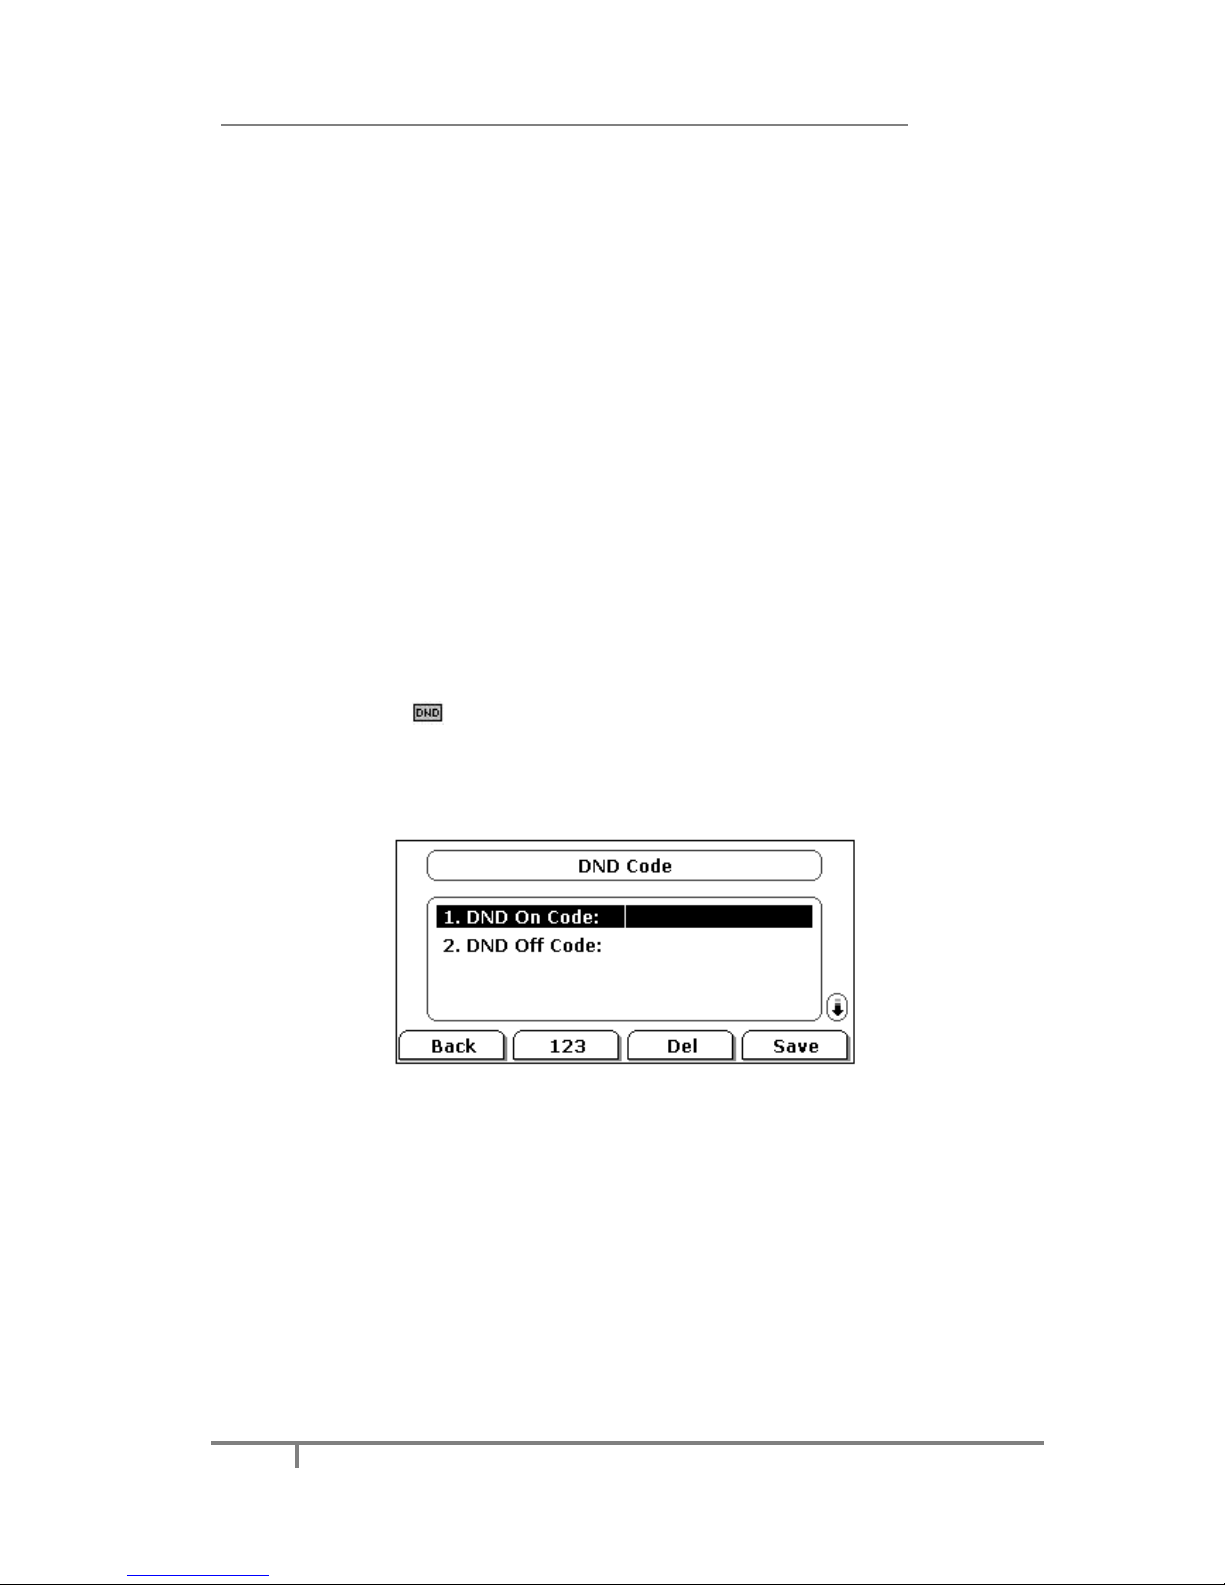
To configure Call Completion via phone interface:
1) Press the following hot keys: Menu->Features->Call Completion to enter the
configuration page.
2) By the Switch soft key, select whether to enable this option.
3) Press the Save soft key to save your changes.
Page 60
Enterprise IP Phone Basic Call Functions
54
Answering a call
Answering an incoming call
1) If you are not on an active call, lift the handset to answer it using the handset,
or press the Speaker button to answer it using the speakerphone, or press the
Headset button to answer it using the headset.
2) If you are on an active call, the LCD will prompt to display: Incoming Call
:
xxx.
Press Answer hot key to answer the call, or Reject hot key to refuse it.
During the conversation, you can alternate between Headset, Handset and Speaker
mode by pressing the corresponding buttons or picking up the handset.
Denying an incoming call
Press Reject hot key or X button to deny the incoming call directly.
DND
Press DND hot key to active DND Mode. Further incoming calls will be rejected and
the LCD will display icon. Press DND hot key again to deactivate DND mode. You
can find the incoming call record in the Call History.
You can also set DND function by the DND Code:
1) Press Menu->Features->DND Code to enter the configuration interface.
2) Set the DND On Code and the DND Off Code, then press the Save hot key to
save the changes.
3) If the DND mode is not enabled, when you press the DND hot key, the phone
will send a message to the server, and the server will turn on the DND function.
Then any calls to the extension will be rejected by the server automatically. The
incoming call record will be displayed in the Call History.
Intercom
Intercom mode is useful in an office environment as a quick access to connect to the
operator or the secretary.
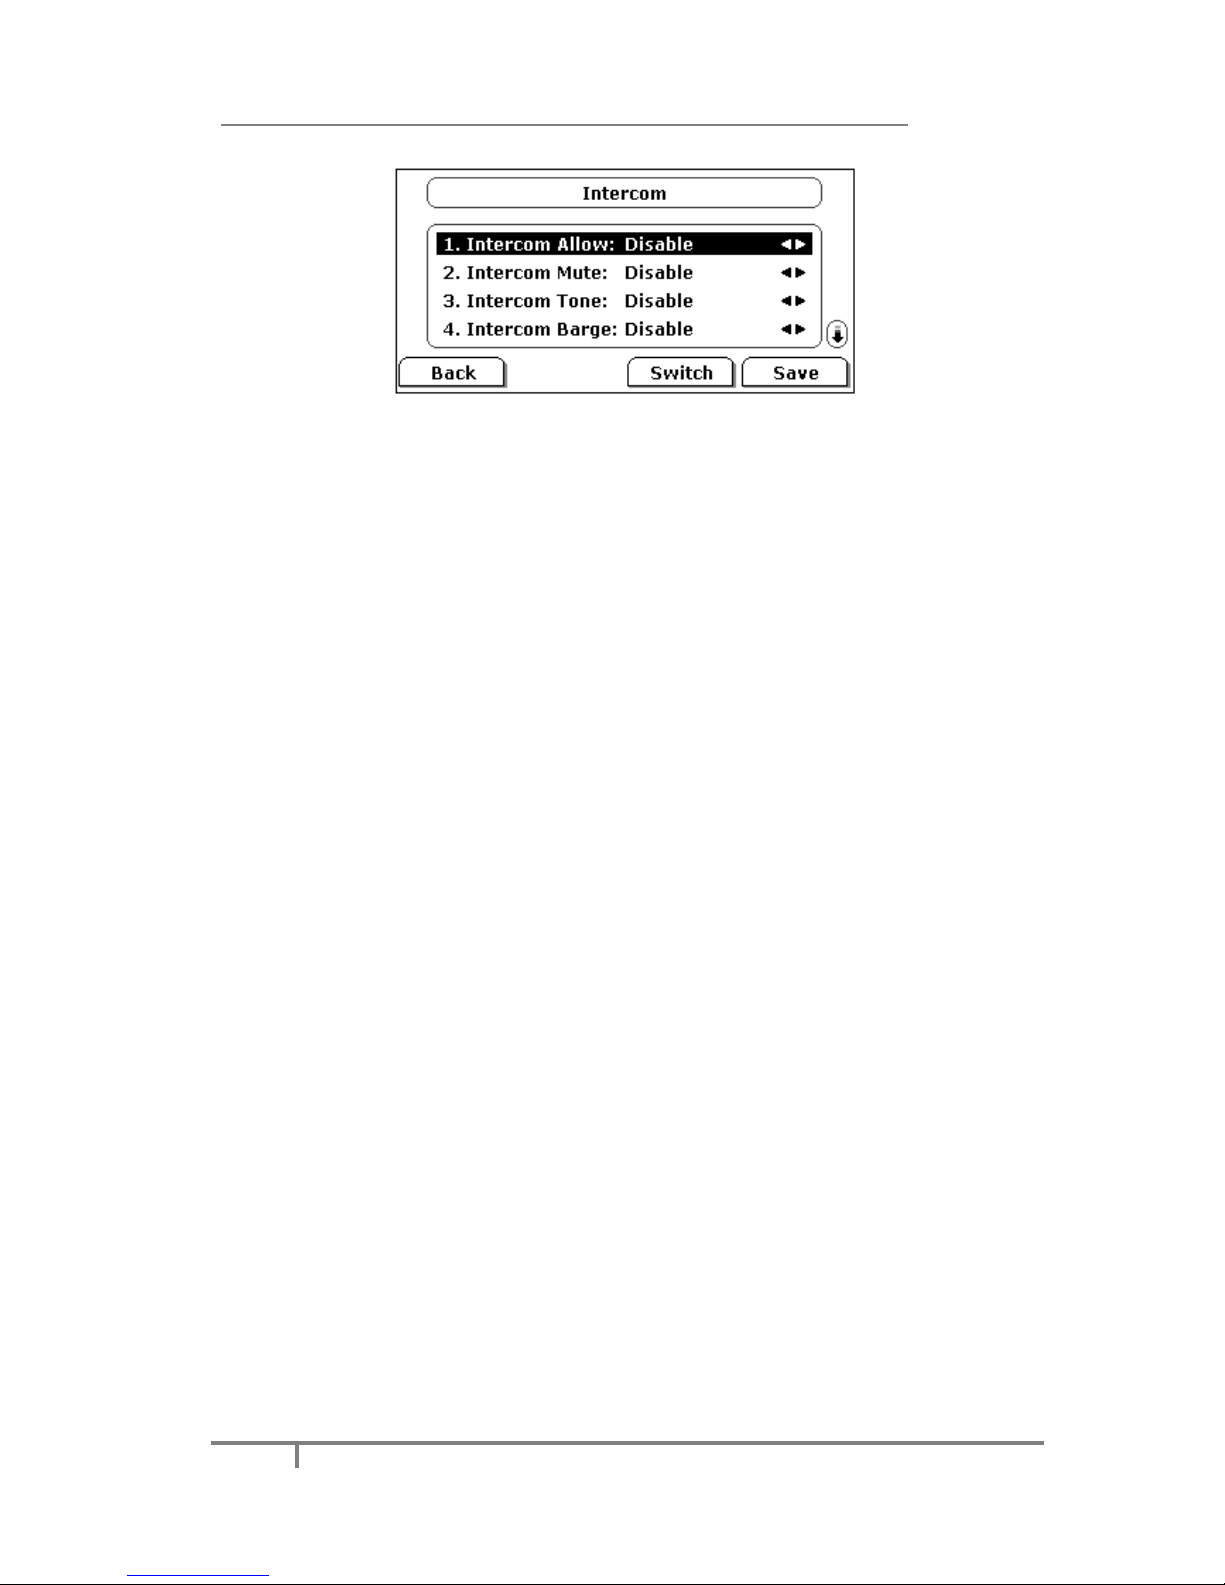
To configure Intercom option via phone interface:
1) Press the following hot keys: Menu->Features->Intercom->OK to enter the
Page 61
Enterprise IP Phone Basic Call Functions
55
configuration page.
2) Intercom Allow: To set whether to answer the incoming intercom calls.
3) Intercom Mute: To set whether to mute the incoming intercom calls
automatically.
4) Intercom Tone: To set whether to play ring tones when there is incoming
intercom calls to your extension.
5) Intercom Barge: To set whether to answer the incoming intercom calls during a
conversation. If the option is enabled, when there is incoming intercom calls to
your extension and you are on an intercom conversation, it will refuse the call
automatically; or it will put the current call on hold and put the incoming
intercom call through.
6) Choose and set the different options by Navigation keys and the Switch soft
key.
7) Press the Save soft key to save your changes.
To configure Intercom option via web interface:
1) Click on Phone->Features
2) Configure Allow Intercom, Intercom Mute, Intercom Tone or Intercom
Barge. You can refer to the above instruction for more information.
Call Forward
This feature allows you to forward an incoming call to another phone number , such
as a cell phone or voice mailbox.
The following call forwarding events can be configured:
Always: Incoming calls are immediately forwarded.
Busy: Incoming calls are immediately forwarded when the phone is busy.
No Answer: Incoming calls are forwarded when the phone is not answered
after a
specific period.
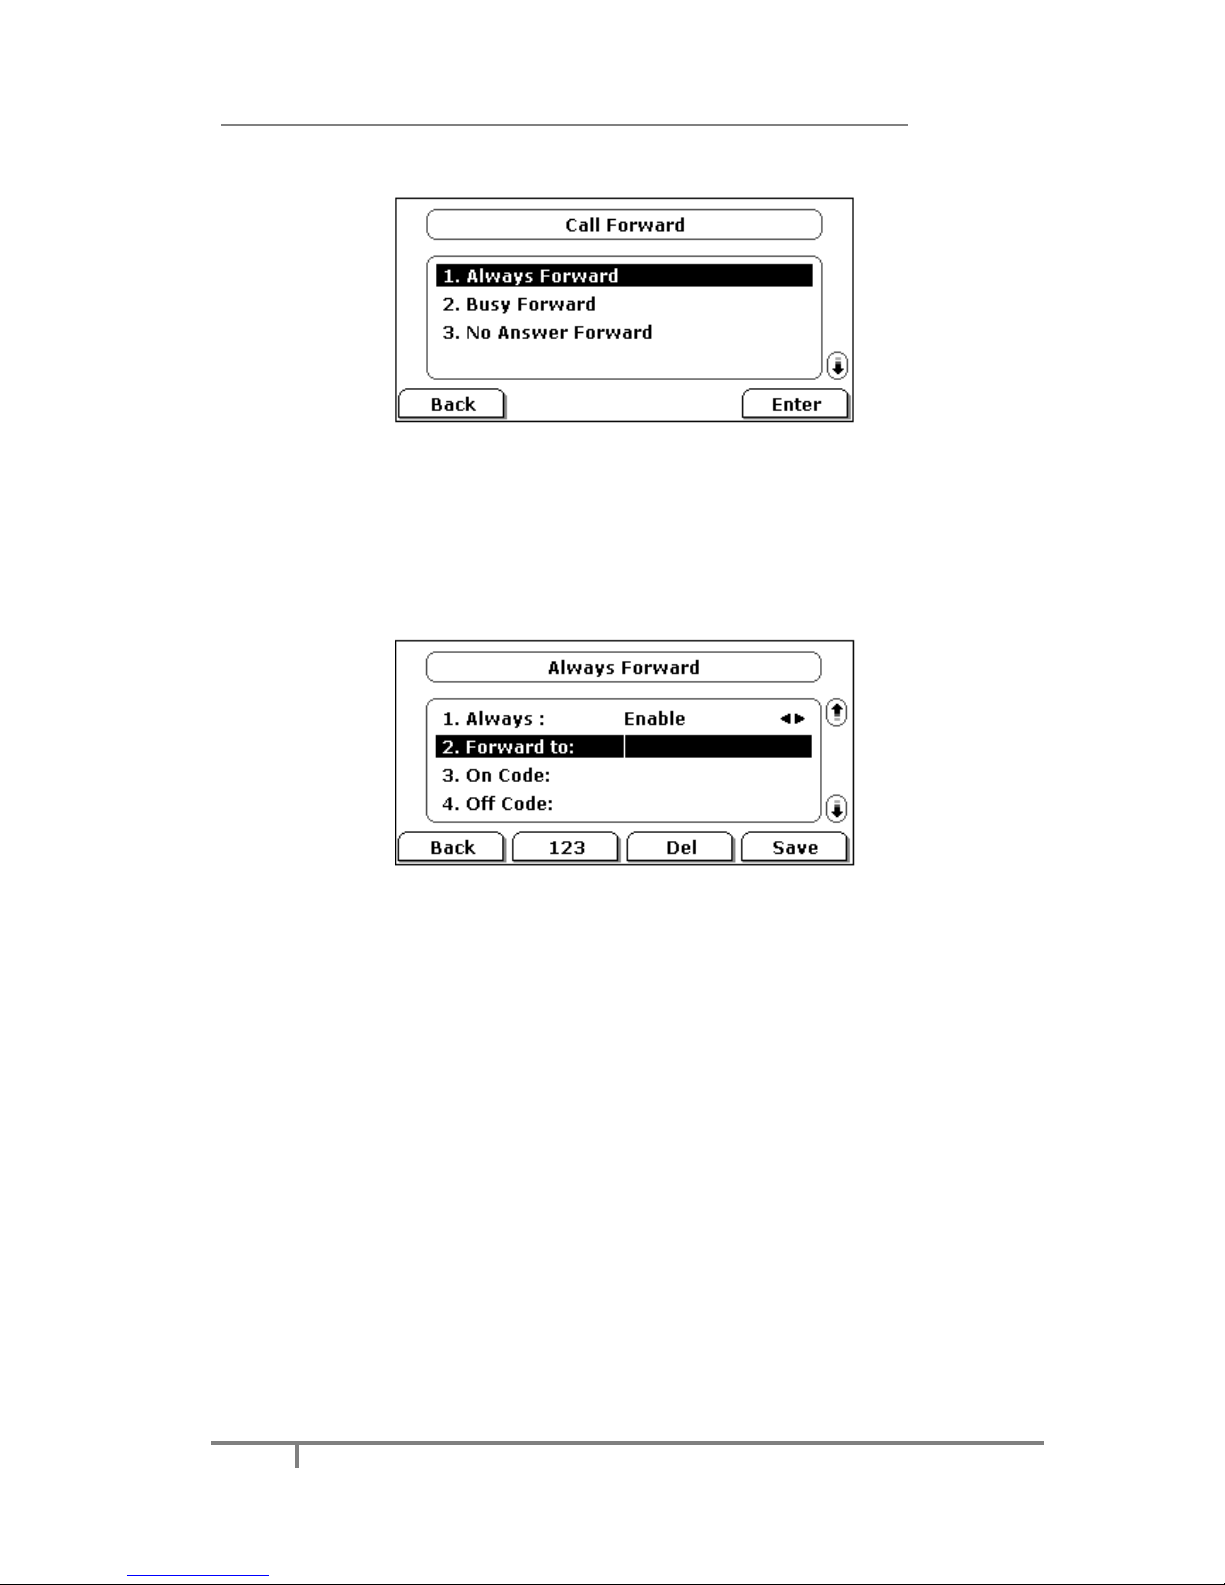
To configure Forward option via Phone interface:
1) Press the following hot keys: Menu->Features ->Call Forward->Enter. You
can also press the Tran button to enter the forward setting page directly when
the phone is in the idle status.
Page 62
Enterprise IP Phone Basic Call Functions
56
2) There are 3 options: Always Forward, Busy Forward and No Answer
Forward.
3) If you choose one of them, enter the phone number you want to forward to.
4) If you want to realize this function by server, please enter the On Code and Off
Code option, then when you choose to enable the call forward function via your
IP phone, it will send message to the server, and the server will turn on the
function. When there is call to the extension, the server will forward it to the set
number automatically based on the forward type. The IP phone will show the
record in Call History.
5) Press Save hot key to save the changes.
To configure Call Forward via Web interface:
Click on Phone->Features->Forward to do the relating changes. Please refer to
the above configuration information.
In addition, you can enable or disable the phone to forward an incoming call to
international number which begins with the international call prefixes of 00. If you
need specify the international call prefix, contact your system administrator for more
information.
Forward international is enabled by default.
To configure Forward International via phone interface:
1) Press Menu -> Settings -> Advanced Settings -> Fwd International.
2) Select Disable or Enable in the pull-down menu of Fwd International.
3) Press Save to save your changes.
Page 63

Enterprise IP Phone Basic Call Functions
57
Active Call
Mute
This function allows you to mute the microphone of the active audio device during a
call; you cannot be heard by the other party. You can still hear all other parties while
mute is enabled. When you press the MUTE button, all of the conversation will be
muted.
To mute/resume a conversation:
Press MUTE button during a conversation, the icon will be shown in the LCD. Press
it again to make the microphone back to normal conversation.
Call Hold
This call function allows you to place an active call on hold. In this case your IP PBX
might play a melody or message to the other party while waiting. Other calls can be
received and made while a call is put on hold.
To hold/retrieve a call via Phone interface:
1) Press the HOLD button or Hold hot key to put your active call on hold.
2) During the call, there will be a "dodo.." sound for each 30 second, suggesting
that there is a current call in Hold state.
3) If there is only one call on hold, press the Resume hot key or Hold button to
retrieve the call.
4) If there are more than one call on hold, press the Line button and the
Up/Down button to highlight the call, then press the Resume hot key or HOLD
button to retrieve the call.
Note:
When you are under the call hold status, put down the handset and the
conversation will continue over the speaker instead of being hung up.
Call Waiting
This call feature allows your phone to accept other incoming calls to the extension no
matter under which circumstances.
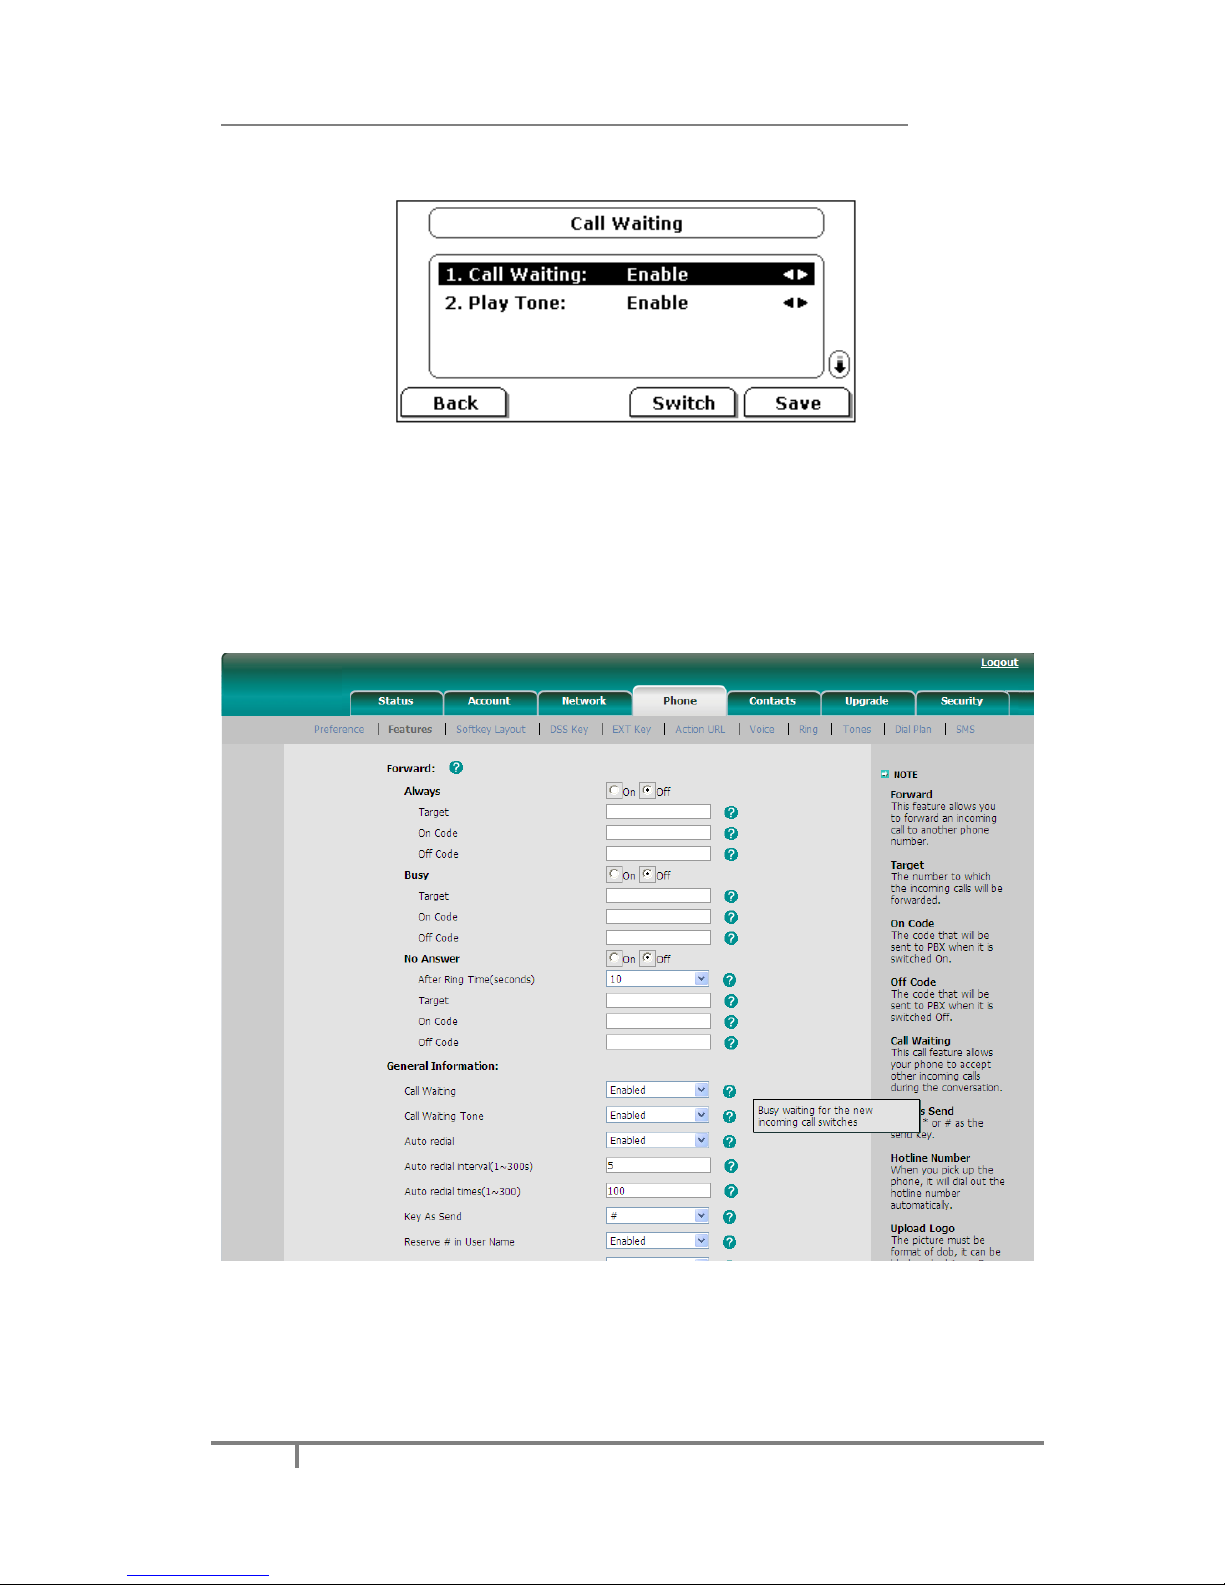
To enable/disable Call Waiting via Phone interface:
1) Press Menu->Features->Call Waiting->Enter hot keys.
Page 64
Enterprise IP Phone Basic Call Functions
58
2) Use the navigation keys or Switch hot key to enable/disable the call waiting
option.
3) Use the navigation keys or Switch hot key to enable/disable the Play Tone
option. This option used to define whether to play ring tones when there is an
incoming call during an active call.
4) Press Save hot key to save the changes, or Back to return to the previous
menu.
To enable/disable Call Waiting via Web interface:
Click on Phone->Features->Call Waiting option to do the relating changes.
Call Transfer
You can customize your phone so that incoming calls are transferred to the third
party such as another extension, mobile phone number, etc. There are three ways to
transfer the call: Blind Transfer, Attended Transfer and Semi-Attended
Page 65

Enterprise IP Phone Basic Call Functions
59
Transfer. If there are calls connected at present, A can choose the extensions to be
transferred.
To Blind Transfer via phone interface:
1) A and B is on an conversation, A press TRAN Button or Transfer hot key to put
B on hold, then A can dial the third telephone number C(or press Directory
soft key to enter the contact list, then choose a record)and press the Transfer
hot key to call out. A will quit the conversation, and the LCD will display as
Transferred.
2) After C answered it, or A press the Cancel hot key, the transfer is finished.
3) A will be disconnected from the call. B can talk to C.
4) If C refused to answer the call, it will prompt A that the transfer operation is
failed. If the current mode is Speaker, it will ring up; if the current mode is
Handset or Headset, it will play ring tones for every five seconds. Press any
function key to exit the prompt interface. This function should be supported by
server.
To configure Attended Transfer via Phone interface:
1) A and B is on an conversation, A press TRAN Button or Transfer hot key to put
B on hold, then A can dial the telephone number of C(or press Directory soft
key to enter the contact list, then choose a record)and press the OK or SEND
button to call out.
2) After C answered it, A and C can have a private conversation without B hearing.
A can press the TRAN button to complete the transfer.
3) A will be disconnected from the call. B can talk to C.
To configure Semi-Attended Transfer via phone interface:
1) A and B is on an conversation, A press the TRAN button or Transfer hot key to
put B on hold, then A can dial a new number C(or press Directory soft key to
enter the contact list, then choose a record)and press the OK or SEND button
to call out.
2) While C is ringing, A hang up or press the Transfer hot key. Then A will quit the
conversation, and the LCD will display as Transferred.
3) A will be disconnected from the call, when C pick up, B can talk to C.
Note:
Make sure that the SIP server you have registered supports this function.
3-way Conference
You can establish a three-party conference, during the conversation three phone
parties can communicate with each other.
To establish a conference:
1) Press the Conf hot key during an active call.
2) The first call is placed on hold. You will hear a dial tone. Dial the number to
conference in(or press Directory soft key to enter the contact list, then choose
a contact to conference in), then press the Send hot key.
Page 66

Enterprise IP Phone Basic Call Functions
60
3) When the call is answered, you can have a private conversation at first. And then
press the CONF button, the conference call will include you and the other two
parties.
4) During the conference, press the Split hot key to split the conference into two
hold lines, and press the Resume hot key to resume the chosen call
respectively.
5) When you press the Hold key, the conference will be on hold.
6) Hang up to disconnect all parties.
Network Conference
If you want to make a conference with more than three people, you can enable the
function of network conference. This function needs the server’s support.
If you enabled this function, you can put the conference on the server.
To enable network conference via web interface:
1) Click on Account->Account X->Advance->Conference Type, there is a pull-
down menu, choose Network from the list.
2) Enter the Conference URI.
3) Click Confirm button to save the changes.
To establish a conference:
1) Press the Conf hot key during an active call.
2) Dial the number to join in the conference, then press the Send hot key
3) When the call is answered, press the CONF button.
4) After starting a three way conference, press Conf button to enter Conference
dialing interface and invite another party to participate in conference.
5) After starting conference, press Hold key to hold local call without influencing
others in conference.
Page 67
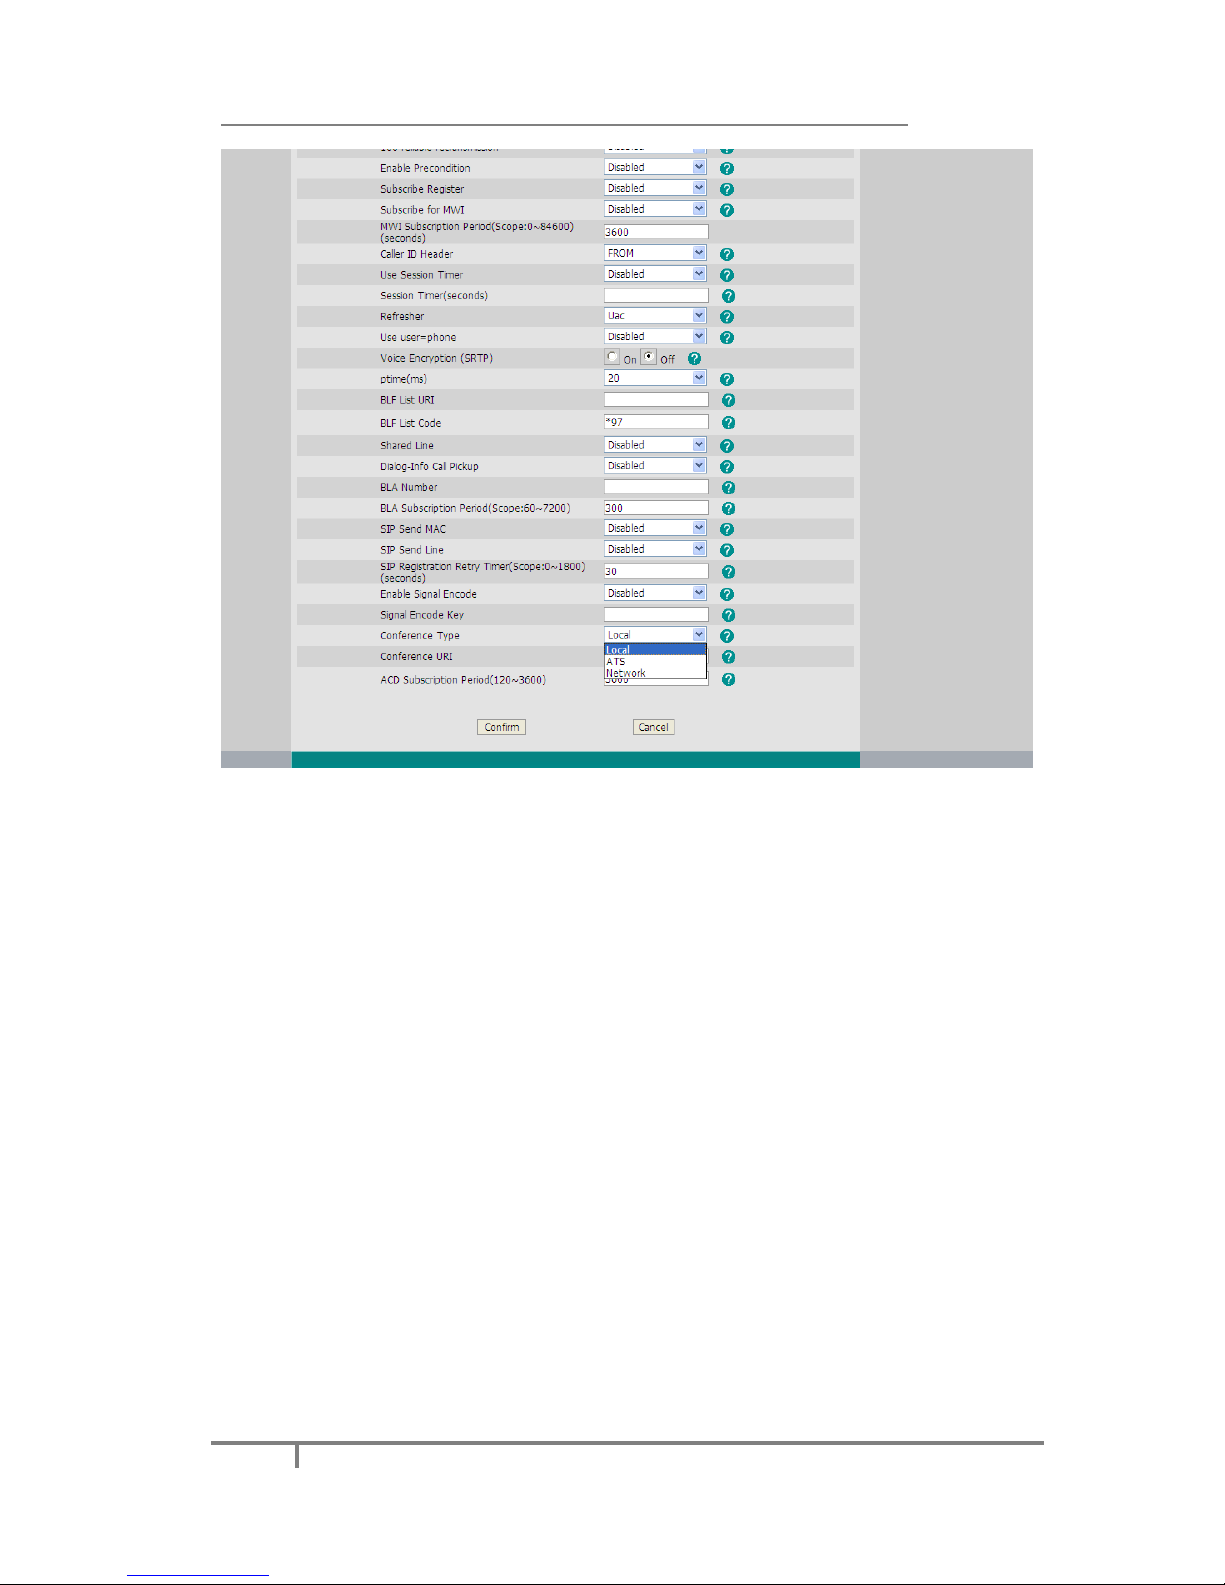
Enterprise IP Phone Basic Call Functions
61
HuaWei ATS Conference
To enable this function can make Multi-Party Conference come true; you can add or
delete any attenders, also you can have a private chat with any member. This
function needs the server’s support.
To enable ATS conference via web interface:
1) Click on Account->Account X->Advance->Conference Type, there is a pull-
down menu, choose ATS from the list.
2) Enter the Conference URI.
3) Press Confirm button to save the changes.
To establish a conference:
1) Press the Conf hot key during an active call.
2) Dial the number to conference in, then press the Send hot key
3) When the call is answered, press the CONF button.
4) After the CONF is established, initiator can continually add CONF members, press
Add hot key to enter dial-up interface,enter the number,press send button to
dial out,when the people answer the call , he have been attended to the CONF.
5) Initiator can use private chart function to have a private chart with any member,
choose any members in phone member list, and then press PriChat hot key,
both sides enter into private chart mode, if there are only 3 CONF members, all
Page 68

Enterprise IP Phone Basic Call Functions
62
of the sides begin to private chart and the third party enter a Hold mode. If the
attender is more than 3, and then the other attenders keep on talking. If you
want to end the private chat, press ExitPri hot key.
6) Initiator can use remove function to remove any CONF members, choose any
members in phone member list, and then press remove hot key again.
7) Initiator Hangs up, the CONF over.
Message
The phone supports SMS (Short Messaging Service) and Voicemail, if you want to
use them, please make sure that your telephony system supports this feature and
the feature Message of your account has been enabled.
Voicemail
Your voice mailbox messages, which are usually stored on a media server of your
local or hosted VoIP telephony system, can be accessed from your phone.
New voice messages can be indicated both acoustically and visually as described
below:
The idle screen will indicate the new voice messages coming.
The MESSAGE button will be lighted.
Page 69
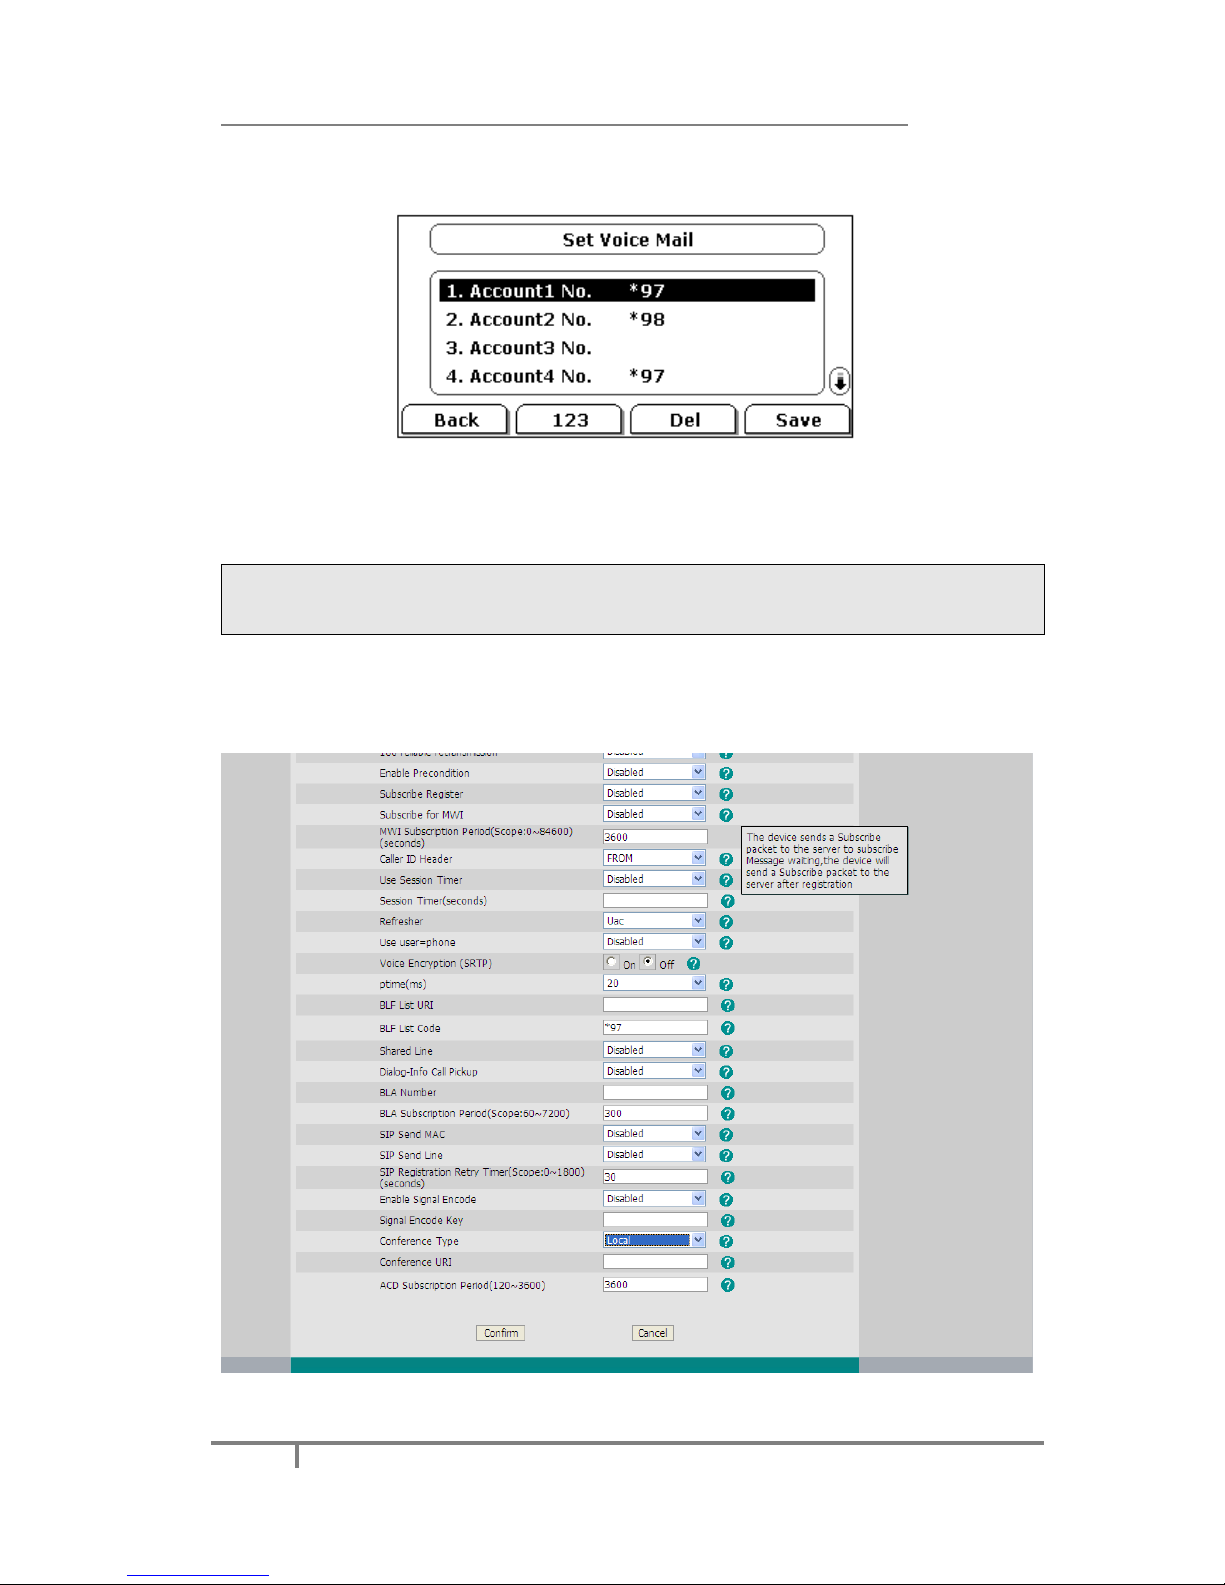
Enterprise IP Phone Basic Call Functions
63
To configure the Voicemail code via Phone interface:
1) Press Menu->Messages->Voice Mail->Set Voice Mail.
2) Use the navigation keys to highlight the Line which you want to set, enter the
code with which the phone connects to your system. Press 123 hot key to select
the proper input method.
3) Press Save hot key to save the change, or Back to return to the previous menu.
Note:
Please contact your system administrator for the connecting code. Different systems
have different codes.
To configure Subscribe for MWI via the web interface:
1) Click on Account->Advanced-> Subscribe for MWI.
2) Choose Enable in the pull-down menu.
To view the voicemail via the Phone interface:
Page 70
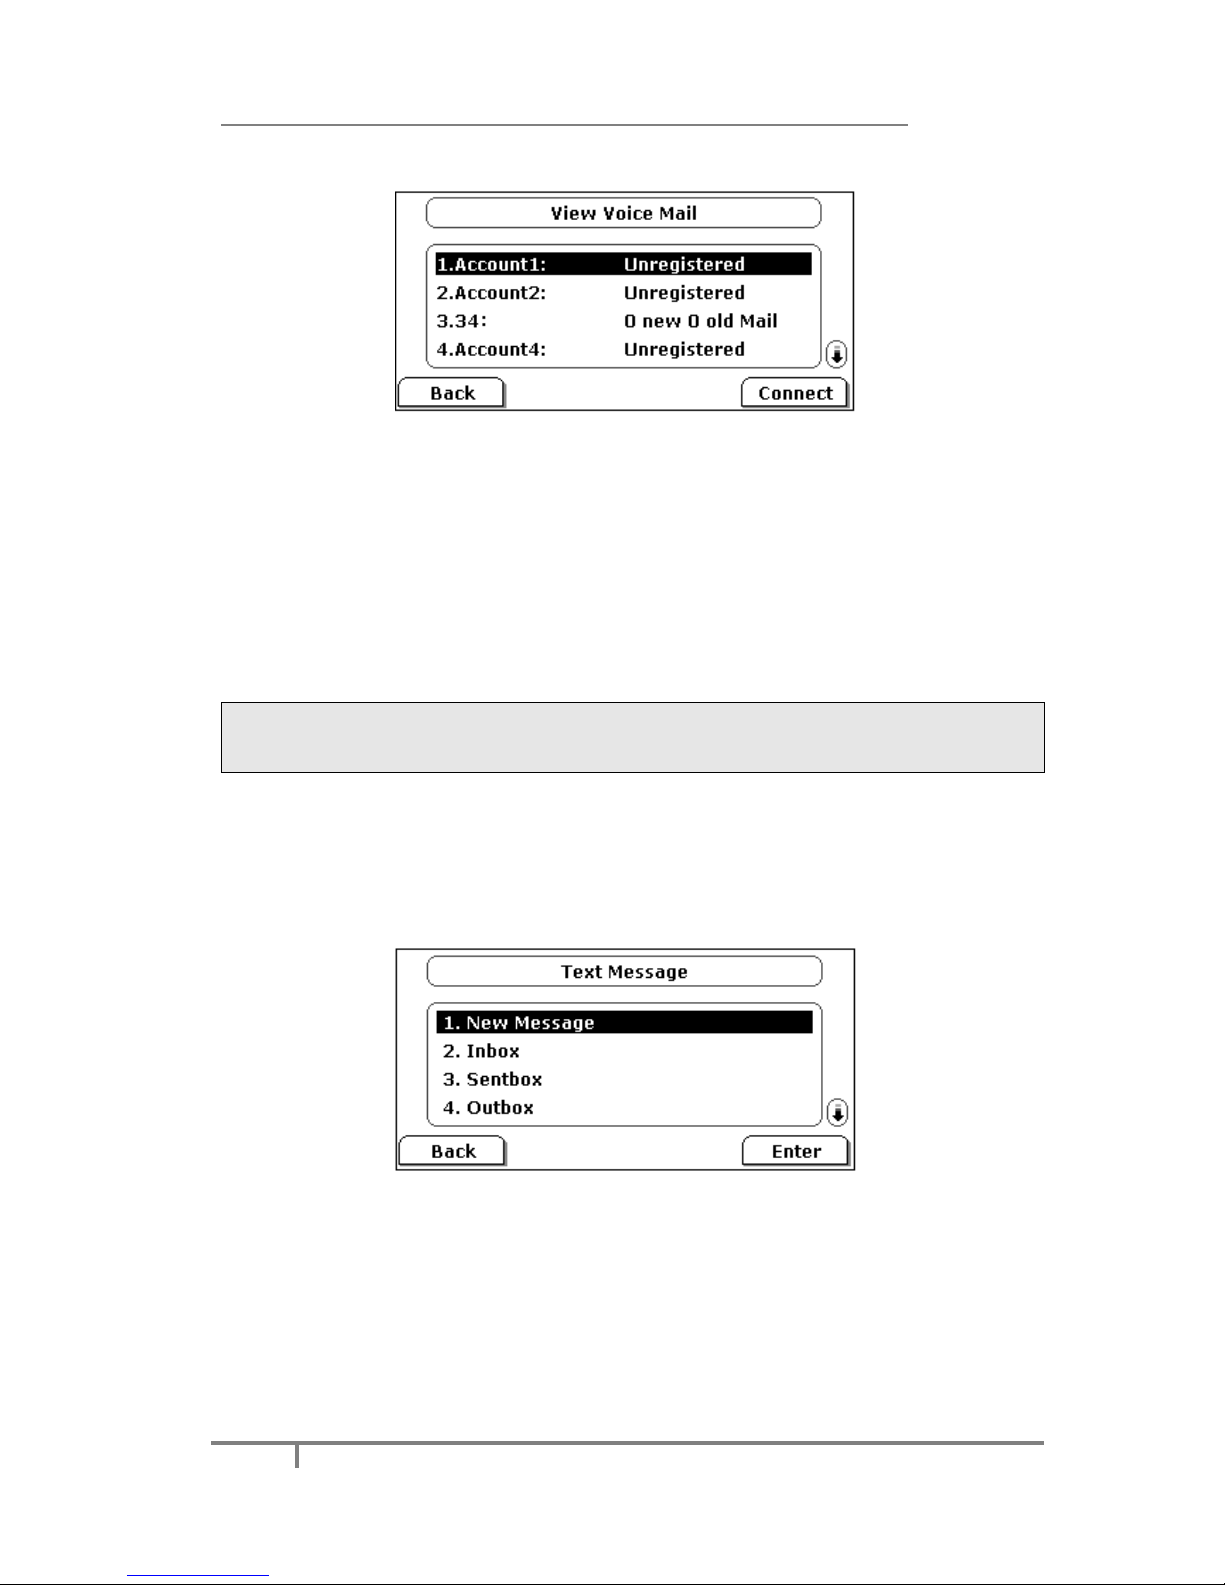
Enterprise IP Phone Basic Call Functions
64
1) Press Menu->Messages->Voice Mail->View Voice Mail.
2) You can view the amount of the voice mails that includes new or old voice mails.
3) Choose an account and press the Connect button, then you are able to listen to
your new and old messages.
To retrieve the new voicemail via the Phone interface:
1) Press the Voicemail hot key directly, if you already set the Voicemail number.
2) You may be prompted to enter the password which is needed to connect to your
VoIP telephony system. It depends on your system.
3) Your voice mailbox is enabled and you are able to listen to your new and old
messages.
Note:
Before retrieving the new voicemail, please make sure that the connecting code has
been set on the phone.
SMS
You can retrieve the SMS in the same way as Voicemail.
To retrieve the SMS via Phone interface:
1) Press Menu->Messages->Text Message, press Enter hot key.
2) Use the navigation hot key to highlight the options. You can read the message
in the Inbox/ Sentbox/ Outbox/ Draftbox.
Page 71
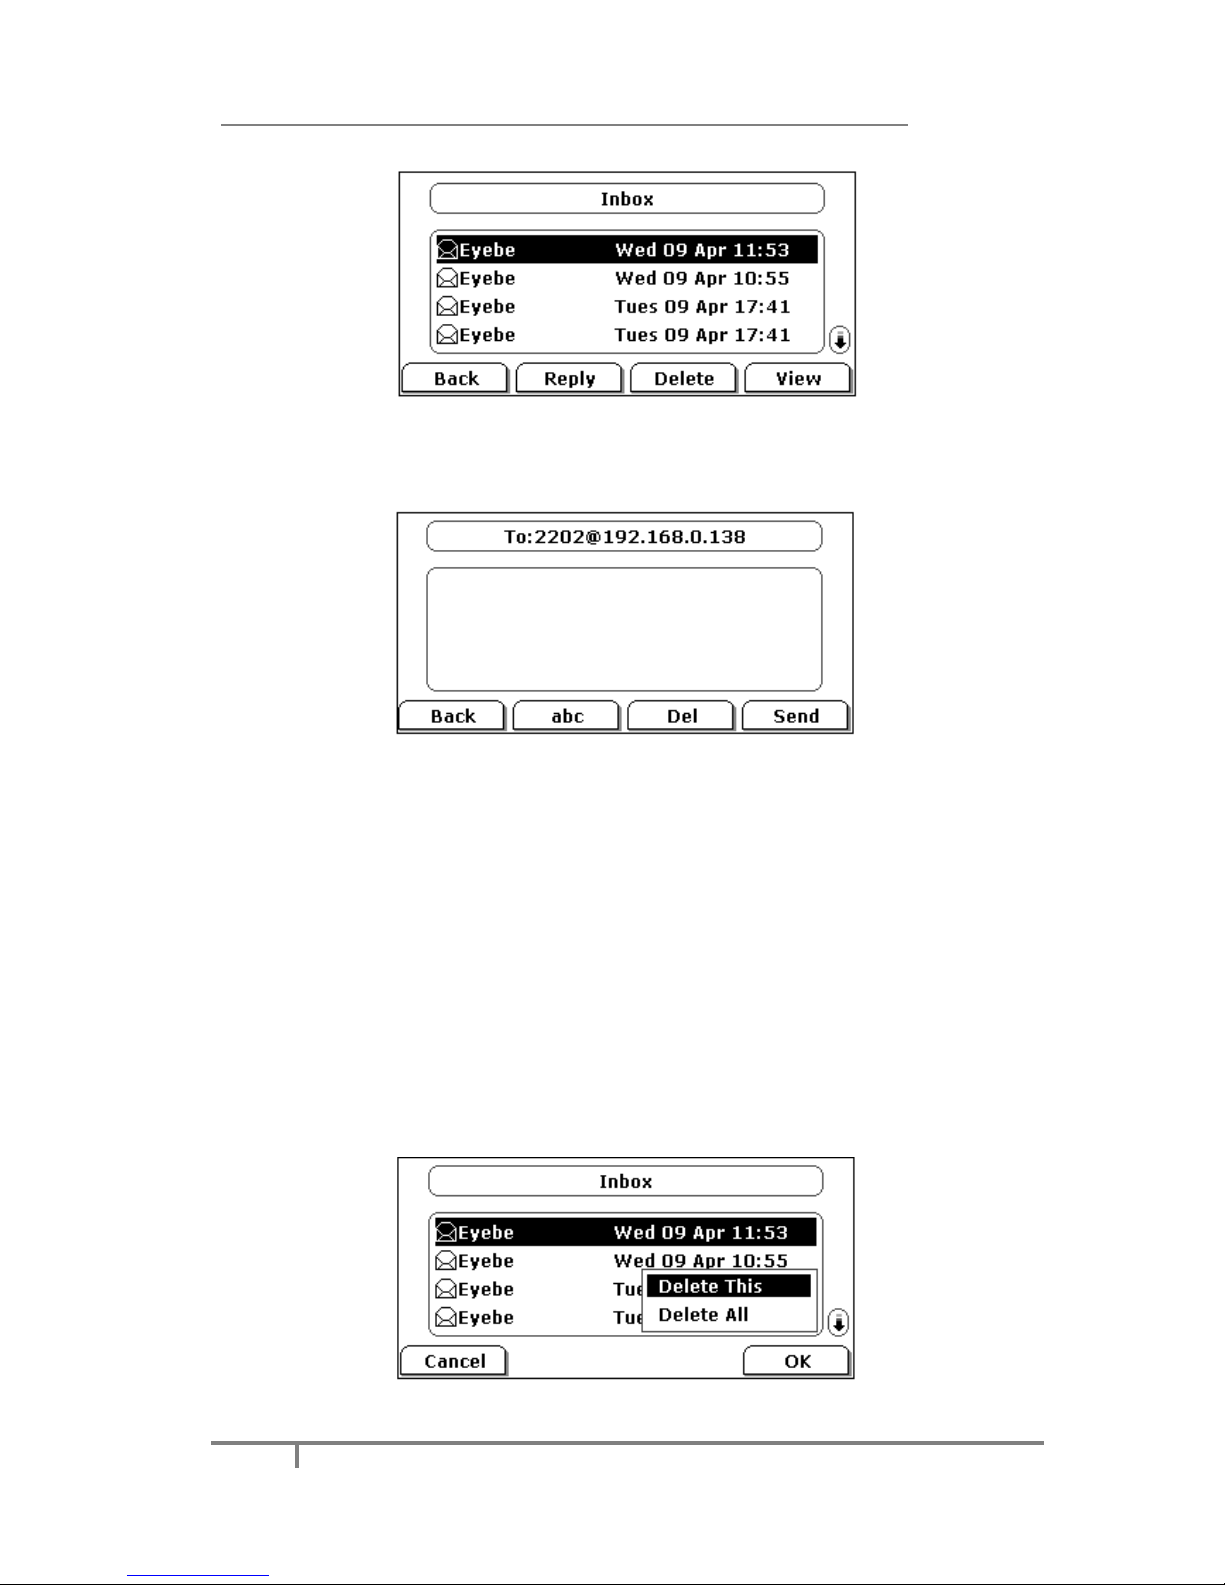
Enterprise IP Phone Basic Call Functions
65
3) Press View hot key to open and read the specific message.
To reply the SMS via Phone interface:
1) After retrieving the specific message, press Reply hot key, use the abc hot key
to change the input Method.
2) Press Send hot key, you are required to choose an account which is used to send
out the message and the number you want to send to.
3) Press Send hot key to send out the message, or Back hot key to return to the
previous menu.
To edit a new message via the Phone interface:
1) Press Menu->Messages->Text Message->New Message to enter.
2) Edit the new message, use the abc hot key to switch the input method.
3) Press Send hot key to send out the message, or Back hot key to return to the
previous menu.
To delete the message via the phone interface:
1) After retrieving the specific message, press Delete hot key.
2) You are prompted to confirm the delete operation, press Ok hot key to delete
the message, or Cancel hot key to return to previous menu.
Page 72
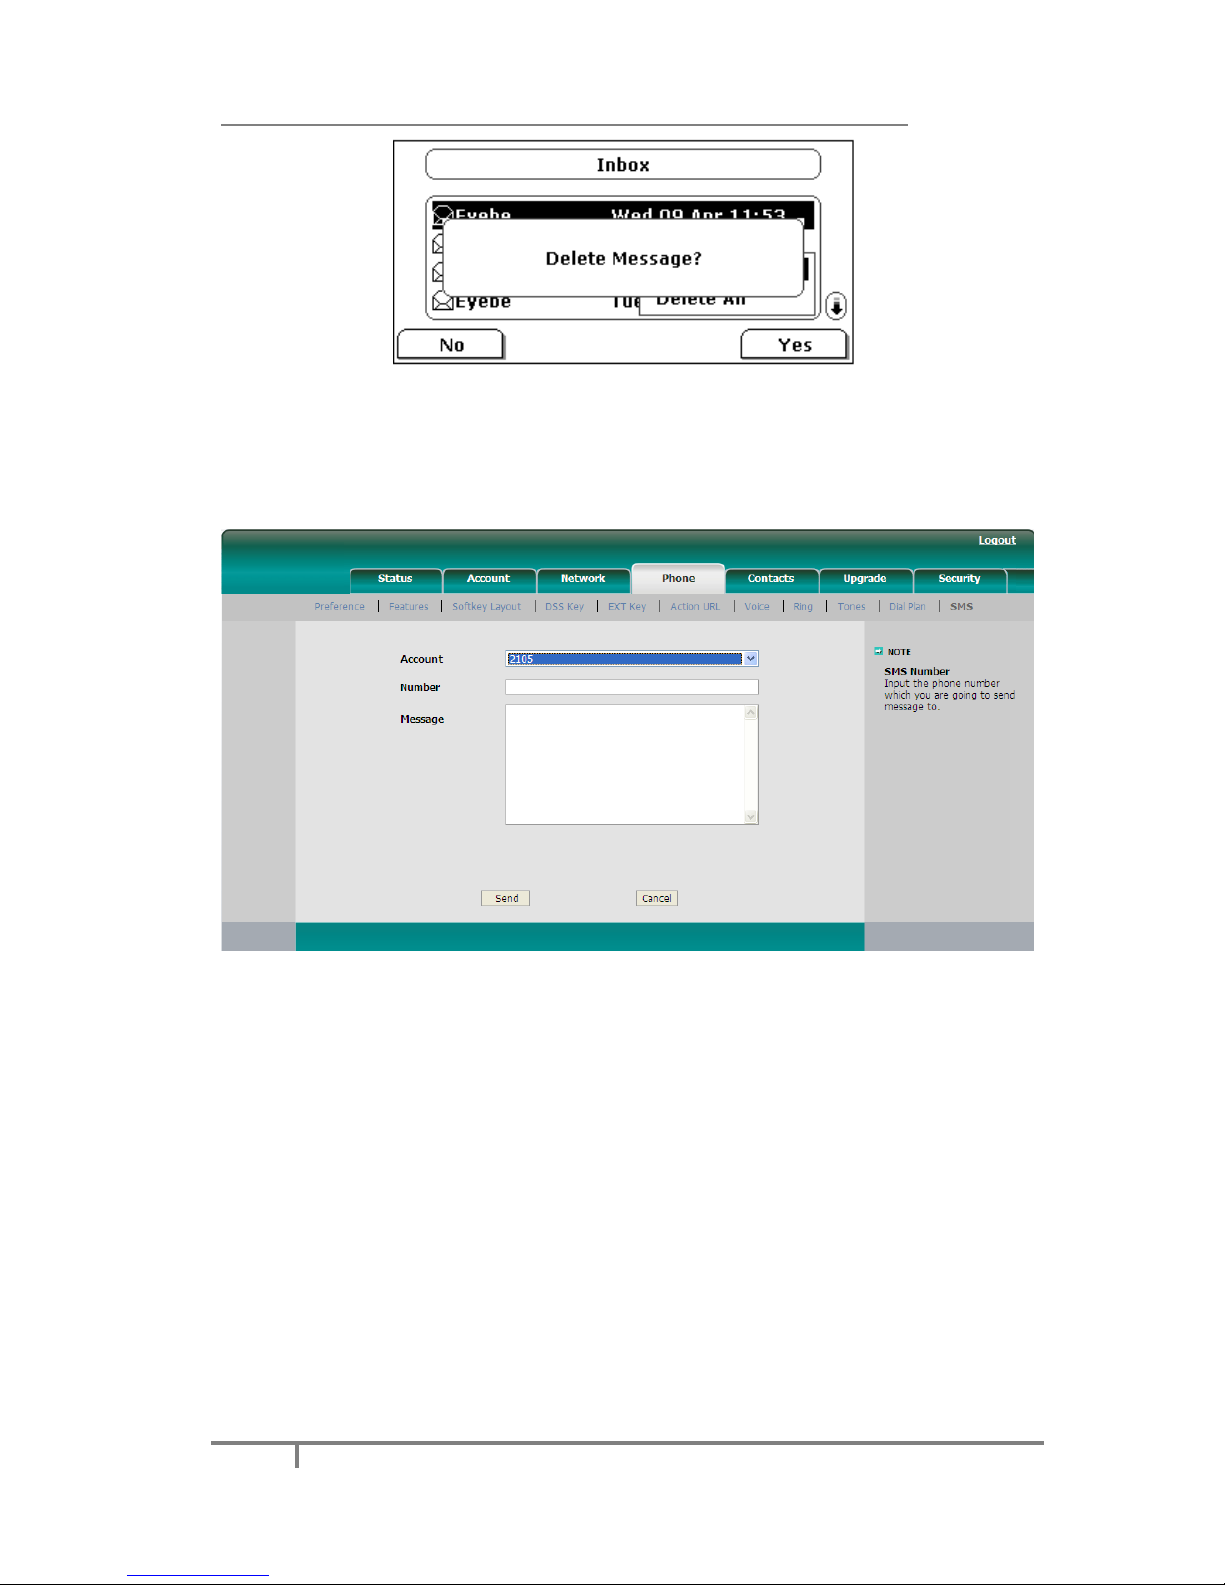
Enterprise IP Phone Basic Call Functions
66
To edit the message via Web interface:
1) Click on Phone->SMS.
2) Choose the Account, and enter Number, Message content.
3) Press Send button to send out the message, or Cancel button to cancel the
operation.
Page 73

Enterprise IP Phone Advanced Phone Functions
67
Advanced Phone Functions
Account Settings
Please refer to the previous part “Configuration and Registration” for the basic
Account setting information. The following table lists the instruction of the field about
the advanced Account Setting.
Field Name
Description
UDP Keep-alive
Message
Defines whether to active the phone UDP Keep-alive
mechanism. The default is Enabled.
UDP Keep-alive
Interval(seconds)
This parameter specifies how often the phone will send a
packet to the SIP server. Default is 30 seconds.
Login
Expire(seconds)
This parameter specifies the time frequency that phone
refreshes its registration. The default interval is 3600
seconds.
Local SIP Port
Local SIP port. The default value is 5060.
RPort
The parameter allows you configuring the proxy to send
responses back to a particular address and port. The default
is disabled.
SIP Session Timer
This document defines an extension to the Session Initiation
Protocol (SIP). This extension allows for a periodic refresh of
SIP sessions through a re-INVITE or UPDATE request. The
refresh allows both user agents and proxies to determine if
the SIP session is still active.
Subscribe
Period(seconds)
This parameter could set the period of the subscription. The
default value is 1800.
DTMF Type
Select the DTMF type.
You can only configure these settings via Web interface.
1) Click on Account.
2) Select the desired account.
Page 74
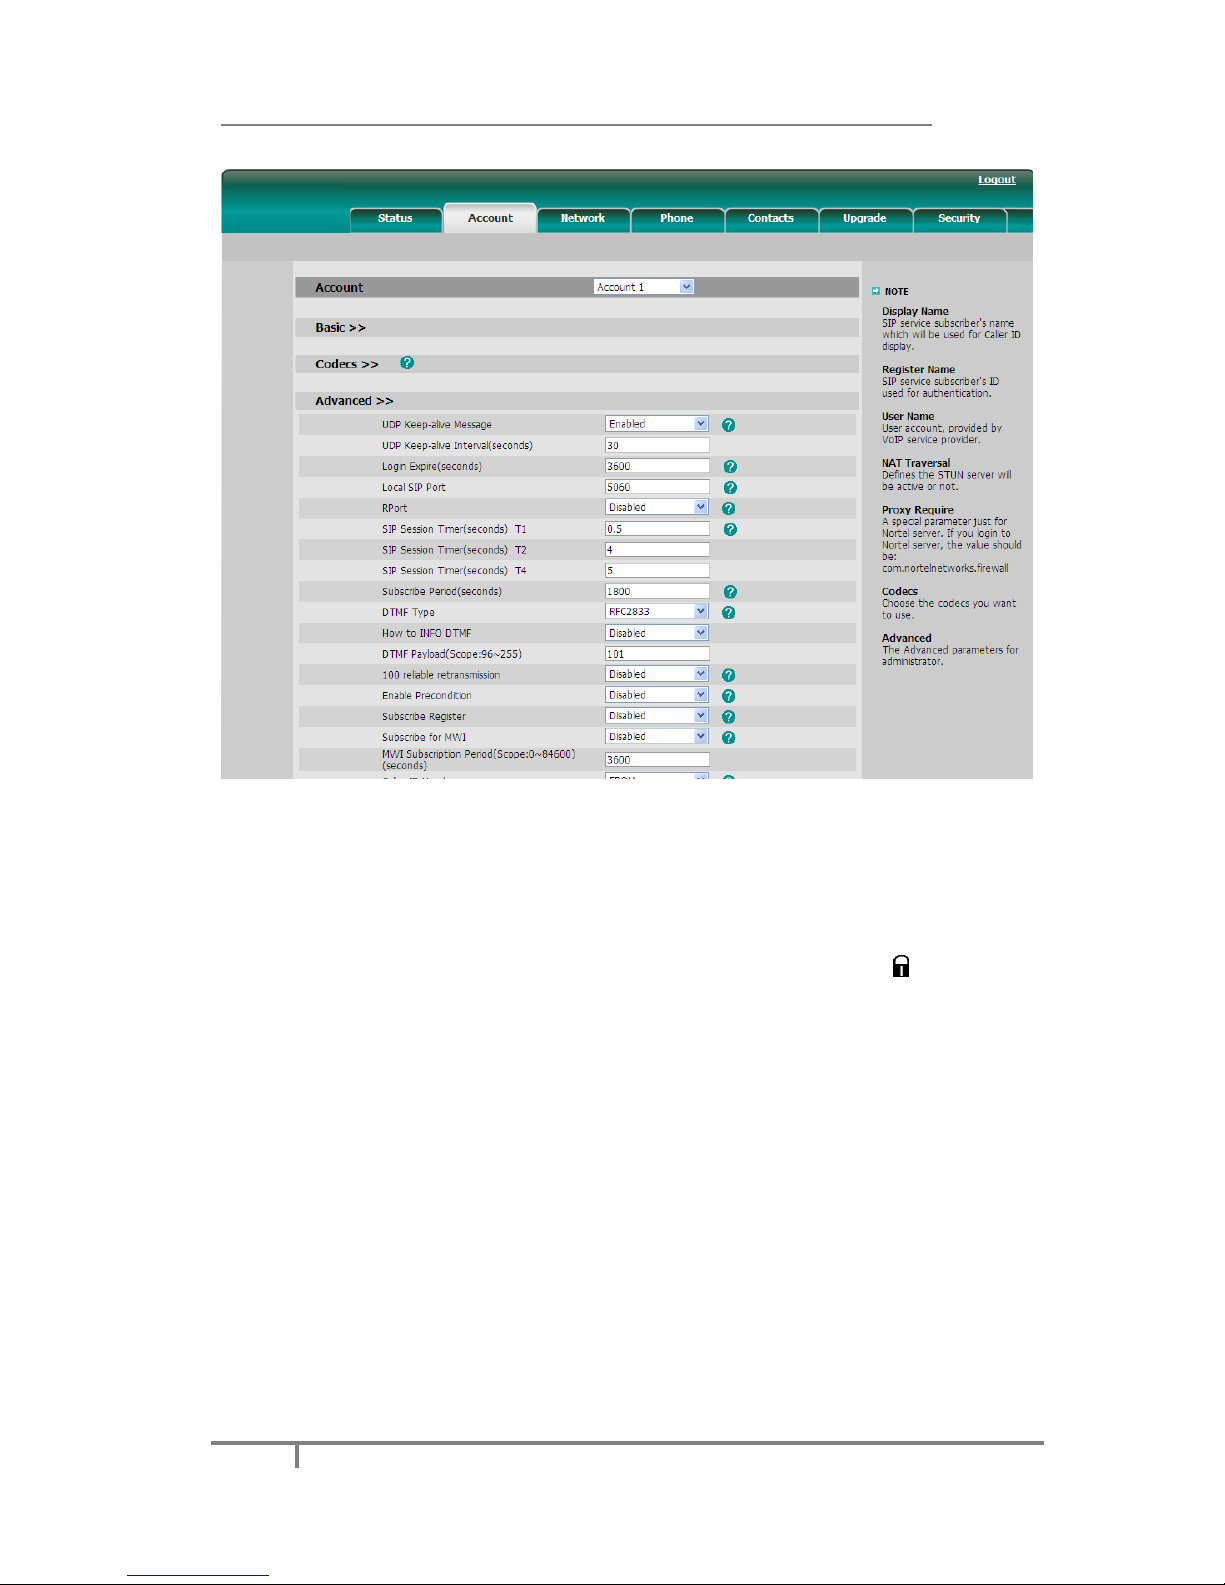
Enterprise IP Phone Advanced Phone Functions
68
3) Click on Advanced to do the relating settings.
You can consult your system administrator for more information.
TLS
TLS(Transport Layer Security), an IETF standards track protocol (RFC 5246), was
based on the earlier SSL specifications developed by Netscape Corporation.
If you make a call based on TLS , the IP phone UI will display the icon in ring back
interface.
Page 75
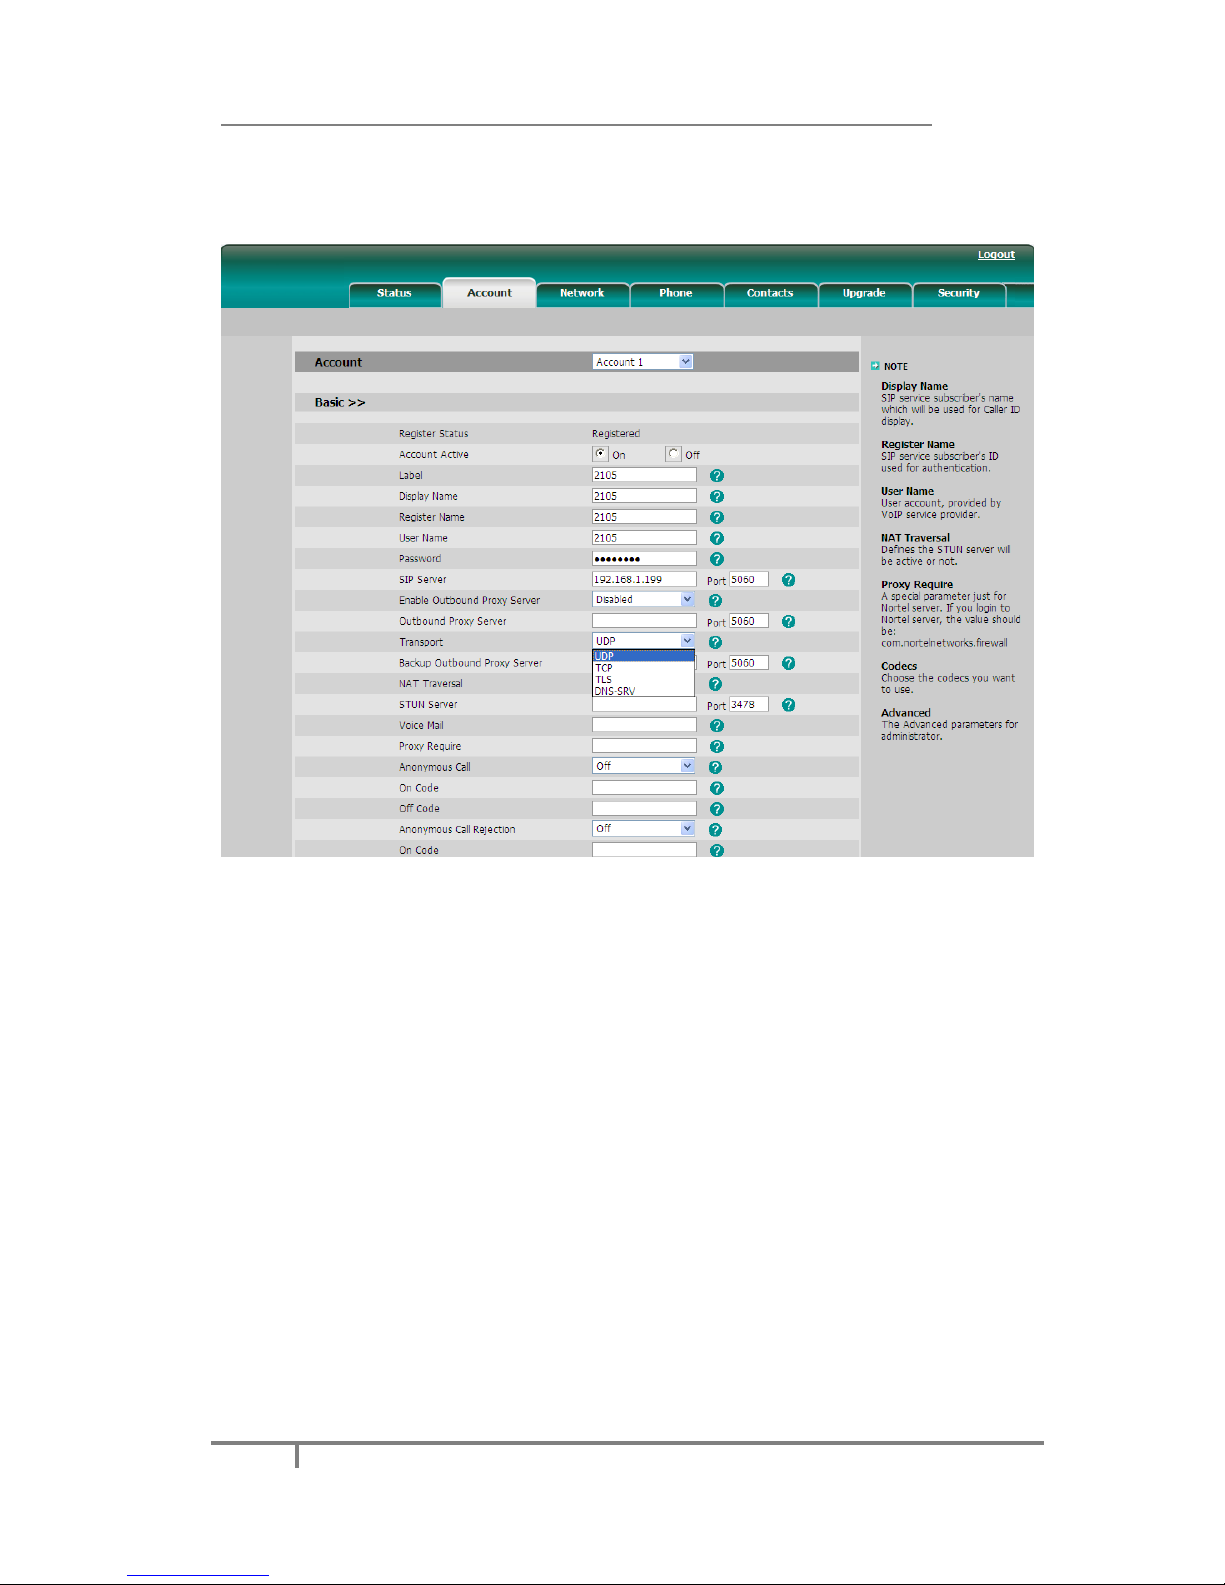
Enterprise IP Phone Advanced Phone Functions
69
Click on Account->Basic, choose Transport option, in the pull-down menu, you
can choose the TLS option, and then click on the Confirm button to save the
change.
DNS-SRV
If the SIP server cannot be used, the phone will be connected on the server which is
available.
Page 76
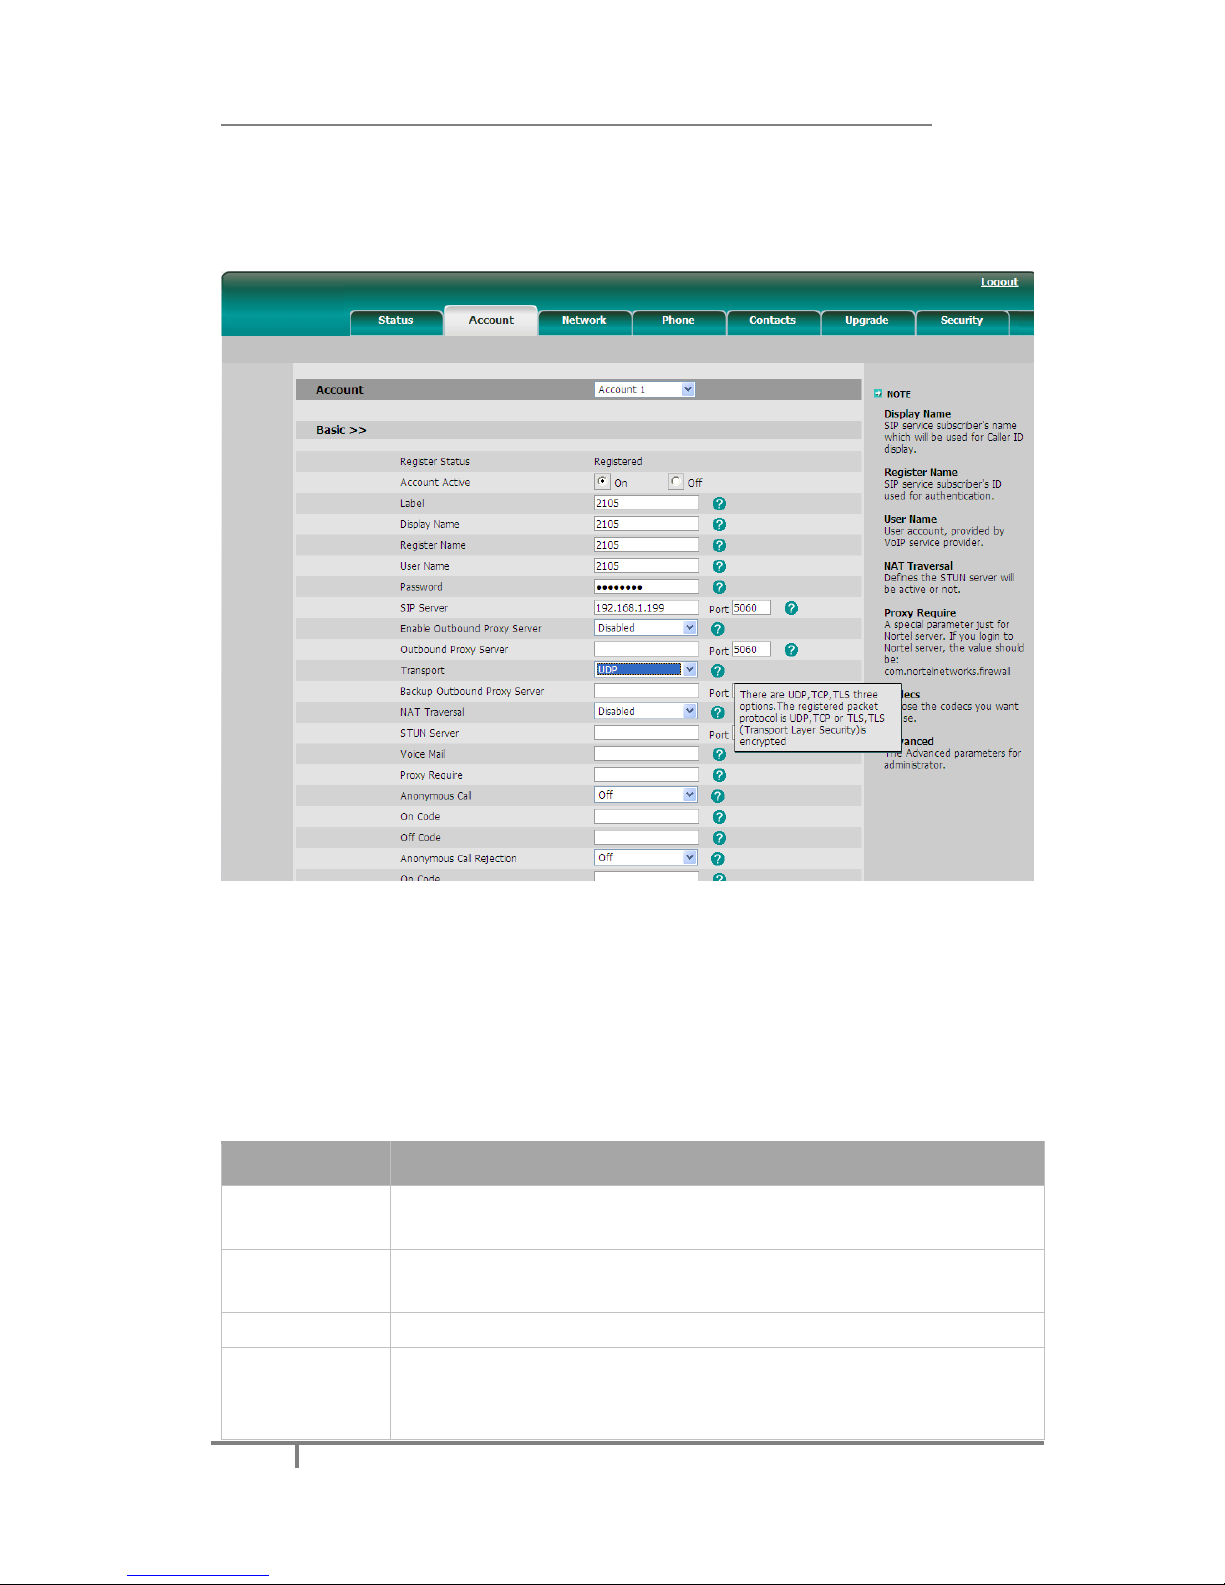
Enterprise IP Phone Advanced Phone Functions
70
To set DNS-SRV via web interface:
Click on Account->Basic, choose Transport option, in the pull-down menu, you
can choose the DNS-SRV option, and then click on the Confirm button to save the
change.
Network Setting
PC Port Setting
Please refer to the previous part “Configuration and Registration” for the basic
Network WAN setting information. The following table lists the instructions of the
field about the Network PC Port Setting.
Field Name
Description
As Bridge
If you select the Bridge mode, then the two Fast Ethernet ports
will be transparent.
As Router
If you select the Router mode, the SIP phone will work as a
router.
IP address
User could configure the PC port IP address.
DHCP Server
If you set the DHCP server on, the device connected to the PC
port will get the IP address automatically between the start IP
address and the end IP address. But if you select the bridge
Page 77
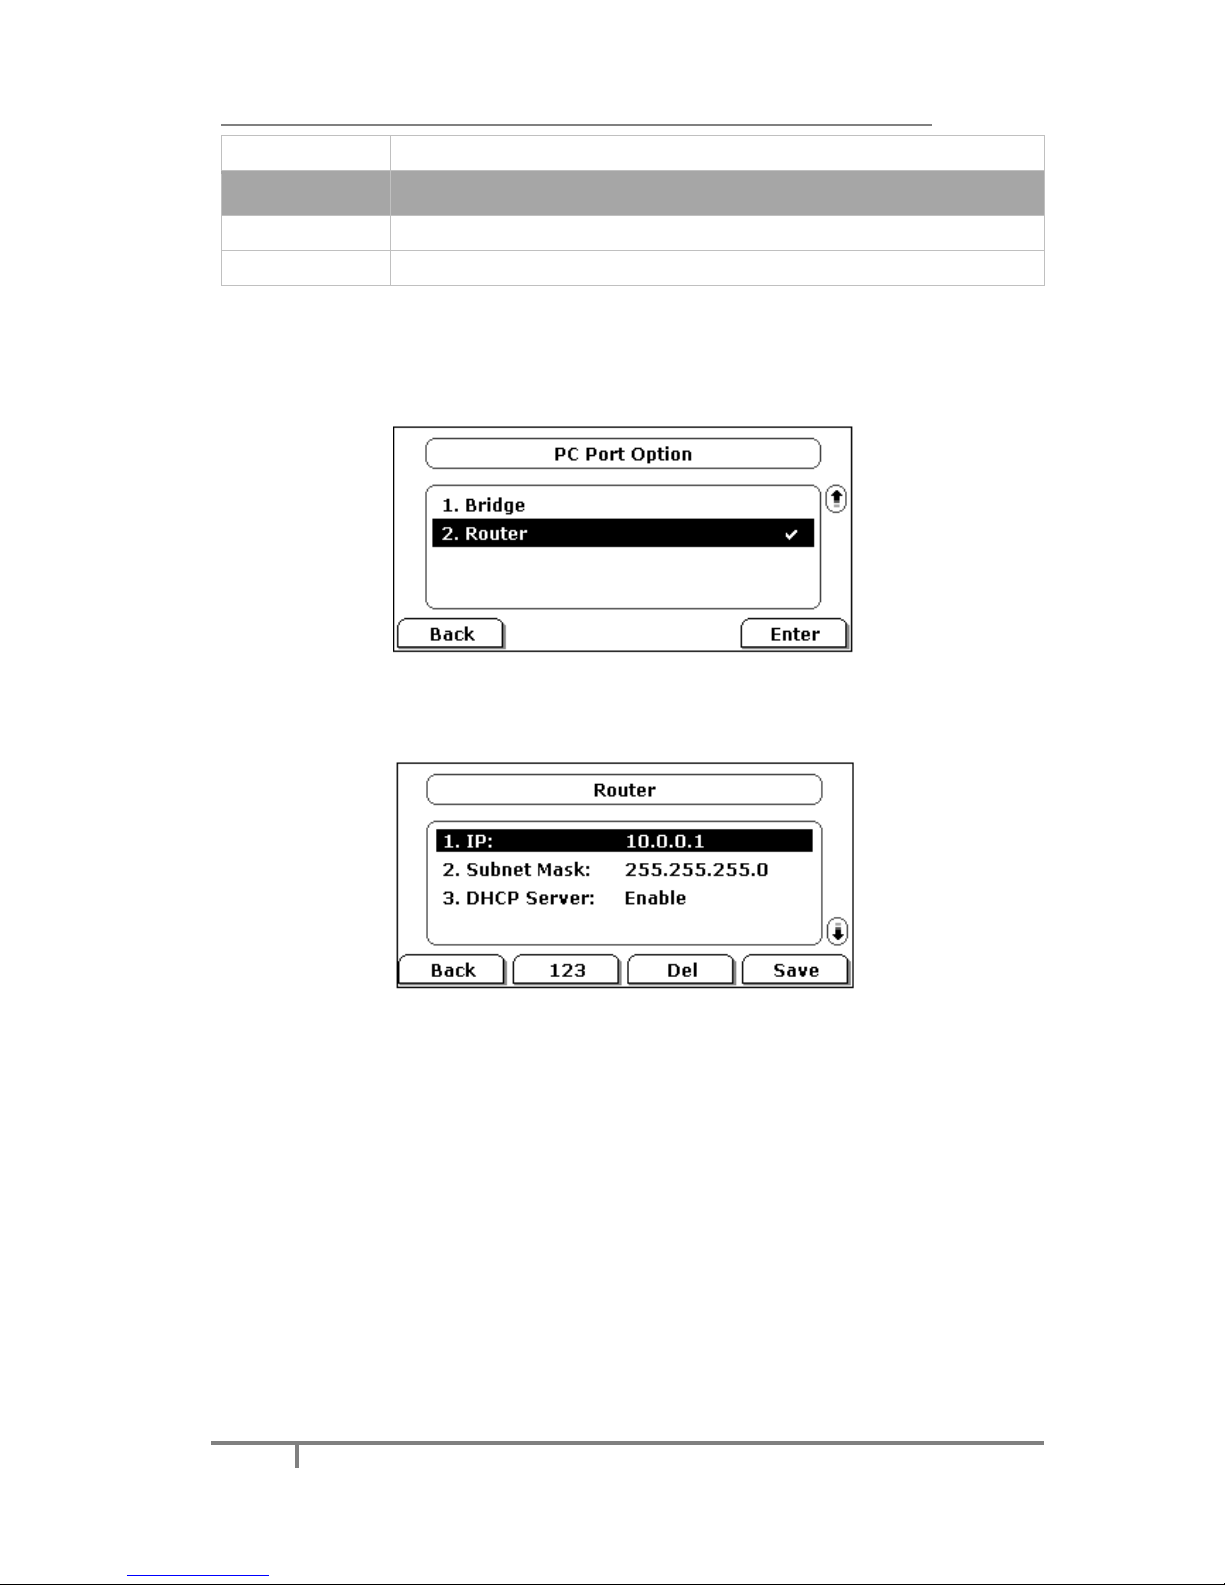
Enterprise IP Phone Advanced Phone Functions
71
mode, the DHCP server can not work.
Field Name
Description
Start IP
Indicate the range of the IP address.
End IP
Indicate the range of the IP address.
To configure PC Port settings via Phone interface:
1) Press Menu->Settings->Advanced Settings.
2) Enter the password required, scroll to Network option, press Enter hot key,
select PC port option, then press Enter hot key.
3) If you choose Bridge, it will save and return to the previous menu.
4) If you choose Router, you will be prompted to enter the IP Address, Subnet
Mask, DHCP Server Disable/Enable .etc.
5) Press Save hot key to save the changes, or Back hot key to return to the
previous menu.
Page 78
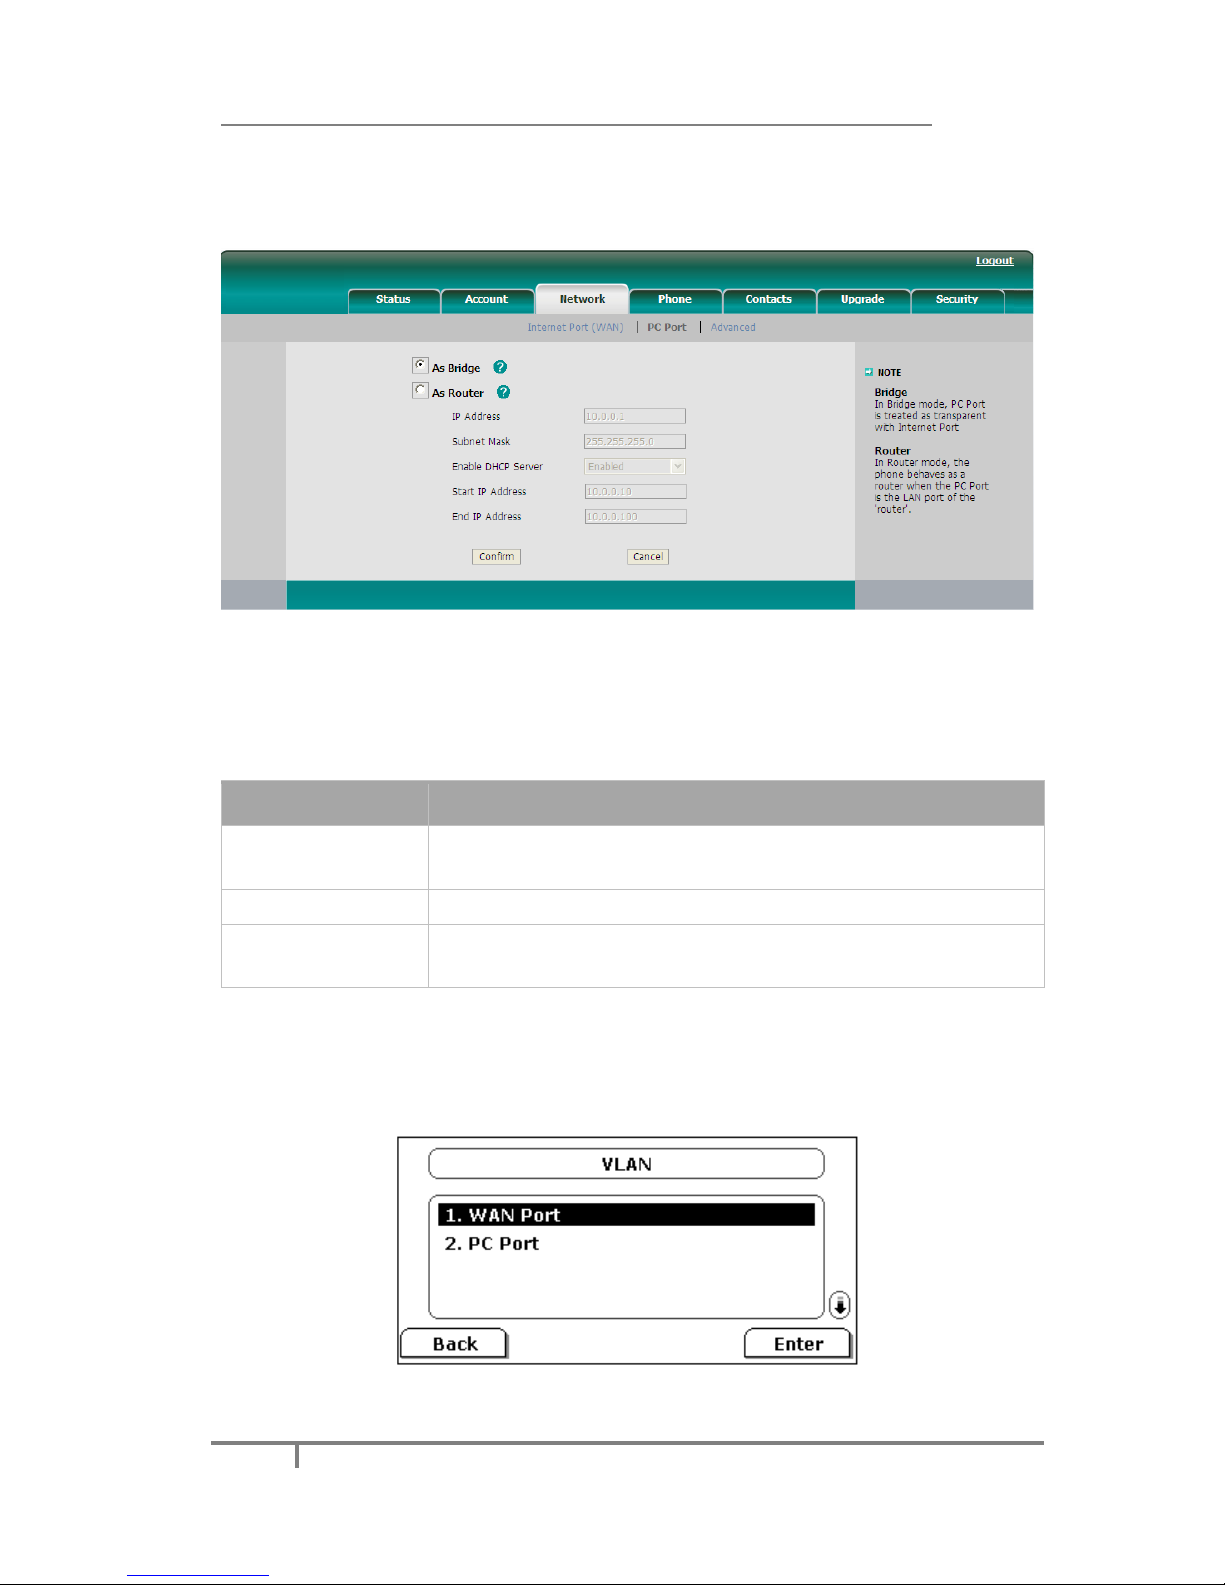
Enterprise IP Phone Advanced Phone Functions
72
To configure PC Port settings via Web interface:
Click on Network-> PC Port to do the relating configuration, You can consult your
system administrator for more information.
VLAN Setting
VLAN is a group of hosts with a common set of requirements that communicate as if
they were attached to the Broadcast domain, regardless of their physical location.
The following table lists the instruction of the field about the VLAN Setting.
Field Name
Description
QoS
When the network capacity is insufficient, QoS could provide
priority to users by setting the value.
Local RTP Port
Define the port for voice transmission.
WebServer
Users can choose the WebServer type: Disable, HTTP, HTTPS,
or HTTPS & HTTP.
To configure VLAN settings via Phone interface:
1) Press Menu->Settings->Advanced Settings.
2) Enter the password required, scroll to Network option, press Enter hot key,
select VLAN option, then press Enter hot key again.
Page 79
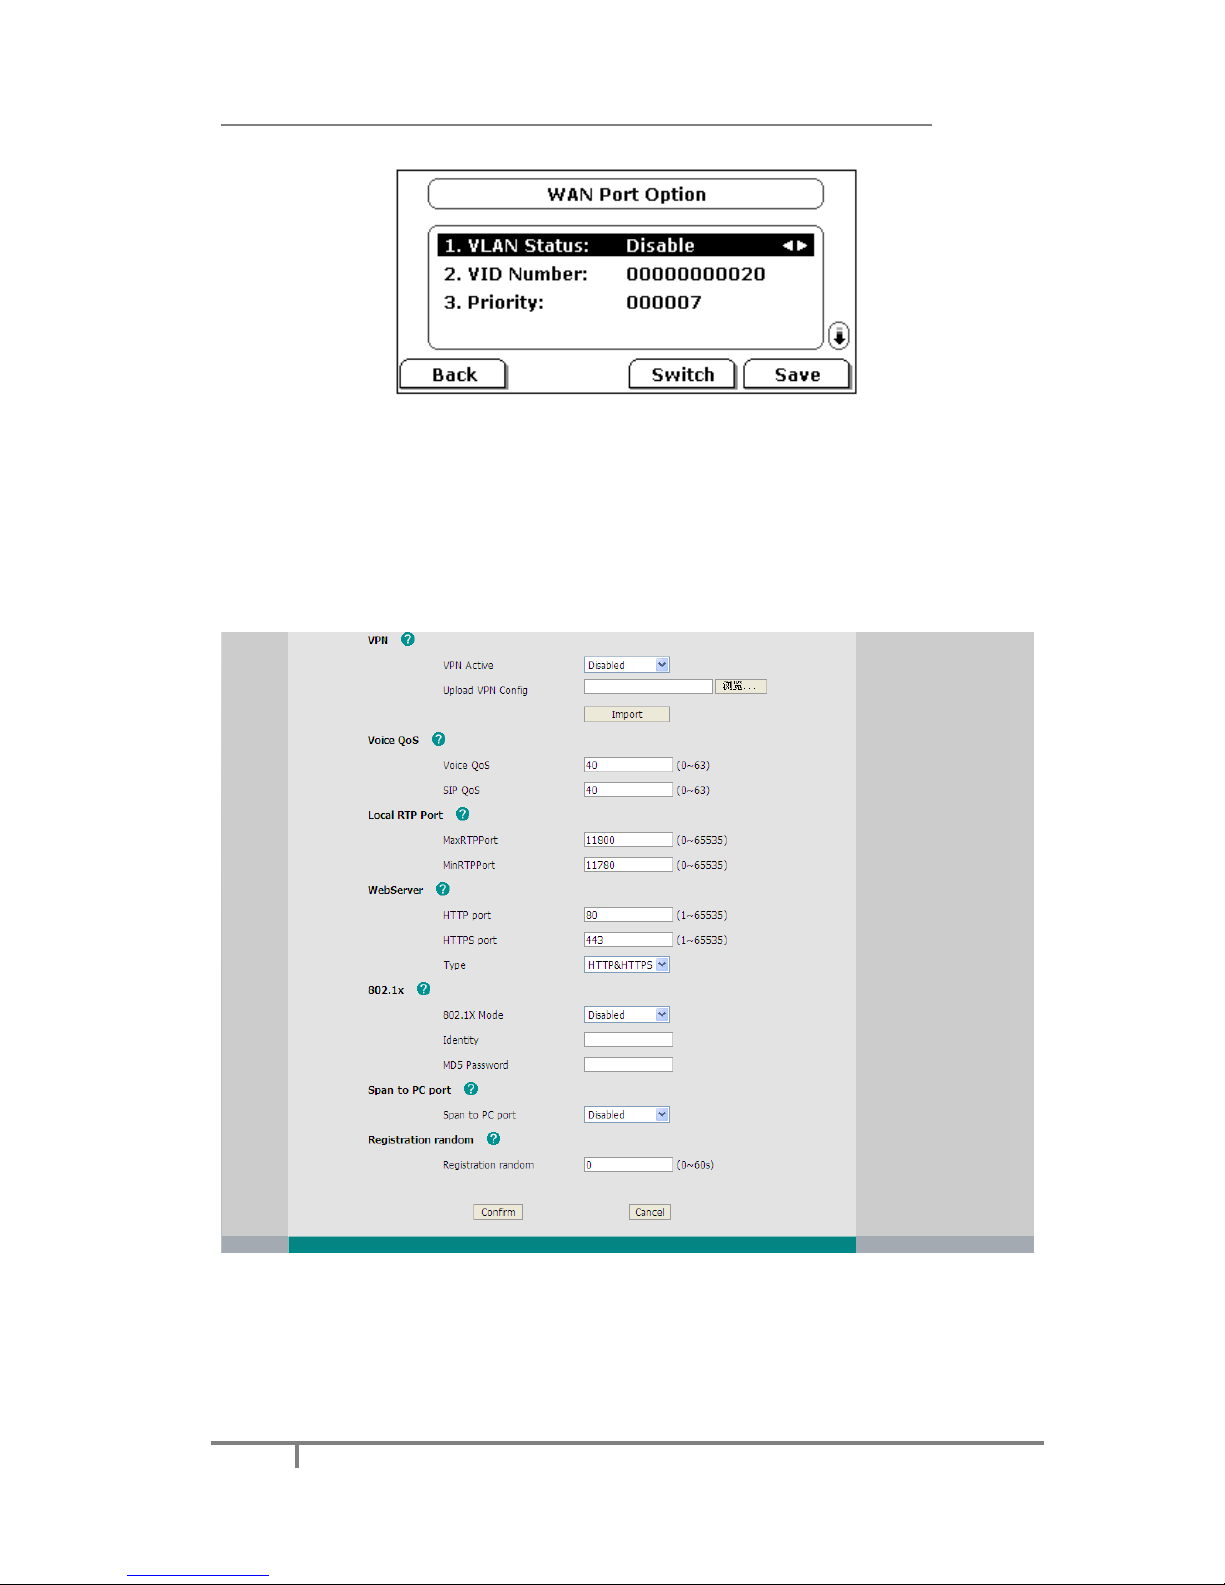
Enterprise IP Phone Advanced Phone Functions
73
3) Select WAN Port, press Enter hot key.
4) Set the VLAN Status, and input the VID Number, Priority.
5) Press Save hot key to save the settings, or Back hot key to return to VLAN
menu.
6) Follow the same way to set the PC Port option.
To configure VLAN settings via Web interface:
Click on Network->Advanced to do the relating configuration. You can consult your
system administrator for more information.
LLDP
The Link Layer Discovery Protocol (LLDP) is a vendor-neutral Layer 2 protocol that
allows a network device to advertise its identity and capabilities on the local network.
Page 80
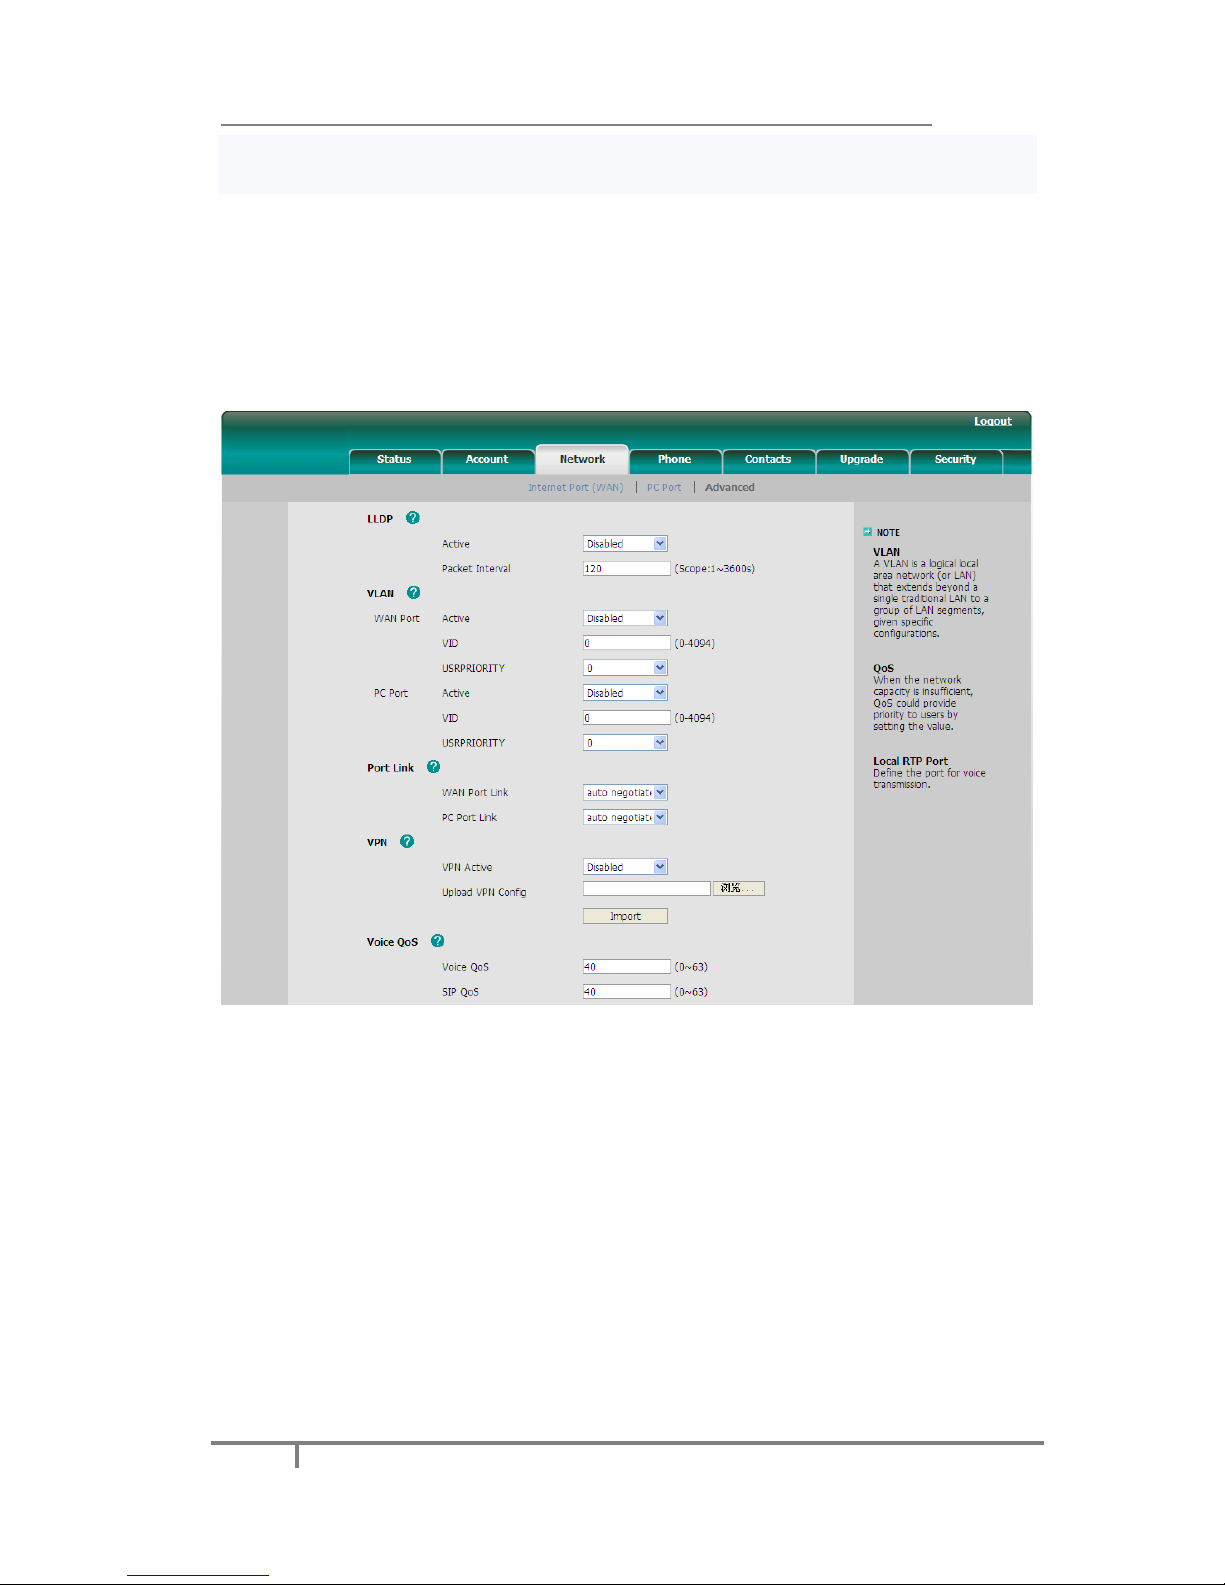
Enterprise IP Phone Advanced Phone Functions
74
Enable LLDP function; the phone will go to switch to get related VLAN parameters
automatically. (Synchronous with VLAN in switch)
To configure LLDP settings via Web interface:
1) Click on Network->Advanced->LLDP->Active option, in the pull-down menu,
choose Enable.
2) Then enter the corresponding Packet Interval in Packet Interval field.
3) You can also disable this function when you choose Disable in active field.
4) Click on the Confirm button to save the change.
HTTPS
This IP phone can support HTTPS (Hypertext Transfer Protocol over Secure Socket
Layer). Adding SSL layer under HTTP, in short, it is a security version of HTTP. Users
can set this transmission mode via web page.
Page 81
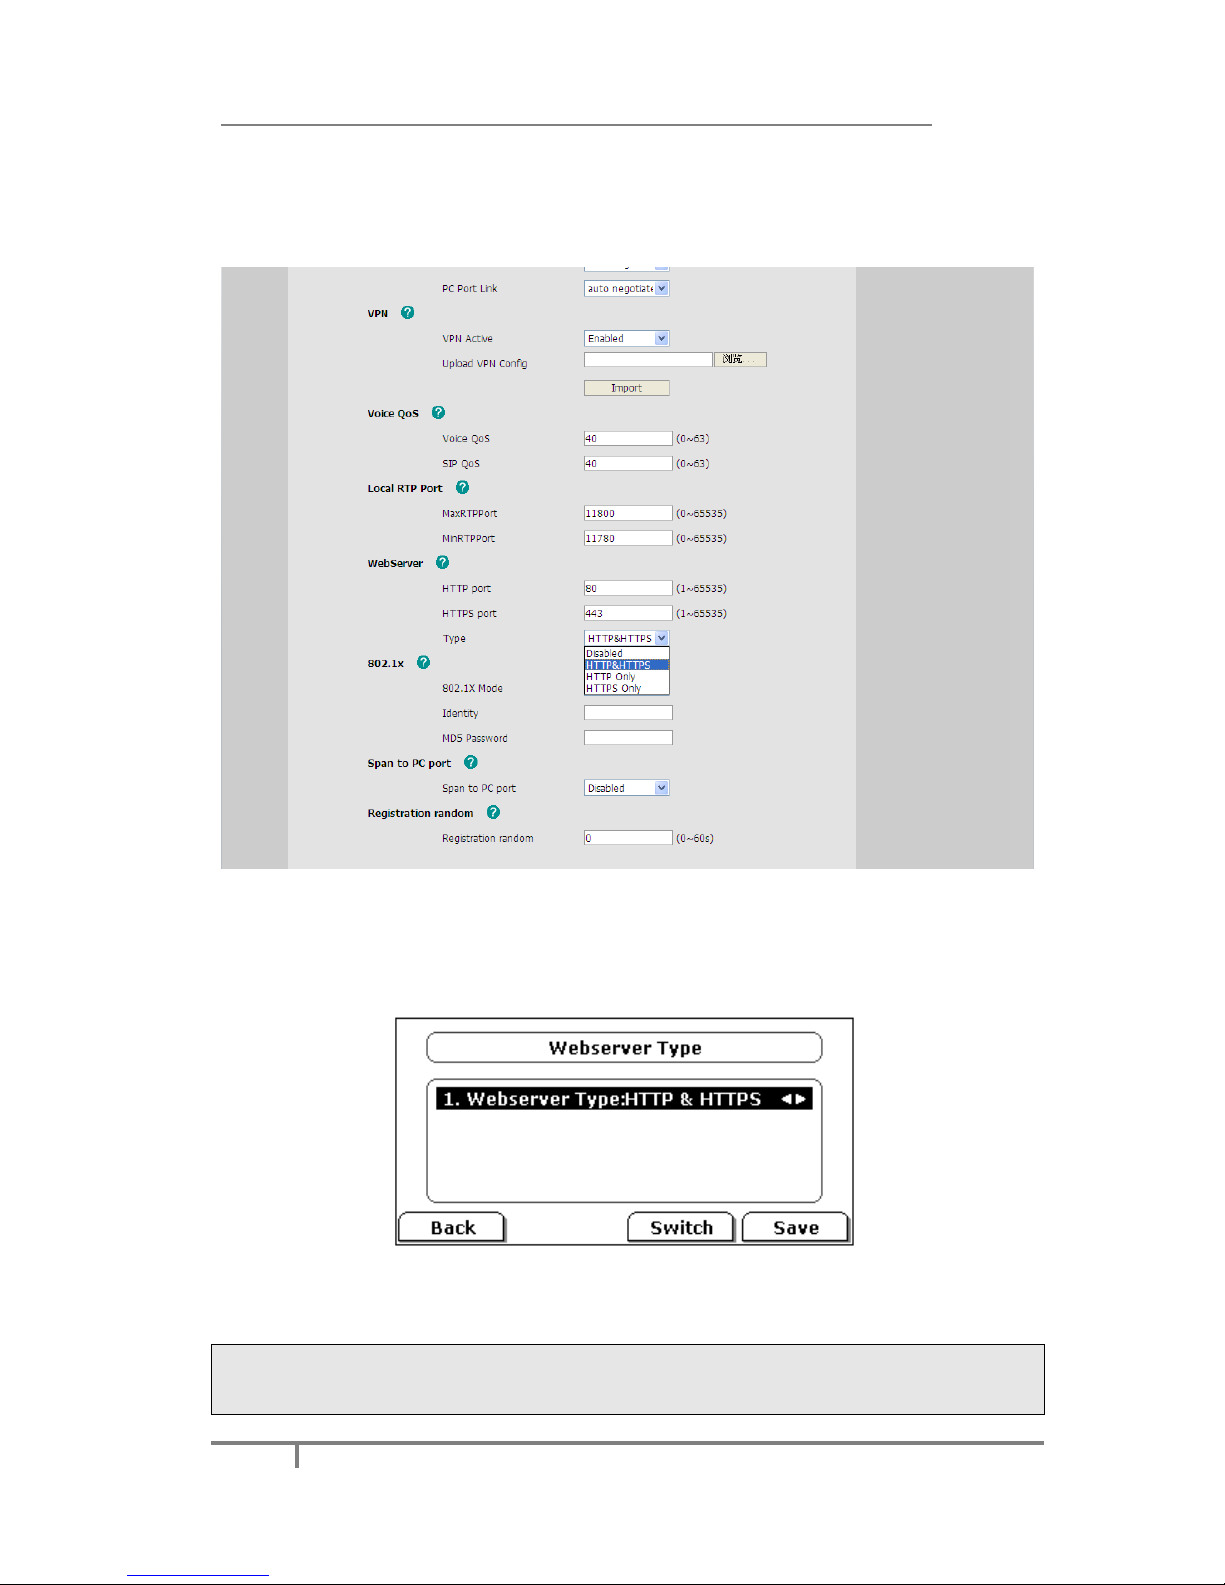
Enterprise IP Phone Advanced Phone Functions
75
To configure HTTPS settings via Web interface:
Click on Network->Advanced, choose WebServer option, in the pull-down menu
of Type field, choose the transmission mode, and then click on the Confirm button
to save the changes.
To configure HTTPS settings via Phone interface:
1) Press Menu->Settings->Advanced Settings.
2) Enter the password required, scroll to Network option, press Enter hot key,
select Webserver Type option, then press Enter hot key again.
3) Press the navigation keys or Switch hot key to choose the transmission mode.
4) Press Save hot key to save the settings, or Back hot key to return to Webserver
Type menu.
Note:
1. For more details of the HTTPS, you can consult with your system administrator.
2. IP phone also support Internet Protocol Version 6.
Page 82
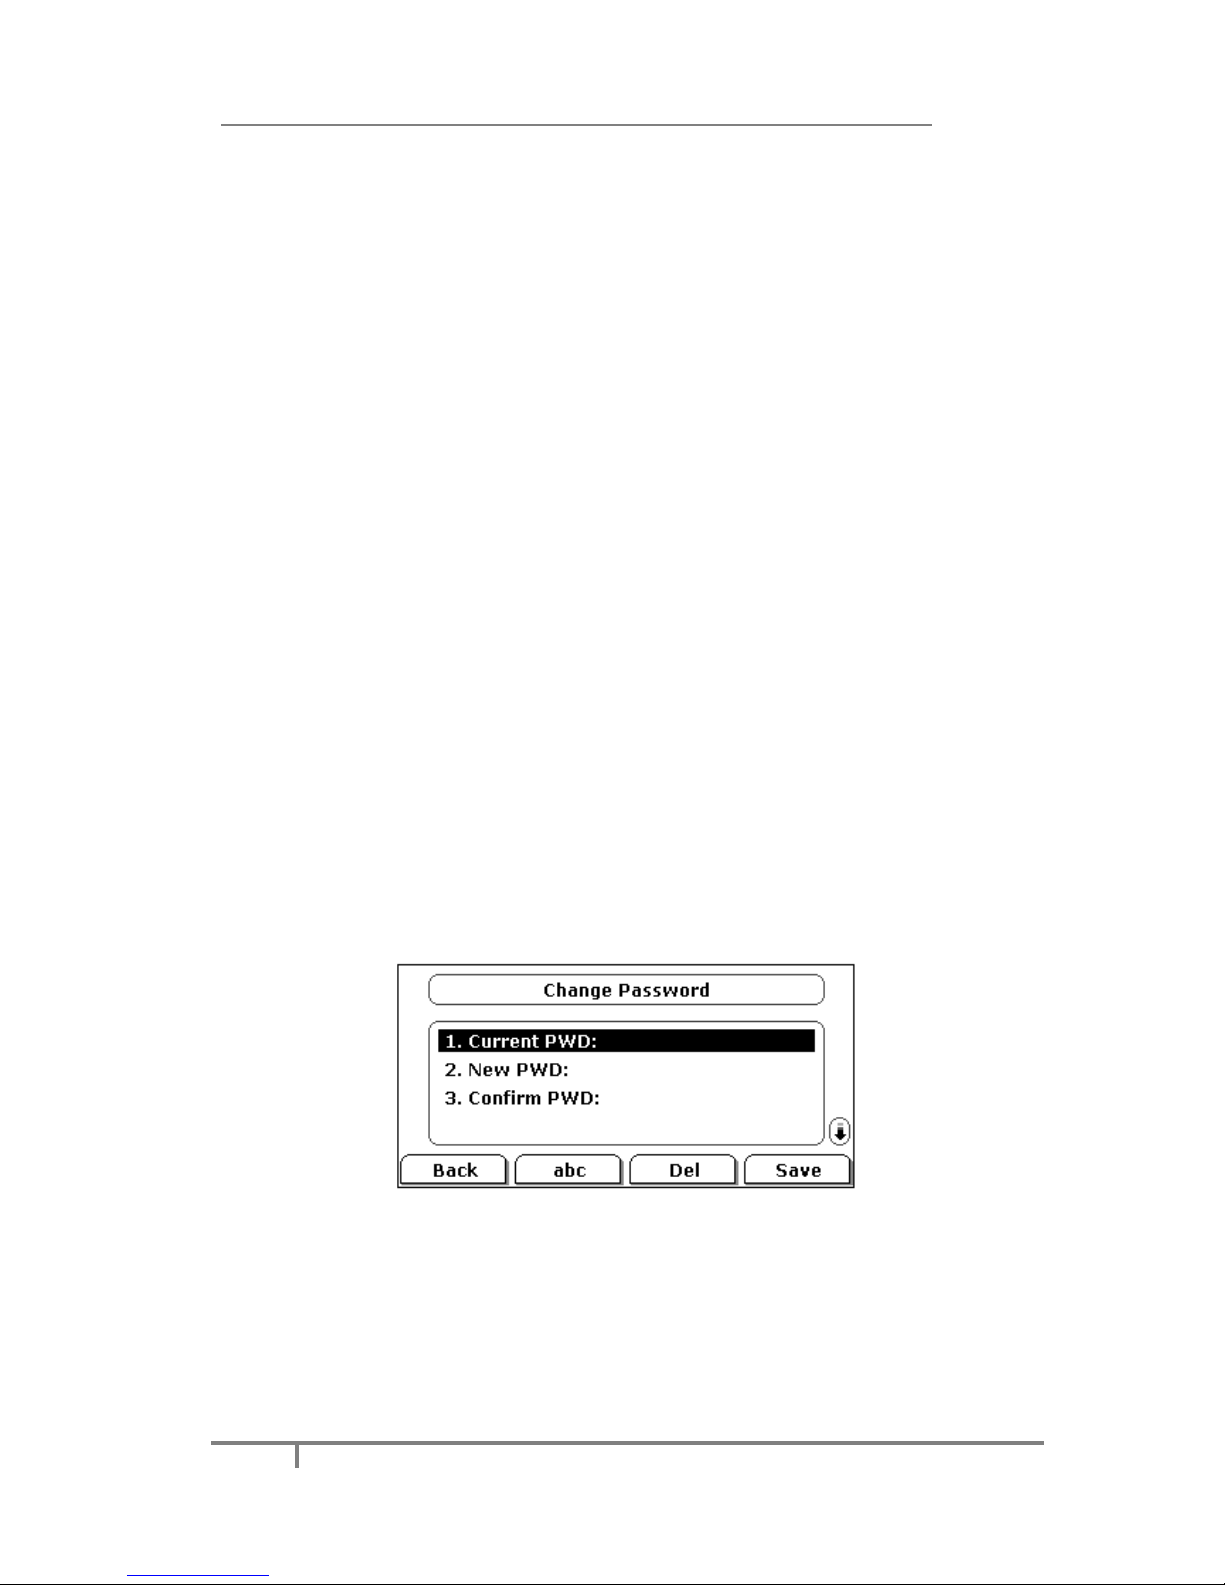
Enterprise IP Phone Advanced Phone Functions
76
Maintenance Tasks
Administrator Mode
The phone allows two modes to configure the phone:
User Mode
Administrator Mode
Administrator mode grants unlimited access to the phone configuration on both Web
and Phone interface. User Mode cannot set the following options: Advance settings of
accounts, Advance settings of Network, Reset to Factory, and other advance phone
settings.
Administrator/User Password
Administrator mode grants unlimited access to the phone configuration on both web
and phone user interface. The administrator/user password is used to access:
Web interface.
The advance settings of the phone such as Network, Account via the Web and
Phone interface.
The default administrator password is admin. Meanwhile the user name for Web
interface access is admin.
To change the administrator password via Phone interface:
1) Press the hot keys: Menu->Settings->Advanced Settings.
2) You are prompted to enter the required password, the default one is admin.
3) Scroll to Set Password, press Enter hot key.
4) You are prompted to enter the Current, New and Confirm password, press
abc hot key to change the input method.
5) Press Save hot key to confirm the change, press Back hot key to return to
previous menu.
To change the administrator password via Web interface:
Click on Security->Password->admin, enter the Current, New and Confirm
password, click on Confirm button to save the changes, or Cancel button to cancel
the changes.
To logout via Web interface:
Page 83
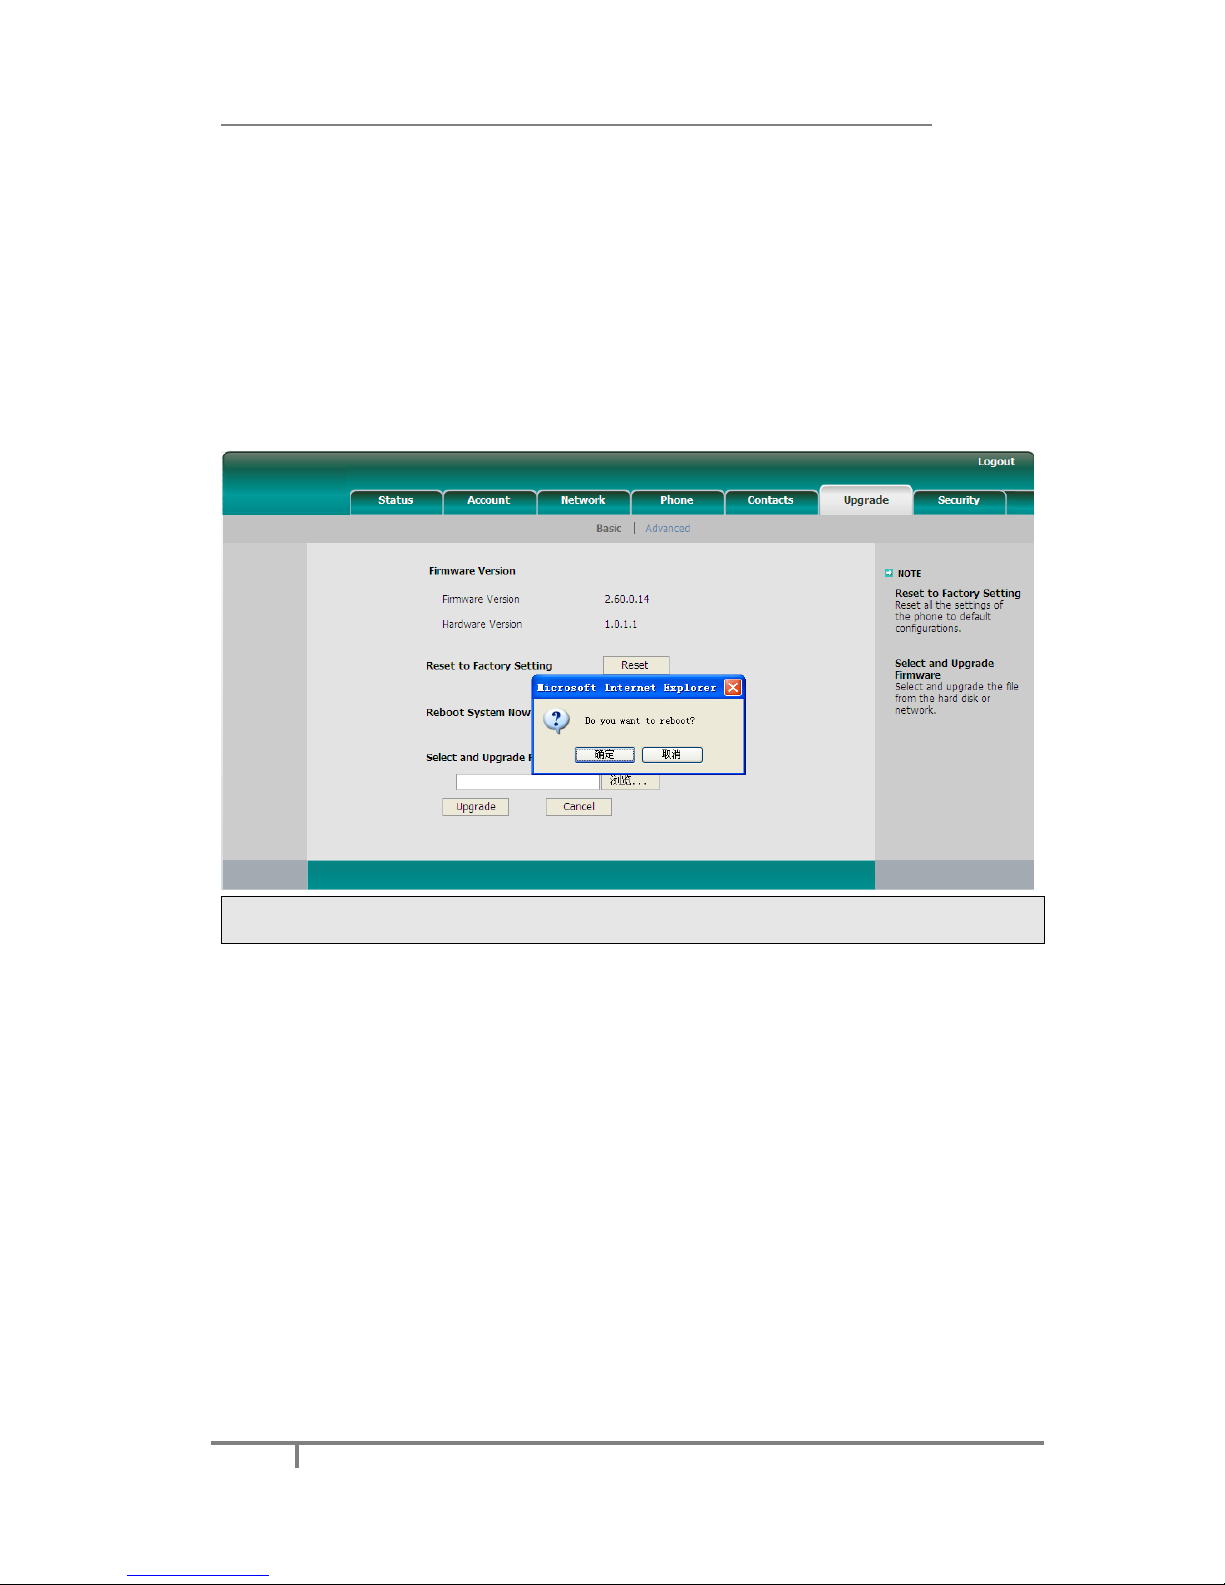
Enterprise IP Phone Advanced Phone Functions
77
Click on the Logout button in the top right corner.
Reboot
You should reboot the phone when you are challenged, e.g. after applying changes to
the phone configuration.
To reboot via Web interface:
1) Click on Upgrade->Basic.
2) Click on Reboot button.
3) You are prompted to confirm the change, press OK to confirm the changes,
press Cancel to cancel the operation.
Note:
Please do not power off during reboot, or it will cause the flash memory error.
Reset to Factory
You should reset the phone only in this case: the phone configuration was changed
and the phone is not functioning anymore. To maintain the configuration of the
phone, you need your system administrator or service provider’s advice.
To reset to factory via phone interface:
1) Press the hot keys: Menu->Settings->Advance Settings.
2) You are prompted to enter the required password, the default one is admin.
3) Scroll to Reset to factory, press Enter hot key.
4) You are prompted to confirm the change, press OK hot key to reset to factory
settings, press Cancel hot key to return to previous menu.
Page 84
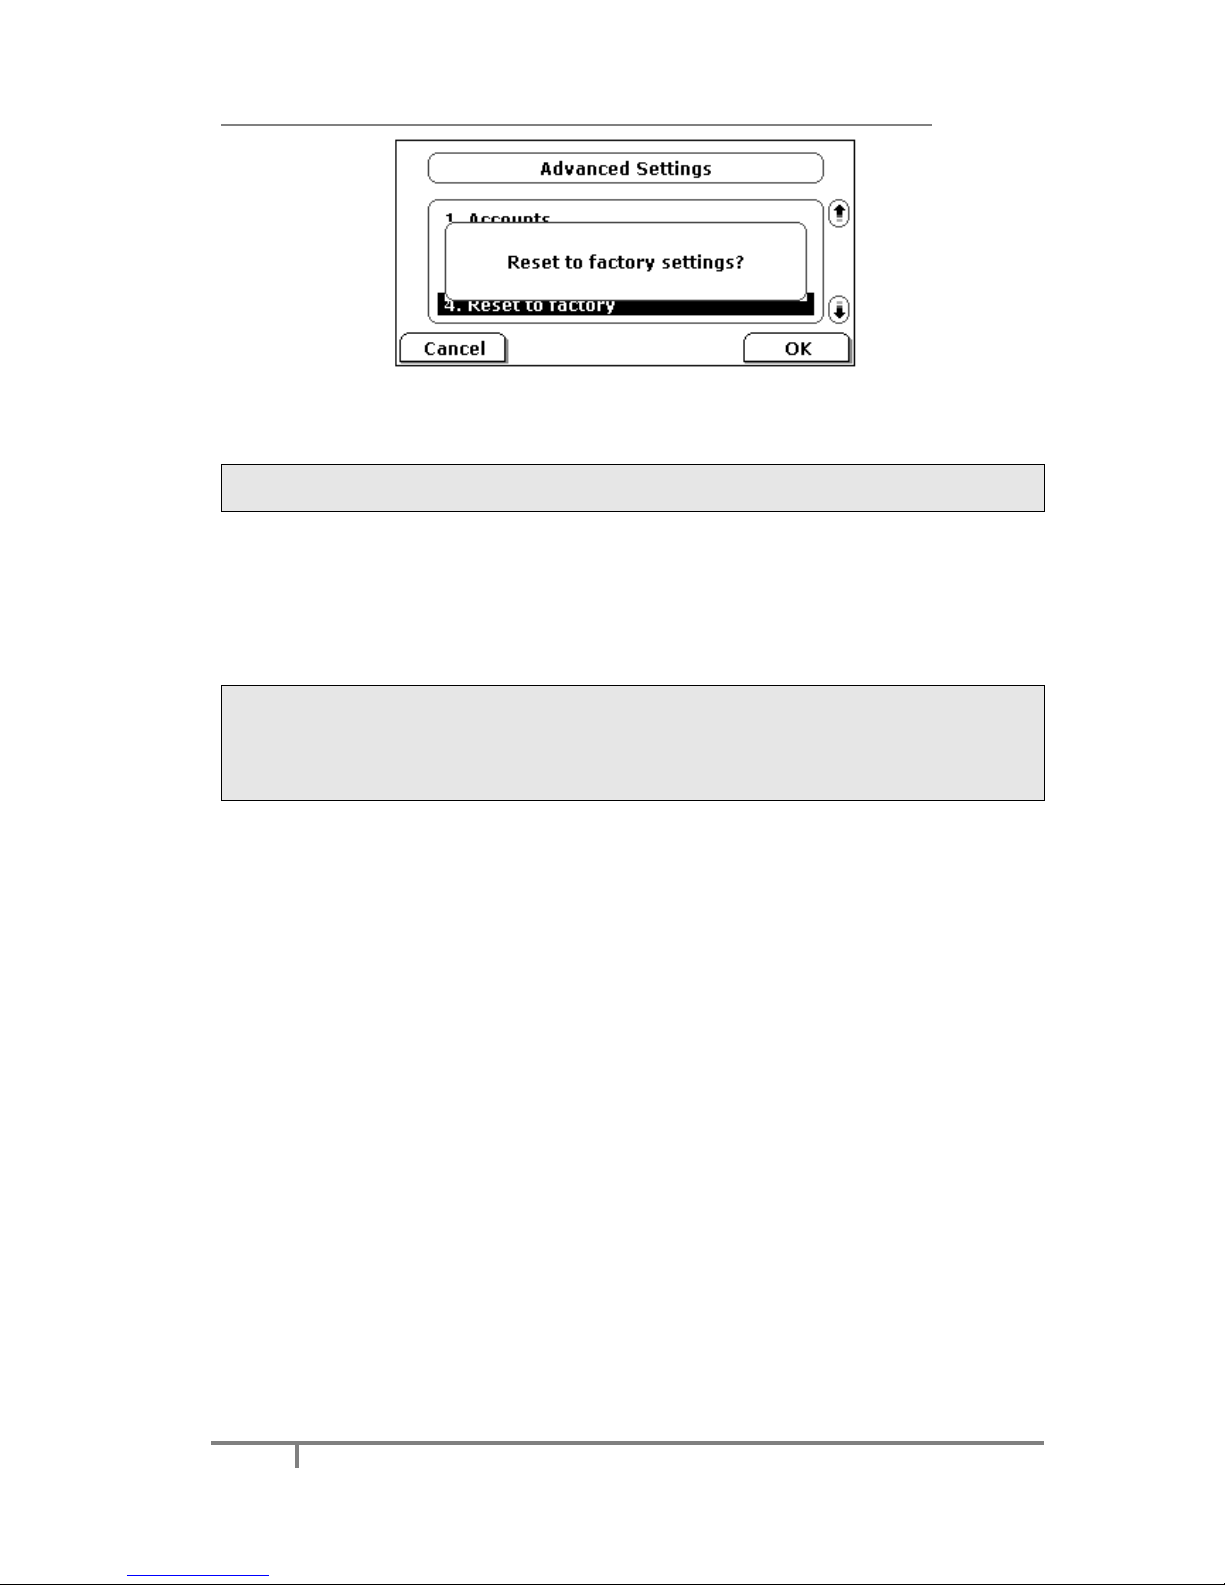
Enterprise IP Phone Advanced Phone Functions
78
5) It will take a few minutes to reset, please do not power off during resetting, or it
will cause flash memory error.
Note:
The reset to factory option must in the admin mode.
To reset to factory via Web interface:
1) Click on Upgrade->Basic.
2) Click on Reset button.
3) You are prompted to confirm the change, press OK to confirm the changes,
press Cancel to cancel the operation.
Note:
If you confirm Reset to Factory, contact list, call history, account settings, etc will be
lost. You need to export the configuration first if you still want to import the old
configurations after reset. Or your phone must be configured manually unless mass
provisioning is used!
To Export/Import the old configuration file via Web interface:
1) Click on Upgrade->Advanced, select Export/Import Config, click on Export
button to export the file to your local computer.
2) Click on Upgrade->Advanced, select Export /Import Config, click on
Browse button, select the specific configuration file in your local computer, click
on Import button.
Page 85
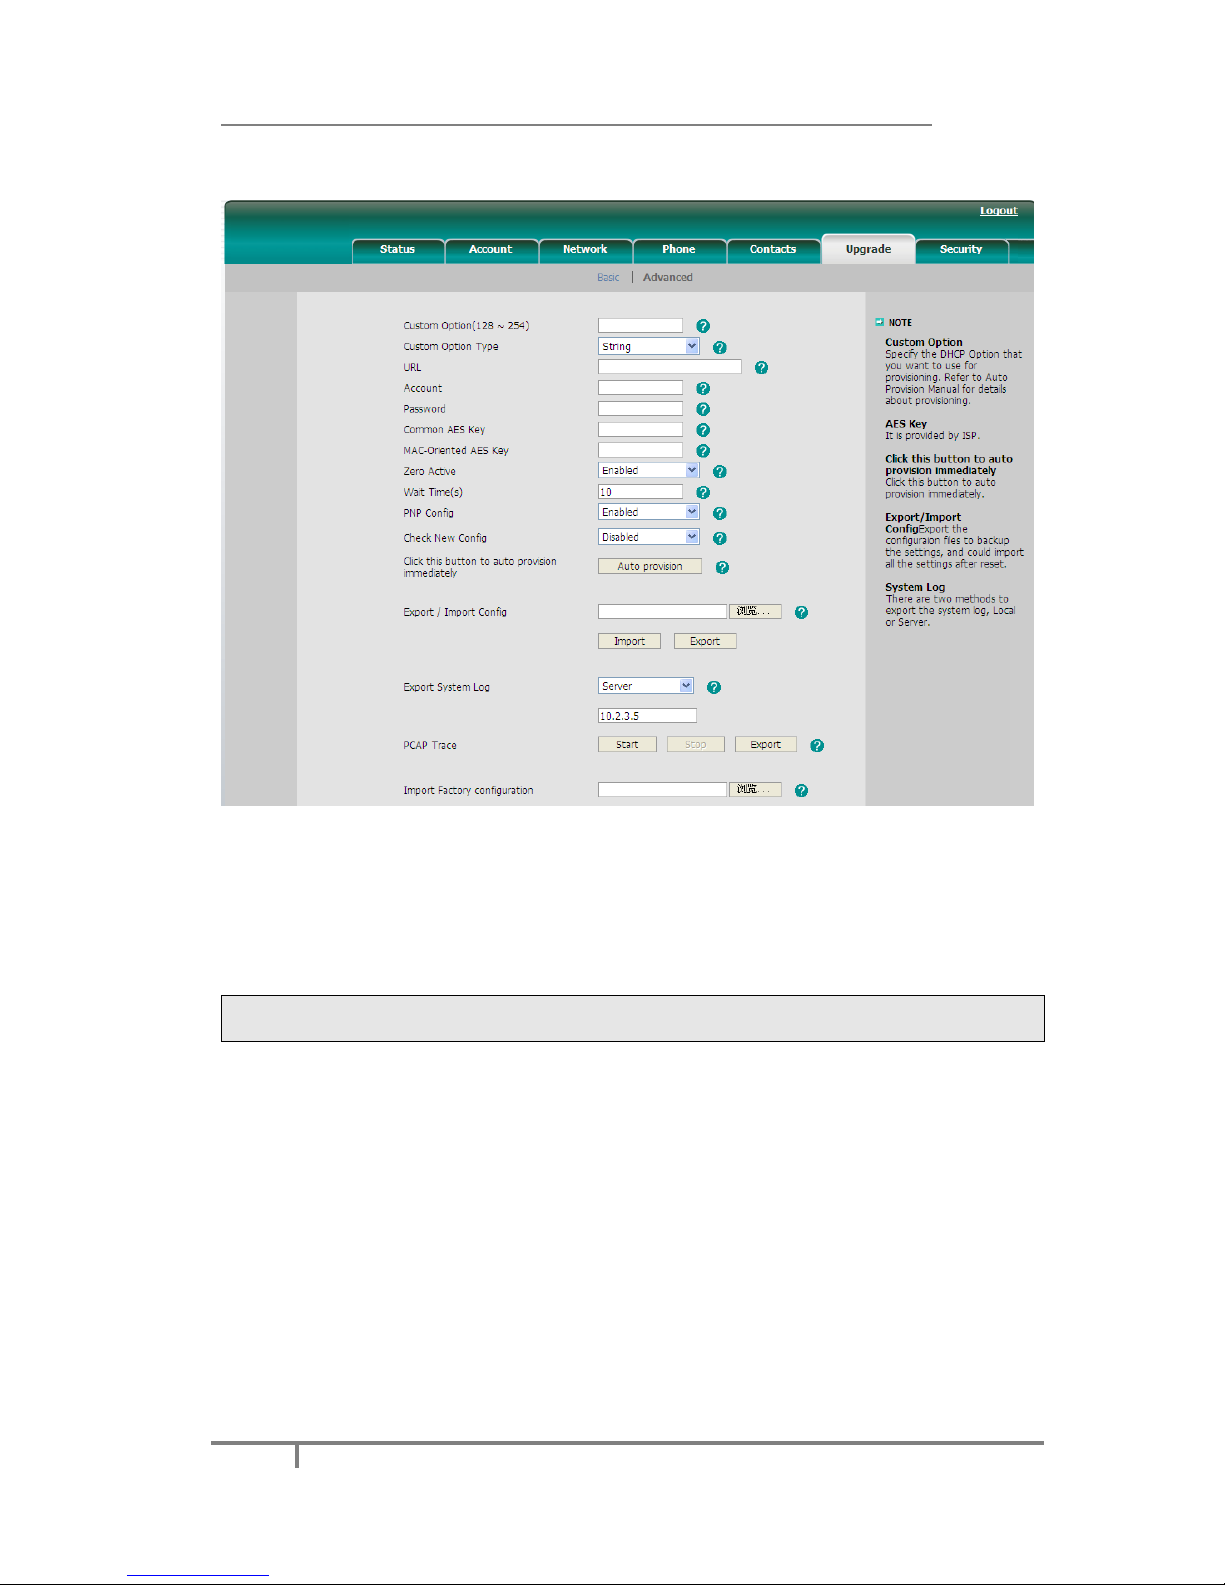
Enterprise IP Phone Advanced Phone Functions
79
3) It will take a few minutes to reset, please do not power off during resetting, or it
will cause flash memory error.
Firmware Update
The phone is delivered with pre-installed firmware. If you require updating the
phone’s firmware please contact your system administrator. You can only update the
firmware via Web interface.
Warning:
Please do not power off or unplug the Ethernet cable during the updating.
To update the firmware manually via Web interface:
1) Click on Upgrade->Basic, select the firmware file in your local computer.
2) Click on Upgrade button to update the new firmware.
To update the firmware automatically via Web interface:
1) Click on Upgrade->Advanced, configure the relating settings: Custom Option,
Custom Option Type, URL, Account, Password, Common AES Key and
MAC-Oriented AES Key, PNP config and Check New Config.
2) Click on Confirm button, the phone will check the server for a new firmware in a
specific time, and it updates automatically if there is new firmware.
3) You can also update the firmware immediately by pressing Auto-provision
button.
Page 86
Enterprise IP Phone Advanced Phone Functions
80
Set Auto Provision via phone interface:
1) Press Menu->Settings->Advanced Settings-> Auto Provision.
2) Enter the URL, User Name and Password.
3) Click on the Save hot key to save the changes.
The parameters of the Auto-provision:
Parameter
Description
Update Protocol
The phone can be updated via TFTP, FTP or HTTP.
TFTP Server
If you choose TFTP as protocol TFTP, you need to enter the
TFTP server IP address and port.
Check new config
You can specific the period that your phone checks the new
firmware from the server: Power on, Repeatedly, Weekly, Power
on + Repeatedly, Power on + Weekly and Disabled.
Scheduling
You can specific the period in days which the phone checks and
updates the new firmware, the range is 1-30 days.
Note:
1. Any power interruption during the following process will most likely lead to a
flash memory error. As a result the system cannot boot up anymore.
2. The upgrade priority is PNP, Custom Option, URL by descending.
3. Users can also delete some configuration options by Auto-provision, for
example, to delete the admin password.
4. Automatic firmware upgrade via the keypad is available only under the
circumstance of all accounts unregistered or unsuccessfully registered.
5. If the automatic firmware upgrade via the keypad is necessary, please contact
your system administrator for the specific function code.
Page 87
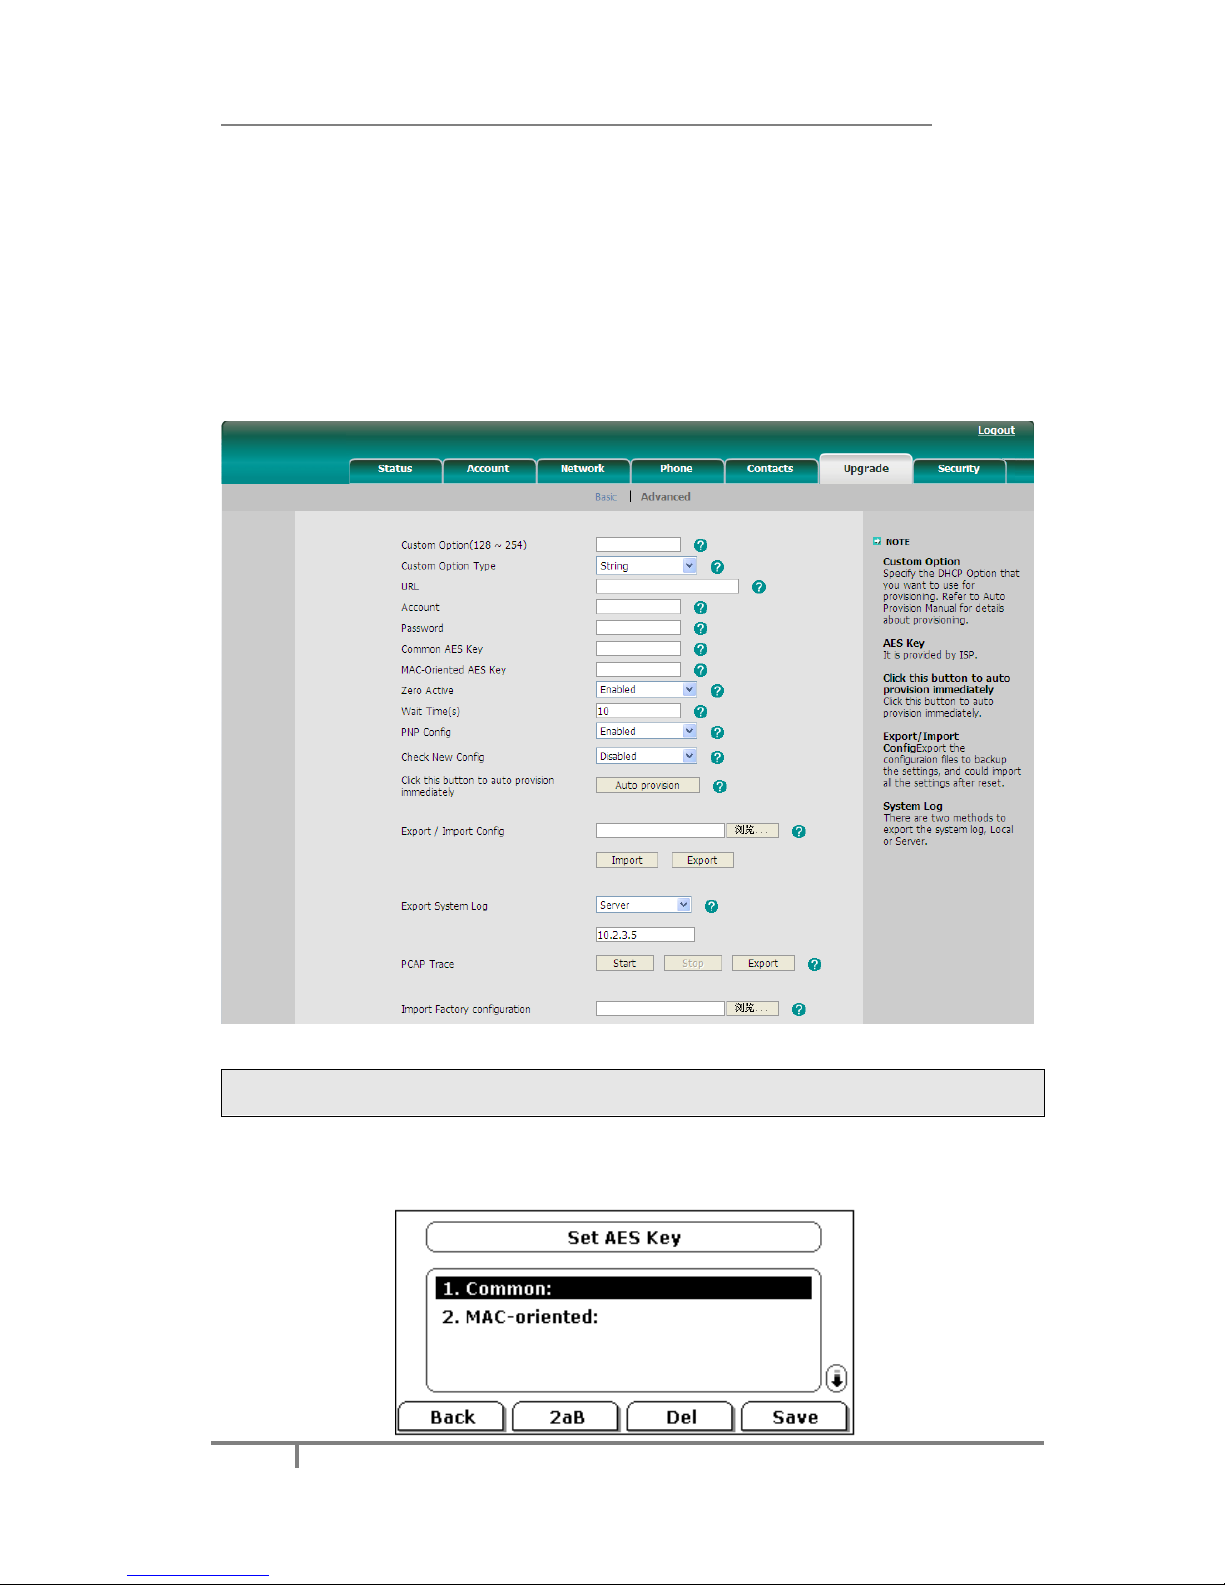
Enterprise IP Phone Advanced Phone Functions
81
Decryption
This IP phone can support y000000000000.cfg and mac.cfg files encryption and
decryption for user authentication to realize security usage. If there are any
encrypted y000000000000.cfg or mac.cfg files on the server, uses can open the
webpage of your IP phone.
Click on Upgrade->Advanced, choose and fill in the Common AES Key (for
y000000000000.cfg and MAC-Oriented AES Key (for mac.cfg) option, then click on
the Confirm button to decryption the files and upgrade to the new version. Shown as
below:
Note:
You can consult your system administrator for the decrypt password.
Set AES Key via phone interface:
1) Press Menu->Settings->Advanced Settings->Set AES Key.
Page 88
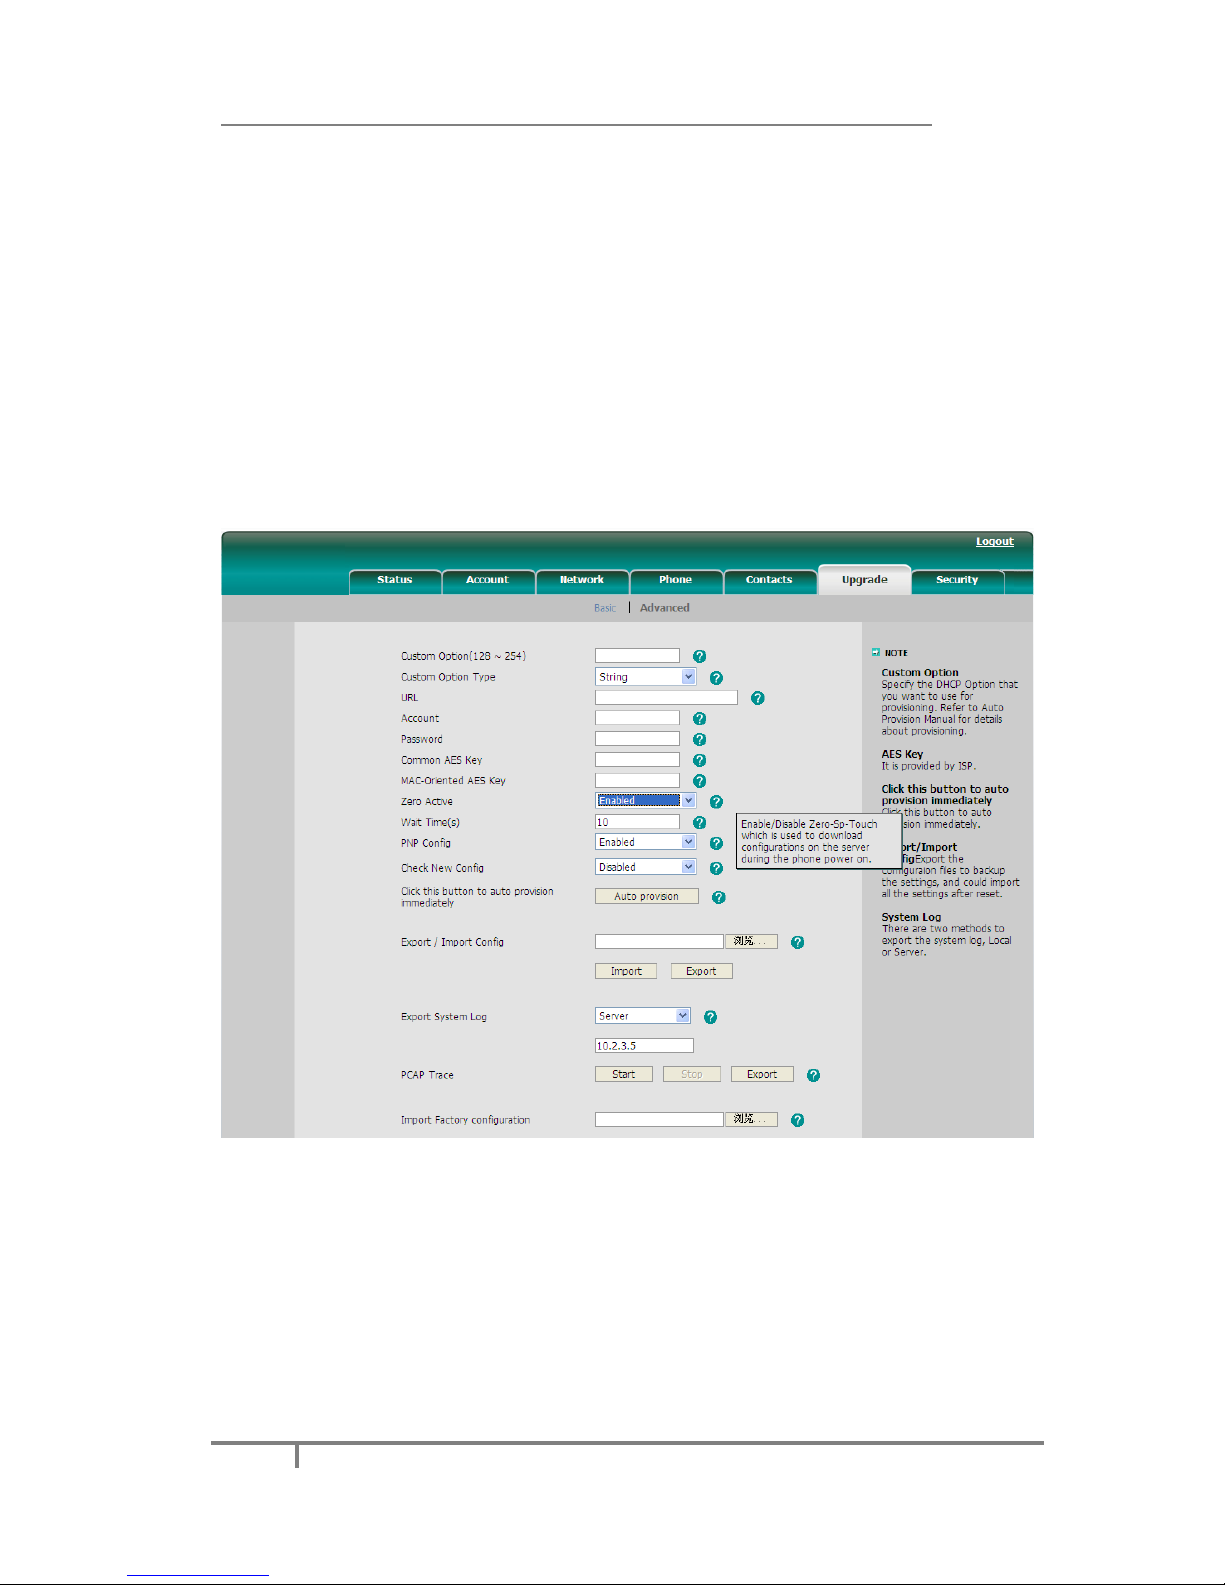
Enterprise IP Phone Advanced Phone Functions
82
2) Enter the Common AES and the MAC-oriented option.
3) Press the Save hot key to save the changes.
Zero-sp-touch
Zero-sp-touch can help users to configure AUTOP and network parameters quickly.
First to enable this function via Web interface, when the power is on or press the
corresponding DSSKEY, the phone will turn to the zero-sp-touch interface.
To enable Zero-sp-touch when the power is on via web interface:
1) Click on Upgrade->Advanced->Zero Active, in the pull-down menu, choose
Enable to enable this function.
2) Enter the time in the Wait Time field.
3) Click on Confirm button to save the changes.
Select zero-sp-touch, first a pull-down menu come into view.
1) No operation or press Cancel hot key, it will enter idle status.
2) Press Status key to enters phone’s Status interface and press OK button to
return.
3) Press OK key, enter Network Setting interface, press next key to enter an
AutoP setting interface, enter the corresponding contents; press OK key to save
the settings. Press Back key return to previous menu.
Page 89
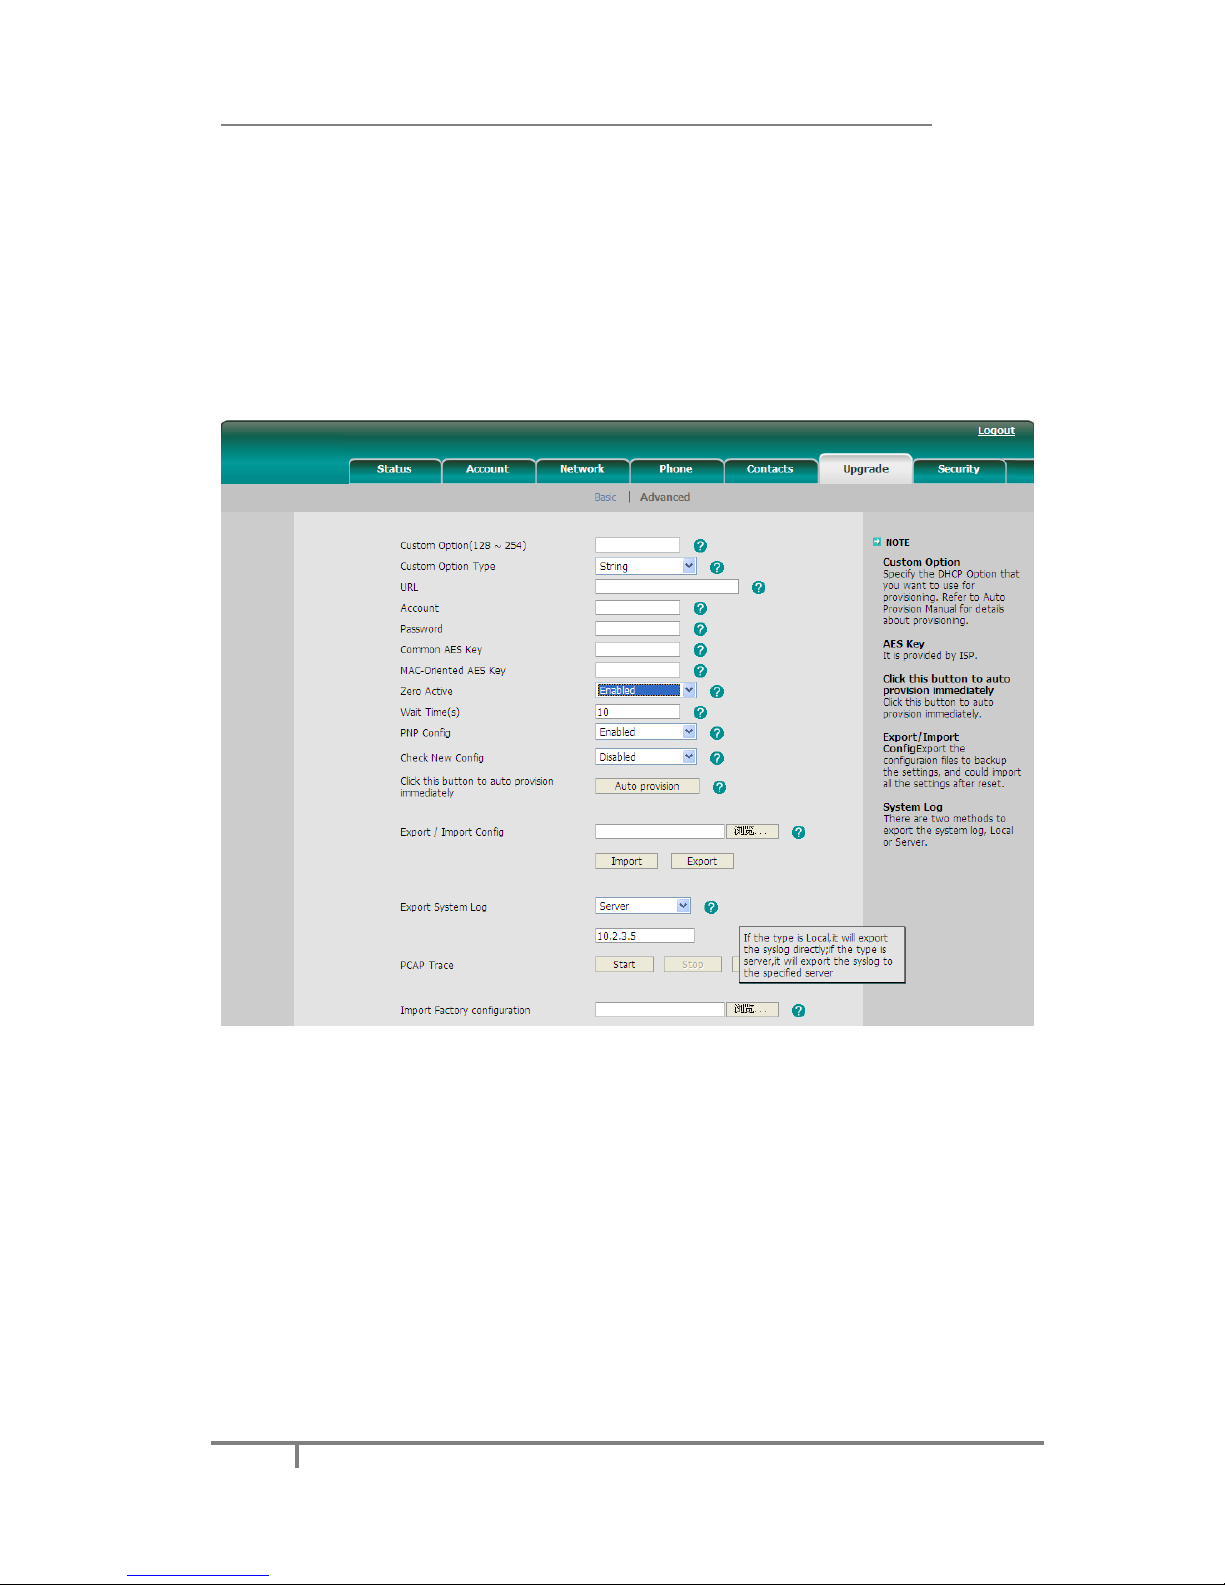
Enterprise IP Phone Advanced Phone Functions
83
System Log Export
If there are any errors happened in your phone, you can export the system log and
send them to your system administrator for diagnosis.
To export the System Log:
Click on Upgrade->Advanced, select Export System Log type, if the type is
Local, it will export the syslog directly; if the type is Server, it will export the syslog
to the specified server.
1) Click on Export button to export the file.
PCAP Trace Export
The PCAP Trace used to record the date transport of your IP phone. If there are any
errors in your phone, you can export the PCAP trace and send them to your system
administrator for diagnosis.
To export the PCAP Trace:
Click on Upgrade->Advanced to enter the interface, select PCAP Trace option,
click Start button to begin to capture the trace, and click Stop to stop capture the
trace, and then click on Export to export the file to your local computer.
Page 90

Enterprise IP Phone Advanced Phone Functions
84
802.1X
IEEE 802.1X is an IEEE Standard for port-based Network Access Control (PNAC). It is
part of the IEEE 802.1 group of networking protocols. It provides an authentication
mechanism to devices attached to a LAN, either establishing a point-to-point
connection or preventing it if authentication fails. It is used for securing wireless
802.1x access points and is based on the Extensible Authentication Protocol (EAP).
This IP phone can support 802.1X. Please consult your system administrator for
more details.
DSS key Configuration
Enter into the DSS key interface,there are three types of key: MEMERORY
key、LINE key、Program key. The configuration of LINE key and MEMERORY
key are almost the same. The phone has 10 Memory keys and 6 Line keys which
are able to configure 35 features per key. The following list shows the valid type on
the Memory key or LINE key and provides a description of each feature. The
Memory key’s default value for each key is N/A which indicates the DSS key hasn’t
been configured for any features. The Line key’s default value for each key is Line.
N/A
Line
Speed Dial
BLF
BLF List
Voice Mail
Pick Up
Group Pickup
Call Park
Intercom
DTMF
Prefix
Local Group
XML Group
XML Browser
LDAP
Broadsoft Group
Conference
Forward
Transfer
Hold
DND
Redial
Call Return
SMS
Record
Page 91

Enterprise IP Phone Advanced Phone Functions
85
URL Record
Multicast Paging
Group Listening
Public Hold
Private Hold
Shared Line
Hot Desking
ACD
Zero-sp-touch
URL
Note:
1. Quick access functions like Intercom and Voicemail must be pre-configured on
your PBX in order to work on your phone. Consult your system administrator for
more details.
2. Users can connect EXP38/EXP39 to extend the number of DSS keys.
Line
This key function is used to accept incoming calls and allows placing active calls on
hold or resuming them. It can also be used to make a call using a specific extension
Configure the key as Line:
1) Click on Phone->DSS Key->Memory Key.
2) Line is selected from the pull down menu “Type”.
3) This functionality will be applied to the line selected from the pull down menu
“Line”. When the default value is Auto, press Line DSS key in the idle state to
make a call, the phone will select an available extension as the outgoing
extension
4) Click Confirm button to save the changes.
Speed Dial
This key function allows you to speed up dialing numbers often used or hard to
remember. Optionally, you can also configure a speed dial key to dial prefix numbers.
With this option, the prefix numbers automatically dial when you press the DSS key.
Configure the key as Speed Dial:
1) Click on Phone->DSS Key->Memory Key or Line Key.
2) Speed Dial is selected from the pull down menu “Type”.
3) Enter the number you want to dial out in the Value field.
4) This functionality will be applied to the line selected from the pull down menu
“Line”.
5) Click Confirm button to save the changes.
Page 92

Enterprise IP Phone Advanced Phone Functions
86
BLF
This key function allows you to monitor the status (idle, ringing, or busy) of other
SIP accounts. User can dial out by pressing a BLF DSS key.
Configure the key as BLF:
1) Click on Phone->DSS Key->Memory Key or Line Key.
2) BLF is selected from the pull down menu “Type”.
3) Enter the number you want to monitor in the Value field,
4) This functionality will be applied to the line selected from the pull down menu
“Line”.
5) Enter the function codes in the Extension field.
6) Click Confirm button to save the changes.
Please refer to “LED Instruction” for more details about the LED status in different
situation.
Note:
In the Web interface, you can enter pickup code in the Extension field to enable
the pickup function. For example, if you enter 212 in the value field, and enter the
pickup code *83 in the Extension field, when there is an incoming call to 212,
press the BLF DSS key, the call is picked up by the phone.
BLF List
This key function can monitor the list status, You can add accounts to the monitored
list, the server sends messages to the phone to decide which account BLF list to be
monitored.
Configure BLF List key via web interface:
1) Click on Account->Advanced-> BLF List URI, enter the BLF List URI.
2) Enter the BLF List Code in the BLF List Code field.
3) Click Confirm button to save the changes.
To configure BLF List key via web interface:
1) Click on Phone->DSS Key->Memory Key or Line Key
2) Select BLF List from the pull down menu of Type.
3) In the Line field, select a line for which to apply this key.
4) Click Confirm button to save the configuration.
Voice Mail
This key function is configured as Voicemail, which allows you to retrieve voicemail
quickly by pressing this key.
Configure the key as Voice Mail via web interface:
1) Click on Phone->DSS Key->Memory Key or Line Key,choose one of the keys
you want to make the assignment, there is a pull-down menu in the Type field,
choose Voice Mail from the list.
Page 93

Enterprise IP Phone Advanced Phone Functions
87
2) Enter the number you want to set as the voice mail box in the Value field.
3) In the Line field, select a line for which to apply this key.
4) Click Confirm button to save the changes.
Pick Up
This key function allows you to specify extension that you want to monitor. when the
monitored extension receives a call, you can press this DSS key to pick up the
incoming calls.
Configure the key as Pick Up:
1) Choose Phone->DSS Key->Memory Key or Line Key, choose one of the keys
you want to make the assignment, there is a pull-down menu in the Type field,
choose Pick Up option from the list.
2) Enter the feature code (for example, input *78345, *78 is the feature code and
the 345 is the extension number you want to pickup) in the Value field.
3) In the Line field, select a line for which to apply this key.
4) Click Confirm button to save the changes.
Group Pick up
This key function allows you to specify a group you want to monitor. You can add
accounts to the monitored group, when the monitored group receives a call, you can
press this key to pick up the incoming call. If the group receives multiple calls
simultaneously, you will pick up the specific one the server assigns to you.
Configure the key as Group Pick Up:
1) Click on Phone->DSS Key->Memory Key or Line Key.
2) Group Pick Up is selected from the pull down menu “Type”.
3) Enter the feature code (for example,*79) in the Value field.
4) This functionality will be applied to the line selected from the pull down menu
“Line”.
5) Click Confirm button to save the changes.
Call Park
This key function allows you to place a call on hold at one phone and then retrieve
the parked call from any other phone. When the conversation which is monitored is
transferred to an unused extension, you can press this key to retrieve the call.
Configure the key as Call Park:
1) Click on Phone->DSS Key->Memory Key or Line Key.
2) Call Park is selected from the pull down menu “Type”.
3) Enter the feature code(for example, enter *681234, *68 is the call park code
and the 1234 is the extension you want to park) in the Value field.
4) This functionality will be applied to the line selected from the pull down menu
“Line”.
5) Click Confirm button to save the changes.
Page 94

Enterprise IP Phone Advanced Phone Functions
88
6) Retrieve the parked call by dialing the call park retrieval code and the parked
extension from any other phone.
Intercom
This key function is useful in an office environment as a quick access to connect the
operator or the secretary. Before configure the Intercom DSS key, enable allow
Intercom via Web interface. You can refer to Basic Call Function/Intercom.
Configure the key as Intercom:
1) Click on Phone->DSS Key->Memory Key or Line Key.
2) Intercom is selected from the pull down menu “Type”.
3) Enter the extension number you want to intercom in the Value field.
4) This functionality will be applied to the line selected from the pull down menu
“Line”.
5) Click Confirm button to save the changes.
Note:
Intercom feature is not available on all servers. Please contact your system
administrator for more details.
DTMF
This key function allows you to send out the desired DTMF number during the
conversation. The number needs to be set in advance.
Configure the key as DTMF:
1) Click on Phone->DSS Key->Memory Key or Line Key.
2) DTMF is selected from the pull down menu “Type”.
3) Enter the specific number in the Value field.
4) Click Confirm button to save the changes.
Prefix
This key function allows you to dial a call with the prefix number. When press the
DSS key in the idle state, the phone will be ready to make a new call, and show up
the prefix number which your set previously on the dial interface. You can enter
other digit and then dial out
Configure the key as Prefix:
1) Click on Phone->DSS Key->Memory Key or Line Key.
2) Prefix is selected from the pull down menu “Type”.
3) Enter the specific number in the Value field.
4) Click Confirm button to save the changes
Page 95

Enterprise IP Phone Advanced Phone Functions
89
Local Group
This key function allows you to access Local Group quickly. Press the DSS key in the
idle state, you can enter the Local Group interface.
Configure the key as Local Group:
1) Click on Phone->DSS Key->Memory Key or Line Key.
2) Local Group is selected from the pull down menu “Type”.
3) Select a group from the pull down menu “Line “.
4) Click Confirm button to save the changes.
XML Group
This key function allows you to access the XML Group quickly. Press the DSS key in
the idle state, you can enter into the XML Group interface.
Configure the key as XML Group:
1) Click on Phone->DSS Key->Memory Key or Line Key.
2) XML Group is selected from the pull down menu “Type”.
3) The default value in the pull down menu “Line” is N/A.
4) If you pre-configure the remote phone book on the Contacts, then you can
select a remote phone book to specify the group in the pull down menu “Line”.
5) Click Confirm button to save the changes.
XML Browser
Xml browser is a simple browser feature, which is based on xml language and
http/https service, you can use tools such as php, javascript, etc., accordance with
the established syntax to generate server-side functions dynamically to meet the
need of the user xml file, and then download it to phone by http/https. In order to
realize a simple browser feature, Using xml browser, customers can achieve the
customized features, such as weather information, stock information, date of inquiry,
access to address book, google search, news browsing, playing music,etc.
Configure the key as Xml Browser:
1) Click on Phone->DSS Key->Memory Key or Line Key.
2) Xml Browser is selected from the pull down menu “Type”.
3) Enter the URL address you want to connect to in the Value field.
4) Click Confirm button to save the changes.
LDAP
This key function allows you to access LDAP quickly, you can refer to Contact
Management->LDAP for more details.
Configure the key as LDAP:
1) Click on Phone->DSS Key->Memory Key or Line Key.
2) LDAP is selected from the pull down menu “Type”.
Page 96

Enterprise IP Phone Advanced Phone Functions
90
3) Click Confirm button to save the changes.
4) When you press this key in the idle state, the phone will enter into the contact
search interface.
Broadsoft Group
This key function allows you to access Broadsoft Group. Press the DSS key under the
idle state, you can enter into the Broadsoft Group interface.
Configure the key as Broadsoft Group:
1) Click on Phone->DSS Key->Memory Key or Line Key.
2) Broadsoft Group is selected from the pull down menu “Type”.
3) The default value in the pull down menu “Line” is N/A.
4) If you pre-configure the Broadsoft Group on the Contacts, then you can select
a Broadsoft Group to specify the group in the pull down menu “Line”.
5) Click Confirm button to save the changes.
Conference
This key function allows you to conference another party during a conversation.
Configure the key as Conference:
1) Click on Phone->DSS Key->Memory Key or Line Key.
2) Conference is selected from the pull down menu “Type”.
3) Enter the number you want to conference in the Value field.
4) Click Confirm button to save the changes.
Forward
This key function allows you to forward a call to other account. Press the DSS key in
the idle state, the phone will turn to the Always forward configure interface, then you
can configure the Forward to number, when there is any call to the extension will be
forwarded to the configure number automatically.
Configure the key as Forward:
1) Click on Phone->DSS Key->Memory Key or Line Key
2) Forward is selected from the pull down menu “Type”.
3) Enter the extension you want to forward to in the Value field.
4) If you leave the Value field blank, the DSS key acts as a Forward button.
5) Click Confirm button to save the changes.
Transfer
This key function allows you to perform the Blind/Attended/Semi-Attended Transfer
during a conversation.
Configure the key as Transfer:
1) Click on Phone->DSS Key->Memory Key or Line Key.
2) Transfer is selected from the pull down menu “Type”.
Page 97

Enterprise IP Phone Advanced Phone Functions
91
3) Enter the extension you want to forward to in the Value field.
4) During a conversation, press this key, the phone will Blind transfer the call.
5) If you leave the Value field blank, the DSS key acts as a Transfer button.
6) Click Confirm button to save the changes.
Hold
This key function allows you to hold or retrieve a call during the conversation.
Configure the key as Hold:
1) Click on Phone->DSS Key->Memory Key or Line Key.
2) Hold is selected from the pull down menu “Type”.
3) Click Confirm button to save the changes.
DND
This key function allows you to activate the DND function immediately when you
press the DSS key. Press it again to deactivate DND mode.
Configure the key as DND:
1) Click on Phone->DSS Key->Memory Key or Line Key.
2) DND is selected from the pull down menu “Type”.
3) Click Confirm button to save the changes.
Redial
This key function allows you to access the Dialed Calls interface when press the
DSS key in the idle state, then you can select a call to dial out or add it to the
contacts,etc.
Configure the key as Redial:
1) Click on Phone->DSS Key->Memory Key or Line Key
2) Redial is selected from the pull down menu “Type”.
3) Click Confirm button to save the changes.
Call Return
This key function allows you to call return the latest call you received.
Configure the key as Call Return:
1) Click on Phone->DSS Key->Memory Key or Line Key.
2) Call Return is selected from the pull down menu “Type”.
3) Click Confirm button to save the changes.
SMS
This key function allows you to access the Text Message interface quickly when
press it in the idle state.
Configure the key as SMS:
Page 98

Enterprise IP Phone Advanced Phone Functions
92
1) Click on Phone->DSS Key->Memory Key or Line Key.
2) SMS is selected from the pull down menu “Type”.
3) Click Confirm button to save the changes.
Record
This key function allows you to record during the conversation. Using this feature,
please pay attention to the maximum record time and frequency in advance.
Generally, it’s only a few minutes.
Configure the key as Record:
1) Click on Phone->DSS Key->Memory Key or Line Key.
2) Record is selected from the pull down menu “Type”.
3) Click Confirm button to save the changes.
URL Record
This key function allows you to achieve the call recording capability during the
conversation when follows the voice prompts.
1) During a conversation, press the DSS key to start recording.
2) Enable the Recording function, the recording icon will be flashing on the LCD.
3) Press the DSS key again to disable the recording function, the flashing recording
icon will be disappeared simultaneously.
4) Follow the voice prompts to listen to the recording.
Configure the key as URL Record:
1) Click on Phone->DSS Key->Memory Key or Line Key.
2) URL Record is selected from the pull down menu “Type”.
3) Enter the server URL in the Value field.
4) Click Confirm button to save the changes.
Note:
During a conversation, press this type of DSS key to start the recording process; if
the other party hangs up, the phone will turn to idle state.
Multicast Paging
Multicast is the delivery of a message or information to a group of destination
simultaneously in a single transmission from the source creating copies automatically
in other network elements.
A multicast paging is essentially a predefined broadcast address that the phone is
programmed to listen to. Each phone can be configured to listen to as many as 10
different multicast IP addresses. The priority of the IP Addresses is equivalent to the
stream priority, 1 is the highest, 10 is the lowest. Streams with higher priorities will
overlap those with lower priorities.
Users can configure the phone to send (receive) a Real Time Transport Protocol (RTP)
stream to (from) pre-configured multicast address without involving SIP signaling.
Page 99
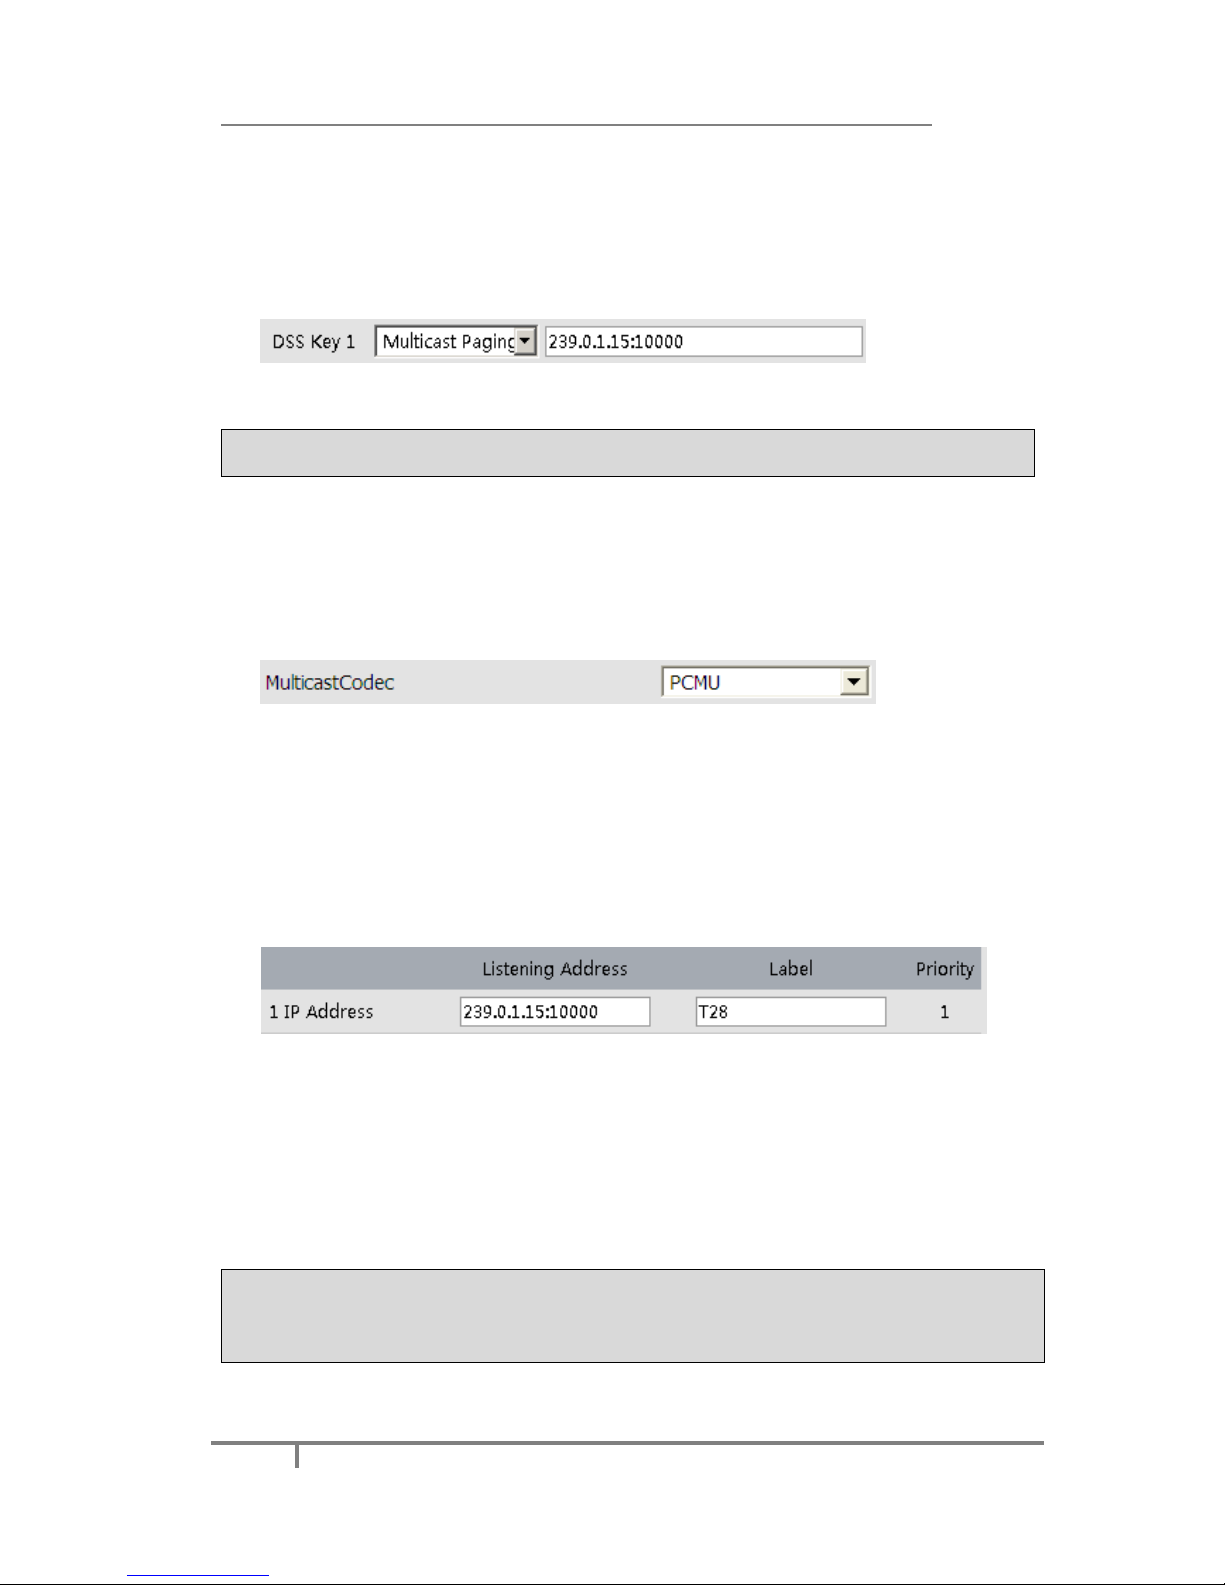
Enterprise IP Phone Advanced Phone Functions
93
To configure a programmable key for sending Multicast RTP stream via web interface:
1) Click on Phone -> DSS Key -> Memory Key. Then choose the desired key you
want to configure as multicast Paging.
2) Select the key Type as Multicast Paging in the pull-down menu;
3) Enter the multicast address(es) (IP: port) in the Value field.
4) Click Confirm to save the configuration.
Note:
The multicast address ranges from 224.0.0.0 to 239.255.255.255.
Users can also configure the phone to use a default codec for sending Multicast RTP
stream via web interface:
1) Click on Phone -> Features.
2) Select a codec (i.e., PCMU) from the pull-down menu of the MulticastCodec
configuration item.
3) Click Confirm to save the configuration.
To configure Listening Address(es) for receiving Multicast RTP stream via web
interface:
1) Click on Contacts -> MulticastIP. Enter the Listening Address(es) which is
preconfigured as multicast address (IP: port) in the Listening Address field.
2) Enter the Label(String) which will appear on the LCD screen when receiving RTP
from the corresponding Listening Address.
3) Click Confirm to save the configuration .
After pressing a Multicast Paging key on the phone, the Phone sends RTP to a
preconfigured multicast address(es) (IP:port). Any phone in the local network then
listens for RTP on the preconfigured multicast address(es) (IP:port). For both
sending and receiving of the multicast RTP there is no sip signaling involved. The
phone receiving RTP will display the preconfigured listening multicast label (Label) to
the user.
Note:
Multicast RTP is one way only- from sender to the multicast address(es) (receiver).
For outgoing RTP multicasts, all other existing calls on the phone will be put on
hold.
Page 100

Enterprise IP Phone Advanced Phone Functions
94
Group Listening
This key function allows you to enable the Speakerphone and Handset/Headset mode
at the same time. It is suitable for the group conversation which has more than one
person at one side. You are able to speak and listen by using handset/headset;
meanwhile the others nearby can listen by using speakerphone. You can get back to
the previous mode by pressing the key again. (If the current mode is handset or
headset, users can press the speaker button to open or close the group listening
function)
Configure the key as Group Listening:
1) Click on Phone->DSS Key->Memory Key or Line Key.
2) Group Listening is selected from the pull down menu “Type”.
3) Click Confirm button to save the changes.
Public Hold
This key function allows particular BLA group to hold or retrieve a call during a
conversation
Configure the key as Public Hold:
1) Click on Phone->DSS Key->Memory Key or Line Key, Press Confirm button
to save the changes.
2) Public Hold is selected from the pull down menu “Type”.
3) Click Confirm button to save the changes.
Private Hold
This key function allows all members belonging to that particular BLA group to hold
the call, but only the initiator can retrieve the call during a conversation.
Configure the key as Private Hold:
1) Click on Phone->DSS Key->Memory Key or Line Key.
2) Private Hold is selected from the pull down menu “Type”.
3) Click Confirm button to save the changes.
Shared Line
Shared Line Appearances (SLA, which is also named as BLA) feature allows
subscribers to share SIP lines and also provides status monitoring of the shared line.
When a user places an outgoing call using such an appearance, all members
belonging to that particular SLA group are notified of this status and are blocked
from using this line appearance until the line goes back to idle or the call is placed on
hold.
Similarly all members of the SLA group are notified of an incoming call and the call
can be picked up on a line appearance associated with the SLA extension.
Configure the key as Shared Line:
 Loading...