

Weldex WDR-4011-1TB, WDR-4011-2TB, WDR-4011-750, WDR-4011, WDR-8264-750 User Manual
...
1

TO REDUCE FIRE OR SHOCK HAZARD,
DO NOT EXPOSE THE UNIT TO RAIN OR MOISTURE.
The installation should be made by a qualified
service person and conformed to all local codes.
WARNING
* This is a brief manual for quick and convenient reference.
Please refer to the User Manual contained in CD for details.
* The picture & functions & supplied items might differ according to the
specification and model.
2

Contents
1. Getting Started ……………………………..…………………………. 4
1.1 Checking Supplied Items ………………………………………………………. 4
1.2 User Login ……………………………………………………………………….. 4
1.3 Date/Time Setting and HDD Format ………………………………………….. 5
1.4 Quick Setup ……………………………………………………………………… 5
2. System Operation ………………………………….…………………… 6
2.1 Using Tool Bar …………………………………………………………………… 6
2.2 Using Pop-Up Menu ……………………………………………………………. 6
2.3 Display Mode ……………………………………………………………………. 7
2.4 PTZ Mode ……………………………………………………………………….. 7
2.5 Search and Playback Mode …………………………………………………… 8
2.6 Quick Backup Mode ……………………………………………………………. 8
3. System Setting …………………………………..……………………… 9
4. Web Operation by M/S I/E …………………….……………………… 10
5. Remote Software …………………………………….………………… 11
5.1 RMS(RemoteManager Software) …………………………………………….. 11
5.2 CMS(CentralManager Software) ……………………………………………… 11
6. Mobile Viewer (WAP Connection) …………………………………… 12
7. MMS (Mobile Viewer by Smart Phone) ……………………………... 13
7.1 iPhone …………………………………………………………………………… 13
7.2 Google Android Phone ………………………………………………………… 13
7.3 Black Berry ……………………………………………………………………… 14
7.4 Windows Mobile O/S Phone ………………………………………………….. 14
3
NOTE
1) Refer to the [Separate Manual] on CD for functional explanation of Front
Panel, Rear Panel and IR Remote Controller.
2) The type of IR Remote Controller and Terminal Block may differ depending on
the DVR model.
3) Supplied items can be different according to the model.
1. Getting Started
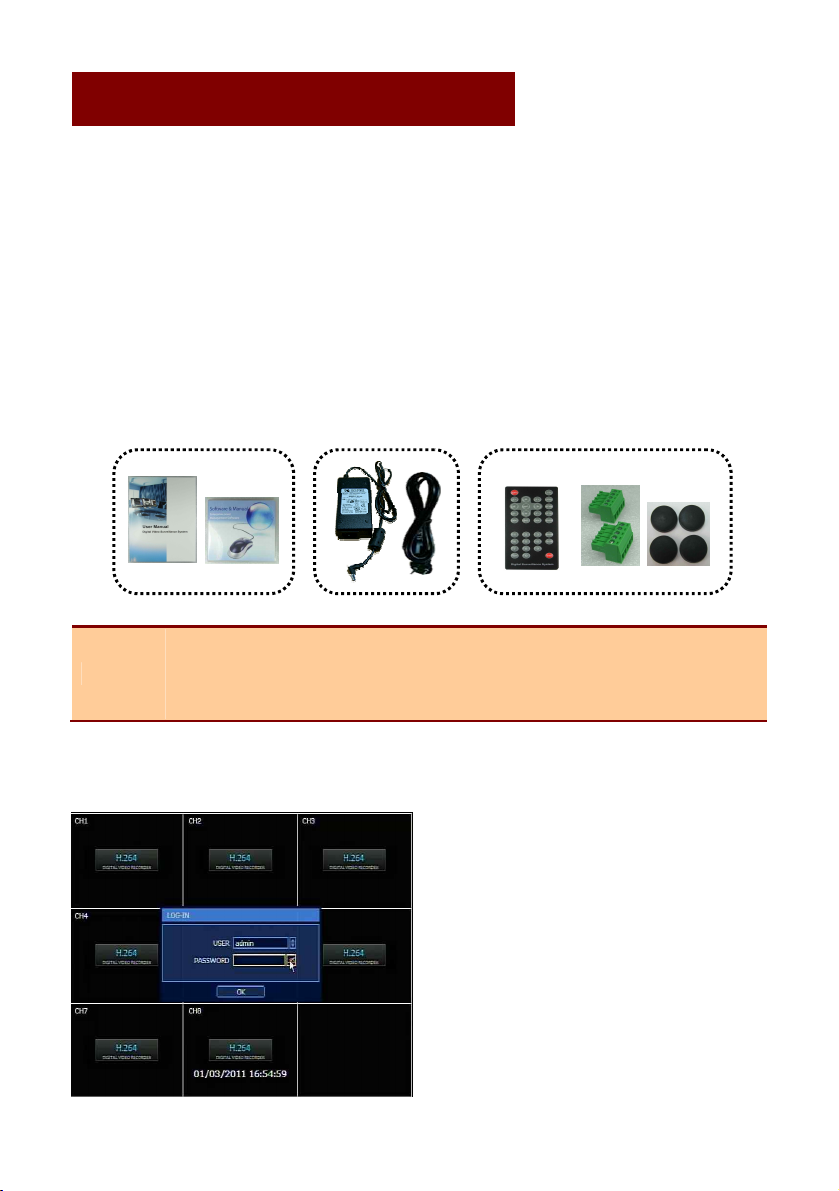
1.1 Checking Supplied Items
Make sure that you have following items supplied with your DVR. If any of these items is
missing or damaged, notify your vendor immediately.
l Quick Manual : 1 Piece
l CD (User Manual & Software) : 1 Piece
l 12V D/C Adaptor & Power Cable : 1 Set
l IR Remote Controller : 1 Piece
l Terminal Block : 1 Pair
l Rubber Mount : 1 Set
1.2 User Login
1) After turning on the system, login
window will show up.
2) Click the keyboard icon to call virtual
keypad and input password.
Default USER ID and PASSWORD
are “ADMIN” and “1234”. Admin user
is to fully control the DVR system.
3) Click [OK] to finish login process.
4
NOTE
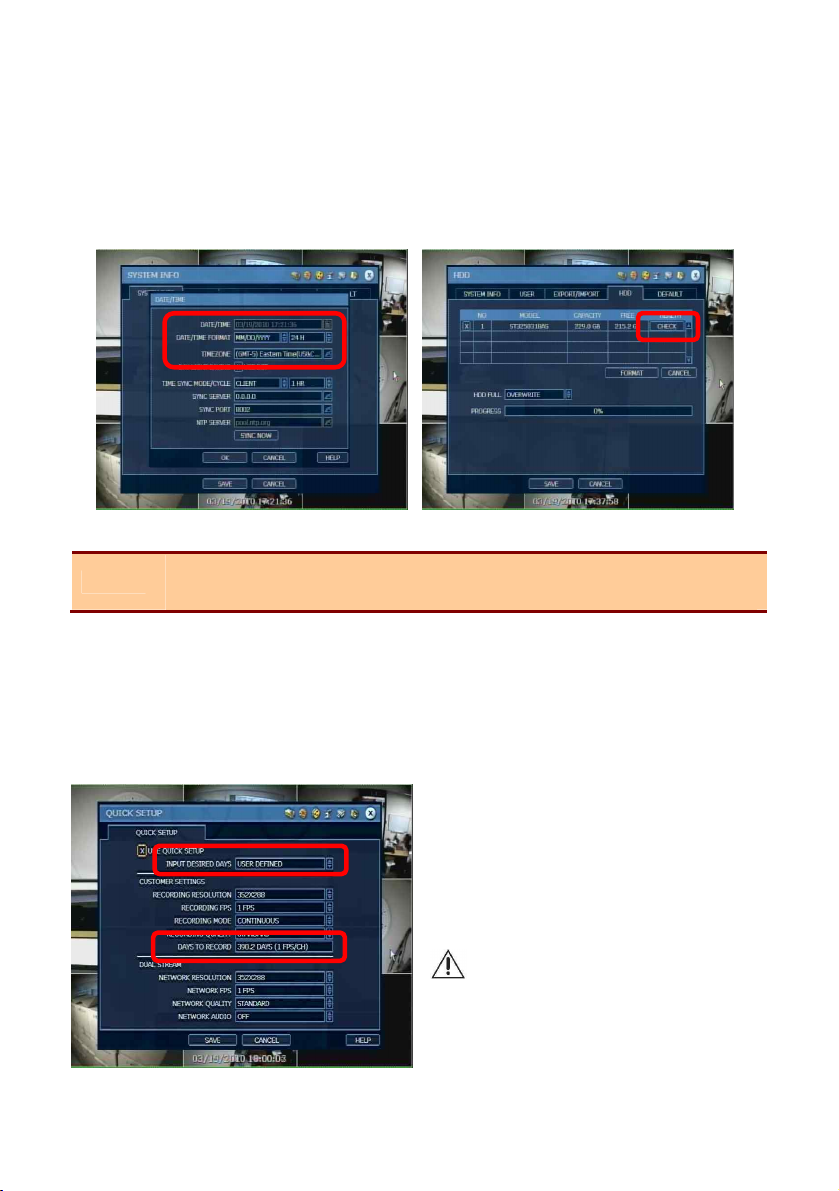
Click [CHECK] button of each HDD to open the window of DVR HEALTH
CHECK. User can see full information of each HDD such as model name, serial
no, capacity, bad sector ratio, life time (used time) and temperature.
1.3 Date/Time Setting and HDD Format
1) Go to the menu of [TOOL > System > System Info > Date/Tome] and make a proper
time/date setting based on your time zone.
2) User has to format new HDD before use. Go to the menu of [TOOL > System > HDD]
and select the HDD to format.
1.4 Quick Setup
Quick Setup is to help user make easy configuration for recording resolution, recording
speed, recording mode, recording quality and recording periods based on the capacity
of HDD installed.
1) Go to the menu of [TOOL > Quick
Setup] and select [Use Quick Setup]
2) Input [Desired Days], then the system
optimally adjusts full setting values and
shows “Recordable Period” based on
the capacity of HDD installed.
CAUTION !
Recordable period calculated by Quick
Setup is just for reference and may vary
depending on the actual site situation.
5
 Loading...