

Page 1
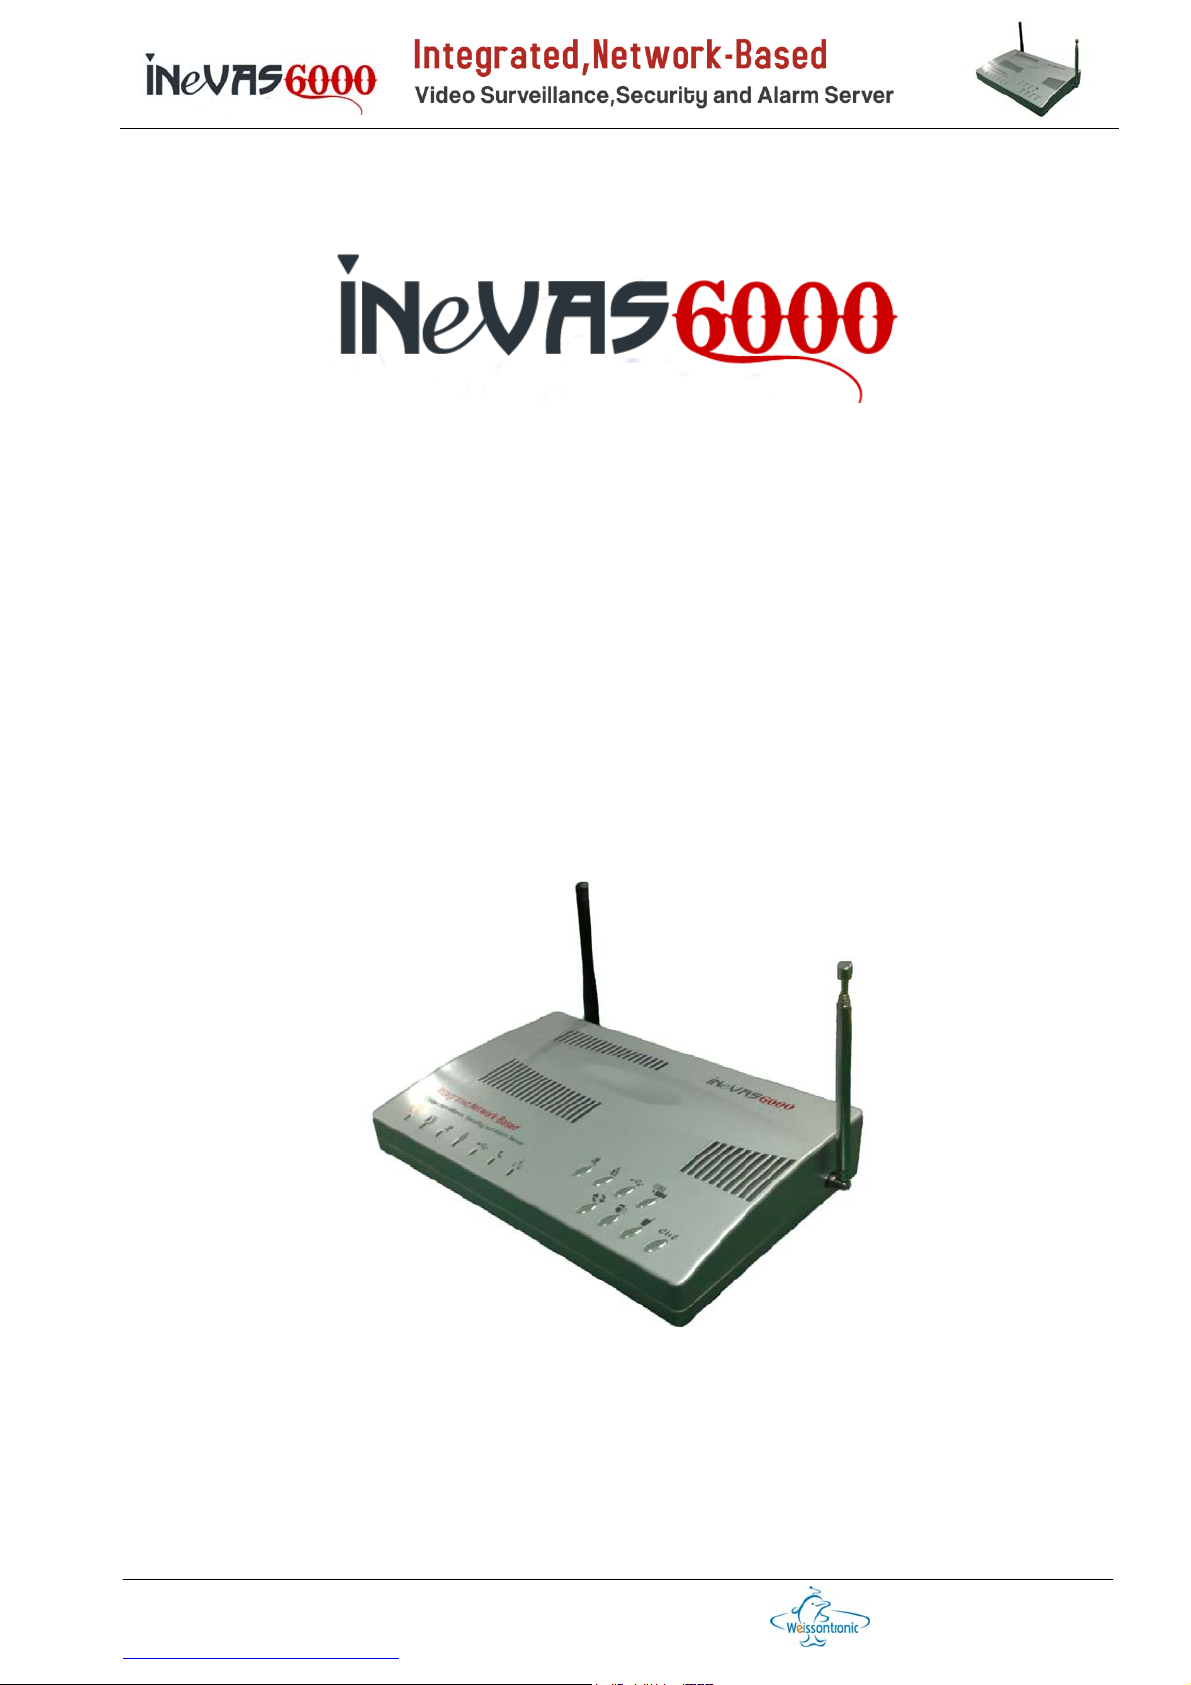
User’s Guide
V1.0 Draft
Weixun Electronics (Weissontronics) Technologies Co. Ltd.
728, Changchi Road, Gutang, Cixi City, Zhejiang Province, PRChina, 315300
Tel: +86 574 6301 7347 / 6302 8417 x 118/168, Fax: +86 574 6301 7347 / 6302 8417 x 128
http://www.nbweixun.com/en/index.php
第 1 页
Page 2
Revision
Date Version Comments
12/11/2010 V1.0 Draft version launched
Click here to access the most-updated guide
Weixun Electronics (Weissontronics) Technologies Co. Ltd.
728, Changchi Road, Gutang, Cixi City, Zhejiang Province, PRChina, 315300
Tel: +86 574 6301 7347 / 6302 8417 x 118/168, Fax: +86 574 6301 7347 / 6302 8417 x 128
http://www.nbweixun.com/en/index.php
第 2 页
Page 3
Contents
Chapter 1 Notice..................................................................................................................................5
Chapter 2 Product Overview .............................................................................................................. 6
Section 2.1 Introduction......................................................................................................................6
Section 2.2 Specification..................................................................................................................... 8
Section 2.3 Main Functions.................................................................................................................9
Section 2.4 Package List.....................................................................................................................9
Section 2.5 Network and Software Requirement................................................................................. 9
Section 2.6 Backpanel Interface........................................................................................................10
Section 2.7 Frontpanel Key and LEDs.............................................................................................. 11
Chapter 3 PC Client Overview..........................................................................................................12
Section 3.1 Install and Run PC client ................................................................................................ 12
Section 3.2 Details on the Main Window........................................................................................... 13
Chapter 4 Device Settings................................................................................................................ 18
Section 4.1 Channel..........................................................................................................................19
Section 4.2 Network/System.............................................................................................................20
Section 4.3 Storage...........................................................................................................................24
Section 4.4 Talkback.........................................................................................................................25
Section 4.5 User Management..........................................................................................................25
Section 4.6 Phone/GSM alarm..........................................................................................................26
Section 4.7 Hardware........................................................................................................................27
Section 4.8 Media Center..................................................................................................................28
Section 4.9 3322 DDNS.................................................................................................................... 28
Section 4.10 DynDNS.........................................................................................................................29
Section 4.11 EMAIL ............................................................................................................................30
Section 4.12 System Monitor....................................................................................................
Section 4.13 Update............................................................................................................................33
Chapter 5 Alarm Settings .................................................................................................................33
Section 5.1 Guard Settings............................................................................................................... 34
Section 5.2 Motion Settings..............................................................................................................36
Section 5.3 Manual Alarm Settings ...................................................................................................36
Section 5.4 Alarm and Control by Telephone....................................................................................37
Section 5.5 Alarm and Control by SMS/MMS................................................................................... 37
Section 5.6 Setting and program of wireless security sensors..........................................................39
Chapter 6 Playback, Alarm Reader and Advanced Settings.......................................................... 41
Section 6.1 PC Record......................................................................................................................41
Section 6.2 Playback.........................................................................................................................42
Section 6.3 Alarm Reader.................................................................................................................43
Section 6.4 Motion ............................................................................................................................44
Section 6.5 Misc................................................................................................................................ 45
Section 6.6 User Management..........................................................................................................46
Section 6.7 U-Disk Data fix ...............................................................................................................46
Chapter 7 Video Play in Smart Phone ............................................................................................. 47
..........32
Weixun Electronics (Weissontronics) Technologies Co. Ltd.
728, Changchi Road, Gutang, Cixi City, Zhejiang Province, PRChina, 315300
Tel: +86 574 6301 7347 / 6302 8417 x 118/168, Fax: +86 574 6301 7347 / 6302 8417 x 128
http://www.nbweixun.com/en/index.php
第 3 页
Page 4
Section 7.1 Installation of Client Software in Smart Phone ...............................................................48
Section 7.2 Client Software Setup..................................................................................................... 48
1) Symbian S60 v3....................................................................................................................48
2) Windows Mobile 6.0..............................................................................................................48
Section 7.3 Client Software Usage....................................................................................................48
Appendix A List of Smart Phones That Can Run the Client Software ............................................. 49
Weixun Electronics (Weissontronics) Technologies Co. Ltd.
728, Changchi Road, Gutang, Cixi City, Zhejiang Province, PRChina, 315300
Tel: +86 574 6301 7347 / 6302 8417 x 118/168, Fax: +86 574 6301 7347 / 6302 8417 x 128
http://www.nbweixun.com/en/index.php
第 4 页
Page 5
Chapter 1 Notice
Please follow this guide to setup and use the iNeVAS6000 series products. The hardware
and software is subject to change without prior notice. Please visit the company website
to find the change and update: http://www.nbweixun.com/en/index.php.
Caution
We do our best to make the product as perfect as possible, however, due to the
application complexity and/or some unexpected events like weather, human
interference, power cut, network failure or bandwidth limit etc, our product can not
assure 100% accuracy in the video surveillance and security alarm. Please be aware of
this limit and we will NOT bear the loss due to this limit.
SAFETY WARNING
It needs professionals to install the product and other peripheral. There are falloff,
electric shock and/or other safety risks during installation. Safety steps should be
followed strictly. The product can only be used indoor. In case of any peripherals like
video cameras are installed outdoor, please take proper lightning proof steps.
Weixun Electronics (Weissontronics) Technologies Co. Ltd.
728, Changchi Road, Gutang, Cixi City, Zhejiang Province, PRChina, 315300
Tel: +86 574 6301 7347 / 6302 8417 x 118/168, Fax: +86 574 6301 7347 / 6302 8417 x 128
http://www.nbweixun.com/en/index.php
第 5 页
Page 6
Chapter 2 Product Overview
Section 2.1 Introduction
iNeVAS6000 series is a combo of DVR / DVS (Digital Video Recorder / Digital Video
Server) and wireless security alarm host.
Quite different from traditional DVR which emphasizes the function of video recording and
playback for after-event investigation and proof, iNeVAS6000 focuses on delivering the
security events information to users at the first time in every economically possible ways.
And give user enough time to take proper actions to prevent damages or at least stop the
damages.
It gives out two separate H.264 video streams for each input analog video, one with high
bit-rate for local / remote storage and PC surveillance in broadband networks, and the
other with low bit-rate for mobile phone surveillance in narrow-band networks like GPRS.
It also implants a wireless security alarm host which accepts the programmed alarms
from 11 wireless / 4 wired sensors attached like infrared motion detection sensor,
magnetic door/window sensor, smoke detector/fire sensors etc. It forwards these security
alarms to user by way of siren, light, PC client, telephone, SMS / MMS and / or email.
These alarm sensors can be linked with the video cameras. User is not only informed of
the alarms, but also gets the event detail from video/image/audio at the same time. Based
on all these field information, user can tell if it is a true alarm or false one and take proper
actions at the first-time.
Equipped with the professional PC client software and IP network, user can access to
multiple iNeVAS6000s distributed around different areas, wherever in the same building
or in different cities, and display the live videos and audios from different iNeVAS6000 in
the same PC at the same time. User can also use the web browser to display the live
videos and audios from iNeVAS6000. And it supports multiple users in different areas to
access the same iNeVAS6000 simultaneously.
iNeVAS6000 series is very appropriate for home and small chain-store application since
its four CIF video streams can fit the popular ADSL bandwid th whose upstream bandwid th
is only 512Kbps. More than 4 CIF video streams will have the bandwidth bottleneck.
Weixun Electronics (Weissontronics) Technologies Co. Ltd.
728, Changchi Road, Gutang, Cixi City, Zhejiang Province, PRChina, 315300
Tel: +86 574 6301 7347 / 6302 8417 x 118/168, Fax: +86 574 6301 7347 / 6302 8417 x 128
http://www.nbweixun.com/en/index.php
第 6 页
Page 7
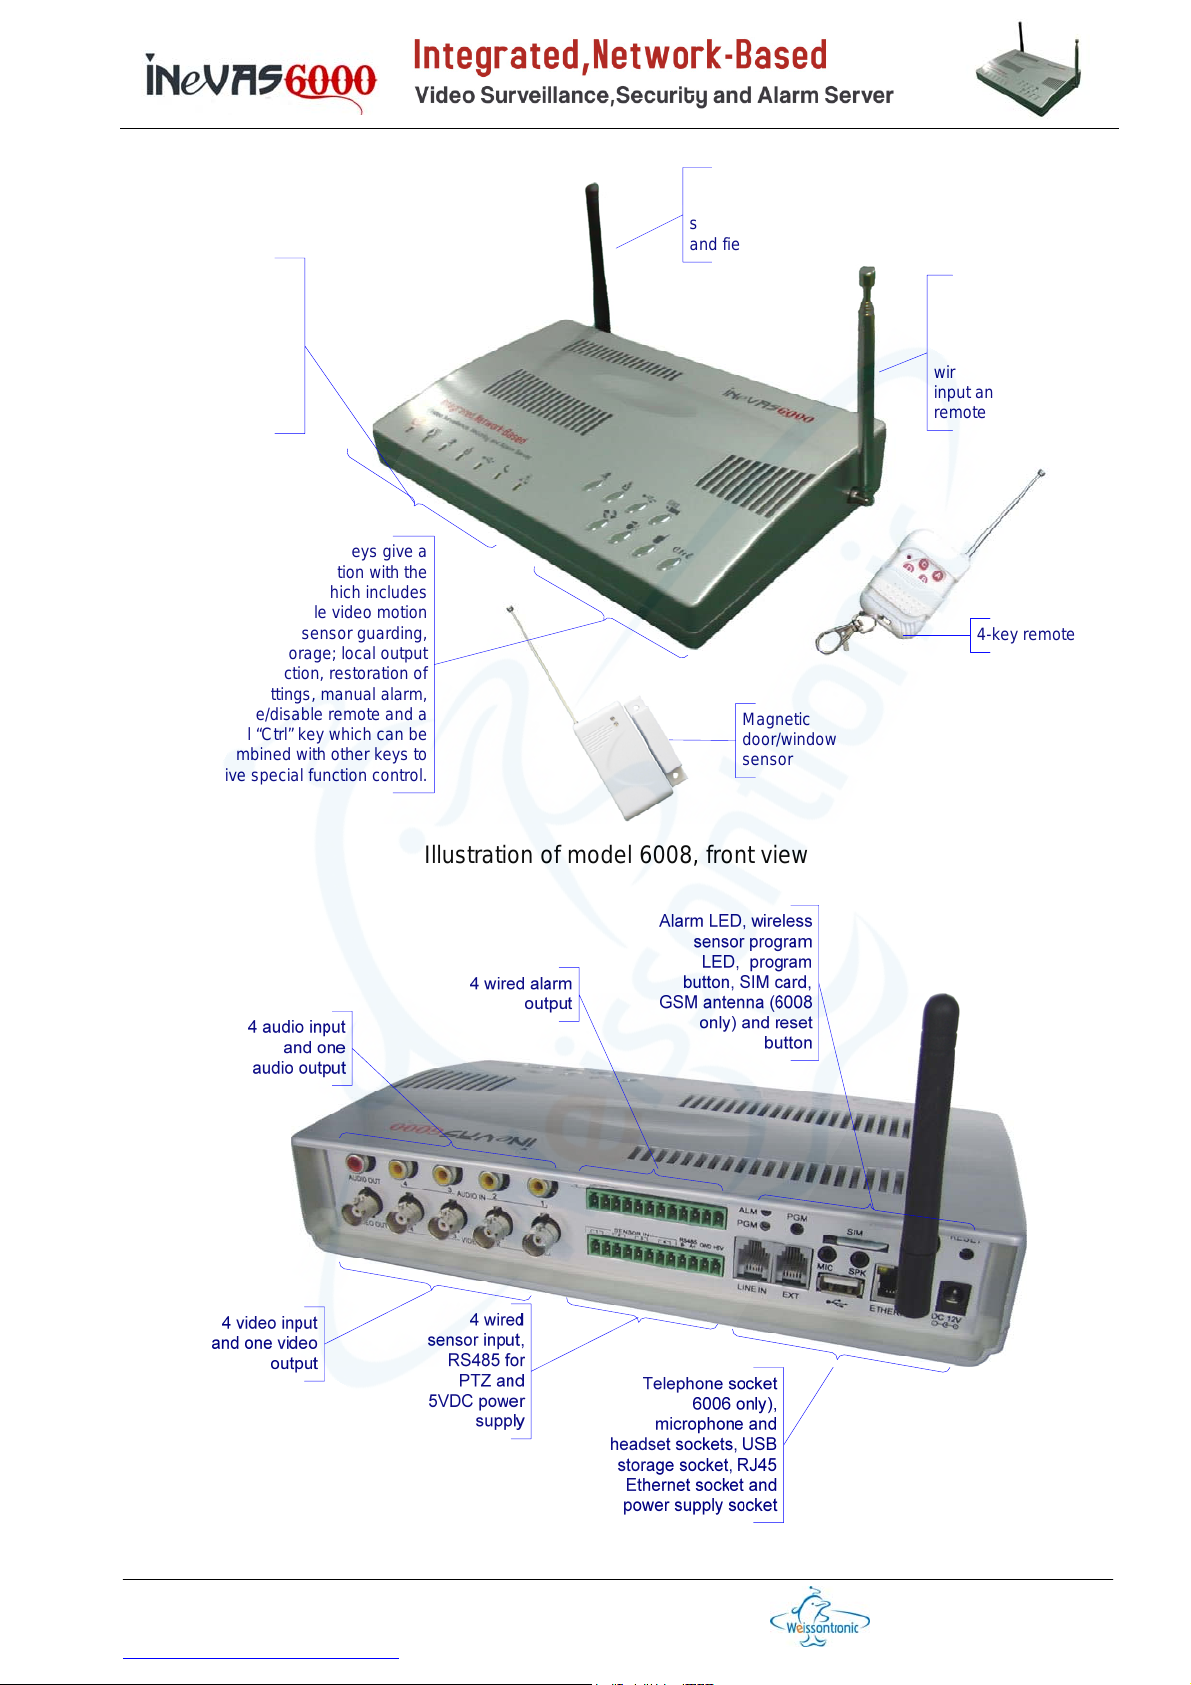
7 colorful LEDs
indicate the status of
power supply,
running, video motion
detection, sensor
guarding, USB
storage, phone
module and network
8 shining oval keys give a
direct interaction with the
machine, which includes
enable/disable video motion
detection, sensor guarding,
USB storage; local output
video selection, restoration of
default settings, manual alarm,
enable/disable remote and a
special “Ctrl” key which can be
combined with other keys to
give special function control.
iNeVAS6008's GSM
antenna, used to
send out SMS/MMS
and field audio
Antenna of
implanted wireless
alarm host which
can accept 11
wireless sensor’s
input and a 4-key
remote
4-key remote
Magnetic
door/window
sensor
Illustration of model 6008, front view
Illustrations of model 6008, back view
Weixun Electronics (Weissontronics) Technologies Co. Ltd.
728, Changchi Road, Gutang, Cixi City, Zhejiang Province, PRChina, 315300
Tel: +86 574 6301 7347 / 6302 8417 x 118/168, Fax: +86 574 6301 7347 / 6302 8417 x 128
http://www.nbweixun.com/en/index.php
第 7 页
Page 8
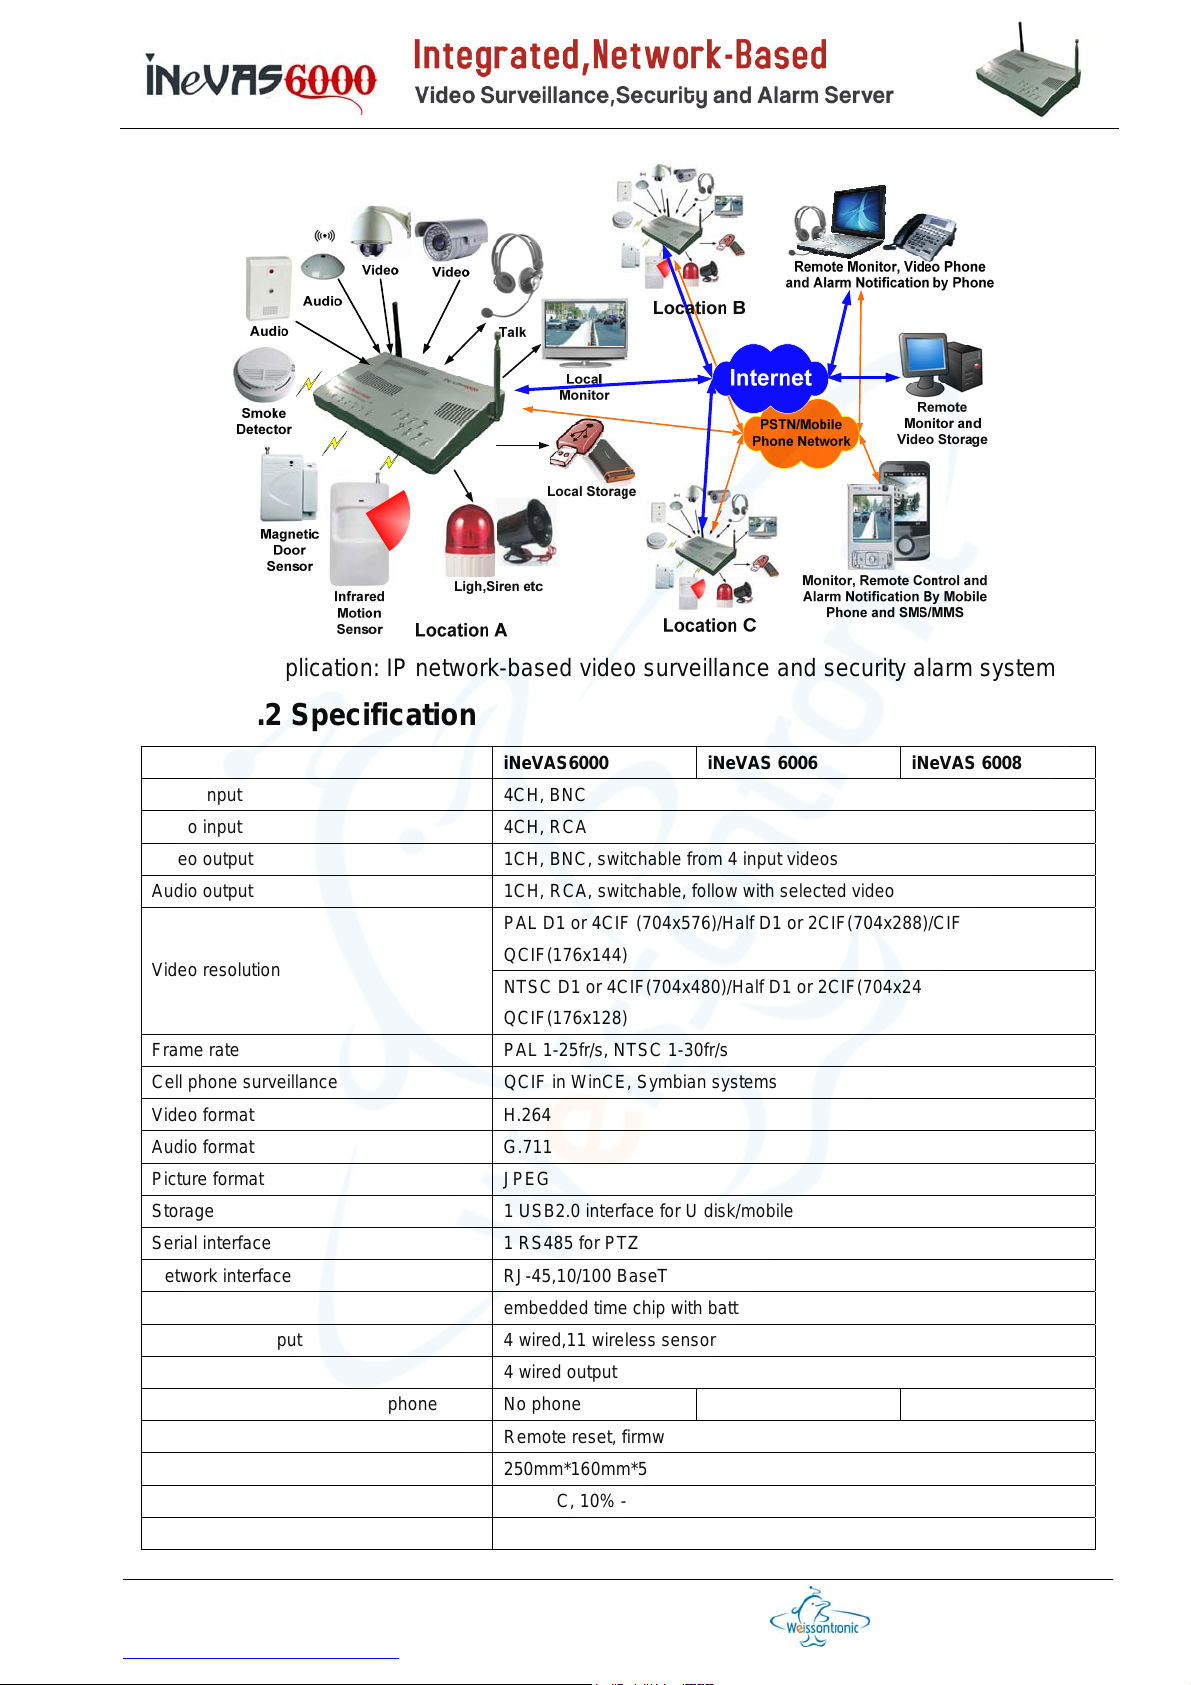
Typical application: IP network-based video surveillance and security alarm system
Section 2.2 Specification
Items iNeVAS6000 iNeVAS 6006 iNeVAS 6008
Video input 4CH, BNC
Audio input 4CH, RCA
Video output 1CH, BNC, switchable from 4 input videos
Audio output 1CH, RCA, switchable, follow with selected video
PAL D1 or 4CIF (704x576)/Half D1 or 2CIF(704x288)/CIF(352x288)/
Video resolution
Frame rate PAL 1-25fr/s, NTSC 1-30fr/s
Cell phone surveillance QCIF in WinCE, Symbian systems
Video format H.264
Audio format G.711
Picture format JPEG
Storage 1 USB2.0 interface for U disk/mobile HDD
Serial interface 1 RS485 for PTZ
Network interface RJ-45,10/100 BaseT
Time embedded time chip with battery
Alarm sensor input 4 wired,11 wireless sensors
Alarm out 4 wired output
Remote alarm and control by phone No phone Telephone Mobile Phone
Remote maintenance Remote reset, firmware upgrade
Dimension 250mm*160mm*50mm(w/o antenna)
Operating ambient 0 - 50°C, 10% - 90% no dew
Power supply/dissipation DC 12V/2A, < 10W
QCIF(176x144)
NTSC D1 or 4CIF(704x480)/Half D1 or 2CIF(704x240)/CIF(352x2 40)/
QCIF(176x128)
Weixun Electronics (Weissontronics) Technologies Co. Ltd.
728, Changchi Road, Gutang, Cixi City, Zhejiang Province, PRChina, 315300
Tel: +86 574 6301 7347 / 6302 8417 x 118/168, Fax: +86 574 6301 7347 / 6302 8417 x 128
http://www.nbweixun.com/en/index.php
第 8 页
Page 9
Section 2.3 Main Functions
Remote video surveillance: with professional PC client software or web browser, user
can monitor the remote field videos and audios by way of Internet.
Motion detect: once motion is detected, it will alarm as scheduled and record the
video clips or take a snapshot.
Smart phone monitor: it supports WINCE or SYMBIAN smart phone to browse the
field video. Please refer to Appendix A for the supported handsets.
Video record: it supports local video record in the U-disk or USB mobile HDD (FAT32
file format); videos can also be saved in the remote PCs; continuous recording and
event-triggered recording methods are offered.
Video playback: the saved local videos can be played back remotely by way of
Internet or can be played back after the U-disk or USB mobile HDD is connected to
the PCs directly.
PTZ control: pan, tilt and zoom are supported.
Integrated alarm host: it supports generally available wired/wireless sensors to guard
the specific areas; once these sensors are triggered and the alarms are received by
the host, it will startup the local siren, light etc, and forward these alarms to the
remote users by way of PC client, email, calling preset phone numbers (6006 model
only), SMS/MMS (6008 model only) at the same time. User can use the keyboard,
remote, PC client, telephone (6006 model only) or SMS (6008 model only) to
arm/disarm the host.
Dynamic DNS: embedded DynDNS.org and 3322.org for dynamic DNS
Remote maintenance: with professional PC client software, user can access the
remotely distributed iNeVAS6000s at the same time. And perform setup,
configuration, schedule, firmware upgrade and remote restart etc
Section 2.4 Package List
1. one mainframe and its DC12V /2A power supply
2. one GSM antenna for model 6008
3. one remote with cell installed, one wireless magnetic door sensors and its 12V cell
4. one CDROM including this guide and PC/smart phone software
5. Warranty and QC pass
6. one copy of quick setup
Section 2.5 Network and Software Requirement
iNeVAS6000 can be used in 10/100M or 100/1000M adaptive Ethernet with sufficient
bandwidth (up to the number of video channels and the video quality). In case of insufficient
bandwidth, please decrease the resolution, frame rate and/or quality of videos.
The PC client software can be run in the following Windows OS:
Windows XP SP2 and above
Windows2000/2003
Vista
Windows 7(not tested)
Internet Explorer beyond 6.0 is preferred.
Weixun Electronics (Weissontronics) Technologies Co. Ltd.
728, Changchi Road, Gutang, Cixi City, Zhejiang Province, PRChina, 315300
Tel: +86 574 6301 7347 / 6302 8417 x 118/168, Fax: +86 574 6301 7347 / 6302 8417 x 128
http://www.nbweixun.com/en/index.php
第 9 页
Page 10
PC hardware requirement:
CPU: >450MHz
Memory size: >256M
Ethernet: >10M
Display: >1024x768(in case initialization fails when startup the PC client, please increase
the resolution)
Section 2.6 Backpanel Interface
5). Alarm and Program LED
1). 4 audio input and 1 audio output
3). 4 wired alarm output
6). Program key, SIM seat, GSM Antenna and reset key
2). 4 video input and 1 video output
4). 4 wired sensor input, RS485 and +5V
7). Telephone,USB,MIC,speaker,Ethernet and power socket
WARNING Backpanel interfaces peripherals. When connect or
disconnect peripherals to the backpanel, please cut the power of
mainframe and peripherals first. Otherwise, risk of electric shock
and/or equipment damage.
1). 4 audio input and 1 audio output: RCA connectors where the 4 yellow ones are for input
while the red one for output
2). 4 video input and 1 video output: BNC connectors, where 4 for input and 1 for output
3). 4 wired alarm output: green terminals, where one input occupies 2 neighboring positions
(<=12V DC, <=300mA). The terminal consists of two parts. The seat is soldered in the
board while the head can be plugged out for easy installation of wires. After the head is
disconnected from the seat, first loose the top screw a little bit, then insert the stripped wire
into the square hole, make the copper wire contacted with the metal inside and drive the
top screw tight. After all the wires are installed, insert the head back into the seat.
4). 4 wired sensor input, RS485 and +5V: green terminals, too. SENSOR IN is for wired
sensor input, where one input occupies 2 neighboring positions. The input should be
switch signal and user can use the PC client to set it as normal open or normal close to
match the sensor. RS485 interface is used for PTZ control. +5V and GND is power supply
whose driving current should never be bigger than 300mA.
Be careful when using this 5V power supply, never drive bigger than
300mA current and never mis-connect +5V and the Ground, otherwise
mainframe and the peripheral using this power supply might be damaged.
Weixun Electronics (Weissontronics) Technologies Co. Ltd.
728, Changchi Road, Gutang, Cixi City, Zhejiang Province, PRChina, 315300
Tel: +86 574 6301 7347 / 6302 8417 x 118/168, Fax: +86 574 6301 7347 / 6302 8417 x 128
http://www.nbweixun.com/en/index.php
第 10 页
Page 11
5). Alarm and Program LED: when receiving alarms from wireless sensors, the ALM LED will
light. During program wireless sensors, the PGM will give different colors to indicate
different phases. Please refer to section “5.5 configure and program of wireless sensors”
6). Program key, SIM seat, GSM antenna and reset key: PGM is the program key for
wireless sensors, please refer to section “5.5 configure and program of wireless
sensors” on how to use this key. SIM seat and GSM antenna are for model 6008 only,
where SIM card (please order from your local GSM mobile phone service provider) and
GSM antenna are installed. Reset key is used to reset the mainframe when it is out of
work or anytime when it needs reset.
6008 can only work with GSM/GPRS SIM card and does not with that of
CDMA system. Please be careful when inserting the SIM card into the seat
and try not to drop into the mainframe.
7). Telephone, USB, MIC, speaker, Ethernet and power socket: the telephone socket is for
model 6006 only, where LINE IN connects the line from central office and EXT connects
an extended telephone in parallel. The interface with icon connects U-Disk or USB
mobile HDD for video recording locally . MIC and SPK are for microphone and head phone.
All are 3.5mm sockets. ETHERNET is RJ-45 socket for connecting 10/100M Base-T
Ethernet. Socket with icon is for 12VDC/2A power input where the core pin is
positive.
Please only use the supplied 12VDC/2A power adapter; otherwise there is
a big risk of damaging the mainframe due to wrong polarity or working
improperly due to insufficient current supply.
Section 2.7 Frontpanel Key and LEDs
When the LEDs are on:
z Power LED: indicates there is 12V DC power supply
z Running LED: indicates the mainframe runs properly
z Motion detect LED: indicates the motion detect function is enabled
z Arm LED: indicates the wired/wireless sensors are put into function.
z USB LED: indicates the USB storage media works properly. Once it flashes, indicating
the USB media does not work properly or it is missing, which will stop the planned video
Weixun Electronics (Weissontronics) Technologies Co. Ltd.
728, Changchi Road, Gutang, Cixi City, Zhejiang Province, PRChina, 315300
Tel: +86 574 6301 7347 / 6302 8417 x 118/168, Fax: +86 574 6301 7347 / 6302 8417 x 128
http://www.nbweixun.com/en/index.php
第 11 页
Page 12
recording.
z Phone LED: indicates the telephone for model 6006 or GSM/GPRS for model 6008
works properly. Flash indicates the phone function does not work well. One exception is
when model 6008 sends out MMS, it will also flash, but only three times and ends up
with a buzz sound.
z Network LED: indicates the network interface works properly.
Function of the keys (Note 1)
z Motion detect key: used to enable/disable the motion detect function, same as key A in
the remote (Note 2). Note: please refer to “Chapter 5 Alarm settings” for the motions
detect settings.
z Arm/Disarm Key: used to arm/disarm the wired/wireless sensors, same as key B in the
remote. Note: please refer to “Chapter 5 Alarm settings” for the guard settings
z USB key: in case the USB storage media needs to be disconnected from the
mainframe, please do press this key first and wait for the USB LED to be turned off,
otherwise the video data might be damaged. Same as key C in the remote.
z Video Channel Key: used to select the video channels displayed in the local monitor.
Press the key once and it will change to next channel. When channel 4 reaches, it will
turn back to channel 1 again. Press this key together with key Ctrl, it will change the
channels automatically with the period set in the PC client.
z Restore default key: press this key together with Ctrl key and hold until buzz sounds
and all the LEDs in the frontpanel is turned on. Af ter that, all the LEDs except the Power
LED will be turned off again. Then the default settings are restored. Please be cautious
to use this function sine it will clear all the user settings.
z Manual alarm key: when this key is pressed, the mainframe will send out a top priority
alarm, no matter it is armed or disarmed. Same as key D in the remote. Note: use PC
client to do the settings.
z Remote enable key: used to enable/disable the remote. Press this key and buzz
sounds once, the remote is enabled; press this key together with the Ctrl key, the buzz
will sound twice and the remote is disabled. Note: the remote can be also set in the PC
client.
z Ctrl key: as already mentioned in others key, this is a specific key used together with
other keys.
Note1: press and hold the frontpanel key and remote key for a while until the buzz sounds
Note2: the remote should be programmed with the mainframe before it can be used. Please
refer to section “5.5 configure and program of wireless sensors” and make sure it is enabled.
Chapter 3 PC Client Overview
Section 3.1 Install and Run PC client
Insert the CDROM in the driver and locate the folder starting as “client”. Copy this folder to
your PC and find the program “IPClientPro.exe”. Double click with mouse to run and a login
windows will pop up like below. The default user is “admin” and no password.
Weixun Electronics (Weissontronics) Technologies Co. Ltd.
728, Changchi Road, Gutang, Cixi City, Zhejiang Province, PRChina, 315300
Tel: +86 574 6301 7347 / 6302 8417 x 118/168, Fax: +86 574 6301 7347 / 6302 8417 x 128
http://www.nbweixun.com/en/index.php
第 12 页
Page 13
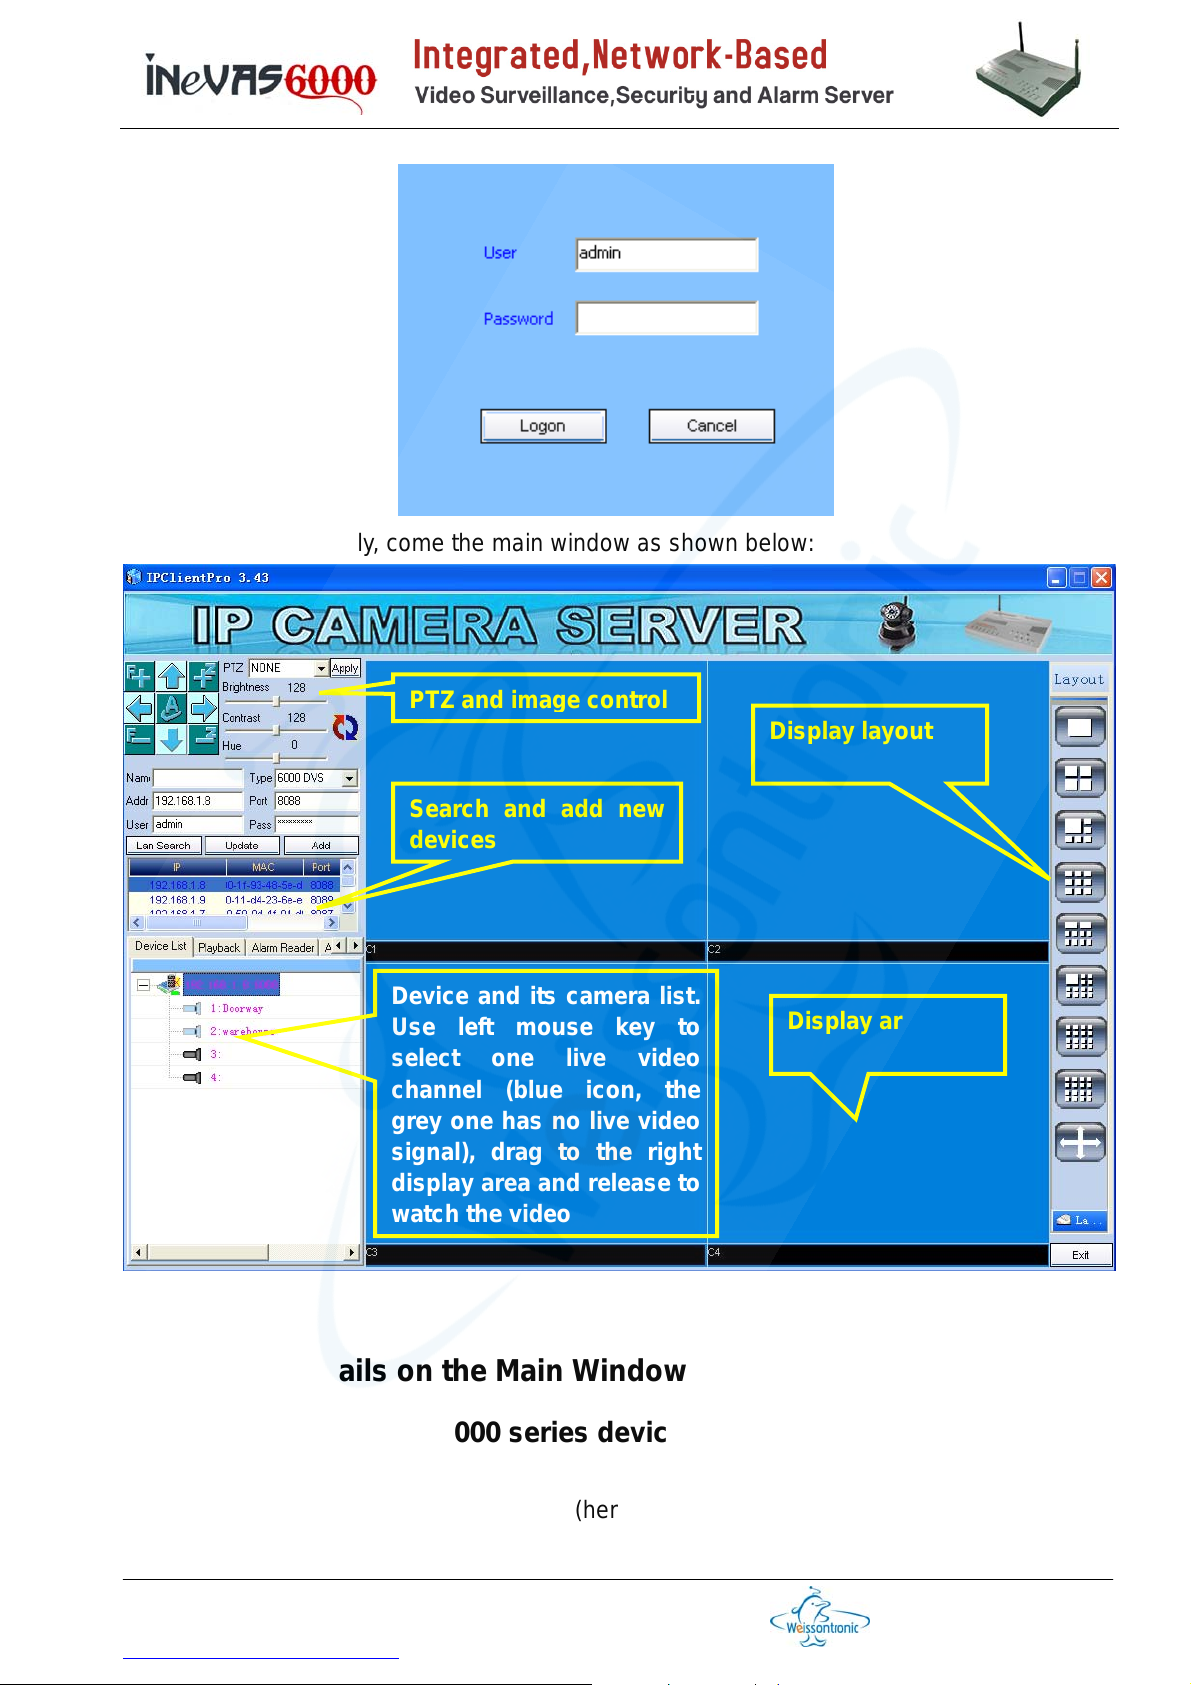
After logon successfully, come the main window as shown below:
PTZ and image control
Search and add new
devices
Device and its camera list.
Use left mouse key to
select one live video
channel (blue icon, the
grey one has no live video
signal), drag to the right
display area and release to
watch the video
Display layout
Display areas
Section 3.2 Details on the Main Window
Search / add iNeVAS6000 series devices
As shown below, it includes:
Name: give the iNeVAS6000 device (hereafter device) an easy-to-remember name
which will be used in this PC client.
Weixun Electronics (Weissontronics) Technologies Co. Ltd.
728, Changchi Road, Gutang, Cixi City, Zhejiang Province, PRChina, 315300
Tel: +86 574 6301 7347 / 6302 8417 x 118/168, Fax: +86 574 6301 7347 / 6302 8417 x 128
http://www.nbweixun.com/en/index.php
第 13 页
Page 14
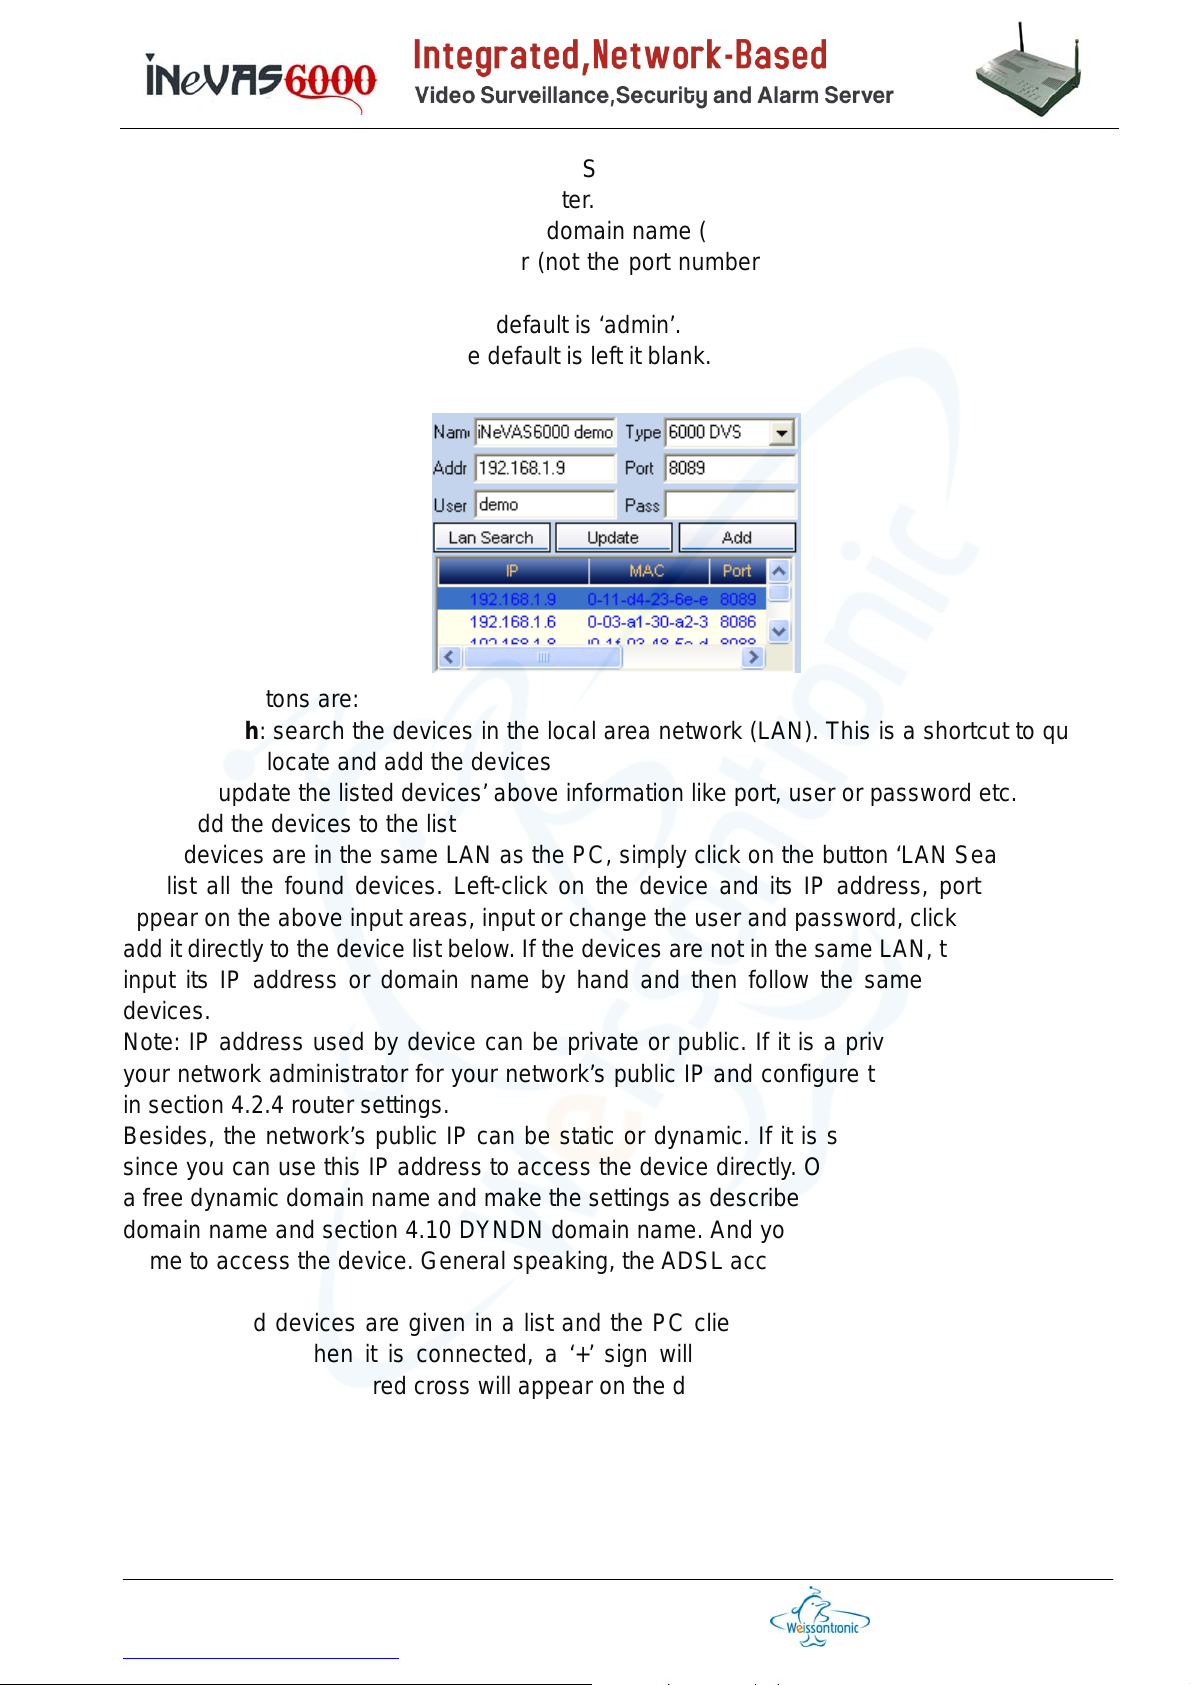
Type: select the device type. For iNeVAS6000 series, please select 6000 DVS; if it is a
media center, select media center.
Addr: input the device IP address or domain name (see Note below)
Port: input the device port number (not the port number for web browser access). The
default is 8080.
User: input the user name. The default is ‘admin’.
Pass: input the password. The default is left it blank.
The three buttons are:
LAN Search: search the devices in the local area network (LAN). This is a shortcut to quickly
locate and add the devices
Update: update the listed devices’ above information like port, user or password etc.
Add: add the devices to the list
If the devices are in the same LAN as the PC, simply click on the button ‘LAN Search’, then it
will list all the found devices. Left-click on the device and its IP address, port number will
appear on the above input areas, input or change the user and password, click ‘Add’ button to
add it directly to the device list below. If the devices are not in the same LAN, then you have to
input its IP address or domain name by hand and then follow the same steps to add the
devices.
Note: IP address used by device can be private or public. If it is a private IP, please con sult
your network administrator for your network’s public IP and configure the router as described
in section 4.2.4 router settings.
Besides, the network’s public IP can be static or dynamic. If it is static, then congratulations
since you can use this IP address to access the device directly. Otherwise, you have to apply
a free dynamic domain name and make the settings as described in section 4.9 3322 dynamic
domain name and section 4.10 DYNDN domain name. And you can use this dynamic domain
name to access the device. General speaking, the ADSL access uses dynamic IP address.
All the added devices are given in a list and the PC client will try to connect to each device
automatically. When it is connected, a ‘+’ sign will appear beside the device icon. If the
connection fails, a big red cross will appear on the device icon.
Weixun Electronics (Weissontronics) Technologies Co. Ltd.
728, Changchi Road, Gutang, Cixi City, Zhejiang Province, PRChina, 315300
Tel: +86 574 6301 7347 / 6302 8417 x 118/168, Fax: +86 574 6301 7347 / 6302 8417 x 128
http://www.nbweixun.com/en/index.php
第 14 页
Page 15
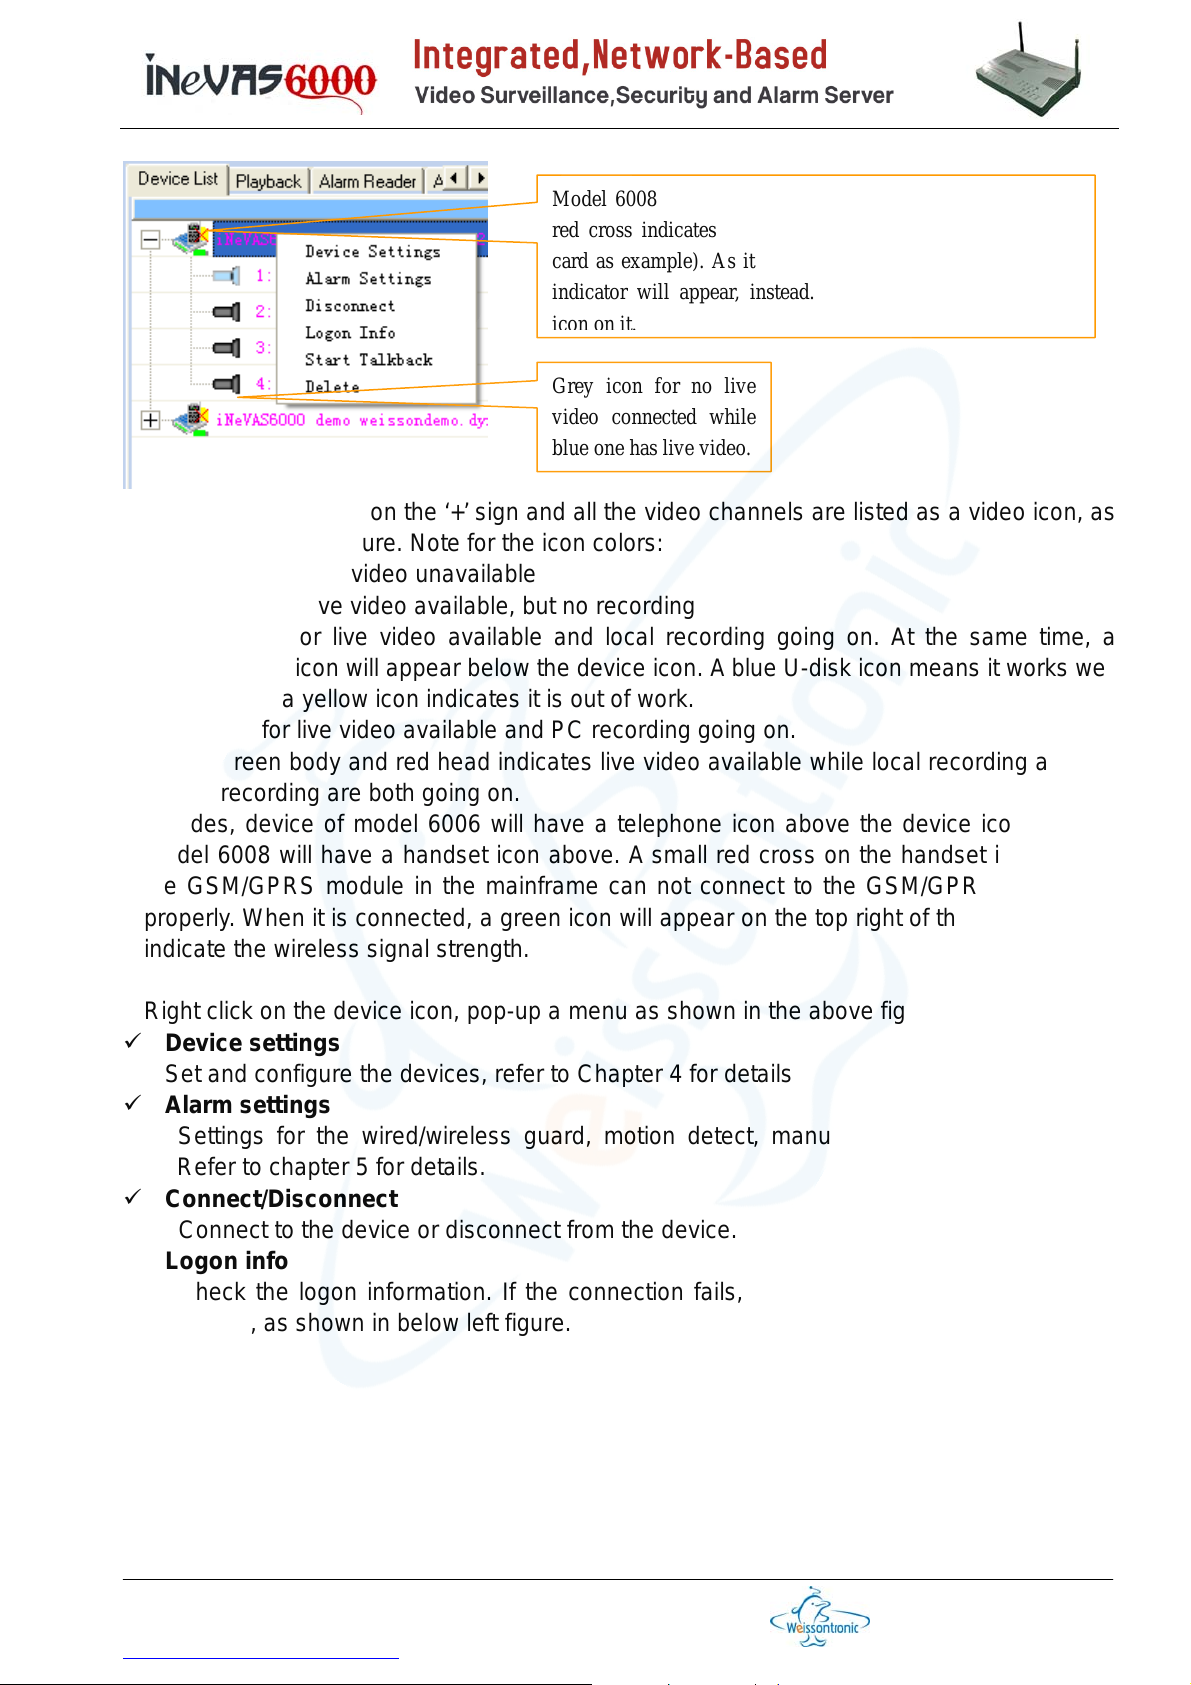
Model 6008 has a handset icon on the device icon, where a
red cross indicates the GSM/GPRS is out of work(no SIM
card as example). As it works well, a wirelss signal strength
indicator will appear, instead. Model 6006 has a telephone
Grey icon for no live
video connected while
blue one has live video.
When connected, click on the ‘+’ sign and all the video channels are listed as a video icon, as
shown in the above figure. Note for the icon colors:
1. grey for live video unavailable
2. blue for live video available, but no recording
3. green for live video available and local recording going on. At the same time, a
U-disk icon will appear below the device icon. A blue U-disk icon means it works well
while a yellow icon indicates it is out of work.
4. red for live video available and PC recording going on.
5. green body and red head indicates live video available while local recording and PC
recording are both going on.
Besides, device of model 6006 will have a telephone icon above the device icon while
model 6008 will have a handset icon above. A small red cross on the handset indicates
the GSM/GPRS module in the mainframe can not connect to the GSM/GPRS network
properly. When it is connected, a green icon will appear on the top right of the handset to
indicate the wireless signal strength.
Right click on the device icon, pop-up a menu as shown in the above figure, where:
9 Device settings
Set and configure the devices, refer to Chapter 4 for details
9 Alarm settings
Settings for the wired/wireless guard, motion detect, manual alarm and PTZ preset.
Refer to chapter 5 for details.
9 Connect/Disconnect
Connect to the device or disconnect from the device.
9 Logon info
Check the logon information. If the connection fails, it will indicate the possible failure
reason, as shown in below left figure.
Weixun Electronics (Weissontronics) Technologies Co. Ltd.
728, Changchi Road, Gutang, Cixi City, Zhejiang Province, PRChina, 315300
Tel: +86 574 6301 7347 / 6302 8417 x 118/168, Fax: +86 574 6301 7347 / 6302 8417 x 128
http://www.nbweixun.com/en/index.php
第 15 页
Page 16
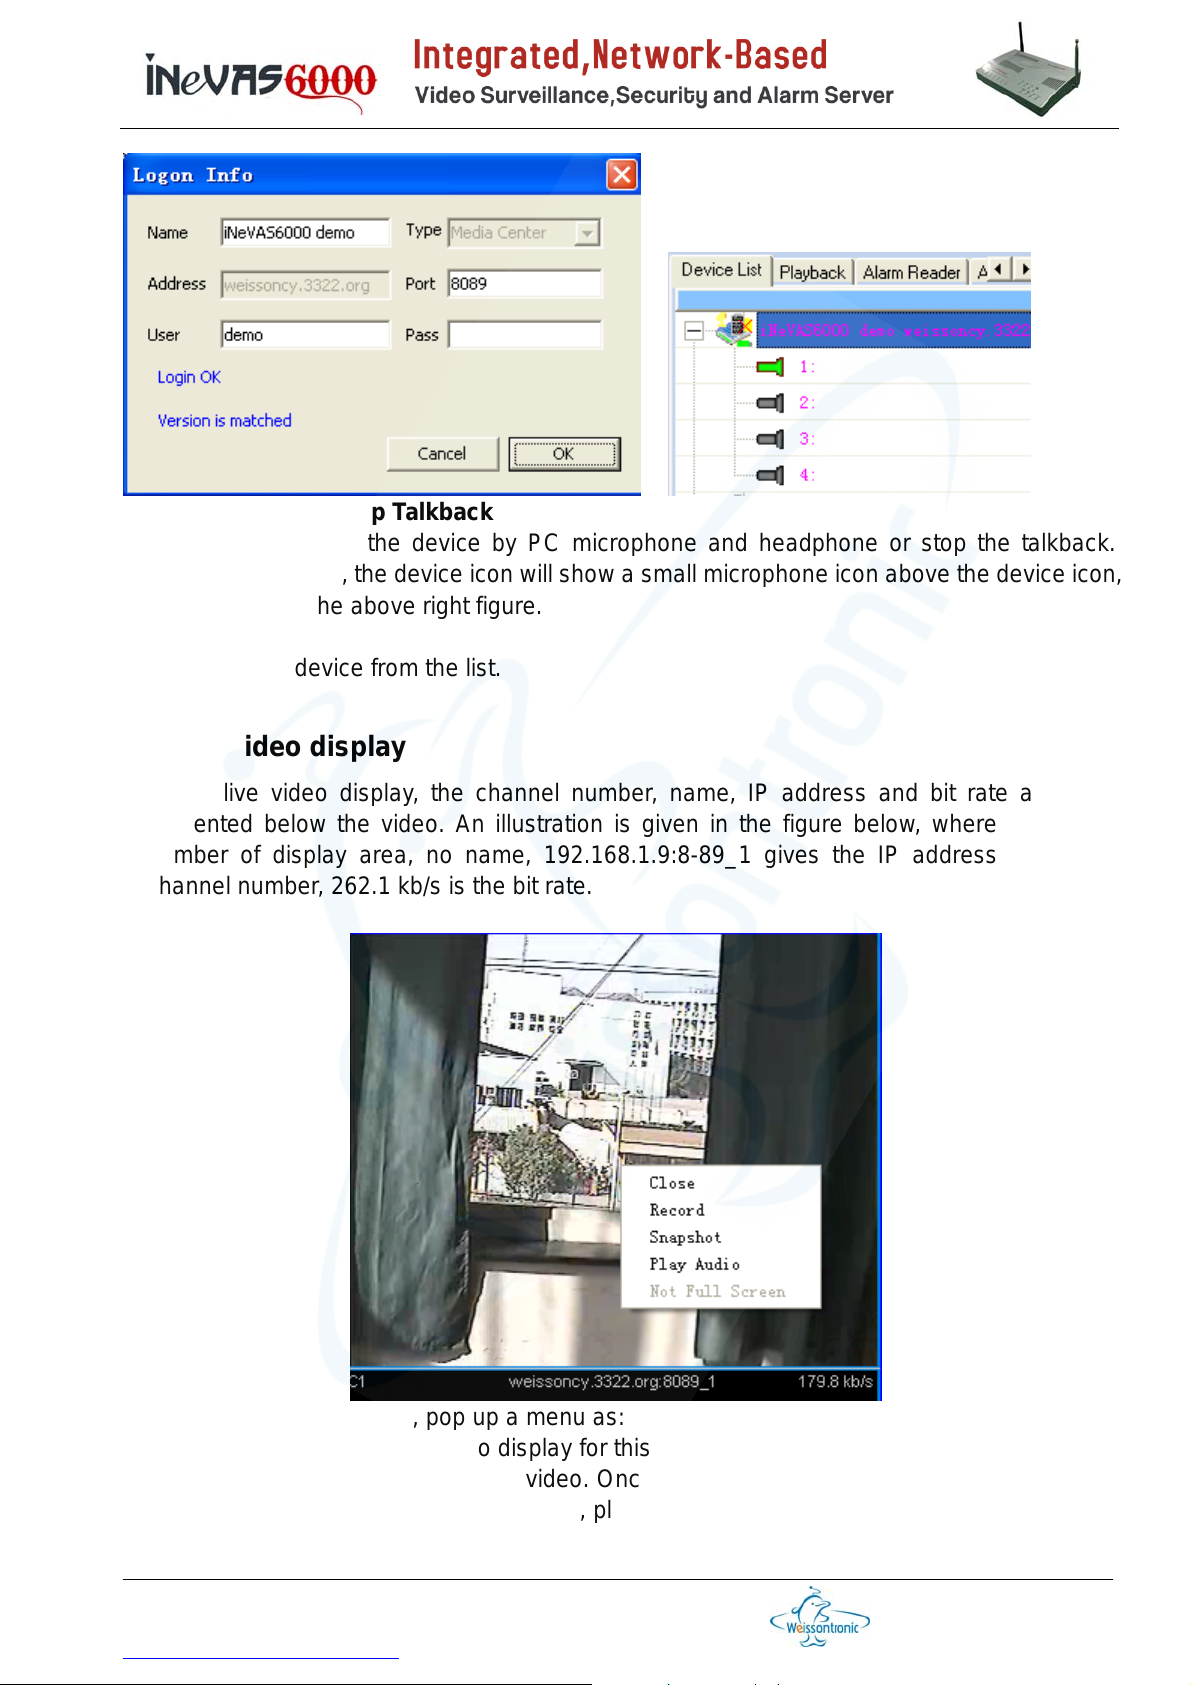
9 Start Talkback/Stop Talkback
Start talkback to the device by PC microphone and headphone or stop the talkback.
During talkback, the device icon will show a small microphone icon above the device icon,
as shown in the above right figure.
9 Delete
Delete the device from the list.
Live video display
In the live video display, the channel number, name, IP address and bit rate are also
presented below the video. An illustration is given in the figure below, where C1 is the
number of display area, no name, 192.168.1.9:8-89_1 gives the IP address, port and
channel number, 262.1 kb/s is the bit rate.
Right click on the live video, pop up a menu as:
a) Close : close the live video display for this channel
b) Record: PC record of the live video. Once it begins, a solid red dot will appear below
the live video. Before PC recording, please select the saving path in the PC. Refer to
section 5.1 for more details.
Weixun Electronics (Weissontronics) Technologies Co. Ltd.
728, Changchi Road, Gutang, Cixi City, Zhejiang Province, PRChina, 315300
Tel: +86 574 6301 7347 / 6302 8417 x 118/168, Fax: +86 574 6301 7347 / 6302 8417 x 128
http://www.nbweixun.com/en/index.php
第 16 页
Page 17
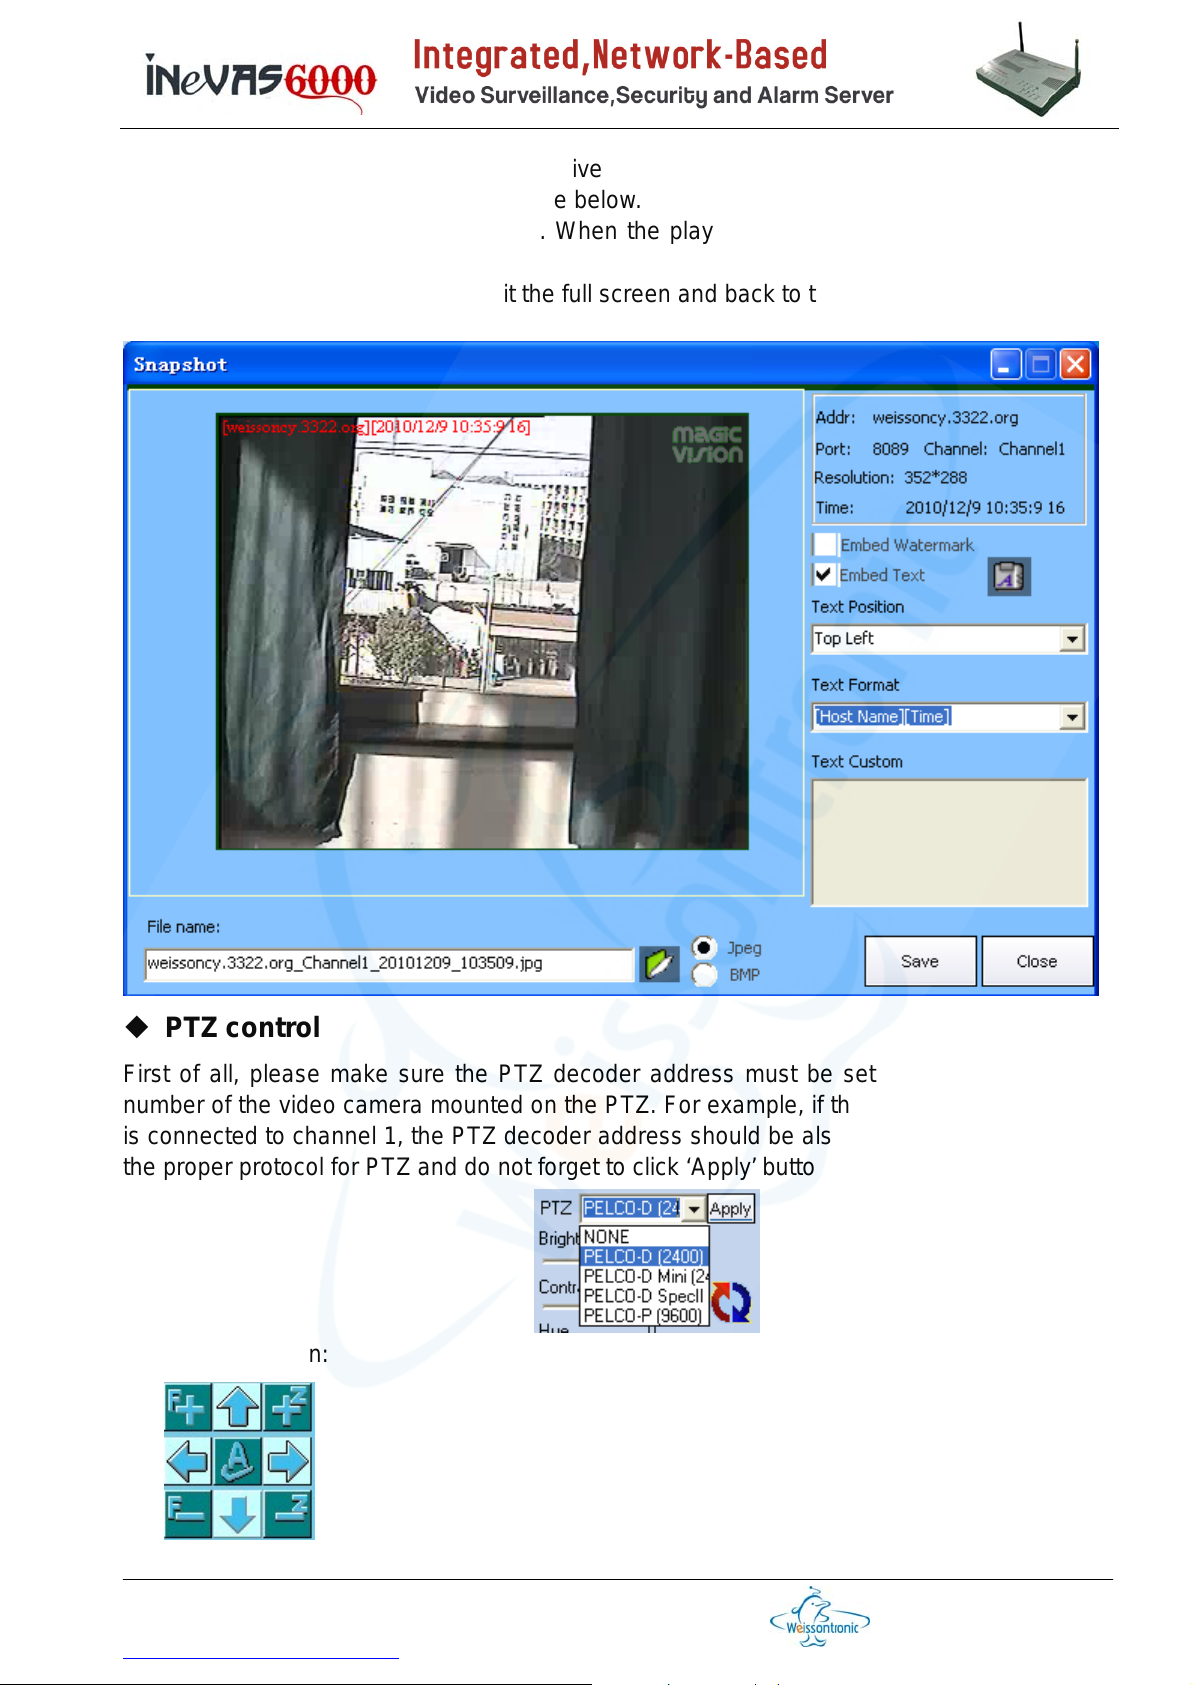
c) Snapshot: take a snapshot of the live video. Watermark or other text like time can be
embedded, as shown in the figure below.
d) Play Audio: play the live audio. When the play begins, an speaker icon will appear
below the video
e) Not Full Screen : used to exit the full screen and back to the window
PTZ control
First of all, please make sure the PTZ decoder address must be set same as the channel
number of the video camera mounted on the PTZ. For example, if the mounted video camera
is connected to channel 1, the PTZ decoder address should be also 1. Second, please select
the proper protocol for PTZ and do not forget to click ‘Apply’ button, as shown below.
Note for the button:
The arrow up, down, left and right guide the PTZ to move accordingly while
Weixun Electronics (Weissontronics) Technologies Co. Ltd.
728, Changchi Road, Gutang, Cixi City, Zhejiang Province, PRChina, 315300
Tel: +86 574 6301 7347 / 6302 8417 x 118/168, Fax: +86 574 6301 7347 / 6302 8417 x 128
http://www.nbweixun.com/en/index.php
第 17 页
Page 18
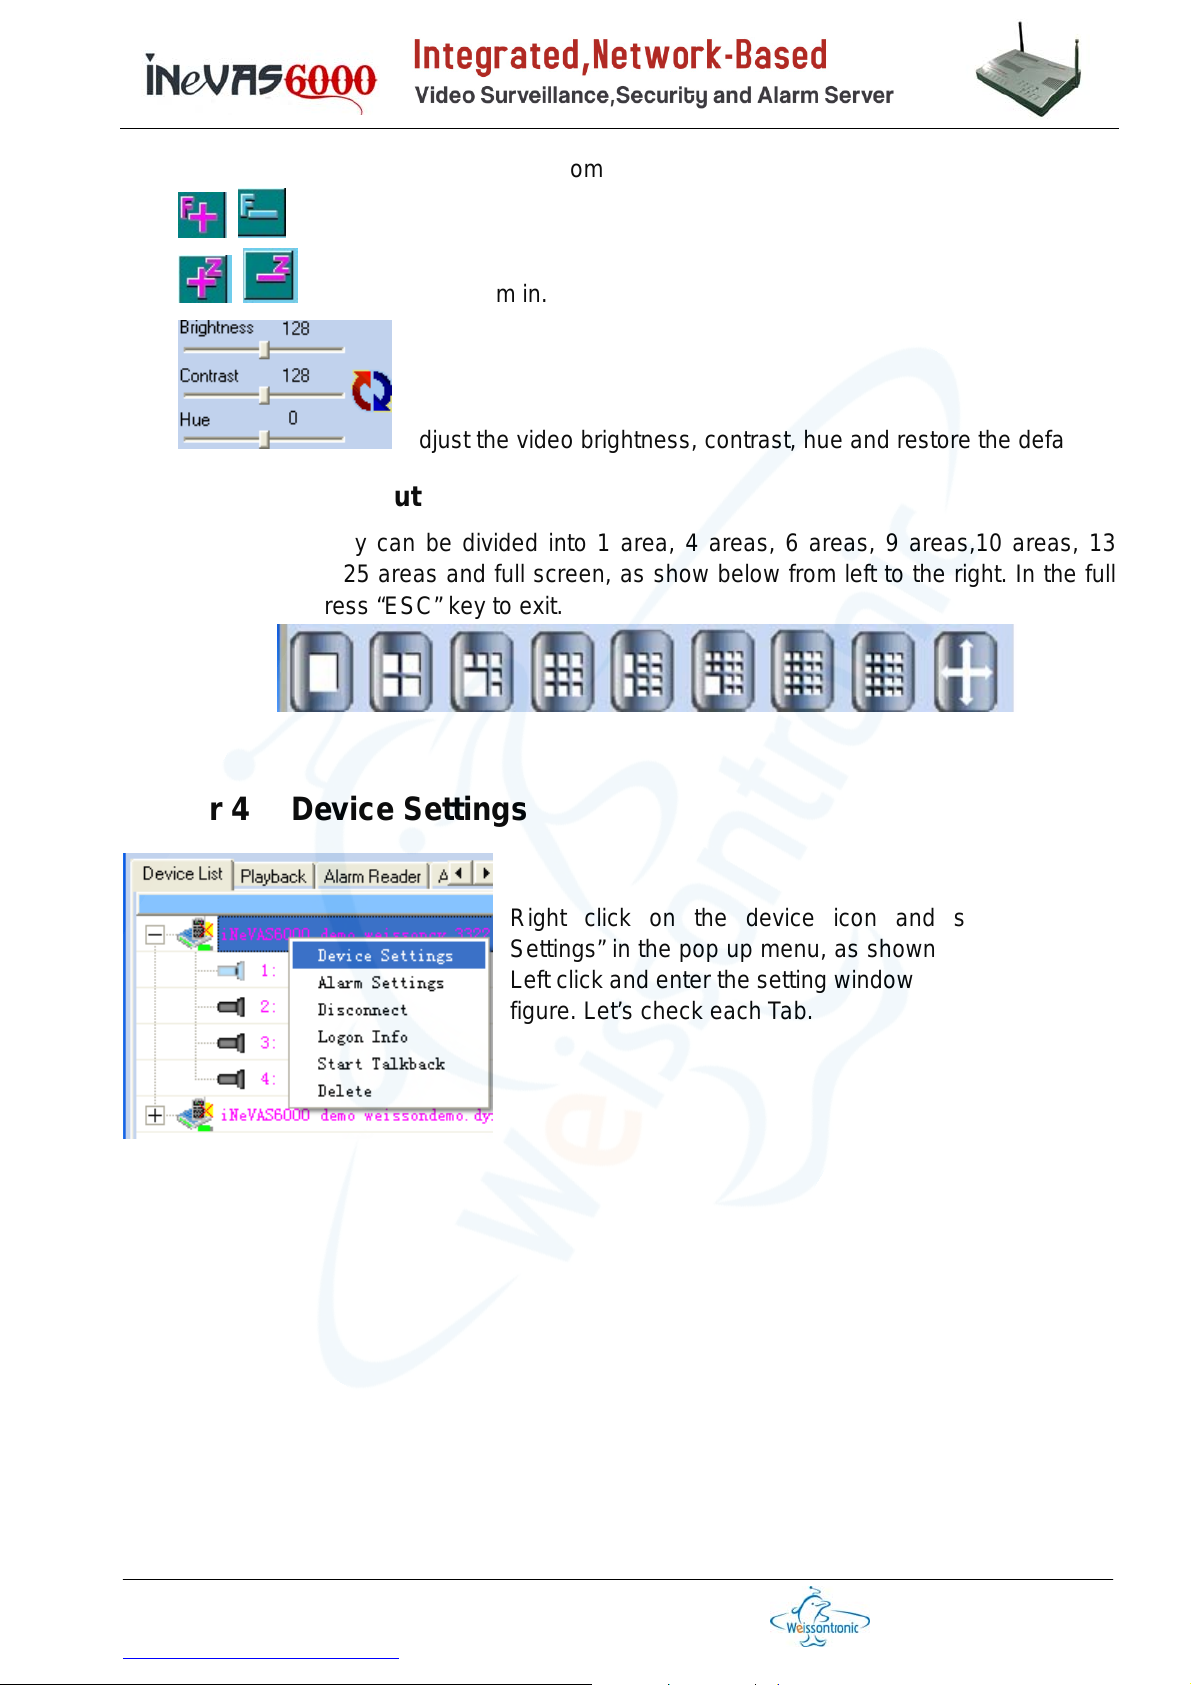
the central “A” is for automatic patrol.
Focus
Zoon out and zoom in.
Adjust the video brightness, contrast, hue and restore the default.
Display area layout
The screen display can be divided into 1 area, 4 areas, 6 areas, 9 areas,10 areas, 13
areas, 16 areas, 25 areas and full screen, as show below from left to the right. In the full
screen mode, press “ESC” key to exit.
Chapter 4 Device Settings
Right click on the device icon and select “Device
Settings” in the pop up menu, as shown in the left figure.
Left click and enter the setting window as shown in below
figure. Let’s check each Tab.
Weixun Electronics (Weissontronics) Technologies Co. Ltd.
728, Changchi Road, Gutang, Cixi City, Zhejiang Province, PRChina, 315300
Tel: +86 574 6301 7347 / 6302 8417 x 118/168, Fax: +86 574 6301 7347 / 6302 8417 x 128
http://www.nbweixun.com/en/index.php
第 18 页
Page 19
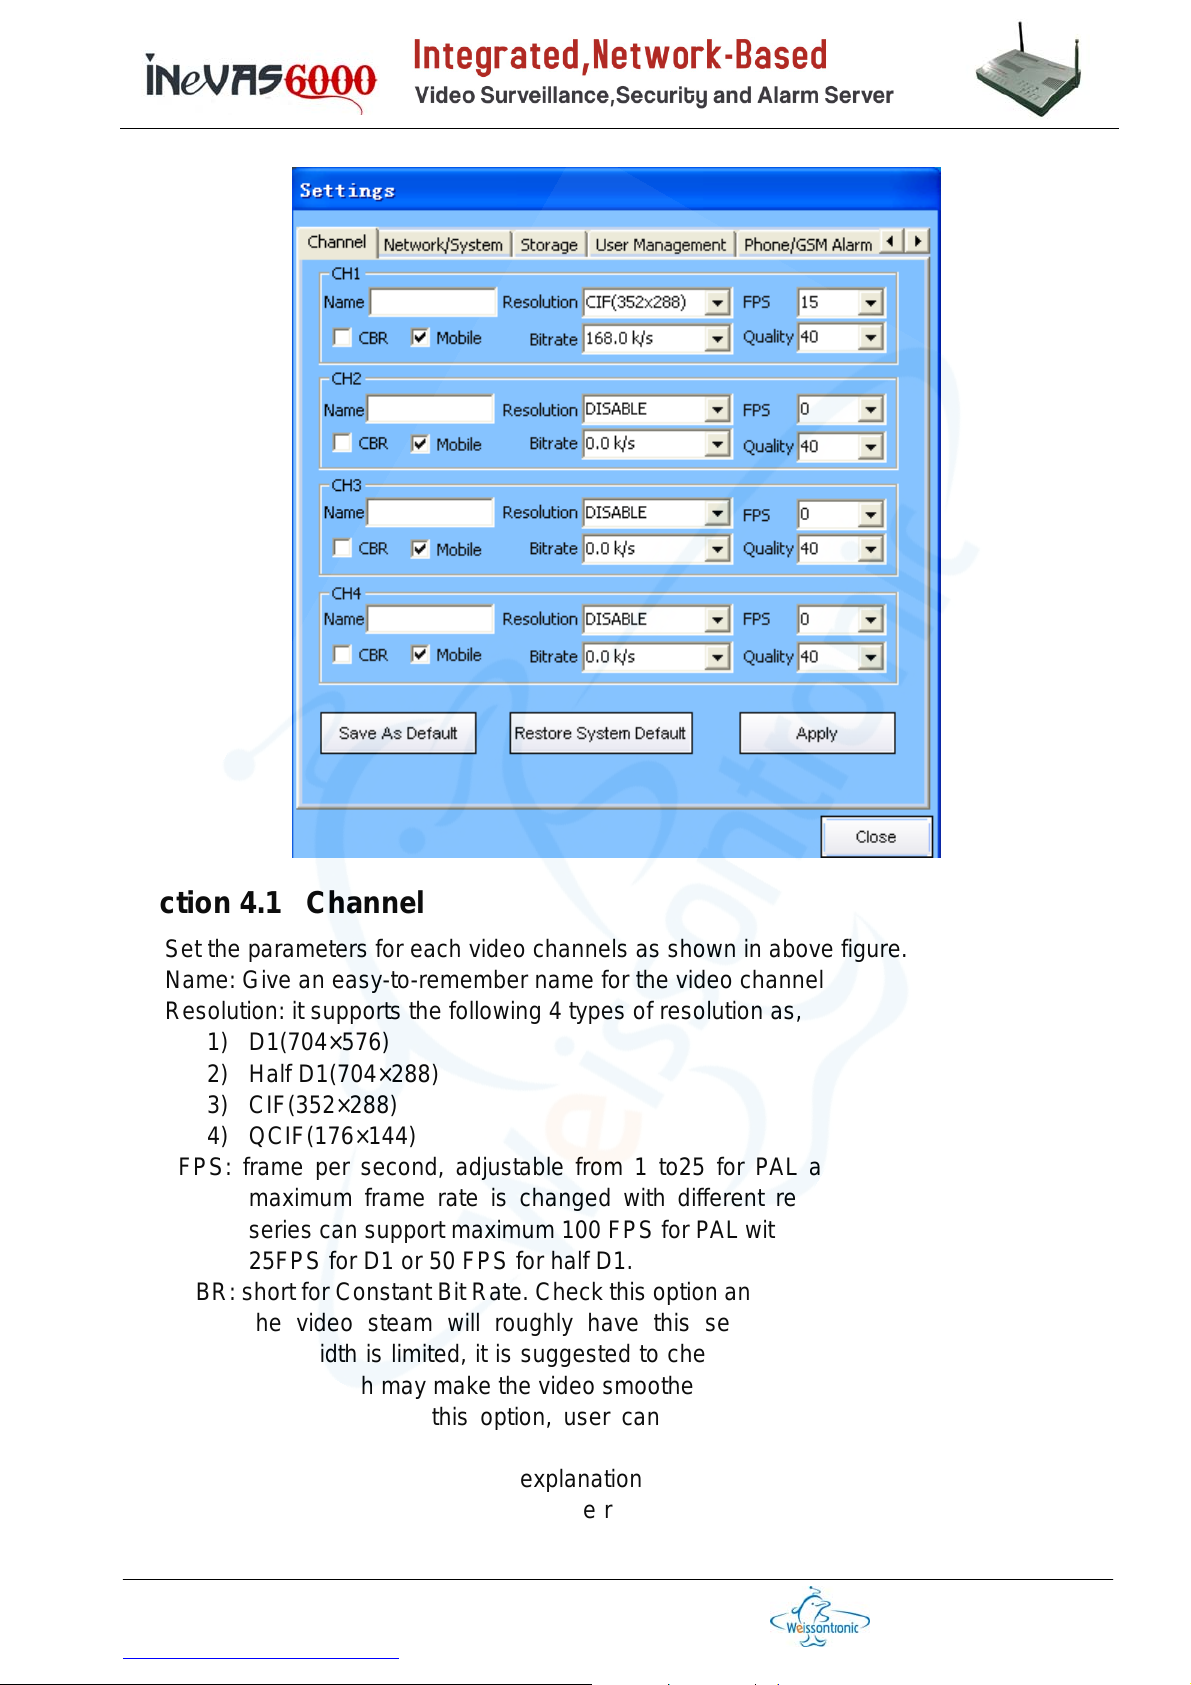
Section 4.1 Channel
Set the parameters for each video channels as shown in above figure.
Name: Give an easy-to-remember name for the video channel
Resolution: it supports the following 4 types of resolution as,
1) D1(704×576)
2) Half D1(704×288)
3) CIF(352×288)
4) QCIF(176×144)
FPS: frame per second, adjustable from 1 to25 for PAL and 1 to 30 for NTSC. The
maximum frame rate is changed with different resolution setting. iNeVAS6000
series can support maximum 100 FPS for PAL with CIF resolution, or equivalently,
25FPS for D1 or 50 FPS for half D1.
CBR: short for Constant Bit Rate. Check this option and select the followed bit rate value,
the video steam will roughly have this selected bit rate. When the Internet
bandwidth is limited, it is suggested to check this option and select a low bit rate
value which may make the video smoother.
Mobile: after checking this option, user can browse the live video with smart mobile
phone
Bit rate: refer to the above CBR explanation
Quality: the video quality, which can be regarded as the ability to portrait the fine details
of what is shot, for simplicity. This selection only works when CBR is not checked.
Weixun Electronics (Weissontronics) Technologies Co. Ltd.
728, Changchi Road, Gutang, Cixi City, Zhejiang Province, PRChina, 315300
Tel: +86 574 6301 7347 / 6302 8417 x 118/168, Fax: +86 574 6301 7347 / 6302 8417 x 128
http://www.nbweixun.com/en/index.php
第 19 页
Page 20
The default value is 40 which is also the suggested value for daily use. It is
strongly suggested not to beyond 70, otherwise, unexpected huge bit rate might
be resulted which may suffocate the network.
Note the button:
Save As Default: as it said, the current settings will be saved as the default settings, that
is, every time the device is rebooted, it will load this default settings.
Restore System Default: as it said, to load the system default settings which is the
preloaded basic settings by factory.
Apply: apply the changes to the device
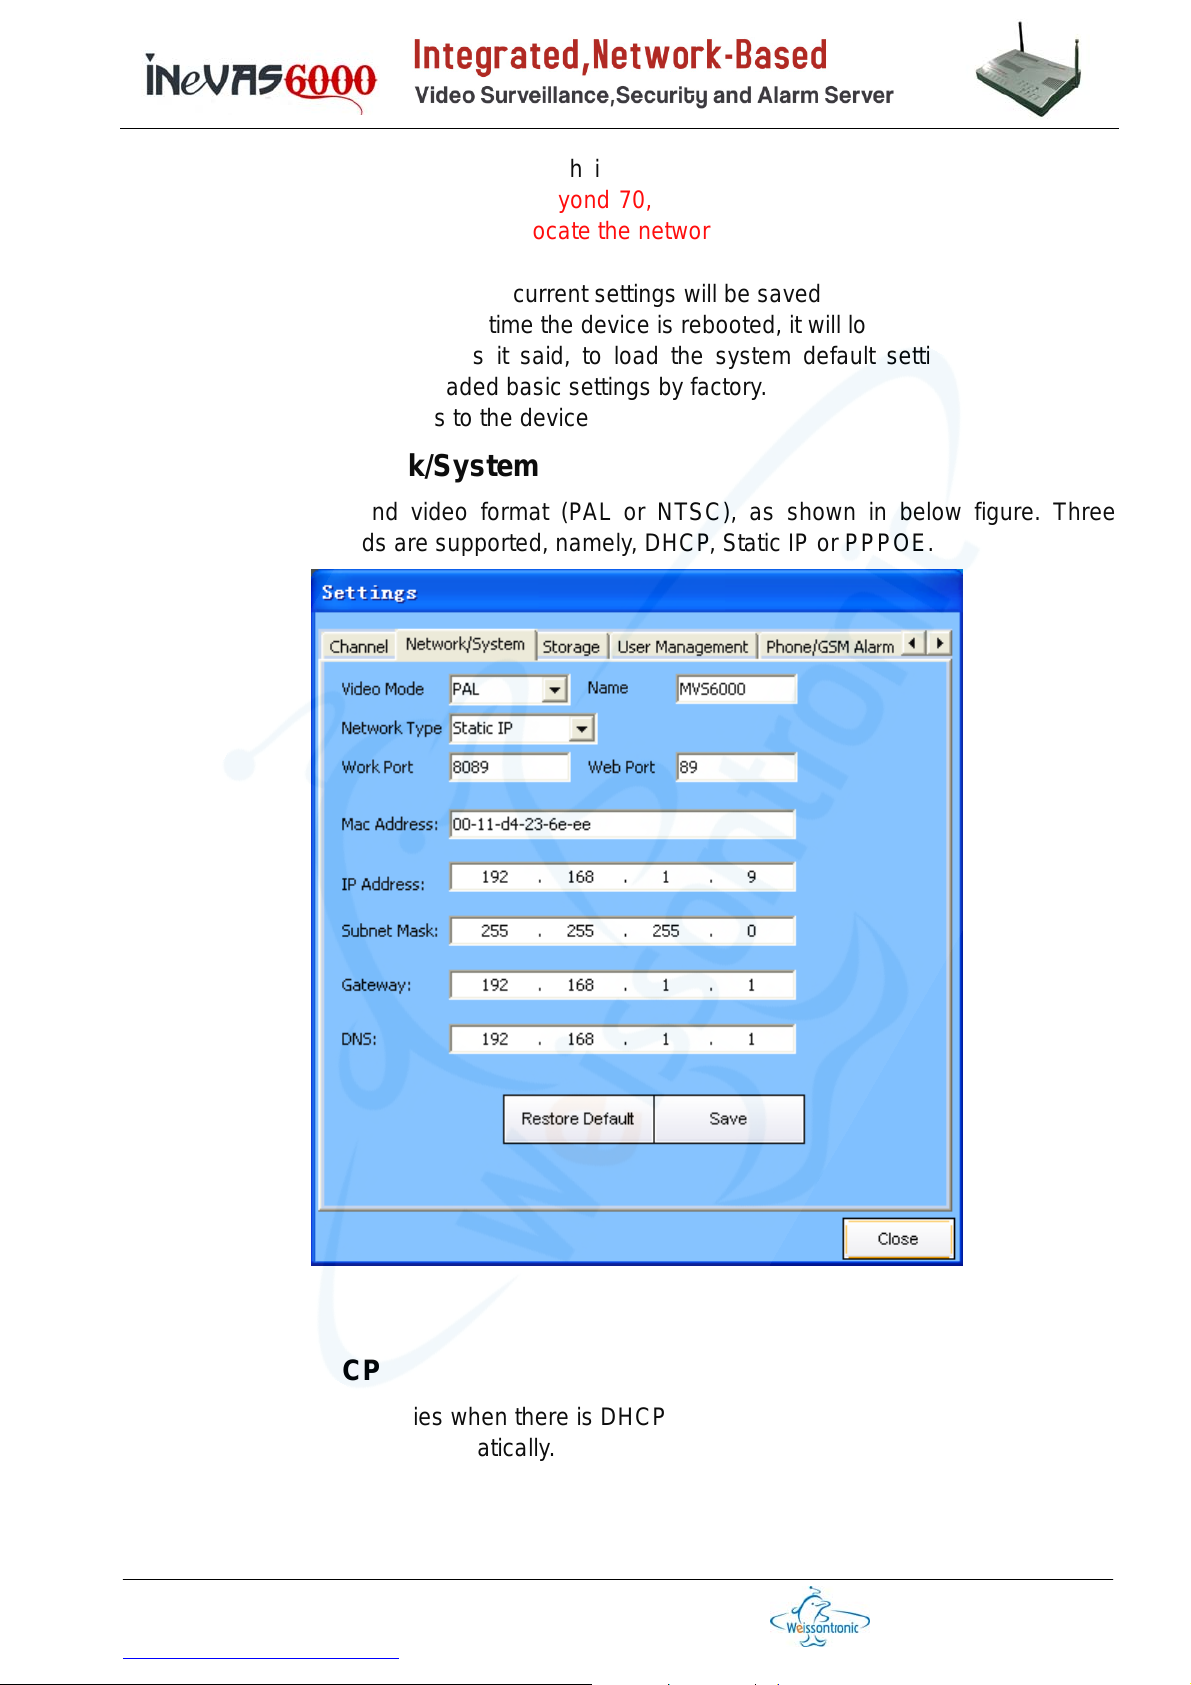
Section 4.2 Network/System
Settings for network and video format (PAL or NTSC), as shown in below figure. Three
network access methods are supported, namely, DHCP, Static IP or PPPOE.
Section 4.2.1 DHCP
This method only applies when there is DHCP server in the network which will assign an
IP address to the device automatically.
Weixun Electronics (Weissontronics) Technologies Co. Ltd.
728, Changchi Road, Gutang, Cixi City, Zhejiang Province, PRChina, 315300
Tel: +86 574 6301 7347 / 6302 8417 x 118/168, Fax: +86 574 6301 7347 / 6302 8417 x 128
http://www.nbweixun.com/en/index.php
第 20 页
Page 21
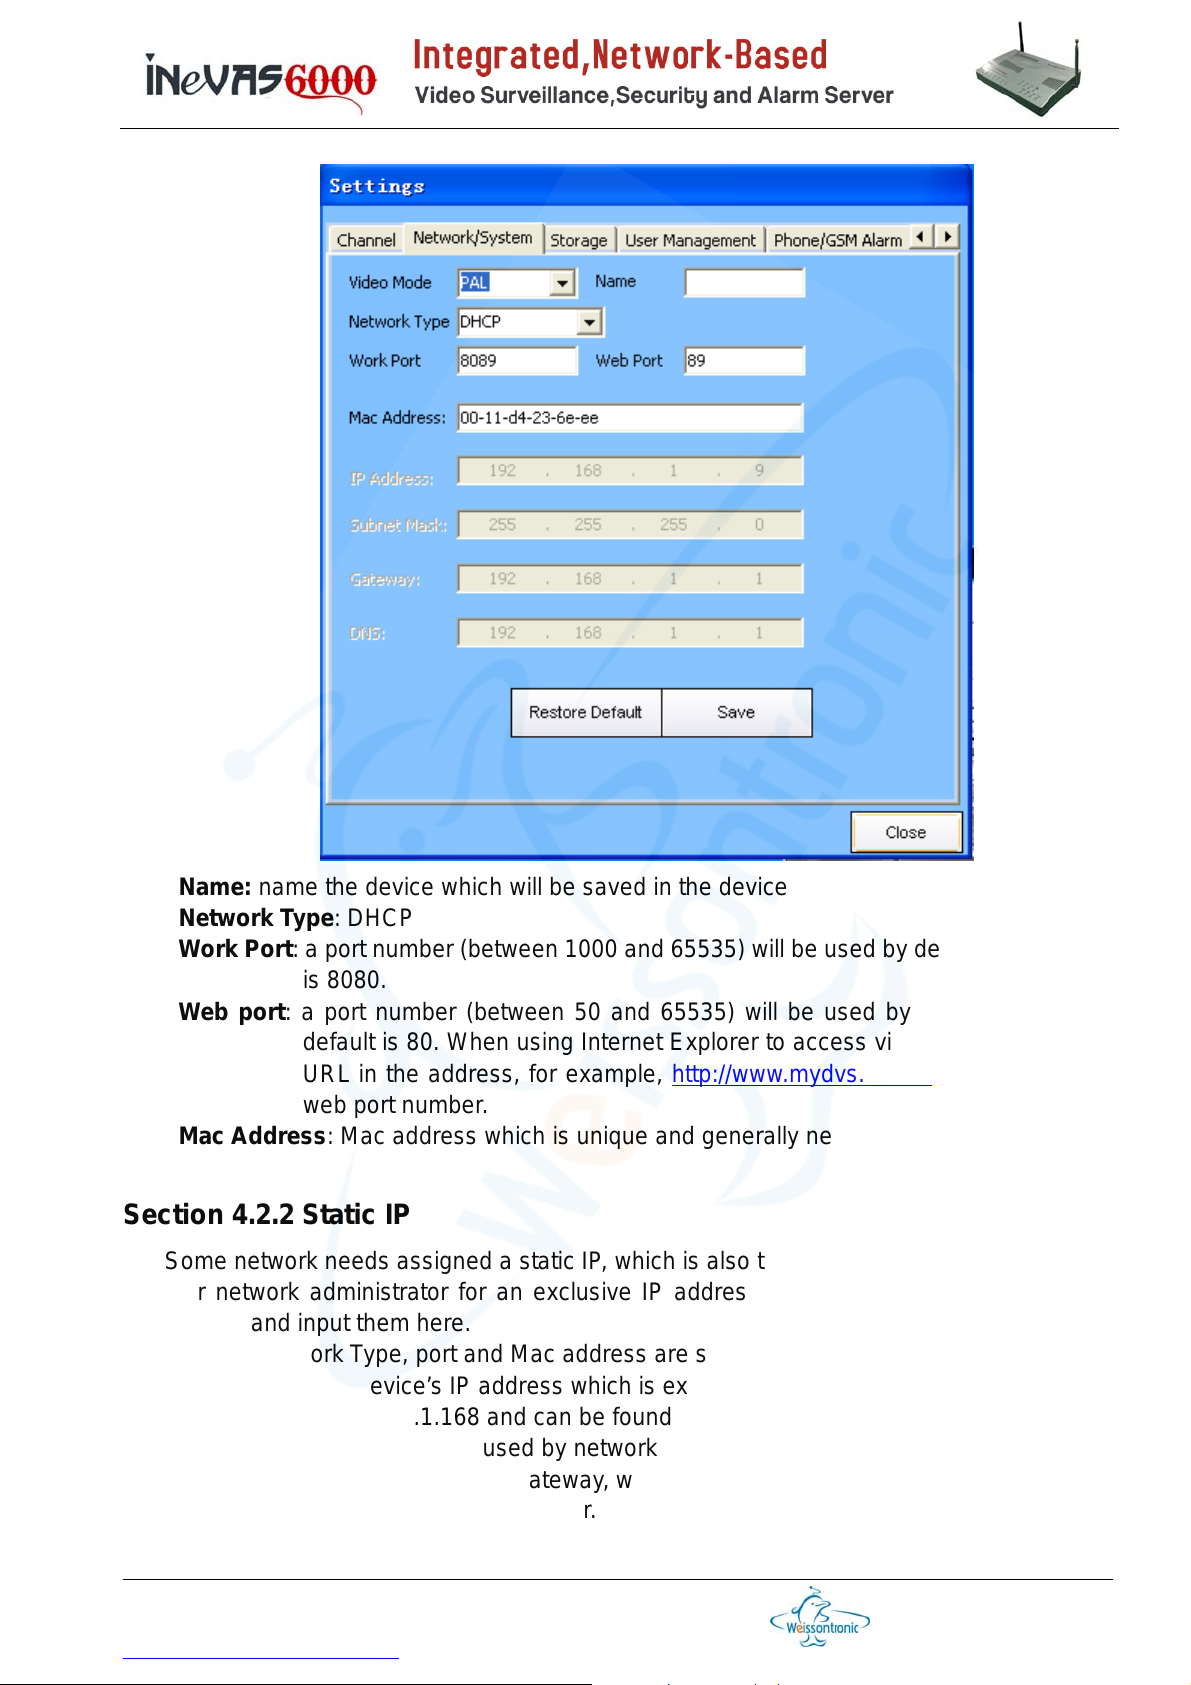
Name: name the device which will be saved in the device
Network Type: DHCP
Work Port: a port number (between 1000 and 65535) will be used by device. The default
is 8080.
Web port: a port number (between 50 and 65535) will be used by web browser. The
default is 80. When using Internet Explorer to access video, please input the
URL in the address, for example, http://www.mydvs.net:81, where 81 is the
web port number.
Mac Address: Mac address which is unique and generally need not change.
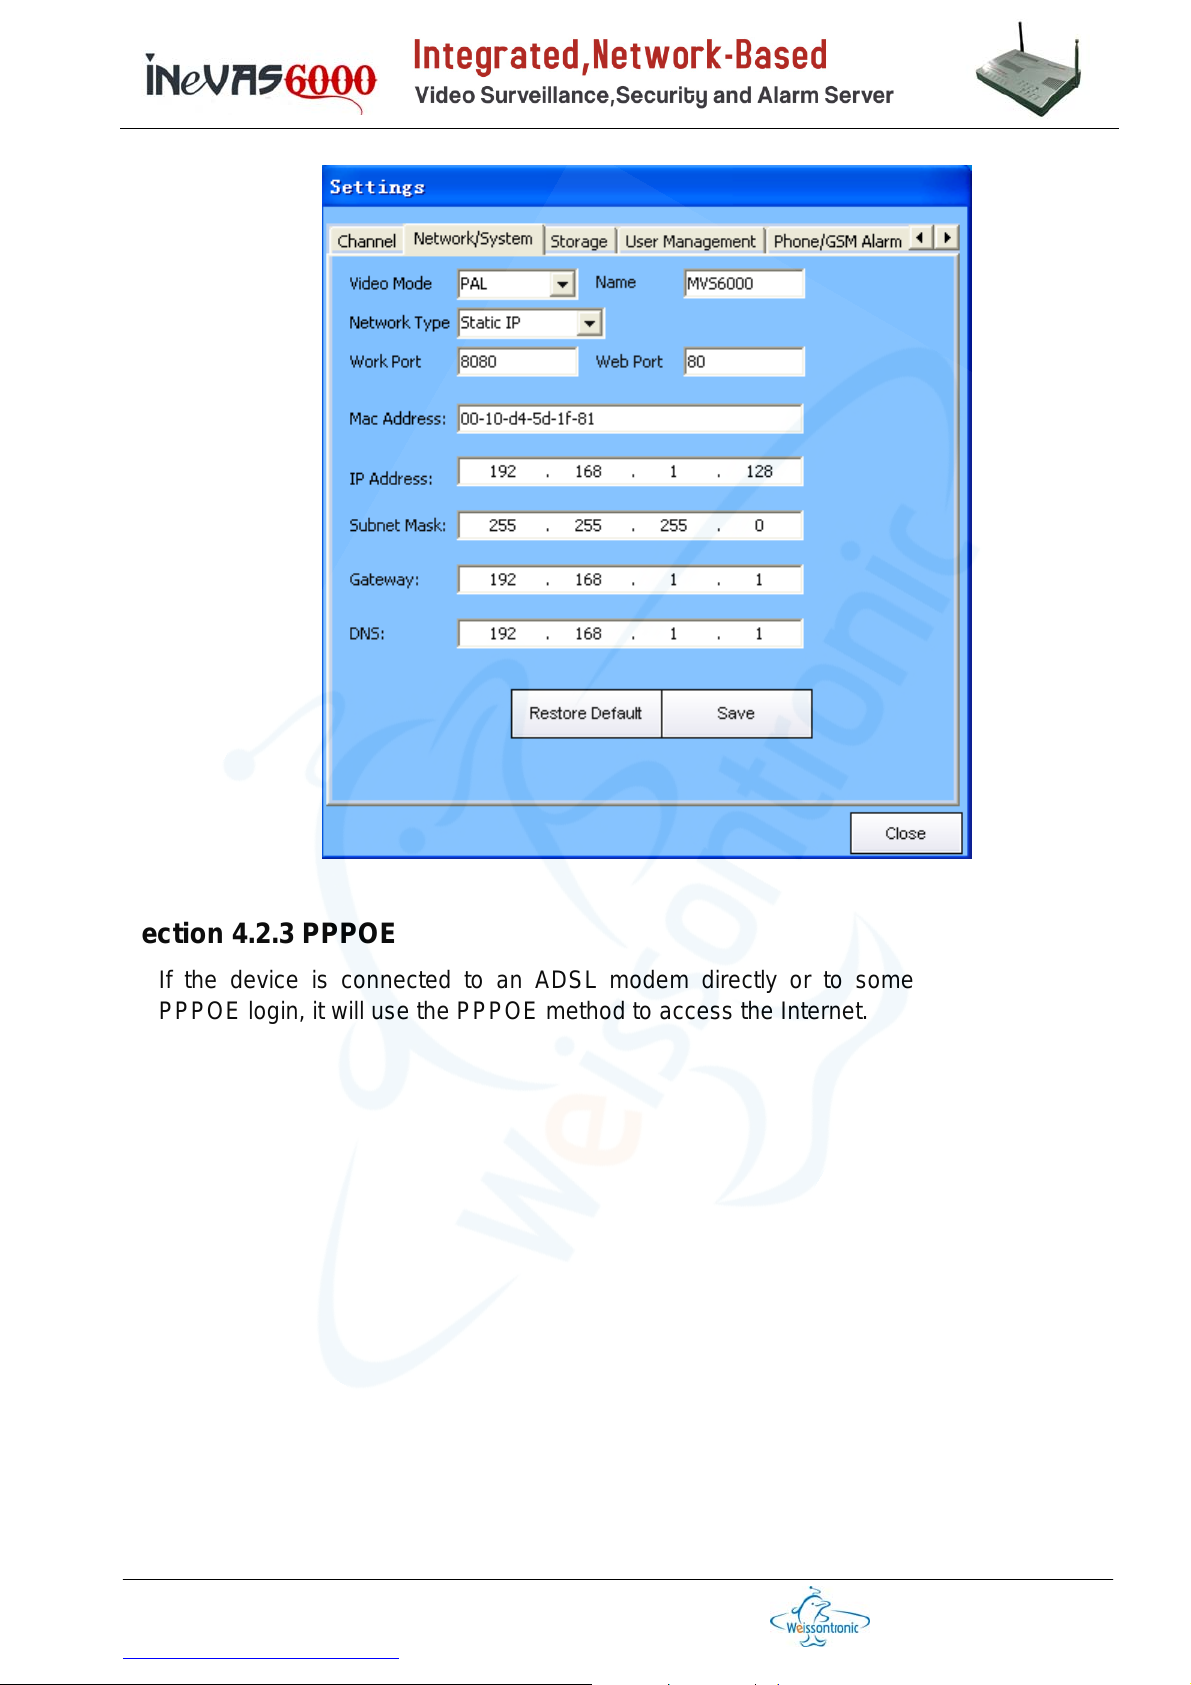
Section 4.2.2 Static IP
Some network needs assigned a static IP, which is also the default setting. Please consult
your network administrator for an exclusive IP address, its mask, gateway and DNS IP
address and input them here.
Name, Network Type, port and Mac address are same as that in the DHCP.
IP Address: the device’s IP address which is exclusive in the same network. The default
is 192.168.1.168 and can be found in the nameplate in the box bottom.
Subnet Mask: a mask code used by network devices
Gateway: the IP address of the gateway, which can not be left empty and generally is the
IP address of the local router.
DNS: the public IP address of domain name server.
Weixun Electronics (Weissontronics) Technologies Co. Ltd.
728, Changchi Road, Gutang, Cixi City, Zhejiang Province, PRChina, 315300
Tel: +86 574 6301 7347 / 6302 8417 x 118/168, Fax: +86 574 6301 7347 / 6302 8417 x 128
http://www.nbweixun.com/en/index.php
第 21 页
Page 22
Section 4.2.3 PPPOE
If the device is connected to an ADSL modem directly or to some network requiring
PPPOE login, it will use the PPPOE method to access the Internet.
Weixun Electronics (Weissontronics) Technologies Co. Ltd.
728, Changchi Road, Gutang, Cixi City, Zhejiang Province, PRChina, 315300
Tel: +86 574 6301 7347 / 6302 8417 x 118/168, Fax: +86 574 6301 7347 / 6302 8417 x 128
http://www.nbweixun.com/en/index.php
第 22 页
Page 23
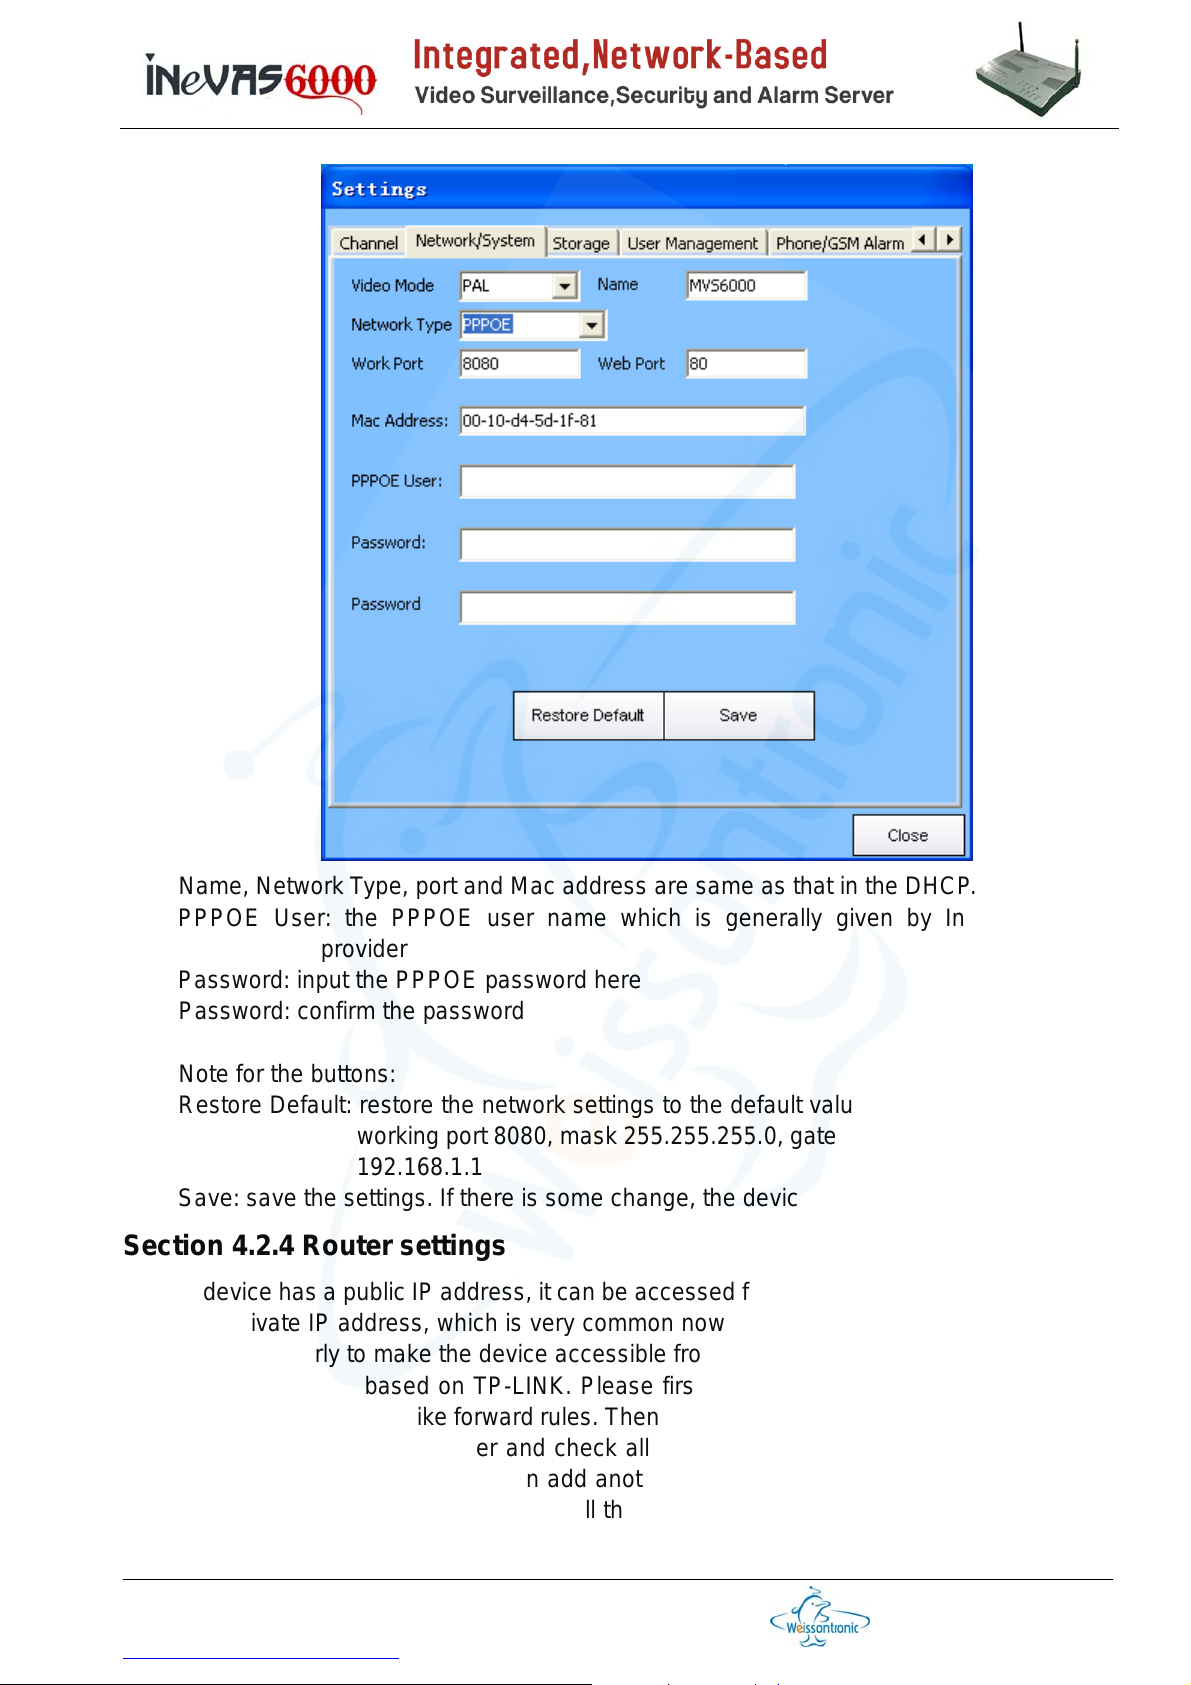
Name, Network Type, port and Mac address are same as that in the DHCP.
PPPOE User: the PPPOE user name which is generally given by Internet service
provider
Password: input the PPPOE password here
Password: confirm the password
Note for the buttons:
Restore Default: restore the network settings to the default value, i.e., IP 192.168.1.168,
working port 8080, mask 255.255.255.0, gateway 192.168.1.1 and DNS
192.168.1.1
Save: save the settings. If there is some change, the device needs restarted.
Section 4.2.4 Router settings
If the device has a public IP address, it can be accessed from Internet directly. However, if
it has a private IP address, which is very common nowadays, it is necessary to configure
the router properly to make the device accessible from Internet.
Here is an example based on TP-LINK. Please first open the administrator window and
browse to the menu item like forward rules. Then add a virtual server and input the device
IP address, working port number and check all the protocols. If you’d like to access the
device video from web browser, then add another virtual server with the same device IP
address but the web port number. After all these settings submitted or saved, it may ask
for reboot the router and please follow the steps to do so.
Weixun Electronics (Weissontronics) Technologies Co. Ltd.
728, Changchi Road, Gutang, Cixi City, Zhejiang Province, PRChina, 315300
Tel: +86 574 6301 7347 / 6302 8417 x 118/168, Fax: +86 574 6301 7347 / 6302 8417 x 128
http://www.nbweixun.com/en/index.php
第 23 页
Page 24
Section 4.3 Storage
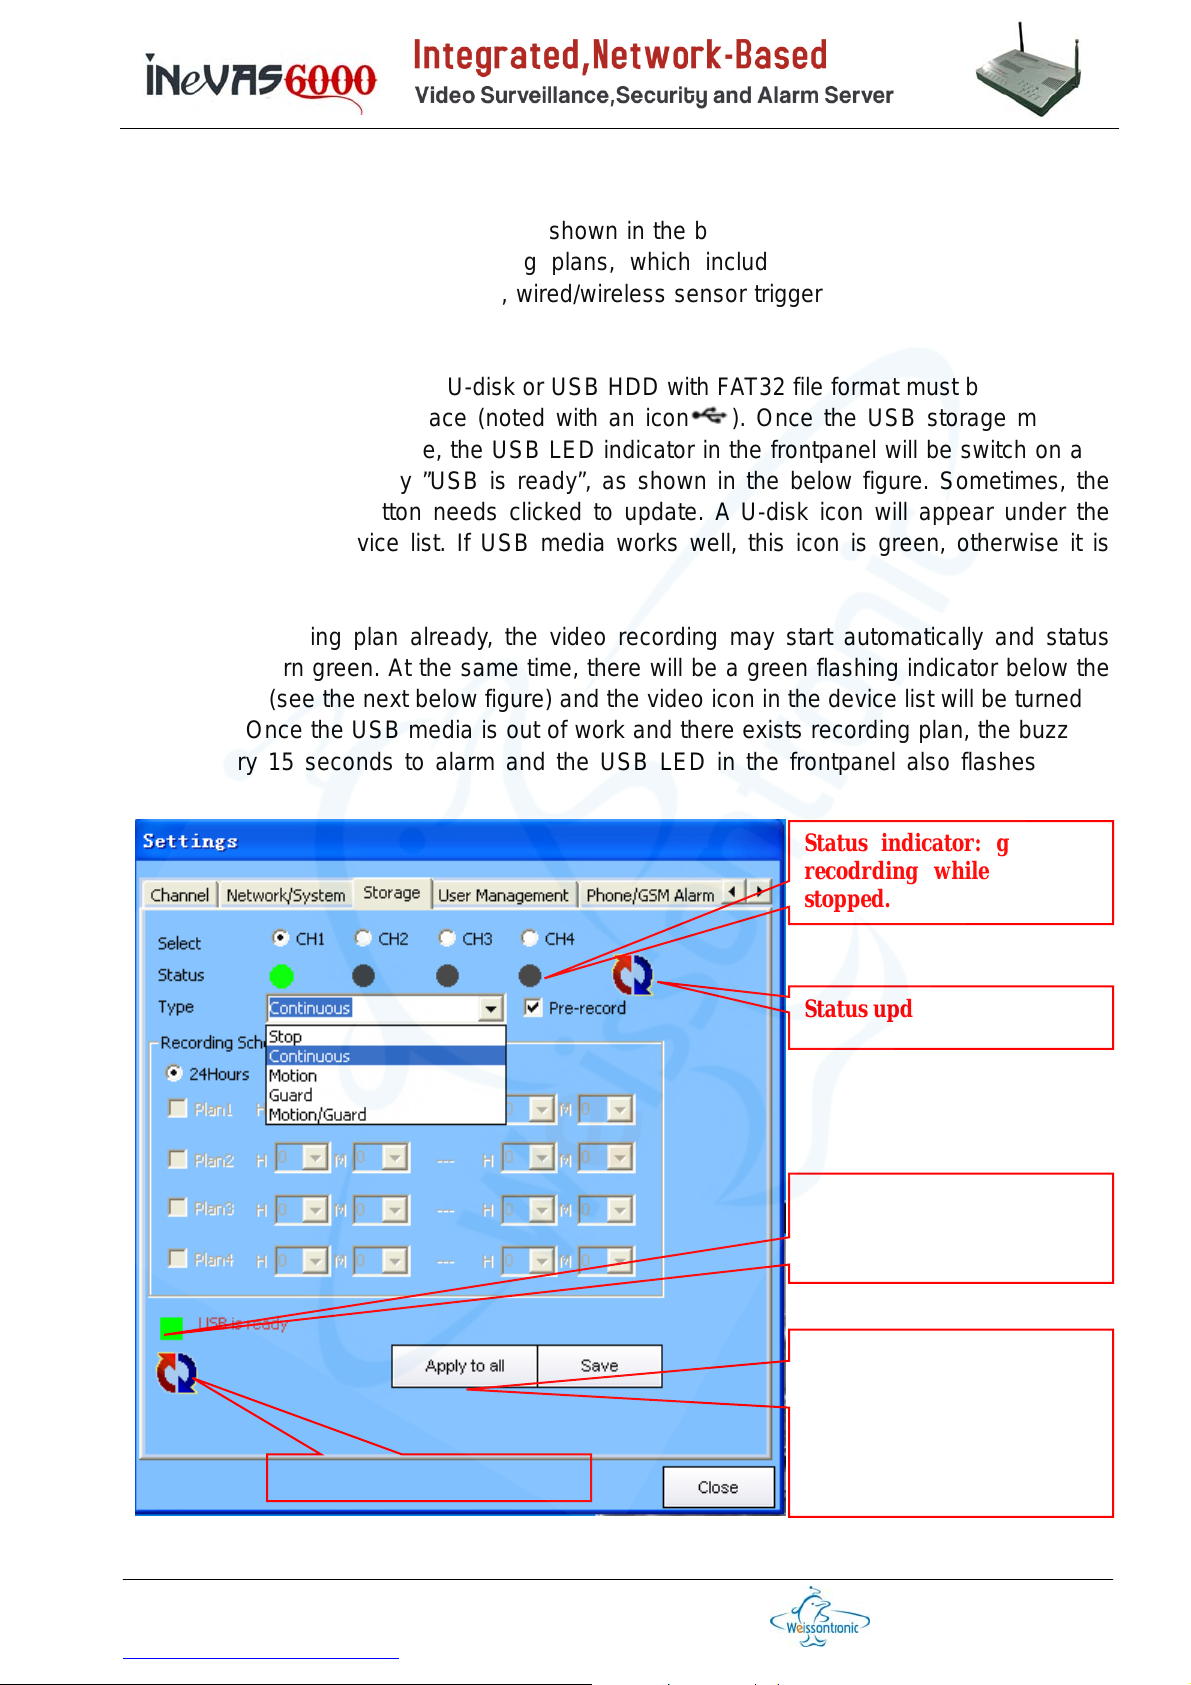
Here set the local video recordings. As shown in the below figure, the 4 video channels can
be configured by separate recording plans, which includes different recoding type like
continuous, motion detect triggered, wired/wireless sensor triggered, or either triggered, and
different schedules.
To record the videos locally, a U-disk or USB HDD with FAT32 file format must be connected
to the backpanel USB interface (noted with an icon ). Once the USB storage media is
recognized by the mainframe, the USB LED indicator in the frontpanel will be switch on and
the PC client will also say ”USB is ready”, as shown in the below figure. Sometimes, the
below status update button needs clicked to update. A U-disk icon will appear under the
device icon in the device list. If USB media works well, this icon is green, otherwise it is
yellow.
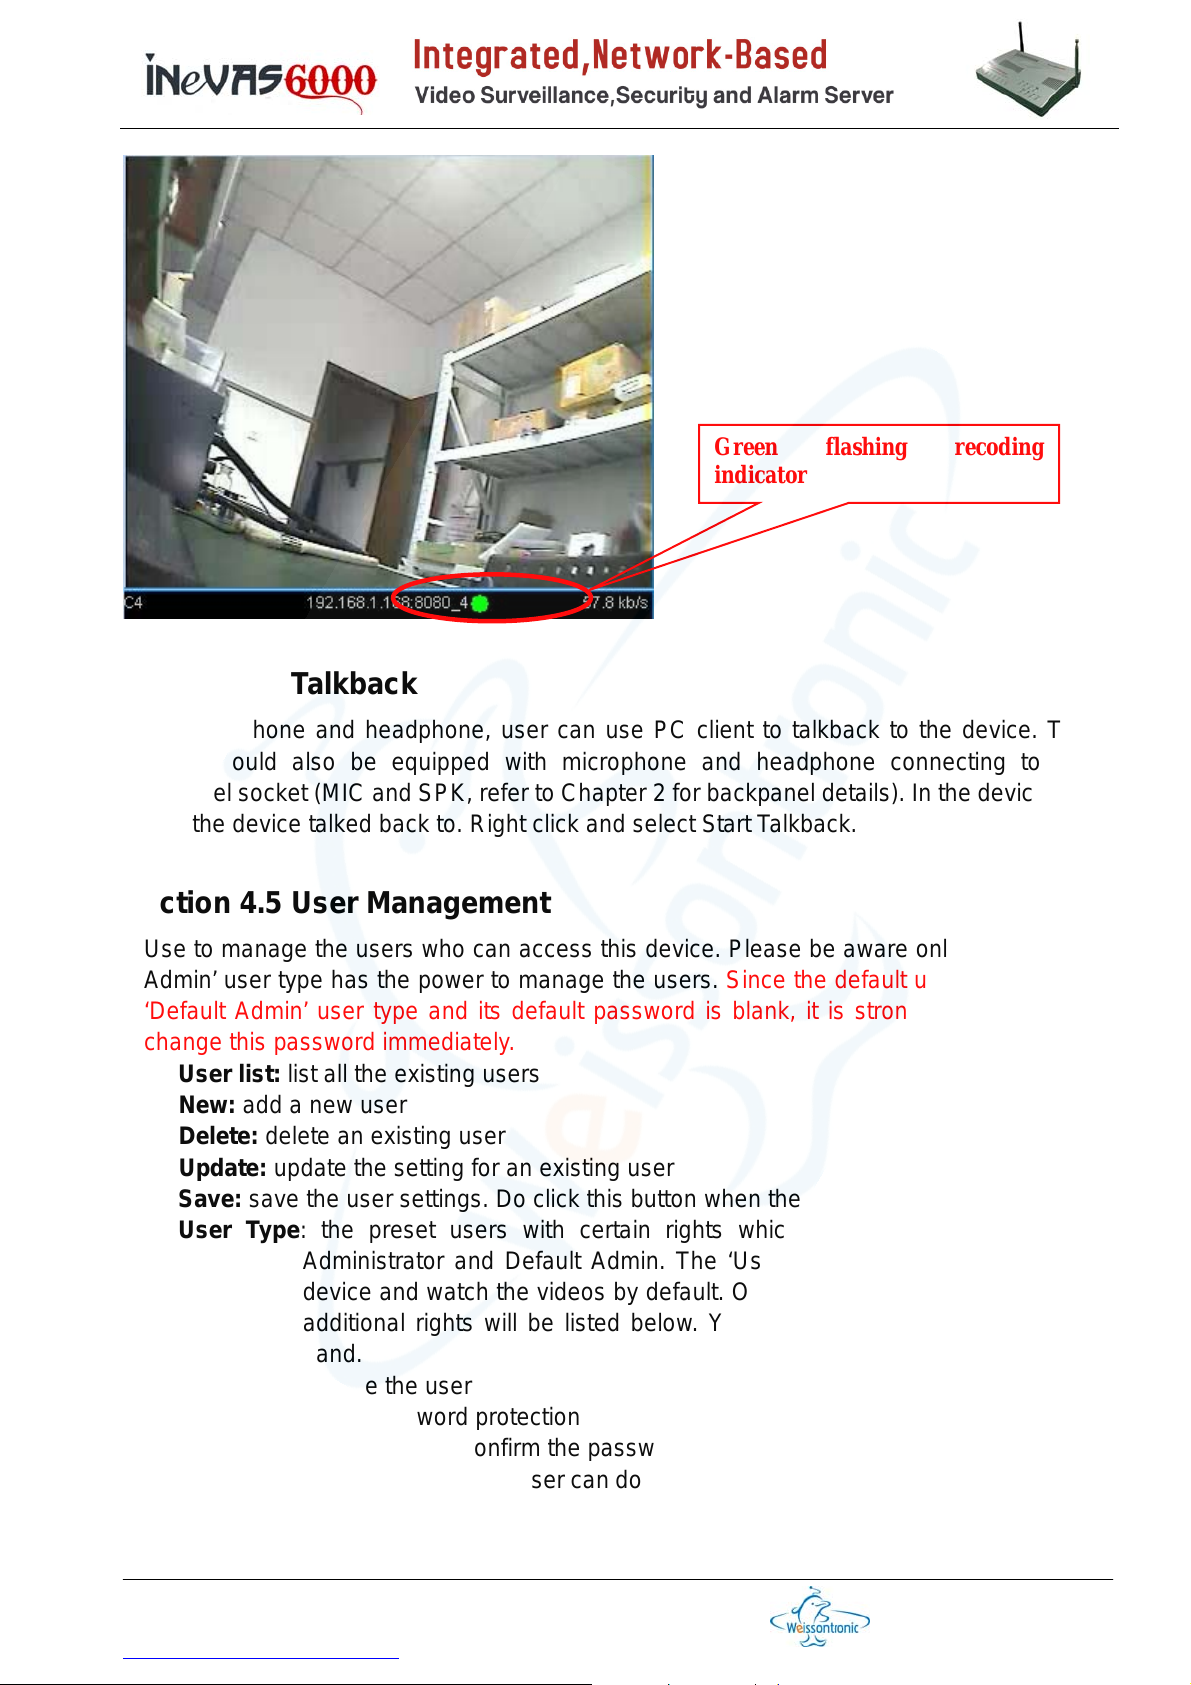
If there is recording plan already, the video recording may start automatically and status
indicator will turn green. At the same time, there will be a green flashing indicator below the
video display (see the next below figure) and the video icon in the device list will be turned to
green, too. Once the USB media is out of work and there exists recording plan, the buzz will
sound every 15 seconds to alarm and the USB LED in the frontpanel also flashes as an
alarm.
Status update
Status indicator: green for
recodrding while grey for
stopped.
Status update
U-Disk indicator: green for
working properly while grey
for out-of-work or missing
The left button applies
current settings to all the
video channels of this
device. The right button
save the current settings to
take effect.
Weixun Electronics (Weissontronics) Technologies Co. Ltd.
728, Changchi Road, Gutang, Cixi City, Zhejiang Province, PRChina, 315300
Tel: +86 574 6301 7347 / 6302 8417 x 118/168, Fax: +86 574 6301 7347 / 6302 8417 x 128
http://www.nbweixun.com/en/index.php
第 24 页
Page 25
Section 4.4 Talkback
Green flashing recoding
indicator
With microphone and headphone, user can use PC client to talkback to the device. The
device should also be equipped with microphone and headphone connecting to the
backpanel socket (MIC and SPK, refer to Chapter 2 for backpanel details). In the device list,
select the device talked back to. Right click and select Start Talkback.
Section 4.5 User Management
Use to manage the users who can access this device. Please be aware only the ‘Default
Admin’ user type has the power to manage the users. Since the default user ‘admin’ is a
‘Default Admin’ user type and its default password is blank, it is strongly suggested to
change this password immediately.
User list: list all the existing users
New: add a new user
Delete: delete an existing user
Update: update the setting for an existing user
Save: save the user settings. Do click this button when there is any change to save.
User Type: the preset users with certain rights which can be User, Power User,
Administrator and Default Admin. The ‘User’ type only can connect to the
device and watch the videos by default. Once other user type is selected, its
additional rights will be listed below. You can change the right settings by
hand.
User Name: name the user
User Password: password protection
Password Confirmation: confirm the password
Rights: the right s define what a user can do with this device, like channel PTZ control etc,
as shown in above figure.
Select All: select all the additional rights listed below
Weixun Electronics (Weissontronics) Technologies Co. Ltd.
728, Changchi Road, Gutang, Cixi City, Zhejiang Province, PRChina, 315300
Tel: +86 574 6301 7347 / 6302 8417 x 118/168, Fax: +86 574 6301 7347 / 6302 8417 x 128
http://www.nbweixun.com/en/index.php
第 25 页
Page 26
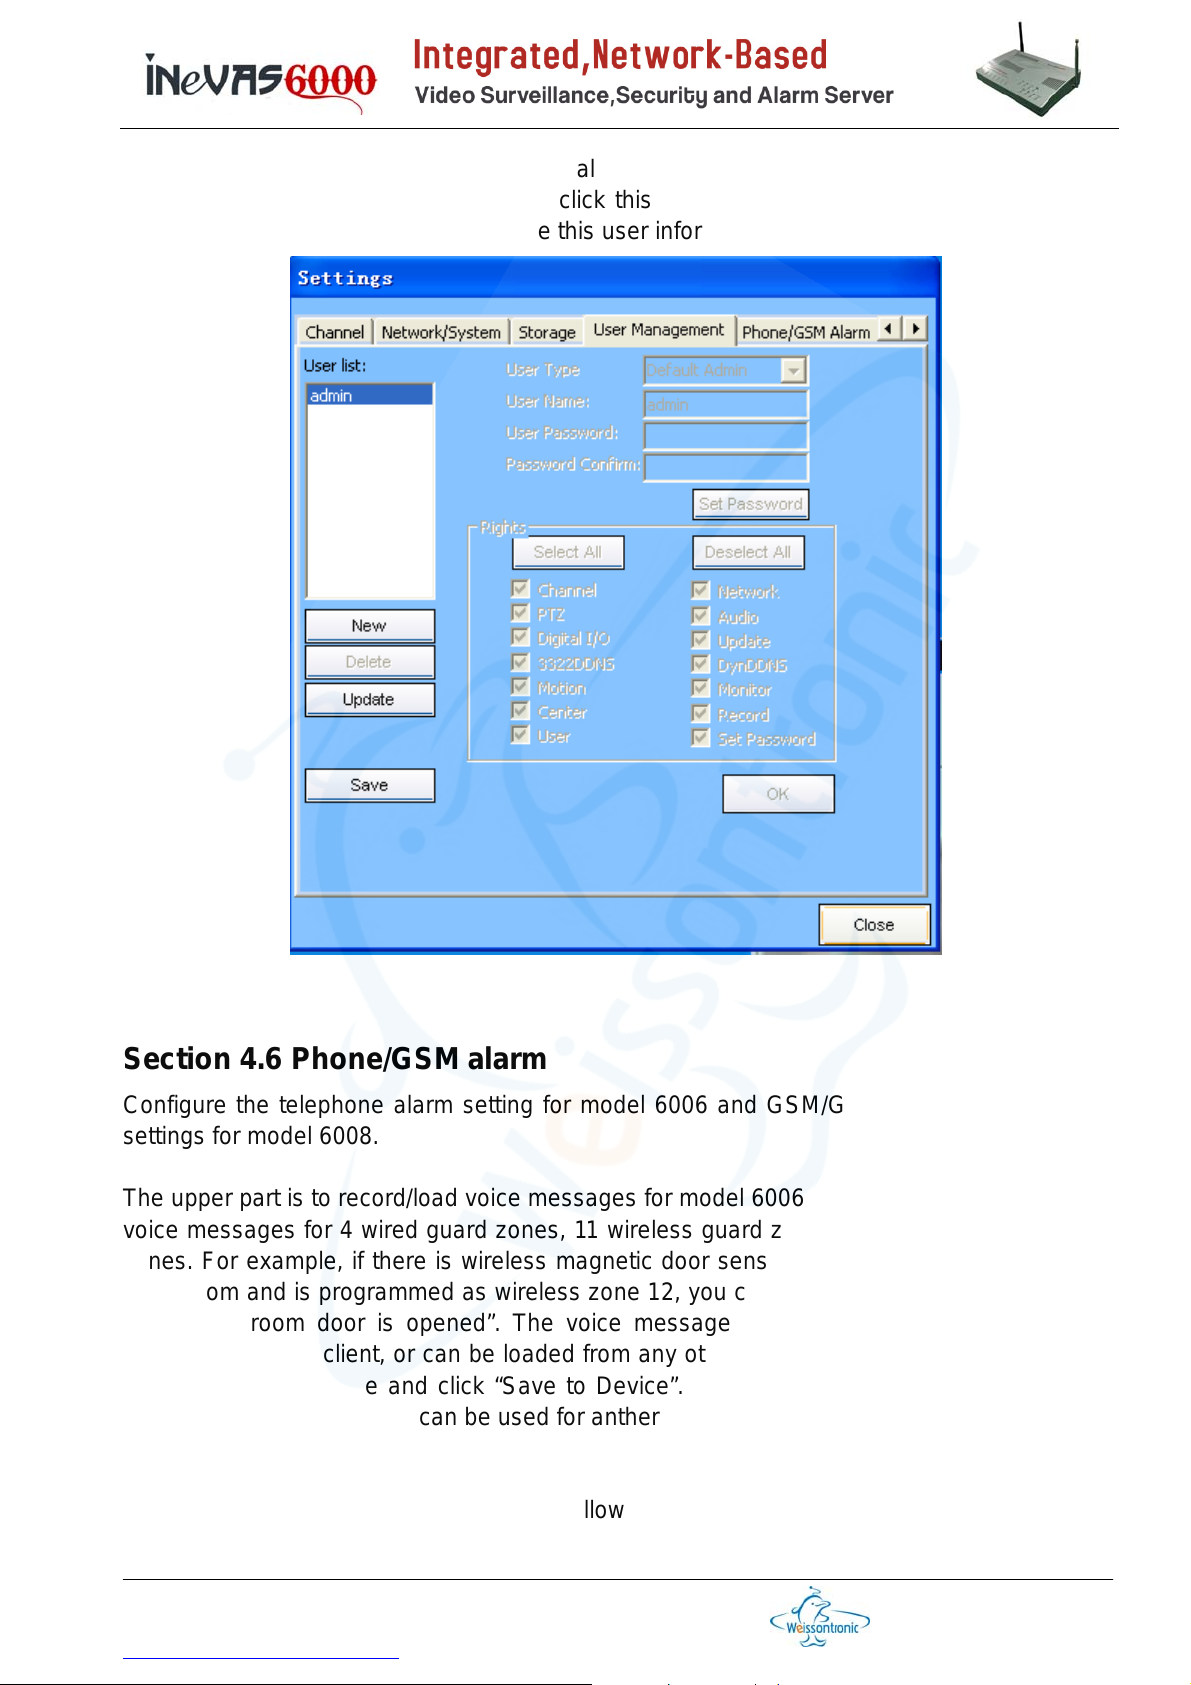
Deselect All: deselect all the additional rights listed below
OK: When a user setting is done, click this button to finish. Please be noted, it is not
saved yet. If you’d like to save this user information, do please click Save.
Section 4.6 Phone/GSM alarm
Configure the telephone alarm setting for model 6006 and GSM/GPRS SMS/MMS alarm
settings for model 6008.
The upper part is to record/load voice messages for model 6006. User can record separate
voice messages for 4 wired guard zones, 11 wireless guard zones and 4 motion detection
zones. For example, if there is wireless magnetic door sensor installed on the door to the
living room and is programmed as wireless zone 12, you can record the voice message as
“The living room door is opened”. The voice message can be record with the Record
function in the PC client, or can be loaded from any other files. After the voice message is
loaded, select the zone and click “Save to Device”. The voice message can also be get
back from the device which can be used for anther device, that is, “Load from Device”.
The lower part includes:
Allow income call: check this option will allow user to remote control the arm/disarm by
telephone. Please also input a password in the right side to prevent any unexpected
Weixun Electronics (Weissontronics) Technologies Co. Ltd.
728, Changchi Road, Gutang, Cixi City, Zhejiang Province, PRChina, 315300
Tel: +86 574 6301 7347 / 6302 8417 x 118/168, Fax: +86 574 6301 7347 / 6302 8417 x 128
http://www.nbweixun.com/en/index.php
第 26 页
Page 27
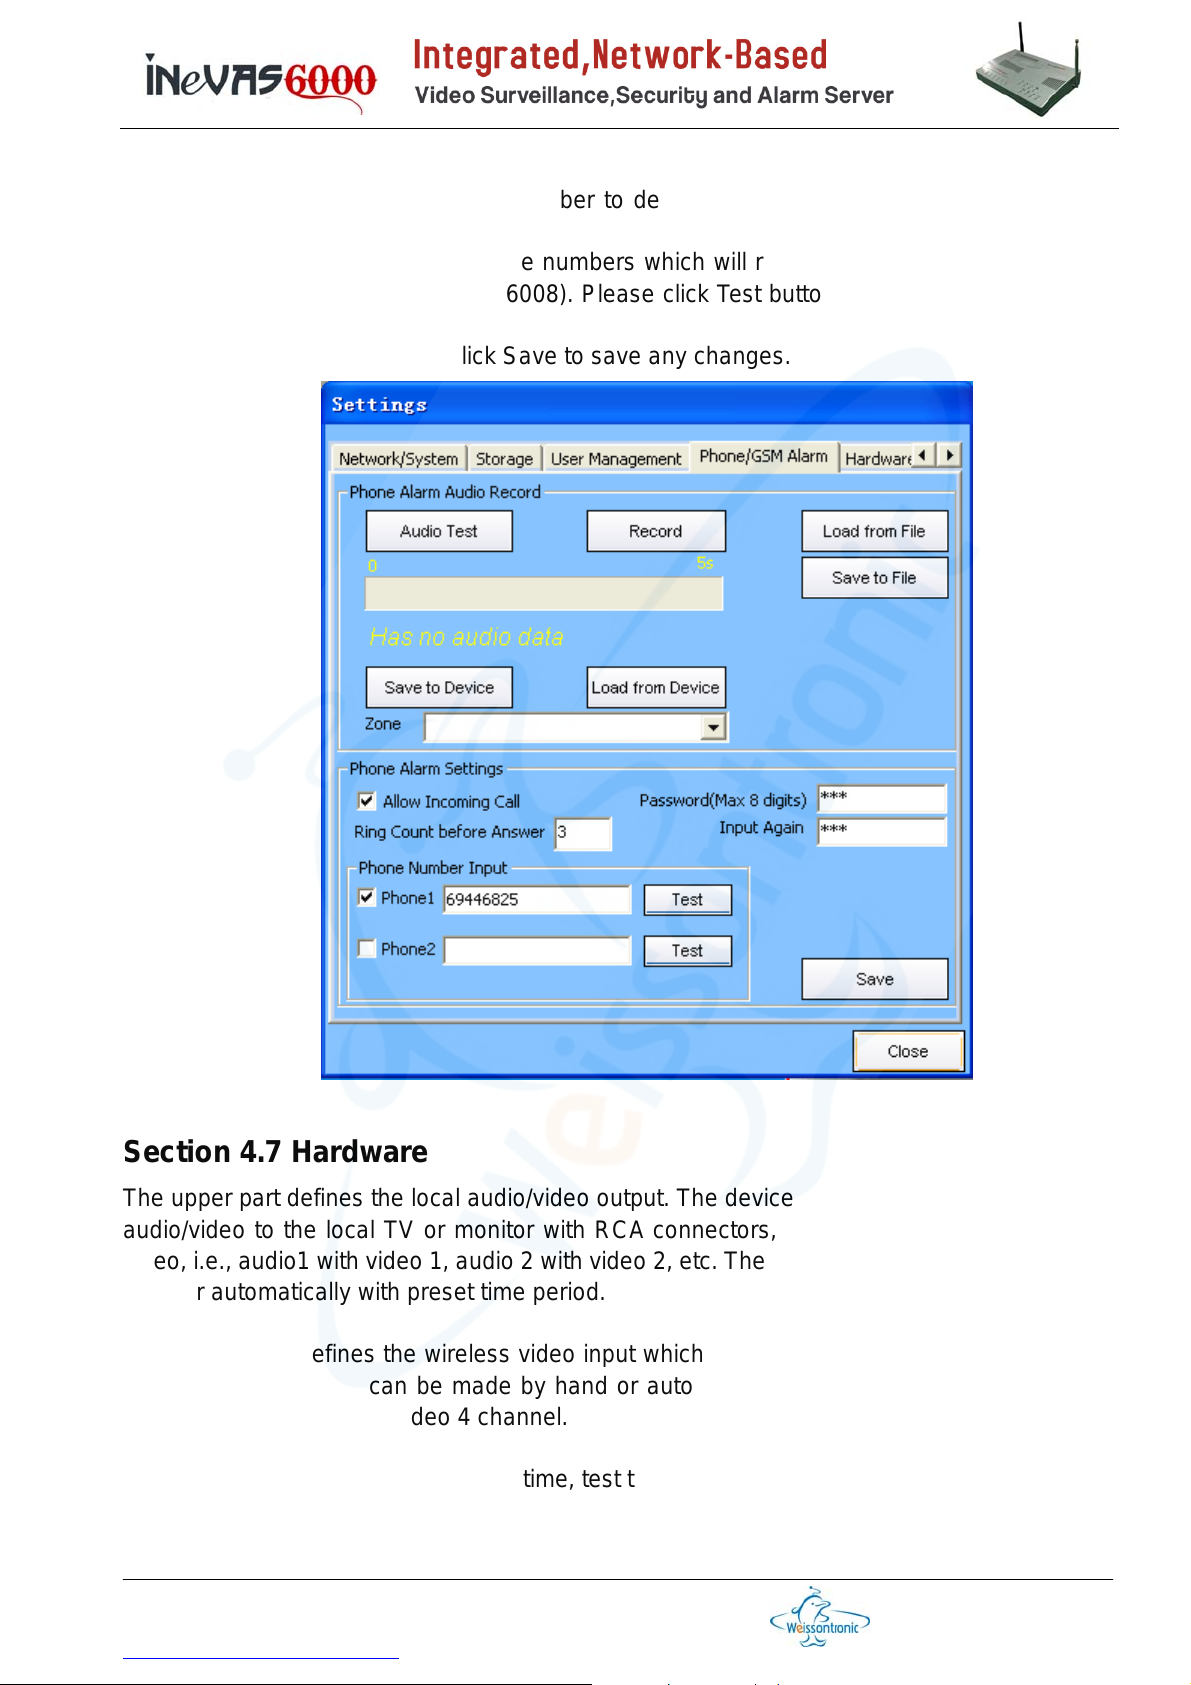
intrusion.
Ring Count before Answer: input a number to define the ringing times before the device
answer the phone call
Phone Number Input: input two phone numbers which will receive the alarm by telephone
(model 6006) or SMS/MMS (model 6008). Please click Test button to test if the phone call
works or not.
After all these settings, please click Save to save any changes.
Section 4.7 Hardware
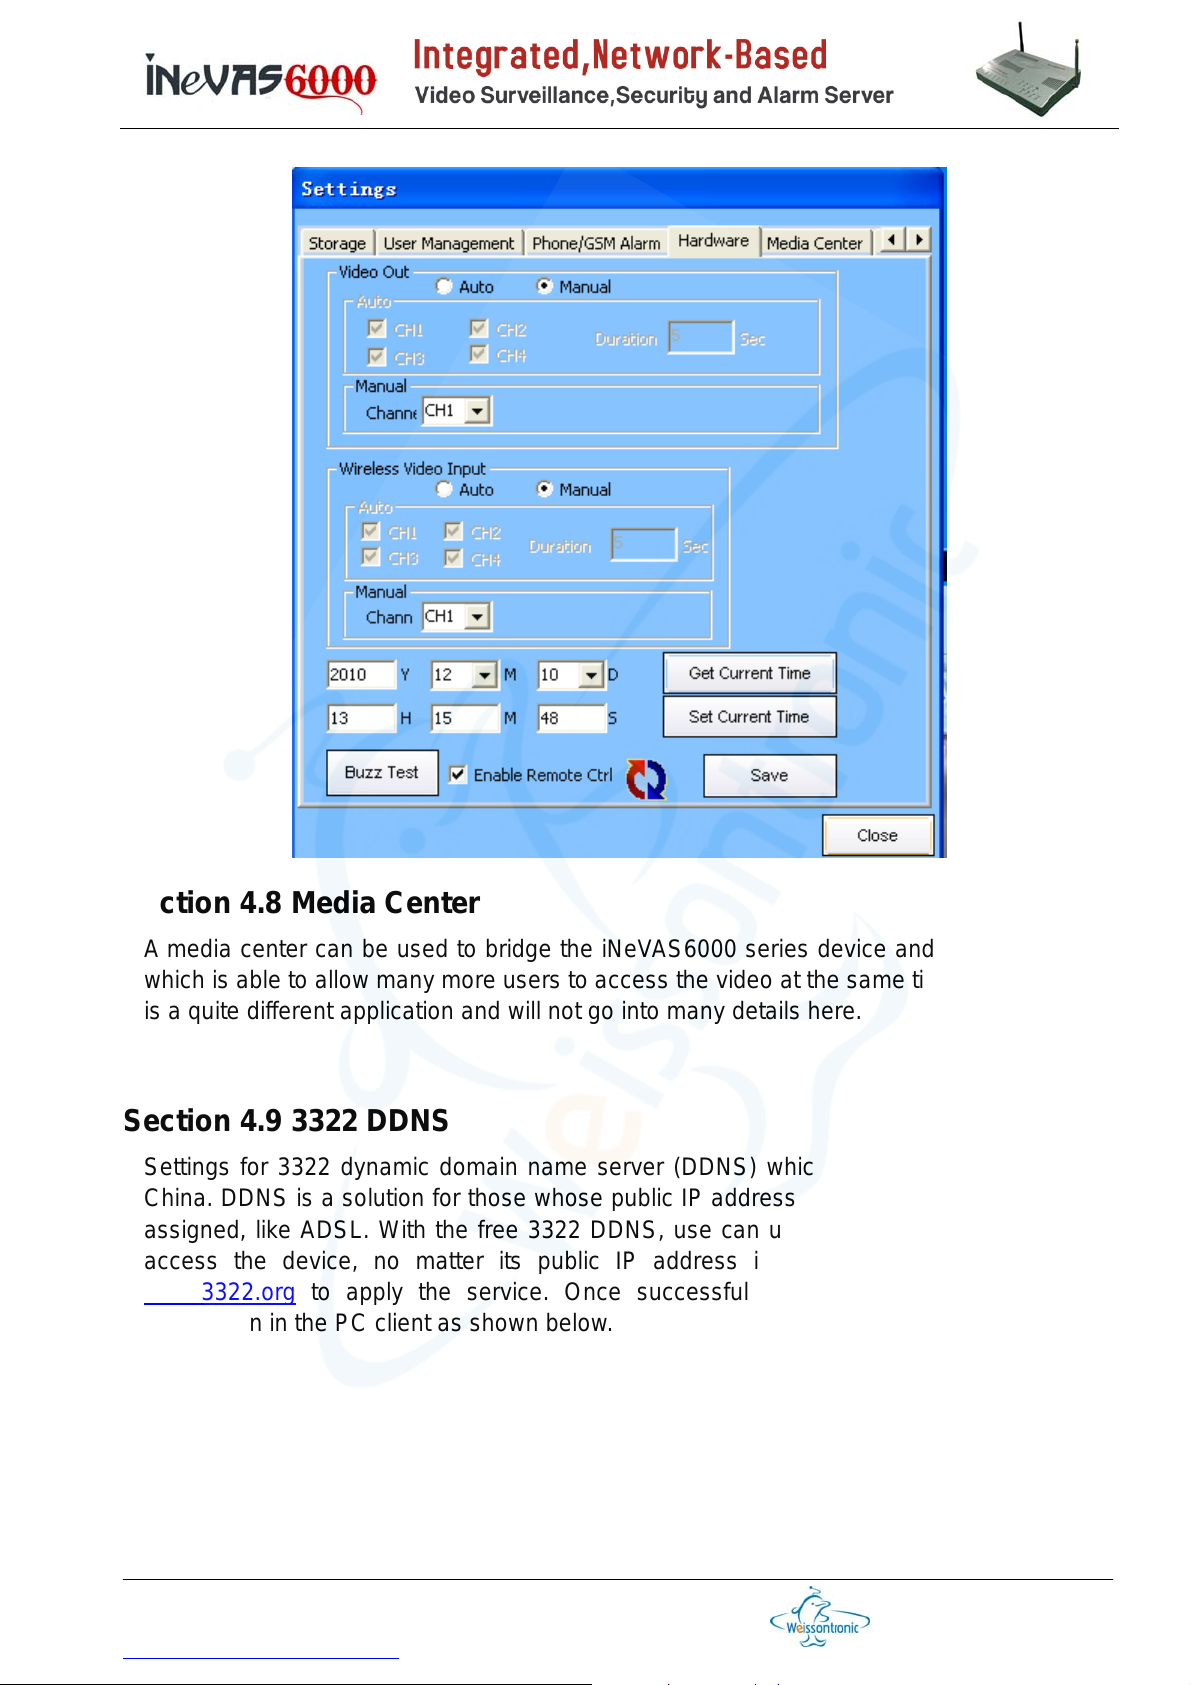
The upper part defines the local audio/video output. The device outputs one of the 4 incoming
audio/video to the local TV or monitor with RCA connectors, where the audio will follow the
video, i.e., audio1 with video 1, audio 2 with video 2, etc. The output selection can be made by
hand or automatically with preset time period.
The middle part defines the wireless video input which is supported only in some customized
models. The selection can be made by hand or automatically. One note is that the selected
wireless video will be the video 4 channel.
The lower part can get/set the device time, test the buzz and enable the wireless remote.
Weixun Electronics (Weissontronics) Technologies Co. Ltd.
728, Changchi Road, Gutang, Cixi City, Zhejiang Province, PRChina, 315300
Tel: +86 574 6301 7347 / 6302 8417 x 118/168, Fax: +86 574 6301 7347 / 6302 8417 x 128
http://www.nbweixun.com/en/index.php
第 27 页
Page 28
Section 4.8 Media Center
A media center can be used to bridge the iNeVAS6000 series device and the PC client,
which is able to allow many more users to access the video at the same time. However, it
is a quite different application and will not go into many details here.
Section 4.9 3322 DDNS
Settings for 3322 dynamic domain name server (DDNS) which is suggested for use in
China. DDNS is a solution for those whose public IP address is not fixed, or dynamically
assigned, like ADSL. With the free 3322 DDNS, use can use this free domain name to
access the device, no matter its public IP address is changing. Please first visit
www.3322.org to apply the service. Once successfully applied, input the following
information in the PC client as shown below.
Weixun Electronics (Weissontronics) Technologies Co. Ltd.
728, Changchi Road, Gutang, Cixi City, Zhejiang Province, PRChina, 315300
Tel: +86 574 6301 7347 / 6302 8417 x 118/168, Fax: +86 574 6301 7347 / 6302 8417 x 128
http://www.nbweixun.com/en/index.php
第 28 页
Page 29
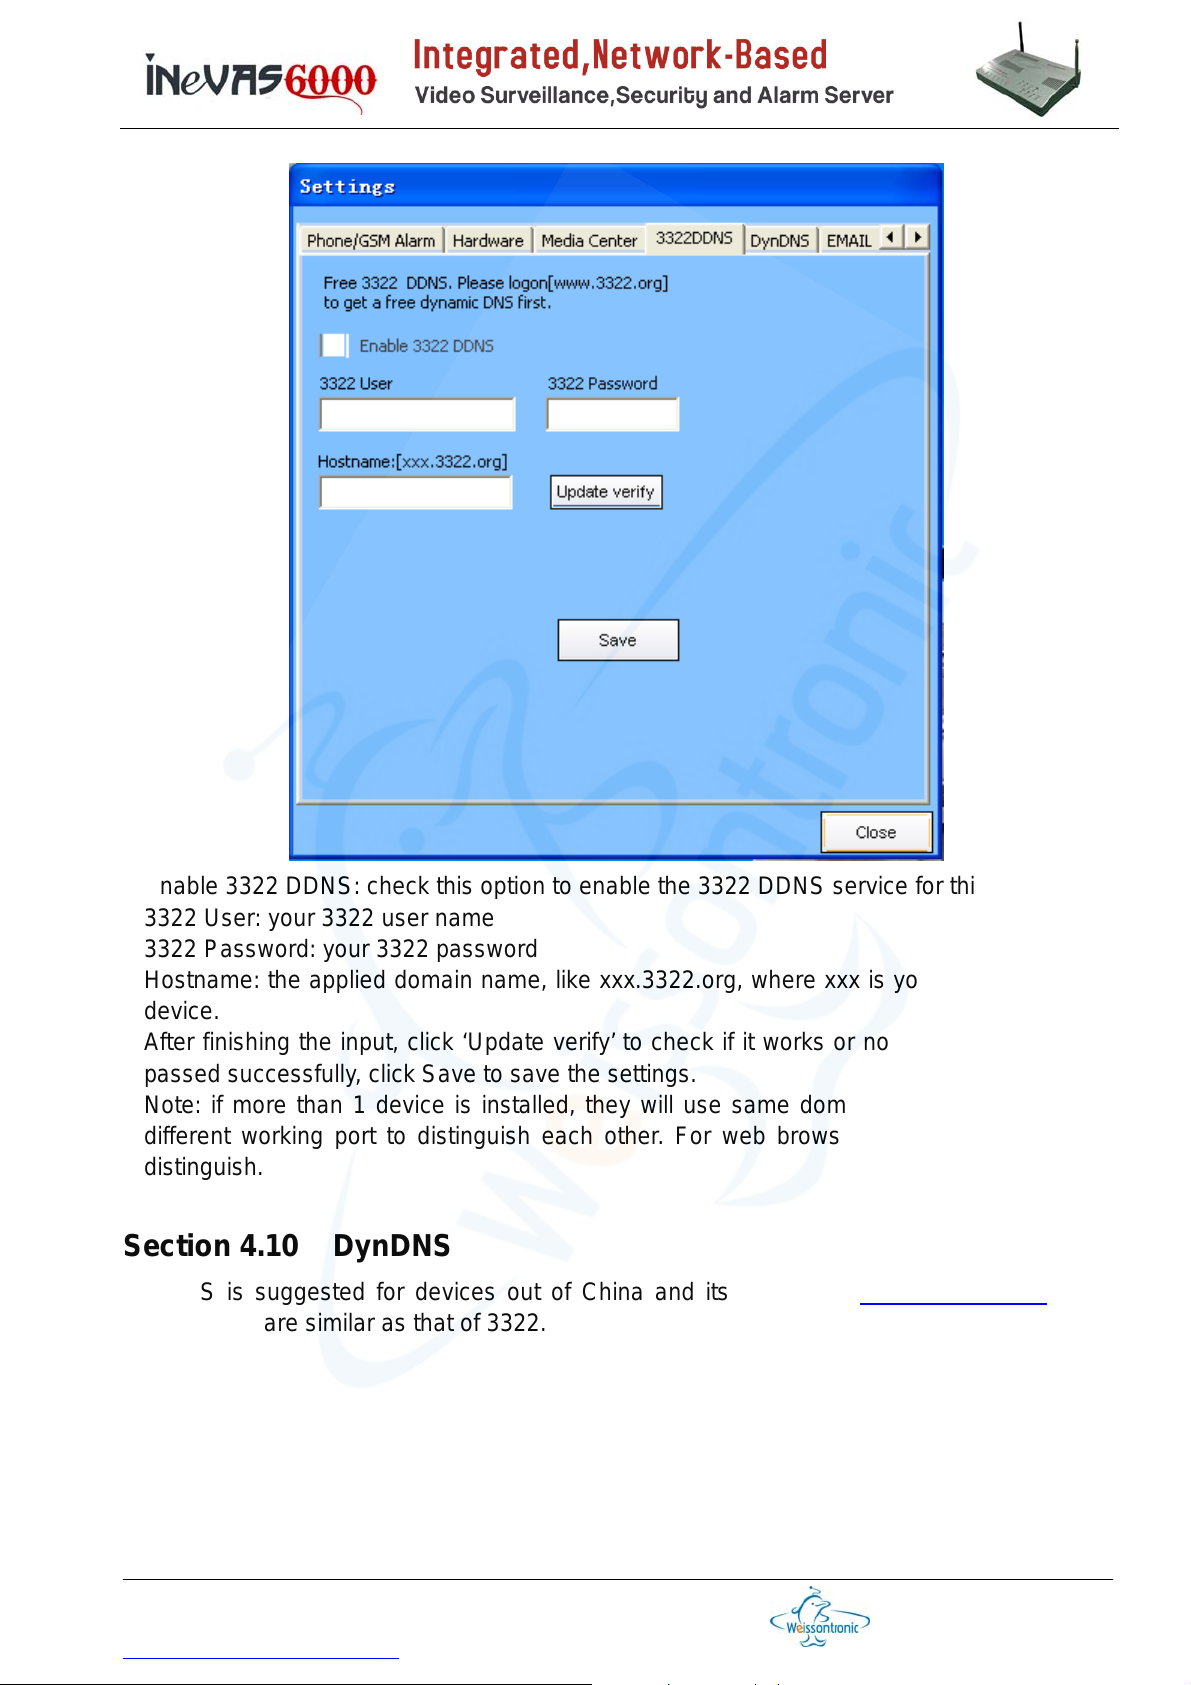
Enable 3322 DDNS: check this option to enable the 3322 DDNS service for this device
3322 User: your 3322 user name
3322 Password: your 3322 password
Hostname: the applied domain name, like xxx.3322.org, where xxx is your name for this
device.
After finishing the input, click ‘Update verify’ to check if it works or not. If the verification
passed successfully, click Save to save the settings.
Note: if more than 1 device is installed, they will use same domain name and use the
different working port to distinguish each other. For web browser, it’s the web port to
distinguish.
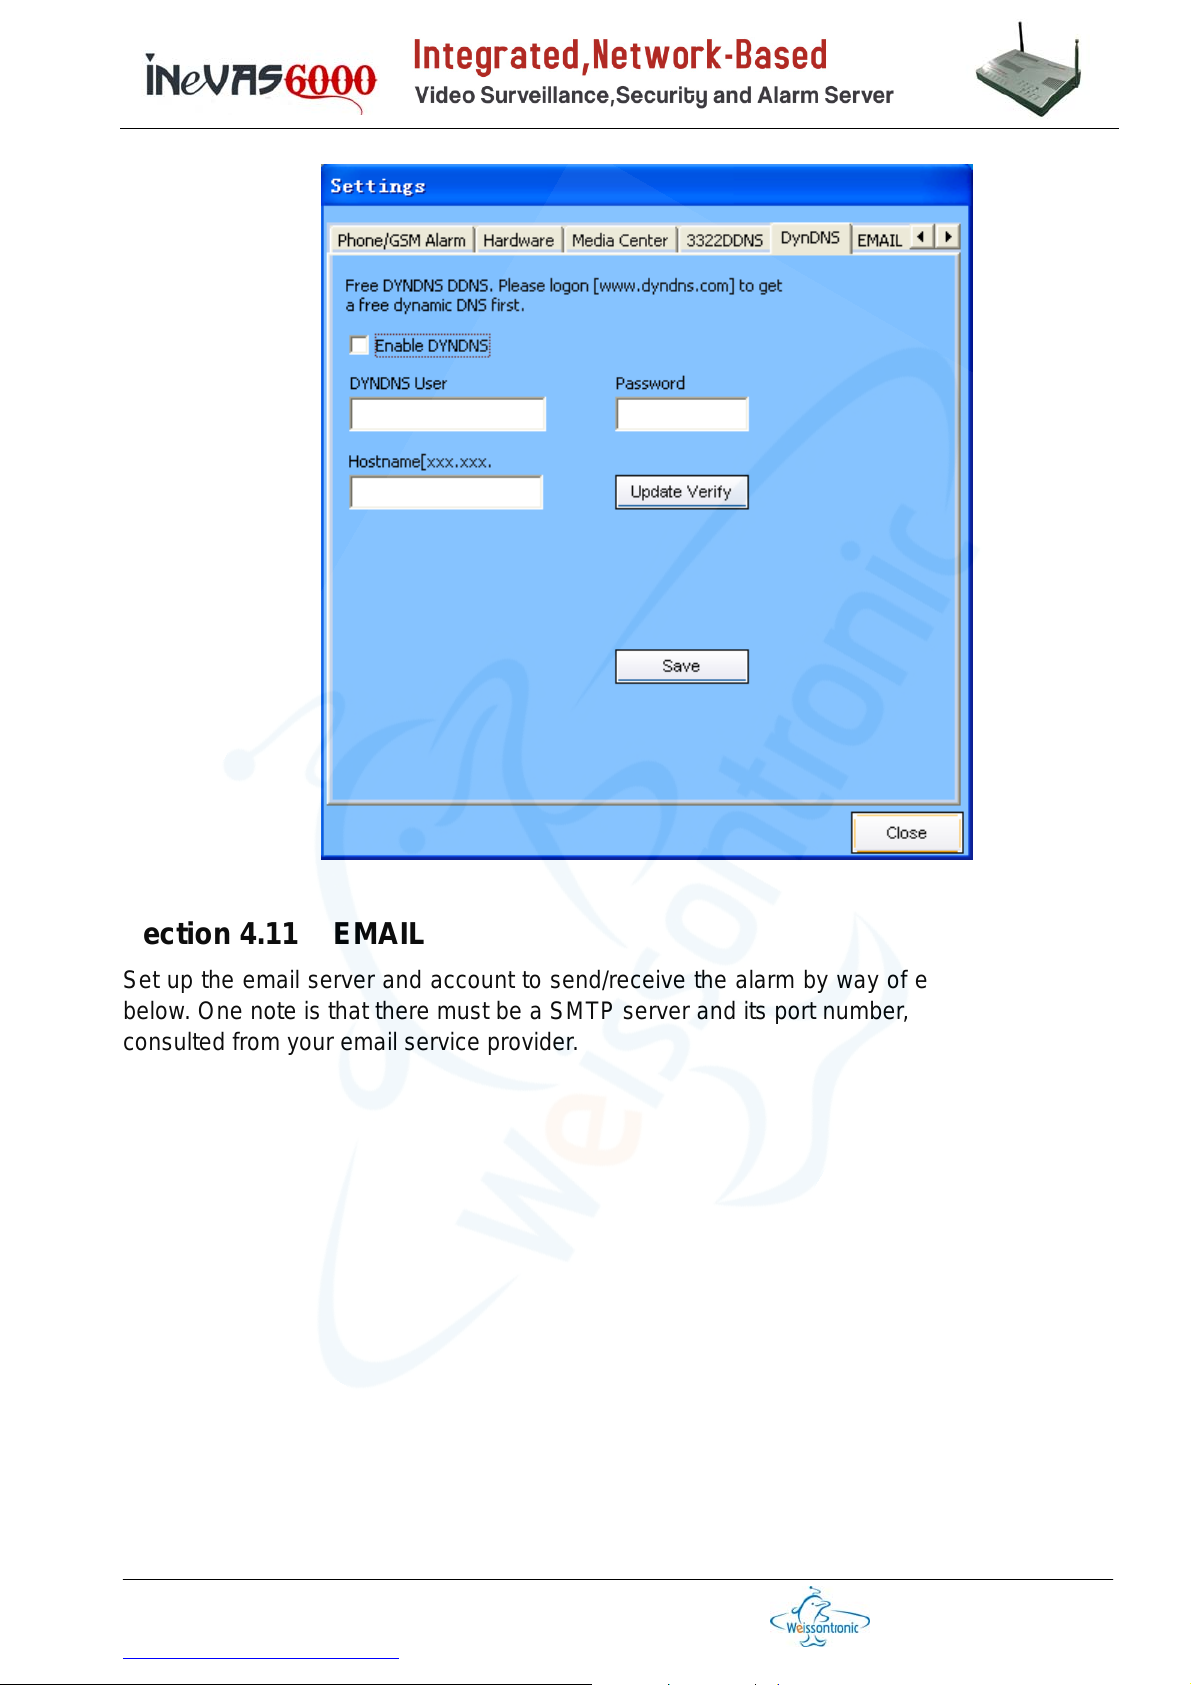
Section 4.10 DynDNS
DynDNS is suggested for devices out of China and its website is www.dyndns.com. Its
setting steps are similar as that of 3322.
Weixun Electronics (Weissontronics) Technologies Co. Ltd.
728, Changchi Road, Gutang, Cixi City, Zhejiang Province, PRChina, 315300
Tel: +86 574 6301 7347 / 6302 8417 x 118/168, Fax: +86 574 6301 7347 / 6302 8417 x 128
http://www.nbweixun.com/en/index.php
第 29 页
Page 30
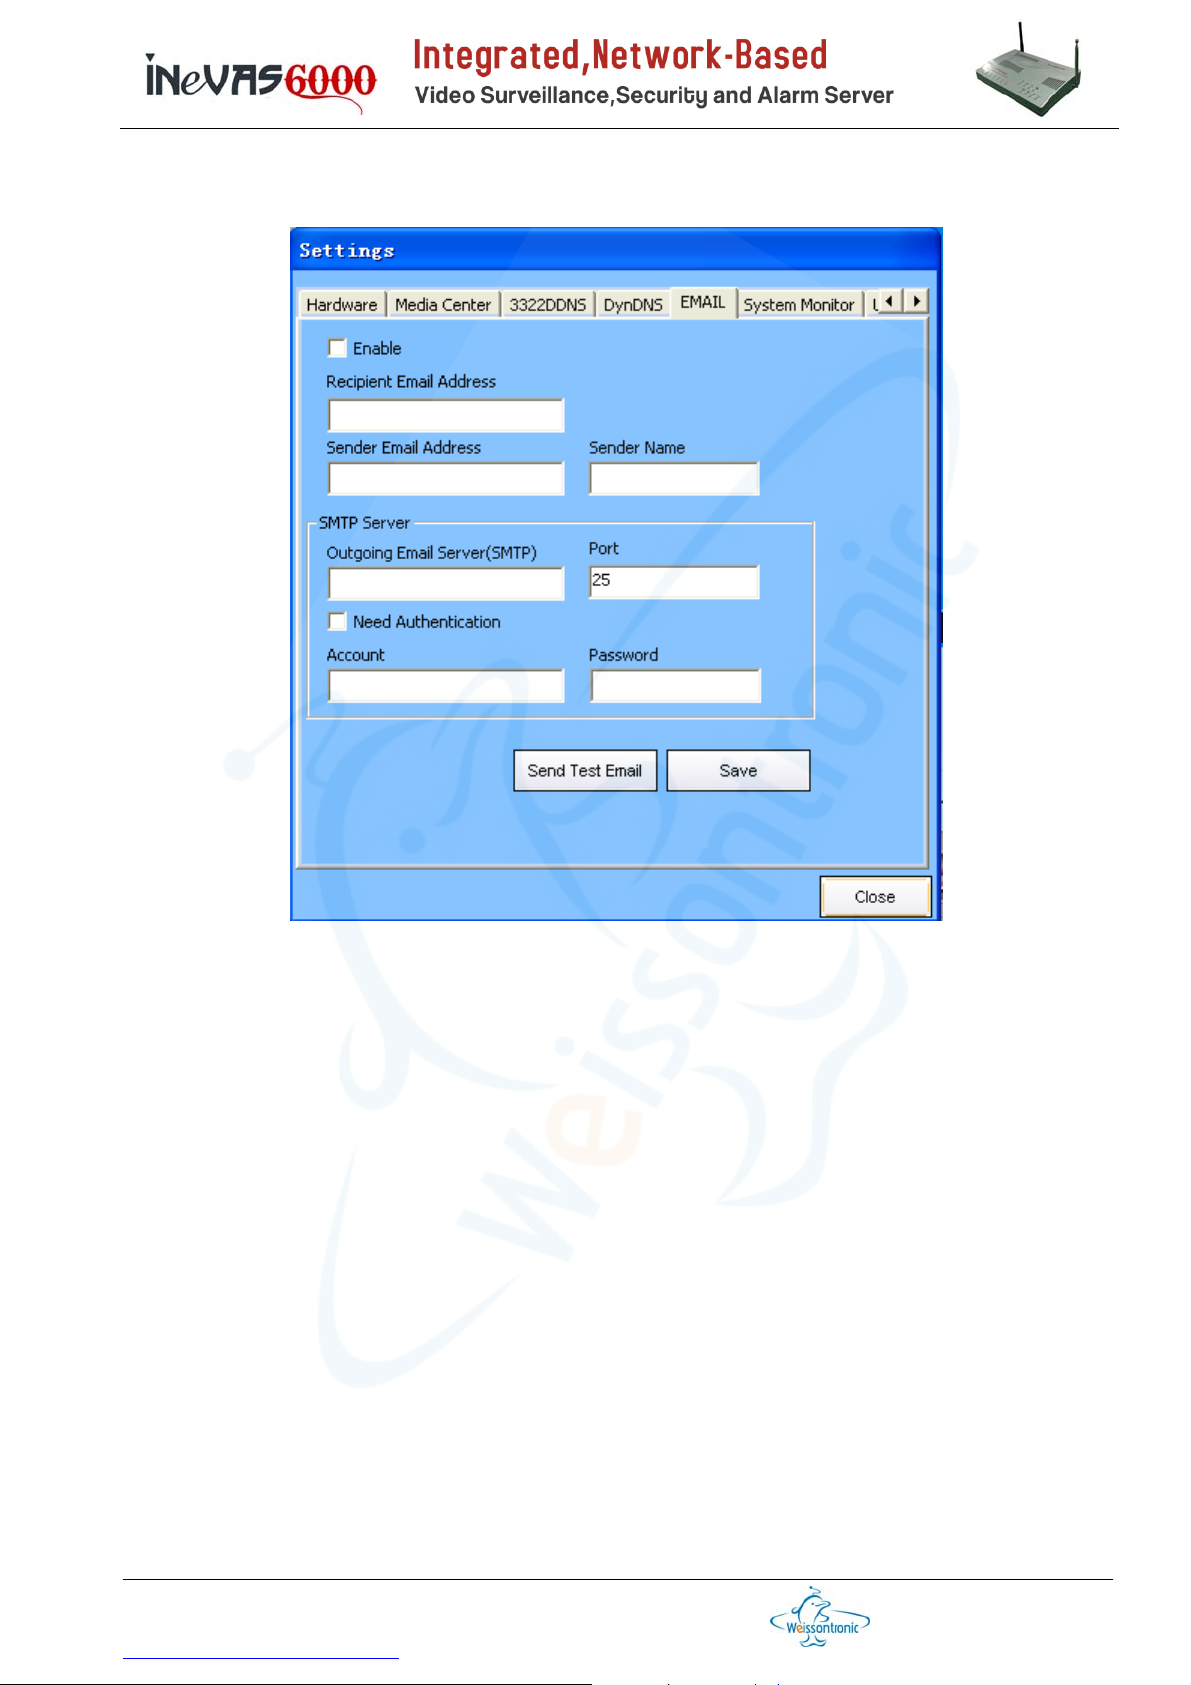
Section 4.11 EMAIL
Set up the email server and account to send/receive the alarm by way of email, as shown
below. One note is that there must be a SMTP server and its port number, which should be
consulted from your email service provider.
Weixun Electronics (Weissontronics) Technologies Co. Ltd.
728, Changchi Road, Gutang, Cixi City, Zhejiang Province, PRChina, 315300
Tel: +86 574 6301 7347 / 6302 8417 x 118/168, Fax: +86 574 6301 7347 / 6302 8417 x 128
http://www.nbweixun.com/en/index.php
第 30 页
Page 31
Weixun Electronics (Weissontronics) Technologies Co. Ltd.
728, Changchi Road, Gutang, Cixi City, Zhejiang Province, PRChina, 315300
Tel: +86 574 6301 7347 / 6302 8417 x 118/168, Fax: +86 574 6301 7347 / 6302 8417 x 128
http://www.nbweixun.com/en/index.php
第 31 页
Page 32
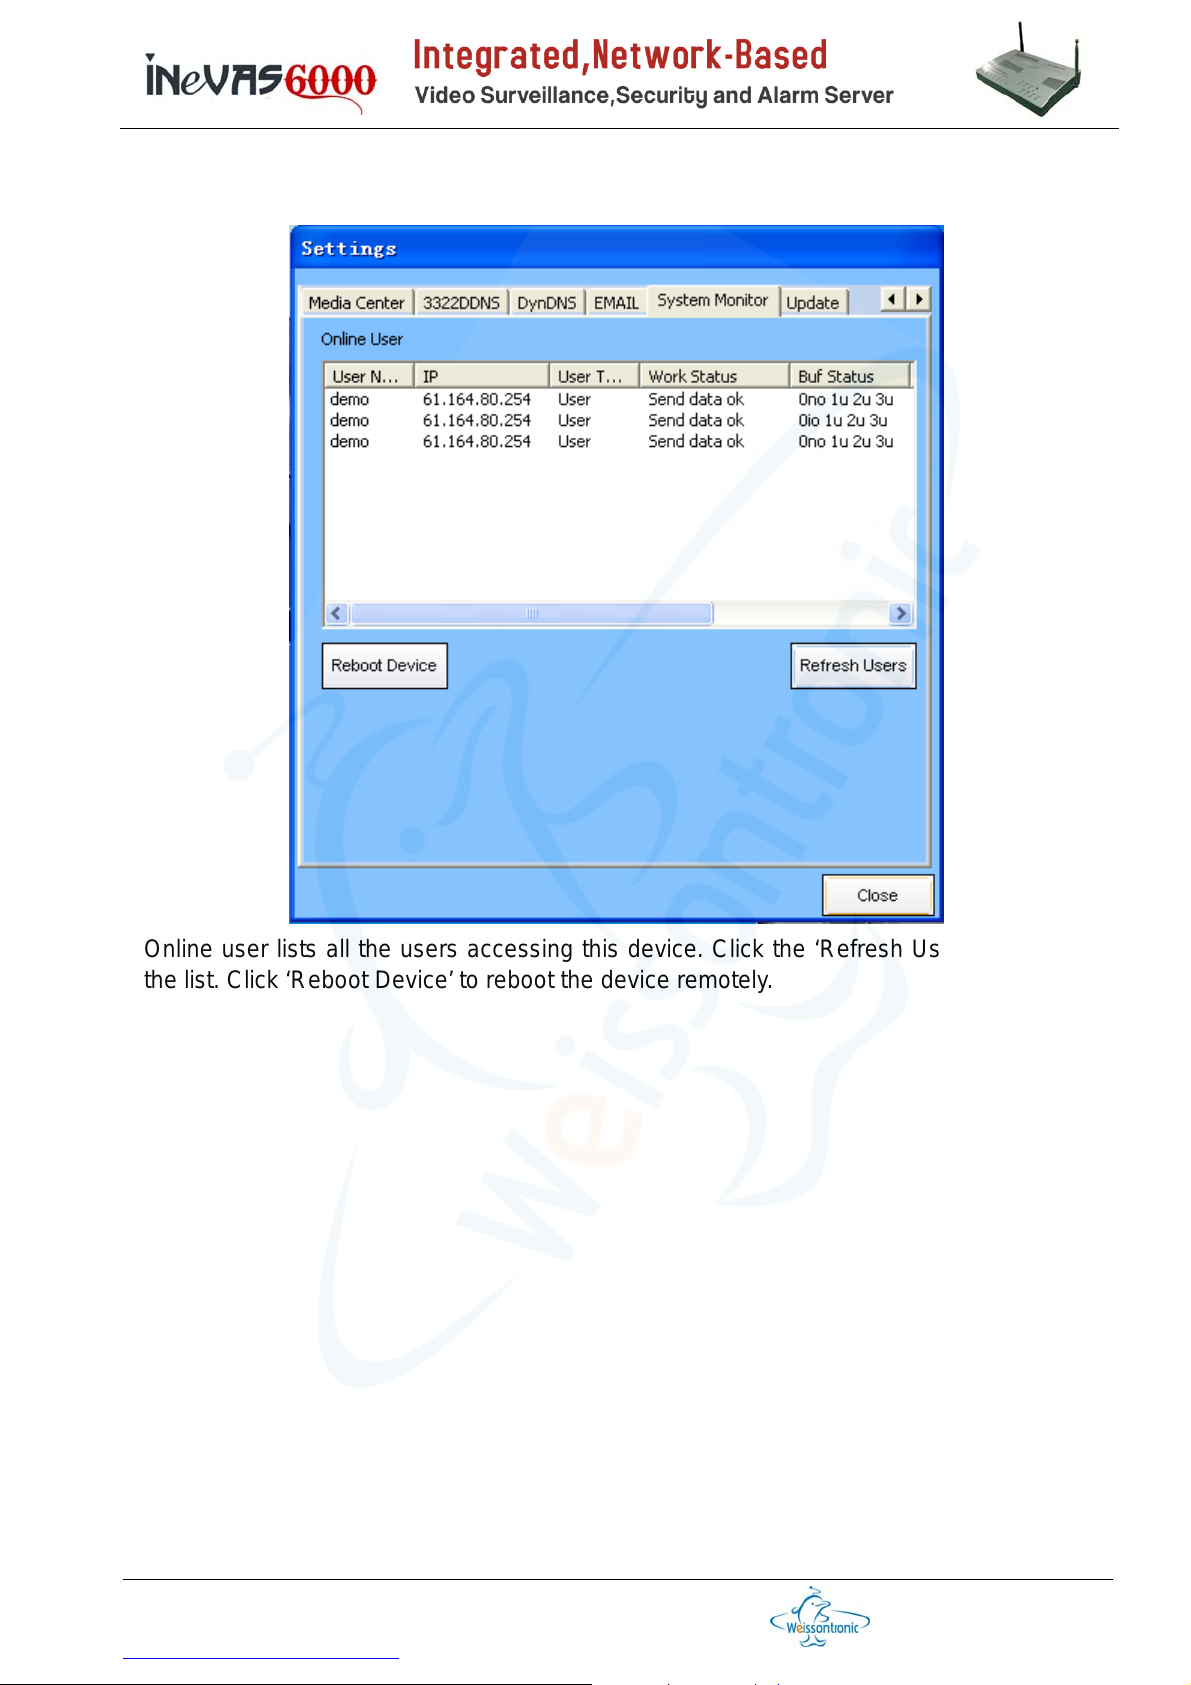
Section 4.12 System Monitor
Online user lists all the users accessing this device. Click the ‘Refresh Users’ to update
the list. Click ‘Reboot Device’ to reboot the device remotely.
Weixun Electronics (Weissontronics) Technologies Co. Ltd.
728, Changchi Road, Gutang, Cixi City, Zhejiang Province, PRChina, 315300
Tel: +86 574 6301 7347 / 6302 8417 x 118/168, Fax: +86 574 6301 7347 / 6302 8417 x 128
http://www.nbweixun.com/en/index.php
第 32 页
Page 33
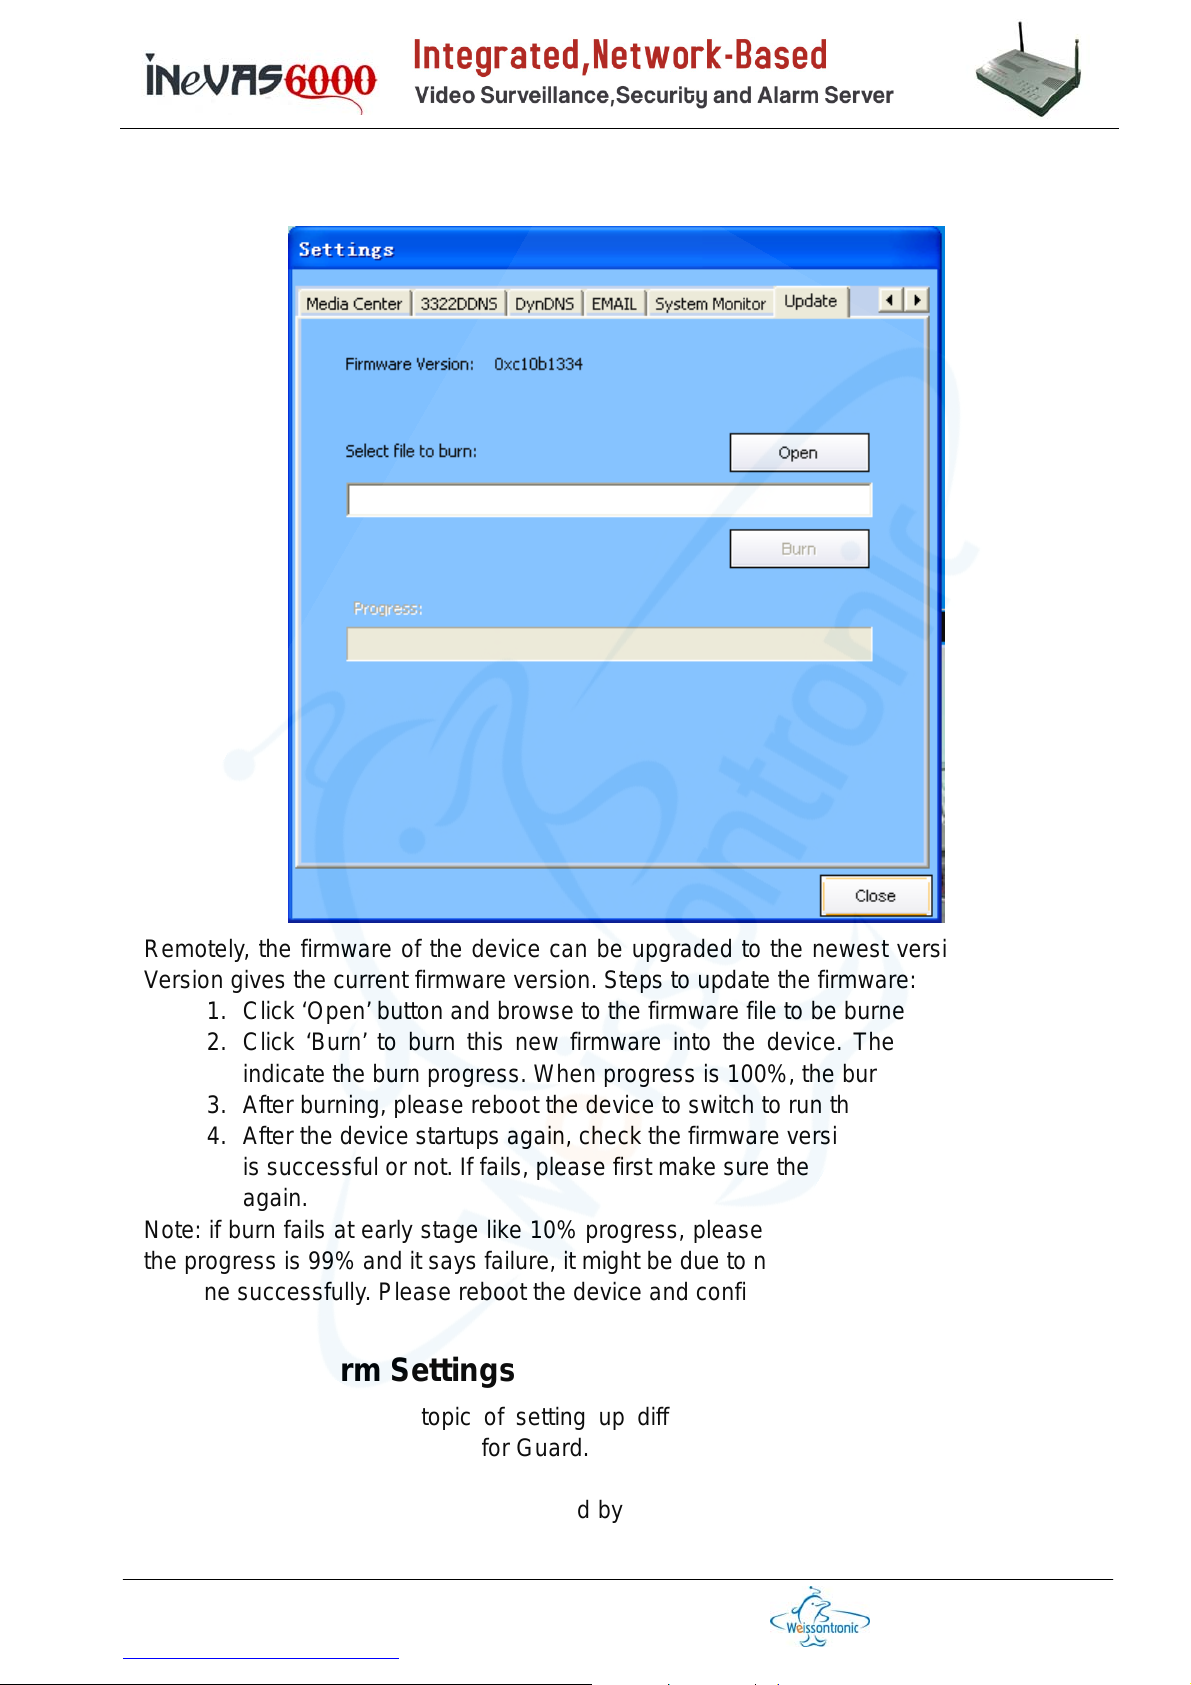
Section 4.13 Update
Remotely, the firmware of the device can be upgraded to the newest version. Firmware
Version gives the current firmware version. Steps to update the firmware:
1. Click ‘Open’ button and browse to the firmware file to be burned into the device.
2. Click ‘Burn’ to burn this new firmware into the device. The progress bar will
indicate the burn progress. When progress is 100%, the burn is done.
3. After burning, please reboot the device to switch to run the new firmware.
4. After the device startups again, check the firmware version to confirm if the burn
is successful or not. If fails, please first make sure the network is ok and then try
again.
Note: if burn fails at early stage like 10% progress, please wait a minute and try again. If
the progress is 99% and it says failure, it might be due to network issue and in fact, might
be done successfully. Please reboot the device and confirm if it is done or not.
Chapter 5 Alarm Settings
This chapter covers the topic of setting up different kinds of alarms, namely Guard,
Motion, Manual Alarm and PTZ for Guard.
Guard alarm refers to the alarms reported by wired/wireless security sensors attached to
the device. There are a lot of different sensors, for example, passive infrared (PIR) motion
Weixun Electronics (Weissontronics) Technologies Co. Ltd.
728, Changchi Road, Gutang, Cixi City, Zhejiang Province, PRChina, 315300
Tel: +86 574 6301 7347 / 6302 8417 x 118/168, Fax: +86 574 6301 7347 / 6302 8417 x 128
http://www.nbweixun.com/en/index.php
第 33 页
Page 34
detection sensor can sense the human body’s movement, magnetic door sensor can
sense the door opening, smoke or water sensor can sense the existence of smoke or
water etc. Since each sensor has its specific covering zone, hereafter, we use the zone
stands for the sensor for easy-to-remember. iNeVAS6000 series device can support 4
wired and 11 wireless security sensors. Please refer to the figures in the section 2.1 and
2.6 for the sensors interfaces.
Similarly, motion detect zones are those zones covered by video cameras. The device
can analyze the video pictures and sense the object movement. Once the motion is
detected, it will give out an alarm. But, please be cautious to use this function since
the device can only detect the changes in the video pictures and can not tell
whether the change is resulted from a human being moving, or a dog’s moving, or
a falling leaf, or signal noise, or the change of light, or anything else. Motion
detection can not replace the monitor of a human guard.
Manual alarm is used to give out an emergent alarm by hand, no matter the device is
armed or disarmed for security alarms. PTZ preset can guide PTZ equipment turn to the
previously-defined zones when there is a ‘Guard’ alarm, which will be not covered in
details in this guide.
The device is also equipped with 4 wired alarm output interface (on/off) which can be
used to switch on siren, light and other alerting device. Be careful not to exceed the
voltage and current level.
Right click on the device icon in the list and select ‘Alarm Settings’, the setting windows
will pop up, as shown in figure below.
Section 5.1 Guard Settings
Zone: it lists all the guard zones where the first 4 are covered by wired sensors and the
rest 11 by wireless sensors. Check the enable option to active the sensor. The wired
sensor input can be set to ‘normally open’ or ‘normally close’ to match the sensor.
Alarm Out Linked: used to link the zone with the 4 alarm outputs. Once linked, when
there is an alarm happed in this zone, the linked alarm output will trigger the alert device.
Video Linked: used to link the zone with the 4 video channels. Once linked, when there is
an alarm happened in this zone, the linked video can be recorded or snapshot and sent to
user by MMS or email.
Email: check the options to receive alarm and/or linked video pictures by email.
Buzz: check this option to sound the buzz as an alert when there is alarm happened.
GSM/GPRS: once there is alarm in this zone, send the SMS/MMS to user handset as an
alert. This applies for model 6008 only, If it is model 6006, there will be telephone call.
Model 6000 does not have this option.
Work Time: schedule the working time for these guard sensors.
Button Arm/Set is used to enable the guard sensors or change the settings while Disarm
is to disable the guard sensors. Once it is armed (see the red circle in the below figure)
Weixun Electronics (Weissontronics) Technologies Co. Ltd.
728, Changchi Road, Gutang, Cixi City, Zhejiang Province, PRChina, 315300
Tel: +86 574 6301 7347 / 6302 8417 x 118/168, Fax: +86 574 6301 7347 / 6302 8417 x 128
http://www.nbweixun.com/en/index.php
第 34 页
Page 35
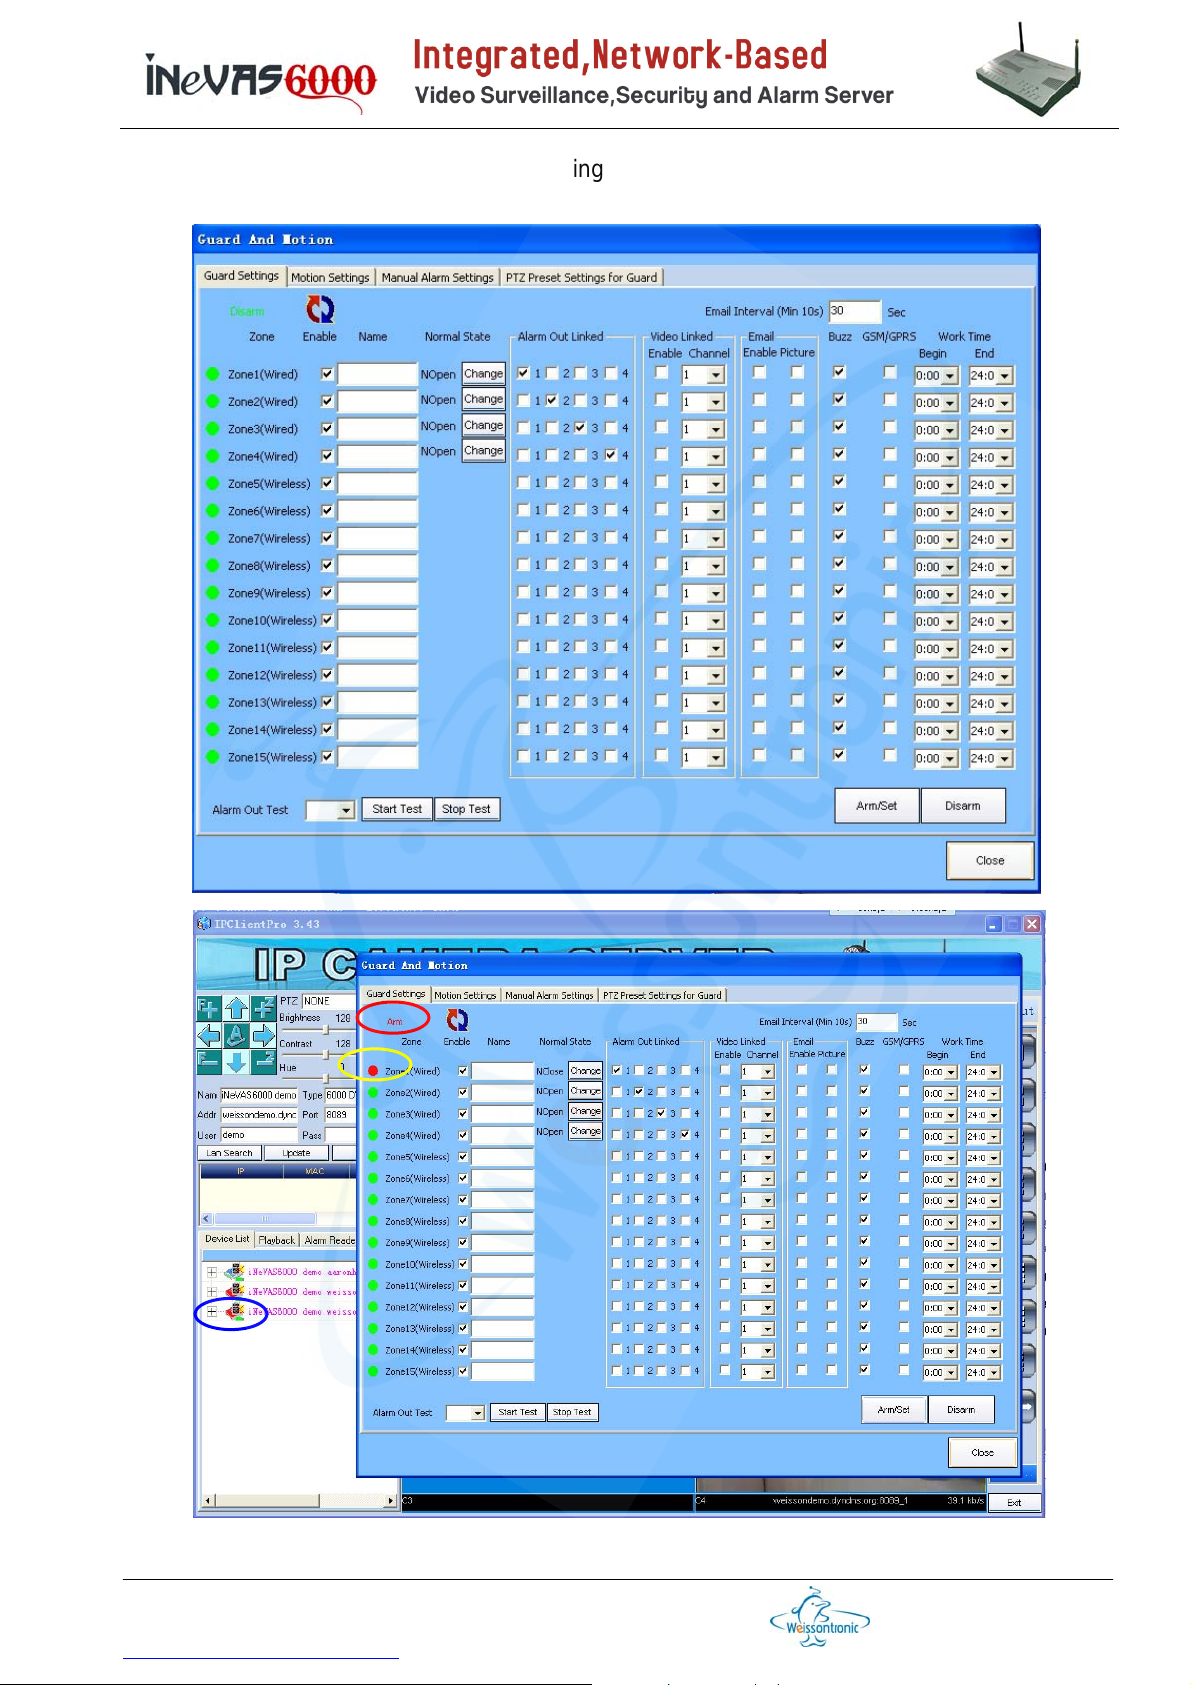
and there is an alarm, there will be alerting as shown in the yellow and blue circle in the
below figure.
Weixun Electronics (Weissontronics) Technologies Co. Ltd.
728, Changchi Road, Gutang, Cixi City, Zhejiang Province, PRChina, 315300
Tel: +86 574 6301 7347 / 6302 8417 x 118/168, Fax: +86 574 6301 7347 / 6302 8417 x 128
http://www.nbweixun.com/en/index.php
第 35 页
Page 36
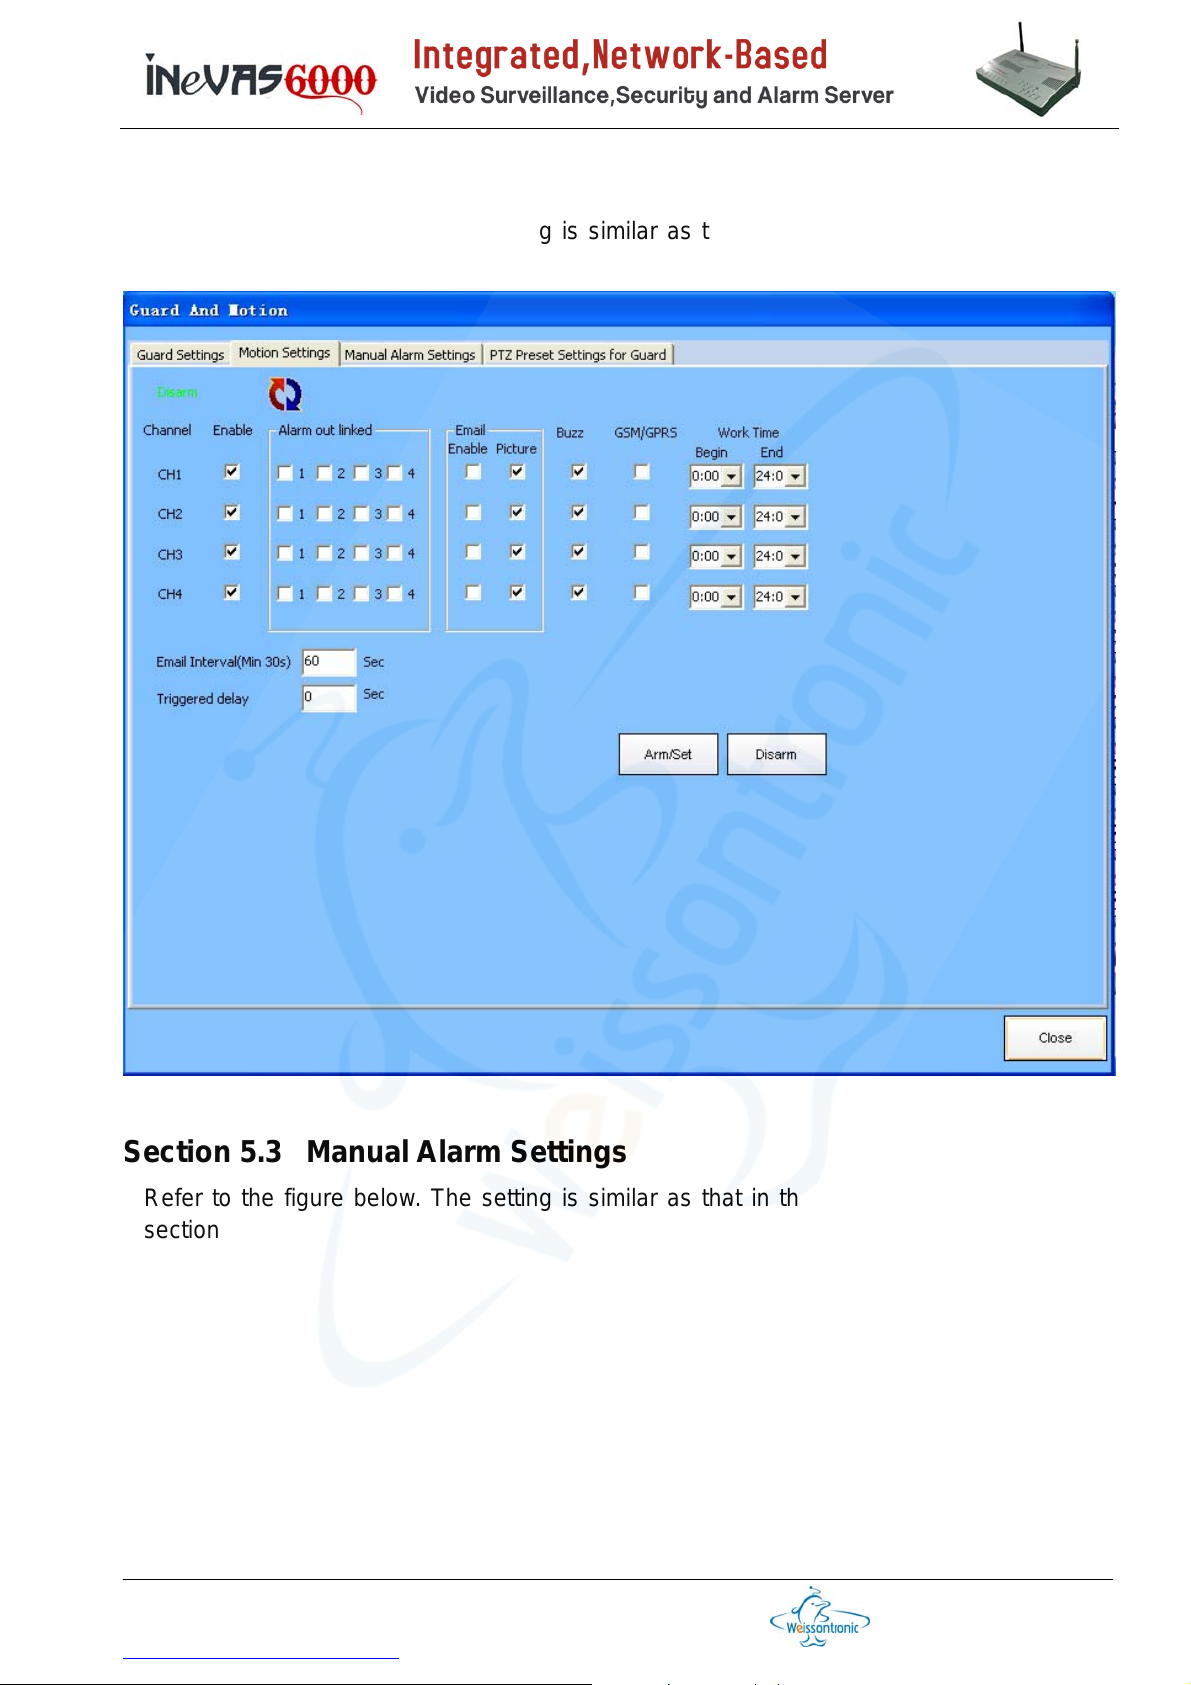
Section 5.2 Motion Settings
Refer to the figure below. The setting is similar as that in the Guard Settings of above
section
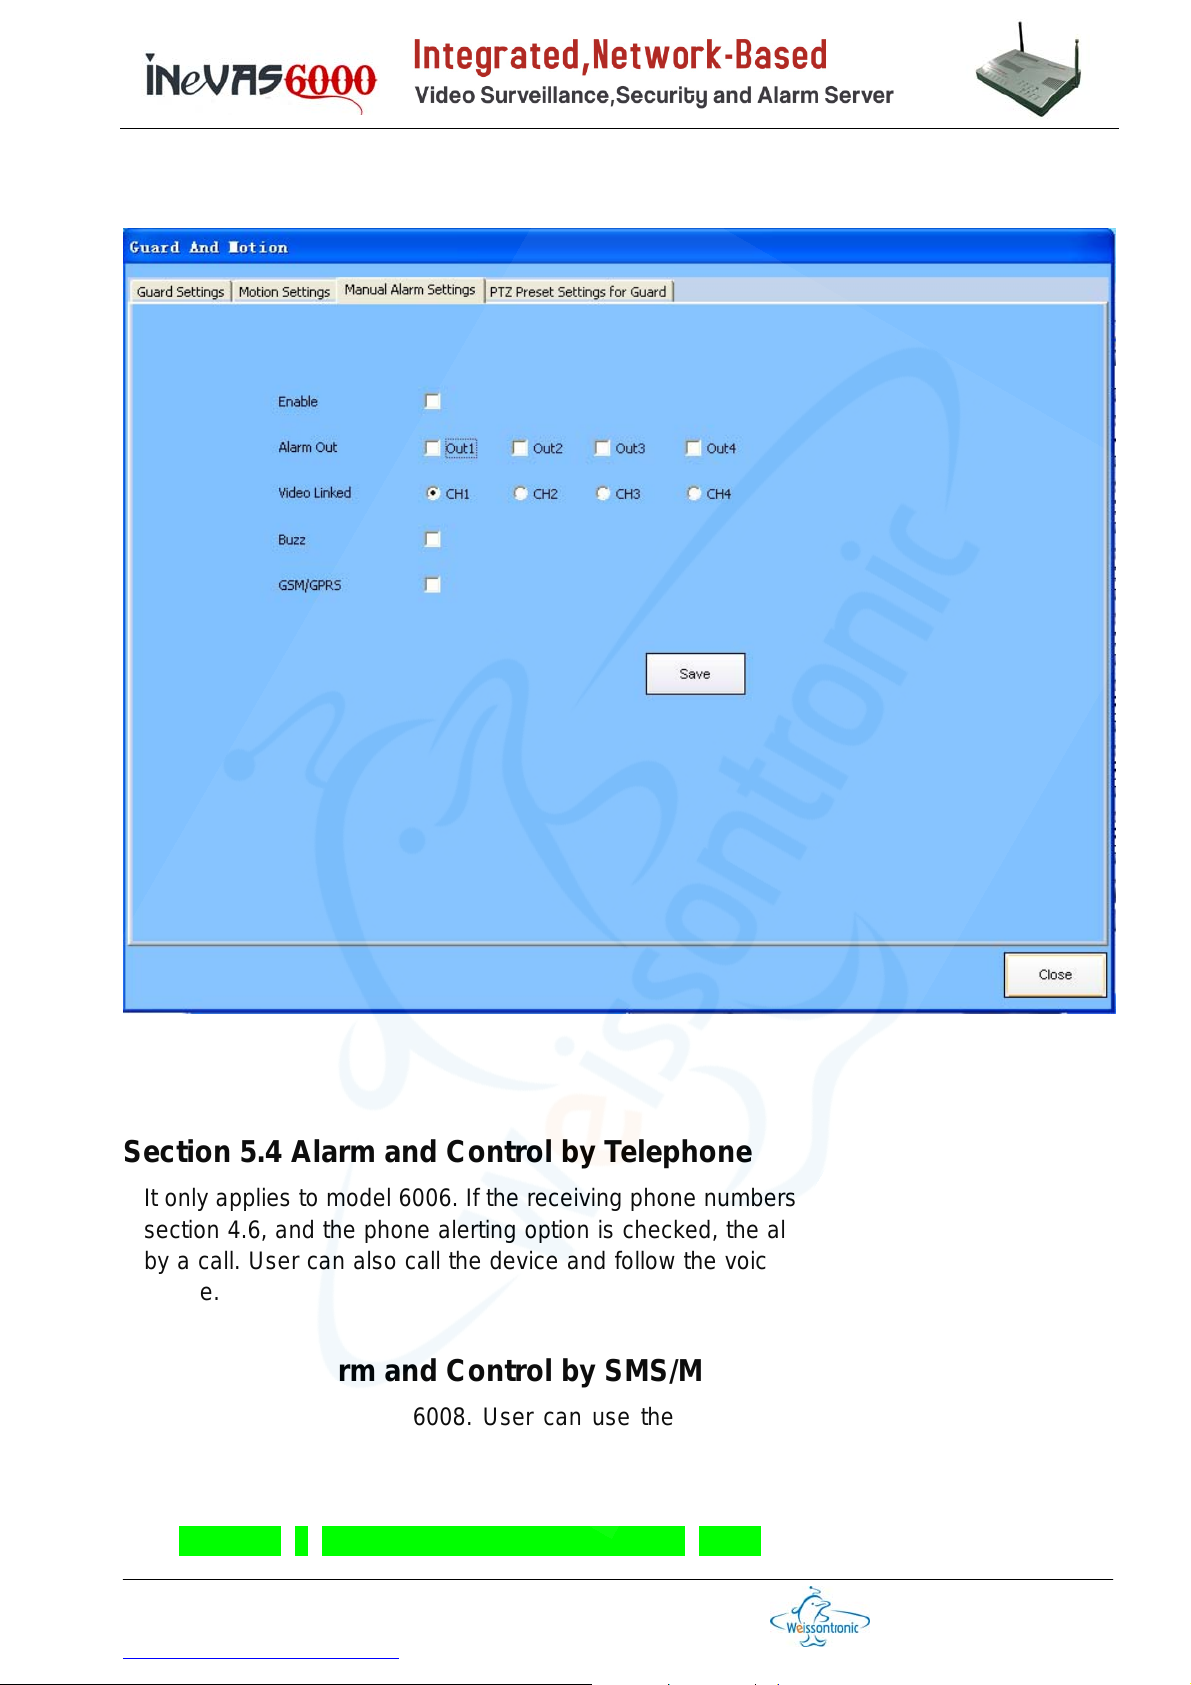
Section 5.3 Manual Alarm Settings
Refer to the figure below. The setting is similar as that in the Guard Settings of above
section
Weixun Electronics (Weissontronics) Technologies Co. Ltd.
728, Changchi Road, Gutang, Cixi City, Zhejiang Province, PRChina, 315300
Tel: +86 574 6301 7347 / 6302 8417 x 118/168, Fax: +86 574 6301 7347 / 6302 8417 x 128
http://www.nbweixun.com/en/index.php
第 36 页
Page 37
Section 5.4 Alarm and Control by Telephone
It only applies to model 6006. If the receiving phone numbers are added, as described in
section 4.6, and the phone alerting option is checked, the alarm will be delivered to user
by a call. User can also call the device and follow the voice message to Arm/Disarm the
device.
Section 5.5 Alarm and Control by SMS/MMS
It only applies to model 6008. User can use the mobile phone’s SMS (short message
service) to control the device.
1. Arm/Disarm/Inquiry
i. SMS format:
password+#+[a or A|1-15|ma or MA|m or M 1-4]+[*|#|?]
Weixun Electronics (Weissontronics) Technologies Co. Ltd.
728, Changchi Road, Gutang, Cixi City, Zhejiang Province, PRChina, 315300
Tel: +86 574 6301 7347 / 6302 8417 x 118/168, Fax: +86 574 6301 7347 / 6302 8417 x 128
http://www.nbweixun.com/en/index.php
第 37 页
Page 38
password: password when calling the device, refer to section 4.6 for details
#: this # is a separator
a or A: for all the guard zones
1-15: select a guard zone
ma or MA: all the motion zones
m or M 1-4: m or M followed by a number between 1 and 4 to select a motion zone
*: arm
#: disarm
?: inquiry
ii. Example
If the password is ‘123’,
Arm all the zones: 123#a*
Disarm all the zones: 123#a#
Arm guard zone 2: 123#2*
Disarm guard zone 2: 123#2#
Inquiry guard zone 2: 123#2?
Arm all the motion zones: 123#ma*
Disarm all the motion zones: 123#ma#
Arm motion zone 2: 123#m2*
Disarm motion zone 2: 123#m2#
Inquiry motion zone 2: 123#m2?
2. Talkback and listen
i. SMS format
Before talkback and listen, send SMS in the below format to the device for
preparation.
password+#+[0-4]+[c or C]
password: password when calling the device, refer to section 4.6 for details
#: this # is a separator
0-4: o for talkback, 1-4 for audio channel number for listening
c or C: command for talkback or listen
ii. Example
Talkback: 123#0c
Listen to audio channel 1: 123#1c
After you receive the SMS saying that the device is get ready, please call the
device’s mobile phone number to talkback or listen.
3. Snapshot and MMS
i. SMS format
password+#+[1-4]+[p or P 1-3]
password: password when calling the device, refer to section 4.6 for details
#: this # is a separator
1-4: select the video channel to be snapshot
p or P: command for snapshot, 1-3 for the pictures taken every about 1 second. If
Weixun Electronics (Weissontronics) Technologies Co. Ltd.
728, Changchi Road, Gutang, Cixi City, Zhejiang Province, PRChina, 315300
Tel: +86 574 6301 7347 / 6302 8417 x 118/168, Fax: +86 574 6301 7347 / 6302 8417 x 128
http://www.nbweixun.com/en/index.php
第 38 页
Page 39
there is no number followed after p or P, or the number is bigger than 3, only one
picture will be taken.
When device receive the snapshot SMS, it will answer an SMS to tell if the video in
this channel is available or not. If there is video, it will take the number of pictures
and send to user handset by MMS.
ii. Example
To snapshoot video channel 1 with 1 picture: 123#1p1
Section 5.6 Setting and program of wireless security sensors
iNeVAS6000 series work well with the low-cost wireless sensors based on 2262 or 2262
compatible solutions. The sensor works in the 315MHz frequency band and its oscillator
resistor should be set to 3.3M Ohm. Here are the configuration steps (take the wireless
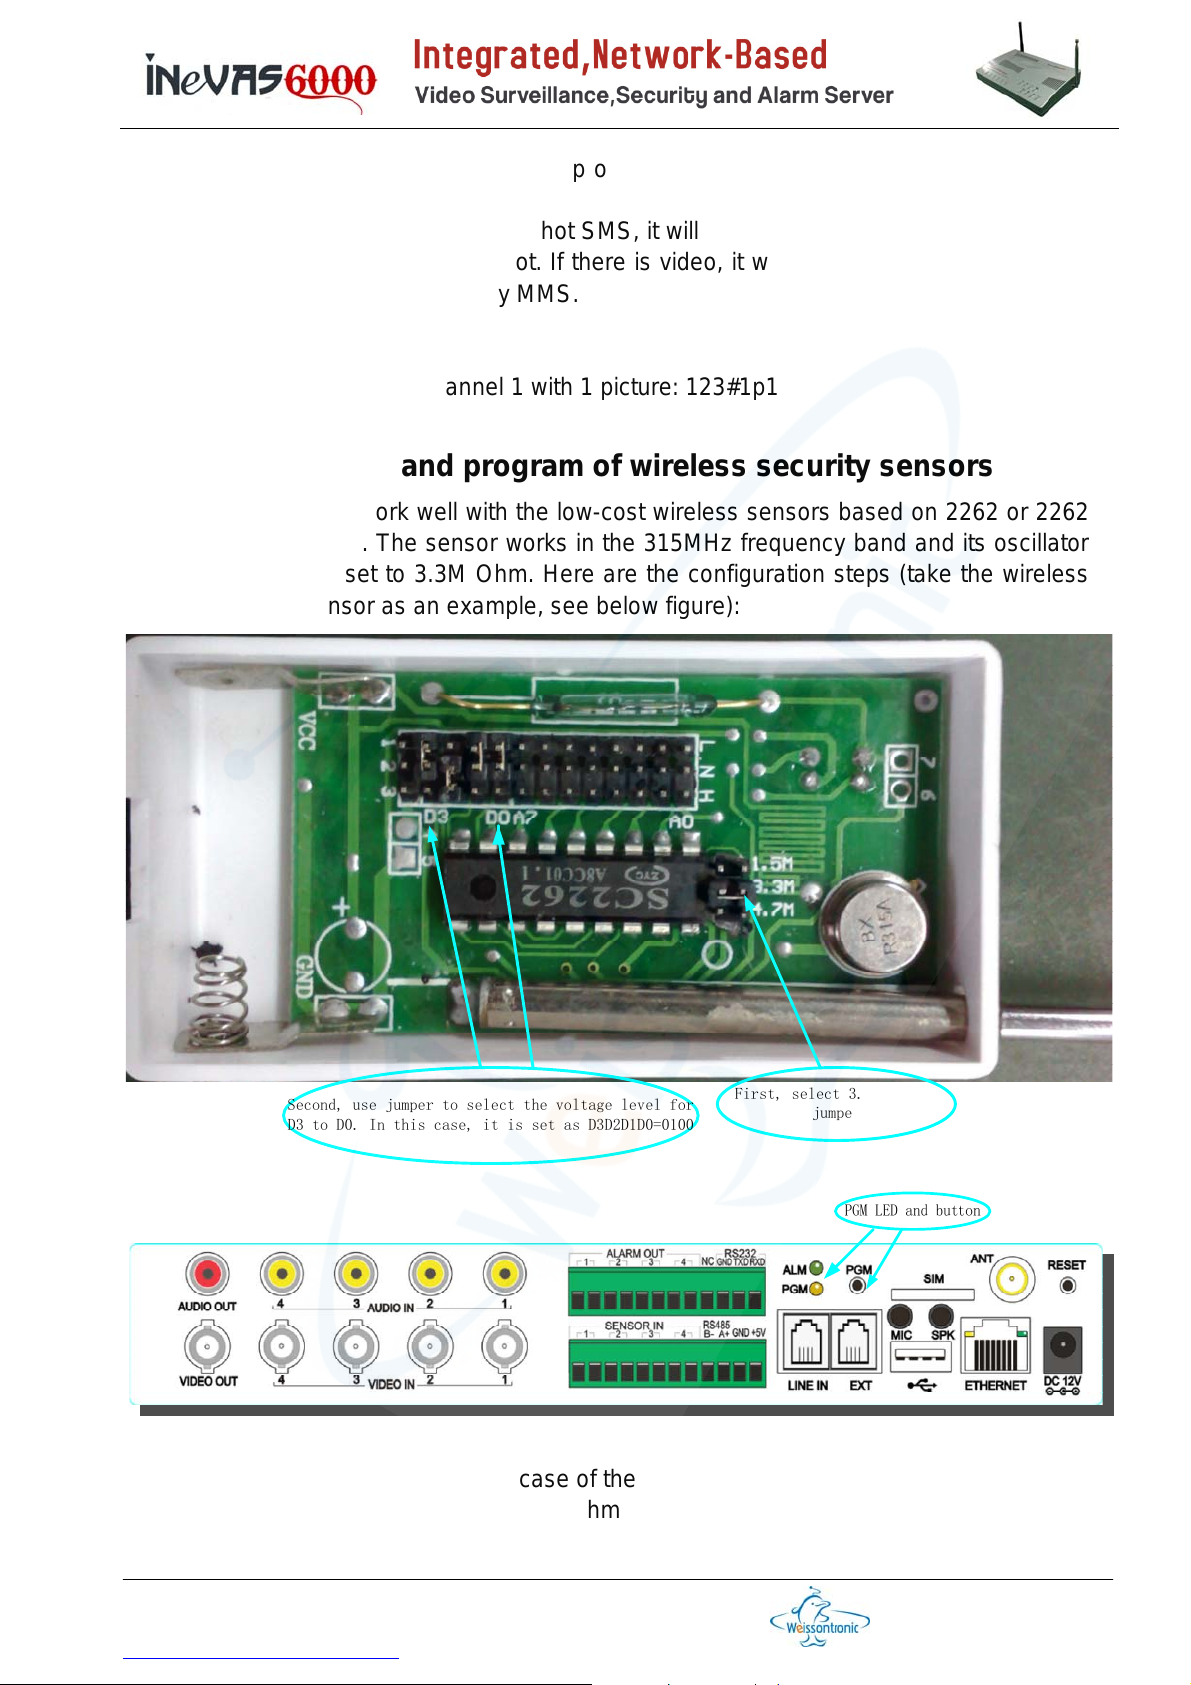
magnetic door sensor as an example, see below figure):
Second, use jumper to select the voltage level for
D3 to D0. In this case, it is set as D3D2D1D0=0100
First, select 3.3M with a
jumper
1. open the bottom cover of the case of the sensor and take out of the cell
2. use the jumper to select the 3.3M Ohm resistor
3. use the jumper to select the voltage level for D3 to D0, which is determining the
Weixun Electronics (Weissontronics) Technologies Co. Ltd.
728, Changchi Road, Gutang, Cixi City, Zhejiang Province, PRChina, 315300
Tel: +86 574 6301 7347 / 6302 8417 x 118/168, Fax: +86 574 6301 7347 / 6302 8417 x 128
http://www.nbweixun.com/en/index.php
第 39 页
Page 40
zone number (see table below for the relationship). Note: when N is shorted to L
with a jumper, it is low voltage level or ‘0’; when N is shorted to H, it is high voltage
level or ‘1’. User can also set that for A7 to A0 similarly .
4. seat back the cell and put back the case bottom cover
5. Press the PGM button in the backpanel and hold on until the yellow PGM LED is on.
Cautious: If hold on after the PGM LED is on, all the programmed wireless sensors
will be cleared in the device. Refer to step 8.
6. Let the sensor gives out a wireless signal, in this case, simply move the magnet
away from the sensor and the red LED indicator will be on indicating signaling a
wireless alarm. At the same time, observe the PGM LED in the backpanel: if it is
turned off quickly, this sensor is programmed into the device; otherwise, if the LED
is till on or off after a long time, the sensor fails to be programmed into the device. If
fail, please return back to step 1 to 4 to see if the sensor is configured accordingly.
7. If the sensor is programmed into device successfully, install it in the planned area
and go to the setup in the PC client, as in section 5.1.
8. Clear all the programmed wireless sensors in the device: press and hold the PGM
button for a long time until the PGM LED flashes for 3 times, all the programmed
wireless sensors in the device are cleared.
D3 D2 D1 D0 Zone number
0 0 0 0 Reserved
0 0 0 1 Reserved for remote
0 0 1 0 Reserved for remote
0 0 1 1 12
0 1 0 0 Reserved for remote
0 1 0 1 10
0 1 1 0 6
0 1 1 1 14
1 0 0 0 Reserved for remote
1 0 0 1 9
1 0 1 0 5
1 0 1 1 13
1 1 0 0 8
1 1 0 1 11
1 1 1 0 7
1 1 1 1 15
Note: from above table, it can be seen that the wireless remote uses the same method as
that of wireless sensors. So the remote also needs to be programmed into the device.
One big difference is that its D3-D0 and A7-A0 are set fixed and can not be reconfigured
for simplicity. The side-effect is that all the devices use the same remote, which might
introduce a safety risk. User should decide if the remote can be used or not to control the
device. If safety is a big concern, please disable the remote, as shown in section 4.7.
Weixun Electronics (Weissontronics) Technologies Co. Ltd.
728, Changchi Road, Gutang, Cixi City, Zhejiang Province, PRChina, 315300
Tel: +86 574 6301 7347 / 6302 8417 x 118/168, Fax: +86 574 6301 7347 / 6302 8417 x 128
http://www.nbweixun.com/en/index.php
第 40 页
Page 41
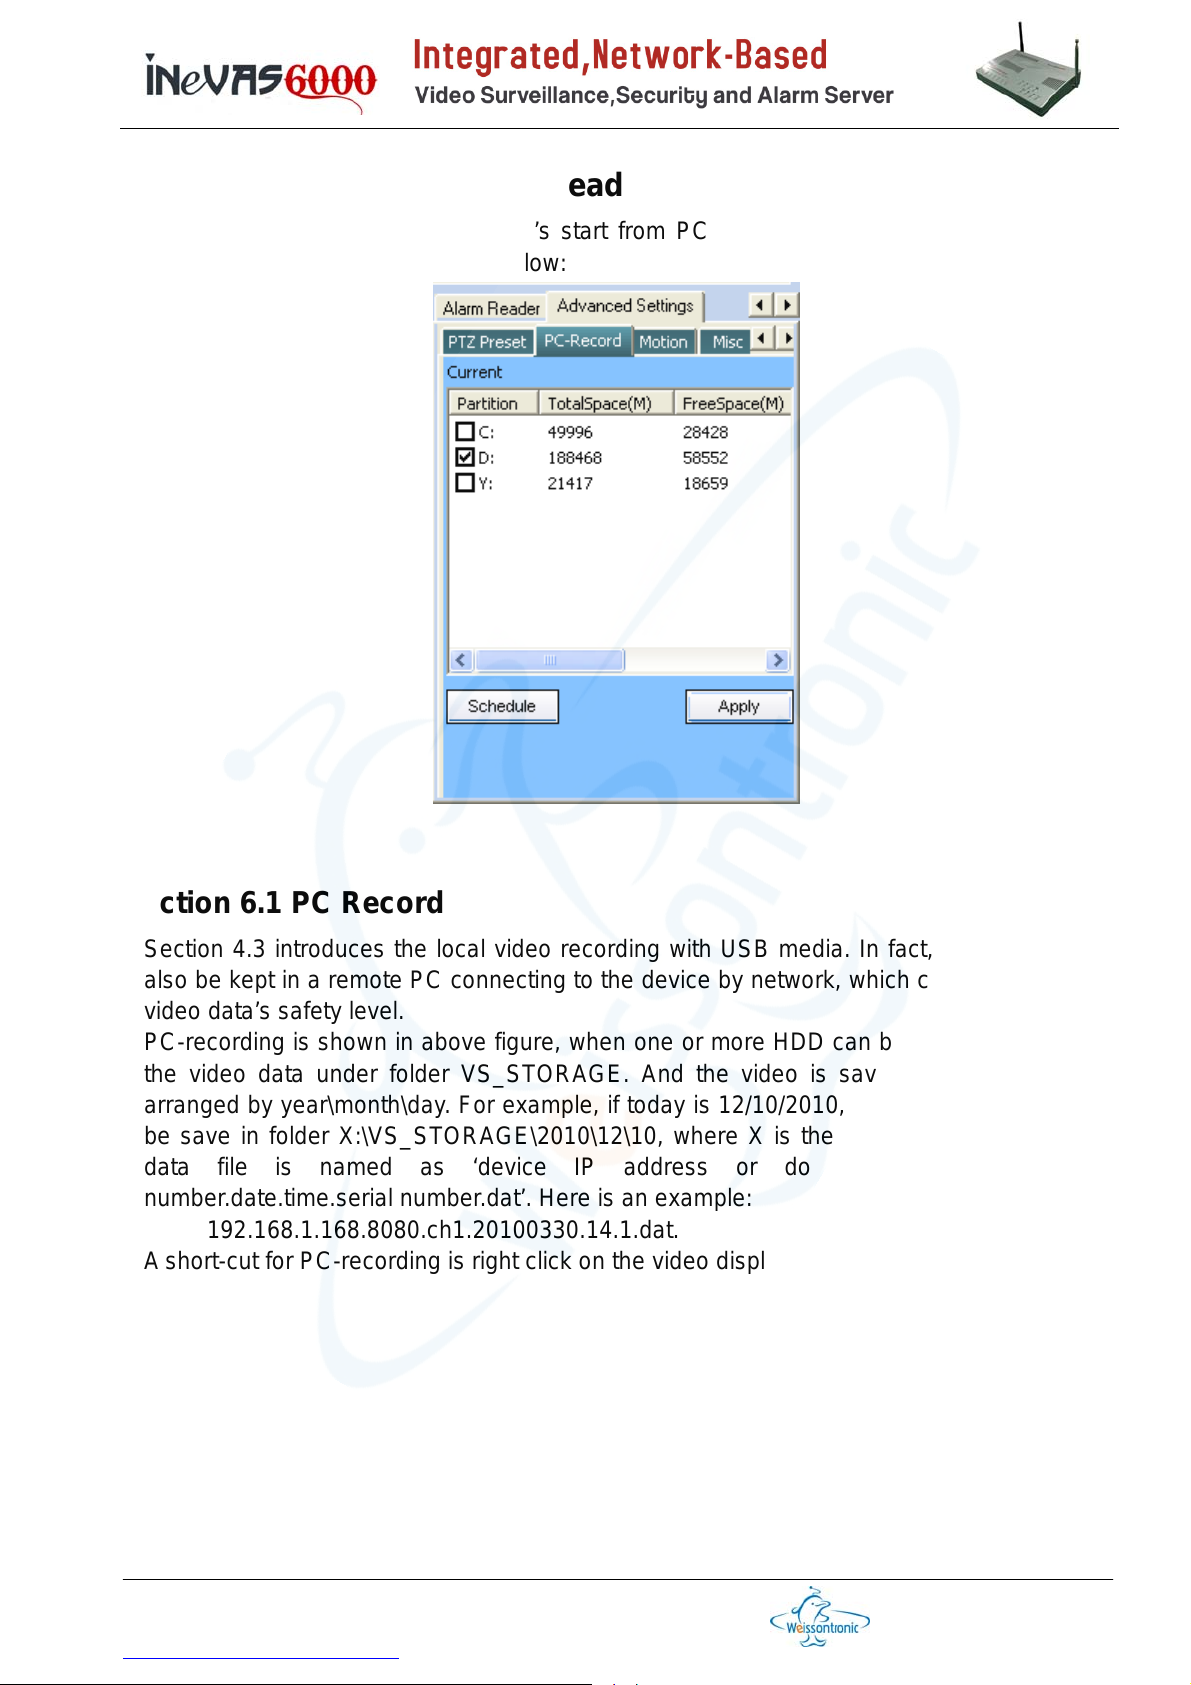
Chapter 6 Playback, Alarm Reader and Advanced Settings
Before introducing the playback, let’s start from PC video recording. Select Advanced
Settings −> PC-Record, as show below:
Section 6.1 PC Record
Section 4.3 introduces the local video recording with USB media. In fact, the video can
also be kept in a remote PC connecting to the device by network, which can improve the
video data’s safety level.
PC-recording is shown in above figure, when one or more HDD can be selected to save
the video data under folder VS_STORAGE. And the video is saved in the subfolder
arranged by year\month\day. For example, if today is 12/10/2010, then today’s video will
be save in folder X:\VS_STORAGE\2010\12\10, where X is the HDD driver. The video
data file is named as ‘device IP address or domain name.port.channel
number.date.time.serial number.dat’. Here is an example:
192.168.1.168.8080.ch1.20100330.14.1.dat.
A short-cut for PC-recording is right click on the video display and select ‘Record’.
Weixun Electronics (Weissontronics) Technologies Co. Ltd.
728, Changchi Road, Gutang, Cixi City, Zhejiang Province, PRChina, 315300
Tel: +86 574 6301 7347 / 6302 8417 x 118/168, Fax: +86 574 6301 7347 / 6302 8417 x 128
http://www.nbweixun.com/en/index.php
第 41 页
Page 42
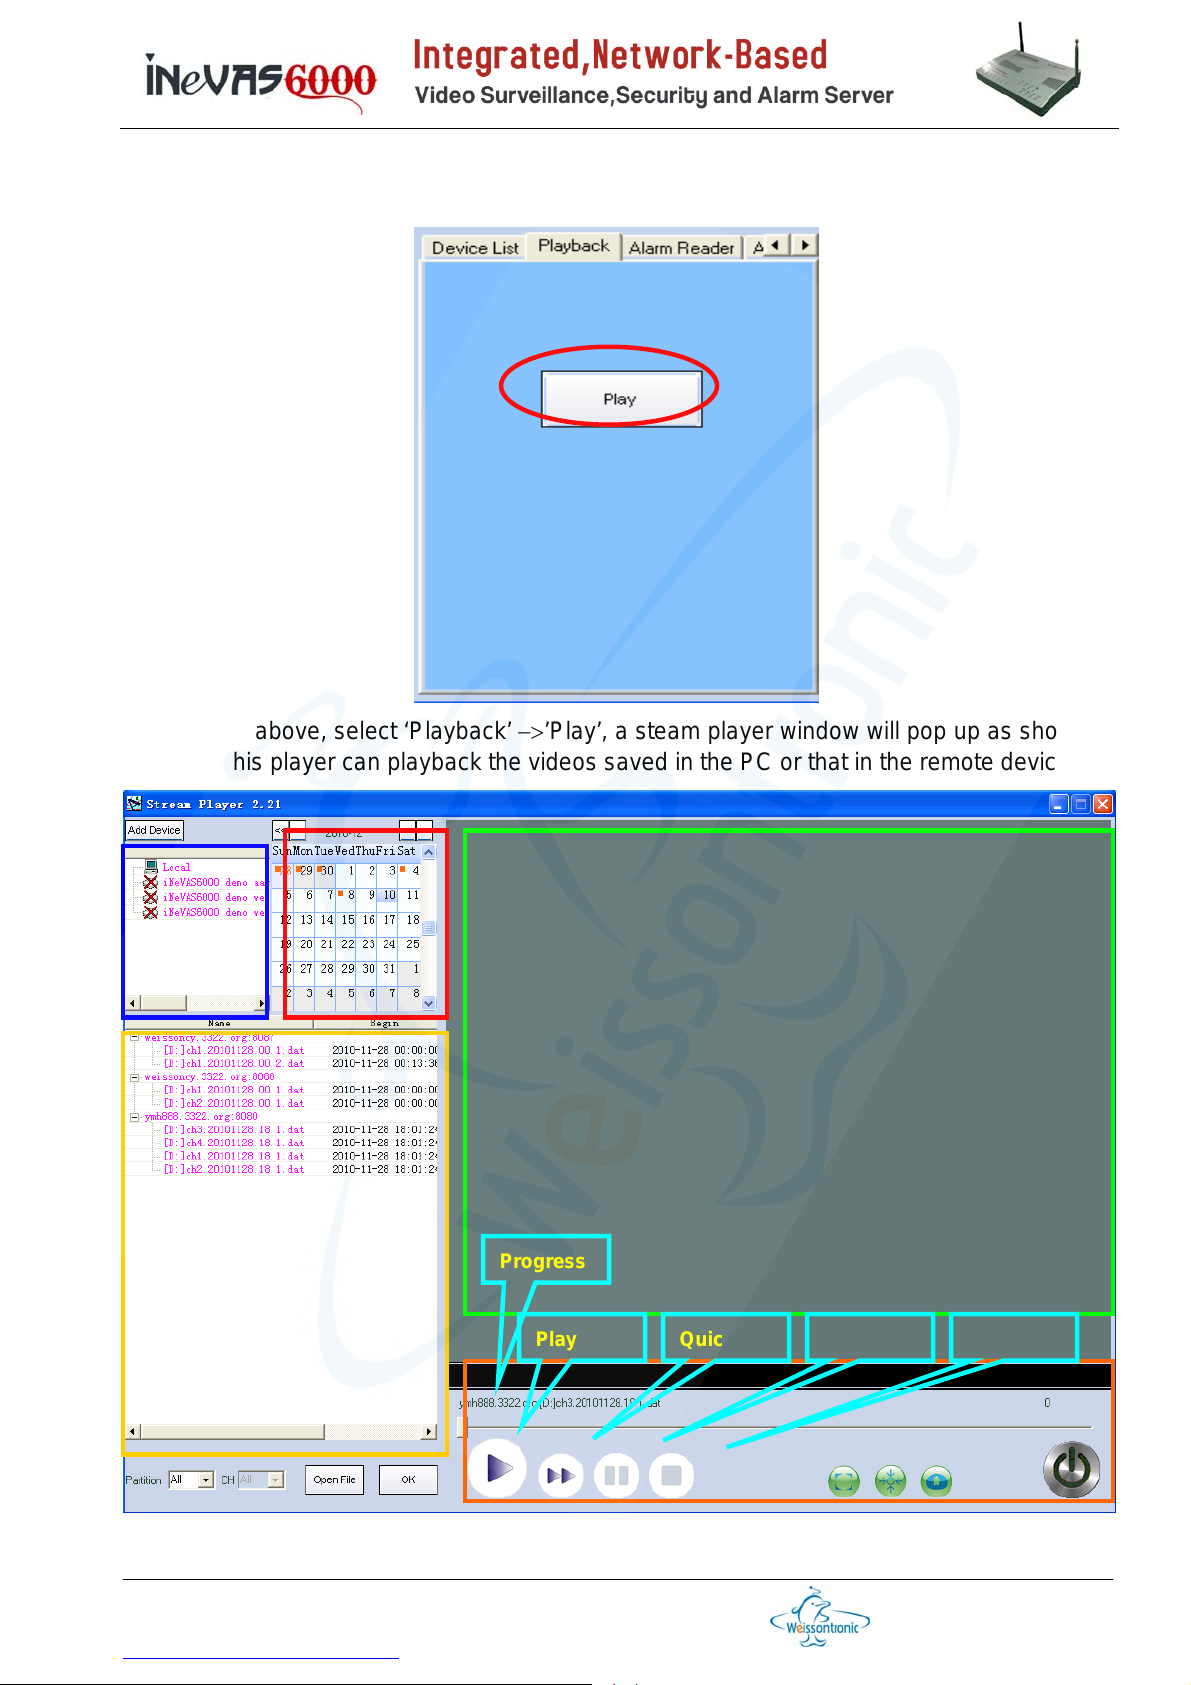
Section 6.2 Playback
As shown above, select ‘Playback’ −>’Play’, a steam player window will pop up as shown
below . This player can playback the videos saved in the PC or that in the remote devices.
Progress
Play Quick Pause Stop
Weixun Electronics (Weissontronics) Technologies Co. Ltd.
728, Changchi Road, Gutang, Cixi City, Zhejiang Province, PRChina, 315300
Tel: +86 574 6301 7347 / 6302 8417 x 118/168, Fax: +86 574 6301 7347 / 6302 8417 x 128
http://www.nbweixun.com/en/index.php
第 42 页
Page 43
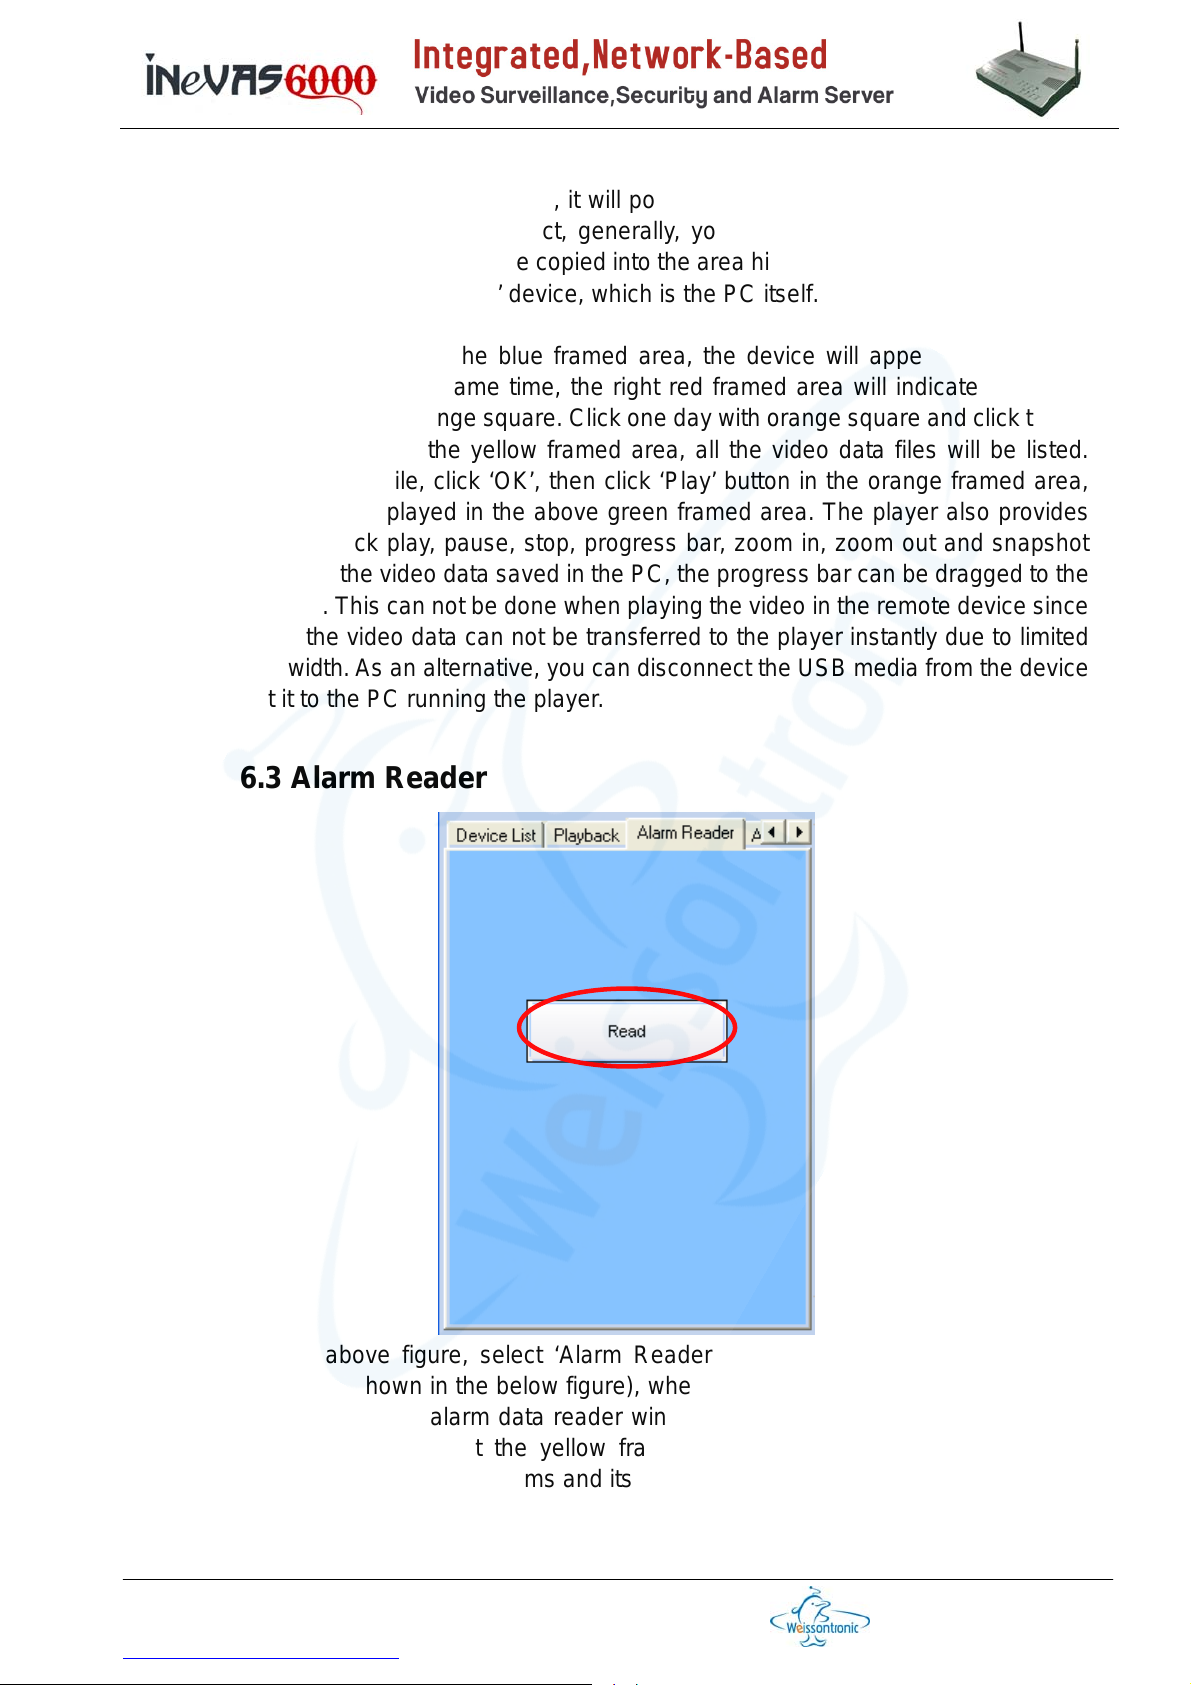
In the above player, click ‘Add Device’, it will popup another window to let you search or
input device address and port. In fact, generally, you do not need to do so since the
device list in the main window will be copied into the area highlighted with blue frame. The
blue frame area also has a ‘Local’ device, which is the PC itself.
Double click on a device in the blue framed area, the device will appear in the below
yellow framed area. At the same time, the right red framed area will indicate the dates
with saved videos by an orange square. Click one day with orange square and click the ‘+’
sign beside the device in the yellow framed area, all the video data files will be listed.
Select one video data file, click ‘OK’, then click ‘Play’ button in the orange framed area,
the save video will be played in the above green framed area. The player also provides
the function like quick play, pause, stop, progress bar, zoom in, zoom out and snapshot
etc. When playing the video data saved in the PC, the progress bar can be dragged to the
time as you want. This can not be done when playing the video in the remote device since
in most cases, the video data can not be transferred to the player instantly due to limited
network bandwidth. As an alternative, you can disconnect the USB media from the device
and connect it to the PC running the player.
Section 6.3 Alarm Reader
As show in the above figure, select ‘Alarm Reader’ −> ‘Read’, an alarm data reader
window will pop up(shown in the below figure), where you can review the security events
and its linked videos. The alarm data reader window is similar to that of video playback
window. The difference is that the yellow frames area lists the security events from
wired/wireless/motion detection alarms and its linked video clips.
Weixun Electronics (Weissontronics) Technologies Co. Ltd.
728, Changchi Road, Gutang, Cixi City, Zhejiang Province, PRChina, 315300
Tel: +86 574 6301 7347 / 6302 8417 x 118/168, Fax: +86 574 6301 7347 / 6302 8417 x 128
http://www.nbweixun.com/en/index.php
第 43 页
Page 44
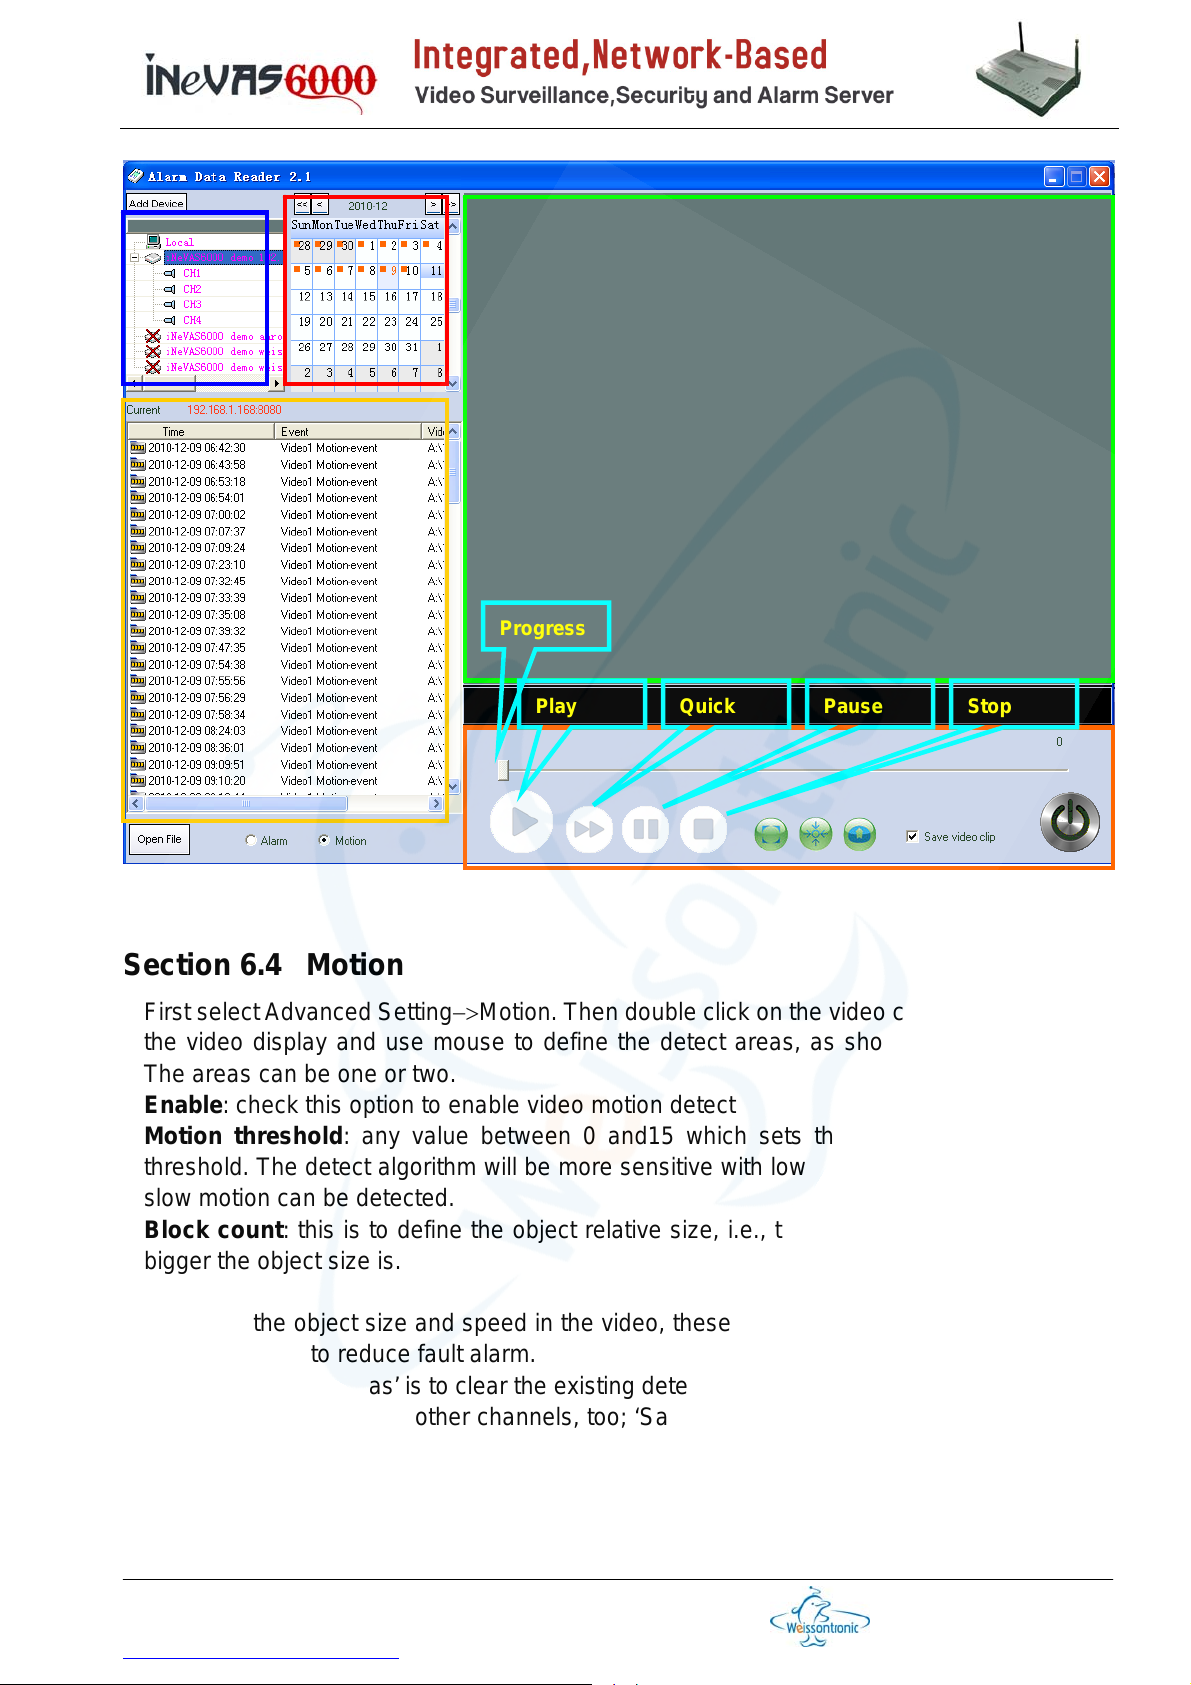
Progress
Play Quick Pause Stop
Section 6.4 Motion
First select Advanced Setting−>Motion. Then double click on the video channel to enlarge
the video display and use mouse to define the detect areas, as shown in below figure.
The areas can be one or two.
Enable: check this option to enable video motion detect
Motion threshold: any value between 0 and15 which sets the object moving speed
threshold. The detect algorithm will be more sensitive with low value threshold, i.e., even
slow motion can be detected.
Block count: this is to define the object relative size, i.e., the more blocks counted, the
bigger the object size is.
Based on the object size and speed in the video, these above two parameters should be
set accordingly to reduce fault alarm.
The button ‘Clear areas’ is to clear the existing detection areas; ‘Apply to all’ will apply the
current settings to all the other channels, too; ‘Save’ is to save the current settings to the
device.
Weixun Electronics (Weissontronics) Technologies Co. Ltd.
728, Changchi Road, Gutang, Cixi City, Zhejiang Province, PRChina, 315300
Tel: +86 574 6301 7347 / 6302 8417 x 118/168, Fax: +86 574 6301 7347 / 6302 8417 x 128
http://www.nbweixun.com/en/index.php
第 44 页
Page 45
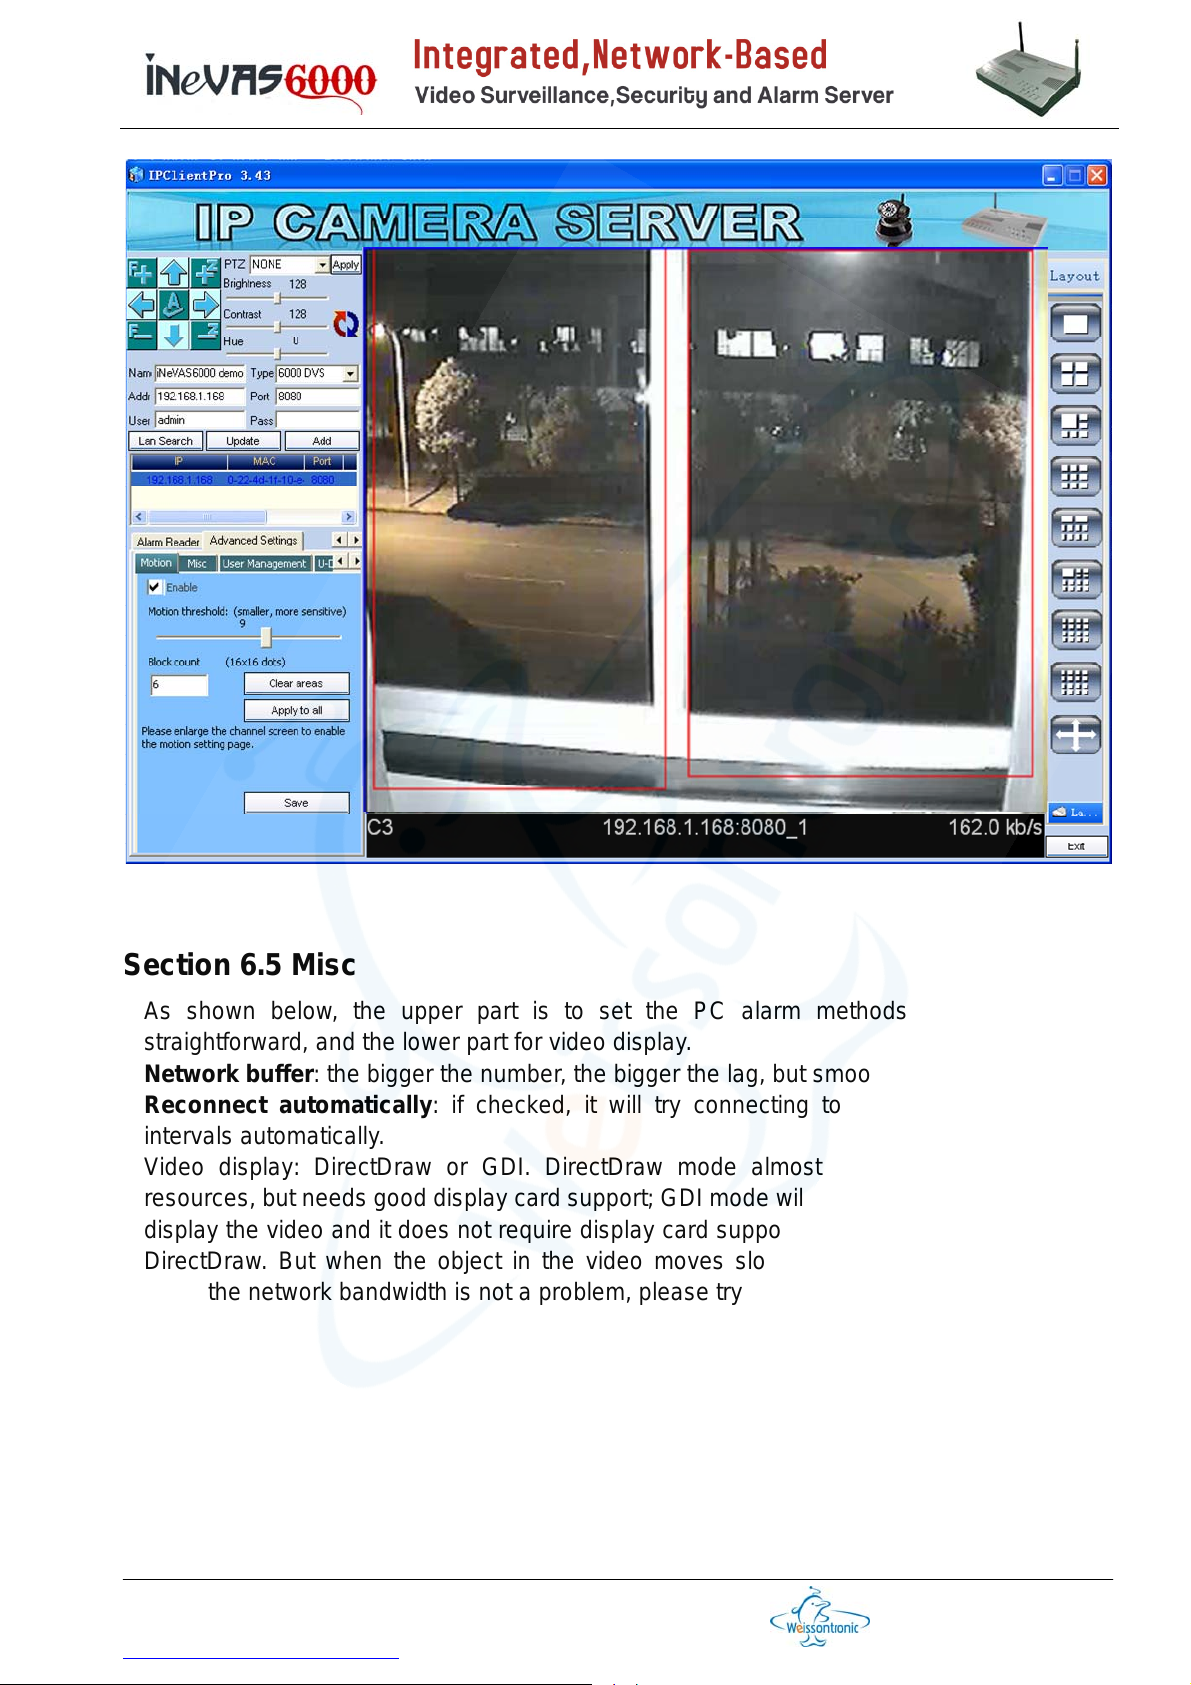
Section 6.5 Misc
As shown below, the upper part is to set the PC alarm methods, which is quite
straightforward, and the lower part for video display.
Network buffer: the bigger the number, the bigger the lag, but smoother
Reconnect automatically: if checked, it will try connecting to the device at regular
intervals automatically.
Video display: DirectDraw or GDI. DirectDraw mode almost does not occupy CPU
resources, but needs good display card support; GDI mode will use the CPU resources to
display the video and it does not require display card support much. The default mode is
DirectDraw. But when the object in the video moves slowly and discontinuously even
when the network bandwidth is not a problem, please try GDI.
Weixun Electronics (Weissontronics) Technologies Co. Ltd.
728, Changchi Road, Gutang, Cixi City, Zhejiang Province, PRChina, 315300
Tel: +86 574 6301 7347 / 6302 8417 x 118/168, Fax: +86 574 6301 7347 / 6302 8417 x 128
http://www.nbweixun.com/en/index.php
第 45 页
Page 46
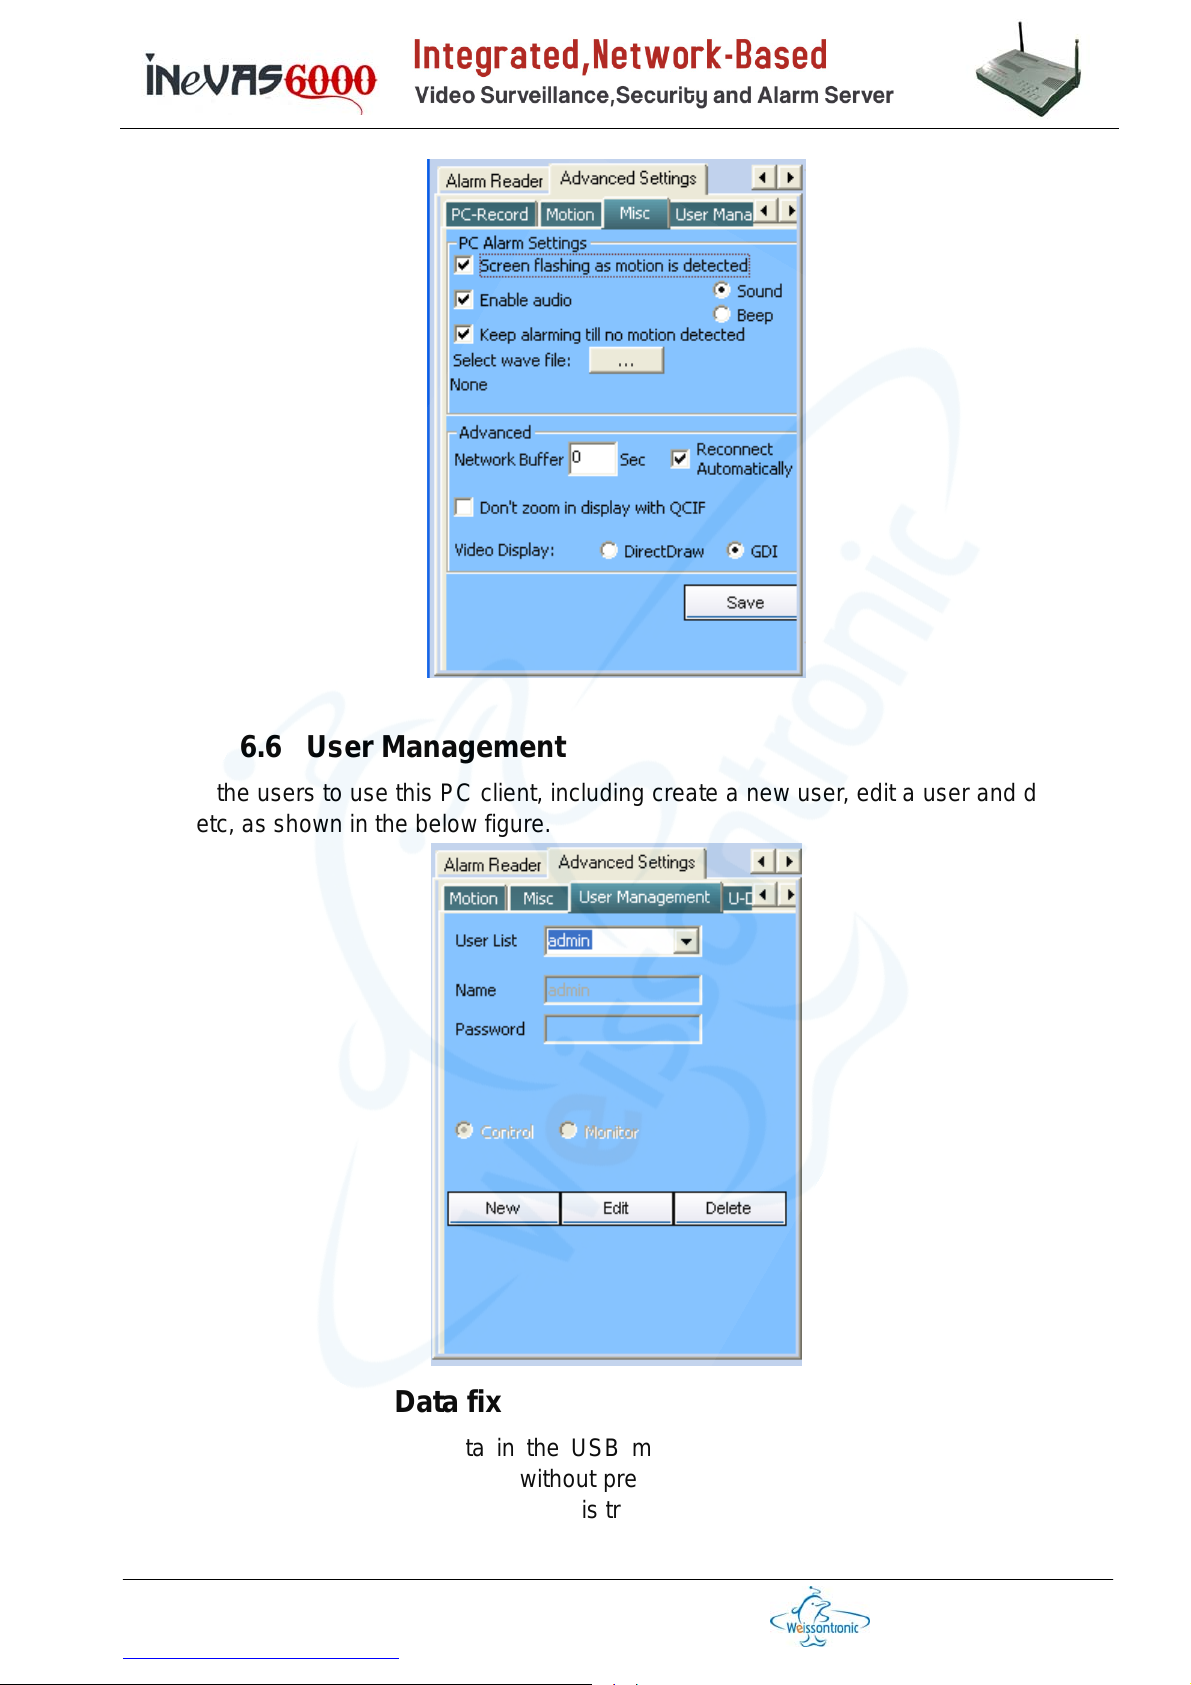
Section 6.6 User Management
Manage the users to use this PC client, including create a new user, edit a user and delete
a user etc, as shown in the below figure.
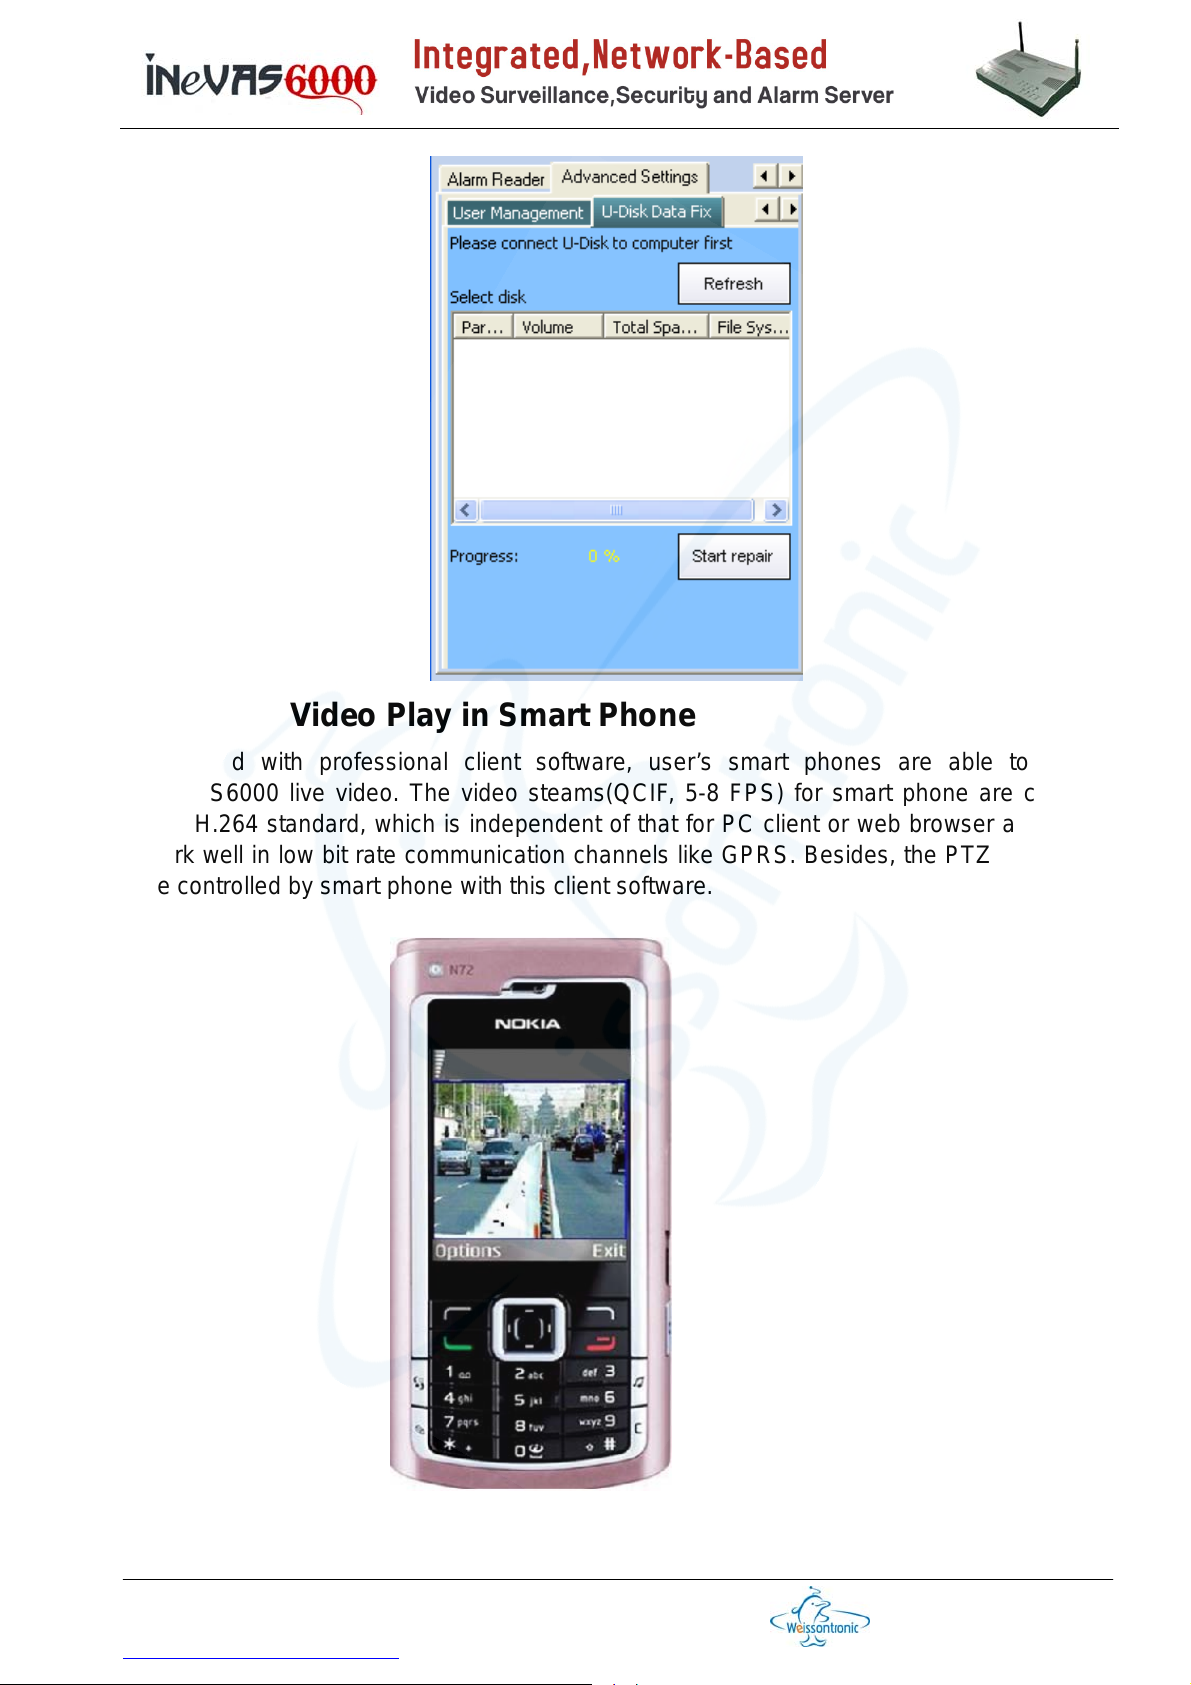
Section 6.7 U-Disk Data fix
In some cases, the video data in the USB media might be damaged due to sudden
power-cut, remove the USB media without pressing the frontpanel USB key first etc. The
U-Disk fix tool, as shown in below figure, is trying to fix the damaged data files.
Weixun Electronics (Weissontronics) Technologies Co. Ltd.
728, Changchi Road, Gutang, Cixi City, Zhejiang Province, PRChina, 315300
Tel: +86 574 6301 7347 / 6302 8417 x 118/168, Fax: +86 574 6301 7347 / 6302 8417 x 128
http://www.nbweixun.com/en/index.php
第 46 页
Page 47
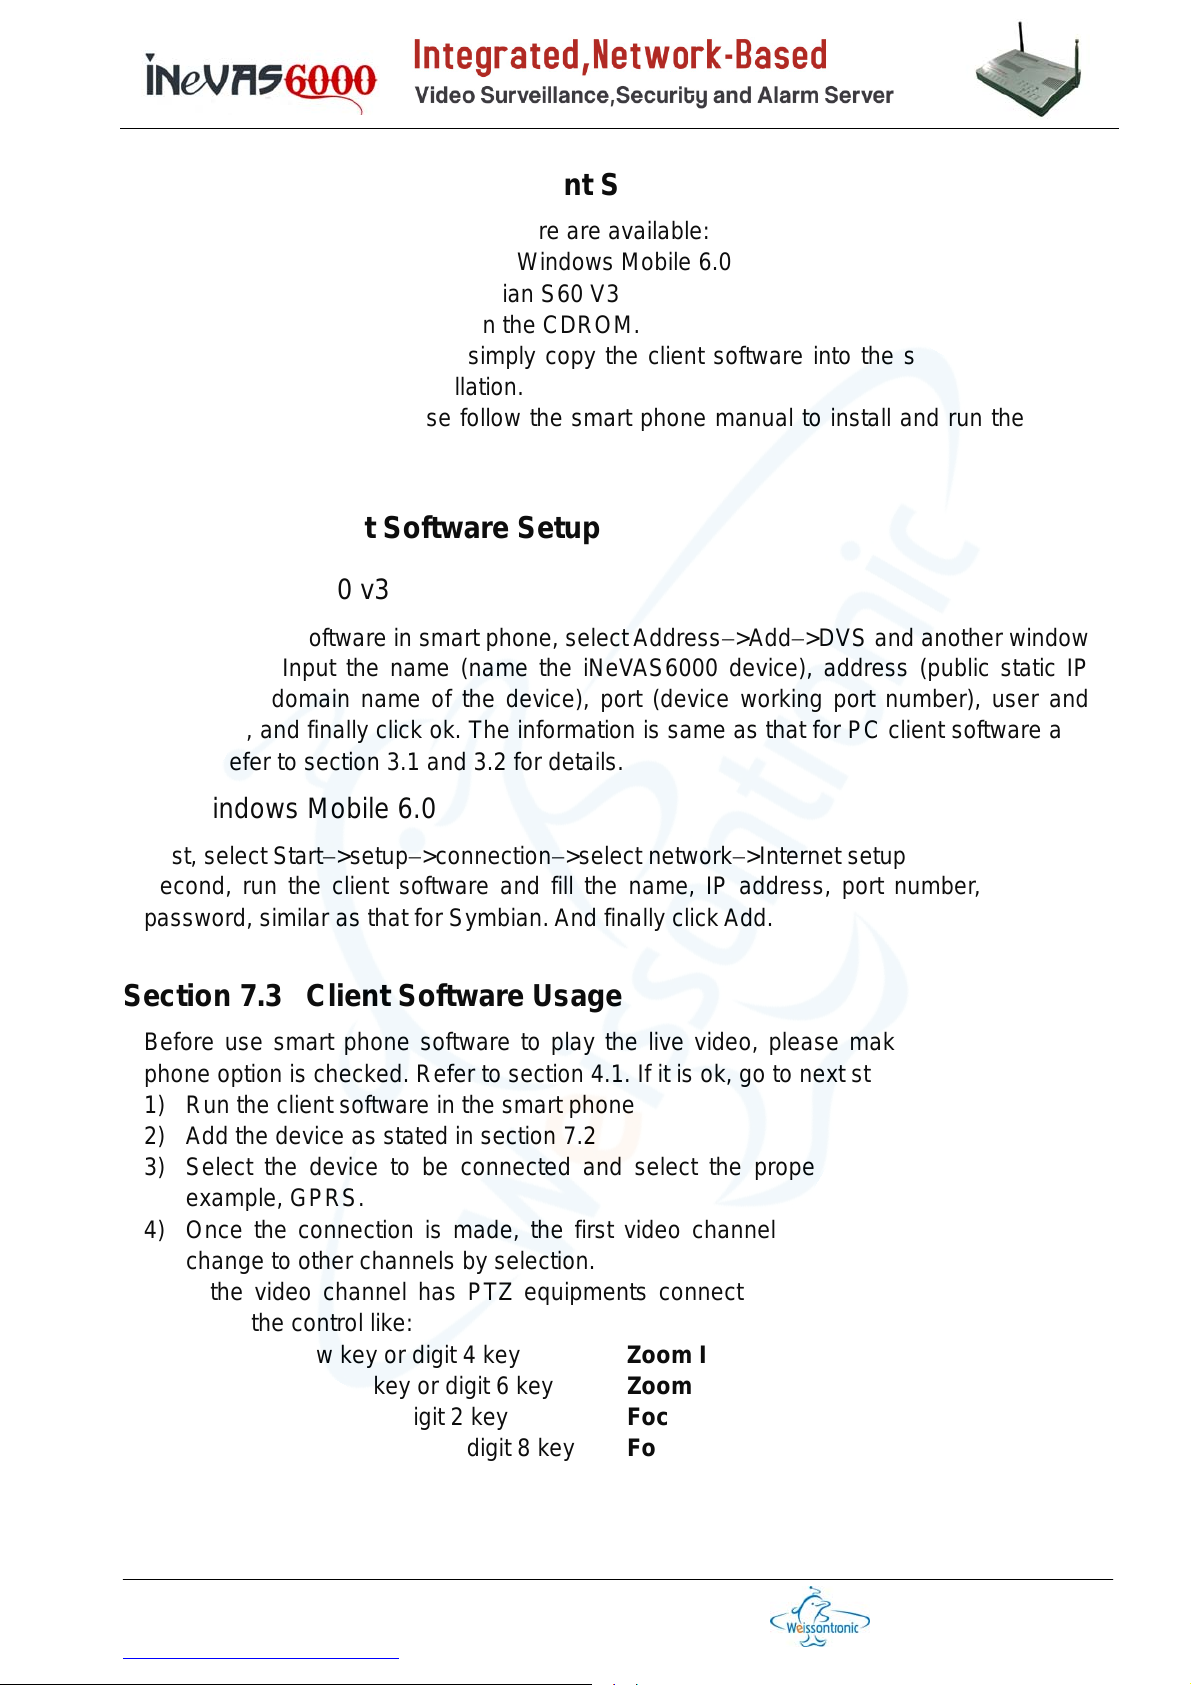
Chapter 7 Video Play in Smart Phone
Equipped with professional client software, user’s smart phones are able to play
iNeVAS6000 live video. The video steams(QCIF, 5-8 FPS) for smart phone are coded
with H.264 standard, which is independent of that for PC client or web browser and can
work well in low bit rate communication channels like GPRS. Besides, the PTZ can also
be controlled by smart phone with this client software.
Weixun Electronics (Weissontronics) Technologies Co. Ltd.
728, Changchi Road, Gutang, Cixi City, Zhejiang Province, PRChina, 315300
Tel: +86 574 6301 7347 / 6302 8417 x 118/168, Fax: +86 574 6301 7347 / 6302 8417 x 128
http://www.nbweixun.com/en/index.php
第 47 页
Page 48
Section 7.1 Installation of Client Software in Smart Phone
Up to now, 4 versions of client software are available:
1) Windows Mobile 5.0 and Windows Mobile 6.0
2) Symbian S60 V2/ Symbian S60 V3
The client software is available in the CDROM.
For Windows Mobile system, simply copy the client software into the smart phone and
click to run. No need for installation.
For Symbian system, please follow the smart phone manual to install and run the client
software.
Section 7.2 Client Software Setup
1) Symbian S60 v3
Run the client software in smart phone, select Address−>Add−>DVS and another window
will pop up. Input the name (name the iNeVAS6000 device), address (public static IP
address or domain name of the device), port (device working port number), user and
password, and finally click ok. The information is same as that for PC client software and
please refer to section 3.1 and 3.2 for details.
2) Windows Mobile 6.0
First, select Start−>setup−>connection−>select network−>Internet setup
Second, run the client software and fill the name, IP address, port number, user and
password, similar as that for Symbian. And finally click Add.
Section 7.3 Client Software Usage
Before use smart phone software to play the live video, please make sure the mobile
phone option is checked. Refer to section 4.1. If it is ok, go to next steps:
1) Run the client software in the smart phone
2) Add the device as stated in section 7.2
3) Select the device to be connected and select the proper connection method, for
example, GPRS.
4) Once the connection is made, the first video channel will be played and you can
change to other channels by selection.
5) If the video channel has PTZ equipments connected, use the phone keyboard to
make the control like:
Left: left arrow key or digit 4 key Zoom In: digit 1 key
Right: right arrow key or digit 6 key Zoom Out: digit 3 key
Up: up arrow Key or digit 2 key Focus In: digit 7 key
D own: down arrow key or digit 8 key Focus Out: digit 9 key
Weixun Electronics (Weissontronics) Technologies Co. Ltd.
728, Changchi Road, Gutang, Cixi City, Zhejiang Province, PRChina, 315300
Tel: +86 574 6301 7347 / 6302 8417 x 118/168, Fax: +86 574 6301 7347 / 6302 8417 x 128
http://www.nbweixun.com/en/index.php
第 48 页
Page 49
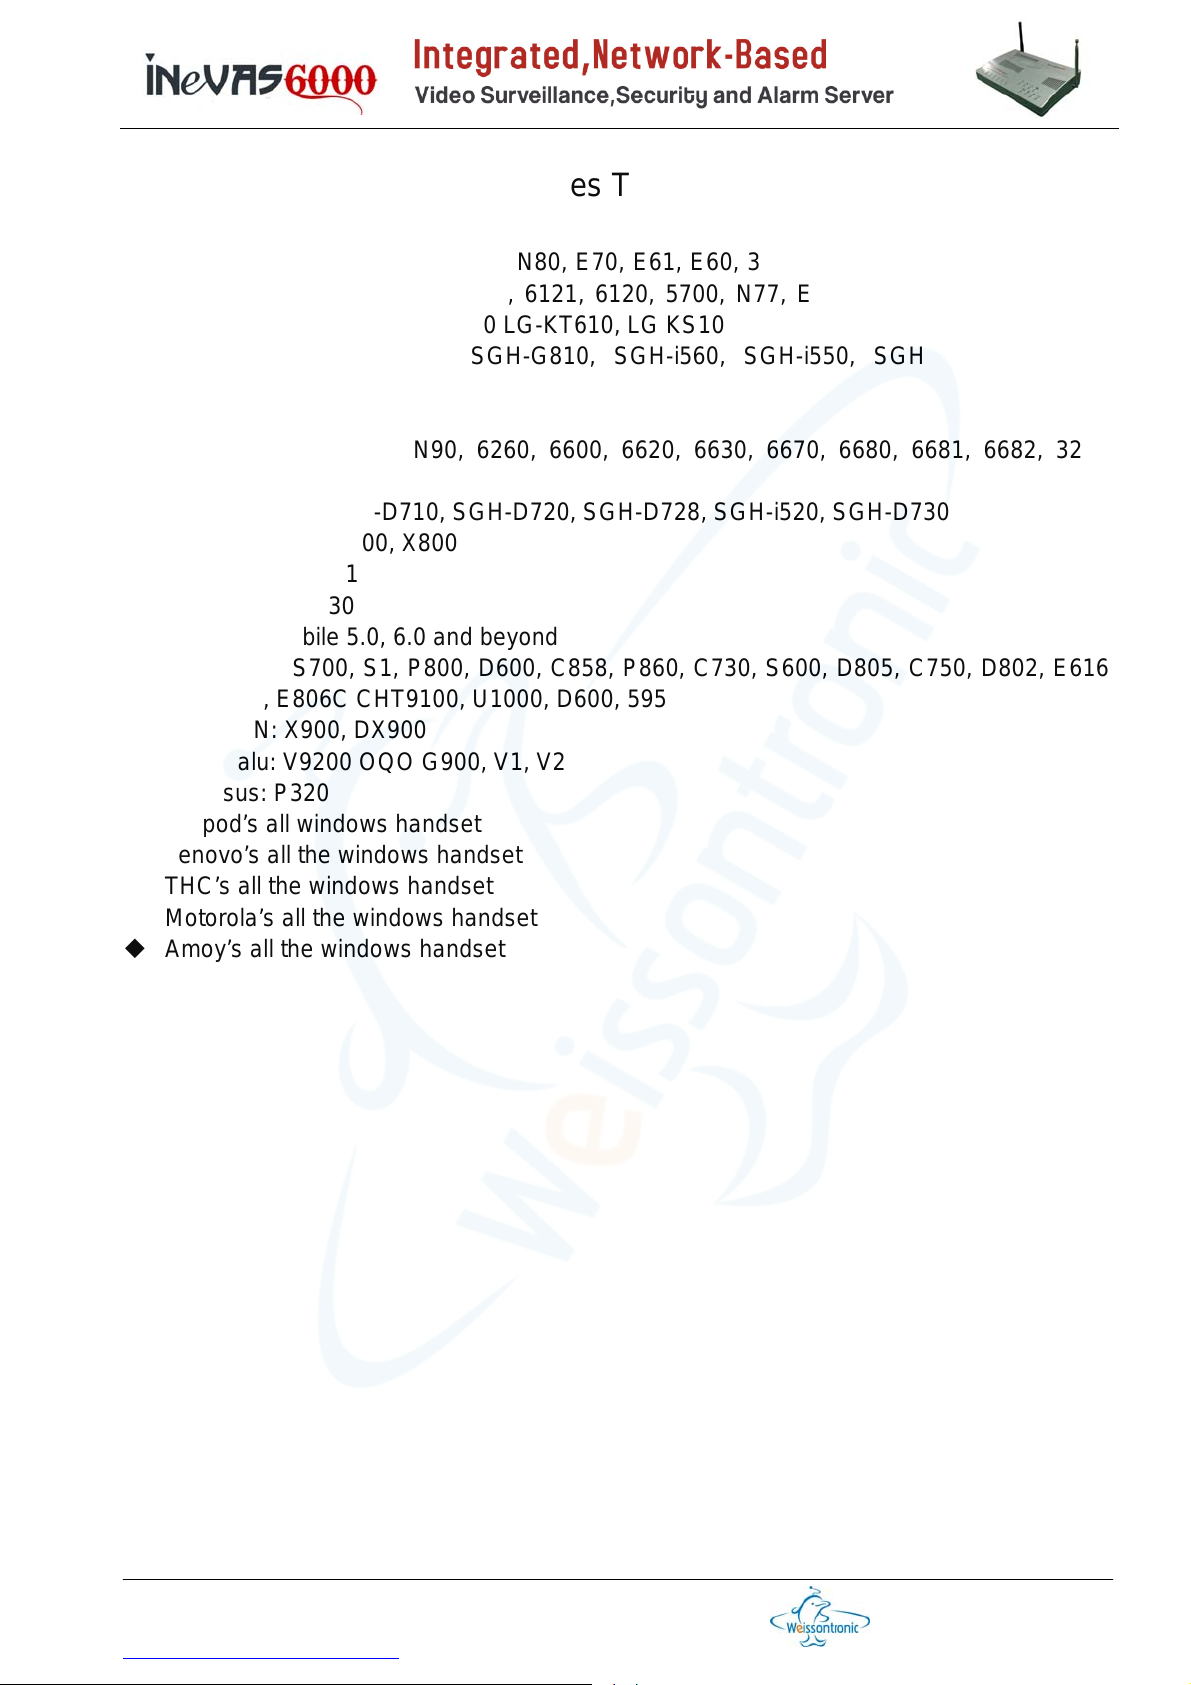
Appendix A List of Smart Phones That Can Run the Client Software
Symbian S60 V3
9 Nokia: N73, N93, N92, N71, N80, E70, E61, E60, 3250, N91, E71, E66, 5320, 6210,
N96, N82, E51, N95, N81, 6121, 6120, 5700, N77, E90, E65, 6110, N93i, N76,
6290, N75, E62, E50, 5500 LG-KT610, LG KS10
9 Samsung: SGH-L870, SGH-G810, SGH-i560, SGH-i550, SGH-i450, SGH-i400,
SGH-i520, SGH-i718
Symbian S60 V2
9 Nokia: N70, N72, N90, 6260, 6600, 6620, 6630, 6670, 6680, 6681, 6682, 3230,
6708, 7610
9 Samsung: SGH-D710, SGH-D720, SGH-D728, SGH-i520, SGH-D730
9 Panasonic: X700, X800
9 Siemens: SX1
9 Lenovo: P930
Windows Mobile 5.0, 6.0 and beyond
9 Dopod: S700, S1, P800, D600, C858, P860, C730, S600, D805, C750, D802, E616,
P660, E806C CHT9100, U1000, D600, 595
9 ETEN: X900, DX900
9 Hualu: V9200 OQO G900, V1, V2
9 Asus: P320
Do pod’s all windows handset
Lenovo’s all the windows handset
THC’s all the windows handset
Motorola’s all the windows handset
Amoy’s all the windows handset
Weixun Electronics (Weissontronics) Technologies Co. Ltd.
728, Changchi Road, Gutang, Cixi City, Zhejiang Province, PRChina, 315300
Tel: +86 574 6301 7347 / 6302 8417 x 118/168, Fax: +86 574 6301 7347 / 6302 8417 x 128
http://www.nbweixun.com/en/index.php
第 49 页
 Loading...