

Page 1
COFFEEMAKER
Use and Care Manual
SS0311-0BP
®
Should you have any questions or concerns about your new product, please call our Customer Service Line at
1-800-577-1557 (U.S. and Canada). Please do not return to the store.
SS0311-0BP_29561_E_IB_A.indd 1SS0311-0BP_29561_E_IB_A.indd 1 12/6/22 10:32 AM12/6/22 10:32 AM
We want you to have a 5-star experience!
1
Page 2
CONTENTS
Important Safeguards
Getting to know your Coffee Maker
Features and Benefits
Before Brewing
Brewing Single Serve-Pods
Brewing Single Serve-Ground Coffee
Care and Cleaning
Troubleshooting
Warranty and Customer
Service Information
3
4
5
5
6
7
8
9
10
WARNING
The lightning symbol refers to “dangerous voltage”; the exclamation symbol refers
to maintenance instructions. See below.
Warning: To reduce the risk of fire or electric shock, do not remove the cover of the
coffeemaker. There are no user-serviceable parts inside. Repair should be done by
authorized service personnel only.
RISK OF FIRE OR ELECTRIC SHOCK. DO NOT OPEN.
2
SS0311-0BP_29561_E_IB_A.indd 2SS0311-0BP_29561_E_IB_A.indd 2 12/6/22 10:32 AM12/6/22 10:32 AM
Page 3

Please Read and Save this Use and Care Book.
IMPORTANT SAFEGUARDS.
When using electrical appliances, basic safety precautions should always be followed
to reduce the risk of fire, electric shock, and/or injury, including the following:
• Read all instructions.
• Do not touch hot surfaces. Use handles or knobs.
• To protect against fire, electric shock and injury to
persons do not immerse cord, plugs or appliance in
water or other liquid.
• Close supervision is necessary when any appliance
is used by or near children.
• Unplug from outlet when the appliance is not in use,
and before cleaning. Allow to cool before putting
on or taking off parts, and before cleaning the
appliance.
• Do not operate any appliance with a damaged
cord or plug, or after the appliance malfunctions
or has been damaged in any manner. Contact
Consumer Support at the number listed in this
manual.
• The use of accessory attachments not
recommended by the appliance manufacturer may
result in fire, electric shock or injury to persons.
• Do not use outdoors.
• Do not let cord hang over edge of table or counter,
or touch hot surfaces.
• Do not place on or near a hot gas or electric
burner, or in a heated oven.
• To disconnect, turn the unit OFF, then remove plug
from wall outlet.
• Do not use this appliance for anything other than
intended use.
• Only use capsules intended for this appliance. If
the capsule does not fit, do not force the capsule
into the appliance.
• WARNING: To avoid the risk of injury, do not
open the brew chamber during the brew process.
Scalding may occur if the lid is removed during the
brewing cycles.
• This appliance is not intended for use by persons
(including children) with reduced physical, sensory
or mental capabilities, or lack of experience
and knowledge, unless they have been given
supervision or instruction concerning use of the
appliance by a person responsible for their safety.
• Children should be supervised to ensure that they
do not play with the appliance.
• Never fill the water reservoir past the 50 oz.
marking.
SAVE THESE INSTRUCTIONS.
This product is for household use only.
POLARIZED PLUG (120V models only)
This appliance has a polarized plug
(one blade is wider than the other). To
reduce the risk of electric shock, this
plug is intended to t into a polarized
outlet only one way. If the plug does not
t fully into the outlet, reverse the plug.
If it still does not t, contact a qualied
electrician. Do not attempt to modify the
plug in any way.
TAMPER- R E S I S TA N T SCREW
Warning: This appliance is equipped
with a tamper-resistant screw to
prevent removal of the outer cover. To
reduce the risk of re or electric shock,
do not attempt to remove the outer
cover. There are no user-serviceable
parts inside. Repair should be done only
by authorized service personnel.
SS0311-0BP_29561_E_IB_A.indd 3SS0311-0BP_29561_E_IB_A.indd 3 12/6/22 10:32 AM12/6/22 10:32 AM
ELECTRICAL CORD
a) A short power-supply cord is provided
to reduce the risks resulting from
becoming entangled in or tripping
over a longer cord.
b) Extension cords are available and may
be used if care is exercised in their use.
c) If an extension cord is used:
1) The marked electrical rating of the
extension cord should be at least as
great as the electrical rating of the
appliance; and
2) The cord should be arranged
so that it will not drape over the
counter top or tabletop where it
can be pulled on by children or
tripped over.
Note: If the power cord is damaged,
please contact the warranty
department listed in these instructions.
3
Page 4
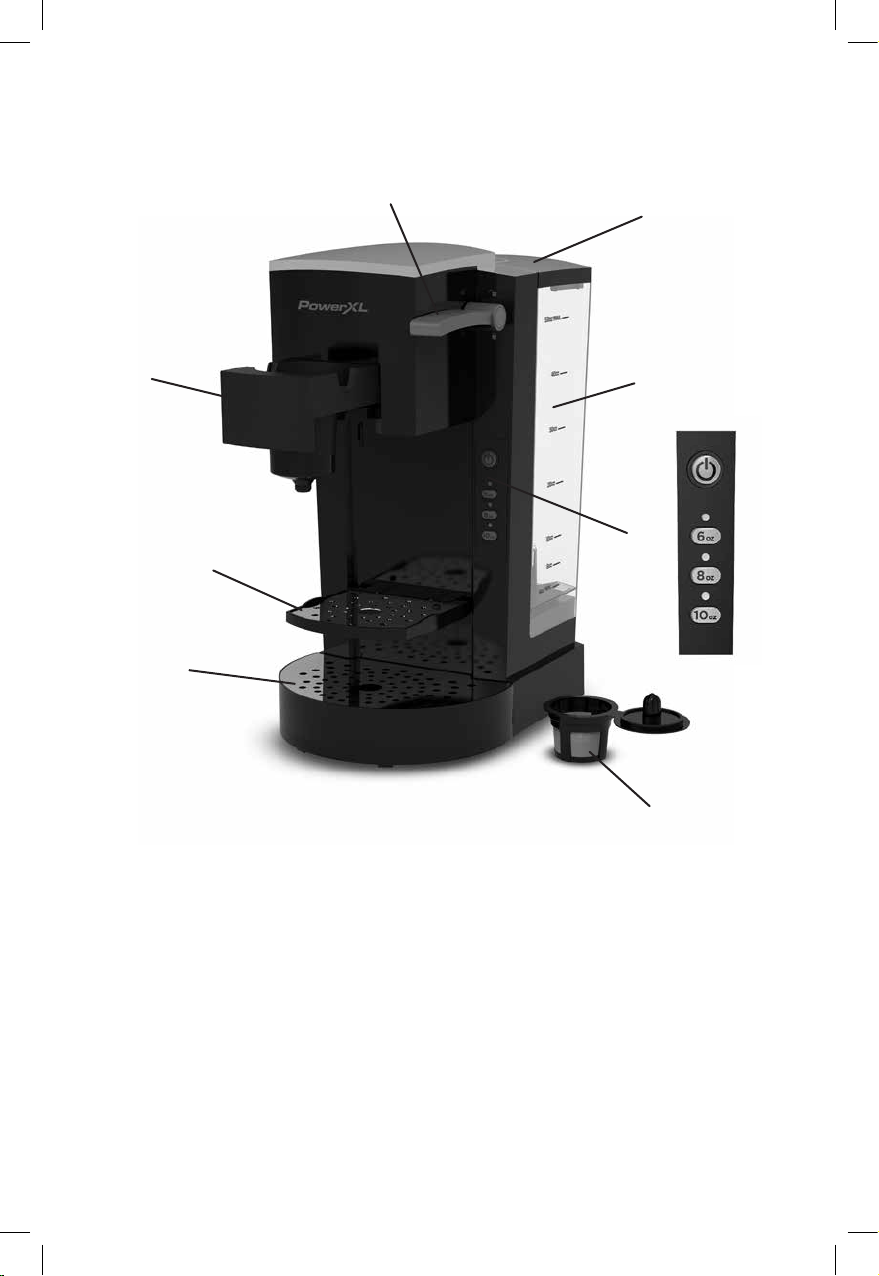
GETTING TO KNOW YOUR COFFEE MAKER
1
8
2
7
6
3
4
5
1. Lock handle
2. Pod/Filter holder
3. Hinged cup rest
6. LED lit control panel
7. 50 oz. Removable water reservoir
8. Water reservoir lid
4. Drip tray
5. Reusable single serve ground coffee filter
Product may vary slightly from what is illustrated.
4
SS0311-0BP_29561_E_IB_A.indd 4SS0311-0BP_29561_E_IB_A.indd 4 12/6/22 10:32 AM12/6/22 10:32 AM
Page 5

FEATURES AND BENEFITS
Washable single serve ground
coffee filter
The washable single serve ground
coffee lter can easily be removed
and washed after brewing, and is
top rack dishwasher safe.
Auto-Shutoff
Once the brewing cycle is complete,
the coffeemaker will automatically
shut off for peace of mind.
Removable Water Reservoir
Large capacity (50 oz.) easy to ll
removable water reservoir.
BEFORE BREWING
1. Register your product at www.prodprotect.com/powerxl.
2. Carefully unpack your coffeemaker, removing all packaging materials, labels,
stickers and the plastic band around the power plug.
3. Thoroughly clean your coffeemaker according to the basic cleaning instructions
found in the Care and Cleaning section of this manual.
4. Clean the inside of your coffeemaker by running two full brewing cycles with
water only, no coffee:
a. Make sure water reservoir is seated correctly by aligning the reservoir
outlet with the inlet port on the machine base, or the machine will not work
properly.
b. Pour fresh, cold water into the water reservoir up to the 20 oz. mark.
c. Plug cord into standard electrical outlet.
d. Push the ON-OFF / Power Button to immediately brew water through the
coffeemaker without adding coffee.
e. Once the cycle is nished, discard water.
f. Turn off appliance, unplug and allow to cool down for 15 minutes
before repeating.
5
SS0311-0BP_29561_E_IB_A.indd 5SS0311-0BP_29561_E_IB_A.indd 5 12/6/22 10:32 AM12/6/22 10:32 AM
Page 6
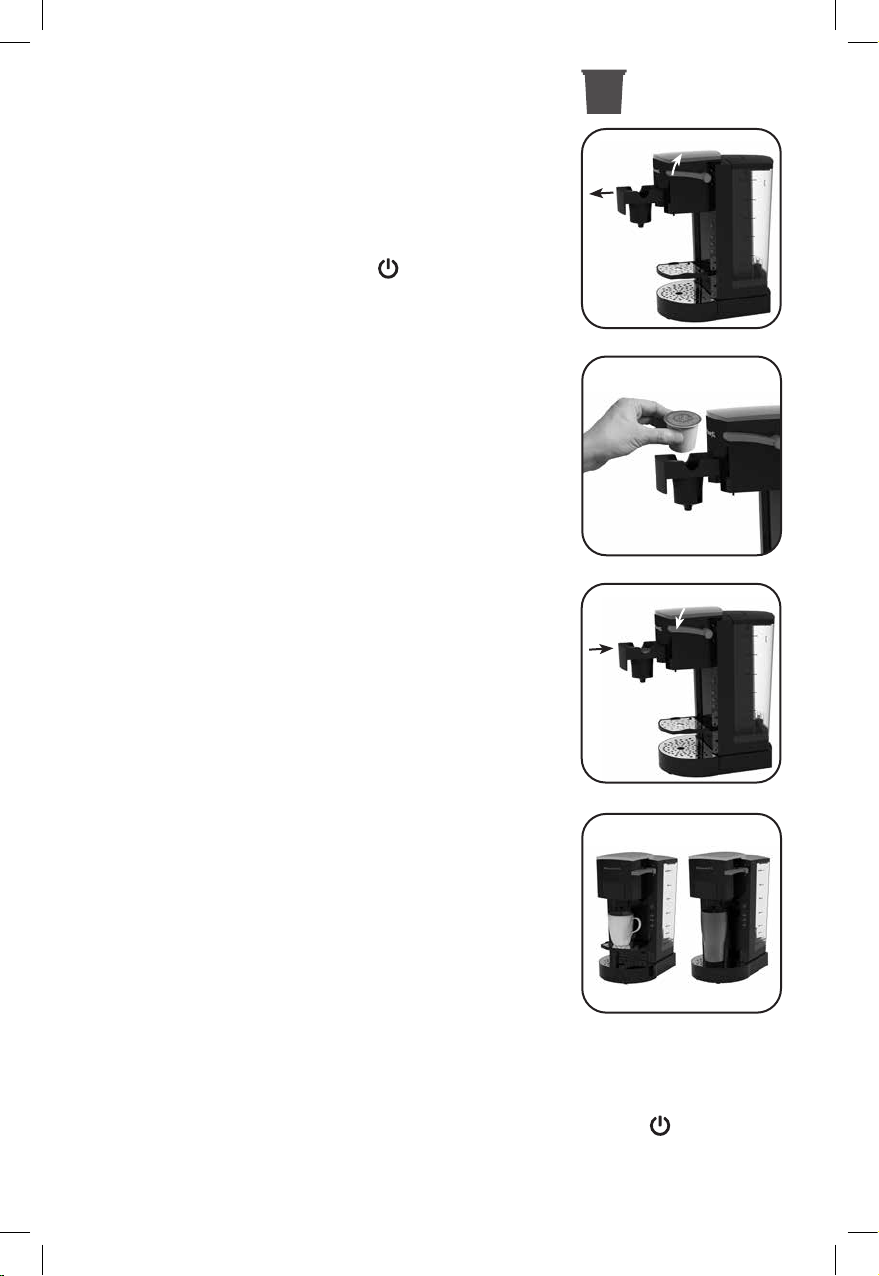
BREWING SINGLE SERVE—PODS
1. One coffee pod generally brews 6 to 10 ounces. For
stronger coffee or when filling higher capacity mugs,
select the 6, 8, or 10 ounce setting and brew twice
using two separate pods. To customize strength, see
Brewing Single Serve–Ground Coffee.
2. Make sure your
and the red power button LED
Brewing.)
3. Ensure the water reservoir is filled with a minimum
of 20 ounces of water. Do not fill reservoir past the
MAX fill line.
IMP O R TA N T: If you attempt to brew any single serve
selection with less than 20 ounces of water in the
reservoir, the brew selection buttons will flash several
times to alert you to add more water.
4. To open, lift the lock handle and pull out the pod/filter
hold er (A).
5. Insert a coffee pod of your choice into the pod/filter
holder. (B)
NOTE: Do not remove the foil lid or puncture the
coffee pod before inserting.
CAUTION: There are four sharp needles that puncture
the coffee pod, three above the pod/filter holder
and one in the bottom of the pod/filter holder. To
avoid risk of injury, do not put your fingers inside the
brewing area.
6. Push the pod/filter holder into the machine and lower
the lock handle (C). This will puncture the coffee pod.
NOTE: A great deal of pressure is required for
pressurized pod brewing. For your safety, the amount of
force needed to close the lock handle with a pod in place
is greater than that of the other brewing options.
7. Use the hinged cup rest when brewing smaller size
cups (6oz.). Fold the cup rest up when using larger
size cups or mugs (8 or 10 oz.) and place on the drip
tray (D).
8. To start the brew cycle, press your choice of brew size.
NOTE: The green LED brew selection light turns off when
brewing is complete. Output volume can be adjusted
manually after the brew cycle is complete by reselecting a brew button.
CAUTION: There is extremely hot water in the coffee pod during the brew process.
To avoid risk of injury do not open the pod/filter holder during brewing process.
9. To turn off the coffeemaker at any time, press the power button
CAUTION: The coffee pod will be hot.
10. When cooled, carefully remove and dispose of the used pod.
6
coffee maker
is in ready mode
is lit. (See Before
A
B
C
D
.
SS0311-0BP_29561_E_IB_A.indd 6SS0311-0BP_29561_E_IB_A.indd 6 12/6/22 10:32 AM12/6/22 10:32 AM
Page 7
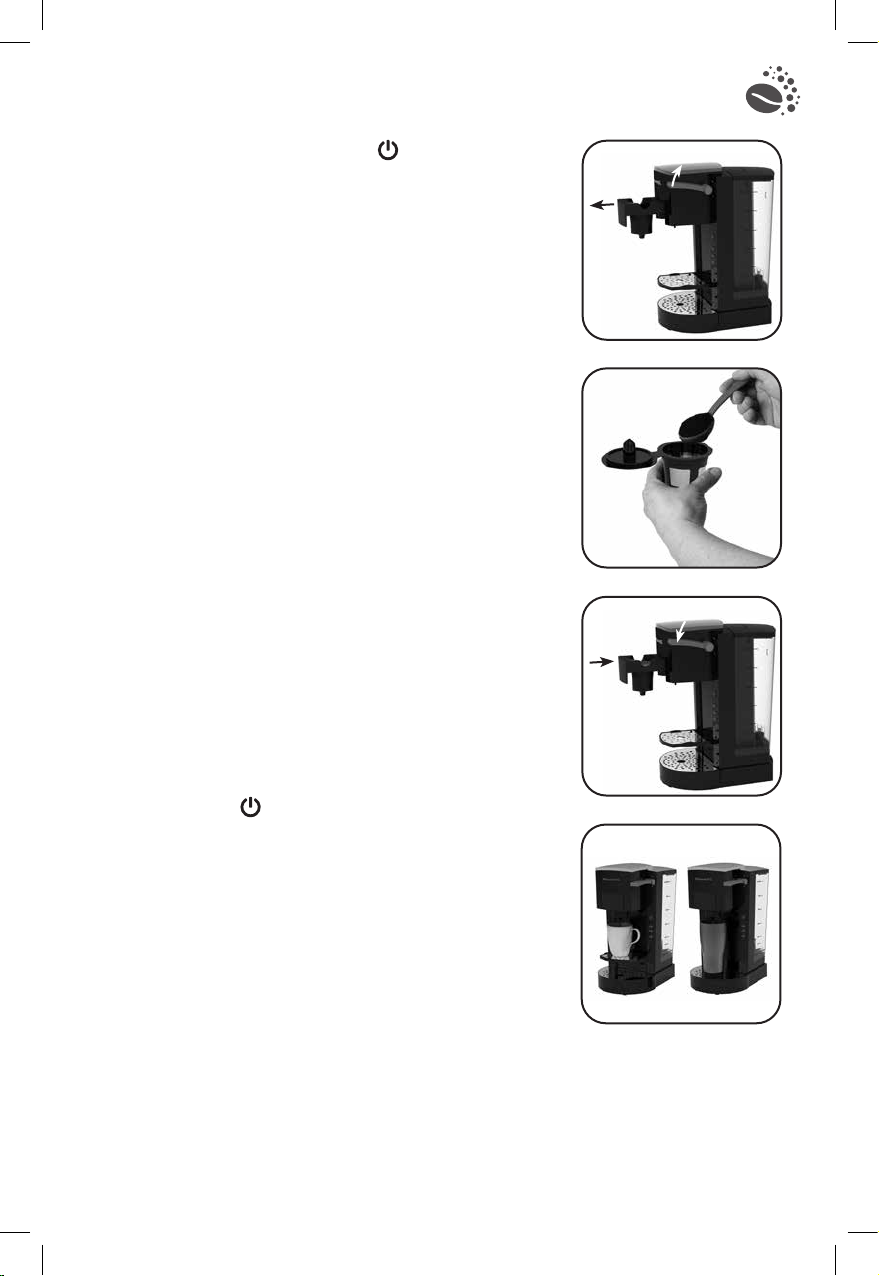
BREWING SINGLE SERVE—GROUND COFFEE
1. Make sure your
and the red power button LED
Brewing.)
2. Ensure the water reservoir is filled with a minimum
of 20 ounces of water. Do not fill reservoir past the
MAX fill line.
IMP O R TA N T: If you attempt to brew any single serve
selection with less than 20 ounces of water in the
reservoir, the brew selection buttons will flash several
times to alert you to add more water.
3. To open, lift the lock handle and pull out the pod/filter
holder (E).
4. Fill the single serve ground coffee filter with your
desired amount of coffee grounds, one tablespoon
per brewed cup or to taste (F). Close the filter lid and
place it into the pod/filter holder.
5. Push the pod/filter holder into the machine and lower
the lock handle (G).
6. Use the hinged cup rest when brewing smaller size
cups (6oz.). Fold the cup rest up when using larger
size cups or mugs (8 or 10 oz.) and place on the drip
tray (H).
7. To start the brew cycle, press your choice of brew size.
NOTE: The green LED brew selection light turns off
when brewing is complete. Output volume can be
adjusted manually after the brew cycle is complete by
reselecting a brew button.
8. To turn off the coffeemaker at any time, press the
power button
9. When cooled, carefully dispose of the used grounds
and wash the reusable filter for future use.
coffee maker
.
is in ready mode
is lit. (See Before
E
F
G
H
7
SS0311-0BP_29561_E_IB_A.indd 7SS0311-0BP_29561_E_IB_A.indd 7 12/6/22 10:32 AM12/6/22 10:32 AM
Page 8
CARE AND CLEANING
Basic Cleaning
Follow the directions below to clean your coffee maker after each use.
1. Ensure your coffeemaker is unplugged and cool.
2. Open the pod/filter holder and remove coffee grounds or empty pod.
3. Wash the single serve ground coffee filter in a dishwasher or by hand in warm
water with dish soap.
4. Wipe the outside of the coffeemaker and power cord with a soft, damp cloth.
5. To clean the inside of the pod/filter holder, wipe surfaces with a damp cloth.
Note: Do not use abrasive cleansers or scouring pads on this product. Never
immerse the coffeemaker in water.
COFFEE MAKER PART CLEANING INSTRUCTIONS
Housing
Power Cord
Single serve ground coffee filter
Descaling
Mineral deposits left by hard water can clog your coffeemaker. Cleaning is
recommended once a month. Excessive steaming or a prolonged brewing cycle is
a sign that a cleaning is needed.
1. Pour white vinegar into water reservoir up to the 10 oz. mark on the water
window. Add cold water up to the 20 oz. mark.
2. Place a mug on the mug rest.
3. Press the START switch and let the cleaning solution brew through until the
reservoir is empty.
4. Repeat the process using a new solution; do not reuse the first solution.
5. Fill the reservoir with cold water and brew the plain water through to flush
out any remaining solution. You may have to repeat the plain water cycle to
remove any remaining vinegar taste.
6. Wash and dry the permanent filter, filter basket, lid and mug as instructed in
CLEANING.
Wipe with a soft, damp cloth.
Wash by hand in warm soapy water,
or in the dishwasher (top rack only).
8
SS0311-0BP_29561_E_IB_A.indd 8SS0311-0BP_29561_E_IB_A.indd 8 12/6/22 10:32 AM12/6/22 10:32 AM
Page 9
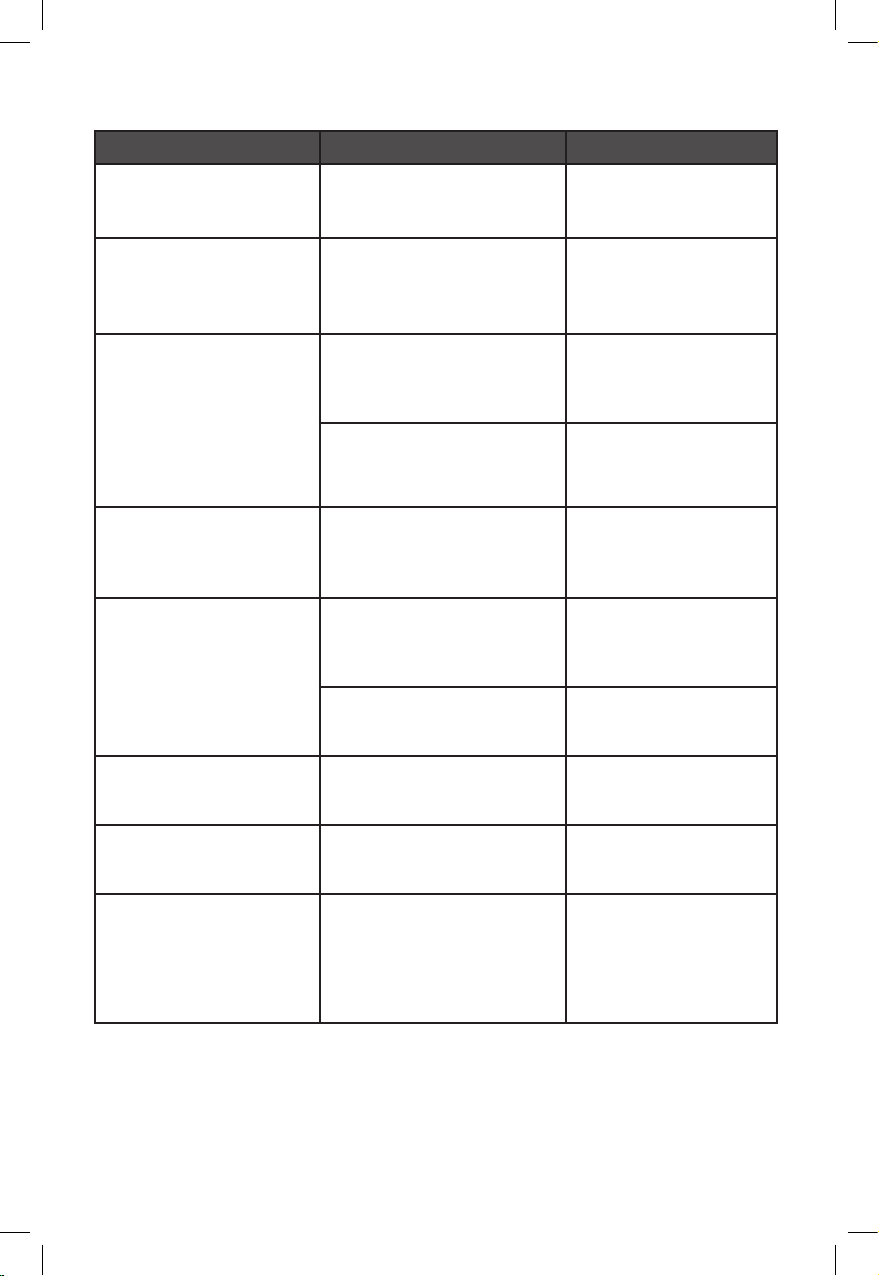
TROUBLESHOOTING
PROBLEM POSSIBLE CAUSE SOLUTION
Coffeemaker will
not turn on.
Coffee maker
is leaking.
The brew basket
overflows.
Unit is unplugged. Make sure appliance
is plugged into a
working outlet.
Water reservoir may be
overlled.
Excessive amount of
ground coffee used.
Coffeemaker needs
cleaning.
Make sure water
reservoir has not
been lled beyond
the 50oz. MAX line.
Reduce the amount
of coffee used to
eliminate brew
basket overows.
Follow the
instructions in the
descaling section.
Coffeemaker brews
more slowly than usual
or less coffee than
expected.
Red LED light is
flashing.
Green LED light is
flashing rapidly.
3 Green LED lights are
flashing slowly.
Large cup (10 oz.)
green LED light is
flashing slowly.
The coffeemaker needs
cleaning.
The machine is
overheated, such as dry
brewing.
The upper piercer is
clogged and causing the
machine to overheat.
The lock handle is in the
unlocked position.
There is not enough water
in the reservoir.
There is excessive scale
buildup in the machine.
Follow the
instructions in the
descaling section.
Unplug the machine
and wait at least 3
minutes before using
again.
Use a paper clip or
similar tool to loosen
and remove clog.
Press the lock handle
down into the locked
position.
Fill the water reservoir
with at least 20 oz. of
water.
Depress the Large
cup button for more
than 3 seconds to
descale. Follow the
instructions in the
“Descaling” section.
If additional assistance is needed, please contact our consumer service team at
1-800-465-6070.
9
SS0311-0BP_29561_E_IB_A.indd 9SS0311-0BP_29561_E_IB_A.indd 9 12/6/22 10:32 AM12/6/22 10:32 AM
Page 10

WARRANTY AND CUSTOMER
SERVICE INFORMATION
Two-Year Limited Warranty
(Applies only in the United States and Canada)
For service, repair or any questions regarding your appliance, call the
appropriate 800 number listed within this section. Please DO NOT return
the product to the place of purchase. Also, please DO NOT mail product
back to manufacturer, nor bring it to a service center. You may also want to
consult the website listed on the cover of the manual.
What does it cover?
• Any defect in material or workmanship provided; however, Spectrum Brands Inc’s
liability will not exceed the purchase price of product.
For how long?
• Two years from the date of original purchase with proof of purchase.
What will we do to help you?
• Provide you with a reasonably similar replacement product that is either new or
factory refurbished.
How do you get service?
• Save your receipt as proof of date of sale.
• Visit the online service website at www.prodprotect.com/powerxl, or call
toll-free 1-800 -577-1557, for general warranty service.
• If you need parts or accessories, please call 1 - 800 -738-0245.
How does state law relate to this warranty?
This warranty gives you specic legal rights. You may also have other rights that
vary from state to state or province to province.
What does your warranty not cover?
• Damage from commercial use
• Damage from misuse, abuse or neglect
• Products that have been modied in any way
• Products used or serviced outside the country of purchase
• Glass parts and other accessory items that are packed with the unit
• Shipping and handling costs associated with the replacement of the unit
• Consequential or incidental damages (Please note, however, that some
states do not allow the exclusion or limitation of consequential or incidental
damages, so this limitation may not apply to you.)
Are there additional warranty exclusions?
• This warranty shall not be valid where it is contrary to U.S. and other applicable
laws, or where the warranty would be prohibited under any economic sanctions,
export control laws, embargos, or other restrictive trade measures enforced
by the United States or other applicable jurisdictions. This includes, without
limitation, any warranty claims implicating parties from, or otherwise located in,
Cuba, Iran, North Korea, Syria and the disputed Crimea region.
10
SS0311-0BP_29561_E_IB_A.indd 10SS0311-0BP_29561_E_IB_A.indd 10 12/6/22 10:32 AM12/6/22 10:32 AM
Page 11

SS0311-0BP – 1400W 120 V ~ 60 Hz
Please do not throw this product away with normal household waste. If possible, take it to
an official collection point in your area that recycles this type of product. Thank you for
considering the environment.
11
SS0311-0BP_29561_E_IB_A.indd 11SS0311-0BP_29561_E_IB_A.indd 11 12/6/22 10:32 AM12/6/22 10:32 AM
Page 12
www.powerxlproducts.com
®
Dist. by: Empower Brands, LLC, Middleton, WI 53562
TM
®Registered Trademark and
Trademark of Empower Brands, LLC.
©2023 Empower Brands, LLC. All rights reserved.
T22-9003337-A
Made in China.
2956 1 E
12
SS0311-0BP_29561_E_IB_A.indd 12SS0311-0BP_29561_E_IB_A.indd 12 12/6/22 10:32 AM12/6/22 10:32 AM
 Loading...