

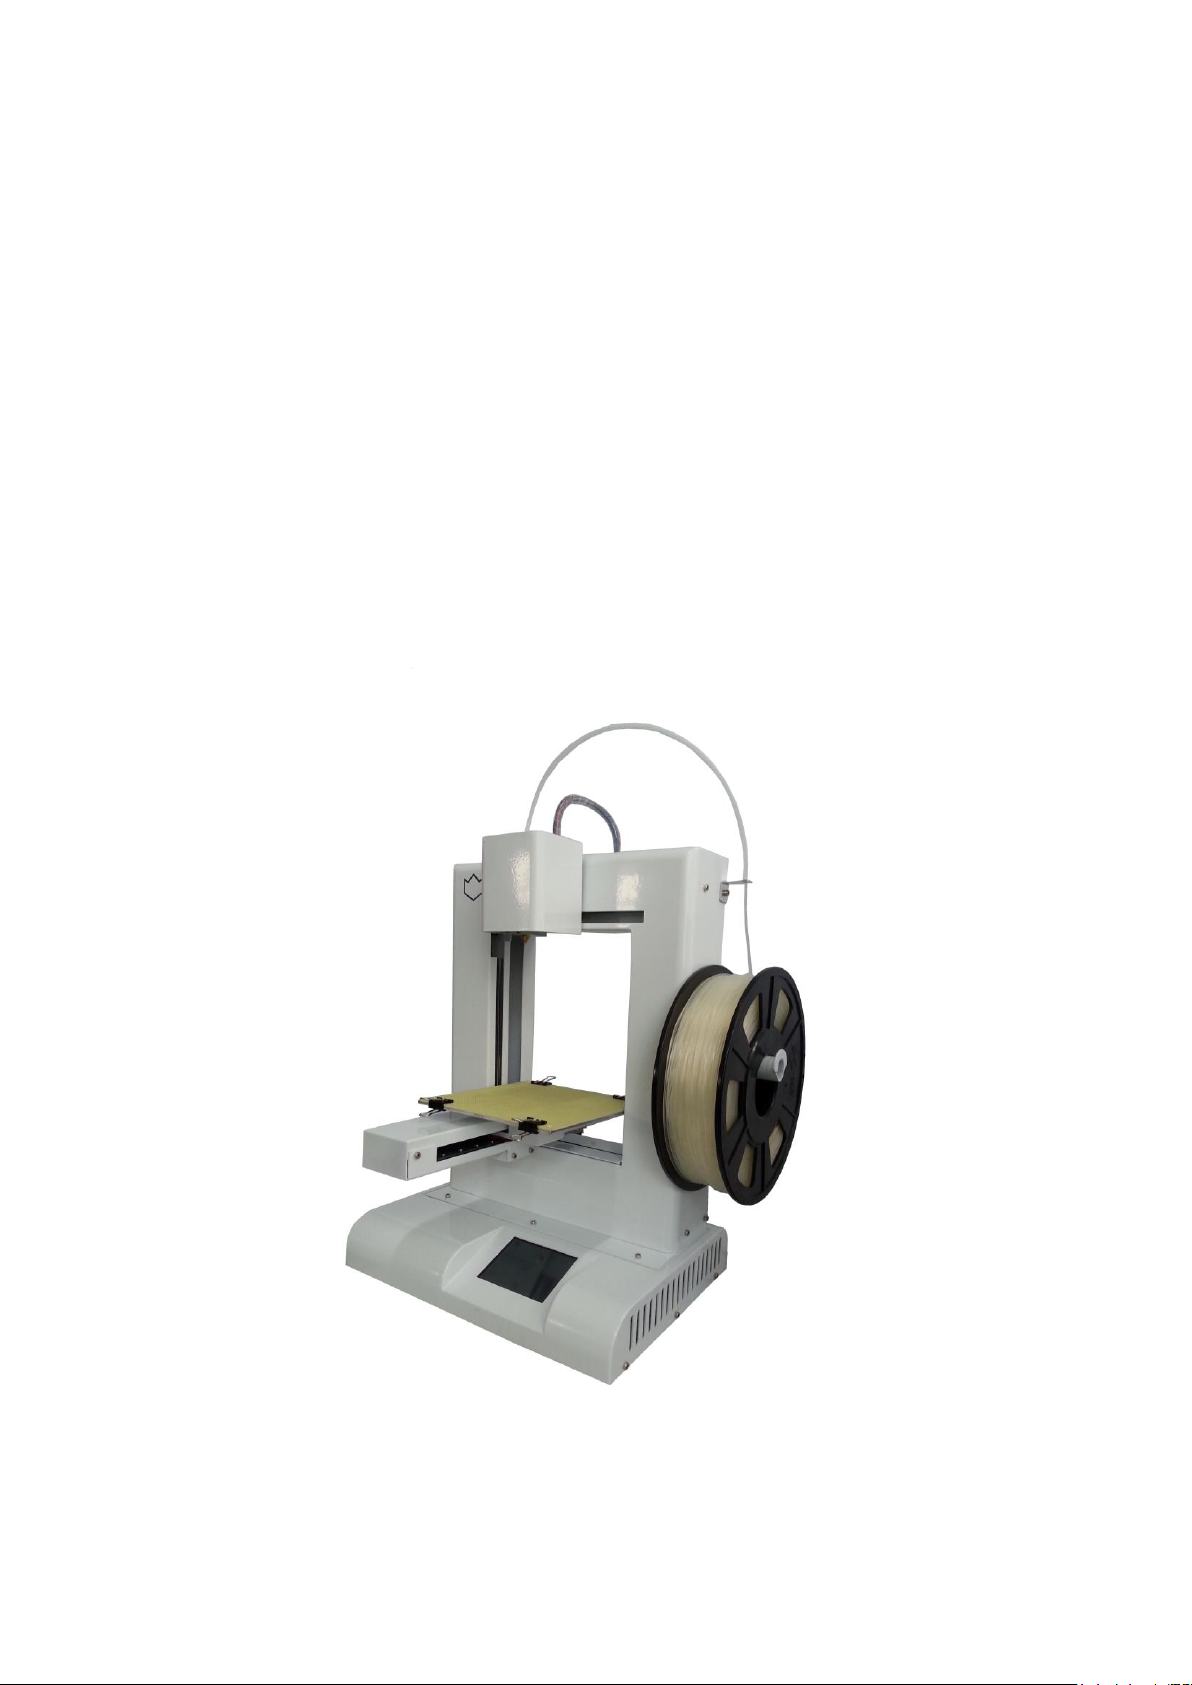
Product User Manual
IdeaWerk™ 3D Printer WT150

Contents
Contents
1. Unpack and checking........................................................................................... 1
1.1 Check the Machine .................................................................................... 1
1.2 Check the Accessories ............................................................................... 3
2. Brief Introduction ............................................................................................... 3
2.1 Precautions and Safety ............................................................................... 3
2.2 Appearance and Structure.......................................................................... 4
2.3 Technical Specifications ............................................................................. 6
3. Software Installation ............................................................................................ 8
3.1 Software Installation .................................................................................. 8
3.2 Port Confirmation ................................................................................... 11
3.3 Python installation ................................................................................... 12
4. Preparations before printing .............................................................................. 15
4.1 Platform Calibration and measuring Z height .......................................... 15
4.2 Select temperature ................................................................................... 22
5. Introduction of main functions ......................................................................... 24
5.1 Introduction of main functions................................................................ 24
6. Forward and reverse the filament ....................................................................... 34
6.1 How to feed material ............................................................................... 34
6.2 How to reverse material ........................................................................... 36
7. Build from SD card and control ........................................................................ 37
7.1 Build from SD card ................................................................................. 37
7.2 Operation on control screen ...................................................................... 3
8. How to fix common problem ............................................................................ 42
8.1 Resolution of filament feeding unsmooth................................................ 42
8.2 Resolution of nozzle blocking ................................................................. 43
Acknowledgements ............................................................................................ 44
1. Unpack and checking
Distributed by
Conrad Electronic SE
Klaus-Conrad-Str.1
D-92240 Hirschau
1. Unpack and checking
1.1 Check the Machine
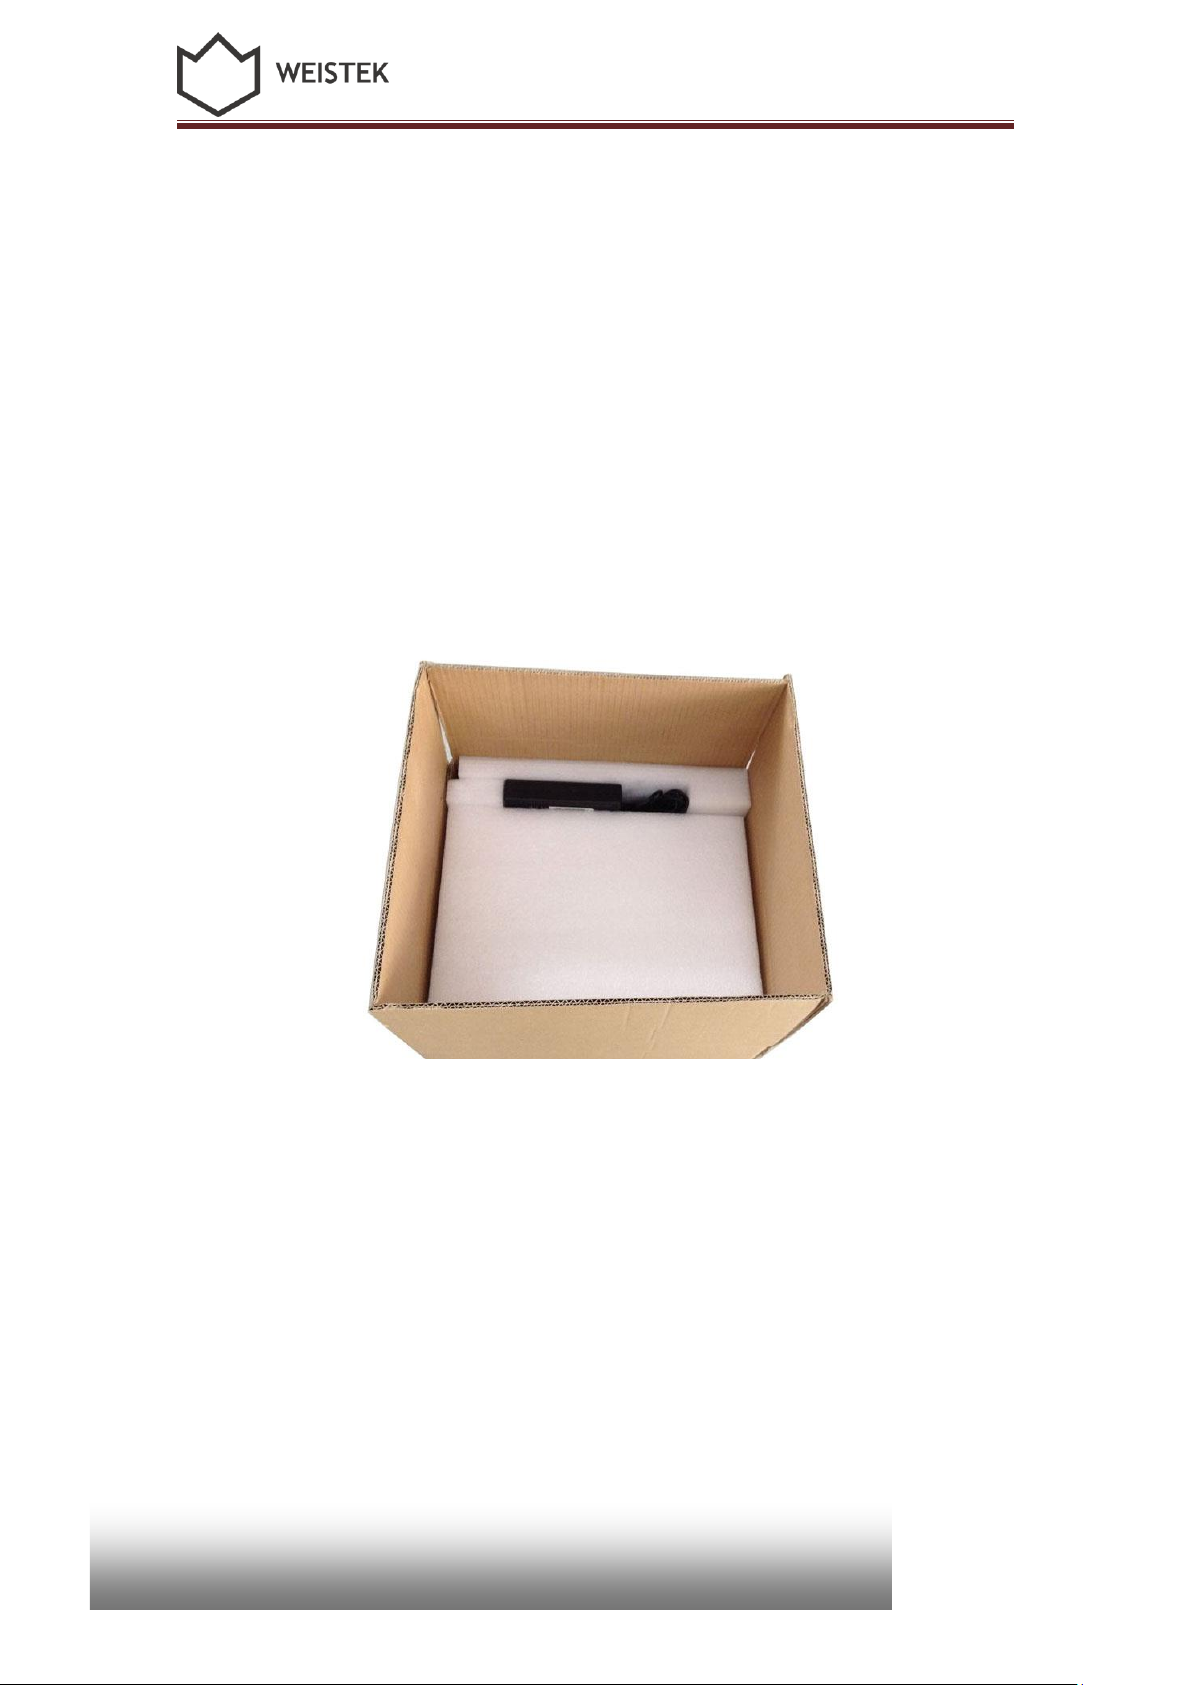
1) Open the packing carton box, unwrap the EPE covering, remove the machine and
accessories from the box.
2) Overall observe the machine to make sure there is no serious damage. If any problem,
please contact with the after sale service staff in time.
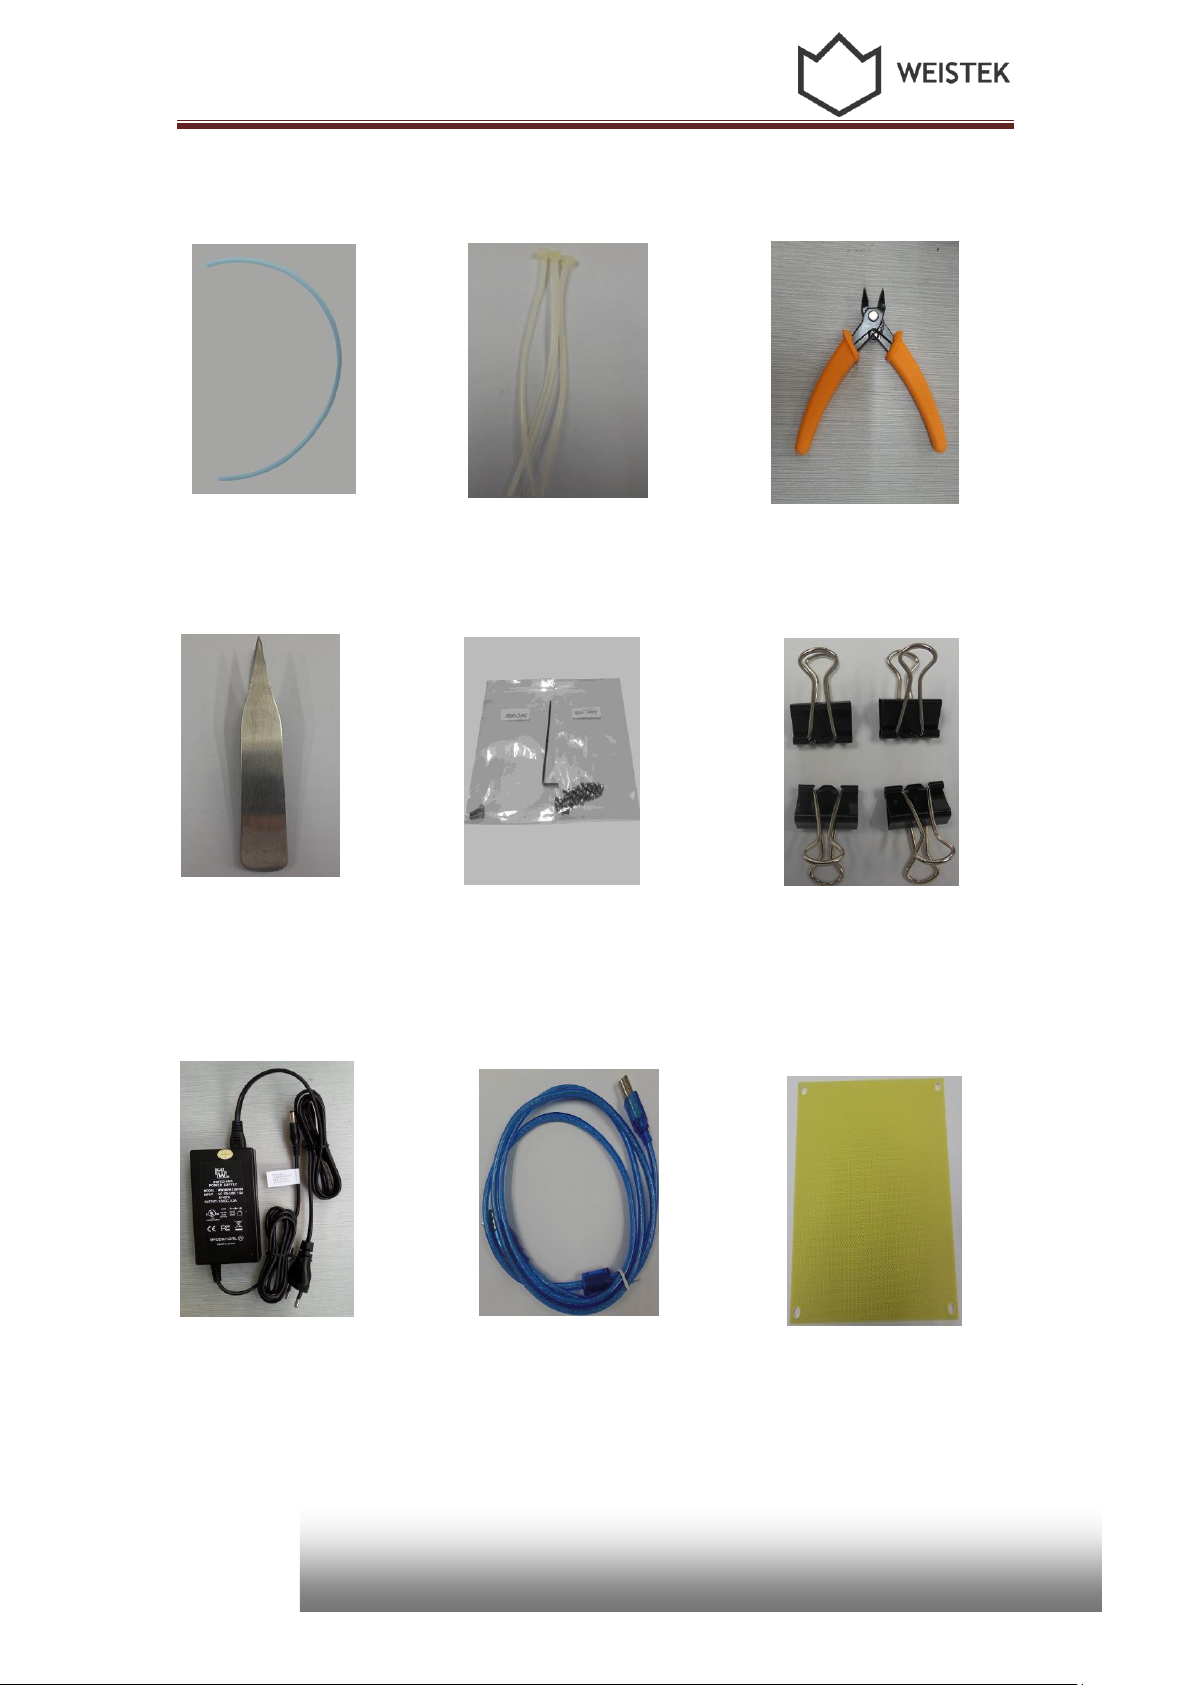
1.2 Check the Accessories
All of the following accessories are consisted in the box together with the machine.
(Pic 1.1-01)
1
1. Unpack and checking
Distributed by
Conrad Electronic SE
Klaus-Conrad-Str.1
D-92240 Hirschau
Teflon tube filament guide Nylon cable ties Cut pliers
Tweezers Allen wrench Clips
Power adapter and power cord USB Cable Build plate
2

1. Unpack and checking
Distributed by
Conrad Electronic SE
Klaus-Conrad-Str.1
D-92240 Hirschau
Spool holder SD card Acupuncture Needle
(Pic 1.2-01)
2. Brief Introduction
2.1 Precautions and Safety
Place the machine in dry environment when operating.
To avoid blocking the nozzle, do not heat up the extruder before feeding the
material
Machine should be away from fire or water.
Use the machine in a ventilated environment, so that to avoid smelling.
Do not touch or remove the power cord or data line when operating.
Never touch the extruder or build bed by any parts of your body or anything
which is easy on fire when machine is operating, for they are very hot to harm
3
1. Unpack and checking
Distributed by
Conrad Electronic SE
Klaus-Conrad-Str.1
D-92240 Hirschau
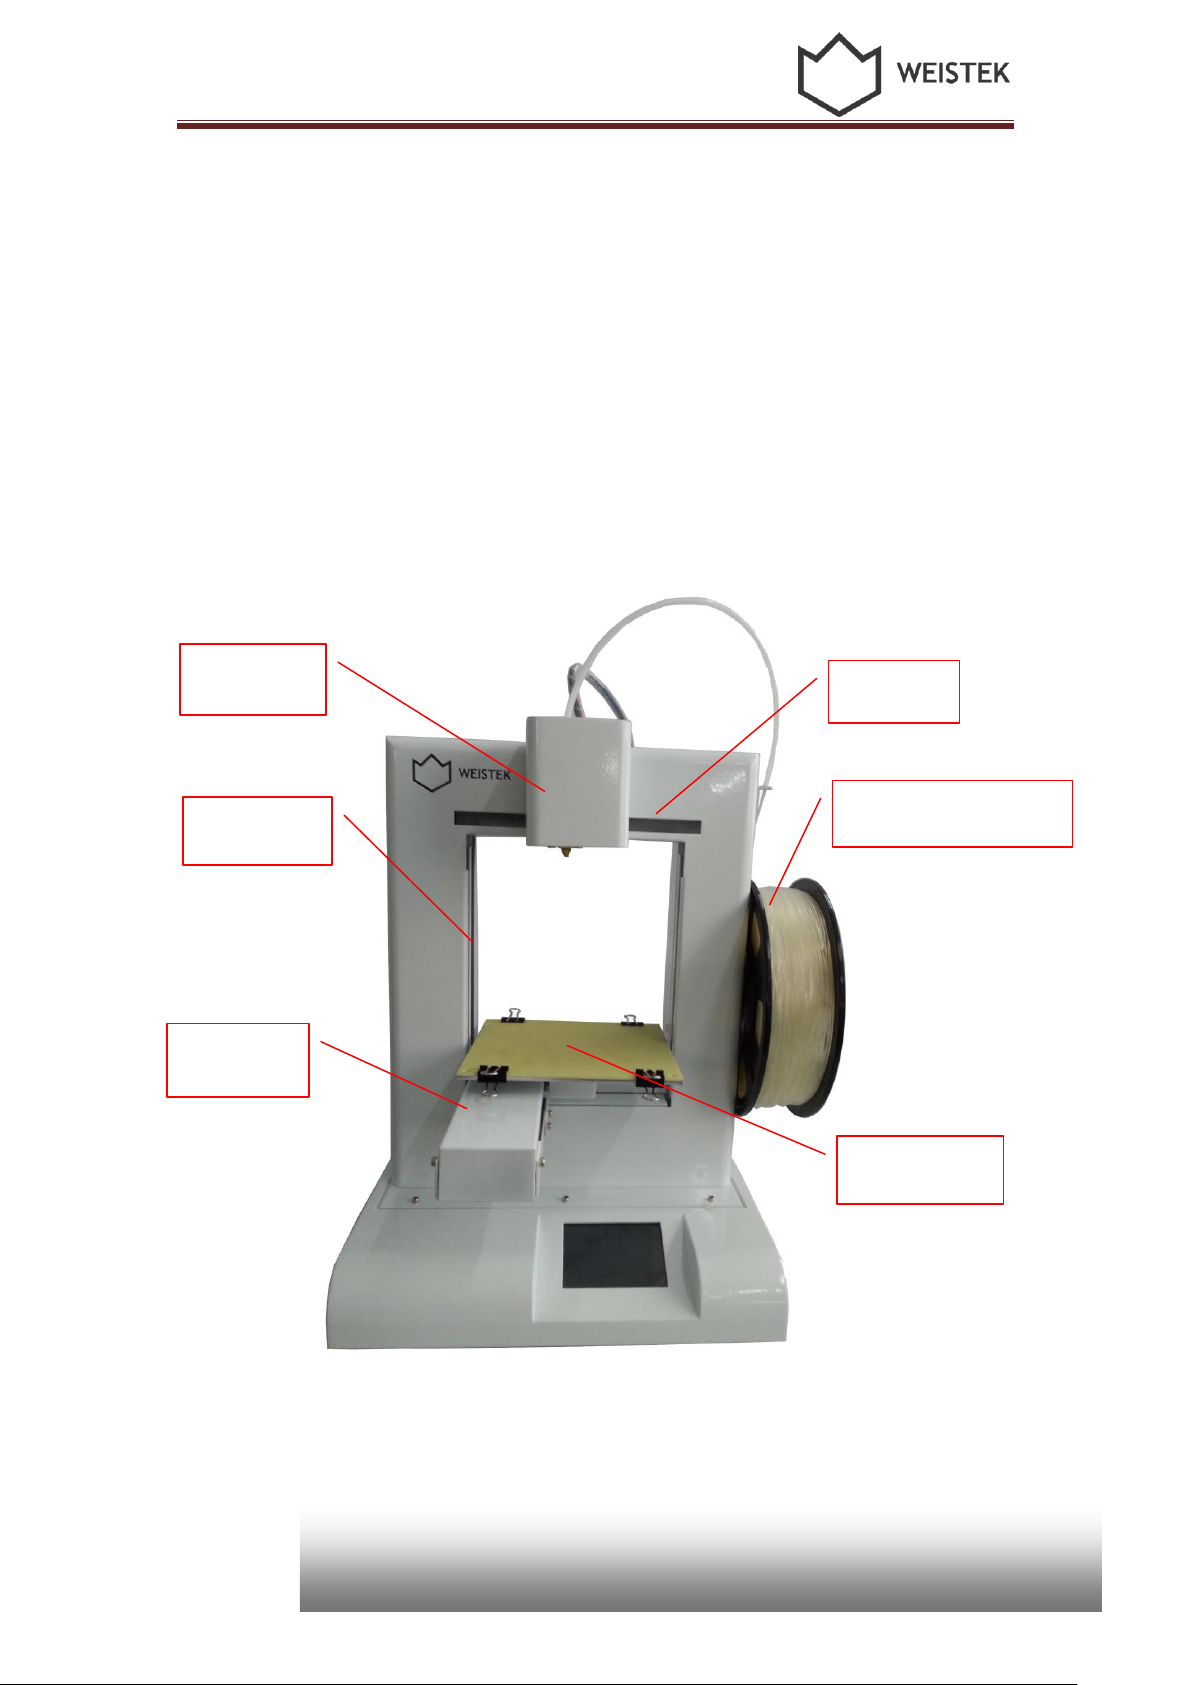
Filament Spool
Extruder
X axis
Z axis
Build Plate
Y axis
your skin or cause fire.
Gloves are required when removing the printed part to avoid harm of cutting,
scratching or burning.
2.2 Appearance and Structure
4
(Pic 2.2-01)
Distributed by
Conrad Electronic SE
Klaus-Conrad-Str.1
D-92240 Hirschau
Note: the direction
of the clip must be
parallel to the X
axis
Please note how
to insert SD card
(Pic 2.2-02)
2. Brief Introduction
(Pic 2.2-03)
5
2. Brief Introduction
Distributed by
Conrad Electronic SE
Klaus-Conrad-Str.1
D-92240 Hirschau
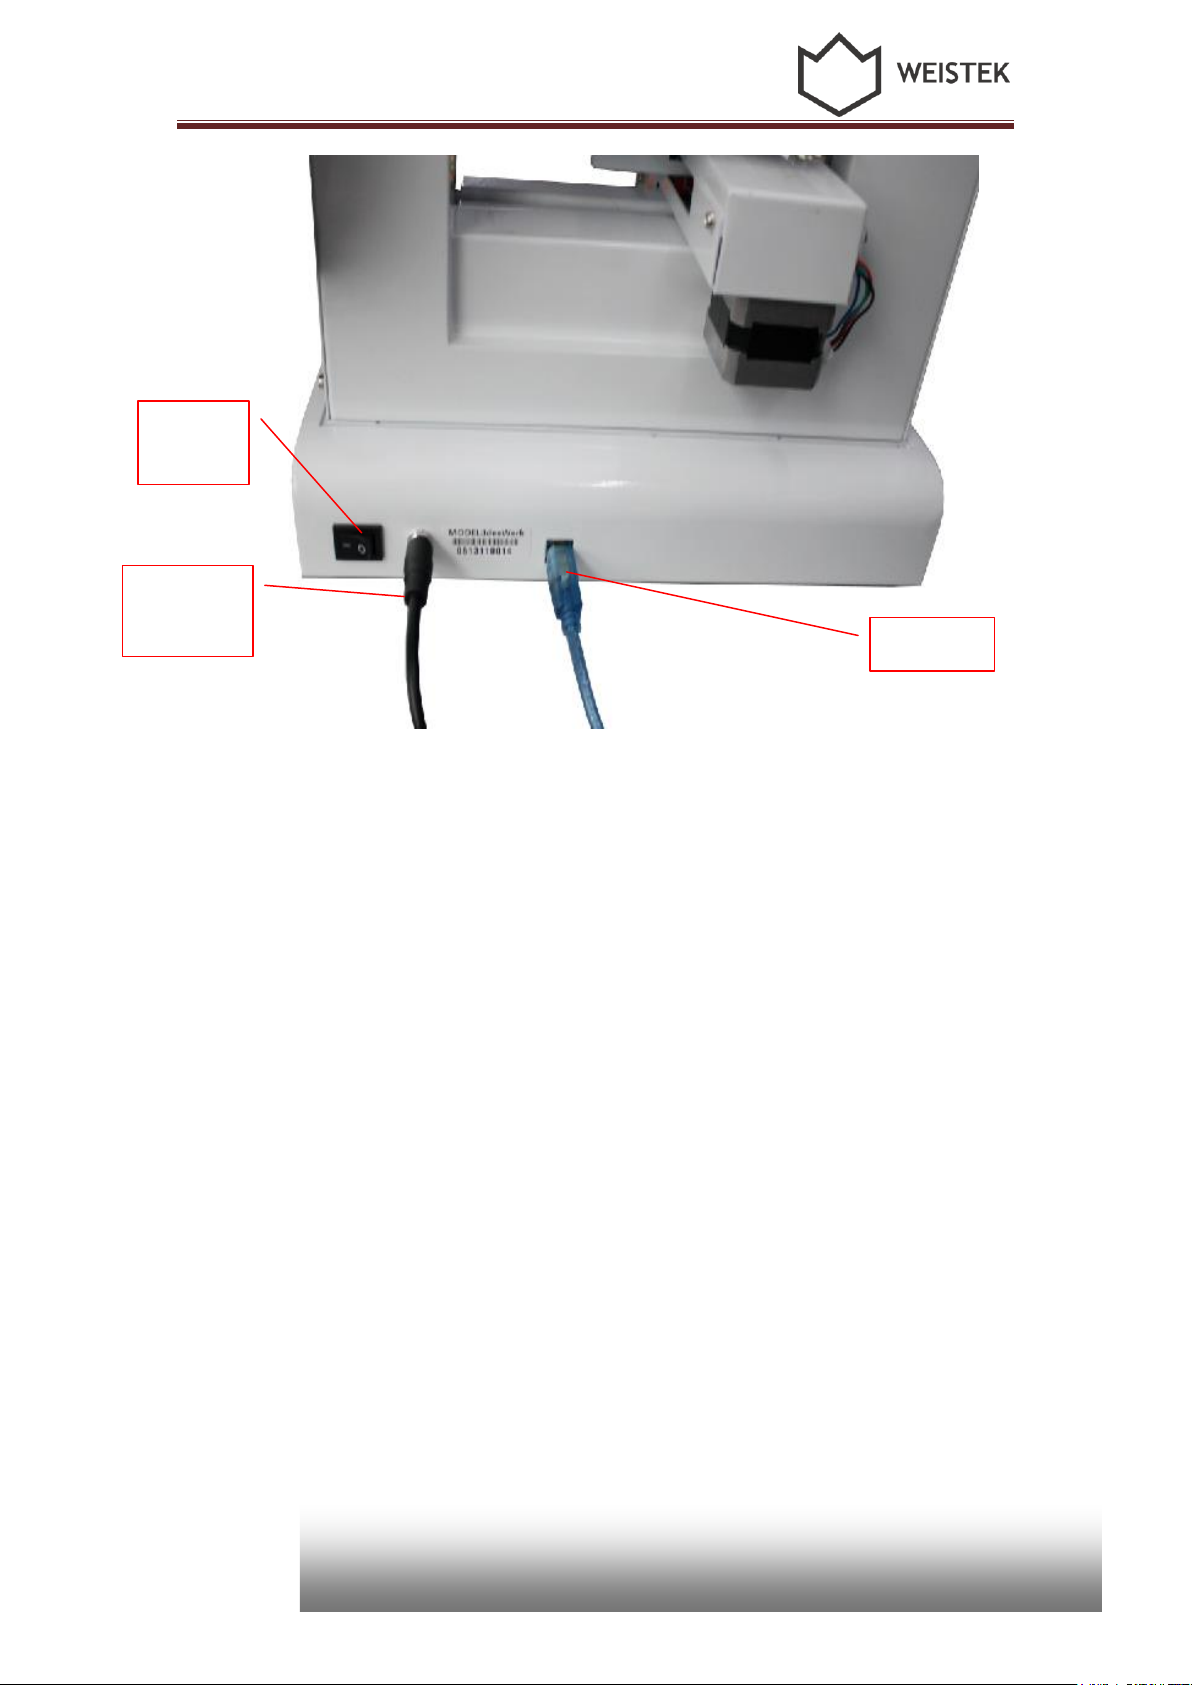
Power
Switch
Power
Input
USB Port
(Pic 2.2-04)
2.3 Technical Specifications
Dimensions: 298mm × 221mm × 403mm
Printing Dimensions: 150mm × 150mm × 140mm
Layer Thickness: 0.18~0.3mm
Speed: 30 – 150cm3/h
Net Weight: 7.5kg
Material: PLA
Materials Printing Temperature: PLA 220 - 230°C
Power: Input: AC 100-240V, 1.6A, 47-63Hz; Output: 12V/DC, 5.3A
6

Distributed by
Conrad Electronic SE
Klaus-Conrad-Str.1
D-92240 Hirschau
Maximum Operating Power: 63.6W
Input Format: STL/X3G/GCODE
Operating Systems: Windows XP/Vista/Win7/Win8
Operating Software: ReplicatorG-0040(optimized by Weistek1.0)
Environment Temperature: 5℃~35℃
Relative Humidity: 30%~90%
2. Brief Introduction
7
3. Software Installation
Distributed by
Conrad Electronic SE
Klaus-Conrad-Str.1
D-92240 Hirschau
3. Software Installation
3.1 Software Installation
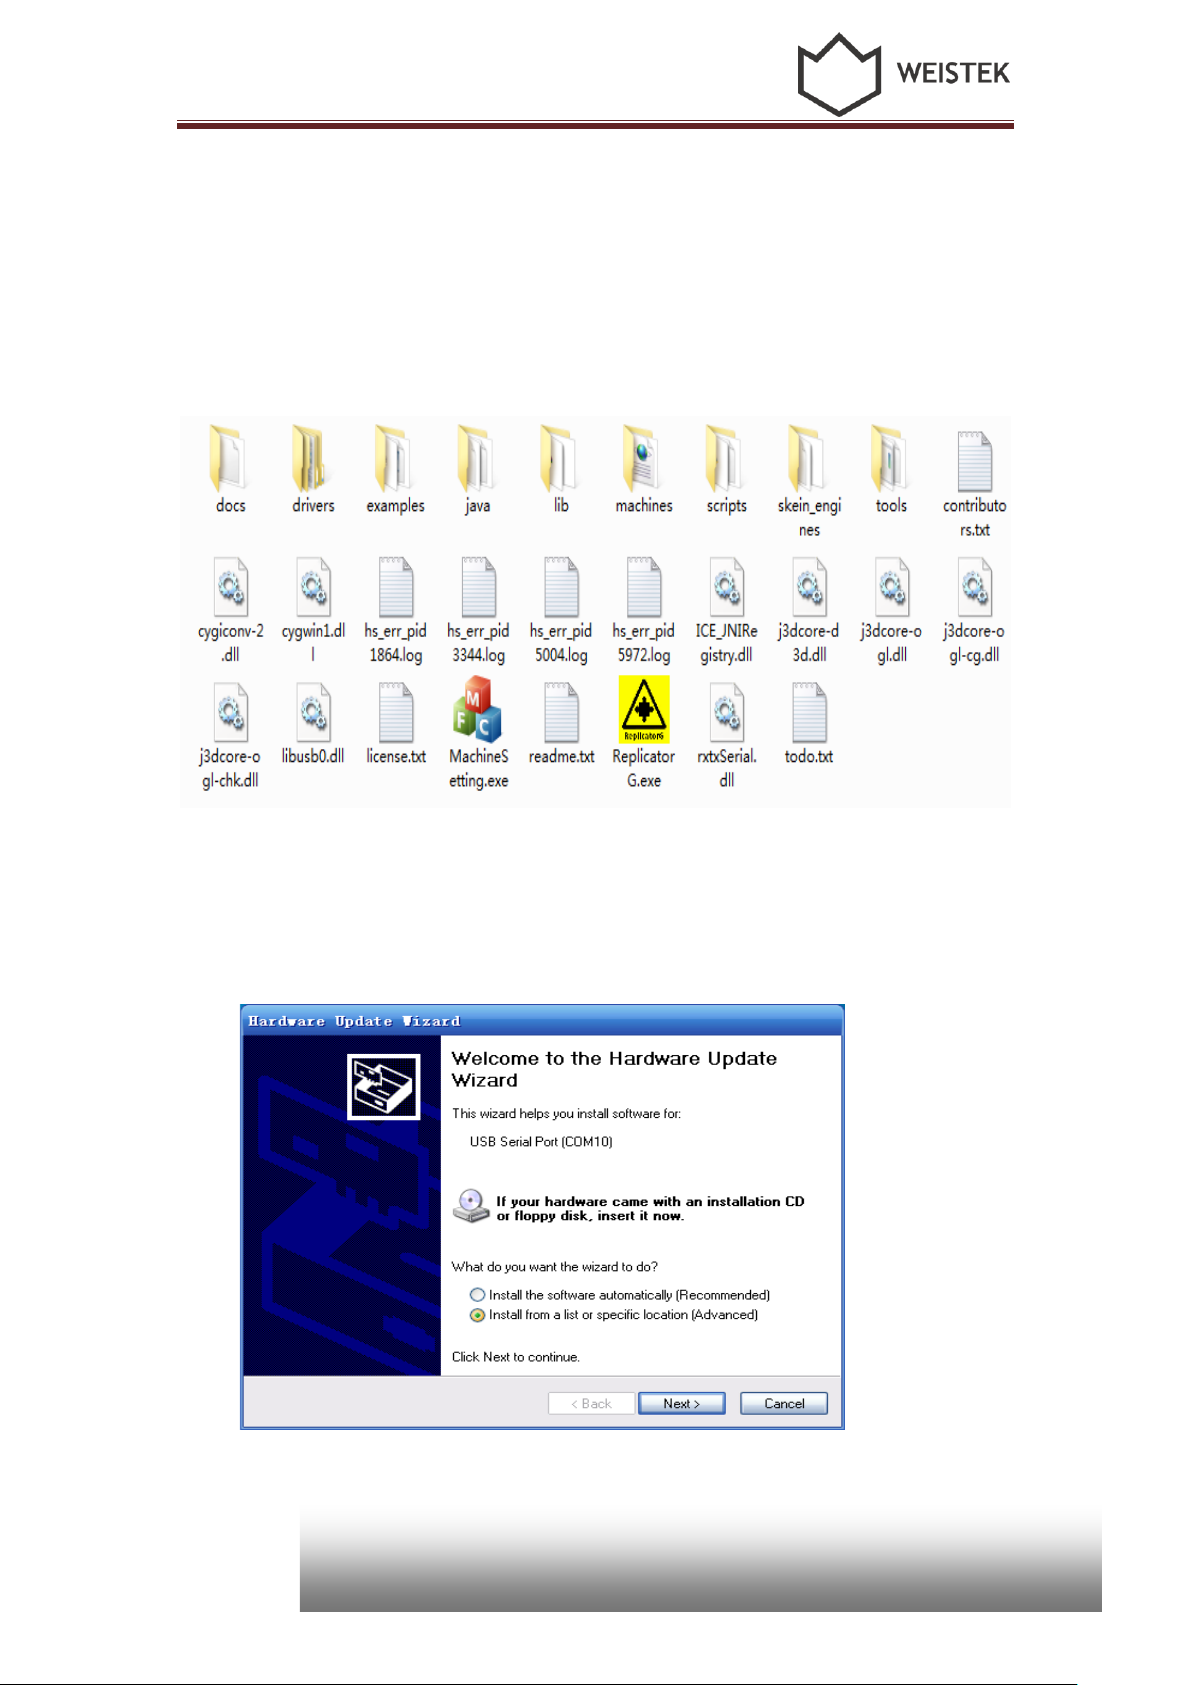
1) Copy the software from the disc before connecting the machine with your computer.
Decompress the file.
(Pic3.1-01)
2) Refer to the power and USB interfaces in the picture 3.1-02. Choosing “install from a
list or specific location (advanced)(S)” when the following interface pops up after
finishing connecting USB cable. Then, click “next” to continue.
8
(Pic 3.1-02)
3. Software Installation
Distributed by
Conrad Electronic SE
Klaus-Conrad-Str.1
D-92240 Hirschau
Check this out
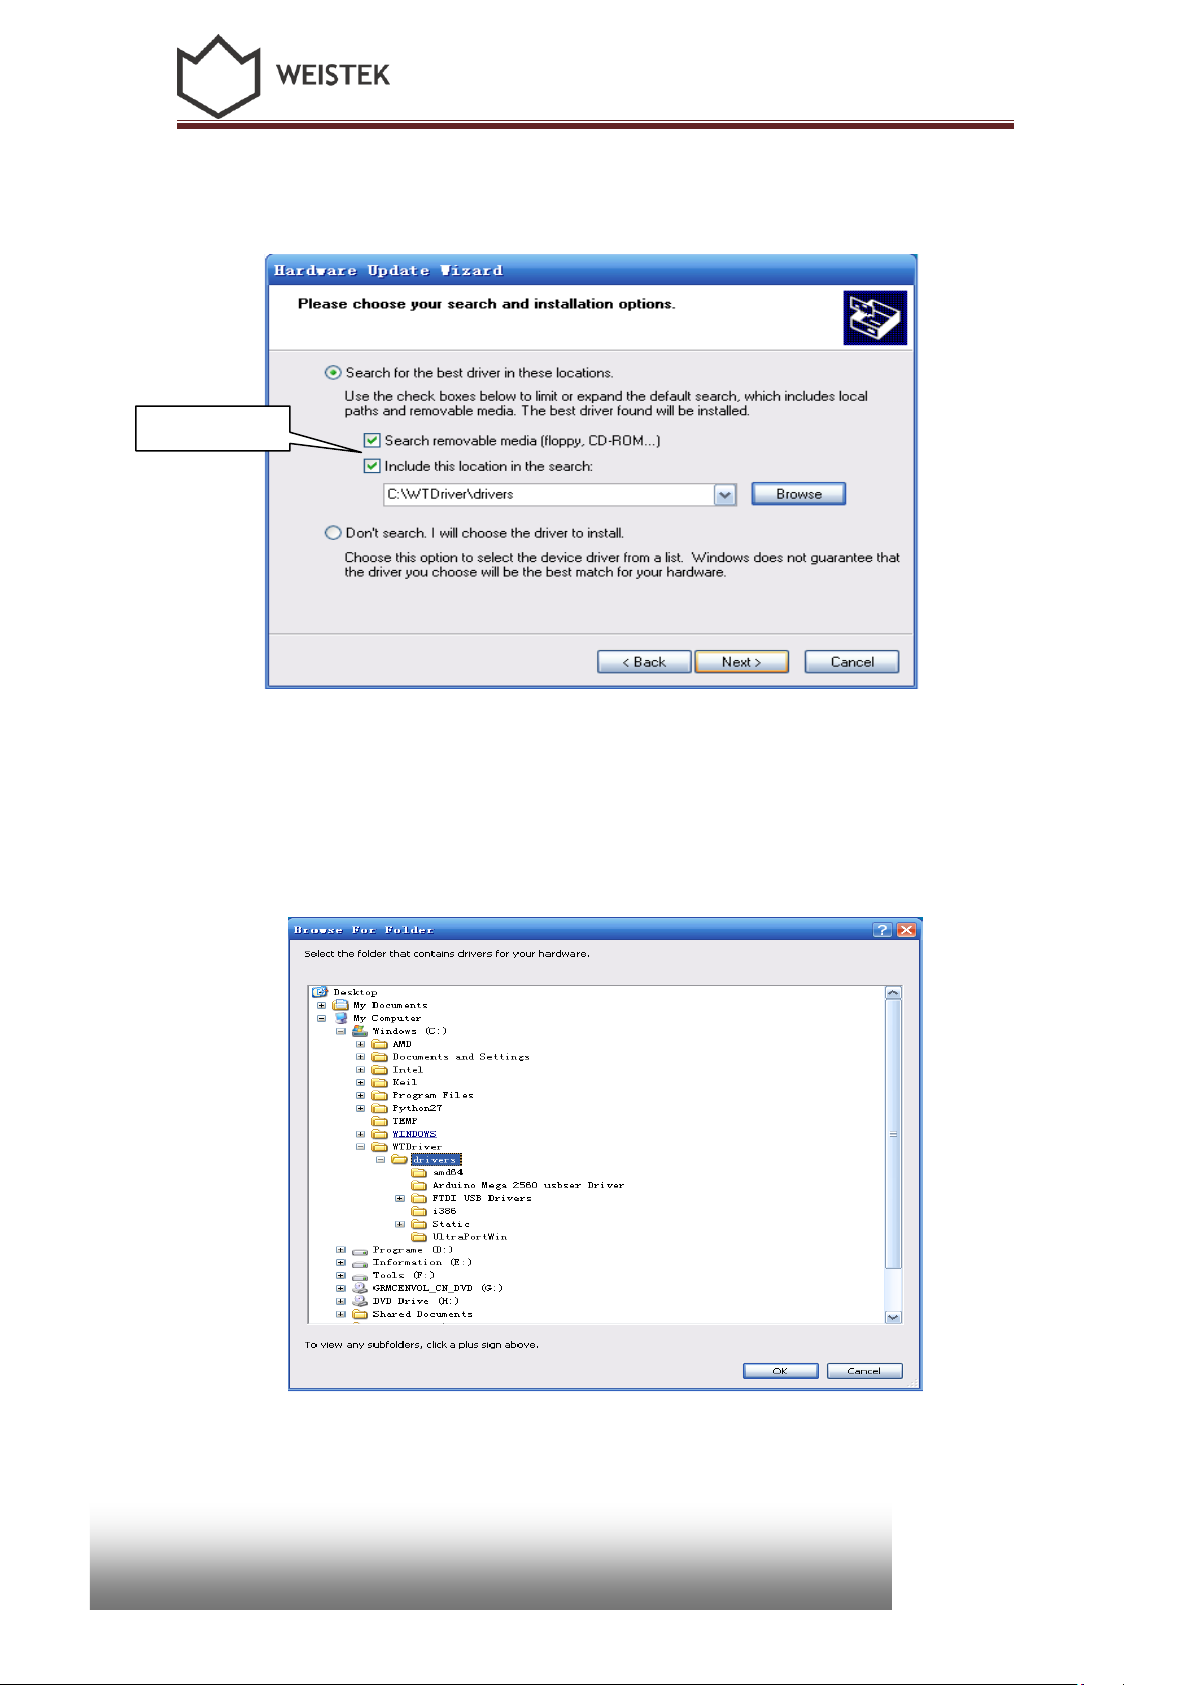
3>Select “Include this location in the search” in the below pop-up window, then clicking
“Browse”
(Pic 3.1-03)
4> Select a folder for WAY in the pop-up window Browse For Folder, and find
“drivers” folder, then clicking [OK]. Then, click [Next] in the window of Hardware
Update Wizard.
(Pic 3.1-04)
9
3. Software Installation
Distributed by
Conrad Electronic SE
Klaus-Conrad-Str.1
D-92240 Hirschau
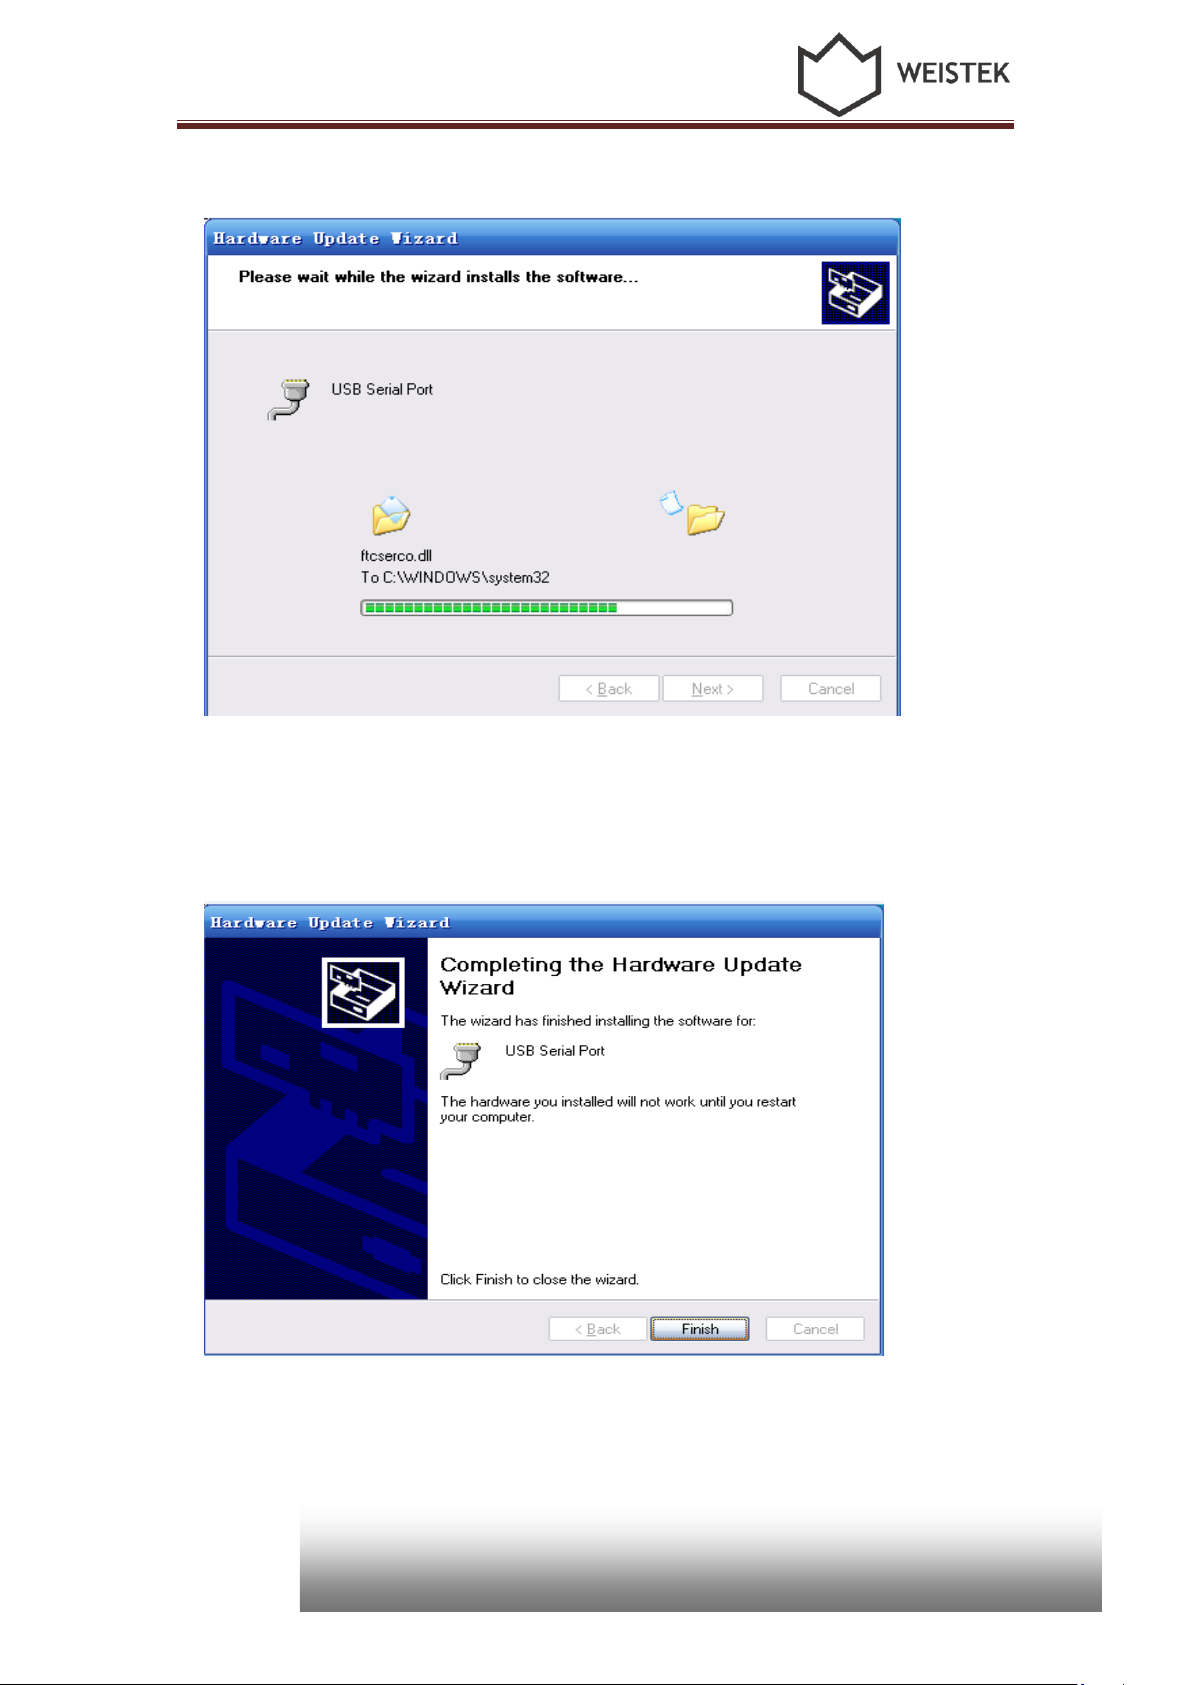
5> Click [next] when the following interface pops up.
(Pic 3.1-05)
6>waiting till the below window pops up, then clicking [Finish]. Until now a serials of
ports were installed successfully
(Pic 3.1-06)
10
3. Software Installation
Distributed by
Conrad Electronic SE
Klaus-Conrad-Str.1
D-92240 Hirschau
3.2 Port Confirmation
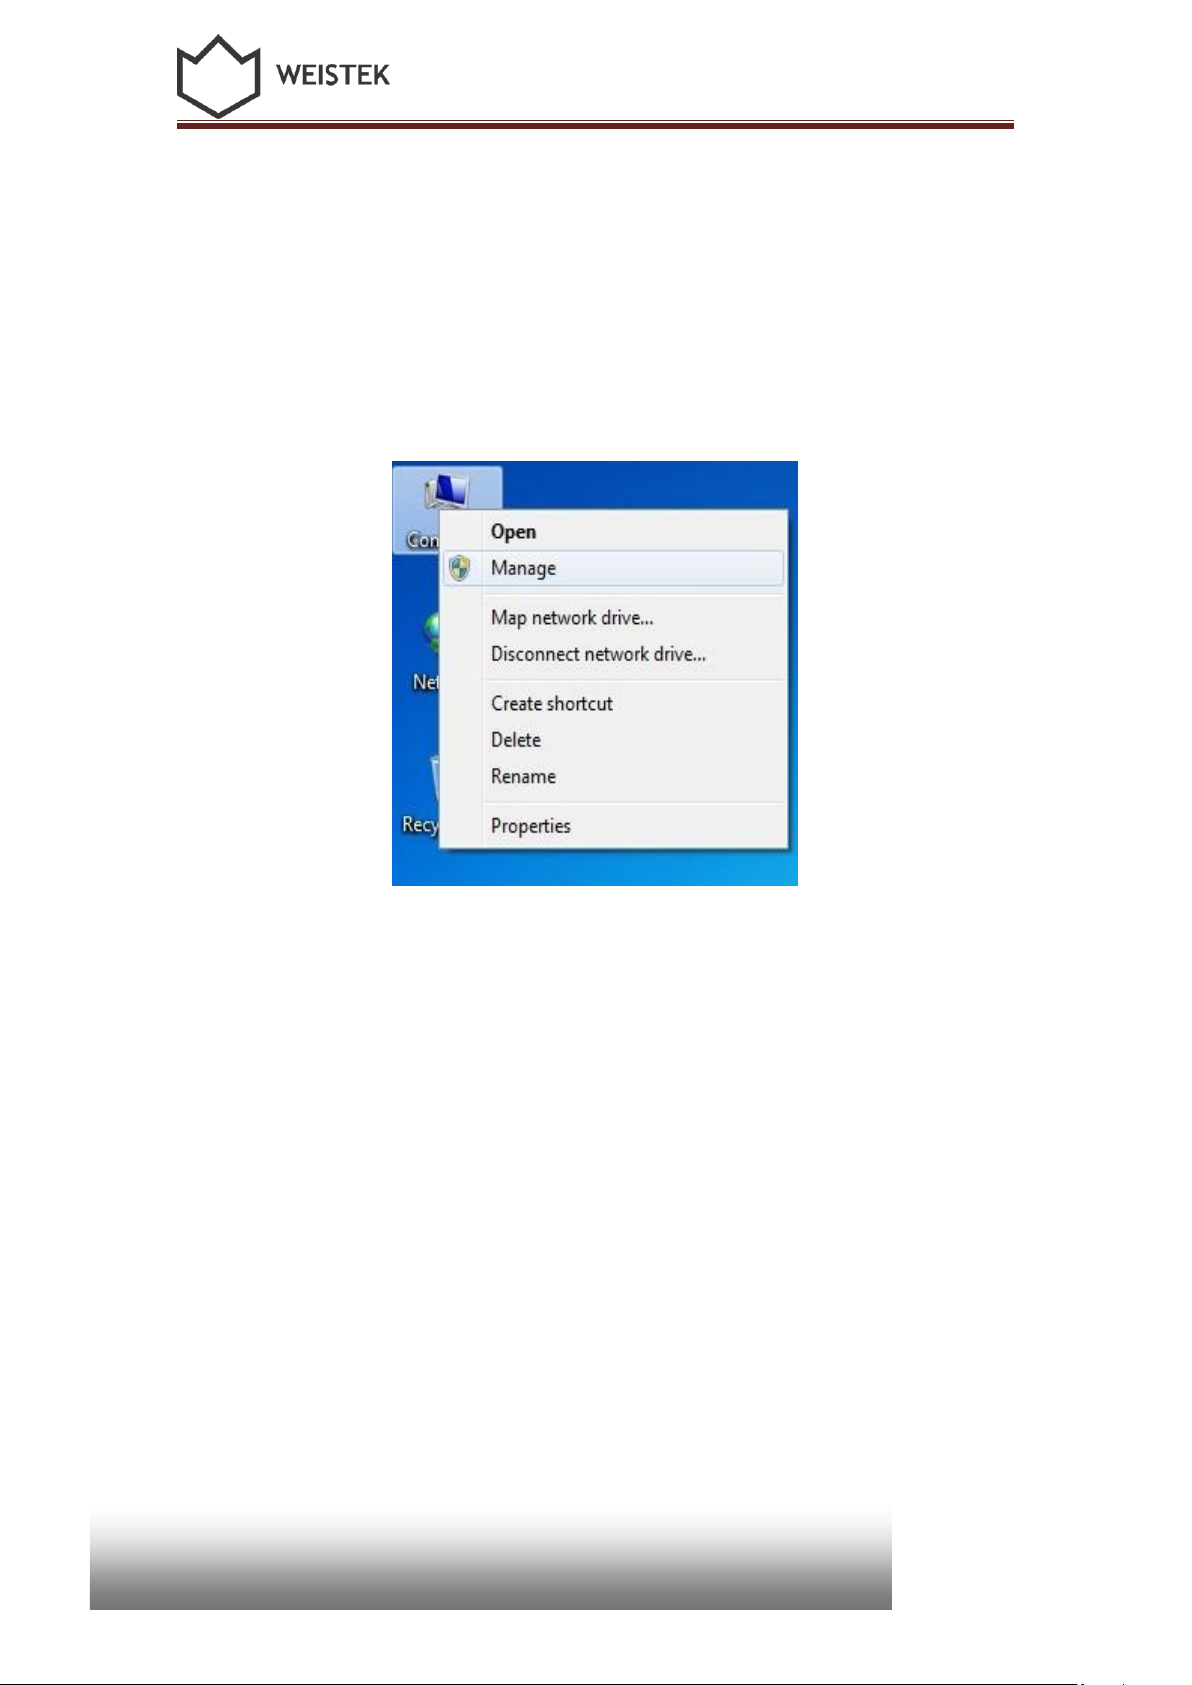
After finishing drives installation, please use the below methods to confirm whether it is
successful or not
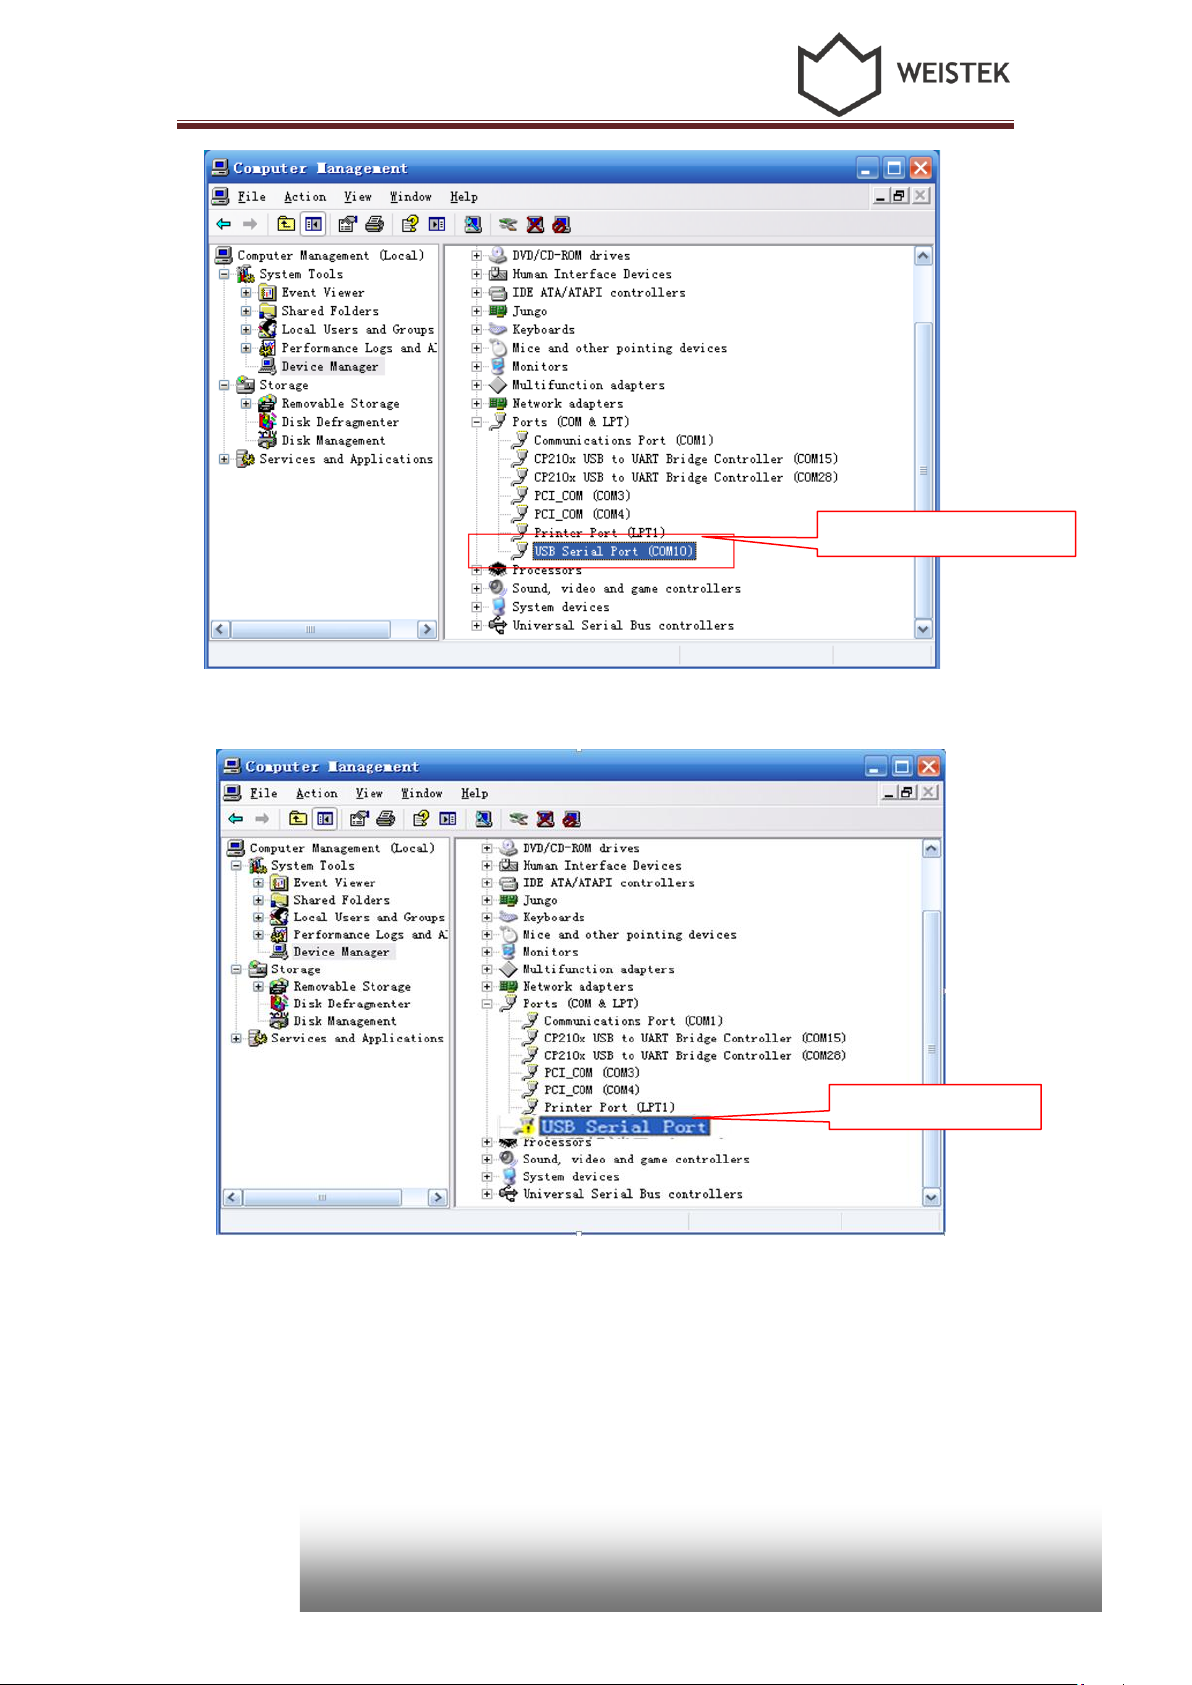
1> right click「Computer」, choose「Manage」, and then choose「Device Manager」
(Pic 3.2-01)
2> Select “Ports (COM&LPT)”in the below pop-up window,. If no ? or ! ahead of
“USB Serial Port” shows the USB Serial Port Drive is installed successfully.
11
3. Software Installation
Distributed by
Conrad Electronic SE
Klaus-Conrad-Str.1
D-92240 Hirschau
Installation succeeded
Installation failed
(Pic 3.2-02)
(Pic 3.2-03)
3.3 Python installation
as following:
12
Install Python software after finishing driver installation. The installation steps are

3. Software Installation
Distributed by
Conrad Electronic SE
Klaus-Conrad-Str.1
D-92240 Hirschau
1>Double-click software ,click [next] in the following windows.
(Pic 3.3-01)
2> Disk C is the default destination. Don’t change anything, just click [next] as
following:
3> Click [next] in the following windows.
(Pic 3.3-02)
13

3. Software Installation
Distributed by
Conrad Electronic SE
Klaus-Conrad-Str.1
D-92240 Hirschau
(Pic 3.3-03)
4> Click [finish] to complete Python installation.
(Pic 3.3-04)
14

3. Software Installation
Distributed by
Conrad Electronic SE
Klaus-Conrad-Str.1
D-92240 Hirschau
(Pic 3.3-05)
4. Preparations before printing
Before start to print the SD card should insert in the 3D printer, or software will not
able to connect the printer.
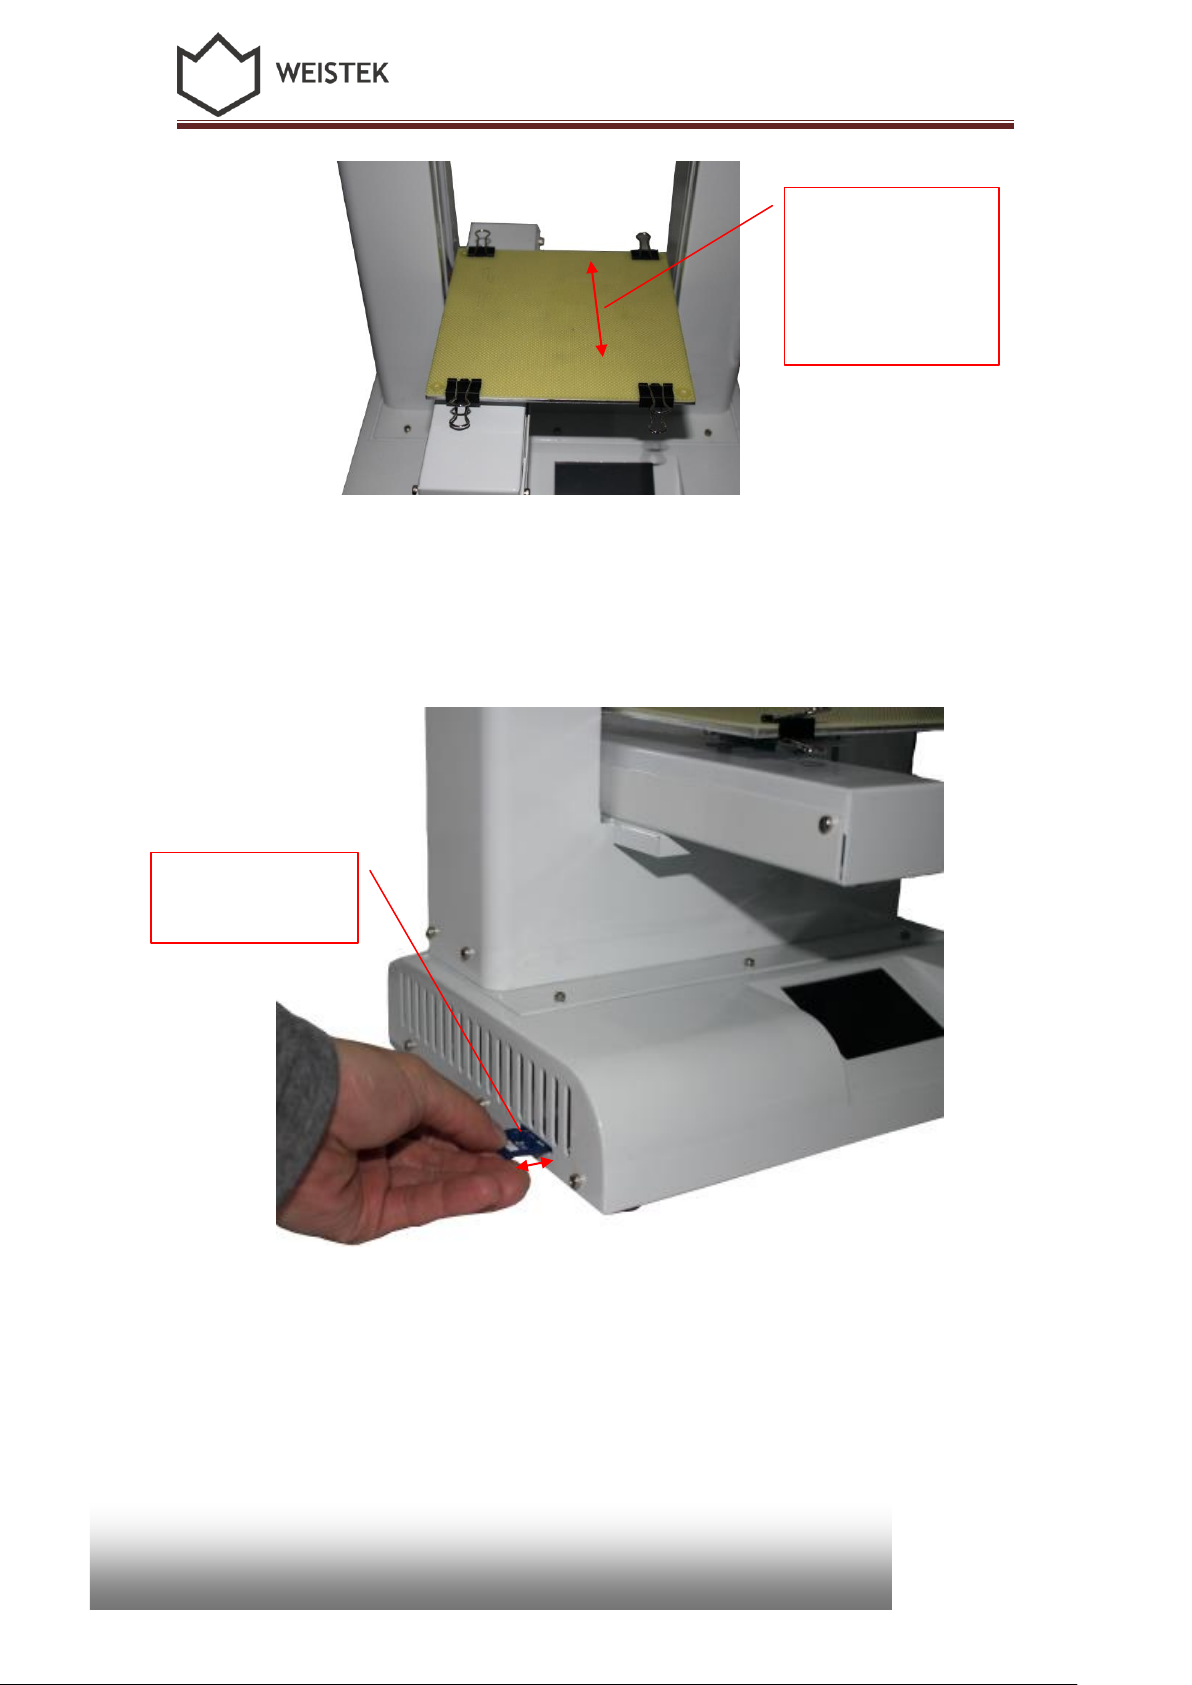
4.1 Platform Calibration and measuring Z height
The plate should be calibrated before printing. Make sure the plate to be flat and level,
and appropriate distance to the extruder.
4.1.1 Place the platform at the bottom of Z axis. Start [Machine Setting], choose the
correct serial port and connect the printer.
15

4. Preparations before printing
Distributed by
Conrad Electronic SE
Klaus-Conrad-Str.1
D-92240 Hirschau
Start this
program
(Pic 4.1-01)
(Pic 4.1-02)
4.1.2 Click [Connect], Connecting devices.
16

4. Preparations before printing
Distributed by
Conrad Electronic SE
Klaus-Conrad-Str.1
D-92240 Hirschau
Green
arrows
indicate
equipment
connection
(Pic 4.1-03)
4.1.3Click [Roughly measure], the platform will go up and measure the height of Z axis
automatically and stop at the height of 138mm.
(Pic 4.1-04)
17

4. Preparations before printing
Distributed by
Conrad Electronic SE
Klaus-Conrad-Str.1
D-92240 Hirschau
(Pic 4.1-05)
4.1.3 Select accurately measure step distance on the right of the [Accurately measure]
button, then click [Accurately measure] to move the platform step by step, till only
0.3mm between the platform and the extruder.
(Pic 4.1-06)
18

4. Preparations before printing
Distributed by
Conrad Electronic SE
Klaus-Conrad-Str.1
D-92240 Hirschau
0.3mm between
the platform and
the extruder
Put a card here.
(Pic 4.1-07)
Tip: How to estimate the distance: put a card between the extruder and the platform,
while no more distance’s left, make sure the card can slice between extruder and platform
smoothly without any damage.
(Pic 4.1-08)
4.1.4 Now you can check if the platform is flat or not. Move the platform forward and
backward, to check the distances. Also, move the extruder to the left and right, to
check the distance.
19

4. Preparations before printing
Distributed by
Conrad Electronic SE
Klaus-Conrad-Str.1
D-92240 Hirschau
(Pic 4.1-09)
Use the wrench to fasten or loosen the screws beneath the platform to adjust the
platform if somewhere distance is not around 0.3mm.
20
(Pic 4.1-10)

Distributed by
Conrad Electronic SE
Klaus-Conrad-Str.1
D-92240 Hirschau
(Pic 4.1-11)
X axis
Y axis
4. Preparations before printing
4.1.5 After adjusting the platform, click [Meter Z], platform will go down again and
stop when it touches the Limit Switch. This process is measuring the Z height.
New data will be shown on the program.
(Pic 4.1-12)
Note: It is not necessary to measure Z height each time before printing. The program
will memorize the data for your next printing. It is suggested to adjust the platform every
3-4 months after using.
4.1.6 Click [Apply] and exit the program.
21

4. Preparations before printing
Distributed by
Conrad Electronic SE
Klaus-Conrad-Str.1
D-92240 Hirschau
Start this program
Target temperature
4.2 Select temperature
4.2.1 Open the tool showed below.
(Pic 4.2-01)
4.2.2 How to select temperature: Extruder target temperature, 220~230oC.
22
(Pic 4.2-02)

Distributed by
Conrad Electronic SE
Klaus-Conrad-Str.1
D-92240 Hirschau
4.2.3 Click [Apply] and exit the program.
Click Apply
4. Preparations before printing
(Pic 4.2-03)
23

5. Introduction of main functions
Distributed by
Conrad Electronic SE
Klaus-Conrad-Str.1
D-92240 Hirschau
5. Introduction of main functions
5.1 Introduction of main functions
5.1.1 Software interface
Please choose [Skeinforge] before printing, as picture shows.
(Pic 5.1-01)
Then choose Machine Type [Replicator 2] before printing, as picture shows.
24
(Pic 5.1-02)

5. Introduction of main functions
Distributed by
Conrad Electronic SE
Klaus-Conrad-Str.1
D-92240 Hirschau
Six main function bottoms: File, Edit, GCode, Machine, Thingiverse, Help
(Pic 5.1-03)
5.1.2 When user firstly starts the software, the software will show a blank area without
any model like below picture shows.
(Pic 5.1-04)
25

5. Introduction of main functions
Distributed by
Conrad Electronic SE
Klaus-Conrad-Str.1
D-92240 Hirschau
5.1.3 Click「file」, choose「Open」to open an STL file of the model. The model will show
up on the center of the interface.
(Pic 5.1-05)
5.1.4 If your model does not show correctly on the virtual plate, use the bottoms on the
right side of the interface to edit the model.
(Pic 5.1-06)
26

5. Introduction of main functions
Distributed by
Conrad Electronic SE
Klaus-Conrad-Str.1
D-92240 Hirschau
5.1.5 When the interface turns green and shows like the picture below, that means the
software has connected to the right serial port.
(Pic 5.1-07)
5.1.6 After editing the model, click「Generate Gcode」. Wait a few minutes till the Gcode
is finished.
How to deal with this problem: Choose [Defaults], then [Load Parameter]. After this step,
(Pic 5.1-08)
27

5. Introduction of main functions
Distributed by
Conrad Electronic SE
Klaus-Conrad-Str.1
D-92240 Hirschau
Parameter
settings
the parameters will be correct as default.
(Pic 5.1-09)
5.1.7 Please operate some more times to get skills of printing.
28

5. Introduction of main functions
Distributed by
Conrad Electronic SE
Klaus-Conrad-Str.1
D-92240 Hirschau
(Pic 5.1-10)
Setting Parameters Description
A: Choose slicing profile: IdeaWerk。
B: If your model contains vacant part, you need to select support.
None: None support
Exterior support: select to generate GCode with exterior support
Full support: select to generate GCode with full support
C: Infill percentage. If you want to print the model as a complete solid one, best
selection will be 95%. As your wish, you can select smaller percentage to save time and
material.
D: Layer Height should be 0.15mm-0.3mm. It decides smoothness of model surface and
printing speed. Thinner layer makes the surface smoother, and estimated time will be
longer.
E: Number of shells should be ≥1. Usually between 1 and 3.
29

5. Introduction of main functions
Distributed by
Conrad Electronic SE
Klaus-Conrad-Str.1
D-92240 Hirschau
F: Feed rate should be 30-80mm/s. Best selection is 60mm/s.
G: Travel feed rate should be 60-150mm/s. Best selection is 80mm/s.
5.1.8 Confirm the settings and generate Gcode. Click「OK」to continue.
(Pic 5.1-11)
5.1.9 Wait several minutes till generation finished.
30

5. Introduction of main functions
Distributed by
Conrad Electronic SE
Klaus-Conrad-Str.1
D-92240 Hirschau
(Pic 5.1-12)
5.1.10 Click to start building. Click「Proceed anyway」to continue.
(Pic 5.1-13)
31

5. Introduction of main functions
Distributed by
Conrad Electronic SE
Klaus-Conrad-Str.1
D-92240 Hirschau
Click here
Click(Yes)
If GCode warning is shown, please ignore it. Do not cancel and choose “Proceed any
way”.
(Pic 5.1-14)
5.1.11 Click「Yes」to continue.
(Pic 5.1-15)
32

Distributed by
Conrad Electronic SE
Klaus-Conrad-Str.1
D-92240 Hirschau
5.1.12 Model is printing.
5. Introduction of main functions
(Pic 5.1-16)
Warning: Do not cut down power during printing process, or the printing plate will
drop down without any tip.
5.1.13 Printing plate will drop down slowly when printing finishes. Caution not to pinch
your hands.
Remove the model from the plate with the shovel. Remember to wear your gloves.
33

5. Introduction of main functions
Distributed by
Conrad Electronic SE
Klaus-Conrad-Str.1
D-92240 Hirschau
Filament feeding hole
(Pic 5.1-17)
6. Forward and reverse the filament
6.1 How to feed material
6.1.1 To avoid material stuck inside the extruder, please make sure the filament is fed
through the center of the hole.
34
(Pic 6.1-01)

7. Build from SD card and control
Distributed by
Conrad Electronic SE
Klaus-Conrad-Str.1
D-92240 Hirschau
Correct
Error
6.1.2 First step, put the filament free end through the holder guide, and feed the filament
through the guiding tube. Second, push the free end into the extruder feeding hole.
6.1.3 Select Extruder Target Temperature at 220oC. Heat up extruder. After heating up,
click 「Forward」until the material string comes out from the nozzle. Click「Stop」when
finish this step.
(Pic 6.1-02)
The filament free end must be cut to be flat.
(Pic 6.1-03)
35

6. Forward and reverse the filament
Distributed by
Conrad Electronic SE
Klaus-Conrad-Str.1
D-92240 Hirschau
Forward
Feed the materials end to end.
(Pic 6.1-04)
(Pic 6.1-05)
6.2 How to reverse material
To reverse material, the extruder should be heated up first. Then click 「Reverse」until
the filament is totally reversed from the extruder. Click「Stop」to finish this step.
36

Distributed by
Conrad Electronic SE
Klaus-Conrad-Str.1
D-92240 Hirschau
(Pic 6.2-01)
Reverse
7. Build from SD card and control
7. Build from SD card and control
7.1 Build from SD card
After generating Gcode of the model, click bottom to create an .x3g file. Save
the .x3g file in your SD card.
Note: 1. SD card capacity should be no larger than 2D.
2. .x3g file name should be made up from English or Arabic number only.
37

7. Build from SD card and control
Distributed by
Conrad Electronic SE
Klaus-Conrad-Str.1
D-92240 Hirschau
Should be .x3g
format
Click here (Yes)
Click here (OK)
(Pic 7.1-01)
(Pic 7.1-02)
7.2 Operation on control screen
Control should be done on the screen when building from SD card.
7.2.1 Click anywhere on the screen to start operating.
38

7. Build from SD card and control
Distributed by
Conrad Electronic SE
Klaus-Conrad-Str.1
D-92240 Hirschau
(Pic 7.2-01)
7.2.2 Scan the file as the guide shows.
(Pic 7.2-02)
39

7. Build from SD card and control
Distributed by
Conrad Electronic SE
Klaus-Conrad-Str.1
D-92240 Hirschau
7.2.3 Click on the name of the file to start building.
(Pic 7.2-03)
7.2.4 The picture (Pic 7.1-04) shows the condition of the machine when building. Click
Light to switch on the light inside the machine box, in order to observe the printing
process more clearly.
(Pic 7.2-04)
40

7. Build from SD card and control
Distributed by
Conrad Electronic SE
Klaus-Conrad-Str.1
D-92240 Hirschau
7.2.5 Click Stop to end the process of building if needed.
(Pic 7.2-05)
7.2.6 Error alert shows up if anything wrong when building.
(Pic 7.2-06)
41

8. How to fix common problem
Distributed by
Conrad Electronic SE
Klaus-Conrad-Str.1
D-92240 Hirschau
8. How to fix common problem
8.1 Resolution of filament feeding unsmooth
What is unsmooth: During printing, the extruder can’t extrude filament or
extrude intermittently, at this situation,
1: Check the extruder temperature if is too low or not, increase 5-10oC each time to see
if the problem is solved or not. See Pic8.1- 01
2: Check the gear of the extruder, if there are a lot of filament waste pellet, just clean it
and then print again to see if situation get better or not.
(Pic 8.1-01)
42

8. How to fix common little problem
Distributed by
Conrad Electronic SE
Klaus-Conrad-Str.1
D-92240 Hirschau
8.2 Resolution of nozzle blocking
If the extruder is still not able to work, then you have to check if the nozzle of the
extruder is blocked or not. This is always due to wrong operation of machine and
use wrong filament or wrong operation of joining the filament.
Solutions:
1) Heat the extruder temperature to appropriate temperature (only for PLA. PLA:
220°C -230°C).
Click Reverse, if needed, at the same time have to pull back the filament with hand
(some time the filament was bite a breach by the gear, the gear can’t touch the
filament, need to pull the filament to the gear so the reverse will work)
2)Change a new filament, the temperature of extruder can be selected a little
high(around 250oC).
3)Then Start to extrude, use your needle (or any of your needle like tools) insert into
the hole of nozzle, dredge up and down, at the same time, press the filament which is
extruding. Keep doing this until the filament comes out from the nozzle.
43

8. How to fix common problem
Distributed by
Conrad Electronic SE
Klaus-Conrad-Str.1
D-92240 Hirschau
(Pic 8.2-01)
Acknowledgements
Thanks for using IdeaWerk™ 3D printer and thanks for your supports for Weistek.
For after sale service please contact with your retailer.
44
 Loading...