

Page 1
ENGLISH
67955-001
Rev 01
Installation and
User Guide
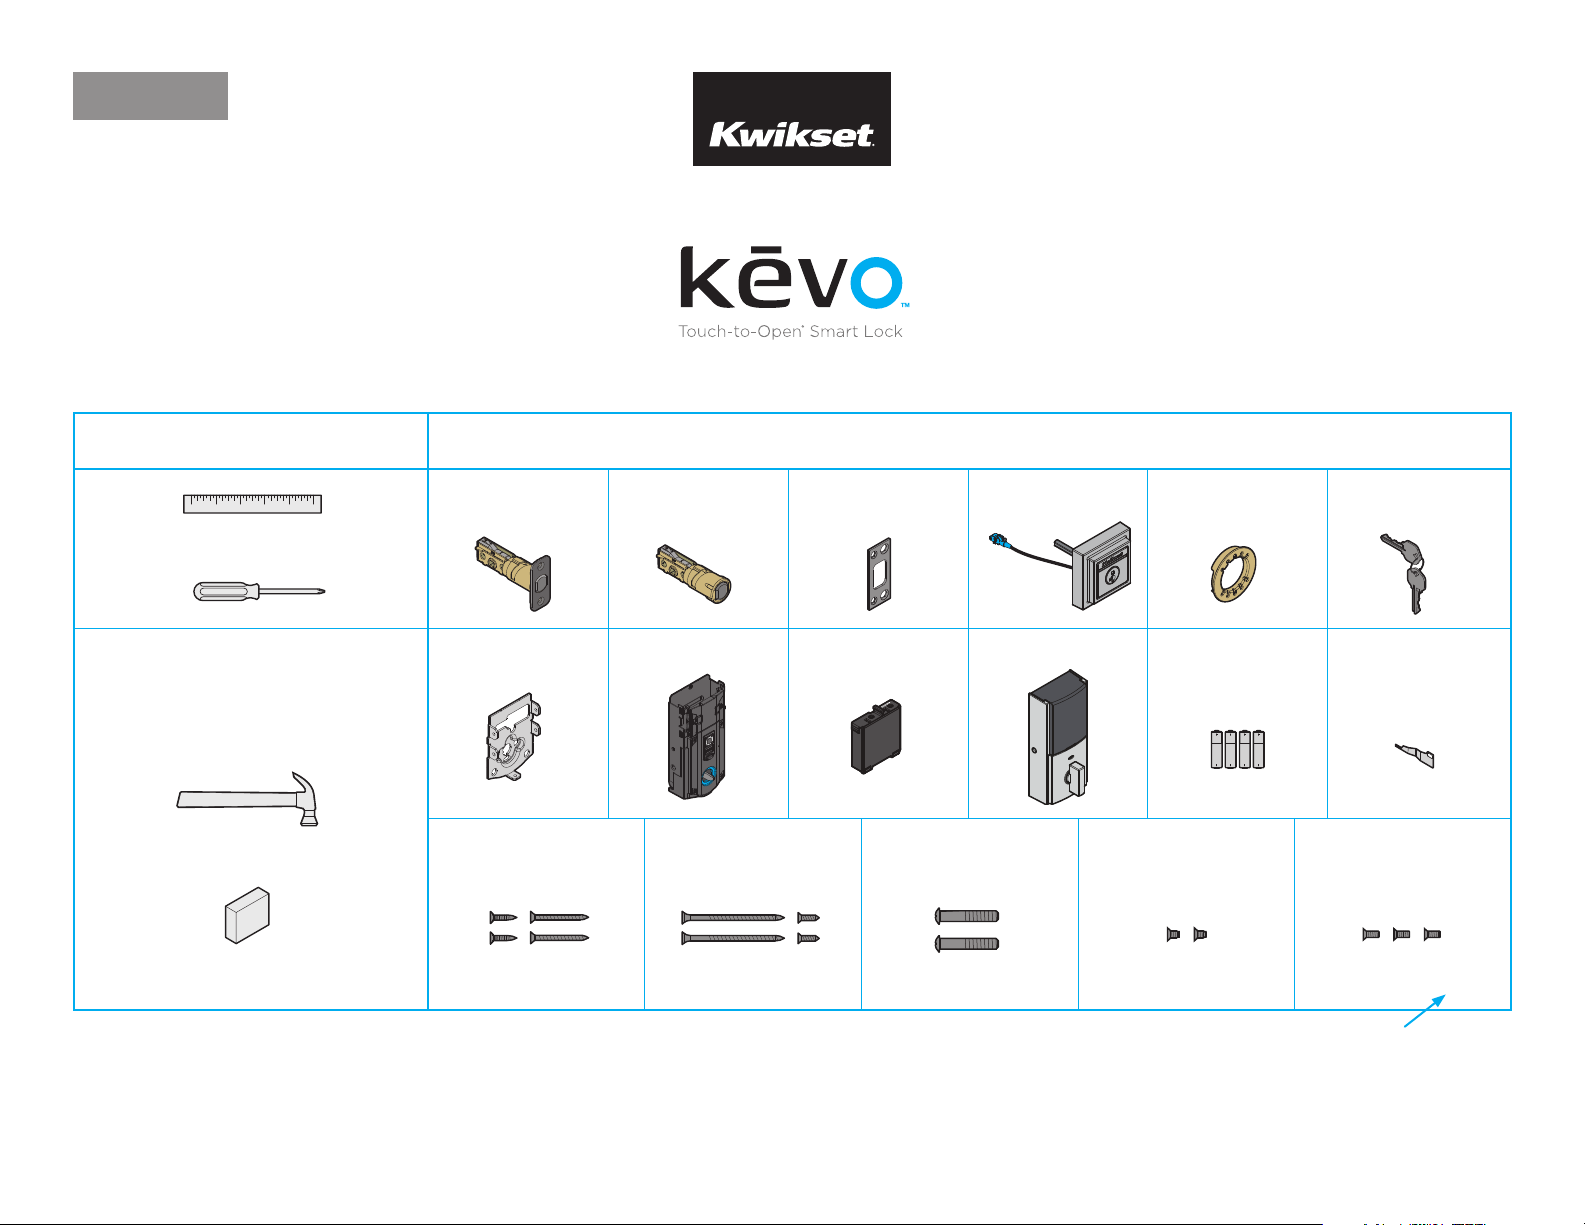
Parts in the boxRequired tools
Ruler
Phillips screwdriver
Additional tools
(depending on application)
Hammer
Wood block
Latch with
rectangular faceplate
A
Mounting plate SmartKey toolInterior assembly
G
Latch screws Strike screws Mounting plate screws
N Q R
P
Drive-in latch Strike Exterior assembly Adapter ring
B C D E F
Battery pack Interior cover Batteries
H J K L M
S
03809 46780 4919164844 64109
Interior assembly
screws
T U
Note: Part numbers are printed on screw bags.
Keys
Interior cover
screws
Kevo Support: www.kwikset.com/kevo/support
USA: 1-800-327-5625
Australia free call 1800 623 118
New Zealand free call 0800 736 776
1 / 11 © 2018 Spectrum Brands, Inc.
Page 2
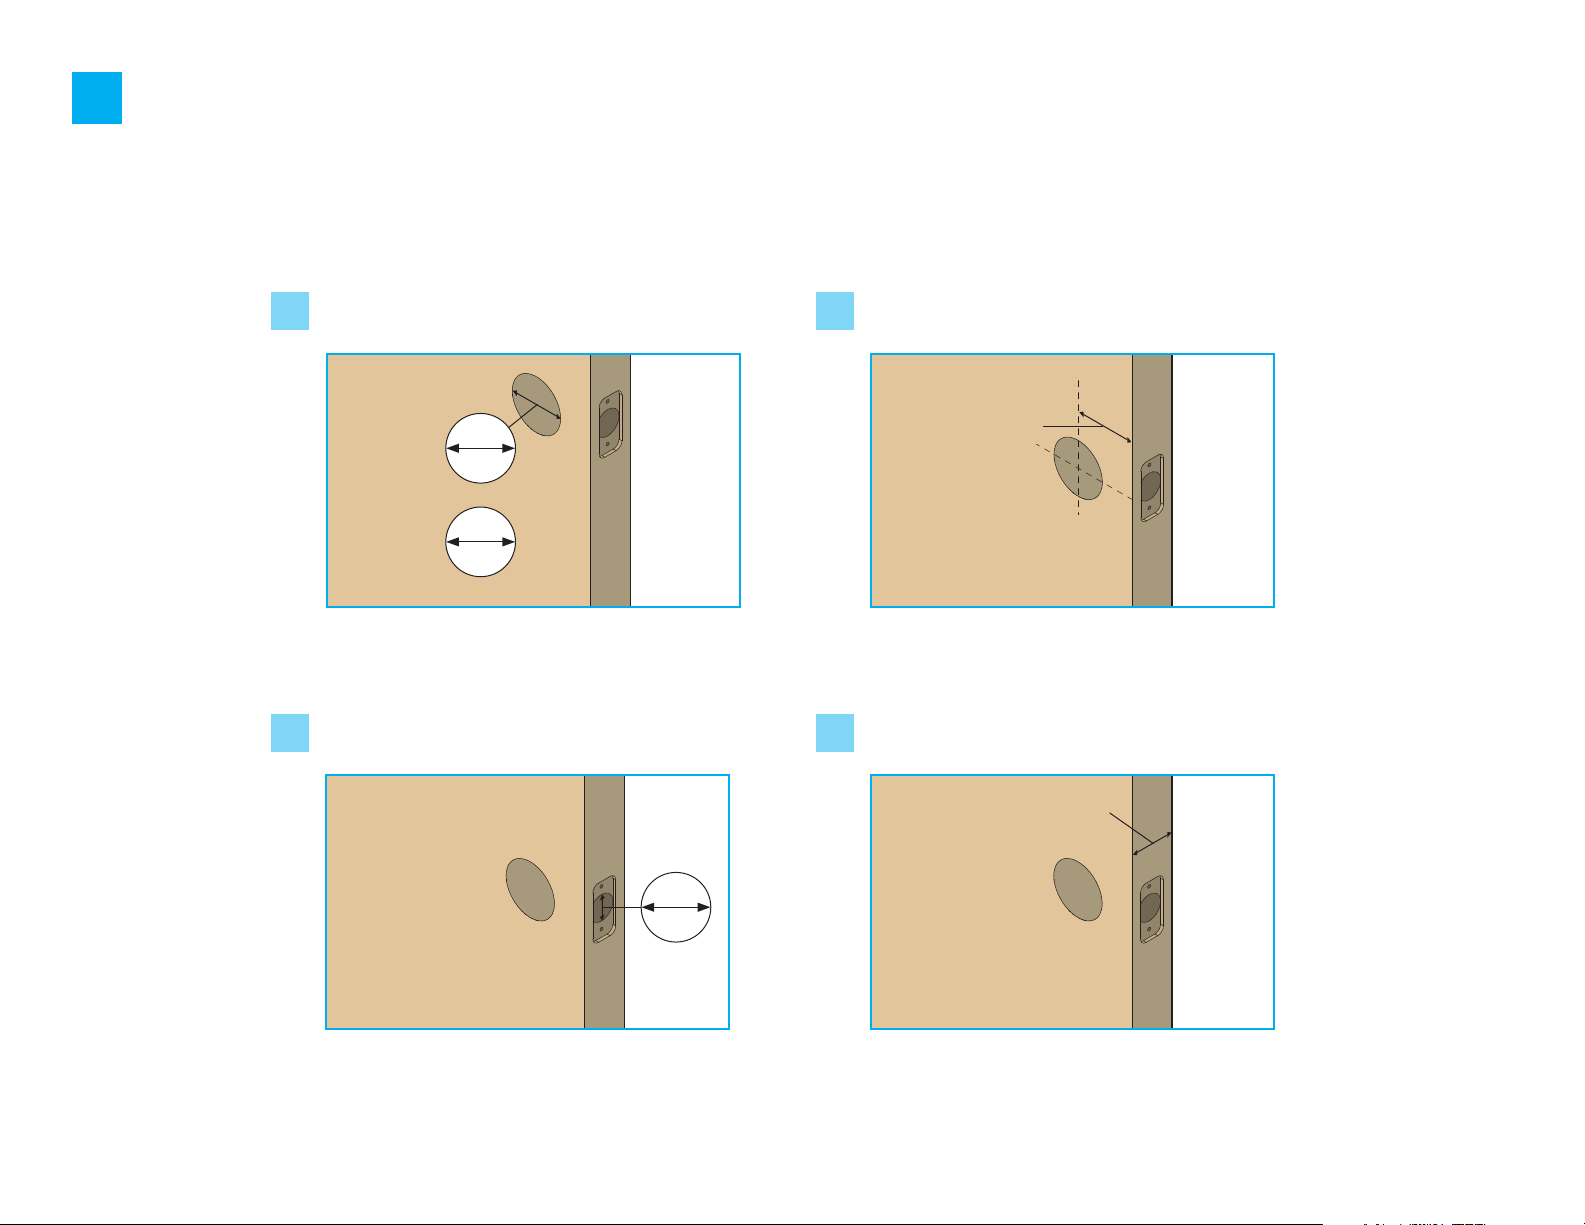
Prepare the door and check dimensions
1
If drilling a new door, use the supplied template and the complete
door drilling instructions available at www.kwikset.com/doorprep.
Measure to conirm that the hole in the door
A
is either 21/8" (54 mm) or 11/2" (38 mm).
21/8"
54 mm
or
11/2"
38 mm
Note: Additional door preparation may be required for
doors with 11/2" (38 mm) holes. Consult the deadbolt
drilling instructions at www.kwikset.com/doorprep
Measure to conirm that the hole in
C
the door edge is 1" (25 mm).
Measure to conirm that the backset is
B
either 23/8" or 23/4" (60 or 70 mm).
23/8" or 23/4"
60 or 70 mm
Measure to conirm that the door is 13/4" (44 mm) thick.
D
backset
13/4"
44 mm
Kevo Support: www.kwikset.com/kevo/support
USA: 1-800-327-5625
Australia free call 1800 623 118
New Zealand free call 0800 736 776
1"
25 mm
2 / 11 © 2018 Spectrum Brands, Inc.
Page 3

Install the latch and strike
2
Is the door edge chiseled?
A B
YES
chiseled
Use latch “A”. If the
latch bolt is not already
extende d, extend the
latch bolt as shown.
A
or
NO
not
chiseled
Use latch “B”. If the
latch bolt is not already
extende d, extend the
latch bolt as shown.
B
Hold the latch in front of the door hole, with the latch
face lush against the door edge.
A
Is the D-shaped hole centered in the door hole?
C
B
YES
or
D-shaped hole centered D-shaped hole NOT centered
No adjustment is required.
Proceed to next step.
Rotate latch face as
shown to extend latch.
A
NO
Which latch are you installing?
D
Latch “A” Latch “B”
A
Install strike on the door frame.
E
Make sure the hole in the door frame is
drilled a minimum of 1" (25 mm) deep.
or
B
“UP” is
on top
“UP” is
on top
N (x2)
wood
block
Kevo Support: www.kwikset.com/kevo/support
USA: 1-800-327-5625
Australia free call 1800 623 118
New Zealand free call 0800 736 776
Longer screws, Q,
install closest to
the door jamb.
B
Note: The longer screws, Q, (3" / 76 mm) must be used
to maintain highest security.
3 / 11 © 2018 Spectrum Brands, Inc.
Q (x2)
R (x2)
C
door frame
Page 4

Install the exterior assembly
3
What is the diameter of the hole in the door? Install exterior assembly and mounting plate.
A C
Diameter is 21/8" (54 mm) Diameter is 11/2" (38 mm)
21/8"
54 mm
“E” is required for installation.
Install “E” on “D”.
D
E
What is the thickness of your door?
B
Door is 13/8" (35 mm) thick Door is 13/4" (44 mm) thick
Kevo Contemporary does not
support this door thickness.
13/8"
35 mm
or
or
11/2"
38 mm
“E” is not needed for
installation. Discard “E”.
E
13/4"
44 mm
Locate mounting plate (G).
a
Note: It is on the back of
the interior assembly.
G
b
D
Cable goes underneath latch.
c
G
d
Route cable
through
center hole,
then push
cable into
bottom hole.
Keep parallel to
edge of door
Rotate torq ue blade to align
with D-shaped hole.
S (x2)
Tighten
screws evenly
e
S
S
Insert key and test latch. If
latch does not extend or retract
smoothly, adjust screws (S).
F
Remove key when inished
and make sure the latch
bolt is fully extended.
Kevo Support: www.kwikset.com/kevo/support
USA: 1-800-327-5625
Australia free call 1800 623 118
New Zealand free call 0800 736 776
4 / 11 © 2018 Spectrum Brands, Inc.
Page 5

Install the interior assembly
4
Remove battery cover and battery pack from interior assembly.
A
Make sure
a
turnpiece is in the
vertical position.
Connect cable and install interior assembly.
B
Make sure
a
cable “clicks”
into place.
Remove
b
interior cover.
c
Remove
battery pack.
K KH H
vertical
Tuc k
H
b
If connector lever
is extended, push
it back down.
c
cable into
interior
housing.
J
Do not install
batteries yet.
Tuck extra cable within
assemb ly cavity.
Do not pinch cable
during inal install.
Push turnpiece shaft
d
onto torque blade.
torque
blade
Kevo Support: www.kwikset.com/kevo/support
USA: 1-800-327-5625
Australia free call 1800 623 118
New Zealand free call 0800 736 776
turnpiece
shaft
e
Secure with
screws.
bottom hole
T (x2)
Tip
Use lever if
you need to
remove cable.
5 / 11 © 2018 Spectrum Brands, Inc.
Page 6

Perform the door handing process
5
This step will teach the lock the orientation of your door and is crucial for lock operation.
Install 4 AA batteries in the battery pack.
A B
L (x4)
J
Ensure correct polarity. For best
results, use new, non-rechargeable
Alkaline batteries only.
IMPORTANT: The Status LED will lash red and green, and the lock will beep. Press
C D
and release the Program button again. The latch bolt will retract and extend on its own.
IMPORTANT: Make sure the door is open. Insert the battery pack
while PRESSING AND HOLDING the Program button. Release the button
when the battery pack is all the way inside the lock interior.
Did the latch bolt bolt retract and extend on its own?
status LED
Kevo Support: www.kwikset.com/kevo/support
USA: 1-800-327-5625
Australia free call 1800 623 118
New Zealand free call 0800 736 776
YES NO
Door handing process was
successful! Proceed to next step
after latch bolt stops moving.
6 / 11 © 2018 Spectrum Brands, Inc.
or
Remove batte ry pack , wait
15 seconds, then attempt
the process again.
Page 7

OPTIONAL: Re-key the lock
6
If desired, the lock may be re-keyed to work with your existing key.
See the supplied SmartKey Re-key instructions for more information.
Download the app and set up your smartphone
7
touch surface
If this lock was professionally installed (or installed by someone other than the homeowner), make sure that step 7 is performed by the homeowner.
Download the Kevo app at kwikset.com/kevo/app or scan the QR code below.
A
Continue to follow the instructions inside the app to calibrate the
C
lock so it learns where you keep your phone during normal use.
Normal use Locking the door
When using your phone to
lock and unlock the door,
make sure the phone is on,
Bluetooth is enabled, and
the Kevo app is running
in the background.
Always stand at an
extended arm's reach,
and avoid holding your
device close to the lock.
You may hold the phone in
your hand, pocket, bag or
purse as long as there is a
clear line of sight between
the lock and the phone.
Follow the instructions inside the app to create an account and enroll your irst smartphone.
B
Send eKeys to family and friends with Kevo-compatible smartphones.
D
Unlocking the door
Touch the lock exterior on the touch surface. The
light string will display the following animations,
the lock will beep once, and the door will lock.
Blue sweep Blue sweepOrange swe ep,
moving towards
door edge
LED sweep dire ction will follow the bolt direction when locking and unlo cking the door
Last 2 LEDs
remain on for
2 seconds
Touch the lock exterior on the touch surface. The
light string will display the following animations,
the lock will beep twice, and the door will unlock.
Green sweep,
moving away
from door edge
First 2 LEDs
remain on for
2 seconds
Kevo Support: www.kwikset.com/kevo/support
USA: 1-800-327-5625
Australia free call 1800 623 118
New Zealand free call 0800 736 776
7 / 11 © 2018 Spectrum Brands, Inc.
Page 8

Install the interior cover
8
Important information about the interior cover:
If the window is unlocked, it can
slide up for more convenient
access to programming buttons
while the cover is installed.
Note: The interior cover and
screws must be removed for
battery pack access.
window
The interior cover will be secured by
three screws to prevent someone
from removing the battery or
tampering with your lock's settings.
The window on the interior
cover is locked by default.
If you want to keep the window locked: If you want to unlock the window:
Install
cov er.
aa
Remove
security
screw.
K
K
Install
screws.
U (x3)
Install
bb c
cov er.
K
Install
screws.
U (x3)
Battery Replacement
9
Slide cover up. Remove
a
Kevo Support: www.kwikset.com/kevo/support
USA: 1-800-327-5625
Australia free call 1800 623 118
New Zealand free call 0800 736 776
Replace batteries.
b
battery pack.
J
c
J
K
Ensure correct polarity. For best results, use new,
non-rechargeable Alkaline batteries only.
8 / 11 © 2018 Spectrum Brands, Inc.
Page 9

Kevo at a Glance
1. Touch surface
2. SmartKey tool
access
5. Reset button
6. Back panel
7. Program butto n
8. Turnpiece shaft
A B
3. Light string
4. Keyway
9. Positioning
Technology button
10. Switches
11. St atus LED
Reference Guide
1. Touch Kevo anywhere on t he
metallic surface below the light
string to lock and unlo ck.
2. Inser t your Smar tKey tool here
when rekeyin g your lock to
work with your existing key.
3. Changes color to
communicate with you.
4. Insert your st andard key here.
5. Only use to re set Kevo
to delete all eKeys and
fobs. Se e “System Reset”
for more information.
6. Where all the programming
features are l ocated.
7. Use to enroll phones and fobs.
8. Engages with turnpiece wh en
interior cove r is installed.
When the cover is removed,
the turnpiece shaft can
be used to manually lock
and unlock the door.
9. Use to reset Kevo
activation range.
10. Use to enab le and disable the
Status LED, Triple Touch Lock,
Audio, and Auto-Lock.
11. Communicates whether the
door is lo cked or unlocked
and las hes red for a low
batter y alert. Can be turned
on and o by Switc h #1.
Kevo-Compatible Devices
Smartphones and Smart Devices
A Kevo-compatible smartphone (or othe r
mobile internet-connected device or t ablet)
must have Bluetooth Smart Ready/ Bluetooth
4.0 and an app speciic to the device must be
installed. Find out if your device is compatible
at www.kwikset.com/kevo/devices.
Kevo Fob
A Kevo Fob is a Bluetooth device that provides the
same touch-to-open convenience as a smartphone.
Up to eight fobs can be enrolled in a single Kevo lock. A
single fob can be enrolled in up to 2 5 dierent Kevo locks.
Note: You may choose to use only Kevo fobs, only
smartphones or a mix of both in your Kevo system.
Standard Key
Always make sure you have access to your standard key.
Switches
Switch 1
Status LED
Door lock status LED blinks every 6
seconds. ON position is factory default.
1 2 3 4
on o
Kevo Support: www.kwikset.com/kevo/support
USA: 1-800-327-5625
Australia free call 1800 623 118
New Zealand free call 0800 736 776
Switch 2
Triple Touch Lock
See “Triple Touch Lock.”
OFF position is factory default.
Switch 3
Audio
Beeping sound is heard during
programming and normal operation.
ON position is factory default.
Switch 4
Auto-Lock
Automatically re-locks door 30
seconds after unlocking. OFF position
is factory default.
Triple Touch Lock and Auto-Lock
Triple Touch Lock allows you to lock the door from the outside
without the use of a smartphon e or fob. You might use Triple
Touch Lock if you are using only a standard key in your system
but wish to lock the door by touch, if your smartphone or fob is
disabled, or if you have a visitor in your home that will leave and
lock the door behind them.
To lock the door with this feature , tap the touch surface
three time s, pausing briely between each touch. The
lock will perform the lock light seque nce (page 7).
To enable Triple Touch Lock, set Switch #2 to the ON p osition.
Auto- Lock will automatically re-lock the door 30 seconds af ter
unlocking. To enable Auto -Lock, set Switch #4 to the ON position.
Both features are OFF by default.
CAUTIO N: With these feature enabled, it is possible to lock
yourself outside if you don’t have an enrolled smartphone,
Kevo fob or standard key with you.
9 / 11 © 2018 Spectrum Brands, Inc.
System Reset
WARN ING: Resetting your Kevo system will restore your
lock to factory settings and delete all smartphones and fobs
from Kevo’s memory.
If you wish to pe rform a system reset , press and hol d the Reset
button on t he back panel for 10 seconds u ntil the lock beep s and the
light ring lashes red.
A B
Phones: After a system reset, you will need to re-e nroll your
Owner phone. You will still be able to send eKeys at no charge to
anyone who previously had an active eKey at the time of reset.
Fobs: After a system reset, all fobs will nee d to be re-enrolled.
See the online Troubleshooting guide for instructions.
Page 10

Light String Notiications
Out of Ran ge
Blue pulse Magenta sweep
Deadbolt Low Battery
After normal
locking/unlocking
light string
notiications
Invalid Credential
Blue sweep Red sweep
Red pulse 3 center
red LEDs
Fob Low Batte ry
After normal
locking/unlocking
light string
notiications
No Credential
Blue pulse
Red Pulse 2 outer
red LEDs
Deadbolt Jammed
Blue pulse Green sweep Red pulse 2 Red LEDs alte rnate
Unit Thinking
Blue sweep
between right and left
Boot Up/LE D Test
Multicolor sweep
White
Orange
Red
Magenta
Blue
Green
White
Status LED Notiications
Amber lash
Door is locked
Kevo Support: www.kwikset.com/kevo/support
USA: 1-800-327-5625
Australia free call 1800 623 118
New Zealand free call 0800 736 776
Green lash
Door is unlocked
The 4 AA batteries in the Kevo interior
are low and ne ed to be replaced.
Red la sh
10 / 11 © 2018 Spectrum Brands, Inc.
Page 11

Advanced Features
Positioning Technology
The Kevo smart lock features a unique positioning
technology that can tell if your device is inside or outside
your home to help prevent your door from being unlocked
by unauthorized users while your device is inside.
For additional security, Kevo will also limit the ac tivation range on the
outside . The Kevo smart lock will learn about your entryway and the
typical positions where you might keep your phone during normal use.
If you ind that the Kevo activation range is not ideal for your use, you
can reset what Kevo learned, and Kevo will learn your environme nt
again. Quickly press and release the Positioning Technology button
(B)on the lock interior. Kevo will learn your environment again.
Important Safeguards
1. Read all instructions in their entirety.
2. Familiarize yourself with all warning and caution statements.
3. Remind all family members of safety precautions.
4. Always have access to your lock’s standard key.
5. If using the Triple Touch Lock or Auto-Lock features,
make sure to have your smartphone, fob or standard
key with you to prevent locking yourself out.
6. Familiarize yourself with all light ring error notiications.
7. Replace low batteries immediately.
Preventin g Inadvertent Un locking of Your Door
WARN ING: Failure to follow these safeguards could result in
your lock opening inadvertently.
1. Avoid keeping and storing phones and fobs unnecessarily
close to the lock when inside the home.
2. Restrict access to your Kevo lock’s back panel and
routinely check your settings to ensure they have
not been altered without your knowledge.
History Log
A history of the lock ’s activity may be viewed through the Kevo app or
by logging into the web portal: www.mykevo.com.
Notiications
The Kevo app can send notiications when the door is locked and
unlocked by eKey holders. You can choose to receive the system’s
default notiications or set up custom notiications to monitor a speciic
user or time frame.
Dual Factor Authentication
Kevo features an optional, added-security passcode that you can enable
inside the app to be used in addition to the app’s password. Enabling the
passcode will require you to enter a 4-digit PIN whenever you access the
app, and it protects your Kevo account against unauthorized changes
when your phone is unlocked.
3. Protect the password to your Kevo app and web portal accounts.
4. When sending an eKey, always double-check that
you are sending it to the correct recipient.
5. Protect and restrict access to your smartphone so that your
app settings cannot be altered without your knowledge.
6. Enable the Kevo app’s security passcode so that your app
settings cannot be altered without your knowledge.
7. When sending eKeys, be aware of the dierence
between an Admin user and other users in the system:
an Admin user can send, disable and delete eKeys.
8. If your smartphone is lost or stolen, use the Kevo
web portal (www.mykevo.com) to disable it.
9. If a fob in your Kevo system is lost or stolen, reset
your lock to delete it from memory.
Kevo Plus
With Kevo Plus, you will be able to lock and unlock your home and check
whether your door is locked or unlocked when you are away from home.
You can upgrade to Kevo Plus inside the Kevo app.
Visit www.kwikset.com/kevo/kevo-plus for more information.
Connect Smart Products
Connec t Kevo to selec t smart product s. In the Kevo app, tap the gear
icon to connect to smart products (iOS only: select “Preferences”). Visit
www.kwikset.com/kevo/support for more information.
CAUTION: As with any radio-based technology, it should be
noted that the accuracy and reliability of the Kevo lo ck’s inside -outside
sensor cannot be guaranteed. Users should not rely solely on the Kevo
lock’s sensor for security purposes and should always use caution. This
manufacturer assumes no responsibility for incorrect results or damages
resulting from the us e of the Kevo lock ’s sensor.
Certain home conigurations may impede the Kevo lock ’s sensor more
than others. Example: You r home oice is located next to your entry way,
and part of the oice ex tends past the front door, jutting into the front
yard. If your device is being actively used in that oice extension, the
Kevo lock’s sensor could possibly detect the device as being outside of
your home while that device is in active use .
WARN ING: This Manufacturer advises that no lock can provide
complete security by itself. This lock may be defeated by forcible or
technical means, or evaded by entry elsewhere on the prop erty. No
lock can substitute for caution, awareness of your environment , and
common sens e. Builder’s hardware is available in multiple per formance
grades to suit the application. In order to enhance securit y and
reduce risk, you should consult a qualiied lo cksmith or other security
professional.
Kevo Support: www.kwikset.com/kevo/support
USA: 1-800-327-5625
Australia free call 1800 623 118
New Zealand free call 0800 736 776
11 / 11 © 2018 Spectrum Brands, Inc.
 Loading...