

Page 1
1 / 11 © 2017 Spectrum Brands, Inc.
USA: 1-800-677-5625 • Canada : 1-800-501-9471
www.weiserlock.com
66085 / 01
ENGLISH
Installation and
User Guide
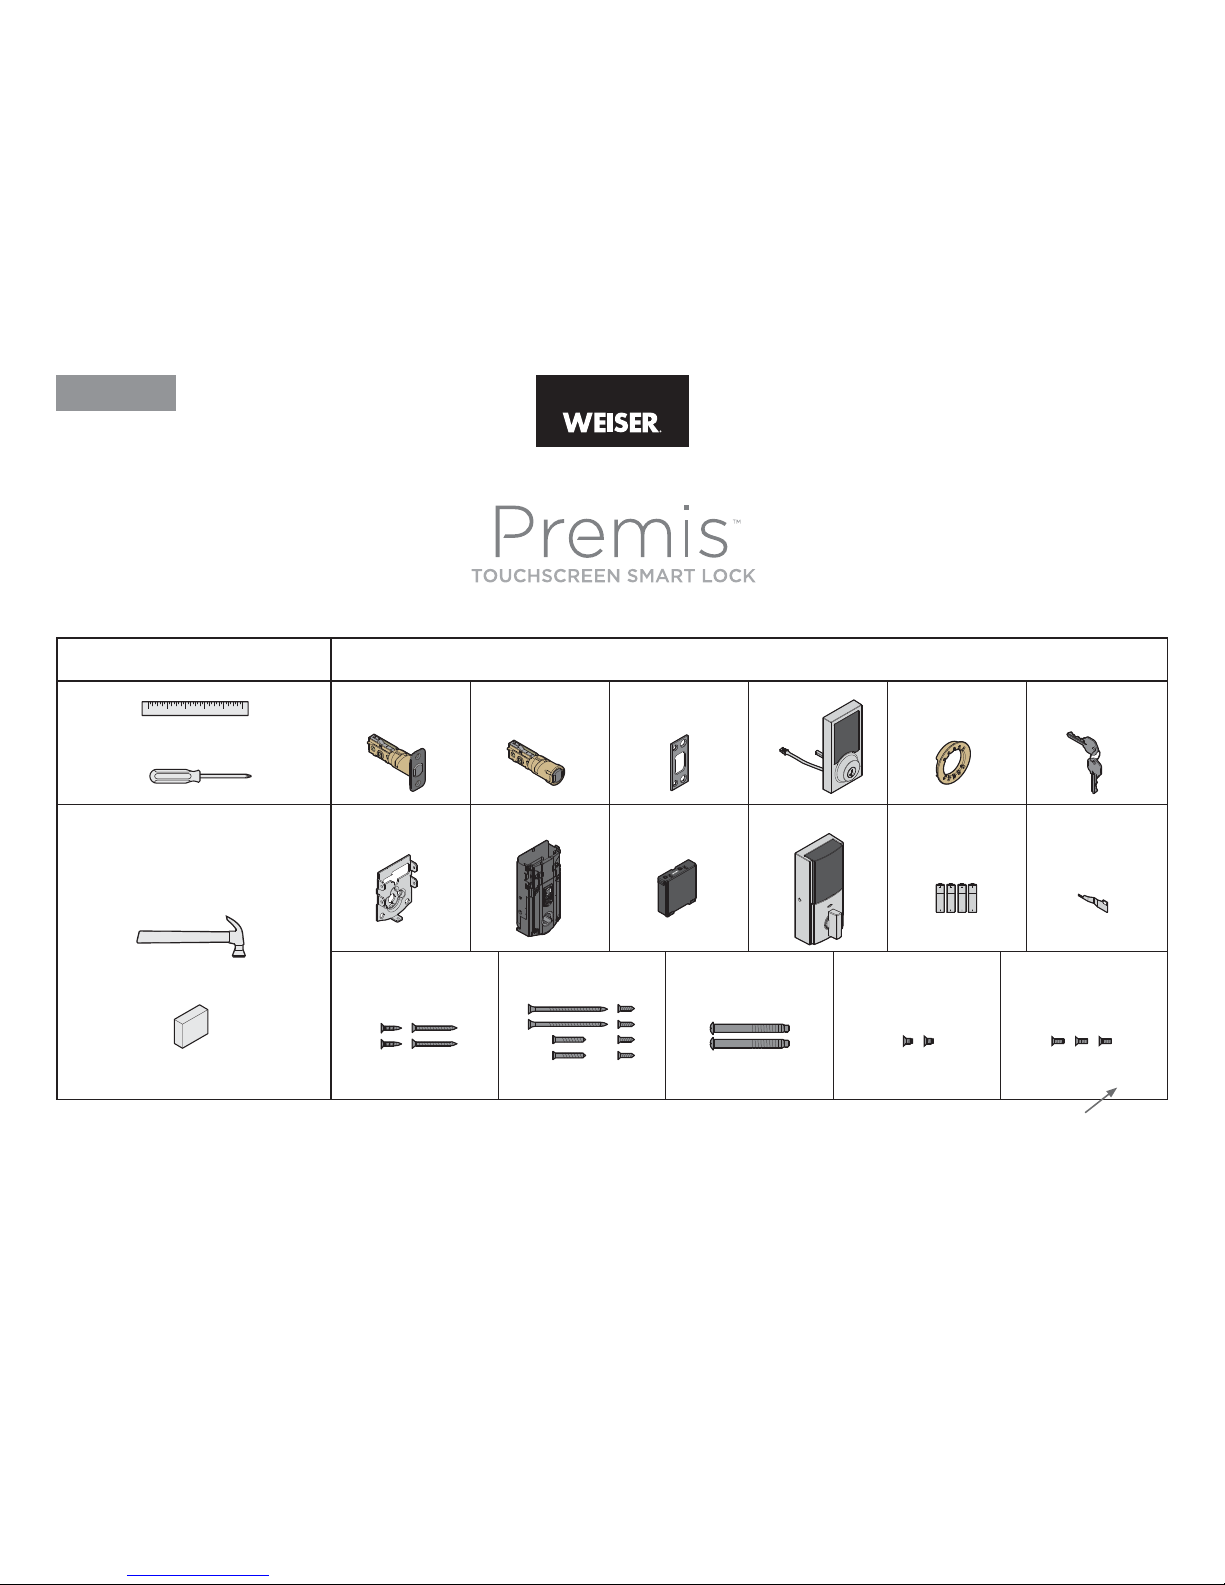
Parts in the boxRequired tools
Additional tools
(depending on application)
Latch with
rectangula r faceplate
Ruler
Phillips screwdriver
Hammer
Wood bl ock
Latch screws Strike screws Mounting plate screws
03809 49191 6410948654
Mounting plate SmartKey toolInterior assem bly
Keys
Battery pac k Interior cover Batteries
Interior asse mbly
screws
Interior cover
screws
Drive-in latch Strike Exterior
assembly
Adapter ring
A
G
NS
UV
P
HJKLM
BC DE F
Note: Part numbers are printed on screw bags.
SL03031011
Q
W
R
Page 2
2 / 11 © 2017 Spectrum Brands, Inc.
USA: 1-800-677-5625 • Canada : 1-800-501-9471
www.weiserlock.com
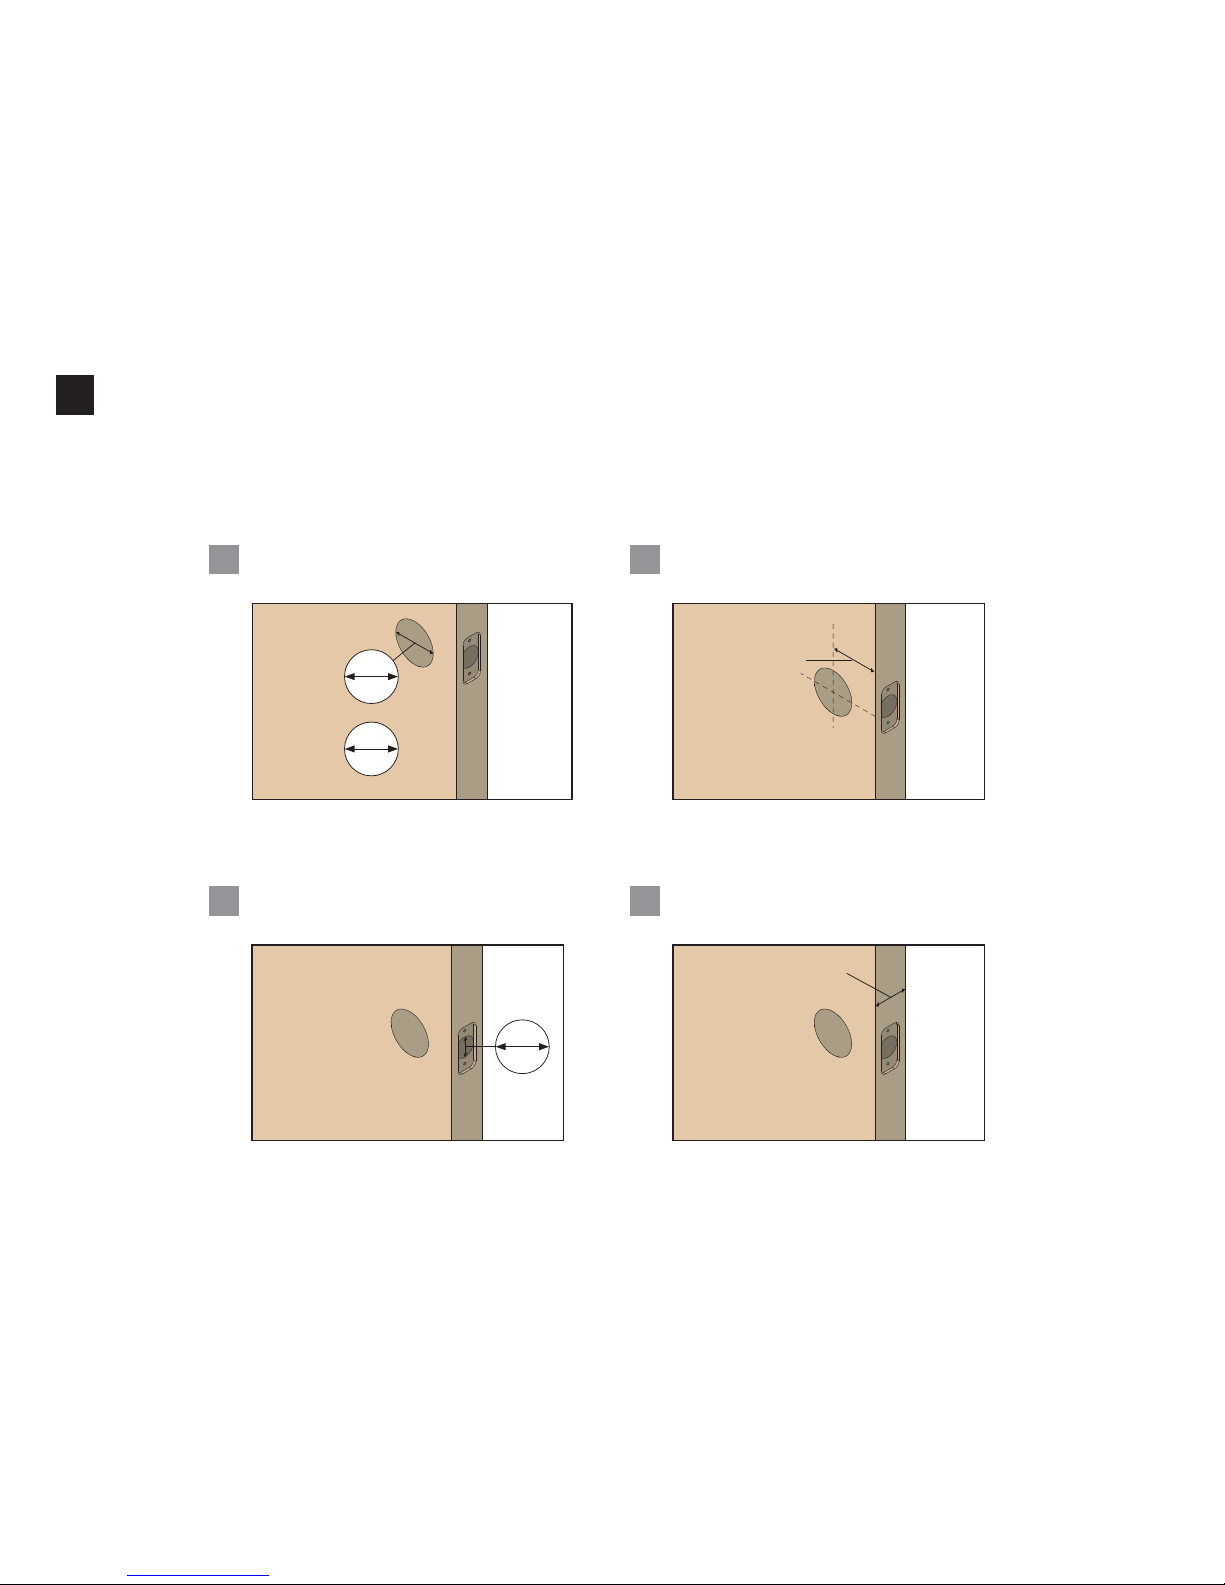
If drilling a new door, use the supplied template and the complete
door drilling instructions available at www.weiserlock.com/doorprep.
Note: Additio nal door preparation m ay be required for
doors with 11/ 2" (38 mm) holes . Consult the deadb olt
drilling instructions at www.weiserlock.com/doorprep
or
Measure to conirm that th e hole in the door
is either 21/8" (5 4 mm) or 11/2" (38 mm).
A
21/8"
54 mm
11/2"
38 mm
backset
Measure to conirm that th e backset is
either 23/8" or 23/4" (60 or 70 mm).
23/8" or 23/4"
60 or 70 mm
B
Measure to conirm that th e hole in
the door edge is 1 " (25 mm).
C
1"
25 mm
13/8"– 2"
35 – 44 mm
Measure to conirm th at the door is between
13/8" and 2" ( 35 mm and 51 mm) thick.
D
1
Prepare the door and check dimensions
Page 3
3 / 11 © 2017 Spectrum Brands, Inc.
USA: 1-800-677-5625 • Canada : 1-800-501-9471
www.weiserlock.com
A
A
N (2x)
A
A
B
B
B
B
Q (2x)
R (2x)
C
Longer screws , Q,
install cl osest to
the door jam b.
door frame
A B
C
D
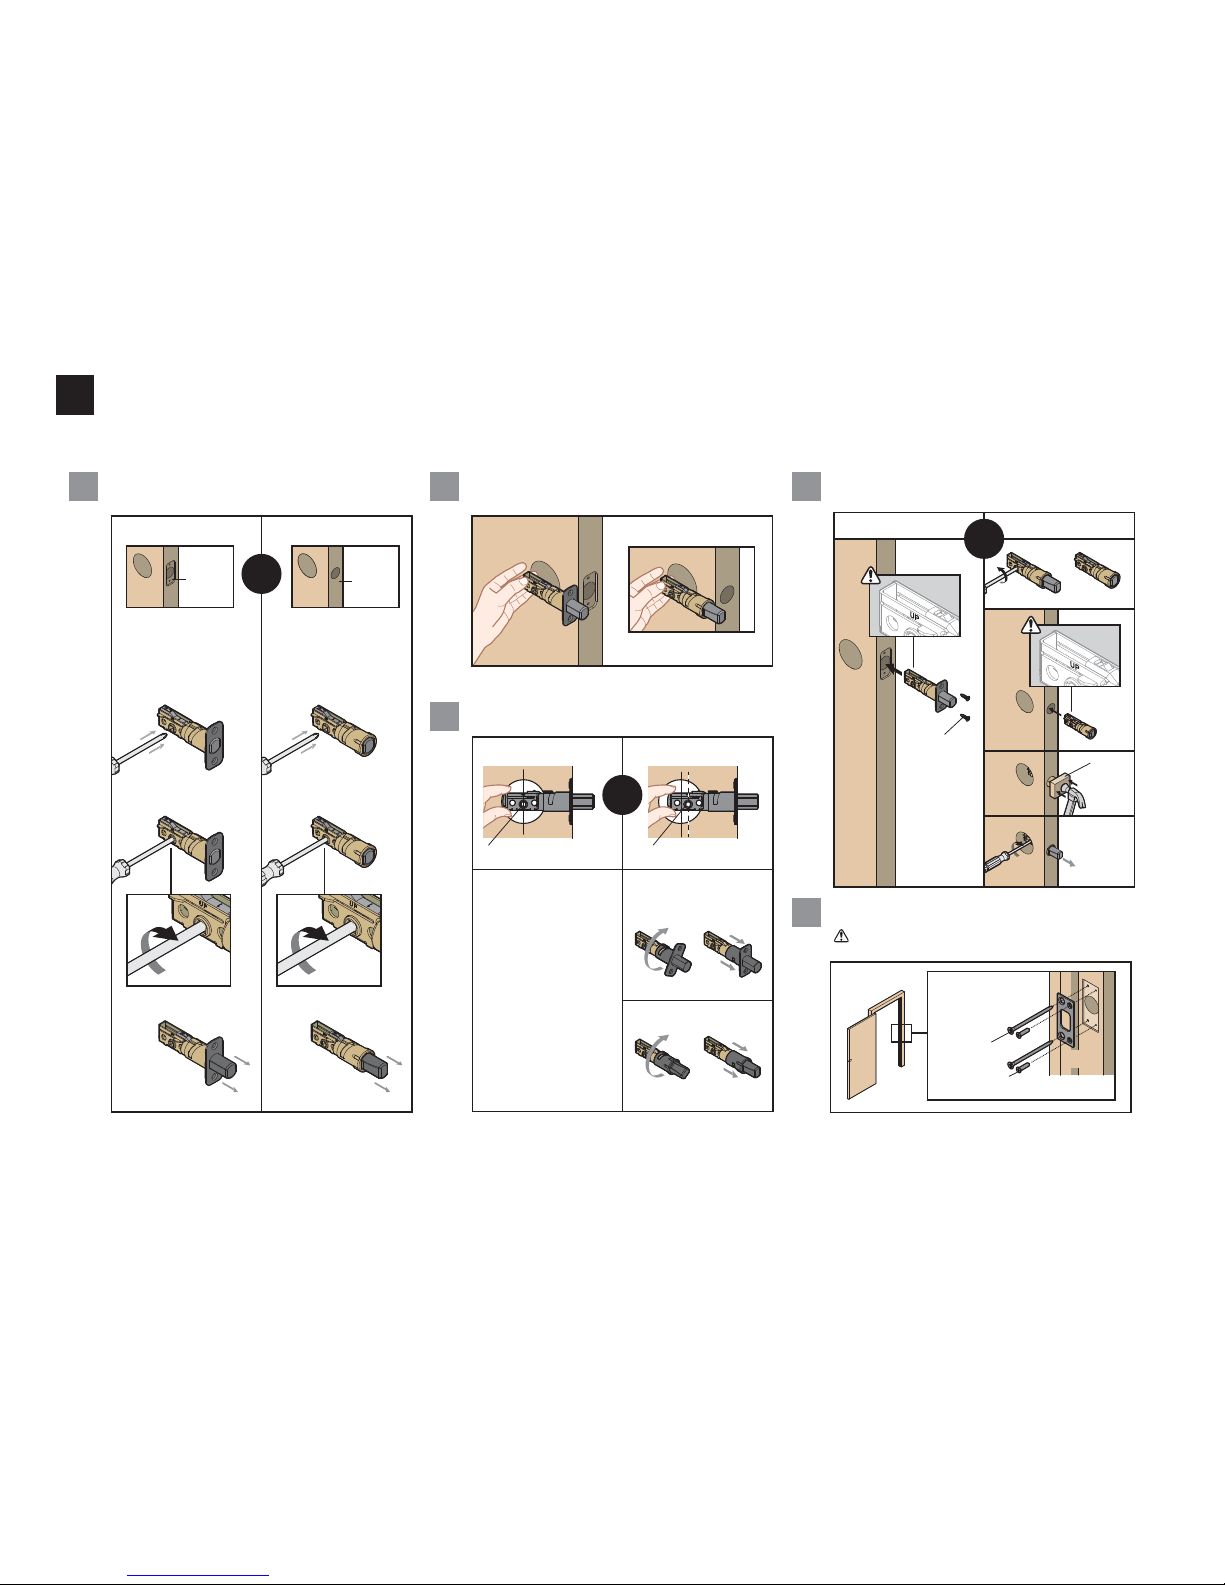
Is the door edge c hiseled?
Is the D-shap ed hole centered in the door hole?
Which latch are you ins talling?Hold the latch in front of th e door hole, with the latch
face lush again st the door edge.
YES
YES
NO
NO
Use latch “A”. If the
latch bolt is no t already
extended , extend the
latch bolt as sh own.
No adjustme nt is required.
Proceed to nex t step.
D-shaped hole centered D-shaped hole NOT centered
Rotate latch face as
shown to extend la tch.
“UP” is
on top
“UP” is
on top
wood
block
Use latch “B ”. If the
latch bolt is no t already
extended , extend the
latch bolt as sh own.
Latch “A” Latch “B”
E
Install strike on the do or frame.
Make sure the hole in the d oor frame is drilled a
minimum of 1" ( 25 mm) deep.
or
chiseled
not
chiseled
or
or
Note: The long er screws, Q, (3" / 76 mm) mus t be used
to maintain highest security.
2
Install the latch and strike
Page 4
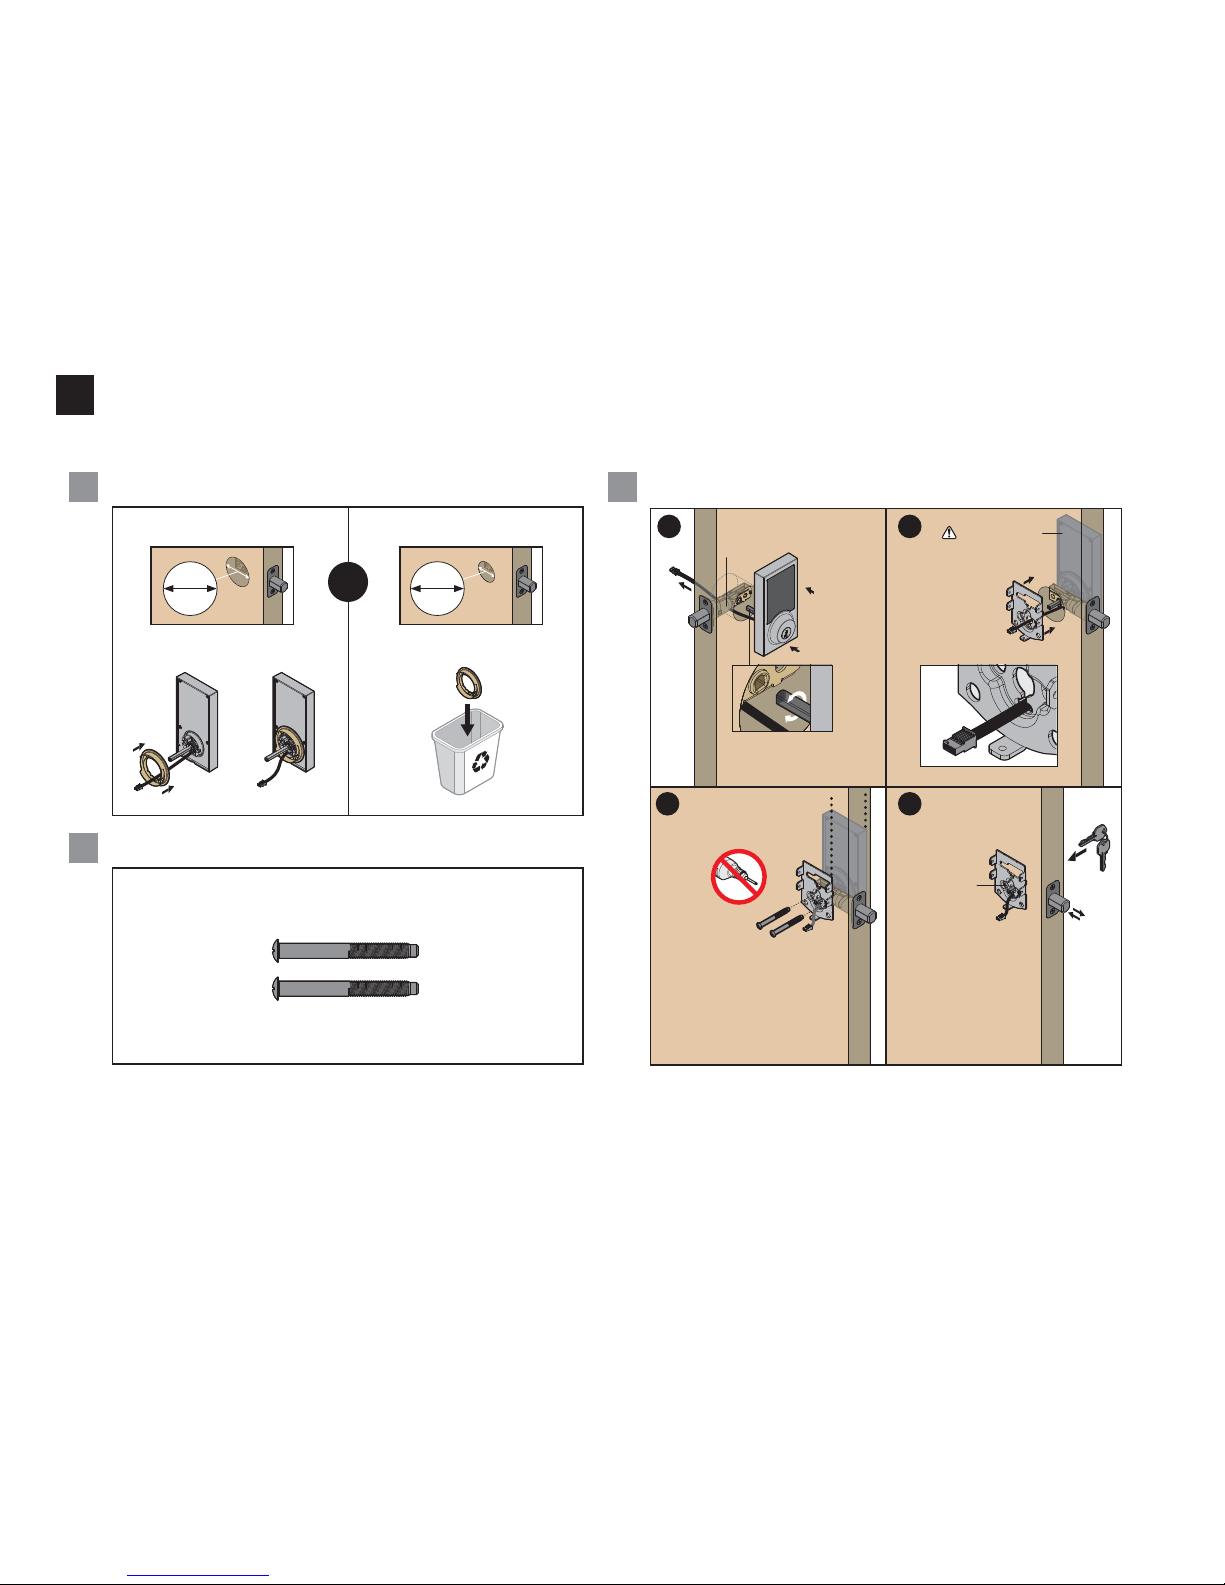
3
Install the exterior assembly
Diameter i s 21/8" (54 mm) Diameter i s 11/2" (38 mm)
21/8"
54 mm
11/2"
38 mm
“E” is requi red for installation .
Install “ E” on “D”.
“E” is not ne eded for
installat ion. Discard “E”.
or
What is the diameter of th e hole in the door? Install exterio r assembly and mounting plate.
A C
B
a
b
c
d
Cable goe s
underneath
latch.
Rotate torque b lade to align
with D-shaped hole.
Route cable
through cen ter
hole, the n
push cabl e into
bottom hole.
Support exterior
assembly during
mounting pl ate
installation.
Keep paralle l to
edge of door
Insert key an d test latch.
If latch does n ot extend
or retract smo othly,
adjust screws (S).
Remove key when in ished
and make sure the l atch
bolt is fully ex tended.
Tighten
screws evenly.
D
E
S
S
S
F
E
4 / 11 © 2017 Spectrum Brands, Inc.
USA: 1-800-677-5625 • Canada : 1-800-501-9471
www.weiserlock.com
Locate screws for step 3C a nd keep them within reach.
D
G
Page 5

KKHH
J
5 / 11 © 2017 Spectrum Brands, Inc.
USA: 1-800-677-5625 • Canada : 1-800-501-9471
www.weiserlock.com
a
a
b
b d
c
c
Remove battery cover an d battery pack from interior asse mbly.
Connect ca bles and install interior as sembly.
A
B
Make sure
turnpiece is i n the
vertical p osition.
Secure with
screws.
bottom hole
Push turnpie ce shaft
onto torque blad e.
turnpiece
shaft
torque
blade
vertical
Remove
interior cover.
Remove
battery pa ck.
Do not insta ll
batteries yet.
U (2x)
Ensure tight ca ble
connection.
align
Lay excess cab le lat
inside the b ottom of
the interior housing.
H
4
Install the interior assembly
Page 6

6 / 11 © 2017 Spectrum Brands, Inc.
USA: 1-800-677-5625 • Canada : 1-800-501-9471
www.weiserlock.com
5
Perform the door handing process
A C
D
B
This step will tea ch the lock the orientat ion of your door and is crucial fo r lock operation.
Install 4 AA bat teries in the battery pack. After a few second s, the latch bolt will retract and exten d on its
own to learn the orientati on of the door. This is called the door
handing process, and it is crucial to lo ck operation.
If the touchscre en indicates a failure, peform the
manual door ha nding procedure on page 10.
If the door handi ng process is still unsuccessful , consult the online
User Guide at ww w.weiserlock.com/sup port/guides/premis-user.
Ensure correct polarity. For best
results, u se new, non-rechargeable
Alkaline batterie s only.
Make sure the door is op en. Insert the battery p ack.
J
L (4x)
Once the doo r handing process
is complete , the touchscreen
will indicate s uccess or failure:
Success:
lashing c heckmark
symbol and s ingle
column of digits
Fail ure:
lashing
“X” patte rn
Page 7

7 / 11 © 2017 Spectrum Brands, Inc.
USA: 1-800-677-5625 • Canada : 1-800-501-9471
www.weiserlock.com
Download the Premis app and pair your lock to your phone
Download the Premi s app from the App Store.
A
Follow the instructio ns inside the app to pair your smartph one, manage
the settings of your l ock, and send user codes to fam ily and friends.
B
6
7
8
Install the interior cover
Importa nt information abou t the interior cover: Cover Install ation:
OPTIONAL: Re-key the lock
If desired, the lock may be re-keyed to work with your existing key.
See the supplied SmartKey Re-key instructions for more information.
V (3x)
K
K
Compatibilty
HomeKit™ requires an iPhone®, iPad® or iPod touch® with iOS 8.1 or later.
Controlling HomeKit-enabled accessories away from home requires
an Apple TV® (4th generation or later) with Apple TV® software 7.0
or later and an iPhone®, iPad® or iPod touch® with iOS 8.1 or later.
For best results, lock should be within 40 feet of
an Apple TV® for remote capability.
The interior cover will be s ecured by
three screws to prevent so meone
from removing the batte ry or
tampering with your lock's setting.
The window on the interi or
cover is locked by default .
window
If the window is
unlocked, it can
slide up for more
convenient access
to the programming
buttons and the
battery pack wh ile
the cover is installed .
Note: The interio r
cover and battery
pack access.
a
b
c
If you want to unlo ck
the window, remove
the securit y screw.
Skip to step b if you
want to keep the
window locked.
Install th e
interior cover.
Secure the
interior cover
with three
(3) screws.
Page 8

8 / 11 © 2017 Spectrum Brands, Inc.
USA: 1-800-677-5625 • Canada : 1-800-501-9471
www.weiserlock.com
Premis at a Glance
Exterior
Tou ch sc ree n
Back
panel
Program
button
Status
LED
Checkmark
symbol
Lock
symbol
Switches
(Not used)
Button “B”
Tur npi ec e
shaft
Note: When th e cover is removed,
the turnpiec e shaft can be used to
manually lo ck and unlock the doo r.
Keyway
SmartKey
tool hole
Interior (cover removed)
Button “A”
Locking and Unlocking
With the Premis App
When you are within Blueto oth range of your lock, you can use Siri com mands to lock and unlock your doo r.
Make sure your phone i s unlocked, and refer to your lock by the n ame you assigned to it inside the Pre mis
app. You can also tap the sym bol of your lock inside the Premis app to l ock and unlock the door.
If you have an Apple TV (4th gen eration or later), you can lock and unlock the do or when you’re away
from home. Jus t sign in to iCloud with the same Apple ID on you r phone and App le TV.
Note: Remote loc king and unlocking functionalit y will be disabled if your Apple T V goes to sleep. It is
recommende d that you disable your Apple TV 's sleep mode inside your Apple T V's settings.
With the Touchscreen
To lock and unlock your door with th e Premis touchscreen, you mus t have at least one use r code programme d.
It is recommend ed that you add your user codes from insi de the Premis app. If you would like to add them
directly at the lock , follow the instructions at www.weiserlo ck.com/support/guides/prem is-user.
Option 1
Touch screen with
palm or back of
hand until dig its
illuminate.
Option 2
Touch lower left
area of screen
(where checkma rk
is located) un til
digits illuminate.
Option 3
Touch screen
with three or
more inge rs until
digits illuminate.
Activating the Screen
Locking the D oor Auto-Lock
SecureScreen™
1. Activate the scree n.
2. Press Lock sy mbol.
Note: If no us er codes are
programme d, the door cannot
be locked via to uchscreen.
The Auto-Loc k feature
automatically re-locks
your door 30 s econds
after unloc king. This
feature is o by default,
but you may enab le it
inside the Pre mis app.
You may also adjust t he
time delay (be tween 30
seconds an d 4 minutes)
within the app.
Unlockin g the Door
1. Activate the scree n.
2. If Secure Screen™ is enabled , touch
the random di gits that appear.
3. Enter use r code.
If you press th e wrong digit while e ntering a user co de, you
can press th e Lock symbol onc e to clear the digit s entered
previously a nd immediatel y restart the cod e entry proces s.
If desired , this feature
can be disa bled inside
the Premis ap p.
SecureScre en is an added-se curity feature that display s
random digi ts before you enter a user c ode to unlock
the door. This feature e nsures that there are i ngerprints
on all digits s o that codes cannot b e identiied by
examining th e touchscreen for in ger prints.
Page 9

Lights and Sound
System Alerts
Amber l ash
Door is locked
Green lash
Door is unlo cked.
Red las h
The 4 AA batte ries in the
interior ass embly are low and
need to be replaced.
Status LED Colors
The Status LED blinks every 6 seconds on lock interior to communicate
whether the door is locked or unlocked, or if the batteries are low. The
Status LED may be turned o inside the Premis app.
Note: During the pairing process, the Status LED will lash red and green,
followed by a short beep (if the lock's sound is not muted).
Sound
The lock beeps during normal use and programming. If desired, you may
mute the lock inside the Premis app.
Note: Beeping will not be heard if the lock’s sound is muted.
9 / 11 © 2017 Spectrum Brands, Inc.
USA: 1-800-677-5625 • Canada : 1-800-501-9471
www.weiserlock.com
X-p atter n
Flashes 1 time with 1 beep
• Incorrect user code entered.
Flashes 3 times with 3 beeps
• No user codes programmed.
• Programming timeout after 20 seconds.
• Unsuccessful programming.
Flashes 15 times with 15 beeps
• 3 incorrect codes entered within 1 minute (you may
re-enter code after 60 second touchscreen lockout).
Checkmark & Lock
Flashing simultaneously 5 times
with long continuous beep
• Low battery.
Alternate lashing 5 times with long continuous beep
• Door jammed while attempting to lock.
Beeping only
Lock beeps continuously
• Tamper alarm sounds when cable is disconnected.
Remove the battery pack, reconnect the
cable, and reinstall the battery pack.
Page 10

Manual Door Handing
10 / 11 © 2017 Spectrum Brands, Inc.
USA: 1-800-677-5625 • Canada : 1-800-501-9471
www.weiserlock.com
1 Remove bat tery pack. 3 Press th e Program
button once more.
2 Press an d HOLD the
Program but ton while
reinsert ing the battery pack .
Release butto n once battery
pack is inst alled. The status
LED will lash re d and green.
4 The latch bolt w ill extend and retract to le arn the
orientatio n of the door.
2 Press an d HOLD the
Program but ton while
reinsert ing the battery pack .
Keep holding th e button for
30 second s until the lock
beeps and t he status LED
lashes red.
Status
LED
If the touch screen indica tes a failure, see t he online Premis U ser
Guide at www.weiserlock.com/support/guides/premis-user.
Success Failure
If needed , the door handing pro cess can be initiated m anually.
This is usefu l if the lock is being move d to a di erent door.
Three metho ds are available to reset you r
Premis lock , depending on you r needs:
1 Remove bat tery pack.
4 After a few seco nds, the lock will initi ate the door handing pro cess, and the latch
bolt will exte nd and retract to learn the o rientation of the door.
Resetting the Lock
3 Press th e Program
button once m ore. The
status LED will lash
green and red s everal
times.
3. Factory Reset
A factory res et will do the following:
1. Network Reset
A network rese t will do the following:
• Remove the lock from your Pre mis app and HomeKi t system.
All users an d schedules will stil l be in place after a netwo rk reset. They
will be redis covered by the Premis app on ce you pair the lock agai n.
From the Premis App:
Follow the instru ctions in the Premis ap p
to delete your lock.
From the lock :
Press and ho ld Button “A” on the back panel
for 7 second s, until the lock bee ps one time.
2. System Reset
A system reset wi ll do the following:
• Remove the lock from your Pre mis app and HomeKi t system.
• Remove all users , schedules, an d user codes that were a dded inside the ap p.
• Remove all user codes t hat were programmed dire ctly at the lock.
• Disable Au to-Lock.
• Turn on the Status LED if it was turne d o inside t he Premis app.
• Re-enable Se cureScreen if it was dis abled inside the Premi s app.
• Unmute sound if it was mu ted from the Premis app.
To perform a system res et, press and hold B utton “A” on the
back panel fo r 20 seconds. The lo ck will beep after 7 se conds.
Keep holdin g until you hear a secon d beep.
• Remove the lock from your Pre mis app and HomeKi t system.
• Remove all users, sc hedules, and use r codes
that were adde d inside the app.
• Remove all user codes t hat were
programme d directly at the lock.
• Disable Au to-Lock.
• Turn on the Status LED if it was turne d
o ins ide the Premis app.
• Re-enable Se cureScreen if it was
disable d inside the Premis app.
• Unmute sound if it was mu ted from the Premis app.
• Initiate the door han ding process
Follow the instru ctions below to per form a factory reset:
Page 11

Important Safeguards
Tro u bl e sh o ot i ng
11 / 11 © 2017 Spectrum Brands, Inc.
USA: 1-800-677-5625 • Canada : 1-800-501-9471
www.weiserlock.com
• Protect your user codes and mastercode.
• Familiarize yourself with all warning and caution statements.
• Remind all family members of safety precautions.
• Dispose of used batteries according to local laws and regulations.
• Always have access to your lock’s standard key.
• Replace low batteries immediately.
• Protect the password to your Premis app.
• Protect your phone by enabling Touch ID and/or setting a passcode.
• When sending a user code, always double-check that you are sending it to the correct recipient.
• Protect and restrict access to your smartphone so that your app settings cannot be altered without your knowledge.
CAUTION: Prevent unauthorized entry. Since anyone with access to the back panel can change the user codes, you must restrict
access to the back panel and routinely check the user codes to ensure they have not been altered without your knowledge. The use
of a mastercode can help protect your settings.
WARNING: This Manufacturer advises that no lock can provide complete security by itself. This lock may be defeated by forcible or
technical means, or evaded by entry elsewhere on the property. No lock can substitute for caution, awareness of your environment,
and common sense. Builder’s hardware is available in multiple performance grades to suit the application. In order to enhance
security and reduce risk, you should consult a qualiied locksmith or other security professional.
A complete trouble shooting guide is located in the o nline Premis User
Guide at www.weiserlock.com/support/guides/premis-user.
 Loading...