

Page 1
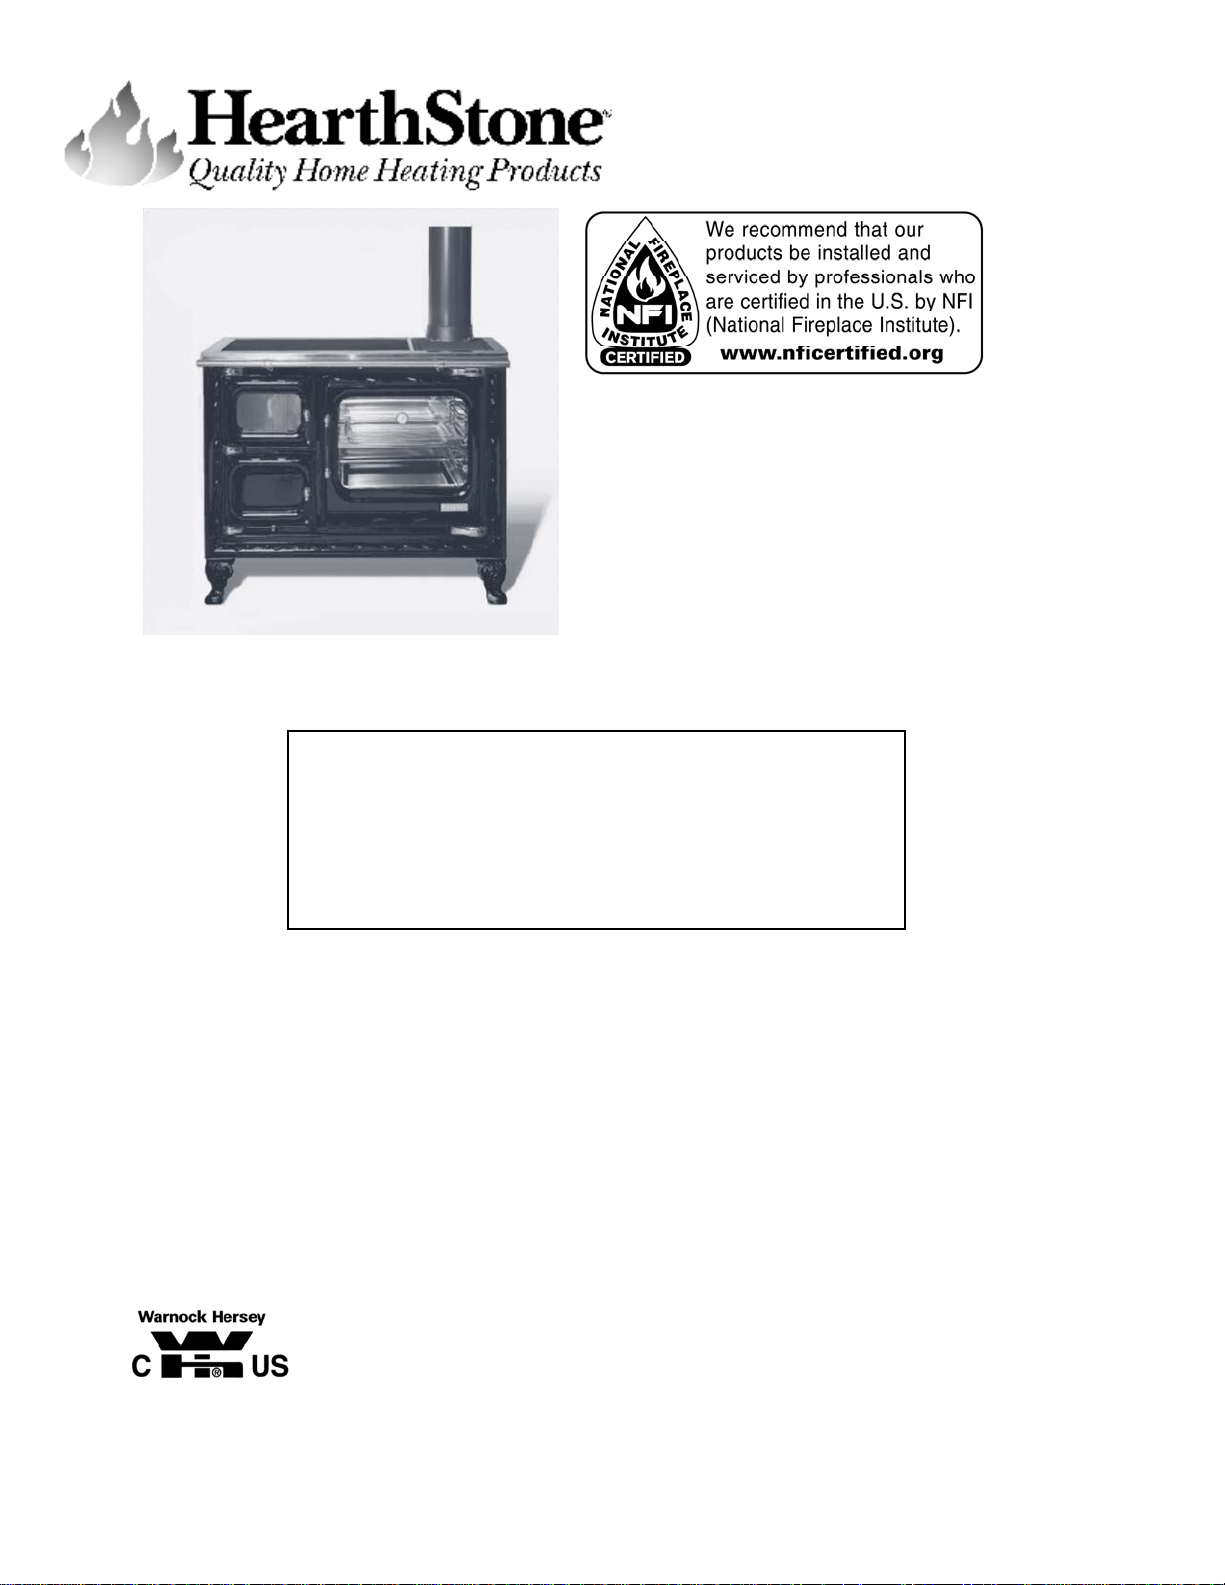
Deva 100 (8220)
Wood-fired cookstove
OWNER'S MANUAL
INSTALLATION AND OPERATING
INSTRUCTIONS
CONTACT LOCAL AUTHORITIES HAVING
JURISDICTION (BUILDING DEPARTMENT or FIRE
OFFICIALS) ABOUT PERMITS REQUIRED,
RESTRICTIONS AND INSTALLATION INSPECTION
IN YOUR AREA.
PLEASE READ THIS ENTIRE OWNER’S MANUAL BEFORE YOU INSTALL AND USE
YOUR NEW Deva WOOD STOVE. To reduce the risk of fire, follow the installation instructions.
Failure to follow these instructions may result in property damage, bodily injury, or even death.
SAVE THESE INSTRUCTIONS FOR FUTURE REFERENCE!
Deva 100 Model# 8220
6400-40460
Revised 10-12-07
Page 2

HearthStone Quality Home Heating Products Inc ® 2 Model 8220
Page 3

TABLE OF CONTENTS
INTRODUCING YOUR DEVA 100 COOKSTOVE ............................................................................ 4
CODES ...................................................................................................................................................... 5
AFETY INFORMATION ............................................................................................................................. 5
S
Periodic Checklist ........................................................................................................................... 6
Emergency Procedures.................................................................................................................... 7
S
PECIFICATIONS ....................................................................................................................................... 8
SETTING UP YOUR DEVA 100 COOKSTOVE.................................................................................. 9
NPACKING ............................................................................................................................................. 9
U
I
NSTALLING YOUR STOVE ........................................................................................................................ 9
HEARTH REQUIREMENTS AND FLOOR PROTECTION .............................................................................. 10
CLEARANCES TO COMBUSTIBLES .......................................................................................................... 10
Components of a Venting System................................................................................................. 12
Installing a Venting System .......................................................................................................... 13
CONNECTING YOUR WOOD-FIRED COOKSTOVE ..................................................................................... 14
Connecting to a Prefabricated Metal Chimney ............................................................................. 14
OPERATING YOUR DEVA 100 WOOD STOVE.............................................................................. 19
CONTROLS AND FEATURES .................................................................................................................... 19
CHOOSING FIREWOOD ............................................................................................................................ 20
BUILDING A FIRE ................................................................................................................................... 21
Building A Fire For Everyday Use ............................................................................................... 21
Burn Rate ...................................................................................................................................... 22
Over-Fire Caution ......................................................................................................................... 22
Removal And Disposal Of Ashes ................................................................................................. 22
MAINTENANCE ................................................................................................................................. 23
Creosote Formation And Need For Removal ............................................................................... 23
Gaskets .......................................................................................................................................... 23
Glass .............................................................................................................................................. 24
Cast Iron ........................................................................................................................................ 25
TROUBLESHOOTING ........................................................................................................................ 25
TROUBLESHOOTING GUIDE .................................................................................................................... 26
EPLACEMENT PARTS & OPTIONAL ACCESSORIES ................................................................................ 27
R
SAFETY LABEL ....................................................................................................................................... 28
HearthStone Quality Home Heating Products Inc ® Model 8220
3
Page 4

Introducing Your
Deva 100 Wood-fired Cookstove
Congratulations! You have just invested in a
most unique wood burning cook stove – the
Deva 100 from HearthStone Quality Home
Heating Products Inc®. The Deva 100 Model
8220 is a wood burning cook-stove. At 1.6 cubic
feet firebox and 2.47 cubic feet oven capacity
you can be proud to join the HearthStone family
with our Premier Wood Burning Cookstove.
The generous height allows for loading of wood
through the front up to 17” inches long!
Your purchase insures years of clean,
comfortable heat and cooking with minimal
maintenance. The Deva 100 blends modern
technology with the unique beauty of cast iron.
We trust that you will appreciate the quality of
our handcrafted product.
Please read this manual in its entirety. Its
purpose is to familiarize you with your
cookstoves safe installation, operation and
maintenance. It contains information that will
be useful to you now and in years to come, so
keep it handy and refer to it as needed.
Use these instructions as well as national, state,
and local building codes to install your
cookstove. Be sure to maintain the designated
stovepipe and cookstove clearances to walls,
ceilings, hearth, and other combustible surfaces.
This will help reduce the risk of fire. Failure to
follow these instructions can result in property
damage, bodily injury, and even death.
Locate your cookstove in a safe, convenient,
open area; away from traffic flow, doors, and
hallways; and near a chimney and chimney
connector. Review the proper clearance
measurements from combustible surfaces. You
can safely reduce required clearances in most
cases with a special connector pipe and special
wall coverings as specified by this manual, the
NFPA 211 codes, and your local authorities
having jurisdiction.
Keep furniture, drapes, curtains, wood, paper,
and other combustibles far away from the stove.
Never install the cookstove in a location where
gasoline, kerosene, charcoal lighter fluid or
other flammable liquids are used or stored.
SAFETY NOTICE:
A HOUSE FIRE MAY RESULT IF THIS
COOKSTOVE IS NOT INSTALLED
PROPERLY. FOR YOUR SAFETY,
CAREFULLY FOLLOW THE
INSTALLATION DIRECTIONS.
CONTACT LOCAL BUILDING OR FIRE
OFFICIALS ABOUT RESTRICTIONS
AND INSTALLATION INSPECTION IN
YOUR AREA.
HearthStone Quality Home Heating Products Inc ® Model 8220
4
Page 5

The performance of your stove depends on
many variables. Since all installations are
unique, the general information and operating
procedures presented here can only serve as
useful if you have any questions; do not hesitate
to contact your dealer for additional
information.
Validate your warranty - return your warranty
registration card to HearthStone within 30 days
of purchase to validate your warranty. Contact
your dealer for any necessary warranty service.
This cookstove is manufactured and warranted
by:
HearthStone Quality Home Heating
Products Inc®
CODES
When you install your Deva, it is imperative
that you adhere to all local codes, which can be
obtained from either of the following two
national sources:
American National Standards Institute, Inc.
(ANSI)
1430 Broadway
New York, NY 10018
National Fire Protection Association, Inc.
(NFPA)
Battery March Park
Quincy, MA 02269
S
AFETY INFORMATION
Read and understand this Owner's Manual
thoroughly before installing and using this
stove.
Make sure to install your stove:
According to the manufacturer's
recommendations.
In accordance with all applicable codes.
With the proper sized chimney.
When using your stove:
Warn children and others unfamiliar with
wood-fired cookstoves the danger of
touching hot, radiating surfaces of your
stove. For your additional safety, obtain
hearth and stove guards through your local
dealer. Keep pets away from the stove to
prevent unnecessary hazards.
Burn natural wood only. Higher efficiencies
and lower emissions result when burning
air-dried, seasoned wood, as compared to
green or freshly cut wood.
Use caution when loading firewood into a
hot stove.
Keep the fuel loading door closed at all
times except when loading wood.
Keep the ash pan tray fully inserted.
Avoid grease build-up when cooking on the
top surface. Clean the surface regularly after
using the cook top surface.
Use care when cooking on the glass top.
Scratching the surface will weaken and
shorten the life of the glass. (Pick up your
cooking pots pans instead of sliding them
on the surface.)
HearthStone Quality Home Heating Products Inc ® Model 8220
5
Page 6

Never modify this cookstove in any way.
Never burn kiln dried wood, painted or
treated wood, solvents, trash, plywood,
colored or glossy paper, artificial logs,
cardboard, coal, garbage or driftwood.
Especially, do not burn coal in this stove.
Never Use gasoline type fuel, kerosene,
charcoal lighter fluid, or other liquid fuels or
solid fire starters to start or invigorate the
fire. These fuels can possibly generate
carbon monoxide, which can sap the supply
of oxygen or even create an explosion.
Keep all such materials away from the stove.
Never use a wood grate andirons or other
device to elevate the fire.
Do not allow logs to rest against or
otherwise come in contact with the glass
when the door is closed.
Do not slam the door or use it to force wood
in to the cookstove.
Never over-fire your cookstove. (See page
22)
Never put articles of clothing or candles on
a hot cookstove.
Do not connect the cookstove to a flue that
is serving another appliance.
Do not set any materials on the cook top
that are not intended. The surface will
become very hot during operation and even
though ignition may or may not take place
the heat will melt or burn most objects
which may in turn drip into the firebox will
may create an ignition.
Other safety guidelines
Keep all combustible items such as
furniture, drapes, clothing, and other items,
at least 36" (0.92 m) from the cookstove
(See page 100 for more clearance to
combustible information)
Install a smoke detector.
Keep a fire extinguisher handy. We
recommend the type rated "A B C."
Dispose of ashes properly. (See page 22)
PERIODIC CHECKLIST
Perform each of these tasks at the specified
intervals. (While these are to be used as a rule of
thumb, HearthStone recommends that a
qualified service technician should inspect your
wood burning system approximately every other
month during the heavy use season)
Every Week:
• Empty ashes from the firebox and ash pan,
sooner if the firebox is full.
Every Month:
• Visually inspect chimney connector and
chimney for creosote; clean accordingly.
Tap the outside of the pipe to feel for
buildup of creosote. If the pipe feels
hollow, your pipe is most likely clean
and safe for use. If the pipe feels solid
or full, it is probably full of creosote
and should be cleaned before further
use.
Every Other Month:
• A visual inspection of the chimney
connector and chimney for creosote is
recommended depending upon your use of
the stove.
• Check the fuel loading door seal using the
"dollar bill test." (When the fire is out and
the stove is cool, shut the door on a dollar
bill. If the bill pulls out without any
resistance, then your stove’s door isn't
HearthStone Quality Home Heating Products Inc ® Model 8220
6
Page 7

sealed properly.) To tighten the seal, change
the door gasket.
Every Season:
Have a qualified service technician inspect your
chimney and wood burning system.
• Dismantle the chimney connector and clean
it thoroughly. Replace any pieces that show
signs of rust or deterioration.
• Inspect and, if necessary, clean your
chimney.
• Thoroughly clean out the inside of the stove.
• Inspect all door gasket material and replace
if worn, frayed, cracked or extremely hard.
• Clean and inspect the oven and oven door
components.
EMERGENCY PROCEDURES
If you have a stovepipe or chimney fire, follow
these instructions:
1. If the fire is too threatening, leave the area
and call the fire department immediately! If
not, perform the next three steps.
2. Close the primary air control.
3. Close the stovepipe damper (if present).
4. Keep all doors to the stove closed!
▌ WARNING:
DO NOT ATTEMPT TO PUT OUT A
STOVEPIPE OR CHIMNEY FIRE BY
THROWING WATER ONTO THE
STOVE, STOVEPIPE, OR CHIMNEY.
THE EXTREMELY HIGH
TEMPERATURE ASSOCIATED WITH
SUCH FIRES CAN CAUSE INSTANTANEOUS STEAM AND SERIOUS
BODILY HARM.
Once the chimney fire has expired, leave the
primary air control closed and let the fire in the
stove die out completely. The cookstove should
not be fired again until the stove, stovepipe, and
chimney are all thoroughly inspected for any
sign of damage. You must correct any damage
before using your cookstove again.
HearthStone Quality Home Heating Products Inc ® Model 8220
7
Page 8
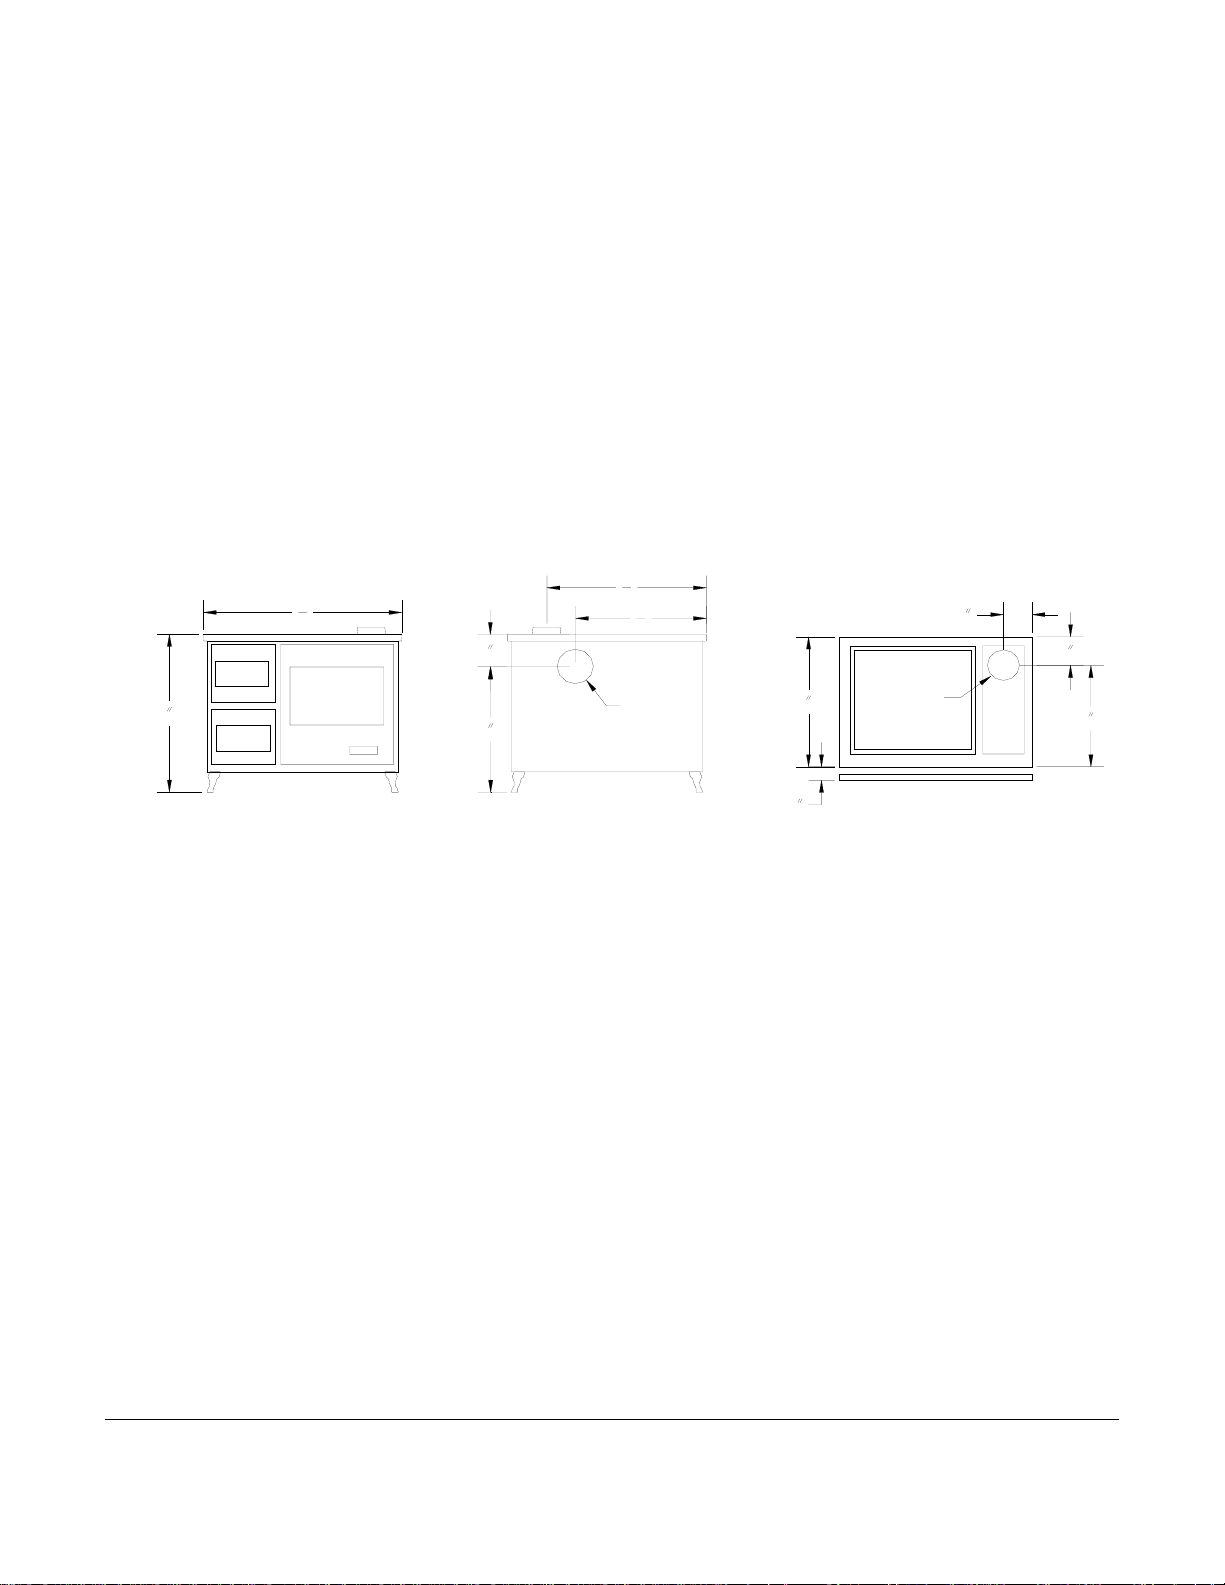
Specifications
Oven Capacity: 2.47 cubic feet
Firebox Capacity 1.6 cubic feet
Maximum Heat Output: 46,000 BTUs per
hour of cordwood (based
on independent laboratory
test results)
Maximum Log Length: 17" (43 cm) fuel
loading door
40"
Height: 33-3/4" (85 cm)
Width: 40” (102 cm)
Depth: 23 3/4" (60 cm)
Fuel loading door dimension: 7”x 9-3/4”
(18 cm x 25 cm)
Stovepipe Size 6" (15.2 cm) diameter
33-1/2"
23-1/4"
6-3/4
33-3/4
26-3/4
7
6"
23-3/4
2-1/2
6"
Front
6
17-3/4
HearthStone Quality Home Heating Products Inc ® Model 8220
8
Page 9

Setting Up Your Deva
Wood Stove
UNPACKING
HearthStone packages your Deva 100 cookstove
with the greatest care, so that it ships safely.
Under certain circumstances, however, damage
can occur during transit and handling. When
you receive your cookstove, unpack it carefully,
inspecting your stove and all parts for damage.
Also, make sure that all parts are included in the
box. If any parts are damaged or missing,
please contact your dealer immediately.
INSTALLING YOUR STOVE
The Deva 100 is not approved for installation
in a mobile home.
The Deva 100 Cookstove does not require the
use of additional outside air for combustion.
There is no kit available for this installation so
please keep this in mind when installing and
planning your Deva 100.
First you must decide where your stove will
reside. After choosing an appropriate spot,
inspect this location to make sure that the stove
will have enough clearance to combustible
materials. These combustibles can include
walls, floor, ceiling, cabinets, fireplace, and
chimney. You must carefully consider the
clearances to all of these combustibles before
actually connecting your cookstove. When
considering these clearances, also decide the
kind of floor the stove will rest on. Depending
on your floor, you can install your stove as it is,
or use a floor protector, some types of flooring
may require additional floor protection.
Please use this section to plan how to locate
your stove.
HearthStone Quality Home Heating Products Inc ® Model 8220
Read this chapter to obtain a sound
understanding of how to properly install your
stove.
If you use a close clearance connector pipe, it
must be tested to UL standards and listed.
Check the listing for your pipe for actual
clearances. The diagrams in this manual
represent typical installations, but are specific to
the Simpson Dura-Vent DVL brand. Clearances
cannot be reduced without the use of close
clearance connector pipe and/or by protecting
the surfaces per NFPA 211 standards.
CLEARANCES TO NFPA 211
PROTECTED SURFACES
You can reduce the clearances to combustible
surfaces by using any National Fire Protection
Agency (NFPA) approved wall protection
system. Please refer to NFPA 211 for
specifications and complete details. You can
obtain this information directly from NFPA.
National Fire Protection Agency
Batterymarch Park
Quincy, MA 02269
1-800-344-3555
1-617-770-3000
9
Page 10
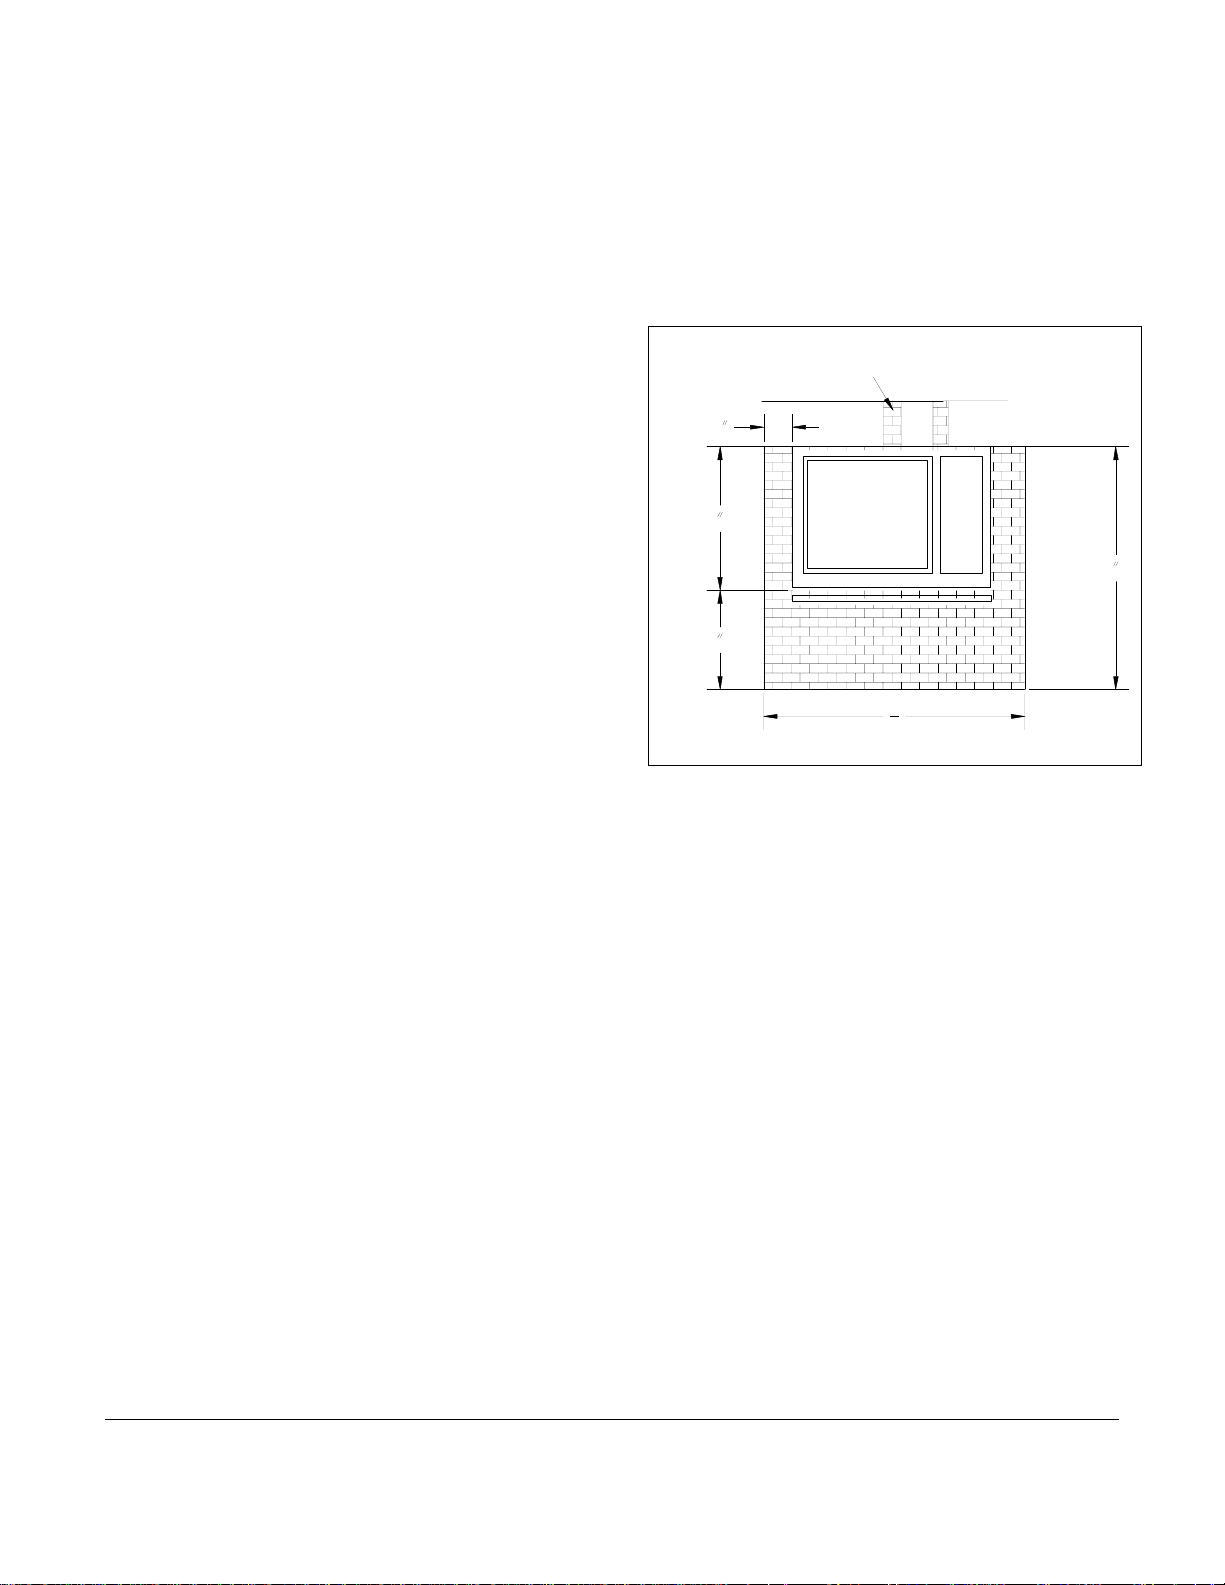
HEARTH REQUIREMENTS AND FLOOR
PROTECTION
Install your stove on the following:
A non-combustible floor protector that you
obtain from your dealer, or any other
noncombustible material. A floor protector
is any noncombustible surface laid on the
If the overall R-value of your setup is greater
than the R-value of the specified floor protector,
then your setup is acceptable.
determine the overall R-value of the
layers.
If ve nting th e un i t using the re a r exi t, floor
protec tion must extend 2" on either side of pipe.
floor underneath the stove that extends, 16
inches -US (or 46 cm in Canada) beyond the
8
fuel loading door and 8 inches (20 cm)
beyond each side of the cook stove. (See
Figure 1) The hearth protection for your
Deva 100 must have an R-value of at least
0.89 or be a UL Listed floor protection.
23-3/4
39-3/4(US)
41-3/4(CAN)"
An example of a non-combustible floor
protector would be a hearth constructed with a
16 (US)
18 (CAN)"
continuous layer of a listed backer board (such
as Wonder-Board or Durock) used for ember
protection with a tile, brick, slate, or another
56"
noon-combustible facing.
For horizontal chimney connector installations,
Figure 1. Hearth Protection for top vent installations
the floor protection must be installed beneath
the connector and 2” beyond each side.
Floor protector’s come with various types of
specifications. To convert a floor protector’s
specification to an R-value, do one of the
following:
• If the R-value is given, use that value—
no conversion is needed.
• If a K-factor is given with a required
thickness (T) in inches, use this formula:
R-value = 1/K x T
• If a C-factor is given, use the formula:
R-value = 1/C
To determine the R-value of the proposed
alternate floor protector:
• Use either the K-factor or the C-factor
formula explained above to convert
CLEARANCES TO COMBUSTIBLES
Please use this section to plan the layout
for your stove. Consider clearance of pipe
to combustibles and cookstove to
combustibles.
You must follow minimum clearances for the
Deva 100 cookstove to combustibles such as
walls and ceilings. You may reduce the general
clearances if installing the stove near Protected
Surfaces.
specifications not expressed as R-values.
• For multiple layers of floor protectors,
simply add the R-values of each layer to
HearthStone Quality Home Heating Products Inc ® Model 8220
10
Page 11
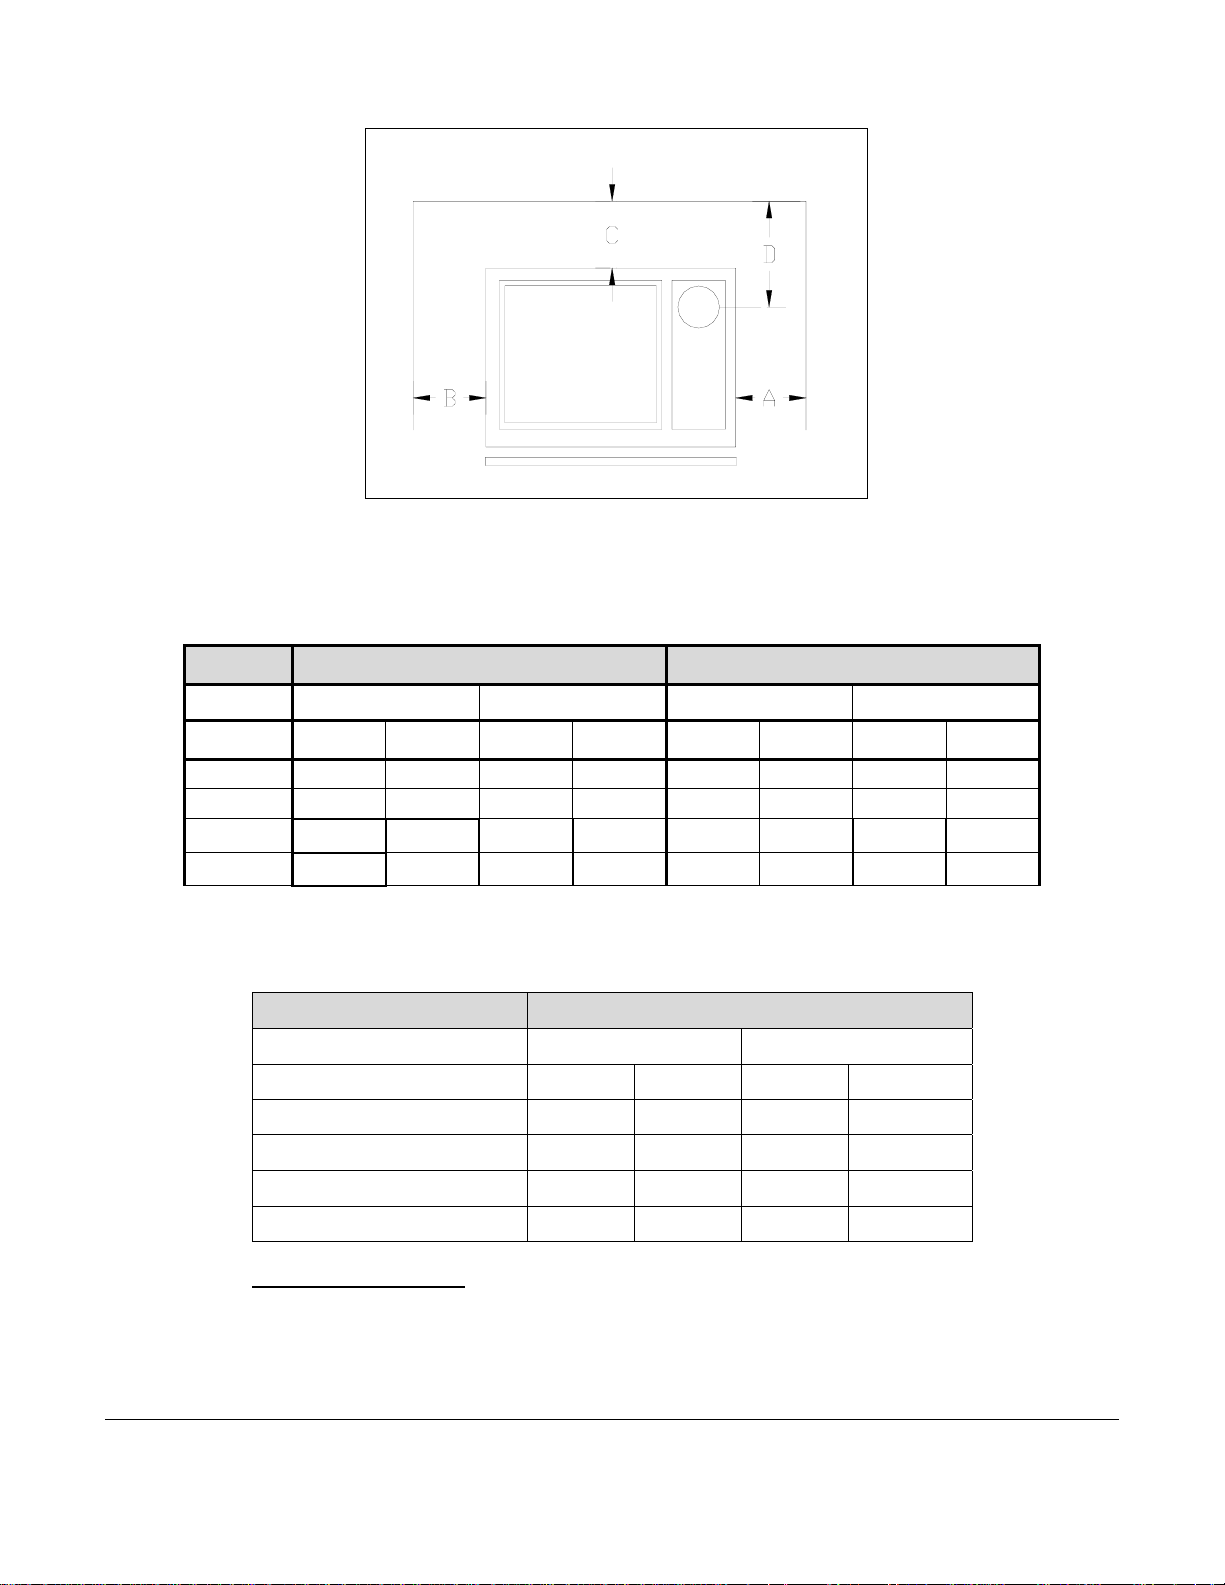
Figure 2. Clearance to Combustibles
MINIMUM CLEARANCES TO COMBUSTIBLES (from closest point of stove)
Clearances
Single wall connector Double walls connector
Top Exit Rear Exit Top Exit Rear Exit
(in) (cm) (in) (cm) (in) (cm) (in) (cm)
A
B
C
D
10 26 4 11 4 11 4 11
10 26 4 11 4 11 4 11
16 41 16 41
21.5 55 n/a n/a
14 36 16 41
19.5 50 n/a n/a
ALCOVE
Clearances
A
B
C
D
Single wall connector Double wall connector)
(in) (cm) (in) (cm)
7 18 4 11
16 41 14 36
16 41
21.5 55
Top exit connector
14 36
19.5 50
Alcove requirements
Maximum alcove depth is 48”/122cm
Minimum alcove height is 96”/ 2439cm
Minimum alcove width is 63”/ 160cm (with single wall connector)
Minimum alcove width is 58”/ 147cm (with double wall connector)
HearthStone Quality Home Heating Products Inc ® Model 8220
11
Page 12
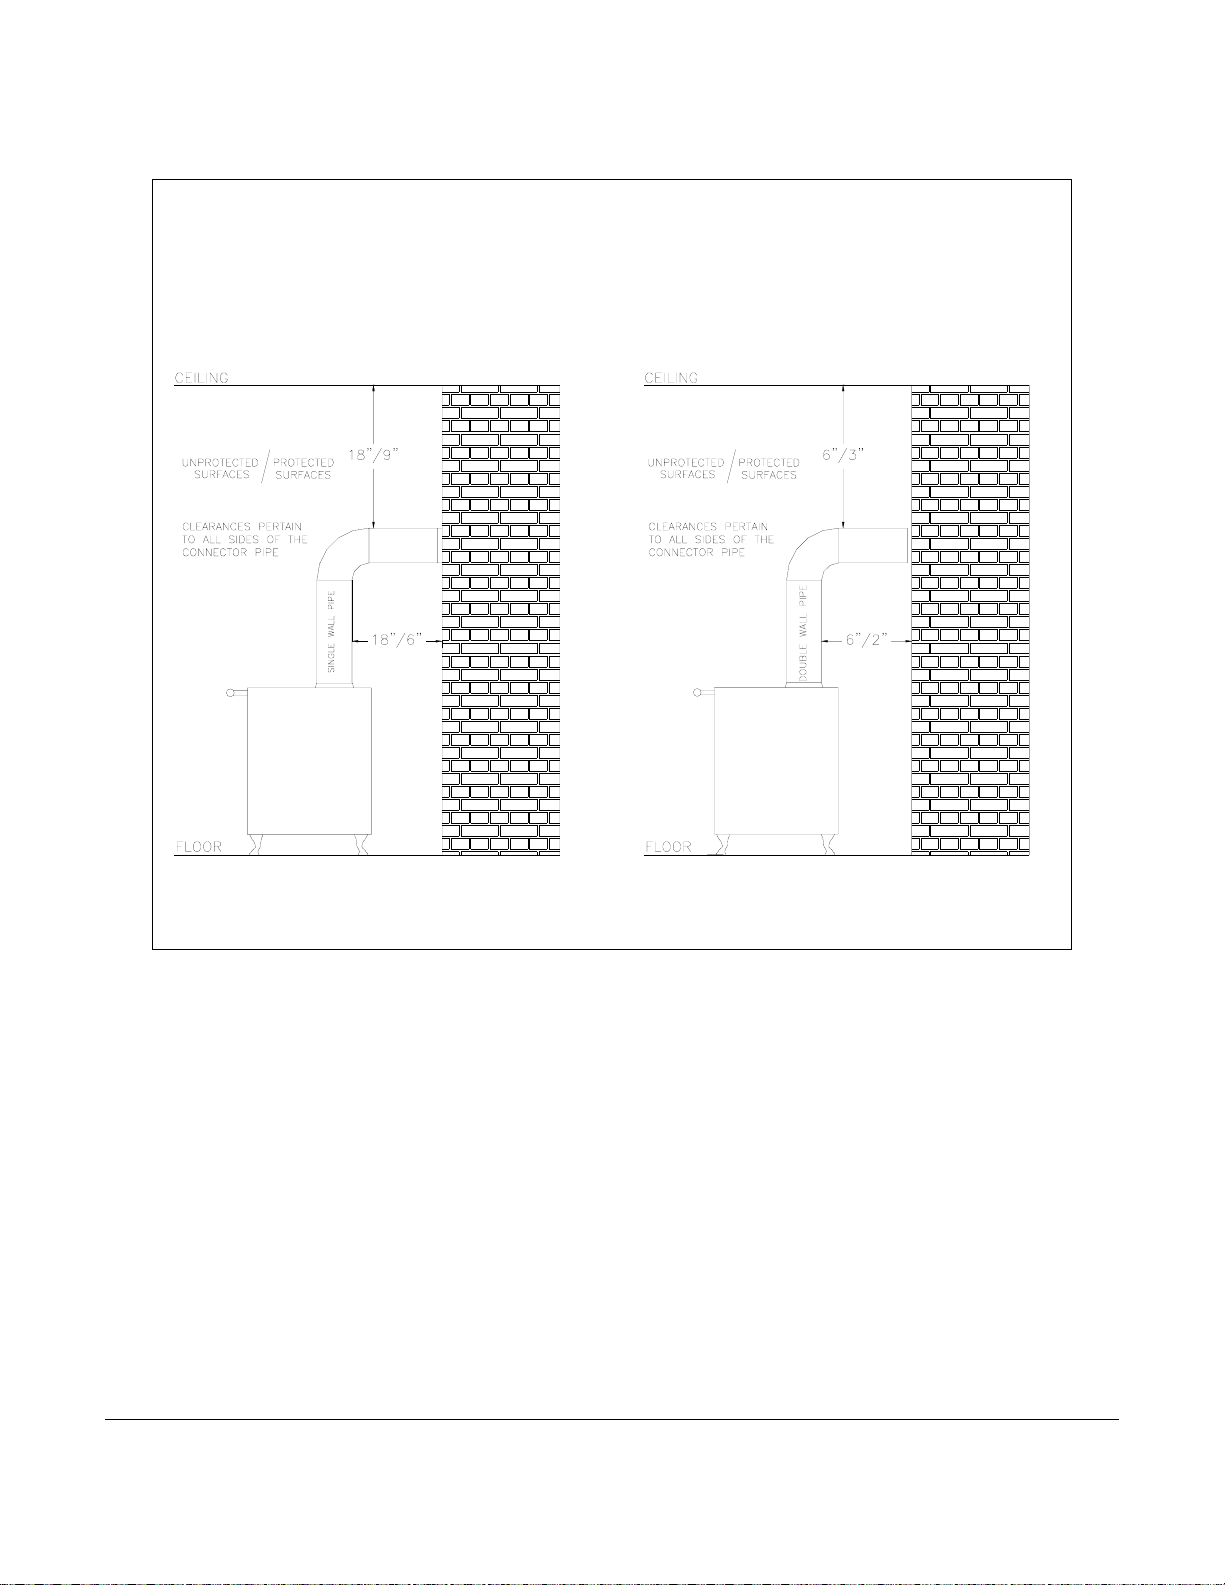
CHIMNEY CONNECTOR
CLEARANCE TO COMBUSTIBLES
DOUBLE WALL CONNECTORSINGLE WALL CONNECTOR
VENTING COMPONENTS AND
CONFIGURATION
C
OMPONENTS OF A VENTING SYSTEM
DO NOT CONNECT THIS UNIT TO A CHIMNEY
FLUE SERVING ANOTHER APPLIANCE
The complete venting system consists of several
components: chimney connector, wall thimble,
wall pass-through, chimney, and liner. It is
absolutely necessary that if you install all of
these components, they must remain within the
clearances to combustibles discussed earlier to
HearthStone Quality Home Heating Products Inc ® Model 8220
install your stove safely. To protect against the
possibility of a house fire, you must properly
install and constantly maintain the venting
system. Upon inspection, immediately replace
rusted, cracked, or broken components.
• The chimney connector is the stovepipe from
the woodstove to the chimney. The chimney
connector stove pipe must be 6" (152 mm)
diameter, 24 MSG or 25 MSG blued steel
connector pipe. Do not use aluminum or
galvanized steel pipe - they cannot withstand
the extreme temperatures of a wood fire.
12
Page 13

o Double wall connector (close clearance
pipe) which must be used with a listed
factory-built “Type HT" chimney and
may also be used with a masonry
chimney to reduce clearances, is available
from several manufacturers, your dealer
can help you choose. Some air insulated
connector pipe models available are:
Simpson Dura Vent DVL, Metalbestos
DS. The following models have
acceptable close clearance connector pipe
for the Deva 100; Security, GSW and
Ameritec.
o Chimney connector shall not pass
through floor or ceiling, nor any attic
or roof space, closet or similar
concealed space. Where passage
through a wall or partition of
combustible construction is desired, the
installation shall conform to NFPA 211
or CAN/CSA - B365.
o It is very important to follow minimum
clearances for chimney connectors to
combustibles such as walls and
ceilings when installing the stove near
non-combustible surfaces. Typical
chimney connector clearances are
outlined below. The single wall
clearances are generic; the Double wall
clearances are for Simpson Dura Vent
DVL, CHECK THE
SPECIFICATIONS FROM THE
MANUFACTURER OF YOUR
CONNECTOR.
• A thimble is a manufactured (or site-
constructed) device installed in combustible
walls through which the chimney connector
passes to the chimney. It keeps the walls
from igniting. You must use a wall thimble
when installing a chimney connector
through a combustible wall to the chimney.
• A wall pass-through (or chimney support
package) also keeps the walls from igniting.
You must use one when connecting through
a wall or ceiling to a prefabricated chimney.
• Only install this stove to a lined masonry
chimney or an approved high temperature
prefabricated residential type building
heating appliance chimney. Do not connect
this stove to a chimney serving another
appliance; you will compromise the safe
operation of both the wood cookstove and
the connected appliance.
▌ WARNING:
DO NOT CONNECT THIS APPLIANCE TO ANY
AIR DISTRIBUTION DUCT OR SYSTEM.
• A liner is the UL 1777 or ULC S635 (for
factory built fireplace or masonry) chimney.
You must connect your stove to a chimney
comparable to those recommended in this
manual. Do not use stovepipe as a chimney or
liner system. Use stovepipe for freestanding
installations only to connect the stove to a
proper chimney.
INSTALLING A VENTING SYSTEM
Stovepipe sections must be attached to the stove
and to each other with the crimped end toward
the stove. If creosote builds up, this allows the
creosote to run into the stove and not the outside
of the stovepipe and onto the stove.
Secure all venting joints. Attach the stovepipe to
the stove's flue collar, with at least three sheet
metal screws. Install #10 x 1/2" (3 mm x 13
mm) sheet metal screws into the holes predrilled in the flue collar.
You can simplify connecting stovepipe by using
additional accessories such as telescoping pipes,
slip-connectors or clean-out tees. These
accessories ease the inspection of your chimney,
as well as allowing you to easily dismantle the
stovepipe (without moving the cookstove) when
you periodically inspection the stovepipe
connection and chimney.
HearthStone Quality Home Heating Products Inc ® Model 8220
13
Page 14

Install the stove as close as practical to the
chimney, while maintaining all proper
clearances. Install stovepipe that is as short and
as straight as possible. Horizontal runs of
stovepipe should always rise away from the
stove a minimum of 1/4" per foot (21mm/m).
Long runs of stovepipe to increase heat
dispersal are not recommended. Using longer
lengths of stovepipe or more connecting elbows
than necessary increase the chances of draft
resistance and the accumulation of creosote
buildup.
In general, you do not need to install a stovepipe
damper with the Deva. Some installations,
however, could benefit from a stovepipe
damper, such as a tall chimney which can create
a higher than normal draft. In such cases, a
damper can help regulate the draft. The Deva
requires a draft between 0.06" w.c. and 0.1" w.c.
For drafts above 0.1" w.c, install a stovepipe
damper. Locate your local HearthStone dealer to
purchase a draft gauge to measure the draft of
your chimney and flue system.
Remember, the NFPA has recommended,
minimum clearances for chimney connectors to
combustibles such as walls and ceilings.
CONNECTING YOUR WOOD-FIRED
COOKSTOVE
You can install your Deva 100 to a prefabricated
metal chimney or a masonry chimney.
CONNECTING TO A PREFABRICATED
METAL CHIMNEY
When connecting the Deva 100 to a
prefabricated metal chimney, you must follow,
precisely, the manufacturer's installation
instructions. Use only Type HT (2100 deg. F),
prefabricated metal chimneys listed per UL 103
or ULC S629 standards.
▌ WARNING:
DO NOT CONNECT THE STOVE TO A
CHIMNEY FLUE SERVING ANOTHER
APPLIANCE.
Make sure the size of the chimney’s flue is
appropriate for the Deva 100. The Deva 100
requires a 6" (152 mm) inside diameter flue for
new installations. A 6” diameter flue provides
adequate draft and performance. You can use
an 8" (203 mm) diameter existing flue with a
reducer. An oversized flue contributes to
creosote accumulation. (In this case, bigger is
NOT better.)
When purchasing a prefabricated chimney to
install with your stove, be sure to also purchase
from the same manufacturer, the wall passthrough (or ceiling support package), "T"
section package, fire-stops (when needed),
insulation shield, roof flashing, chimney cap,
and any other needed accessories. Follow the
manufacturer’s instructions when installing the
chimney and accessories. In addition, be sure to
maintain all manufacturers’ recommendations
for the proper clearances to the chimney.
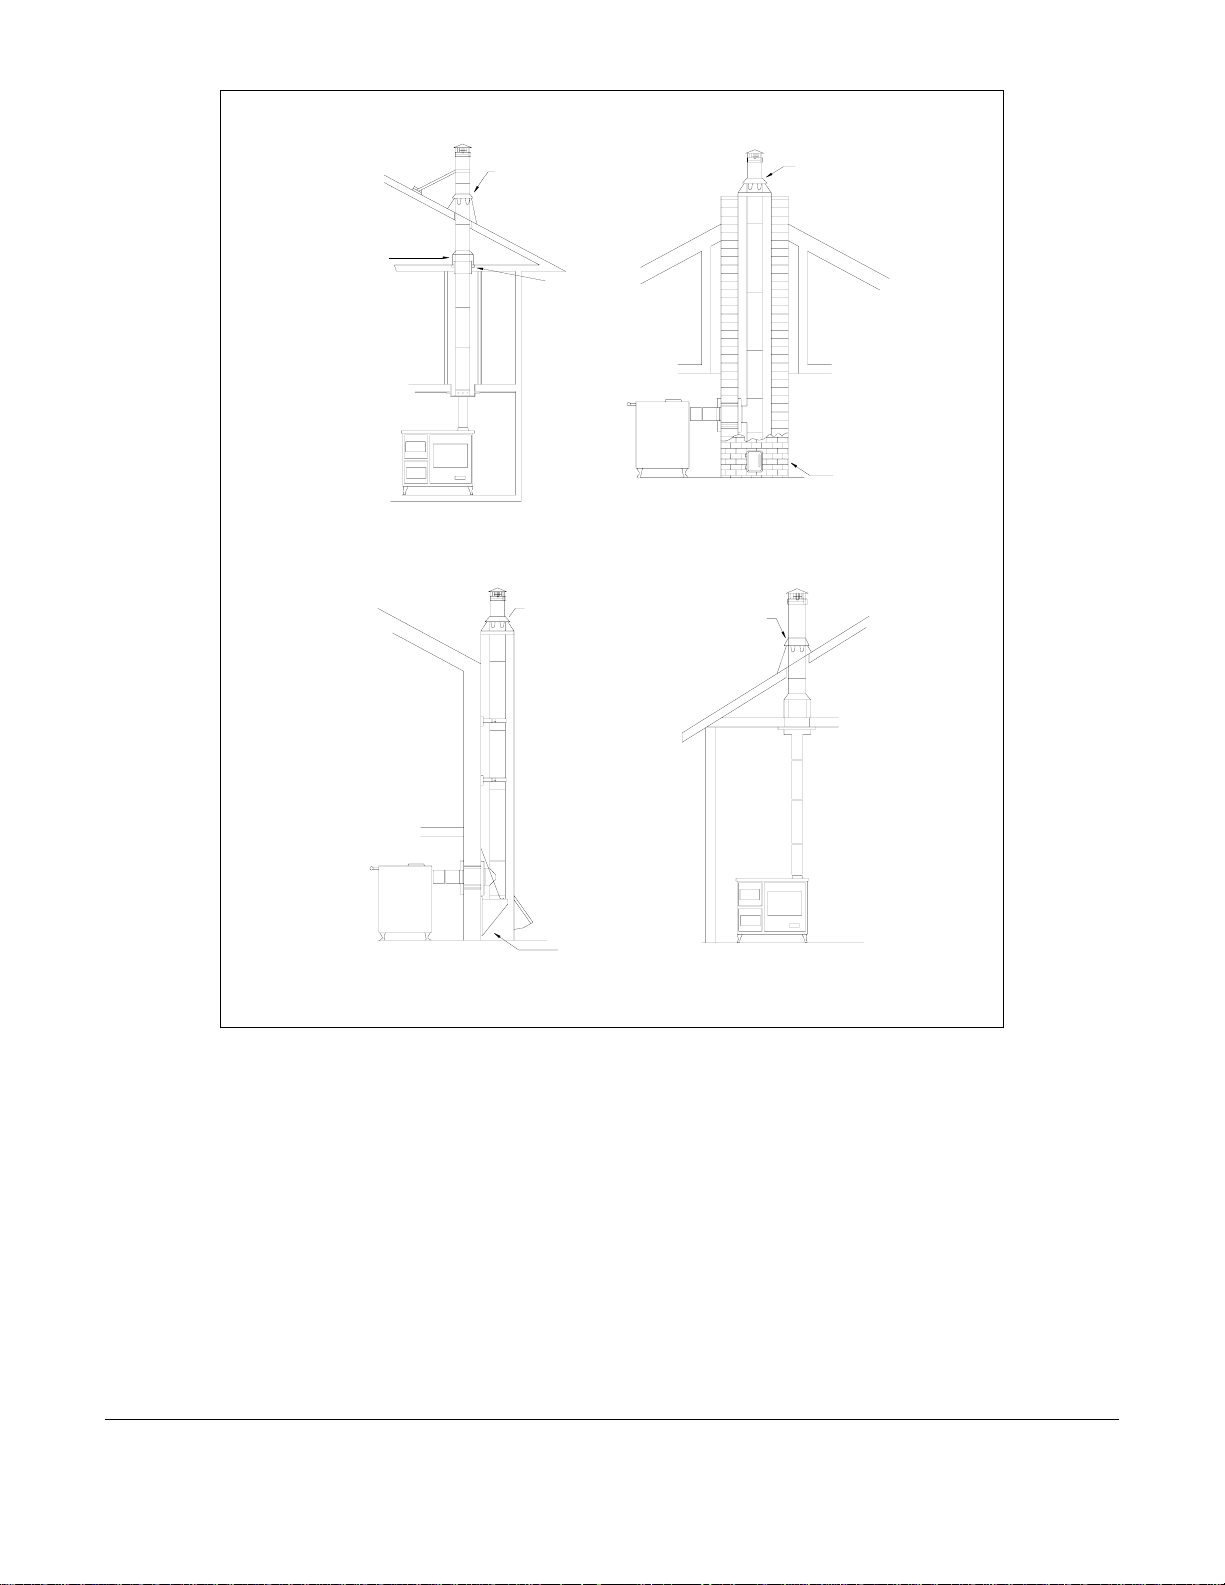
There are two ways to install a prefabricated
metal chimney:
• An interior installation where the chimney
passes inside the residence through the
ceiling and roof.
•
An exterior installation where the chimney
passes through the wall behind the stove
then up the outside of the residence.
HearthStone Quality Home Heating Products Inc ® Model 8220
14
Page 15
Extended Roof
Support Bracket
(Conduit
not included)
Attic Insulation Shield
Chimney Cap
Storm Collar
Adjustable Roof
Flashing
Chimnet Cap
Storm Collar
Adjustable Roof
Flashing
Twist-Lock
Chimney Sections
Stovepipe
Two story house installation with attic.
Wall Thimble
Chimney through outer wall with enclosed chase.
Chimney is supported by Tee Support Bracket.
Firestop Radiation
Shield
Firesafe Encl osure
Support Box and Trim
Collar with built-in
Starter section
Chimnet Cap
Storm Collar
Adjustable Roof
Flashing
Chimney Sections
Chase Enclosure
Wall St rap
Tee
Tee clean-out
Access door
Tee Support Bracket
Clay tile or
other Liner
Wall Thimble
Tee
Chimney pipe through Clay tile
or other Lined Masonry Chimney
Chimnet Cap
Storm Collar
Adjustable Roof
Flashing
Support Box
with built-in
Starter
section
One story house installation with attic.
Chimney is supported by Ceiling.
Chimney Sections
Masonry Chimney
Tee clean-out
Access door
Insulation
Shield
Stovepipe
Whenever possible, choose an interior chimney.
An interior chimney heats up more quickly and
retains its heat; thus promotes a better draft and
discourages the formation of creosote. An
exterior chimney does not benefit from the
warmth of being surrounded by the building, so
it typically operates at lower flue temperatures
than an interior chimney. An exterior
chimney’s draft is not as strong and may
experience increased creosote accumulation.
HearthStone Quality Home Heating Products Inc ® Model 8220
REVERSAL OF THE FLUE COLLAR
In order to reverse the flue collar to vent the
stove straight out the back, follow these simple
steps;
1) Using a 10mm wrench, or socket. Locate
and remove the four bolts holding the
flue collar in place. Once all four bolts
are removed pull the collar away from
the stove. Inspect the gasket, ensuring it
is in place, and in working order.
15
Page 16

2) Locate and remove the four bolts that
hold the block-off plate on the back of
the stove. Remove the plate.
3) Place the flue collar on the back of the
stove over the rear flue exit with the
gasket side towards the stove. Rotate the
collar so the 3 chimney connector screws
are easiest to access when necessary to
install later. Replace the four bolts using
the 10mm wrench.
4) Place the cover plate over the flue exit
on the top of the stove, using the same
four bolts that were removed.
ONNECTION TO A MASONRY CHIMNEY
C
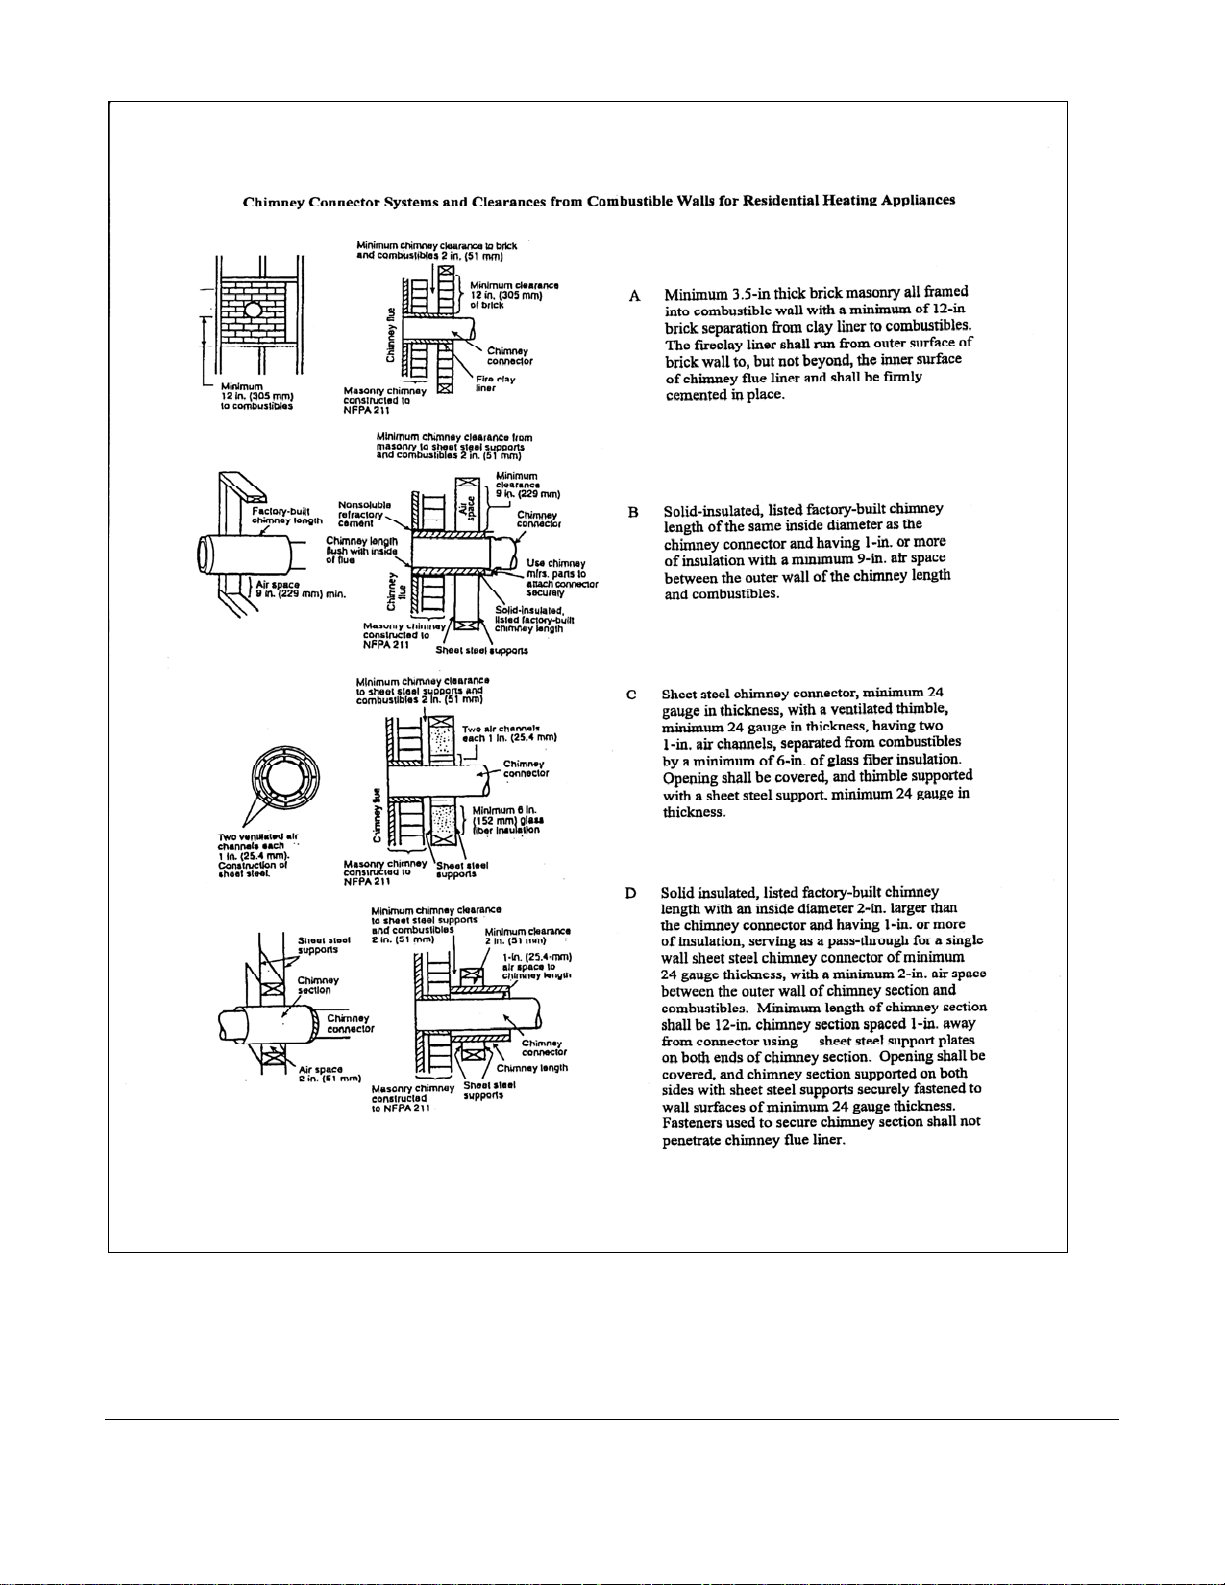
Consider two primary elements when
connecting your stove to a masonry chimney:
the chimney itself and the thimble where the
stovepipe connects to the chimney. Use only
Code approved masonry chimneys with a flue
liner.
Before connecting to a masonry chimney, hire a
professional to examine the chimney for cracks,
loose mortar, and other signs of deterioration
and blockage. If the chimney needs repair,
complete the project before installing and using
your stove. Do not install your stove until the
chimney is safe for use.
Make sure the chimney’s cleanout is complete
and working properly. To avoid a loss of draft,
the cleanout must close off completely. If
allowed to cool, your stove will perform poorly
and creosote will build up in the chimney.
Make sure the size of the chimney’s flue is
appropriate for this stove and that it is not too
large. Use a masonry chimney with an 8" x 8"
(203 mm x 203 mm) tile size for best results.
An oversized flue will contribute to the
accumulation of creosote.
Use the following checklist to ensure that your
masonry chimney meets these minimum
requirements:
Chimney wall construction:
Brick or modular block at least 4" (102 mm)
thick.
A rubble or stone wall at least 12" (305 mm)
thick.
Flue liner:
Minimum thickness of 5/8" (16 mm).
Installed with refractory mortar.
At least 1" (25 mm) air space.
An equivalent flue liner must be a listed
chimney liner system meeting type HT
requirements or other approved material.
Interior chimney requirements:
At least 2" (51 mm) clearance to
combustible structure
Fire stops must be installed at the spaces
where the chimney passes through floors
and/or ceiling.
Insulation must be 2" (51 mm) from the
chimney.
Exterior chimney requirements:
At least 1" (25 mm) clearance to
combustible structure.
HearthStone Quality Home Heating Products Inc ® Model 8220
16
Page 17
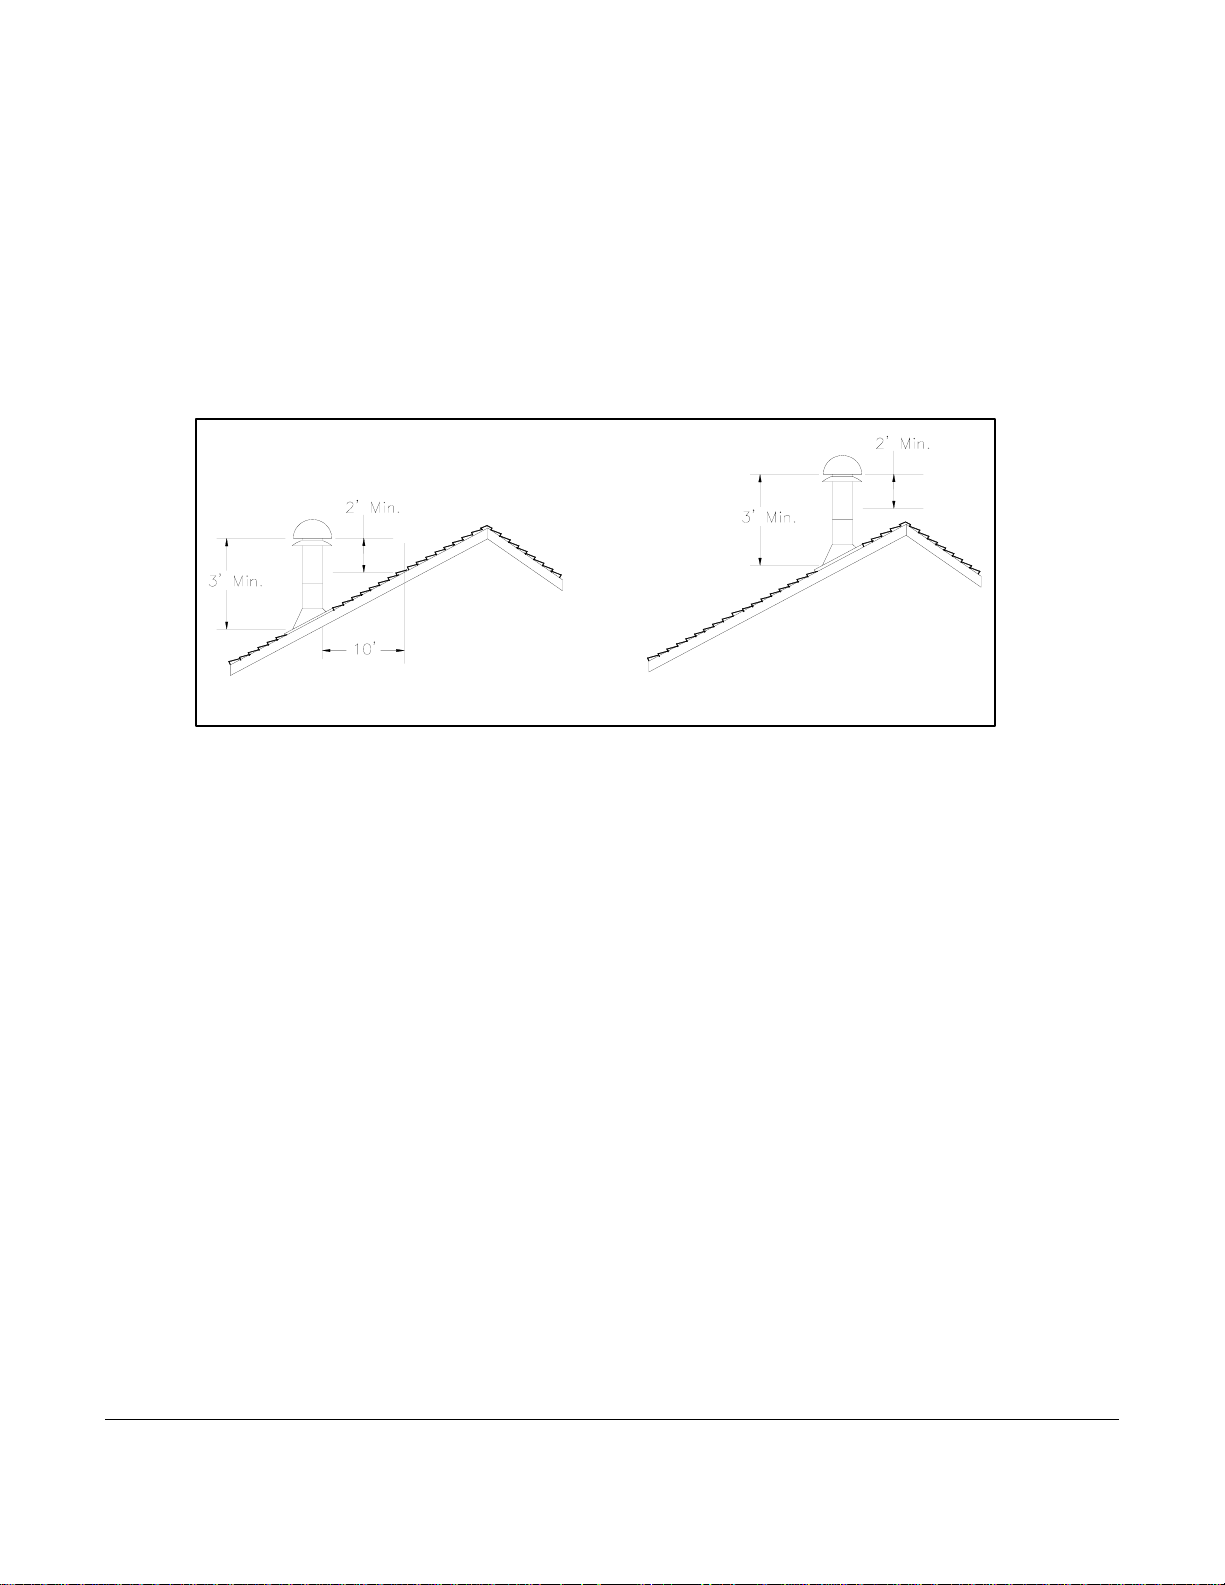
Chimney height requirements: (See
Illustration)
At least 3 feet (0.9 m) higher than the
highest part of the roof opening through
which it passes.
At least 2 feet (0.6 m) higher than any part
of the roof within 10 feet (3 m) measured
horizontally from the top of the chimney.
This stove requires a minimum chimney height
of 13 feet (4 m). The maximum allowable
chimney height is 30 feet (9 m).
HearthStone Quality Home Heating Products Inc ® Model 8220
17
Page 18
HearthStone Quality Home Heating Products Inc ® Model 8220
18
Page 19
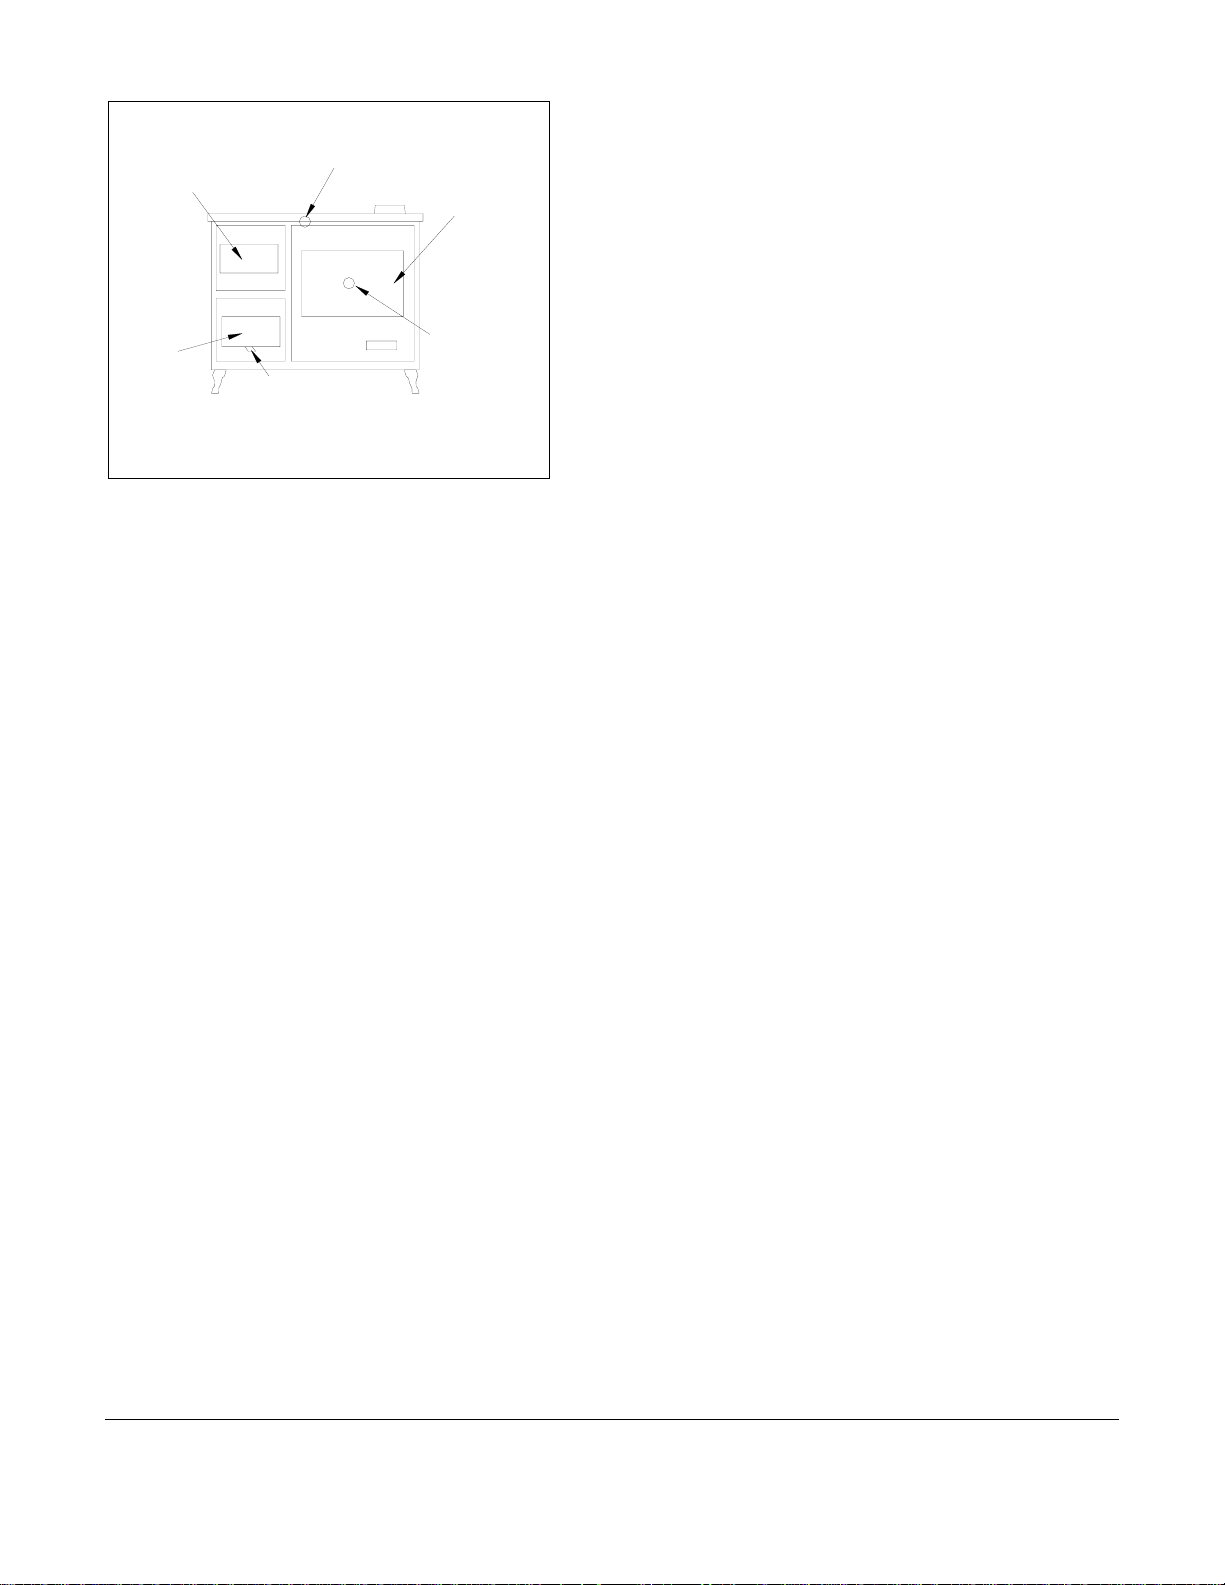
Fuel Loading
Door
Flue Bypass
Oven Door
Ash Pan
Door
Primary Air
Control
Oven
Thermometer
Figure 2 Controls and Features
WARNING:
DO NOT INSTALL IN A SLEEPING ROOM
WARNING:
HOT WHILE IN OPERATION. KEEP
CHILDREN, CLOTHING AND FURNITURE
AWAY. CONTACT MAY CAUSE SKIN BURNS.
Please read this entire chapter before lighting
your first fire. It explains the controls and
features of your wood stove, how to choose
firewood, and how to use your stove on a daily
basis.
CONTROLS AND FEATURES
Before lighting any fires, become familiar with
the location and operation of your stove's
controls and features and learn how to use them.
For your own safety, do not modify these
features in any way.
FLUE BYPASS SYSTEM: When starting a fire
in a cold Deva 100 you will need to use the flue
bypass system. This is the handle at the top
Operating Your Deva
Wood Stove
center of your stove that pushes and pulls in and
out. To open the bypass, pull the handle out.
This opens a “bypass” channel that allows the
hot gases to heat up the chimney quicker. This
bypass allows for a direct outlet of the flue
gases and smoke. With the bypass closed the
gases follow the normal route around the oven
and then out. You should keep the bypass open
until your flue has established a draft. Once a
draft has been established push the bypass
closed. This will ensure the most efficient use of
your Deva.
*Burning the Deva 100 with the bypass open
will not allow the oven to reach maximum
temperatures.
FUEL LOADING DOOR HANDLE: The fuel
loading door allows you to load wood into your
stove. To open the door, lift the handle to the 9
o’clock position and pull the door. To latch the
door, lower the handle to the 6 o’clock position.
Pull gently on the door to make sure it is
properly latched.
HearthStone Quality Home Heating Products Inc ® Model 8220
19
Page 20

PRIMARY AIR CONTROL: This feature is
located on the lower portion of the ash door of
the stove. The primary air control allows you to
regulate the amount of air entering the firebox.
Generally speaking, the more air allowed into
the firebox, the faster and hotter the rate of burn;
conversely, less air creates a slower burn. Push
the lever to the left to open the primary air
control; push the lever to the right of the stove
to close the primary air control.
ASH PAN: The ash pan is located under the
firebox door. The ash pan collects burned ash
from a fire and allows you to conveniently
remove the ash from your wood stove. The ash
pan is easy to remove. Sift the ashes across the
grate and into the ash pan, then rotate the ash
door handle to the 9:00 o’clock and pull to open.
Remove the ash pan by grabbing the handle and
sliding it out carefully. After you have disposed
of the ashes, push the ash pan all the way into
the stove and close the ash door by turning the
handle to the 6 o’clock position.
Remove ashes when the stove is cold. If the ash
pan is warm, use protective fireplace gloves.
Exercise extreme caution when handling,
storing or disposing of ashes.
CHOOSING FIREWOOD
Your Deva 100 cookstove is designed to only
burn firewood-also known as cordwood.
▌ CAUTION:
DO NOT USE CHEMICALS OR
FLAMMABLE FLUIDS SUCH AS
GASOLINE, NAPHTHA, KEROSENE,
CHARCOAL LIGHTER FLUID OR
ENGINE OIL TO START A FIRE. DO
NOT USE CHARCOAL, PELLETS,
COAL, ARTIFICIAL LOGS OR ANY
OTHER MATERIALS AS FUEL; THEY
ARE NOT SAFE. DO NOT BURN
GARBAGE.
The quality of your firewood affects heat output,
duration of burn and performance of your stove.
HearthStone Quality Home Heating Products Inc ® Model 8220
Softwoods generally burn hotter and faster,
while hardwoods burn longer and produce more
coals. Density and moisture content are two
critical factors to consider when purchasing
wood for your stove.
The following is a list of wood species and their
relative BTU (British Thermal Unit) content.
The higher the BTU the longer the burn.
Firewood with higher BTUs is generally
considered more ideal for a wood stove.
HIGH: Apple, Black Birch, Hickory, Locust,
White Oak, Black Beech, Mesquite
MEDIUM HIGH: White Ash, Beech, Yellow
Birch, Sugar Maple, Red Oak
MEDIUM LOW: Black Ash, White Birch, Grey
Birch, Elm, Norway Pine, Pitch Pine, Black
Cherry, Soft Maple, Tamarack
LOW: White Pine, White Cedar, Balsam Fir,
Spruce, Aspen, Basswood, Butternut, Hemlock
Moisture content also plays a key role in the
performance of your stove. Wood freshly cut
from a living tree (green wood) contains a great
deal of moisture. As you might expect, green
wood has difficulty burning and should be
seasoned before using it in your cookstove. To
properly season green wood, it should be split,
stacked and allowed to air dry for a period of
one year.
Stack the firewood on skids or blocks to keep it
off the ground, cover only the top of the stack.
Plastic or tarps that cover the sides of the
woodpile trap moisture and
prevent the wood
from drying. As for stacking, an old Vermonter
said, "The spaces between the logs should be
large enough for a mouse to get through, but not
for the cat that's chasing it."
Firewood should not be stored within the stove's
specified clearances to combustible materials.
20
Page 21

BUILDING YOUR FIRST FIRE
Once you understand the controls of your wood
stove and have chosen the appropriate firewood,
you are ready to start a fire.
When you light your first fires, the wood stove
will emit some smoke and fumes. This is
normal “off-gassing” of the paints and oils used
when manufacturing the wood stove. If you
find it necessary, open a few windows to vent
your room. The smoke and fumes will usually
subside after 10 to 20 minutes of operation. The
odor and smoke will end once the stove is
“cured”.
The first fires may produce other odors from
impurities that exist in the area immediately
surrounding the stove. Some of these impurities
can be cleaning solvents, paint solvents,
cigarettes, smoke, pet hair, dust, adhesives, a
new carpet, and new textiles. These odors will
dissipate over time. You can alleviate these
odors by opening a few windows or otherwise
creating additional ventilation around your
stove.
BUILDING A FIRE
1. Open the door and place five or six
double sheets of tightly twisted
newspaper in the center of the firebox.
Arrange kindling in a crisscross pattern
over the newspaper. Kindling should be
approximately ten pieces, 1/2" (13 mm)
in diameter and 10" to 17" (254 to 431
mm) long.
2. Open the flue bypass system by pulling
the handle out completely. (as described
on page 18)
3. Fully open the primary air control by
pushing the lever toward the left of the
stove.
4. Light the paper under the kindling.
Leave the door slightly ajar momentarily
until the kindling has started to burn and
draft begins to pull.
5. Close the door and allow the fire to burn.
6. Once the kindling is burning, open the
door and add logs, small at first, to build
the fire up. Otherwise, keep the fuel
loading door and ash door closed while
the stove is in use.
Do not open the fuel loading door
with the bypass closed!
7. Close the bypass system by pushing the
handle all the way in.
8. Once the fire is burning well, use the
primary air control to regulate the
desired rate of burn. Pushing the lever
to the left of the stove opens the
PRIMARY AIR CONTROL for a high
rate of burn or pushing it to the right of
the stove for a low rate of burn.
9. The flue bypass is used to control the
cook top and oven temperature.
Note: When opening the door to reload or
re-arrange logs, it is advisable to open the
door just a crack, pause for a moment,
then open the door completely. This
procedure will allow the firebox to clear
of smoke before the door is opened fully.
You must open the flue bypass system
prior to opening your fuel loading door.
Also, reloading on a bed of hot, red coals
reduces smoking time and will bring fresh
fuel up to a high temperature rapidly.
HearthStone Quality Home Heating Products Inc ® Model 8220
21
Page 22

BURN RATE
HIGH BURN: Fully load the firebox with wood
on a bed of hot coals or on an actively flaming
fire and fully open the primary air control. A
high burn rate is recommended once or twice a
day to fully heat the stovepipe and chimney,
which will help minimize creosote
accumulation.
MEDIUM BURN: Set the primary air control to
a mid-range setting appropriate for the heating
needs of the area being heated. A medium burn
rate should be the typical setting and is
preferable if the stove is to be left unattended.
LOW BURN: Close the primary air control for a
low burn rate. A low burn rate over extended
periods of time is not advisable as it may
promote the accumulation of creosote. The
venting system should be inspected frequently if
low burn rates are maintained consistently.
OVER-FIRE CAUTION
Over-firing means the stove is operating at
temperatures above the recommended
temperatures outlined above in the BURN RATE
section. Over-firing should be carefully avoided
since it will cause damage to the stove.
Symptoms of over-firing include short burn
times, a roaring sound in the stove or stovepipe,
and discoloration of the stovepipe.
Over-firing can be caused by excessive draft,
inappropriate fuel, and operator error. Correct
an over-fire situation as follows:
EXCESSIVE DRAFT: Contact your dealer to
have a draft reading taken. Any draft in excess
of 0.1 wc requires a damper in the stovepipe.
Some installations may require more than one
damper.
INAPPROPRIATE FUEL: Do not burn coal,
kiln dried lumber, wax logs or anything other
than natural cordwood.
OPERATOR ERROR: Make sure all the gaskets
are in good condition. Replace worn out or
compressed gaskets. Do not burn the stove with
the fuel loading door, or ash pan door in the
open position.
Monitoring the temperature is the best way to
determine that the stove is over-firing. If you
suspect that your stove is over-firing, contact
your dealer immediately. Damage done by
over-firing is not covered by your warranty.
Results of over-firing can include: warped or
burned out internal parts, cracked refractory,
discolored or warped external parts, and
damaged enamel.
NOTE: ANY SYMPTOMS OF OVER-FIRING
WILL VOID YOUR WARRANTY!!
REMOVAL AND DISPOSAL OF ASHES
Ashes should be removed when the stove is
cold. Use protective fireplace gloves when the
pan is warm. Exercise extreme caution when
handling, storing or disposing of ashes.
To remove ashes from the firebox, sift the ashes
across the ash grate using a poker or other
suitable implement. Remove the ashes by
pulling the handle on the ash pan and sliding it
carefully out. Dump the ashes as described
below. Re-insert the ash pan by pushing it in all
the way. Be sure that the ash pan has been
pushed firmly into place. Alternately, the ashes
can be removed with a shovel through the fuel
loading door.
Ashes should be dumped from the ash drawer
into a metal container with a tight fitting lid. Do
not place any other items or trash into the metal
container. Replace the lid onto the container
and allow the ashes to cool. Do not place the
ash disposal container on a combustible surface
or vinyl flooring, as the container will be hot
Pending disposal, place the closed ash container
on a noncombustible floor or on the ground,
well away from all combustible materials.
Ashes should be retained in the closed container
until all cinders have thoroughly cooled.
!
HearthStone Quality Home Heating Products Inc ® Model 8220
22
Page 23

Ashes should NEVER be placed in wooden or
plastic containers, or in paper or plastic bags, no
matter how long the fire has been out. Coals
within a bed of ashes can remain hot for several
days once removed from the firebox.
MAINTENANCE
CREOSOTE FORMATION AND NEED FOR
REMOVAL
When wood is burned slowly, it produces tar
and other organic vapors, which combine with
expelled moisture to form creosote. These
creosote vapors condense in the relatively cool
chimney flue of a slow-burning fire. As a
result, creosote residue accumulates on the flue
lining. When ignited, this creosote makes an
extremely hot fire, which may damage the
chimney or even destroy the house.
To prevent the buildup of creosote:
1. Burn the stove with the primary air
control fully open and the flue bypass
open for 30 minutes daily to burn out
creosote deposits from within the stove
and the venting system.
2. After reloading with wood, burn the
stove with the primary air control fully
open for 20 to 30 minutes. This manner
of operation ensures early engagement
of the secondary combustion system
which, when engaged, minimizes
creosote buildup in the chimney.
The stovepipe connector and chimney should be
inspected regularly during the heating season to
determine if a creosote build-up has occurred.
If a creosote residue greater than 1/4" (6 mm)
has accumulated, it should be removed to reduce
the risk of a chimney fire.
The venting system must be inspected at the
stove connection and at the chimney top.
Cooler surfaces tend to build creosote deposits
quicker, so it is important to check the chimney
at the top (where it is coolest) as well as from
the bottom near the stove.
Accumulated creosote should be removed with a
cleaning brush specifically designed for the type
of chimney in use. A certified chimney sweep
should be used to perform this service. Contact
your dealer for the name of a certified chimney
sweep in your area (your dealer may be a
certified sweep!).
GASKETS
Gasket material should normally be replaced
every two to three seasons, depending on stove
use. If the door seal is loose, a new gasket will
assure a tight seal and improved stove
performance. Contact your dealer for a gasket
kit, which includes instructions, and gaskets for
your stove.
To replace the fuel loading door gasket, first
remove the old gaskets with a utility or putty
knife. Clean all gasket channels with a wire
brush. Apply gasket cement to the channels and
push the new gasket into place without
stretching the gasket material. The door should
be shut immediately to fully press the gasket
into place and assure a positive seal.
We require the use of the following gaskets:
FUEL LOADING DOOR: 40" (102 cm)
Length, 1/4" Diameter, Low Density Black
Rope
FUEL LOADING GLASS: 40" (102 cm)
Length, 3/4" adhesive backed flat tape
ASH PAN DOOR: 40" (102 cm)
Length, 1/4" Diameter, Low Density, Black
Rope
REVERSIBLE FLUE: 28" (71 mm) Length,
1/4" Diameter, Low Density, Black Rope
HearthStone Quality Home Heating Products Inc ® Model 8220
23
Page 24
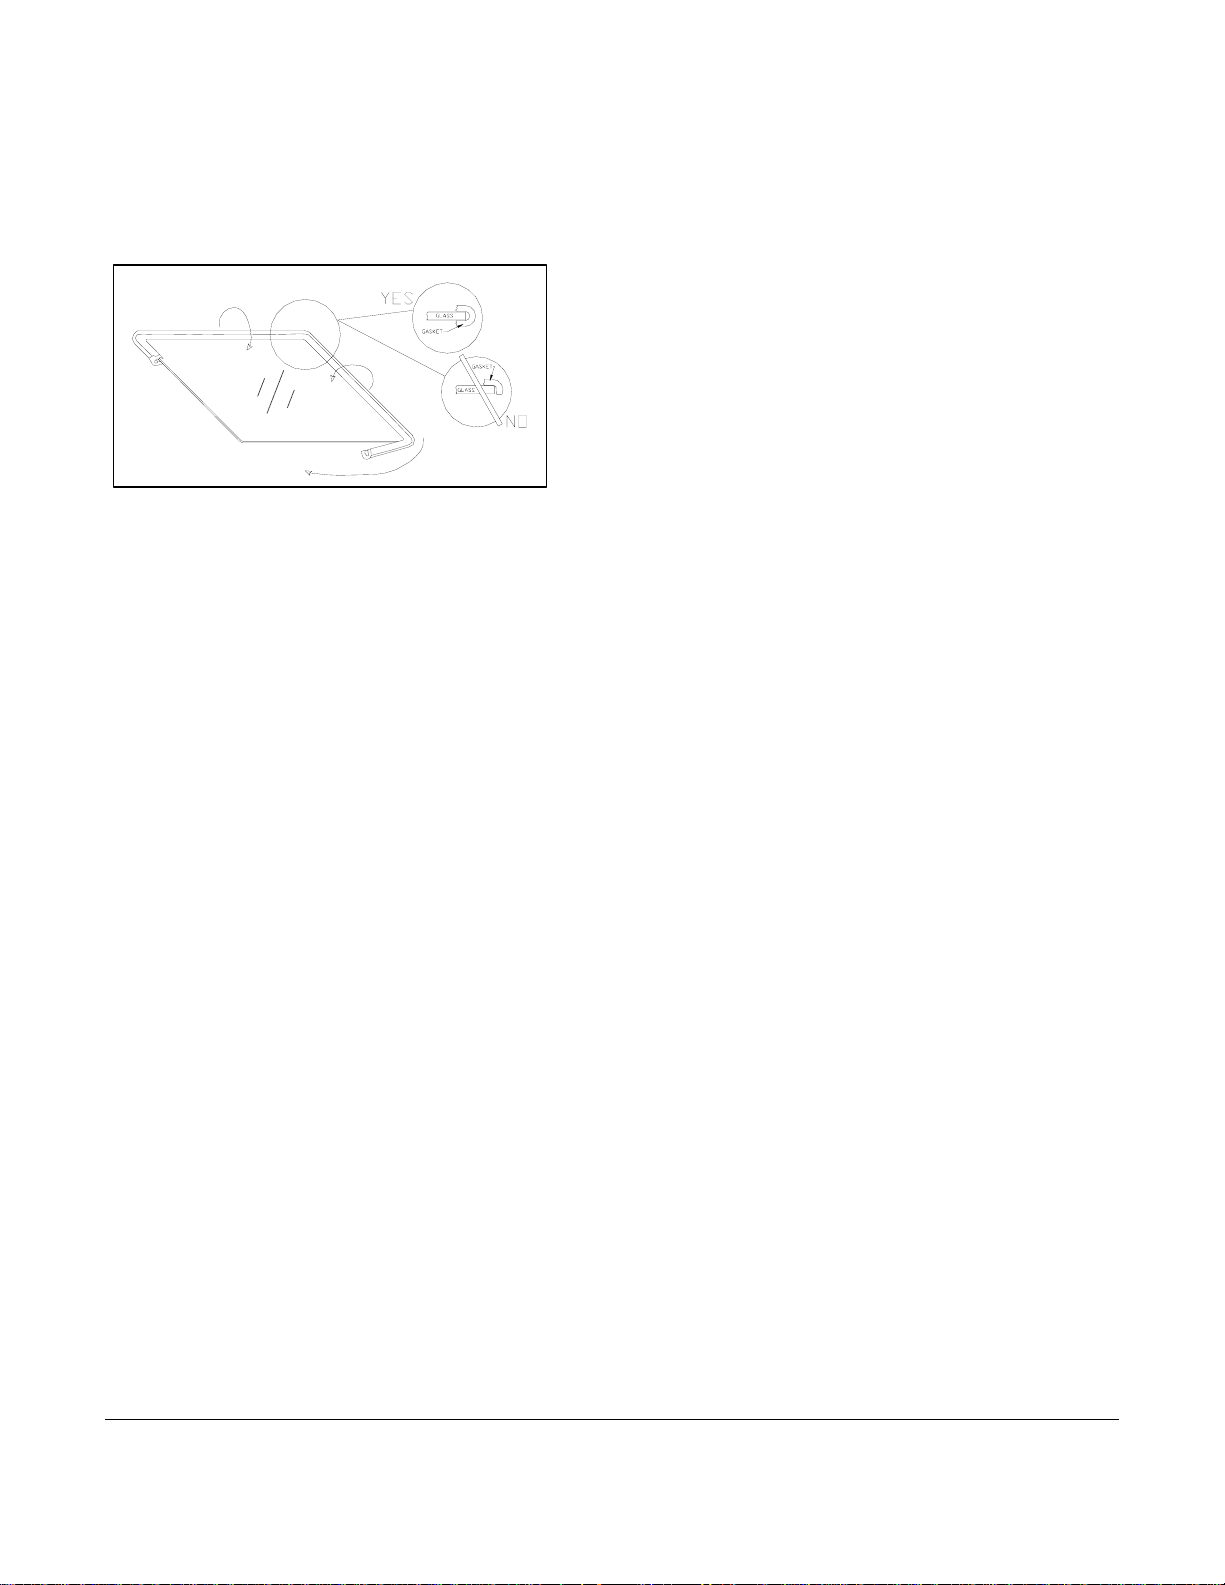
GLASS
Do not operate the stove with a broken door
glass. Do not abuse the fuel loading door by
striking or slamming it.
When necessary, the glass can be cleaned with
low alkaline content commercial stove glass
cleaners, which are available from your local
dealer. Never attempt to clean the glass while
the fire is burning or the glass is hot. Following
the instructions provided with the cleaner can
clean most deposits. To clean heavier deposits,
remove the door from the cookstove and lay the
it face down on a workbench or table. Apply
the cleaner to the glass and allow it to set for a
few minutes. By laying the door flat, it will
allow the cleaner to penetrate rather than
running off the surface of the glass. Wipe the
cleaner off with a soft cloth.
Important: scratching or etching the
glass will weaken the integrity of the
glass. Do not use a razor blade, steel
wool, or any other abrasive material to
clean the glass. Use low alkaline content
cleaners only.
The fuel loading door glass is a ceramic, shockresistant glass, made specifically for use in
wood-burning stoves. Do not use any
replacement glass other than the ceramic glass
manufactured and supplied for use in this
cookstove. Replacement glass is available
through your local dealer.
The fuel loading door glass should be replaced
immediately if broken. Contact your local
dealer for replacement glass, which is
5. Peel the paper backing from the tape gasket.
accompanied with instructions and everything
needed for the repair. If you replace the glass
yourself, wear work gloves and safety glasses.
The procedure for the fuel loading door glass and glass
gasket replacement is as follows:
1. Remove the top hinge straight up and away from
the stove.
2. Remove the door by pulling it up and away from
the stove.
2. Place the door face down on a flat, smooth
surface.
3. Apply penetrating oil to the 2 screws in the
retention frame. Remove the 2 screws. Separate
the cast iron window frame from the door.
4. Carefully lift the damaged glass from the door
and discard.
Apply the new gasket to the new glass as
illustrated above.
6. Place the gasketed glass onto the door.
7. Screw the window frame back on the door.
8. Install the door.
MAINTENANCE OF THE GLASS COOK TOP
Be sure utensils have no rough spots to scratch
the surface. Be sure the surface is clean before
the fire is started. Avoid spills and boil-overs by
turning down heat to lowest possible setting for
cooking task, and by using large enough pan.
Wipe up wet spots promptly, being careful to
avoid steam burns. Don't cook with foil on the
glass cook top. It could be damaged by foil
melting onto it. Cover pans to prevent spatters.
LEANING OF THE GLASS COOK TOP
C
Special care should be taken when removing hot
substances. Turn off all surface units affected by
the spillover and remove the hot pans. Wearing
an oven mitt to hold the scraper, scrape the spill
to a cool area of the cook top and use a paper
towel to remove any excess. Do not continue to
use the soiled area until all the spillover has
been removed. A couple of recommended cook
top cleaners are:
Weiman Cooktop Cleaning Creme
Cera Care
Hopes Cooktop Cleaning Creme
Cerama Bryte
"
HearthStone Quality Home Heating Products Inc ® Model 8220
24
Page 25

CAST IRON
Exterior cast iron parts are porcelainized with an
enamel finish. Use a damp sponge to wipe
clean. Dry the cast iron thoroughly to prevent
rusting.
Enamel castings can be cleaned with a standard
glass cleaner. With time and use, a very fine,
subtle network of crazed lines may appear
seemingly beneath the surface of the enamel.
Crazing is a natural predictable process and
does not represent a flaw.
TROUBLESHOOTING
Most are correctable and generally require only
a minor adjustment of the stove, installation, or
operating technique. In cases where weather
conditions dramatically affect stove
performance, the problems are typically
temporary and solve themselves once the
weather changes.
One common cause of poor performance is an
oversized chimney flue. Oversized chimney
flues result in decreased pressure, which
prevents the smoke from rising out the chimney.
Oversized flues are also more difficult to heat
effectively, especially when burning a high
efficiency stove. Cool flue temperatures inhibit
the establishment of a strong draft (and
encourage the accumulation of creosote). The
lack of a strong draft will cause the fire to die
down and may even force the smoke to pour
into the room.
If your chimney is the proper size and a strong
draft is not easily established, there is the
possibility of the chimney being too cold.
Again, hot chimneys promote a stronger draft.
Other draft guidelines are as follows:
AN "AIRTIGHT" HOUSE: If your home is
super-insulated or especially well sealed, the
(infiltration) air supply to the interior of the
house may be inadequate. This phenomenon of
air starvation within the building can be
exacerbated if exhaust fans, such as clothes
dryers, bathroom fans or cook-stove exhaust
fans, are in operation within the home. The
need for additional air may be accommodated
by opening a window to provide the adequate
air.
TALL TREES OR BUILDINGS: These
obstructions, when located in proximity to the
top of the chimney can cause chronic or
occasional downdrafts. When selecting a site
for a new chimney, take care to consider the
placement of other objects in the vicinity of the
proposed chimney location.
WIND VELOCITY: Generally, the stronger
and steadier a wind, the stronger (better) the
draft. However, "gusty" wind conditions may
cause erratic downdrafts.
BAROMETRIC PRESSURE: Chimney
drafts are typically sluggish on balmy, wet or
muggy days. This is a weather-related
phenomenon, which generally is self-correcting
as the weather changes.
BRISKNESS OF FIRE: The hotter the fire in
your stove, the hotter your chimney and,
therefore, the stronger the draft.
BREAKS IN THE VENTING SYSTEM: An
unsealed clean-out door at the bottom of the
chimney, leaky stovepipe joints, a poor
stovepipe-to-thimble connection, or a leaky
chimney may cause inadequate draft.
SEASONAL FACTORS: Early fall and late
spring are generally difficult seasons in which to
establish proper drafts. The colder the outside
air (relative to room temperatures), the stronger
the draft.
HearthStone Quality Home Heating Products Inc ® Model 8220
25
Page 26

TROUBLESHOOTING GUIDE
PROBLEM POSSIBLE CAUSE SOLUTIONS
STOVE SMOKES Operating Technique Fully open the primary air control one minute before opening doors.
Fully open the flue bypass sytem
Cold Chimney Preheat the chimney when first starting a fire.
Blocked Chimney Examine the chimney and stovepipe for blockage or creosote
accumulations.
Oversized Chimney Reline the chimney to the appropriate diameter
Undersized Chimney Install a draft inducer or replace the chimney.
Chimney Too Short Lengthen the chimney.
Air Infiltration Into The
Chimney
More Than One Appliance
Connected to the Flue
BACK-PUFFING OR
GAS EXPLOSIONS
Extra Low Burn Rate Burn the stove at a higher burn rate.
Chimney Down-draft Install a chimney cap.
Excessive Ash Build-up Empty ash pan more frequently.
UNCONTROLLED
OR SHORT BURN
Excessive Draft Check the installation. Operate at LOW BURN. Install stovepipe
Deteriorated Cement Seals Reseal the stove with furnace cement.
Extra Long Chimney Shorten the chimney. Install stovepipe damper.
High Winds or Hilltop
Excessive Draft Draft in excess of 0.1 wc should be corrected with a stovepipe
INSUFFICIENT HEAT Poor Quality or Green
Low Burn Rate Operate the stove at a higher burn rate.
Air Insulated Chimney Replace with a pre-fabricated insulated chimney system or a
Cold Exterior Chimney Reline or insulate the chimney.
Leaky Stovepipe or
Too Much Heat Loss From
INSUFFICIENT
OVEN HEAT
BLISTERING OF
ENAMEL CASTING
Excessive Draft Check the DRAFT. A damper may be required. Operate the stove at
Operating Technique Fully open the primary air control one minute before opening the
Unsealed or Open Door Close the door tightly or replace the gaskets.
Location:
Wood
Chimney
House
Fuel Bypass is open
Oven door is not sealed
properly
Operating Technique Do not over-fire the stove. Monitor stove temperatures. Use
Seal chimney connections and openings in clean-out doors.
Disconnect all other appliances and seal openings.
door and keep it fully open for a few minutes after reloading.
damper.
Install a chimney cap.
damper.
Completely close the flue bypass system
Use only air-dried wood, preferably dried at least one year.
properly sized masonry chimney.
Check the installation.
Caulk windows, seal openings in home.
Push Flue Bypass in to close the bypass.
Check the seal and repair if necessary
seasoned wood only.
a LOW BURN range.
HearthStone Quality Home Heating Products Inc ® Model 8220
26
Page 27
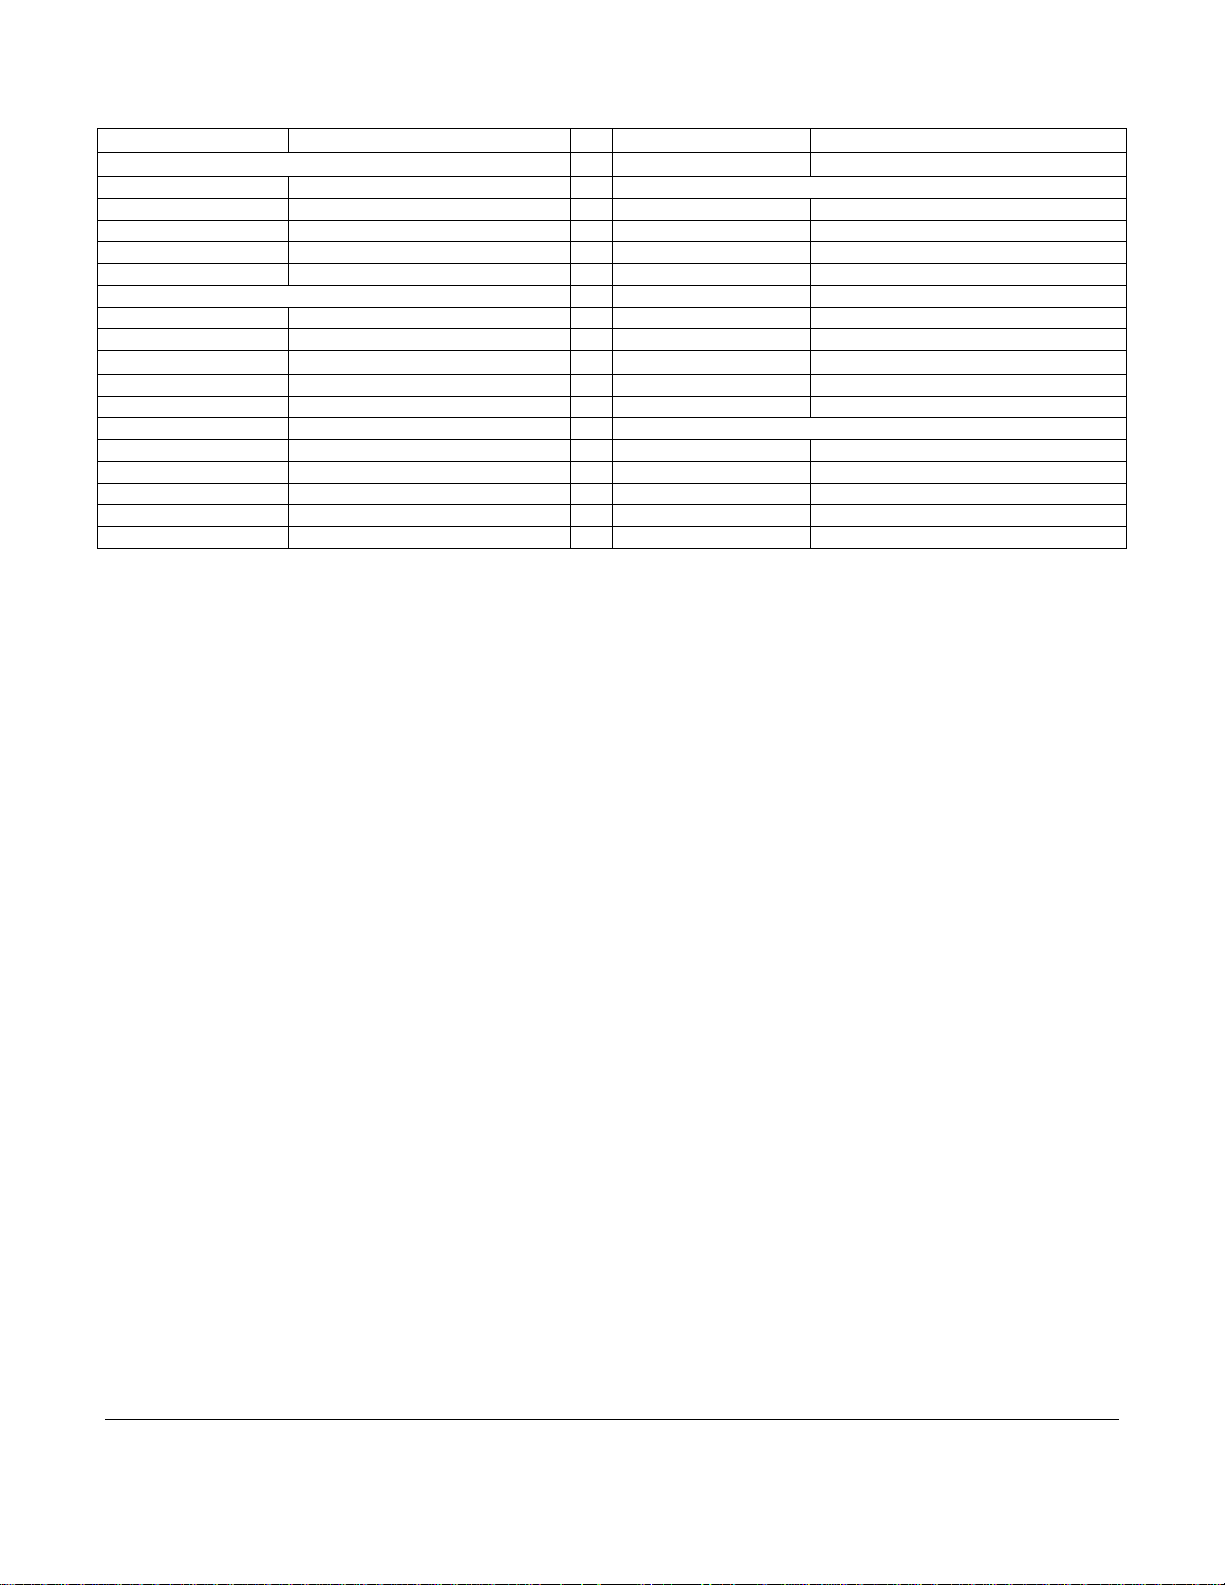
REPLACEMENT PARTS & OPTIONAL ACCESSORIES
PART NUMBER: DESCRIPTION: PART NUMBER: DESCRIPTION:
GLASS
3030-050 FUEL LOADING DOOR GLASS
3030-051 OVEN DOOR GLASS 91-59710 SIDE ASSEBLY
91-58710 TOP GLASS ASSEMBLY 91-58711 OVEN DOOR ASSEMBLY
91-58712 ASH DOOR ASSEMBLY
91-58713 FUEL LOADING DOOR ASSEMBLY
HANDLES
91-71710 OVEN DOOR HANDLE 5170-005 HANDLE BAR SUPPORT
91-71711 FIREBOX DOOR HANDLE 5170-007 HANDLE BAR
91-71712 ASH DOOR HANDLE
3060-432 REFRACTORY BASE
3060-433 LEFT REFRACTORY
3060-434 RIGHT REFRACTORY
MISC. COMPONENTS
2650-016 FLUE COLLAR
5170-010
REFRACTORY STONE BRACKET
REFRACTORY STONE
HearthStone Quality Home Heating Products Inc ® Model 8220
27
Page 28
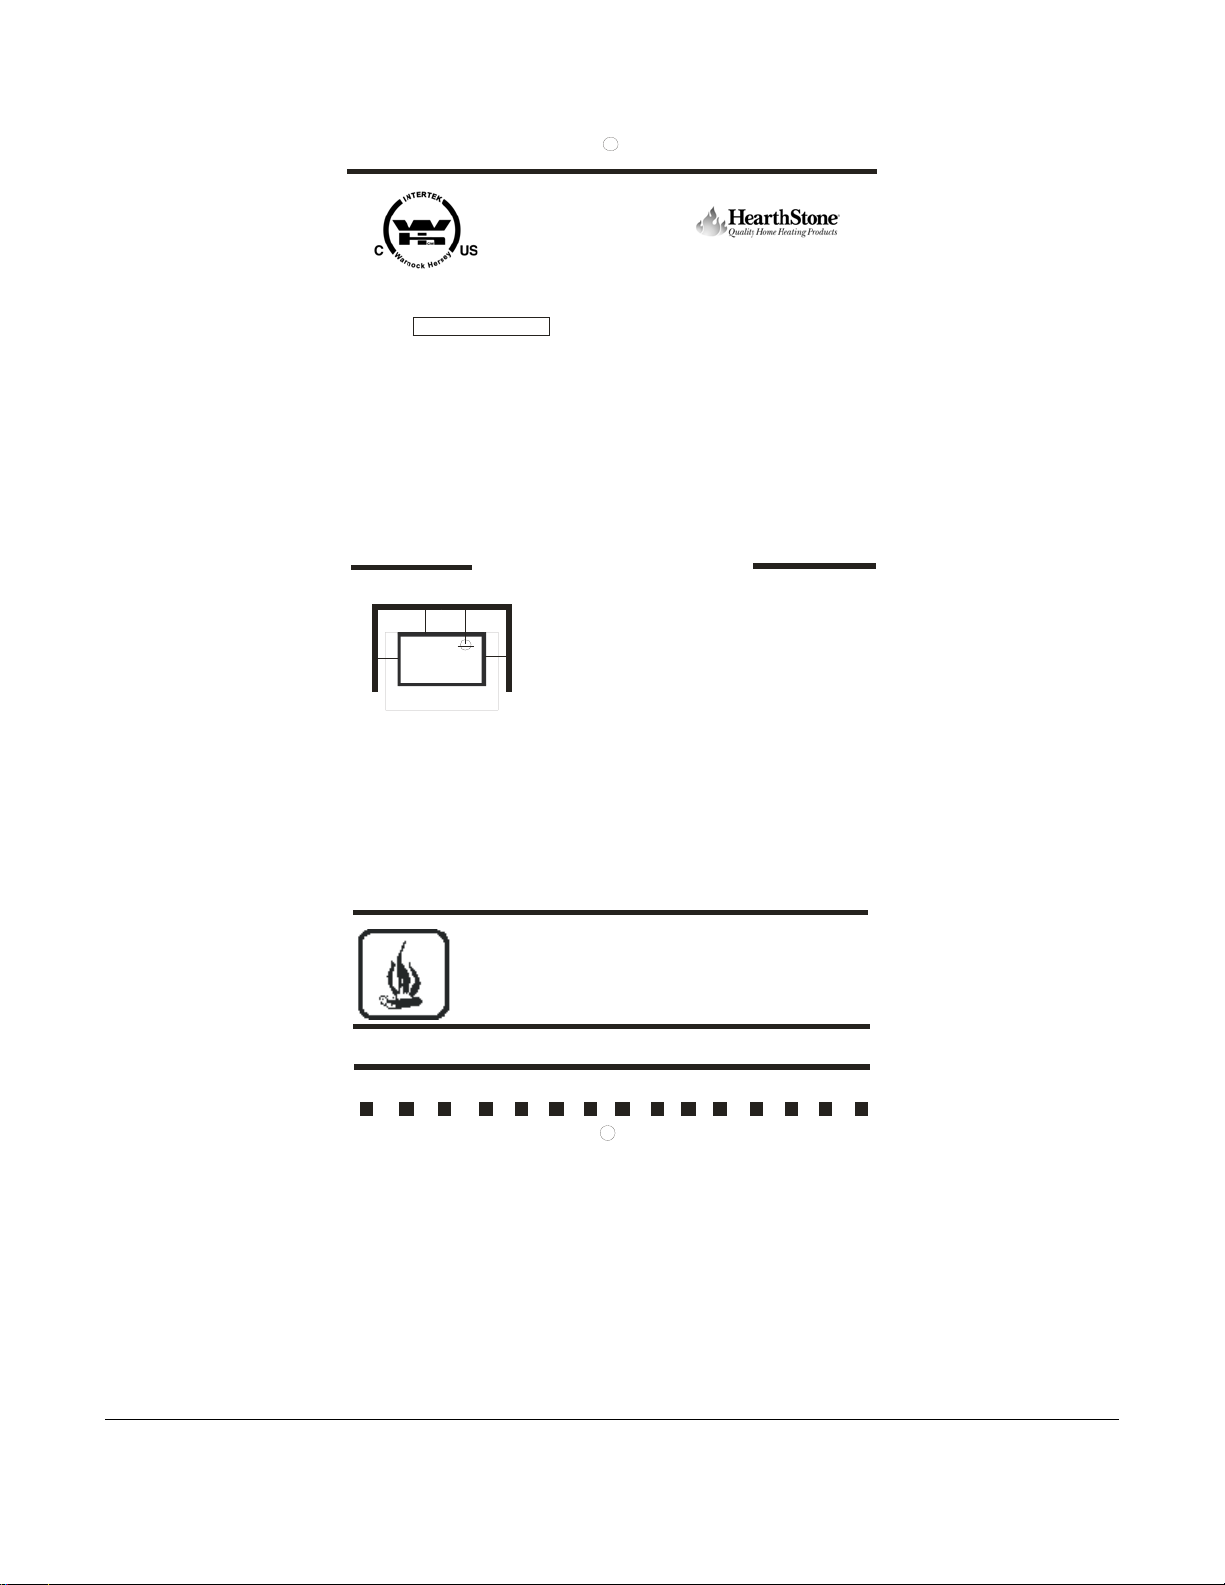
SAFETY LABEL
CONTACT YOUR LOCAL BUI LDING OFFICIALS ABOUT RESTRI CTIONS
INSPECT ION I N YOUR ARE A AND IN STALLAT ION
Listed Room Heater, Solid Fuel Type
Manufactured by:
Ind ustrias He rgom S. A. fo r
Apdo. de Correos, 208 de Santa nd er
WN 04380
Inte rtek Testing
Services NA, inc.
SE RIAL #
MODE L NA ME:
TESTED TO: UL 1482, ULC S627
TYPE OF FUEL: Solid Wood Only
CAUTION: Sp ecial method s are required
when passing chimney throug h a wall or
ceiling, refer to local building codes. Do
not connect t his unit to a chim ney fl ue
serving another app liance.
NOTE: Replace fireb ox glass only with
4mm CERAMIC gl a ss
BA C K W A LL
C
STOVE
B
SI DEWALL
Hearth P rotection
When ins t all ed on a co mbustibl e floor, minimal heart h prote ction must be a non co mbu st ibl e materia l with an R -v al ue of a t le ast 0. 89 und erneath the co oksto ve t hat
extends 16”US (46cm CAN )
bey ond ea ch s ide o f the c ooks tove. If usin g the r
pro tec tio n m ust ex tend und er the flu e con nector and ext en d 2” be yond ea ch side o f
the pipe.
* Refer to the Installation Manual for additional clearance information.
Santand er, Spai n 390 80 USA
“PREVENT HOUSE FI RES”
DEVA 82 20
C learance to Comb ustible Materials*
Single w al l con ne cto r
D
A - 10”(26 cm)
SIDEWAL L
B - 10”(26 cm)
C - 16”(41cm)
D - 21 .5”( 55c m)
A
beyond the fuel loading door and 8”US (20cm C AN)
Inst all and use only in accordance with
manufacture’s installation instructions
and your local building codes .
Do not operate with d oors open.
Do n ot obstruct spa ce unde r heat er
Do not use grate or elevate fire. Build
wood fire directl y on hearth.
Do n ot ov er- fir e. If the heater or ch imn ey
connector glows, you are over-firing.
ear exit of th e stove, the floor
317 Stafford Ave .
Morrisville VT 0566 1
WARNINGS:
Alcove
A - 7” (18 cm)
B - 16” (41cm)
C - 16” (41cm)
D - 21.5” (55cm)
VENT REQUIREM ENTS:
6 inch diameter, single wall, minimum 24 MSG black or 25 MSG blue steel
connector with list ed f actory-built Ty pe HT chimney or lined masonry chimney.
CAUT ION: H OT WH ILE IN OPER AT ION. D O NOT TOUCH. K EEP
CHILDREN, CLOTHING AND FURNITURE AWAY. CONTACT MAY
CAUSE SKIN BURNS. SEE NAMEPLATE AND INST RUCTIONS.
INSPECT AND CLEAN CHIMNEY AND CONNECTOR
FREQUENTLY. UN DER C ERTAIN C ONDITION S OF USE,
CREOSOTE BUILDUP MAY OCCUR RAPIDLY.
U.S . EN V IR ONM EN TA L PRO TECT ION A GE NCY
Certified to comply with July 1 , 1990 particulate emissions standard s
2007 2008 2 009 Jan Feb Mar Apr May Jun Jul Au g Sep Oct Nov Dec
Date of Manufactu re
DO NOT R EMOVE OR C OVE R THIS LABEL
33 00-619 Rev A
HearthStone Quality Home Heating Products Inc ® Model 8220
28
Page 29

HEARTHSTONE WOODSTOVE LIMITED WARRANTIES
These warranties give you specific legal rights. You may also have other rights, which vary from State to State.
HearthStone Quality Home Heating Products, Inc. (HearthStone) warrants to the original purchaser only
“Original Purchaser”) the new wood burning cookstove sold by HearthStone and purchased by the Original
Purchaser (the “Cookstove”) against any of the occurrences listed in this document that result from defects in
material or workmanship. All obligations of HearthStone under this document commence on the date the Original
Purchaser purchases the Cookstove (the “Purchase Date”).
LIMITED LIFETIME WARRANTY
HearthStone warrants the following parts of the Cookstove against the following occurrences that result from
defects in material and workmanship:
• All cast iron parts – against breakage, cracking or burn-through.
• Air supply systems – against breakage, cracking or burn-through.
• Glass – against breakage due to thermal shock.
LIMITED FIVE-YEAR WARRANTY
HearthStone warrants the following parts of the Cookstove against the following occurrences that result from
defects in material and workmanship:
• Refractory brick – against breakage and deterioration not resulting from physical damage or over-loading of
the wood burning cookstove.
• Door handles and latch mechanisms – against breakage.
This warranty expires on the fifth (5
• Ceramic cook top-
th
) anniversary of the Purchase Date.
LIMITED ONE-YEAR WARRANTY
HearthStone warrants the following parts of the wood burning cookstove against the following occurrences that
result from defects in material and workmanship:
• Enamel Finish – against peeling or fading, excluding
crazing.
• Stove cement and all gaskets – against breakage or deterioration.
• Accessories and electrical components such as blowers, switches and thermo discs, excluding
components, hearth components, electrical components and other components or accessories used in
conjunction with the installation of the Cookstove not manufactured or supplied by HearthStone – against
breakage or malfunction.
This warranty expires on the first (1
st
) anniversary of the Purchase Date.
chipping, mechanical abrasion, chemical abrasion or
venting
EXCLUSIONS
The warranties contained in this document do not cover, nor is HearthStone responsible for:
1. Damage resulting from installation or operation of the Cookstove in a manner contrary to the owner’s
manual.
2. Damage or non-performance resulting from faulty or incomplete setup, installation and start-up or
mishandling, abuse, or misuse of the Cookstove, including but not limited to over-firing.
3. Damage resulting from installation, modification, alteration, repair or service of the Cookstove by any
party other than HearthStone or an authorized HearthStone dealer (a “Dealer”).
4. Damage resulting from the use as fuel of driftwood, treated wood, wax, artificial or manufactured logs,
coal or other material other than natural wood.
5. Damage due to water or due to installation of the Cookstove in a damp or high condensation area.
(the
HearthStone Quality Home Heating Products Inc ® Model 8220
29
Page 30

6. Damage due to installation of the Cookstove in an atmosphere contaminated by damaging chemicals,
including but not limited to chlorine, fluorine or salts.
7. Scratches on glass, enameled surfaces or stones due to mechanical abrasion.
8. Standard wear and tear of the Cookstove resulting from normal usage over time.
9. Damage resulting from operational-related problems such as over-firing, downdrafts, smoke spillage, or
use of corrosive driftwood.
10. Damage or inadequate performance caused by site, installation or environmental conditions beyond
HearthStone’s control, including but not limited to nearby trees, rooftops, buildings, wind, hills,
mountains, inadequate or excessive venting, insufficient make up air, or negative air pressure whether or
not caused by mechanical systems such as furnaces, exhaust fans, clothes dryers, etc.
11. A defect in any part of the Cookstove if the Original Purchaser fails to comply with HearthStone’s or a
Dealer’s request to ship the part or the Cookstove to HearthStone or a Dealer, as the case may be.
THE WARRANTIES CONTAINED IN THIS DOCUMENT ARE EXCLUSIVE AND ARE GIVEN BY
HEARTHSTONE AND ACCEPTED BY THE ORIGINAL PURCHASER IN LIEU OF ALL OTHER
EXPRESS WARRANTIES AND ANY OBLIGATIONS, LIABILITIES, RIGHTS, CLAIMS, OR REMEDIES
IN CONTRACT OR TORT, WHETHER OR NOT ARISING FROM HEARTHSTONE’S NEGLIGENCE,
ACTUAL OR IMPUTED. ALL IMPLIED WARRANTIES, INCLUDING THE WARRANTIES OF
MERCHANTABILITY AND FITNESS FOR A PARTICULAR PURPOSE, ARE GIVEN ONLY
EXTENT REQUIRED BY FEDERAL OR STATE LAW. EXCEPT AS OTHERWISE REQUIRED BY STATE
LAW, UPON THE EXPIRATION OF THE EXPRESS LIMITED WARRANTIES CONTAINED HEREIN, NO
IMPLIED WARRANTIES, INCLUDING THE IMPLIED WARRANTIES OF MERCHANTABILITY OR
FITNESS FOR A PARTICULAR PURPOSE, SHALL APPLY TO THE SUBJECT COOKSTOVE. SOME
STATES DO NOT ALLOW LIMITATIONS ON HOW LONG AN IMPLIED WARRANTY LASTS, SO
THE ABOVE LIMITATION MAY NOT APPLY TO YOU.
TO THE
THE WARRANTIES CONTAINED IN THIS DOCUMENT EXTEND ONLY
PURCHASER OF THE COOKSTOVE WARRANTED HEREUNDER. THEY DO NOT EXTEND TO ANY
SUBSEQUENT OWNERS.
UNDER NO CIRCUMSTANCES SHALL HEARTHSTONE BE LIABLE TO THE ORIGINAL PURCHASER
OR ANY OTHER PERSON FOR ANY INCIDENTAL OR CONSEQUENTIAL DAMAGES, INCLUDING
BUT NOT LIMITED TO DAMAGE TO PROPERTY OR PERSONAL INJURIES, WHETHER ARISING OUT
OF BREACH OF WARRANTY, TORT, OR OTHERWISE, EVEN IF HEARTHSTONE HAS BEEN
APPRAISED OF THE POSSIBILITY OF SUCH DAMAGES. SOME STATES DO NOT ALLOW THE
EXCLUSION OR LIMITATION OF INCIDENTAL OR CONSEQUENTIAL DAMAGES, SO THE
ABOVE LIMITATION OR EXCLUSION MAY NOT APPLY TO YOU.
QUALIFYING FOR WARRANTY COVERAGE
To obtain performance of any obligation under this document, the Original Purchaser must, within the applicable
warranty time period, contact HearthStone, at the address listed in the Warranty Registration section below or a
Dealer for instructions regarding the return of defective parts for repair, the return of the Cookstove for repair, or
a Dealer service call. The Original Purchaser should refer to the Dealer network search engine contained on
HearthStone’s Web site (www.hearthstonestoves.com
), to find a Dealer nearest the Original Purchaser’s location.
TO THE ORIGINAL
REMEDY
The remedy for any breach of the foregoing warranties will consist of repair or replacement, at HearthStone’s
option, of any covered defect in the Cookstove. When the Original Purchaser contacts HearthStone or a Dealer,
HearthStone or the Dealer, as the case may be, will instruct the Original Purchaser to either
part, or the entire Cookstove (if needed), with shipping prepaid, to HearthStone or a Dealer or
make a service call at the place where the Cookstove is located. In the event the Original Purchaser refuses to
return the defective
allow a Dealer to
HearthStone Quality Home Heating Products Inc ® Model 8220
30
Page 31

allow a Dealer to make a service call, HearthStone or a Dealer, as the case may be, will request that the Original
Owner return the defective part, or the entire Cookstove (if needed), with shipping prepaid, to HearthStone or a
Dealer. Notwithstanding any other provision of this document, the Original Purchaser shall pay for any
travel fees and service charges related to a Dealer’s service call.
Parts: HearthStone will replace defective parts covered by the foregoing warranties at no charge.
Labor: Within the first (1
st
) year after the Purchase Date, HearthStone will pay for warranty labor performed by
a Dealer at HearthStone’s published labor rates in effect at the time the labor is performed. Thereafter, the
Original Purchaser is responsible for the cost of labor.
Shipping cost for parts: Within the first ninety (90) days after the Purchase Date, HearthStone will pay for the
shipping of Cookstove parts covered by any of the foregoing warranties to and from HearthStone or a Dealer, as
the case may be. Thereafter, the Original Purchaser is responsible for all shipping costs related to shipping
Cookstove parts to and from HearthStone or a Dealer, as the case may be.
Shipping cost for the Cookstove: Within the first (1
st
) year after the Purchase Date, if the Original Purchaser is
instructed to return the Cookstove to HearthStone or a Dealer for repair, HearthStone will pay fifty percent (50%)
and the Original Purchaser will pay fifty percent (50%) of the shipping
costs related to shipping the Cookstove to
and from HearthStone or a Dealer, as the case may be. Thereafter, the Original Purchaser is responsible for one
hundred percent (100%) of all of the shipping costs related to shipping the Cookstove to and from HearthStone or
a Dealer, as the case may be. Notwithstanding any other provision of this document, in no event will HearthStone
pay for any Dealer fees or other fees for pick up or delivery of the Cookstove returned for repair; the Original
Purchaser shall be responsible for any such fees.
WARRANTY REGISTRATION
The Original Purchaser may send a completed and signed Warranty Registration Form, which is enclosed in the
Coodstove warranty packet, to the following address:
HearthStone Quality Home Heating Products, Inc.
Warranty Department
NOTE: SENDING IN THE SIGNED WARRANTY REGIST RATION FORM IS NOT A CONDITION OF
WARRANTY COVERAGE OR HEARTHSTONE’S PERFORMANCE.
HearthStone Quality Home Heating Products Inc ® Model 8220
31
 Loading...