

Page 1
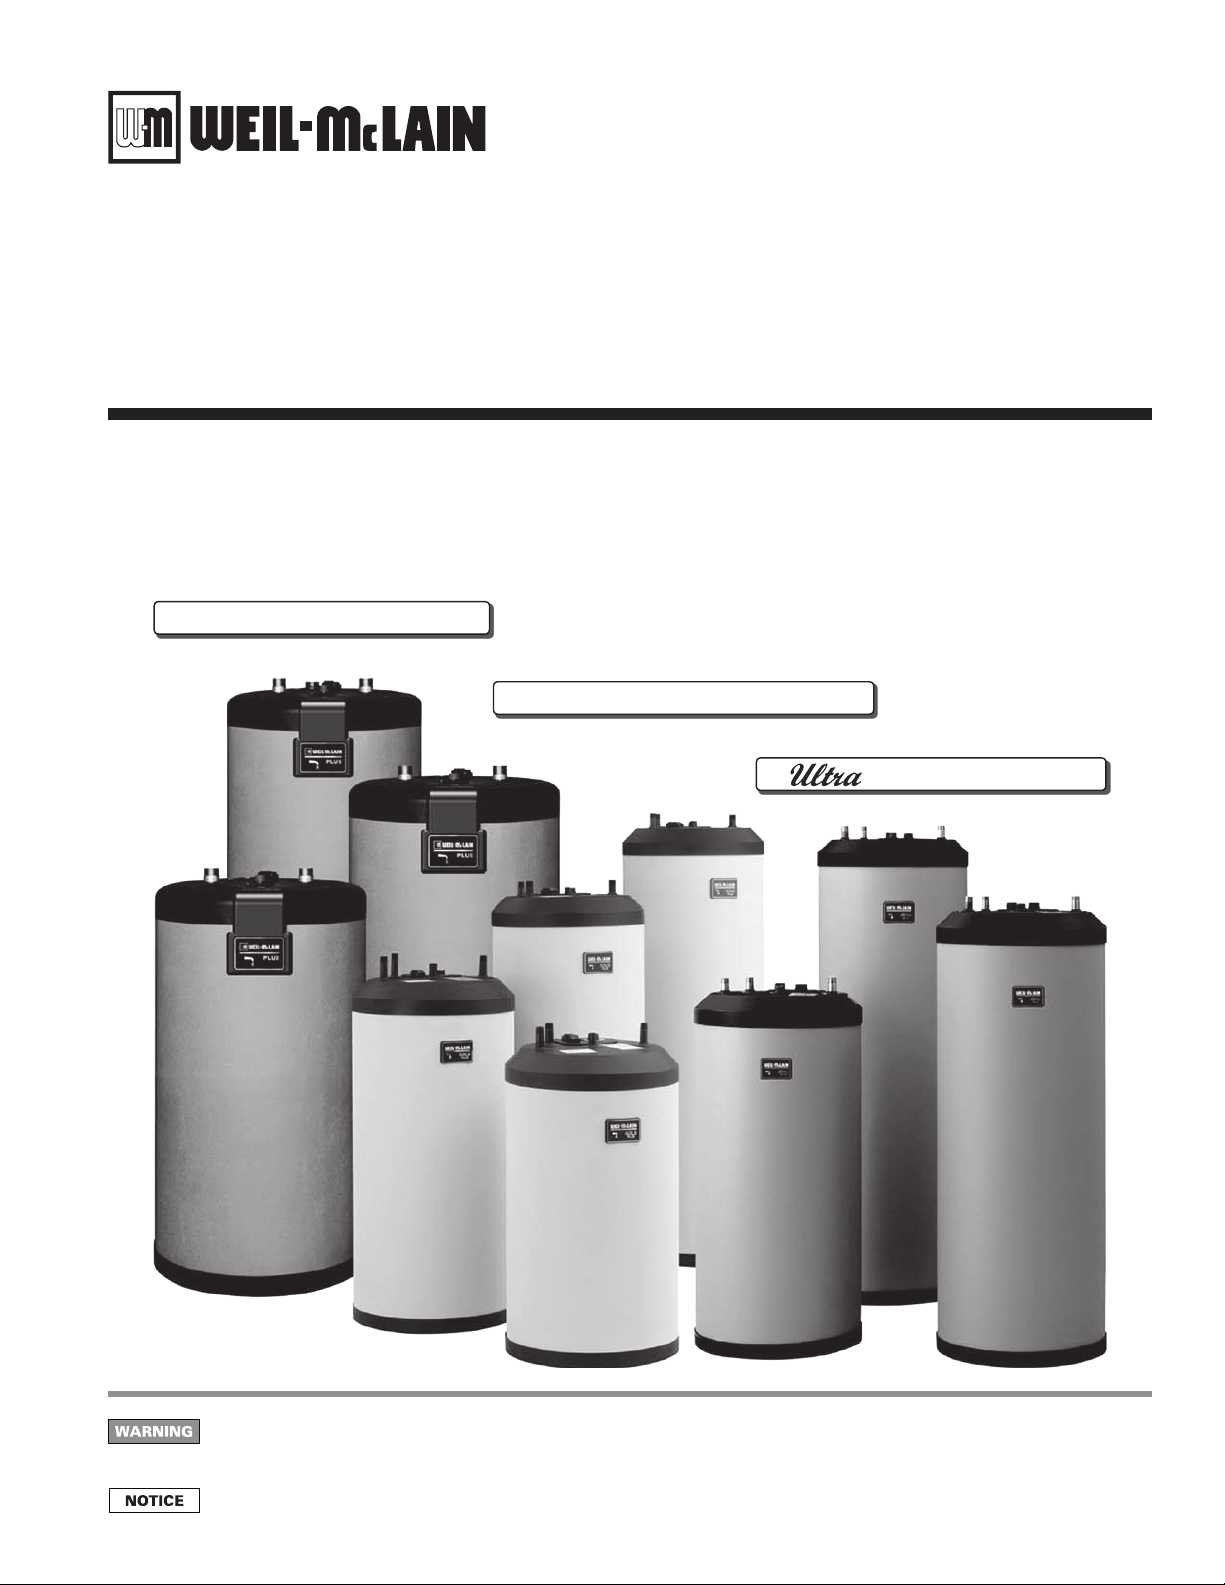
PLUS Line
Indirect-Fired Water Heaters
Series 3
Manual
Plus 100/110/119
GOlD P
• Installation
• Startup
lus
30/40/60/80
• Maintenance
• Parts
P
lus
40/60/80
This manual must only be used by a qualified heating installer/service technician. Before installing, read all instructions,
including this manual and any related manuals or supplements. Perform steps in the order given. Failure to comply
could result in severe personal injury, death or substantial property damage.
User — Read important user safety information found on pages 2, 18, 19 and 20. Installation and service should only
be performed by a qualified service technician. Retain this manual for future reference.
Part Number PLUS-E017-A/1206
Page 2
PLUS LINE
Read this page first
Indirect-Fired Water Heaters – Series 3
Hazard
definitions
The following defined terms are used throughout this manual to bring attention to the presence of hazards of various risk levels, or to important information concerning the life of the
product.
Indicates presence of hazards that will cause severe personal injury, death
or substantial property damage.
Indicates presence of hazards that can cause severe personal injury, death
or substantial property damage.
Indicates presence of hazards that will or can cause minor personal injury
or property damage.
Indicates special instructions on installation, operation or maintenance
that are important but not related to personal injury or property
damage.
Read all instructions before installing. Failure to follow all instructions in
proper order can cause severe personal injury, death or substantial property
damage.
Studies have indicated that dangerous bacteria, including legionella
pneumophila, can form in the potable water distribution system if certain
minimum water temperatures are not maintained. Contact your local
health department for more information.
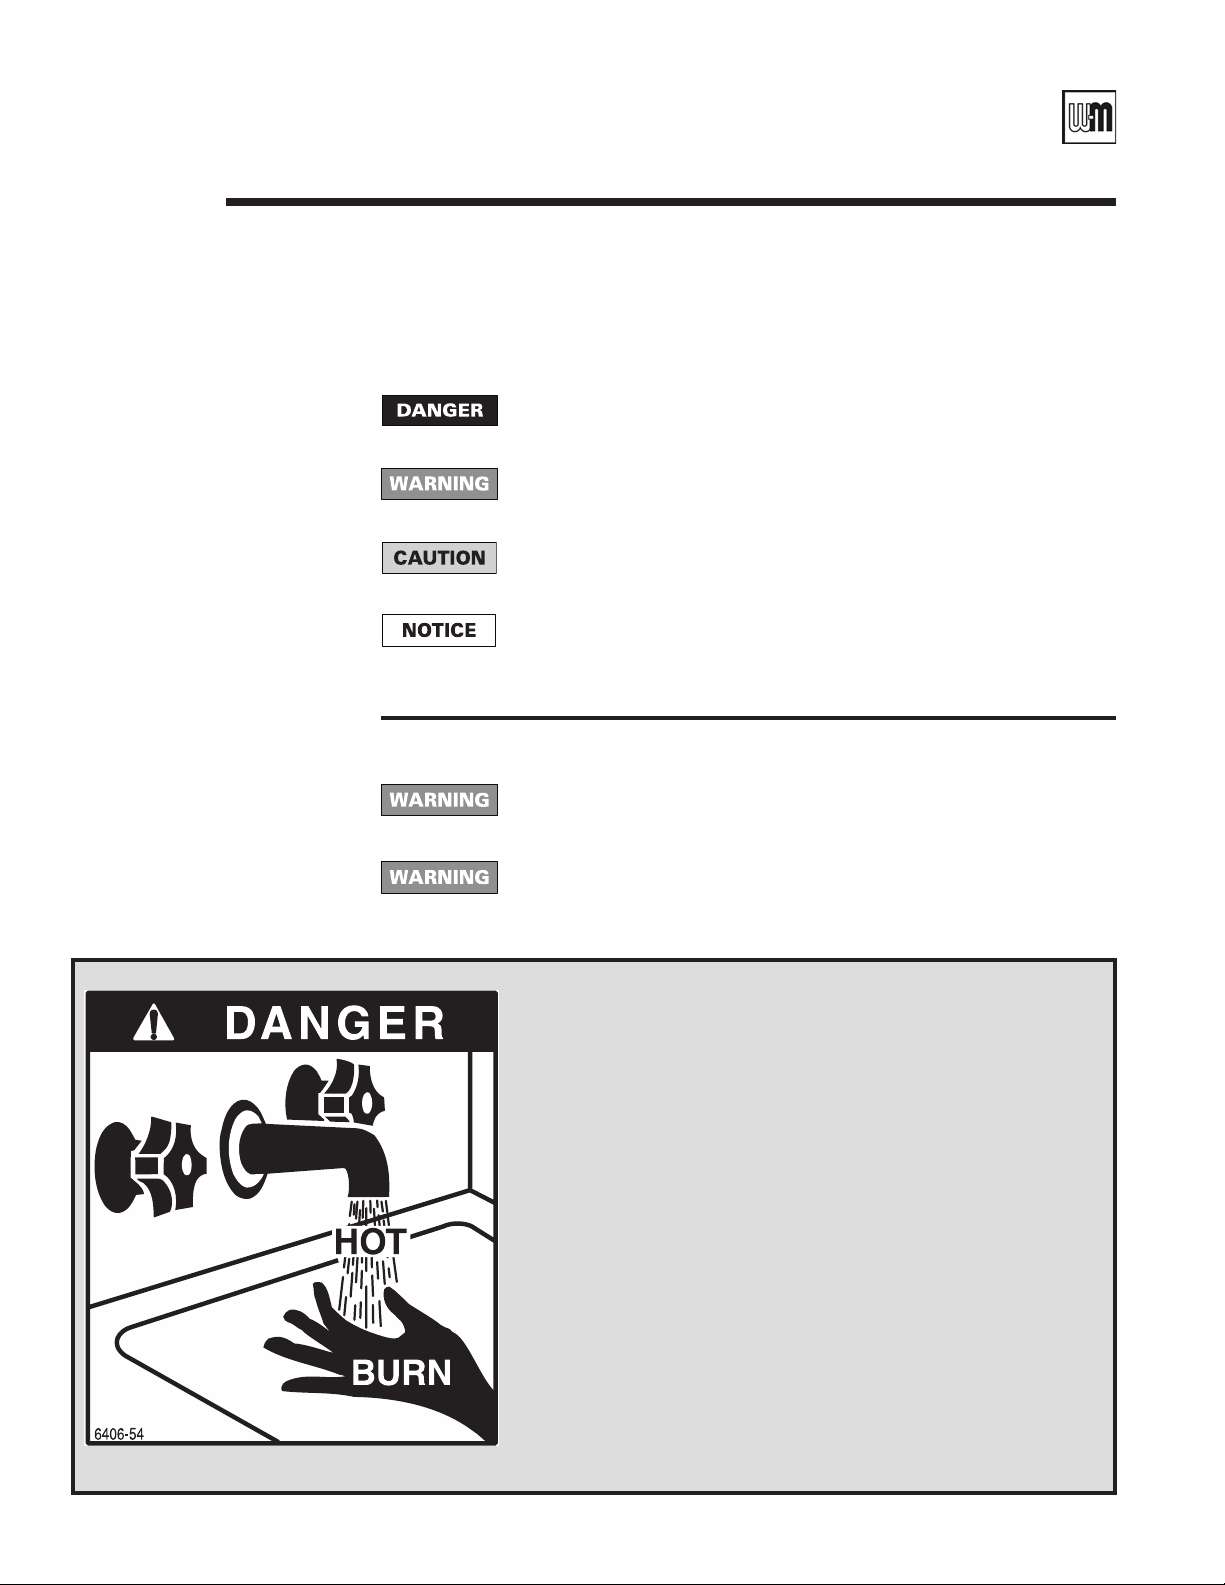
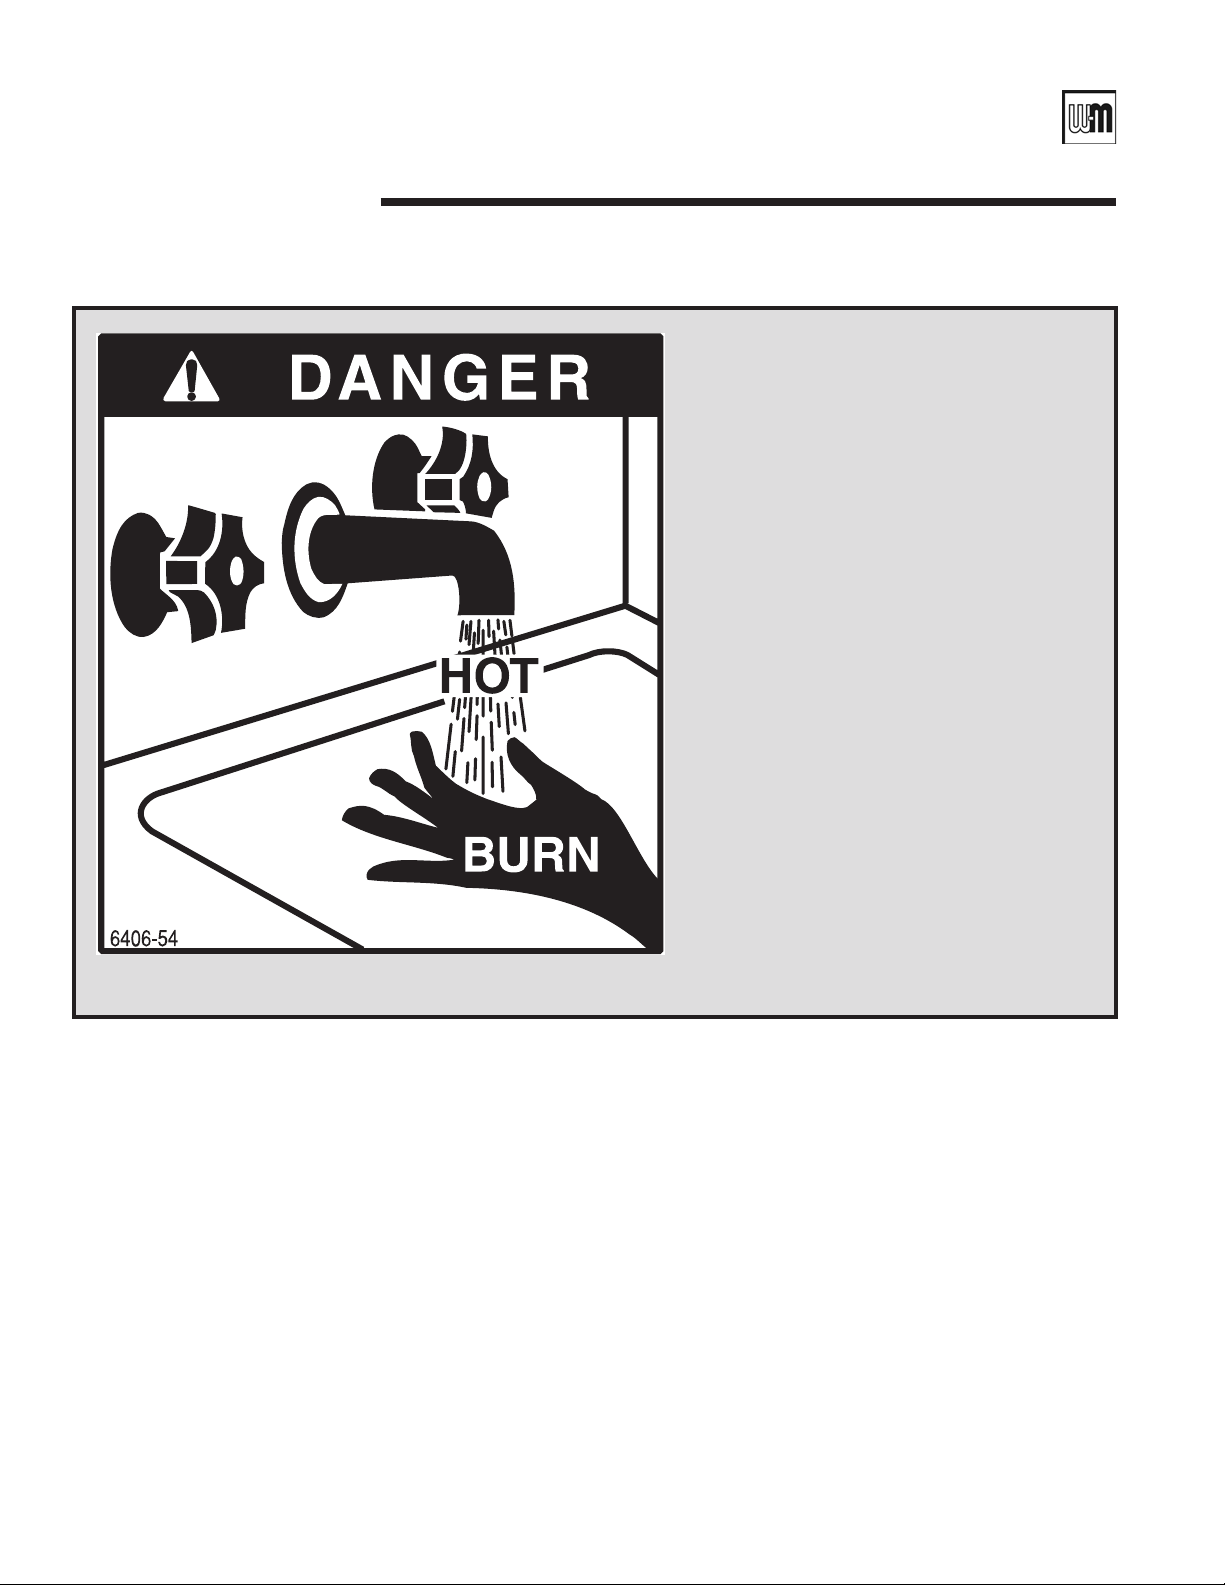
Hot Water Can Scald!
• Water heated to temperature for clothes washing, dish washing and
other sanitizing needs can scald and cause permanent injury.
• Children, elderly, and infirm or physically handicapped persons are
more likely to be permanently injured by hot water. Never leave them
unattended in bathtub or shower. Never allow small children to use
a hot water tap or draw their own bath.
• If anyone using hot water in the building fits the above description,
or if state laws or local codes require certain water temperatures
at hot water taps, you must take special precautions:
• Use lowest possible temperature setting.
• Install some type of tempering device, such as an automatic
mixing valve, at hot water tap or water heater. Automatic
mixing valve must be selected and installed according to valve
manufacturer’s recommendations and instructions.
• Water passing out of drain valves may be extremely hot. To avoid
injury:
• Make sure all connections are tight.
• Direct water flow away from any person.
Protection Must Be Taken Against Excessive Temperature and Pressure!
— Installation of a Temperature & Pressure (T&P) relief valve is
required.
2
Part Number PLUS-E017-A/1206
Page 3

Manual • Installation • Start-Up • Usage • Maintenance • Parts
Contents
Overview
This manual contains six sections, A through F.
Sections A, E and F apply to ALL GOLD Plus 30, 40, 60 or 80; PLUS 40, 60,
or 80; and PLUS 100, 110, or 119 water heater installations, regardless of the boiler
used. Section A gives guidelines for domestic water connections to the water
heater. Section E lists replacement parts. Section F includes water heater dimensions and ratings.
Section B provides boiler-side piping, wiring and start-up information for instal-
lations with Gas-fired boilers only. Notice that ALL Gas-fired boiler
installations require primary/secondary piping, as shown in Part B.
Sections C and D provide boiler-side piping and wiring information for installa-
tions with all boilers except Gas.
A. GenerAl instAllAtion (All wAter heAters) ..........................6
A1. Pre-installation
Codes ............................................................................................................................ 6
Location ........................................................................................................................ 6
Recommended clearances ........................................................................................... 6
Operating restrictions ................................................................................................... 7
Code restrictions .......................................................................................................... 7
A2. Water heater piping
Temperature & pressure relief valve ........................................................................... 8
Air vent .......................................................................................................................... 8
Piping drawings and drain valve information ........................................................ 9-12
Thermal expansion ..................................................................................................... 13
Water hammer ............................................................................................................ 13
General piping information ........................................................................................ 13
Domestic water piping ............................................................................................... 14
Boiler water ................................................................................................................. 14
A3. Water heater wiring
Water heater thermostat connection ......................................................................... 15
A4. Water heater start-up
Filling the inner (domestic water) tank ...................................................................... 16
Filling the outer (boiler water) tank ............................................................................ 16
Start-up checklist ........................................................................................................ 17
A5. Adjusting water heater temperature
Safety warning and General notes ............................................................................ 18
Setting the thermostat — GOLD Plus 30/40/60/80 or Plus 40/60/80 ............... 19
Setting the thermostat — PLUS 100/110/119 ............................................................ 19
Part Number PLUS-E017-A/1206
A6. Water heater maintenance
Maintenance schedule — Annual service by qualified technician ........................... 20
Maintenance schedule — Homeowner’s monthly maintenance ............................. 20
Filling ........................................................................................................................... 21
Draining ....................................................................................................................... 21
Draining inner (domestic water) tank ........................................................................ 21
Draining outer (boiler water) tank .............................................................................. 21
A7. Recirculation and heat tracing
Maintaining domestic water temperature in the supply piping ............................... 22
Time delay at fixtures ................................................................................................. 22
(continued on next page)
3
Page 4

PLUS LINE
Contents continued
Indirect-Fired Water Heaters – Series 3
Balancing .................................................................................................................... 22
Components required ................................................................................................ 22
Connecting to the water heater ................................................................................. 22
B. GAs-fired Boiler ApplicAtions ..............................................24
B1. Install system water piping (space heating)
System water piping methods ................................................................................... 25
Boiler circulator .......................................................................................................... 25
Sizing space heating system piping .......................................................................... 25
Zoning with zone valves............................................................................................. 26
Zoning with circulators ............................................................................................... 27
B2. Install boiler-to-water heater piping
Combined space heating/water heating applications ............................................... 28
Dedicated water heating-only applications ............................................................... 28
B3. Field wiring — Gas-fired boilers only
Installation must comply with:................................................................................... 30
Line voltage connections ........................................................................................... 30
Wiring boiler circulator ............................................................................................... 30
Wiring water heater circulator ................................................................................... 30
Wiring a system circulator ......................................................................................... 31
Routing line voltage wiring ........................................................................................ 31
Low voltage connections ........................................................................................... 31
Room thermostat (space heating) ............................................................................. 31
Outdoor temperature sensor ..................................................................................... 31
Water heater thermostat ............................................................................................ 31
Additional limits .......................................................................................................... 31
B4. Start-up — Gas-fired boilers only
Follow boiler manual .................................................................................................. 33
Set space heating operation ...................................................................................... 33
Water heater operation .............................................................................................. 33
Water heater operation setup .................................................................................... 33
Verify space heating operation .................................................................................. 33
Verify water heater operation .................................................................................... 34
Operating information ................................................................................................ 34
Replace boiler jacket front door ................................................................................. 34
c. Boiler pipinG (except GAs) ......................................................35
Zoning with pumps
GOLD Plus 30/40/60/80 or
Two-pipe system piping — Figure 20........................................................................ 36
Primary/secondary piping — Figure 21 ..................................................................... 37
PLUS 100/110/119
Primary/secondary piping — Figure 22 ..................................................................... 38
Zoning with zone valves
Figure 23 (All water heater models) .......................................................................... 39
Dedicated boiler applications
GOLD Plus 30/40/60/80 or
Figure 24 ..................................................................................................................... 40
(continued on next page)
4
Plus 40/60/80
Plus 40/60/80
Part Number PLUS-E017-A/1206
Page 5

Manual • Installation • Start-Up • Usage • Maintenance • Parts
Contents continued
PLUS 100/110/119
Figure 25 ..................................................................................................................... 41
Multiple water heater applications
Multiple water heaters – water heater piping — Figures 26/27 ................................ 42
Boiler water piping for multiple water heaters — Figure 28 ..................................... 43
Steam boiler applications
Connecting water heater to steam boiler .................................................................. 44
Installation and start-up of water heaters connected to steam boilers .................... 44
Steam boiler application piping and wiring (Figure 29) ............................................
d. Boiler-side wirinG & controls (except GAs) .... 46
Wiring requirements ................................................................................................ 47
Wiring requirements — Circulators ........................................................................... 47
Wiring requirements — Zone Valves ......................................................................... 47
Boiler models requiring domestic priority with GOLD Plus 30 ................................ 47
45
Zoning with pumps:
Zoning with Weil-McLain circulator zone controller (WMCR)
• Weil-McLain circulator zone controller (Figure 30) ................................................ 48
Other options for for zoning with pumps
• Using priority zone pump (Figure 31) ..................................................................... 49
• Using pump relays • Domestic priority with priority relay (Figure 32) .............. 50
• Using pump relays • No domestic priority (Figure 33) ...................................... 51
• Pump relays • Priority with 3-way valve & priority relay (Figure 42) ................. 60
Zoning with zone valves:
Zoning with Weil-McLain zone valve controller (WMZV)
• Domestic priority optional (controller switch) (Figure 34) ..................................... 52
Zoning with 4-wire zone valves
• No domestic priority (Figure 35) ............................................................................. 53
• With or without domestic priority • Models 30/40/60/80 (Figure 37) ................ 55
• With domestic priority • PLUS 100/110/119 (Figure 39) .................................... 57
• With priority using 2-way priority valve • PLUS 100/110/119 (Figure 40) ......... 58
Zoning with 3-wire zone valves
• No domestic priority (Figure 36) ............................................................................. 54
• With or without domestic priority • Models 30/40/60/80 (Figure 38) ................ 56
• With domestic priority • PLUS 100/110/119 (Figure 39) .................................... 57
• With domestic priority using 2-way priority valve (Figure 41) .............................. 59
Part Number PLUS-E017-A/1206
e. replAcement pArts.........................................................................................61
GOLD Plus 30/40/60/80 or PLUS 40/60/80 .................................................. 62-63
PLUS 100/110/119 ................................................................................................. 64-65
f. wAter heAter dimensions & performAnce rAtinGs
Dimensions ................................................................................................................. 66
Performance ratings ................................................................................................... 67
Warranty ..................................................................................................................... 68
5
Page 6
PLUS LINE
A1 Pre-installation
Indirect-Fired Water Heaters – Series 3
Codes
Location
Recommended
clearances
Installation must conform with instructions in this manual and, where applicable:
• local, state, provincial, and national codes, laws, regulations and ordinances.
• in Canada — B149.1 or B149.2 Installation Code.
PLUS water heaters are exempt from ASME Section VIII, Division 1 Code construction per
Interpretation VIII-1-86-136. Check with local codes for applicability.
Where recommendations in this manual differ from local or national codes, local or national
codes take precedence.
This water heater is not intended for outdoor installation.
Select a convenient location for water heater, based on domestic and boiler piping hook-ups.
Keeping the distance between boiler and water heater short will:
• reduce piping heat loss.
• provide minimum friction loss.
Install water heater so if tank or any connections should leak, the water flow will not cause
damage to area near water heater, or to lower floors of structure. When such locations cannot
be avoided, install a suitable drain pan under water heater. Drain pans are available at your
local plumbing supply store.
This product is designed for vertical installation only.
Installation location must provide adequate clearances for servicing and proper operation of
the water heater.
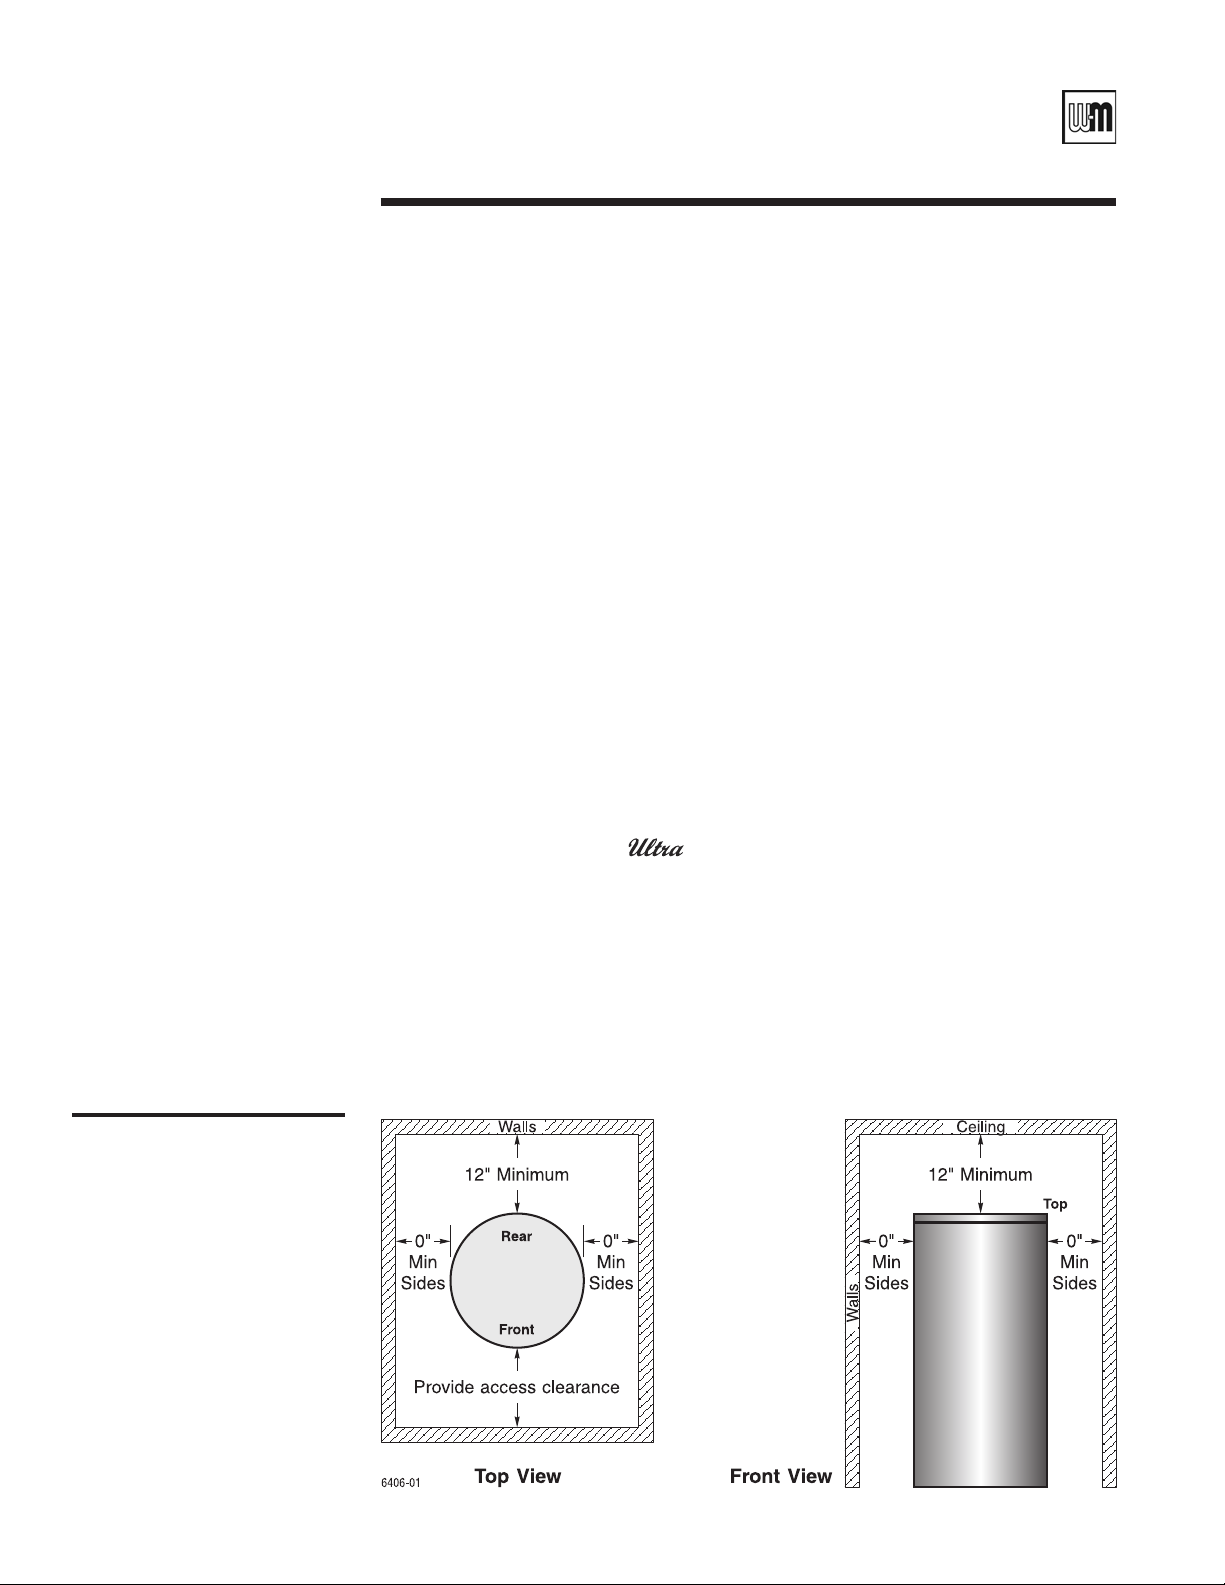
GOLD Plus 30/40/60/80 or Plus 40/60/80 (see Figure 1)
• Zero clearance is permissible to either side of water heater, but Instruction label or other
labels may be hidden.
• Top (vertical) clearance is 12” minimum.
• Refer to boiler manual for boiler clearances.
PLUS 100/110/119 (see Figure 1)
• Zero clearance is permissible to either side of the water heater, but Instruction label or
other labels may be hidden.
• Top (vertical) clearance is 12” minimum.
• Refer to boiler manual for boiler clearances.
Clearance recommendations
6
Figure 1
Part Number PLUS-E017-A/1206
Page 7

Manual • Installation • Start-Up • Usage • Maintenance • Parts
A1 Pre-installation continued
Operating
restrictions
Code restrictions
• Maximum domestic hot water temperature (Use only for special high-temperature
operational requirements
• 160°F for GOLD Plus 30/40/60/80 or Plus 40/60/80.
• 190°F for PLUS 100/110/119.
• Maximum boiler water temperature — 210°F.
• Maximum working pressure for inner (domestic water) tank — 150 psig.
• Maximum working pressure for outer (boiler water) tank — 45 psig.
• pH and chloride limits for water heaters are:
• chloride — less than 80 mg/l.
• pH — above 6 and less than 8.
National Standard Plumbing Code
Single wall heat exchanger in water heater complies with National Standard Plumbing Code,
provided that:
• boiler water (including additives) is practically non-toxic, having toxicity rating or class
of 1, as listed in Clinical Toxicology of Commercial Products, and
• boiler water pressure is limited to maximum 30 psig by approved relief valve.
Uniform Plumbing Code
Single-wall heat exchangers are permitted if they satisfy all of the following requirements —
1. The heat transfer medium is potable water or contains only substances which are recognized
as safe by the U. S. Food and Drug Administration.
2. The pressure of the heat transfer medium is maintained less than the normal minimum
operating pressure of the potable water system.
Exception: Steam complying with #1, above.
3. The equipment is permanently labeled to indicate that only additives recognized as safe
by the FDA shall be used in the heat transfer medium.
Other heat exchanger designs may be permitted where approved by the Administrative
Authority.
):
Part Number PLUS-E017-A/1206
7
Page 8

PLUS LINE
A2 Water heater piping
Indirect-Fired Water Heaters – Series 3
Temperature &
pressure (T & P)
relief valve
To reduce risk of excessive pressures and temperatures in water heater,
install temperature and pressure protective equipment required by local
codes, but no less than a combination temperature and pressure relief
valve certified by a nationally recognized testing laboratory that maintains periodic inspection of production of listed equipment or materials,
as meeting the requirements for Relief Valves and Automatic Gas Shutoff
Devices for Hot Water Supply Systems, ANSI Z21.22. This valve must be
marked with a maximum working pressure of the water heater.
1. Size T&P relief valve by the following specifications, unless they conflict with local
codes:
• GOLD Plus 30/40/60/80 or
100,000 BTU/hr, with a long element. Set to relieve at 150 psi. (Watts model 100XL-8
relief valve or equivalent.)
• PLUS 100/110/119: 3/4” NPT with an AGA Rating of 200,000 BTU/hr, with a long
element. Set to relieve at 150 psi. (Watts model 40XL-8 relief valve or equivalent.)
GOLD Plus, Plus and PLUS water heaters are exempt from ASME Section VIII per
Interpretation VIII-1-86-136. Consult local codes for applicability.
2. Installing T&P relief valve –
GOLD Plus 30/40/60/80 or Plus 40/60/80 (Page 9)
• Install T&P relief valve either:
a. in tapping marked AUX.
b. in run (straight through leg) of tee located at domestic hot water outlet of water
heater. (Required for the Commonwealth of Massachusetts.) Use a long element
T&P relief valve.
PLUS 100/110/119 (Page 11)
• Install T&P relief valve either:
a. in tapping marked
b. in run (straight through leg) of tee located at domestic hot water outlet of water
heater. (Required for the Commonwealth of Massachusetts.) Use a long element
T&P relief valve.
3. T&P relief valve discharge piping must be:
• made of material serviceable for temperatures of 250°F or greater.
• directed so that hot water flows away from all persons.
• directed to a suitable place for disposal.
• installed so as to allow complete draining of the T&P relief valve and discharge line.
T&P relief valve discharge piping must not be:
• excessively long. Using more than 2 elbows or 15 feet of piping can reduce discharge
capacity.
• directly connected to a drain. Terminate discharge piping within 6” from floor. Refer
to local codes.
• plugged, reduced or restricted.
Do not install any valve between T&P relief valve and tank connection,
or on T&P relief valve discharge piping. Do not plug T&P relief valve or
discharge piping. Improper placement and piping of T&P relief valve can
cause severe personal injury, death or substantial property damage.
AUX.
Plus 40/60/80: 3/4” NPT with an AGA Rating of
Air vent
1. Remove plastic shipping cap from 1/2” NPT pipe fitting on top of water heater.
2. Install automatic air vent provided with water heater, using suitable pipe dope or tape.
3. Unscrew vent cap on air vent one full turn. Leave cap unscrewed one turn for normal
venting.
8
The boiler-side piping must be equipped with a diaphragm- or bladder-
type expansion tank, NOT a closed-type expansion tank.
Part Number PLUS-E017-A/1206
Page 9
Manual • Installation • Start-Up • Usage • Maintenance • Parts
Water heater piping continuedA2
Figure 2
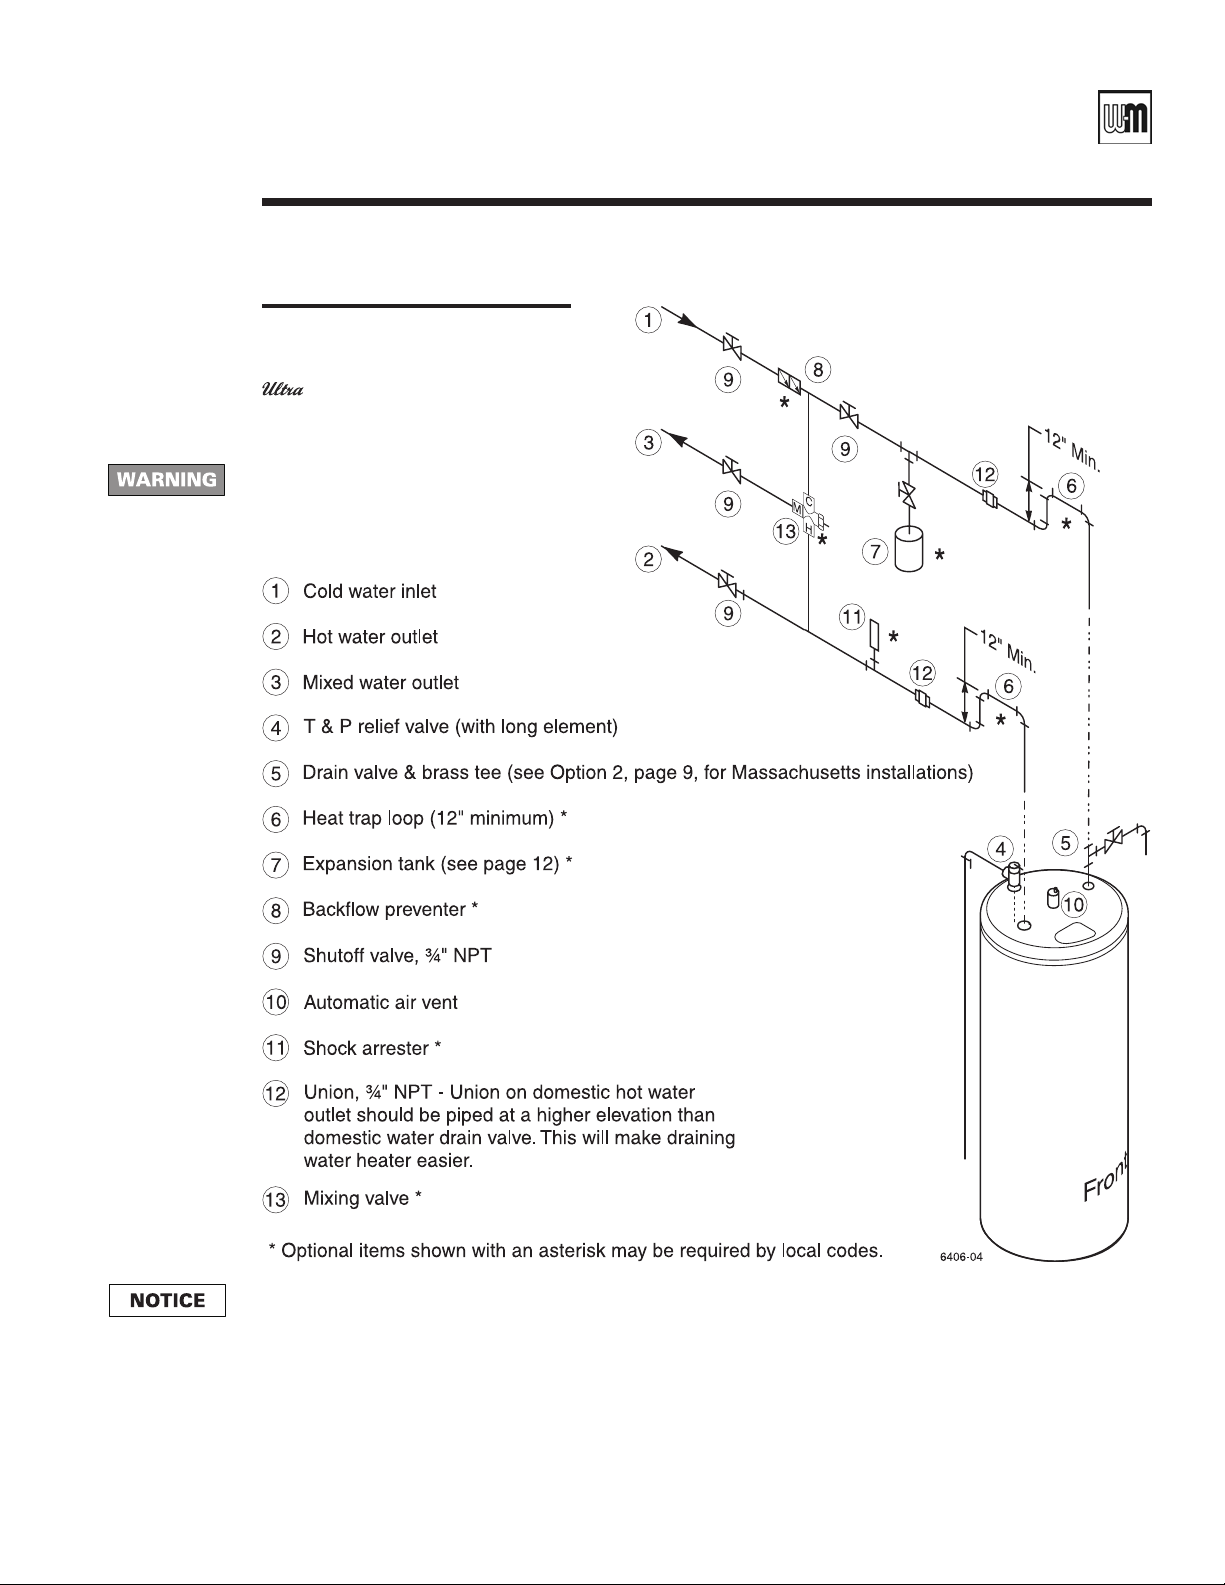
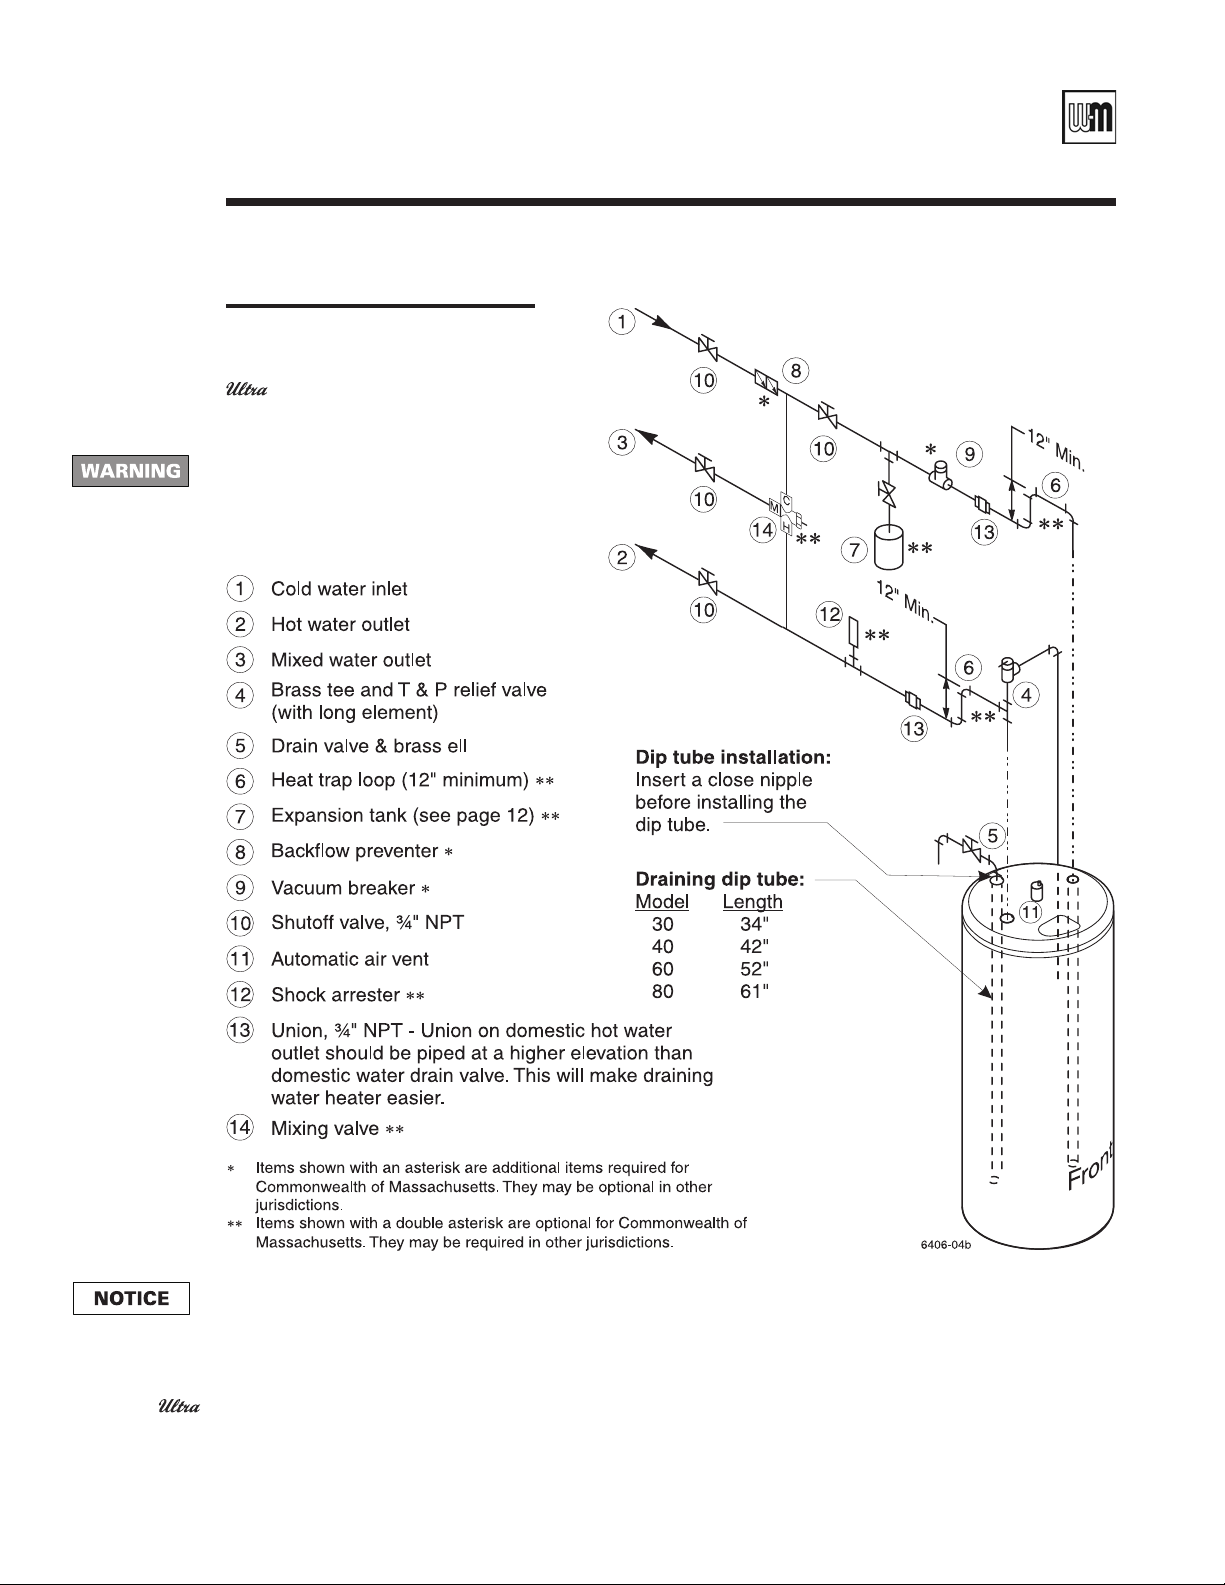
Piping — OPTION 1
GOLD Plus 30/40/60/80 or
Plus 40/60/80
(See Figure 3, page 10, for Option 2,
required for Massachusetts)
An expansion tank may be required on
the DHW piping. See Thermal expansion
WARNING on page 13. Failure to comply
could result in severe personal injury,
death or substantial property damage.
When the water supply pressure is higher than 70 psig, install a pressure-reducing valve on the cold water supply
line to prevent leakage from the T & P relief valve.
Drain valve
GOLD Plus 30/40/60/80
Option 1
Part Number PLUS-E017-A/1206
Apply the following and Figure 2 to water heaters other than those installed in Massachusetts.
For Commonwealth of Massachusetts installations, see Option 2, Figure 3, page 9.
1. Install the ¾” NPT brass tee (supplied with water heater) in the domestic water inlet piping
using suitable pipe dope or tape, located as shown in Figure 2.
2. Pipe the drain valve off of the brass tee as shown in Figure 2, using suitable pipe dope or
tape.
3. For jurisdictions requiring a vacuum breaker, use the piping shown in Figure 3, page 9,
(Option 2).
9
Page 10
PLUS LINE
Water heater piping continuedA2
Figure 3
Piping — OPTION 2
Models 30/40/60/80 or
Plus 40/60/80
(Required for Commonwealth of
Massachusetts)
An expansion tank may be required on
the DHW piping. See Thermal expansion WARNING on page 13. Failure to
comply could result in severe personal
injury, death or substantial property
damage.
Indirect-Fired Water Heaters – Series 3
When the water supply pressure is higher than 70 psig, install a pressure-reducing valve on the cold water supply
line to prevent leakage from the T & P relief valve.
Drain valve
GOLD Plus 30/40/60/80
or Plus 40/60/80
Option 2
10
Apply the following and Figure 3 to water heaters installed in Massachusetts. The drain valve
is mounted in the AUX tapping on top of the water heater.
1. Insert a close nipple and then an open-ended “draining” dip tube into the AUX tapping
on top of the heater.
2. Connect a ¾” NPT elbow to the AUX tapping, using suitable pipe dope or tape.
3. Pipe the drain valve (supplied with water heater) to the elbow, using suitable pipe dope or
tape, as shown in Figure 3.
4. Pipe the T & P relief valve in the run of the ¾” NPT brass tee (supplied with heater), located
in the domestic water outlet piping as shown in Figure 3.
Part Number PLUS-E017-A/1206
Page 11
Manual • Installation • Start-Up • Usage • Maintenance • Parts
Water heater piping continuedA2
Figure 4
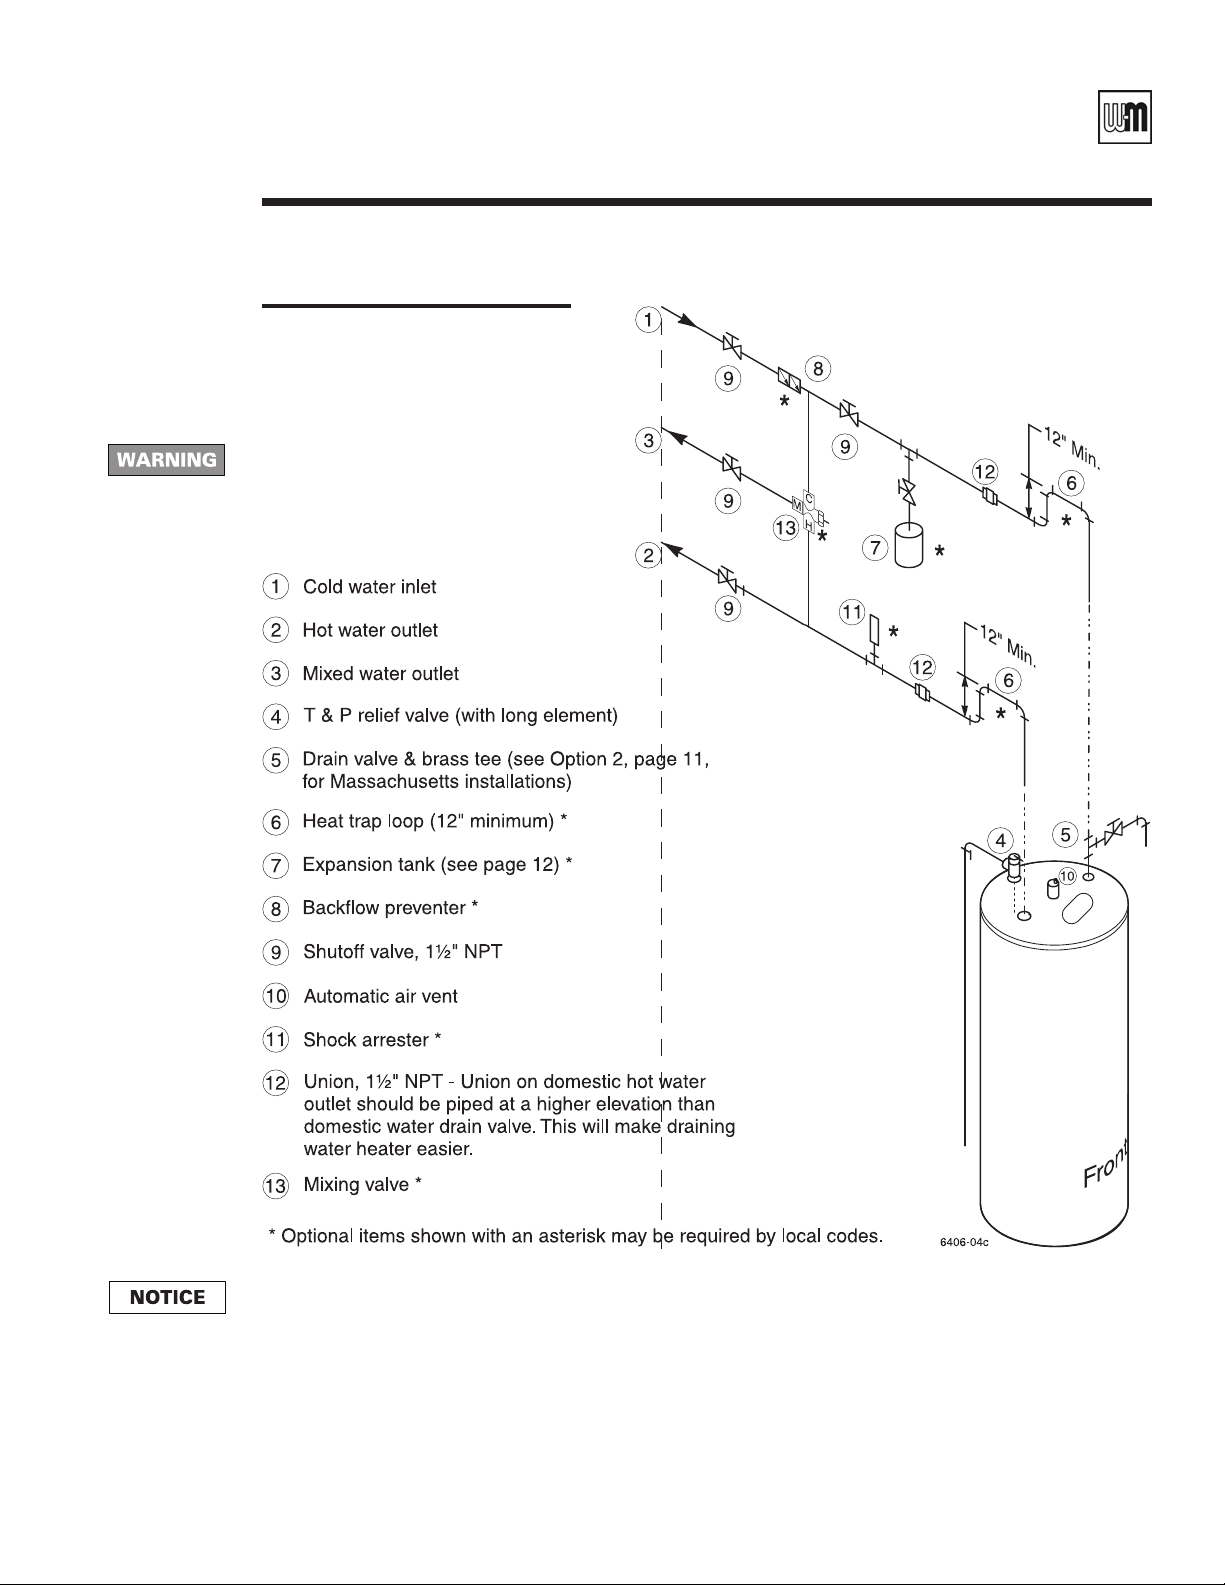
Piping — OPTION 1
PLUS 100/110/119
(See Figure 5, page 12, for OPTION 2,
required for Massachusetts)
An expansion tank may be required on
the DHW piping. See Thermal expansion WARNING on page 13. Failure to
comply could result in severe personal
injury, death or substantial property
damage.
When the water supply pressure is higher than 70 psig, install a pressure-reducing valve on the cold water supply
line to prevent leakage from the T & P relief valve.
Drain valve
PLUS 100/110/119
Option 1
Part Number PLUS-E017-A/1206
Apply the following and Figure 4 to water heaters other than those installed in Massachusetts.
For Commonwealth of Massachusetts installations, see Option 2, Figure 5, page 11.
1. Install a brass tee in the domestic water inlet piping using suitable pipe dope or tape, located
as shown in Figure 4.
2. Pipe the drain valve off of the brass tee as shown in Figure 4, using suitable pipe dope or tape.
3. For jurisdictions requiring a vacuum breaker, use the piping shown in Figure 5, page 11
(Option 2).
4. Obtain brass tee and drain valve from local supplier.
11
Page 12

PLUS LINE
Water heater piping continuedA2
Figure 5
Piping — OPTION 2
PLUS 100/110/119
(Required for Commonwealth of
Massachusetts)
An expansion tank may be required on
the DHW piping. See Thermal expansion WARNING on page 13. Failure to
comply could result in severe personal
injury, death or substantial property
damage.
Indirect-Fired Water Heaters – Series 3
12
When the water supply pressure is higher than 70 psig, install a pressure-reducing valve on the cold water supply
line to prevent leakage from the T & P relief valve.
Drain valve
PLUS 100/110/119
Option 2
Apply the following and Figure 5 to water heaters installed in Massachusetts. The drain valve
is mounted in the AUX tapping on top of the water heater.
1. Insert an open-ended “draining” dip tube into the AUX tapping on top of the heater.
2. Connect a elbow to the AUX tapping, using suitable pipe dope or tape.
3. Pipe the drain valve to the elbow, using suitable pipe dope or tape, as shown in Figure 5.
4. Pipe the T & P relief valve in the run of the brass tee, located in the domestic water outlet
piping as shown in Figure 5.
5. Obtain brass tee and drain valve from local supplier.
Part Number PLUS-E017-A/1206
Page 13
Manual • Installation • Start-Up • Usage • Maintenance • Parts
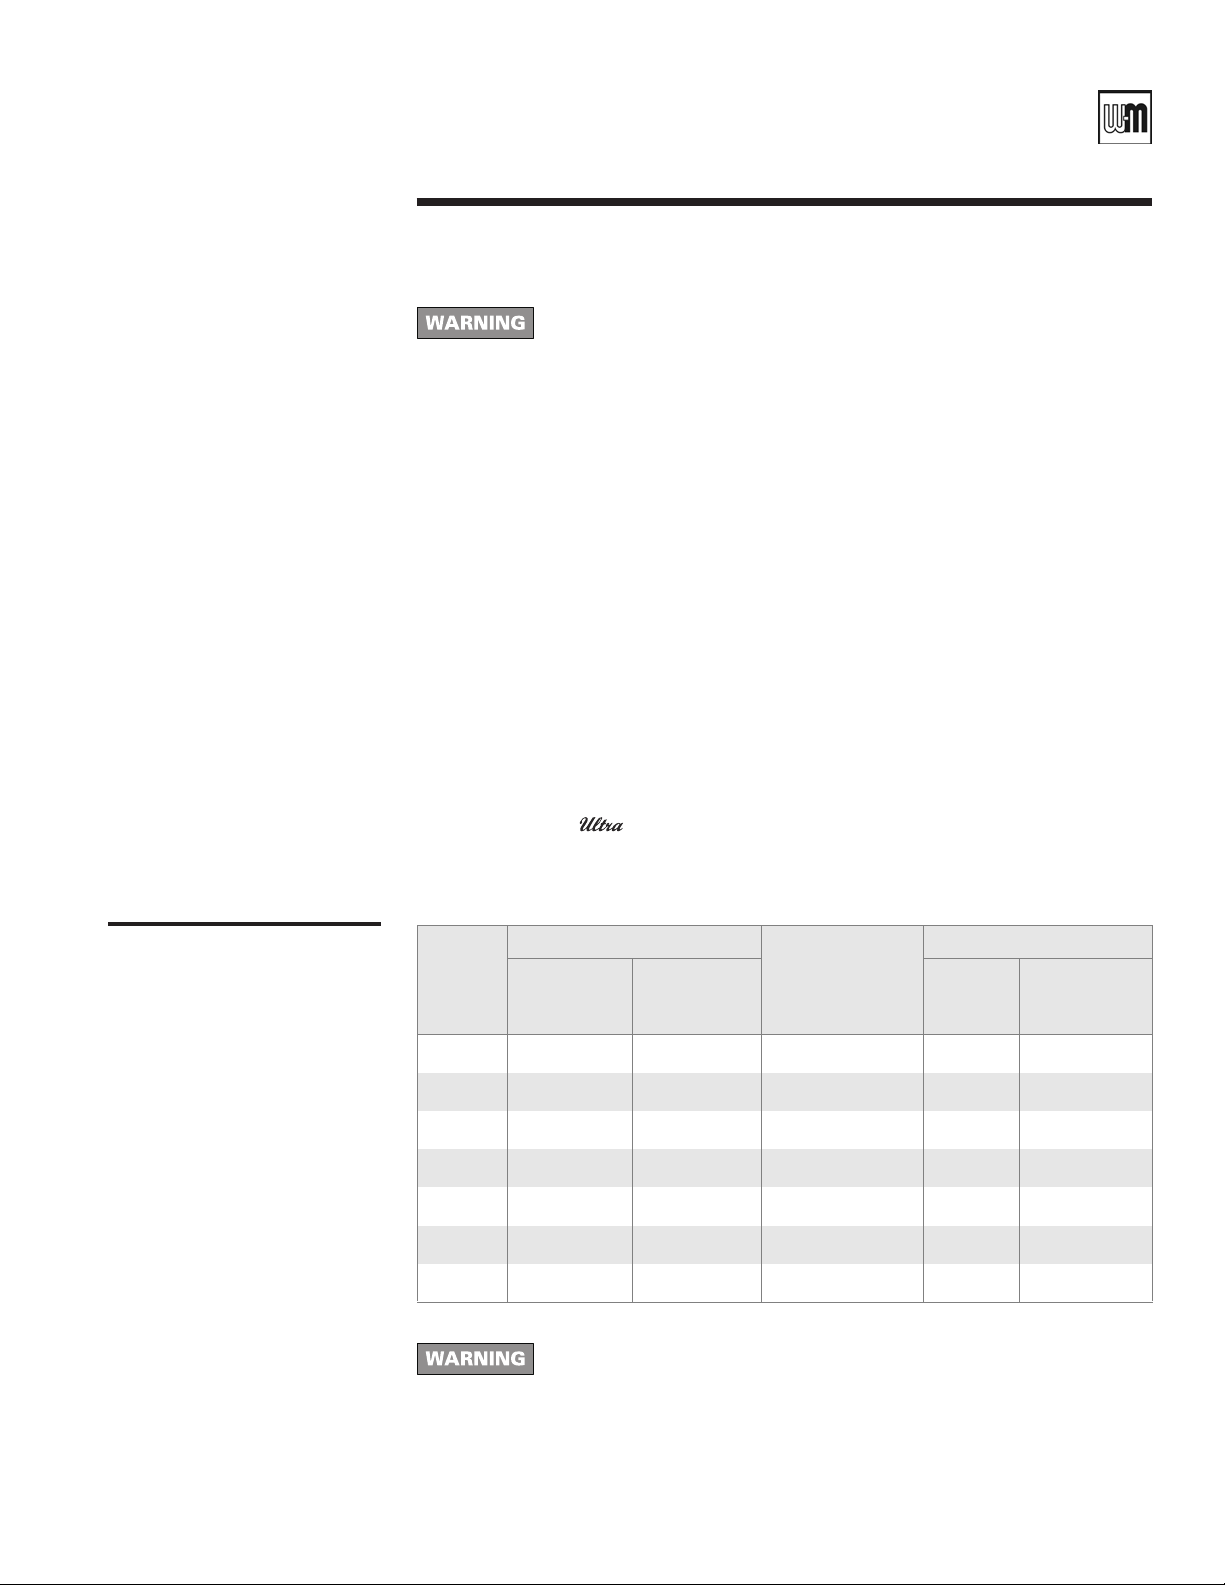
Water
Heater
Model
Connections Recommended
Piping Between
Water Heater
and Boiler
Recirculation Dip Tube
Domestic
Water
Inlet/Outlet
Boiler Water
Supply/
Return
Length
(inches)
Diameter
(inches)
30 ¾ 1 1 34 ¾
40 ¾ 1 1 42 ¾
60 ¾ 1 ¼ 1 ¼ 52 ¾
80 ¾ 1 ¼ 1 ½ 61 ¾
100 1 ½ 1 ½ 1 ½ 25 1 ½
110 1 ½ 1 ½ 1 ½ 32 1 ½
119 1 ½ 2 2 32 1 ½
A2
Thermal expansion
Water hammer
General piping
information
Water heater piping continued
If a backflow preventer, check valve, or pressure reducing valve is piped
on cold water inlet of water heater, you must install an expansion tank on
cold water supply line to prevent normal thermal expansion from repeatedly forcing open T&P relief valve. The T&P relief valve is not intended
Refer to expansion tank manufacturer’s instructions for proper sizing.
Failure to follow the above could result in severe personal injury, death or
Dishwashers, clothes washers, and fast-closing positive shutoff valves incorporated in the system
all contribute to creating water shock. Install a water hammer arrester to prevent damage to pipes
and appliances. See control manufacturer’s instructions for application and installation.
• For domestic water piping, see pages 8 through 12.
• See pages 22–23, for domestic water recirculation piping.
• See Table 1 for piping connections:
• All plumbing must meet or exceed all local, state and national plumbing codes.
• Use pipe dope or tape suitable for potable water.
• Use isolation valves to isolate system components.
• See Section B for Gas boiler and system piping or Sections C boiler and system piping
with other boilers.
for constant duty, such as relief of pressure due to repeated normal system
expansion.
substantial property damage.
Table 1
Piping (Inches NPT)
If domestic water-side pressure exceeds 70 psig, install a pressure
reducing valve to prevent pressure spikes. Higher pressures can cause the
heater pressure/temperature valve to lift or weep.
Part Number PLUS-E017-A/1206
13
Page 14

PLUS LINE
Indirect-Fired Water Heaters – Series 3
Water heater piping continuedA2
Domestic water
piping
Boiler water
• Union on domestic hot water outlet should be piped at a higher elevation than domestic
water drain valve. This will make draining water heater easier.
• Install unions for easy removal of water heater. Use dielectric unions or couplings to protect
hot and cold water fittings from corrosion when connecting dissimilar materials such as
copper and galvanized iron pipe.
• If copper pipe is used for domestic water connections, first solder pipe to a threaded adapter,
and then screw adapter into cold water inlet on top of water heater. Inlet contains an
internal plastic dip tube rated at 230°F, which can be damaged by heat from soldering.
• When the supply pressure is higher than 70 psig, install a pressure reducing valve on cold
water supply line to prevent water loss through T&P relief valve.
• If water heater will replace tankless coil in boiler,` disconnect piping to coil or remove coil
from boiler and replace with a cover plate. Allow water to drain from coil. Do not plug
tankless coil.
Plugging tankless coil inlet and outlet will result in severe personal injury,
death or substantial property damage.
• Boiler water (including additives) must be practically non-toxic, having toxicity rating or
class of 1, as listed in Clinical Toxicology of Commercial Products.
• If antifreeze is used in boiler system, local codes may require a backflow preventer on
cold water supply line. Use antifreeze specifically intended for hydronic heating systems.
Inhibited propylene glycol is recommended.
Do not use automotive, ethylene glycol or petroleum-based antifreeze. Do
not use any undiluted antifreeze. This can cause severe personal injury,
death or substantial property damage.
14
Part Number PLUS-E017-A/1206
Page 15
Manual • Installation • Start-Up • Usage • Maintenance • Parts
A3
Water heater
thermostat
connection
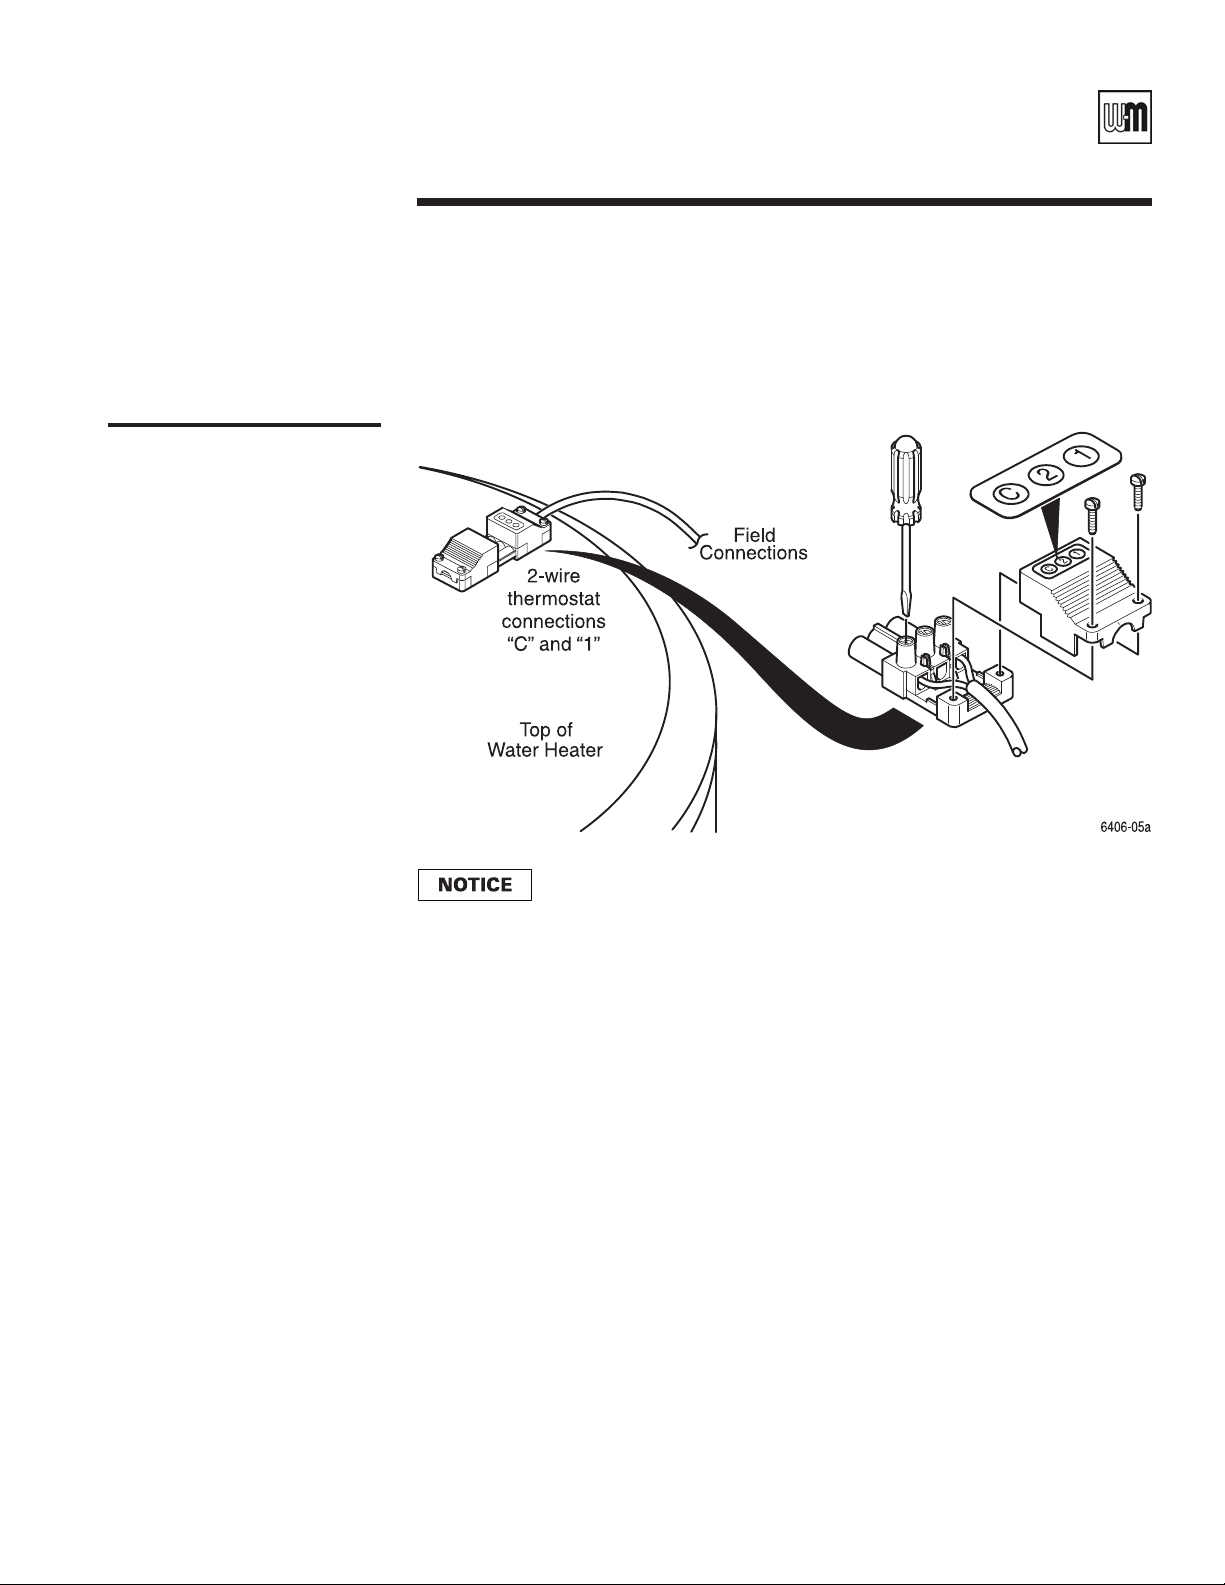
Figure 6
Thermostat connection
Water heater wiring
PLUS-Line indirect water heaters utilize a snap-set connector for easy wiring between water
heater thermostat and boiler controls (also see Section B or D). See Figure 6, below.
Terminal 1 of the snap-set is the normally-open contact; terminal 2 is the
normally-closed contact; terminal C is common.
Part Number PLUS-E017-A/1206
15
Page 16

PLUS LINE
A
B
Indirect-Fired Water Heaters – Series 3
A4
Filling the inner
(domestic water)
tank
Filling the outer
(boiler water) tank
Water heater start-up
• Inner tank must be completely filled and pressurized before pressurizing outer tank.
• Never use water heater unless inner and outer tanks are completely filled
with water.
1. Close domestic water drain valve.
2. Open domestic water isolation valves for water heater.
3. Vent air from inner (domestic water) tank by opening nearest hot water faucet. Fill domestic
water tank completely by allowing water to run until there is a constant flow of water.
4. Close hot water faucet.
• Inner tank must be completely filled and pressurized before pressurizing outer tank.
• Never use water heater unless inner and outer tanks are completely filled
with water.
1. Close boiler water drain valve at boiler water outlet of water heater.
2. Open water heater’s boiler water isolation valves.
3. Allow air to escape from outer (boiler water) tank by opening cap “A” (see Figure 7) on
automatic air vent, located on top of water heater. See the NOTICE below.
Figure 7
Open cap on air vent to allow air
to escape from outer tank
16
For proper operation of the water heater, always leave vent cap unscrewed
one full turn.
The boiler-side piping must be equipped with a diaphragm- or bladder-
type expansion tank, NOT a closed-type expansion tank.
4. Follow instructions furnished with boiler to fill with water.
5. When tank is full, air will stop escaping, and air vent will close. If air vent does not seat
properly (i.e., water leaks out), remove cap “A”. Briefly push in valve “B” (see above) and
release it to clean valve seat. Screw cap “A” on completely, then unscrew one turn.
6. If antifreeze is used in boiler water, check concentration. Boiler water (including addi-
tives) must be practically non-toxic, having a toxicity rating of Class 1, as listed in Clinical
Toxicology of Commercial Products. Inhibited propylene glycol is recommended. Follow
antifreeze manufacturer’s instructions.
Do not use automotive, ethylene glycol or petroleum-based antifreeze. Do
not use any undiluted antifreeze. This can cause severe personal injury,
death or substantial property damage if ignored.
Part Number PLUS-E017-A/1206
Page 17

Manual • Installation • Start-Up • Usage • Maintenance • Parts
A4
Start-up checklist
Water heater start-up continued
❏ Long element T&P relief valve is properly installed and drain discharge is directed away
from all persons.
❏ Both inner and outer tanks are filled with water.
❏ All air has been bled from both domestic and boiler water systems.
❏ Automatic air vent is installed and cap is unscrewed one full turn.
❏ Cold and hot water lines are correctly connected to domestic water system.
❏ Supply and return piping from boiler is correctly connected to water heater.
❏ All wiring is installed correctly.
❏ Thermostat on water heater is set according to system requirements. See pages 18–19.
❏ Boiler and water heater are operating properly.
❏ Fittings and piping have been checked for leaks.
❏ Installer has reviewed the following sections with system maintainer:
• Water Heater Start-Up
• Adjusting Water Heater Temperature
• Water Heater Maintenance
Part Number PLUS-E017-A/1206
17
Page 18
PLUS LINE
Indirect-Fired Water Heaters – Series 3
Adjusting water heater temperatureA5
Hot Water Can Scald!
• Water temperature over 125°F can cause severe
burns instantly, or death from scalds.
• Feel water before bathing or showering.
• Consumer Product Safety Commission and
some states recommend temperature settings
of 130°F or less. Setting thermostat higher than
130°F setting will increase risk of scald injury and
can cause severe personal injury or death.
• Water heated to a temperature suitable for
clothes washing, dish washing and other sanitizing needs will scald and cause permanent
injury.
• Children and elderly, infirm, or physically handicapped persons are more likely to be injured by
hot water. Never leave them unattended in or near
a bathtub, shower or sink. Never allow small children to use a hot water faucet or draw their own
bath. If anyone using hot water in the building
fits this description, or if state laws or local codes
require certain water temperatures at hot water
faucets, take special precautions:
• Install an automatic mixing valve at water
heater or at each hot water faucet, bath, and
shower outlet. Selection and installation
must comply with valve manufacturer’s
recommendations and instructions.
• Use the lowest practical temperature setting.
• Check water temperature after any
adjustment. You must follow “Setting the
Thermostat” on page 19.
18
General notes
• Household water usage patterns will affect water
temperature at any faucet or shower. Occasionally
check temperature at each point of use, then adjust
thermostat accordingly. Always recheck temperature after adjusting thermostat.
• When hot water is used in repeated small quantities,
a “stacking” effect can develop in hot water tank.
The upper layer of water in tank can be much hotter
than lower layers.
• Lowering the thermostat setting or installing
automatic mixing valves as indicated in these instructions will reduce water temperature levels.
Consult your installer or service technician.
Part Number PLUS-E017-A/1206
Page 19
Manual • Installation • Start-Up • Usage • Maintenance • Parts
A5
Adjusting water heater temperature continued
Studies have indicated that dangerous bacteria, including legionella pneumophila, can form in the potable
water distribution system if certain minimum water temperatures are not maintained. Contact your local
health department for more information.
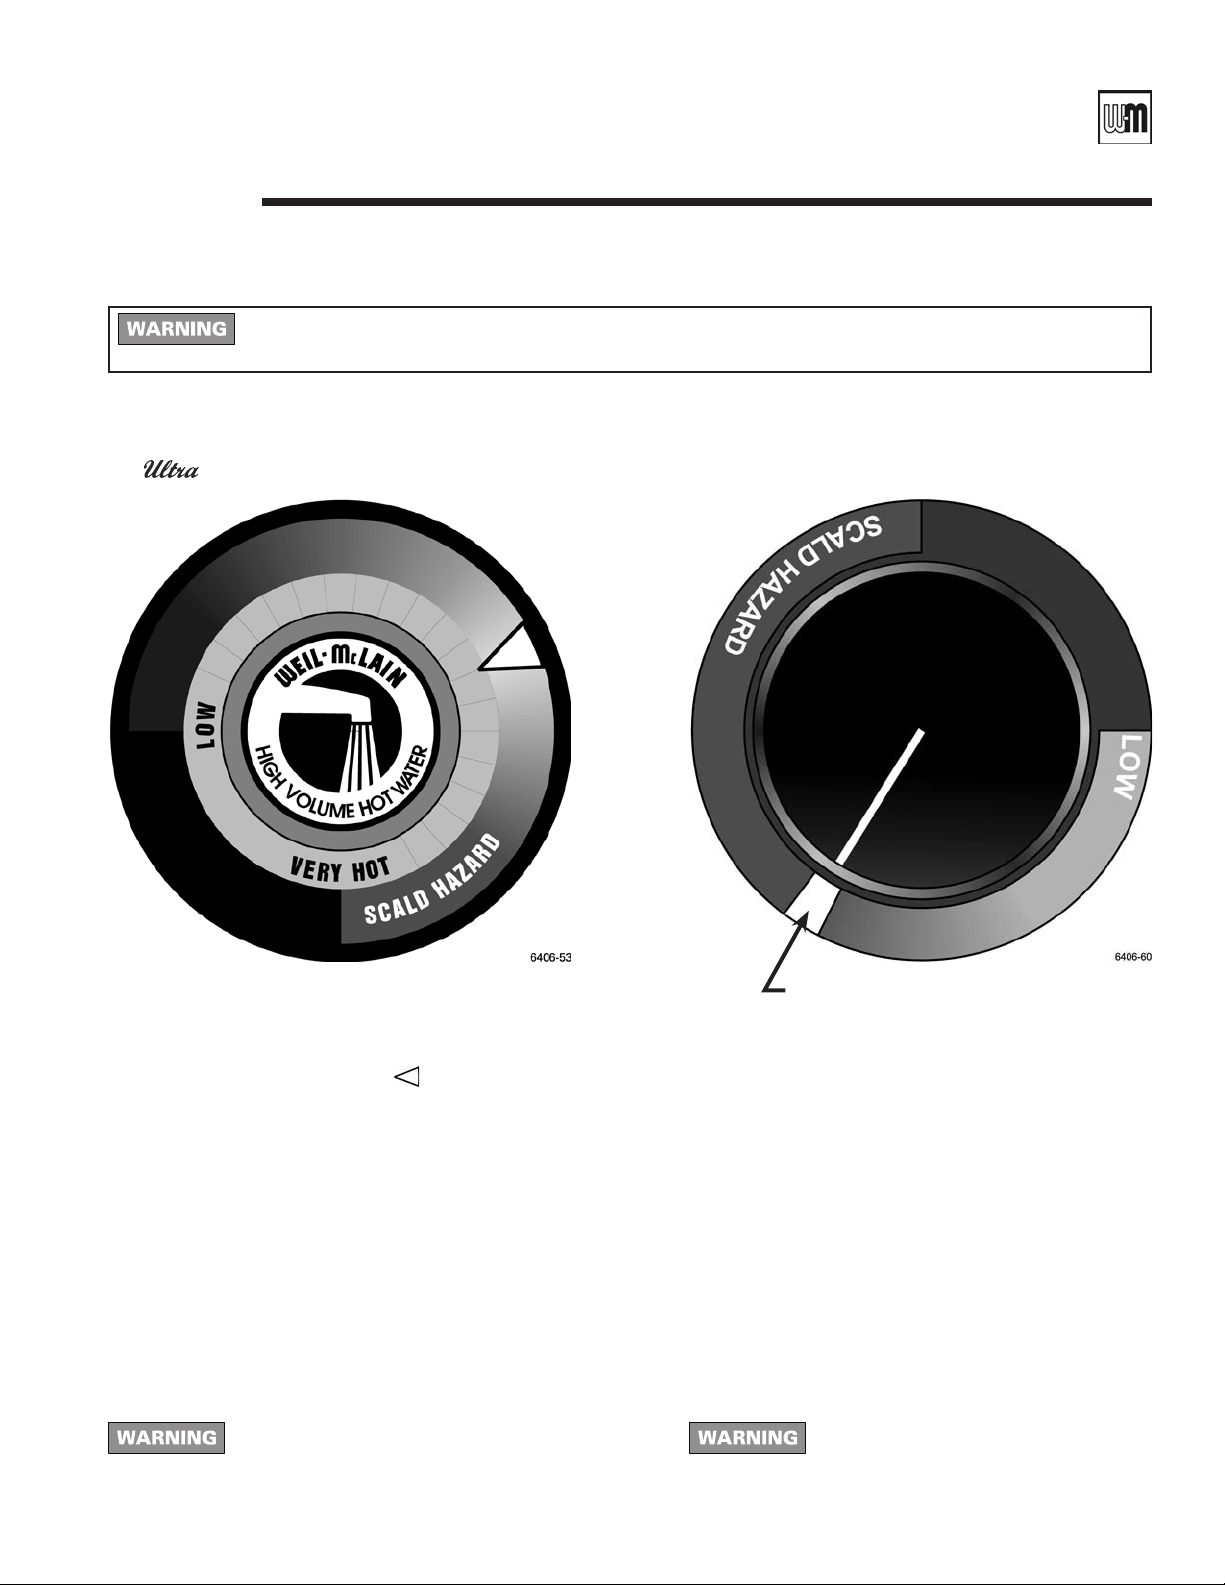
Setting the thermostat
GOLD Plus 30/40/60/80
or Plus 40/60/80
Setting the thermostat
PLUS 100/110/119
Water heater thermostat is factory set to its lowest temperature. The arrowhead indicator on the label is the
preferred starting point for setting temperature. This may
or may not be suitable for your needs.
Turn thermostat knob clockwise to increase water
temperature.
Turn thermostat knob counter-clockwise to reduce
water temperature.
When decreasing temperature setting, the stored hot water
must be used before checking temperature at faucet.
Check water temperature at a hot water faucet immediately
after first heating cycle. Further temperature adjustment
may be necessary as water heating system is used. Recheck
water temperature at faucet after adjustment.
When adjusting thermostat, be sure boiler limit control is
set a minimum 20°F higher.
At no time should boiler limit control be
set above 210°F. This can cause severe
personal injury, death or substantial
property damage if ignored.
Part Number PLUS-E017-A/1206
Factory Setting
Water heater thermostat is factory set to its lowest tem
perature. The white factory setting mark on the label is the
preferred starting point for setting temperature. This may
or may not be suitable for your needs.
Turn thermostat knob
temperature.
Turn thermostat knob counter-clockwise to reduce
water temperature.
When decreasing temperature setting, the stored hot water
must be used before checking temperature at faucet.
Check water temperature at a hot water faucet immediately
after first heating cycle. Further temperature adjustment
may be necessary as water heating system is used. Recheck
water temperature at faucet after adjustment.
When adjusting thermostat, be sure boiler limit control is
set a minimum 20°F higher.
At no time should boiler limit control be
clockwise to increase water
set above 210°F. This can cause severe
personal injury, death or substantial
property damage if ignored.
19
-
Page 20
PLUS LINE
6406-10
A
B
Indirect-Fired Water Heaters – Series 3
Water heater maintenanceA6
Maintenance
schedule – annual
service technician
Annual service by qualified service technician to include:
• Any procedures required by local codes.
• Check air vent operation.
• Verify system pressure. Air venting procedure may require adding water to bring system
up to pressure, typically 12 psig.
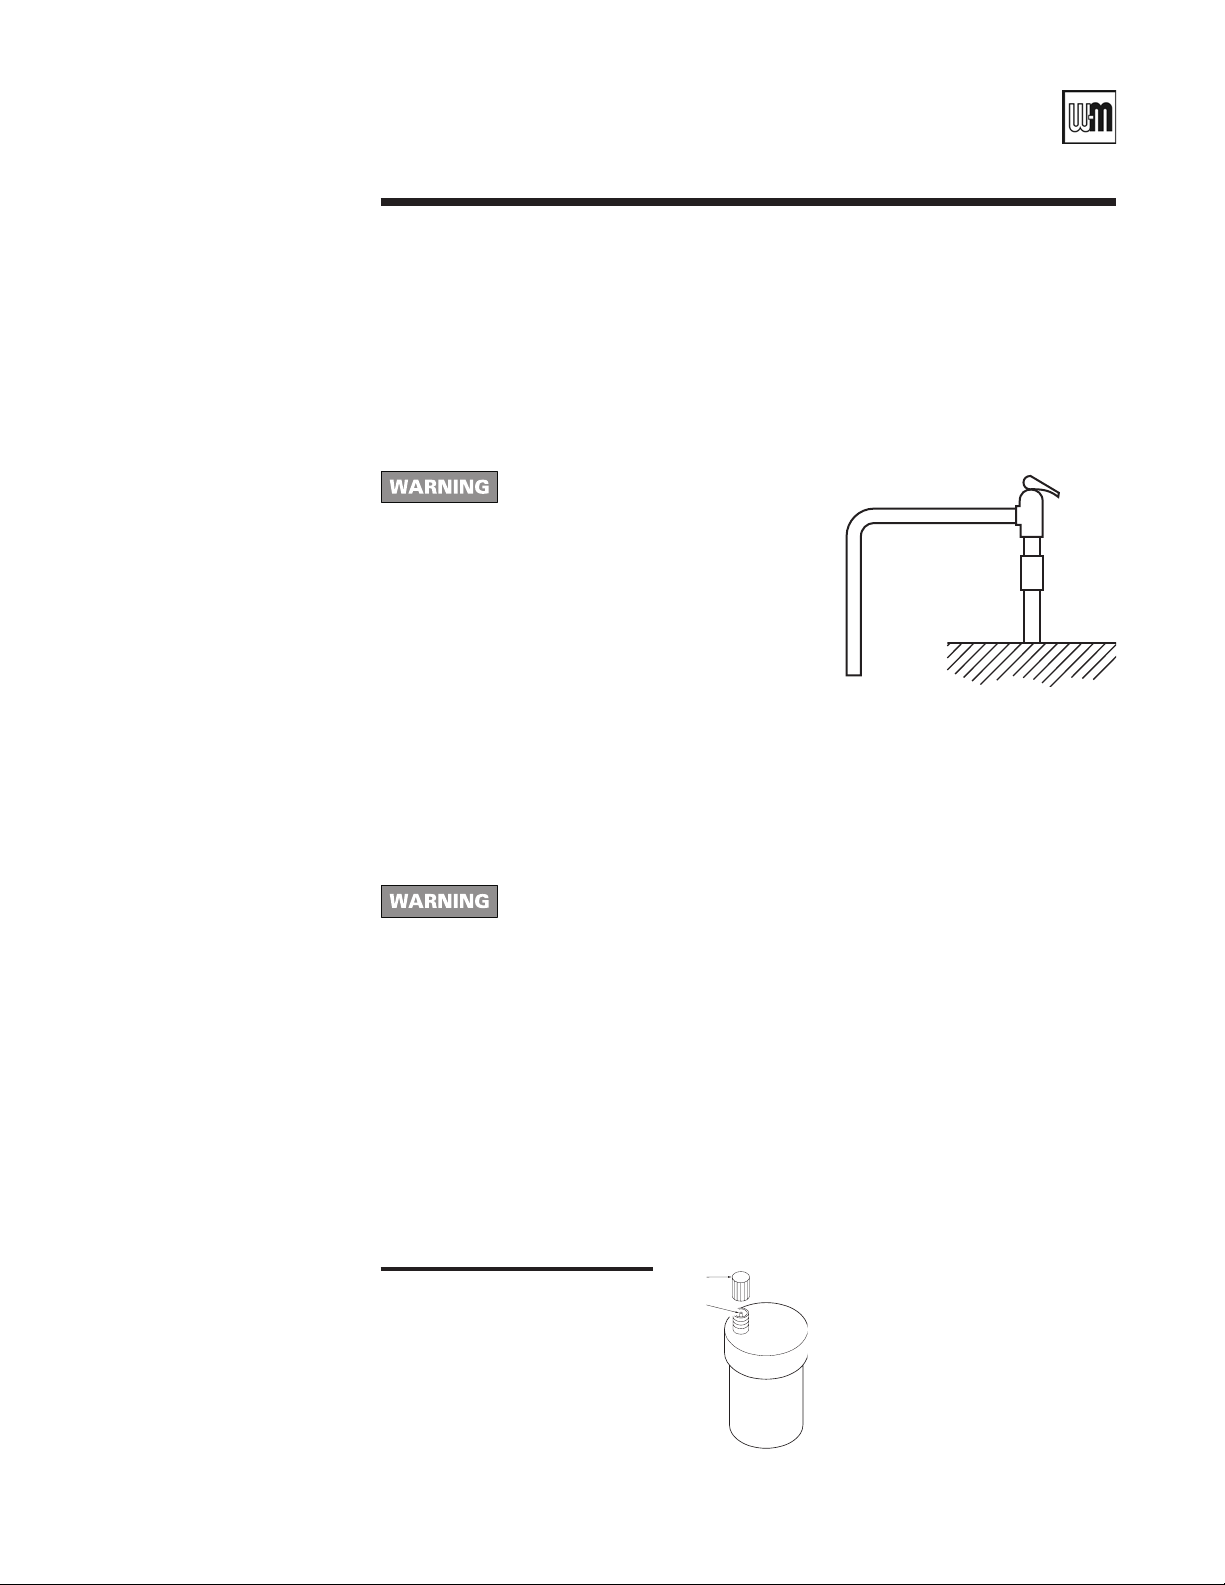
• Manually operate T&P relief valve at least once a year. This will release some hot water.
Before operating T&P relief valve,
make sure no one is in front of or
around T&P relief valve discharge
piping. Hot discharge water can
cause severe personal injury or
substantial property damage.
• Move operating lever to open position for a few seconds and then move it back,
allowing it to snap closed. After T&P relief valve is operated, if it continues to release
water, close cold water inlet to water heater immediately. Follow draining instructions,
and replace T&P relief valve. If T&P relief valve weeps periodically, it may be due to
thermal expansion (see “Thermal Expansion”, page 13). Do not plug T&P relief valve
or discharge piping.
Plugging T&P relief valve or discharge piping can cause excessive pres-
sure in water heater, resulting in severe personal injury, death or substantial
property damage.
• Follow instructions on circulator to oil it, if oil-lubricated.
• Check valves, pipes and fittings for leaks.
• Check function of field-installed controls and valves (see control manufacturer’s instructions).
• Review homeowner’s maintenance responsibilities and their frequencies, including any
not listed in the following paragraphs.
Maintenance
schedule – monthly
homeowner
20
Homeowner monthly maintenance to include:
• Check air vent operation:
• Automatic air vent — remove cap (see Figure 8). Briefly push in valve and release it to
clean valve seat. Screw cap on completely, then unscrew one turn. If air vent does not
operate, call qualified service technician.
Figure 8
Remove air vent cap to check
operation
• Visually check valves, pipes and fittings for leaks. Call qualified service technician to repair
leaks.
Part Number PLUS-E017-A/1206
Page 21

Manual • Installation • Start-Up • Usage • Maintenance • Parts
Water heater maintenance continuedA6
Filling
Draining
See Filling the Inner (Domestic Water) Tank, and Filling the Outer (Boiler Water) Tank,
on page 16.
Drain water heater if it will be shut off and exposed to freezing temperatures. Freezing water
will expand and may damage water heater.
If boiler water contains sufficient antifreeze, then only the domestic water needs to be
drained.
If boiler water does not contain sufficient antifreeze, then the boiler water and the domestic
water must be drained.
Close boiler water isolation valves and relieve pressure to below 15 psi in
outer tank before draining inner tank to prevent damage to inner tank.
If antifreeze is used in boiler water, check concentration. Boiler water (including additives)
must be practically non-toxic, having toxicity rating or class of 1, as listed in Clinical Toxicol-
ogy of Commercial Products. Inhibited propylene glycol is recommended. Follow antifreeze
manufacturer’s instructions.
Do not use automotive, ethylene glycol or petroleum-based antifreeze. Do
not use any undiluted antifreeze. This can cause severe personal injury,
death or substantial property damage if ignored.
Water from opened drain valves, unions and other connections may be
extremely hot. To avoid severe personal injury, death or substantial property
damage:
• Tighten all drain hose connections.
• Direct hot water away from all persons.
Draining inner
(domestic water)
tank
Draining outer
(boiler water) tank
See piping drawings, pages 9–12.
1. Disconnect power supply to water heater.
• If outer (boiler water) tank pressure is greater than 15 psig, relieve boiler pressure to
less than 15 psig, and close isolation valves before proceeding.
2. Close cold water supply isolation valve.
3. Remove cap and connect a hose to domestic water drain valve. Hose should extend to drain
at floor level to allow siphoning of domestic water tank.
4. Open union on domestic water outlet or hot water faucet at highest point above heater.
5. Open domestic water drain valve to start siphoning.
6. When draining is complete, close union or hot water faucet and domestic water drain
valve.
See piping drawings, pages 9–12.
1. Disconnect power supply to water heater.
2. Close boiler water isolation valves between water heater and boiler.
3. Connect hose to boiler water drain valve at water heater. Open and drain water to a safe
place.
4. To speed draining, loosen air vent on top of tank.
5. When draining is complete, close drain valve and retighten air vent.
Part Number PLUS-E017-A/1206
21
Page 22

PLUS LINE
Time in seconds required to get hot water at fixture (from ASPE)
Fixture flow rate (GPM) - 0.5 1.5 2.5 4.0
Piping length (feet) - 10 25 10 25 10 25 10 25
Copper pipe ½" 25 63 8 21 5 13 3 8
¾" 48 119 16 40 10 24 6 15
Steel pipe ½" 63 157 21 52 13 31 8 20
¾" 91 228 30 76 18 46 11 28
CPVC pipe ½" 64 159 21 53 13 62 8 20
¾" 95 238 32 79 19 48 12 30
NOTE: Select branch size and length for less than 31 seconds delay.
Recirculation and heat tracingA7
Indirect-Fired Water Heaters – Series 3
Maintaining domestic water temperature in the
supply piping
Two options are available to maintain supply temperature available at or
near the fixtures on storage water heating systems:
· Recirculation
Recirculation is used to reduce wait time for water use, to minimize
hot water and energy waste caused during the waiting period, and to
prevent degradation of the system supply water temperature. ASPE
recommends recirculation when the distance from the water heater
to the furthest fixture exceeds 100 feet or the time lag for hot water to
reach a fixture(s) exceeds 30 seconds. Consult local codes and American
Society of Plumbing Engineers (ASPE) Domestic Water Heating Design
Manual, 1998, for further information.
· Self-regulating heat tracing
Self-regulating heat tracing may be a better alternative than recircula
tion for residential and small commercial applications. Self-regulating
heat tracing uses electrical energy to maintain water temperature, but
it eliminates the need for return piping and components required in a
recirculation system.
Time delay at fixtures
Table 2 is from the ASPE Domestic Water Heating Design Manual, 1998. It
shows the time required for usable hot water to arrive at a fixture based on
the fixture flow rate (available from industry and manufacturer’s data) and
the length and diameter of the dead-end branch pipe supplying the fixture.
The time lag should generally not exceed 30 seconds. For residential and
office applications, the owner may prefer a limit of 10 seconds.
You can use Table 2 as a guide to determining the location of circula
tion return lines relative to fixtures.
These branches must be balanced to prevent pipe ero
sion and unacceptable time delays at some fixtures.
Balancing options include circuit setters, memory stop
valves or factory preset devices (with flow metering
provision in the piping).
Components required
For residential applications, consult pump manufacturer’s data for pump selection and additional components
required.
On most commercial systems, install the devices shown
in Figure 9, page 23, and any other devices or piping
methods required by local codes. The check valves
are required to prevent fixtures from taking hot water
-
through the return lines. Shutoff valves are needed to
allow cleaning and replacing balancing devices. Include
strainers to remove sediment which could damage the
pump and/or affect the flow balancing devices.
Size the pump and piping based on the temperature
drop allowed between the water available at the water
heater and the water delivered at the fixture. The return
piping will almost always be smaller than the supply
piping, but should never be smaller than ½” to prevent
problems with the pump.
Make provision for removal of air in all return lines.
Where the returns cannot be vented by topmost fixtures
in the system, install automatic air venting at the top
of the return piping.
-
Balancing
When multiple branches are connected to the supply piping, each branch
must be connected to the recirculation system. At each of these connec
tions to the return piping, install shutoff valves, a flow metering device,
check valve and a strainer as shown in Figure 9 on page 23. Check local
codes for specific installation requirements.
Table 2
Time lag to obtain hot water at
fixture for branch lengths of 10
(ASPE Domestic Water Heating Design Manual)
22
and 25 feet
Connecting to the water heater
Install a recirculation dip tube in the AUX tapping on
top of the water heater. This requires mounting the
T&P relief valve as shown for Option 2 in the piping
diagrams, pages 10 and 12. See Figure 10, page 23, for
the piping required to the water heater.
Part Number PLUS-E017-A/1206
Page 23

Manual • Installation • Start-Up • Usage • Maintenance • Parts
Figure 9
Recirculation components
Figure 10 Recirculation connection at water heater
Components
1 Circulator — Little flow is required to maintain a temperature in the piping. Size of
circulator depends on minimum flow requirements of the tempering valve. Minimum
flow rates of the tempering valve must be maintained.
2 Aquastat — Used to control the on-off position of the circulator. Aquastat is set 5° to
10° lower than mixed water outlet of the mixing valve (#7). The circulator cannot run
continuously as bypass through the mixing valve will eventually allow the temperature
on the piping to climb to the water heater temperature during draw periods.
3 – 6 Check valves — Assure the flow of water in one direction. Each check valve func-
tions as follows: #3 and #4 prevent bypass in the event of pressure drop, #5 prevents
thermal siphoning of hot water to the cold water supply, #6 prevents flow of cold water
to the tempered water supply. A draw of tempered water will not result in flow of cold
water into the return loop.
Operation
• During period of normal use (fixtures on) — Circulator is off. There is no flow through
#6, there is flow through #5 equal to the flow at the fixtures, there is flow through #3
and/or #4 equal to flow at fixture.
• When all fixtures are off — Circulator is off. There is no flow through #3, #4, #5 or #6.
Water temperature in piping is cooling.
Part Number PLUS-E017-A/1206
• When temperature at aquastat #2 falls 10° below temperature to be maintained
— Circulator is on. There is flow through #6 equal to the minimum required by the
mixing valve, flow through #3 and #4 equals the flow of the circulator. There is no flow
through #5.
• Aquastat reaches temperature — Circulator is off. There is no flow through #3, #4, #5
or #6.
Problems
• Missing check valves #3 or #4 — Extreme pressure drop can cause reverse flow of
water; hot to cold supply or cold to hot supply.
• Missing check valve #5 — Hot water can migrate from the water heater back through
the cold water supply.
• Missing check valve #6 — Cold water can be forced back through the tempered water
supply when a fixture is opened.
• No aquastat #2 — Pump runs continuously. Small amount of water will pass through
mixing valve. Eventually all hot water is flowing through valve. Recirculated water
through cold port, hot water through hot port.
• Circulator too small — Mixing valve performance erratic.
23
Page 24

PLUS LINE
B Gas-fired boiler applications
Indirect-Fired Water Heaters – Series 3
Overview
Follow the guidelines in this section to install Gas-fired boilers with PLUS or
PLUS indirect water heaters. Install the domestic water piping and water heater following
the guidelines of Section A. See Sections C and D for other boiler applications.
B1. Install system water piping
System water piping methods ................................................................................... 25
Boiler circulator .......................................................................................................... 25
Sizing space heating system piping .......................................................................... 25
Zoning with zone valves............................................................................................. 26
Zoning with circulators ............................................................................................... 27
Combined space heating/water heating applications ............................................... 28
Dedicated water heating-only applications ............................................................... 28
B2. Install boiler-to-water heater piping
Combined space heating/water heating applications ............................................... 28
Dedicated water heating-only applications ............................................................... 28
B3. Field wiring — Gas-fired boilers only
Installation must comply with:................................................................................... 30
Line voltage connections ........................................................................................... 30
Wiring boiler circulator ............................................................................................... 30
Wiring PLUS circulator ............................................................................................... 30
Wiring a system circulator ......................................................................................... 31
Routing line voltage wiring ........................................................................................ 31
Low voltage connections ........................................................................................... 31
Room thermostat (space heating) ............................................................................. 31
Outdoor temperature sensor ..................................................................................... 31
PLUS water heater thermostat ................................................................................... 31
Additional limits .......................................................................................................... 31
Gas
B4. Start-up — Gas-fired boilers only
Follow boiler manual .................................................................................................. 33
Set space heating operation ...................................................................................... 33
Water heater operation .............................................................................................. 33
Water heater operation setup .................................................................................... 33
Verify space heating operation .................................................................................. 33
Verify water heater operation .................................................................................... 34
Operating information ................................................................................................ 34
Replace boiler jacket front door ................................................................................. 34
24
Part Number PLUS-E017-A/1206
Page 25

Manual • Installation • Start-Up • Usage • Maintenance • Parts
Gas
B1
Install system water piping (space heating)
System water piping
methods
All piping methods shown in this manual
use primary/secondary connection to the
boiler loop. These designs ensure proper
flow through the Gas boiler, for
the most efficient and reliable operation
of the boiler and the heating system. For
other piping methods, consult your local
Weil-McLain representative or refer to
separate Gas boiler piping guides.
Wall-mounted boilers — Piping can exit
bottom of boiler enclosure. See separate
wall-mounting instructions for details.
Expansion tank and make-up
water
1. Ensure expansion tank size will handle boiler and
system water volume and temperature. Allow 3
gallons for the boiler and its piping.
Undersized expansion tanks cause system
water to be lost from relief valve and
make-up water to be added through fill
valve. Eventual boiler failure can result
due to excessive make-up water addition.
2. Tank must be located as shown in this supplement,
or following recognized design methods. See tank
manufacturer’s instructions for details.
3. Connect the expansion tank to the air separator
only if the separator is on the suction side of the
system circulator. Always install the system fill con
nection at the same point as the expansion tank
connection to the system.
4. The piping drawings in this manual show only
diaphragm expansion tanks. Use only bladder-type
or diaphragm-type tanks with PLUS indirect water
heater applications.
5. Refer to the
piping examples.
Diaphragm (or bladder) expansion tank
1. Always install an automatic air vent on top of the air
separator to remove residual air from the system.
2. See Figure 11 for correct location of the expansion
tank.
DO NOT USE a closed-type expansion tank
Boiler Manual for other system
Figure 11 Expansion tank piping
The boiler-side piping must be
equipped with a diaphragm- or
bladder-type expansion tank, NOT
a closed-type expansion tank. This
is necessary to allow venting air
from the top of the indirect water
heater boiler-side.
Boiler circulator
The boiler circulator is shipped loose. It must be located
in either the return or supply piping, as shown in the
appropriate piping diagram in this supplement or the
Boiler Manual.
DO NOT use the boiler circulator in any
-
location other than those shown in this
manual or the boiler manual. The boiler
circulator is selected to ensure adequate
flow through the boiler. Failure to
comply could result in unreliable performance and nuisance shutdowns from
insufficient flow.
Sizing space heat system
piping
1. See Figures 12 and 13, pages 26 and 27, or the
Gas Boiler Manual for recommended piping. In all
diagrams, the space heating system is isolated from
the boiler loop by the primary/secondary connection.
2. Size the piping and components in the space heating
Part Number PLUS-E017-A/1206
25
Page 26

PLUS LINE
Indirect-Fired Water Heaters – Series 3
Gas
B1
Install system water piping (space heating) (continued)
Zoning with zone valves
1. Connect boiler to system as shown in Figure 12
when zone valve zoning. The primary/secondary
piping shown ensures the boiler loop will have sufficient flow. It also avoids applying the high head
of the boiler circulator to the zone valves.
2. Connect water heater (domestic hot water) piping to indirect storage water heater as shown in
Section A of this manual.
The PhD Control Module turns off
space heating during water heater heating. The boiler circulator will turn off,
preventing hot water from circulating to
the system. The flow/check valve shown
on the boiler outlet piping prevents gravity circulation in the boiler loop during
water heater heating.
3. Controlling the system circulator
a. To cycle the system circulator from the PhD
control module, add a circulator relay wired to the
boiler circulator terminals as shown on page 30.
NOTE 1: To ensure adequate flow rate through the
boiler, use the following pipe size on all
boiler loop piping (connecting boiler to and
from the primary/secondary connection,
item 21):
-80 or -105 – 1” or larger.
-155 or -230 – 1¼” or larger.
-310 – 1½” or larger.
Figure 12 Zone valve zoning plus optional water
heater piping
26
Use at least the minimum piping size
above and pipe the boiler using only primary/secondary piping as shown. Failure
to follow these guidelines could result in
system problems.
Legend Figure 12
1 boiler
2 PLUS-Line indirect water heater
3 Boiler relief valve (see boiler manual for piping details)
4 Boiler relief valve discharge piping (see boiler manual for
details)
5 Water heater circulator (see page 7 for suggested
sizing)
6 Isolation valves
7 System circulator
8 Diaphragm (or bladder) type expansion tank (see page 3
for piping of closed-type expansion tank, if used)
9 Air separator [with automatic air vent only on systems
using diaphragm (or bladder) type expansion tank]
10 Flow/check valves (with weighted seats to prevent gravity
circulation)
11 Purge/drain valves
12 Boiler circulator
13 Zone valves, typical
20 Make-up water supply
21 Primary/secondary connection
Part Number PLUS-E017-A/1206
Page 27

Manual • Installation • Start-Up • Usage • Maintenance • Parts
Gas
B1
Install system water piping (space heating) (continued)
Zoning with circulators
1. Connect boiler to system as shown in Figure 13
when circulator zoning. The boiler circulator cannot be used for a zone. It must supply only the boiler
loop.
2. Install a separate circulator for each zone.
3. Connect water heater (domestic hot water) piping to indirect storage water heater as shown in
Section A of this manual.
The PhD Control Module turns off
space heating during water heater heating. The boiler circulator will turn off,
preventing hot water from circulating to
the system. The flow/check valve shown
on the boiler outlet piping prevents gravity circulation in the boiler loop during
water heater heating.
NOTE 1: To ensure adequate flow rate through the
boiler, use the following pipe size on all boiler
loop piping (connecting boiler to and from
the primary/secondary connection, item
21):
-80 or -105 – 1” or larger.
-155 or -230 – 1¼” or larger.
-310 – 1½” or larger.
Figure 13 Circulator zoning plus optional water
heater piping
Use at least the minimum piping size
above and pipe the boiler using only primary/secondary piping as shown. Failure
to follow these guidelines could result in
system problems.
Legend Figure 13
1 boiler
2 PLUS-Line indirect water heater
3 Boiler relief valve (see boiler manual for piping details)
4 Boiler relief valve discharge piping (see boiler manual for
details)
5 Water heater circulator (see page 7 for suggested sizing)
6 Isolation valves
7 System circulator
8 Diaphragm (or bladder) type expansion tank (see page 3
for piping of closed-type expansion tank, if used)
9 Air separator [with automatic air vent only on systems using
diaphragm (or bladder) type expansion tank]
10 Flow/check valves (with weighted seats to prevent gravity
circulation)
11 Purge/drain valves
12 Boiler circulator
14 Zone circulators, typical
20 Make-up water supply
21 Primary/secondary connection
Part Number PLUS-E017-A/1206
27
Page 28

PLUS LINE
Indirect-Fired Water Heaters – Series 3
Gas
B2
Install boiler-to-water heater piping
Combined space heating/water
heating applications
1. Figure 14 shows recommended piping between Gas
boiler and PLUS water heater. All show direct connection
of the water heater piping to the boiler because the boiler
circulator shuts down during water heater operation.
2. Table 3, page 29, uses the recommended flow rates for the
PLUS water heater and minimum flow rates for the
Gas boiler to provide recommended water heater piping
and circulator sizing. If using another circulator, verify it is
at least equal to the Taco selection given in Table 3, page 29.
For general information on head loss through boiler and
boiler-to-water heater piping, refer to the Gas Boiler
Manual.
3. Procedure:
Step 1: Select Gas Boiler model and water heater model
Step 2: Read recommended minimum flow rate, GPM, in
Step 3: Read across to find recommended minimum pipe size
Step 4: Read across to find recommended Taco circulator model.
in Table 3, page 29.
table.
for boiler-to-water heater piping.
Use a circulator with a pump curve at least equal to the
Taco circulator shown. See Figure 16, page 29 for pump
curves of typical Taco circulators.
Dedicated water heating-only
applications
1. Figure 15 shows recommended piping between Gas
Boiler and PLUS water heater for dedicated water-heating
only applications.
2. Pipe sizing:
Table 4, page 29, provides the recommended minimum pipe
size for boiler-to-water heater piping.
Circulator:
3.
Use the circulator recommended in Table 4, page 29. Install
the circulator as shown in Figure 15.
4. Procedure:
Step 1: Select Gas Boiler model and water heater
model in Table 4, page 29.
Step 2: Read flow rate expected using the circulator speci-
fied inthe last column.
Step 3: Size connecting piping as listed under “Boiler pip-
ing” in the table.
Figure 15 Boiler-to-water heater piping —
Dedicated water-heating only application
Figure 14 Boiler-to-water heater piping — Combined
space heating/water heating application
3 Boiler relief valve (see Boiler Manual for piping details)
4 Relief valve discharge piping (see Boiler Manual for details)
5 Water heater circulator — must be at least equal in capacity to circulator
recommended in Table 3, page 29
6 Isolation valves
10 Flow/check valve (with weighted seat to prevent gravity circulation)
11 Purge/drain valves
3 Boiler relief valve (see Boiler Manual for piping details)
4 Relief valve discharge piping (see Boiler Manual for details)
5 Water heater circulator — (see Table 4, page 29)
8 Expansion tank (diaphragm or bladder type)
6 Isolation valves
10 Flow/check valve (with weighted seat)
11 Purge/drain valve
20 Fill line to fill valve (item 23)
28
Part Number PLUS-E017-A/1206
Page 29

Manual • Installation • Start-Up • Usage • Maintenance • Parts
Boiler PLUS
Model
1st Hour
rating, GPH
Boiler
piping
Head losses, Feet w.c. DHW
Pump
115°F 140°F GPM
Rec.
size
Boiler Heater Piping TOTAL
Ultra-
80
40 160 124
6.6 1" 5.8 1.0 2.4 9.2 007
60 168 132
80 176 140
100 190 155
110 210 175
119 230 190
Ultra-
105
40 203 141
6.4 1" 5.9 1.0 2.3 9.3 007
60 211 162
80 219 170
100 230 185
110 250 205
119 270 225
Ultra-
155
40 238 153 8.7 1" 5.7 1.0 3 .9 10.6
0010
60 294 190 9.6 1¼" 7.1 1.0 2.3 10.5
80 302 230
10.8 1¼" 9.0 1.0 2.8 12.8 0012
100 315 245
110 335 265
119 355 285
Ultra-
230
40 248 160
12.0 1¼" 8.2 1.0 3.4 12.6 0012
60 330 196
80 411 305
13.5 1¼" 10.0 1.0 4.2 15.2 0014
100 440 335
110 460 355
119 480 375
Ultra-
310
40 254 164 15.0 1¼" 6.0 1.0 5.1 12.1 0012
60 351 208 18.6 1½" 8.5 1.0 3.3 12.8 0011
80 579 373
22.0 1½" 11.2 1.0 4.5 16.6 0013
100 440 335
110 460 355
119 480 375
Boiler PLUS
Model
1st Hour
rating, GPH
Boiler
piping
Head losses, Feet w.c. Circ.
115°F 140°F GPM
Rec.
size
Boiler Heater Piping TOTAL
Ultra-
80
40 160 124
6.6 1" 5.8 1.0 2.4 9.2 007
60 168 132
80 176 140
100 190 155
110 210 175
119 230 190
Ultra-
105
40 203 141
6.4 1" 5.9 1.0 2.3 9.2 007
60 211 162
80 219 170
100 230 185
110 250 205
119 270 225
Ultra-
155
40 250 160
12.1 1¼” 11.4 1.0 4.5 16.9 0014
60 295 220
80 305 230
100 315 245
110 335 265
119 355 285
Ultra-
230
40 240 170
13.5 1¼” 10.0 1.0 5.2 16.2 0014
60 335 220
80 430 325
100 440 335
110 460 355
119 480 375
Ultra-
310
40 240 170
18.3 1½” 8.3 1.0 4.2 13.5 0014
60 335 220
80 580 410
100 590 435
110 610 465
119 630 485
Table 3
The following ratings are for Ultra Gas boilers only, with supply water temperature at 190°F.
For boilers other than Ultra Gas, see page 67 for ratings.
Combined space heating/water
heating (see Notes)
Table 4
Dedicated water-heating, using circulator
supplied with boiler (see Notes)
Gas
Notes Tables 3 and 4
1. First hour ratings in Tables 3 and 4 are based
on:
• 115°F or 140°F domestic outlet water supply
temperature from water heater.
• 50°F domestic water inlet temperature.
• 190°F boiler water temperature leaving
Gas boiler.
• Circulator and pipe sizes as given in the
Tables.
2. If the net Btu/hr rating of the boiler is close to
the space heating load (for combined systems)
— or if there is an unusually large demand for
domestic water — increased boiler capacity
may be required.
Part Number PLUS-E017-A/1206
Figure 16 Pump curves for Taco circulators
29
Page 30

PLUS LINE
Field wiring — Gas boilers onlyB3
Indirect-Fired Water Heaters – Series 3
Gas
ELECTRICAL SHOCK HAZARD
— For your safety, turn off electrical
power supply at service entrance panel
before making any electrical connections
to avoid possible electric shock hazard.
Failure to do so can cause severe personal
injury or death.
Wiring must be N.E.C. Class 1.
If original wiring as supplied with boiler
must be replaced, use only type 105 °C
wire or equivalent.
Boiler must be electrically grounded as
required by National Electrical Code
ANSI/NFPA 70 – latest edition.
Installation must comply with:
1. National Electrical Code and any other national,
state, provincial or local codes or regulations.
2. In Canada, CSA C22.1 Canadian Electrical Code
Part 1, and any local codes.
Line voltage connections
1. Connect 120 VAC power wiring to line voltage
terminal strip in left compartment of electrical
entrance, as shown in Figure 17, item 1.
2. Provide and install a fused disconnect or service
switch (15 amp. recommended) as required by the
code. (See Figure 17, item 2)
Wiring boiler circulator
1. The Taco 0011 circulator supplied with the boiler is
wired one of two locations, depending on whether
system is combined space heating/water heating or
dedicated water-heating only. Boiler circulator is
shipped loose. Wire Boiler circulator to terminals
(refer to Figure 17):
a. Combined system: terminals 5, 6, and 7 (installed as
Figure 17, item 3).
b. Dedicated system: terminals 3, 4, and ground wire nut
(installed as Figure 17, item 5).
Wiring water heater circulator
1. For combined systems, connect water heater circulator to line voltage terminal strip terminals 3 and
4 and ground wire nut. See Figure 17.
Figure 17 Line voltage field wiring connections (service switch provided by installer)
30
Part Number PLUS-E017-A/1206
Page 31

Manual • Installation • Start-Up • Usage • Maintenance • Parts
Field wiring — Gas boilers only (continued)B3
Gas
Wiring a system circulator
1. For combined systems, to activate a system circulator when the Boiler circulator operates, wire as
shown at bottom of Figure 17, page 30.
2. You must install a relay as shown. DO NOT wire in
parallel with the Boiler circulator. See CAUTION in
Figure 17.
Routing line voltage wiring
1. Route line voltage connections to the jacket openings shown in Figure 18.
Low voltage connections
(Fig. 18)
1. Connect low voltage wiring to low voltage terminal strip (Figure 19, page 32, item 1) as shown in
Figure 19 and the boiler wiring diagram.
2. Route all low voltage wires through grommeted
jacket opening to right of low voltage terminal strip,
as shown in Figure 18.
Room thermostat (space heating)
1. For combined space heating/water heating systems,
connect Figure 19, item 2, room thermostat or end
switch (isolated contact only) between terminals 5
and 6.
2. Install thermostat on inside wall away from influences of drafts, hot or cold water pipes, lighting
fixtures, television, sunrays, or fireplaces.
3. Thermostat anticipator (if applicable):
a. If connected directly to boiler, set for 0.1 amps.
b. If connected to relays or other devices, set to match
total electrical power requirements of connected
devices. See device manufacturers’ specifications and
thermostat instructions for details.
4. Install a summer/winter switch (Figure 19, item 7)
across terminals 1 and 2 to force fixed-temperature
operation during summer months. (When the
switch is closed, boiler will attempt to maintain
constant temperature.)
5. Route sensor wires through the grommeted hole at
right of the electrical entrance (see Figure 18).
Water heater thermostat
1. Connect PLUS water heater aquastat terminals
“C” and “1” to Gas boiler low voltage terminal strip between terminals 3 and 4 (Figure 9,
item 3).
Additional limits
1. Connect additional limit controls and interlocks
between the terminals shown in Figure 19.
2. Controls connected between terminals 6 and 7
(see Figure 19, item 4) will cause a soft lockout
(automatic reset). When limit(s) closes, boiler will
resume normal operation.
3. Controls connected between terminals 6 and 8
(see Figure 19, item 5). will cause a hard lockout
(manual reset). The boiler will only restart after
the Ultra display panel RESET switch is pressed.
Figure 18 Routing field wiring
Outdoor temperature sensor
1. Outdoor reset operation applies only to combined
space heating/water heating systems.
2. Connect outdoor temperature sensor (Figure 19,
item 6) between terminals 1 and 2 to enable outdoor reset operation of the Gasboiler. If
fixed-temperature operation is required, do not
install outdoor sensor.
3. Mount sensor on exterior wall, shielded from direct sunlight or flow of heat or cooling from other
sources.
Part Number PLUS-E017-A/1206
31
Page 32

PLUS LINE
Indirect-Fired Water Heaters – Series 3
Gas
B3
Field wiring — Gas boilers only (continued)
Figure 19 Low voltage field wiring connections
32
Summer/winter switch (item 7) — Install a summer/winter switch, if desired, to disable the boiler
(space heating) circulator during non-heating months. Connect switch across the outdoor sensor
terminals. When switch closes, the boiler circulator is disabled and the boiler operates only on call
for DHW heating.
Part Number PLUS-E017-A/1206
Page 33

Manual • Installation • Start-Up • Usage • Maintenance • Parts
Start-up — Gas boilers onlyB4
Gas
Follow boiler manual
1. Follow all procedures in the Gas boiler manual
to start up and verify operation of the boiler.
Set space heating operation
Verify space heating mode
1. Press the “Mode” button until the display shows
“Para.” This is the parameter mode.
2. Press the “Step” button until the display first digit
shows “3.”
3. The last digit must show “1.” If any other number
displays, press the “+” button until “1” shows in the
right-hand digit. Press the “Store” button to save
this setting.
Set space heating target temperature
1. Press the control panel “Step” button until
the display first digit shows “4.” The right 3 digits
show the outlet water temperature setting.
2. Press the “+” or “-” button to change the setting to
the desired outlet water temperature. (The factory
default setting is 190 °F.)
a. Outdoor sensor installed — Setting is the target
temperature for outdoor temperature at or below
32 °F. At higher outside temperatures, the
control module calculates the target temperature. (See
Control Supplement for detailed discussion of
outdoor reset.)
When a summer/winter switch is used, closing the
switch will disable the boiler (space heating) circulator
during summer operation.
b. Outdoor sensor not installed — Setting is the target
temperature at all times.
3. Press the “Store” button to save the setting.
PhD
Water heater operation
1. The PLUS water heater thermostat must be connected to low voltage terminal strip terminals 3
and 4 as shown on page 10.
2. When the water heater thermostat calls for heat,
the module shuts down the boiler circulator, acti
vates the water heater circulator and immediately
sets target outlet water temperature to 190°F. This
provides automatic priority heat allocation to the
indirect water heater for maximum response and
recovery.
3. The water heater circulator continues for 30 seconds
after the heating cycle to deliver the most possible
heat.
Water heater operation setup
1. Go to step 2 if the control is in Parameter mode
already. Press the “Mode” button until the display
shows “Para” (parameter mode).
2. Press the “Step” button until the display first digit
shows “2.”
3. The last digit must show “1.” If any other number
displays, press the “+” button until “1” shows in the
right-hand digit. Press the “Store” button to save
this setting.
4. The
circulator when the indirect water heater operating
control closes. The control module shuts off the
boiler circulator (stops space heating) during calls
for DHW heating.
PhD control module turns on the PLUS
Verify space heating operation
NOTE: “[ _ _ _ _ ]” in the following indicates the
characters that should show on the display panel.
“180” in the right 3 places means the display shows the
measured boiler water temperature. The number shown
will not necessarily be 180.
1. Turn down aquastat on PLUS tank. If necessary,
turn off power and remove one of the PLUS aqua
stat wires to ensure boiler will not receive a DHW
heat call.
2. Turn off power to boiler at service switch.
3. Wait a few seconds, then turn on power to boiler.
[A180] (self-check on power-up, for a few seconds)
[0180] (no call for heat)
4. Raise room thermostat to call for heat.
[5180] (blower/circulator on) The blower and boiler circu-
lator energize and the control checks for air flow.
[1180] (prepurge) After a few seconds delay (control self-
check), blower speed will increase to ignition speed.
The blower will run in prepurge for 10 seconds.
[2180] (ignition) After prepurge, the control module
opens the gas valve and starts ignition spark.
a. If burner flame proves within 4.5 seconds, burner
continues to fire. Burner will fire at start-up
rate — 50% of maximum input — for about 10
-
seconds to allow flame to stabilize.
b. If burner flame does not prove within 4.5 sec
onds, control module attempts ignition sequence
again. Flame must prove within 5 attempts or
control will lockout (display will show [
c. Verify flame failure operation by closing boiler
manual gas cock to prevent gas flow. Open
manual gas valve after testing.
-
-
E 02]).
Part Number PLUS-E017-A/1206
33
Page 34

PLUS LINE
Start-up — Gas boilers only (continued)B4
Indirect-Fired Water Heaters – Series 3
Gas
[3180] (burner on, space heating) Once flame is proven
and stable, the burner turns down to low fire for ap
proximately 2 minutes.
• After this low fire period, the burner is allowed to
modulate. Firing rate depends on actual outlet water
temperature versus target temperature.
5. Allow boiler to bring water temperature to target
temperature.
[6180] (target temperature reached) The burner will shut
down. The blower will run in postpurge (see below),
then turn off. The boiler circulator continues to run
as long as there is a call for heat.
6. Lower room thermostat to stop call for heat.
[1180] (postpurge) When the room thermostat is satis-
fied (call for heat ended), the burner turns off. The
blower will continue for a 15-second postpurge, then
turn off. (If another call for heat occurs, the boiler will
remain off for one minute before starting again, and
the display will show [
[0180] (no call for heat) Boiler is now in standby mode
(waiting for heat call).
6180].)
7. Repeat above steps several times to verify operation.
8. Return the room thermostat to normal setting.
Verify water heater operation
1. Reconnect PLUS aquastat wiring to boiler if necessary.
2. Turn off power to boiler at service switch.
3. Wait a few seconds, then turn on power to boiler.
[A180] (self-check on power-up, for a few seconds)
[0180] (no call for heat)
4. Raise PLUS aquastat above tank temperature, to
call for heat.
[5180] (blower/circulator on) The blower and PLUS circu-
lator energize and the control checks for air flow.
[1180] (prepurge) Blower speed will increase to igni-
tion speed. The blower will run in prepurge for 10
seconds.
[2180] (ignition) After prepurge, the control module
opens the gas valve and starts ignition spark.
a. If burner flame proves within 4.5 seconds, burner
continues to fire. Burner will fire at start-up
rate — 50% of maximum input — for about 10
seconds to allow flame to stabilize.
b. If burner flame does not prove within 4.5 sec
onds, control module attempts ignition sequence
again. Flame must prove within 5 attempts or
control will lockout (display will show [
E 02]).
c. Verify flame failure operation by closing boiler
-
manual gas valve to prevent gas flow. Open gas
cock after testing.
[4180] (burner on, PLUS) Once flame is proven and
stable, the burner is allowed to modulate. Firing rate
depends on actual outlet water temperature versus
target temperature.
5. Allow boiler to bring water temperature to target
temperature.
[6180] (target temperature reached) The burner will shut
down. The blower will run in postpurge (see below),
then turn off. The PLUS circulator continues to run
as long as there is a call for PLUS heating.
6. Lower PLUS aquastat to stop call for heat.
[1180] (postpurge) When the room thermostat is satisfied
(call for heat ended), the burner turns off. The blower
will continue for a 15-second postpurge, then turn off.
(If another PLUS call for heat occurs, the boiler will
begin the heating cycle immediately.)
[8180] (PLUS circulator run-on) The PLUS circulator
continues to run for 30 seconds.
[0180] (no call for heat) Boiler is now in standby mode
(waiting for heat call).
7. Repeat above steps several times to verify operation.
8. Return the PLUS aquastat to normal setting.
Operating information
1. To check operating conditions (actual and target
temperatures, for example), see Gas Boiler
Manual for an explanation of the control
module Information mode.
2. During normal operation (no shutdown or lock
out), the right 3 display digits show actual boiler
outlet water temperature.
Replace jacket front door
Replace boiler jacket front door after
installation or servicing. The boiler front
door must be securely fastened to the
boiler to prevent boiler from drawing
air from inside the boiler room. This is
-
particularly important if the boiler is
located in the same room as other appliances. Failure to keep the door securely
fastened could result in severe personal
injury or death.
-
34
Part Number PLUS-E017-A/1206
Page 35

Manual • Installation • Start-Up • Usage • Maintenance • Parts
C
Boiler-side piping (except Gas)
This section provides suggested boiler-side and system piping for boilers other than
Gas-fired boilers (see Section B for Gas applications). You will find suggested piping
for:
• single or multiple water heaters
• zoned systems using zone valves or circulators
• dedicated boiler applications
• recirculation piping
Make sure to apply an appropriate control wiring method. Each piping diagram lists compatible
control wiring diagrams in Section D.
Zoning with pumps
GOLD PLUS 30/40/60/80 or
Two-pipe system piping — Figure 20........................................................................ 36
Primary/secondary piping — Figure 21 ..................................................................... 37
PLUS 100/110/119
Primary/secondary piping — Figure 22 ..................................................................... 38
Zoning with zone valves
Figure 23 (All water heater models) .......................................................................... 39
Dedicated boiler applications
GOLD PLUS 30/40/60/80 or
Figure 24 ..................................................................................................................... 40
PLUS 40/60/80
PLUS 40/60/80
PLUS 100/110/119
Figure 25 ..................................................................................................................... 41
Multiple water heater applications
Multiple water heaters – water heater piping — Figures 26/27 ................................ 42
Boiler water piping for multiple water heaters — Figure 28 ..................................... 43
Connecting a water heater to a steam boiler
Figure 29 ..................................................................................................................... 45
Part Number PLUS-E017-A/1206
35
Page 36

PLUS LINE
Indirect-Fired Water Heaters – Series 3
Boiler-side piping (except Gas) continuedC
Figure 20
GOLD Plus 30/40/60/80
Plus 40/60/80
• Zoning with pumps
• Place pumps at beginnings of
zones. Placing them at the ends
of zones could result in heating
idle zones.
• Size manifold piping for total flow
of all zone pumps.
• Lo c ate fl ow/c heck va l ves
as close as possible to water
heater boiler side connections
— to reduce heat loss between
cycles.
• Pipe GV boilers only as shown
on page 24.
Wiring options:
• Figure 30, page 48 — WMCR
zone controller, optional priority
• Figure 31, page 49 — Priority
zone pump
• Figure 32, page 50 — Pump
relays with domestic priority
• Figure 33, page 51 — Pump
relays without domestic priority
36
Notes
1. This drawing is conceptual only. It shows representative piping components and layout.
Weil-McLain does not represent that this drawing meets any particular mechanical or
building codes. The installer is responsible for inclusion of all required safety devices, or
other miscellaneous piping hardware not shown on drawing. The installer is responsible
for proper sizing/selection of all hardware shown on this diagram.
2. See Weil-McLain installation instructions for specific details on installing the boiler.
Part Number PLUS-E017-A/1206
Page 37

Manual • Installation • Start-Up • Usage • Maintenance • Parts
C Boiler-side piping (except Gas) continued
Figure 21
GOLD Plus 30/40/60/80
Plus 40/60/80
• Zoning with pumps
• Primary/secondary piping
• Place pumps at beginnings of
zones. Placing them at the ends
of zones could result in heating
idle zones.
• Size primary circuit manifold for
total flow of all zone pumps, with
pressure drop of no more than 1
foot W.C.
• Lo c ate fl ow/c heck va l ves
as close as possible to water
heater boiler side connections
— to reduce heat loss between
cycles.
Wiring options:
• Figure 30, page 48 — WMCR
zone controller, optional priority
• Figure 31, page 49 — Priority
zone pump
• Figure 32, page 50 — Pump
relays with domestic priority
• Figure 33, page 51 — Pump
relays without domestic priority
Notes
1. This drawing is conceptual only. It shows representative piping components and layout.
Weil-McLain does not represent that this drawing meets any particular mechanical or
building codes. The installer is responsible for inclusion of all required safety devices, or
other miscellaneous piping hardware not shown on drawing. The installer is responsible
for proper sizing/selection of all hardware shown on this diagram.
2. See Weil-McLain installation instructions for specific details on installing the boiler.
Part Number PLUS-E017-A/1206
37
Page 38

PLUS LINE
Indirect-Fired Water Heaters – Series 3
Boiler-side piping (except Gas) continuedC
Figure 22
GOLD Plus 30/40/60/80
Plus 40/60/80
PLUS 100/110/119
• Zoning with pumps
• Primary/secondary piping
• Place pumps at beginnings of
zones. Placing them at the ends
of zones could result in heating
idle zones.
• Size primary circuit manifold for
total flow of all zone pumps, with
pressure drop of no more than 1
foot W.C.
Wiring options:
• Figure 42, page 60 — Pump
relays and 3-way priority valve
and priority relay
38
Notes
1. This drawing is conceptual only. It shows representative piping components and layout.
Weil-McLain does not represent that this drawing meets any particular mechanical or
building codes. The installer is responsible for inclusion of all required safety devices, or
other miscellaneous piping hardware not shown on drawing. The installer is responsible
for proper sizing/selection of all hardware shown on this diagram.
2. See Weil-McLain installation instructions for specific details on installing the boiler.
Part Number PLUS-E017-A/1206
Page 39

Manual • Installation • Start-Up • Usage • Maintenance • Parts
C Boiler-side piping (except Gas) continued
Figure 23
GOLD Plus 30/40/60/80
Plus 40/60/80
PLUS 100/110/119
• Zoning with zone valves
• Place pumps at beginnings of
zones. Placing them at the ends
of zones could result in heating
idle zones.
• Size manifold piping for total flow
of all zone pumps.
Wiring options:
• Figure 34, page 52 — WMZV
zone valve controller, priority
optional (priority valve not
required)
• Figure 40, page 58 or
Figure 41, page 59 — Priority
using 2-way valve
• Figure 37, page 55 or Figure
38, page 56 — Priority with
2-way priority valve and 2-way
zone valve on water heater
circuit
• Figure 35, page 53 or
Figure 36, page 54 — No
priority, using 2-way zone valve
on water heater circuit
Notes
Part Number PLUS-E017-A/1206
1. This drawing is conceptual only. It shows representative piping components and layout.
Weil-McLain does not represent that this drawing meets any particular mechanical or
building codes. The installer is responsible for inclusion of all required safety devices, or
other miscellaneous piping hardware not shown on drawing. The installer is responsible
for proper sizing/selection of all hardware shown on this diagram.
2. See Weil-McLain installation instructions for specific details on installing the boiler.
39
Page 40

PLUS LINE
Indirect-Fired Water Heaters – Series 3
Boiler-side piping (except Gas) continuedC
Figure 24
Dedicated single boiler with
single water heater
In residential application (typically
GOLD Plus 30/40/60/80 or
Plus 40/60/80).
• Locate flow/check valve as close
as possible to water heater boiler
side connections — to reduce
heat loss between cycles.
40
Notes
1. These drawings are conceptual only. They show representative piping components and
layout. Weil-McLain does not represent that the drawings meet any particular mechanical
or building codes. The installer is responsible for inclusion of all required safety devices, or
other miscellaneous piping hardware not shown on drawings. The installer is responsible
for proper sizing/selection of all hardware shown on this diagram.
2. See Weil-McLain installation instructions for specific details on installing the boiler.
3. Recommended piping for PLUS 100/110/119 water heaters used in residential applications.
Part Number PLUS-E017-A/1206
Page 41

Manual • Installation • Start-Up • Usage • Maintenance • Parts
C Boiler-side piping (except Gas) continued
Figure 25
Dedicated single boiler with
single water heater
In commercial application
(typically PLUS 100/110/119).
• Locate flow/check valve as close
as possible to water heater boiler
side connections — to reduce
heat loss between cycles.
Notes
Part Number PLUS-E017-A/1206
1. These drawings are conceptual only. They show representative piping components and
layout. Weil-McLain does not represent that the drawings meet any particular mechanical
or building codes. The installer is responsible for inclusion of all required safety devices, or
other miscellaneous piping hardware not shown on drawings. The installer is responsible
for proper sizing/selection of all hardware shown on this diagram.
2. See Weil-McLain installation instructions for specific details on installing the boiler.
3. Recommended piping for GOLD Plus 30/40/60/80 water heaters used in commercial
applications.
41
Page 42

PLUS LINE
Boiler-side piping (except Gas) continuedC
Figure 26
Multiple water heaters —
domestic water piping
Failure to install automatic mixing
valve where recommended can
result in severe personal injury or
death.
Indirect-Fired Water Heaters – Series 3
Notes
Figure 27
Details for Figure 28, page 43
— alternate water heater piping
and Easy-Fit® Manifold detail
42
1. The drawings on this page are conceptual only. They show representative piping components and
layout. Weil-McLain does not represent that these drawings meet any particular mechanical or building
codes. The installer is responsible for inclusion of all required safety devices, or other miscellaneous
piping hardware not shown on drawing. The installer is responsible for proper sizing/selection of
all hardware shown on this diagram.
2. Any one PLUS tank thermostat may be utilized to control heater temperature.
3. Install automatic mixing valve at either the system hot water connection or at each water heater.
4. See pages 32-33 for additional recirculation information and piping detail.
Part Number PLUS-E017-A/1206
Page 43

Manual • Installation • Start-Up • Usage • Maintenance • Parts
C Boiler-side piping (except Gas) continued
Figure 28
Multiple water heaters and
dedicated multiple boilers —
boiler water piping
(see legend and details in Figure 26,
page 42)
Notes
Part Number PLUS-E017-A/1206
1. This drawing is conceptual only. It shows representative piping components and layout. Weil-McLain
does not represent that this drawing meets any particular mechanical or building codes. The installer
is responsible for inclusion of all required safety devices, or other miscellaneous piping hardware not
shown on drawing. The installer is responsible for proper sizing/selection of all hardware shown on
this diagram.
2. See Weil-McLain installation instructions for specific details on installing the boiler.
43
Page 44

PLUS LINE
Boiler-side piping (except Gas) continuedC
Indirect-Fired Water Heaters – Series 3
ON STEAM BOILER APPLICATIONS ONLY — You must replace the automatic air vent
supplied with the water heater with a manual air vent. Failure to do so could result in severe
personal injury, death or substantial property damage.
Connecting water heater to
steam boiler
When designing steam and domestic hot water systems, there are some key issues that must be taken
into consideration during the initial design phase. By
designing the system properly from the start, you can
avoid problems and have a hot water loop in a steam
boiler system.
Special considerations:
• Keep the loop temperature below the flash point.
Flashing can result in noise and circulator damage
or shortened life.
• Be sure the loop is completely closed, with no automatic air vents or anything that could allow air
to enter the system when the pump shuts off. Use
manual air vents only to prevent the possibility of
flooding the boiler.
• Pipe supply from one side of the boiler, return to
the opposite side.
• Supply from a tapping that is high enough to
prevent introducing sediment into the piping and
circulator yet still positions the circulator below the
water line. Avoid the mud leg of the boiler.
• Use an all bronze circulator (avoid wet rotor circulators). This will reduce clogging and will resist the
corrosion potential from the steam condensate.
• Make sure the circulator is properly sized. If the
pump runs too far out on the curve, cavitation
potential increases significantly.
• Return piping should be dedicated domestic return.
• Use (2) flow/check valves as shown to reduce the
potential for gravity circulation. Do not use springloaded check valves in place of the flow/check valves
shown in Figure 29 on page 45.
Installation and start-up of
water heaters connected to
steam boilers
See Figure 29, page 45, for suggested piping schematic.
Pipe the domestic water connections to the water heater
per Section A of this manual.
• Boiler connections for the water heater must be
below the water line.
• For steam piping, refer to the boiler manual.
• Replace the automatic air vent furnished with the
water heater with a manual air vent.
• Wire the water heater and circulator to the boiler
per suggested wiring in Figure 29.
To fill the boiler and water heater:
• Close isolation valves 5 and 6 (Figure 29) to isolate
the boiler.
• Fill the boiler to the recommended water level per
the boiler manual. Fill the domestic side of the water
heater per Section A of this manual.
• To fill the water heater outer tank with boiler water,
isolation valves 5 and 6 must remain closed. Valves
1 and 2 should be fully opened. Drain valves 3 and
4 should also be fully opened.
• Open the water heater manual air vent to bleed the
system of air.
Open the water heater manual air
vent one turn only.
• Fill the boiler/water heater system through drain
valve 3 until a steady stream of water flows through
drain valve 4, initially purging the system of air.
• Continue to fill the boiler/water heater system while
closing drain valve 4.
• When drain valve 4 is fully closed and a steady
stream of water is exiting at the air vent, close the
manual air vent tightly. Drain valve 3 can now be
closed.
Water may spray from the manual
air vent.
44
• Open isolation valve 5 (at the front of the boiler).
Then open valve 6.
• Start the boiler per instructions given in the boiler
manual.
Part Number PLUS-E017-A/1206
Page 45

Manual • Installation • Start-Up • Usage • Maintenance • Parts
C Boiler-side piping (except Gas) continued
Figure 29
Steam boiler application
Domestic water heating using
water pumped from steam boiler
• Locate flow/check valve as
close as possible to water
heater boiler side connections
— to reduce heat loss between
cycles.
Use ball valve 7 to blend some of
the water returning to the boiler
with the hot water coming from the
boiler. This will reduce the possibility of flashing (cavitation) in the
circulator. Slowly open valve 7 until
temperature gauge 8 reads 200°F.
Lock or remove the handle from
valve 7 after adjusting.
Notes
Part Number PLUS-E017-A/1206
1. These drawings are conceptual only. They show representative piping components and
layout. Weil-McLain does not represent that the drawings meet any particular mechanical
or building codes. The installer is responsible for inclusion of all required safety devices, or
other miscellaneous piping hardware not shown on drawings. The installer is responsible
for proper sizing/selection of all hardware shown on this diagram.
2. See Weil-McLain installation instructions for specific details on installing the boiler.
45
Page 46

PLUS LINE
Boiler-side wiring & controls (except Gas)D
Make sure to use a compatible piping method as shown in the Section C. (Each wiring diagram
Indirect-Fired Water Heaters – Series 3
This section provides suggested boiler-side wiring and control suggestions for boilers covered
in Section C of this manual. Section D does not apply to Gas-fired boilers, covered in
Section B. In Section D, you will find suggested wiring for:
• zoning with zone valves
• zoning with circulators
• wiring with and without domestic priority
• using separate relays or zone controllers
lists compatible piping alternatives.)
wirinG requirements .............................................................................................. 47
Wiring requirements — Circulators ........................................................................... 47
Wiring requirements — Zone Valves ......................................................................... 47
Boiler models requiring domestic priority with GOLD Plus 30 ................................ 47
ZoninG with pumps:
Zoning with Weil-McLain circulator zone controller (WMCR)
• Weil-McLain circulator zone controller ................................................................... 48
Other options for for zoning with pumps
• Using priority zone pump ....................................................................................... 49
• Using pump relays • Domestic priority with priority relay ................................ 50
• Using pump relays • No domestic priority ......................................................... 51
• Pumps relays • Domestic priority with 3-way priority valve & priority relay .... 60
ZoninG with Zone vAlves:
Zoning with Weil-McLain zone valve controller (WMZV)
• Domestic priority optional (controller switch) ....................................................... 52
Zoning with 4-wire zone valves
• No domestic priority ............................................................................................... 53
• With or without priority • GOLD Plus 30/40/60/80 or Plus 40/60/80 ......... 55
• With domestic priority • PLUS 100/110/119 ....................................................... 57
• With domestic priority using 2-way priority valve • PLUS 100/110/119 ........... 58
Zoning with 3-wire zone valves
• No domestic priority ............................................................................................... 54
• With or without priority • GOLD Plus 30/40/60/80 or Plus 40/60/80 ......... 56
• With domestic priority • PLUS 100/110/119 ....................................................... 57
• With domestic priority using 2-way priority valve ................................................. 59
46
Part Number PLUS-E017-A/1206
Page 47

Manual • Installation • Start-Up • Usage • Maintenance • Parts
Boiler Models
CGa 25/3/4/5/6/7/8
GV, CGi, CG, CGs, CGx 3/4/5/6
EG 35/40/45/50
68, GO 2/3/4
D Boiler-side wiring & controls (except Gas) continued
Electrical shock hazard.
Can cause severe personal injury, death or substantial property damage.
Disconnect power before installing and/or servicing.
Wiring requirements
1. All wiring must be a minimum of 18 gauge and installed in accordance with:
• U.S.A. — National Electrical Code and any other national, state or local code
requirements having jurisdiction.
• Canada — CSA C22.1 Canadian Electrical Code Part 1 and any other national,
provincial and local code requirements having jurisdiction.
2. If original wire as supplied with appliance must be replaced, Type 90° C or its equivalent
must be used.
3. Refer to control component instructions packed with boiler for application information.
4. An optional service switch may be installed in water heater electrical circuit. This switch
would only shut off the water heater, not the home heating system. Do not shut off water
heater if there is a chance of freezing.
5. All electrical contacts are shown with no power applied - off shelf condition.
Circulators
6. Size priority relay for total amp draw of all circulators.
Zone Valves
7. Size transformer for maximum load of all zone valves.
8. Priority valve (Figures 40–41, pages 58–59) is closed when heating domestic water.
Part Number PLUS-E017-A/1206
Domestic priority is recommended for the boilers listed in Table 5,
below, when used with GOLD Plus 30 water heaters:
Table 5
These boiler models
should use domestic
priority when used with
heater GOLD Plus 30
47
Page 48

PLUS LINE
Boiler-side wiring & controls (except Gas) continuedD
Indirect-Fired Water Heaters – Series 3
Figure 30
Typical wiring:
• Zoning with pumps
• Weil-McLain circulator zone
controller (WMCR-4 shown)
• Refer to Wiring requirements on
page 47.
System piping —
Apply this wiring to systems
in:
• Figure 20, page 36
• Figure 21, page 37
Domestic water priority with Weil-McLain WMCR Circulator Zone Controller
48
Notes
1. These drawings are conceptual only. They show representative piping components and
layout. Weil-McLain does not represent that the drawings meet any particular mechanical
or building codes. The installer is responsible for inclusion of all required safety devices, or
other miscellaneous piping hardware not shown on drawings. The installer is responsible
for proper sizing/selection of all hardware shown on this diagram.
2. Follow component manufacturer’s instructions for installation of all items shown.
3. See Weil-McLain installation instructions for specific details on installing the boiler.
Part Number PLUS-E017-A/1206
Page 49

Manual • Installation • Start-Up • Usage • Maintenance • Parts
D Boiler-side wiring & controls (except Gas) continued
Figure 31
Typical wiring :
• Zoning with pumps
• Using priority zone pump
• Also refer to Weil -McLain
Boiler Zone Wiring Guide for
further details.
• Refer to Wiring requirements on
page 47.
System piping —
Apply this wiring to systems
in:
• Figure 20, page 36
• Figure 21, page 37
Primary/secondary piping sys-
tems
Boiler loop pump (for primar y/
secondary piping systems, as in Fig
ure 21, page 37) should be powered
by the boiler control or transformer/
relay for packaged residential boilers.
Provide a pump relay for this pump
when pump relay is not provided
with boiler.
Pump zones
Maximum of 4 total pump zones
when wiring one zone for priority.
Notes
-
1. These drawings are conceptual only. They show representative piping components and
layout. Weil-McLain does not represent that the drawings meet any particular mechanical
or building codes. The installer is responsible for inclusion of all required safety devices, or
other miscellaneous piping hardware not shown on drawings. The installer is responsible
for proper sizing/selection of all hardware shown on this diagram.
2. Follow component manufacturer’s instructions for installation of all items shown.
3. See Weil-McLain installation instructions for specific details on installing the boiler.
Part Number PLUS-E017-A/1206
49
Page 50

PLUS LINE
Indirect-Fired Water Heaters – Series 3
Boiler-side wiring & controls (except Gas) continuedD
Figure 32
Typical wiring:
• Zoning with pumps
• Using pump relays
• Domestic priority with
priority relay
• Also refer to Weil -McLain
Boiler Zone Wiring Guide for
further details.
• Refer to Wiring requirements on
page 47.
System piping —
Apply this wiring to systems
in:
• Figure 20, page 36
• Figure 21, page 37
Primary/secondary piping sys-
tems
Boiler loop pump (for primar y/
secondary piping systems, as in Fig
ure 21, page 37) should be powered
by the boiler control or transformer/
relay for packaged residential boilers.
Provide a pump relay for this pump
when pump relay is not provided
with boiler.
-
50
Notes
1. These drawings are conceptual only. They show representative piping components and
layout. Weil-McLain does not represent that the drawings meet any particular mechanical
or building codes. The installer is responsible for inclusion of all required safety devices, or
other miscellaneous piping hardware not shown on drawings. The installer is responsible
for proper sizing/selection of all hardware shown on this diagram.
2. Follow component manufacturer’s instructions for installation of all items shown.
3. See Weil-McLain installation instructions for specific details on installing the boiler.
Part Number PLUS-E017-A/1206
Page 51

Manual • Installation • Start-Up • Usage • Maintenance • Parts
D Boiler-side wiring & controls (except Gas) continued
Figure 33
Typical wiring:
• Zoning with pumps
• Using pump relays
• No domestic priority
• Also refer to Weil -McLain
Boiler Zone Wiring Guide for
further details.
• Refer to Wiring requirements on
page 35.
System piping —
Apply this wiring to systems
in:
• Figure 20, page 36
• Figure 21, page 37
Primary/secondary piping sys-
tems
Boiler loop pump (for primar y/
secondary piping systems, as in Fig
ure 21, page 37) should be powered
by the boiler control or transformer/
relay for packaged residential boilers.
Provide a pump relay for this pump
when pump relay is not provided
with boiler.
Notes
-
1. These drawings are conceptual only. They show representative piping components and
layout. Weil-McLain does not represent that the drawings meet any particular mechanical
or building codes. The installer is responsible for inclusion of all required safety devices, or
other miscellaneous piping hardware not shown on drawings. The installer is responsible
for proper sizing/selection of all hardware shown on this diagram.
2. Follow component manufacturer’s instructions for installation of all items shown.
3. See Weil-McLain installation instructions for specific details on installing the boiler.
Part Number PLUS-E017-A/1206
51
Page 52

PLUS LINE
Boiler-side wiring & controls (except Gas) continuedD
Indirect-Fired Water Heaters – Series 3
Figure 34
Typical wiring:
• Zoning with Weil-McLain
zone valve controller
(WMZV-4 shown)
• Domestic priority optional
(controller switch)
• Also refer to Weil -McLain
Boiler Zone Wiring Guide for
further details.
• Refer to Wiring requirements on
page 47.
System piping —
Apply this wiring to systems
in:
• Figure 23, page 39 (using 2-way
water heater zone valve and no
priority valve)
Domestic water priority with Weil-McLain WMZV Zone Valve Controller
Install all zone valves per valve
man ufac turer’s in stru c tions.
52
Part Number PLUS-E017-A/1206
Page 53

Manual • Installation • Start-Up • Usage • Maintenance • Parts
D Boiler-side wiring & controls (except Gas) continued
Figure 35
Typical wiring:
• Zoning with 4-wire zone
valves
• No domestic priority
• Also refer to Weil -McLain
Boiler Zone Wiring Guide for
further details.
• Refer to Wiring requirements on
page 47.
System piping —
Apply this wiring to systems
in:
• Figure 23, page 39 (using 2-way
water heater zone valve and no
priority valve)
Notes
Part Number PLUS-E017-A/1206
1. These drawings are conceptual only. They show representative piping components and
layout. Weil-McLain does not represent that the drawings meet any particular mechanical
or building codes. The installer is responsible for inclusion of all required safety devices, or
other miscellaneous piping hardware not shown on drawings. The installer is responsible
for proper sizing/selection of all hardware shown on this diagram.
2. Follow component manufacturer’s instructions for installation of all items shown.
3. See Weil-McLain installation instructions for specific details on installing the boiler.
53
Page 54

PLUS LINE
Indirect-Fired Water Heaters – Series 3
Boiler-side wiring & controls (except Gas) continuedD
Figure 36
Typical wiring:
• Zo nin g wi th 3-w ire zo ne
valves
• No domestic priority
• Also refer to Weil -McLain
Boiler Zone Wiring Guide for
further details.
• Refer to Wiring requirements on
page 47.
System piping —
Apply this wiring to systems
in:
• Figure 23, page 39 (using 2-way
water heater zone valve and no
priority valve)
54
Notes
1. These drawings are conceptual only. They show representative piping components and
layout. Weil-McLain does not represent that the drawings meet any particular mechanical
or building codes. The installer is responsible for inclusion of all required safety devices, or
other miscellaneous piping hardware not shown on drawings. The installer is responsible
for proper sizing/selection of all hardware shown on this diagram.
2. Follow component manufacturer’s instructions for installation of all items shown.
3. See Weil-McLain installation instructions for specific details on installing the boiler.
Part Number PLUS-E017-A/1206
Page 55

Manual • Installation • Start-Up • Usage • Maintenance • Parts
D Boiler-side wiring & controls (except Gas) continued
Figure 37
Typical wiring:
• Zo nin g wi th 4-w ire zo ne
valves
• With OR without domestic
priority
• GOLD Plus 30/40/60/80 or
Plus 40/60/80
• Also refer to Weil -McLain
Boiler Zone Wiring Guide for
further details.
• Refer to Wiring requirements on
page 47.
System piping —
Apply this wiring to systems
in:
• Figure 23, page 39 (using 3-way
priority valve or NO priority using
2-way water heater zone valve
and no priority valve)
Notes
Part Number PLUS-E017-A/1206
1. These drawings are conceptual only. They show representative piping components and
layout. Weil-McLain does not represent that the drawings meet any particular mechanical
or building codes. The installer is responsible for inclusion of all required safety devices, or
other miscellaneous piping hardware not shown on drawings. The installer is responsible
for proper sizing/selection of all hardware shown on this diagram.
2. Follow component manufacturer’s instructions for installation of all items shown.
3. See Weil-McLain installation instructions for specific details on installing the boiler.
55
Page 56

PLUS LINE
Boiler-side wiring & controls (except Gas) continuedD
Figure 38
Typical wiring:
• Zoning with 3-wire zone
valves
• With OR without domestic
priority
• GOLD Plus 30/40/60/80 or
Plus 40/60/80
• Also refer to Weil -McLain
Boiler Zone Wiring Guide for
further details.
Indirect-Fired Water Heaters – Series 3
• Refer to Wiring requirements on
page 47.
System piping —
Apply this wiring to systems
in:
• Figure 23, page 39 (using 3-way
priority valve or NO priority using
2-way water heater zone valve
and no priority valve)
56
Notes
1. These drawings are conceptual only. They show representative piping components and
layout. Weil-McLain does not represent that the drawings meet any particular mechanical
or building codes. The installer is responsible for inclusion of all required safety devices, or
other miscellaneous piping hardware not shown on drawings. The installer is responsible
for proper sizing/selection of all hardware shown on this diagram.
2. Follow component manufacturer’s instructions for installation of all items shown.
3. See Weil-McLain installation instructions for specific details on installing the boiler.
Part Number PLUS-E017-A/1206
Page 57

Manual • Installation • Start-Up • Usage • Maintenance • Parts
D Boiler-side wiring & controls (except Gas) continued
Figure 39
Typical wiring:
• Zoning with zone valves
• With domestic priority
• PLUS 100/110/119 only
• Also refer to Weil -McLain
Boiler Zone Wiring Guide for
further details.
• Refer to Wiring requirements on
page 47.
System piping —
Apply this wiring to systems
in:
• Figure 23, page 39 (using 2-way
water heater zone valve and no
priority valve)
Notes
Part Number PLUS-E017-A/1206
1. These drawings are conceptual only. They show representative piping components and
layout. Weil-McLain does not represent that the drawings meet any particular mechanical
or building codes. The installer is responsible for inclusion of all required safety devices, or
other miscellaneous piping hardware not shown on drawings. The installer is responsible
for proper sizing/selection of all hardware shown on this diagram.
2. Follow component manufacturer’s instructions for installation of all items shown.
3. See Weil-McLain installation instructions for specific details on installing the boiler.
4. Contact rating of water heater thermostat is 0.5 amp at 24 VAC.
57
Page 58

PLUS LINE
Indirect-Fired Water Heaters – Series 3
Boiler-side wiring & controls (except Gas) continuedD
Figure 40
Typical wiring:
• Zo nin g wi th 4-w ire zo ne
valves
• With domestic priority using
2-way priority valve
• PLUS 100/110/119 only
• Also refer to Weil -McLain
Boiler Zone Wiring Guide for
further details.
• Refer to Wiring requirements on
page 47.
System piping —
Apply this wiring to systems
in:
• Figure 23, page 39, (using 2-
way water heater zone valve and
2-way priority valve)
58
Notes
1. These drawings are conceptual only. They show representative piping components and
layout. Weil-McLain does not represent that the drawings meet any particular mechanical
or building codes. The installer is responsible for inclusion of all required safety devices, or
other miscellaneous piping hardware not shown on drawings. The installer is responsible
for proper sizing/selection of all hardware shown on this diagram.
2. Follow component manufacturer’s instructions for installation of all items shown.
3. See Weil-McLain installation instructions for specific details on installing the boiler.
Part Number PLUS-E017-A/1206
Page 59

Manual • Installation • Start-Up • Usage • Maintenance • Parts
✱
Room
thermostat
Transformer
(Power)
Zone valve
Room
Thermostat
Water heater
zone valve
Additional zones may
be added as shown above
Boiler
thermostat
terminals
Isolation
relay
Water heater
zone
24
V.A.C.
Zone 2
Zone
valve
Zone 1
Additional
zones
120
V.A.C.
High voltage
H N
*
Use Isolation Relay on
3-wire zone valves with
non-isolated end switches.
Transformer and boiler
control can burn out if
Isolation Relay is not used.
Water heater
thermostat
Snap Set
1
2
C
Low voltage (24 vac) field wiring
Low voltage boiler field wiring
NO
NC
High voltage (120 vac) field wiring
H N
500075-30b
Priority valve
Priority relay
Contact not
used
D Boiler-side wiring & controls (except Gas) continued
Figure 41
Typical wiring:
• Zo nin g wi th 3-w ire zo ne
valves
• With domestic priority using
2-way priority valve
• Also refer to Weil -McLain
Boiler Zone Wiring Guide for
further details.
• Refer to Wiring requirements on
page 47.
System piping —
Apply this wiring to systems
in:
• Figure 23, page 39 (using 2-way
water heater zone valve and 2way priority valve)
Notes
1. These drawings are conceptual only. They show representative piping components and
layout. Weil-McLain does not represent that the drawings meet any particular mechanical
or building codes. The installer is responsible for inclusion of all required safety devices, or
other miscellaneous piping hardware not shown on drawings. The installer is responsible
for proper sizing/selection of all hardware shown on this diagram.
2. Follow component manufacturer’s instructions for installation of all items shown.
3. See Weil-McLain installation instructions for specific details on installing the boiler.
Part Number PLUS-E017-A/1206
59
Page 60

PLUS LINE
Indirect-Fired Water Heaters – Series 3
Boiler-side wiring & controls (except Gas) continuedD
Figure 42
Typical wiring:
• Zoning with pumps
• Pump relays
• Domestic priorit y with 3 -
way priority valve and priority
relay
• Also refer to Weil -McLain
Boiler Zone Wiring Guide for
further details.
• Refer to Wiring requirements on
page 47.
System piping —
Apply this wiring to systems
in:
• Figure 22, page 38
60
Notes
1. These drawings are conceptual only. They show representative piping components and
layout. Weil-McLain does not represent that the drawings meet any particular mechanical
or building codes. The installer is responsible for inclusion of all required safety devices, or
other miscellaneous piping hardware not shown on drawings. The installer is responsible
for proper sizing/selection of all hardware shown on this diagram.
2. Follow component manufacturer’s instructions for installation of all items shown.
3. See Weil-McLain installation instructions for specific details on installing the boiler.
Part Number PLUS-E017-A/1206
Page 61

Manual • Installation • Start-Up • Usage • Maintenance • Parts
E Replacement parts — Series 3 only
A. GOLD Plus 30, 40, 60 or 80
Plus 40, 60 or 80
..................................................................................................................................... 50
B. PLUS 100, 110 or 119
..................................................................................................................................... 52
Part Number PLUS-E017-A/1206
61
Page 62

PLUS LINE
E Replacement parts continued
GOLD Plus 30/40/60/80 or
PLUS 40/60/80
Series 3
Indirect-Fired Water Heaters – Series 3
62
Part Number PLUS-E017-A/1206
Page 63

Manual • Installation • Start-Up • Usage • Maintenance • Parts
Replacement parts — GOLD Plus 30/40/60/80, Ultra Plus 40/60/80, Series 3
Item Description Size Manufacturer Weil-McLain Part
Number
1 Thermostat Kit with Knob - No Cover Plate Weil-McLain 633-900-130
not shown
Drain Valve Kit Weil-McLain 633-900-117
2
Dip Tube Kit, GOLD Plus 30 ¾" Weil-McLain 633-900-118
Dip Tube Kit, GOLD Plus 40, Ultra PLUS 40 ¾" Weil-McLain 633-900-119
Dip Tube Kit, GOLD Plus 60, Ultra PLUS 60 ¾" Weil-McLain 633-900-120
Dip Tube Kit, GOLD Plus 80, Ultra PLUS 80 ¾" Weil-McLain 633-900-125
3 Snap-Set with Wire Connector Weil-McLain 635-600-145
4 Cover Plate and Plastic Fasteners Weil-McLain 633-900-200
not shown
Thermostat with Cover Plate Kit Weil-McLain 633-900-102
5 Plastic Top Cover (specific to tank size) Weil-McLain
633-800-440
6
Drywell replacement kit, Gold Plus 30 Weil-McLain
635-600-061
Drywell replacement kit, Gold Plus 40, Ultra PLUS 40 Weil-McLain
635-600-062
Drywell replacement kit, Gold Plus 60, Ultra PLUS 60 Weil-McLain
635-600-063
Drywell replacement kit, Gold Plus 80, Ultra PLUS 80 Weil-McLain
635-600-064
E Replacement parts continued
Part Number PLUS-E017-A/1206
63
Page 64

PLUS LINE
E Replacement parts continued
PLUS 100/110/119
Series 3
Indirect-Fired Water Heaters – Series 3
64
Part Number PLUS-E017-A/1206
Page 65

Manual • Installation • Start-Up • Usage • Maintenance • Parts
Replacement parts — PLUS 100/110/119 Series 3
Item Description Size Manufacturer
Weil-McLain Part
Number
1 Thermostat Kit with Knob - No Cover Plate Weil-McLain 635-100-010
2 PLUS100/110/119 Dip Tube Kit 1½" Weil-McLain 633-900-115
3 Snap-Set with Wire Connector Weil-McLain 635-600-080
4 Cover Plate and Plastic Fasteners for 100/110/119 Weil-McLain 635-600-205
not shown
Thermostat with Cover Plate Kit Weil-McLain 635-100-010
5
Plastic Top Cover (specific to tank size) 100/110
119
Weil-McLain
Weil-McLain
633-800-441
633-800-442
6 Dip Tube “O” Ring 1½" Weil-McLain
635-600-098
7
Drywell Replacement Kit for 100/110/119 Weil-McLain
635-600-065
E Replacement parts continued
Part Number PLUS-E017-A/1206
65
Page 66

PLUS LINE
PLUS-Line Indirect-Fired Water Heaters — Series 3
Water
Heater
Model
Storage Heating
surface
Head
loss on
Boiler-
side
Dimensions Ship.
weight
(approx.)
DHW
side
Boiler
side
DHW
inlet/outlet
(items 3 / 4)
Boiler water
supply/return
(items 1 / 2)
A B C D E
Gallons Gallons Sq. Feet Feet Inches NPT Inches NPT Inches Inches Inches Inches Inches Pounds
GOLD Plus 30
28 5 13 ¾ ¾ 1 38 9 30 22 ¼ 14 ¼ 135
GOLD Plus 40
Ultra Plus 40
36 6 16 1 ¾ 1 46 9 38 22 ¼ 14 ¼ 155
GOLD Plus 60
Ultra Plus 60
46 8 20 1 ¼ ¾ 1 ¼ 57 9 49 22 ¼ 14 ¼ 180
GOLD Plus 80
Ultra Plus 80
56 8 24 1 ½ ¾ 1 ¼ 66 9 58 ¼ 22 ¼ 14 ¼ 200
PLUS 100
70 14 29 2 1 ½ 1 ½ 61 10 50 ½ 26 ½ 10 ⁵⁄₈ 271
PLUS 110
95 25 34 2 1 ½ 1 ½ 78 10 67 ¼ 26 ½ 10 ⁵⁄₈ 362
PLUS 119
119 30 42 2 ½ 1 ½ 2 73 ¼ 10 63 32 ¼ 10 ⁵⁄₈ 479
Indirect-Fired Water Heaters – Series 3
F
Water heater dimensions
Dimensions — PLUS-Line indirect water heaters, Series 3
66
Part Number PLUS-E017-A/1206
Page 67

Manual • Installation • Start-Up • Usage • Maintenance • Parts
Boiler
DOE
Heating
Capacity
MBH
First Hour Rating Capacity (GPH) — Boiler Water Supply at 200°F / Domestic Water from 50°F to 115°F
GOLD
Plus
30
Boiler
Water
GPM
Minimum
GOLD/
Ultra
Plus
40
Boiler
Water
GPM
Minimum
GOLD/
Ultra
Plus
60
Boiler
Water
GPM
Minimum
GOLD/
Ultra
Plus
80
Boiler
Water
GPM
Minimum
PLUS
100
Boiler
Water
GPM
Minimum
PLUS
110
Boiler
Water
GPM
Minimum
PLUS
119
Boiler
Water
GPM
Minimum
50 115
8
125
9
130
13
140
20
150
24
170
26
190
28
70 155 160 170 175 185 205 225
90 190 195 205 215 225 245 265
110 230 235 240 250 260 280 300
130 230 260 280 285 300 320 335
150 230 260 315 325 335 355 375
170 230 260 355 360 370 390 410
190 230 260 365 400 410 430 450
210 230 260 365 435 445 465 485
250 230 260 365 510 520 540 560
300 230 260 365 600 610 630 650
350 230 260 365 670 690 725 745
400 230 260 365 670 690 775 835
450 230 260 365 670 690 775 930
500 230 260 365 670 690 775 970
Boiler
DOE
Heating
Capacity
MBH
First Hour Rating Capacity (GPH) — Boiler Water Supply at 200°F / Domestic Water from 50°F to 140°F
GOLD
Plus
30
Boiler
Water
GPM
Minimum
GOLD/
Ultra
Plus
40
Boiler
Water
GPM
Minimum
GOLD/
Ultra
Plus
60
Boiler
Water
GPM
Minimum
GOLD/
Ultra
Plus
80
Boiler
Water
GPM
Minimum
PLUS
100
Boiler
Water
GPM
Minimum
PLUS
110
Boiler
Water
GPM
Minimum
PLUS
119
Boiler
Water
GPM
Minimum
50 90
8
95
9
105
13
115
20
125
18
145
25
165
28
70 120 125 130 140 150 170 190
90 140 150 160 165 180 200 215
110 140 170 185 195 205 225 245
130 140 170 210 220 230 250 270
150 140 170 220 245 260 280 295
170 140 170 220 275 285 305 325
190 140 170 220 300 310 330 350
210 140 170 220 325 340 360 375
250 140 170 220 380 390 410 430
300 140 170 220 410 435 480 495
350 140 170 220 410 435 525 565
400 140 170 220 410 435 525 630
450 140 170 220 410 435 525 630
500 140 170 220 410 435 525 630
F
Water heater performance ratings
For water heater to achieve the rated performance below: Boiler water must be supplied to the water heater at
at least 200°F, and the boiler water flow rate must be no less than given in the tables below. For Gas boiler
applications, with supply water at 190°F, see the ratings in Section B of this manual)
Part Number PLUS-E017-A/1206
67
Page 68

Residential & Commercial Cast Iron Boilers
Residential Water Warranty— Limited Lifetime
Residential SteamWarranty — Limited 10 Year
Comme rcial Warranty — Limited 10 Year
First Year — (All Residential & Commercial Cast Iron Boilers) W eil-McLain
warrants that its cast iron boilers are free from defects in material and workmanship for one year from date of installation. If any parts are found to be defective
from such defects, Weil-McLain will provide replacement of such defective parts.
Second Through Tenth Year — (Residential & Commercial Water/Steam)
Weil-McLain warrants that the cast iron sections
of its water and steam boilers are
free from defects in material and workmanship from the date of installation for the
second through the tenth year. If, during s uch time, any section is found to be
defective, Weil-McLain will provide replacement of such defective section(s).
Eleventh Year and Beyond — (Residential Water Only) Weil-McLain warrants
that the cast iron sections
of its residential water boilers are free from defects in
material and workmanship for the eleventh year and beyond from the date of
installation. If, d uring s uch time period, any s ection(s) is found to be defective,
Weil-McLain will provide replacement of such defective s ection(s) upon the
payment of a proportionate charge based on the time the boiler has been in
service. The proportionate charge will be equal to the appropriate percentage of
the list price of such section(s ) at the time the warranty claim is made, and will be
determined as follows: 11th year-5%; 12th year-10%; 13th year-15%; 14th year20%; 15th year-25%; 16th year-30%; 17th year-35%; 18th year-40%; 19th year45%; 20th year-50%; 21st year-55%; 22nd year-60%; 23rd year-65%; 24th year70%; 25th year & beyond -75%.
These warranties do not cover boilers operated with combustion air c ontaminated externally by chemical vapors or with improper fuel additives, or with water
conditions which may have caused unusual deposits in the cast iron sections.
See section“For all Weil-McLain Products” for additional warranty information.
Weil-McLain Limited Warranties
NOTE: Residential warranties do not cover any residential products installed in build-
ings other than one or two family dwelling units, unless they are buildings with individual residential products for each dwelling unit.
THE WARRANTIES DESCRIBED HEREIN ARE IN LIEU OF ALL OTHER WARRANTIES, EXPRESS OR IMPLIED, INCLUDING BUT NOT LIMITED TO ANY IMPLIED WARRANTIES OF FITNESS FOR A PARTICULAR PURPOSE AND MERCHANTABILITY. WEIL-McLAIN EXPRESSLY DISCLAIMS AND EXCLUDES ANY
LIABILITY FOR CONSEQUENTIAL, INCIDENTAL, INDIRECT OR PUNITIVE DAM AGES FOR BREACH OF ANY EXPRESS WARRANT Y. F or prompt product war-
ranty claims, notify the installer who, in turn, will notify the W eil-McLain distributor
from whom he purchased the boiler. If this action does not result in warranty resolution, contact Weil-McLain Consumer Relations Department, 500 Blaine Street, Michigan City, Indiana 46360, with details in support of the warranty claim. Alleged defective part or parts must be returned through the same trade channel in accordance
with the Weil-McLain procedure currently in forc e for handling returned goods for the
purpose of inspection to determine cause of failure. Weil-McLain will furnish new
part(s) to an authorized Weil-McLain distributor who, in turn will furnish the new part
(s) to the heating contractor who installed the boiler. If you have any questions about
the coverage of this warranty, contact Weil-Mc Lain at the address above.
Indirect-Fired Water Heaters
Residential Water Heater Warranty — Limited Lifetime
Comme rcial Water Heater Warranty — Limited 15 Year
First Year — (Residential and Commercial Water Heaters) Weil-Mc Lain warrants
that its indirect-fired water heaters are free from defects in material and workmanship
for one year from the date of installation. If any parts are found to be defective from
such defects, Weil-Mc Lain will provide replacement of such defective parts.
Second Year and Beyond — (Residential Only)
Second Through FifthYears — (Commercial Only)
Weil-McLain warrants that the tank assembly components
of its indirect-fired water
heaters are free from defects in material and workmanship for the s econd through
the fifth year from the date of installation (commercial only), or for the second year
from the date of installation and beyond (for residential only). If, during such time
periods, a leak in the tank assembly should occur, Weil-McLain will provide replacement for the original tank assembly.
Sixth Year through Fifteenth Year — (Commercial Only) W eil-McLain warrants
that the tank assembly components
of its commercial indirect-fired water heaters are
free from defects in material and workmanship for the sixth year through the fifteenth
year following the date of installation. If, during such time period, a leak in the tank
assembly should occur, Weil-McLain will provide replacement for such defective tank
assembly. Such replacement will be furnished with the nearest comparable model
available from W eil-McLain at the t ime of such replacement and upon payment of a
proportionate charge. Proportionate charges will be equal to the appropriate percentage of the current list price of such commercial indirect-fired water heater at the time
warranty claim is made and will be determ ined as follows: 6th & 7th year-55%; 8th &
9th year-60%; 10th & 11th year-65%; 12th & 13th year-70%; 14th & 15th year-75%.
These warranties do not cover:
1. Any water heater not in itially installed with a new te mperatur e-pressure relief valve
bearing the l isting of the American Society o f Mechanical Engineers (A.S.M.E.) at the
time of the water heater installation.
2. Any water heater tha t has a failure or malfunction res ulting from a.) fa ilure to keep the
tank full of pota ble water; b.) failur e to assure that water in the tank is fr ee to circulate
at all times; or c.) failure to keep the tank free of water sediment or scale deposits.
3. Any water heater that has potable water in the unit with a chloride or chlorine content
higher than 80 mg/liter.
4. Any water heater installed in a r esidence containing any type of water softener system
that is not installed and maintained in accordance with manufacturer’s specifications.
5. A ny water heater installation where no n-metallic piping products without an oxygen
barrier are used.
6. Any water heater used for non-potable application such as pool or process heating.
See section“For all Weil-McLain Products” for additional warranty information.
Weil-McLain
Ultra
Cast Aluminum Boilers
Residential Warranty — Limited 15 Year
(includes 5-Year Ultra Protection Plan)
Commercial Warranty — Limited 15 Year
(does NOT incl ude Ultra HPP)
First Through Fifth Year — Weil-McLain warrants that its cast aluminum boilers
are free from defects in material and workmanship for one year from the date of
installation and the heat exchanger is free from defects in material and
workmanship for five years from the date of installation. If a ny parts in the first
year, or the heat e xchanger in the first five years are found to be defective from
such defects, Weil-Mc Lain will provide replacement of such defective parts or heat
exchanger.
In addition t o the product warranty, W eil-McLain will provide a 5-Year “
Ultra”
Homeowner Protection Plan (“UHPP”) for residential applications only to cover parts and labor
for five years from the date of installation provided only if the Ultra boiler is properly registered
with the UHPP Administrator within one mont h of the date of installation. UHPP claims must be
processed directly throught hePlan Administrator and not throughWeil-McLain.
Sixth Through Tenth Year — W eil-McLain warrants that the heat exchangers of
its cast aluminum boilers are free from defects in m aterial and workmanship for
the sixth through the tenth year from the date of installation. If, during such time,
the heat exchanger is found to be defective, Weil-McLain will provide replacement
of such defective heat exchanger.
Eleventh Through Fifteenth Year — W eil-McLain warrants that the heat
exchangers of its cast aluminum boilers are free from defects in material and
workmanship for the eleventh through fifteenth year from the date of installation.
If, during such time period, the heat exchanger is found to be defective, W eilMcLain will provide replacement for such defective heat exchanger upon the
payment of a proportionate charge based on the time the boiler has been in
service. The proportionate charge will be equal to the appropriate percentage of
the list price of such heat exchanger at the time the warranty claim is m ade, and
will be determined as follows: 11th year - 10%; 12th year - 20%; 13th year 40%; 14th year - 60%; 15th year - 80%; 16th year & beyond - 100%.
This warranty does not cover boilers operated with combustion air contaminated
externally by chemical vapors or with improper fuel additives, or with water/
system conditions which may have caused heat exchanger failure.
See section“For all Weil-McLain Products” for additional warranty information.
Radiant Heating Products
Radiant Heating Products Warranty — Limite d 30 Year
IPP & IPC Products Warranty — Limited 3 Year
Weil-McLain warrants that its AlumiPex and Qual-Pex radiant heating products are
free from defects in material and workmanship for thirty years (three years for IPP
and IPC products) from the date of installation. If any parts are found to be defective
from such defects during such time period, Weil-Mc Lain will provide replacement of
such defective parts. It is expressly understood that failure as a result of freezing of
water within the pipes (tubing) does not constitute a defect in material or
workmanship and shall not be covered by this warranty.
See section“For all Weil-McLain Products” for additional warranty information.
Parts and Accessories
Parts and Accessories Warranty — Limite d 1 Year
Weil-McLain warrants that parts and accessories that were purchased through WeilMcLain are free from defects in material and workmanship for one year from the date
of installation. If any parts and/or accessories are found to be defective from such
defects during such time period, W eil-McLain will provide replacement of such
defective parts. Parts and accessories covered under this warranty include only
those items that are not
covered under other Weil-Mc Lain product warranties.
See section“For all Weil-McLain Products” for additional warranty information.
For All Weil-M cLain Products: These warranties are subject to the condition
that the Weil-McLain Product(s) must have been installed in accordance with
manufacturers ’ instructions by a heating contractor whose principal occupation is
the sale and installation of plumbing, heating and/or air conditioning equipment.
These warranties extend only to the first retail purchaser of the products and only
to a product that has not been moved from its original installation site.
In addition to each product warranty listed, Weil-McLain warranties do not cover
:
1. Components that are part of the heating system (products) but were not furnished by Weil-Mc Lain as a part of the heating system (products).
2. The workmanship of any installer of Weil-McLain’s product(s). In addition, this
warranty does not assume any liability of any nature for unsatisfactory performance caused by improper installation.
3. Any costs for labor for removal and reinstallation of the alleged defective part,
transportation to Weil-McLain, if necessary, and any other materials necessary
to perform the exchange.
4. Any products that have a failure or malfunction resulting from improper or
negligent operation, accident, abuse, freezing, misuse, unauthorized alteration
or improper repair or maintenance.
5. Improper adjustments (including boiler/burner), control settings, care or maintenance. Information is in the installation, start-up, operations, owner/user’s
manuals, service/maintenance instructions, and other printed/technical information provided with the product or direct from Weil-McLain or weil-mclain.com
.
68
Part Number PLUS-E017-A/1206
 Loading...