

Page 1

COPYRIGHT
This publication is protected under international copyright laws, with all rights reserved. Neither
this manual, nor any of the material contained herein, may be reproduced without written consent
of GoerTek.
Copyright 2005
Version 1.0, December 2005
TRADEMARK RECOGNITION
Bluetooth is a trademark of the Bluetooth SIG, Inc. (Special Interest Group). The Bluetooth
trademark is owned by Bluetooth SIG, Inc. USA.
Skype is a trademark of Skype Limited.
Toshiba is a registered trademark of Toshiba Corporation.
Windows Media Player is either a registered trademark or trademark of Microsoft Corporation in
the United States and/or other countries.
Other product names used in this manual are the properties of their respective owners and are
acknowledged.
FEDERAL COMMUNICATIONS COMMISSION (FCC)
This equipment has been tested and found to comply with the limits for a Class B digital device,
pursuant to Part 15 of the FCC Rules. These limits are designed to provide reasonable protection
against harmful interference in a residential installation. This equipment generates, uses, and can
radiate radio frequency energy and, if not installed and used in accordance with the instructions,
may cause harmful interference to radio communications. However, there is no guarantee that
interference will not occur in a particular installation. If this equipment does cause harmful
interference to radio or television reception, which can be determined by turning the equipment off
and on, the user is encouraged to try to correct the interference by one or more of the following
measures:
- Reorient or relocate the receiving antenna.
- Increase the separation between the equipment and the receiver.
- Connect the equipment onto an outlet on a circuit different from that to which the receiver is
connected.
- Consult the dealer or an experienced radio/TV technician for help.
Shielded interconnect cables and a shielded AC power cable must be employed with this
equipment to ensure compliance with the pertinent RF emission limits governing this device.
ABOUT THIS MANUAL
This manual is provided for home users to set up and operate the GSH300 Bluetooth Stereo
Headset. Please read this manual before using the headset and retain it for future reference.
SAFETY INFORMATION
Electronic Devices
To avoid electromagnetic interference (EMI), turn off the headset in any place where posted
notices instruct you to do so.
Note:Most modern electrical devices are susceptible to electromagnetic
interference if inadequately shielded, designed, or otherwise configured for electromagnetic
compatibility.
Aircraft
Turn off the headset when on board aircraft. The use of Bluetooth-enabled devices could interfere
with the telecommunication system of aircraft.
Medical Instruments
If you use a medical device, such as a pacemaker, consult the manufacturer of your medical device
to determine if it is adequately shielded from electromagnetic interference. Your physician might
assist you in obtaining this information.
Power Adapter
Only use the supplied power adapter with the headset.
Repair or Service
There are no user-serviceable parts in the headset. Any attempt to modify, or remove the
rechargeable battery will void the warranty. Refer all servicing to qualified personnel. (See
“Troubleshooting” on page 32.)
Contents
1 Getting Started ......................................................................................................10
1.1 Checking the Package Contents ..............................................................10
1.2 Identifying Parts ............................................................................................11
1.2.1 Multi-function and 3-Way Buttons ..................................................11
1.2.2 Status LED ............................................................................................... 12
1.3 Charging the Built-in Battery .................................................................... 12
1.3.1 Charging with a Computer ................................................................. 13
1.3.2 Charging with the AC Adapter ......................................................... 13
1.3.3 When to Recharge the Battery? ........................................................ 14
1.4 Wearing the Headset ................................................................................... 14
1.5 Practice Using Controls ............................................................................... 15
1.6 Headset Range of Operation .................................................................... 15
1.7 Powering the Headset on and off ............................................................ 16
2 Phone Operation .................................................................................................. 16
2.1 Pairing the Headset with a Phone ........................................................... 16
2.2 Making, Redialing, and Ending Calls ....................................................... 17
2.3 Answering a Call ............................................................................................ 18
2.4 Call Waiting and Three-way Calling ........................................................ 18
2.5 Switching Calls Between Headset and Phone .................................... 18
2.6 Rejecting a Call .............................................................................................. 19
2.7 Adjusting the Volume .................................................................................. 19
2.8 Phone Functions at a Glance ..................................................................... 20
3 Music Playback ...................................................................................................... 21
3.1 Pairing with a Computer for Music Playback ....................................... 21
3.2 Listening to Music on your Computer ................................................... 25
3.3 Music Functions at a Glance ...................................................................... 27
4 Making Internet Phone Calls ............................................................................ 27
4.1 Pairing with a Computer for Internet Calls ........................................... 27
4.2 Setting Sound Options for Skype™ ........................................................ 30
4.3 Taking Skype Calls ........................................................................................ 31
Page 2
5 Appendix ................................................................................................................. 32
5.1 Troubleshooting ............................................................................................ 32
5.2 Frequently Asked Questions .................................................................... 34 5.3
Specifications ................................................................................................ 35 5.4
Warranty ........................................................................................................... 35
1 Getting Started
Congratulations on purchasing the GSH300 Stereo Bluetooth Headset. The GoerTek ultra-light
headset is comfortable to wear and easy to use.
Be sure to read the safety information on page 2 before using the headset.
1.1 Checking the Package Contents
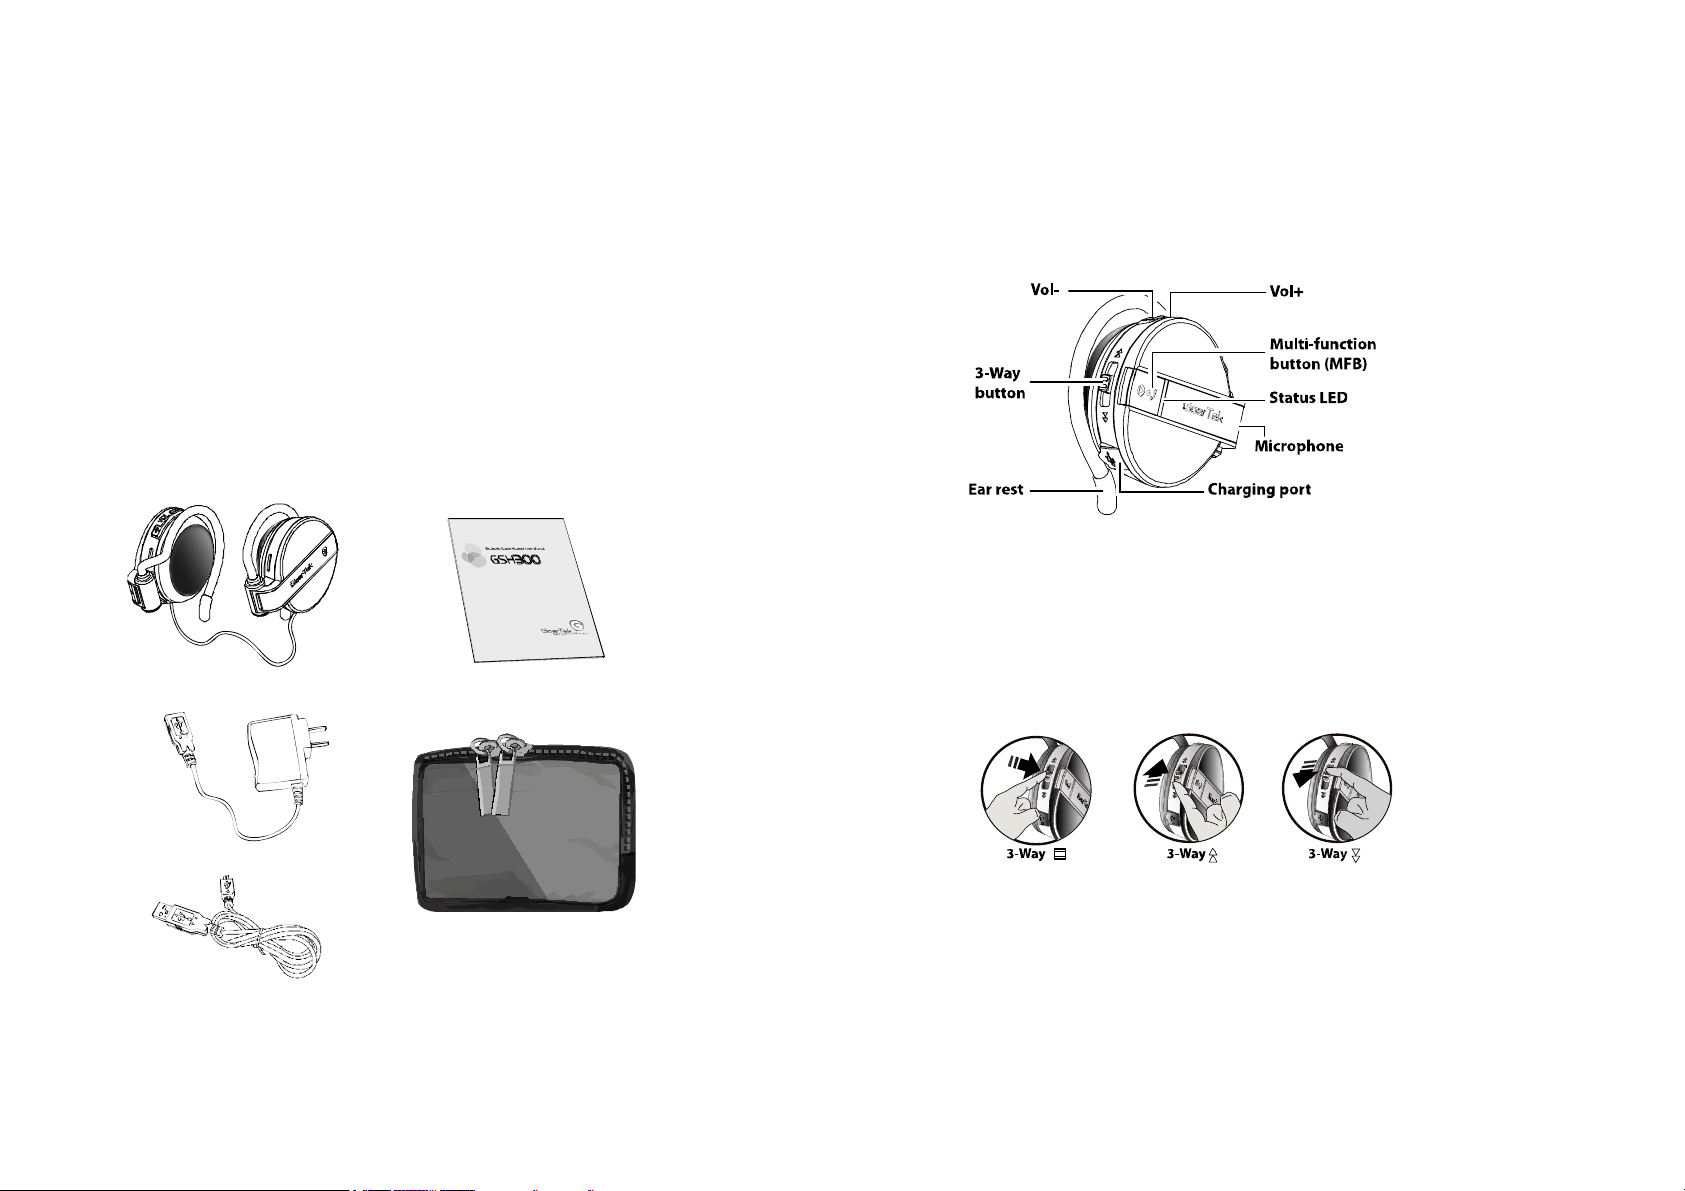
Check that the following items are included in your package.
If any item is missing or damaged, return the package to your reseller.
1.2 IDENTIFYING PARTS
Refer to the following illustration to identify the parts on the headset right-speaker unit. (There are
no controls on the left-speaker unit.)
1.2.1 Multi-function and 3-Way Buttons
The multi-function button is called MFB in this manual. Its function depends on how long you
keep the button pressed. A short-press is less than one second. A long-press is two to five seconds;
A very-long-press is more than five seconds. (as indicated in this manual).
The 3-Way button can be pressed in the following three ways:
Bluetooth Stereo Headset This User Manual USB Cable AC Adapter Travel Pouch
Here is an example of how button presses are described in this manual:
To turn on the headset, long-press MFB (about 3 seconds). To mute the microphone volume, press
3-Way . To play the next song press 3-Way .
Important:The 3-Way button only works with Bluetooth devices that
support the A2DP profile.
Page 3
1.2.2 Status LED
1.3 CHARGING THE BUILT-IN BATTERY
The headset has a built-in battery, which must be charged fully before you use the headset.
Charging takes about 3.5 hours. You can charge the headset through the ac adapter or the USB
connector on a computer.
When fully charged, the headset can be on standby for up to 200 hours. You can call or listen to
music continuously for up to 14 hours.
Caution:Be sure the USB connectors are aligned correctly and do not
force the connection. Use the USB icon on the connectors and in the illustrations below as a guide.
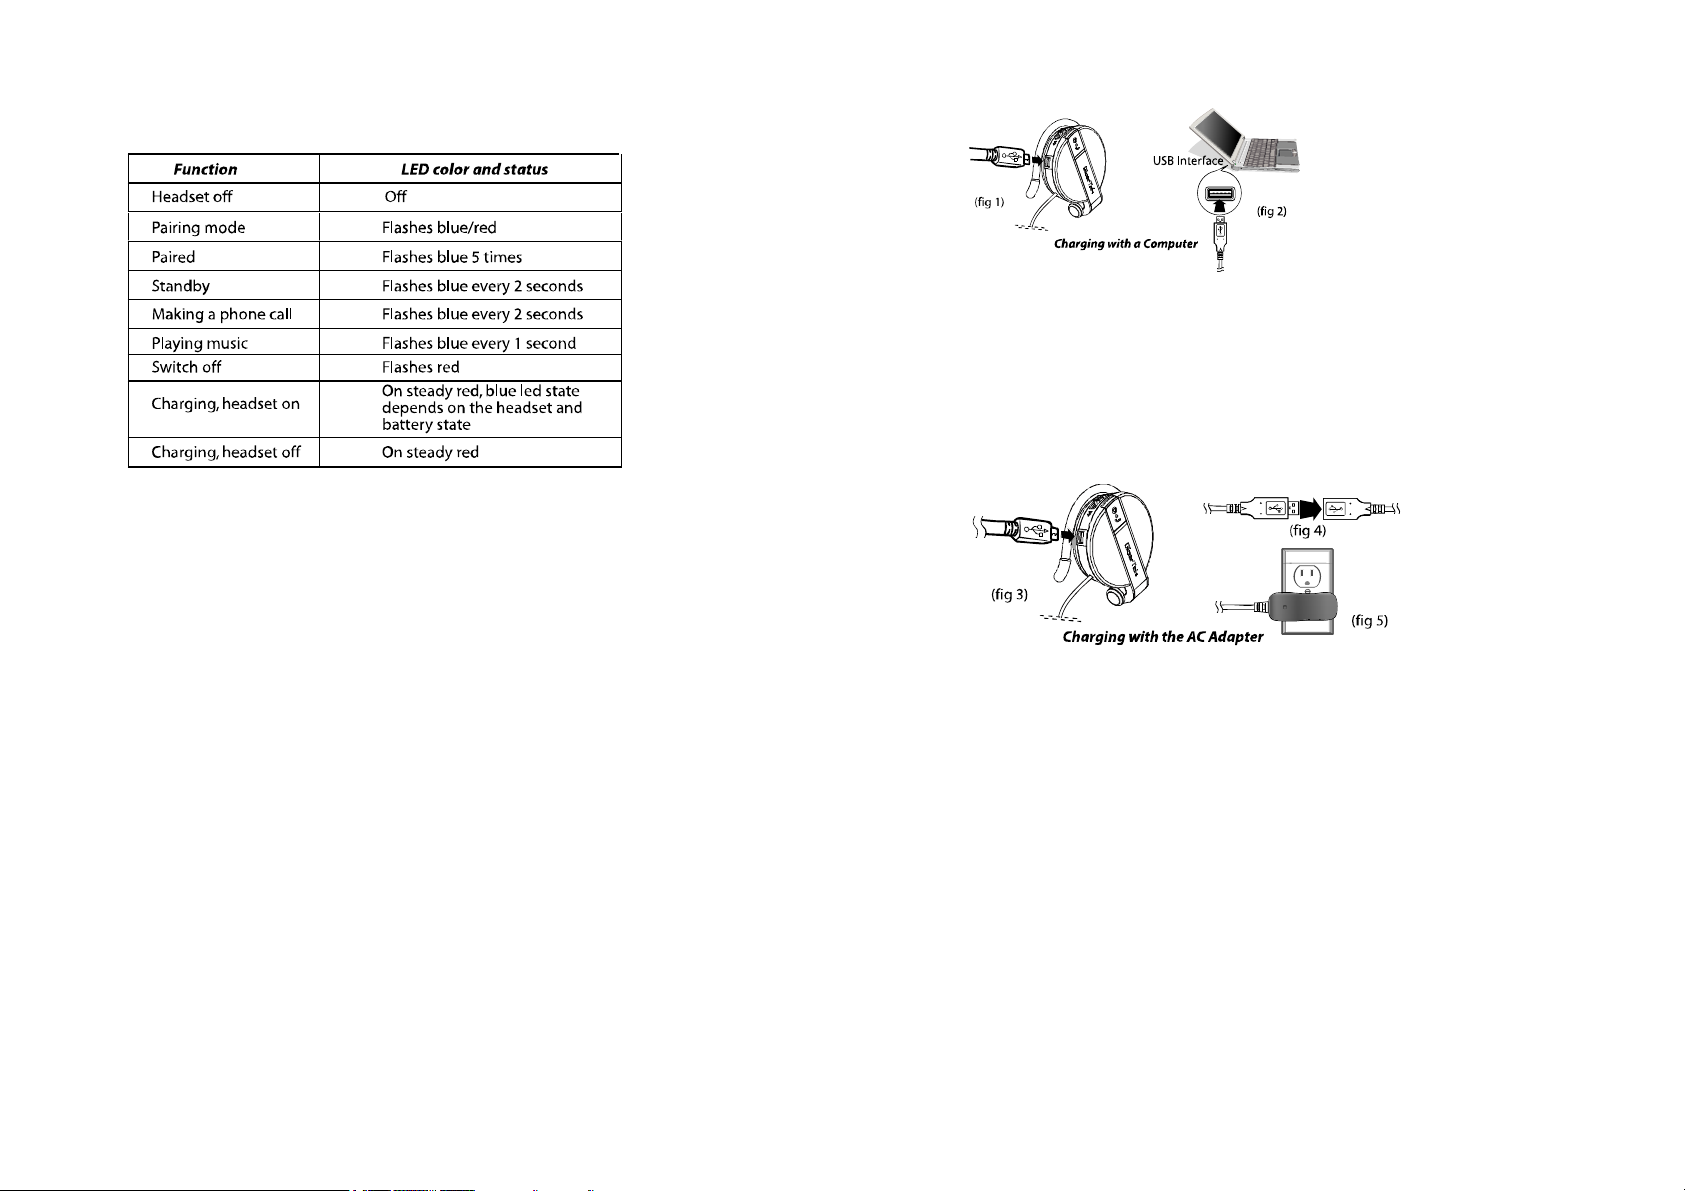
1.3.1 Charging with a Computer
1. Open the charging port dust cover.
2. Connect the small connector on the USB cable to the charging port
on the headset (fig 1).
3. Connect the other end of the USB cable to a USB connector on the
computer. The LED lights red (fig 2).
4. Unplug the cable when the red LED turns off.
1.3.2 Charging with the AC Adapter
1. Open the charging port dust cover.
2. Connect the small connector on the USB cable to the U charging port
on the headset (fig 3).
3. Connect the other end of the USB cable to the USB connector on the
AC adapter (fig 4).
4. Plug the AC adapter into an electrical outlet. The LED lights red (fig 5).
5. Unplug the cable when the red LED turns off.
Tip! You can still use the headset while it is charging. When used while
charging, the LED flashes blue/red.
1.3.3 When to Recharge the Battery?
When you turn on the headset and the LED lights red, the battery needs to be recharged.
Important:The rechargeable battery in the headset must be disposed
or recycled according to local ordinance regulations.
1.4 WEARING THE HEADSET
The headset is designed to rest comfortably on your ears with the cable behind your neck. The
speaker unit with the controls goes over your right ear.
1. Hold the headset and push the ear rest with one finger to extend it (fig
6).
2. Hook the ear rest over your ear and release the speaker (fig 7).
Page 4

1.5 PRACTICE USING CONTROLS
With the headset on, push Vol-
with your index finger and
Vol+ with your middle finger.
Use your thumb to press the
3-Way and MFB buttons (fig 8).
Of course, you can use any method to operate the controls. Just use one method and it will quickly
become second nature.
1.6 HEADSET RANGE OF OPERATION
The range of operation between Bluetooth devices is about 10 meters. Bluetooth does not require
line of sight and can transmit through walls and other nonmetal obstacles. Thick or reinforced
concrete can limit the range.
1.7 POWERING THE HEADSET ON AND OFF
To indicate operation status, the headset LED lights . While trying out headset functions, you can
put the left speaker on and hold the right speaker to see the controls and the LED.
1. Standby Mode: Long-press (about 3 seconds) MFB until the LED flashes
blue.
Pairing Mode: Long-press (about 5 seconds) MFB until the LED flashes red/blue. (After about 3
seconds, the LED flashes blue [standby]; keep the button pressed until the LED flashes red/blue.)
Important: You cannot go from standby mode to pairing mode. You must turn off the headset, and
then long-press MFB to be in pairing mode.
2. To turn off the headset, long-press (about 5 seconds) MFB until you
hear a beep. Then release MFB. The LED flashes red five times and the headset turns off.
2 Phone Operation
You can use the headset with most Bluetooth-enabled phones. (Visit http://www.goertek.com for a
list of supported phones.) The headset supports Bluetooth handsfree and headset profiles; however
your phone may not support all the features mentioned below.
2.1 PAIRING THE HEADSET WITH A PHONE
Before you can use the headset to make calls, you must pair the headset with your phone. Pairing
creates a secure link between your phone and the unique ID of the headset. You only have to pair
devices once.
1. To put the headset in pairing mode, long-press (about 5 seconds) MFB until the LED flashes
red/blue.
2. Scroll to the Bluetooth menu in your phone and search for active
devices. (Refer to your phone’s user manual for details.)
3. When the search completes, a list of devices found is displayed. (The
screen examples here are from a Nokia 6230.)
4. Select GSH300 and when prompted input the default passkey [0000].
When successfully paired, the red/blue LED on the headset changes to flashing blue.
You can pair the headset with up to eight Bluetooth devices. When you turn on the headset, it
automatically tries to pair with the last device it was connected to. When you pair the device with
a ninth device, the oldest-paired device is deleted.
Page 5

2.2 MAKING, REDIALING, AND ENDING CALLS
If your phone supports voice dialing, you can make the call from the headset. Otherwise, you must
initiate the call from your phone.
1. Voice dialing: Short-press MFB, then say the voice tag.
Phone keypad: Dial the number on the phone.
2. To end the call, short-press MFB (or use the end-call function on your
phone).
3. To redial the last number, long-press (about 3 seconds) 3-way .
Note:If necessary, rerecord your voice tags using the microphone on the
headset.
2.3 ANSWERING A CALL
If you want the headset to automatically answer incoming calls, enable this feature on your phone.
Auto answer: The headset rings on an incoming call and you are connected automatically.
Manual answer: When the headset rings for the incoming call, short-press MFB to connect.
Note:Some phones may not ring or may not transfer a ring tone to the
headset for incoming calls. You can still take the call as described above.
2.4 CALL WAITING AND THREE-WAY CALLING
1. To answer a second incoming call, short-press 3-way , the incoming
call will be accept and the active call will be held.
2. To join the second call with the first, long-press MFB, both calls are
active.
3. To release all call, short-press 3-way .
4. To answer a second incoming call, and release the active call, short-press
MFB.
5. To keep active call, and release other calls, short-press 3-way .
2.5 SWITCHING CALLS BETWEEN HEADSET AND PHONE
While you are making a call, you can switch the call between the headset and your phone.
Headset to phone: Long-press (about 3 seconds) MFB. (Or switch the call through your phone if
supported.) The call switches to your phone.
Phone to headset: Long-press (about 3 seconds) MFB. (Or switch the call through your phone if
supported.) The call switches back to the headset.
Phone to headset (when headset off): If the headset is off during a call, turn on the phone and
short-press MFB. The call switches to the headset.
2.6 REJECTING A CALL
If you do not want to take an incoming call, long-press MFB . The incoming call is cut off.
2.7 ADJUSTING THE VOLUME
You can adjust the volume during a call by pressing the volume buttons on the headset or the
volume buttons on your phone.
Press VOL+ to increase Vol+ the volume (fig 9).
Press VOL- to decrease the volume.
Long-press 3-Way
to mute the
microphone. Long-press again to
enable the microphone.
Note:Mute only affects the microphone. You can still hear the caller; but
the caller cannot hear you.
2.8 PHONE FUNCTIONS AT A GLANCE
Page 6

4. Right-click the Bluetooth Manager icon in the system tray and click
Add New Connection (fig 13).
3 Music Playback
You can listen to music in high-quality stereo on your computer or an audio player if the device
supports streaming audio over Bluetooth (through a Bluetooth AV profile). You can purchase a
Bluetooth dongle (transmitter/receiver) that connects to the USB connector on the computer; some
models also connect to the audio-out connector on an MP3 player or other audio device.
3.1 PAIRING WITH A COMPUTER FOR MUSIC PLAYBACK
This section assumes you have already installed a Bluetooth USB dongle on your computer.
Before you can use the headset for music playback with your computer, you must pair the headset
with your computer. The headset must be turned on in pairing mode. The following instructions
are for pairing with the Toshiba® Bluetooth Setting utility.
1. To put the headset in pairing mode, long-press (about 5 seconds) MFB
until the LED flashes red/blue.
2. Right-click the Bluetooth Manager icon (fig 10) in the system tray
and click Service Properties (fig 11).
3. In the Service Properties window, check AV Remote Control Service
and click OK (fig 12).
5. Select the Custom Mode radio button and click Next. The wizard
searches for the device and the following screen appears (fig 14).
6. Select GSH300 and click Next (fig 15).
7. Under Service Class, select Audio Sink and click Next (fig 16).
8. Type in the default passkey [0000] and click OK (fig 17).
Page 7

9. Type a connection name such as Music and click Next (fig 18).
10. Click Finish to complete the connection. Right-click GSH300 icon
and click Connect. Once connected the icon changes to a handshake (fig 19).
3.2 LISTENING TO MUSIC ON YOUR COMPUTER
When listening to music you should connect to the Music (AV) profile.
Note:If you create a profile for Internet phone calls (see “Making
Internet Phone Calls” on page 27) and use it for listening to music, the stereo function of the
headset will be lost resulting in poor sound quality.
The example below describes how to use the headset with Windows Media Player™.
1. To turn on the headset, long-press (about 3 seconds) MFB until the LED
flashes blue.
2. If the Bluetooth Settings utility is not open, double-click the Bluetooth
Manager icon in the system tray (fig 21).
11. The new connection is shown in the Bluetooth Settings window
(fig 20).
Now you can listen to the music listed in Windows Media Player. Press Vol+ or Vol- key to adjust
the music volume. (please re-start the computer if the buttons of headset cannot work for music
playback.)
3. Right-click GSH300 icon and click Connect. Once connected the icon
changes to a handshake (fig 22).
4. Open and start playing a playlist on Windows Media Player. (You can
also press 3-Way to open Windows Media Player.)
5. Press VOL-/+ on the headset to adjust the volume.
6. Press 3-Way to toggle play/pause.
7. Press 3-Way to play the next song.
8. Press the 3-Way to play the previous song.
Page 8

9. Long-press 3-Way (about 3 seconds) to stop playing; short-press to
resume play.
10. To turn off the headset, long-press (about 5 seconds) MFB.
Note:You can use the headset to listen to other music players on your
computer. However, other players may not support using the 3-Way button.
3.3 MUSIC FUNCTIONS AT A GLANCE
4 Making Internet Phone Calls
There are many Internet phone services (VoIP) that let you make calls from your computer.
Because Internet calling uses a different Bluetooth headset profile than for music, you must add a
new connection for this function.
4.1 PAIRING WITH A COMPUTER FOR INTERNET CALLS
Disconnect from the Music profile if connected and turn off the headset. (You cannot make a new
connection if the headset is connected to another profile.)
1. To put the headset in pairing mode, long-press (about 5 seconds) MFB
until the LED flashes red/blue.
2. Right-click the Bluetooth Manager icon in the system tray and click
Add New Connection (fig 23).
4. Select GSH300 and click Next (fig 25).
5. Under Service Class, select Headset and click Next (fig 26).
6. When you hear a signal tone on the headset, short-press MFB (fig 27).
3. Select the Custom Mode radio button and click Next. The wizard
searches for the device and the following screen appears (fig 24).
7. Type a connection name such as Phone and click Next.
8. A registration confirmation screen appears. Click Finish to complete
the connection. The new connection is shown in the Bluetooth Settings window (fig 28).
Page 9

9. Right-click the Phone icon and click Connect (fig 29).
4. Under the Audio In/Out drop-down menus, select the Bluetooth
audio option and click Save. (If you are not connected to the headset, Bluetooth audio will not be
available under Sound Devices.)
5. Under Skype Contacts, click Skype Test Call to check if the headset
speakers and microphone are working. (Refer to “Troubleshooting” on page 32 if you have an
audio problem.)
4.3 TAKING SKYPE CALLS
When taking Skype calls you must connect to the Phone (headset) profile. If you take a call when
connected to the Music (AV) profile, the microphone will not function (fig 32).
10. When you hear a signal tone on the headset, short-press MFB.
Once connected the icon changes to a handshake (fig 30).
4.2 SETTING SOUND OPTIONS FOR SKYPE™
Skype PC-to-PC calls are free, and there is a per-minute charge to call normal phones. Skype can
be downloaded from http://www.skype.com. Before you can take a Skype call through the headset,
you must con-figure Skype sound options.
1. Make sure you are connected to the Skype profile.
2. On the Skype menu bar click Tools -> Options.
3. In the Options window, select Sound Devices (fig 31).
Note:The headset only controls volume. Use the Skype interface for all
call functions.
1. Answer or place a call with the Skype interface.
2. Press VOL-/+ on the headset to adjust the vol-ume.
3. Use the Skype interface to end the call.
5 Appendix
5.1 TROUBLESHOOTING
If you cannot get the headset to work, try the following:
- Turn off the devices and turn them on again.
- Ensure the headset is charged.
- Ensure devices are within the 10-meter (33 feet) range.
- Ensure no obstructions such as thick concrete walls are between con-
necting devices.
Try the following to troubleshoot an audio problem when connected to a computer.
1. Click Start -> Control Panel.
2. In Control Panel, open Sounds and Audio Devices .
3. Select the Audio tab and
ensure your Bluetooth
device is selected under
Sound playback and
Page 10

Sound recording (fig 33)
.
3. CAN ANOTHER BLUETOOTH PHONE USER HEAR MY CONVERSATION?
No. Through pairing, you have created a secure link between your phone and the headset.
4. IS PAIRING NEEDED EACH TIME WHEN I USE THE HEADSET?
No. The pairing information will be stored in both devices even if one or both of them have been
turned off.
5. IS IT NECESSARY TO RECONNECT THE TWO DEVICES WHEN THERE IS AN
INTERRUPTION ON THE LINK BETWEEN MY PHONE AND HEADSET?
It varies according by phone. Some phones can be reconnected automatically if both devices are
within the effective distance; some must be reconnected.
6. WHY IS THERE NOISE IN MY HEADSET?
When the distance between your phone and headset exceeds the effective distance, background
noise may occur. A poor signal for your phone can also cause background noise on the headset.
7.WHAT SHOULD I DO IF THE HEADSET'S SOUND QUALITY IS POOR?
Try adjusting the volume of your phone or the headset. Also, check the quality of the signal for
your phone in your area.
5.3 SPECIFICATIONS
5. Click Test hardware and follow the instructions in the Wizard.
If the headset is still not working after trying the above, or if you need assistance with any other
problem, please contact us:
GoerTek Electronics
Global Location:
Qingdao,China Shenzhen,China Taiwan
Hong Kong USA
http://www.goertek.com
e-mail: service@goertek.com
5.2 FREQUENTLY ASKED QUESTIONS
1. CAN THE HEADSET BE USED WITH ALL PHONES?
No. It is only suitable for handsets that have the Bluetooth Voice Gateway function built in.
2. HOW FAR IS THE EFFECTIVE RANGE BETWEEN THE HEADSET AND A
BLUETOOTH-ENABLED DEVICE?
The effective range (without obstruction) is 10 meters (33 feet, Class II). Thick or reinforced
concrete walls limit the range.
5.4 WARRANTY
Please retain the sales receipt as proof of purchase. During the 1-year warranty period, the product
is eligible for replacement in case of defects in material and workmanship. In such cases, the
defective unit will be repaired or replaced by the manufacturer or an authorized distributor.
However, this warranty does not cover damages caused by improper use or from unauthorized
modifications by third parties. In addition, this warranty does not cover expendable materials and
defects, which constitute as normal wear and tear.
 Loading...