

Page 1

Contents
1.Introduction
2.specifications
3.Package contents
4. LED status indicator.
5.OS Requirements
6. Software Installation
Page 1 of 11
GBDU60 User Guide
7.Hardware Installation
8.Starting to use the GBDU60 Bluetooth USB adapter
8.1 Connecting to a new Bluetooth device
8.2 File Transfer
8.3 Service Properties Settings
8.4 Personal Area Network (PAN)
8.FAQs
Click here
Introduction
Bluetooth as a wireless technology specification is adopted globally. It serves as a
standard for wireless communication that enables wireless real time data connection,
updating, or synchronizing within short-range, rendering cable clutter a thing of the
past. Once inside a Bluetooth environment, Bluetooth devices will automatically
search for and find each other. Then based on the different Profiles of the devices, a
wide range of applications and functions can be realized. For example, using
Bluetooth technology, you can establish wireless connections between desktop and
laptop computers, PDAs, cellular phones, printers, scanners, digital cameras, and even
home appliances— on a globally available band (2.4-2.48GHz) for worldwide
compatibility.
But many old fashioned computers are not Bluetooth enabled. The Goertek GBDU60 Bluetooth
USB adapter has an inbuilt Bluetooth function combined with a Plug and Play feature of USB
devices. It makes a non-Bluetooth computer Bluetooth enabled with a maximum data rate of
1
Page 2

Page 2 of 11
3Mbps. After installing a simple driver, you just plug the GBDU60 Bluetooth USB adapter into
the USB port of your desktop or laptop computer, Windows will automatically search for and find
the device.
Specifications
Standard: Bluetooth V2.0 specification + EDR
Internal antenna
Low power consumption mode
Coverage: 10meters (Class 2)
Frequency: 2.4Ghz ISM
LED status indicator.
Severn Bluetooth peripheries in a PAN
Package Contents
The Goertek GBDU60 Bluetooth USB adapter package contains:
1. GBDU60 Bluetooth USB adapter;
2. User Guide;
3. CD driver
LED status indicator
The GBDU60 adapter has a blue LED indicator to indicate its current status.
1.The blue indicator blinks quickly: data in communication
2.The blue indicator blinks at longer intervals: in ordinary working status
OS Requirements
The GBDU60 adapter supports the following systems:
1、 Windows 2000
2 、Windows XP
3 、Windows 98se (edition2)
4 、Windows me
In different operational systems, the GBDU60 adapter realizes its seven functions similarly.
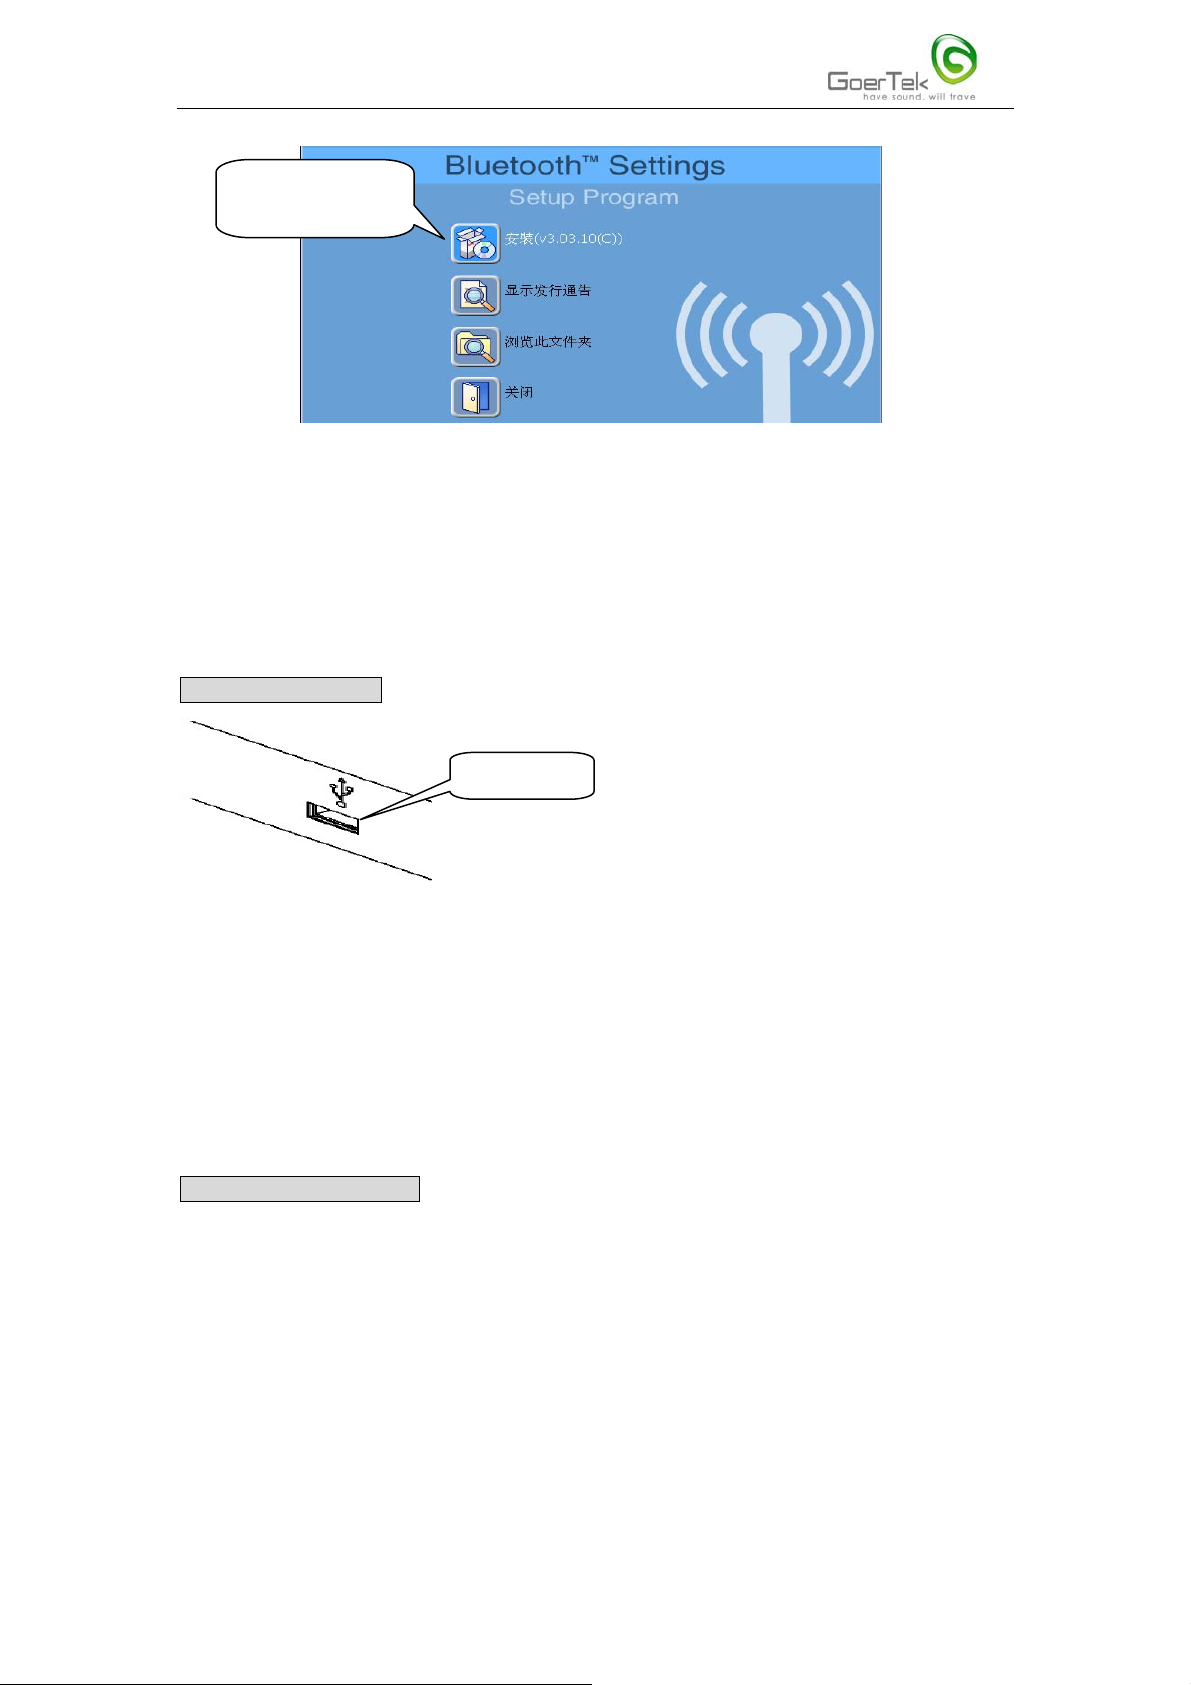
Software Installation
1.Place the CD inside your CD drive, Installation dialog box will automatically be displayed. If
the dialog box does not appear, click on Start Menu->Run, then enter H:\setup.exe (if your CD
drive happens to be H), click Enter on your keyboard or Yes button.
2.Click "Install V3.03.10(C)" to start software installation;
2
Page 3
Page 3 of 11
click here to start
installation
3.Click Next button;
4.Click the radio button to the left of "I accept the terms in the license agreement", then click
Next button;
5.Click Install button;
6.Restart Windows.
Hardware Installation
USB port
1.Plug the Bluetooth USB adapter into the USB port on your computer;
2.Windows will search for the new USB device automatically, and then follow the
instructions to install.
Note: Windows XP users may be required to click Next button, then Press Any Key to
Continue, and then click Finish button to finish the installation.
Starting to use the adapter
Take Windows XP Simple Chinese as an example.
Connecting to a new Bluetooth device.
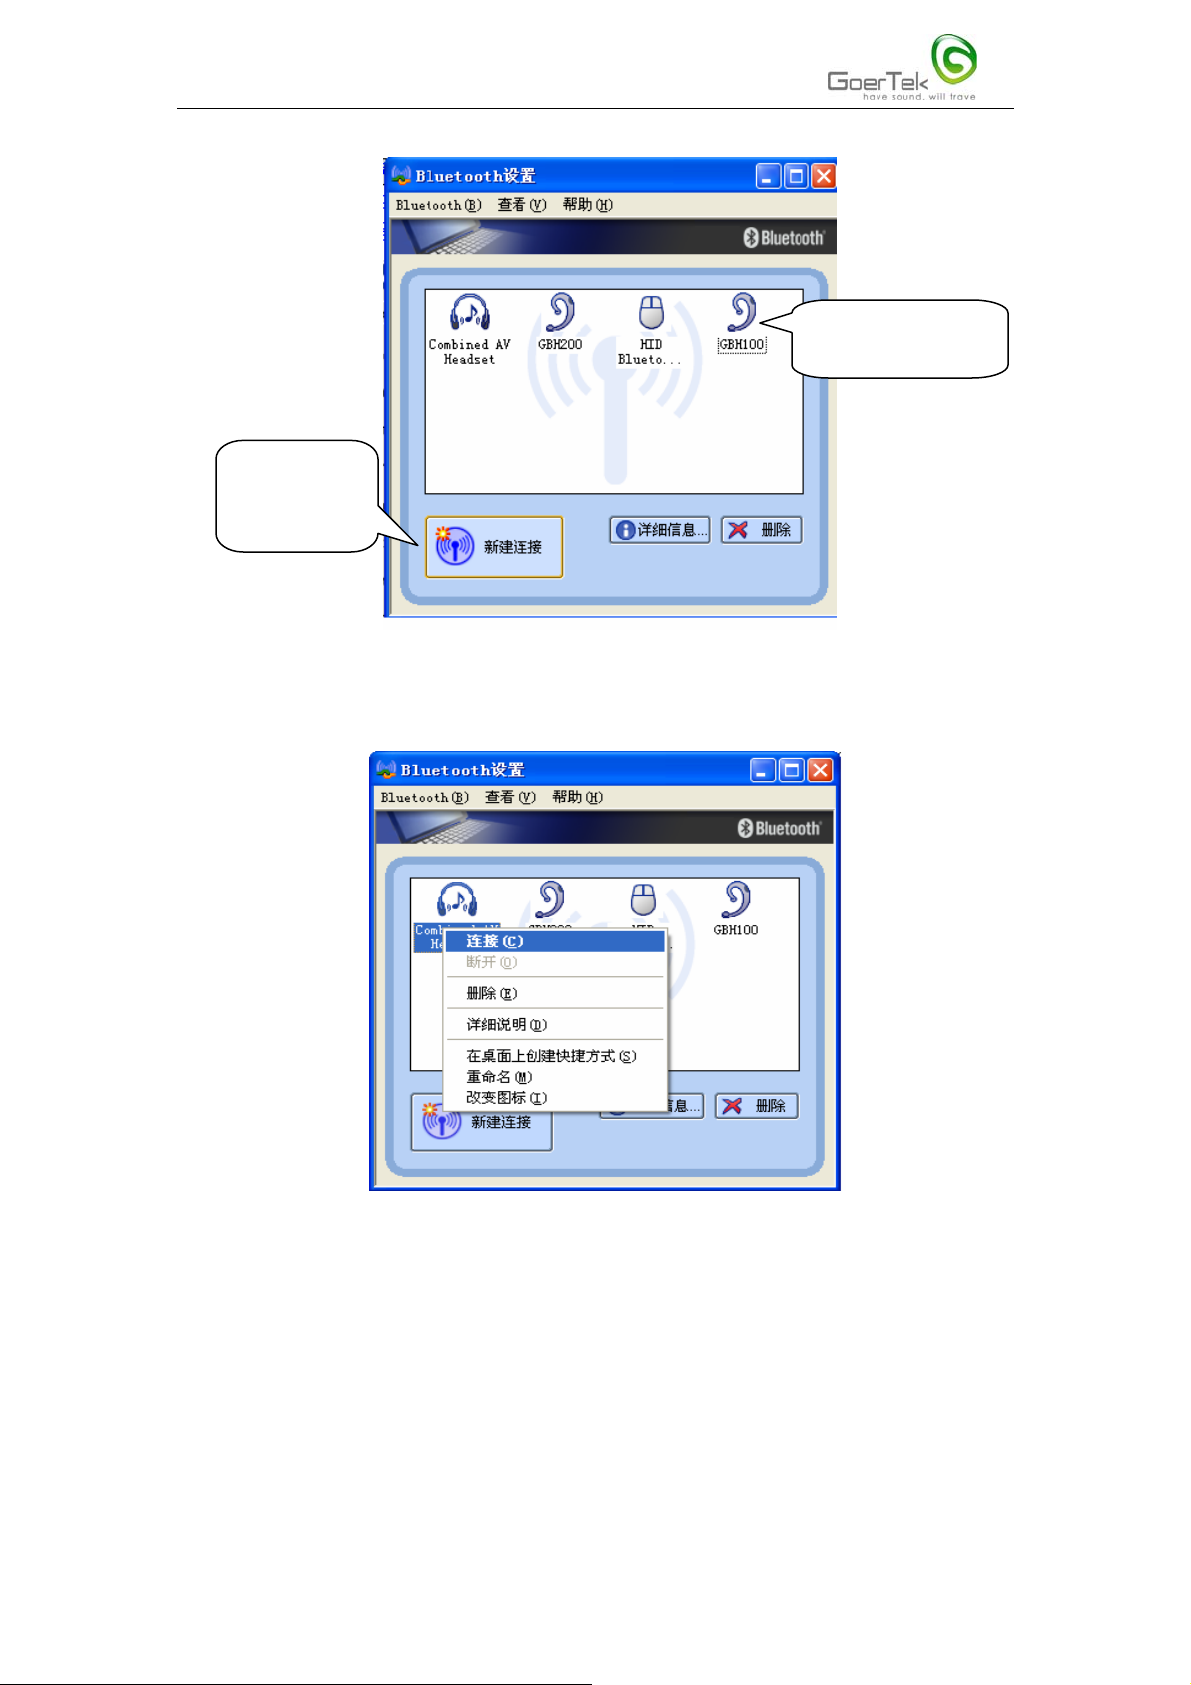
1.On the Desktop, click on Start menu->Programs->Bluetooth->Bluetooth Settings, in the
dialog box click "Add Bluetooth Connections" to connect to a new Bluetooth device. Bluetooth
devices already connected are listed. See the figure below.
3
Page 4
Page 4 of 11
Device list already
connected
Click here to
establish new
connections
2.To re-connect a Bluetooth device already connected, right click the device icon and select
Connect. See the figure below. You may delete a connected Bluetooth device then re-connect it.
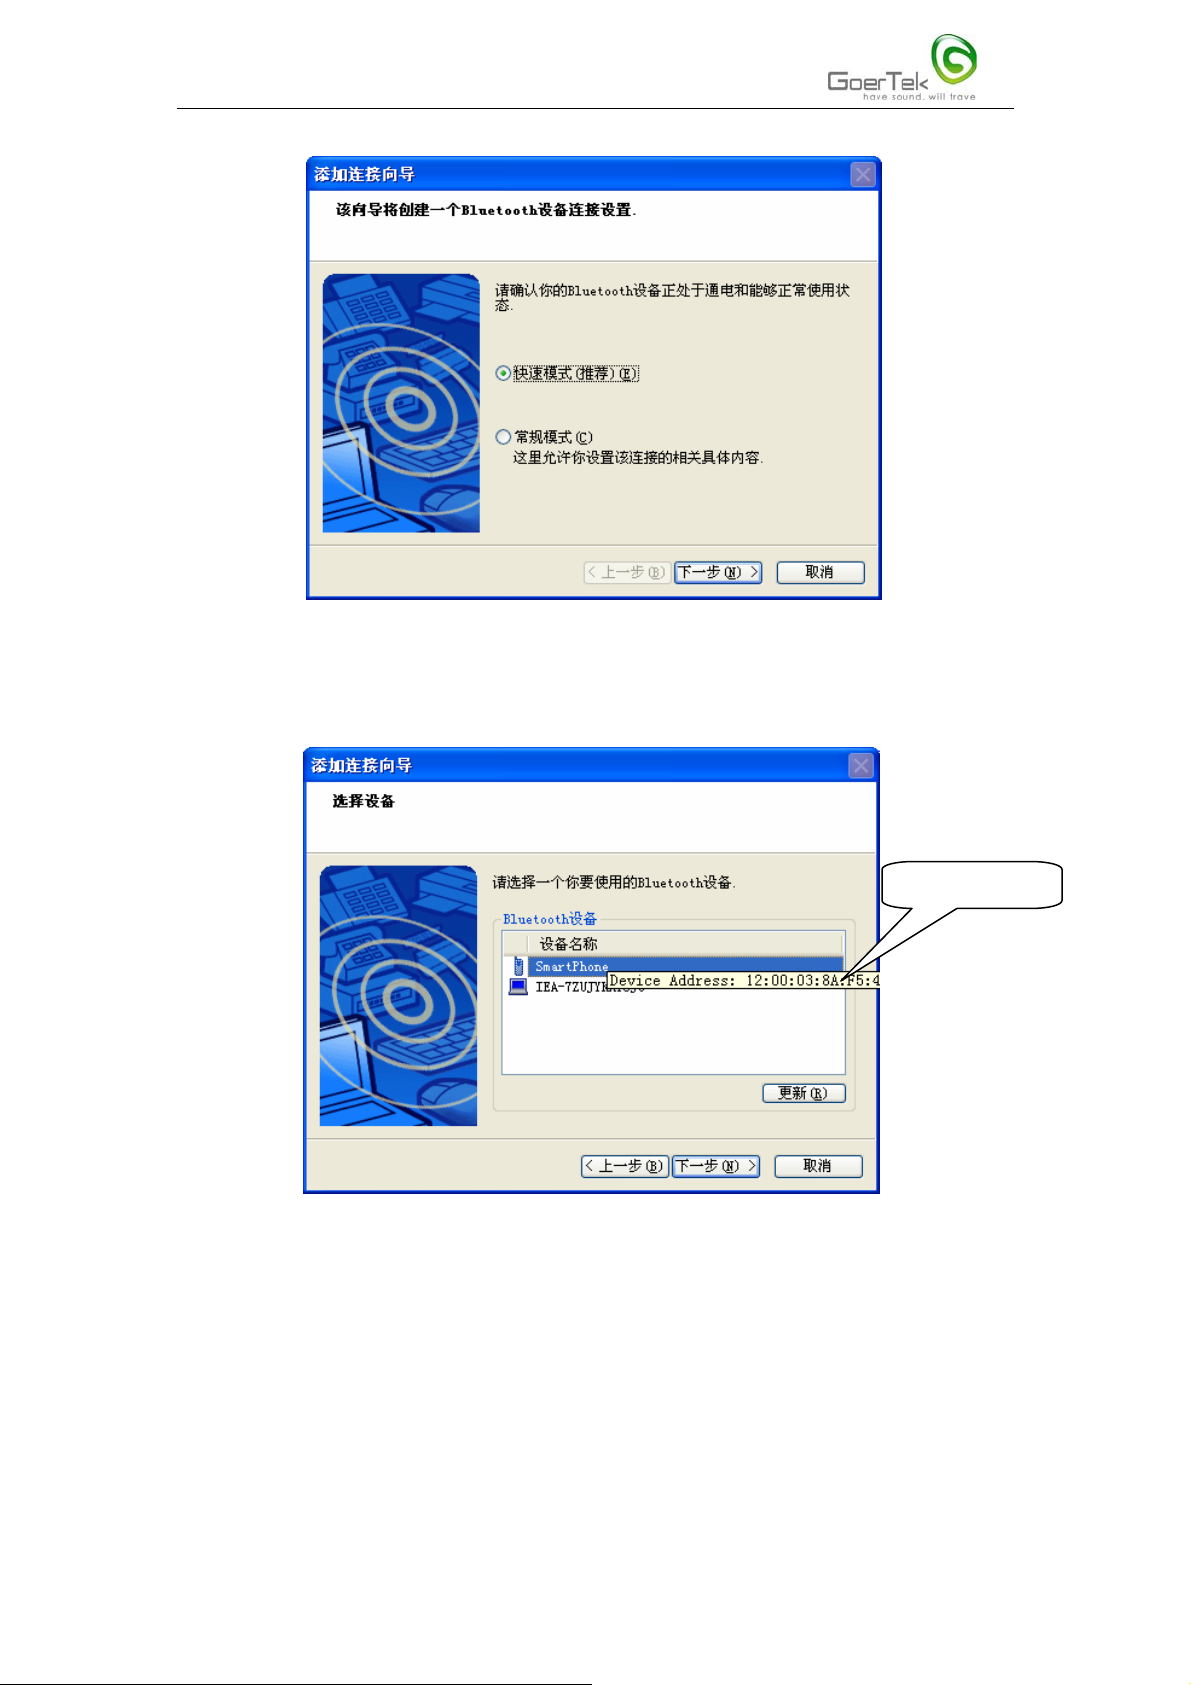
3.After click "Add Bluetooth Connections", a dialog box pops up, generally select "Quick Mode
(recommended)", and then click Next button.
4
Page 5
Page 5 of 11
4.The system automatically searches for the Bluetooth device nearby in "Visible" status and list
the device in the Bluetooth device list. If the desired device isn't listed, click "Renew" to start
search again. Select the Bluetooth device, click Next button.
Device Address
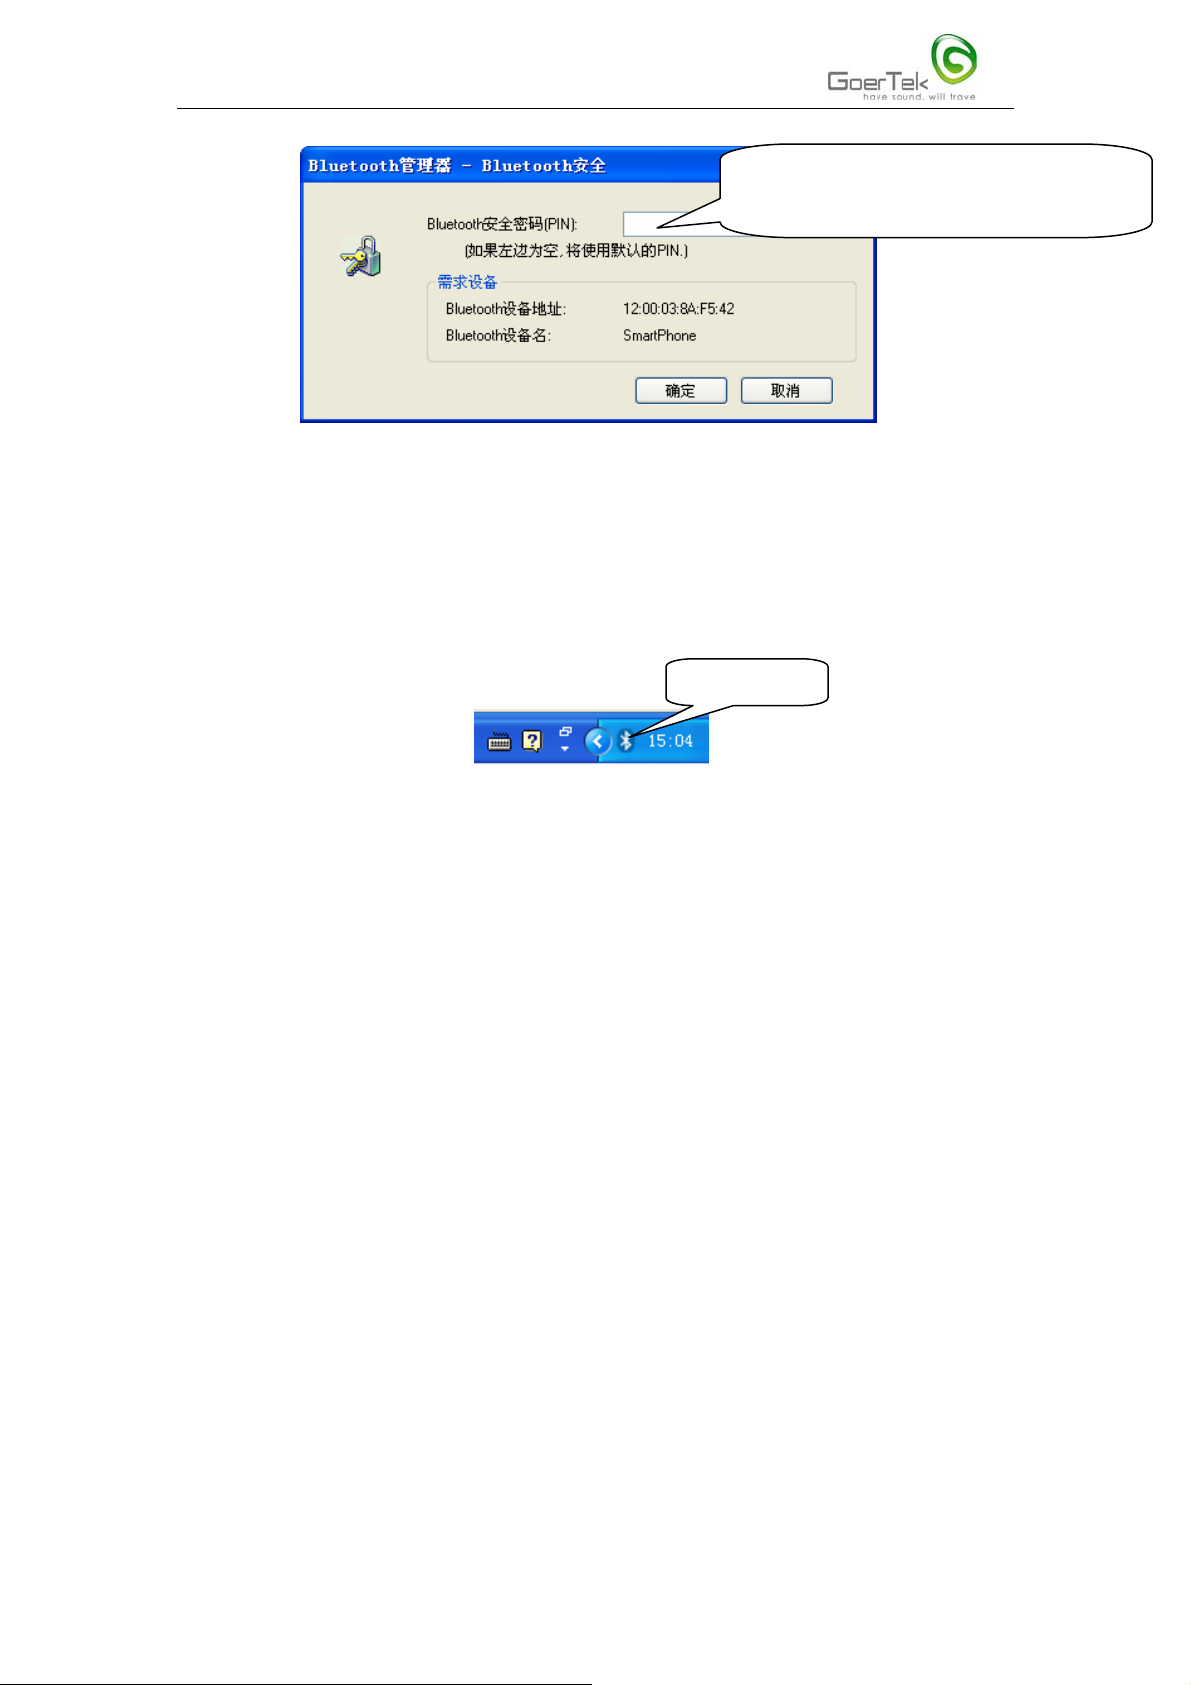
5.To connect to the selected Bluetooth device, you need to input a connection PIN. PIN is a must
for a secure connection between Bluetooth devices.
5
Page 6
Page 6 of 11
PIN is provided by device manufacturer and
is to be found in user guide
6.Key in PIN, click Yes button. Then follow the requirements of the Bluetooth device to continue.
If successfully connected, the device will be listed in the Bluetooth device list.
7. Follow the directions in step 2 to re-establish connections.
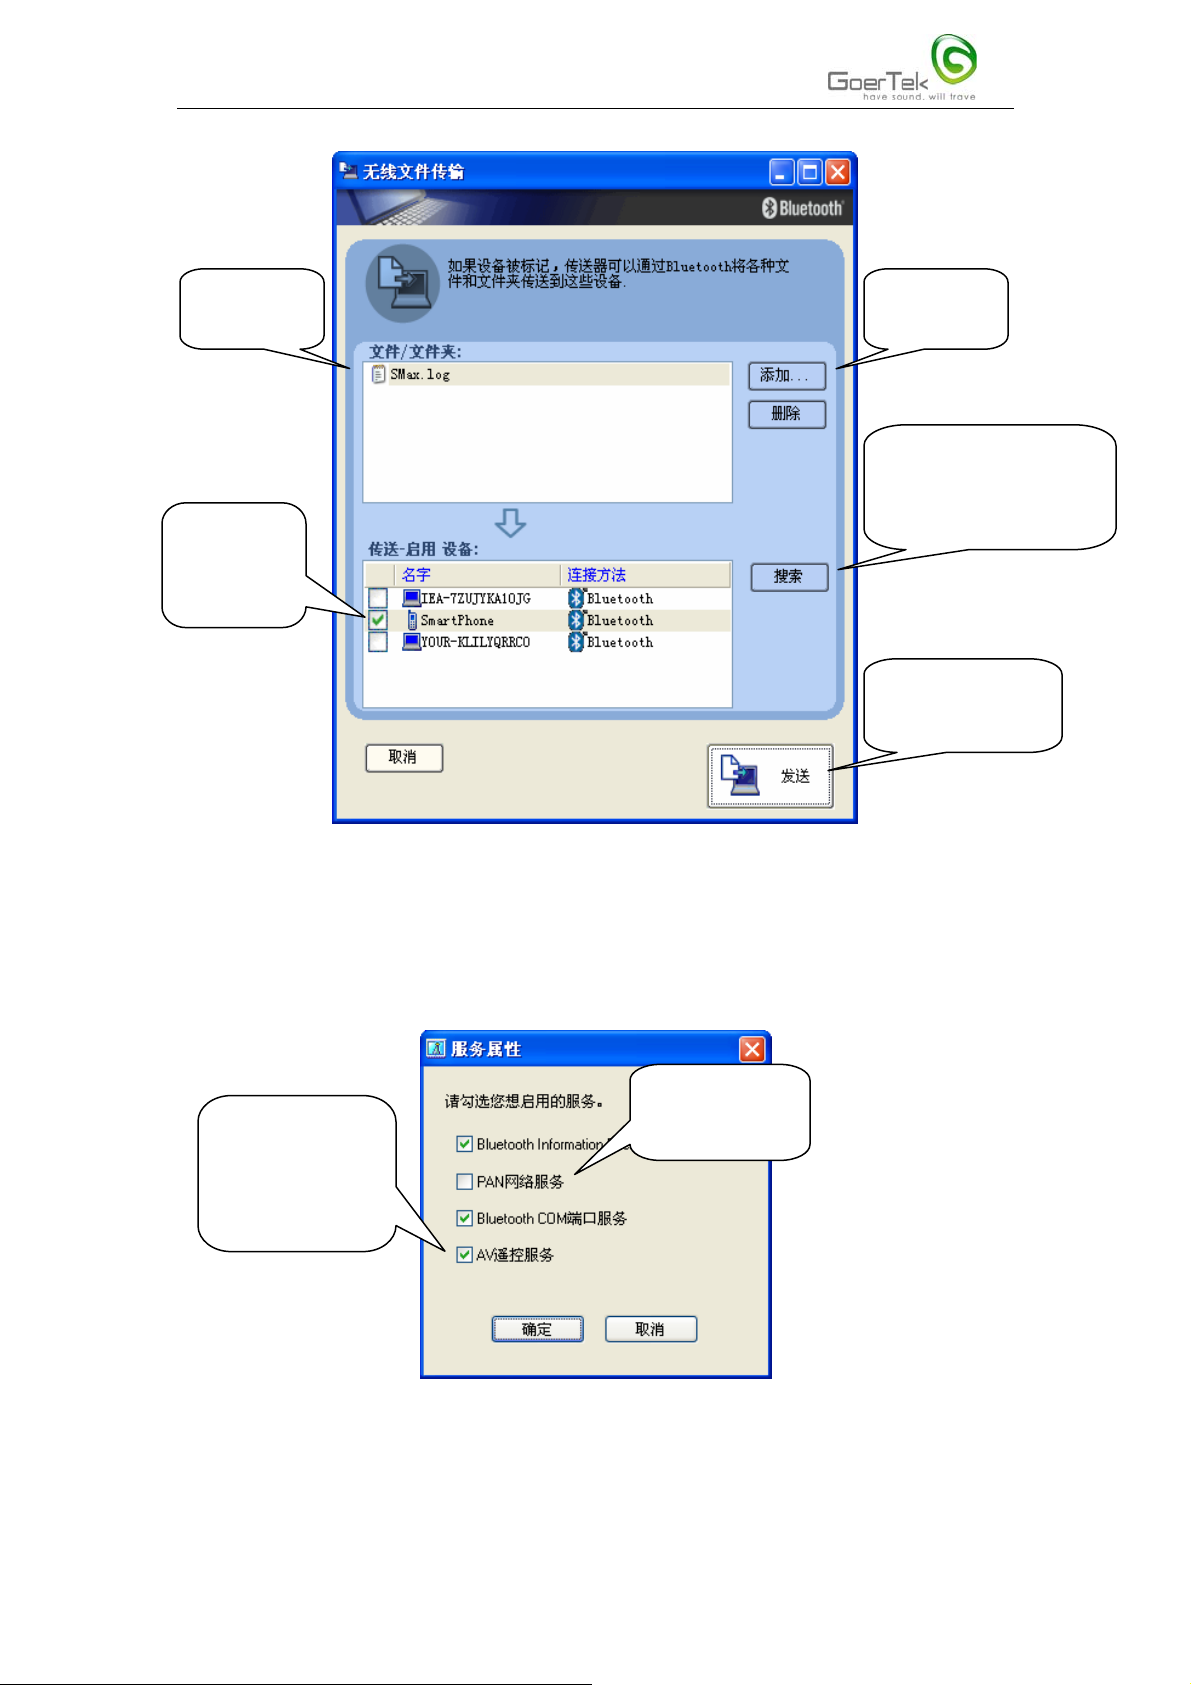
File Transfer
1.Right click Bluetooth icon on the tool bar.
Click here
2.Select "File Transfer" in the popped up menu. Find the destination Bluetooth device and add the
files to be transferred, click "Send".
6
Page 7
Page 7 of 11
Added file
list
Click here
to add file
Click here to find
available destination
Select the
Bluetooth devices
destination
device
Click here to
transfer files
Service Properties Settings
1.Right click the Bluetooth icon, in the popped up menu select " Service Properties". Select the
desired services then click Yes button.
Open PAN
Use headset
server service
buttons instead of
Windows Media
Player buttons
7
Page 8

Page 8 of 11
Personal Area Network (PAN)
1.First select "PAN Server Service" in the "Service Properties" check box as showed in the figure
above. After the service is activated, an icon as showed below will appear on the toolbar.
PAN server service
2.In a PAN, the device that first accepts connection applications becomes Server automatically. All
else devices in the PAN are Clients.
3.A Client can be connected to a Server in the way it is connected to all other Bluetooth devices.
The Client becomes part of the network after a successful connection. The number of Bluetooth
devices in a PAN is as large as 7.
FAQs
Q1: A device available for pairing cannot be connected:
-Make sure the device is within range, and in pairing status, then try again.
Note: A Bluetooth device can only be found in "Visible" mode by other Bluetooth devices.
Q2: The services on a non-pairing remote device cannot be found:
-Check whether the power is on, or whether the device is in "Visible" mode.
Q3: Why can't some Bluetooth services be realized?
-Make sure you have selected the service in the "Service Properties" check box. Under default
condition, some services are not activated.
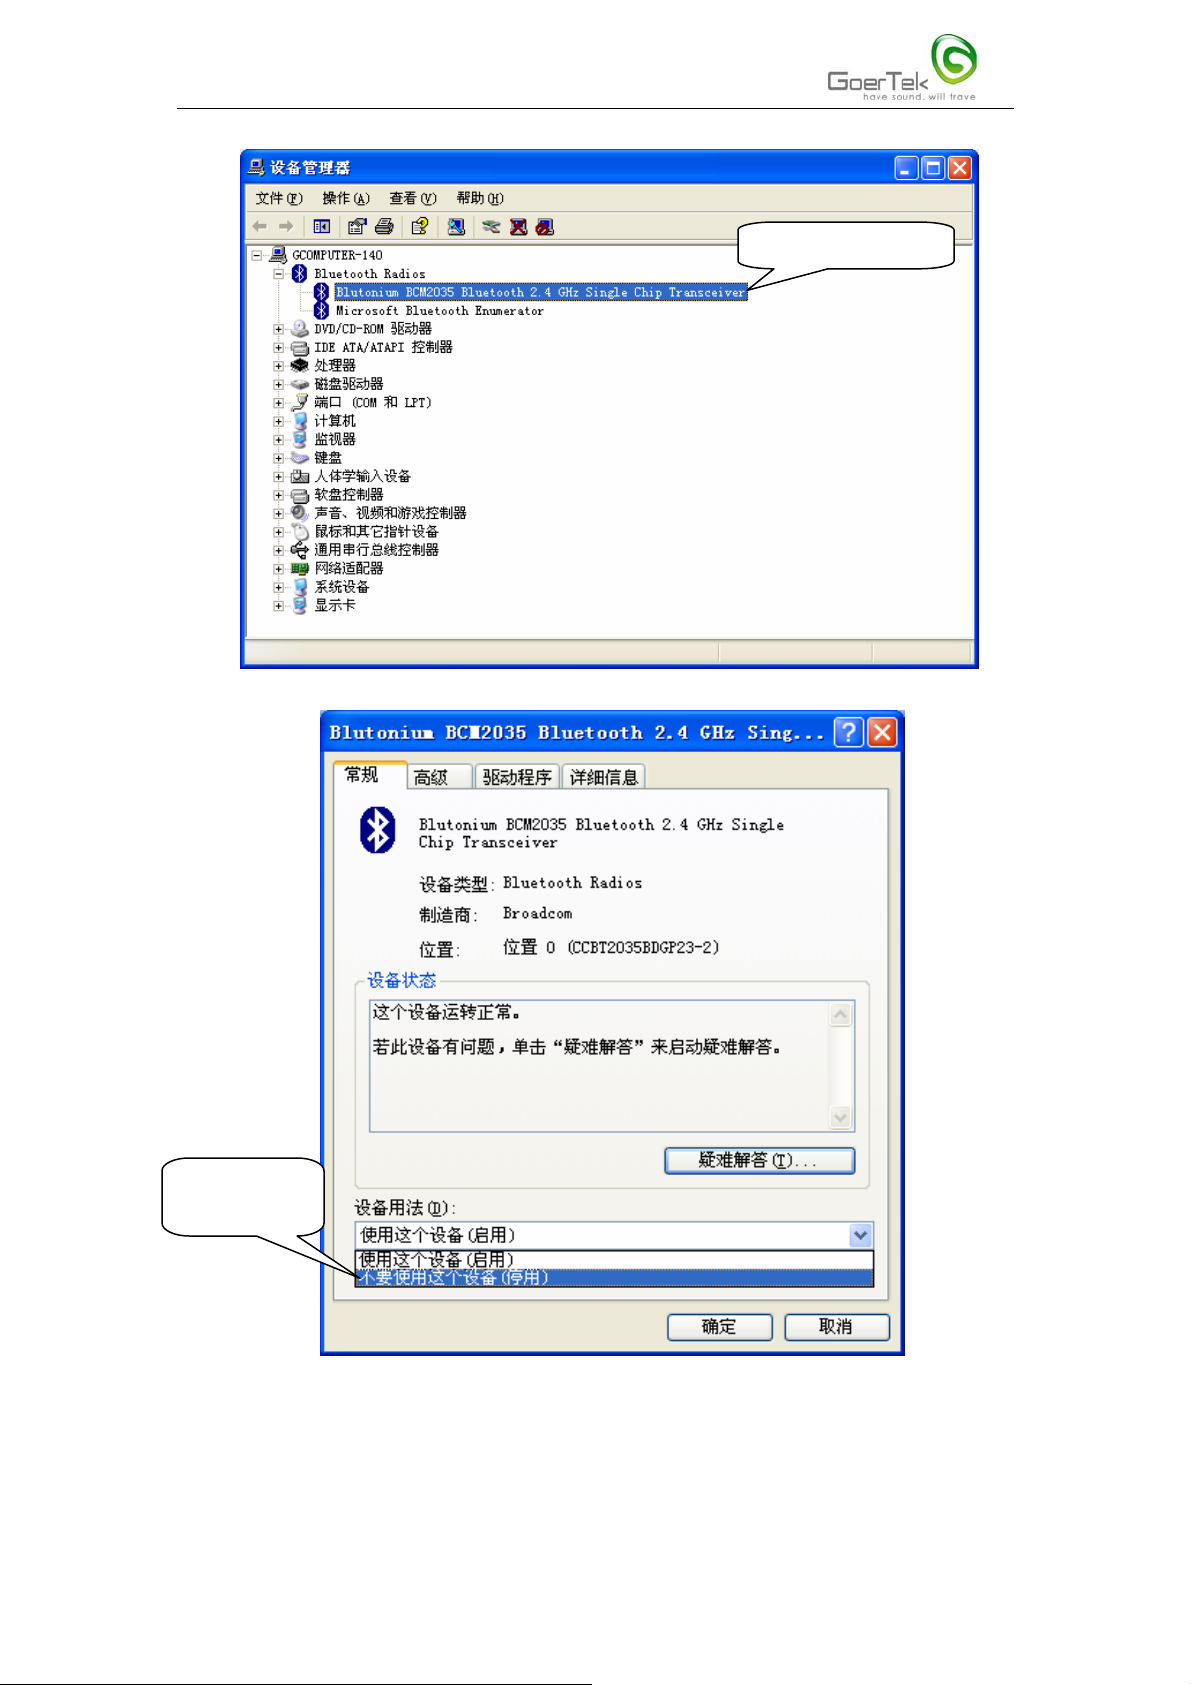
Q4:My notebook computer has an in-built Bluetooth driver, how to ignore it and choose to use the
Goertek driver?
-Click on Start->Settings->System->Hardware->Device Manager->bluetooth Radios, right click
the first item, and then click "Properties".
8
Page 9
Page 9 of 11
r
Right click here
Select to stop
the drive
Q5: How to know Bluetooth Device Address and other properties?
9
Page 10

Page 10 of 11
-In "Bluetooth Settings", right click the device, select "Details", you can see the properties of the
device. See the figure bellow.
Click here to
show the
window below
Properties of the device
10
Page 11

Page 11 of 11
Federal Communications Commission (FCC) Statement
15.21
You are cautioned that changes or modifications not expressly approved by the part responsible
for compliance could void the user’s authority to operate the equipment.
15.105(b)
This equipment has been tested and found to comply with the limits for a Class B digital device,
pursuant to part 15 of the FCC rules. These limits are designed to provide reasonable protection
against harmful interference in a residential installation. This equipment generates, uses and can
radiate radio frequency energy and, if not installed and used in accordance with the instructions,
may cause harmful interference to radio communications. However, there is no guarantee that
interference will not occur in a particular installation. If this equipment does cause harmful
interference to radio or television reception, which can be determined by turning the equipment off
and on, the user is encouraged to try to correct the interference by one or more of the following
measures:
-Reorient or relocate the receiving antenna.
-Increase the separation between the equipment and receiver.
-Connect the equipment into an outlet on a circuit different from that to which the receiver is
connected.
-Consult the dealer or an experienced radio/TV technician for help.
Operation is subject to the following two conditions:
1) this device may not cause interference and
2) this device must accept any interference, including interference that may cause undesired
operation of the device.
FCC RF Radiation Exposure Statement:
This equipment complies with FCC radiation exposure limits set forth for an uncontrolled
environment. End users must follow the specific operating instructions for satisfying RF exposure
compliance. This transmitter must not be co-located or operating in conjunction with any other
antenna or transmitter.
11
 Loading...