

Page 1

SpeedMarking-Laser
User's Manual
Page 2

Page 3

Foreword
5658600000/00/05.07
3
Foreword
Revisions
Version Date Modification
0.0 05/07 First release
Range of delivery
Please check to ensure that your SpeedMarkingLaser is complete. Your SpeedMarking-Laser should
contain the following parts.
• Special packing SpeedMarking-Laser
• SpeedMarking-Laser
• Toner
• Parallel printer cable
• Power cord
• User's Manual
• CD with software and driver
Installation instructions
This manual contains important information for installing and initial start-up procedures for the
SpeedMarking-Laser.
You can find here information about the installation,
setup and remedy of defects of the SpeedMarkingLaser.
For more information, useful tips, or the latest drivers, check our homepage at:
www.weidmueller.com
Follow the Downloads → Printer Drivers → Speed
Marking Laser links.
You can also send us an e-mail at
info@weidmueller.com.
Contact address
Weidmüller Interface GmbH & Co. KG
Postfach 3030
32720 Detmold
Klingenbergstraße 16
32758 Detmold, Germany
Phone +49 (0) 5231 14-0
Fax +49 (0) 5231 14-2083
E-Mail info@weidmueller.com
Internet www.weidmueller.com
Page 4

Contents
4
5658600000/00/05.07
Contents
Foreword ............................................................................................................................3
Revisions.............................................................................................................................3
Range of delivery.................................................................................................................3
Installation instructions.........................................................................................................3
Contact address...................................................................................................................3
Contents.............................................................................................................................4
1. Safety instructions................................................................................................6
2. Printer installation.................................................................................................8
2.1 Printer components.................................................................................................8
2.2 Setting up the printer...............................................................................................9
2.3 Unpacking the printer............................................................................................10
2.4 Insertion of toner cartridge ....................................................................................10
2.5 Connection of printer cable ...................................................................................11
2.6 Connection of mains cable....................................................................................12
2.7 Installation of printer driver....................................................................................12
3. Basic information of the printer......................................................................... 14
3.1 Printer functions....................................................................................................14
3.2 Operating panel.....................................................................................................15
3.3 Operating panel buttons........................................................................................15
3.4 LED displays.........................................................................................................16
3.5 Switch for printing SF markers..............................................................................17
3.6 Printer drivers........................................................................................................17
3.7 Accessories and ordering information...................................................................18
4. Printing jobs........................................................................................................19
4.1 Printing of adhesive backing markers ...................................................................19
4.2 Printing preparation...............................................................................................19
4.3 Printing jobs ..........................................................................................................20
Page 5

Contents
5658600000/00/05.07
5
5. Printer tips and maintenance.............................................................................21
5.1 Improvement of printing ........................................................................................21
5.2 Extend the lifespan of the special-toner cartridge .................................................21
5.3 Maintenance of special-toner cartridge.................................................................21
5.4 Printer maintenance..............................................................................................22
6. Troubleshooting..................................................................................................23
6.1 Fuses....................................................................................................................23
6.2 Overheating shutoff...............................................................................................23
6.3 Remedy for congestion.........................................................................................23
6.4 Problems with the printing quality..........................................................................25
6.5 Checklist for troubleshooting.................................................................................26
7. Guarantees ..........................................................................................................28
7.1 Limited guarantee .................................................................................................28
7.2 Guarantee exclusions ...........................................................................................28
7.3 Restriction of liability .............................................................................................28
7.4 Customer support during and after the guarantee period......................................29
7.5 Packaging instructions..........................................................................................29
7.6 Guarantee for toner...............................................................................................29
8. Printer specifications..........................................................................................30
8.1 Environmental conditions......................................................................................30
8.2 Consumables........................................................................................................31
Page 6
Safety instructions
6
5658600000/00/05.07
1. Safety instructions
Read the following instructions carefully before starting up the SpeedMarking-Laser.
Observe the warnings and notices on the
SpeedMarking-Laser at all times.
• The mains voltage must correspond to
the system voltage given on the SpeedMarking-Laser type plate.
• Connect the device to a properly earthed
and fused socket outlet only. Do not use
a socket outlet already being used by
devices that are turned on and off at
regular intervals, such as photocopiers
or ventilators.
• Do not connect the SpeedMarking-Laser
to either a switched or a timer-controlled
socket outlet.
Do not use the computer system close to
potential electromagnetic disturbance
fields such as loudspeakers or base transceiver stations for mobile telephones.
If you connect the SpeedMarking-Laser to
the power supply via an extension cable,
ensure that the total nominal current of all
of the devices connected to the extension
cable does not exceed the capacity for that
extension cable. In addition, you should
ensure that the total nominal current of all
the devices plugged into the wall-mounted
socket outlet does not exceed the ampere
rating for that socket outlet.
Do not carry out repairs to the device yourself.
• Never use damaged or worn out power
cables.
• Connect the device to the mains only
with cable described in this guide.
• Avoid the usage of multiple cables.
• Connect the network cable directly
(never via an extension cable) to the
power socket.
• Keep the mains cable undamaged and
keep it in its original state. Do not place
any heavy objects on it. Do not pull at it
with force and do not bend it more than
necessary. A disregard of these instructions can lead to electrocution or fire.
• Place the device close to an accessible
power socket in order to be able to pull
the mains plug in case of an emergency.
• Never connect or disconnect the mains
plug to the power socket with wet hands.
There is a risk of electrocution.
Disconnect the SpeedMarking-Laser and
contact a qualified service engineer if any
of the following occurs:
• The power cord or plug are worn or damaged.
• A fluid has penetrated into the SpeedMarking-Laser.
• The SpeedMarking-Laser is allowed to
fall or the enclosure is damaged.
• The SpeedMarking-Laser does not operate normally or the standard of performance varies noticeably.
Keep any moisture or dust off the device.
Otherwise, there is the danger of fire or
electrocution.
Page 7
Safety instructions
5658600000/00/05.07
7
• Do not spill any fluids into the SpeedMarking-Laser.
• Place the device onto a solid, flat surface. Otherwise, it could fall down and
lead to possible danger to personnel.
• For installation in limited space, make
sure that there is sufficient ventilation for
the device.
• Do not block or cover openings of the
SpeedMarking-Laser.
• Do not insert any objects into these
openings.
This device is not to be operated without supervision.
The internally-emitting radiation is kept inside the printer by the protective housing
and the external cover. The laser beam
cannot emit from the device during operation.
The printer cannot be used or maintained if
the protective cover is taken off the laser or
scanner unit. The reflective beam is invisible and can damage the eyes.
Warning signs (BGV A 8 (VBG 125) & DIN 4844)
WARNING
Mind your hands.
Do not reach inside.
WARNING
Hot surface.
Do not touch.
Page 8
Printer installation
8
5658600000/00/05.07
2. Printer installation
This chapter is for the setup and installation of the
new SpeedMarking-Laser.
Follow after unpacking the printer the listed steps in
the checklist in its exact order. Each step is described in detail with easily understandable specifications.
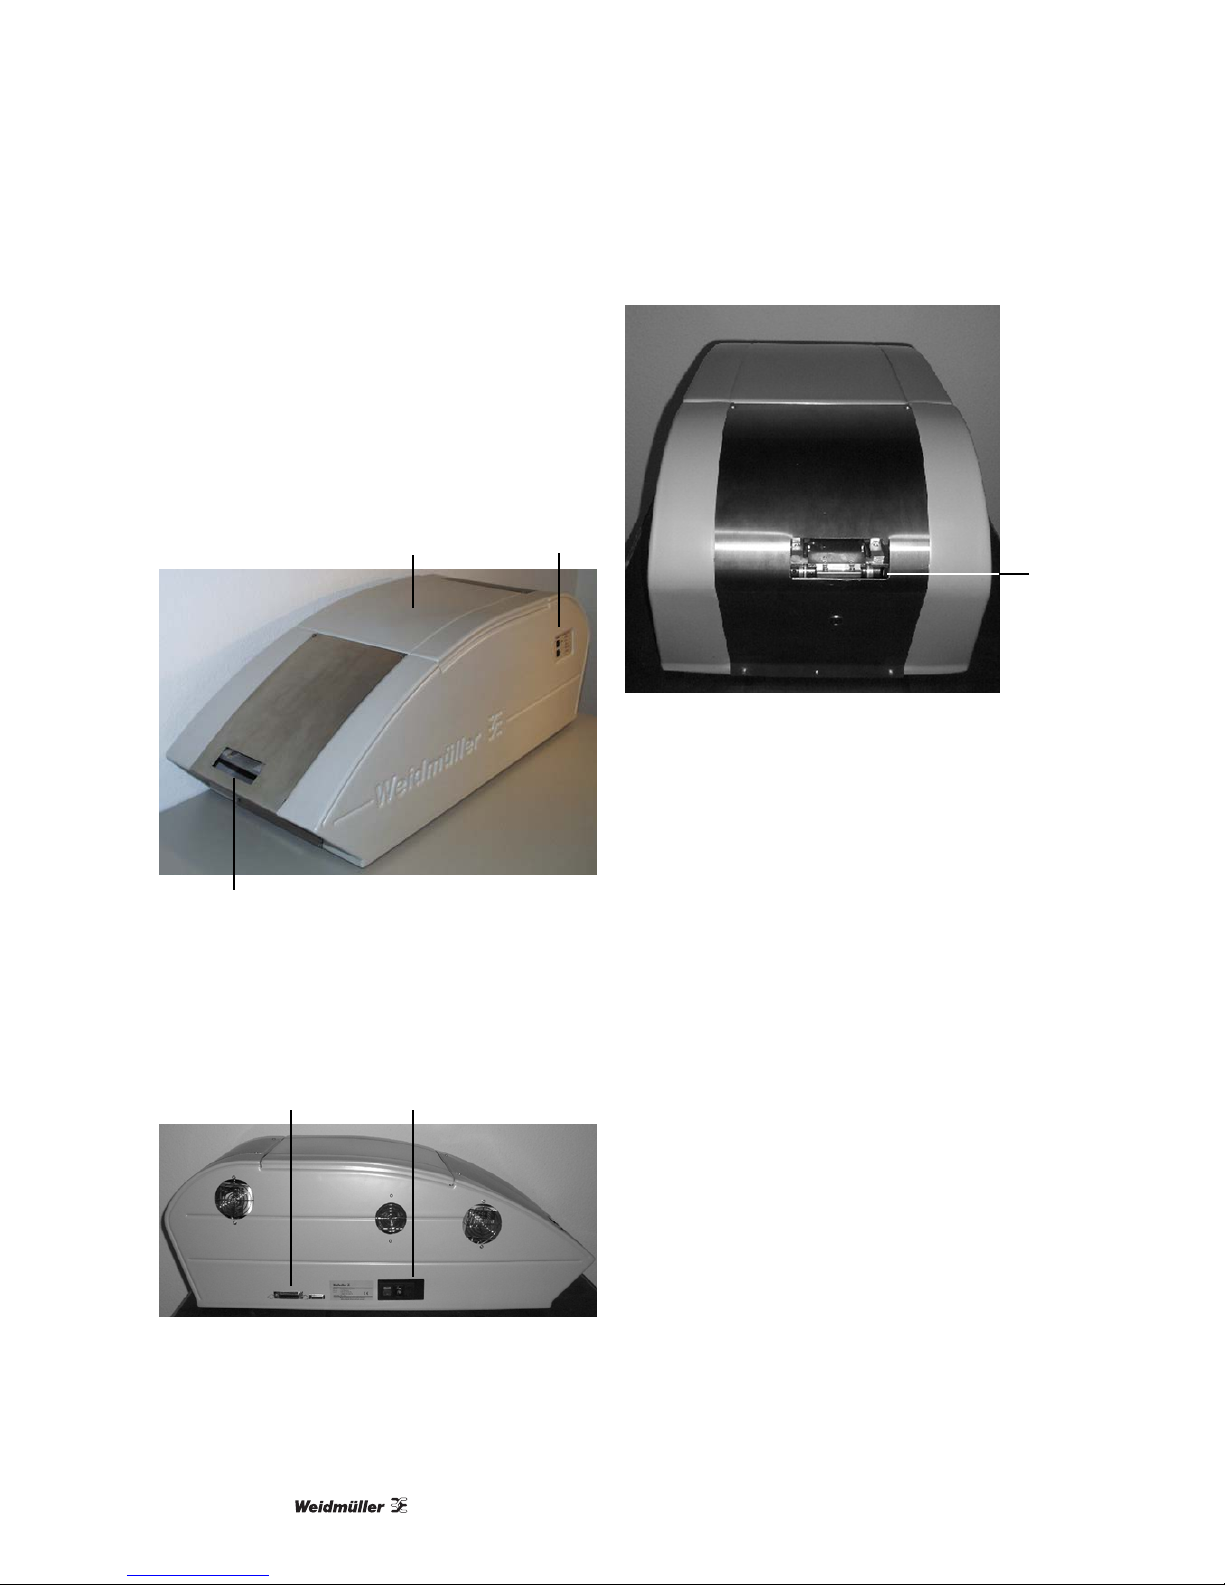
2.1 Printer components
A B
C
Figure 1 Front side
A Cover
B Operating panel
C Output
A B
Figure 2 Rear side
A Parallel interface
B On/Off switch and mains connection
A
Figure 3 Rear side
A Input
Page 9
Printer installation
5658600000/00/05.07
9
2.2 Setting up the printer
• Place the device onto a solid, flat surface.
• Provide sufficient ventilation.
• The ambient conditions should be stable, e.g. the temperature and humidity fluctuations should be limited
(Temperature: 20 °C – 35 °C; Humidity: 55% – 75%).
• Avoid direct sunlight on the printer.
• The environment of the printer should be free of any chemicals.
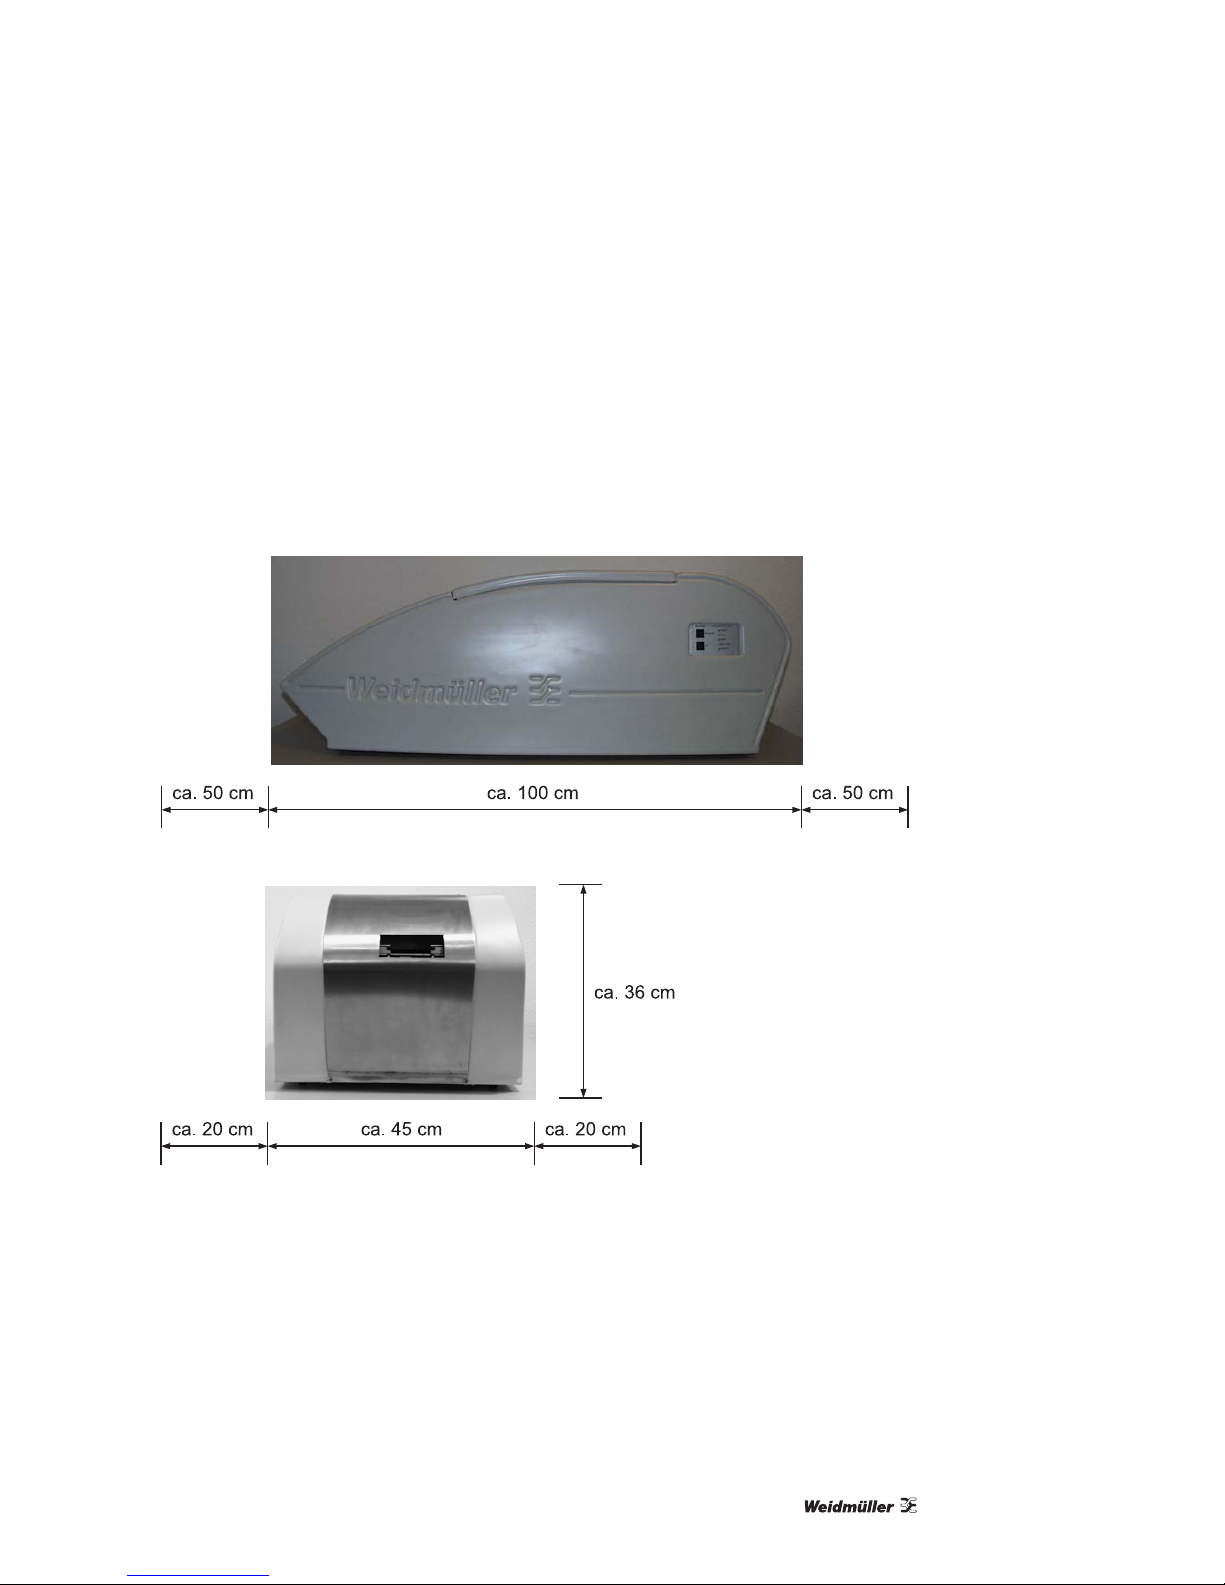
The following dimensions show the space required for setting up the printer.
Figure 4 Space in front of and behind the printer
Figure 5 Space on both sides of the printer
Make sure that there is enough space in order:
• to open the upper cover
• to load material into the entry
• to empty the storage tray
• to be able to access the on/off switch
• to connect the mains and printer connection
• to use the operating panel
Page 10
Printer installation
10
5658600000/00/05.07
2.3 Unpacking the printer
Store all packaging material.
In case of repairs you should return the
printer in its original packaging to avoid any
possible damage in transit.
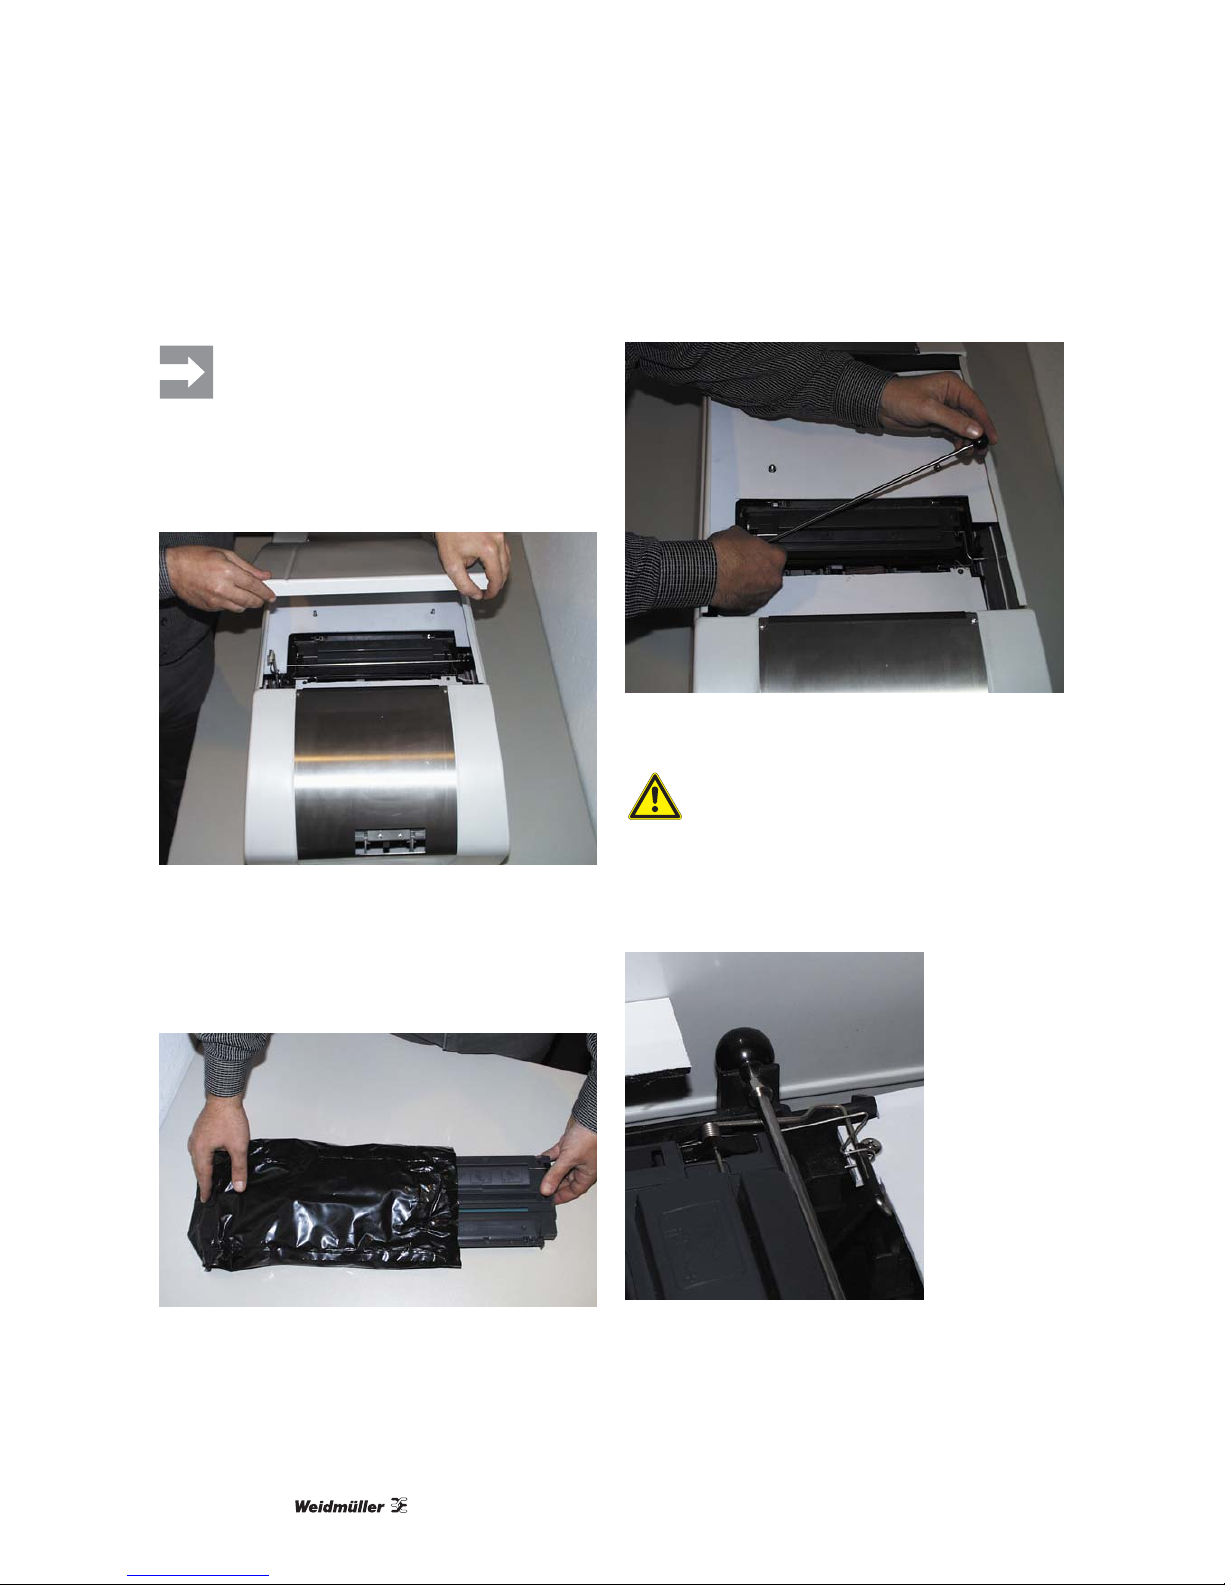
2.4 Insertion of toner cartridge
Figure 6 Opening the upper cover
1 Open the upper cover
2 Remove the transport retainer that is situated be-
low the cover of the SpeedMarking-Laser.
3 Take the toner cartridge out of its packaging.
Figure 7 Removal of toner cartridge out of pack-
aging
4 Remove the alignment rod for the roller.
Figure 8 Remove alignment rod for the roller
Caution
To avoid any damages, the toner cartridge
should be exposed to the sunlight only for
a few minutes.
5 Follow for steps 5-6 the instructions on the roller.
Figure 9 Roller
6 Do not position the toner cartridge upside down
and do not shake it.
Page 11
Printer installation
5658600000/00/05.07
11
7 The transparent plastic-sealing strip is at the right
side of the toner cartridge.
Pull the strip (30 - 35 cm) completely out of the
toner cartridge and dispose of it.
Avoid any contact with the black toner on
the strip.
If any toner gets on your clothing, wipe it of
f
by means of a dry cloth. Wash it subsequently with cold water.
8 Insert the toner cartridge into the printer. Observe
that the arrow on the toner cartridge is pointing in
the same direction as the arrow on the printer.
Insert the alignment rod for the roller in its designated holding fixture. Close the upper cover.
Figure 10 Insertion of toner cartridge
Never print without the cover of the
SpeedMarking-Laser. The possible light
exposure of the toner results in strong soiling of the device. The MultiCard strips will
be printed completely black.
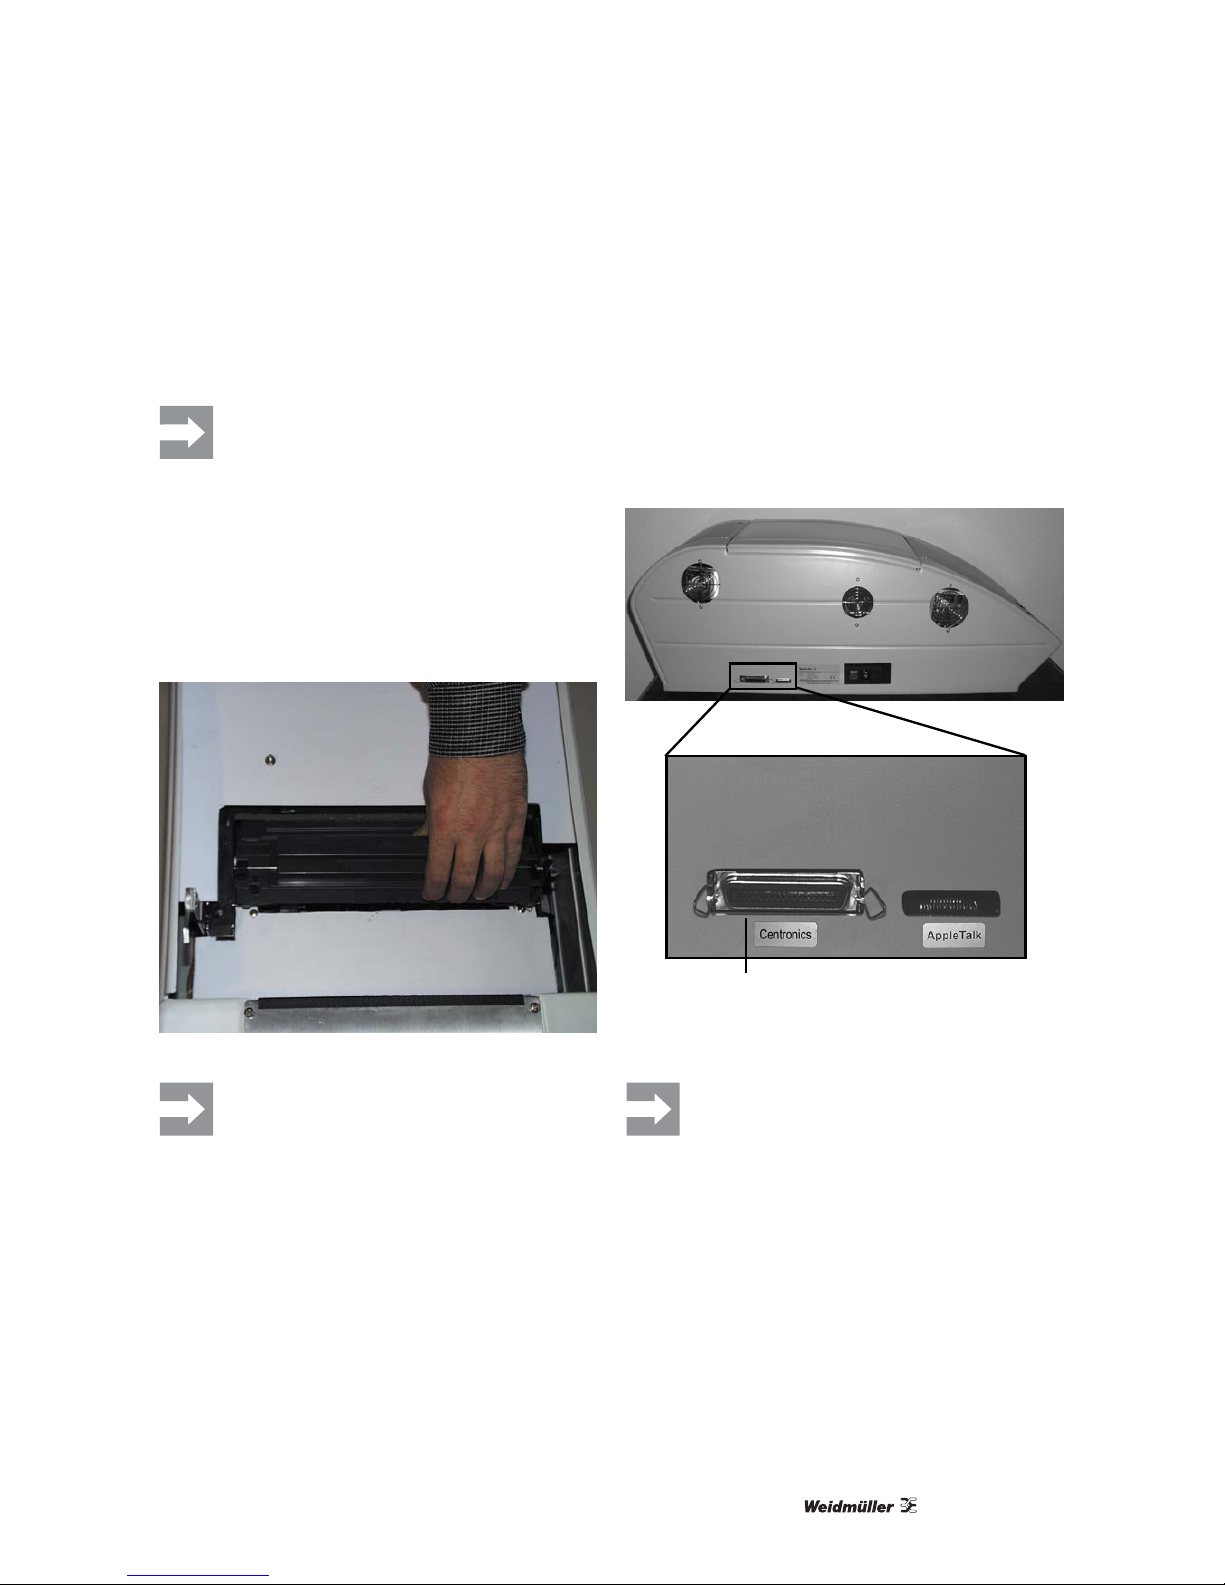
2.5 Connection of printer cable
The SpeedMarking-Laser possesses a parallel connection. Use this connection, if
• a connection should be established to a computer
or laptop.
• your parallel cable has a standard length (up to
3 m).
A
Figure 11 Connection
A Parallel connection for the printer cable
The printer cable is included in the range of
supply.
Page 12

Printer installation
12
5658600000/00/05.07
2.6 Connection of mains cable
Figure 12 Connection of mains cable
WARNING
Make sure that the power is not switched
on.
1 Switch off the printer by pressing the On/Off but-
ton on the rear side.
2 Insert the mains cable firmly into the printer.
3 Connect one end of the mains cable to an
earthed multiple socket. Make sure that the
mains connection is sufficiently secured.
You can find more information in chapter 8
"Printer specifications".
4 Switch on the printer.
2.7 Installation of printer driver
Before printing, you should install the
printer software.
Before you can use the printer with its
software applications, you have to install
the printer driver.
Windows printer system
Install one of these printer drivers, if the operating
system on your computer is Windows NT4, Windows
95/98, Windows ME, Win 2000/XP.
The SpeedMarking-Laser is compatible to the following printer types:
• HP III
• HP LaserJet 6P
• HP LaserJet 6P/6MP (recommended)
Install from the delivered CD the printer driver HP
LaserJet 6P/6MP-Standard
1 Place the CD into your CD-ROM drive. The CD
starts automatically.
2 In the following menu, choose "printer driver" →
"SMARK“ → and your installed operating system.
3 If the CD does not start automatically, choose
from the CD the file “setup.exe”
or
the following path:
(CD-ROM:\ D:\Driver\SMARK\English\[Choose
the corresponding operating system]).
Page 13

Printer installation
5658600000/00/05.07
13
Installation of the Windows printer drivers
For Windows 2000/XP
1 Save the printer driver locally on the hard disk.
2 Add a new printer.
Windows 2000:
1 “Start“ → “Settings“ → “Printer“ → “New printer“.
2 Follow the installation assistant of the printer.
3 Select “Local printer“ → “Use existing connec-
tion“ (LPT1:).
4 Press the button "data carrier" and choose by
pressing "search" the file "hp6pmp.inf" from the
previous locally-stored driver files.
5 Choose the printer HP LaserJet 6P/6MP-
Standard and finish the installation.
Windows XP:
1 „Start“ → ”Settings“ → ”Printer & Fax machine“ →
“Add printer“.
2 Follow the installation assistant of the printer.
3 Select “Local printer“ → “Use existing connec-
tion“ (LPT1:).
4 Press the button "data carrier" and choose by
pressing "search" the file "hp6pmp.inf" from the
previous locally-stored driver files.
5 Choose the printer HP LaserJet 6P/6MP-
Standard and finish the installation.
For Windows ME
1 Follow the installation assistant of the printer.
2 Select “Local printer” (LPT1:).
3 Press the button "disk" and choose by pressing
"search" the file "OEM95.inf" from the previous
locally-stored driver files.
4 Choose the printer HP LaserJet 6P/6MP-
Standard and finish the installation.
For Windows 95/98
The installation program for the printer driver starts
automatically from the CD.
1 Follow the instructions of the program and install
the printer driver locally on the hard disk.
For Windows NT 4
1 Follow the installation assistant of the printer.
2 Select “Local printer“ (LPT1:).
3 Press the button "search" and choose by press-
ing "search" the file "hp6pmp.inf" from the previous locally-stored driver files.
4 Choose the printer HP LaserJet 6P/6MP-
Standard and finish the installation.
Page 14

Basic information of the printer
14
5658600000/00/05.07
3. Basic information of the printer
3.1 Printer functions
Technical data
Application: Printing of the product portfolio MultiCard
Speed: Maximum 3-4 cards per minute
Operating time: Approx. 2-3 hours per day
Printing quality: 600 x 600 points dpi for texts and graphics
Feed: Manual loading
Conditioning: Heat radiator with approx. 1200 Watt
Fusing: Heat radiator with approx. 1200 Watt
Interface: Centronics parallel (others optionally possible)
Connection: AC 230 V / 16A
Operating conditions: Office conditions
Ambient temperature: 20 °C – 35° C
Humidity: 55% – 75%
Dimensions (W x L x H): 1000 x 430 x 380 mm
Table 1 Technical data
The SpeedMarking-Laser offers the user the
following:
• Saving of time: 3 - 4 MultiCards per minute
• Easy to use
• High marking quality
• Markers immediately ready for use
• Works fast, independent of the amount of data
• Extreme flexibility through fast and demand-
oriented production
• Printing of the product portfolio MultiCard
You can find more information in chapter
4.1 "Printing of adhesive backing markers".
• Reduced storage costs because only neutral
markers are needed
• Suitable for graphics
Page 15

Basic information of the printer
5658600000/00/05.07
15
3.2 Operating panel
A
B
C
D
E
F
Figure 13 Operating panel
A Button Job Cancel
B Button Test
C LED Error (red)
D LED Data (green)
E LED Ready (green)
F LED MultiCard (yellow)
3.3 Operating panel buttons
The printer possesses the buttons: Job Cancel (A)
and Test (B).
Job Cancel
Press the button Job Cancel to abort an ongoing
printing job. During deletion of the printer storage,
the LEDs on the operating panel will light up one after the other. The LEDs will then switch into the
ready mode. This can take some time depending on
the size of the printing job.
If the button Job Cancel has been pressed
by mistake, then the job has to be printed
again.
If the button Job Cancel is pressed during
no-load operation, the upper LEDs of the
operating panel will light one after the
other.
Test
• Press the button Test to restart the printing after
the printer has been stopped or data is still stored
in the printer storage (the Data LED and Ready
LED light up).
• Press the button Test in order to delete error mes-
sages of the printer (Error LED lights up).
A
B
Figure 14 Operating panel buttons
A Cancel job
B Test
Page 16

Basic information of the printer
16
5658600000/00/05.07
3.4 LED displays
The LED displays indicate status and error messages. The LEDs can be in the following mode.
Off On Flashing
Messages of the upper status field
The following status messages of the operating
panel indicate different requirements of the printer
for the preparation of a printing job or during printing.
If the error LED lights up, then there is an error at
the printer.
You can find more about error messages
in chapter 6 "Troubleshooting".
Errors Data Ready MultiCard Description
The printer is ready for printing.
The printer is receiving or processing data.
Data that has not been printed is in the printer storage.
Press the button Test in order the print the data or the
button Cancel job to delete a job.
If all LEDs light up one after the other, the printer is per-
forming a warming-up, processes a self-test or cancels a
printing job.
Table 2 LED displays
Page 17

Basic information of the printer
5658600000/00/05.07
17
3.5 Switch for printing SF markers
Figure 15 SF switch
1 Open the cover of the SpeedMarking-Laser.
The switch for printing SF markers is situated here.
If SF marker should be printed, the switch must be
set to "SF 1-6".
If long or high markers are used (e.g. SF
5/21) and the print-out in the last row is not
printed properly, than set the switch also to
"SF 1-6".
3.6 Printer drivers
The SpeedMarking-Laser is compatible to the following printer types:
• HP III
• HP LaserJet 6P
• HP LaserJet 6P/6MP (recommended)
More information for installation of the
printer driver is available in chapter 2.7
"Installation of printer driver".
Page 18

Basic information of the printer
18
5658600000/00/05.07
3.7 Accessories and ordering information
Optional Description and utilization Part numbers
Special-toner cartridge Spare cartridge 1770070000
Cable and interface accessories Connection of printer
Software CD CD including drivers and printing software 1954040000
Loader Automatic feeding of MultiCard 1782880000
Table 3 Accessories and ordering information
Page 19

Printing jobs
5658600000/00/05.07
19
4. Printing jobs
This chapter is about printing options and printing
jobs that have to be performed regularly.
4.1 Printing of adhesive backing
markers
The Weidmüller adhesive-backing device
markers ESG, SM and CC are recognizable by their brown paper material. Their
suitability for printing in the SpeedMarkingLaser is only limited.
Please make sure that each used type of
marker has been tested and approved by
the user, by checking for any issues with
the adhesive part of the marker. In case
adhesive may leak from the marker, do not
use it.
CAUTION
Observe the following for the automatic labelling of the adhesive-backing markers.
The impairment of the interaction area as
well as the soiling of the roller can lead to
blotchy printing of the markers and to
damaging the device.
It is necessary to clean the Corona unit if
printing 5 MultiCards or more.
• The adhesive backing of the markers leave adhe-
sive remnants on the Corona unit of the printer.
• A roller contaminated by glue residues of the spe-
cial-toner cartridge cannot be cleaned and must
therefore be changed.
The cleaning of the Corona unit is described under "Cleaning of the SpeedMarking-Laser" in chapter 5.4 "Printer maintenance".
4.2 Printing preparation
Selection of media
Only markers of the Weidmüller MultiCard line with a
height of 9 mm or less can be printed with the
SpeedMarking-Laser.
You can find more information in chapter
4.1 "Printing of adhesive backing markers".
For usage of SF MultiCard strips, please
observe the chapter 3.5 "Switch for printing
SF markers".
CAUTION
It is only allowed to feed entire MultCard
strips into the printer.
Damaged or incomplete MultiCard strips
can damage the device.
As a rule, soiled or smudgy MultiCard
strips should not be used.
Each MultiCard can only be used once.
Page 20

Printing jobs
20
5658600000/00/05.07
4.3 Printing jobs
4.3.1 Stopping a printing job
A printing job can be stopped by the software application, printer queue or by pressing the button Job
Cancel.
If the printer has not started a printing job, try to stop
it first using the software application.
If the printing job is in the printing queue or in the
printing spooler, try to delete the printing job there.
If the printing job is printing, press the button Job
Cancel. The printer finishes the MultiCard strips that
are already in the printer storage and deletes the
rest of the printing job.
If the status LEDs light up one after the other after
the printing job has been cancelled, the computer
sends the printing job nevertheless to the printer.
Delete the printing job from the printer queue or wait
until the printer has finished sending the data.
The printer switches into the ready mode (ready
LED lights up).
A
Figure 16 Job Cancel button
A Job Cancel
Tips for cancelling a job
If you press the button Job Cancel, only
the current printing job in the printer will be
cancelled.
If multiple printing jobs are in the printer
storage, the button Job Cancel has to be
pressed for each printing job.
4.3.2 Printing with manual feeding
The SpeedMarking-Laser is equipped with a manual
feed. This is done as follows.
1 The MultiCard markers will be fed with the project
marking surface into the entry (see also Figure
17 “Manual feeding”).
2 The marker is inserted until it firmly touches the
stop at the end.
Figure 17 Manual feeding
When a marker has been drawn in, the
next MultiCard can be inserted.
Page 21

Printer tips and maintenance
5658600000/00/05.07
21
5. Printer tips and maintenance
This chapter includes suggestions how high quality
and low consumption can be reached at the same
time. Moreover, special maintenance jobs for toner
cartridge and printer are described here.
5.1 Improvement of printing
In this chapter, the described settings concerning
the printing quality can be modified via the software
program of the Windows printer drivers.
The printing must always be done with the best quality and the highest resolution.
You can find more general information
concerning these settings and adjustments
on the help screens of the software.
5.2 Extend the lifespan of the
special-toner cartridge
If light areas appear on the printout, then toner is
missing. You can improve the printing quality temporarily by re-distributing the toner in the cartridge.
1 Finish the current print job before changing the
toner cartridge.
2 Open the cover of the SpeedMarking-Laser.
3 Take the toner cartridge out of the SpeedMark-
ing-Laser.
4 Sway (never shake) the toner cartridge back and
forth multiple times in order to distribute the toner
again. Do not position the toner cartridge upside
down.
5 Insert the toner cartridge again into the Speed-
Marking-Laser.
6 Close the cover.
If the printout remains pale, change the
toner cartridge.
If any toner gets on your clothing, wipe it of
f
by means of a dry cloth. Wash it subsequently with cold water.
5.3 Maintenance of specialtoner cartridge
5.3.1 Lifespan of special-toner cartridges
The lifespan of a special-toner cartridge depends on
the amount of toner being used for printing jobs. If
mainly text is printed, the special-toner cartridge
lasts for 1500 MultiCard strips with a coverage of
5%.
It is taken for granted that "Highest quality" and a
printing density of "3" (standard setting) is set.
5.3.2 Storage of special-toner cartridge
Take the special-toner cartridge out of the packaging
just before installation. The period of storage of an
unopened special-toner cartridge is approximately
2.5 years. In contrast, the period of storage of an
opened special-toner cartridge is 6 months.
CAUTION
To avoid any damages, the toner cartridge
should only be exposed to the sunlight for
a few minutes.
Page 22

Printer tips and maintenance
22
5658600000/00/05.07
5.4 Printer maintenance
Cleaning of the SpeedMarking-Laser
To maintain high printing quality, clean the SpeedMarking-Laser each time after changing the special
toner cartridge. The cleaning also has to be done if
there are problems with the printing quality. In this
regard, observe the following instructions:
Keep the SpeedMarking-Laser free of dust or any
dirt particles.
Clean the outside of the housing with a slightly moist
cloth.
CAUTION
Do not use any ammonia-containing cleaning agents on or in the vicinity of the
SpeedMarking-Laser.
• Over time, small dust particles and toner residues
accumulate in the Speed-Marking-Laser. This can
lead to white strips on the printout. After cleaning,
you will get a normal printing result.
WARNING
Switch off the SpeedMarking-Laser and
pull the mains cable before you start cleaning the SpeedMarking-Laser.
1 Open the cover of the SpeedMarking-Laser.
2 Take the toner cartridge out of the SpeedMark-
ing-Laser.
CAUTION
To avoid any damages, the toner cartridge
should be exposed to the sunlight only for
a few minutes.
3 With a dry and lint-free cloth, remove any dust,
dirt, toner and possible adhesive elements out of
the printing area.
Figure 18 Print area
4 Insert the toner cartridge again into the Speed-
Marking-Laser.
5 Insert the alignment rod for the roller in its desig-
nated holding fixture.
6 Close the cover, insert the mains cable and
switch the printer on again.
Page 23

Troubleshooting
5658600000/00/05.07
23
6. Troubleshooting
This chapter is about troubleshooting if the following
problems with the printer occur:
6.1 Fuses
A
B
Figure 19 Fuses
A Upper fuse:
5 x 20 mm 10 A / Slow → Control printer
B Lower fuse:
5 x 20 mm 10 A / Slow → Power circuit of the
pre-heating and of the fixation unit
The lower fuse is for the power circuit of the preheating and for the fixation unit. If this fuse fails, neither of the heaters will work.
The upper fuse is for the control of the printer. If the
control is not working, the printer cannot be switched
on.
This device is subject to special conditions regarding
its connection to the mains supply (EU Member
States).
The supply impedance at the point of connection to
the public electricity supply must not exceed (0.14 +
i 0.09) Ohm.
In all other cases, consult the power supply company before connecting the device to the public supply system.
6.2 Overheating shutoff
During long operation, the device may be shutoff to
save it from overheating.
The error LED is lit. If pressing the button Test does
not lead to an intake of a MultiCard, leave the device
on for 10 - 15 minutes for cooling down and press
the button Test again. The stored printing jobs will
be processed.
6.3 Remedy for jamming
Occasionally, jamming of MultiCards can occur during a printout.
Jamming can occur in the following areas:
• Input area
• Toner cartridge area
• Output area
Normally, jamming occurs in the following cases:
• A MultiCard strip has not been loaded or transported properly.
• The cover was opened during printing.
• In the input area was a deficient or an incomplete
MultiCard strip.
Remove the accumulated MultiCard and
follow the instructions on the following
pages. If it is not clear where the problem
was, look at first in the area of the toner
cartridge.
Page 24

Troubleshooting
24
5658600000/00/05.07
6.3.1 Congestion in the input area
1 Turn the SpeedMarking-Laser off.
2 Open the cover and remove the toner cartridge.
CAUTION
To avoid any damages, the toner cartridge
should be exposed to the sunlight only for
a few minutes.
3 Remove the accumulated material from the input
area. To do this you may have to move the green
transport belt. Care must be taken to avoid moving the belt out of its guides.
4 Check whether the input area is completely
cleaned.
5 Insert the toner cartridge again.
6 Insert the alignment rod for the roller in its desig-
nated holding fixture.
7 Close the cover.
8 Turn the SpeedMarking-Laser on again.
The SpeedMarking-Laser should now be operational
again.
If the error LED does not go out, there is
the possibility of accumulated material in
the SpeedMarking-Laser.
6.3.2 Congestion in toner area
1 Turn off the SpeedMarking-Laser.
2 Open the cover and remove the toner cartridge.
CAUTION
To avoid any damages, the toner cartridge
should only be exposed to the sunlight for
a few minutes.
3 Remove the accumulated material from the input
area. To do this you may have to move the green
transport belt. Care must be taken to avoid moving the belt out of its guides.
4 Check whether the toner area is completely
cleaned.
5 Check whether the Corona unit runs smoothly.
6 Insert the toner cartridge again.
7 Insert the alignment rod for the roller in its desig-
nated holding fixture.
8 Close the cover.
9 Turn the SpeedMarking-Laser on again.
The SpeedMarking-Laser should now be operational
again.
If the error LED does not go out, there is
the possibility of accumulated material in
the SpeedMarking-Laser.
Page 25

Troubleshooting
5658600000/00/05.07
25
6.3.3 Congestion in the output area
1 Turn off the SpeedMarking-Laser.
2 Open the cover and remove the toner cartridge.
CAUTION
To avoid any damages, the toner cartridge
should be exposed to the sunlight only for
a few minutes.
3 Remove the accumulated material from the input
area. To do this you may have to move the green
transport belt. Care must be taken to avoid moving the belt out of it’s guides.
4 Check whether the output area is completely
cleaned.
5 Check whether the Corona unit runs smoothly.
6 Insert the toner cartridge again.
7 Insert the alignment rod for the roller in its desig-
nated holding fixture.
8 Close the cover.
9 Turn the SpeedMarking-Laser on again.
The SpeedMarking-Laser should now be operational
again.
If the error LED does not go out, there is
the possibility of accumulated material in
the SpeedMarking-Laser.
6.4 Problems with the printing
quality
6.4.1 Checklist for printing quality
General problems with the printing quality can be resolved by observing the following checklist.
1 Re-distribute the toner inside the toner cartridge.
Sway (never shake) the toner cartridge back and
forth multiple times. Do not position the toner cartridge upside down.
2 Clean the inner part of the SpeedMarking-Laser.
Remove with a dry and lint-free cloth any dust,
dirt, toner and possible adhesive elements out of
the printing area.
3 Check the condition of the markers.
CAUTION
Damaged or incomplete MultiCard strips
can damage the device.
A
s a rule, soiled or smudgy MultiCard strips
should not be used.
Each MultiCard can only be used once.
4 Change the special toner and check the printing
quality again.
5 Check the storage conditions of the printing me-
dia (Temperature: 20 °C – 35 °C; Humidity: 55%
– 75%).
An insufficient saturation of the material can lead
to an unsatisfactory printout, pale print and missing sharp contours.
The storage conditions of the printing media are described under "Storage of printing media" in chapter 8.2.2 "Specification
for the printing media".
Page 26

Troubleshooting
26
5658600000/00/05.07
6.5 Checklist for troubleshooting
If the SpeedMarking-Laser is not printing, follow the
checklist in its specified order.
Make sure that the ready LED lights up.
If no LED lights up:
• Check the connection of the mains cable.
• Check the on/off switch.
• Check the power source.
• Check the fuses.
You can find more information in chapter
6.1 "Fuses".
6.5.1 Troubleshooting for error messages
If the error LED lights up, there is an error at the
SpeedMarking-Laser.
Find the corresponding LED display and follow the
solution suggestions to remedy the error.
Repairable errors
• The upper cover is open. Close the upper cover.
• The toner cartridge is missing or has not been in-
stalled properly. Check the toner cartridge and
place it carefully into its right position.
• Accumulated material is in the SpeedMarking-
Laser.
Refer chapter 6.3 "Remedy for ".
Data error
If the error LED and the data LED light up simultaneously, a data error has occurred at the SpeedMarking-Laser.
• To find out the reason for the data error, press the
buttons Test and Job Cancel and keep these
pressed. A second LED display indicates the particular error.
EA error
The connection cable between the printer and computer is possibly loose or of low quality.
• Make sure that the cable is fixed strongly and that
you use a high-quality cable.
Errors, when the printing can be continued
A temporary error occurred during printing.
• Press the key Test. The page will automatically be
printed again.
Temporary error
The printer has a temporary error.
• Turn the SpeedMarking-Laser off and on again. If
the error occurs again, contact the customer support. Phone number +49 (0) 52 31 14 12 52.
Page 27

Troubleshooting
5658600000/00/05.07
27
6.5.2 General troubleshooting
Empty, deficient or incomplete pages and disruption of the printing operation
Pages have been printed but are blank.
• The sealing band of the special-toner cartridge has
not possibly been removed.
Pages have been printed, but the printing is deficient, pages have only been partially printed or the
printing is overlapping.
• Make sure that the software application uses the
right printer driver.
• The data file sent to the printer is incorrect. Try to
print another file in order to see whether this one is
printed correctly.
• Exchange the printer cable with one that you know
is functioning. This tells you whether the printer
cable is faulty.
Font problems
The printing job contains the wrong font types or the
printing job has been formatted wrongly.
• Make sure that the software application uses the
right printer driver.
• The printer does not possess this font type. The
font type has to be downloaded via the software
application.
• It is possible that font is not available on the printer
and has been replaced by the software application
with another font.
You can find information about the selection of font types in the User’s Manual.
Page 28

Guarantees
28
5658600000/00/05.07
7. Guarantees
This chapter offers information about guarantees
that are valid for the SpeedMarking-Laser and the
special-toner cartridge.
7.1 Limited guarantee
Weidmüller offers a six month guarantee on the
SpeedMarking-Laser after purchase by the user.
During the guarantee period, Weidmüller is committed to repair the damaged SpeedMarking-Laser as
they see fit.
If the SpeedMarking-Laser should be repaired by
Weidmüller, make sure that the SpeedMarkingLaser is not further damaged by the transport packaging or the transport.
If possible, use the original packaging material.
7.2 Guarantee exclusions
Excluded from the guarantee for the SpeedMarkingLaser are errors or damages that can be traced to
the following causes:
• Inappropriate or inadequate maintenance by the
customer.
• Software or interfaces provided by the customer.
• Unauthorized modification or misuse.
• Operation outside the described environmental
conditions.
• Usage of unauthorized printing media.
• Exceeding the indicated throughput.
• Operation of the SpeedMarking-Laser via a me-
chanical relay without an adequate overvoltage
fuse.
• Inappropriate setup and maintenance of the installation location.
• Usage of special-toner cartridges that are not distributed by Weidmüller.
Usage of a toner cartridge that is not distributed by
Weidmüller has no consequences on the guarantee.
If it turns out that the equipment failure, printing
quality, resistance of marker labelling or damage of
the SpeedMarking-Laser is the consequence of usage of a toner cartridge not distributed by Weidmüller, then the repair is not covered by the guarantee.
If the throughput of the SpeedMarking-Laser during
operation is exceeded (when more than 600 MultiCards per day or 12000 MultiCards per month are
printed), this is a misuse of the SpeedMarking-Laser
and the labour and material costs will be charged for
all ensuing repairs.
CAUTION
For usage of a mechanical relay, ensure
that it is equipped with an overvoltage
fuse. The usage of unprotected mechanical relays can lead to damages to the
SpeedMarking-Laser.
The guarantee period starts on the day of delivery or
the day of installation by Weidmüller.
Except for the above mentioned guarantee,
Weidmüller provides no other written, verbal, contractual or legal guarantees.
7.3 Restriction of liability
Weidmüller is not liable for indirect damages or compensation for expenditures
while fulfilling the contract including compensation demands for lost earnings or lost
savings.
Page 29

Guarantees
5658600000/00/05.07
29
7.4 Customer support during
and after the guarantee period
If the SpeedMarking-Laser fails during the guarantee
period, please contact the customer support.
If you send the device to the customer support, pack
it according to the packaging instructions in this
chapter. We recommend insuring the package for
the transport.
Transport damages caused by insufficient
packaging are at the expense of the customer.
If possible, use the original packaging material.
Please observe the packaging instructions.
7.5 Packaging instructions
1 Remove the special-toner cartridge and put it into
the original carton of the SpeedMarking-Laser.
If possible, use the original carton and the packaging material.
2 If possible, add printing examples and MultiCard
strips of the used material.
3 Attach a copy of the completed info formula (next
page) for the customer support.
If you have disposed of the original packaging material of the SpeedMarking-Laser, contact a packaging
or postal service to pack the SpeedMarking-Laser
again.
Transport damages caused by insufficient
packaging are at the expense of the customer.
If possible, use the original packaging material.
Please observe the packaging instructions.
7.6 Guarantee for toner
1 Pack the defect special-toner cartridge into the
original carton.
2 Make sure that the toner packaging is sealed.
Use additional packaging parts in order to stabilize the toner cartridge.
Attach the following information to the packet:
• Your name and your address
• If possible, printing examples of the deficient spe-
cial-toner cartridge
• Attach a copy of the completed info formula (next
page) for the customer support.
The info sheet “Form for customer support“
is at the end of this User’s manual.
Page 30

Printer specifications
30
5658600000/00/05.07
8. Printer specifications
8.1 Environmental conditions
8.1.1 Dimensions
Height 380 mm
Width 430 mm
Length 1000 mm
Weight
(including toner cartridge)
35 kg
8.1.2 Electrical ratings:
Mains voltage: 110 V/AC 230 V/AC
Power input 1300 W 1300 W
Recommended minimum
current capacitance
16 A 16 A
Frequency 50 – 60 Hz 50 – 60 Hz
8.1.3 Environmental conditions
Environmental conditions during operation
Temperature 20 °C to 35 °C
Relative humidity 55% to 75%
Page 31

Printer specifications
5658600000/00/05.07
31
8.2 Consumables
8.2.1 Toner
Article No.: 1760070000
Durability: 2.5 years (original packaging, at 10 °C – 40 °C)
Capacity: 1500 cards with 5% coverage
8.2.2 Specification for the printing media
You can print with the SpeedMarking-Laser entire cards of the Weidmüller MultiCard program, if you follow
the specifications and guidelines of this manual. Printing media that do not fulfil these requirements can
damage the printer and it can result in forfeiting the guarantee.
Storage of printing media
For reaching optimal printing results, we recommend an initial storage phase (of at least 24 hours before
use) under office conditions (Temperature: 20 °C – 35 °C; Humidity: 55% – 75%).
Page 32

Printer specifications
32
5658600000/00/05.07
Page 33

Info - Form for customer support
Date:
Person who sends back the device:
Contact person:
Telephone number:
( )
Additional contact persons: Telephone number:
( )
Address of shipper: Special shipment instructions:
Which product will be sent? Model number: Serial number:
Add relevant printouts to the return consignment of the product.
Accessories not relevant for the repair, e.g. manuals, shouldn´t be sent.
What has to be done?
1. Describe the failure. (What has been the failure? What have you been doing during occurrence of the
failure? Could the failure happen again? etc.)
2. Additional comments:
How is being paid for repairs?
Covered under guarantee Date of purchase/Date of receipt:________________
By order number:
Apart from the guarantee service, a repair request must be supplemented by an order number and/or an
authorized signature. If the standard repare prices are not correct, a minimum order quantity is necessary.
The standard repare prices can be requested at the service station.
Authorized signature: ____________________ Telephone number:
____________________
The invoice should be sent to the following address: Special invoice directive:
Page 34

Page 35

Page 36

www.weidmueller.com
Weidmüller Interface GmbH & Co. KG
Postfach 3030
32720 Detmold
Klingenbergstraße 16
32758 Detmold
Phone +49 (0) 5231 14-0
Fax +49 (0) 5231 14-2083
E-Mail info@weidmuller.com Order number:
Internet www.weidmueller.com 5658600000/00/05.07
 Loading...