

Page 1
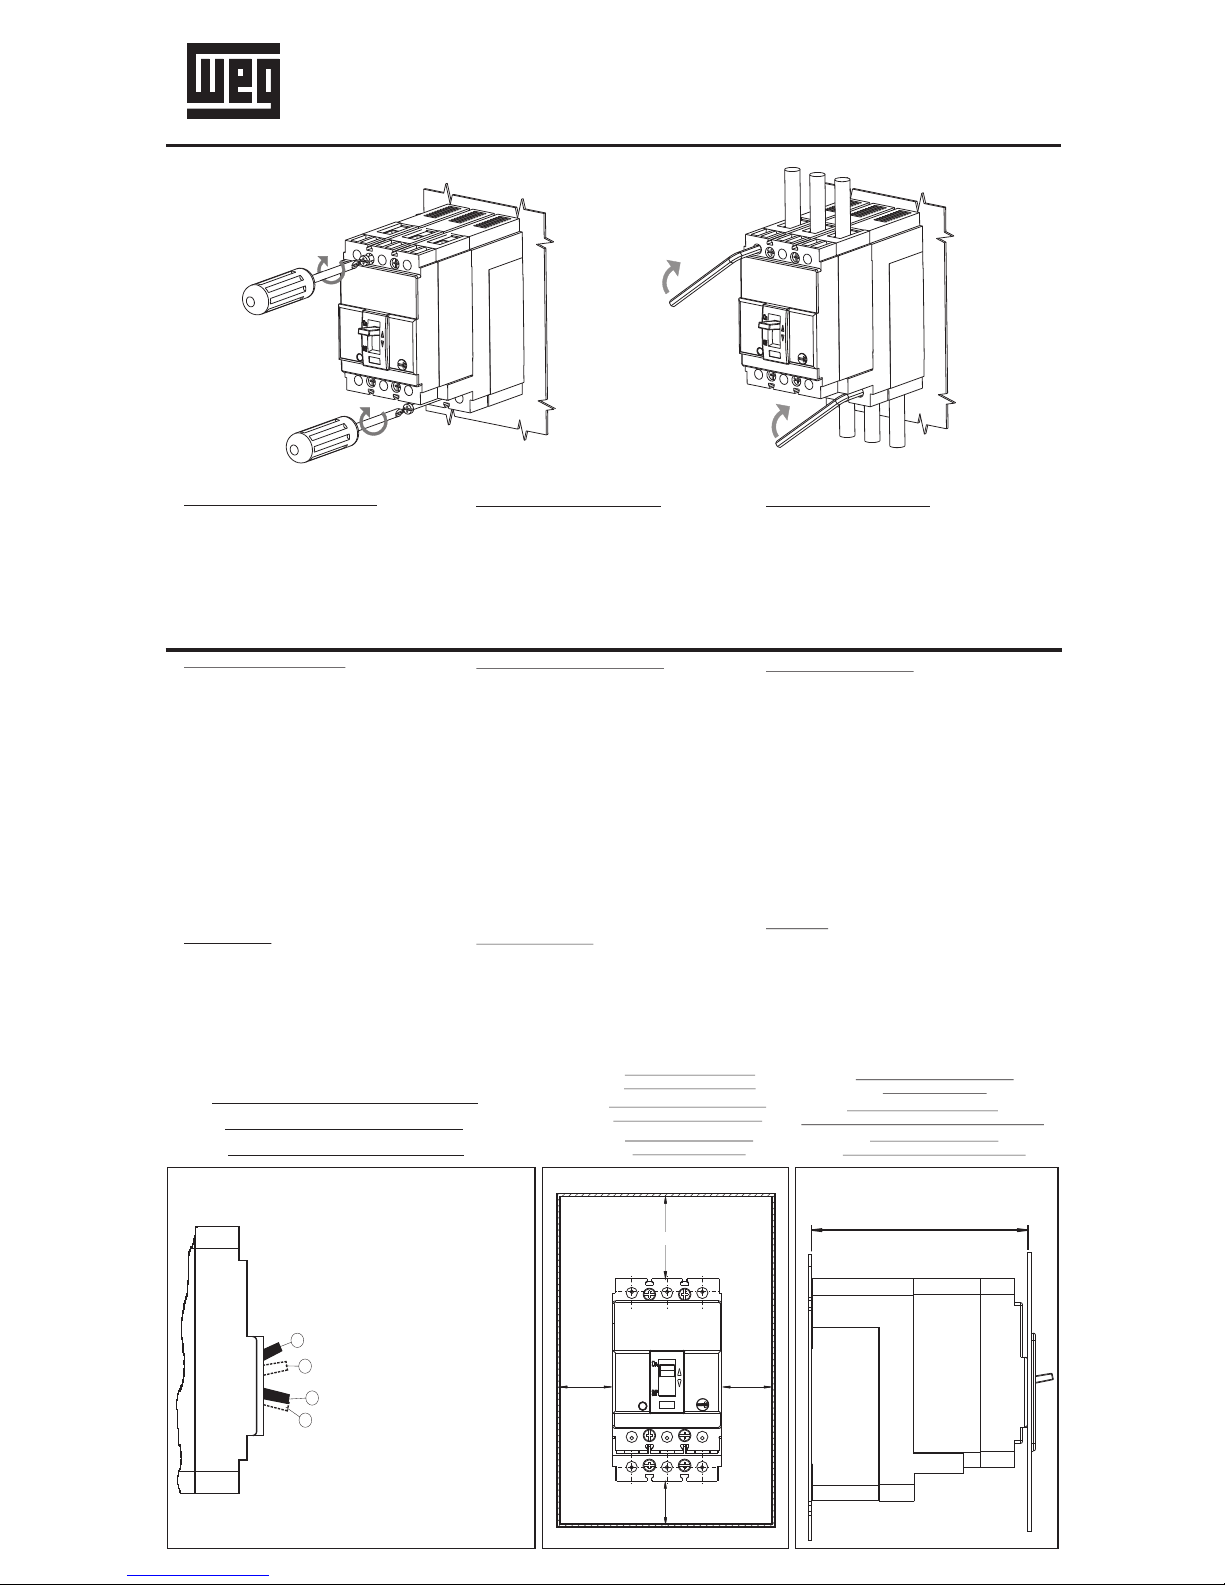
POSITIONS OF THE OPERATING LEVER
LINEA DE INTERRUPTORES
LINHA DE DISJUNTORES
CIRCUIT-BREAKER LINE
MINIMUN DISTANCES
FROM THE WALLS
DISTÂNCIAS MÍNIMAS ATÉ
AS PAREDES EXTERNAS
DISTANCIAS MINIMAS
DESDE LAS PAREDES
MINIMUN DISTANCES
BETWEEN PANEL AND FRONT
DISTÂNCIA MÍNIMA ENTRE A
CHAPA DE MONTAGEM E A PORTA DO PAINEL
DISTANCIA MINIMA ENTRE
PANEL Y FRENTE
INSTRUCCIONES DE MONTAJE:
1° Montar el interruptor limitador de corriente
DWA160L sobre la bandeja soporte, con los dos
tornillos suministrados en la caja.
2° Ajustar los cables de conexión en el interruptor limitador DWA160L
CONTROL DE RECEPCION:
El interruptor se provee con: los tornillos de fijación, y los accesorios especificados en el pedido, embalados adecuadamente en una caja de
cartón.
El interruptor también será provisto con las
prescripciones para su instalación, distancias
mínimas, secciones de cables, barras recomendadas e instructivo de mantenimiento.
Si al desembalar el producto hubiere alguna
irregularidad, notifique a WEG (directamente o
a través del proveedor o representante) a la
brevedad.
ALMACENAJE:
Es aconsejable que el interruptor aunque permanezca pocos días en depósito, conserve su
embalaje original y preferentemente en un ambiente seco, libre de polvo y de elementos contaminantes.
INSTRUÇÔES DE MONTAGEM:
1° Montar o disjuntor limitador de corrente
DWA160L sobre a bandeja de suporte, com os
dois parafusos fornecidos na caixa.
2° Ajustar os cabos de conexão no disjuntor
limitador DWA160L.
CONTROLE DE RECEBIMENTO:
O disjuntor é fornecido com os parafusos de fixação e com os acessórios especificados no
pedido, embalados adequadamente em uma
caixa de papelão. Também deverá estar dentro
da embalagem a instrução de montagem contendo as distâncias mínimas, seções dos
cabos ou barras recomendados e as prescrições de instalação e manutenção.
Se ao desembalar, houver alguma irregularidade no produto, notifique a WEG (diretamente,
ou por intermédio do fornecedor ou representante) o mais breve possível.
ARMAZENAMENTO:
Armazenar o disjuntor em um ambiente seco,
livre de pó e de agentes corrosivos, conservando sua embalagem original.
“DWM160L / DWA160L“
ASSEMBLY INSTRUTIONS:
1° Assemble the limitation circuit-breaker block
DWA160L on the support tray, with the two fixing
screws.
2° Adjust the connections cables to the limitor
circuit -breaker DWA160L.
CHECKING ON RECEIPT:
The circuit-breaker is provided with fixing
(mounting) screws and the accessories specified
on the order with proper packaging.
The circuit-breaker will be provided with directions
for its installation, minimum distances, cross
sections of cables or recommended bars and
maintenance.
Carry out a visual check that the unit is in
good conditions on the connections and on the
protection setting. Don’t hesitate to contact WEG
for any further information you may require.
STORAGE:
The circuit-breaker should be stored inside the
package, in a clean, dust-free, non-corrosive place,
even for only a few days.
POSIÇÕES DA ALAVANCA DE MANOBRA
POSICIONES DE LA PALANCA DE MANIOBRA
I
O
1
2
Interruptor cerrado.
Disjuntor ligado.
Circuit-breaker in “ON” position.
Interruptor abierto por intervención
de relés. En este caso, para volver
a cerrar el interruptor, se deberá
previamente llevar la palanca hacia
"2"(posición extrema en el rearme).
Disjuntor desarmado por intervenção de reles. Para religar o disjuntor, deve-se previamente levar a
alavanca até a posição “2” (Posição de rearme).
"I"
Circuit-breaker tripped due to release operation. To reset the
circuit-breaker, move the lever to
position “2” (lever end position to
reset the operating mechanism)
and after to position “I”.
.
"1”
Interruptor abierto.
Disjuntor desligado.
Circuit-breaker in “OFF” position.
"O"
50,0
20,0
20,0
20,0
140.0
1 2
CARACTERÍSTICAS GENERALES CARACTERÍSTICAS GERAIS GENERAL CHARACTERISTICS
INSTRUCCIONES DE MONTAJE INSTRUÇÕES DE MONTAGEM ASSEMBLY INSTRUCTIONS
V SILVA
FERNANDES
Instructivo DWA DWM 160L
2 dobras centrais
Papel Sulfite 75g
10000134258
PACHTMAN
17/07/08
000
02
E
VERIFICADO
500000076832
Acrescentado desenho com dobras
V Silva
Fernades
Pachtmann
17/07/08
02
215,6 mm
358,8 mm
500000205464
Removido endereço e CNPJ WEG AUTOMAÇÂO S.A.
-
VINICIUS
SOCRATES
FABIO
01/08/09
03
Page 2
POSITIONS OF THE OPERATING LEVER
LINEA DE INTERRUPTORES
LINHA DE DISJUNTORES
CIRCUIT-BREAKER LINE
MINIMUN DISTANCES
FROM THE WALLS
DISTÂNCIAS MÍNIMAS ATÉ
AS PAREDES EXTERNAS
DISTANCIAS MINIMAS
DESDE LAS PAREDES
MINIMUN DISTANCES
BETWEEN PANEL AND FRONT
DISTÂNCIA MÍNIMA ENTRE A
CHAPA DE MONTAGEM E A PORTA DO PAINEL
DISTANCIA MINIMA ENTRE
PANEL Y FRENTE
INSTRUCCIONES DE MONTAJE:
1° Montar el interruptor limitador de corriente
DWA160L sobre la bandeja soporte, con los dos
tornillos suministrados en la caja.
2° Ajustar los cables de conexión en el interruptor limitador DWA160L
CONTROL DE RECEPCION:
El interruptor se provee con: los tornillos de fijación, y los accesorios especificados en el pedido, embalados adecuadamente en una caja de
cartón.
El interruptor también será provisto con las
prescripciones para su instalación, distancias
mínimas, secciones de cables, barras recomendadas e instructivo de mantenimiento.
Si al desembalar el producto hubiere alguna
irregularidad, notifique a WEG (directamente o
a través del proveedor o representante) a la
brevedad.
ALMACENAJE:
Es aconsejable que el interruptor aunque permanezca pocos días en depósito, conserve su
embalaje original y preferentemente en un ambiente seco, libre de polvo y de elementos contaminantes.
INSTRUÇÔES DE MONTAGEM:
1° Montar o disjuntor limitador de corrente
DWA160L sobre a bandeja de suporte, com os
dois parafusos fornecidos na caixa.
2° Ajustar os cabos de conexão no disjuntor
limitador DWA160L.
CONTROLE DE RECEBIMENTO:
O disjuntor é fornecido com os parafusos de fixação e com os acessórios especificados no
pedido, embalados adequadamente em uma
caixa de papelão. Também deverá estar dentro
da embalagem a instrução de montagem contendo as distâncias mínimas, seções dos
cabos ou barras recomendados e as prescrições de instalação e manutenção.
Se ao desembalar, houver alguma irregularidade no produto, notifique a WEG (diretamente,
ou por intermédio do fornecedor ou representante) o mais breve possível.
ARMAZENAMENTO:
Armazenar o disjuntor em um ambiente seco,
livre de pó e de agentes corrosivos, conservando sua embalagem original.
“DWM160L / DWA160L“
ASSEMBLY INSTRUTIONS:
1° Assemble the limitation circuit-breaker block
DWA160L on the support tray, with the two fixing
screws.
2° Adjust the connections cables to the limitor
circuit -breaker DWA160L.
CHECKING ON RECEIPT:
The circuit-breaker is provided with fixing
(mounting) screws and the accessories specified
on the order with proper packaging.
The circuit-breaker will be provided with directions
for its installation, minimum distances, cross
sections of cables or recommended bars and
maintenance.
Carry out a visual check that the unit is in
good conditions on the connections and on the
protection setting. Don’t hesitate to contact WEG
for any further information you may require.
STORAGE:
The circuit-breaker should be stored inside the
package, in a clean, dust-free, non-corrosive place,
even for only a few days.
POSIÇÕES DA ALAVANCA DE MANOBRA
POSICIONES DE LA PALANCA DE MANIOBRA
I
O
1
2
Interruptor cerrado.
Disjuntor ligado.
Circuit-breaker in “ON” position.
Interruptor abierto por intervención
de relés. En este caso, para volver
a cerrar el interruptor, se deberá
previamente llevar la palanca hacia
"2"(posición extrema en el rearme).
Disjuntor desarmado por intervenção de reles. Para religar o disjuntor, deve-se previamente levar a
alavanca até a posição “2” (Posição de rearme).
"I"
Circuit-breaker tripped due to release operation. To reset the
circuit-breaker, move the lever to
position “2” (lever end position to
reset the operating mechanism)
and after to position “I”.
.
"1”
Interruptor abierto.
Disjuntor desligado.
Circuit-breaker in “OFF” position.
"O"
50,0
20,0
20,0
20,0
140.0
1 2
CARACTERÍSTICAS GENERALES CARACTERÍSTICAS GERAIS GENERAL CHARACTERISTICS
INSTRUCCIONES DE MONTAJE INSTRUÇÕES DE MONTAGEM ASSEMBLY INSTRUCTIONS
Page 3

SECCIONES DE CABLES RECOMENDADAS CONFORME A IEC - 60947 - 1
SEÇÕES DE CABOS RECOMENDADOS CONFORME NORMA IEC - 60947 - 1
CABLES SIZES RECOMMENDED ACCORDING TO IEC - 60947 - 1
INSTALAÇÃO:
Instalar o disjuntor em um ambiente seco, sem pó, sem
substâncias corrosivas que possam afetar seu funcionamento. Além disto, deverá estar livre de vibrações ou
golpes. Em caso de instalação em lugar não recomendado, deve ser providenciado um quadro ou caixa
fechada
para a instalação.
RECOMENDAÇÕES PARA AS CONEXÕES
Para realizar as conexões, as superficies de contato deverão estar planas, limpas, sem rebarbas, marcas e
vestígios de oxidação. Pode-se utilizar uma lima fina ou
esmeril para a remoção dessas imperfeições. Para a remoção de gordura ou graxa das superfícies, utilizar um
pano com álcool ou solvente. Em caso de utilização de
cabos para as conexões, é recomendado o emprego de
terminais adequados. Em caso de conexões com barras
de cobre (para temperatura ambiente superior a 40º C,
ou em ambientes contaminados), recomenda-se pratear as zonas de contato das barras com os terminais
dos disjuntores.
O torque de aperto não deverá exceder a 6 Nm.
IMPORTANTE
Para que exista um bom contato entre as conexões,
é necessário manter apertados os parafusos e porcas
correspondentes. É recomendado reapertar regularmente
os parafusos dos prensa cabos.
Para garantir o correcto funcionamento do módulo limitador de corrente DWA160L, deve estar necessariamente
ligado a um disjuntor da linha DWA -160 ou DWM-160.
INSTALACION:
Deberá ser instalado en un ambiente seco, sin polvo
ni sustancias corrosivas que puedan afectar su funcionamiento. Además deberá estar resguardado de vibraciones o golpes . En caso de que el lugar no sea
el recomendado para la instalación, esta deberá
efectuarse en un gabinete o caja tipo estanco.
RECOMENDACION PARA LAS CONEXIONES
Para realizar las conexiones, las superficies en contacto deberán estar planas y limpias, eliminando rebabas,
marcas y rastros de oxidación utilizando para ello una
lima fina o tela esmeril.
Para quitar la grasitud de las superficies utilizar un paño con solvente o alcohol.
En caso de utilizar conexiones con cable, es aconsejable el empleo de terminales adecuadas de identación.
El par de apriete no deberá exceder de 6 Nm.
IMPORTANTE
Para que exista un buen contacto en las conexiones
será necesario mantener apretados los tornillos y tuercas correspondientes. Así mismo, se aconseja volver
a apretar regularmente los prisioneros en el caso de
conexión con prensacable.
Para garantizar el correcto funcionamiento del mòdulo
limitador de corriente DWA160L, debe estar necesariamente conectado a un interruptor de la linea DWA-160,
DWM-160.
INSTALLATION:
The circuit-breaker must be installed in a dry, dustfree, non-corrosive place with no shocks or vibration. If the installation place is not according to recommended, install the circuit-breaker in an enclosure or cubicle with an appropriate protection
degree.
CONNECTIONS
For proper connection, the contact surfaces should
be flat, clean, without rough edges, marks or signs
of oxidation.
To remove excess of grease on the surfaces, use a
cloth with some solvent.
In case of using connection with cables, is recommended to use suitable terminals.
The tight torque shall not be execeed of 6 Nm.
IMPORTANT
For good contact betwen connections, it is necessary to keep the corresponding screws and nuts
tight. In case of using connections with terminal
lugs, it is recommended to press the screws regularly.
To guarantee the correct operation of the current limitation block DWA160L, it must be necessarily
connected to the circuit-breaker type DWA-160 or
DWM-160.
DIRECTIVES
WEG AUTOMAÇÃO
www.weg.net
CORRIENTE NOMINAL
CORRENTE NOMINAL
RATED CURRENT
SECCION DEL CABLE
SEÇÃO DE CABOS
CABLE SIZE
mm
(Cu)
2
A
25 32 40 50 63 80 100 125 160
4 6 10 10 16 25 35 50 70
DIMENSIONES GENERALES
DIMENSÕES GERAIS
GENERAL DIMENSION
L
C
SALIDA
SAIDA
OUTPUT
ENTRADA
ENTRADA
INPUT
21,5 26
25
25
123
L
C
143
77
91
75
66
25
25
= 120.0 =
26.0
47
46.0
AGUJEROS PARA
FIJACIÓN INTERRUPTOR
1*
FURAÇ O PARA
FIXAÇ O DO DISJUNTOR
Ã
Ã
DRILLING FOR FIXING
CIRCUIT BREAKER
CALADO DE
PUERTA
FURAÇ O DA
PORTA
Ã
DRILLING OF DOOR
RM 4
R 3
45 5147
12
12
25
11.511
On
Off
SEPARADOR DE FASES
PHASE BARRIERS
SEPARADOR DE FASES
Montar no disjuntor
To be placed in circuit-breaker
Montaje en el interruptor
 Loading...