

Page 1
User guide
Weenect Dogs 2
Page 2

Page 3
Nous avons conçu Weenect Dogs 2 comme une aide. Notez que
la couverture réseau (GSM) et l’intensité du signal GPS peuvent
impacter la abilité du service.
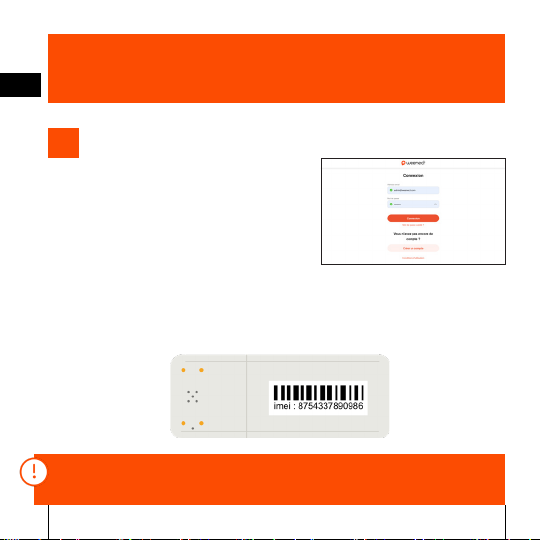
Activer votre traceur
1
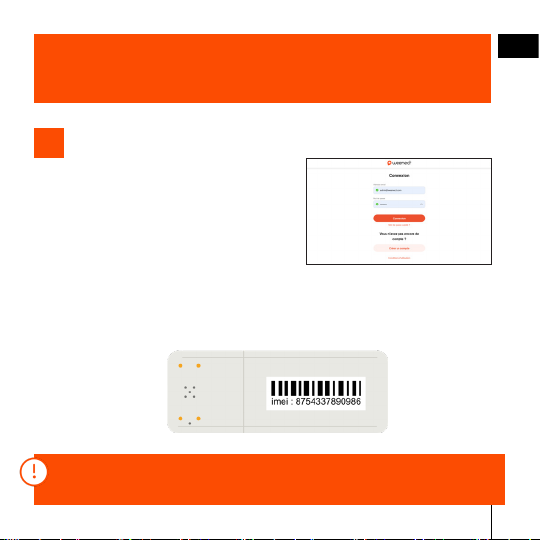
Créez votre compte sur
1
my.weenect.com (et non pas
weenect.com) ou depuis
l’application (voir partie 3).
Puis enregistrez votre traceur en suivant les étapes décrites
2
dans la procédure. Le numéro IMEI se trouve au dos de
votre traceur.
Si vous avez déjà un compte connectez-vous avec votre identiant et
votre mot de passe pour pouvoir enregistrer votre nouveau traceur.
FR
EN
DE
NL
IT
ES
3
Page 4

FR
EN
DE
NL
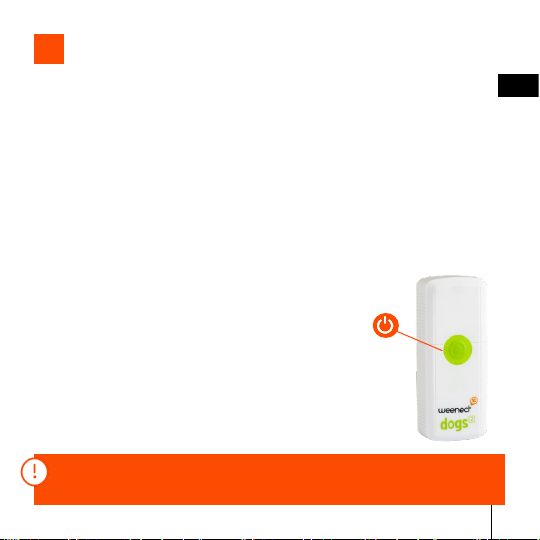
Allumer votre traceur
2
Mettez votre traceur en extérieur, puis appuyez sur le
1
bouton on/off pendant 3 secondes. Dès que le produit
vibre et sonne vous pouvez relâcher le bouton. Le traceur
est allumé.
IT
ES
Conservez votre traceur en extérieur le temps que la led
2
bleue clignote. Félicitations, votre traceur a maintenant
obtenu une première position GPS.
Pour éteindre votre traceur appuyez
3
trois fois successivement sur le bouton
on/off. Dès que le traceur vibre votre
traceur est éteint.
Pour visualiser ces procédures en vidéos rendez-vous sur la
page : leds.weenect.com
4
Page 5
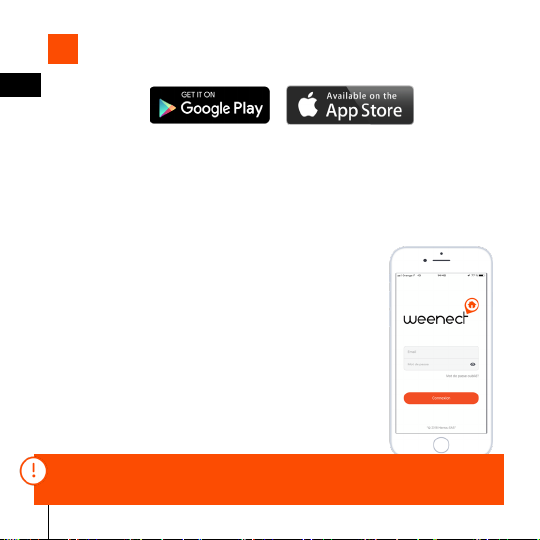
Installer l’application « Weenect-GPS»
3
FR
EN
DE
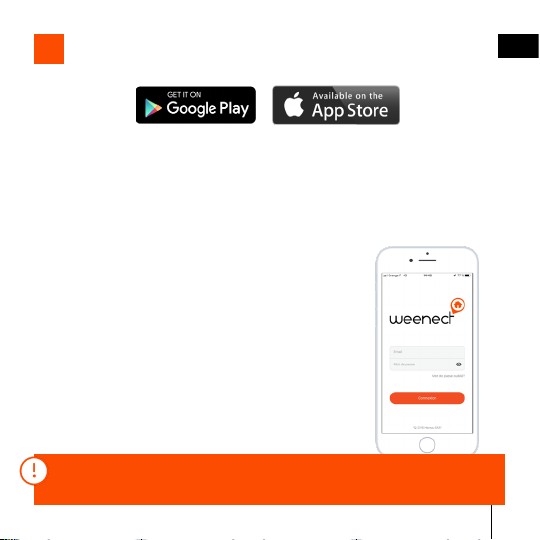
Cherchez l’application « Weenect-GPS » sur l’App Store ou
1
sur Google Play. Installez-la.
Connectez-vous à l’application en utilisant vos identiant et
2
mot de passe, ou créez votre compte.
Pour découvrir les fonctionnalités de
3
l’application en vidéos rendez-vous à
l’adresse : app.weenect.com
Ne pas confondre l’application « Weenect-GPS » avec
l’application « Weenect location ».
NL
IT
ES
5
Page 6
FR
EN
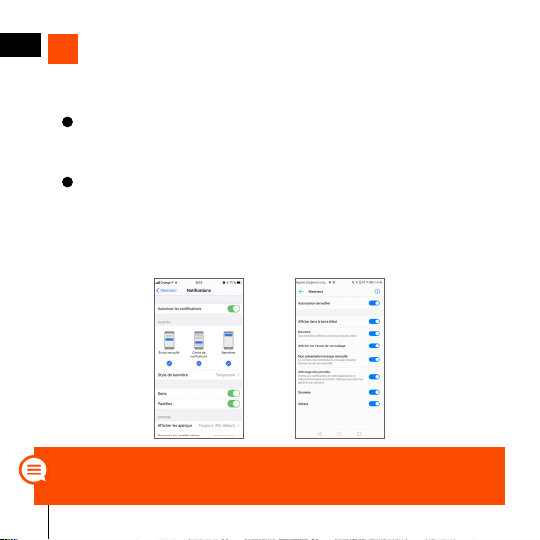
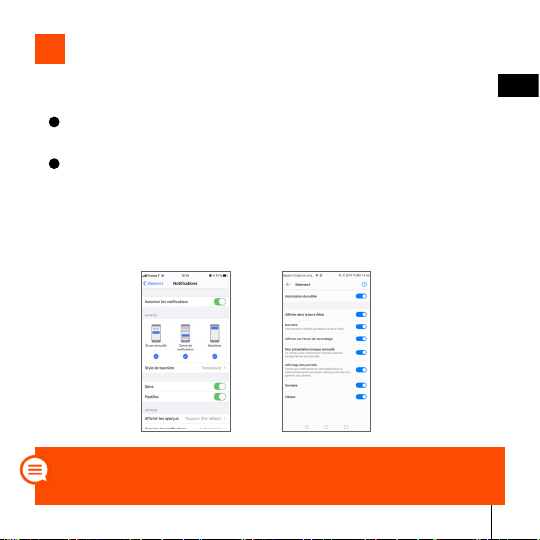
Activer les notications
4
Activez les notications sur votre mobile ou votre tablette.
DE
Si vous utilisez iOS, allez dans Réglages > Weenect >
Notications.
NL
Si vous utilisez Android, allez dans Réglages >
IT
ES
Applications > Weenect > Notications.
Important : n’oubliez pas d’activer le mode bannière et
l’afchage sur l’écran verrouillé.
iOS
Astuce : vous n’êtes pas obligé de garder l’application ouverte pour
recevoir les notications. Vous devez simplement vous connecter une
première fois pour qu’elles fonctionnent.
6
Android
Page 7
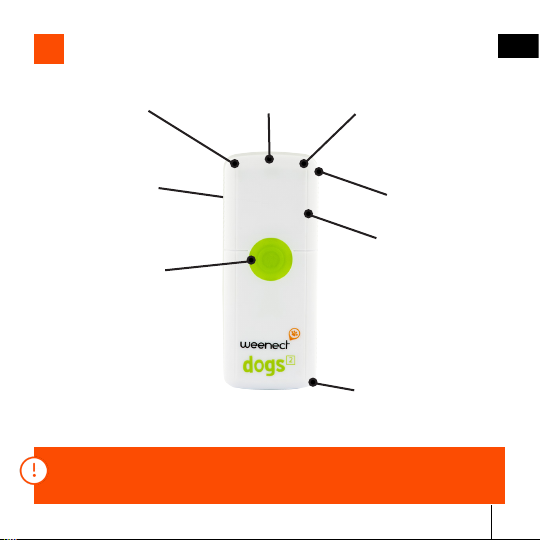
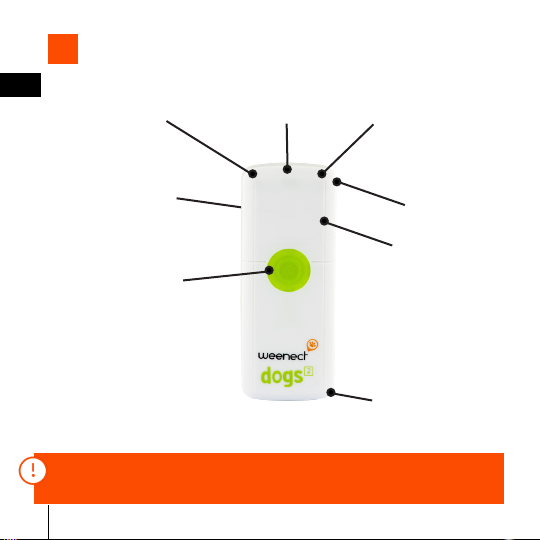
Comprendre votre traceur
5
Led jaune pour la
connexion GSM
Led rouge pour le niveau
de batterie / le chargement
Port de chargement
Led bleue pour le
signal GPS
Microphone
FR
EN
DE
NL
IT
Antenne GPS
Bouton on/off
Attache lanyard
An d’améliorer les performances GPS de votre traceur, préférez une
xation harnais sur le dos an que l’antenne soit orientée vers les
satellites.
ES
7
Page 8
FR
EN
DE
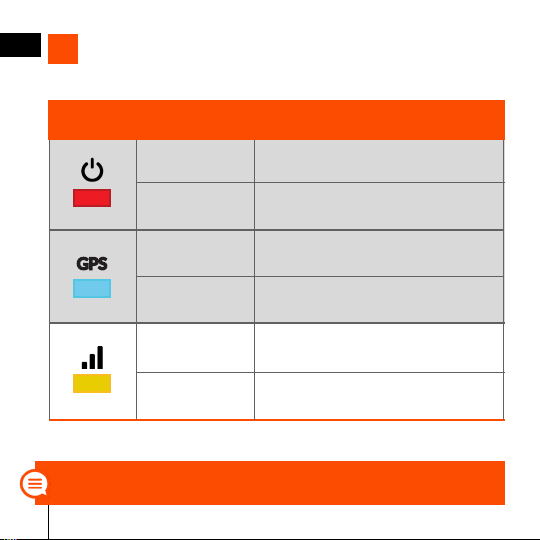
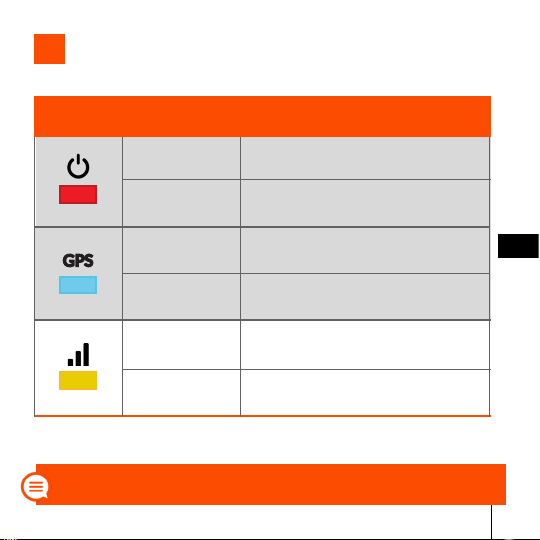
Comprendre les LEDS
6
Icône/LED Etat de la LED Signication
NL
IT
ES
Pour voir ces explications en vidéos rendez-vous sur la page :
leds.weenect.com
8
Fixe Le traceur est en chargement
Clignote La batterie du traceur est faible
Éteinte
Clignote
Clignote très
rapidemment
Clignote deux fois
successivement
Signal GPS invalide, placez votre
traceur en extérieur
Signal GPS valide, le traceur reçoit
bien sa position
Non-connecté au serveur, aucun
réseau GSM
Connecté au serveur, le traceur envoie
bien des informations.
Page 9

Nous contacter
7
Contactez-nous en utilisant le formulaire présent à
1
l’adresse my.weenect.com/support ou depuis votre
application. Cela permettra au service client d’avoir
accès à toutes vos informations lorsqu’il recevra votre
message.
L’état de nos services est en permanence actualisé
2
sur notre compte Twitter : @StatusWeenect.
Pensez à nous suivre sur les réseaux sociaux pour
3
vous tenir au courant de nos dernières actualités et
interagir avec la communauté. Nous sommes présents
sur Facebook et Instagram.
FR
EN
DE
NL
IT
ES
9
Page 10
FR
We’ve designed Weenect Dogs2 as an aid to dog surveillance, not a
substitute for it. Please be aware that network coverage (GSM) and
EN
GPS signal strength may have an impact on service reliability.
DE
Activating your tracker
1
NL
First create an account on
1
IT
ES
my.weenect.com or from within
the app (see part 3).
Then register your tracker by following the steps described
2
in the procedure. The IMEI number can be found on the
back of your tracker.
If you already have an account, you’ll need to log in using your
username and password in order to register your new tracker.
10
Page 11
Switching on your tracker
2
Take your tracker outside hold down the on-off button for
1
three seconds. Once the tracker vibrates, you can release
the button. The tracker is now turned on.
Keep your tracker outside until the blue LED is blinking.
2
Congratulations! Your tracker has now established its
GPS position for the rst time.
To switch your tracker off, press the on/off
3
button three times in succession or press 5
seconds consecutively. Once you feel your
tracker vibrate it is switched off.
To watch these procedures on video, please visit
leds.weenect.com
FR
EN
DE
NL
IT
ES
11
Page 12
FR
EN
DE
Installing the «Weenect-GPS» app
3
NL
IT
ES
Search for the «Weenect-GPS» app on the App Store or
1
Google Play. Install the app.
Log into the app using your existing
2
username and password, or create a new
account if you don’t already have one.
To watch a video about the app’s
3
functions and features, please visit
app.weenect.com
Be careful not to confuse the «Weenect-GPS» app with the
«Weenect location» app.
12
Page 13
Turning notications on
4
Turn on notications on your phone or tablet.
FR
EN
If using iOS, go to Settings > Weenect > Notications
If using Android, go to Settings > Applications >
Weenect > Notications
Important: don’t forget to adjust the settings to allow banner
notications and display of notications on the lock screen.
iOS
Tip: you don’t need to keep the app open in order to receive
notications. You simply need to log in for the rst time for them to
work.
Android
DE
NL
IT
ES
13
Page 14
FR
EN
DE
NL
IT
Understanding your tracker
5
Yellow LED for the
GSM connection
Red LED to indicate the
battery / charge level
Charging port
Blue LED for the
GPS signal
Microphone
ES
GPS antenna
On/off button
Lanyard
To optimize you tracker’s GPS performances, we recommand to use a
back harness attach in order to have the GPS antenna facing the sky.
14
Page 15

Understanding the LEDs
6
Icon/LED LED status Meaning
Fixed The tracker is charging
FR
EN
DE
NL
Blinking The tracker battery is low
Off
Blinking
Blinking very
rapidly
Blinking twice
successively
To watch these explanations on video, please visit:
leds.weenect.com
Invalid GPS signal — take your tracker
outside
Valid GPS signal — the tracker has
established its position
No server connection — no GSM
network available
Connected to the server — the tracker is
successfully transmitting informations
IT
ES
15
Page 16

FR
EN
DE
NL
IT
ES
Contact us
7
Please contact us by using the form available at
1
my.weenect.com/support or from within the app itself.
This ensures our customer services have access to
all your information when they receive your message.
Constantly updated service status information is pro-
2
vided on our Twitter account: @StatusWeenect.
Don’t forget to follow us on social networks so you
3
can keep up to date with our latest news and interact
with the community. We’re also on Facebook and
Instagram.
16
Page 17

Wir haben Weenect Dogs 2 zur Unterstützung der Überwachung
Ihrer Hunde entwickelt, und nicht als Ersatz dafür. Beachten Sie,
dass die Netzabdeckung (GSM) und die GPS-Signalstärke die
Zuverlässigkeit unserer Dienste beeinträchtigen kann.
Aktivieren Sie ihren Tracker
1
Registrieren Sie sich auf unserer
1
Website my.weenect.com oder
direkt auf unserer App (siehe teil 3).
Melden Sie dann Ihren Tracker an und folgen Sie unseren
2
Anweisungen. Die IMEI-Nummer bendet sich auf der
Rückseite Ihres GPS-Senders.
Falls Sie bereits ein Konto besitzen, melden Sie sich mit Ihrem
Benutzernamen und Passwort an, um Ihren neuen Tracker zu registrieren.
17
FR
EN
DE
NL
IT
ES
Page 18

FR
EN
DE
NL
IT
ES
Schalten Sie Ihren Tracker ein
2
Gehen Sie mit Ihrem Tracker nach draußen und drücken
1
Sie 3 Sekunden lang die Ein-/Aus-Taste. Sobald das
Gerät vibriert, können Sie die Taste loslassen. Der
Tracker ist eingeschaltet.
Bleiben Sie draußen bis das blaue LED Licht blinkt.
2
Herzlichen Glückwunsch, Ihr Tracker hat nun seine erste
GPS-Position erhalten.
Um Ihren Tracker auszuschalten,
3
drücken Sie dreimal hintereinander
auf die Ein-/Aus-Taste oder drücken
Sie nacheinander 5 Sekunden lang
auf die Taste. Sobald der GPSSender vibriert, ist er ausgeschaltet.
Um sich dieses Verfahren als Video anzuschauen, besuchen
Sie die Seite : leds.weenect.com
18
Page 19

Installieren Sie die „Weenect-GPS» App
3
FR
EN
DE
Finden Sie die „Weenect-GPS“ App auf ihrem App Store
1
oder Google Play Store, um Sie herunterzuladen.
Melden Sie sich mit Ihrem Benutzernamen und Passwort in
2
der App an oder erstellen Sie ein Konto.
Um die verschiedenen Funktionen der
3
App als Video zu entdecken, besuchen
Sie: app.weenect.com
Verwechseln Sie nicht die „Weenect-GPS“ App mit der
„Weenect location“ App.
NL
IT
ES
19
Page 20

FR
EN
Aktivieren Sie die App-Benachrichtigungen.
4
Aktivieren Sie die Benachrichtigungen auf ihrem Handy oder
Tablet.
DE
NL
IT
ES
Falls Sie iOS benutzen, gehen Sie in die Einstellungen
> Weenect > Mitteilungen
Falls Sie Android benutzen, gehen Sie in die
Einstellungen > Apps > Weenect > Benachrichtigungen.
Wichtig: Vergessen Sie nicht, die Mitteilungen als Banner oder
auf dem Sperrbildschirm zu aktivieren.
iOS
Tipp: Sie müssen die App nicht offen haben, um Benachrichtigungen
zu erhalten. Sie müssen sich nur einmal einloggen, damit es
funktioniert.
20
Android
Page 21

Ihren Tracker verstehen
5
Gelbes LED Licht für
die GSM Verbindung
Auade Anschluss
Rotes LED Licht für den
Akkustand / Auade Stand
Blaues LED Licht für
das GPS Signal
Mikrofon
FR
EN
DE
NL
IT
GPS-antenne
Ein/Aus-Knopf
Umhängeband
Um die GPS-Leistung Ihres Trackers zu optimieren, empfehlen wir
die Verwendung eines Rückengeschirrs, damit die GPS-Antenne in
Richtung Himmel zeigt.
ES
21
Page 22

FR
EN
DE
Die LED Lichter verstehen
6
Symbol/LED LED-Zustand Bedeutung
NL
IT
ES
Um diese Erklärungen als Video zu sehen, gehen Sie auf die Seite:
leds.weenect.com
22
Leuchtet konstant
Blinkt Die Batterie des Trackers ist niedrig
Aus
Blinkt
Sehr schnelles
Blinken
Blinkt zweimal
hintereinander
Der Tracker lädt sich auf
Ungültiges GPS-Signal, stellen Sie
Ihren Tracker draußen auf.
Gültiges GPS-Signal, der Tracker
erhält seine Position
Mit dem Server nicht verbunden, kein
GSM Netzwerk
Mit dem Server verbunden, der
Tracker sendet viele Informationen
Page 23

Kontaktieren Sie uns
7
Kontaktieren Sie uns über das Formular auf
1
my.weenect.com/support oder direkt von Ihrer App
aus. Dies ermöglicht dem Kundenservice, auf all Ihre
Informationen zurückzugreifen, wenn er Ihre Nachricht erhält.
Der Status unserer Dienste wird ständig über unseren
2
Twitter-Account aktualisiert: @StatusWeenect.
Folgen Sie uns auf sozialen Netzwerken, um über
3
unsere neuesten Aktivitäten auf dem Laufenden zu
bleiben und mit der Community zu interagieren. Wir
sind auf Facebook und Instagram aktiv.
FR
EN
DE
NL
IT
ES
23
Page 24

FR
Weenect Dogs 2 werd ontworpen als hulpmiddel bij, maar niet als vervanging van,
toezicht op uw honden. Houd er rekening mee dat de netwerkdekking (GSM) en
EN
de sterkte van het GPS-signaal invloed kunnen hebben op de betrouwbaarheid
van de dienst.
DE
Uw tracker activeren
1
NL
Creëer uw account op
1
IT
ES
my.weenect.com of vanuit de
app (zie deel 3).
Sla daarna uw tracker op door de stappen te volgen die in
2
de procedure staan beschreven. U vindt het EMEI-nummer
op de achterkant van uw tracker.
Als u al een account hebt, log dan in met uw gebruikersnaam en
wachtwoord om uw nieuwe tracker op te slaan
24
Page 25

Uw tracker inschakelen
2
Zet uw tracker buiten neer, en druk dan 3 seconden lang
1
op de on/off knop. Zodra het product trilt een bel klinkt
kunt u de knop loslaten. De tracker is ingeschakeld.
Houd uw tracker buiten zolang als het blauwe ledlampje
2
knippert. Gefeliciteerd, uw tracker heeft nu een eerste
GPS-positie doorgekregen.
Om uw plotter uit te schakelen, drukt u
3
driemaal op de aan / uitknop of drukt u
achtereenvolgens op de 5 seconden.
Zodra de tracker trilt, is uw tracker
uitgezet.
Ga naar de pagina: leds.weenect.com om deze procedures
op video te bekijken.
FR
EN
DE
NL
IT
ES
25
Page 26

FR
EN
DE
De app «Weenect-GPS» installeren
3
NL
ES
Zoek de app « Weenect-GPS » op de App Store of op
1
Google Play. Installeer deze.
IT
Log in op de app door middel van uw gebruikersnaam en
2
wachtwoord, of maak uw account aan.
Ga naar het adres: app.weenect.com
3
om de functies van de app in video’s te
bekijken
Verwar alstublieft niet de app «Weenect-GPS»met de app
«Weenect locatie».
26
Page 27

De meldingen activeren
4
Activeer de meldingen op uw mobiele telefoon of op uw tablet.
FR
EN
Als u iOS gebruikt, ga dan naar Instellingen > Weenect
> Meldingen.
Als u Android gebruikt, ga dan naar Instellingen > Apps
> Weenect > Meldingen.
Belangrijk: vergeet niet om de bannermodus en de weergave
op het vergrendelde scherm te activeren.
iOS
Tip: u bent niet verplicht om de app open te houden om meldingen te
ontvangen. U hoeft alleen maar een eerste keer in te loggen om ze te
laten functioneren.
Android
DE
NL
IT
ES
27
Page 28

FR
EN
DE
NL
IT
Uw tracker begrijpen
5
Gele led voor de
GSM-verbinding
Laadpoort
Rode led voor het batteri-
jniveau / het opladen
Blauwe led voor het
GPS-signaal
Microfoon
ES
On/off knop
Koord
Om de GPS-prestaties van uw tracker te optimaliseren, raden we u
aan om het aan een rugharnas vast te maken, zodat de GPS antenne
steeds naar de hemel gericht is.
28
GPS antenne
Page 29

De LEDS begrijpen
6
Icoon/LED Status LED Betekenis
Continu De tracker is bezig met laden
FR
EN
DE
NL
Knipperend De batterij van de tracker is zwak
Uit
Knipperend
Knippert zeer
snel
Knippert twee
keer achter
Als u deze uitleg op video wilt bekijken, ga dan naar pagina:
leds.weenect.com
Ongeldig GPS signaal, plaats uw
tracker buiten
Geldig GPS signaal, de tracker krijgt
zijn positie door
Niet verbonden met de server, geen
GSM netwerk
Verbonden met de server, de tracker
stuurt zijn informatie
IT
ES
29
Page 30

FR
EN
DE
NL
IT
ES
Contact met ons opnemen
7
Neem contact met ons op door het formulier te ge-
1
bruiken dat zich bevindt op het adres my.weenect.
com/support of vanuit uw app. Hiermee krijgt de klan-
tenservice toegang krijgen tot al uw gegevens wanneer die uw bericht ontvangt.
De staat van onze diensten wordt voortdurend bijgew-
2
erkt op ons Twitter account: @StatusWeenect.
Vergeet niet om ons te volgen op social media om
3
op de hoogte te blijven van het laatste nieuws en in
gesprek te gaan met de community. We zijn aanwezig
op Facebook en Instagram.
30
Page 31

Abbiamo concepito Weenect Dogs 2 come ausilio alla sorveglianza
dei cani, ma non per sostituire l’occhio vigile del padrone. Si ricorda
che la copertura della rete (GSM) e l’intensità del segnale GPS
possono inuenzare l’afdabilità del servizio.
Attiva il localizzatore
1
Crea il tuo account su
1
my.weenect.com o tramite
l’applicazione (vedi parte 3).
Poi registra il tuo localizzatore seguendo la procedura
2
passo a passo. Il numero IMEI è indicato sul retro del tuo
localizzatore.
Se hai già un account, accedi con il tuo nome utente e la tua password
per registrare il tuo nuovo localizzatore.
FR
EN
DE
NL
IT
ES
31
Page 32

FR
EN
DE
NL
IT
ES
Accensione del localizzatore
2
Accendi il localizzatore fuori casa e premi il pulsante
1
on/off per 3 secondi. Quando il dispositivo vibra, puoi
rilasciare il pulsante. Il localizzatore è acceso.
Rimani fuori con il localizzatore mentre il led blu
2
lampeggia. Congratulazioni, il tuo localizzatore ha
ricevuto la prima posizione GPS.
Per spegnere il localizzatore, premi
3
3 volte di seguito il pulsante on/off o
premere i 5 secondi consecutivamente.
La vibrazione ti segnala che il
localizzatore si è spento.
Per un video tutorial di queste procedure visita la pagina :
leds.weenect.com
32
Page 33

Installazione dell’applicazione «Weenect-GPS»
3
FR
EN
DE
Cerca l’applicazione «Weenect-GPS» sull’App Store o su
1
Google Play. Scaricala.
Accedi all’applicazione con il tuo nome utente e la tua
2
password o crea un account.
Per scoprire le funzioni dell’applicazione
3
con i nostri video, vai all’indirizzo:
app.weenect.com
Non confondere l’applicazione «Weenect-GPS» con
l’applicazione «Weenect location».
NL
IT
ES
33
Page 34

FR
EN
Attivazione delle notiche
4
Attiva le notiche sul cellulare o sul tablet.
DE
Se utilizzi iOS, vai su Impostazioni > Weenect >
Notiche.
NL
Se utilizzi Android, vai su Impostazioni > Applicazioni >
IT
ES
Weenect > Notiche.
Importante: non dimenticare di attivare la modalità banner e la
visualizzazione a schermo bloccato.
iOS
Trucchetto: non sei obbligato a tenere aperta l’applicazione per
ricevere le notiche. Ti basta accedere la prima volta per farle
funzionare.
34
Android
Page 35

Conosci il tuo localizzatore
5
Led giallo per la
connessione GSM
Led rosso per livello
batteria / ricarica
Porta di ricarica
Led blu per il
segnale GPS
Microfono
FR
EN
DE
NL
IT
Antenna GPS
Pulsante on/off
Lacetto Lanyard
Per ottimizzare le prestazioni del localizzatore GPS, ti consigliamo di
usare un’imbracatura sulla schiena in modo che l’antenna GPS sia
rivolta verso i satelliti.
ES
35
Page 36

FR
EN
DE
Capire i LED
6
Capire/LED Stato de la LED Signicato
NL
IT
ES
Per vedere un video con queste spiegazioni visita la pagina:
leds.weenect.com
36
Fisso Il localizzatore è in carica
Lampeggia La batteria del localizzatore è scarica
Spento
Lampeggia
Lampeggia molto
velocemente
Lampeggia due
volte di seguito
Segnale GPS non valido, collocare il
localizzatore all’aperto
Segnale GPS valido, il localizzatore
riceve bene la propria posizione
Non connesso al server, nessuna rete
GSM
Connesso al server, il localizzatore
invia correttamente informazioni
Page 37

Contattaci
7
Contattaci utilizzando il modulo che trovi all’indirizzo
1
my.weenect.com/support o tramite l’applicazione. In
questo modo il servizio clienti avrà accesso a tutti i
tuoi dati quando riceverà il messaggio.
FR
EN
DE
NL
Lo stato dei nostri servizi è sempre aggiornato sul
2
nostro account Twitter: @StatusWeenect.
Seguici sui social network per tenerti aggiornato sulle
3
nostre ultime novità e interagire con la comunità. Ci
trovi su Facebook e Instagram.
IT
ES
37
Page 38

FR
Hemos diseñado Weenect Dogs 2 para que sirva de ayuada a la
vigilancia de su perro; no es un reemplazo. Tenga en cuenta que
EN
la cobertura de red (GSM) y la intensidad de la señal GPS pueden
afectar a la abilidad del servicio.
DE
Activar su localizador
1
NL
Cree su cuenta en
1
IT
ES
my.weenect.com o desde la
aplicación (ver parte 3).
Después, guarde su localizador siguiendo las fases
2
descritas en el procedimiento. El número IMEI se encuentra
en la parte trasera del localizador.
Si ya tiene una cuenta, conéctese con su usuario y contraseña para
poder registrar su nuevo localizador.
38
Page 39

Encender su localizador
2
Una vez en el exterior mantenga el botón on/off durante
1
3 segundos. Cuando el producto vibre, puede soltar el
botón. El localizador está encendido.
Mantenga su localizador en el exterior mientras parpadea
2
el led azul. Felicidades, su localizador acaba de
conseguir una primera posición GPS.
Para apagar su localizador, pulse tres
3
veces seguidas el botón on/off o presione
los 5 segundos consecutivos. Cuando el
localizador vibre, está apagado.
Para ver estos procedimientos en vídeo, visite la página
leds.weenect.com
FR
EN
DE
NL
IT
ES
ES
39
Page 40

FR
EN
DE
Instalar la aplicación «Weenect-GPS»
3
NL
ES
Busque la aplicación «Weenect-GPS» en la App Store o en
1
Google Play. Instálela.
IT
Conéctese a la aplicación utilizando su usuario y
2
contraseña, o cree su cuenta.
Para descubrir las funcionalidades de la
3
aplicación en vídeo, visite
app.weenect.com
No confunda la aplicación «Weenect-GPS» con la aplicación
«Weenect location».
40
Page 41

Activar las noticaciones
4
Active las noticaciones en su móvil o tableta.
FR
EN
Si usa iOS, vaya a Ajustes > Weenect > Noticaciones.
Si usa Android, vaya a Ajustes > Aplicaciones >
Weenect > Noticaciones.
Importante: no olvide activar el modo banner y la visualización
en la pantalla bloqueada.
iOS
Consejo: no es obligatorio dejar la aplicación abierta para recibir las
noticaciones. Solo tiene que conectarse una vez para que funcionen.
Android
DE
NL
IT
ES
ES
41
Page 42

FR
EN
DE
NL
IT
Entender su localizador
5
Led amarillo para la
conexión GSM
Puerto de carga
Led rojo para el nivel de
batería/ la carga
Led azul para la
señal GPS
Micrófono
ES
Botón on/off
Lazo
Para optimizar la busquedas de GPS del localizador, recomendamos
usar un accesorio con correa en la parte trasera para que la antena
GPS apunte el cielo.
42
Antenna GPS
Page 43
Entender los LED
6
Icono/LED Estado de LED Signicado
Fijo El localizador está cargando
FR
EN
DE
NL
Intermitente La batería del localizador está baja
Apagado
Intermitente
Parpadea muy
rápidamente
Parpadea dos
veces seguidas
Para ver estas explicaciones en vídeo, diríjase a la página:
leds.weenect.com
Señal GPS no válida, coloque su
localizador en el exterior
Señal GPS válida, el localizador
recibe su posición correctamente
No conectado al servidor, ninguna red
GSM
Conectado al servidor, el localizador
envía informaciones correctamente
IT
ES
ES
43
Page 44

FR
EN
DE
NL
IT
ES
Contacto
7
Póngase en contacto con nosotros utilizando el for-
1
mulario presente en la dirección my.weenect.com/
support o desde su aplicación. Esto permitirá al Ser-
vicio de Atención al Cliente tener acceso a todos sus
datos cuando reciba su mensaje.
El estado de nuestros servicios se actualiza
2
continuamente en nuestra cuenta de Twitter :
@StatusWeenect.
No olvide seguirnos en las redes sociales para estar
3
al tanto de nuestras últimas novedades e interactuar
con la comunidad. Estamos presentes en Facebook
e Instagram.
44
Page 45

Use precautions and Warranty
Shocks: ideally stow in a schoolbag or on the belt. Remember to use the protective pouch
to protect the locator from any shocks.
Submersion in water: avoid any contact between the locator and water or any other liquid.
The protective pouch is water-resistant (resistant to splashing), but cannot be submerged
in water without damaging the locator.
Charging the locator: always use the USB cable provided to charge your locator. Never
force the plug into the locator port; if it won’t go in, make sure that the plug is being
inserted the right way round.
Handling the locator: under no circumstances should you open the locator case and
attempt to repair it yourself as this could invalidate the warranty. Contact Customer
Service if there is a malfunction.
Use temperatures: the locator has been designed to operate at temperatures of between
-20°C and 55°C. Temperatures above or below could damage it.
The locators have a two-year manufacturer ’s warranty. This warranty is valid for a locator
failure not caused by dropping or breaking it or improper use and as long as the customer
has a subscription and his payments are up to date. If this period does not comply with the
applicable law, the warranty will be extended to the legal minimum period.
Page 46

WEENECT© est une marque de la société HAREAU SAS. Ce produit appartient à la
société HAREAU SAS Société par actions simpliée, inscrite au RCS de Paris sous le
numéro 538 863 937, 101 rue de sèvres - 75280 PARIS cedex - France, dont l’adresse
email est family@weenect.com.
Nous déclarons par la présente que le produit ci-joint est conforme avec les exigences
essentielles de la Diretive (1999/5/EC) de la R&TTE et de la Directive (2011/65/EU) sur
la restriction de l’utilisation de certaines substances dangereuses dans les équipements
électriques et électroniques en application de la norme EN 50581 :2012
Pour consulter la déclaration de conformité :
https://www.weenect.com/pdf/en/doc-we202.pdf
WEENECT® is a brand of Hareau SAS. This product is owned by Hareau SAS. Simplied
joint stock company, registered with the Paris Trade and Companies Registry under number 538 863 937, 101 Rue de Sèvres - 75280 Paris cedex - France, which email adress
is family@weenect.com
We hereby declare, that the product above is in compliance with the essential requirements of the R&TTE Directive (1999/5/EC) and the Directive (2011/65/EU) on the restriction of the use of certain hazardous substances in electrical and electronic equipment by
application of EN 50581:2012.
To consult the declaration of conformity :
https://www.weenect.com/pdf/en/doc-we202.pdf
 Loading...