

Page 1

FR
EN
DE
NL
IT
ES
PT
User guide
Page 2

Démarrage rapide
Pour garantir une prise en main aisée de votre traceur nous vous
recommandons de bien lire le présent guide.
1 – Activez votre traceur
Rendez-vous sur my.weenect.com et suivez les indications
fournies pour créer votre compte, activer votre traceur, et choisir
un abonnement.
2 – Téléchargez l’application
Pour télécharger l’application mobile gratuite Weenect recherchez “Weenect” dans l’App Store pour iPhone ou Google Play
pour Android.
3 – Allumez votre traceur
Une fois que votre traceur est activé allumez-le en extérieur en
appuyant sur le bouton On/O pendant 3 secondes, jusqu’à ce
que le traceur émette un bruit, vibre, et que les diodes clignotent,
puis relâchez.
FR
EN
DE
NL
IT
ES
PT
Page 3
FR
EN
DE
NL
IT
ES
PT
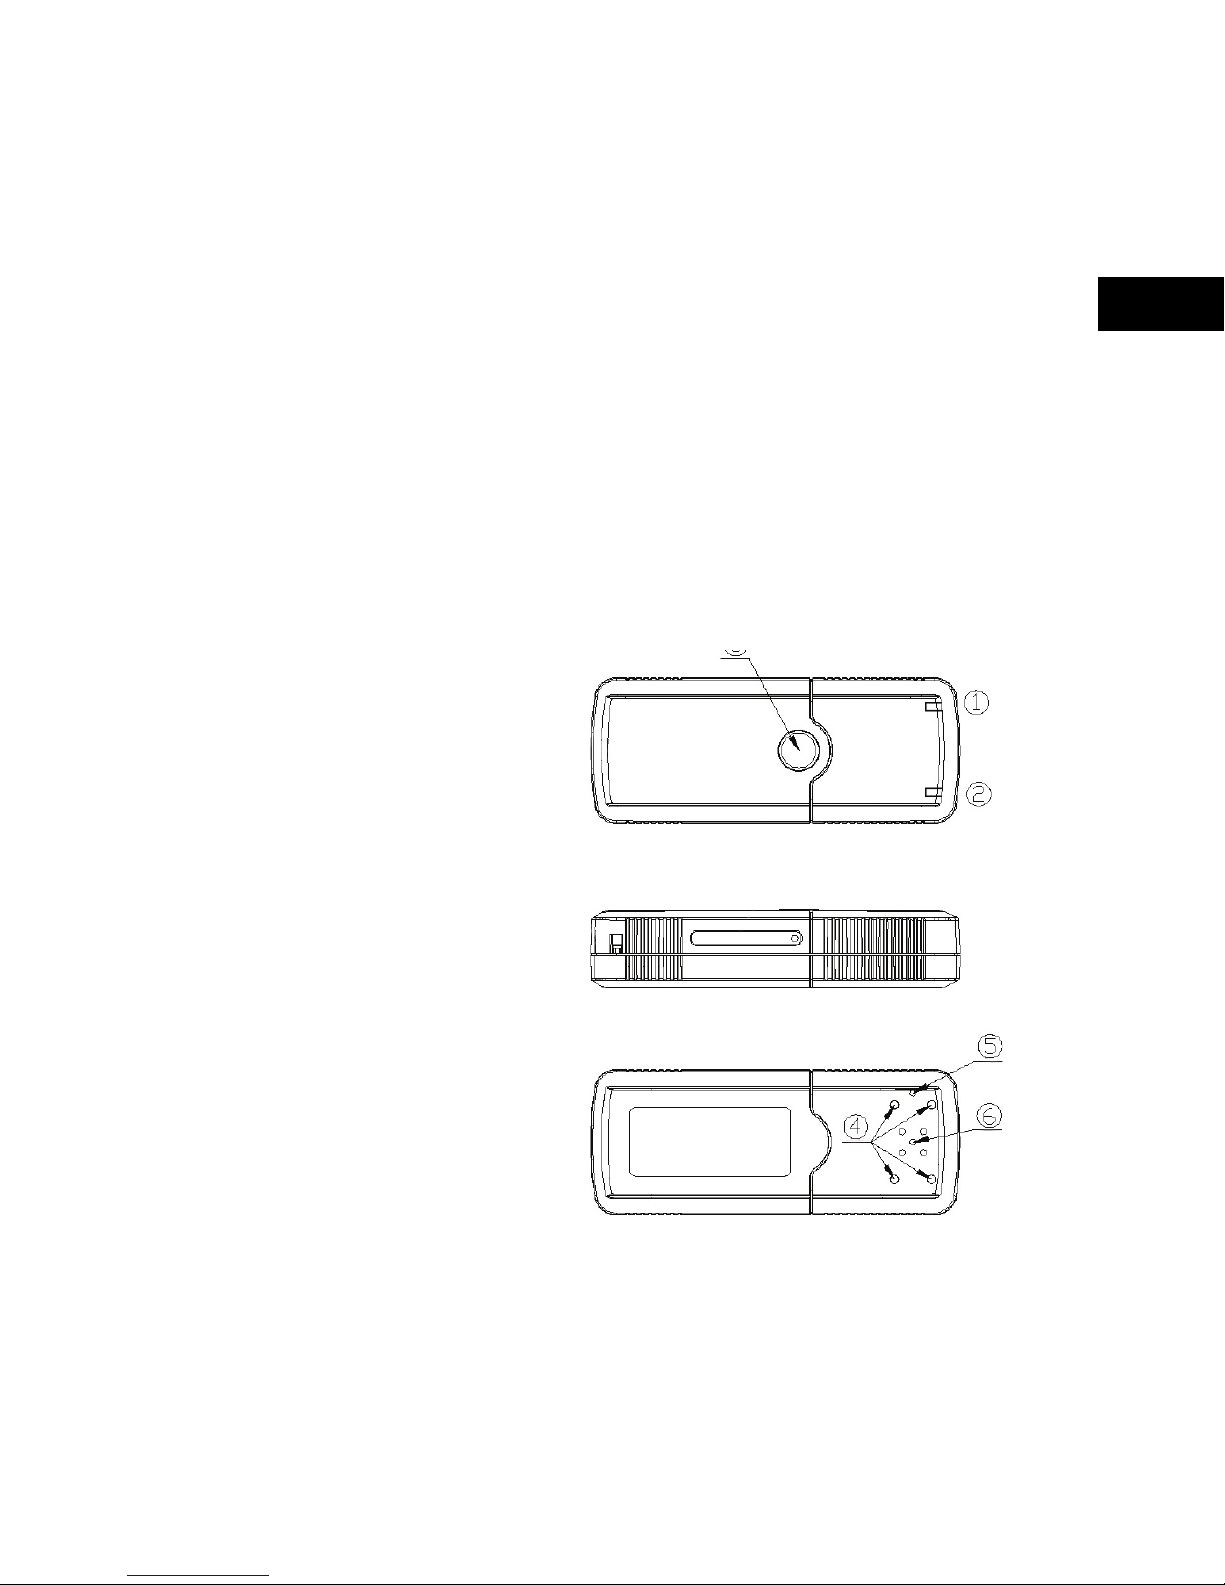
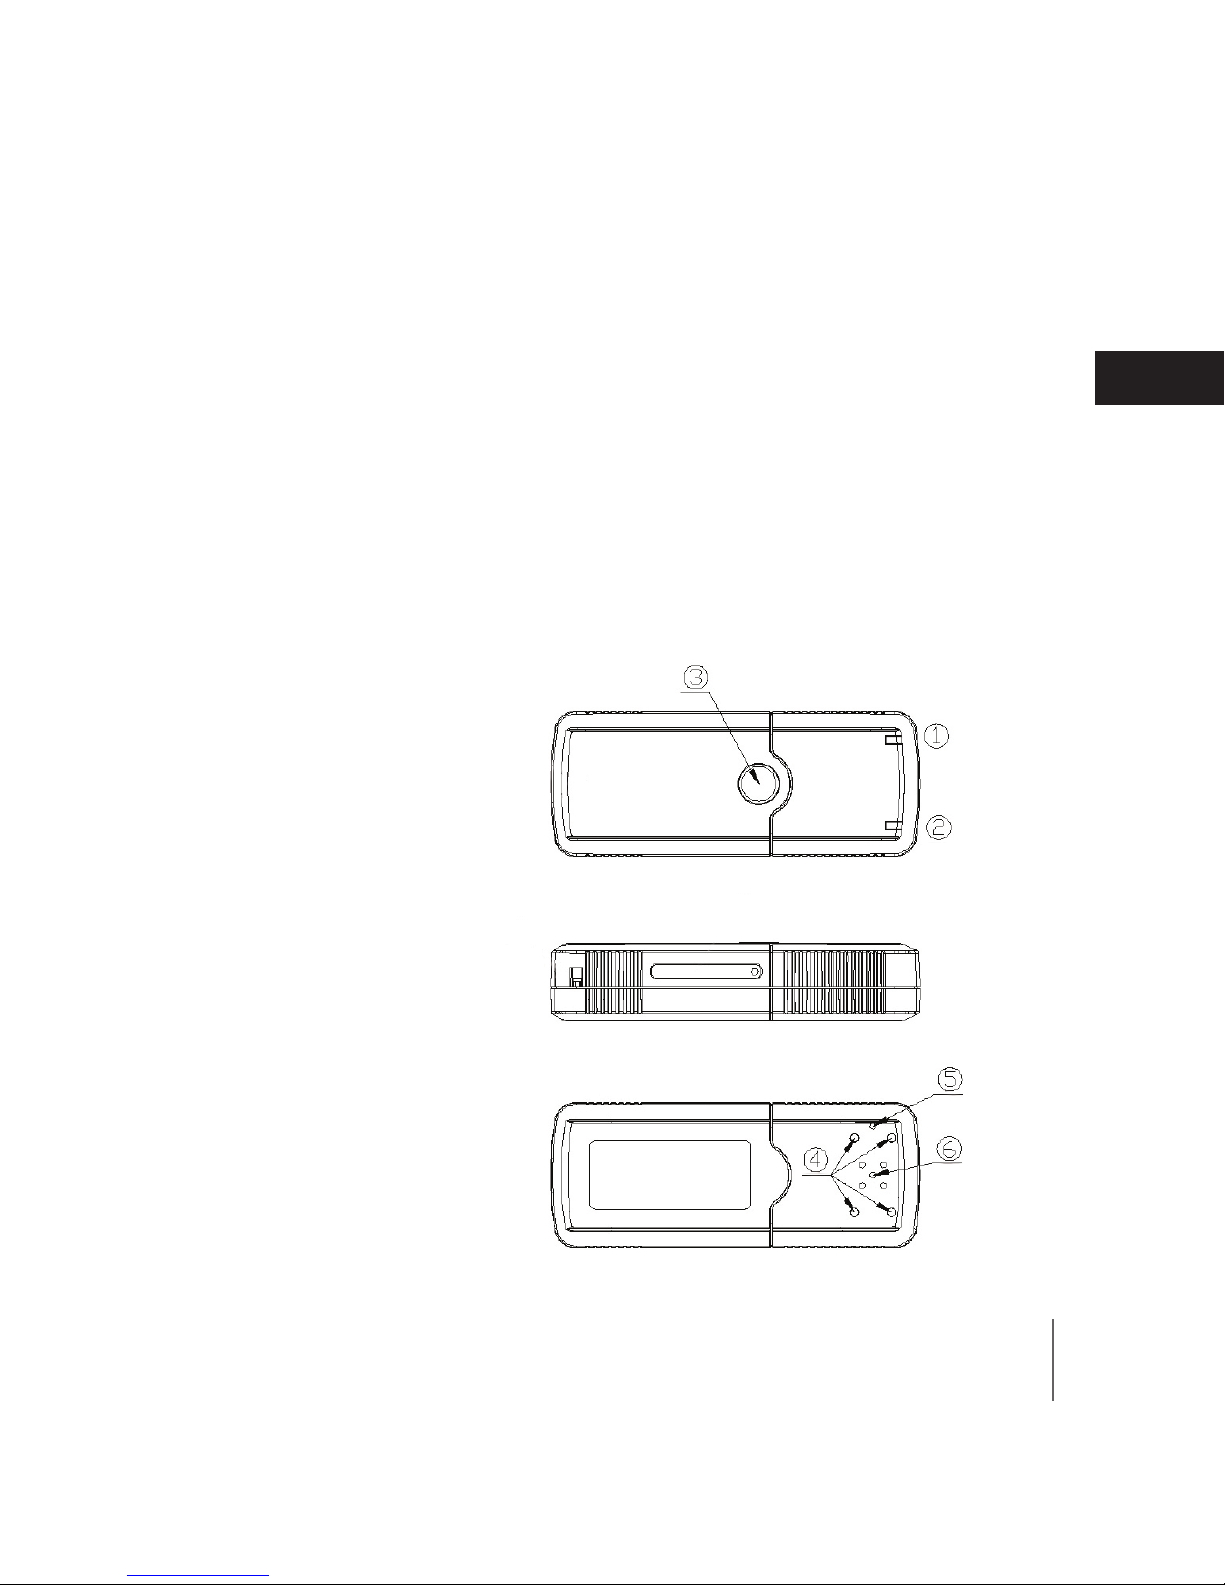
Contenu de votre boîte
Votre pack Weenect Cats est composé :
1 - d’un traceur GPS Weenect Cats
2 - d’un système d’attache
3 - d’un socle de chargement
4 - d’un câble USB
Le traceur
1 - Diode jaune
2 - Diode bleue
3 - Bouton On / O
4 – Connecteurs de charge
5 - Microphone
6 – Haut-parleur
Page 4

4
Charger le traceur
Socle de chargement
Pour charger votre traceur, utilisez le socle de chargement prévu
à cet eet et veillez à ce que le socle soit branché via le câble
USB.
Le traceur
Diode bleue : Elle apparaît quand le traceur est en train de charger sur son socle et disparaît quand il est complètement chargé.
Les modes
An d’optimiser encore un peu plus la durée de vie de votre batterie nous vous proposons 3 modes diérents d’utilisation du
traceur. Ces modes changent l’intervalle auquel le traceur envoi
sa position.
Vous pouvez changer le mode du traceur à distance directement
depuis l’application mobile.
Mode « Temps réel » : le traceur remonte automatiquement sa
position toutes les 10 secondes. Batterie : jusqu’à 12 heures.
FR
EN
DE
NL
IT
ES
PT
Page 5

5
Mode « Quotidien » : le traceur remonte sa position toutes les 5
minutes à l’arrêt et toutes les minutes en déplacement. Batterie:
jusqu’à 36 heures.
Mode « Veille » : le traceur est allumé mais ne remonte aucune
position, le GPS est éteint. Vous pouvez ponctuellement demander la position à l’aide du bouton rafraichir ou changer de
mode pour la localiser. Batterie : jusqu’à 4 jours.
Fonctionnement du traceur
Allumer-éteindre le traceur
Pour allumer : Allumez toujours votre traceur en extérieur. Pour
se faire, appuyez sur le bouton On/O pendant 3 secondes,
jusqu’à ce que le traceur émette un bruit, vibre et que les diodes
clignotent, puis relâchez le bouton.
Pour éteindre : Appuyez 3 fois à la suite sur le bouton On / O,
le traceur émettra alors un double bip, votre traceur sera éteint.
Les diodes
Indicateur GPRS (diode jaune): La lumière jaune est un indicateur de connexion au serveur, indispensable pour recevoir les
positions du traceur. Une fois que la diode jaune se stabilise et
FR
EN
DE
NL
IT
ES
PT
Page 6

6
FR
EN
DE
NL
IT
ES
PT
clignote comme un battement de cœur (deux clignotements
/ elle s’arrête, etc.) cela signie que votre traceur est bien connecté au réseau.
Indicateur GPS (diode bleue): La lumière bleue indique, lorsque
celle-ci clignote, que le signal GPS est valide. Si elle ne clignote
pas, merci de rapprocher le traceur d’une fenêtre ou de la placer
en extérieur an de capter les signaux GPS.
Assistance
Accédez aux réponses des questions les plus fréquentes depuis
le centre d’aide à l’adresse weenect.zendesk.com
Vous y trouverez également un guide d’utilisation complet ainsi
que des tutoriels vidéos.
Pour nous contacter, utilisez le formulaire de contact de ce
même centre d’aide.
Précautions d’usage
Immersion dans l’eau: le traceur a été conçu pour être résistant
aux éclaboussures et à la pluie lorsqu’il est protégé par son étui
de protection, mais en aucun cas pour aller dans l’eau.
Page 7

7
Chargement du traceir : utilisez toujours le socle de chargement
et le câble USB fournis pour recharger votre traceur. Ne forcez
jamais l’introduction de la che dans le port du boîtier ; si l’introduction bloque assurez-vous que la che est positionnée dans
le bon sens.
Manipulation du traceur : n’ouvrez en aucun cas le boîtier du traceur et ne tentez pas de le réparer vous-même au risque de ne
plus être couvert par la garantie ; En cas de dysfonctionnement
contactez le service client.
Températures d’utilisation : le traceur a été conçu pour fonctionner à des températures comprises entre -20°C et 55°C. Des
températures inférieures ou supérieures pourraient l’endommager.
Garantie
Le ou les traceurs sont garantie(s) 2 ans par le constructeur.
Cette garantie est applicable en cas de panne du traceur, non
provoquée par une chute ou une casse, ou un usage non-conforme, et tant que le client est titulaire d’un abonnement et à
jour de ses paiements. Si cette durée n’est pas conforme au droit
applicable, la garantie sera étendue à la durée minimale autorisée par la loi.
FR
EN
DE
NL
IT
ES
PT
Page 8

8
FR
EN
DE
NL
IT
ES
PT
IMPORTANT
Notications
An de recevoir les notications push de l’application mobile,
il est important de les accepter dans les réglages de votre téléphone mais aussi dans les réglages de l’application mobile
« Weenect ». Il faut aussi que votre téléphone soit connecté à internet (3G ou Wi).
Vous pouvez également recevoir chaque alerte via mails, et SMS
(en option).
Alertes entrée / sortie de zone
Le GPS peut-être soumis à des perturbations (intérieur, immeubles,
arbres) qui peuvent engendrer des erreurs de positionnement. An
de ne pas déclencher une fausse alerte, nous nous assurons que le
traceur eectu un déplacement cohérent, de ce fait les alertes sortie
de zone sont déclenchées quelques minutes après la réelle sortie.
Réalité augmentée / boussole
La direction et la distance achées par ces fonctionnalités sont
calculées à partir de la diérence entre la position GPS de votre
téléphone et la dernière position GPS du traceur.
Page 9

9
FR
EN
DE
NL
IT
ES
PT
La marge d’erreur des deux positions aecte le résultat si le traceur
est proche du téléphone : mauvaise direction et mauvaise distance.
Merci d’utiliser ces fonctionnalités quand le traceur est loin de vous.
Page 10

10
FR
EN
DE
NL
IT
ES
PT
Quick start
To help you get started using your tracker, we recommend that
you read this guide carefully.
1 – Activate your tracker
Go to my.weenect.com and follow the instructions for creating
your account, activating your tracker, and selecting a subscription.
2 – Download the app
To download the free Weenect mobile app, search for “Weenect”
in the App Store for iPhone or Google Play for Android.
3 – Turn your tracker on
Once your tracker is activated, go outside and turn it on by press-
ing the On/O button for three seconds until the tracker emits
a sound, vibrates, and the lights blink; then release the button.
Page 11
11
FR
EN
DE
NL
IT
ES
PT
Contents of your box
Your Weenect Cats pack includes:
1 - a Weenect Cats GPS tracker
2 - an attachment system
3 - a charging base
4 - a USB cable
Tracker
1 – Yellow Lights
2 – Blue Lights
3 - On/O button
4 – Charging connectors
5 – Microphone
6 - Speaker
Page 12

12
FR
EN
DE
NL
IT
ES
PT
Charge the tracker
Charging base
To charge your tracker, use the charging base provided, ensuring
that it is connected to a power source via the USB cable.
Tracker
Blue light: This light appears when the tracker is charging on its
base and disappears when it is fully charged.
Modes
To further optimize the life of your battery, we oer 3 dierent
usage modes for the tracker. These modes change the interval
during which the tracker sends its position.
You can change the tracker’s mode remotely directly from the
mobile app.
“Real time” mode: the tracker sends its position automatically
every 10 seconds. Battery life: up to 12 hours.
“Daily” mode: the tracker sends its position every 5 minutes
when stopped and every minute when moving. Battery life: up
to 36 hours.
“Standby” mode: the tracker is turned on but does not send any
Page 13

13
FR
EN
DE
NL
IT
ES
PT
position and the GPS is turned off. You can request the position
from time to time using the refresh button or change the mode
to locate it. Battery life: up to 4 days.
Tracker operation
Turn the tracker on/o
To turn the tracker on: Always turn the tracker on outside. To do
so, press the On/O button for 3 seconds until the tracker emits
a sound and vibrates and the lights blink, then release the button.
To turn the tracker o: Press the On/O button three consecutive times. The tracker will then beep twice and turn o.
Lights
GPRS indicator (yellow light): The yellow light indicates a connection to the server, which is essential for receiving the tracker’s
positions.
Once the yellow light stabilizes and blinks like a heartbeat (two
blinks/stops, etc.), this means that your tracker is connected to
the network.
Page 14

14
FR
EN
DE
NL
IT
ES
PT
GPS indicator (blue light): When the blue light blinks, this indicates that the GPS signal is good. If it does not blink, please
move the tracker close to a window or put it outside to capture
GPS signals.
Assistance
See answers to frequently asked questions by visiting the help
center at weenect.zendesk.com
You will also nd a complete user’s guide, as well as tutorial
videos. To contact us, use the contact form from the help center.
Standard precautions
Immersion in water: the tracker is designed to resist splashes
and rain when covered by its protective case, but not to be submerged in water under any circumstances.
Charging the tracker: always use the charging base and USB cable provided to recharge your tracker. Never force the plug into
the port on the charging unit; if you cannot insert the plug, make
sure it is positioned in the right direction.
Handling the tracker: never open the tracker unit and do not try
to repair it yourself at the risk of voiding the warranty. In case of
Page 15

15
FR
EN
DE
NL
IT
ES
PT
malfunction, contact customer service.
Working temperatures: the tracker is designed to work at tem-
peratures between -20°C and 55°C. Low or high temperatures
could damage it.
Warranty
Trackers are covered by a two-years manufacturer’s warranty. This warranty covers tracker malfunction so long as it is not
caused by an impact or breakage or failure to follow the usage
instructions. To claim under the warranty, the customer must
have a subscription and payments must be up to date. If the duration of the warranty does not comply with applicable law, it
will be extended to the minimum duration required by law.
IMPORTANT
Notications
To receive push notications in the mobile application, you
need to accept these both in your telephone’s settings and in
the « Weenect » application settings. Your telephone also needs
to be connected to the internet (3G or WiFi). Notications are
also available via email and text message (optional).
Page 16

16
FR
EN
DE
NL
IT
ES
PT
Zone entry and exit notications
Certain conditions (indoors, buildings, trees, etc.) may interfere
with the GPS signal. To avoid false alarms, we ensure that the
tracker denitely is moving before sending notications, and
consequently zone exit notications are triggered a few minutes
after the tracker actually leaves the zone.
Augmented reality/compass
The direction and distance shown by these functions are calculated using the dierence between your telephone’s GPS position and the tracker’s last GPS position. The margin of error of
these two positions aects the result if the tracker is close to
your telephone, giving the wrong direction and distance. Please
use these functions when the tracker is far away from you.
Page 17

17
FR
EN
DE
NL
IT
ES
PT
Schnellstart:
Um eine leichte Einarbeitung in die Handhabung Ihres Ortungsgeräts gewährleisten zu können, empfehlen wir Ihnen, sich die
vorliegende Anleitung aufmerksam durchzulesen.
1 – Ihr Ortungsgerät aktivieren
Besuchen Sie uns auf my.weenect.com und folgen Sie den Anleitungen zur Erstellung Ihres Kontos, zur Aktivierung Ihres Senders und der Auswahl Ihres Abonnements.
2 – Laden Sie die Anwendung hoch
Um die kostenlose mobile Weenect-Anwendung hochzuladen,
suchen Sie “Weenect” im App Store für iPhone oder Google Play
für Android.
3 – Schalten Sie Ihr Ortungsgerät ein
Sobald Ihr Sender aktiviert ist, schalten Sie ihn draußen ein, indem Sie 3 Sekunden lang auf die On/O-Taste drücken, bis der
Sender ein Geräusch von sich gibt, vibriert und die Dioden blinken, dann die Taste loslassen.
Page 18

18
FR
EN
DE
NL
IT
ES
PT
Inhalt Ihrer Schachtel
Ihr Weenect Cats-Pack enthält:
1 - ein GPS-Ortungsgerät Weenect Cats
2 - eine Befestigungsvorrichtung
3 - eine Ladestation
4 - ein USB-Kabel
Das Ortungsgerät
1 - Gelb Diode
2 - Blaue Diode
3 - An/Aus-Taste
4 – Ladeverbindungen
5 – Mikrofon
6 - Lautsprecher
Page 19

19
FR
EN
DE
NL
IT
ES
PT
Das Ortungsgerät auaden
Ladestation
Um Ihr Ortungsgerät aufzuladen, benutzen Sie die dafür vorgesehene Ladestation und achten Sie darauf, dass die Station
über das USB-Kabel angeschlossen ist.
Das Ortungsgerät
Blaue Diode: Sie erscheint, wenn das Ortungsgerät auf seiner
Station aufgeladen wird und verschwindet, wenn das Auaden
abgeschlossen ist.
Die Modi
Um die Lebensdauer Ihrer Batterie noch ein wenig mehr zu optimieren, bieten wir Ihnen 3 verschiedene Anwendungsmodi für
das Ortungsgerät an. Diese Modi verändern das Intervall, in dem
das Ortungsgerät seine Position verschickt.
Sie können die Modi des Ortungsgeräts fernbedient direkt von
der mobilen Anwendung aus abändern.
„Echtzeit“-Modus: das Ortungsgerät leitet seine Position automatisch nach jeweils 10 Sekunden weiter. Batterie: bis zu 12
Stunden.
Page 20

20
FR
EN
DE
NL
IT
ES
PT
„Alltags“-Modus: Das Ortungsgerät leitet seine Position nach
jeweils 5 Minuten im Stillstand und nach jeweils 1 Minute in Bewegung weiter. Batterie: bis zu 36 Stunden.
„Standby“-Modus: Das Ortungsgerät ist angeschaltet, leitet aber
keine Position weiter, das GPS ist abgeschaltet.
Sie können die Position mit Hilfe der Aktualisierungstaste von
Zeit zu Zeit abfragen oder den Modus zur Lokalisierung abändern. Batterie: bis zu 4 Tagen.
Funktionsweise des Ortungsgeräts
Das Ortungsgerät an-/ausschalten
Zum Anschalten: Schalten Sie Ihr Ortungsgerät immer im Freien
an. Drücken Sie dafür 3 Sekunden lang auf die An/Aus-Taste, bis
dass das Ortungsgerät ein Geräusch abgibt, vibriert und die Dioden blinken und lassen Sie dann die Taste los.
Zum Ausschalten: Drücken Sie dreimal hintereinander auf die
An/Aus-Taste, das Ortungsgerät gibt einen doppelten Piepton
von sich und ist dann ausgeschaltet.
Die Dioden
GPRS-Anzeige (gelb Diode): Das gelb Licht ist eine Anzeige für
Page 21

21
FR
EN
DE
NL
IT
ES
PT
die Verbindung mit dem Server, die unverzichtbar ist, um die Positionen des Ortungsgeräts zu erhalten. Sobald sich die gelb Diode stabilisiert hat und wie ein Herzschlag blinkt (zweimal Blinken / einmal Stopp, etc.) bedeutet dies, dass Ihr Ortungsgerät an
das Netzwerk angeschlossen ist.
GPS-Anzeige (blaue Diode): Das blaue Licht zeigt an, wenn es
blinkt, dass das GPS-Signal gültig ist. Wenn es nicht blinkt, gehen
Sie bitte mit dem Ortungsgerät näher an ein Fenster oder begeben Sie sich mit dem Ortungsgerät ins Freie, um die GPS-Signale
zu empfangen.
Assistenz
Im Hilfecenter auf unserer Website www.weenect.com nden
Sie die Antworten auf die am häugsten gestellten Fragen.
Hier nden Sie auch einen vollständigen Nutzerleitfaden und
Videoanleitungen.
Wenn Sie uns kontaktieren möchten, nutzen Sie bitte das Kontaktformular in unserem Online-Hilfecenter.
Page 22

22
FR
EN
DE
NL
IT
ES
PT
Vorsichtsmaßnahmen für den Gebrauch
Eintauchen in Wasser: Das Ortungsgerät ist so konzipiert, dass es
für Wasserspritzer und Regen wasserfest ist, wenn es durch sein
Schutzetui geschützt ist, aber es darf auf keinen Fall in Wasser
eingetaucht werden.
Auaden des Ortungsgeräts: Benutzen Sie immer die mitgelieferte Ladestation und das mitgelieferte USB-Kabel zum Auaden
Ihres Ortungsgeräts. Führen Sie den Stecker niemals mit Gewalt
in den Eingang des Gehäuses ein. Falls die Einführung blockiert,
vergewissern Sie sich, dass der Stecker richtig ausgerichtet ist.
Handhabung des Ortungsgeräts: Önen Sie niemals das Gehäuse des Ortungsgeräts und versuchen Sie nicht, es selbst zu
reparieren, andernfalls verfällt die Garantie. Kontaktieren Sie bei
Störungen den Kundendienst.
Anwendungstemperaturen: Das Ortungsgerät wurde so konzipiert, dass es bei Temperaturen zwischen -20°C und 55°C betrieben werden kann. Hohe und niedrige Temperaturen können das
Gerät möglicherweise beschädigen.
Page 23

23
FR
EN
DE
NL
IT
ES
PT
Garantie
Das oder die Ortungsgeräte verfügen über eine Garantie von
2 Jahre durch den Hersteller. Diese Garantie gilt im Falle einer
Funktionsstörung des Ortungsgeräts, die nicht durch einen
Sturz oder Bruch verursacht wurde beziehungsweise durch eine
unsachgemäße Verwendung und falls der Kunde Besitzer eines
Abonnements ist und mit seinen Zahlungen nicht in Verzug ist.
Falls diese Dauer nicht dem geltenden Gesetz entspricht, wird
die Garantie auf die durch das Gesetz minimal festgelegte Dauer
ausgedehnt.
WICHTIG
Benachrichtigungen
Um Push-Benachrichtigungen der mobilen Anwendung zu erhalten, ist es wichtig, sie in den Einstellungen Ihres Telefons aber
auch in den Einstellungen der mobilen Anwendung „Weenect“
zu akzeptieren. Darüber hinaus muss das Telefon über eine Internetverbindung (3G oder WLAN) verfügen.
Sie können ebenfalls jeden Alarm per E-Mail und SMS erhalten
(als Option).
Page 24

24
FR
EN
DE
NL
IT
ES
PT
Alarm Betreten / Verlassen der Zone
Das GPS kann Störungen (Innenbereiche, Wohngebäude,
Bäume) ausgesetzt sein, die zu Positionsfehlern führen können.
Um keinen falschen Alarm auszulösen, vergewissern wir uns,
dass sich das Ortungsgerät kohärent fortbewegt, aus diesem
Grund wird der Alarm beim Verlassen der Zone einige Minuten
nach dem tatsächlichen Verlassen ausgelöst.
Gesteigerte Realität / Kompass
Die die durch diese Funktionen angezeigten Richtungen und
Entfernungen werden ausgehend von der Dierenz zwischen
der GPS-Position Ihres Telefons und der letzten GPS-Position des
Ortungsgeräts berechnet. Die zulässige Abweichung dieser beiden Positionen beeinusst das Ergebnis, wenn sich das Ortungsgerät in der Nähe des Telefons bendet: schlechte Richtung und
schlechte Entfernung.
Diese Funktionsweisen bitte benutzen, wenn das Ortungsgerät
weit von Ihnen entfernt ist.
Page 25

25
FR
EN
DE
NL
IT
ES
PT
Snel starten
Lees deze handleiding goed door om uw tracker snel in gebruik
te nemen.
1 - Uw tracker activeren
Ga naar my.weenect.com en volg de aanwijzingen om uw account aan te maken, uw tracker te activeren en een abonnement
te kiezen.
2 - De app downloaden
Zoek in de App Store voor iOS of in Google Play voor Android
naar de gratis mobiele app ‘Weenect’.
3 - Uw tracker inschakelen
Zodra uw tracker geactiveerd is, schakelt u hem buiten aan door
gedurende 3 seconden op de On/O knop te drukken, tot de
tracker een geluid maakt, trilt en de dioden knipperen, en laat u
dan de knop los.
Page 26

FR
EN
DE
NL
IT
ES
PT
Inhoud van de doos
Uw Weenect Cats-pakket bestaat uit:
1 - Weenect Cats GPS-tracker
2 - bevestigingssysteem
3 - laadstation
4 - USB-kabel
De tracker
1 -Geel led
2 – Blauwe led
3 - On/O-knop
4 - laadaansluitingen
5 – microfoon
6- luidspreker
Page 27

27
FR
EN
DE
NL
IT
ES
PT
De tracker opladen
Laadstation
Gebruik voor het opladen van uw tracker het laadstation en zorg
dat deze goed aangesloten is via de USB-kabel.
De tracker
Blauwe led: Deze led licht op wanneer de tracker bezig is met
opladen op het laadstation. De led gaat weer uit wanneer de
tracker volledig opgeladen is.
De gebruikswijzen
Voor een nog langere levensduur van uw accu kunt u het baken op 3 verschillende manieren gebruiken. Bij iedere manier is
de tussentijd waarin het baken zijn positie doorgeeft, anders.
U kunt de gebruikswijze op afstand rechtstreeks met uw applicatie wijzigen.
« Real time » modus: het baken geeft zijn positie automatisch
iedere 10 seconden door. Accu: tot 1 dag
« Dagelijkse » modus: het baken geeft zijn positie iedere
5 minuten door bij stilstand en iedere minuut bij verplaatsing.
Accu : tot 3 dagen.
Page 28

28
FR
EN
DE
NL
IT
ES
PT
« Stand-by » modus: het baken staat aan, maar geeft zijn positie niet door, de GPS staat uit. U kunt van tijd tot tijd de positie
opvragen met behulp van de knop verversen of de gebruikswijze veranderen om deze te lokaliseren. Accu : tot 8 dagen.
Werking van de tracker
De tracker in-/uitschakelen
Om in te schakelen: Schakel uw tracker altijd buiten in. Houd de
On/O-knop drie seconden ingedrukt, totdat de tracker geluid
maakt, trilt en de leds knipperen. Laat daarna de knop los.
Om uit te schakelen: Druk drie keer na elkaar op de On/O-knop.
De tracker laat twee piepjes horen en schakelt zichzelf uit.
De leds
GPRS-indicator (geel led): De geel led geeft aan dat er verbinding is met de server, wat nodig is om de posities van de tracker
te kunnen ontvangen. Als de geel led gaat knipperen zoals een
hartslag (twee keer knipperen, rust, enz.), dan heeft de tracker
een goede verbinding met het netwerk.
Page 29

29
FR
EN
DE
NL
IT
ES
PT
GPS-indicator (blauwe led): Een knipperende blauwe led geeft
aan dat het GPS-signaal goed ontvangen wordt. Als de led niet
knippert, moet u de tracker in de buurt van een venster of buiten plaatsen om de GPS-signalen op te kunnen vangen.
Hulp
U vindt de antwoorden op de meest gestelde vragen in de helpdesk op het adres weenect.zendesk.com
U vindt daar ook een volledige gebruiksgids, alsook video
tutorials. Om ons te contacteren, gebruikt u het contactformulier van dezelfde helpdesk.
Gebruiksadviezen
Waterdichtheid: de tracker is met de beschermhoes bestand
tegen spetters en regen, maar mag in geen geval onder water
komen.
Opladen van de tracker: gebruik altijd het meegeleverde laadstation en de USB-kabel om uw tracker op te laden.
Sluit de stekker zonder forceren aan op de poort van het kastje.
Als u weerstand voelt, controleer dan of de stekker omgedraaid
moet worden.
Page 30

30
FR
EN
DE
NL
IT
ES
PT
Behandelen van de tracker: open in geen geval de behuizing
van de tracker en probeer niet om zelf reparaties uit te voeren,
waardoor de garantie niet meer geldig zou kunnen zijn. Neem in
geval van problemen contact op met de klantenservice.
Gebruikstemperaturen: de tracker is ontworpen voor gebruik bij
een temperatuur tussen -20°C en 55°C. Lagere of hogere temperaturen kunnen het toestel beschadigen.
Garantie
De fabrikant geeft het/de baken(s) 2 jaar garantie. Deze garantie
is van toepassing in geval van problemen met het baken die niet
veroorzaakt worden door een val of een breuk of een niet-conform gebruik en mits de klant een abonnement heeft en zijn
contributie betaald heeft. Als deze periode niet overeenkomt
met het van toepassing zijnde recht, wordt de garantie verlengd
tot de minimaal door de wet toegestane periode.
BELANGRIJK
Mededelingen
Om de push mededelingen van de mobiele applicaties te ontvangen, is het belangrijk deze te accepteren in de instellingen
van uw telefoon, maar ook in de instellingen van de mobiele
Page 31

31
FR
EN
DE
NL
IT
ES
PT
applicatie « Weenect ». Verder moet uw telefoon op internet zijn
aangesloten (3G of Wi).
Het is ook mogelijk waarschuwingen te ontvangen via mail en
SMS (optie).
Waarschuwing betreden / verlaten van een zone
De GPS kan last van storingen hebben (binnenshuis, in gebouwen, onder bomen), waardoor er een verkeerde positie weergegeven kan worden. Om geen vals alarm te slaan, zorgen wij dat
het baken een samenhangende verplaatsing uitvoert, om die reden worden waarschuwingen betreende het verlaten van een
zone enkele minuten na het daadwerkelijk verlaten gegeven.
Verhoogde realiteit / kompas
De richting en de afstand die door deze functionaliteiten worden
weergegeven worden berekend aan de hand van het verschil
tussen de GPS-positie van uw telefoon en de laatste GPS-positie
van het baken.
De foutmarge van de twee posities is van invloed op het resultaat wanneer het baken zich in de buurt van de telefoon
bevindt: verkeerde richting en verkeerde afstand. Gelieve deze
functionaliteiten te gebruiken wanneer het baken zich ver van
u bevindt.
Page 32

32
FR
EN
DE
NL
IT
ES
PT
Avvio rapido
Per consentire un uso agevole del localizzatore, ti raccomandiamo di leggere attentamente questa guida.
1 – Attiva il localizzatore
Vai su my.weenect.com e segui le indicazioni fornite per creare
il tuo account, attivare il tuo localizzatore e scegliere un abbonamento.
2 – Scarica l’applicazione
Per scaricare l’applicazione mobile gratuita Weenect cerca
“Weenect” nell’App Store per iPhone o Google Play per Android.
3 – Accendi il localizzatore
Una volta che il localizzatore è attivato, accendilo premendo il
pulsante On / O per 3 secondi nché il localizzatore non emette
un suono, vibra e i diodi lampeggiano, poi rilascia il pulsante.
Page 33

33
FR
EN
DE
NL
IT
ES
PT
Contenuto della confezione:
La confezione Weenect Cats contiene:
1 - un localizzatore GPS Weenect Cats
2 - un sistema d’attacco
3 - un sistema di carica
4 - un cavo USB
Il localizzatore
1 - Diodo giallo
2 - Diodo blu
3 - Pulsante On / O
4 – Connettori di carica
5 – Microfono
6- Altoparlante
Page 34

34
FR
EN
DE
NL
IT
ES
PT
Caricare il localizzatore
Base di ricarica
Per caricare il localizzatore, utilizza l’apposita base di ricarica e
controlla che la base sia collegata attraverso il cavo USB.
Il localizzatore
Diodo blu: Appare quando il localizzatore è in carica sulla base e
scompare quando è completamene carico.
Le modalità
Per ottimizzare ancora un po’ la durata della batteria ti proponiamo 3 diverse modalità di utilizzo del localizzatore. Puoi modicare l’intervallo al quale il localizzatore invia la sua posizione.
Puoi modicare la modalità del localizzatore a distanza usando
l’applicazione mobile.
Modalità “Tempo reale”: il localizzatore invia automaticamente la
sua posizione ogni 10 secondi. Batteria: no a 12 ore.
Modalità “Quotidiana”: il localizzatore invia la sua posizione ogni
5 minuti da fermi e ogni minuto quando si è in movimento. Batteria: no a 36 ore.
Modalità “Stand-by”: il localizzatore è acceso ma non invia alcu-
Page 35

35
FR
EN
DE
NL
IT
ES
PT
na posizione, il GPS è spento. Puoi richiedere la posizione quando vuoi con il pulsante “ricarica” o modicare la modalità di localizzazione. Batteria: no a 4 giorni.
Funzionamento del localizzatore
Accendere/spegnere il localizzatore
Per accenderlo: Accendi sempre il localizzatore all’esterno. Per
farlo, premi il pulsante On / O per 3 secondi no a che il localizzatore emette un suono, vibra e i diodi lampeggiano, poi rilascia
il pulsante.
Per spegnerlo: Premi 3 volte di seguito il pulsante On / O, il localizzatore emetterà un doppio bip, a quel punto sarà spento.
I diodi
Indicatore GPRS (diodo giallo): La luce gialla è un indicatore di
connessione al server, indispensabile per ricevere le posizioni
del localizzatore. Quando il diodo giallo si stabilizza e lampeggia
come un cuore che batte (due lampeggiamenti / si arresta, ecc.)
signica che il localizzatore è connesso alla rete.
Indicatore GPS (diodo blu): La luce blu indica, quando lampeggia, che il segnale GPS è valido. Se non lampeggia, avvicina il
Page 36

36
FR
EN
DE
NL
IT
ES
PT
localizzatore a una nestra o mettilo all’esterno per catturare il
segnale GPS.
Assistenza
Consulta le risposte alle domande più frequenti dal centro di assistenza all’indirizzo: www.weenect.zendesk.com
Qui troverai anche un manuale d’uso completo e dei tutorial video. Per contattarci, utilizza il modulo di contatto di questo centro
di assistenza.
Precauzioni d’uso
Immersione in acqua: il localizzatore è stato progettato per resistere agli schizzi e alla pioggia quando è protetto dalla custodia
protettiva, ma non può in nessun caso essere immerso in acqua.
Caricamento del localizzatore: utilizza sempre la base di ricarica
e il cavo USB in dotazione per ricaricare il localizzatore.
Non forzare mai l’introduzione della scheda nella porta del localizzatore; se la scheda non si inserisce, assicurati che sia posizionata nel verso corretto.
Page 37

37
FR
EN
DE
NL
IT
ES
PT
Manipolazione del localizzatore: non aprire mai la scatola del
localizzatore e non cercare di ripararla da solo altrimenti la garanzia non sarà più valida; in caso di malfunzionamento contatta
il servizio clienti.
Temperature d’uso: il localizzatore è stato progettato per funzionare a temperature comprese tra -20°C e 55°C. Temperature
inferiori o superiori potrebbero danneggiarlo.
Garanzia
Il Localizzatore è garantito 2 anni dal produttore. Questa garanzia è applicabile in caso di guasto del localizzatore, non dovuto a
caduta o rottura o a un uso non conforme e nché il cliente è titolare di un abbonamento ed è regolare con i pagamenti. Se tale
durata non è conforme alla legislazione applicabile, la garanzia
sarà estesa alla durata minima autorizzata per legge.
IMPORTANTE
Notiche
Per ricevere le notiche push dall’applicazione mobile, è impor-
Page 38

38
FR
EN
DE
NL
IT
ES
PT
tante accettarle nelle impostazioni del telefono ma anche nelle impostazioni dell’applicazione mobile “Weenect”. Il telefono
deve anche essere connesso a internet (3G o Wi-Fi).
Puoi anche ricevere gli avvisi via mail e SMS (opzionale).
Avvisi entrata / uscita dalla zona
Il GPS può essere soggetto a disturbi (ambienti chiusi, immobili,
alberi) che possono dare luogo a errori di posizionamento. Per
non inviare un falso allarme, ci assicuriamo che il localizzatore
eettui un percorso coerente, pertanto gli avvisi di uscita dalla
zona sono inviati alcuni minuti dopo l’uscita reale
Realtà aumentata / bussola
La direzione e la distanza visualizzate con queste funzioni sono
calcolate a partire dalla dierenza tra la posizione GPS del telefono e l’ultima posizione GPS del localizzatore. Il margine d’errore delle due posizioni inuisce sul risultato se il localizzatore è
vicino al telefono: direzione e distanza errate. Usa queste funzioni quando il localizzatore è lontano da te.
Page 39

39
FR
EN
DE
NL
IT
ES
PT
Inicio rápido
Para garantizar un buen uso del localizador, le recomendamos
leer con atención esta guía.
1 – Activar el localizador
Visite my.weenect.com y siga las indicaciones proporcionadas
para crear su cuenta, activar su localizador y seleccionar un
abono.
2 – Descargar la aplicación
Para descargar la aplicación móvil gratuita Weenect solo hay que
buscar «Weenect» en la App Store para iPhone o en Google Play
para Android.
3 – Encender el localizador
Una vez que su localizador esté activado enciéndalo en el exte-
rior pulsando el botón On/O durante 3 segundos, hasta que
el localizador emita un ruido, vibre y los diodos parpadeen,
después suelte.
Page 40

40
FR
EN
DE
NL
IT
ES
PT
Contenido de la caja
El pack Weenect Pets consta de:
1 - un localizador GPS Weenect Cats
2 - un sistema de sujeción
3 - una base de carga
4 - un cable USB
Localizador
1 - Diodo amarillo
2 - Diodo azul
3 - Botón ON/OFF
4 - Conectores de carga
5 – Micrófono
6- Altavoz
Page 41

41
FR
EN
DE
NL
IT
ES
PT
Cargar el localizador
Base de carga
Para cargar el localizador, utilice la base de carga prevista para
este efecto y asegúrese de que la base esté conectada por medio
del cable USB.
Localizador
Diodo azul: Aparece cuando el localizador se está cargando en la
base y desaparece cuando está totalmente cargado.
Modos
Para optimizar aún más la vida útil de su batería, le proponemos
3 modos de uso diferentes del localizador. Estos modos cambian
el intervalo al que el localizador envía su posición.
Puede cambiar el modo del localizador a distancia directamente
desde la aplicación móvil.
Modo “Temps reel” (Tiempo real): el localizador indica automáticamente su posición cada 10 segundos. Batería: hasta 12 horas.
Modo “Quotidien” (Diario): el localizador indica su posición cada
5 minutos en posición de parada y cada minuto durante el
Page 42

42
FR
EN
DE
NL
IT
ES
PT
desplazamiento. Batería: hasta 36 horas.
Modo “Veille” (Espera): el localizador está encendido, pero no in-
dica ninguna posición. El GPS está apagado. De forma puntual,
puede solicitar la posición con el botón de actualización o cambiar de modo para localizarla. Batería: hasta 4 días.
Funcionamiento del localizador
Encender/apagar el localizador
Para encenderlo: Encienda siempre el localizador en el exterior.
Para ello, pulse el botón ON/OFF durante 3 segundos, hasta que
el localizador emita un ruido, vibre y los 2 diodos parpadeen. A
continuación, suelte el botón.
Para apagarlo: Pulse 3 veces seguidas el botón ON/OFF. El localizador emitirá un pitido doble, que indica que está apagado.
Diodos
Indicador GPRS (diodo amarillo): La luz amarilla es un indicador
de conexión al servidor, indispensable para recibir las posiciones
del localizador. Cuando el diodo amarillo se estabilice y parpadee
como el latido del corazón (dos parpadeos/parada, etc.), signica que el localizador está conectado a la red correctamente.
Page 43

43
FR
EN
DE
NL
IT
ES
PT
Indicador GPS (diodo azul): La luz azul indica, cuando parpadea,
que la señal GPS es válida. Si no parpadea, acerque el localizador
a una ventana o sitúelo en el exterior para captar señales GPS.
Ayuda
Acceda a las respuestas de las preguntas más frecuentes en el
centro de ayuda en la dirección weenect.zendesk.com
También encontrará una guía de uso completa, así como tutoriales en vídeo. Para ponerse en contacto con nosotros, utilice el
formulario de contacto de este mismo centro de ayuda.
Precauciones de uso
Inmersión en el agua: el localizador ha sido diseñado para ser resistente a las salpicaduras y a la lluvia gracias a su carcasa protectora. No obstante, no se debe meter bajo el agua en ningún caso.
Carga del localizador: utilice siempre la base de carga y el cable
USB incluidos para cargar el localizador. No fuerce nunca la introducción de la toma en el puerto de la caja. Si la introducción se
bloquea, asegúrese de que la toma esté en el sentido correcto.
Manipulación del localizador: no abra en ningún caso la caja del
Page 44

44
FR
EN
DE
NL
IT
ES
PT
localizador y no trate de repararlo usted mismo ya que podría
perder la garantía. En caso de fallo de funcionamiento, contacte
con el servicio de atención al cliente.
Temperaturas de uso: el localizador ha sido diseñado para funcionar a temperaturas comprendidas entre -20 °C y 55 °C. Las
temperaturas inferiores o superiores podrían dañarlo.
Garantía
El (los) localizador(es) está(n) garantizado(s) durante 2 años por
el fabricante.
Esta garantía es aplicable en caso de avería del localizador, no
provocada por una caída o rotura, ni por un uso no conforme,
siempre y cuando el cliente sea titular de un abono y esté al día
con sus pagos. Si este periodo de tiempo no está conforme con
el derecho aplicable, la garantía se ampliará al periodo de tiempo mínimo permitido por la ley.
MPORTANTE
Noticaciones
Para recibir las noticaciones push de la aplicación móvil, es importante aceptarlas en los ajustes de su teléfono así como en los
Page 45

45
FR
EN
DE
NL
IT
ES
PT
Iajustes de la aplicación móvil «Weenect». Asimismo, su teléfono
debe estar conectado a Internet (3G o Wi).
También puede recibir las alertas a través de correo electrónico
y SMS (opcional).
Alertas de entrada/salida de zona
El GPS puede estar sujeto a interferencias (interiores, edicios,
árboles) que pueden provocar errores de posicionamiento. Para
no activar una falsa alerta, nos aseguramos de que el localizador
realice un desplazamiento coherente, de modo que las alertas
de salida de zona se activan unos minutos después de la salida
real.
Realidad aumentada/brújula
La dirección y la distancia mostradas por estas funciones se calculan a partir de la diferencia entre la posición GPS de su teléfono y la última posición GPS del localizador. El margen de error
de ambas posiciones afecta al resultado si el localizador está
cerca del teléfono: dirección incorrecta y distancia incorrecta.
Utilice estas funciones cuando el localizador esté lejos de usted.
Page 46

FR
EN
DE
NL
IT
ES
PT
Arranque rápido:
Para garantir uma fácil aderência da sua baliza, recomendamos
que leia atentamente este guia.
1 - Ative a sua baliza
Vá a my.weenect.com e siga as indicações fornecidas, para criar
a sua conta, ativar o seu localizador e escolher uma subscrição.
2 – Descarregue a aplicação
Para descarregar a aplicação móvel gratuita Weenect procure
“Weenect” na App Store para o iPhone ou Google Play para Android.
3 - Ligue a sua baliza
Depois do localizador ativado, ligue-o ao exterior pressionado
o botão On/O (Ligar/Desligar) durante 3 segundos, até que o
localizador emita um ruído, vibre e que os díodos pisquem e,
depois, solte-o.
Page 47

FR
EN
DE
NL
IT
ES
PT
Conteúdo da sua caixa
O seu pack Weenect Kids é composto por:
1 - uma baliza GPS Weenect Cats
2 - um sistema de xação
3 - uma base de carregamento
4 - um cabo USB
A baliza
1 - LED amarelo
2 - LED azul
3 - Botão On/O
4 – Conectores de carregamento
LED
5 – microfone
6 - Altifalante
Page 48

48
FR
EN
DE
NL
IT
ES
FR
EN
DE
NL
IT
ES
PT
Carregar a baliza
Base de carregamento
Para carregar a baliza, utilize a base de carregamento prevista
para este efeito e certique-se de que está devidamente ligada
através do cabo USB.
A baliza
LED azul: Aparece quando a baliza estiver a carregar na base e
desaparece quando estiver completamente carregada.
Os modos
Para otimizar ainda um pouco mais a duração útil da bateria,
propomos-lhe 3 modos diferentes de utilização da baliza. Estes
modos alteram o intervalo de tempo no qual a baliza envia a sua
posição.
Pode alterar o modo da baliza à distância diretamente a partir
da aplicação móvel.
Modo “Tempo real”: a baliza sobe automaticamente a sua
posição todos os 10 segundos. Bateria: até 12 horas.
Page 49

49
FR
EN
DE
NL
IT
ES
PT
FR
EN
DE
NL
IT
ES
PT
Modo “Quotidiano”: a baliza sobe a sua posição todos os 5 minutos quando em paragem e todos os minutos quando em deslocação. Bateria: até 36 horas.
Modo “Standby”: a baliza está ligada mas não sobe para nenhuma posição, o GPS está desligado.
Pode, pontualmente, solicitar a posição com a ajuda do botão
atualizar ou mudar de modo para localizá-la. Bateria: até 4 dias.
Funcionamento da baliza
Ligar/desligar a baliza
Para ligar: Ligue sempre a sua baliza no exterior. Para tal, prima
o botão On/O durante 3 segundos, até que a baliza emita um
barulho, vibre e os 2 LED pisquem ao mesmo tempo e, de seguida, solte o botão.
Para desligar: Prima 3 vezes seguidas o botão On/O, a baliza
emitirá um bip duplo, e a sua baliza cará desativada.
Os LED
Indicador GPRS (LED amarelo): A luz amarela é um indicador de
ligação ao servidor, indispensável para receber as posições da
baliza.
Page 50

50
FR
EN
DE
NL
IT
ES
PT
FR
EN
DE
NL
IT
ES
PT
Quando o LED amarelo estabilizar e piscar como um batimento
cardíaco (dois ashes/ paragem, etc.) signica que a sua baliza
está ligada à rede.
Indicador GPS (LED azul): A luz azul indica, quando piscar, que o
sinal GPS está válido. Caso não pisque, aproxime a baliza de uma
janela ou coloque-a no exterior para captar os sinais GPS.
Assistência
Aceda às respostas às perguntas mais frequentes, a partir do
centro de ajuda no nosso endereço weenect.zendesk.com
Aí irá encontrar, igualmente, um guia de utilização completo,
bem como vídeos tutoriais.
Para nos contactar, utilize o formulário de contacto deste centro
de ajuda.
Precauções de uso
Imersão em água: a baliza foi projetada para ser resistente a salpicos e chuva quando estiver protegida por um estojo de proteção, mas em caso algum pode entrar na água.
Page 51

51
FR
EN
DE
NL
IT
ES
PT
FR
EN
DE
NL
IT
ES
PT
Carregamento da baliza: utilize sempre a base de carregamento e o cabo USB fornecidos para recarregar a sua baliza. Nunca
force a introdução da cha na porta da caixa; se a introdução
bloquear, certique-se de que a cha está posicionada no sentido correto.
Manuseamento da baliza: não abra, em caso algum, a caixa da
baliza e não tente repará-la pelos seus próprios meios dado o
risco de deixar de estar coberto pela garantia; em caso de avaria,
contacte o apoio ao cliente.
Temperaturas de utilização: a baliza foi concebida para funcionar a temperaturas entre -20 °C e 55 °C. As temperaturas inferiores
ou superiores poderão danica-lo.
Garantia
A ou as Balizas têm uma garantia do fabricante de 2 anos. Esta
garantia aplica-se em caso de avaria da baliza, não causada por
uma queda ou uma quebra, ou um uso não conforme, e enquanto o cliente for titular de uma assinatura e tem os pagamentos em dia. Caso esta duração não esteja conforme ao direito
aplicável, a garantia será alargada à duração mínima autorizada
pela lei.
Page 52

52
FR
EN
DE
NL
IT
ES
PT
FR
EN
DE
NL
IT
ES
PT
IMPORTANTE
Noticações
Para receber as noticações push da aplicação móvel, é importante aceitá-las nas denições do seu telefone mas também nas
denições da aplicação móvel “Weenect”. É também necessário
que o seu telefone esteja ligado à internet (3G ou Wi-).
Pode também receber cada alerta via mails e SMS (como opção).
Alertas de entrada/saída de zona
O GPS pode ser sujeito a perturbações (interior, imóveis, árvores)
que podem gerar erros de posicionamento. Para não ativar um
alerta falso, garantimos que a baliza efetua uma deslocação coerente. Por este motivo, os alertas de saída de zona são ativados
decorridos alguns minutos após a saída real.
Realidade aumentada/bússola
A direção e a distância apresentadas por estas funcionalidades
são calculadas a partir da diferença entre a posição GPS do seu
telefone e a última posição GPS da baliza. A margem de erro das
duas posições afeta o resultado se a baliza estiver próxima do
telefone: direção e distância incorretas. Utilize estas funcionalidades quando a baliza está longe de si.
 Loading...