

Fobis Technologies Inc.Fobis Technologies Inc.
Fobis Technologies Inc.
Fobis Technologies Inc.Fobis Technologies Inc.
“creators of the weemote®”“creators of the weemote®”
“creators of the weemote®”
“creators of the weemote®”“creators of the weemote®”
weemote®weemote®
weemote®
weemote®weemote®
andand
and
andand
weemote® Sr.weemote® Sr.
weemote® Sr.
weemote® Sr.weemote® Sr.
READ THIS FIRST
WELCOME
We created this Quickstart Guide to help you get
your weemote® set-up as fast as possible.
Please follow the Step-by-Step sections in
this guide, in the order presented. Doing so
will save you from possible confusion and
frustration later.
For most consumers who have a cable-ready
TV, these will be the only instructions you will
need. Since the weemote® is highly
configurable for many different types of home
entertainment systems, we have also included a
reference guide. There may be cases when you
need to use both guides to setup your
weemote®.
If you run into problems and can’t find the
answers in either guide, then please visit our
web site at www.weemote.com for the latest
updates and technical bulletins. Please note
that there is a troubleshooting section
contained in the Reference guide.
We welcome your feedback on our manuals. If
you found a unique way to use the weemote®,
please let us know so we can spread the word.
Send your comments to info@fobis.com or call
us at 305-253-8387.
QUICKSTART GUIDEQUICKSTART GUIDE
QUICKSTART GUIDE
QUICKSTART GUIDEQUICKSTART GUIDE
For Product Codes R7 and LaterFor Product Codes R7 and Later
For Product Codes R7 and Later
For Product Codes R7 and LaterFor Product Codes R7 and Later
© 7/05, Property of Fobis Technologies Inc.
Rev. R3.4
weemote® is a registered trademark
patent #D451,905
We also encourage you to register your
weemote® so we can inform you of other cool
gadgets we are working on. You can register online at our web site or fill out and mail/fax back
the enclosed registration card.
Enjoy your weemote®!
Need help? Go to www.weemote.com 2

TABLE OF CONTENTS
HOW IT WORKS
Welcome ................................................................. 2
Table of Contents .................................................... 3
How It Works ........................................................4-6
STEP 1: Getting Started....................................... 7-8
STEP 2: List Your Favorite Channels ...................... 9
TIP - Entering Numbers ........................................ 10
STEP 3: Program Your Favorite Channels....... 11-12
STEP 4: Setting your TV Code ............................. 13
TV Codes ......................................................... 15-19
STEP 5: Setting your Set-Top Code...................... 20
STEP 6: Finishing Up ............................................ 21
Set-Top Codes ................................................. 22-23
Notes ..................................................................... 24
The Notes page is a great place to store your codes
and option settings.
Please note the conventions used this guide to
specify the state of the LED light on the weemote
during programming:
light is on solid
light blinks
light flashes quickly
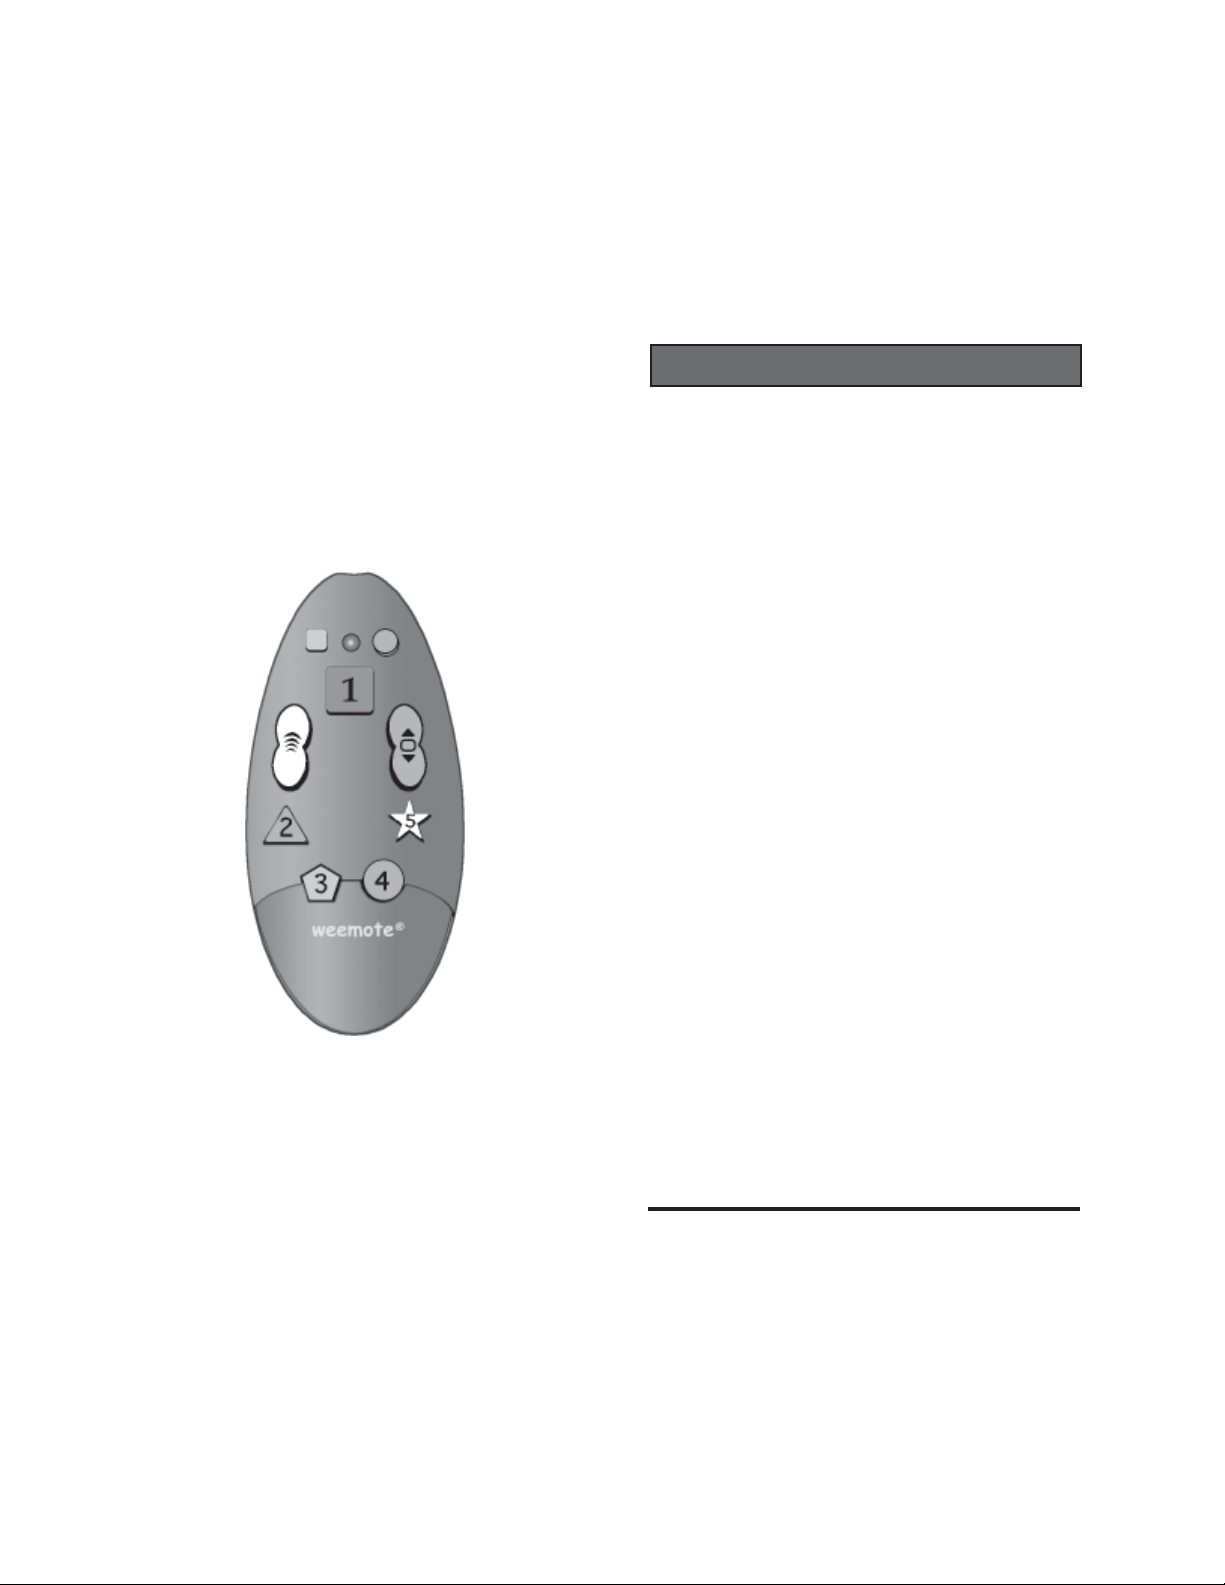
User Interface
Program
Interface
Mute Button (GRAY). Normally set as a MUTE
control but can be changed to be any learned
signal from your existing remote control.
LED Light (RED/GREEN/ORANGE). In normal
use, lights up whenever an active weemote
button is pressed. The light changes states
when you are programming the weemote.
Conventions used this guide are: on, for
Need help? Go to www.weemote.com 3
blink and for fast flash. Depending on how
your weemote is configured, the LED light can
stay on for a long time when the power button is
pressed.
Need help? Go to www.weemote.com 4
HOW IT WORKS
HOW IT WORKS
Power Button (RED). A single press of the
power button can do many things, depending on
how you have programmed your weemote. The
most simple function is turning your TV on and
off. If you are also using a Set-Top box, this
button will turn also turn your Set-Top box on
and off. When a Set-Top box is configured, this
button can also set your TV to channel 3/4 to
3
ensure that your Set-Top channels are always
ready for viewing from your TV. This button can
also be set to send the first favorite channel you
program on the FAV# button whenever you
press the power button. You can also set the
weemote to NOT turn your TV or Set-Top box
on and off using this button .
Favorite Buttons 1-5. Buttons that allow you to
program channel numbers from 1 to 9999 . For
the kids weemote®, you must program a
minimum of one channel. You can program the
same channel on multiple buttons. If you have a
cable box, satellite receiver or DVR (Set-Top),
the weemote will automatically route all channel
changing commands to your Set-Top Box. You
can also set any or all of the Favorite Channel
buttons to learn any signal from your existing
remote control. For example, you might want to
add your last channel, sleep timer or video input
control from your existing remote control to any
one of the Favorite buttons on the weemote.
Volume Up/Down Control. This button is
factory set to control the volume from your TV.
You have the option to turn the volume control
off in cases where you don’t want the user to
change the volume from the weemote®. Using
the learning feature, you can also assign the
volume control to be used with your Home
Theater audio source.
Channel Up/Down Control. For the
weemote®, the channel up/down control is
factory set to only cycle through the favorite
channels you have programmed into the
weemote®. For the weemote® Sr, the channel
up/down control is factory set to go to all
channels, just like a standard remote. You have
the option to swap these settings or to turn this
control off altogether. See Page 14 for more
information on how to change this option.
Programming Buttons. These buttons are
only accessible when you remove the programming cover of the weemote®. Used to setup
your weemote® as described in this guide and
the reference guide. Since these buttons are
normally secured after you program the
weemote®, your settings are always protected.
All programming information is stored in
permanent memory, regardless of battery
levels.
Need help? Go to www.weemote.com 5
Need help? Go to www.weemote.com 6
GETTINGGETTING
GETTING
STEPSTEP
STEP
STEPSTEP
1. You will need a small headed Philips screwdriver and 2 “AAA” batteries. Don’t use a large
head screwdriver - you will strip the screws!
2. Are you a DirecTV subscriber? If so, then you
can quickly setup your weemote® for kids use.
See page 18 of the Reference Guide. Please
note that if you use this feature you will still
need to program in your TV code (Step 4- Page
13)
3. Is your home entertainment system supported?
separate VCR’s tuner as your method for changing
channels on your TV. The weemote® does not work
with RF based, remote control receivers found in
some Sat. Receivers.
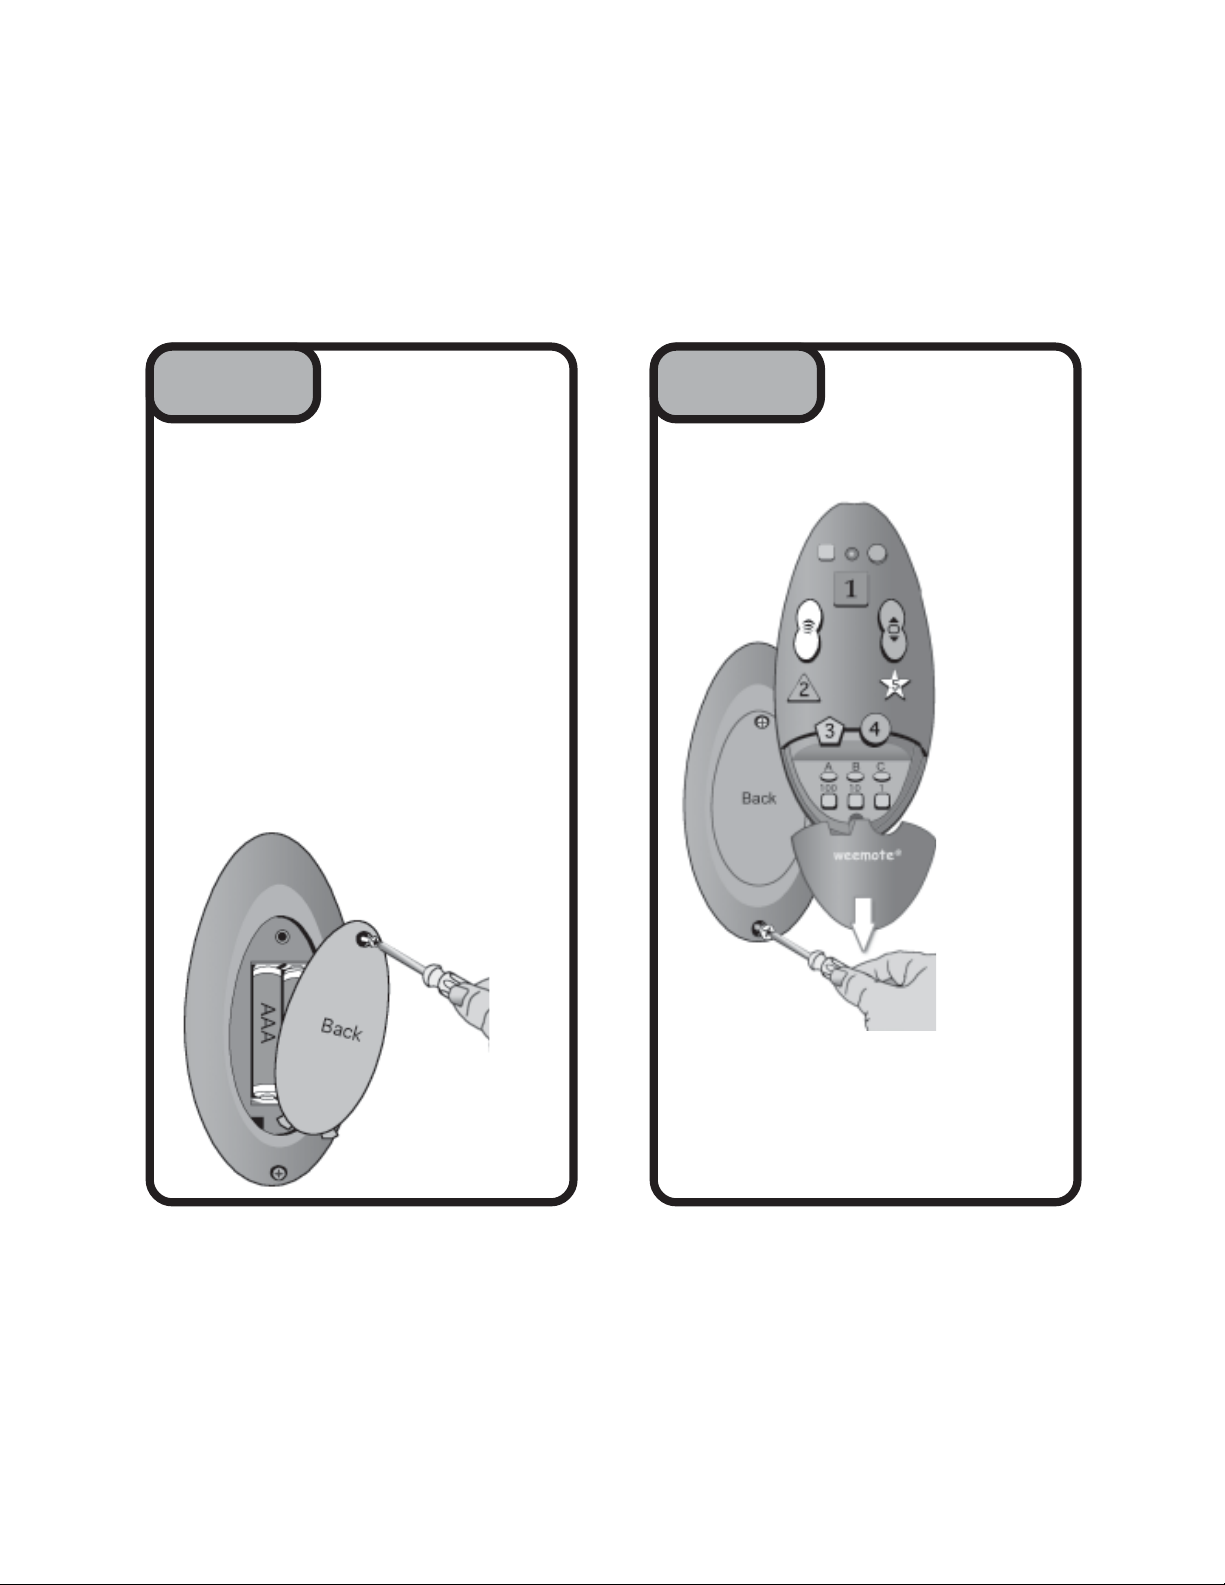
INSTALL THE BATTERIESINSTALL THE BATTERIES
INSTALL THE BATTERIES
INSTALL THE BATTERIESINSTALL THE BATTERIES
11
1
11
The weemote® will not work using a
GETTINGGETTING
STARTEDSTARTED
STARTED
STARTEDSTARTED
Screw stays on cover
GETTINGGETTING
GETTING
STEPSTEP
STEP
STEPSTEP
REMOVE THE SETUP COVERREMOVE THE SETUP COVER
REMOVE THE SETUP COVER
REMOVE THE SETUP COVERREMOVE THE SETUP COVER
11
1
11
GETTINGGETTING
STARTEDSTARTED
STARTED
STARTEDSTARTED
Install 2 “AAA”
Batteries. Do not
overtighten the
screw!
Need help? Go to www.weemote.com
Screw stays
on unit
After you loosen the screw, turn the unit around and
apply downward pressure on the setup cover, just
below the Fav#3 and Fav#4 buttons. DO NOT USE A
SCREWDRIVER TO WEDGE THE OVER OPEN!
Take care not to over tighten the screws when you put
the covers back on.
7
Need help? Go to www.weemote.com
8

LIST YOURLIST YOUR
LIST YOUR
STEPSTEP
STEP
STEPSTEP
For weemote® users:
You are required to setup at least one channel.
Channels 6-10 can be programmed but will only
be available from the channel up/down button.
22
2
22
LIST YOURLIST YOUR
FAVORITEFAVORITE
FAVORITE
FAVORITEFAVORITE
CHANNELSCHANNELS
CHANNELS
CHANNELSCHANNELS
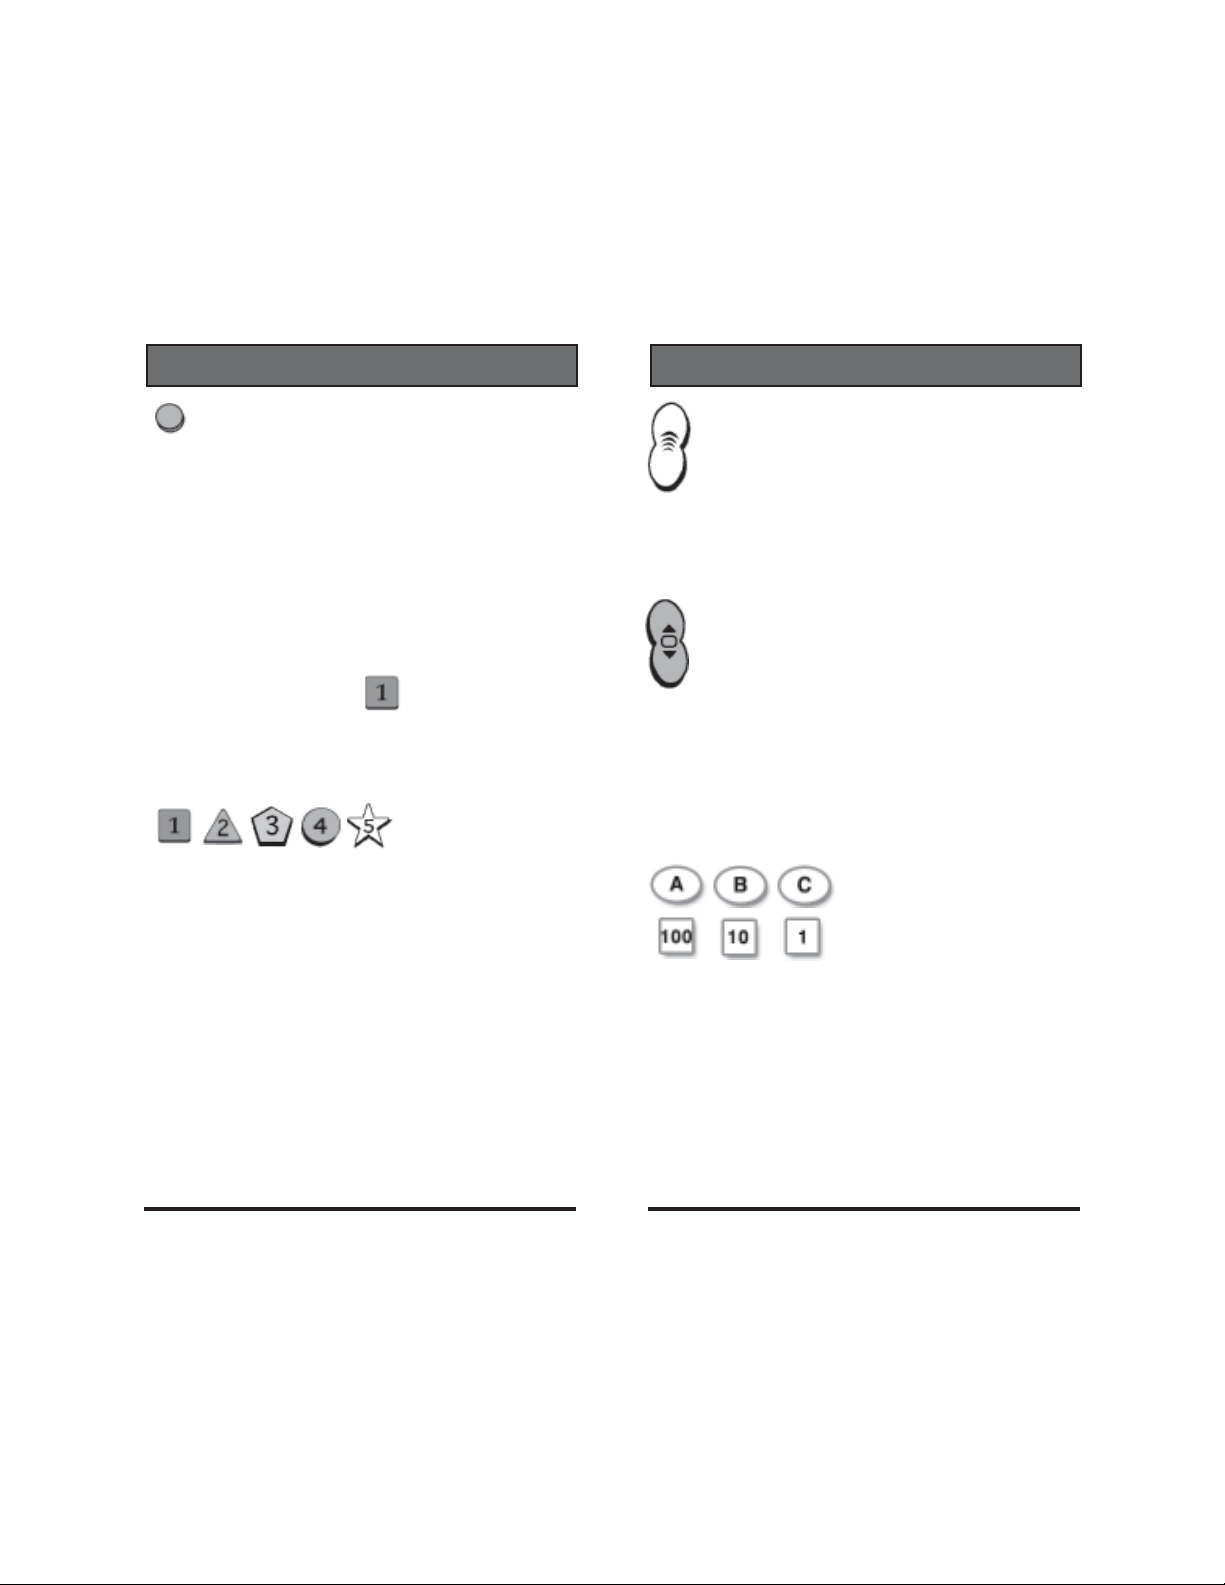
TIP - ENTERING NUMBERS
Before you begin to program in your favorite channels or
codes, here is a quick overview on the 100, 10 and 1
buttons. These buttons allow you to program in the
channels and codes you will need to setup the weemote®.
To support channels above 999, we have also provided a
means to enter in channels in the thousands range - see
note at the bottom of this page.
For weemote® Sr. users:
The weemote® Sr. is already set to go to all
channels using the Channel Up/Down control.
You can program channels 6-10 but if you do this,
you will lose the ability to scroll through all the
channels using the channel up/down control.
For both weemote® and weemote® Sr. users:
You can set an option for the Favorite Channel
programmed on button #1 to automatically go on
whenever you press the RED power button.
Please refer to Page 14 of the Reference Guide
on how to set this option.
6
7
8
9
10
Depending on which number you need, you simply break
down that number by 1000’s, 100’s, 10’s and 1’s. For
example, channel 294 would be entered by pressing the
100 button twice (100 X 2), the 10 button nine times (10 X
9) and the 1 button four times (1 X 4). See diagram below.
Don’t worry about entering zeros - the weemote® will add
them in later. The weemote® will automatically add one
zero but if you need more, there is an option available to
allow you to support sending 3/4 digits, if your device
needs it.
Example:
To Enter Channel 294
PRESS - # TIMES
294
100 1 0 1
200 + 90 + 4 = 294
To enter in channel numbers in the thousands range, you
would use the “A” button to enter increments of 1000. For
example, to enter in channel 8294, you would press and
release the “A” button 8 times (=8000), followed by
entering the remaining channel information, “294”, as
shown above.
weemote
program
buttons
Need help? Go to www.weemote.com
9
Need help? Go to www.weemote.com 10

STEPSTEP
STEP
STEPSTEP
33
3
33
PROGRAM YOURPROGRAM YOUR
PROGRAM YOUR
PROGRAM YOURPROGRAM YOUR
FAVORITESFAVORITES
FAVORITES
FAVORITESFAVORITES
STEPSTEP
STEP
STEPSTEP
33
3
33
PROGRAM YOURPROGRAM YOUR
PROGRAM YOUR
PROGRAM YOURPROGRAM YOUR
FAVORITESFAVORITES
FAVORITES
FAVORITESFAVORITES
Please note that besides entering channels on the
dedicated favorite channel buttons #1-#5, you can also
use the learning feature to selectively add special
controls from your existing remote control to your
weemote®. For example, you might want to add the
Last Channel or Sleep Timer control from your existing
remote. You can mix and match learning and preset
channels. Please refer to Page 10 of the Reference
Guide on how to use the learning feature.
1. Press and hold down the button until the LED
light turns on solid GREEN , then release the
button.
2. If you wish to program channels 6-10, then press and
release the MUTE button, otherwise skip this Step.
The LED light will blink once if you perform this step.
3. Press and Release the Favorite Channel Button you
wish to program. In this example, we will press and
release Favorite Channel . The LED light will blink
once .
If you are entering Channels 6-10, (STEP 2) please
note the following table.
Favorite Button = Favorite Channel #6
Favorite Button = Favorite Channel #7
Favorite Button = Favorite Channel #8
Favorite Button = Favorite Channel #9
Favorite Button = Favorite Channel #10
4. Enter in the Favorite Channel Number using the
, and program buttons.
For example, to enter in channel 296:
A. Press and release the “100” button X 2 times = 200
B. Press and release the “10” button X 9 times = 90
C. Press and release the “1” button X 6 times = 6
*If you need to enter a channel number in the thousands
range, press and release the
enter in each 1000 increment.
5. Press and release the Favorite Channel Button
again that you are currently programming. In this
example, we press and release the Favorite Channel
button. The LED light will blink twice .
6. To program another Favorite Channel, simply repeat
Steps 3-5. Once you are finished programming all
Favorite Channels, simply press and release the
button. The LED light will blink three times
and then turn off.
the favorite channel button, the LED light should light
up brightly. If it is dim, the button is NOT programmed.
button in this step to
At this point, if you press
Need help? Go to www.weemote.com
11
Need help? Go to www.weemote.com
12

SETTING YOURSETTING YOUR
SETTING YOUR
STEPSTEP
STEP
STEPSTEP
1. Turn your TV on, manually. Please note that if you
have a Sony TV, your weemote® is already preloaded with a Sony code. If you have a Sony TV,
proceed directly to Step 6 to see if this code works.
44
4
44
SETTING YOURSETTING YOUR
TV CODETV CODE
TV CODE
TV CODETV CODE
SETTING YOURSETTING YOUR
SETTING YOUR
STEPSTEP
STEP
STEPSTEP
Press the “100” button 1 time = 100
You do not use the “10” button in this case.
Press the “1” button 9 times = 9
44
4
44
SETTING YOURSETTING YOUR
TV CODETV CODE
TV CODE
TV CODETV CODE
2. Please refer to the TV, TV/VCR, TV/DVD CODES
on the following pages.. NOTE: TV, TV/VCR and TV/
DVD TYPE CODES ARE LISTED SEPARATELY. If
you cannot find your brand TV listed by it’s type (TV/
VCR or TV/DVD or TV/VCR/DVD), then look for your
brand in the other type categories and try those
codes. If you still can’t find your brand in any TV
catagory, then you will need to search for your code See Page 6 of the Reference Guide .
3. Locate the first code listed for your brand and TV
type .For ths example, we will use the code 109
which is the first listed for a SONY brand TV.
4. Press and hold down the button until the
LED light turns on solid GREEN , then release
the button.
5. Enter the Code number. In our example, we are
using the SONY code number 109.
6. Now, press and release the POWER button . If
the TV turns off, then press and relese the POWER
button again. If the TV turns on, then you have the
correct code. In this case, go ahead and press and
release the button. The LED light will blink
three times and then turn off.
If the POWER button does not respond correctly in
this step, then go back and repeat Steps 5 and 6,
trying the next code available that is listed for your
brand. If you have tried all the codes listed for your
brand and you still cannot find a code to turn your TV
on and off, then you will need to proceed with
searching for your code as described on Page 6 of the
Reference guide.
If you are only setting up a cable-ready TV, then
this will be your final step. If you use any special
buttons on your existing TV remote to change
channels such as the ENTER button , or your TV
requires the use of 3 or 4 complete digits for
changing channels, then please refer to page 8 of
the reference guide.
Need help? Go to www.weemote.com
13
Need help? Go to www.weemote.com
14

TV Codes
Admiral 3 18 41 90 125
129 187
Advent 257 262
Aiwa 90 251
Akai 32 70 149 172
Apex 12 95
Audio Dynamics 238
Audiovox 24 41 120 170
Broksonic 5 23 28 172 174
176
Carver 151
Citizen 5 6 16 18 22
23 24 26 150 163
172 202
Craig 21 41
Crown 26 41
Curtis Mathes 616182659
90 125 131 163 172
192 194 202
Daewoo 524262930
31 32 130 170 172 267
268 269 270
Dayton 1 92 194
Dell 265 276 Disney 274
Durabrand 274
Emerson 17 20 23 26 28
33 35 36 37 38 39 41
90 122 141 143 171 172 176
181 187 203 204 205
Fisher 42 90 99 Fujitsu 187
Funai 41 132 187
GE 38 9 23 43 44
125 130 143 147 165 170 172
182 183 195 206 207 211
Go Video 260
Goldstar 5232628
45 46 151 168 172 194
Grundig 47
Need help? Go to www.weemote.com 15
TV Codes
Hitachi 51823264849
50 51 52 53 54 55 116
126 142 169 172 185
Infinity/JBL 10 66 151
JC Penny 3561416
26 44 96 125 131 149 163
165 172 194 202 206 207
JVC 57 58 59 60 186 279
Kenwood 6 Konka 266
Luxman 5 23 172
Magnavox 6 8 10 17 27
28 64 65 66 67 68 110
132 150 151 154 163 164 167
172 175 187 192 194 200 281
Memorex 18 32 72 90 149
172 187
MGA 45 6 23 7172
149 163 172 187 192 194
Midland 1 3 165
Mitsubishi 4 5 23 28 70
71 122 123 129 149 172 187
192 194
NEC 56 7 23 2890
163 172 183 191 192 194
Optimus 90 166 196
Orion 162 176 204
Panasonic 8 9 10 11 66
73 151 165 173 177 183 195
196 211
Philco 5 6 64 65 67 68
110 149 150 151 163 169 172
176 183
Philips 510276668
146 150 151 163 164
Pioneer 2 8 48 51 76
131 166
Proscan 125 172 184
Quasar 8 9 165 183 195 196
Need help? Go to www.weemote.com 16

TV Codes
211
Radio Shack 326284172
90 112 141 172 194
RCA 35 8 14 48 78
79 80 82 84 85 86 87
125 127 130 134 149 172 182
183 210
Realistic 35 41 90 141
172 194
Sampo 6 19 163 188 192 194
Samsung 616232628
32 112 151 163 172 192 194
202 Sansui 176
Sanyo 42 89 90 91 92 109
194
Sears 32342909596
98 99 101 102 104 125 131
132 151 172 187 194 201 202
Sharp 26 91 129 141
Sony 109 119 122 189 200
Soundesign 23 41 150 172 187
Sylvania 6102864
65 66 68 110 112 132 150
151 163 172 192 194 263
Tandy 112 113 129
Tatung 9 159 183 211
Technics 8 165 196
Thomson 51 116 142
Toshiba 16 17 47 90 96
118 131 180 201 202
Totevision 26 Viewsonic 261
Wards 5 61823446465
67 68 119 125 141 151 163
172 182 187 192 194 206 207
Westinghouse 41 90 130 170
171 176 204 258
Yamaha 56
Zenith 1 18 24 40 178 264
Need help? Go to www.weemote.com 17
TV/VCR Codes
Broksonic 219 226
Citizen 224
Curtis Mathes 224 231
Daewoo 224 247 250 252
Electrohome 224 240
Emerson 219 222 223 224 225
226 227 251 253
Funai 251
GE 231 233 248
Goldstar 223 224 225 230 238
254 Harmon 238
Hitachi 224 225 231 241 251
JC Penny 223 224 231 238 241
242 JVC 234 235 238
Kenwood 251 Magnavox 224 225
231 236 237 241 251
Marantz 237 238
Memorex 223 242 244 245 248
251 MGA 240 Mitsubishi 239 240
Optimus 242 Orion 219 226
Panasonic 231 241 242
Philco 224 225 236 237 251
Pioneer 235 Pulsar 248
Quasar 231 241 242
Radio Shack 224 229 230 242
RCA 231 233 241 251
Realistic 222 223 224 229 251
Samsung 221 224 225 229 244
245 246 247 Sansui 219 235
Sanyo 244 245 Sears 223 224 225
Sharp 224 225 255 Signature 251
Sony 200 Soundesign 251
Sylvania 229 237 240 251
Symphonic 251 Tandy 251 Teac 251
Technics 242 Toshiba 240 247
Totevision 223 224 Wards 224 251
Need help? Go to www.weemote.com 18

TV/VCR Codes
White Westinghouse 251
Yamaha 238 251
Zenith 219 223 235 248 251
TV/DVD CODES
Apex 15
Broksonic 278
Emerson 273
JVC 279
Magnavox 34
Philips 63
Samsung 280
Sylvania 69 273 274
Toshiba 74
SETTING YOURSETTING YOUR
SETTING YOUR
STEPSTEP
STEP
STEPSTEP
1. Turn on your Cable Box , Satellite Receiver or Digital
Video Recorder (DVR).
Please note that DVR (TiVo) units are also considered to
be a Set-Top device. If you also have a seperate SetTop box with your DVR, program in the one unit you use
for viewing live TV.
2. Please refer to the CABLE, SATELLITE OR DVR
CODES listed on the following pages. If you have DVR
based device, and you can’t find your brand in the DVR
list, then try other DVR brand codes followed by your
brand listed in the Cable/Sat list. If you still cannot find a
working code, then please refer to Page 6 of the
Reference Guide on how to search for your code.
3. Locate the first code for your brand Set-Top device.
4.Press and hold down the button until the
LED light turns on solid GREEN , then release
the button.
5. Enter the Code number using the , and
55
5
55
SETTING YOURSETTING YOUR
SET-TOP CODESET-TOP CODE
SET-TOP CODE
SET-TOP CODESET-TOP CODE
Need help? Go to www.weemote.com 19
program buttons.
6. Now, press and release the POWER button . If
the Set-Top turns off, then press and relese the
POWER button again. If the Set-Top turns on,
then you have the correct code. In this case, go
ahead and press and release the
Need help? Go to www.weemote.com
button. The
20

SETTING YOURSETTING YOUR
SETTING YOUR
STEPSTEP
STEP
STEPSTEP
LED light will blink three times and then
turn off. If the POWER
correctly in this step, then go back and repeat Steps 5
and 6, trying the next code available that is listed for
your brand. If you have tried all the codes listed for
your brand and you still cannot find a code to turn
your Set-Top on and off, then you will need to
proceed with searching for your code as described on
Page 6 of the Reference guide.
If you use any special buttons on your existing
Set-Top remote to change channels such as the
OK, ENTER, SELECT button, or you need to input
3 to 4 complete digits for changing channels, then
please refer to page 8 of the reference guide. At
this point, you should be finished with the basic
programming of your weemote®.
STEP STEP
STEP
STEP STEP
There are a wide variety of special options you
can set with the weemote®. While most users
may not need or want to use these added
features, you might want to look at the Reference Guide on Page 4-5 to read more about all
the special options available.
66
6
66
55
5
55
SETTING YOURSETTING YOUR
SET-TOP CODESET-TOP CODE
SET-TOP CODE
SET-TOP CODESET-TOP CODE
button does not respond
THE LASTTHE LAST
THE LAST
THE LASTTHE LAST
WORD...WORD...
WORD...
WORD...WORD...
SET-TOP CODES
CABLE BOX CODES
Americast 128 AT&T 115
General Instrument 13549
55 75 109 115 121 122
134 183 196 197 200 201
202 203 220 247 248 249
250 251 252 254
Hitachi 52 124 132 220
Hyndai 127
Jerrold 150525355
75 115 120 122 200 220
Motorola 109 115 268 ALSO TRY
GENERAL INSTRUMENT
Panasonic 14 60 61 99 157
177
Pioneer 2626468
Samsung 665
Scientific Atlanta 3666768
69 Sony 24 Sylvania 72
Viewstar 20 185 Zenith 5118
SATELLITE CODES
Channel Master 147 187
Curtis Mathes 174
DirecTV 93 94 95 96 97
98 124 132 257
Dish Network 100 101 119
Dishplayer 100 101
Echostar 113 119 137 150 204
205 206 207 208 209
ExpressVU 119 Fujitsu 186 259
General Instrument TRY CABLE CODES ABOVE
Hitachi 124 132
Hughes Network 93 94 95 96
97 98 124 132
JVC 100 101 119
Need help? Go to www.weemote.com
21
Need help? Go to www.weemote.com 22

SET-TOP CODES
SATELLITE CODES
Magnavox 40 117 126
Memorex 117 137
Panasonic 123 178
Philips 16 117 126 176
Primestar 49 121
Radio Shack 183 196 197 225
RCA 110 116 118 141 233
Samsung 16 108 197
Sony 112 114 Star Sight 109
Toshiba 133 134 174 187
Zenith 174
DVR CODES
RCA Ultimate TV 118
Replay TV 31 157
Showstopper 157
Sony Ultimate TV 114
Telus IPTV 256
TiVo 30 32 33 151
TiVo/Philips 151
TiVo Sony 162
Please note that if these codes do not work
and you have a Digital Video Recorder (DVR)
that is integrated into a Cable Box or Satellite
Receiver, then try the Cable Box or Satellite
Receiver codes listed for the brand name
manufacturer of your Integrated DVR/Cable or
DVR/Sat unit.
NOTES
Need help? Go to www.weemote.com 23
Need help? Go to www.weemote.com 24
 Loading...