

Fobis Technologies Inc.Fobis Technologies Inc.
Fobis Technologies Inc.
Fobis Technologies Inc.Fobis Technologies Inc.
“designing gadgets for real life”“designing gadgets for real life”
“designing gadgets for real life”
“designing gadgets for real life”“designing gadgets for real life”
Typical TV SetupTypical TV Setup
Typical TV Setup
Typical TV SetupTypical TV Setup
4 easy steps!4 easy steps!
4 easy steps!
4 easy steps!4 easy steps!
Install batteries &
remove the setup cover
Enter Favorite Channels
WELCOME
This Set-Up Guide is designed to get your
weemote® programmed as quickly as possible.
In order to ensure a fast setup, please follow
the Step-by-Step sections in this guide, in
the order presented. Doing so will save you
from possible confusion and frustration later.
This guide is divided into two sections. The first
section provides information in a Step-by-Step
Quickstart format while the last section includes
more detailed setup options and reference
material.
Enter your TV Brand
Secure battery &
setup cover
BEFORE YOU BEGIN:
You need -
Two AAA Alkaline Batteries
and
A small Philips head screwdriver
to remove the battery door and
setup cover
Remember to use the Code Information label located on the battery door
side facing the batteries. An extra label is included in this package.
weemote® 3weemote® 3
weemote® 3
weemote® 3weemote® 3
weemote® Sr.weemote® Sr.
weemote® Sr.
weemote® Sr.weemote® Sr.
SETUP GUIDESETUP GUIDE
SETUP GUIDE
SETUP GUIDESETUP GUIDE
© 8/02, Property of Fobis Technologies Inc.
Rev. R5-A
weemote® is a registered trademark
patent #D451,905
As with any new sophisticated product like the
weemote®, things are bound to come up which
don’t make it into our manual. If you run into
trouble and can’t find the answers in this
manual, then please visit our web site at
www.weemote.com for the latest updates and
technical bulletins. Please note that there is a
troubleshooting section at the end of this
guide.
We welcome your feedback on our manual. If
you found a unique way to use the weemote®,
please let us know so we can spread the word.
Send your comments to info@fobis.com or call
us at 305-253-8387.
We also encourage you to register your
weemote® so we can inform you of other cool
gadgets we are working on. You can register online at our web site or fill out and mail the
enclosed post card.
Enjoy your weemote®!
Need help? Go to www.weemote.com 2
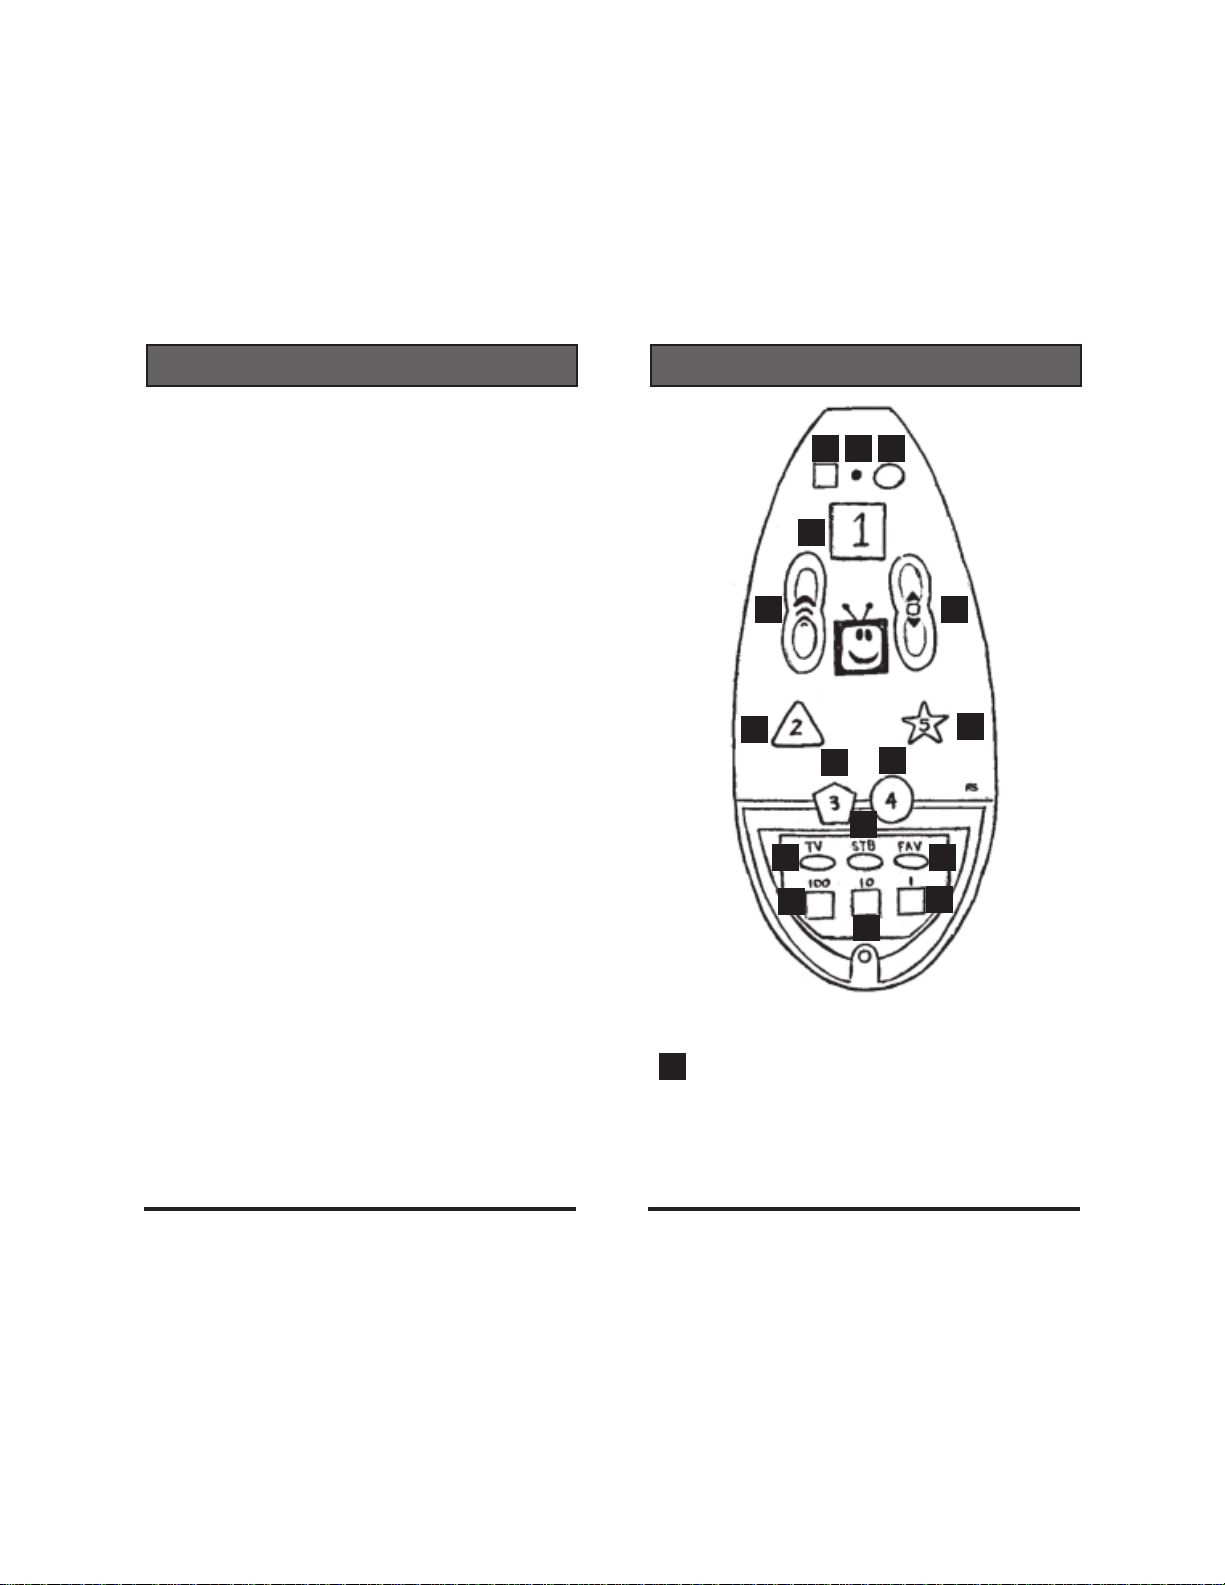
TABLE OF CONTENTS
HOW IT WORKS
Welcome ................................................................. 2
Table of Contents .................................................... 3
How It Works ........................................................4-6
STEP 1: Before You Begin ...................................... 7
STEP 2: Removing the Batt./Setup Covers ............ 8
STEP 3: List Your Favorite Channels ...................... 9
TIP - Entering Numbers ........................................ 10
STEP 4: Program Your Favorite Channels....... 11-12
STEP 5: Setting your TV or TV/VCR Code ........... 13
STEP 6: Your Existing TV Remote Control ........... 14
STEP 7: Testing your TV Code ............................. 15
STEP 8: Last Step for TV Users ........................... 15
TV Codes ......................................................... 16-20
TV/VCR Combo Codes .................................... 21-22
STEP 9: Setting your Set-Top Code...................... 23
STEP 10: Your Existing Remote Control ............... 24
STEP 11: Testing your Set-Top Code .................... 25
STEP 12: Finishing Up .......................................... 25
STEP 13: Special Options..................................... 26
Cable Box Codes .................................................. 27
Satellite Receiver Codes .................................. 28-29
ReplayTV/TiVo/Ultimate TV Codes ....................... 30
Setting the ENTER/OKAY Option ......................... 31
Setting the 3-Digit Option ...................................... 31
TV Startup Mode Options ..................................... 32
Disabling the Volume Control................................ 33
Channel Up/Down Option ..................................... 33
Powering up to a Favorite Channel ....................... 34
Adjusting Channel Changing Speed ..................... 34
Set-Top Power On/Off Option ............................... 36
Searching for your Code ....................................... 36
Code Recall .......................................................... 37
Clearing Favorite Channels .................................. 38
Clearing TV/Set-Top Codes .................................. 39
Complete System Reset ....................................... 39
Troubleshooting ............................................... 40-41
Care and Maintenance .......................................... 42
Warranty................................................................ 43
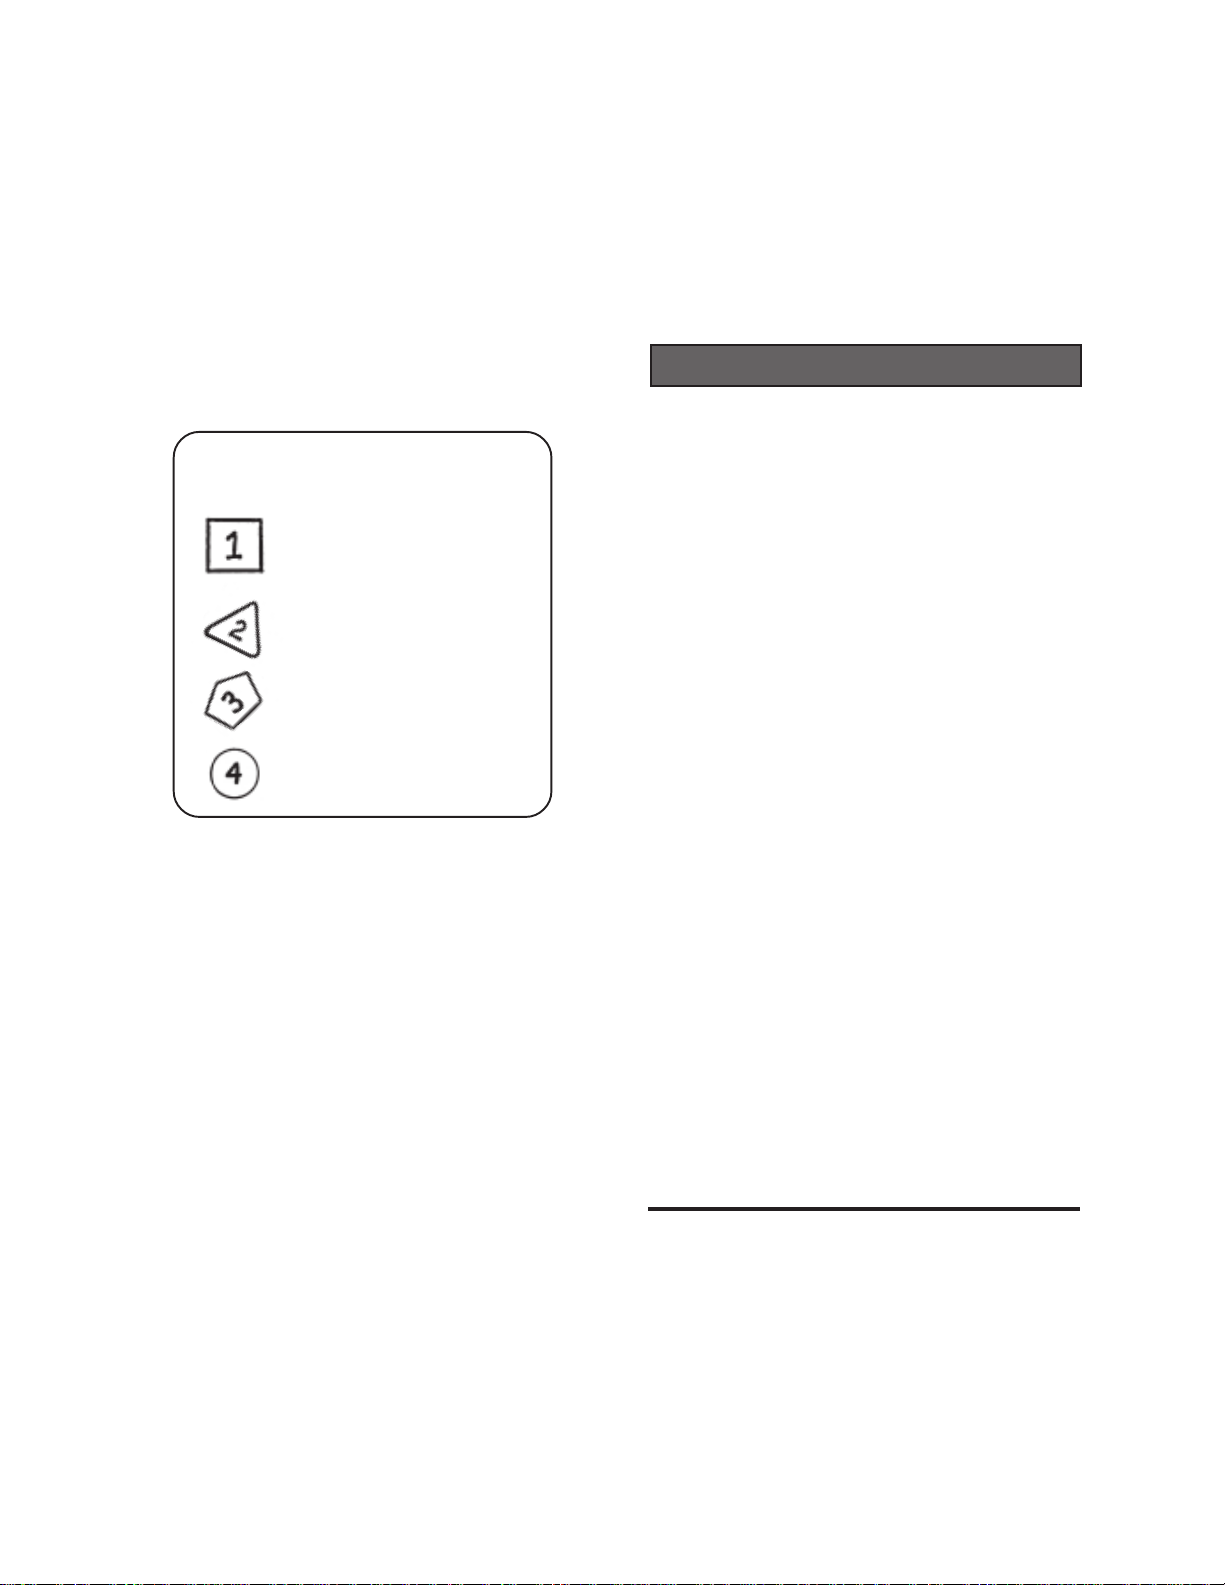
User Interface
1 2 3
4
5
4
4
4
8
7
10
10
Mute/Favorite Channel Button (GRAY).
1
6
4
9
10
Program Interface
Normally set as a MUTE control but can be
changed to be your 6th Favorite Channel.You
can set channel 3 on this button for fast access
to your VCR for movie playing. See Page 9.
Need help? Go to www.weemote.com 3
Need help? Go to www.weemote.com 4
HOW IT WORKS
HOW IT WORKS
LED Light (RED). Lights up whenever an active
2
weemote button is pressed. Note that any
selected Favorite channel button is not defined
if pressed and the light does not go on brightly.
Depending on how your weemote is configured,
the LED light can stay on for a long time when
the power button is pressed.
Power Button (RED). A single press of the
3
power button can do many things, depending on
how you have programmed your weemote. The
most simple function is turning your TV on and
off. If you are also using a Set-Top box, this
button will turn also turn your Set-Top box on
and off. When a Set-Top box is configured, this
button also sets your TV to channel 3 to ensure
that your Set-Top channels are always ready for
viewing from your TV. If you use channels 2,4,5
or the video port to view your Set-Top channels,
then you can change this setting. This button
can also be set to send the first favorite channel
you program on the GREEN#1 button whenever
you press the power button. You can also set
the weemote to NOT turn your Set-Top box on
and off using this button .
Favorite Channels 1-5. Dedicated buttons that
4
allow you to program channel numbers from 1
to 9999 . You must program a minimum of one
channel for the weemote® to operate and you
can program the same channel on multiple
buttons. When you define a Set-Top code, the
weemote automatically routes all channel
changing commands to your Set-Top Box.
Volume Up/Down Control (YELLOW). This
5
button is normally active but can be turned off in
cases where you don’t want the user to change
the volume from the weemote®.
Channel Up/Down Control (BLUE). This
6
button is factory set to only allow the favorite
channels to be selected. In this mode, favorite
channels 7-10 are only accessible from this
button, if defined. There are two other optional
settings available. You can either turn this
control off altogether or allow it to surf all
available channels on your system (Adult
Mode).
TV Button. TV Programming Button. This
7
button allows you to program in the applicable
code for your TV or TV/VCR combo unit.
STB Button. Set-Top Programming Button. This
8
button allows you to program in the applicable
code for your Set-Top device (Cable Box,
Satellite Receiver or DVR Unit).
FAV Button. Favorite Channel Programming
9
Button. This button is used to allow you to
program in your favorite channels.
100, 10 and 1 Buttons. Used for entering in
10
your actual code numbers or channel numbers.
In favorite program mode, the top portion of the
channel up/down button is used to enter in 1000
numbers (4-Digit Channels).
Need help? Go to www.weemote.com 5
Need help? Go to www.weemote.com 6
BEFORE YOUBEFORE YOU
BEFORE YOU
STEPSTEP
STEP
STEPSTEP
1. If you have a cable-ready TV or TV/VCR.
COMPLETE Steps 1-8 in this guide
Please note that the weemote® is already
loaded with the most popular Sony TV code.
2. If you have a cable-ready TV connected to
a Set-Top box (STB).
COMPLETE Steps 1-13 in this guide
Set-Top boxes are defined as cable TV boxes
and satellite receivers such as DirecTV and
Echostar. We also consider ReplayTV ,TiVo or
Ultimate TV players as Set-Top (STB) devices.
3. If you only want to program your Set-Top
box (STB).
COMPLETE Steps 1-4 and 9-13 in this guide
11
1
11
BEFORE YOUBEFORE YOU
BEGINBEGIN
BEGIN
BEGINBEGIN
REMOVING THEREMOVING THE
REMOVING THE
STEPSTEP
STEP
STEPSTEP
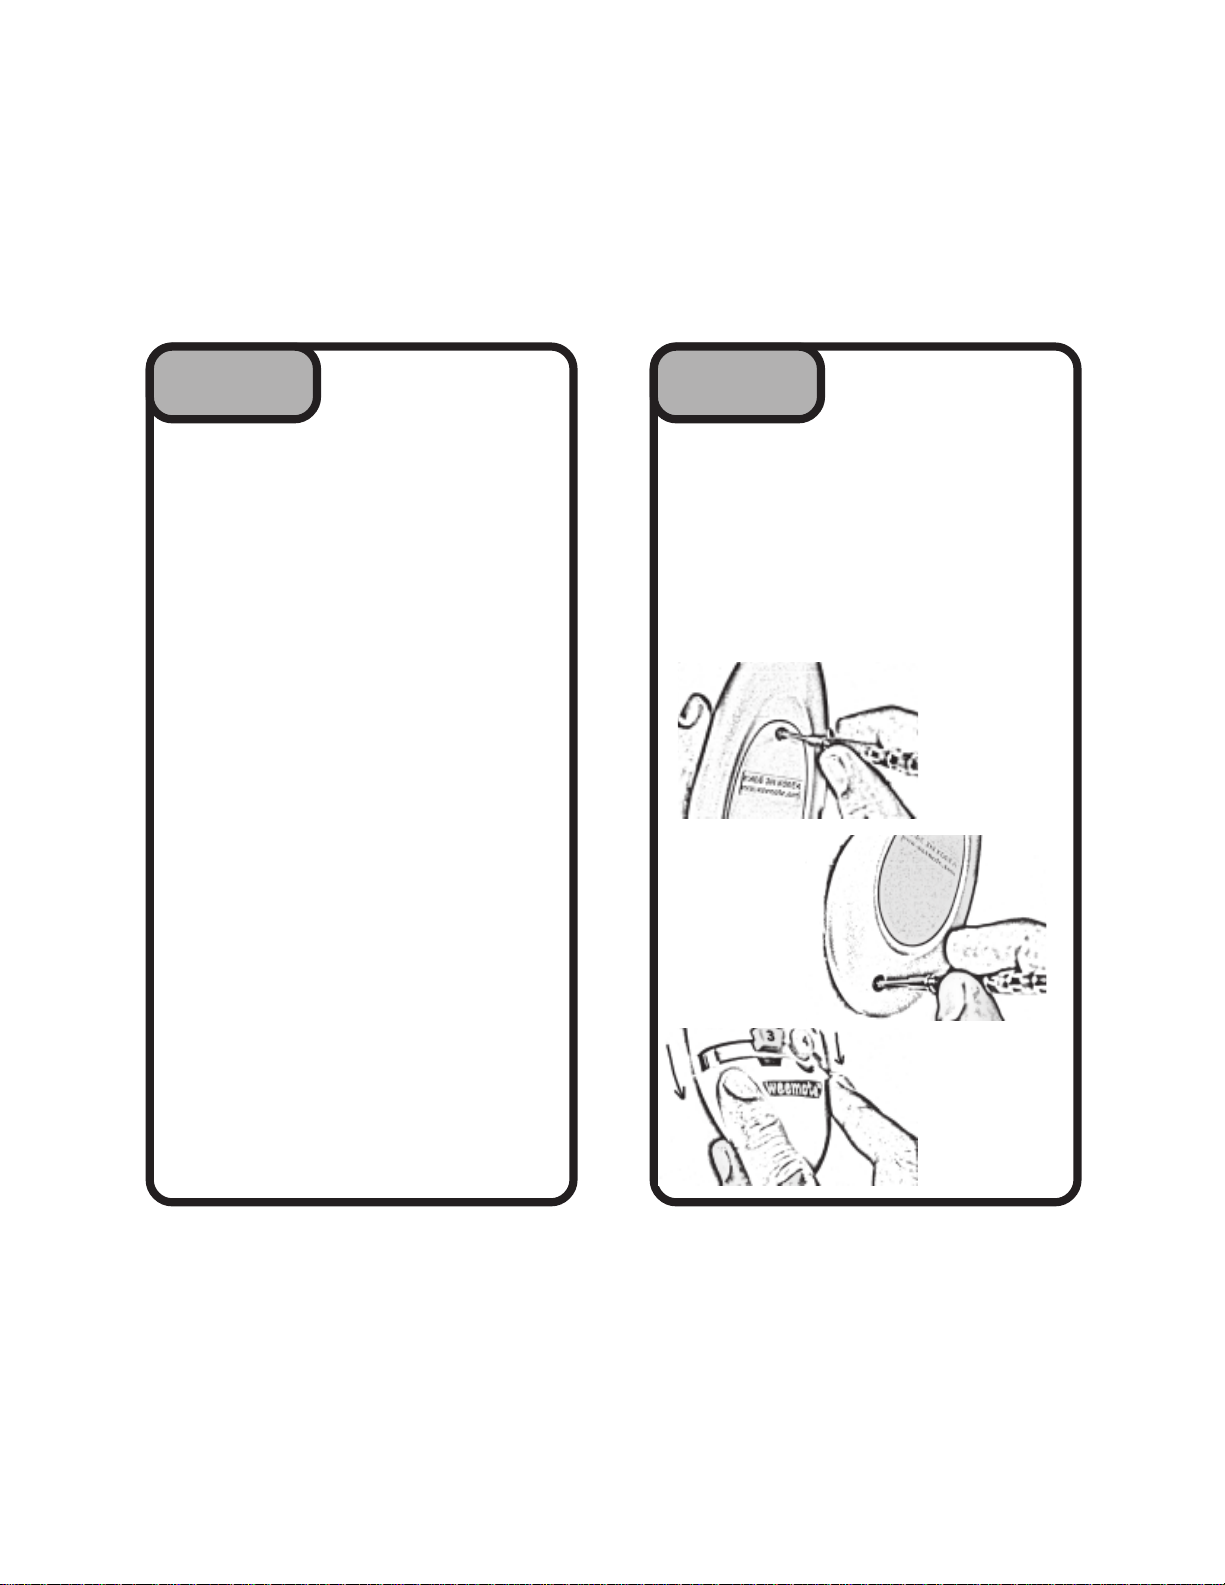
Note the diagrams below. The screws are
designed to remain on the covers so they don’t get
lost. Take care not to over tighten the screws
when you put the covers back on. Use a small
size Philips headed screwdriver or you will
strip the screw heads. Note that the code
information label is located behind the battery door
side facing the batteries.
22
2
22
REMOVING THEREMOVING THE
BATTERY ANDBATTERY AND
BATTERY AND
BATTERY ANDBATTERY AND
SETUP COVERSETUP COVER
SETUP COVER
SETUP COVERSETUP COVER
Removing
the battery
door
Fig. A
Please note that if you only want all weemote®
controls to be sent to the Set-Top box, you must
clear the TV code already set in your
weemote®. Please refer to page 38 - “Clearing
TV/Set-Top Codes”
WARNING: The weemote® will not work if you are
using a separate VCR’s tuner as your method for
changing channels on your TV. The weemote®
will also not work with UHF (radio) based, longrange remote control systems. These systems
allow you to control your Set-Top device without
pointing the remote directly at the device or from
different room.
Need help? Go to www.weemote.com
Removing the
setup cover
Fig. B
Pull down to
remove setup
cover
Fig. C
7
Need help? Go to www.weemote.com
8
LIST YOURLIST YOUR
LIST YOUR
STEPSTEP
STEP
STEPSTEP
You are only required to setup at least one
channel. Note that Channel 1 can be set to go on
whenever you press the RED power button. If
you set channel 6, then you lose the MUTE
control. Channels 7-10 can be set but will only be
available from the channel up/down button (Surf)
33
3
33
LIST YOURLIST YOUR
FAVORITEFAVORITE
FAVORITE
FAVORITEFAVORITE
CHANNELSCHANNELS
CHANNELS
CHANNELSCHANNELS
6
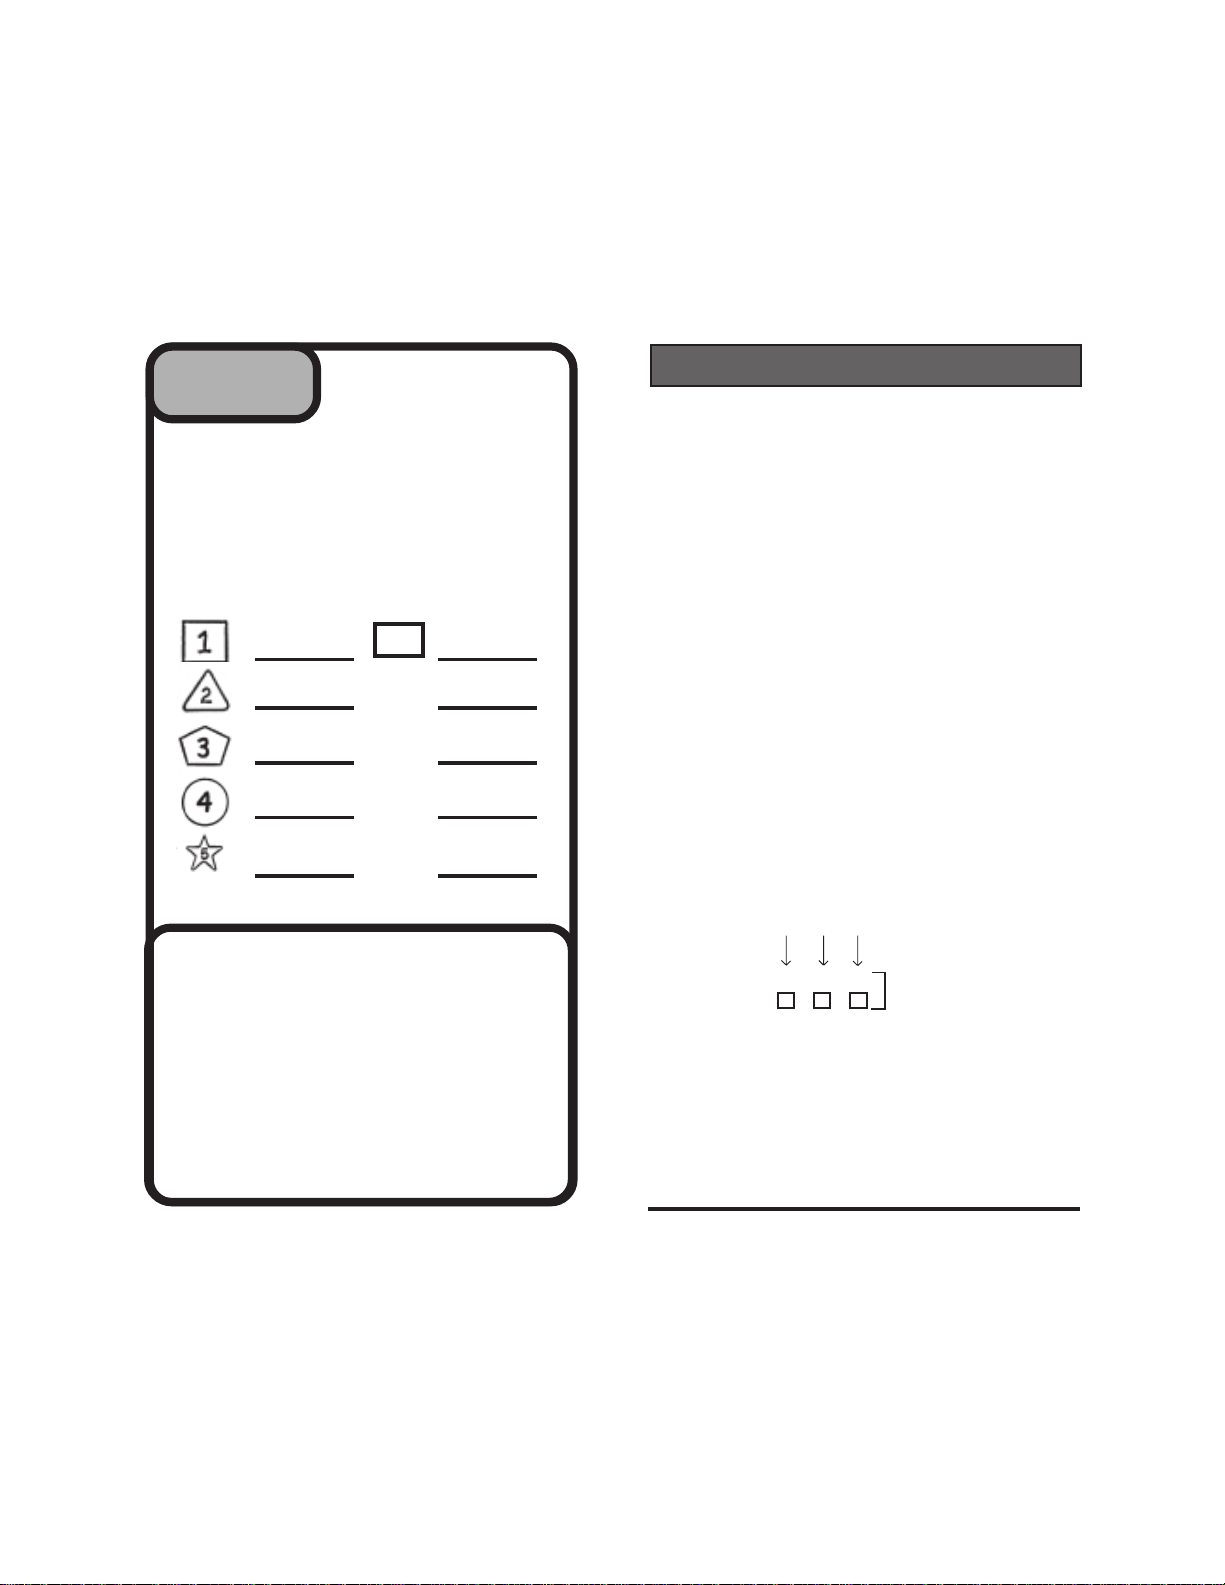
TIP - ENTERING NUMBERS
Before you begin to program in your favorite channels or
codes, here is a quick overview on the 100, 10 and 1
buttons. These buttons allow you to program in the
channels and codes you will need to setup the weemote®.
To support channels above 999, we have also provided a
means to enter in channels in the thousands range - see
note at the bottom of this page.
.
Depending on which number you need, you simply break
down that number by 1000’s, 100’s, 10’s and 1’s. For
example, channel 294 would be entered by pressing the
100 button twice (100 X 2), the 10 button nine times (10 X
9) and the 1 button four times (1 X 4). See diagram below.
7
8
9
10
APPLICATION FOR EASIER MOVIEAPPLICATION FOR EASIER MOVIE
APPLICATION FOR EASIER MOVIE
APPLICATION FOR EASIER MOVIEAPPLICATION FOR EASIER MOVIE
VIEWING WITH THE WEEMOTE®VIEWING WITH THE WEEMOTE®
VIEWING WITH THE WEEMOTE®
VIEWING WITH THE WEEMOTE®VIEWING WITH THE WEEMOTE®
In this application, you could program the
normally used MUTE button to go to either
channel 3 or 4, depending on which channel
you use to output your VCR signal. Now the
child can pop the tape into the VCR, hit the
play button and then press the weemote’s
square gray button to ensure that the TV will
display the movie from the VCR deck.
Need help? Go to www.weemote.com
And don’t worry about zeros - the weemote® will add them
in later. For example, if you need to enter channel 07 or
007 to get channel 7, just enter the number 7 (1 button
seven times) and the weemote® will handle sending
channel 07 or channel 007 if you need this option (3-Digit
Option).
To enter in channel numbers in the thousands range, you
would use the top portion of the channel up/down button to
enter increments of 1000. For example, to enter in
channel 8294, you would press the top portion of the
channel up/down button 8 times (=8000), followed by
entering the remaining information as shown above.
9
Need help? Go to www.weemote.com 10
Example:
To Enter Channel 294
PRESS - # TIMES
294
100 1 0 1
200 + 90 + 4 = 294
weemote
program
buttons
PROGRAM YOURPROGRAM YOUR
PROGRAM YOUR
STEPSTEP
STEP
STEPSTEP
ENTERING FAVORITE CHANNELS 1-5
1. Press and hold the “FAV” button for about three
seconds until the LED light begins to flash, then release
the button.
2. Press the favorite channel button you wish to program
- in this example we are using the (Green #1) Button to
program in channel 296.
3. Press the following combination of the 100, 10 and 1
buttons to enter channel 296
.
A. Press the “100” button X 2 times = 200
B. Press the “10” button X 9 times = 90
C. Press the “1” button X 6 times = 6
*If you need to enter a channel number in the thousands
range, use the top portion of channel up/down button in
this step to enter in each 1000 increment.
4. Press the Favorite Channel (Green) Button #1 again to
complete the sequence. DO NOT PRESS THE FAV
BUTTON. Please check the LED - it should flash three
times and then go out to confirm that the channel has
been programmed. If it does not, start over again.
To setup favorite channels 2-5, simply use the steps
above except that for Steps 2 and 4, you would substitute
the (Green #1) button for the other favorite channel
button (2,3,4 or 5) you wish to program.
TO ENTER IN A CHANNEL TO REPLACE THE MUTE
BUTTON (CHANNEL 6):
44
4
44
PROGRAM YOURPROGRAM YOUR
FAVORITEFAVORITE
FAVORITE
FAVORITEFAVORITE
CHANNELSCHANNELS
CHANNELS
CHANNELSCHANNELS
PROGRAM YOURPROGRAM YOUR
PROGRAM YOUR
STEPSTEP
STEP
STEPSTEP
1. Press and hold the “FAV” button for about three
seconds until the LED light begins to flash, then
release the button.
2. Press the MUTE button TWO TIMES.
3. Press the combination of the 1000 (Channel Up)
100, 10 and 1 buttons required for the favorite
channel number.
4. Press the MUTE button ONE TIME to complete the
sequence. The LED should flash time times and go
out to confirm the channel has been defined.
TO ENTER IN FAVORITE CHANNELS 7-10:
1. Press and hold the “FAV” button for about three
seconds until the LED light begins to flash, then
release the button.
2. Press the MUTE button ONE TIME. The LED light
should be on solid.
3. Press the favorite channel button for the channel
number (7-10) you wish to program as shown in the
table below.
For channel 7: Press Favorite Channel Button #2 Blue
For channel 8: Press Favorite Channel Button #3 Orange
For channel 9: Press Favorite Channel Button #4 Raspberry
For channel 10: Press Favorite Channel Button #5 Yellow
4. Press the combination of the 1000 (Channel Up)
100, 10 and 1 buttons required for the favorite
channel number.
5. Press the Press Favorite Channel Button used
above in Step 3 once to complete the sequence. The
LED should flash three times and go out to confirm
your entry.
44
4
44
PROGRAM YOURPROGRAM YOUR
FAVORITEFAVORITE
FAVORITE
FAVORITEFAVORITE
CHANNELSCHANNELS
CHANNELS
CHANNELSCHANNELS
Need help? Go to www.weemote.com
11
Need help? Go to www.weemote.com
12
SETTING YOURSETTING YOUR
SETTING YOUR
STEPSTEP
STEP
STEPSTEP
1. Turn your TV on, manually.
2. Please refer to the TV or TV/VCR CODES listed
after STEP 8. NOTE: TV AND TV/VCR CODES ARE
LISTED SEPARATELY. If you cannot find your
brand TV or TV/VCR listed, then you will need to
search for your code - See Page 36.
3. Locate the first code listed for your TV or TV/VCR.
For this example, we will use the code 109 which is
the first listed for a SONY brand TV.
4. Press and hold the “TV” button for about three
seconds until the LED light begins to flash, then
release the button.
5. Enter the Code number. In our example, we are
using the SONY code number 109.
Press the “100” button 1 time = 100
You do not use the “10” button in this case.
Press the “1” button 9 times = 9
6. Press the “TV” button again to set the code. The
LED should flash three times and then turn off to
confirm that the code was entered.
55
5
55
SETTING YOURSETTING YOUR
TV OR TV/VCRTV OR TV/VCR
TV OR TV/VCR
TV OR TV/VCRTV OR TV/VCR
CODECODE
CODE
CODECODE
CONTINUEDCONTINUED
CONTINUED
STEPSTEP
STEP
STEPSTEP
7. Press the RED power button to see if the TV
turns off. If it does not, then go back to the
beginning of Step 5, using the next code
number listed for your manufacturer. If you have
run through all the possible codes and still
cannot get the TV to power off, then please see
Page 36 - Searching for your Code.
STEPSTEP
STEP
STEPSTEP
1. DO YOU USE THE “ENTER” OR “OKAY”
BUTTON TO CHANGE CHANNELS?
YES: Please go to Page 31 to set the Enter/
Okay Option, then continue to Step 7.
NO: Go on to question 2 below
2. WHEN YOU CHANGE CHANNELS, DO
YOU USE ALL THREE DIGITS REGARDLESS
OF THE CHANNEL NUMBER, I.E. CHANNEL 7
IS ENTERED ON YOUR REMOTE AS “007”?
YES: Please go to Page 31 to set the
3-Digit Option, then continue to Step 7.
NO: Go on to Step 7.
55
5
55
66
6
66
CONTINUEDCONTINUED
HOW DO YOUHOW DO YOU
HOW DO YOU
HOW DO YOUHOW DO YOU
USE YOURUSE YOUR
USE YOUR
USE YOURUSE YOUR
EXISTINGEXISTING
EXISTING
EXISTINGEXISTING
TV REMOTETV REMOTE
TV REMOTE
TV REMOTETV REMOTE
CONTROL?CONTROL?
CONTROL?
CONTROL?CONTROL?
Need help? Go to www.weemote.com
13
Need help? Go to www.weemote.com
14

TEST THETEST THE
TEST THE
STEPSTEP
STEP
STEPSTEP
1. Make sure your TV is turned off.
2. Point the weemote® at your TV and press the Power
(RED) button. The TV should go on. Now, check the
volume up/down button as well as the channel up/
down button. If all these functions work, then you have
the correct code for your TV.
If any of the functions above do not work, then you will
need to try another TV code. Go back and repeat Step
5. Note that if you have a SONY TV and the channels
do not come up correctly, then you have the wrong TV
code. Note that if the favorite channel digits come up
too slowly or too quickly, then you will need to adjust
the speed of your weemote - See Page 33.
NOTE: When you are finished testing and you are
using a Set-Top box with your system, then you will
need to set the TV back to the correct channel or video
input normally used with your Set-Top box.
STEPSTEP
STEP
STEPSTEP
1. Write the TV code number on the Code
Information Label located behind the battery
door side facing the batteries .
2. If you are also using a Set-Top box, then
proceed directly to STEP 9.
3. For TV only users, review STEP 13 for
other Options you can set with your weemote.
Reattach the Setup cover and battery cover.
DO NOT OVERTIGHTEN THE SCREWS!!!
77
7
77
88
8
88
TEST THETEST THE
TV CODETV CODE
TV CODE
TV CODETV CODE
LAST STEP FORLAST STEP FOR
LAST STEP FOR
LAST STEP FORLAST STEP FOR
TV ONLY USERS!TV ONLY USERS!
TV ONLY USERS!
TV ONLY USERS!TV ONLY USERS!
TV Codes
AOC 561928 120 140 163
172 192
ASA 47
Admiral 3184190125 129 187
Aiko 24 Aiwa 90 251
Akai32 70 149 172
Alaron 187 Amark 120 224 225
Amstrad 33
Anam 592141 120 121 183
Anam National 211 Archer 120
Audio Dynamics 238
Audiovox 24 41 120 170
Bell & Howell 18 90
Broksonic 52328172 174
CXC 041
Candle 562223 150 163 172
Capehart 19 Carver 151
Centurion 192 194
Citizen 561618 22 23 24
Concerto 523172
Contec 41 91 181 185 227
Craig 21 41 Crown 26 41
Curtis Mathes 61618265990
DBX 238
Daewoo 52426293031
176
26 150 163 172 202
125 131 163 172 192 194
202
32 130 170 172
Need help? Go to www.weemote.com
15
Need help? Go to www.weemote.com 16

TV Codes
TV Codes
Dayton 192194
Daytron 26 Denon 169
Dimensia 125 Dumont 147
Electrohome 26 149 224 240
Emerson 17 23 26 28 33 35
Envision 163
Fisher42090 099
Fujitsu 187
Funai 41 132 187 Futuretech 41
General Electric 3892343
Goldstar 52326284546
Grundig 47 Hallmark 23 172
Harmon 62 Hinari 187
Hitachi 5182326484950
Infinity/JBL 10 66 151
JC Penney 35 6141626
JVC 57 58 59 60 186
Jensen 56 KEC 41
KTV 26 39 41 172
Kawasho 61 Kenwood 6
Kloss 22 62 110
36 37 38 39 41 90
122 141 143 171 172 176
181 187 203 204 205
44 125 130 143 147
165 170 172 182 183
195 206 207 211
151 168 172 194
51 52 53 54 55 116 126
142 169 172 185
44 96 125 131 149 163
165 172 194 202 206 207
LXI 310286690125 129
131 132 151 172 194 201
Lodgenet 18 Logik 18
Luxman 523172
MGA 456 237172 149
163 172 187 192 194
MTC 561623 31 163 172
202
Magnasonic 24 129 131 151 187
Magnavox 68 1017 27 28
64 65 66 67 68 110 132
150 151 154 163 164 167 172
175 187 192 194 200
Majestic 18
Marantz 6106668149 151
Matsui 32 109
Memorex 18 032 072 090 149 172
Midland 13 165
Mitsubishi 45 2328 70 71
Multitech 41
NAD 2 131 166 172 201
NEC 567 232890 163
National 11 151 190 195 196 211
Nikkai 11 3 118 Novabeam 062
Onwa 41 Optimus 90 166 196
Optonica 129 Orion 176 204
Osume 91
163 172
187
72 122 123 129 149 172
187 192 194
172 183 191 192 194
Need help? Go to www.weemote.com 17
Need help? Go to www.weemote.com 18

TV Codes
TV Codes
Panasonic 89 101166 73
151 165 177 183 195 196 211
Philco 566465 67 68 110
149 150 151 163 169 172 176
183
Philips 510276668146 150
151 163 164
Pioneer 284851 76 131 166
Portland 52426172
Proscan 125 172
Proton 613192326172
Pulsar 1
Quasar 89165 183 195 196 211
RCA 358 14487879
80 82 84 85 86 87 125
127 130 134 149 172 182 183
210
Radio Shack 32628417290
Realistic 35 41 90 141 172 194
Runco 1 SAA 145
SSS 541Saba 51 116 142
Saisho 32 33 109
Sampo 619163 192 194
Samsung 56 1623 26 28
Sansui 176
Sanyo 42 89 90 91 92 109 194
Scott 26 28 37 41 93 172 187
Sears 3234290959698
112 141 172 194
32 112 151 163 172 192
194 202
192 194 204
99 101 102 104 125 131 132
151 172 187 194 201 202
Sharp 26 91 129 141 Signature 18
Sony 109 119 122 189 200
Soundesign 23 41 150 172 187
Spectricon 120 Starlite 41
Supra 22 23 172
Sylvania 61028646566
Symphonic 132 179 TMK 5 023 172
Tandy 112113 129 Tatung 9 183 211
Technics 8 165 196
Techwood 523165 172
Teknika 45 1618 22 23
Telerent 18 Teletech 32
Thomson 51 116 142
Toshiba 16 17 47 90 96 118
Totevision 26 Universal 44 206 207
Vector Research 6 Victor 57
Video Concepts 70 Vidtech 52328172
Viking 22
Wards 561823 28 44 64
65 67 68 119 125 141 151 163
172 182 187 192 194 206 207
Westinghouse 41 090 130 170 171 176
Yamaha 56Yorx 192 194
Zenith 1182440178
Zonda 120
68 110 112 132 150 151
163 172 192 194
24 26 41 72 114 149
150 151 172 187 202
131 180 201 202
204
Need help? Go to www.weemote.com 19
Need help? Go to www.weemote.com 20

TV/VCR Combo Codes
TV/VCR Combo Codes
Amark 224 225 Audio Dynamics 238
Broksonic 219 226 Citizen 224
Contec 227 Corando 224 Coronado 225
Curtis Mathes 224 231 DBX 238
Daewoo 224 247 250 252
Dayton 224 Electrohome 224 240
Emerson 219 222 223 224 225 226
Funai 251 General Electric 231 233 248
Goldstar 223 224 225 230 238 254
Harmon 238
Hitachi 224 225 231 241 251
JC Penney 223 224 231 238 241 242
JVC 234 235 238 KMC 224 225
KTV 224 225 Kenwood 235 251
LXI 223 251 254 Lloytron 224
MGA 240
Magnavox 224 225 231 236 237
Marantz 237 238 Marta 223
Memorex 223 242 244 245 248 251
Mitsubishi 239 240 Optimus 242
Orion 219 226 Panasonic 231 241 242
Philco 224 225 236 237 251
Philips 220 223 225 236 237 251
Pioneer 235 Portland 224 225
Proton 224 Pulsar 248
Quasar 231 241 242
227 251 253
241 251
RCA 231 233 241 251
Radio Shack 224 229 230 242
Realistic 222 223 224 229 251
Runco 243
Samsung 221 224 225 229 244 245
Sansui 219 235
Sanyo 244 245
Scott 224 247
Sears 223 224 225
Sharp 224 225 255
Signature 251
Sony 200
Soundesign 251
Sylvania 229 237 240 251
Symphonic 251
Tandy 251 Teac 251
Technics 242
Teknika 223 224 225 251
Toshiba 240 247
Totevision 223 224
Vector Research 238
Victor 235
Video Concepts 251
Wards 224 251
Yamaha 238 251
Zenith 219 223 235 248 251
246 247
Need help? Go to www.weemote.com 21
Need help? Go to www.weemote.com 22

SETTING YOURSETTING YOUR
SETTING YOUR
STEPSTEP
STEP
STEPSTEP
1. Turn on your Cable Box , Satellite Receiver
or Digital Video Recorder (DVR).
Please note that ReplayTV, TiVo and Ultimate
TV (DVR) units are also considered to be a
Set-Top device. If you also have a seperate
Set-Top box with these units, program in the
one unit you mostly use for live TV use.
2. Please refer to the CABLE, SATELLITE OR
DIGITAL VIDEO RECORDER CODES listed in
the Reference Guide. NOTE: CABLE, SATEL-
LITE AND DVR CODES ARE LISTED
SEPERATELY. If you cannot find your brand
listed there, then please refer to Page 35 on
how to search for your code.
3. Locate the first code for your brand Set-Top
device.
4. Press and hold the “STB” button for about
three seconds until the LED light begins to
flash, then release the button.
5. Enter the Set-Top Code number. In our
example, we are using the Scientific Atlanta
code number 003.
99
9
99
SETTING YOURSETTING YOUR
SET-TOP CODESET-TOP CODE
SET-TOP CODE
SET-TOP CODESET-TOP CODE
CONTINUEDCONTINUED
CONTINUED
STEPSTEP
STEP
STEPSTEP
8. Press the RED power button to see if the SetTop box turns off. If it does not, then go back to
the beginning of Step 9, using the next code
number listed for your manufacturer. If you have
run through all the possible codes and still
cannot get the Set-Top box to power off, then
please refer to page 36 on how to search for
your code.
Please note that In some cases, you may find a
code that does not turn your Set-Top box on and
off but will change channels. Test for this
condition if you have tried everything to find a
code that will turn your Set-Top box on and off.
STEPSTEP
STEP
STEPSTEP
DO YOU USE THE “ENTER” OR “OKAY”
BUTTON TO CHANGE CHANNELS?
YES: Please go to Page 31 to set the Enter/
Okay Option, then continue to Step 11.
NO: Go on to question 2 below
99
9
99
1010
10
1010
EXISTING SET-TOPEXISTING SET-TOP
EXISTING SET-TOP
EXISTING SET-TOPEXISTING SET-TOP
REMOTE CONTROL?REMOTE CONTROL?
REMOTE CONTROL?
REMOTE CONTROL?REMOTE CONTROL?
CONTINUEDCONTINUED
HOW DO YOUHOW DO YOU
HOW DO YOU
HOW DO YOUHOW DO YOU
USE YOURUSE YOUR
USE YOUR
USE YOURUSE YOUR
6. Press the “1” button 3 times = 3
In this example, there is no need to use the
“100” and “10” buttons as the channel number
is below 10.
7. Press the “STB” button again to set the code.
The LED should flash three times and then turn
off to confirm that the code was entered.
Need help? Go to www.weemote.com
23
2. WHEN YOU CHANGE CHANNELS, DO
YOU USE ALL THREE DIGITS REGARDLESS
OF THE CHANNEL NUMBER, I.E. CHANNEL 7
IS ENTERED ON YOUR REMOTE AS “007”?
YES: Please go to Page 31 to set the
3-Digit Option, then continue to Step 11.
NO: Go on to Step 11.
Need help? Go to www.weemote.com
24

TEST THETEST THE
TEST THE
STEPSTEP
STEP
STEPSTEP
IMPORTANT NOTE: If your Set-Top box is
set for viewing on Channel 2,4,5 of your TV,
or is cabled using direct video connections
(RCA Jacks or S-Video), then please go to
Page 32 to set the TV Startup Mode option,
then come back to this Step.
1. Make sure your TV and Set-Top box is
turned off.
1111
11
1111
TEST THETEST THE
SET-TOP CODESET-TOP CODE
SET-TOP CODE
SET-TOP CODESET-TOP CODE
SPECIALSPECIAL
SPECIAL
STEPSTEP
STEP
STEPSTEP
If you followed all the appropriate steps in this guide, your
weemote® is now ready for use. At this point, you should
consider other options you can set to enhance the
weemote’s functionality for your specific needs. These
options can be programmed now or at anytime.
1. Volume Control. You can turn this control completely
off which is useful in cases where you don’t want the user
to control the volume with the weemote®. See Page 33.
1313
13
1313
SPECIALSPECIAL
OPTIONSOPTIONS
OPTIONS
OPTIONSOPTIONS
2. Point the weemote® at your Set-Top box
and press the Power (red) button. The Set-Top
box should go on as well as the TV. Now, check
the volume up/down button as well as the
channel up/down button. If all these functions
work, then you have the right code for your SetTop box.
If any of the functions above do not work, then
you will need to try another Set-Top code. Go
back and repeat Step 9.
FINISHINGFINISHING
FINISHING
STEPSTEP
STEP
STEPSTEP
1. Write the Set-Top code number on the Code
Information Label located behind the battery
door side facing the batteries .
2. Review STEP 13 for other Options you can
set with your weemote. Reattach the Setup
cover and battery cover. DO NOT OVERTIGHTEN THE SCREWS!!!
Need help? Go to www.weemote.com
1212
12
1212
FINISHINGFINISHING
UPUP
UP
UPUP
25
2. Channel Up/Down Control. The channel up/down
control is factory set to only circulate through the favorite
channels you have programmed in. Additional options are
to turn this control off altogether or allow it to access all
channels available (Adult Mode). See Page 33.
3. Powering up to a Favorite Channel. The weemote®
can be set to go to the First Favorite Channel assigned
on the GREEN #1 button whenever the user presses the
RED power button. Note that this feature may not work
with all devices and may operate better by adjusting your
weemote’s speed - item 4. See Page 34.
4. Speed Adjustment. With this option, you have the
ability to speed up or slow down that rate at which the
weemote sends channel changing information to your TV
or Set-Top device. You can essentially “tune” the
weemote to send the favorite channel information at the
fastest possible speed, ensuring the highest reliable
channel changing possible. See Page 34.
5. Set-Top Powering. You can set the weemote to NOT
turn your Set-Top box on and off whenever the RED
power button is pressed. See Page 36.
Need help? Go to www.weemote.com
26

Cable Box Codes
Satellite Receiver Codes
AT&T 115 Americast 128 Eagle 6
Eastern 715
General Instrument 1354955
75 109 115 121 122 134 183
196 197 200 201 202 203 220
247 248 249 250 251 252 254
Hamlin 88 89 90
Hitachi 53 124 132 220 Hyundai 127
Jerrold 15052535575
Macom 44 187
Motorola SEE GENERAL INSTRUMENTS
NEC 10 NSC 20
Oak 56 57 58 59 Pace 11
Panasonic 14 60 61 99 157 177
Pioneer 2626468111
Pulsar 65 Radio Shack 23 131
Regal 89 90 Regency 7 SL-Marx 7
Samsung 665
Scientific Atlanta 366676869
Signal 6 Signature 53 220
SkyCable 129
Sony 24 Sprucer 14 60
Starcom 55 200 201
Stargate 72265163
Sylvania 72 Texscan 72
Tocom 73 74 75 Videoway 5
Viewstar 20 185
Zenith 5118
115 120 122 200 220
Alphastar 125 Amway 139 143
Birdview 235 CI Satellite 146
Cable Innovations 183 Century 148
Channel Master 147 187
Chaparral 214 215 216 217
Cheyenne 216 Citoh 145 Conifer 142
Curtis Mathes 174 DISHPlayer 100 101
DX Antenna 213 DX Communications 121 144
*DirecTV 093 094 095 096 097
Dish Network 100 101 119
Drake 149 187 188 189 191 194
Echostar 11 3 11 9 137 150 204 205
Express VU 11 9 Fujitsu 186
General Instrument 1354955
75 121 122 134 183 196 197 200
201 202 203 220 247 248 249
250 251 252 254
Hitachi 124 Homecable 226
Houston Tracker113
Hughes Network 93 94 95 96 97
IQ 212 Insight 124 Intersat 143 241
JVC 100 101 119 Janeil 178 186
Kenwood 243 Legend 137 204
Macom 134 174
Magnavox 40 117 126
*If you have a DirecTV Receiver, you should try the codes listed
under the name brand of your receiver first.
098 124 132
206 207 208 209
98 124 132
Need help? Go to www.weemote.com 27
Need help? Go to www.weemote.com 28

Satellite Receiver Codes
Digital Video Recorder Codes
Memorex 117 137 Norsat 142
Orb 140
Panasonic 123 178
Pansat 246
Philips 16 117 126 176
Pico 139
Primestar 049 121
Prosat 138 Quick Draw 144
RCA 110 116 11 8 141 233
Radio Shack 183 196 197 225
Ramsey 139
Realistic 225 230
Rural Cable 196
Samsung 108
STS 212 213 Sierra 216
Sony 112 114
Star Sight 109
Star Trak 136 218 219 222 223
Strong 136
Super Guide 253
Tee-Com 219
Toshiba 133 134 174 187
Uniden 117 126 135 179 180 181 182
183 184 224 225 226 227 228
230 232
Video Cipher II 186 Video Pall 186
Zenith 174 186
RCA Ultimate TV 118
ReplayTV 31 157
TIVO 30 32 33 151
TIVO/Philips151
TIVO/Sony 162
ShowStopper 157
Sony Ultimate TV 114
Please note that if these codes do not work
and you have a Digital Video Recorder (DVR)
that is integrated into a Cable Box or Satellite
Receiver, then try the Cable Box or Satellite
Receiver codes listed for the brand name
manufacturer of your Integrated DVR/Cable or
DVR/Sat unit.
Need help? Go to www.weemote.com 29
Need help? Go to www.weemote.com 30

System Options
System Options
SETTING THE ENTER/OKAY OPTION
Some TV’s and Set-Top boxes require that the
ENTER or OKAY button be used when changing
channels. The best way to tell whether you need to
use this option is to use your existing remote. Point
your existing remote at your TV or SET-TOP box,
and then change a few channels. Now try using the
Enter or Okay button on your remote. Did the
channels change faster? If yes, proceed with this
setup, otherwise you do not need to use this option.
STEP 1: Press and hold the “TV” or “STB” button,
depending on which unit needs the enter option for
about 3 seconds. Once the LED light begins to flash,
then release the button.
STEP 2: Press the “FAV” button once.
STEP 3: Press the NUMBER “1” button located in
the setup area next to the 100 and 10 buttons. The
LED light flashes three times and then goes out to
confirm that the option has been set.
STEP 4: Continue on to Step 6 (TV) or Step 10
(Set-Top) to complete your setup.
To clear this option, simply repeat the Steps above.
SETTING THE 3-DIGIT OPTION
The latest digital TV and SET-TOP boxes support
hundreds of channels. These units typically
require that you enter three digits, regardless of
the channel number. For instance, channel 7
cannot be entered as simply 7, but rather 007.
The best way to tell whether you need to use this
option is to use your existing remote. Point your
existing remote at your TV or SET-TOP box, and
then select channel 7. Did you need to enter in
007 in order for the channel to change? If so, then
go ahead and set this option.
STEP 1: Press and hold the “TV” or “STB” button,
depending on which unit needs the 3-Digit option for
about 3 seconds. Once the LED light begins to flash,
then release the button.
STEP 2: Press the “FAV” button once.
STEP 3: Press the “100” button once. The LED light
flashes three times and then goes out to confirm that
the option has been set.
STEP 4: Continue on to Step 6 (TV) or Step 10 (SetTop) to complete your setup.
To clear this option, simply repeat the Steps above.
TV STARTUP MODE OPTION
Set-Top boxes are normally set for viewing with your
TV set to channel 3. If your Set-Top box is set for
viewing with your TV set to channel 2, 4, 5 or your
Set-Top is cabled directly to your TV’s video port,
then you need to set this option.
STEP 1: Press and hold the “TV” button for about
three seconds until the LED light flashes, then
release the button.
STEP 2: Press the “CHANNEL UP” button (top of
long blue button) once.
STEP 3: Press the Favorite Channel button that
corresponds to your setup (see table below). The
LED light flashes three times and then goes out to
confirm that the option has been set.
TV Startup Mode Option Table
TV set to Video Port, Press Channel #1 (Green)
TV set to channel 2, Press Channel #2 (Blue)
TV set to channel 3, Press Channel #3 (Orange)
TV set to channel 4, Press Channel #4 (Purple)
TV set to channel 5, Press Channel #5 (Yellow)
NOTE: To change this option again, simply repeat the steps above
except that in STEP 3, press the desired button (see table above).
Need help? Go to www.weemote.com 31
Need help? Go to www.weemote.com 32

System Options
System Options
DISABLING THE VOLUME CONTROL
This feature allows you to completely turn off the
volume control.
1. Press and hold the “TV” button for about three
seconds until the LED light begins to flash, then
release the button.
2. Press the “FAV” button once. The LED will remain
on.
3. Press the number “10” button. The LED will blink
three times and go out to confirm your selection.
To turn the volume control back on, simply repeat
steps 1-3 above.
CHANNEL UP/DOWN OPTION
This option allows you to either turn the channel up/
down control completely off or allow the user to surf
all available channels in your system (Adult Mode).
1. Press and hold the “TV” button for about three
seconds until the LED light begins to flash, then
release the button.
2. Press the “FAV” button once. The LED will remain
on.
3. If you press the GREEN #1 button, then you set
the option for turning the channel up/down control
completely off. If you press the BLUE #2 button,
then you set the option for allowing the channel up/
down control to access all channels (Adult Mode).
4. After you press one of the selections above, the
LED should flash three times and go out to confirm
that the option has been set.
To clear this option back to only having favorite
channels being accessible, simply repeat the Steps
above for the last setting you made.
POWER UP TO FAVORITE CHANNEL
NOTE: DO NOT TURN THIS FEATURE ON UNTIL
YOUR WEEMOTE® IS COMPLETELY SETUP.
This feature allows you to set the weemote® to send
the first favorite channel programmed on the
GREEN #1 button whenever the user presses the
RED power button to turn on the TV and/or Set-Top
box on.
1. Press and hold the “TV” button for about three
seconds until the LED light begins to flash, then
release the button.
2. Press the RED power button once. The LED will
flash three times and go out to confirm this option.
You should test this feature several times on your
system to make sure it works properly. Some older
Set-Top boxes may not work properly with this
feature and some TV’s react too slowly when turned
on for this feature to work properly.
If you run into timing problems, you can try to make
the feature work better by making speed adjustments but making any speed adjustment also effects
favorite channel changing as well - see next section.
SPEED ADJUSTMENT
This feature allows you to control the speed at
which the weemote® sends channel digit information to your TV or Set-Top box as well as the
speed of the power button control sequence.
In some cases, making this adjustment is necessary in order for the weemote® to work properly
with your TV or Set-Top device. The typical
problem that suggests you need to adjust the
speed is that you notice the channel changing
before all channel digits are sent, i.e. channel 294
changes to 2 or 29.
Need help? Go to www.weemote.com 33
Need help? Go to www.weemote.com 34

System Options
In other cases, it is desirable to set the weemote®
to operate at the fastest possible speed to match
the performance of your equipment. As a rule, the
faster the information is sent, the less chance there
might be of interference with the signal, causing
channel changing to be more reliable. There are
other factors to ensure faster channel changing
such as making sure you don’t need to set the
ENTER or OKAY option. If you have not done so
already, make sure you review this by looking at
STEPS 6 (TV) and 10 (STB).
A speed value range of between 1 and 100 can be
entered into the weemote®. The lower the speed
value number, the faster your speed, i.e. a speed
setting of “1” sends information at the fastest
possible speed. We have found from experience
that the optimal speed value range is between 510, especially for Set-Top devices.
To enter a speed value:
1. Press and hold the FAV button until it begins to
flash, then release the button
2. Press and release the TV button (The LED
should now stay on)
3. Enter a speed value using the 100, 10 and 1
keys.
4. Press and release the TV button again - The
LED should flash three times to confirm the value
has been set.
You may need to try a range of different speed
value settings to find the optimal setting for your TV
and/or Set-Top box. Changing the speed value/s
does not effect any other program settings - you do
not need to go back and reprogram your codes or
favorite channels.
System Options
SET-TOP POWER ON/OFF
This option allows you to turn off the Power signal
that is normally sent to your Set-Top device
everytime the RED power button is pressed. This is
desirable if you leave your Set-Top device powered
on all the time.
Step 1: Press and hold the STB button down until
the LED light flashes, then release the button.
Step 2: Enter the command "950" using the 100, 10
and 1 keys.
Step 3: Press and release the STB button.
At this point, if the option has been enabled (SETTOP POWER OFF), the LED will flash three times
and go out. If the option has been disabled (SETTOP POWER ON), the LED will stutter flash.
SEARCHING FOR YOUR CODE
Sometimes you may not able to find a match using
the codes supplied in this manual for your TV or SetTop. In this case, you need to try and search for your
code as described below.
1. Turn on the TV, TV/VCR or Set-Top unit, depending on which unit that needs a code searched.
2. Press and hold the “TV” or “STB” button depending on which device you trying to locate a code, for
about 3 seconds until the LED starts to flash, then
release the button.
3. Point the weemote® at the device and begin to
press the volume up (YELLOW) button about every
half a second until the device turns off. Keep in
mind that you may need to press this button over
150 times to cycle through all the possible codes
that could work. To confirm you are in search mode,
you should see the LED light go off everytime you
press the button down and go back on bright when
you release the button.
Need help? Go to www.weemote.com 35
Need help? Go to www.weemote.com 36

System Options
System Options
4. When the TV or Set-Top device turns off, press
the “TV” or “STB” button again to lock in the code.
The LED should flash three times and go out to
confirm your selection.
Don’t worry if you go past the correct code. Simply
go back to Step 1 and then at Step 3, instead of
pressing the volume up button, press the volume
down button. This tells the weemote® to search in
the reverse direction back towards the matching
code.
5. Now test the code as described on pages 14 (TV)
or 24 (Set-Top). Once you find a code, please go to
the next section so that you can identify the code
number- CODE RECALL.
6. If the code does not work properly for all functions, please go back to Step 1 and repeat the
process. Keep in mind that when you begin a new
code search that the weemote® will begin from the
last point where you stopped from your last search.
CODE RECALL
Once you search and find a code, you can have the
weemote® signal the code back to you using the
LED. This allows you to write down the code on the
information label, located on the battery door side
facing the batteries.
1. Press and hold the “TV” or “STB” button, depending on which code you trying to read back for about
three seconds until the LED starts to flash, then
release the button.
2. Now press the same button “TV” or “STB” button
again and look at the LED.
The weemote® will begin to flash back the code in
the following manner. It will start by flashing back the
100’s value, then pause, followed by the 10’s value,
then pause and finish by flashing back the 1’s value.
Each flash represents a “1” value. Please note that a
“ZERO” is represented by a fast flicker of the LED.
As an example, right after Step 2; if the weemote®
flashes 4 times then pauses (4 X 100) then flashes 6
times then pauses (6 X 10) then flashes quickly and
goes out ( 1 X 0), then the code is 460.
CLEARING FAVORITE CHANNELS
The following procedure clears a programmed
channel from the weemote®.
1. Press and hold the “FAV” button for about 3
seconds until the LED begins to flash, then release
the button.
2. Press the favorite channel button you wish to
clear. Refer to the table below:
Clearing Channels 1-10 Table
To clear channel 1, Press Channel #1 (Green)
To clear channel 2, Press Channel #2 (Blue)
To clear channel 3, Press Channel #3 (Orange)
To clear channel 4, Press Channel #4 (Purple)
To enter channel 5, Press Channel #5 (Yellow)
To clear channel 6, Press MUTE 2 TIMES
To clear channel 7:
Press Mute - then press Channel #2 (Blue)
To clear channel 8:
Press Mute - then press Channel #3 (Orange)
To clear channel 9:
Press Mute - then press Channel #4 (Purple)
To clear channel 10:
Press Mute - then press Channel #5 (Yellow)
3. Press the same Favorite Channel button you
want to clear again. The LED will flash three times
and go out to confirm that the channel has been
cleared. Note that if you are clearing channel 6 on
the MUTE button, then in this STEP you would press
the MUTE button again.
Need help? Go to www.weemote.com 37
Need help? Go to www.weemote.com 38

System Options
TROUBLESHOOTING
CLEARING TV/SET-TOP CODES
1. Press and hold the “TV” or “STB” button, depending on which code you are trying to clear for about 3
seconds until the LED starts to flash, then release
the button.
2. Enter in the code 333 using the 100, 10 and 1
buttons.
3. Press the “TV” or “STB” button again (depending
on which device you are trying to clear) to complete
the sequence. The LED should flash three times and
go out to confirm the code has been cleared.
You should delete the TV code if you intend to only
use your Set-Top box with the weemote®. In this
way, you can have all weemote® commands
normally sent to the TV such as volume and mute be
sent to your Set-Top box.
COMPLETE SYSTEM RESET
We recommend you use this feature whenever you
want to completely reprogram the weemote®. This
helps if you are having problems or you decide to
setup the weemote with a completely different
entertainment system.
If you are having problems with the weemote®
losing it’s program information every few days, we
suggest you pull the batteries completely out of the
unit and wait about two days before replacing the
batteries, then proceed with a System Reset.
1. Press and hold the “TV” button for about 3
seconds until the LED starts to flash, then release
the button.
2. Enter in the code 999 using the 100, 10 and 1
buttons.
3. Press the button again to complete the sequence.
The LED should flash quickly and go out to confirm
that the weemote® has been reset to factory
settings.
Need help? Go to www.weemote.com 39
1. The LED does not light or flash?
Check to make sure you have installed the batteries
properly. Check to make sure that the batteries are
not dead or too weak to operate the weemote®.
2. The weemote® powers on my TV or SET-TOP but
does not change channels?
The weemote® must have at least one channel
programmed in order for channel changing to work.
Press the channel buttons you programmed. If the
LED does not light up brightly, i.e. the light is dim,
then the channels have not been entered or programmed properly. Please go back to Step 4 and
repeat entering your channels.
If your setup is TV only, make sure you did not
program in a Set-Top code by mistake. Try clearing
the STB code - See Page 39.
Check to make sure you have set the proper code in
the weemote®. Sometimes a code will only partially
work. Fully test each code as described in this
manual.
3. I see the correct channel digits on my TV but the
channel does not change?
Make sure you programmed in the ENTER/OKAY
option or 3-Digit option, depending on what your
equipment needs. Some TV’s or Set-Top boxes will
not change channels until either 3 complete digits or
an ENTER or OKAY command has been sent from
the weemote®.
4. When changing channels, the channel numbers
that are sent to the TV from the weemote® are not
the same as what I programmed?
Check to make sure you have set the correct code in
the weemote®. This happens frequently with Sony
codes. The weemote is designed to output exactly the
channel number you program in when pressing the
channel buttons in normal operation. Keep trying
other codes.
Need help? Go to www.weemote.com 40

TROUBLESHOOTING
CARE AND MAINTENANCE
5. The channel digits on my TV or Set-Top display
either the first or last digit I programmed in. For
example, channel 57 shows up as channel 5 or 7?
It sounds like you need to make some speed adjustments in the weemote®. See Page 34.
6. Whenever I turn on the Set-Top box, the TV turns
on, then back off.
Check to see if your TV is plugged into your set-top
box. If so, plug it directly into an electrical outlet or
delete the TV code - See Pages 7 and 39.
7. The channel up/down button only goes to the
channels I programmed in the weemote®?
The weemote® is factory set to limit channel access.
See Page 33 for other options you can set.
8. I notice that sometimes the weemote® seems to
get confused. Sometimes, the programmed channels
get knocked out of alignment when the child is
pressing the buttons too quickly?
There are two possible problems here. The first is to
check and make sure whether you need the ENTER/
OKAY or 3-Digit option. Some TV’s and Set-Tops will
delay or not even change channels if these options
are not set. If one of these options is needed and not
set, channel changing will be unreliable.
Depending on your TV or Set-Top, the weemote®
may be sending the channel changing information too
slowly. See Page 34 for adjusting the speed of your
weemote®.
9. My weemote® seems to be losing channel/program
information every few days.
Make sure you are using Alkaline batteries. Standard
batteries will not work properly. You should reset your
weemote®, replace with new batteries and see if this
clears up the problem. See Page 39 - System Reset.
If the problem persists, please contact us.
Need help? Go to www.weemote.com 41
1. Keep the weemote® dry. If it gets wet, wipe it
dry immediately. Liquids may contain minerals
that can corrode the case and electronics.
2. Use and store the weemote® only in normal
temperature environments. Temperature extremes can shorten the life of the electronics,
warp the plastic body and cause the batteries to
leak.
3. Keep the weemote® away from excessive
dust, dirt or sand. Exposure to these elements
can cause the keypad to work erratically or fail
altogether.
4. Even though the weemote® was designed to
handle above average shocks, dropping the unit
frequently can cause the case to crack as well
as the internal electronics to malfunction.
5. Use only fresh batteries and take them out if
you do you not plan to use the weemote® for
long periods of time. Batteries that leak can
cause extensive damage to the Weemote®.
6. Wipe the weemote® with a damp cloth
occasionally to keep it looking new. Do not use
harsh chemicals, cleaning solvents, or strong
detergents as they may cause permanent
damage to the weemote’s finish.
Modifying or tampering with the weemote’s
internal components can cause malfunction and
may invalidate your warranty. If your weemote®
is not performing properly, please complete a
trouble report at our Customer Support page on
our website.
Need help? Go to www.weemote.com 42

LIMITED WARRANTY
Fobis Technologies Inc. (“FOBIS”) warrants, to the original
purchaser only, that this product will be free from defects in
materials and workmanship, under normal use, for ninety
(90) days from the date of original purchase.
This warranty does not cover damage or failures caused
by products or services not supplied by FOBIS, or which
result from accident, misuse, abuse, neglect, mishandling,
misapplication, faulty installation, setup adjustment,
improper maintenance, alteration, maladjustment of
consumer controls, modifications, commercial use, or that
is attributable to acts of GOD.
There are no express warranties except as listed above.
FOBIS SHALL NOT BE LIABLE FOR INCIDENTAL OR
CONSEQUENTIAL DAMAGES RESULTING FROM THE
USE OF THIS PRODUCT OR ARISING OUT OF ANY
BREACH OF WARRANTY. ALL EXPRESS AND IMPLIED
WARRANTIES, INCLUDING THE WARRANTIES OF
MERCHANTABILITY AND FITNESS FOR A PARTICULAR
PURPOSE, ARE LIMITED TO THE WARRANTY PERIOD
SET FORTH ABOVE. Some states do not allow the
exclusion or limitation of incidental or consequential
damages, or limitations on how long an implied warranty
lasts, so the above exclusions or limitations may not apply
to you. This warranty gives you specific legal rights and
you may also have other rights which vary from state to
state.
NOTES
To obtain warranty service for a defective product during
the warranty period, please return the product, preferably
in the original package, along with your purchase receipt,
to the company of your original purchase. A note detailing
the complaint would be helpful. The store, at its option, will
replace or repair this product if found to be defective.
Fobis Technologies Inc.
(305) 253-8387
Email: info@fobis.com
Need help? Go to www.weemote.com 43
Need help? Go to www.weemote.com 44
 Loading...