

Fobis Technologies Inc.Fobis Technologies Inc.
Fobis Technologies Inc.
Fobis Technologies Inc.Fobis Technologies Inc.
“designing gadgets for real life”“designing gadgets for real life”
“designing gadgets for real life”
“designing gadgets for real life”“designing gadgets for real life”
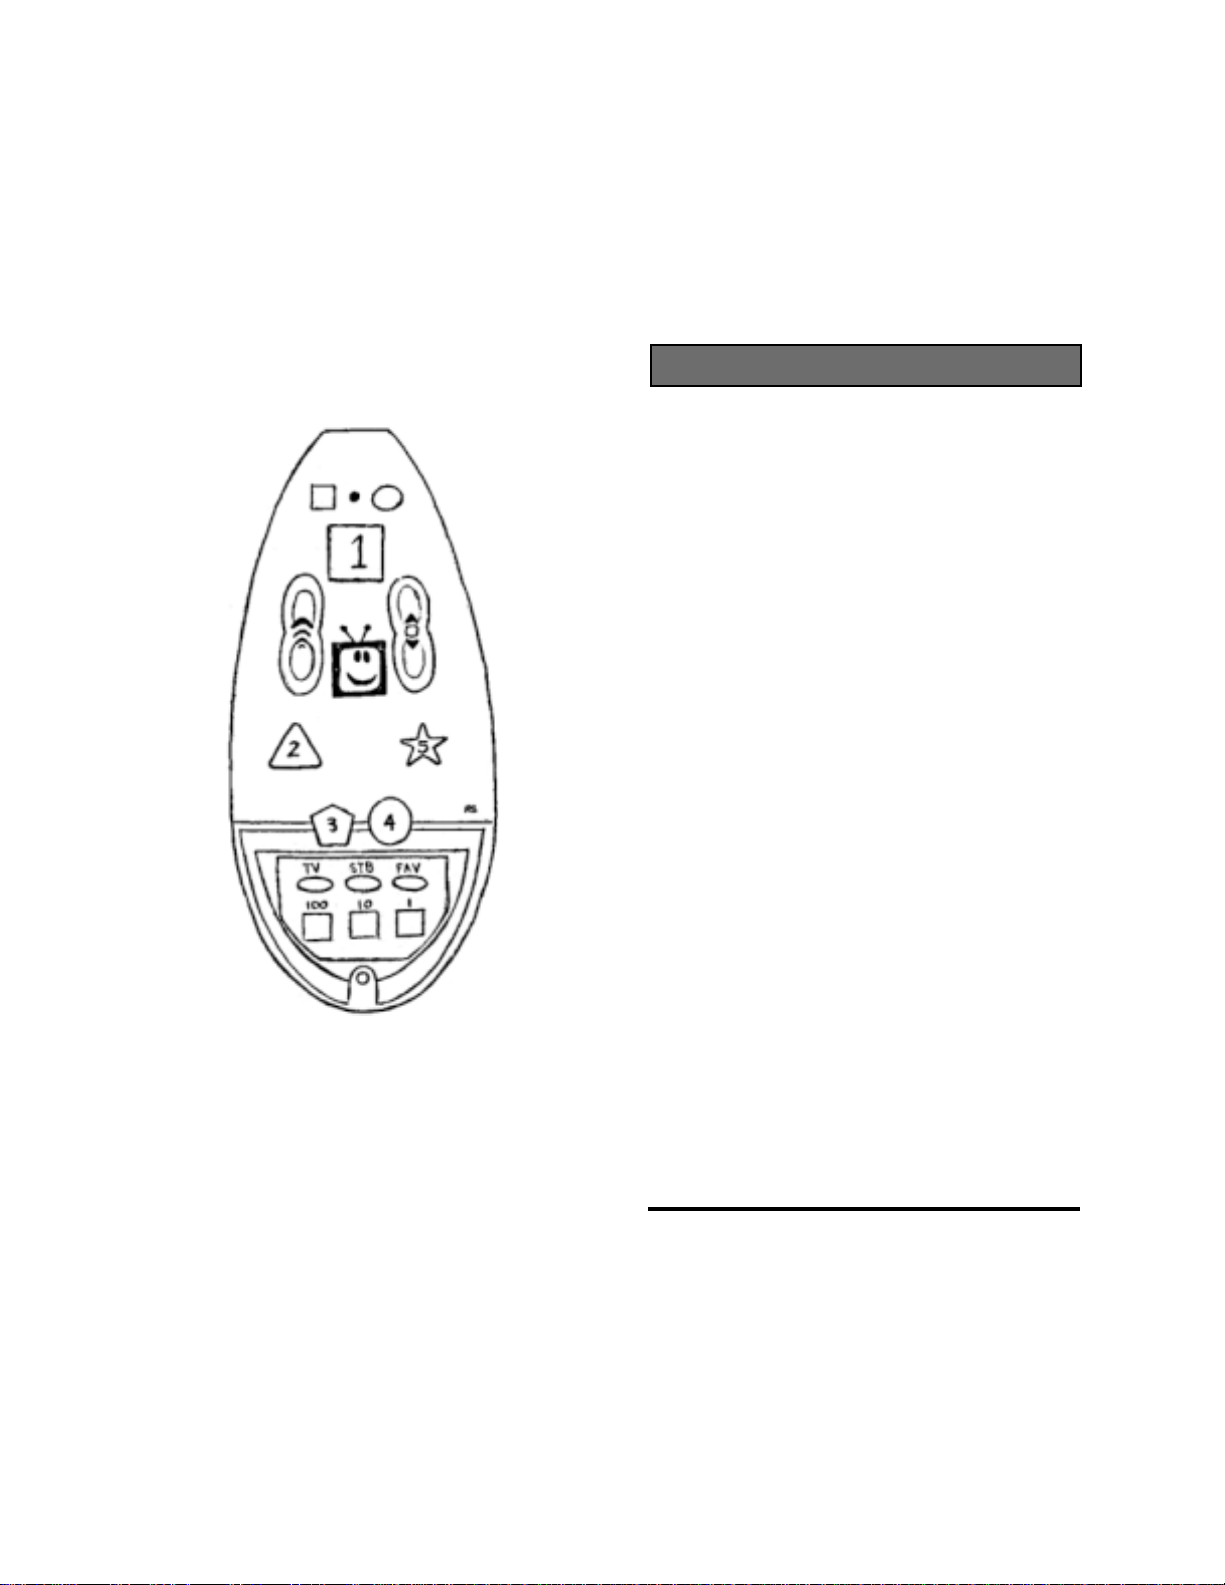
Mute PWR
LED
CHVOL
INTRODUCTION
This installation guide is designed to get your
weemote® 2 setup as quickly as possible. In
order to ensure a fast setup, please follow
this guide, step-by-step, in the order presented. Doing so will save you from possible
confusion and frustration later.
The companion “REFERENCE GUIDE” provides
more detail for those who need more information, have complex entertainment systems or
wish to further customize the Weemote’s setup.
It also contains the TV and Set-Top codes
needed to configure your Weemote®.
You will need to refer to Reference Guide to find
your TV, TV/VCR and Set-Top codes. Just follow
the steps in this guide and we will instruct you
whenever the Reference Guide is needed.
We welcome your feedback on our manual. If
you have any suggestions, please email us at
info@fobis.com.
If you run into any difficulty, please visit our web
site at www.weemote.com for the latest updates
and technical bulletins.
READ ME FIRST!
weemote® 2weemote® 2
weemote® 2
weemote® 2weemote® 2
QUICKSTARTQUICKSTART
QUICKSTART
QUICKSTARTQUICKSTART
GUIDEGUIDE
GUIDE
GUIDEGUIDE
© 2/01, Property of Fobis Technologies Inc.
Rev. 6/0301
weemote® is a registered trademark
patent pending
We also encourage you to register your
weemote® so we can inform you of other cool
gadgets we are working on. You can register online at our web site or fill out and mail the
enclosed post card.
Enjoy your weemote® 2!
The Fobis Team
Need help? Go to www.weemote.com 2
STEPSTEP
STEP
STEPSTEP
11
1
11
BEFORE YOUBEFORE YOU
BEFORE YOU
BEFORE YOUBEFORE YOU
BEGINBEGIN
BEGIN
BEGINBEGIN
STEPSTEP
STEP
STEPSTEP
22
2
22
WHATWHAT
WHAT
WHATWHAT
NEEDNEED
NEED
NEEDNEED
YOU YOU
YOU
YOU YOU
1. If you have a cable-ready TV or TV/VCR.
COMPLETE Steps 1-9 in this guide
Please note that the weemote® is already
loaded with the most popular Sony TV code.
2. If you have a cable-ready TV connected to
a Set-Top box.
COMPLETE Steps 1-13 in this guide
Set-Top boxes are defined as cable TV boxes
and satellite receivers such as DirecTV and
Echostar.
Replay players as a Set-Top device in the
weemote®.
3. If you only want to program your Set-Top
box.
COMPLETE Steps 1-5 and 10-13 in this guide
Please note that if you only want all weemote®
controls to be sent to the Set-Top box, you must
clear the TV code already set in your
weemote®. Please refer to the reference guide
on how to clear the TV code.
NOTE: The weemote® 2 will not work if you
are using a separate VCR’s tuner as your
method for changing channels on your TV.
The weemote® will also not work with UHF
(radio) based remote control systems
sometimes used in satellite receivers like
Echostar.
Please note that we consider TiVo or
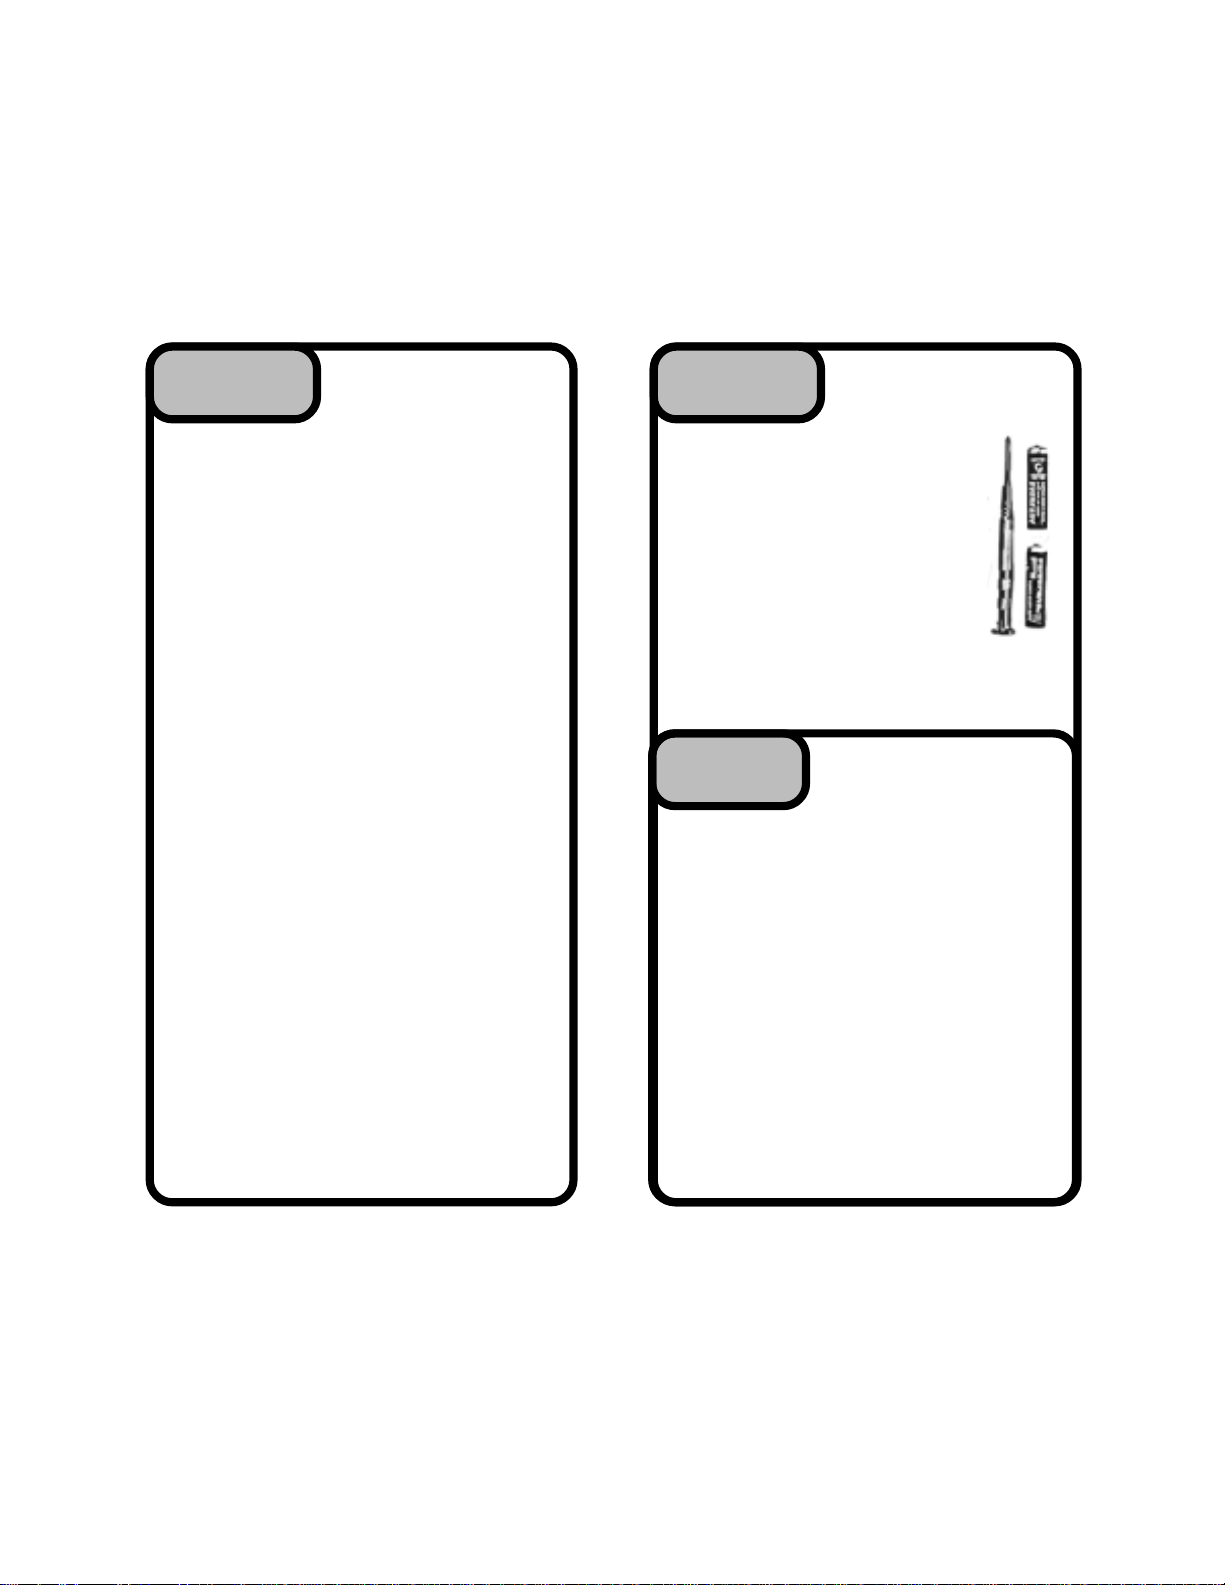
1. The weemote®
2. This Guide
3. Reference Guide
4. Battery Sticker
(one battery sticker is already
mounted inside the battery cover)
5. *A small philips head screw-
driver
6. *2 AAA Batteries (NEW FOR
BEST RESULTS)
* Items 5 and 6 are not included in your
weemote package
REMOVING THEREMOVING THE
REMOVING THE
STEPSTEP
STEP
STEPSTEP
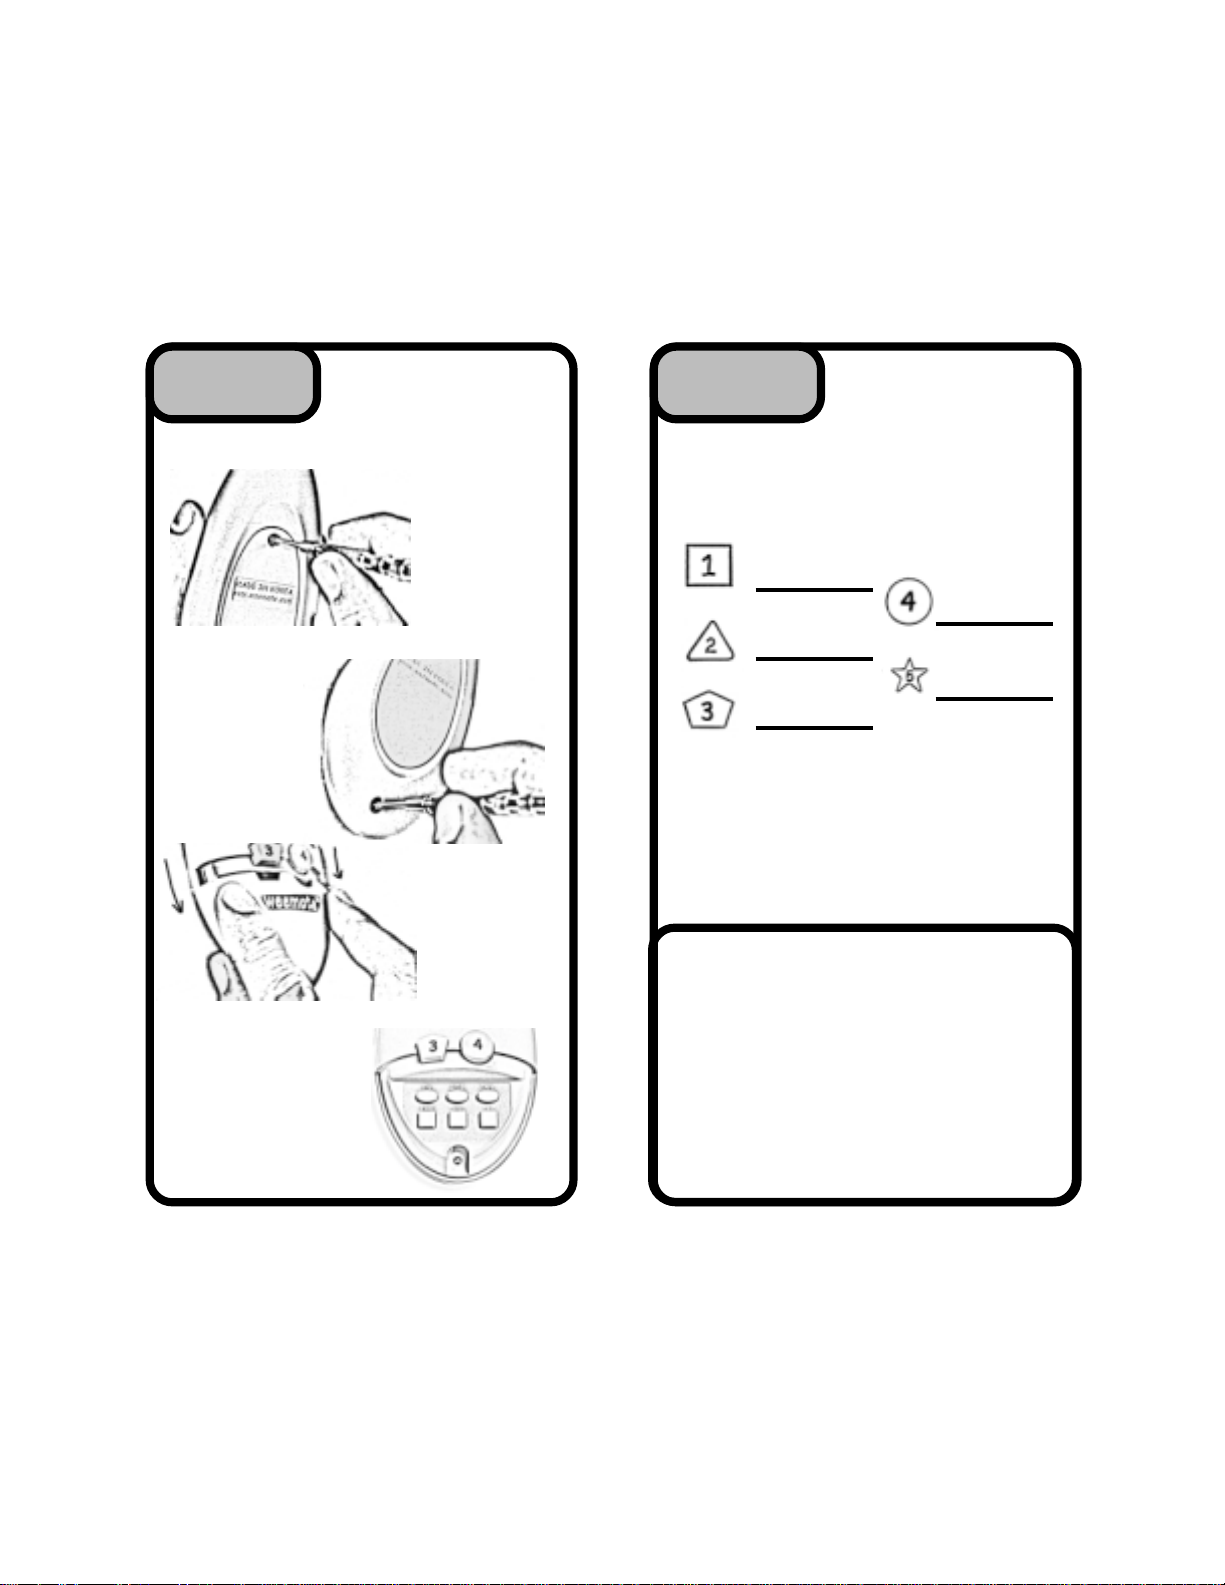
You must remove the setup cover in order to
gain access to the weemote® program
buttons.
Refer to the diagrams on the next page,
figures A-D. Note that the screws are
designed to remain on the covers so they
don’t get lost. Take care not to over tighten
the screws when you put the covers back on.
NOTE: You cannot setup the weemote®
until the setup cover is removed.
33
3
33
REMOVING THEREMOVING THE
BATTERY COVERBATTERY COVER
BATTERY COVER
BATTERY COVERBATTERY COVER
ANDAND
AND
ANDAND
SETUP COVERSETUP COVER
SETUP COVER
SETUP COVERSETUP COVER
Need help? Go to www.weemote.com
3
Need help? Go to www.weemote.com
4
STEPSTEP
STEP
STEPSTEP
33
3
33
CONTINUEDCONTINUED
CONTINUED
CONTINUEDCONTINUED
STEPSTEP
STEP
STEPSTEP
44
4
44
WRITE DOWNWRITE DOWN
WRITE DOWN
WRITE DOWNWRITE DOWN
YOUR CHILD’SYOUR CHILD’S
YOUR CHILD’S
YOUR CHILD’SYOUR CHILD’S
FAVORITEFAVORITE
FAVORITE
FAVORITEFAVORITE
CHANNELSCHANNELS
CHANNELS
CHANNELSCHANNELS
Removing the
setup cover
Fig. B
Weemote® setup
buttons
Fig. D
Removing
the battery
door
Fig. A
Pull down to
remove setup
cover
Fig. C
You do not need to setup all five.
The weemote® 2 can support up to 10
channels in the following manner. Channel 6
can be programmed to replace the MUTE
button (small square Gray button) and channels 7-10 can be programmed but will only be
available from the channel up/down button.
Please refer to the reference guide for adding
these additional channels.
APPLICATION FOR EASIER MOVIEAPPLICATION FOR EASIER MOVIE
APPLICATION FOR EASIER MOVIE
APPLICATION FOR EASIER MOVIEAPPLICATION FOR EASIER MOVIE
VIEWING WITH THE WEEMOTE®VIEWING WITH THE WEEMOTE®
VIEWING WITH THE WEEMOTE®
VIEWING WITH THE WEEMOTE®VIEWING WITH THE WEEMOTE®
In this application, you could program the
normally used MUTE button to go to either
channel 3 or 4, depending on which channel
you use to output your VCR signal. Now the
child can pop the tape into the VCR, hit the
play button and then press the weemote’s
square gray button to ensure that the TV will
display the movie from the VCR deck.
this, please see the reference guide.
To do
Need help? Go to www.weemote.com
5
Need help? Go to www.weemote.com
6

HINT - ENTERING CHANNELSHINT - ENTERING CHANNELS
HINT - ENTERING CHANNELS
HINT - ENTERING CHANNELSHINT - ENTERING CHANNELS
Before we begin to program in the channels,
here is a quick overview on the 100, 10 and 1
buttons. These buttons allow you to program in
the channels and code/s you will need to setup
the weemote® 2. You must remove the setup
cover in order to access these buttons.
Depending on which number you need, you
simply break down that number by 100’s, 10’s
and 1’s. For example, channel 294 would be
entered by pressing the 100 button twice (100
X 2), the 10 button nine times (10 X 9) and the
1 button four times (1 X 4). See diagram below.
And don’t worry about zeros - the weemote®
will add them in later. For example, if you need
to enter channel 07 or 007 to get channel 7,
just enter the number 7 (1 button seven times)
and the weemote® will handle sending channel
07 or 007.
Example:
To Enter Channel 294
PRESS - # TIMES
294
PROGRAM YOURPROGRAM YOUR
PROGRAM YOUR
STEPSTEP
STEP
STEPSTEP
1. Press and hold the “FAV” button for about
three seconds until the LED light begins to flash.
2. Press the favorite channel button you wish to
program - in this example we are using the
(Green) Button Number “1” to program in
channel 127.
3. Press the following combination of the 100, 10
and 1 buttons.
A. Press the “100” button X 1 time = 100
B. Press the “10” button X 2 times = 20
C. Press the “1” button X 7 times = 7
6. Press the Favorite Channel (Green) Button
Number “1” again to complete the sequence. DO
NOT PRESS THE FAV BUTTON. Please check
the LED - it should flash three times and then
go out to confirm that the channel has been
programmed. If it does not, try again.
55
5
55
PROGRAM YOURPROGRAM YOUR
FAVORITEFAVORITE
FAVORITE
FAVORITEFAVORITE
CHANNELSCHANNELS
CHANNELS
CHANNELSCHANNELS
100 10 1
200 + 90 + 4 = 294
NOTE: You must program at least one
favorite channel in order for the weemote®
to work!
Need help? Go to www.weemote.com 7
weemote
program
buttons
To setup favorite channels 2-5, simply use the
steps above except that for Steps 2 and 6, you
would substitute the Green Number 1 button for
the other favorite channel button (2,3,4 or 5)
you wish to program.
For programming channels 6-10, please refer to
the reference guide.
Need help? Go to www.weemote.com
8

SETTING YOURSETTING YOUR
SETTING YOUR
STEPSTEP
STEP
STEPSTEP
1. Turn your TV on.
2. Please refer to the TV or TV/VCR CODES
listed in the Reference Guide. NOTE: TV AND
TV/VCR CODES ARE ARE LISTED
SEPERATELY. If you cannot find your brand
TV or TV/VCR listed here, then please refer to
the Reference Guide to search for your code.
66
6
66
SETTING YOURSETTING YOUR
TV OR TV/VCRTV OR TV/VCR
TV OR TV/VCR
TV OR TV/VCRTV OR TV/VCR
CODECODE
CODE
CODECODE
CONTINUEDCONTINUED
CONTINUED
STEPSTEP
STEP
STEPSTEP
7. Press the RED power button to see if the TV
turns off. If it does not, then go back to the
beginning of Step 6, using the next code
number listed for your manufacturer. If you have
run through all the possible codes and still
cannot get the TV to power off, then please
refer to the Reference Guide on how to search
for your code.
66
6
66
CONTINUEDCONTINUED
3. Locate the first code for your TV or TV/VCR.
For this example, we will use the code 109
which is the first listed for a SONY brand TV.
4. Press and hold the “TV” button for about
three seconds until the LED light begins to
flash.
5. Enter the Code number. In our example, we
are using the SONY code number 109.
Press the “100” button 1 time = 100
Press the “1” button 9 times = 9
You do not use the “10” button in this case.
6. Press the “TV” button again to set the code.
The LED should flash three times and then turn
off to confirm that the code was entered.
Need help? Go to www.weemote.com
HOW DO YOUHOW DO YOU
HOW DO YOU
STEPSTEP
STEP
STEPSTEP
1. DO YOU USE THE ENTER KEY TO
CHANGE CHANNELS?
YES: Please go to Page 15 to set the Enter
Option, then continue to Step 8.
NO: Go on to question 2 below
2. WHEN YOU CHANGE CHANNELS, DO
YOU USE ALL THREE DIGITS REGARDLESS
OF THE CHANNEL NUMBER, I.E. CHANNEL 7
IS ENTERED ON YOUR REMOTE AS “007”?
YES: Please go to Page 15 to set the
3-Digit Option, then continue to Step 8.
NO: Go on to Step 8.
9
Need help? Go to www.weemote.com
77
7
77
HOW DO YOUHOW DO YOU
USE YOURUSE YOUR
USE YOUR
USE YOURUSE YOUR
EXISTINGEXISTING
EXISTING
EXISTINGEXISTING
TV REMOTETV REMOTE
TV REMOTE
TV REMOTETV REMOTE
CONTROL?CONTROL?
CONTROL?
CONTROL?CONTROL?
10

TEST THETEST THE
TEST THE
STEPSTEP
STEP
STEPSTEP
1. Make sure your TV is turned off.
2. Point the weemote® at your TV and press the
Power (red) button. The TV should go on. Now,
check the volume up/down button as well as the
channel up/down button. If all these functions
work, then you have the right code for your TV.
If any of the functions above do not work, then
you will need to try another TV code. Go back
and repeat Step 6.
NOTE: When you are finished testing and you
are using a Set-Top box with your system, then
you will need to set the TV back to the correct
channel or video input (see Step 12).
STEPSTEP
STEP
STEPSTEP
1. Write the TV code down on the battery
sticker located behind the battery door.
2. If you are also using a Set-Top box, then
you will need to proceed directly to STEP
10.
3. Go ahead and reattach the Setup area
cover and battery cover. DO NOT OVERTIGHTEN THE SCREWS!!!
88
8
88
99
9
99
TEST THETEST THE
TV CODETV CODE
TV CODE
TV CODETV CODE
LAST STEP FORLAST STEP FOR
LAST STEP FOR
LAST STEP FORLAST STEP FOR
TV ONLY USERS!TV ONLY USERS!
TV ONLY USERS!
TV ONLY USERS!TV ONLY USERS!
SETTING YOURSETTING YOUR
SETTING YOUR
STEPSTEP
STEP
STEPSTEP
1. Turn on your Cable Box , Satellite Receiver
or Personal Video Recorder.
Please note that TiVo and Replay (PVR) units
are considered Set-Top devices to the
weemote®. If you also have a Set-Top box with
these units, you only need to program in the
TiVo or Replay code as your STB setting.
2. Please refer to the CABLE, SATELLITE OR
PERSONAL VIDEO RECORDER CODES
listed in the Reference Guide. NOTE: CABLE,
SATTELITE AND PVR CODES ARE LISTED
SEPERATELY. If you cannot find your brand
listed there, then please refer to the Reference
Guide to search for your code.
3. Locate the first code for your brand Set-Top
device.
4. Press and hold the “STB” button for about
three seconds until the LED light begins to
flash.
5. Enter the Set-Top Code number. In our
example, we are using the Scientific Atlanta
code number 003.
6. Press the “1” button 3 times = 3
In this example, there is no need to use the
“100” and “10” buttons as the channel number
is below 10.
7. Press the “STB” button again to set the code.
The LED should flash three times and then turn
off to confirm that the code was entered.
1010
10
1010
SETTING YOURSETTING YOUR
SET-TOP CODESET-TOP CODE
SET-TOP CODE
SET-TOP CODESET-TOP CODE
Need help? Go to www.weemote.com
11
Need help? Go to www.weemote.com
12

CONTINUEDCONTINUED
CONTINUED
STEPSTEP
STEP
STEPSTEP
8. Press the RED power button to see if the SetTop box turns off (*See Note Below). If it does
not, then go back to the beginning of Step 10,
using the next code number listed for your
manufacturer. If you have run through all the
possible codes and still cannot get the Set-Top
box to power off, then please refer to the
Reference Guide on how to search for your
code.
* Some codes may operate channel changing but not power. If you
leave your Set-Top normally on, then you can use one of these codes.
In this case, for each code tested, try to see if you can change channels
by pressing the channel up/down button (long blue button) By using one
of these codes, the weemote® will not power the Set-Top box on/off.
STEPSTEP
STEP
STEPSTEP
1. DO YOU USE THE ENTER KEY TO
CHANGE CHANNELS?
YES: Please go to Page 15 to set the Enter
Option, then continue to Step 12.
NO: Go on to question 2 below
1010
10
1010
1111
11
1111
EXISTING SET-TOPEXISTING SET-TOP
EXISTING SET-TOP
EXISTING SET-TOPEXISTING SET-TOP
REMOTE CONTROL?REMOTE CONTROL?
REMOTE CONTROL?
REMOTE CONTROL?REMOTE CONTROL?
CONTINUEDCONTINUED
HOW DO YOUHOW DO YOU
HOW DO YOU
HOW DO YOUHOW DO YOU
USE YOURUSE YOUR
USE YOUR
USE YOURUSE YOUR
TEST THETEST THE
TEST THE
STEPSTEP
STEP
STEPSTEP
IMPORTANT NOTE: If your Set-Top box is
set to use Channel 2,4,5 on your TV or your
TV is cabled using direct video connections
(RCA Jacks or S-Video), then please go to
Page 16 to set the Channels/Direct Video
option, then come back to this Step.
1. Make sure your TV and Set-Top box is
turned off.
2. Point the Weemote® at your Set-Top box
and press the Power (red) button. The Set-Top
box should go on as well as the TV. Now,
check the volume up/down button as well as the
channel up/down button. If all these functions
work, then you have the right code for your SetTop box.
If any of the functions above do not work, then
you will need to try another Set-Top code. Go
back and repeat Step 10.
STEPSTEP
STEP
STEPSTEP
1212
12
1212
1313
13
1313
TEST THETEST THE
SET-TOP CODESET-TOP CODE
SET-TOP CODE
SET-TOP CODESET-TOP CODE
FINISHING UPFINISHING UP
FINISHING UP
FINISHING UPFINISHING UP
2. WHEN YOU CHANGE CHANNELS, DO
YOU USE ALL THREE DIGITS REGARDLESS
OF THE CHANNEL NUMBER, I.E. CHANNEL 7
IS ENTERED ON YOUR REMOTE AS “007”?
YES: Please go to Page 15 to set the
3-Digit Option, then continue to Step 12.
NO: Go on to Step 12.
Need help? Go to www.weemote.com
13
1. Write the Set-Top code down on the battery
sticker located behind the battery door.
2. Go ahead and reattach the Setup area cover
and battery cover. DO NOT OVERTIGHTEN
THE SCREWS!!!
Need help? Go to www.weemote.com
14

SETTING THE ENTER OPTIONSETTING THE ENTER OPTION
SETTING THE ENTER OPTION
SETTING THE ENTER OPTIONSETTING THE ENTER OPTION
A small number of TV’s and SET-TOP boxes require
that the ENTER key be used when changing
channels. The best way to tell whether you need to
use this option is to use your existing remote. Point
your existing remote at your TV or SET-TOP box, and
then change a few channels. Now try using the Enter
button on your remote. Did the channels change
faster? If yes, proceed with this setup, otherwise you
do not need to use this option.
STEP 1: Press and hold the “TV” or “STB” button,
depending on which unit needs the enter option. Hint:
If you are using a SET-TOP box, then press the STB
button. After about 3 seconds, the LED light will flash.
STEP 1: Press and hold the “TV” or “STB” button,
depending on which device requires this option, for
about 3 seconds, until the LED light flashes.
STEP 2: Press the “FAV” button once.
STEP 3: Press the “100” button once. The LED light
flashes three times and then goes out to confirm that
the option has been set.
STEP 4: Continue on to Step 8 (TV) or Step 12 (SetTop) to complete your setup.
NOTE: If you go back and change the TV or STB
code, the 3-DIGIT option will be cleared.
STEP 2: Press the “FAV” button once.
STEP 3: Press the NUMBER “1” button located in the
setup area next to the 100 and 10 buttons. The LED
light flashes three times and then goes out to confirm
that the option has been set.
STEP 4: Continue on to Step 8 (TV) or Step 12 (SetTop) to complete your setup.
Note: If you go back and change the TV or STB
code, the ENTER option will be cleared.
SETTING THE 3-DIGIT OPTIONSETTING THE 3-DIGIT OPTION
SETTING THE 3-DIGIT OPTION
SETTING THE 3-DIGIT OPTIONSETTING THE 3-DIGIT OPTION
The latest digital TV and SET-TOP boxes support
hundreds of channels. These units typically require
that you enter three digits, regardless of the channel
number. For instance, channel 7 cannot be entered
as simply 7, but rather 007.
The best way to tell whether you need to use this
option is to use your existing remote. Point your
existing remote at your TV or SET-TOP box, and then
select channel 7. Did you need to enter in 007 in
order for the channel to change? If so, then complete
this section.
Need help? Go to www.weemote.com 15
CHANNELS/DIRECT VIDEO OPTIONCHANNELS/DIRECT VIDEO OPTION
CHANNELS/DIRECT VIDEO OPTION
CHANNELS/DIRECT VIDEO OPTIONCHANNELS/DIRECT VIDEO OPTION
In most cases, your Set-Top box is set to run with your
Television tuner set to channel 3. In some cases, your
Set-Top box tuner may be set to run with your Television
tuner set to channel 2, 4, 5 or your Set-Top may be
cabled directly to your TV’s video port. To set this
option, please do the following.
STEP 1: Press and hold the “TV” button for about three
seconds until the LED light flashes.
STEP 2: Press the “CHANNEL UP” button (top of long
blue button) once.
STEP 3: Press the Favorite Channel button that
corresponds to your setup (see table below). The LED
light flashes three times and then goes out to confirm
that the option has been set.
Set-Top Channel/Direct Video to TV Table
TV set to Video Port, Press Channel #1 (Green)
TV set to channel 2, Press Channel #2 (Blue)
TV set to channel 3, Press Channel #3 (Orange)
TV set to channel 4, Press Channel #4 (Purple)
TV set to channel 5, Press Channel #5 (Yellow)
NOTE: To change this option again, simply repeat
the steps above except that in STEP 3, press the
desired button (see table above).
Need help? Go to www.weemote.com 16

TROUBLESHOOTING
TROUBLESHOOTING
Please check the support section on our web site if
you do not see your problem listed below.
1. The LED does not light or flash?
Check to make sure you have installed the batteries
properly. Check to make sure that the batteries are
not dead or too weak to operate the weemote®.
2. The weemote® powers on my TV or SET-TOP but
does not change channels?
The weemote® must have at least one channel
programmed in order for channel changing to work.
Press the channel buttons you programmed. If the
LED does not light up brightly, i.e. the light is dim,
then the channels have not been entered or programmed properly. Please go back to Step 5 and
repeat entering your channels.
If your setup is TV only, make sure you did not
program in a set-top code by mistake. Try clearing the
STB code by referring to the reference guide.
Check to make sure you have set the proper code in
the weemote®. Sometimes a code will only partially
work. Fully test each code as described in this
manual.
3. I see the correct channel digits on my TV but the
channel does not change?
Make sure you programmed in the ENTER option or
3-Digit option, depending on what your equipment
needs. Some TV’s or Set-Top boxes will not change
channels until either 3 complete digits or an ENTER
command has been sent from the weemote®.
4. When changing channels, the channel numbers
that are sent to the TV from the weemote® are not
the same as what I programmed?
Check to make sure you have set the correct code in
the weemote®. This happens frequently with Sony
codes. The weemote is designed to output exactly the
Need help? Go to www.weemote.com 17
channel number you program in when pressing the
channel buttons in normal operation. Keep trying
other codes.
5. The channel digits on my TV display show always
show either the first or last digit I programmed in. For
example, channel 57 shows up as channel 5 or 7?
It sounds like you need to make some speed adjustments in the weemote®. Please contact us for
specific instructions on how to do this.
6. Whenever I turn on the Set-Top box, the TV turns
on, then back off.
Check to see if your TV is plugged into your set-top
box. If so, plug it directly into an AC outlet.
7. The channel up/down button only goes to the
channels I programmed in the weemote®?
This is normal since the weemote® is designed to
limit channel access.
8. I notice that sometimes the weemote® seems to
get confused. Sometimes, the programmed channels
get knocked out of alignment when the child is
pressing the buttons too quickly?
There are two possible problems here. The first is to
check and make sure whether you need the ENTER
or 3-Digit option. Some TV’s and Set-Tops will delay
until they change channels if they do not see 3-Digits
or an ENTER command. Without this option set,
channel changing will be unreliable.
Depending on your TV or Set-Top, the weemote®
may be sending the channel changing information too
slowly. Please contact us if you have this problem.
9. I am confused with exactly what I have setup in the
weemote® at this point. What should I do?
Your best bet is to reset the weemote® and start over.
Refer to the reference guide.
Need help? Go to www.weemote.com 18

CARE AND MAINTENANCE
LIMITED WARRANTY
1. Keep the weemote® dry. If it gets wet, wipe it
dry immediately. Liquids may contain minerals
that can corrode the case and electronics.
2. Use and store the weemote® only in normal
temperature environments. Temperature extremes can shorten the life of the electronics,
warp the plastic body and cause the batteries to
leak.
3. Keep the weemote® away from excessive
dust, dirt or sand. Exposure to these elements
can cause the keypad to work erratically or fail
altogether.
4. Handle the weemote® with care. Dropping the
unit frequently can cause the case to crack as
well as the internal electronics to malfunction.
5. Use only fresh batteries and take them out if
you do you not plan to use the weemote® for
long periods of time. Batteries that leak can
cause extensive damage to the Weemote®.
6. Wipe the weemote® with a damp cloth
occasionally to keep it looking new. Do not use
harsh chemicals, cleaning solvents, or strong
detergents as they may cause permanent
damage to the weemote’s finish.
Modifying or tampering with the weemote’s
internal components can cause malfunction and
may invalidate your warranty. If your weemote®
is not performing properly, please complete a
trouble report at our Customer Support page on
our website.
Fobis Technologies Inc. (“FOBIS”) warrants, to the original
purchaser only, that this product will be free from defects in
materials and workmanship, under normal use, for ninety
(90) days from the date of original purchase.
This warranty does not cover damage or failures caused
by products or services not supplied by FOBIS, or which
result from accident, misuse, abuse, neglect, mishandling,
misapplication, faulty installation, setup adjustment,
improper maintenance, alteration, maladjustment of
consumer controls, modifications, commercial use, or that
is attributable to acts of GOD.
There are no express warranties except as listed above.
FOBIS SHALL NOT BE LIABLE FOR INCIDENTAL OR
CONSEQUENTIAL DAMAGES RESULTING FROM THE
USE OF THIS PRODUCT OR ARISING OUT OF ANY
BREACH OF WARRANTY. ALL EXPRESS AND IMPLIED
WARRANTIES, INCLUDING THE WARRANTIES OF
MERCHANTABILITY AND FITNESS FOR A PARTICULAR
PURPOSE, ARE LIMITED TO THE WARRANTY PERIOD
SET FORTH ABOVE. Some states do not allow the
exclusion or limitation of incidental or consequential
damages, or limitations on how long an implied warranty
lasts, so the above exclusions or limitations may not apply
to you. This warranty gives you specific legal rights and
you may also have other rights which vary from state to
state.
To obtain warranty service for a defective product during
the warranty period, please return the product, preferably
in the original package, along with your purchase receipt,
to the company of your original purchase. A note detailing
the complaint would be helpful. The store, at its option, will
replace or repair this product if found to be defective.
Need help? Go to www.weemote.com 19
Fobis Technologies Inc.
(305) 253-8387
Email: support@fobis.com
Need help? Go to www.weemote.com 20
 Loading...