

Page 1
WE-EF LEUCHTEN
Montage- und
Wartungshinweise für
Scheinwerfer
FLB440
FLB460
FLB480
Installation and
Maintenance Instructions for
Floodlight
FLB440
FLB460
FLB480
Page 2
1
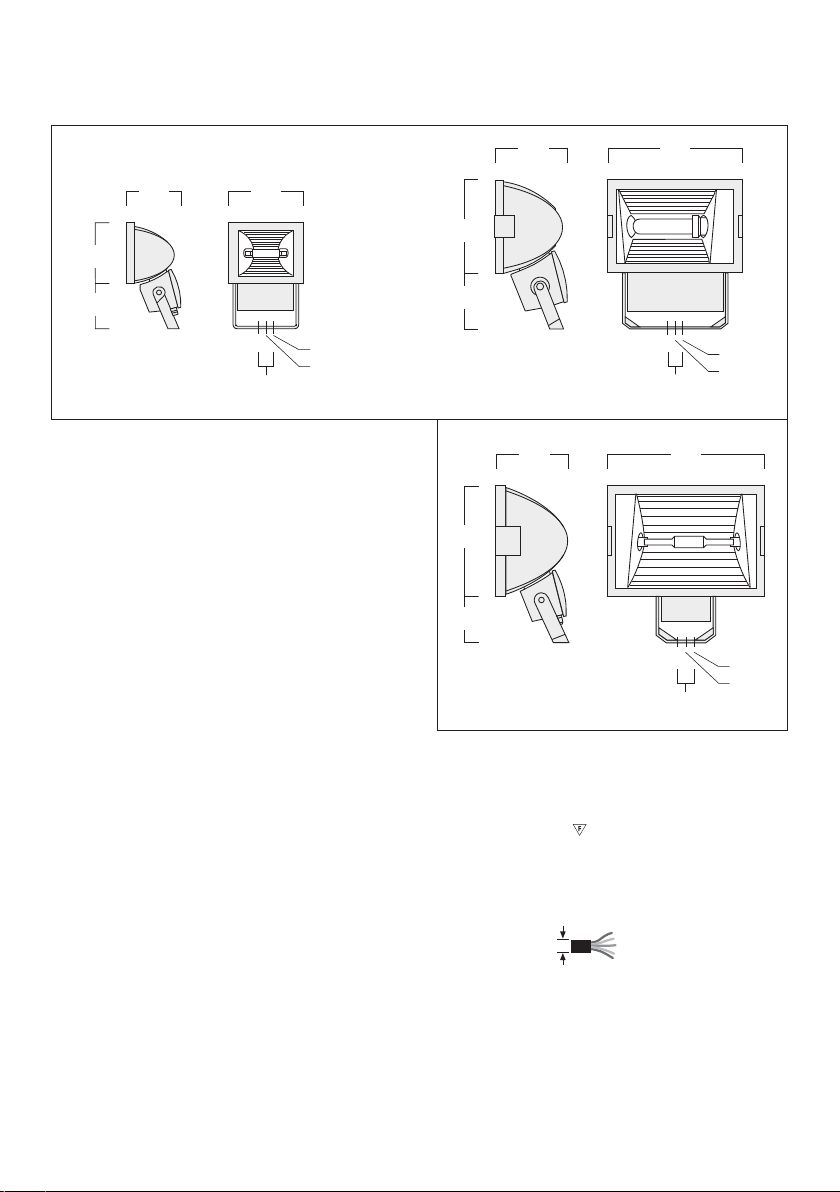
FloodlightsScheinwerfer
Lampen / Lamps
HIT 70-150W . . . . . . . . . . . . . . . . . . . . . . . . . . . . . . . . RX7s
HIT 250-400W . . . . . . . . . . . . . . . . . . . . . . . . . . . . . . . . E40
HIT 250-400W . . . . . . . . . . . . . . . . . . . . . . . . . . . . . . . . . Fc2
HIT 1000-2000W . . . . . . . . . . . . . . . . . . . . . . . Kabel / Cable
HST 70-150W . . . . . . . . . . . . . . . . . . . . . . . . . . . . . . . . RX7s
HST 250-1000W . . . . . . . . . . . . . . . . . . . . . . . . . . . . . . . E40
HST 250-400W . . . . . . . . . . . . . . . . . . . . . . . . . . . . . . . . Fc2
FLB460
225
290
174
420
44
ø 18
ø 14
FLB440
155
175
130
215
44
ø 18
ø 14
FLB480
245
385
160
545
ø 22
ø 14
44
Schutzart / Protection IP66
Schutzklasse / Class I, , ta = 25°C
Windangriffsfläche / Windage area FLB440: . . . 0,051 m²
FLB460: . . . 0,159 m²
FLB480: . . . . 0,22 m²
Ø 6 - 13 mm
Page 3

2
Installation
The luminaire must be installed and maintained by a suitably qualified person in compliance with latest construction and electrical regulations and relevant legislation.
The given information from the lamp manufacturer about
the correct lamp, operation and maintenance are strictly
to be observed.
The minimum distance to the illuminated object has to be
observed (see sign inside of luminaire).
The luminaire shall be operated only with complete
protection cover. Replace any broken protection cover.
In case of questions please contact our technical hotline:
+49 5194 909209 (from Monday - Friday from 08.00 until
16.00 hours.
Installation Procedure
1) Prior to electrical connection, proceed with mechanical
installation by firmly fixing stirrup A to optional mounting accessory ordirectly to asuitable surface. Luminaire
shall be turned towards object to be illuminated.
Caution: Make sure not to damage any electric cable,
water pipe or other devices while drilling holes.
2) Switch off the mains electrical supply.
3) Remove gear box cover B by releasing the hexagon
socket screws C.
4) Check that rating shown on the luminaire label conforms
with the mains electrical supply.
5) Feed the mains supply cable D through the cable
gland E.
6.a)FLB440 / FLB460:
Connect the mains supply leads to their respective
terminals in the terminal connector F (N = neutral,
L = phase, = Earthing). Tighten cable gland E firmly.
Montage
Montage und Wartung darf nur von geschultem Fach per so nal mit entsprechender beruflicher Quali fi kation in Über ein stimmung mit den neuesten elektrischen Installa tions- und
Sicherheitsvorschriften durchgeführt werden.
Die Hinweise der Leuchtmittelhersteller der einge setzten
Lampe für Betrieb und Wartung sind unbedingt zu beachten.
Der Mindestabstand zu beleuchteten Gegenständen (siehe
Bildzeichen in der Leuchte) ist einzuhalten.
Die Leuchte darf nur mit vollständiger Schutzab deckung
betrieben werden. Ersetzen Sie jede gebrochene Schutz abdeckung.
Bei Fragen wenden Sie sich bitte an unsere technische
Hotline unter +49 5194 909209 (Montag - Freitag von
08:00 Uhr bis 16:00 Uhr).
Vorgehensweise
1) Vor der elektrischen Montage mit der mechanischen
Montage beginnen, indem der Montagebügel A an
dem optionalen Montagezubehör oder direkt an eine
passende Oberfläche montiert wird. Die Leuchte in
Richtung des zu beleuchtenden Objektes ausrichten.
Achtung: Bitte sichergehen, dass keine elektrischen
Kabel, Wasserleitungen oder andere Geräte während
des Bohrvorganges beschädigt werden.
2) Spannungsfreiheit der Anschlussleitung herstellen.
3) Durch Lösen der Schrauben C den Deckel der
Anschluss box B entfernen.
4) Vergleichen Sie die örtliche Spannung und Frequenz
mit den Daten auf dem Leistungsschild.
5) Die entsprechend zugeschnittene Anschlussleitung D
durch die Kabelverschraubung E einführen.
6.a)FLB440 / FLB460:
Anschlussleitung an die entsprechend markierten Kon takte der Anschlussklemme F anschließen (N = neutral,
L = Phase, = Erde). Kabelverschraubung E fest
anziehen.
Page 4

3
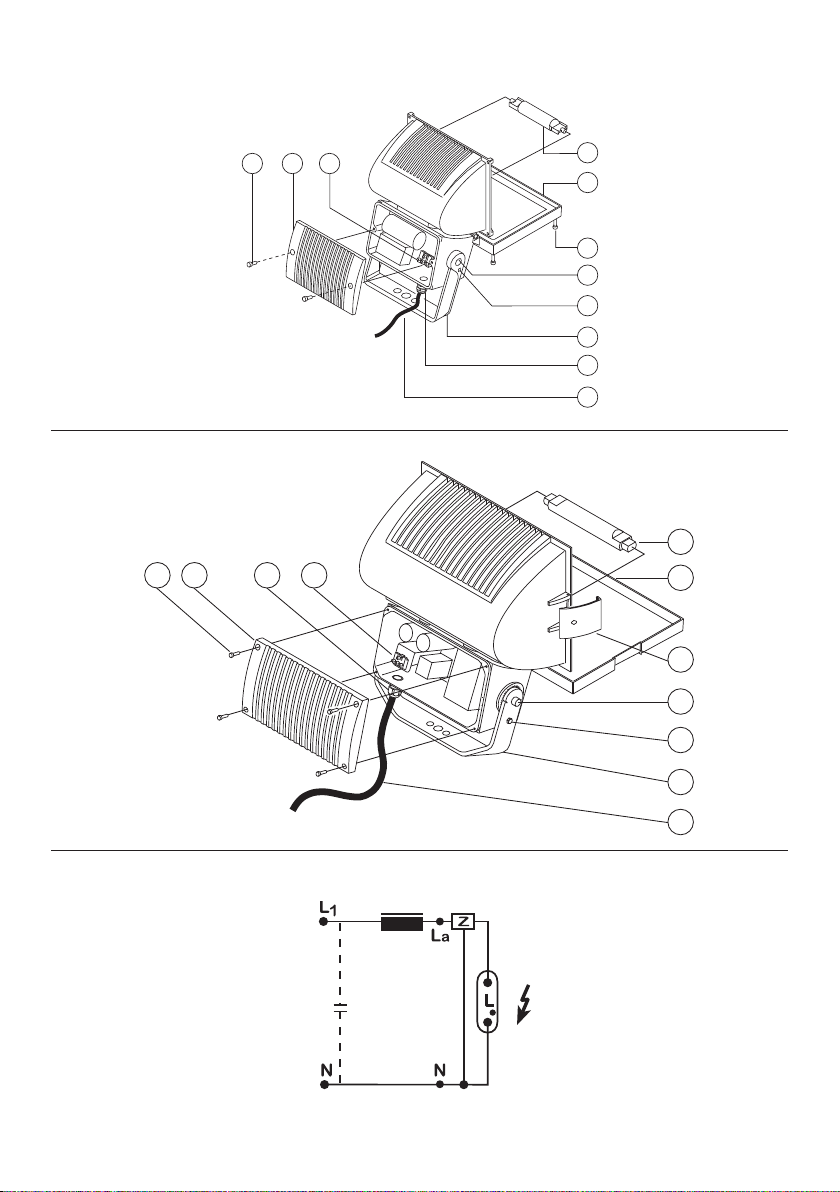
6.b)FLB480:
A separate operating device is absolutely necessary for
this luminaire. The operation without operating device
can lead to irreparable defects on the lamp. The connection is shown in wiring diagram. Insert the corresponding cut connection cable through the cable gland
E. Connect the neutral conductor (N), operating device
outlet (La) and the earthing to the corresponding
marked contacts of the terminal clamp F.
7) Reposition gear box cover B and secure in position
by evenly tightening the hexagon socket screws C.
8) FLB440:
Open lens frame G by releasing the four fixing srews H.
FLB460 / FLB480:
Open lens frame Gby releasing thetwo locking devices H.
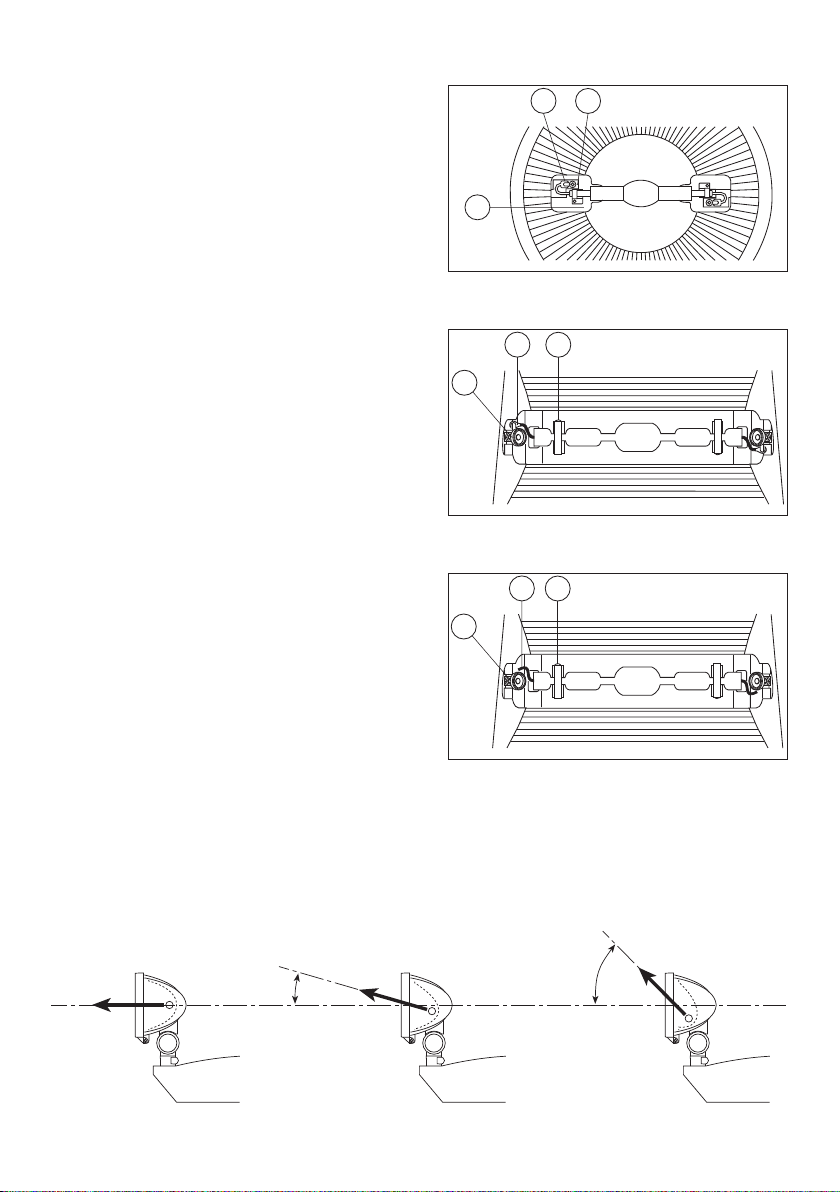
9) Fit the appropriate lamp I, as indicated on the luminaire
label, by inserting it firmly into the lampholder.
For double ended HIT lamps fitted with cable tails,
ensure proper electrical connection by firmly securing
both fork terminals L or cable ends M underneath fasteners N. In addition, secure lamp in position by means
of safety catches O. (fig. I, II, III).
10) FLB440:
Reposition lens frame G and secure in position by
evenly tightening the four hexagon socket srews H.
FLB460 / FLB480:
Reposition lens frame G and secure in position by
evenly tightening the the two locking devices H.
11) Loosen the two hexagon socket screws J slightly. Then
aim luminaire in desired direction, tighten screws J
firmly. In addition, tighten screw K to secure orientation
of luminaire.
Important: Refer to fig. IV for beam output details. If
aiming angles are specified, use protractor to precisely
aim the luminaire.
6.b)FLB480:
Der Scheinwerfer benötigt zwingend ein separates
Betriebsgerät. Der Betrieb ohne Betriebsgerät führt zu
irreparablen Schäden am Leuchtmittel. Der Anschluss
wird in Schaltbild dargestellt. Die entsprechend zu geschnittene Anschlussleitung durch die Verschraubung
E führen. Nulleiter (N), Betriebsgeräteausgang (La) und
Schutzleiteranschluss an die entsprechend markierten
Kontakte der Anschlussklemme F anschließen.
7) Den Deckel der Anschlussbox B wieder aufsetzen und
die Schrauben C gleichmäßig fest anziehen.
8) FLB440:
Den Glasrahmen G durch Lösen der 4 Befestigungs schrauben H abnehmen.
FLB460 / FLB480:
Den Glasrahmen G durch Lösen der 2 Verschlüsse H
abnehmen.
9) Die passende Lampe I fest in die Fassung installieren
(Lampentyp, -leistung und Sockel müssen mit den An gaben auf dem Leuchtenleistungsschild übereinstimmen).
Bei zweifach gesockelten HIT Lampen mit Anschluss kabel wird der korrekte elektrische Anschluss durch
den festen Einbau beider Anschlussklemmen L oder
Kabelenden M unterhalb der Befestigung N sicher gestellt. Zusätzlich sichert man die Lampenposition
durch Hilfe der Schnappriegel O. (Abb. I, II, III).
10) FLB440:
Den Glasrahmen G aufsetzen und durch Verschließen
der 4 Bestigungs schrauben H wieder in Position bringen.
FLB460 / FLB480:
Den Glasrahmen G aufsetzen und durch Verschließen
der 2 Verschlüsse H wieder in Position bringen.
11) Die 2 Schrauben J leicht lösen. Die Leuchte in die
gewünschte Position ausrichten, Schrauben J wieder
fest anziehen. Zusätzlich Schraube K anziehen, um die
Leuchtenrichtung zu sichern.
Wichtig: Beziehen Sie sich auf die Abb. IV bzgl. der
Austrahl-Details. Wenn Ausricht winkel spezifiziert sind,
benutzen Sie einen Winkel messer, um die Leuchte
genau auszurichten.
Page 5
4
Lamp Replacement and Maintenance
Do not open luminaire while in operation or while mains
supply is switched on!
1) Switch off the mains electrical supply.
2) Open lens frame. Clean all exterior surfaces, if
necessary by using a wet cloth with mild detergent.
3) Check gasket for damage and replace if necessary.
4) Replace lamp, consider point 9) of installation
instruction.
5) Repostion lens frame and secure
FLB440:
evenly tightening the four hexagon socket srews H
FLB460 / F LB480:
evenly tightening the the two locking devices H.
Protect our enviroment: Discard used lamps in compliance
with the most recent environmental legislation.
Lampenwechsel und Wartung
Leuchtengehäuse nicht während des Betriebes öffnen!
1) Spannungsfreiheit der Anschlussleitung herstellen.
2) Abdeckung etnfernen. Alle äußeren Oberflächen reinigen,
wenn nötig benutzen Sie einen feuchten Lappen mit
geeignetem Reinigungsmittel.
3) Dichtungen auf Funktionsfähigkeit überprüfen und ggf.
austauschen.
4) Lampe wechseln, dabei Punkt 9) der Montage berücksichtigen.
5) Abdeckung schließen und
FLB440:
die 4 Bestigungs schrau ben H festziehen.
FLB460 / FLB480:
die 2 Verschlüsse H schließen.
Für die Entsorgung der Lampe sind die zur Zeit gültigen
Umweltgesetze zu beachten.
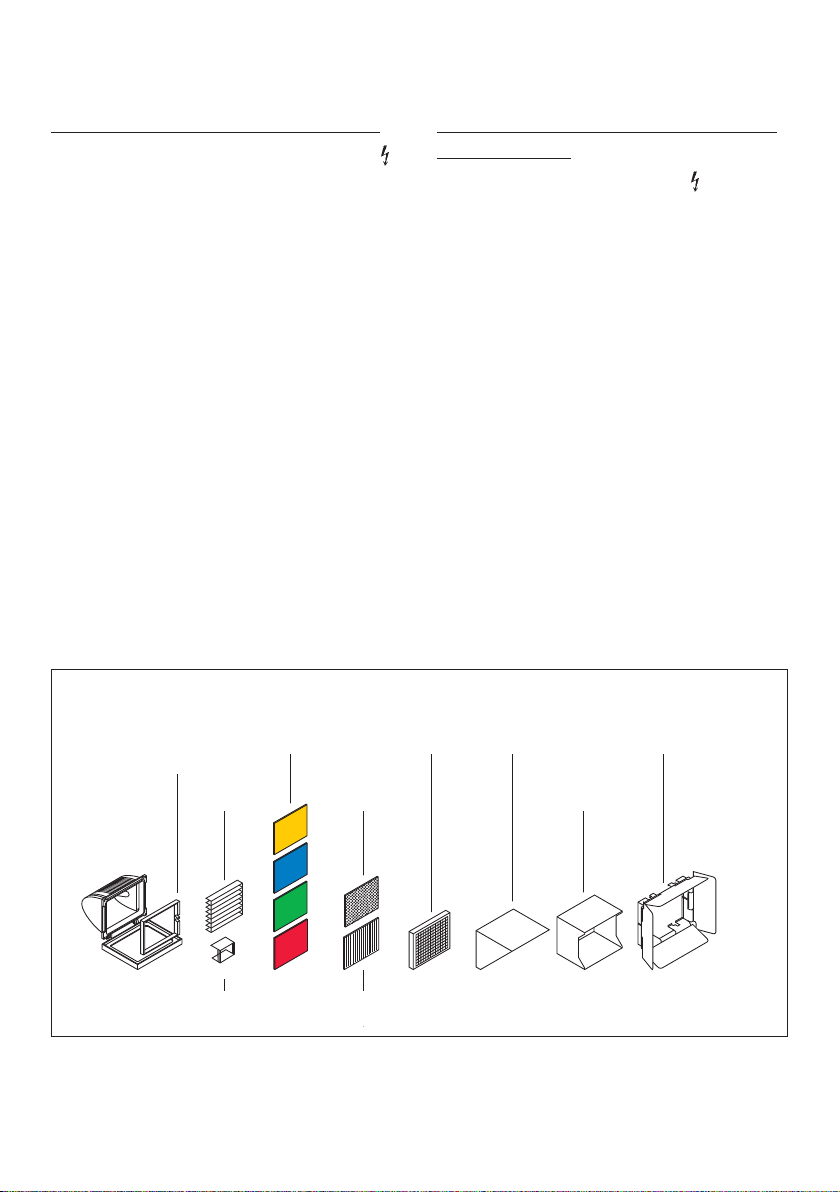
Optischer Adapter
Optical adaptor
Linearblende horizontal
Linear source shield
Lamellenblende horizontal
Horizontal louvre
Wallwash Streulinse
Wallwash lens
Schutzitter
Wire guard
Seitenblende
Glare shield
Abblendtubus
Framing snoot
Seitenklappen
Barn doors
Dichroitische Farbfilter
Dichroic colour filter
Streulinse allseitig
Flood lens
Optisches Zubehör / Optical Accessories
Page 6
I
G
H
J
K
A
E
D
C B F
C
B
E F
I
G
H
J
K
A
D
FLB460 / FLB480
FLB440
Schaltbild für FLB480:
Betrieb mit Zündgerät
Wiring diagram for FLB480:
operation with ignitor
Page 7
6
O
N
M
N
L
O
O
L
N
Abb. I.
Elektrischer Anschluss der Lampe – zweiseitig gesockelt
HIT-SA-DE 1000W / Kabel
HIT-SA-DE 2000W / Kabel
Fig. I.
Electrical Connection – Double Ended HIT Lamps
HIT-SA-DE 1000W / Cable
HIT-SA-DE 2000W / Cable
Abb. II.
Elektrischer Anschluss der Lampe – zweiseitig gesockelt
HIT-LA-DE 1000W / Kabel
HIT-LA-DE 2000W / Kabel
fig. II.
Electrical Connection – Double Ended HIT Lamps
HIT-LA-DE 1000W / Cable
HIT-LA-DE 2000W / Cable
Abb. III
Elektrischer Anschluss der Lampe – zweiseitig gesockelt
HIT-LA-DE 1000W / Kabel / FC
HIT-LA-DE 2000W / Kabel / FC
fig. III.
Electrical Connection – Double Ended HIT Lamps
HIT-LA-DE 1000W / Cable / FC
HIT-LA-DE 2000W / Cable / FC
Abb. IV. Lichtverteilung
fig. IV. Beam Distribution
10º
45º
FLB440 / FLB460 / FLB480 [B]
FLB440 / FLB460 / FLB480 [M]
FLB440 / FLB460 / FLB480 [E] FLB440 / FLB460 / FLB480 [E10] FLB440 / FLB460 / FLB480 [A]
Page 8

FLB440_FLB460_FLB480_010512 / 006-0740
Technische Änderungen vorbehalten.
Technical specifications are subject to change.
© WE-EF 2012
WE-EF LUMIERE
France
Tel +33 4 74 99 14 44
Fax +33 4 74 99 14 40
[email protected]
WE-EF ILLUMINAZIONE
Italy
Tel +39 02 90 09 23 54
[email protected]
WE-EF LIGHTING
United States of America
Tel +1 724 742 0030
Fax +1 724 742 0030
[email protected]
WE-EF LIGHTING
Australia
Tel +61 3 8587 0444
Fax +61 3 8587 0499
[email protected]
WE-EF LEUCHTEN
Germany
Tel +49 5194 909-0
Fax +49 5194 909-299
[email protected]
WE-EF HELVETICA
Switzerland
Tel +41 22 752 49 94
Fax +41 22 752 49 74
[email protected]
WE-EF LIGHTING
United Kingdom
Tel +44 844 880 5346
Fax +44 844 880 5347
[email protected]
WE-EF LIGHTING
Thailand
Tel +66 2 738 9610-14
Fax +66 2 175 2174
[email protected]
www.we-ef.com
 Loading...