

Page 1

11n AP Router User’s Manual
802.11n WLAN
AP Router
User’s Manual
1
Page 2

11n AP Router User’s Manual
Table of Contents
1 Introduction ........................................................... 6
Features ................................................................................. 6
Device Requirements ............................................................ 6
Using this Document .............................................................. 7
Notational conventions .................................................. 7
Typographical conventions ............................................ 7
Special messages .......................................................... 7
Getting Support ...................................................................... 7
2 Getting to know the device ................................... 8
Computer / System requirements ......................................... 8
Package Contents .................................................................. 8
LED meanings & activations .................................................. 8
Top Side ......................................................................... 8
Rear and Left Panel and bottom Side ........................... 9
3 Computer configurations under
different OS, to obtain IP address
automatically ...................................................... 10
For Windows 98SE / ME / 2000 / XP .................................. 10
For Windows Vista-32/64 .................................................... 14
For Windows 7-32/64 ........................................................... 19
For Windows 8-32/64 ........................................................... 24
4 Connecting your device ..................................... 29
Connecting the Hardware .................................................... 29
5 Advanced Configuration ..................................... 31
Advanced Configuration with Router Mode ........................ 31
Wireless Connection ............................................................ 35
6 What the Internet/WAN access of your
own Network now is ........................................... 38
Internet/WAN access is the DHCP client ............................ 40
Internet/WAN access is the Static IP ................................... 41
Internet/WAN access is the PPPoE client ........................... 43
7 Getting Started with the Web pages .................. 44
Accessing the Web pages ................................................... 44
Testing your Setup ............................................................... 46
Default device settings ......................................................... 46
8 Quick Setup ........................................................ 48
Static IP ........................................................................ 49
2
Page 3

11n AP Router User’s Manual
Dynamic IP ................................................................... 50
PPPoE .......................................................................... 51
Wireless Basic Setup ........................................................... 52
Finish the Quick Setup ......................................................... 53
9 LAN Interface ..................................................... 54
LAN Interface Setup ............................................................. 54
Changing the LAN IP address and subnet
mask .................................................................................. 56
DHCP Static IP Configuration .............................................. 59
10 Internet Setup ..................................................... 61
Configuring Static IP connection ......................................... 64
Configuring DHCP Client connection .................................. 65
Configuring PPPoE connection ........................................... 66
Clone MAC Address ............................................................ 67
11 IPv6 .................................................................... 68
Wireless Basics .................................................................... 68
12 Wireless Network ............................................... 69
Wireless Basics .................................................................... 69
Wireless Multiple BSSID Settings ....................................... 71
WPS Setup ........................................................................... 73
Wireless Advanced Settings ................................................ 74
Wireless Access Control Mode ........................................... 75
Allow Listed .................................................................. 76
Wireless Repeater ............................................................... 78
13 Access Control List Configuration ...................... 81
Access Control List Config ................................................... 81
14 Port Triggering.................................................... 82
Port Triggering Config .......................................................... 82
15 URL Blocking ..................................................... 83
URL Blocking for specified URL Address ........................... 84
16 Dynamic DNS ..................................................... 86
Configure DynDNS .............................................................. 89
Configure TZO ..................................................................... 91
17 QoS .................................................................... 93
18 UPnP .................................................................. 94
19 Virtual Server ...................................................... 95
Configuring Virtual Server .................................................... 95
Configuring custom applications ......................................... 96
Virtual Server for FTP .................................................. 97
3
Page 4

11n AP Router User’s Manual
Port Forwarding for HTTP ........................................... 99
Deleting custom applications ..................................... 101
20 Reboot/Reset ...................................................102
Reboot/Reset ..................................................................... 102
21 Firmware Upgrade ...........................................103
About firmware versions .................................................... 103
Manually updating firmware ............................................... 103
22 Backup/Restore Settings .................................105
Save Settings to File .......................................................... 105
Load Settings from File ...................................................... 106
23 Password .........................................................108
Setting your username and password .............................. 108
24 Time and Date ..................................................110
Time and Date Configuration settings ............................... 110
25 Status ...............................................................112
26 Active Client Table ...........................................113
27 Statistics ...........................................................114
28 IPV6 ..................................................................115
A Configuring your Computers ............................116
Configuring Ethernet PCs .................................................. 116
Before you begin ........................................................ 116
Windows® XP PCs .................................................... 116
Windows 2000 PCs ................................................... 116
Windows Me PCs ...................................................... 118
Windows 95, 98 PCs ................................................. 118
Windows NT 4.0 workstations ................................... 119
Assigning static Internet information to
your PCs ................................................................. 120
B IP Addresses, Network Masks, and
Subnets ............................................................121
IP Addresses ...................................................................... 121
Structure of an IP address ......................................... 121
Network classes ......................................................... 121
Subnet masks .................................................................... 122
C UPnP Control Point Software on
Windows ME/XP ..............................................124
UPnP Control Point Software on Windows ME ................ 124
UPnP Control Point Software on Windows XP
with Firewall ..................................................................... 125
4
Page 5

11n AP Router User’s Manual
SSDP requirements ................................................... 125
D Troubleshooting ...............................................128
Troubleshooting Suggestions ............................................ 128
Diagnosing Problem using IP Utilities ............................... 130
ping ............................................................................. 130
nslookup ..................................................................... 130
E Glossary ...........................................................132
5
Page 6

11n AP Router User’s Manual
1 Introduction
Congratulations on becoming the owner of the Wireless
Gateway. You will now be able to access the Internet using your
high-speed xDSL/Cable modem connection.
This User Guide will show you how to connect your Wireless
Gateway, and how to customize its configuration to get the most
out of your new product.
Features
The list below contains the main features of the device and may
be useful to users with knowledge of networking protocols. If
you are not an experienced user, the chapters throughout this
guide will provide you with enough information to get the most
out of your device.
Features include:
• 10/100Base-T Ethernet router to provide Internet
connectivity to all computers on your LAN
• Network address translation (NAT) functions to provide
security for your LAN
• Network configuration through DHCP Server and DHCP
Client
• Services including IP route and DNS configuration, RIP,
and IP
• Supports remote software upgrades
• User-friendly configuration program accessed via a web
browser
The Wireless Gateway has the internal Ethernet switch
allows for a direct connection to a 10/100BASE-T Ethernet
network via an RJ-45 interface, with LAN connectivity for
both the Wireless Gateway and a co-located PC or other
Ethernet-based device.
Device Requirements
In order to use the Wireless Gateway, you must have the
following:
• One RJ-45 Broadband Internet connection via cable
modem or xDSL modem
• Instructions from your ISP on what type of Internet access
you will be using, and the addresses needed to set up access
• One or more computers each containing an Ethernet card
(10Base-T/100Base-T network interface card (NIC))
• TCP/IP protocol for each PC
• For system configuration using the supplied
a. web-based program: a web browser such as Internet
Explorer v4 or later, or Netscape v4 or later. Note that
version 4 of each browser is the minimum version
6
Page 7
11n AP Router User’s Manual
requirement – for optimum display quality, use Internet
Explorer v5, or Netscape v6.1
You do not need to use a hub or switch in order to connect more
Note
than one Ethernet PC to your device. Instead, you can connect
up to four Ethernet PCs directly to your device using the ports
labeled Ethernet on the rear panel.
Using this Document
Notational conventions
• Acronyms are defined the first time they appear in the text
and also in the glossary.
• For brevity, the Wireless Gateway is referred to as “the device”.
• The term LAN refers to a group of Ethernet-connected
computers at one site.
Typographical conventions
• Italic text is used for items you select from menus and drop-
down lists and the names of displayed web pages.
• Bold text is used for text strings that you type when prompted
by the program, and to emphasize important points.
Special messages
This document uses the following icons to draw your attention to
specific instructions or explanations.
Note
Provides clarifying or non-essential information on the current
topic.
Definition
Explains terms or acronyms that may be unfamiliar to many
readers. These terms are also included in the Glossary.
Provides messages of high importance, including messages
relating to personal safety or system integrity.
WARNING
Getting Support
Supplied by:
Helpdesk Number:
Website:
7
Page 8
11n AP Router User’s Manual
2 Getting to know the device
Computer / System requirements
• 1. Pentium 200MHZ processor or above
• 2. Windows 98SE, Windows Me, Windows 2000, Windows
XP, Windows Vista, Windows 7 and Windows 8
• 3. 64MB of RAM or above
• 4. 25MB free disk space
Package Contents
1. 11n AP Router
2. CD-ROM (Software & Manual)
3. Quick Installation Guide
4. Ethernet Cable (RJ-45)
5. Power Adapter
LED meanings & activations
Top Side
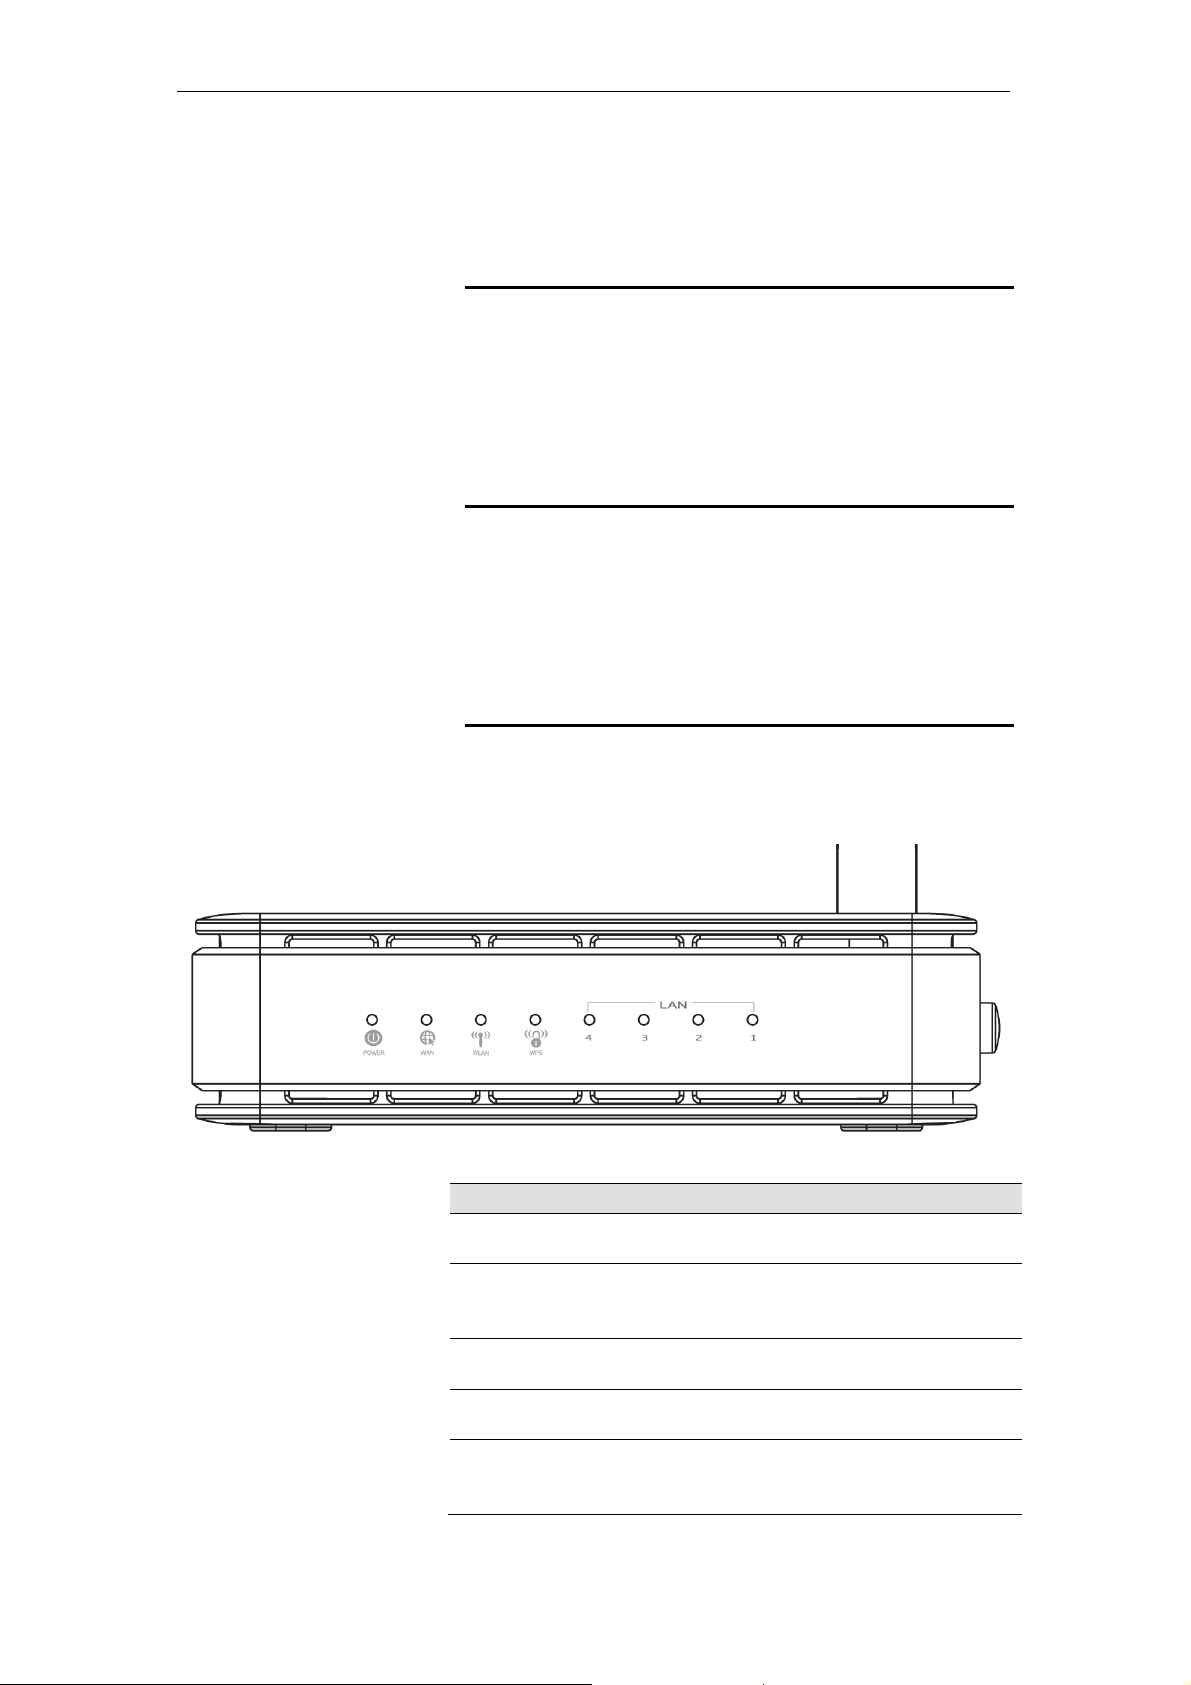
The Top Side contains lights called Light Emitting Diodes (LEDs)
that indicate the status of the unit.
Figure 1: Top Side and LEDs
Label Color Function
POWER green
WAN green
WLAN green
WPS green
LAN green
On: device is powered on
Off: device is powered off
On: WAN link established and active
Off: No LAN link
Blink: Valid Ethernet packet being transferred
On: WLAN link established and active
Blink: Valid Wireless packet being transferred
Off: WPS link isn’t established and active
Blink: Valid WPS packet being transferred
On: LAN link established and active
Off: No LAN link
Blink: Valid Ethernet packet being transferred
8
Page 9
11n AP Router User’s Manual
Rear and Left Panel and bottom Side
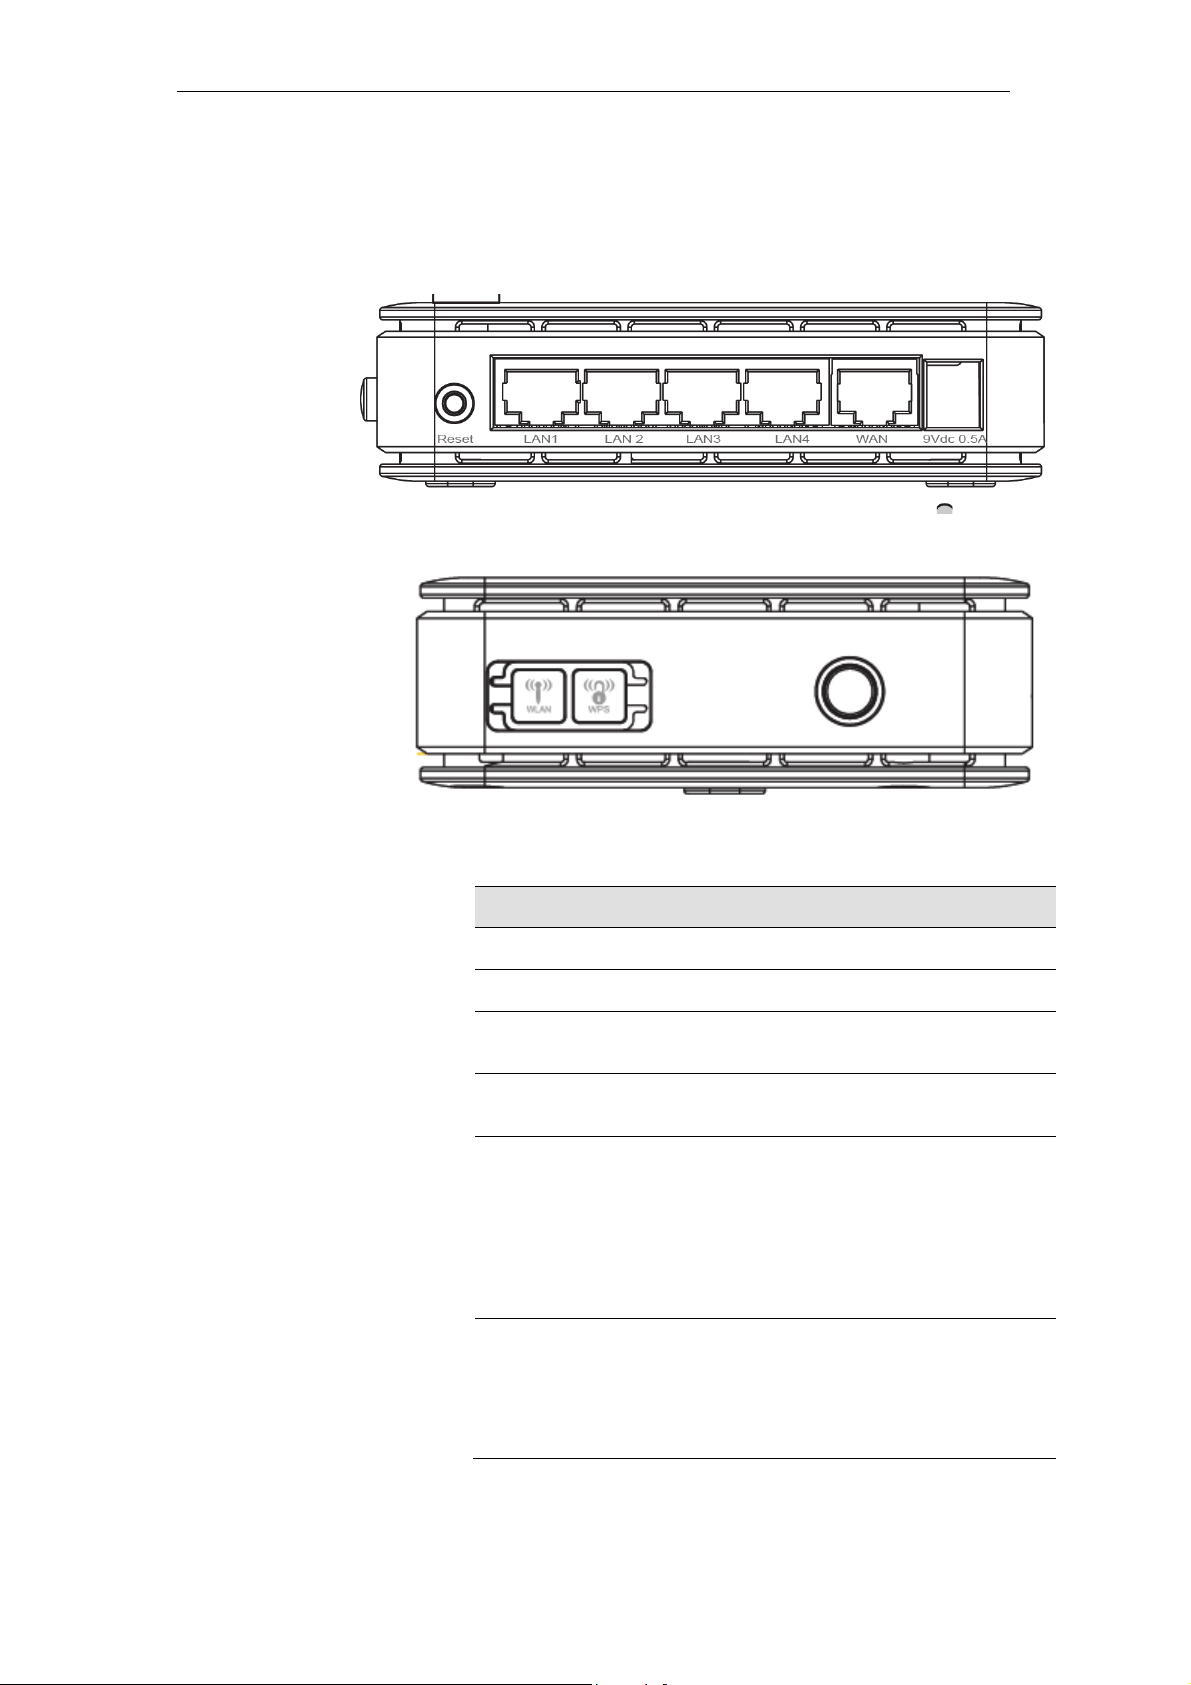
The rear and right panel and bottom side contains a Restore
Defaults button, the ports for the unit's data and power
connections.
Label Function
DC 9V Connects to the supplied power adaptor
LAN Connects the device via LAN Ethernet to a PC
WAN
WLAN
WPS
RESET
Connects the device via WAN Ethernet to xDSL /
Cable Modem
Press this button for at least two full second to turn
off/on wireless signals
WPS
Press this button for 3,4,5, or 6 full seconds
and the WPS LED will flash to start WPS.
Now go to the wireless adapter or device and
press its WPS button. Make sure to press the
button within 120 seconds (2 minutes) after
pressing the router's WPS button.
RESET
Reset button. RESET the 11n AP Router to its default
settings.
Press this button for at least 7 full seconds
to RESET device to its default settings.
9
Page 10
11n AP Router User’s Manual
3 Computer configurations under different OS,
to obtain IP address automatically
Before starting the 11n AP Router configuration, please kindly
configure the PC computer as below, to have automatic IP
address / DNS Server.
For Windows 98SE / ME / 2000 / XP
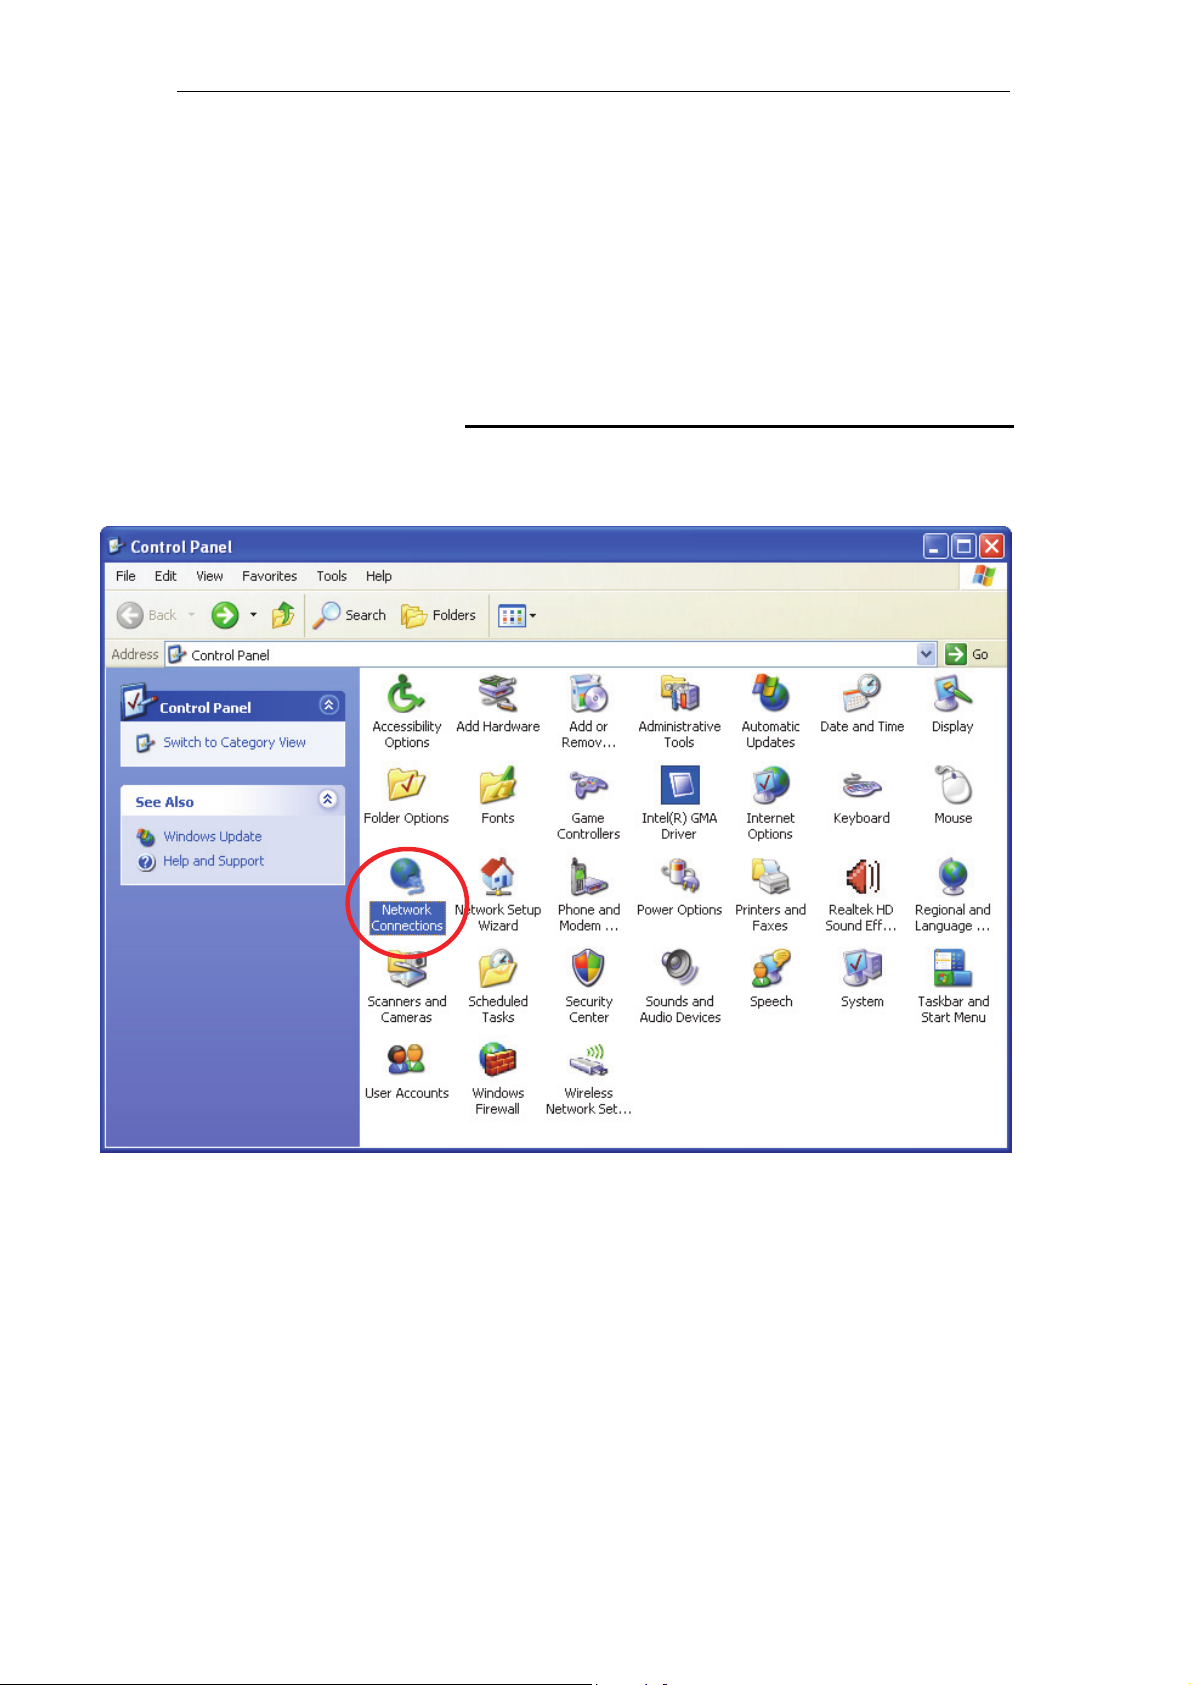
1. Click on "Start" -> "Control Panel" (in Classic View). In
the Control Panel, double click on "Network Connections"
to continue.
10
Page 11
11n AP Router User’s Manual
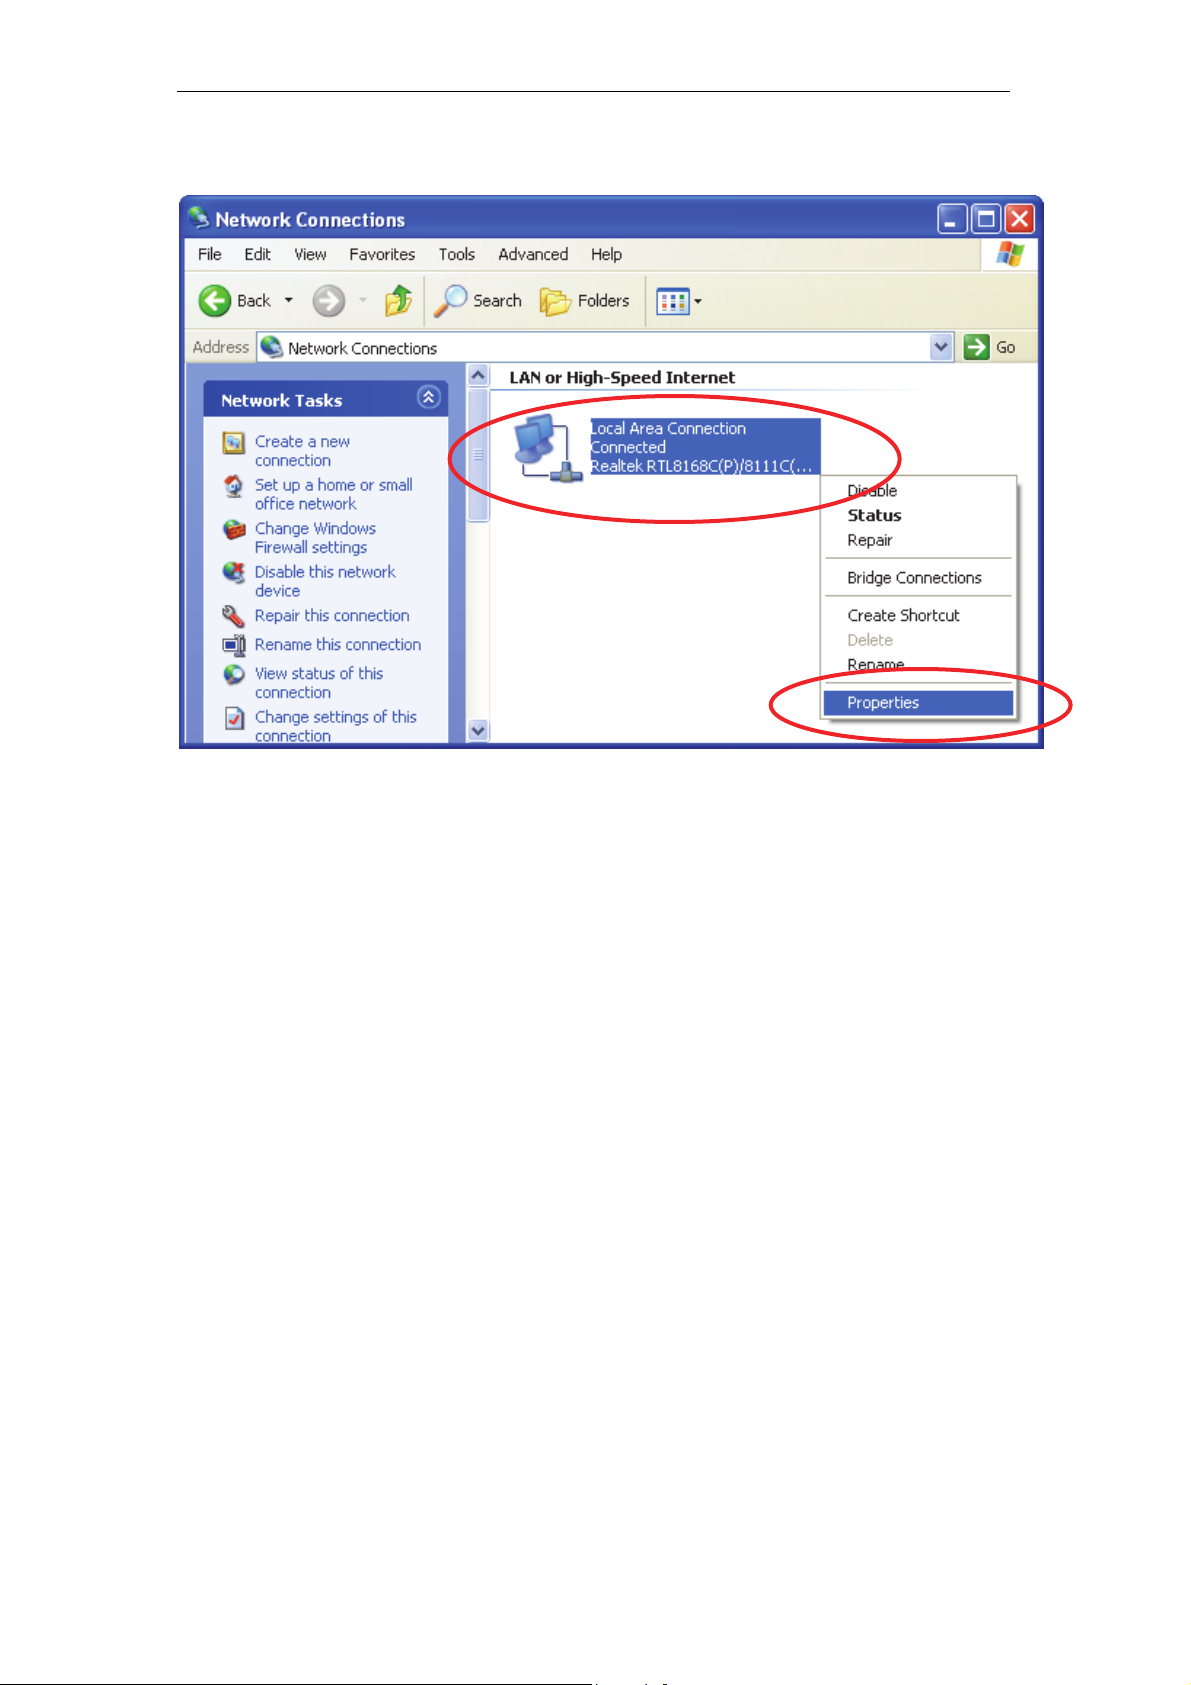
2. Single RIGHT click on "Local Area connection", then click
"Properties".
11
Page 12
11n AP Router User’s Manual
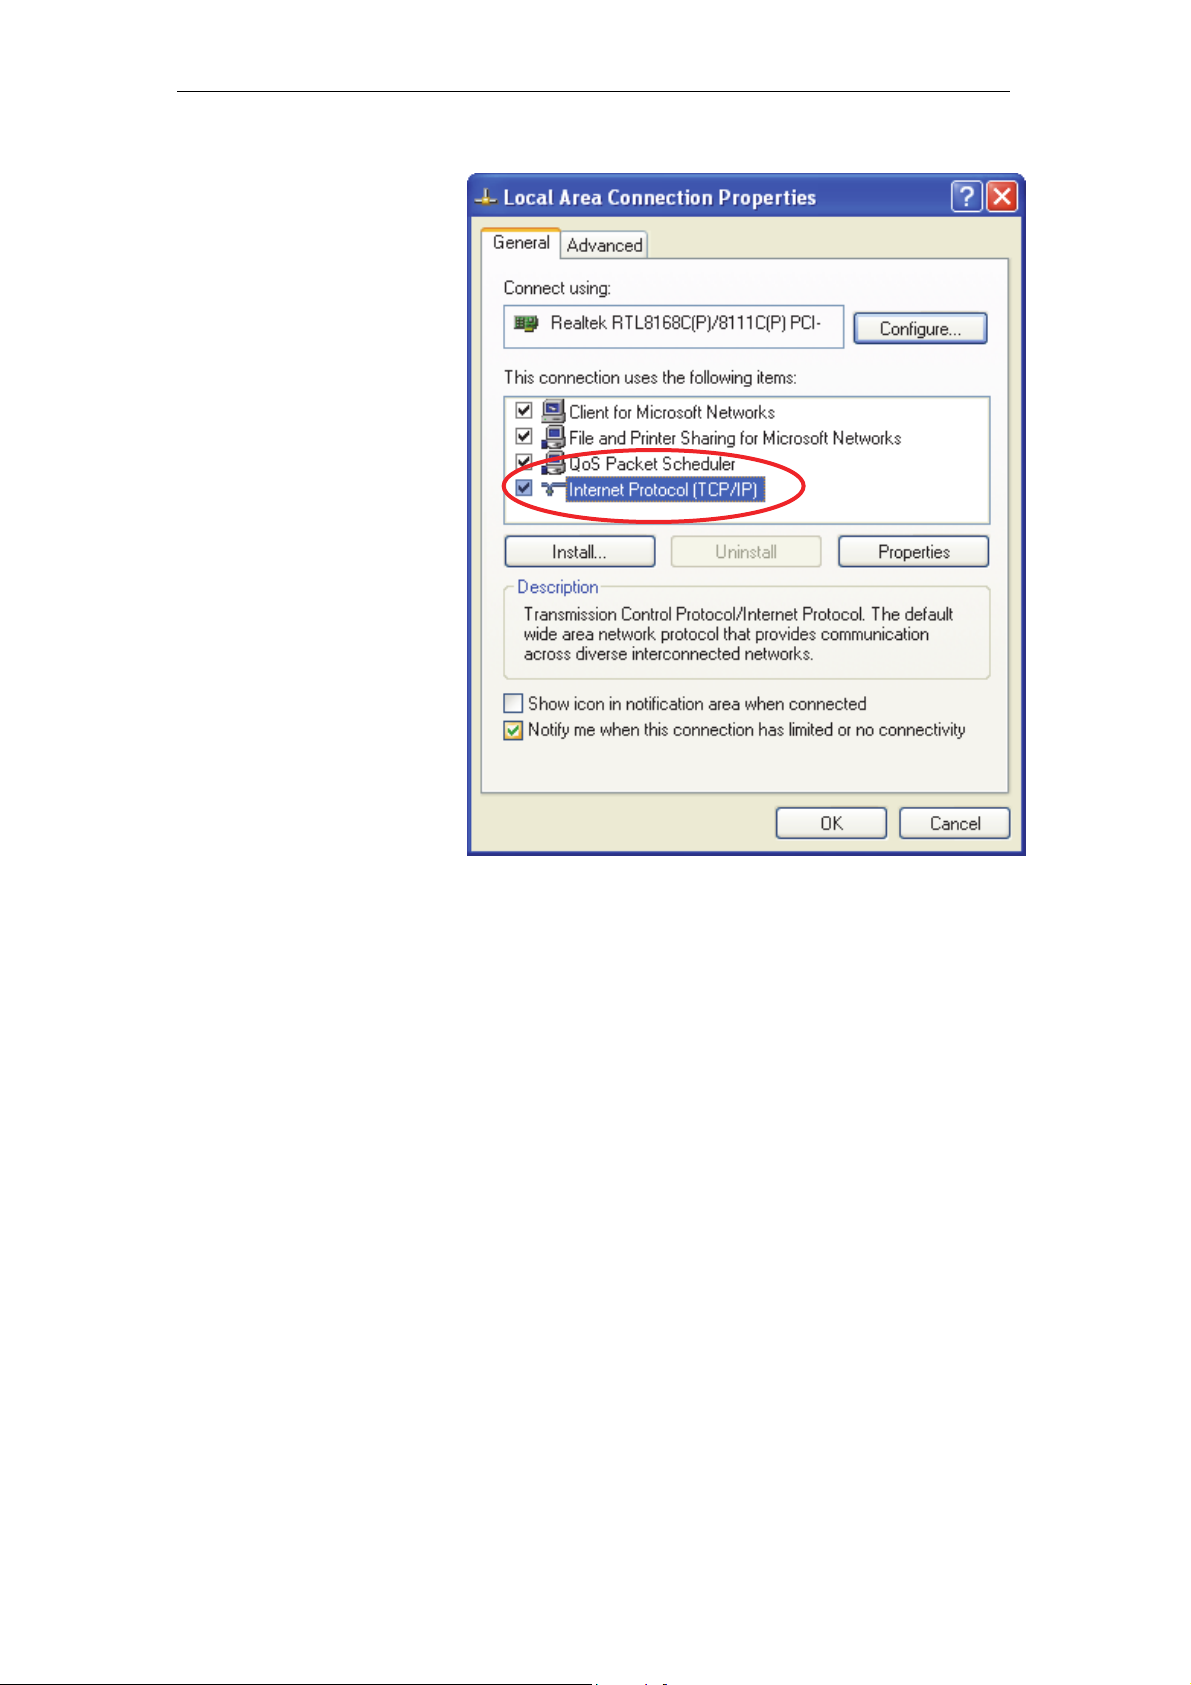
3. Double click on "Internet Protocol (TCP/IP)".
12
Page 13
11n AP Router User’s Manual
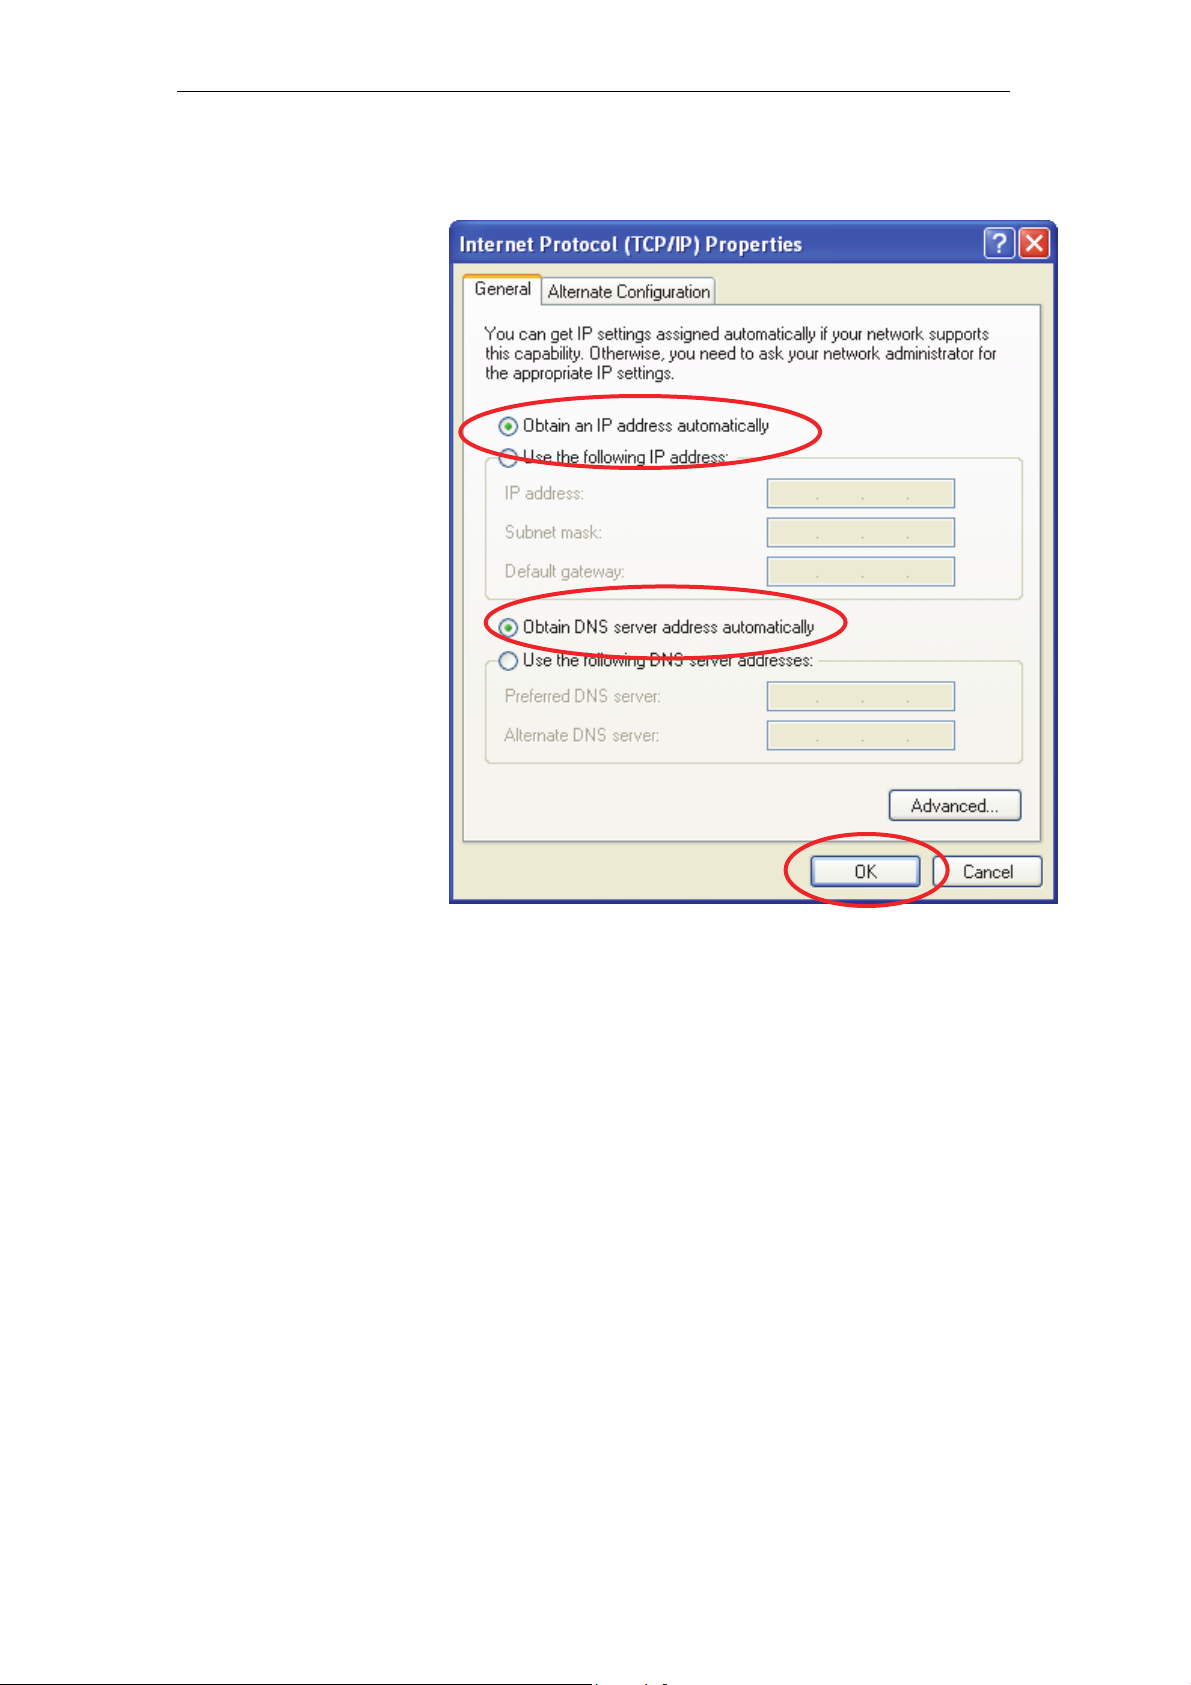
4. Check "Obtain an IP address automatically" and "Obtain
DNS server address automatically" then click on "OK" to
continue.
5. Click "Show icon in notification area when connected"
(see screen image in 3. above) then Click on "OK" to
complete the setup procedures.
13
Page 14
11n AP Router User’s Manual
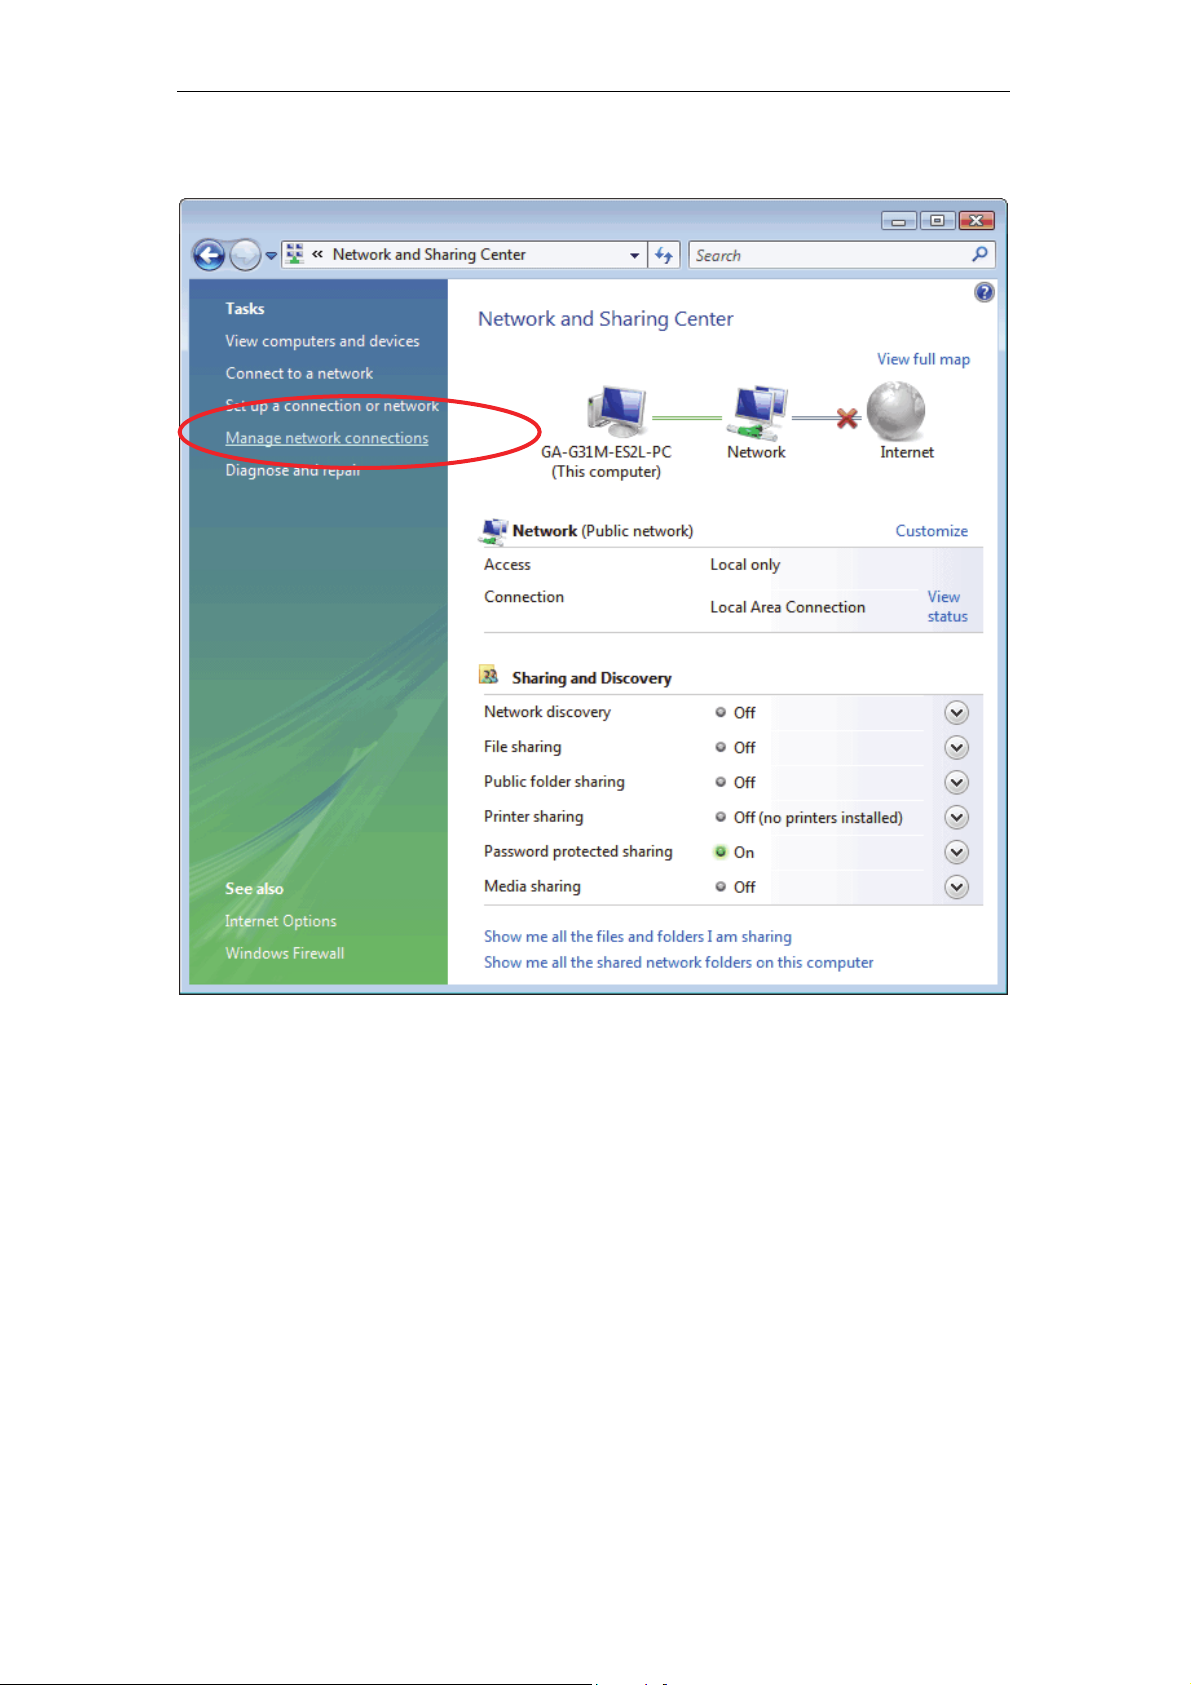
For Windows Vista-32/64
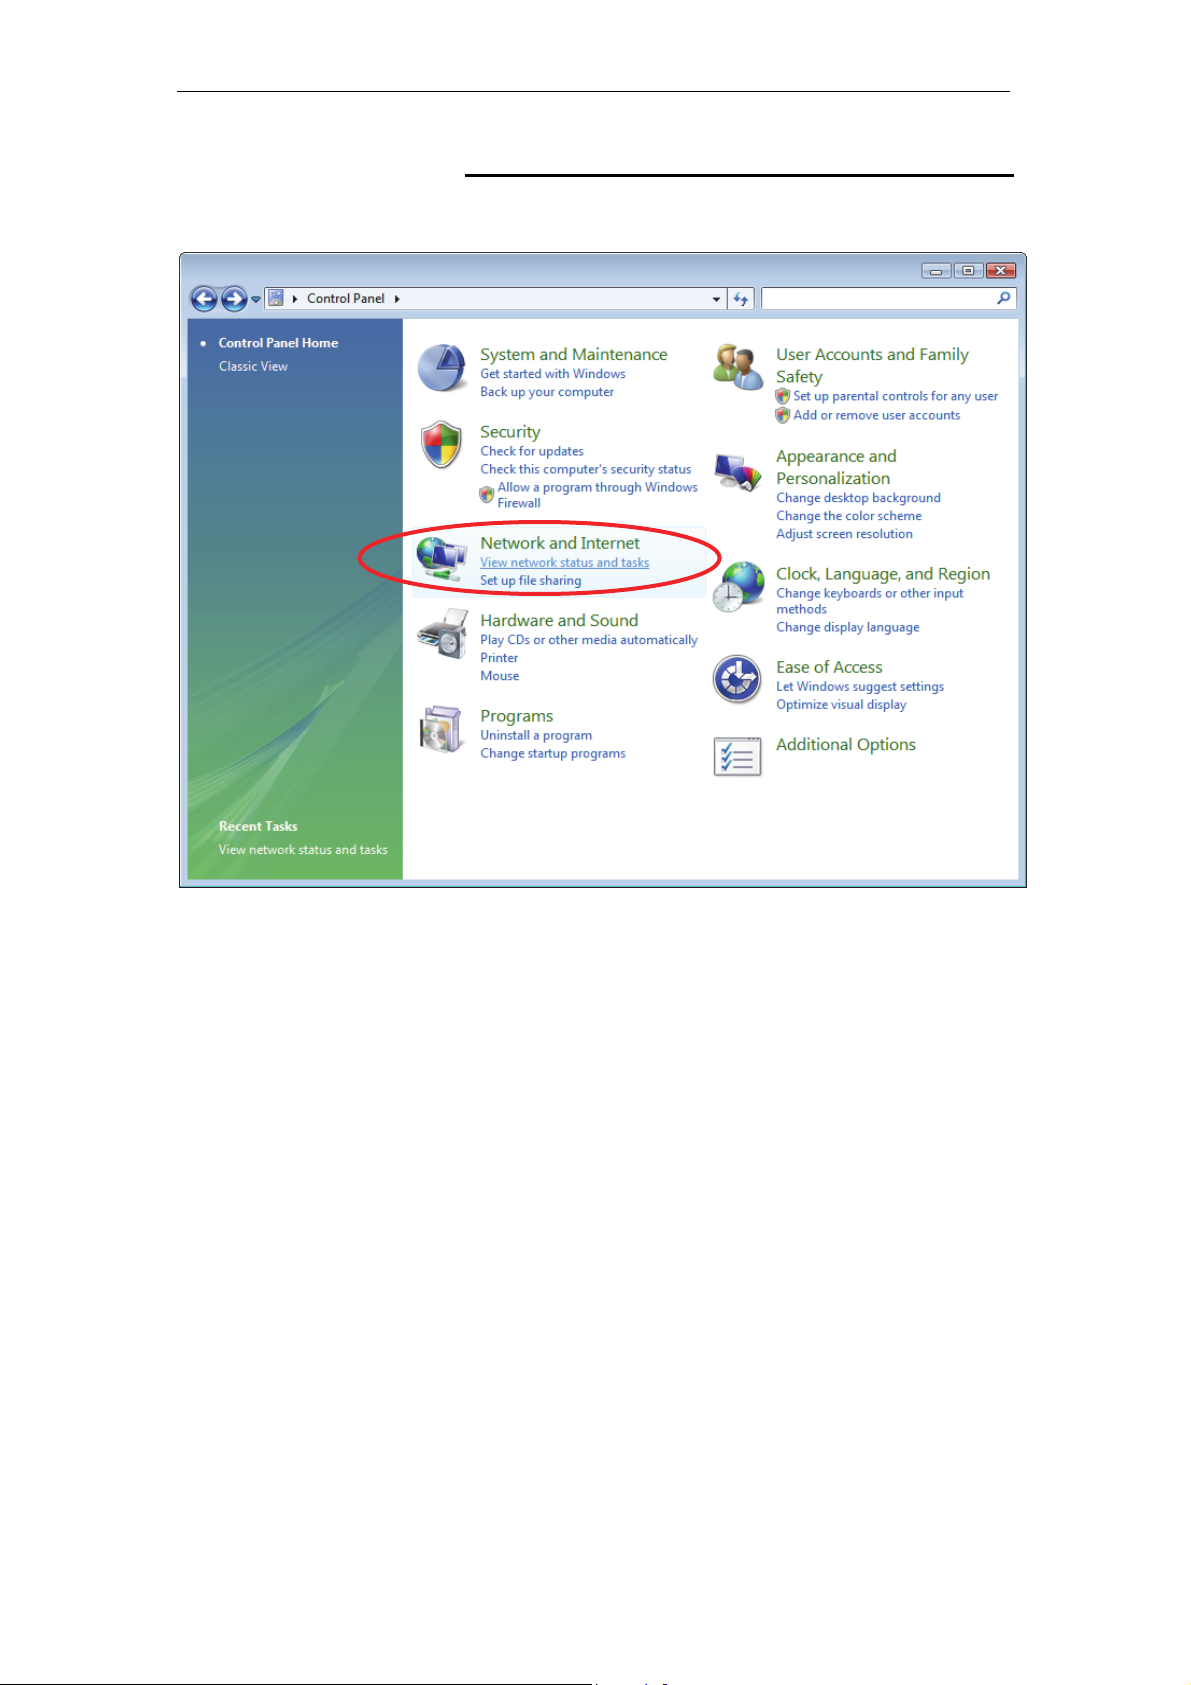
1. Click on “Start” -> “Control Panel” -> “View network
status and tasks”.
14
Page 15
11n AP Router User’s Manual
2. In the Manage network connections, click on “Manage
network connections” to continue.
15
Page 16
11n AP Router User’s Manual
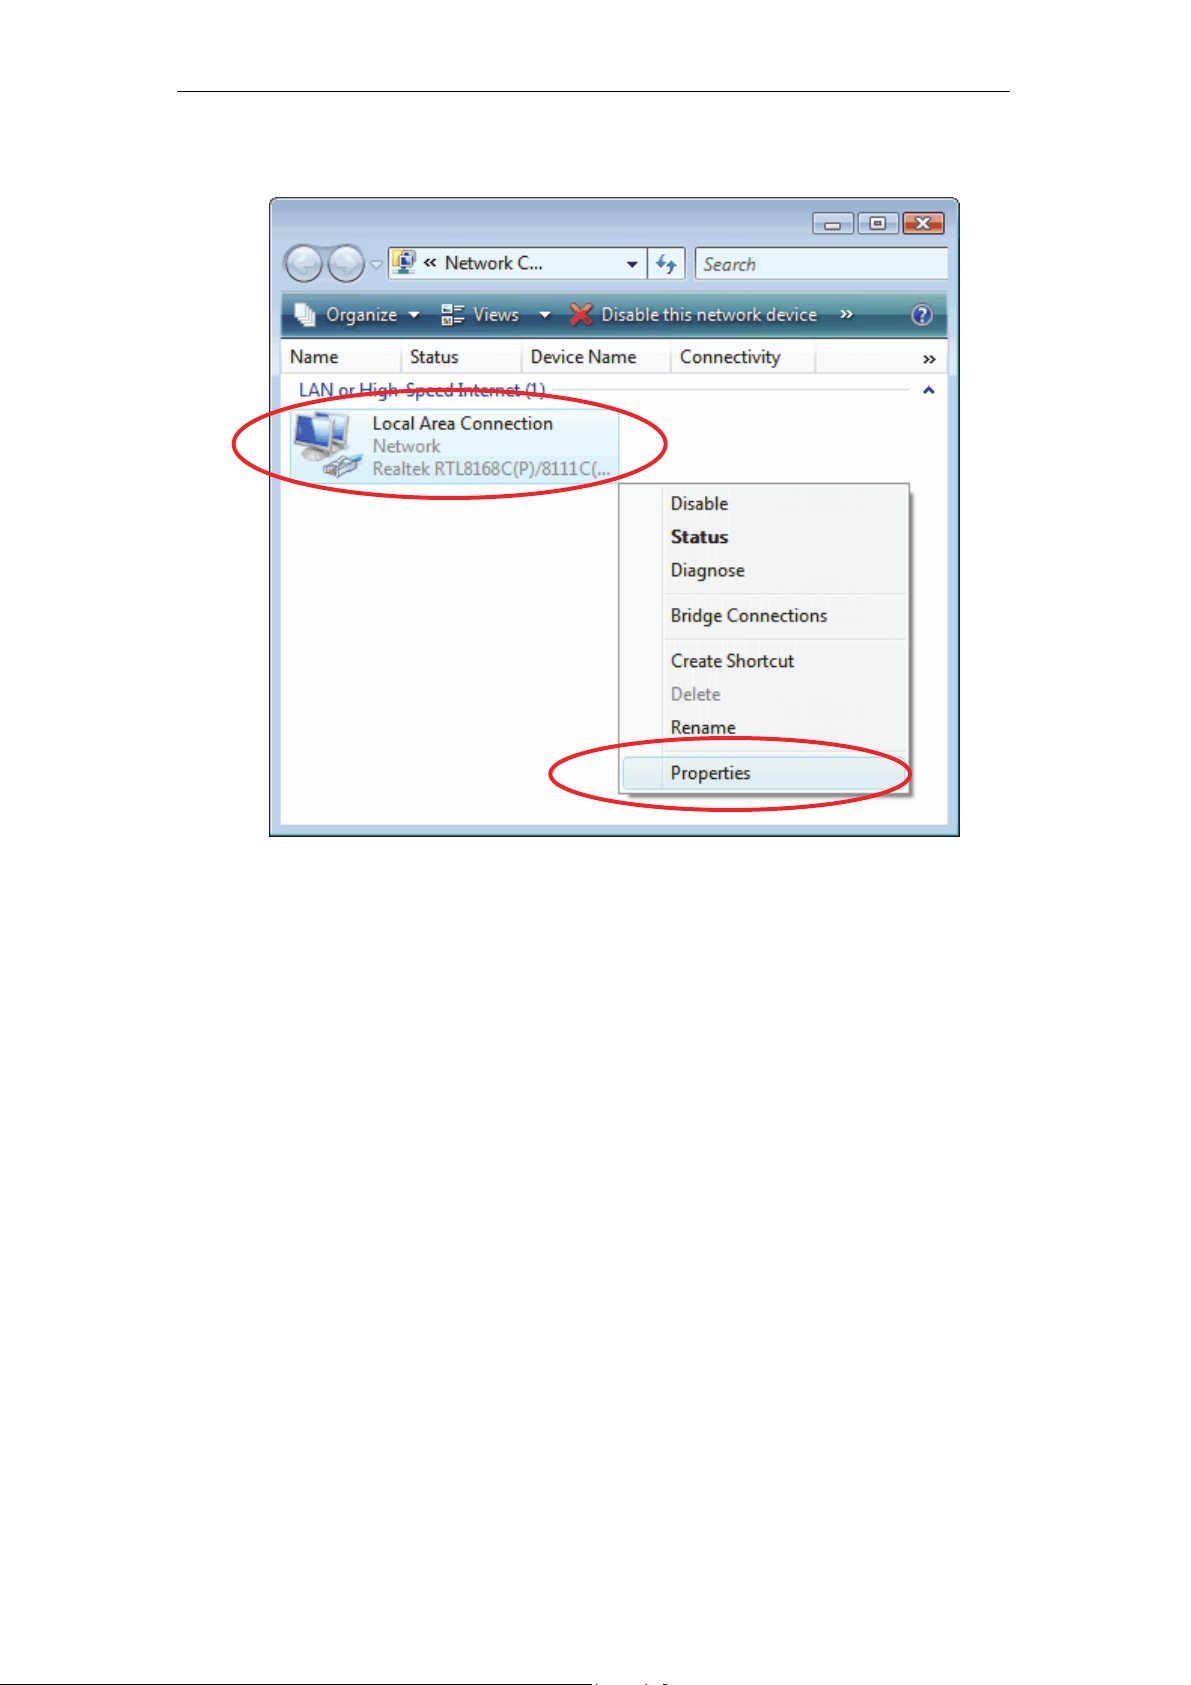
3. Single RIGHT click on "Local Area connection", then click
"Properties".
16
Page 17
11n AP Router User’s Manual
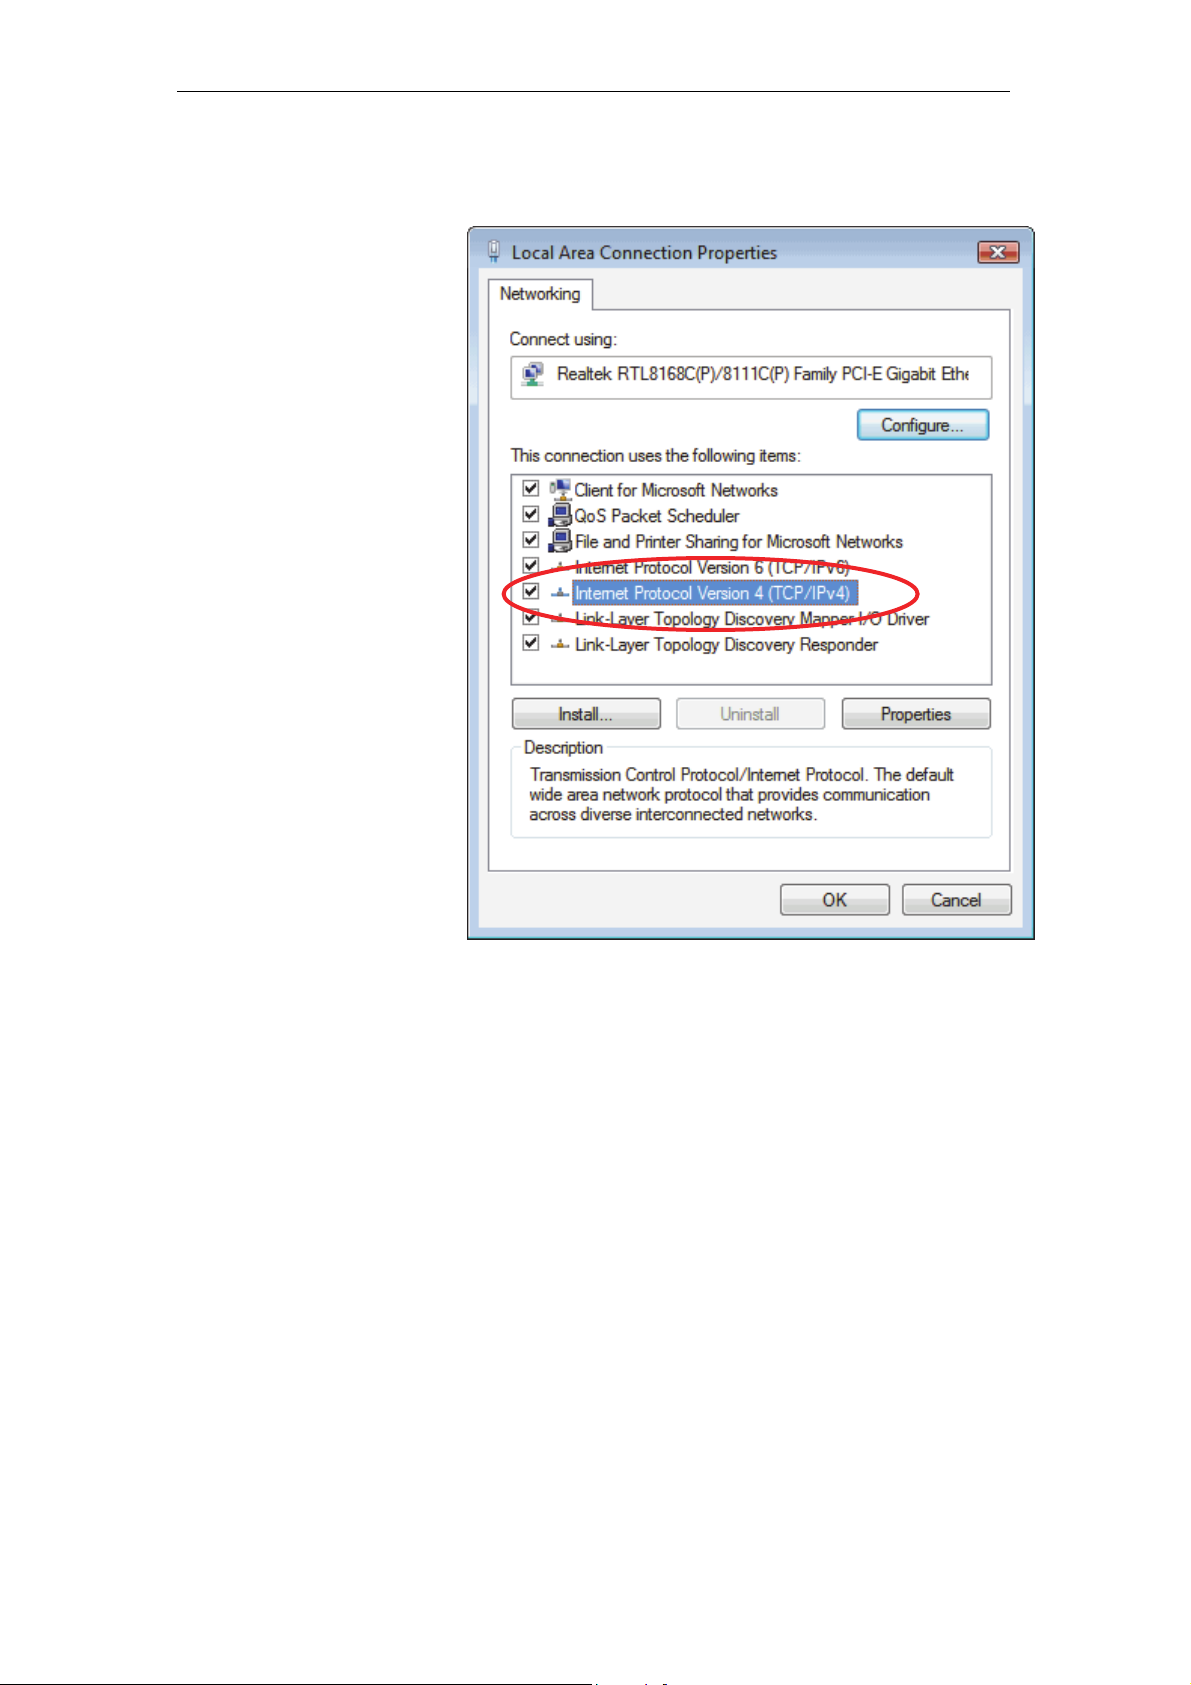
4. The screen will display the information "User Account
Control" and click "Continue" to continue.
5. Double click on "Internet Protocol Version 4 (TCP/IPv4)".
17
Page 18
11n AP Router User’s Manual
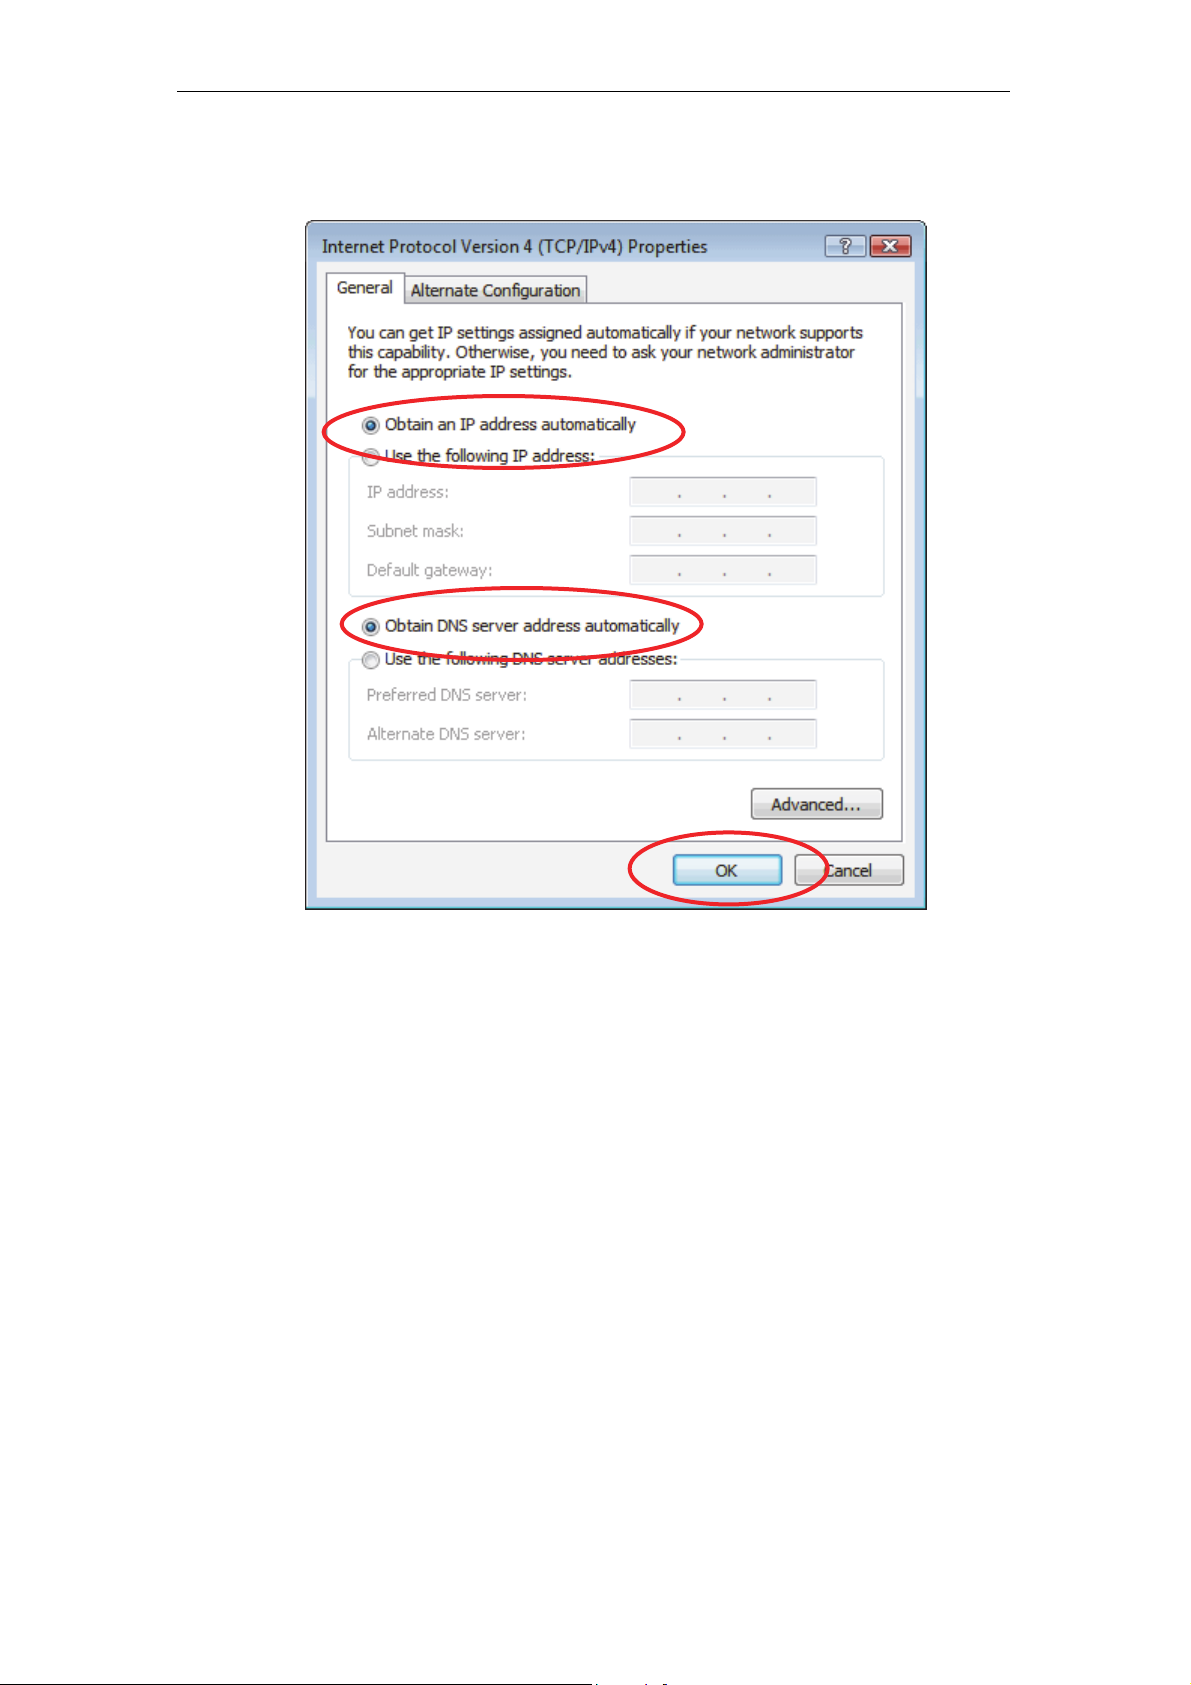
6. Check "Obtain an IP address automatically" and "Obtain
DNS server address automatically" then click on "OK" to
continue.
18
Page 19
11n AP Router User’s Manual
For Windows 7-32/64
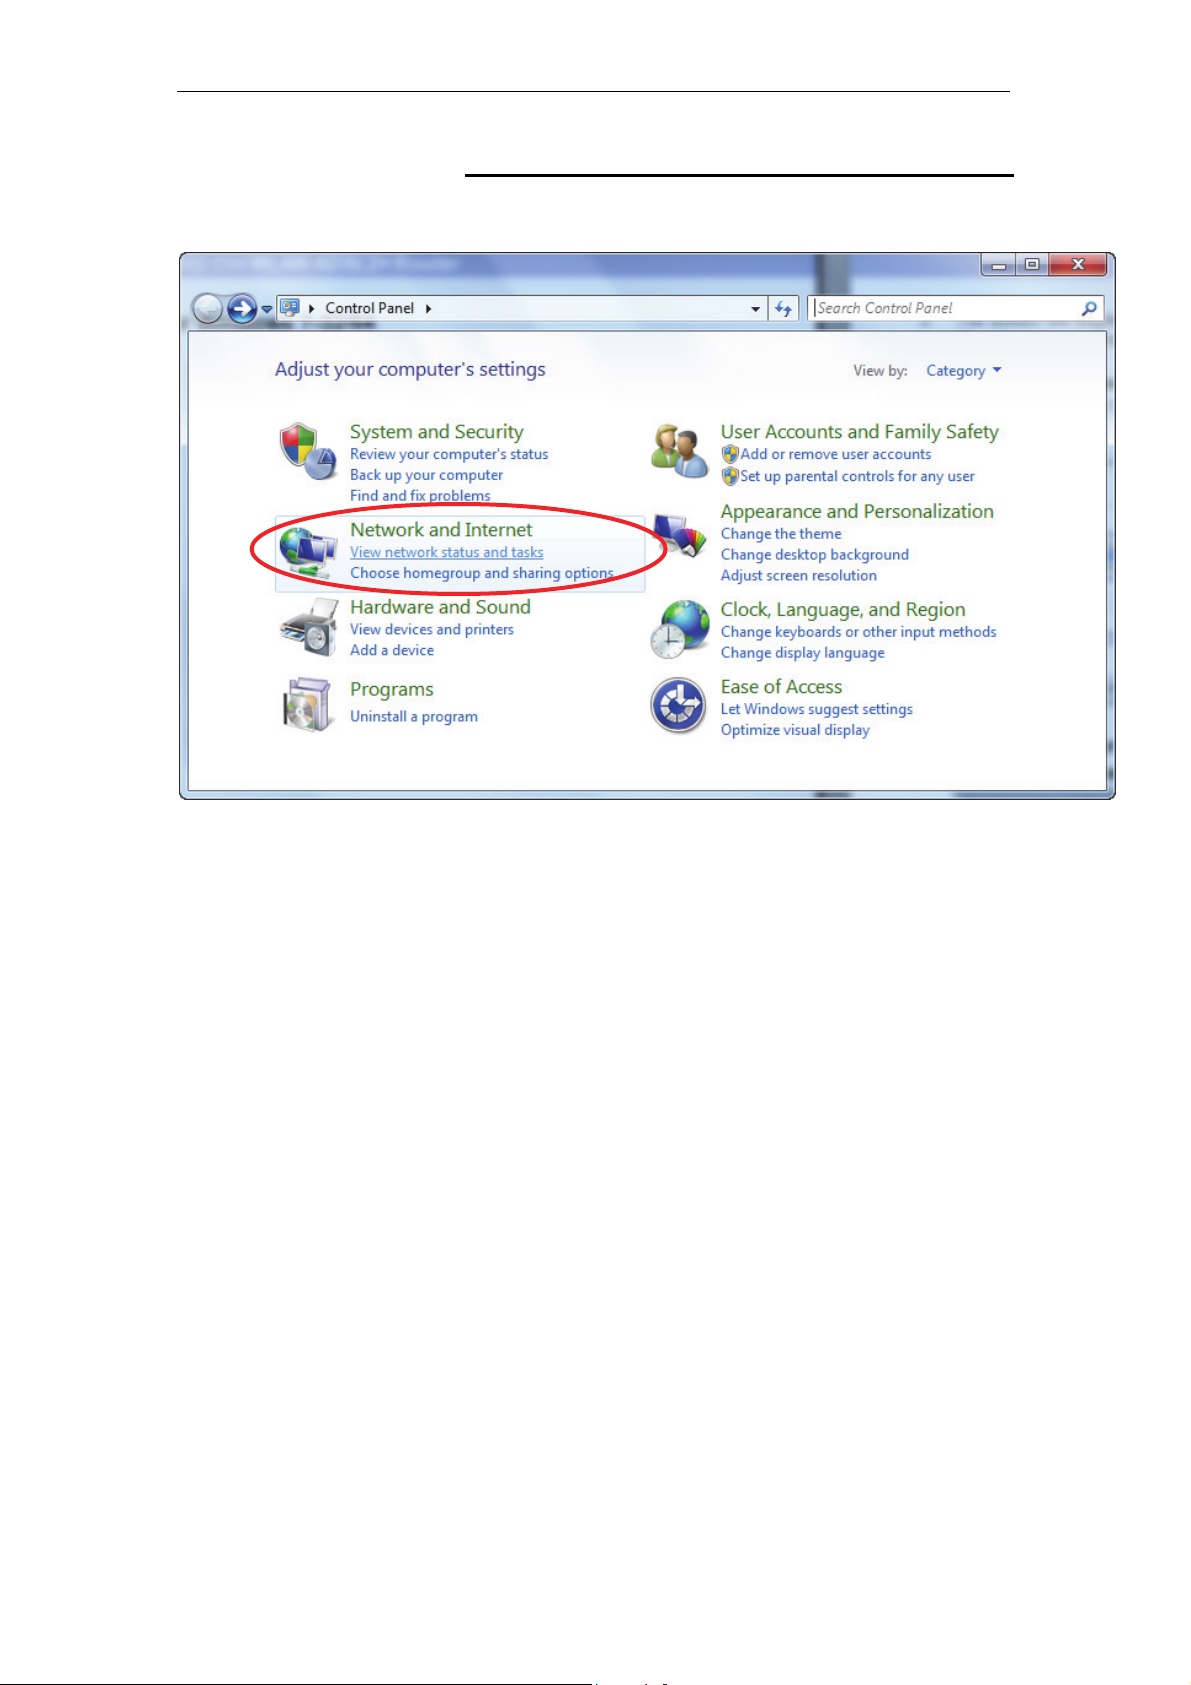
7. Click on “Start” -> “Control Panel” (in Category View) ->
“View network status and tasks”.
19
Page 20
11n AP Router User’s Manual
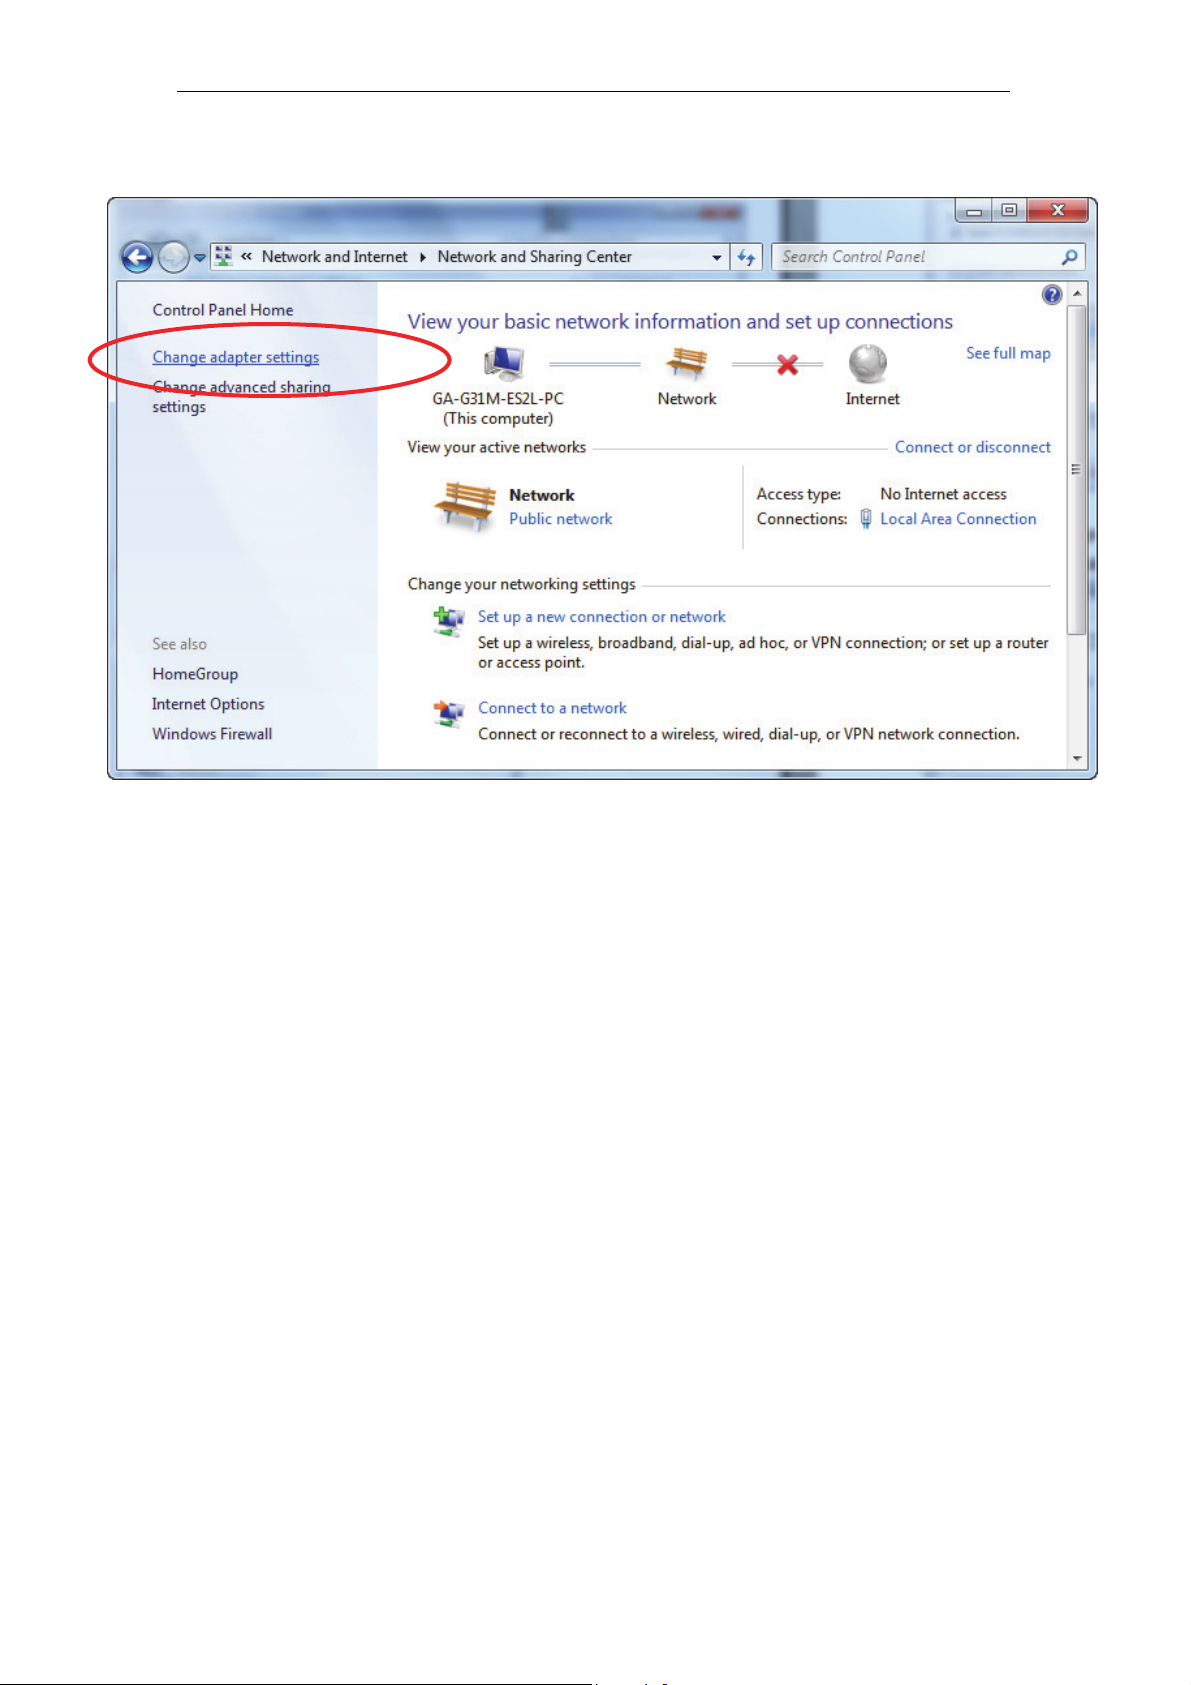
8. In the Control Panel Home, click on “Change adapter
settings” to continue.
20
Page 21
11n AP Router User’s Manual
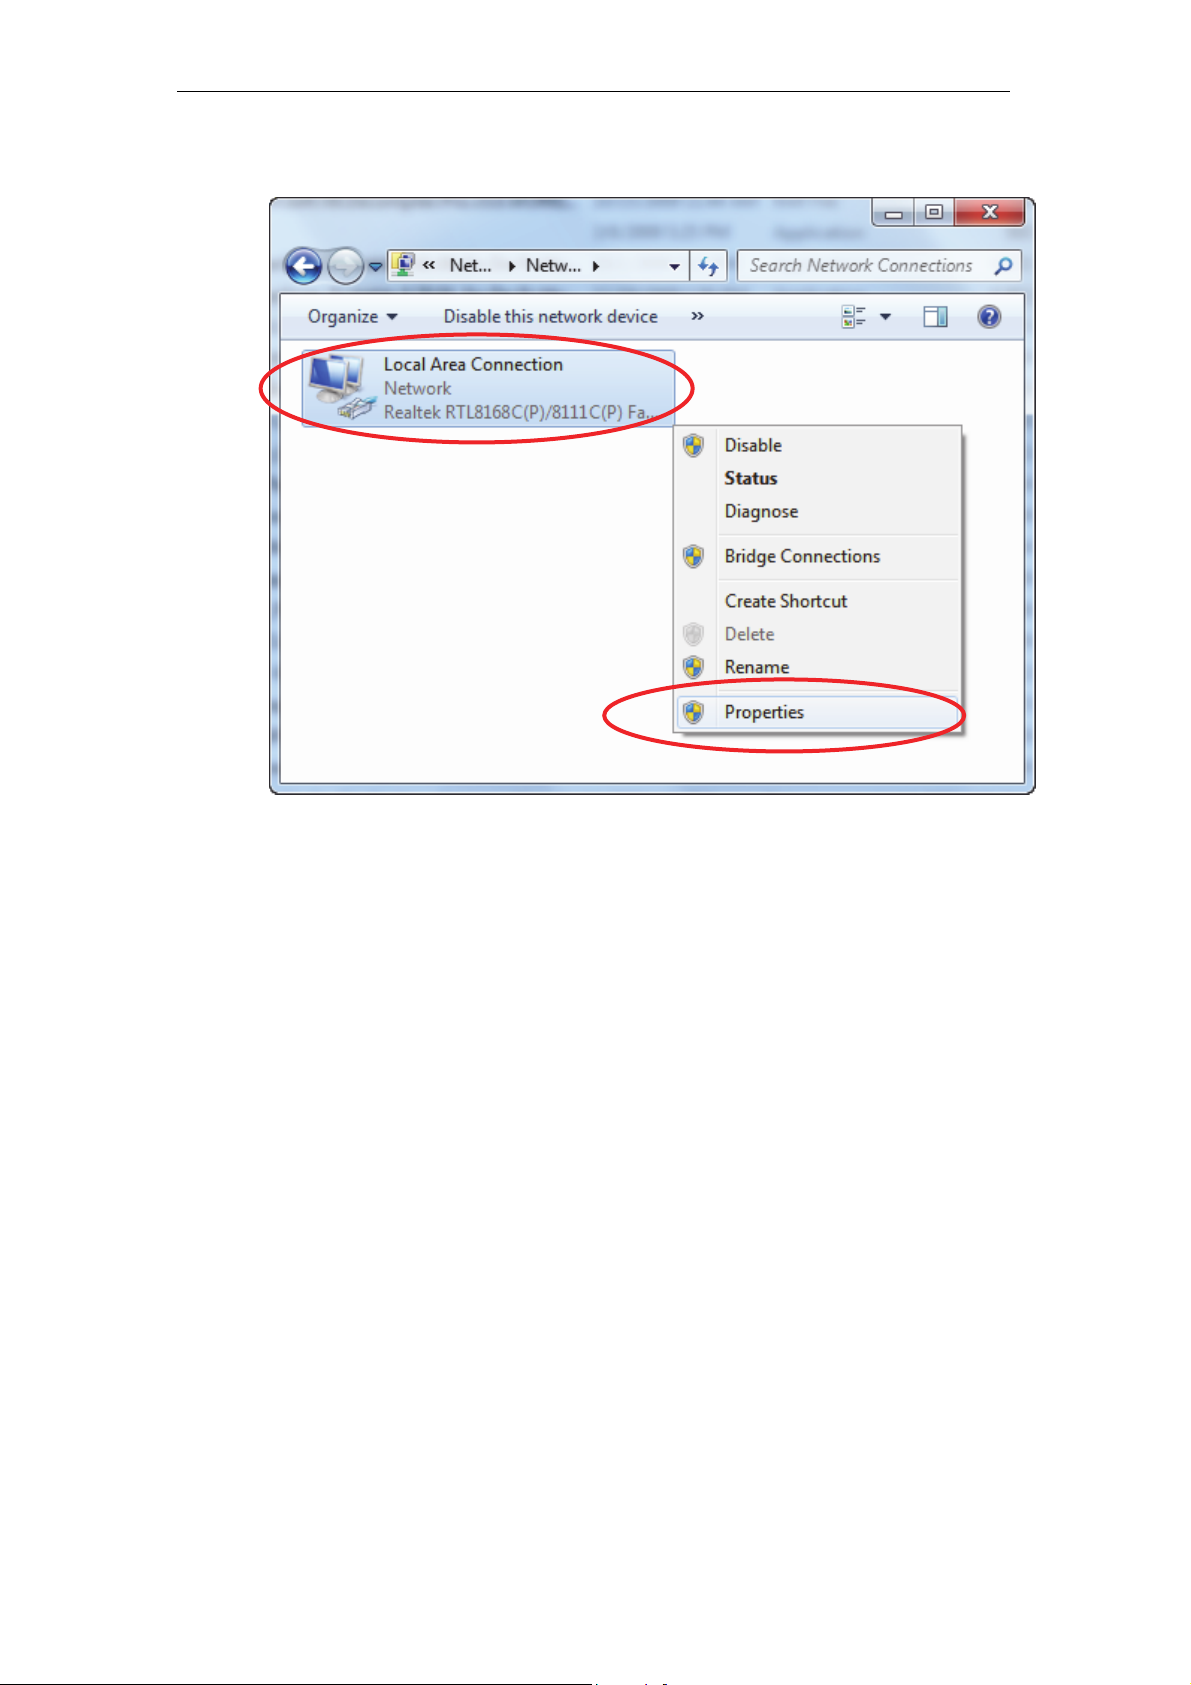
9. Single RIGHT click on “Local Area Connection”, then click
“Properties”.
21
Page 22

11n AP Router User’s Manual
10. Double click on "Internet Protocol Version 4 (TCP/IPv4)".
22
Page 23
11n AP Router User’s Manual
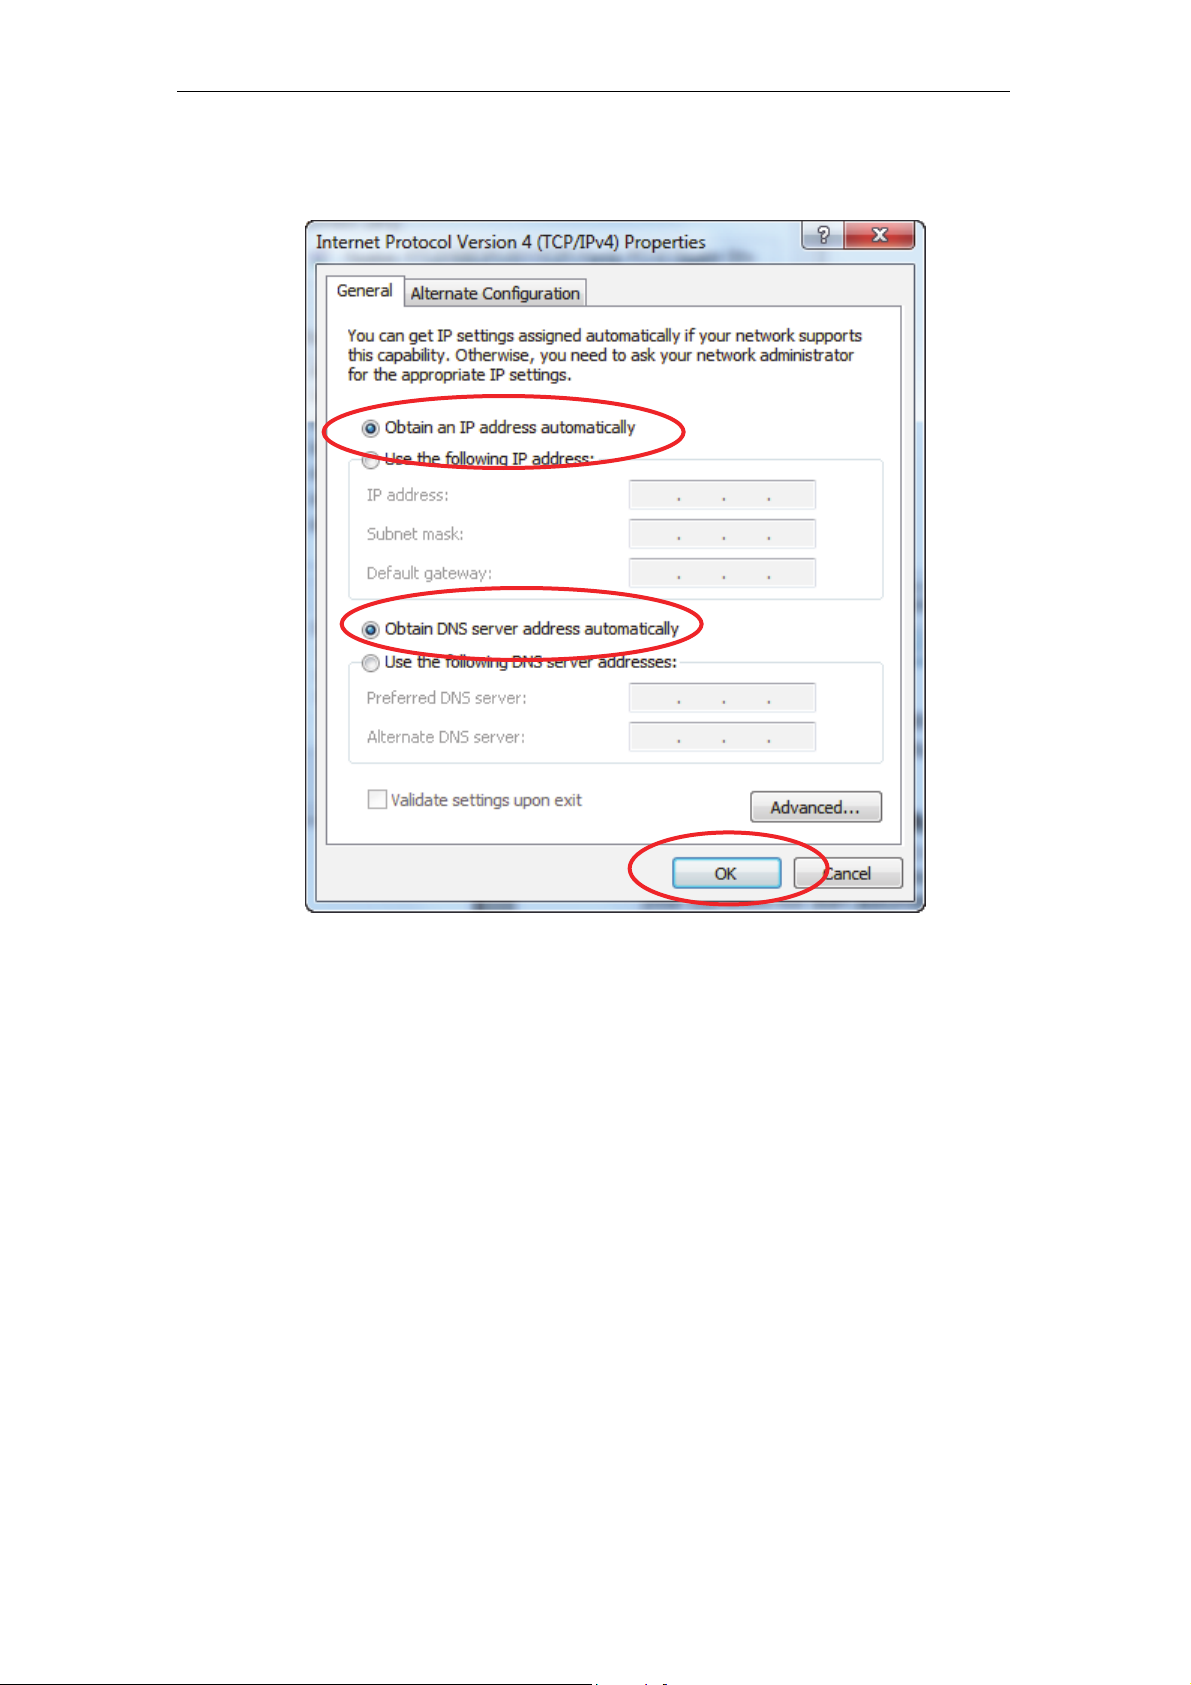
11. Check "Obtain an IP address automatically" and "Obtain
DNS server address automatically" then click on "OK" to
continue.
23
Page 24
11n AP Router User’s Manual
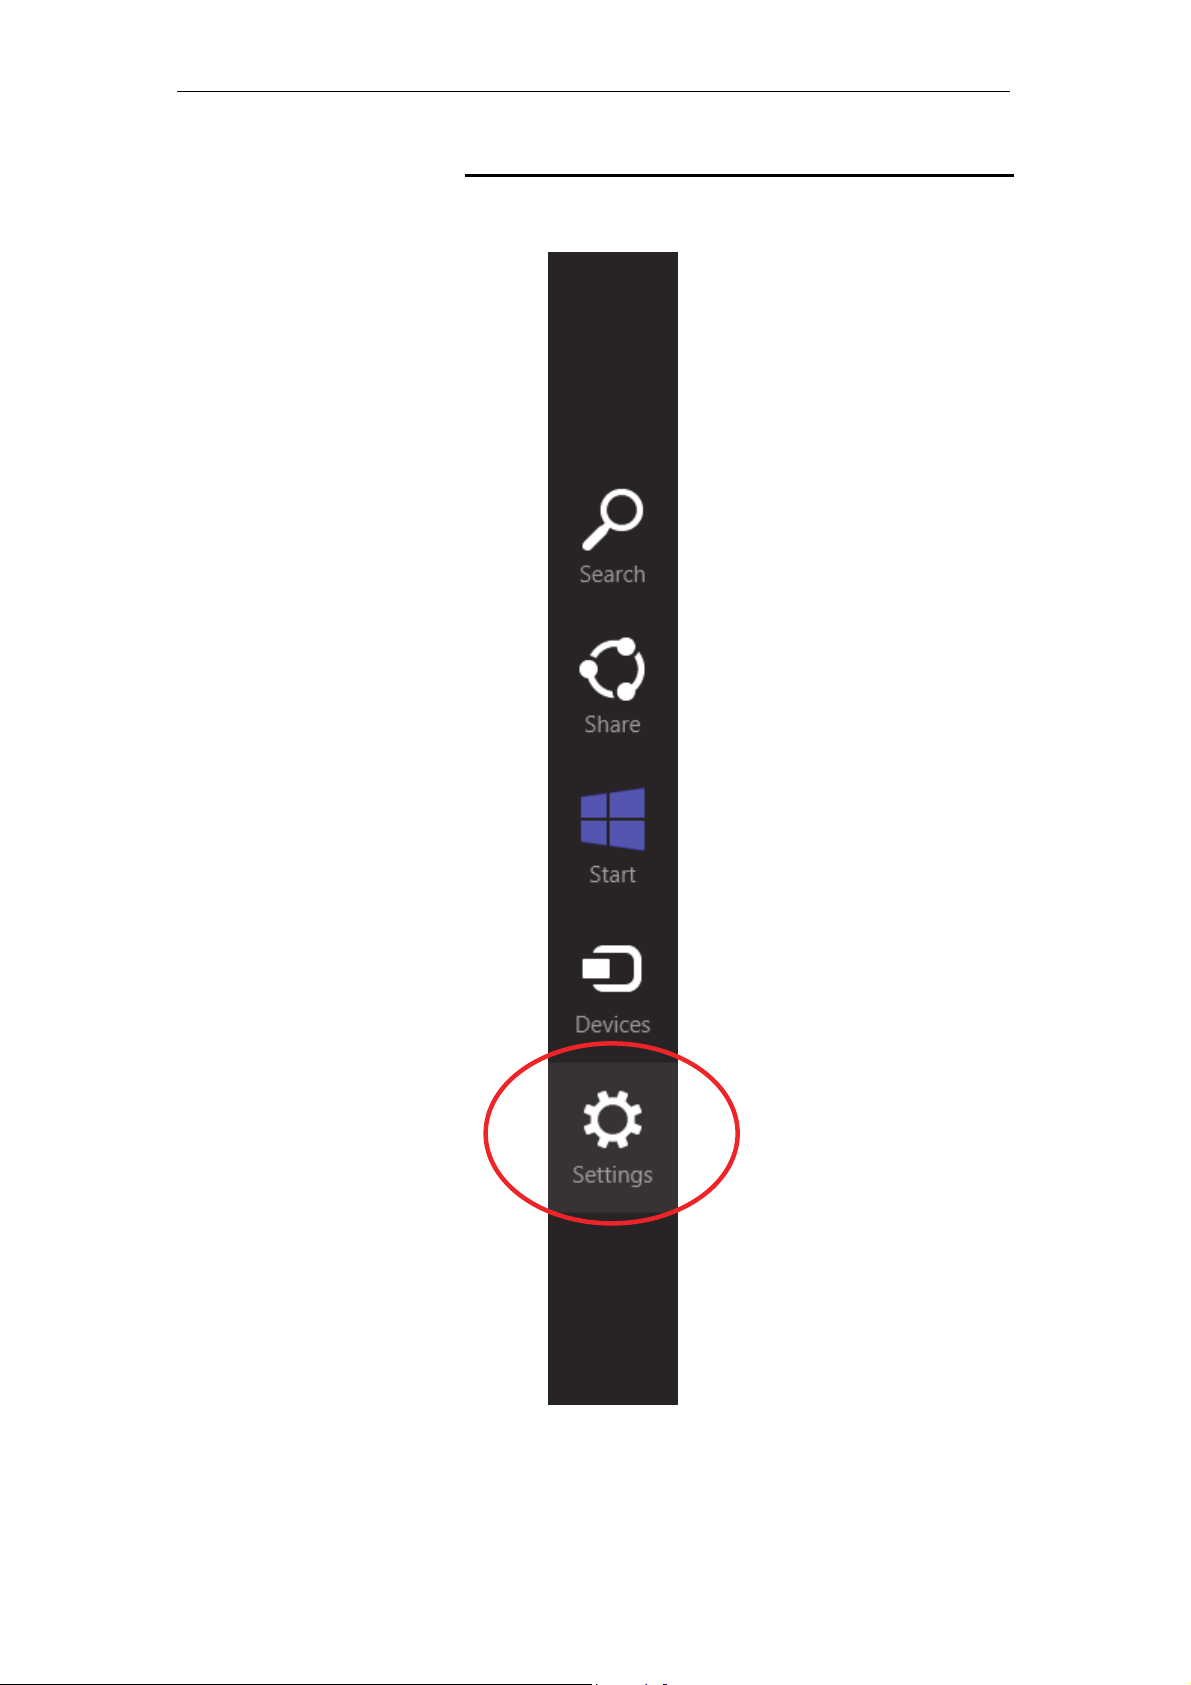
For Windows 8-32/64
1. Move the mouse or tap to the upper right corner and click
on “Settings”.
24
Page 25
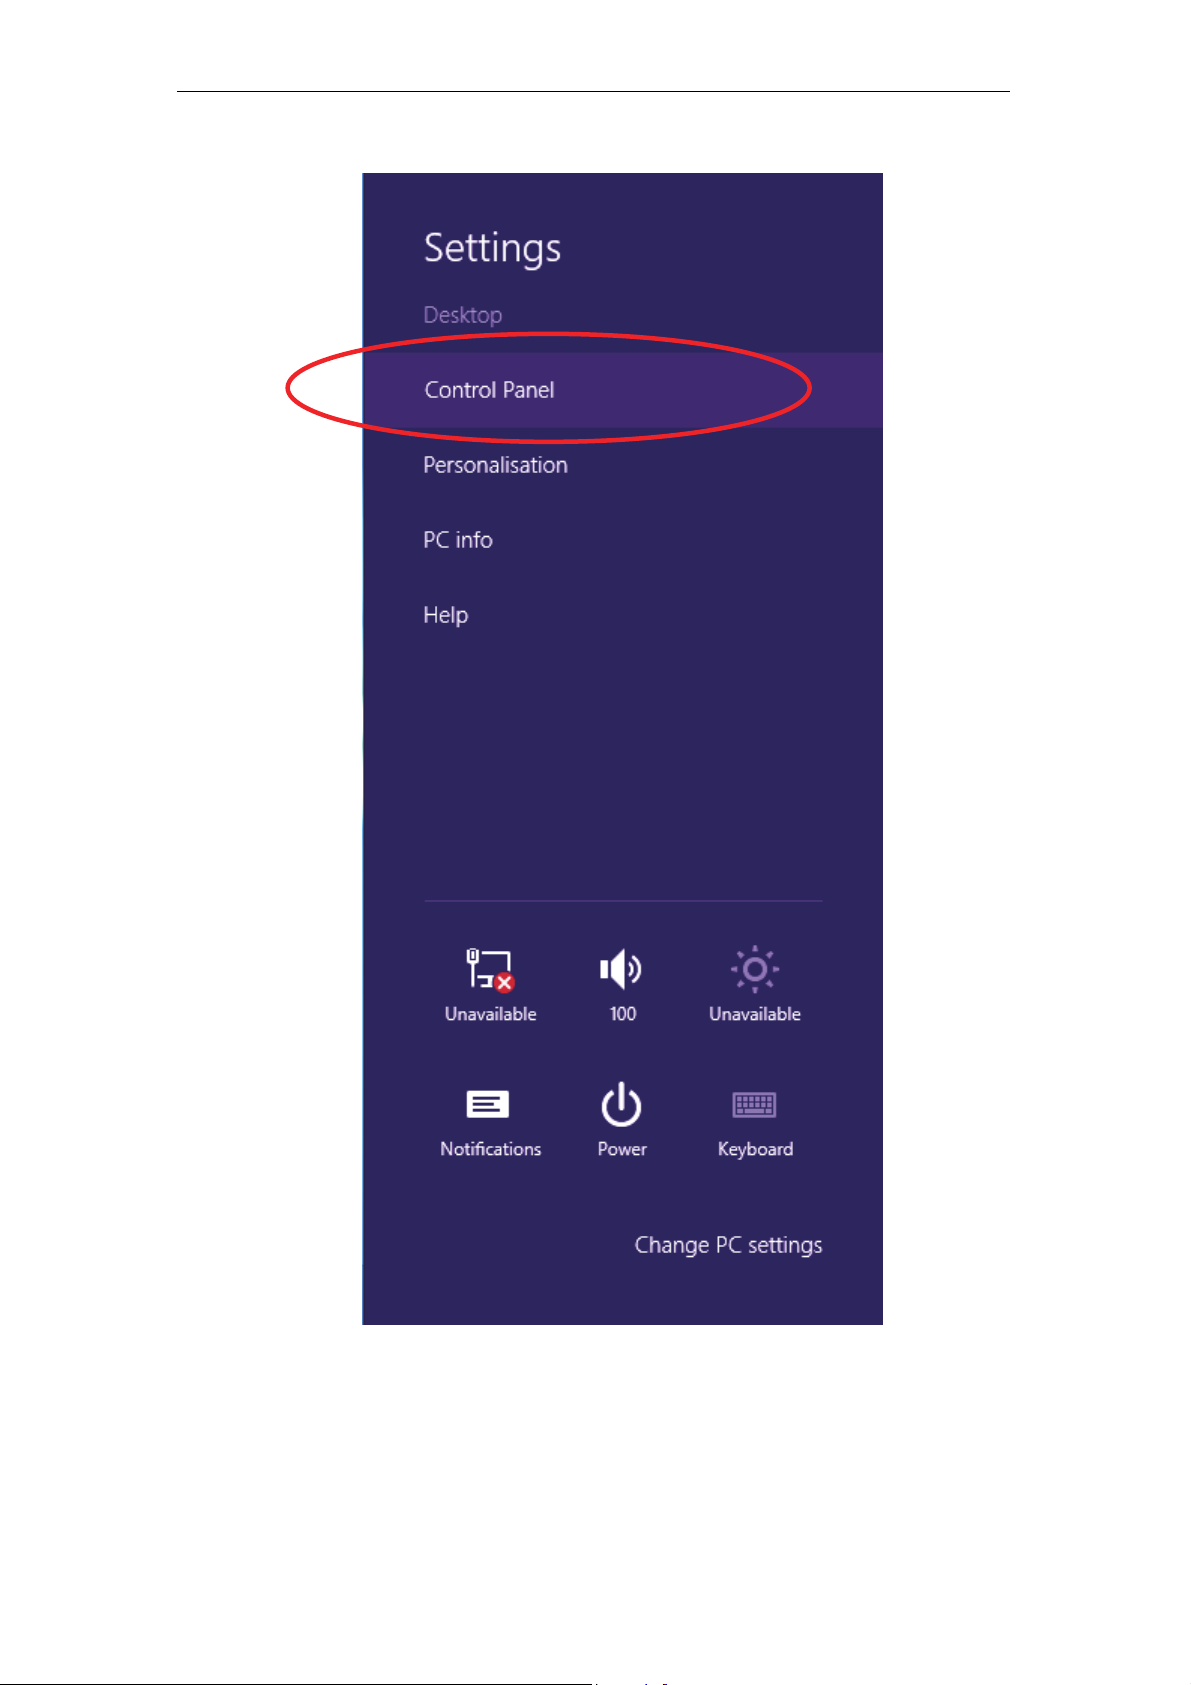
11n AP Router User’s Manual
2. Click on “Control Panel”.
25
Page 26
11n AP Router User’s Manual
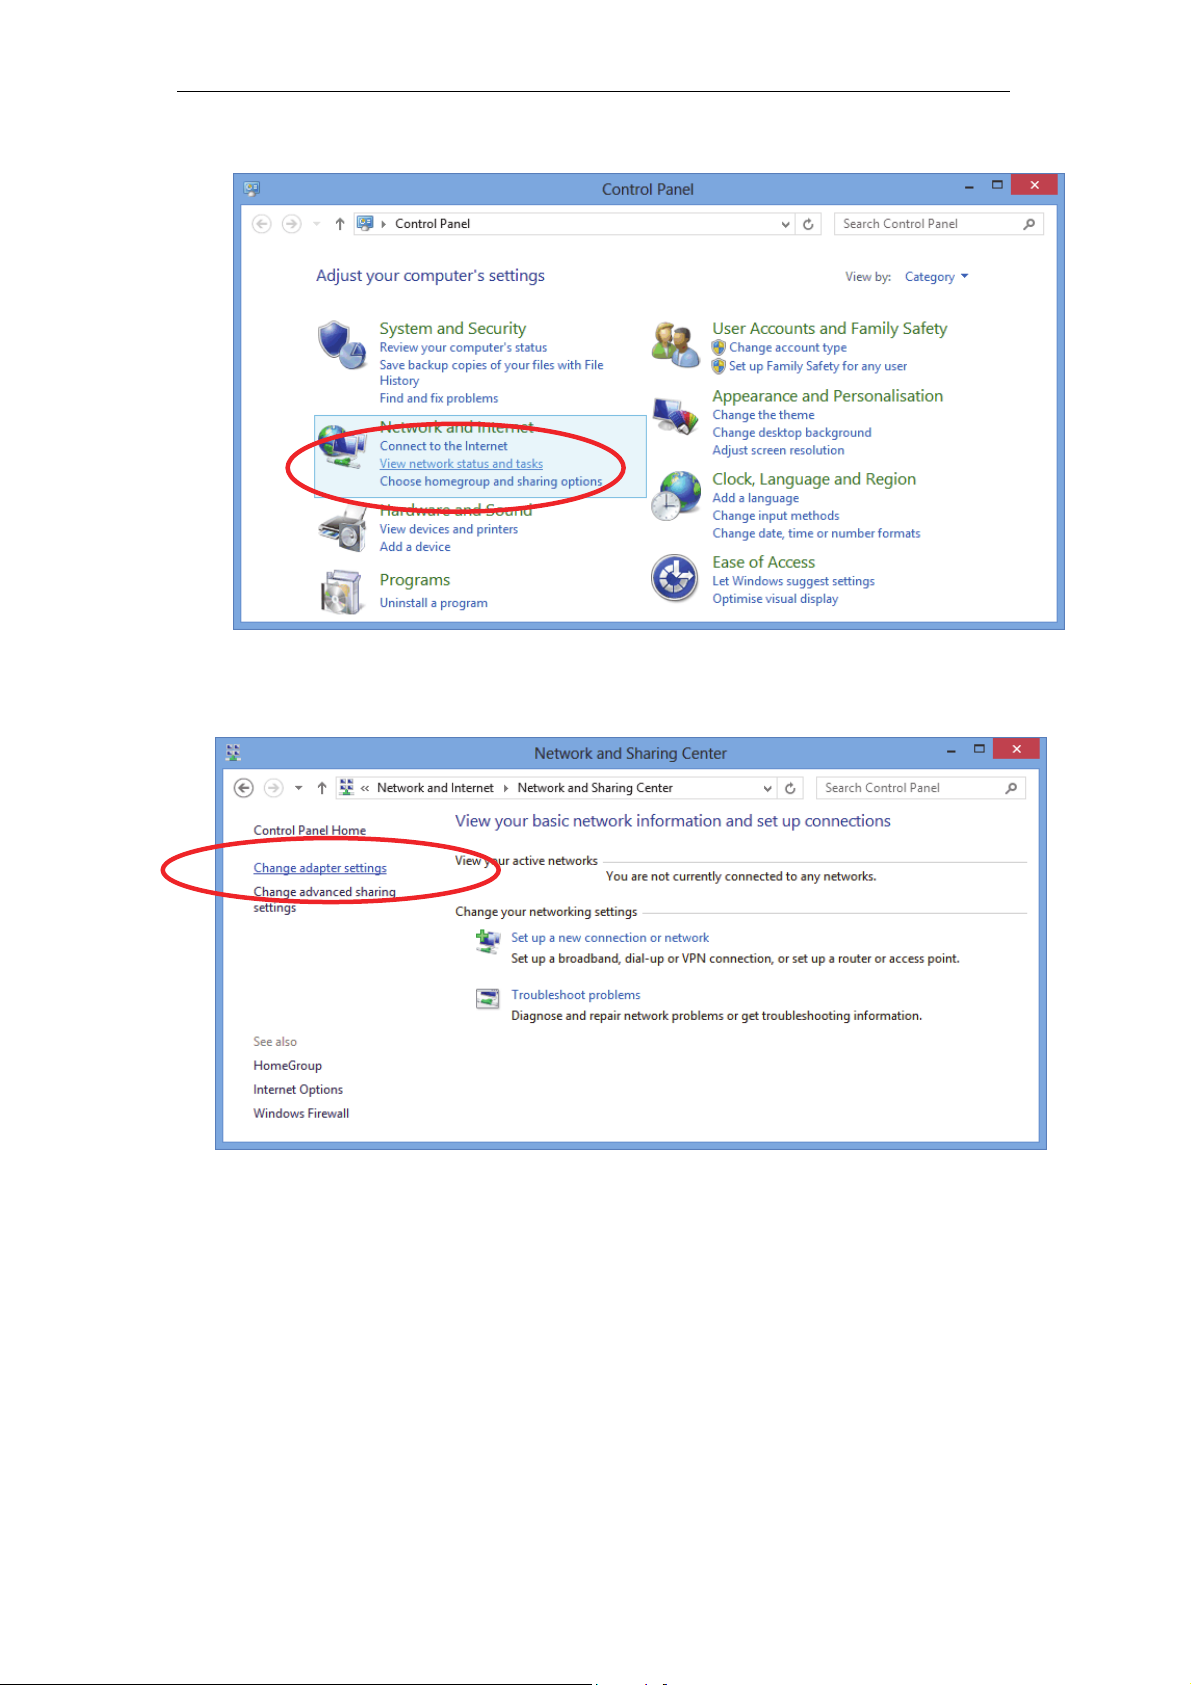
3. Click on “View network status and tasks”.
4. In the Control Panel Home, click on “Change adapter
settings” to continue.
26
Page 27
11n AP Router User’s Manual
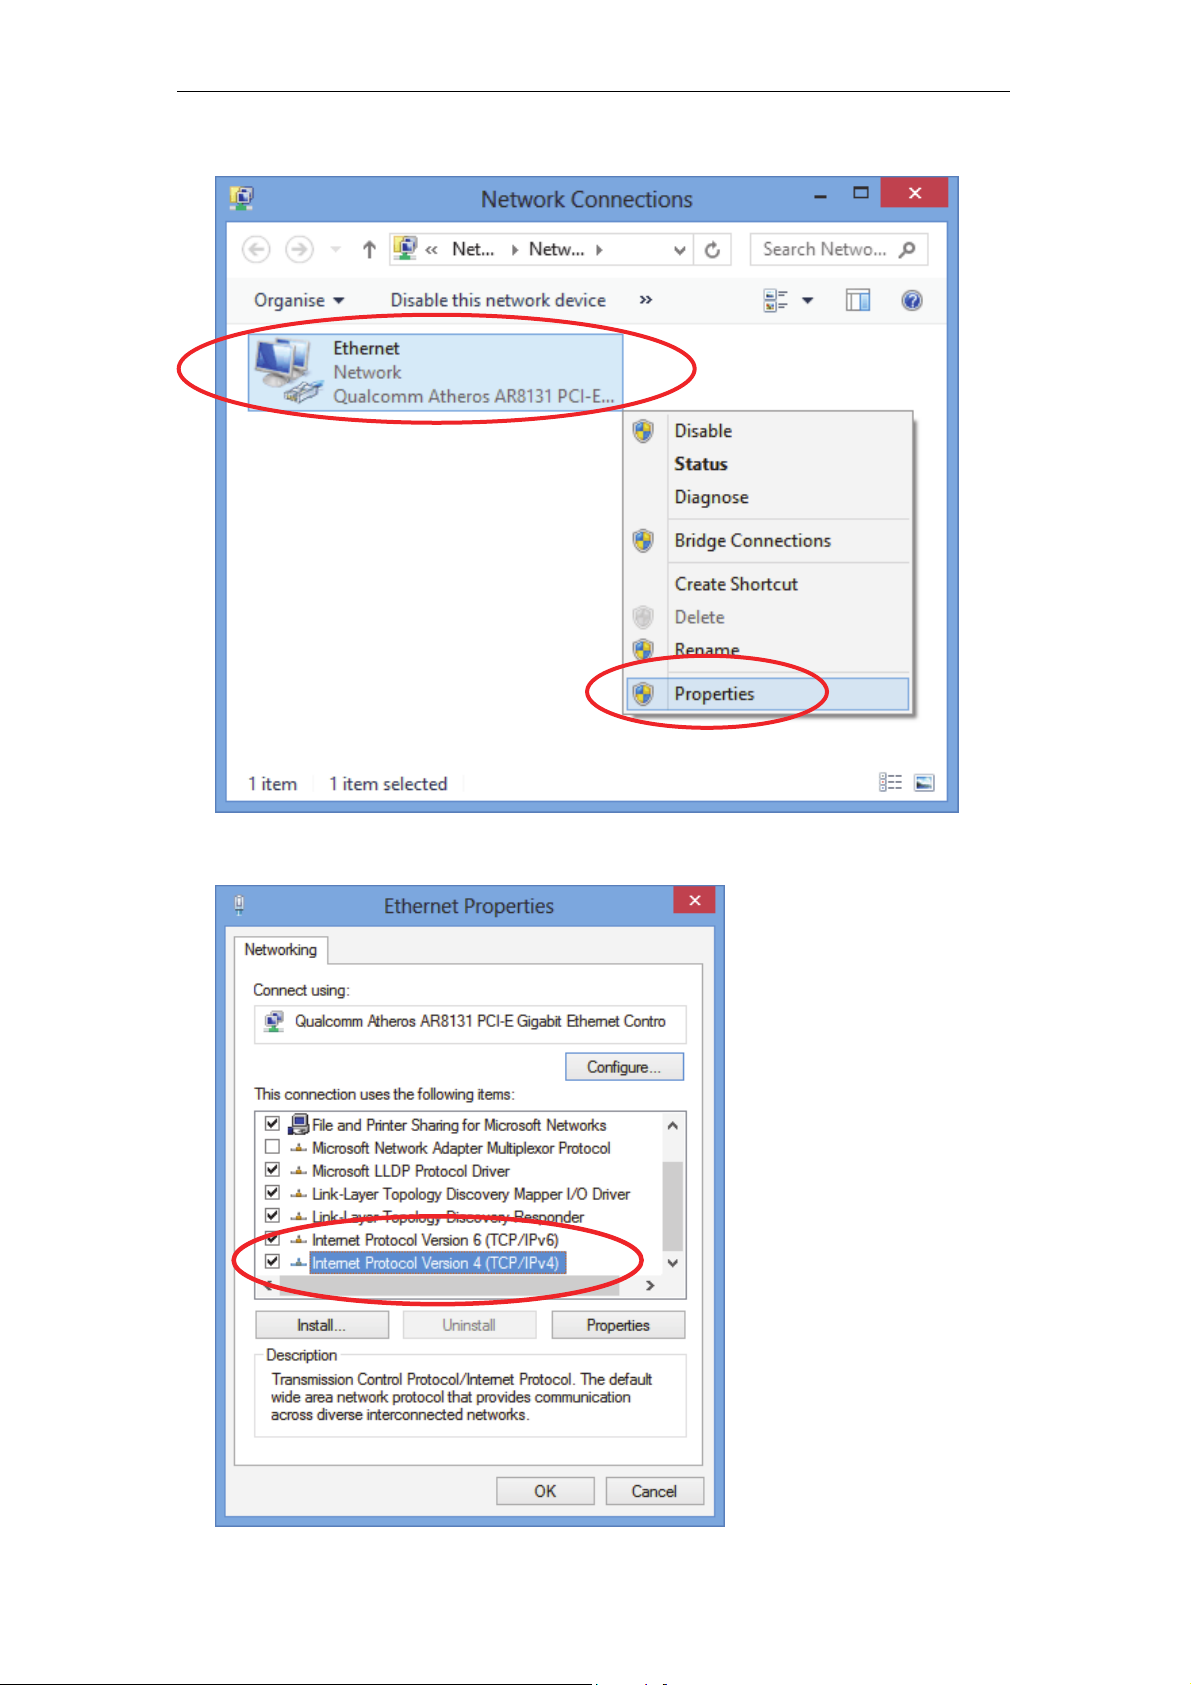
5. Single RIGHT click on “Ethernet", then click "Properties".
6. Double click on "Internet Protocol Version 4 (TCP/IPv4)".
27
Page 28
11n AP Router User’s Manual
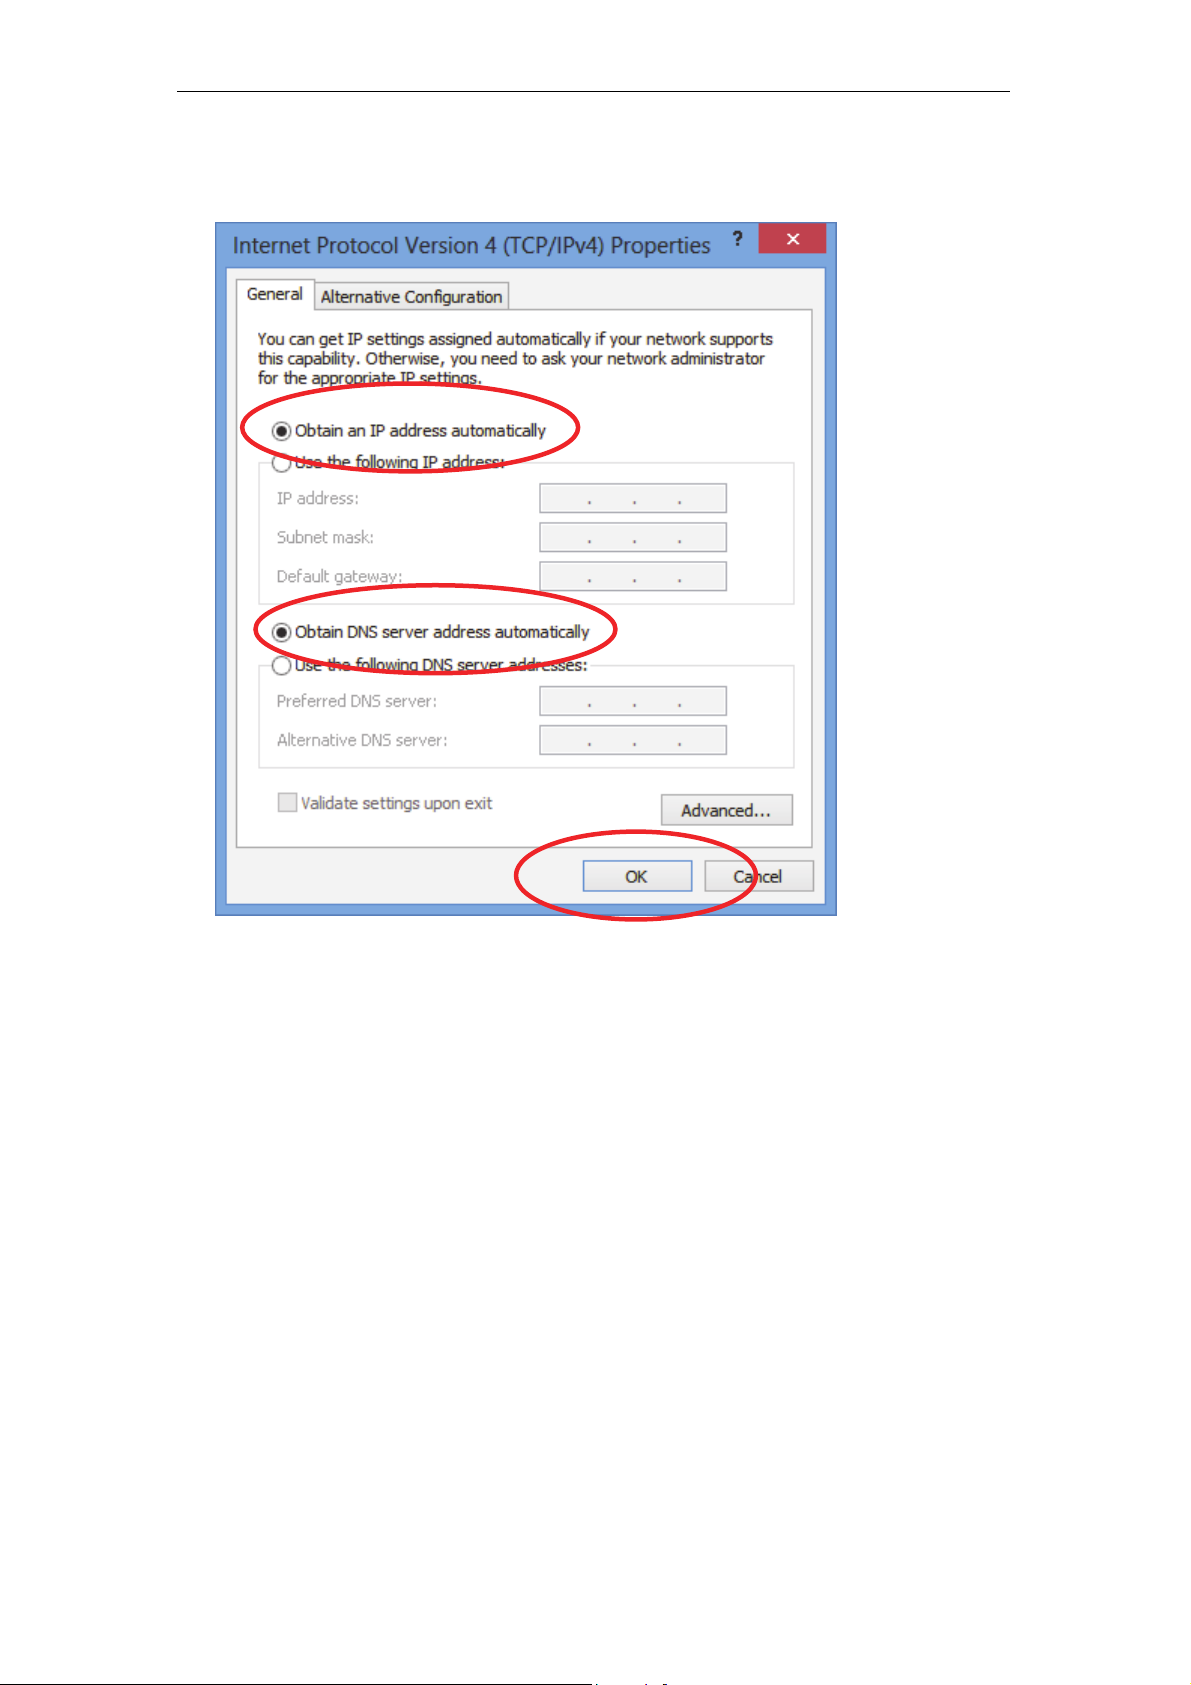
7. Check "Obtain an IP address automatically" and “Obtain
DNS server address automatically” then click on "OK" to
continue.
28
Page 29

11n AP Router User’s Manual
4 Connecting your device
This chapter provides basic instructions for connecting the
Wireless Gateway to a computer or LAN and to the Internet.
In addition to configuring the device, you need to configure the
Internet properties of your computer(s). For more details, see
the following sections:
• Configuring Ethernet PCs
This chapter assumes that you have already established a
DSL/Cable service with your Internet service provider (ISP).
These instructions provide a basic configuration that should be
compatible with your home or small office network setup. Refer
to the subsequent chapters for additional configuration
instructions.
Connecting the Hardware
This section describes how to connect the device to the wall
phone port, the power outlet and your computer(s) or network.
Before you begin, turn the power off for all devices. These
include your computer(s), your LAN hub/switch (if applicable),
WARNING
and the Wireless Gateway.
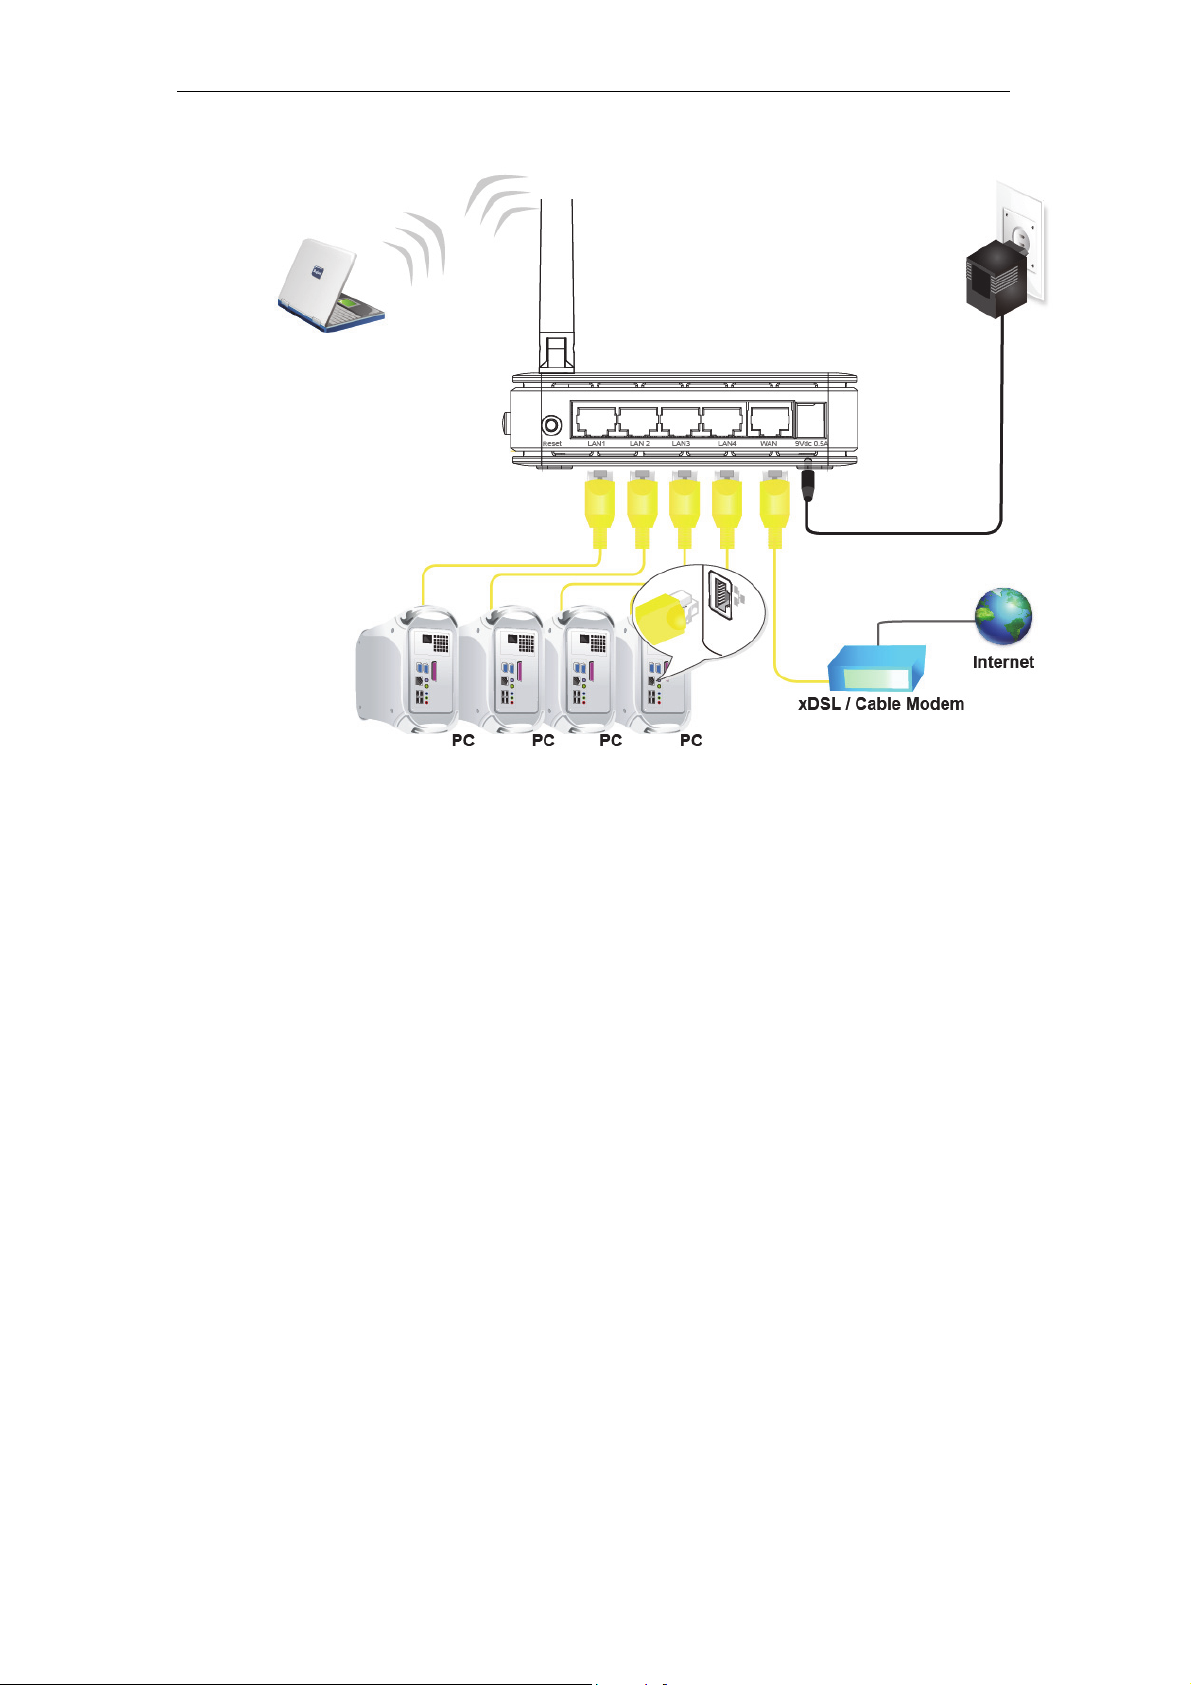
The diagram below illustrates the hardware connections. The
layout of the ports on your device may vary from the layout
shown. Refer to the steps that follow for specific instructions.
29
Page 30
11n AP Router User’s Manual
Step 1. Connect the Ethernet cable to WAN Port
Connect the RJ45 Ethernet cable from your xDSL/Cable
Modem's Ethernet port to 11n AP Router 's WAN Port.
Step 2. Connect the Ethernet cable to LAN Port
Connect the supplied RJ45 Ethernet cable from your PC's
Ethernet port to any of the 11n AP Router Router's LAN
Port.
Step 3. Attach the power connector
Connect the power adapter to the power inlet POWER of
your 11n AP Router.
30
Page 31
11n AP Router User’s Manual
5 Advanced Configuration
Advanced Configuration with Router Mode
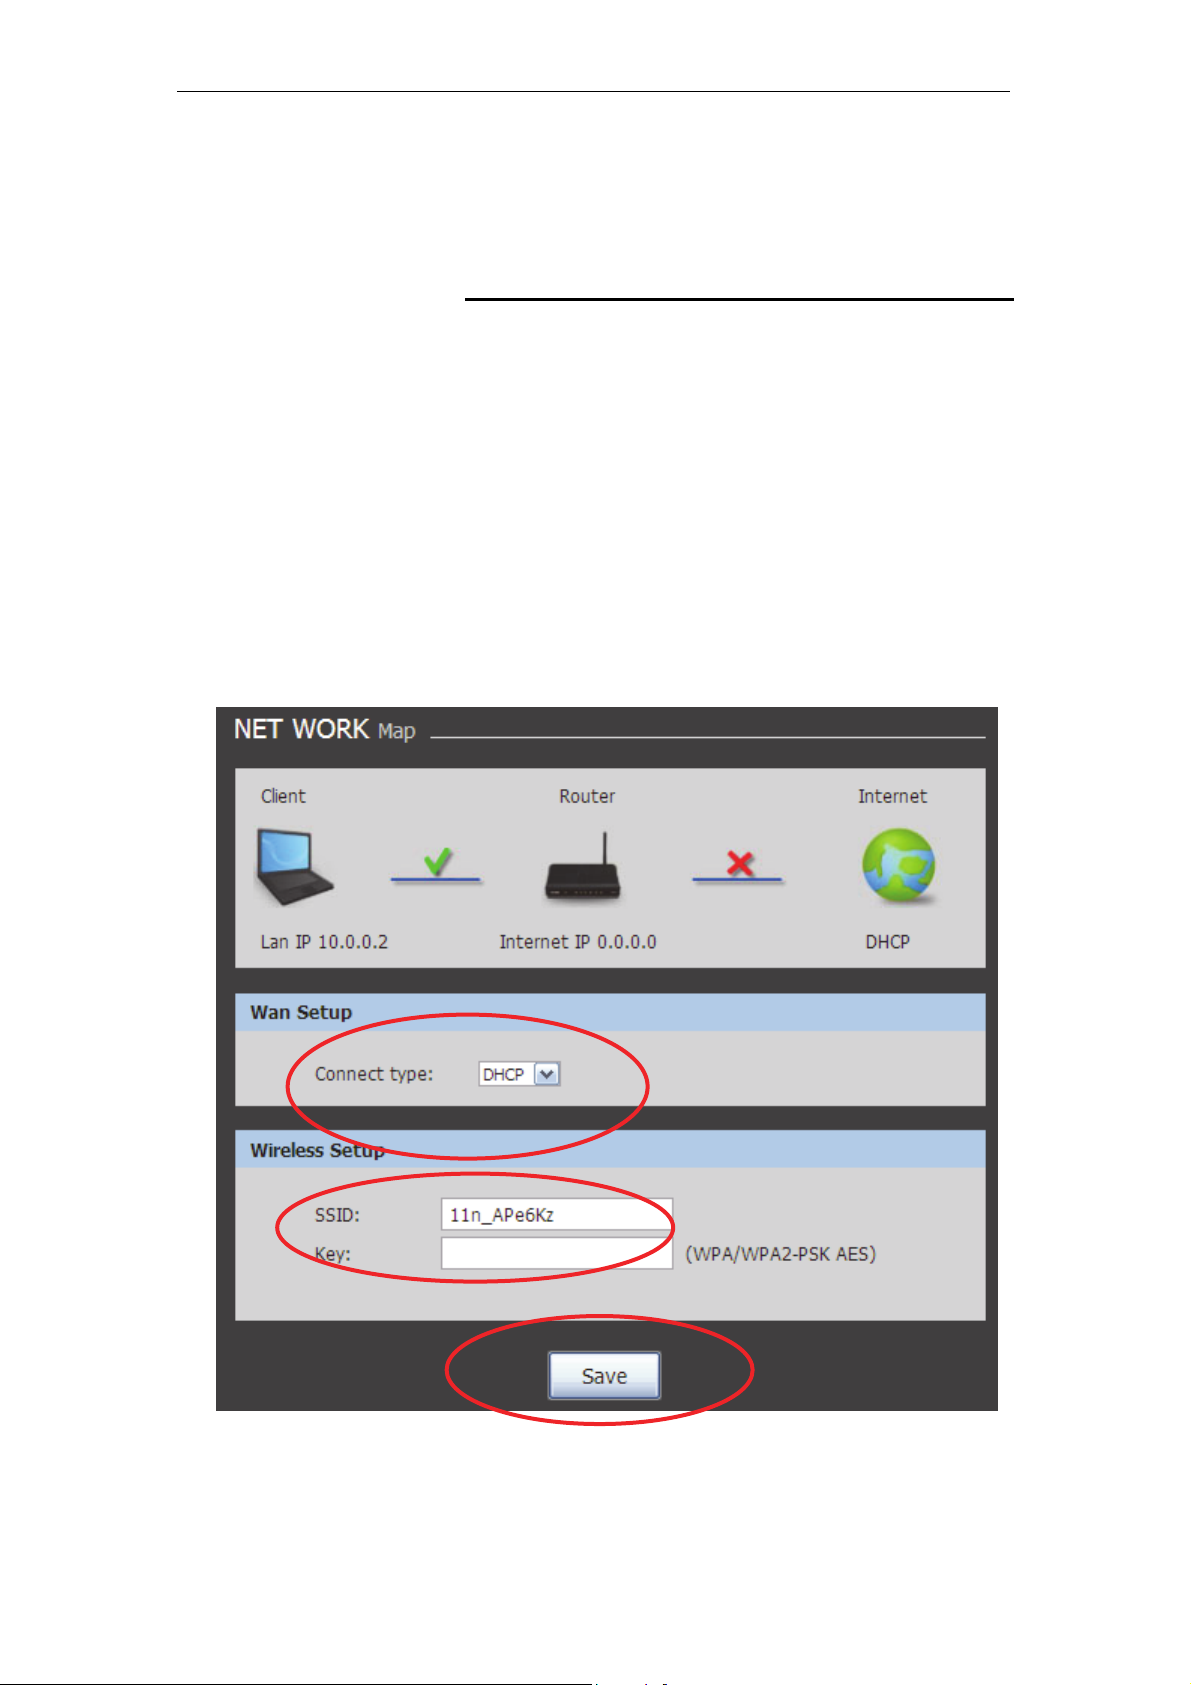
1. From any of the LAN computers connected to , launch your
web browser, type the following URL in the web address (or
location) box, and press [Enter] on your keyboard:
http://10.0.0.2
2. Select the Connect type DHCP, Static or PPPoE and enter
related parameters that your ISP (Internet Services Provider)
or Network Administrator provided.
3. Please enter the “SSID” if you want to change (the default
settings SSID = 11n_APxxxx which could be found on
the bottom side of the device).
4. Please enter your own wireless password at least 8
characters for example 12345678 in the Key field /
Network key field (the Encryption type = WPA/WPA2PSK AES).
5. Click on “Save” button.
31
Page 32
11n AP Router User’s Manual
Examples
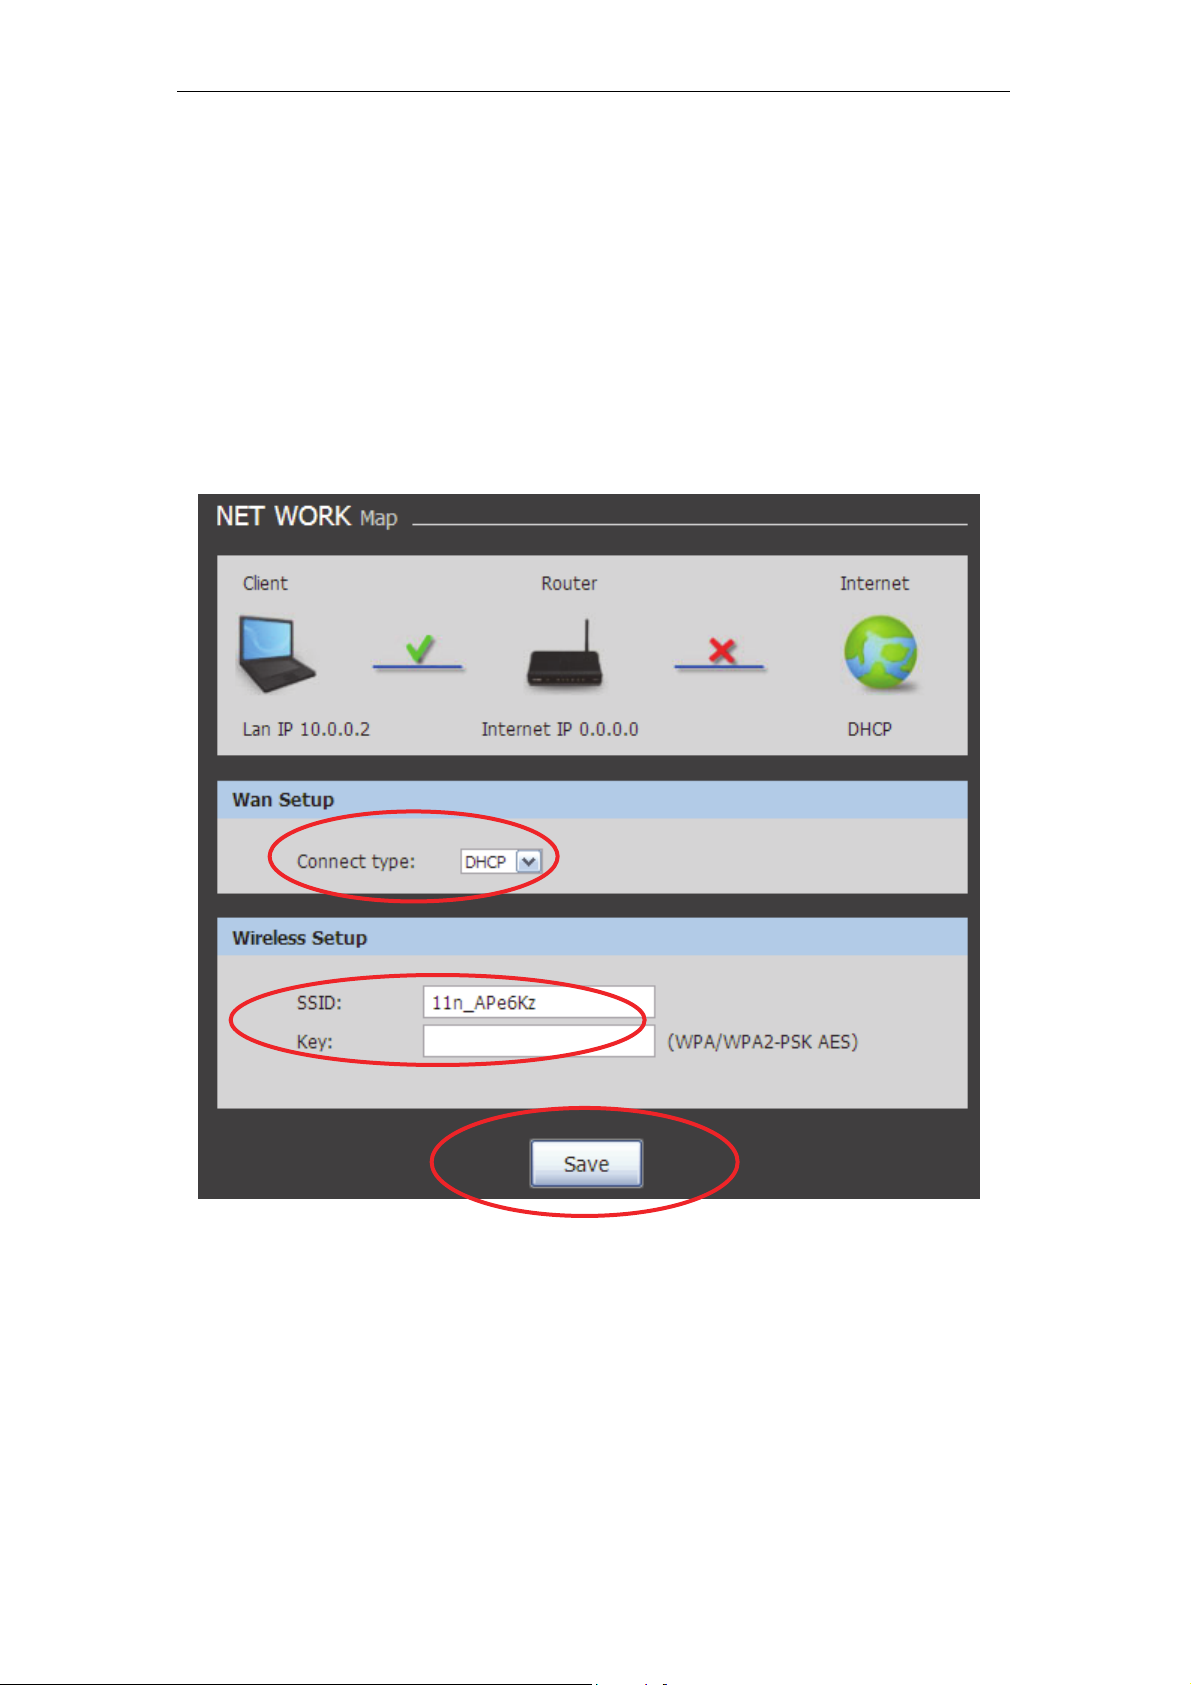
DHCP (Dynamic IP)
Select DHCP
Please enter the SSID if you want to change (the default
settings SSID = 11n_APxxxx which could be found on the
bottom side of the device).
Please enter your own wireless password at least 8 characters
for example 12345678 in the Key field / Network key field (the
Encryption type = WPA/WPA2-PSK AES).
Click on Save button
32
Page 33
11n AP Router User’s Manual
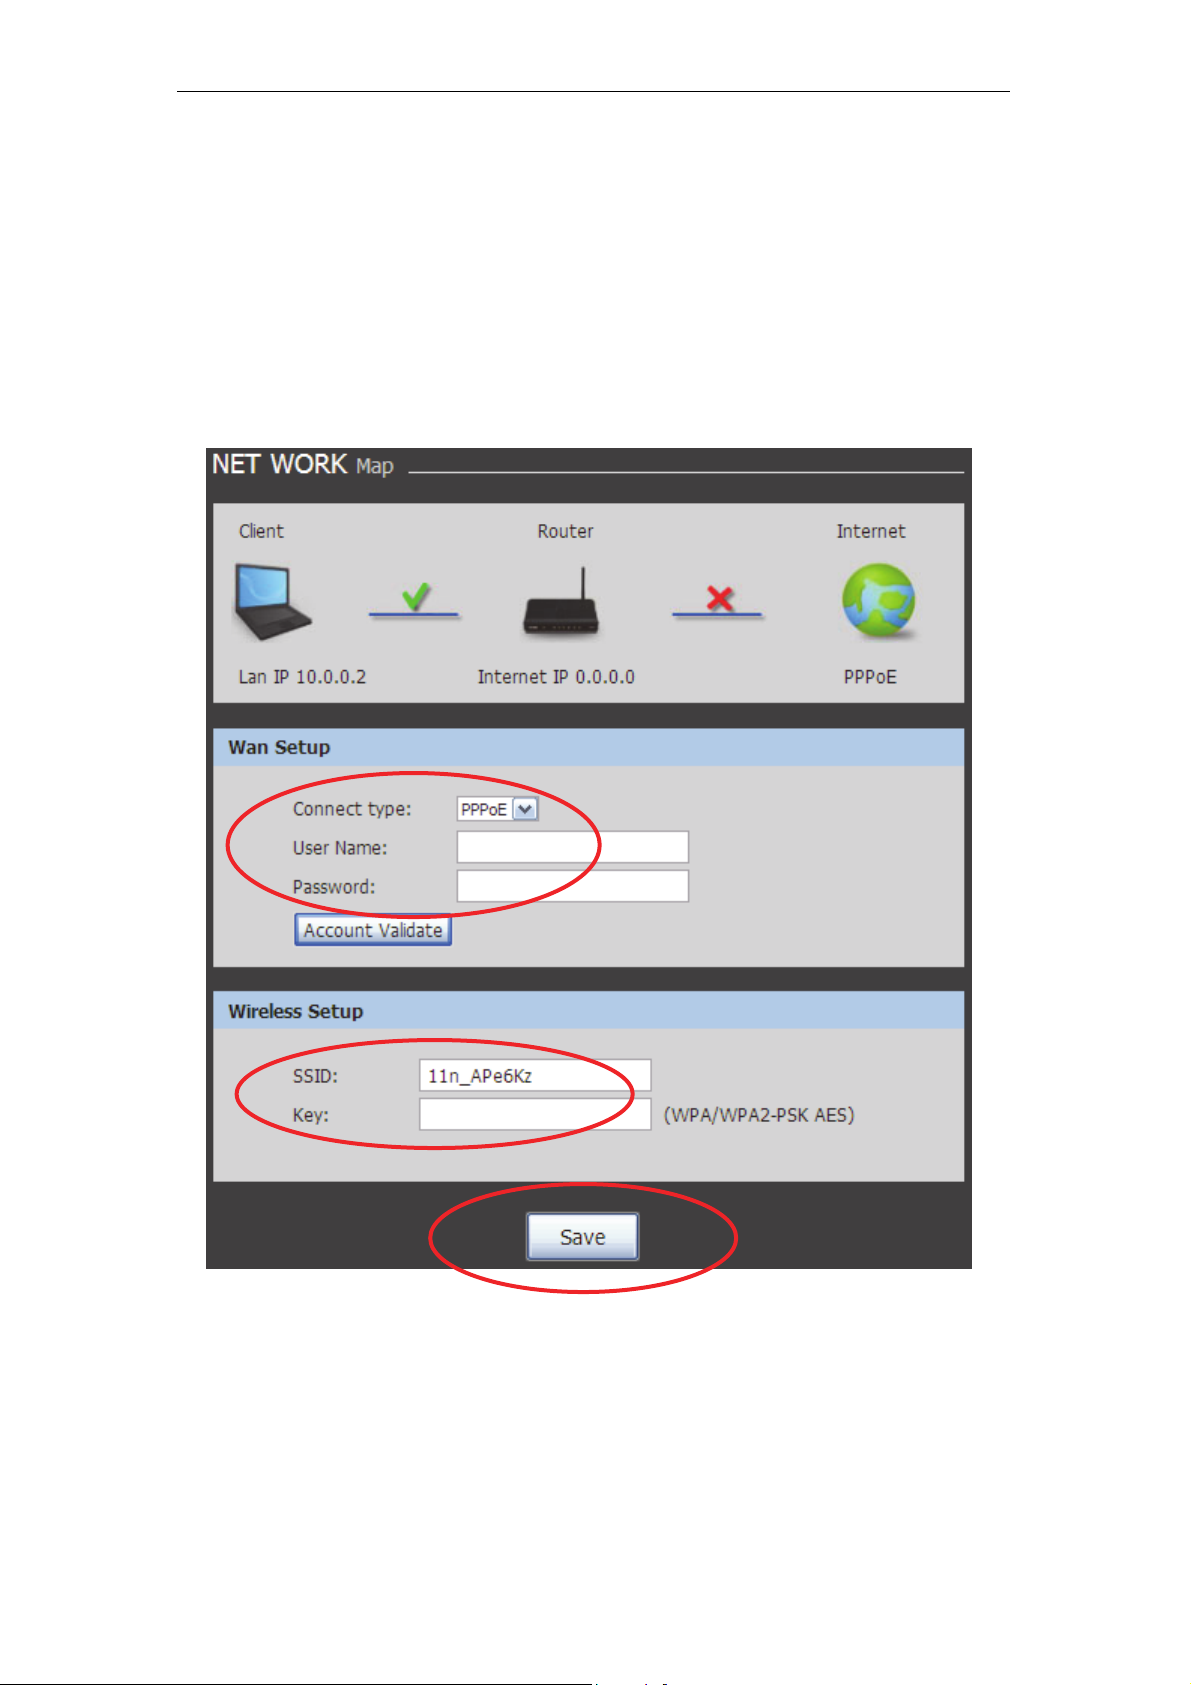
PPPoE
Select PPPoE Mode
Enter Username and Password offered by the ISP
Please enter the SSID if you want to change (the default
settings SSID = 11n_APxxxx which could be found on the
bottom side of the device).
Please enter your own wireless password at least 8 characters
for example 12345678 in the Key field / Network key field (the
Encryption type = WPA/WPA2-PSK AES).
Click on Save button
33
Page 34
11n AP Router User’s Manual
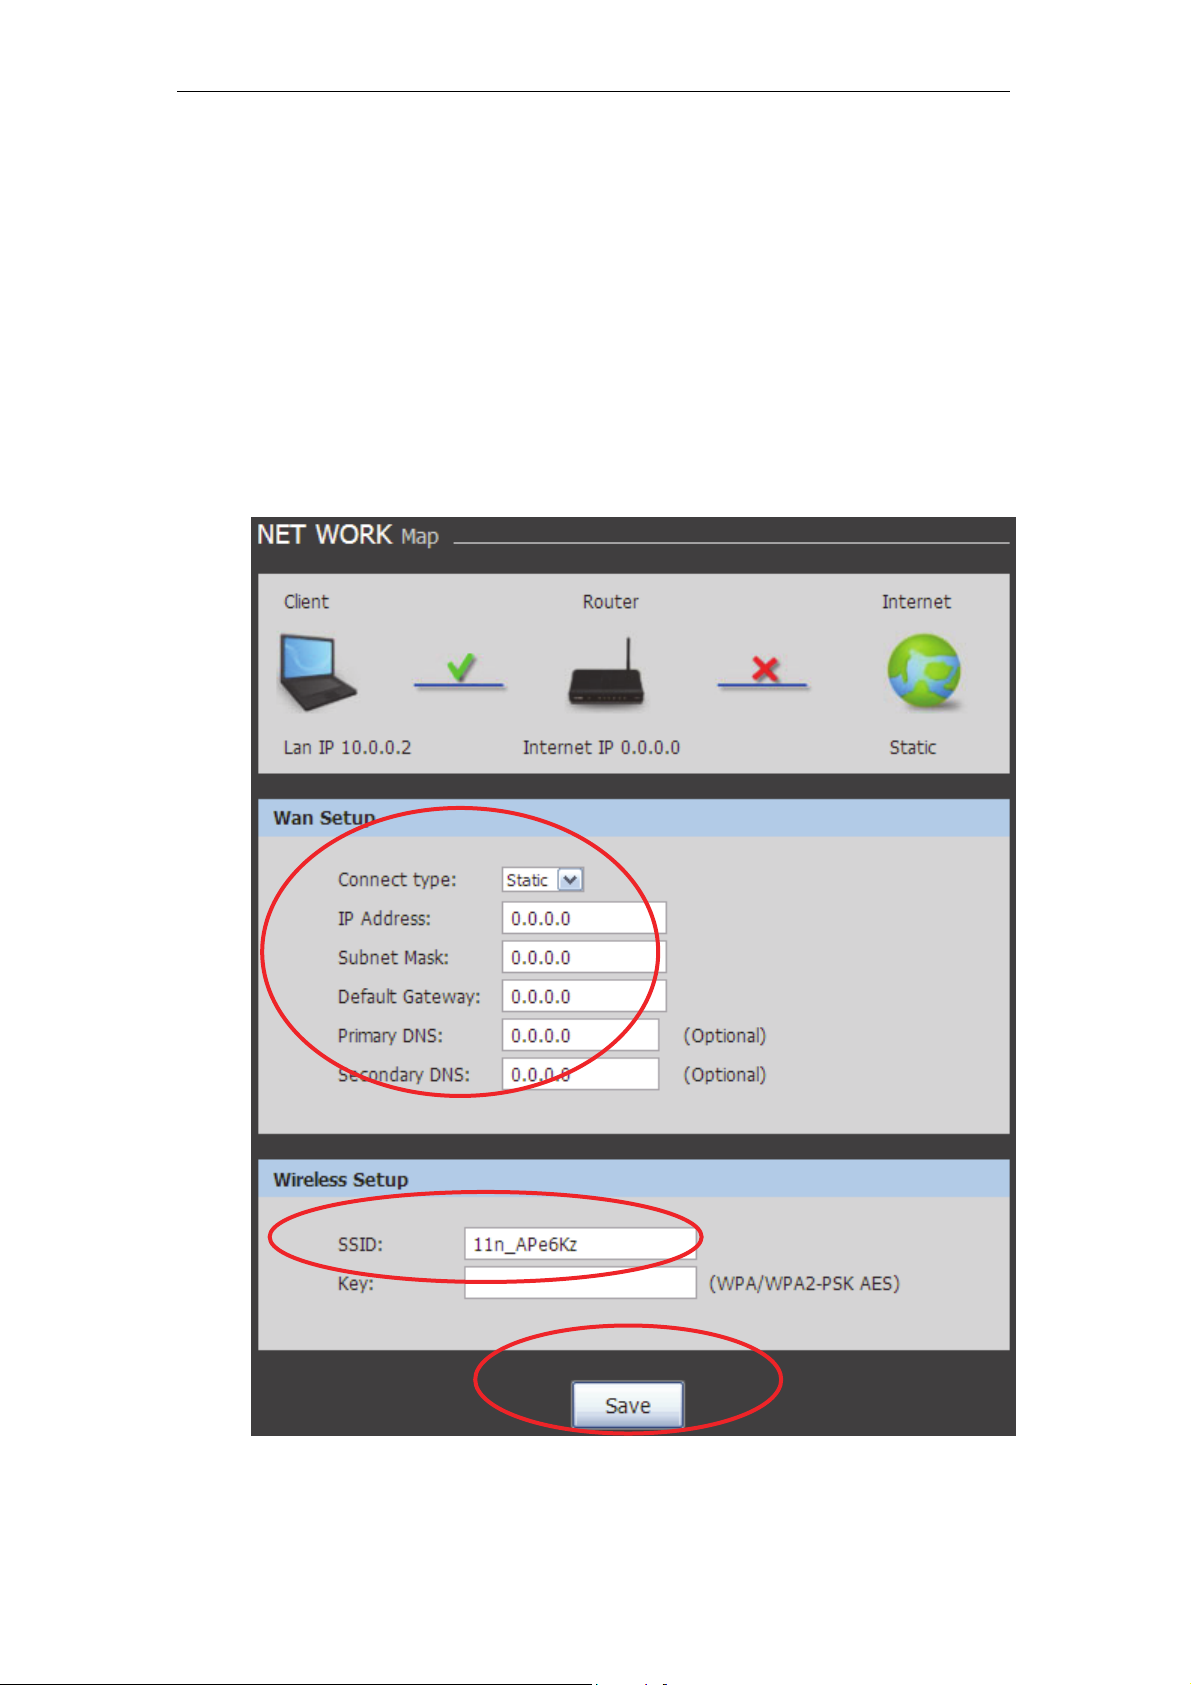
Static IP
Select Static IP
Config IP Address, Subnet mask, Default Gateway and DNS
Server offered by ISP (Internet Services Provider) or Network
Administrator
Please enter the SSID if you want to change (the default
settings SSID = 11n_APxxxx which could be found on the
bottom side of the device).
Please enter your own wireless password at least 8 characters
for example 12345678 in the Key field / Network key field (the
Encryption type = WPA/WPA2-PSK AES).
Click on Save button
34
Page 35
11n AP Router User’s Manual
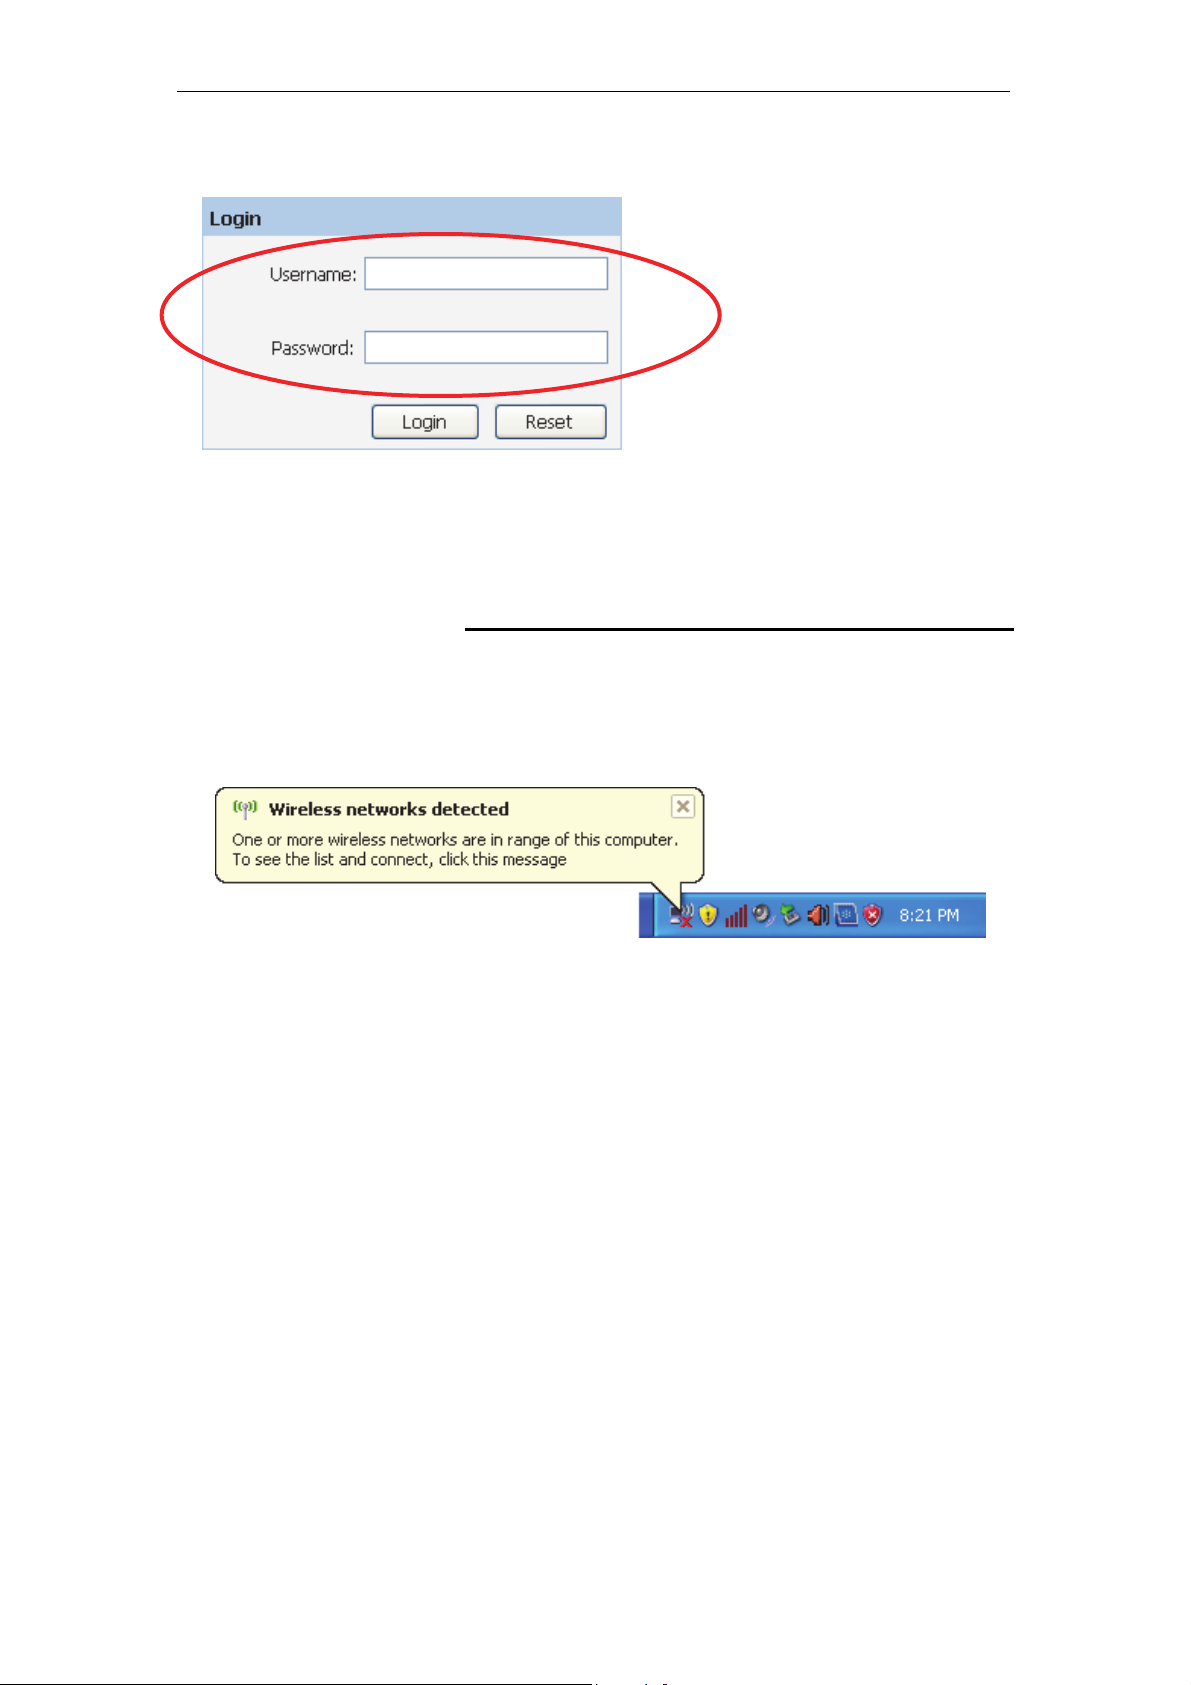
6. Please enter the Login User Name: admin and Login
Password: administrator and then click on Login button.
7. Now, the 11n AP Router has been configured completed,
and suitable for Wireless and Internet Connections.
Wireless Connection
For easy installation it is saved to keep the settings. You can
later change the wireless settings via the wireless configuration
menu. (see user manual on the CD – Chapter 12).
8. Double click on the wireless icon on your computer and
search for the wireless network that you enter SSID name.
35
Page 36
11n AP Router User’s Manual
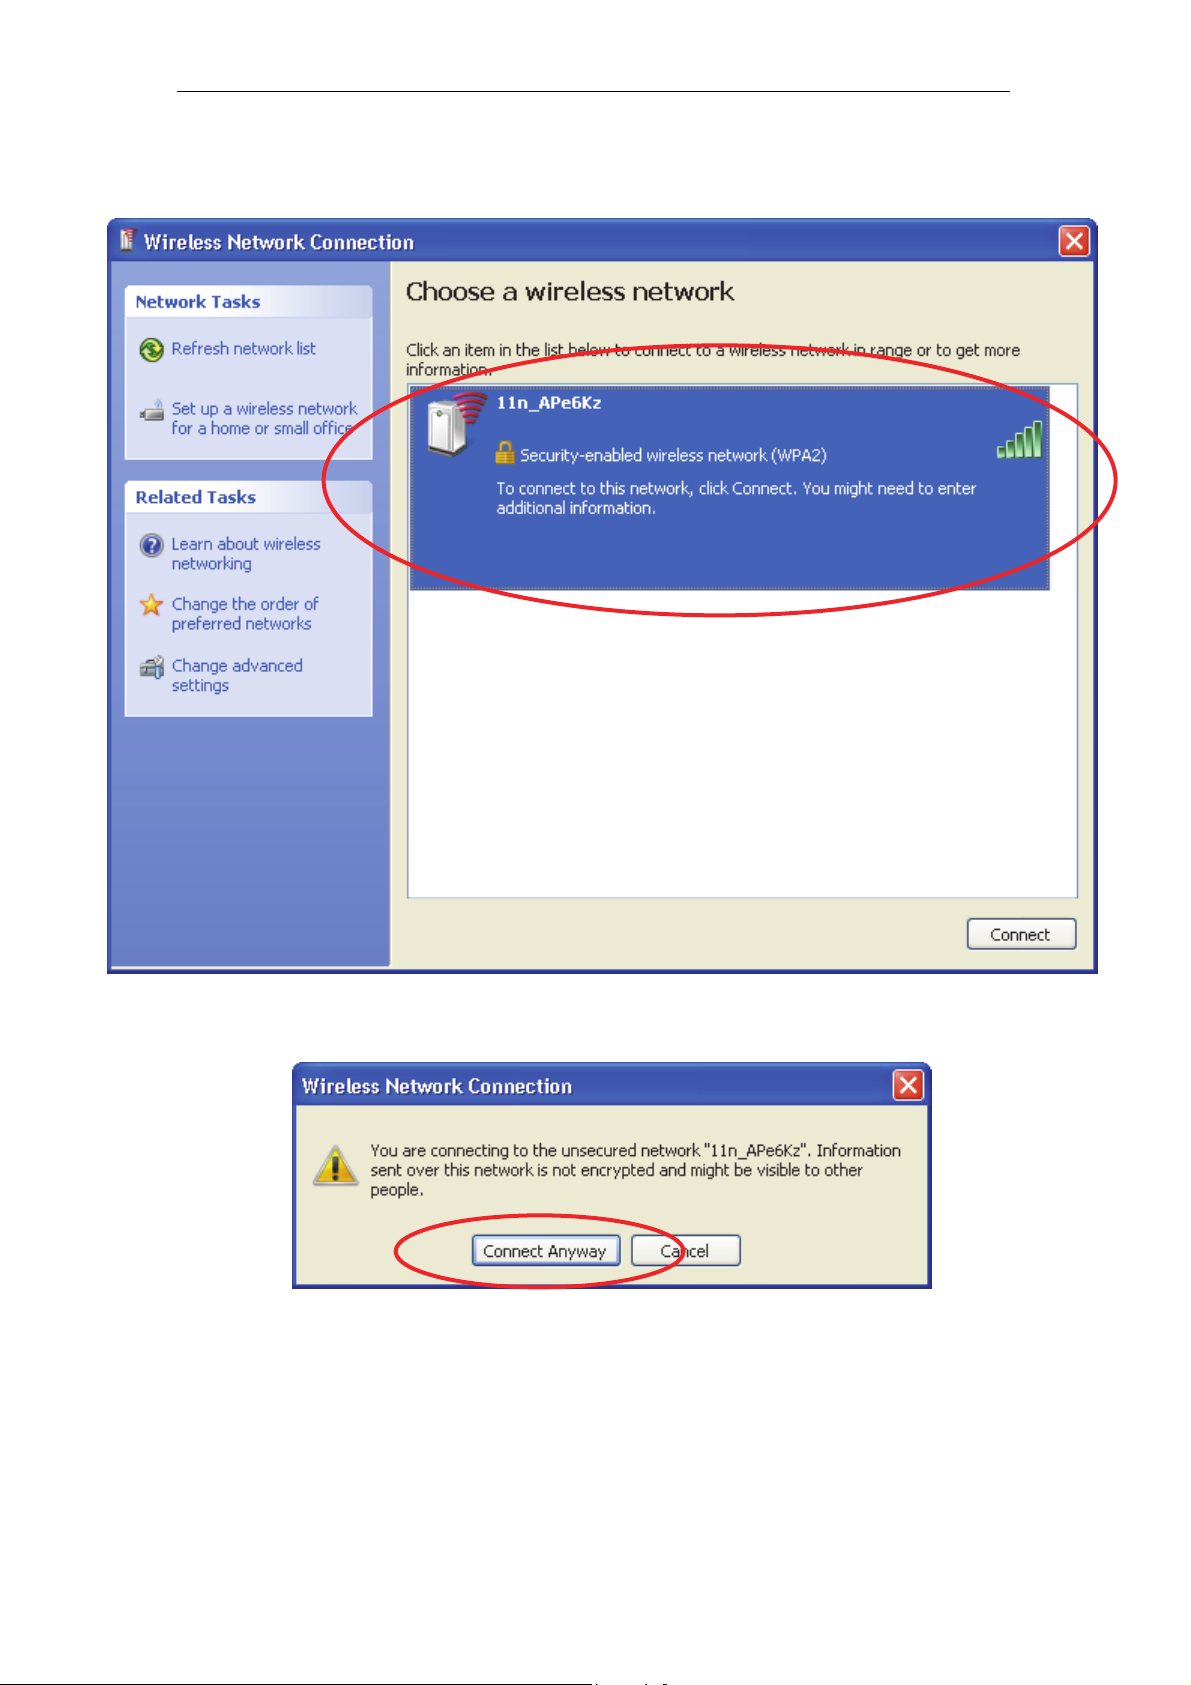
9. Click on the wireless network that you enter SSID name
(the default settings SSID = 11n_APxxxx which could
be found on the bottom side of the device) to connect.
10. If the wireless network isn’t encrypted, click on "Connect
Anyway" to connect.
36
Page 37
11n AP Router User’s Manual
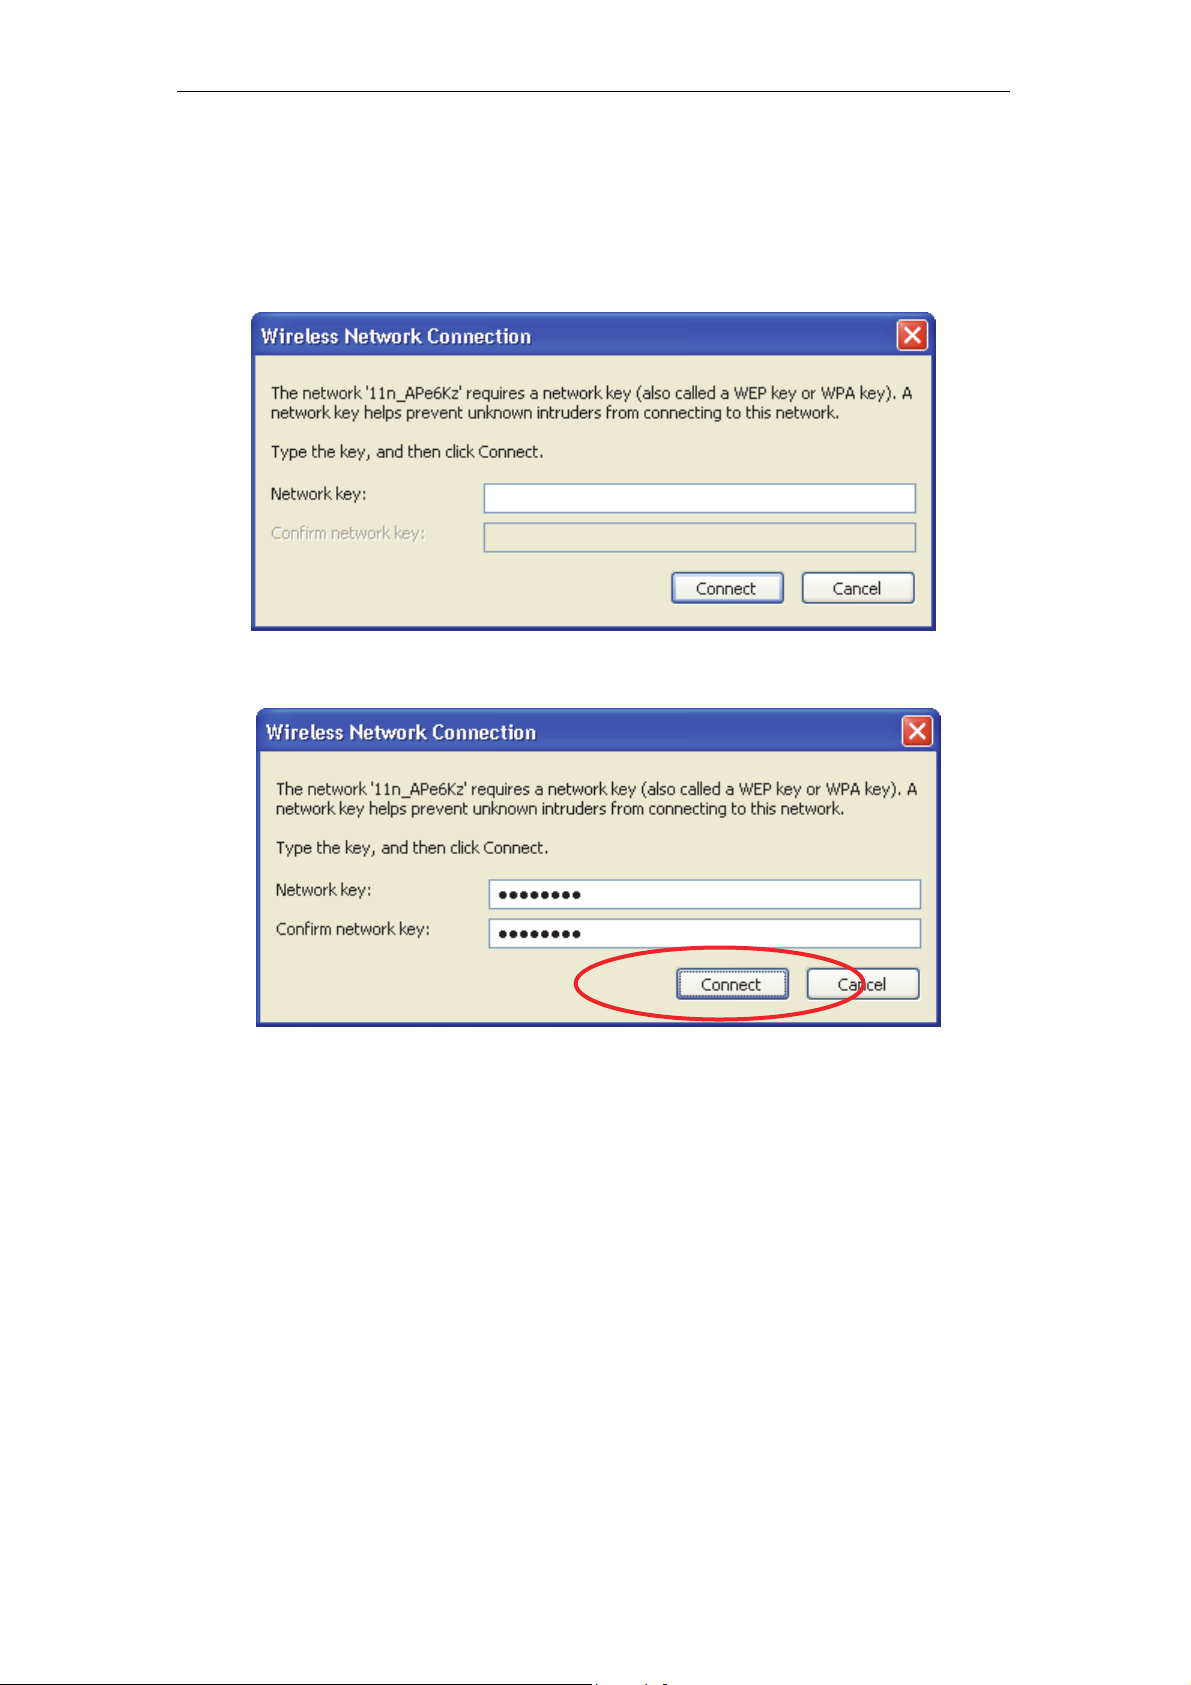
11. If the wireless network is encrypted, enter your own
wireless password at least 8 characters for example
12345678 in the key field / Network key field / Confirm
Network key field (the default settings Security Mode =
None). You can later change this network key via the
wireless configuration menu. (see user manual on the CD –
Chapter 12).
12. Click on "Connect" or "Apply".
13. Now you are ready to use the Wireless Network to Internet
or intranet.
37
Page 38
11n AP Router User’s Manual
6 What the Internet/WAN access of your own
Network now is
Now you could check what the Internet/WAN access of your
network is to know how to configure the WAN port of Wireless
Gateway.
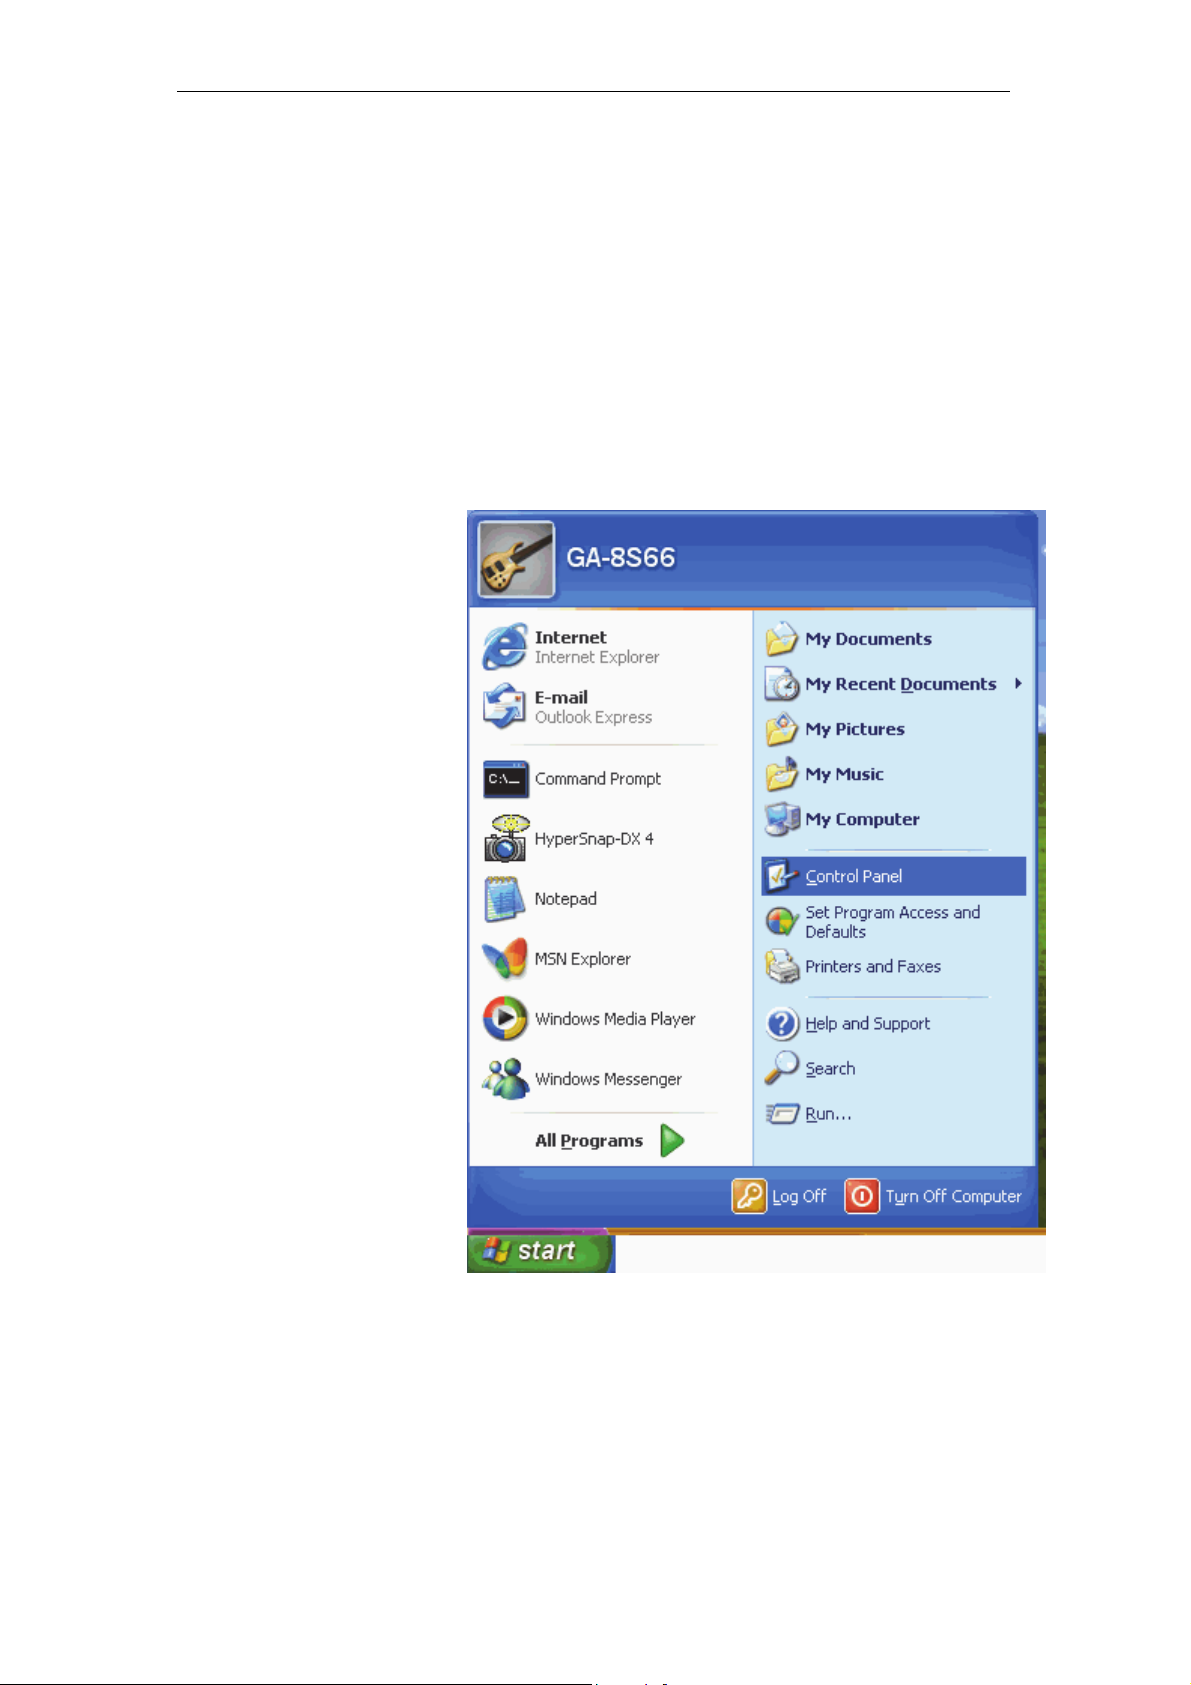
Please follow steps below to check what the Internet/WAN
access if your own Network is DHCP Client, Static IP or PPPoE
Client.
1. Click Start -> Control Panel
38
Page 39
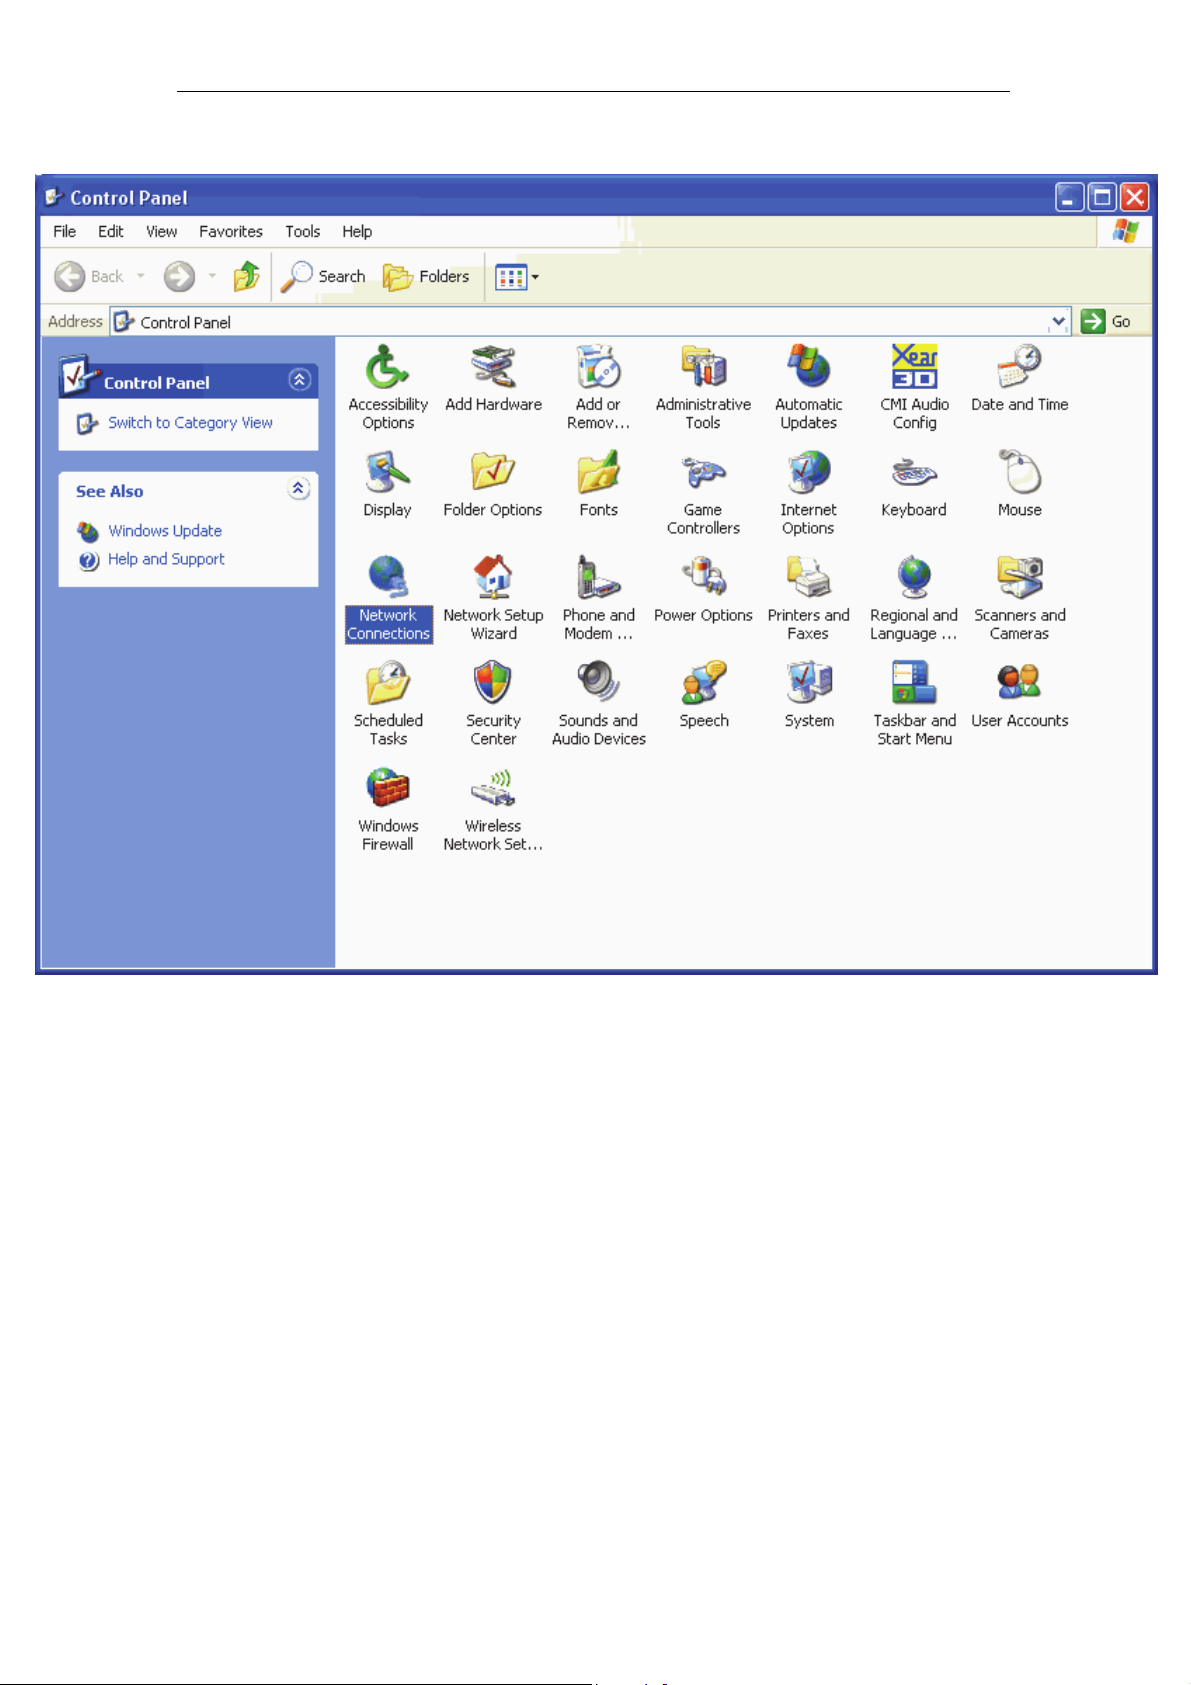
11n AP Router User’s Manual
2. Double click Network Connections
39
Page 40
11n AP Router User’s Manual
Internet/WAN access is the DHCP client
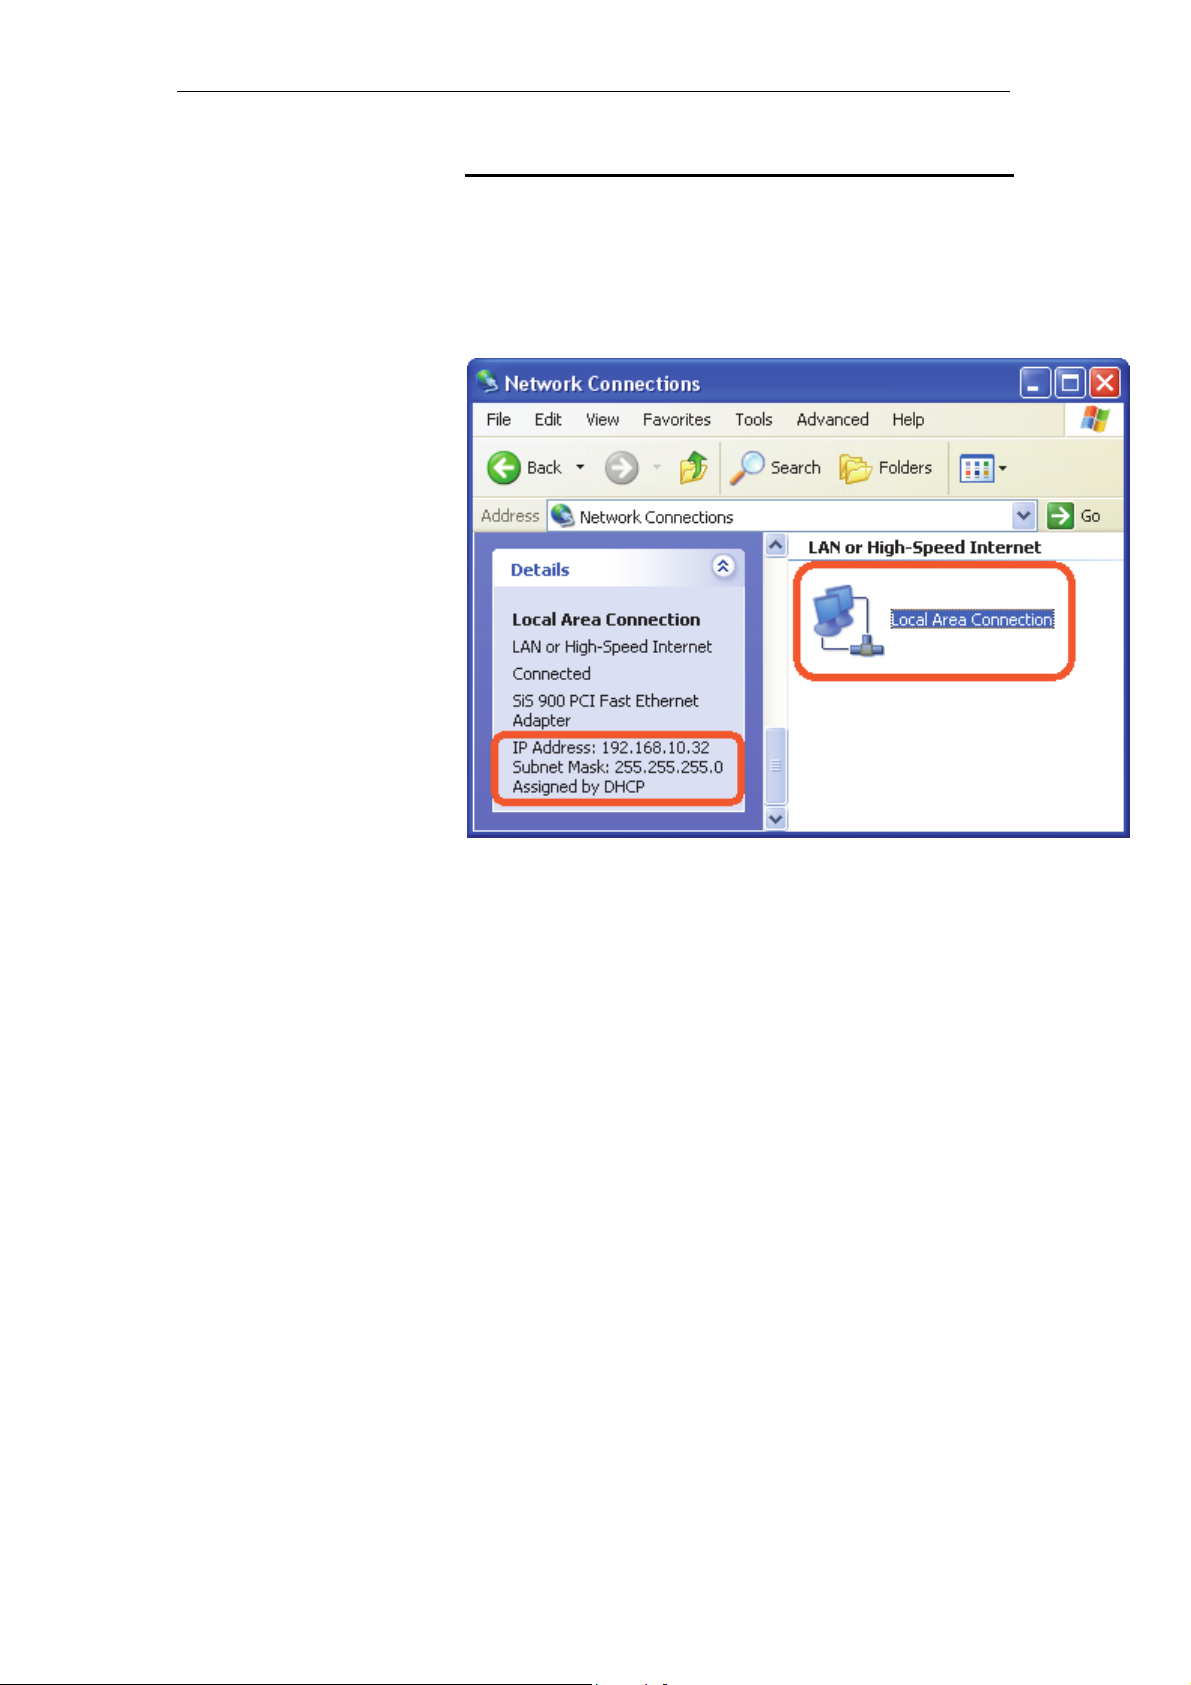
If you cannot see any Broadband Adapter in the Network
Connections, your Internet/WAN access is DHCP Client or
Static IP.
3. Click Local Area Connection in LAN or High-Speed
Internet and you could see string Assigned by DHCP in
Details.
40
Page 41
11n AP Router User’s Manual
Internet/WAN access is the Static IP
If you cannot see any Broadband Adapter in the Network
Connections, your Internet/WAN access is DHCP Client or
Static IP.
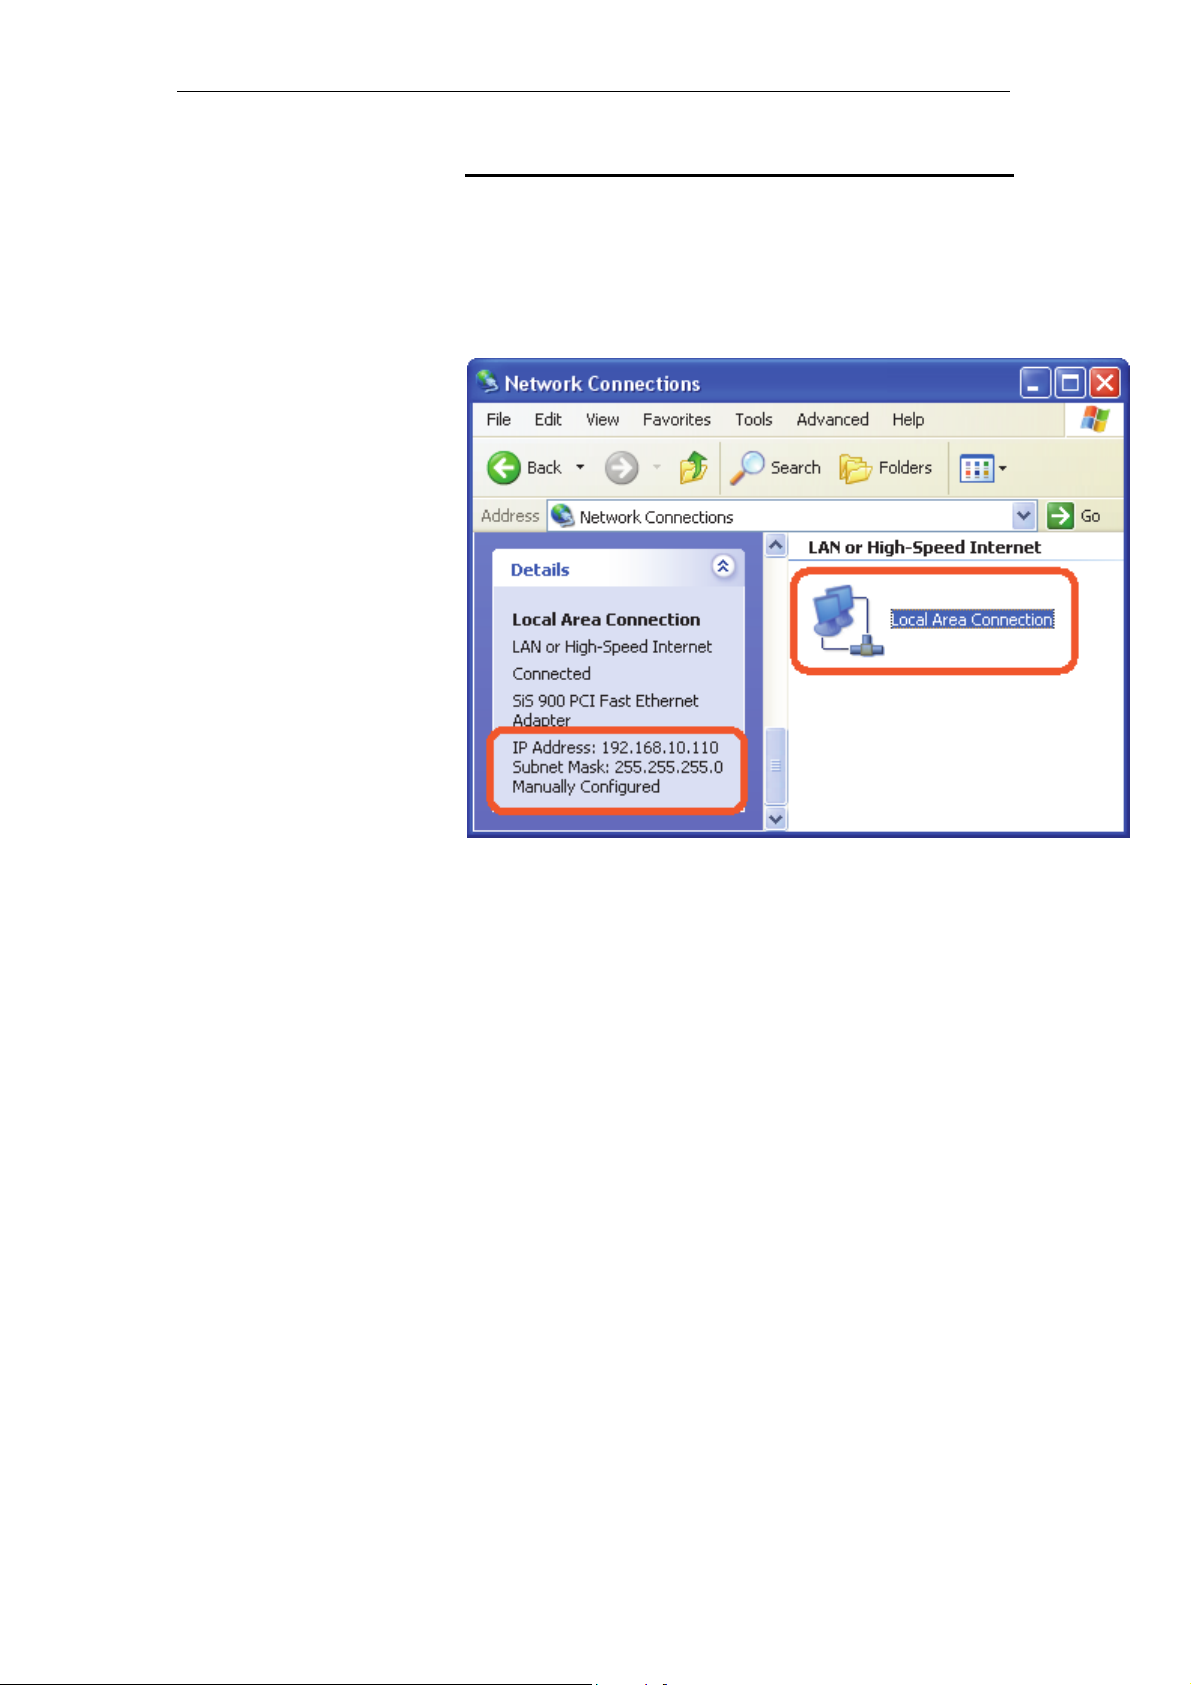
4. Click Local Area Connection in LAN or High-Speed
Internet and you could see string Manually Configured in
Details.
41
Page 42
11n AP Router User’s Manual
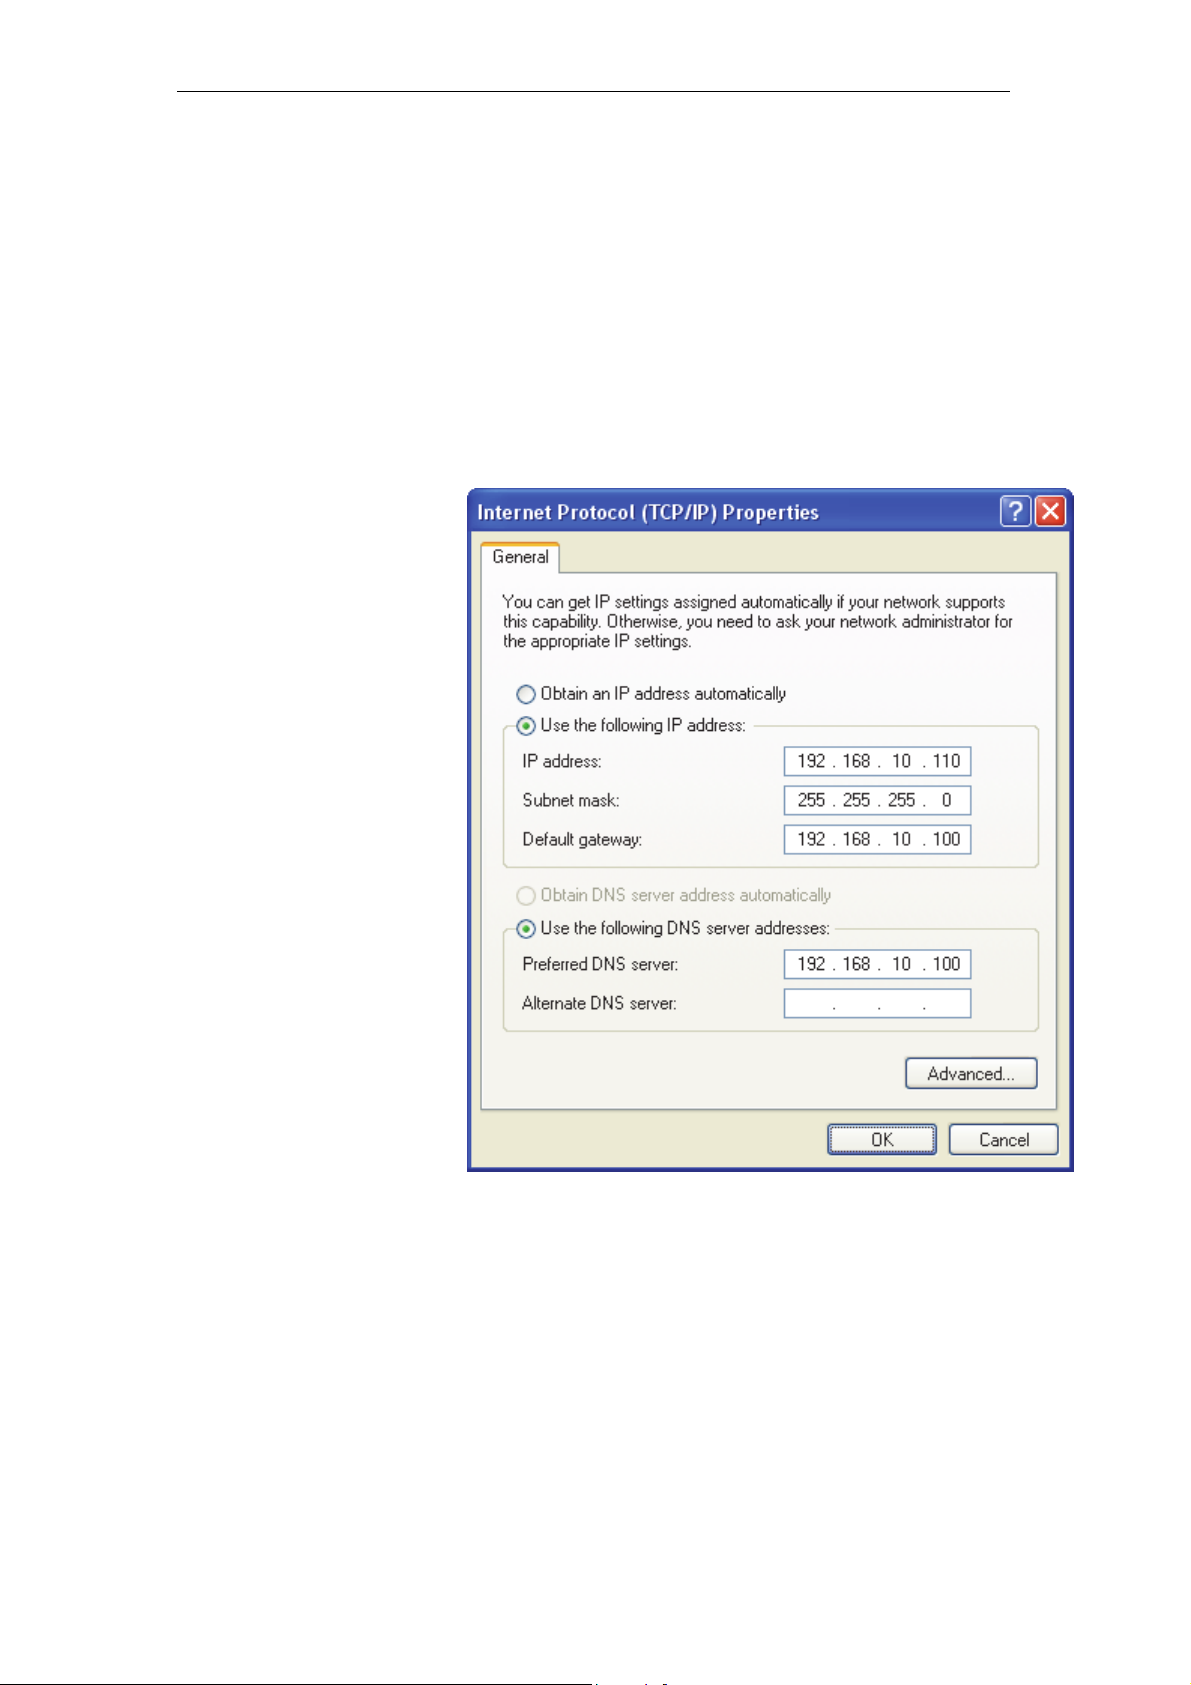
5. Right click Local Area Connection and click Properties
and then you could get the IP settings in detail and write
down the IP settings as follow:
IP Address: 192.168.10.110
Subnet mask: 255.255.255.0
Default gateway: 192.168.10.100
Preferred DNS server: 192.168.10.100
Alternate DNS Server: If you have it, please also write it
down.
42
Page 43
11n AP Router User’s Manual
Internet/WAN access is the PPPoE client
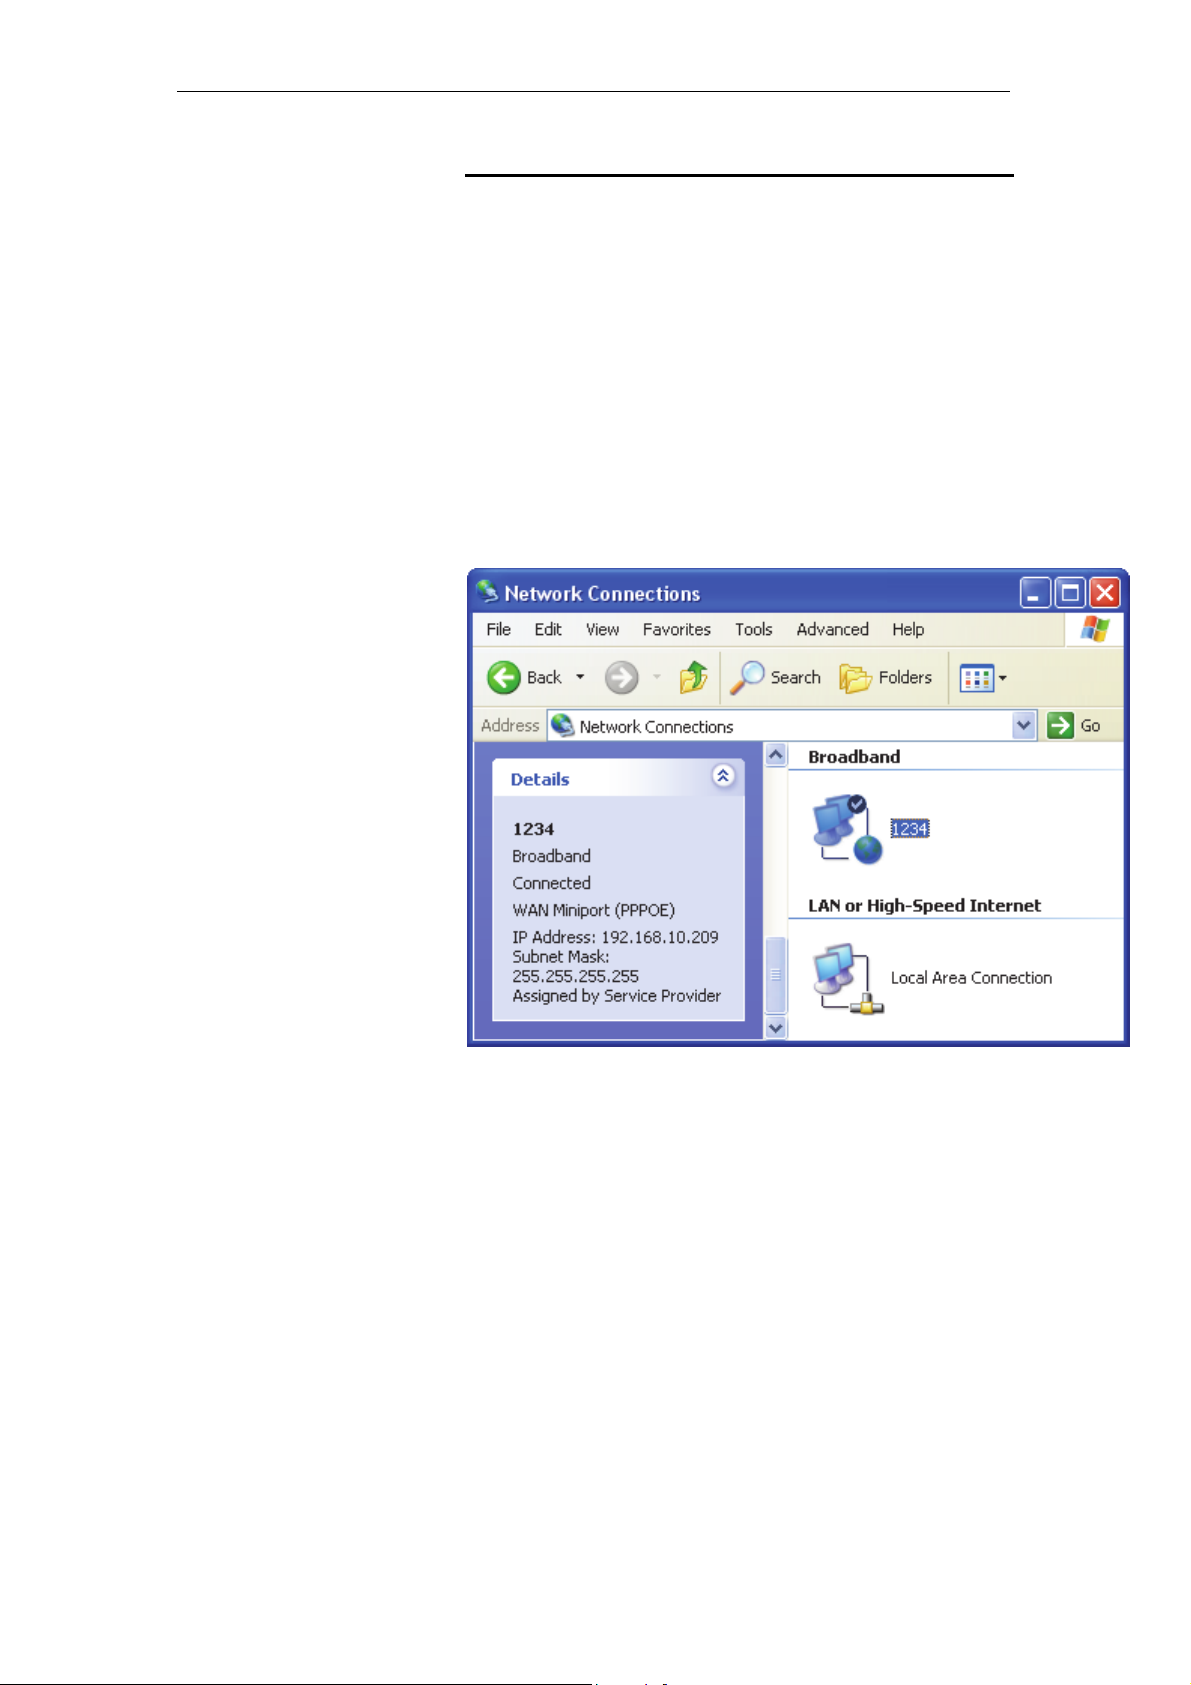
If you can see any Broadband Adapter in the Network
Connections, your Internet/WAN access is PPPoE Client.
6. Click Broadband Adapter in Broadband and you could
see string Assigned by Service Provider in Details.
For PPPoE configuration on Wireless Gateway, you’ll need
following information that you could get from your Telecom, or
by your Internet Service Provider.
Username of PPPoE: 1234 for example
Password of PPPoE: 1234 for example
43
Page 44
11n AP Router User’s Manual
7 Getting Started with the Web pages
The Wireless Gateway includes a series of Web pages that
provide an interface to the software installed on the device. It
enables you to configure the device settings to meet the needs
of your network. You can access it through your web browser
from any PC connected to the device via
Accessing the Web pages
To access the Web pages, you need the following:
• A PC or laptop connected to the LAN port on the device.
• A web browser installed on the PC. The minimum browser
version requirement is Internet Explorer v4 or Netscape v4.
For the best display quality, use latest version of Internet
Explorer, Netscape or Mozilla Fire fox. From any of the LAN
computers, launch your web browser, type the following
URL in the web address (or location) box, and press [Enter]
on your keyboard:
http://10.0.0.2
the LAN ports.
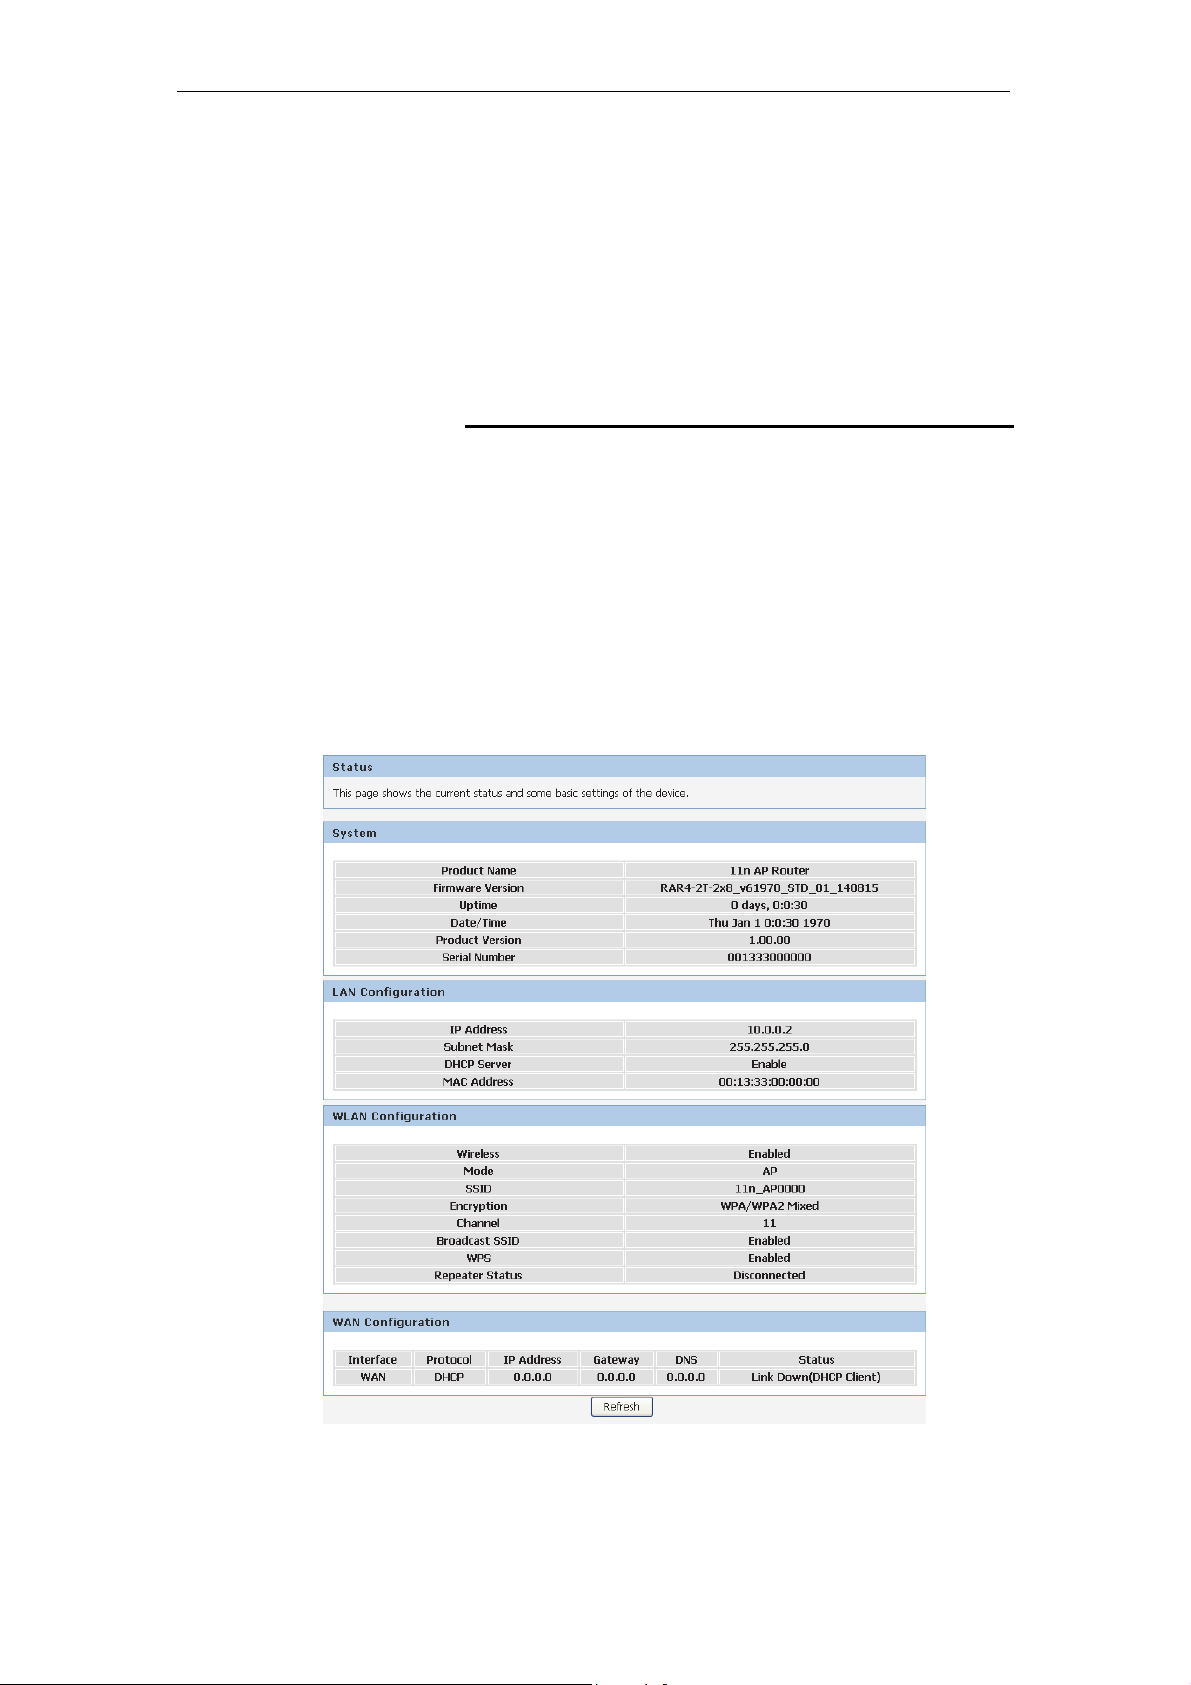
The Status homepage for the web pages is displayed:
Figure 2: Homepage
The first time that you click on an entry from the lefthand menu, a login box is displayed. You must enter
your username and password to access the pages.
44
Page 45
11n AP Router User’s Manual
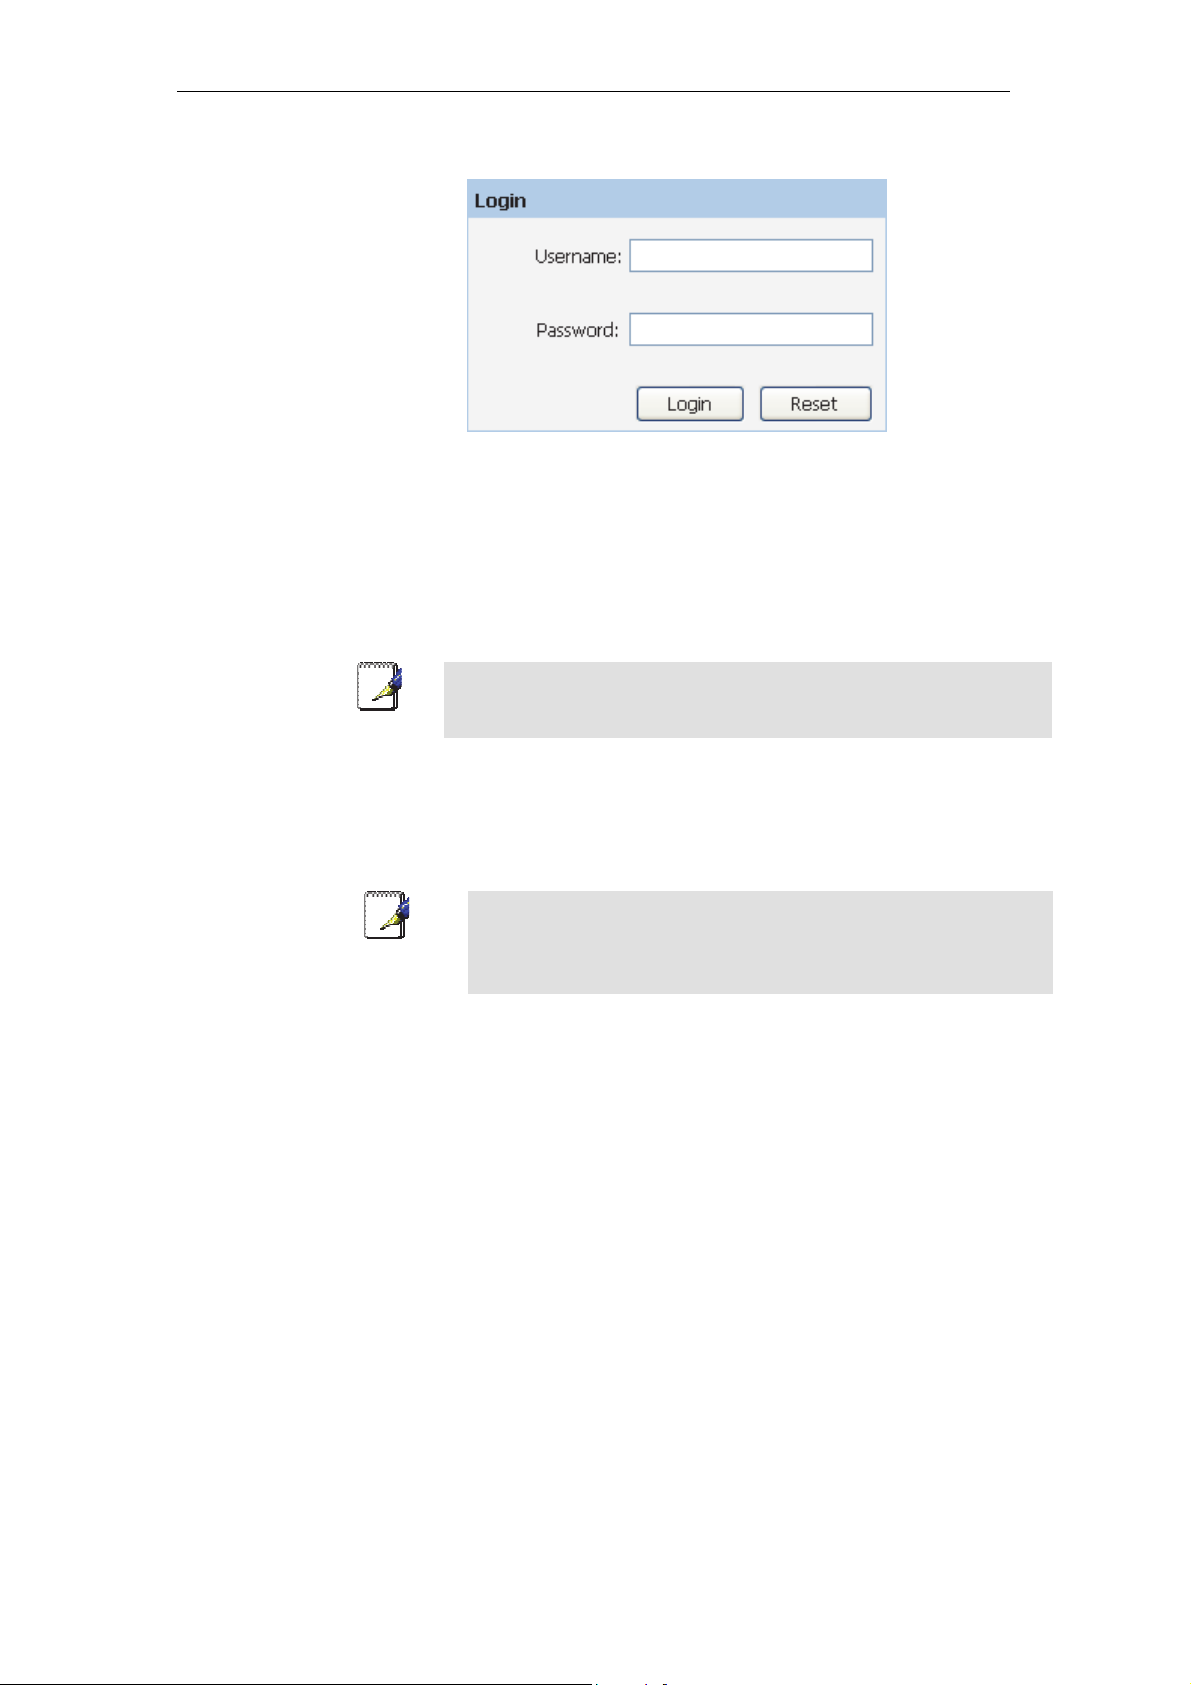
A login screen is displayed:
Figure 3: Login screen
1. Enter your user name and password. The first time you log
into the program, use these defaults:
User Name:
Password:
admin
administrator
You can change the password at any time or you can configure your
Note
Note
device so that you do not need to enter a password. See Password.
2. Click on OK. You are now ready to configure your device.
This is the first page displayed each time you log in to the Web
pages.
If you receive an error message or the Welcome page is not
displayed, see Troubleshooting Suggestions.
45
Page 46

11n AP Router User’s Manual
Testing your Setup
Once you have connected your hardware and configured your
PCs, any computer on your LAN should be able to use the DSL
/Cable connection to access the Internet.
To test the connection, turn on the device, wait for 30 seconds
and then verify that the LEDs are illuminated as follows:
Table 1. LED Indicators
Label Color Function
POWER green
WLAN green
WAN green
LAN green
On: device is powered on
Off: device is powered off
On: WLAN link established and active
Blink: Valid Wireless packet being transferred
On: WAN link established and active
Off: No LAN link
Blink: Valid Ethernet packet being transferred
On: LAN link established and active
Off: No LAN link
Blink: Valid Ethernet packet being transferred
If the LEDs illuminate as expected, test your Internet connection
from a LAN computer. To do this, open your web browser, and
type the URL of any external website (such as
http://www.yahoo.com
). The LED labeled WAN should blink
rapidly and then appear solid as the device connects to the site.
If the LEDs do not illuminate as expected, you may need to
configure your Internet access settings using the information
provided by your ISP. For details, see Internet Access. If the
LEDs still do not illuminate as expected or the web page is not
displayed, see Troubleshooting Suggestions or contact your
ISP for assistance.
Default device settings
In addition to handling the xDSL / Cable modem connection to
your ISP, the Wireless Gateway can provide a variety of
services to your network. The device is preconfigured with
default settings for use with a typical home or small office
network.
The table below lists some of the most important default settings;
these and other features are described fully in the subsequent
chapters. If you are familiar with network configuration, review
these settings to verify that they meet the needs of your network.
Follow the instructions to change them if necessary. If you are
unfamiliar with these settings, try using the device without
modification, or contact your ISP for assistance.
We strongly recommend that you contact your ISP prior to
changing the default configuration.
WARNING
46
Page 47

11n AP Router User’s Manual
Option Default Setting Explanation/Instructions
WAN Port IP
Address
DHCP Client
This is the temporary public IP address of the WAN
port on the device. It is an unnumbered interface that
is replaced as soon as your ISP assigns a ‘real’ IP
address. See Network Settings -> WAN Interface.
LAN Port
IP Address
Assigned static IP address:
10.0.0.2
Subnet mask:
This is the IP address of the LAN port on the device.
The LAN port connects the device to your Ethernet
network. Typically, you will not need to change this
address. See Network Settings -> LAN Interface.
255.255.255.0
DHCP (Dynamic
Host Configuration
Protocol)
DHCP server enabled with the
following pool of addresses:
10.0.0.2
through
10.0.0.254
The Wireless Gateway maintains a pool of private IP
addresses for dynamic assignment to your LAN
computers. To use this service, you must have set up
your computers to accept IP information dynamically,
as described in Configuring Ethernet PCs.
47
Page 48
11n AP Router User’s Manual
8 Quick Setup
The Quick Setup page displays useful information about the
setup of your device, including:
• details of the device’s Internet access settings
• details of the device’s VoIP settings
• details of the device’s Wireless settings
To display this page:
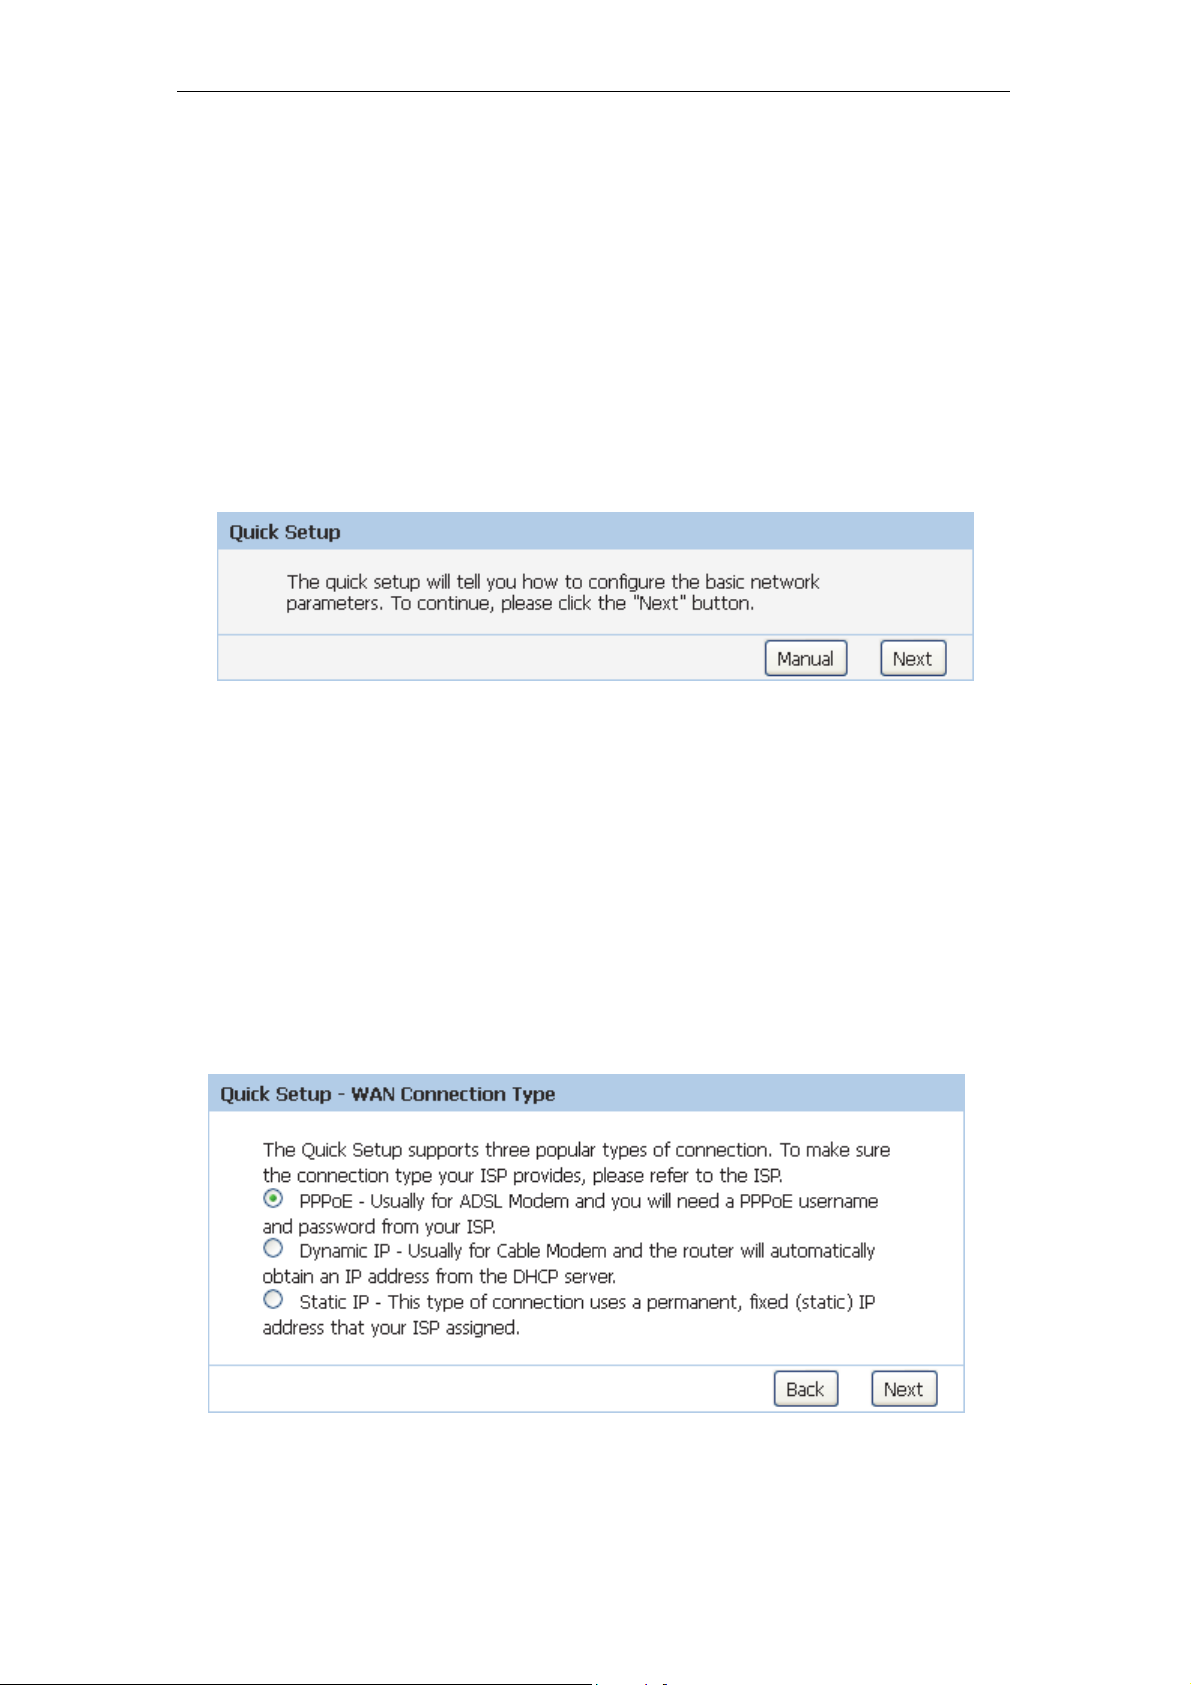
From the head menu, click on Setup. The following page is
displayed:
Figure 4: Quick Setup page
WAN Connection Type
This page is used to configure the parameters for Internet
network which connects to the WAN port of your Access Point.
Here you may change the access method to static IP, Dynamic
IP or PPPoE by click the item value of WAN Connection Type.
To change the WAN Connection Type:
3. From the WAN Connection Type, select static IP, Dynamic
IP or PPPoE setting determined by your Network
Administrator or ISP.
4. Click Next.
48
Page 49
11n AP Router User’s Manual
Static IP
In this mode, the device is supposed to connect to internet via
ADSL/Cable Modem. The NAT is enabled and PC in
LAN/WLAN port share the same IP to ISP through WAN port.
The connection type can be setup in WAN page by using static
IP.
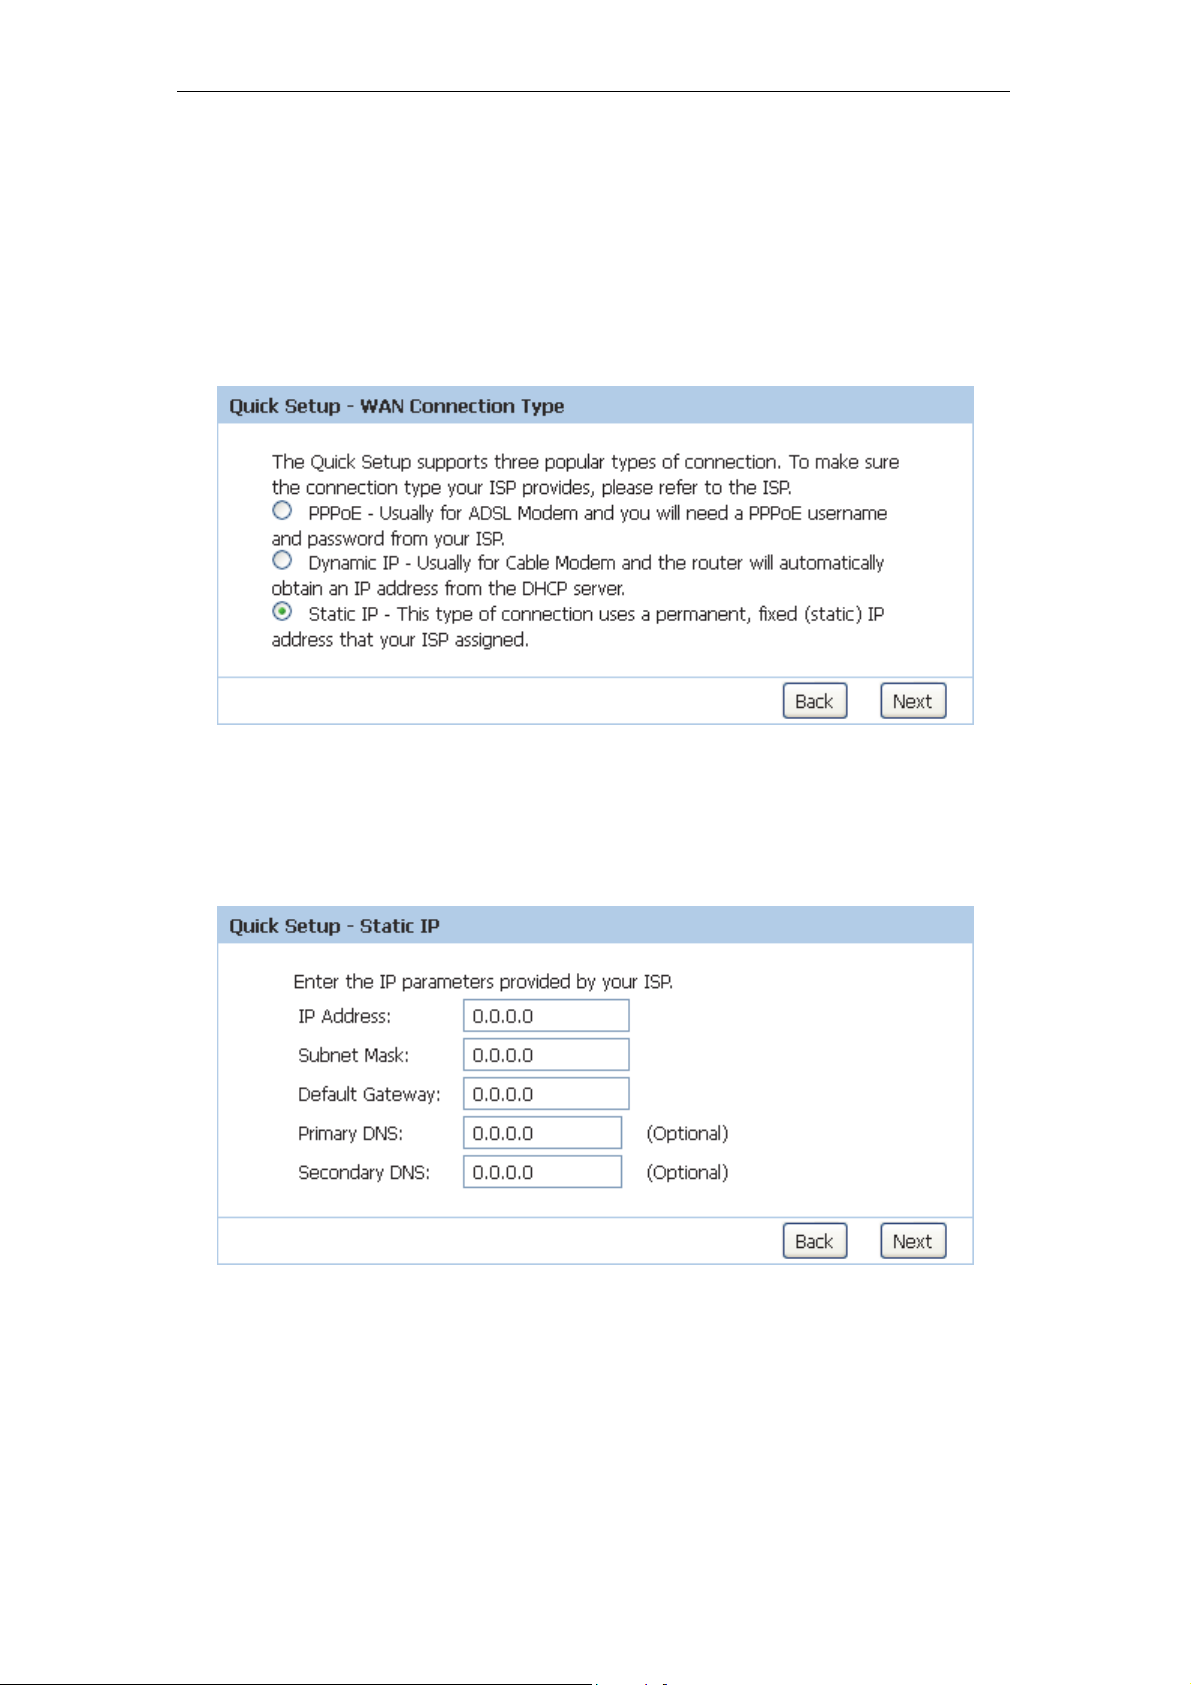
1. From the WAN Connection Type, select Static IP setting
determined by your Network Administrator or ISP.
2. Click Next.
3. Enter IP Address for example 172.1.1.1.
4. Enter Subnet Mask for example 255.255.255.0.
5. Enter Default Gateway for example 172.1.1.254.
6. Enter Primary DNS for example 172.1.1.254.
7. Click Next.
49
Page 50
11n AP Router User’s Manual
Dynamic IP
In this mode, the device is supposed to connect to internet via
ADSL/Cable Modem. The NAT is enabled and PCs in
LAN/WLAN port share the same IP to ISP through WAN port.
The connection type can be setup in WAN page by using
Dynamic IP.
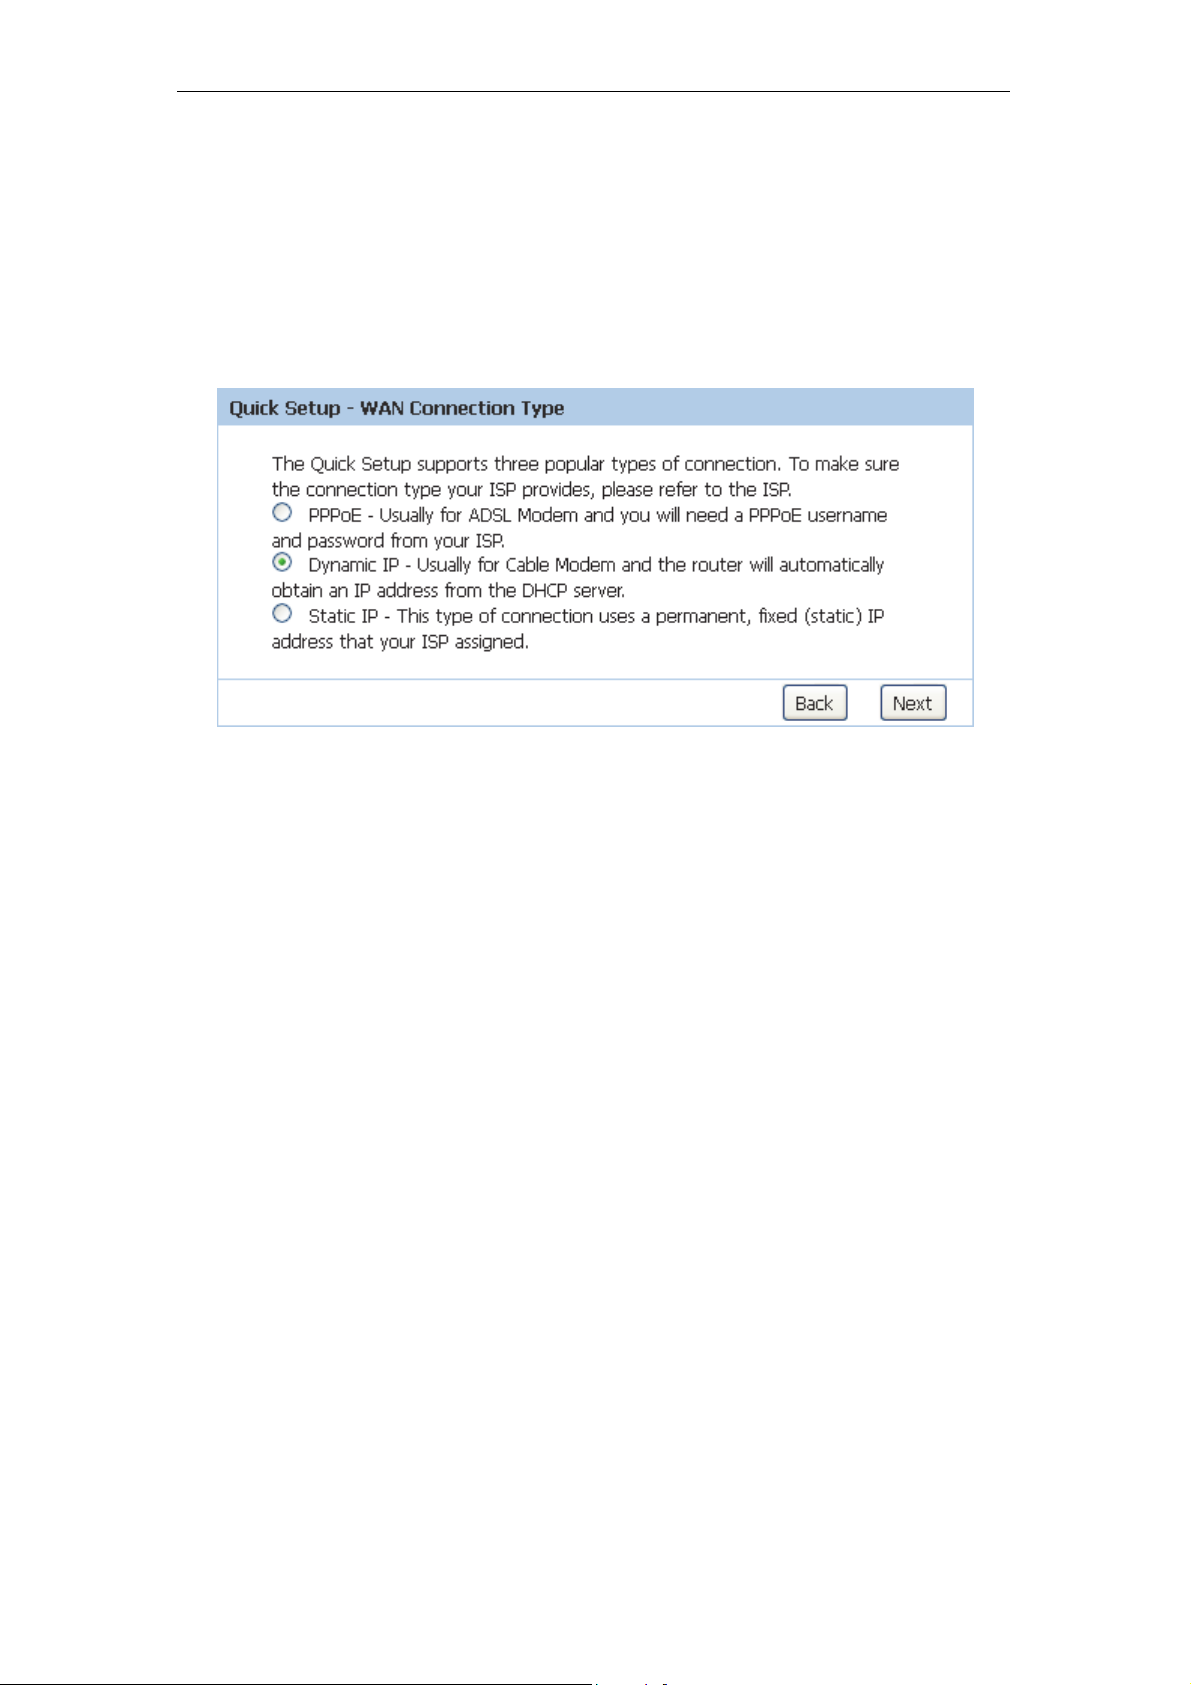
1. From the WAN Connection Type, select Dynamic IP setting
determined by your Network Administrator or ISP.
2. Click Next.
50
Page 51
11n AP Router User’s Manual
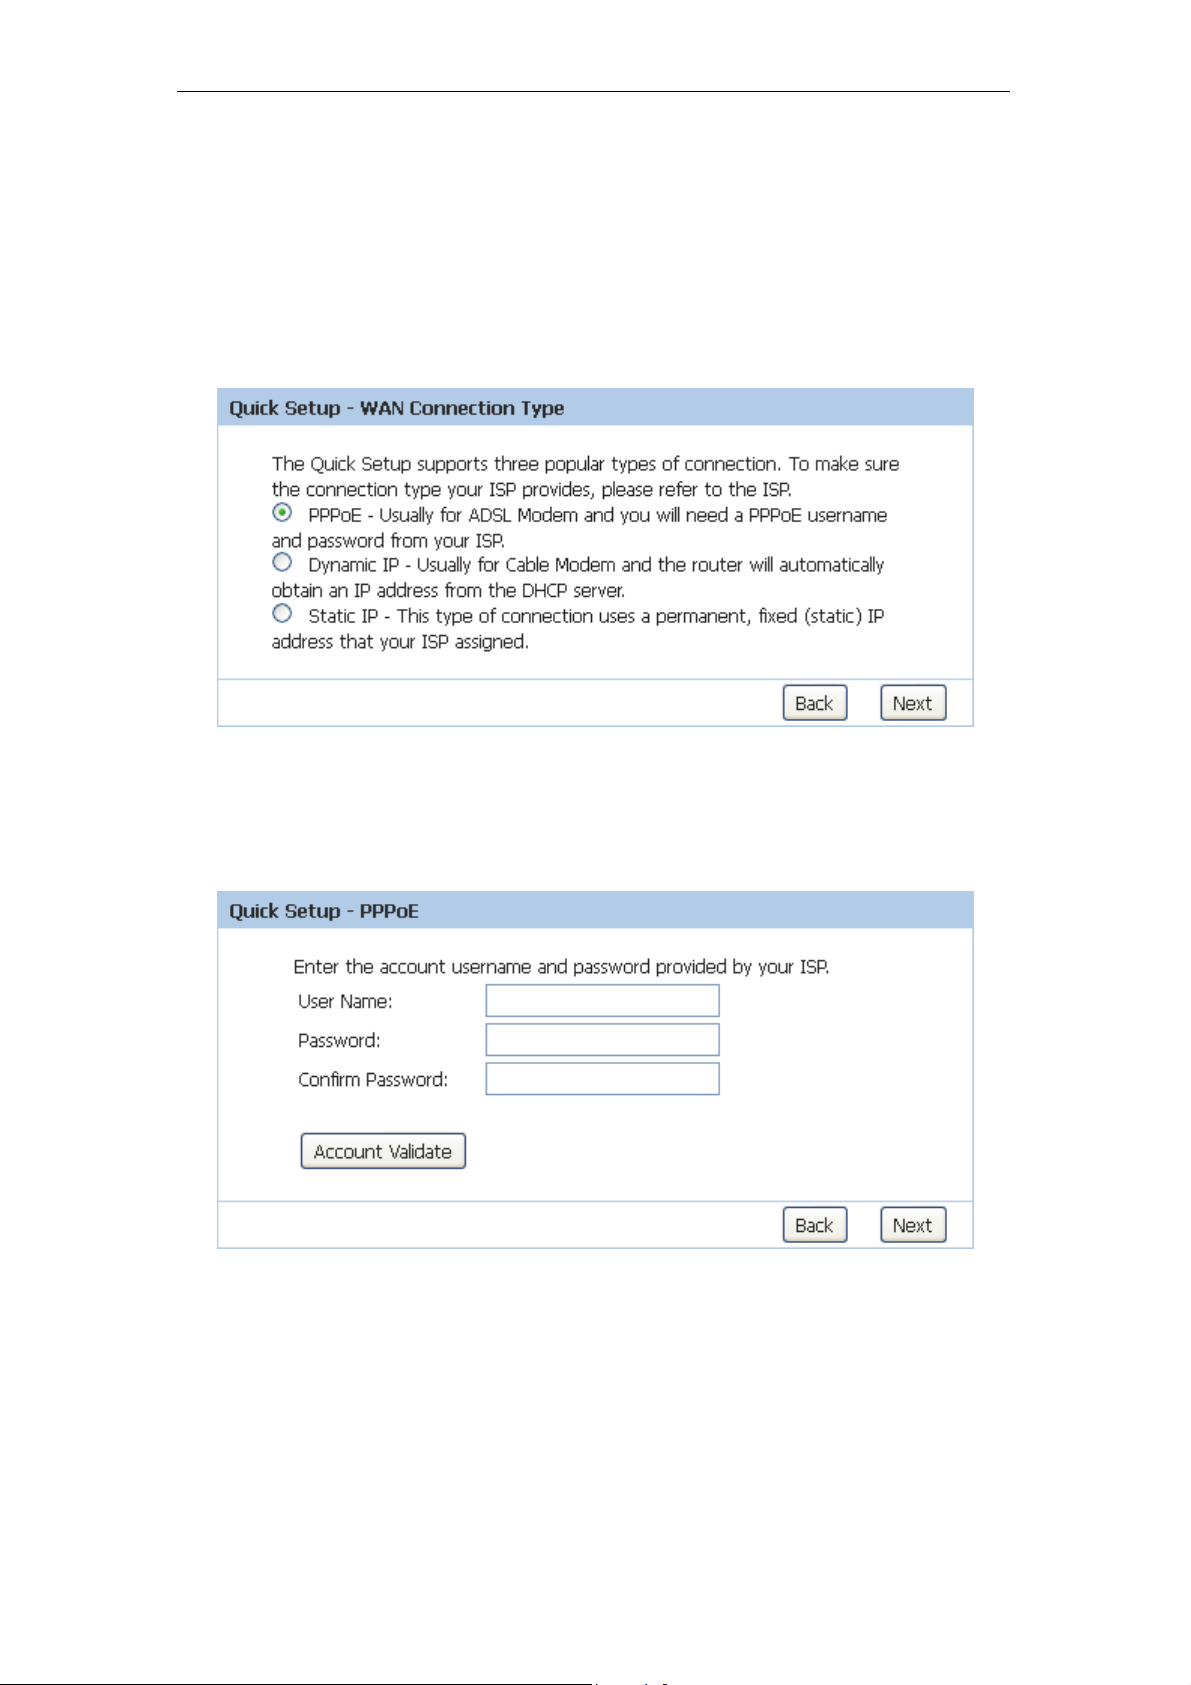
PPPoE
In this mode, the device is supposed to connect to internet via
ADSL/Cable Modem. The NAT is enabled and PCs in four LAN
ports share the same IP to ISP through WAN port. The
connection type can be setup in WAN page by using PPPoE.
1. From the WAN Connection Type drop-down list, select
PPPoE setting determined by your Network Administrator
or ISP.
2. Click Next.
3. Enter User Name for example 1234.
4. Enter Password for example 1234.
5. Enter Confirm Password for example 1234.
6. Click Next.
51
Page 52
11n AP Router User’s Manual
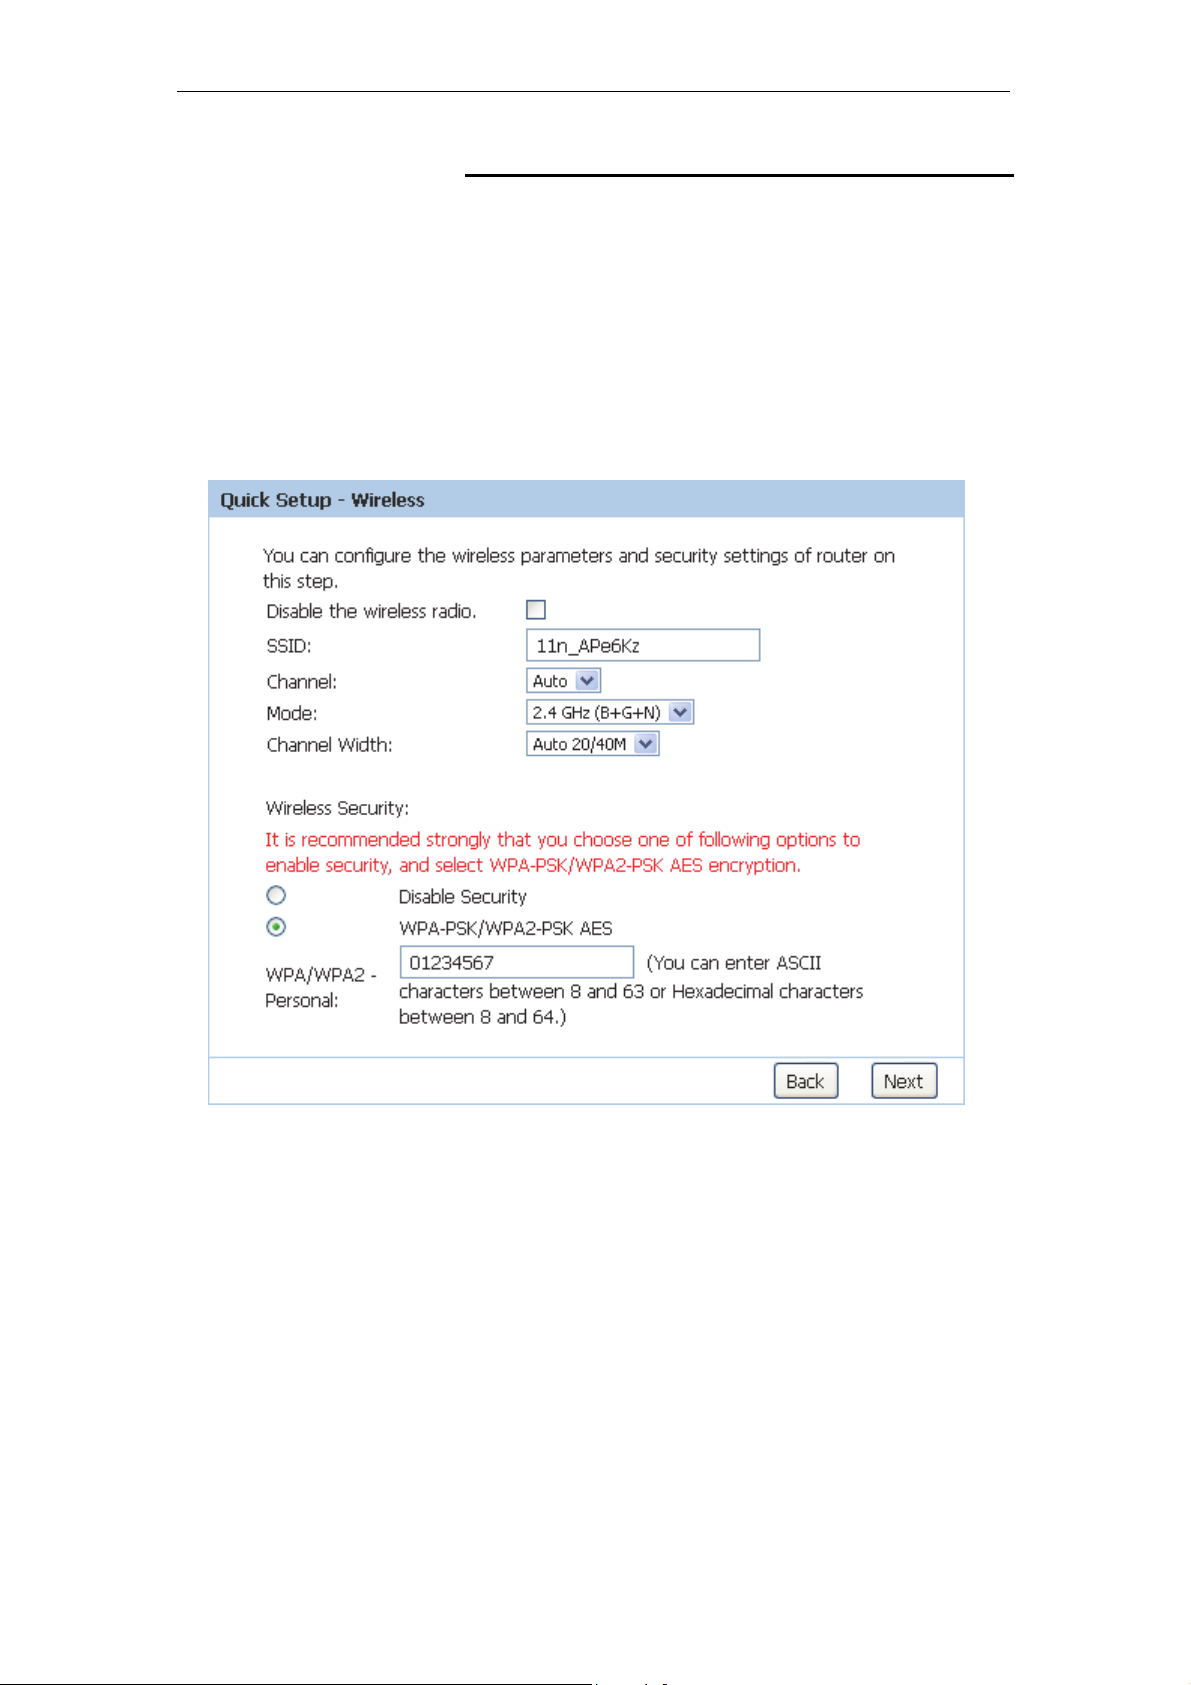
Wireless Basic Setup
This page is used to configure the parameters for wireless LAN
clients which may connect to your Access Point.
7. Enter SSID for example 11n_AP_Router.
8. From the Channel drop-down list, select a Channel.
9. From the Mode drop-down list, select a Mode.
10. From the Channel Width drop-down list, select a Channel
Width.
11. From the Wireless Security, select a Security and enter the
key if any.
12. Click Next.
52
Page 53
11n AP Router User’s Manual
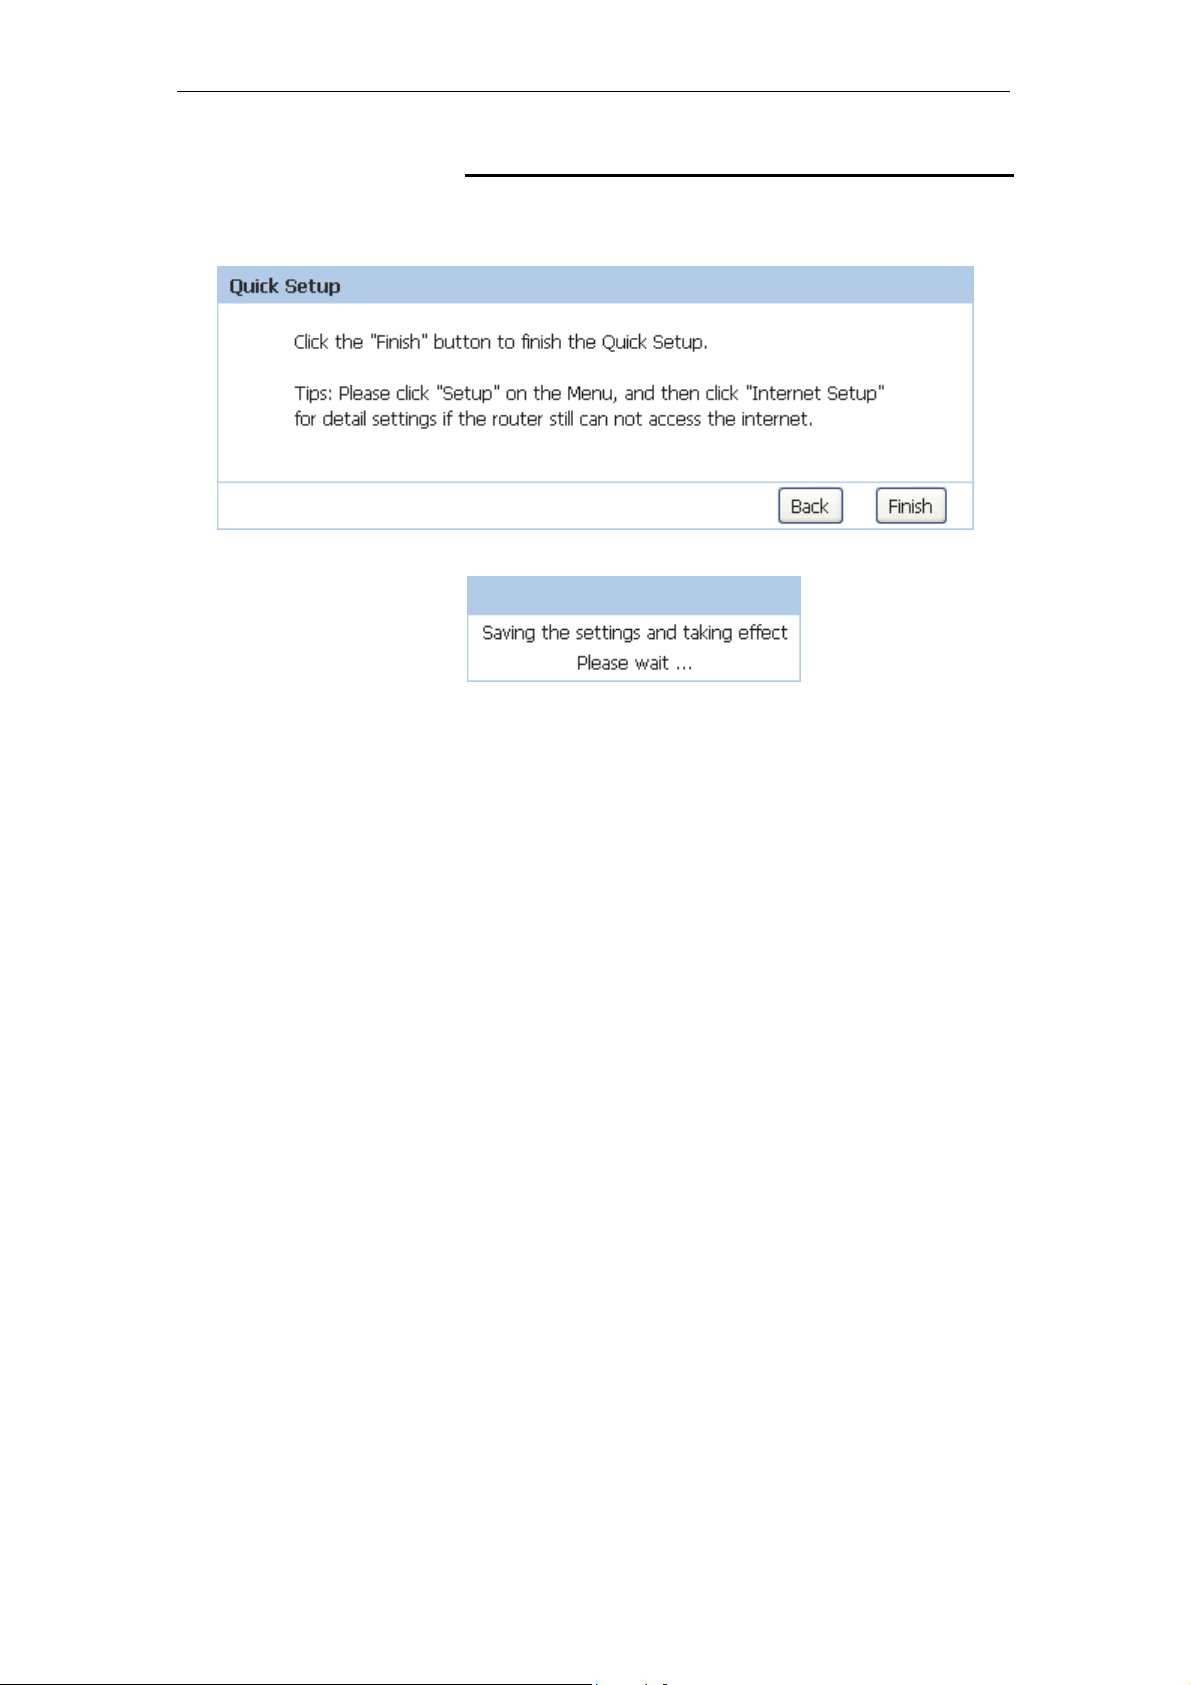
Finish the Quick Setup
This page is used to finish the all the settings of Quick Setup.
13. Click Finish.
53
Page 54
11n AP Router User’s Manual
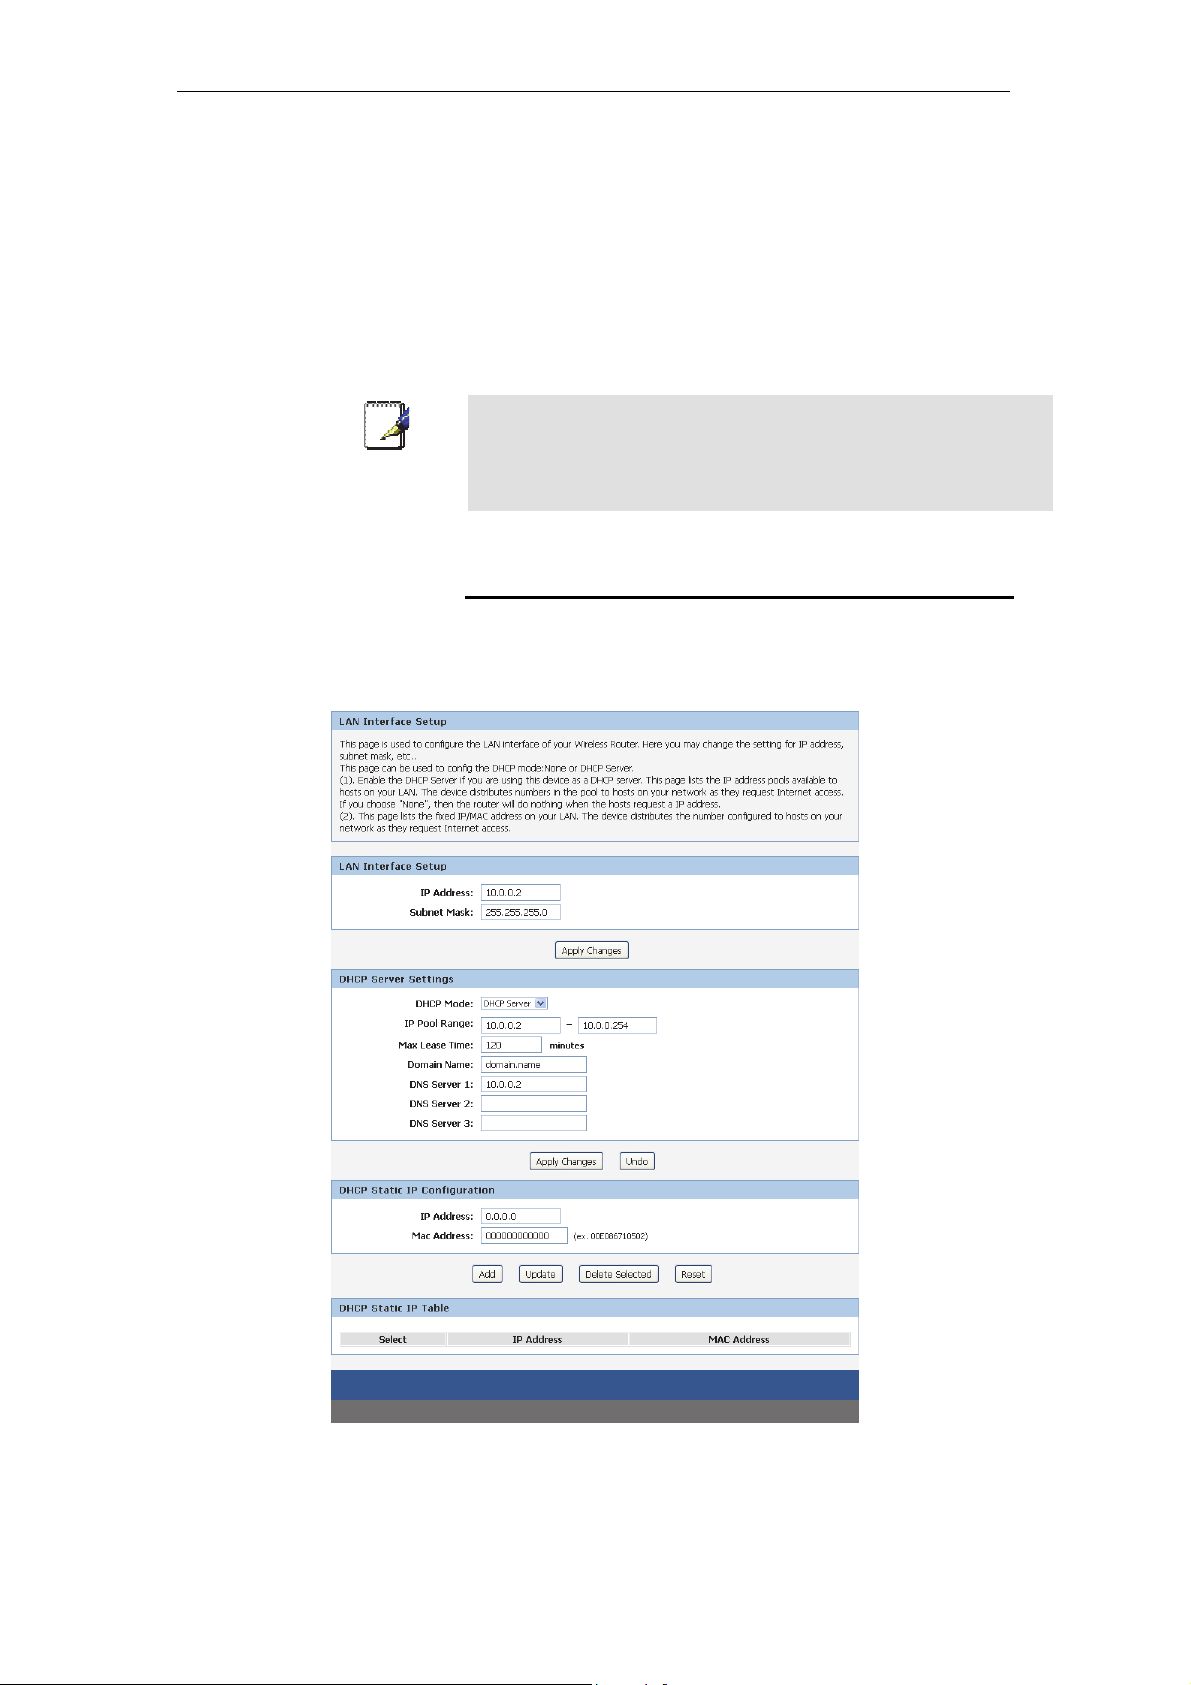
9 LAN Interface
This chapter is to configure the parameters for local area
network which connects to the LAN port of your Access Point.
Here you may change the setting for IP address, subnet mask,
DHCP, etc...
You should only change the addressing details if your ISP asks
Note
you to, or if you are familiar with network configuration. In most
cases, you will not need to make any changes to this
configuration.
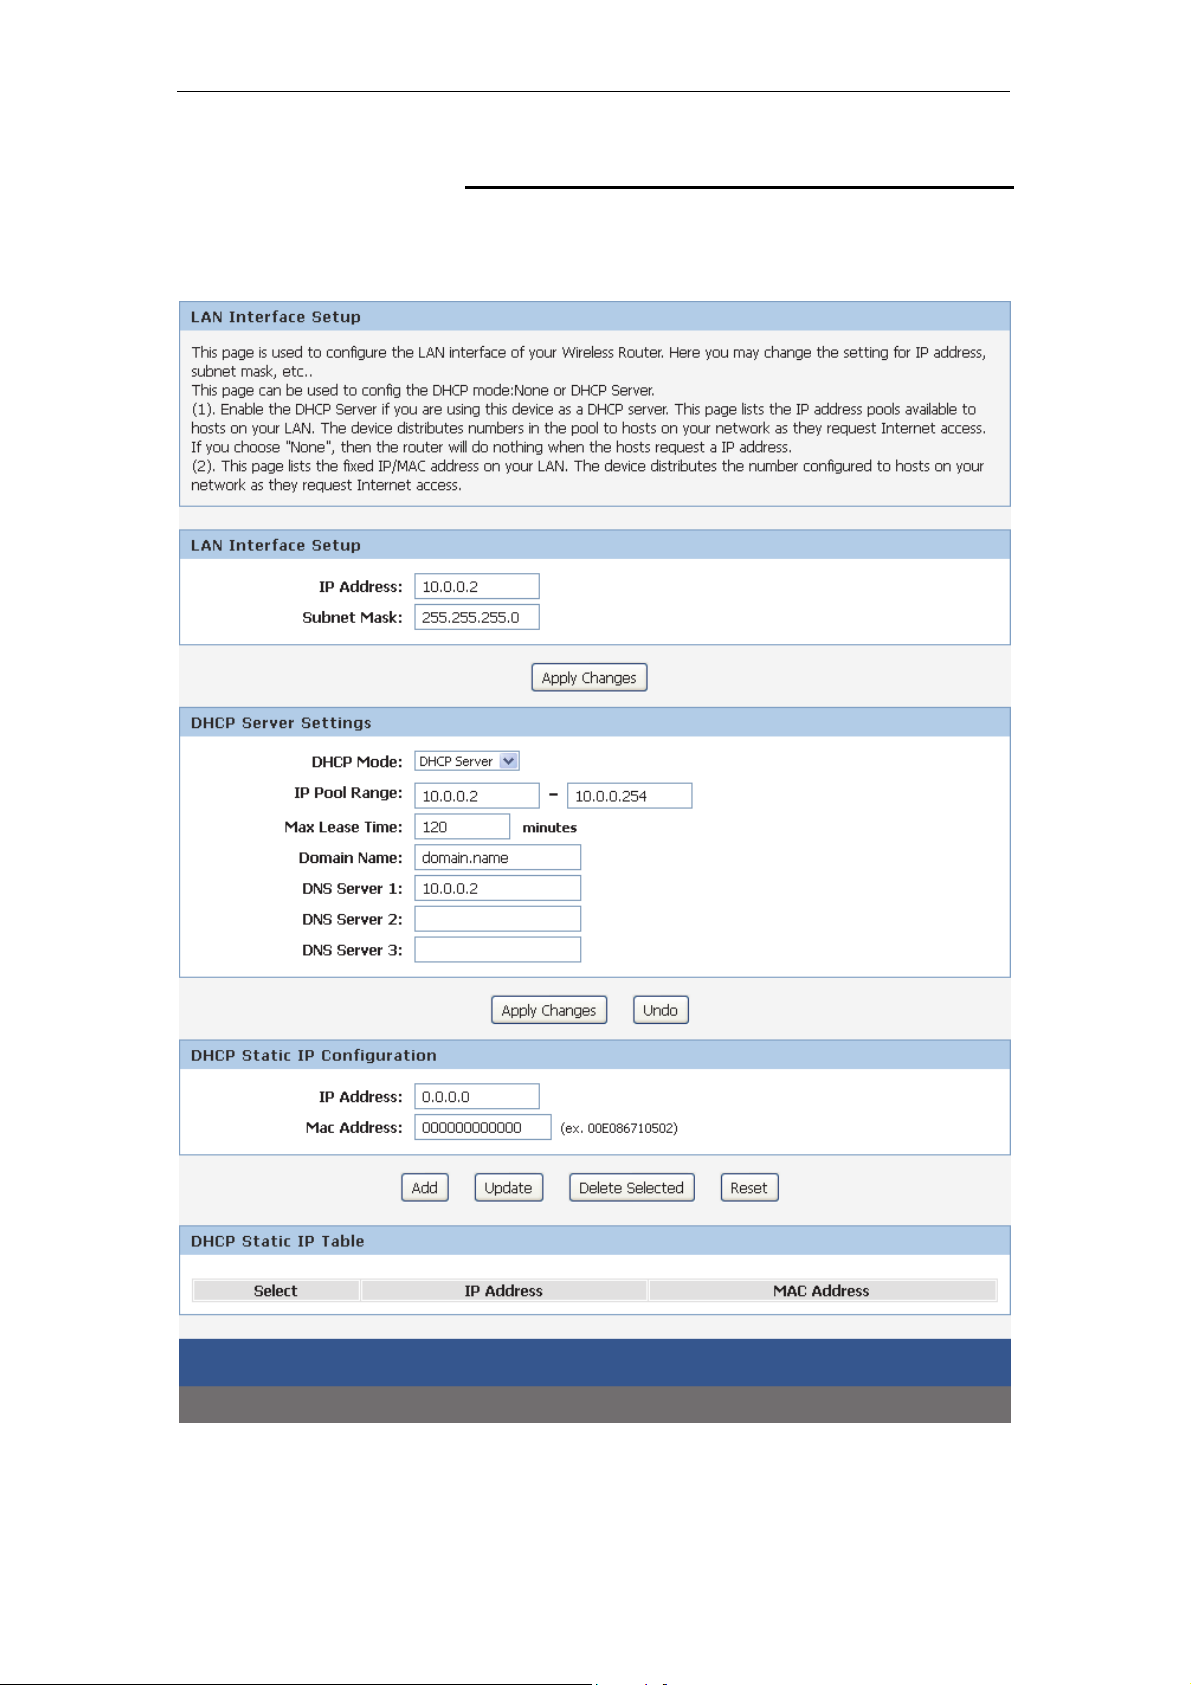
LAN Interface Setup
To check the configuration of LAN Interface:
1. From the Setup menu, click on Local Network. The
following page is displayed:
54
Page 55

11n AP Router User’s Manual
Field Description
IP Address The IP address of your router on the local area network. Your local
area network settings are based on the address assigned here.
Subnet Mask The subnet mask of your router on the local area network.
DHCP Mode Once your router is properly configured and DHCP Server is
enabled, the DHCP Server will manage the IP addresses and other
network configuration information for computers and other devices
connected to your Local Area Network. There is no need for you to
do this yourself.
The computers (and other devices) connected to your LAN also
need to have their TCP/IP configuration set to "DHCP" or "Obtain an
IP address automatically".
IP Pool Range These two IP values (from and to) define a range of IP addresses
that the DHCP Server uses when assigning addresses to computers
and devices on your Local Area Network. Any addresses that are
outside of this range are not managed by the DHCP Server; these
could, therefore, be used for manually configured devices or
devices that cannot use DHCP to obtain network address details
automatically.
Your router, by default, has a static IP address of 192.168.0.1. This
means that addresses 192.168.0.2 to 192.168.0.254 can be made
available for allocation by the DHCP Server.
Max Lease Time The amount of time that a computer may have an IP address before
it is required to renew the lease. The lease functions just as a lease
on an apartment would. The initial lease designates the amount of
time before the lease expires. If the tenant wishes to retain the
address when the lease is expired then a new lease is established. If
the lease expires and the address is no longer needed then another
tenant may use the address.
Domain Name Domain name for the dhcp server scope.
DNS Servers DNS Server address for the dhcp server scope.
IP Address The IP address to be configured for your computer or device on the
local area network.For example, 192.168.0.2.
Mac Address The mac address of your computer or device on the local area
network.
55
Page 56
11n AP Router User’s Manual
Changing the LAN IP address and subnet mask
To Change the configuration of LAN Interface:
1. From the Setup menu, click on Local Network. The
following page is displayed:
56
Page 57
11n AP Router User’s Manual
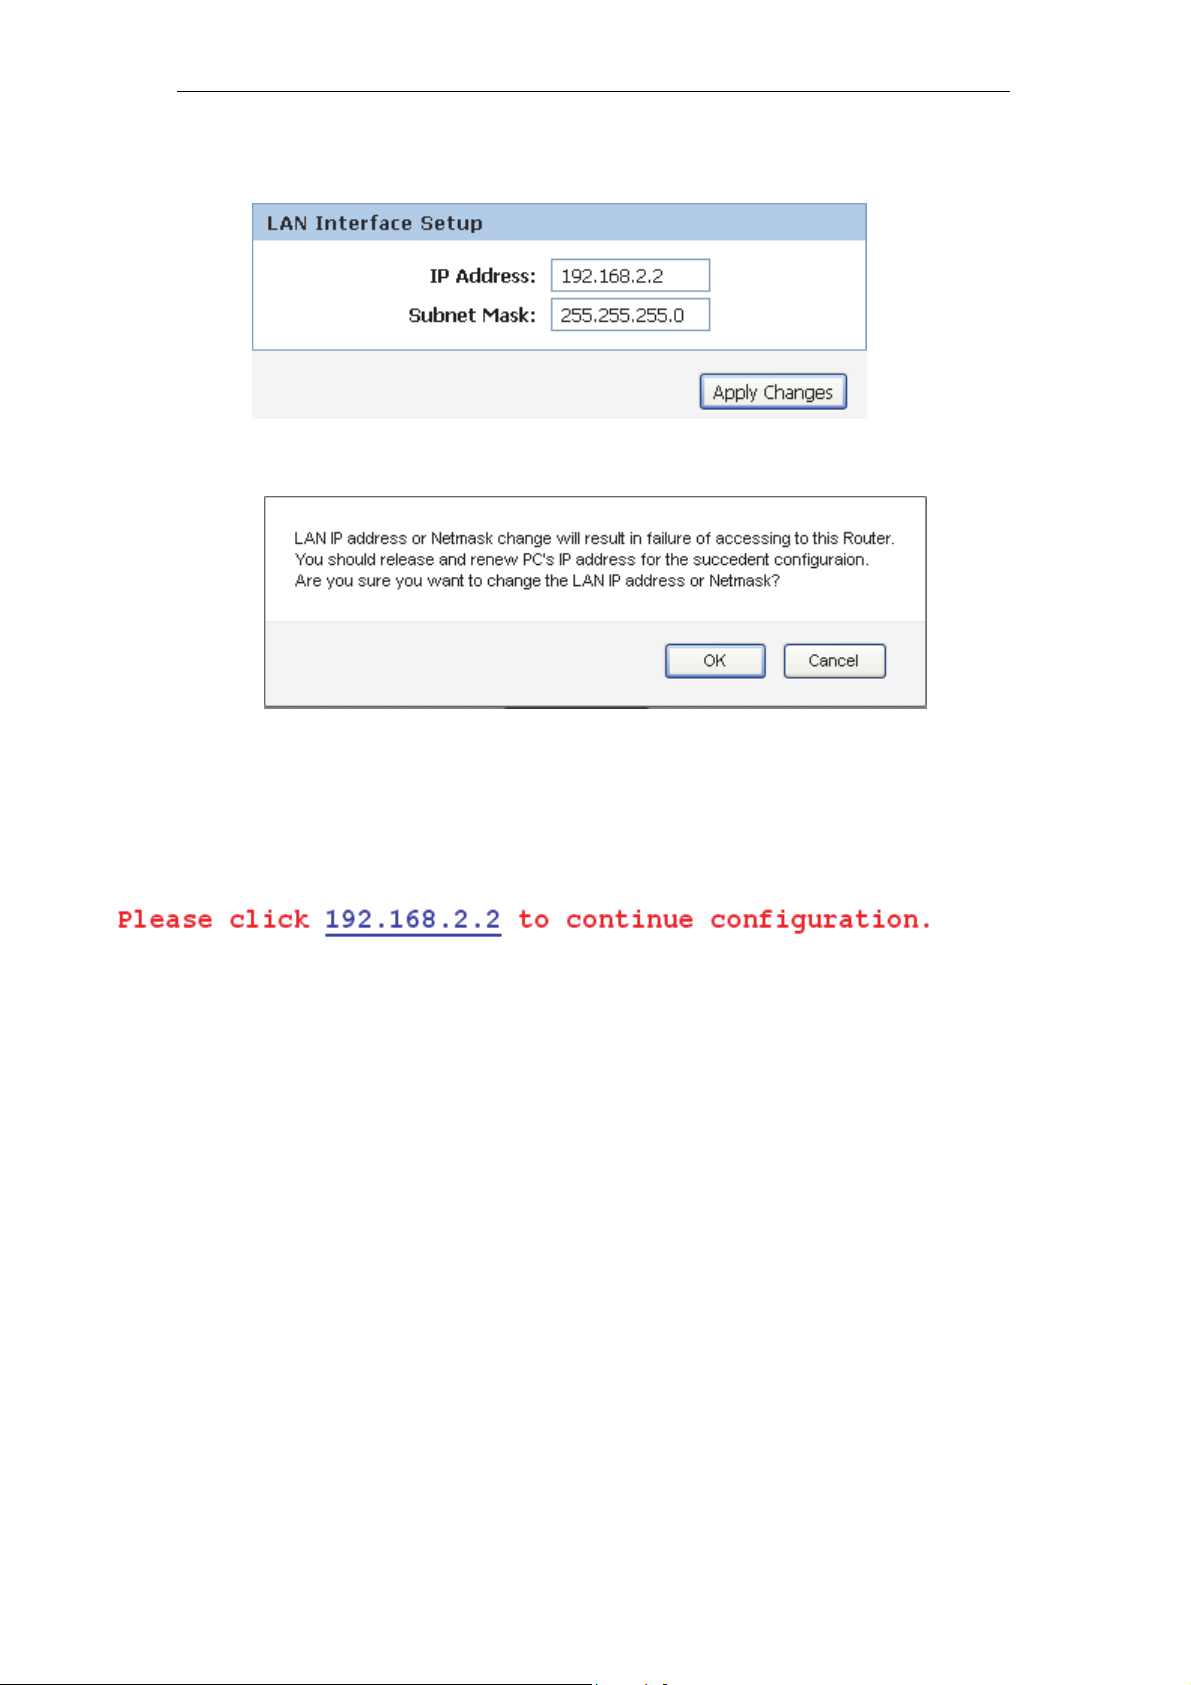
2. Change the IP Address and Subnet Mask.
3. Click Apply Changes.
4. Click OK.
5. Type IP Address and Change default LAN port IP address.
6. Click in the IP Address and Subnet Mask box and type a
new IP Address and Subnet Mask.
7. Change the default DHCP Client Range.
8. Click Apply Changes.
57
Page 58
11n AP Router User’s Manual
You may also need to renew your DHCP lease:
Windows 95/98
a. Select Run... from the Start menu.
b. Enter winipcfg and click OK.
c. Select your ethernet adaptor from the pull-down menu
d. Click Release All and then Renew All.
e. Exit the winipcfg dialog.
Windows NT/Windows 2000/Windows XP
a. Bring up a command window.
b. Type ipconfig /release in the command window.
c. Type ipconfig /renew.
d. Type exit to close the command window.
Linux
a. Bring up a shell.
Note
b. Type pump -r to release the lease.
c. Type pump to renew the lease.
If you change the LAN IP address of the device while connected
through your Web browser, you will be disconnected. You must
open a new connection by entering your new LAN IP address as
the URL.
58
Page 59
11n AP Router User’s Manual
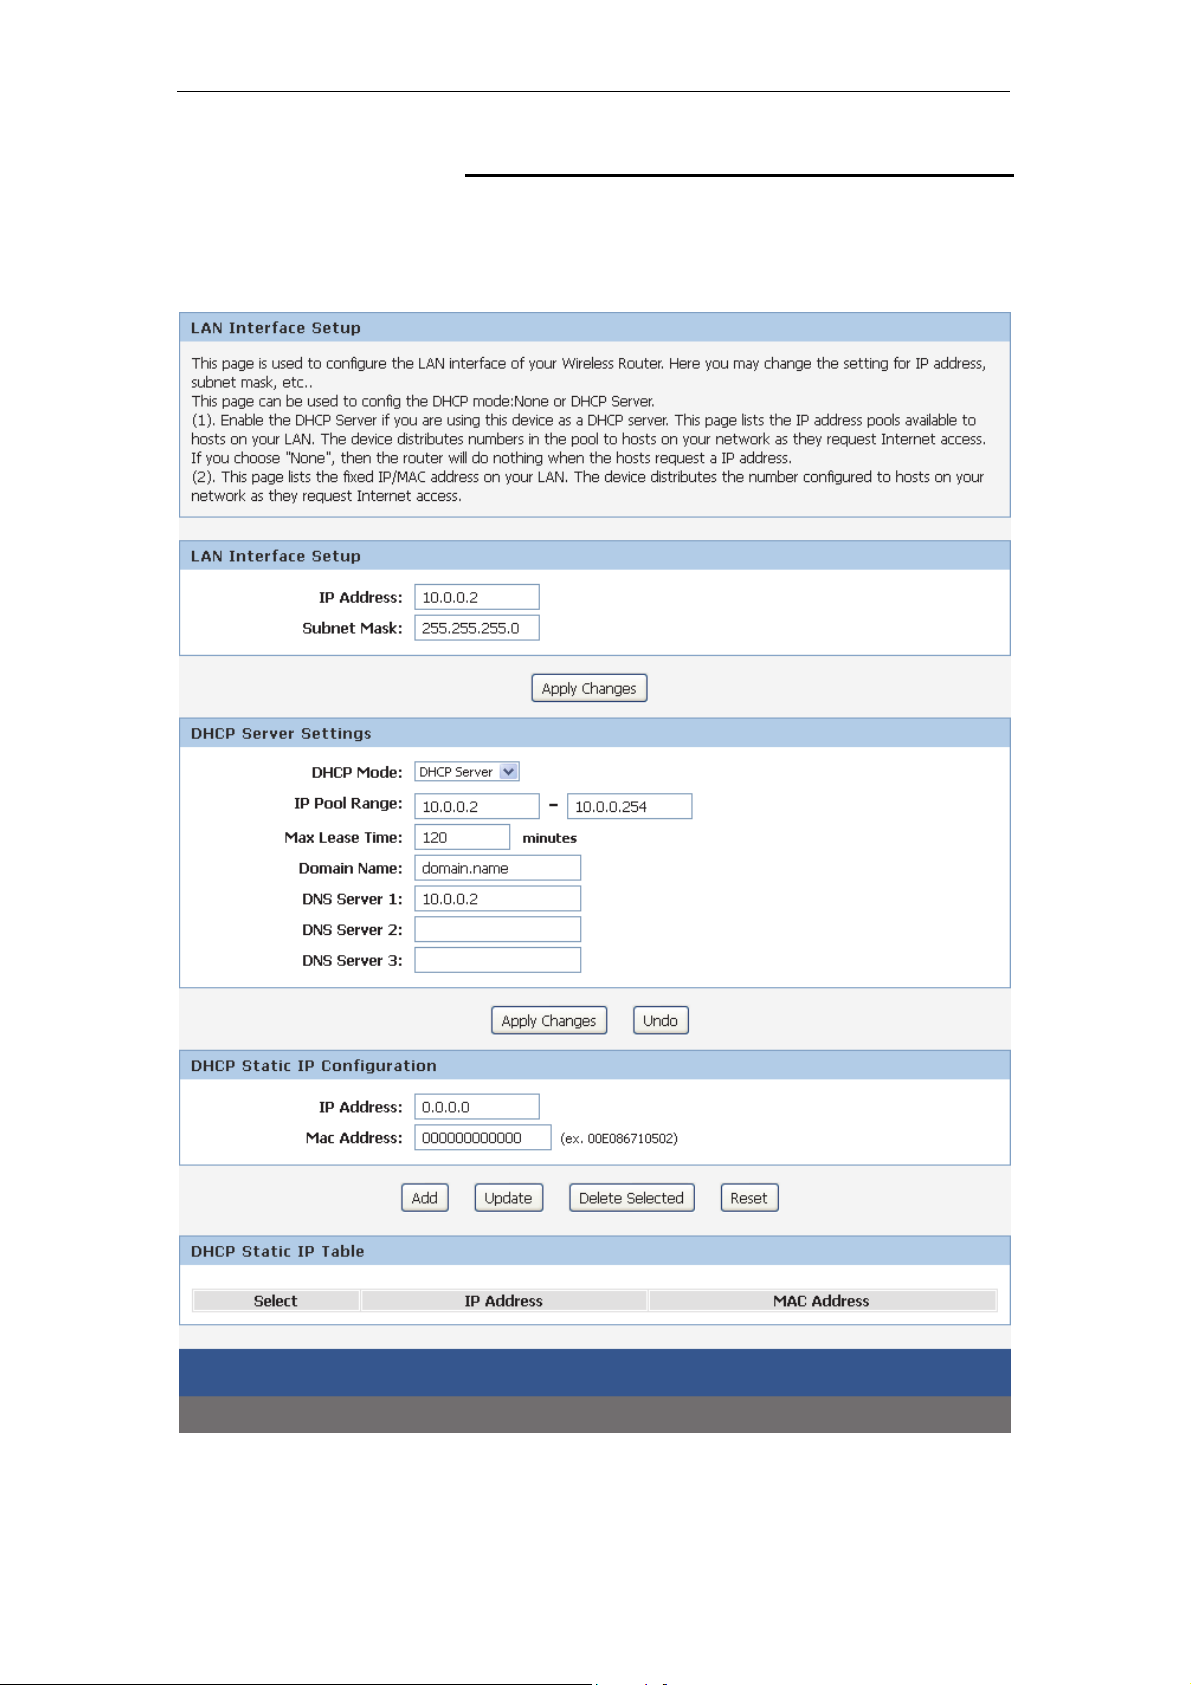
DHCP Static IP Configuration
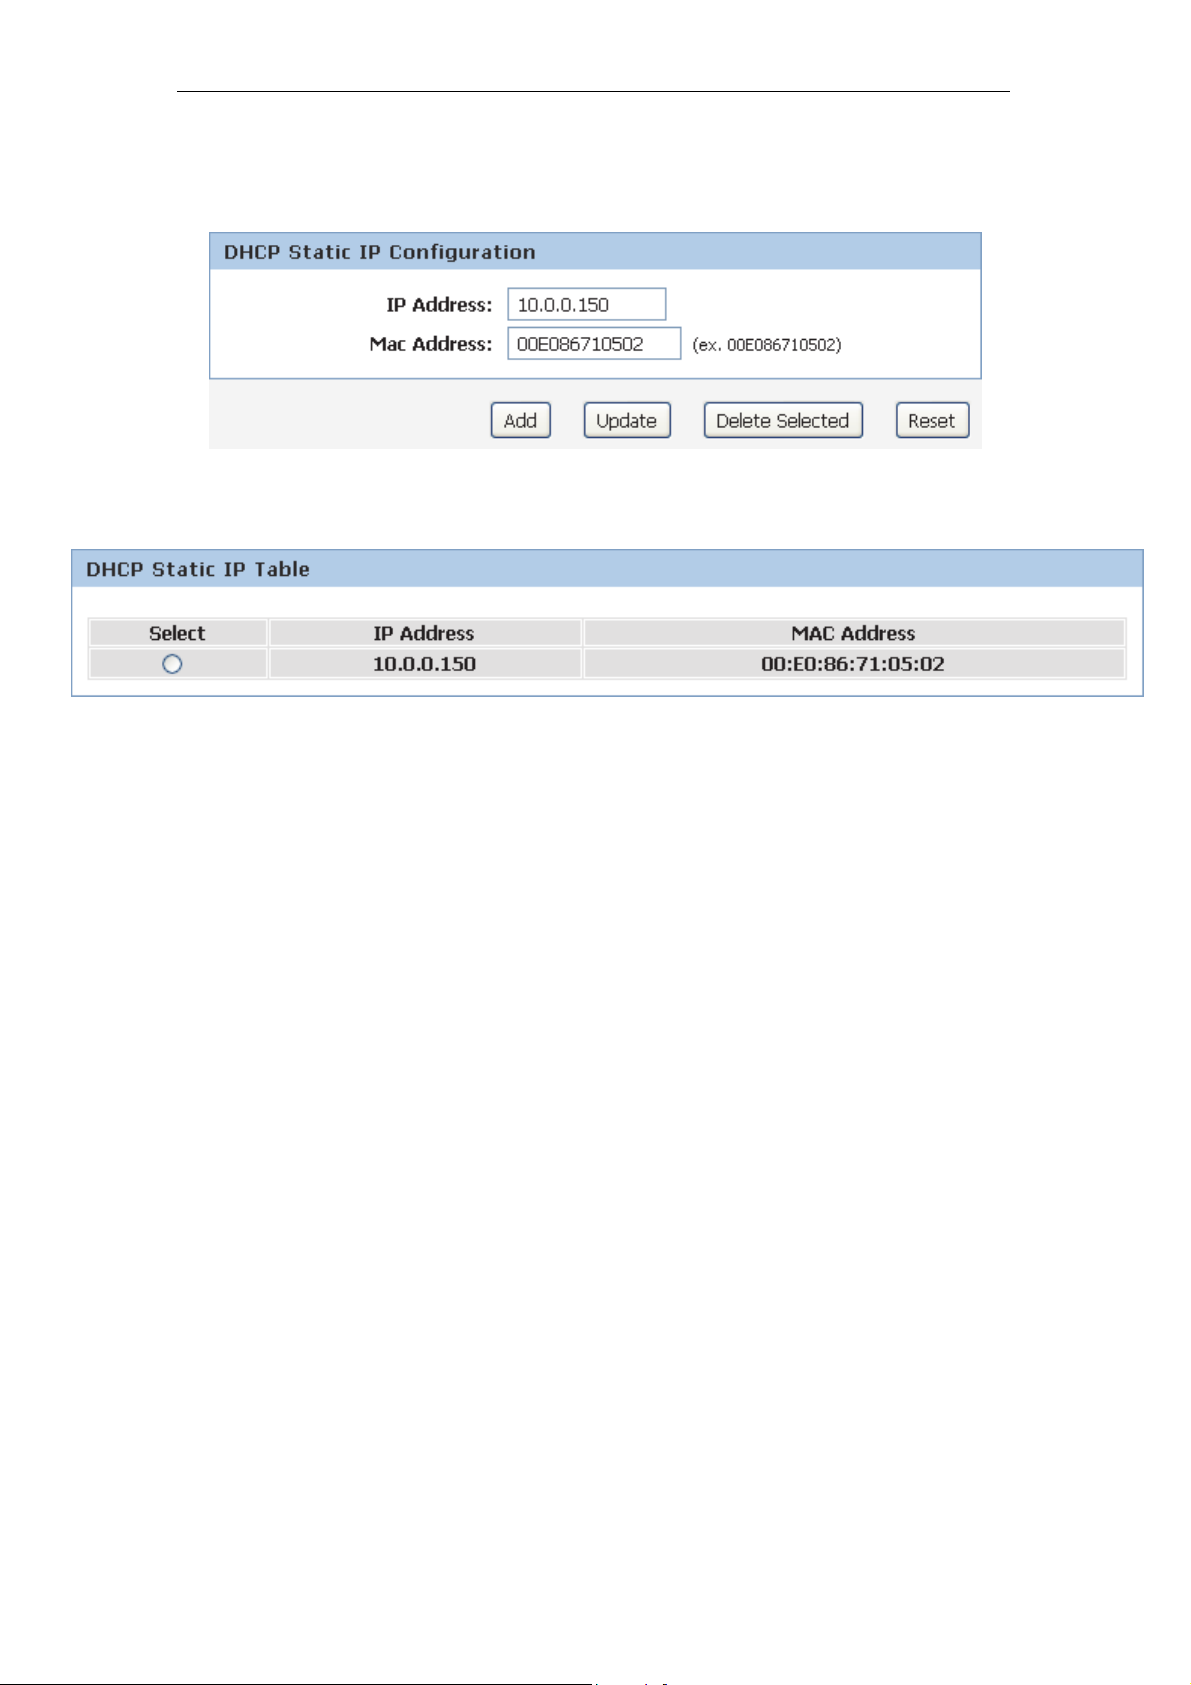
If you need to assign static ip for your computer or device on the
local area network, configure static ip with the mac address.:
1. From the Setup menu, click on Local Network. The
following page is displayed:
59
Page 60
11n AP Router User’s Manual
2. Enter the IP Address.
3. Enter the Mac Address.
4. Click Add.
5. The DHCP Static IP Configuration that you created has
been added in the DHCP Static IP Table.
60
Page 61

11n AP Router User’s Manual
10 Internet Setup
This chapter describes how to configure the way that your
device connects to the Internet. Your ISP determines what type
of Internet access you should use and provides you with any
information that you need in order to configure the Internet
access to your device.
Wireless Gateway supports 3 methods of obtaining the WAN IP
address:
Option Description
Static IP Choose this option if you are a leased line user with a fixed IP address.
DHCP Client Choose this option if you are connected to the Internet through a Cable
modem line.
PPPoE Choose this option if you are connected to the Internet through a DSL line
61
Page 62
11n AP Router User’s Manual
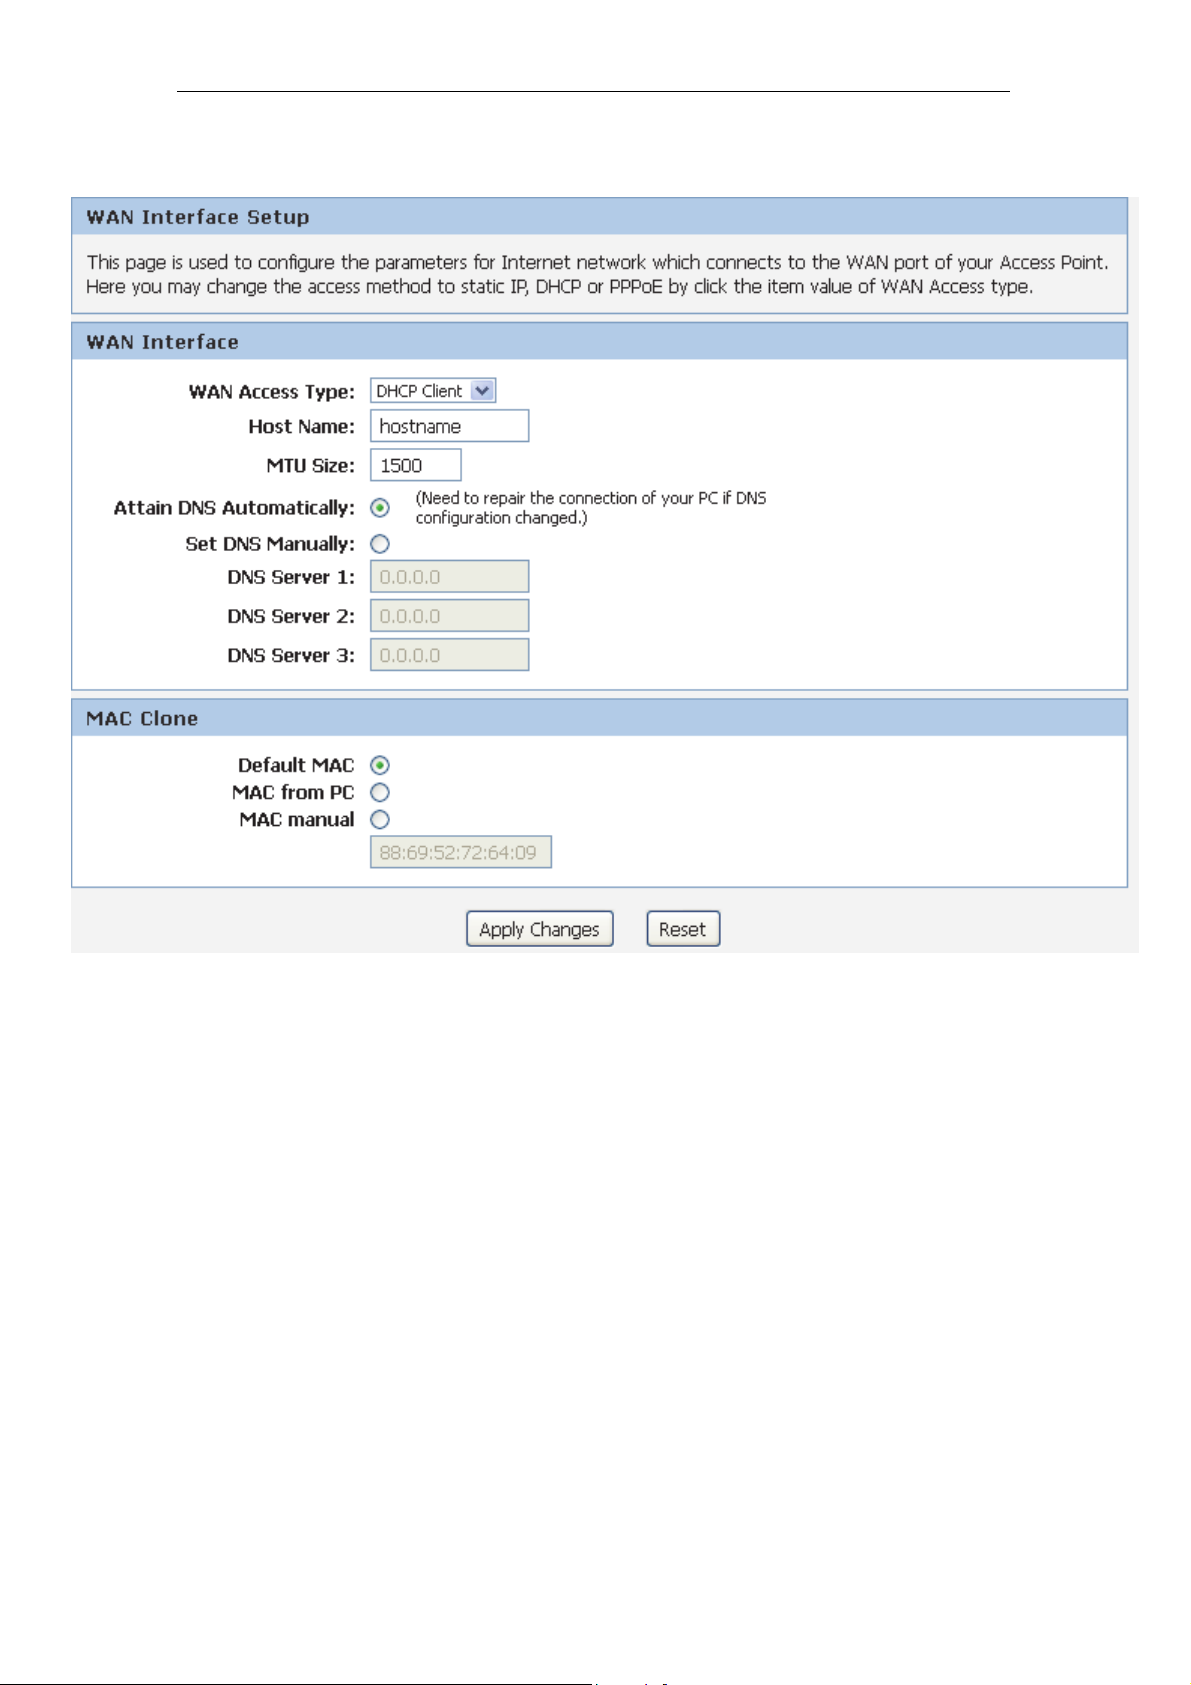
1. From the Setup menu, click on Internet Setup. The
following page is displayed:
62
Page 63

11n AP Router User’s Manual
Option Description
WAN
Access
Type
Static IP Choose this option if you are a leased line user with a
fixed IP address.
DHCP Client Choose this option if you are connected to the Internet
through a Cable modem line.
PPPoE Choose this option if you are connected to the Internet
through a DSL line
Host Name The name of the DHCP host
IP Address Check with your ISP provider
Subnet Mask Check with your ISP provider
Default Gateway Check with your ISP provider
User Name User name for PPPoE registration recognized by the
Internet service provider
Password Password for PPPoE registration recognized by the
Internet service provider
Service Name Service Name for PPPoE registration recognized by the
Internet service provider
Continuous The connection is always on
Connection
Type
Connect on
Demand
Enter the minutes after which the session must be
disconnected, if no activity takes place
Manual Manually connect
Idle Time Enter the minutes after which the session must be
disconnected
MTU Size Specify the network MTU rate
Attain DNS Automatically Obtain DNS server address automatically
DNS 1 (Primary DNS Server) Check with your ISP provider
DNS 2 (Secondary DNS Server) Check with your ISP provider
DNS 3 (Third DNS Server) Check with your ISP provider
MAC Clone Clone MAC lets the device identify itself as another
computer or device
63
Page 64
11n AP Router User’s Manual
Configuring Static IP connection
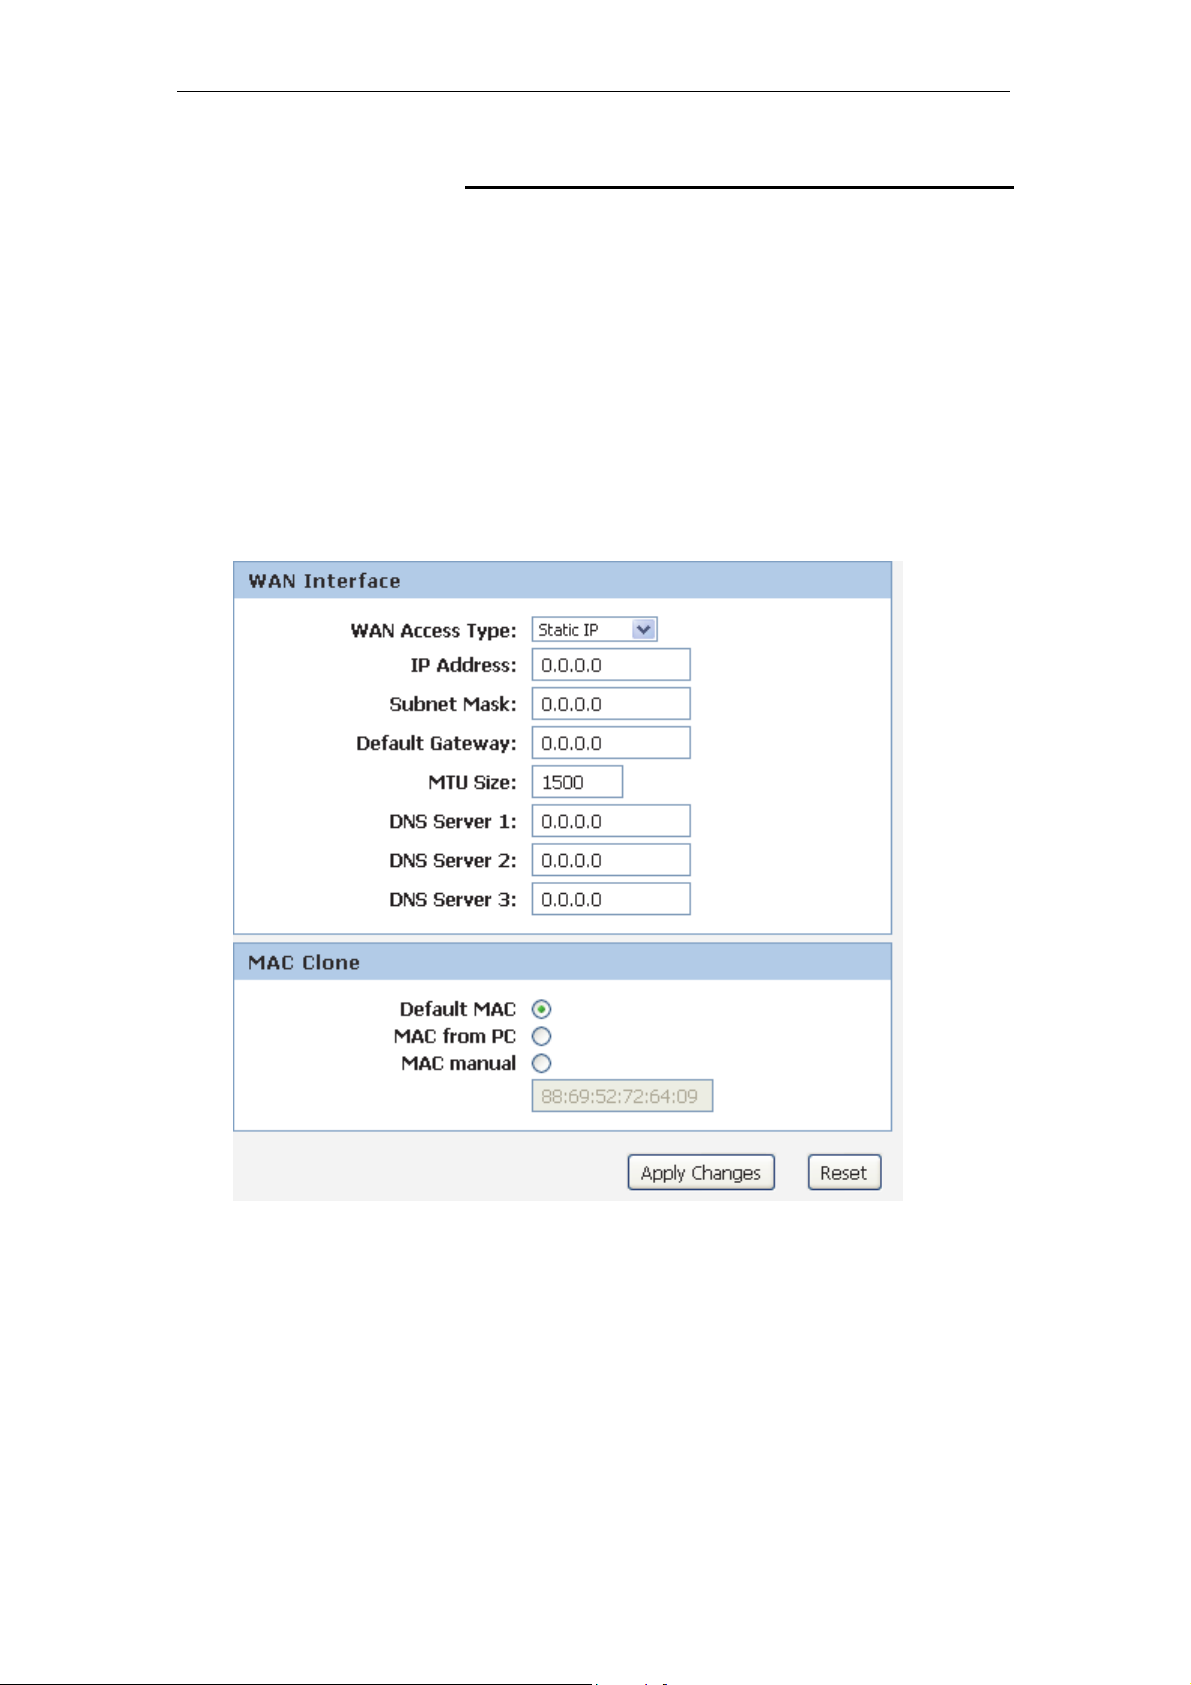
If you are a leased line user with a fixed IP address, enter in the
IP address, subnet mask, gateway address, and DNS (domain
name server) address(es) provided to you by your ISP.
If your ISP wants you to connect to the Internet using Static IP,
follow the instructions below.
1. From the Setup menu, click on Internet Setup. The
following page is displayed:
2. From the WAN Access Type drop-down list, select Static IP
setting.
3. Enter WAN IP Address, WAN Subnet Mask, Default
Gateway and DNS which was given by Telecom or by your
Internet Service Provider (ISP).
4. Click Apply Changes.
64
Page 65
11n AP Router User’s Manual
Configuring DHCP Client connection
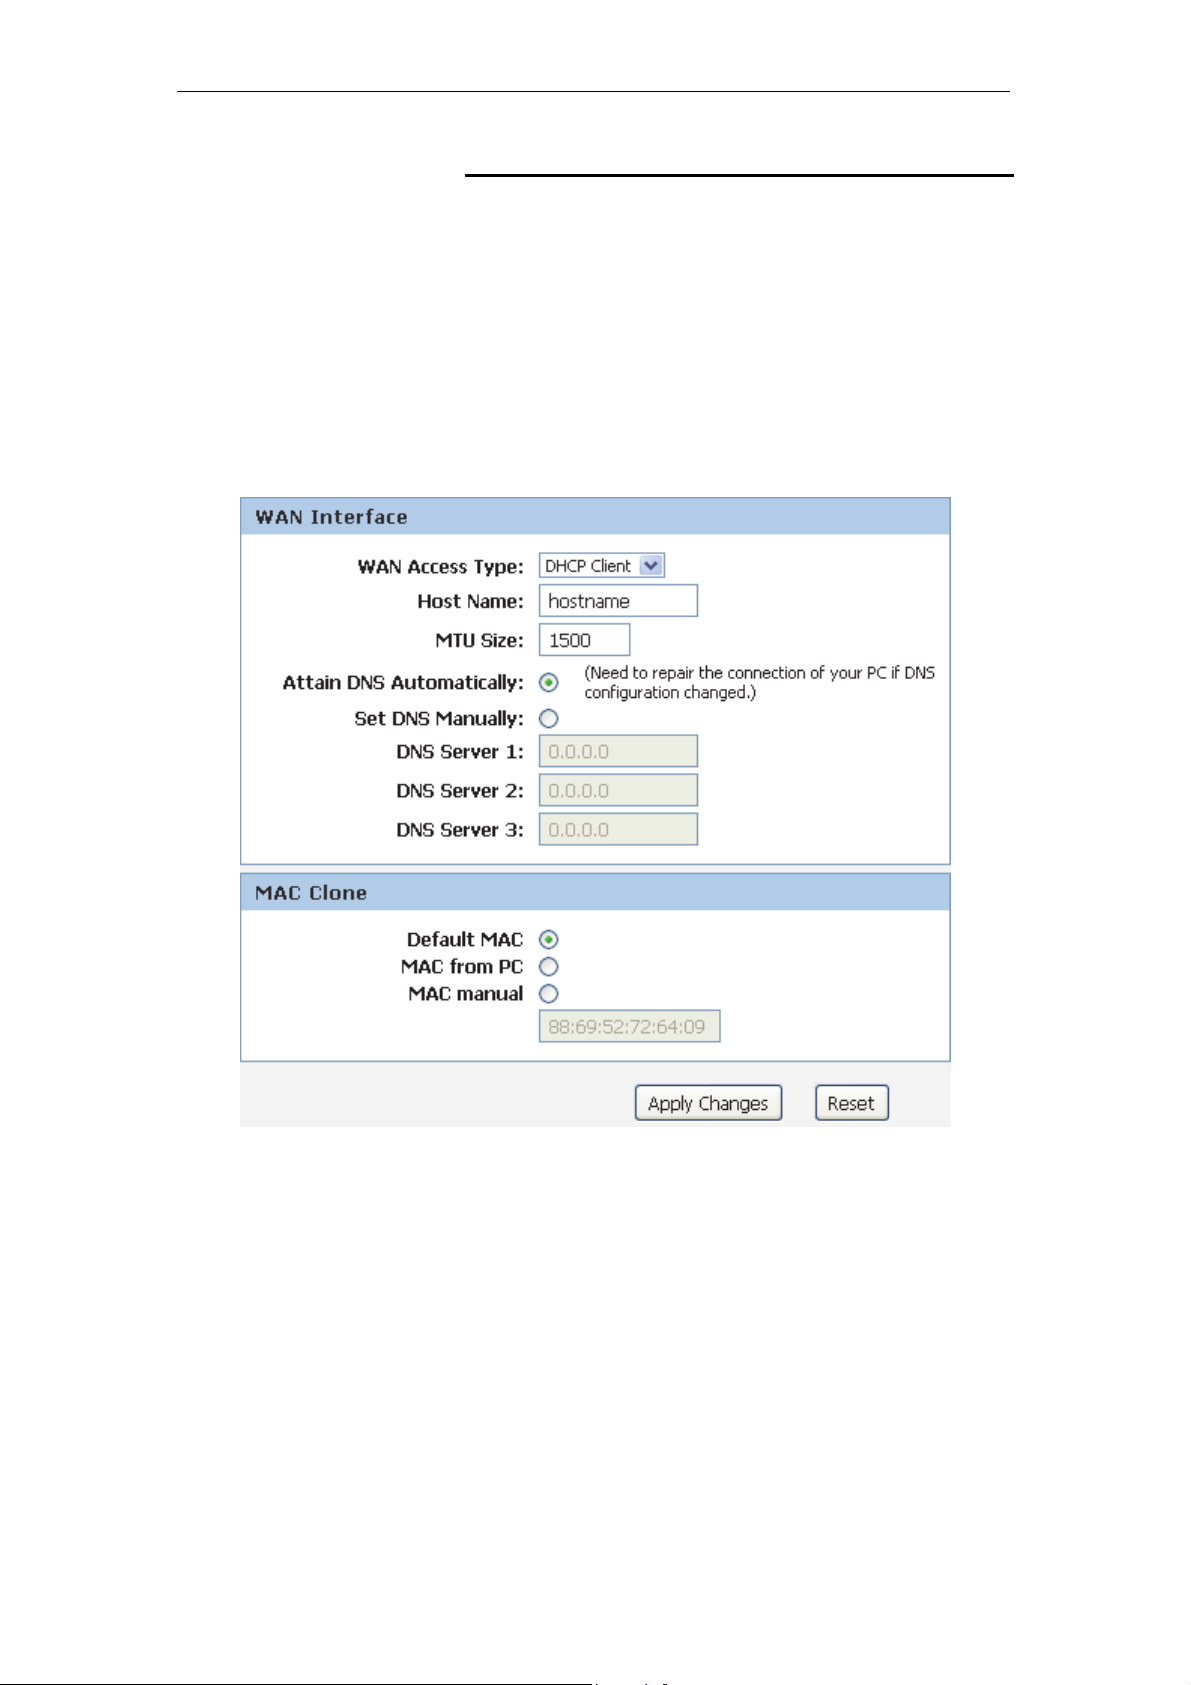
Dynamic Host Configuration Protocol (DHCP), Dynamic IP (Get
WAN IP Address automatically). If you are connected to the
Internet through a Cable modem line, then a dynamic IP will be
assigned.
If your ISP wants you to connect to the Internet using DHCP
Client, follow the instructions below.
1. From the Setup menu, click on Internet Setup. The
following page is displayed:
2. From the WAN Access Type drop-down list, select DHCP
Client setting.
3. Click Apply Changes.
65
Page 66
11n AP Router User’s Manual
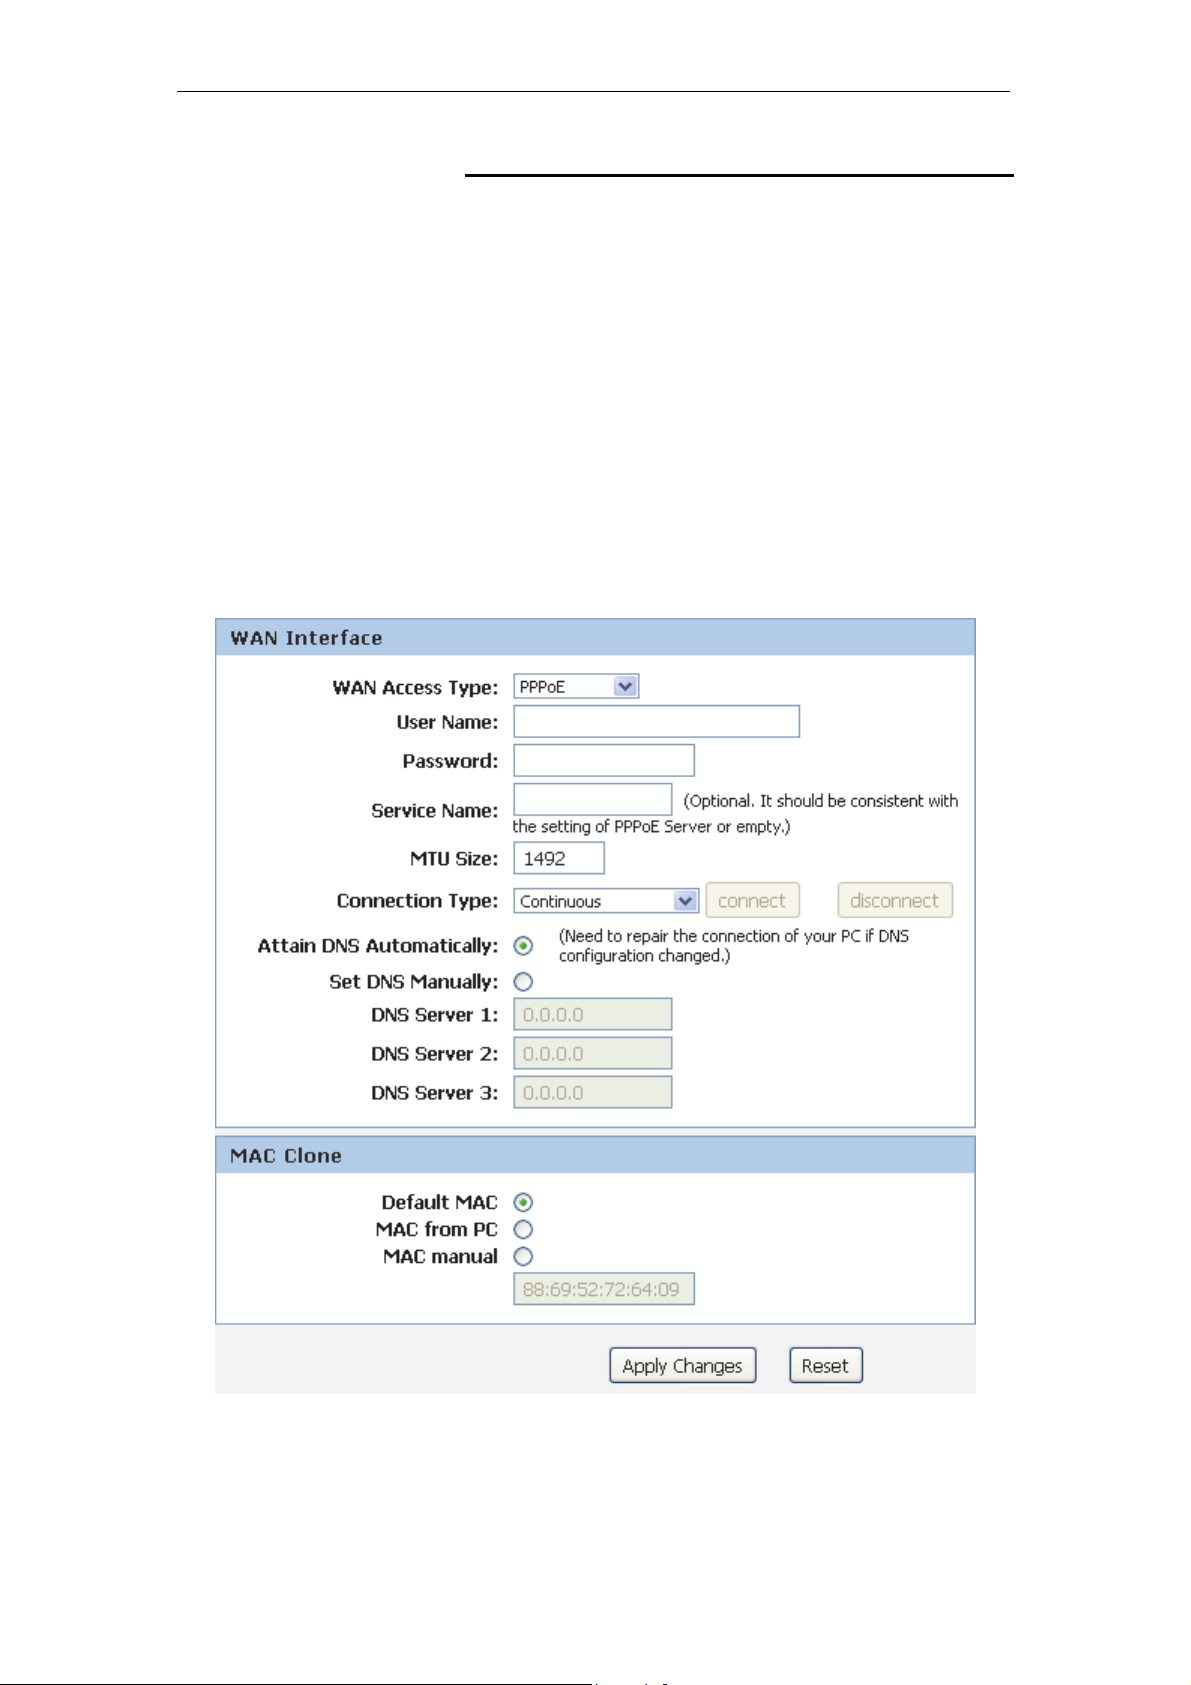
Configuring PPPoE connection
If your ISP’s Internet service uses PPPoE you need to set up a
PPP login account. The first time that you login to the Internet,
your ISP will ask you to enter a username and password so
they can check that you are a legitimate, registered Internet
service user. Your device stores these authentication details, so
you will not have to enter this username and password every
time you login.
If your ISP wants you to connect to the Internet using PPP,
follow the instructions below.
1. From the Setup menu, click on Internet Setup. The
following page is displayed:
2. From the WAN Access Type drop-down list, select PPPoE
setting.
3. Enter User Name/Password provided by your ISP. Type
them in the relevant boxes.
4. Click Apply Changes.
66
Page 67
11n AP Router User’s Manual
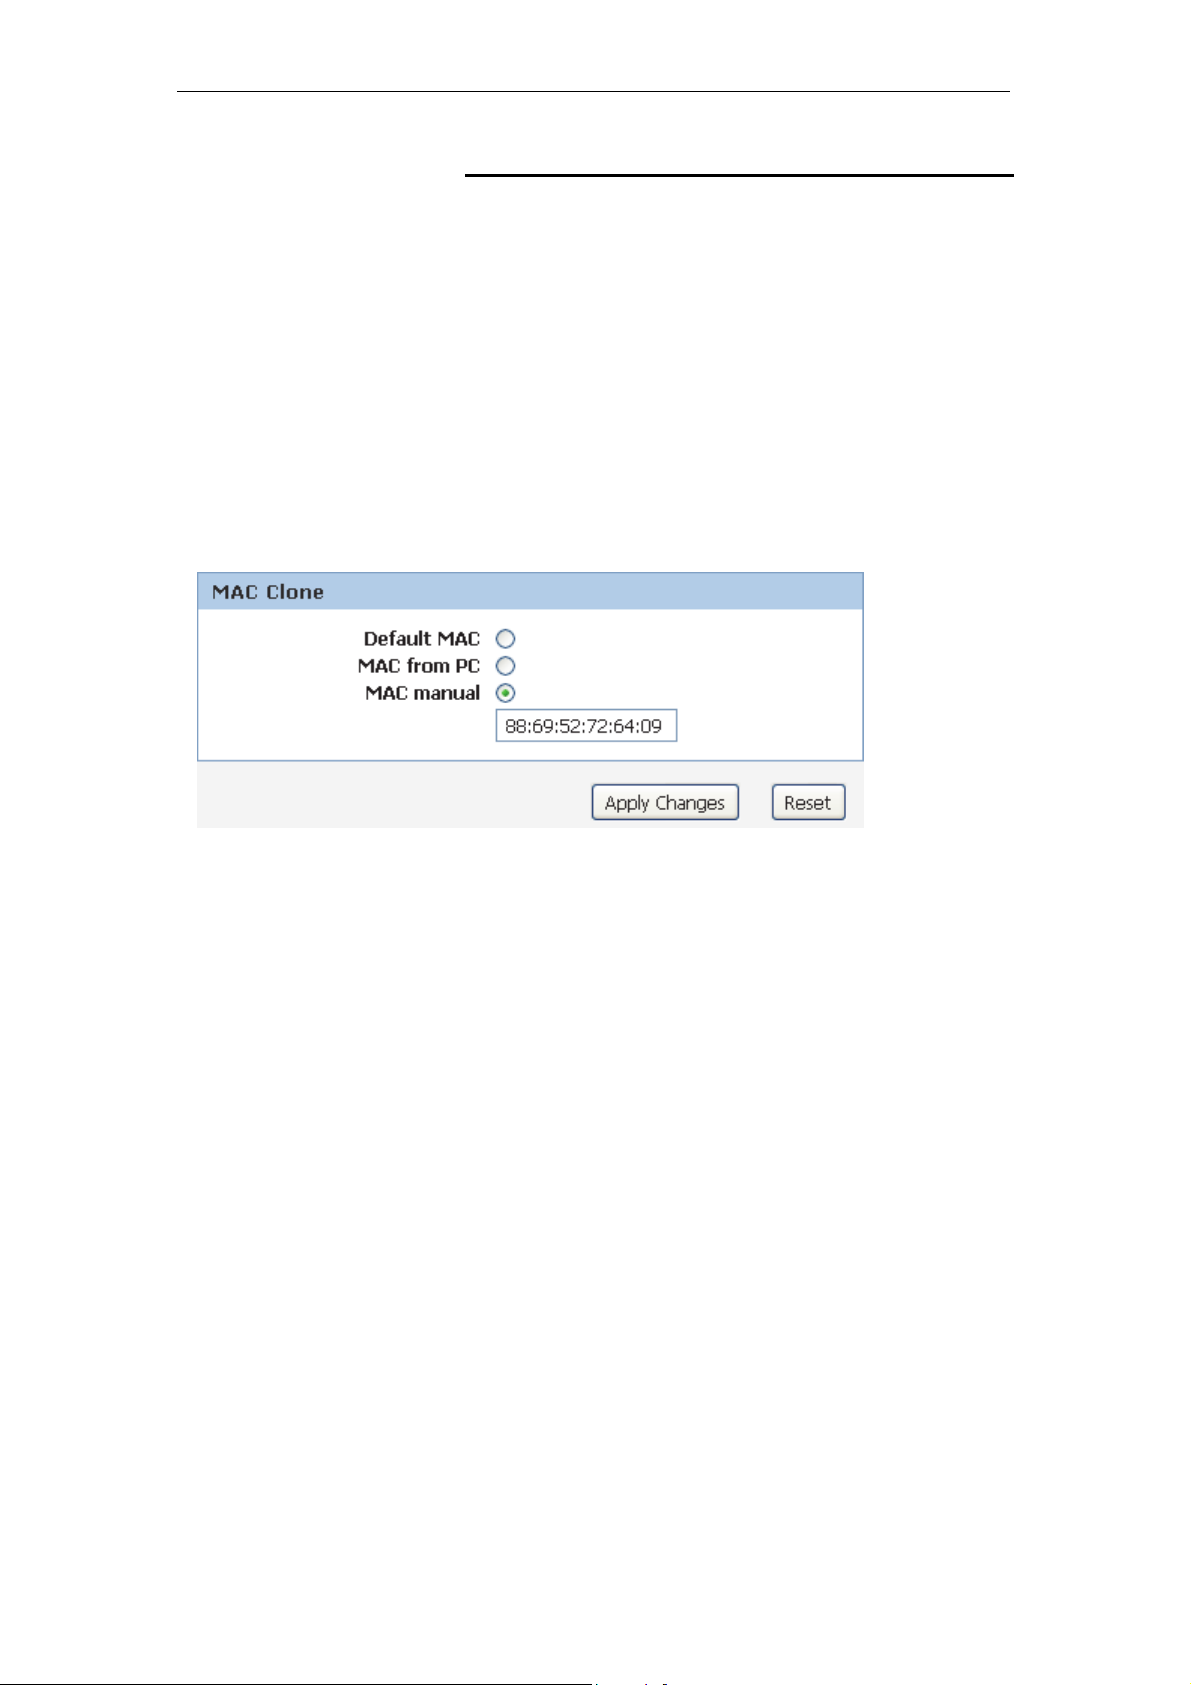
Clone MAC Address
Some particularly ISPs do not want you to have a home
network and have a DSL/Cable modem that allows only 1 MAC
to talk on the internet. If you change network cards, you have to
call them up to change the MAC. The Wireless Gateway can it’s
MAC to computer's one that was originally set up for such an
ISP.
This page allows you to enable or disable Clone MAC Address
option.
1. From the Setup menu, click on Internet Setup. The
following page is displayed:
2. Click MAC manual ratio.
3. Enter the MAC for example 88:69:52:72:64:09 that you
want to be instead of in the Clone MAC Address field.
4. Click Apply Changes.
67
Page 68
11n AP Router User’s Manual
11 IPv6
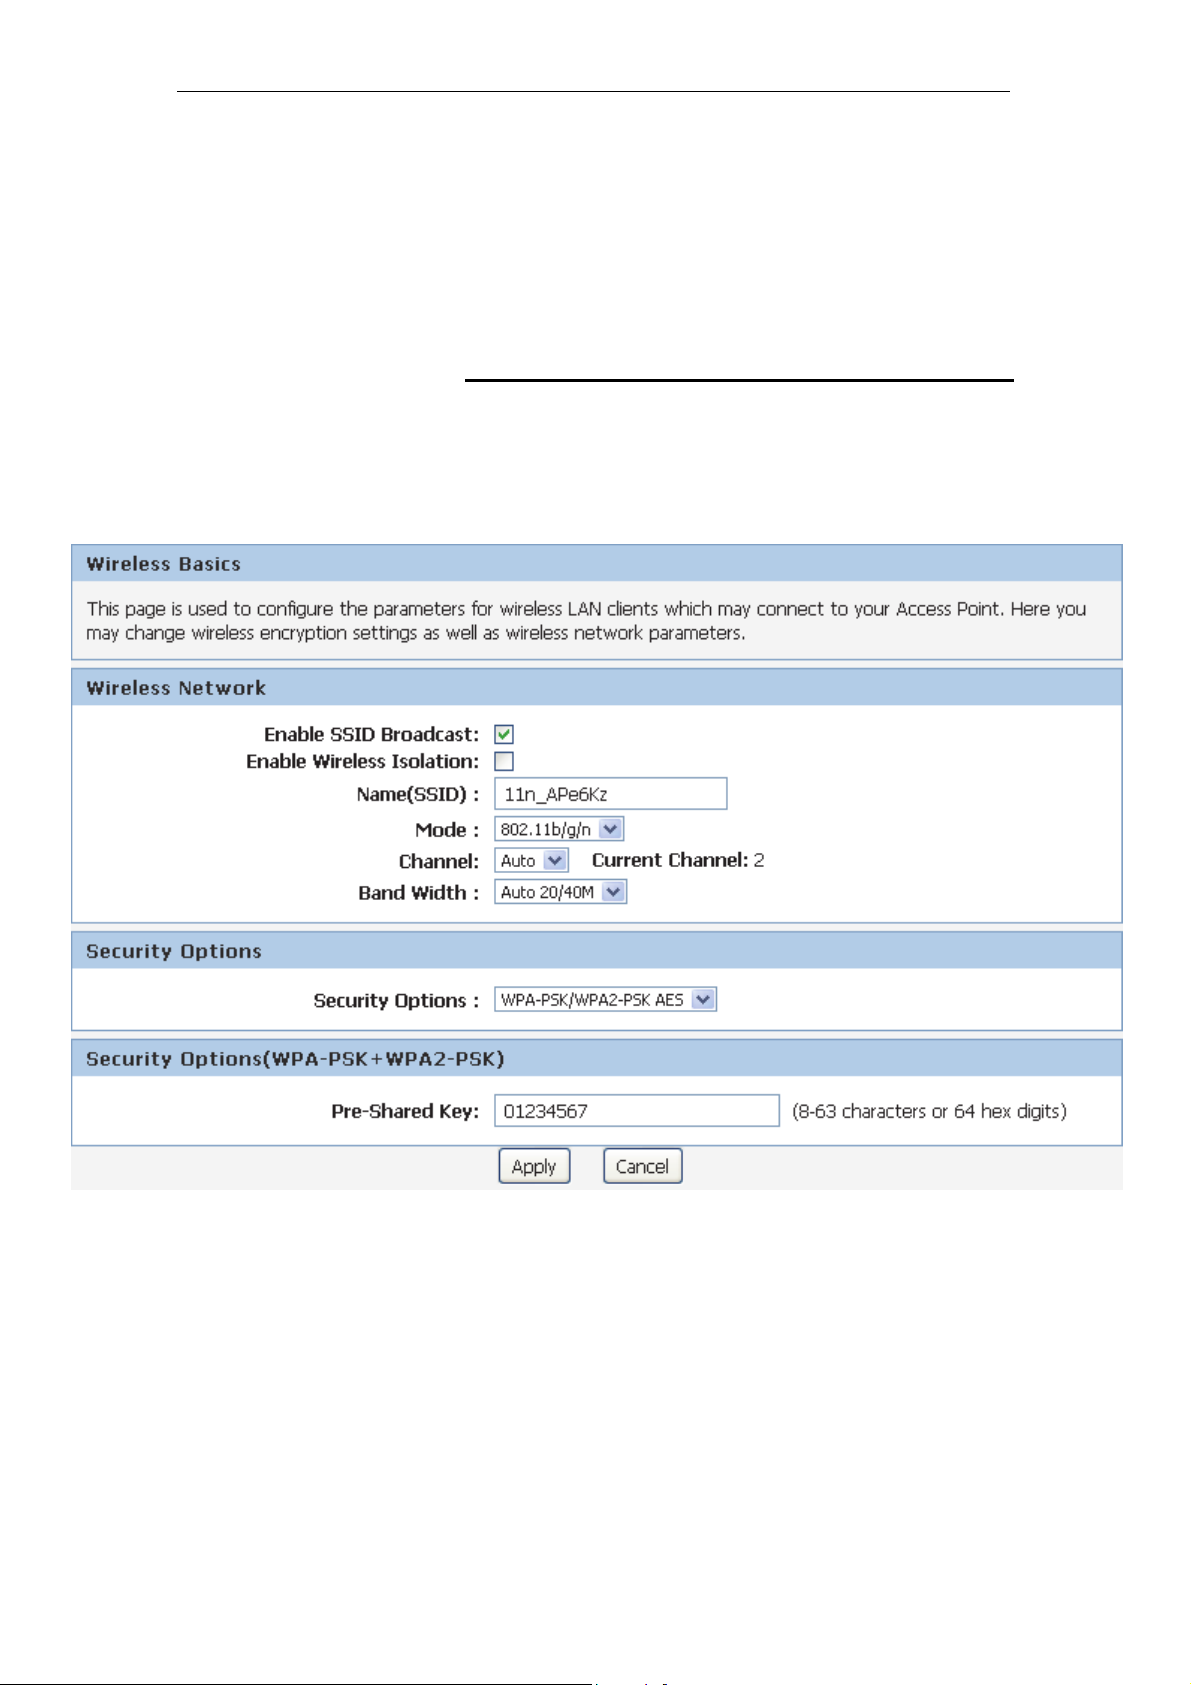
Use this section to configure your IPv6 Connection type. If you
are unsure of your connection method, please contact your
Internet Service Provider.
Wireless Basics
The Wireless Network page allows you to configure the
Wireless features of your device. To access the Wireless Basics
page:
From the Setup menu, click on IPv6. The following page is
displayed:
68
Page 69
11n AP Router User’s Manual
12 Wireless Network
This chapter assumes that you have already set up your
Wireless PCs and installed a compatible Wireless card on your
device. See Configuring Wireless PCs.
Wireless Basics
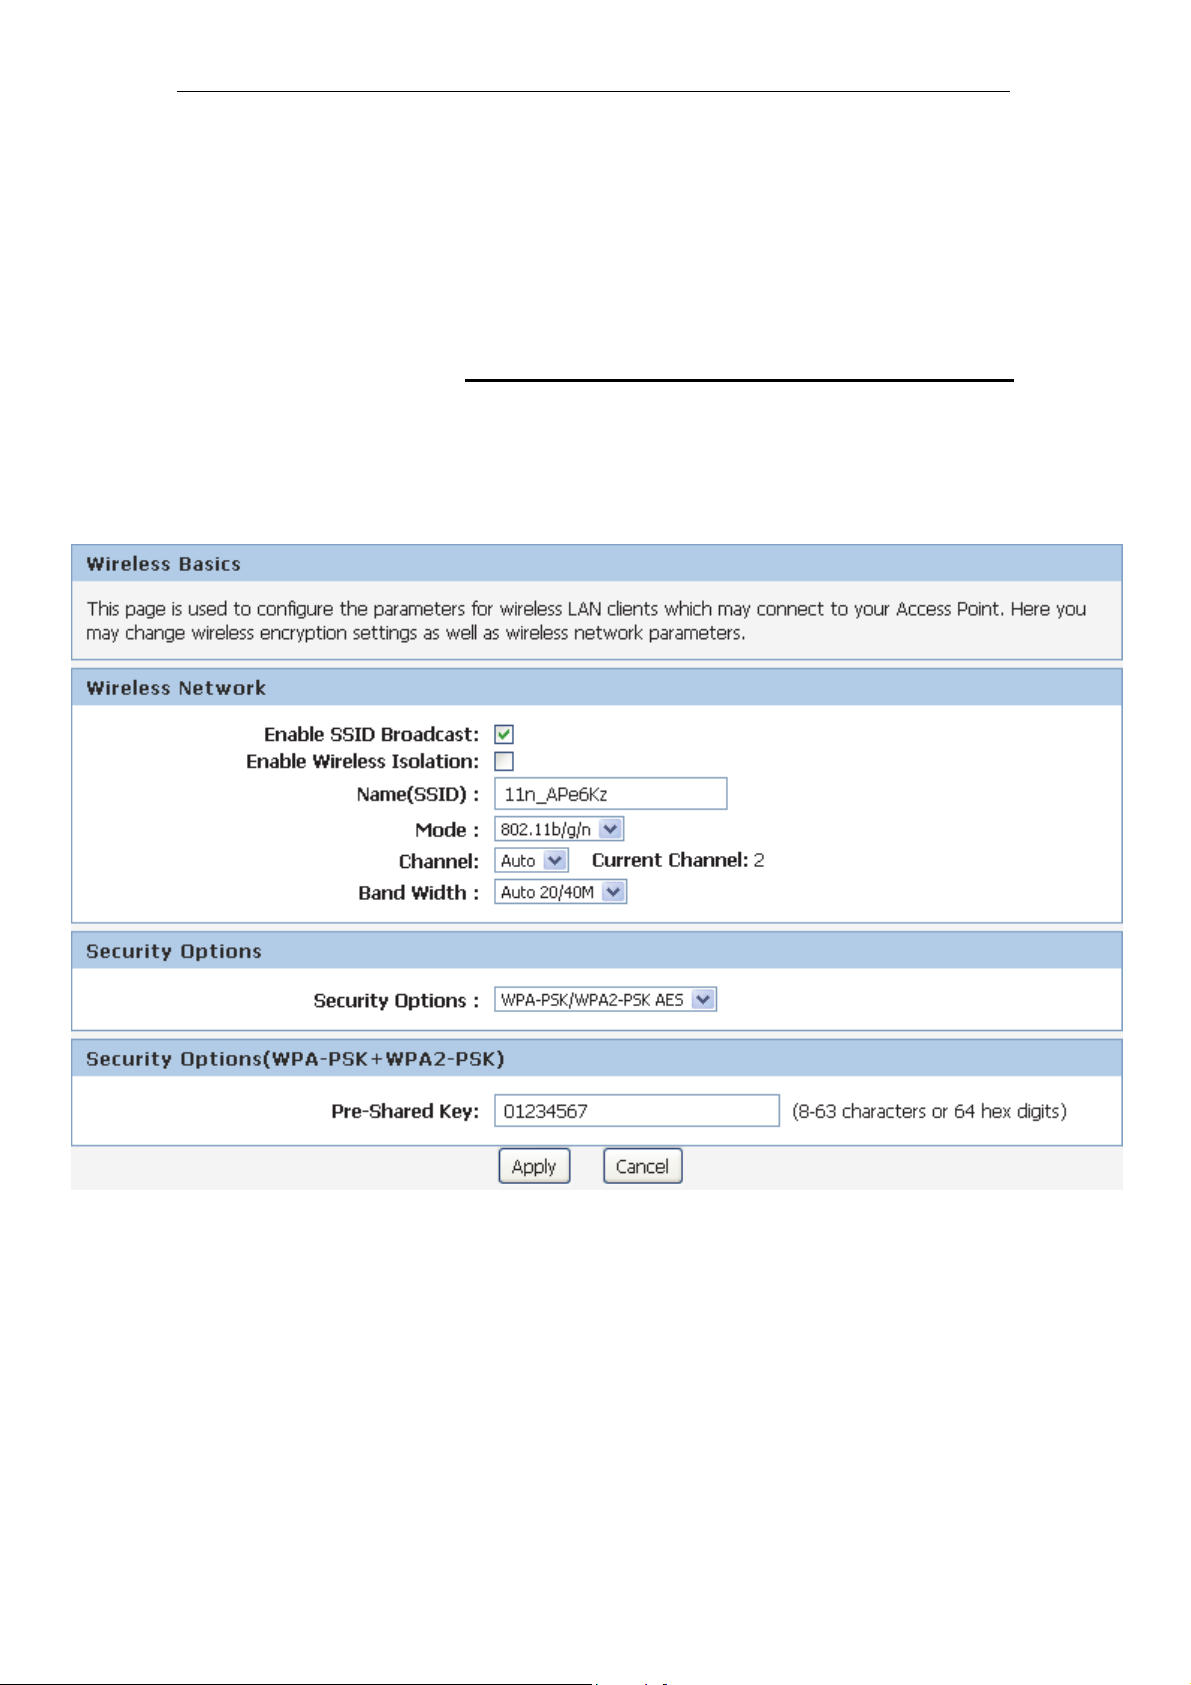
The Wireless Network page allows you to configure the
Wireless features of your device. To access the Wireless Basics
page:
From the Wireless menu, click on Wireless Basics. The
following page is displayed:
Figure 5: Wireless Network page
69
Page 70

11n AP Router User’s Manual
Field Description
Enable SSID
Broadcast
Enable Wireless
Isolation
Broadcast or Hide SSID to your Network.
Default: Enabled
Isolate your Network.
Default: Disabled
SSID Specify the network name.
Each Wireless LAN network uses a unique Network Name to identify
the network. This name is called the Service Set Identifier (SSID). When
you set up your wireless adapter, you specify the SSID. If you want to
connect to an existing network, you must use the name for that
network. If you are setting up your own network you can make up your
own name and use it on each computer. The name can be up to 20
characters long and contain letters and numbers.
Mode Specify the WLAN Mode to 802.11b mode, 802.11g mode, 802.11b/g
mode, 802.11n mode, 802.11n/g mode or 802.11b/g/n mode
Channel Choose a Channel from the pull-down menu.
Band Width Choose a Band Width from the pull-down menu.
Max
Select the Max Transmission Rate from the drop-down list
Transmission
Rate
Security Options Configure the Encryption to None, WEP, WPA-PSK[TKIP] , WPA2-
PSK[AES] or WPA-PSK/WPA2-PSK AES
Security
Encryption(WEP)
Security
Authentication Type: Automatic or Shared Keys
Encryption Strength: 64 bits or 128 bits
Select and configure Key 1, Key 2, Key 3 or Key 4
Encryption(WEP)
Key
Security
Enter the Pre-Shared Key
Options(WPAPSK)
Security
Enter the Pre-Shared Key
Options(WPA2PSK)
Security
Enter the Pre-Shared Key
Options(WPAPSK+WPA2PSK)
70
Page 71
11n AP Router User’s Manual
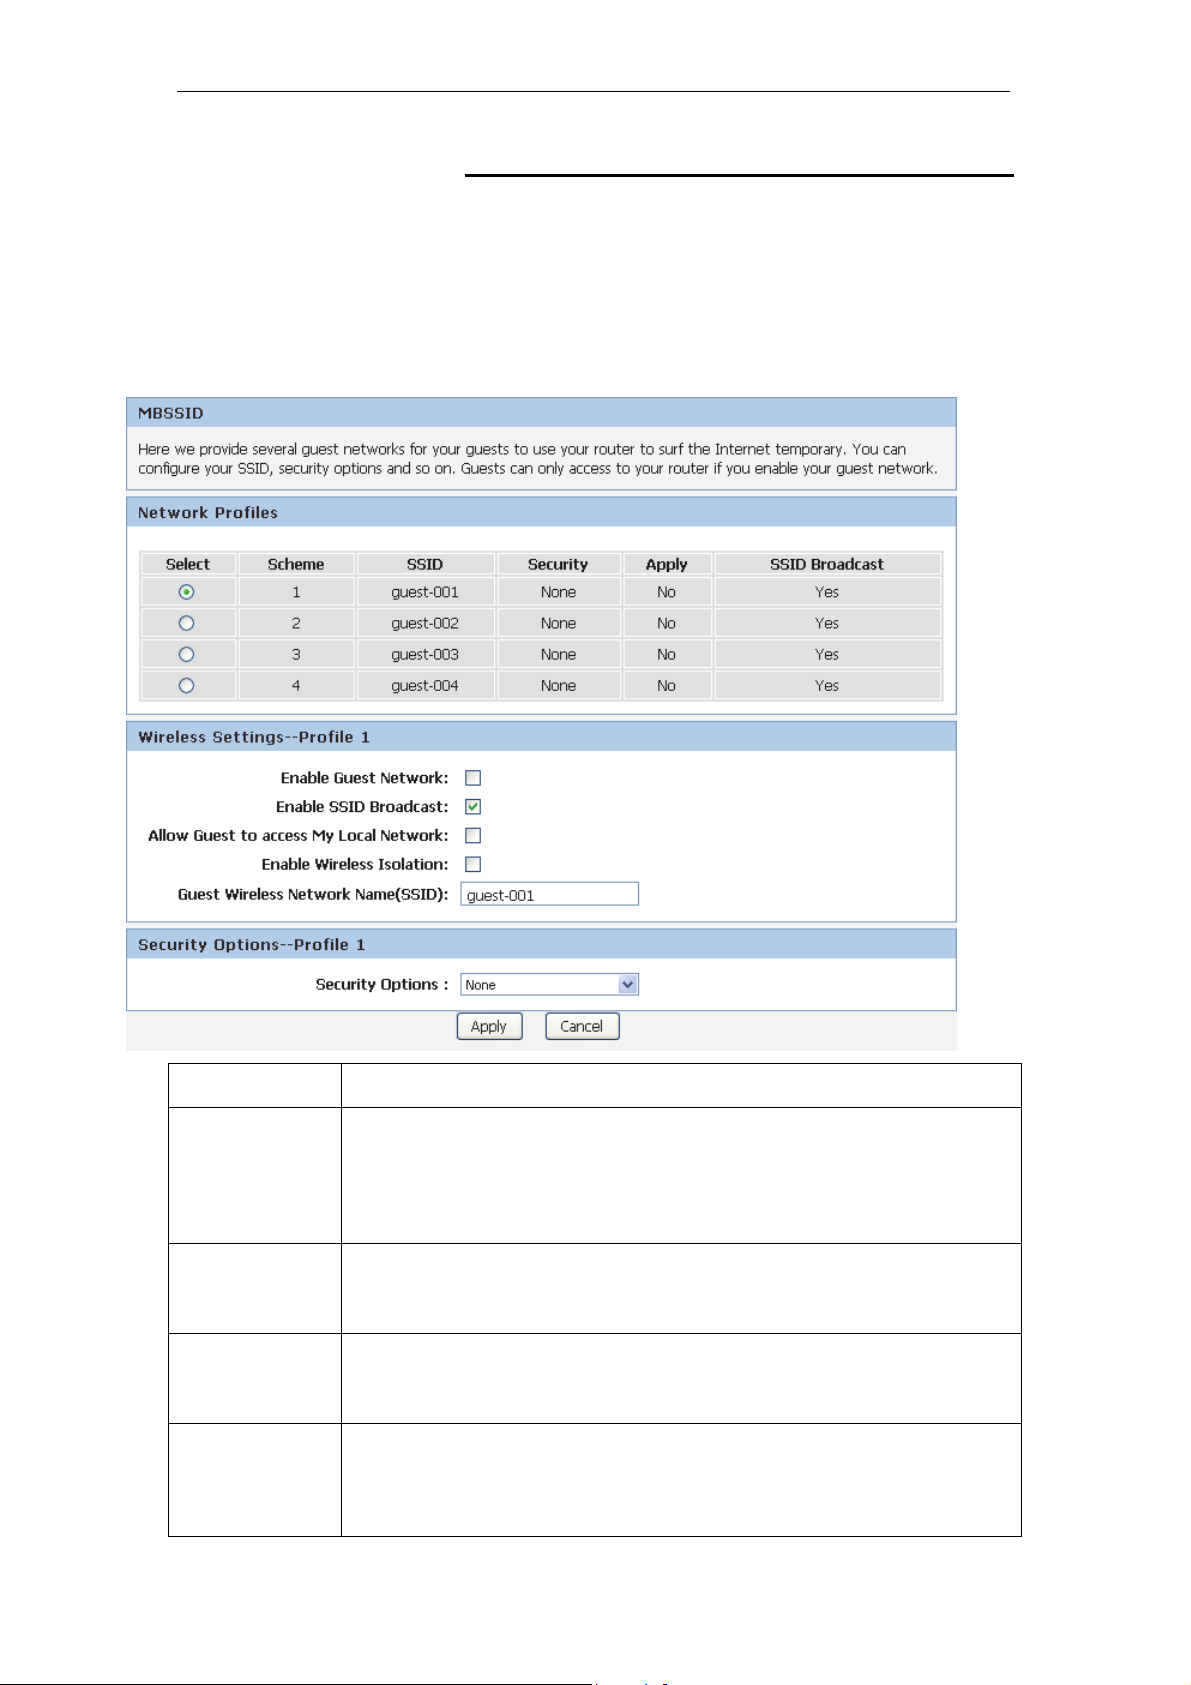
Wireless Multiple BSSID Settings
Here we provide several guest networks for your guests to use
your router to surf the Internet temporary. You can configure
your SSID, security options and so on. Guests can only access
to your router if you enable your guest network.
To access the MBSSID Settings page:
From the WLAN menu, click on MBSSID. The following page is
displayed:
Field Description
Network
Profiles
You can click radio button of each profile to check detail info or change
settings of each profile. The table is a brief summary of how many
profiles you can create, it provides profile number, SSID of this profile,
Security type of this profile, this guest wireless network is Enabled or
Not, and the SSID will be displayed or not.
Enable Guest
Network
If this check box is checked, then this guest network is enabled. You
and your visitors can connect to your network via the SSID of this
profile.
Enable SSID
Broadcast
If Enabled, the Wireless Access Point will broadcast its name (SSID)
to all Wireless Stations. Stations which have no SSID (or a null value)
can then adopt the correct SSID for connections to this Access Point.
Allow Guest to
access My
Local Network
If Unchecked, any user connects to this SSID can only access internet,
but can not access gateway's management UI, such as Web Server,
Telnet, etc. . All clients in this SSID are not allowed to access clients of
other SSIDs and Ethernet network.
71
Page 72

11n AP Router User’s Manual
If Checked, any user who connects to this SSID can access not only
internet but also local networks of this wireless router like users in
primary SSID.
Enable Wireless
Isolation
Guest Wireless
Network
Name(SSID)
Security
Options
If checked, the wireless client under this SSID can`t access other
wireless clients under the same SSID.
If unchecked, the wireless client under this SSID can access other
wireless clients under the same SSID.
Enter a value of up to 32 alphanumeric characters. The same Name
(SSID) must be assigned to all wireless devices in your network. The
default SSID is SSID_N, N is profile number, but we strongly
recommend that you change your network`s Name (SSID) to a different
value. This value is also case-sensitive. For example, SSID is not the
same as SSId.
None - no data encryption
WEP - Wired Equivalent Privacy, use WEP 64- or 128-bit data encryption
Note: Wi-Fi Protected Setup function is disabled when the security
setting is WEP with Shared-Key authentication
WPA-PSK [TKIP] - Wi-Fi Protected Access with Pre-Shared Key, use
WPA-PSK standard encryption with TKIP encryption type
WPA2-PSK [AES] - Wi-Fi Protected Access version 2 with Pre-Shared
Key, use WPA2-PSK standard encryption with the AES encryption type
WPA-PSK [AES] + WPA2-PSK [AES] - Allow clients using either WPAPSK [AES] or WPA2-PSK [AES]
To achieve the best performance with 11N wireless adapters under
robust security network, we recommends that you change your
network`s security option to WPA2-PSK.
72
Page 73
11n AP Router User’s Manual
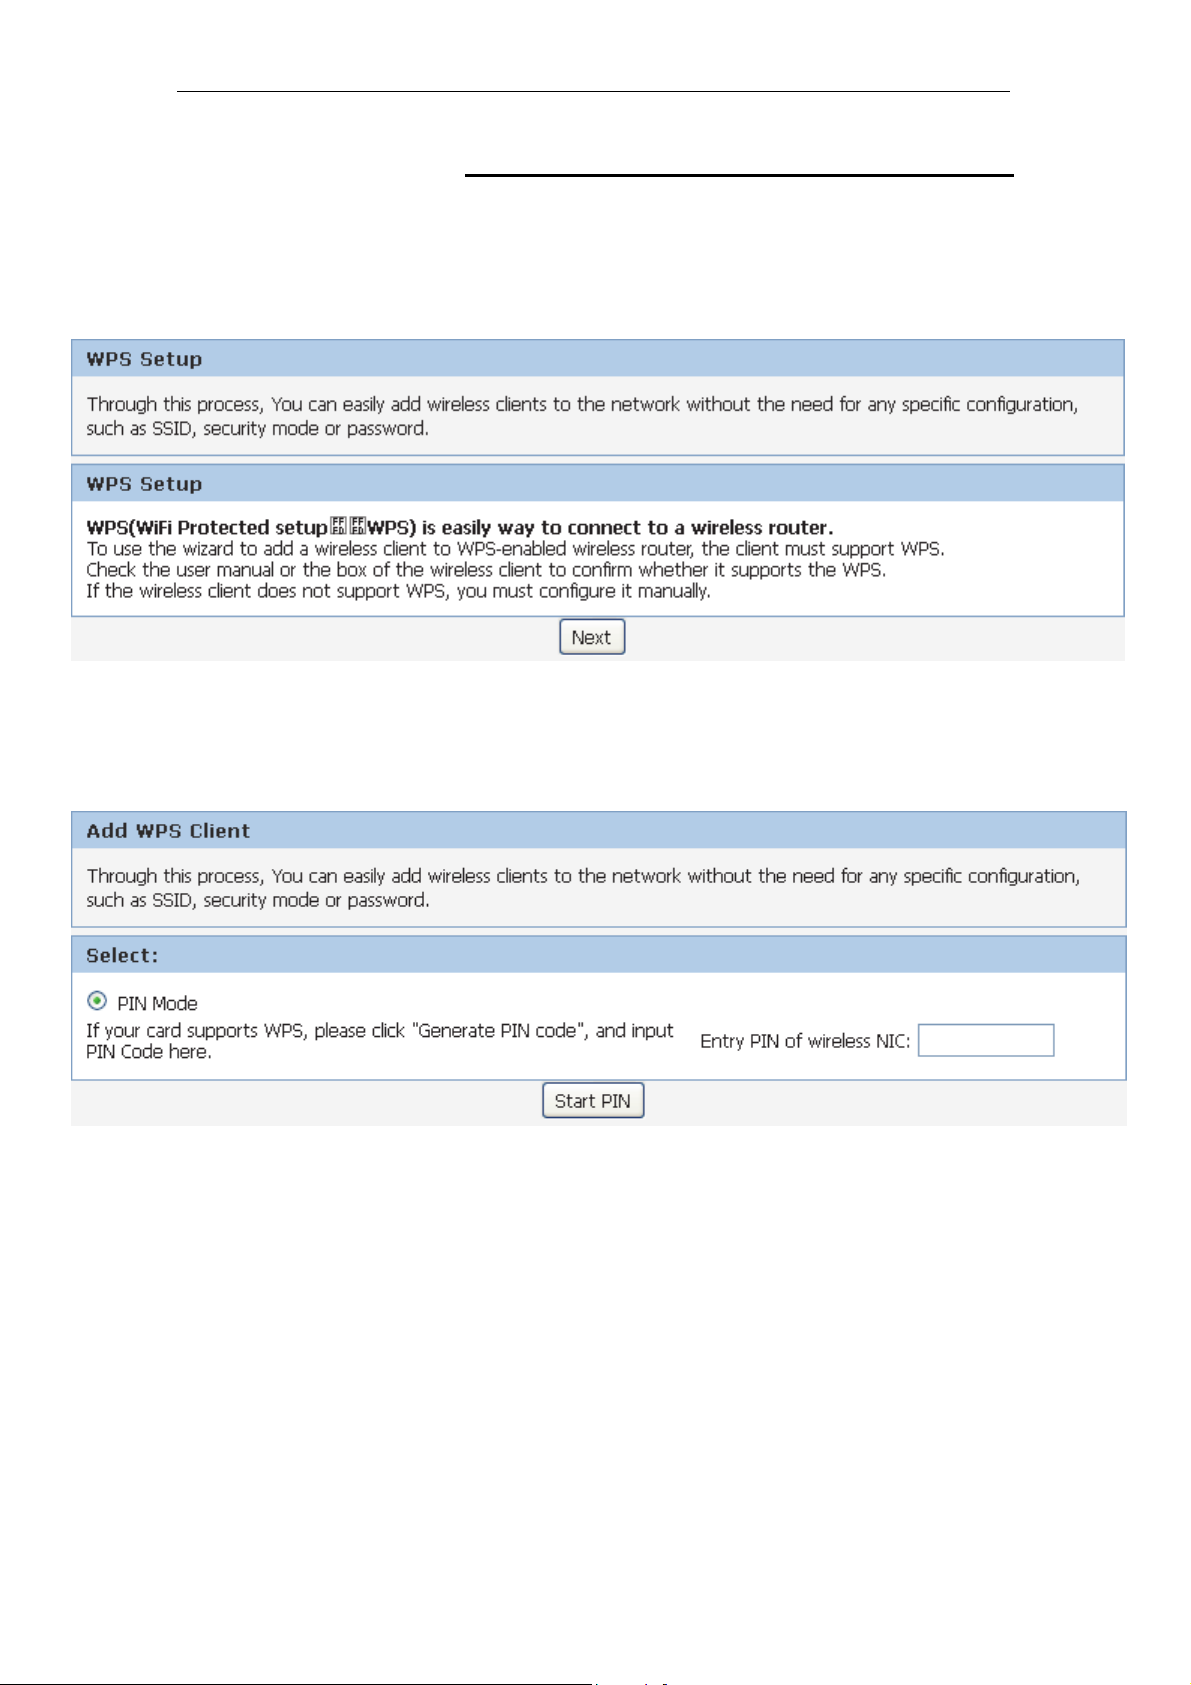
WPS Setup
Through this process, You can easily add wireless clients to the
network without the need for any specific configuration, such as
SSID, security mode or password.
From the Wireless menu, click on WPS. The following page is
displayed:
You can add wireless client by PIN mode. If you use PIN mode,
you should input client PIN code. Meanwhile you should start
client WPS process. You can find client PIN code on client
manager.
73
Page 74
11n AP Router User’s Manual
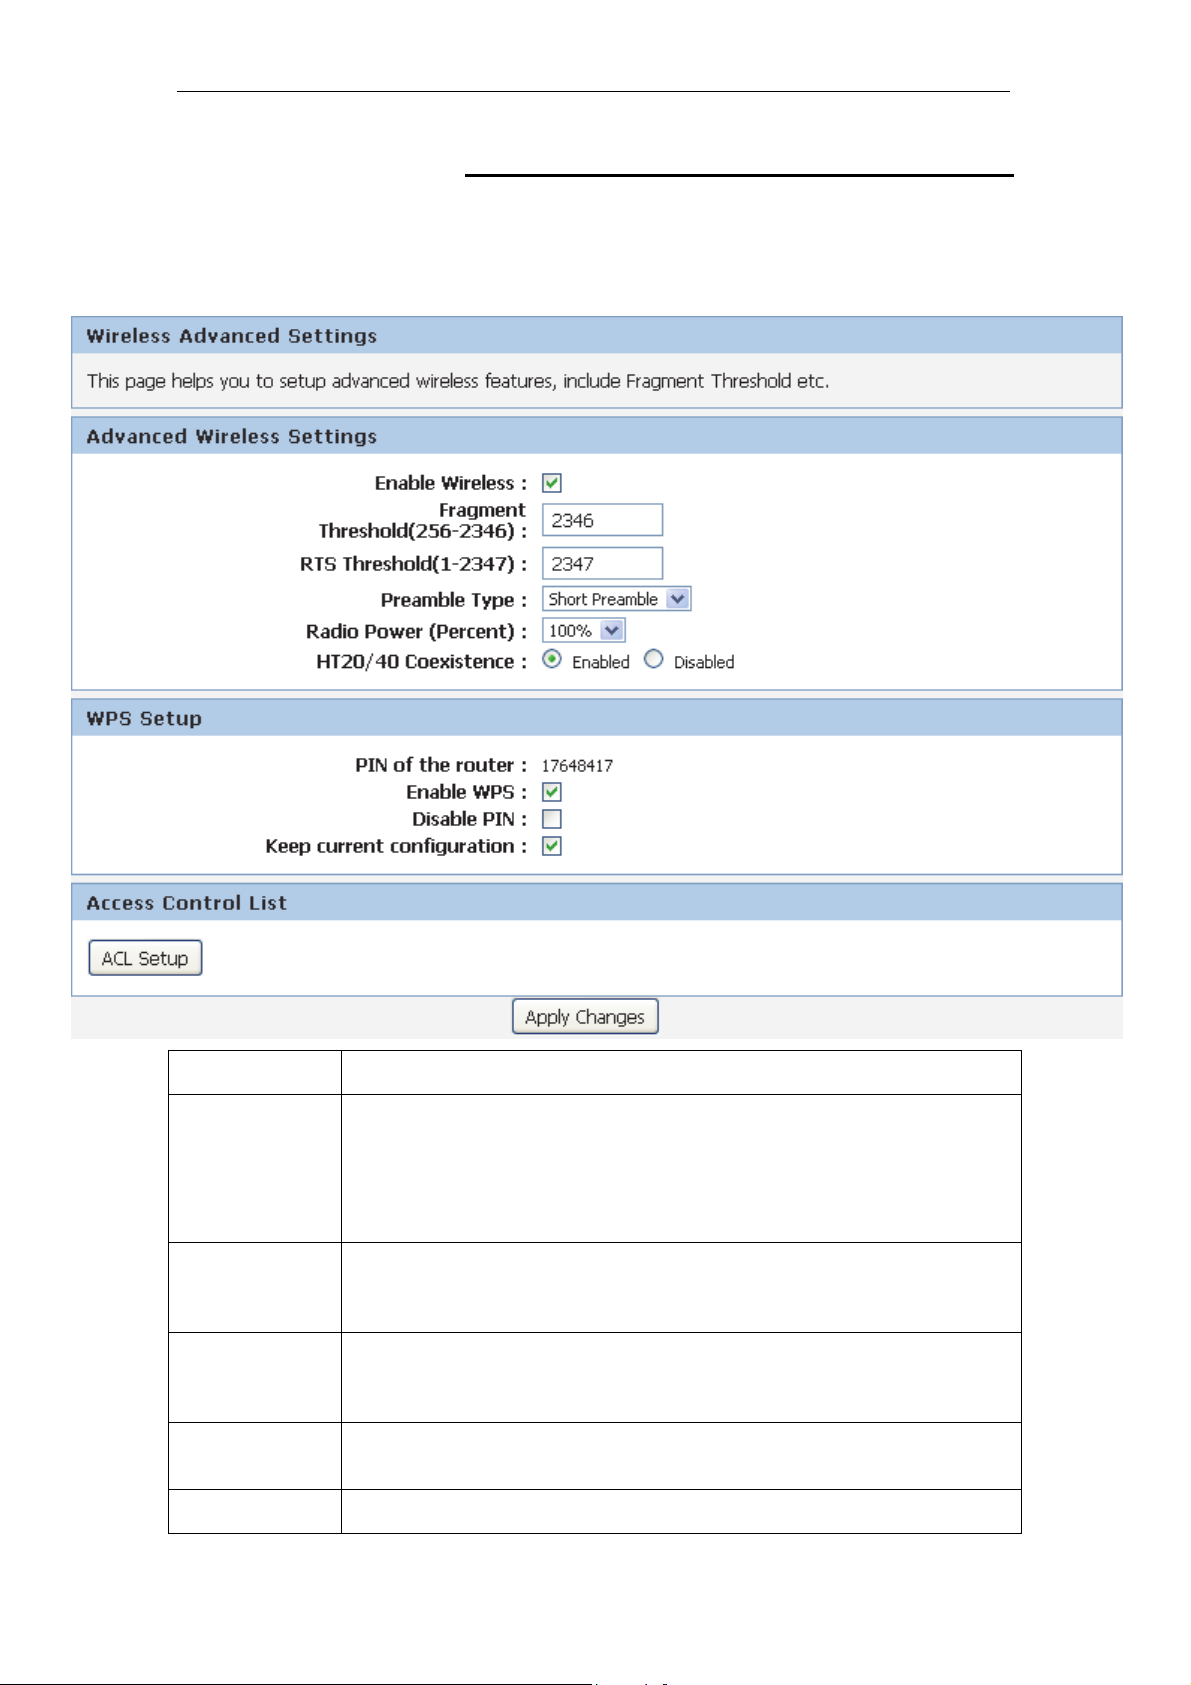
Wireless Advanced Settings
This page helps you to setup advanced wireless features,
include Fragment Threshold etc.
From the Wireless menu, click on Wireless Advanced. The
following page is displayed:
Field Description
Fragment
Threshold
When transmitting a packet over a network medium, sometimes the
packet is broken into several segments, if the size of packet exceeds
that allowed by the network medium.
The Fragmentation Threshold defines the number of bytes used for the
fragmentation boundary for directed messages.
RTS Threshold RTS stands for “Request to Send”. This parameter controls what size
data packet the low level RF protocol issues to an RTS packet. The
default is 2347.
Preamble Type This is the length of the CRC (Cyclic Redundancy Check) block for
communication between the router and wireless clients. High network
traffic areas should select Short preamble type.
Radio Power
TX Power measurement.
(Percent)
HT20/40 Disable or Enable 20/40MHz Coexist
74
Page 75
11n AP Router User’s Manual
Coexistence
Enable WPS Disable or Enable WPS
Disable PIN Disable or Enable PIN
Keep current
configuration
Disable or Enable current configuration
Wireless Access Control Mode
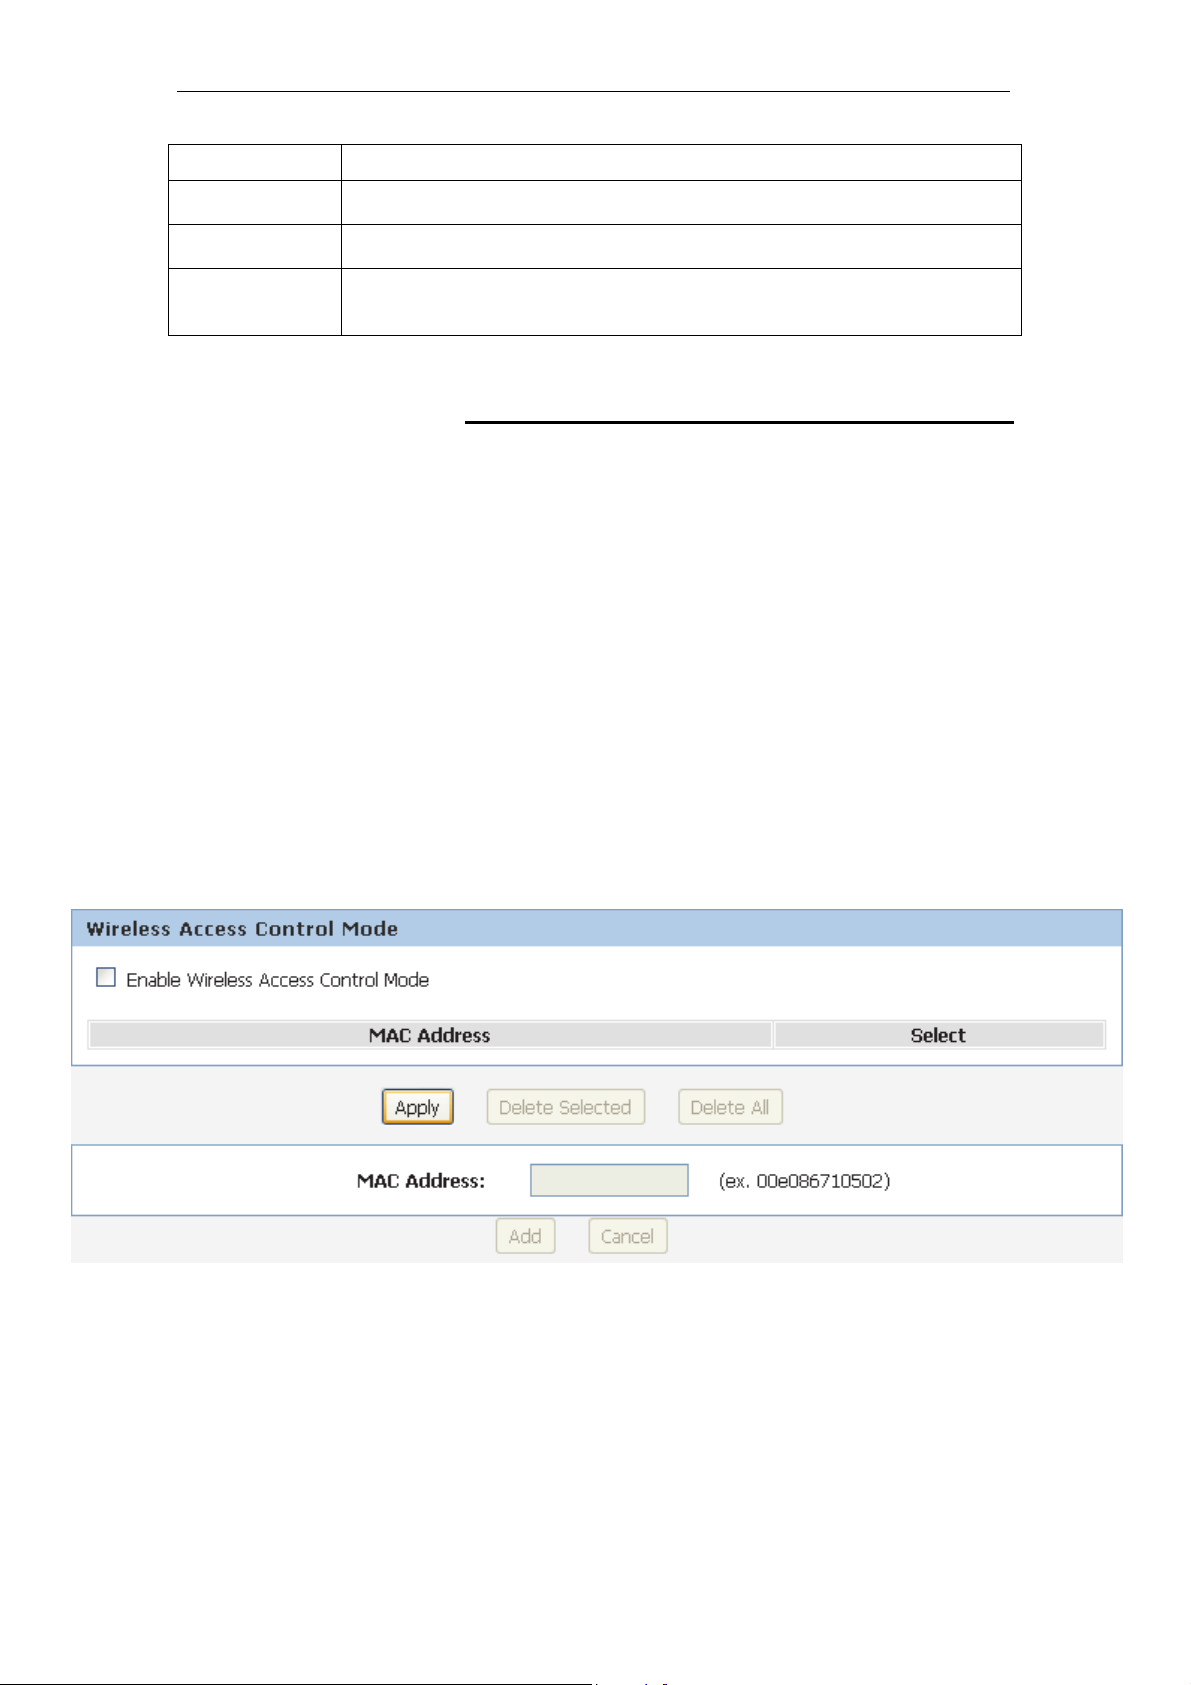
For security reason, using MAC ACL's (MAC Address Access
List) creates another level of difficulty to hacking a network. A
MAC ACL is created and distributed to AP so that only
authorized NIC's can connect to the network. While MAC
address spoofing is a proven means to hacking a network this
can be used in conjunction with additional security measures to
increase the level of complexity of the network security
decreasing the chance of a breach.
MAC addresses can be add/delete/edit from the ACL list
depending on the MAC Access Policy.
If you choose 'Allowed Listed', only those clients whose wireless
MAC addresses are in the access control list will be able to
connect to your Access Point. When 'Deny Listed' is selected,
these wireless clients on the list will not be able to connect the
Access Point. To access the Wireless Network Access Control
page:
From the Wireless menu, click on Access Control and then click
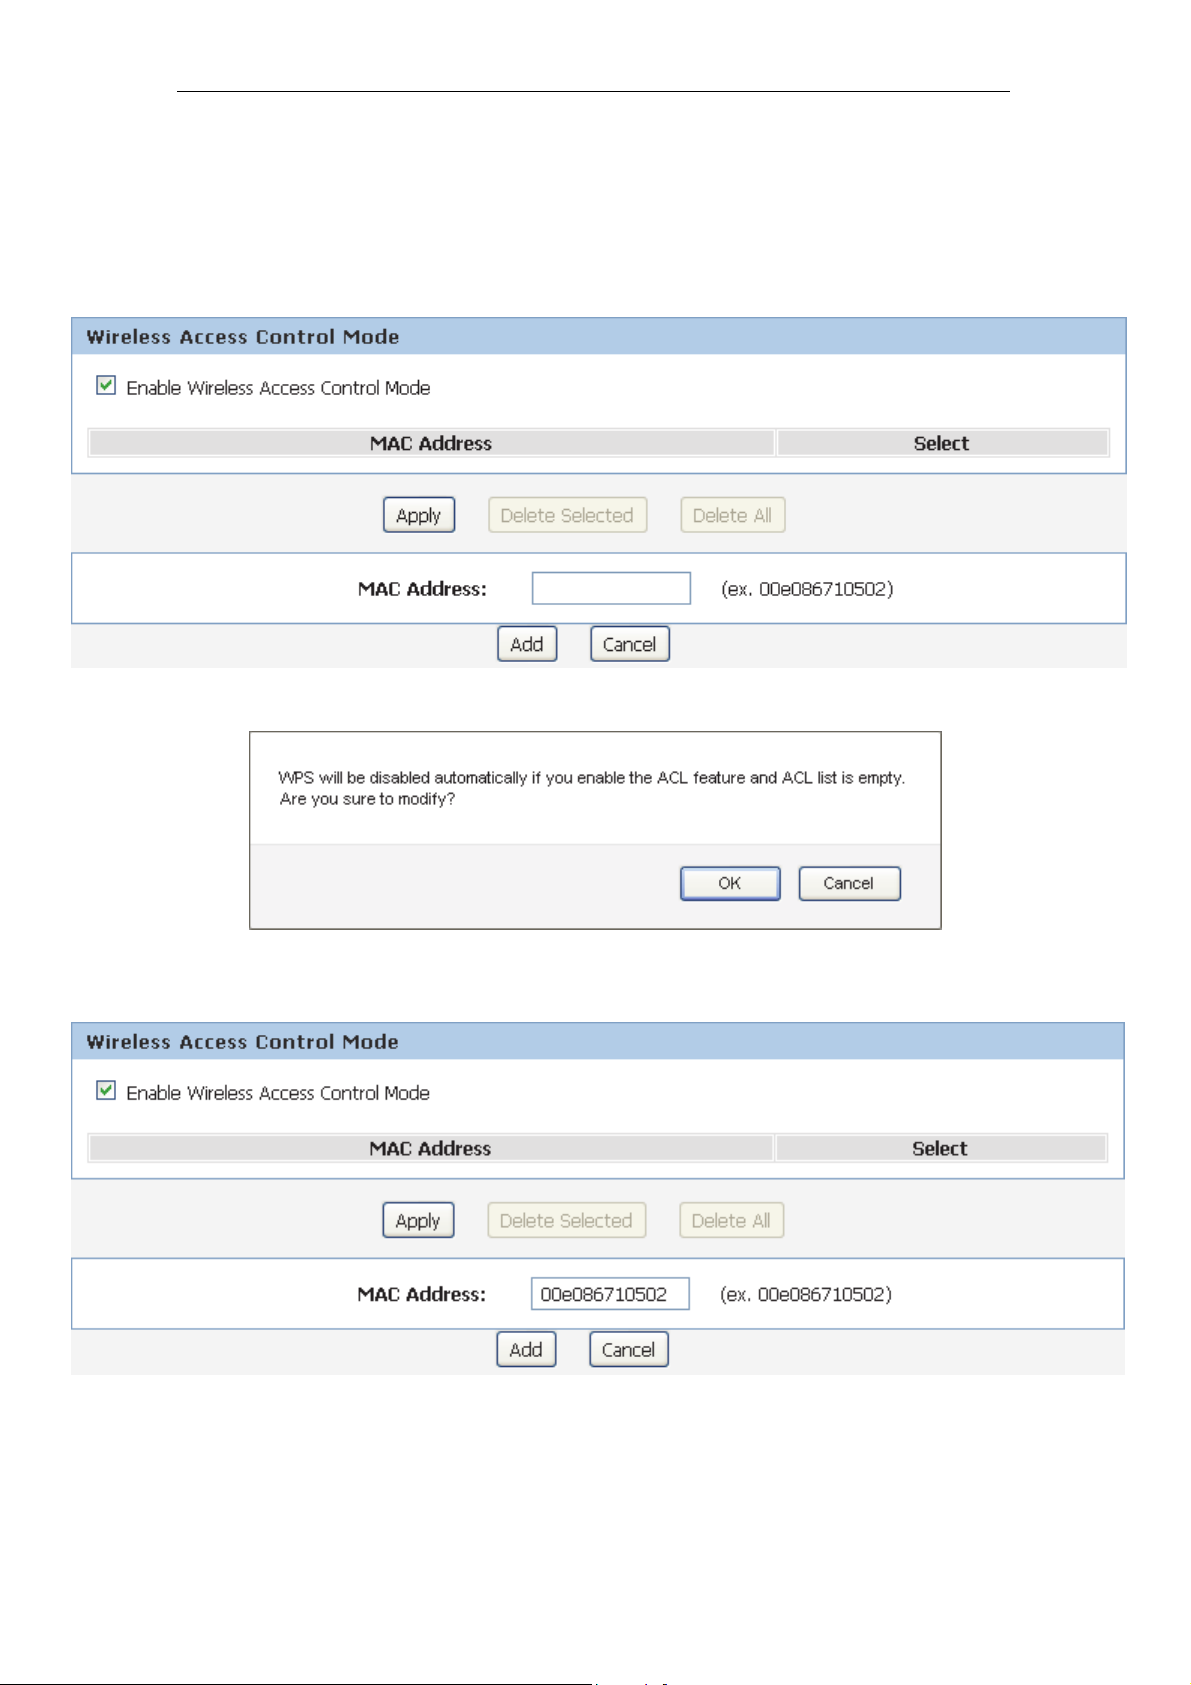
on ACL Setup button. The following page is displayed:
75
Page 76
11n AP Router User’s Manual
Allow Listed
If you Enable Wireless Access Control Mode, only those clients
whose wireless MAC addresses are in the access control list
will be able to connect to your Access Point.
1. Enable Wireless Access Control Mode.
2. Click Apply button.
3. Click OK button.
4. Enter the MAC Address.
5. Click Add button.
76
Page 77
11n AP Router User’s Manual
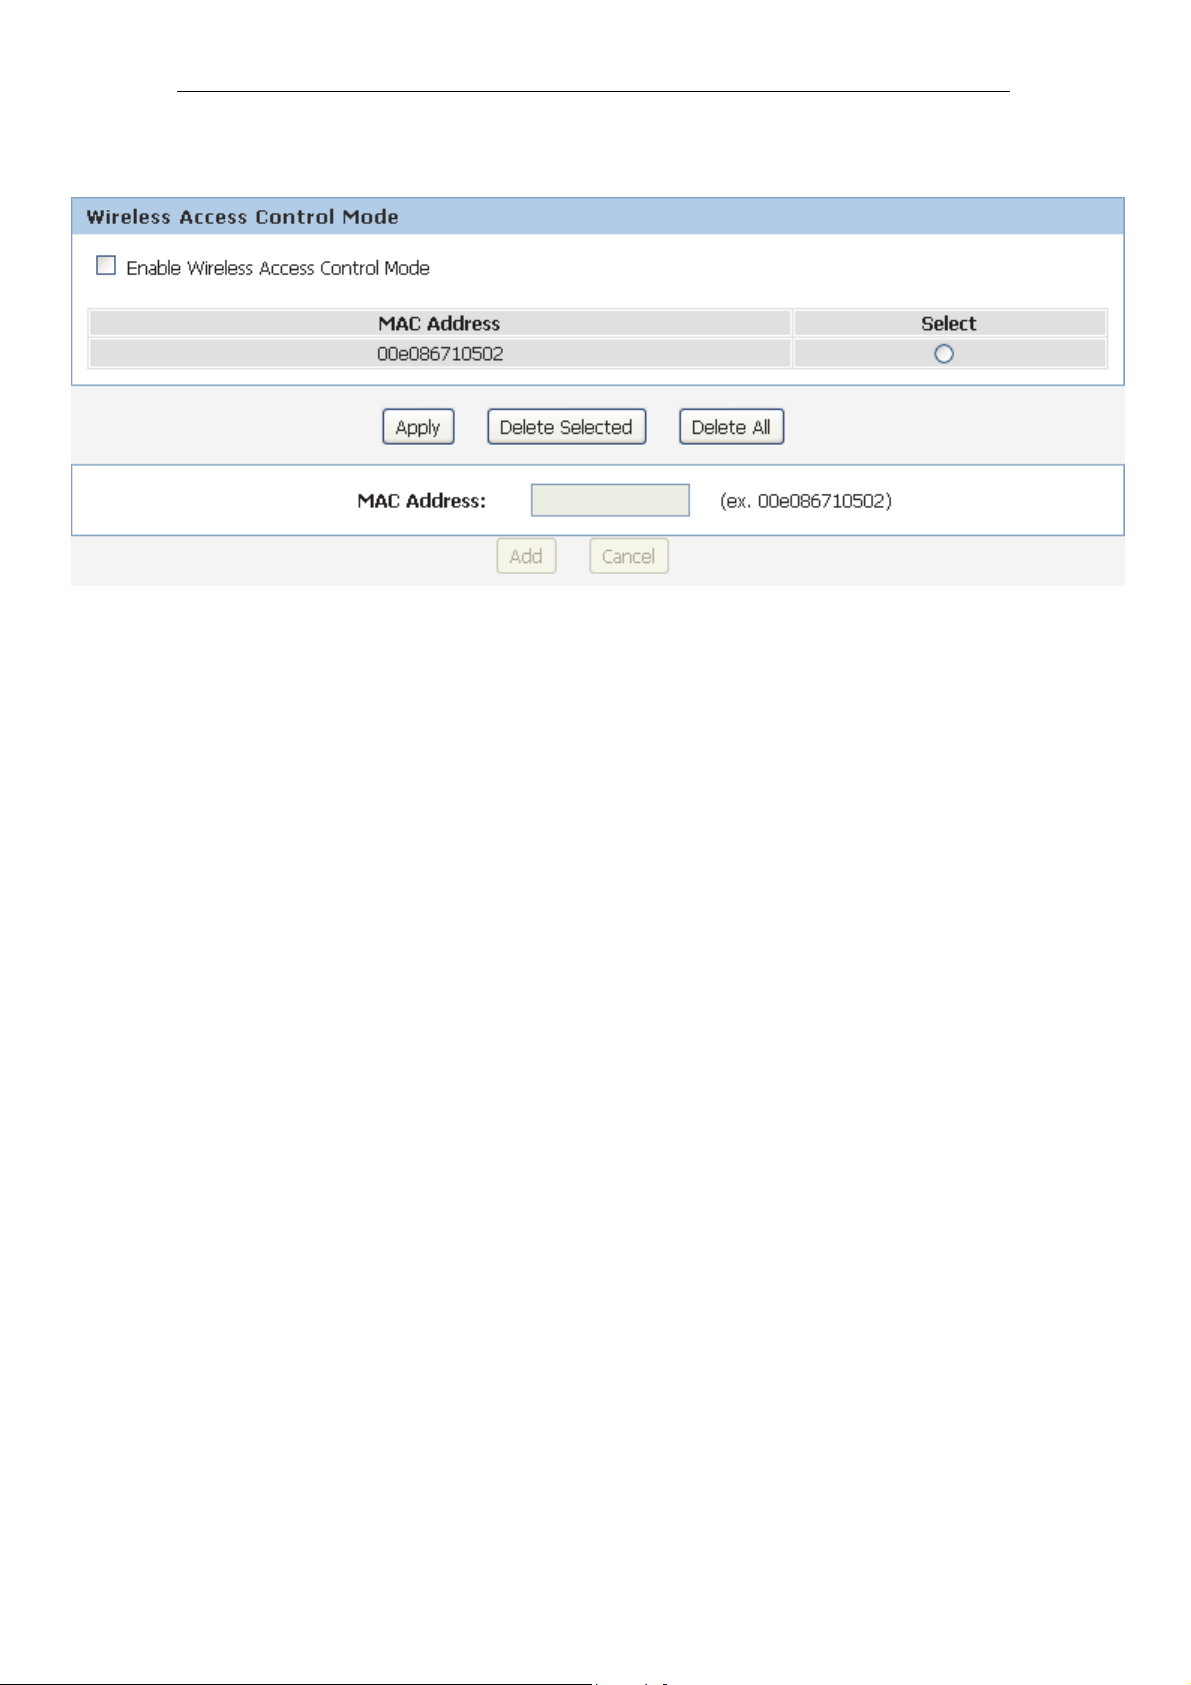
6. The MAC Address that you created has been added in the
Access Control List.
77
Page 78
11n AP Router User’s Manual
Wireless Repeater
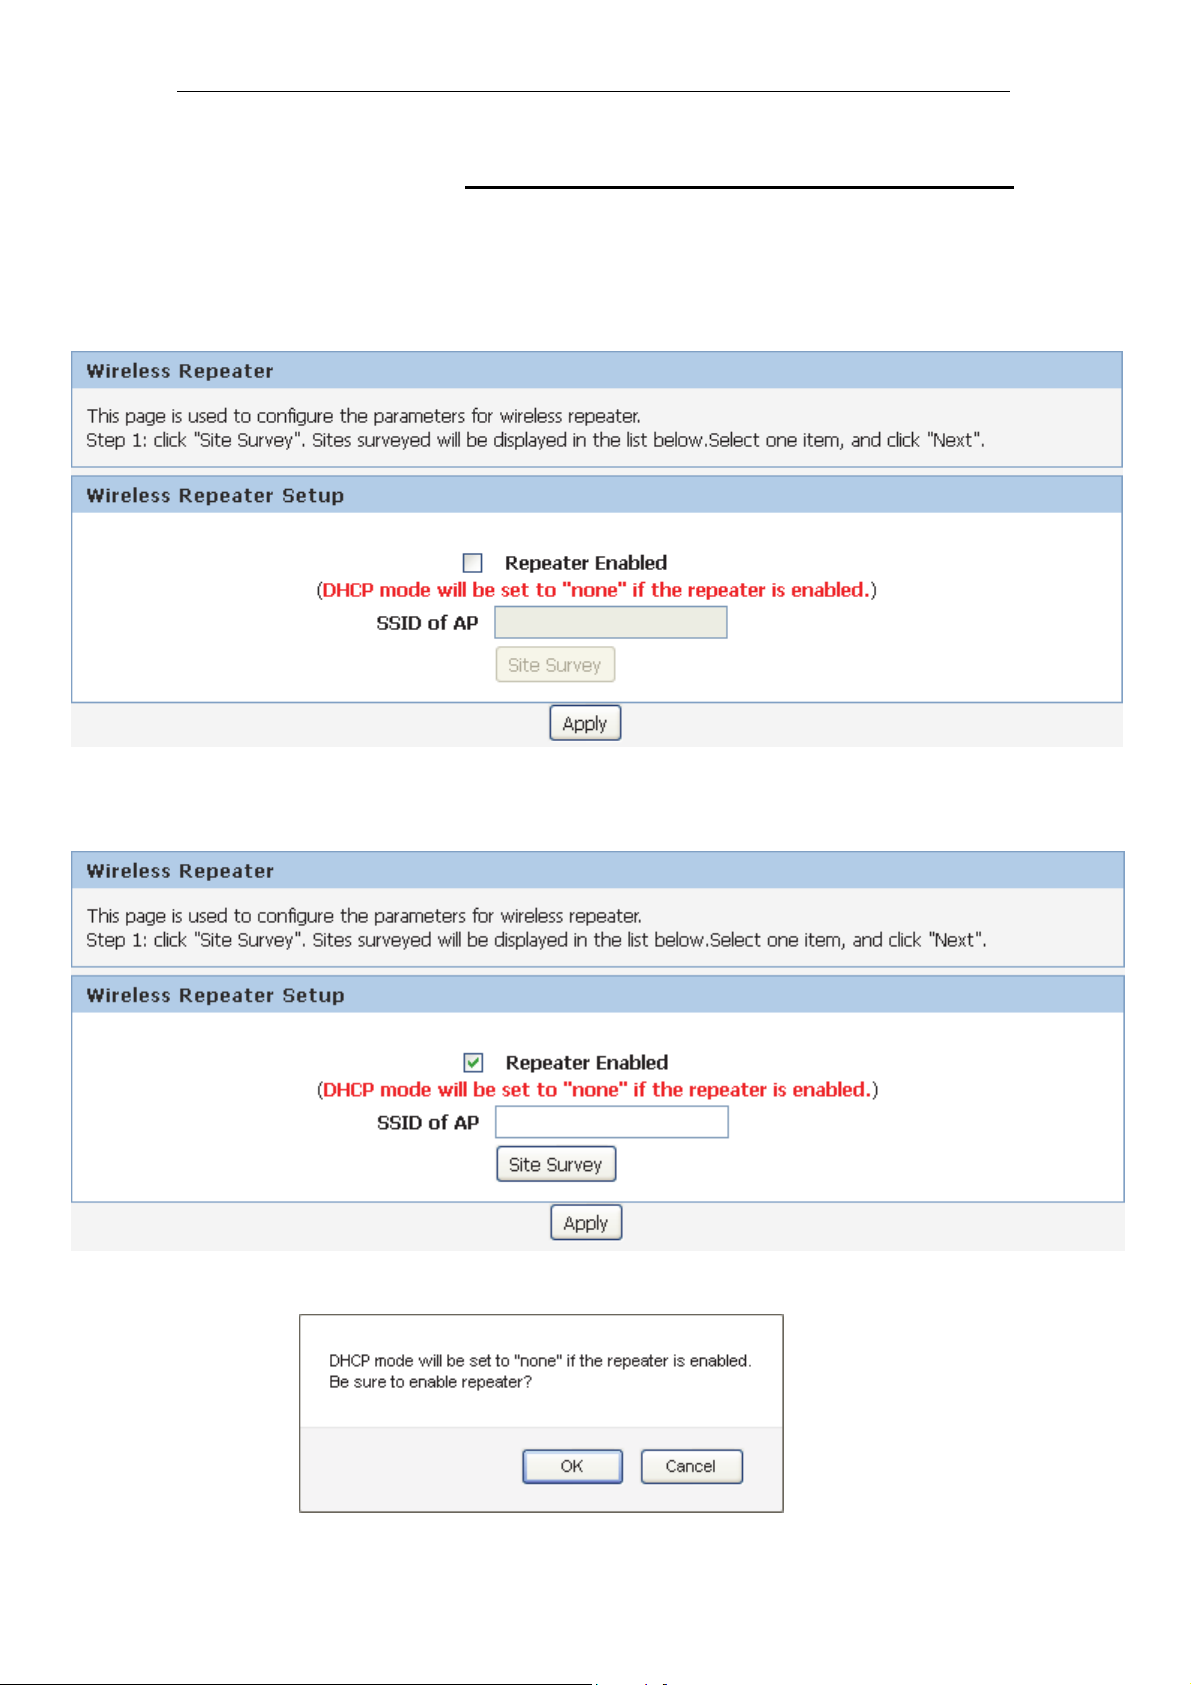
This page provides tool to scan the wireless network. If any
Access Point or IBSS is found, you could choose to connect it
manually. To access the Wireless Repeater settings page:
From the Wireless menu, click on Wireless Repeater. The
following page is displayed:
1. Enable Repeater Enabled.
2. Click Site Survey button.
3. Click OK button.
78
Page 79
11n AP Router User’s Manual
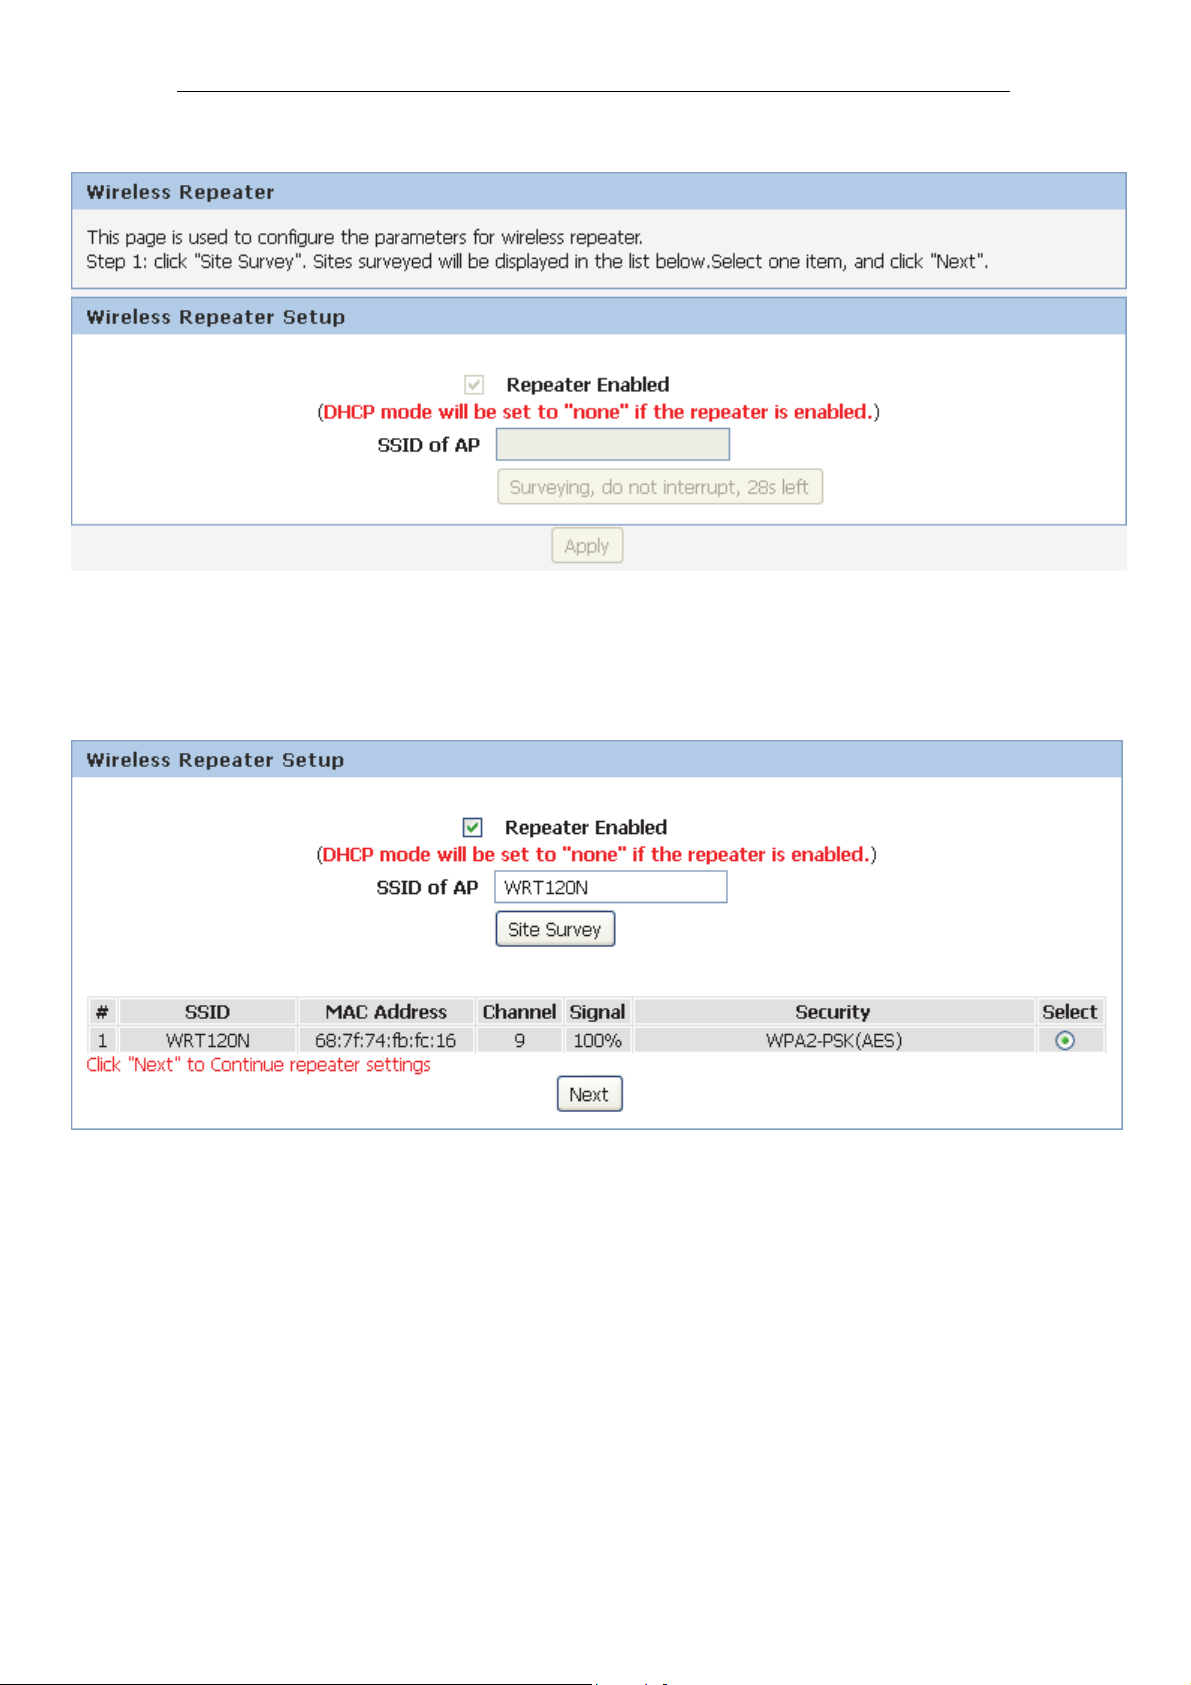
4. Surveying, do not interrupt, 30s left.
5. Now you could see the APs that scanned by the Wireless
Gateway were listed below.
6. Click on the ratio of AP’s SSID under the item Select that
you want the Wireless Gateway to connect to.
7. Click Next button.
79
Page 80
11n AP Router User’s Manual
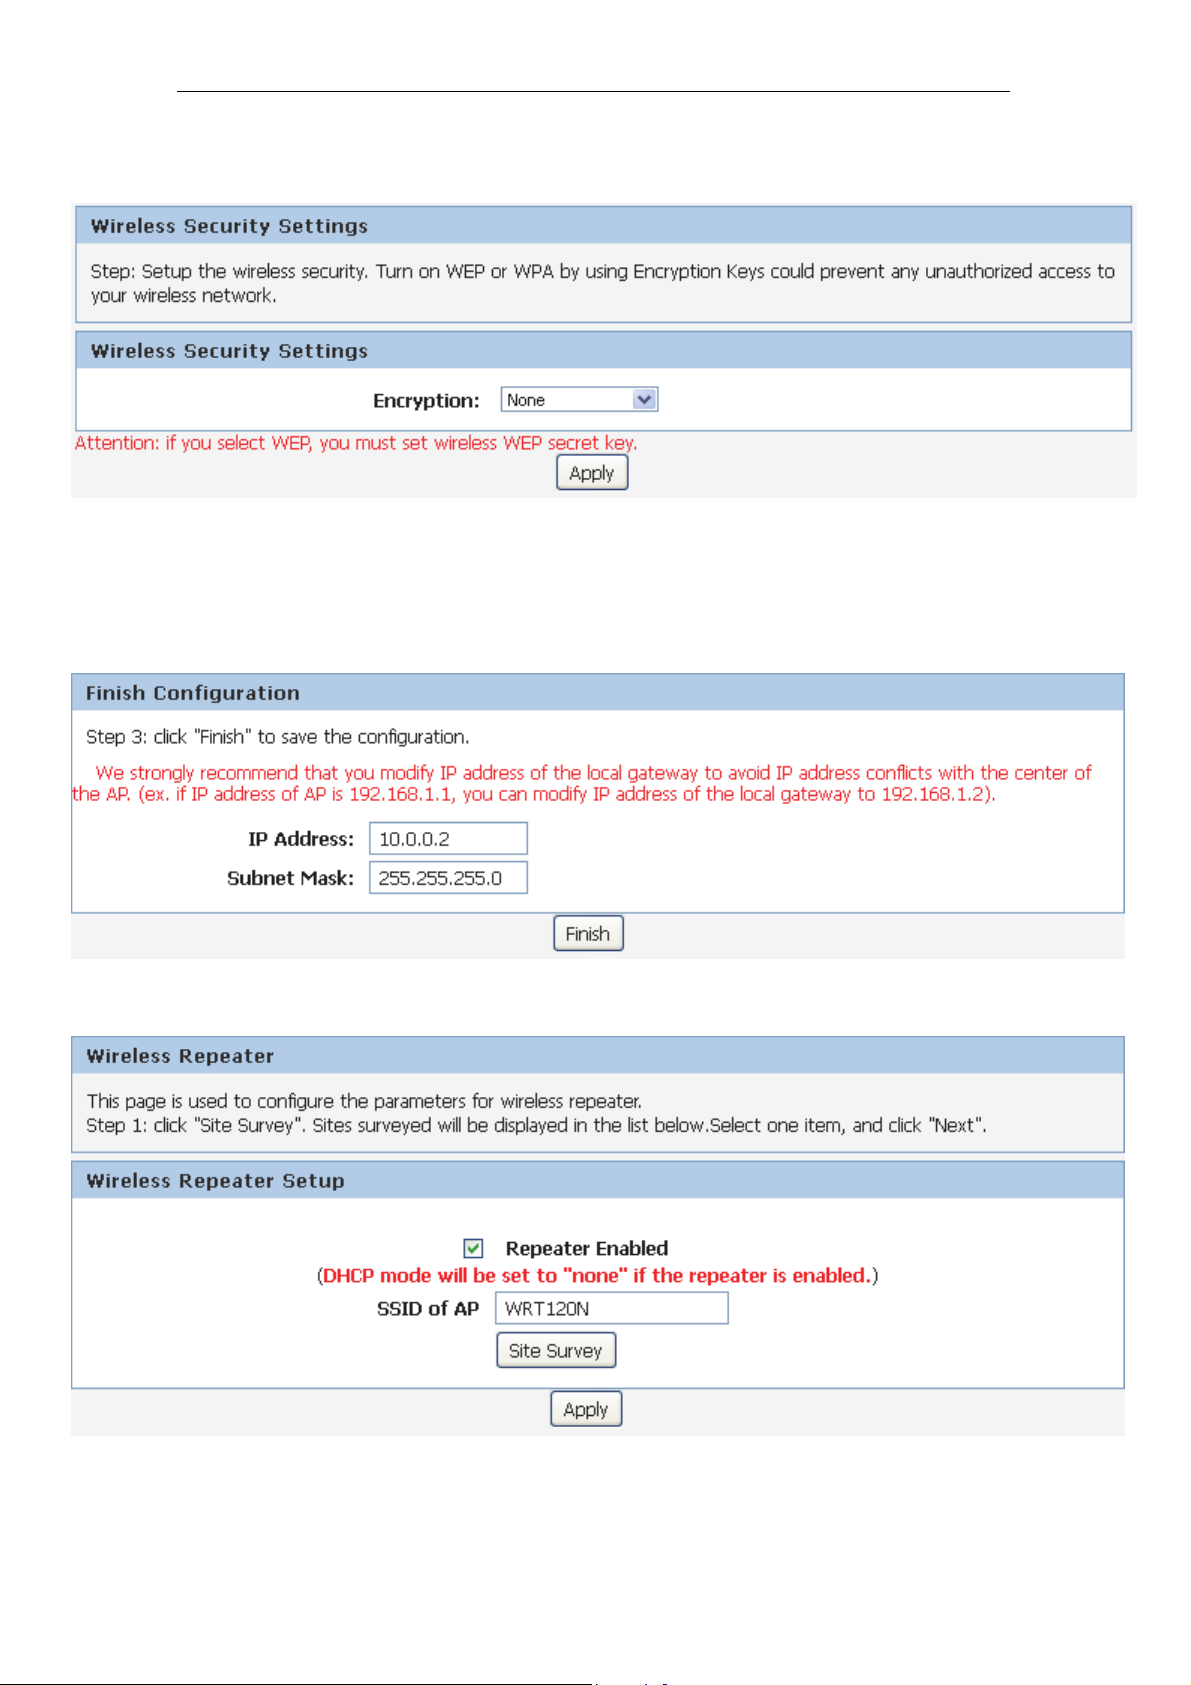
8. Setup Wireless Security Settings.
9. Click Apply button.
10. We strongly recommend that you modify IP address of the
local gateway to avoid IP address conflicts with the center
of the AP. (ex. if IP address of AP is 192.168.1.1, you can
modify IP address of the local gateway to 192.168.1.2).
11. Click Finish button.
12. Click Apply button.
80
Page 81
11n AP Router User’s Manual
13 Access Control List Configuration
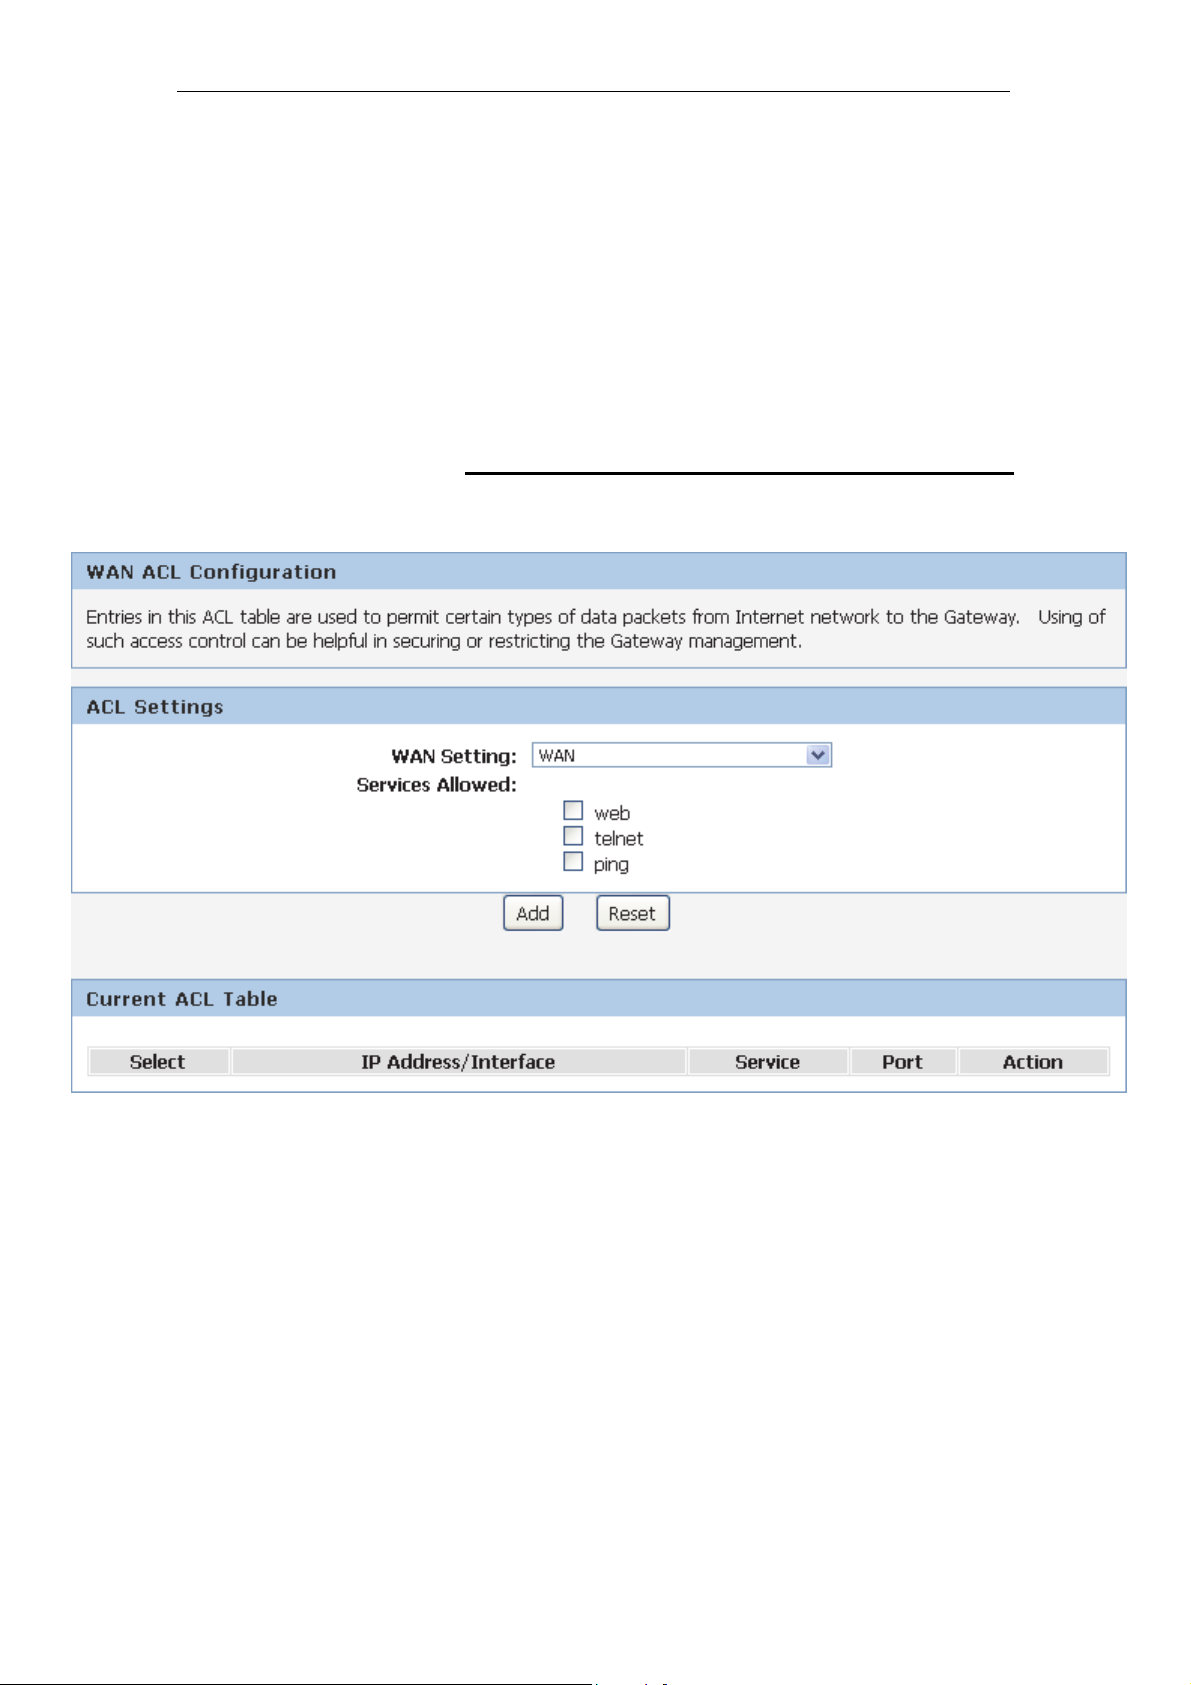
You can specify which services are accessable form WAN side.
Entries in this ACL table are used to permit certain types of data
packets from your local network or Internet network to the
Gateway.
Using of such access control can be helpful in securing or
restricting the Gateway management.
Access Control List Config
1. From the Advanced menu, click on Access Control List.
The following page is displayed:
Figure 6: ACL Configuration page
81
Page 82
11n AP Router User’s Manual
14 Port Triggering
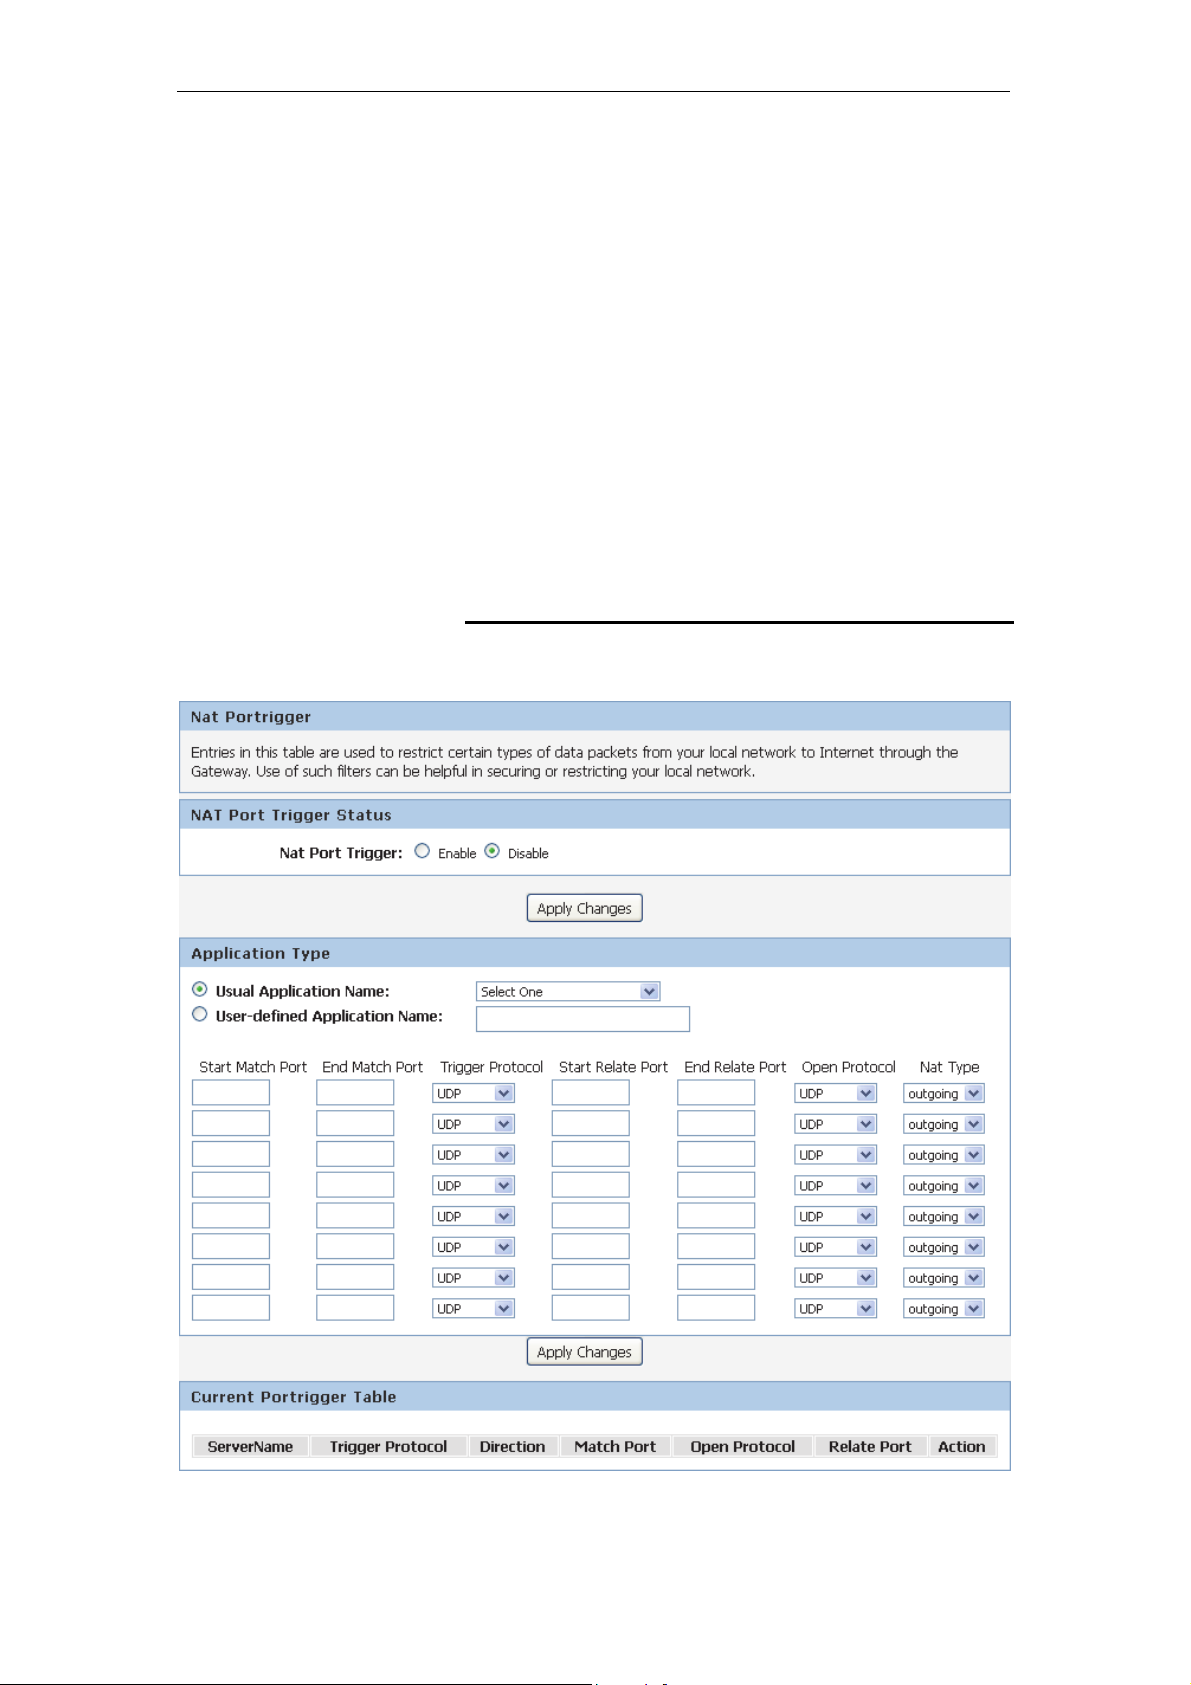
Port Triggering is a special form of Port Forwarding in which it
requires an outgoing connection before allowing incoming
connections on a single or multiple port. Port Triggering is
mostly used when your computer is behind a NAT router.
For example, if a gaming application sends outgoing data on
ports 5000-6000 but receives the incoming data on port 111,
typically behind a NAT router the router simply drops the data
because it does not know which computer it should send
requests to. But with port triggering you can tell the router to
allow incoming data on port 111 when an outgoing data sends it
through ports 5000-6000. It gives more flexibility than static port
forwarding because you don't need to set it up for a specific
computer.
Port Triggering Config
2. From the Advanced menu, click on Port Triggering. The
following page is displayed:
82
Page 83
11n AP Router User’s Manual
15 URL Blocking
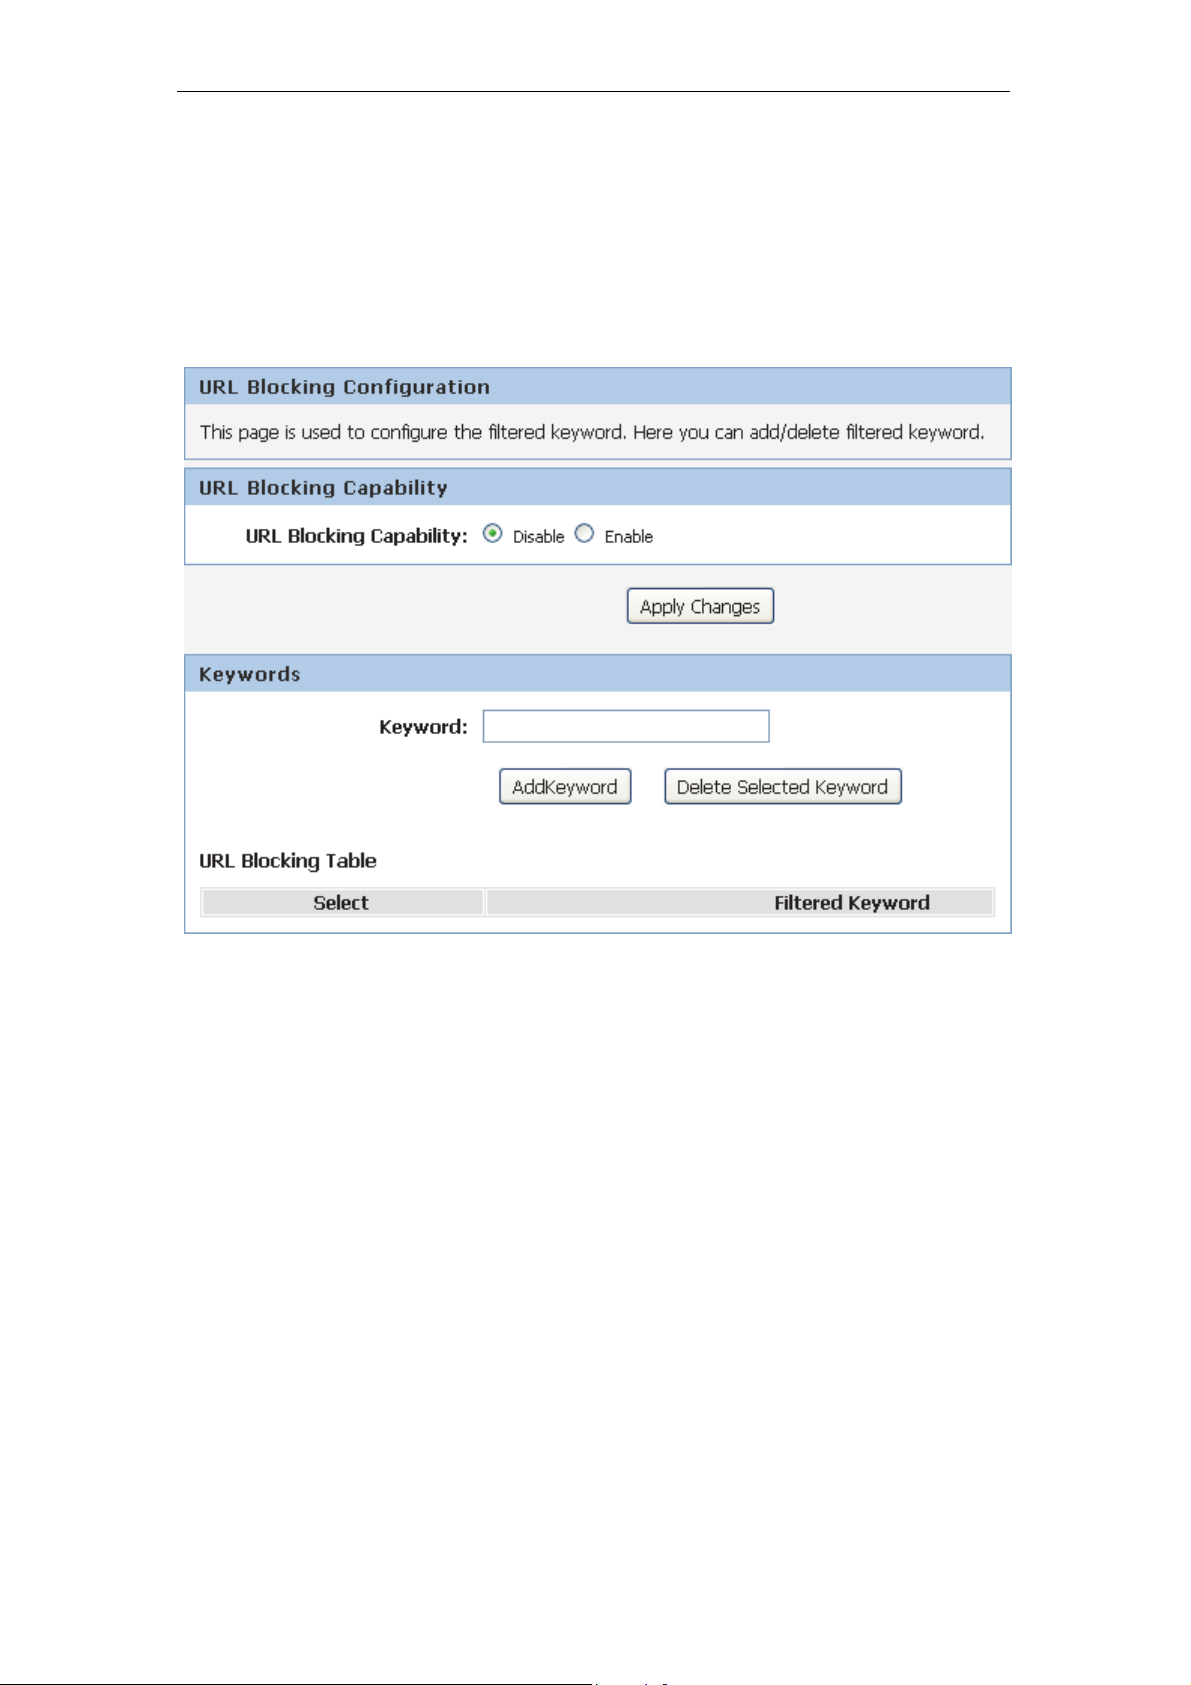
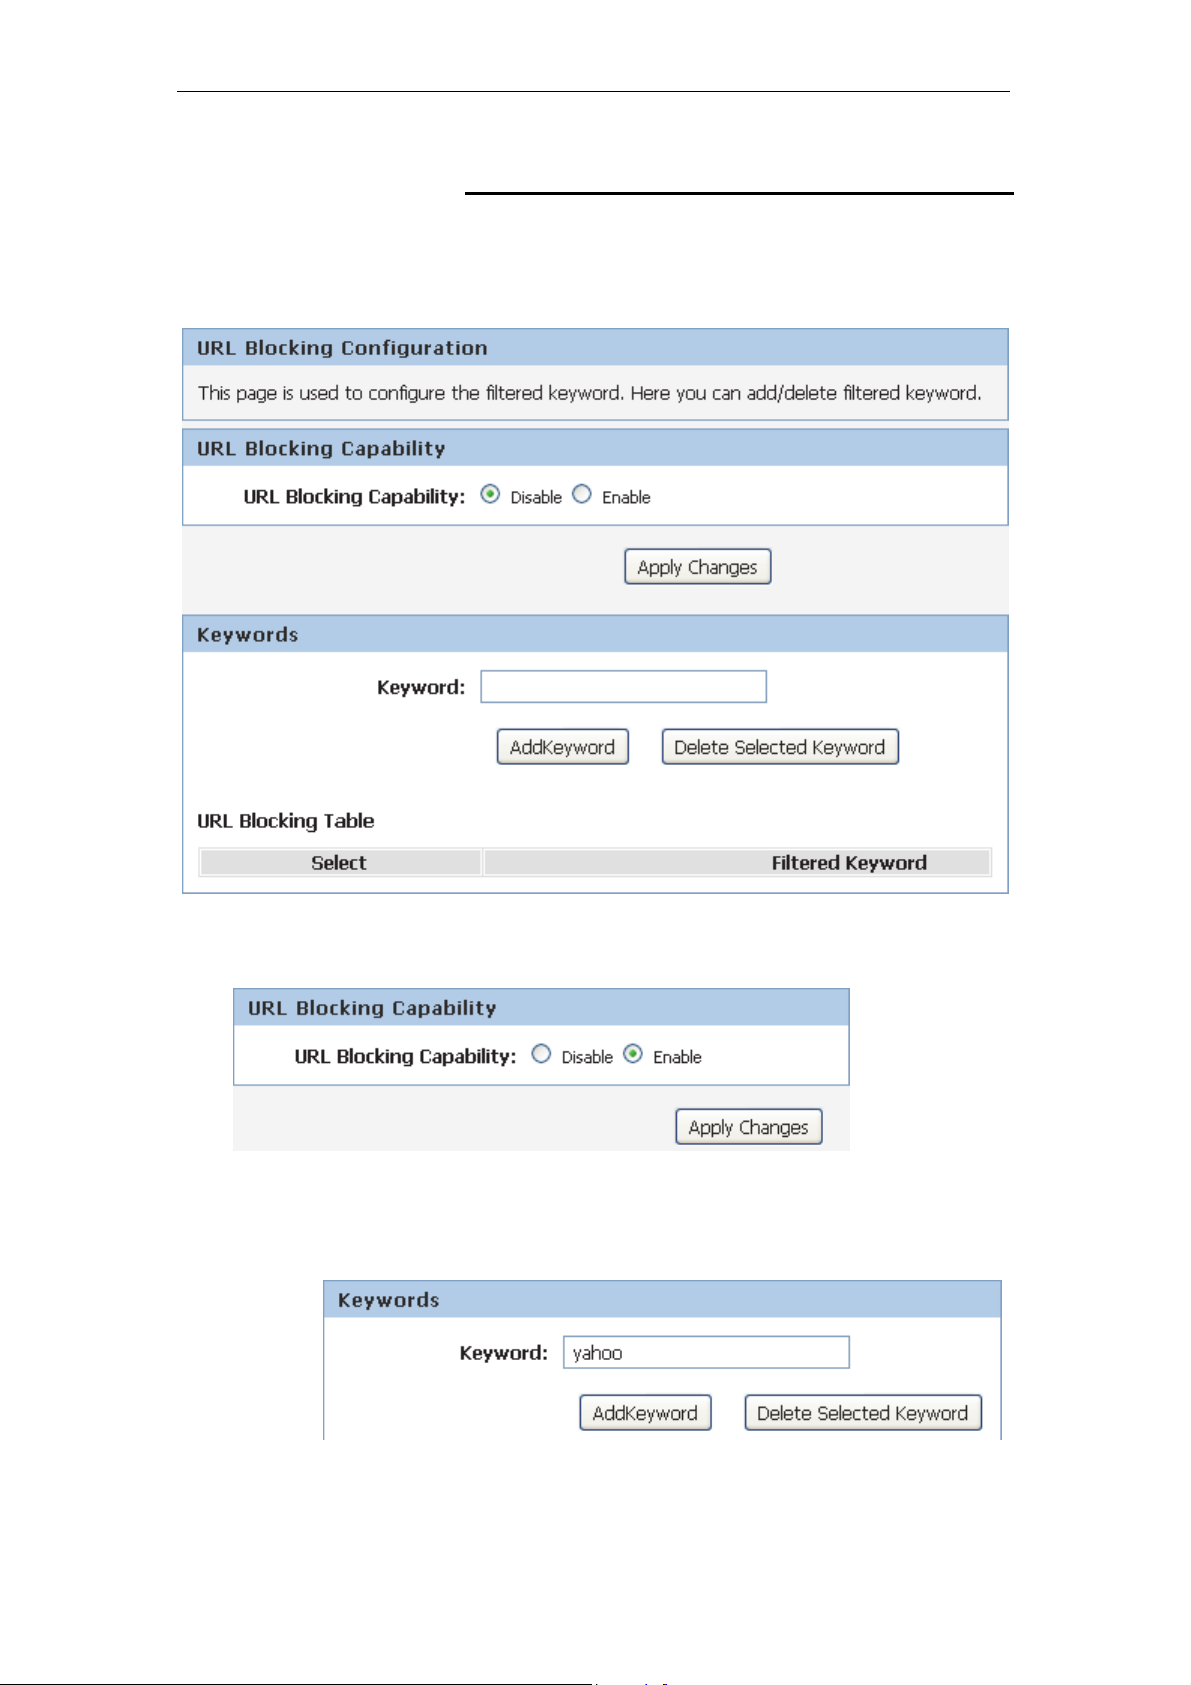
URL Blocking is used to deny LAN users from accessing the
internet. Block those URLs which contain keywords listed below.
1. From the Advanced -> URL Blocking menu. The following
page is displayed:
83
Page 84
11n AP Router User’s Manual
URL Blocking for specified URL Address
Please follow example below to deny LAN users from accessing
the Internet.
2. From the Advanced -> URL Blocking menu. The following
page is displayed:
3. Enable URL Blocking Capability.
4. Click Apply Changes.
5. Enter the URL Address that you want to be denied for LAN
user.
6. Click AddKeyword.
84
Page 85

11n AP Router User’s Manual
7. Now the URL Filter that you created has been added and
listed in the Current Filter Table.
8. Now the URL Address in the Current Filter Table cannot be
visited.
85
Page 86
11n AP Router User’s Manual
16 Dynamic DNS
When you want your internal server to be accessed by using
DNS name rather than using the dynamic IP address, you can
use the DDNS service. The DDNS server allows to alias a
dynamic IP address to a static hostname.
This chapter provides you an overview of the Dynamic DNS
feature of the modem and configuration details related to it.
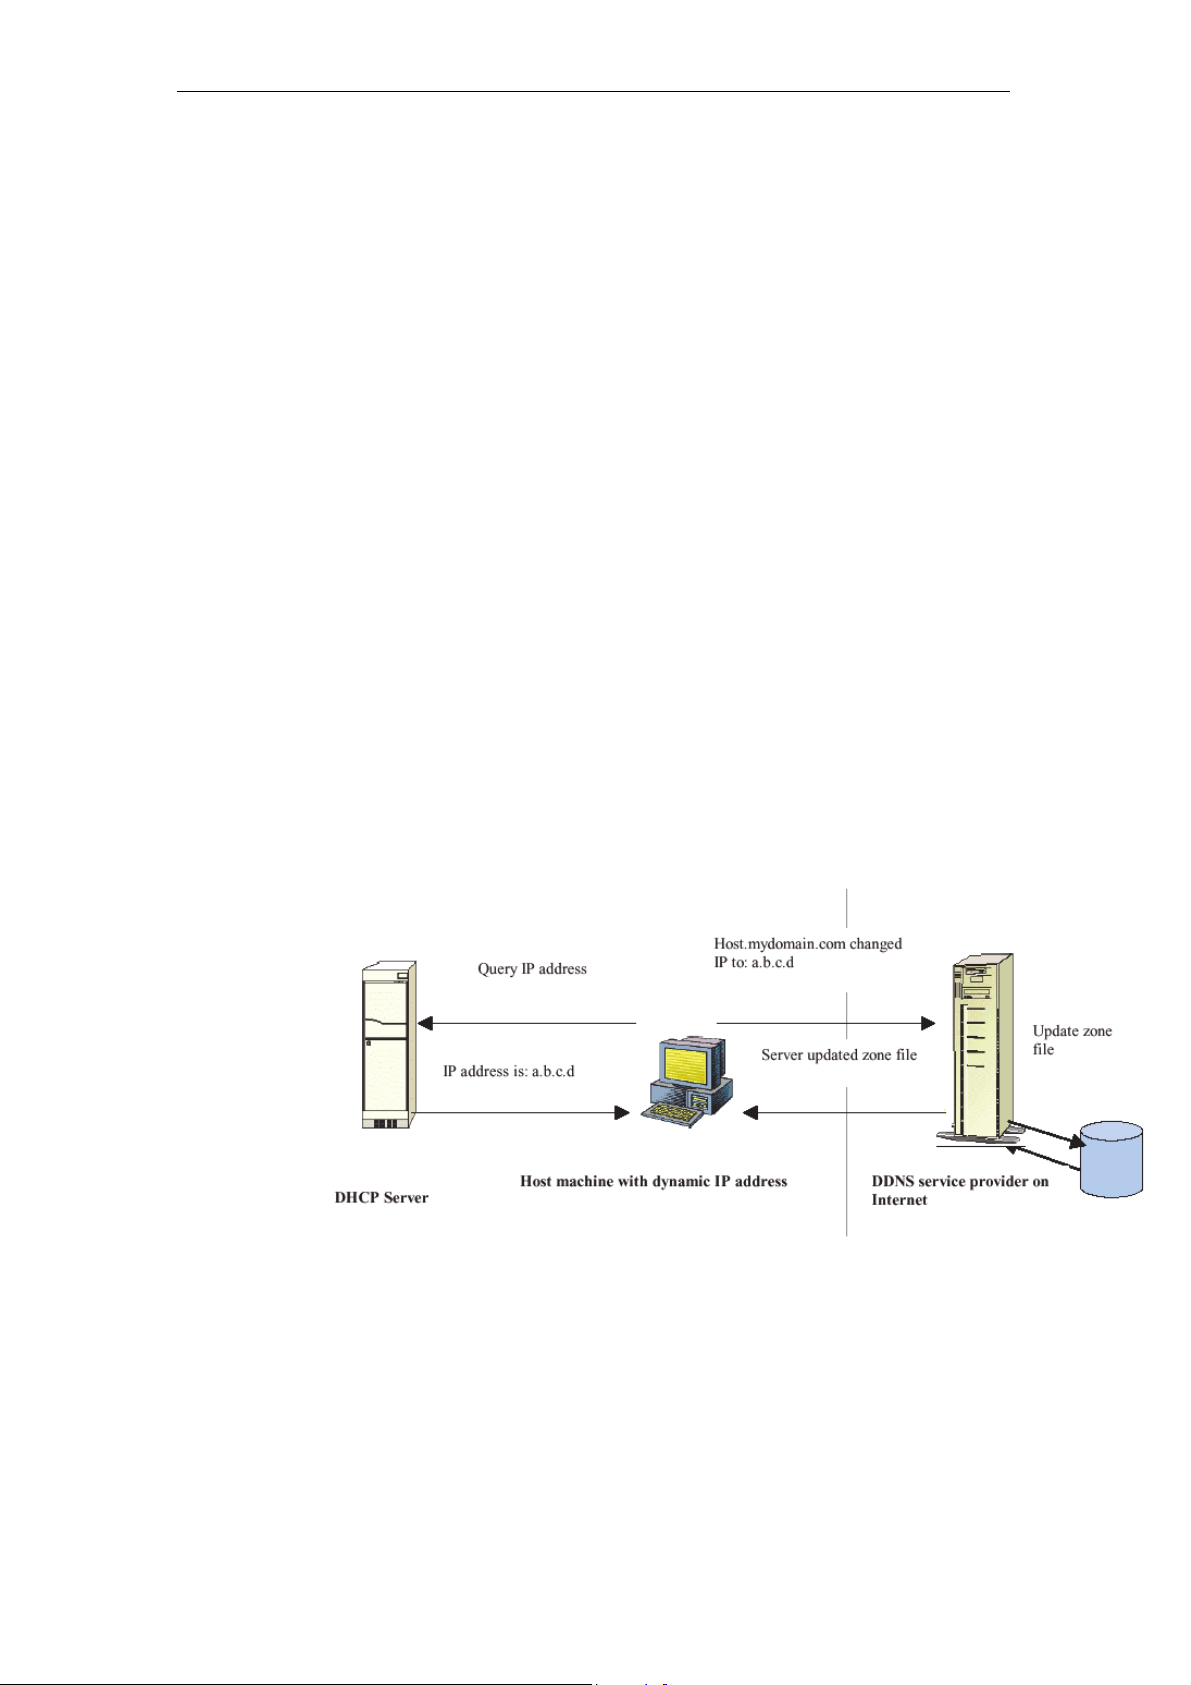
Overview
If some host has a dynamic IP address that keeps changing
frequently, it is difficult to keep updating the IP record that is
associated with the domain name of this host in the zone files.
This will result in non-accessibility of this host on the Internet.
Dynamic DNS service allows to keep mapping of a dynamic IP
address of such host to a static hostname. Dynamic DNS
services are provided by many websites. The host needs to
register with some website and get a domain name. When the
IP address of the host changes, it just needs to send a message
to the website that's providing dynamic DNS service to this host.
For this to work, an automated update client needs to be
implemented. These update clients send update messages to
the servers whenever there is some change in the IP address of
that host. Then, the server updates the entries for that host and
replies back with some return code.
Above Figure explains one such scenario in which a host gets a
dynamic IP address for itself from a DHCP server. As the host
has registered with one of the dynamic DNS service providers
on the Internet, it sends an update message to the service
provider with host name and changed IP address. The service
provider updates the new IP address of the host in the zone
files that have entry for that host name and replies back with
some return code. The return code communicates the success
or failure of the update message. This process is repeated
every time the host's IP address changes.
86
Page 87

11n AP Router User’s Manual
If the dynamic DNS service provider is notified of the same IP
address again and again, then it considers it an abuse and
might block the host name. To avoid this scenario, the IP
address that was successfully updated to the ISP is stored on
the unit. Whenever we receive an IP address change
notification, the new IP address is compared with the IP address
that was stored on the last update. If they differ, then only an
update request is sent. However, when the system comes up
there is no way of knowing what was the IP address on last
successful update before the system went down. You need to
give the command “system config save“ periodically to save this
IP address on Flash.
Registering With Dynamic DNS Service Provider
Currently, Wireless Gateway supports two Dynamic DNS
service providers, www.tzo.com and www.dyndns.com. To use
their Dynamic DNS service, you first need to visit the Web site
of a service provider and register. While registering, you need to
provide your username, password, and hostname as mandatory
parameters. A service provider may also prompt you to fill some
optional parameters.
Note
Configuring IP Interfaces
You need to create a Dynamic DNS interface per IP interface
and can only create one Dynamic DNS interface service on one
IP interface. For more information on creating IP interfaces,
refer to section Creating IP interfaces.
www.dyndns.org provides three kinds of services - Dynamic DNS,
Custom DNS and Static DNS. You can create different domains in
these systems. Custom DNS service is a full DNS solution for
newly purchased domains or domains you already own. A webbased interface provides complete control over resource records
and your entire domain, including support for dynamic IPs and
automated updates. Static DNS service points a DNS hostname
in some domain owned by dyndns.org to the user's ISP-assigned
static or pseudo-static IP address.
DynDNS service points a fixed hostname in some domain owned
by dyndns.org to the user's ISP-assigned dynamic IP address.
This allows more frequent update of IP addresses, than allowed
by Static DNS.
87
Page 88
11n AP Router User’s Manual
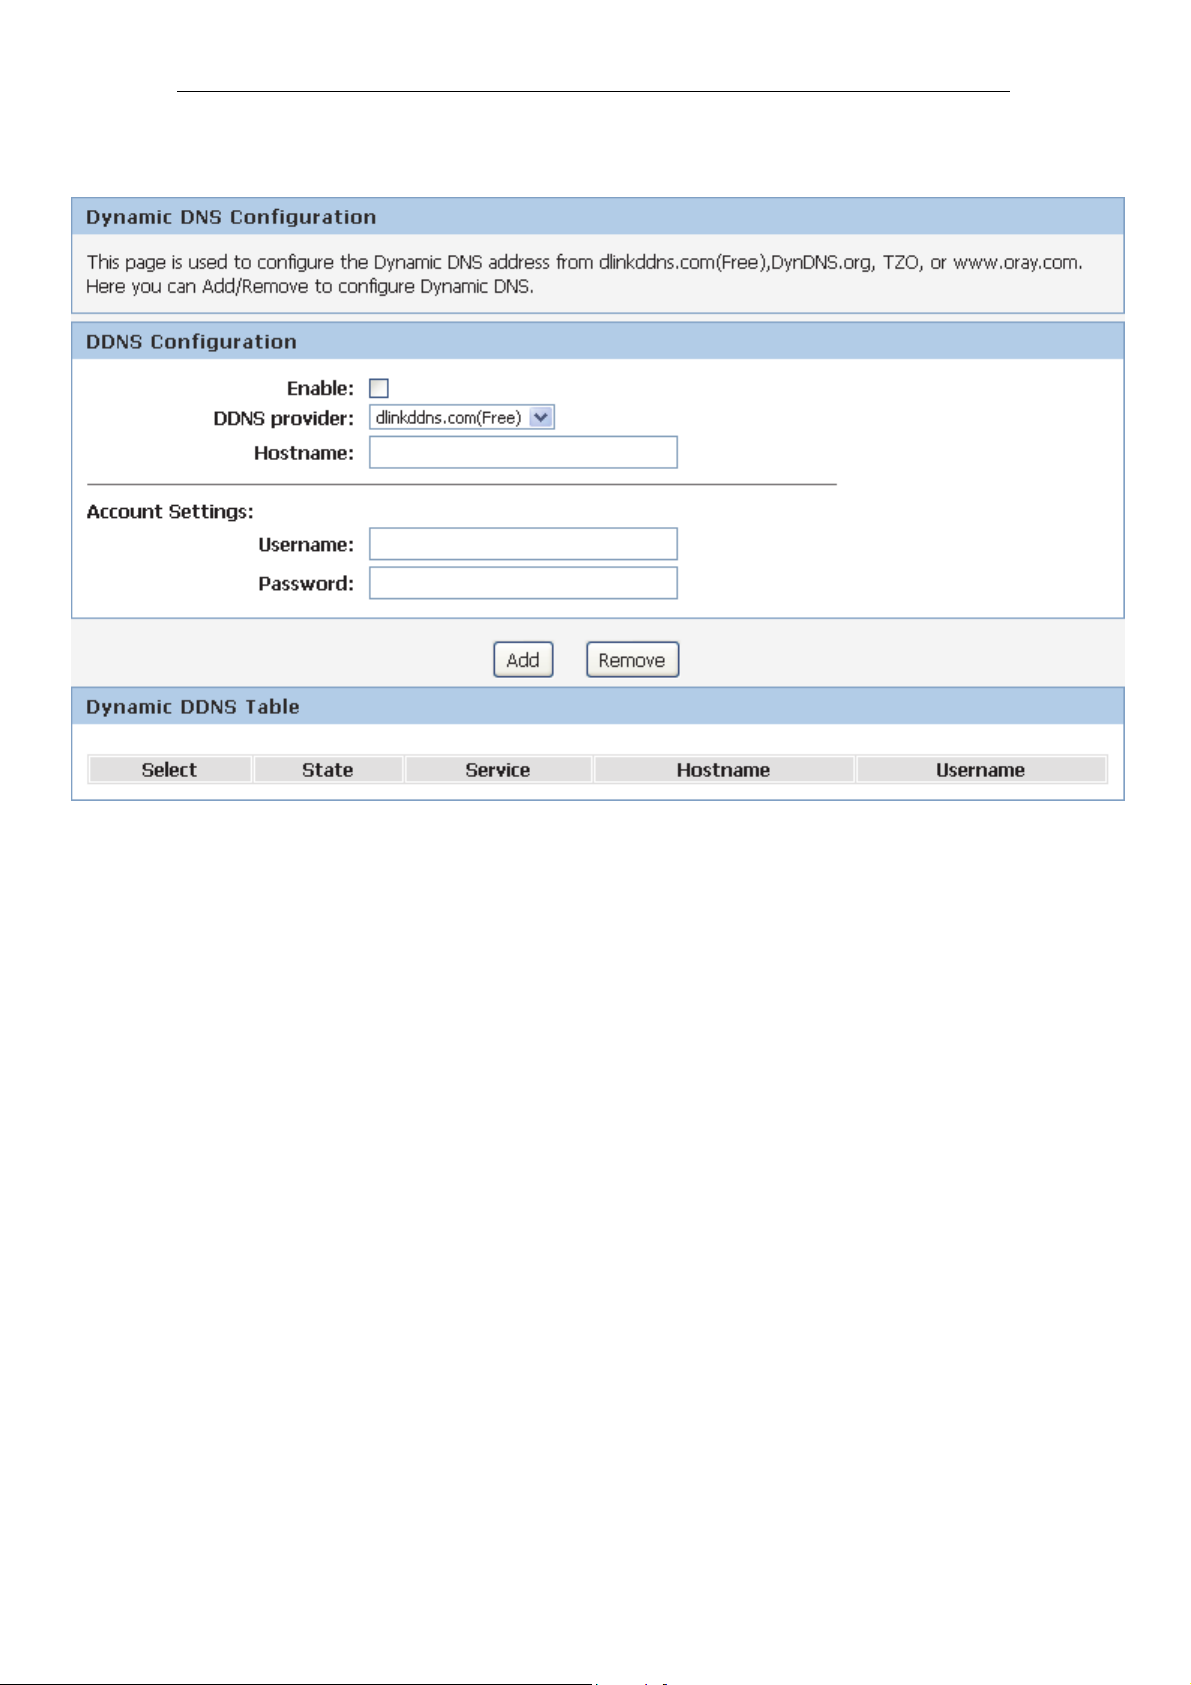
1. From the Advanced -> Dynamic DNS menu. The following
page is displayed:
88
Page 89
11n AP Router User’s Manual
Configure DynDNS
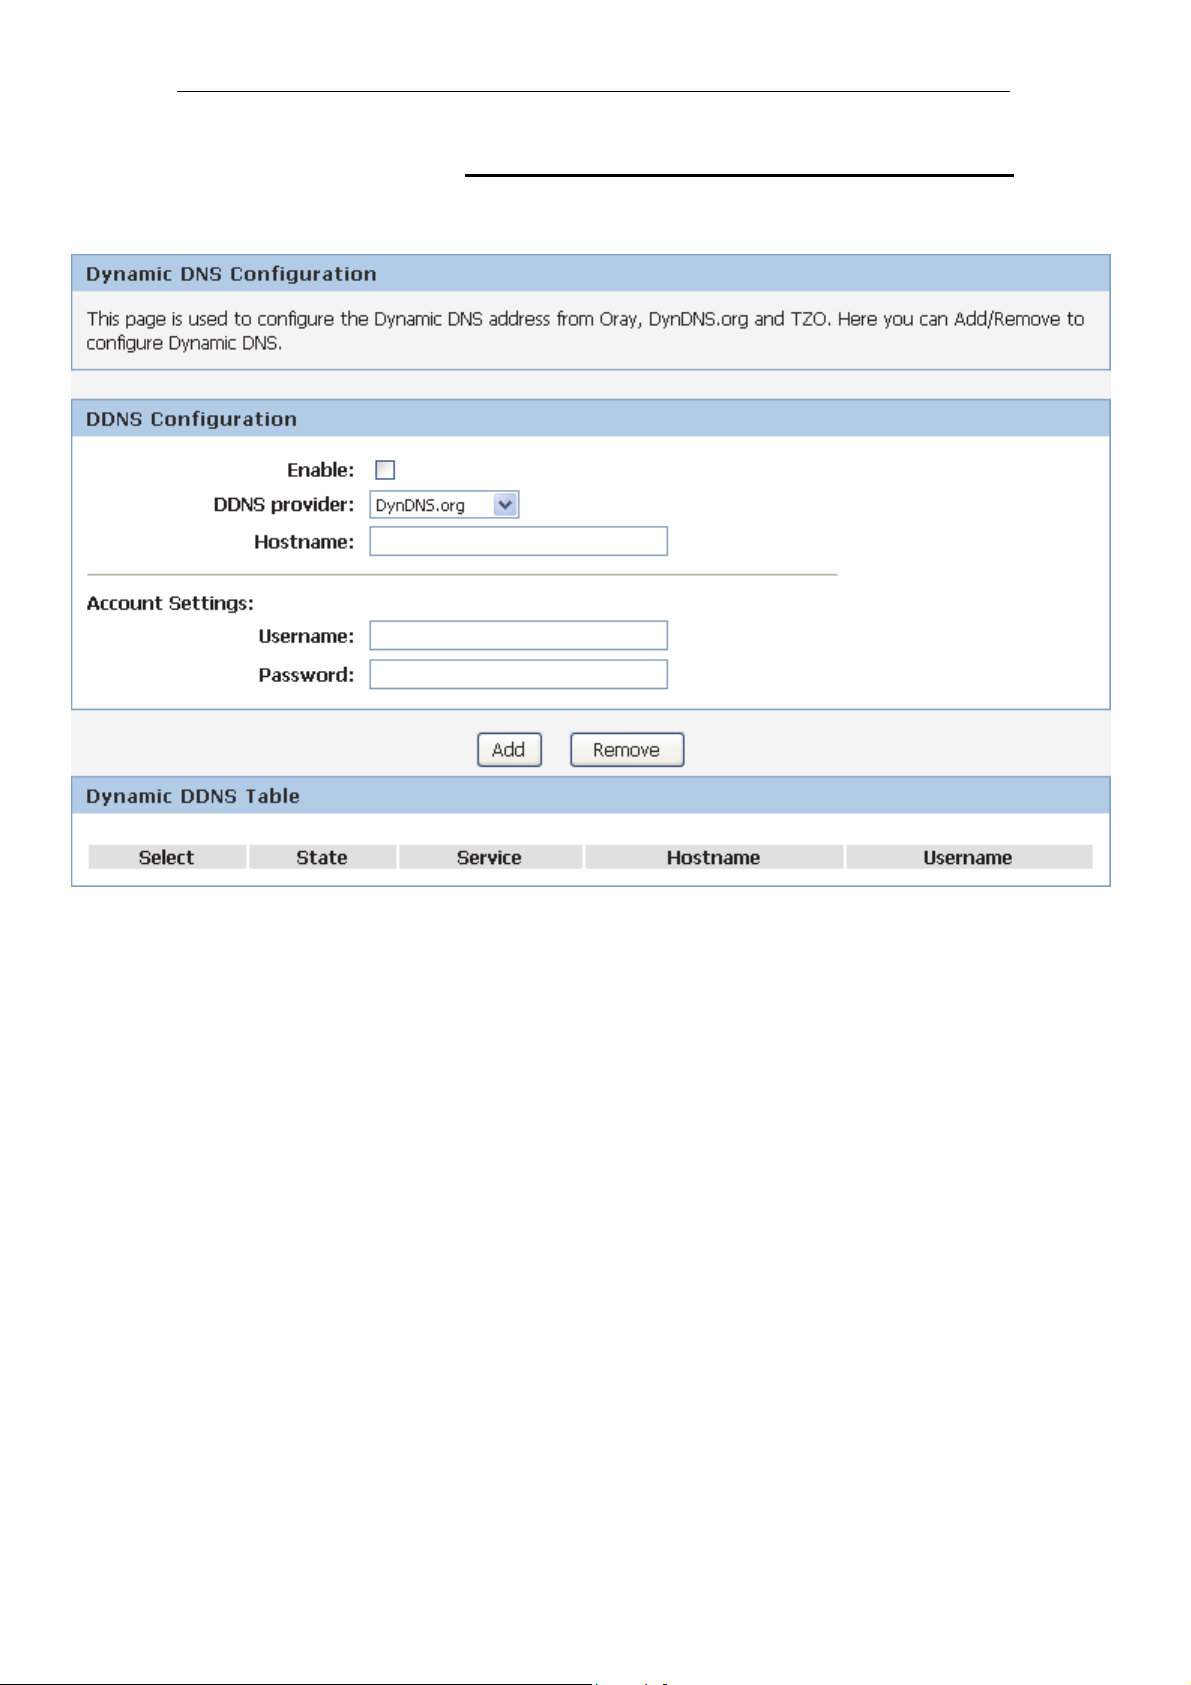
2. From the Advanced -> Dynamic DNS menu. The following
page is displayed:
89
Page 90
11n AP Router User’s Manual
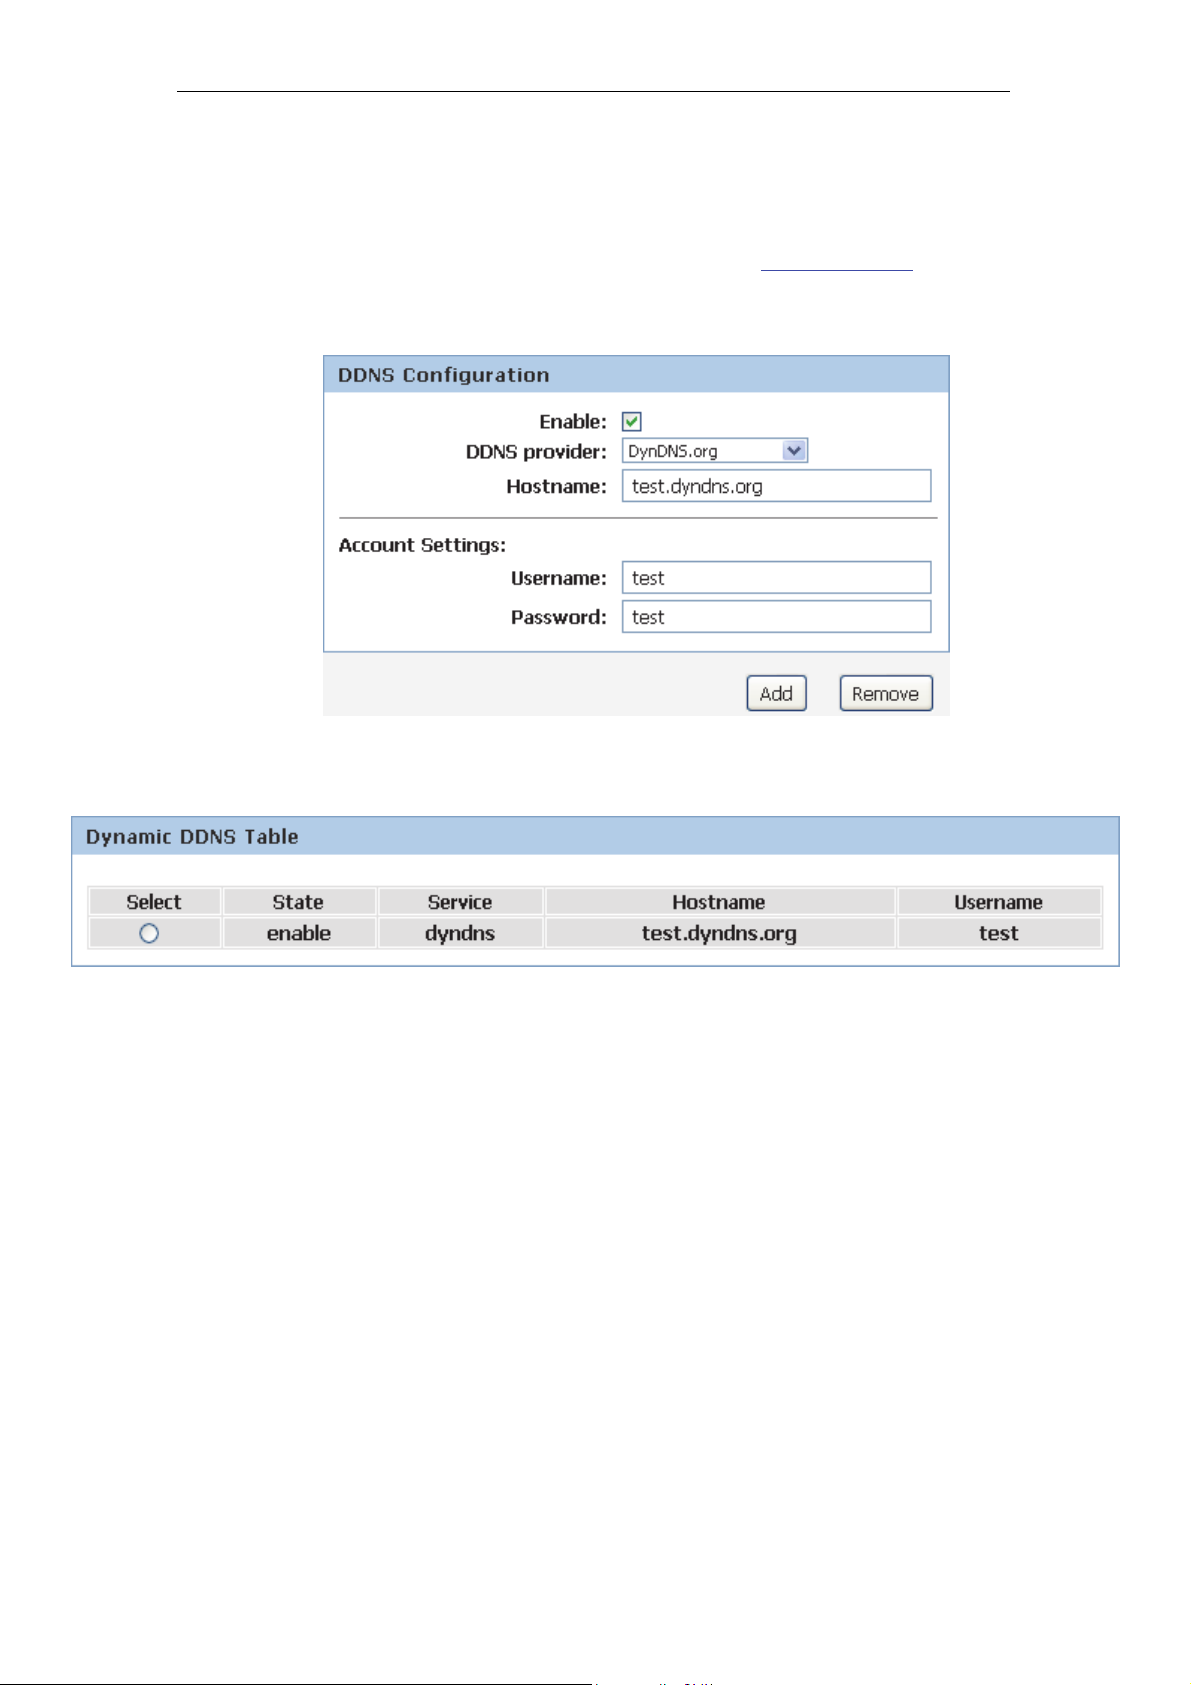
3. Enable DDNS
4. Select the DynDNS.org from the Service Provider dropdown list.
5. Type your own unique User Name, Password and Domain
Name which you applied from www.dyndns.com
in the
relevant boxes. They can be any combination of letters or
numbers with a maximum of 20 characters.
6. Click Add.
7. Now the Dynamic DNS that you created has been added
and listed in the Dynamic DDNS Table.
90
Page 91
11n AP Router User’s Manual
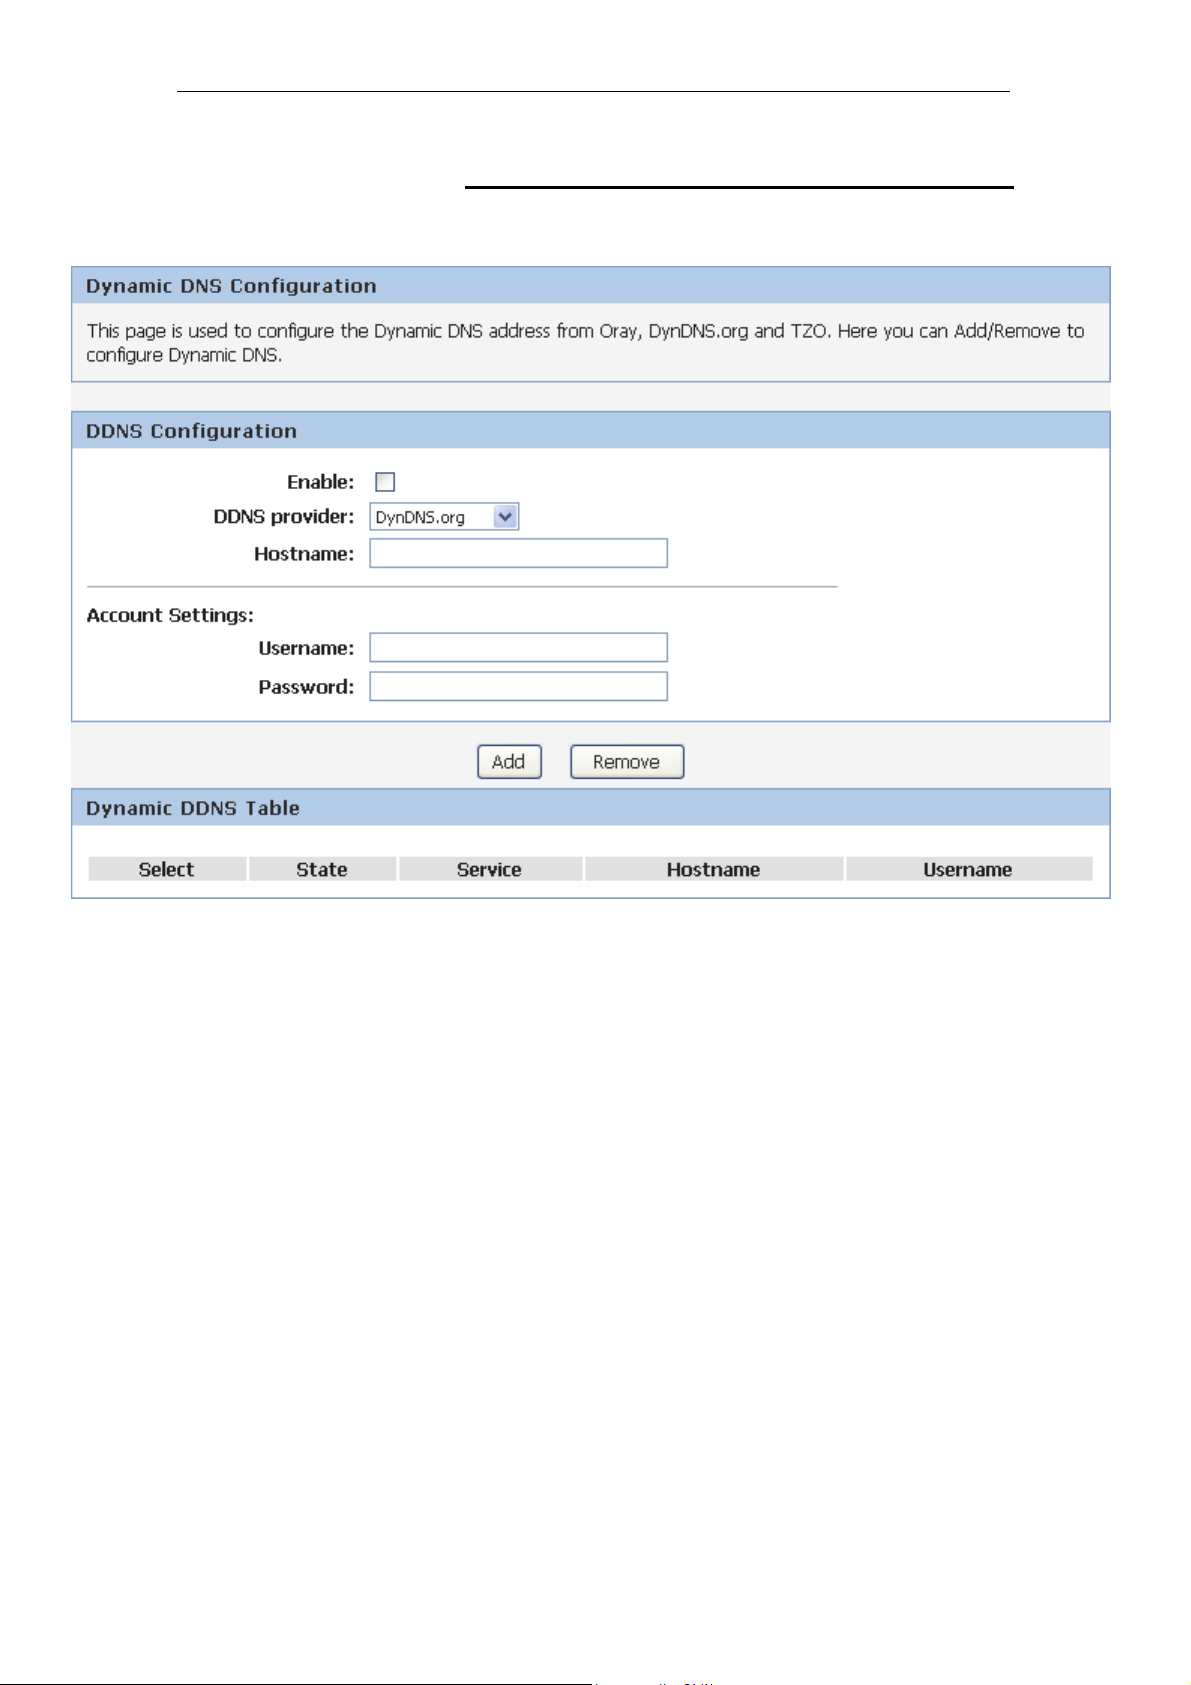
Configure TZO
1. From the Advanced -> Dynamic DNS menu. The following
page is displayed:
91
Page 92
11n AP Router User’s Manual
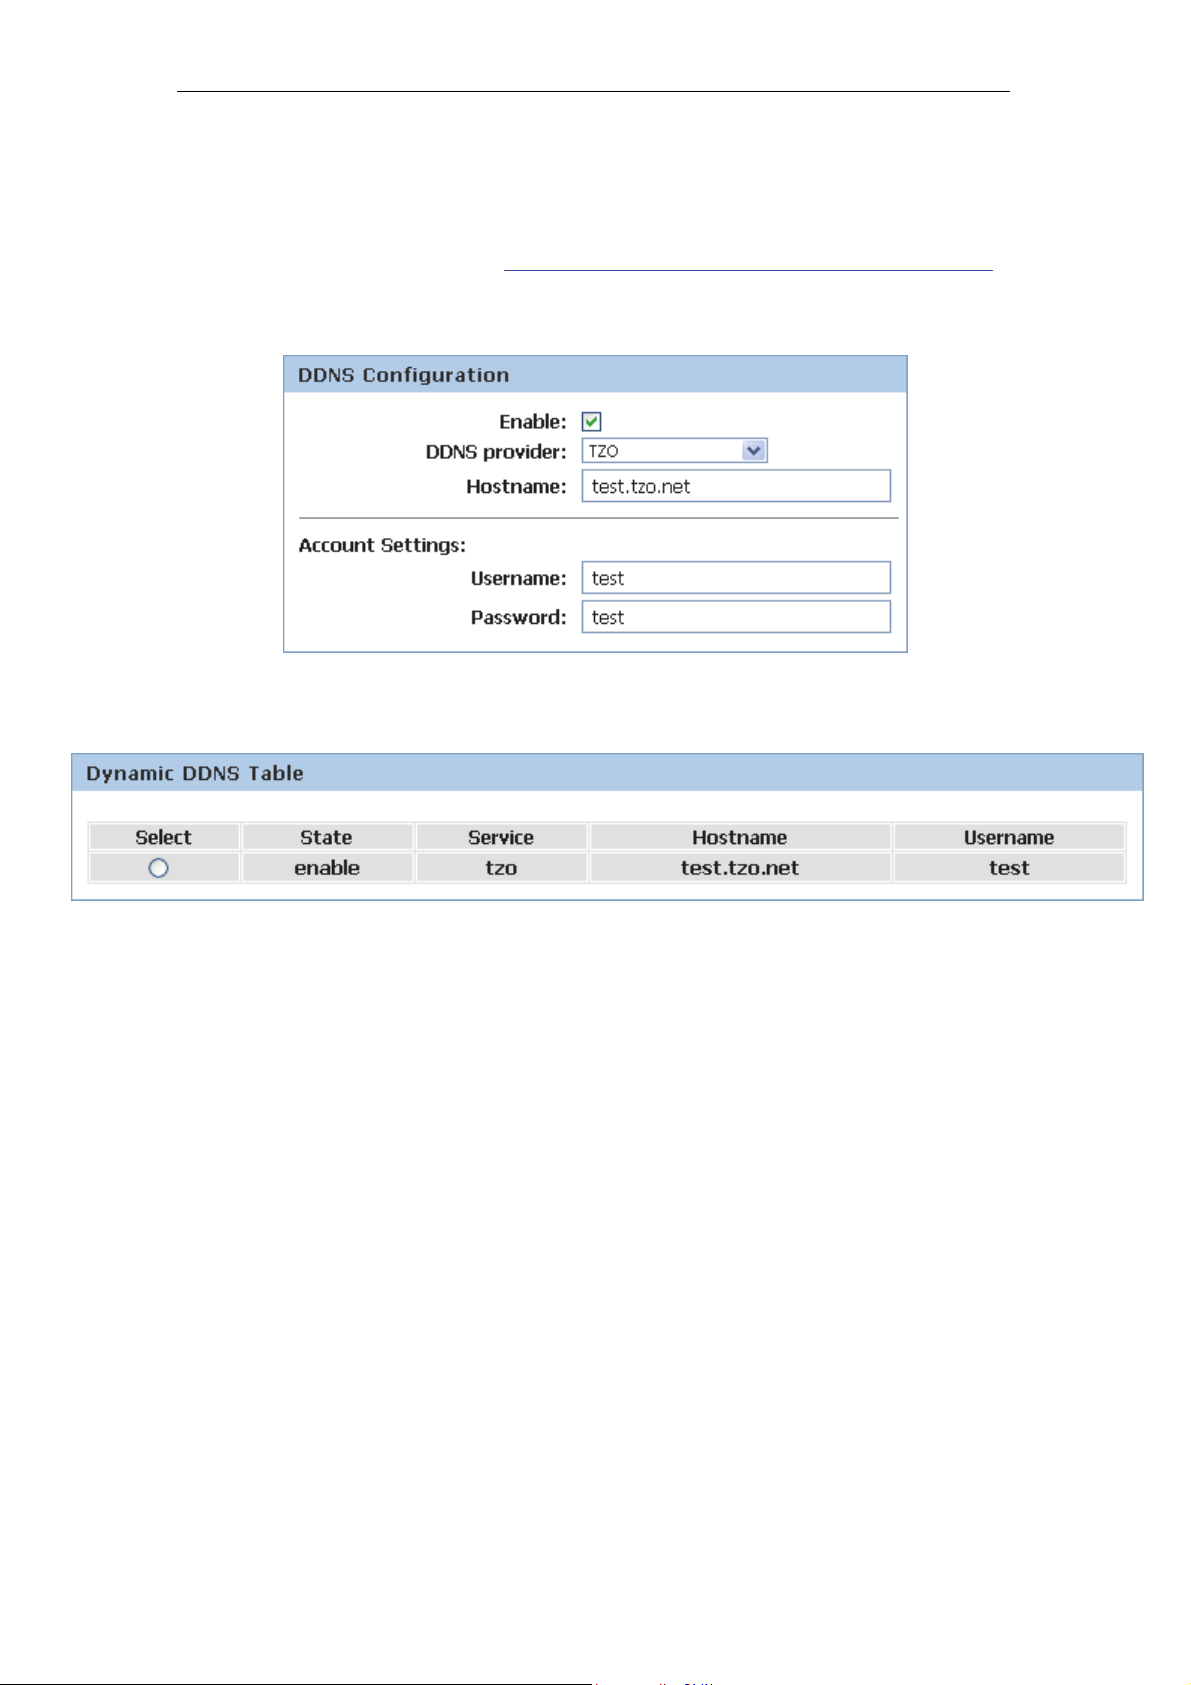
2. Enable DDNS
3. Select the TZO from the Service Provider drop-down list.
4. Type your own unique Email, Key and Domain Name which
you applied from
http://www.tzo.com/MainPageWebClient/clientsignup.html
in the relevant boxes. They can be any combination of
letters or numbers with a maximum of 20 characters.
5. Click Add.
6. Now the Dynamic DNS that you created has been added
and listed in the Dynamic DDNS Table.
92
Page 93
11n AP Router User’s Manual
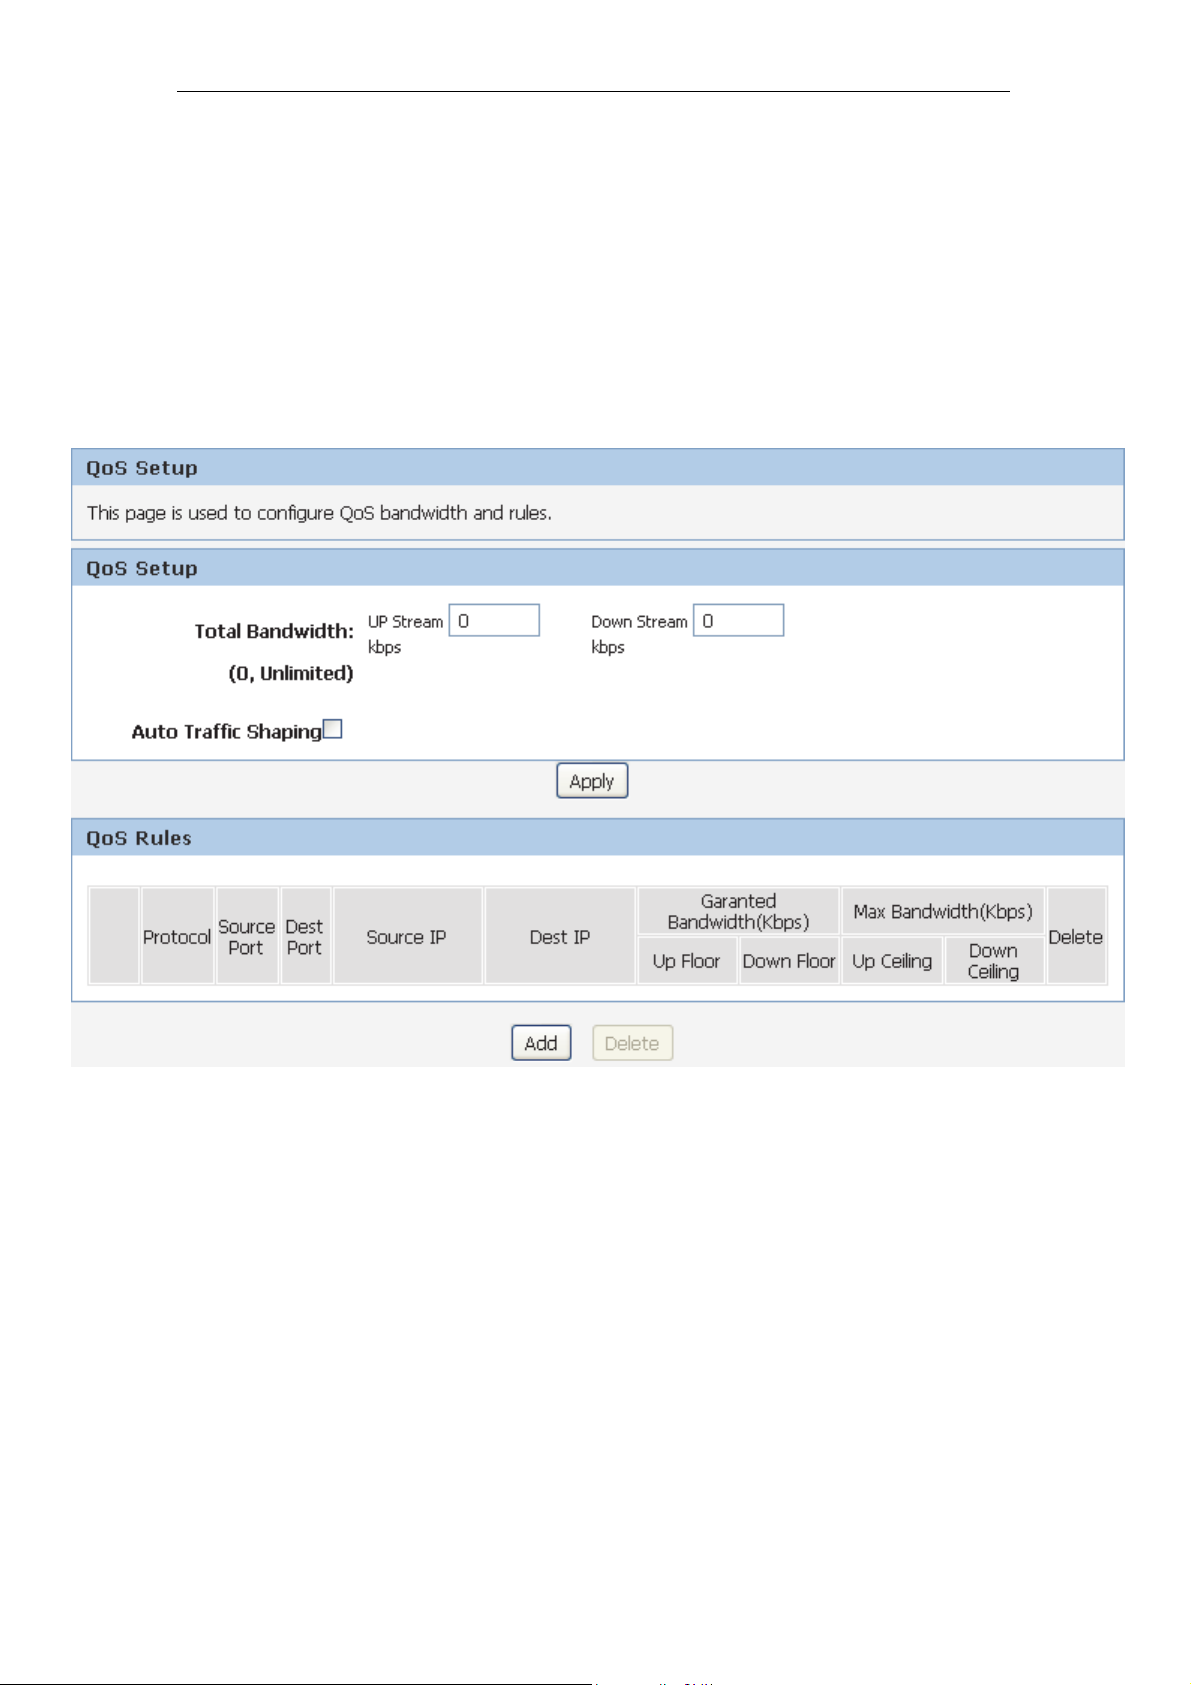
17 QoS
QoS is a pro-active measures to adjust the output rate of flow.
The role is to limit the outflow of a network traffic of a connection
with sudden, so that such packets to send out a uniform rate.
You can add traffic shaping rules.
1. From the Advanced -> QoS Setup menu. The following
page is displayed:
93
Page 94
11n AP Router User’s Manual
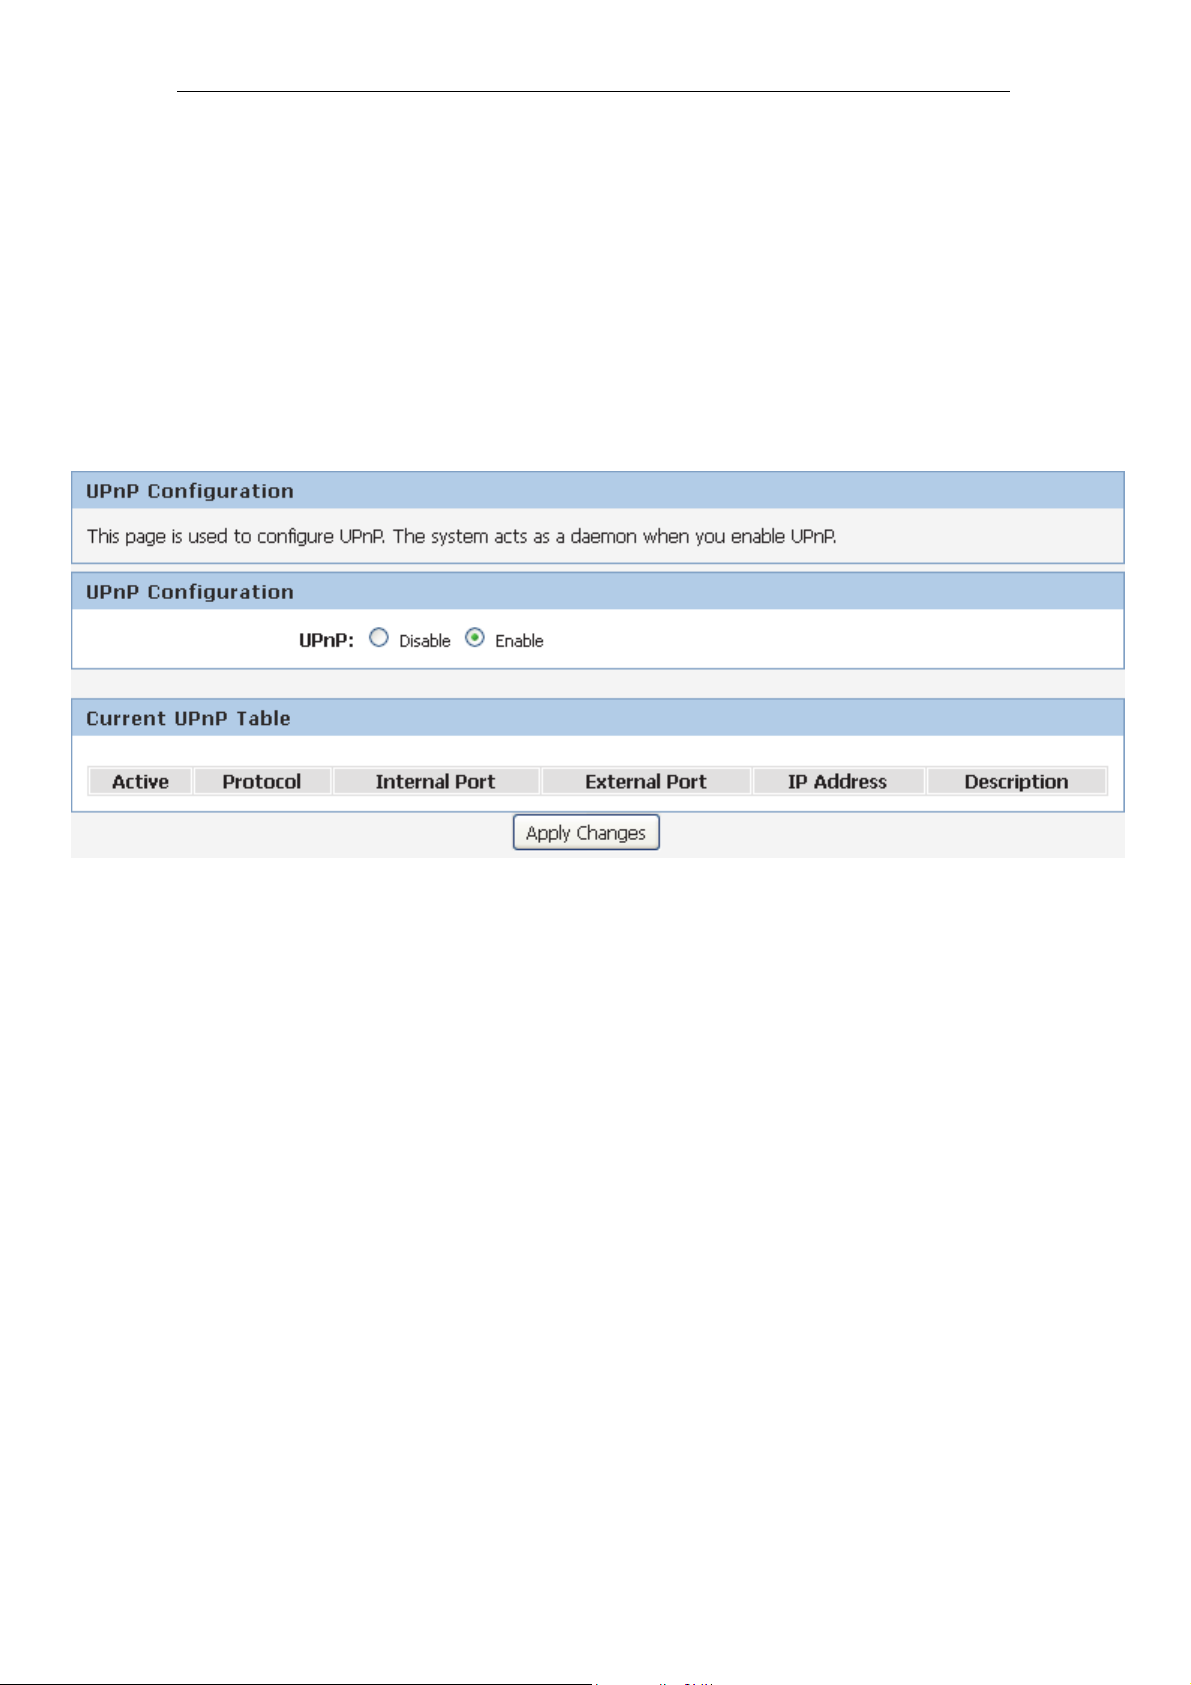
18 UPnP
UPnP is short for Universal Plug and Play, which is a
networking architecture that provides compatibility among
networking equipment, software, and peripherals. This router
has optional UPnP capability, and can work with other UPnP
devices and software.
1. From the Advanced -> UPnP menu. The following page is
displayed:
94
Page 95

11n AP Router User’s Manual
19 Virtual Server
Your device has built in advanced Security features that protect
your network by blocking unwanted traffic from the Internet.
If you simply want to connect from your local network to the
Internet, you do not need to make any changes to the default
Security configuration. You only need to edit the configuration if
you wish to do one or both of the following:
• allow Internet users to browse the user pages on your local
network (for example, by providing an FTP or HTTP server)
• play certain games which require accessibility from the
Internet
This chapter describes how to configure Security to suit the
needs of your network.
By default, the IP addresses of your LAN PCs are hidden from
the Internet. All data sent from your LAN PCs to a PC on the
Internet appears to come from the IP address of your device.
In this way, details about your LAN PCs remain private. This
security feature is called Port Forwarding.
Configuring Virtual Server
Certain network games, chat or file sharing software do not
work with your default Port Forwarding setting. Your device
knows the port, protocol and trigger information needed to allow
access to the common applications listed below, but by default,
access to them is disabled.
Application TCP
port
number
E-mail 110, 25 N/A false
News 119 N/A false
MSN Messenger 1863 N/A false
5050
Yahoo! Instant Messenger
AOL Instant Messenger 5190 N/A false
Internet Relay Chat (IRC) 194 194 false
Netmeeting (h323)
Real Audio
Ping
Web connections (HTTP,
HTTPS)
DialPad 51210 N/A true
5055
5100
1720 N/A true
N/A 1719 true
1731
522
544
7070
N/A
(ICMP)
80, 443 N/A false
UDP
port
Trigger
required?
number
N/A false
N/A false
544
6770
N/A
(ICMP)
false
false
95
Page 96

11n AP Router User’s Manual
Application TCP
port
number
N/A
FTP 21 N/A false
Telnet 23 N/A false
Secure shell (SSH) 22 N/A false
Windows Media Services 1755 1755 false
Gnutella 6346 N/A false
Kazaa 1214 N/A false
Windows Terminal Server 3389 N/A false
DNS N/A 53 false
PPTP 1723 1723 false
Internet Key Exchange N/A 500 false
LDAP 389 N/A false
GRE
Databeam (T.120) 1503 N/A false
N/A
(GRE)
UDP
port
number
51200
51201
N/A
(GRE)
Trigger
required?
true
false
You can enable access to a common application from a specific
PC on your network.
If you want to allow access to an application that is not included
on the above list of common applications, you can create and
enable a custom application.
Configuring custom applications
If you want to enable access to an application that does not
appear on your device’s default list of common applications you
can create a custom application.
In order to create a custom application, you must know:
1. the protocol used by the application (e.g., TCP, UDP and so
on)
2. the primary port or range of ports used by the application
3. whether the application requires a trigger, and if so, the
secondary port or range of ports used by the application
4. the address translation type used by the trigger
Your application provider or games manufacturer should
provide you with these details.
96
Page 97
11n AP Router User’s Manual
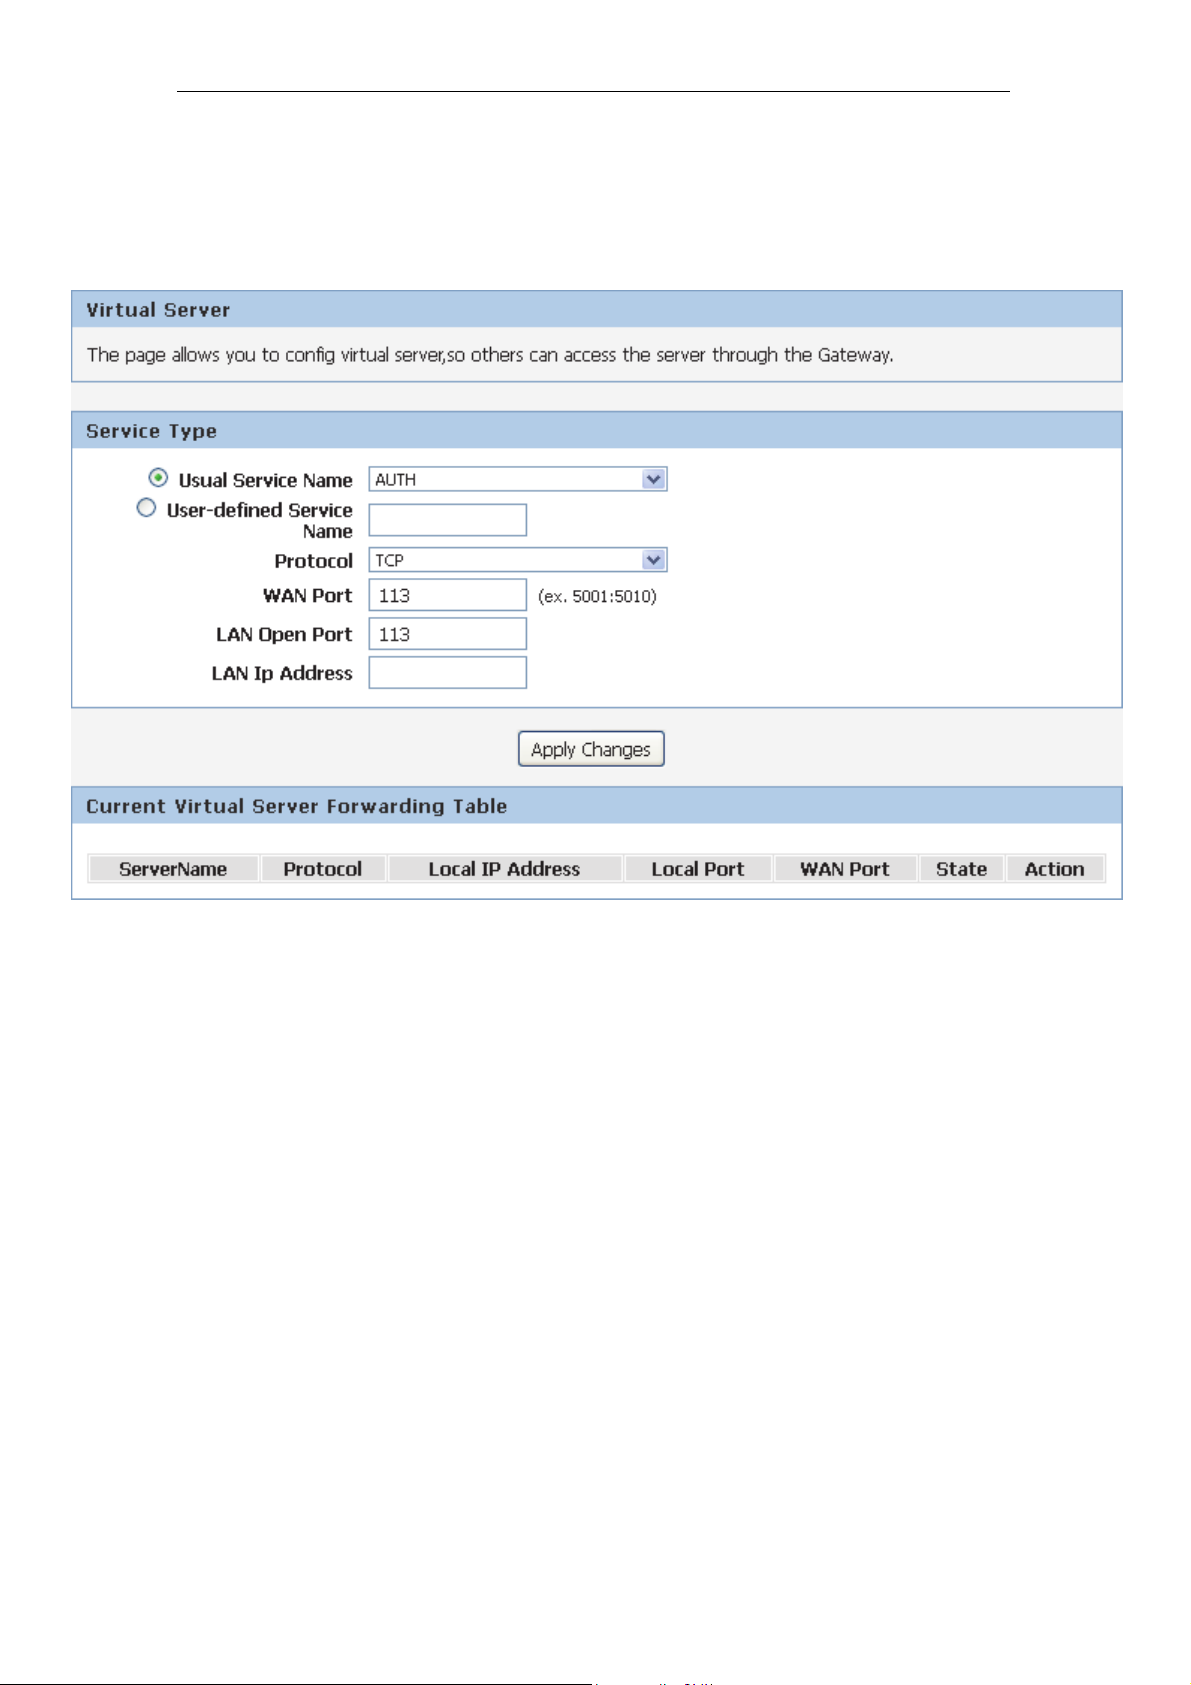
Virtual Server for FTP
In this example configuration, a custom application called FTP
Server using TCP port 21 is created.
5. From the Advanced -> Virtual Server menu. The following
page is displayed:
97
Page 98
11n AP Router User’s Manual
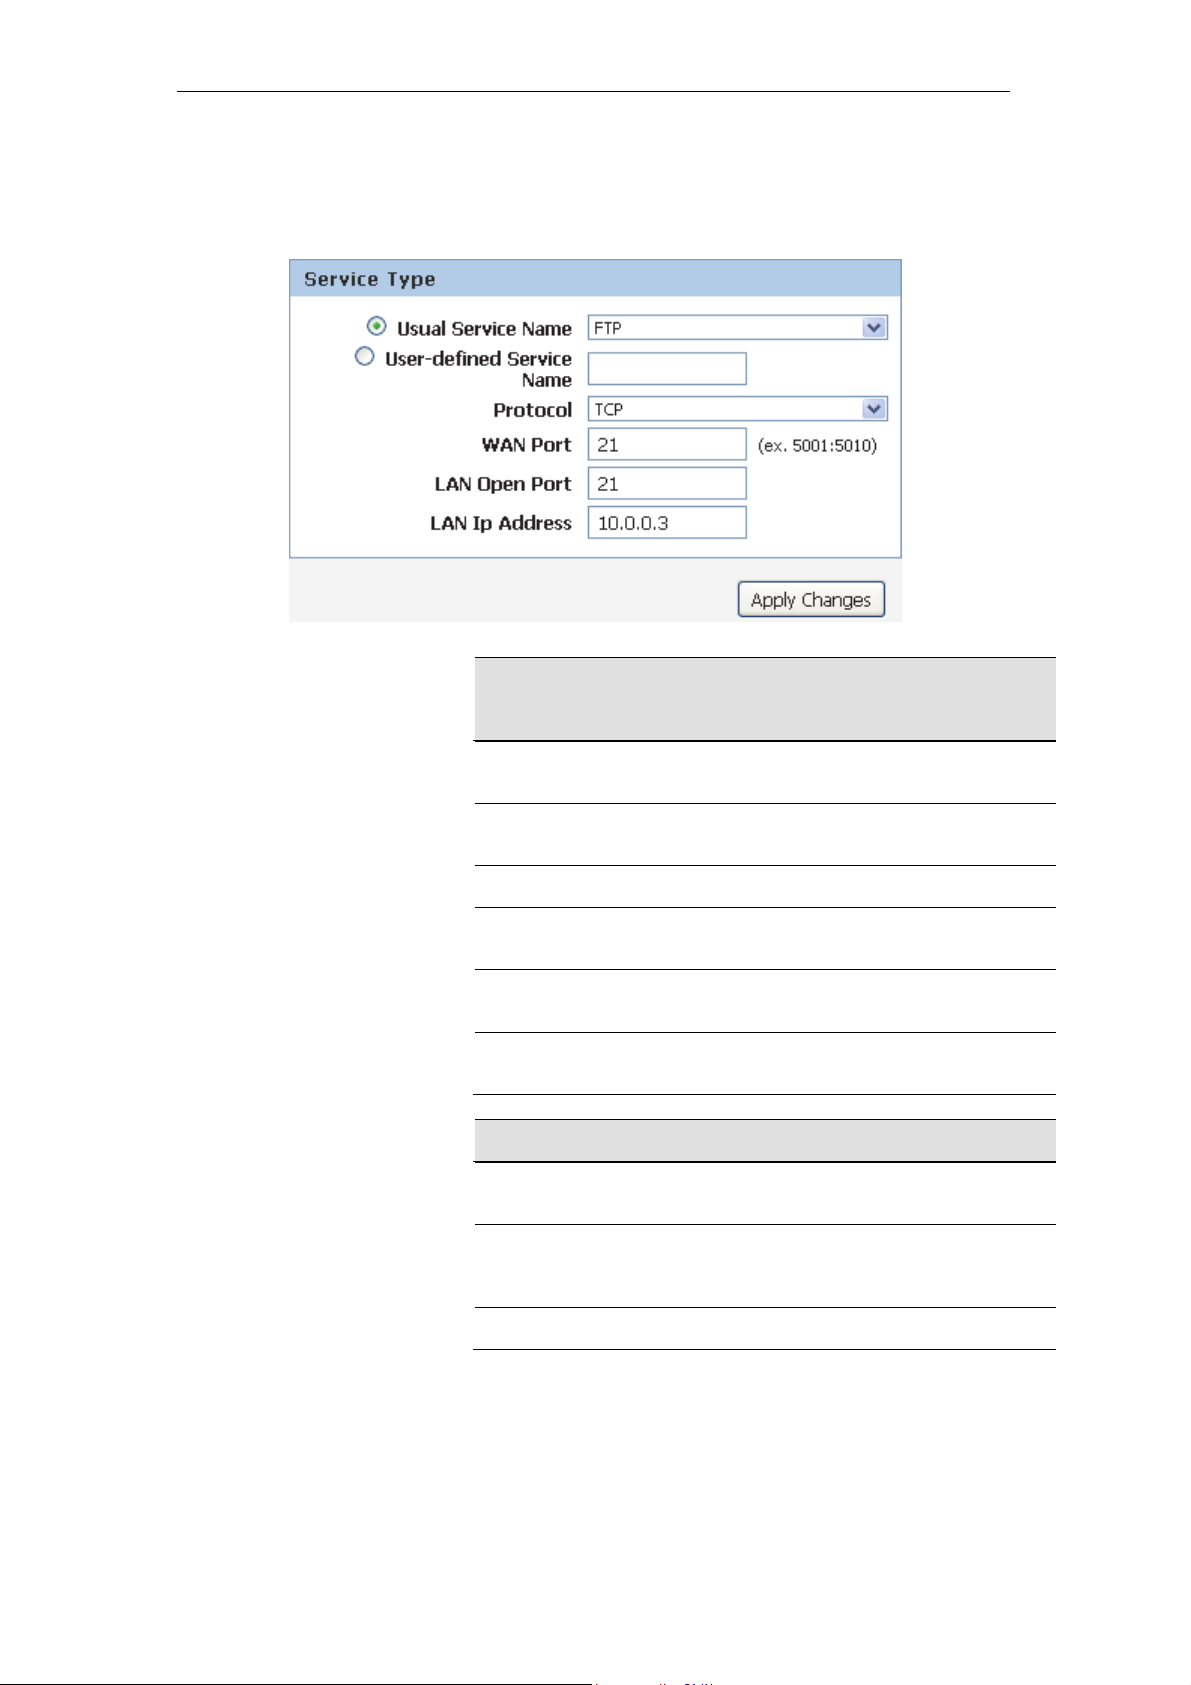
6. Select FTP from the Usual Service Name drop-down list.
7. Select TCP from the Protocol drop-down list.
8. Type the Local IP Address for your FTP Server.
9. Click Apply Changes
Fields on the
first setting
block
Usual Service
Name
User-defined
Service Name
Description
The usual Service is listed here.
To define the Service Name manually.
Protocol There are 2 options available: TCP, UDP.
WAN Port
LAN Open Port
LAN Ip Address
The destination port number that is made open for this
application on the WAN-side
The destination port number that is made open for this
application on the LAN-side.
IP address of your local server that will be accessed by
Internet.
Function Button Description
Apply Changes
Delete
Click to change the setting of default actions to the
configuration.
Delete the selected port forwarding rules from the
forwarding table. You can click the checkbox at the
Select column to select the forwarding rule.
Disable Disable forwarding rules from the forwarding table.
98
Page 99
11n AP Router User’s Manual
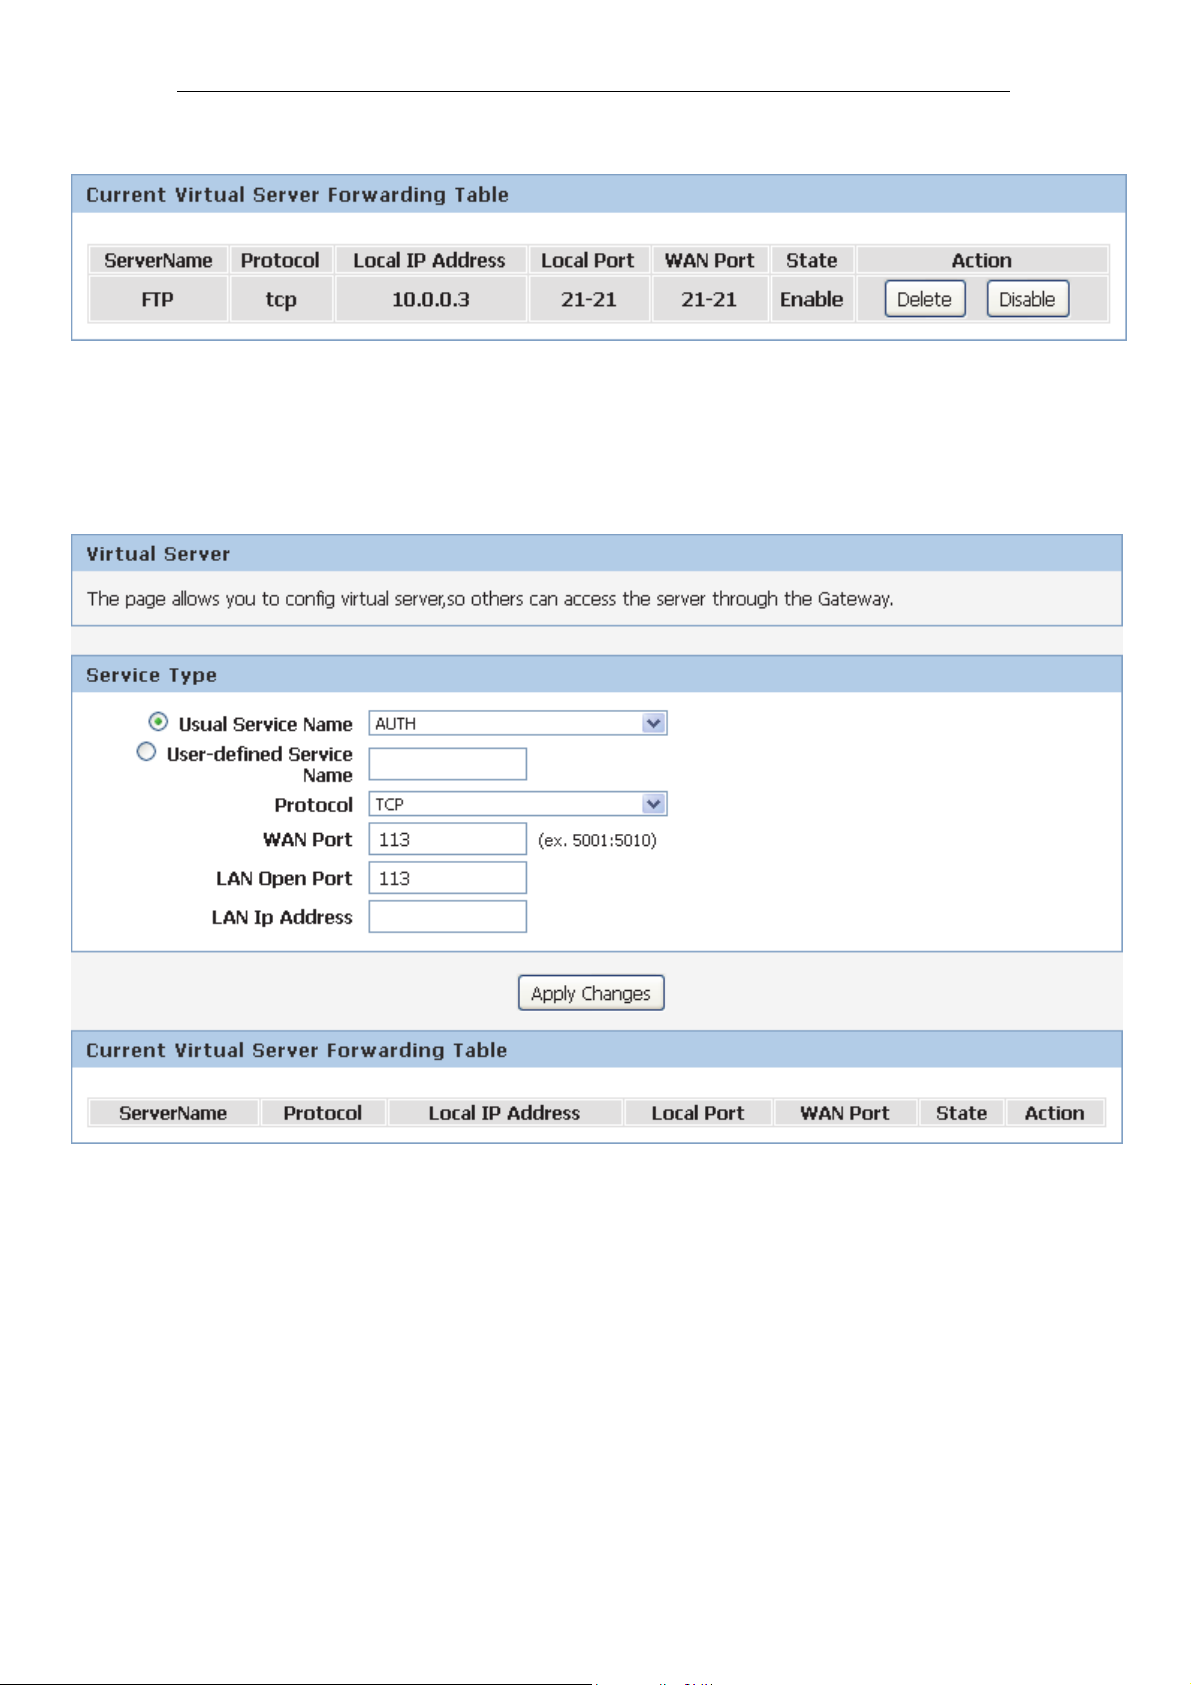
10. Configure Virtual Server setting successfully!
Port Forwarding for HTTP
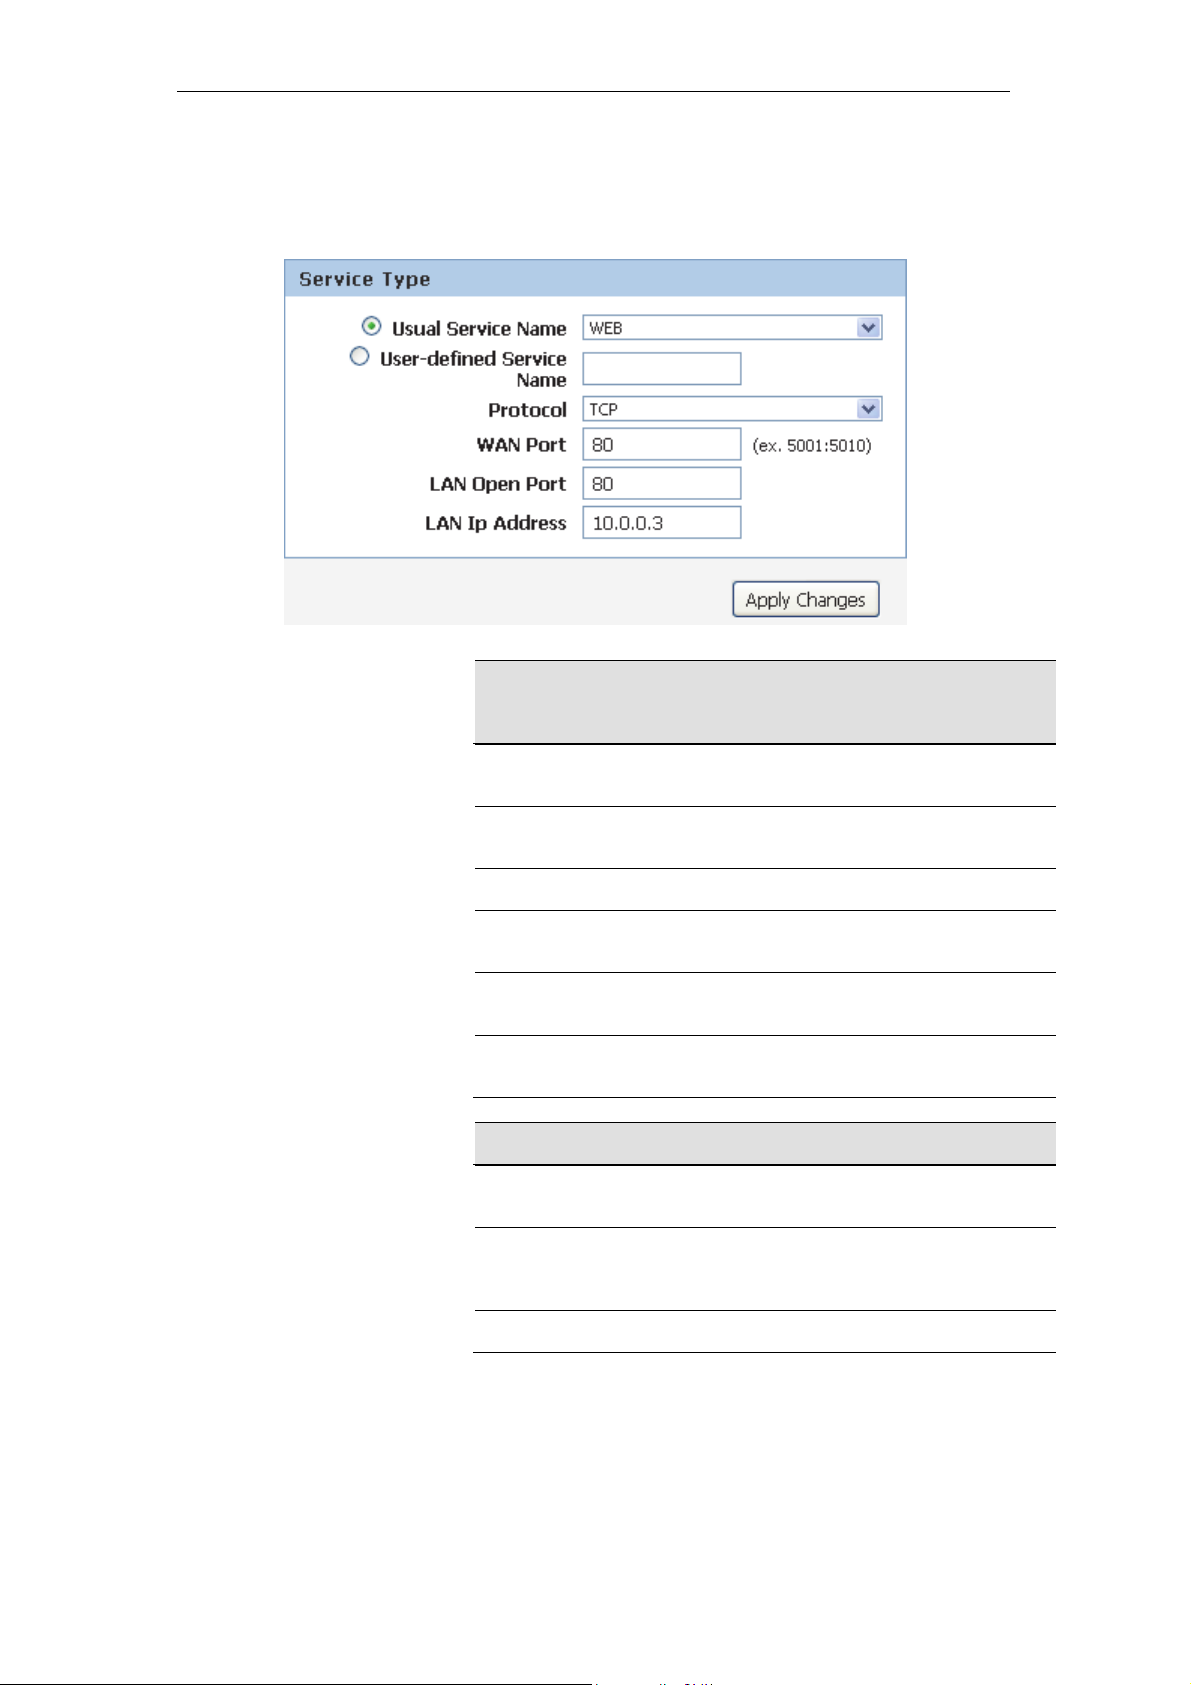
In this example configuration, a custom application called HTTP
Server using TCP port 80 is created.
1. From the Advanced -> Virtual Server menu. The following
page is displayed:
99
Page 100
11n AP Router User’s Manual
2. Select WEB from the Usual Service Name drop-down list.
3. Select TCP from the Protocol drop-down list.
4. Type the Local IP Address for your HTTP Server.
5. Click Apply Changes
Fields on the
first setting
block
Usual Service
Name
User-defined
Service Name
Description
The usual Service is listed here.
To define the Service Name manually.
Protocol There are 2 options available: TCP, UDP.
WAN Port
LAN Open Port
LAN Ip Address
The destination port number that is made open for this
application on the WAN-side
The destination port number that is made open for this
application on the LAN-side.
IP address of your local server that will be accessed by
Internet.
Function Button Description
Apply Changes
Delete
Click to change the setting of default actions to the
configuration.
Delete the selected port forwarding rules from the
forwarding table. You can click the checkbox at the
Select column to select the forwarding rule.
Disable Disable forwarding rules from the forwarding table.
100
 Loading...