

Page 1

Manuals and Documents
Brought to you by
Wechillit.com Ltd
WCI Group House
18 Pride Hill
Shrewsbury SY1 1DQ
Tel: 01743 289418
Fax: 01743 289416
Web: www.wechillit.com
Page 2

EF SERIES 1-TANK/2-TANK
ELECTRIC FRYER
USER’S MANUAL
Page 3

Thank you for purchasing the EF Series Electric Fryer. In order to
make proper use of this product and to avoid problems, please read
this manual carefully and retain for future reference.
WARNING
Any modification, incorrect installation or maintenance by
unqualified persons may lead to injury or death. Please contact
supplier and trained professionals for any maintenance or
adjustment.
WARNING
Do not place or store any flammable liquid, gas or other unsafe
objects near the unit.
WARNING
The exterior of this equipment must be grounded. If the oil level
drops below the minimum indicated level there is a danger of fire.
This product has been designed and developed to feature attractive design, quality materials
and convenient operation, maintenance and durability. It provides constant temperature
control, fast heating and economy ofboth oil and energy and can cook, fry and warm food.
Page 4
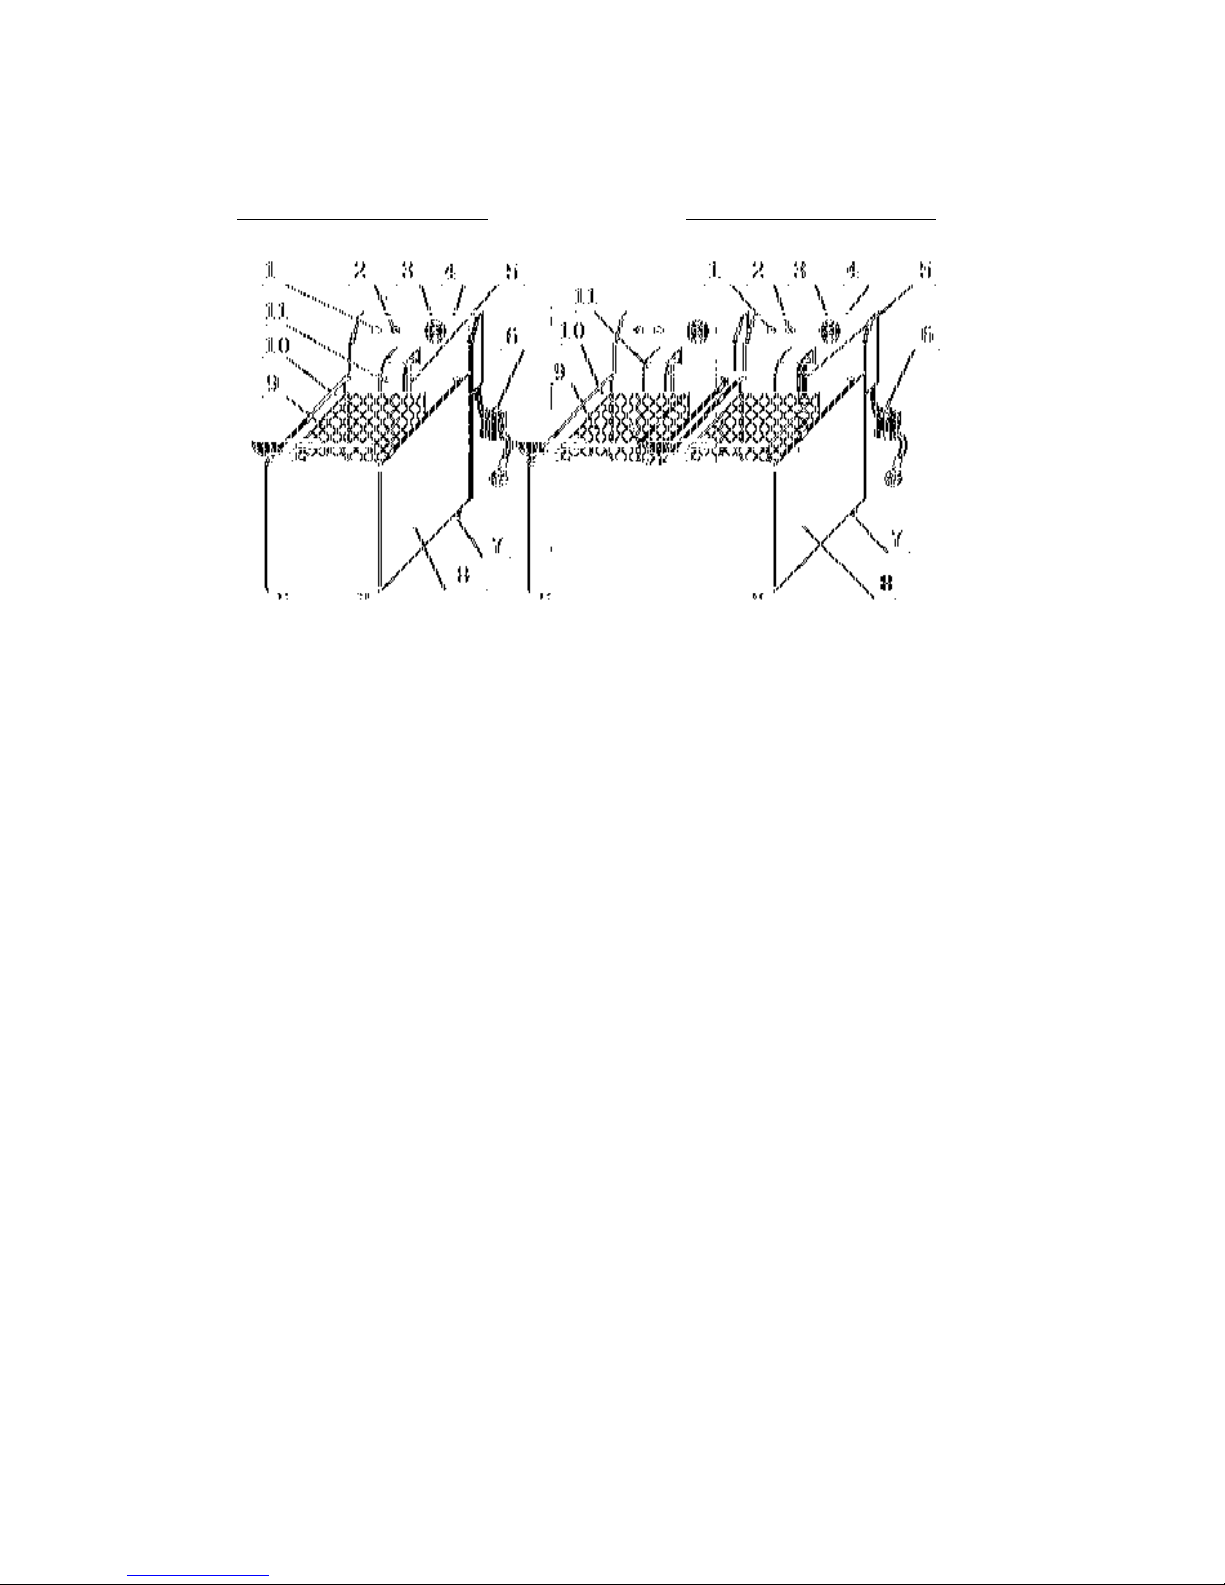
A.Structure
EFseries 1-tank electric fryer EFseries 2-tank electric fryer
1-POWER INDICATOR 2-HEATING INDICATOR
3-TEMPERATURE CONTROLLER 4-HEAD UNIT
5-ELECTRIC ELEMENT 6-POWER CABLE
7-RUBBER FEET 8-LOWER BOX 9-FRYING BASKET
10-OIL PAN
B. Function
1. The EF series electric fryer is available in two models: one tank and
two tank fryer. The two tank fryer can fry two different kinds of
food without mixing the smell.
2. The unit is fitted with a thermostat which sets the temperature for
frying. There are also power and heating indicators to show the
heating status.
3. When the temperature of the oil rises to above the level above the
Page 5

high limit, the safety cut-out device will cut off the power
automatically. This avoids danger from the unit temperature getting
too high and must be reset by hand.
4. When lifting the head unit, a micro-switch activates and cuts off
the power for safety and to prevent the element being dry burned.
5. The handle of frying basket can be folded and dismantled. The
removable oil tank is constructed from stainless steel and has oil
level calibration marks. The unit is easy to operate, clean, transport
and store.
6. The element has a protecting plate and is easy to withdraw from the
tank by lifting the head unit. This facilitates easy cleaning of the
element and the oil tank.
C.Basic parameter
Name
1-Tank Electric Fryer
Model EF-4L EF-6L EF-8L EF-11L
Voltage ~220V, 50Hz ~220V, 50Hz ~220V, 50Hz ~220V, 50Hz
Power 2000W 2500W 3250W 3500W
Number of oil
pot
1 1 1 1
Size of oil pot
(mm)
185×270×175 240×300×150 240×300×200 300×325×200
Volume 4(L) 6(L) 8(L) 11(L)
Number of
frying basket
1 1 1 1
Size of frying
basket
150×220×135 195×250×125 195×250×150 210×280×150
Page 6
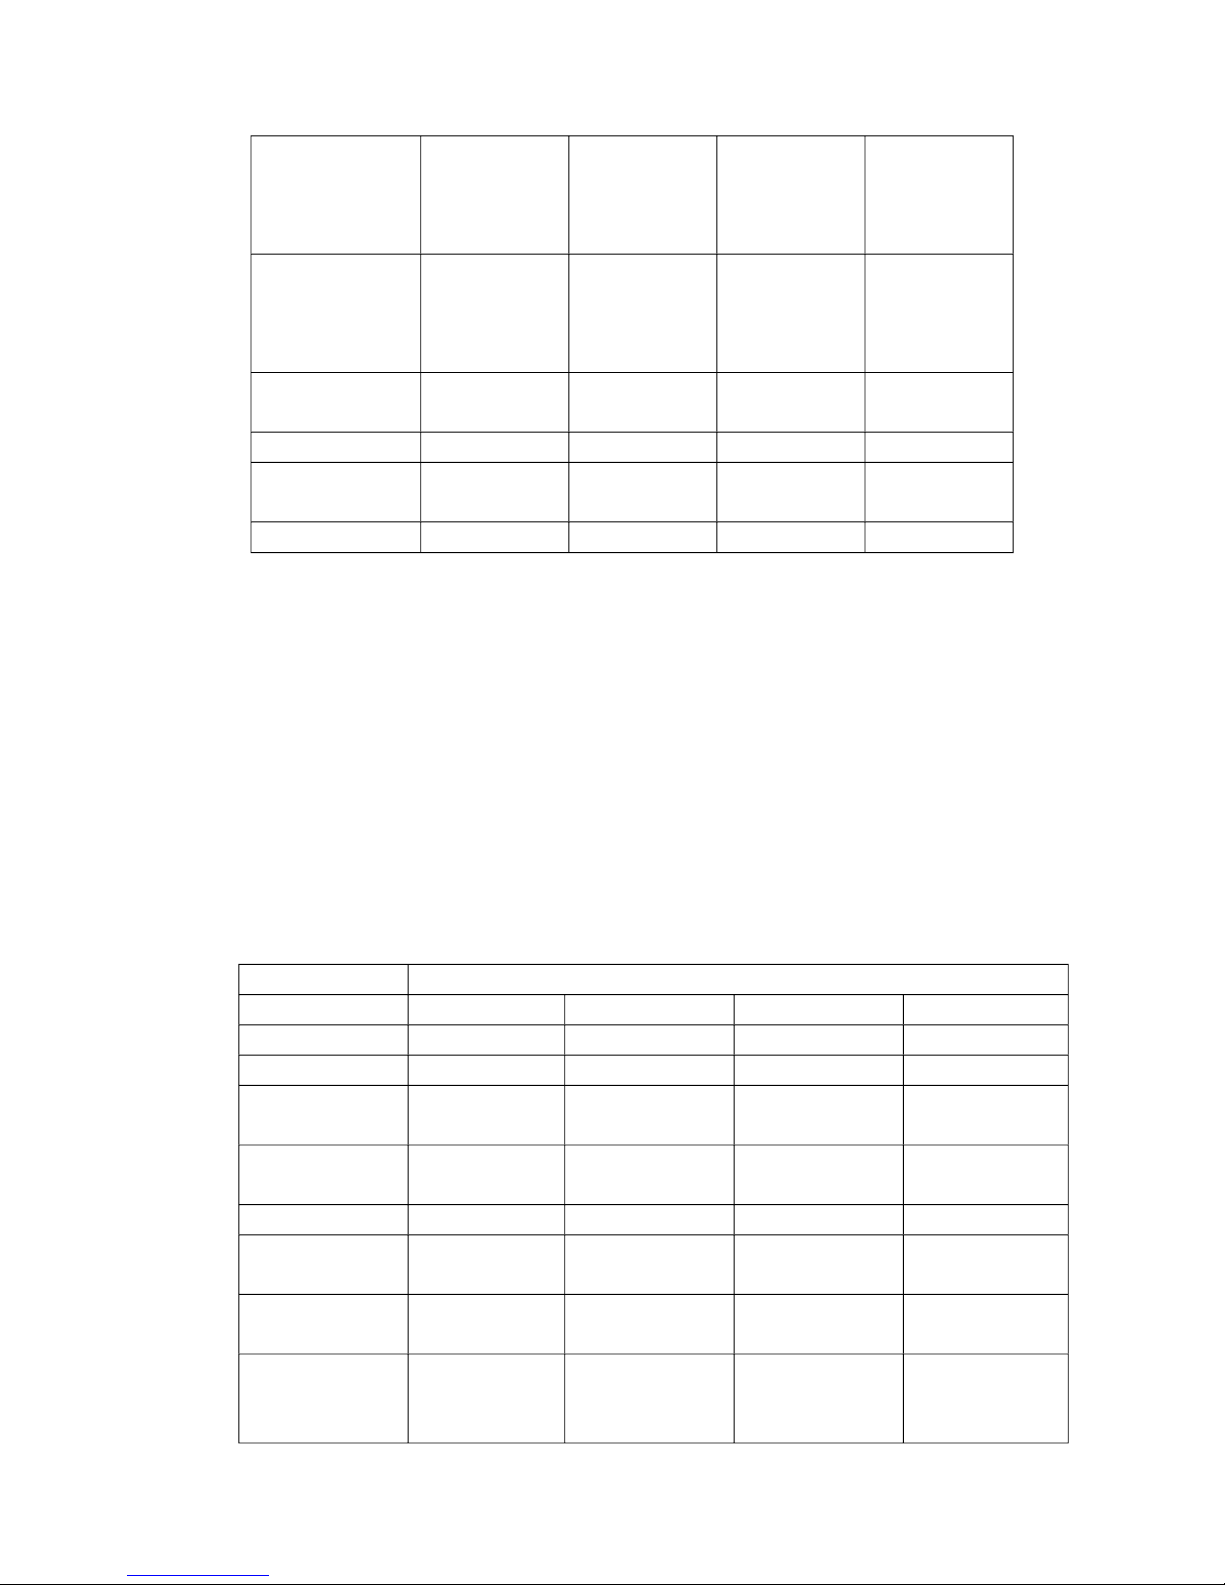
The setting
range of
temperature of
oil
60ºC-190ºC 60ºC-190ºC 60ºC-190ºC 60ºC-190ºC
Moving
temperature of
temperature
limiter
230ºC 230ºC 230ºC 230ºC
Hand resisting
temperature
150ºC
150ºC
150ºC
150ºC
Dimension(mm) 220×400×315 265×430×290 265×430×340 325×460×340
Length of
handle(mm)
240 240 240 240
Weight 5.5kg 6kg 7.2kg 8.1kg
Name
2-Tank Electric Fryer
Model EF-4L-2 EF-6L-2 EF-8L-2 EF-11L-2
Voltage ~220V, 50Hz ~220V, 50Hz ~220V, 50Hz ~220V, 50Hz
Power 2×2000W 2×2500W 2×3250W 2×3500W
Number of oil
pot
2 2 2 2
Size of oil pot
(mm)
185×270×175 240×300×150 240×300×200 300×325×200
Volume 2×4(L) 2×6(L) 2×8(L) 2×11(L)
Number of
frying basket
2 2 2 2
Size of frying
basket
150×220×135 195×250×125 195×250×150 210×280×150
The setting
range of
temperature of
60ºC -190ºC 60ºC -190ºC 60ºC -190ºC 60ºC -190ºC
Page 7
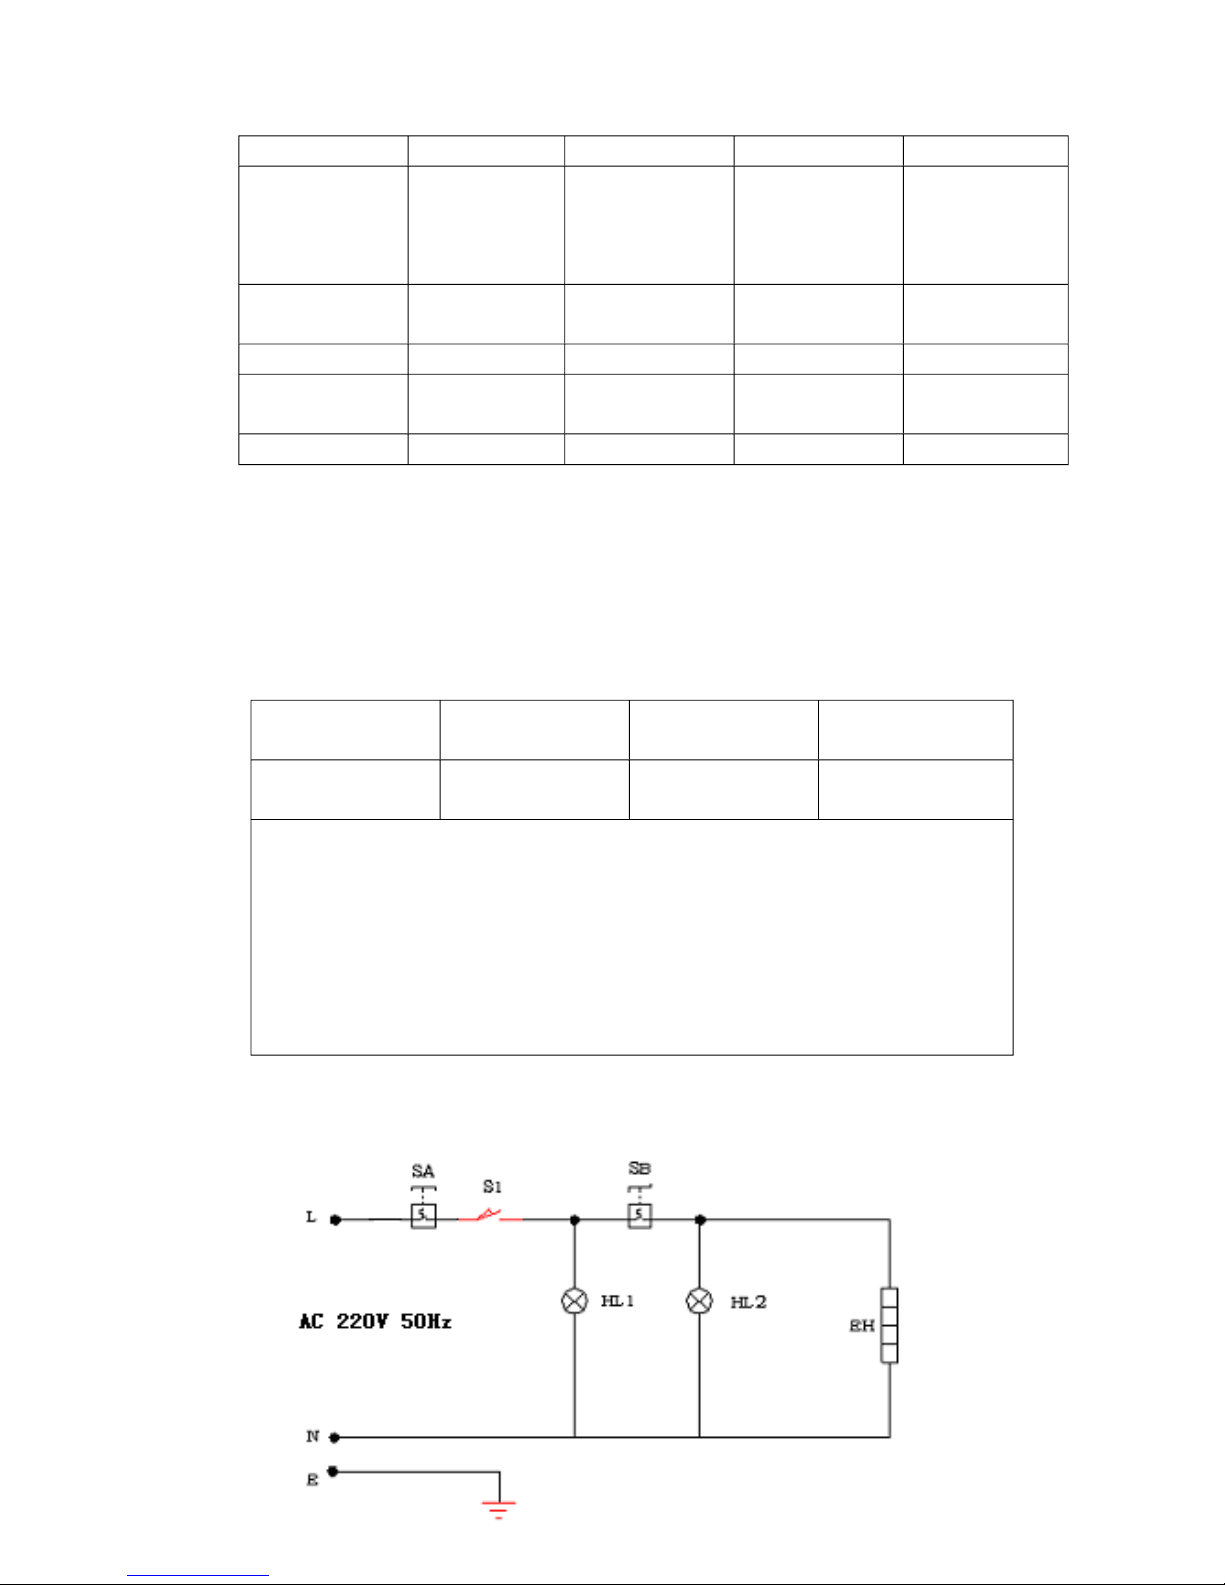
oil
Moving
temperature of
temperature
limiter
230ºC 230ºC 230ºC 230ºC
Hand resisting
temperature
150ºC
150ºC
150ºC
150ºC
Dimension(mm)
435×400×315 550×430×290 550×430×340 670×460×340
Length of
handle(mm)
240 240 240 240
Weight 10.2kg 11.1kg 13.1kg 14.6kg
THE QUANTITY OF FOOD FOR COOKING AT ONE TIME,
SHOULD NOT BE OVER THE AMOUNTS DETAILED BELOW
(BASED ON MEAT):
EF-4L/4L-2 EF-6L/6L-2 EF-8L/8L-2 EF-11L/11L-2
0.6Kg/pot 0.9Kg/pot 1.2Kg/pot 1.6Kg/pot
NOTE
THE QUANTITY OF FOOD OTHER THAN MEAT MUST BE LIMITED IN ORDER
TOAVOID OIL OVERFLOWING.
CARE MUST BE TAKEN WHEN FRYING FOOD WITH A HIGH WATER CONTENT
TOAVOID THE OIL BOILING OVER.
PARTICULARLY WET FOOD OR FOOD THAT IS TOO LARGE CAN CAUSE A
SURGE OF BOILING OIL.
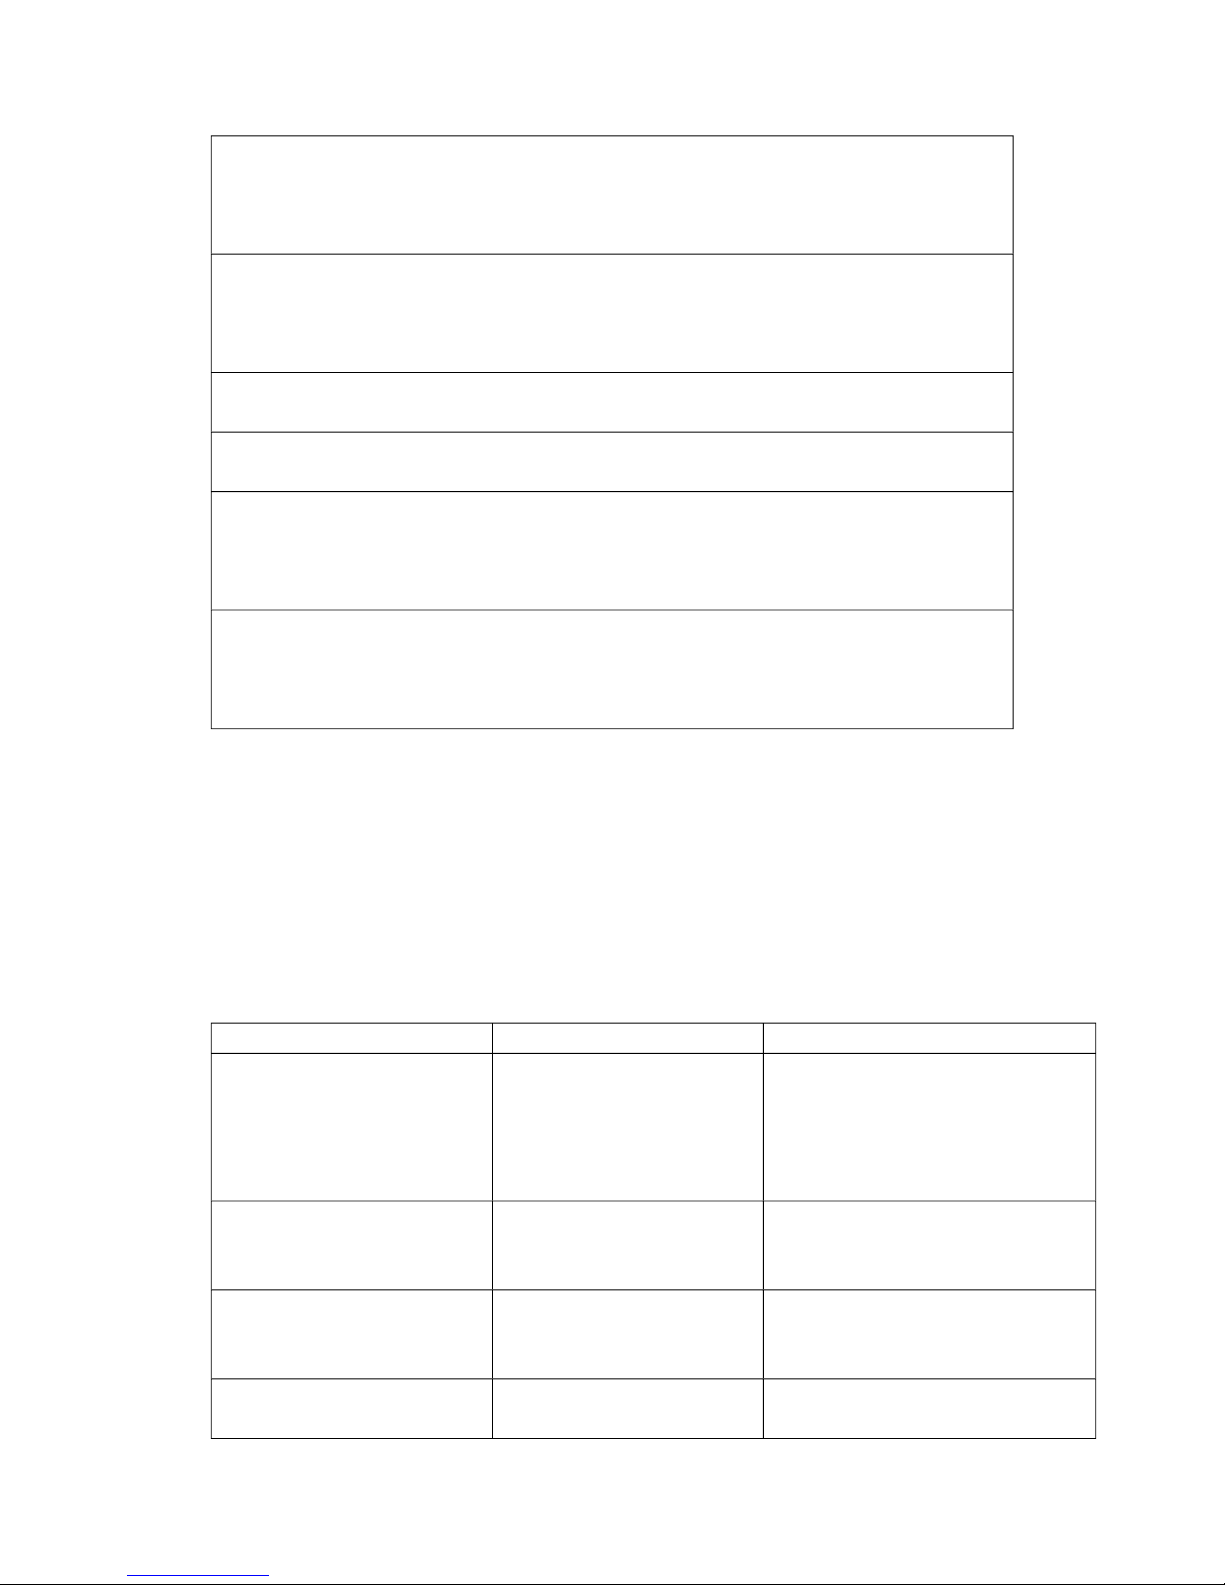
D.Circuit diagram
Page 8

S1 MICRO-SWITCH SATEMPERATURE LIMITER
EH ELECTRIC HEATING TUBE HL1 POWER INDICATOR
HL2 HEATING INDICATOR E EARTH GROUND
SB TEMPERATURE CONTROLLER
NOTE:
THE CIRCUITS FOR THE GF SERIES 1-TANK/2-TANK ELECTRIC
FRYER ARE DIFFERENT. THE DIFFERENCE IS THAT 2-TANK ELECTRIC
FRYER HAS TWO TANKS AND TWO ELECTRIC BOXES AND TWO
SEPARATE TEMPERATURE CONTROLLERS.
E. Instruction
1. Check that the power supply is correct, and make sure the supplied
voltage is coordinated with the voltage required by the unit.
2. There is an oil level mark in the oil tank. During use the quantity
of oil in the oil tank should be kept between the “MAX” and
“MIN” levels.
3. 1) Plug the machine and switch on the power. The green indicator
illuminates. This shows that current has been supplied to the
machine.
2) Rotate the temperature controller clockwise, until the required
temperature is set. At that time, the yellow indicator illuminates
Page 9

and green indicator switches off. This shows that the electric
element has stopped working and temperature of the oil in the tank
has risen to the correct level.
4. 1) When the temperature of the oil rises to the required temperature,
the temperature controller will cut off the power automatically.
2) When the temperature of the oil lowers, the temperature controller
switches the power back on automatically. The yellow indicator
illuminates, the green indicator switches off, and the electric heating
element works again causing the temperature of the oil to rise.
3) This process is repeated to ensure that the temperature of the oil
remains constant at the required temperature.
5. The lid of the tank is designed to keep the tank clean and to retain
heat. When putting on the lid, please make sure there is no water on
it in case water drops into the tank and causes oil splashes.
6. 1) The enclosed frying basket is for frying small food. There is a
hook and handle on the basket.
2) Immerse the basket in the oil when operating. When frying is
finished, lift the basket and rest it on the front notch of the tank to
drain the oil. The user can put large food into the tank directly to
fry.
7. After use, rotate the temperature controller anti-clockwise as far as
it will go to cut off the power.
Page 10

8. 1) Pour the old oil out of the pot when the temperature drops to
normal.
2) First switch off the power, fish plate out of the tank, and then
take the fryer head out of the back notch in the bottom box. Electric
heating tube and electric box are removed from the tank, and
should be put in a suitable, safe place. The oil tank can now be
cleaned.
9. In order to make sure the fryer remains safe and lasts for a long
time, the user should clean out the dregs of oil and dirt from the
element.
10.The fish plate in the oil tank is designed to protect the element.
Make sure to put the partition board into the tank when frying food.
11.1) There is temperature in electric box. The moving temperature is
230ºC; reset temperature is less 170ºC.
2) There is a reset button which must be pressed when the high
temperature limit cut out has been activated. This button is located
below the fryer head. Press the reset button to restart.
12.There is a micro switch in the fryer head. When the head is put
into the bottom unit of the fryer, the electricity is connected, and
when it is lifted out the electricity is disconnected.
13.Fresh vegetable oil should be used to avoid the risk of boiling over.
Do not use old oil because it will have a reduced flash-point and be
Page 11

more prone to surge boiling.
F. Notes for installation
1. The voltage for this equipment must be coordinated with the supply
voltage.
2. User should install a suitable power switch and breaker switch near
the fryer.
3. At the back of the unit is the earth bolt. Please connect the earth
wire in compliance with the safety regulations reliably with copper
cable of no less than 2mm².
4. Before use, check whether every connection is formed, voltage is
normal and ground connection is safe.
5. Do not use water to clean the electric box directly.
6. The installation of this fryer must be done by professionals.
Notice
● This equipment must be operated by trained cook or professionals.
● Do not dismantle and refit the machine. Any dismantling or
alteration could cause serious accidents.
● Do not clean the product with a water jet or immerse the electric box
into water while cleaning as this creates the risk of electric shock.
●
High temperature can cause burns. When the fryer is in use and before
or after being used, do not touch directly the body of the unit because
of high temperature.
Page 12
●
Do not use a power supply with incorrect voltage.
Do not use a main switch that does not comply with safety regulations.
●
In thunderstorm conditions, unplug the unit to avoid damage from
power surges.
●
Take care not to damage the unit with hard objects.
●After using, please shut off main switch.
●The installation and maintenance of electric circuit must be carried out
by professionals.
●
If the power cord is damaged, the user should consult the manufacturer,
maintenance department or professionals to repair.
Warning!
●
When using ensure that your hands, plug and switch are dry.
●
Oil should not be allowed to get lower than the minimum oil level. Do not dry
burn.
●
Do not use water to clean the electric box directly or immerse the electric box into
water to clean.
●
Do not use old oil to fry because it will cause over boiling.
G.Troubleshooting
Problem Cause Solution
1. When the machine is
plugged in and the power is
switched on, the power
indicator does not illuminate
and there is no heat.
1. The plug is not properly
inserted.
2. Micro-switch contacts
may not be correctly
seated.
1. Ensure the plug is inserted
properly.
2. Adjust the limit distance of
micro-switch
2. The heating indicator does
not illuminate and
temperature does not rise.
1. The connection of
electric element is loose.
1. Tighten the screws on both
sides of the element.
2. Replace the element.
3. Power indicator is on but
the setting temperature is not
raised.
1.Temperature controller is
burned.
1. Change temperature controller.
4. Temperature control is
normal but indicator is not
1. Indicator is burned. 1. Change indicator.
Page 13

on.
5. After circuit heating
electric heating tube is not
heated.
1. Temperature limiter
works.
1. Reset “over heating protecting
button” by hand.
6. Temperature control can
not be controlled.
1. Temperature limiter is
out of order.
1. Change temperature limiter.
Aforementioned troubles are just for reference. If any fault
occurs, please cease using, return it to professional technicians
for check and repair.
H.Transportation and storage
During transportation, the machine should be careful handled and
protected from shaking. The packaged machine should not be stored in the
open air. It should be stored in a ventilated warehouse without corrosive
gas. It should not be stored upside down. If it needs to be stored in open air
temporarily, protection against rain is needed.
I. Cleaning and maintenance
1. Disconnect the power supply before cleaning in case of accident.
2. Do not use a wet cloth with non-corrosive cleanser to clean the module
plate, the surface of the equipment and power cord. Direct washing by
water is not permitted in case of any damage to the equipment.
3. If the unit is not in use at any time, please switch off the temperature
controller and main switch.
4. Please store the equipment in a ventilated storehouse without corrosive
gas after cleaning when it is not to be used for a long time.
Page 14

J. Daily check
Check the condition of the machine before and after use
every day.
Is the machine positioned correctly?
Is the power cord old, broken or
damaged?
Before using
Is the control panel damaged?
Is there a strange smell?
After using
Is there a strange sound
WARNING!
●
Please check the machine everyday.
Regular checks of the product that can avoid serious accidents. The
temperature of the machine should not get above 200ºC.
●
Stop using the machine if you feel that there may be a problem with the
machine.
Ask a properly qualified person to check and maintain the machine as
soon as possible.
Page 15
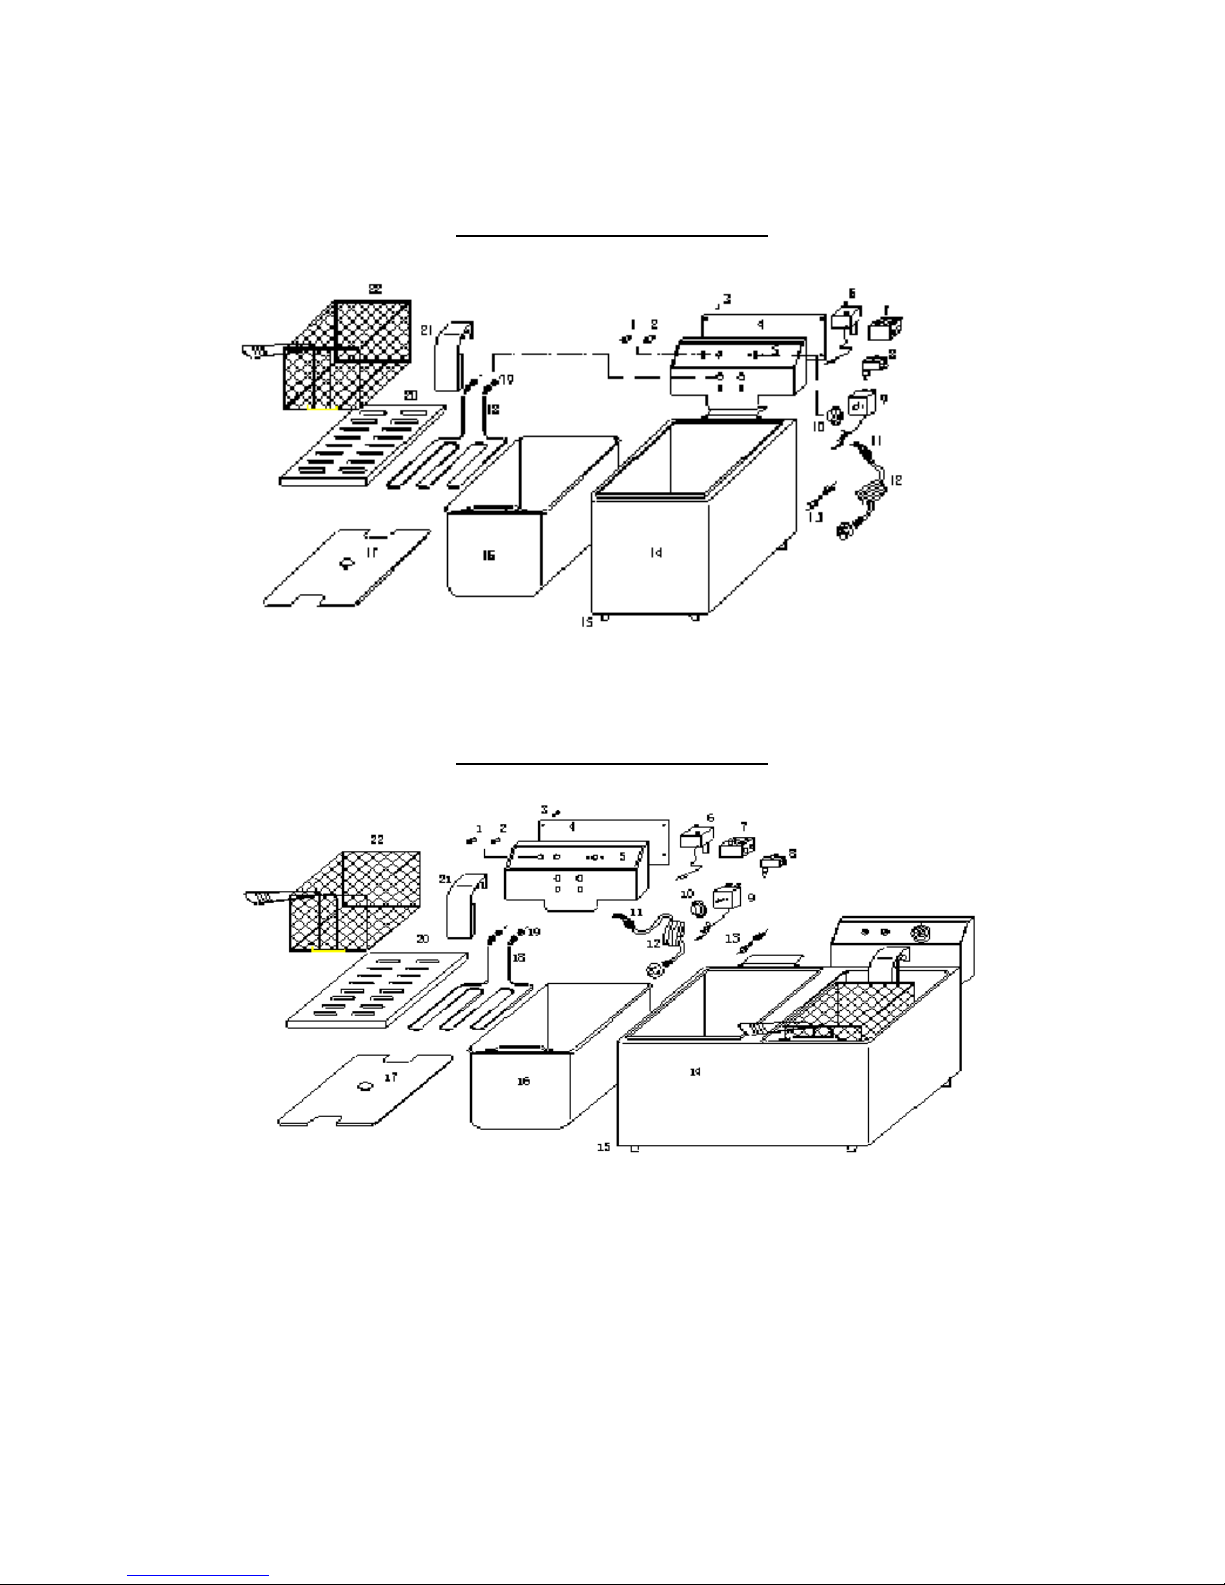
K.Diagram
EF series 1-tank electric fryer
EF series 2-tank electric fryer
1: POWER INDICATOR 2:HEATING INDICATOR 3:SCREW OF SIDE BOARD
4:BACK BOARD 5:ELECTRIC BOX 6:TEMPERATURE LIMITER
7:PORCELAIN SOCKET FOR CONNECTION 8: MICRO-SWITCH
10: KNOB 11:SHEATH OF POWER CABLE 12: POWER CABLE
13: EQUIPOTENTIAL GROUNDED SCREW 14: LOWER BOX 15: RUBBER FEET
16: OIL POT 17: COVER OF OIL POT 18:ELEMENT 19:FIRMED SCREW
20: PARTITION BOARD 21: PROTECTING BOARD FOR ELEMENT 22:
FRYING BASKET
Page 16
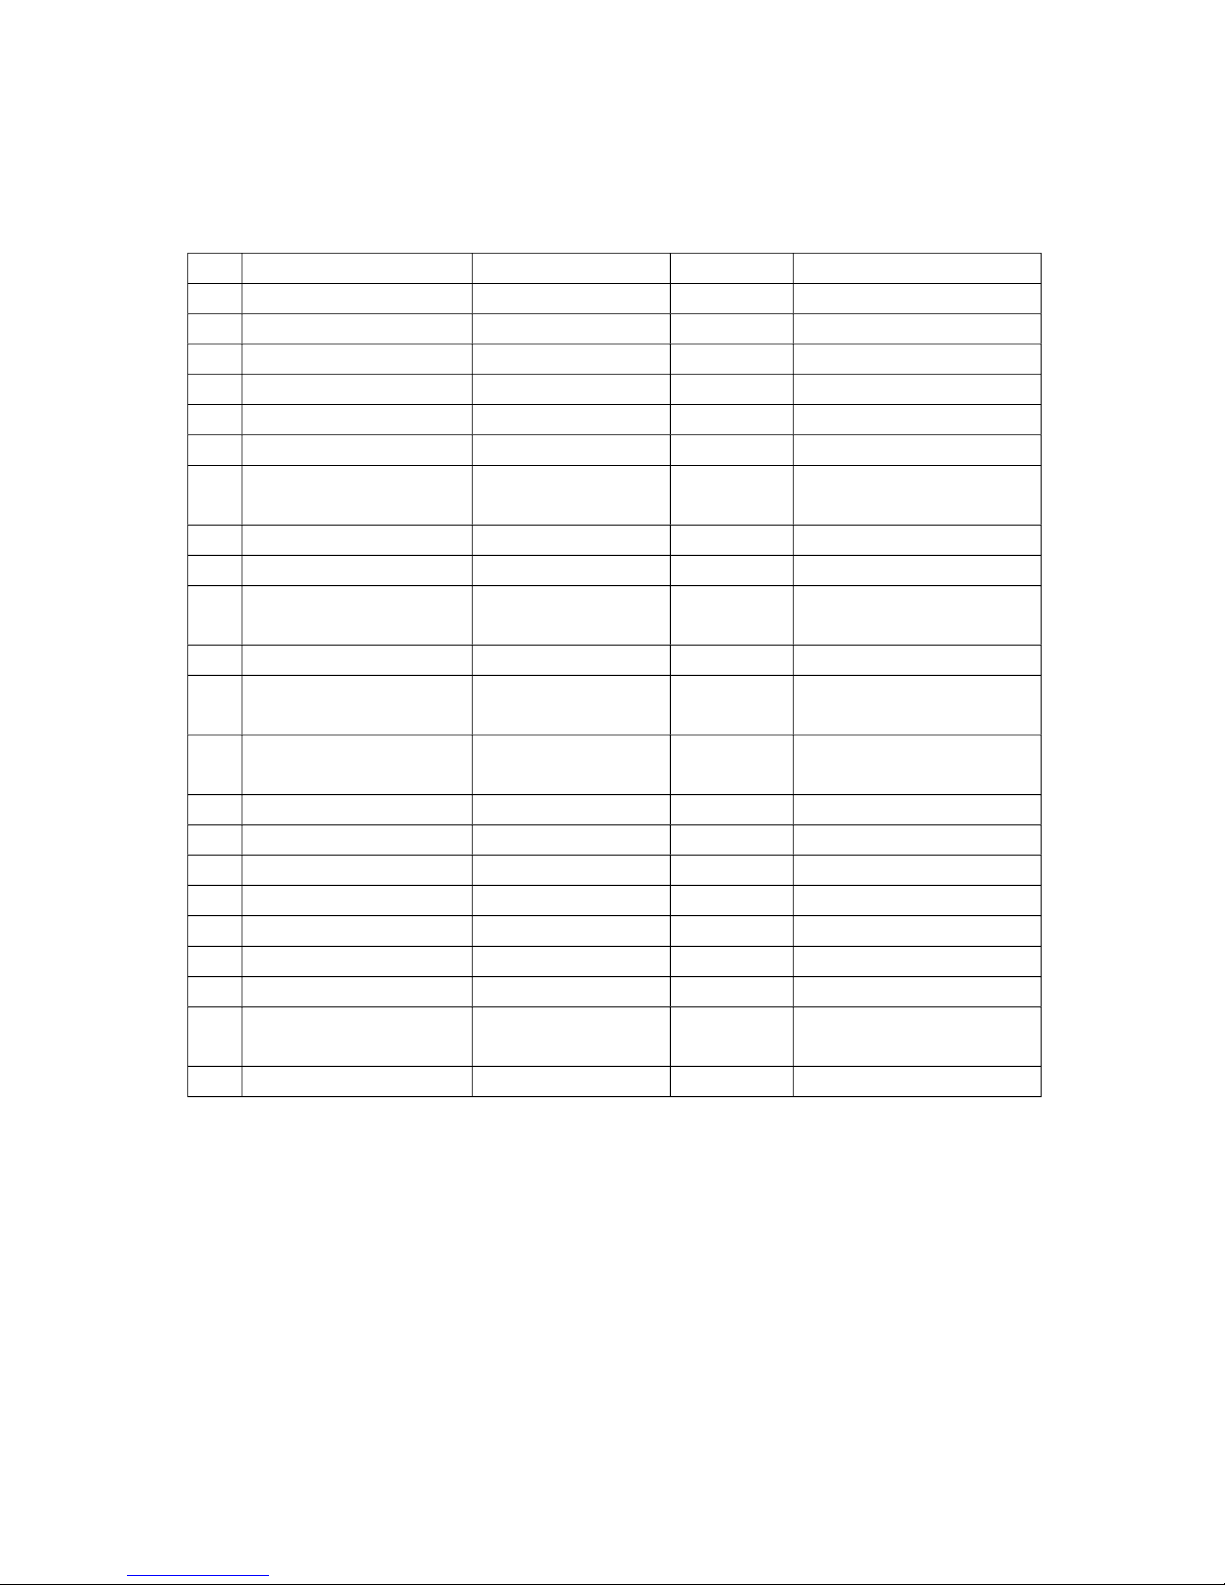
DIAGRAM LIST
Name of product: EF series 1-tank fryer
NO NAME SPECIFICATION AMOUNT NOTE
1
Power indicator
Φ
1
2 250V/14A 1 Outsourcing, green with line
2 Heating indicator
Φ
12 250V/14A 1 Outsourcing, green with line
3 Fix screw for back board M4×8 with flat pat 4 Outsourcing
4 Back board Stainless S=0.8 1
5 Electric box Stainless S=0.8 1
6 Temperature limiter 230/250V 1 Outsourcing
7 Connection ceramic Insulated ceramic
250V/16A
1
8 Micro-switch KW-7-0/16A 1 Outsourcing
9 Temperature controller 190/250V 1 Outsourcing
10 Knob of temperature
controller
ABS Plastic 1
11 Sheath of power cable
Φ
15/ABS Plastic 1 Withbayonet
12 Power cable 250V 3×1.5mm² 1 Outsourcing, with plug (
2.5m)
13 Equipotential ground
screw
M6×15/brass 1 With screw and spring, flat
pat
14 Bottom box Stainless S=0.8 1
15 Rubber feet
Φ
30×15/black 4 Outsourcing
16 Oil pot Stainless steel 1 Outsourcing, with oil level
17 Cover of oil pot Stainless S=0.8 1
18 Element 230V/50Hz 1 Out-processing
19 Fix screw for element 45# steel M12 2
20 Partition board for oil Stainless S=0.8 1
21 Protecting board for
element
Stainless S=0.8 1
22 Frying basket Stainless wire, net 1 Handle can be folded
Info:
The specification of each electric heating tube in fryer is:
- EF-4L: 2000W, 230V/50Hz
- EF-6L: 2500W, 230V/50Hz
- EF-8L: 3250W, 230V/50Hz
- EF-11L: 3500W, 230V/50Hz
Page 17
DIAGRAM LIST
Name of product: EF series 2-tank fryer
NO NAME SPECIFICATION AMOUNT NOTE
1
Power indicator
Φ
1
2 250V/14A 2 Outsourcing, green with line
2 Heating indicator
Φ
12 250V/14A 2 Outsourcing, green with line
3 Fix screw for back board M4×8 with flat pat 8 Outsourcing
4 Back board Stainless S=0.8 2
5 Electric box Stainless S=0.8 22
6 Temperature limiter 230/250V 2 Outsourcing
7 Connection ceramic Insulated ceramic
250V/16A
2
8 Micro-switch KW-7-0/16A 2 Outsourcing
9 Temperature controller 190/250V 2 Outsourcing
10 Knob of temperature
controller
ABS Plastic 2
11 Sheath of power cable
Φ
15/ABS Plastic 2 Withbayonet
12 Power cable 250V 3×1.5mm² 2 Outsourcing, with plug (
2.5m)
13 Equipotential ground
screw
M6×15/brass 2 With screw and spring, flat
pat
14 Bottom box Stainless S=0.8 1
15 Rubber feet
Φ
30×15/black 4 Outsourcing
16 Oil pot Stainless steel 2 Outsourcing, with oil level
17 Cover of oil pot Stainless S=0.8 2
18 Element 230V/50Hz 2 Out-processing
19 Fix screw for element 45# steel M12 4
20 Partition board for oil Stainless S=0.8 2
21 Protecting board for
element
Stainless S=0.8 2
22 Frying basket Stainless wire, net 2 Handle can be folded
Info:
The specification of each electric heating tube in fryer is:
- EF-4L-2: 2000W, 230V/50Hz
- EF-6L-2: 2500W, 230V/50Hz
- EF-8L-2: 3250W, 230V/50Hz
- EF-11L-2: 3500W, 230V/50Hz
 Loading...