

Page 1
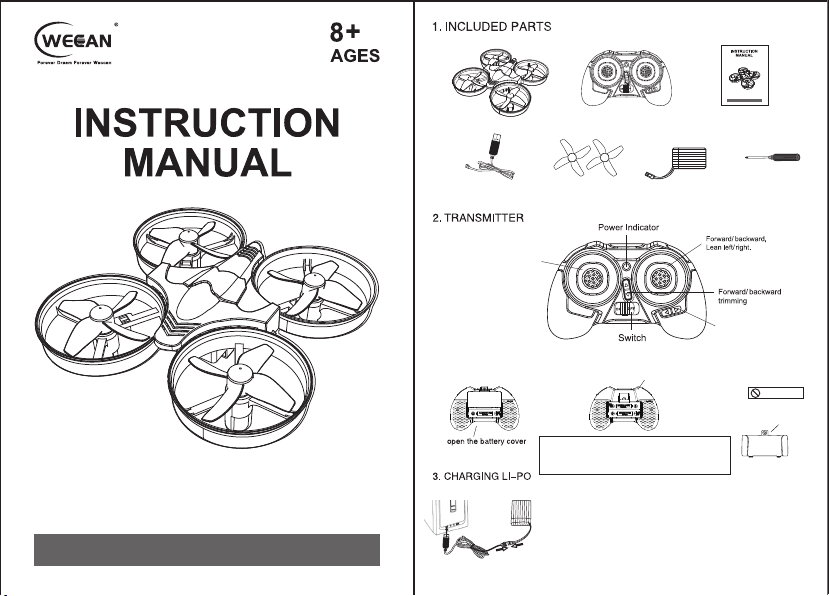
1* Quadcopter
1*Transmitter 1* Instruction Manual
Model:SG-F8
Please read the instruction manual carefully before
using and keep for future reference.
1* USB
Charging wires
2.1 Instruction of Transmitter :
Up/down, turn left/right. Boot
default slow-speed mode,
press enter into high-speed
mode, then press again to
enter into headless mode.
Press once again to exit
headless mode and enter
into slow speed mode
2.2 Install Batteries:
4*Blade
Use 2 AAA batteries and insert batteries as per the correct
polarities (DO NOT mix batteries of different sizes). Do not
mix old and new batteries. Do not mix alkaline,
standard(carbon-zinc), or re-chargeable batteries.
First, connect the battery plug to the matching input on the
computer (includes USB charger) and then connect the USB
charge to a USB power source. When battery is charging, LED
light is on When fully charged, LED light is off. Charging time is
about 50-60 minutes. Flight time is around 5 minutes. Do not leave
charging battery unattended.
1*Battery 1*Screw driver
Press quickly for 360-degree flip.
Press longer for auto return
Left/right sideways
trimming
Transmitter
Under no circumstance should you
disassemble battery cover
FORBIDDEN
Page 2

4. OPERATION INSTRUCTIONS 5. OPERATING AND CONTROL
4.1 POWER & MATCH
4.1.1 :① Insert the battery into the battery compartment of the quadcopter, connect the
battery plug into quadcopter input (the indicator will flash). Put the quadcopter on a flat
surface.
② Press the ON/OFF button of the transmitter and you will hear one ‘beep’ sound. Push the
throttle stick to the highest position and then pull it back to the lowest position until you hear
one ‘beep’ sound again. This time the power indicator of the transmitter and the LED light of
the quadcopter will stay on. The quadcopter and the transmitter are now paired.
5.1 Operation
It may take some time to learn how to operate this quadcopter. If the quadcopter is flying low,
gently push the left control stick to adjust the flying height. DO NOT push the stick too hard.
Up
Turn right
4.1.2 After pair connection is done with quadcopter : push upward of the throttle stick to start
the quadcopter.
4.2 Gyroscope calibration: When pairing
connection is finished, put the quadcopter on a
flat surface and pull the throttle stick to the left
lowest position point and then towards the right
button to calibrate the gyroscope. If two LED
lights flash, it means the gyroscope is returning
and scanning for position. If the LED light stops
flashing, it means the calibration is successful.
(Refer to the picture on the right).
Note : Before flying, the quadcopter should be placed on a flat surface to calibrate to ensure
stable flying. If the quadcopter flies off track, you can adjust with the remote.
Down
Push the left control stick up or down, the
quadcopter will up or down accordingly.
Push the right control stick forward or
backward, the quadcopter will go forward
or backward accordingly.
5.2 Trimming :
Slowly push upwards on the throttle stick. If the
quadcopter is leaving the ground and keeps going
in a different direction, please use the trimming
key to trim it to fly in a level state.
1. When the Drone flies forward or backward, you
can adjust by pressing the FRONT / BACK
trimming buttons. Note: If Drone flies forward, you
must press the Back button and if Drone flies
backward, you must press the Front button.
2. When the quadcopter flies left or right during
flight, you can adjust by pressing the TURN
LEFT/ RIGHT trimming buttons on the remote.
Note : If the quadcopter flies to the right, you must
press the LEFT TURN button and if the
quadcopter flies to the left, you must press the
RIGHT TURN button.
Push the left control stick turn left or turn
right, the quadcopter will turn left or turn
right accordingly.
Left side Right side
Push the right control stick to the left side
or right side and the quadcopter will go left
or right accordingly.
Right
Fly to left Fly to right
Turn left
Page 3

6. 360-degree flips:
Press the flip button on light control stick and transmitter will ‘beep’ indicating the go ahead to
enter flip mode.
Flips are now possible.
In order to get good flipping performance. It is recommended to keep 1.5m (4.9 ft.) of altitude
between the quadcopter and the ground.
It will make flipping easlier during ascending as altitude will be lost during flips.
6.1 Left 360-degree flips:
First press the flip button to enter flip
mode. Push left and the quadcopter
will flip left.
6.2 Right 360-degree flips:
First press the flip button to enter flip
mode. Push right and the quadcopter
will flip right.
※ Starting Headless Mode :
After pairing the quadcopter, press down on the left control stick to enter Headless mode. This
can be done when the quadcopter is in the air or on the ground.
Step 1: confirm the forward direction before entering into the headless mode and then press
the headless button. The transmitter will keep sending out sound of ‘beep’ intermittently (blue
light for the forward direction), now it has entered into headless mode. Regardless of the
direction the quadcopter is flying, it will follow the direction you want when it is paired.
※Leave Headless Mode :
If you need to exit the headless mode, please press the headless mode button to exit. When
you hear one indication sound of ‘beep’ from the transmitter, it means it has entered into
slow-speed mode.
6.3 Forward 360-degree flips:
First press the flip button to enter flip
mode. Push forward and the
quadcopter will flip forward.
6.4 Backward 360-degree flips:
First press the flip button to enter flip
mode. Push backward and the
quadcopter will flip backward.
7. HEADLESS MODE
7.1 Headless Mode Shift :
Headless mode simplifies flying by connecting straight to the transmitter. No matter where the
quadcopter points, it will follow the front, left, right, and back of the transmitter.
See the diagram.
Note: In headless mode, a forward push on the controller will send the quadcopter in a
forward direction, away from you. Pull back on the controller and the quadcopter will come
back towards you again, no matter the orientation of the front blades of the quadcopter to the
user as long as the user is stationary. If the user changes location, simply re-pair the
controller using the below instructions.
Low Power Alert :
The flips mode will shut down and the quadcopter will return.
8. AUTO RETURN :
Press down the button of right control stick for a longer period for Auto Return and the
quadcopter will return to you automatically, but make sure not to move the transmitter. Once
the quadcopter is close to you, press down the auto return button for a longer period once
again to stop the quadcopter in it’s place.
Page 4

MAX II
9. FLIGHT EMVIRONMENT :
Do not operate quadcopter under
bad weather conditions to avoid
any potential damages.
10. INSTALL BLADES :
The blades need to be installed in their
designated location. Blade A/B should be
installed to marked A/B on body or the
quadcopter will not operate properly.
11. TRUOBLE SHOOTING
11.1 Transmitter and quadcopter are not paired.
Solution :
1) Ensure pairing was successful. If not, re-try.
2) Double check whether the installation of the blades is correct.
3) Confirm that the remote control is the original match. If not, re-start and then re-pair.
11.2 Unable to flip
Solution :
1) Press function combination button, which will change to flip mode.
2)Check if Li-po (battery) power is too low and needs to be recharged.
11.3 Quadcopter is shaking with noise :
Solution :
1) battery voltage is too low. Replce the battery with a new one.
2)Power OFF the quadcopter then restart.
3)Put the quadcopter on a level horizontal plane and recalibrate the gyroscope.
11.4 Cannot take off :
Solution :1)Wrong installation of the blade. Make sure the blades are connected to the right
motor.
2)Make sure quadcopter’s shell is not loose.
3)Check if the quadcopter battery is fully charged. If battery is too low, the inner light on the
quadcopter’s shell will flash.
Hold the head aiming towards the motor
axis and press down to lock. Be careful not
to damage or deform the blades.
WARNING:
* Consumer is responsible for any injuries caused while using this quadcopter
* Keep body parts away from this product while in use
* This product is not suitable for children under 8 years of age
* Small parts included; keep away from children
* Check the charger, wire, plugs and other parts regularly
* Only use the charger included with this product
* Dinconnect the charger included with this model
* Never short circuit batteries, disassemble or throw in fire
* This product may vary from the illustrations on the package or this manual
* Keep the package and manual, as they contain useful information
* Batteries of different types or capacities shall not be mixed within any single electrical circuit.
* Do not mix old and new batteries.
* Do not mix alkaline, standard(carbon-zinc), or re-chargeable batteries.
Industry Canada Notice RSS210
This device complies with Industry Canada license-exempt RSS standard(s).
Operation is subject to the following two conditions:
(1) this device may not cause interference, and
(2) this device must accept any interference, including interference that may
cause undesired operation of the device.
This digital apparatus does not exceed the Class B limits for radio noise emissions from digital
apparatus set out in the Radio Interference Regulations of Industry Canada.
The 2.4G Transmitter, FCC ID:Z3CWECCAN-RCDRONE
changes or modifications not expressly approved by the party responsible for compliance could
void the user’s authority to operate the equipment.
This equipment has been tested and found to comply with the limits for a Class B digital
device, pursuant to Part 15 of the FCC Rules. These limits are designed to provide reasonable
protection against harmful interference in a residential installation. This equipment generates,
uses and can radiate radio frequency energy and, if not installed and used in accordance with
the instructions, may cause harmful interference to radio communications. However, there is
no guarantee that interference will not occur in a particular installation.
If this equipment does cause harmful interference to radio or television reception, which can be
determined by turning the equipment off and on, the user is encouraged to try to correct the
interference by one or more of the following measures:
-- Reorient or relocate the receiving antenna.
-- Increase the separation between the equipment and receiver.
-- Connect the equipment into an outlet on a circuit different from that to which the receiver is
connected.
-- Consult the dealer or an experienced radio/TV technician for help.
This device complies with Part 15 of the FCC Rules. Operation is subject to the following two
conditions: (1) this device may not cause harmful interference, and (2) this device must accept
any interference received, including interference that may cause
undesired operation.
 Loading...