

Page 1
Quick Start Guide
This Quick Start Guide provides an overview for installing and configuring Webroot® SME Security. For more detailed
instructions, see the System Administrator Guide.
Planning the Installation
Before you begin installing Webroot SME Security, review the guidelines in this section.
Upgrade Support
If your company is currently running Webroot Spy Sweeper Enterprise 3.1 and a supported MS SQL database
(2000, 2005, or 2005 Express), you can upgrade to Webroot SME Security 3.1.5. However, if your company is
running a version of Webroot Spy Sweeper Enterprise prior to 3.1 or a DBISAM database, see the following
table for upgrade information. Also, if you are running older versions of the Spy Sweeper Clients, most of
them are still supported, except for version 2.1.
If Your Company is Running ... Follow These Steps ...
Webroot Spy Sweeper Enterprise
3.0 or lower
DBISAM database
Webroot Spy Sweeper Clients
2.5.1, 3.0, or 3.1
Webroot Spy Sweeper Client 2.1 This version is no longer supported. You must upgrade to the new Webroot
Yo u must upgrade to Webroot Spy Sweeper Enterprise 3.1 before you can
install Webroot SME Security 3.1.5. Contact your Webroot Sales
representative or Webroot Support for more information.
The DBISAM database is no longer supported. See the System Administrator
Guide for instructions.
These previous versions of the Client are supported for older operating
systems. You do not need to upgrade these clients unless you want to do so.
Client or to one of the versions listed above.
Webroot Component Requirements
Before installing Webroot SME Security, review the requirements for the main components: Webroot Server,
Webroot Clients, and Distributors. (If your internal network is complex or uses proxy servers, or if you run
firewall programs at the desktop or server level, see Appendix A of the System Administrator Guide.)
Webroot Server Requirements
Operating system: Windows 2000 Pro or Server with SP 4 or
Windows XP Pro with SP 2 (see the System Administrator Guide for important notes) or
Windows 2003 Standard, Enterprise, R2, or Small Business Server with SP1
CPU: 1 GHz minimum
Memory: 1 GB minimum
Disk space: 1 GB minimum
Database support: Microsoft SQL Server 2005 Express Edition (English language; free download) or
Microsoft SQL Server 2000 or 2005
Webroot Software, Inc. • PO Box 19816 • Boulder, CO 80308 • www.webroot.com
Copyright: © 2006 Webroot Software, Inc. All rights reserved.
Page 2

Webroot Server Requirements (Continued)
Browser: Internet Explorer 6.0 SP1 or later
Network requirements: The Webroot Server components require the following network access:
Client Service (WebrootClientService.exe):
• Requires local network access.
Update Service (WebrootUpdateService.exe):
• Requires local network and Internet access.
• Requires outbound access for HTTPS requests on port 443 for your company server.
Admin Console (WebrootAdminConsole.exe):
• Requires local network access.
• Requires use of port 50003 on your server, by default. The Distributor Service on your
server uses the same port.
• Secure Sockets Layer (SSL) access requires use of port 50023.
Webroot Client Requirements
Operating system: Windows 2000 Pro or Server or
Windows XP Home, Professional, or Tablet or
Windows 2003 Standard, Enterprise, or Small Business Server
CPU: 1 GHz minimum
Memory: 128 MB RAM minimum; 256 MB RAM or more recommended
Disk space: 100 MB free space
Browser: Internet Explorer 6.0 SP1 or later
Network requirements: The Webroot Client components require the following network access:
CommAgent™ (CommAgent.exe):
• Requires local network access.
• Requires use of ports 50001 and 50002 on the client workstation.
Webro ot C lie nt (SpySweeperUI.exe):
• No network access requirements.
Spy Sweeper Engine (SPYSWEEPER.exe):
• Requires local network or Internet access, depending on which is needed to access
the company server.
Webroot Distributor Requirements*
Operating system: Windows 2000 Pro or Server with SP 4 or
Windows XP Pro with SP 2 or
Windows 2003 Standard, Enterprise, or Small Business Server with SP1
CPU: 1 GHz minimum
Memory: 1 GB minimum
Disk space: 1 GB minimum
Network requirements Distributor Service (WebrootUpdateDistributor.exe):
• Requires local network access.
• Requires use of port 50003 on your server. The Admin Console service on your
company server uses the same port.
* This Distributor Service can be installed on additional servers to manage clients in different geographical locations. For
more information about deploying multiple distributors, see the System Administrator Guide.
2 Planning the Installation
Page 3
Installing Components
Follow these steps to install the SQL database, the Webroot Server, Webroot Clients, and the Distributor.
Configuring a SQL Server Database
As a first step, you must install and configure either a SQL Server or SQL Server Express database. (Do not
use the SQL Server Express version if you have a large number of distributors. For more information, see the
System Administrator Guide.) See the following table for important database installation notes.
Database Installation Notes
Microsoft SQL Server
2000 or 2005
Microsoft SQL Server
2005 Express Edition (free
download)
If you are using SQL Server 2000 or 2005 for your database, you must create the
database before installing the Webroot Server. Make sure you have the user name and
password available before installing the Webroot Server. In addition, you may also want
to create a system data source name (DSN) if you experience problems connecting to the
database.
When you install the Webroot Server, the installer attempts to enable TCP/IP access and
the correct authentication mode (mixed mode). If you have problems with the database
configuration, refer to Webroot’s Knowledge Base available from:
http://webrootenterprise.supportportal.com/Portal/Home.aspx
If you are using SQL Server 2005 Express for your database, you can either install it in
advance or link to it from the Webroot SME Security installer to download and install it
from there. You must also install Microsoft .NET Framework 2.0, which can also be
accessed from the Webroot Server installer.
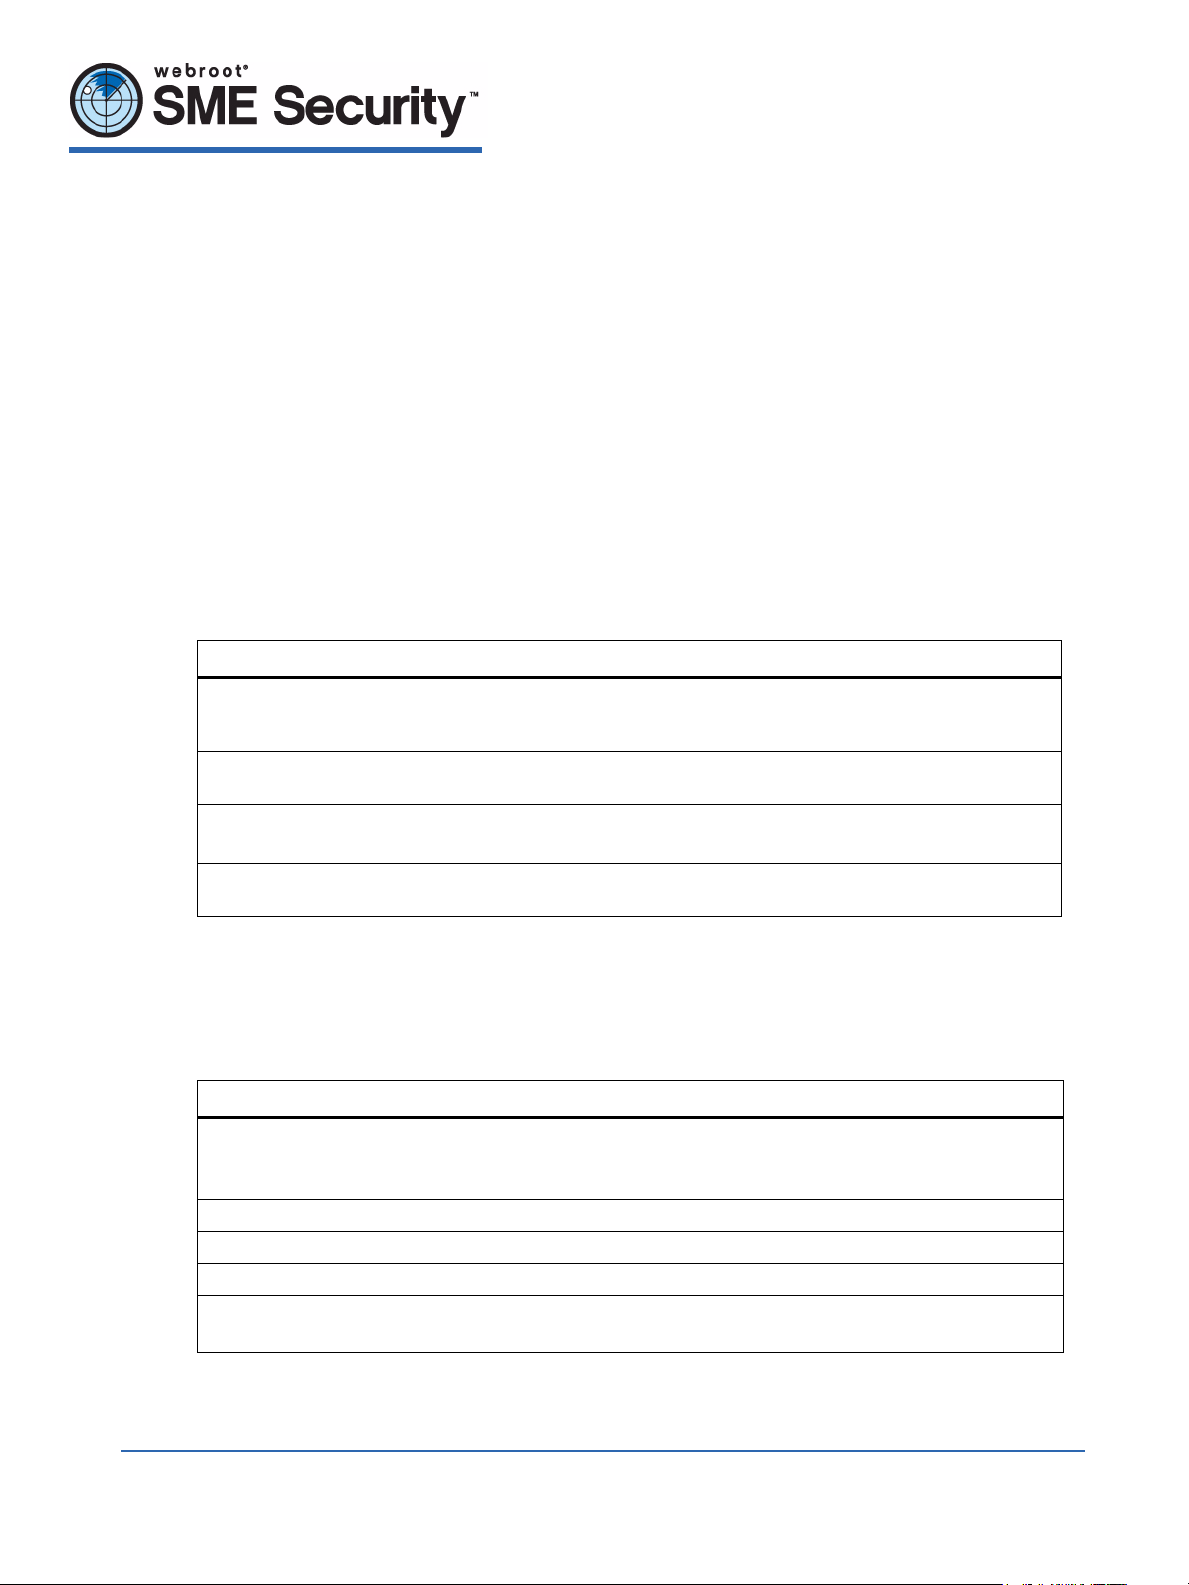
During the database installation, make sure you select Mixed Mode for the
authentication mode.
If you have an existing Webroot Spy Sweeper Enterprise 3.1 installation and a DBISAM database, see the
System Administrator Guide for instructions. The DBISAM database is no longer supported.
Installing and Configuring the Webroot Server
Follow these instructions to install the following Server executables:
• Client Service. Controls communications between the Webroot Server and Webroot Clients.
• Update Service. Controls updates from the Webroot Update Server.
• Admin Console. Provides a user interface for administering Webroot SME Security.
(When installing the Webroot Server on Windows Server 2003 Service Pack 1, you may receive various errors
and the installation may fail. To resolve installation problems see the System Administrator’s Guide.)
The following table provides important information required during Webroot Server installation.
Required Information for Webroot Server Installation
Database Connection In the Database Connection Information screen, you must enter the following
information about your SQL database:
• SQL Server Name
•Instance Name
• Database Name
• SQL User Name
• Password
You will use either MS SQL Server or SQL Server Express. You need the above
information regardless of which version of MS SQL Server you are using.
Keycode In the Company Information screen, you must enter your unique Key Code. If you
purchased Webroot SME Security through a sales representative or online, you received
your Key Code in an e-mail message. You can copy the Key Code from the message and
paste it in. If you purchased Webroot SME Security from a store or received it already
installed on your new computer, the Key Code is on the product packaging.
Quick Start Guide 3
Page 4

Required Information for Webroot Server Installation (Continued)
User Name and Password In the Default Admin Account screen, you will create a user name and password to
access the Admin Console. Make sure you write down this name and password and keep
it somewhere safe.
Proxy Server If you use a proxy server to access the Internet, you must enter your proxy server name
or IP address and the port number in the Proxy Settings screen. If your proxy server
requires authentication, you must enter the server’s user name and password.
Email Settings In the Email Settings screen, you can enter the following information for e-mail
notifications:
• Host name: fully qualified domain name for your e-mail server (SMTP server) used
for outgoing mail.
• From address: the e-mail address that notification messages will come from.
• SMTP login: the user name and password (if your SMTP server requires a login).
Client Services In the Server Settings screen, you must specify the IP address or host name that the
client workstations will use to communicate with your company server. For IP
resolution, use the IP address of the network interface card (NIC) visible to client
workstations. For host name resolution, select or enter the fully qualified domain name
of your server (requires a properly configured DNS environment).
You must also specify the port on your company server that the Client Service will use
to communicate with your client workstations. The default port is 50000. Be sure that
the port you use is not used by another process.
Service Credentials In the Service Credentials screen, you can enter a user name and password for your
domain, which is necessary if you want to install the Webroot Client on workstations
from the Admin Console.
To install the Webroot Server components:
1. Log into the system with Administrative rights.
2. Make sure all Windows programs are closed.
3. Start the installation program, as described in the following table.
To install from a CD: To install from a downloaded file:
1. Insert the CD into your CD drive.
If the installation options do not display
automatically, use Windows Explorer to navigate
to your CD drive. Then double-click
WebrootServerSetup.exe to start the installation.
2. Click Install Webroot SME Security to start the
installation and display the Welcome window.
1. Follow the instructions on the Web site to download the
WebrootServerSetup.exe file.
2. Go to where you downloaded the file.
If you downloaded the file to your Windows Desktop,
you will see an icon on your desktop. If you downloaded
the file to a different location, use Windows Explorer to
navigate to the file.
3. Double-click WebrootServerSetup.exe to start the
installation and display the Welcome window.
4. At the Welcome screen, click Next.
The License Agreement window opens.
5. Read the license agreement and select the I Accept the License Agreement option if you agree with
the content.
If you want to print the license agreement, click Print.
The Installation Checklist window opens.
6. Make sure that you have the information and that your system meets the listed system requirements.
Select each item in the checklist and click Next.
The next screen to open depends on whether a SQL Server 2000 or 2005 database is installed, no
database is installed, or a SQL Server Express database is installed.
4 Installing Components
Page 5
If SQL Server 2000 or 2005 is installed:
The Database Connection windows opens. Skip to step 7 for entering database connection
information.
If no database is installed:
The Prerequisites window opens with links to download and install SQL Server Express and .NET
2.0. (Installing .NET 2.0 is required only if you are using SQL Server Express.) If you want to install
SQL Server Express or .NET 2.0, click the links provided, download the files, and follow the
installation wizards.
Be sure to remember the database name, user name, and password you set during the SQL Server
Express installation. You will need this information when you continue with the installation of the
Webroot Server.
When you install SQL Server Express, you can accept all the default values during the installation.
However, you must select the Mixed Mode option in the Authentication Mode window.
After you make these changes, the Database Connection window opens.
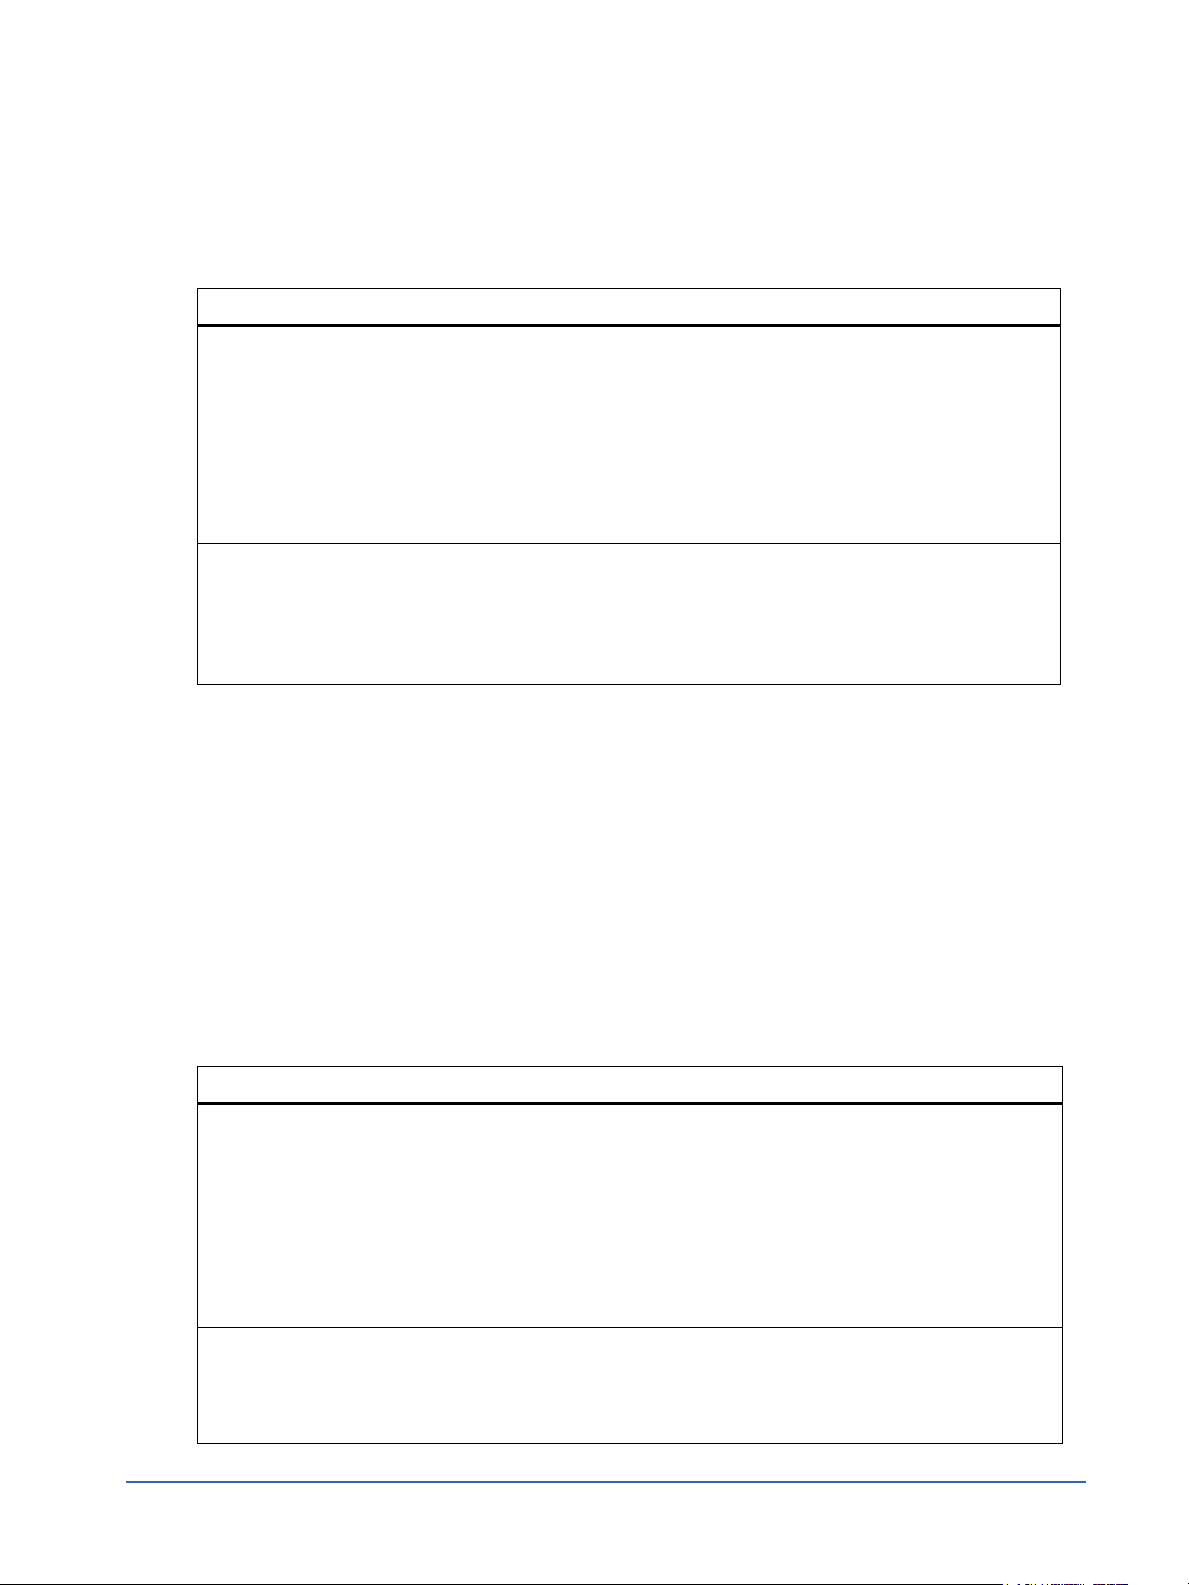
If SQL Server Express is installed:
The SQL Server Express Settings window opens, indicating that Setup has detected SQL Server
Express on your system, but that some settings are incorrect.
Quick Start Guide 5
Page 6
Select the Attempt to Fix the Incorrect SQL Server Express Settings option and click Next.
If you select Continue without Repairing the SQL Server Express Installation option, you must
change the SQL Server Express settings yourself before Webroot SME Security will work with the
database. For more information, refer to the Webroot Knowledge Base available from:
http://webrootenterprise.supportportal.com/Portal/Home.aspx
The Database Connection window opens.
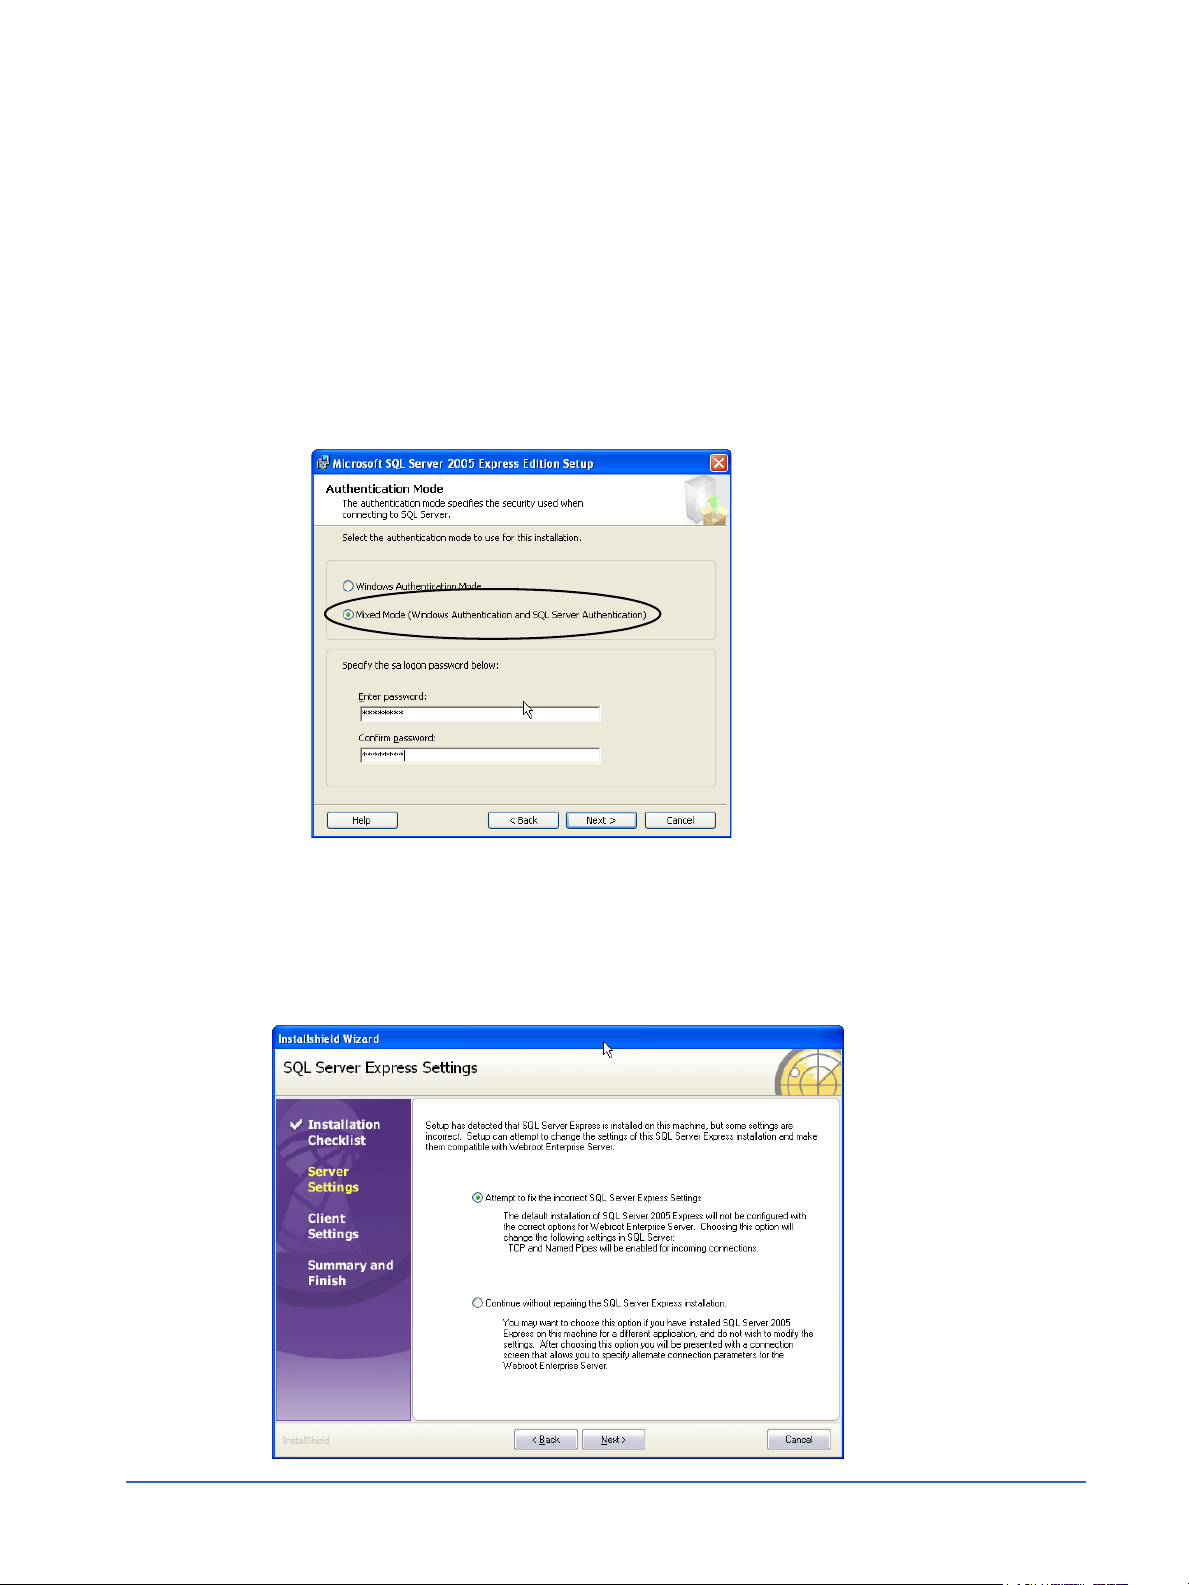
7. In the Database Connection window, verify that the database information is correct, enter the
password, and click Next.
SQL Server Name: Name of the server that is running MS SQL Server or SQL Server Express.
Instance Name: For SQL Server Express, enter the name of the instance that you defined for
Webroot SME Security data.
For MS SQL Server, leave this field blank unless you know the SQL Server
instance you want to use.
Database Name: Name of the database you defined for Webroot SME Security data.
SQL User Name: User name you defined for the Webroot SME Security database in SQL Server
or SQL Server Express.
Password: Password you defined for the Webroot SME Security database in SQL Server
or SQL Server Express
.
6 Installing Components
Page 7
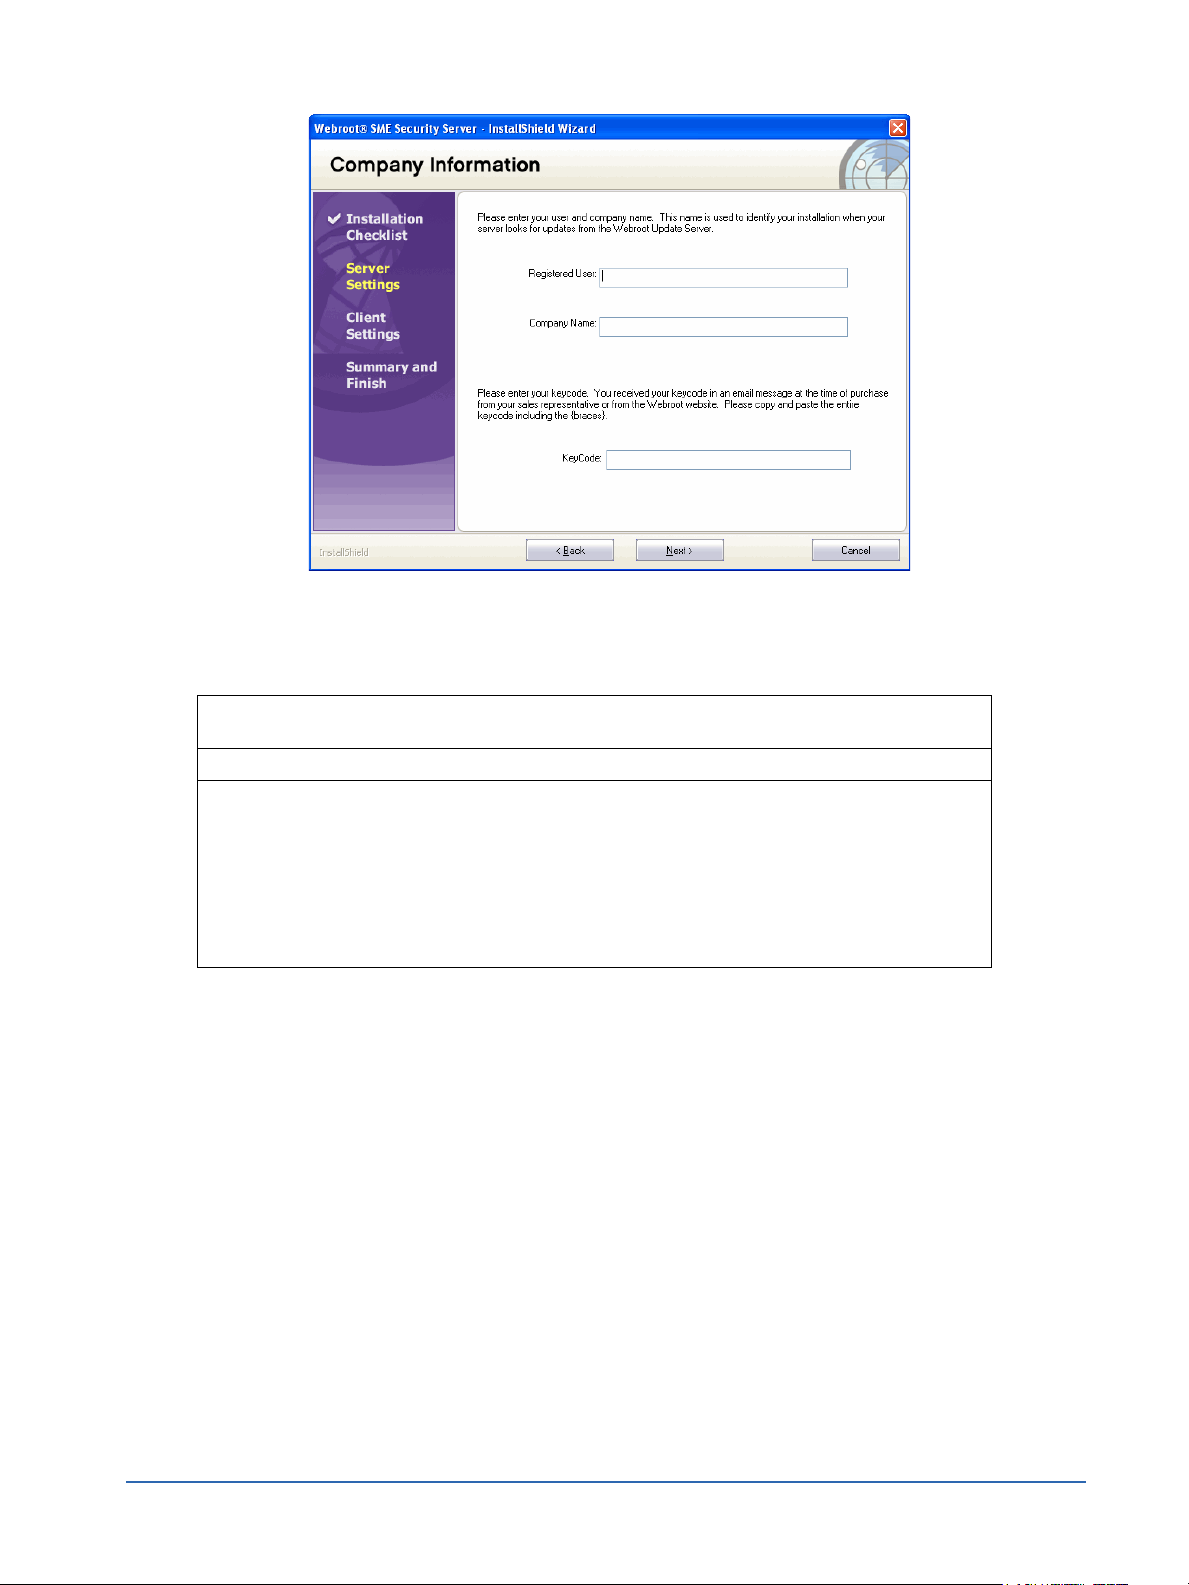
The Company Information window opens.
8. In the Company Information window, enter the registration and Key Code information and click
Next.
Registered User: Name of the person who will be the registered user of Webroot SME Security
and the Admin Console.
Company Name: Name of your company.
Keycode: Unique code that identifies the rights and privileges associated with your
installation, such as the number of licenses you have purchased.
If you purchased Webroot SME Security through a sales representative or
online, you received your Key Code in an e-mail message. You can copy the
Key Code from the message and paste it in. If you purchased Webroot SME
Security from a store or received it already installed on your computer, the
Key Code is on the product packaging.
Be sure to include the braces.
Quick Start Guide 7
Page 8
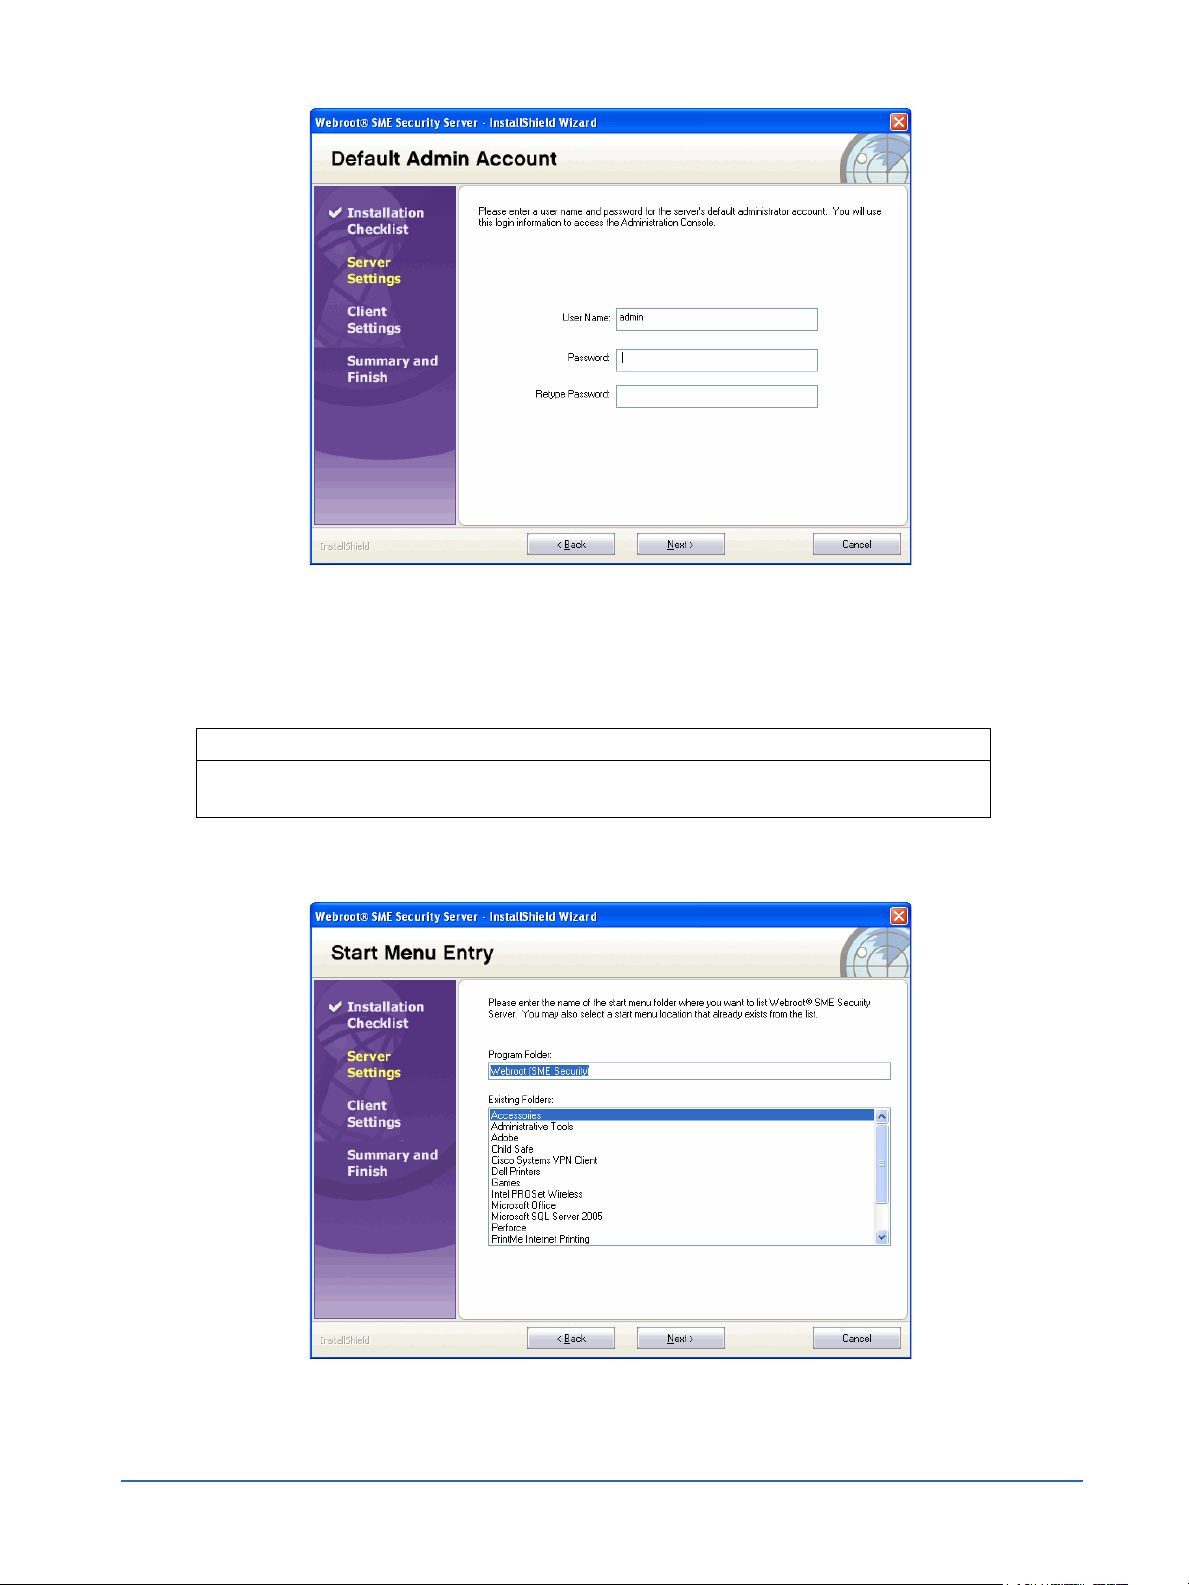
The Default Admin Account window opens.
9. In the Default Admin Account window, enter a user name and password, then click Next.
Be sure to write down your user name and password. You must remember this name and password to
access the Admin Console.
User Name: Login name to access the Admin Console.
Password:
Retype Password:
Password for the login.
The Start Menu Entry window opens and shows the default Start menu folder.
10. If you want to use the default folder, click Next. If you want to use a different Start menu folder, enter
a new name or select an existing folder.
8 Installing Components
Page 9

The Installation Paths window opens and shows you the default locations for installing the
components and for product updates and spyware/virus definitions.
11. If you want to keep the default locations, click Next. Otherwise, select or enter new locations. Both
paths must refer to local disks that are physically on the server. Network disks are not supported.
Install Path: If you want to install the Webroot Server to a different folder, enter the path or
click Browse to navigate to the folder you want.
Updates Path: If you want to download Webroot Server updates to a different folder, enter
the path or click Browse to navigate to the folder you want.
You cannot change this folder after installation.
The Proxy Settings window opens.
Quick Start Guide 9
Page 10

12. If you do not use a proxy server to access the Internet, click Next to skip this screen. If you will use a
proxy server to access the Internet, enter the information in the fields.
Proxy Server: Enter the proxy server name or IP address and port number in one of the
following formats: server_name.company.com:80 or 10.0.0.1:80.
Use Proxy Login:
User:
Password:
If you use a proxy server that requires authentication, select the Use Proxy
Login option.
Enter your user name and password in the fields.
The E-mail Settings window opens.
13. In the Email Settings window, enter or select the information and click Next. If desired, you can edit
these settings later in the Admin Console.
E-mail Host: Fully qualified domain name for your e-mail server used for outgoing mail
(SMTP server). If you do not have this information, enter NA and edit the
information from the Admin Console.
From Address: E-mail address that notification messages will come from. Must be a real e-
mail address in the format: tom@webroot.com.
My SMTP Server Requires a
Login
User Name:
Password for SMTP:
If you use a secure SMTP e-mail server, select this option.
Enter the user name and password in the fields.
Note: Webroot SME Security only supports Auth-Login.
10 Installing Components
Page 11

The Server Settings window opens.
14. In the Server Settings window, verify or enter new information and click Next. If desired, you can edit
these settings later in the Admin Console.
Server Polling Interval: Select how often you want the Webroot Server to check the Webroot Update
Server for new spyware/virus definitions and software updates.
Client Service IP/Host
Name:
Client Service Port: Enter the port on your company server that the Client Service will use to
Server Updates: Select how you want to handle updates to your Webroot Server installation,
Select or enter the IP address or host name that the client workstations will use
to communicate with your company server.
For IP resolution, use the IP address of the network interface card (NIC)
visible to client workstations. For host name resolution, select or enter the
fully qualified domain name of your server (requires a properly configured
DNS environment).
communicate with your client workstations. The default port is 50000. Be
sure that the port you enter is not used to communicate with another system.
including the Admin Console:
• Automatic Installation of Updates: Automatically updates your Server
installation whenever updates are available.
• Manual Installation of Updates: Requires you to manually install Server
updates when they are available.
Quick Start Guide 11
Page 12

The Client Settings window opens.
15. In the Client Settings window, select the desired information and click Next. If desired, you can edit
these settings later in the Admin Console.
Tray Icon Setting: Select how you want the Webroot Client to appear on client workstations.
• Pop up on Scan: Displays a tray icon that client users can double-click to display
the Webroot Client window and automatically pops up the window whenever a
sweep starts, whether scheduled or using Sweep Now.
• Stay Minimized in Tray: Default and recommended setting. Displays a system
tray icon that client users can double-click to display the Webroot Client, but does
not pop up the window whenever a sweep starts. From this interface, end users
can start their own sweeps and adjust any allowable settings.
• Stay Invisible: Does not display a system tray icon and does not do anything
when a sweep starts. End users have no access to the Webroot Client window.
Client Polling Interval: Select how often you want Webroot Clients to check for updates and for schedule
and configuration changes from your server.
Install new definitions
automatically
Install new client
updates automatically
Shield and Sweep
Settings:
Select to have spyware and virus definitions installed automatically on all client
workstations whenever updates are available.
Select to have Webroot Client program updates installed automatically on all client
workstations whenever updates are available.
Select the desired settings:
• Maximum protection: Turns on all shields and sweeps weekly at 12 am
Saturday.
• Recommended: Turns on all Windows System and Internet Explorer shields to
protect workstations from unauthorized changes.
• Custom: No settings will be configured at this time.
12 Installing Components
Page 13

The Service Credentials window opens.
16. If you want to install the Webroot Clients from the Admin Console, select the “Run ...” option, enter a
user name and password for your domain, and click Next. If you do not need to install Webroot
Clients from the Admin Console (see “Using Alternate Methods to Install Webroot Clients” on
page 19), leave the option blank and click Next.
The Summary window opens and shows the current settings.
17. Click Next.
The Webroot Server installs and automatically starts the Client Service and Update Service. These
services (WebrootClientService.exe and WebrootUpdateService.exe) run as Windows services and
should always be running. This permits your company server to download updates from the Webroot
Update Server and permits client workstations to download updates and configuration changes from
your company server.
18. Click Finish.
You are now ready to configure one or more client workstations, and if needed, one or more distributor servers.
For more information, see “Installing and Configuring the Webroot Client” on page 14 and “Installing and
Assigning Distributor Servers” on page 21.
Quick Start Guide 13
Page 14

Installing and Configuring the Webroot Client
The Webroot Client configuration installs the following components on each client workstation:
• CommAgent. Communicates periodically with your company server to check for configuration
changes, new or updated applications, or updated threat definitions.
• Webroot Client. Detects viruses and potentially unwanted programs, such as spyware. Also provides
access to options for workstation users.
• Spy Sweeper Engine. Provides the core functions for Webroot SME Security.
Determine the best method for installing the Webroot Client as described below:
Method Description
Admin Console Configure the logon properties for the Webroot Admin Console Service, access the Admin
Console, then install the Webroot Clients on workstations from the Admin Console. See the
next section, “Using the Admin Console to Install Webroot Clients.”
MSI file Go to each workstation and manually execute the installation files. See “Using the MSI
File” on page 19.
Logon script Use the example logon scripts provided by Webroot. See “Using a Logon Script” on
page 20.
Group Policies If you use Active Directory, you can use Group Policies. See “Using Group Policies” on
page 20.
Image of Webroot
Client
Include the Webroot Client as part of an image installed on each workstation. See “Using an
Image File” on page 20.
Using the Admin Console to Install Webroot Clients
You can install and update the Webroot Clients from the Admin Console, which requires that you complete the
following tasks:
• Configure the logon properties for the Webroot Admin Console Service.
• Access the Admin Console.
• Install the Webroot Clients.
Configuring Logon Properties for Webroot Admin Console Service
To use the client deployment feature of the Admin Console, you must first properly credential the Webroot
Admin Console Service from the Services control panel in Windows. The user account that you specify must
have administrative privileges in the domains where you want to remotely install and uninstall the Webroot
Client.
To configure the logon properties:
1. From the Start menu, select Control Panel.
2. Access Services from Administrative Tools.
3. Right-click the Webroot Admin Console Service and select Properties.
14 Installing Components
Page 15

4. Click the Log On tab.
5. Select This account.
6. Click Browse.
7. Enter the domain name and partial user name using the following format:
DomainName\PartialUserName.
The user name must be a domain administrator.
8. Click Check Names.
Quick Start Guide 15
Page 16

9. If multiple user names display, select the correct user name and click OK.
10. Click OK again.
11. Highlight the password field and enter the correct password for the user in both the Password and
Confirm Password fields.
12. Click Apply.
13. Click OK.
16 Installing Components
Page 17

14. Click OK.
15. Restart the service.
Quick Start Guide 17
Page 18

Accessing the Admin Console
To access the Admin Console, you must enter a user name and password, which you specified during Webroot
Server installation. You can also access the Admin Console using an HTML Application (HTA) that installs
when you install the Webroot Server.
To access the Admin Console:
1. Start Internet Explorer and enter one of the following in the Address bar:
• If you are working from the computer where the Webroot Server is installed, enter: http://
localhost:50003/Admin
• If you are working from another computer on your network, enter:
http://[server_computer_name]:50003/Admin
• If you want to access the HTA version, select Start > All Programs > Webroot (SME Security)
> Admin Console.
The Welcome window opens.
2. Enter your user name and password.
3. Click Login.
A progress bar opens and shows the status of the resources loading, then the Admin Console displays
in your browser. Use the function tree to navigate in the Admin Console. Do not use the Back button
in your browser.
Function tree—
Expand and
select nodes to
see available
settings and
actions.
Installing Webroot Clients
You can install and update the Webroot Clients from the Admin Console. You can also see what version each
client workstation has installed and the last heartbeat.
If your client workstations are using Windows XP SP2 and the Windows Firewall, you must configure the
firewall to have certain exceptions. For more information, see the System Administrator Guide.
Installing the Webroot Client from the Admin Console requires Windows networking, access to the admin
share (c$), and NetBIOS enabled on your network.
To install and update Webroot Clients from the Admin Console:
Main panel—
Displays the
settings and
actions available
for the selected
function.
1. From the Admin Console function tree, select Administration > Client Install/Uninstall.
18 Installing Components
Page 19

The Client Install/Uninstall panel opens with the Network View tab selected. A list of the domains or
workgroups that exist on your network appear in the middle panel.
2. From the middle panel, select the domain or workgroup of the workstations.
A list of workstations appears in the far right panel.
3. Select the client workstations where you want to install the Webroot Client. You can select more than
one workstation by using Ctrl or Shift as you select workstations.
If you do not see some client workstations in the Network View tab, you can click the Name/IP tab.
From this panel, you can install Webroot Clients using the host name, IP address, or an IP address
range.
If you are updating an existing installation, you do not need to uninstall the Webroot Client first.
4. Click Refresh or go to the Client Management panel to see the status of the installation.
Using Alternate Methods to Install Webroot Clients
You can install Webroot Client components using any of the following alternate methods:
• Execute the WebrootClientSetup.msi file from each workstation.
• Use a logon script to execute the WebrootClientSetup.msi file.
• Use Group Policies, if you use Active Directory.
• Include the Webroot Client as part of an image installed on workstations.
Using the MSI File
From each workstation, you can execute the WebrootClientSetup.msi file. Make sure that all five of the client
installation files are in the same folder whenever WebrootClientSetup.msi executes:
• WebrootClientSetup.exe
• WebrootClientSetup.ini
• WebrootClientSetup.msi
• SSECleanup.exe
• SSEStart.exe
Typically, these files are in the C:\Program Files\Webroot\SME\Server\Client folder of the system where you
installed Webroot Server. The WebrootClientSetup.ini file contains the IP address and port of your company
server and is needed for the Webroot Client to install successfully.
The WebrootClientSetup.msi client installation program defaults to visible installation where you see a
progress bar and receive feedback when the installation is complete.
You can use the following client installation options when you configure client workstations:
Client Installation Options
Performing a silent install: If you would like to perform a silent installation, add the /q switch in the line that
executes WebrootClientSetup.msi. The installation program defaults to a visible
installation where you see a progress bar and receive feedback when the installation is
complete. The syntax is:
WebrootClientSetup.msi /q
Specifying the server IP
address and port:
You can specify the server IP address and port in the command line instead of relying on
the .ini file. The syntax is:
WebrootClientSetup.msi SERVERIP=10.10.10.10
SERVERPORT=50000
For a silent installation:
WebrootClientSetup.msi /q SERVERIP=10.10.10.10
SERVERPORT=50000
Quick Start Guide 19
Page 20

Client Installation Options (Continued)
Bypassing client
deployment settings:
You can also bypass the client deployment settings, as described in the examples below.
(If you are using the /q switch, the setting should go after it.)
Pop-up on scan: RUN_CLIENT_AS=0
Stay minimized: RUN_CLIENT_AS=1
Stay invisible: RUN_CLIENT_AS=2
The syntax is:
WebrootClientSetup.msi /q RUN_CLIENT_AS=1
SERVERIP=10.10.10.10 SERVERPORT=50000
Using a Logon Script
Use a logon script to execute the WebrootClientSetup.msi file (see also the previous table). Webroot has
provided some example logon scripts that you can change to meet your needs.
Below is an example logon script. You must adjust it for your setup and network environment. You must put
the script on your domain controllers or logon servers, then assign it so that it executes when a workstation
logs in to your network. This script assumes that you have a shared drive on your network that contains the
WebrootClientSetup.msi and WebrootClientSetup.ini files. Typically, these files are in the C:\Program
Files\Webroot\SME\Server\Client folder of the system where the Webroot Server has been installed. Copy the
client files to the network share of your choice, then adjust the script to match your share path. Also be sure to
give all workstations read access and execute access to the share.
@echo off
if exist "C:\Program Files\Webroot\SME\Client\SPYSWEEPER.EXE" goto check
if not exist "C:\Program Files\Webroot\SME\Client\SPYSWEEPER.EXE" goto install
:check
if exist "C:\Program Files\Webroot\SME\Client\SpySweeperUI.exe" goto loaded
if not exist "C:\Program Files\Webroot\SME\Client\SpySweeperUI.exe" goto install
:install
echo Loading Webroot Enterprise Clients...
"C:\Program Files\Webroot\SME\Server\Client\WebrootClientSetup.msi"
goto end
:loaded
echo Webroot Enterprise Clients are already Installed
:end
Using Group Policies
Use Group Policies, if you use Active Directory. For more information, refer to http://support.microsoft.com/
default.aspx?kbid=314934 and http://support.microsoft.com/?kbid=302430.
Using an Image File
To use an image file, include the Webroot Client as part of an image installed on workstations.
• Install the Webroot Client on the target system you are intending to image. If you will be
implementing multiple Admin Consoles, you need to create a separate image for clients managed
under each console.
• Stop the Webroot CommAgent service.
• Remove the following registry key:
HKEY_LOCAL_MACHINE\SOFTWARE\Webroot\Enterprise\CommAgent\guid
• Create your image.
Monitoring Webroot Client Polling
Client workstations poll the company server at random intervals within 20 seconds of installation. During the
first contact, the CommAgent also provides the name and MAC address of the client workstation and
automatically adds the client to a default group. To view client information, go to Administration > Client
Management. Once you configured the client workstations and they have polled the company server, you can
change the groups, if needed. You can also schedule sweeps and change sweep settings based on groups. For
more information, see the System Administrator Guide.
20 Installing Components
Page 21

Installing and Assigning Distributor Servers
By default, a Distributor Service is installed with the Webroot Server and acts as a single distributor server. If
your workstations are located in different geographical locations, you can install the Distributor Service on one
or more of your company servers. If you do not have workstations in different locations, you can skip this
section.
You must complete the following tasks to install and use distributor servers:
• Install the Distributor Service software.
• Assign distributor servers.
• Change the port number distributors use.
Install the Distributor Service
This procedure installs and starts the Distributor Service (WebrootUpdateDistributor.exe). By default, a
distributor server listens to port 50003.
If you need to change a distributor server to listen on a different port, you can do so. However, the port on each
distributor server must be the same as the port used on the company server for the Distributor Service. For
information on changing the local distributor port on the company server, see “Changing the Port Distributor
Servers Used” on page 23. The Admin Console Service on your company server also uses the same port.
For installation options, see the following table.
Distributor Installation Options
Performing a silent
install (or uninstall):
Specifying a folder: You can specify the folder where you install the Distributor, as follows:
Enabling logging: To enable logging when using the MSI file (“no logging” is the default), use the following
If you would like to perform a silent installation, add the /qn switch in the line that executes
WebrootDistributorSetup.msi:
WebrootDistributorSetup.msi /qn
The installation program defaults to a visible installation where you see a progress bar and
receive feedback when the installation is complete.
Or, if you are using the WebrootDistributorSetup.exe file, add the following:
WebrootDistributorSetup.exe /s /v” /qn”
If necessary, you can perform a silent uninstall by executing one of the following:
WebrootDistributorSetup.msi /qn REMOVE=”ALL”
WebrootDistributorSetup.exe /s /v” /qn” REMOVE=\”ALL\””
WebrootDistributorSetup.msi INSTALLDIR=”<drive>:\<folder>\”
or
WebrootDistributorSetup.exe /
v”INSTALLDIR=\”<drive>:\<folder>\””
syntax:
WebrootDistributorSetup.msi /qn
INSTALLDIR=”<drive>:\<folder>\”
/l*v ”<drive>:\<folder>\name.log”
To install the Distributor Service:
1. On the system where you installed the Webroot Server, access the following folder:
\Program Files\Webroot\SME\Server\Distributor.
This is the default folder where the WebrootDistributorSetup files are installed. If you installed them
to a different directory, access that directory instead.
2. Copy the files in this folder to the server you want to act as a distributor.
3. Execute the WebrootDistributorSetup.exe file.
4. Follow the on-screen instructions.
5. Continue with the instructions in the next section for assigning distributor servers.
Quick Start Guide 21
Page 22

Assigning Distributor Servers
After you install Distributor Services, you must assign their servers to client groups. By default, each client
workstation is added to a default group named after the domain or workgroup the client workstation is in. You
can assign a distributor server to one or more groups or to the whole company. For example, if you install four
distributor servers and assign them all to the whole company, the system randomly selects the order of
distributors it sends back to the client workstations. This process spreads the load across the servers to ensure
that the servers are not overwhelmed with update requests. Distributor servers also can control bandwidth use
over a WAN by localizing the Webroot Client definition and update downloads.
To assign a distributor server:
1. From the Admin Console function tree, select Administration > Distributors.
The Distributors panel opens with a list of all existing groups in the group tree (middle panel).
2. Click Add Distributor.
The Add Distributor window opens.
3. Enter a name for the distributor server.
If you enter the DNS name of a server on your network, the IP address automatically populates when
you tab to the second field.
4. If necessary, enter the IP address of the server.
5. Click OK.
The server name now displays in the list on the right side of the panel.
6. Drag a server from the list to a group or to the company in the group tree.
To remove a server assignment, select the server in the group tree and click Unassign Distributor. To
remove the selected distributors from their assignments and from the list of distributors, click Delete
Distributors.
To update the status of the distributors, click Refresh.
22 Installing Components
Page 23

Your company server will automatically send copies of all updates to all distributors. You still need to
assign updates manually (from Administration > Updates >Manual Install) or set automatic
installation rules (from Administration > Updates > Auto Install) to determine which updates
should be applied to which groups. For more information, see the System Administrator Guide.
Changing the Port Distributor Servers Used
The company server uses the same port (50003 by default) for both the Distributor Service and Admin Console
Service. The distributor servers that you configured must use the same port for the Distributor Service.
If you need to change this port, complete the following tasks:
1. Change the Distributor Service port on the company server.
2. Change the Distributor Service port on each distributor server.
Changing the Distributor Service Port on the Company Server
The Distributor Service on your company server uses port 50003 by default to distribute updates to your
distributor servers and client workstations. Be sure that the port you use is not used to communicate with
another system. The Admin Console service on your company server also uses the same port.
To change the Distributor Service port on the company server:
1. From the Admin Console function tree, select Administration > Configuration > System Settings.
The System Settings panel opens, with several subpanels where you can view and edit settings.
2. Click the Network show/hide bar.
3. Change the port under Admin Server/Distributor Settings.
4. Click Apply.
5. Log out of the Admin Console.
6. Restart the Webroot Admin Console Service.
7. Access the Admin Console using the new port number.
8. From the Admin Console function tree, select Dashboard > Server Status.
Quick Start Guide 23
Page 24

The Server Status panel opens.
9. Check that the Update Distributor port is open.
Changing the Distributor Service Port on the Distributor Server
If you change the Distributor Service port on the company server, you must also change it on each distributor
service.
The paths in the following steps assume you have installed the Admin Console and the Update Distributors in
the default location: “C:\Program Files\Webroot.” If you have installed any of them to a different directory,
substitute the correct root in the specified path.
To change the Distributor Service port on the distributor server:
1. On the distributor server, stop the Webroot Update Distributor Service.
2. For backup purposes, rename the following file on the distributor server:
“C:\Program Files\Webroot\SME\Server\WebServer\conf\
WebrootUpdateDistributor.conf”
3. From your company server, copy the file “C:\Program Files\Webroot\SME\Server
\WebServer \conf\WebrootUpdateDistributor.conf” to the distributor server.
4. Restart the Webroot Update Distributor Service.
5. To test that the correct port is open, open a browser and try the following URLs:
http://<distributor_machine_name>:<non_ssl_port>/Distributor/servlet/
UpdateReplicator
https://<distributor_machine_name>:<ssl_port>/Distributor/servlet/
UpdateReplicator
You should get an empty page as a response.
Trying the same URLs with the incorrect port yields a failure to connect to server error, which will be
treated in various ways by your browser, such as navigating to a search page.
Configuration and Operation Checklist
The following checklist provides an overview for configuring and using Webroot SME Security.
Step For More Information ...
Check system settings, notification settings, and
Webroot Client groups for easier administration.
Configure sweep settings and Smart Shields and run
initial sweeps on clients.
View the dashboard status for any detected threats
and view news from Webroot.
See Chapter 3 of the System Administrator Guide.
See Chapter 4 of the System Administrator Guide.
See Chapter 5 of the System Administrator Guide.
24 Configuration and Operation Checklist
 Loading...