

Page 1

Webroot Enterprise
System Administrator
Guide
Webroot Software, Inc.
PO Box 19816
Boulder, CO 80308
www.webroot.com
Page 2

Webroot Enterprise System Administrator Guide
© 2004–2005 Webroot Software, Inc. All rights reserved. Webroot, Spy Sweeper , and the Webroot
and Spy Sweeper icons are registered trademarks or trademarks of Webroot Software, Inc. All
other trademarks are properties of their respective owners.
Page 3

Content s
1: Planning Your Installation 1
About This Guide . . . . . . . . . . . . . . . . . . . . . . . . . . . . . . . . . . . . . . . . . . . . . . . . . . . . . . . . . . . 1
Conventions . . . . . . . . . . . . . . . . . . . . . . . . . . . . . . . . . . . . . . . . . . . . . . . . . . . . . . . . . . . . 1
Technical Support . . . . . . . . . . . . . . . . . . . . . . . . . . . . . . . . . . . . . . . . . . . . . . . . . . . . . . . . . . . 2
System Requirements . . . . . . . . . . . . . . . . . . . . . . . . . . . . . . . . . . . . . . . . . . . . . . . . . . . . . . . . 2
Understanding Webroot Enterprise . . . . . . . . . . . . . . . . . . . . . . . . . . . . . . . . . . . . . . . . . . . . . 3
Planning for Webroot Enterprise Deployment . . . . . . . . . . . . . . . . . . . . . . . . . . . . . . . . . . . . . 5
How Webroot Enterprise Updates Work . . . . . . . . . . . . . . . . . . . . . . . . . . . . . . . . . . . . . . . . . 7
Key Steps to Installing and Setting Up Webroot Enterprise. . . . . . . . . . . . . . . . . . . . . . . . . . . 8
2: Installing Webroot Enterprise 9
Setting up a SQL Server Database . . . . . . . . . . . . . . . . . . . . . . . . . . . . . . . . . . . . . . . . . . . . . . 9
Installing Webroot Enterprise Server on Your Company Server. . . . . . . . . . . . . . . . . . . . . . 11
Setting Up Client Workstations. . . . . . . . . . . . . . . . . . . . . . . . . . . . . . . . . . . . . . . . . . . . . . . . 20
Setting Up Client Workstations from the Admin Console. . . . . . . . . . . . . . . . . . . . . . . . 20
Alternate Client Workstation Setup Methods. . . . . . . . . . . . . . . . . . . . . . . . . . . . . . . . . . 21
Client Installation Options . . . . . . . . . . . . . . . . . . . . . . . . . . . . . . . . . . . . . . . . . . . . . . . . 22
Example Logon Script . . . . . . . . . . . . . . . . . . . . . . . . . . . . . . . . . . . . . . . . . . . . . . . . . . . 23
Uninstalling Spy Sweeper from Client Workstations. . . . . . . . . . . . . . . . . . . . . . . . . . . . 24
Installing and Assigning Distributor Servers . . . . . . . . . . . . . . . . . . . . . . . . . . . . . . . . . . . . . 24
Installing Distributor Servers . . . . . . . . . . . . . . . . . . . . . . . . . . . . . . . . . . . . . . . . . . . . . . 24
Assigning Distributor Servers . . . . . . . . . . . . . . . . . . . . . . . . . . . . . . . . . . . . . . . . . . . . 25
Changing the Distributor Server Port . . . . . . . . . . . . . . . . . . . . . . . . . . . . . . . . . . . . . . . . 26
Understanding the Admin Console Window. . . . . . . . . . . . . . . . . . . . . . . . . . . . . . . . . . . . . . 27
3: Setting Up the Webroot Enterprise Server 29
Accessing the Admin Console and Viewing News. . . . . . . . . . . . . . . . . . . . . . . . . . . . . . . . . 29
Editing the Server Settings . . . . . . . . . . . . . . . . . . . . . . . . . . . . . . . . . . . . . . . . . . . . . . . . . . . 29
Setting Up Notification . . . . . . . . . . . . . . . . . . . . . . . . . . . . . . . . . . . . . . . . . . . . . . . . . . . . . . 32
Setting Up Notification E-mail Addresses . . . . . . . . . . . . . . . . . . . . . . . . . . . . . . . . . . . . 32
Setting Up Notification Messages . . . . . . . . . . . . . . . . . . . . . . . . . . . . . . . . . . . . . . . . . . 33
Setting Up Error Notification . . . . . . . . . . . . . . . . . . . . . . . . . . . . . . . . . . . . . . . . . . . . . . 33
Managing Clients . . . . . . . . . . . . . . . . . . . . . . . . . . . . . . . . . . . . . . . . . . . . . . . . . . . . . . . . . . 34
Managing Groups . . . . . . . . . . . . . . . . . . . . . . . . . . . . . . . . . . . . . . . . . . . . . . . . . . . . . . . 34
Creating and Exporting Client Reports. . . . . . . . . . . . . . . . . . . . . . . . . . . . . . . . . . . . . . . 35
Polling Client Workstations Now. . . . . . . . . . . . . . . . . . . . . . . . . . . . . . . . . . . . . . . . . . . 36
Deleting Client Workstations . . . . . . . . . . . . . . . . . . . . . . . . . . . . . . . . . . . . . . . . . . . . . . 36
Filtering Information. . . . . . . . . . . . . . . . . . . . . . . . . . . . . . . . . . . . . . . . . . . . . . . . . . . . . . . . 37
4: Managing Spy Sweeper 39
Managing Spyware . . . . . . . . . . . . . . . . . . . . . . . . . . . . . . . . . . . . . . . . . . . . . . . . . . . . . . . . . 39
Setting Up Automatic Spyware Handling . . . . . . . . . . . . . . . . . . . . . . . . . . . . . . . . . . . . 39
Setting Up Continuous Monitoring: Active Shields. . . . . . . . . . . . . . . . . . . . . . . . . . . . . 41
Configuring Sweeps . . . . . . . . . . . . . . . . . . . . . . . . . . . . . . . . . . . . . . . . . . . . . . . . . . . . . . . . 43
Webroot Enterprise System Administrator Guide i
Page 4

Configuring Sweep Settings. . . . . . . . . . . . . . . . . . . . . . . . . . . . . . . . . . . . . . . . . . . . . . . 43
Setting Up Sweep Alerts. . . . . . . . . . . . . . . . . . . . . . . . . . . . . . . . . . . . . . . . . . . . . . . . . . 45
Running Sweeps . . . . . . . . . . . . . . . . . . . . . . . . . . . . . . . . . . . . . . . . . . . . . . . . . . . . . . . . . . . 46
Running a Sweep Now . . . . . . . . . . . . . . . . . . . . . . . . . . . . . . . . . . . . . . . . . . . . . . . . . . . 46
Scheduling Sweeps. . . . . . . . . . . . . . . . . . . . . . . . . . . . . . . . . . . . . . . . . . . . . . . . . . . . . . 47
Viewing and Stopping Sweeps. . . . . . . . . . . . . . . . . . . . . . . . . . . . . . . . . . . . . . . . . . . . . 48
Updating Spy Sweeper . . . . . . . . . . . . . . . . . . . . . . . . . . . . . . . . . . . . . . . . . . . . . . . . . . . . . . 48
Installing Updates Manually. . . . . . . . . . . . . . . . . . . . . . . . . . . . . . . . . . . . . . . . . . . . . . . 49
Installing Updates Automatically. . . . . . . . . . . . . . . . . . . . . . . . . . . . . . . . . . . . . . . . . . . 50
Setting Up Update Notification . . . . . . . . . . . . . . . . . . . . . . . . . . . . . . . . . . . . . . . . . . . . 50
Setting up Updating for Mobile End Users . . . . . . . . . . . . . . . . . . . . . . . . . . . . . . . . . . . 51
Viewing a Summary of Detected Spyware. . . . . . . . . . . . . . . . . . . . . . . . . . . . . . . . . . . . . . . 52
Unlocking Functions at a Client Workstation. . . . . . . . . . . . . . . . . . . . . . . . . . . . . . . . . . . . . 52
5: Monitoring Status 53
Reviewing the Webroot Enterprise Dashboard. . . . . . . . . . . . . . . . . . . . . . . . . . . . . . . . . . . . 53
Viewing the Sweep Status . . . . . . . . . . . . . . . . . . . . . . . . . . . . . . . . . . . . . . . . . . . . . . . . 54
Viewing the Definition Status . . . . . . . . . . . . . . . . . . . . . . . . . . . . . . . . . . . . . . . . . . . . . 55
Viewing the Infection Status . . . . . . . . . . . . . . . . . . . . . . . . . . . . . . . . . . . . . . . . . . . . . . 55
Viewing the Top Spyware Threats. . . . . . . . . . . . . . . . . . . . . . . . . . . . . . . . . . . . . . . . . . 56
Viewing the Server Status . . . . . . . . . . . . . . . . . . . . . . . . . . . . . . . . . . . . . . . . . . . . . . . . 57
Viewing Update History and Installed Applications. . . . . . . . . . . . . . . . . . . . . . . . . . . . . . . . 57
Viewing Update History. . . . . . . . . . . . . . . . . . . . . . . . . . . . . . . . . . . . . . . . . . . . . . . . . . 57
Viewing Applications Installed by Workstation. . . . . . . . . . . . . . . . . . . . . . . . . . . . . . . . 57
Viewing Client Status . . . . . . . . . . . . . . . . . . . . . . . . . . . . . . . . . . . . . . . . . . . . . . . . . . . . . . . 58
Viewing Errors . . . . . . . . . . . . . . . . . . . . . . . . . . . . . . . . . . . . . . . . . . . . . . . . . . . . . . . . . . . . 58
Generating Reports . . . . . . . . . . . . . . . . . . . . . . . . . . . . . . . . . . . . . . . . . . . . . . . . . . . . . . . . . 59
A: Webroot Enterprise Port Requirements 61
B: Migrating an Existing Installation from DBISAM to SQL Server 63
Index 65
ii Contents
Page 5
1: Planning Your Inst allation
Webroot Enterprise™ lets you install and manage Webroot® products throughout your company.
You can set up groups with different settings, install updates automatically or manually, view the
status of all products, and much more.
Webroot Enterprise gives you companywide management and control to ensure that your
company’s computer resources are protected from a variety of threats.
About This Guide
This Guide tells you how to set up and use Webroot Enterprise to install and manage Webroot
products throughout the company. It assumes that you have detailed knowledge of the Windows
operating systems in use in your company and your network.
The information in this Guide is also available from the help button.
Conventions
This Guide uses several typographical conventions to help explain how to use Webroot Enterprise.
Convention Definition
Bold Words in bold show it ems to select or click, such as menu item s or buttons.
Tree navigation The Guide uses parent node > child node notation for tree navigation. For
Note
Caution
example, Admin Tasks > Settings. This means to expand to the Admin Tasks
node in the tree and select the Settings node.
This symbol means the following information is a note that gives you important
information that may affect how you use Webroot Enterprise.
This symbol means the following information is a caution that warns you about
actions that may affect your ability to use some programs on your computer.
This symbol means that the following information is a procedure.
Webroot Enterprise System Administrator Guide 1
Page 6

Technical Support
Technical support is available by phone and e-mail:
• Call 800-870-8102
• Send your questions to: esupport@webroot.com.We will respond within one business day.
System Requirements
Following are the system requirements for Webroot Enterprise.
Table 1: Company server system requirements
Operating system
CPU
Memory
Disk
space 30 MB free space for operation. Additional free space needed
Windows NT 4.0 SP5 or higher , W indows 2000 , Wind ows XP
(see note below), Windows Server 2003
200 MHz minimum; 350 MHz or better recommended
512 MB recommended
for database growth. We recommend 1 GB of free space.
Table 2: Distributor server system requirements
Operating system
Windows NT 4.0 SP5 or higher, Windows 2000 SP4 or
higher, Windows XP (see note below), Windows Server 2003
CPU
Memory
Disk
space 60 MB free space for operation.
Table 3: Client workstation system requirements
Operating system
CPU
Memory
Disk
space 15 MB free space
Internet Explorer
200 MHz minimum; 350 MHz or better recommended
512 MB recommended
Windows 98, 98SE, ME, NT 4.0, 2000, or XP
150 MHz or better recommended
32 MB RAM minimum; 128 MB RAM or better recom mended
Version 6.0 with Service Pack 1 required for Windows 98,
98SE, and ME
Note
Due to modifications that Microsoft made in Service Pack 2 for Windows XP that limit
simultaneous TCP/IP connections, we do not recommend using the Poll Now or Sweep Now
functions for more than five client workstations at a time. If you do, you may see temporary
system lag and an Event ID error 4226 entry in your Windows system log. If you are managing
large numbers of clients with frequent polling intervals from a server with Windows XP and SP2,
you may also see the 4226 error when more than five clients poll in simultaneously.
2 1: Planning Your Installation
Page 7
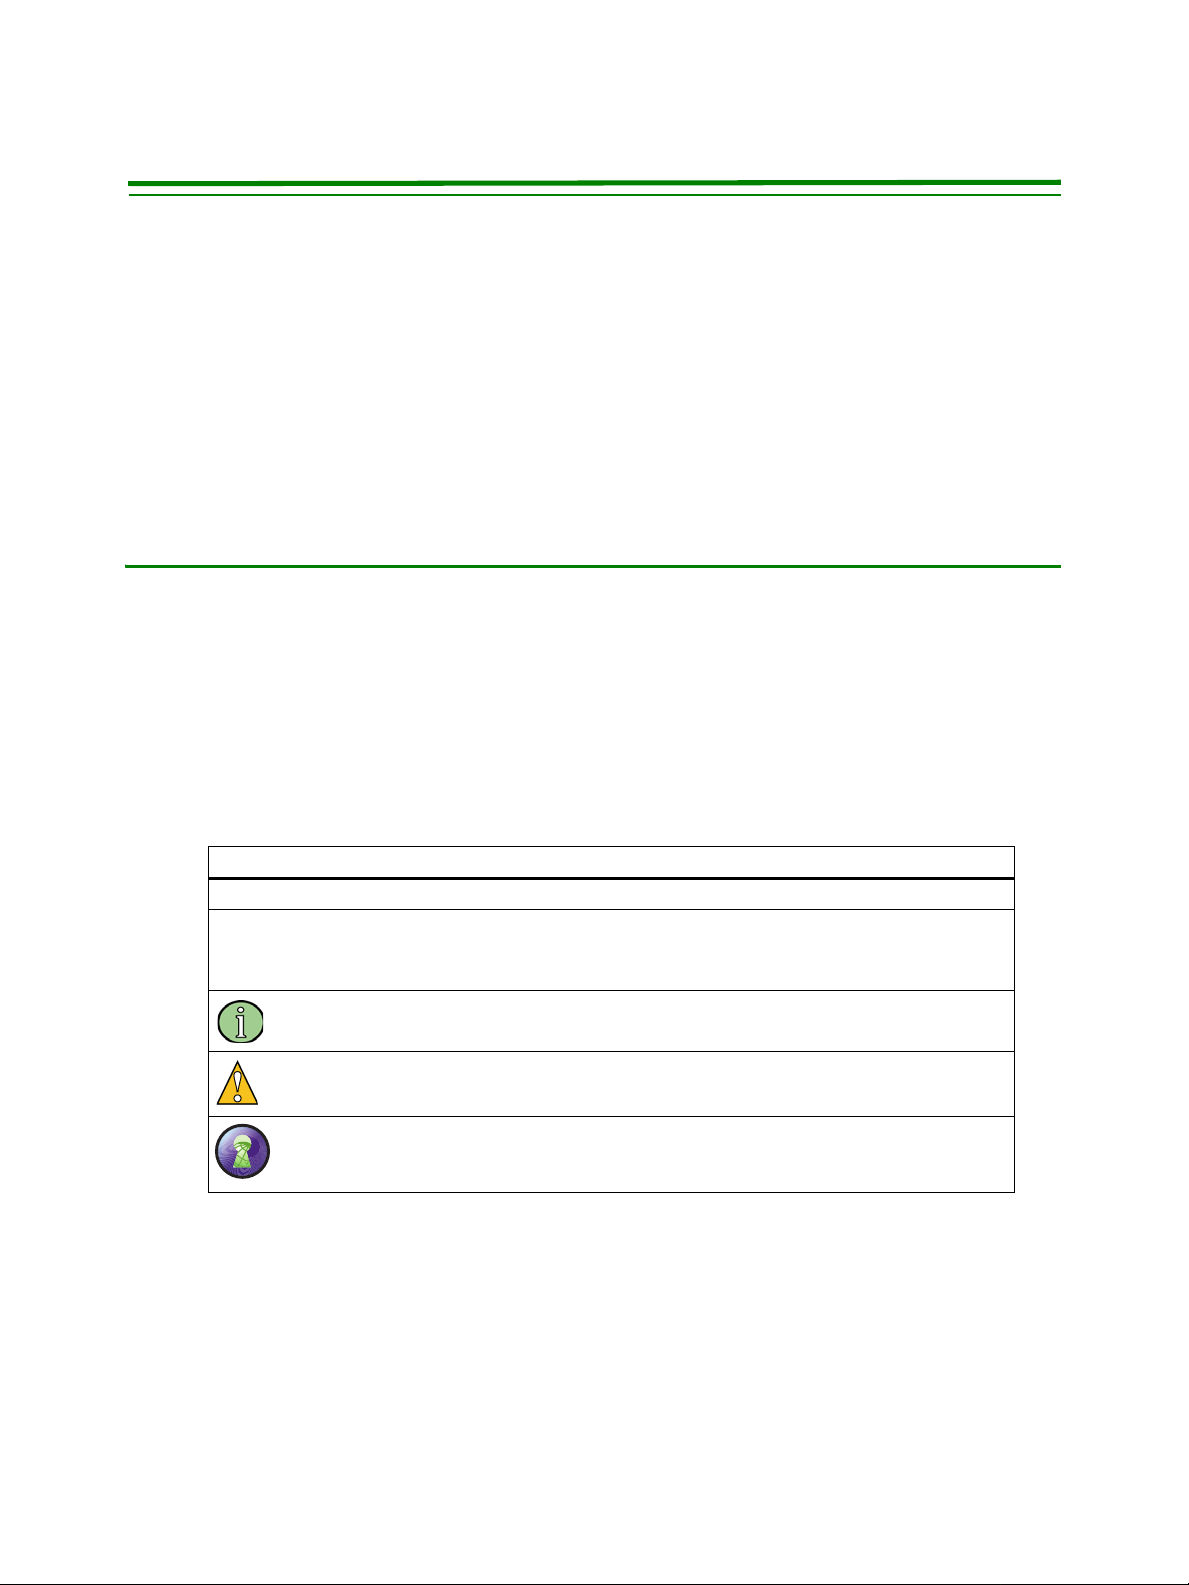
Understanding W ebroot Enterprise
Webroot Enterprise offers a total enterprise solution for your companywide spyware management
using a client/server architecture. Figure 1 shows a base configuration and how Webroot
Enterprise works.
Webroot Update Server where
application and definition
updates are available.
You r company server, with Webroot
Enterprise installed, downloads updates from
the Webroot Update Server over the Internet.
Internet
LAN
Workstations on your LAN, with the Spy
Sweeper client installed, download updates
from your company server.
Figure 1: Webroot Enterprise base architecture
The Webroot Enterprise product includes three types of components that you install on your
computers:
• On a company server, you install Webroot Enterprise Server™, which is described in
Table 4.
– If you want to use more than one company server, consider using additional
distributor servers, as described in “Planning for Webroot Enterprise Deployment” on
page 5, or contact technical support for assistance.
• On each end user’s computer, you install the client workstation components, which are
described in Table 5.
• On each distributor server, you install the distributor service, which is described in
Table 6.
If you have a complex internal network, run firewall pr ograms at the desktop or server level, or use
proxy servers internally , you should review “Appendix A, Webroot Enterprise Port Requirements”
on page 61.
Webroot Enterprise System Administrator Guide 3
Page 8

Table 4: Webroot Enterprise Server components
Component File name Description Installation/Network
Access Requirement
Client Service™ WebrootClientService.exe Controls the
communication between
the client workstations and
your company server.
Update Service
Admin Console™
WebrootUpdateService.exe Controls the updates from
™
the Webroot Update
Server
™ to your company
server.
WebrootAdminConsole.exe Provides a graphical user
interface (GUI) to let you
set up and manage the
Webroot applications
across the company. Most
of this Guide describes
how to use this component.
• Installed during the
installation of Webroot
Enterprise Server.
• Requires local network
access.
• Installed during the
installation of Webroot
Enterprise Server.
• Requires local network and
Internet access.
• Requires use of port 443 on
your server.
• Installed during the
installation of Webroot
Enterprise Server.
• Does not require any network
access.
Table 5: Webroot Enterprise client workstation components
Component File name Description Installation/Network
Access Requirement
Communication
Agent
(CommAgent™)
Spy Sweeper
Table 6: Webroot Enterprise distributor server components
Component File name Description Installation/Network
Distributor service
CommAgent.exe • Communicates periodically
with the Client Service on your
company server to see if any
new or updated applications
are available.
• Runs as a system service on
each client workstation.
SpySweeper.exe • Detects spyware and provides
access to options for
workstations users.
• Runs as a system service on
each client workstation.
WebrootUpdateDistribu
tor.exe
• Communicates periodically
with the Client Service on your
company server to receive
updates and with CommAgents
to distribute updates.
• Runs as a system service on the
server.
• Installed when you set
up client workstations.
• Requires local network
access.
• Installed when you set
up client workstations.
Access Requirement
• Installed when you set
up distributor servers.
• Requires local network
access.
4 1: Planning Your Installation
Page 9

Planning for Webroot Enterprise Deployment
If you plan to deploy W ebroot Enterprise to 500 or fewer client workstations, you can use the base
configuration shown in Figure 1. If you are deploying to more than 500 client workstations, you
should review the information in this section to determine the best configuration and settings to
use.
Table 7 provides general configuration and database recommendations based on the number of
client workstations.
Table 7: Configuration and database recommendations
Number of client
workstations
Up to 500 Single 350 MHz processor
500 to 10,000 Single 1 GHz processor,
10,000 to 40,000 Single 1 GHz processor,
40,000 to 75,000 Dual 1 GHz processors,
Over 75,000 Deploy multiple company
Company server
specifications
with 512 MB RAM
512 MB RAM
1GB RAM
2GB RAM
servers
Contact technical support
for assistance
Database Number of
distributor servers
DBISAM 0 One hour
DBISAM 0 to 2 Two hours
MS SQL Server 2 to 3 Four hours
MS SQL Server 3 to 6 Four hours
Base on number
of client
workstations
each server
handles
Base on number of
client workstations each
server handles
Poll no more
frequently than
Base on number of
client workstations
each server
handles
You may want to install additional distributor servers or company servers for two reasons:
• You have multiple sites and want to minimize bandwidth usage on WAN segments
between the sites. The normal communication between the client and the server is only
about 1 KB. Spy definition updates are typically 1 MB. A new Spy Sweeper client update
can be as large as 5.5 MB.
• You have a large number of clients relative to your server capabilities. Many things can
affect the performance of the server.
Deploying distributor servers reduces WAN bandwidth consumed when spy definitions or
software updates are delivered. Distributor servers receive copies of Spy Sweeper client and
definitions updates. For more information about how updates work, see “How W ebroot Enterprise
Updates Work” on page 7.
In a configuration that uses distributor servers, the client workstations poll the company server. If
updates are available, the company server sends a randomized list of distributor servers to each
client workstation. The client workstation requests updates from the first distributor server on the
list. The distributor server sends the updates to the client workstation. If the distributor server is
not available, the client workstation sends its request to the next distributor server on the list. The
company server is always the last server on the list and will send the updates if no distributor
server is able to do so.
The figures that follow show some recommended configurations for typical deployments.
Webroot Enterprise System Administrator Guide 5
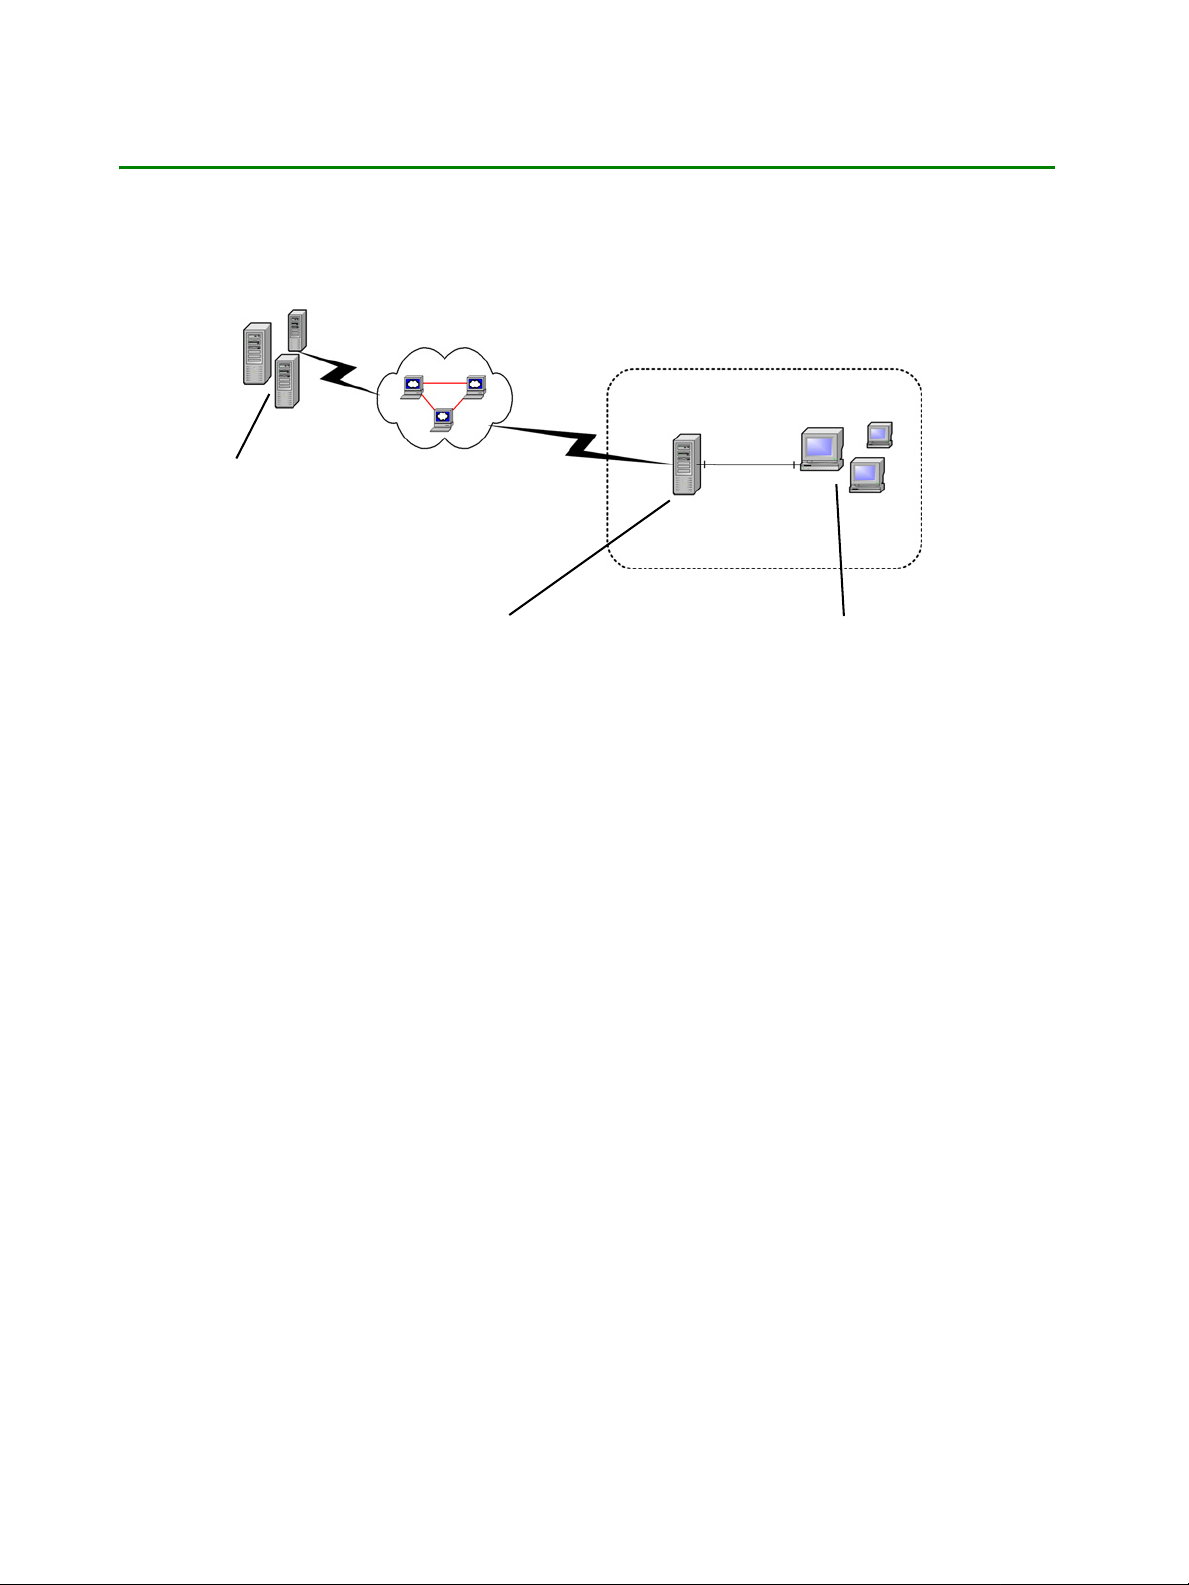
Page 10
Company server using DBISAM
Configuration poll and sweep results
Settings and updates
Clients
Figure 2: Single site with 500 clients
Configuration poll and sweep results
Company server
using DBISAM
Settings and distributor addresses
Request for
updates
Updates
Distributors
Figure 3: Single site with 10,000 clients
Clients
Updates
6 1: Planning Your Installation
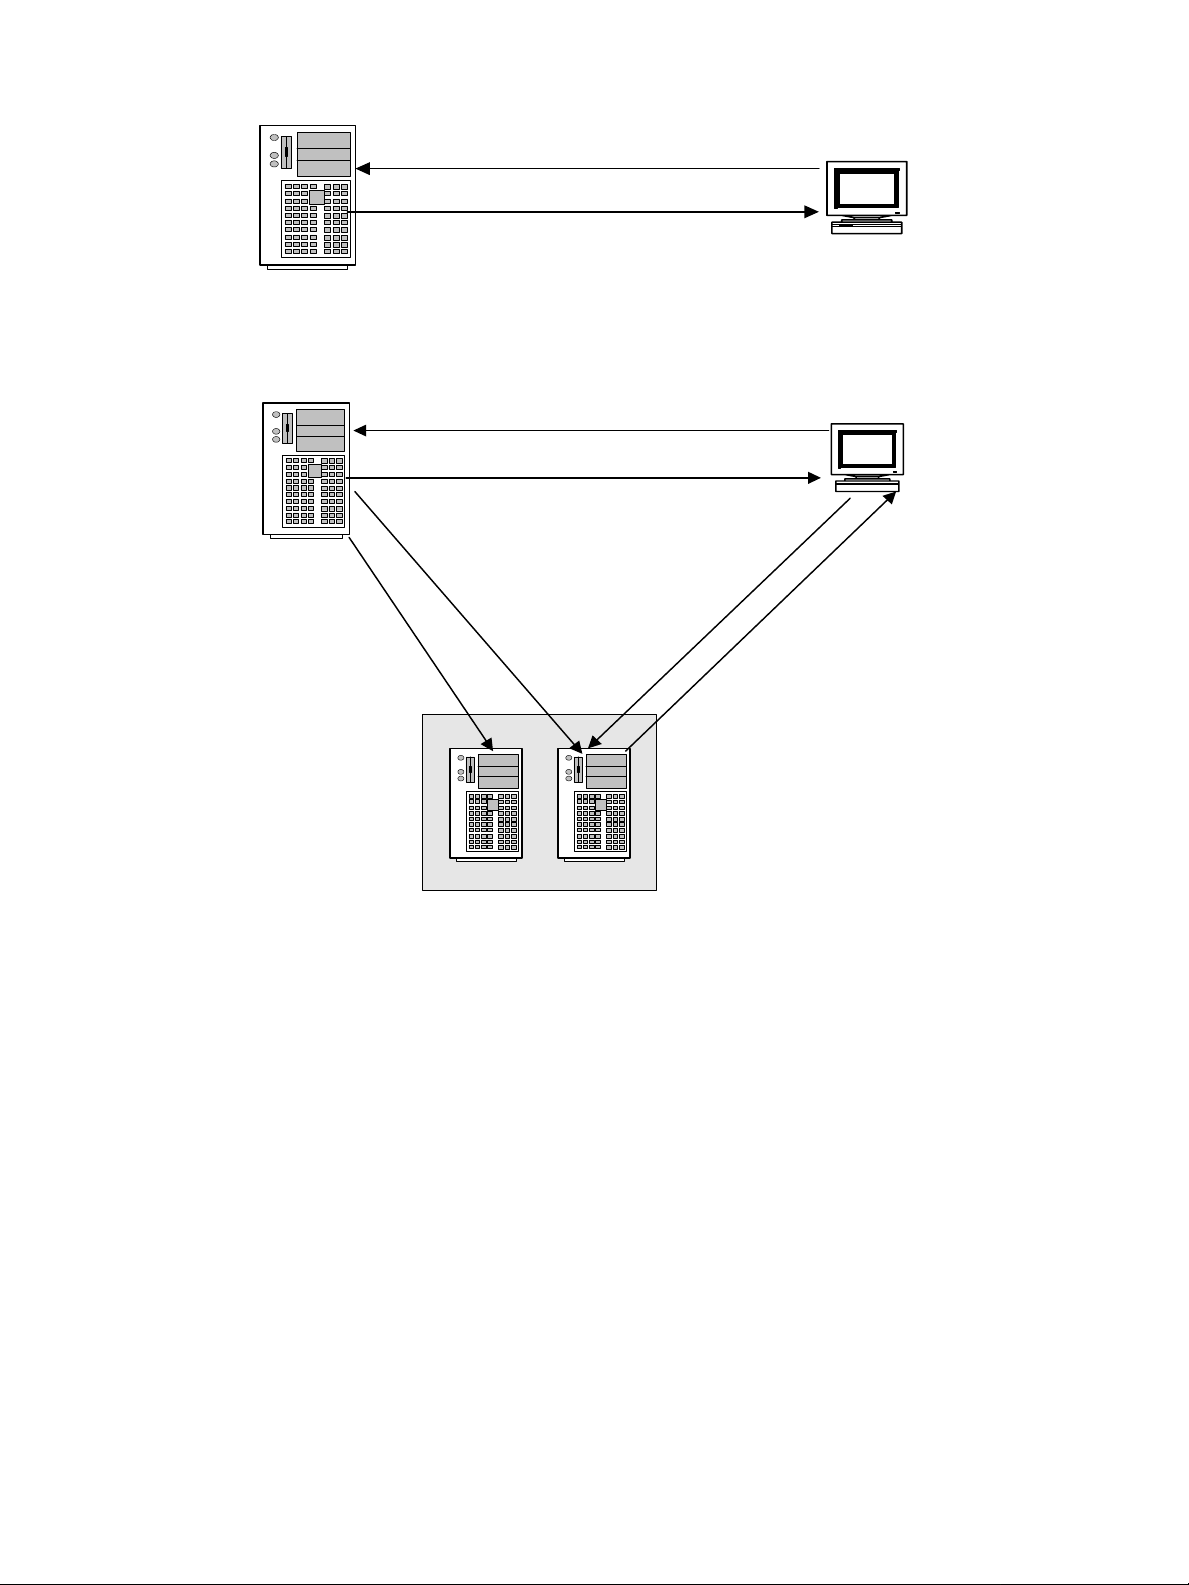
Page 11
Company server
using SQL
Configuration poll
and sweep results
Updates
Updates
Settings and
distributor addresses
Site 2
Request for
updates
Site 1
Updates
Request for
updates
Clients
Clients
Updates
Distributors
Distributors
Figure 4: Multiple sites with more than 10,000 total clients
How Webroot Enterprise Up dates Work
Most Webroot Enterprise updates are completely automatic after initial installation and setup. The
whole update process works like this:
1. Your company server automatically moves updates to all assigned distributors once they
are downloaded from the Webroot Update Server. Your distributor servers synchronize
with your company server every minute.
2. The client workstations poll the company server.
3. If updates are available, the company server sends a randomized list of distributor servers
containing the update to the client workstation.
• For client workstations to receive updates, you must assign updates to specific groups
or to the company as a whole. From the Admin Console, select Manage Desktop
Applications > Spy Sweeper > Update Spy Sweeper and go to either Manual
Install or Auto Install. If you set up automatic installation on after an update has
downloaded, the automatic installation does not apply to that update. For more
information, see “Updating Spy Sweeper” on page 48.
4. The client workstation requests updates from the first distributor server on the list.
Webroot Enterprise System Administrator Guide 7
Page 12

5. The distributor server sends the updates to the client workstation.
6. If the distributor server is not available, then the client workstation sends its request to the
next distributor server on the list. The company server is always the last server on the list,
and it will send the updates if no other distributor server is able to do so.
This process spreads the load across all distributor servers to ensure that the servers are not
overwhelmed with update requests.
Key Step s to Inst alling and Setting Up Webroot Enterprise
Once you have determined how you will deploy Spy Sweeper Enterprise in your environment, you
are ready to begin the installation and setup. The six major steps in getting started are:
1. Gather information for server installation.
• For more information, see Table 8 on page 11.
2. Install Webroot Enterprise Server.
• For more information, see “Installing Webroot Enterprise Server on Your Company
Server” on page 11.
3. Check for latest news and updates.
• For more information, see “Accessing the Admin Console and Viewing News” on
page 29 and “Installing Updates Manually” on page 49.
4. Deploy initial clients.
• For more information, see “Setting Up Client Workstations” on page 20.
5. Set up sweep settings and initial sweeps.
• For more information, see “Managing Spyware” on page 39, “Configuring Sweeps”
on page 43, and “Running Sweeps” on page 46.
6. Broader deployment.
8 1: Planning Your Installation
Page 13

2: Inst alling Webroot Enterprise
You must perform the following tasks to install Webroot Enterprise:
1. If you are using Microsoft SQL Server for your database, set up the SQL database. (See
page 9.)
• For information about determining what database to use, see “Planning for Webroot
Enterprise Deployment” on page 5.
2. Install Webroot Enterprise Server on your company server. (See page 11.)
3. Set up one or more client workstations. (See page 20.)
4. If you are using distributor servers, install one or more distributors. (See page 24.)
Setting up a SQL Server Database
If you determined that you will use Microsoft SQL Server for your installation, you must create
the database and a system DSN before starting the installation process. You must also have the
user name and password available.
For information about determining whether to use SQL Server, see “Planning for Webroot
Enterprise Deployment” on page 5. If you have an existing Webroot Enterprise installation and
need to migrate the database from DBISAM to SQL Server, see “Appendix B, Migrating an
Existing Installation from DBISAM to SQL Server” on page 63.
To set up the SQL Server database:
1. Open the SQL Enterprise Manager.
2. Browse to the Databases folder.
3. Right-click and select New Database.
Webroot Enterprise System Administrator Guide 9
Page 14
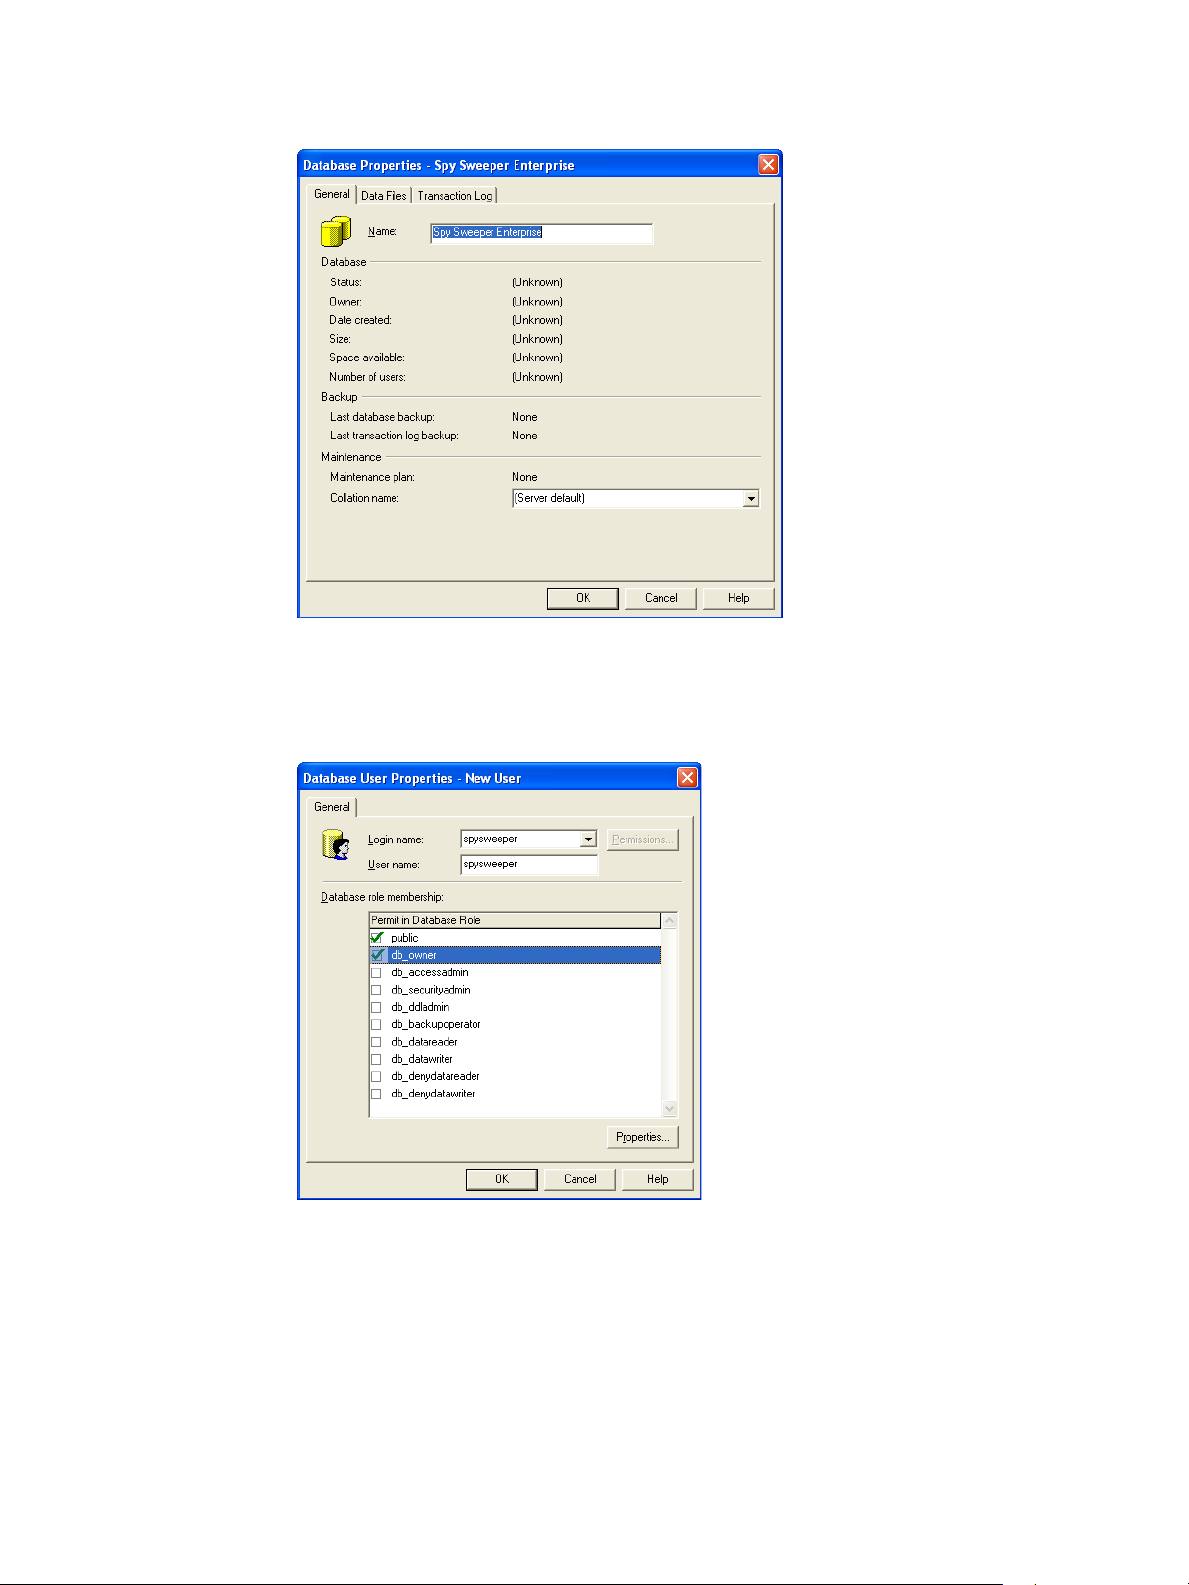
4. Give the new database a unique name.
5. Browse to the Users pane of the new database.
6. Right-click and select New Database User.
7. Create a new user and select the db_owner role in the Database Role Membership section.
8. Configure your SQL server for SQL Server and Windows authentication and use a SQL
user account instead of a Windows account to access a SQL database with Webroot
Enterprise.
9. When you install Webroot Enterprise Server, select SQL Server 2000 in the Database
Settings window.
• The Select the SQL Server 2000 drop-down list takes a moment to populate with the
list of SQL servers in your environment.
10. Select the SQL server where you just set up the database.
10 2: Installing Webroot Enterprise
Page 15

• If the server name of your SQL Server does not appear in the drop-down list, you can
manually enter the name into the field.
11. Enter the name and login information for the database created above.
• The installer program attempts to log in to the SQL database with the credentials
provided and displays a message if it cannot connect to the database.
Note
SQL Server databases must use Case Insensitive collation to function correctly with Webroot
Enterprise Server.
Installing W ebroot Enterprise Server on Your Company Server
The Webroot Enterprise Server installation process installs all of the executables described in
Table 4 on page 4. You must install Webroot Enterprise Server while logged in with
Administrative rights.
The WebrootClientService.exe and We brootUpdateService.exe run as Windows services and
should always be started. This permits your company server to download updates from the
Webroot Update Server and client workstations to download updates and configuration changes
from your company server.
During the installation, you must enter all of the information requested to continue the process.
You should be prepared with information listed in Table 8.
Table 8: Information required for Webroot Enterprise Server installation
Field Description
Download Folder
Key Code
E-mail Host
From Address
Client Service Port
Path to the folder where your company server stores the updates it
downloads from the Webroot Update Server. For best performance,
use a folder on the same server. It can also be a folder on any drive
your company server can access.
Unique code that identifies the rights and privileges associated with
your installation, such as the number of licenses you have purchased
for each client workstation application.
Be sure to include the brackets.
Fully qualified domain name for your e-mail server used for outgoing
mail (SMTP server).
E-mail address that notification messages will come from. Must be a
real e-mail address in the format: tom@webroot.com.
Port on your company server that the Client Service will use to
communicate with your client workstations. The default port is 50000.
Be sure that the port you use is not used to by another process.
Webroot Enterprise System Administrator Guide 11
Page 16
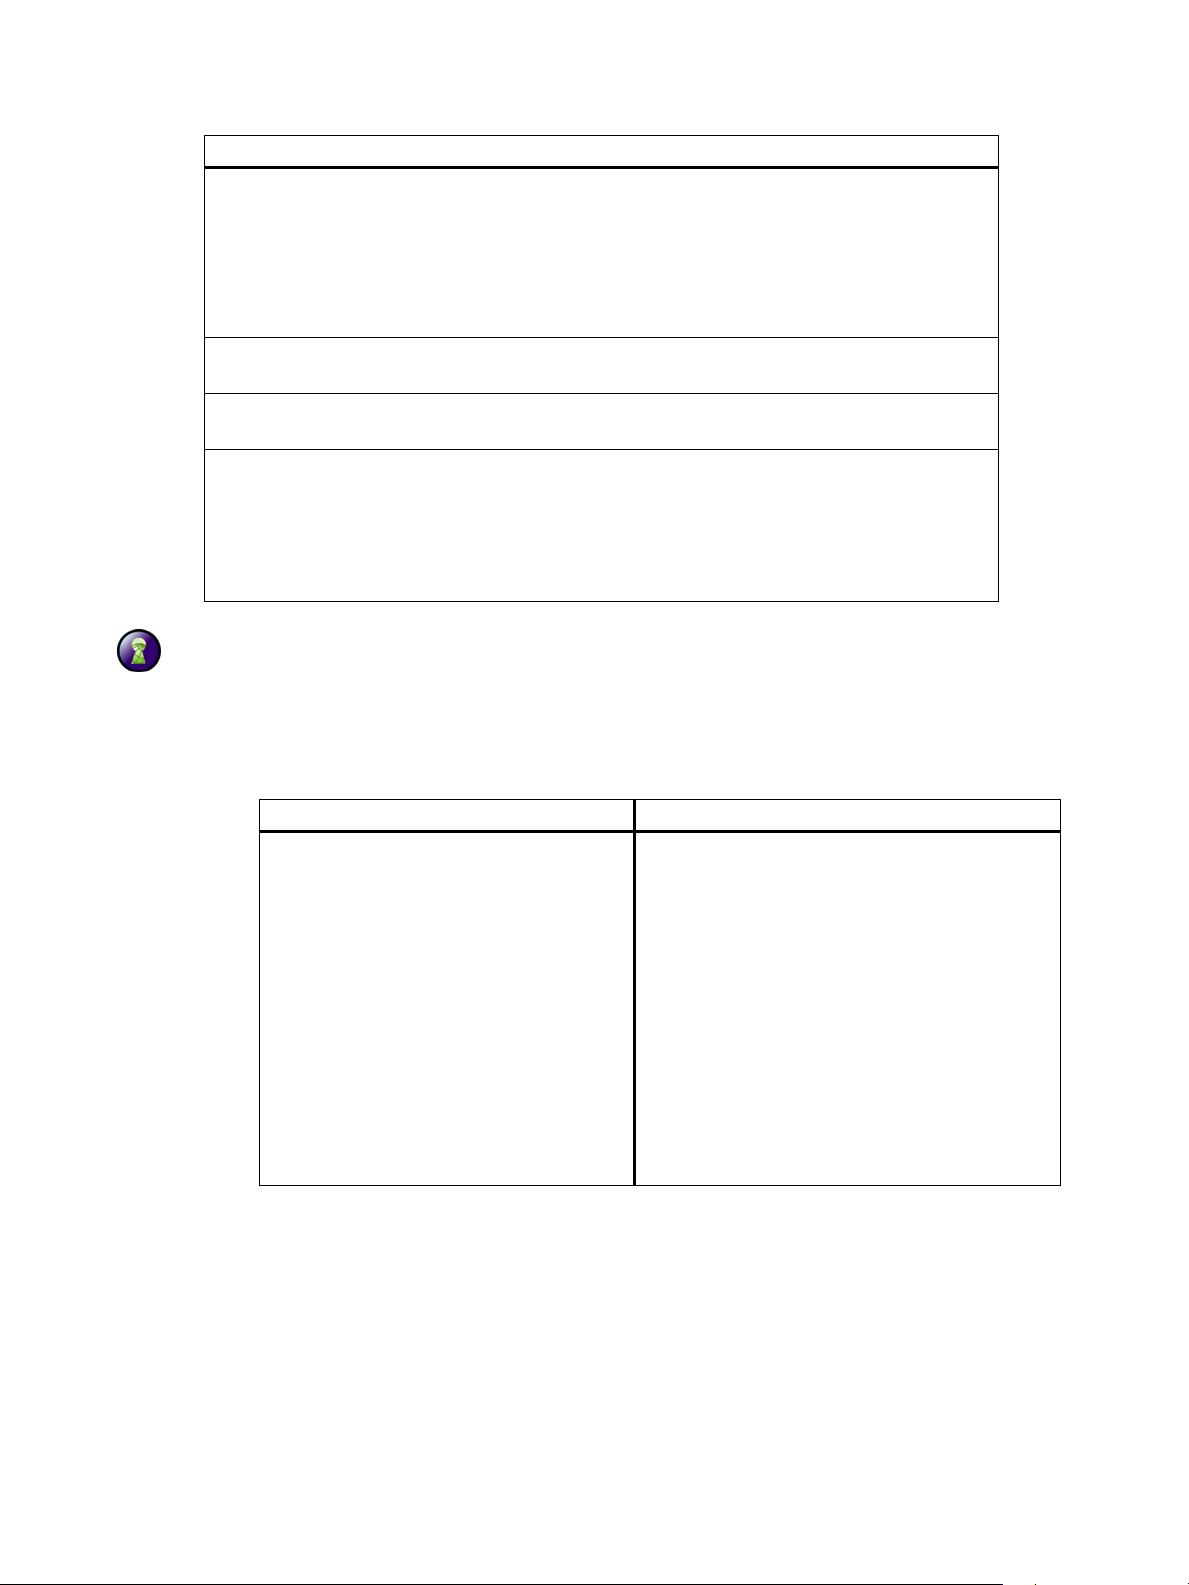
Table 8: Information required for Webroot Enterprise Server installation (Contin ued)
Field Description
Proxy Server
Proxy Username
Proxy Password
Client Service IP
If you use a proxy server to access the Internet, enter your proxy
server name or IP address and port number in one of the following
formats:
• server_name.company.com:80
• 10.0.0.1:80
If you do not use a proxy server, leave the field blank.
If you use a proxy server that requires authentication, enter your proxy
server username.
If you use a proxy server that requires authentication, enter your proxy
server password.
Enter the IP address or host name that the client workstations will use
to communicate with your company server. For IP resolution, select
the IP address of the network interface card (NIC) visible to client
workstations. For host name resolution, enter the fully qualifi ed
domain name of your server (requires a properly configured DNS
environment).
To install Webroot Enterprise Server:
1. Close all other Windows programs that you have open on your computer.
2. Start the installation program.
To install from a CD To install from a downloaded file
1. Insert the CD into your CD drive.
• The installation options should display
automatically. If they do not, use
Windows Explorer to navigate to your
CD drive. Then double-click
WebrootEnterpriseServerSetup.exe to
start the installation.
2. Click Install Webroot Enterprise to start
the installation.
• The Welcome window displays.
1. Follow the instructions on the Web site to
download the WebrootEnterpriseServerSetup.exe
file.
2. Go to where you downloaded the file.
• If you downloaded the file to your Windows
Desktop, close all open programs, and you
will see an icon on your desktop for the file
you downloaded.
• If you downloaded the file to a different
location, use Windows Explorer to navigate
to the file.
3. Double-click WebrootEnterpriseServerSetup.exe.
• The Welcome window displays.
12 2: Installing Webroot Enterprise
Page 17
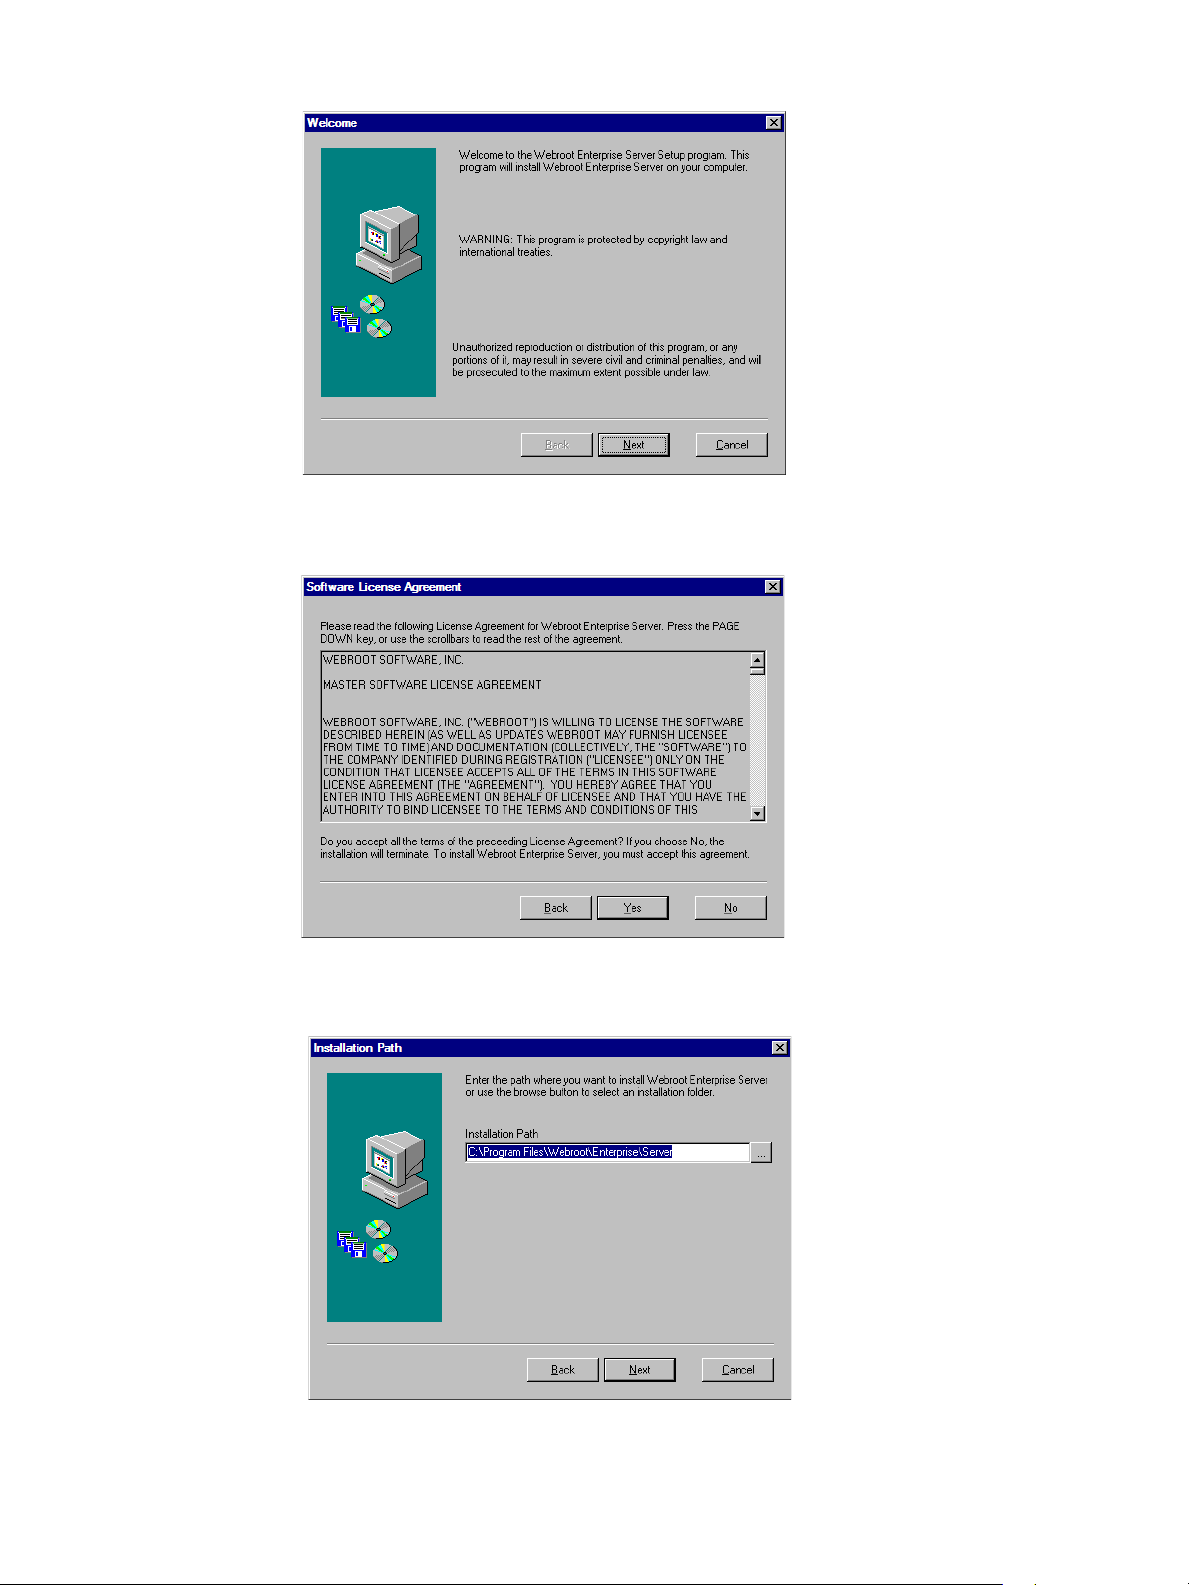
3. Click Next.
• The Software License Agreement window displays.
4. Read the license agreement and click Yes if you agree with the content.
• The Installation Path window displays showing you the default installation location.
Webroot Enterprise System Administrator Guide 13
Page 18
5. Click Next.
• If you want to install to a different location, click browse and navigate to the new
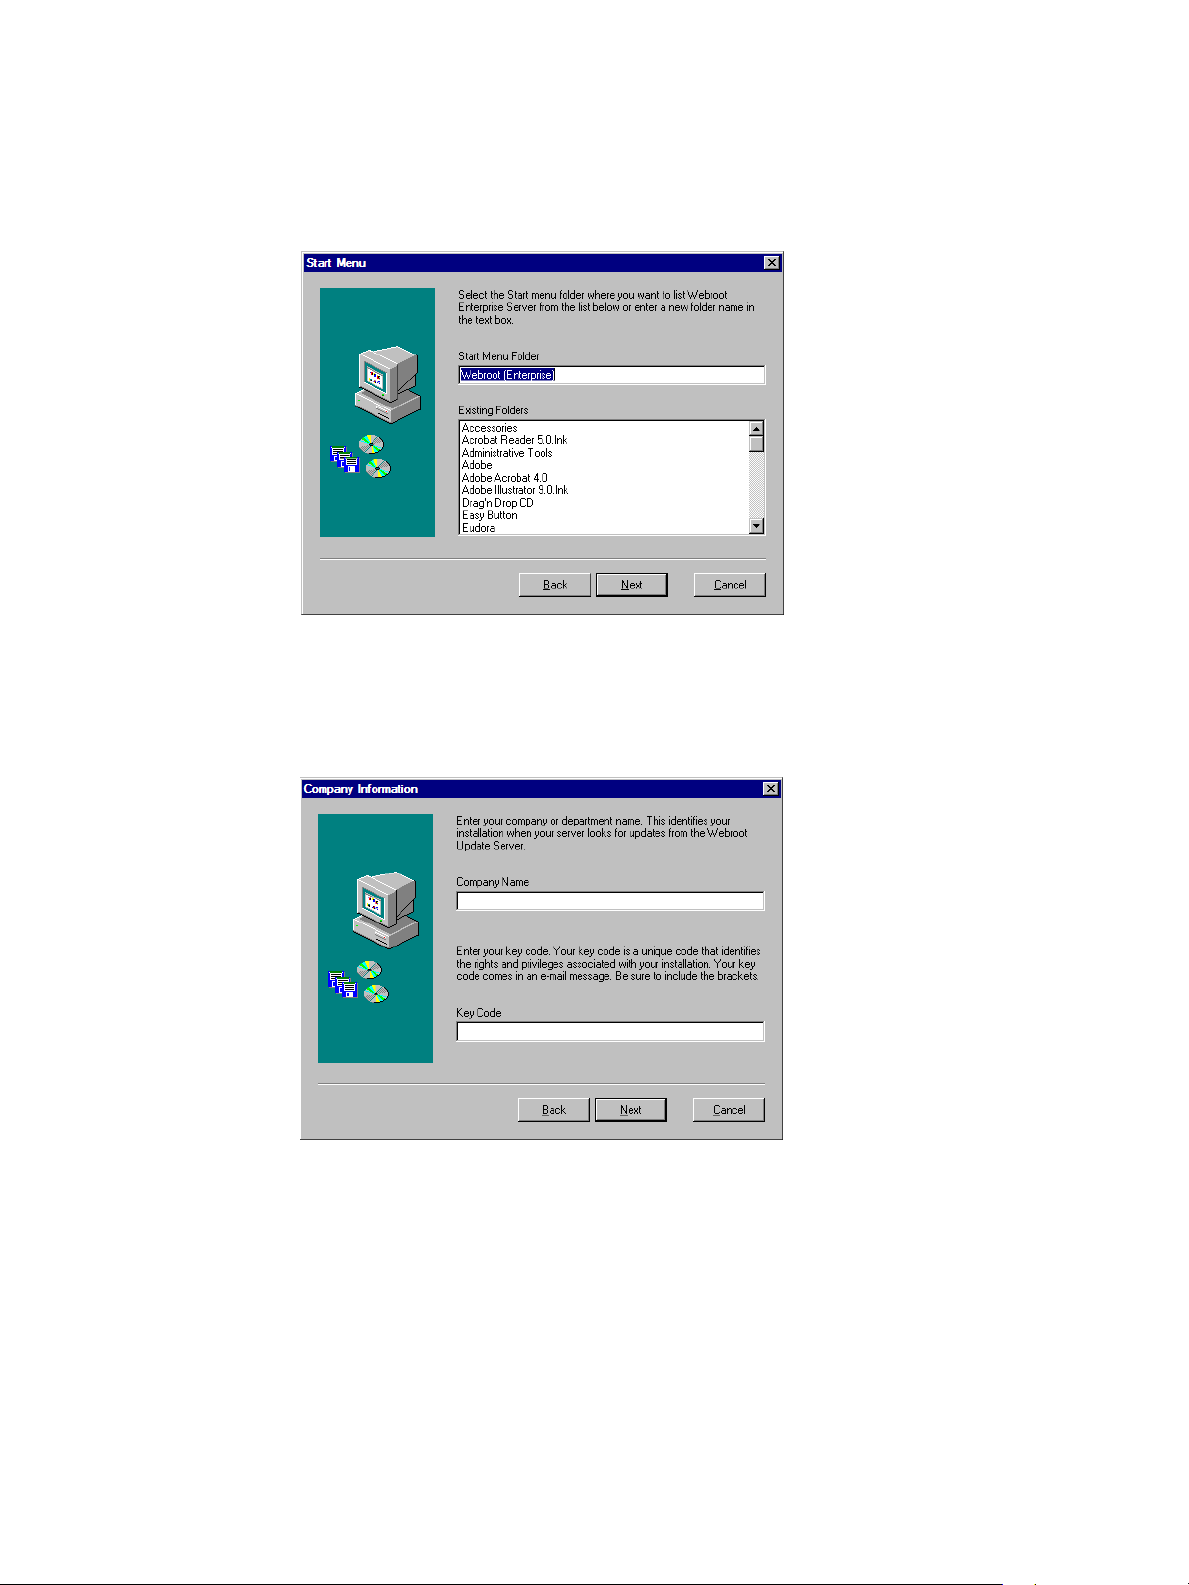
• The Start Menu window displays showing the default Start menu folder.
location.
6. Click Next.
• If you want to use a different Start menu folder , enter a new name or select an existing
group.
• The Company Information window displays.
14 2: Installing Webroot Enterprise
Page 19
7. Enter the information and click Next.
Company Name
Key Code
Name of your company. This identifies your Webroot Enterprise
product when your company server looks for updates from the
Webroot Update Server.
Unique code that identifies the rights and privileges associated with
your installation, such as the number of licenses you have purchased
for each client workstation application.
If you purchased Webroot Enterprise through a sales representative or
online, you received your key code in an e-mail message. You can
copy the key code from the message and paste it in. If you purchased
Webroot Enterprise from a store or received it already installed on
your computer, the key code is on the product packaging.
Be sure to include the braces.
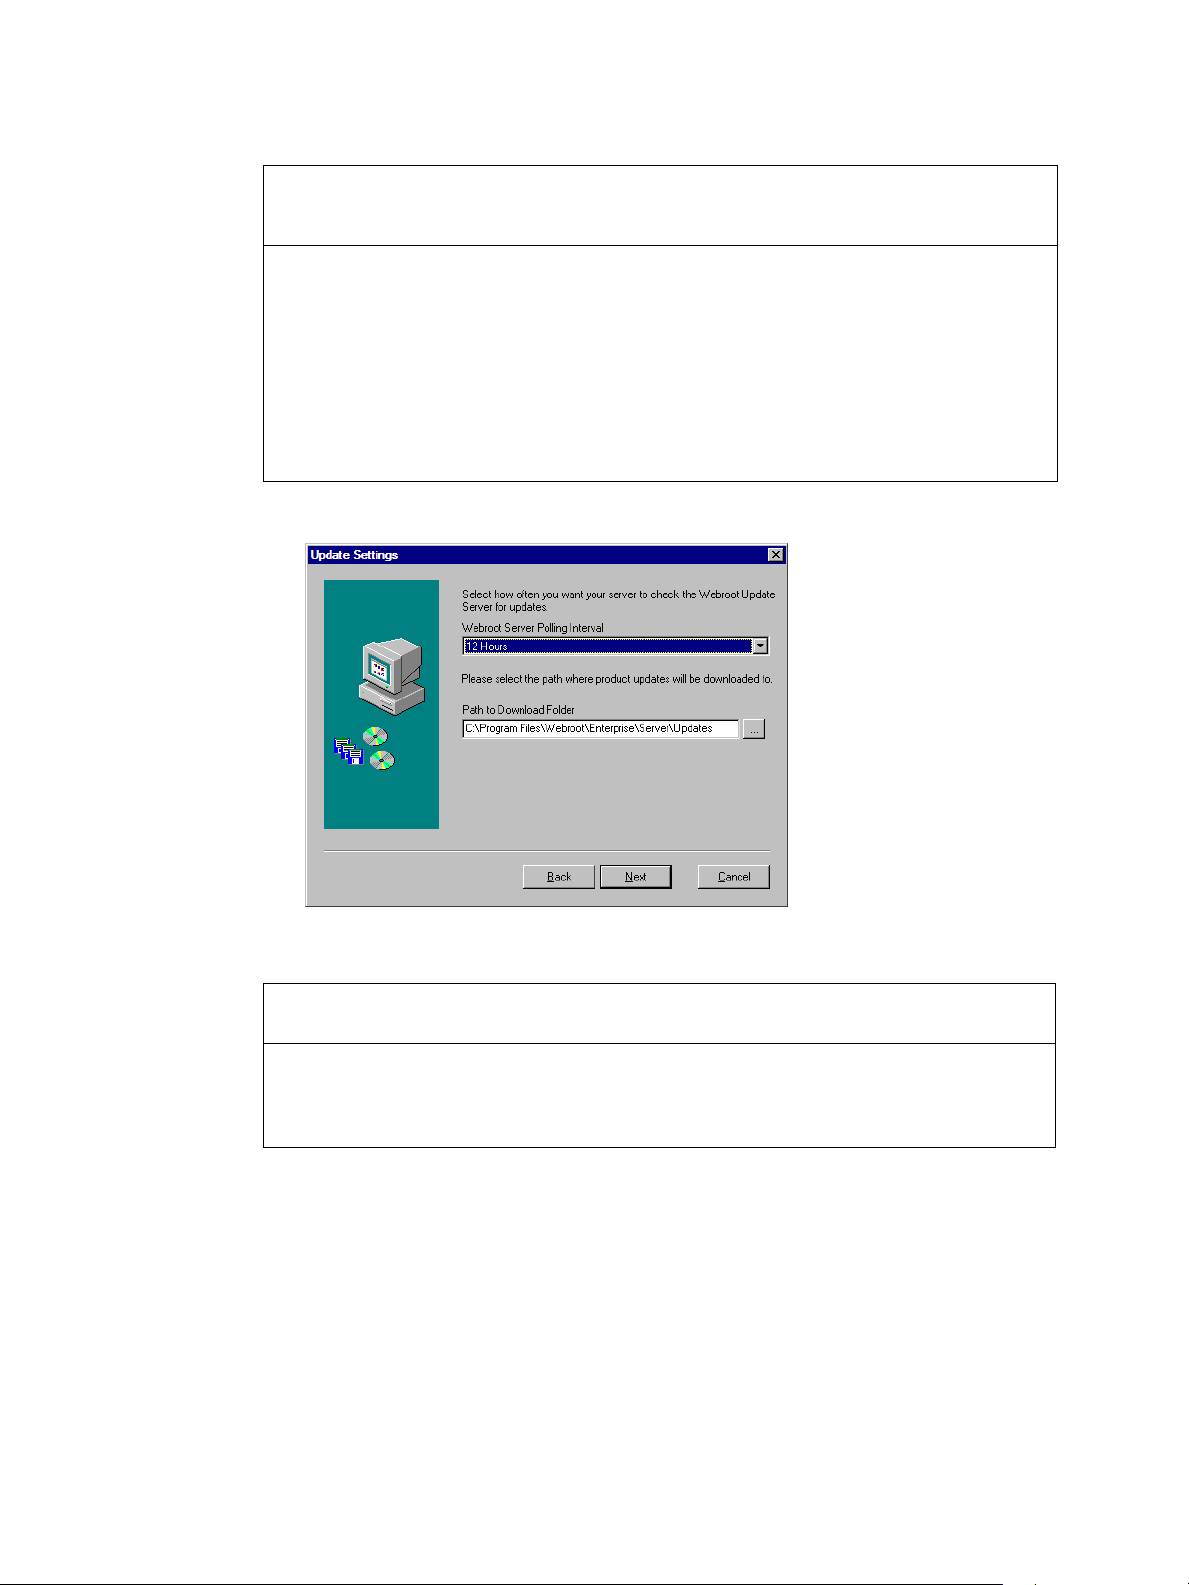
• The Update Settings window displays.
8. Enter or select the information and click Next.
Webroot Server Polling
Interval
Path to Download Folder
Select how often you want your server to check the Webroot Update
Server for updates.
Path to the folder where your company server stores the updates it
downloads from the Webroot Update Server. For best performance,
use a folder on the same server. It can also be a folder on any drive
your company server can access.
• The Proxy Settings window displays.
Webroot Enterprise System Administrator Guide 15
Page 20
9. Enter or select the information and click Next.
Proxy Server
Use Proxy Login
Proxy Username
Proxy Password
If you use a proxy server to access the Internet, enter your proxy
server name or IP address and port number in one of the following
formats:
• server_name.company.com:80
• 10.0.0.1:80
If you do not use a proxy server, leave the field blank.
If you use a proxy server that requires authentication, select this
option.
If you use a proxy server that requires authentication, enter your
proxy server username.
If you use a proxy server that requires authentication, enter your
proxy server password.
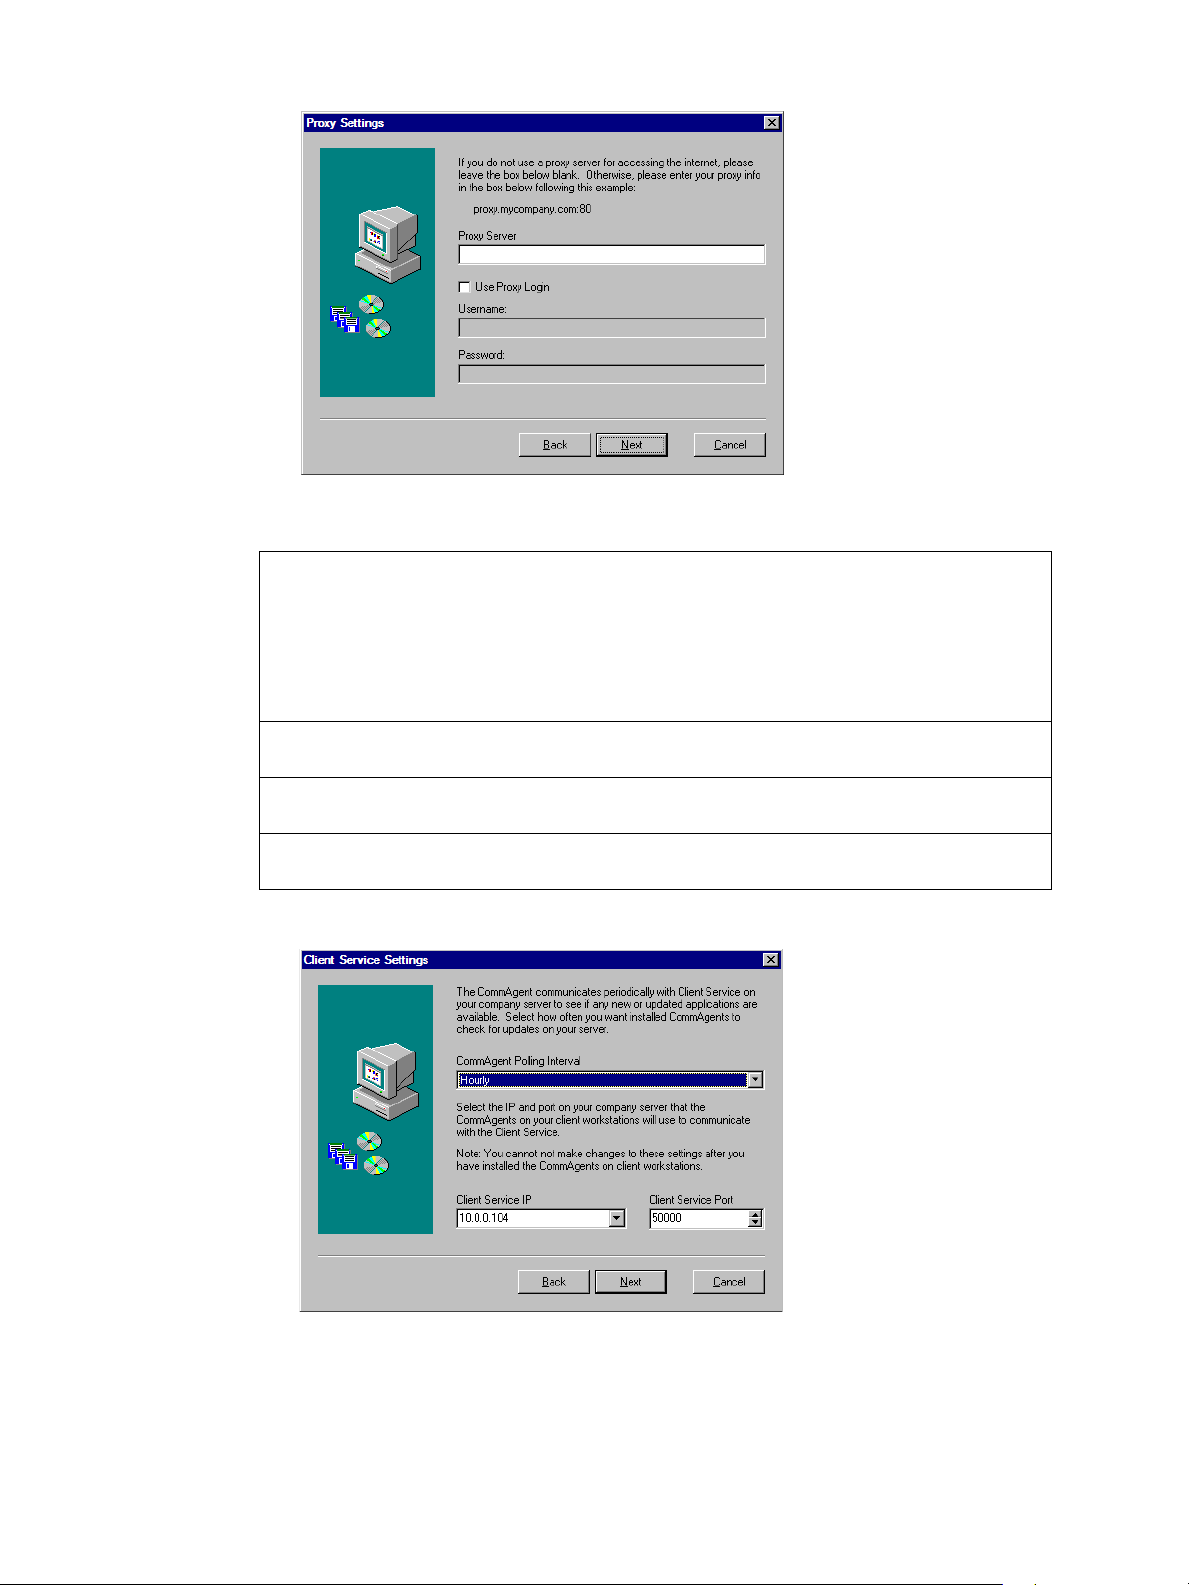
• The Client Service Settings window displays.
16 2: Installing Webroot Enterprise
Page 21

10. Enter or select the information and click Next.
CommAgent Polling
Interval
Client Service IP
Client Service Port
How often you want installed CommAgents on each client
workstation to check for updates and for schedule and configuration
changes from your server.
Enter the IP address or host name that the client workstations will use
to communicate with your company server. For IP resolution, select
the IP address of the network interface card (NIC) visible to client
workstations. For host name resolution, enter the fully qualified
domain name of your server (requires a properly configured DNS
environment).
Port on your company server that the Client Service will use to
communicate with your client workstations. The default port is 50000.
Be sure that the port you use is not used to communicate with another
system.
• The E-mail Settings window displays.
11. Enter or select the information and click Next.
E-mail Host
From Address
Message Timeout
Fully qualified domain name for your e-mail server used for outgoing
mail (SMTP server). If you do not have this information, enter NA
and edit the information from the Admin Console.
E-mail address that notification messages will come from. Must be a
real e-mail address in the format: tom@webroot.com.
Amount of time the Admin Console will wait to connect to the mail
server before timing out.
• The SMTP Settings window displays.
Webroot Enterprise System Administrator Guide 17
Page 22
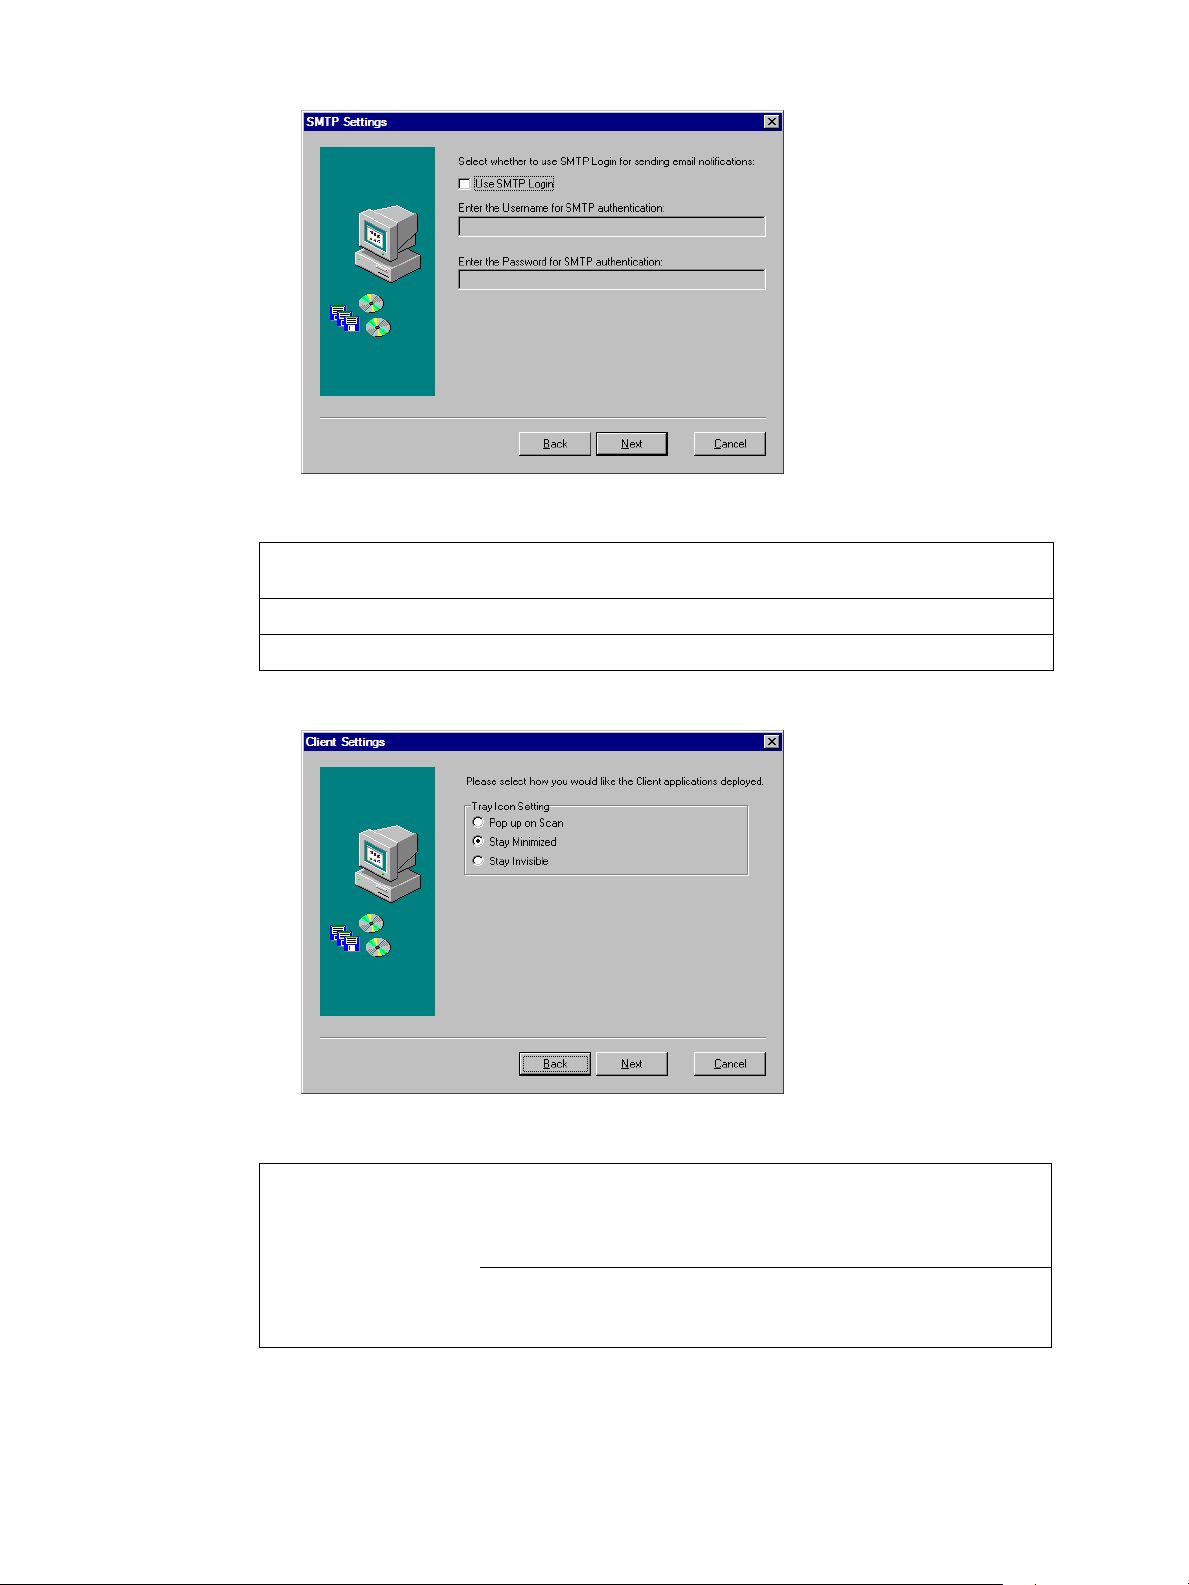
12. Enter or select the information and click Next.
Use SMTP Login
Username for SMTP
Password for SMTP
If you use a secure SMTP e-mail server, select this option and enter
the username and password below.
Name needed to log in to a secure SMTP server.
Password needed to log in to a secure SMTP server.
• The Client Settings window displays.
13. Enter or select the information and click Next.
Tray Icon Setting
Pop up on Scan
18 2: Installing Webroot Enterprise
Select how you want Spy Sweeper to appear on client workstations.
You can change this setting from the Admin Console by selecting
Manage Desktop Applications > Spy Sweeper > Configure Spy
Sweeper > Sweep Settings.
Displays a system tray icon that end users can double-click to display
the Spy Sweeper window and automatically pops up the window
whenever a sweep starts, whether scheduled or using Sweep Now.
Page 23

Stay Minimized
Stay Invisible
Default and recommended setting. Displays a system tray icon that
end users can double-click to display the Spy Sweeper window, but
does not pop up the window whenever a sweep starts. From this
interface, end users can start their own sweeps and adjust any
allowable settings. When a sweep is running, the tray icon will
animate to show that Spy Sweeper is sweeping their system.
Does not display a system tray icon and does not do anything when a
sweep starts. End users have no access to the Spy Sweeper window to
use options that are set as editable in the Admin Console.
• The Database Settings window displays.
14. Enter or select the information and click Next.
DBISam
SQL Server 2000
SQL Server Database
Name field
User Name and
Password fields
Select this option only if you have fewer than 10,000 client
workstations.
Select this option only if you have SQL Server 2000 and you have
over 10,000 client workstations.
The Select the SQL Server 2000 drop-down list takes a moment to
populate with the list of SQL servers in your environment. Select the
SQL server where you set up the database.
Enter the name of your SQL Server database. You must already have
the database and a system DSN set up.
Enter the user name and password for your SQL Server.
• The Start Copying window displays showing you the current settings.
Webroot Enterprise System Administrator Guide 19
Page 24

15. Click Next.
• Webroot Enterprise Server installs and automatically starts the Client Service and
• A message displays telling you to set up your client workstations.
Update Service.
16. Click Finish.
• Webroot Enterprise Server updates automatically when necessary.
You are now ready to set up on e or more client workstations and distributor servers (if needed).
For more information, see “Setting Up Client Workstations” on page 20 and “Installing and
Assigning Distributor Servers” on page 24.
Setting Up Client Workst ations
After you install the Webroot Enterprise Server, you must set up one or more client workstations.
This setup installs two components on each client workstation:
• CommAgent—communicates periodically with your company server to see if any
configuration changes, new or updated applications, or definitions are available. The
CommAgent also updates its settings based on the current server settings in the Admin
Console each time it communicates with the company server.
• Spy Sweeper—protects your computers from spyware.
You can install and update these components from the Admin Console. If you prefer to use other
installation methods, see “Alternate Client Workstation Setup Methods” on page 21.
Setting Up Client Workstations from the Admin Console
You can install and update client workstation components from the Admin Console. You can also
see what version each client workstation has installed and the last heartbeat.
20 2: Installing Webroot Enterprise
Page 25

Note
Installing the client components from the Admin Console requires Windows networking and
access to the admin share (c$).
To install and update client workstations from the Admin Console:
1. From the Admin Console function tree, select Admin Tasks > Client Deployment.
• The Client Deployment panel displays, with a list of the dom ains or workgroups that
exist on your network..
2. Select the domain or workgroup whose workstations you want to see.
• To see fewer client workstations in the list, use the filter options. For more
information, see “Filtering Information” on page 37.
3. Select the client workstations where you want to install the client components.
• You can select more than one workstation by using Ctrl or Shift as you select
workstations.
• If you are updating an existing installation, you do not need to uninstall the client
components first.
4. Click Deploy Client.
• If you do not have access to the admin share (c$) of a workstation, the workstation
asks for a user name and password that has admin share access.
5. Click Refresh or go to the Client Management panel to see the status of the installation.
• If you need to uninstall the client components, select the workstation and click
Uninstall Client.
Alternate Client Workstation Setup Methods
You can also install these components using any of the following methods:
• Going to each individual workstation and executing one of the following:
– Execute the SpySweeperSetup.msi file.
• Make sure that all seven of the client installation files (instmsi.exe, instmsiw.exe,
SpySweeperSetup.exe, SpySweeperSetup.ini, SpySweeperSetup.msi,
SseCleanup.exe, and SSEStart.exe) are in the same folder whenever
SpySweeperSetup.msi executes. Typically, these files are in the C:\Program
Files\Webroot\Enterprise\Server\Client folder of the system where you installed
Webroot Enterprise Server.
• The SpySweeperSetup.ini file contains the IP address and port of your company
server and is needed for the client to install successfully.
– For unpatched Windows 98, 98SE, ME, or NT execute the SpySweeper.exe file.
• This file installs Windows Installer 2.0, which is required for the client
workstation installation, then installs the client components.
• Make sure that all seven of the client installation files (instmsi.exe, instmsiw.exe,
SpySweeperSetup.exe, SpySweeperSetup.ini, SpySweeperSetup.msi,
Webroot Enterprise System Administrator Guide 21
Page 26

SseCleanup.exe, and SSEStart.exe) are in the same folder whenever
SpySweeper.exe executes. Typically, these files are in the C:\Program
Files\Webroot\Enterprise\Server\Client folder of the system where you installed
Webroot Enterprise Server.
• Using a logon script to execute one of the above files. Webroot has provided some
example logon scripts that you can change to meet your needs. See “Example Logon
Script” on page 23.
• Using Group Policies, if you use Active Directory. For more information, refer to http://
support.microsoft.com/default.aspx?kbid=314934 and http://support.microsoft.com/
?kbid=302430.
• Including the Spy Sweeper client as part of an image installed on workstations.
– Install Spy Sweeper on the target system you are intending to image. If you will be
implementing multiple Admin Consoles, you need to create a separate image for
clients managed under each console.
– Stop the Webroot CommAgent service.
– Remove the following registry key:
HKEY_LOCAL_MACHINE\SOFTWARE\Webroot\Enterprise\CommAgent\guid
– Create your image.
The SpySweeperSetup.msi client installation program defaults to visible installation where you
see a progress bar and receive feedback when the installation is complete. For information about
using different installation options, see “Client Installation Options” on page 2 2.
The CommAgents contact the Client Service on your company server, as displayed in the Client
Service Port field in the Admin Console (Admin Tasks > Settings), to look for product updates
and configuration changes. If updates are available, the CommAgents access the updates from the
distributors assigned on the Assign Distributors panel in the Admin Console. If no other
distributors are assigned, the company server (the default distributor) passes updates to the client
workstations.
Client workstations poll the company server at random intervals within 20 seconds of installation.
During the first contact, the CommAgent also provides the name and MAC address of the client
workstation and automatically adds the client to a default group. For more information, see
“Managing Groups” on page 34.
Once you set up the client workstations and they have polled the company server, you can change
the groups, if needed. You can also schedule sweeps and change sweep settings based on groups.
For more information, see “Chapter 3, Setting Up the Webroot Ente rprise Server” on page 29.
Client Installation Options
You can use the following options in your logon script when you set up client workstations:
• If you would like to use a silent installation, add the /q switch in the line that executes
SpySweeperSetup.msi. The installation program defaults to visible installation where you
see a progress bar and receive feedback when the installation is complete. The syntax is:
– SpySweeperSetup.msi /q
22 2: Installing Webroot Enterprise
Page 27

• You can specify the server IP address and port in the command line instead of relying on
the .ini file. The syntax is:
– SpySweeperSetup.msi SERVERIP=10.10.10.10 SERVERPORT=50000
For a silent installation:
– SpySweeperSetup.msi /q SERVERIP=10.10.10.10 SERVERPORT=50000
• You can also pass the client deployment setting. This setting should go after the /q switch
if you are using that:
– Pop up on scan—
– Stay minimized—
RUN_CLIENT_AS=0
RUN_CLIENT_AS=1
– Stay invisible—RUN_CLIENT_AS=2
The syntax is:
– SpySweeperSetup.msi /q RUN_CLIENT_AS=1 SERVERIP=10.10.10.10
SERVERPORT=50000
• You can apply any of these command line arguments to the SpySweeperSetup.exe installer
(which is used for installing on systems lacking the 2.0 version of Windows Inst aller). The
syntax is:
– SpySweeperSetup.exe /q RUN_CLIENT_AS=1 SERVERIP=10.10.10.10
SERVERPORT=50000
Example Logon Script
Below is an example logon script. You have to adjust it for your setup and network environment.
You have to put the script on your domain controllers or logon servers, then assign it so that it
executes when a workstation logs in to your network. This script assumes that you have a shared
drive on your network that contains the SpySweeperSetup.msi and SpySweeperSetup.ini files.
Typically, these files are in the C:\Program Files\Webroot\Enterprise\Server\Client folder of the
system where the Webroot Enterprise Server has been installed. Copy the client files to the
network share of your choice, then adjust the script to meet your share path. Also be sure to give
all workstations read and execute access to the share.
@echo off
REM Check to see if clients are installed on the local machine, if they
are then display a confirmation
REM message otherwise install the client package and display a message
REM Check to see if the Enterprise CommAgent is installed, if not go to
install otherwise go to check
if exist "C:\Program Files\Webroot\Enterprise\Spy
Sweeper\SpySweeper.exe"
goto check if not exist "C:\Program Files\Webroot\Enterprise\Spy
Sweeper\SpySweeper.exe"
goto install
REM Check to see if Enterprise Spy Sweeper is installed, if not go to
install otherwise go to loaded
:check if exist "C:\Program Files\Webroot\Enterprise\Spy
Sweeper\SpySweeperTray.exe"
goto loaded if not exist "C:\Program Files\Webroot\Enterprise\Spy
Sweeper\SpySweeperTray.exe"
goto install
Webroot Enterprise System Administrator Guide 23
Page 28

REM Display an install message, execute the client setup package from a
shared network drive and then go to end
:install echo Loading Webroot Enterprise Clients...
"C:\Program Files\Webroot\Enterprise\Server\Client\SpySweeperSetup.msi"
goto end
REM If the clients are already installed then display the following
message
:loaded echo Webroot Enterprise Clients are already Installed
:end
Uninstalling Spy Sweeper from Client Workstations
You can uninstall client workstation components using the Admin Console from the Client
Deployment panel (Admin Tasks > Client Management). Select the client workstation and click
Uninstall Client. You can most easily uninstall clients that were deployed from the Client
Deployment panel using this method. If you need to uninstall one of these clients manually using
Add/Remove Programs, you need to browse to a folder containing the SpySweeperSetup.msi file
on your network.
Users with administrative privileges can uninstall Spy Sweeper from client workstation using Add/
Remove Programs. The uninstall process requires access to the SpySweeperSetup.msi file and will
look for it in the location from which it was originally run. You need to leave the
SpySweeperSetup.msi file in a place that will be available in the future unless you want to prevent
users from uninstalling the client.
Note
The uninstallation process permanently deletes all spyware that was quarantined on the client
workstation.
Installing and Assigning Distributor Servers
By default, the Distributor service is installed with Webroot Enterprise Server on your company
server. This acts as a single distributor server.
If you need to add distributor servers, you can install the distributor server software on one or more
of your servers. For information about determining whether you need additional distributor
servers, see “Planning for Webroot Enterprise Deployment” on page 5.
Installations with 500 or fewer client workstations typically do not need to install additional
distributor servers.
You must complete the following tasks to install and use distributor servers:
1. Install the distributor server software. (See page 24.)
2. Assign distributor servers. (See page 25.)
Installing Distributor Servers
The distributor server installation installs and starts the Distributor service
(WebrootUpdateDistributor.exe).
24 2: Installing Webroot Enterprise
Page 29

To install distributor servers:
1. Execute the WebrootDistributorSetup.exe file on the server you want to be a distributor
server.
• The file is typically in the C:\Program Files\Webroot\Enterprise\Server\Distributor
folder of the system where you installed Webroot Enterprise Server.
2. Follow the on-screen instructions.
• You can now assign distributor servers.
Assigning Distributor Servers
After you install the distributor server on your servers, you must assign those servers to groups.
You can assign a distributor server to one or more groups or to the whole company . For example, if
you set up four distributor servers and assign them all to the whole compan y, the system randomly
selects the order of distributors it sends back to the client workstations.
For a complete description of the how the update process works, see “How Webroot Enterprise
Updates Work” on page 7.
This process spreads the load across the servers to ensure that the servers are not overwhelmed
with update requests. Distributor servers also can control bandwidth use over a W AN by localizin g
the client definition and update downloads.
To assign a distributor server:
1. Select Start > Programs > Webroot (Enterprise) > Admin Console.
• The Admin Console window displays, showing the Webroot Enterprise Dashboard
panel.
2. Select Admin Tasks > Assign Distributors.
• The Assign Distributors panel displays, with a list of all existing groups on the left
side.
3. Click Add New Distributor.
• The Add Distributor window displays.
4. Enter a name for the distributor server.
• If you enter the DNS name of a server on your network, the IP address automatically
populates when you tab to the second field.
5. If necessary, enter the IP address of the server.
6. Click OK.
• The server name now displays in the list on the right side of the panel.
Webroot Enterprise System Administrator Guide 25
Page 30

7. Drag a server from the list to a group or to the company in the group tree.
• To remove a server assignment, select the server in the group tree and click Unassign
Distributor.
• To update the status of the distributors, click Refresh.
• To remove the selected distributors from their assignments and from the list of
distributors, click Remove Distributors, then click Apply Changes.
8. Click Apply Changes.
• Your company server will automatically send copies of all updates to all distributors.
You still need to assign updates manually (from Spy Sweeper >Update Spy Sweeper
>Manual Install) or set automatic installation rules (from Spy Sweeper >Update
Spy Sweeper >Auto Install) to determine which updates should be applied to which
groups.
Changing the Distributor Server Port
The default port that a distributor server listens to is port 50003. If you need to change a distributor
server to listen on a different port, you can do so.
To change the distributor server port:
1. On the distributor server, create a backup copy of the following file:
C:\Program Files\Webroot\Enterprise\Distributor\etc\jetty.xml
2. Edit the original jetty.xml file with Notepad or another text editor.
3. Change the jetty .p ort att r ibu te inside t he add Listen er blo ck fro m t he default po rt of 50 003
to the new port.
4. Open regedit and browse to:
HKEY_LOCAL_MACHINE\Software\Webroot\Enterprise\Server\.
5. Enter a new string Value named: DistributorPort.
• Be sure to capitalize the letters D and P.
6. As a value, enter a new listening port.
• Be sure to leave out all trailing and leading spaces.
7. Restart the Webroot Update Distributor service.
• To restart the Webroot Update Distributor service, sele ct Start > Control Panel >
Administrative Tools > Services. Select the Webroot Update Distributor service and
click the Restart the service link in the upper-left corner of the window.
26 2: Installing Webroot Enterprise
Page 31

Understanding the Admin Console W indow
The Admin Console window lets you set up, manage, and monitor Webroot Enterprise functions
and applications. Figure 5 shows the window and describes its parts.
Function tree—
Expand and
select nodes to
see the available
settings and
actions.
Main panel—
Displays the
settings and
actions available
for the selected
function.
Figure 5: Admin Console window
Webroot Enterprise System Administrator Guide 27
Page 32

28 2: Installing Webroot Enterprise
Page 33

3: Setting Up the Webroot Enterprise
Server
You can perform the following tasks to complete the setup of the Webroot Enterprise Server:
• Access the Admin Console and view news (see page 29)
• Edit the server settings (see page 29)
• Set up notification (see page 32)
• Manage client workstations (see page 34)
• Assign distributor servers (see page 25)
• Filter information (see page 37)
Accessing the Admin Console and Viewing News
The Admin Console is where you set up, manage, and monitor We broot Enterprise updates and
applications.
Webroot maintains a Webroot Spy Sweeper Enterprise news page that contains information about
current version numbers and general spyware news. It also contains links to notes about updates
and current documentation.
To access the Admin Console and view news:
1. Select Start > Programs > Webroot (Enterprise) > Admin Console.
• The Admin Console window displays, showing the News panel. The News panel
includes information of interest to system administrators about spyware.
2. Select Admin Tasks > News.
3. Click Update News.
Editing the Server Settings
You entered your server settings during the installation process. These settings provide
information to each Spy Sweeper client about the frequency and address for contacting your
company server.
Below are important notes about the server settings:
• Client workstations will only get updates and setting changes when the CommAgent polls
your company server. Any updates you make here (or elsewhere) will be applied after the
polling interval has passed. For example, if your polling interval is every hour and your
last client heartbeat was 30 minutes ago, changes you make will be applied 30 minutes
from now.
Webroot Enterprise System Administrator Guide 29
Page 34

– If you need to be sure that all clients receive updates or setting changes immediately,
you can use the Poll Now button in the Client Management panel, however, you
should use this option selectively to ensure that you do not overwhelm your network
and servers.
• Updates for the Webroot Ente rprise Server, including the Admin Console, download and
install automatically whenever you r co mp any server contacts the Webroot Update Server.
• Updates for the Spy Sweeper program and definitions download whenever your company
server contacts the W ebroot Update Server , but they do not install automatically. You must
either manually install them (see “Installing Updates Manually” on page 49) or set up
automatic installation (see “Installing Updates Automatically” on page 50).
To edit the server settings:
1. From the Admin Console function tree, select Admin Tasks > Settings.
• The Settings panel displays, with three tabs of settings you can view and edit.
2. Enter information into each field.
Field Description
Basic tab
Company Name
Download Folder
Webroot Server
Polling Interval
CommAgent Polling
Interval
Key Code
Name of your company. This identifies your Webroot Enterprise
product when your server looks for updates from the Webroot Update
Server.
Path to the folder where your company server stores the updates it
downloads from the Webroot Update Server. Typically, this is a folder
on your company server. It can also be a folder on any drive your
company server can access.
How often you want your server to check for updates on the Webroot
Update Server. If you select Manual Only, you must manually check
for updates from Status > Update History, then click Check for
Updates.
How often you want installed CommAgents on each client
workstation to check for updates and configuration changes on your
server. If you change this, each CommAgent will retrieve the new
setting the next time it contacts the server.
Unique code that identifies the rights and privileges associated with
your installation, such as the number of licenses you have purchased
for each client workstation application.
If you purchased Webroot Enterprise online, you received your key
code in an e-mail message. You can copy the key code from the
message and paste it in. If you purchased Webroot Enterprise from a
store or received it already installed on your computer, the key code is
on the product packaging.
Be sure to include the braces.
30 3: Setting Up the Webroot Enterprise Server
Page 35

Field Description
Client Service IP
Port
E-mail tab
E-mail Host
From Address
Message Timeout
Use SMTP Login
Login Name
Login Password
Send Test E-mail
Enter the IP address or host name that the client workstations will use
to communicate with your company server. For IP resolution, select
the IP address of the network interface card (NIC) visible to client
workstations. For host name resolution, enter the fully qualified
domain name of your server (requires a properly configured DNS
environment).
Port on your company server that the Client Service will use to
communicate with your client workstations. The default port is 50000.
Be sure that the port you use is not used to communicate with another
system.
Fully qualified domain name for your e-mail server used for outgoing
mail (SMTP server).
E-mail address that notification messages will come from. Must be a
real e-mail address in the format: tom@webroot.com.
Amount of time the Admin Console will wait to connect to the mail
server before timing out.
If you use a secure SMTP e-mail server, select this option and enter
the Login Name and Login Password below.
Name needed to log in to a secure SMTP server.
Password needed to log in to a secure SMTP server.
Select an e-mail address from the drop-down list and click Send Test
E-mail. All e-mail addresses entered into Admin Tasks > E-mail
Addresses are listed in the drop-down list. You can also enter an e-
mail address to test it before adding it.
Advanced tab
Proxy Server
Proxy Username
Proxy Password
Min Initial Retry
(Seconds)
Max Initial Retry
(Seconds)
If you use a proxy server to access the Internet, enter your proxy
server name or IP address and port number in one of the following
formats:
• server_name.company.com:80
• 10.0.0.1:80
If you do not use a proxy server, leave the field blank.
If you use a proxy server that requires authentication, enter your proxy
server username.
If you use a proxy server that requires authentication, enter your proxy
server password.
Minimum time a rejected client workstation should wait before trying
to connect again.
The actual retry time is a randomly generated time between the
minimum and maximum. If the client workstation is rejected again, it
doubles the retry time. A rejected client continues to double the retry
time until it connects successfully or until it reaches the final retry
time. It then continues at the final retry interval until it is successful.
Maximum time a rejected client workstation should wait before trying
to connect again. The actual retry time will be between the minimum
and maximum, as described above.
Webroot Enterprise System Administrator Guide 31
Page 36

Field Description
Final Retry (Seconds)
Database tab
3. Click Apply Changes.
Amount of time between retries after the client has been rejected
several times. The rejected client continues to retry to connect at this
interval until it is successful.
You cannot change the type of database after installation. The
information in this tab is read-only.
Setting Up Notification
You can set up the following for the messages that the Webroot Enterprise Server sends to notify
you of various events such as the availability of product updates:
• E-mail addresses to use for notification (see page 32)
• E-mail message content (see page 33)
• Error notification (see page 33)
• Update notification (see page 50)
Setting Up Notification E-mail Addresses
You can set up e-mail addresses that the Webroot Enterprise Server uses to notify you of various
events such as the availability of product updates.
To set up notification e-mail addresses:
1. From the Admin Console function tree, select Admin Tasks > E-mail Addresses.
• The E-mail Addresses panel displays.
2. Click to add a new row to the table.
3. Enter a name and valid e-mail address into the row.
4. Click to save the row.
5. Click Apply Changes.
32 3: Setting Up the Webroot Enterprise Server
Page 37

Setting Up Notification Messages
You can set up the messages that Webroot Enterprise Server sends for the following types of
events:
• Availability of updates or definitions to the Webroot Enterprise Server or client
workstation components
• Detected spyware
• Errors that occur on client workstations
To set up notification e-mail messages:
1. From the Admin Console function tree, select Admin Tasks > Configure E-mail
Notifications.
• The Configure E-mail Notifications panel displays.
2. Click the tab for the type of message you want to set up.
3. Enter the E-mail Subject you want to use for this type of message.
• The field is already populated with example text that you can keep or edit.
4. Enter the message text you want for this type of message.
• The field is already populated with example text that you can keep or edit.
• For information that will vary, select an option from the Merge Fields drop down list
and click Insert. Each event will contain information to fill in these merge fields
(variables) with content appropriate to the event.
5. Click Apply Changes.
Setting Up Error Notification
You can configure who receives notification of different types of errors that come from your client
workstations.
To set up error notification:
1. From the Admin Console function tree, select Admin Tasks > Error Notifications.
• The Error Notifications panel displays with a list of all e-mail addresses you have
entered for notification and the alert categories of increasing scope.
2. Drag a name from the list to an alert category
• To move an e-mail address from one category to another, drag it from the current
category and drop it onto another category.
• T o receive all error messages, move the e-mail address to the Errors, Warnings & Info
category.
3. Click Apply Changes.
Webroot Enterprise System Administrator Guide 33
Page 38

Managing Clients
You can manage client workstations and perform the following functions from the Admi n
Console:
• Manage groups (see page 34)
• Create and export client reports (see page 35)
• Poll client workstations now (see page 36)
• Delete client workstations (see page 36)
Managing Groups
You can set up groups to help administer the Webroot product updates, sweep scheduling, and
sweep settings. Every workstation where you have installed the Spy Sweeper client must belong to
a group. By default, each client workstation is added to a default group named after the domain or
workgroup the client workstation is in.
You can administer the following by group:
• Which applications to install on client workstations
• Which updates to install on client workstations
• Specific settings for each application
You can change the group organization and assignments to meet your needs. You might use groups
to distinguish between different types of users. For example, you could have a group that includes
all system administrators and use this group to test new products and product updates before
distributing them throughout the company. You can also use groups to distinguish between
departments, geographic locations, or any other category you choose.
You can also filter the client workstation list to make it easier to create and manage groups. For
more information, see “Filtering Information” on page 37.
To set up groups:
1. From the Admin Console function tree, select Admin Tasks > Client Management.
• The Client Management panel displays, with a list of all existing groups on the left
side.
• To see all client workstations that have the Spy Sweeper client installed, click the top
(company) node of the group tree.
• To see fewer client workstations in the list, use the filter options. For more
information, see “Filtering Information” on page 37.
2. Click Add Group.
• You can also right-click anywhere in the group tree and select Add Group.
• The New Group window displays.
3. Enter a group name.
34 3: Setting Up the Webroot Enterprise Server
Page 39

4. Click OK.
• The group name now displays in the group tree on the left side of the panel.
5. Drag a workstation from the list to a group in the group tree.
• T o move a workstation from group to another, drag it from the current group and drop
it onto another group.
• To delete a group, move all workstations in the group to another group, select the
group you want to delete, and click Delete Group.
• T o delete a workstation from a group, select the group, then select the workstation and
click Delete Selected Workstations. If the deleted workstation contacts the company
server, the workstation is added to a default group named after the domain or
workgroup the client workstation is in.
6. Click Apply Changes.
Creating and Exporting Client Reports
Using the filter on the Client Management panel, you can create various reports. For example, you
can filter based on the last heartbeat date, application version, or definition version. If you want to
save a report as file, you can export it as a comma separated (CSV) file.
To create and export client reports:
1. From the Admin Console function tree, select Admin Tasks > Client Management.
• The Client Management panel displays with a list of all existing groups on the left
side.
• To see all client workstations that have the Spy Sweeper client installed, click the top
(company) node of the group tree.
2. Click the group that includes the workstation you want to report on.
3. Use the filter options to display the information you want in your report.
• For more information, see “Filtering Information” on page 37.
4. Select the workstations you want to include in the report.
• You can select more than one workstation by using Ctrl or Shift as you select
workstations.
5. Click Export Selected Workstations to File.
• You can also right-click the selected workstations and select Export Selected
Workstations to File.
• The Save Workstations to File window displays.
6. Select where you want to save the file and enter a file name.
7. Click Save.
Webroot Enterprise System Administrator Guide 35
Page 40

Polling Client Workstations Now
You can poll one or more client workstations from the Client Management panel. You can use this
function if you have changed some settings, such as assigning program or definition updates, and
you want client workstations to receive those updates immediately.
Note
Use this option selectively to ensure that you do not overwhelm your network and servers with a
large number of client workstations requesting updates at the same time.
To poll client workstations now:
1. From the Admin Console function tree, select Admin Tasks > Client Management.
• The Client Management panel displays with a list of all existing groups on the left
side.
• To see all client workstations that have the Spy Sweeper client installed, click the top
(company) node of the group tree.
2. Click the group that includes the client workstation you want to poll.
3. Select the client workstation you want to poll.
• You can select more than one workstation by using Ctrl or Shift as you select
workstations.
4. Click Poll Now.
• You can also right-click the selected workstations and select Poll Now.
• The poll starts on the selected client workstations. A confirmation message displays,
with the number of workstations the system sent the polling message to.
• To check the status of the polling, click Refresh and filter on the heartbeat to see that
client workstations have updated.
Deleting Client Workstations
If you find that a client workstation has not had a heartbeat for a long time or you know that the
workstation no longer exists, you can delete the workstation from the database. If the client
workstation reconnects to the network and contacts your company server, the system creates a new
database entry, and the client workstation is added to a default group named after the domain or
workgroup the client workstation is in.
To delete client workstations:
1. From the Admin Console function tree, select Admin Tasks > Client Management.
• The Client Management panel displays with a list of all existing groups on the left
side.
• To see all client workstations that have the Spy Sweeper client installed, click the top
(company) node of the group tree.
2. Click the group that includes the client workstation you want to delete.
36 3: Setting Up the Webroot Enterprise Server
Page 41

3. Select the client workstation you want to delete.
• You can select more than one workstation by using Ctrl or Shift as you select
workstations.
4. Click Delete Selected Workstations.
• You can also right-click the selected workstations and select Delete Selected
Workstations.
• The system removes the workstation from the list.
5. Click Apply Changes.
• The system deletes the workstation from its database.
Filtering Information
On some Admin Console panels, you can filter the information to display only the information that
meets your filter criteria. For example, on the Client Management panel, you can limit the number
of workstations displayed by filtering on the workstation name, IP address, last heartbeat date, last
sweep date, and application version.
You can also group information by one or more column headings.
The filtering options work the same way , regardless of which panel you are working on. You know
that the filter options are available when the column headings on the right side of the panel are
drop-down lists. For example, in the Client Management panel (Admin Tasks > Client
Management), you can see that the column headings look like drop-down lists.
To filter information:
1. From a panel that has the filter options, select the drop-down list from one column
heading.
• The drop-down list contains the following options:
– {All}—Use this to view all rows in the table.
– {Custom}—Use this to filter based on the information contained in the current
column.
– Each item currently listed in the selected column—Use this to view just one row
of the table.
2. Select {Custom}.
• The Custom Filter window displays.
3. From the first drop-down list, select how you want to match your filter criteria.
4. In the field next to drop-down list, enter the information you want to filter on.
• For example, in the Client Management panel, you can filter based on the current Defs
Version field, select equals, then enter the current definition version number.
5. If you want to add more filter criteria, select AND or OR, select how you want to match
the second set of criteria, and enter information to filter on.
Webroot Enterprise System Administrator Guide 37
Page 42

6. Click OK.
• The information in the panel changes to display only those workstations that meet
your filter criteria.
• At the bottom of the panel, a gray bar displays that lets you do the following:
– Close the gray bar—Click the x.
– Turn off the filter temporarily—Select the check box to toggle the current filter on
and off.
– Edit or save the filter and open other filters—Click Customize to see these
additional filter options.
To group information:
1. From a panel that has the filter options, drag a table heading to the gray area above the
table.
• For example, in the Client Management panel, click a group, then drag the App
Version field to the gray area.
2. Click the plus sign next to the column heading in the table to see the information that
matches the heading content.
• Continuing the example above, click the plus sign next to each occurrence of App
Version in the table to see all client workstations in the current group that have the
same version of the application.
38 3: Setting Up the Webroot Enterprise Server
Page 43

4: Managing Spy Sweeper
Spy Sweeper lets you protect your end users’ privacy and your company’s computers from a
variety of spyware including those that monitor all computer activities (system monitors) and
those that can steal or destroy data (Trojan horses). It also detects spyware that pops up ads on your
computer (adware) and cookies that may contain personal information (tracking cookies).
You can set up and perform the following Spy Sweeper functions from the Admin Console:
• Manage spyware (see page 39)
• Configure sweeps (see page 43)
• Run sweeps (see page 46)
• Update Spy Sweeper (see page 48)
• View a summary of detected spyware (see page 52)
As a system administrator, you can also unlock functions at a client workstation and customize the
Spy Sweeper settings for an end user. For more information see “Unlocking Functions at a Client
Workstation” on page 52.
Managing Spyware
You can manage spyware for client workstations in the following ways:
• Set up automatic handling of spyware found (see page 39)
• Set up continuous monitoring of certain spyware activities (see page 41)
Setting Up Automatic Spyware Handling
By default, Spy Sweeper quarantines detected spyware for 30 day s. You can change this default
behavior for client workstations in the following ways:
• By setting up exceptions for spyware by type
– You can set up Spy Sweeper to automatically handle detected spyware based on the
spyware type. Spy Sweeper can automatically do one of the following for each
spyware type:
• Log only, don’t quarantine (default)
• Quarantine, delete after 2 days
• Quarantine, delete after 7 days
• Quarantine, delete after 30 days
• Don’t quarantine, delete right away
Webroot Enterprise System Administrator Guide 39
Page 44

• By setting up exceptions for specific spyware to keep or to restore already quarantined
spyware
– To override the default spyware handling for each spyware type, you can set specific
spyware to keep. You may want to use this option if your end users have specific
spyware on their computers that they need to keep to make another program run
properly.
– Spy Sweeper must detect the spyware on at least one client workstation before you
can set Spy Sweeper to keep it.
– Setting a specific spyware to keep also restores that spyware from quarantine, when
the client workstation next polls, if it has already been detected and quarantined.
Note
The settings here override the settings for each spyware type.
You can set up automatic spyware h andling by group or for the whole company.
Note
W e recommend creating settings at the company level first, then determining what settings, if any,
should be different by group.
To set up automatic spyware handling:
1. From the Admin Console function tree, select Manage Desktop Applications > Spy
Sweeper > Manage Spyware > Detected Spyware.
• The Detected Spyware panel displays with a list of each spyware type.
2. From the group tree, select the group you want to set up.
• If you want this setting to apply to the whole company, select the company at the top
of the group tree.
3. For each spyware type, select how you want Spy Sweeper to handle it.
• T o see more information about a specific spyware item, select it in the Found Spy List
and review the description at the bottom of the panel.
4. For any spyware you want to always keep, move the spyware from the Found Spy List to
the Always Keep/Restore from Quarantine list.
• The Found Spy List includes each spyware instance that Spy Sweeper has found on a
workstation in the company.
• Moving spyware to the Always Keep/Restore from Quarantine list restores any
already quarantined instances of the spyware on the next sweep.
40 4: Managing Spy Sweeper
Page 45

5. Click Apply Changes.
• Spy Sweeper will now automatically handle each spyware type based on your
selections. It will also always keep the spyware in the Always Keep/Restore from
Quarantine list for the selected group when it runs sweeps.
• To change the settings for one group to be the same as the settings for the whole
company , select the group in the group tree and click Apply Company Settings, then
click Apply Changes.
Setting Up Continuous Monitoring: Active Shields
You can set up Spy Sweeper to continuously monitor several common spyware-related activities.
W e call these settings “Active Shields.” You can set up continuous monitoring options by group or
for the whole company.
Note
We recommend creating settings at the company level first, then determining what settings, if any,
should be different by group.
To set up continuous monitoring:
1. From the Admin Console function tree, select Manage Desktop Applications > Spy
Sweeper > Manage Spyware > Active Shields.
• The Active Shields panel displays with the continuous monitoring (Active Shields)
options.
2. From the group tree, select the group you want to set up.
• If you want these settings to apply to the whole company, select the company at the
top of the group tree.
• The tabs in the Active Shields panel show the current settings for the selected group or
for the company.
3. Select each option you want.
Option Description
Standard tab
Memory Shield
On
Startup Shield
On
Sweeps memory once per minute looking for spyware.
Actively watches startup items for any changes. Some spyware will add
startup items, so that the spyware will always start. This shield ensures that
spyware does not add something to the startup items, but also effectively
prevents end users from installing software. Be sure that your users do not
need to install new software before selecting this shield or set this shield to
user editable and instruct users to disable the shield before installing
software.
Webroot Enterprise System Administrator Guide 41
Page 46

Option Description
Messenger
Shield On
Messenger
Service Startup
Type
Leave the
Messenger
Service Running
when Messenger
Shield Is Turned
Off
Internet Explorer
tab
Tracking Cookie
Shield On
IE Hijack Shield
On
Hosts File Shield
On
Keep Hosts File
Read-only
IE Home Page
Shield On
Protected Home
Page
(Applies only to Windows NT, 2000, and XP.) This option turns off and
actively watches the Microsoft Messenger Service. This service is not an
instant messaging program and does not affect your use of instant
messaging. This service is often used for sending spam and creating pop-up
ads. Turning off the service stops these types of spam and pop-ups.
If you use this service to broadcast information to your users, do not turn on
this shield.
If you turn the Messenger Shield off, after having turned it on, this option
controls the state of the Messenger Service Startup Type when the
Messenger Shield is off.
If you turn the Messenger Shield off, after having turned it on, this option
controls the status of the Messenger Service when the Messenger Shield is
off.
Actively watches for tracking cookies as you visit Web sites and removes
them. Tracking cookies are cookies that can track your Web activities. These
may include cookies that contain user names, passwords, or similar
information that you enter on some Web sites.
Actively protects various Internet Explorer functions, such as the search
page, error pages, and other default pages that Internet Explorer displays.
Some spyware changes (“hijacks”) these pages without letting you know.
Whenever spyware tries to change these pages, Spy Sweeper blocks the
change.
This option actively prevents changes to the Hosts file. Some spyware will
add or change the IP address for a Web site in the Hosts file. When you try
to go to the added or changed W eb site, you will really go to a dif ferent Web
site, such as an advertising site. This shield ensures that spyware does not
change an IP address in the Hosts file.
If end users are permitted to edit the Hosts file, do not turn this shield on.
If you turn the Hosts File Shield off, after having turned it on, this option
controls the state of the Hosts file when the Hosts File Shield is off.
Watches for any changes to the home page that you set in Internet Explorer.
The home page is the Web site that displays automatically when you start
Internet Explorer or when you click the Home bu tton.
When you enable this shield, the home page you enter will replace the end
user’s existing home page. End users will only be able to change their home
page through the Options >Active Shields panel in Spy Sweeper. If the
Tray Icon Setting (Manage Desktop Applications > Spy Sweeper >
Configure Spy Sweeper > Sweep Settings) is set to Stay Invisible, end
users will not be able to change their home page.
Enter the Web address of the Web site you want as your home page in the
format:
http://www.webroot.com
42 4: Managing Spy Sweeper
Page 47

Option Description
Blocked
Applications/Web
Sites tab
Blocked
Websites Shield
On
Spy Installation
Shield On
Adds a list of suggested sites to block to your Hosts file and sets the IP
address for those sites to the IP address for your computer. This blocks
banner and other advertising from these sites. When you go to a Web site
that has advertising from one of the blocked sites, you may see a small
graphic that indicates a broken link to a graphic (typically a red x in a box).
This just shows where the blocked ad would display.
To add your own sites, enter the Web site address and click Add.
Actively watches for known spyware that tries to install itself on your
computer. Whenever known spyware tries to install itself, Spy Sweeper
stops the installation.
You can also add executable file names to the list, and this shield will stop
the file from executing on the client computer when a user tries to start a
specific program. For example, you could add a file sharing program that
you do not want to let company personnel use. To add a program, enter the
file name in the text box and click Add.
4. If you want end users to be able to change a setting, select the User Editable option.
5. Click Apply Changes.
• Spy Sweeper will now actively shield the settings you selected.
• To change the settings for one group to be the same as the settings for the whole
company , select the group in the group tree and click Apply Company Settings, then
click Apply Changes.
Configuring Sweeps
You can configure the following settings related to spyware sweeps:
• Sweep settings (what to sweep) (see page 43)
• Alerts related to found spyware (see page 45)
Configuring Sweep Settings
You can configure settings that control how Spy Sweeper sweeps client workstations looking for
spyware. You can also set up a password to unlock functions at a client workstation. For more
information, see “Unlocking Functions at a Client Workstation” on page 52.
You can configure sweep settings by group or for the whole company.
Note
We recommend creating settings at the company level first, then determining what settings, if any,
should be different by group.
Webroot Enterprise System Administrator Guide 43
Page 48

To configure sweep settings:
1. From the Admin Console function tree, select Manage Desktop Applications > Spy
Sweeper > Configure Spy Sweeper > Sweep Settings.
• The Sweep Settings panel displays with available sweep options.
2. From the group tree, select the group you want to set up.
• If you want these settings to apply to the whole company, select the company at the
top of the group tree.
• The settings in the Sweep Settings panel show the current settings for the selected
group or for the company.
3. Select each option you want.
Option Description
Drives to Sweep
Skip Files Larger Than
Sweep Memory
Sweep Registry
Sweep Only Known
Spyware Folders
Sweep All Folders on
Selected Drives
Allow Users to Cancel
Sweeps
Select the drives you want Spy Sweeper to sweep. Typically, most
spyware installs on the C: drive, but you should sweep all hard drives
periodically.
If you know that you have very large files that you do not want Spy
Sweeper to sweep, select this option and enter a file size in kilobytes.
For example, you may want to use this option if you have large
graphics or video files on your computer that you created and you
know do not contain spyware. This will save time during sweeps.
Typically, spyware files are small.
Select this option to have Spy Sweeper sweep your computer’s
memory for spyware. T ypically, you want to sweep memory each time
you run a sweep. Spyware commonly loads into memory.
Select this option to have Spy Sweeper sweep your computer’s registry
for spyware. Typically, you want to sweep the registry each time you
run a sweep. Spyware commonly creates entries in your computer’s
registry.
Select this option to make the sweep run faster. When you use this
option, Spy Sweeper only looks in the folders where spyware files are
typically found. Using this option performs a less thorough sweep. You
should periodically sweep all folders.
Select this option to have Spy Sweeper look in all folders on the drives
you select to sweep. This type of sweep will take longer to run. Using
this option performs a more thorough sweep.
Select this option to permit end users to stop a sweep, regardless of
how the sweep was started.
44 4: Managing Spy Sweeper
Page 49

Option Description
Tray Icon Setting
Pop up on Scan
Stay Minimized
Stay Invisible
Password
Select how you want Spy Sweeper to appear on client workstations.
Displays a system tray icon that end users can double-click to display
the Spy Sweeper window and automatically pops up the window
whenever a sweep starts, whether scheduled or using Sweep Now.
Default and recommended setting. Displays a system tray icon that end
users can double-click to display the Spy Sweeper window, but does
not pop up the window whenever a sweep starts. From this interface,
end users can start their own sweeps and adjust any allowable settings.
When a sweep is running, the tray icon will animate to show that Spy
Sweeper is sweeping their system.
Does not display a system tray icon and does not do anything when a
sweep starts. End users have no access to the Spy Sweeper window to
use options that are set as editable in the Admin Console.
Enter a password that lets system administrators access and change
Spy Sweeper settings when you are working at a client workstation.
For more information, see “Unlocking Functions at a Client
Workstation” on page 52.
4. If you want end users to be able to change a setting, select the User Editable option.
5. Click Apply Changes.
• Spy Sweeper will use these options when running sweeps.
• To change the settings for one group to be the same as the settings for the whole
company , select the group in the group tree and click Apply Company Settings, then
click Apply Changes.
Setting Up Sweep Alerts
You set Spy Sweeper to send e-mail alerts to specific people when it detects different types of
spyware. Before you can set up e-mail alerts, you must enter one or more notification recipients.
For more information, see “Setting Up Notification E-mail Addresses” on page 32.
To set up sweep alerts:
1. From the Admin Console function tree, select Manage Desktop Applications > Spy
Sweeper > Configure Spy Sweeper > Alert Notifications.
• The Alert Notifications panel displays with the available alert types and notification
recipients.
2. Drag the name of a notification recipient to the alert tree.
• To move a recipient to different alert type, drag it from the current type and drop it
onto another type.
3. Click Apply Changes.
• Spy Sweeper will use these settings to send alerts when it detects spyware.
Webroot Enterprise System Administrator Guide 45
Page 50

Running Sweeps
You can run sweeps the following ways:
• Run a sweep now (see page 46)
• Schedule sweeps (see page 47)
You can also view and stop sweeps that are running. For more information, see “Viewing and
Stopping Sweeps” on page 48.
Running a Sweep Now
You can run a sweep on one or more client workstations when you learn about a critical spyware
threat. The sweep will use the current sweep settings. If you want to change the settings, make the
changes first and wait for the next polling interval to ensure that client workstations receive the
new settings. You can also use the Poll Now function to tell all client workstations to poll and get
the new settings immediately. For information about changing sweep settings, see “Configuring
Sweep Settings” on page 43. For information about polling now, see “Polling Client Workstations
Now” on page 36.
The Sweep Now function uses port 50001 to communicate with client workstations. You cannot
edit this setting.
Note
Running a sweep during business hours may slow performance for each affected client
workstation. In addition, you can sweep a maximum of 100 client workstations, because the
Sweep Now function listens for responses from each client being swept.
You can start a sweep now from either the Sweep Now panel or the Client Management panel.
46 4: Managing Spy Sweeper
Page 51

To run a sweep now:
From the Sweep Now panel From the Client Management panel
1. From the Admin Console function tree,
select Manage Desktop Applications
> Spy Sweeper > Manage Spyware >
Sweep Now.
• The Sweep Now panel displays.
2. Select the group or client workstation
where you want to run the sweep.
• If you want to run the sweep on all
client workstations in the company,
select the company at the top of the
group tree.
3. Click Sweep Now.
• To cancel a sweep that is running,
select the group or client
workstation where you want to stop
the sweep and click Cancel Sweeps
in Progress.
1. From the Admin Console function tree, select Admin
Tasks > Clien t Management.
• The Client Management panel displays with a list
of all existing groups on the left side.
2. Select the group or client workstation where you want
to run the sweep.
• You can select more than one client workstation
by using Ctrl or Shift as you select workstations.
• If you want to run the sweep on all client
workstations in the company, select the company
at the top of the group tree.
3. Right-click the client workstations you want and
select Sweep Now.
• The sweep starts on the selected client
workstations.
• To check the status of the sweeps, go to Manage
Desktop Applications > Manage Spyware >
Sweep Now and click the group that the
workstations belong to.
Scheduling Sweeps
You can schedule sweeps to run on one or more specific days at a specific time.
You can schedule sweeps by group or for the whole company. Below are some things to consider
when setting up scheduled sweeps:
• Avoid scheduling sweeps at the same time as anti-virus scans.
• Schedule different groups to sweep at different times to reduce load on the company
server when clients report their results.
• You can schedule Windows NT, 2000, XP, and 2003 clients to sweep during off-hours as
long as the system remains p owered on (even with the u s er logg ed ou t). For Windows 98,
98SE, and ME systems, the user will need to be logged in to execute a scheduled sweep.
You need to let users know when their sweep is scheduled to make sure they leave their
computer in the proper state for the sweep to run.
• Spy Sweeper intelligently throttles its disk usage to allow users to access the disk but will
continue through the sweep even if there are repeated interruptions.
To run schedule sweeps:
1. From the Admin Console function tree, select Manage Desktop Applications > Spy
Sweeper > Run Sweeps > Schedule Sweeps.
• The Schedule Sweeps panel displays.
Webroot Enterprise System Administrator Guide 47
Page 52

2. Select the group or client workstation where you want to schedule the sweep.
• If you want these settings to apply to the whole company, select the company at the
top of the group tree.
• The settings in the Schedule Sweeps panel show the current settings for the selected
group or for the company.
3. If you want end users to be able to change these settings, select the User Editable option.
Note
We do not recommend making the schedule options user editable.
4. Select the day of the week and the time you want to run the sweep.
• The schedule uses the 24-hour clock.
5. If you want to sweep only known spyware folders at Windows startup or shutdown, select
the option you want at the bottom of the panel.
• These options only scan known spyware folders, so the sweep runs quickly. Using one
of these options helps to ensure that sweeps are run periodically, even if the computer
is turned off when regular sweeps are scheduled.
6. Click Apply Changes.
• To change the settings for one group to be the same as the settings for the whole
company , select the group in the group tree and click Apply Company Settings, then
click Apply Changes.
Viewing and Stopping Sweeps
You can view sweeps that are running. You can also stop sweeps, regardless of how you or an end
user started the sweep.
To view and stop sweeps:
1. From the Admin Console function tree, select Manage Desktop Applications > Spy
Sweeper > Manage Spyware > Sweep Now.
• The Sweep Now panel displays, with information about sweeps that are running.
2. Select a group to see which workstations in that group are currently running sweeps.
3. To can cel a sweep that is running, select the group o r client workstation where you want to
stop the sweep and click Cancel Sweeps in Progress.
Updating S py Sweeper
Your company server checks with the Webroot Update Server for any available server updates,
client program updates, and definition updates. You configure the frequency of this check using
the Webroot Server Polling Interval field, which is on the Basic tab of the Settings panel (Admin
Tasks > Settings).
48 4: Managing Spy Sweeper
Page 53

If you want server components updates to install automatically as soon as they are downloaded,
select the Automatically Install Server Updates option on the Basic tab. If this option is not
selected, you must manually install server updates by executing the setup batch file contained in
each server update folder.
Updates for the client Spy Sweeper program and definitions download whenever your company
server contacts the Webroot Update Server, but they do not install automatically. You must either
manually install them or set up automatic installation rules at the company or group level.
You can set up and do the following related to the distribution of Spy Sweeper updates:
• Install updates manually (see page 49)
• Install updates automatically (see page 50)
• Set up notification (see page 50)
• Set up updating for mobile end users (see page 51)
Installing Updates Manually
You can install updates manually whenever you receive notification of an update. For information
about setting up notification, see “Setting Up Update Notification” on page 50.
You may want to use manual updates for major and minor updates as well as bug fixes and new
products. This gives you the chance to install these updates on a few client workstations to see how
they work before deploying them to many users.
You can manually install updates by group or for the whole company.
Note
We recommend creating settings at the company level first, then determining what settings, if any,
should be different by group.
To install updates manually:
1. From the Admin Console function tree, select Manage Desktop Applications > Spy
Sweeper > Update Spy Sweeper > Manual Install.
• The Manual Install panel displays with the available updates and group tree.
2. Drag an update to a group in the group tree.
• To install the update on all client workstations in the company, drag the update to the
company name at the top of the group tree.
3. Repeat step 2 for each update and group you want to install.
4. Click Apply Changes.
• The next time each client workstation contacts the company server, it will install the
update.
Webroot Enterprise System Administrator Guide 49
Page 54

Installing Updates Automatically
You can setup Spy Sweeper to automatically install updates when your company receives them
from the Webroot Update Server. The automatic settings only apply to updates received after you
change these settings. You must manually install any updates that you received before you set up
the automatic installation.
We suggest that definitions be set to automatically install. You want to keep your definitions as up
to date as possible and automatically installing them assures that all users will have the most recent
definitions.
Note
We recommend setting only definitions to install automatically. Install other update types
manually.
You can set up automatic update installatio n by group or for the whole company.
Note
W e recommend creating settings at the company level first, then determining what settings, if any,
should be different by group.
To install updates automatically:
1. From the Admin Console function tree, select Manage Desktop Applications > Spy
Sweeper > Update Spy Sweeper > Auto Install.
• The Auto Install panel displays with the types updates and group tree.
2. Drag an update type to a group in the group tree.
• To set the update type to automatically install on all client workstations in the
company, drag the update type to the company name at the top of the group tree.
3. Repeat step 2 for each update type and group.
4. Click Apply Changes.
• The next time each client workstation contacts the company server (based on the
polling interval), it will install any available updates set to install automatically.
Setting Up Update Notification
You can set up e-mail notification for Spy Sweeper updates. Whenever an update arrives from the
Webroot Update Server, the Admin Console can send an e-mail message to one or more people.
Before you can set up notification, you must enter one or more notification recipients. For more
information, see “Setting Up Notification E-mail Addresses” on page 32.
50 4: Managing Spy Sweeper
Page 55

To set up notification for Spy Sweeper updates:
1. From the Admin Console function tree, select Manage Desktop Applications > Spy
Sweeper > Update Spy Sweeper > Update Notifications.
• The Update Notifications panel displays with a list of the types of updates and
available e-mail notification recipients.
2. Drag the name of an e-mail recipient to the update tree.
• To move a recipient to different update type, delete it from the current type and add it
to another type using the buttons.
3. Click Apply Changes.
Setting up Updating for Mobile End Users
If you have end users who use laptops and travel a lot, you can let them receive Spy Sweeper
definition updates directly from Webroot.
Note
Be sure that the Tray Icon Setting is set to Stay Minimized (recommended) or Pop Up on Scan, or
end users will not be able to display the Spy Sweeper main window.
To set up updating for mobile end users:
1. From the Admin Console function tree, select Manage Desktop Applications > Spy
Sweeper > Configure Spy Sweeper > Sweep Settings.
• The Sweep Settings panel displays with the types updates and group tree.
2. Select the group or client workstation where you want to change the mobile update setting.
• If you want these settings to apply to the whole company, select the company at the
top of the group tree.
3. Select the Enable Mobile Client Support option.
4. Click Apply Changes.
• The next time each client workstation contacts the company server, it will update Spy
Sweeper and make visible the Update Spy Definitions button on the Spy Sweeper
main window. Whenever end users have an Internet connect, they can use the button
to retrieve definition updates. The button is not available for use if a user downloaded
updated definitions within the last six hours.
Webroot Enterprise System Administrator Guide 51
Page 56

Viewing a Summary of Detected Sp yware
You can view a summary of the spyware that Spy Sweeper has detected on client workstations
throughout the company either by group or by spyware type.
To view a summary of detected spyware:
1. From the Admin Console function tree, select Status > Product Summaries > Spy
Sweeper.
• The Spy Sweeper panel displays with the group tree and spyware type tree.
2. Select a group, client workstation, or spyware type to see where spyware was found.
Unlocking Functions at a Client Workst ation
As a system administrator, you can unlock functions at a client workstation and customize the Spy
Sweeper settings for an end user. Unlocking functions requires a password that you set in the
Admin Console. By default, there is no password set up. You must set up the password before you
can unlock functions at an end user’s client workstation. For information about setting the
password, see the Password option in step 3 of “Configuring Sweep Settings” on page 43.
After you set up the password and the client workstation has polled, you can go to an end user’s
workstation and unlock functions.
Note
If the Tray Icon Setting in the Admin Console is set to Stay Invisible, you cannot access the Spy
Sweeper interface at all from a client workstation. For information about changing this setting, see
the Tray Icon Setting option in step 3 of “Configuring Sweep Settings” on page 43.
To unlock functions at a client workstation:
1. At a client workstation, double-click the Spy Sweeper icon in the system tray.
• The Spy Sweeper window displays.
2. Press Ctrl+Alt+p.
• The Admin Password window displays.
3. Enter the password you set up in the Admin Console.
4. Click OK.
• Now all functions that are not normally available to end users are available. These
include Always Keep and Always Remove, as well as other functions that are not set
up as user editable in the Admin Console. Refer to the Spy Sweeper online help for
more information about using these functions.
5. After you customize the settings as needed, press Ctrl+Alt+p to lock the functions again.
52 4: Managing Spy Sweeper
Page 57

5: Monitoring St atus
You can monitor the status of Webroot Enterprise in the following ways:
• Review the Webroot Enterprise Dashboard (see page 53)
• View update history and installed applications (see page 57)
• View client status (see page 58)
• View errors (see page 58)
• Generate reports (see page 59)
Reviewing the Webroot Enterprise Dashboard
The Webroot Enterprise Dashboard shows you an overview of your overall system health. The
main Dashboard panel lets you see at a glance whether you have any issues that require your
attention in the following categories:
• Sweep Status—Shows whether client workstations have completed a full sweep within the
last week. (See page 54.)
• Definition Status—Shows whether client workstations have the current definitions
installed. (See page 55.)
• Infection Status—Shows whether threats have been found on client workstations. (See
page 55.)
• Top Spyware Threats—Shows whether moderate or critical threats have been found on
client workstation in the last 48 hours. (See page 56.)
• Server Status—Shows the last downloaded software versions, port status, and Webroot
Enterprise services status. (See page 57.)
Each category in the Dashboard can have one of the following statuses:
• Good (green)—All items in the category are good.
• Warning (yellow)—At least one item in the category has a warning status.
• Critical (red)—At least one item in the category has a critical status.
– See the details about each category for more information about what the status icons
specifically mean for the category.
Webroot Enterprise System Administrator Guide 53
Page 58

Figure 6 shows the main Dashboard panel.
Large icon shows overall
status. If any single
category has a warning or
critical status, this icon
reflects the most serious
status.
Information refreshes
hourly. Click Refresh to
update all Dashboard
information based on the
latest polling data f rom each
client workstation.
Click a link to view more
details.
Figure 6: Webroot Enterprise Dashboard main panel
Viewing the Sweep Status
The Dashboard Sweep Status panel lists client workstations that have one of the following
statuses:
• Cri tical (red)—Th ese client workstations ha ve not completed a full sweep in the last
30 days or more.
• Warning (yellow)—These client workstations have not completed a full sweep in the
last 7 to 29 days.
A full sweep is any sweep that uses the Sweep All Folders on Selected Drives option (Manage
Desktop Applications > Spy Sweeper > Configure Spy Sweeper > Sweep Settings).
Status bar icon, which
displays in every Admin
Console panel, shows the
same overall status as the
large icon above.
To view the Sweep Status:
1. From the Admin Console function tree, select Webroot Enterp rise Dashboard > Sweep
Status.
• The Sweep Status panel displays.
54 5: Monitoring Status
Page 59

2. Click Refresh to update the status based on the latest polling data from each client
workstation.
• To export the data from either table, select the workstations you want to include, then
right-click the selected workstations and select Export to Excel. You can select more
than one workstation by using Ctrl or Shift as you select workstations.
Viewing the Definition Status
The Dashboard Definition Status panel lists client workstations that have one of the following
statuses:
• Critical (red)—These client workstations have definitions that are two or more
versions behind the current version.
• Warning (yellow)—These client workstations have definitions that are one version
behind the current version.
To view the Definition Status:
1. From the Admin Console function tree, select Webroot Enterprise Dashboard >
Definition Status.
• The Definitions Status panel displays.
2. Click Refresh to update the status based on the latest polling data from each client
workstation.
• To export the data from either table, select the workstations you want to include, then
right-click the selected workstations and select Export to Excel. You can select more
than one workstation by using Ctrl or Shift as you select workstations.
Viewing the Infection Status
Dashboard Infection Status panel lists client workstations that have on e of the following statuses:
• Critical risk (red)—Spy Sweeper found threats on these client workstations that
totalled 5 points or more.
• Moderate risk (yellow)—Spy Sweeper found threats on these client workstations that
totalled between 1 and 4 points.
Table 9 shows the points Spy Sweeper assigns to found threats
Table 9: Points assigned to found threats
Threat Points
Trojan horse 5
System monitor 5
Adware 1
Other 1
Webroot Enterprise System Administrator Guide 55
Page 60

To view the Infection Status:
1. From the Admin Console function tree, select Webroot Enterprise Dashboard >
Infection Status.
• The Infection Status panel displays.
2. Click Refresh to update the status based on the latest polling data from each client
workstation.
• To export the data from either table, select the workstations you want to include, then
right-click the selected workstations and select Export to Excel. You can select more
than one workstation by using Ctrl or Shift as you select workstations.
Viewing the Top Spyware Threats
The Dashboard Top Spyware Threats panel lists the top spyware threats found in the last 48 hours
and includes an overall threat status:
• Critical risk (red)—Spy Sweeper found threats on client workstations that totalled 5
points or more.
• Moderate risk (yellow)—Spy Sweeper found threats on client workstations that
totalled between 1 and 4 points.
Table 10 shows the points Spy Sweeper assigns to found threats
Tab le 10 : Poin ts assign e d to fo un d th reats
Threat Points
Trojan horse 5
System monitor 5
Adware 1
Other 1
To view the Top Spyware Threats:
1. From the Admin Console function tree, select Webroot Enterprise Dashboard > Top
Spyware Threats.
• The Top Spyware Threats panel displays.
2. Click Refresh to update the status based on the latest polling data from each client
workstation.
• T o export the data from the table, select the rows you want to include, then right-click
the selected rows and select Export to Excel. You can select more than one row by
using Ctrl or Shift as you select rows.
56 5: Monitoring Status
Page 61

Viewing the Server Status
The Dashboard Server Status panel lists the latest downloaded software and definition versions,
the current port settings, and the Webroot services status for the company server. The panel also
includes an overall server status.
• Critical (red)—One or more of the listed ports is closed or one or more Webroot
services is stopped.
• Good (green)—All of the listed ports are open and all Webroot services are running.
To view the Server Status:
1. From the Admin Console function tree, select Webr oot Enterprise Dashboard > Server
Status.
• The Server Status panel displays.
2. Click Refresh to update the status.
3. If a service is not running, click the blue Start text to start it.
Viewing Up date History and Inst alled Applications
You can view the following information about updates and installed applications:
• Update history—List of updates downloaded from the Webroot Update Server. (See
page 57.)
• Installed applications—List of applications installed by client workstation. (See page 57.)
Viewing Update History
You can view a history of when Webroot Enterprise Server and Spy Sweeper client updates were
downloaded from the Webroot Update Server.
To view the update history:
• From the Admin Console function tree, select Status > Update History.
• The Update History panel displays with a list of all of the updates downloaded to date.
Viewing Applications Installed by Workstation
You can view information about the applications installed and the version for each client
workstation.
Webroot Enterprise System Administrator Guide 57
Page 62

To view applications installed:
1. From the Admin Console function tree, select Admin Tasks > Client Management.
• The Client Management panel displays with a list of all existing groups on the left
side.
• To see all client workstations that have the Spy Sweeper client installed, click the top
(company) node of the group tree.
2. Select the group or client workstation whose application version you want to see.
• You can select more than one client workstation by using Ctrl or Shift as you select
workstations.
3. Use the filter or grouping option to organize the list by application update.
• For more information, see “Filtering Information” on page 37.
Viewing Client St atus
You can view a list of each client workstation that has the Spy Sweeper client installed on it and
when it last contacted the company server. The information also includes when Spy Sweeper last
ran a sweep on the client workstation.
To view the client status:
• From the Admin Console function tree, select Admin Tasks > Client Management.
• The Client Management panel displays with a list when each client workstation last
contacted the company server.
Viewing Errors
You can view any errors that an application generates on a client workstation. You can then report
the error to Webroot.
You should review the error list periodically to determine if any applications have caused errors.
To view errors:
1. From the Admin Console function tree, select Status > Errors.
• The Errors panel displays with a list errors.
2. Contact Webroot Enterprise Support for assistance with the resolving the error.
58 5: Monitoring Status
Page 63

Generating Reports
You can generate the following types of reports:
• Error—Includes all errors from Spy Sweeper.
• Spyware—Includes details of the spyware found.
To generate reports:
1. From the Admin Console function tree, select Reports and the type of report you want.
2. From the group tree, select the group you want.
• If you want the report to include the whole company, select the company name at the
top of the group tree.
3. Select the date range you want the report to include.
4. Click Preview/Print to preview the report.
• To save the report to any of several file formats, click Print, then select the Print to
File option, Type, and Where to save the file.
Webroot Enterprise System Administrator Guide 59
Page 64

60 5: Monitoring Status
Page 65

A: Webroot Enterprise Port
Requirement s
A number of communication ports must be opened for proper communications between all
network components within the Webroot Enterprise architecture. Table 11 de scribes the port
requirements for a Webroot Enterprise installation.
The aim of this information is not to document how to open all of these ports for a particular
firewall, but rather to describe what ports must be open and on what systems within your Webroot
Enterprise architecture.
Table 11: Webroot Enterprise communications ports
Port Component Description Installation/network
access requirement
443 WebrootUpdateService.exe
Required on Distributor Servers
50003 WebrootUpdateDistributor.exe
Required on Distributor Servers
50000 WebrootClientService.exe
Required on company server
and client workstations
50001 Sweep Now Function
Required on company server
and client workstations
50002 Poll Now Function
Required on company server
and client workstations
• HTTP protocol over SSL.
• Communicates periodically with
We broot to retrieve updates and
move them to distributor servers.
• Runs as a system service on the
server.
•HTTP.
• Responds to CommAgent on client
workstations to distribute updates.
• Runs as a system service on the
server.
• Controls the communication
between the client workstations and
your company server.
• Function initiated from the Admin
Console that initiates a Spy
Sweeper sweep of the selected
client workstations.
• Function initiated from the Admin
Console that initiates a poll of the
selected client workstations to
update their heartbeat and status to
the server.
• Installed when you set
up distributor servers.
• Requires local network
access.
• Installed when you set
up distributor servers.
• Requires local network
access.
• Installed during the
installation of Webroot
Enterprise Server.
• Requires local network
access.
• Not an installed
component, but a
function called from
within the Admin
Console.
• Requires local network
access.
• Not an installed
component, but a
function called from
within the Admin
Console.
• Requires local network
access.
Webroot Enterprise System Administrator Guide 61
Page 66

62 A: Webroot Enterprise Port Requirement s
Page 67

B: Migrating an Existing Installation from
DBISAM to SQL Server
If you have an existing Webroot Enterprise installation and need to migrate the database from
DBISAM to SQL Server, you can do so. The migration tool only changes a DBISAM database to a
SQL Server database for the same version of Webroot Enterprise.
Note
You only need to migrate to SQL Server if you expect to install more than 10,000 clients.
To migrate from DBISAM to SQL Server:
1. From your Webroot Enterprise company server, start the Admin Console and select Help
> About to be sure that your installation has updated to version 2.0
• You can only migrate to SQL Server if you have version 2.0 or later installed.
2. Stop the following Webroot Enterprise services:
• Webroot Client Service
• Webroot Update Service
3. Copy the DB folder to a temporary location.
• If you installed the Webroot Enterprise Server to the default location, the DB folder is
in the following location:
– : C:\Program Files\Webroot\Enterprise\Server\
4. Uninstall the following Webroot Enterprise programs, in this order, using Add/Remove
Programs:
• Webroot Spy Sweeper Enterprise Client, if installed on the company server
• Webroot Spy Sweeper Enterprise Distribution Server
• Webroot Enterprise Server
5. Set up the SQL database.
• For more information, see “Setting up a SQL Server Database” on page 9.
6. Install a new Webroot Enterprise Server, making sure you select the SQL Server 2000
option during the installation.
• The full installation file for Webroot Enterprise Server 2.1 is available from the
Supplemental Downloads page at: http://www.webroot.com/entcenter.
• For more information, see “Installing Webroot Enterprise Server on Your Company
Server” on page 11.
Webroot Enterprise System Administrator Guide 63
Page 68

7. Start the import utility to bring the DBISAM database files into the SQL Server database.
• If you installed the W ebroot Enterprise Server to the default location, the import utility
is in the following location:
– C:\Program Files\Webroot\Enterprise\Server\SSEImport.exe
• Depending on the size of the database being imported, the process can take from a few
seconds to several minutes.
• On completion of the import, a confirmation message displays.
64 B: Migrating an Existing Installation from DBISAM to SQL Server
Page 69

Index
A
Active Shields, setting up
Add Group button 34
Admin Console
configuring server settings
defined 4
installing 4
starting 29
understanding 3
understanding the main window 27
updating 30
Advanced tab 31
alerts, setting up for sweeps 45
Always Keep list 40
applications
viewing errors from client workstations
viewing installed by group 57
viewing update history of 57
assigning distributor servers 24, 25
B
Basic tab
Blocked Websites Shield On option 43
C
canceling sweeps
changing
the port for distributors servers
Check for Updates button 30
client components
example logon script
installation options 22
client components, installing 20, 21
Client Service
defined
installing 4
Client Service IP field 12, 17, 31
Client Service Port field 11, 1 7
client workstations
adding to groups
creating reports about 35
deleting 36
example logon script 23
options for setting up 22
polling now 36
removing from groups 34
setting up 20, 21
30
48
4
41
29
26
23
34
58
uninstalling Spy Sweeper from 24
unlocking Spy Sweeper functions at 52
viewing application errors from 58
CommAgent Polling Interval field 17, 30
CommAgents
defined
installation options 22
installing 4, 20, 21
viewing heartbeat status of 58
viewing update history of 57
Company Name field 15, 30
company server status, monitoring 57
configuration examples 5
configuring sweeps 43
continuous monitoring, setting up 41
conventions, typographic 1
creating
reports about client workstations
customer support 2
D
Dashboard
Definition Status panel
icons defined 53
Infection Status panel 55
Refresh button 53
reviewing 53
Server Status panel 57
status bar 53
Sweep Status panel 54
Top Spyware Threats panel 56
database
migrating from DBISAM to SQL
setting up SQL 9
Database tab 32
database, recommendations about selecting type 5
DBISam option 19
DBISAM, migrating from 63
Definition Status panel
defined
icons in 55
definition status, monitoring 55
definitions
updating
updating automatically 50
updating for mobile end users 51
updating manually 49
4
35
55
63
55
48
Webroot Enterprise System Administrator Guide 65
Page 70

Delete Group button 35
Delete Selected Workstations button 37
Deleted Selected Workstations button 35
deleting
client workstations
36
Deploy Client button 21
distributor servers
assigning
24, 25
changing the default port for 26
how they work 5
installing 24
recommendations about number to use 5
removing 25
unassigning 25
updating process 7
distributors
defined
4
installing 4
Download Folder field 11, 30
Drives to Sweep drop-down list 44
E
E-mail Host field
11, 17, 31
E-mail tab 31
Enable Mobile Client Support option 51
errors
viewing for applications on client workstations
example logon script 23
Export Selected Workstations to File button 35
exporting reports about client workstations 35
F
file, saving reports to
59
filtering information 37
Final Retry field 32
firewalls
configuring ports required for Webroot Enterprise
From Address field 11, 17, 31
G
generating reports
59
grouping information 37
groups
deleting
34
renaming 34
setting up 34
viewing applications installed 57
H
handling
spyware
39
spyware automatically 39
spyware automatically by type 39
heartbeat status, viewing for CommAgents 58
58
Hosts File Shield On options 42
I
icons
defined for the main Dashboard panel
IE Hijack Shield On option 42
Infection Status panel
defined
55
icons in 55
infection status, monitoring 55
information, filtering 37
installing
client components
20, 21
CommAgents 20, 21
distributor servers 24
example logon script 23
key steps for 8
options for client components 22
options for CommAgents 22
options for Spy Sweeper 22
Spy Sweeper 20, 21
Webroot Enterprise 9
Webroot Enterprise Server 11
Internet Explorer Home Page Shield On option 42
K
Keep Hosts File Read-only option
42
keeping spyware 40
Key Code field 11, 15, 30
L
Leave the Messenger Service Running when Messenger
Shield Is Turned Off
42
Login Name field 31
Login Password field 31
logon script example 23
61
M
managing
Spy Sweeper
39
spyware 39
spyware automatically 39
spyware automatically by type 39
Max Initial Retry field 31
Memory Shield On option 41
Message Timeout field 17, 31
messages for notification, setting up 33
Messenger Service Startup Type option 42
Messenger Shield On option 42
migrating
from DBISAM to SQL
63
Min Initial Retry field 31
monitoring
definition status
55
53
66 Index
Page 71

infection status
55
server status 57
status 53
sweep status 54
top spyware threats 56
N
News, viewing
29
notification
setting up
32
setting up e-mail addresses for 32
setting up for errors 33
setting up for Spy Sweeper updates 50
setting up messages for 33
P
Password field
45
Password for SMTP field 18
Path to Download Folder field 15
planning for Webroot Enterprise deployment 5
Poll Now button 36
polling
client workstations now
36
recommendations about setting frequency 5
Pop up on Scan option 18, 45
Port field 31
ports
changing for distributor servers
26
Webroot Enterprise requirements for 61
Protected Home Page field 42
Proxy Password field 12, 16, 31
Proxy Server field 12, 16, 31
Proxy Username field 12, 16, 31
Q
quarantined spyware, what happens during
uninstallation
24
R
Refresh button
36
removing distributor servers 25
reports
creating related to client workstations
35
saving to a file 59
reports, generating 59
restoring spyware 40
running
a sweep now
46
sweeps 46
sweeps on a schedule 47
S
saving reports to a file
59
scheduling sweeps 47
Send Test E-mail button 31
server settings, configuring in the Admin Console 29
Server Status panel
defined
57
icons in 57
server status, monitoring 57
setting
a SQL database
9
setting sweep settings 43
setting up
client workstations
20, 21
continuous monitoring 41
error notification 33
groups 34
key steps for 8
notification 32
notification e-mail addresses 32
notification messages 33
options for client workstations 22
sweep alerts 45
shields, setting up 41
Skip Files Larger Than option 44
sorting information 37
Spy Installation Shield On option 43
Spy Sweeper
defined
4
example logon script 23
installation options 22
installing 4, 20, 21
managing 39
setting up notification about updates 50
unlocking functions at a client workstation 52
updating 48
updating automatically 50
updating definitions for mobile end users 51
updating manually 49
viewing a summary of detected spyware 52
viewing date of last sweep 58
spyware
handling automatically by type
39
managing 39
managing automatically 39
restoring 40
setting up to always keep 40
viewing a summary of detected 52
spyware, monitoring 56
SQL
migrating to
63
setting up database 9
SQL Server 2000 option 19
SQL Server Database Name field 19
starting the Admin Console 29
Startup Shield On option 41
status
monitoring
53
Webroot Enterprise System Administrator Guide 67
Page 72

Stay Invisible option 19, 45
Stay Minimized option 19, 45
stopping sweeps 48
support 2
Sweep All Folders on Selected Drives option 44
Sweep Memory option 44
Sweep Now button 47
Sweep Only Known Spyware Folders option 44
Sweep Registry option 44
Sweep Status panel
defined
54
icons in 54
sweep status, monitoring 54
sweeps
configuring
43
running 46
running now 46
scheduling 47
setting up alerts for 45
settings for 43
stopping 48
viewing those running 48
sweeps, viewing last date of 58
system health status bar, defined 53
system requirements 2
updating
definitions
48
definitions automatically 50
definitions for mobile end users 51
definitions manually 49
overview of for Webroot Enterprise 7
Spy Sweeper 48
Spy Sweeper automatically 50
Spy Sweeper manually 49
the Admin Console 30
Webroot Enterprise Server 30
Use Proxy Login option 16
Use SMTP Login option 18, 31
User Editable option 43, 45
Username and Password fields 19
Username for STMP field 18
V
viewing
a summary of detected spyware
applications installed by group 57
heartbeat status of CommAgents 58
News 29
sweeps 48
update history 57
52
T
technical support
2
threats, monitoring 56
Top Spyware Threats panel
defined
56
icons in 56
Tracking Cookie Shield On option 42
Tray Icon Setting field 18
Tray Icon Setting option 45
typographic conventions 1
U
unassigning distributor servers
25
Uninstall Client button 21
uninstalling, Spy Sweeper 24
unlocking, Spy Sweeper functions at a client
workstation 52
Update News button 29
Update Service
defined
4
installing 4
updates, viewing history of 57
W
Webroot Enterprise
architecture
3, 5
installing 9
key steps to installing and setting up 8
planning deployment of 5
port requirements 61
understanding 3
updating process described 7
Webroot Enterprise Server
installing
11
updating 30
viewing update history of 57
Webroot Server Polling Interval field 15, 30
workstations
adding to groups
34
creating reports about 35
deleting 36
moving to a different group 34
polling now 36
removing from groups 34
68 Index
 Loading...