

Page 1
ENGLISH
FRANÇAIS
FRANÇAIS
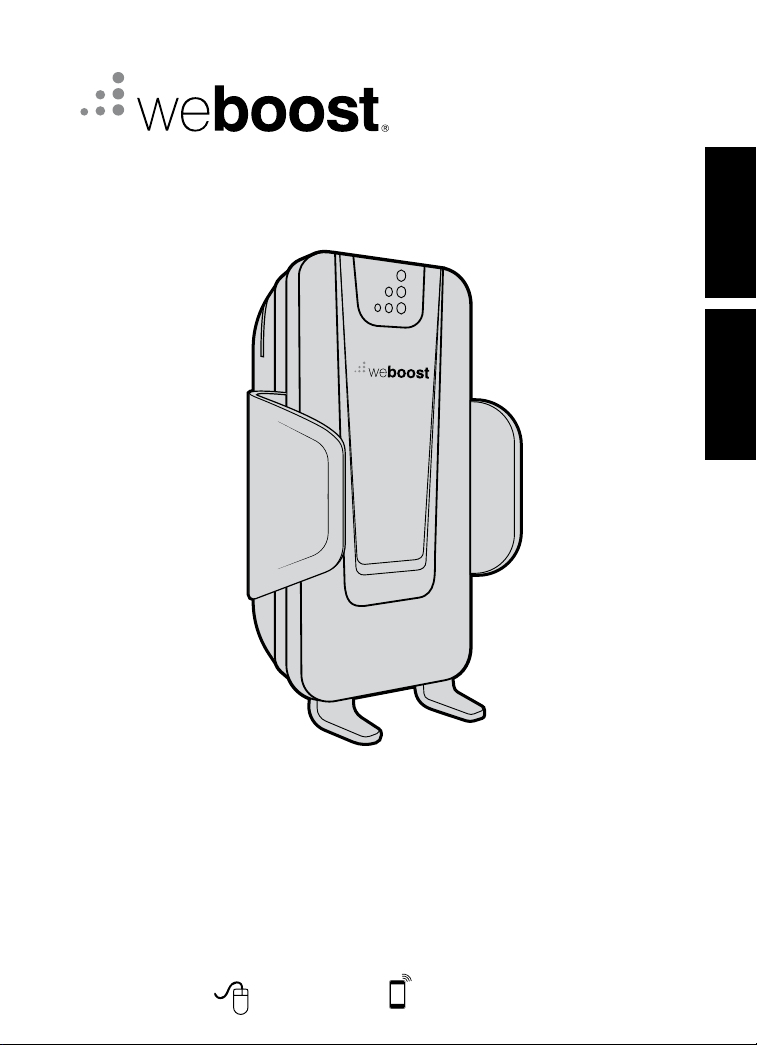
Drive 4G-S
Cellular Signal Booster
Need help? www.weBoost.com
®
Customer Support 866-294-1660
Mon.- Fri. Hours: 7 am to 6 pm MST
Page 2
IT IS VERY IMPORTANT TO POWER YOUR
SIGNAL BOOSTER USING A SURGE
PROTECTED AC POWER STRIP WITH AT
LEAST A 1000 JOULE RATING.
FAILURE TO DO THIS WILL VOID YOUR WARRANTY
IN THE EVENT OF A POWER SURGE OR LIGHTNING
STRIKE.
THE SIGNAL BOOSTER UNIT IS DESIGNED
FOR USE IN AN INDOOR, TEMPERATURE-
!!
CONTROLLED ENVIRONMENT (LESS
THAN 150 DEGREES FAHRENHEIT). IT IS
NOT INTENDED FOR USE IN ATTICS OR SIMILAR
LOCATIONS SUBJECT TO TEMPERATURES IN
EXCESS OF 150°F.
Contents
Package Contents ...............................................................2
Installation Options ..............................................................3
ENGLISH
Option 1: Vehicle Installation ...................................................3
Option 2: In-Building Installation .................................................4
Adjusting the Drive 4G-S Arms ....................................................5
Troubleshooting Understanding the Drive 4G-S Light .................................5
Additional FAQ ..................................................................6
Safety and Recommendations .....................................................6
Optional Accessories ............................................................7
Signal Booster Specifications .....................................................8
Guarantee and Warranty ................................................. Back Cover
Drive 4G-S® operates on (Band 12/17, 13) 700 / 800 / AWS (1700 / 2100) / (Band 25) 1900 MHz
Model #460022 FCC: PWO460022 IC: 4726A-460022t
FCC requires to never use the cell phone in the cradle next to your ear.
The term “IC” before the radio certication number only signies that Industry Canada technical specications were met.
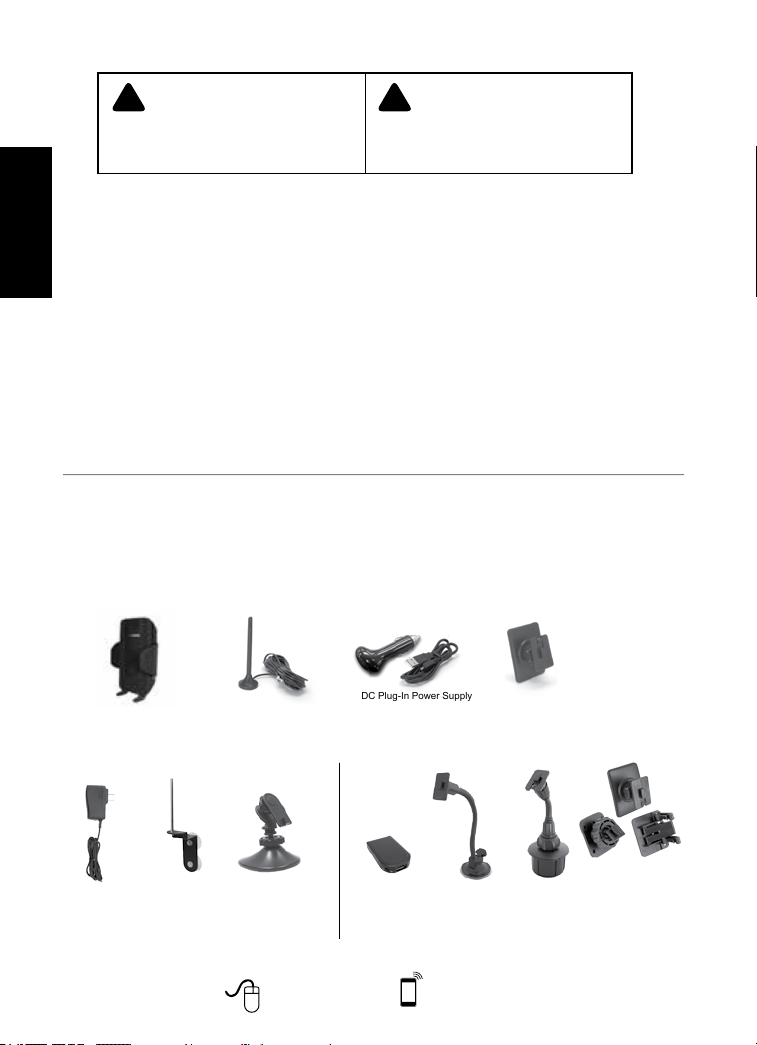
Inside this Package
Mini-Magnet Mount Antenna
®
Drive 4G-S
Optional Accessories
Antenna Window Mount
AC Power Supply
(859969)*
2
(Used with Mini-Magnet
Mount Antenna)
(901128)*
*Case included
Appearance of device and accessories may vary. (This product is not marketed by Verizon Wireless or AT&T).
Need help? www.weBoost.com
(301126)
Adjustable
Desk Mount
(901137)*
DC Plug-In Power Supply
& USB cable
(859910)
Mobile Power
Supply
(859984)
Gooseneck
Suction Cup
Cradle Mount
(901120)
Customer Support 866-294-1660
Mon.- Fri. Hours: 7 am to 6 pm MST
Vehicle Dash
Adhesive
Mounting Bracket
Cup Holder
Cradle Mount
(901130)
Vehicle Dash
Mounting Kit
-Rugged/Screw Mount-
-Adhesive Mount-
-Vent Clip Mount-
(901134
(included in some kits)
)
Page 3
Installation Options
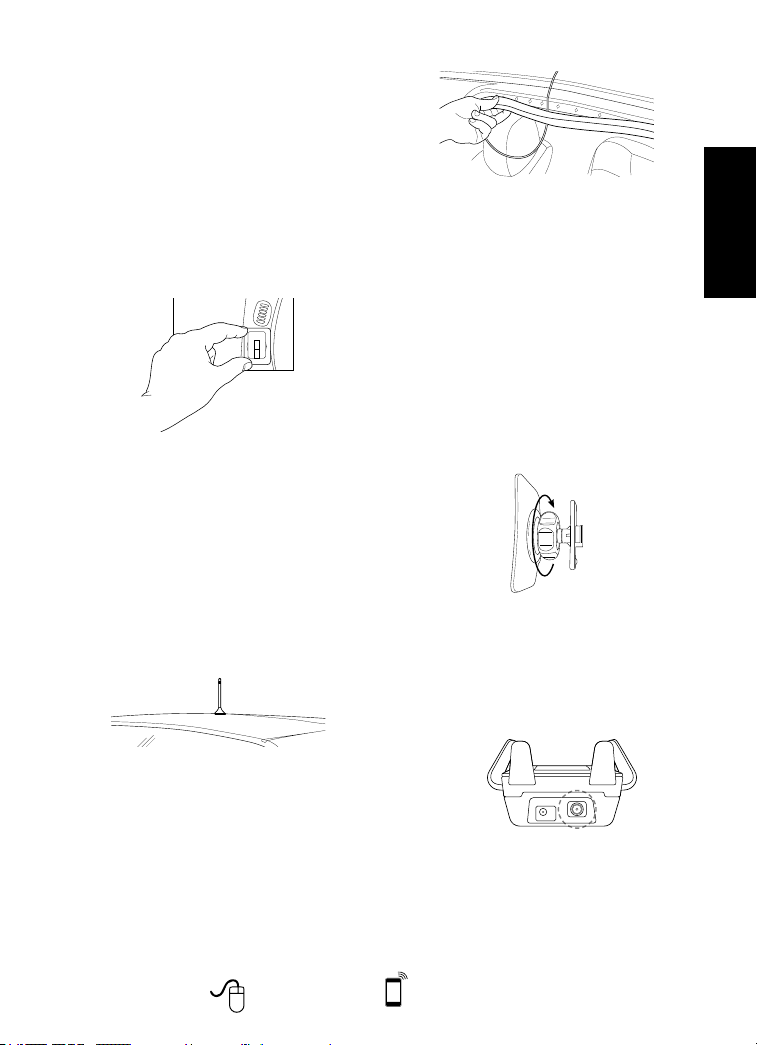
Option 1: Vehicle Installation
1. Attach the Mounting Bracket to the
vehicle’s dashboard.
• Clean the area where the bracket is
to be mounted with the alcohol wipe
included. Allow the area to dry.
• Peel the backing to expose the adhesive
and press the bracket onto the desired
location on the dashboard. NOTE: Be
sure the tab is positioned vertically.
• Allow the adhesive to cure for 24 hours
before you attach the Drive 4G-S (Step
4).
2. Install the Outside Antenna. Select a
location on top of the car that is:
• Near the center of the vehicle’s roof.
• At least 12 inches from any other
antennas.
• Free of obstructions.
• At least 6 inches from any windows
(including sunroofs).
ENGLISH
4. Attach the Drive 4G-S to the Mounting
Bracket. After waiting 24 hours for the
adhesive on the bracket to cure, attach
the Drive 4G-S by aligning the rectangular
hole on the back of the Drive 4G-S with
the tab on the Mounting Bracket, grasping
the sides of the Drive 4G-S, and sliding it
downward approximately ¼ inch into place.
The Mounting Bracket is designed to
swivel for more convenient viewing
angles. Once the Drive 4G-S is in place,
you can adjust the angle of the bracket by
loosening the knurled nut, applying gentle
pressure to the top or bottom of the Drive
4G-S, and then tightening the nut when
the desired angle is achieved.
5. Attach the antenna to the Drive 4G-S.
Connect the cable from the Outside
Antenna to the antenna connector on the
bottom of the Drive 4G-S. Do NOT plug
in the power supply (next step) until the
Outside Antenna cable is connected to
the Drive 4G-S.
• At least 8 inches from any people.
The Outside Antenna must be installed
vertically.
3. Run the Outside Antenna cable into the car.
The cable is strong enough that it may be
shut in most vehicle doors without damaging
the cable. For a cleaner look, carefully pull
down the door seal, run the cable under the
seal, and push the seal back into place. This
method reduces wear on the cable as the
door opens and closes.
Need help? www.weBoost.com
Note: The Drive 4G-S has a convenient
Customer Support 866-294-1660
Mon.- Fri. Hours: 7 am to 6 pm MST
USB charging port located on the
right side of your booster. This port
allows for charging your phone or
device, using your existing cable.
3
Page 4
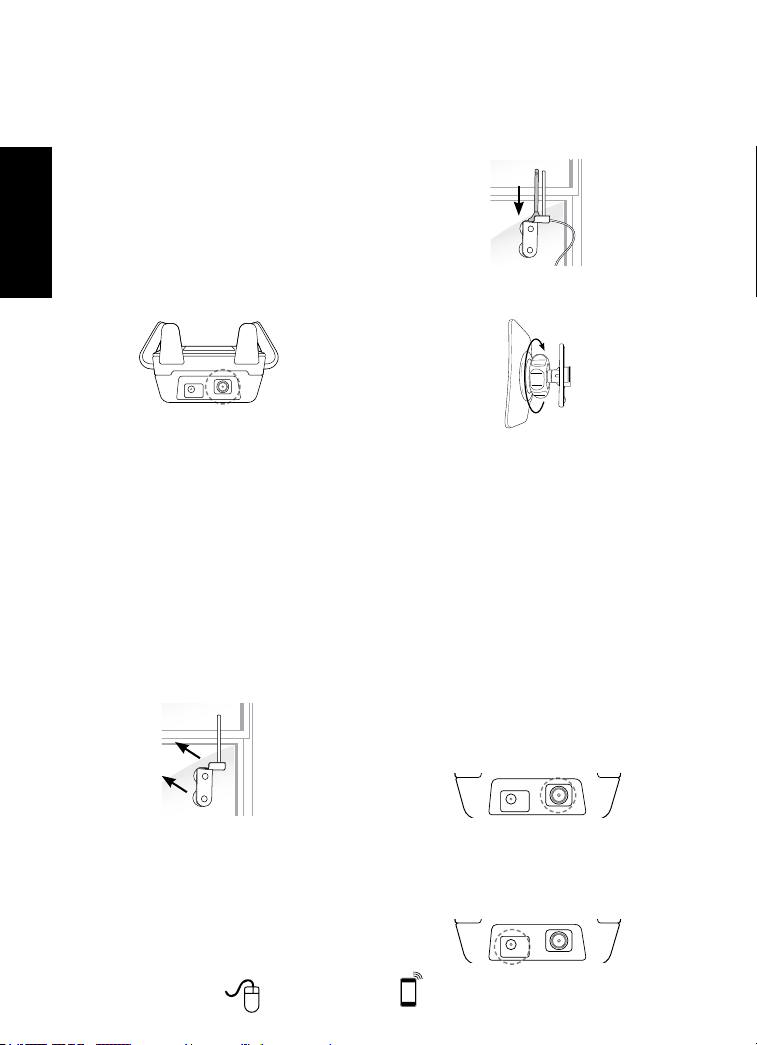
6. Power up your Drive 4G-S. Connect the
power cable to the mini-USB port on the
bottom of the Drive 4G-S. Then insert the
adapter into the vehicle 12V DC power
source. Use only the supplied weBoost
power supply. While the Drive 4G-S may
remain on, leaving the Drive 4G-S on
in a vehicle when it is not running may
discharge the battery in a day or two. Also
note that some 12V DC power sources
are shut down when the vehicle ignition
is turned to off. Use a Bluetooth headset,
ENGLISH
wired hands-free device or speakerphone
for talking on the phone.
• With the bracket in place, attach the
magnet base of the antenna to the at
surface of the bracket. The antenna
must be mounted vertically for the best
signal.
2. Install the Mounting Bracket and Drive
4G-S.
Option 2: In-Building Installation
Note: Home Ofce Accessory Kit sold
separately
1. Install the Outside Antenna to a window.
For best results:
• Select a window on the side of the
building where you get the strongest
cell signal.
• Attach the suction cup bracket (sold
separately) to the inside of a window so
the cable will reach the location of the
Mounting Bracket and Drive 4G-S. Place
the bracket as high on the window as
possible.
NOTE: Many newer energy efcient dual
pane windows use a metal coating that may
decrease the strength of a cellular signal,
reducing the effectiveness of the Drive 4G-S.
If you have dual pane windows, consider a
weBoost signal boost product that provides
an option for mounting an antenna on an
outside wall or roof of a building.
4
Need help? www.weBoost.com
Put your Drive 4G-S in the Mounting
Bracket (see instructions under Vehicle
Installation) and place it in a convenient
location such as a desk or table top in the
room where you will use the phone. The
location should be at least three feet from
the Outside Antenna to avoid oscillation
(feedback). Your cell phone must be in the
cradle for the Drive 4G-S to amplify the
signal. Use a Bluetooth headset, wired
hands-free device or speakerphone for
talking on the phone.
3. Attach the antenna to the Drive 4G-S.
Connect the cable from the Outside
Antenna to the antenna connector on the
bottom of the Drive 4G-S. Do NOT plug
in the power supply (next step) until the
Outside Antenna cable is connected to the
Drive 4G-S.
4. Power up your Drive 4G-S. Connect the
power cable to the mini-USB port on the
bottom of the Drive 4G-S. Then insert the
adapter and power it on. Use only the
supplied weBoost power supply.
Customer Support 866-294-1660
Mon.- Fri. Hours: 7 am to 6 pm MST
Page 5
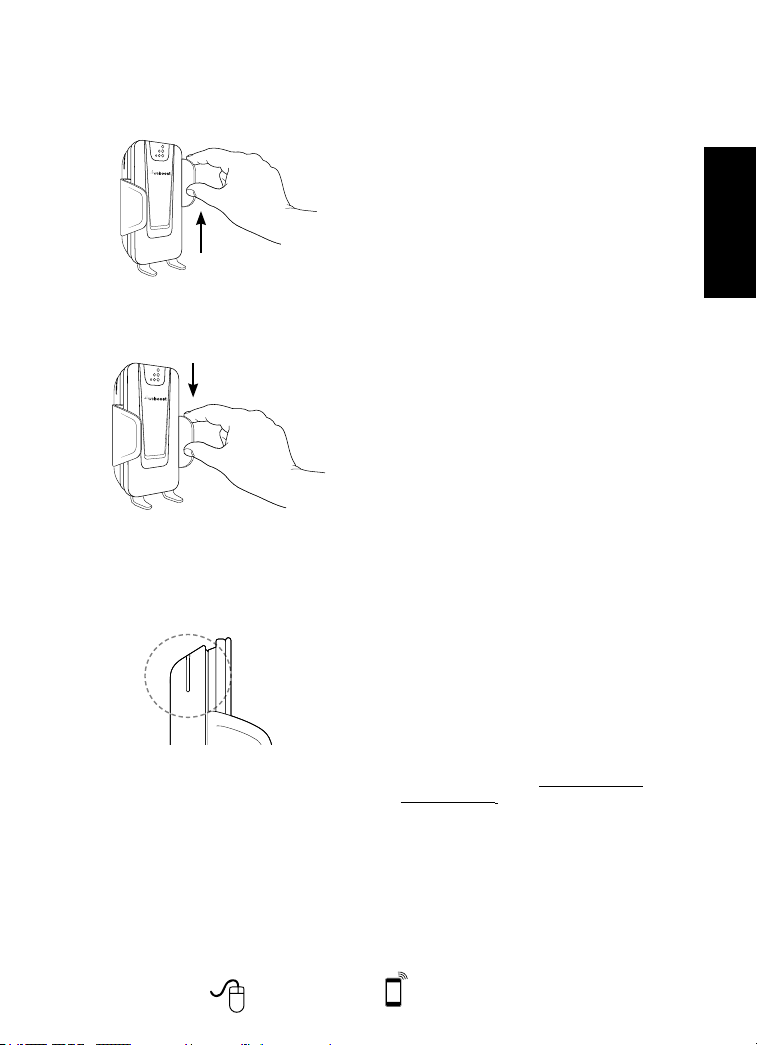
Adjusting the Drive 4G-S Arms
To change arms, gently lift the arm upward until
the arm slides free from the Drive 4G-S.
To reposition arms, move the arm above a
different slot on the Drive 4G-S and gently slide
the arm down until the arm is rmly in place.
Troubleshooting &
Understanding the Light
The Signal Boost includes a indicator light on
the side of the Drive 4G-S. The indicator light
will either be green or red.
Green indicates that the booster is
powered and operating at maximum gain.
Solid Red indicates that the booster has
shut off on the associated frequencies to
prevent oscillation (feedback).
Green/red Blinking indicates that the
booster is operating at a reduced gain to
prevent oscillation (feedback).
Fixing Red Light Issues
If one or more lights on the Signal Boost are
red:
1. Make sure all connections are tight.
2. Increase the distance between the outside
antenna and the Drive 4G-S, by moving
them horizontally and/or vertically farther
apart until the light change to green.
Remember to keep the antenna at least 6
inches from any window or sunroof.
3. Follow the same steps for a green/red
blinking light until the light goes solid
green.
4. If more separation is not possible and the
coverage of the booster is too small with a
green/red blinking light indicating reduced
gain, contact the weBoost Customer
Support Team for assistance:
866-294-1660.
Lights Off
1. Check connections on the power supply
to see that it is rmly plugged into both the
Drive 4G-S and the power source.
2. If using a DC power supply in your
vehicle, ensure the power supply is
properly inserted. Then check the 12 volt
power from the car socket and the fuse.
Replace the fuse if necessary.
3. If using a power strip in a building, ensure
the power strip is plugged in and turned
on and that power is coming from the
outlet.
NOTE: The Signal Booster can be reset by
disconnecting and reconnecting the power
supply.
For additional descriptions on troubleshooting,
see the install video at weboost.com/us/
drive4G-Svideo .
ENGLISH
Need help? www.weBoost.com
Customer Support 866-294-1660
Mon.- Fri. Hours: 7 am to 6 pm MST
5
Page 6
Additional FAQ:
What hours can I contact customer support?
Customer Support can be reached from 7:00am to 6:00pm MST, by calling (866-294-1660), or by email, at
[email protected].
How does weather affect the performance of my Outside Antenna?
Water vapor (e.g. rain, fog, snow or other precipitation) creates an effective lter to cellular signal. In
times of heavy precipitation, you may see less performance.
What’s the difference between the 800 MHz and the 1900 MHz bands? How do I know which MHz
band my cell phone uses?
The Drive 4G-S works with all major North American cellular providers on the 850 & 1900 MHz frequencies.
Traditionally, 850/1900MHz are associated with voice and 3G data; while 700MHz and 1700/2100MHz are
ENGLISH
associated with 4G data. For more detail see below.
Carrier Frequency Use
We recommend visiting www.wirelessadvisor.com (United States) or http://bit.ly/1mQf2Gl (Canada) for
information regarding the frequency band used by your cell service provider in a specic geographical
location.
Safety and Recommendations
WARNING: Connect ing the Signal Booster directly to the ce ll phone with use of an adapter will damage the c ell
WARNING: Use only the p ower supply provided in this p ackage. Use of a non-weBoost product may damage your
WARNING: The Outside Antenna must be installed no higher than 10 meters (31’9”) above ground.
phone.
equipment.
WARNING: The Signal Booster unit is designed for use in an indoor, temperature-controlled environm ent (less than
RF SAFET Y WARNING: Any antenna used with this device must be located at least 8 inches from all persons.
150 degrees Fahrenheit). It is not intended for use in attic s or similar locat ions subjec t to temperatures
in excess of that range.
This is a CONSUMER device.
BEFORE USE, you MUST REGISTER THIS DEVICE with your wireless provider and have your provider’s
consent. Most wireless providers consent to the use of signal boosters. Some providers may not consent
to the use of this device on their network. If you are unsure, contact your provider.
You MUST operate this device with approved antennas and cables as specified by the manufacturer.
Antennas MUST be installed at least 20 cm (8 inches) from any person.
You MUST cease operating this device immediately if requested by the FCC or a licensed wireless service
provider.
WARNING. E911 location information may not be provided or may be inaccurate for calls served by using
this device.
This device complies with Par t 15 of FCC rules. Operation is subject to two con ditions: (1) This d evice may not cause
harmful interference, and (2) this device must accept any interference received, including interference that may cause
undesir ed operati on. Changes or modifications not expressly approved by weBoost could void the authorit y to operate
this equipment.
6
Need help? www.weBoost.com
Customer Support 866-294-1660
Mon.- Fri. Hours: 7 am to 6 pm MST
Page 7

Mobile Antennas
Mini-Mag
• 301126 w/ 12.5
RG174 cable- SMA
12” Mag Mount w/ 12.5’ RG174
• 311103
• 311125
• 311128
• 314202
• 311703
Trucker antenna w/10.5’ RG58
• 311101
• 311701
Trucker antenna w/13.5’ RG58
• 311119
• 311133
NMO Antenna’s w/ RG174
Kit 311104-17410
• 800/1900 NMO antenna
• 10’ RG174 cable
Kit 311112-17410
• 800/1900 NMO antenna
• 10’ RG174 cable
Kit 314203-17410
• 800/900/1900 NMO antenna
• 10’ RG174 cable
Marine Antenna w/RG58
Kit 311130-5810
• Marine Antenna
• 10’ RG58 cable
Glass Mount w/14’ RG58 cable
• 311102
• 311114 (Mini Glass Mount)
NMO Antenna’s w/ RG58
Kit 311104-5810
• 800/1900 NMO antenna
• 10’ RG58 cable
Kit 311112-5810
• 800/1900 NMO antenna
• 10’ RG58 cable
Kit 314203-5810
• 800/900/1900 NMO antenna
• 10’ RG58 cable
Outside Fixed Antennas
50 Ohm Outside Antenna Kits
Kit 314453-5825
• 50 Ohm Pole Mount
Panel Antenna
• 25’ RG58 Cable
Kit 314411-5825
• 50 Ohm Wide
Band Directional
• 25’ RG58 Cable
Kit 301111-5850
• Yagi Directional Antenna
• 50’ RG58 Cable
Kit 311129-5840
• 800 MHz Yagi Directional
• 40’ RG58 Cable
Kit 311203-5820
• Omni-Directional antenna
• 20’ RG58 Cable
Kit 311124-5830
• 1900 MHz Yagi Antenna
• 30’ RG58 Cable
Kit 314411-40075
• 50 Ohm Wide
Band Directional
• 75’ LMR400 Cable
Kit 311203-40020
• Omni-Directional antenna
• 20’ LMR400 Cable
Kit 301111-400170
• Yagi Directional w/ N-Female
• 170’ LMR400
Kit 311124-400100
• 1900 MHz Yagi Directional
• 100’ LMR400 Cable
Kit 311129-400100
• 800 MHz Yagi Antenna
• 100’ LMR400 Cable
Kit 314453-40075
• 50 Ohm Pole Mount
Panel Antenna
• 75’ LMR400 Cable
75 Ohm Outside Antenna Kits
Kit 301111-0675
• Yagi Directional Antenna
• 75’ RG6 Cable
• N-Male to F-Female adapter
Kit 311201-0620
• Omni Directional
w/ F-Female
• 20’ RG6 Cable
Kit 311129-0660
• 800 MHz Yagi Directional
• 60’ RG6 Cable
• N-Male to F-Female adapter
Kit 311124-0650
• 1900 MHz Yagi Directional
• 50’ RG6 Cable
• N-Male to F-Female adapter
Kit 314473-0640
• 75 Ohm Pole Mount
Panel Antenna
• 40’ RG6 Cable
Kit 314475-0630
• 75 Ohm Wide
Band Directional
• 30’ RG6 Cable
Kit 311141-0620
• 75 Ohm Grey Brick Antenna
• 20’ RG6 Cable
Kit 301111-11140
• Yagi Directional Antenna
• 140’ RG11 Cable
• N-Male to F-Female adapter
Kit 311201-1120
• Omni Directional
w/ F-Female
• 20’ RG11 Cable
Kit 311129-11110
• 800 MHz Yagi Directional
• 110’ RG11 Cable
• N-Male to F-Female adapter
Kit 311124-1180
• 1900 MHz Yagi Directional
• 80’ RG11 Cable
• N-Male to F-Female adapter
Kit 314473-1175
• 75 Ohm Pole Mount
Panel Antenna
• 75’ RG11 Cable
Kit 314475-1175
• 75 Ohm Wide
Band Directional
• 75’ RG11 Cable
Kit 311141-1120
• 75 Ohm Grey Brick Antenna
• 20’ RG11 Cable
ENGLISH
Need help? www.weBoost.com
Customer Support 866-294-1660
Mon.- Fri. Hours: 7 am to 6 pm MST
7
Page 8
Signal Booster Specifications
Model Number 460022
Connectors SMA-Female
Antenna Impedance 50 Ohms
Frequency 698-716 MHz, 746-787 MHz, 824-894 MHz, 1850-1995 MHz, 1710-1755/2110-2155 MHz
Passband Gain (nominal)
20 dB Bandwidth (MHz)
ENGLISH
Power output for single cell
phone (Uplink) dBm
Power output for single cell
phone (Downlink) dBm
Power output for multiple
received channels (Uplink) dBm
Power output for multiple
received channels
(Downlinklink) dBm
Noise Figure 5 dB nominal
Isolation > 40 dB
Power Requirements 5.5 V 2 A
Each Sign al Booster is ind ividually test ed and factory set to ensure FCC c ompliance. The Signal Booster cannot be adjuste d without facto ry
reprogr amming or disabl ing the hardware . The Signal Boo ster will amplif y, but not alter inc oming and outgo ing signals in or der to increase
coverage of authorized f requency bands o nly. If the Signal B ooster is not in u se for five minut es, it will reduc e gain until a si gnal is detected.
If a detec ted signal is too high in a freque ncy band, or if th e Signal Booste r detects an osc illation, the Si gnal Booster wi ll automaticall y turn
the power off on that ban d. For a detected o scillation the Signal Booster w ill automatica lly resume norm al operation af ter a minimum of 1
minute. Af ter 5 (five) such automati c restarts, a ny problemati c bands are perma nently shut of f until the Signal B ooster has been manu ally
restar ted by momentar ily removing powe r from the Signa l Booster. Noise p ower, gain, and linea rity are maint ained by the Signa l Booster’s
microprocessor.
The Manu facturer’s rated output power of t his equipment is for single car rier operation . For situations when multiple c arrier signals are
present , the rating woul d have to be reduce d by 3.5 dB, espe cially where th e output signal i s re-radiated and can cause in terference to
adjacent band users. Thi s power reducti on is to be by means of input power or g ain reduction a nd not by an atten uator at the outpu t of the
device.
No. Tones
No. Tones 700
700
MHz Band12/17
16.7
700
MHz Band12/17 700MHz Band13 800MHz 1700/2100MHz 1900MHz
Typical
Maximum
32.7
36.9
700
MHz Band12/17 700MHz Band13 800MHz 1700MHz 1900MHz
24.28 24.35 24.44 25.14 24.25
700
MHz Band12/17 700MHz Band13 800MHz 2100MHz 1900MHz
10.84 11.23 11.72 12.35 10.96
MHz Band12/17 700MHz Band13 800MHz 1700MHz 1900MHz
700
2 24.8 22.5 20.7 21.4 22.5
3 21.2 19.0 17.1 17.9 18.9
4 18.7 16.5 14.6 15.4 16.4
5 16.8 14.6 12.7 13.5 14.5
6 15.2 13.0 11.1 11.9 12.9
MHz Band12/17 700MHz Band13 800MHz 2100MHz 1900MHz
2 13.0 12.9 13.5 12.5 10.9
3 9.4 9.4 10.0 9.0 7.4
4 6.9 6.9 7.5 6.5 4.9
5 5.0 4.9 5.5 4.6 2.9
6 3.4 3.4 3.9 3.0 1.3
700MHz Band13
15.7
34.0
37.1
Drive 4G-S
800MHz
16.0
41.8
43.8
1700/2100
15.7
88.2
90.4
MHz
1900
15.1
84.5
85.5
MHz
8
Need help? www.weBoost.com
Customer Support 866-294-1660
Mon.- Fri. Hours: 7 am to 6 pm MST
Page 9

Notes:
___________________________________________________________
___________________________________________________________
___________________________________________________________
___________________________________________________________
___________________________________________________________
___________________________________________________________
___________________________________________________________
___________________________________________________________
___________________________________________________________
___________________________________________________________
___________________________________________________________
___________________________________________________________
___________________________________________________________
___________________________________________________________
___________________________________________________________
___________________________________________________________
___________________________________________________________
___________________________________________________________
___________________________________________________________
___________________________________________________________
___________________________________________________________
___________________________________________________________
___________________________________________________________
___________________________________________________________
___________________________________________________________
___________________________________________________________
___________________________________________________________
ENGLISH
Need help? www.weBoost.com
Customer Support 866-294-1660
Mon.- Fri. Hours: 7 am to 6 pm MST
9
Page 10
30-Day Money-Back Guarantee
All weBoost products are protected by weBoost 30-day money-back guarantee. If for any reason the
performance of any product is not acceptable, simply return the product direc tly to the reseller with a
dated pro of of purchase.
Disclaimer: The information provided by weBoost, LLC is believed to be complete and
U.S. Patent N os.– 7,221,967; 7,729,669; 7,486, 929; 7,409,186; 7,684,838; 7,783,318; 8,473,018; 8,5 83,034; 8,583 ,033
accurate. However, no responsibility is assumed by weBoost, LLC for any
business or personal losses ar ising from its use, or for any infringements of
patents or other rights of third par ties that may result from its use.
Copyri ght © 2014 weBoost, L LC All rights reserved.
3301 East Deseret Drive, St. George, UT 84790
web: www.WeBoost.com email: [email protected]
phone: 866-294-1660 local: 435-673-5021 fax: 435-656-2432
111284_Drive4G-S_ERIN_12.03.14
 Loading...