


WebEye B101 Manual Ver 1.0
WebEye B101 User’s Guide
* This manual is for WebEye B101 firmware version 1.2.0. If you have later version of
firmware, please download the last updated user’s guide from WebGate’s homepage
(www.webgateinc.com)
nn For WebEye
• Network: 10 Base- T LAN
(Leased line, xDSL, Cable Modem, ISDN) or PSTN
nn For a PC to access WebEye
Processor: Pentium II and above
•
• RAM: 64MB and More
OS: Windows 98/ME/NT/2000
•
• Screen Resolution: 1024 X 768 pixels and above
Network: 10 Base- T LAN or PSTN
•
System Requirements
WebGate Inc.

This equipment has been tested and found to comply with the limits for a Class B digital
device, pursuant to part 15 of the FCC Rules. These limits are designed to provide reasonable
This equipment generates, uses
frequency energy and, if not installed and used in accordance with the
instructions, may cause harmful interference to radio communications, However, there is no
nce will not occur in a particular installation. If this equipment does cause
harmful interference to radio or television reception, which can be determined by turning the
ne or more of
FCC Compliance Statement
Caution : Any changes or modifications in construction of this device which are not expressly
approved the party responsible for compliance could void the user's authority to operate the
equipment.
NOTE :
protection against harmful interference in a residential installation.
and can radiate radio
guarantee that interfere
equipment off and on, the user is encouraged to try to correct the interference by o
the following measures:
- Reorient or relocate the receiving antenna.
- Increase the separation between the equipment and receiver.
- Connect the equipment into an outlet on a circuit different from that to which the
receiver is connected.
- Consult the dealer or an experienced radio/TV technician for help.
2
WebEye WebEye B101B101
User’s Guide

to an adaptor other than 12V DC or 24V AC, may cause
distributor for after sales service. In all cases, you are prohibited to disassemble the
Camera surveillance laws may differ for each country. Therefore, please contact the
local region first to avoid any surveillance law violations and to apply for authorized
Important Notice
1. WebEye B101 is not weatherproof. Therefore you should be well aware of
environmental specifications that are included in the manual. In case of outdoor use,
where it needs additional weather criteria, you should equip weatherproof case to
protect WebEye B101 from water, moisture, or temperature (higher or lower than
specification). For WebEye cleaning, gently wipe with clean dry cloth.
2. Be sure to use a 12V DC or 24V AC adaptor to supply power to WebEye B101.
Connecting WebEye B101
electric damage to WebEye B101.
3. Be caution in handling WebEye B101 for physical shocks may harm the product.
4. WebEye B101 is made of aluminum. Therefore you can hurt human beings if you throw
it to them or hit on them. When installing WebEye B101, be sure it is attached tight and
stable to avoid any human injures. Be cautious to locate on safe places where children
are unreachable.
5. If WebEye B101 does not operate properly, please contact the closest local WebGate
product. If so, WebGate is not responsible for any malfunction nor service warranty.
6.
purposes only.
3
WebEye WebEye B101B101
User’s Guide

CONTENTS
I. Introduction .....................................................................................................................................................................6
II. Product Description .....................................................................................................................................................7
1. Contents ........................................................................................................................................................................7
2. WebEye B101 view and description........................................................................................................................7
1) Front view and description..............................................................................................................................7
2) Rear view and description............................................................................................................................... 8
3) LED of Ethernet port ........................................................................................................................................8
4) Descrip tions on DIP Switches........................................................................................................................9
III. WebEye Installation Summary, Connection & Placing.................................................................................... 9
1. Installation Summary ..................................................................................................................................................9
2. Connecting.................................................................................................................................................................... 9
IV. Installing WebEye Setup Program.......................................................................................................................... 9
V. Assigning IP Address and Configuring Administrator’s Condition. ............................................................10
1. Connecting WebEye to a PC...................................................................................................................................10
1) Connecting WebEye on Internet or LAN....................................................................................................10
2) Connecting WebEye to a PC. ........................................................................................................................ 10
2. Assigning IP address and Configuring administrator’s condition with Setup program................................10
1) Starting Setup Program for WebEye............................................................................................................10
2) Configuring Administrator’s Conditions.................................................................................................... 11
3. Assigning IP Address with ARP command.......................................................................................................... 11
1) Using ARP in Windows 98 and NT.............................................................................................................11
2) Using ARP in Windows 95 ...........................................................................................................................11
3) Verifying Installation......................................................................................................................................12
VI. Accessing WebEye Homepage & Monitoring Real -time Image ...................................................................12
1. Starting Web browser................................................................................................................................................12
2. Login page..................................................................................................................................................................12
1) ID and password..............................................................................................................................................12
2) Behind Firewall ............................................................................................................................................... 13
3) WebEye Plug-in for Netscape user..............................................................................................................13
4) WebEye Active-X for MS Explorer User...................................................................................................13
5) FAQ...................................................................................................................................................................13
3. Real time monitoring through Default Viewer.....................................................................................................14
1) Image control...................................................................................................................................................14
2) Integrated PTZ mechanism control..............................................................................................................15
3) Convenient pop -up menu............................................................................................................................... 15
4) Administrator’s page access.......................................................................................................................... 16
5) Program download.......................................................................................................................................... 16
6) About.................................................................................................................................................................16
4. Real time monitoring through Server Push Viewer.............................................................................................17
1) Image Control..................................................................................................................................................17
2) PTZ mechanism control.................................................................................................................................17
4
WebEye WebEye B101B101
User’s Guide

3) Pop -up Menu.................................................................................................................................................... 18
4) To Home ........................................................................................................................................................... 18
5) Capture ..............................................................................................................................................................18
6) Admin ............................................................................................................................................................... 18
7) Plug-in............................................................................................................................................................... 18
8) FAQ...................................................................................................................................................................18
VII. Configuring Administrator’s Condition at ‘Admin’ page ...........................................................................18
1. Administrator Login..................................................................................................................................................18
1) Accessing through setup program................................................................................................................18
2) Accessing through Web browser ..................................................................................................................19
2. Configuring Administrator’s Condition at Homepage........................................................................................19
1) System Configuration ..................................................................................................................................... 19
2) User Configuration .........................................................................................................................................19
3) Network Configuration ..................................................................................................................................20
4) Dynamic IP registration service for ISDN and xDSL users.................................................................... 21
5) How to find registered WebEye in WebEye Internet homepage .............................................................22
6) Security Configuration...................................................................................................................................22
7) Video Configuration ....................................................................................................................................... 23
8) Application Configuration.............................................................................................................................24
9) Pan/Tilt/Zoom Configuration........................................................................................................................25
10) Serial Port Configuration.............................................................................................................................26
11) Digital I/O Configuration ............................................................................................................................ 26
12) Alarm Configuration .................................................................................................................................... 27
13) User Custom Configuration ........................................................................................................................ 27
Appendix
Detailed Specifications of WebEye B101 .................................................................................................................... 29
1. General........................................................................................................................................................................29
2. Network.......................................................................................................................................................................29
3. Mechanical.................................................................................................................................................................30
4. Environmental ............................................................................................................................................................30
5. Compatible external devices and software............................................................................................................30
5
WebEye WebEye B101B101
User’s Guide

I. Introduction
• What is WebEye B101 ?
The WebEye B101 is a network dome camera server solution with an integrated Internet server, image
compression device, flash memory, and many other features. No other hardware is necessary for use. The
WebEye relay video source from a dome camera to network and provides real time images over networks and
the Internet. Simply provide power and connect LAN cable and video cable to the WebEye. WebEye utilizes
Wavelet image compression and Linux operating system. Wavelet and Linux enable WebEye to transfer high
quality images faster and with a greater degree of reliability than standard JPEG systems.
Features and Benefits
•
Ease of Use – WebEye requires either Netscape Navigator 4.7 (or higher) or Microsoft Internet Explorer 5.0
(or higher) for use. Windows 2000 is recommended for best results. Connect WebEye to the Internet and it is
ready for use.
Compatible with most Systems and Protocols – WebEye supports TCP/IP networking, SMTP, HTTP and
other Internet-related protocols. In addition, the WebEye can be used in mixed operating system environments,
such as Windows, UNIX, Macintosh and OS/2. WebEye also integrates easily into other Internet/Intranet
applications and CGI scripts.
Simple Administration - WebEye can be configured and managed directly from its own web page. Moreover,
as new upgrades become available, it is easy to upgrade all WebEye camera products remotely over the
network.
Wavelet Image Format - Unlike many other products that need to fracture image files prior to broadcast, the
WebEye delivers complete, highly compressed pictures in Wavelet format. Wavelet has image compression
rates 30-300% higher than standard JPEG. By utilizing Wavelet, image file sizes are much smaller than
conventional camera servers and Wavelet's image quality is superior to other camera servers as well. Wavelet
can transmit up to 123 frames per second.
External Device Connection - External devices such as IR-sensors, switches and external video input can be
connected to WebEye via the auxiliary Input/Output port.
User’s Programmable Space – WebEye contains 4.5MB of configurable Flash Memory for
user-programmable and user-configurable space. Because WebEye also acts as a server, this space can be
used to create a personal web page.
Embedded Linux Operating System – WebEye uses an embedded Linux operating system within its 32bit
RISC CPU. Linux is based on UNIX and is one of the most stable operating systems available. There is very
little chance of the operating system crashing.
6
WebEye WebEye B101B101
User’s Guide
II. Product Description
1. Contents
Unpack and check all the items as below.
Item Description Remarks
WebEye B101 Network server for dome camera
Manual
Crossover Cable 1 meter crossover cable Red-colored
Direct Cable 2 meter direct cable White -colored
DB-9 Connector and wire
Screw & anchor 4 set s of screws and plastic anchors
CD ROM title Setup program and manual
WebEye User's Guide
Quick reference guide
DB-9 connector wired with 2meter
communication cable to connect with
an external Modem
2. WebEye B101 view and description
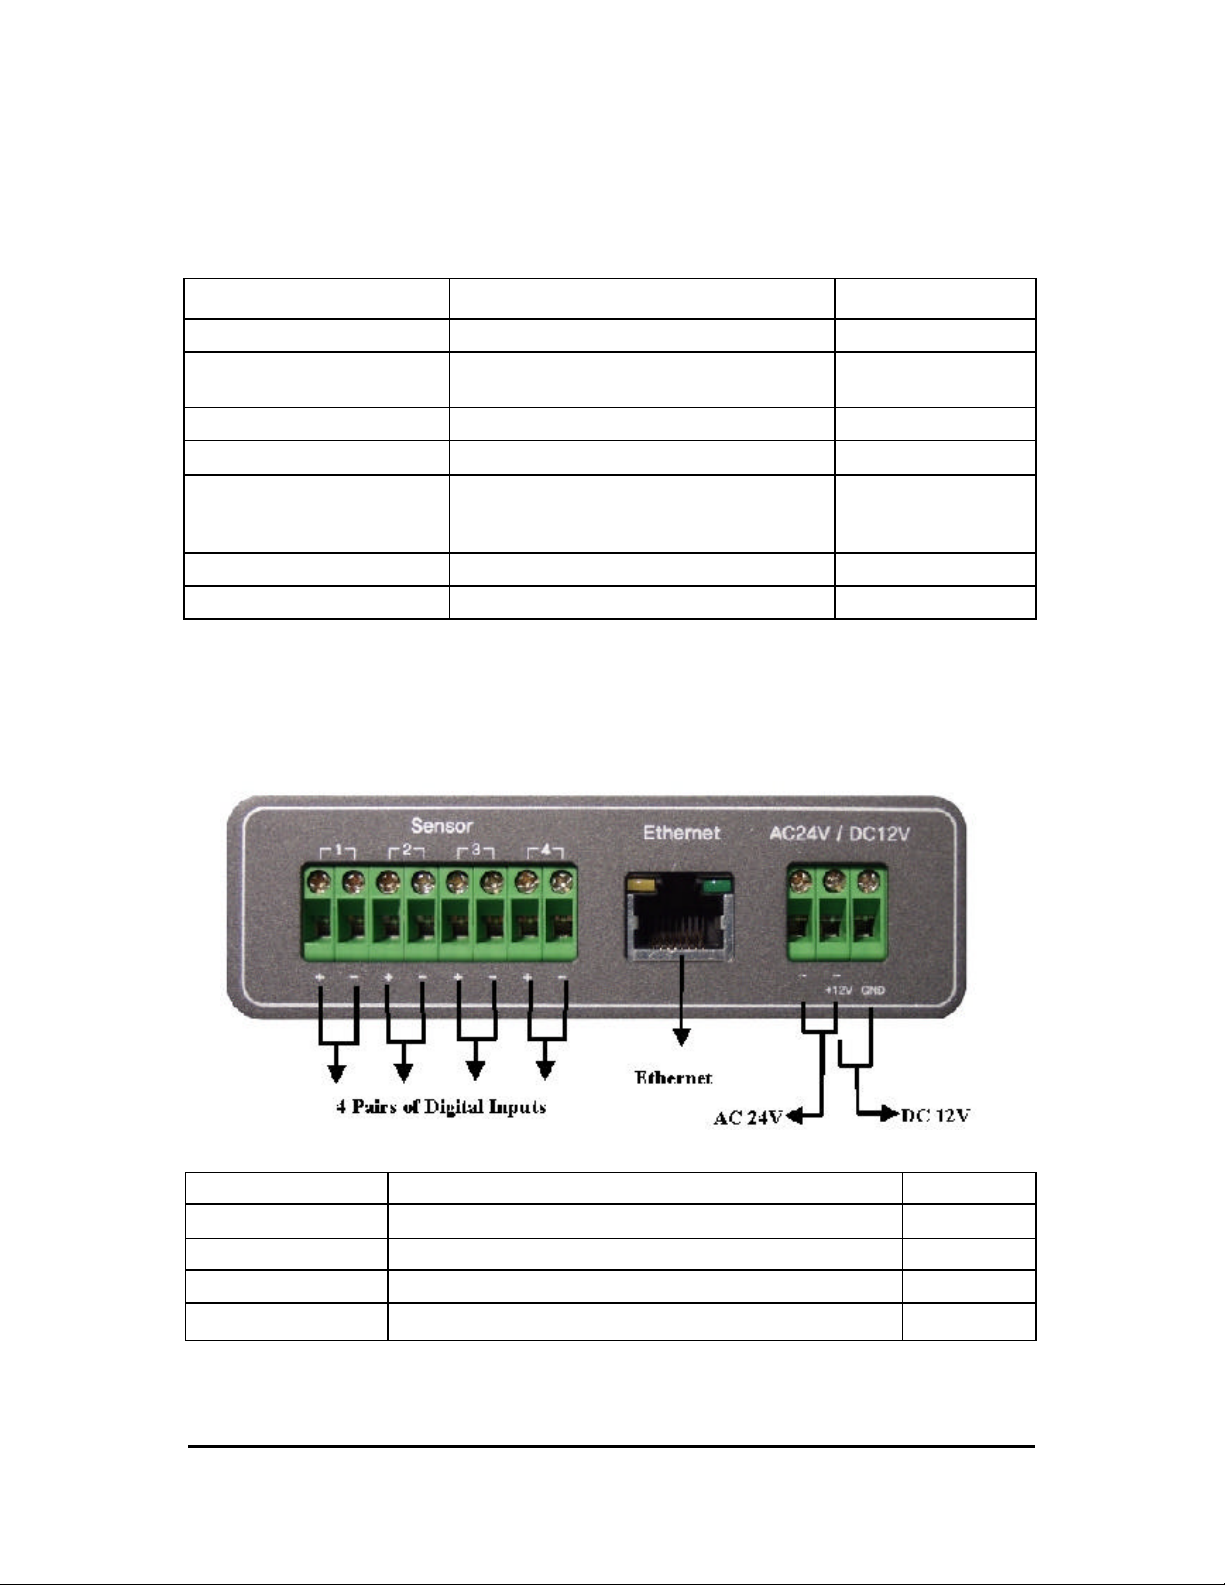
1) Front view and description
Provided on CD
Printed material
Connector Name Description Remark
Digital Inputs To input digital signal. There are 4 pairs of digital inputs.
Ethernet To connect 10 Base-T Ethernet cable. Article 3)
DC 12V To connect a power supply unit of 12V DC.
AC 24V To connect a power supply unit of 24V AC.
7
WebEye WebEye B101B101
User’s Guide
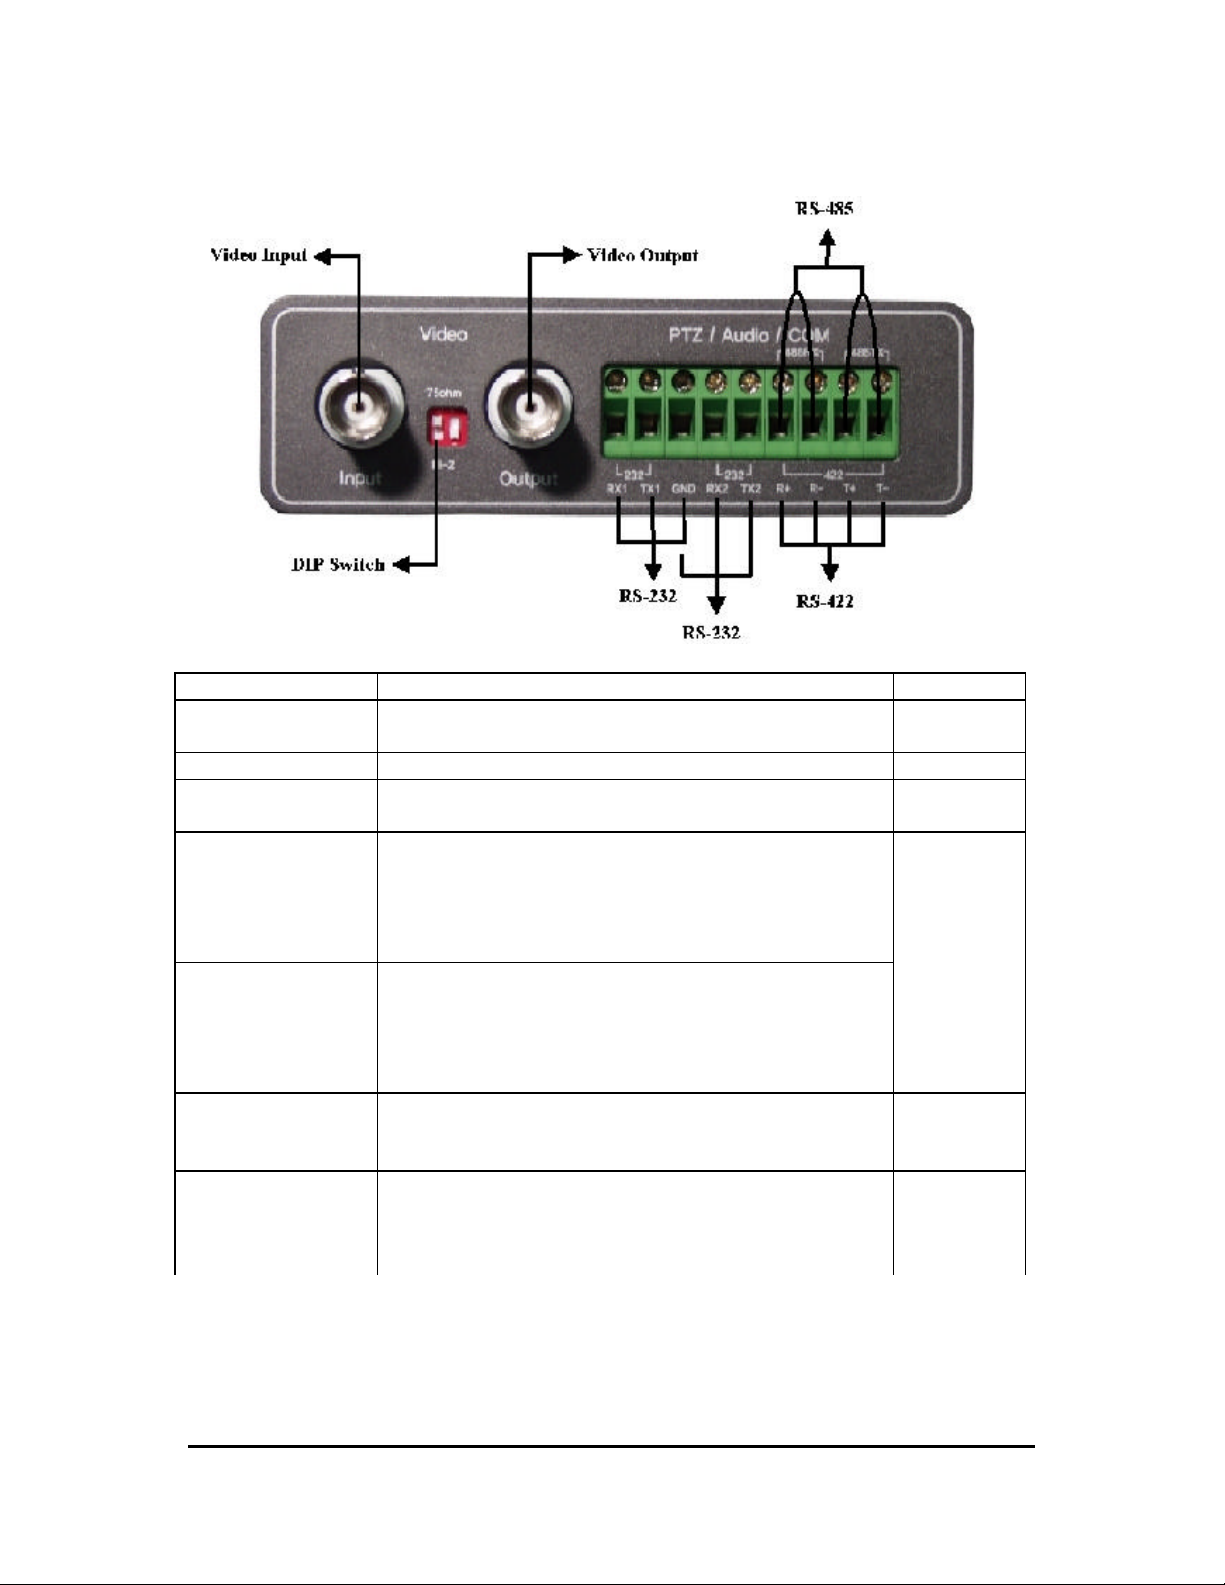
2) Rear view and description
Connector Name Description Remark
DIP switch
To designate video signal termination of ‘Video Input’
BNC connector. (Only the left switch is used)
Article 4)
Video Input To input video signal through a coaxial cable.
Video Output
To output video signal through a coaxial cable.
(Roof-through from ‘Video Input’ BNC connector)
To communicate between WebEye and external devices
such a dome camera, WebEye A10 (An audio transmission
RS-232
kit), or an external modem. These pins are for devices that
satisfy RS-232C protocol, and they are consisted in RX1,
TX1, and GND.
To communicate between WebEye and external devices
GND pin is
co-used.
such a dome camera, WebEye A10 (An audio transmission
RS-232
kit), or an external modem. These pins are for devices that
satisfy RS-232C protocol, and they are consisted in RX2,
TX2, and GND.
To communicate between WebEye and a dome camera that
RS-422
satisfies RS-422 protocol. They are half-duflex. It is
consisted in R+, R-, T+, and T-.
To communicate between WebEye and a dome camera that
RS-485
satisfies RS-485 protocol. They are consisted in 485+ and
485-. Short R+ and R- with a wire to get RS422+ and short
T+ and T- to get RS422-.
3) LED of Ethernet port
Yellow LED : This LED indicates the status of data transmission. After power is supplied, it is on for the first
4-5 seconds and then it goes off. And it blinks continuously when a user access WebEye and WebEye
transmits data.
8
WebEye WebEye B101B101
User’s Guide

Green LED : This LED indicates the status of networking. After power is supplied, it is on for the first 1 -2
seconds, and then it blinks once at every one second as long as the network is connected.
4) Descriptions on DIP Switches
This is to designate video signal termination. If you want to monitor real time image through a CCTV monitor
as well as WebEye, you may connect a dome camera to ‘Video Input ’ connector and a CCTV monitor to
‘Video Output’ connector. In this case, you should decide which one is terminal of video signal. WebEye is
not affected if a CCTV monitor is designated as terminal. If you connect a dome camera to ‘Video Input’ and
monitor real time video only through a PC, place the first DIP switch (marked with No. 1) at upper position
‘ON’. If you monitor real time video through a CCTV monitor as well as a PC, connect a dome camera to
‘Video Input ’ and a monitor to ‘Video Output’. And place the first DIP switch (marked with No. 1) at lower
position ‘OFF’. If the CCTV monitor has a DIP switch and it is configurable the termination, you may change
the termination from the CCTV monitor to WebEye such as the DIP switch in WebEye ‘ON ’ and the DIP
switch in a CCTV monitor ‘OFF’. However a CCTV monitor is generally set as termination of the video
signal.
III. WebEye Installation Summary, Connection & Placing
1. Installation Summary
• Connect Ethernet and Power to WebEye on local network for configuration
• Install a setup program of WebEye to a PC on local network
• Assign an IP address to WebEye and configure administrator’s condition
• Configure user’s condition
• Place WebEye for your purpose, and re-connect power and Ethernet
Adjust the Focus
•
2. Connecting
• Connect Ethernet line to the Ethernet port in the rear.
• Connect the power supply to a power supply port in the rear.
Confirm that the LED of the Ethernet port blinks
•
3. Placing
• Place WebEye appropriately for your purpose
IV. Installing WebEye Setup Program
Copy WebEyeSetup.exe file from the enclosed CD (or Diskette).
•
• Paste the file into your PC
• Click the file on your PC to activate Setup program.
9
WebEye WebEye B101B101
User’s Guide

V. Assigning IP Address and Configuring Administrator’s Condition.
1. Connecting WebEye to a PC
1) Connecting WebEye on Internet or LAN.
You may use direct cable (white colored one) to connect WebEye on Internet or LAN. Though you connect
WebEye as follows, a remote user may not access WebEye before you configure its network setting properly.
2) Connecting WebEye to a PC.
You may use crossover cable (red colored one) to directly connect WebEye to a PC. This connection is just to
configure WebEye.
2. Assigning IP address and Configuring administrator’s condition with Setup program
1) Starting Setup Program for WebEye
Click the “WebEyeSetup.exe ” file on your PC. When the Setup Program is executed, the setup program
detects and shows every WebEye connected on the local network.
From the WebEyes listed, select one to assign a new IP address. (Default is 211.53.133.92). To choose a
WebEye, click on its MAC Address or IP addres
The “Reboot” button will reboot the WebEye. This process takes 10 -20 seconds.
10
WebEye WebEye B101B101
User’s Guide

2) Configuring Administrator’s Conditions
To access the WebEye’s Administrator’s Page from the Setup Menu, enter the admin.’s password and click
the “Start Configuration” button.
To configure several WebEyes simultaneously, follow the Steps below. However, some information such as
“Date and Time at System,” “Serial Number,” and “IP Configuration at Network,” will not change. “Date and
Time at System” and “IP Configuration at Network” can be changed in the Setup program. The“Serial
Number”never changes.
• After configuring all of the conditions, close WebEye homepage.
• Click “Save” button.
• Save the information to a directory.
• Select another WebEye on the local network and type in the administrator’s password.
Click “Start Configuration” and “Load” buttons in turns.
•
• A “Loading Completed” message will appear on the window when the procedure is completed.
3. Assigning IP Address with ARP command
1) Using ARP in Windows 98 and NT
When using WebEye with Windows 98 and Windows NT, follow the steps below.
Open a DOS window and type the following commands.
•
arp -s <WebEye IP address> <WebEye Ethernet address>
ping -t <WebEye IP address>
• Example
arp -s 192 .168.1.3 00-40-8c-10-00-86
ping -t 192.168.1.3
2) Using ARP in Windows 95
When using WebEye with Windows 95, follow the steps below.
• Open a DOS window and type the following commands.
arp -s <WebEye IP add.> <WebEye Ethernet add.> <my PC IP add.>
ping <WebEye IP address>
• Example
arp -s 192 .168.1.3 00-40-8c-10-00-86 192.168.1.2
ping 192.168.1.3
11
WebEye WebEye B101B101
User’s Guide

3) Verifying Installation
After successfully completing the above proc edures, the following message (or similar) will appear on the
screen :
Request timed out
:
Request timed out
Reply from 200.243.232.178: bytes=32 time=2ms TTL=255
Reply from 200.243.232.178: bytes=32 time=2ms TTL=255
Ping statistics for 200.243.232.178:
Packets: Sent = 4, Received = 4, Lost = 0 (0% loss),
Approximate round trip times in milliseconds:
Minimum = 1ms, Maximum = 2ms, Average = 1ms
If the above “ping” reply does not appear , press 'F3' and 'Enter' keys. Normally “Request timed out” me ssages
appear 7 times before reply ing properly.
Once the above “ping” reply appears press <Ctrl>+<C> keys to make it stop.
When the “ping” reply stops, data loss may range from 0% to 99%. This is normal. If the statistic shows
‘100% loss’, check the following criterions: (a) network line and connection status are stable; (b) IP address
assigned to WebEye is available; (c) PC and WebEye have the same local network IP address. Same local IP
address of C grade network means that first 3 sets of numbers are the same but the fourth set is different. For
example 192.168.1.2 and 192.168.1.3 are in the same local network. (If there is a ‘Network Mask’ on the
network, this can be an exception. For detailed information on IP, refer to appendix 3)
VI. Accessing WebEye Homepage & Monitoring Real-time Image
After assigning WebEye an IP address, you may access WebEye B101 and monitor real-time image on
Internet. However you may not access its Homepage on remote network until assigning other addressees like
gateway address, subnet mask, broadcast address properly.
1. Starting Web browser
Start your web browser and enter your WebEye IP address. Then you can see a build-in homepage of WebEye.
WebEye supports up to 100 users simultaneously. If a person tries to access WebEye as the 101st user, one
cannot receive any image but will see a message of user counter on upper right side of homepage as
‘Connected Client#: 100’
2. Login page
1) ID and password
To verify registered WebEye users, there is a Login page . If you are to connect to WebEye, you should follow
login procedures.
12
WebEye WebEye B101B101
User’s Guide

If you key in user’s ID and password, you may access to a viewer to monitor real-time images. With
administrator’s ID and password, you may also access to a real-time image viewer with administrator’s
authority.
The default value of both user’s ID and password are ‘guest’, and administrator may change it at Admin page.
But, each ID and password must be composed within 9 bytes. (e.g. 9 English letters)
2) Behind Firewall
If your PC is connected on a network where firewall is. In the case, you may not view real time image
properly because video TCP port of WebEye is blocked. Common video TCP port (A default video TCP port
of WebEye is 8080th port.) is blocked under firewall. If you are under firewall, you may view real time image
through WebEye ’s Server Push Viewer that transmits video through Web TCP port instead of video TCP port.
By clicking on ‘Behind Firewall’ menu, you may directly connect Server Push Viewer when you access
WebEye homepage.
3) WebEye Plug-in for Netscape user
To monitor real-time image through Netscape Navigator, user should install WebEye Plug-in program first by
clicking WebEye Plug-in menu. When you connect WebEye for the first time or you have Plug-in program of
lower version, you have to download it clicking ‘Download WebEye Plug In Now!’ button. Then you click
‘Grant’ and ‘Install’ buttons respectively.
4) WebEye Active -X for MS Explorer User
For a Microsoft Explorer User, Active-X Control program is required. The program will be installed
automatically when a user accesses to WebEye. For Active -X installation on your PC, just click ‘Yes’ to the
question if you want to install the program on pop -up window. If you cannot see images after installation, you
should check if Active-X Control program (a file named Web Camera Server Control) is installed or not. You
may check Web Camera Server Control file (Active-X Control program) in the fold of
C:\Windows\Download Program Files. If the Web Camera Server Control file is not installed at all in the
directory, try it again to download and install it. If the file is already installed but image is not seen, remove
the file and re-install it.
5) FAQ
A lot of questions and answers are provided here for troubleshooting. If user ha s another question that is not
answered here, please contact WebGate through its Internet homepage.
13
WebEye WebEye B101B101
User’s Guide

3. Real time monitoring through Default Viewer
At default viewer, a user may configure image transmission method and control integrated PTZ mechanism of
a dome camera. The PTZ control panel is activated in some seconds depending on network speed.
On the left side panel, there are menus for changing real time image viewer, accessing administration page,
downloading Plug-in program and viewing information on version and Q&A.
• 720x486 Viewer: By selecting this viewer, a user monitor images of 720 by 486 resolutions. This viewer
has the identically same functions of default viewer but the image panel is bigger by 4 times than that of
default viewer.
• Server Push Viewer: If WebEye B101 or user’s PC is behind firewall on network, a user may monitor
real time image through ‘Server Push Viewer’. Some functions such as ‘Progressive Mode’ image
transmission, ‘Image Quality’ control, and ‘Quality Box’ creation menus out of image control and ‘Preset ’,
‘Auto Focus’, and ‘Focus Sensitivity’ control out of PTZ control are not supported in this viewer.
1) Image control
There are five menus for controlling image transmission method. These menus are not to be activated non-PC
platform such as Macintosh and Unix system.
(1) Gray Mode
If you choose this mode, the images are displayed in black and white. And, you can view the images
transmitted faster than in color image. By click again the button, the function is released.
(2) Progressive Mode
In the case of ‘Progressive Mode’ on, every image is regenerated from low to high resolution. In other words,
14
WebEye WebEye B101B101
User’s Guide

an image is reproduced from vague to clear for user to see what is happening and later one may detect exact
things. This function is useful when you use a low speed network, because it reduces waiting time.
(3) Single Shot Mode
When this button is clicked, one frame of image is reproduced. Therefore, it is stopped transmitting further
image. To resume transmitting real-time images, click the button again.
(4) Resolution
You may select a level of resolution among 3 levels (360x243, 180x121, 90x60). High-resolution image is big,
and its transmission speed is slow. You may monitor 720x486 resolution images through ‘720x486 Viewer’.
(5) Frame rate
You may choose image transmission speed. If you choose ‘Fastest’, you can get images at the fastest speed
under your network environment.
2) Integrated PTZ mechanism control
This is to control integrated PTZ mechanism of a dome camer a. The control panel is deactivated at first. And
it is to be activated when a user click on ‘Take Control’ button.
(1) Take Control / Give Control
This is to get power of controlling PTZ mechanism of the connected dome camera. A user who is permitted to
control PTZ mechanism may get the power by clicking ‘Take Control’ button.
When the user gets the power, the button is toggled into ‘Give Control’. During the assigned time, a user may
abandon the control power.
(2) Pan/Tilt
In the center of the control panel, there is a plotted space with 4 arrows of up, down, left and right directions.
This is to control pan and tilt mechanism of a dome camera with the mouse. By placing the mouse cursor on
the panel and clicking the left button of a mouse at a certain point of the panel, a dome camera pans and tilts.
(3) Zoom (W/T)
You may zoom in (W: Wide) and zoom out (T: Tele).
(4) Auto Focus
Basically, a dome camera has auto-focus function and it focuses an object automatically. A new object in the
view, however, may not be focused. In the case ‘Auto Focus ’ button is used to send commands to focus
automatically to all objects that appear in the view newly.
(5) Manual Focus (N/F)
You may control zoom mechanism with near (N) and far (F) buttons. This is to optim ize image’s focus.
Focusing sensitivity is set with ‘Focus Sensitivity’ in pop-up menu as well as in administration page.
3) Convenient pop-up menu
A small window of 5 menus appears when you click the right button of the mouse. However only a certain
users who are permitted can utilize the functions such as ‘Image Info’, ‘Quality Box’, ‘Focus Sensitivity’, and
‘Image Quality’. And the results of the four functions are to be affected in every image that is transmitted to
all users. ‘Save File As’ menu is permitted to any user.
15
WebEye WebEye B101B101
User’s Guide

(1) Image Info
You may decide the color (black or white) of the information that is shown on the left top of the image. And
you may leave out the information. A user who has ‘Video control’ right may utilize this menu.
(2) Quality Box
This is to set a certain area clear and remained area dull. You can overcome insufficient network bandwidth
with this function , because the file size is reduced with unfocused area. Quality Box is to be set like under
written description.
• Choose ‘New QBOX’ button.
• Place mouse cursor on a certain point of real time image where to start QBOX.
Click and drag the mouse point.
•
You can also re-use previous QBOX area to focus again by clicking ‘Enable QBOX’. ‘Disable QBOX ’ is to
finish. The image activated Focusing Area function is seen in the right. The image quality of outer area of
QBOX is to be set with ‘Ambient Level ’ menu. The level is from 1 to 5. If you select ‘Level 1’, the quality is
similar to focused area. And if you select ‘Level 5’, the unfocused area is shown dark.
(3) Focus sensitivity
You may configure movement degree of zoom mechanism. The sensitivity is from Level 0 to Level 9. By
selecting ‘Level 9’, user zooms in or out at the largest degree. A user who has ‘PTZ control’ right may utilize
this menu.
(4) Image quality
It is to set image quality. The image quality is from Level 0 to 9. If user chooses the ‘Level 9’, WebEye sends
the finest image. However, transmission frame rate will be reduced because of large sized data. If user
chooses ‘Level 0’, WebEye sends dullest image but fast. A user who has ‘Video control’ right may utilize this
menu.
(5) Save File As
It is to save a frame of still image as an electric file . A still image can be saved as bitmap (*.bmp) file or
Wavelet format file (*.eye). Wavelet formatted image file is to be reproduced on Internet browsers such as
Netscape Navigator or Internet Explorer as long as the PC is installed Active -X or Plug-in program.
4) Administrator’s page access
Clicking ‘Goto Administrator’s Page’ menu, you go to a login page of administration page. However only the
user who has authority as an administrator can access the page with administrator’s ID and password.
5) Program download
As WebEye compresses image with Wavelet algorithm, user needs to install Plug-in program to see
transmitted image through Netscape Navigator on one’s PC. Clicking ‘Netscape Plugin’ menu, a user accesses
a page where to download Plug -in program.
6) About
User may look up information on software versions clicking ‘Version’ and on trouble shooting clicking
‘FAQ ’ regarding to installation or running WebEye.
16
WebEye WebEye B101B101
User’s Guide

4. Real time monitoring through Server Push Viewer
If WebEye is installed on a network where firewall is, you may access WebEye through server-push viewer to
monitor real-time images.
1) Image Control
‘Progressive Mode’ image transmission menu is not supported.
(1) Resolution
You may select a resolution level among five. (90x60, 180x121, 360x243, 720x243, 720x486)
(2) Frame Rate
You may c hoose image transmission speed. (1fps, 3fps, 5fps, 10fps, fastest)
(3) Play Control
If you choose this mode, the images are displayed in black and white. And, you can view the images
transmitted faster than in color image. By click again the button, the function is released.
(4) Single Shot Mode
When this button is clicked, one frame of image is reproduced. Therefore, it is stopped transmitting further
image. To resume transmitting real-time images, click the button again.
2) PTZ mechanism control
‘Preset’ and ‘Auto Focus’ are not supported.
(1) Pan and Tilt
If you click the buttons, you can move the direction of WebEye to where you want to see.
(2) Zoom
You may zoom in and zoom out.
(3) Focus
You may control manually to optimize the image’s focus.
17
WebEye WebEye B101B101
User’s Guide

(4) Acceleration Rate
You may choose moving speed of Pan/Tilt/Zoom mechanism among three steps of fast, normal and slow.
3) Pop-up Menu
‘Image Quality’ control, ‘Quality Box’ creation, and ‘Focus Sensitivity’ control are not supported.
(1) Image Info
You may decide the color (black or white) of the information that is shown on the left top of the image. And
you may leave out the information. A user who has ‘Video control’ right may utilize this menu.
(2) Save File As
It is to save a frame of still image as an electric file . A still image can be saved as bitmap (*.bmp) file or
Wavelet format file (*.eye). Wavelet formatted image file is to be reproduced on Internet browsers such as
Netscape Navigator or Internet Explorer as long as the PC is installed Active -X or Plug-in program.
4) To Home
This is to go to main viewer. The main viewer is set in administrator’s page.
5) Capture
This is to capture image and save as a file. This menu is the same function as ‘Save File As’ menu.
6) Admin
Clicking ‘Admin ’ menu, you go to a login page of administration page. However only the user who has
authority as an administrator can access the page with administrator’s ID and password.
7) Plug -in
As WebEye compresses image with Wavelet algorithm, user needs to install Plug-in program to see
transmitted image through Netscape Navigator on one’s PC. Clicking ‘Netscape Plugin’ menu, a user accesses
a page where to download Plug -in program.
8) FAQ
User may look up information on trouble shooting clicking ‘FAQ’ regarding to installation or running
WebEye.
VII. Configuring Administrator’s Condition at ‘Admin’ page
This page is for administrator. Administrator may control operating status remotely. This page can be
accessed through Setup program by clicking ‘Start Configuration’ button.
1. Administrator Login
1) Accessing through setup program
First you click on MAC address or IP address of WebEye to select a certain one. Then you key in the
administrator’s ID and password (Default ID and password are ‘admin ’), and click ‘Start Configuration’
button in turns. When you click ‘Start Configuration’ button, the setup program automatically connects you to
Admin page of WebEye Homepage.
18
WebEye WebEye B101B101
User’s Guide

2) Accessing through Web browser
On Web browser, a user may access WebEye login page with its IP address. In the login page, a user may key
in administrator’s ID and password or a normal user’s ID and password . With any of ID and password, the
user may access real time image viewer page.
2. Configuring Administrator’s Condition at Homepage
1) System Configuration
This page is to set name, date & time, location,
and description of one’s WebEye. Model, serial
number and software version appear
automatically.
(1) WebEye Name
The name is to be used to register the WebEye
on a certain server, if you use dynamic IP
address.
(2) Model
By clicking ‘Detailed H/W Information’, you may view detailed hardware information such as maximum
numbers of channel, serial port, digital input, digital output, etc. The model name is marked automatically.
(3) Installation Location & Additional Description
The information is shown in the real time image viewer page as well as in a dynamic IP registration list.
(4) Date & Time
There are three date & time menus. In ‘WebEye Current Date & Time’ panel, the date and time, which is set
in WebEye, appears. In ‘System (PC) Current Date & Time ’ panel, the same date and time as is set in user’s
PC appears.
(5) Administrator’s E-mail Address
In this panel, administrator records one’s e-mail address. If administrator put a ‘contact’ menu of e -mail
communication on real time image viewer page, the linked e-mail address to the ‘contact’ menu is to be
synchronized with this. So administrator can keep up e-mail address easily.
(6) Initialize Flash Info
Administrator initializes almost all the information saved on flash memory. However ‘Date & Time’, ’Model’,
‘Serial Number ’, IP configuration, passwords, and all items in ‘ Video’ menu are not initialized.
(7) Rebooting
If WebEye has any problem, administrator can reboot it without adjusting power supply. This button works as
on/off switch.
2) User Configuration
This page is to configure IDs and passwords
of an administrator and 5 users.
(1) User Account
19
WebEye WebEye B101B101
User’s Guide

There are one administrator’s account and 5 users’ accounts. Account name can be changed.
(2) Password
If you want to open your WebEye to everyone, you may not change default user’s ID and password. However
you should change administrator’s ID and password with unique ones of yours.
(3) Access Rights
Administrator may give or forfeit users’ right of PTZ control and video control. With default setting,
administrator has both right of PTZ control and video control and normal user doesn’t have any right.
3) Network Configuration
This page is to define network type and set
network addresses of WebEye.
(1) DHCP Client Protocol
If administrator activates ‘DHCP Client
Protocol’ menu, all the addresses are going to set
automatically by WebEye detecting them from
DHCP server of your ISP. The detected
addresses are not seen on the screen.
(2) Select Network In terface
If WebEye is connected on xDSL line that needs
PPPoE process, administrator should select
‘xDSL (PPPoE)’. However the xDSL line
doesn ’t need PPPoE process, administrator
should select ‘Ethernet’ though WebEye is
connected on xDSL line.
(3) Etherne t Interface
Administrator may configure IP address, subnet mask, broadcast address, gateway address, and DNS
addresses of WebEye. For broadcast address, administrator may set it automatically by clicking ‘Get From
Netmask’ button after assigning IP address and subnet mask.
MTU Size: Depending on network type, administrator may set data packet size with this menu to utilize the
network at most effectively .
DNS Server IP Address: This is used when you register your WebEye B101 on dynamic IP registration list
of WRS (WebEye Registration Server). WRS has its domain name of ‘webeye.to’ and the domain name is
registered on DNS servers on the world.
(4) xDSL Interface
If WebEye is connected on xDSL line and needs PPPoE process, administrator should select ‘xDSL (PPPoE)’
and configure ID and password for PPPoE. ID and password may be acquired from the ISP that installed the
line. And WebEye may get IP address when it is connected on xDSL line.
20
WebEye WebEye B101B101
User’s Guide

4) Dynamic IP registration service for ISDN and xDSL users
This page is to register WebEye on dynamic
IP registration server.
If WebEye is installed on a network of
dynamic IP address (floating IP address),
administrator should register the WebEye to
‘dynamic IP registration server’ to give
simple connectivity to com mon users.
To solve the problem WebGate run a server making a list of WebEyes that have dynamic IP addresses. On the
server, WebEye registers its information such as name, location, and description, so that common users may
detect a certain WebEye. Name, location and description are assigned at ‘System Configuration’ page. If
administrator does not change them, the WebEye will register default information on the list, and it will be
very difficult to point out and access a certain WebEye. The list is on an Internet homepage of WebEye,
‘www.webeye.to’.
(1) Auto IP Registration Function
Administrator may register one’s WebEye by enabling ‘Auto IP Registration Function’. Registration process
is that WebEye detects IP addresses from DHCP server and informs the detected IP addresses to dynamic IP
registration server. And the server updates already registered information with new one. Please keep in mind
that user have to enable ‘DHCP Client Protocol’ at ‘Network Configuration’ page to have WebEye get
dynamic IP addresses automatically, when WebEye is installed on a network of dynamic IP address.
(2) Registration Server Address
This is to configure a server address for registration. The registration server to be used for Dynamic IP
registration should be installed proper S/W, developed by WebGate Inc. If you do not run a server for IP
registration, keep the server’s name as default figure (webeye.to).
(3) Registration Interval
Dynamic IP address is commonly used on xDSL, ISDN or Cable Modem lines. To maintain continuous
connectivity, user should reset the ‘Registration Interval’ shorter than the default value. Because an IP is to be
changed from time to time, some user may not access by clicking on a WebEye if actual information on
WebEye is changed from the registered IP information on the dynamic IP registration server.
(4) Add Public List
There are two registration systems. One is to register on a public list and another is on a private list. Please
refer to Article 3)
Public List: This list is open to anyone who accesses WebEye Internet homepage
•
(www.webeye.to).
• Private List: This list is not seen to anyone. Even the owner of a WebEye can get the information on
one ’s WebEye only without viewing information on other’s WebEye.
(5) Access Token
Access token is a password and it is used when you register your own WebEye on a list ‘User’s WebEye ’ out
of all WebEyes on WRS(WebEye Registration Server.)
21
WebEye WebEye B101B101
User’s Guide

5) How to find registered WebEye in WebEye Internet homepage
On WebEye Internet homepage (www.webeye.to), there are menus to find WebEye that is registered on WRS
(WebEye Registration Server).
(1) Sign up membership
To search your WebEye out of a public list or a private list, you have to sign up membership first. You may
sign up on the server through ‘Membership ’ menu.
(2) Finding WebEye from public list
To access WebEye that is registered on public list, you may find it through ‘Service’ or ‘Demo ’ menus. Once
click ‘Service’ or ‘Demo’ menu, you may find ‘WRS (WebEye Registration Service) WebEye list’ on WRS
page that is a main page of the ‘Service’ menu. The sub -menu ‘WRS’ is on the left side.
(3) Finding WebEye from private list
To access WebEye that is registered on private list, you should make your own WebEye list before. You may
make the list through ‘User’s WebEye’ menu. In the list, there are to be registered any WebEye from the
‘Public List’ or ‘Private List’. On ‘User’s WebEye’ page, there two sub-menus, ‘Your WebEye List’ and
‘Search and Append’.
My WebEye List: You may maintain your own WebEye registering it on this list. When you login this
homepage, WRS (WebEye Registration Server) detects and shows all the WebEyes that you listed appear on
your own list.
Search and Appe nd: This menu is to append a certain WebEye on your own list. You may append WebEye
on your own list as follows.
6) Security Configuration
This page is to control accessibility to one ’s
WebEye with IP addresses.
(1) IP/Subnet Filtering Mode
If this function is on, only the user whose
PC’s IP address is registered on WebEye can
access the WebEye. Administrator may
temporarily disallow a registered user to
access to WebEye with a menu on the right
side of each IP address. Any IP addresses are
to be listed.
If administrator inactivates ‘IP/Subnet
Filtering Mode’, anyone may access one’s
WebEye through a Web browser with any PC.
(2) Image Encryption Mode
Administrator may restrict people to receive images from one ’s WebEye, even though people accessed it. If
‘Image Encryption Mode’ is enabled and a pin number is assigned, people have to key in the assigned pin
number to see image after accessing WebEye image viewers.
‘Security Configuration’ is a double-checking function to control accessibility, utilizing ‘User Account
Configuration’ at the same time.
22
WebEye WebEye B101B101
User’s Guide

7) Video Configuration
This page is to configure every channel with
various conditions.
(1) Video Channel State Control
Administrator decides whether to utilize video
signal from selected channel in WebEye or not.
If user disables a channel with an external
camera connecting to WebEye, WebEye does
not show any image from the channel.
(2) Camera Color Type
It is to define every camera whether it is color or B/W camera. This is not to change its original character but
only to define the character and give information to WebEye.
(3) Camera Signal Type
It is to define CCD module of WebEye and external CCD cameras between ‘NTSC’ and ‘PAL’.
(4) Camera Installation Angle
WebEye can always show images in right angle regardless a dome camera ’s installation position. If a dome
camera is located on the floor upside down, user can adjust image angel by selecting ’180 deg’.
(5) Advanced Configuration
By Clicking ‘Advanced Configuration’, you may
access the sub page where to configure detailed
conditions.
Calibration Parameters
Administrator manipulates screen settings by
adjusting brightness, contrast, hue, saturation,
horizontal line shift, and vertical line shift from
the menu. With ‘Video Gain’ menu, you may
optimize the image without adjusting each value
of other menus.
Caption Display Options
Administrator may configure caption on real time
image with display options such as color and
contents. Caption is to be made of time
information, channel information, and additional
explanation (user defined string).
Visual Setting Parameters
Administrator may configure QBOX and image
quality level with aid of real time image. By placing the mouse curse on real time image and clicking the left
button, you may view pop -up menus.
• QBOX Parameters : Administrator sets QBOX area with a mouse to ‘click and drag ’. Selected area
shows in ‘Left Top Placement’ and ‘Right Bottom Placement’ panels in figures. With ‘Ambient Level’
23
WebEye WebEye B101B101
User’s Guide

menu, Administrator may set quality level of unfocused area in the image (out of the focused range).
• Image Quality Level: Administrator chooses image quality level from 0 to 9. If level 9 is chosen,
WebEye sends the finest image. However, transmission speed will be reduced because of larger sized data.
The image level inside the ‘QBOX ’ is the same level as is selected in this menu.
8) Application Configuration
This page is to configure e -mail and file sending
function.
(1) Recipient E-mail Address
This is to designate a person to receive E-mail.
(2) Sender’s E-mail Address
This is to put a person ’s e-mail address that is
considered as the e-mail sender.
The e-mail sender can be a person who should
take care of the situation when events occur.
E-mail will be delivered to a person who is
defined as a recipient in the blank of ‘E-Mail
Recipient ’. The person who received e-mail can
send a message of countermove to a person who
is defined as an e-mail sender.
(3) Check E-Mail Options
Relay Mail Server: With the same problem of e-mail blocking, WebEye has a function to relay its e -mail
through an available e-mail server so that e -mail can have the relay server’s domain name. After activating
‘User Relay Mail Server’ menu, you key in a server’s domain name such as ‘@abcdefg.com’.
Content-Transfer-Type: It is to define e-mail format. E-mail servers support ‘Base64’ format in common,
but some servers not. In the case, you may select the format as ‘Quoted Printable’.
(4) E-Mail Event Configuration
Event source: Administrator should define with which event E-m ail is to be delivered among MD (motion
detection), sensor 1, sensor 2, sensor3, and sensor 4. If administrator clicks on sensor1, e-mail is sent when
the sensor1 detects events. (To utilize sensor input detection, a sensor should be connected to WebEye.)
File name : With the images of MD and Sensor event, a file is named combining all options. And with the
image of periodic sending event, administrator may decide how to name image files among three methods.
Administrator names a file with data & time (DATETIME; E.g IMG-CH00-2001030-223031.eye) or serial
number (SEQNUM; E.g. IMG-CH00-SN1.eye). The image file has its extension of ‘eye ’ so that the file is to
be reproduced on Internet browser.
Image quality: Administrator may set image ’s resolution that is delivered by e-mail. Resolution is to be set
among 90x60, 180x121, 360x243, 720x243, and 720x486. An image of 90 by 60 is of the lowest resolution
and the smallest size.
(5) FTP directory configuration
24
WebEye WebEye B101B101
User’s Guide

Administrator assigns FTP server address, FTP user account, FTP user password, and FTP user path to
receive files when events occur.
(6) FTP event configuration
Administrator may set sending conditions, image resolution, and filename. Image resolution, filename, and
sending conditions setting methods for FTP are same as that of e-mail.
9) Pan/Tilt/Zoom Configuration
This page is to select which serial port to
use and to configure PTZ functions such as
‘Mode ’, ‘Preset’, etc.
(1) Select Serial Port
It is to select a serial port among ‘Serial
#1’, ‘Serial #2’, and ‘Serial #3’ with which a pan/tilt/zoom control receiver is connected to WebEye. Serial #1
and Serial #2 are RS232C interfaces and Serial #3 is RS422/RS485 interface.
(2) Serial Port Base Address
This menu is to identify the base addresses between WebEye and a dome camera. Administrator may connect
analogue PTZ controller as well as WebEye B101 to a dome camera. And an analogue PTZ controller can be
connected with several dome cameras.
(3) Advanced
You may register preset points and configure mode.
When you register preset, you would better stop other user control PTZ mechanism. If not, other users may
disturb you in setting preset.
New Preset
You register a new preset point as follows. You may register up to 64 presets.
• Focus on a certain point to register as a preset point controlling PTZ mechanism.
Click ‘New Preset ’ button, then a dialog box ‘New Preset’ appears.
•
• Select a number from 1 to 64
• Set the preset name.
• Click ‘Add/Change ’ button
• In ‘Current Preset List’ panel, you may view preset points that are registered currently . At the bottom of
this window, you may check if the selected number is occupied or not.
New Group
You make a new group with combining registered presets. You may make and list up to 6 groups. Each group
is to contain 64 points. The procedure to make a group is as follows.
• Click ‘New Group’ button, then a dialog box ‘New Group’ appears.
Select a number from 1 to 6.
•
• Set the group name.
• Set interval time. This signifies a duration from time when to move to the next pres et point to time when
to move to the one after the next preset point.
• List proper preset point among registered ones in ‘Current Group Member’. According to the order that
25
WebEye WebEye B101B101
User’s Guide

you listed in a group, a dome camera travels.
• Click ‘Add/Change ’ button
• In ‘Curren t Group Member’ panel, all registered preset points appear. At the bottom of this window, you
may check if the selected number is occupied or not.
Mode
There are three modes like ‘Normal Mode’, ‘Swing Mode’, and ‘Group Mode’.
• Under normal mode, user may c ontrol PTZ mechanism of a dome camera with corresponding buttons in
control panel. If you activate ‘Give/Take Mode’ each user is to be permitted to control the PTZ
mechanism for a certain period of time on a first-come-first-served basis.
• If swing mode is selected, the connected dome camera swings between the designated points. Time
duration of ‘Wait (some) seconds’ signifies the same meaning that of group mode.
• If group mode is selected, the dome camera travels among listed preset point according to the listed order.
10) Serial Port Configuration
This page is to select a communication
protocol among listed ones.
(1) Serial Port Selection
Administrator selects a serial port to
configure. WebEye B101 has three serial
ports. ‘Serial #1’ and ‘Serial #2’ are
RS232C interface ports, and ‘Serial #3’ is a RS422/RS485 interface port.
(2) Select Attached Device
Administrator selects a communication protocol that an attached external device satisfies among already listed
protocols. WebGate has listed protocols of Philips, Pelco (P and D), Sensormatic, and Video Technical.
Audio Device
This protocol is for WebEye A10, which is an audio transmission device connected to WebEye B101.
Control Parameters
With listed protocols of Philips, Pelco, Sensormatic and VT, you may also configure its control parameters
such as ‘Baud Rate’, ‘Stop Bits’, ‘Data Bits’, and ‘Parity Check’ according to connected dome camera
settings.
Manual Setting
If your mechanism doesn’t use any of already listed protocols, you may define the protocol manually by
selecting ‘Manual Setting’ and set parameters through ‘Control Parameters’ and ‘PTZ CMD’ menus.
11) Digital I/O Configuration
This page is to configure digital input status.
This is related with E-mail and FTP
applications and PTZ preset points.
(1) Device Type for Input Ports
Administrator defines active state of 4 digital
input ports. If you connect normal open type
26
WebEye WebEye B101B101
User’s Guide

device to input port, you should select ‘NO (Normal Open)’. With normal close type device, you should select
‘NC (Normal Close)’.
(2) Current State for Input Ports
WebEye shows current states of the 4 digital devices connected to 4 input ports. In the status panel, active
state or de -active state message shows. ‘De -Active State’ means that connected device didn’t detect any event
when ‘Apply button’ is clicked.
12) Alarm Configuration
This page is to set conditions for recording
images during event situation, so that WebEye
sends the images through e-mail or FTP.
(1) Motion Detection Threshold
Administrator sets threshold for motion detection
function. Threshold ‘0’ is the most sensitive state
and ‘900’ is the dullest state.
(2) Alarm Parameters for E-mail / FTP
Application
Administrator defines conditions for recording
image to WebEye, if WebEye detect events
through motion detection unction (MD Event) or
external devices (SID1, SID2, SID3, and SID4).
WebEye can record 2 frames for 2 seconds
before the event and 2 frames for 2 seconds after the event as well as 1 frame at the moment of event. Its
maximum recording rate is 1 frame per second and the total fames are maximum 5. WebEye records the
images and send them through e -mail or FTP according to preset conditions on ‘Application Configuration’
page and ‘Alarm Configuration’ page. If event lasts long,
(3) Alarm P reset
This is to match a certain preset point to one of the external devices such as an infrared sensor. You may
designate any of registered preset point for each external device. If you enabled this function with matching a
certain preset with a external sensor, the connected dome camera pans, tilts and zooms to preset degrees.
13) User Custom Configuration
This page is to customize TCP ports of data
transmission and default viewer composition.
(1) Web Server TCP Port
Administrator assigns a web server TCP port
through which people can access WebEye and
WebEye sends data. 80th port is assigned default
value.
(2) Video Server TCP Port
Administrator assigns a video server TCP port
through which WebEye transmits images to users. 8080th port is assigned as default value.
27
WebEye WebEye B101B101
User’s Guide

(3) Select Main Page
Administrator assigns a viewer as a main page that appears when users access WebEye. Administrator can
select between ‘Default Viewer ’ and ‘720x486 Viewer’. ‘Default Viewer’ is to show images with maximum
resolution of 360 by 243 and ‘720x486 Viewer’ shows images with maximum resolution of 720 by 486
(4) Default Viewer Editing
‘Default Viewer’ is designed for users to edit easily. Editable parts are as bellows .
Main Title: It is to change the title that is written on the bottom of the real-time image viewer.
•
• Logo Image Source URL: Administrator may assign a path of a certain directory from the inside the
WebEye or a URL of a certain Web site where the logo is.
Logo Image Link URL: Administrator may link the logo with a certain web page. User can link the logo
•
with a company homepage or a personal one.
• Background Color and Foreground Color : Ground color of login page can be changed. Administrator
may set the color with RGB value.
28
WebEye WebEye B101B101
User’s Guide

(Appendix 1)
Detailed Specifications of WebEye B101
1. General
Hardware
CPU 32bit RISC Embedded processor
Flash memory 8Mbyte
RAM 16Mbyte
OS Embedded Linux
Video Channel NTSC or PAL video format are supported
1Ch. Video Input
1Ch. Video Output
Image Resolution Control 720X486, 720X243, 360X243, 180X121, 90X60
Image Compression
Compression Algorithm Wavelet
Compression Rate 10:1 ~200:1
Performance
Transfer Rate Max up to 120fps (With 3KB image)
Decoding Rate 2 ~ 30fps
Local Compression rate Max 30fps
Security Password (Based User Authentication)
IP-filtering (Secure Mode)
Image Encryption
Alarms and I/O Motion detection
Sending e-mail automatically
Sending the images files through FTP automatically
Software -controlled 4 alarms input
MISC. function High quality image area setting
Image quality Control (10 Levels)
Periodical sending the images through E-Mail, FTP
Gray/Progressive/Single-Shot Mode
User customized home page publishing supported by FTP
Power Supply DC 12V, 1.0A or AC 24V via external power supply
2. Network
Browser MS Internet Explorer Ver 4.0 or later
Netscape Ver 4.5 or later
JAVA Applet for non PC User (MAC or Unix)
Connector 10 Based -T Ethernet (RJ-45)
Installation Assign IP address using setup program or ARP, RARP protocol
Protocols supported TCP/IP, HTTP, ARP, RARP, ICMP, DHCP, FTP, SMTP and PPPoE
S/W Update Flash memory allows central remote software updates over the network
using FTP or private ' WebyeUpgrade' program.
Management Configuration is achieved by private setup program And Web server
built in administration page.
29
WebEye WebEye B101B101
User’s Guide

3. Mechanical
Dimension H x W x L = 35mm x 120mm x 120mm
Weight 350g
4. Environmental
(*) This data is a target specification .
Temperature *
Operating -5° C ~ +50°C, Gradient 15 °C/Hr max
Non-Operating -20°C ~ +60°C, Gradient 15° C /Hr max
Humidity *
Operating 8% ~ 90% R.H. No condensation
Non-Operating 8% ~ 90% R.H. No condensation
Vibration *
Acceleration 1.2G
Frequency 10Hz ~ 60Hz
Sweep Time 1 OCT/Min
Shock * 10 G (10msec half sine wave Repeated twice maximum/sec)
5. Compatible external devices and software
PTZ control 2 Ch. RS-232 and 1Ch. RS-422/RS-485
Sensor input 4 auxiliary inputs are supported, and is made of ‘Opto coupler’
Opto coupler stands with 3-5V and 10 -20mA
30
WebEye WebEye B101B101
User’s Guide
 Loading...