

Page 1
E/S-620/650
174
YOU MUST READ THiS OWNER'S GUIDE
BEFORE OPERATING YOUR GAS GRILL
A DANGER
if you smell gas:
1. Shut off gas to the appliance.
2. Extinguish any open flames.
3. Open lid.
4. if odor continues, keep away from the
appliance and immediately call your gas
supplier or your fire department.
Leaking gas may cause a fire or explosion
which can cause serious bodily injury or
death, or damage to property.
A WARNING:
1. Do not store or use gasoline or other
flammable liquids or vapors in the
vicinity of this or any other appliance.
2. An LP cylinder not connected for use
shall not be stored in the vicinity of this
or any other appliance.
A WARNING: Follow all leak-check
procedures carefully in this manual prior
to barbecue operation. Do this even if the
barbecue was dealer-assembled.
NOTICE TO iNSTALLER: These instructions
must be left with the owner and the owner
should keep them for future use.
OUTDOOR USE ONLY.
THIS GAS APPLIANCE iS DESIGNED FOR
A WARNING: Do not try to light this
appliance without reading the "Lighting
instructions" section of this manual.
8917/, US 10/02/08
NG
US ENGLISH
Page 2
DANGER
Failure to follow the Dangers, Warnings and Cautions contained in this Owner's Manual may result in serious bodily injury or
death, or in a fire or an explosion causing damage to property.
WARNINGS
z_ Do not store a spare or disconnected liquid propane cylinder under or near this barbecue.
z_ Improper assembly may be dangerous. Please follow the assembly instructions carefully.
z_ After a period of storage, and/or nonuse, the Weber ®gas barbecue should be checked for gas leaks and burner obstructions
before use. See instructions in this manual for correct procedures.
z_ Do not operate the WebeP gas barbecue if there is a gas leak present.
z_ Do not use a flame to check for gas leaks.
z_ Combustible materials should never be within 24 inches (61 cm) of the back or sides of your Weber _ gas barbecue.
z_ Do not put a barbecue cover or anything flammable on, or in the storage area under the barbecue.
z_ Your Weber _ gas barbecue should never be used by children. Accessible parts of the barbecue may be very hot. Keep young
children away while it is in use.
Z_ You should exercise reasonable care when operating your Weber ®gas barbecue. It will be hot during cooking or cleaning and
should never be left unattended, or moved while in operation.
z_ Should the burners go out while in operation, turn all gas valves off. Open the lid and wait five minutes before attempting to
relight, using the lighting instructions.
z_ Do not use charcoal or lava rock in your Weber ®gas barbecue.
z_ Never lean over open grill or place hands or fingers on the front edge of the cooking box.
z_ Should a grease fire occur, turn off all burners and leave lid closed until fire is out.
z_ Do not enlarge valve orifices or burner ports when cleaning the valves or burners.
z_ The Weber ®gas barbecue should be thoroughly cleaned on a regular basis.
Z_ Liquid propane gas is not natural gas. The conversion or attempted use of natural gas in a liquid propane unit or liquid propane
gas in a natural gas unit is dangerous and will void your warranty.
Z_ Do not attempt to disconnect any gas fitting while your barbecue is in operation.
Z_ Use heat-resistant barbecue mitts or gloves when operating barbecue.
Z_ Keep any electrical supply cord and the fuel supply hose away from any heated surfaces.
Z_ Combustion byproducts produced when using this product contain chemicals known to the state of California to cause cancer,
birth defects, or other reproductive harm.
Z_ Do not use this barbecue unless all parts are in place. The unit must be properly assembled according to the assembly
instructions.
Z_ Do not build this model of grill in any built-in or slide in construction, ignoring this Warning could cause a fire or an explosion
that can damage property and cause serious bodily injury or death.
z_ Proposition 65 Warning: Handffng the brass material on this product exposes you to lead, a chemical known to the state of
California to cause cancer, birth defects or other reproductive harm.
(Wash hands after handfing this product.)
LIQUID PROPANE GAS UNITS ONLY:
z_ Use the pressure regulator and hose assembly that is supplied with your Weber _ gas barbecue.
z_ Do not attempt to disconnect the gas regulator and hose assembly or any gas fitting while your barbecue is in operation.
z_ A dented or rusty liquid propane cylinder may be hazardous and should be checked by your liquid propane supplier. Do not
use a liquid propane cylinder with a damaged valve.
Z_ Although your liquid propane cylinder may appear to be empty, gas may still be present, and the cylinder should be
transported and stored accordingly.
z_ If you see, smell or hear the hiss of escaping gas from the liquid propane cylinder:
1. Move away from liquid propane cylinder.
2. Do not attempt to correct the problem yourself.
3. Call your fire department.
Page 3
Weber-Stephen Products Co. (Weber) hereby warrants to the ORIGINAL PURCHASER of this Weber _
gas grill that itwill be free of defects in material and workmanship from the date of purchase as follows:
Aluminum castings 25-years (2 years on paint; excludes fading)
Stainless sleel Shroud, 25-years;
Porcelain-enameled shroud, 25-years
Cookbox Assembly 10-years (2 year on paint excludes fading)
Stainless steel burners tubes, 10-years
Stainless steel cooking grates, 5-years no rust through or burn through
Stainless steel Flavodzer bars, 5-years no rust through or burn through
Porcelain-enameled cast-iron
cooking grates, 5-year no rust through or burn through
Porcelain-enameled
cooking grates, 3-years no rust through or burn through
Porcelain-enameled
Flavodzer bars, 2-years no rust through or burn through
Infrared Rotisserie Burner, 2-years
All remaining parts, 2-years
When assembled and operated in accordance with the printed instructions accompanying it.
Weber may require reasonable proof of your date of purchase. THEREFORE, YOU SHOULD RETAIN
YOUR SALES SLIP OR INVOICE.
This Limited Warranty shall be limited to the repair or replacement of parts that prove defective under
normal use and service and which on examination shall indicate, to Weber's satisfaction, they are
defective. Before returning any parts, contact the Customer Service Representative in your area
using the contact information on our website. If Weber confirms the defect and approves the claim,
Weber will elect to replace such parts without charge. If you are required to return defective parts,
transportation charges must be prepaid. Weber will return parts to the purchaser, freight or postage
prepaid.
This Limited Warranty does not cover any failures or operating difficulties due to accident, abuse,
misuse, alteration, misapplication, vandalism, improper installation or improper maintenance or
service, or failure to perform normal and routine maintenance, including but not limited to damage
caused by insects within the burner tubes, as set out in this owner's manual.
Deterioration or damage due to severe weather conditions such as hail, hurricanes, earthquakes
or tornadoes, discoloration due to exposure to chemicals either directly or in the atmosphere, is not
covered by this Limited Warranty.
There are no other express warrants except as set forth herein and any applicable implied warranties
of merchantability and fitness are limited in duration to the period of coverage of this express written
Limited Warranty. Some regions do not allow limitation on how long an implied warranty lasts, so this
limitation may not apply to you.
Weber is not liable for any special, indirect or consequential damages. Some regions do not allow the
exclusion or limitation of incidental or consequential damages, so this limitation or exclusion may not
apply to you.
Weber does not authorize any person or company to assume for it any other obligation or liability in
connection with the sale, installation, use, removal, return, or replacement of its equipment; and no
such representations are binding on Weber.
This Warranty applies only to products sold at retail.
WEBER-STEPHEN PRODUCTS CO.
Customer Service Center
1890 Roselle Road, Suite 308
Schaumburg, IL 60195
USA
For replacement parts call:
1-800-446-1071
www.weber.com ®
Weber-Stephen Products Co., (Weber) mediante la presente le garantiza al COMPRADOR ORIGINAL
de esta barbacoa de gas WebeP _que la misma estara libre de defectos en cuanto a materiales y
fabricacion a partir de la fecha de compra segt_n Io siguiente:
Piezas coladas de aluminio
Cubierta de acero inoxidable,
Cubierta porcelanizada,
Camara para asar
Tubes de acero inoxidable
de los quemadores,
Pardlas de cocci6n de
acero inoxidable,
Barras Flavorizer de
acero inoxidable,
Parrillas de cocci6n de hierro
Parrillas de cocci6n porcenlanizadas,
cuando se ensambla y opera de acuerdo a las instrucciones impresas que la acompafian.
Weber pudiese requerir prueba razonable de la fecha de compra, PeR LO TANTO, DEBERA,
GUARDAR SU REClBO O FACTURA DE VENTA.
Esta garantia limitada ester limitada a la reparacion o reemplazo de piezas que resultasen defectuosas
bajo use y servicio normal y las cuales al examinarse indiquen, a plena satisfaccion de Weber, que
efectivamente son piezas defectuosas. Antes de devolver cualquier parte, contacte al Representante
de Atencion al Cliente en su _trea, cuya informacion de contacto la encontrar_t en nuestro sitio web. Si
Weber confirma el defecto y aprueba el reclamo, esta elegir_t reparar o reemplazar tal pieza sin cargo
alguno. Si usted tiene que retornarnos las partes defectuosas, los gastos de transporte deben ser
prepagados. Weber retornar_t las partes al comprador con transporte o franqueo prepagado.
Esta Garantia Limitada no cubre ninguna falla o problema de operacion a causa de accidentes,
abuse, mal use, alteracion, use en aplicaciones indebidas, vandalismo, instalacion inapropiada o
mantenimiento o servicio inapropiados, o per no Ilevar a cabo el mantenimiento normal y rutinario,
entre los que se incluyen, pero sin limitacion, los da_os causados per insectos dentro de los tubes
quemadores, segt_n se detalla eneste manual del propietario.
Weber-Stephen Products Co. (Weber) garantit par le present document b.I'ACHETEUR D'ORIGINE de
ce grill a gaz Weber e que celui-ci ne comportera aucun defaut de piece ni de main d'oeuvre a compter
de la date d'achat comme suit :
Tubes du brQleur en acier inoxydable,
Grilles de cuisson en acier inoxydable.
Barres Flavodzer en acier inoxydable,
Grilles de cuisson en font® far 6maillOe.
_tcondition qu'il ait ete assemble et utilise conformement aux instructions imprimees qui
I'accompagnent.
Weber peut exiger une preuve raisonnable de vetre date d'achat. VOUS DEVRIEZ DONC
CONSERVER VOTRE TICKET DE CAISSE OU VOTRE FACTURE.
La presente Garantie limitee est limitee _tla reparation ou au remplacement des pieces qui s'averent
defectueuses dans le cadre d'une utilisation nermale et d'un entretien normal et dent I'examen indique,
_tla satisfaction de Weber, qu'elles sent defectueuses. Avant de reteurner teute piece, veuillez
entrer en contact avec le Representant du Service clientele le plus preche gr&ce aux coordonnees
_tvotre disposition sur notre site Internet. Si Weber confirme le defaut et appreuve la demande,
Weber cheisira de remplacer ces pieces sans frais. S'il vous est demand® de reteurner les pieces
defectueuses, les frais de transport devrent _tre prepayes. Weber reteurnera les pieces _tI'acheteur,
france de port.
La present® Garantie limitee ne couvre pasteute defaillance eu difficulte d'utilisation provoquee par un
accident, une utilisation abusive, une mauvaise utilisation, une alteration, une mauvaise application, un
acte de vandalisme, une installation incerrecte eu une maintenance ou un entretien incorrects, ou le
defaut d'entretien normal et regulier, y compris mais pas seulement les dommages proveques par des
insectes a I'interieur des tubes du brt]leur, tel que decrit dans le present mode d'emplei.
colado porcelanizado,
Barras Flavorizer porcelanizadas,
Qumeador infrarrojo del
asador giralorio,
Todas la demas partes,
Font® d'aluminiurn
Structure en acier inoxydable.
Structure 6maillee,
Gdlles de cuisson 6maillOes,
Barres Flavorizer 6maillOes,
Brt31eur de la rOtissoire & infrarouge,
Toutes les autres pieces,
25-a_os (2 ai_os para la pintura excluyendo la decoloraci6n)
25-a_os
25-a_os
10-a_os (2 ai_os para la pintura excluyendo la decoloraci6n)
10-a_os
5-ai_os sin pertoracion per fuego u oxidaci6n
5-ai_os sin pertoraci6n per fuego u oxidaci6n
5-ailos sin pertoraci6n per fuego u oxidacion
3-ailos sin pertoracion per fuego u oxidacion
2-ai_os sin pertoraci6n per fuego u oxidaci6n
2-ailos
2-ai_os
25 ans (2 ans pour lapeinture a I'exception de route d@coloration)
25 ans
25 ans
Cuve.
10 ans (2 ans pour la peinture a I'exception de toute deceleration)
10ans
5 ans sans trou provoque par la rouille ou par une brt31ure
5 ans sans trou provoque par la rouille ou par une brt31ure
5 ans sans trou provoque par la rouille ou par une brt31ure
3 ans sans trou provoque par la rouille ou par une brQlure
2 ans sans trou provoque par la rouille ou par une brt31ure
2 ans
2 ans
Esta Garantia Limitada no cubre el deterioro o da_os a causa de condiciones de tiempo inclement®
tales come granizo, huracanes, terremotos o tornados ni tampoco la decoloracion per exposicion a
sustancias quimicas bien sea per contacto directo o per que las mismas contenidas en la atmosfera.
No existe ninguna otra garantia expresa que no sean las las ac_t indicadas y cualesquier garantias
implicitas de comerciabilidad y aptitud de use est_tn limitadas en duracion al tiempo de cobertura de
esta expresa Garantia Limitada per escrito. Algunas regiones no permiten limitacion alguna en el
tiempo que una garantia implicita pueda durar, per Io que esta limitacion pudiera no aplicarle a usted.
Weber no se hace responsable de cualesquier da_os especiales, indirectos o emergentes. Algunas
regiones no permiten la exclusion o limitacion de dafios incidentales o emergentes, per Io que esta
limitacion o exclusion pudieran no aplicarle a usted.
Weber no autoriza a persona o empresa alguna a asumir en su nombre ninguna obligacion o
responsabilidad en relacion con la venta, instalacion, use, retire, devolucion o reemplazo de sus
equipos, y ninguna tal representacion sera vinculante para Weber.
Esta Garantia aplica solo a aquellos productos vendidos al per menor.
WEBER-STEPHEN PRODUCTS CO.
CustomerService Center
1890 Roselle Road, Suite308
Schaumburg, lL 60195
USA
Para partes de repuesto llama a:
1-800-446-1071
www.weber.com ®
Toute deterioration ou tout dommage resultant de conditions meteorologiques graves comme de la
gr¢le, des ouragans, des seismes ou des tornades, toute deceleration resultant d'une exposition a des
agents chimiques directement ou dans I'atmosphere, n'est pas couverte dans le cadre de la presente
Garantie limitee.
II n'existe aucune autre garantie expresse hormis celles exposees dans le present document et toute
garantie de commercialisation et de ben etat induite est limitee enduree _tla periode de couverture de
la presente Garantie limitee ecrite expresse. Certaines regions n'autorisent pas de limitation de duree
de la garantie induite ; il est donc posible que cette limitation ne s'applique pas a vous.
Weber ne peut _tre tenu pour responsable de tout dommage particulier, induit ou se produisant par
vole de consequence. Certaines regions n'autorisent pas I'exclusion ou la limitation des dommages
indirects ou se produisant par vole de consequence ; il est donc possible que cette limitation ou
exclusion ne s'applique pas _tvous.
Weber n'autorise aucune personne ou societe a presumer en son nom de toute autre obligation
ou responsabilite en relation avec la vente, rinstallation, rutilisation, le retrait, le retour ou le
remplacement de ses equipements ; et aucune de ces representations ne lie Weber.
La presente Garantie s'applique uniquement aux produits vendus au detail.
Para compras hechas en M#xico
WEBER-STEPHEN PRODUCTS S.A. de C.V.
Marcella No. 338,
Colonia Americana
44180 M_xico, C.P.
M_xico
Para partes de repuesto Ilame a:
(52} (33) 3615-0736
www.weber.com ®
WEBER-STEPHEN PRODUCTS CO.
Product Registration
P.O. Box 40530
Burlington, ON L7P 4W1
Pour des pieces de rechange, appelez le :
1-800-265-2150
www.weber.com ®
Page 4
ViSiON €:CLATC:E, DIAGRAIVlA DE DESPIECE
2
3 _ °
4 _
5
6
9
10
11
12
13
14
E/$620 NG US 082208
27
15
16
17
18
19
2O
21
22
24
©©
©
28
29
-- 30
31
32
33
34
35
36
37
--38
25
26
39
4O
41
Page 5
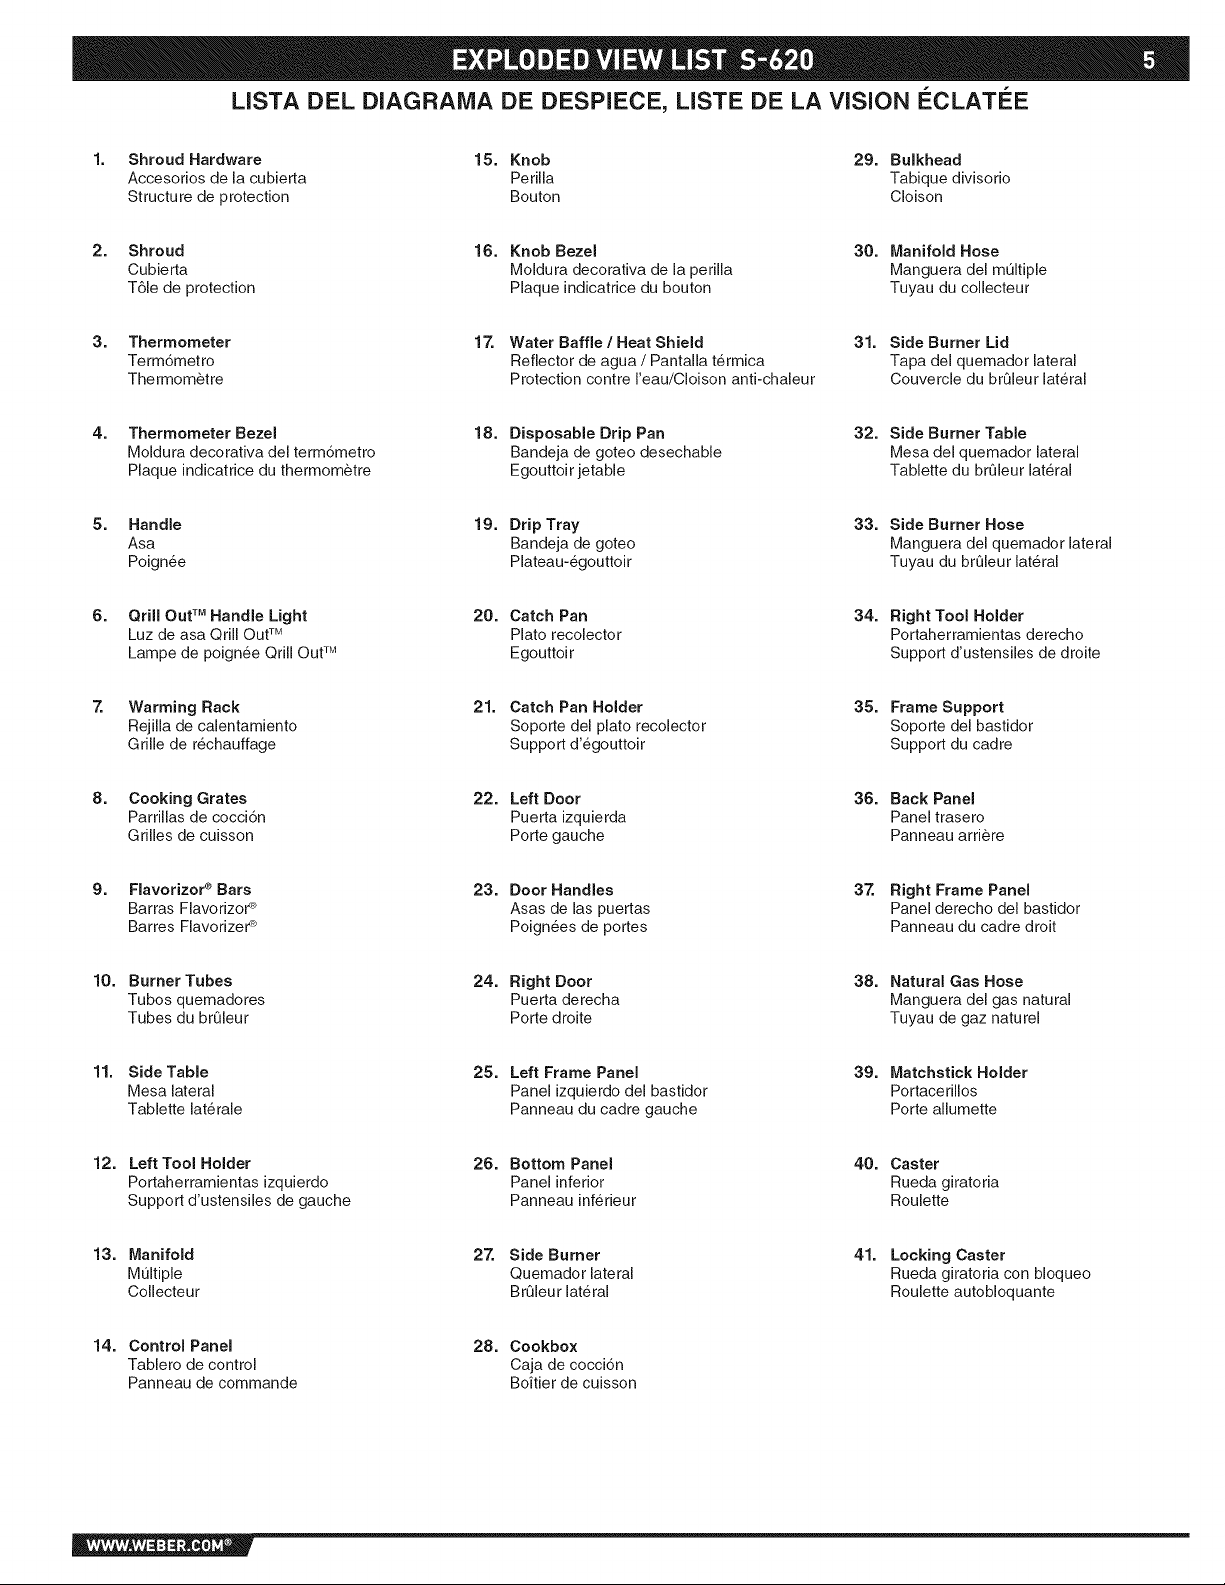
LISTA DEL DIAGRAIVIA DE DESPIECE, LISTE DE LA ViSiON €:CLAT¢:E
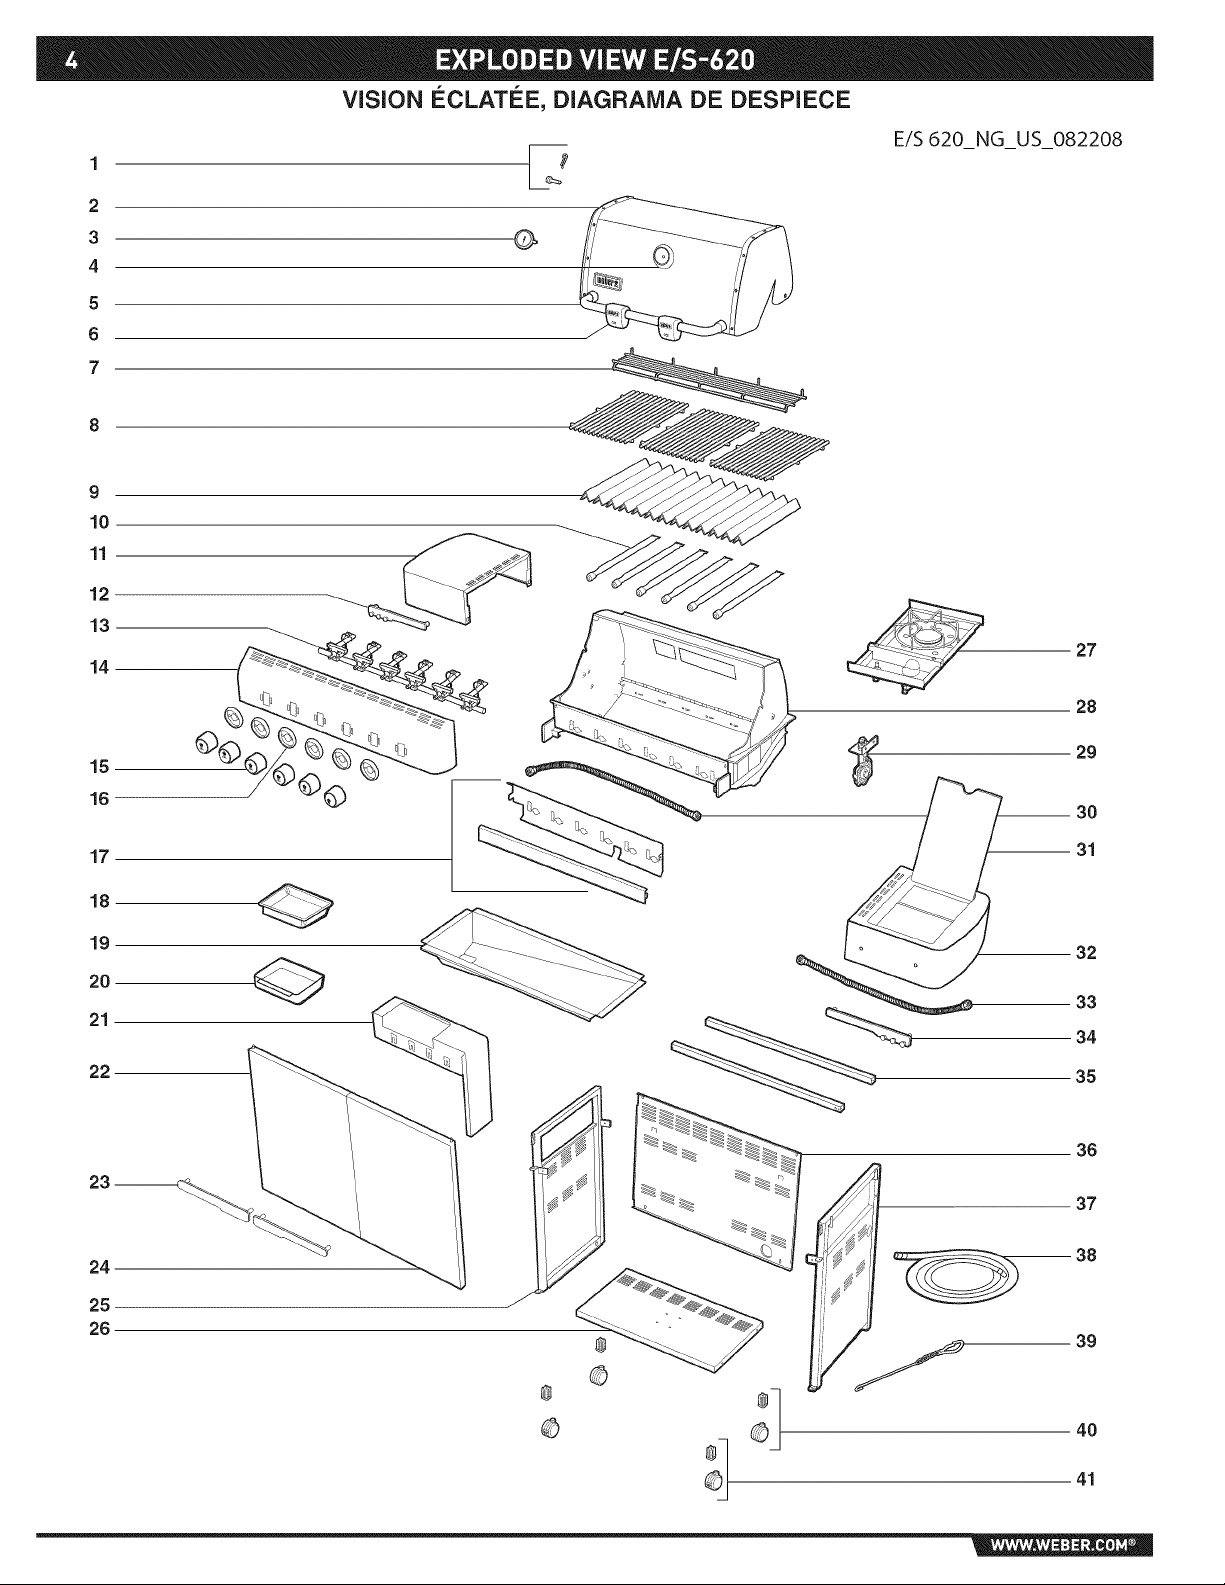
1. Shroud Hardware 15. Knob 29. Bulkhead
Accesorios de la cubierta Perilla Tabique divisorio
Structure de protection Bouton CIoison
2. Shroud 16. Knob Bezel 30. Manifold Hose
Cubierta Moldura decorativa de la perilla Manguera del multiple
T61e de protection Plaque indicatrice du bouton Tuyau du collecteur
3. Thermometer 17. Water Baffle/Heat Shield 31. Side Burner Lid
Term6metro Reflector de agua / Pantalla termica Tapa del quemador lateral
Thermometre Protection contre I'eau/Cloison anti-chaleur Couvercle du brQleur lateral
4. Thermometer Bezel
Moldura decorativa del term6metro
Plaque indicatrice du thermometre
5. HandJe 19. Drip Tray 33. Side Burner Hose
Asa Bandeja de goteo Manguera del quemador lateral
Poignee Plateau-egouttoir Tuyau du brQleur lat@al
6. Qrill Out TM Handle Light 20. Catch Pan
Luz de asa @ill Out TM Plato recolector
Lampe de poignee @ill Out TM Egouttoir
7. Warming Rack 21. Catch Pan Holder 35. Frame Support
Rejilla de calentamiento Soporte del plato recolector Soporte del bastidor
Grille de rechauffage Support d'egouttoir Support du cadre
8. Cooking Grates 22. Left Door 36. Back Panel
Parrillas de cocci6n Puerta izquierda Panel trasero
Grilles de cuisson Porte gauche Panneau arriere
9. FJavorizor ®Bars 23. Door Handles 37. Bight Frame Panel
Barras FlavorizoP Asas de las puertas Panel derecho del bastidor
Barres FlavorizeP Poignees de portes Panneau du cadre droit
10. Burner Tubes 24. Right Door 38. Natural Gas Hose
Tubos quemadores Puerta derecha Manguera del gas natural
Tubes du brQleur Porte droite Tuyau de gaz naturel
18. Disposable Drip Pan
Bandeja de goteo desechable
Egouttoir jetable
32. Side Burner Table
Mesa del quemador lateral
Tablette du brQleur lat@al
34. Right Tool Holder
Portaherramientas derecho
Support d'ustensiles de droite
11. SideTable 25. Left Frame Panel 39. Matchstick Holder
Mesa lateral Panel izquierdo del bastidor Portacerillos
Tablette lat@ale Panneau du cadre gauche Porte allumette
12. Left Tool Holder 26. Bottom Panel 40. Caster
Portaherramientas izquierdo Panel inferior Rueda giratoria
Support d'ustensiles de gauche Panneau inferieur Roulette
13. Manifold 27. Side Burner 41. Locking Caster
MUltiple Quemador lateral Rueda giratoria con bloqueo
Collecteur BrQleur lat@al Roulette autobloquante
14. Control Panel 28. Cookbox
Tablero de control Caja de cocci6n
Panneau de commande Boitier de cuisson
Page 6
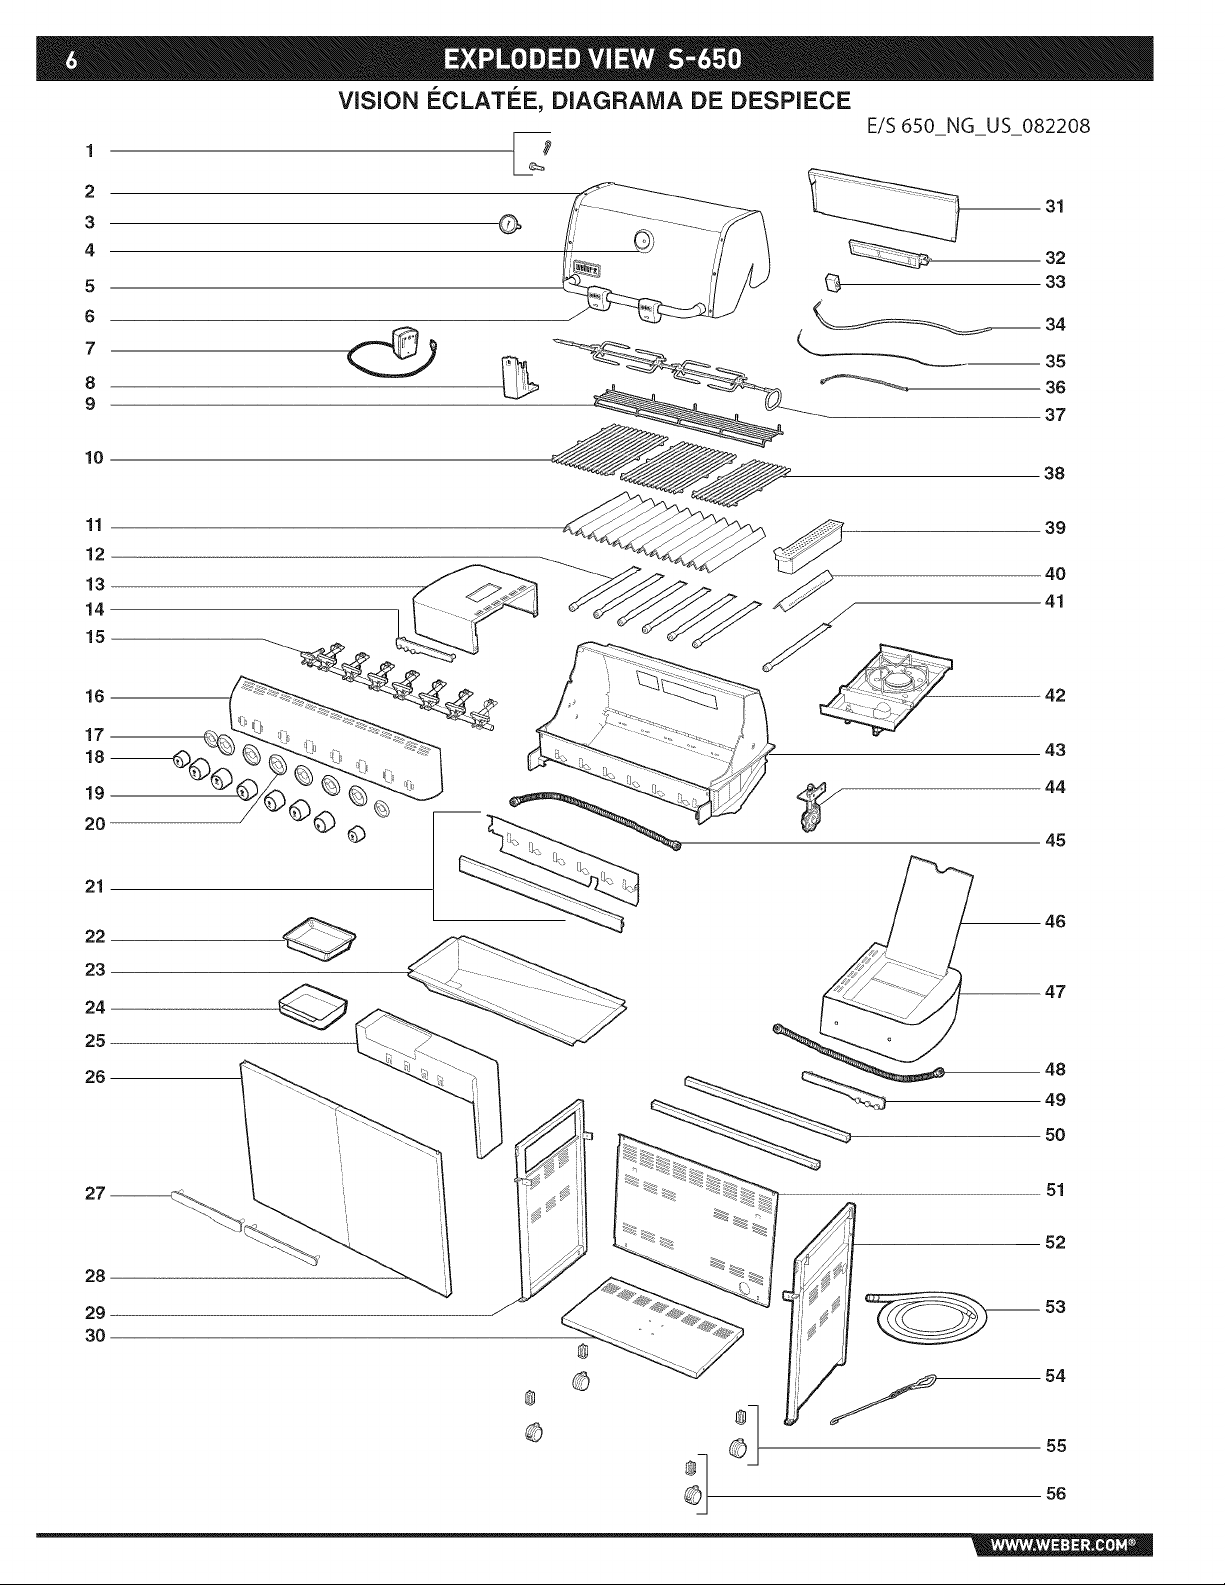
ViSiON €:CLATC:E, DIAGRAIVlA DE DESPIECE
E/$650 NG US 082208
2
3
4
5
6
7
8
9
_ 33
31
32
35
36
37
10
11
12
13
14
15
16
17
18--
19
20
21
22
23
24
25
26
©
38
39
40
41
42
43
44
45
46
47
48
__ 49
5O
51
52
Page 7
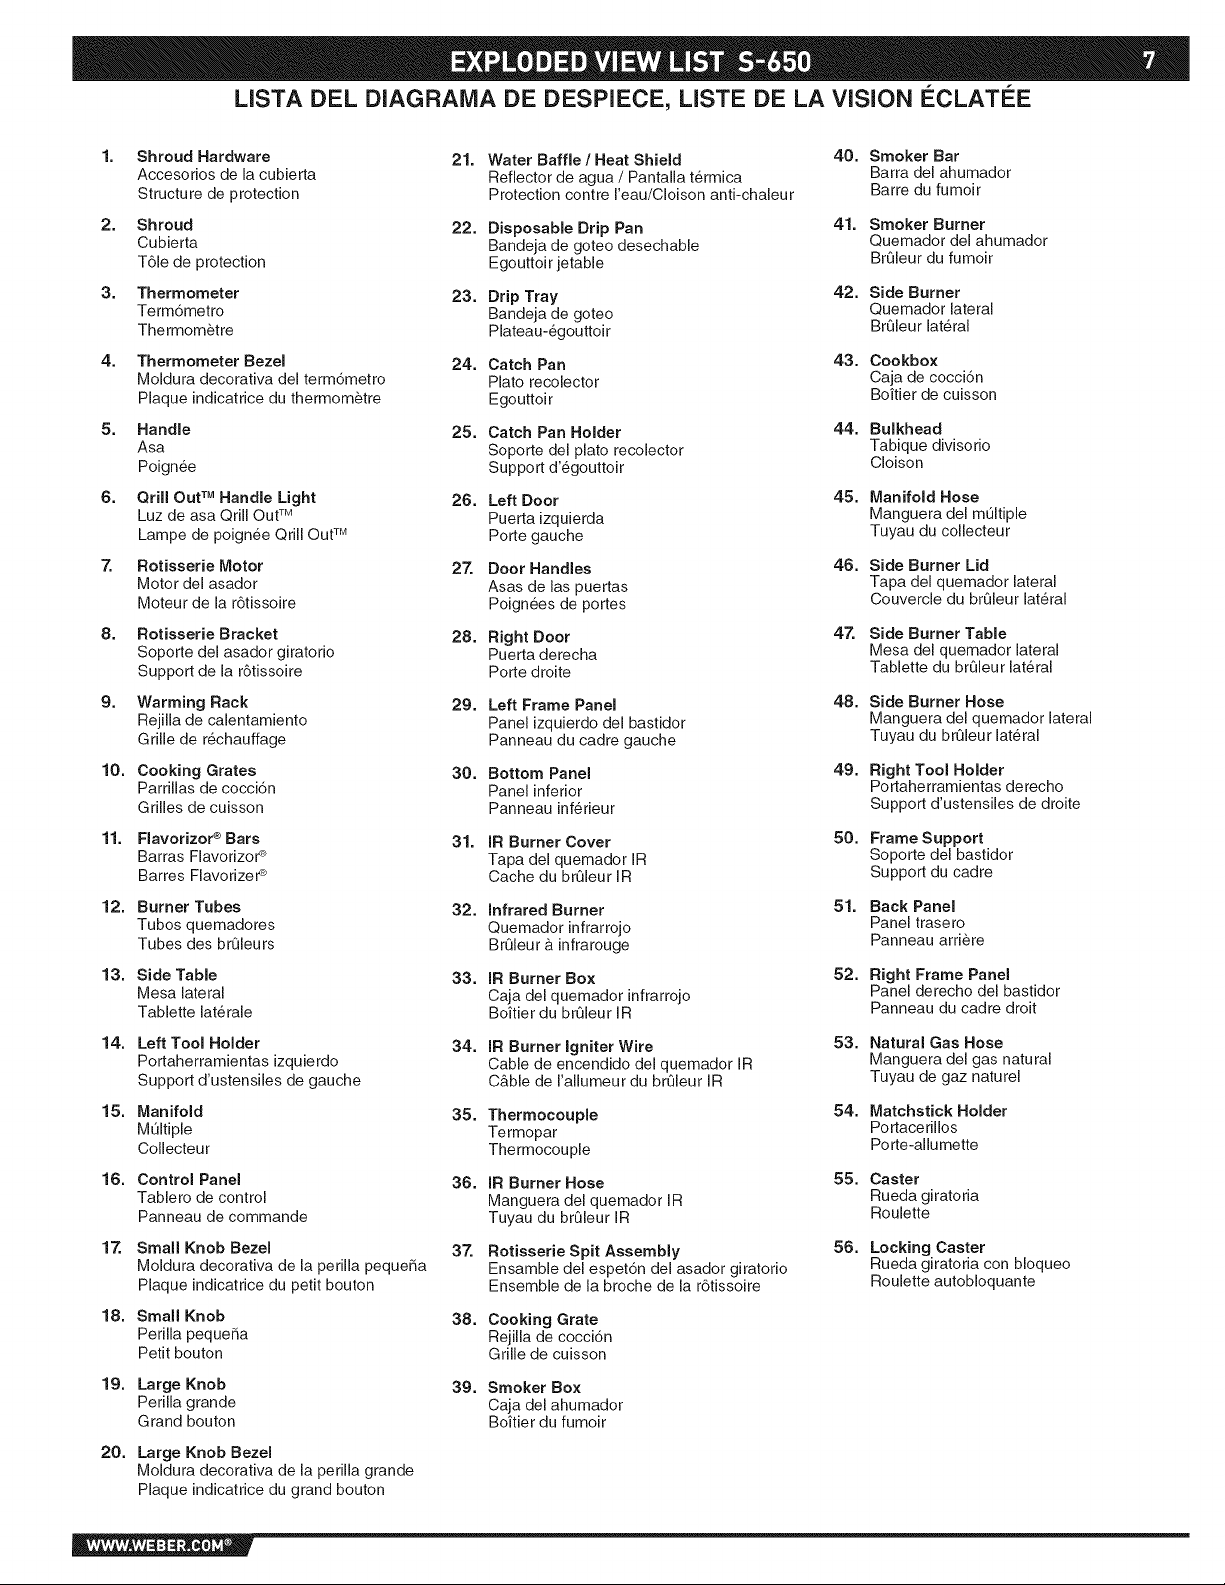
LISTA DEL DIAGRAMA DE DESPIECE, LISTE DE LA ViSiON I_CLATI_E
1. Shroud Hardware 21. Water Baffle / Heat Shield 40.
Accesorios de la cubierta Reflector de agua / Pantalla termica
Structure de protection Protection contre I'eau/Cloison anti-chaleur
2. Shroud 22. Disposable Drip Pan 41.
Cubierta Bandeja de goteo desechable
T61e de protection Egouttoir jetable
3. Thermometer 23. Drip Tray 42. Side Burner
Term6metro Bandeja de goteo Quemador lateral
Thermometre Plateau-egouttoir Br_leur lat@al
4. Thermometer Bezel 24. Catch Pan 43. Cookbox
Moldura decorativa del term6metro Plato recolector Caja de cocci6n
Plaque indicatrice du thermometre Egouttoir Boitier de cuisson
5. Handle 25. Catch Pan Holder 44. Bulkhead
Asa Soporte del plato recolector Tabique divisorio
Poignee Support d'egouttoir CIoison
6. Qrill Out TM Handle Light 26. Left Door 45.
Luz de asa @ill Out TM Puerta izquierda
Lampe de poignee @ill Out *M Porte gauche
Rotisserie Motor 27. Door Handles 46.
Motor del asador Asas de las puertas
Moteur de la r6tissoire Poignees de portes
8. Rotisserie Bracket 28. Right Door 47.
Soporte del asador giratorio Puerta derecha
Support de la r6tissoire Porte droite
9. Warming Rack 29. Left Frame Panel 48.
Rejilla de calentamiento Panel izquierdo del bastidor
Grille de rechauffage Panneau du cadre gauche
10. Cooking Grates 30. Bottom Panel 49.
ParrJllas de coccJ6n Panel inferior
Grilles de cuisson Panneau inferieur
11. Flavorizor ®Bars 31. IR Burner Cover 50. Frame Support
Barras Flavorizor _ Tapa del quemador IR Soporte del bastidor
Barres Flavorizer :e Cache du brQleur IR Support du cadre
12. Burner Tubes 32. Infrared Burner 51. Back Panel
Tubos quemadores Quemador infrarrojo Panel trasero
Tubes des brQleurs BrQleur b,infrarouge Panneau arriere
13. Side Table 33. IR Burner Box 52.
Mesa lateral Caja del quemador infrarrojo
Tablette lat@ale Boitier du brQleur IR
14. Left Tool Holder 34. IR Burner Igniter Wire 53.
Portaherramientas izquierdo Cable de encendido del quemador IR
Support d'ustensiles de gauche Cb,ble de I'allumeur du brQleur IR
15. Manifold 35. Thermocouple 54. MatchstickHolder
Multiple Termopar Portacerillos
Collecteur Thermocouple Porte-allumette
16. Control Panel 36. IR Burner Hose 55. Caster
Tablero de control Manguera del quemador IR Rueda giratoria
Panneau de commando Tuyau du brQleur IR Roulette
17. Small Knob Bezel 37. Rotisserie Spit Assembly 56.
Moldura decorativa de la perilla peque_a Ensamble del espet6n del asador giratorio
Plaque indicatrice du petit bouton Ensemble de la broche de la r6tissoire
18. Small Knob 38. Cooking Grate
Perilla pequeSa Rejilla de cocci6n
Petit bouton Grille de cuisson
19. Large Knob 39. Smoker Box
Perilla grande Caja del ahumador
Grand bouton Boifier du fumoir
20.
Large Knob Bezel
Moldura decorativa de la perilla grande
Plaque indicatrice du grand bouton
Smoker Bar
Barra del ahumador
Barre du fumoir
Smoker Burner
Quemador del ahumador
Br_leur du fumoir
Manifold Hose
Manguera del mt_ltiple
Tuyau du collecteur
Side Burner Lid
Tapa del quemador lateral
Couvercle du br_leur lateral
Side Burner Table
Mesa del quemador lateral
Tablette du brQleur lat@al
Side Burner Hose
Manguera del quemador lateral
Tuyau du brQleur lat@al
Right Tool Holder
Portaherramientas derecho
Support d'ustensiles de droite
Right Frame Panel
Panel derecho del bastidor
Panneau du cadre droit
Natural Gas Hose
Manguera del gas natural
Tuyau de gaz naturel
Locking Caster
Rueda giratoria con bloqueo
Roulette autobloquante
Page 8
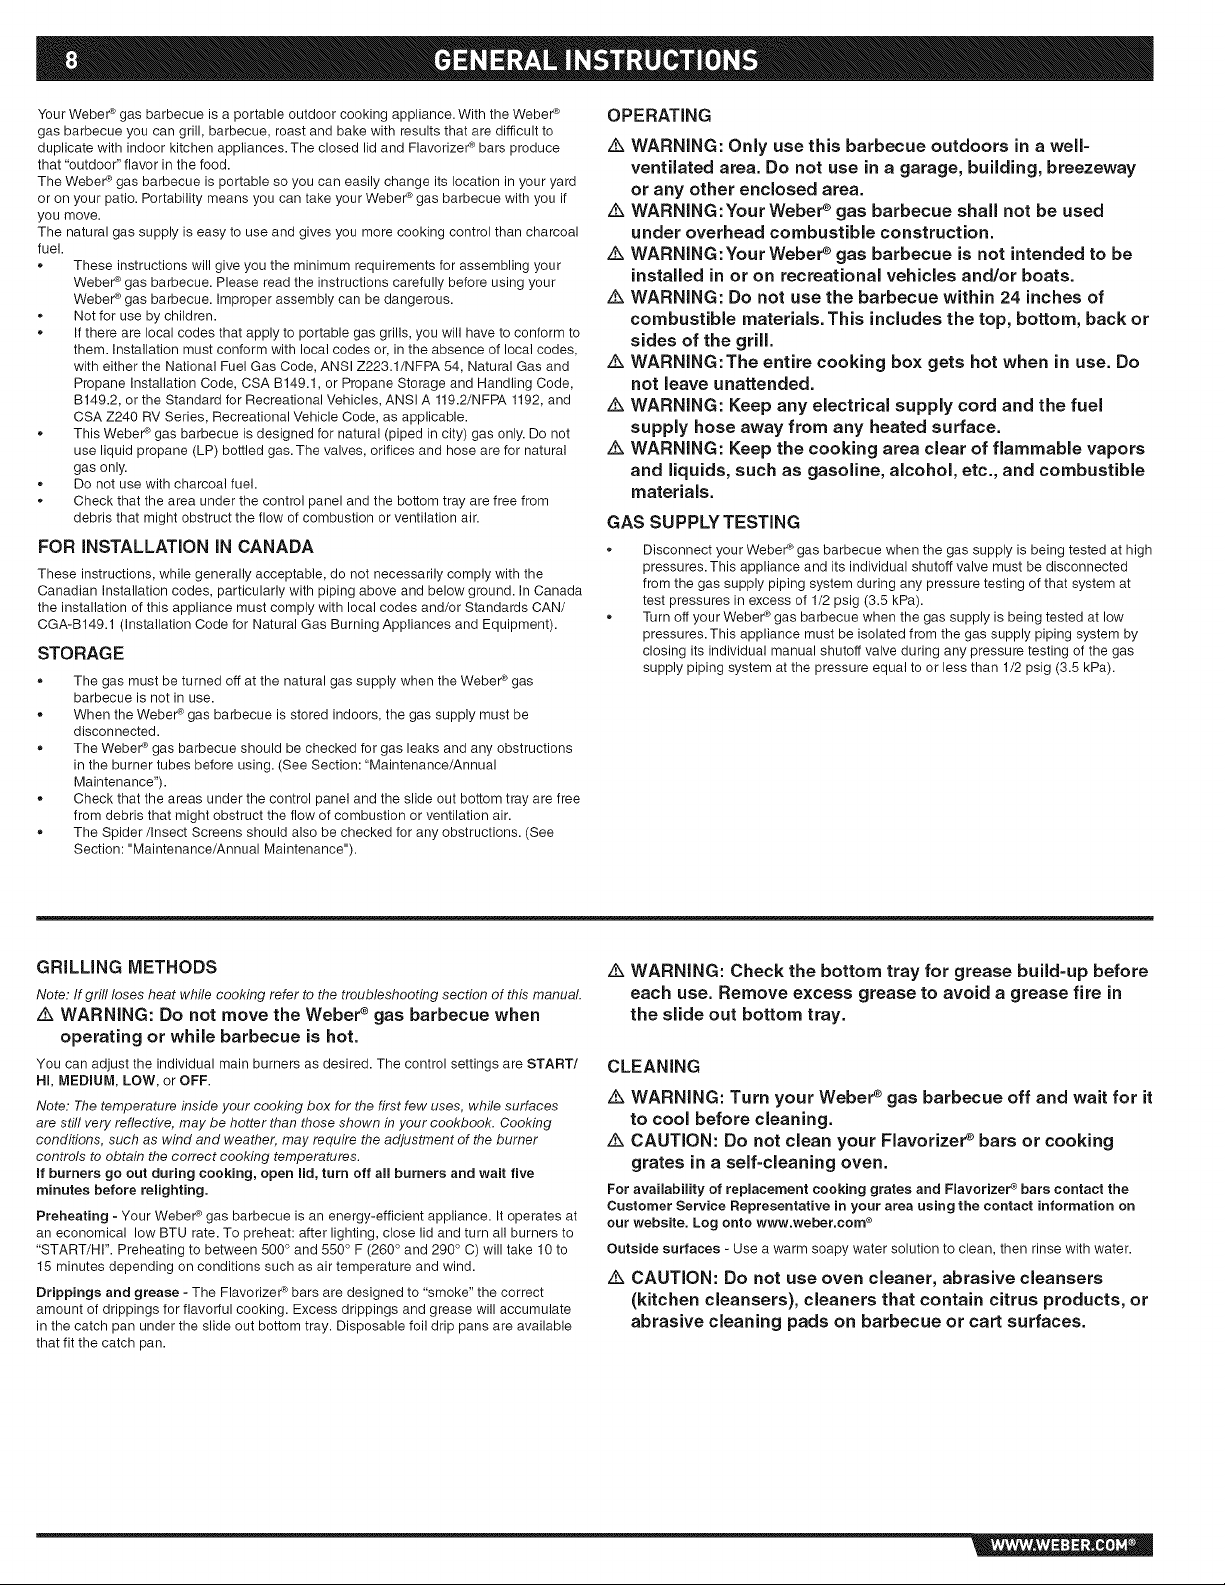
Your Weber ¢ gas barbecue is a portable outdoor cooking appliance. With the Weber ¢
gas barbecue you can grill, barbecue, roast and bake with results that are difficult to
duplicate with indoor kitchen appliances.The closed lid and Flavorizei _ bars produce
that "outdoor" flavor in the food.
The Weber ¢ gas barbecue is portable so you can easily change its location in your yard
or on your patio. Portability means you can take your Weber ¢ gas barbecue with you if
you move.
The natural gas supply is easy to use and gives you more cooking control than charcoal
fuel.
o These instructions will give you the minimum requirements for assembling your
Weber ¢ gas barbecue. Please read the instructions carefully before using your
Weber ¢ gas barbecue. Improper assembly can be dangerous.
Not for use by children.
If there are local codes that apply to portable gas grills, you will have to conform to
them. Installation must conform with local codes or, in the absence of local codes,
with either the National Fuel Gas Code, ANSI Z223.1/NFPA 54, Natural Gas and
Propane Installation Code, CSA B149.1, or Propane Storage and Handling Code,
B149.2, or the Standard for Recreational Vehicles, ANSI A 119.2/NFPA 1192, and
CSA Z240 RV Series, Recreational Vehicle Code, as applicable.
This Weber ¢ gas barbecue is designed for natural (piped in city) gas only. Do not
use liquid propane (LP) bottled gas. The valves, orifices and hose are for natural
gas only.
Do not use with charcoal fuel.
Check that the area under the control panel and the bottom tray are free from
debris that might obstruct the flow of combustion or ventilation air.
FOR INSTALLATION IN CANADA
These instructions, while generally acceptable, do not necessarily comply with the
Canadian Installation codes, particularly with piping above and below ground. In Canada
the installation of this appliance must comply with local codes and/or Standards CAN/
CGA-B149.1 (Installation Code for Natural Gas Burning Appliances and Equipment).
STORAGE
,, The gas must be turned off at the natural gas supply when the Weber ¢gas
barbecue is not in use.
,, When the Weber ¢ gas barbecue is stored indoors, the gas supply must be
disconnected.
,, The Weber ¢ gas barbecue should be checked for gas leaks and any obstructions
in the burner tubes before using. (See Section: "Maintenance/Annual
Maintenance").
,, Check that the areas under the control panel and the slide out bottom tray are free
from debris that might obstruct the flow of combustion or ventilation air.
,, The Spider/Insect Screens should also be checked for any obstructions. (See
Section: "Maintenance/Annual Maintenance").
OPERATING
WARNING: Only use this barbecue outdoors in a well-
ventilated area. Do not use in a garage, building, breezeway
or any other enclosed area.
z_ WARNING:Your Weber ®gas barbecue shall not be used
under overhead combustibJe construction.
z_ WARNING:Your Weber ®gas barbecue is not intended to be
instalJed in or on recreationaJ vehicles and/or boats.
WARNING: Do not use the barbecue within 24 inches of
combustible materials. This includes the top, bottom, back or
sides of the grill.
WARNING:The entire cooking box gets hot when in use. Do
not leave unattended.
WARNING: Keep any electrical supply cord and the fuel
supply hose away from any heated surface.
WARNING: Keep the cooking area clear of flammable vapors
and liquids, such as gasoline, alcohol, etc., and combustible
materials.
GAS SUPPLY TESTING
Disconnect your Weber _ gas barbecue when the gas supply is being tested at high
pressures.This appliance and its individual shutoff valve must be disconnected
from the gas supply piping system during any pressure testing of that system at
test pressures in excess of 1/2 psig (3.5 kPa).
Turn off your Weber ¢ gas barbecue when the gas supply is being tested at low
pressures.This appliance must be isolated from the gas supply piping system by
closing its individual manual shutoff valve during any pressure testing of the gas
supply piping system at the pressure equal to or less than 1/2 psig (3.5 kPa).
GRiLLiNG METHODS
Note: If grill loses heat while cooking refer to the troubleshooting section of this manual.
A WARNING: Do not move the Weber ®gas barbecue when
operating or while barbecue is hot.
You can adjust the individual main burners as desired. The control settings are START/
HL MEDIUM, LOW, or OFF.
Note: The temperature inside your cooking box for the first few uses, while surfaces
are stiff very reflective, may be hotter than those shown in your cookbook. Cooking
conditions, such as wind and weather, may require the adjustment of the burner
controls to obtain the correct cooking temperatures.
if burners go out during cooking, open lid, turn off all burners and wait five
minutes before relighting.
Preheating - Your Weber _ gas barbecue is an energy-efficient appliance. It operates at
an economical low BTU rate. To preheat: after lighting, close lid and turn all burners to
"START/HI". Preheating to between 500 ° and 550 ° F (260 ° and 290 ° C) will take 10 to
15 minutes depending on conditions such as air temperature and wind.
Drippings and grease - The Flavorizer ¢ bars are designed to "smoke" the correct
amount of drippings for flavorful cooking. Excess drippings and grease will accumulate
in the catch pan under the slide out bottom tray. Disposable foil drip pans are available
that fit the catch pan.
WARNING: Check the bottom tray for grease build-up before
each use. Remove excess grease to avoid a grease fire in
the slide out bottom tray.
CLEANING
WARNING: Turn your Weber ®gas barbecue off and wait for it
to cool before cleaning.
CAUTION: Do not clean your Flavorizer _ bars or cooking
grates in a self-cleaning oven.
For availabimity of replacement cooking grates and Fmavorizer _bars contact the
Customer Service Representative in your area using the contact information on
our website. Log onto www.weber.com ®
Outside surfaces - Use a warm soapy water solution to clean, then rinse with water.
z_ CAUTION: Do not use oven cleaner, abrasive cleansers
(kitchen cleansers), cleaners that contain citrus products, or
abrasive cleaning pads on barbecue or cart surfaces.
Page 9
Slide out Bottom tray - Remove excess grease, then wash with warm soapy water,
then rinse.
Flavorizer _ bars and Cooking grates - Clean with a suitable stainless steel bristle
brush. As needed, remove from grill and wash with warm soapy water, then rinse with
water.
Catch pan - Disposable foil trays are available, or you can line the catch pan with
aluminum foil. To clean the catch pan, wash with warm soapy water, then rinse.
Thermometer - Wipe with warm soapy water; clean with plastic scrub ball.
Inside cooking module - Brush any debris off of burner tubes. DO NOT ENLARGE
BURNER PORTS (OPENINGS). Wash inside of cooking box with warm soapy water
and a water rinse.
Inside Lid - While lid is warm, wipe inside with paper towel to prevent grease build-up.
Flaking built-up grease resembles paint flakes.
Stainless steel surfaces - Wash with a soft cloth and a soap and water solution. Be
careful to scrub with the grain direction of the stainless steel.
Do not use cleaners that contain acid, mineral spirits or xylene. Rinse well after
cleaning.
Preserve Your Stainless Steel - Your grill or its cabinet, lid, control panel and shelves
may be made from stainless steel. To keep the stainless steel looking its best is a
simple matter. Clean it with soap and water, rinse with clear water and wipe dry. For
stubborn particles, the use o1a non-metallic brush can be used.
z_ IMPORTANT: Do not use a wire brush or abrasive cleaners
on the stainless steel surfaces of your grill as this will cause
scratches.
z_ IMPORTANT: When cleaning surfaces be sure to rub/wipe
in the direction of the grain to preserve the look of your
stainless steel.
INSTALL GAS SUPPLY
GENERAL SPECiFiCATiONS FOR PiPiNG
Note: Contact your local municipality for building codes regulating outdoor
gas barbecue installations. In absence of Local Codes, you must conform to
the latest edition of the National Fuel Gas Code: ANSI Z 223.1/NFPA 54, or CAN/
CGA-B149.1, Natural Gas and Propane Installation Code, WE RECOMMEND THAT THIS
INSTALLATION BE DONE BY A PROFESSIONAL.
Some of the following are general requirements taken from the latest edition of the
National Fuel Gas Code: ANSI Z 223.1/NFPA 54, or CAN/CGA-B149.1, Natural Gas and
Propane Installation Code for complete specifications.
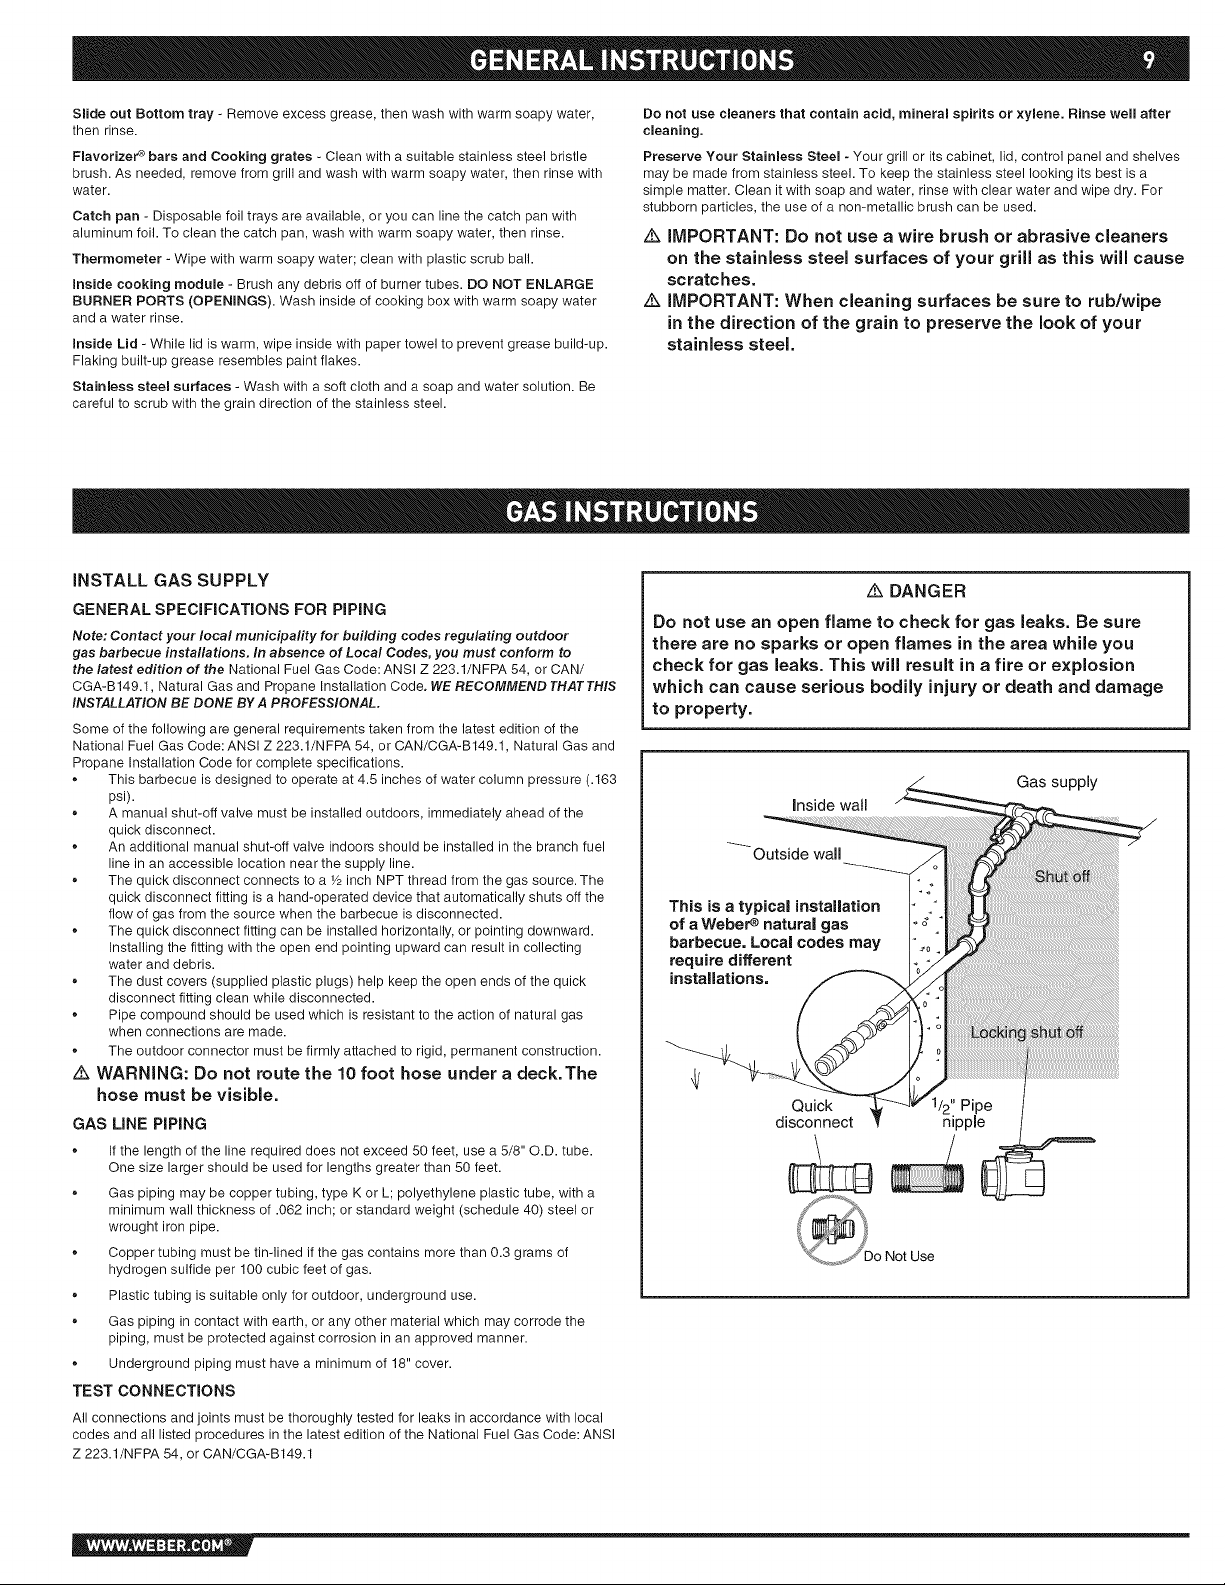
,, This barbecue is designed to operate at 4.5 inches of water column pressure (.163
psi).
,, A manual shut-off valve must be installed outdoors, immediately ahead of the
quick disconnect.
,, An additional manual shut-off valve indoors should be installed in the branch fuel
line in an accessible location near the supply line.
,, The quick disconnect connects to a V2 inch NPT thread from the gas source. The
quick disconnect fitting is a hand-operated device that automatically shuts off the
flow of gas from the source when the barbecue is disconnected.
,, The quick disconnect fitting can be installed horizontally, or pointing downward.
Installing the fitting with the open end pointing upward can result in collecting
water and debris.
,, The dust covers (supplied plastic plugs) help keep the open ends of the quick
disconnect fitting clean while disconnected.
,, Pipe compound should be used which is resistant to the action of natural gas
when connections are made.
,, The outdoor connector must be firmly attached to rigid, permanent construction.
z_ WARNING: Do not route the 10 foot hose under a deck.The
hose must be visible.
GAS LiNE PiPiNG
,, If the length of the line required does not exceed 50 feet, use a 5/8" O.D. tube.
One size larger should be used for lengths greater than 60 feet.
,, Gas piping may be copper tubing, type K or L; polyethylene plastic tube, with a
minimum wall thickness of .062 inch; or standard weight (schedule 40) steel or
wrought iron pipe.
,, Copper tubing must be tin-lined if the gas contains more than 0.3 grams of
hydrogen sulfide per 100 cubic feet of gas.
,, Plastic tubing is suitable only for outdoor, underground use.
,, Gas piping in contact with earth, or any other material which may corrode the
piping, must be protected against corrosion in an approved manner.
,, Underground piping must have a minimum of 18" cover.
TEST CONNECTIONS
All connections and joints must be thoroughly tested for leaks in accordance with local
codes and all listed procedures in the latest edition of the National Fuel Gas Code: ANSI
Z 223.1/NFPA 54, or CAN/CGA-B149.1
DANGER
Do not use an open flame to check for gas leaks. Be sure
there are no sparks or open flames in the area while you
check for gas leaks. This will result in a fire or explosion
which can cause serious bodily injury or death and damage
to property.
Gas supply
This is a typical installation
of a Webere natural gas
barbecue. Local codes may
require different
installations,
Quick
disconnect
Use
Page 10
TYPE OF GAS
Your natural gas grill is factory built to operate using natural gas only. Never attempt to
operate your grill on gases other than the type specified on the grill rating plates.
Your grill operates at 4.5" of water column pressure. If replacement of the hose
becomes necessary, factory specified parts are required. See your local dealer.
For safety and design reasons, the conversion of a Weber _ grill from operation using
Natural gas to operation using LP gas requires the change out of the entire gas supply
system of the grill. If this becomes necessary, see your dealer for additional information.
WHAT IS NATURAL GAS?
Natural gas, often called methane, is a safe modern fuel. Natural gas is supplied by your
local utility and should be readily available if your house is already heated with gas.
PORTABLE INSTALLATION
Weber _ recommends moving the grill at least two (2) feet from the gas supply and
any combustible surfaces. After the gas supply has been run and checked for leaks in
accordance to the assembly instructions, you are ready to grill. To connect the hose
to the gas supply, pull back the outer fitting, insert the hose fitting all of the way, and
release the outer fitting. This process will produce a gas joint.
LEAK CHECK PREPARATION
CHECK THAT ALL BURNER VALVES ARE OFF
Valves are shipped in the "OFF" position, but you should check to be sure that they are
turned off. Check by pushing in and turning clockwise. If they do not turn, they are off.
Proceed to the next step. If they do turn continue turning them clockwise until they stop,
then they are off. Proceed to the next step.
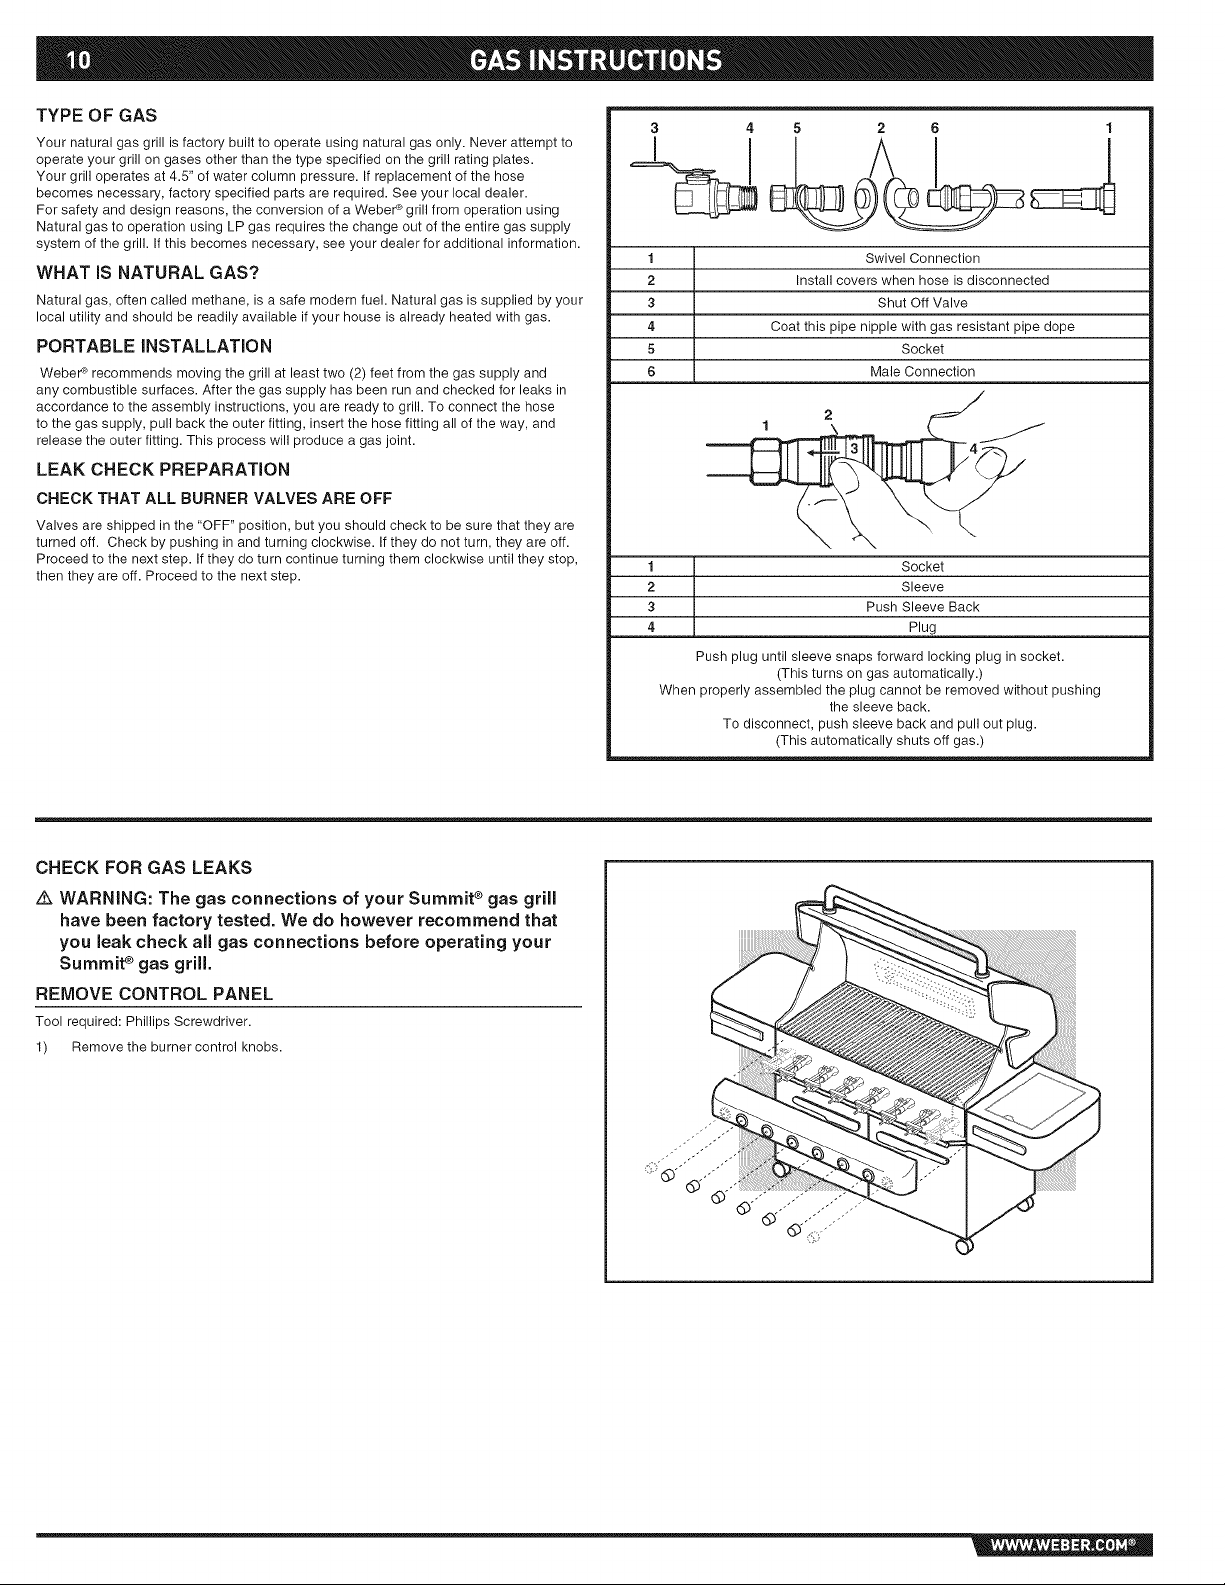
3 4 5 2 6 1
1 Swivel Connection
2 Install covers when hose is disconnected
3 Shut Off Valve
4 Coat this pipe nipple with gas resistant pipe dope
5 Socket
6 Male Connection
1 Socket
2 Sleeve
3 Push Sleeve Back
4 Plug
Push plug until sleeve snaps forward locking plug in socket.
When properly assembled the plug cannot be removed without pushing
(This turns on gas automatically.)
the sleeve back.
To disconnect, push sleeve back and pull out plug.
(This automatically shuts off gas.)
CHECK FOR GAS LEAKS
WARNING: The gas connections of your Summit ®gas grill
have been factory tested. We do however recommend that
you leak check all gas connections before operating your
Summit ®gas grill.
REMOVE CONTROL PANEL
Tool required: Phillips Screwdriver.
1) Remove the burner control knobs.
Page 11
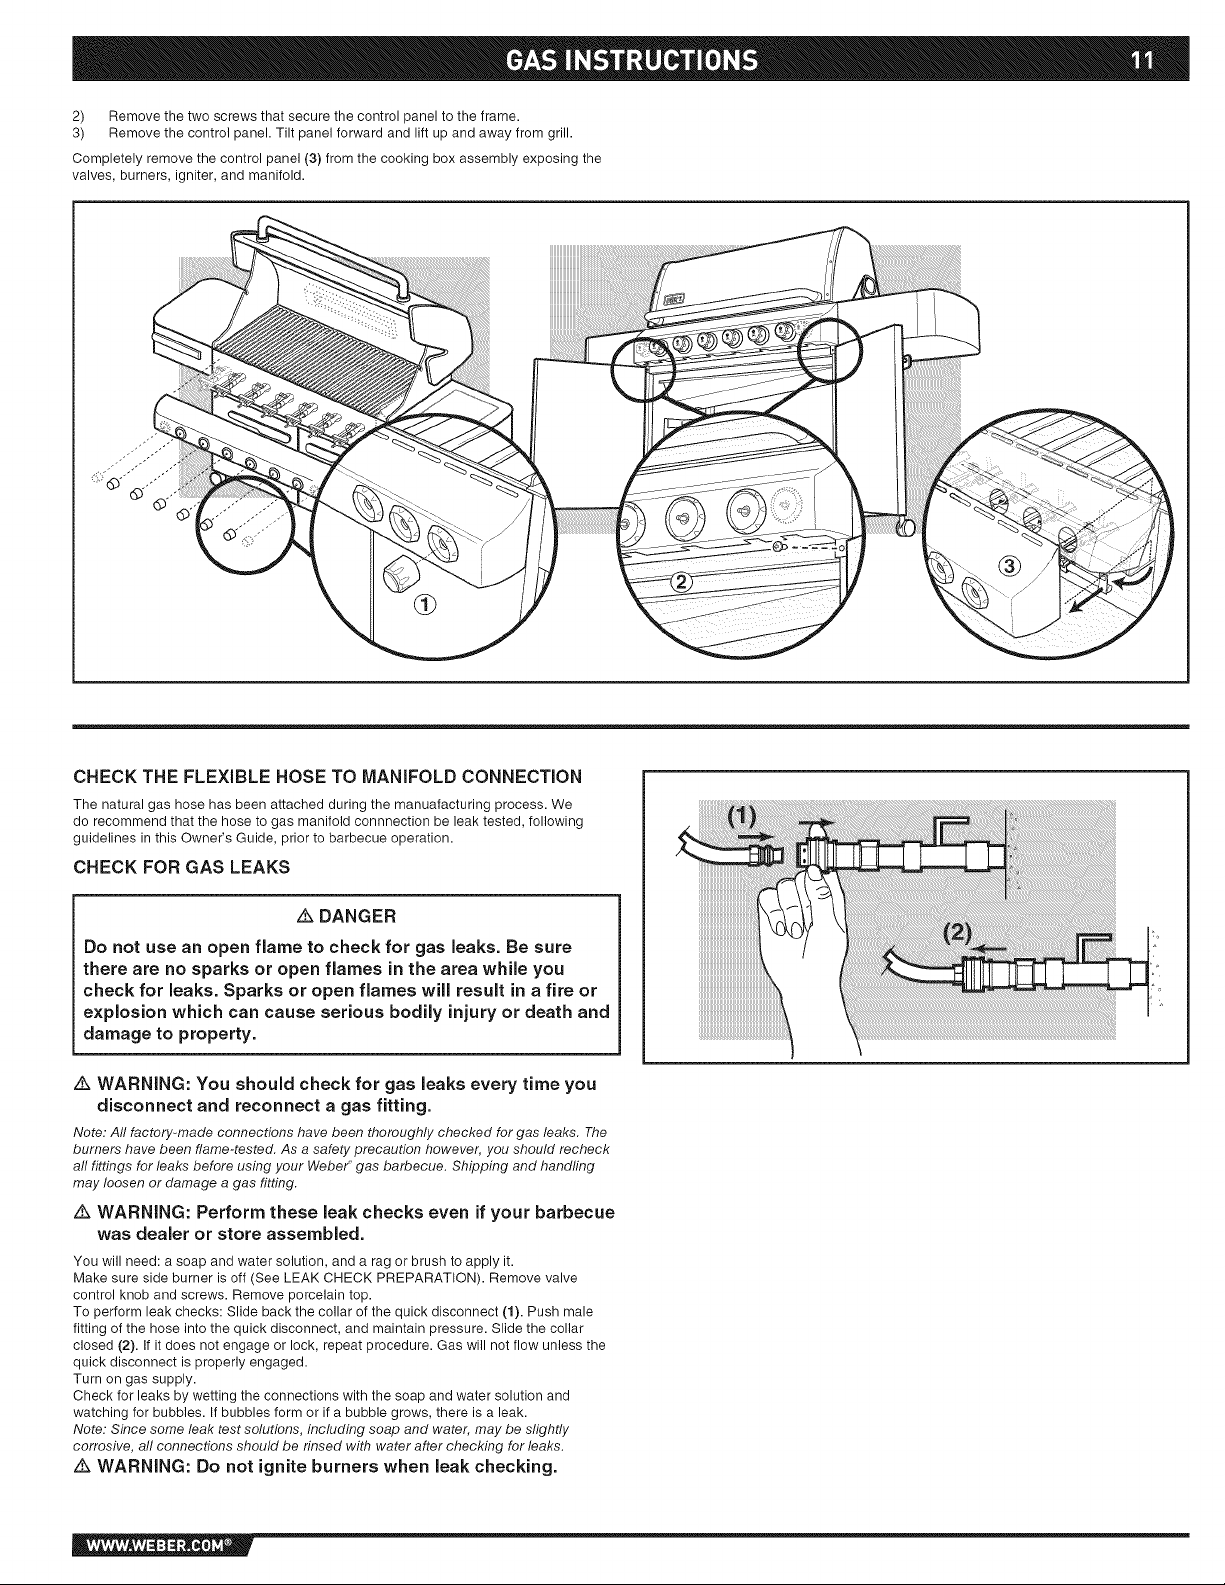
2) Removethetwoscrewsthatsecurethecontrolpaneltotheframe.
3) Removethecontrolpanel.Tiltpanelforwardandliftupandawayfromgrill.
Completelyremovethecontrolpanel(3)fromthecookingboxassemblyexposingthe
valves,burners,igniter,andmanifold.
CHECK THE FLEXIBLE HOSE TO MANIFOLD CONNECTION
The natural gas hose has been attached during the manuafacturing process. We
do recommend that the hose to gas manifold connnection be leak tested, following
guidelines in this Owner's Guide, prior to barbecue operation.
CHECK FOR GAS LEAKS
DANGER
Do not use an open flame to check for gas leaks. Be sure
there are no sparks or open flames in the area while you
check for leaks. Sparks or open flames will result in a fire or
explosion which can cause serious bodily injury or death and
damage to property.
WARNING: You should check for gas leaks every time you
disconnect and reconnect a gas fitting.
Note: Aft factory-made connections have been thoroughly checked for gas leaks. The
burners have been flame-tested. As a safety precaution however, you should recheck
aft fittings for leaks before using your Weber _gas barbecue. Shipping and handtlng
may loosen or damage a gas fitting.
WARNING: Perform these leak checks even if your barbecue
was dealer or store assembled.
You will need: a soap and water solution, and a rag or brush to apply it.
Make sure side burner is off (See LEAK CHECK PREPARATION). Remove valve
control knob and screws. Remove porcelain top.
To perform leak checks: Slide back the collar of the quick disconnect (1). Push male
fitting of the hose into the quick disconnect, and maintain pressure. Slide the collar
closed (2). If it does not engage or lock, repeat procedure. Gas will not flow unless the
quick disconnect is properly engaged.
Turn on gas supply.
Check for leaks by wetting the connections with the soap and water solution and
watching for bubbles. If bubbles form or if a bubble grows, there is a leak.
Note. Since some leak test solutions, including soap and water, may be slightly
corrosive, all connections should be rinsed with water after checking for leaks.
WARNING: Do not ignite burners when leak checking.
Page 12
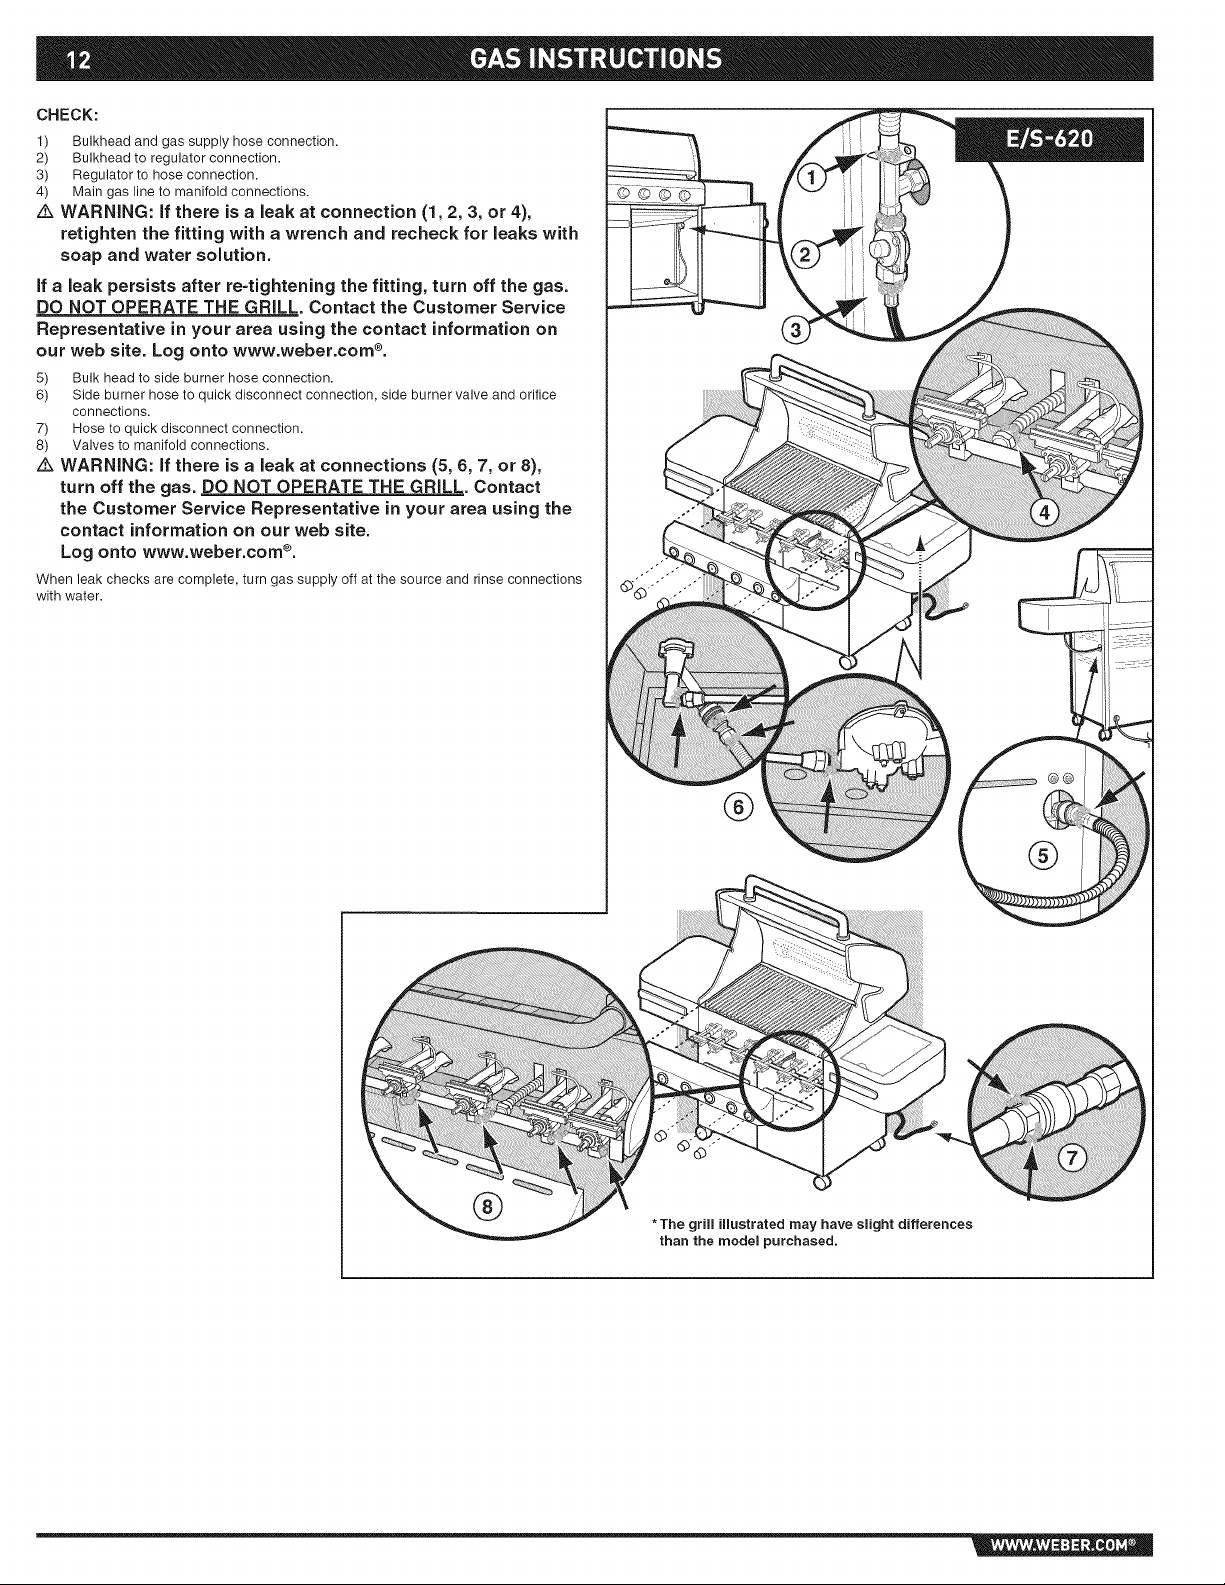
CHECK:
1) Bulkhead and gas supply hose connection.
2) Bulkhead to regulator connection.
3) Regulator to hose connection.
4) Main gas line to manifold connections.
z_ WARNING: If there is a leak at connection (1,2, 3, or 4),
retighten the fitting with a wrench and recheck for leaks with
soap and water solution.
If a leak persists after re-tightening the fitting, turn off the gas.
DO NOT OPERATE THE GRILL. Contact the Customer Service
Representative in your area using the contact information on
our web site. Log onto www.weber.com ®.
5) Bulk head to side burner hose connection.
6) Side burner hose to quick disconnect connection, side burner valve and orifice
connections.
7) Hose to quick disconnect connection.
8) Valves to manifold connections.
& WARNING: If there is a leak at connections (5, 6, 7, or 8),
turn off the gas. DO NOT OPERATE THE GRILL. Contact
the Customer Service Representative in your area using the
contact information on our web site.
Log onto www.weber.com ®.
When leak checks are complete, turn gas supply off at the source and rinse connections
with water.
®
@@
®
®
*The grill illustrated may have slight differences
than the model purchased.
Page 13
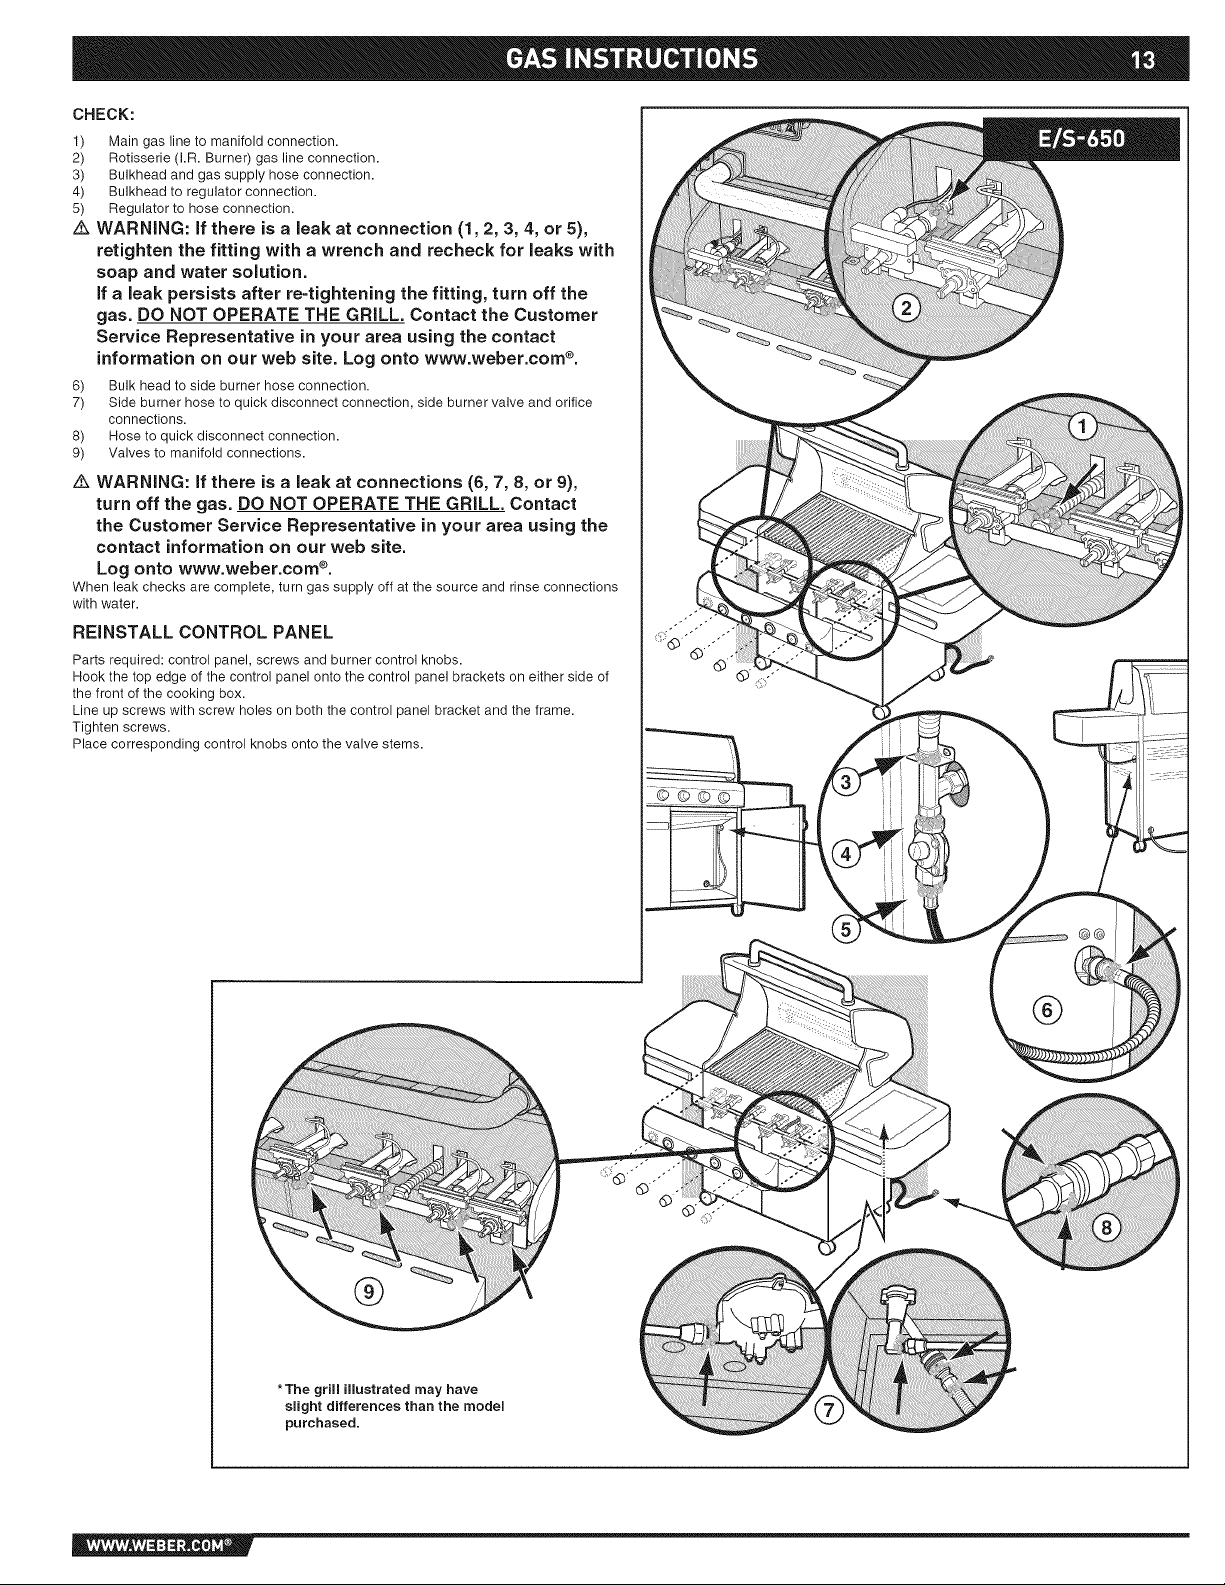
CHECK:
1) Main gas line to manifold connection.
2) Rotisserie (I.R. Burner) gas line connection.
3) Bulkhead and gas supply hose connection.
4) Bulkhead to regulator connection.
5) Regulator to hose connection.
z_ WARNING: if there is a leak at connection (1,2, 3, 4, or 5),
retighten the fitting with a wrench and recheck for leaks with
soap and water solution.
If a leak persists after re-tightening the fitting, turn off the
gas. DO NOT OPERATE THE GRILL. Contact the Customer
Service Representative in your area using the contact
information on our web site. Log onto www.weber.com ®.
6) Bulk head to side burner hose connection.
7) Side burner hose to quick disconnect connection, side burner valve and orifice
connections.
8) Hose to quick disconnect connection.
9) Valves to manifold connections.
Z_ WARNING: If there is a leak at connections (6, 7, 8, or 9),
turn off the gas. DO NOT OPERATE THE GRILL. Contact
the Customer Service Representative in your area using the
contact information on our web site.
Log onto www.weber.com ®.
When leak checks are complete, turn gas supply off at the source and rinse connections
with water.
REINSTALL CONTROL PANEL
Parts required: control panel, screws and burner control knobs.
Hook the top edge of the control panel onto the control panel brackets on either side of
the front of the cooking box.
Line up screws with screw holes on both the control panel bracket and the frame.
Tighten screws.
Place corresponding control knobs onto the valve stems.
*The grill illustrated may have
slight differences than the model
purchased.
@@
®
Page 14
GRILLING METHODS
Note. If grill looses heat while cooking refer to the troubleshooting section of this
manual.
You can adjust the individual burners as desired. The control settings are START/HI,
MEDIUM, LOW, or OFF.
If burners go out during cooking, turn off all burners and wait 5 minutes before relighting.
z_ WARNING: Check the bottom tray and catch pan for grease
build-up before each use. Remove excess grease to avoid a
grease fire in the bottom tray.
PREHEATING
Preheating the grill before grilling is important. Light your Summit e gas grill according to
the instructions in this Owner's Manual. Turn all of the main burners to Start/Hi, close
the lid, and preheat grill with the lid down until grill thermometer reaches 5509F (260 °-
288°C).This is the recommended broiling temperature. This will take approximately 10
to 15 minutes, depending on outside temperatures.
COVERED COOKING
All grilling is done with the lid down to provide uniform, evenly circulated heat. With the
lid closed, the Summit ®gas grill cooks much like a convection oven. The thermometer
in the lid indicates the cooking temperature inside the grill. All preheating and grilling is
done with the lid down. No peeking -- heat is lost every time you lift the lid.
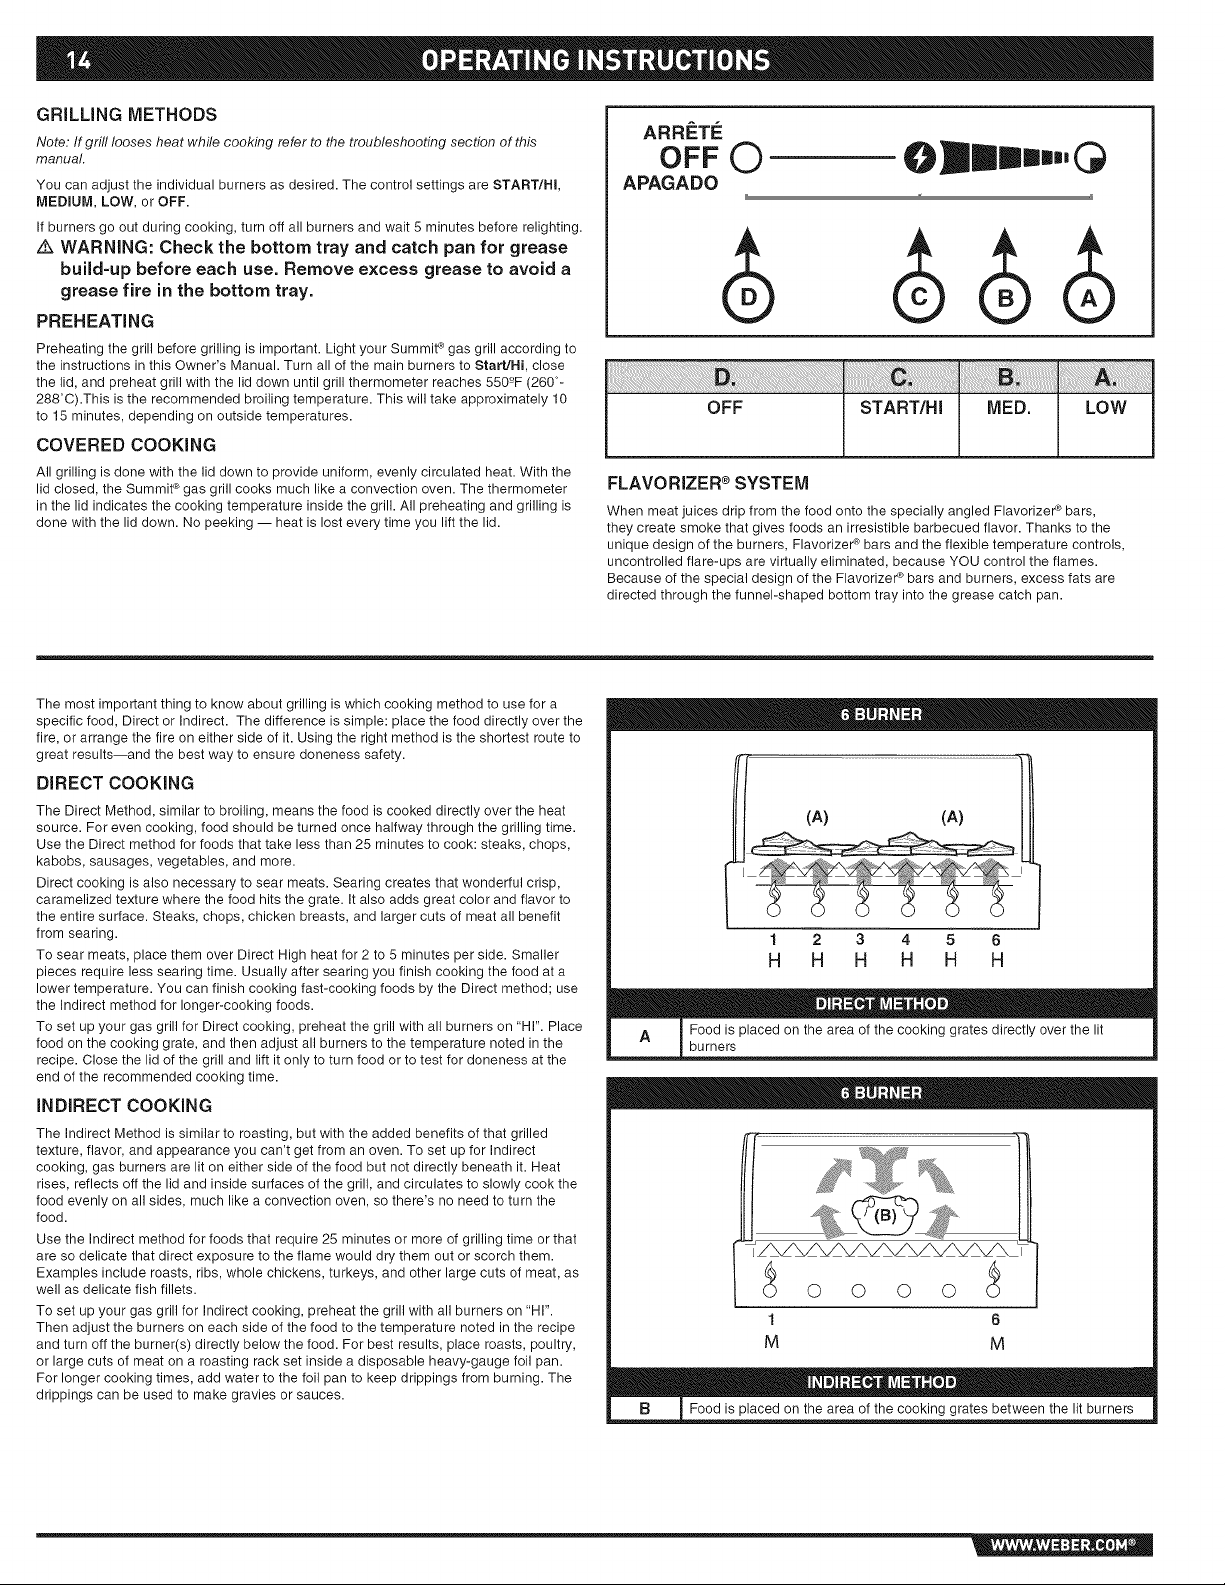
ARRF=TE
OFF O
APAGADO
OFF START/HI IVIED. LOW
FLAVORIZER ®SYSTEM
When meat juices drip from the food onto the specially angled Flavorizer ¢ bars,
they create smoke that gives foods an irresistible barbecued flavor. Thanks to the
unique design of the burners, Flavorizer ¢ bars and the flexible temperature controls,
uncontrolled flare-ups are virtually eliminated, because YOU control the flames.
Because of the special design of the Flavorizer ¢ bars and burners, excess fats are
directed through the funnel-shaped bottom tray into the grease catch pan.
The most important thing to know about grilling is which cooking method to use for a
specific food, Direct or Indirect. The difference is simple: place the food directly over the
fire, or arrange the fire on either side of it. Using the right method is the shortest route to
great results--and the best way to ensure doneness safety.
DIRECT COOKING
The Direct Method, similar to broiling, means the food is cooked directly over the heat
source. For even cooking, food should be turned once halfway through the grilling time.
Use the Direct method for foods that take less than 25 minutes to cook: steaks, chops,
kabobs, sausages, vegetables, and more.
Direct cooking is also necessary to sear meats. Searing creates that wonderful crisp,
caramelized texture where the food hits the grate. It also adds great color and flavor to
the entire surface. Steaks, chops, chicken breasts, and larger cuts of meat all benefit
from searing.
To sear meats, place them over Direct High heat for 2 to 5 minutes per side. Smaller
pieces require less searing time. Usually after searing you finish cooking the food at a
lower temperature. You can finish cooking fast-cooking foods by the Direct method; use
the Indirect method for longer-cooking foods.
To set up your gas grill for Direct cooking, preheat the grill with all burners on "HI". Place
food on the cooking grate, and then adjust all burners to the temperature noted in the
recipe. Close the lid of the grill and lift it only to turn food or to test for doneness at the
end of the recommended cooking time.
INDIRECT COOKING
The Indirect Method is similar to roasting, but with the added benefits of that grilled
texture, flavor, and appearance you can't get from an oven. To set up for Indirect
cooking, gas burners are lit on either side of the food but not directly beneath it. Heat
rises, reflects off the lid and inside surfaces of the grill, and circulates to slowly cook the
food evenly on all sides, much like a convection oven, so there's no need to turn the
food.
Use the Indirect method for foods that require 25 minutes or more of grilling time or that
are so delicate that direct exposure to the flame would dry them out or scorch them.
Examples include roasts, ribs, whole chickens, turkeys, and other large cuts of meat, as
well as delicate fish fillets.
To set up your gas grill for Indirect cooking, preheat the grill with all burners on "HI".
Then adjust the burners on each side of the food to the temperature noted in the recipe
and turn off the burner(s) directly below the food. For best results, place roasts, poultry,
or large cuts of meat on a roasting rack set inside a disposable heavy-gauge foil pan.
For longer cooking times, add water to the foil pan to keep drippings from burning. The
drippings can be used to make gravies or sauces.
(A) (A)
i
'[ I-"
1 2 3 4 5 6
H H H H H H
A Food is placed on the area of the cooking grates directly over the lit
burners
1 6
M M
Food isplaced on the area ofthe cooking grates between the lit burners
Page 15
GRILLING TIPS & HELPFUL HINTS
o Always preheat the grill before cooking. Set all burners on "HI" heat and close lid;
heat for 10 minutes, or until thermometer registers 500°-550°F (260°-288°C).
Sear meats and cook with the lid down for perfectly grilled food every time.
Grilling times in recipes are based on 70°F (20°C) weather and little or no wind.
Allow more cooking time on cold or windy days, or at higher altitudes. Allow less
cooking time in extremely hot weather.
Grilling times can vary because of the weather, or the amount, size and shape of
the food being grilled.
The temperature of your Summit ® gas grill may run hotter than normal for the first
few uses.
, Grilling conditions may require the adjustment of the burner controls to attain the
correct cooking temperatures.
In general, large pieces of meat will require more cooking time per pound than
small pieces of meat. Foods on a crowded cooking grate will require more cooking
time than just a few foods. Foods grilled in containers, such as baked beans, will
require more time if grilled in a deep casserole rather than a shallow baking pan.
Trim excess fat from steaks, chops and roasts, leaving no more than a scant _A
inch (6.4mm) of fat. Less fat makes cleanup easier, and is a virtual guarantee
against unwanted flare-ups.
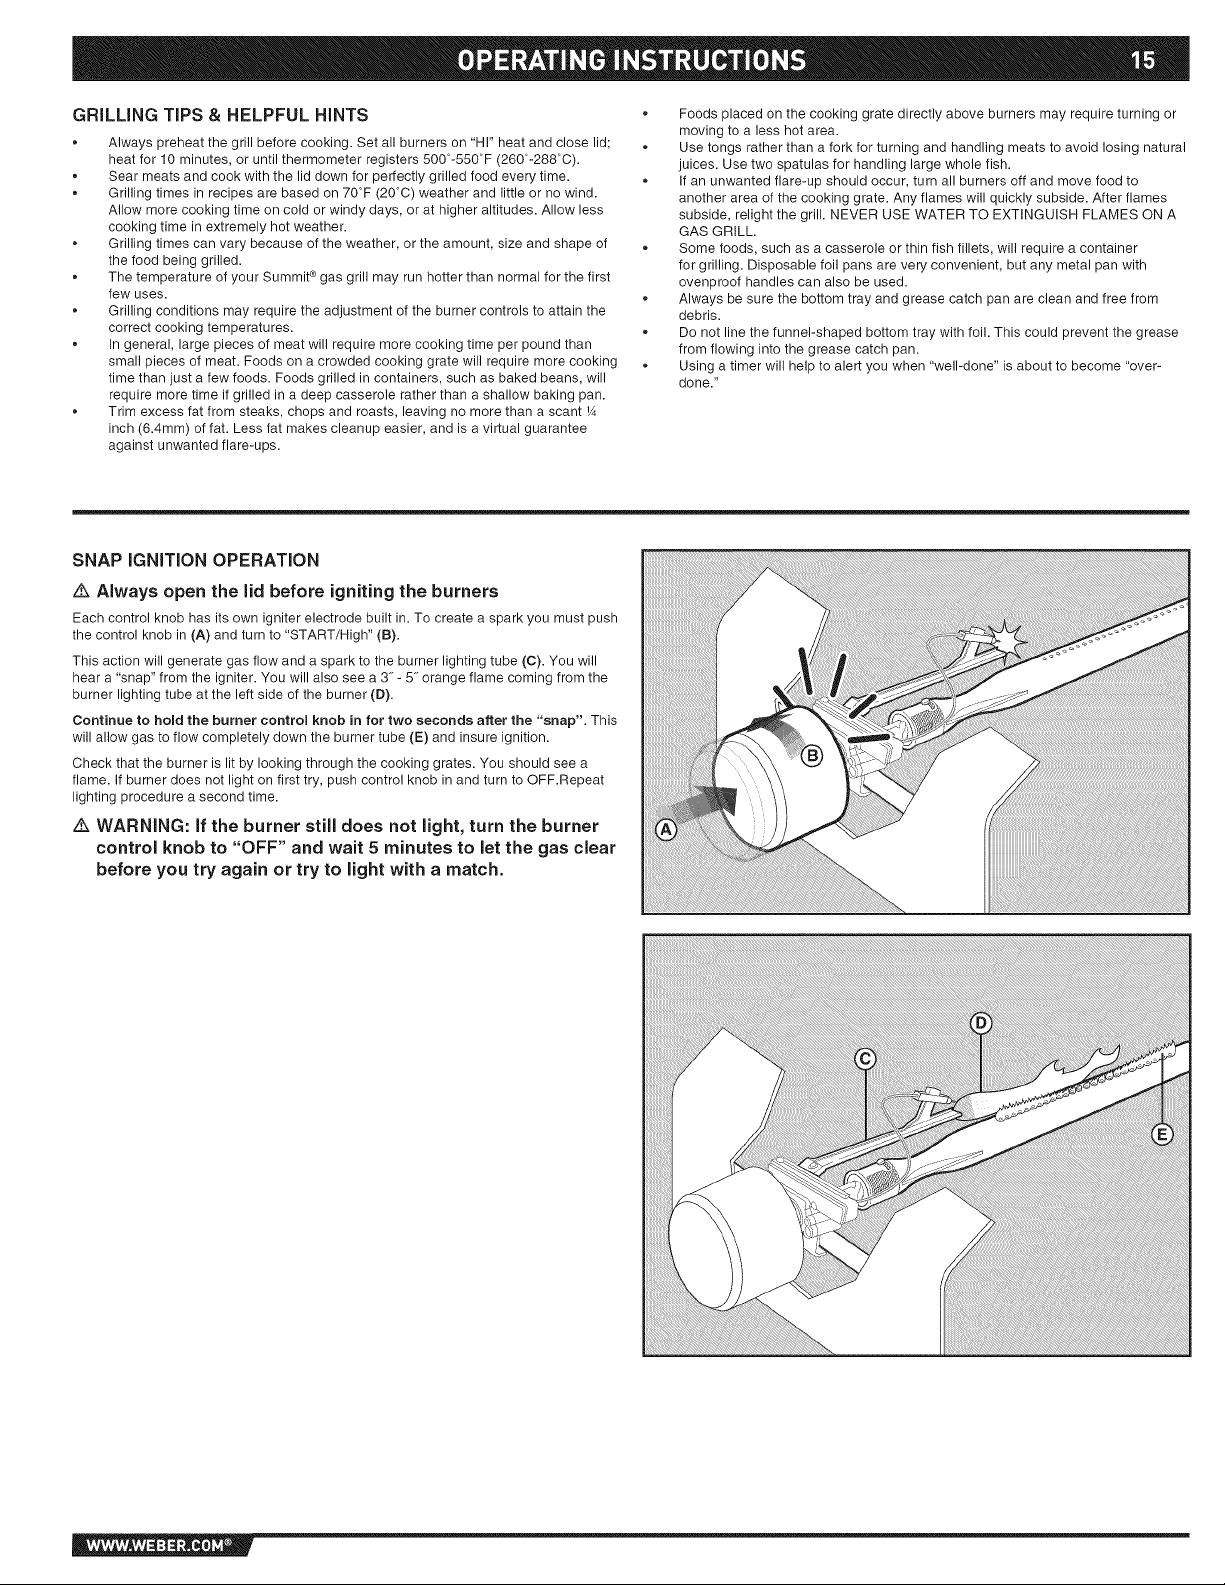
SNAP IGNITION OPERATION
Always open the lid before igniting the burners
Each control knob has its own igniter electrode built in. To create a spark you must push
the control knob in (A) and turn to "START/High" (B).
This action will generate gas flow and a spark to the burner lighting tube (C). You will
hear a "snap" from the igniter. You will also see a 3" - 5" orange flame coming from the
burner lighting tube at the left side of the burner (D).
Continue to hold the burner control knob in for two seconds after the "snap". This
will allow gas to flow completely down the burner tube (E) and insure ignition.
Check that the burner is lit by looking through the cooking grates. You should see a
flame. If burner does not light on first try, push control knob in and turn to OFF.Repeat
lighting procedure a second time.
WARNING: If the burner still does not light, turn the burner
control knob to "OFF" and wait 5 minutes to let the gas clear
before you try again or try to light with a match.
Foods placed on the cooking grate directly above burners may require turning or
moving to a less hot area.
Use tongs rather than a fork for turning and handling meats to avoid losing natural
juices. Use two spatulas for handling large whole fish.
If an unwanted flare-up should occur, turn all burners off and move food to
another area of the cooking grate. Any flames will quickly subside. After flames
subside, relight the grill. NEVER USE WATER TO EXTINGUISH FLAMES ON A
GAS GRILL.
Some foods, such as a casserole or thin fish fillets, will require a container
for grilling. Disposable foil pans are very convenient, but any metal pan with
ovenproof handles can also be used.
Always be sure the bottom tray and grease catch pan are clean and free from
debris.
Do not line the funnel-shaped bottom tray with foil. This could prevent the grease
from flowing into the grease catch pan.
Using a timer will help to alert you when "well-done" is about to become "over-
done."
Page 16

LIGHTING
Summary lighting instructions are inside the left hand cabinet door.
DANGER
Failure to open the lid while igniting the barbecue's burners,
or not waiting 5 minutes to allow the gas to clear if the
barbecue does not light, may result in an explosive flame=up
which can cause serious bodily injury or death.
MAiN BURNER SNAP IGNITION
Note: Each control knob snap igniter creates a spark from the igniter electrode to the
burner lighting tube. You generate the energy for the spark by pushing in the control
knob and turning to "START/HI". This will ignite each individual burner.
& WARNING: Check hose before each use of barbecue for
nicks, cracking, abrasions or cuts. if the hose is found to
be damaged in any way, do not use the barbecue. Replace
using only Weber _ authorized replacement hose. Contact
the Customer Service Representative in your area using the
contact information on our web site.
Log onto www.weber.com ®.
1) Open the lid.
2) Make sure all burner control knobs are turned to "OFF". (Push control knob in and
turn clockwise to ensure that it is in the "OFF" position.)
3) Turn on the gas supply at source.
z_ WARNING: Do not lean over the open barbecue.
4) Push the control knob in and turn to "START/HI" until you hear the igniter snap -
continue to hold control knob in for two seconds. This action will spark the igniter,
the burner lighting tube and then main burner.
5) Check that the burner is lit by looking through the cooking grates. You should see
a flame. If burner does not light on first try, push control knob in and turn to OFF.
Repeat lighting procedure a second time.
WARNING: If the burner still does not light, turn the burner
control knob to "OFF" and wait 5 minutes to let the gas clear
before you try again or try to light with a match.
*The grill illustrated may have slight
differences than the model purchased.
® ®
TO EXTiNGUiSH
Push in and turn each burner control knob clockwise to "OFF" position. Turn gas supply
off at the source.
MAIN BURNER MANUAL LIGHTING
DANGER
Failure to open the lid while igniting the barbecue's burners,
or not waiting 5 minutes to allow the gas to clear if the
barbecue does not light, may result in an explosive flame=up
which can cause serious bodily injury or death.
1) Open the lid.
2) Make sure all burner control knobs are turned to "OFF". (Push each knob in and
turn clockwise to ensure they are in the "OFF" position.)
3) Turn on the gas supply at source.
4) Put match in the match holder and strike match.
z_ WARNING: Do not lean over open barbecue.
5) Insert match holder and lit match down through cooking grates and Flavorize¢ _
bars to ignite the selected burner.
6) Push the control knob in and turn to "START/HI".
WARNING: If the burner does not light, turn burner control
knob to "OFF" and wait 5 minutes to let the gas clear before
you try again.
TO EXTiNGUiSH
Push in and turn each burner control knob clockwise to "OFF" position. Turn gas supply
off at the source.
I
*The grill illustrated may have slight
differences than the model purchased.
® ®
Page 17
LIGHTING THE SIDE BURNER
DANGER
Failure to open the lid while igniting the side burner, or not
waiting 5 minutes to allow the gas to clear if the side burner
does not light, may result in an explosive flame=up which can
cause serious bodily injury or death.
WARNING: Check hose before each use of barbecue for nicks,
cracking, abrasions or cuts. If the hose is found to be damaged
in any way, do not use the barbecue. Replace using only Weber _
authorized replacement hose. Contact the Customer Service
Representative in your area using the contact information on
our web site. Log onto www.weber.com ®.
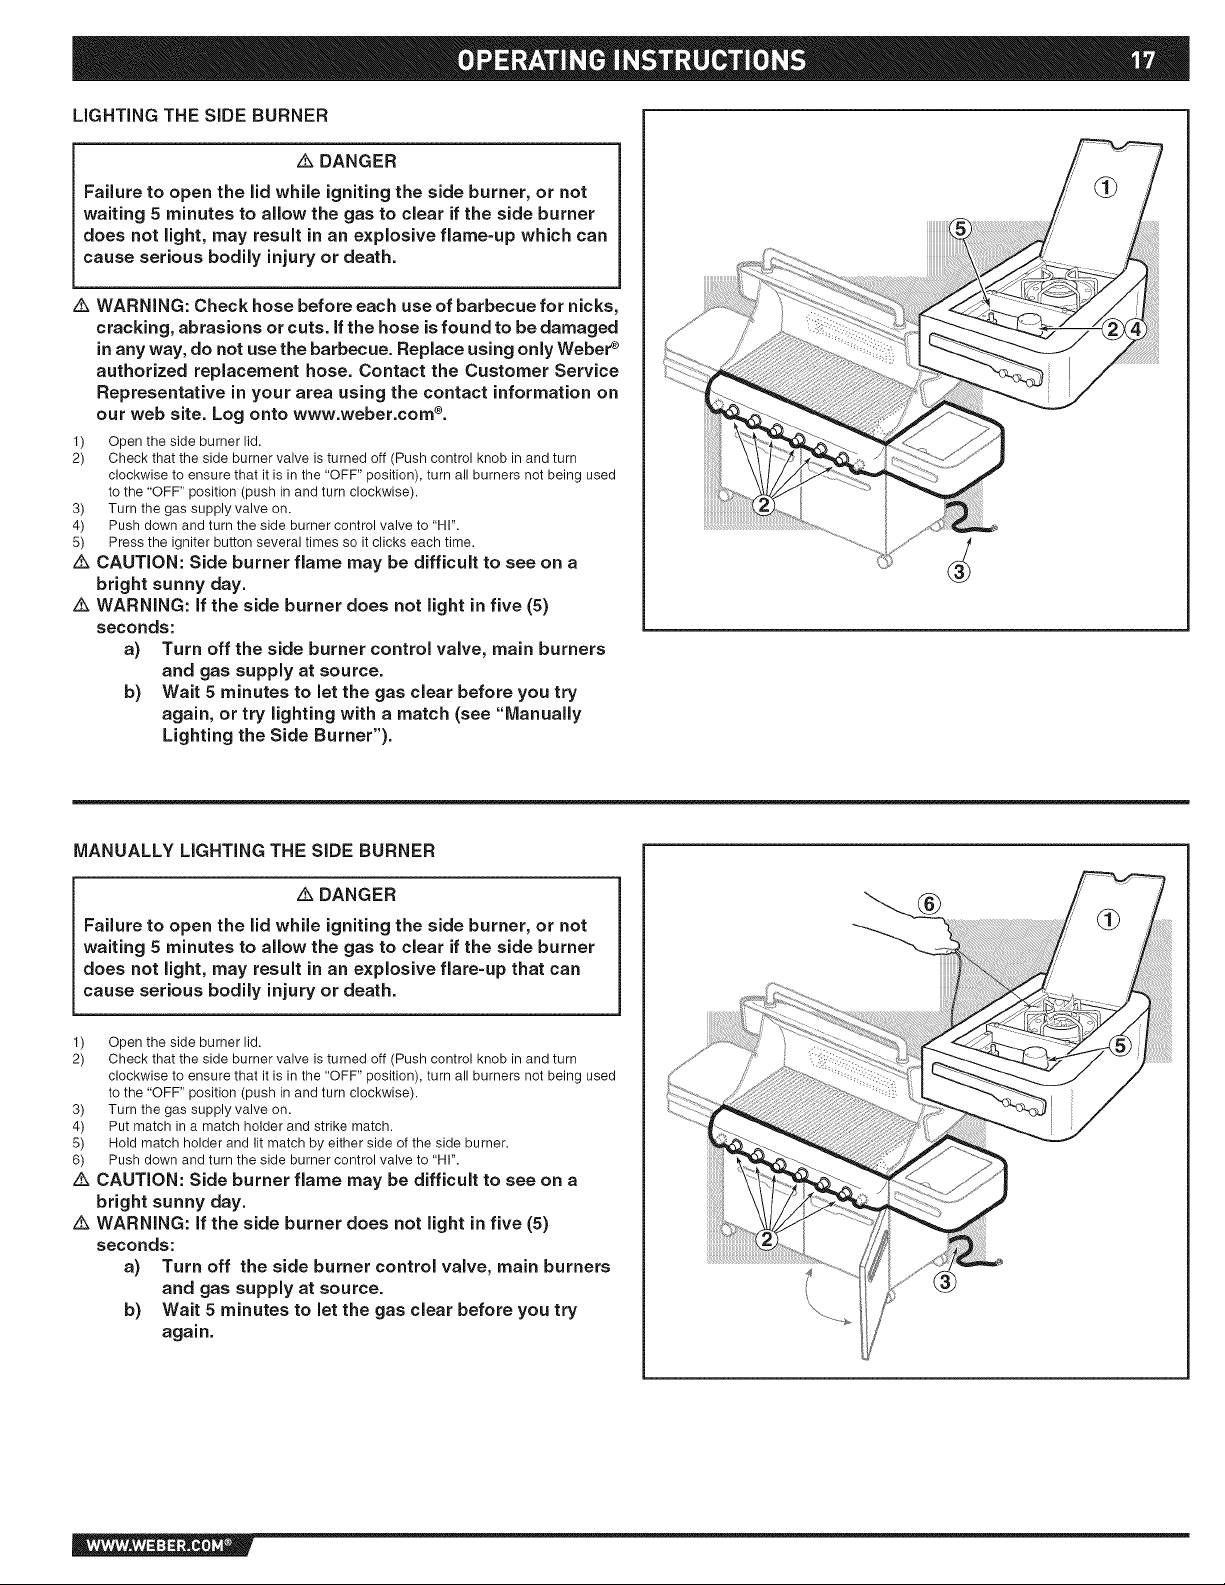
1) Open the side burner lid.
2) Check that the side burner valve is turned off (Push control knob in and turn
clockwise to ensure that it is in the "OFF" position), turn all burners not being used
to the "OFF" position (push in and turn clockwise).
3) Turn the gas supply valve on.
4) Push down and turn the side burner control valve to "HI".
5) Press the igniter button several times so it clicks each time.
z_ CAUTION: Side burner flame may be difficult to see on a
bright sunny day.
z_ WARNING: if the side burner does not light in five (5)
seconds:
a) Turn off the side burner control vaJve, main burners
and gas supply at source.
b) Wait 5 minutes to let the gas clear before you try
again, or try lighting with a match (see "Manually
Lighting the Side Burner").
MANUALLY LIGHTING THE SIDE BURNER
DANGER
Failure to open the lid while igniting the side burner, or not
waiting 5 minutes to allow the gas to clear if the side burner
does not light, may result in an explosive flare=up that can
cause serious bodily injury or death.
1) Open the side burner lid.
2) Check that the side burner valve is turned off (Push control knob in and turn
clockwise to ensure that it is in the "OFF" position), turn all burners not being used
to the "OFF" position (push in and turn clockwise).
3) Turn the gas supply valve on.
4) Put match in a match holder and strike match.
5) Hold match holder and lit match by either side of the side burner.
6) Push down and turn the side burner control valve to "HI".
z_ CAUTION: Side burner flame may be difficult to see on a
bright sunny day.
z_ WARNING: If the side burner does not light in five (5)
seconds:
a) Turn off the side burner control valve, main burners
and gas supply at source.
b) Wait 5 minutes to let the gas clear before you try
again.
®
Page 18

USING THE SMOKER
The smoker uses presoaked wood chips. For best results with faster cooking foods like
steaks, burgers and chops, etc., we recommend using finer wood chips because they
ignite and create smoke faster. For longer cooking foods such as roasts, chicken and
turkeys, etc., we recommend using larger wood chunks because they ignite slowly and
provide smoke for a longer period of time. As you gain experience in using your smoker,
we encourage you to experiment with different combinations of wood chips and chunks
to find the smoke flavor that best suits your taste.
TO USE THE SMOKER
As a starting point, soak wood chips in water for at least 30 minutes before using. (Wet
wood will produce more smoke flavor.) Place a handful of wood chips or a few larger
chunks in the bottom of the smoker body (1). As you gain experience in smoking,
increase or decrease the amount of wood to suit your taste.
Note: Always grill with the lid closed to allow the smoke to fully penetrate the food.
Light the smoker burner by following the instructions for Lighting The Smoker Burner
After wood starts to smolder turn control knob to "LOW".
Smoke will start in approximately 10 minutes and last as long as 45 minutes. If you
require more smoke flavor, refill the smoker with wood chips and/or chunks. Keep the
lid of the grill closed while cooking.
Note: After refilling smoker, smoke will take about 10 to 15 minutes to start again.
The smoker may be used to enhance meat, poultry and fish recipes. Cook with the lid
down according to the times indicated in charts or recipes.
DANGER
Do not use any flammable fluid in the smoker to ignite the
wood. This will cause serious bodily injury.
(1)
CLEANING THE SMOKER
Before each use, empty the smoker of ash to allow proper air flow.
Note: Smoking will leave a "smoke" residue on the surface of the smoker. This residue
cannot be removed and will not affect the function of the smoker. To a lesser degree a
"smoke" residue will accumulate on the inside of your gas grill. This residue need not
be removed and will not adversely affect the function of your gas grill.
LIGHTING THE SMOKER BURNER
DANGER
Failure to open the lid while igniting the grill, or not waiting
5 minutes to allow the gas to clear if the grill does not light,
may result in an explosive flare=up which can cause serious
bodily injury or death.
SMOKER BURNER SNAPIGNmON
Note. The control knob snap igniter creates a spark from the igniter electrode to the
burner lighting tube. You generate the energy for the spark by pushing in the control
knob and turning to "START/HI". This will ignite the smoker burner.
WARNING: Check hose before each use of grill for nicks,
cracking, abrasions or cuts. if the hose is found to be
damaged in any way, do not use the grill. Replace using only
®
Weber authorized replacement hose. Contact the Customer
Service Representative in your area using the contact
information on our web site. Log onto www.weber.com ®.
1) Open the grill lid.
2) Open smoker box lid.
3) Fill smoker with water soaked wood chunks or chips.
4) Make sure that all burner control knobs not being used are turned to "OFF". (Push
control knob in and turn clockwise to ensure that it is in the "OFF" position).
5) Turn on the gas at source.
z_ WARNING: Do not lean over the open grill while lighting.
6) Push the control knob in and turn to "START/HI" until you hear the igniter snap -
continue to hold control knob in for two seconds. This action will spark the igniter,
the burner lighting tube and then main burner.
7) Check that the burner is lit by looking through the cooking grates. You should see
a flame. If burner does not light on first try, push control knob in and turn to OFF.
Repeat lighting procedure a second time
*The grill illustrated may have slight
differences than the model purchased.
® ®
®
®
®
DANGER
If the smoker burner does not light, turn the burner control
knob to "OFF" and wait 5 minutes to let the gas clear before
attempting to light.
8) Close smoker cover after wood starts to smolder and turn control knob to "LOW".
TO EXTINGUISH
Push in and turn each burner control knob clockwise to "OFF" position. Turn gas supply
off at the source.
Page 19
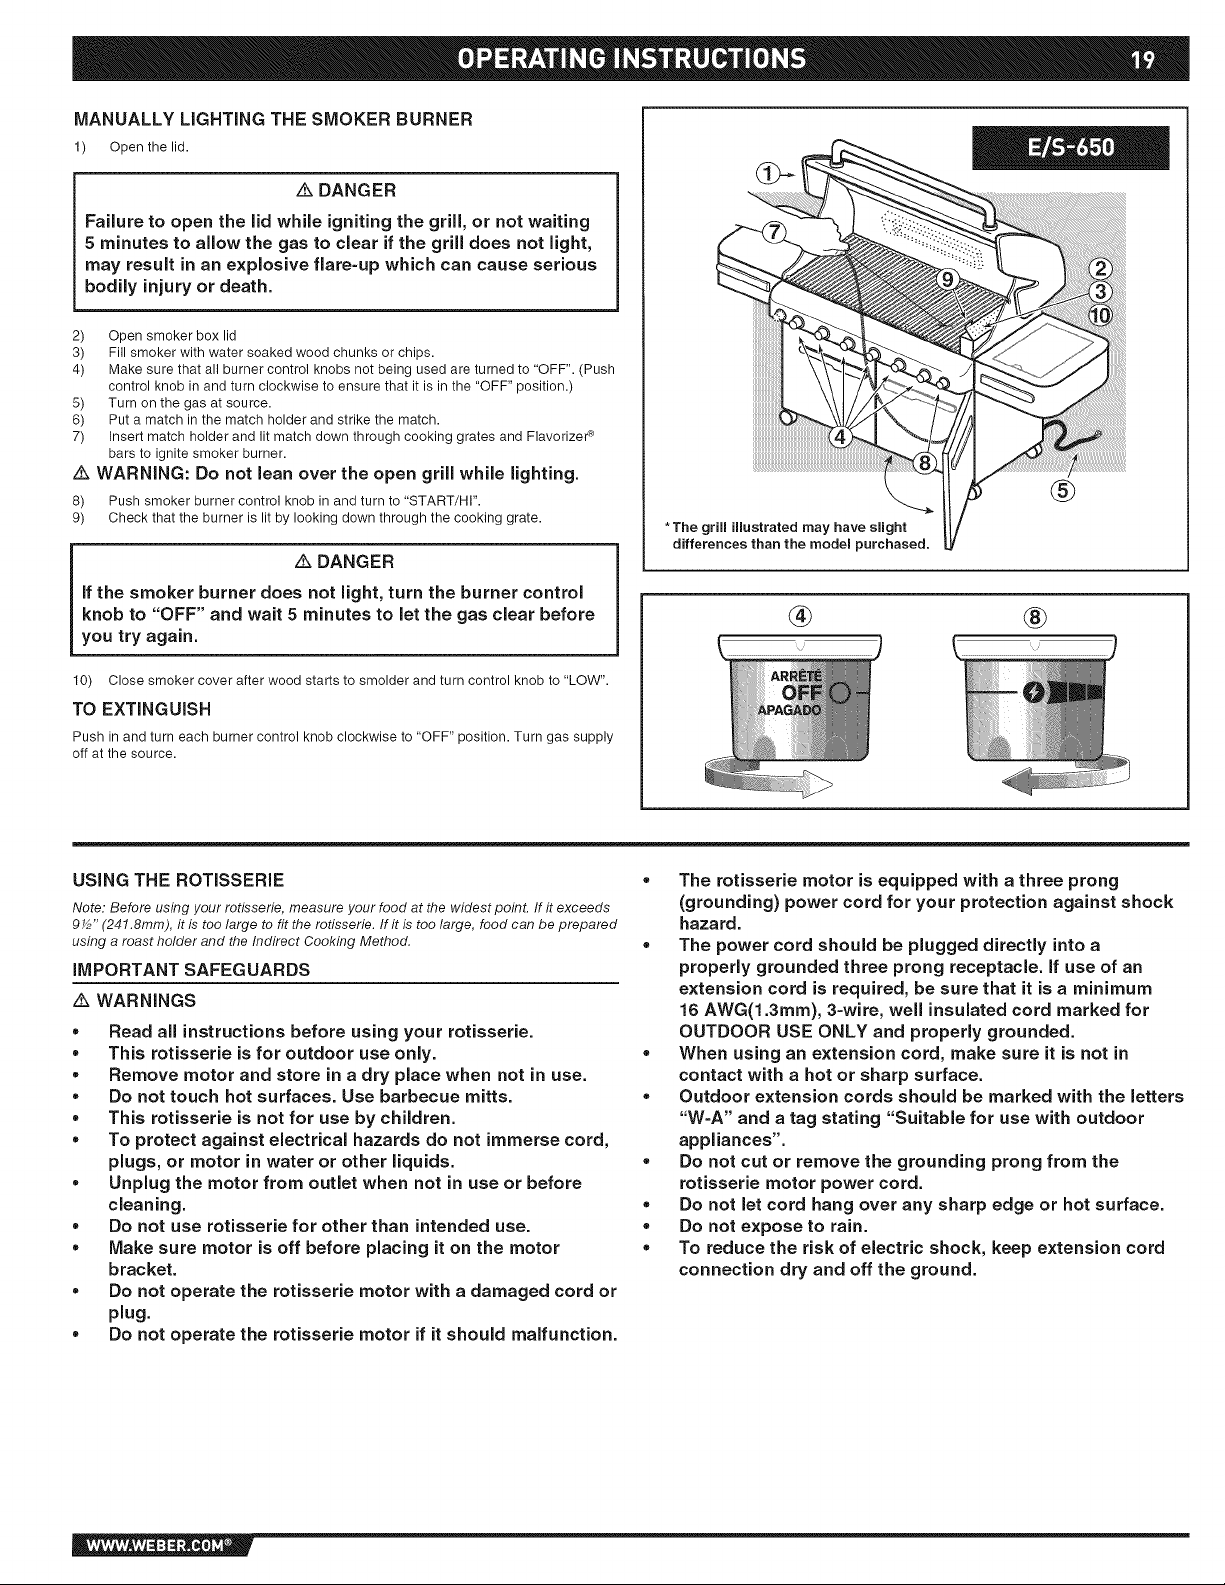
MANUALLY LIGHTING THE SMOKER BURNER
1) Open the lid.
DANGER
Failure to open the lid while igniting the grill, or not waiting
5 minutes to allow the gas to clear if the grill does not light,
may result in an explosive flare=up which can cause serious
bodily injury or death.
2) Open smoker box lid
3) Fill smoker with water soaked wood chunks or chips.
4) Make sure that all burner control knobs not being used are turned to "OFF". (Push
control knob in and turn clockwise to ensure that it is in the "OFF" position.)
5) Turn on the gas at source.
6) Put a match in the match holder and strike the match.
7) Insert match holder and lit match down through cooking grates and Flavorizei _
bars to ignite smoker burner.
z_ WARNING: Do not lean over the open grill while lighting.
8) Push smoker burner control knob in and turn to "START/HI".
9) Check that the burner is lit by looking down through the cooking grate.
DANGER
If the smoker burner does not light, turn the burner control
knob to "OFF" and wait 5 minutes to let the gas clear before
you try again.
10) Close smoker cover after wood starts to smolder and turn control knob to "LOW".
TO EXTINGUISH
Push in and turn each burner control knob clockwise to "OFF" position. Turn gas supply
off at the source.
*The grill illustrated may have slight
differences than the model purchased.
® ®
USING THE ROTISSERIE
Note: Before using your rotisserie, measure your food at the widest poinL If it exceeds
g½" (241.8mm), it is too large to fit the rotisserie. If it is too large, food can be prepared
using a roast holder and the Indirect Cooking Method.
IMPORTANT SAFEGUARDS
WARNINGS
• Read all instructions before using your rotisserie.
• This rotisserie is for outdoor use only.
• Remove motor and store in a dry place when not in use.
• Do not touch hot surfaces. Use barbecue mitts.
• This rotisserie is not for use by children.
• To protect against electrical hazards do not immerse cord,
plugs, or motor in water or other liquids.
• Unplug the motor from outlet when not in use or before
cleaning.
• Do not use rotisserie for other than intended use.
• Make sure motor is off before placing it on the motor
bracket.
• Do not operate the rotisserie motor with a damaged cord or
plug.
• Do not operate the rotisserie motor if it should malfunction.
• The rotisserie motor is equipped with a three prong
(grounding) power cord for your protection against shock
hazard.
• The power cord should be plugged directly into a
properly grounded three prong receptacle. If use of an
extension cord is required, be sure that it is a minimum
16 AWG(1.3ram), 3-wire, well insulated cord marked for
OUTDOOR USE ONLY and properly grounded.
• When using an extension cord, make sure it is not in
contact with a hot or sharp surface.
• Outdoor extension cords should be marked with the letters
"W-A" and a tag stating "Suitable for use with outdoor
appliances".
• Do not cut or remove the grounding prong from the
rotisserie motor power cord.
• Do not let cord hang over any sharp edge or hot surface.
• Do not expose to rain.
• To reduce the risk of electric shock, keep extension cord
connection dry and off the ground.
Page 20
A short power cord is supplied to reduce the risk of
tripping over the cord. Extension cords may be used, but
caution must be taken to prevent tripping over the cord.
In absence of local codes the rotisserie motor must be
grounded electrically in accordance with the National
Electric Code, ANSI / NFPA 70, or Canadian Electrical
Code, CSA C22.1.
WARNING: Setup up the rotisserie with food before lighting
rotisserie burner.
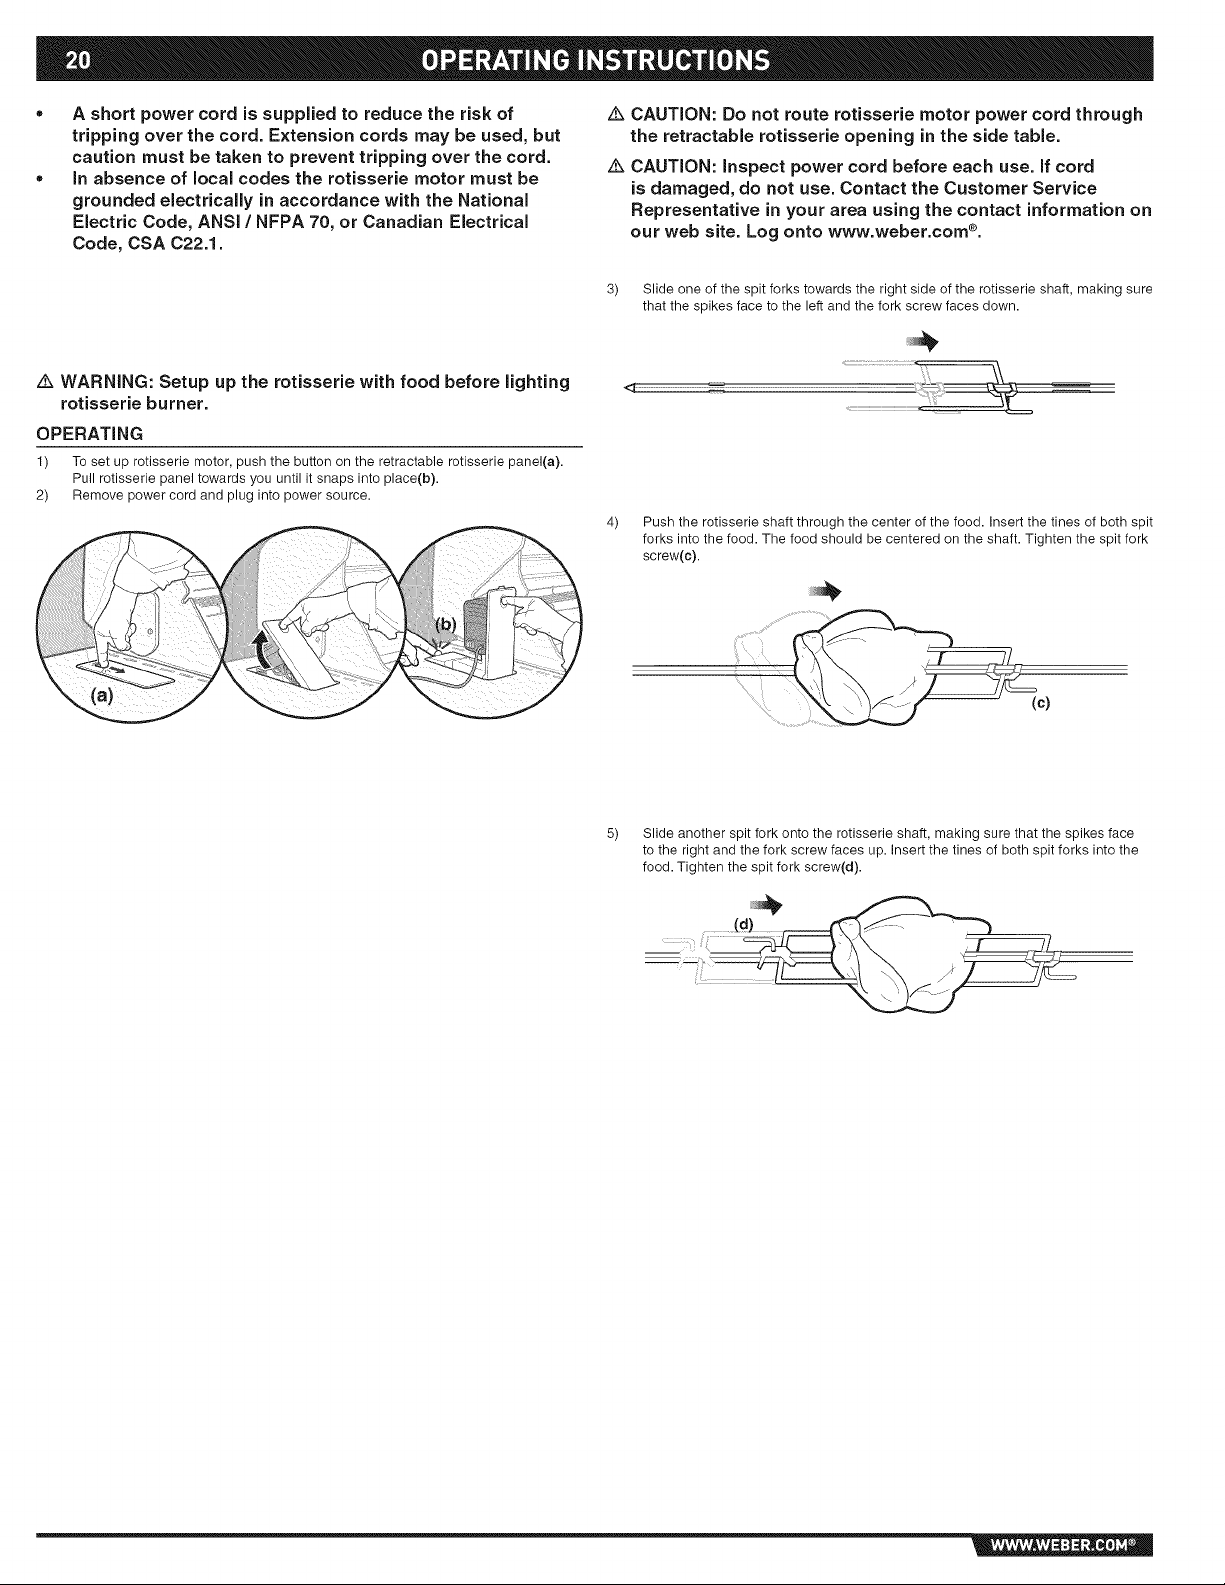
OPERATING
1) To set up rotisserie motor, push the button on the retractable rotisserie panel(a).
Pull rotisserie panel towards you until it snaps into place(b).
2) Remove power cord and plug into power source.
CAUTION: Do not route rotisserie motor power cord through
the retractable rotisserie opening in the side table.
CAUTION: inspect power cord before each use. if cord
is damaged, do not use. Contact the Customer Service
Representative in your area using the contact information on
our web site. Log onto www.weber.com ®.
3) Slide one of the spit forks towards the right side of the rotisserie shaft, making sure
that the spikes face to the left and the fork screw faces down.
4) Push the rotisserie shaft through the center of the food. Insert the tines of both spit
forks into the food. The food should be centered on the shaft. Tighten the spit fork
screw(c).
(c)
Slide another spit fork onto the rotisserie shaft, making sure that the spikes face
to the right and the fork screw faces up. Insert the tines of both spit forks into the
food. Tighten the spit fork screw(d).
Page 21
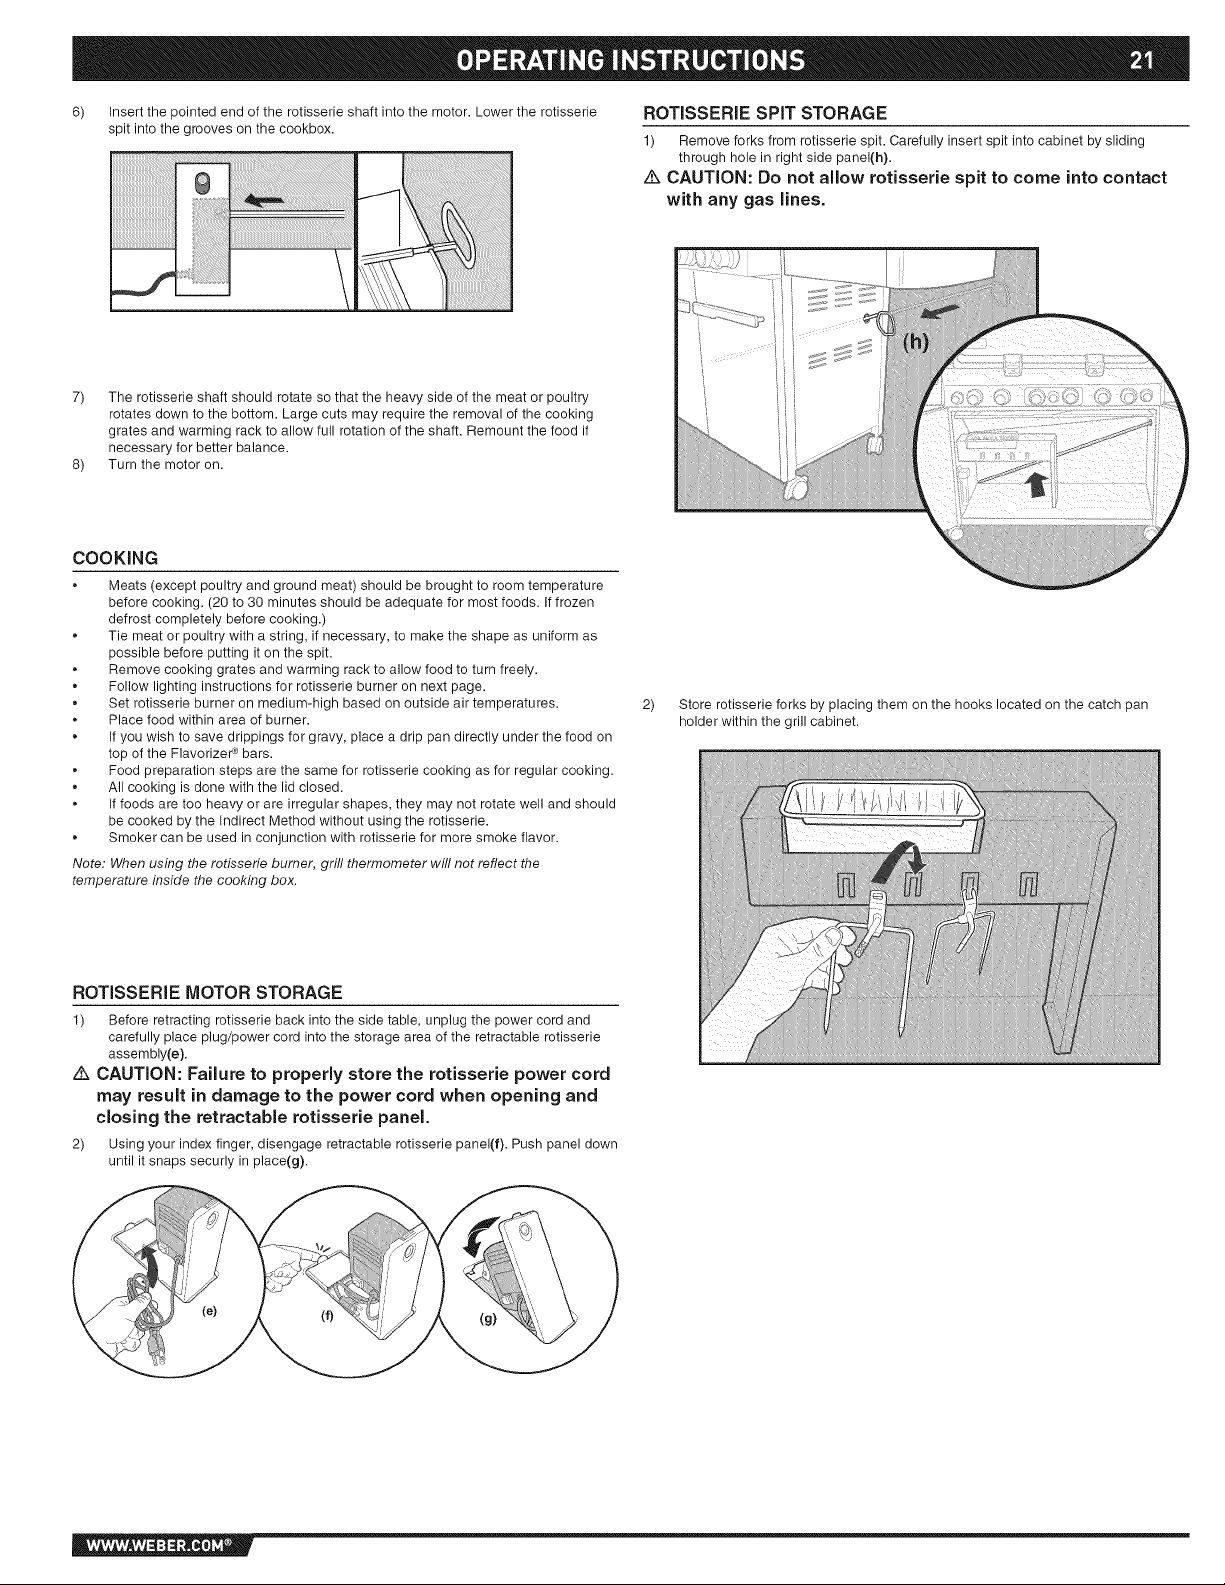
6) Insertthepointedendoftherotisserieshaftintothemotor.Lowertherotisserie
spitintothegroovesonthecookbox.
7) Therotisserieshaftshouldrotatesothattheheavysideofthemeatorpoultry
rotatesdowntothebottom.Largecutsmayrequiretheremovalofthecooking
gratesandwarmingracktoallowfullrotationoftheshaft.Remountthefoodif
necessaryforbetterbalance.
8) Turnthemotoron.
COOKING
o Meats (except poultry and ground meat) should be brought to room temperature
before cooking. (20 to 30 minutes should be adequate for most foods. If frozen
defrost completely before cooking.)
Tie meat or poultry with a string, if necessary, to make the shape as uniform as
possible before putting it on the spit.
Remove cooking grates and warming rack to allow food to turn freely.
Follow lighting instructions for rotisserie burner on next page.
Set rotisserie burner on medium-high based on outside air temperatures.
Place food within area of burner.
If you wish to save drippings for gravy, place a drip pan directly under the food on
top of the Flavorizer e bars.
Food preparation steps are the same for rotisserie cooking as for regular cooking.
All cooking is done with the lid closed.
If foods are too heavy or are irregular shapes, they may not rotate well and should
be cooked by the Indirect Method without using the rotisserie.
Smoker can be used in conjunction with rotisserie for more smoke flavor.
Note: When using the rotisserie burner, grill thermometer will not reflect the
temperature inside the cooking box.
ROTISSERIE SPIT STORAGE
1) Remove forks from rotisserie spit. Carefully insert spit into cabinet by sliding
through hole in right side panel(h).
z_ CAUTION: Do not allow rotisserie spit to come into contact
with any gas lines.
2) Store rotisserie forks by placing them on the hooks located on the catch pan
holder within the grill cabinet.
ROTISSERIE MOTOR STORAGE
1) Before retracting rotisserie back into the side table, unplug the power cord and
carefully place plug/power cord into the storage area of the retractable rotisserie
assembly(e).
CAUTION: Failure to properly store the rotisserie power cord
may result in damage to the power cord when opening and
closing the retractable rotisserie panel.
2) Using your index finger, disengage retractable rotisserie panel(f). Push panel down
until it snaps securly in place(g).
Page 22
LIGHTING THE ROTISSERIE BURNER
ROTISSERIE BURNER SNAP IGNITION
Note: Each control knob snap igniter creates a spark from the igniter electrode to the
burner fighting tube. You generate the energy for the spark by pushing in the control
knob and turning to "START/HI". This wi// ignite each individual burner.
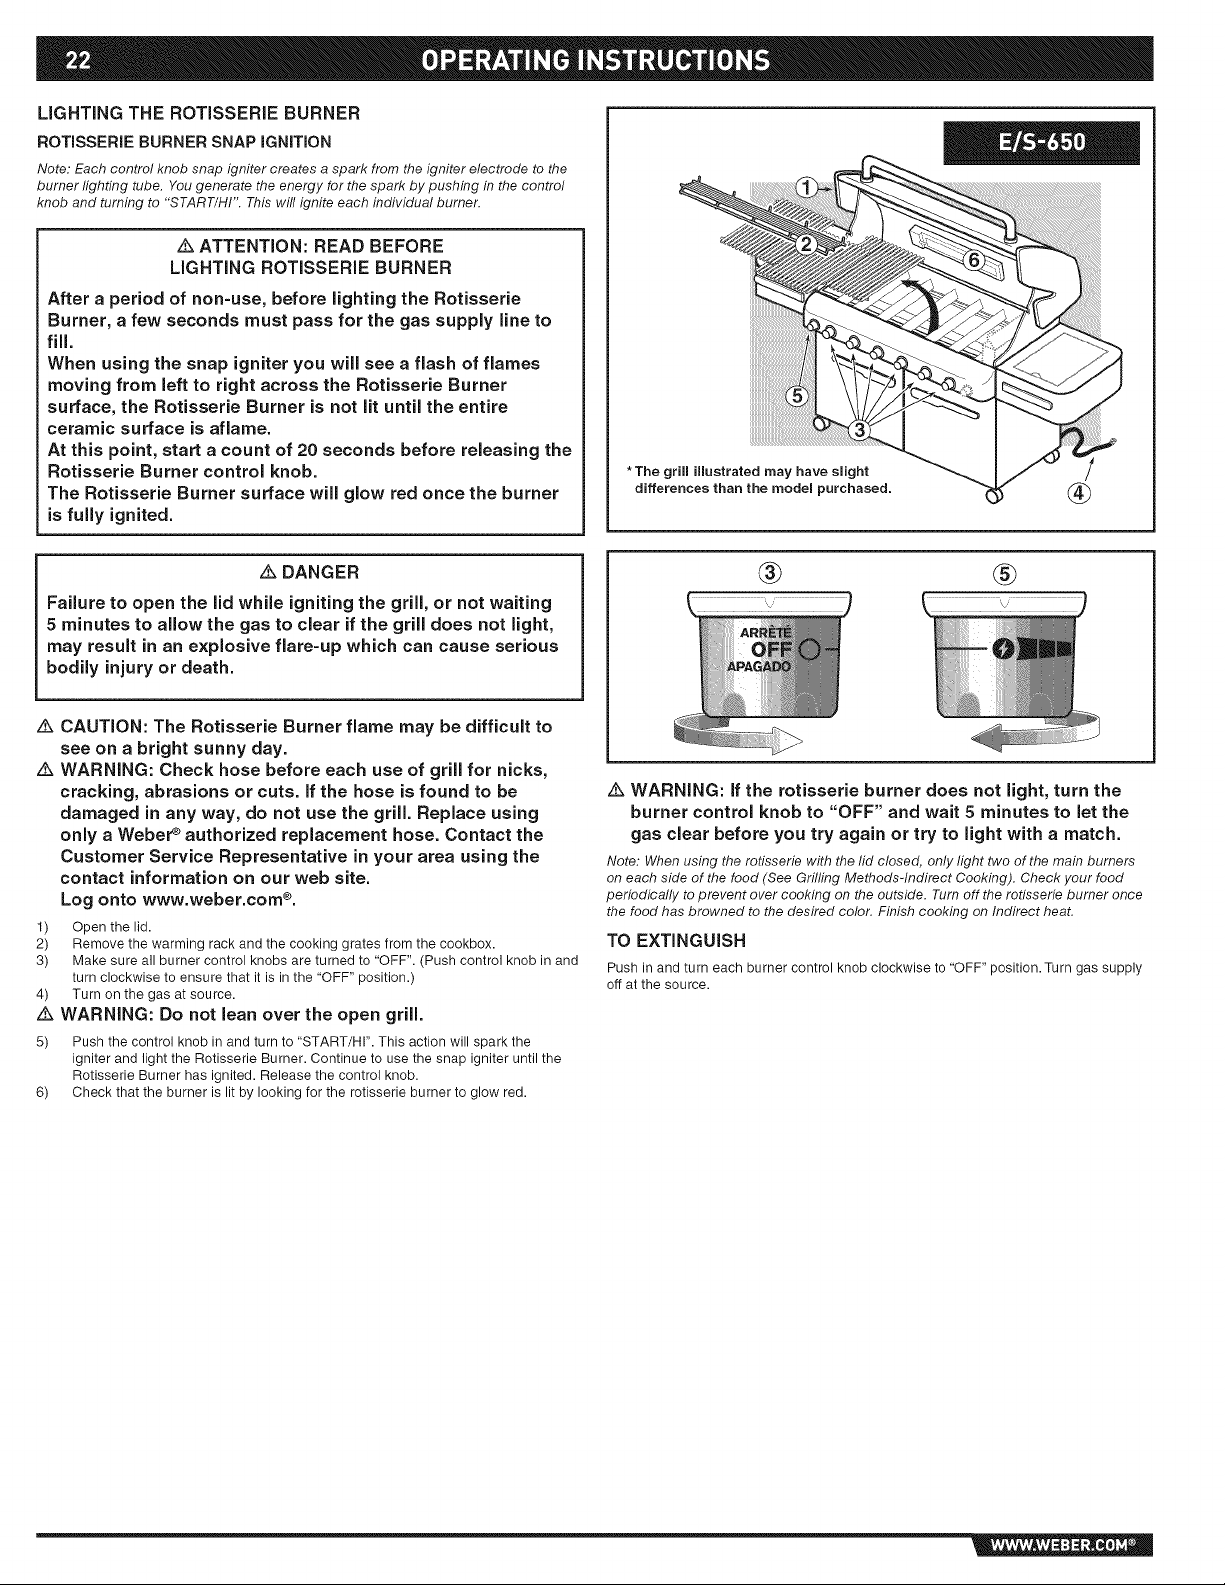
ATTENTION: READ BEFORE
LIGHTING ROTISSERIE BURNER
After a period of non-use, before lighting the Rotisserie
Burner, a few seconds must pass for the gas supply line to
fill.
When using the snap igniter you will see a flash of flames
moving from left to right across the Rotisserie Burner
surface, the Rotisserie Burner is not lit until the entire
ceramic surface is aflame.
At this point, start a count of 20 seconds before releasing the
Rotisserie Burner control knob.
The Rotisserie Burner surface will glow red once the burner
is fully ignited.
*The grill illustrated may have slight
differences than the model purchased.
®
DANGER
Failure to open the lid while igniting the grill, or not waiting
5 minutes to allow the gas to clear if the grill does not light,
may result in an explosive flare=up which can cause serious
bodily injury or death.
CAUTION: The Rotisserie Burner flame may be difficult to
see on a bright sunny day.
WARNING: Check hose before each use of grill for nicks,
cracking, abrasions or cuts. If the hose is found to be
damaged in any way, do not use the grill. Replace using
only a Weber _ authorized replacement hose. Contact the
Customer Service Representative in your area using the
contact information on our web site.
Log onto www.weber.com ®.
1) Open the lid.
2) Remove the warming rack and the cooking grates from the cookbox.
3) Make sure all burner control knobs are turned to "OFF". (Push control knob in and
turn clockwise to ensure that it is in the "OFF" position.)
4) Turn on the gas at source.
Z_ WARNING: Do not lean over the open grill.
5) Push the control knob in and turn to "START/HI". This action will spark the
igniter and light the Rotisserie Burner. Continue to use the snap igniter until the
Rotisserie Burner has ignited. Release the control knob.
6) Check that the burner is lit by looking for the rotisserie burner to glow red.
® ®
WARNING: if the rotisserie burner does not light, turn the
burner control knob to "OFF" and wait 5 minutes to let the
gas clear before you try again or try to light with a match.
Note: When using the rotisserie with the lid closed, only fight two of the main burners
on each side of the food (See Gd//ing Methods-Indirect Cooking). Check your food
periodicafly to prevent over cooking on the outside. Turn off the rotisserie burner once
the food has browned to the desired co/or. Finish cooking on Indirect heat.
TO EXTINGUISH
Push in and turn each burner control knob clockwise to "OFF" position. Turn gas supply
off at the source.
Page 23
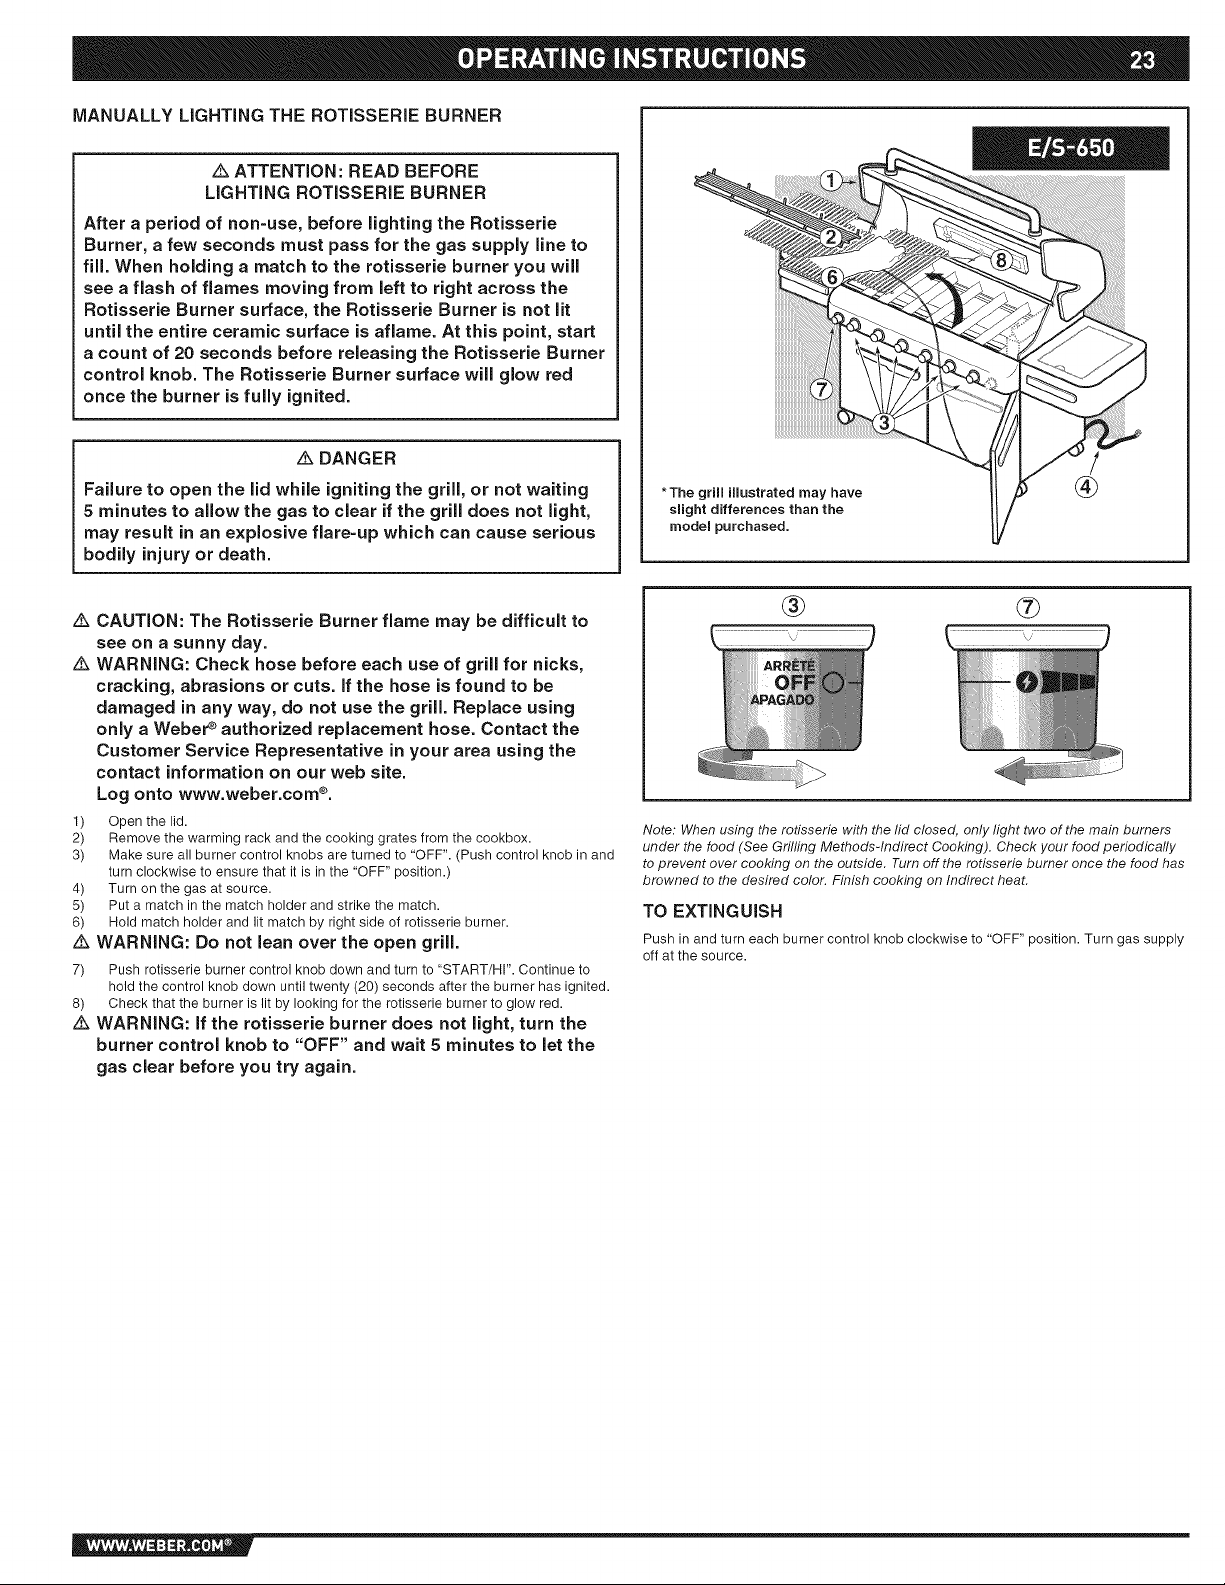
MANUALLY LIGHTING THE ROTISSERIE BURNER
ATTENTION: READ BEFORE
LIGHTING ROTISSERIE BURNER
After a period of non-use, before lighting the Rotisserie
Burner, a few seconds must pass for the gas supply line to
fill. When holding a match to the rotisserie burner you will
see a flash of flames moving from left to right across the
Rotisserie Burner surface, the Rotisserie Burner is not lit
until the entire ceramic surface is aflame. At this point, start
a count of 20 seconds before releasing the Rotisserie Burner
control knob. The Rotisserie Burner surface will glow red
once the burner is fully ignited.
DANGER
Failure to open the lid while igniting the grill, or not waiting
5 minutes to allow the gas to clear if the grill does not light,
may result in an explosive flare=up which can cause serious
bodily injury or death.
*The grill illustrated may have
slight differences than the
model purchased.
CAUTION: The Rotisserie Burner flame may be difficult to
see on a sunny day.
WARNING: Check hose before each use of grill for nicks,
cracking, abrasions or cuts. If the hose is found to be
damaged in any way, do not use the grill. Replace using
only a Weber _ authorized replacement hose. Contact the
Customer Service Representative in your area using the
contact information on our web site.
Log onto www.weber.com _.
1) Open the lid.
2) Remove the worming rack and the cooking grates from the cookbox.
3) Make sure all burner control knobs are turned to "OFF". (Push control knob in and
turn clockwise to ensure that it is in the "OFF" position.)
4) Turn on the gas at source.
5) Put a match in the match holder and strike the match.
6) Hold match holder and lit match by right side of rotisserie burner.
Z_ WARNING: Do not lean over the open grill.
7) Push rotisserie burner control knob down and turn to "START/HI". Continue to
hold the control knob down until twenty (20) seconds after the burner has ignited.
8) Check that the burner is lit by looking for the rotisserie burner to glow red.
WARNING: If the rotisserie burner does not light, turn the
burner control knob to "OFF" and wait 5 minutes to let the
gas clear before you try again.
® ®
Note: When using the rotisserie with the lid closed, only light two of the main burners
under the food (See Grilling Methods-Indirect Cooking). Check your food periodically
to prevent over cooking on the outside. Turn off the rotisserie burner once the food has
browned to the desired color. Finish cooking on Indirect heat.
TO EXTINGUISH
Push in and turn each burner control knob clockwise to "OFF" position. Turn gas supply
off at the source.
Page 24

OPERATING THE HANDLE LIGHT
The Weber Grill Out TM Handle Light has a built-in "Tilt Sensor." With the power button (a)
activated, the light will come on when the grill lid is open. The light will turn off when the lid
is closed. For daytime use, deactivate the sensor by pressing power button (a).
PROBLEM CHECK CURE
Weber Grill Out TM Handle Are the batteries old? Replace batteries.
Light does not light.
If problems cannot be corrected by using these methods, please contact the Customer Service Representative in your area using the contact information on our web
site. Log onto www.weber.com ®.
Are the batteries installed correctly? See assembly illustration.
Is the lid in the up position with the power button ON? Light will activate when lid is open.
Is the Weber Grill OutTM Handle Light activated? Press the power button.
Is the Weber Grill OutTM Handle Light positioned correctly on the handle? Adjust position (See assembly illustration).
PROBLEM CHECK CURE
Rotisserie burner does not light. Did you hold the burner control knob in and Try to relight burner by holding burner control knob in and continue holding in until
If problems cannot be corrected by using these methods, please contact the Customer Service Representative in your area using the contact information on our
web site. Log onto www.weber.com ®.
hold in for 20 seconds until after burner 20 seconds after burner has ignited.
ignited?
Did you wait to see the entire ceramic surface When relighting burner by holding burner control knob in, wait to see the entire
become alight before counting 20 seconds? ceramic surface become alight before counting 20 seconds?
Did you repeatedly use the snap ignition until After waiting five minutes for gas to clear, try repeatedly using the snap igniter until
the burner ignited? the burner ignites (refer to "Lighting the Rotisserie Burner").
Does the igniter work (Do you see a spark ITry manually lighting the burner (refer to "Lighting the Rotisserie Burner"). Call
when you repeatedly use the snap igniter? customer service.
PROBLEM CHECK CURE
Side Burner does not light. Is gas supply off? Turn supply on.
Flame is low in "HI" position Is the fuel hose bent or kinked? Straighten hose.
Push button ignition does not work. Does burner light with a match? If match lights burner, check igniter (see below).
if problems cannot be corrected by using these methods, please contact the Customer Service Representative in your area using the contact information on our web
site. Log onto www.weber.com ®.
Page 25

SIDE BURNER MAINTENANCE
WARNING: All gas controls and supply valves should be in
the "OFF" position.
Make sure black wire is connected between the igniter and electrode.
Make sure white wire is connected between the igniter and grounding clip.
Spark should be a white/blue color, not yellow.
1) Igniter Wire
2) Ground wire
3) Burner
iiii!i,, V;iiiiiii!!!!!!!i;i!iliiii;i;;;;;;;;;i;iiiiiiiiiiiiiiiiii
Side Burner Grate --
Side Burner cap
Side Burner Ring & Head
igniter Electrode
Control Knob
igniter
iii!iiiiP,, '\;_iii!ii!iil¸I:ii!iiiiiiiiiiiiiiiiiiiiiiiiiiiiiiiiiiiiiiiiiiiiiiiii
(3)
/
PROBLEM
Burners burn with a yellow or orange flame, in
conjunction with the smemmof gas (This is normam
for the burner mighting tube).
Symptoms:
Burner does not might, or flame is mowin "HF
position.
Experiencing flare-ups:
CAUTION: Do not line the bottom tray
with aluminum foil.
Burner flame pattern is erratic. Flame is low when Are burners clean? Clean burners. (See Section "Maintenance".)
burner is on "HF. Flames do not run the whome
mength of the burner tube.
Inside of lid appears to be "peeling." (Resembles The lid is porcelain enamel or stainless steel, not paint. It Clean thoroughly. (See Section "Cleaning".)
paint peeling.) cannot "peel". What you are seeing is baked on grease
Cabinet doors are not aligned. Check the adjustment pin on the bottom of each door. Loosen adjustment nut/s. Slide door/s until aligned. Tighten
If problems cannot be corrected by using these methods, please contact the Customer Service Representative in your area using the contact information on our web
site. Log onto www.weber.com ®.
Inspect Spider/Insect Screens for possible obstructions. Clean Spider/Insect Screens. (See Section "Annual
(Blockage of holes.) Maintenance")
Is fuel hose bent or kinked? Straighten fuel hose.
Does Burner light with a match?
Did you use the snap igniter several times until the main
burner lit (See Lighting Instructions)?
Does the igniter work (Do you see a spark when you
repeatedly use the snap igniter?
Are you preheating barbecue in the prescribed manner?
Are the cooking grates and Flavorizei _ bars heavily
coated with burned-on grease?
Is the bottom tray "dirty" and not allowing grease to flow
into catch pan?
that has turned to carbon and is flaking off.
THIS IS NOT A DEFECT.
CHECK CURE
If you can light Burner with a match, then check the
Crossover ¢ ignition system.
Make sure to hold the control knob in for two seconds after
snapping the igniter and seeing the orange flame from the
burner lighting tube.
Try manually lighting the burner (refer to "Main Burner
Manual Lighting"). Call customer service.
All burners on HI for 10 to 15 minutes for preheating.
Clean thoroughly. (See Section "Cleaning")
Clean bottom tray.
nut.
Page 26

WEBER ®SPIDER/INSECT SCREENS
Your Weber ¢ gas barbecue, as well as any outdoor gas appliance, is a target for spiders
and other insects. They can nest in the venturi section (1) of the burner tubes. This
blocks the normal gas flow, and can cause the gas to flow back out of the combustion
air opening. This could result in a fire in and around the combustion air openings, under
the control panel, causing serious damage to your barbecue.
The burner tube combustion air opening is fitted with a stainless steel screen (2) to
prevent spiders and other insects access to the burner tubes through the combustion air
openings.
We recommend that you inspect the Spider/insect screens at meastonce a year.
(See Section "Annual Maintenance".) Also inspect and clean the the Spider/Insect
screens if any of the following symptoms should ever occur:
1) The smell of gas in conjunction with the burner flames appearing yellow and lazy•
2) Barbecue does not reach temperature•
3) Barbecue heats unevenly•
4) One or more of the burners do not ignite•
DANGER
FaiJure to correct the above mentioned symptoms may result
in a fire, which can cause serious bodily injury or death, and
cause damage to property.
MAIN BURNER CLEANING PROCEDURE
TURN OFF THE GAS SUPPLY.
Remove the manifold (See "Replacing Main Burners").
Look inside each burner with a flashlight.
Clean the inside of the burners with a wire (a straightened-out coat hanger will work).
Check and clean the air shutter opening at the ends of the burners. Check and clean
the valve orifices at the base of the valves. Use a Steel bristle brush to clean outside of
burners. This is to make sure all the burner ports are fully open.
z_ CAUTION: Do not enlarge the burner ports when cleaning.
REPLACE MAIN BURNERS
1) Your Summite gas grill must be off and cool.
2) Turn gas off at source.
3) Disconnect gas supply.
4) Remove cooking grates.
5) Remove smoker box.
6) Remove Flavorizer _ bars.
REMOVE CONTROL PANEL
7) Tool required: Phillips Screwdriver.
a) Remove the burner control knobs.
b) Remove the two screws that secure the control
panel to the frame.
c) Remove the control panel. Tilt panel forward and
lift up and away from grill. Completely remove
the control panel from the cooking box assembly
exposing the valves, burners, igniter, and manifold.
Page 27

8) Removethetwoscrewsthatsecurethemanifoldtothecookbox.Pullmanifold
assemblyoutfromthemanifoldframe.
9) Pulltheselectedburner(s)tube(s)frommanifoldframeandreplacewithanew
burnertube.
10)Toreinstallthemanifoldassembly,reversesteps7through9.
CAUTION: The burner openings (A) must be positioned
properly over the valve orifices (D).
Make sure the opposite end of the burner tubes (C) properly
align into the slots on the backside of the cookbox. Check
proper assembly before fastening manifold in place.
z_ WARNING: After reinstalling the gas lines, they should be
leak checked with a soap and water solution before using
the grill. (See, "Check for gas leaks.")
ANNUAL MAINTENANCE
INSPECTION AND CLEANING OF THE SPIDER/INSECT SCREENS
To inspect the Spider/Insect screens, remove the control panel. If there is dust or dirt on
the screens, remove the burners for cleaning the screens.
Brush the Spider/Insect screens lightly with a soft bristle brush (i.e. an old toothbrush).
z_ CAUTION: Do not clean the Spider/Insect screens with hard
or sharp tools. Do not dislodge the Spider/Insect screens or
enlarge the screen openings.
Lightly tap the burner to get debris and dirt out of the burner tube. Once the Spider/
Insect screens and burners are clean replace the burners.
If the Spider/Insect screen becomes damaged or cannot be cleaned, please contact the
Customer Service Representative in your area using the contact information on our web
site. Log onto www.weber.com ®.
BURNER FLAME PATTERN
The Weber ¢gas barbecue burners have been factory set for the correct air and gas
mixture. The correct flame pattern is shown.
1) Burner tube
2) Tips occasionally flicker yellow
3) Light blue
4) Dark blue
If the flames do not appear to be uniform throughout the burner tube, follow the burner
cleaning procedures.
®
-®
-®
Page 28

Page 29

E/S-620/650
174
DEBE LEER ESTA GUIA DEL PROPIETARIO
ANTES DE PONER A FUNCIONAR LA
BARBACOA DE GAS
Ak PELIGRO
Si huele a gas:
1. Cierre el suministro de gas al artefacto.
2. Apague todas las flamas cerrando la
valvula general de paso.
3. Abra la tapa.
4. Llame inmediatamente a la central de
fugas o a su proveedor de gas.
Una fuga de gas puede provocar un incendio
o e×plosibn que puede resultar en lesiones
corporales serias o la muerte, o dahos a la
propiedad.
/k PARA SU SEGURIDAD
.
No almacene gasolina u otros fluidos
flamables en la cercania de su aparato.
2.
Ning_n cilindro de propano licuado que
no est6 conectado para su uso deberb
almacenarse cerca de 6ste o cualquier
otto artefacto dom6stico.
ik
NOTA IMPORTANTE: Antes de porter a
funcionar la asador, siga cuidadosamente
todos los procedimientos en este manual
para verificar que no existan fugas. Haga
esto aun y cuando la asador haya sido
ensamblada pot el distribuidor.
ik
NOTA IMPORTANTE: No trate de encender
este artefacto sin antes leer la secci6n
"instrucciones para encender la asador"
de este manual.
AVISO AL INSTALADOR:
Estas instrucciones deben permanecer con el
propietario, quien las deber_ guardar para un
futuro uso.
ESTE ARTEFACTO A GAS EST._, DISENADO ]
PARA USARSE SOLAMENTE AL AIRE LIBRE.
_l_ MEMBER
1
89174 ESNA
Page 30

Z_PELiGRO
El hacer caso omiso de los avisos de peligros, advertencias y precauciones contenidos en este Manual del Propietario pudiera
resultar en lesiones corporales serias o la muerte, o en un fuego o explosi6n que cause daSos a la propiedad.
ADVERTENCIAS
Z_ No almacene un tanque de propano licuado desconectado o de repuesto debajo o cerca de este asador.
Z_ El ensamblaje incorrecto puede set peligroso. Pot favor siga cuidadosamente las instrucciones de ensamblaje.
Z_Tras haber estado guardada o sin uso pot alg_n tiempo, antes de usar la barbacoa de gas Weber +verifique que no existan
fugas de gas o obstrucciones en el quemador. Vea en este manual las instrucciones para los procedimientos correctos.
Z_ No opere la barbacoa de gas Weber ®si existe una fuga de gas.
Z_ No utilice una llama abierta para comprobar la e×istencia de fugas de gas.
Z_ Nunca debe haber materiales combustibles a una distancia menor de 24 pulgadas (60 cm) de la parte superior, inferior, trasera
o lateral de su asador de gas Weber ®.
Z_ No coloque una funda para barbacoas ni cualquier otra articulo inflamable sobre o dentro del _rea de almacenaje ubicada
debajo del asador.
Z_ Nunca permita que los niSos usen la barbacoa de gas Weber ®. AIgunas partes accesibles de la barbacoa pudieran estar muy
calientes. Mantenga alejados a los niSos pequeSos mientras _sta se est_ usando.
Z_ Usted debe proceder con razonable cuidado al usar su barbacoa de gas Weber ®.E_staestar_ caliente al cocinarse en ella o al
limpiarla, y nunca deber_ dejarse desatendida o moverse mientras est_ funcionando.
z_ Si Ilegasen a apagarse los quemadores, cierre todas las v_lvulas de gas. Abra la tapa y espere cinco minutos antes de tratar de
volver a encender la barbacoa, usando las instrucciones de encendido en este manual.
z_ No use carb6n o piedra p6mez en su barbacoa de gas Weber ®.
z_ No se incline sobre la barbacoa abierta o coloque las manos o dedos en el horde delantero de la caja de cocci6n.
Z_ Si la grasa Ilegase a agarrar fuego, apague todos los quemadores y mantenga la tapa cerrada hasta que se haya apagado el
fuego.
Z_Ai limpiar ias v_ivuias o los quemadores, no ensanche los orificios de las v_lvulas o las aberturas de los quemadores.
Z_ La barbacoa de gas Weber _ deber_ limpiarse a fondo regularmente.
Z_ El propano licuado no es gas natural. El uso de gas natural en una unidad de propano licuado o viceversa, propano licuado en
una de gas natural, es peligroso y anular_ su garantia.
Z_ IVlientras opere la barbacoa, utilice guantes resistentes al calor.
Z_ Mantenga alejados de todas las superficie calientes a todo cord6n el_ctrico y a la manguera de suministro de combustible.
z_ Los subproductos de ia combusti6n producidos ai usar este producto contienen sustancias quimicas que son conocidas pot
el Estado de la California como causantes de c_ncer, defectos de nacimiento, u otros daSos reproductivos.
z_ No use esta barbacoa a menos que todas sus partes est_n colocadas en su sitio. La unidad debe ensamblarse correctamente
de acuerdo con las instrucciones de ensamblaje.
z_ No construya este modelo de barbacoa en ninguna construcci6n en la que la barbacoa est_ incorporada de manera fija o
deslizable. El no acatar esta Advertencia pudiera resultar en un fuego o una explosi6n que pudiera causar daSos a la propiedad
y heridas corporales graves o la muerte.
Z_ Propuesta 65 Advertencia: Ei manipular los materiaies de iat6n en este producto io exponen al piomo, una sustancia quimica
conocida pot el estado de California como causante de c_ncer, de defectos de nacimiento o de otros dafios reproductivos.
(L_vese las manos despu_s de manipular este producto.)
0NICAMENTE UNIDADES DE GAS PROPANO LICUADO
z_ Use el regulador que se suministra con la barbacoa de gas Weber _.
z_ No trate de desconectar el regulador de gas o ninguna cone×i6n de gas mientras est_ funcionando la barbacoa.
Z_ Un cilindro de propano licuado aboilado u o×idado pudiera set peiigroso y deber_ set revisado pot su suplidor de propano
iicuado. No utilice ning_n ciiindro de propano licuado con una v_ivuia daSada.
Z_Aunque el cilindro de propano licuado pudiera aparentar estar vacio, algo de gas pudiera a_n estar presente, pot Io que el
cilindro deber_ transportarse y almacenarse tomando esta posibilidad en consideraci6n.
Z_ Si usted ve, huele o escucha el silbido de un escape de gas del cilindro de propano licuado:
1. Ap_rtese dei ciiindro de propano licuado.
2. No trate de corregir ei probiema usted mismo.
3. Llame al cuerpo de bomberos local.
Page 31

La barbacoa de gas Weber ¢ es un aparato portable para cocinar al aire libre. Con la
barbacoa de gas Weber ¢ usted puede asar de manera convencional, a la barbacoa, y
al homo con unos resultados que son diffciles de duplicar con los artefactos de cocina
de la casa. La tapa cerrada y las barras Flavorizer _ le dan a la comida ese sabot a "aire
libre".
La barbacoa de gas Weber ¢ es portable pot Io que usted puede reubicarla fb.cilmente
de sitio en su jardfn o patio. La portabilidad significa que, si usted se muda, se puede
Ilevar su barbacoa de gas Webei _ consigo.
El suministro de gas natural es facil de usary le da a usted mb.s control al cocinar que
el carb6n.
• Estas instrucciones le indicaran los requisitos mfnimos para ensamblar su
barbacoa de gas Weber ¢. Por favor lea cuidadosamente las instrucciones antes
de utilizar su barbacoa de gas Weber_L Un ensamblaje incorrecto puede set
peligroso.
• No debe ser usado per ni_os.
• Si hubiesen c6digos locales que aplicasen alas barbacoas de gas porta.til, usted
deberb, acatarlos. La instalaci6n debe cumplir con los c6digos locales o, en
ausencia de estos, bien sea con el "C6digo nacional de gas combustible", ANSI
Z223.1/NFPA 54, el "C6digo de instalaciones de gas natural y propano", CSA
B149.1, o el "C6digo de manipulaci6n y almacenaje de propano', B149.2, o la
"Norma para vehfculos recreativos", ANSI A 119.2/NFPA 1192, y CSA Z240 RV
Series, "C6digo para vehfculos recreativos", segQn corresponda.
• Esta barbacoa de gas WeberCest4 disefiada para ser usada solamente con
gas natural (en las ciudades, suministrado a traves de tubeffas). No utilice gas
propano licuado embotellado. Las vb.lvulas, los orificios, la manguera y regulador
son aptos solamente para el gas natural
• No la use con carb6n.
• AsegQrese de que el _.rea debajo del panel de control y la bandeja inferior
no tenga desechos que pudiesen obstruir el flujo de aire de combusti6n o de
ventilaci6n.
Para compras hechas en M_xico
• Si hubiese c6digos locales quese aplicasena los asadoresde gas port_.tiles,
usted debera cumplir con lamas recienteedici6n de NOM.
PARA LA INSTALACION EN CANADA
Esta instrucciones, aunque de manera general son aceptables, no necesariamente
cumplen con los c6digos de instalaci6n canadienses, en particular en Io que respecta a
a tuberfas bajo y sobre tierra. En Canada la instalaci6n de este artefacto debe cumplir o
con los c6digos locales y/o la Norma CSA-B149,1 CC6digo de instalaci6n de artefactos
y equipos que queman gas natural").
ALMACENAJE o
,, Cuando la barbacoa de gas Weber ¢ no este us4mdose, el suministro de gas debe
cerrarse.
,, Cuando la barbacoa de gas Weber ¢ sea almacenada bajo techo, el suministro de
gas debe desconectarse.
,, Antes de usarla, se debera verificar que la barbacoa de gas WebeP _no tenga
fugas de gas ni obstrucciones en los tubos de los quemadores. (Vea la secci6n:
"Mantenimiento/Mantenimiento anual").
,, Asegt_rese de que el Area debajo del panel de control y la bandeja inferior
corrediza no tengan desechos que pudiesen obstruir el flujo de aire de
combusti6n o de ventilaci6n.
,, Tambien deberb, revisarse que la malla contra arahas e insectos no este
obstruida. (Vea la secci6n: "Mantenimiento/Mantenimiento anuar').
OPERACION
z_ ADVERTENCIA: S61o use esta barbacoa a[ aire libre en
un _rea bien venti[ada. No [a use en un garaje, edificio,
pasadizo techado o en cuaJquier otra _rea cerrada.
z_ ADVERTENClA: Su barbacoa de gas Weber ®no deber_
usarse debajo de un techo combustible.
z_ ADVERTENCIA: La barbacoa de gas Weber ® no ha sido
dJseffada para insta[arse en o sobre vehicu[os y/o botes
recreativos.
z_ ADVERTENC[A: No uti[Jce la barbacoa a una distancia menor
de 24 pulgadas (60 cm) de materia[es combustibles. Esto
incluye [a parte superior, inferior, posterior y lateral de la
barbacoa.
z_ ADVERTENCIA: La caja de cocci6n entera se ca[ienta a[
usarse. No la deje desatendida.
z_ ADVERTENClA: Mantenga a cua[quier cord6n el6ctrico y a [a
manguera de suministro de gas a[ejados de toda superficie
caJiente.
z_ ADVERTENClA: Mantenga el _rea de cocinar [ibre de
vapores y [iquidos inflamabJes tales como gaso[ina, alcohol,
etc. y de materia[es combustibles.
PRUEBAS A LA LJNEADE SUMINISTRO DE GAS
Desconecte su barbacoa de gas Weber ¢ cuando se este probando el suministro
de gas altas presiones.. El artefacto y su valvula de cierre propia deben ser
desconectados del sistema de tuberia del suministro de gas durante cualesquiera
pruebas a presi6n de dicho sistema en exceso de 1/2 psig (3.5 kPa).
Apague la barbacoa de gas Weber ¢ cuando se este probando el suministro
de gas a bajas presiones. Durante cualquier prueba de presi6n del sistema de
tuberfas de suministro de gas a una presi6n igual o menor de 1/2 psig (3.5 kPa),
este artefacto debe aislarse de diche sistema de tuberfas cerrando la valvula de
cierre manual del mismo.
MI_TODOS DE ASAR A LA PARRILLA
Nora: Si la barbacoa pierde calor mientras se est4 cocinando consulte la seccidn de
resolucidn de problemas de este manual.
Z_ ADVERTENC[A: No mueva la barbacoa de gas Weber _
mientras est_ funcionando o est_ caliente.
Puede ajustar los quemadores principales individuales a su gusto. Las posiciones de
los controles son START/HI (ENCENDIDO/FUEGO ALTO), MEDIUM (MEDIO), LOW
(bajo), o OFF (apagado).
Nora: La temperatura dentro de la caja de coccidn durante las primeras ocasiones en
que se use, cuando las superficies sean todavfa demasiado reflectoras, podr4 estar
m4s caliente de Io que se indica en el Iibro de recetas. Las condiciones bajo las que
se este cocinando, tales como el viento y el tiempo, pueden hacer que se requieran
ajustes a los controles de los quemadores para obtener las temperaturas de coccidn
correctas.
Si el quemador se apagase durante [a cocci6n, abra la tapa, apague todos los
quemadores, y espere cinco minutes antes de volver a encender.
Precalentamiento - La barbacoa de gas Weber ¢ es un artefacto que usa
eficientemente la energfa. Esta opera a una baja tasa de consumo calorffico. Para
precalentar: despues de encenderla, cierre la tapa y gire todos los quemadores a
"START/HI". El precalentar a una temperatura entre 500 ° y 550 ° F (260 ° y 290 ° C)
tardara de 10 a 15 minutos dependiendo de tales condiciones come la temperatura del
aire y el viento.
Grasa escurrida - Las barras Flavorizer ¢ han sido diseSadas para "ahumar" la cantidad
correcta de grasa escurrida para asf obtener una cocci6n con saz6n. El exceso de
grasa escurrida se acumulara en el plato recolector debajo de la bandeja corredera
inferior. Hay disponibles bandejas de goteo desechables que caben en el plato
recolector.
Z_ADVERTENCIA: Antes de cada uso, vedfique que no haya
grasa acumulada en [a bandeja inferior. Retire el exceso
de grasa para evitar que _sta se incendie en la bandeja
corredera inferior.
LIMPIEZA
z_ ADVERTENC[A: Apague la barbacoa de gas Weber ®y espere
a que se enfrJe antes de [impiarla.
z_ PRECAUClON: No IJmpie las barras Flavorizer _ o las parrillas
cocci6n en un homo autoJimpiante.
Para averiguar donde comprar las parrillas de cocci6n y las barras Flavorizer ®de
reemplazo, contacte a[ Representante de Atenci6n a[ Cliente en su _rea usando [a
informaci6n de contacto en nuestro sitio web. Con_ctese a www.weber.com ®
Superficies extemas - Utilice una soluci6n de agua jabonosa tibia para limpiarlas y
luego enjub.guelas con agua.
z_ PRECAUCION: Sobre la superficie de la barbacoa o del carro
no utiilice [Jmpiadores de homo, limpiadores abrasivos
(limpiadores de cocinas), limpiadores que contengan
productos citricos, o almohadillas de limpieza abrasivas.
Page 32

Deslice hacia afuera la bandeja del rondo - Retire el exceso de grasa, luego lavela
con agua jabonosa tibia y finalmente enju_.guela.
Barras Flavorizer_y rejillas de cocci6n - Lfmpielas con un cepillo de cerdas de acero
inoxidable adecuado. Segun se requiera, retfrela de la barbacoa y Ib.vela con agua
jabonosa tibia y luego enjuaguela con agua.
Plato recolector - Hay disponibles bandejas desechables de Ib.mina de metal, o
usted mismo puede forrar el plato recolector con papel aluminio. Para limpiar el plato
recolector, Ib.velo con agua jabonosa tibia y luego enjuague.
Term6metro - P_.sele un trapo con agua tibia jabonosa, y Ifmpielo con una pelota
plb.stica de fregar.
Dentro del m6dulo de cocci6n - Quite cualquier resto de los tubos del quemador NO
AGRANDE LAS ABERTURAS DE LOS QUEMADORES Lave la parte interior de la
caja de cocci6n con agua jabonosa y luego enjuaguela con agua.
Tapa interna - Mientras la tapa este tibia, limpie la parte interna con una toalla de papel
para prevenir la acumulaci6n de grasa. La grasa acumulada escamada se asemeja a
las escamas de pintura.
Superficies de acero inoxidable - L_.velas con un patio suave y una soluci6n de agua
y jab6n. Tenga cuidado de fregarlas en la direcci6n del grano del acero inoxidable.
No utilice limpiadores que contengan &cido, destilado de petr61eo o xileno.
Enju_guelas bien despu_s de lavarlas.
Preserve su acero inoxidable
La barbacoa o su gabinete, tapa, panel de control y estantes pudieran estar hechos de
acero inoxidable. Es sencillo mantener vistoso al acero inoxidable. Lfmpielo con agua
y jab6n, enjuaguelo con agua limpia y sequelo con un trapo. Para p_.rticulas dfficiles de
sacar, se puede usar un cepillo no met_.lico.
Z_ IMPORTANTE: No utilice cepillos de alambre o limpiadores
abrasivos sobre las superficies de acero inoxidable ya que
las rayar_n.
z_ IMPORTANTE: AI limpiar las superficies aseg_irese de
frotar/restregar en la direcci6n del grano para preservar la
vistosidad del acero inoxidable.
INSTALE EL SUMINISTRO DE GAS
ESPECIFICACIONES GENERALES DE LA TUBER|A
Nota: P6ngase en contacto con su municipalidad para obtener los c6digos de
construcci6n que regulan las instalaciones de barbacoas de gas al aire libre. Si no
existiesen c6digos locales, usted deberb, cumplir con la ma.s reciente edici6n del
"C6digo nacional de gas combustible": ANSI Z 223.1/NFPA 54, o CAN/CGA-B149.1,
"C6digo para las instalaciones de gas natural y propano". LE RECOMENDAMOS QUE
ESTA INSTALACI6N SEA REALIZADA P©R UN PROFESIONAL.
Algunos de los datos indicados a continuaci6n son requisitos generales tomados de la
m_.s reciente edicion del "C6digo nacional de gas combustible." ANSI Z 223.1/NFPA 54,
o CAN/CGA-B149.1, "C6digo nacional de gas combustible", para las especificaciones
completas.
Esta barbacoa ester disefiada para operar a una presi6n de 4.5 pulgadas de
columna de agua (0.163 psi).
AI aire libre, debera instalarse una v_.lvula de cierre manual inmediatamente
delante del desconectador rapido.
Bajo techo, deberb, instalarse una valvula de cierre manual adicional en la
Ifnea de derivaci6n de combustible, en un sitio accesible cerca de la Ifnea de
suministro.
El desconectador rapido se conecta a una rosca NPT de Y2pulg.c proveniente
de la fuente de gas. El desconectador r_.pido es un dispositivo operado
manualmente que al desconectar la barbacoa automaticamente cierra el flujo de
gas proveniente de la fuente.
El desconectador ra.pido puede conectarse horizontalmente o hacia abajo. El
instalar este accesorio con el extremo abierto hacia arriba puede resultar en la
acumulaci6n de agua y suciedad.
Las tapas guardapolvo (los tapones de pl_.stico suministrados) ayudan a
mantener limpios a los extremos abiertos de los desconectadores rb.pidos
mientras estos esten desconectados.
AI realizar las conexiones, se deberb, usar un compuesto para tuber[a que sea
resistente a la acci6n del gas natural.
El conector al aire libre debe estar fijado firmemente a una construcci6n rigida y
permanente.
z_ ADVERTENCIA: No pase la manguera de 10 pies pot debajo
de un piso. La manguera debe estar visible.
INSTALACION DE LA TUBER|A DE GAS
Si la Iongitud de tuberfa requerida no excede los 50 pies, use una tuberia de 5/8"
de dia.metro externo. La siguiente medida mayor debera utilizarse para longitudes
mayores de 50 pies.
La tuberia de gas puede ser de tubos de cobre, tipo K o L; tubes de pla.stico de
polietileno, con un espesor de pared minimo de 0,062 pulgadas; o tubos de acero
o hierro dulce de peso est_.ndar (cedula 40).
Los tubes de cobre deben estar revestidos de estaflo si el gas contiene mb.s de
0.3 gramos de sulfuro de hidr6geno por 100 pies c0bicos de gas.
Los tubes de plastico son aptos s61o para use subterr_.neo al aire libre.
La tuberia de gas en contacto con tierra, o cualquier otro material que pudiera
corroerla, debe protegerse contra la corrosi6n de una manera aprobada.
La tuberfa subterrb.nea debe tener una cubierta de tierra de per Io menos 18
pulgadas.
PRUEBA DE LAS CONEXIONES
Toda conexi6n y junta debe probarse a fondo para detectar la posible presencia de
fugas de acuerdo con los c6digos locales y todos los procedimientos enumerados en la
edici6n ma.s reciente del "C6digo nacional de gas combustible": ANSI Z 223.1/NFPA 54,
o CAN/CGA-B149.1
z_ PEMGRO
No utilice una llama abierta para comprobar si existen fugas
de gas. Aseg_rese de que no haya chispas o llamas abiertas
en el _rea mientras comprueba si existen fugas. Chispas o
llamas causar_n un fuego o explosi6n, las cuales pueden
causar serias lesiones corporales o la muerte, y daSos a la
propiedad.
Suministro de gas
Dentro de la pared
Fuera de la pared
Esto es una instalaci6n tipica
de gas natural de los
asadores Weber ®. Los codigos
locales pueden requerir
distintas instalaciones.
Desconecci6n
rapida
Niplede 1/_
No utilize
Page 33

TIPO DE GAS:
Su barbacoa de gas natural est,. construida de fabrica para operar solamente con gas
natural. Nunca trate de operar la barbacoa con otros gases diferentes a los indicados
en la placa de especificaciones de la misma.
Su barbacoa funciona a un presi6n de 4.5" de columea de agua. Si fuese necesario
reemplazar la manguera, se requeriran partes especificadas por la fb.brica. Consulte
con su distribuidor local.
Por razones de seguridad y dise_o, la conversi6n de una barbacoa Weber ¢ que opera
con gas natural a una que opere con gas propano licuado requiere cambiar la totalidad
del sistema de suministro de gas de la misma. Si esto fuese necesario, consulte a su
distribuidor para mayor informaci6n.
&QUE_ES EL GAS NATURAL?
El gas natural, a menudo denominado metano, es un combustible moderno seguro.
El gas natural es suministrado pot empresas de servicio pL_blico y debeffa tenerlo
disponible si la calefacci6n de su casa funciona con gas.
INSTALACION TRANSPORTABLE
Weber _ recomienda mover la barbacoa pot los menos a dos (2) pies (60 cm) del punto
de suministro de gas o de cualquier superficie combustible. Despues de haber tendido
el suministro de gas y haberse verificado la ausencia de fugas de acuerdo con las
instrucciones de ensamblaje, usted estar_, listo para empezar a asar. Para conectar
la manguera al suministro de gas, hale hacia atras el adaptador externo, inserte el
adaptador de la manguera totalmente hacia adentro, y suelte el adaptador externo. Este
proceso producirb, una junta de gas.
PREPARATIVOS PARA LA BUSQUEDA DE FUGAS
VERIFIQUE QUE TODAS LAS V._LVULAS DE LOS QUEMADORES
ESTEN CERRADAS
Las valvulas son despachadas de fabrica en la posici6n "OFF" (cerradas), pero usted
debe verificarlo para asegurarse de que efectivamente esten cerradas. Verifiquelo
presionandolas hacia abajo y gir_.ndolas hacia la derecha. Si no giran, esta.n cerradas.
Proceda al paso siguiente. Si sf girasen, continue gir_.ndolas hacia la derecha hasta
que paren; allf estaran cerradas. Proceda al paso siguiente.
3 4 5 2 6 1
1 Conexi6n giratoria
2 Instale las cubiertas cuando la manguera este desconectada.
3 Wlvula de cierre
4 Recubra este niple con barniz de tubeffa resistente al gas
5 Recept_.culo
6 Conexi6n macho
1 Recept_.culo
2 Manga
3 Empuje la manga hacia atras
4 Enchufe
Empuje el enchufe hasta que la manga salte hacia adelante inmovilizandolo en el
receptaculo.
(Esto automaticamente abre el gas.)
Cuando est,. correctamente ensamblado, el enchufe no puede sacarse sin empujar
la manga hacia atr_.s.
Para desconectar, empuje la manga hacia atras y hale el enchufe hacia afuera.
(Esto automb.ticamente cierra el gas.)
PRUEBA DE FUGAS DE GAS
z_ ADVERTENCIA: Las conexiones de gas en su barbacoa
de gas Summit ® hart sido probadas en la f_brica. Le
recomendamos, sin embargo, que usted tea[ice pruebas de
fugas en todas [as cone×iones previo a poner a funcionar [a
barbacoa de gas Summit ®.
RETIRE EL PANEL DE CONTROL:
Parte requerida: destornillador Phillips.
1) Retire las perillas de control del quemador.
Page 34

2) Retirelosdostornillosquesujetanelpaneldecontrolalbastidor.
3) Retireelpaneldecontrol.Inclineelpanelhaciaadelanteylevb.nteloalejb.ndolo
delabarbacoa.
Retirecompletamentealpaneldecontrol(3)delensambledelacajadecocci6npara
exponerlasvalvulas,losquemadores,elencendedoryelmOltiple.
REVISE LA MANGUERA FLEXIBLE A LA CONEXI6N DEL
IVIOLTIPLE
La manguera de gas natural ha sido fijada durante el proceso de manufactura. Antes
de poner a funcionar la barbacoa, recomendamos que se verifique que la conexi6n de
la manguera al mt31tiple de gas no tenga fugas siguiendo los lineamientos en esta Gufa
del Propietario.
COMPRUEBE QUE NO HAYA FUGAS DE GAS
PELIGRO
No utilice una llama abietta para comprobar si existen fugas
de gas. Aseg_rese de que no haya chispas o llamas abiertas
en el _rea mientras comprueba si existen fugas. Chispas o
llamas causar_n un fuego o explosi6n, las cuales pueden
causar serias lesiones corporales o la muerte y daSos a la
propiedad.
z_ ADVERTENCIA: Cada vez que conecte o desconecte una
cone×i6n de gas, debet_ vetificar que no hayan fugas de
gas.
Nota: Todas /as conexiones de f_brica hart sido revisadas a fondo en busca de fugas.
Los quemadores hart sido probados con/as llamas encendidas. Como medida de
precaucidn, sin embargo, usted deberd verificar que ninguna conexidn tenga fugas
antes de utiflzar /a barbacoa de gas Weber'. Durante el manejo y despacho puede
haberse aflojado o dadado a/guna conexidn de gas.
z_ ADVERTENClA: Lleve a cabo estos chequeos de fugas
aun y cuando su barbacoa haya sido ensamblada pot el
distribuidor o en la tienda donde la compr6.
Usted necesitara: una soluci6n de agua y jab6n y un trapo o una brocha para aplicarla.
Asegt_rese de que el quemador lateral este apagado (Vea PREPARATIVOS PARA LA
BUSQUEDA DE FUGAS). Retire la perilla y los tornillos de la vb.lvula de control. Quite
la cubierta superior de porcelana
Para realizar la comprobaci6n de que no hay fugas: Deslice hacia atras el collarfn
del desconectador rb.pido(1). Empuje la conexi6n macho de la manguera dentro del
desconectador rb.pido y mantenga la presi6n. Deslice el collarfn hasta quedar cerrado
(2). Si no se acoplase o cerrase, repita el procedimiento. El gas no fluira a menos que el
desconectador r_.pido este debidamente acoplado.
Abra el suministro de gas.
Compruebe la existencia de fugas mojando las conexiones con la soluci6n de agua y
jab6n y viendo si se generan burbujas. Si se forman burbujas o si una burbuja crece
existe una fuga.
Nota: Dado que algunas soluciones para la deteccidn de fugas, incluyendo el agua y
jabdn, pueden ser Iigeramente corrosivas, todas las conexiones deber#n enjuagarse
con agua despu6s de realizar la comprobacidn de las fugas.
ADVERTENCIA: No encienda los quemadores mientras est_
vetificando la existencia de fugas.
Page 35

VERIFIQUE:
1) La conexi6n de la manguera de suministro de gas y el pasamuros.
2) La conexi6n del pasamuros al regulador.
3) La conexi6n del regulador a la manguera.
4) Las conexiones de la Ifnea de gas principal al multiple.
ADVERTENCIA: Si hay una fuga en la cone×i6n (1,2, 3, o
4), vuelva a apretar la cone×i6n con una llave y vuelva a
revisarla con la soluci6n de agua y jab6n.
Si una fuga persiste aun despu6s de volver a apretar
la conexi6n, cierre el gas. NO OPERE LA BARBACOA
Contacte al Representante de Atenci6n al Cliente usando
la inforrnaci6n de contacto en nuestro sitio en la Internet.
Con6ctese a www.weber.corn ®.
5) La conexi6n del pasamuros a la manguera del quemador lateral.
6) La conexi6n de la manguera del quemador lateral alas conexiones del
desconectador rapido, de la vb.lvula del quemador lateral y de los orificios.
7) La conexi6n de la manguera al desconectador rapido
8) Las conexiones de las valvulas al mt]ltiple.
z_ ADVERTENCIA: Si hubiese una fuga en las conexiones (5, 6,
7, o 8) cierre el gas. NO OPERE LA BARBACOA. Contacte al
Representante de Atenci6n al Cliente usando la inforrnaci6n
de contacto en nuestro sitio en la Internet.
Con6ctese a www.weber.com ®
Cuando se haya completado la comprobaci6n de las fugas de gas, cierre el suministro
de gas en la fuente y enjuague las conexiones con agua.
®
*La barbacoa ilustrada puede tenet ligeras
diferenciae con respecto al modelo comprado.
Page 36

VERIFIQUE:
1) La conexi6n de la Ifnea de gas principal al mt31tiple.
2) La conexi6n de la Ifnea de gas al quemador del asador giratorio (quemador
infrarrojo).
3) La conexi6n de la manguera de suministro de gas y el pasamuros.
4) La conexi6n del pasamuros al regulador.
5) La conexi6n del regulador a la manguera.
z_ ADVERTENCIA: Si hay una fuga en la conexi6n (1,2, 3, 4,
o 5), vuelva a apretar la conexi6n con una Ilave y vuelva a
revisarla con la solucibn de agua y jab6n.
Si una fuga persist® aun despu_s de volver a apretar
la conexi6n, cierre el gas. NO OPERE LA BARBACOA.
Contact® al Representante de Atenci6n al Client® usando la
inforrnaci6n de contact® en nuestro sitio web.
Con_ctese a www.weber.corn ®.
6) La conexi6n del pasamuros a la manguera del quemador lateral.
7) La conexi6n de la manguera del quemador lateral a las conexiones del
desconectador rb.pido, de la valvula del quemador lateral y de los orificios.
8) La conexi6n de la manguera al desconectador rb.pido
9) Las conexiones de las vb.lvulas al mOltiple.
z_ ADVERTENCIA: Si hubiese una fuga en las cone×iones (6, 7,
8, o 9), cierre el gas. NO OPERE LA BARBACOA. Contact® al
Representante de Atenci6n al Client® usando la inforrnaci6n
de contact® en nuestro sitio web.
Con_ctese a www.weber.com e.
Cuando se haya completado la detecci6n de fugas de gas, cierre el suministro de gas
en la fuente y lave las conexiones con agua.
VUELVA A INSTALAR EL PANEL DE CONTROL.
Partes requeridas: panel de control, tornillos y perillas de control del quemador.
Coloque el panel de control de vuelta sobre los soportes del mismo a cada lad® del
frente de la caja de cocci6n.
Aline® los tornillos con los sus respectivos agujeros tanto en el panel de control como
en los soportes de este t_ltimo. Apriete los tornillos.
Introduzca las perillas de control correspondientes en los vastagos de las vb.lvulas.
®
*La barbacoa ilustrada puede tenet ligeras
diferencias con respect® al model® cornprado.
Page 37

MI_TODOS PARA ASAR:
Nota: Si la barbacoa pierde calor mientras se est_ cocinando consulte la seccidn de
resolucidn de problemas de este manual.
Puede ajustar los quemadores individuales a su gusto. Las posiciones de los controles
son START/HI (ENCENDIDO/FUEGO ALTO), MEDIUM (MEDIO), LOW (BAJO), o OFF
(apagado).
Si los quemadores se apagasen durante la cocci6n, apague todos los quemadores y
espere 5 minutos antes de volver a encender.
z_ ADVERTENC[A: Antes de cada uso, verifique que no haya
grasa acurnulada en el plato recolector y [a bandeja inferior.
Retire el exceso de grasa para evitar que se incendie la
bandeja inferior.
PRECALENTADO
Es importante precalentar la barbacoa antes de asar. Encienda su parrilla de gas
Summitede acuerdo con las instrucciones en este Manual del Propietario. Gire todos los
quemadores principales a Start/Hi, cierre la tapa y precaliente la barbacoa con la tapa
cerrada hasta que el term6metro de la misma alcance 550-°F (260°-288°C). Esta es la
temperatura recomendada para asar a la parrilla. Esto tomara aproximadamente 10 a 15
minutes, dependiendo de la temperatura al aire libre.
COCC[ON CUBIERTA
Todo asado debera realizarse con la tapa cerrada para proporcionar un calor uniforme
y una circulaci6n pareja. Con la tapa cerrada, la parrilla de gas Summit e cocinara de
manera muy parecida a un homo de convecci6n. El term6metro en la tapa indica la
temperatura de cocci6n dentro del asador. Todo precalentamiento y cocci6n se realiza
con la tapa cerrada. Nada de miraditas - se pierde calor cada vez que usted abre la tapa.
Lo mas importante que hay que saber acerca de asar es cual metodo de cocci6n usar
para un alimento especffico, el metodo Directo o Indirecto. La diferencia es sencilla:
colocar los alimentos directamente sobre el fuego, o encender el fuego a cada lado de
ellos. Usar el metodo correcto es la ruta mas corta a resultados fabulosos - y la mejor
manera de garantizar la seguridad de que este bien cocido.
COCClON DIRECTA
El metodo directo, similar al asado, significa que los alimentos se cocinan directamente
sobre la fuente de calor. Para una cocci6n pareja, los alimentos deberan voltearse una
vez a la mitad del tiempo de asado.
Use el metodo directo para alimentos que toman menos de 25 minutes en asarse:
bistecs, chuletas, brochetas, salchichas, vegetales, y mas.
La cocci6n directa tambien es necesaria para dorar las carnes. La doradura crea esa
fabulosa textura crujiente y caramelizada donde el alimento toca la parrilla. Tambien le
da un gran color y saz6n a toda la superficie. Los bistecs, chuletas, pechugas de polio,
y los cortes mayores de came todos se benefician de la doradura.
Para dorar las cames, col6quelas sobre fuego alto directo durante 2 a 5 minutos pot
lado. Las piezas menores requieren menos tiempo de doradura. Normalmente despues
de dorar se termina de asar los alimentos a una temperatura m_.s baja. Puede asar
aquellos alimentos que se cocinan rapido usando el metodo directo; utilice el metodo
indirecto para los alimentos que tardan mas en asarse.
Para poner a punto la parrilla para la cocci6n directa, precalientela con todos los
quemadores en "HI" (fuego alto). Coloque los alimentos sobre la parrilla de cocci6n
y luego ajuste todos los quemadores a la temperatura indicada en la receta. Cierre
la tapa de la barbacoa y levantela solamente para darle vuelta a los alimentos o
comprobar cub.n bien hecha esta al final del tiempo recomendado de cocci6n.
COCCl6N INDIRECTA
El metodo indirecto es similar al asado, pero con el beneficio adicional de esa textura,
saz6n, y apariencia de la comida a la parrilla que no se puede obtener en un homo.
Para preparar la barbacoa para la cocci6n indirecta, se encienden los quemadores
a cado lado de los alimentos pero no aquellos directamente debajo de ellos. El calor
asciende, se refleja de la tapa y de las superficies internas de la parrilla, y circula para
cocinar lentamente los alimentos de manera pareja por todos los lades, en forma muy
similar a un homo de convecci6n, por Io que no hay necesidad de voltearlos.
Utilice el metodo indirecto para los alimentos que requieran 25 minutos o mb.s de
tiempo de asado o que son tan delicados que la exposici6n directa a la llama los
secarfa o quemaffa. Los ejemplos incluyen asados, costillas, pollos enteros, pavos, y
otros cortes grandes de came al igual que filetes delicados de pescado.
Para preparar la barbacoa de gas para la cocci6n indirecta, precalientela con todos los
quemadores en "HI". Luego ajuste los quemadores de cada lade de los alimentos a la
temperatura indicada en la receta y apague el (los) quemador(es) directamente debajo
de ellos. Para los mejores resultados, coloque los asados, aves, o cortes grandes de
came sobre una rejilla de asar colocada dentro de una bandeja desechable de lamina
gruesa. Para tiempos de cocci6n mb.s largos, agregue agua a la bandeja de lamina
para evitar que el chorreo de grasa se queme. El chorreo de grasa puede usarse para
hacer salsa.
ARRETE
OFF O
APAGADO
OFF START/
HI
EL S[STEMA FLAVORIZER ®
Cuando los jugos de came chorrean de los alimentos alas barras Flavorizer ¢ colocadas
en un angulo especial, estas crean un humo que le da a la comida una irresistible
saz6n a barbacoa. Gracias al diseSo unico de los quemadores, las barras Flavorizer _
y los flexibles controles de temperatura, los fogonazos descontrolados han sido
virtualmente eliminados, pues USTED controla las llamas. Debido al especial disdio de
las barras Flavorizer ¢ y de los quemadores, las grasas en exceso son dirigidas a traves
de la bandeja de forma de embudo del fondo al plato recolector de grasa.
MED. LOW
(A) (A)
"-[ I-
1 2 3 4 5 6
H H H H H H
A Los alimentos se colocan en el area de las parrillas de cocci6n
directamente encima de los quemadores encendidos.
,-/_?
L oo oo I
1 6
M M
B Los alimentos se colocan en el area de las parrillas de cocci6n entre
los quemadores indirectos.
Page 38

CONSEJOS PR._,CTICOS PARA ASAR
Siempre precaliente la barbacoa antes de cocinar en la misma. Ajuste todos los
quemadores a la posici6n "HI" (llama alta) y cierre la tapa, caliente durante 10
minutes, o hasta que el term6metro marque 500°-550°F (260°-288°C).
Para alimentos siempre perfectamente asadas, dote la carnes y cocine con la
tapa cerrada.
Los tiempos de asado en las recetas son en base a una temperatura ambiental
de 70°F (20°C) y poco o ningun viento. Permita un mayor tiempo de cocci6n en
dfas fffos o de viento, o a mayores altitudes. Permita menos tiempo de cocci6n en
climas extremadamente calurosos.
Los tiempos pueden variar a causa del clima, o la cantidad, tamafio y forma de
los alimentos asados.
La temperatura a la cual funciona su asador de gas Summit ®puede set mayor de
Io normal al principio.
Las condiciones de asado pueden requerir el ajuste de los controles de los
quemadores para obtener las temperaturas de cocci6n correctas.
Pot Io general, las piezas de came mAs grandes requeriran mayor tiempo de
cocci6n pot libra que las piezas mAs chicas. Los alimentos abarrotados sobre
una parrilla de cocci6n requerirAn de mas tiempo de cocci6n que s61o unos pocos
alimentos. Los alimentos asados dentro de recipientes, tales come judfas en
salsa de tomate, tomarAn mAs tiempo si se cocinan en una cacerola profunda que
en una olla liana.
FUNClONAMIENTO DEL ENCEND[DO RAP[DO
z_ Siempre abra [a tapa antes encender los quemadores.
Cada perilla de control tiene su propio electrodo de encendido incorporado a ella. Para
generar una chispa debe presionar la perilla de control (A) y girarla a "START/High"
(encendido/fuego alto) (B).
Esta acci6n generara un flujo de gas y una chispa al tubo de encendido del quemador
(C). Oira un "chasquido" proveniente del encendedor. Tambien vera una llama
anaranjada de 3- - 5- de largo proveniente del tubo encendedor del quemador (D).
Mantenga presionada ia periiia de control durante dos segundos adicionales
despu_,s del "chasquido". Esto permitira que el gas fluya a todo Io largo del tube
quemador (E) y se asegure el encendido.
Verifique que el quemador este encendido viendo a traves de las parrillas de cocci6n.
Debera vet una llama. Si el encendedor no se encendiese al primer intento, presione la
perilla de control y girela a la posici6n "OFF" (apagada) y repita el procedimiento una
segunda vez.
ADVERTENC[A: Si el quemador no se enciende, gire la
periiia del control del quemador a [a posicibn "OFF" y
espere 5 minutos para permitir que el gas se disipe antes de
tratar de nuevo o de tratar de encender[o con un ceril[o.
o Recorte el exceso de grasa de los bistecs, chuletas y asados, dejando apenas _A
de pulgada (6.4 mm) de grasa. Menos grasa facilita la limpieza, yes una garantfa
casi absoluta contra las indeseadas Ilamaradas.
Los alimentos colocados sobre la parrilla de cocci6n directamente encima de los
quemadores pudieran requerir que se les de la vuelta o que se les mueva a un
Area menos caliente.
Use tenacillas en vez de un tenedor para dar vuelta y manipular las carnes
para asf evitar perder los jugos naturales. Use dos espatulas para manipular un
pescado entero grande.
Si Ilegase a ocurrir alguna Ilamarada indeseada, apague todos los quemadores
y mueva los alimentos a otra zona de la parrilla de cocci6n. Cualquier llama se
apagarA rApidamente. Una vez que las llamas se apaguen, vuelva a encender
la parrilla. JAM,_,S USE AGUA PARA EXTINGUIR LAS LLAMAS EN UNA
PARRILLA DE GAS.
Algunos alimentos, tales como los guisos o los filetes delgados de pescado,
requeriran de un recipiente para asarlos. Las ollas desechables de lamina
son muy convenientes, pero puede usarse cualquier olla de metal con asas
resistentes al calor.
Asegurese siempre de que la bandeja inferior y el plato recolector de grasa esten
limpios y libres de desechos.
No forre con hoja de aluminio a la bandeja inferior en forma de embudo. Ello
pudiera prevenir que la grasa fluya al plato recolector de grasa.
El usar un temporizador le ayudara a alertarle cuando "bien cocido" este a punto
de convertirse en "sobre cocido."
Page 39

ENCENDIDO
Dentro del puerta izquierda del gabinete se encuentran las instrucciones resumidas de
encendido.
PELIGRO
El no abrir la tapa mientras se est_ encendiendo el
quemador de la barbacoa, o no esperar 5 minutos para que
el gas se disipe si _sta no se enciende, puede resultar en
una Ilamarada explosiva, la cual puede causar lesiones
corporales serias o la muerte.
ENCENDIDO R_,PIDO DEL QUEMADOR PRINCIPAL
Nota: Cada perilla de control de encendido r_pido crea una chispa que va del
electrodo de encendido al tubo quemador de encendido. AI presionar la perilla de
control y girarla a "START/HI" (encendido/fuego alto), usted genera la energfa para la
chispa. Esto encender# cada quemador individual.
z_ ADVERTENCIA: Inspeccione la manguera previo a cada
uso de la barbacoa y aseg_rese de que no tenga muescas,
grietas, abrasiones o cortes. Si se encontrase que la
manguera estuviese daSada de cualquier manera, no utilice
la barbacoa. Reempl_cela solamente con una manguera de
repuesto autorizada pot Weber _. Contacte al Representante
de Servicios al Cliente en su _rea utilizando la informaci6n
de contacto en nuestro sitio web.
Con_ctese a www.weber.com ®.
1) Abra la tapa.
2) AsegL_rese de que todas las perillas de control del quemador esten en la posici6n
"OFF" (apagadas). (Empuje la perilla de control hacia adentro y gire en direcci6n
de las manecillas del reloj para asegurarse de que este en la posici6n "OFF"
(apagada).
3) Abra el suministro de gas en la fuente.
ADVERTENCIA: No se incline sobre la barbacoa abierta.
Presione la perilla de control y gire hacia "START/HI" hasta que oiga el chasquido
del encendedor - mantenga a la perilla de control en dicha posici6n durante dos
segundos. Esta acci6n hara que el encendedor genere una chispa y encienda el
tube piloto y luego el quemador principal.
*La barbacoa ilustrada puede tenet ligeras
diferencias con respecto al modelo comprado.
® ®
5) Verifique que el quemador este encendido viendo a traves de las parrillas de
cocci6n. Debera ver una llama. Si el encendedor no se encendiese al primer
intento, presione la perilla de control y girela a la posici6n "OFF" y repita el
procedimiento una segunda vez.
z_ ADVERTENCIA: Si el quemador no se encendiese, gire
la perilla del control del quemador a la posici6n "OFF" y
espere 5 minutos para permitir que el gas se disipe antes de
tratar de nuevo o de tratar de encenderlo con una cerilla.
PARAAPAGAR
Presione y gire la perilla de control del quemador en direcci6n de las agujas del reloj a
la posici6n "OFF". Cierre el suministro de gas en la fuente del mismo.
ENCENDIDO MANUAL DEL QUEMADOR PRINCIPAL
PEMGRO
El no abrir la tapa mientras se est_ encendiendo el quemador
de la barbacoa, o no esperar 5 minutos para que el gas se
disipe si la barbacoa no se enciende, puede resultar en
una Ilamarada explosiva, la cual puede causar lesiones
corporales serias o la muerte.
1) Abra la tapa.
2) AsegL_rese de que todas las perillas de control de los quemadores esten en la
posici6n "OFF" (apagadas). (Presione cada perilla y gfrela en direcci6n de las
agujas del reloj para asegurarse de que esten cerradas en la posici6n OFF).
3) Abra el suministro de gas en la fuente.
4) Coloque el cerillo en el portacerillos y enciendalo.
ADVERTENCIA: No se incline sobre la barbacoa abierta.
5) Inserte el portacerillos con el cerillo encendido a traves de las parrillas de cocci6n
y de las barras Flavorized _ para encender el quemador seleccionado.
6) Presione la perilla de control del quemador y gfrela hacia "START/HI" (encendido/
fuego alto).
z_ ADVERTENCIA: Si el quemador no se enciende, gire la
perilla del control del quemador Delantero a la posici6n OFF
(apagado) y espere 5 minutos para permitir que el gas se
disipe antes de tratar de nuevo.
PARA APAGAR
Presione y gire la perilla de control del quemador en direcci6n de las agujas del reloj a
la posici6n "OFF". Cierre el suministro de gas en la fuente del mismo.
*La barbacoa ilustrada puede tenet ligeras
diferencias con respecto al modelo comprado.
® ®
Page 40

COMO ENCENDER EL QUEMADOR LATERAL
PELIGRO
El no abrir la tapa rnientras se est_ encendiendo el quernador
lateral, o no esperar 5 rninutos para que el gas se disipe
si el quernador lateral no se enciende, puede resultar en
una llarnarada explosiva, la cual puede causar lesiones
corporales serias o la rnuerte.
z_ ADVERTENCIA: inspeccione ia rnanguera previo a cada
uso de la barbacoa y aseg_rese de que no tenga rnuescas,
grietas, abrasiones o cortes. Si se encontrase que la
rnanguera estuviese daSada de cualquier rnanera, no utilice
la barbacoa. Reernpl_cela solarnente con una rnanguera de
repuesto autorizada pot Weber _. Contacte al Representante
de Servicios al Cliente en su _rea utilizando la inforrnaci6n
de contacto en nuestro sitio web.
Con_ctese a www.weber.corn ®.
1) Abra la tapa del quemador lateral.
2) Verifique que la valvula del quemador lateral este cerrada (empuje la perilla de
control hacia adentro y gfrela en direcci6n de las agujas del reloj para asegurar de
que este en la posici6n "OFF"), coloque todos los quemadores que no se esten
usando en la posici6n "OFF'" (empujando hacia adentro y girando en la direcci6n
de las agujas del reloj).
3) Abra la valvula de suministro de gas.
4) Presione y gire la valvula de control del quemador lateral a la posici6n "HI" (fuego
alto).
5) Pulse el bot6n rojo de encendido varias veces, de manera que haga "clic" cada
vez.
Z_ PRECAUCION: En dias asoleados, la llama del quernador
lateral puede set dificil de vet.
z_ ADVERTENCIA: Si el quernador lateral no se enciende en
cinco (5) segundos:
a) Cierre Ja v_lvula de control del quemador lateral, los
quemadores principales y el suministro de gas en Ja fuente.
b) Espere 5 minutos para permitir que el gas se disipe antes
de volver a tratar de de nuevo, o tratar de encender con un
cerillo (vea "Encendido manual del quemador lateral').
ENCENDIDO MANUAL DEL QUEMADOR LATERAL
PELIGRO
Ei no abrir la tapa rnientras se est_ encendiendo ei quernador
lateral, o no esperar 5 rninutos para que el gas se disipe
si el quernador lateral no se enciende, puede resultar en
una llarnarada explosiva, la cual puede causar lesiones
corporales serias o la rnuerte.
1) Abra la tapa del quemador lateral.
2) Verifique que la valvula del quemador lateral este cerrada (empuje la perilla de
control hacia adentro y gfrela en direcci6n de las agujas del reloj para asegurar de
que este en la posici6n "OFF"), coloque todos los quemadores que no se esten
usando en la posici6n "OFF'" (empujando hacia adentro y girando en la direcci6n
de las agujas del reloj).
3) Abra la valvula de suministro de gas.
4) Coloque un cerillo en el portacerillos y enciendalo.
,5) Aguante el portacerillos y encienda con el cerillo cualquier lado del quemador
lateral.
6) Presione y gire la valvula de control del quemador lateral a la posici6n "HI" (fuego
alto).
Z_ PRECAUCION: En dias asoleados, la llama del quernador
lateral puede set dificil de vet.
z_ ADVERTENCIA: Si el quernador lateral no se enciende en
cinco (5) segundos:
a) Cierre la v_lvula de control del quernador lateral, los
quernadores principales y el surninistro de gas en la
fuente.
b) Antes de probar de nuevo, espere 5 rninutos para
dejar que el gas se disipe.
®
Page 41

COIVlO USAR EL AHUMADOR
El ahumador usa astillas de madera premojadas. Para resultados 6ptimos con
alimentos que se cocinan m_.s rb.pidamente tales como bistecs, hamburguesas,
chuletas, etc., recomendamos usar astillas de madera mb.s finas dado que se
encienden y crean humo de manera mas rapida. Para alimentos con tiempos de
cocci6n mb.s largos tales como los asados, pollos y paves, etc., recomendamos el
uso de trozos de madera ma.s grandes dado que se encienden mb.s lentamente y
proporcionan humo durante un peffodo de tiempo mas largo. En la medida en que
usted gane experiencia usando su ahumador, le animamos a experimentar con
diferentes combinaciones de astillas y pedazos de madera para encontrar el sabor del
ahumado que masse ajusta a su gusto.
PARA USAR EL AHUIVIADOR
Como punto de partida, remoje las astillas de madera en agua durante pot Io menos 30
minutes antes de usarlas.
(La madera hQmeda producirb, mas sabor a ahumado.) Coloque un puSado de astillas
de madera o unos cuantos trozos grandes en el fondo del cuerpo del ahumador (1). En
la medida que usted gane experiencia ahumando, incremente o reduzca la cantidad de
madera para ajustarla a su gusto.
Nota: Siempre ase con la tapa cerrada para permitir que el humo penetre la comida a
rondo.
Encienda el quemador del ahumador siguiendo las instrucciones dadas en "Encendido
del quemador del ahumador". Una vez que la madera empiece a arder, ajuste la perilla
de control a una llama baja.
El humo comenzarb, a producirse en aproximadamente 10 minutos y puede Ilegar a
durar unos 45 minutes. Si requiere un saber mas ahumado, rellene el ahumador con
astillas y/o trozos de madera. Mantenga la tapa del asador cerrada mientras cocine.
Nota: Nota: despu_s de volver a Ilenar el ahumador, tardar_ 10 a 15 minutos en
comenzar a humear de nuevo.
El ahumador puede usarse para realzar las recetas de carnes, aves y pescados.
Cocine con la tapa cerrada de acuerdo con los tiempos indicados en las tablas o las
recetas.
PELIGRO
No use ning_n liquido inflarnable en el ahumador para
encender la rnadera. Esto causar_ serias lesiones
corporales.
LIMPIEZA DEL AHUMADOR
Antes de cada uso, vacfe las cenizas del ahumador para permitir el flujo apropiado de
aire.
Nota: El ahumar dejar_ un residuo de "humo" sobre la superficie del ahumador. Este
residuo no se puede eliminar y no afectar_ el funcionamiento del ahumador. En menor
grado, un residuo de "humo" se acumular_ dentro de su asador de gas. Este residuo
no necesita quitarse y no afectar_ adversamente al funcionamiento de la barbacoa de
gas.
ENCENDIDO DEL QUEIVIADOR DEL AHUIVIADOR
PELIGRO
El no abrir la tapa rnientras se est_ encendiendo la barbacoa,
o no esperar 5 minutos para permitir que el gas se disipe si
la barbacoa no se enciende, puede resultar en una Ilamarada
explosiva, la cual puede causar lesiones corporales serias o
la rnuerte.
ENCENDIDO R._PIDO DEL QUEIVlADOR DEL AHUIVlADOR
Nota: Cada perilla de control de encendido r_pido crea una chispa que va del electrodo
de encendido a! tubo quemador de encendido. AI presionar la perilla de control y girarla
a "START/Hl"(encendido/fuego alto), usted genera la energfa para la chispa. Esto
encender_ el quemador del ahumado_
z_ ADVERTENCIA: Inspeccione la rnanguera previo a cada
uso de la parrilla y aseg_rese de que no tenga rnuescas,
grietas, abrasiones o cortes. Si se encontrase que la
rnanguera estuviese daSada de cualquier manera, no utilice
la barbacoa. Reernpl_cela solamente con una rnanguera de
repuesto autorizada pot Weber ®.Contacte al Representante
de Servicios al Cliente en su _rea utilizando la informaci6n de
contacto en nuestro sitio web. Con_ctese a www.weber.corn ®.
1) Abra la tapa de la barbacoa.
2) Abra la tapa de la caja del ahumador
3) Llene la caja del ahumador con pedazos o astillas de madera empapadas con
agua.
4) AsegL_rese de que las perillas de control de los quemadores que no se esten
usando esten en la posici6n "OFF" (apagados). (Empuje la perilla de control hacia
adentro y gire en direcci6n de las agujas del reloj para asegurarse de que este en la
posici6n "OFF")
5) Abra el gas en la fuente del mismo.
z_ ADVERTENCIA: AI encender, no se incline sobre la barbacoa
abierto.
6) Presione la perilla de control y gfrela hacia "START/HI" (encendido/fuego alto) hasta
que oiga el chasquido del encendedor - mantenga a la perilla de control en dicha
posici6n durante dos segundos. Esta acci6n hara que el encendedor genere una
chispa y encienda el tubo piloto y luego el quemador principal.
7) Verifique que el quemador este encendido viendo a traves de las parrillas de
cocci6n. Deber_. ver una llama. Si el encendedor no se encendiese al primer intento,
presione la perilla de control y gfrela a la posici6n "OFF" y repita el procedimiento
una segunda vez.
*La barbacoa
ilustrada puede tenet
ligerae diferencias
con respecto al
modelo comprado.
® ®
PELIGRO
Si el quernador del ahurnador no se enciende, gire _aperilla
del control del quemador a la posici6n "OFF" y espere 5
rninutos para perrnitir que el gas se disipe antes de tratar de
nuevo.
8) Una vez que la madera empiece a arder, cierre la cubierta del ahumador y gire la
perilla de control a "LOW" (fuego bajo).
PARA APAGAR
Presione y gire la perilla de control de cada quemador en direcci6n de las agujas del
reloj a la posici6n "OFF". Cierre el suministro de gas en la fuente del mismo.
Page 42

ENCENDIDO MANUAL DEL QUEMADOR DEL AHUMADOR
1) Abra la tapa.
PELIGRO
El no abrir la tapa mientras se est_ encendiendo la barbacoa,
o no esperar 5 minutos para permitir que el gas se disipe si
la barbacoa no se enciende, puede resultar en una llamarada
explosiva, la cual puede causar lesiones corporales serias o
la muerte.
2) Abra la tapa de la caja del ahumador
3) Llene la caja del ahumador con pedazos o astillas de madera empapadas con
agua.
4) AsegQrese de que las perillas de control de los quemadores que no se esten
usando esten en la posici6n "OFF" (apagados). (Empuje la perilla de control hacia
adentro y gire en direcci6n de las agujas del reloj para asegurarse de que este en
la posici6n "OFF")
.5) Abra el gas en la fuente del mismo.
6) Coloque un cerillo en el portacerillos y enciendalo.
7) Inserte el portacerillos con el cerilla encendido a traves de las parrillas de cocci6n
y de las barras Flavorizer ¢ para encender el quemador del ahumador.
z_ ADVERTENCIA: Mientras la enciende, no se incline sobre la
barbacoa abierta.
8) Presione la perilla de control del quemador del ahumado y gffela hacia START/HI
(encendido/alto).
9) Verifique que el quemador este encendido viendo hacia abajo a traves de la
parrilla de cocci6n.
PELIGRO
Si el quemador del ahumador no se enciende, gire la perilla
del control del quemador a la posici6n "OFF" y espere 5
minutos para permitir que el gas se disipe antes de tratar de
n uevo,
®
*La barbacoa ilustrada puede tenet
ligeras diferencias con respecto al
modelo comprado.
® ®
10) Una vez que la madera empiece a arder, cierre la cubierta del ahumador y gire la
perilla de control a "LOW" (fuego bajo).
PARA APAGAR
Presione y gire la perilla de control de cada quemador en direcci6n de las agujas
del reloj a la posici6n "OFF". Cierre el surninistro de gas en la fuente del rnisrno.
USO DEL ASADOR GIRATORIO
Nota: Antes de usar el asador giratorio, mida el alimento a asar en su punto m_s
ancho. Si _ste excede de g½" (241.8 mm), entonces es demasiado grande para que
quepa en el asador giratorio. Si es demasiado grande, la comida puede preparase
usando un sostenedor de asado y el m#todo de Coccidn Indirecta.
MEDIDAS PREVENTIVAS IMPORTANTES
ADVERTENCIAS
• Pot favor lea cuidadosamente las instrucciones antes de
utilizar el asador giratorio.
• Este asador giratorio debe usarse solamente al aire libre.
• Retire el motor y almac_nelo en un lugar seco cuando no
est_ en uso.
• No toque las superficies calientes. Use guantes protectores
para barbacoas.
• Este asador giratorio no debe set usado pot niSos.
• Como protecci6n contra riesgos el_ctricos no sumerja el
cable, enchufes, o motor en agua u otros liquidos.
• Desenchufe el motor cuando no est_ en uso, o antes de
limpiar.
• No use el asador giratorio para ning_n otro uso que no sea
para el cual est_ diseSado.
• Aseg_rese de que el motor est_ apagado antes de
colocarlo sobre el soporte del mismo.
• No opere el motor del asador giratorio con el cable
el_ctrico o el enchufe daSado.
• No opere el motor del asador giratorio si _ste est_ faHando.
• El motor del asador giratorio est_ equipado con un cord6n
el_ctrico de tres clavijas (conectado a tierra) para su
protecci6n contra descargas el_ctricas.
• El cord6n el_ctrico deber_ enchufarse directamente a un
enchufe para tres clavijas debidamente conectado a tierra.
Si se requiere el uso de un cable de e×tensi6n, aseg_rese
de que sea pot Io menos de 1,3ram 2x3 hilos, bien aislado,
y especfficamente para uso en exteriores y debidamente
conectado a tierra.
• Cuando se use una extensi6n el_ctrica, aseg_rese de que
no haga contacto con ninguna superficie caliente o filosa.
• Los cables de extensi6n para exteriores deber_n estar
marcados con las letras "W-A" y una etiqueta que diga
"Apto para usarse con artefactos para e×teriores'.
• No corte o elimine la clavija de conexi6n a tierra del cord6n
el_ctrico del motor del asador giratorio.
• No permita que el cord6n el_ctrico cuelgue sobre ning_n
borde filoso o superficie caliente.
Page 43

• NoIo exponga a la lluvia.
• Para reducir el riesgo de descargas el6ctricas, mantenga la
extensibn el_ctrica seca y levantada del suelo.
• Se suministra un cord6n de suministro el6ctrico corto para
minimizar el riesgo de tropezar con el mismo y caerse. Los
cables de extensi6n pueden usarse, pero debe tomarse la
debida precauci6n para prevenir que se tropiece con ellos.
• En caso de no existir c6digos locales, el motor del asador
giratorio deber_ conectarse a tierra de acuerdo con el
C6digo EI6ctrico National, ANSI/NFPA 70, o el C6digo
EI6ctrico Canadiense, CSA C22.1.
z_ ADVERTENCIA: Coloque el alimento en el asador rotativo
antes de eneender el quemador del mismo.
OPERACION
1) Para instalar el motor del asador giratorio, presione el bot6n en el panel retractil
del asador giratorio(a). Hale el panel del asador giratorio hacia usted hasta que
calce en su lugar(b).
2) Retire el cord6n electrico y enchQfelo en la fuente de alimentaci6n electrica.
z_ PRECAUCION: No pase el cord6n el6ctrico del motor del
asador giratorio a trav_s de la abertura retr_ctil del mismo en
la mesa lateral.
PRECAUCION: Inspeccione el cord6n el6ctrico antes de
cada uso. Si el cord6n est_ da_ado, no Io use. Contacte al
Representante de Atenci6n al Cliente usando la informaci6n
de contacto en nuestro sitio web. Con6ctese a www.weber.
COrn ®.
3) Deslice una de las horquillas del asador hacia el lade derecho del eje del asador
giratorio, asegur_tndose de que los pinches den de cara hacia la izquierda y el
tornillo de la horquilla este cara abajo.
iiii_
4) Empuje el eje del asador a traves del centre de la comida. Inserte los dientes de
ambas horquillas en el alimento. El alimento debera estar centrado sobre el eje.
Apriete el tornillo de la horquilla(e).
(c)
5) Deslice otra horquilla sobre el eje del asador giratorio, asegur_tndose de que los
pinches den hacia el lade derecho y el tornillo de la horquilla este cara arriba.
Inserte los dientes de ambas horquillas en el alimento. Apriete el tornillo de la
horquilla(d).
Page 44

6) Inserte el extremo puntiagudo del eje del asador en el motor. Baje el espet6n del
asador dentro de las ranuras en la caja de cocci6n.
7) El eje del rotor debera rotar de tal manera que el lado pesado de la came o ave
rote hacia el rondo. Los cortes grandes quiz_ts necesiten que se retiren la rejillas
de cocinar y la gradilla de calentamiento para permitir la rotaci6n completa del
eje. Si fuese necesario para Iograr un mejor balance, vuelva a colocar el alimento
de nuevo.
8) Encienda el motor.
C6MO COClNAR
o Las carnes (excepto las aves y la came molida) deberan dejarse calentar a la
temperatura ambiente antes de cocinarlas. (20 a 30 minutos debera set suficiente
para la mayorfa de los alimentos. Si estan congelados, descongelelos completamente
antes de cocinar.)
Si fuese necesario, ate la came o las aves con un cordel para darles la forma mas
uniforme posible antes de colocarlas en el asador.
Retire la rejillas de cocinar y la gradilla de calentamiento para permitir que la comida
rote libremente.
Siga las instrucciones en la p_tgina siguiente para encender el quemador del asador
giratorio.
Ajuste el quemador del asador a fuego medio - alto bas_tndose en la temperatura al
aire libre.
Coloque la comida dentro del b.rea del quemador.
Si desea guardar la grasa que se escurre para usarla como salsa para la came,
coloque una bandeja de goteo encima de las barras Flavorizer ¢y directamente debajo
de la comida.
Los pasos de preparaci6n de la comida para asar en el asador giratorio son los
mismos que para la cocci6n normal.
Toda la cocci6n debera Ilevarse a cabo con la tapa cerrada.
Si los alimentos son demasiado pesados o de formas irregulares, podra ocurrir que
no roten bien y deberan cocinarse mediante el Metodo Indirecto sin usar el asador
giratorio.
Se puede usar el ahumador en conjunci6n con el asador giratorio para un sabor mas
ahumado.
Nota: Cuando se usa el quemador del asador giratorio, el termdmetro de la parrilla no
reflejar_ la temperatura dentro de la caja de coccidn.
ALMACENAJE DEL ESPETON DEL ASADOR GIRATORIO
1) Retire las horquillas del espet6n del asador. Con cuidado inserte el espet6n dentro
del gabinete desliz_tndolo a traves del agujero en el panel del lado derecho(h).
z_ PRECAUCI6N: No perrnita que el espet6n haga contacto con
las Ifneas de gas.
2) Almacene las horquillas del asador colocandolas en los ganchos ubicados sobre
el soporte del plato recolector dentro del gabinete de la barbacoa.
ALMACENAJE DEL MOTOR DEL ASADOR GIRATORIO
1) Antes de retraer el asador giratorio de vuelta a la mesa lateral, desenchufe el
cord6n electrico y con cuidado coloque el enchufe y el cord6n electrico dentro del
b.rea de almacenaje del ensamble retractil del asador giratorio(e).
z_ PRECAUCI6N: El no alrnacenar correctarnente el cord6n
el6ctrico del asador giratorio pudiera resultar en daSos al
rnisrno al abrir y cerrar el panel retr_ctil del asador giratorio.
2) Con su dedo fndice, desacople el panel retractil del asador giratorio(f). Empuje el
panel hacia abajo hasta que encaje completamente en su lugar(g).
Page 45

ENCENDIDO DEL QUEIVlADOR DEL ASADOR GIRATORIO
ENCENDIDO RAPIDO DEL QUEIVIADOR DEL ASADOR GIRATORIO
Nora: Oada perilla de control de encendido r_pido crea una chispa que va del
electrodo de encendido al tubo quemador de encendido. AI presionar la perilla de
control y girarla a "START/HI" (encendido/fuego alto), usted genera la energfa para la
chispa. Esto encender_ cada quemador individual.
Z_ATENCION: LI_ALO ANTES DE
ENCENDER EL QUEIVlADOR DEL ASADOR GIRATORIO
Tras cualquier tiernpo sin uso, antes de encender el
quernador del asador giratorio, deben pasar unos cuantos
segundos para que se Ilene la linea de surninistro de gas.
AI usar el encendedor r_pido, ver_ un fogonazo de llamas
rnovi_ndose de derecha a izquierda a Io largo de la superficie
del quernador del asador giratorio; 6ste no estar_ encendido
hasta tanto toda la superficie cer_rnica est_ en llamas.
En este rnornento, inicie un conteo de 20 segundos antes de
soltar la perilla de control del quernador del asador giratorio.
La superficie del quernador del asador giratorio estar_ al rojo
vivo una vez est_ totalrnente encendido.
*La barbacoa ilustrada puede tenet
ligeras diferencias con respecto al
modelo comprado.
®
PELIGRO
El no abrir la tapa rnientras se est_ encendiendo la barbacoa,
o no esperar 5 rninutos para perrnitir que el gas se disipe si
la barbacoa no se enciende, puede resultar en una llarnarada
explosiva, la cual puede causar lesiones corporales serias o
la rnuerte.
Z_ PRECAUCION: La llama del quernador del asador giratorio
puede set dificil de vet en un dia brillanternente asoleado.
z_ ADVERTENCIA: Inspeccione la rnanguera previo a cada
uso de la barbacoa y aseg_rese de que no tenga rnuescas,
grietas, abrasiones o cortes. Si se encontrase que la rnanguera
estuviese da_ada de cualquier rnanera, no utilice la barbacoa.
Reernpl_cela solarnente con una rnanguera de repuesto
autorizada pot Weber _. Contacte al Representante de Atenci6n
al Cliente en su _rea utilizando la inforrnaci6n de contacto en
nuestro sitio web. Con_ctese a www.weber.corn ®.
1) Abra la tapa.
2) Retire la rejilla de calentamiento y la parrilla de cocci6n de la caja de cocci6n.
3) AsegQrese de que todas las perillas de control de los quemadores esten en la
posici6n "OFF" (apagadas) (Presione la perilla de control y gire en direcci6n de
las agujas del reloj para asegurarse de que este en la posici6n "OFF" (apagada).)
4) Abra el gas en la fuente del mismo.
Z_ADVERTENCIA: No se incline sobre la barbacoa abierta.
5) Presione la perilla de control del quemador y g[rela hacia "START/HI". Esta acci6n
har_. que el encendedor chispee y encienda el quemador del asador giratorio.
Contin0e usando el encendedor r_.pido hasta que el quemador del asador
giratorio se haya encendido. Suelte la perilla de control.
6) Verifique que el quemador este encendido revisando que el quemador del asador
giratorio este al rojo vivo.
® ®
Z_ ADVERTENCIA: Si el quernador del asador giratorio no
se enciende, gire la perilla del control del quernador a la
posici6n OFF (apagado) y espere 5 rninutos para perrnitir
que el gas se disipe antes de tratar de nuevo o de que usted
trate de encenderlo con un cerillo.
Nota: Cuando se use el asador con la tapa cerrada, solamente encienda dos de los
quemadores principales a cada lado de los alimentos (vea los M_todos de asar -
Coccidn indirecta). Revise periddicamente sus alimentos para prevenir que se cocinen
de m_s en la parte extema. Una vez que el alimento se haya dorado al color deseado,
apague el quemador del asador giratorio. Termine de asarlo con calor indirecto.
PARA APAGAR
Presione la perilla de control del quemador del asador giratorio y g[rela en la direcci6n
de las agujas del reloj a la posici6n "OFF" (apagada). Cierre el suministro de gas en la
fuente del mismo.
Page 46

ENCEND[DO MANUAL DEL QUEMADOR DEL ASADOR
G[RATORIO
ATENC[ON: LI_ALO ANTES DE
ENCENDER EL QUEMADOR DEL ASADOR
Tras de un tiempo sin haberse utiiizado, antes de encender
el quemador del asador giratorio, deben pasar unos cuantos
segundos para que se llene la linea de suministro de gas.
AI encender el quemador del asador giratorio con un ceriiio,
usted ver_ un fogonazo de llamas movi_ndose de derecha a
izquierda a [o [argo de [a superficie de[ quemador de[ asador
giratorio; el asador giratorio no estar_ encendido hasta tanto
toda [a superficie cer_mica est_ en llamas. En este momento,
inicie un conteo de 20 segundos antes de soitar [a periiia de
control de[ quemador de[ asador. La superficie de[ quemador
de[ asador estar_ al rojo vivo una vez est_ totaimente
encendido.
PEL[GRO
E[ no abrir [a tapa mientras se est_ encendiendo e[ quemador
de [a parri[[a, o no esperar 5 minutos para permitir que e[
gas se disipe si [a parri[[a no se enciende, puede resuitar
en una [[amarada exp[osiva, [a cua[ puede causar [esiones
corporaies serias o la muerte.
PRECAUC[ON: La llama de[ quemador de[ asador giratorio
puede ser dificil de vet en un dia bri[[antemente asoieado.
ADVERTENC[A: [nspeccione [a manguera previo a cada
uso de la barbacoa y aseg_rese de que no tenga muescas,
grietas, abrasiones o cortes. Si se encontrase que [a manguera
estuviese daffada de cua[quier manera, no uti[ice [a barbacoa.
Reempi_ce[a solamente con una manguera de repuesto
autorizada pot Webe¢_. Contacte a[ Representante de Servicios
al Cliente en su _rea utiiizando la informaci6n de contacto en
nuestro sitio web. Con_ctese a www.weber.com ®.
1) Abra la tapa.
2) Retire de la caja de cocci6n la rejilla para calentar y las parrillas de cocci6n.
3) Asegurese de que todas las perillas de control de los quemadores esten en la
posici6n "OFF" (apagadas) (Presione la perilla de control y gfrela en direcci6n de
las agujas del reloj para asegurarse de que este en la posici6n "OFF")
4) Abra el gas en la fuente del mismo.
5) Coloque un cerillo en el portacerillos y enciendalo.
6) Agarre el portacerillos y encienda con el cerillo per el lado derecho del quemador
lateral.
ADVERTENCIA: No se incline sobre la barbacoa abierta.
7) Presione la perilla de control del quemador del asador giratorio y gfrela hacia
"START/HI" (encendido/fuego alto). ContinQe presionando a la perilla de control
unos veinte (20) segundos m_.s despues de que el quemador se haya encendido.
8) Verifique que el quemador este encendido revisando que el quemador del asador
giratorio este al rojo vivo.
*La barbacoa iiustrada puede tenet
ligerae diferenciae con respecto al
modelo comprado.
® ®
ADVERTENC[A: Si el quemador del ahumador no se
enciende, gire [a perilla de[ control de[ quemador a la
posicidn OFF (apagada) y espere 5 minutos para permitir
que el gas se disipe antes de tratar de nuevo.
Nota: Cuando se use el asador girator/o con la tapa cerrada, solamente encienda
dos de los quemadores principales a cada lado de los alimentos (vea los M6todos
de asar- Coccidn indirecta).. Revise periddicamente sus a!imentos para prevenir que
se cocinen de m_s en la parte externa. Una vez que el alimento se haya dorado al
color deseado, apague el quemador del asador giratorio. Termine de asarlo con calor
indirecto.
PARA APAGAR
Presione la perilla de control del quemador del asador y gfrela en la direcci6n de las
agujas del reloj a la posici6n "OFF'". Cierre el suministro de gas en la fuente del mismo.
Page 47

La lampara del asa Weber Grill Out TM cuenta con un "sensor de inclinaci6n" Con el bot6n
de encendido (a) activado, la luz se encenderdt al abrirse la tapa. La luz se apagara al
cerrar la tapa. Para usarse durante el dfa, desactive al sensor pulsando el bot6n de
encendido(a).
OPERAC[ON DE LA LUZ DEL ASA
PROBLEIVIA REV[SAR REIVIEDIO
La Izimpara del ass Weber Grill Out TM _,Estan gastadas las bateffas? Reemplace las bateffas.
no se enciende.
Si los prob[emas no pueden corregirse usando cualquiera de estos m_todos, pot favor contacte al Representante de Atenci6n al C[iente en su
_rea usando la informaci6n de contacto en nuestro sitio web. Con_ctese a www.weber.com ®.
_,Estan correctamente instaladas las baterfas? Vea la ilustraci6n de ensamblaje.
_,Esta la tapa abierta hasta arriba con el bot6n La lampara se activarb, cuando la tapa este abierta.
de encendido energizado?
_,Esta activada la luz del asa Weber Grill Pulse el bot6n de encendido.
Out'M?
_,Esta la la.mpara del asa Weber Grill Ajuste su posici6n (vea la ilustraci6n de ensamblaje).
Out'Mcolocada correctamente sobre el asa?
PROBLEIVIA REVISAR REIVIEDIO
E[ quemador de[ asador giratorio no
se enciende
Si los probiemas no pueden corregirse usando cualquiera de estos m_todos, por favor contacte al Representante de Atenci6n al Cliente en su _rea usando la
informaci6n de contacto en nuestro sitio web. Con_ctese a www.weber.com ®.
El quemador lateral no ee enciende
La llama se mantiene baja en la _,Est_t doblada la manguera de Enderece la manguera.
posici6n "HI" (fuego alto) combustible?
El bot6n de encendido no funciona, see enciende el quemador con un cerillo? Si el quemador se enciende con un cerillo, revise el encendedor (ver abajo).
_,Mantuvo usted presionada la perilla de
control del quemador durante 20 segundos
despues de haberse encendido?
_,Esper6 usted hasta ver que toda la superficie
de cer_.mica se encendiera antes de empezar
a contar los 20 segundos?
_,Us6 repetidamente el encendedor r_.pido
hasta que el encendedor se prendiese?
_,Funciona el encendedor? &Ve una chispa
cuando usa repetidas veces el encendedor
rb.pido?
Trate de volver a encender el quemador manteniendo presionada la perilla de
control del quemador hasta encenderse y continuar manteniendola presionada
hasta 20 segundos despues de haberse encendido.
Cuando vuelva a encender el quemador manteniendo presionada la perilla de
control del mismo, espere a que vea la superficie de ceramica entera encendida
antes de empezar a contar los 20 segundos.
Despues de esperar cinco minutes para que se disipe el gas, trate de usar
repetidamente el encendedor r_.pido hasta que el quemador de encienda (consulte
el "Encendido del quemador del asador giratorio").
Trate de encender manualmente el quemador (consulte "Encendido manual del
quemador del asador giratorio"). P6ngase en contacto con nuestro departamento de
Atenci6n al Cliente.
REVISAR
_Est_. cerrado el suministro de gas? Abra el suministro de gas.
REIVIEDIOPROBLEIVIA
Si los prob[emas no pueden corregirse usando cua[quiera de estos rn_todos, pot favor contacte a[ Representante de Atenci6n a[ C[iente en su _rea usando [a
informaci6n de contacto en nuestro sitio web. Con_ctese a www.weber.com ®.
Page 48

IVIANTENIIVIIENTO DEL QUEIVIADOR LATERAL
ADVERTENCIA: Todos los controles y v_lvulas de suministro
de gas deber_n estar cerrados en la posici6n "OFF
AsegL_rese de que el cable negro este conectado entre el encendedor y el electrodo.
Asegerese de que el cable blanco este conectado entre el encendedor y el clip de
conexi6n a tierra.
La chispa debera ser de color blanco/azul, no amarilla.
1) Cable de encendido
2) Cable de conexi6n a tierra
3) Quemador
Parilla del quemador lateral --
Tapa del quemador lateral
Aro y cabezal del quemador lateral
Electrodo de encendido
Perilla de control --
Encendedor
(3]
PROBLEIVIA
La llama en los quemadores es de color amarillo
o anaranjado, conjuntamente con olor a gas
(esto es normal para el tubo encendedor del
quemador).
Sintomas:
El quemador no se enciende, o la llama se
mantiene baja en la posici6n "HI" (fuego alto).
Se producen Ilamaradas:
.,k PRECAUCION: No forre la bandeja del rondo Limpie la bandeja del fondo.
con hoja de aluminio.
El quemador produce llamas con un patr6n sEst_.n limpios los quemadores? Limpie los quemadores. (Vea la secci6n de "Mantenimiento':)
err_tico. La llama se mantiene baja cuando el
quemador est& en "HI" (fuego alto). Las llamas no
corren a Io largo de todo el tubo del quemador.
La parte interna de la tapa pareciera estar La tapa est,. porcelanizada o es de acero inoxidable y no L[mpiela a fondo. (Yea la secci6n "Limpieza'_)
"pel_ndose'_ (Se parece al desprendimiento de est,, pintada. No puede "pelarse'J Lo que est,. viendo es
pintura.) grasa asada que se ha convertido en carb6n y se est,.
Las puertas del gabinete no est_n alineadas. Revise el perno de ajuste en la parte inferior de cada Afloje la(s) tuerca(s) de ajuste. Deslice la(s) puerta(s) hasta
Si los problemas no pueden corregirse usando cualquiera de estos m_todos, por favor contacte al Representante de Atenci6n al Cliente en su _rea usando la
informaci6n de contacto en nuestro sitio web. Con_ctese a www.weber.com ®.
Revise que no haya obstrucciones en las malla contra
araSas e insectos. (Taponamiento de orificios.)
sEst_, doblada la manguera de combustible?
sSe enciende el quemador con un cerillo? Si usted puede encender el quemador con un cerillo,
_,Utiliz6 el encendedor ra.pido varias veces hasta
que el quemador principal se encendiese (vea las
"lnstrucciones de encendido")?
_,Funciona el encendedor? _,Ve una chispa cuando usa
repetidas veces el encendedor rapido?
sEst_, precalentando la barbacoa de la manera prescrita?
_,Est_.n las parrillas de cocci6n y las barras Flavorizer ¢
recubiertas con una capa gruesa de grasa quemada?
_,Est_. la bandeja del rondo "sucia" y no deja que la grasa
fluya al plato recolector?
descascarando.
ESTO NO ES UN DEFECTO.
puerta, quedar alineada(s.) Apriete la tuerca.
REVISAR
REIVIEDIO
Limpie las mallas contra ara_as e insectos. (Yea la secci6n:
"Mantenimiento anuar')
Enderece la manguera de combustible.
entonces revise el sistema de encendido Crossover ¢.
AsegOrese de mantener presionada la perilla de control
durante dos segundos despues de accionar el encendedor y
ver la llama anaranjada proveniente del tubo encendedor de
los quemadores.
Trate de encender manualmente el quemador (consulte
"Encendido manual del quemador principal"). P6ngase en
contacto con atenci6n al cliente.
Coloque a todos los quemadores en HI (fuego alto) durante
10 a 15 minutos para precalentar la barbacoa.
Lfmpielas a rondo. (Vea la secci6n "Limpieza'J)
Page 49

MALLAS WEBER ®CONTRA ARA_IAS E INSECTOS
La barbacoa de gas Weber ¢, al igual que cualquier otro aparato de gas al aire libre, es
un blanco para las arahas y dema.s insectos. Pueden crear sus nidos en la secci6n del
venturi (1) del tubo quemador. Esto bloquea el flujo normal de gas, y puede causar que
el gas fluya hacia atras pot la va.lvula de aire de combusti6n. Esto puede resultar en un
fuego en y alrededor de las aberturas para el aire de combusti6n, causando un dafio
serio a la barbacoa.
La compuerta de cierre del aire del tubo quemador ester equipada con una malla (2) de
acero inoxidable para prevenir la entrada de ara_as e insectos a los tubos quemadores
a traves de las aberturas para el aire de combusti6n.
Le recomendamos que inspeccione las mallas contra ara_as e insectos pot
Io menos una vez al a_o. (Yea la secci6n: "Mantenimiento anual") Tambi_n,
inepeccione y limpie dichas mallas ei cualquiera de los eiguientes efntomae se
presentase:
1) Olor a gas en conjunci6n con llamas del quemador con un apariencia muy
amarilla y floja.
2) La barbacoa no alcanza la temperatura de funcionamiento.
3) La barbacoa se calienta de manera dispareja.
4) Uno o mas quemadores no se encienden.
PROCEDIMIENTO PARA LA LIIVIPIEZA DEL QUEIVIADOR
PRINCIPAL
ClERRE EL SUMINISTRO DE GAS.
Retire el mt31tiple (vea "Reemplace los quemadores principales").
Revise la parte interna de cada quemador con una linterna.
Limpie la parte interna de los quemadores con un alambre (un colgador de ropa
enderezado funcionara bien). Revise y limpie la abertura de las compuertas de cierre
del aire en los extremos de los quemadores. Revise y limpie los orificios de las valvulas
en la base de las valvulas. Utilice un cepillo de cerdas de acero para limpiar la parte
externa de los quemadores. Esto se hace para asegurarse de que las aberturas de los
quemadores esten completamente abiertas.
z_ PRECAUCION: AI limpiar, no agrande las aberturas del
quemador.
A PELIGRO
El no corregir estos sfntomas pudiera resultar en un fuego
que puede causar lesiones corporales serias o la muerte y
daSos a la propiedad.
REEMPLACELOS QUEMADORES
PRINCIPALES
1) Su barbacoa de gas Summit ®debe estar apagada y
frfa.
2) Cierre el gas en la fuente.
3) Desconecte el suministro de gas.
4) Retire las parrillas de cocci6n.
5) Retire la caja de ahumado.
6) Retire las barras Flavorizer ¢.
RETIRE EL PANEL DE CONTROL:
Parte requerida: Destornillador Phillips.
a) Retire las perillas de control de los quemadores.
b) Retire los dos tornillos que sujetan el panel de
control al bastidor.
c) Retire el panel de control. Incline el panel hacia
adelante y leva.ntelo alejb.ndolo de la barbacoa.
Retire completamente al panel de control (4) del
ensamble de la caja de cocci6n para exponer
las valvulas, los quemadores, el encendedor y el
mt31tiple.
Page 50

8) Retirelosdostornillosquefijanelmt31tiplealacajadecocci6n.Haleel
ensamblajedelmt31tiplefueradelbastidordelmismo.
9) Haledelbastidordelmt3itiplelostubosquemadoresseleccionadosy
reemplb.celosconlostubosquemadoresnuevos.
10)Parareinstalarelensamblajedelmultiple,reverselospasos7al9.
Z_ PRECAUCION: Los agujeros del quemador (A) deben
colocarse correctamente sobre los orificios de las v_lvulas
(B),
Aseg_rese de que los extremos opuestos de los tubos
quemadores (C) est_n debidamente alineados en las ranuras
del lado posterior de la caja de cocci6n. Antes de atornillar
el m_ltiple en su sitio, verifique que est_ correctamente
ensamblado.
Z_ ADVERTENCIA: Tras reinstalar las lineas de gas y antes
de usar la barbacoa, dichas lineas deber_n inspeccionarse
con una solucibn de agua y jab6n para verificar de que no
existan fugas de gas. (Yea, '°Compruebe que no haya fugas
de gas.")
MANTENIIVIIENTO ANUAL
Inspecci6n y limpieza de la rnalla contra ara_as y demos ineectos
Para inspeccionar la malla contra ara_as y demas insectos, retire el panel de control.
Si hubiese polvo o sucio sobre las mallas, retire los quemadores para limpiar las mallas.
Con un cepillo de cerdas suaves (p.ej.: un cepillo de dientes viejo), cepille suavemente
las malla contra ara_as y demb.s insectos.
z_ PRECAUCION: No limpie las rnallas contra ara_as y
demos insectos con herramientas duras o afiladas. No las
desmonte ni agrande los orificios de las mismas.
Golpee ligeramente el quemador para sacar la basura y suciedad fuera del tubo
quemador. Una vez limpios, vuelva a colocar las mallas y quemadores en su sitio.
Si la malla contra arahas y dem_.s insectos se dahase o no pudiese limpiarse, por favor
p6ngase en contacto con el Representante de Servicios al Cliente de su zona, cuya
datos de contacto encontrara en nuestro sitio en la Internet.
Conectese a www.weber.com ®.
PATRON DE LA LLAMA DEL QUEMADOR
Los quemadores de la barbacoa de gas Weber _ han side ajustados en la fabrica para
que les entre la mezcla correcta de aire y gas. Aca se muestra el patr6n correcto de la
llama.
1) Tubo quemador
2) Las puntas ocasionalmente titilaran con un color amarillo
3) Azul claro
4) Azul oscuro
Si las llamas no se presentan de manera uniforme a Io largo del tubo quemador, siga
las instrucciones de limpieza del quemador.
Page 51

E/S-620/650
174
VOUS DEVEZ LIRE CE MODE D'EMPLOi
AVANT D'UTILISER VOTRE GRILL A GAZ
[
DANGER
S'il y a une odeur de gaz:
1. C oupez I'adrnission de gaz de I'appariel.
2. Eteindre route flarnrne hue.
3. Ouvrir le couvercle.
4. Si I'odeur persiste, 61oignez-vous de
I'appareil et appelez irnrn6diaternent
le foumisseur de gaz ou le service
d'incendie.
Une fuite de gaz risque de provoquer un
incendie ou une e×plosion susceptible
d'occasionner des blessures graves, voire
rnortelles, ou des d_g_ts rnat6riels.
,_ AVERTISSEMENT:
1. Ne pas entreposer ni utiliser de
I'essence ni d'autres vapeurs ou liquides
inflammables darts le voisinage de
I'appareil, ni de tout autre appareil.
2. Une bouteille de propane qui n'est pas
raccord_e en vue de son utilisation, ne
doit pas _tre entrepos6e darts le voisinage
de cet appareil ou de tout autre appareil.
A MISE EN GARDE: Suivez routes les
proc6dures de d6tection des fuites de
ce manuel avec soin avant d'utiliser le
barbecue. Faites-le rn_rne si le barbecue a
6t6 assernbl6 par le revendeur.
NOTE A L'iNTENTION DE L'iNSTALLATEUR:
Les pr6sentes instructions doivent _tre
rernises au propri6taire et le propri6taire
devrait les conserver pour les utiliser plus
tard.
CET APPAREIL A GAZ EST CONCU
POUR UNE UTILISATION EN EXTERIEUR
UNIQUEMENT.
A MISE EN GARDE: N'essayez pas d'allurner
cet appareil sans life la section des
"instructions pour I'allurnage" de ce
manuel.
MEMBER
89174 FC
Page 52

DANGER
Le non respect des consignes intitul_es Danger, IVliseen garde et Attention contenues dans le present Mode d'emploi peut
entrainer une blessure grave ou la mort, ou un incendie ou une explosion provoquant des dornmages a la proprietY.
MISES EN GARDE
z_ Ne stockez pas de bouteille de gaz propane liquide de rechange ou de bouteille de gaz propane liquide d_branch_e au=dessous
ou a pro×imit_ de ce barbecue.
z_ Un mauvais montage peut se r_v_ler dangereux. Veuillez suivre les instrucitons de montage avec soin.
z_ Aprbs une p_riode de stockage et/ou d'inutilisation, le barbecue a gaz Weber ®devrait faire I'objet d'une v_rification visant
&d_tecter toute fuite et toute obstruction des br_leurs avant toute utilisation. Voir les instructions de ce manuel pour les
procedures correctes.
z_ N'utilisez pas le barbecue &gaz Weber _en cas de fuite.
z_ N'utilisez pas de flamme pour d_tecter les fuites de gaz.
z_ Aucune matibre inflammable ne devrait jamais se trouver dans un rayon de 24 pouces par rapport & I'arri_re ou aux c6t_s de
votre barbecue a gaz Weber ®.
z_ Ne placez pas de b&che de protection de barbecue ni aucune mati_re inflammable sur la barbecue ou dans la zone de stockage
au=dessous du barbecue.
z_ Votre barbecue a gaz Weber ®ne devrait jamais _tre utilis_ par des enfants. Les pibces accessibles du barbecue peuvent
atteindre une temperature tr_s _lev_e. Maintenez les jeunes enfants a I'_cart pendant son utilisation.
Z_ Vous devriez faire preuve d'une prudence raisonnable Iorsque vous utilisez votre barbecue a gaz Weber _. Celui=ci sera tr_s
chaud pendant la cuisson ou le nettoyage et ne devrait jamais _tre laiss_ sans surveillance ni d_plac_ pendant son utilisation.
Z_ Si les br_leurs s'_teignaient pendant I'utilisation, fermez toutes les valves de gaz. Ouvrez le couvercle puis patientez cinq
minutes avant d'essayer de rallumer les br_leurs, en utilisant les instructions pour I'allumage.
Z_ N'utilisez pas de charbon de bois ni de pierres de lave dans votre barbecue a gaz Weber _.
Z_ Ne vous penchez jamais au=dessus du grill ouvert ou ne placez jamais les mains ou les doigts sur I'extr_mit_ avant du boitier
de cuisson.
Z_ Si un feu de graisse se produisait, fermez tousles br_leurs et laissez le couvercle ferm_ jusqu'a ce que le feu s'_teigne.
Z_ N'_largissez pas les orifices des valves ou les ports des brQleurs Iorsque vous nettoyez les valves ou les br_leurs.
Z_ Le barbecue a gaz Weber ®devrait _tre nettoy_ m_ticuleusement de fa_on r_guli_re.
Z_ Le gaz propane liquide n'est pas du gaz naturel. La conversion ou la tentative d'utilisation de gaz naturel darts un appareil
propane liquide ou de gaz propane liquide darts un appareil a gaz naturel est dangereuse et annulera votre garantie.
Z_ Utilisez des gants pour barbecue r_sistants a la chaleur Iorsque vous utilisez le barbecue.
z_ Maintenez tout cordon _lectrique d'alimentation ainsi que le tuyau d'alimentation en combustible & I'_cart de toute surface
chauff_e.
Z_ Les d_riv_s de combustion g_n_r_s Iors de I'utilisation de ce produit contienne des agents chimiques reconnus par I'Etat de
Californie comme provoquant des cancers, des anomalies cong_nitales ou d'autres troubles de la reproduction.
Z_ N'uti_isez ce barbecue que si toutes les pi_ces sont en place. Cet appareil dolt _tre correctement assembl_ conform_ment aux
instructions de montage.
Z_ N'int_grez pas ce module de grill _ n'importe queHe construction encastr_e ou a glissi_re. Le non respect de cet Avertissement
risque de provoquer un incendie ou une explosion susceptible de provoquer des d_g_ts materiels ainsi que des blessures
graves voire un d_c_s.
APPAREiLS A GAZ PROPANE UNIQUEMENT:
Z_ Utilisez I'ensemble r_gulateur de pression et tuyau fourni avec votre barbecue a gaz Weber _.
z_ Ne tentez pas de d_connecter I'ensemble r_gulateur et tuyau de gaz ni tout autre raccord de gaz pendant que vous utilisez
votre barbecue.
z_ L'utilisation d'une bouteille de gaz propane liquide comportant une bosse ou d'une bouteille rouill_e peut _tre dangereuse et
une telle bouteille devrait _tre v_rifi_e par votre fournisseur de propane. N'utilisez pas une bouteille de propane liquide dont la
valve est d_t_rior_e.
Z_ Bien que votre bouteille de propane liquide puisse sembler vide, il est possible qu'elle contienne encore du gaz, et la bouteille
devrait _tre transport_e et stock_e en consequence.
Z_ Si vous voyez, sentez ou entendez du gaz s'_chapper de la bouteille de propane liquide:
1. Eloignez-vous de la bouteiHe de propane liquide.
2. Ne tentez pas de corriger le probl_me vous=m_me.
3. Appelez votre service incendie.
Page 53

Votre barbecue a. gaz Weber ¢ est un appareil de cuisson d'exterieur portatif. Avec le
barbecue a gaz Weber _vous pouvez faire des grillades, cuire au barbecue, r6tir et cuire
avec des resultats difficilement reproductibles avec des appareils de cuisine d'interieur.
Le couvercle ferme et les barres Flavorize_ produisent cette saveur "d'exterieur"
particuliere dans les aliments.
Le barbecue _.gaz Webe_ est portatif de sorte que vous puissiez facilement modifier
son emplacement dans votre cour ou votre patio. Son caractere transportable
signifie que vous pouvez emmener votre barbecue WebeP avec vous lots de vos
deplacements.
L'alimentation en gaz naturel est simple a utiliser et vous donne davantage de contr61e
sur la cuisson que le charbon de bois.
o Les presentes instructions vous foumiront les exigences minimales pour
le montage de votre barbecue a gaz Weber e. Veuillez life les instructions
attentivement avant d'utiliser votre barbecue a gaz Weber. Un mauvais montage
peut etre dangereux.
Ne convient pas a.une utilisation par des enfants.
Si des codes regionaux s'appliquent aux grills a gaz portatifs, vous devrez les
respecter. L'installation dolt 6tre conforme aux codes regionaux ou, en I'absence
de tels codes, avec le Code national des gaz combustibles, ANSI Z223.1/NFPA
54, le Code des installations aux gaz naturel et propane, CSA B149.1, ou le
Code relatif au stockage et b. la manipulation de propane, B149.2, ou a.la Norme
relative aux vehicules de Ioisirs, ANSI A 119.2/NFPA 1192, et Series CSA Z240
RV, Codes des vehicules de Ioisirs, le cas echeant.
Ce barbecue a gaz WebeP est con_u pour une utilisation avec du gaz naturel
(gaz de ville) uniquement. N'utilisez pas de gaz en provenance d'une bouteille de
propane liquide (PL). Les valves, les orifices et le tuyau conviennent uniquement
b.une utilisation avec du gaz naturel.
N'utilisez pas votre barbecue avec du charbon de bois.
Verifiez que la zone au-dessous du panneau de commandeet le plateau inferieur
ne comportent aucun debris susceptible de faire obstacle a la circulation de I'air
necessaire e la combustion ou e la ventilation.
POUR UNE iNSTALLATiON AU CANADA
Les presentes instructions, bien que generalement acceptables, ne sont pas
necessairement conformes aux Codes d'installation canadiens, en particulier en ce qui
concerne les canalisations aeriennes et souterraines. Au Canada, I'installation de cet
appareil dolt etre conforme aux codes regionaux et/ou aux Normes CAN/CGA-B149.1
(Code relatif e I'installation des appareils et equipements e combustion de gaz naturel).
STOCKAGE
Le gaz dolt _tre ferme au niveau de I'arrivee de gaz naturel Iorsque le barbecue e
gaz WebeP est inutilise.
Lorsque le barbecue e gaz WebeP est stocke a I'interieur, I'arrivee de gaz dolt
etre debranchee.
Le barbecue b.gaz Webed _devrait faire I'objet de verifications de detection des
fuites et vous devriez verifier I'absence d'obstruction des tubes du br01eur avant
de I'utiliser. (Voir la Section :"Maintenance/Maintenance annuelle").
Verifiez que les zones situees sous le panneau de commandeet le plateau
inferieur amovible ne comportent aucun debris susceptible de faire obstacle a la
circulation de I'air necessaire e la combustion eta la ventilation.
Les Grilles anti-araignees/insectes devraient egalement _tre inspectees
la recherche de tout obstacle. (Voir la Section : "Maintenance/Maintenance
annuelle").
UTILISATION
Z_ IVllSE EN GARDE: N'utilisez ce barbecue qu'en ext_rieur
dans une zone bien ventil_e. Ne I'utilisez pas dans un
garage, un b_timent, un passage couvert ou toute autre zone
confin_e.
IVllSE EN GARDE: Votre barbecue & gaz Weber ®ne dolt pas
_tre utilis_ au-dessous d'une structure inflammable.
MISE EN GARDE: Votre barbecue & gaz Weber ®n'est pas
congu pour _tre install_ clans ou sur un v_hicule de Ioisirs
et/ou un bateau.
MISE EN GARDE: N'utilisez pas le barbecue dans un rayon
de 24 pouces de toute mati_re inflammable. Ceci inclut le
haut, le has, I'arri_re ou les c6t_s du grill.
z_ MISE EN GARDE: La totalit_ du boitier de cuisson devient
tr_s chaude pendant son utilisation. Ne le laissez pas sans
surveillance.
MISE EN GARDE: Maintenez tout cordon _lectrique ainsi
que le tuyau d'alimentation en combustible & I'_cart de toute
surface chauff_e.
MISE EN GARDE: Maintenez la zone de cuisson d_gag_e de
toute _manation et de tout liquide inflammables comme de
I'essence, de I'alcool, etc., et de toute mati_re inflammable.
TEST DE L'ALIIVIENTATION EN GAZ
Deconnectez votre barbecue _, gaz Weber _ Iorsque I'arrivee de gaz est testee
des pressions elevees. Cet appareil et sa valve de fermeture individuelle doivent
_tre deconnectes de la canalisation d'arrivee de gaz pendant tout test de pression
des pressions de test superieures b. 1/2 psig (3,5 kPa).
Fermez votre barbecue e gaz WebeP pendant le test de I'arrivee de gaz _.de
basses pressions. Cet appareil dolt ¢tre isole de la canalisation d'arrivee de gaz
en fermant sa valve de fermeture manuelle individuelle lots de tout test sous
pression de la canalisation d'arrivee de gaze une pression egale ou inferieure e
1/2 psig (3,5 kPa).
IVIETHODES POUR LES GRILLADES
Remarque : Si le grill perd de la chaleur pendant la cuisson, consultez la section de
depannage de ce manuel.
& MISE EN GARDE: Ne d_placez pas le barbecue a gaz Weber _
pendant son utilisation ou Iorsque celui=ci est a haute
temperature.
Vous pouvez ajuster les br01eurs principaux individuellement comme vous le souhaitez.
Les parametrages de commande sont START/Hi, MEDIUM, LOW, ou OFF.
Remarque : La temperature a/'int_deur de votre boftier de cuisson pendant/es
premieres utifisations, pendant que /es surfaces sont encore tres refl_chissantes,
peut _tre sup_rieure a ce//es indiquees dans votre tivre de recettes. Les conditions
de cuisson, comme /e vent et /es conditions met_oro/ogiques, peuvent n_cessiter
/'ajustement des commandes du brO/eur afin d'obtenir /es temperatures de cuisson
correctes.
Si les brQleurs s'_teignent en coure de cuisson, ouvrez le couvercle, fermez tous
lee br_leure et patientez cinq minutes avant de les rallumer.
Pr_chauffage - Votre barbecue a gaz Weber ¢ est un appareil qui utilise efficacement
I'energie. II fonctionne selon une puissance nominale en BTU faible et economique.
Pour prechauffer : apres I'allumage, fermez le couvercle et positionnez tousles brOleurs
sur "START/HI". Un prechauffage entre 500 ° et 550 ° F (260 ° et 290 ° C) prend de 10
15 minutes en fonction de facteurs comme la temperature ambiante et le vent.
Jus de viande et graisse - Les barres Flavorizer _ sent con_ues pour "faire fumer"
la quantite de jus de viande correcte pour une cuisson savoureuse. Le jus de viande
et la graisse en exces s'accumulent dans I'egouttoir au-dessous du plateau inferieur
amovible. Nous proposons des plats en aluminium jetables adaptable dans I'egouttoir.
Z_ IVllSE EN GARDE: V_rifiez le niveau du d_p6t de graisse
present sur le plateau inf_rieur avant chaque utilisation.
Retirez I'exc_s de graisse pour _viter un feu de graisse
I'int_rieur du plateau inf_rieur amovible.
NETTOYAGE
z_ MISE EN GARDE: Fermez votre barbecue a gaz Webe¢ _ et
attendez que celui-ci ait refroidi avant de le nettoyer.
z_ ATTENTION: Ne nettoyez pas vos barres Flavorize¢ "_ou vos
grilles de cuisson clans un four auto=nettoyant.
Pour conna_tre la disponibilit_ des grilles de cuisson et des barree Flavorizer ® de
rechange, veuillez entrer en contact avec le Repr_sentant du Service clientele de
votre r_gion grace aux coordonn_es _ votre disposition cur notre site Intemet.
Connectez-vous sur www.webet.com ®
Surfaces externes - Utilisez une solution d'eau savonneuse chaude pour le nettoyage,
ensuite rincez a I'eau.
ATTENTION: N'utilisez pas de nettoyant pour four, de
d_tergents abrasifs (d_tergents de cuisine), de d_tergents
contenant des agrumes, ni des tampons de nettoyage
abrasifs sur les surfaces du barbecue ou du chariot.
Page 54

Sortez le plateau amevible en le faisant gliseer - Retirez la graisse en exces, puis
lavez a I'eau savonneuse chaude, avant de rincer.
Barres Flaverizer _ et grilles de cuisson - Nettoyez-les avec une brosse en acier
inoxydable adaptee. Si necessaire, retirez-les du grill et lavez-les a I'eau savonneuse
chaude, puis rincez-les e I'eau.
Egouttoir - Nous proposons des plats en aluminium jetables, ou vous pouvez recouvrir
I'egouttoir de papier aluminium. Pour nettoyer I'egouttoir, lavez-le a I'eau savonneuse
chaude, puis rincez-le.
Thermom_tre - Essuyez-le avec de I'eau savonneuse chaude ; nettoyez-le avec une
balle de plastique a recurer.
Int_rieur du module de cuisson - Retirez tout debris en le brossant vers I'exterieur
des tubes du brOleur. N'ELARGISSEZ PAS LES PORTS (OUVERTURES). Lavez
I'interieur du boftier de cuisson a I'eau savonneuse chaude puis rincez e I'eau.
Int_rieur du couvercle - Lorsque le couvercle est encore chaud, essuyez I'interieur
avec une serviette en papier pour empecher toute accumulation de graisse. Les eclats
de graisse accumulee ressemblent e des eclats de peinture.
Surfaces en acier inoxydable - Lavez les surfaces avec un chiffon doux et une
solution d'eau savonneuse. Veillez e frotter dans le sens du grain de I'acier inoxydable.
N'utilisez pas de produits de nettoyage contenant de I'acide, dee alcoole
min_raux ou du xylene. Rincez bien une lois le nettoyage termin_.
Pr_servez votre acier inoxydable
Votre grill ou son placard, son couvercle, son panneau de commande ainsi que
ses etageres peuvent etre en acier inoxydable. Preserver I'aspect optimal de I'acier
inoxydable n'est pas complique. Nettoyez e I'eau savonneuse, rincez _.I'eau claire et
essuyez pour secher. Pour les particules tenaces, vous pouvez utiliser une brosse non
metallique.
IMPORTANT: N'utilisez pas de brosse m_tallique ni de
d_tergents abrasifs sur les surfaces en acier inoxydable de
votre grill car ceci le rayerait.
IMPORTANT: Lorsque vous nettoyez les surfaces assurez=
vous de frotter/essuyer darts le sens du grain pour
preserver I'aspect de votre acier inoxydable.
INSTALLATION DE L'ALIMENTATION EN GAZ
SP!_ClFICATIONS Gf=NC:RALESRELATIVES A LA CANALISATION
Remarque : Veuillez entrer en contact avec votre municipalite pour prendre
connaissance des codes de construction reglementant les installations de barbecues
e gaz d'exterieur, en I'absence de Codes regionaux, vous devez vous conformer
e la derniere edition du Code national des gaz combustibles : ANSI Z 223.1/NFPA
54, ou CAN/CGA-B149.1, Code des installations au gaz naturel et propane. NOUS
RECOMMANDONS QUE CETTE INSTALLATION SOIT EFFECTUEE PAR UN
PROFESSlONNEL.
Certaines des exigences ci-dessous sent des exigences generales de la derniere
edition du Code national des gaz combustibles : ANSI Z 223.1/NFPA 54, ou CAN/
CGA-B149.1, Code des installations au gaz naturel et propane pour des specifications
exhaustives.
o Ce barbecue est congu pour fonctionner avec une pression de colonne d'eau de
4.5 pouces (0,183 psi).
Une valve de fermeture manuelle dolt etre installee en exterieur, immediatement
avant la deconnexion rapide.
Une valve de fermeture manuelle supplementaire e I'interieur devrait _tre installee
dans la conduite d'alimentation en combustible annexe en un endroit accessible
pres de la conduite d'alimentation en gaz.
La deconnexion rapide se raccorde a un tuyau NPT de V2pouce a partir de la
source de gaz. Le raccord de deconnexion rapide est un dispositif manuel qui
arr6te automatiquement le debit de gaz en provenance de la source Iorsque le
barbecue est debranche.
Le raccord de deconnexion rapide peut etre installe horizontalement, ou oriente
vers le bas. L'installation du raccord avec I'extremite ouverte orientee vers le haut
peut entra'iner I'accumulation d'eau et de debris.
Les caches anti-poussiere (bouchons de plastique foumis) contribuent a maintenir
les extremites ouvertes du raccord de deconnexion rapide propre Iorsqu'ils sent
deconnectes.
L'element de canalisation utilise devrait 6tre resistant a I'action du gaz naturel
Iorsque les raccords sent effectues.
Le connecteur d'exterieur dolt 6tre fermement fixe a une construction rigide et
permanente.
I
MISE EN GARDE: Ne faite spas passer le tuyau de 10 pieds
sous un cache. Le tuyau dolt _tre visible.
CONDUITE DE GAZ
Si la Iongueur de canalisation necessaire n'excede pas 50 pieds, utilisez un
tube de 5/8" O.D.. Une taille superieure devrait etre utilisee pour les Iongueurs
superieures a.50 pieds.
La conduite de gaz peut Ctre en tuyaux de cuivre, de type K ou L ; en tuyaux de
plastique polyethyDne, avec une epaisseur de paroi minimale de 0,062 pouce ;ou
de I'acier de poids standard (taille 40) ou en tuyau de fer forge.
Les tuyaux de cuivre doivent etre recouverts d'etain si le gaz contient plus de 0,3
grammes de sulfure d'hydrogene pour 100 pieds cubes de gaz.
Les tuyaux en plastique conviennent pour une utilisation souterraine en exterieur.
Les canalisations de gaz en contact avec la terre, ou toute autre matiere
susceptible de corroder la canalisation, doivent _tre protegees centre la corrosion
d'une maniere homologuee.
Les canalisations souterraines doivent _tre recouvertes d'une epaisseur minimale
de 18".
TEST DES RACCORDS
Tous les raccords et les joints doivent faire I'objet de contr61es de detection des fuites
conformement aux codes regionaux et _.toutes les procedures figurant dans la derniere
edition du Code national des gaz combustibles : ANSI Z 223.1/NFPA 54, ou CAN/
CGA-B149.1
DANGER
N'utilisez pas de flamme nue pour d_tecter les fuites de gaz.
Assurez=vous de I'absence d'_tincelles ou de flammes nues
darts la zone o_ vous d_tectez les fuites. Ceci provoquerait
un incendie ou une explosion susceptible de provoquer
une blessure grave ou la mort ainsi que des dommages _ la
proprietY.
Page 55

TYPE DE GAZ
Votre grill b.gaz est con£u en usine pour fonctionner avec du gaz naturel uniquement.
Ne tentez jamais d'utiliser votre grill avec d'autres gaz que le type specifie sur les
plaques nominales du grill.
Votre grill fonctionne avec une pression de colonne d'eau de 4.5". Si le remplacement
du tuyau s'avere necessaire, vous devez obligatoirement utiliser les pieces specifiees
en usine. Veuillez consulter le revendeur le plus proche.
Pour des raisons de securite et de conception, la conversion d'un grill Weber ¢
d'un fonctionnement au Gaz naturel a un fonctionnement au gaz PL necessite le
remplacement de la totalite du dispositif d'alimentation en gaz du grill. Si cela se revele
necessaire, veuillez consulter votre revendeur pour de plus amples informations.
QU'EST-CE QUE LE GAZ NATUREL ?
Le gaz naturel, souvent appele methane, est un combustible moderne et sOr. Le gaz
naturel vous est fourni par votre service public local et devrait etre disponible facilement
dans votre maison si celle-ci est dejb. chauffee au gaz.
INSTALLATION PORTATIVE
WebeP _recommande de deplacer le grill & au moins deux (2) pieds d'ecart par rapport
b.I'arrivee de gazet a toute surface inflammable. Une lois que I'arrivee de gaz a
ere installee et que vous avez effectue la detection des fuites conformement aux
instructions de montage, vous 6tes pr6t b.utiliser le grill. Pour raccorder le tuyau a.
I'arrivee de gaz, retirez le raccord externe, inserez le raccord du tuyau jusqu'au bout,
puis relb.chez le raccord externe. Cette procedure produira un raccord de gaz.
PREPARATION DE LA DETECTION DES FUITES
VERIFIEZ QUE TOUTES LES VALVES DU BRULEUR SONT FERMEES
Les valves sont expediees en position fermee ("OFF"), mais vous devriez les verifier
pour vous assurer qu'elles sont fermees. Verifiez en les valves en les enfon£ant et
en les tournant dans le sens des aiguilles d'une montre. Si elles ne tournent pas, elles
sont fermees. Passez a I'etape suivante. Si elles tournent, continuez _.les tourner
dans le sens des aiguilles d'une montre jusqu'_, ce qu'elles ne tournent plus, elles sont
maintenant fermees. Passez a I'etape suivante.
3 4 5 2 6 1
1
2
3
4
5
6
1
2
3
4
Enfoncez la fiche vers I'avant jusqu'b, ce que I'etui s'encastre, bloquant ainsi la fiche
Lorsqu'elle est montee correctement, la fiche ne peut pas ¢tre retiree si vous ne
Pour debrancher, repoussez le cache en arriere puis retirez la fiche de la prise.
Mettez les couvercles en place Iorsque le tuyau est debranche
Enduisez ce raccord de conduite de p&te ajoint resistante au gaz
(Ceci ouvre automatiquement le gaz.)
repoussez pas le cache en I'arriere.
(Ceci coupe automatiquement le gaz.)
Raccord a charniere
Valve de fermeture
Prise
Fiche m&le
Prise
Cache
Repoussez I'etui en arriere
Fiche
dans la prise.
DETECTION DES FUITES DE GAZ
& MISE EN GARDE: Les raccords de gaz de votre grill a gaz
Summit ®ont _t_ test_s en usine. Nous vous recornrnandons
toutefois de d_tecter les fuites au niveau de tous les
raccords avant d'utiliser votre grill & gaz Summit ®.
RETRAIT DU PANNEAU DE COMMANDE
Piece necessaire: Tournevis cruciforme.
1) Retirez les boutons de commande du brOleur.
:?'d)'"d).,"
Page 56

2) Retirez les deux vis qui maintiennent le panneau de commande sur le cadre.
3) Retirez le panneau de commande. Inclinez le panneau vers I'avant et soulevez-le
I'ecart du grill.
Retirez completement le panneau de commande (3) de I'ensemble du bo'itier de
cuisson, exposant ainsi les valves, les braleurs, I'allumeur et le collecteur.
VERIFICATION DU RACCORD ENTRE LETUYAU SOUPLE ET LE
COLLECTEUR
Le tuyau a.gaz naturel a ete fixe pendant le processus de fabrication. Nous vous
recommandons vraiment de verifier qu'il n'y a pas de fuite au niveau du raccord entre le
tuyau et le collecteur, en suivant les recommandations du present Mode d'emploi, avant
d'utiliser le barbecue.
DETECTION DES FUITES DE GAZ
DANGER
N'utiJisez pas de flamme hue pour d_tecter Jes fuites de gaz.
Assurez=vous de I'absence d'_tincelJes ou de fiammes hues
dans la zone pendant que vous d_tectez les fuJtes. Des _tin=
celJes ou des flammes hues provoqueraJent un incendJe ou
une explosion susceptible d'entrainer une blessure grave ou
la mort et des dommages _ la propri_t6.
Z_ MISE EN GARDE: Vous devriez d_tecter Jes fuites de gaz
chaque fois que vous d_branchez puis rebranchez un
raccord de gaz.
Remarque : Tousles raccords effectues en usine ont fait I'objet de contr_les de
d6tection des fuites minutieux. Les brOleurs ont ere testes avec une flamme. Toutefois,
par mesure de precaution, vous devriez v6rifier a nouveau la tota!it6 des raccords afln
de d#tecter toute fuite avant d'utiliser votre barbecue a gaz Weber. L'exp6dition et la
manipulation peuvent desserrer ou d6t6riorer un raccord de gaz.
& IVllSE EN GARDE: Effectuez ces v_rifications m_me si votre
barbecue a 6t_ assembl_ par un revendeur ou en boutique.
II vous faudra : une solution d'eau savonneuse, et un chiffon ou une brosse pour
I'appliquer.
Assurez-vous que le brQleur lateral est ferme (Voir PREPARATION A LA DETECTION
DES FUITES). Retirez la totalite des boutons de commande de la valve et des vis.
Retirez le dessus en porcelaine.
Pour effectuer la detection des fuites : FaRes glisser le collier de la deconnexion rapide
(1) en arri@e. Enfoncez I'extremite m&le du tuyau #, I'interieur de la deconnexion
rapide, et maintenez la pression. Faites glisser le collier pour le fermer (2). Si celui-ci
ne s'engage pas ou ne se verrouille pas, repetez la procedure. Le gaz ne circulera pas
tant que la deconnexion rapide ne sera pas correctement enclenchee.
Ouvrez I'arrivee de gaz.
Detectez les fuites en humidifiant les raccords _.I'aide de la solution d'eau savonneuse
et en regardant si des bulles se forment. Si des bulles se forment ou si une bulle
grossit, cela indique la presence d'une fuite.
Remarque :Dans la mesure ob certaines solutions de detection des fuites, y compris
I'eau savonneuse, peuvent se rev61er legerement corrosives, la totalit6 des raccords
devrait _tre rinc_e a I'eau apres la d6tection des fuites.
& IVllSE EN GARDE: N'allumez pas les br_leurs Iorsque vous
d_tectez les fuites.
Page 57

VERIFIEZ :
1) Le raccord entre I'embouchure et le tuyau d'arrivee de gaz.
2) Le raccord entre I'embouchure et le regulateur.
3) Le raccord entre le regulateur et le tuyau.
4) Les raccords entre la conduite de gaz principale et le collecteur.
MISE EN GARDE : En cas de fuite au niveau du raccord (1,
2, 3, ou 4), resserrez le raccord au moyen d'une cl_ puis
d_tectez _ nouveau les fuites _ I'aide d'une solution d'eau
savonneuse.
En cas de persistance d'une fuJte une foJs que vous avez
resserr_ Je raccord, fermez le gaz. N'UTILISEZ PAS LE GRILL.
VeuiJJez entrer en contact avec Je Repr_sentant du Service
clientele le plus proche grace aux coordonn_es _ votre
disposition sur notre site Intemet.
Connectez=vous sur www,weber.com ®,
5) Le raccord entre I'embouchure et le tuyau du brQleur lateral.
6) Le raccord entre le tuyau du brOleur lateral et le raccord de deconnexion rapide,
les raccords entre la valve et I'orifice du brOleur lateral.
7) Le raccord entre le tuyau et la deconnexion rapide.
8) Les raccords entre les valves et le collecteur.
MISE EN GARDE : En cas de fuite au nJveau des raccords (5,
6, 7,ou 8), fermez Je gaz. N'UTILISEZ PAS LE GRILL.VeuiJJez
entrer en contact avec le Repr_sentant du Service clientele
de votre r_gion gr&ce aux coordonn_es a votre disposition
sur notre site Intemet. Connectez-vous sur www.weber.com ®.
Lorsque vous avez termine la detection des fuites, fermez I'arrivee de gaz b. la source
puis rincez les raccords a I'eau.
®
*11est possible que Je grill de J'iJJustration
pr_sente de I_g_res differences par rapport au
modele achet_.
Page 58

VERIFIEZ :
1) Le raccord entre la conduite de gaz principale et le collecteur.
2) Le raccord de la conduite de gaz de la r6tissoire (BrOleur I.R.).
3) Le raccord entre I'embouchure et le tuyau d'arrivee de gaz.
4) Le raccord entre I'embouchure et le regulateur.
5) Le raccord entre le regulateur et le tuyau.
MISE EN GARDE: En cas de fuite au niveau du raccord (1,
2, 3, 4, ou 5), resserrez le raccord a I'aide d'une cl_ puis
effectuez _ nouveau un contr61e de d_tection des fuites
I'aide d'une solution d'eau savonneuse.
Si une fuite persiste une fois que vous avez resserr_ le
raccord, fermez le gaz. N'UTILISEZ PAS LE GRILL. Veuillez
entrer en contact avec Je Repr_sentant du Service clientele
de votre r_gion grace aux coordonn_es de notre site Intemet.
Connectez=vous sur www.weber.corn ®.
6) Le raccord entre I'embouchure et le tuyau du brQleur lateral.
7) Le raccord entre le tuyau du breleur lateral et la deconnexion rapide, les raccords
entre la valve et I'orifice du breleur lateral.
8) Le raccord entre le tuyau et la deconnexion rapide.
9) Les raccords entre les valves et le collecteur.
MISE EN GARDE: En cas de fuite au niveau des raccords (6,
7,8, ou 9), fermez le gaz. N'UTILISEZ PAS LE GRILL.Veuillez
entrer en contact avec Je Repr_sentant du Service clientele
de votre r_gion gr&ce aux coordonn_es de notre site Internet.
Connectez=vous sur www.weber.corn ®.
Lorsque vous avez termine la detection des fuites, fermez I'arrivee de gaz b. la source
puis rincez les raccords a I'eau.
REIVIISE EN PLACE DU PANNEAU DE COMMANDE
Pieces necessaires : panneau de commande, vis et boutons de commande du brQleur.
Accrochez I'extremite superieure du panneau de commande sur les supports du
panneau de commande de chaque c6te de I'avant du boftier de cuisson.
Alignez les vis en face des trous du support du panneau de commandeet du cadre.
Serrez les vis.
Placez les boutons de commande correspondants sur les tiges des valves.
®
*ll est possible que le grill de I'iJJustration
pr_sente de I_geres differences par rapport au
modele achet&
@@
®
Page 59

IVIETHODES POUR LES GRILLADES
Remarque : si le grill perd de la chaleur pendant la cuisson, veuillez consulter la
section de ddpannage de ce manuel.
Vous pouvez regler les brQleurs individuellement selon vos souhaits. Les reglages de
commande sent START/HI, MEDIUM, LOW, ou OFF.
Si les brQleurs s'eteignent pendant la cuisson, fermez tousles brQleurs puis patientez 5
minutes avant de les rallumer.
z_ IVllSE EN GARDE: V_rifiez le nJveau du d6p6t de graisse
sur le plateau inf_rJeur et sur 1'6gouttoJr avant chaque
utilisation. Retirez J'exc_s de graisse pour 6viter tout feu de
graJsse darts le plateau inf_rieur.
PRE_CHAUFFAGE
II est important de prechauffer le grill avant de faire les grillades. Allumez votre grill
gaz Summit ®conformement aux instructions du present Mode d'emploi. Positionnez
tousles brQleurs principaux sur Start/Hi, fermez le couvercle puis prechauffez le grill
avec le couvercle ferme jusqu'a ce que le thermom_tre du grill atteigne 550-°F (260 °-
288°C). C'est la temperature de cuisson recommandee. Cela prend environ 10 a 15
minutes, en fonction des temperatures exterieures.
CUISSON COUVERTE
Toutes les grillades sont effectuees couvercle ferme pour que la chaleur soit uniforme
et circule de fa_on homog_ne. Lorsque le couvercle est ferme, le grill A gaz Summit ®
cult de fa(_on tr_s semblabble a un four a convection. Le thermom_tre situe dans
le couvercle indique la temperature de cuisson a I'interieur du grill. La totalite du
prechauffage et des grillades est effectuee avec le couvercle ferme. Ne passez pas
votre temps A I'ouvrir pour regarder : vous perdez de la chaleur Achaque lois que vous
soulevez le couvercle.
ARRi_TI_
OFF0 01111==,,,@
APAGADO
$ $$$
OFF START/HI IVIED. LOW
DISPOSITIF FLAVORIZER ®
Lorsque du jus de viande s'ecoule sur les barres Flavorizer _ dent les angles sont
con(_us specifiquement A cet effet, ils creent une fumee qui donne aux aliments une
saveur de barbecue irresistible. GrAce A la forme originale des brQleurs et des barres
Flavorizer ¢ et aux commandes de temperature souples, les embrasements incontr61es
sont quasiment elimines, parce que c'est VOUS qui contr61ez les flammes. GrAce A
la conception particuliere des barres Flavorizer ¢ et des brQleurs, les mati_res grasses
en exc_s sont orientees a travers le plateau inferieur en forme de tuyaux jusque dans
I'egouttoir.
La chose la plus importante A conna'itre Apropos des grillades est le choix de la
methode de cuisson a utiliser pour un aliment particulier, la methode Directe ou
Indirecte. La difference est simple : placez les aliments directement au-dessus du feu,
ou organisez le feu de part et d'autre des aliments. L'utilisation de la bonne methode
constitue le moyen le plus court pour obtenir des resultats formidables et la meilleure
fa_on de garantir une bonne cuisson en toute securite.
CUISSON DIRECTE
La Methode directe, semblable au rechauffage, signifie que les aliments sont cults
directement au-dessus de la source de chaleur. Pour une cuisson homogene, les
aliments devraient ®tre retournes une fois au milieu du temps de cuisson.
Utilisez la methode Directe pour les aliments dent la cuisson dure moins de 25 minutes:
les steaks, les c6tes, les kebabs, les saucisses, les legumes, etc.
La cuisson Directe est egalement necessaire pour saisir les viandes. Le fait de saisir
les viandes cree cette merveilleuse texture craquante, caramelisee a I'endroit ou les
almiments sont en contact avec la grille. Cela donne egalement une couleur et une
saveur agreables A toute la surface. Les steaks, les c6tes, les filets de poulet, et les
gros morceaux de viande beneficient tous de ce mode de cuisson.
Pour saisir les viandes, placez-les au-dessus de la source de forte chaleur Directe
pendant 2 A 5 minutes de chaque c6te. Les petits morceaux ont besoin de moins de
temps de cuisson. Habituellement, une lois que vous avez saisi les aliments, vous
finissez leur cuisson A une temperature inferieure. Vous pouvez terminer la cuisson des
aliments A cuisson rapide en utilisant la methode Directe; utilisez la methode Indirecte
pour les aliments a cuisson lente.
Pour parametrer votre grill A gaz pour la cuisson Directe, prechauffez le grill en reglant
tousles brQleurs sur "HI". Placez les aliments sur la grille de cuisson, puis reglez tous
les brQleurs A la temperature indiquee dans la recette. Fermez le couvercle du grill
et soulevez-le uniquement pour retourner les aliments ou pour contr61er I'etat de la
cuisson au terme de la duree de cuisson recommandee.
CUISSON INDIRECTE
La Methode indirecte est semblable au r6ti mais avec en plus les benefices de cette
texture grillee, de cette saveur et de cet aspect que vous ne pouvez pas obtenir au
four. Pour preparer le grill pour la cuisson Indirecte, les brQleurs A gaz sent allumes
de chaque c6te des aliments mais pas directement au-dessous d'eux. La temperature
augmente, la chaleur est reflechie par le couvercle et les surfaces internes du grill, et
circule pour cuire lentement les aliments de fa(_on homogene de tous les c6tes, d'une
maniere tres semblable ace qui se passe dans un four a convection, alors vous n'avez
pas besoin de retourner les aliments.
Utilisez la methode Indirecte pour les aliments necessitant une duree de grillade de
25 minutes ou plus ou qui sent si delicats qu'une exposition directe A la flamme les
dessecherait ou les ferait roussir. Les exemples sent notamment les r6tis, les petites
c6tes, les poulets entiers, les dindes, et les autres gros morceaux de viande, anisi que
les filets de poisson delicats.
Pour regler votre grill A gaz pour la cuisson Indirecte, prechauffez le grill avec tous
les brQleurs sur "HI". Ajustez ensuite les brQleurs de chaque c6te des aliments pour
atteindre la temperature indiquee dans la recette puis fermez le(s) brQleur(s) situe(s)
I, (A) (A)
=
1 2 3 4 5 6
H H H H H H
La nourriture se place sur les grilles de cuisson juste au-dessus des
A
brQleurs.
1 6
M M
La nourriture se place sur lesgrilles de cuisson entre les brQleurs.
directement au-dessous des aliments. Pour un resultat optimal, placez les r6tis, la
volaille ou les gros morceaux de viande sur une grille a r6tir A I'interieur d'un plat en
aluminium rigide jetable. Pour des durees de cuisson plus Iongues, ajoutez de I'eau
dans le plat en aluminium pour emp¢cher le jus de viande de brOler. Vous pouvez
utiliser le jus de viande pour faire de la graw ou des sauces.
Page 60

ASTUCES & CONSEILS UTILES POUR LES GRILLADES
o Prechauffez toujours le grill avant la cuisson. Reglez tousles brOleurs sur "HI"
puis fermez le couvercle; laissez chauffer pendant 10 minutes, ou jusqu'& ce que
le thermometre atteigne 500°-550°F (260°-288°C).
Grillez les viandes et cuisinez avec le couvercle ferme pour des aliments grilles
la perfection e chaque lois.
Les durees de grillade des recettes sent fournies pour une temperature exterieure
de 70°F (20°C) avec peu ou pas de vent. Laissez les aliments cuire plus
Iongtemps s'il fait froid ou s'il y a du vent, ou en altitude. Diminuez la duree de
cuisson si le temps est extr¢mement chaud.
Les durees de grillade sent susceptibles de varier en fonction des conditions
meteorologiques, ou de la quantite, de la taille et de la forme des aliments
griller.
La temperature de votre grill a gaz Summit ®peut etre superieure e la normale
pendant les premieres utilisations.
Les conditions de grillade peuvent necessiter une adaptation des commandes du
brOleur pour atteindre les temperatures de cuisson correctes.
En general, les gros morceaux de viande necessitent une duree de cuisson
plus Iongue par livre que les petits morceaux de viande. Des aliments places
sur une grille de cuisson surchargee devront cuire plus Iongtemps qu'une petite
quantite d'aliments. Les aliments grilles dans des recipients comme les haricots,
necessiteront une duree de cuisson plus Iongue s'ils sent grilles dans une
casserole profonde que s'ils sont cuits dans un plat peu profond.
UTIUSATION DU BOUTON D'ALLUMAGE
z_ Ouvrez toujours le couvercle avant d'allumer les br=)leurs.
Chaque bouton de commande est pourvu d'une electrode d'allumage integree. Pour
creer une etincelle, vous devez enfoncer le bouton de commande (A) et le tourner vers
"START/High" (B).
Cette action genere une circulation de gaz et une etincelle en direction du tube
d'allumage du brQleur (C). Vous entendez un declic en provenance de I'allumeur. Vous
voyez egalement une flamme orange de 3" &5" sortir du tube d'allumage du brOleur du
c6te gauche du braleur (D).
Maintenez le tube du brQleur enfonc_, pendant deux secondes apres le d_clic.
Cela permet au gaz de circuler tout le long du tube du brOleur (E) et garantit I'allumage.
Verifiez que le brOleur est allume en regardant a.travers les grilles de cuisson. Vous
devriez voir une flamme. Si le brt_leur ne s'allume pas au premier essai, enfoncez le
bouton de commande et positionnez-le sur OFF. Repetez la procedure d'allumage une
seconde fois.
& JVlISEEN GARDE: Si le brQleur ne s'allume toujours pas,
positionnez le bouton de commande du brQleur sur "OFF"
puJs patientez 5 minutes pour laisser le gaz se dJssiper avant
d'essayer a nouveau ou d'essayer d'allumer le br=31euravec
une allumette.
Retirez le surplus de matiere grasse des steaks, des c6tes et des r6tis en ne
laissant pas plus d'_A pouce (6.4mm) de matiere grasse. Le fait qu'il y ait moins
de matiere grasse facilite le nettoyage, et constitue quasiment une garantie contre
les embrasements indesirables.
Les aliments places directement sur la grille de cuisson au-dessus des braleurs
peuvent avoir besoin d'etre retournes ou d'etre deplaces vers une zone moins
chaude.
Utilisez des pinces plut6t que des fourchettes pour retourner et manipuler la
viande afin d'eviter toute perte de jus de viande. Utilisez deux spatules pour
manipuler les gros poissons entiers.
En cas d'embrasement indesirable, fermez tous les brQleurs et deplacez les
aliments vers une autre zone de la grille de cuisson. Toute fiamme se resorbera
rapidement. Une fois que les flammes se sent eteintes, rallumez le grill.
N'UTILISEZ JAMAIS D'EAU POUR ETEINDRE LES FLAMMES SUR UN GRILL
A GAZ.
La cuisson de certains aliments, comme les ragoOts ou les filets de poisson fins,
necessite un recipient. Les plats en aluminium jetables sont tres pratiques mais
vous pouvez utiliser n'importe quel plat metallique avec des gants de cuisiner.
Assurez-vous toujours que le plateau inferieur et I'egouttoir sont propres et ne
contiennent aucun residu.
Ne couvrez pas le plateau inferieur crenele de papier aluminium. Ceci pourrait
emp¢cher la graisse de s'ecouler vers I'egouttoir.
L'utilisation d'un minuteur vous aidera &savoir Iorsque la viande "bien cuite" est
sur le point de devenir "trop cuite."
Page 61

ALLUMAGE
Vous trouverez des instructions d'allumage resumees b.I'interieur de la porte gauche du
placard.
DANGER
Le faJt de ne pas ouvrJr le couvercle pendant que vous
allumez les br_leurs du barbecue, ou de ne pas patienter
5 minutes pour laisser le gaz se dissiper si le barbecue ne
s'allumait pas, pourrait entrainer un embrasement explosif
susceptible de provoquer une blessure grave ou la mort.
BOUTON D'ALLUMAGE DU BRULEUR PRINCIPAL
Remarque : Chacun des allumeurs des boutons de commande cree une etincelle
partir de I'electrode de I'allumeur en direction du tube d'allumage du brOleur. Vous
gen6rez I'energie necessaire a la creation de I'etincelle en enfongant le bouton
de commandeet en le positionnant sur "START/HI". Ceci allume chaque brOleur
individuellemenL
& MISE EN GARDE: V_rifiez le tuyau avant chaque utiEsation
du barbecue afin de d_tecter toute entaille, fissure, abrasion
ou coupure. S'il s'avere que le tuyau est d_t_rior_ de quelque
mani_re, n'utilisez pas le barbecue. Remplacez le tuyau par un
tuyau de rechange agr_ par Weber _ uniquement. Veuillez entrer
en contact avec le Repr_sentant du Service clientele le plus
proche gr&ce au× coordonn_es & votre disposition sur notre site
Internet. Connectez=vous sur www.weber.com ®.
1) Ouvrez le couvercle.
2) Assurez-vous que tous les boutons de commande des brQleurs sent positionnes
sur "OFF". (Enfoncez le bouton de commandeet tournez-le dans le sens des
aiguilles d'une montre pour verifier qu'il est positionne sur "OFF".)
3) Ouvrez I'arrivee de gaz b.la source.
& MISE EN GARDE: Ne vous penchez pas au=dessus du
barbecue ouvert.
Enfoncez le bouton de commande et maintenez-le sur "START/HI" jusqu'a ce
que vous entendiez le declic de I'allumeur - continuez a maintenir le bouton de
commands dans cette position pendant deux secondes. Cette action produira une
etincelle au niveau de I'allumeur, du tube d'allumage du brQleur puis du brQleur
principal.
ALLUMAGE MANUEL DU BRULEUR PRINCIPAL
*ll est possible que le grill
de rillustration pr_sente
de I_g_res differences par
rapport au rnodele achet_.
® ®
5) Verifiez que le brQleur est allume en regardant a travers les grilles de cuisson.
Vous devriez voir une flamme, si le brQleur ne s'allume pas a la premiere
tentative, enfoncez le bouton de commands st positionnez-le sur OFF. Repetez la
procedure d'allumage une seconde lois.
z_ MISE EN GARDE: Si le br_leur ne s'aHume toujoura pas,
positionnez le bouton de commande du Br_leur 1 sur OFF
et patientez 5 minutes pour laisser le gaz se dissiper avant
d'essayer d'allumer le br_leur avec une allumette.
POUR ETEINDRE
Enfoncez st tournez chaque bouton de commande du brQleur dans Is sens des aiguilles
d'une montre vers la position "OFF". Fermez I'arrivee de gaz b. la source.
DANGER
Le fait de ne pas ouvrir le couvercle Iorsque vous allumez les
br_leurs du barbecue, ou de ne pas patienter 5 minutes pour
laisser le gaz se dissiper si le barbecue ne s'allumait pas,
pourrait provoquer un embrasement explosif susceptible de
provoquer une blessure grave ou la mort.
1) Ouvrez le couvercle.
2) Assurez-vous que tousles boutons de commande du brQleur sont positionnes sur
"OFF". (Enfoncez chaque bouton puis tournez-le dans le sens des aiguilles d'une
montre pour vous assurer qu'ils sont positionnes sur "OFF".)
3) Ouvrez I'arrivee de gaz b.la source.
4) Placez une allumette dans le porte-allumettes puis frottez-la.
z_ MISE EN GARDE: Ne vous penchez pas au=dessus du
barbecue ouvert.
5) Inserez le porte-allumettes et allumez le brQleur selectionne avec I'allumette b.
travers les grilles de cuisson et les barres Flavorizer ¢.
6) Enfoncez le bouton de commande puis tournez-le pour le positionner sur "START/
HI".
z_ MISE EN GARDE: Si le br_leur ne s'aHume pas, positionnez
le bouton de commande sur "OFF" et patientez 5 minutes
pour laisser le gaz se dissiper avant d'essayer _ nouveau.
POUR ETEINDRE
Enfoncez et tournez le bouton de commande de chaque braleur dans le sens des
aiguilles d'une montre pour le positionner sur "OFF". Fermez I'arrivee de gaz b.la
source.
*11est possible que le
grill de I'illustration
pr_,sente de I_g_res
differences par rapport
au rnodele achet_.
® ®
Page 62

ALLUMAGE DU BRULEUR LATERAL
DANGER
Le fait de ne pas ouvrir le couvercle Iorsque vous ailumez Je
br_leur lateral, ou de ne pas patienter 5 minutes pour laisser
le gaz se dissiper si le br_leur lateral ne s'allumait pas,
pourrait provoquer un embrasement explosif susceptible
d'entrainer une blessure grave ou la mort.
MISE EN GARDE: V_rifiez le tuyau avant chaque utilisation
du barbecue afin de d_tecter toute entaiJie, fissure, abrasion
ou coupure. Si vous trouvez que le tuyau est d_t_rior_ de
quelque mani_re que ce soit, n'utiJisez pas le barbecue.
Remplacez-le en utiJisant uniquement un tuyau de rechange
agr_ par Weber _. Veuiliez entrer en contact avec le
Repr_sentant du Service clientele le plus proche au moyen
des coordonn_es _ votre disposition sur notre site Internet.
Connectez-vous sur www.weber.com ®.
1) Ouvrez le couvercle du brQleur lateral.
2) Verifiez que le brQleur lateral est positionne sur "OFF". (Enfoncez le bouton de
commandeet tournez dans le sens des aiguilles d'une montre pour vous assurer
qu'il est positionne sur "OFF"), positionnez tousles brQleurs inutilises sur "OFF"
(Enfoncez et tournez dans le sens des aiguilles d'une montre).
3) Ouvrez la valve d'arrivee de gaz.
4) Enfoncez et tournez la valve de commande du brQleur lateral vers "HI".
5) Appuyez plusieurs fois sur le bouton de I'allumeur de sorte qu'il produise un declic
chaque fois.
ATTENTION: II peut _tre difficile de voir la flamme du br_leur
lateral par une journ_e claire et ensoleill_e.
Z_ MISE EN GARDE: si le br_leur lateral ne s'allume pas dans
un d_lai de cinq (5) secondes:
a) Fermez la valve de commande du br_leur lateral, les
br_leurs principaux et I'arriv_e de gaz _ la source.
b) Patientez 5 minutes pour laisser le gaz se dissiper avant
d'essayer _ nouveau, ou essayez de I'allumer avec une
allumette (voir "Allumage manuel du br_leur lat6ral").
ALLUMAGE MANUEL DU BRULEUR LATERAL
DANGER
Le fait de ne pas ouvrir le couvercle Iorsque vous allumez Je
br_leur lateral ou de ne pas patienter 5 minutes pour Jaisser
le gaz se dissiper si le br_ieur lat_raJ ne s'aiiumait pas
pourrait provoquer un embrasement explosif susceptible de
provoquer une blessure grave ou la mort.
1) Ouvrez le couvercle du braleur lateral.
2) Verifiez que le brQleur lateral est positionne sur "OFF". (Enfoncez le bouton de
commandeet tournez dans le sens des aiguilles d'une montre pour vous assurer
qu'il est positionne sur "OFF"), positionnez tousles brQleurs inutilises sur "OFF"
(Enfoncez et tournez dans le sens des aiguilles d'une montre).
3) Ouvrez la valve d'arrivee de gaz.
4) Placez une allumette dans un porte-allumette et frottez-la.
5) Tenez le porte-allumette et allumez les deux c6tes du brQleur avec I'allumette.
6) Enfoncez et tournez la valve de commande du brQleur lateral pour la positionner
sur "HI".
ATTENTION: II peut _tre difficile de distinguer la flamme du
br_Jeur lateral par une journ_e claire et ensoleill_e.
MISE EN GARDE: si Je brQJeur Jat_raJ ne s'allume pas dans
un d_lai de cinq (5) secondes:
a) Fermez Javalve de commande du br_ieur Jat_raJ, Jes
br_leurs principaux et I'arriv_e de gaz a Jasource.
b) Patientez 5 minutes pour laJsser le gaz se dissiper
avant d'essayer & nouveau.
®
Page 63

UTILISATION DU FUIVIOIR
Le fumoir fonctionne avec de petits morceaux de bois imbibes d'eau au prealable. Pour
un resultat optimal avec les aliments a cuisson rapide comme les steaks, les burgers et
les c6tes, etc., nous recommandons I'utilisation de copeaux de bois plus fins parce que
ceux-ci br01ent et produisent de la fumee plus rapidement. Pour les aliments a cuisson
lente comme les r6tis, le poulet et les dindes, etc., nous recommandons I'utilisation de
morceaux de bois plus grands parce que ceux-ci br01ent lentement et foumissent de la
fumee pendant plus Iongtemps. Au fur eta mesure que vous gagnez de I'experience
dans I'utilisation de votre fumoir, nous vous encourageons b. experimenter differents
melanges de pepites et de copeaux de bois pour trouver la saveur fumee la plus
adaptee a vos goOts.
POUR UTILISER LE FUMOIR
Pour commencer, plongez les copeaux de bois dans I'eau pendant au moins 30 minutes
avant de les utiliser.
(Du bois humide produit davantage de saveur fumee.) Placez une poignee de copeaux
de bois ou quelques morceaux de bois plus gros au bas de la structure du fumoir
(1). Au fur et a mesure que vous acquerrez I'experience du fumage, augmentez ou
diminuez la quantite de bois pour I'adapter b. vos go0ts.
Remarque: Grillez toujours les aliments avec le couvercle ferm_ pour permettre a la
fumee de bien pen_trer a I'int_rieur des aliments.
Allumez le br01eur du fumoir en suivant les instructions pour I'Allumage du brOleur du
fumoir. Une lois que le bois a commence a brOler, positionnez le bouton de commande
sur "LOW".
Le bois commence _.fumer apres environ 10 minutes et fume jusqu'a 45 minutes.
Si vous avez besoin de plus de saveur fumee, rechargez le fumoir en pepites et/ou
copeaux de bois. Maintenez le couvercle du grill ferme pendant la cuisson.
Remarque : Une lois que vous avez recharge le fumoir, fl faut environ 10 a 15 minutes
pour que celui-ci produise a nouveau de la fum_e.
ALLUMAGE DU BRULEUR DU FUMOIR
(1)
Vous pouvez ut/liser le fumoir pour relever vos recettes de viande, de volaille et de
poisson. Cuisinez avec le couvercle ferm_ en respectant les durees indiquees dans
les tableaux ou les recettes.
DANGER
N'utilisez pas de fluide inflammable pour allumer le bois
dans le fumoir. Ceci provoquerait une blessure grave.
NETTOYAGE DU FUIVIOIR
Avant chaque utilisation, videz les cendres du fumoir pour permettre une circulation
d'air correcte.
Remarque: La fumee laisse un d_p6t de "fum_e" a la surface du fumoir. Ce d_pSt
ne peut pas etre retire et n'a aucune influence sur le fonctionnement du fumoir.
A un degre moindre, un dep6t de "fumee" s'accumule a I'interieur de votre grill
gaz. Ce dep6t n'a pas besoin d'etre retire et n 'a aucune influence negative sur le
fonctionnement de votre grill a gaz.
DANGER
Le fait de ne pas ouvrir le couvercle pendant que vous
allumez le grill, ou de ne pas patienter 5 minutes pour
laisser le gaz se dissiper si le grill ne s'allumait pas, pourrait
entrainer un embrasement explosif susceptible de provoquer
une blessure grave ou un d_c_s.
ALLUMAGE DU BRULEUR DU FUMOIR AVEC LE BOUTON
Remarque: Ea!lumeur a bouton de commande cree une etincelle a partir de I'electrode
de I'allumeur en direction du tube d'allumage du brOleu_ Vous generez I'energie
necessaire a la creation de I'etincelle en enfongant le bouton de commandeet en le
toumant vers "START/HI" Ceci allume le brOleur du fumoi_
MISE EN GARDE: V_rifiez le tuyau avant chaque utilisation
du grill afin de d_tecter toute entaille, fissure, abrasion
ou coupure. Si vous d_couvrez que le tuyau est d_terior_
de quelque mani_re que ce soit, n'utilisez pas le grill.
Remplacez le tuyau en utilisant uniquement un tuyau de
rechange agr_ par Weber ®.Veuillez entrer en contact avec
le Repr_sentant du Service clientele le plus proche gr&ce
aux coordonn_es a votre disposition sur notre site Intemet.
Connectez=vous sur www.weber.com ®.
1) Ouvrez le couvercle du grill.
2) Ouvrez le couvercle du boftier du fumoir.
3) Remplissez le fumoir de petits morceaux de bois ou de copeaux de bois imbibes
d'eau.
4) Assurez-vous que la totalite des boutons de commandes des brOleurs inutilises
est positionnee sur "OFF (Enfoncez le bouton de commandeet tournez dans le
sens des aiguilles d'une montre pour vous assurer qu'il est positionne sur "OFF)
5) Ouvrez le gaz a la source.
z_ MISE EN GARDE: Ne vous penchez pas au=dessus du grill
ouvert Iorsque vous I'allumez.
6) Enfoncez le bouton de commande puis tournez-le vers "START/HI" jusqu'a ce
que vous entendiez le declic de I'allumeur - maintenez le bouton de commande
enfonce pendant deux secondes. Cette action enverra une etincelle vers
I'allumeur, le tube d'allumage du br01eur puis le br01eur principal.
7) Verifiez si le br01eur est allume en regardant a travers les grilles de cuisson.
Vous devriez voir une flamme. Si le br01eur ne s'allume pas au premier essai,
enfoncez le bouton de commandeet positionnez-le sur OFF. Repetez la procedure
d'allumage une seconde fois.
*ll est possible que le
grill de I'illustration
pr_,sente de I_geres
differences par rapport
au modele achet_.
®
® ®
DANGER
Si le br_leur du fumoir ne s'allume pas, tournez le bouton de
commande du br_leur vers "OFF" puis patientez 5 minutes
pour laisser le gaz se dissiper avant de tenter de I'allumer.
8) Fermez le couvercle du fumoir une fois que le bois a commence a br01er puis
tournez le bouton de commande vers "LOW':
POUR ETEINDRE
Enfoncez et tournez chaque bouton de commande du br01eur dans le sens des aiguilles
d'une montre vers la position "OFF': Fermez I'arrivee de gaz a la source.
Page 64

ALLUMAGE MANUEL DU BRULEUR DU FUMOIR
1) Ouvrez le couvercle.
DANGER
Le fait de ne pas ouvrir le couvercle pendant I'allumage
du grill, ou de ne pas patienter 5 minutes pour laisser le
gaz se dissiper si le grill ne s'allumait pas, peut entrainer
un embrasement explosif susceptible de provoquer une
blessure grave ou la mort.
2) Ouvrez le couvercle du bo;tier du fumoir.
3) Remplissez le fumoir de petits morceaux de bois ou de copeaux imbibes d'eau.
4) Assurez-vous que la totalite des boutons de commandes des br01eurs inutilises
est positionnee sur "OFF". (Enfoncez le bouton de commande et tournez dans le
sens des aiguilles d'une montre pour vous assurer qu'il est positionne sur "OFF".)
5) Ouvrez Is gaz a la source.
6) Placez une allumette dans le porte-allumette puis frottez-la.
7) Inserez le porte-allumette et allumez le br01eur du fumoir avec I'allumette b. travers
les grilles de cuisson et les barres Flavorizer ¢.
MISE EN GARDE: Ne vous penchez pas au=dessus du grill
ouvert pendant I'allumage.
8) Enfoncez le bouton de commande du brQleur du fumoir puis positionnez-le sur
"START/HI".
9) Verifiez que le br01eur est allume en regardant b.travers la grille de cuisson.
DANGER
Si le br_leur du fumoir ne s'allume pas, positionnez le
bouton de commande du br_leur sur "OFF" et patientez 5
minutes pour laisser le gaz se dissiper avant d'essayer
nouveau.
iiiiiiiiiiiiiiiiiiiiiiiiiiiiiiiiiiiiiiiiiiiiiiiii
iiiiiiiiiiiiiiiiiiiiiiiiiiiiiiiiiiiiiiiiiiiiiiiii_
*11est possible que le grill de rillustration
pr_sente de I_geres differences par
rapport au module achet_.
® ®
10) Fermez le couvercle du fumoir une fois que le bois a commence a braler et
positionnez le bouton de commands sur "LOW".
POUR ETEINDRE
Enfoncez et tournez chaque bouton de cornrnande du brQleur darts le sens des
aiguilles d'une montre vers la position "OFF". Ferrnez I'arriv_e de gaz _ la source.
UTILISATION DE LA ROTISSOIRE
Remarque : Avant d'utiliser votre retissoire, mesurez votre aliment au point le plus
large. Si la mesure est superieure a 9½" (241,8mm), votre aliment est trop grand pour
entrer dans la retissoire. S'il est trop grand, votre aliment peut etre prepare en utilisant
un support a r5tir et la M_thode de cuisson indirecte.
PRECAUTIONS DE SECURITE IMPORTANTES
Z_ MISES EN GARDE:
• Lisez toutes les instructions avant d'utiliser votre
retissoire.
• Cette retissoire convient pour une utilisation en ext_rieur
uniquement.
• Retirez le moteur et rangez=le au sec Iorsque vous ne
I'utilisez pas.
• Ne touchez pas les surfaces _ haute temperature. Utilisez
des gants de cuisinier.
• Cette retissoire ne convient pas & une utilisation par des
enfants.
• Afin de vous prot_ger contre tout risque _lectrique, ne
plongez pas le cordon d'alimentation, les fiches ou le
moteur darts I'eau ni darts d'autres liquides.
• D_branchez le moteur de la prise secteur Iorsque vous ne
I'utilisez pas ou avant de le nettoyer.
• N'utilisez pas la retissoire pour un autre usage que celui
pour lequel elle a _t_ congue.
• Assurez-vous que le moteur est arr_t_ avant de le placer
sur son support.
• Ne faites pas fonctionner le moteur de la retissoJre si le
cordon d'alimentation ou la prise sont d_t_rior_s.
• N'utilisez pas le moteur de la retissoire en cas de
dJsfonctionnement.
• Le moteur de la retissoire est _quip_ d'un cordon
d'alJmentation a trois ergots (de raccordement a la terre)
afin de vous prot_ger contre Jes rJsques d'_lectrocution.
• Le cordon d'alJmentation devraJt _tre branch_ dJrectement
dans un r_ceptacle a trois ergots correctement raccord_
la terre. Si I'utilisation d'un cordon de rallonge est
n_cessaJre, assurez-vous qu'il s'agit au minimum
d'un cordon de 16 AWG (1,3 ram) & 3 brins bien Jsol_
comportant une indication selon laquelle il CONVlENT
POUR UNE UTILISATION EN EXTERIEUR UNIQUEMENT et
qu'il est correctement raccord_ a la terre.
• Lorsque vous utilisez un cordon de rallonge, assurez=vous
que celui=ci n'entre pas en contact avec une surface
haute temperature ou avec une surface coupante.
• Les cordons de rallonge d'e×t_rJeur devraient comporter
I'Jnscription "W-A" et une _tiquette indiquant "Convient
pour une utilisation avec des appareils d'ext_rieur'.
Page 65

• Ne coupez pas ou ne retirez pas I'ergot de raccordement
la terre du cordon d'alimentation du moteur de la
r6tissoire.
• Ne laissez pas le cordon pendre au=dessus de toute
extr_rnit_ coupante ou de toute surface _ haute
temperature.
• N'exposez pas le moteur de la r6tissoire a la pluie.
• Pour r_duire le risque de choc _lectrique, maintenez le
raccord du cordon de rallonge au sec et _loign_ du sol.
• Un cordon d'alimentation court est fourni afin de r_duire
le risque de se prendre les pieds dedans. Vous pouvez
utiliser des cordons de rallonge mais vous devez faire
preuve de prudence afin de ne pas tr_bucher sur le
cordon.
• En rabsence de codes r_gionaux, le rnoteur de la r6tissoire
doit _tre raccord_ au sol _lectriquement conform_ment au
Code national de F_lectricit_, ANSI / NFPA 70, ou au Code
de r_lectricit_ du Canada, CSA C22.1.
IVlISE EN GARDE : Disposez les aliments _ I'int_rieur de la
r6tissoire avant d'allumer le br_leur.
UTILISATION
1) Pour mettre le moteur de la r6tissoire en place, appuyez sur le bouton situe sur le
panneau de la r6tissoire retractable (a).Tirez le panneau de la r6tissoire vers vous
jusqu'a ce qu'un declic indique qu'il est correctement positionne (b).
2) Retirez le cordon d'alimentation et branchez lea une source d'electricite.
ATTENTION ."Ne faites pas passer le cordon d'alimentation
du moteur de la r6tissoire _ travers I'ouverture du plan de
travail destin_e a la r6tissoire r_tractable.
ATTENTION : Inspectez le cordon d'alimentation avant
chaque utilisation. En cas de d_t_rioration du cordon, ne
rutilisez pas. Contactez le Repr_sentant du Service clientele
le plus proche grace aux informations _ votre disposition sur
notre site Intemet. Connectez=vous sur www.weber.corn ®.
3) Faites glisser I'une des pointes de la broche vers le c6te droit de I'axe de la
r6tissoire, en vous assurant que les parties piquantes soient orientees vers la
gauche et que la vis de la broche soit orientee vers le bas.
Enfoncez I'axe de la r6tissoire au milieu des aliments. Inserez les extremites des
4)
deux broches dans les aliments. Les aliments devraient Ctre centres sur I'axe.
Serrez les vis de la broche (o).
iiiiiii_
(c)
5) Glissez une autre broche sur I'axe de rotation de la r6tissoire, en vous assurant
que les pointes soient orientees vers la droite et que la vis de la broche soit
orientee vers le haut. Inserez les extremites des deux broches dans les aliments.
Serrez la vis de la broche (d).
Page 66

6) Inserez I'extremite pointue de I'axe de rotation de la r6tissoire _. I'interieur du
moteur. Abaissez la broche de la r6tissoire dans les encoches situees sur la cuve.
/
STOCKAGE DE LA BROCHE DE LA ROTISSOIRE
1) Retirez les parties piquantes de la broche de la r6tissoire. Inserez avec precaution
la broche dans le meuble en la faisant glisser b.travers le trou b.I'interieur du
panneau lateral droit (h).
z_ ATTENTION : Ne laissez pas la broche de la r6tissoire entrer
en contact avec des conduites de gaz.
4i!!i!iiill
7) Eaxe de la r6tissoire devrait pivoter de sorte que le c6te le plus Iourd de la viande
ou de la volaille soit entraTne vers le bas. Les pieces de grande taille peuvent
necessiter le retrait des grilles de cuisson et de la grille de maintien au chaud afin
de permettre la rotation complete de I'axe. Remontez les aliments si cela s'avere
necessaire pour obtenir un meilleur equilibre.
8) AIlumez le moteur.
/
CUISSON
o Les viandes (a rexception de la volaille et de la viande hachee) devraient 6tre
portees b.temperature ambiante avant la cuisson. (20 a 30 minutes devraient
convenir pour la plupart des aliments. Si les aliments sent surgeles, decongelez-
les compl_tement avant la cuisson.)
o Si cela s'avere necessaire, liez la viande ou la volaille b. I'aide d'une ficelle pour
rendre la forme aussi homog_ne que possible avant de la placer sur la broche.
. Retirez les grilles de cuisson et la grille de maintien au chaud pour permettre aux
aliments de pivoter librement.
. Suivez les instructions pour I'allumage du brQleur de la r6tissoire page suivante.
. Reglez le br0ieur de la r6tissoire sur moyen-eleve en fonction de la temperature
de I'air exterieur.
. Placez les aliments dans la zone du br01eur.
o Si vous souhaitez conserver les jus de viande pour la sauce, placez un egouttoir
directement au-dessous des aliments au-dessus des barres Flavorizer ¢.
. Les etapes de preparation des aliments sent les m_mes pour la cuisson _.la
r6tissoire que pour une cuisson ordinaire.
. La totalite de la cuisson s'effectue couvercle ferme.
. Si les aliments sont trop Iourds ou presentent des formes irregulieres, il est
possible qu'ils ne pivotent pas bien et qu'ils doivent Ctre cults par le biais de la
Methode de cuisson indirecte sans utilisation de la r6tissoire.
. Le fumoir peut _tre utilise en association avec la r6tissoire pour une saveur fumee
plus prononcee.
Remarque : Lorsque vous utilisez le brOleur de la r6tissoire, le thermometre du grill
n'indique pas la temperature a I'int6rieur de la cuve.
2) Rangez les parties piquantes de la r6tissoire en les plagant sur les crochets situes
sur le support de I'egouttoir b. I'interieur du meuble du grill.
STOCKAGE DU MOTEUR DE LA ROTISSOIRE
1) Avant de retracter la r6tissoire a I'interieur du plan de travail, debranchez le cordon
d'alimentation et placez avec prudence la fiche/le cordon d'alimentation dans la
zone de rangement de la r6tissoire retractable (e).
ATTENTION : Le non respect des consignes de stockage du
cordon d'alimentation de la r6tissoire risque de d'entrainer
sa d_t_rioration au moment de I'ouverture et de la fermeture
du panneau de la r6tissoire r_tractable.
2) Avec I'index, degagez le panneau de la r6tissoire retractable (f). Enfoncez le
panneau vers le bas jusqu'a ce qu'un declic indique qu'il est correctement
positionne (g).
Page 67

ALLUMAGE DU BRULEUR DE LA ROTISSOIRE
BOUTON D'ALLUMAGE DU BRULEUR DE LA ROTISSOIRE
Remarque: Eallumeur de chaque bouton de commande cr6e une 4tincelle en
provenance de I'electrode de I'allumeur vers le tube d'allumage du brOleur Vous
generez I'energie necessaire a la creation de I'etincelle en enfongant le bouton
de commandeet en le toumant vers "START/HI', Ceci allume chaque brOleur
individuellement.
A ATTENTION: LISEZ CECl AVANT
D_,LLUMER LE BRULEUR DE LA ROTISSOIRE
Apr_s une p_riode d'inutilisation, avant d'allumer le Br_leur
de la r6tissoire, quelques secondes doivent s'6couler pour
que la conduite de gaz d'alimentation se remplisse.
Loraque vous utilisez le bouton d'allumage, vous voyez un
6clair de flammes se d6placer de gauche _ droite & travera
la surface du BrQleur de la r6tissoire, le Br_leur de la
r6tissoire n'est pas allure6 tant que la totalit6 de la surface
en c_ramique n'est pas allum6e. A partir de ce moment,
commencez & d6compter 20 secondes avant de tel&chef le
bouton de commande du BrQleur de la r6tissoire. La surface
du BrQleur de la r6tissoire rougeoie une fois que le br_leur
est compl_tement allure6.
z_ DANGER
Le fait de ne pas ouvrir le couvercle Iorsque vous allumez
le grill, ou de ne pas patienter 5 minutes pour laisser le gaz
se dissiper si le grill ne s'allumait pas, pourrait entrainer
un embrasement explosif susceptible de provoquer une
blessure grave ou la mort.
*11est possible que le grill de
rillustration pr_sente de i_geres
differences par rapport au rnodele achet&
® ®
®
Z_ATTENTION: II peut 6tre difficile de voir la flamme du Br_leur
de la r6tissoire par une journ6e lumineuse et ensoleiH6e.
z:_MISE EN GARDE: V_rifiez le tuyau avant chaque utilisation
du grill afin de d6tecter toute entaiHe, fissure, abrasion ou
coupure. Si le tuyau se r_v_le d_t6rior6 de quelque mani_re,
n'utilisez pas le grill Ne remplacez le tuyau que par un tuyau
de rechange agr66 par Weber _.Veuillez entrer en contact
avec le Repr6sentant du Service clientele le plus proche
grace aux coordonn6es _ votre disposition sur notre site
Internet. Connectez=vous sur www.weber.com ®.
1) Ouvrez le couvercle.
2) Retirez la grille de maintien au chaud et les grilles de cuisson du boftier de
cuisson.
3) Assurez-vous que tous les boutons de commande des braleurs sont positionnes
sur "OFF (Enfoncez lebouton de commande puis tournez-le dans le sens des
aiguilles d'une montre pour vous assurer qu'il est positionne sur "OFF)
4) Ouvrez le gaz a la source.
Z_ MISE EN GARDE: Ne vous penchez pas au=dessus du grill
ouvert.
5) Enfoncez le bouton de commande et positionnez-le sur "START/HI': Cette action
provoque une etincelle au niveau de I'allumeur et allume le BrOleur de la r6tissoire.
Continuez a utiliser I'allumeur automatique jusqu'a ce que le BrQleur de la
r6tissoire soit allume. Relg.chez le bouton de commande.
6) Verifiez que le braleur est allume en regardant si le braleur de la r6tissoire
rougeoie.
& MISE EN GARDE: Si le br_leur de la r6tissoire ne s'allume
pas, positionnez le bouton de commande du br_leur sur
"OFF" puis patientez 5 minutes pour laisser le gaz se
dissiper avant d'essayer a nouveau ou d'essayer d'allumer
le br_leur avec une aHumette.
Remarque: Lorsque vous utilisez la rOtissoire avec le couvercle ferme, allumez
seulement deux des brOleurs principaux de chaque cote des aliments (Voir les
Methodes pour les grillades - Cuisson indirecte). Verifiez vos aliments de temps en
temps pour emp#cher une cuisson excessive a I'exterieur. Eteignez le brOleur de la
rOtissoire une lois que les aliments ont dore jusqu'a la teinte souhaitee. Finissez la
cuisson a la chaleur Indirecte.
POUR ETEINDRE
Enfoncez et tournez le bouton de commande du brt31eurdans le sens des aiguilles
d'une montre pour le positionner sur "OFF". Fermez I'arrivee de gaz a la source.
Page 68

ALLUMAGE MANUEL DU BRULEUR DE LA ROTISSOIRE
!k ATTENTION: LISEZ CECl AVANT
DE PROCEDER A L'ALLUMAGE DU BRULEUR DE LA
ROTISSOIRE
Apr_s une p_riode d'inutilisation, avant d'allumer le Br_leur
de la r6tissoire, vous devez patienter quelques secondes
pour que la conduite d'arriv_e de gaz se remplisse. Lorsque
vous avancez une allumette en direction du br_leur de la
r6tissoJre vous voyez un _clair de flammes se d_pla_ant
de gauche _ droJte a travers la surface du Br_leur de la
r6tissoire, le Br_leur de la r6tissoire n'est pas allum_
tant que la totalJt_ de la surface en c_ramJque n'est pas
enflamm_e. A partir de cet instant, commencez un d_compte
de 20 secondes avant de tel&chef le bouton de commande du
Br_leur de la r6tissoire. La surface du Br_leur de la r6tissoire
rougeoie une fois que le br_leur est totalement allum_.
DANGER
Le fait de ne pas ouvrir le couvercle pendant que vous
allumez le grill, ou de ne pas patienter 5 minutes pour
laisser le gaz se dissiper si le grill ne s'allumait pas, pourrait
entra_ner un embrasement explosif susceptible de provoquer
une blessure grave ou la mort.
*11set possible que le grill de
rillustration pr_sente de I_geres
differences par rapport au models achet_.
® ®
!
®
ATTENTION: II peut _tre difficile de voir la flamme du Br_leur
de la r6tissoire par une journ_e ensoleill_e.
MISE EN GARDE: V_rifiez le tuyau avant chaque utilisation
du grill afin de d_tecter toute entaille, fissure, abrasion ou
coupure. Si le tuyau se r_v_le d_t_rior_ de quelque mani_re,
n'utilisez pas le grill. Remplacez-le uniquement par un tuyau
de rechange agr_ par Weber _. Veuillez entrer en contact avec
le Repr_sentant du Service clientele de votre r_gion gr&ce
aux coordonn_es _ votre disposition sur notre site Internet.
Connectez=vous sur www.weber.com ®.
1) Ouvrez le couvercle.
2) Retirez la grille de maintien au chaud et les grilles de cuisson du be;tier de
cuJsson.
3) Assurez-vous que tousles boutons de commande des brQleurs sent positionnes
sur "OFF". (Enfoncez le bouton de commande et tournez-le dans le sens des
aiguilles d'une montre pour vous assurer qu'il est positionne sur "OFF".)
4) Ouvrez le gaz b. la source.
5) Placez une allumette dans le porte-alumette puis frottez-la.
6) Tenez le porte-allumette et allumez le brQleur de la r6tissoire avec rallumette
depuis le c6te droit.
MISE EN GARDE: Ne vous penchez pas au-dessus du grill
ouvert.
7) Enfoncez le bouton de commande du brOleur de la r6tissoire puis positionnez-le
sur "START/HI". Maintenez le bouton de commande enfonce jusqu'b, vingt (20)
secondes _. partir du moment oQ le brOleur s'est allume.
8) Verifiez que le braleur est allume en regardant si le brQleur de la r6tissoire
rougeoie.
MISE EN GARDE: Si le br_leur de la r6tissoire ne s'allume
pas, positionnez le bouton de commande du br_leur sur
"OFF" puis patientez 5 minutes pour laisser le gaz se
dissiper avant d'essayer & nouveau.
Remarque: Lorsque vous uti/isez /a rOtissoire avec /e couverc/e ferme, a//umez
seu/ement deux des brO/eurs principaux au-dessous des ailments (Voir /es M_thodes
pour/es gri//ades - Cuisson indirecte). V_rifiez r_gu/ierement /'_tat de vos ailments
pour emp_cher que /'ext_rieur ne soit trop cult. Fermez /e brO/eur de/a rOtissoire une
fois que les aliments ont dor_ jusqu'a la teinte souhait_e. Finissez la cuisson grace a la
chaleur Indirecte.
POUR ETEINDRE
Enfoncez et tournez le bouton de commande du breleur dans le sens des aiguilles
d'une montre vers la position "OFF". Fermez rarrivee de gaz b. la source.
Page 69

UTILISATION DE L'ECLAIRAGE DE LA POIGNEE
L'eclairage de poignee Weber Grill Out TM est equipe d'un "Detecteur d'inclinaison." Si le
bouton de mise en marche (a) est active, la lumiere s'allume Iorsque le couvercle du grill
est ouvert. La lumiere s'eteint Iorsque le couvercle est ferme. Pour une utilisation pendant
la journee, desactivez le detecteur en appuyant sur le bouton de mise en marche (a).
PROBLEIVIE VERIFICATION SOLUTION
L'_clairage de poign_e Les piles sont-elles usagees ? Remplacez les piles.
Weber Grill Out" ne s'allume
pas. Les piles sont-elles correctement installees ? Voir I'illustration de montage.
Le couvercle est -il en position haute et le bouton de mise en marche est-il positionne La lumiere s'allume Iorsque le couvercle est ouvert.
sur ON ?
L'eclairage de poignee Weber Grill Out TM est-il active ? Appuyez sur le bouton de mise en marche.
L'eclairage de poignee Weber Grill OutTM est-il positionne correctement sur la Ajustez la position de la lampe (Voir I'uillustration de
peignee ? montage).
Si vous ne parvenez pae _ r_soudre lee problemes en utilieant ces m_thodes, veuillez entrer en contact avec le Repr_eentant du Service clientele le plus proche
grace aux coordonn_ee _ votre disposition sur notre site Internet. Connectez-vous cur www.weber.com ®.
PROBLEIVIE VERIFICATION SOLUTION
Le br_leur de la rGtieeoire ne Avez-vous maintenu le bouton de commande Essayez de rallumer le brOleur en maintenant le bouton de commande du brt31eur
s'allume pas. du br01eur de la rGtissoire enfonce pendant 20 enfonce pendant 20 secondes une fois que le br01eur s'est allume.
Si vous ne parvenez pae _ r_soudre lee problemes en utilieant ces m_thodes, veuillez entrer en contact avec le Repr_eentant du Service clientele le plus proche
grace aux coordonn_ee _ votre disposition sur notre site Internet. Connectez-vous cur www.weber.com ®.
secondes apres I'allumage du br01eur ?
Avez-vous attendu de voir la totalite de la Lorsque vous rallumez le br01eur en maintenant le bouton de commande du br01eur
surface en ceramique allumee avant de enfonce, attendez de voir la totalite de surface en ceramique allumee avant de
decompter 20 secondes ? decompter 20 secondes.
Avez-vous utilise le boputon d'allumage Une fois que vous avez attendu cinq minutes pour laisser le gaz se dissiper,
plusieurs lois jusqu'a ce que le brt31eur essayez d'utiliser le bouton d'allumage plusieurs lois jusqu'e ce que le br01eur
s'allume ? s'allume (Voir "Allumage du br01eur de la rGtissoire").
L'allumeur fonctionne-t-il (Voyez-vous une Essayez d'allumer le brt31eurmanuellement (Voir "Allumage du br01eur de la
etincelle Iorsque vous utilisez plusieurs fois le rGtissoire"). Appelez le service clientele.
bouton d'allumage ?
PROBLEIVIE VERIFICATION
Le brQleur lateral ne s'allume pae. Earrivee de gaz est-elle fermee ?
La flamme est petite en position "HI'_ Le tuyau d'alimentation en combustible est-il pile ou pince ?
L'allumage par bouton pouseoir ne fonctionne pas. Le breleur s'allume-t-il avec une allumette ?
Si vous ne parvenez pas _ r_soudre lee problemes en utilisant tee m_thodes, veuillez entrer en contact avec le Repr_sentant du Service clientele le plus proche
grace aux coordonn_ee _ votre disposition sur notre site Internet. Connectez-voue sur www.weber.com ®.
Ouvrez I'arrivee de gaz.
Redressez le tuyau.
Si le brQleur s'allume avec une allumette, verifiez
I'allumeur (voir ci-dessous).
SOLUTION
Page 70

MAINTENANCE DU BRULEUR LATERAL
z_ MISE EN GARDE: La totalit_ des commandes de gaz et des
valves d'alimentation devraient _tre positionn_es sur "OFF".
Assurez-vous que le c_.ble noir est branche entre I'allumeur et I'electrode.
Assurez-vous que le cb.ble blanc est branche entre I'allumeur et la pince de
raccordement & la terre.
L'etincelle devrait ¢tre blanche/bleue, pas jaune.
1) C_.ble de I'allumeur
2) C_.ble de raccordement a la terre
3) BrQleur
Grille du brQleur lateral __
Cache du brQleur lateral
Anneau et t6te du brQleur lateral
Electrode de rallumeur
Bouton de commande
Ailumeur
(3)
PROBLEIVIE VERIFICATION
Lee brQleurs produisent une flamme jaune ou
orange, et une odeur de gaz se d_gage (C'est
normal pour le tube d'allumage du brQleur).
SymptSmes :
Le brQieur ne s'ai(ume pas, ou la flamme est
petite en position "HE
Des embrasements se produisent :
Z_ ATTENTION : Ne recouvrez pas (e Nettoyez le plateau inferieur.
plateau inf6rieur de papier aluminium.
L'aspect de la flamme du brQleur est irr_gulier. Les brOleurs sont-ils propres ? Nettoyez les breleurs. (Voir la Section "Maintenance'_)
La flamme est petite Iorsque le brQleur est r_gl_
sur "HI': Les flammes ne brQlent pas sur toute la
Iongueur du tube du brQleur.
L'int_rieur du couvercme sembme "s'_cailler." (Cela Le couvercle est en email ou en acier inoxydable, il Nettoyez meticuleusement. (Voir la Section "Nettoyage")
ressemble _ des _cmats de peinture.) n'est pas peint. II ne peut pas "s'ecailler'_ Ce que vous
Les portes du placard ne sont pas aiign_es. Verifiez la goupille de reglage au bas de chaque porte. Desserrez le ou les ecrou(s) de reglage. Faites glisser la
Si vous ne parvenez pas _ r_soudre les problemes en utilisant ces m_thodes, veuiiiez entrer en contact avec le Repr_sentant du Service clientele le plus proche
grace aux coordonn_es _ votre disposition sur notre site Internet. Connectez-vous sur www.weber.com ®.
Inspectez les Grilles anti-araignees/insectes pour Nettoyez les Grilles anti-araignees/insectes. (Voir la Section
detecter les obstacles potentiels. (81ocage des trous.) "Maintenance annuelle")
Le tuyau d'alimentation en combustible est-il pile ou Redressez le tuyau d'alimentation en combustible.
pince ?
Le braleur s'allume-t-il avec une allumette ? Si vous pouvez allumer le braleur avec une allumette,
Avez-vous utilise le bouton de I'allumeur plusieurs fois Assurez-vous de maintenir le bouton de commande enfonce
jusqu'a ce que le brQleur principal soit allume (Voir pendant deux secondes une lois que vous avez appuye sur
Instructions pour I'allumage) ? I'allumeur et que vous avez vu la flamme orange sortir du
Eallumeur fonctionne-t-il (Voyez-vous une etincelle
Iorsque vous utilisez plusieurs fois le bouton de I'allumeur
?
Prechauffez-vous le barbecue selon la methode
recommandee ?
Les grilles de cuisson et les barres Flavorizer ¢ sont-elles
recouvertes d'une epaisse couche de graisse brOlee ?
Le plateau inferieur est-il "sale" et emp¢che-t-il la graisse
de s'ecouler vers I'egouttoir ?
voyez, ce sont des eclats de graisse carbonisee qui se
detachent du couvercle.
IL NE S'AGIT PAS D'UN DEFAUT.
verifiez ensuite le dispositif d'allumage Crossover ¢.
tube d'allumage du brOleur.
Essayez d'allumer le brQleur manuellement (Voir 'Allumage
manuel du braleur principal"). Appelez le Service clientele.
Tousles brOleurs sur HI pendant 10 a 15 minutes pour le
prechauffage.
Nettoyez meticuleusement. (Voir la Section "Nettoyage")
ou les porte(s) jusqu'a ce que celle(s)-ci soi(en)t alignee(s).
Serrez I'ecrou.
SOLUTION
Page 71

GRILLES ANTI-ARAIGNEES/INSECTES WEBER ®
Votre barbecue a gaz WebeP, comme tout appareil b.gaz d'exterieur, constitue une
cible pour les araignees et les autres insectes. Ceux-ci peuvent faire leur nid dans
la section des venturi (1) des tubes du brQleur. Ceci bloque le debit normal du gaz,
et risque de provoquer le retour du gaz b. I'exterieur de I'ouverture destinee e I'air
necessaire a la combustion. Ceci pourrait entra'iner un incendie a I'interieur et autour
des ouvertures destinees b. recevoir I'air necessaire a la combustion, au-dessous du
panneau de commande, provoquant une deterioration grave de votre barbecue.
L'ouverture destinee a. recevoir I'air necessaire a.la combustion est protegee par une
grille en acier inoxydable (2) afin d'emp¢cher les araignees et les autres insectes
d'acceder aux tubes du br01eur a travers les ouvertures de circulation de I'air necessaire
e la combustion.
Nous vous recommandons d'inspecter lee Grilles anti-araign_es/insectes
au moins une lois par an. (Voir la Section "Maintenance annuelle".) Veuillez
_galement inspecter et nettoyer les Grilles anti-araign_es/insectes si I'un des
sympt6mes suivant se produisait:
1) Une odeur de gaz associee a I'aspect jaune et faible des flammes du brOleur.
2) Le barbecue n'atteint pas la temperature.
3) Le barbecue ne chauffe pas de faqon homogene.
4) Un ou plusieurs brOleurs ne s'allument pas.
PROCEDURE DE NETTOYAGE DU BRULEUR PRINCIPAL
FERMEZ L'ARRIVEE DEGAZ.
Retirez le collecteur (Voir "Remplacez les BrQleurs principaux").
Regardez a I'interieur de chaque br01eur avec une lampe torche.
Nettoyez I'interieur des brQleurs a I'aide d'un fil de fer (un cintre deplie fera I'affaire).
Verifiez et nettoyez les orifices des clapets d'arrivee d'air aux extremites des br01eurs.
Verifiez et nettoyez les orifices e la base des valves. Utilisez une Brosse en fils d'acier
pour nettoyer I'exterieur des br01eurs. Cela permet de s'assurer que tous les ports des
brQleurs sont enti@ement ouverts.
z_ ATTENTION: N'_largissez pas les ports des br_leurs
pendant le nettoyage.
DANGER
Le faJt de ne pas corrJger Jes syrnptSmes rnentionn_s cJ=
dessus pourrait entrainer un Jncendie, susceptible de
provoquer une blessure grave ou la mort et des dornrnages
la propri_t&
REMPLACEMENT DES BRULEURS
PRINCIPAUX
1) Votre grill e gaz Summit ®dolt etre eteint et avoir
refroidi.
2) Fermez le gaz a la source.
3) Deconnectez I'arrivee de gaz.
4) Retirez les grilles de cuisson.
5) Retirez le bo'itier du fumoir.
6) Retirez les barres Flavorizer ¢.
RETIREZ LE PANNEAU DE COIVIMANDE
7) Piece necessaire: tournevis cruciforme.
a) Retirez les boutons de commande du br01eur.
b) Retirez les deux vis qui maintiennent le panneau
de commande sur le cadre.
c) Retirez le panneau de commande. Inclinez le
panneau vers I'avant et soulevez-le pour I'eloigner
du grill.
Retirez completement le panneau de commande de
I'ensemble du boftier de cuisson, exposant ainsi les valves,
les brQleurs, I'allumeur et le collecteur.
Page 72

8) Retirezlesdeuxvisquimaintiennentlecollecteurcentreleboftierdecuisson.
RetirezI'ensembleducollecteurducadreducollecteur.
9) Retirezle(s)tube(s)du/desbrOleur(s)selectionne(s)ducadreducollecteuret
remplacez-le(s)parun/destube(s)debrOleur(s)neuf(s).
10)PourremettreenplaceI'ensembleducollecteur,inversezlesetapes7a9.
z_ ATTENTION: Les orifices du br=31eur(A) doivent _tre
positionn_s correctement au-dessus des orifices des valves
(8).
Assurez-vous que I'extr_mit_ oppos_e des tubes du br=31eur
(C) est correctement align_e avec les fentes a Farri_re du
boitier de cuisson. V_rifiez que le montage est correct avant
de fixer le collecteur en place.
z_ MISE EN GARDE: Une fois que vous aurez remis en place
les conduites de gaz, celles-ci devraient faire I'objet d'un
contr61e de d_tection des fuites au moyen d'une solution
d'eau savonneuse avant toute utilisation du grill. (Volt,
"D_tection des fuites de gaz.")
MAINTENANCE ANNUELLE
iNSPECTiON ET NETTOYAGE DE LA GRILLE ANTI-ARAIGNEES/
INSECTES
Pour inspecter les Grilles anti-araignees/insectes, retirez le panneau de commande. En
cas de presence de poussiere ou d'impuretes sur les grilles, retirez les brOleurs pour
nettoyer les grilles.
Brossez legerement les Grilles anti-araignees/insectes avec une brosse a polls souples
(par exemple, une vieille brosse a dents).
z_ ATTENTION: Ne nettoyez pas les Grilles anti-araign_es/
insectes _ I'aide d'ustensiles durs ou coupants. Ne
d_logez pas les Grilles-anti araign_es/insectes de leurs
emplacements et n'_largissez pas les ouvertures des grilles.
Tapotez legerement le brOleur pour faire sortir les debris et les impuretes du tube du
brOleur. Une fois que les Grilles anti-araignees/insectes sent propres, remettez les
brOleurs en place.
Si la Grille anti-araignees/insectes se deteriore ou ne peut pas etre nettoyee, veuillez
entrer en contact avec le Representant du service clientele le plus proche e I'aide des
coordonnees a.votre disposition sur notre site Internet.
Connectez-vous sur www.weber.com ®.
ASPECT DES FLAMMES DU BROLEUR
Les brt31eursdu barbecue a.gaz Weber ¢ ont ete parametres en usine pour recevoir le
melange d'air et de gaz correct. L'illustration montre I'aspect correct de la flamme.
1) Tube du brt31eur
2) Les extremites flamboient de temps en temps en jaune
3) Bleu clair
4) Bleu fence
Si les flammes ne semblent pas uniformes tout au long du tube du brQleur, suivez les
procedures de nettoyage du brQleur.
®
®
®
Page 73

Page 74

Z_ATTENTION: This product has been safety tested and is only certified for use in a specific country. Refer to country
designation located on outer carton.
These parts may be gas carrying or gas burning components. Please contact Weber-Stephen Products Co., Customer Service Department for
genuine Weber-Stephen Products Co. replacement part(s) information.
Z_WARNING: Do not attempt to make any repair to gas carrying or gas burning components without contacting Weber-
Stephen Products Co., Customer Service Department.Your actions, if you fail to follow this product Warning, may
cause a fire or an explosion resulting in serious personal injury or death and damage to property.
Z_ATENCION: A este producto se le han realizado pruebas de seguridad y ha sido certificado para usarse en un pais
especffico. Refi_rase al pais indicado en la parte e×terna del cart6n de empaque.
Estas partes pueden ser componentes que transporten gas o Jo quemen. Por favor p6ngase en contacto con el Departamento de Atenci6n al Cliente
de Weber-Stephen Products Co. para obtener informaci6n sobre las partes de repuesto Weber-Stephen Products Co. genuinas.
Z_ADVERTENCIA: No trate de realizar reparaci6n alguna a los componentes que transporten o quemen gas sin antes
ponerse en contacto con el Departamento de Atenci6n al Cliente de Weber=Stephen Products Co. Si no llegase a
acatar esta advertencia, sus acciones podr{an causar un fuego o una e×plosi6n que resulte en lesiones personales
serias o la muerte o daSos a la propiedad.
Z_ATTENTION: Ce produit a _t_ soumis _ des tests de s_curit_ et est uniquement certifi_ pour une utilisation dans un
pays sp_cifique. Consultez I'emballage e×terne pour en savoir plus sur le pays d'utilisation appropri_.
Ces pieces peuvent _.tre des composants d'acheminement ou de combustion de gaz. Contactez le service clientele de Weber-Stephen Products Co.
pour en savoir plus sur les pieces de rechange Weber-Stephen Products Co. d'origine.
Z_AVERTISSEIVlENT: Ne tentez pas d'effectuer des r_parations quelles qu'elles soient sur des composants
d'acheminement ou de combustion de gaz sans contacter pr_alablement le service clientele de Weber-Stephen
Products Co. Le non-respect du present avertissement peut r_sulter en un incendie ou une e×plosion susceptibles
de provoquer des blessures graves voire mortelles ainsi que des dommages materiels.
WEBER-STEPHEN PRODUCTS CO.
www.weber.com _)
©2008 The following trademarks are registered in the name of Weber-Stephen Products Co., an Illinois corporation, located at 200 East Daniels Road, Palatine, Illinois 60067 U.S.A.
Australia; Smokey Joe, Weber, Kettle SilhouetteY., Genesis, Austria; Kettle Silhouette_, Smokey Joe, Weber, Benelux; Kettle Silhouette_., Smokey Joe, Weber, Compact Grill Configuration,
Botswana; Weber, Canada; Smokey Joe, Genesis, China; Kettle Silhouette_, Denmark; Kettle Silhouette_, Smokey Joe, Weber, Finland; Smokey Joe, France; Kettle Silhouette_, Smokey
Joe, Weber, One-Touch, Germany; Smokey Joe, Weber, One-Touch, Greece; Smokey Joe, Ireland; Kettle Silhouette_, Smokey Joe, Italy; Smokey Joe, Weber, Japan; Smokey Joe, Weber,
Korea; Smokey Joe, Weber, New Zealand; Weber, Smokey Joe, Nigeria; Weber, Norway; Smokey Joe, Weber, Portugal; Weber, South Africa: Smokey Joe, Weber, Kettle Configuration,
Spain; Smokey Joe, Weber, Sweden; Kettle SilhouetteY, Smokey Joe, Switzerland; Kettle Silhouette_., Smokey Joe, Weber, United Kingdom; Smokey Joe, Weber, Weber One-Touch, U.S.A..;
Kettle Configuration, Kettle SilhouetteY, Smokey Joe, Weber, One-Touch, Firespice, Go-Anywhere, U.S.A.;Kettle Configuration, Kettle Silhouette, Genesis, Flavorizer, Crossover, Flamgo,
Performer, Rapidfire, Tuck 'N Carry, Jumbo Joe, Bar-B-Kettle, Master-Touch, Spirit, Grill Out, Summit, Platinum, 1-800-Grill-Out, Ranch, Matchless Flame, Zimbabwe; Weber, Kettle Configu-
ration, Kettle Silhouette_.
Page 75

&
1. How Can We Reach You? / _C6rno Podernos Ponernos En Contacto Con Usted? / Comment Pouvons-nous Vous Joindre?
First Name / Nornbre / Pr6norn M.L / Inicial / Seconde Initiale Last Name / Apeliido / Norn
Address / Direccibn / Adresse
State / Estado / Etat
Zip Code / C6digo Postal / Code Postal
Apt. # / Apt. # / Appt. # City / Ciudad / Ville
Telephone / Tel_fono / T_lephone
( ) =
E-mail Address / Direcci6n De Correo Electrbnico / Adresse E-mail
2. How would you prefer for us to contact you? / &Cbrno preferiHa que nos
pongarnos en contacto con usted? / Comment pr_f_reriez-vous que nous avez-vous achet_?
vous contactions? 1. [] Summit _RE=420 TM
1. [] By US mail / Por correo / Par courder postal am&dcain 2. [] Summit ® E=450 TM
2. [] By e=mail / Per correo electr6nico / Par e=mail 3. [] Summit _RS=420 TM
3. [] By phone / Per tel6fono / Par t&l&phone 4. [] Summit _ S=450 TM
4. [] No preference / Ninguna preferencia / Aucune pr6f6rence 5. [] Summit _ S-470 TM
5. [] Please don't contact me unless it is in regards to a technical matter related to my 6. [] Builtqn Summit ® S=460 TM
grill / Por favor no se pongan en contacto conmigo a menos que sea sobre un Empotrado Summit ® S=460 TM
tema t&cnico relacionado con el asador / Merci de ne me contacter que si votre Integre Summit '_S=460 TM
appel concerne un probl_me technique concernant mort grill
6. [] I prefer to receive information in Spar/ish / Prefiero recibir informaci6n en espaflol
/ Je pr6f_re recevoir des informations en espagr/ol 7.
3. When did you buy your grill? / &Cudndo cornprb usted el asador? / Quand
avez-vous achet_ votre grill?
Month / Mes / Mois Day / Dfa / Jour Year / Aflo / Annie
Without tax, how much did you pay for your grill? / &Sin irnpuesto, cudnto
pag6 por el asador? / Hors taxes, cornbien avez-vous pay_ votre grill?
$ .oo
6. Which model did you purchase? / &Qu_ rnodelo cornpr6? / O,uel module
Have you ever owned a Weber grill before? / &Ha tenido alguna vez antes
un asador Weber_? / Avez-vous d_j_ poss_d_ un grill Weber _ auparavant ?
1. [] Yes/Sf/Oui
Number of Weber gas grills owned:
NLimero de asadores de gas Weber '_ que ha tenido:
Nombre de grills £ gaz Webe: poss&d6s :
Number of Weber charcoal grills owned:
NLimero de asadores de carb6n Weber _ que ha tenido:
Nombre de grills _ charbon Weber poss4d&s :
2. [] No, this is my first Weber grill / No, 6ste es mi primer asador Weber '_/ Non, il
s'agit de mon premier grill Webe:
7. [] Summit _ E=620 TM
8. [] Summit _ E=650 TM
9. [] Summit _RS=620 TM
10. [] Summit _ S=650 TM
11. [] Summit _ S=670 TM
12. [] Builtqn Summit ® S=660 TM
Empotrado Summit ® S=660 TM
Integre Summit '_S=660 TM
Where did you buy your grill? / 6D6nde cornprb el asador? / O_ avez-vous
achet6 votre grill?
PLEASE CONTINUE ON BACK / POR FAVOR CONTINOE EN EL REVERSO / VEUILLEZ CONTINUER AU VERSO. _" _
Page 76

Thanks for sharing your contact information with us. Again, it all stays strictly
between us -- Weber does not share customers' names with anyone else. if
you need replacement parts or have questions about the assembly, use or
maintenance of your grill, please call Weber Customer Service.
Gracias per compartir su informaci6n de contacto con nosotros. De nuevo,
todo quedar_ estrictamente entre nosotros -- Weber no comparte los nombres
de sus clientes con nadie. Si necesita partes de repuesto o tiene preguntas
acerca del ensamblaje, uso o mantenimiento del su asador, pot favor llame al
Departamento de Soporte y Servicio al Cliente de Weber.
Merci de nous avoir communiqu_ vos coordonn_es. Nous vous rappelons que ces
informaitons resteront strictement entre nous :Weber ne communique les noms
de ses clients _ personne. Si vous avez besoin de pi_ces de rechange ou si vous
avez des questions sur le montage, I'utilisation ou I'entretien de votre grill,
veuillez consulter le Service Client de Weber.
For purchases made in the U.S.:
Para compras hechas en los Estados Unidos:
Pour les achats effectu_s aux Etats-Unis:
For purchases made in Mexico:
Para compras hechas en M_xico:
Pour les achats effectu_s au Mexique:
For purchases made in Canada:
Para compras hechas en CanadA:
Pour les achats effectu_s au Canada:
Product Registration
RO. Box 1999
Palatine, IL 60078-1999
1-800-446-1071
Weber=Stephen Products S.A. de CM
Marcella No. 338
CoLAmericana • Guadalajara, Jalisco
44160 Mexico, C. R • Mexico
Tel6fono - (52) (33)3615-0736 x113
R.RC. WPR 030919 ND4
Product Registration
RO. Box 40530
Burlington, ON L7P 4W1
1-800-265-2150
A
Knowing more about who buys our grills helps the crew back in R&D come
up with new cutting edge Weber products. Please fill in the answers you feel
comfortable sharing with us, and pass by any question you prefer to leave
blank. Thank you for being so generous.
Saber m_s sobre qui_n compra nuestros asadores ayuda al equipo de
Investigaci6n y Desarrollo a concebir nuevos productos Weber de avanzada.
Por favor rellene las respuestas con las que se sienta rods cbmodo en
compartir con nosotros, y pase por alto cualquier pregunta que prefiera dejar
en blanco. Gracias por su generosidad.
Le fair de mieux connaitre les personnes qui ach_tent nos grills aide le
personnel du service R&D & d_velopper de nouveaux produits Weber innovants.
VeuilJez r_pondre aux questions en fournissant les r_ponses pour lesquelles
vous vous sentez _ I'aise, et passez route question que vous pr_f_rez laisser
sans r_ponse. Nous vous remercions pour votre g_n_rosit_.
8. Are you: / Es usted: / Vous @tes:
1. [] Male / Hombre / Un homme 2. [] Female / Mulet / Une femme
9. Are you married? / _.Estd casado? / Etes-vous mari_?
1. [] Yes/S[/Oui 2. [] No/No/Non
10. What's your date of birth? / iCudJ es su fecha de nacimiento? / Quelle est
votre date de naissance ?
Month / Mes / Mois Day / Dfa / Jour Year / Aho / Annie
11. Including yourself, how many people live in your household? (example 01,
02, etc.) / Incluy_ndolo a usted, 2.cu_ntos viven en su casa? (ejemplo 01, 02,
etc.) / Vous compris, combien de personnes composent votre foyer ? (par
exemple, 1 an, 2 arts, etc.)
Children under 18 Adults
NiF_os menores de 18 Adultos
Enfar/ts de moins de 18 ans Aduites
12. Do you own or rent the place you call home? / _.Posee o alquila el lugar
que usted llama casa? / Poss_dez-vous ou Iouez-vous le lieu que vous
appelez votre domicile ?
1. [] Own / Propio / Propri_taire 2. [] Rent / Aiquiler / Locataire
13. Whats your annual household income? / _.Cu_nto es su ingreso familiar
anual? / Quel est le revenu annuel de votre foyer ?
1. [] <$15,000 9. [] $60,000=$74,999
2. [] $15,000=$24,999 10. [] $75,000=$99,999
3. [] $25,000-$29,999 11. [] $100,000-$149,999
4. [] $30,000-$34,999 12. [] $150,000-$174,999
5. [] $35,000-$39,999 13. [] $175,000-$199,999
6. [] $40,000-$44,999 14. [] $200,000-$249,999
7. [] $45,000-$49,999 15. [] $250,000-$299,999
8. [] $50,000-$59,999 16. [] >$300,000
14. Which activities or interests do you have that keep you (or your partner)
busy? / 2.Qu_ actividades o intereses tiene que Io mantienen a usted (o a
su compa_ero/a) ocupado? / Quelies sont les activit_s ou centres d'int_r_t
(pour vous ou votre conjoint) qui vous occupent ?
1 []
Arts or antiques / Artes o antig{iedades / Arts ou antiquit&s
2. []
Bicycling / Ciclismo / Bicyclette
3. []
Boating or sailing / N£utica o velerismo / Bateau ou navigation
4. []
Buying videos / Comprar videos / Achat de vid&os
5. []
Subscribing to cable TV / Suscripci6n a televisi6n pot cable / Inscriptions £ la TV
cabl6e
6. []
Camping or hiking / Acampar o excursionismo a pie / Camping ou marche
7. []
Attending cultural arts or events / Asistir a artes culturales o eventos / Assister
des repr6sentations artistiques ou '_des 6v&nements culturels
s. []
Dieting / Hacer dieta / R&gime alimentaire
9. []
Donating to charity / Donar a obras caritativas / Dons '_ des orgar/ismes caritatifs
10.[]
Fishing / Pesca / P6che
u. []
Foreign travel / Viajes al extrar/jero / Voyages £ 1'6tranger
12.[]
Gardening or plants / Jardiner[a o plantas / Jardinage ou plar/tes
Golf / Golf / Golf
is. []
Grandchildren / Nietos / Petits-enfants
14. []
15.[]
Houseplants / Plantas de interior / Plantes d'int@ieur
16.[]
Hunting / Caza / Chasse
17. []
Motorcycles / Motocicletas / Motocycbttes
Needlework / Costura / Couture
is. []
19.[]
My cat / Mi gate / Mon chat
20. []
My dog / Mi perro / Mort chien
2t []
Listening to music on my CD player / Escuchar mOsica en mi tocadiscos CD /
Ecouter de la musique sur mort lecteur CD
22. []
Listening to music on any device / Escuchar mOsica en alg0n dispositivo / Ecouter
de la musique quel que soit I'appareil utilis&
23. []
Personal computers / Computadores personabs / Ordinateurs personnels
24. []
Photography / Fotograffa / Photographie
25. []
Physical fitness or exercise / Mar/tenerme en buena forma ffsica o ejercicio /
Fitness ou exercices physiques
26. []
Politics / Poh'tica / Politique
27. []
Running / Correr / Course
2s. []
Shopping by mail order or catalog / Comprar pot ventas pot correo o cat41ogos /
Achats par correspondance ou sur catalogue
29. []
Snow skiing / Esquiar sobre nieve / Ski
so. []
Stocks & bonds / Acciones y bonos / Actions & obligations
Tennis / Tenis / Tennis
Sl. []
s2. []
Veterans' affairs / Asuntos de los veteranos de guerra / Affaires li_es aux anciens
combattants
33. []
Walking / Caminar / Marche
34. []
Watching sports on TV / Ver deportes pot TV / Regarder le sport £ la TV
s5. []
Other / Otros / Autre ( ')
@2008 Weber_Stephen Products Co. All rights reserved. PrmtedlnUSA 55798_0708
 Loading...