

Page 1
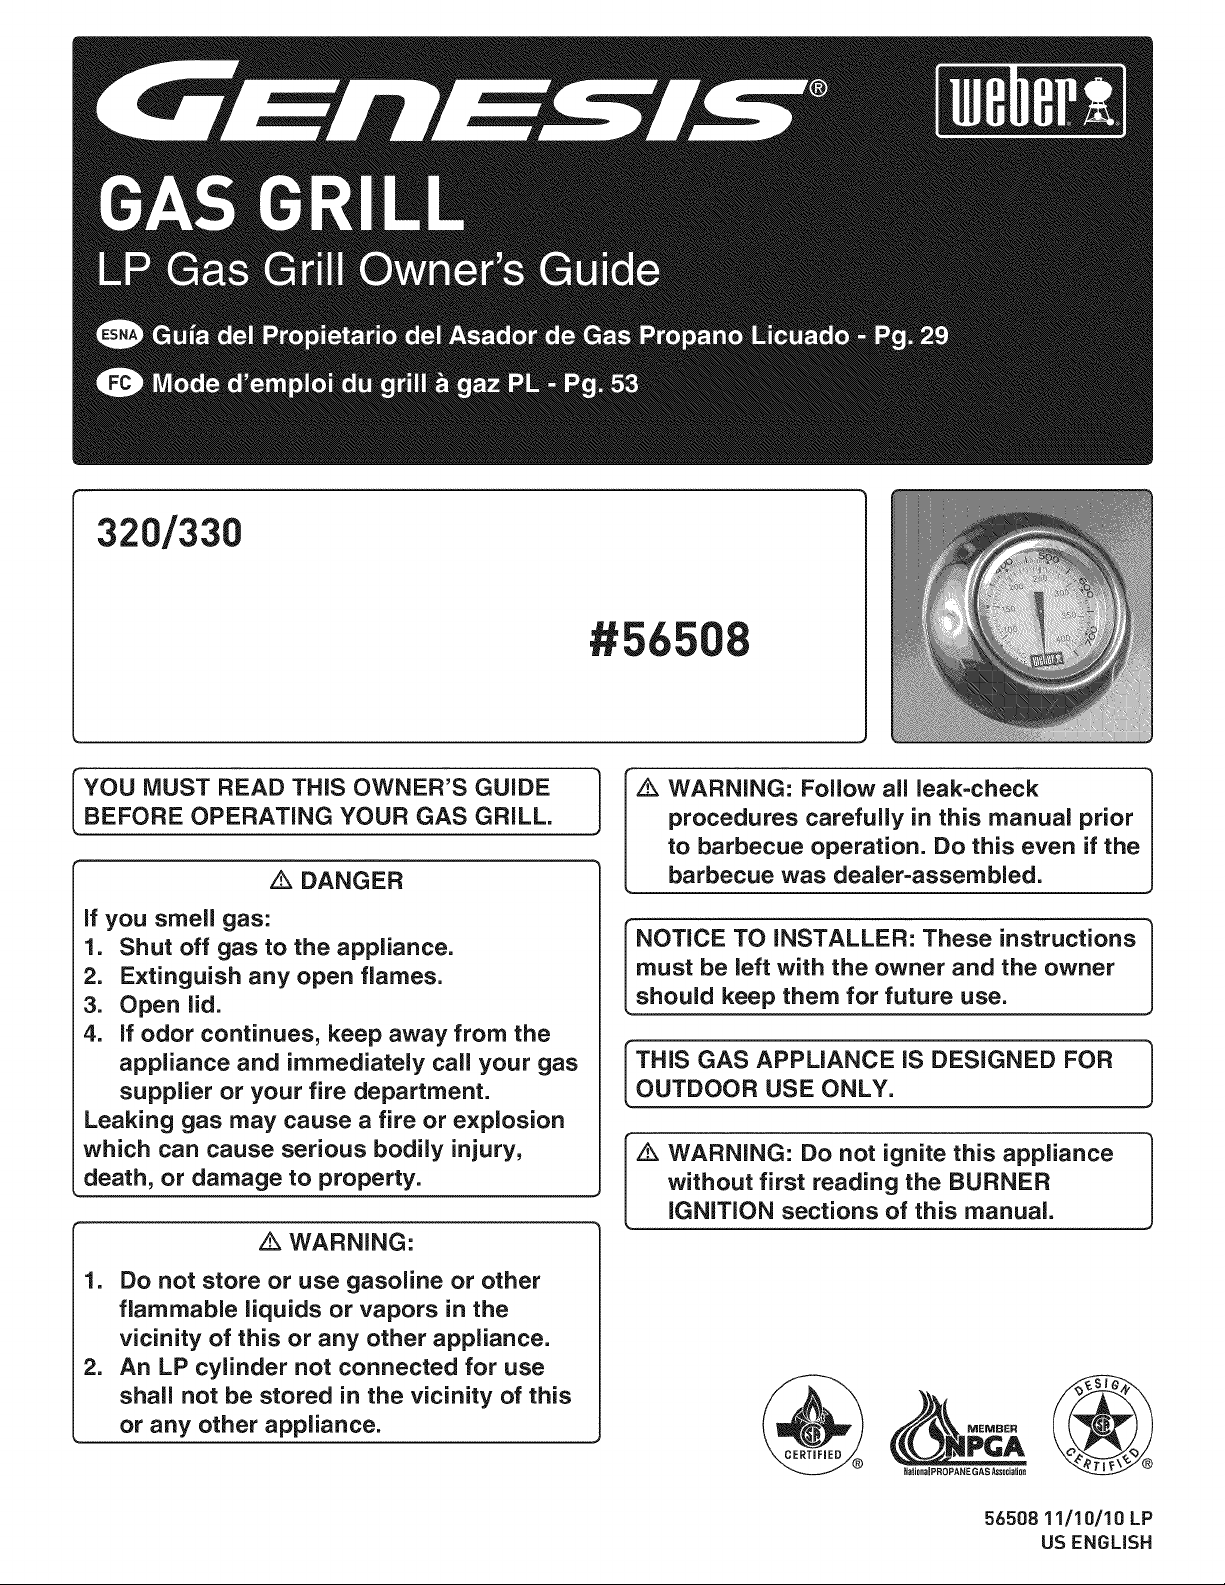
320/330
YOU MUST READ THiS OWNER'S GUIDE
BEFORE OPERATING YOUR GAS GRILL.
Z_ DANGER
procedures carefully in this manual prior
I [ z_ WARNING: Follow all leak-check
to barbecue operation. Do this even if the
barbecue was dealer-assembled.
if you smell gas:
1. Shut off gas to the appliance.
2. Extinguish any open flames.
3. Open lid.
4. if odor continues, keep away from the
appliance and immediately call your gas
supplier or your fire department.
Leaking gas may cause a fire or explosion
which can cause serious bodily injury,
death, or damage to property.
/k WARNING:
1. Do not store or use gasoJine or other
flammable liquids or vapors in the
vicinity of this or any other appliance.
2. An LP cylinder not connected for use
shall not be stored in the vicinity of this
or any other appliance.
NOTICE TO iNSTALLER: These instructions
must be left with the owner and the owner
should keep them for future use.
_THIS GAS APPLIANCE iS DESIGNED FOR 1
OUTDOOR USE ONLY.
z_ WARNING: Do not ignite this appliance
without first reading the BURNER
iGNiTiON sections of this manual.
56508 11/10/10 LP
US ENGLISH
Page 2
DANGER
Failure to follow the Dangers, Warnings and Cautions contained in this Owner's Manual may result in serious bodily injury or
death, or in a fire or an explosion causing damage to property.
WARNINGS
z_ Do not store a spare or disconnected liquid propane
cylinder under or near this barbecue.
z_ improper assembly may be dangerous. Please follow the
assembly instructions carefully.
z_ After a period of storage, and/or nonuse, the Webe_ gas
barbecue should be checked for gas leaks and burner
obstructions before use. See instructions in this manual for
correct procedures.
z_ Do not operate the Weber _ gas barbecue if there is a gas
leak present.
z_ Do not use a flame to check for gas leaks.
z_ Combustible materials should never be within 24 inches (61
cm) of the back or sides of your Weber ®gas barbecue.
z_ Do not put a barbecue cover or anything flammable on, or in
the storage area under the barbecue.
z_ Your Weber ®gas barbecue should never be used by
children. Accessible parts of the barbecue may be very hot.
Keep young children away while it is in use.
z_ You should exercise reasonable care when operating your
Weber ®gas barbecue, it will be hot during cooking or
cleaning and should never be left unattended, or moved
while in operation.
Z_ Should the burners go out while in operation, turn all
gas valves off. Open the lid and wait five minutes before
attempting to relight, using the igniting instructions.
z_ Do not use charcoal or lava rock in your Weber ® gas
barbecue.
Z_ Never lean over open grill or place hands or fingers on the
front edge of the cookbox.
Z_ Should a grease fire occur, turn off all burners and leave lid
closed until fire is out.
Z_ Do not enlarge valve orifices or burner ports when cleaning
the valves or burners.
Z_ The Weber ®gas barbecue should be thoroughly cleaned on
a regular basis.
Z_ Liquid propane gas is not natural gas. The conversion or
attempted use of natural gas in a liquid propane unit or
liquid propane gas in a natural gas unit is dangerous and
will void your warranty.
Z_ Do not attempt to disconnect any gas fitting while your
barbecue is in operation.
Z_ Use heat-resistant barbecue mitts or gloves when operating
barbecue.
Z_ Keep any electrical supply cord and the fuel supply hose
away from any heated surfaces.
Z_ Combustion byproducts produced when using this product
contain chemicals known to the state of California to cause
cancer, birth defects, or other reproductive harm.
Z_ Do not use this barbecue unless all parts are in place. The
unit must be properly assembled according to the assembly
instructions.
Z_ Do not build this model of grill in any built-in or slide in
construction, ignoring this Warning could cause a fire or
an explosion that can damage property and cause serious
bodily injury or death.
Z_ Proposition 65 Warning: Handling the brass material on
this product exposes you to lead, a chemical known to the
state of California to cause cancer, birth defects or other
reproductive harm.
(Wash hands after handling this product.)
LIQUID PROPANE GAS UNITS ONLY:
z_ Use the pressure regulator and hose assembly that is
supplied with your Weber ®gas barbecue.
z_ Do not attempt to disconnect the gas regulator and hose
assembly or any gas fitting while your barbecue is in
operation.
z_ A dented or rusty liquid propane cylinder may be hazardous
and should be checked by your liquid propane supplier. Do
not use a liquid propane cylinder with a damaged valve.
Z_ Although your liquid propane cylinder may appear to be
empty, gas may still be present, and the cylinder should be
transported and stored accordingly.
z_ if you see, smell or hear the hiss of escaping gas from the
liquid propane cylinder:
1. Move away from liquid propane cylinder.
2. Do not attempt to correct the problem yourself.
3. Call your fire department.
2
Page 3
WARNINGS .......................................... 2 TROUBLESHOOTING................................. 22
TABLE OF CONTENTS ................................. 3 SiDE BURNER TROUBLESHOOTING .................... 22
EXPLODED VIEW 320 ................................. 4
EXPLODED VIEW LiST 320 ............................. 5
EXPLODED VIEW 330 ................................. 6
EXPLODED VIEW LiST 330 ............................. 7
WARRANTY ......................................... 8
GENERAL INSTRUCTIONS ............................. 9
CANADIAN INSTALLATION .......................................... 9
OPERATING ...................................................... 9
STORAGE AND/OR NONUSE ........................................ 9
GASINSTRUCTIONS ................................. 10
SAFE HANDLING TIPS FOR LIQUID PROPANE GAS CYLINDERS ......... 10
IMPORTANT LP CYLINDER INFORMATION ........................... 11
LEAK CHECK PREPARATION ....................................... 11
CHECK FOR GAS LEAKS .......................................... 13
REFILLING THE LIQUID PROPANE CYLINDER ......................... 14
BEFORE USING THE GRILL ........................... 15
FUEL LEVEL .................................................... 15
SLIDE OUT GREASE TRAY AND DISPOSABLE DRIP PAN ................ 15
ELECTRONIC IGNITER INSPECTION ................................ 15
HOSE INSPECTION .............................................. 15
MAINTENANCE ..................................... 23
CLEANING ...................................................... 23
WEBER ® SPIDER/INSECT SCREENS ................................ 23
BURNER TUBES CLEANING OR REPLACEMENT ...................... 24
ELECTRONIC IGNITION SYSTEM OPERATIONS ....................... 26
SIDE BURNER MAINTENANCE ..................................... 27
ANNUAL MAINTENANCE .......................................... 27
MAIN BURNER IGNITION & USAGE..................... 16
MAIN BURNER IGNITION .......................................... 16
TO EXTINGUISH ................................................. 16
MAIN BURNER MANUAL IGNITION ................................. 17
TO EXTINGUISH ................................................. 17
SEAR STATION®IGNITION & USAGE [330 MODELJ ........ 18
SEAR STATION ®BURNER IGNITION ................................. 18
SEAR STATION ®BURNER MANUAL IGNITION ......................... 18
USING THE SEAR STATION _ ....................................... 18
GRILLING TIPS & HELPFUL HINTS ..................... 19
PREHEATING ................................................... 19
COVERED COOKING ............................................. 19
DRIPPINGS AND GREASE ........................................ 19
FLAVORIZER ® SYSTEM ........................................... 19
SEAR STATION ® ................................................. 19
SIDE BURNER IGNITION & USAGE ..................... 20
SIDE BURNER IGNITION .......................................... 20
TO EXTINGUISH ................................................. 20
SIDE BURNER MANUAL IGNITION .................................. 21
TO EXTINGUISH ................................................. 21
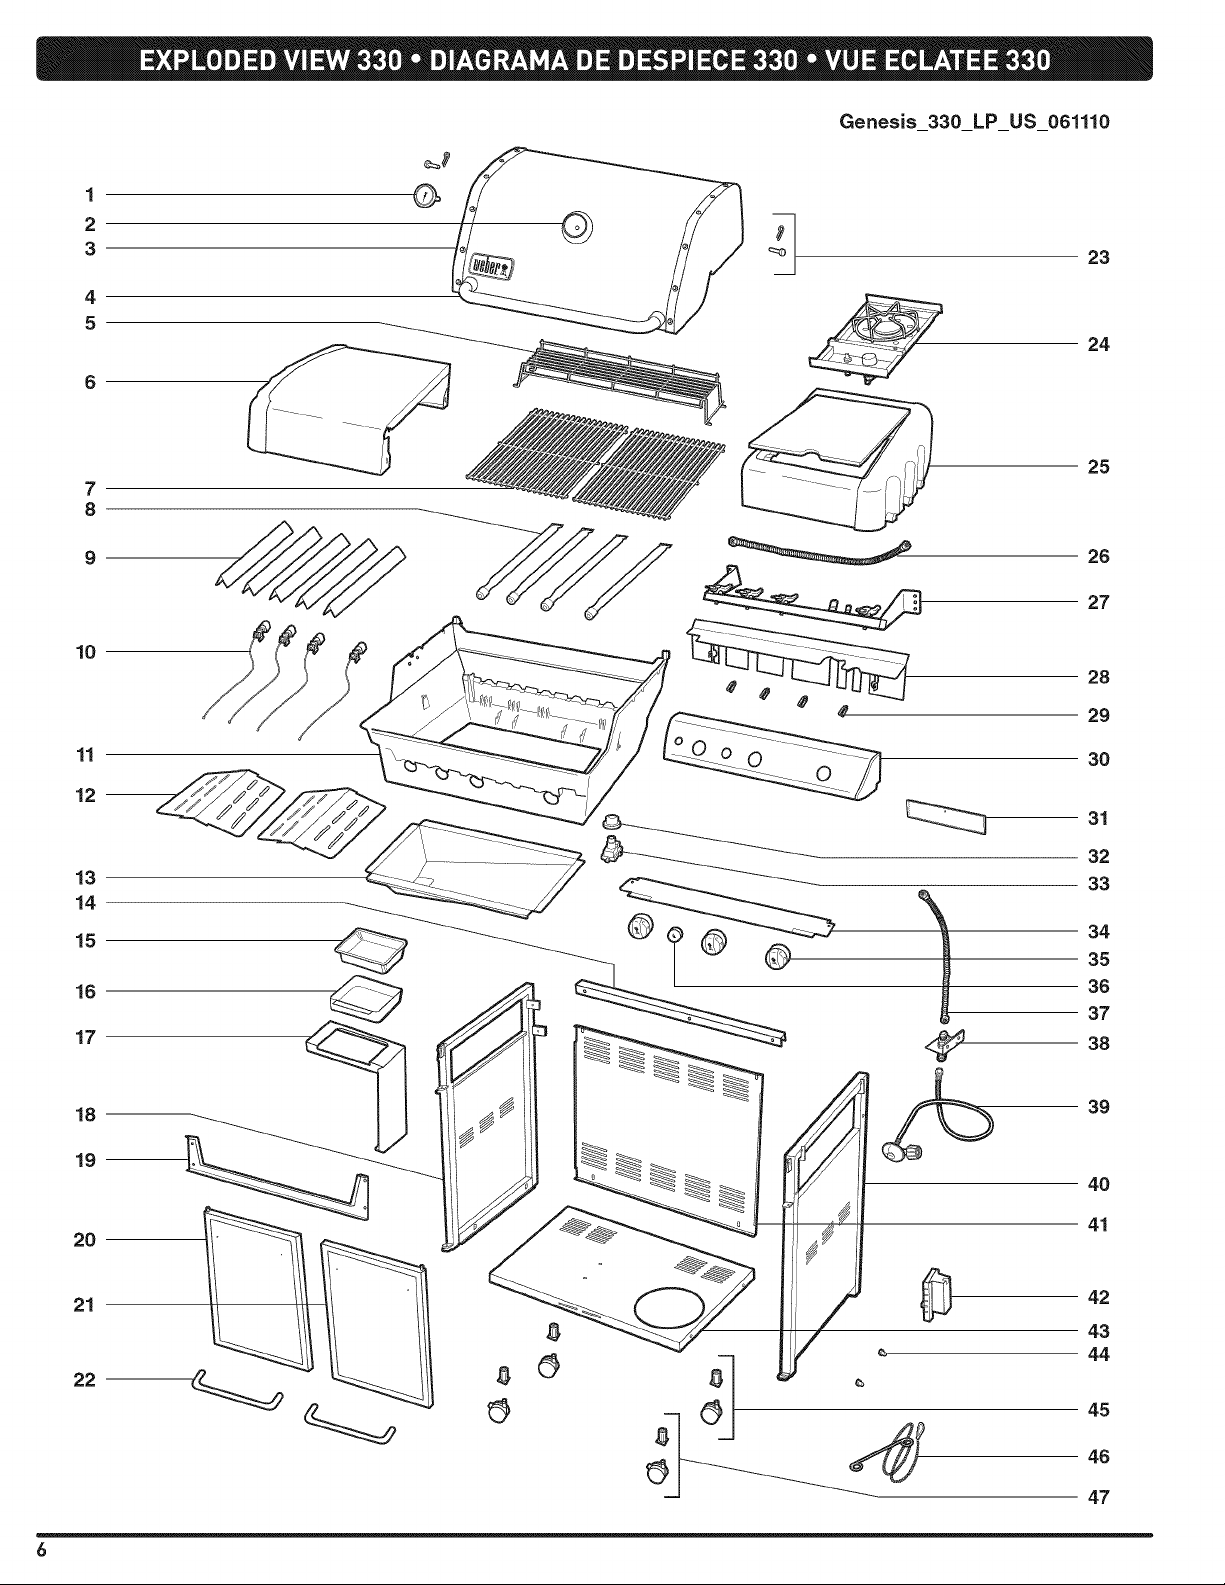
Page 4
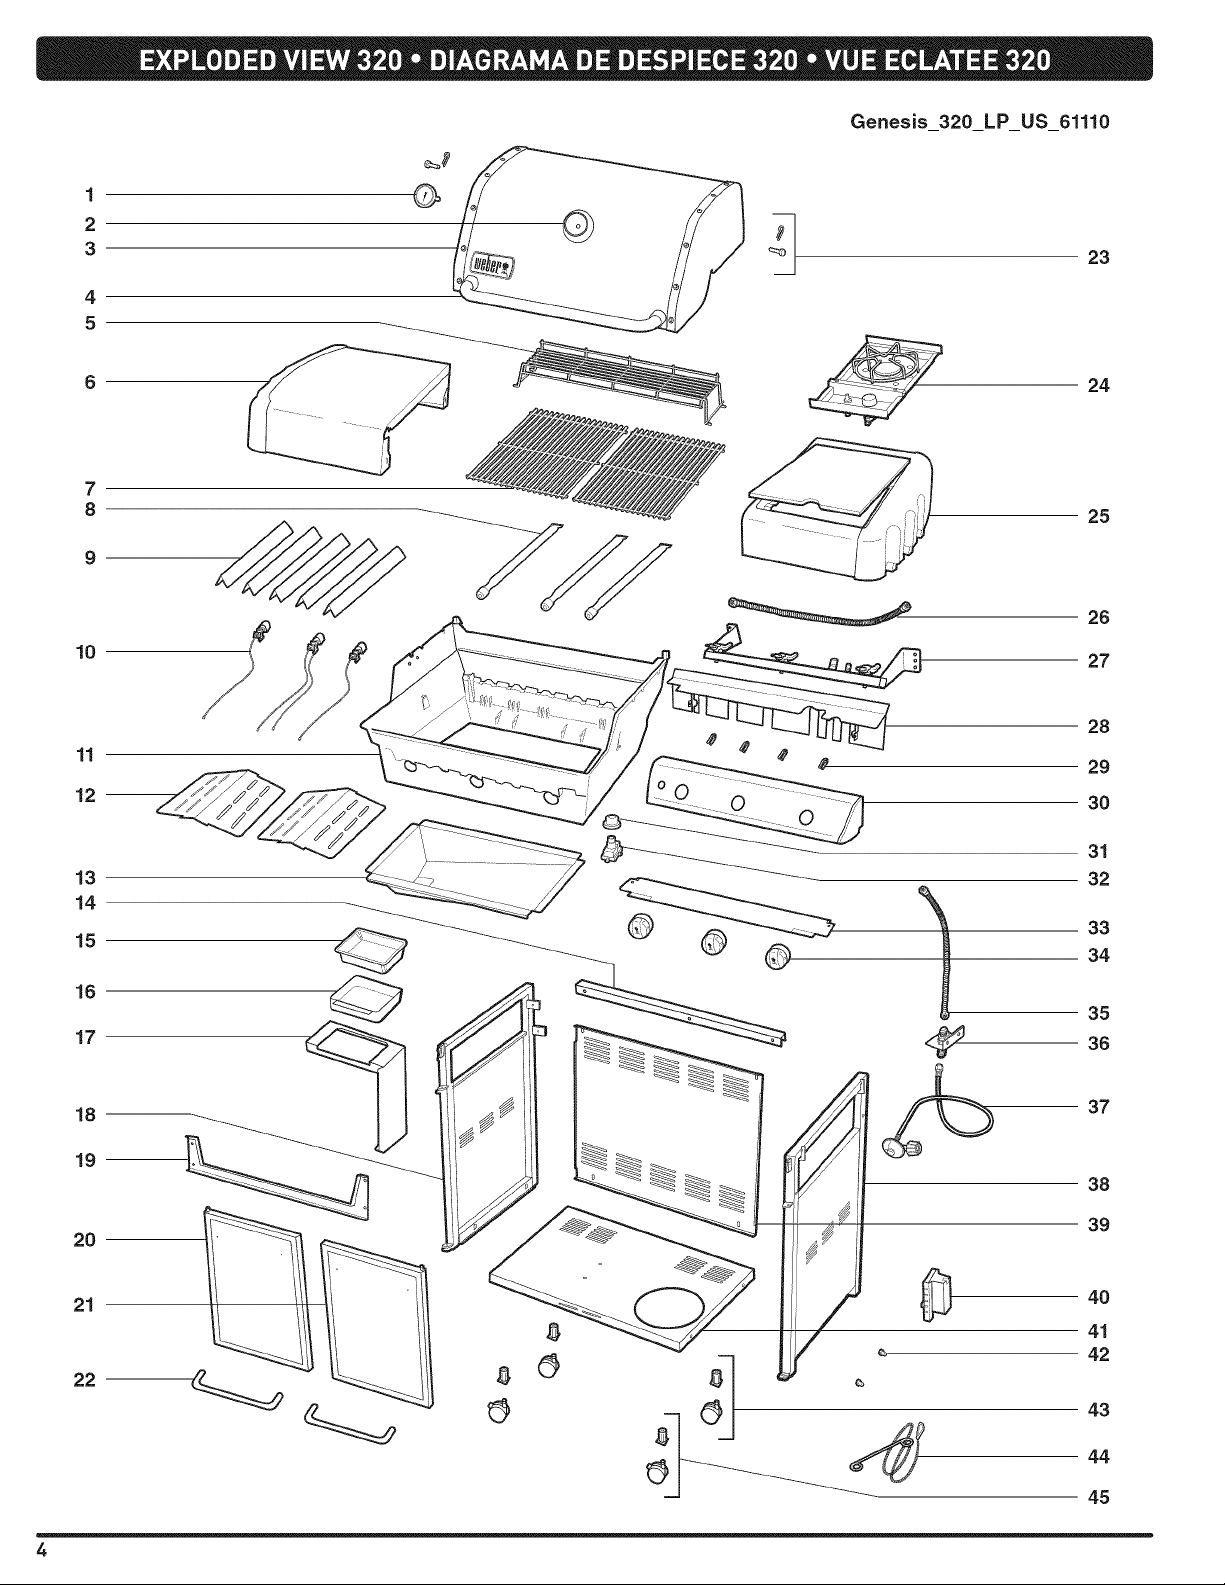
10
Genesis_320 LP US 61110
1
2
3
23
4
5
24
7
8
25
26
27
11
12--
13
14
15
16
17
18
19
2O
21
22
28
29
30
31
37
38
39
4O
41
42
4
Page 5
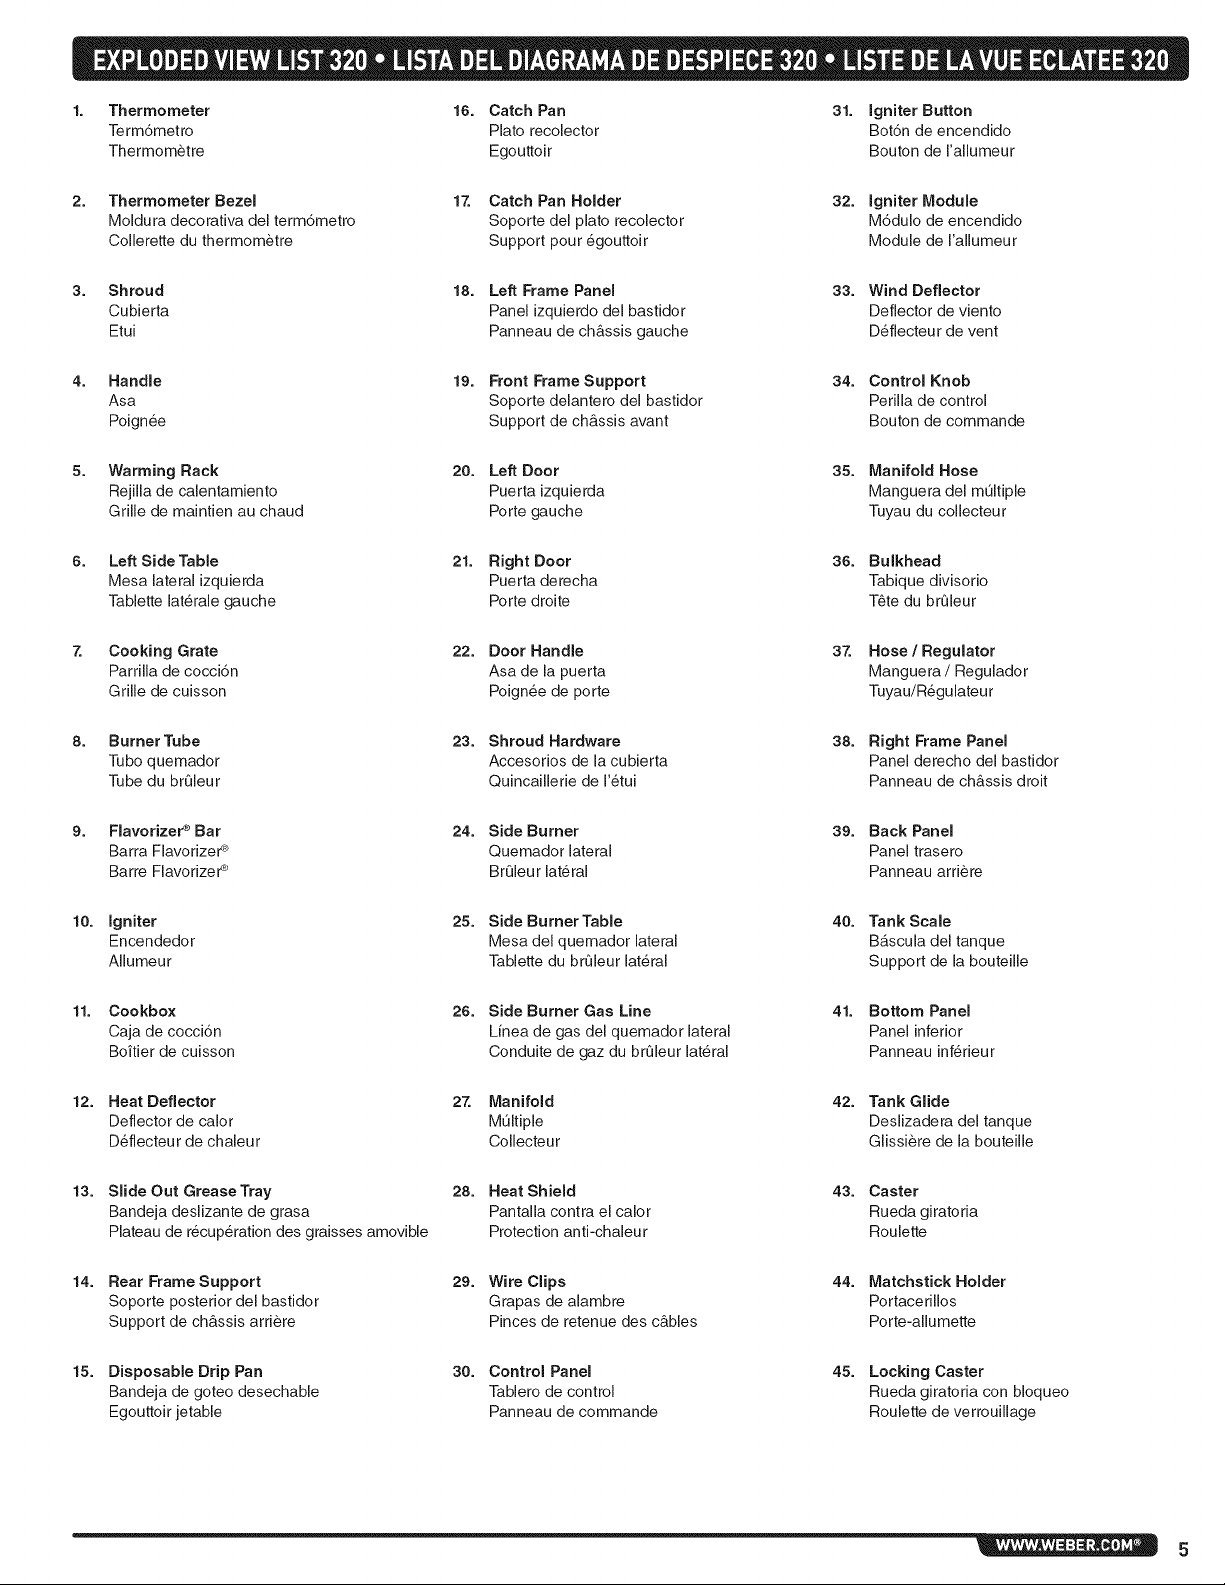
1. Thermometer 16. Catch Pan 31. igniter Button
Term6metro Plato recolector Bot6n de encendido
Thermometre Egouttoir Bouton de I'allumeur
2. Thermometer Bezel
Moldura decorativa del term6metro
Collerette du thermometre
3. Shroud 18. Left Frame Panel 33. Wind Deflector
Cubierta Panel izquierdo del bastidor Deflector de viento
Etui Panneau de ch&ssis gauche Deflecteur de vent
4. Handle 19. Front Frame Support 34. Control Knob
Asa Soporte delantero del bastidor Perilla de control
Poignee Support de ch&ssis avant Bouton de commande
5. Warming Rack 20. Left Door 35. Manifold Hose
Rejilla de calentamiento Puerta izquierda Manguera del multiple
Grille de maintien au chaud Porte gauche Tuyau du collecteur
6. Left SideTable 21. Right Door 36. Bulkhead
Mesa lateral izquierda Puerta derecha Tabique dJvisorio
Tablette lat@ale gauche Porte droite T_te du brQleur
7. Cooking Grate 22. Door Handle 37. Hose/Regulator
Parrilla de coccJ6n Asa de la puerta Manguera / Regulador
Grille de cuisson Poignee de porte Tuyau/Regulateur
8. Burner Tube 23. Shroud Hardware 38. Right Frame Panel
Tubo quemador Accesorios de la cubierta Panel derecho del bastidor
Tube du brQleur Quincaillerie de I'etui Panneau de ch&ssis droit
17. Catch Pan Holder
Soporte del plato recolector
Support pour egouttoir
32. igniter Module
M6dulo de encendido
Module de I'allumeur
9. FJavorizer ®Bar 24. Side Burner 39. Back Panel
Barra Flavorizer _ Quemador lateral Panel trasero
Barre FlavorizeF _ BrQleur lateral Panneau arriere
10. igniter 25. Side Burner Table 40. Tank Scale
Encendedor Mesa del quemador lateral Bascula del tanque
Allumeur Tablette du brQleur lat@al Support de la bouteille
11. Cookbox 26. Side Burner Gas Line 41. Bottom Panel
Caja de cocci6n Linea de gas del quemador lateral Panel inferior
Boitier de cuisson Conduite de gaz du brQleur lateral Panneau inferieur
12. Heat Deflector 27. Manifold 42. Tank Glide
Deflector de calor Multiple DeslJzadera del tanque
Deflecteur de chaleur Collecteur Glissiere de la bouteille
13. Slide Out GreaseTray 28. Heat Shield
Bandeja deslizante de grasa Pantalla contra el calor
Plateau de recup@ation des graisses amovible Protection anti-chaleur
14. Rear Frame Support 29. Wire Clips 44. Matehstick Holder
Soporte posterior del bastidor Grapas de alambre Portacerillos
Support de ch&ssis arriere Pinces de retenue des c&bles Porte-allumette
15. Disposable Drip Pan
Bandeja de goteo desechable
Egouttoir jetable
30. Control Panel
Tablero de control
Panneau de commande
43. Caster
Rueda giratoria
Roulette
45. Locking Caster
Rueda giratoria con bloqueo
Roulette de verrouillage
5
Page 6
10
Genesis_330 LP US 061110
1
2
3
4
5
7
8
23
24
25
26
27
28
11
12--
13
14
15
16
17
18
19
2O
29
3O
31
32
33
35
36
37
aa
39
40
41
21
22
6
Page 7
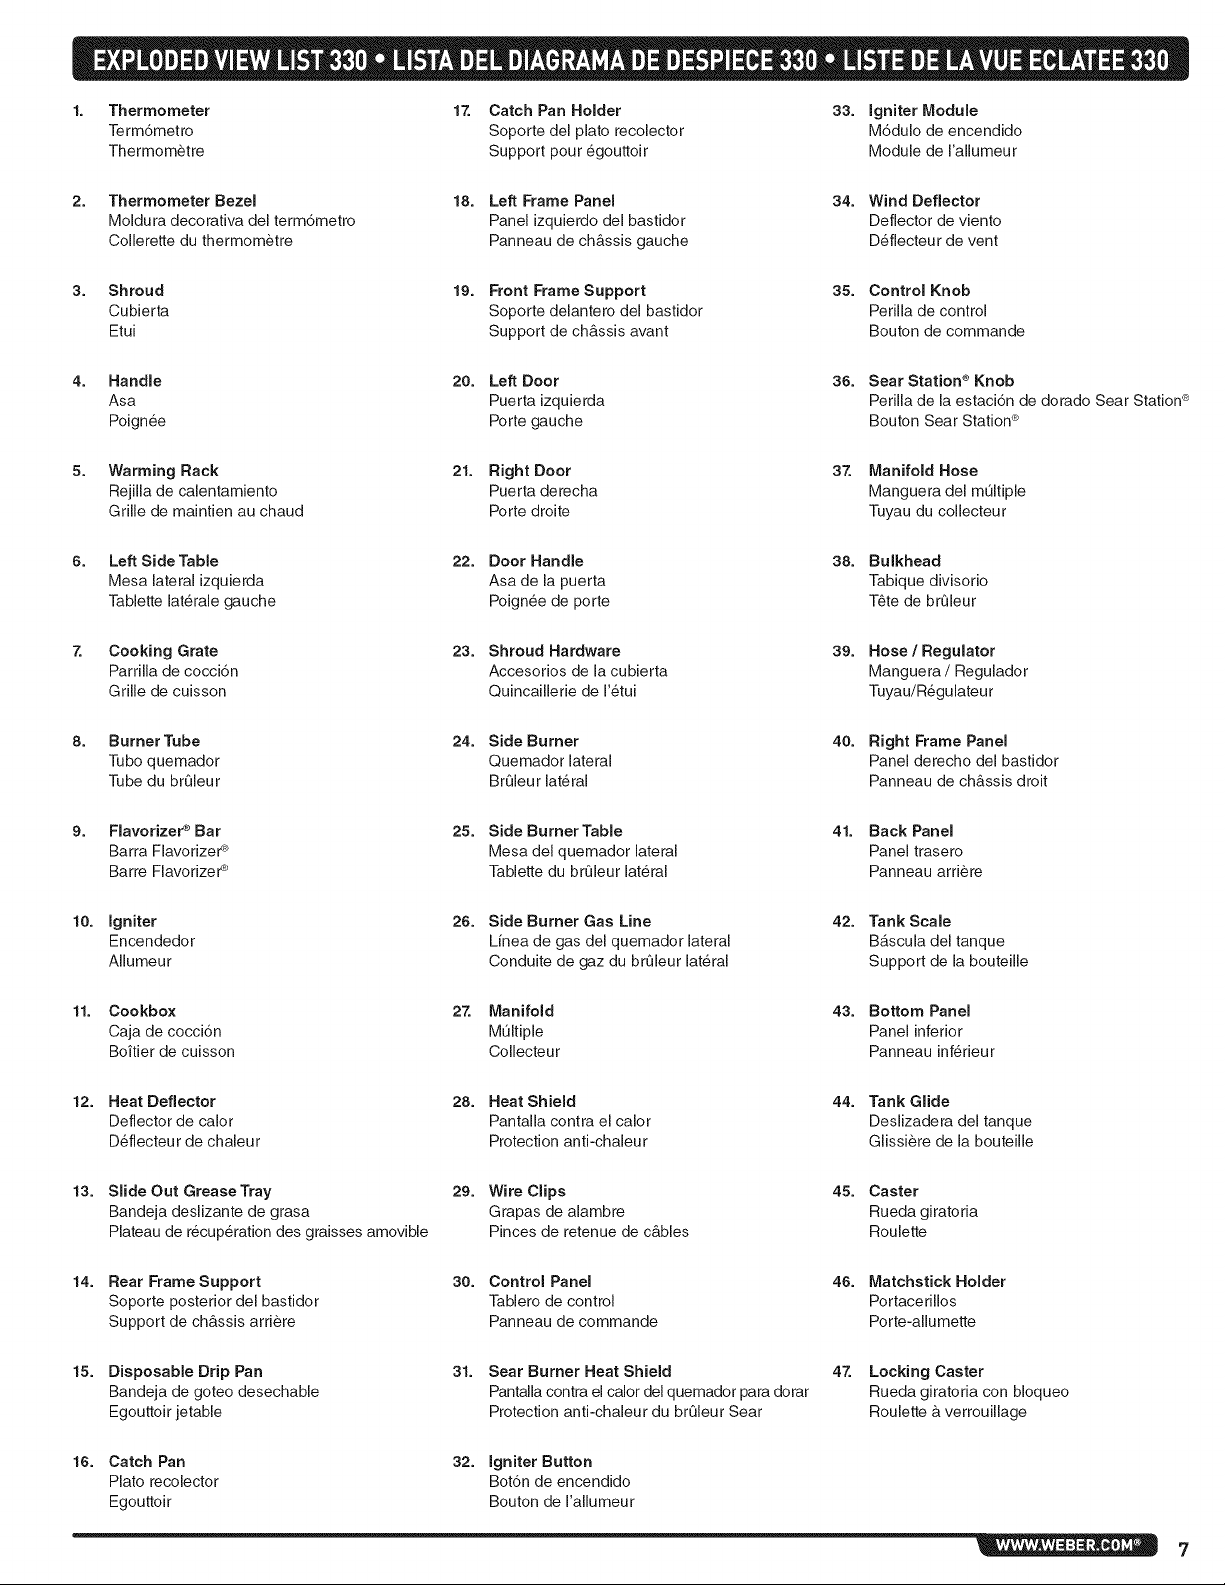
Thermometer 17. Catch Pan Holder
Term6metro Soporte del plato recolector
Thermometre Support pour egouttoir
33.
Igniter Module
M6dulo de encendido
Module de I'allumeur
2. Thermometer Bezel 18. Left Frame Panel 34.
Moldura decorativa del term6metro Panel izquierdo del bastidor
Collerette du thermometre Panneau de chb,ssis gauche
3. Shroud 19. Front Frame Support 35. Control Knob
Cubierta Soporte delantero del bastidor Perilla de control
Etui Support de chb,ssis avant Bouton de commande
4. Handle 20. Left Door 36.
Asa Puerta izquierda
Poignee Porte gauche
5. Warming Rack 21. Right Door 37. Manifold Hose
Rejilla de calentamiento Puerta derecha Manguera del multiple
Grille de maintien au chaud Porte droite Tuyau du collecteur
6. Left SideTable 22. Door Handle 38. Bulkhead
Mesa lateral izquierda Asa de la puerta Tabique dJvisorio
Tablette lat@ale gauche Poignee de porte T_te de brQleur
7. Cooking Grate 23. Shroud Hardware 39.
Parrilla de coccJ6n Accesorios de la cubierta
Grille de cuisson Quincaillerie de I'etui
8. Burner Tube 24. Side Burner 40.
Tubo quemador Quemador lateral
Tube du br_leur Br_leur lateral
Wind Deflector
Deflector de viento
Deflecteu r de vent
Sear Station ®Knob
Perilla de la estaci6n de dorado Sear Station ®
Bouton Sear Station ®
Hose / Regulator
Manguera / Regulador
Tuyau/Regulateur
Right Frame Panel
Panel derecho del bastidor
Panneau de chb,ssis droit
9. Flavorizer ®Bar 25. Side Burner Table 41. Back Panel
Barra Flavorizer _ Mesa del quemador lateral Panel trasero
Barre Flavorizer ® Tablette du br_leur lat@al Panneau artier®
10.
Igniter 26. Side Burner Gas Line 42. Tank Scale
Encendedor Linea de gas del quemador lateral Bascula del tanque
Allumeur Conduit® de gaz du brQleur lateral Support de la bout®ill®
11.
Cookbox 27. Manifold 43. Bottom Panel
Caja de cocci6n MUltiple Panel inferior
Boitier de cuisson Collecteur Panneau inferieur
12. Heat Deflector 28. Heat Shield 44. Tank Glide
Deflector de calor Pantalla contra el calor Deslizadera del tanque
Deflecteur de chaleur Protection anti-chaleur Glissiere de la bout®ill®
13. Slide Out GreaseTray 29. Wire Clips
Bandeja deslizante de grasa Grapas de alambre
Plateau de recup@ation des graisses amovible Pinces de retenue de cb,bles
14. Rear Frame Support 30. Control Panel 46. MatchstickHolder
Soporte posterior del bastidor Tablero de control Portacerillos
Support de chb,ssis artier® Panneau de command® Porte-allumette
15. Disposable Drip Pan
Bandeja de goteo desechable
Egouttoir jetable
31. Sear Burner Heat Shield 47. Locking Caster
Pantalla contra el calor del quemador para dorar Rueda giratoria con bloqueo
Protection anti-chaleur du brQleur Sear Roulette b, verrouillage
45. Caster
Rueda giratoria
Roulette
16. Catch Pan 32. Igniter Button
Plato recolector Bot6n de encendido
Egouttoir Bouton de I'allumeur
7
Page 8
Weber-Stephen Products Co. (Weber) hereby warrants to the ORIGINAL PURCHASER of this WebeP
gas grill that it will be free of defects in material and workmanship from the date of purchase as follows:
Aluminum castings: 25-years (2 years on paint: excludes fading)
Stainless steel shroud: 25-years
Porcelain-enameled shroud: 25-years
Stainless steel burners tubes: t0-years
Stainless steel cooking grates: 5-years no rust through or burn through
Stainless steel F]avorizer ® bars: 5-years no rust through or burn through
Porcelain-enameled cast-iron cooking grates: 5-year no rust through or burn through
Porcelain-enameled cooking grates: 3-years no rust through or burn through
Porcelain-enameled F]avorizer ® bars: 2-years no rust through or burn through
infrared rotisserie burner: 2-years
NI remaining parts: 2-years
when assembled and operated in accordance with the printed instructions accompanying it. Weber
may require reasonable proof of your date of purchase. THEREFORE, YOU SHOULD RETAIN YOUR
SALES SLIP OR INVOICE.
This Limited Warranty shall be limited to the repair or replacement of parts that prove defective under
normal use and service and which on examination shall indicate, to Weber's satisfaction, they are
defective. Before returning any parts, contact the Customer Service Representative in your area
using the contact information on our website. If Weber confirms the defect and approves the claim,
Weber will elect to replace such parts without charge. If you are required to return defective parts,
transportation charges must be prepaid. Weber will return parts to the purchaser, freight or postage
prepaid.
This Limited Warranty does not cover any failures or operating difficulties due to accident, abuse,
misuse, alteration, misapplication, vandalism, improper installation or improper maintenance or
service, or failure to perform normal and routine maintenance, including but not limited to damage
caused by insects within the burner tubes, as set out in this owner's manual.
Deterioration or damage due to severe weather conditions such as hail, hurricanes, earthquakes
or tornadoes, discoloration due to exposure to chemicals either directly or in the atmosphere, is not
covered by this Limited Warranty.
There are no other express warrants except as set forth herein and any applicable implied warranties
of merchantability and fitness are limited in duration to the period of coverage of this express written
Limited Warranty. Some regions do not allow limitation on how long an implied warranty lasts, so this
limitation may not apply to you.
Weber is not liable for any special, indirect or consequential damages. Some regions do not allow the
exclusion or limitation of incidental or consequential damages, so this limitation or exclusion may not
apply to you.
Weber does not authorize any person or company to assume for it any other obligation or liability in
connection with the sale, installation, use, removal, return, or replacement of its equipment; and no
such representations are binding on Weber.
This Warranty applies only to products sold at retail.
WEBER-STEPHEN PRODUCTS CO.
Customer Service Center
1890 Roeelle Road, Suite 308
Schaumburg, IL 60195
USA
For replacement parts calh
1-800-446-1071
Visit www.weber.com ®,select your country of origin, and register your grill today. ®
8
Page 9
Your Webeff _gas barbecue is a portable outdoor cooking appliance. With the Weber ¢
gas barbecue you can grill, barbecue, roast and bake with results that are difficult to
duplicate with indoor kitchen appliances.The closed lid and Flavorizer _ bars produce
that "outdoor" flavor in the food.
The Weber ¢ gas barbecue is portable so you can easily change its location in your yard
or on your patio. Portability means you can take your Weber ¢ gas barbecue with, if you
meve.
Liquid Propane (LP) gas supply is easy to use and gives you more cooking control than
charcoal fuel.
o These instructions will give you the minimum requirements for assembling your
Webei _ gas barbecue. Please read the instructions carefully before using your
Weber ¢ gas barbecue. Improper assembly can be dangerous.
Not for use by children.
If there are local codes that apply to portable gas grills, you will have to conform to
them. Installation must conform with local codes or, in the absence of local codes,
with either the National Fuel Gas Code, ANSI Z223.1/NFPA 54, Natural Gas and
Propane Installation Code, CSA B149.1, or Propane Storage and Handling Code,
B149.2, or the Standard for Recreational Vehicles, ANSI A 119.2/NFPA 1192, and
CSA Z240 RV Series, Recreational Vehicle Code, as applicable.
The pressure regulator supplied with the Webeff _gas barbecue must be used.This
regulator is set for 11 inches of water column (pressure).
This Webeff _ gas barbecue is designed for use with liquid propane (LP) gas only. Do
not use with natural (piped in city) gas. The valves, orifices, hose and regulator are for
LP gas only.
Do not use with charcoal fuel.
Check that the area under the control panel and the slide out grease tray are free
from debris that might obstruct the flow of combustion or ventilation air.
The areas around the LP cylinder must be free and clear from debris.
Replacement pressure regulators and hose assemblies must be those specified by
Weber-Stephen Products Co. ®
CANADIAN INSTALLATION
These instructions, while generally acceptable, do not necessarily comply with the
Canadian Installation codes, particularly with piping above and below ground. In
Canada the installation of this appliance must comply with local codes and/or Standard
CSA-B149.2 (Propane Storage and Handling Code).
OPERATING
z_ WARNING: Only use this barbecue outdoors in a well-
ventilated area. Do not use in a garage, building, breezeway
or any other enclosed area.
z_ WARNING: Keep ventilation openings for cylinder enclosure
free and clear from debris.
z_ WARNING: Your Weber ®gas barbecue shall not be used
under overhead combustible construction.
z_ WARNING: Your Weber ®gas barbecue is not intended to be
installed in or on recreational vehicles and/or boats.
z_ WARNING: Do not use the barbecue within 24 inches of
combustible materials.
z_ WARNING: The entire cookbox gets hot when in use. Do not
leave unattended.
z_ WARNING: Keep electrical supply cord and the fuel supply
hose away from heated surfaces.
z_ WARNING: Keep the cooking area clear of flammable vapors
and liquids such as gasoline, alcohol, etc., and combustible
materials.
z_ WARNING: Never store an extra (spare) LP cylinder under or
near the Weber _ gas barbecue.
z_ WARNING: The LP cylinder used with your barbecue must
be with a listed OPD (Overfilling Prevention Device) and
a QCCl or Type 1 (CGA810) cylinder connection. The
cylinder connection must be compatible with the barbecue
connection.
STORAGE AND/OR NONUSE
The gas must be turned off at the liquid propane cylinder when the WebeP _gas
barbecue is not in use.
When the Weber ¢ gas barbecue is stored indoors, the gas supply must be
DISCONNECTED and the LP cylinder stored outdoors in a well-ventilated space.
LP cylinder must be stored outdoors in a well -ventilated area out of reach of children.
Disconnected LP cylinder must not be stored in a building, garage or any other
enclosed area.
When the LP cylinder is not disconnected from the Weber _ gas barbecue, the
appliance and LP tank must be kept outdoors in a well-ventilated space.
The Weber ¢ gas barbecue should be checked for gas leaks and any obstructions
in the burner tubes before using. (Refer to "MAINTENANCE/ANNUAL
MAINTENANCE").
Check that the areas under the control panel and the drip tray are free from debris
that might obstruct the flow of combustion or ventilation air.
The Spider/Insect screens should also be checked for any obstructions. (Refer to
"MAINTENANCE/ANNUAL MAINTENANCE"). ®
9
Page 10
SAFE HANDLING TIPS FOR LIQUID PROPANE GAS CYLINDERS
, Liquid Propane (LP) gas is a petroleum product as are gasoline and natural gas. LP
gas is a gas at regular temperatures and pressures. Under moderate pressure, inside
a cylinder, LP gas is a liquid. As the pressure is released, the liquid readily vaporizes
and becomes gas.
, LP gas has an odor similar to natural gas.You should be aware of this odor.
LP gas is heavier than air. Leaking LP gas may collect in low areas and prevent
dispersion.
To fill, take the LP cylinder to a gas propane dealer, or look up "gas-propane" in the
phone book for other sources of LP gas.
WARNING: We recommend that your LP cylinder be filled
at an authorized LP gas dealer, by a qualified attendant,
who fills the tank by weight. IMPROPER FILLING IS
DANGEROUS.
, Air must be removed from a new LP cylinder before the initial filling.Your LP dealer is
equipped to do this.
, The LP cylinder must be installed, transported and stored in an upright position. LP
cylinders should not be dropped or handled roughly.
, Never store or transport the LP cylinder where temperatures can reach 125° F (too
hot to hold by hand - for example: do not leave the LP cylinder in a car on a hot day).
Note: A refill will last about 18-20 hours of cooldng time at normal use. The fuel scale, a
feature on some of our grills, will indicate the propane supply so you can refill before
running out. You do not have to run out before you refill.
, Treat "empty" LP cylinders with the same care as when full. Even when the LP tank
is empty of liquid there still may be gas pressure in the cylinder. Always close the
cylinder valve before disconnecting.
z_ CAUTION: Place dust cap on cylinder valve outlet whenever
the cylinder is not in use. Only install the type of dust cap
on the cylinder valve outlet that is provided with the cylinder
valve. Other types of caps or plugs may result in leakage of
propane.
= Do not use a damaged LP cylinder. Dented or rusty LP cylinders or LP cylinders
with a damaged valve may be hazardous and should be replaced with a new one
immediately.
= The joint where the hose connects to the LP cylinder must be leak tested each time
the LP cylinder is reconnected. For example, test each time the LP cylinder is refilled.
= Be sure the regulator is mounted with the small vent hole pointed downward so that it
will not collect water. This vent should be free of dirt, grease, bugs etc.
= The gas connections supplied with your Weber ¢ gas appliance have been designed
and tested to meet 100% CSA and ANSI requirements.
WARNING: Replacement LP tanks must match the regulator
connection supplied with this Weber _ gas appliance.
Liquid Propane Cylinder Requirements
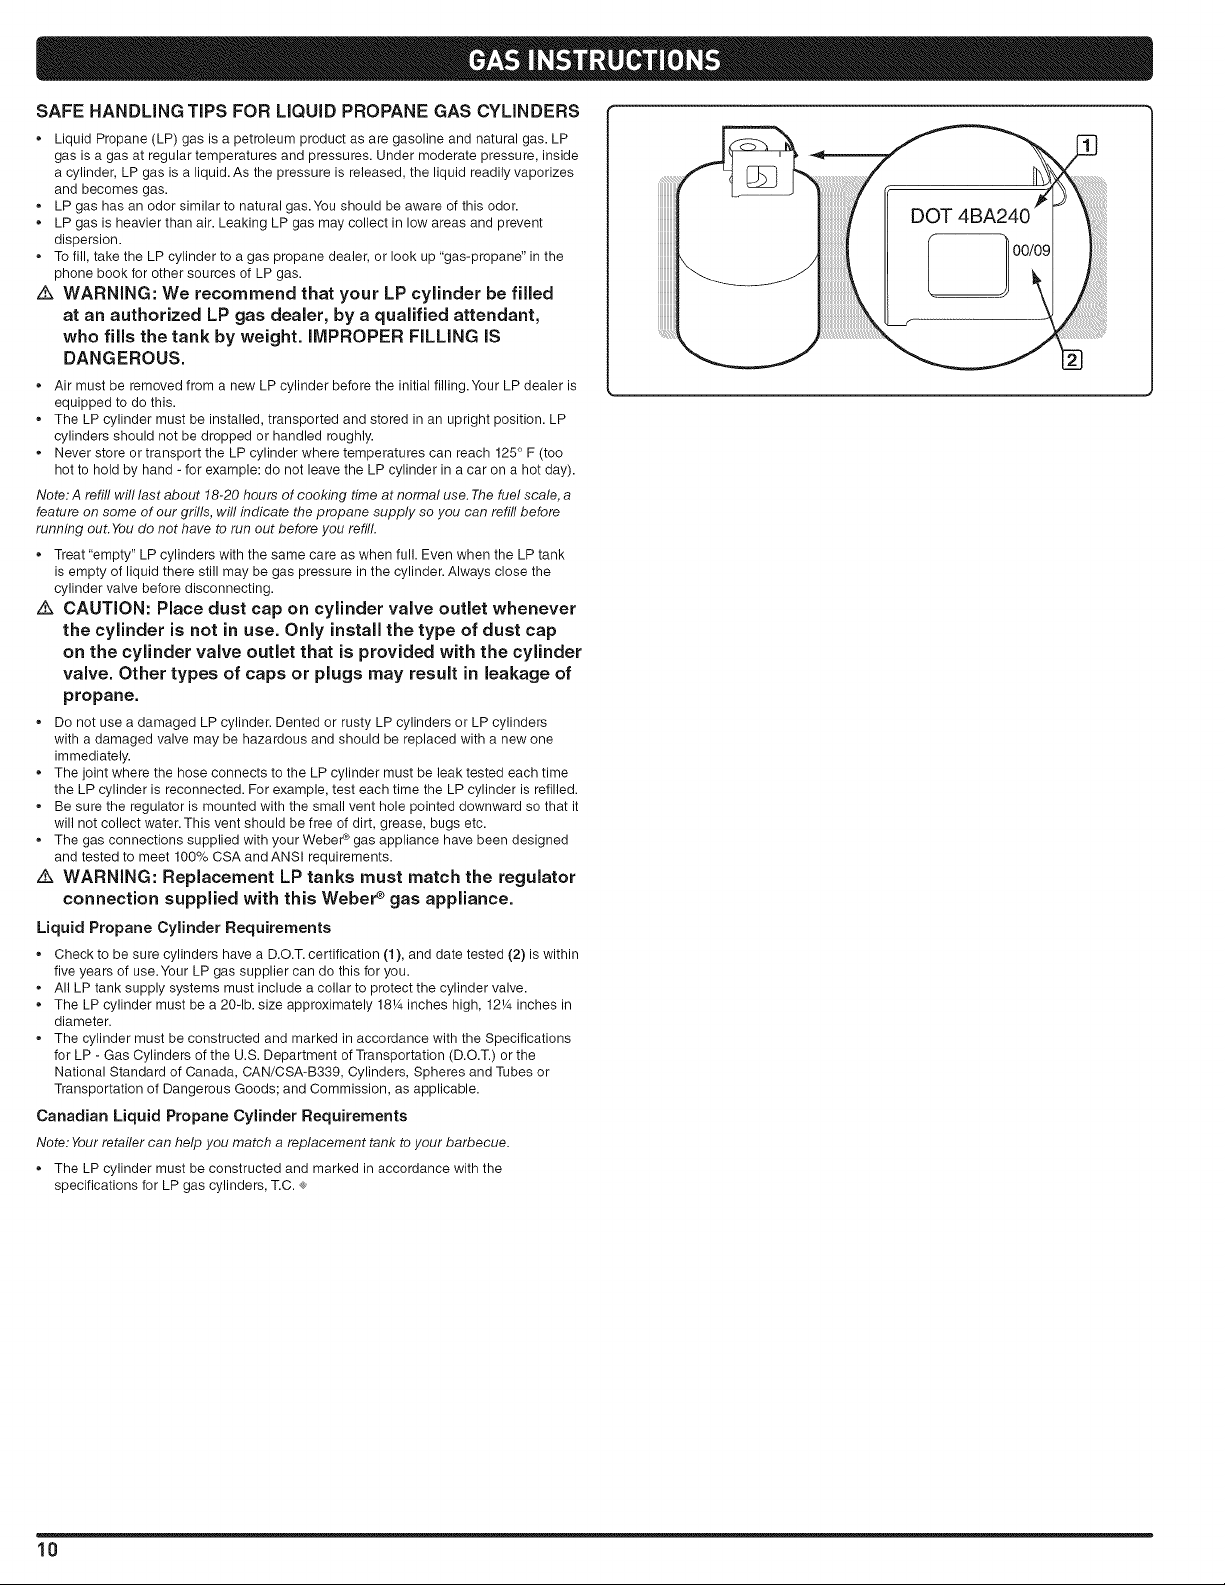
, Check to be sure cylinders have a D.O.T. certification (1), and date tested (2) is within
five years of use.Your LP gas supplier can do this for you.
= All LP tank supply systems must include a collar to protect the cylinder valve.
= The LP cylinder must be a 20-lb. size approximately 18_A inches high, 12_Ainches in
diameter.
= The cylinder must be constructed and marked in accordance with the Specifications
for LP - Gas Cylinders of the U.S. Department of Transportation (D.O.T.) or the
National Standard of Canada, CAN/CSA-B339, Cylinders, Spheres and Tubes or
Transportation of Dangerous Goods; and Commission, as applicable.
Canadian Liquid Propane Cylinder Requirements
Note: Your retailer can help you match a replacement tank to your barbecue.
, The LP cylinder must be constructed and marked in accordance with the
specifications for LP gas cylinders, T.C. ®
10
Page 11
IMPORTANT LP CYLINDER INFORIVIATION
NEVER store a spare LP cylinder under or near Weber + gas
appliances. NEVER fill the tank beyond 80% full. Failure to
follow these statements exactly may result in a fire causing
z_ DANGER
death or serious injury.
Weber ¢ gas appliances are equipped for a cylinder supply system designed for vapor
withdrawal.
z_ WARNING: Only use Weber ®gas appliances outdoors in
a well=ventilated area. Do not use in a garage, building,
breezeway or any other enclosed area.
The proper filling methods for the filling of your cylinder are by weight or volume, as
described in NFPA 58. Please make sure your filling station fills your LP cylinder by
weight or volume. Ask your filling station to read purging and filling instructions on the LP
cylinder before attempting to fill. ®
LEAK CHECK PREPARATION
Check That All Burner Valves Are Off
Valves are shipped in the OFF position, but you should check to be sure that they are
turned off. Check by pushing down and turning clockwise. If they do not turn, they are off.
If they do turn, continue turning them clockwise until they stop, then they are off.
The Liquid Propane Cylinder
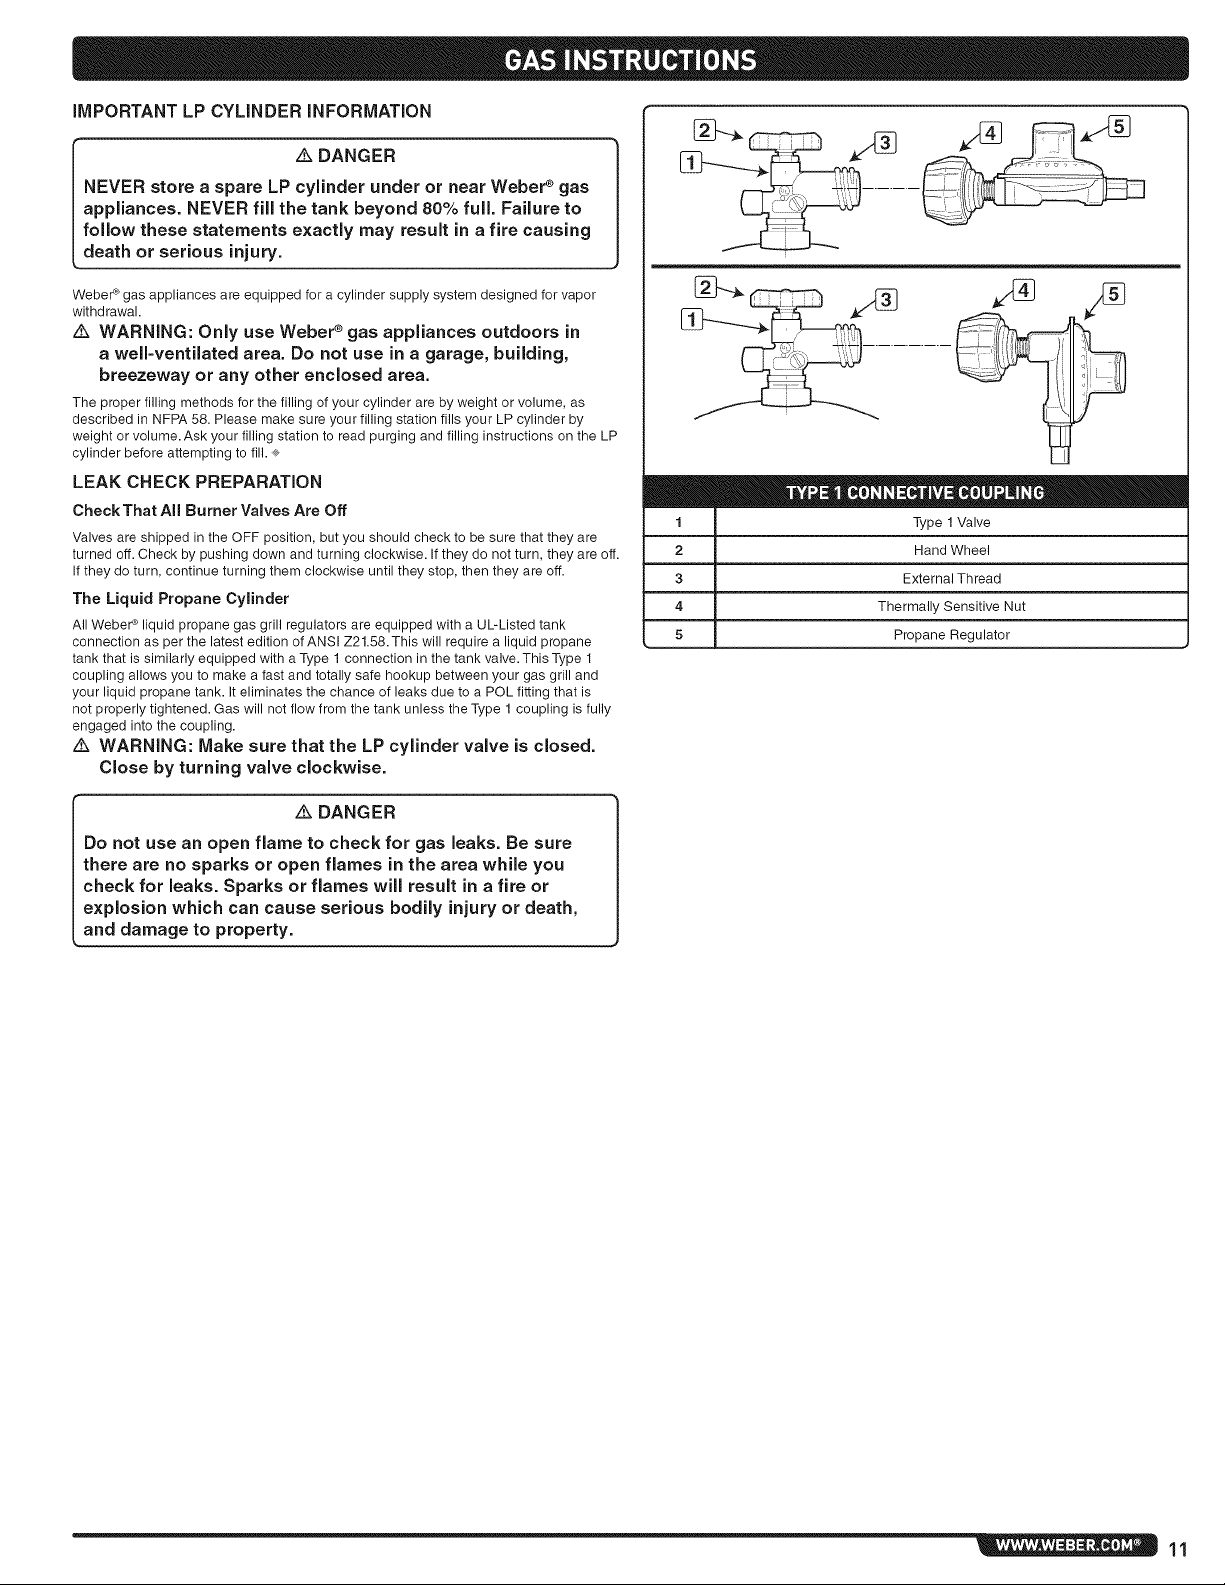
All Weber ¢ liquid propane gas grill regulators are equipped with a UL-Listed tank
connection as per the latest edition of ANSI Z21.58. This will require a liquid propane
tank that is similarly equipped with a Type 1 connection in the tank valve. This Type 1
coupling allows you to make a fast and totally safe hookup between your gas grill and
your liquid propane tank. It eliminates the chance of leaks due to a POL fitting that is
not properly tightened. Gas will not flow from the tank unless the Type 1 coupling is fully
engaged into the coupling.
z_ WARNING: Make sure that the LP cylinder valve is closed.
Close by turning valve clockwise.
1 Type 1 Valve
2 Hand Wheel
3 External Thread
4 Thermally Sensitive Nut
5 Propane Regulator
z_ DANGER
Do not use an open flame to check for gas leaks. Be sure
there are no sparks or open flames in the area while you
check for leaks. Sparks or flames will result in a fire or
explosion which can cause serious bodily injury or death,
and damage to property.
11
Page 12
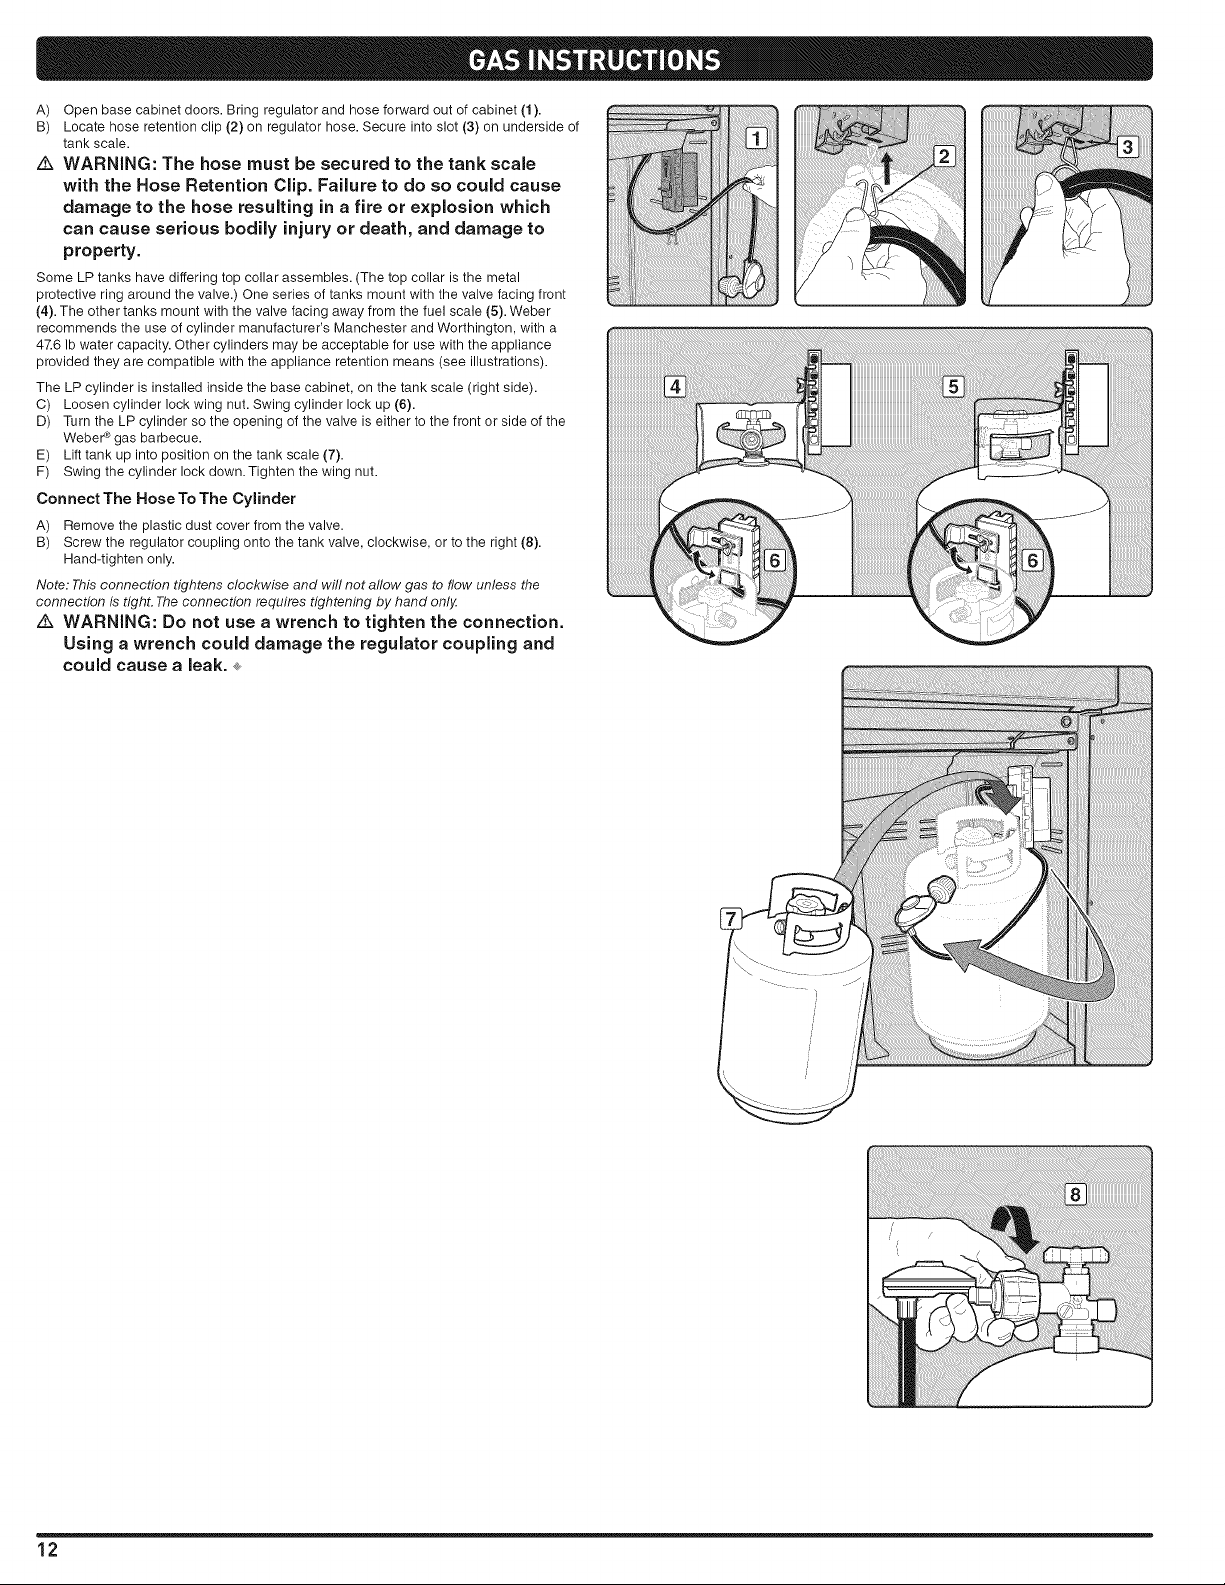
A) Open base cabinet doors. Bring regulator and hose forward out of cabinet (1).
B) Locate hose retention clip (2) on regulator hose. Secure into slot (3) on underside of
tank scale.
z_ WARNING: The hose must be secured to the tank scale
with the Hose Retention Clip. Failure to do so could cause
damage to the hose resulting in a fire or explosion which
can cause serious bodily injury or death, and damage to
property.
Some LP tanks have differing top collar assembles. (The top collar is the metal
protective ring around the valve.) One series of tanks mount with the valve facing front
(4). The other tanks mount with the valve facing away from the fuel scale (5). Weber
recommends the use of cylinder manufacturer's Manchester and Worthington, with a
47.6 Ib water capacity. Other cylinders may be acceptable for use with the appliance
provided they are compatible with the appliance retention means (see illustrations).
The LP cylinder is installed inside the base cabinet, on the tank scale (right side).
C) Loosen cylinder lock wing nut. Swing cylinder lock up (6).
D) Turn the LP cylinder so the opening of the valve is either to the front or side of the
Weber ¢ gas barbecue.
E) Lift tank up into position on the tank scale (7).
F) Swing the cylinder lock down. Tighten the wing nut.
Connect The Hose To The Cylinder
A) Remove the plastic dust cover from the valve.
B) Screw the regulator coupling onto the tank valve, clockwise, or to the right (8).
Hand-tighten only.
Note: This connection tightens clockwise and will not allow gas to flow unless the
connection is tight. The connection requires tightening by hand onljz
Z_ WARNING: Do not use a wrench to tighten the connection.
Using a wrench could damage the regulator coupling and
could cause a leak. ÷
_/_l!;i!iiiiiiiiiiiii!i
_iiiiiiii;i!i!ilill
12
Page 13
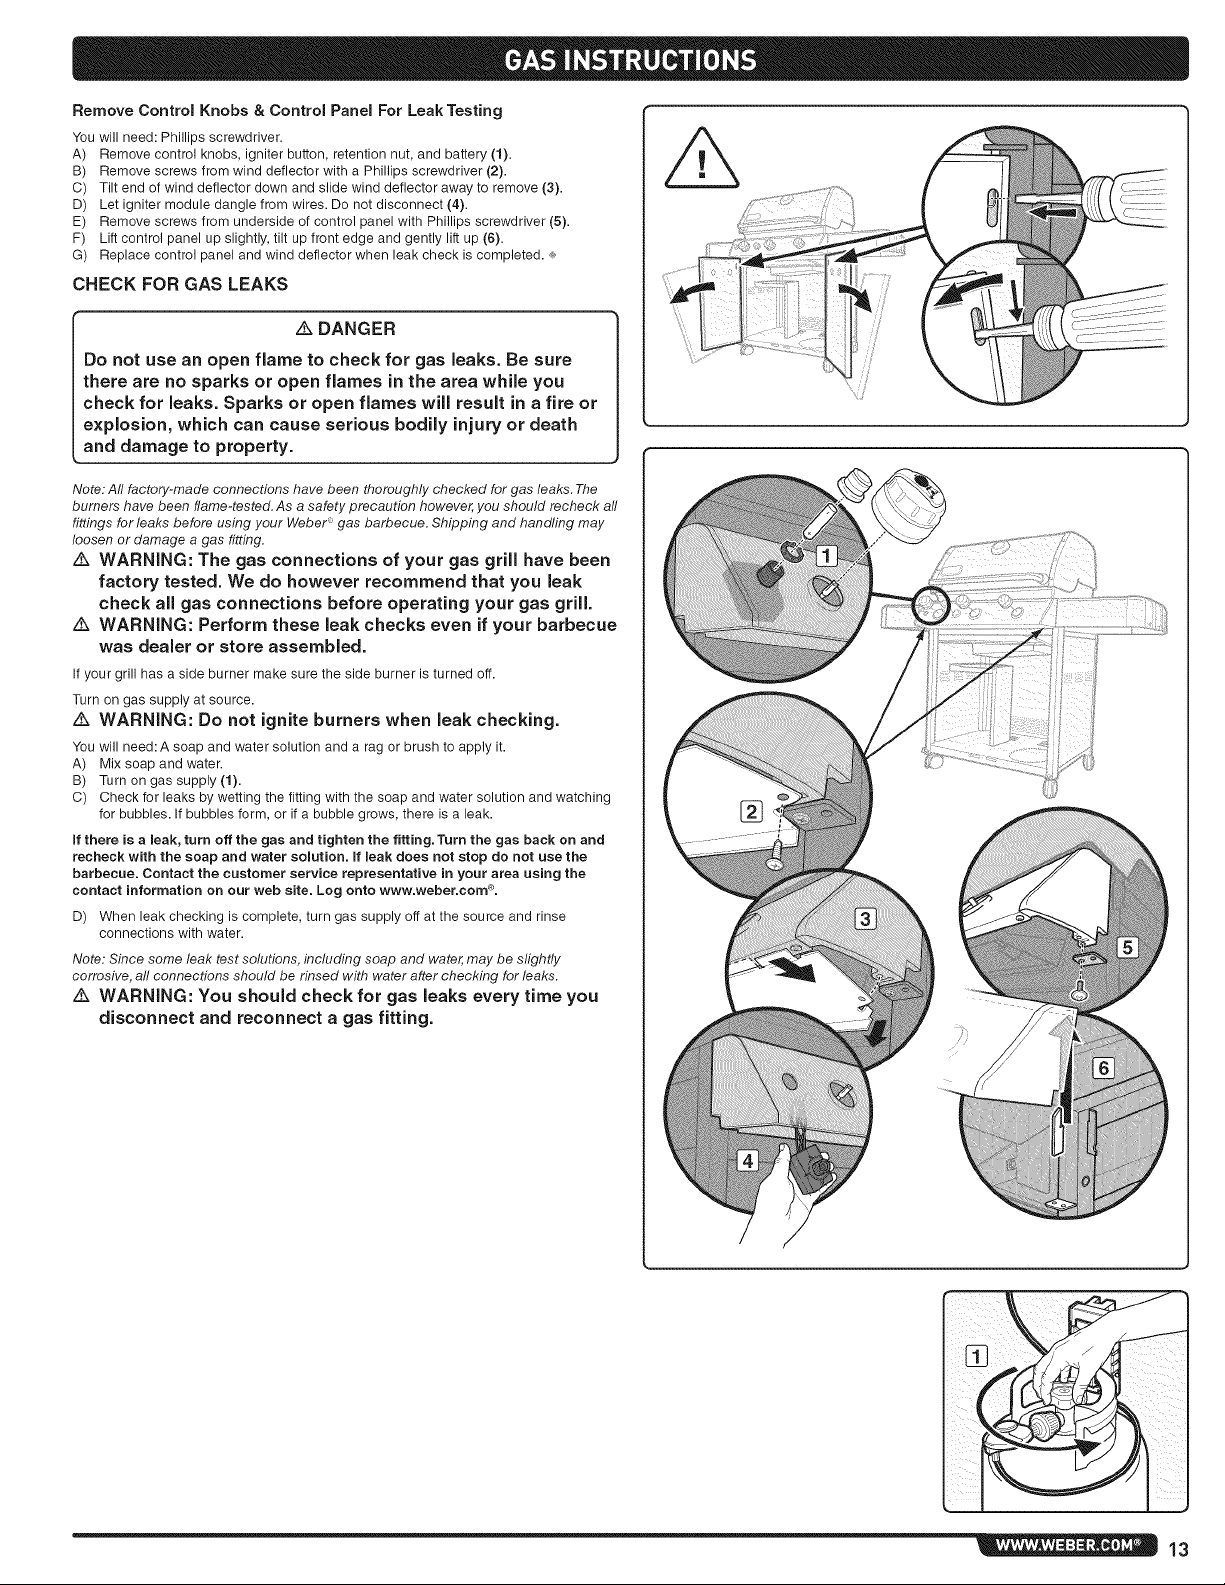
Remove Control Knobs & Control Panel For Leak Testing
You will need: Phillips screwdriver.
A) Remove control knobs, igniter button, retention nut, and battery (1).
B) Remove screws from wind deflector with a Phillips screwdriver (2).
C) Tilt end of wind deflector down and slide wind deflector away to remove (3).
D) Let igniter module dangle from wires. Do not disconnect (4).
E) Remove screws from underside of control panel with Phillips screwdriver (5).
F) Lift control panel up slightly, tilt up front edge and gently lift up (6).
G) Replace control panel and wind deflector when leak check is completed. ¢
CHECK FOR GAS LEAKS
DANGER
Do not use an open flame to check for gas leaks. Be sure
there are no sparks or open flames in the area while you
check for leaks. Sparks or open flames will result in a fire or
explosion, which can cause serious bodily injury or death
and damage to property.
Note: All factory-made connections have been thoroughly checked for gas leaks. The
burners have been flame-tested. As a safety precaution however, you should recheck all
fittings for leaks before using your Weber- gas barbecue. Shipping and handling may
loosen or damage a gas fitting.
Z_ WARNING: The gas connections of your gas grill have been
factory tested. We do however recommend that you leak
check all gas connections before operating your gas grill.
z_ WARNING: Perform these leak checks even if your barbecue
was dealer or store assembled.
If your grill has a side burner make sure the side burner is turned off.
Turn on gas supply at source.
WARNING: Do not ignite burners when leak checking.
You will need: A soap and water solution and a rag or brush to apply it.
A) Mix soap and water.
B) Turn on gas supply (1).
C) Check for leaks by wetting the fitting with the soap and water solution and watching
for bubbles. If bubbles form, or if a bubble grows, there is a leak.
If there is a leak, turn off the gas and tighten the fitting. Turn the gas back on and
recheck with the soap and water solution. If leak does not stop do not use the
barbecue. Contact the customer service representative in your area using the
contact information on our web site. Log onto www.weber.com ®.
D) When leak checking is complete, turn gas supply off at the source and rinse
connections with water.
Note: Since some leak test solutions, including soap and water, may be slightly
corrosive, a!l connections should be rinsed with water after checking for leaks.
z_ WARNING: You should check for gas leaks every time you
disconnect and reconnect a gas fitting.
_iii iiii_:
13
Page 14
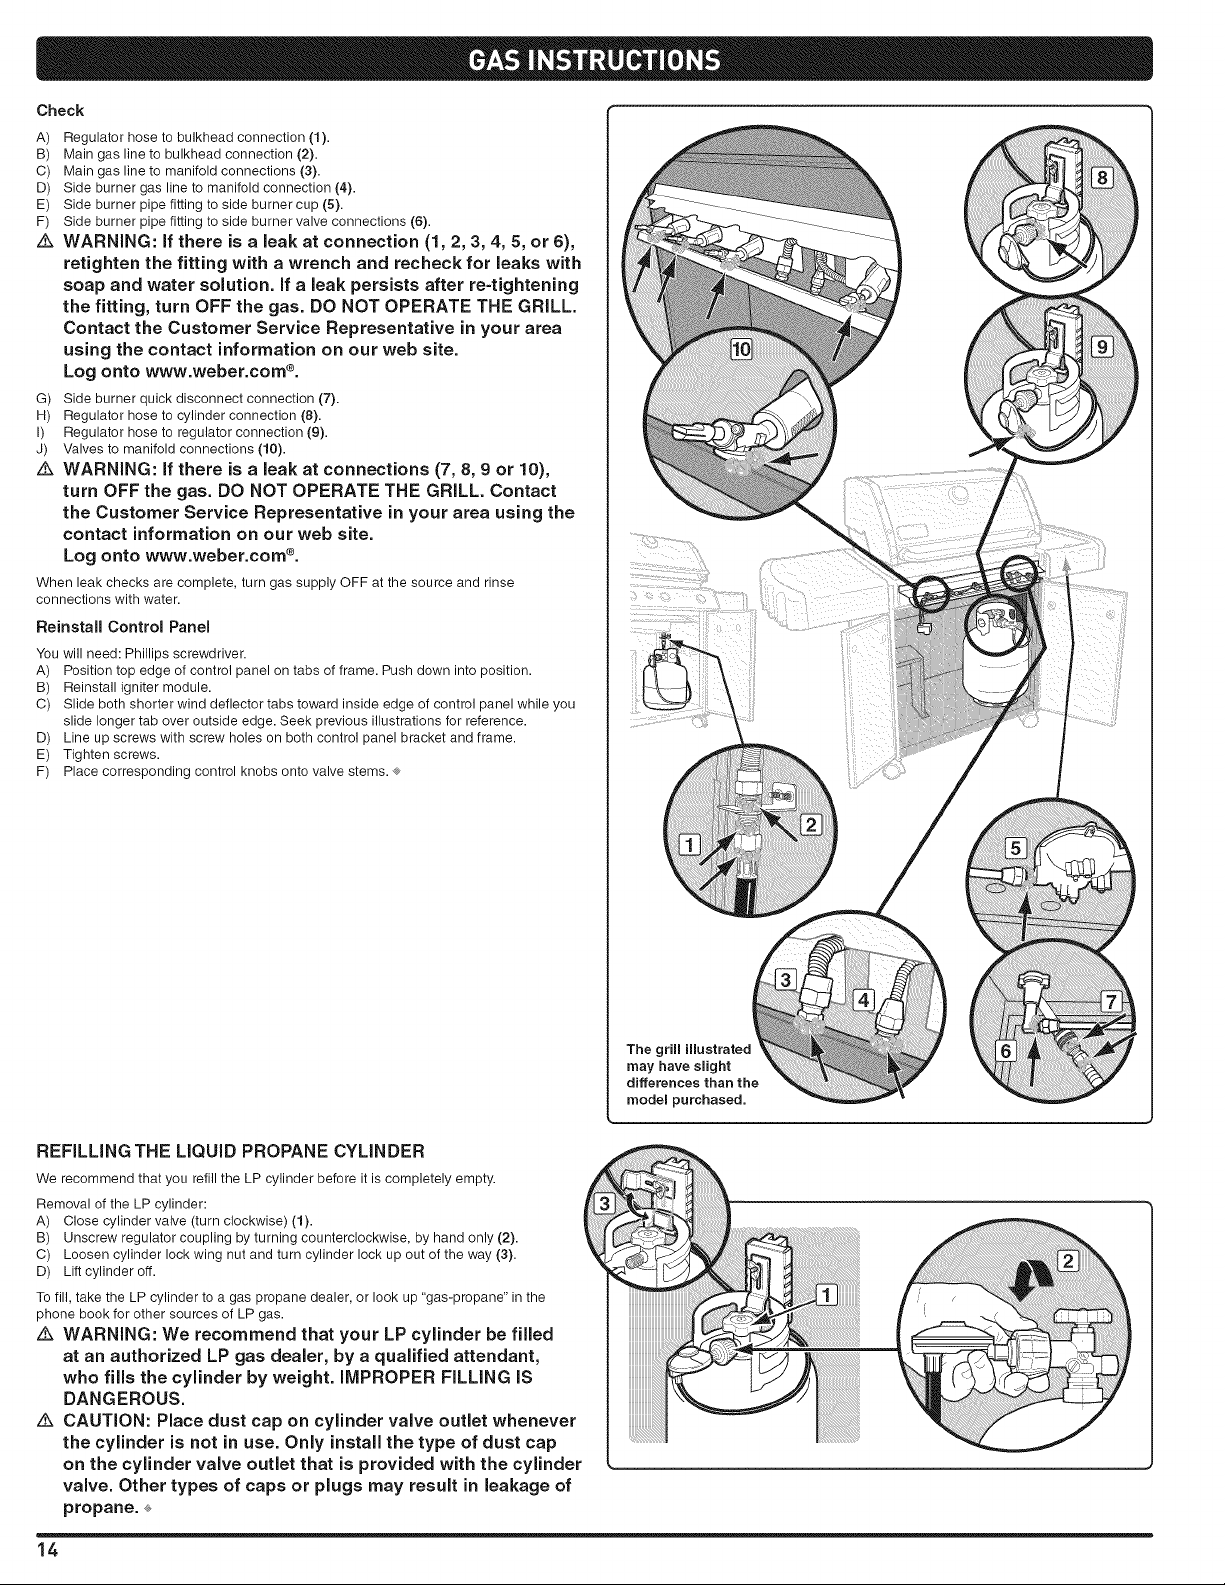
Check
A) Regulator hose to bulkhead connection (1).
B) Main gas line to bulkhead connection (2).
C) Main gas line to manifold connections (3).
D) Side burner gas line to manifold connection (4).
E) Side burner pipe fitting to side burner cup (5).
F) Side burner pipe fitting to side burner valve connections (6).
z_ WARNING: If there is a leak at connection (1,2, 3, 4, 5, or 6),
retighten the fitting with a wrench and recheck for leaks with
soap and water solution. If a leak persists after re=tightening
the fitting, turn OFF the gas. DO NOT OPERATE THE GRILL.
Contact the Customer Service Representative in your area
using the contact information on our web site.
Log onto www.weber.com ®.
G) Side burner quick disconnect connection (7).
H) Regulator hose to cylinder connection (8).
I) Regulator hose to regulator connection (9).
J) Valves to manifold connections (10).
WARNING: if there is a leak at connections (7, 8, 9 or 10),
turn OFF the gas. DO NOT OPERATE THE GRILL. Contact
the Customer Service Representative in your area using the
contact information on our web site.
Log onto www.weber.com ®.
When leak checks are complete, turn gas supply OFF at the source and rinse
connections with water.
Reinstall Control Panel
You will need: Phillips screwdriver.
A) Position top edge of control panel on tabs of frame. Push down into position.
B) Reinstall igniter module.
C) Slide both shorter wind deflector tabs toward inside edge of control panel while you
slide longer tab over outside edge. Seek previous illustrations for reference.
D) Line up screws with screw holes on both control panel bracket and frame.
E) Tighten screws.
F) Place corresponding control knobs onto valve stems. ®
REFILLING THE LIQUID PROPANE CYLINDER
We recommend that you refill the LP cylinder before it is completely empty.
Removal of the LP cylinder:
A) Close cylinder valve (turn clockwise) (1).
B) Unscrew regulator coupling by turning counterclockwise, by hand only (2).
C) Loosen cylinder lock wing nut and turn cylinder lock up out of the way (3).
D) Lift cylinder off.
To fill, take the LP cylinder to a gas propane dealer, or look up "gas-propane" in the
phone book for other sources of LP gas.
WARNING: We recommend that your LP cylinder be filled
at an authorized LP gas dealer, by a qualified attendant,
who fills the cylinder by weight. IMPROPER FILLING IS
DANGEROUS.
z_ CAUTION: Place dust cap on cylinder valve outlet whenever
the cylinder is not in use. Only install the type of dust cap
on the cylinder valve outlet that is provided with the cylinder
valve. Other types of caps or plugs may result in leakage of
propane.
14
The grill illustrated
may have slight
differences than the
model purchased.
Page 15
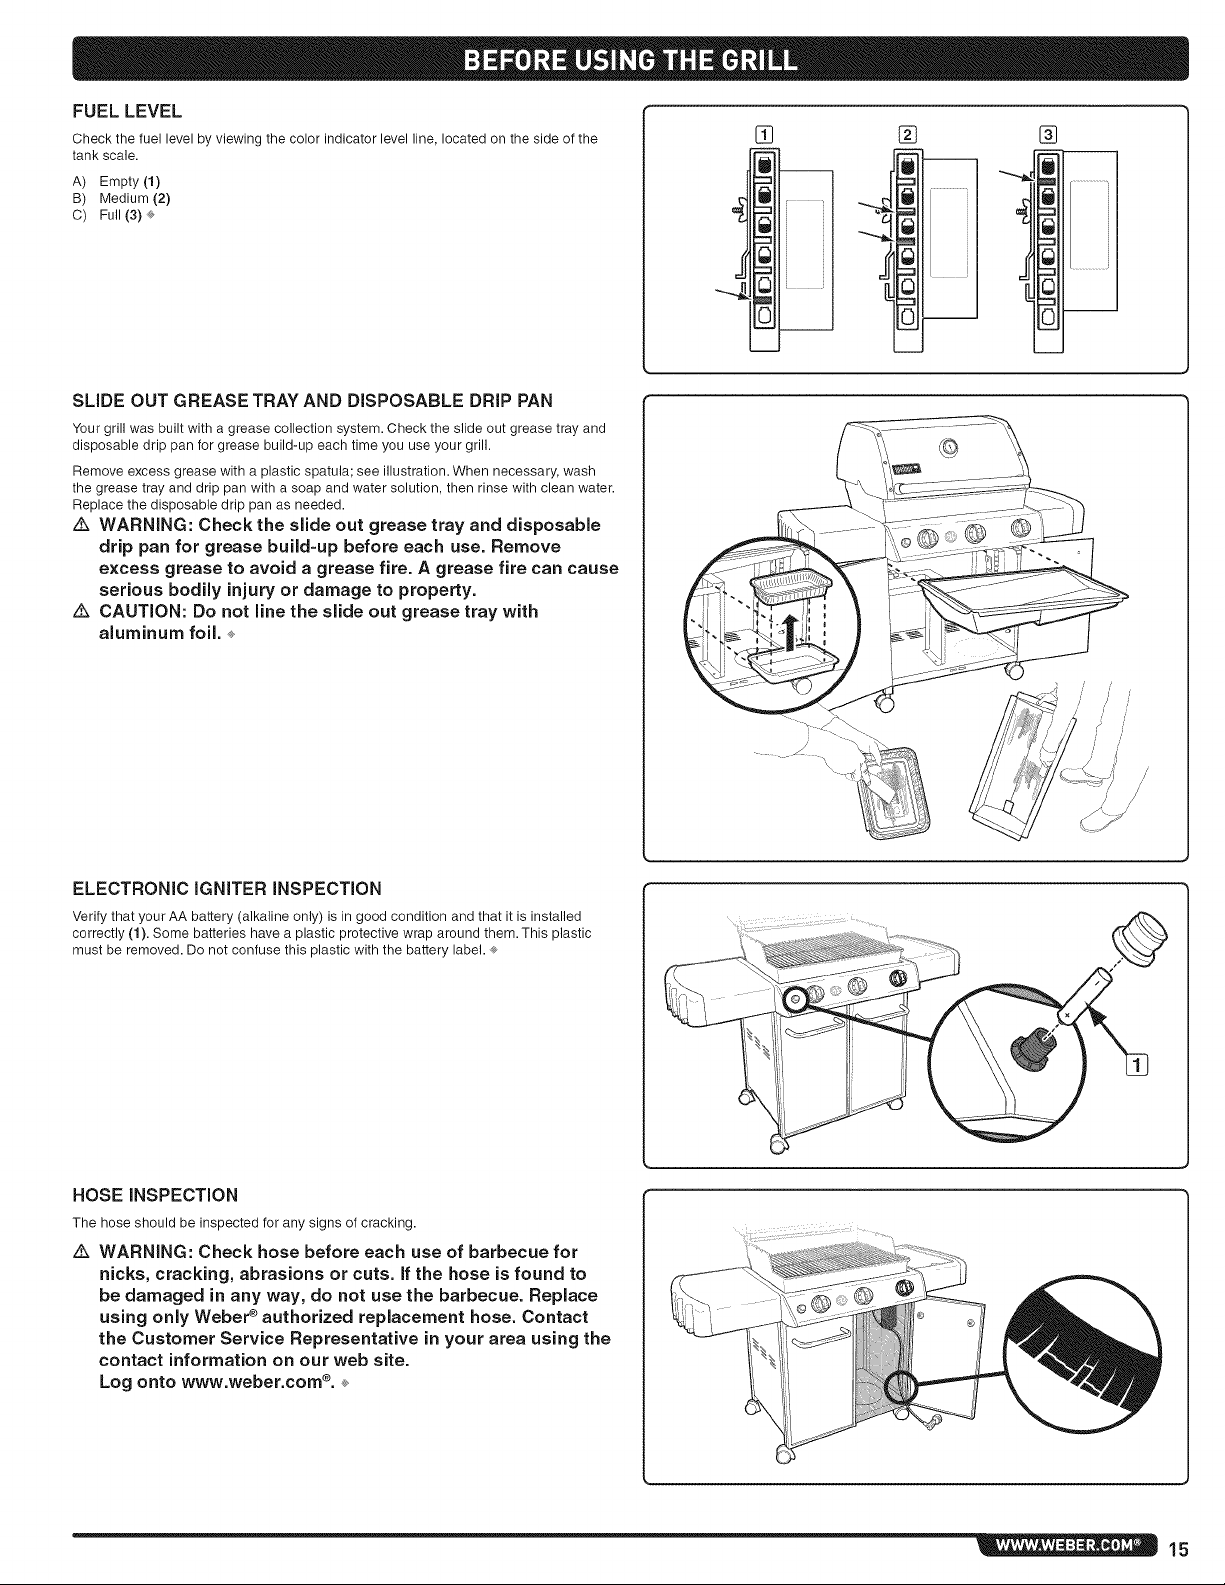
FUEL LEVEL
Check the fuel level by viewing the color indicator level line, located on the side of the
tank scale.
A) Empty (1)
B) Medium (2)
C) Full (3) ®
SLIDE OUT GREASE TRAY AND DISPOSABLE DRIP PAN
Your grill was built with a grease collection system. Check the slide out grease tray and
disposable drip pan for grease build-up each time you use your grill.
Remove excess grease with a plastic spatula; see illustration. When necessary, wash
the grease tray and drip pan with a soap and water solution, then rinse with clean water.
Replace the disposable drip pan as needed.
z_ WARNING: Check the slide out grease tray and disposable
drip pan for grease build=up before each use. Remove
excess grease to avoid a grease fire. A grease fire can cause
serious bodily injury or damage to property.
z_ CAUTION: Do not line the slide out grease tray with
aluminum foil.
[] [] []
,[
IIII
m
i
ELECTRONIC IGNITER INSPECTION
Verify that your AA battery (alkaline only) is in good condition and that it is installed
correctly (1). Some batteries have a plastic protective wrap around them. This plastic
must be removed. Do not confuse this plastic with the battery label. ® ©
HOSEINSPECTION
The hose should be inspected for any signs of cracking.
WARNING: Check hose before each use of barbecue for
nicks, cracking, abrasions or cuts. If the hose is found to
be damaged in any way, do not use the barbecue. Replace
using only Weber ®authorized replacement hose. Contact
the Customer Service Representative in your area using the
contact information on our web site.
Log onto www.weber.com ®.
15
Page 16
MAIN BURNER IGNITION
Summary lighting instructions are inside the left hand cabinet door.
w
ARRETE
_ DANGER
Failure to open the lid while igniting the barbecue's burners,
or not waiting five minutes to allow the gas to clear if the
barbecue does not light, may result in an explosive flare-up
wh!ch can cause seri?us b?di!Y !nJu_ ?r de,!h:
Electronic ignition System
Note:Each control knob operates an individual bume_ TheElectronic Ignition System
ignites a burner with a spark from the igniter electrode inside the Gas CatcherTM
ignition chambe_ Yougenerate the energy forthe spark by pushing the electronic
ignition button.Youwi// hear it clicking.
WARNING: Check hose before each use of barbecue for
nicks, cracking, abrasions or cuts. If the hose is found to
be damaged in any way, do not use the barbecue. Replace
using only Weber ® authorized replacement hose. Contact
the Customer Service Representative in your area using the
contact information on our web site.
Log onto www.weber.com ®.
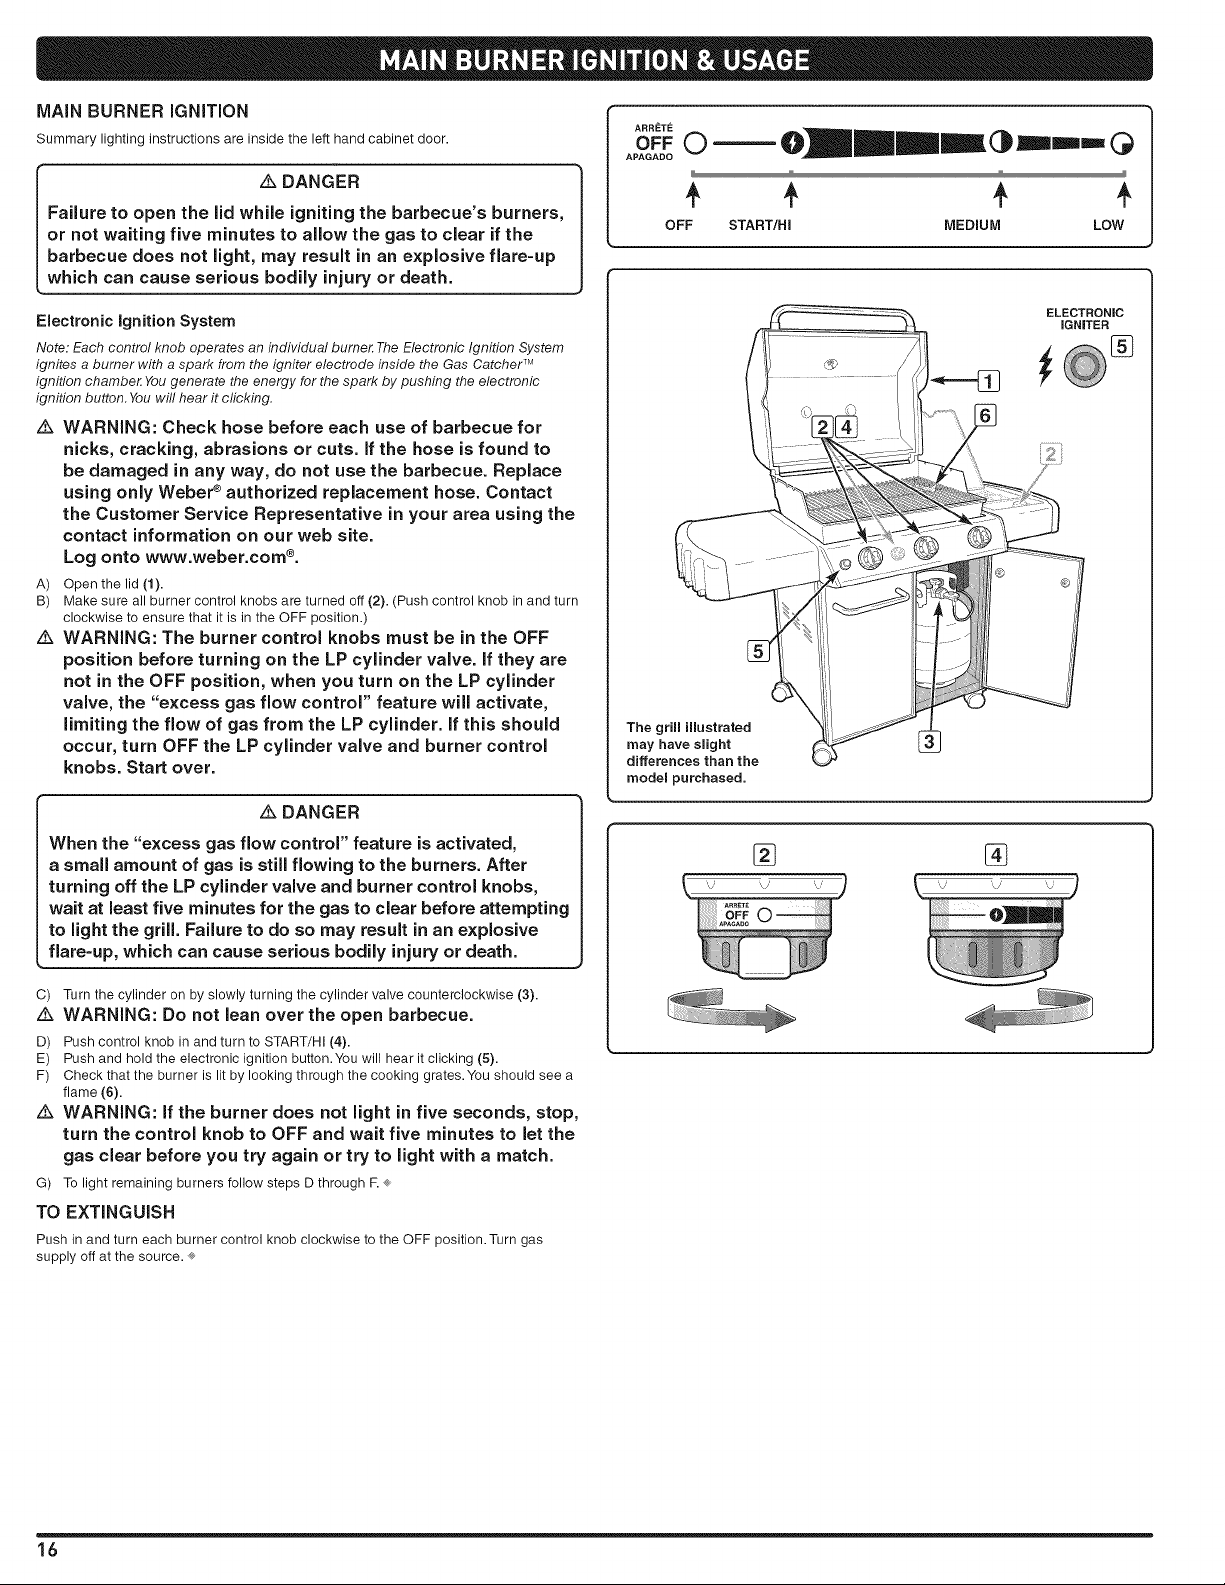
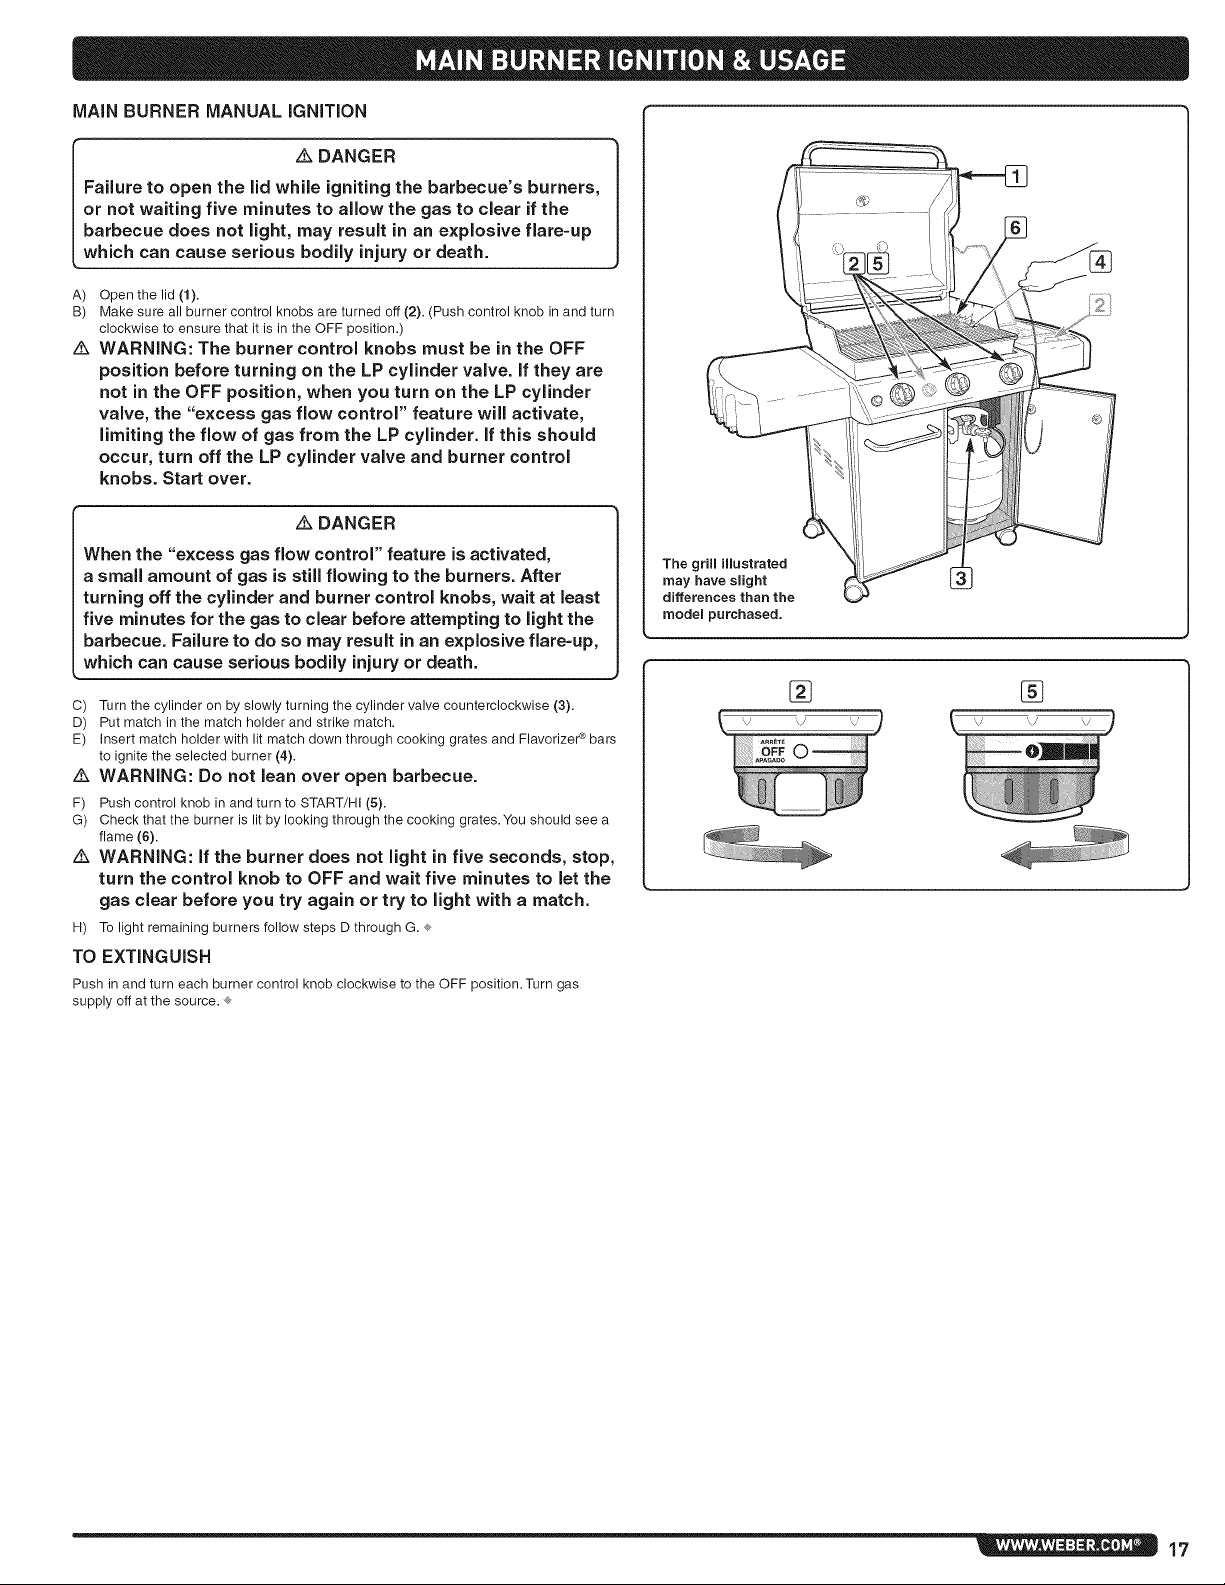
A) Open the lid (1).
B) Makesure all burner control knobsare turned off (2). (Push control knob in andturn
clockwise to ensure that it is inthe OFF position.)
WARNING: The burner control knobs must be in the OFF
position before turning on the LP cylinder valve. If they are
not in the OFF position, when you turn on the LP cylinder
valve, the "excess gas flow control" feature will activate,
limiting the flow of gas from the LP cylinder. If this should
occur, turn OFF the LP cylinder valve and burner control
knobs. Start over.
DANGER
When the "excess gas flow control" feature is activated,
a small amount of gas is still flowing to the burners. After
turning off the LP cylinder valve and burner control knobs,
wait at least five minutes for the gas to clear before attempting
to light the grill. Failure to do so may result in an explosive
flare-up, which can cause serious bodily injury or death.
÷ + + +
OFF START/HI MEDIUM LOW
The grill illustrated
may have slight
differences than the
model purchased.
ELECTRONIC
iGNiTER
2
C) Turn the cylinder on by slowly turning the cylinder valve counterclockwise (3).
z_ WARNING: Do not lean over the open barbecue.
D) Push control knob in and turn to START/HI (4).
E) Push and hold the electronic ignition button.You will hear it clicking (5).
F) Check that the burner is lit by looking through the cooking grates. You should see a
flame (6).
WARNING: If the burner does not light in five seconds, stop,
turn the control knob to OFF and wait five minutes to let the
gas clear before you try again or try to light with a match.
G) To light remaining burners follow steps D through R ®
TO EXTINGUISH
Push in and turn each burner control knob clockwise to the OFF position.Turn gas
supply off at the source. ®
16
Page 17
MAIN BURNER MANUAL IGNITION
Failure to open the lid while igniting the barbecue's burners,
or not waiting five minutes to allow the gas to clear if the
barbecue does not light, may result in an explosive flare-up
_ DANGER
which can cause serious bodily injury or death.
A) Open the lid (1).
B) Make sure all burner control knobs are turned off (2). (Push control knob in and turn
clockwise to ensure that it is in the OFF position.)
WARNING: The burner control knobs must be in the OFF
position before turning on the LP cylinder valve. If they are
not in the OFF position, when you turn on the LP cylinder
valve, the "excess gas flow control" feature will activate,
limiting the flow of gas from the LP cylinder. If this should
occur, turn off the LP cylinder valve and burner control
knobs. Start over.
DANGER
When the "excess gas flow control" feature is activated,
a small amount of gas is still flowing to the burners. After
turning off the cylinder and burner control knobs, wait at least
five minutes for the gas to clear before attempting to light the
barbecue. Failure to do so may result in an explosive flare-up,
which can cause serious bodily injury or death.
The grill illustrated
may have slight
differences than the
model purchased.
C) Turn the cylinder on by slowly turning the cylinder valve counterclockwise (3).
D) Put match in the match holder and strike match.
E) Insert match holder with lit match down through cooking grates and Flavorizer _ bars
to ignite the selected burner (4).
z_ WARNING: Do not lean over open barbecue.
F) Push control knob in and turn to START/HI (5).
G) Check that the burner is lit by looking through the cooking grates. You should see a
flame (6).
WARNING: If the burner does not light in five seconds, stop,
turn the control knob to OFF and wait five minutes to let the
gas clear before you try again or try to light with a match.
H) To light remaining burners follow steps D through G.
TO EXTINGUISH
Push in and turn each burner control knob clockwise to the OFF position.Turn gas
supply off at the source. ®
17
Page 18
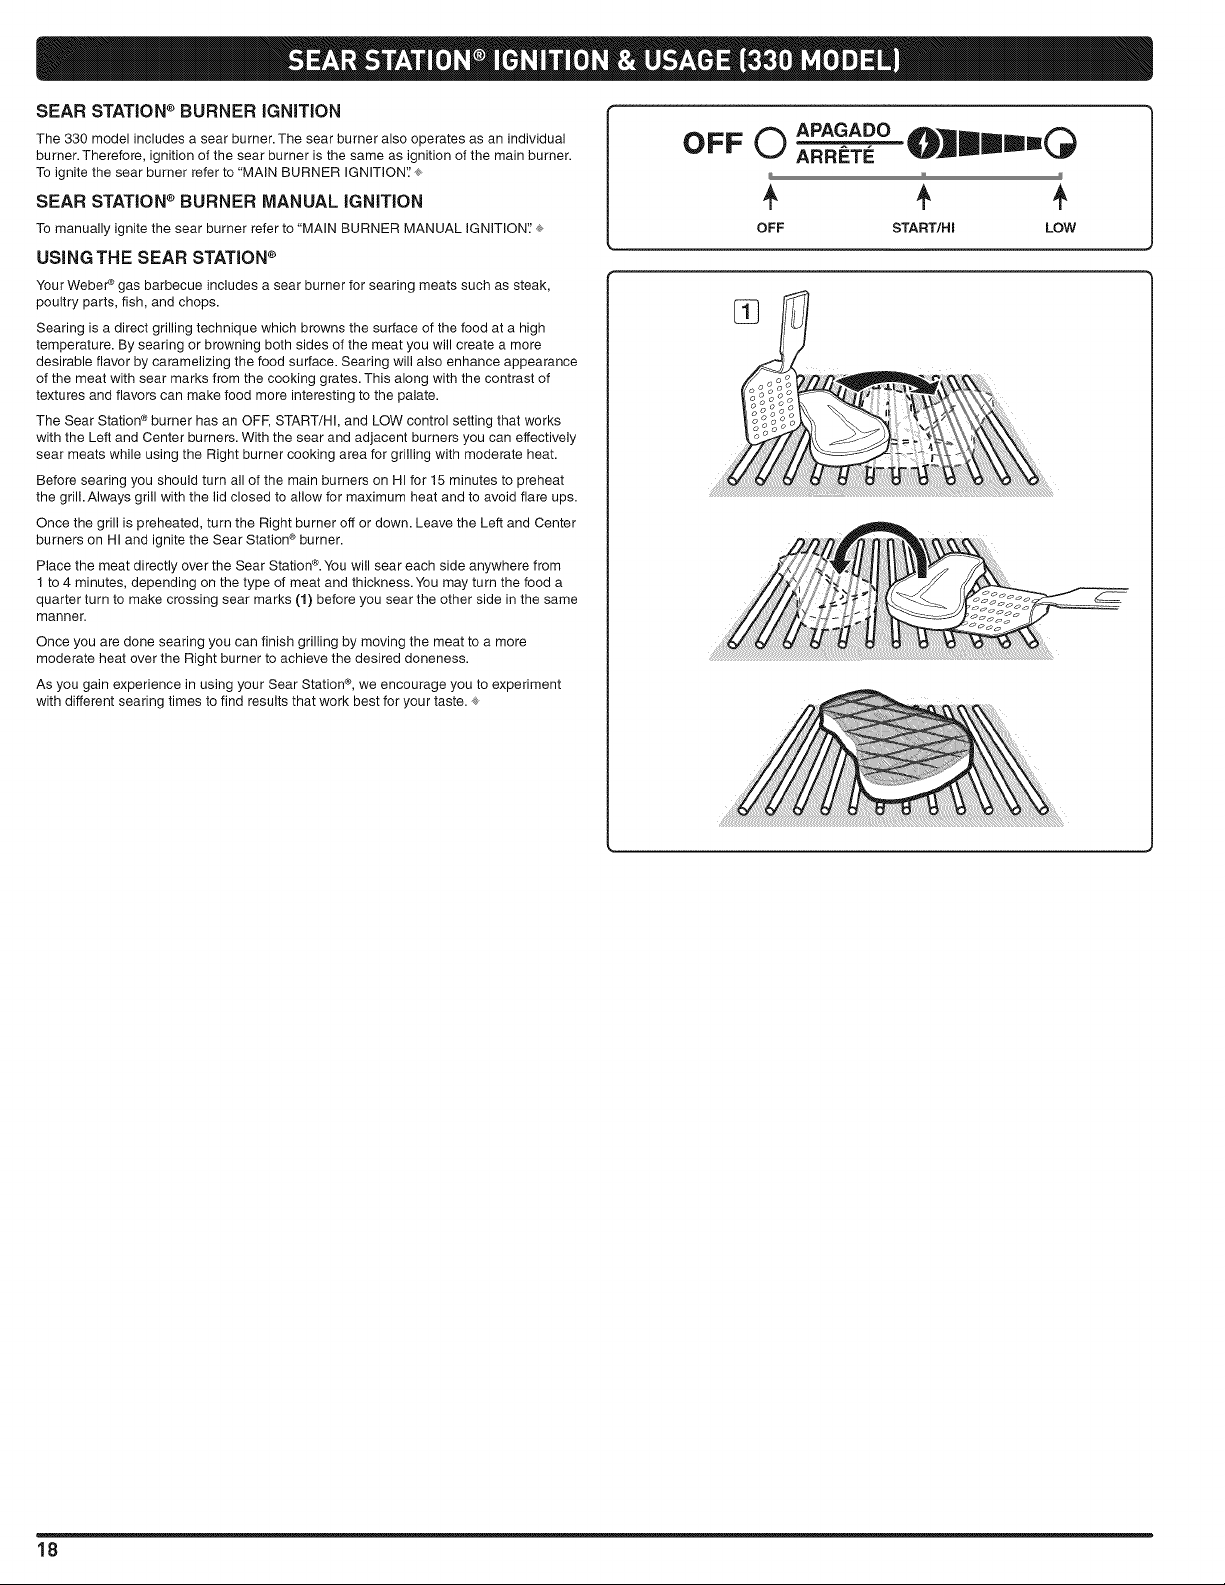
SEAR STATION _ BURNER iGNiTiON
The 330 model includes a sear burner. The sear burner also operates as an individual
burner. Therefore, ignition of the sear burner is the same as ignition of the main burner.
To ignite the sear burner refer to "MAIN BURNER iGNiTION'.' ÷
SEAR STATION e BURNER MANUAL IGNiTiON
To manually ignite the sear burner refer to "MAIN BURNER MANUAL IGNITION': ÷
USING THE SEAR STATION ®
Your Webe# _ gas barbecue includes a sear burner for searing meats such as steak,
poultry parts, fish, and chops.
Searing is a direct grilling technique which browns the surface of the food at a high
temperature. By searing or browning both sides of the meat you will create a more
desirable flavor by caramelizing the food surface. Searing will also enhance appearance
of the meat with sear marks from the cooking grates. This along with the contrast of
textures and flavors can make food more interesting to the palate.
The Sear Station ®burner has an OFF, START/HI, and LOW control setting that works
with the Left and Center burners. With the sear and adjacent burners you can effectively
sear meats while using the Right burner cooking area for grilling with moderate heat.
Before searing you should turn all of the main burners on HI for 15 minutes to preheat
the grill. Always grill with the lid closed to allow for maximum heat and to avoid flare ups.
Once the grill is preheated, turn the Right burner off or down. Leave the Left and Center
burners on HI and ignite the Sear Station ®burner.
Place the meat directly over the Sear Station ®. You will sear each side anywhere from
1 to 4 minutes, depending on the type of meat and thickness. You may turn the food a
quarter turn to make crossing sear marks (1) before you sear the other side in the same
manner.
Once you are done searing you can finish grilling by moving the meat to a more
moderate heat over the Right burner to achieve the desired doneness.
As you gain experience in using your Sear Station ®, we encourage you to experiment
with different searing times to find results that work best for your taste.
OFF O APAGAOO mll=mm(
ARRETE
÷ ÷ +
OFF START/HI LOW
18
Page 19
, Always preheat the grill before cooking. Set all burners on HI heat and close lid; heat
for 10 minutes, or until thermometer registers 5000-550 ° F (260°-288°C).
Sear meats and cook with the lid down for perfectly grilled food every time.
Grilling times in recipes are based on 70°F (20°C) weather and little or no wind. Allow
more cooking time on cold or windy days, or at higher altitudes. Allow less cooking
time in extremely hot weather.
Grilling times can vary because of the weather, orthe amount, size and shape of the
food being grilled.
The temperature of your gas grill may run hotter than normal for the first few uses.
Grilling conditions may require the adjustment of the burner controls to attain the
correct cooking temperatures.
In general, large pieces of meat will require more cooking time per pound than small
pieces of meat. Foods on a crowded cooking grate will require more cooking time
than just a few foods. Foods grilled in containers, such as baked beans, will require
more time if grilled in a deep casserole rather than a shallow baking pan.
Trim excess fat from steaks, chops and roasts, leaving no more than a scant _Ainch
(6.4mm) of fat. Less fat makes cleanup easier, and is a virtual guarantee against
unwanted flare-ups.
Foods placed on the cooking grate directly above burners may require turning or
moving to a less hot area.
Use tongs rather than a fork for turning and handling meats to avoid losing natural
juices. Use two spatulas for handling large whole fish.
If an unwanted flare-up should occur, turn all burners off and move food to another
area of the cooking grate. Any flames will quickly subside. After flames subside, relight
the grill. NEVER USE WATER TO EXTINGUISH FLAMES ON A GAS GRILL.
Some foods, such as a casserole or thin fish fillets, will require a container for grilling.
Disposable foil pans are very convenient, but any metal pan with ovenproof handles
can also be used.
Always be sure the slide out grease tray and catch pan are clean and free from debris.
Do not line the slide out grease tray with foil. This could prevent the grease from
flowing into the catch pan.
Using a timer will help to alert you when "well-done" is about to become "over-
done."
Note: If grill looses heat while cooking refer to the troubleshooting section of this
manual.
& WARNING: Do not move the Weber _ gas barbecue when
operating or while barbecue is hot.
You can adjust the individual burners as desired.The control settings (1) are OFF,
START/HI, MEDIUM, or LOW.
FLAVORIZER®SYSTEM
When meat juices drip from the food onto the specially angled Flavorizer ¢ bars,
they create smoke that gives foods an irresistible barbecued flavor. Thanks to the
unique design of the burners, Flavorizer ¢ bars and the flexible temperature controls,
uncontrolled flare-ups are virtually eliminated, because YOU control the flames. Because
of the special design of the Flavorizer ¢ bars and burners, excess fats are directed
through the slide out grease tray into the grease catch pan.
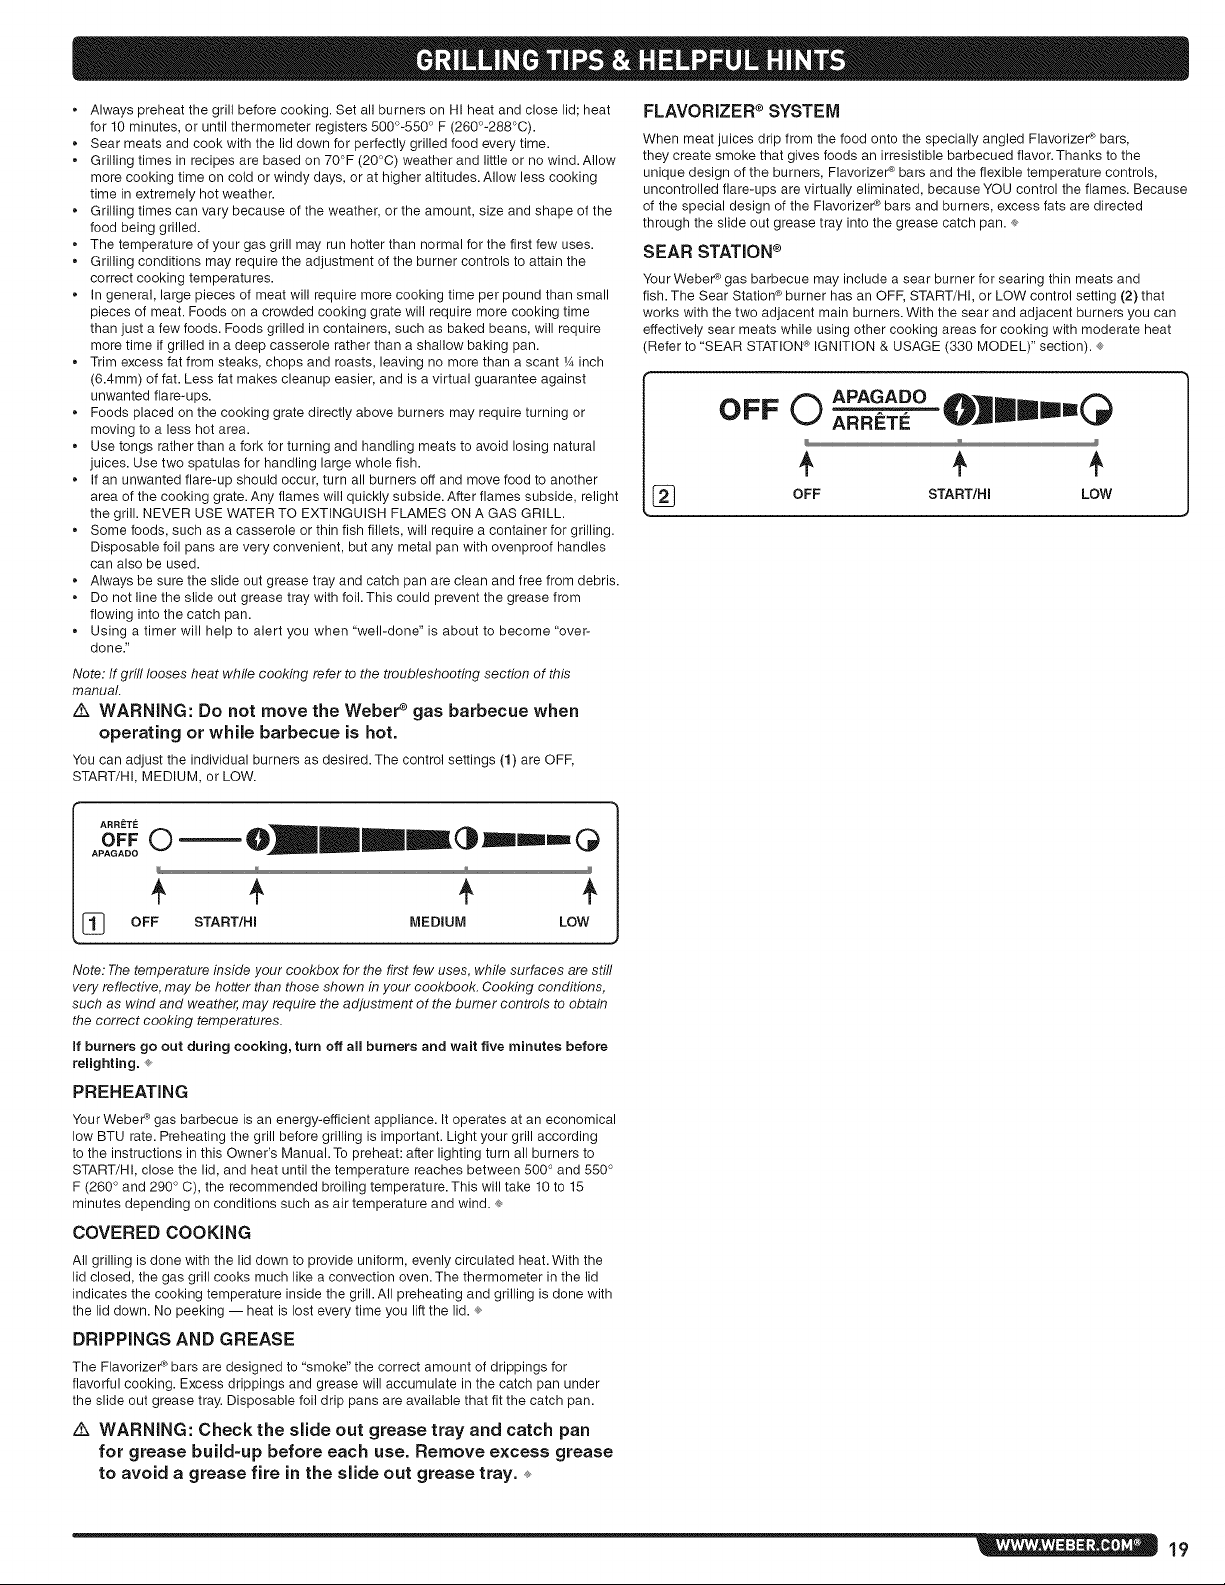
SEAR STATION ®
Your Weber _ gas barbecue may include a sear burner for searing thin meats and
fish. The Sear Station ®burner has an OFF, START/HI, or LOW control setting (2) that
works with the two adjacent main burners. With the sear and adjacent burners you can
effectively sear meats while using other cooking areas for cooking with moderate heat
(Refer to "SEAR STATION ® IGNITION & USAGE (330 MODEL)" section). ®
ARR/=TI_
I OFF O APAOAO0 O]lmmm=(
[_} OFF START/HI LOW
÷ ÷ ÷
+ ÷ + ÷
oFF s.A..,., .Eo,u. LOW
Note: The temperature inside your cookbox for the first few uses, while surfaces are still
very reflective, may be hotter than those shown in your cookbook. Cooking conditions,
such as wind and weather, may require the adjustment of the burner controls to obtain
the correct cooking temperatures.
if burners go out during cooking, turn off all burners and wait five minutes before
reiighting. ®
PREHEATING
Your Weber ¢ gas barbecue is an energy-efficient appliance. It operates at an economical
low BTU rate. Preheating the grill before grilling is important. Light your grill according
to the instructions in this Owner's Manual. To preheat: after lighting turn all burners to
START/HI, close the lid, and heat until the temperature reaches between 500 ° and 550 °
F (260 ° and 290 ° C), the recommended broiling temperature. This will take 10 to 15
minutes depending on conditions such as air temperature and wind.
COVERED COOKING
All grilling is done with the lid down to provide uniform, evenly circulated heat. With the
lid closed, the gas grill cooks much like a convection oven.The thermometer in the lid
indicates the cooking temperature inside the grill. All preheating and grilling is done with
the lid down. No peeking -- heat is lost every time you lift the lid.
DRIPPINGS AND GREASE
The Flavorizer e bars are designed to "smoke" the correct amount of drippings for
flavorful cooking. Excess drippings and grease will accumulate in the catch pan under
the slide out grease tray. Disposable foil drip pans are available that fit the catch pan.
z_ WARNING: Check the slide out grease tray and catch pan
for grease build-up before each use. Remove excess grease
to avoid a grease fire in the slide out grease tray.
19
Page 20
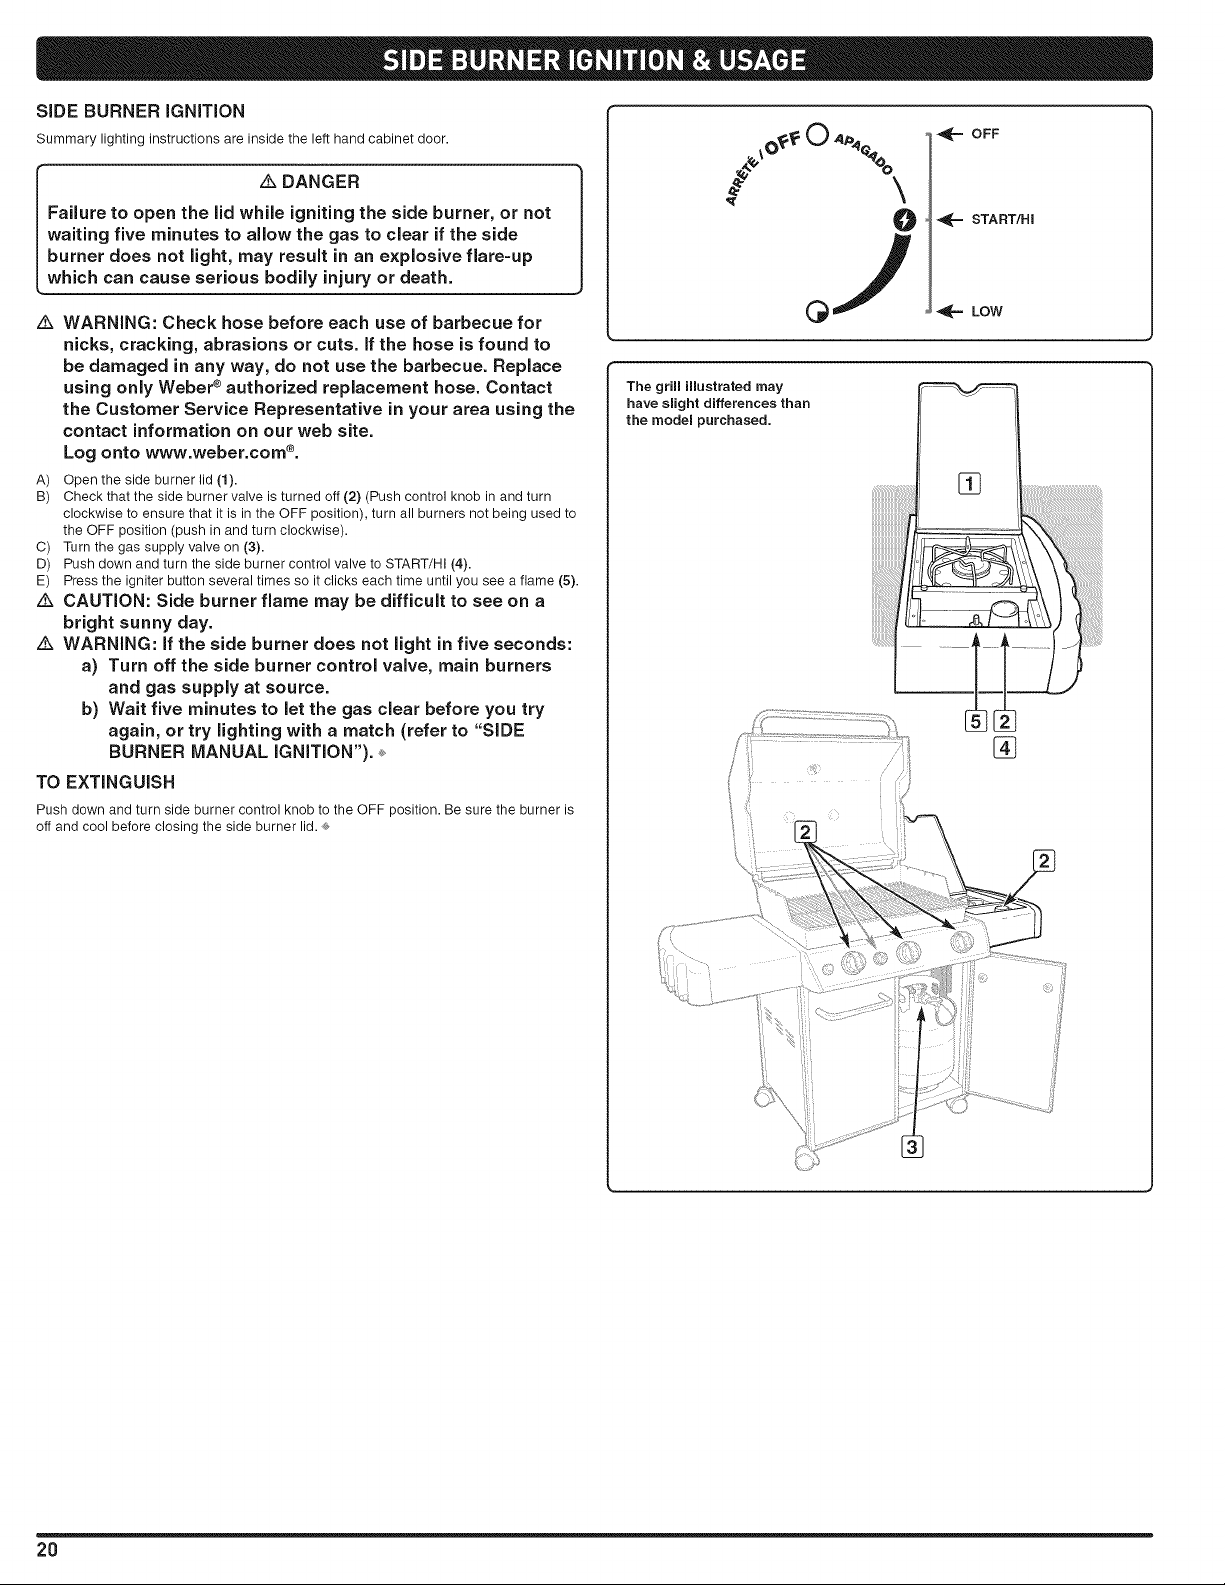
SIDE BURNER IGNITION
Summary lighting instructions are inside the left hand cabinet door.
DANGER
Failure to open the lid while igniting the side burner, or not
waiting five minutes to allow the gas to clear if the side
burner does not light, may result in an explosive flare-up
which can cause serious bodily injury or death.
z_ WARNING: Check hose before each use of barbecue for
nicks, cracking, abrasions or cuts. If the hose is found to
be damaged in any way, do not use the barbecue. Replace
using only Weber ®authorized replacement hose. Contact
the Customer Service Representative in your area using the
contact information on our web site.
Log onto www.weber.com ®.
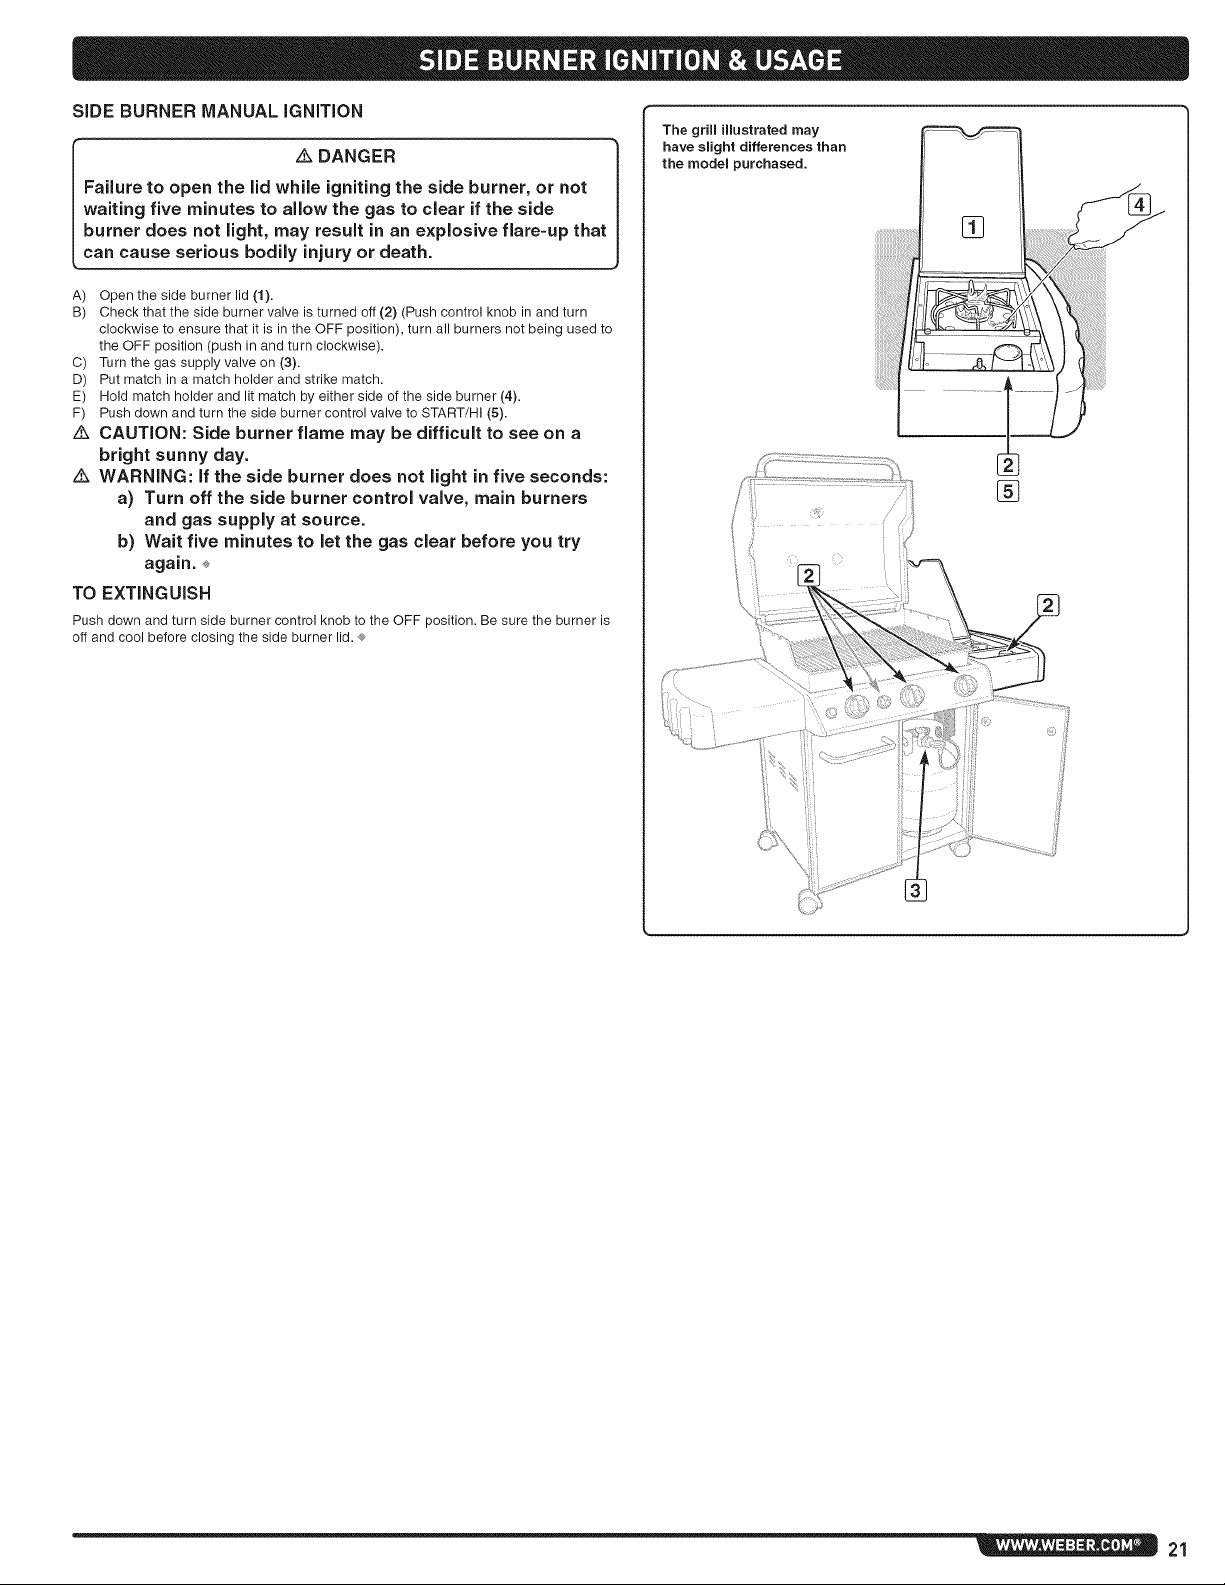
A) Open the side burner lid (1).
B) Check that the side burner valve is turned off (2) (Push control knob in and turn
clockwise to ensure that it is in the OFF position), turn all burners not being used to
the OFF position (push in and turn clockwise).
C) Turn the gas supply valve on (3).
D) Push down and turn the side burner control valve to START/HI (4).
E) Press the igniter button several times so it clicks each time until you see a flame (5).
z_ CAUTION: Side burner flame may be difficult to see on a
bright sunny day.
WARNING: If the side burner does not light in five seconds:
a) Turn off the side burner control valve, main burners
and gas supply at source.
b) Wait five minutes to let the gas clear before you try
again, or try lighting with a match (refer to "SIDE
BURNER MANUAL IGNITION").
TO EXTINGUISH
Push down and turn side burner control knob to the OFF position. Be sure the burner is
off and cool before closing the side burner lid. ®
The grill illustrated may
have slight differences than
the model purchased.
O
OFF
START/HI
_== LOW
%
20
Page 21
SIDE BURNER MANUAL IGNITION
Failure to open the lid while igniting the side burner, or not
waiting five minutes to allow the gas to clear if the side
burner does not light, may result in an explosive flare=up that
Z_ DANGER
can cause serious bodily injury or death.
A) Open the side burner lid (1).
B) Check that the side burner valve is turned off (2) (Push control knob in and turn
clockwise to ensure that it is in the OFF position), turn all burners not being used to
the OFF position (push in and turn clockwise).
C) Turn the gas supply valve on (3).
D) Put match in a match holder and strike match.
E) Hold match holder and lit match by either side of the side burner (4).
F) Push down and turn the side burner control valve to START/HI (5).
z_ CAUTION: Side burner flame may be difficult to see on a
bright sunny day.
WARNING: If the side burner does not light in five seconds:
a) Turn off the side burner control valve, main burners
and gas supply at source.
b) Wait five minutes to let the gas clear before you try
again. ÷
TO EXTINGUISH
Push down and turn side burner control knob to the OFF position. Be sure the burner is
off and cool before closing the side burner lid. ®
The grill illustrated may
have slight differences than
the model purchased.
®
21
Page 22
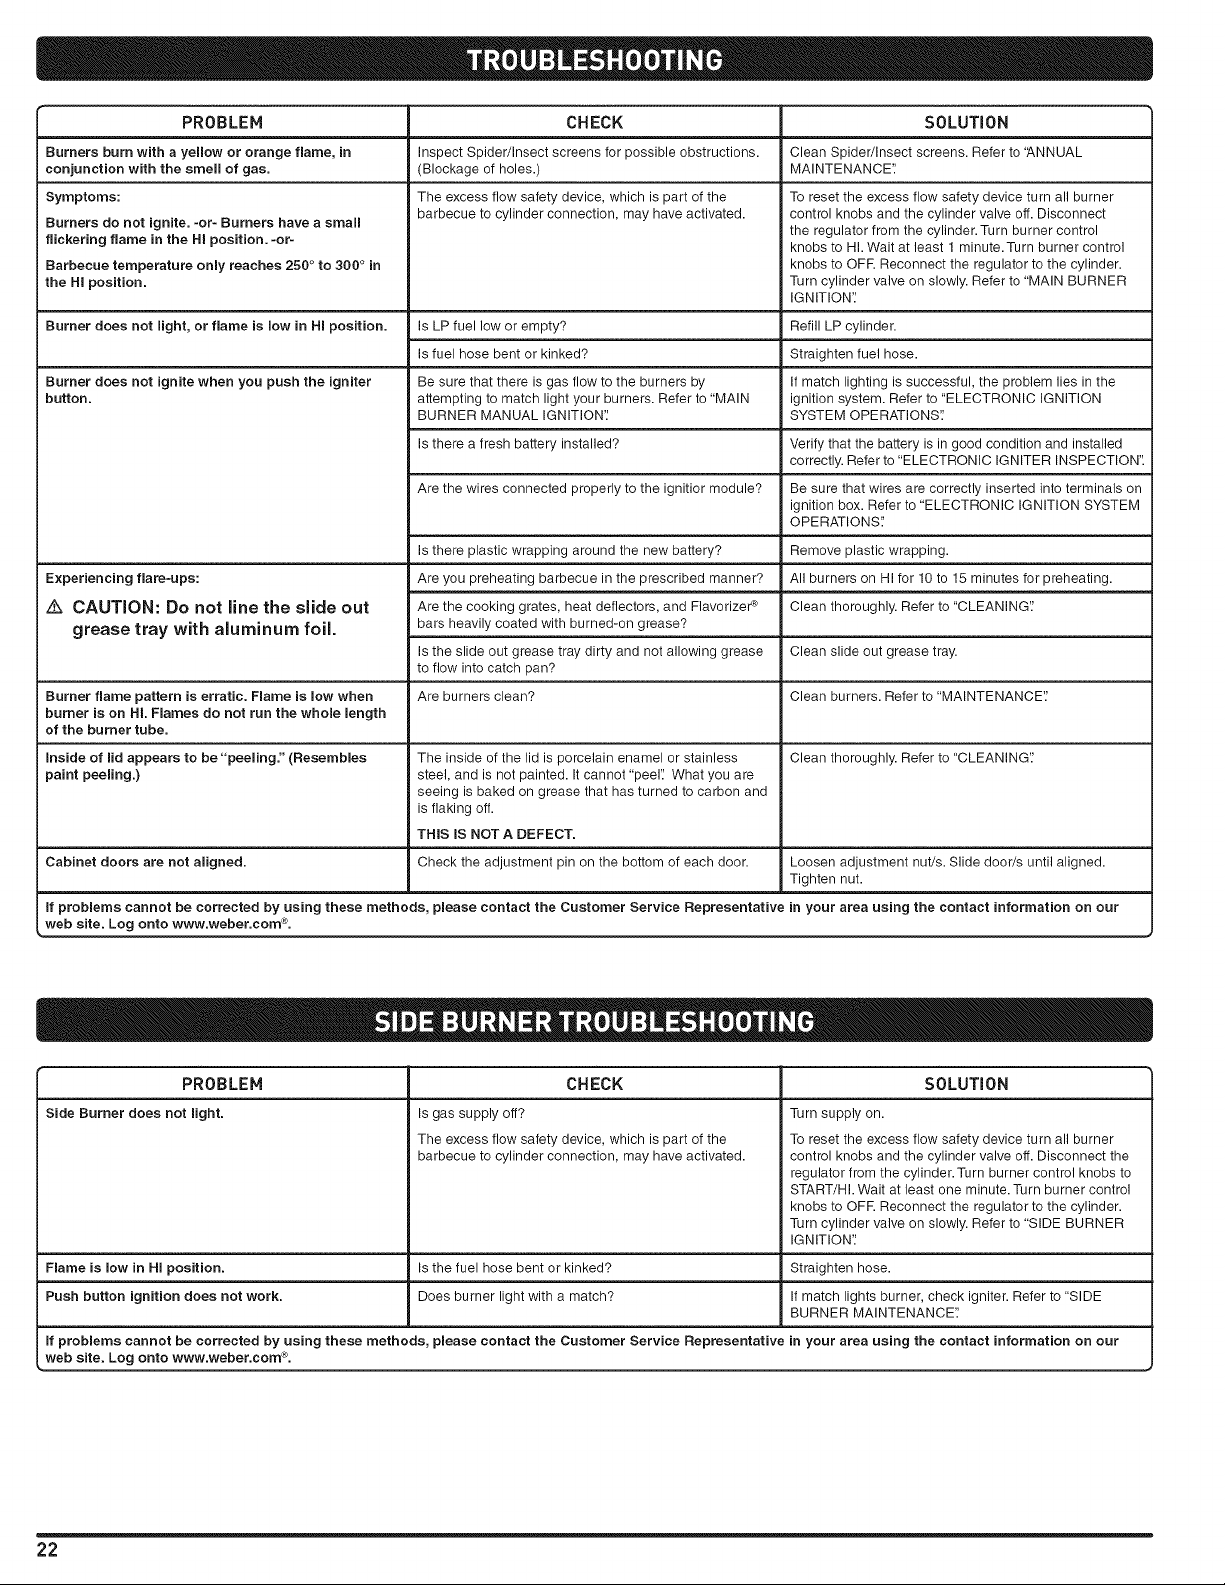
PROBLEM SOLUTION
Burners burn with a yellow or orange flame, in Clean Spider/insect screens. Refer to 'ANNUAL
conjunction with the smelm of gas. MAINTENANCE'.'
Symptoms:
Burners do not ignite. -or- Burners have a small
flickering flame in the HI position. -or-
Barbecue temperature only reaches 250 ° to 300 ° in
the HI position.
Burner does not light, or flame is low in HI position.
Burner does not ignite when you push the igniter
button.
Experiencing flare-ups:
CAUTION: Do not line the slide out
grease tray with aluminum foil.
Burner flame pattern is erratic. Flame is low when Clean burners. Refer to "MAINTENANCE'.'
burner is on HI. Flames do not run the whole length
of the burner tube.
Inside of lid appears to be "peeling." (Resembmes The inside of the lid is porcelain enamel or stainless Clean thoroughly. Refer to "CLEANING'.'
paint peeling.) steel, and is not painted. It cannot "peel': What you are
Cabinet doors are not aligned. Check the adjustment pin on the bottom of each door. Loosen adjustment nut/s. Slide dooris until aligned.
If problems cannot be corrected by using these methods, please contact the Customer Service Representative in your area using the contact information on our
web site. Log onto www.weber.com ®.
Inspect Spider/Insect screens for possible obstructions.
(Blockage of holes.)
The excess flow safety device, which is part of the
barbecue to cylinder connection, may have activated.
Is LP fuel low or empty?
is fuel hose bent or kinked?
Be sure that there is gas flow to the burners by
attempting to match light your burners. Refer to "MAIN
BURNER MANUAL IGNITION'.'
Is there a fresh battery installed?
Are the wires connected properly to the ignitior module? Be sure that wires are correctly inserted into terminals on
Are you preheating barbecue in the prescribed manner?
Are the cooking grates, heat deflectors, and Flavorize¢ _
bars heavily coated with burned-on grease?
is the slide out grease tray dirty and not allowing grease
to flow into catch pan?
Are burners clean?
seeing is baked on grease that has turned to carbon and
is flaking off.
THIS IS NOT A DEFECT.
CHECK
To reset the excess flow safety device turn all burner
control knobs and the cylinder valve off. Disconnect
the regulator from the cylinder. Turn burner control
knobs to Hi. Wait at least 1 minute.Turn burner control
knobs to OFF. Reconnect the regulator to the cylinder.
Turn cylinder valve on slowly. Refer to "MAIN BURNER
IGNITION':
Refill LP cylinder.
Straighten fuel hose.
if match lighting is successful, the problem lies in the
ignition system. Refer to "ELECTRONIC IGNITION
SYSTEM OPERATIONS'.'
Verify that the battery is in good condition and installed
correctly. Refer to "ELECTRONIC IGNITER INSPECTION".
ignition box. Refer to "ELECTRONIC IGNITION SYSTEM
OPERATIONS'.'
Remove plastic wrapping.is there plastic wrapping around the new battery?
All burners on HI for 10 to 15 minutes for preheating.
Clean thoroughly. Refer to "CLEANING':
Clean slide out grease tray.
Tighten nut.
PROBLEM SOLUTION
Side Burner does not light.
Flame is low in HI position. Is the fuel hose bent or kinked? Straighten hose.
Push button ignition does not work. Does burner light with a match? If match lights burner, check igniter. Refer to "SIDE
If problems cannot be corrected by using these methods, please contact the Customer Service Representative in your area using the contact information on our
web site. Log onto www.weber.com ®.
Is gas supply off?
The excess flow safety device, which is part of the
barbecue to cylinder connection, may have activated.
CHECK
Turn supply on.
To reset the excess flow safety device turn all burner
control knobs and the cylinder valve off. Disconnect the
regulator from the cylinder.Turn burner control knobs to
START/HI. Wait at least one minute. Turn burner control
knobs to OFF. Reconnect the regulator to the cylinder.
Turn cylinder valve on slowly. Refer to "SIDE BURNER
IGNITION':
BURNER MAINTENANCE'.'
22
Page 23
CLEANING
z_ WARNING: Turn your Weber _ gas barbecue off and wait for
it to cool before cleaning.
Z_ CAUTION: Do not clean your Flavorizer _ bars or cooking
grates in a self=cleaning oven.
Outside surfaces - Use a warm soapy water solution to clean, then rinse with water.
z_ CAUTION: Do not use oven cleaner, abrasive cleansers
(kitchen cleansers), cleaners that contain citrus products, or
abrasive cleaning pads on barbecue or cart surfaces.
Slide out grease tray - Remove excess grease, wash with warm soapy water, then
rinse.
z_ CAUTION: Do not line the slide out grease tray with
aluminum foil.
Flavodzer ¢ bars and cooking grates - Clean with a suitable stainless steel bristle
brush. As needed, remove from grill and wash with warm soapy water, then rinse with
water.
For availability of replacement cooking grates and Flavorizer ¢ bars contact the
Customer Service Representative in your area using the contact information on
our website. Log onto www.weber.com ®.
Catch pan - Disposable foil trays are available, or you can line the catch pan with
aluminum foil. To clean the catch pan, wash with warm soapy water, then rinse.
Thermometer - Wipe with warm soapy water; clean with plastic scrub ball.
Cookbox - Brush any debris off of burner tubes. DO NOT ENLARGE BURNER PORTS
(OPENINGS). Wash inside of cookbox with warm soapy water and a water rinse.
inside lid - While lid is warm, wipe inside with paper towel to prevent grease build-up.
Flaking built-up grease resembles paint flakes.
Stainless steel surfaces - Wash with a soft cloth and a soap and water solution. Be
careful to scrub with the grain direction of the stainless steel.
Do not use cleaners that contain acid, mineral spirits or xylene. Rinse well after
cleaning.
Preserve your stainless steel - Your grill or its cabinet, lid, and control panel may be
made from stainless steel.To keep the stainless steel looking its best is a simple matter.
Clean it with soap and water, rinse with clear water and wipe dry. For stubborn particles,
the use of a non-metallic brush can be used.
Z_ IMPORTANT: Do not use a wire brush or abrasive cleaners
on the stainless steel surfaces of your grill as this will cause
scratches.
z_ IMPORTANT: When cleaning surfaces be sure to rub/wipe
in the direction of the grain to preserve the look of your
stainless steel.
WEBER ®SPIDER/INSECT SCREENS
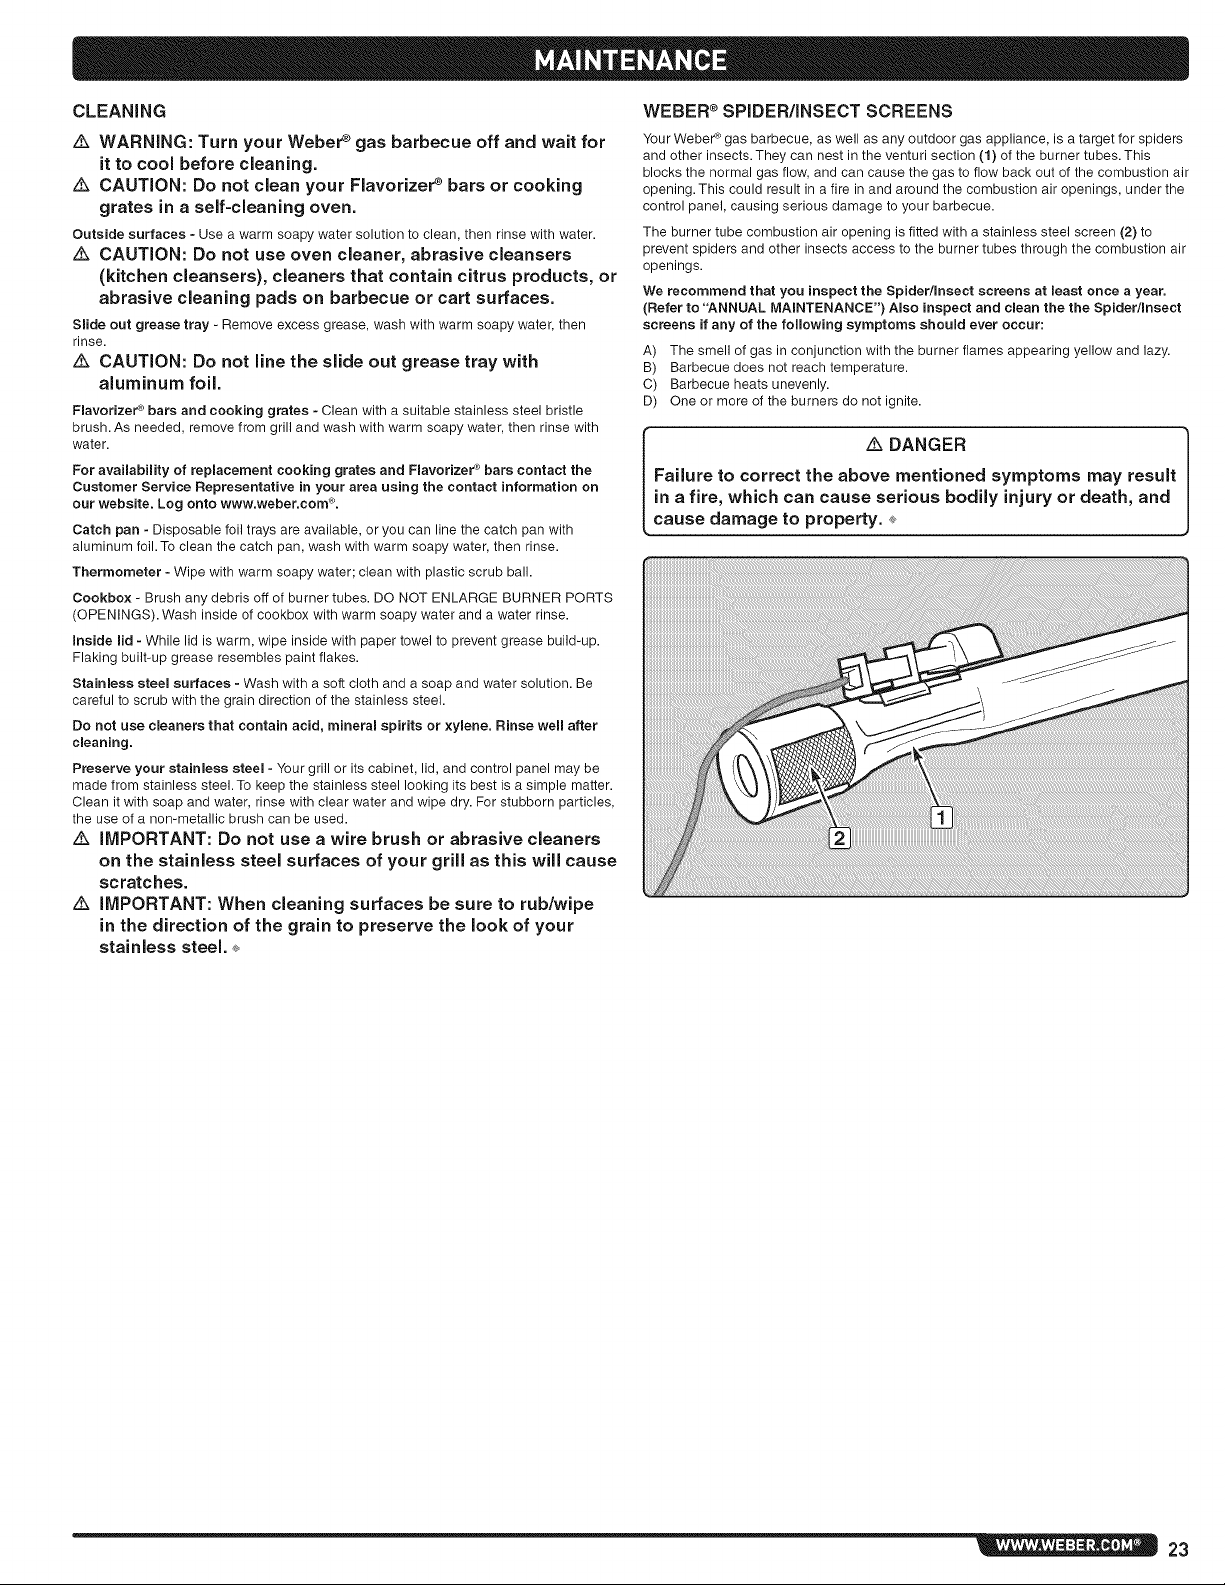
Your Weber _ gas barbecue, as well as any outdoor gas appliance, is a target for spiders
and other insects. They can nest in the venturi section (1) of the burner tubes. This
blocks the normal gas flow, and can cause the gas to flow back out of the combustion air
opening. This could result in a fire in and around the combustion air openings, under the
control panel, causing serious damage to your barbecue.
The burner tube combustion air opening is fitted with a stainless steel screen (2) to
prevent spiders and other insects access to the burner tubes through the combustion air
openings.
We recommend that you inspect the Spider/Insect screens at least once a year.
(Refer to "ANNUAL MAINTENANCE") Also inspect and clean the the Spider/Insect
screens if any of the following symptoms should ever occur:
A) The smell of gas in conjunction with the burner flames appearing yellow and lazy.
B) Barbecue does not reach temperature.
C) Barbecue heats unevenly.
D) One or more of the burners do not ignite.
DANGER
Failure to correct the above mentioned symptoms may result
in a fire, which can cause serious bodily injury or death, and
cause damage to property.
23
Page 24
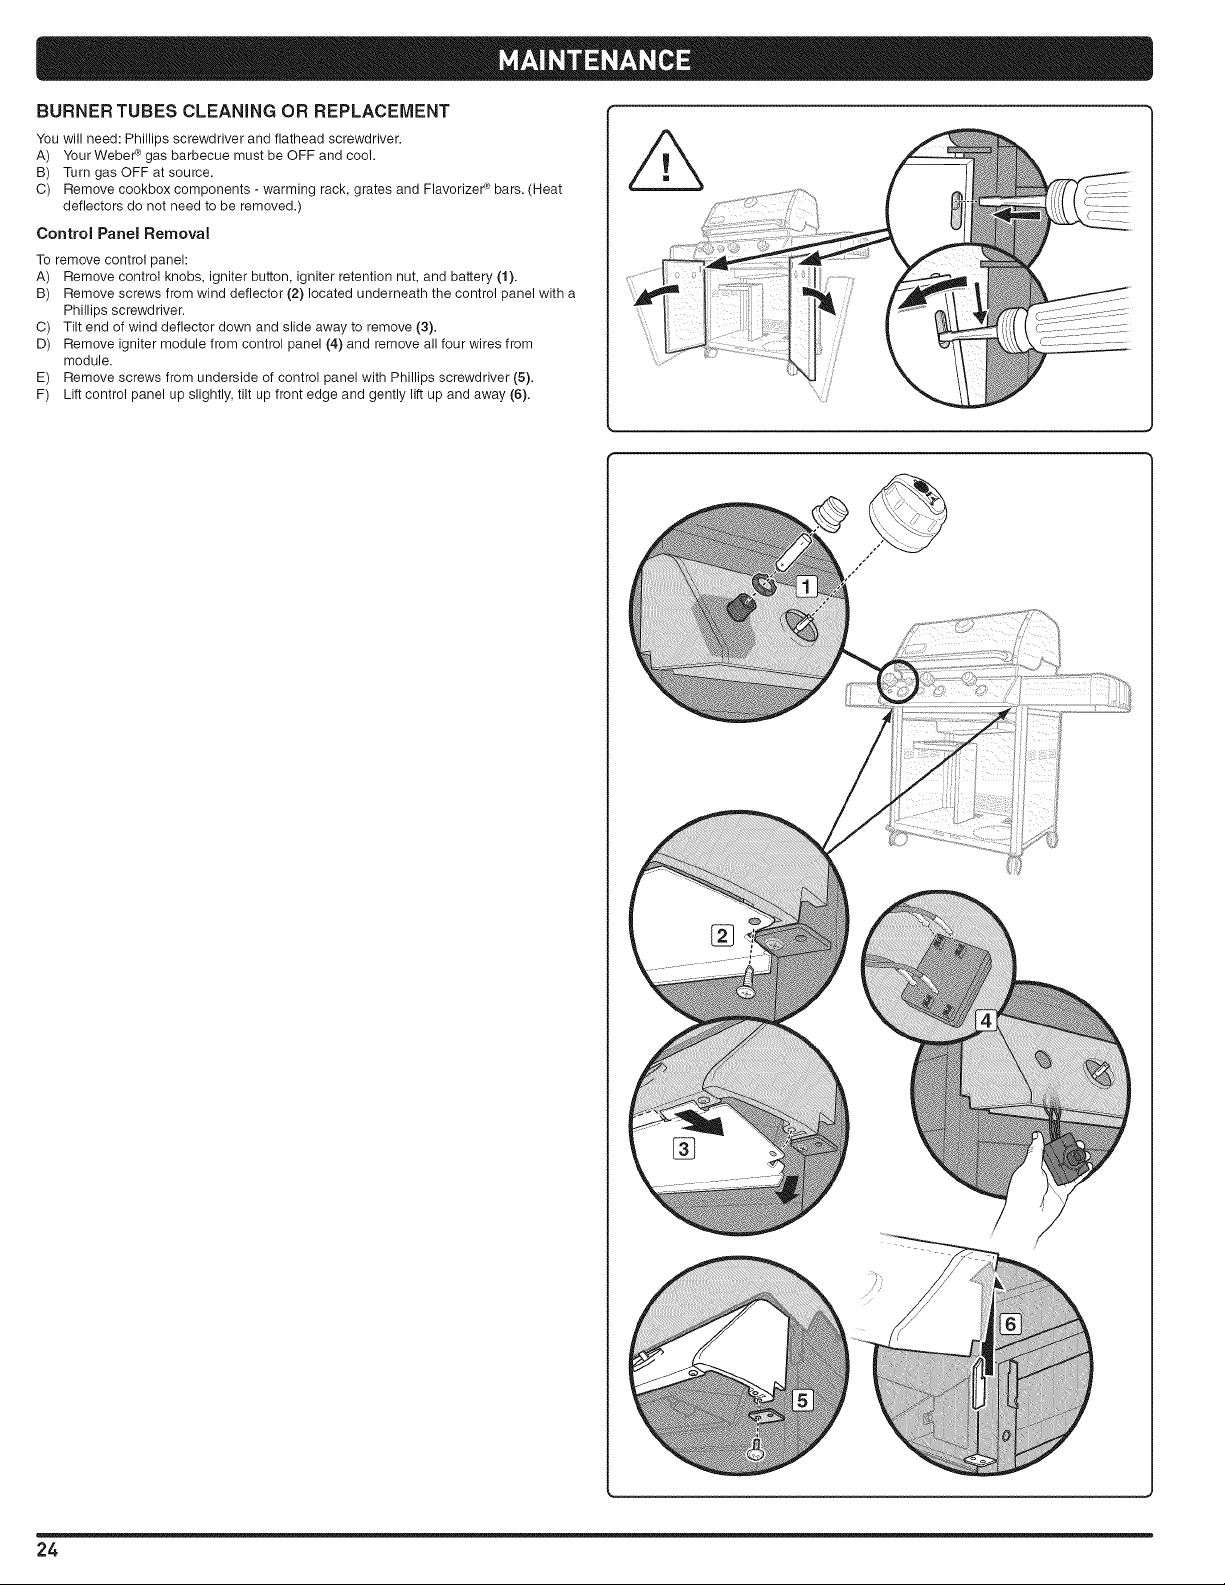
BURNER TUBES CLEANING OR REPLACEMENT
You will need: Phillips screwdriver and flathead screwdriver.
A) Your WebeP gas barbecue must be OFF and cool.
B) Turn gas OFF at source.
C) Remove cookbox components - warming rack, grates and FlavorizeP bars. (Heat
deflectors do not need to be removed.)
Control Panel Removal
To remove control panel:
A) Remove control knobs, igniter button, igniter retention nut, and battery (1).
B) Remove screws from wind deflector (2) located underneath the control panel with a
Phillips screwdriver.
C) Tilt end of wind deflector down and slide away to remove (3).
D) Remove igniter module from control panel (4) and remove all four wires from
module.
E) Remove screws from underside of control panel with Phillips screwdriver (5).
F) Lift control panel up slightly, tilt up front edge and gently lift up and away (6).
24
Page 25

Burner Tube Removal
To remove burner tube(s):
A) Remove igniter wire(s) from igniter clip(s) (7).
B) Remove screw that holds burner tube to the cookbox using a flathead screwdriver (8).
C) Pull burner tube assembly (this includes igniter) up and out of cookbox (9).
Note. 310/320 units will have an additional grounding wire attached to the center
burner tube (10).
Burner Tube Cleaning
To clean the burner tube(s):
A) Look inside each burner with a flashlight (11).
B) Clean the inside of the burners with a wire (12) (a straightened-out coat hanger will
work).
C) Check and clean the air shutter opening at the ends of the burners. Check and
clean the valve orifices at the base of the valves. Use a steel bristle brush to clean
outside of burners (13).This is to make sure all the burner ports are fully open.
z_ CAUTION: Do not enlarge the burner ports when cleaning.
Burner Tube Reinstallation
To reinstall burner tubes:
A) Slide burner tube and igniter wire through hole in cookbox (14). Refer to
"ELECTRONIC IGNITION SYSTEM OPERATIONS" for proper burner position.
B) Align burner tube with valve.
z_ CAUTION: The burner openings (15) must be positioned
properly over the valve orifices (16).
C) Re-install screw that holds the burner tube to the cookbox using a flathead
screwdriver. Burner tube may seem loose (17), when screw is snug. This is normal.
D) Route wires back through igniter clips. Refer back to figure (7).
CAUTION: All wires must be properly routed through wire
clips.
E) Attach wires to module, following the numerical/color coding (18). Refer to
"ELECTRONIC IGNITION SYSTEM OPERATIONS" for proper attachment of wires.
z_ WARNING: After reinstalling the gas lines, they should be
leak checked with a soap and water solution before using
the barbecue. (Refer to "CHECK FOR GAS LEAKS".)
z_ WARNING: Make sure that all parts are assembled and
hardware is fully tightened before operating the grill. Your
actions, if you fail to follow this Product Warning, may
cause a fire, an explosion, or structural failure resulting
in serious personal injury or death as well as damage to
property.
25
Page 26

ELECTRONIC IGNITION SYSTEM OPERATIONS
If the Electronic Ignition System fails to ignite, be sure there is gas flow by attempting to
match light your burners. Refer to "MAIN BURNER MANUAL IGNITION'_ If match lighting
is successful, the problem lies is the electronic ignition.
WARNING: All gas controls and supply valves should be in
the OFF position.
= Verify that the AA battery (alkaline only) is in good condition and installed correctly
(1). Some batteries have a plastic protective wrap around them. This plastic must be
removed. Do not confuse this plastic with the battery label.
o Make sure the ignition wires are attached to igniter module properly. Refer to the
"IGNITER MODULE WIRE GUIDE" below.
Make sure the ceramic igniter assembly is fully positioned into burner tube igniter
channel (2). If properly positioned, you will hear a snap (3).
Make sure the Electronic Ignition button is working by listening and looking for sparks
at burner.
if the Electronic Ignition System still fails to light, contact the Customer Service
Representative in your area using the contact information on our web site. Log
onto www.wsbsr.com _. ®
©
26
[]
Black (1) Left Burner (A)
Yellow (2) Right Burner (B)
Blue (3) Center Burner (C)
Green (Ground) (4) Center Burner (C)
Black (1) Left Burner (A)
Yellow (2) Right Burner (B)
Blue (3) Center Burner (C)
Green (4) Sear Burner (D)
Page 27

SIDE BURNER MAINTENANCE
WARNING: All gas controls and supply valves should be in
the OFF position.
Make sure black wire is connected between the igniter and electrode.
Make sure white wire is connected between the ignitor and grounding clip.
Spark should be a white/blue color, not yellow.
A) Igniter wire (1)
B) Ground wire (2)
C) Burner (3) ®
Side Burner Grate --
Side Burner Cap
Side Burner Ring & Head
Igniter Electrode
Control Knob
Igniter
ANNUAL MAINTENANCE
inspection And Cleaning Of The Spider/Insect Screens
Toinspectthe Spider/Insect screens, remove the control panel. If there isdust or dirt on
the screens,removethe burners for cleaningthe screens.
Brush the Spider/Insect screenslightlywith a soft bristle brush (i.e. an oldtoothbrush).
Z_ CAUTION: Do not clean the Spider/Insect screens with hard
or sharp tools. Do not dislodge the Spider/Insect screens or
enlarge the screen openings.
Lightly tap the burner to get debris anddirt out of theburner tube. Once the Spider/
Insectscreens andburners are clean, replacethe burners.
If the Spider/Insect screen becomes damaged or cannot becleaned, please contact the
Customer Service Representativein your area usingthe contact information on our web
site.Log onto www.weber.com®.
Burner Flame Pattern
The Weber ¢ gas barbecue burners have been factory set for the correct air and gas
mixture. The correct flame pattern is shown.
A) Burnertube (1)
B) Tips occasionally flicker yellow (2)
C) Light blue (3)
D) Dark blue (4)
If the flames do not appear to be uniform throughout the burner tube, follow the burner
cleaning procedures. ®
%
®
27
Page 28

ATTENTION: This product has been safety tested and is only certified for use in a specific country. Refer to country
designation located on outer carton.
These parts may be gas carrying or gas burning components. Please contact Weber-Stephen Products Co., Customer Service
Department for genuine Weber-Stephen Products Co. replacement part(s) information.
WARNING: Do not attempt to make any repair to gas carrying, gas burning, igniter components or structural
components without contacting Weber=Stephen Products Co., Customer Service Department. Your actions, if you fail to
follow this Product Warning, may cause a fire, an explosion, or structural failure resulting in serious personal injury or
death as well as damage to property.
WEBER-STEPHEN PRODUCTS CO.
www,weber, com®
@2011 Designed and engineered by Weber-Stephen Products Co.,
an Illinois corporation, located at 200 East Daniels Road, Palatine, Illinois 60067 U.S.A.
Printed in U.S.A.
Page 29

320/330
DEBE LEER ESTA GUIA DEL PROPIETARIO
ANTES DE PONER A FUNCIONAR LA
BARBACOA DE GAS.
ik PELIGRO
Si huele a gas:
1. Cierre el suministro de gas al artefacto.
2. Apague todas las flamas cerrando la
valvula general de paso.
3. Abra la tapa.
4. Llame inmediatamente a la central de
fugas o a su proveedor de gas.
Una fuga de gas puede provocar un
incendio o explosibn que puede resultar en
lesiones corporales serias o la muerte, o
da5os a la propiedad.
Z_ ADVERTENCIA
=
No almacene gasolina u otros fluidos
flamables en la cercania de su aparato.
2.
Ning_n cilindro de propano licuado que
no est_ conectado para su uso deber&
almacenarse cerca de 6ste o cualquier
otro artefacto dom6stico.
z_ ADVERTENCIA: Antes de porter a
funcionar la asador, siga cuidadosamente
todos los procedimientos en este manual
para verificar que no existan fugas. Haga
esto aun y cuando la asador haya sido
ensamblada por el distribuidor.
AVISO AL INSTALADOR:
Estas instrucciones cleben permanecer con
el propietario, quien las deber& guardar
para un futuro uso.
-ESTEARTEFACTO A GAS EST/_,
I DISENADO PARA USARSE SOLAMENTE
AL AIRE LIBRE.
artefacto sin primero leer las secciones
de ENCENDIDO DEL QUEMADOR de
_ ADVERTENCIA: No encienda este ]
este manual.
56508 LP
ESNA SPANISH NORTH AHERICA
Page 30

Z_ PELIGRO
El hacer caso omiso de los avisos de peligros, advertencias y precauciones contenidos en este Manual del Propietario pudiera
resultar en lesiones corporales serias o la muerte, o en un fuego o explosibn que cause daSos a la propiedad.
ADVERTENCIAS
z_ No aimacene un tanque de propano iicuado desconectado o
de repuesto debajo o cerca de este asador.
z_ El ensamblaje incorrecto puede set peligroso. Pot favor siga
cuidadosamente las instrucciones de ensamblaje.
z_ Tras haber estado guardada o sin uso pot aig_n tiempo,
antes de usar la barbacoa de gas Weber _ verifique que no
e×istan fugas de gas o obstrucciones en el quemador. Vea
en este manual las instrucciones para los procedimientos
correctos.
z_ No opere la barbacoa de gas Weber ®si existe una fuga de
gas.
Z_ No utilice una llama abierta para comprobar la existencia de
fugas de gas.
Z_ Nunca debe haber materiales combustibles a una distancia
menor de 24 pulgadas (60 cm) de la parte superior, inferior,
trasera o lateral de su asador de gas Weber%
z_ No coloque una funda para barbacoas ni cualquier otra
art{culo inflamable sobre o dentro del _rea de almacenaje
ubicada debajo del asador.
z_ Nunca permita que los niSos usen la barbacoa de gas
Weber ®.Algunas partes accesibles de la barbacoa pudieran
estar muy calientes. Mantenga alejados a los niSos
pequeSos mientras _sta se est_ usando.
z_ Usted debe proceder con razonable cuidado al usar su
barbacoa de gas Weber. E_staestar_ caliente al cocinarse
en ella o al limpiarla, y nunca deber_ dejarse desatendida o
moverse mientras est_ funcionando.
z_ Si Ilegasen a apagarse los quemadores, cierre todas las
v_lvulas de gas. Abra la tapa y espere cinco minutos antes
de tratar de volver a encender la barbacoa, usando las
instrucciones de encendido en este manual.
z_ No use carb6n o piedra p6mez en su barbacoa de gas
Weber ®.
z_ No se incline sobre la barbacoa abierta o coloque las manos
o dedos en el horde delantero de la caja de cocci6n.
z_ Si la grasa Ilegase a agarrar fuego, apague todos los
quemadores y mantenga la tapa cerrada hasta que se haya
apagado el fuego.
z_ AI limpiar las v_lvulas o los quemadores, no ensanche los
orificios de ias v_lvulas o ias aberturas de los quemadores.
z_ La barbacoa de gas Weber_ deber_ limpiarse a fondo
regularmente.
Z_ El propano licuado no es gas natural. El uso de gas natural
en una unidad de propano licuado o viceversa, propano
licuado en una de gas natural, es peligroso y anular_ su
garantia.
Z_ Mientras opere la barbacoa, utilice guantes resistentes al
calor.
Z_ Mantenga alejados de todas las superficie calientes a
todo cord6n el_ctrico y a la manguera de suministro de
combustible.
z_ Los subproductos de ia combusti6n producidos ai usar este
producto contienen sustancias quimicas que son conocidas
pot el Estado de la California como causantes de c_ncer,
defectos de nacimiento, u otros daSos reproductivos.
Z_ No use esta barbacoa a menos que todas sus partes
est_n colocadas en su sitio. La unidad debe ensamblarse
correctamente de acuerdo con las instrucciones de
ensamblaje.
Z_ No construya este modelo de barbacoa en ninguna
construcci6n en la que la barbacoa est_ incorporada de
manera fija o deslizable. El no acatar esta Advertencia
pudiera resultar en un fuego o una explosi6n que pudiera
causar daSos a la propiedad y heridas corporales graves o
la muerte.
Z_ Propuesta 65 Advertencia: El manipular los materiales de
lat6n en este producto Io exponen al plomo, una sustancia
quimica conocida pot ei estado de California como causante
de c_ncer, de defectos de nacimiento o de otros daSos
reproductivos.
(L_vese las manos despu_s de manipular este producto.)
UNICAMENTE UNIDADES DE GAS PROPANO LICUADO
z_ Use el regulador que se suministra con la barbacoa de gas
Weber _.
z_ No trate de desconectar el regulador de gas o ninguna
conexi6n de gas mientras est_ funcionando la barbacoa.
z_ Un cilindro de propano iicuado aboiiado u o×idado pudiera
set peligroso y deber_ set revisado pot su suplidor de
propano licuado. No utilice ning_n cilindro de propano
licuado con una v_lvula daSada.
Z_ Aunque ei ciiindro de propano iicuado pudiera aparentar
estar vacio, algo de gas pudiera a_n estar presente, pot Io
que ei cilindro deber_ transportarse y almacenarse tomando
esta posibilidad en consideraci6n.
z_ Si usted ve, huele o escucha el silbido de un escape de gas
del cilindro de propano iicuado:
1. Ap_rtese dei ciiindro de propano licuado.
2. No trate de corregir ei probiema usted mismo.
3. Llame al cuerpo de bomberos local. ÷
3O
Page 31

DIAGRAMADEDESPIECE320 .......................... 4
LISTA DEL DIAGRAMA DE DESPIECE 320 ................. 5
DIAGRAMA DE DESPIECE330 .......................... 6
LISTA DEL DIAGRAMA DE DESPIECE 330 ................. 7
ADVERTENCIAS ..................................... 30
TABLADE CONTENIDO ............................... 31
OARANTiA......................................... 32
INSTRLICCIONES GENERALES ........................ 33
PARA COMPRAS HECHOS EN MEXICO .............................. 33
INSTALACI6N CANADIENSE ....................................... 33
OPERACION DE LA BARBACOA .................................... 33
ALMACENAJE Y/O SIN USO ........................................ 33
INSTRUCCIONES SOBRE ELGAS ...................... 34
SUGERENCIAS PARA EL MANEJO SEGURO DE
LOS CILINDROS DE GAS PROPANO LICUADO ........................ 34
INFORMACION IMPORTANTE SOBRE EL CILINDRO DE
PROPANO LICUADO .............................................. 35
PREPARATIVOS PARA LA BUSQUEDA DE FUGAS ..................... 35
DETECCION DE FUGAS DE GAS ................................... 37
COMO RECARGAR EL CILINDRO DE PROPANO LICUADO .............. 38
CONSEJOS PRACTICOS PARA ASAR .................... 43
PRECALENTADO ................................................ 43
COCCION CUBIERTA ............................................. 43
PRINGUES Y GRASA ............................................. 43
EL SISTEMA FLAVORIZER ®........................................ 43
ESTACION DE DORADO SEAR STATION ®............................. 43
ENCENDIDO Y US0 DEL QUENADOR LATERAL........... 44
ENCENDIDO DEL QUEMADOR LATERAL ............................. 44
PARA APAGAR ................................................... 44
ENCENDIDO MANUAL DEL QUEMADOR LATERAL ..................... 45
PARA APAGAR ................................................... 45
RESOLUCION DE PROBLENAS ........................ 46
RESOLUCl0N DE PROBLEFtAS CON
ELOUENADOR LATERAL ............................. 4'7
MANTENIMIENT0 ................................... 4'7
LIMPIEZA ....................................................... 47
MALLAS WEBER ® CONTRA ARAI_AS E INSECTOS ..................... 47
LIMPIEZA O REEMPLAZO DE LOS TUBOS QUEMADORES .............. 48
OPERACIONES DEL SISTEMA DE ENCENDIDO ELECTRONICO .......... 50
MANTENIMIENTO DEL QUEMADOR LATERAL ......................... 51
MANTENIMIENTO ANUAL .......................................... 51
ANTES DE UTILIZAR LA BARBAC0A .................... 39
NIVEL DE COMBUSTIBLE ......................................... 39
BANDEJA CORREDIZA RECOLECTORA DE
GRASA Y BANDEJA DESECHABLE DE GOTEO ........................ 39
INSPECCION DEL ENCENDEDOR ELECTRONICO ..................... 39
INSPECCION DE LA MANGUERA ................................... 39
ENCENDIDO Y USODEL OUEMADOR PRINCIPAL ......... 40
ENCENDIDO DEL QUEMADOR PRINCIPAL ........................... 40
PARA APAGAR ................................................... 40
ENCENDIDO MANUAL DEL QUEMADOR PRINCIPAL ................... 41
PARA APAGAR ................................................... 41
ENCENDIDO Y US0 DE LA ESTACION DE
DORADO "SEAR STATION®'°{MODELO 330) .............. 42
ENCENDIDO DEL QUEMADOR DE LA ESTACION DE
DORADO "SEAR STATION ®''. ....................................... 42
ENCENDIDO MANUAL DEL QUEMADOR DE LA ESTACION DE
DORADO"SEAR STATION ®'' . ....................................... 42
COMO USAR LA ESTACION DE DORADO "SEAR STATION ®'' . ............ 42
31
Page 32

Weber-Stephen Products Co., (Weber) mediante la presente le garantiza al COMPRADOR ORIGINAL
de esta barbacoa de gas Weber _ qua la misma estara libra de defectos en cuanto a materiales y
fabricacion a paC(ir de la fecha de compra segL_n Io siguiente:
Piezas coladas de aluminio:
Cubierta de acero inoxidable:
Tubos de acero inoxidab[e de los quemadores:
Parrilas de cocci6n de acero inoxidab[e:
Barras Flavorize¢ _ de acero inoxidable:
Pardllas de cocciOn de hierro colado porcelanizado:
Qumeador infrarrojo del asador giratorio:
cuando se ensambla y opera de acuerdo alas instrucciones impresas que la acompa_an.
Weber pudiese requerir prueba razonable de la fecha de compra. POR LO TANTO, DEBER_,
GUARDAR SU RECIBO O FACTURA DE VENTA.
Esta garantia limitada esta limitada a la reparacion o reemplazo de piezas que resultasen defectuosas
bajo uso y servicio normal y las cuales al examinarse indiquen, a plena satisfaccion de Weber, que
efectivamente son piezas defectuosas. Antes de devolver cualquier parte, contacte al Representante
de Atencion al Cliente en su area, cuya informacion de contacto la encontrar_, en nuestro sitio web. Si
Weber confirma el defecto y aprueba el reclamo, esta elegir_, reparar o reemplazar tal pieza sin cargo
alguno. Si usted tiene que retornarnos las paC(es defectuosas, los gastos de transpoC(e deben ser
prepagados. Weber retornara las paC(es al comprador con transpoC(e o franqueo prepagado.
Cubierta porcelanizada:
Parril[as de cocciOn porcenlanizadas:
Barras F[avorizeff _ porcelanizadas:
Todas [a demas partes:
25=afros (2 afios para la pintura excluyendo la decoloraci6n)
25=afros
25=afios
10=afios
5=afios sin pertoraciOn pot fuego u oxidaciOn
5=afios sin pertoraciOn pot fuego u oxidaciOn
5=afios sin pertoraciOn pot fuego u oxidaciOn
3=afios sin pertoraciOn pot fuego u oxidaciOn
2-afios sin perloraciOn pot fuego u oxidaciOn
2-afios
2=afios
Esta Garantia Limitada no cubre ninguna falla o problema de operacion a causa de accidentes,
abuso, mal uso, alteracion, uso en aplicaciones indebidas, vandalismo, instalacion inapropiada o
mantenimiento o servicio inapropiados, o por no Ilevar a cabo el mantenimiento normal y rutinario,
entre los que se incluyen, pero sin limitacion, los da_os causados por insectos dentro de los tubos
quemadores, segL_n se detalla en este manual del propietario.
Esta Garantia Limitada no cubre el deterioro o dafios a causa de condiciones de tiempo inclemente
tales como granizo, huracanes, terremotos o tornados ni tampoco la decoloracion por exposicion a
sustancias quimicas bien sea por contacto directo o por que las mismas contenidas en la atmosfera.
No existe ninguna otra garantia expresa que no sean las las ac_. indicadas y cualesquier garantias
implicitas de comerciabilidad y aptitud de uso estan limitadas en duracion al tiempo de cobeC(ura de
esta expresa Garantia Limitada por escrito. Algunas regiones no permiten limitacion alguna en el
tiempo que una garantia implicita pueda durar, por Io que esta limitacion pudiera no aplicarle a usted.
Weber no se hace responsable de cualesquier dafios especiales, indirectos o emergentes. Algunas
regiones no permiten la exclusion o limitacion de da_os incidentales o emergentes, por Io que esta
limitacion o exclusion pudieran no aplicarle a usted.
Weber no autoriza a persona o empresa alguna aasumir en su nombre ninguna obligacion o
responsabilidad en relacion con la venta, instalacion, use, retiro, devolucion o reemplazo de sus
equipos, y ninguna tal representacion sera vinculante para Weber.
Esta Garantia aplica solo aaquellos productos vendidos al por menor.
WEBER-STEPHEN PRODUCTS CO.
Customer Service Center
1890 RoseHe Road, Suite 388
Schaumbarg, IL 60195
USA
Para partee de repuesto Ilame a:
1-800-446-1071
www.weber.eom ¢
Para compras hechas en Mexico
WEBER-STEPHEN PRODUCTS S.A. de C.V.
MarceHa No. 338,
Colonia Americana
44160 M_xieo, C.P.
M_xieo
Para partee de repuesto ilame a:
(52) (33) 3615-0736
www.weber.com _
Visite www.weber.com , aeleccione aa paia de origen y registre aa barbacoa boy. ®
®
32
Page 33

La barbacoa de gas Weber _ es un aparato transportable para cocinar al aire libre. Con
la barbacoa de gas Weber _ usted puede asar a la parilla, a la barbacoa, al homo y
hornear con unos resultados que son diffciles de duplicar con los aparatos de cocina
de casa. La tapa cerrada y las barras Flavorizer _ le dan a los alimentos ese sabor a
"aire libre'_
La barbacoa de gas Weber ¢ es portAtil por Io que usted puede reubicarla fAcilmente de
sitio en su jardin o patio. La portabilidad significa que, si usted se muda, se puede Ilevar
su barbacoa de gas Webei _ consigo.
El suministro de gas propano licuado es facil de usar y le da mas control al cocinar que
el carb6n.
o Estas instrucciones le indicaran los requisitos mfnimos para ensamblar la barbacoa
de gas Weber _. Por favor lea cuidadosamente las instrucciones antes de utilizar la
barbacoa de gas Weber _. Un ensamblaje incorrecto puede set peligroso.
No debe ser usada por ni_os.
Si hubiese c6digos locales que aplicasen para las barbacoas de gas porta.til, usted
debera, acatarlas. La instalaci6n debe cumplir con los c6digos locales o, en ausencia
de estos, bien sea con el "C6digo nacional de gas combustible',' ANSI Z223.1/NFPA
54, el "C6digo de instalaciones de gas natural y propane',' CSA B149.1, o el "C6digo
de manipulaci6n y almacenaje de propano'i B149.2, o la "Norma para vehfculos
recreativos'i ANSI A 119.2/NFPA 1192, y CSA Z240 RV Series, "C6digo para
vehfculos recreativos'i segOn corresponda.
Debe usarse el regulador de presi6n suministrado con la barbacoa de gas Weber _
Este regulador esta ajustado para una presi6n de 11 pulgadas de columna de agua.
Esta barbacoa de gas Webe_ est,. disefiada para ser usada solamente con gas
propano licuado (LP). No la use con gas natural (suministrado a traves de tuberias
en las ciudades). Las valvulas, los orificios, la manguera y regulador son solamente
aptos para gas propano licuado.
No la use con carb6n.
AsegOrese de que el Area debajo del panel de control y de la bandeja corrediza para
la grasa no tengan desechos que pudiesen obstruir el flujo de aire de combusti6n o
de ventilaci6n.
Las Areas alrededor del cilindro de gas de propano licuado deben estar libres y sin
acumulaci6n de desperdicios.
Los reguladores de presi6n y ensambles de manguera de reemplazo deben set los
especificados per Weber-Stephen Products Co.
PARA COMPRAS HECHAS EN IVII_X[CO
Si hubiese c6digos locales que se aplicasen a los asadores de gas portatiles, usted
deberb, cumplir con lamas reciente edici6n de NOM. ®
INSTALACION CANADIENSE
Esta instrucciones, aunque de manera general son aceptables, no necesariamente
cumplen con los c6digos de instalaci6n canadienses, en particular en Io que respecta
a a tuberfas bajo y sobre tierra. En CanadA, la instalaci6n de este artefacto debe
cumplir con los c6digos locales y/o la Norma CSA-B149.2 ("C6digo de manipulaci6n y
almacenaje de propane").
OPERACION DE LA BARBAOOA
z_ ADVERTENCIA: S61o use esta barbacoa a[ aire [ibre en
un _rea bien venti[ada. No [a use en un garaje, edificio,
pasadizo techado o en cuaiquier otra _rea cerrada.
z_ ADVERTENC[A: Mantenga [as aberturas de venti[aci6n de [a
caja del ci[indro [ibres de obstrucciones y limpias.
z_ ADVERTENClA: La barbacoa de gas Weber _ no deber_
usarse debajo de un techo combustible.
z_ ADVERTENClA: La barbacoa de gas Weber _ no ha sido
diseffada para instalarse en o sobre vehiculos y/o botes
recreativos.
ADVERTENCIA: No utilice la barbacoa a menos de 24
puigadas (61 cm) de distancia de materiaies combustibles.
z_ ADVERTENCIA: La caja de cocci6n entera se caiienta al
usarse. No la deje desatendida.
ADVERTENC[A: IVlantenga a cualquier cord6n el_ctrico
y a la manguera de suministro de gas aiejados de toda
superficie ca[iente.
z_ ADVERTENCIA: IVlantenga el _rea de cocinar [ibre de
vapores y [iquidos inf[amab[es tales como gaso[ina, alcohol,
etc. y de materiales combustibles.
z_ ADVERTENCIA: Nunca a[macene cilindros de propano
[icuado extra (de repuesto) debajo o cerca de [a barbacoa de
gas Weber _.
ADVERTENClA: El ci[indro de propano [icuado usado con
[a barbacoa debe contar con un "Dispositivo de prevenci6n
de sobrel[enado" (OPD, pot sus sig[as en ingles) y una
conexi6n QCC1 o tipo 1 (CGA810). La conexi6n del cilindro
debe set compatible con [a de [a barbacoa. ÷
ALMACENAJE Y/O SIN USO
La valvula de gas en el cilindro de propano licuado debe mantenerse cerrada
mientras la barbacoa de gas Weber _ este sin usarse.
Cuando la barbacoa de gas Weber _ este almacenada bajo techo, el suministro de
gas debe DESCONECTARSE y el tanque de propano licuado debe guardarse al aire
libre en un espacio bien ventilado.
El cilindro de propano licuado debe guardarse al aire libre en un Area bien ventilada
fuera del alcance de los nffios. El cilindro desconectado de propano licuado no debe
almacenarse dentro de ninguna edificaci6n, garaje o Area cerrada.
Cuando el cilindro de propano licuado no este desconectado de la barbacoa de gas
Weber _, el artefacto junto con el tanque de propano licuado deberb.n mantenerse al
aire libre en un espacio bien ventilado.
La barbacoa de gas Weber ¢ debe revisarse antes de usarse para verificar de que no
tenga fugas de gas ni obstrucciones en los tubos de los quemadores. (Consulte la
secci6n "MANTENIMIENTO/MANTENIMIENTO ANUAI ").
Asegurese de que el Area debajo del panel de control y la bandeja inferior no tengan
desechos que pudiesen obstruir el flujo de aire de combusti6n o de ventilaci6n.
Tambien debera revisarse que la malla contra ara_as e insectos no este obstruida.
(Consulte la secci6n "MANTENIMIENTO/MANTENIMIENTO ANUAL").
33
Page 34

SUGERENClAS PARA EL MANEJO SEGURO DE LOS
ClLINDROS DE GAS PROPANO LICUADO
, El gas propane licuado es un producto petrolero al igual que Io son la gasolina y el
gas natural. El propano es un gas a temperaturas y presiones normales. Bajo presi6n
moderada, dentro de un cilindro, el gas propano es un Ifquido. En la medida en que
se libera la presi6n, el Ifquido se evapora f_.cilmente y se convierte en gas.
, El gas propano tiene un olor similar al gas natural. Usted debera estar al tanto de
este olor.
El gas propano es mb.s pesado que el aire. El gas propano proveniente de una fuga
puede acumularse en Areas bajas y prevenir su dispersi6n.
Para Ilenar un cilindro de gas propano, Ilevelo a un expendedor de gas propano, o
busque a otros suplidores bajo "gas propano" en el directorio telef6nico.
ADVERTENCIA: Recomendamos Ilenar su cilindro de
gas propano licuado con un distribuidor de gas propano
autorizado que tenga un encargado debidamente calificado
y que Ilene el tanque en base a peso. EL LLENADO
INCORRECTO ES PELIGROSO.
, Antes de su Ilenado inicial, el aire debe set retirado de todo cilindro nuevo de
propano licuado. Los distribuidores de propane licuado estAn equipados para hacerlo.
, El cilindro de propano licuado debe instalarse, transportarse y almacenarse en
una posici6n parada. Los cilindros de propano licuado no deben dejarse caer o
manipularse de manera brusca.
, Nunca almacene o transporte los cilindros de propano licuado en sitios donde la
temperatura alcance los 125 ° F (52 ° C) (demasiado caliente para sostenerlo con la
mane - pot ejemplo: no deje un cilindro de gas propano dentro de un carro en un dfa
caluroso).
Nota: una recarga durar_ alrededor de 18-20 horas de tiempo de coccidn bajo
uso normal. La escala de combustible, una caracterfstica de algunas de nuestras
barbacoas, indlcar# el sumlnlstro de propano de manera que usted puede recargar
antes de agotarse el mlsmo. No neceslta agotar el tanque antes de rellenarlo.
, Trate a los cilindros de propano licuado "vacfos" con el mismo cuidado que cuando
estan Ilenos. Aun cuando el tanque de gas propano no contenga Ifquido todavfa
puede haber presi6n del gas en el cilindro. Siempre cierre la valvula del cilindro antes
de desconectarlo.
z_ PRECAUCION: Siempre que el cilindro est_ sin usarse,
coloque la capucha antipolvo sobre el la salida de la v_lvula
del mismo. Solo instale sobre la salida de la valvula el tipo
de capucha antipolvo con la que vino provista la misma.
Otros tipos de capuchas o tapones pudieran causar fugas
de propano.
, No use ningQn cilindro de propane licuado dahado. Cilindros de propane
licuado abollados u oxidados o con la valvula dahada son peligrosos y deberan
reemplazarse por uno nuevo inmediatamente.
, Cada vez que se reconecte un cilindro de propane licuado, se debe revisar que la
uni6n per donde se conecta la manguera al cilindro no presente fugas. Pot ejemplo,
haga la prueba cada vez que se Ilena el cilindro de propane licuado.
, AsegQrese de que el regulador este montado con el peque_o agujero respiradero
viendo hacia abajo de manera que no se acumule agua en 61.Este respiradero debe
mantenerse libre de sucio, grasa, insectos, etc.
, Las conexiones de gas suministradas con la barbacoa de gas WebeP _han sido
dise_adas para cumplir en un 100% con los requisitos de las normas CSA y ANSI.
ADVERTENCIA: Lo tanques de propano licuado de
reemplazo deben tenet conexiones compatibles con la del
regulador suministrado con esta barbacoa.
Requisitos de los cilindros de propano licuado
, AsegQrese de que los cilindros tengan una certificaci6n del D.O.T. (Departamento de
Transporte) (1), y que la fecha en que fueron probados (2) no sea de mas de cinco
ahos atr&s. Su proveedor de propano licuado puede hacerlo por usted.
= Todos los sistemas de tanques de suministro de propano licuado deben incluir un
collar que proteja la valvula del cilindro.
= El cilindro de gas debe tener un tamaho aproximado de 20 lb. (18_A pulgadas de alto,
12_Apulgadas de diametro).
= Los cilindros deben construirse y marcarse de acuerdo con las "Especificaciones
para cilindros de gas propano licuado" del Departamento de Transporte (D.O.T.) de
los EE.UU. o la Norma Nacional Canadiense "CAN/CSA-B339, Cilindros, esferas y
tubos" o "Transporte de bienes peligrosos"; y Comisi6n, segun aplique.
Requisitos canadienses sobre los cilindros de propano licuado
Nota: Su proveedor de venta al por menor puede ayudarle a buscar un tanque de
reemplazo para su barbacoa.
El cilindro de propano licuado debe estar construido y marcado de acuerdo con las
especificaciones para cilindros de gas propano licuado, T.C. ®
34
Page 35

INFORMACION IMPORTANTE SOBRE EL ClLINDRO DE
PROPANO LICUADO
PELIGRO
NUNCA almacene un cilindro de gas propano licuado de
resetva debajo o cerca de esta barbacoa. NUNCA Ilene el
tanque m_s all_ de un 80% Ileno. El no acatar estrictamente
estos avisos de PELIGRO pudiera resultar en un fuego letal
o causar lesiones serias.
Su barbacoa de gas Weber ¢esta equipada para usarse con un sistema de suministro
desde cilindros disdiado para el retiro del vapor.
z_ ADVERTENCIA: Solamente use esta barbacoa en un _rea
bien ventilada al aire libre. No la use en un garaje, edificio,
pasadizo techado o en cualquier otra _rea terraria.
Las maneras correctas para Ilenar su cilindro son por peso o por volumen, seg0n se
describe en la norma NFPA-58. Por favor asegurese de que su estaci6n de Ilenado Ilene
su cilindro de gas propano licuado midiendo el peso o el volumen. P[dale al personal de
la estaci6n de Ilenado que lean las instrucciones sobre c6mo purgar y Ilenar el cilindro
de gas propano licuado antes de tratar de Ilenarlo. ®
PREPARATIVOS PARA LA BUSQUEDA DE FUGAS
Verifique que todas las v_lvulas de los quemadores est_n cerradas
Las valvulas son despachadas de fabrica en la posici6n cerradas, pero usted
debe verificarlo para asegurarse de que efectivamente esten cerradas. Verifiquelo
presionandolas hacia abajo y girandolas hacia la derecha. Si no giran, estan cerradas.
Si sf girasen, continL_e girandolas hacia la derecha hasta que paren; allf estaran
cerradas.
El cilindro de propano licuado
Todos losreguladores de las barbacoas Weber¢de gas propano licuado est&n
equipados con una conexi6n detanque certificada pot los laboratorios UL de acuerdo a
lamas recienteedici6n de la norma ANSI Z21.58. EIIorequerir&un tanque de propano
licuado que este igualmente equipadocon una conexi6nTipo 1en la valvula del tanque
Esteacoplamiento Tipo 1 permite realizar un conexi6n rapiday totalmente segura entre
la barbacoa de gas y el tanque de propano licuado.El mismo elimina laposibilidad de
fugas debido a una conexi6n POL que noeste debidamente apretada. El gas nofluira
del tanque a menosque elacoplamientoTipo 1 estecompletamente embebido dentro
del acoplamiento.
ADVERTENCIA: Aseg_rese de que la v_lvula del cilindro
de propano licuado est_ cerrada. Ci_rrela gir_ndola en la
direcciSn de las manecillas del reloj.
1 Vb.lvula tipo 1
2 Volante de mano
3 Rosca externa
4 Tuerca termosensible
5 Regulador de propano
PELIGRO
No utilice una llama abierta para comprobar si existen fugas
de gas. Aseg_rese de que no haya chispas o llamas abiertas
en el _rea mientras comprueba si existen fugas. Chispas o
llamas causar_n un fuego o explosi6n, las cuales pueden
causar serias lesiones corporales o la muerte, y daSos a la
propiedad.
35
Page 36

A) Abra las puertas del gabinete base. Saque el regulador y la manguera fuera del
gabinete (1).
B) Ubique el clip de retenci6n de la manguera (2) en la manguera del regulador. Fijelo
a la ranura en la parte de abajo de la escala del tanque (3).
z_ ADVERTENCIA: La manguera debe fijarse a la escala del
tanque con el clip de retenci6n de la manguera. El no
hacerlo podria causar da_os a la rnanguera clue podrian
resultar en un fuego o explosi6n, que pueden causar
lesiones corporales o la rnuerte y da_os a la propiedad.
Aigunos tanques de propano licuado tienen collarines superiores con ensambles
diferentes. (El collarfn superior es el aro protector de metal alrededor de la valvula.) Una
serie de tanques se ensamblan con la v_.lvula hacia adelante (4). Los dem_,s tanques
se ensamblan con la vb.lvula viendo en direcci6n contraria a la escala de combustible
(5). Weber recomienda el uso de cilindros fabricados por Manchester y Worthington,
con una capacidad para 47,6 Ibs. de agua. Otros cilindros pudieran set aceptables para
utilizarse con la aplicaci6n siempre que sean compatibles con los medios de retenci6n
del artefacto (vea las ilustraciones).
El cilindro de propano licuado se instala dentro del gabinete base, sobre la escala del
tanque (lado derecho).
C) Afloje la tuerca de orejas del seguro del cilindro. Gire el seguro del cilindro hacia
arriba (6).
D) Gire el cilindro de propano licuado de manera que la abertura de la vb.lvula este
viendo hacia la parte frontal o lateral de la barbacoa de gas Weber ¢.
E) Levante el tanque y col6quelo en posici6n sobre la bascula del tanque (7).
F) Gire el seguro del cilindro hacia abajo. Apriete la tuerca de orejas.
Conecte la manguera al cilindro
A) Retire la cubierta antipolvo de plastico de la vb.lvula.
B) Enrosque el acoplamiento del regulador a la vb.lvula del tanque, en el sentido de las
agujas del reloj o hacia la derecha (8). Apriete s61o a mano.
Nota: Esta conexidn se aprieta hacia la derecha y no permitir# que el gas fluya a
menos que la conexidn est_ apretada. La conexidn sdlo requiere apretarse a mano.
z_ ADVERTENCIA: No use una llave para apretar la conexi6n.
Si usase una llave, podria da_ar el acoplamiento del
regulador y causar una fuga.
_'_i!;i!iiiiiiiiiiil;!;¸
_iiiiiiii;i!i!ilill
36
Page 37

Retire las perillas de control y el panel de control para las pruebas de
detecci6n de fugas
Usted necesitara: Un destomillador Phillips.
A) Retire las perillas de control, el bot6n de encendido, la tuerca de retenci6n y la
baterfa (1).
B) Saque los tomillos del deflector de viento con un destomillador Phillips (2).
C) Incline el extremo del deflector de viento hacia abajo y deslfcelo en direcci6n
contraria a usted para sacarlo (3).
D) Permita que el modulo de encendido cuelgue de los cables No Io desconecte (4).
E) Saque los tornillos de la parte inferior del panel de control con un destornillador
Phillips (5).
F) Levante ligeramente el panel de control, incline el borde delantero hacia arriba y
levb.ntelo con cuidado (6).
G) AI terminar las pruebas de detecci6n de fugas, vuelva a colocar el panel de control
y el deflector de viento en su lugar. ®
DETECCION DE FUGAS DE GAS
PELIGRO
No utilice una llama abierta para comprobar si existen fugas
de gas. Aseg_rese de que no haya chispas o llamas abiertas
en el _rea mientras comprueba si existen fugas. Chispas o
llamas causar_n un fuego o explosi6n, las cuales pueden
causar graves lesiones corporales o la muerte, y daSos
materiales.
Nota: Todas las conexiones hechas en la f_brica han sido revisadas a rondo para
asegurar que no existan fugas. Los quemadores han sido probados con las llamas
encendidas. Como medida de precaucidn, sin embargo, usted deber_ de volver a
revisar todas las conexiones en busca de fugas antes de utilizar su barbacoa de gas
Weber'. Durante el manejo y despacho puede haberse aflojado o dahado alguna
conexidn de gas.
z_ ADVERTENCIA: Las conexiones de gas de su barbacoa de
gas hart sido probadas en la f_brica. Le recomendamos que
inspeccione todas las conexiones de gas antes de operar la
barbacoa de gas.
z_ ADVERTENClA: Lleve a cabo estos chequeos de fugas
aun y cuando su barbacoa haya sido ensamblada pot el
distribuidor o en la tienda donde la compr6.
Si la barbacoa cuenta con un quemador lateral asegL_rese de que este este apagado.
Abra el suministro de gas en la fuente del mismo.
ADVERTENCIA: No encienda los quemadores mientras est_
verificando la existencia de fugas.
Usted necesitara: una soluci6n de agua y jab6n y un trapo o una brocha para aplicarla.
A) Mezcle agua yjab6n.
B) Abra el suministro de gas (1).
C) Compruebe la existencia de fugas mojando las conexiones con la soluci6n de agua
y jab6n y viendo si se generan burbujas. Si se forman burbujas, o si una burbuja
crece, es que hay una fuga.
Si hay una fuga, cierre el gas y apriete la conexi6n. Abra el gas de nuevo y con
la soluci6n de jab6n y agua vuelva a verificar que no existan fugas. Si la fuga no
cesa no utilice la barbacoa. Contacte al Representante de Servicioe al Cliente en
su &tea utilizando la informaci6n de contacto en nuestro eitio web. Con_ctese a
www.weber.com ®.
D) Cuando se haya completado la comprobaci6n de las fugas de gas, cierre el
suministro de gas en la fuente y lave las conexiones con agua.
Nota: Dado que algunas soluciones para la deteccidn de fugas, incluyendo el agua y
jabdn, pueden ser Iigeramente corrosivas, todas las conexiones deber_n enjuagarse
con agua despu_s de realizar la comprobacidn de las fugas.
z_ ADVERTENCIA: Carla vez que conecte o desconecte una
conexi6n de gas, deber_ verificar que no hayan fugas de gas.
37
Page 38

Verifique
A) Laconexi6n de lamanguera del reguladoral tabique divisorio (1).
B) Laconexi6n de laIfnea de gas principal altabique divisorio (2).
C) La conexi6n de la Ifnea de gas principal almultiple (3).
D) La conexi6n de la Ifnea de gas del quemador lateral al multiple (4).
E) Laconexi6n de latuberfa del quemador laterala la copa del quemador lateral(5).
F) La conexi6n de la tuberfa del quemador lateralalas conexiones de la valvula del
quemador lateral (6).
ADVERTENCIA: Si hubiese una fuga en una cone×i6n (1,
2, 3, 4, 5 o 6), vuelva a apretar la eonexi6n con una liave y
con Ja soJuci6n de agua y jab6n vuelva a verificar que no
hayan fugas de gas. Si una fuga persiste a_n despu_s de
volver a apretar la cone×i6n, CJERRE el gas. NO OPERE
LA BARBACOA. Contacte al Representante de Servicios al
Cliente en su _rea utiiizando la informaci6n de contacto en
nuestro sitio web. Con6ctese a www.webet.com ®.
G) La conexi6n de la desconexi6n rapida del quemador lateral (7).
H) La conexi6n de la manguera del regulador al cilindro (8).
I) La conexi6n de la manguera del regulador al regulador (9).
J) Las conexiones de las valvulas al mQltiple (10).
z_ ADVERTENCIA: Si hubiese una fuga en las conexiones
(7, 8, 9 o 10), CIERRE el gas. NO OPERE LA BARBACOA.
Contacte al Representante de Servicios al Ciiente en su _rea
utiJizando la informaci6n de contacto en nuestto sitio web.
Con6ctese a www.webet.com ®.
Cuando se hayan completado las revisiones para detectar fugas de gas, CIERRE el
suministro de gas y enjuague las conexiones con agua.
Reinstale eJ panel de control
Necesitara: un destornillador Phillips
A) Posicione el borde superior del panel de control sobre las pesta_as del bastidor.
Empuje hacia abajo para que encaje su sitio.
B) Reinstale el m6dulo de encendido.
C) Deslice las dos pestahas mas cortas del deflector de viento hacia el borde interno
del panel de control mientras desliza la pesta_a mas larga sobre el borde externo.
Como referencia, ubique las ilustraciones previas.
E) Alinee los tornillos con los orificios de los tornillos tanto en el soporte del panel de
control como en el bastidor.
F) Apriete los tornillos.
G) Coloque las perillas de control correspondientes sobre los vastagos de las
valvulas.
COIVIO RECARGAR EL ClLINDRO DE PROPANO LICUADO
Le recomendamos que Ilene su cilindro de gas propano licuado antes de que este se
vacfe por complete.
C6mo retirar el cilindro de gas propane licuado.
A) Cierre la valvula del tanque (gire en el sentido de las agujas del reloj) (1).
B) Desenrosque el cople del regulador girandolo, solamente a mano, en sentido
contrario a las agujas del reloj (2).
C) Afloje la tuerca de mariposa del seguro del cilindro y y voltee el seguro hacia arriba
para que no moleste (3).
D) Levante el cilindro del soporte.
Para Ilenar un cilindro de gas propano, Ilevelo a un expendedor de gas propano, o
busque a otros suplidores bajo "gas propano" en el directorio telef6nico.
ADVERTENCIA: Recomendamos Ilenar su ciJindro de
gas propano licuado con un distribuidor de gas propano
autorizado que tonga un encargado debidamente calificado
y que IJene el tanque en base a peso. EL LLENADO
INCORRECTO ES PELIGROSO.
z_ PRECAUCJON: Siempte que el ciJindro est_ sin usarse,
coloque la capucha antipolvo sobre el la salida de la v_lvula
del mismo. S61o instaJe sobre la salida de la v_Jvula el tipo
de capucha antipolvo con Jaque vino provista Ja misma.
Otros tipos de capuchas o tapones pudieran causar fugas
de propano.
38
La barbacoa
ilustrada puede
toner ligeras
diferencias con
respecto al modelo
comprado.
Page 39

NIVEL DE COMBUSTIBLE
Verifique el nivel de combustible viendo la Ifnea de color indicadora del nivel, ubicada al
lado de la escala del tanque.
A) Vacfo (1)
B) Medio (2)
C) Lleno (3) ®
BANDEJA CORREDIZA RECOLECTORA DE GRASAY BANDEJA
DESECHABLE DE GOTEO
La barbacoa Ileva incorporada un sistema de captaci6n de grasa. Cada vez que vaya
utilizar la barbacoa, revise la bandeja corrediza recolectora de grasa y la bandeja
desechable de goteo para cerciorarse de que no se haya acumulado grasa en las
mismas.
Retire el exceso de grasa con una esp_.tula pl_.stica; vea a la ilustraci6n. Cuando sea
necesario, lave la bandeja de grasa y la bandeja del goteo con una soluci6n de agua
y jab6n, y luego enjuaguelas con agua limpia. Reemplace la bandeja desechable de
goteo en la medida que sea necesario.
z_ ADVERTENCIA: Cada vez que vaya utilizar la barbacoa,
revise la bandeja corrediza recolectora de grasa y la bandeja
desechable de goteo para cereiorarse de que no se haya
aeumulado grasa en las misrnas. Retire cualquier e×ceso
de grasa para evitar un incendio de grasa. Un ineendio de
grasa puede causar lesiones corporales graves o da_os
materiales.
z_ PRECAUCI6N: No forre la bandeja corrediza recolectora de
grasa con hoja de alurninio. ÷
[] [] []
lU
m
,==
i
INSPECCI6N DEL ENCENDEDOR ELECTRONICO
Verifique que la baterfa AA (solamente alcalinas) este en buenas condiciones y
correctamente instalada (1). AIgunas baterfas tienen una envoltura practica protectora
alrededor de elias. Este plb.stico debe sacarse. I/o confunda este plb.stico con la etiqueta
de la baterfa. ®
INSPECCI6N DE LA MANGUERA
Se deberb, inspeccionar la manguera para ver si tiene alguna sepal de agrietamiento.
z_ ADVERTENCIA: Inspeceione la manguera previo a eada
uso de la barbacoa y aseg_rese de que no tenga muescas,
grietas, abrasiones o cortes. Si se encontrase que la
manguera estuviese daSada de cualquier manera, no utilice
la barbacoa. Reempl_cela solamente con una manguera de
repuesto autorizada pot Weber% Contacte al Representante
de Servicios al Cliente en su _rea utilizando la informaci6n
de contacto en nuestro sitio web.
Con_ctese a www.weber.com ®.÷
©
39
Page 40

ENCENDIDO DEL QUEIV)ADOR PRINCIPAL
Instrucciones resumidas para el encendido se encuentran dentro de la puerta izquierda
del gabinete.
ARRETE
PELIGRO
El no abrir la tapa mientras se est_ encendiendo el
quemador de la barbacoa, o no esperar cinco minutos para
que el gas se disipe si la barbacoa no se enciende, puede
resultar en una liamarada explosiva, la cual puede causar
lesiones corporales serias o la muerte.
Sistema de encendido eiectr6nico
Nota: Cada perilla de control opera un quemador individual. El sistema de encendido
electrdnico enciende los quemadores mediante una chispa del electrodo de ignicidn
ubicado dentro de la camara de encendido Gas Catcher TM . Usted genera la energfa
para la chispa al presionar el botdn de encendido electrdnico. Lo oir# hacer cfic.
z_ ADVERTENCIA: Inspeccione la manguera previo a cada
uso de la barbacoa y aseg_rese de que no tenga muescas,
grietas, abrasiones o cortes. Si se encontrase que la
manguera estuviese daSada de cuaiquier manera, no utiiice
la barbacoa. Reempl_cela solamente con una manguera de
repuesto autorizada pot Weber% Contacte al Representante
de Servicios al Cliente en su _rea utilizando la informaci6n
de contacto en nuestro sitio web.
Con_ctese a www.weber.com ®.
A) Abra la tapa (1).
B) Asegurese de que todas las perillas de control del quemador esten apagadas (2).
(Presione la perilla de control y gfrela en direcci6n de las manecillas del reloj para
asegurarse de que este en la posici6n OFF (apagada).)
z_ ADVERTENCIA: Las perillas de control del quemador
deber_n estar en la posici6n OFF (apagadas) antes de abrir
la v_lvula del tanque de propano licuado. Si no est_n en la
posici6n OFF (apagadas) cuando abra la v_lvula del tanque
de propano licuado, el "contro( de e×ceso de flujo de gas"
se activar_ y Iimitar_ el flujo de gas desde el tanque de
propano Iicuado. Si esto Ilegase a ocurrir, cierre la v_(vula
del tanque de propano licuado y las perilias de control del
quemador. Empiece de nuevo.
+ + + +
APAGADO ENCEDIDO/ FUEGO MEDIO FUEGO BAJO
FUEGO ALTO
La barbacoa ilustrada
puede tenet ligeras
diferencias con respecto
al modelo comprado.
PELIGRO
Cuando se activa el "control de exceso de flujo de gas",
una pequeSa cantidad de gas sigue a_n fluyendo a los
quemadores. Despu_s de cerrar la v_ivula del tanque de
propano licuado y las perillas de control del quemador, espere
por Io menos cinco minutos para que el gas se disipe antes
de tratar de encender la barbacoa. El no hacer esto podr(a
resultar en una Ilamarada explosiva que pudiera causar
lesiones corporales serias o Ja muerte.
C) Abra el suministro de gas del cilindro girando lentamente la vb.lvula del cilindro en
direcci6n contraria alas manecillas del reloj (3).
Z_ ADVERTENCIA: No se incline sobre la barbacoa abierta.
D) Presione la perilla de control y gffela hacia START/HI (encendido/fuego alto) (4).
E) Presione y mantenga presionado el bot6n de encendido electr6nico. Lo oira hace
clic (5).
F) Revise que el quemador este encendido viendo hacia abajo a traves de las rejillas
de cocci6n. Debera ver una llama. (6).
z_ ADVERTENCIA: Si el quemador no se enciende en cinco o
segundos, pare, gire la perilla del control a la posici6n OFF
(apagado) y espere cinco minutos para permitir que el gas
se disipe antes de tratar de nuevo o de tratar de encenderlo
con un ceriHo.
G) Para encender los quemadores restantes siga los pasos D al R
PARA APAGAR
Presione y gire cada una de las perillas de control de los quemadores en direcci6n de
las manecillas del reloj a la posici6n OFF (apagado). Cierre el suministro de gas en la
fuente del mismo. ®
40
Page 41

ENCENDIDO MANUAL DEL QUEMADOR PRiNCiPAL
PELIGRO
El no abrir la tapa mientras se est_ encendiendo el
quemador de la barbacoa, o no esperar cinco minutos para
que el gas se disipe si la barbacoa no se enciende, puede
resultar en una llamarada explosiva, la cual puede causar
lesiones corporales serias o la muerte.
A) Abra la tapa (1).
B) Asegurese de que todas las perillas de control del quemador esten apagadas (2).
(Presione la perilla de control gfrela en direcci6n de las manecillas del reloj para
asegurarse de que este en la posici6n OFF (apagada).)
ADVERTENCIA: Las perillas de control del quemador
deber_n estar en la posici6n OFF (apagadas) antes de
abrir la v_lvula del tanque de propano licuado. Si no est_n
en la posici6n OFF (apagada) cuando abra la v_lvula del
tanque de propano licuado, el "control de e×ceso de flujo
de gas" se activar_ y limitar_ el flujo de gas desde el tanque
de propano licuado. Si esto Ilegase a ocurrir, cierre la
v_lvula del tanque de propano y las perillas de control del
quemador. Empiece de nuevo.
PELIGRO
Cuando se activa el control de exceso de flujo, una pequeSa
cantidad de gas sigue fluyendo a los quemadores. Despu_s
de cerrar la v_lvula del tanque y las perillas de control del
quemador, espere pot Io menos cinco minutos para que el
gas se disipe antes de tratar de encender la barbacoa. El no
hacer esto podr{a resultar en una Ilamarada explosiva que
pudiera causar lesiones corporales serias o la muerte.
La barbacoa ilustrada
puede tenet ligeras
diferencias con respecto
al modelo comprado.
C) Abra el suministro de gas del cilindro girando lentamente la vb.lvula del cilindro en
direcci6n contraria alas manecillas del reloj (3).
D) Coloque el cerillo en el portacerillos y enciendalo.
E) Inserte el portacerillos con el cerillo encendido a traves de las parrillas de cocci6n y
las barras Flavorizer _ para encender el quemador seleccionado (4).
ADVERTENCIA: No se incline sobre la barbacoa abierta.
F) Presione la perilla de control y gfrela hacia START/HI (encendido/fuego alto) (5).
G) Revise que el quemador este encendido viendo hacia abajo a traves de las rejillas
de cocci6n. Debera ver una llama (6).
ADVERTENCIA: Si el quemador no se enciende en cinco
segundos, pare, gire la perilla del control a la posici6n OFF
(apagado) y espere cinco minutos para permitir que el gas
se disipe antes de tratar de nuevo o de tratar de encenderlo
con un cerillo.
H) Para encender los quemadores restantes siga los pasos D al G. ®
PARA APAGAR
Presione y gire cada una de las perillas de control de los quemadores en direcci6n de
las manecillas del reloj a la posici6n OFF (apagado). Cierre el suministro de gas en la
fuente del mismo.
41
Page 42

ENCENDIDO DEL QUEMADOR DE LA ESTACION DE DORADO
"SEAR STATION ®''
El modelo 330 incluye un quemador para dorar. El quemador para dorar tambi_n
funciona como un quemador individual. Pot Io tanto, el encendido del quemador para
dorar es igual al del encendido del quemador principal. Para encender el quemador
para dorar consulte la secci6n "ENCENDIDO DEL QUEMADOR PRINCIPAL' ÷
ENCENDIDO MANUAL DEL QUEMADOR DE LA ESTACI6N DE
DORADO"SEAR STATION _''
Para encender manualmente el quemador para dorar consulte la secci6n "ENCENDIDO
MANUAL DEL QUEMADOR PRINCIPAL." ÷
C6MO USAR LA ESTACI6N DE DORADO "SEAR STATION ®''
La barbacoa de gas Weber ¢ incluye un quemador para dorar cames como los bistecs,
partes de ayes, pescado y chuletas.
Esta es una t_cnica de asado directo que dora ia superficie de los alimentos a altas
temperaturas. AI dorar ambas partes de la came crear_t un sabot mdts gustoso mediante
la caramelizaci6n de la superficie de los alimentos. El dorar tambi_n mejorar_t la
apariencia de la came con las marcas de dorado de la parrilla de cocci6n. Esto, junto
con el contraste de texturas y sabores, puede hacer el alimento ma.s interesante al
paiadar.
El quemador de la estaci6n de dorado "Sear Station _" tiene un ajuste de control OFF,
START/H I, y LOW que funciona conjuntamente con los quemadores izquierdo y central.
Con los quemadores adyacentes y el quemador para dorar usted puede dorar las
cames de manera efectiva mientras usa el quemador derecho para asar bajo calor
moderado.
Antes de empezar a dorar deberdt colocar todos los quemadores principaies a fuego
alto (HI) durante 15 minutos para precalentar la barbacoa. Siempre ase con la tapa
cerrada para Iograr el calor ma.ximo y evitar Ilamaradas.
Una vez precalentada la barbacoa, apague o baje el quemador derecho. Deje los
quemadores izquierdo y central en la posici6n HI (fuego alto) y encienda el quemador
de la estaci6n de dorado ®.
Coloque la came directamente sobre la estaci6n de dorado "Sear Station÷: Dote cada
lado entre 1 y 4 minutos, segt]n el tipo y espesor de la came. Puede girar la came un
cuarto de vuelta para dejar marcas de dorado cruzadas (1) antes de dorar el otro lado
de la misma manera.
Una vez haya terminado de dorar, puede terminar de asar la carne movi_ndola a un
calor mas moderado sobre el calentador derecho para alcanzar el grado de cocci6n
deseado.
En la medida que gane m#ts experiencia con la estaci6n de dorado "Sear Station®7 Io
animamos a que experimente usando diferentes tiempos de dorado para vet cual va
ma.s acorde a su gusto. ÷
OFF O APAGADO mlmmm(
ARRETE
÷ ÷ ÷
APAGADO ENCEDIDO/ FUEGO BAJO
FUEGO ALTO
42
Page 43

+ Siempre precaliente la barbacoa antes de cocinar en la misma. Ajuste todos los
quemadores a la posici6n llama alta y cierre la tapa, caliente durante 10 minutos, o
hasta que el term6metro marque 5000-550 ° F (2600-288 ° C).
+ Para alimentos siempre perfectamente asadas, dore la carnes y cocine con la tapa
cerrada.
+ Los tiempos de asado en las recetas son en base a una temperatura ambiental de
70 ° F (20 ° C) y poco o ningQn viento. Permita un mayor tiempo de cocci6n en dfas
frfos o de viento, o a mayores altitudes. Permita menos tiempo de cocci6n en climas
extremadamente calurosos.
+ Los tiempos pueden variar a causa del clima, o la cantidad, tamaho y forma de los
alimentos asados.
+ La temperatura de operaci6n de la barbacoa de gas podrfa set mb.s caliente de Io
normal durante los primeros uses.
+ Las condiciones de asado pueden requerir el ajuste de los controles de los
quemadores para obtener las temperaturas de cocci6n correctas.
+ Por Io general, las piezas de came mb.s grandes requeriran mayor tiempo de cocci6n
pot libra que las piezas mas chicas. Los alimentos abarrotados sobre una parrilla
de cocci6n requerir_.n de mas tiempo de cocci6n que s61o unos pocos alimentos.
Los alimentos asados dentro de recipientes, tales come judfas en salsa de tomate,
tomar_.n mb.s tiempo si se cocinan en una cacerola profunda queen una ella liana.
+ Recorte el exceso de grasa de los bistecs, chuletas y asados, dejando apenas _Ade
pulgada (6.4 mm) de grasa. Menos grasa facilita la limpieza, yes una garantfa casi
absoluta contra las indeseadas Ilamaradas.
+ Los alimentos colocados sobre la parrilla de cocci6n directamente encima de los
quemadores pudieran requerir que se les de la vuelta o que se les mueva a un b.rea
menos caliente.
+ Use tenacillas en vez de un tenedor para dar vuelta y manipular las carnes para
asf evitar perder los jugos naturales. Use dos espatulas para manipular un pescado
entero grande.
+ Si Ilegase a ocurrir alguna Ilamarada indeseada, apague todos los quemadores
y mueva los alimentos a otra zona de la parrilla de cocci6n. Cualquier llama se
apagara rb.pidamente. Una vez que las llamas se apaguen, vuelva a encender la
parrilla. JAM_,S USE AGUA PARA EXTINGUIR LAS LLAMAS EN UNA PARRILLA
DE GAS.
+ Algunos alimentos, tales como los guisos o los filetes delgados de pescado,
requeriran de un recipiente para asarlos. Las ollas desechables de la.mina son muy
convenientes, pero puede usarse cualquier olla de metal con asas resistentes al
calor.
+ AsegQrese siempre de que la bandeja inferior y el plato recolector de grasa esten
limpios y libres de desechos.
+ No forre la bandeja deslizante de grasa con papel aluminio. Ello podrfa prevenir que
la grasa fluya al plato recolector de grasa.
+ El usar un temporizador le ayudarb, a alertarle cuando "bien cocido" este a punto de
convertirse en "sobre cocido."
Nota: Si la barbacoa pierde calor mientras se est_ cocinando refi_rase a la seccidn de
resolucidn de problemas de este manual.
z_ ADVERTENCIA: No mueva la barbacoa de gas Weber °
mientras est_ en operaci6n o est_ caliente.
Puede ajustar los quemadores individuales a su gusto. Los ajustes de control (1) son
APAGADO, ENCENDER/FUEGO ALTO, FUEGO MEDIO, y FUEGO BAJO.
COCCl0N CUBIERTA
Todo asado debera realizarse con la tapa cerrada para proporcionar un calor uniforme
y con una circulacidn pareja. Con la tapa cerrada, la barbacoa de gas Summit ®cocinara
de manera muy parecida a un homo de conveccidn. El term6metro en la tapa indica
la temperatura de coccidn dentro de la barbacoa.Todo precalentamiento y coccidn se
realiza con la tapa cerrada. Nada de miraditas - se pierde calor cada vez que usted abre
la tapa. +,
PRINGUES Y GRASA
Las barras del Flavorizer +_han sido disefiadas para "ahumar" la cantidad correcta de
pringues y asf obtener una coccidn con bastante sazdn. Los jugos de coccidn y el
exceso de grasa se acumularb.n en el plato recolector debajo de la bandeja corredera
inferior. Hay disponibles bandejas de goteo desechables que caben en el plato
recolector.
z_ ADVERTENCIA: Antes de cada uso, revise que no haya
grasa acurnulada en la bandeja de grasa y en el plato
recolector. Retire el exceso de grasa para evitar que _sta se
incendie en la bandeja corredera de grasa.
EL SlSTEMA FLAVORIZER ®
Cuando los jugos de came chorrean de la comida alas barras Flavorizer + colocadas a
un a.ngulo especial, estas crean un humo que le da a la comida una sazdn a barbacoa
irresistible. Gracias al dise_o tJnico de los quemadores, las barras Flavorizer + y los
flexibles controles de temperatura, los fogonazos descontrolados hart side virtualmente
eliminados, pues USTED controla las llamas. Debido al dise_o especial de las barras
Flavorizer + y de los quemadores, las grasas en exceso son dirigidas a traves de la
bandeja de grasa al plato recolector de grasa. ®
ESTACION DE DORADO SEAR STATION ®
Su barbacoa Weber + podrfa incluir un quemador para dorar carnes y pescados de
poco espesor. El quemador de la estacidn de dorado Sear Station ®tiene un ajuste de
control OFF, START/HI o LOW (2) que funciona en conjunto con los dos quemadores
principales adyacentes. Con el quemador para dorar y los quemadores adyacentes
puede dorar las carnes de manera efectiva mientras usa las dema.s a.reas de coccidn
para cocinar bajo calor moderado (consulte la secci6n "ENCENDIDO Y USO DE LA
ESTACION DE DORADO SEAR STATION ®(MODELO 330)").
OFFO O]lBm=@
ARR#TI_
4 4 +
APAGADO ENCEDIDO/ FUEGO BAJO
FUEGO ALTO
ARRETE
+ + + ÷
APAGADO ENCEDIDO/ FUEGO MEDIO FUEGO BAJO
1_ FUEGO ALTO
Nota: La temperatura dentro de la caja de coccidn durante las primeras ocasiones en
que se use, cuando las superficies adn ser_n bastante reflectoras, podr# estar m#s
ca!iente de Io que se indica en su Iibro de recetas. Las condiciones bajo las que se est6
cocinando, tales como el viento y el tiempo, pueden hacer que se requieran ajustes a los
controles de los quemadores para obtener las temperaturas de coccidn correctas.
Si los quemadores se apagasen durante la cocci6n, apague todos los
quemadores y espere 5 minutos antes de voiver a encender. ®
PRECALENTADO
La barbacoa de gas Weber + es un artefacto que utiliza la energfa eficientemente.
La misma opera a una baja tasa de consume calorffico. Es importante precalentar la
barbacoa antes de asar. Encienda su barbacoa de gas Summit ®de acuerdo con las
instrucciones en este Manual del Propietario. Para precalentar: tras encender gire los
quemadores a la posicidn encendido/alto fuego, cierre la tapa, y caliente hasta que la
temperatura alcance entre 500 ° y 550 ° F (260 ° y 290°C), la temperatura recomendada
para asar. Esto tomar#, entre 10 y 15 minutos, dependiendo de tales condiciones como
la temperatura del aire y el viento.
43
Page 44

ENCENDIDO DEL QUEMADOR LATERAL
Dentro del puerta izquierda del gabinete se encuentran las instrucciones resumidas de
encendido.
PELIGRO
El no abrir la tapa mientras se est_ encendiendo el
quemador lateral, o no esperar cinco minutos para que el
gas se disipe si el quemador lateral no se enciende, puede
resultar en una Ilamarada explosiva, la cual puede causar
lesiones corporales serias o la muerte.
z_ ADVERTENCIA: Inspeccione la manguera previo a cada
uso de la barbacoa y aseg_rese de que no tenga muescas,
grietas, abrasiones o cortes. Si se encontrase que la
manguera estuviese daSada de cualquier manera, no utilice
la barbacoa. Reempl_cela solamente con una manguera de
repuesto autorizada pot Weber% Contacte al Representante
de Servicios al Cliente en su _rea utilizando la informaci6n
de contacto en nuestro sitio web.
Con_ctese a www.weber.com ®.
A) Abra la tapa del quemador lateral (1).
B) Verifique que la valvula del quemador lateral este cerrada (2) (empuje la perilla de
control hacia adentro y gfrela en direcci6n de las agujas del reloj para asegurar
de que este en la posici6n APAGADO), coloque todos los quemadores que no se
esten usando en la posici6n APAGADO (empujando hacia adentro y girando en la
direcci6n de las agujas del reloj).
C) Abra la valvula de suministro de gas (3).
D) Presione y gire la vb.lvula de control del quemador lateral a la posici6n
ENCENDIDO/FUEGO ALTO (4).
E) Pulse el bot6n de encendido varias veces de manera que cada vez haga clic hasta
que vea una llama (5).
z_ PRECAUCI6N: En dias asoleados, la llama del quemador
lateral puede set dificil de vet.
z2, ADVERTENClA: Si el quemador lateral no se enciende en
cinco segundos:
a) Cierre la v_lvula de control del quemador lateral, los
quemadores principales y el suministro de gas en la
fuente.
b) Espere cinco minutos para permitir que el gas se
disipe antes de volver a tratar de de nuevo, o tratar de
encencler con un cerillo (vea "ENCENDIDO MANUAL
DEL QUEMADOR LATERAL").
PARA APAGAR
Presione y gire la perilla de control del quemador lateral a la posici6n OFF (apagado).
Asegurese de que el quemador este apagado y frfo antes de cerrar la tapa del
quemador lateral. ®
La barbacoa ilustrada
puede tenet ligeras
diferencias con respecto
al modelo comprado.
%\
O
4p=APAGADO
ENCENDmDO/
FUEGO ALTO
FUEGO BAJO
%
44
Page 45

ENCENDIDO MANUAL DEL QUEMADOR LATERAL
PELIGRO
El no abrir la tapa mientras se est_ encendiendo el
quemador lateral, o no esperar cinco minutos para que el
gas se disipe si el quemador lateral no se enciende, puede
resultar en una Ilamarada explosiva, la cual puede causar
lesiones corporales serias o la muerte.
A) Abra la tapa del quemador lateral (1).
B) Verifique que la valvula del quemador lateral este cerrada (2) (empuje la perilla de
control hacia adentro y gfrela en direcci6n de las agujas del reloj para asegurar
de que este en la posici6n APAGADO), coloque todos los quemadores que no se
esten usando en la posici6n APAGADO (empujando hacia adentro y girando en la
direcci6n de las agujas del reloj).
C) Abra la valvula de suministro de gas (3).
D) Coloque un cerillo en el portacerillos y enciendalo.
E) Aguante el portacerillos y encienda con el cerillo cualquier lado del quemador
lateral (4).
F) Presione y gire la vb.lvula de control del quemador lateral a la posici6n
fuego alto (5).
Z_ PRECAUCI6N: En dias asoleados, la llama del quemador
lateral puede set dificil de vet.
z_ ADVERTENCiA: Si el quemador lateral no se enciende en
cinco segundos:
a) Cierre la v_lvula de control del quemador lateral, los
quemadores principales y el suministro de gas en la
fuente.
b) Antes de probar de nuevo, espere cinco minutos para
dejar que el gas se disipe.
PARA APAGAR
Presione y gire la perilla de control del quemador lateral a la posici6n OFF (apagado).
Asegurese de que el quemador este apagado y frfo antes de cerrar la tapa del
quemador lateral. ®
La barbacoa ilustrada
puede tenet ligeras
diferencias con respecto
al modelo comprado.
®
45
Page 46

PROBLEMA VERIFIQUE SOLUCION
Los quemadores queman con
una llama amarilla o anaranjada,
conjuntamente con un olor a gas.
Sintomas:
Los quemadores no se encienden.
-o- Los quemadores presentan una
Hama peque6a y parpadeante en ia
posici6n HI (fuego alto). -o-
La temperatura de la barbacoa
somamente alcanza 250 ° a 300 ° en la
posici6n Hi (fuego alto).
El quemador no enciende, o la llama _,Est_t el tanque de propano licuado vacfo o bajo de Rellene el tanque de propano licuado.
se mantiene baja en la posici6n HI combustible?
(fuego alto).
Emquemador no se enciende ampulsar Para asegurarse de que el gas este fluyendo a los Si Iogra encenderlos con un cerillo, el problema esta en el sistema de
el bot6n de encendido, quemadores, trate de encender los quemadores encendido. Consulte la secci6n "OPERACIONES DE LOS SISTEMAS DE
Se producen iiamaradas: _,Est_t precalentando la barbacoa de la manera Coloque todos los quemadores en la posici6n HI (fuego alto) durante 10 a 15
PRECAUCION: No forre la
bandeja deslizante para la _,Estan las rejillas de cocinar, los reflectores de calor Lfmpielos a fondo. Consulte la secci6n "LIMPIEZ,_.'
grasa con papel alurninio, gruesa de grasa quemada?
El quemador produce llamas con un sEst_.n limpios los quemadores? Limpie los quemadores. Consulte la secci6n "MANTENIMIENTO'_
patr6n erratico. La llama se mantiene
baja cuando el quemador est& en
posici6n Hi (fuego alto). Las llamas
no corren a Io largo de todo el tubo
del quemador.
La parte intema de la tapa pareciera La parte interna de la tapa es de esmalte de Limpie a fondo. Consulte la secci6n "LIMPIEZA'
estar "pel&ndose': (Se parece al porcelana o de acero inoxidable, y no esta pintada.
desprendimiento de pintura.) No puede "pelarse': Lo que esta viendo es grasa
Las puertas dei gabinete no est_n Revise el esparrago de ajuste en la parte inferior de Afloje la tuerca o tuercas de ajuste. Deslice la puerta o puertas hasta quedar
alineadas, cada puerta, alineadas. Apriete la tuerca.
Si los problemas no pueden corregirse usando cualquiera de estos m_todos, sirvase contactar al Representante de Atenci6n al Cliente en su area usando la
informaci6n de contacto en nuestro sitio web. Con_ctese a www.weber.com ®.
Revise que no haya obstrucciones en la malla Limpie las mallas contra ara_as e insectos. Consulte la secci6n
contra ara_as e insectos. (Taponamiento de "MANTENIMIENTO ANUAIJ_
orificios.)
Puede haberse activado el dispositivo de seguridad
contra el caudal excesivo, el cual es parte de la
conexi6n de la barbacoa al cilindro.
sEsta doblada la manguera de combustible? Enderece la manguera de combustible.
con un cerillo. Consulte la secci6n "ENCENDIDO ENCENDIDO ELECTRONICO'_
MANUAL DEL QUEMADOR PRINCIPAl"
_,Se tiene una bateffa fresca recien instalada? Verifique que la baterfa este en buen estado y correctamente instalada.
_,Est_mtodos los cables correctamente conectados AsegQrese de que los cables esten correctamente insertados dentro de los
al m6dulo encendedor? terminales en el cajetfn de encendido. Consulte la seccion "OPERACIONES
_,Est_t la nueva bateffa envuelta en plastico? Quite la envoltura plastica.
indicada? minutes para precalentar la barbacoa.
y las barras Flavorizer¢ recubiertas con una capa
_,Est_. sucia la bandeja deslizante de grasa y no Limpie la bandeja deslizante de grasa.
deja que la grasa fluya al plato recolector?
asada que se ha convertido en carb6n y se esta
descascarando.
ESTO NO ES UN DEFECTO.
Para restablecer el dispositivo de seguridad contra el caudal excesivo gire
todas las perillas de control del quemador a la posici6n OFF (apagadas) y
cierre la valvula del cilindro. Desconecte el regulador del cilindro. Gire las
perillas de control de los quemadores a la posici6n HI (fuego alto). Espere per
Io menos 1 minuto. Gire las perillas de control a la posici6n OFF (apagadas).
Vuelva a conectar el regulador al cilindro. Abra la valvula del cilindro
lentamente. Consulte la secci6n "ENCENDIDO DEL QUEMADOR PRINCIPAl''
Consulte la secci6n "INSPECCION DEL ENCENDEDOR ELECTRONICO'_
DE LOS SISTEMAS DE ENCENDIDO ELECTRONICO'_
46
Page 47

PROBLEHA REVISAR
El quemador lateral no se enciende. gEst_, cerrado el suministro de gas?
Puede haberse activado el dispositivo de seguridad
de caudal excesivo, el cual es parte de la conexi6n
de la barbacoa al cilindro.
La llama se mantiene baja en la gEst_, doblada la manguera de combustible?
posici6n FUEGO ALTO.
El bot6n de encendido no funciona. _Se enciende el quemador con un cerillo?
Si los problemas no pueden corregirse usando cualquiera de estos m_todos, pot favor contacte al Representante de Atenci6n al Cliente en su _rea usando la
informaci6n de contacto en nuestro sitio web. Con_ctese a www.weber.com ®.
Abra el suministro de gas.
Para restablecer el dispositivo de seguridad de caudal excesivo cierre todas
las perillas de control de los quemadores y la vb.lvula del cilindro. Desconecte
el regulador del cilindro. Gire la perilla de control a la posici6n ENCENDIDO/
FUEGO ALTO. Espere pot Io menos 1 minuto. Gire las perillas de control a
la posici6n OFR Vuelva a conectar el regulador del cilindro. Lentamente abra
la vb.lvula del cilindro. Consulte la secci6n "ENCENDIDO DEL QUEMADOR
LATERAl''
Enderece la manguera.
Si un cerillo enciende el quemador, revise el encendedor. Consulte la secci6n
"MANTENIMIENTO DEL QUEMADOR LATERAL'
SOLUCION
LIMPIEZA
z_ ADVERTENCIA: Apague la barbacoa de gas Weber _ y
espere a que se enfrfe antes de Iimpiarla.
PRECAUClON: No limpie las barras Flavorizer _ o las
parrillas cocci6n en un homo autolirnpiante.
Superficies E×temas - Utilice una soluci6n de agua jabonosa tibia para limpiarlas y
luego enju_,guelas con agua.
z_ PRECAUClON: Sobre la superficie de la barbacoa o
del carro no utiilice limpiadores de homo, limpiadores
abrasivos (limpiadores de cocinas), limpiadores que
contengan productos cftricos, o alrnohadillas de lirnpieza
abrasivas.
Deslice hacia afuera la bandeja del rondo - Retire el exceso de grasa, luego lavela
con agua jabonosa tibia y finalmente enju_,guela.
PRECAUCI6N: No forte la bandeja deslizante para la grasa
con papel aluminio.
Barras Flavorizer _ y rejillas de cocci6n - Lfmpielas con un cepillo de cerdas de acero
inoxidable adecuado. Seg0n se requiera, retfrela de la barbacoa y Ib.vela con agua
jabonosa tibia y luego enjuaguela con agua.
Para averiguar donde comprar las parrillas de cocci6n y las barras Flavorizer ®de
reemplazo, contacte al Representante de Atenci6n al Cliente en su _rea usando la
informaci6n de contacto en nueetro sitio web. Con_ctese a www.weber.com ®.
Plato recolector - Hay disponibles bandejas desechables de Ib.mina de metal, o
usted mismo puede forrar el plato recolector con papel aluminio. Para limpiar el plato
recolector, Ib.velo con agua jabonosa tibia y luego enjuague.
Term6metro - Pasele un trapo con agua tibia jabonosa, y Ifmpielo con una pelota
plastica de fregar.
Caja de cocci6n - Quite cualquier resto de los tubos del quemador. NO AGRANDE LAS
ABERTURAS DE LOS QUEMADORES. Lave la parte interior de la caja de cocci6n con
agua jabonosa y luego enjuaguela con agua.
Tapa interna - Mientras la tapa este tibia, limpie la parte interna con una toalla de papel
para prevenir la acumulaci6n de grasa. La grasa acumulada escamada se asemeja a
las escamas de pintura.
Superficies de acero inoxidable - Lavelas con un paho suave y una soluci6n de agua
y jab6n. Tenga cuidado de fregarlas en la direcci6n del grano del acero inoxidable.
No utilice limpiadores que contengan _cido, destilado de petr61eo o xileno.
Enju_guelas bien despu_e de lavarlas.
Preserve eu acero inoxidable - La barbacoa o su gabinete, tapa, panel de control y
estantes pudieran estar hechos de acero inoxidable. Es sencillo mantener vistoso al
acero inoxidable. Lfmpielo con agua y jab6n, enju_.guelo con agua limpia y sequelo con
un trapo. Para particulas dfficiles de sacar, se puede usar un cepillo no met_.lico.
IMPORTANTE: No utilice cepillos de alambre o limpiadores
abrasivos sobre las superficies de acero inoxidable ya que
las rayar_n.
IMPORTANTE: AI limpiar las superficies asegdirese de
frotar/restregar en la direcci6n del grano para preservar la
vistosidad del acero inoxidable.
iVIALLAS WEBER ®CONTRA ARAKIAS E INSECTOS
La barbacoa de gas Weber _, al igual que cualquier otro aparato de gas al aire libre, es
un blanco para las araSas y demas insectos. Pueden crear sus nidos en la seccion del
venturi (1) del tubo quemador. Esto bloquea el flujo normal de gas, y puede causar que
el gas fluya hacia atr_.s por la v_.lvula de aire de combusti6n. Esto puede resultar en un
fuego en y alrededor de las aberturas para el aire de combusti6n, causando un daho
serio a la barbacoa.
La compuerta de cierre del aire del tubo quemador est,. equipada con una malla (2) de
acero inoxidable para prevenir la entrada de araflas e insectos a los tubos quemadores
a traves de las aberturas para el aire de combusti6n.
Le recomendamos que inspeccione las mallas contra arahas e insectos por Io
menos una vez al aho (vea "MANTENIMIENTO ANUAL"). Tambi_n, inepeccione y
limpie dichae mallas ei cualquiera de los siguientes efntomas ee presentase:
A) OIor a gas en conjunci6n con llamas del quemador con un apariencia muy amarilla
y floja.
B) La barbacoa no alcanza la temperatura de funcionamiento.
C) La barbacoa se calienta de manera dispareja.
D) Uno o mb.s quemadores no se encienden.
A PELIGRO
El no corregir estos sfntornas pudiera resultar en un fuego
que puede causar lesiones corporales serias o la rnuerte y
dahos a la propiedad. ÷
47
Page 48

LIIVIPIEZA O REEIVlPLAZO DE LOS TUBES QUEIVIADORES
Usted necesitara: un destornillador Phillips y un destornillador de cabeza plana.
A) La barbacoa de gas Weber ¢ debe estar APAGADA y fr[a.
B) CIERRE el gas en la fuente.
C) Retire los componentes de la caja de cocci6n: la rejilla de calentamiento, las
parrillas y las barras Flavorizer ¢. (Las placas de distribuci6n del calor no necesitan
retirarse.)
Retire del panel de control
Para retirar el panel de control:
A) Retire las perillas de control, el bot6n de encendido, la tuerca de retenci6n del
encendedor y la bater[a (1).
B) Con un destornillador Phillips, saque los tornillos del deflector (2) de viento
ubicados debajo del panel de eontrol.
C) Incline el extreme del deflector de viento hacia abajo y desl[celo para sacarlo (3).
D) Retire el m6dulo de ignici6n del panel de control (4) y saque todos los cuatro cables
del m6dulo.
E) Saque los tomillos de la parte de abajo del panel de control con un destornillador
Phillips (5).
F) Levante el panel de control ligeramente, incline el horde delantero hacia arriba y
con cuidado levantelo y saquelo (6).
48
Page 49

Retire del tube quemador
Para retirarel o lostubes quemadores:
A) Saque elo los cables deencendido de los clips de encendido (7).
B) Con un destornillador de cabeza plana, saque el tornillo que fijael tubequemador a
la caja decocci6n (8).
C) Hale el conjunto del tubequemador (que incluyeel encendedor) hacia arriba y
fuera de la caja de cocci6n(9).
Nota:Las unldades 310/320tendr_n un cable adlclonal de conexldn a tierra
conectado al tube quemador central (10).
Limpieza de los tubes quemadores
Paralimpiar lostubes quemadores:
A) Revisela parte interna delquemador con una linterna (11).
B) Limpie la parte interna de los quemadores con unalambre (12) (un gancho de ropa
enderezado funcionara bien).
C) Revisey limpie la abertura de lascompuertas de cierre del aire en losextremes
de los quemadores.Revise y limpie los orificiosde las valvulasen la base de las
vb.lvulas.Utilice un cepillo de cerdas de aceropara limpiarla parte externa de
losquemadores (13).Sehace esto para asegurarse de que las aberturas de los
quemadores esten completamente abiertas.
z_ PRECAUCI6N: AI lirnpiar, no agrande las aberturas del
quemador.
Reinstalaci6n del tube quemador
Para reinstalarlos tubes quemadores:
A) Desliceel tube quemador y el cable del encendedor a traves del orificio en la
caja de cocci6n (14).Consulte las"OPERACIONES DELOS SlSTEMAS DE
ENCENDIDO ELECTRONICO" paraver la posici6ncorrecta del quemador.
B) Alinee el tube quemador con lavalvula.
Z_ PRECAUCI6N: Las aberturas del quemador (15) deber_n
posicionarse correctamente sobre los orificios de la
v_lvula (16).
C) Con un destornillador decabeza plana, vuelva a instalarel tornillo que fija eltube
quemador a la caja de cocci6n. El tube quemador podrfa aparentarestar flojo (17)
cuando el tornillo este bien ajustado. Esto esnormal.
D) Paselos cables de nuevoa traves de losclips del encendedor Consuite de nuevola
figura (7).
z_ PRECAUCION: Todos los cables deben estar correctamente
pasados a trav_s de los clips de los cables.
E) Conecte los cables al m6dulo,de acuerdo a lacodificaci6n numerica o de colores
(18). Para lasconexiones correctas de loscables, consulte las"OPERACIONES
DELSlSTEMA DEENCENDIDO ELECTRONICO"
z_ ADVERTENCIA: Despu_s de reinstalar las Ifneas de gas,
deber_ verificarse que no tengas fugas usando una soluci6n
de agua y jab6n antes de usar la barbacoa. (Yea el paso:
"DETECClON DE FUGAS DE GAS".)
ADVERTENClA: Antes de poner a funcionar la barbacoa,
aseg_rese de que todas las partes est_n ensambladas y que
la tornillerfa est_ totalmente apretada. Si no Ilegase a acatar
esta advertencia respecto al producto, sus acciones podrfan
causar un fuego, una explosi6n o una falla estructural que
pudieran resultar en lesiones personales graves o la muerte
adem_s de daSos a la propiedad. ÷
49
Page 50

OPERACIONES DEL SiSTEIVIA DE ENCENDIDO ELECTRONICO
Si el sistema de encendido electr6nico no Ilegase a encender, aseg0rese de que este
fluyendo gas mediante el encendido de los quemadores con un cerillo. Consulte la
secci6n "ENCENDIDO MANUAL DEL QUEMADOR PRINCIPAE_ Si se Iogra encender
con un cerillo, el problema esta en el encendido electr6nico.
ADVERTENCIA: Todos los controles de gas y v_lvulas de
suministro deber&n estar cerrados en la posici6n OFF.
. Verifique que la baterfa AA (solamente alcalinas) este en buenas condiciones
y correctamente instalada (1). Algunas baterfas tienen una envoltura practica
protectora alrededor de elias. Este plb.stico debe sacarse. No confunda este plastico
con la etiqueta de la baterfa.
. AsegL_rese de que los cables de encendido esten conectados correctamente al
m6dulo de encendido. Consulte la "GUfA DE LOS CABLES DEL MODULO DE
ENCENDIDO" a continuaci6n.
. AsegOrese de que el conjunto del encendedor ceramico este completamente
colocado dentro del canal de encendido del tubo quemador (2). Siesta
correctamente colocado, oira un chasquido (3).
. AsegL_rese de que el bot6n de encendido electr6nico este funcionando escuchando y
viendo si se generan chispas en el quemador.
Si el sistema de encendido electr6nico ann no Iogra encender la barbacoa,
p6ngase en contacto con el Representante de de Servicioe al Cliente en su _rea
utilizando la informaci6n de contacto en nuestro eitio web.
Con_ctese a www.weber.com ®. ÷
©
i,
Negro (1) Quemador izquierdo CA)
Amarillo (2) Quemador derecho (B)
Azul (3) Quemador central (C)
Verde (tierra) (4) Quemador central (C)
iiiiiiii!i !i iiiii
ilili! !i!iii!ii!ii!717ili!i@i77777i
77111!
i®
Negro (1) Quemador izquierdo CA)
Amarillo (2) Quemador derecho (B)
Azul (3) Quemador central (C)
Verde (4) Quemador para dorar (D)
5O
Page 51

IVIANTENIIVllENTO DEL QUEIVIADOR LATERAL
ADVERTENCIA: Todos los controles y v_lvulas de
suministto de gas debet_n estar cetrados en la posici6n
APAGADO.
Asegurese de que el cable negro este conectado entre el encendedor y el electrode.
Asegurese de que el cable blanco este conectado entre el encendedor y el clip de
conexi6n a tierra.
La chispa deberb, ser de color blanco/azul, no amarilla.
A) Cable de encendido (1)
B) Cable de conexi6n a tierra (2)
C) Quemador (3)
Parilla del quemador lateral --
Tapa del quemador lateral
Arc y cabezal del quemador lateral
Emectrodo de encendido
Perimmade controm
Encendedor
IVIANTENIIVIIENTO ANUAL
Inspecci6n y limpieza de la malla contra araSas y demos insectos
Parainspeccionar la mallacontra ara_as y demb.sinsectos,retire el panel de control.
Si hubiese polvo o suciosobre las mallas, retire los quemadorespara limpiar las mallas.
Con uncepillo de cerdas suaves (p.ej.: un cepillo dedientes viejo), cepille suavemente
las malla contra araSasy demas insectos.
z_ PRECAUCION: No limpie las mallas contta ata_as y
demos insectos con herramientas duras o afiladas. No las
desmonte ni agrande los orificios de las mismas.
Golpeeligeramente el quemador para sacar la basuray suciedad fuera del tubo
quemador. Unavez limpios,vuelva a colocar las mallas y quemadores en susitio.
Si la malla contra araSasy dem&s insectosse daSaseo no pudiese limpiarse,porfavor
p6ngaseen contacto con el Representantede Servieios al Clientede su zona, cuyadatos
deeontaetoencontrar&en nuestrositio en la Internet.Conectesea www.weber.com_L
Patr6n de la llama del quemador
Los quemadores de la barbacoa de gas Weber _ han sido ajustados en la fabrica para
que les entre la mezela correcta de aire y gas. Ae_. se muestra el patr6n correcto de la
llama.
A) Tubo quemador(1)
B) Las puntas ocasionalmente titilarb.n con un color amarillo (2)
C) Azul claro (3)
D) Azul oscuro (4)
Si las llamas no se presentan de manera uniforme a Io largo del tubo quemador, siga
las instrucciones de limpieza del quemador.
%
®
51
Page 52

ATENCION: A este producto se le han realizado pruebas de seguridad y ha sido certificado para usarse en un pais
especifico. Refi_rase al pais indicado en la parte e×terna del cart6n de empaque.
Estas partes pueden ser componentes que transporten gas o Io quemen. Por favor p6ngase en contacto con el Departamento de
Atenci6n al Cliente de Weber-Stephen Products Co. para obtener informaci6n sobre las partes de repuesto Weber-Stephen Products
Co. genuinas.
ADVERTENCIA: No trate de realizar reparaci6n alguna a los componentes que transporten o quemen gas sin antes
ponerse en contacto con el Departamento de Atenci6n al Cliente de Weber=Stephen Products Co. Si no Ilegase a acatar
esta advertencia, sus acciones podnan causar un fuego o una explosi6n que resulte en lesiones personales serias o la
muerte o daSos a la propiedad.
WEBER-STEPHEN PRODUCTS CO.
www.weber.com ®
@2011 Dise_ado pot Weber-Stephen Products Co.,
una corporaci6n registrada en illinois, ubicada en 200 East Daniels Road, Palatine, illinois 60067 U.S.A.
Impreso en los EE. UU.
Page 53

320/330
VOUS DEVEZ LiRE CE MODE D'EMPLO! ]
AVANT D'UTILiSER VOTRE GRILL A GAZ.
Ak DANGER
S'il y a une odeur de gaz :
1. Coupez I'admission de gaz de I'appareil.
2. Eteindre toute fiamme nue.
3. Ouvrir le couvercle.
4. Si I'odeur persiste, _loignez-vous de
I'appareil et appelez imm6diatement
le fournisseur de gaz ou le service
d'incendie.
Une fuite de gaz risque de provoquer un
incendie ou une explosion susceptible
d'occasionner des blessures graves, voire
mortelles, ou des d6g&ts mat6riels.
/k MISE EN GARDE : Suivez toutes les
proc6dures de d6tection des fuites de
ce manuel avec soin avant d'utiiiser le
barbecue. Faites-le m_me si le barbecue
a _t_ assembl6 par le revendeur.
pd_imTEA L'iNTENTION DE L'iNSTALLATEUR :
s pr_sentes instructions doivent _tre
ises au propri6taire et le propri6taire
vrait les conserver pour les utiliser
s tard.
CET APPAREIL A GAZ EST CONCU
POUR UNE UTILISATION EN EXTERIEUR
UNJQUEMENT.
ik AVERTISSEMENT :
=
Ne pas entreposer ni utiliser de
I'essence ni d'autres vapeurs ou liquides
inflammables dans le voisinage de
I'appareil, ni de tout autre appareil.
=
Une bouteiiie de propane qui n'est pas
raccord6e en vue de son utilisation,
ne doit pas _tre entrepos_e dans le
voisinage de cet appareil ou de tout
autre appareil.
/k MISE EN GARDE • N'allumez pas cet
appareil sans lire d'abord les sections
traitant de EALLUMAGE DU BRULEUR
de ce manuel.
_'_ MEMBER
Nati0naJPROPANEGAS Ass0ciati0_
56508 LP
FC FRENCH CANADIAN
Page 54

AkDANGER
Le non respect des consignes intitul_es Danger, Mise en garde et Attention contenues dans le present Mode d'emploi peut
entra_ner une blessure grave ou la mort, ou un incendie ou une explosion provoquant des dommages a la proprietY.
z_ MISES EN GARDE
Z_ Ne stockez pas de bouteille de gaz propane liquide de
rechange ou de bouteille de gaz propane liquide d_branch_e
au-dessous ou a proximit_ de ce barbecue.
Z_ Un mauvais montage peut se r_v_ler dangereux. Veuillez
suivre les instrucitons de montage avec soin.
Z_ Apr_s une p_riode de stockage et/ou d'inutilisation, le
barbecue & gaz Weber _ devrait faire I'objet d'une v_rification
visant a d_tecter toute fuite et toute obstruction des
br_leurs avant toute utilisation. Voir les instructions de ce
manuel pour les procedures correctes.
Z_ N'utilisez pas le barbecue a gaz Weber ® en cas de fuite.
Z_ N'utilisez pas de flamme pour d_tecter les fuites de gaz.
Z_ Aucune mati_re inflammable ne devrait jamais se trouver
darts un rayon de 24 pouces par rapport _ I'arri_re ou aux
cSt_s de votre barbecue a gaz Weber ®.
Z_ Ne placez pas de b&che de protection de barbecue ni
aucune mati_re inflammable sur la barbecue ou dans la
zone de stockage au=dessous du barbecue.
Z_ Votre barbecue a gaz Weber _ ne devrait jamais _tre utilis_
par des enfants. Les pi_ces accessibles du barbecue
peuvent atteindre une temperature tr_s _lev_e. Maintenez
les jeunes enfants a I'_cart pendant son utilisation.
Z_ Vous devriez faire preuve d'une prudence raisonnable
Iorsque vous utilisez votre barbecue a gaz Weber +. Celui=
ci sera tr_s chaud pendant la cuisson ou le nettoyage et
ne devrait jamais _tre laiss_ sans surveillance ni d_plac_
pendant son utilisation.
Z_ Si les br_leurs s'_teignaient pendant I'utilisation, fermez
toutes les valves de gaz. Ouvrez le couvercle puis patientez
cinq minutes avant d'essayer de rallumer les br_leurs, en
utilisant les instructions pour I'allumage.
Z_ N'utilisez pas de charbon de bois ni de pierres de lave darts
votre barbecue a gaz Weber.
Z_ Ne vous penchez jamais au-dessus du grill ouvert ou ne
placez jamais les mains ou les doigts sur I'extr_mit_ avant
du boitier de cuisson.
Z_ Si un feu de graisse se produisait, fermez tous les br_leurs
et laissez le couvercle ferm_ jusqu'& ce que le feu s'_teigne.
Z_ N'_largissez pas les orifices des valves ou les ports des
br_leurs Iorsque vous nettoyez les valves ou _es br_leurs.
Z_ Le barbecue a gaz Weber _ devrait _tre nettoy_
m_ticuleusement de fa_on r_guli_re.
Z_ Le gaz propane liquide n'est pas du gaz naturel. La
conversion ou la tentative d'utilisation de gaz naturel darts
un appareil a propane liquide ou de gaz propane liquide
darts un appareil _ gaz naturel est dangereuse et annulera
votre garantie.
Z_ Utilisez des gants pour barbecue r_sistants _ la chaleur
Iorsque vous utilisez le barbecue.
Z_ Maintenez tout cordon _lectrique d'alimentation ainsi que
le tuyau d'alimentation en combustible _ I'_cart de toute
surface chauff_e.
Z_ Les d_riv_s de combustion g_n_r_s Iors de I'utilisation
de ce produit contienne des agents chimiques reconnus
par I'Etat de Californie comme provoquant des cancers,
des anomalies cong_nitales ou d'autres troubles de la
reproduction.
Z_ N'utilisez ce barbecue que si toutes les pi_ces sont en
place. Cet appareil doit _tre correctement assembl_
conform_ment aux instructions de montage.
Z_ N'int_grez pasce module de grill a n'importe quelle
construction encastr_e ou _ glissi_re. Le non respect de
cet Avertissement risque de provoquer un incendie ou une
explosion susceptible de provoquer des d_g_ts materiels
ainsi que des blessures graves voire un d_c_s.
APPAREILS A GAZ PROPANE UNIQUEMENT:
z_ Utilisez I'ensemble r_gulateur de pression et tuyau fourni
avec votre barbecue & gaz Weber +.
z_ Ne tentez pas de d_connecter I'ensemble r_gulateur et
tuyau de gaz ni tout autre raccord de gaz pendant que vous
utilisez votre barbecue.
Z_ L'utilisation d'une bouteille de gaz propane liquide
comportant une bosse ou d'une bouteille rouill_e peut _tre
dangereuse et une telle bouteille devrait _tre v_rifi_e par
votre fournisseur de propane. N'utilisez pas une bouteille de
propane liquide dont la valve est d_t_rior_e.
Z_ Bien que votre bouteille de propane liquide puisse
sembler vide, il est possible qu'elle contienne encore du
gaz, et la bouteille devrait _tre transport_e et stock_e en
consequence.
Z_ Si vous voyez, sentez ou entendez du gaz s'_chapper de la
bouteille de propane liquide:
1. Eloignez-vous de la bouteille de propane liquide.
2. Ne tentez pas de corriger le probl_me vous=m_me.
3. Appelez votre service incendie. ÷
54
Page 55

VUE ECLATEE 320 ................................... 4
LISTE DE LAVUE ECLATEE :320 ......................... 5
VUE ECLATEE :330 .................................... 6
ALLUMAGE & UTILISATION DU BRULEUR LATERAL ...... 68
ALLUMAGE DU BRULEUR LATERAL ................................. 68
POUR ETEINDRE ................................................ 68
ALLUMAGE MANUEL DU BRULEUR LATERAL ......................... 69
POUR ETEINDRE ................................................ 69
LISTE DE LAVUE ECLATEE 330 ......................... 7 DEPANNAGE ....................................... 70
MISES EN GARDE ................................... 54 DEPANNAGEDU BRULEUR LATERAL................... 71
TABLE DES MATIERES ............................... 55
GARANTIE ......................................... 56
GENERALITES ...................................... 57
INSTALLATION AU CANADA ........................................ 57
UTILISATION .................................................... 57
STOCKAGE ET/OU INUTILISATION .................................. 57
INSTRUCTIONS RELATIVES AU GAZ .................... 58
ASTUCES POUR UNE MANIPULATION SANS DANGER DES
BOUTEILLES DE GAZ PROPANE LIQUIDE ............................ 58
INFORMATIONS IMPORTANTES RELATIVES A LA BOUTEILLE DE PL...... 59
PREPARATION DE LA DETECTION DES FUITES ....................... 59
DETECTION DES FUITES DE GAZ .................................. 61
RECHARGEMENT DE LA BOUTEILLE DE PROPANE LIQUIDE ............ 62
AVANT D'UTILISER LE GRILL .......................... 63
NIVEAU DE COMBUSTIBLE ........................................ 63
PLATEAU-EGOUTTOIR AMOVIBLE ET EGOUTTOIR JETABLE ............ 63
INSPECTION DE LALLUMEUR ELECTRONIQUE ....................... 63
INSPECTION DU TUYAU ........................................... 63
ALLUMAGE & UTILISATION DU BRULEUR PRINCIPAL ..... 64
ALLUMAGE DU SRULEUR PRINCIPAL ............................... 64
POUR ETEINDRE ................................................ 64
ALLUMAGE MANUEL DU BRULEUR PRINCIPAL ....................... 65
POUR ETEINDRE ................................................ 65
MAINTENANCE ..................................... 71
NETTOYAGE .................................................... 71
GRILLES ANTI-ARAIGNEES/INSECTES WEBER ® ...................... 71
NETTOYAGE OU REMPLACEMENT DES TUBES DU BRULEUR ........... 72
UTILISATION DU SYSTEME DALLUMAGE ELECTRONIQUE .............. 74
MAINTENANCE DU BRULEUR LATERAL ............................. 75
MAINTENANCE ANNUELLE ........................................ 75
ALLUMAGE & UTILISATION DU
GRILL SEAR STATION®{MODELE 330) .................. 66
ALLUMAGE DU BRULEUR SEAR STATION ® ........................... 66
ALLUMAGE MANUEL DU BRULEUR SEAR STATION ® ................... 66
UTILISATION DE LA SEAR STATION ® ................................ 66
CONSEILS & ASTUCES POUR LA GRILLADE ............. 67
PRECHAUFFAGE ................................................ 67
CUISSON COUVERTE ............................................ 67
ECOULEMENTS DE JUS ET DE GRAISSES .......................... 67
SYSTt_ ME FLAVORIZER ® .......................................... 67
SEAR STATION ® ................................................. 67
55
Page 56

Weber-Stephen Products Co. (Weber) garantit par le present document a.I'ACHETEUR D'ORIGINE de
ce grill a gaz Weber e que celui-ci ne comportera aucun defaut de piece ni de main d'oeuvre a compter
de la date d'achat comme suit :
Fonte d'aluminium:
Structure en acier inoxydable:
Tubes du brQleur en acier inoxydable:
Grilles de cuisson en acier inoxydable:
Barres FlavorizeK _ en acier inoxydable:
Grilles de cuisson en fonte fer emaill6e:
BrQleur de la ratissoire & infrarouge:
_tcondition qu'il ait ete assemble et utilise conformement aux instructions imprimees qui
I'accompagnent. Weber peut exiger une preuve raisonnable de vetre date d'achat. VOUS DEVRIEZ
DONC CONSERVER VOTRE TICKET DE CAISSE OU VOTRE FACTURE.
La presents Garantie limitee est limitee a la reparation ou au remplacement des pieces qui s'averent
defectueuses dans le cadre d'une utilisation normale et d'un entretien normal et dent I'examen indique,
_tla satisfaction de Weber, qu'elles sent defectueuses. Avant de retourner toute piece, veuillez
entrer en contact avec le Representant du Service clientele le plus proche grace aux coordonnees
_tvetre disposition sur notre site Internet. Si Weber confirms le defaut et approuve la demande,
Weber choisira de remplacer ces pieces sans frais. S'il vous est demands de retourner les pieces
defectueuses, les frais de transport devrent 6tre prepayes. Weber retournera les pieces a I'acheteur,
france de port.
La presents Garantie limitee ne couvre pas toute defaillance ou difficulte d'utilisation provequee par un
accident, une utilisation abusive, une mauvaise utilisation, une alteration, une mauvaise application, un
acte de vandalisme, une installation incorrecte eu une maintenance ou un entretien incorrects, ou le
defaut d'entretien normal et regulier, y compris mais pas seulement les demmages prevoques par des
insectes a I'interieur des tubes du brt]leur, tel que decrit dans le present mode d'emplei.
Touts deterioration ou tout dommage resultant de conditions meteorologiques graves comme de la
gr_le, des euragans, des seismes eu des ternades, toute deceleration resultant d'une exposition b. des
agents chimiques directement ou dans I'atmesphere, n'est pas couverte dans le cadre de la presente
Garantie limitee.
II n'existe aucune autre garantie expresse hormis celles exposees dans le present document et toute
garantie de commercialisation et de ben etat induite est limitee enduree a la periode de couverture de
la presente Garantie limitee ecrite expresse. Certaines regions n'autorisent pas de limitation de duree
de la garantie induite ; il est donc posible que cette limitation ne s'applique pas a vous.
Weber ne peut _tre tenu pour responsable de tout dommage particulier, induit ou se produisant par
voie de consequence. Certaines regions n'autorisent pas rexclusion ou la limitation des dommages
indirects ou se produisant par voie de consequence ; il est donc possible que cette limitation ou
exclusion ne s'applique pas a vous.
Weber n'autorise aucune personne ou societe a presumer en son nom de toute autre obligation
ou responsabilite en relation avec la vente, rinstallation, rutilisation, le retrait, le retour ou le
remplacement de ses equipements ; et aucune de ces representations ne lie Weber.
Structure emaill6e:
Grilles de cuisson 6maillees:
Barres Havorize¢ _ 6maillees:
Toutes les autres pieces:
25 ans (2 ans pour lapeinture & rexception de toute d_coloration)
25 ans
25 ans
10 ans
5 arts sans trou provoque par la rouille ou par une brQlure
5 arts sans trou provoque par la rouille ou par une brQlure
5 arts sans trou provoque par la rouille ou par une brQlure
3 arts sans trou provoque par la rouille ou par une brQlure
2 ans sans trou provoque par la rouille ou par une brt31ure
2 arts
2 ans
La presente Garantie s'applique uniquement aux produits vendus au detail.
WEBER-STEPHEN PRODUCTS CO.
Product Registration
Re, Box 40530
Burlington, ON L7P 4Wl
Pour des pi_ces de rechange, appelez le :
1-800-265-2150
www.weber.com ®
Connectez-vous sur www.weber.com ®, s_leotionnez votre pays d'origine, et enregistrez votre
grill aujourd'huL
56
Page 57

Votre barbecue #, gaz Weber ¢ est un appareil de cuisson d'exterieur portatif. Avec ce
barbecue a gaz Weber _ vous pouvez griller, cuire au barbecue, r6tir et cuire avec des
resultats difficilement reproductibles en utilisant des appareils de cuisine d'interieur. Le
couvercle ferme et les Barres Flavorizer _ donnent aux aliments une "saveur d'exterieur"
particuliere.
Ce barbecue a.gaz Weber ¢ est portatif de sorte que vous puissiez facilement changer
son emplacement dans votre cour ou dans votre patio. La transportabilite signifie
que vous pouvez emmener votre barbecue b. gaz Webe¢ _avec vous Iors de vos
deplacements.
Earrivee de gaz Propane liquide (PL) est facile _tutiliser et vous donne davantage de
contr61e sur la cuisson que si vous utilisiez du charbon de bois.
o Les presentes instructions vous fourniront les exigences minimales pour le montage
de votre barbecue a gaz Weber ¢. Veuillez lire les consignes avec attention avant
d'utiliser votre barbecue b.gaz Weber _. Un montage incorrect peut se reveler
dangereux.
Ne convient pas b.une utilisation par des enfants.
S'il existe des codes regionaux s'appliquant aux grills a.gaz portatifs, vous devrez les
respecter. Einstallation dolt etre conforme aux codes regionaux ou, en I'absence de
tels codes, avec le Code national relatif aux gaz combustibles, ANSI Z223.1/NFPA
54, le Code relatif aux installations de gaz naturel et de gaz propane, CSA B149.1, ou
le Code relatif au stockage et & la manipulation du propane, B149.2, ou _.la Norme
relative aux vehicules de Ioisirs, ANSI A 119.2/NFPA 1192, et les Series CSA Z240
RV, Code relatif aux vehicules de Ioisirs, le cas echeant.
Vous devez utiliser le regulateur de pression fourni avec le barbecue a gaz Weber _.
Ce regulateur est parametre pour une colonne d'eau de 11 pouces (pression).
Ce barbecue b.gaz Weber e est congu pour une utilisation avec du gaz propane
liquide (PL) uniquement. Ne I'utilisez pas avec du gaz naturel (gaz de ville). Les
valves, les orifices, le tuyau et le regulateur sent adaptes au gaz PL uniquement.
N'utilisez pas ce barbecue avec du charbon de bois.
Verifiez que la zone situee au-dessous du panneau de commandeet que le bac de
recuperation des graisses amovible ne comportent aucun debris susceptible de faire
obstacle _.la circulation de I'air necessaire a la combustion ou & la ventilation.
Les zones b.proximite de la bouteille de PL doivent Ctre degagees et ne doivent
comporter aucun debris.
Les regulateurs de pression et les ensembles de tuyaux de rechange doivent etre
ceux specifies par Weber-Stephen Products Co. ®
INSTALLATION AU CANADA
Les presentes instructions, bien que generalement acceptables, ne sont pas
necessairement conformes aux Codes d'installation du Canada, en particulier en ce
qui concerne les canalisations au-dessus du sol et les canalisations souterraines. Au
Canada, I'installation de cet appareil dolt Ctre conforme aux codes regionaux et/ou b.la
Norme CSA-B149.2 (Code relatif au stockage eta la manipulation de propane).
UTILISATION
& MISE EN GARDE : Utilisez ce barbecue uniquement en
ext_rieur clans une zone bien ventil_e. Ne I'utilisez pas clans
un garage, un b&timent, un passage couvert ou route autre
zone confin_e.
z_ MISE EN GARDE : Maintenez les ouvertures de ventilation
de I'enclos de la bouteille de gaz cl_gag_es et libre de tout
cl_bris.
z_ MISE EN GARDE : Vous ne clevez pas utiliser votre barbecue
gaz Weber ®au=clessous cl'une structure inflammable.
z_ MISE EN GARDE : Votre barbecue a gaz Weber ®n'est
pas congu pour _tre install_ _ I'int_rieur ou au=clessus de
v_hicules de Ioisirs et/ou de bateaux.
z_ MISE EN GARDE : N'utilisez pas le barbecue clans un rayon
de 24 pouces cle route mati_re inflammable.
z_ IVllSEEN GARDE : La totalit_ clu boitier de cuisson atteint
une temperature _lev_e pendant la cuisson. Ne laissez pas
le grill sans surveillance.
z_ MISE EN GARDE : IVlaintenez tout cordon cl'alimentation
_lectrique ainsi que le tuyau cl'alimentation en combustible
I'_cart de route surface chauff_e.
z_ MISE EN GARDE : Maintenez la zone de cuisson cl6gag6e
de route vapeur ou de tout liquicle inflammable comme de
I'essence, de I'alcool, etc., et cle route mati_re inflammable.
z_ MISE EN GARDE : Ne stockez jamais une bouteille cle PL
suppl_mentaire (de rechange) au-clessous ou _ proximit_ clu
barbecue _ gaz Weber _.
& IVllSE EN GARDE : La bouteille de PL utilis_e avec votre
barbecue cloit 6tre 6quip_e cl'un clispositif de pr6vention
clu surremplissage homologu_ OPD (Overfilling Prevention
Device) et cl'un raccorcl QCCl ou de Type 1 (CGA810). Le
raccorcl de la bouteille de gaz cloit 6tre compatible avec le
raccorcl clu barbecue.
STOCKAGE ET/OU INUTILISATION
Le gaz dolt Ctre ferme au niveau de la bouteille de propane liquide Iorsque vous
n'utilisez pas le barbecue b. gaz Weber ¢.
Lorsque le barbecue a gaz Weber ¢ est stocke en exterieur, I'arrivee de gaz dolt etre
DECONNECTEE et la bouteille de gaz PL stockee en exterieur darts une zone bien
ventilee.
La bouteille de PL dolt Ctre stockee en exterieur dans une zone bien ventilee hors de
portee des enfants. La bouteille de PL debranchee ne dolt pas Ctre stockee dans un
b_ttiment, dans un garage ni dans toute autre zone confinee.
Lorsque la bouteille de PL n'est pas debranchee du barbecue a gaz Weber ¢,
I'appareil et la bouteille de PL doivent etre stockes en exterieur dans un espace bien
ventile.
Le barbecue b.gaz Weber ¢ devrait faire I'objet d'une inspection visant a detecter toute
fuites ainsi que tout obstacle present dans les tubes du brQleur avant toute utilisation
(Voir "MAINTENANCE/MAINTENANCE ANNUELLE").
Verifiez que les zones situees sous le panneau de commande et le plateau inferieur
amovible ne comportent pas de residus susceptibles de faire obstacle a la circulation
de I'air de combustion ou de ventilation.
Les Grilles anti araignees/insectes devraient aussi faire robjet d'un contr61e afin de
detecter toute obstruction (Voir "MAINTENANCE/MAINTENANCE ANNUELLE"). ®
57
Page 58

ASTUCES POUR UNE MANIPULATION SANS DANGER DES
BOUTEILLES DE GAZ PROPANE LIQUIDE
o Le gaz Propane liquide (PL) est un produit derive du petrole comme le sent I'essence
et le gaz naturel. Le gaz PL est gazeux a des temperatures et & des pressions
ordinaires. Soumis _tune pression moderee, e I'interieur d'une bouteille de gaz, le
gaz PL est liquide. Au fur et _tmesure que la pression diminue, le liquide vaporise
rapidement et devient gazeux.
I'odeur du gaz PL ressemble a celle du gaz naturel. Vous devriez avoir conscience
de cette odeur.
Le gaz PL est plus Iourd que Fair. Du gaz PL s'echappant d'une fuite peut
s'accumuler dans des espaces proches du sol, ce qui emp¢cherait sa dispersion.
Pour remplir la bouteille de PL, emmenez-la chez un revendeur de gaz propane, ou
cherchez a "gaz propane" dans I'annuaire pour d'autres source de gaz PL.
z_ MISE EN GARDE : Nous vous recommandons de faire
rernplir votre bouteille de PL aupr_s d'un revendeur de
gaz PL agree, par du personnel qualifi& qui rernplit la
bouteille au poids. UN REIVIPLISSAGE iNCORRECT EST
DANGEREUX.
t'air dolt etre extrait d'une bouteille de PL neuve avant que celle-ci soit remplie pour
la premiere lois. Votre revendeur de PL est equipe pour effectuer cette operation.
La bouteille d ePL dolt 6tre installee, transportee et stockee en position verticale.
Les bouteiiles de PL ne devraient pas 6tre I&chees ou maipulees brutalement.
Ne stockez ou ne transportez jamais la bouteille de PL dans des endroits oQ la
temperature peut atteindre 125 ° F (trop chaud pour tenir & la main - par exemple :
ne laissez pas la bouteille de PL & I'interieur d'une voiture par une journee chaude).
Remarque : Une recharge va durer environ 18-20 heures de temps de cuisson
darts des conditions d'utilisation normales. Le niveau de combustible, fonctionnalit6
disponible sur certains de nos grills, indiquera le niveau de propane de sorte que vous
puissiez recharger la bouteille avant de manquer de combustible. La bouteille n'a pas
besoin d'etre vide pour etre recharg6e.
Manipulez les bouteilles de PL "vides" avec le meme soin que Iorsqu'elles sotn
pleines. Meme Iorsque la bouteille de PL ne contient plus de liquide il peut toujours y
avoir du gaz sous pression e I'interieur. Fermez toujours la valve de la bouteille avant
de la deconnecter.
z_ ATTENTION : Placez le cache anti-poussi_re sur la sortie de
la valve de la bouteille de gaz chaque fois que celle=ci est
inutilis_e. N'installez que le type de cache anti-poussi_re
fourni avec la valve de la bouteille de gaz. L'utilisation
d'autres types de caches ou de bouchons pourrait entrainer
une fuite de propane.
N'utilisez pas de bouteille de PL deterioree. Les bouteilles de PL comportant un
renfoncement ou rouillee ou les bouteilles de PL dont la valve est deterioree peuvent
etre dangereuses et devraient immediatement etre remplacees par des bouteilles
neuves.
Le raccord ot_ le tuyau est relie& la bouteille de gaz PL dolt faire I'objet d'un contrele
de detection des fuites & chaque lois que la bouteille de PL est rebranchee. Par
exemple, detectez les fuites & chaque lois que le bouteiile de PL est rechargee.
Assurez-vous que le regulateur est monte avec le petit trou d'aeration oriente vers
le bas de sorte qu'il ne regoive pas d'eau. Cette aeration devrait etre degagee des
impuretes, de la graisse, des insectes, etc.
Les raccords de gaz fournis avec votre barbecue a gaz Weber _ ont ete congus et
testes pour etre conformes a 100% des exigences du CSA et de IANSI.
& IVllSE EN GARDE : Les bouteilles de PL de rechange doivent
s'adapter au raccord du r_gulateur fourni avec ce barbecue.
Exigences relatives _ la bouteille de propane liquide
Assurez-vous que les bouteilles de gaz sont certifiees D.O.T. (1), et que leur date
verifie (2) est dans les cinq ans. Votre fournisseur de gaz PL peut faire cela pour
VOUS.
Tousles dispositifs de rechargement de bouteilles de PL doivent inclure une
collerette pour proteger la valve de la bouteille de gaz.
La bouteille de PL dolt avoir une taille de 20 lb. environ (18_A pouces de haut, 12_A
pouces de diametre).
La bonbonne dolt etre fabriquee et marquee conformement aux Specifications
s'appliquant aux bonbonnes de gaz - propane liquide du ministere americain des
Transports (D.O.T.) ou & la norme nationale du Canada, CAN/CSA-8339, sur les
bonbonnes, spheres et tuyaux ou sur le transport des marchandises dangereuses; et
commission, si applicable.
Exigences canadiennes en ce qui concerne les bouteilles de propane
liquide
Remarque : Votre detaillant peu vous aider a trouver une bouteille de gaz de rechange
adaptee a votre barbecue.
La bouteille de PL doit etre fabriquee et marquee conformement aux specifications
relatives aux bouteilles de gaz PL, T.C. ®
58
Page 59

INFORMATIONS IMPORTANTES RELATIVES A LA
BOUTEILLE DE PL
DANGER
Ne stockez JAIVlAIS une Bouteille de PL de rechange au=
dessous ou a proximit_ de ce barbecue. Ne remplissez
JAMAIS la bouteille _ plus de 80%. Le non respect strict des
consignes de s_curit_ intitul_es DANGER pourrait entrainer
un incendie provoquant la mort ou une blessure grave.
Votre grill a.gaz Weber ¢ est equipe pour etre raccorde a un dispositif d'alimentation de
bouteille de gaz con£u pour eliminer les emanations.
IVIISEEN GARDE : N'utilisez ce grill qu'en ext_rieur darts
une zone bien ventil_e. Ne I'utilisez pas dans un garage,
darts un passage couvert ni darts toute autre zone confin_e.
Les methodes de remplissage correctes pour le rechargement de votre bouteille de
gaz sont le remplissage au poids ou au volume, tel que decrit par la norme NFPA 58.
Veuillez vous assurer que votre station de remplissage remplit votre bouteiile de PL au
poids ou au volume. Demandez au personnel de votre station de remplissage de lire les
consignes de purge et de remplissage figurant sur la bouteille de PL avant de tenter de
la remplir.
PREPARATION DE LA DETECTION DES FUITES
Verifiez que toutes lea valves des bruleurs sont fermees
Les valves sont expediees en position fermee (ARRETE), mais vous devriez les verifier
pour vous assurer qu'elles sont fermees. Verifiez en les enfon(_ant et en les tournant
dans le sens des aiguilles d'une montre. Si elles ne tournent pas, elles sont fermees. Si
elles tournent, continuez e les tourner jusqu'a ce qu'elles ne tournent plus, elles sont
maintenant fermees.
F-q,
iii
1 Valve de type 1
2 Volant manuel
3 Filetage externe
4 Ecrou thermosensible
5 Regulateur de propane
Utilisez la pince de r_tention du tuyau de la bouteiHe de propane liquide
Latotalite des regulateurs degrills a gazWeber¢ est equipee d'une connexion de
bouteille homologuee UL conformement a la derniere edition de IANSI Z21.58.Ceci va
necessiter une bouteille de propaneliquide qui est equipee de la m¢me maniere avec
uneconnexion deType 1 dans la valve de la bouteille de gaz. Cecouplage de Type 1
vous permetde realiser un accrochage rapide et sans aucun danger entre votregrill
gaz etvotre bouteille depropane liquide.Cela elimine lerisque de fuitedue a une
raccord POL quin'est pas correctementserr& Legaz ne va pas sortir de la bouteille tant
que lecouplage deType 1ne sera pas completement engagea I'interieur du couplage.
MISE EN GARDE : Assurez=vous que la valve de la bouteille
de PL est ferrule. Fermezqa en tournant la valve clans le
sens des aiguilles d'une montre.
DANGER
N'utilisez pas de flamme hue pour d_tecter les fuites de gaz.
Assurez=vous qu'il n'y a aucune _tincelle ou flamme hue
clans la zone Iorsque vous d_tectez les fuites. Des _tincelles
ou des flammes vont provoquer un incendie ou une
explosion qui peuvent entra_ner une blessure grave voire un
d_c_s ainsi que des d_g&ts materiels.
59
Page 60

A) Ouvrez les portes du meuble qui sert de base. Avancez le regulateur et le tuyau et
sortez-les du meuble (1).
B) Localisez la pince de retention du tuyau (2) sur le tuyau du regulateur. Fixez-la bien
dans la fente (3) au-dessous de la graduation de la bouteille.
MISE EN GARDE : Le tuyau dolt _tre bien fix_ sur la
bouteille de gaz a I'aide de la Pince de r_tention du tuyau.
Le non respect de cette consigne risquerait de d_t_riorer le
tuyau avec pour consequence un incendie ou une explosion
susceptible de provoquer des blessures graves voire un
d_c_s ainsi que des d_g_ts materiels.
Certaines bouteilles de PL ont des assemblages de colliers superieurs differents. (Le
collier superieur est la bague de protection metallique autour de la valve.) Une serie de
bouteilles est montee avec la valve orientee vers I'avant (4). Les autres bouteilles se
montent avec la valve orientee a I'oppose de la graduation de niveau de carburant (5).
Weber recommande I'utilisation du fabricant de bouteilles Manchester and Worthington,
avec une capacite en eau de 47,6 Ibs. D'autres bouteilles peuvent ¢tre acceptables pour
une utilisation avec I'appareil e condition d'etre compatible avec les moyens de retention
de rappareil (voir les illustrations).
La bouteille de PL est installee e I'interieur du meuble qui sert de base, sur le support
de la bouteille (c6te droit).
C) Desserrez I'ecrou b.ailettes de verrouillage de la bouteille. Faites pivoter le
verrouillage de la bouteille (6).
D) Tournez la bouteille de PL de sorte que rouverture de la valve se trouve soit
ravant soit sur le c6te du barbecue b. gaz Weber_L
E) Soulevez la bouteille pour la mettre en en position sur le support de la bouteille (7).
F) Abaissez le verrou de la bouteille. Serrez I'ecrou e ailettes.
Connectez le tuyau _ la bouteille
A) Retirez la protection anti-poussiere en plastique de la valve.
B) Vissez le couplage du regulateur sur la valve de la bouteille, dans le sens des
aiguilles d'une montre, ou vers la droite (8). Serrez _.la main uniquement.
Remarque : Cette connexion se serre darts le sens des aiguilles d'une montre et elle
ne permet pas au gaz de circuler tant que le raccord n'est pas serr6. Cette connexion
necessite un serrage a la main uniquement.
MISE EN GARDE : N'utilisez pas de cl_ pour serrer le
raccord. L'utilisation d'une cl_ risque de d_t_riorer le
couplage du r_gulateur et risquerait de provoquer une fuite.
_'_l!;i!iiiiiiiiiiiii!i¸
_iiiiiiii;i!i!ilill
6O
Page 61

Retirez les boutons de cornrnande & le panneau de cornrnande pour
d_tecter les fuites
II vous faudra :un tournevis cruciforme.
A) Retirez les boutons de commande, le bouton de I'allumeur, I'ecrou de retention, et
la pile (1).
B) Retirez les vis du deflecteur de vent a I'aide d'un tournevis cruciforme (2).
C) Inclinez I'extremite du deflecteur de vent vers le baset faites glisser le deflecteur e
vent vers I'exterieur pour le retirer (3).
D) Laissez le module d'allumage pendre depuis les ills. Ne le debranchez pas (4).
E) Retirez les vis du dessous du panneau de commandes a I'aide d'un tournevis
cruciforme (5).
F) Soulevez legerement le panneau de commandes, inclinez I'extremite avant vers le
haut et soulevez doucement (6).
G) Remettez en place le panneau de commandes et le deflecteur de vent une fois la
detection des fuites terminee.
DETECTION DES FUITES DE GAZ
DANGER
N'utilisez pas de flamme hue pour effectuer la d_tection des
fuites. Assurez-vous de I'absence de toute 6tincelle ou flamme
hue dans la zone pendant que vous d_tectez les fuites.
La presence d'_tincelles ou de flammes hues provoquerait
un incendie ou une explosion susceptible d'entrainer des
blessures ou un d_c_s ainsi que des d_g&ts mat6riels.
Remarque : La tota!ite des raccords effectues en usine fair I'objet d'une detection
minutieuse des fuites. Les brOleurs ont ete testes a la flamme. Par mesure de securite
toutefois, vous devriez verifier a nouveau la totalite des raccords afin de detecter toute
fuite avant d'utiliser votre grill a gaz Weber'. L'expedition et la manipulation peuvent
desserrer ou deteriorer un raccord de gaz.
& IVllSE EN GARDE : Les raccords de gaz de votre grill
gaz ont _t_ test_s a I'usine. Nous vous recommandons
n_anmoins de d_tecter les fuites pour tous les raccords de
gaz avant d'utiliser votre grill a gaz.
z_ MISE EN GARDE : Effectuez ces contr61es de d_tection
des fuites m_me si votre barbecue a _t6 assemble par un
revendeur ou en boutique.
Si votre grill est pourvu d'un brQleur lateral, assurez-vous que ce brQleur lateral est
eteint.
Ouvrez I'arrivee de gaz a la source.
Z_ IVllSE EN GARDE : N'allumez pas les br_leurs Iorsque vous
d_tectez les fuites.
II vous faudra :Une solution d'eau savonneuse et un chiffon ou une brosse pour
I'appliquer.
A) Melangez I'eau et le savon.
B) Ouvrez I'arrivee de gaz (1).
C) Detectez les fuites en humidifiant le raccord a I'aide de la solution d'eau
savonneuse et en regardant si des bulles se forment. Si des bulles se forment, ou si
une bulle grossit, il y a une fuite.
S'il y a une fuite, fermez le gaz et serrez le raccord. Ouvrez _ nouveau le gazet
v_rifiez a nouveau a I'aide de la solution d'eau savonneuse. Si la fuite continue,
n'utilieez pas le barbecue. Contactez le repr_sentant du Service client le plus
proche _ I'aide des coordonn_ee _ votre disposition sur notre site Intemet.
Connectez-vous sur www.weber.com _.
D) Une lois la detection des fuites terminee, fermez I'arrivee de gaz b.la source et
rincez les raccords b. I'eau.
Remarque :Dans la mesure oOcertaines solutions de detection des fuites, notamment
I'eau savonneuse, peuvent s'averer legerement corrosives, la totalite des raccords
devrait etre rincee a I'eau apres la detection des fuites.
z_ MISE EN GARDE :Vous devriez d_tecter les fuites _ chaque
fois que vous d_connectez et reconnectez un raccord de gaz.
61
Page 62

V_rifiez :
A) Raccord entre le tuyau du regulateur et la t6te du braleur (1).
B) Raccord entre la conduite de gaz principale et la tete du brOleur (2).
C) Raccords entre la conduite de gaz principale et le collecteur (3).
D) Raccord entre la conduite de gaz du breleur lateral et le collecteur (4).
E) Connexion entre le raccord de la conduite du brQleur et la coupe du brQleur lateral (5).
F) Connexions entre le raccord de la conduite du breleur lateral et la valve du braleur
lateral (6).
Z_ MISE EN GARDE : En cas de fuite au niveau d'un raccord (1,
2, 3, 4, 5, ou 6), resserrez le raccord _ I'aide d'une cl_ puis
d_tectez _ nouveau les fuites _ I'aide d'une solution d'eau
savonneuse. En cas de persistance d'une fuite une fois que
vous avez resserr_ le raccord, ferrnez le gaz (position OFF).
N'UTILISEZ PAS LE GRILL. Contactez le repr6sentant du
Service clientele de votre r6gion a I'aide des coordonn_es
votre disposition sur notre site Internet.
Connectez-vous sur www.weber.corn ®.
G) Raccord entre le brOleur lateral et la deconnexion rapide (7).
H) Connexion entre le tuyau du regulateur et la bouteille de gaz (8).
I) Connexion entre le tuyau du regulateur et le regulateur (9).
J) Connexions entre les valves et le collecteur (10).
Z_ MISE EN GARDE : En cas de fuite au niveau des raccords
(7, 8, 9 ou 10), fermez le gaz (position OFF). N'UTILISEZ PAS
LE GRILL. Contactez le repr_sentant du Service clientele de
votre r_gion a I'aide des coordonn_es &votre disposition
sur notre site Internet.
Connectez-vous sur www.weber.com ®.
Une fois les detections de fuites terminees, fermez I'arrivee de gaz (position OFF) a la
source puis rincez les connexions b.I'eau.
R_installer le panneau de comrnande
II vous faudra :un tournevis cruciforme.
A) Positionnez I'extremite superieure du panneau de commande sur les languettes du
ch&ssis. Enfoncez-le en position.
B) Reinstallez le module de I'allumeur.
C) Faites glisser les deux languettes les plus courtes du deflecteur de vent vers
I'extremite interne du panneau de commande tandis que vous ferez glisser
la languette la plus Iongue au-dessus de I'extremite externe. Recherchez les
illustrations precedentes pour avoir une reference.
D) Alignez les vis avec les trous destines & les recevoir sur le support du panneau de
commande ainsi que sut le ch&ssis.
E) Serrez les vis.
F) Placez les boutons de commande correspondants sur les tiges des valves. ®
RECHARGEMENT DE LA BOUTEILLE DE PROPANE LIQUIDE
Nous vous recommandons de recharger la bouteille de PL avant que celle-ci ne soit
completement vide.
Retrait de la bouteille de PL :
A) Fermez la valve de la bouteille de gaz (tournez dans le sens des aiguilles d'une
montre) (1).
B) Devissez le couplage du regulateur en le tournant dans le sens inverse des aiguilles
d'une montre, a la main uniquement (2).
C) Desserrez I'ecrou a oreilles verrouillant la bouteille de gaz et retirez le verrou de la
bouteille de gaz (3).
D) Soulevez la bouteille de gaz pour la sortir.
Pour recharger la bouteille de PL, emmenez-la chez un revendeur de propane, ou
cherchez _."gaz propane" dans I'annuaire pour d'autres sources de gaz PL.
Z_ MISE EN GARDE : Nous vous recommandons de faire
remplir votre bouteille de PL aupr_s d'un revendeur de gaz
agree, par du personnel qualifi_, qui remplit la bouteille au
poids. UN MAUVAIS REMPLISSAGE EST DANGEREUX.
z_ ATTENTION : Placez le cache anti-poussi_re sur la sortie de
la valve de la bouteille de gaz chaque fois que la bouteille
de gaz est inutilis_e. N'utilisez que le type de cache anti-
poussi_re fourni avec la valve de la bouteille de propane.
L'utilisation d'autres types de caches ou de bouchons
pourrait provoquer une fuite de propane.
62
II est possible
que le grill de
I'illustration
pr_sente de
I_geres differences
par rapport au
modele achet_.
Page 63

NIVEAU DE COMBUSTIBLE
Verifiez le niveau de combustible en regardant la ligne de niveau d'indication coloree,
situee sur le c6te de la graduation de la bouteille de gaz.
A) Vide (1)
B) Moyen (2)
C) Plein (3)
PLATEAU=EGOUTTOIR AMOVIBLE ET EGOUTTOIR JETABLE
Votre grill a ete fabrique avec un dispositif de collecte des graisses integre. Verifiez
le plateau-egouttoir amovible et I'egouttoir jetable afin de detecter la presence
d'accumulations de graisses a chaque fois que vous utilisez votre grill.
Retirez I'exces de graisse a I'aide d'une spatule en plastique ; voir I'illustration. Lorsque
cela s'avere necessaire, lavez le plateau-egouttoir et I'egouttoir jetable a I'aide d'une
solution d'eau savonneuse, puis rincez-les a I'eau claire. Remplacez I'egouttoir jetable
Iorsque son remplacement est necessaire.
MISE EN GARDE : V_rifiez si le plateau-_gouttoir et
I'_gouttoir amovible contiennent des accumulations de
graisses avant chaque utilisation. Retirez les exc_s de
graisse afin d'_viter un embrasement de ces graisses. Un
embrasement des graisses risquerait de provoquer une
blessure grave ou des d_g&ts materiels.
ATTENTION : Ne couvrez=pas le plateau=_gouttoir amovible
d'une feuille de papier aluminium. ÷
[] [] []
.[
lU
m
INSPECTION DE L_,LLUMEUR ELECTRONIQUE
Verifiez que votre pile AA (alcaline uniquement) est en bon etat et qu'elle est
correctement installee (1). Certaines piles sont emballees dans un plastique de
protection. Ce plastique dolt 6tre retire. Ne confondez pas ce plastique avec I'etiquette
de la pile.
INSPECTION DU TUYAU
Le tuyau devrait etre inspecte afin de detecter tout signe de fissure.
MISE EN GARDE : V_rifiez le tuyau avant chaque utilisation
du barbecue afin de d_tecter toute _gratignure, fissure,
abrasion ou coupure. Si le tuyau s'av_re d_t_rior_ de
quelque mani_re que ce soit, n'utilisez pas le barbecue.
Remplacez le tuyau en utilisant uniquement un tuyau de
rechange agr_ par Weber _. Contactez le repr_sentant du
Service clientele de votre r_gion a I'aide des coordonn_es
votre disposition sur notre site Internet.
Connectez=vous sur www.weber.com ®.
©
63
Page 64

ALLUIVIAGE DU BRULEUR PRINCIPAL
Des consignes d'allumage resumees se trouvent b.I'interieur de la porte gauche du
meuble.
ARRETE
DANGER
Le fait de ne pas ouvrir le couvercle Iorsque vous allumez les
br_leurs du barbecue, ou de ne pas patienter cinq minutes
pour laisser le gaz se dissiper si le barbecue ne s'allume
pas, peut provoquer un embrasement explosif susceptible
de causer des blessures graves voire un d_c_s.
Syst_me d'allumage _lectronique
Remarque : Chaque bouton de commande contr_le un brQleur individuel. Le Syst_me
d'allumage electronique a!lume un brOleur avec une 6fincelle emise par 1'61ectrode
de I'allumeur a I'int6rieur du comparfiment d'a!lumage Gas Catcher TM . Vous g_n#rez
I'_nergie pour I'_fincelle en enfongant le bouton d'allumage _lectronique. Vous
entendrez son d6cfic.
& MISE EN GARDE : V_rifiez le tuyau avant chaque utilisation
du barbecue afin de rep_rer toute entaille, fissure, abrasion
ou coupure, si le tuyau s'av_re d_t_rior_ de quelque mani_re
que ce soit, n'utilisez pas le barbecue. Remplacez le tuyau
uniquement avec un tuyau de rechange agr_ par Weber ®.
Contactez le repr_sentant du Service clientele de votre
r_gion en utilisant les coordonn_es & votre disposition sur
notre site Internet.
Connectez=vous sur www.weber.com ®,
A) Ouvrez le couvercle (1).
B) Assurez-vous que tousles boutons de commande du brOleur sent fermes (2).
(Enfoncez le bouton de commande et tournez dans le sens des aiguilles d'une
montre afin de vous assurer qu'il est en position FERME.)
MISE EN GARDE : Les boutons de commande du br_leur
doivent _tre positionn_s sur FERME avant d'ouvrir la valve
de la bouteille de PL. S'ils ne sont pas en position FERME,
Iorsque vous ouvrez la valve de la bouteille de PL, le
dispositif de "contr61e du d_bit de gaz en e×c_s" s'active,
limitant ainsi le d_bit du gaz en provenance de la bouteille
de PL. si cela se produisait, FERMEZ la valve de la bouteille
de PL ainsi que les boutons de commande du br_leur.
Recommencez,
÷ + + +
ARRETE MARCHE/ MOYEN FAIBLE
II est possible que le grill
de rillustration pr_sente
de I_geres differences par
rapport au rnodele achet_.
ELEVE
ELECTRONIC
iGNiTER
DANGER
Lorsque la fonction de "contr61e du d_bit de gaz en exc_s"
est activ_e, une petite quantit_ de gaz circule toujours en
direction des br_leurs. Une fois que vous avez ferm_ la valve
de la bouteille de PL et les boutons de commande du br_leur,
patientez au moins cinq minutes pour laisser le gaz se dissiper
avant d'essayer d'aHumer le grill. Le non respect de cette
consigne risquerait de provoquer un embrasement explosif,
susceptible de provoquer une blessure grave voire un d_c_s.
C) Ouvrez la bouteille en tournant lentement la valve de la bouteille de gaz dans le
sens inverse des aiguilles d'une montre (3).
MISE EN GARDE : Ne vous penchez pas au=dessus du
barbecue ouvert.
D) Enfoncez le bouton de commande et positionnez-le sur DEMARRER/ELEVE (4).
E) Maintenez le bouton d'allumage electronique enfonce.Vous entendrez son declic (5).
F) Wrifiez si le brQleur est allume en regardant a travers les grilles de cuisson. Vous
devriez voir une flamme (6).
MISE EN GARDE : Si le br_leur ne s'allume pas en cinq
secondes, arr_tez, positionnez le bouton de commande
sur FERME puis patientez cinq minutes pour laisser le gaz
se dissiper avant d'essayer & nouveau ou d'essayer de
I'aHumer avec une aHumette.
G) Pour allumer les brQleurs restants, suivez les etapes D a R
64
POUR ETEINDRE
Enfoncez et tournez chacun des boutons du brQleur clans le sens des aiguilles d'une
montre vers la position FERME. Fermez I'arrivee de gaz a la source. ®
Page 65

ALLUMAGE MANUEL DU BRULEUR PRiNCiPAL
DANGER
Le fait de ne pas ouvrir le couvercle Iorsque vous allumez les
br_leurs du barbecue, ou de ne pas patienter cinq minutes
pour laisser le gaz se dissiper si le barbecue ne s'allume
pas, peut provoquer un embrasement explosif susceptible
de cause des blessures graves voire un d_c_s.
A) Ouvrez le couvercle (1).
B) Assurez-vous que tousles boutons de commande du br01eur sent en position
fermee (2). (Enfoncez le bouton de commandeet tournez dans le sens des aiguilles
d'une montre pour vous assurer qu'il est positionne sur FERME.)
MISE EN GARDE : Les boutons de commande du br_leur
doivent _tre en position FERMEE avant d'ouvrir la valve
de la bouteille de PL. S'ils ne sont pas en position
FERMEE, Iorsque vous ouvrez la valve de la bouteille de
PL, le dispositif de "contrSle du d_bit de gaz en e×c_s" va
s'activer, limitant ainsi le d_bit de gaz en provenance de la
bouteille de gaz. Si cela se produisait, fermez la valve de
la bouteille de PL et les boutons de commande du br_leur.
Recommencez.
DANGER
Lorsque le dispositif de "contrSle du d_bit de gaz en exc_s"
est active, une petite quantit_ de gaz continue de circuler
en direction des br_leurs. Une fois que vous avez ferm_ la
bouteille de gazet les boutons de commande du br_leur,
patientez au mois cinq minutes pour que le gaz se dissipe
avant de tenter d'_clairer le barbecue. Le non respect de cette
consigne risque de provoquer un embrasement explosif,
susceptible de provoquer une blessure grave voire un d_c_s.
II est possible que le grill
de rillustration pr_sente
de I_geres differences par
rapport au mod_,le achet_,.
C) Ouvrez la bouteille de gaz en tournant lentement la valve de la bouteille dans le
sens inverse des aiguilles d'une montre (3).
D) Placez I'allumette dans le porte-allumettes puis frottez I'allumette.
E) Inserez le porte-allumette avec I'allumette eclairee a.travers les grilles de cuisson et
les barres Flavorizei _ pour allumer le br01eur selectionne (4).
MISE EN GARDE : Ne vous penchez pas au=dessus du
barbecue ouvert.
F) Enfoncez le bouton de commandeet tournez-le vers DEMARRER/ELEVE (5).
G) Wrifiez si le br01eur est allume en regardant atravers les grilles de cuisson.Vous
devriez voir une flamme (6).
MISE EN GARDE : Si le br_leur ne s'allume pas en cinq
secondes, arr_tez, positionnez le bouton de commande
sur ARRET puis patientez cinq minutes pour laisser le gaz
se dissiper avant d'essayer a nouveau ou d'essayer de
I'aHumer avec une aHumette.
H) Pour allumer les br01eurs restants suivez les etapes D b.G. ®
POUR ETEINDRE
Enfoncez et tournez chaque bouton de commande du br01eur dans le sens des aiguilles
d'une montre vers la position FERME. Fermez I'arrivee de gaz a la source. ®
65
Page 66

ALLUMAGE DU BRULEUR SEAR STATION _
Le modele 330 comprend un brOleur qui permet de saisir les aliments. Ce breleur peut
_galement _tre utilis_ de maniere individuelle. Par consequent, I'allumage du brQleur A
saisir se passe de la m_me maniere que I'allumage du brQleur principal. Pour allumer le
brQleur a. saisir, voir 'ALLUMAGE DU BRULEUR PRINCIPAL' ÷
ALLUMAGE MANUEL DU BRULEUR SEAR STATION®
Pour allumer manuellement le brQleur a saisir, voir 'ALLUMAGE MANUEL DU
BRULEUR PRINCIPAL' ÷
UTILISATION DE LA SEAR STATION _
Votre barbecue & gaz Weber ¢ comprend un brQleur _tsaisir pour saisir des viandes
telles que le steak et les pieces de volaille, les poissons ainsi que les c6tes.
La saisie est une technique de grillade directe qui dote la surface des aliments _.
temperature _lev_e. En saisissant ou en faisant doter les deux c6t_s de la viande,
vous allez crier une saveur plus d_sirable en caram_lisant la surface des aliments. La
cuisson par saisie va _galement optimiser I'aspect de la viande gr&ce aux marques de
cuisson laiss_es par les grilles. Ceci accompagnera le contraste entre les textures et les
saveurs qui peuvent rendre les aliments plus int_ressants pour le palais.
Le brQleur Sear Station ® est pourvu de commandes ARRET, DEPART/ELEVE, et
FAIBLE qui fonctionnent avec les brQleurs Gauche et Central. Avec le brQleur _.saisir et
les brQleurs adjacents vous pouvez saisir les viandes efficacement tout en utilisant la
zone de cuisson du brQleur Droit pour griller a.temperature mod_r_e.
Avant de saisir les aliments vous devriez tourner la totalit_ des brQleurs principaux sur
ELEVE pendant 15 minutes pour pr_chauffer le grill. Grillez toujours avec le couvercle
ferm_ pour permettre un maximum de chaleur et _viter les embrasements.
Une fois que le grill est pr_chauff_, fermez ou baissez le brQleur Droit. Laissez les
brQleurs Gauche et Central sur ELEVE puis allumez le brQleur Sear Station ®.
Placez la viande directement sur la Sear Station ®.Vous saisirez chaque c6t_ entre 1 & 4
minutes, en fonction du type de viande et de son _paisseur. Vous pouvez retourner les
aliments d'un quart de tour pour crier des marques de grillade qui se croisent (1) avant
de saisir I'autre c6t_ de la m_me maniere.
Une fois que vous avez saisi la viande, vous pouvez terminer la grillade en d@lagant la
viande vers une chaleur mod_r_e au-dessus du brQleur Droit pour atteindre le niveau de
cuisson souhait&
Au fur et _.mesure que vous devenez plus exp_riment_ dans I'utilisation de votre Sear
Station ®, nous vous encourageons b.experimenter avec diff_rentes dur_es de cuisson
pour d_terminer ce qui fonctionne le mieux par rapport a vos goQts. ÷
OFFO @lm=="G
ARRETE
÷ ÷ ÷
ARRETE MARCHE/ELEVE FAIBLE
66
Page 67

o Prechauffez toujours le grill avant la cuisson. Reglez tous les brQleurs sur ELEVE
puis fermez le couvercle; laissez chauffer pendant 10 minutes, ou jusqu'& ce que le
thermometre atteigne 500°-550°F (260°-288°C).
Grillez les viandes et cuisinez avec le couvercle ferme pour des aliments grilles a la
perfection b.chaque fois.
Les durees de grillade des recettes sont fournies pour une temperature exterieure de
70°F (20°C) avec peu ou pas de vent. Laissez les aliments cuire plus Iongtemps s'il
fait froid ou s'il y a du vent, ou en altitude. Diminuez la duree de cuisson si le temps
est extremement chaud.
Les durees de grillade sont susceptibles de varlet en fonction des conditions
meteorologiques, ou de la quantite, de la taille et de la forme des aliments b. griller.
II est possible que la temperature de votre grill e gaz atteigne un niveau plus eleve
que la normale Iors des premieres utilisations.
Les conditions de grillade peuvent necessiter une adaptation des commandes du
brQleur pour atteindre les temperatures de cuisson correctes.
En general, les gros morceaux de viande necessitent une duree de cuisson plus
Iongue par livre que les petits morceaux de viande. Des aliments places sur une
grille de cuisson surchargee devront cuire plus Iongtemps qu'une petite quantite
d'aliments. Les aliments grilles dans des recipients comme les haricots, necessiteront
une duree de cuisson plus Iongue s'ils sont grilles dans une casserole profonde que
s'ils sont cults dans un plat peu profond.
Retirez le surplus de matiere grasse des steaks, des c6tes et des r6tis en ne
laissant pas plus d'_A pouce (6.4mm) de matiere grasse. Le fair qu'il y ait moins de
matiere grasse facilite le nettoyage, et constitue quasiment une garantie centre les
embrasements indesirables.
Les aliments places directement sur la grille de cuisson au-dessus des brOleurs
peuvent avoir besoin d'etre retournes ou d'etre deplaces vers une zone moins
chaude.
Utilisez des pinces plut6t que des fourchettes pour retourner et manipuler la viande
afin d'eviter toute perte de jus de viande. Utilisez deux spatules pour manipuler les
gros poissons entiers.
En cas d'embrasement indesirable, fermez tousles brOleurs et deplacez les aliments
vers une autre zone de la grille de cuisson. Toute flamme se resorbera rapidement.
Une fois que les flammes se sont eteintes, rallumez le grill. N'UTILISEZ JAMAIS
D'EAU POUR ETEINDRE LES FLAMMES SUR UN GRILLA GAZ.
La cuisson de certains aliments, comme les ragoOts ou les filets de poisson fins,
necessite un recipient. Les plats en aluminium jetables sont tres pratiques mais vous
pouvez utiliser n'importe quel plat metallique avec des gants de cuisiner.
Assurez-vous toujours que le plateau inferieur et I'egouttoir sont propres et ne
contiennent aucun residu.
Ne recouvrez pas le plateau de recuperation des graisses amovible avec du papier
aluminium. Ceci pourrait empecher la graisse de s'ecouler vers I'egouttoir.
I'utilisation d'un minuteur vous aidera e savoir Iorsque la viande "bien cuite" est sur le
point de devenir "trap cuite."
Remarque : Si le grill perd de la chaleur pendant la cuisson, veuillez consulter la
section intitulee Resolution des problemes de ce manuel.
z_ MISE EN GARDE : Ne d_placez pas le barbecue a gaz Weber °
en cours d'utilisation ou Iorsque celui=ci est tr_s chaud.
Vous pouvez ajuster les brQleurs individuels selon ce que vous souhaitez. Les reglages
des commandes (1) sont MARCHE/ELEVE, M©YEN, FAIBLE, ou ARRETt_.
CUISSON COUVERTE
La totalite de la grillade s'effectue avec le couvercle ferme afin d'apporter une chaleur
uniforme qui circule de fagon homogene. Avec le couvercle ferme, le grill & gaz cult
d'une maniere tres semblable b.un four _t convection. Le thermometre dans le couvercle
indique la temperature de cuisson _t I'interieur du grill. La totalite du prechauffage et de
la grillade s'effectue avec le couvercle ferme. N'ouvrez pas pour regarder -- vous perdez
de la chaleur & chaque lois que vous soulevez le couvercle.
ECOULEMENTS DE JUS ET DE GRAISSES
Les barres Flavorize_ sont congues pour "fumer" la quantite correcte de jus pour
une cuisson savoureuse. Les excedents de jus et de graisses vent s'accumuler dans
I'egouttoir au-dessous du plateau amovible de recuperation des graisses. Des egouttoirs
jetables en aluminium sont disponibles ;ils s'adaptent parfaitement e I'egouttoir.
& MISE EN GARDE : Verifiez le plateau arnovible de
r_cup_ration des graisses ainsi que I'_gouttoir afin de
d_tecter toute accumulation de graisse avant chaque
utilisation. Retirez tout exc_s de rnati_re grasse afin d'_viter
un ernbrasement de graisse a I'int_rieur du plateau arnovible
de r_cup_ration des graisses. ÷
SYSTEME FLAVORIZER ®
Lorsque les jus de viandes s'ecoulent des aliments vers les barres Flavorizer ¢ disposees
selon un angle particulier, elles creent de la fumee qui donne aux aliments une saleur
de barbecue irresistible. Gr&ce _. la conception unique des brQleurs, des barres
Flavorizer ¢ et aux commandes de temperature souples, les embrasements incontr61es
sent presque elimines, parce que VOUS contr61ez les flammes. En raison du design
particulier des barres Flavorizer ¢ et des brQleurs, les graisses en exces sent orientees
vers le plateau de recuperation des graisses amovible puis dans I'egouttoir.
SEAR STATION ®
Votre grill a gaz Weber _ comprend peut-etre un brQleur qui permet de saisir les viandes
et le poisson. Le brQleur Sear Station _ propose les reglages OFF, START/HI, ou LOW (2)
et ces reglages fonctionnent avec les deux brOleurs principaux adjacents. Avec le brQleur
sear et les breleurs adjacents vous pouvez saisir efficacement les viandes tout en
utilisant les autres zones de cuisson pour cuire b. temperateure moderee (Voir la section
'ALLUMAGE & UTILISATION DU BRULEUR SEAR STATION e_(MODELE 330)"). ®
ARRI_TI_
OFF O APAGADO O mmm=(
4 4 4
ARRETE MARCHE/ELEVE FAIBLE
ARRETE
+ + + ÷
ARRETE MARCHE/ MOYEN FAIBLE
1_ ELEVE
Remarque : II est possible que la temperature a I'interieur de votre bottler de cuisson
pendant les premieres utilisations, au moment ob les surfaces sont encore tres
reflechissantes, soit plus elevee que les temperatures indiquees dans votre tivret
de cuisine. Les conditions de cuisson, comme le vent et les conditions ctimatiques,
peuvent necessiter I'ajustement des commandes du brOleur afin d'obtenir les
temperatures de cuisson correctes.
Si lee brQieurs s'_teignent pendant la cuisson, _teignez tous les brQieurs puis
patientez 5 minutes avant de les allumer _ nouveau. ®
PR¢CHAUFFAGE
Votre barbecue a. gaz Weber ¢ est un appareil qui utilise I'energie de maniere efficace.
En fonctionnement, son evaluation BTU est faible et economique. II est important de
prechauffer votre grill avant de I'utiliser. Allumez votre grill en respectant les instructions
du present Mode d'emploi. Pour le prechauffage : apres I'allumage, positionnez tous
les brQleurs sur MARCHE/ELEVE, fermez le couvercle, et laissez chauffer jusqu'a ce
que la temperature atteigne un niveau situe entre 500 ° et 550 ° F (260 ° et 290° C), la
temperature de cuisson recommandee. Ceci prendra 10 e 15 minutes en fonction de
conditions comme la temperature de I'air et le vent.
67
Page 68

ALLUMAGE DU BRULEUR LATERAL
Vous trouverez des instructions d'allumage resumees a I'interieur de la porte gauche du
placard.
z_ DANGER
Le fait de ne pas ouvrir le couvercle Iorsque vous allumez
le br_leur lateral, ou de ne pas patienter cinq minutes
pour laisser le gaz se dissiper si le br_leur lateral ne
s'allumait pas, pourrait provoquer un embrasement explosif
susceptible d'entrainer une blessure grave ou la mort.
z_ MISE EN GARDE: V_rifiez le tuyau avant chaque utilisation
du barbecue afin de d_tecter toute entaille, fissure, abrasion
ou coupure. Si vous trouvez que le tuyau est d_t_rior_ de
quelque mani_re que ce soit, n'utilisez pas le barbecue.
Remplacezqe en utilisant uniquement un tuyau de rechange
agr_ par Weber _. Veuillez entrer en contact avec le
Repr_sentant du Service clientele le plus proche au moyen
des coordonn_es _ votre disposition sur notre site Intemet.
Connectez=vous sur www.weber.com ®.
A) Ouvrez le couvercle du brOleur lateral (1).
B) Verifiez que le brOleur lateral est positionne sur ARRETE (2). (Enfoncez le bouton
de commandeet tournez dans le sens des aiguilles d'une montre pour vous
assurer qu'il est positionne sur ARRETE), positionnez tous les brOleurs inutilises sur
ARRETE (Enfoncez et tournez dans le sens des aiguilles d'une montre).
C) Ouvrez la valve d'arrivee de gaz (3).
D) Enfoncez et tournez la valve de commande du brOleur lateral vers MARCHE/
ELEVE (4).
E) Enfoncez le bouton d'allumage plusieurs fois de sorte que celui-ci emette un declic
chaque lois jusqu'a ce que vous voyez une flamme (5).
Z_ ATTENTION: II peut _tre difficile de voir la flamme du br_leur
lateral par une journ_e claire et ensoleill_e.
z_ MISE EN GARDE: si le br_leur lateral ne s'allume pas clans
un d_lai de cinq secondes:
a) Fermez la valve de commande du brGleur lateral, les
br_leurs principaux et I'arriv_e de gaz a la source.
b) Patientez cinq minutes pour laisser le gaz se dissiper
avant d'essayer a nouveau, ou essayez de I'allumer
avec une aHumette (voir "ALLUMAGE MANUEL DU
BRULEUR LATERAL"). +
POUR ETEINDRE
Enfoncez et tournez le bouton de commande du brQleur lateral vers la position dARRET
(OFF). Assurez-vous que le brQleur est eteint et qu'il a refroidi avant de fermer le
couvercle du brQleur lateral. ®
+ %\
II est possible que le grill
de rillustration pr_sente
de I_geres differences par
rapport au modele achet_.
o)
4_" ARRETE
4['" MARCHE/ELEVE
0
FAIBLE
%
68
Page 69

ALLUMAGE MANUEL DU BRULEUR LATERAL
DANGER
Le fait de ne pas ouvrir le couvercle Iorsque vous allumez
le br_leur lateral ou de ne pas patienter cinq minutes pour
laisser le gaz se dissiper si le br_leur lateral ne s'allumait
pas pourrait provoquer un embrasement explosif susceptible
de provoquer une blessure grave ou la mort.
A) Ouvrez le couvercle du brOleur lateral (1).
B) Verifiez que le brOleur lateral est positionne sur ARRETE (2). (Enfoncez le bouton
de commande et tournez dans le sens des aiguilles d'une montre pour vous
assurer qu'il est positionne sur ARRETE), positionnez tousles brOleurs inutilises sur
ARRET¢: (Enfoncez et tournez dans le sens des aiguilles d'une montre).
C) Ouvrez la valve d'arrivee de gaz (3).
D) Placez une allumette dans un porte-allumette et frottez-la.
E) Tenez le porte-allumette et allumez les deux c6tes du brOleur avec I'allumette (4).
F) Enfoncez et tournez la valve de commande du brOleur lateral pour la positionner sur
MARCHE/ELEVE (5).
z_ ATTENTION: II peut _tre difficile de distinguer la flamme du
br_leur lateral par une journ_e claire et ensoleill_e.
z_ MISE EN GARDE: si le br_leur lateral ne s'allume pas darts
un d_lai de cinq secondes:
a) Fermez la valve de commande du br_leur lateral, les
brQleurs principaux et I'arriv_e de gaz a la source.
b) Patientez cinq minutes pour laisser le gaz se dissiper
avant d'essayer & nouveau.
POUR ETEINDRE
Enfoncez et tournez le bouton de commande du brQleur lateral vers la position dARRET
(OFF). Assurez-vous que le brQleur est eteint et qu'il a refroidi avant de fermer le
couvercle du brQleur lateral. ®
II est possible que le grill
de rillustration pr_sente
de I_geres differences par
rapport au modele achet_.
®
69
Page 70

PROBLEME VERIFICATION SOLUTION
Les brQleurs brQlent avec une
flamme jaune ou orange, associ_e
une odeur de gaz.
Sympt6mes :
Lee brQleurs ne s'allument pas
-ou- Les brQleurs ont une petite
flamme vascillante en position
ELEVE. -ou-
La temperature du barbecue
atteint uniquement 250 ° _ 300 ° en
position ELEVE
Le br!31eur ne s'allume pas, ou
la flarnrne est basse en position
ELEVE.
Le brQleur ne s'allume pas Iorsque Assurez-vous que du gaz circule en direction des brQleurs Si I'allumage avec une allumette reussit, cela signifie que le probleme
vous enfoncez le bouton de en tentant d'allumer vos brQleurs avec une allumette. Voir vient du dispositif d'allumage. Voir "UTILISATION DU SYSTEME
rallumeur. 'ALLUMAGE MANUEL DU BRULEUR PRINCIPAL. DALLUMAGE ELECTRONIQUE.
Inspectez les grilles anti insectes/araignees pour detecter Nettoyez les grilles anti arraignees/insectes. Voir "MAINTENANCE
toute obstruction eventuelle. (Blocage des trous.) ANNUELLE'_
Le dispositif de securite empechant un debit excessif, qui fait
pattie du raccord entre le barbecue et la bouteille de gaz,
s'est peut-6tre active.
Le niveau de combustible PL est-il faible ou vide ? Remplissez la bouteille de PL.
Le tuyau de combustible est-il pile ou pince ? Redressez le tuyau de combustible.
Pour reinitialiser le dispositif de securite de contr61e du debit de gaz
tournez la totalite des boutons de commande des brQleurs ainsi que
la valve de la bouteille de gaz pour les fermer. Positionnez les boutons
de commande des brOleurs sur ELEVE. Patientez au moins 1 minute.
Positionnez les boutons de commande des brOleurs sur FERME.
Reconnectez le regulateur a la bouteille de gaz. Ouvrez la valve de la
bouteille de gaz lentement. Voir 'ALLUMAGE DU BRULEUR PRINCIPAE'.
Une pile neuve a-t-elle ere installee ? Wrifiez que la pile est en bon etat et correctement en place. Voir
Les c&bles sont-ils correctement raccordes au module Assurez-vous que les c&bles sont correctement inseres dans les
d'allumage ? terminaux sur le boitier d'allumage. Voir "UTILISATION DU SYSTEME
Y a-t-il un emballage plastique autour de la pile neuve ? Retirez I'emballage plastique.
En cas d'embrasements : Prechauffez-vous le barbecue selon la methode Tous les brQleurs sur ELEVE pendant 10 b.15 minutes pour le
ATTENTION : Ne
reoouvrez pas Je Y a-ti-il une forte accumulaiton de graisse carbonisee sur les Nettoyez de maniere approfondie. Voir "NETTOYAGE'_
plateau amovible Flavorizer¢ ?
de r_cup_ration des
graisses avec du papier est sale et emp_che la graisse de s'ecouler vers I'egouttoir ?
recommandee ? prechauffage.
grilles de cuisson, les deflecteurs de chaleur et les barres
Est-ce que le plateau amovible de recuperation des graisses Nettoyez le plateau amovible de recuperation des graisses.
"INSPECTION DE LALLUMEUR ELECTRONIQUE':
DALLUMAGE ELECTRONIQUE'_
alurniniurn.
La forme de la flamme du brQleur Les brQleurs sont-ils propres ? Nettoyez les brQleurs. Voir "MAINTENANCE'.'
est irr_gumiere. La flamme est
basse morsque le brQleur est r_gm_
sur ELEVE. Les fmammes ne se
trouvent pas sur route mamongueur
du tube du brQleur.
L'int_rieur du couvercle semble I'interieur du couvercle est compose de porcelaine emaillee Nettoyez de maniere approfondie. Voir "NETTOYAGE.
s'_caiHer. (Ressembme _ de ma ou d'acier inoxydable, et il n'est pas peint. II ne peut pas
peinture qui s'_caiHe.) s'ecailler. Ce que vous voyez c'est de la graisse carbonisee
Lee portes du meuble ne sont pas Verifiez la goupille d'ajustement au bas de chaque porte. Desserrez le ou les ecrous d'ajustement. Faites glisser la ou les portes
en face rune de rautre, jusqu'b, ce qu'elles soient en face. Serrez I'ecrou.
qui s'envole sous forme de flocons.
CE N'EST PAS UN DEFAUT.
Si les probmemes ne peuvent pas 6tre corrig_s en utimisant ces m_thodes, veuimmezcontacter mere 3r_sentant du Service cmient_le de votre r_gion _ l'aide des
coordonn_es _ votre disposition sur notre site _nternet. Connectez-vous sur www.weber.com ®.
70
Page 71

PROBLEHE VERIFICATION SOLUTION
Le brQleur lateral ne s'allume pas.
La flamme est petite en position Le tuyau d'alimentation en combustible est-il pile ou coince ?
ELEVE.
L'allumage par bouton poussoir ne Le brQleur s'allume-t-il avec une allumette ?
fonctionne pas.
Si vous ne parvenez pas _ r_soudre les problernes en utilisant ces m_thodes, veuillez entrer en contact avec le Repr_sentant du Service clientele Is plus proche
grace aux coordonn_es _ votre disposition sur notre site Internet. Connectez-vous sur www.weber.corn ®.
= =
I'arrivee de gaz est-elle fermee ?
Le dispositif de securite limitant Is debit de gaz en exces, qui
fait pattie du raccord entre le barbecue et la bouteille de gaz,
s'est peut-6tre active.
Ouvrez I'arrivee de gaz.
Pour reinitialiser Is dispositif de securite limitant le debit de gaz en
exces, fermez la totalite des boutons de commands du brQleur ainsi
que la valve de la bouteille de gaz. Deconnectez le regulateur de la
bouteille de gaz. Tournez les boutons de commande du br01eur vers
MARCHE/ELEVE. Patientez au moins 1 minute. Positionnez les boutons
de commande du braleur sur ARRETE. Reconnectez le regulateur
la bouteille de gaz. Ouvrez lentement la valve de la bouteille de gaz.
Consultez les instrucitons de la section 'ALLUMAGE DU BRULEUR
LATERAl''
Redressez le tuyau.
Si le brQleur s'allume avec une allumette, verifiez rallumeur (voir
"MAINTENANCE" du brQleur lateral).
NETTOYAGE
z_ MISE EN GARDE : Ferrnez votre barbecue _ gaz Weber _ et
attendez que celui=ci air refroidi avant de le nettoyer.
z_ ATTENTION : Ne nettoyez pas vos barres Flavorize¢ _ ou vos
grilles de cuisson dans un four auto=nettoyant.
Surfaces extemes - Utilisez une solution d'eau savonneuse chaude pour le nettoyage,
ensuite rincez e I'eau.
ATTENTION : N'utilisez pas de nettoyant pour four, de
d_tergents abrasifs (d_tergents de cuisine), de d_tergents
contenant des agrurnes, ni des tampons de nettoyage
abrasifs sur les surfaces du barbecue ou du chariot.
Sortez le plateau amovible en le faisant glisser - Retirez la graisse en exces, puis
lavez a I'eau savonneuse chaude, avant de rincer.
z_ ATTENTION : Ne recouvrez pas le plateau de r_cup_ration
des graisses arnovible de papier alurniniurn.
Barres Flavorizer ®et grilles de cuisson - Nettoyez-les avec une brosse en acier
inoxydable adaptee. Si necessaire, retirez-les du grill et lavez-les e reau savonneuse
chaude, puis rincez-les a reau.
Pour connaitre la disponibilit_ des grilles de cuisson et des barres Flavorizer ¢ de
rechange, veuillez entrer en contact avec le Repr_sentant du Service clientele de
votre r_gion grace aux coordonn_es a votre disposition sur notre site Internet.
Connectez-vous sur www.weber.corn ®.
Egouttoir - Nous proposons des plats en aluminium jetables, ou vous pouvez recouvrir
I'egouttoir de papier aluminium. Pour nettoyer regouttoir, lavez-le e reau savonneuse
chaude, puis rincez-le.
Thermom_tre - Essuyez-le avec de reau savonneuse chaude ; nettoyez-le avec une
balle de plastique e recurer.
Boitier de cuisson - Retirez tout debris en Is brossant vers I'exterieur des tubes du
br01eur. N'ELARGISSEZ PAS LES PORTS (OUVERTURES). Lavez I'interieur du bottler
de cuisson a I'eau savonneuse chaude puis rincez a reau.
Int_rieur du couvercle - Lorsque le couvercle est encore chaud, essuyez rinterieur
avec une serviette en papier pour emp¢cher toute accumulation de graisse. Les eclats
de graisse accumulee ressemblent a des eclats de peinture.
Surfaces en acier inoxydable - Lavez les surfaces avec un chiffon doux st une solution
d'eau savonneuse. Veillez a frotter dans le sens du grain de I'acier inoxydable.
N'utilisez pas de produits de nettoyage contenant de I'acide, des alcools min_rau×
ou du xylene. Rincez bien une lois le nettoyage termin_.
Pr_servez votre acier inoxydable - Votre grill ou son placard, son couvercle, son
panneau de commande ainsi que ses etageres peuvent Ctre en acier inoxydable.
Preserver raspect optimal de I'acier inoxydable n'est pas complique. Nettoyez e reau
savonneuse, rincez e reau claire et essuyez pour secher. Pour les particules tenaces,
vous pouvez utiliser une brosse non metallique.
z_ IMPORTANT : N'utilisez pas de brosse rn_tallique ni de
d_tergents abrasifs sur les surfaces en aciet inoxydable de
votre grill car ceci le rayerait.
z_ IMPORTANT : Lorsque vous nettoyez les surfaces assurez=
vous de frotter/essuyer darts le sens du grain pour
preserver raspect de votre acier inoxydable. ÷
GRILLES ANTI=ARAIGNEES/INSECTES WEBER ®
Votre barbecue _. gaz Weber '_,comme tout appareil a.gaz d'exterieur, constitue une cible
pour les araignees st les autres insectes. Ceux-ci peuvent faire leur nid dans la section
des venturi (1) des tubes du brt31eur. Ceci bisque le debit normal du gaz, et risque de
provoquer le retour du gaz a rexterieur de rouverture destinee _. rair necessaire a la
combustion. Ceci pourrait entrainer un incendie b.rinterieur et autour des ouvertures
destinees a recevoir rair necessaire a la combustion, au-dessous du panneau de
commande, provoquant une deterioration grave de votre barbecue.
I'ouverture destinee _.recevoir I'air necessaire a la combustion est protegee par une
grille en acier inoxydable (2) afin d'emp¢cher les araignees et les autres insectes
d'acceder aux tubes du br_leur a travers les ouvertures de circulation de I'air necessaire
la combustion.
Nous vous recommandons d'inspecter les Grilles anti-araign_es/insectes au
rnoins une lois par an. (Voir la Section "MAINTENANCE ANNUELLE'_) Veuillez
_galement inspecter et nettoyer les Grilles anti-araign_es/insectes si I'un des
sympt6mes suivant se produisait :
A) Une odeur de gaz associee a raspect jaune et faible des flammes du brt31eur.
B) Le barbecue n'atteint pas la temperature.
C) Le barbecue ne chauffe pas de fagon homogene.
D) Un ou plusieurs brOleurs ne s'allument pas.
DANGER
Le fait de ne pas corriger les sympt6rnes rnentionn_s ci=
dessus pourrait entrainer un incendie, susceptible de
provoquer une blessure grave ou la mort et des dommages
la proprietY. ÷
71
Page 72

NETTOYAGE OU REIVIPLACEMENT DES TUBES DU BRULEUR
II vous faudra :un tournevis cruciforme et un tournevis plat.
A) Votre barbecue b. gaz Webe¢ _dolt 6tre ETEINT et refroidi.
B) FERMEZ le gaz a la source.
C) Retirez les composants du bo;tier de cuisson - grille de maintien au chaud, grilles
et barres Flavorize¢ _. (Les plaques de diffusion de la chaleur n'ont pas besoin d'6tre
retirees.)
Retrait du panneau de commande
Pour retirer le panneau de commande :
A) Retirez les boutons de commande, le bouton de I'allumeur, I'ecrou de retention de
I'allumeur ainsi que la pile (1).
B) Retirez les vis du deflecteur de vent (2) situe au-dessous du panneau de
commande a I'aide d'un tournevis cruciforme.
C) Inclinez I'extremite du deflecteur de vent vers le bas puis faites-le glisser vers
I'exterieur pour le retirer (3).
D) Retirez le module de I'allumeur du panneau de commande (4) puie retirez la
totalit_ des quatre file du module.
E) Retirez les vis du dessous du panneau de commande avec le tournevis cruciforme
(5).
F) Soulevez legerement le panneau de commande, inclinez I'extremite avant vers le
haut puis soulevez-le doucement vers le haut pour le retirer (6).
72
Page 73

Retrait du tube du br_leur
Pour retirer le(s) tube(s) du brQleur :
A) Retirez le(s) ill(s) de la ou des pince(s) de I'allumeur (7).
B) Retirez la vis qui maintient le tube du brQleur contre le bottler de cuisson b. I'aide
d'un tournevis plat (8).
C) Tirez sur I'ensemble du tube du brQleur (ceci comprend I'allumeur) vers le haut puis
I'exterieur du boftier de cuisson (9).
Remarque : 310/320 unit_s auront un cable de raccordement a la terre
suppl6mentaire fix6 au tube du brOleur central (10).
Nettoyage du tube du br_leur
Pour nettoyer le(s) tube(s) du brOleur :
A) Regardez b.I'interieur de chaque brt_leur avec une lampe torche (11).
B) Nettoyez rinterieur des brOleurs avec un fil de fer (12) (un cintre deplie
fonctionnera).
C) Wrifiez et nettoyez I'orifice de I'obturateur d'air aux extremites des brOleurs. Wrifiez
et nettoyez les orifices de la valve b. la base de chaque valve. Utilisez une brosse
en ills d'acier pour nettoyer I'exterieur des brQleurs (13). Ceci a pour but de vous
assurer que les ports du br01eur sont compl_tement ouverts.
z_ ATTENTION : N'_largissez pas les ports du br_leur pendant
que vous les nettoyez.
R_installation du tube du br_leur
Pour reinstaller le tube du br01eur :
A) Faites glisser le tube du brQleur et le c&ble de I'allumeur a travers le trou dans
le boitier de cuisson (14). Voir "UTILISATION DES SYSTEMES DALLUMAGE
ELECTRONIQUES" pour la position correcte du br01eur.
B) Alignez le tube du brQleur en face de la valve.
z_ ATTENTION : Les ouvertures du br_leur (15) doivent _tre
correctement positionn_es au=dessus des orifices des
valves (16).
C) Remettez en place les vis qui maintiennent le tube du brQleur contre le bo'_tier de
cuisson _.I'aide d'un tournevis plat. Le tube du br01eur peut sembler desserre (17)
alors que la vis est ajustee. Ceci est normal.
D) Faites passer les ills b.nouveau a travers les pinces de I'allumeur. Voir le schema
(7).
ATTENTION : Tous les fils doivent _tre correctement
orient,s a travers les pinces pr_vues pour maintenir les ills.
E) Fixez les ills au modulo, en respectant le codage numerique/par couleur (18). Voir
"UTILISATION DU SYSTEME D_,LLUMAGE ELECTRONIQUE" pour la fixation
correcte des ills.
MISE EN GARDE: apr_s avoir r_install_ les tuyaux & gaz,
proc_dez a la d_tection de fuites _ventuelles a I'aide d'une
solution savonneuse avant d'utiliser le grill barbecue. (Volt
_tape: "DETECTION DES FUITES DE GAZ'.)
MISE EN GARDE : Assurez-vous que toutes les pi_ces sont
assemblies et que la quincaillerie est compl_tement serr_e
avant d'utiliser le grill. Vos actions, si vous ne respectez
pas cette Mise en garde concernant le produit, peuvent
provoquer un incendie, une explosion, ou une d_faillance
structurelle entrainant une blessure grave voire un d_c_s
ainsi que des d_g&ts materiels.
....._l!iiil_l_i_llilillililliiiii_illiillllllllllllliilililililllllllllliilillill!li
?_%_i_ii_l_li_ii_ii_ii_iililililililiiii_ii_ii_iiiiiiiii_ii_ii_iililililililiiii_ii_ii_iiiiii_ii_ii_i_i_!_iii
iiiiiiiiiiiiiiiiiiiiiiiiiiiiiiiiiiiiiiiii ........: i!iiii iiii
i i!ii!ii!iiiiiiill i ! !i l l i!ii ii l l l l l l l l i !i i i i illil ililililililililililililililililili i ! !ilililililill !ililililiii
i
73
Page 74

UTILISATION DU SYSTEME D:ALLUMAGE ELECTRONIQUE
Si le Systeme d'allumage electronique n'allume pas le brOleur, assurez-vous que le gaz
circule bien en essayant d'allumer yes br01eurs avec une allumette. Voir 'ALLUMAGE
MANUEL DU BRULEUR PRINCIPAL' Si I'allumage avec une allumette reussit, le
probleme reside dans I'allumage electronique.
z_ MISE EN GARDE : La totalit_ des commandes de gaz et des
valves d'arriv_e de gaz devrait _tte en position FERMEE
(OFF}.
o Verifiez que la pile AA (alcaline uniquement) est en bon etat et qu'elle est installee
correctement (1). Certaines piles sont emballees dans un plastique de protection. Ce
plastique dolt 6tre retire. Ne confondez pas ce plastique avec I'etiquette de la pile.
Assurez-vous que les c_bles d'allumage sont correctement fixes sur le module de
I'allumeur. Voir le "GUIDE DE CABLAGE DU MODULE DE LALLUMEUR" ci-dessous.
Assurez-vous que I'assemblage de I'allumeur ceramique est completement
positionne a. I'interieur du canal de I'allumeur du tube du braleur (2). Si le
positionnement est correct, vous entendrez un declic (3).
Assurez-vous que le bouton de IRIlumage electronique fonctionne en ecoutant et en
regardant pour detecter les etincelles au niveau du braleur.
Si le Syst_me d'allumage _lectronique ne s'allume toujours pas, contactez le
repr_sentant du Service clientele de votre r_gion _ raide des coordonn_ee a votre
disposition sur notre site Internet. Connectez-vous sur www.weber.com ®. ¢,
©
® .... e- _ - _ - . o- o o -
Noir (1) Brt31eur gauche (A)
Jaune (2) BrOleur droit (B)
Bleu (3) Br01eur central (C)
Vert (Raccordement b. la terre) (4) Br01eur central (C)
74
iiiii i ¸¸¸!iiiiiiiiiiiiiiiiiiiiiiiiiiiiiiiiiiiiiiiiiiiii !iiiiii iiii¸iiiilililililili
Noir (1) Br01eur gauche CA)
Jaune (2) Br01eur droit (B)
Bleu (3) Br01eur central (C)
Vert (4) Br01eur Sear (D)
Page 75

MAINTENANCE DU BRULEUR LATERAL
z_ MISE EN GARDE: La totalit_ des commandes de gaz et
des valves d'alimentation devraient _tte positionn_es sur
ARRETE.
Assurez-vous que le c&ble noir est branche entre I'allumeur et I'electrode.
Assurez-vous que le c&ble blanc est branche entre I'allumeur et la pince de
raccordement & la terre.
l_etincelle devrait 6tre blanche/bleue, pas jaune.
A) C&ble de I'allumeur (1)
B) C&ble de raccordement & la terre (2)
C) BrOleur(3) ®
Grille du br_meur mat_ram--
Cache du brQmeur mat_ram
Anneau et t6te du brQmeur mat_ram
Electrode de m'ammumeur
Bouton de commande
Ammumeur
MAINTENANCE ANNUELLE
inspection et nettoyage de la grilJe anti-araign_es/insectes
Pour inspecterles Grilles anti-araignees/insectes, retirez le panneau de commande. En
cas de presence de poussiereou d'impuretessur les grilles, retirez lesbrQleurspour
nettoyer lesgrilles.
Brossez leg_rement les Grilles anti-araignees/insectes avec une brosse _.pollssouples
(par exemple, une vieille brosse _tdents).
z_ ATTENTION : Ne nettoyez pas les Grilles anti=araign_es/
insectes _ I'aide d'ustensiles durs ou coupants. Ne
d_logez pas les Grilles-anti araign_es/insectes de Jeurs
emplacements et n'_largissez pas les ouvertures des grilles.
Tapotezlegerement le brQleurpour fairesortir les debris et les impuretesdu tube du
brt31eur.Une foisque les Grilles anti-araignees/insectessont propres, remettez les
brt31eursen place.
Si la Grille anti-araignees/insectes se deteriore ou ne peut pas _tre nettoyee,veuillez
entrer en contactavec le Representantdu service clientelele plusproche &I'aide des
coordonnees _.votre disposition sur notre site Internet.
Connectez-vous sur www.weber.com ®.
Aspect des fJammes du brQleur
Les breleurs du barbecue & gaz Weber _ ont ete parametres en usine pour recevoir le
melange d'air et de gaz correct. _'illustration montre I'aspect correct de la flamme.
A) Tube du brQleur(1)
B) Les extremites flamboient de temps en temps en jaune (2)
C) Bleu clair (3)
D) Bleu fence (4)
Si les flammes ne semblent pas uniformes tout au long du tube du brQleur, suivez les
procedures de nettoyage du brt31eur.
%
®
75
Page 76

76
Page 77

77
Page 78

78
Page 79

79
Page 80

ATTENTION : Ce produit a fait I'objet de tests de s_curit_ et est certifi_ pour une utilisation dans un pays particulier
uniquement. V_rifiez la d_signation de pays situ_e sur le carton d'emballage.
Ces pi_ces peuvent contenir du gaz ou @re des 616ments dont la combustion produit du gaz. Veuillez consulter le Service clientele
de Weber-Stephen Products Co. pour des renseignements sur les pi_ces de rechange originales de Weber-Stephen Products Co.
MISE EN GARDE : Ne tentez pas d'effectuer des r_parations sur des _l_ments contenant du gaz ou sur des _l_ments
dont la combustion produit du gaz sans contacter le service clientele de Weber=Stephen Products Co. Si vous ne
suivez pas la pr_sente Mise en garde relative au produit, vos actions risquent de provoquer un incendie ou une
explosion entrainant des blessures physiques graves voire un d_c_s ainsi que des d_g&ts materiels.
WEBER-STEPHEN PRODUCTS CO.
www,weber, com®
@2011 Conqu et elabor6 par Weber-Stephen Products Co.,
societ6 de I'lllinois, implantee au 200 East Daniels Road, Palatine, Illinois 60067 U.S.A.
Imprim6 aux U.S.A.
 Loading...