

Page 1
KLIMATYZATOR PRZENOŚNY
MOBILE AIR CONDITIONER
AC-H025A2H
PL INSTRUKCJA OBSŁUGI
ENG USER MANUAL
Page 2

PL INSTRUKCJA OBSŁUGI
SPIS TREŚCI
I. Środowisko pracy 5
II. Wskazówki bezpieczeństwa 5
III. Specykacja techniczna 6
IV. Opis elementów produktu 7
V. Pilot zdalnego sterowania 9
VI. Główne funkcje urządzenia 10
VII. Funkcje dodatkowe urządzenia 13
VIII. Instalacje 14
IX. Połączenie zaplikacją Smart 20
X. Czyszczenie ikonserwacja 21
XI. Rozwiązywanie problemów 23
XII. Warunki gwarancji 25
3
Page 3
PL INSTRUKCJA OBSŁUGI PL INSTRUKCJA OBSŁUGI
I. ŚRODOWISKO PRACY
• Ten klimatyzator nadaje się do pracy wzakresie temperatur 0-35 °C
• Ten klimatyzator nadaje się tylko do użytku niekomercyjnego.
• Co najmniej 50 cm przestrzeni powinno pozostać wolne przed iza klimatyzatorem.
• Unikaj używania wwilgotnym otoczeniu; Unikaj bezpośredniego światła słonecznego.
• Proszę utrzymywać wlot iwylot powietrza wczystości inie zastawiać go niczym.
• Proszę zamknąć drzwi iokna podczas używania, aby poprawić efekt chłodzenia / ogrzewania.
• Aby uniknąć sytuacji, takich jak hałas iwibracje klimatyzatora, należy umieścić go na pła-
skim podłożu.
• Ten klimatyzator jest wyposażony wkółka do łatwego przestawiania sprzętu unikaj zabrudzonego podłoża czy włosia, które może owinąć się wokół kółek iutrudniającym przesuwanie.
Dziękujemy za zakup klimatyzatora Webber AC-H025A2H.
• Nie przechylaj ani nie kładź klimatyzatora na boku. Jeśli wystąpi jakakolwiek nieprawidłowość, natychmiast wyłącz zasilanie iskontaktuj się ze sprzedawcą wcelu kontroli inaprawy.
Gratulujemy zakupu oraz witamy wgronie tysięcy zadowolonych
Klientów marki Webber.
II. WSKAZÓWKI BEZPIECZEŃSTWA
Prosimy ozapoznanie się zniniejszą instrukcją, aby zapewnić
sprawne iprzyjemne korzystanie zurządzenia.
1. Proszę sprawdzić czy lokalne specyfikacje zasilania są zgodne z wymaganiami na tabliczce znamionowej produktu przed użyciem.
2. Przed czyszczeniem inaprawą klimatyzatora należy wyłączyć klimatyzator i odłączyć
wtyczkę zasilania.
3. Nie ciągnij za przewód zasilający, aby odłączyć wtyczkę zasilania lub przesunąć urządzenie. Nie należy podłączać ani odłączać wtyczki zasilania, mokrymi rękoma.
4. Używaj tylko zasilacza igniazdka zuziemieniem. Upewnij się, że jest ono sprawne inie
uszkodzone. Jeśli przewód zasilający samego klimatyzatora ulegnie uszkodzeniu, musi
zostać wymieniony przez producenta, wykonawcę usług lub wykwalifikowanego personel techniczny.
5. Jeśli zostaną wykryte jakiekolwiek nienormalne zjawiska (takie jak zapach spalenizny
itp.), Proszę natychmiast odciąć zasilanie iskontaktować się ze sprzedawcą.
6. Nie pozostawiaj sprzętu bez nadzoru, jeżeli wychodzisz, wyłącz urządzenie iodłącz
wtyczkę zasilania.
7. Nie rozlewaj ani nie wylewaj wody na klimatyzator, ponieważ może to spowodować
zwarcie lub uszkodzenie sprzętu.
8. Przy użyciu rur odprowadzających temperatura otoczenia nie powinna być niższa niż
0°C, wprzeciwnym razie łatwo jest spowodować zamarznięcie wody w rurach, co doprowadzi do wycieku zmaszyny.
9. Nie ustawiaj wpobliżu urządzeń grzewczych, utrzymuj z dala od źródeł ognia,
łatwopalnych, wybuchowych iinnych obiektów isubstancji.
4 5
Page 4
PL INSTRUKCJA OBSŁUGI PL INSTRUKCJA OBSŁUGI
10. Użytkownik tego urządzenia musi mieć ukończone 8 lat.
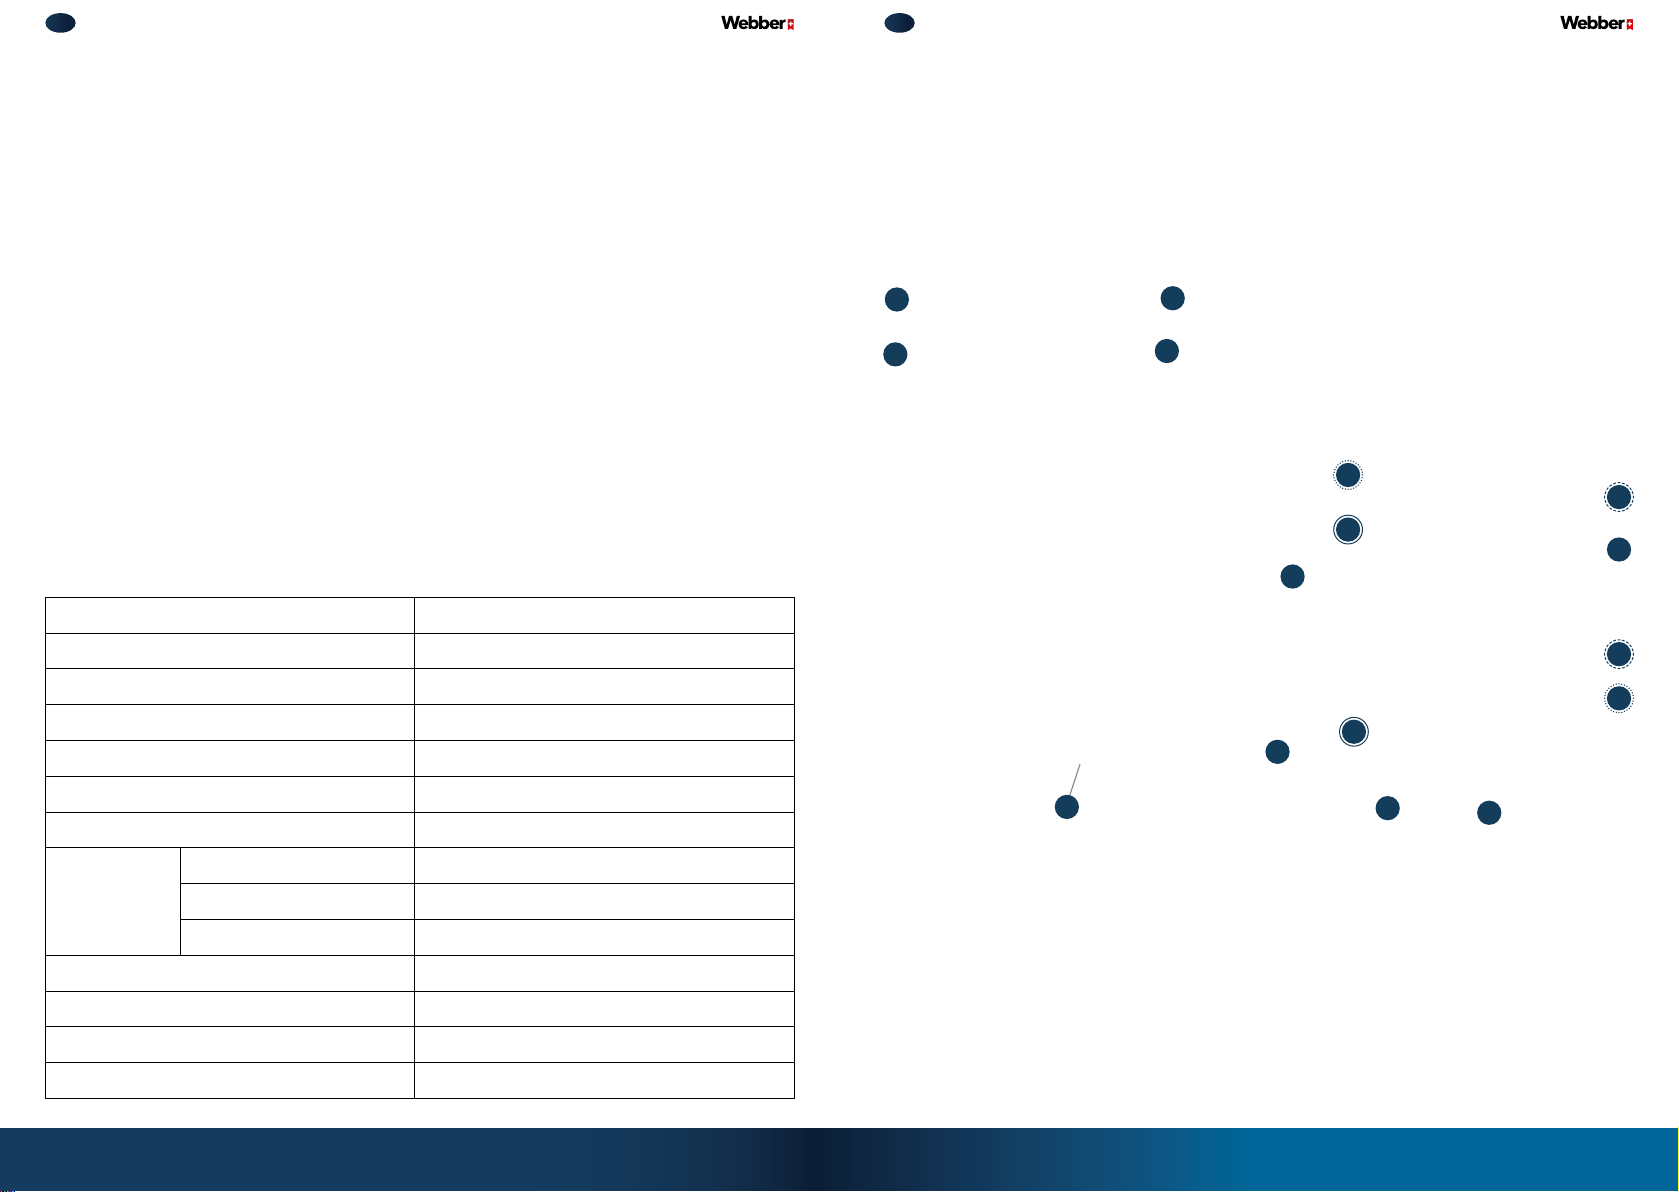
IV. OPIS ELEMENTÓW PRODUKTU
11. Osoby bez wystarczającej wiedzy na temat bezpiecznego użytkowania ipotencjalnych
zagrożeń związanych zurządzeniem, nie mogą zniego korzystać bez nadzoru iwskazówek. Dzieci nie mogą bawić się iużywać tego urządzenia czy też czyścić ikonserwować
sprzętu bez nadzoru osoby dorosłej.
12. Proszę nie umieszczać ani nie wieszać przedmiotów zkapiącą wodą nad klimatyzatorem.
13. Nie naprawiaj ani nie rozkręcaj klimatyzatora samemu.
14. Zabrania się wkładania jakichkolwiek przedmiotów do elementów urządzenia.
15. Sprzęt powinny być instalowany zgodnie zkrajowymi standardami okablowania.
16. Specyfikacja bezpiecznika: T3.15AH250V
17. Maksymalny prąd dozwolony dla bezpiecznika nie może przekraczać 3.15A.
18. Nie przedłużaj przewodu zasilającego samemu.
19. Nie włączaj do gniazdka obciążonego połączeniem zinnymi urządzeniami.
1
2
20. Nie używaj kabli krosowych ani innych urządzeń przejściowych.
21. Nie zakrywaj wylotu powietrza tego klimatyzatora.
III. SPECYFIKACJA TECHNICZNA
URZĄDZENIE
3
4
6
10
7
11
8
Model AC-H025A2H
Moc chłodzenia 720 W
Pobór mocy podczas chłodzenia 410 W/ 1.89 A
Pobór mocy podczas grzania 1600 W/ (PTC)
Max. pobór mocy 1750 W
Zasilanie 220-240 V~ / 50 Hz
7
9
5
12
13
10
6
Przepływ powietrza 195 m³/h
wylot powietrza 1.7 MPa
Ciśnienie
wlot powietrza 0.6 MPa
maksymalne 4.0 MPa
Poziom ciśnienia akustycznego <48 dB(A)
Czynnik chłodniczy R290 / 600 g
1. Wylot powietrza
2. Panel kontrolny
3. Uchwyt
Wymiary 255 x 260 x 885 mm
Masa netto 14 kg
6 7
4. Nawiew oscylacyjny
5. Podstawa zkółkami
6. Wlot powietrza
7. Filtr
8. Rura odprowadzająca
9. Wylot okienny
10. Ramka ltra
11. Złącze do rury
odprowadzającej
12. Korek spustu wody
13. Złącze zasilania
Page 5
PL INSTRUKCJA OBSŁUGI PL INSTRUKCJA OBSŁUGI
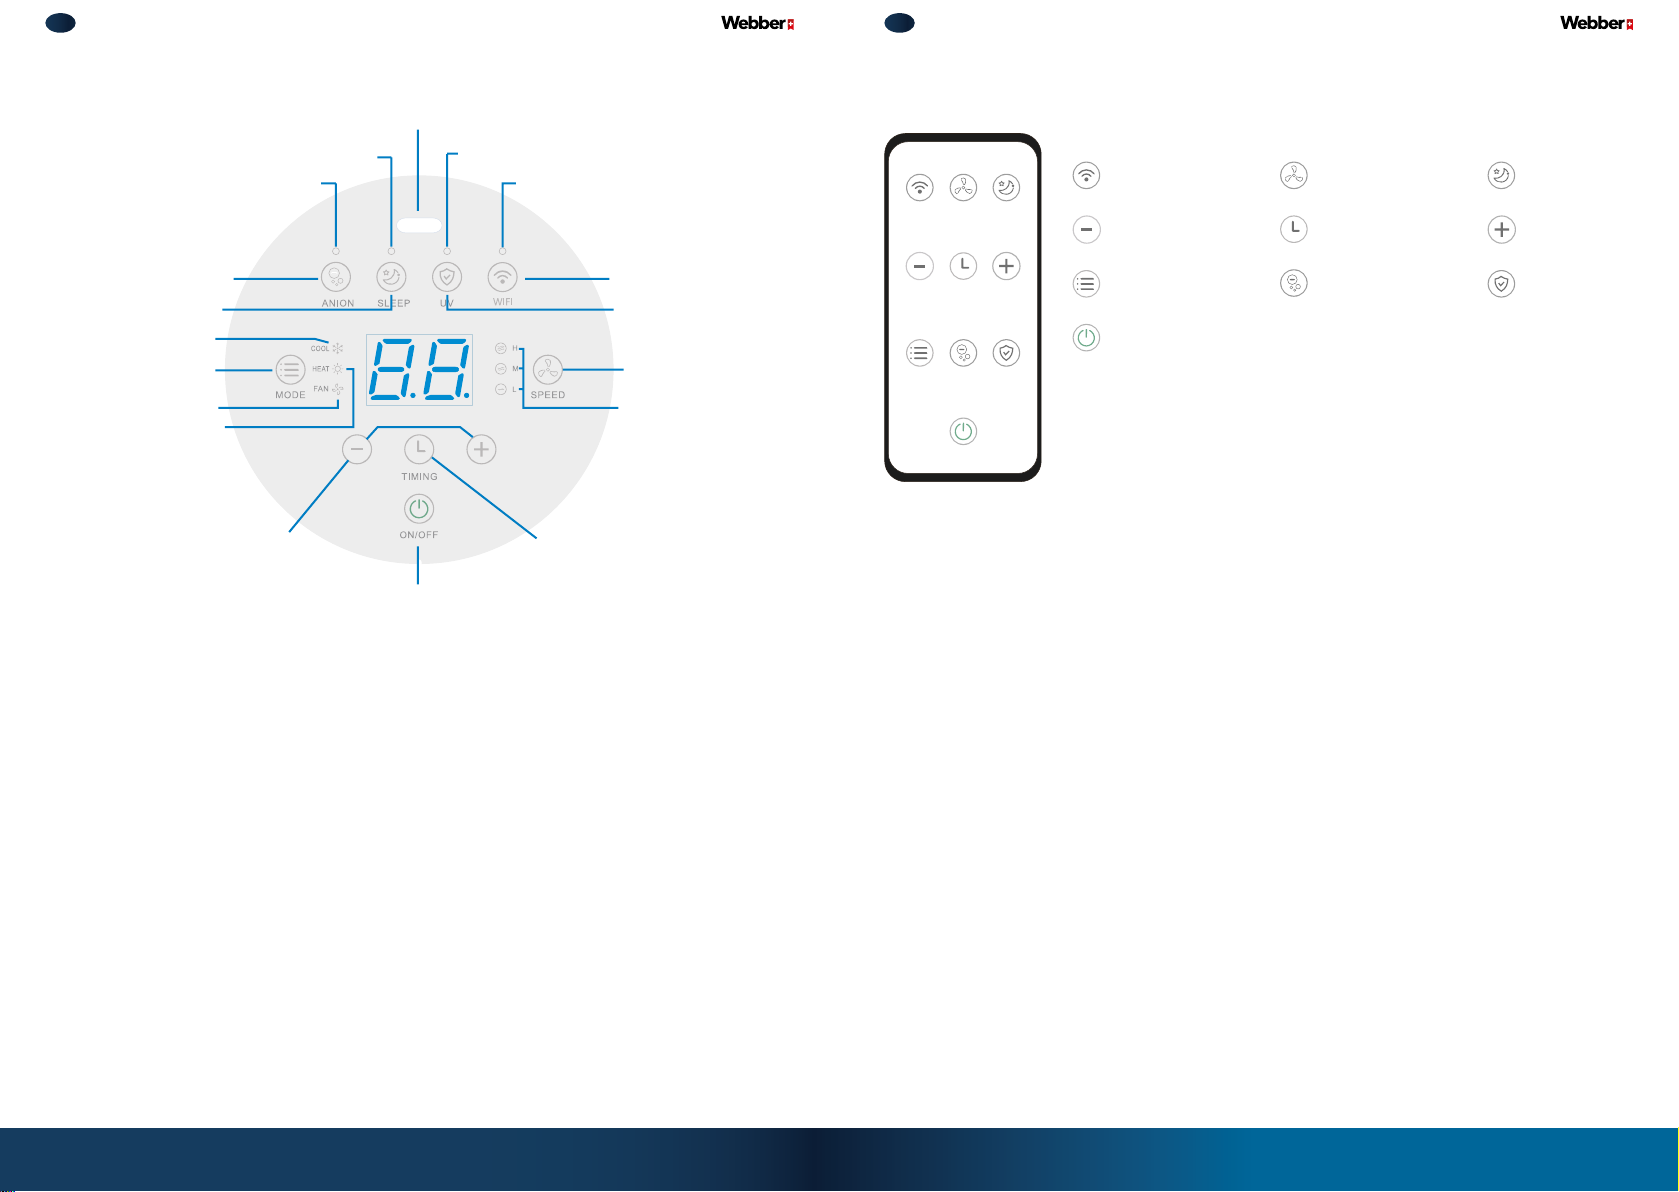
PANEL KONTROLNY
Okno odbioru sygnału zpilota
V. PILOT ZDALNEGO STEROWANIA
Kontrolka trybu jonizacji
Przycisk jonizacji
Przycisk trybu nocny
Kontrolka trybu chłodzenia
Przycisk zmiany trybu
Kontrolka trybu wentylacji
Kontrolka trybu grzania
Kontrolka trybu nocny
+ / –
Przycisk WŁ/W YŁ
Kontrolka lampy UV
Kontrolka Wi-Fi
Przycisk timera
Przycisk Wi-Fi
Przycisk UV
Przycisk
prędkości nawiewu
Kontrolki prędkości
Wi-Fi
Zmniejszanie
Tryb
Prędkość nawiewu
Timer
Jonizacja
Tryb nocny
Zwiększanie
Lampa UV
WŁ/WYŁ
• Przed użytkowaniem należy włożyć 2 baterie AA (1,5V) zwracając uwagę na oznaczenia
biegunów (+ i-).
• Należy ustawić urządzenie przodem do sygnału zpilota.
• Odległość między pilotem aurządzeniem powinna wynosić maksymalnie 6 metrów inie
powinno być między nimi żadnych przeszkód.
• Wpomieszczeniach wyposażonych welektroniczne lampy lub telefony bezprzewodowe,
sygnał pilota może być łatwo zakłócony.
• Pilot powinien być używany jak najbliżej klimatyzatora.
• Jeśli nie używasz pilota przez długi czas, zaleca się wyjąć zniego baterie.
8 9
Page 6
PL INSTRUKCJA OBSŁUGI PL INSTRUKCJA OBSŁUGI
VI. GŁÓWNE FUNKCJE URZĄDZENIA
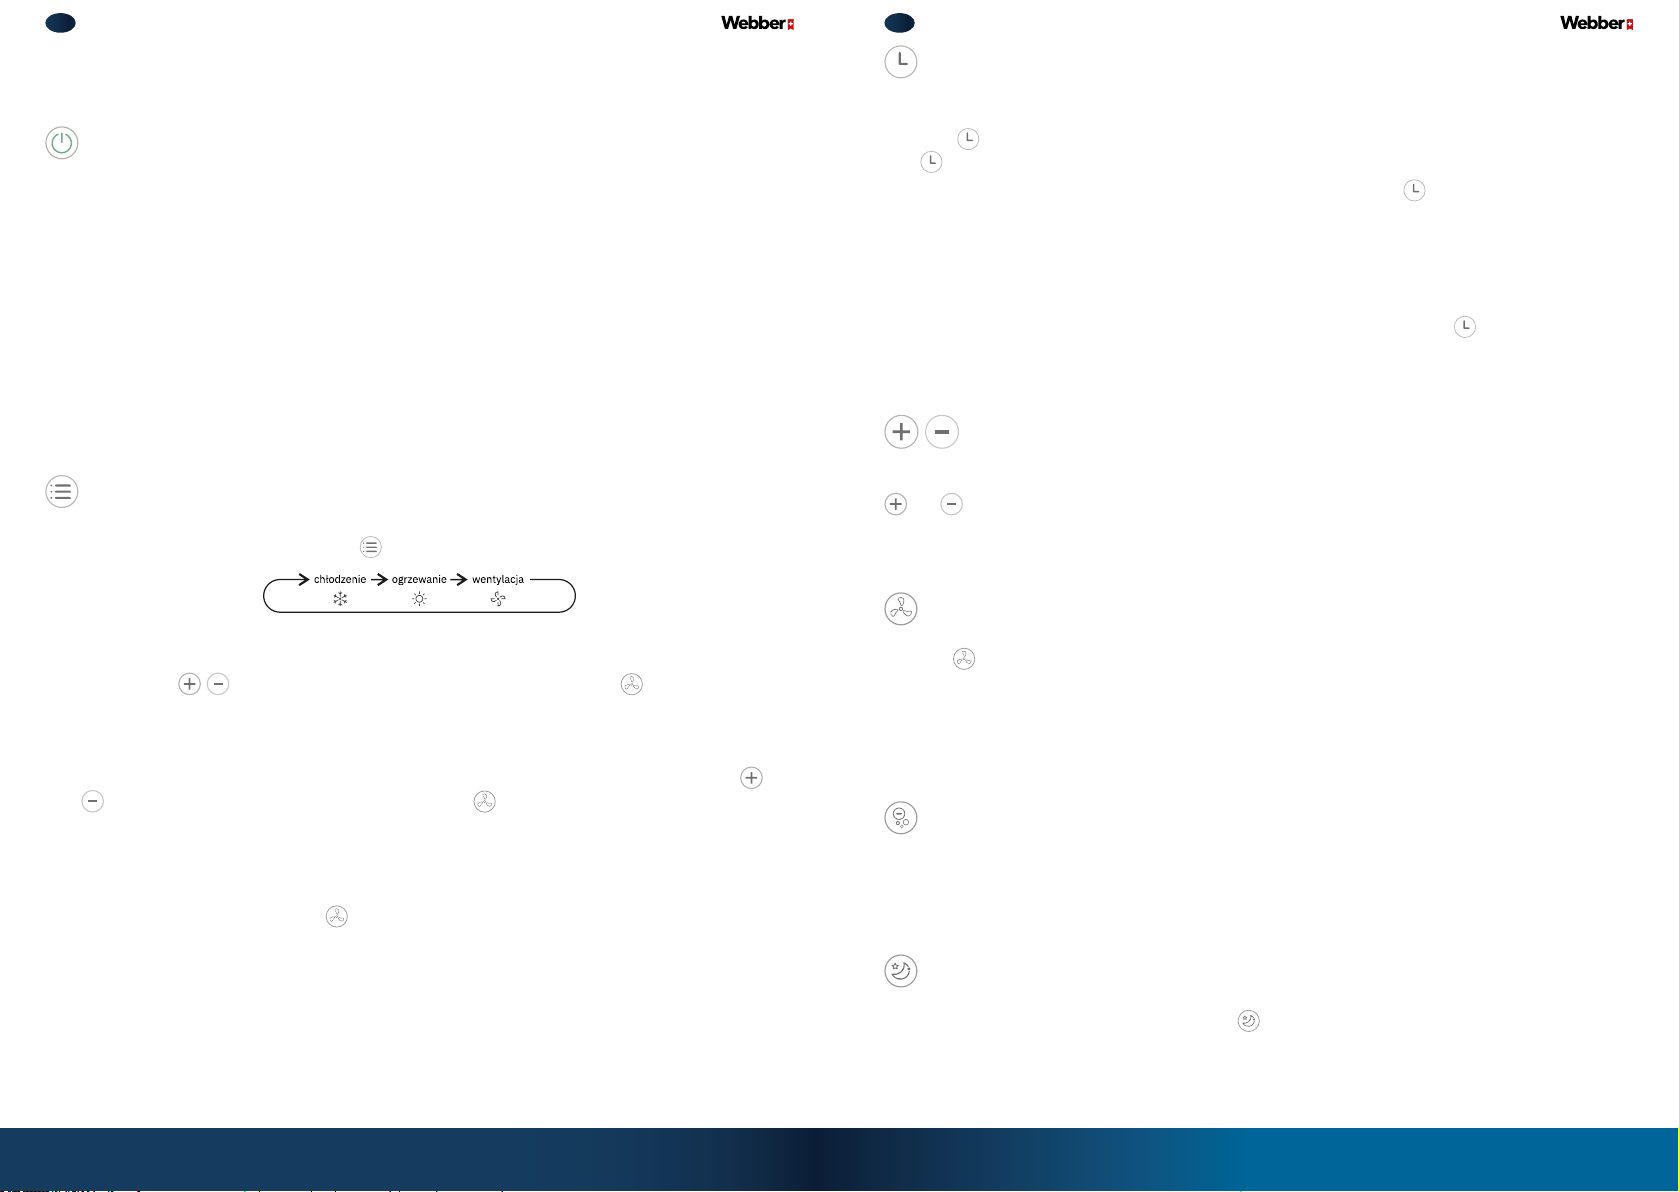
ON/OFF
• Gdy zasilanie jest włączone, urządzenie wyemituje krótki dźwięk (przed podłączeniem
sprawdź parametry mocy na tabliczce znamionowej), urządzenie przechodzi wtryb gotowości do pracy. Wtym czasie maszyną można sterować za pomocą panelu urządzenia
lub pilota zdalnego sterowania.
• Naciśnij przycisk ON/OFF, urządzenie uruchomi się iwejdzie wtryb domyślny, wskazanie
trybu będzie oznaczone zapalonymi diodami na panelu. Naciśnij ponownie przycisk ON/
OFF, aurządzenie wyłączy się iwszystkie lampki kontrolne zgasną. Jeśli nie używasz
urządzenia przez długi czas, zaleca się odłączenie przewodu zasilającego od gniazdka
• Gdy maszyna jest włączona naciśnij przycisk zasilania na 5 sekund, aby włączyć lub wy-
łączyć tryb wentylacji.
TRYBY
• Wybieranie trybu: Naciśnij przycisk , aby przełączać między trybami wpodanej kolejności:
• Tryb chłodzenia: świeci się lampka kontrolna i ikona, klimatyzator działa zgodnie
z ustawionymi parametrami, temperatura docelowa jest ustawiana przez naciśnięcie
przycisków
wpomieszczeniu jest wyższa niż ustawiona, sprężarka uruchamia się, a jeśli niższa –
sprężarka przestaje działać.
• Tryb ogrzewania: Lampka kontrolna ogrzewania iikona ogrzewania świecą się, aklimaty-
zator uruchamia ogrzewanie zgodnie zustawionym programem. Naciśnij przycisk
, aby ustawić docelową temperaturę iprzycisk , aby dostosować siłę nadmuchu. Gdy
temperatura wpomieszczeniu jest niższa od ustawionej, klimatyzator rozpoczyna ogrzewanie, ajeśli jest wyższa – klimatyzator przestaje się nagrzewać, awentylator kontynuuje
pracę lub przestaje działać wzależności od temperatury wykrytej przez maszynę.
• Tryb wentylacji: Lampka kontrolna iikona świecą się, awentylator pracuje zustawioną
prędkością. Naciśnij przycisk
trybie, sprężarka nie działa.
Uwaga
• Gdy klimatyzator jest wtrybie grzania, musi być podłączony do rury odprowadzającej, aby wydmuchać zimne
powietrze na zewnątrz.
• Gdy klimaty zator je st wtrybie chłodze nia wcelu osiągn ięcia lepszego efek tu ch łodzenia, konieczne jes t zain-
stalowanie rur y odprowadzającej wcelu kierowania gorącego powietrza na zewnątrz (metoda instalacji rur
grzewczych jest opisana na str. 16).
, aprędkość jest regulowana przez naciśnięcie . Gdy temperatura
lub
, aby dostosować obroty. Kiedy urządzenie jest wtym
TIMER
• Ustawianie włączenia iwyłączenia: Gdy urządzenie jest uruchomione, naciśnij przy-
cisk
, aby ustawić czas wyłączenia; Gdy urządzenie jest wyłączone, naciśnij przycisk
, aby ustawić czas uruchamiania.
• Ustawianie automatycznego włączenia: Naciśnij przycisk jeden raz, aby wyświetlić
ustawianie czasu na ekranie. Powtórz naciśnięcie przycisku, aby ustawić czas. Za każdym razem, gdy naciśniesz przycisk czas ustawienia timera zwiększa się o1 godzinę. Po
zakończeniu operacji ekran miga 5 razy, aby wyświetlić ustawiony czas, anastępnie powraca do wyświetlania temperatury. Regulowany zakres czasu dla timera wynosi 1-24h.
Ustawienie go na 0 anuluje odliczanie czasu.
• Podczas zaplanowanego uruchamiania iwyłączania, jeśli przycisk zostanie wciśnięty,
zaplanowane wyłączenie lub uruchomienie zostanie anulowane.
REGULACJA TEMPERATURY
Temperaturę można ustawić wzakresie 16-30°C. Za każdym razem należy nacisnąć przycisk
lub aby zwiększyć lub zmniejszyć temperaturę o1°C. Ta funkcja jest nieaktywna wtry-
bie wentylacji.
PRĘDKOŚĆ NAWIEWU
Naciśnij
, aby wybrać prędkość pomiędzy: wysoka → średnia → niska → auto
Wtrybie automatycznym maszyna automatycznie dostosowuje obroty wentylatora woparciu
otemperaturę otoczenia.
Uwaga: Wtrybie osuszania ten przycisk nie działa.
JONIZACJA
Naciśnij iprzytrzymaj przycisk trybu, aby włączyć lub wyłączyć funkcję jonizacji. Po włączeniu lampka kontrolna jonizacji iikona zaświecą się, iodwrotnie, zostanie wyłączona.
TRYB NOCNY
• W trybie chłodzenia naciśnij przycisk
aby aktywować tryb nocny i wymusić niską
prędkość pracy wentylatora. Ustawiona temperatura klimatyzatora automatycznie
wzrośnie o1°C po 1 godzinie io2°C po 2 godzinach, anastępnie będzie działać już wtej
ustawionej temperaturze.
10 11
Page 7
PL INSTRUKCJA OBSŁUGI PL INSTRUKCJA OBSŁUGI
• Wtrybie ogrzewania naciśnij przycisk , aby aktywować tryb nocny iwprowadzić niską
prędkość wentylatora. Ustawiona temperatura klimatyzatora automatycznie spadnie
o1°C po 1 godzinie io2°C po 2 godzinach, anastępnie będzie działać wtej ustawionej
temperaturze.
• Po włączeniu trybu nocnego lampka kontrolna nocny zaświeci się, pozostałe lampki wyświetlacza wyłączą się, aurządzenie będzie działać normalnie. Aby wyjść ztrybu nocny,
naciśnij przycisk nocny wielokrotnie. Przycisk nocny nie jest aktywny wtrybie wentylacji.
LAMPA UV
Naciśnij przycisk UV, aby włączyć lub wyłączyć funkcję sterylizacji. Po włączeniu lampka
kontrolna zaświeci się, po ponownym wciśnięciu zgaśnie, afunkcja będzie wyłączona.
KONTROLKA WI-FI
• Konfiguracja: Po włączeniu urządzenia naciśnij przycisk Wi-Fi raz, kontrolka zacznie
migać, aurządzenie wejdzie wstan konfiguracji sieci. Poczekaj, aż urządzenie mobilne
wejdzie do sieci.
• Usuwanie połączenia: Naciśnij i przytrzymaj klawisz przez 5 sekund, aby usunąć
konfigurację. Po wyczyszczeniu informacje sieciowe między urządzeniem mobilnym,
a klimatyzatorem zostaną usunięte, a urządzenie automatycznie ponownie wejdzie
wstan konfiguracji.
VII. FUNKCJE DODATKOWE URZĄDZENIA
PRĘDKOŚĆ WENTYLATORA
Urządzenie posiada funkcję automatycznego odszraniana, która automatycznie wykrywa
temperaturę iokreśla, czy konieczne jest rozmrażanie podczas pracy, zapewniając, że sprzęt
nadal ma dobrą wydajność grzewczą nawet wniskich temperaturach otoczenia.
Uwaga: Ta funkcja jest niedostępne wtrybie wentylacji iosuszania.
ZABEZPIECZENIE PRZED PRZEPEŁNIENIEM ZBIORNIKA WODY
Gdy urządzenie wykryje, że poziom wody wzbiorniku osiągnął maksymalną wysokość, sprężarka isilnik zostaną wyłączone. Urządzenie wyemituje następnie 10 dźwięków alarmowych,
ana ekranie pojawi się komunikat FU iklimatyzator się wyłączy.
Po opróżnieniu zwody urządzenie powraca do stanu sprzed przepełnienia wodą.
AWARYJNE WYŁĄCZANIE KOMPRESORA
• Podczas pracy urządzenia, jeśli jakakolwiek operacja spowoduje zatrzymanie sprężarki,
urządzenie automatycznie włącza funkcję ochronnego zatrzymania kompresora.
• Wyłączenie awaryjne trwa 3 minuty. Oznacza to, że przez ten czas sprężarka nie uruchomi się ponownie, ainne funkcje będą działać normalnie.
• Sprężarka będzie pracować przez co najmniej 3 minuty po każdym uruchomieniu, zanim
zostanie zatrzymana (zwyjątkiem wyłączenia).
12 13
Page 8
PL INSTRUKCJA OBSŁUGI PL INSTRUKCJA OBSŁUGI
VIII. INSTALACJE
SUGESTIE DOTYCZĄCE UŻYTKOWANIA:
• Urządzenie zawiera kompresor, po wysyłce lub transporcie do miejsca docelowego:
• Podczas instalacji należy przestrzegać wszystkich lokalnych przepisów iregulacji.
• Nie używaj uszkodzonych lub niestandardowych kabli zasilających.
• Zwracaj uwagę na bezpieczeństwo podczas instalacji ikonserwacji.
• Postaw urządzenie niewłączone wpionie na minimum 4 h przed podłączeniem do prądu.
• Gdy temperatura przekracza 43°C albo spada poniżej 15°C bezpiecznik nie włączy funk-
cji chłodzenia.
• Jeżeli nastąpi przerwa wdostawie prądu, urządzenie samo wznowi pracę wostatnio wybranym trybie.
PRZYGOTOWANIE DO INSTALACJI:
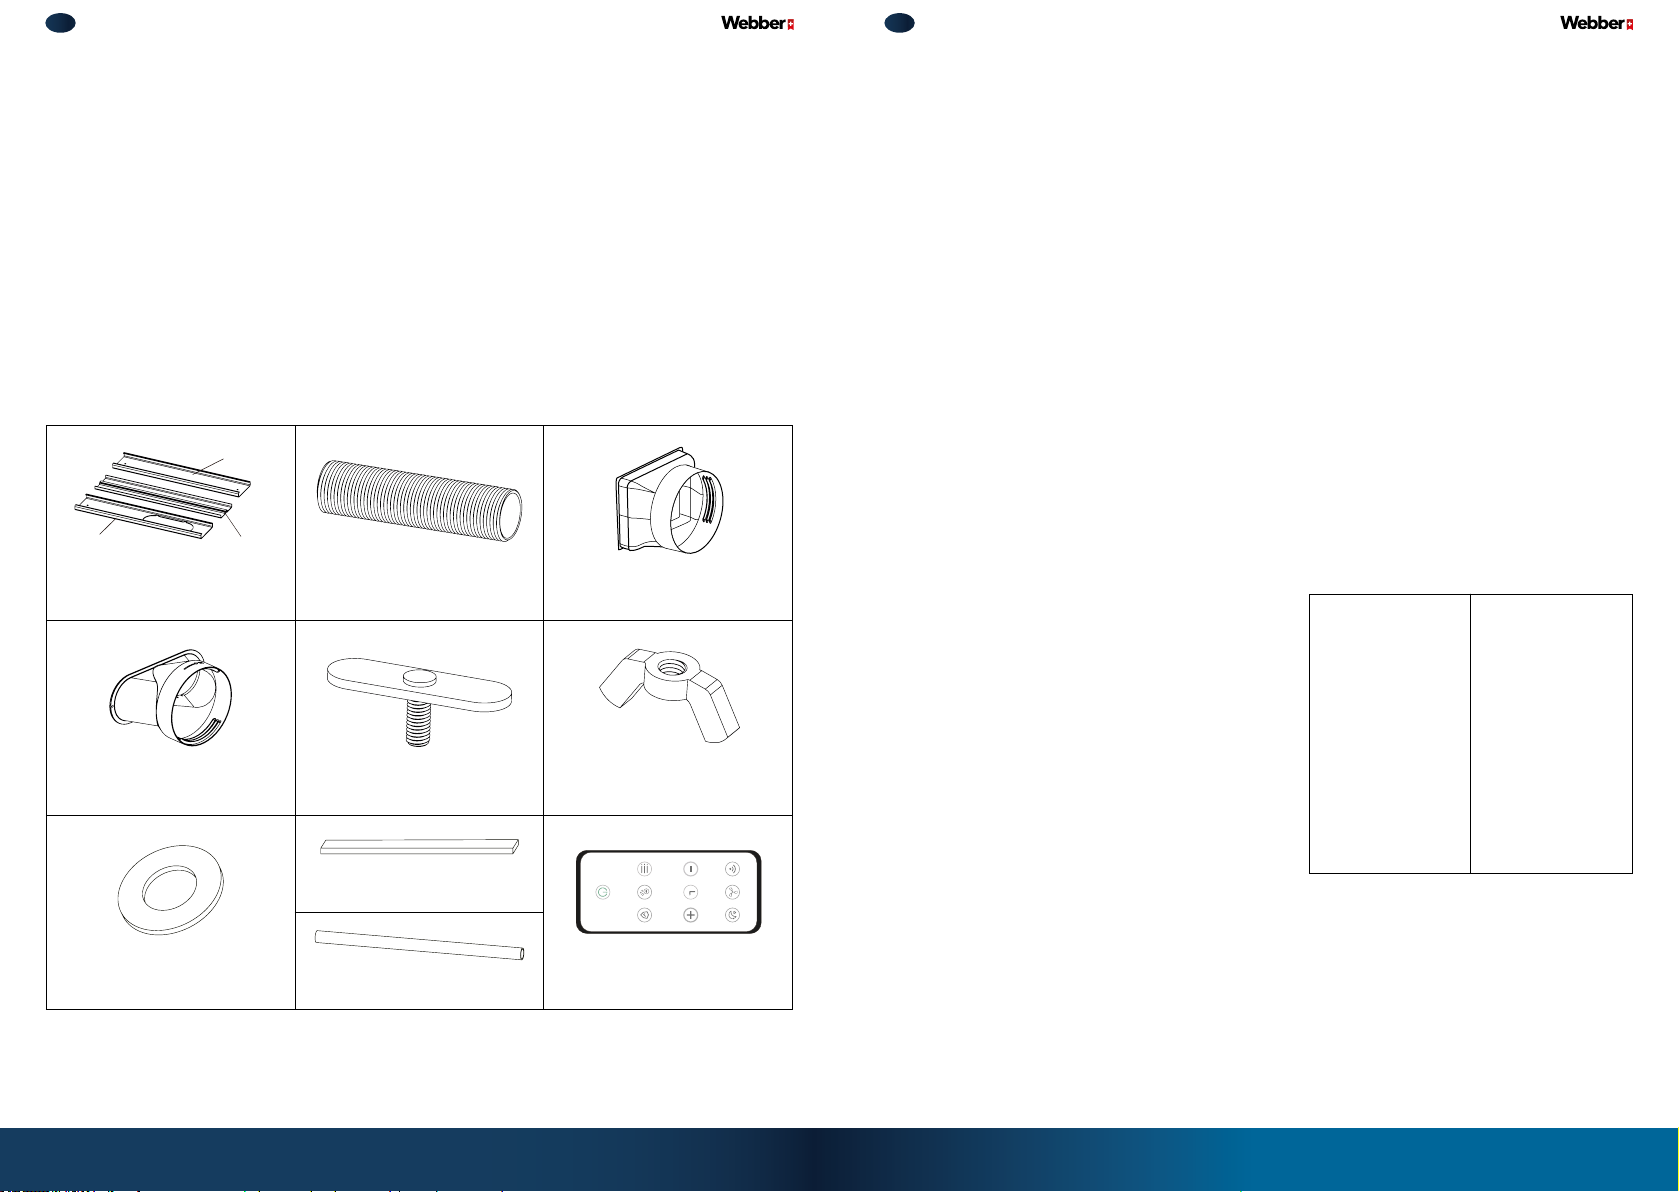
Sprawdź czy wzestawie zawarto wszystkie potrzebne elementy
Lista akcesoriów:
płytka C
płytka A
Panel okienny
Adapter okienny
płytka B
Rura odprowadzająca
Śruba montażowa x 2
Osłonka x 2
Podkładka x 2
Wężyk do spuszczania wody
Złączka rury do urządzenia
Mocowanie motylkowe x 2
Pilot zdalnego sterowania
ODPROWADZANIE WODY
Podczas pracy wtrybie chłodzenia ręczny drenaż na ogół nie jest wymagany, ale podczas
pracy wśrodowiskach owysokiej temperaturze iwysokiej wilgotności może wystąpić sytuacja pełnego zbiornika wody, co wymaga ręcznego lub ciągłego drenażu.
Gdy zbiornik na wodę jest pełny, oświetlenie wokół panelu sterowania zmienia kolor wtakiej
dokładnie kolejności: niebieski, pomarańczowy, zielony. Włącza się sygnał dźwiękowy ana
ekranie wyświetla się F1, aby przypomnieć oopróżnieniu. Gdy woda zostanie wylana/odprowadzona, sprężarka zatrzyma się na 3 minuty, apo tym czasie klimatyzator wznowi pracę.
Etapy odprowadzania wody:
1. Odetnij zasilanie iprzesuń urządzenie do odpo-
Rys. 2Rys. 1
wiedniej pozycji.
2. Przygotuj płytką miskę iumieść ją wpobliżu dolnego odpływu lub przenieś maszynę nad odpływ.
3. Obróć w kierunku przeciwnym do ruchu wskazówek zegara nakrętkę osłaniającą korek, aby
usunąć korek wdolnym odpływie, wyciągnij go
awoda automatycznie wypłynie zotworu spustowego (wcelu wylania wody całkowicie, urządzenie
można lekko przechylić do tyłu) (rys. 1).
4. Po spuszczeniu wody odwróć proces: zainstaluj gumowy korek idokręć nakrętkę.
Uwaga: Podczas chłodzenia wwysokich temperaturach iwysokiej wilgotności, jeśli chcesz uniknąć wyłączania
urządzenia za każdym razem, gdy zbiornik jest pełny, można podłączyć wężyk do spuszczania wody do wylotu
drenażowego (zaleca się obniżenie wylotu drenażowego) wcelu ciągłego drenażu, upewnij się, że rura odpł ywowa
biegnie płynnie prosto wdół (rys. 2).
wylot
spustowy
gumowy ko rek
nakrętk a korka
wąż
odpływow y
14 15
Page 9
PL INSTRUKCJA OBSŁUGI PL INSTRUKCJA OBSŁUGI
INSTALACJA RURY ODPROWADZAJĄCEJ POWIETRZE
Wskazówka: aby poprawić wydajność chłodzenia iutrzymać pełny przepływ, instalacja po-
winna być tak krótka ipłaska, jak to możliwe, bez zniekształceń.
1. Dokręć złącze rury wylotowej do dowolnego końca rury.
Przeciwnie do ruchu
wskazówek zegara
Rura odprowadzająca
Adapter do ur ządzenia
2. Dokręć adapter okienny na drugim końcu rury.
Przeciwnie do ruchu
wskazówek zegara
Rura odprowadzająca
Adapter okienny
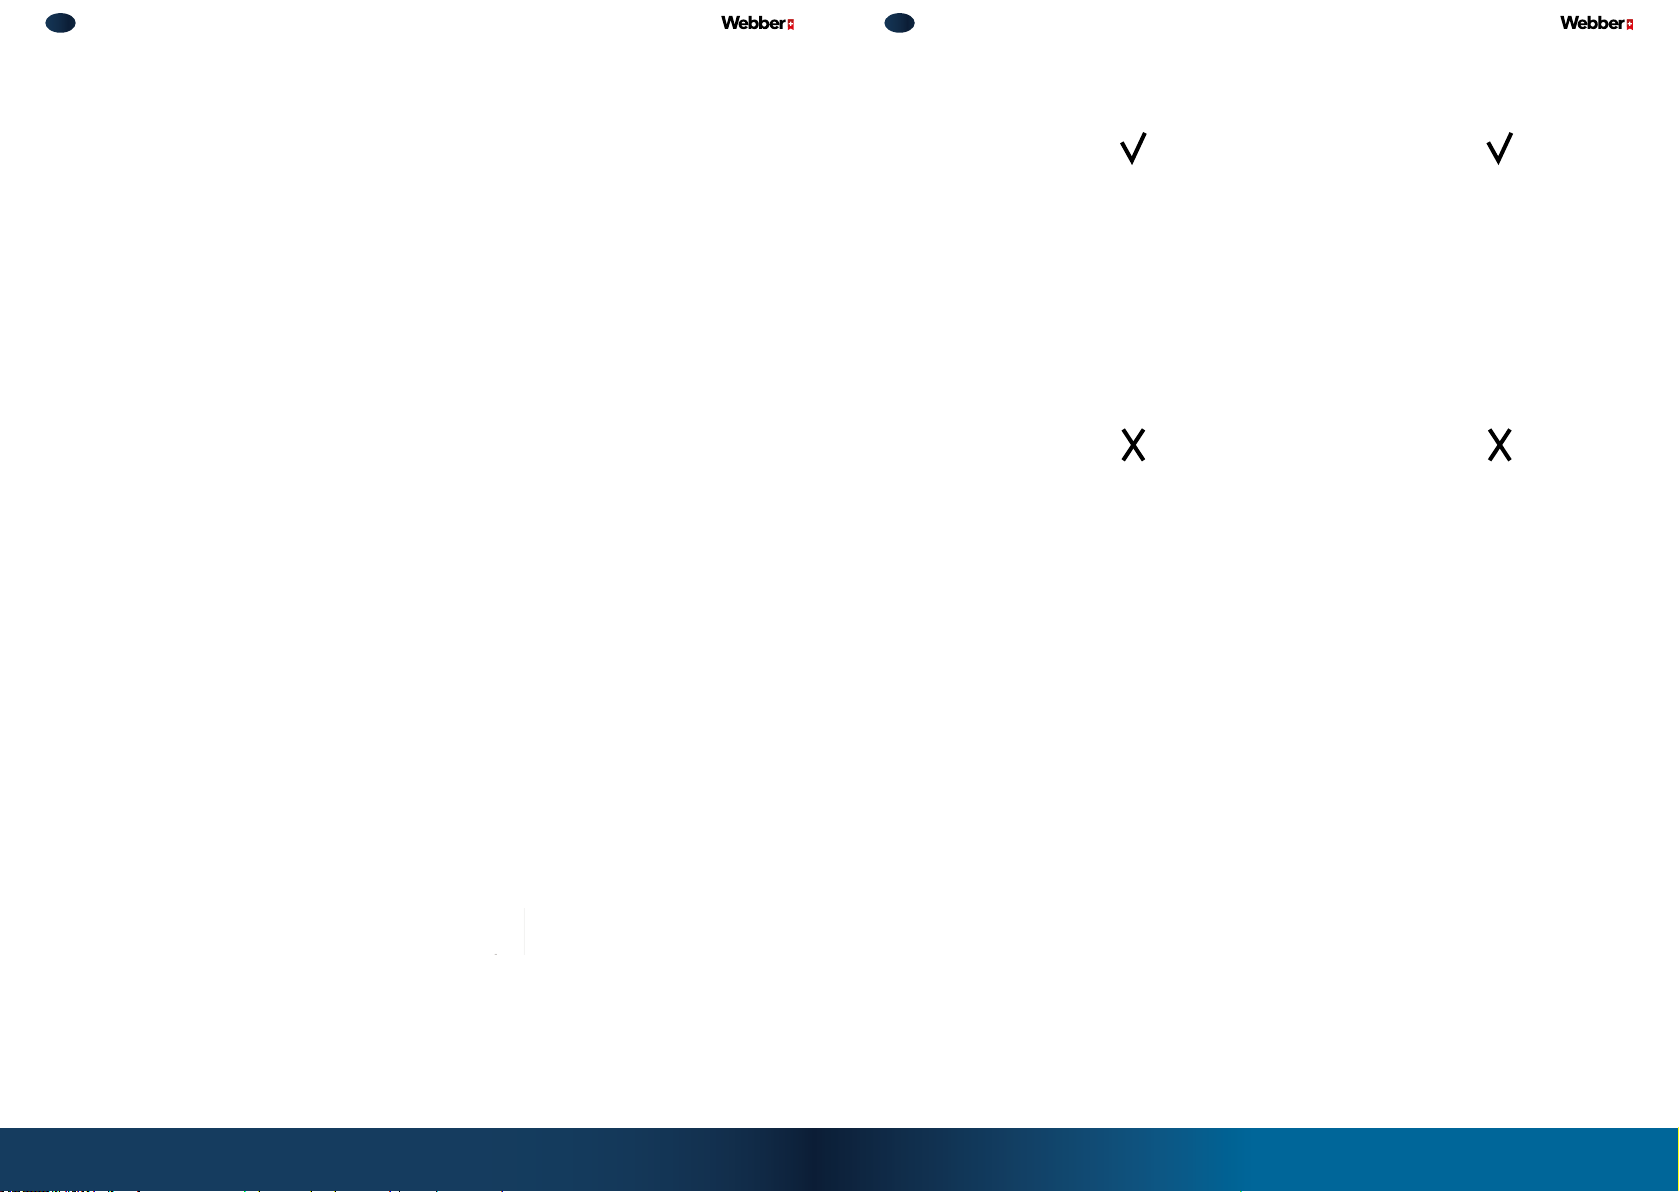
3. Włóż złącze rury od góry do dołu do tylnej szczeliny urządzenia. Jeśli usłyszysz dźwięk
„kliknięcia”, oznacza to, że złącze jest zainstalowane.
Poprawnie
Niepoprawnie
Poprawnie
Niepoprawnie
Rozbieranie złącza
Delikatnie popchnij adapter wgórę, aby wysunąć rurę odprowadzającą zgniazda złącza.
Punkt gr aniczny
Wysuń
Złącze
Złącze
4. Wyprowadź wylot rury na zewnątrz.
Podważ
16 17
Page 10
PL INSTRUKCJA OBSŁUGI PL INSTRUKCJA OBSŁUGI
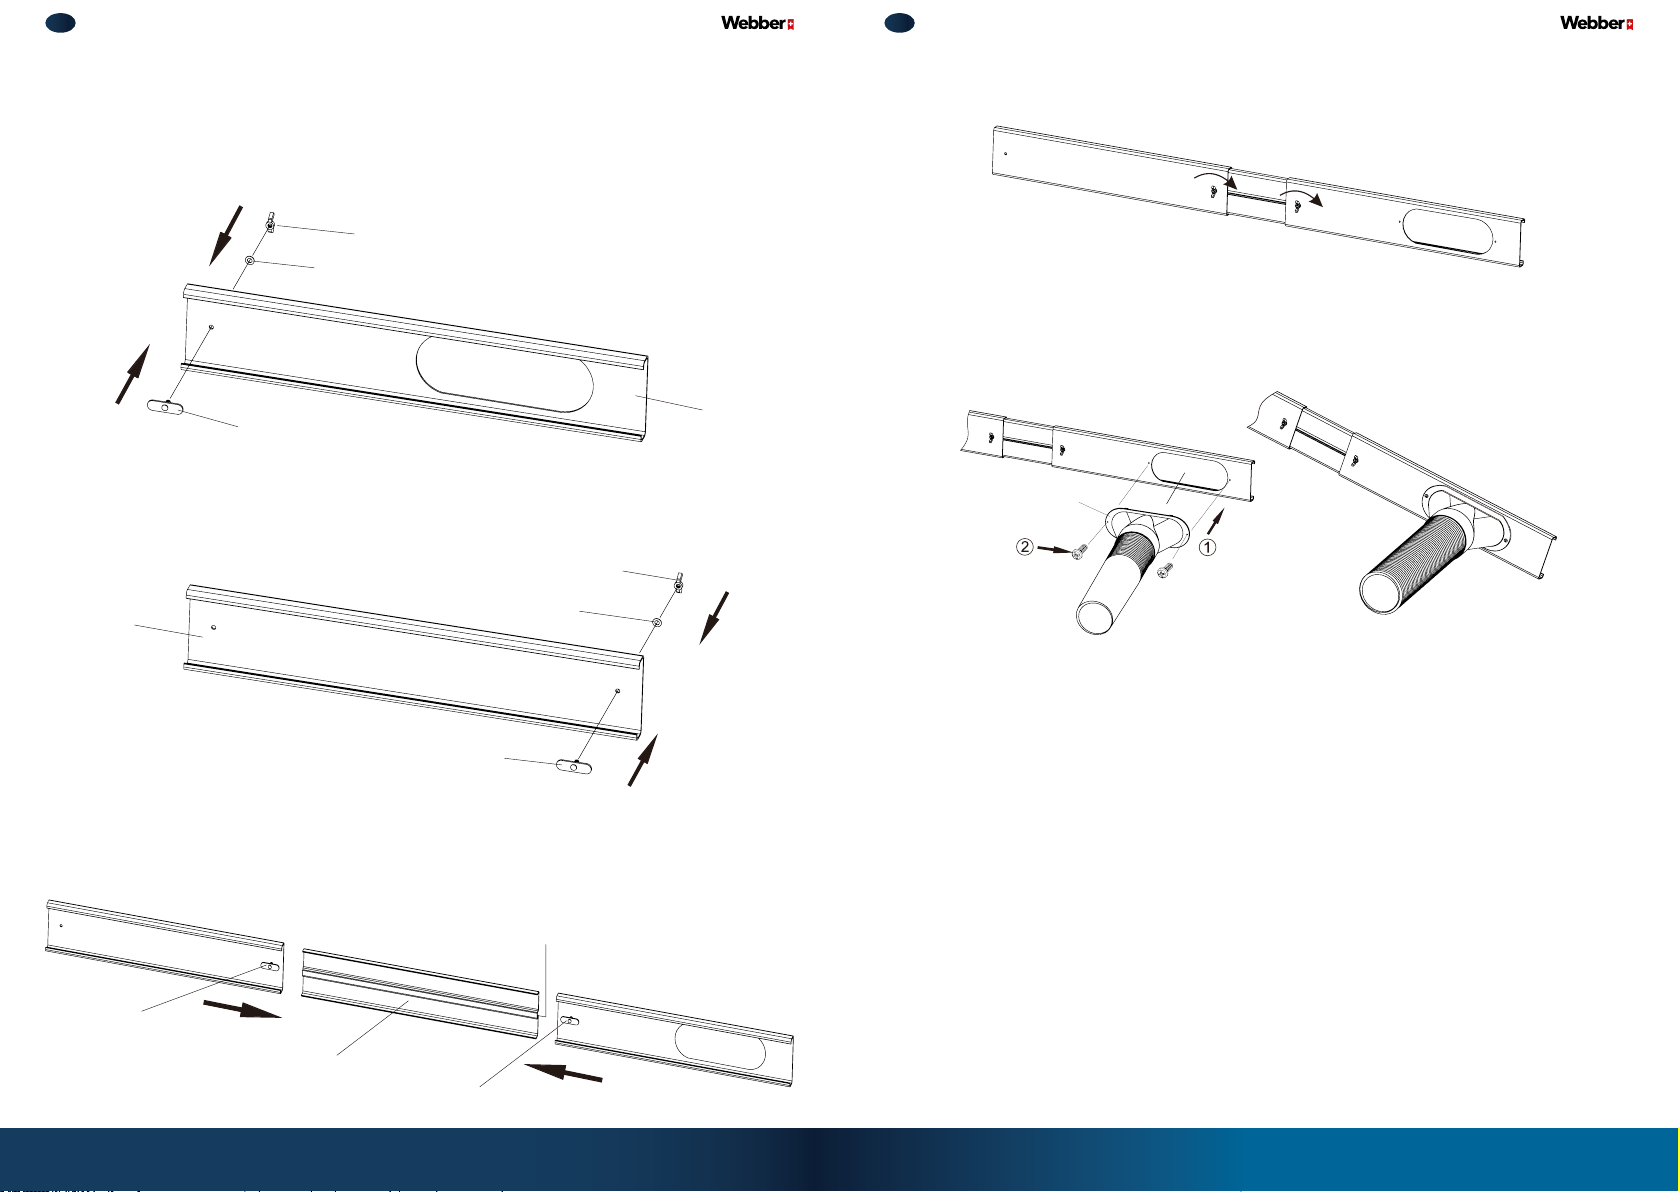
INSTALACJA PANELI OKIENNYCH*
*akcesorium dodat kowe
4. Ustaw położenie płyt AiC na płycie B poprzez rowek ślizgowy na płycie B, aby osiągnąć
wymaganą długość. Następnie dokręć nakrętkę motylkową zgodnie zruchem wskazówek zegara do końca, aby mocno zatwierdzić względne pozycje płyt AiB.
1. Po wkręceniu śruby przez otwór na płycie izolacyjnej A, umieść płaską uszczelkę na
śrubie idokręć nakrętkę (należy uważać, aby nie przekręcić nakrętki do dołu), pozostawiając szczelinę rzędu 2-3 mm.
Nakrętka motylkowa
Podkładka
5. Zainstaluj adapter wkształcie dzióbka zzainstalowaną rurą odprowadzającą na płycie
izolacyjnej okna A, etapy instalacji:
a. Włóż adapter do otworu wpłytce A
b. Dokręć adapter do płyty Aza pomocą śrub
Zgodnie zr uchem
wskazówek zegara
Śruba
Pły tka A
2. Po wkręceniu śruby przez otwór na płycie izolacyjnej C, umieść płaską uszczelkę na
śrubie idokręć nakrętkę (należy uważać, aby nie przekręcić nakrętki do dołu), pozostawiając szczelinę 2-3 mm.
Nakrętka motylkowa
Pły tka C
Podkładka
Śruba
3. Załóż płyty okienne AiC, które zostały zainstalowane wkrokach 1 i2, na oba końce płyty
izolacyjnej B. Podczas instalacji należy wyrównać płyty mocujące na śrubach zprzesuwnymi rowkami płyty B iwłożyć je.
Łącznik
Adapter
6. Zainstaluj tak złożony panel izolacyjny okna na ramie okiennej. Można zainstalować poziomo lub pionowo, zależnie od okna.
Okno pio nowe
Okno poziome
Złożo na płytka A
Pły tka B
Złożo na płytka B
18 19
Page 11
PL INSTRUKCJA OBSŁUGI PL INSTRUKCJA OBSŁUGI
IX. POŁĄCZENIE ZAPLIKACJĄ SMART
INSTALACJA APLIKACJI TUYA SMART
Zeskanuj kod QR produktu lub wyszukaj Tuya Smart wGoogle Play/App Store,
pobierz izainstaluj aplikację. Jeśli już masz zainstalowaną tę aplikację, zostaniesz przekierowany na stronę połączenia urządzenia.
UTWÓRZ KONTO
1. Po otworzeniu aplikacji, wyskoczy okienko zpolityką prywatności Tuya Smart Platform.
Po jej przeczytaniu iwyrażeniu zgody nastąpi przejście do okna z rejestracją/logowaniem. Kliknij Zarejestruj się .
2. Pod napisem Zarejestruj się wyświetli się kraj wybrany przez system telefonii komórkowej, jednakże można zmienić go też ręcznie (uwaga: po zakończeniu rejestracji nie
będzie można zmienić tej opcji ponownie). Wpisz poniżej swój adres e-mail i zaznacz
zgodę, anastępnie kliknij Otrzymaj kod weryfikacyjny .
3. Wejdź na swój podany wcześniej e-mail, otwórz wiadomość od TuyaSmart (jeśli nie możesz jej znaleźć, sprawdź zakładkę Spam). Wtreści maila będzie widniał otrzymany kod
weryfikacyjny. Przepisz go do aplikacji.
4. Po wprowadzeniu kodu nastąpi automatyczne przejście do ustawiania hasła. Wprowadź
je, zgodnie wwytycznymi pod polem ikliknij Zakończ , aby zakończyć rejestrację.
DODAJ URZĄDZENIE
X. CZYSZCZENIE IKONSERWACJA
• Przed rozpoczęciem czyszczenia klimatyzator musi być wyłączony zgniazdka, aby wyeliminować ryzyko porażania prądem.
• Nie czyść urządzenia dużą ilością wody.
• Nie używaj żrących substancji chemicznych, gdyż grozi to uszkodzeniem lub zmatowie-
niem wielu elementów urządzenia.
CZYSZCZENIE OBUDOWY IKRATEK WLOTOWYCH
Czyszczenie obudowy:
• jeśli na powierzchni obudowy znajduje się kurz, użyj miękkiego ręcznika, aby go wytrzeć.
• jeśli obudowa jest mocno brudna, wytrzyj ją neutralnym środkiem czyszczącym.
Czyszczenie kratki: możesz użyć odkurzacza lub miękkiej szczotki.
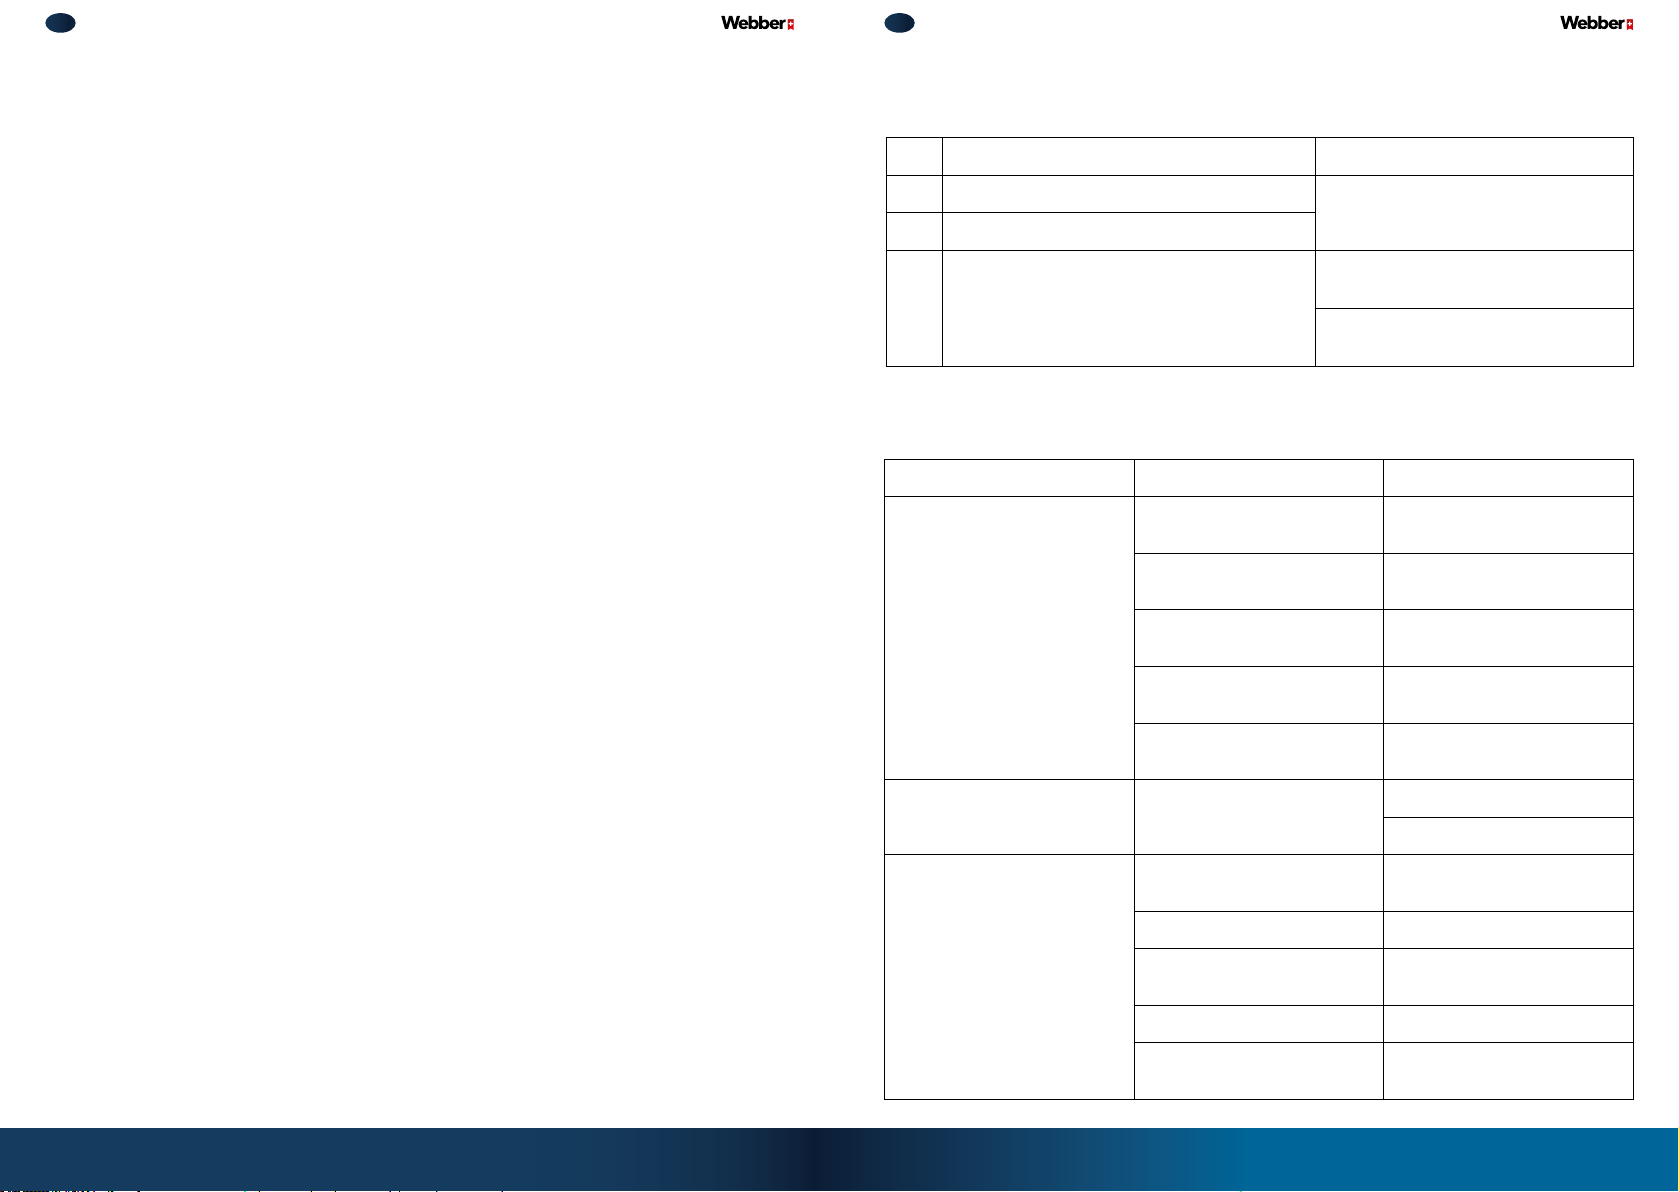
CZYSZCZENIE OBUDOWY FILTRA
siatka ltracyjna
1. Konfiguracja połączenia: przytrzymaj przycisk zasilania przez 5 sekund lub naciśnij
krótko przycisk Wi-Fi na pilocie, kontrolka Wi-Fi zacznie migać, wchodząc w tryb parowania zaplikacją. Funkcja połączenia sieciowego włączy się, gdy urządzenie wyda
zsiebie dźwięk B, wtedyteż będzie migał wskaźnik Wi-Fi, co oznacza, że urządzenie
czeka na skonfigurowanie połączenia.
2. Waplikacji, w zakładce Mój dom kliknij przycisk Dodaj urządzenie znajdujący się na
środku ekranu lub kliknij przycisk + znajdujący się wprawym górnym rogu, anastępnie
rama ltra
wybierz opcję Dodaj urządzenie . Obecnie dostępne są dwie metody: Ręczne dodawanie
iAutomatyczne wykrywanie (tryb automatyczny wymaga zezwolenia aplikacji na korzystanie zWi-Fi iBluetooth).
3. Wybierz po lewej pozycję Małe urządzenie domowe , następnie po prawej przesuń listę
by znaleźć zakładkę środowisko ikliknij Klimatyzator (Wi-Fi) .
4. Zostaniesz przeniesiony na stronę Wybierz sieć Wi-Fi 2,4 GHz iwprowadź hasło (aplikacja obsługuje tylko sieci Wi-Fi wpaśmie częstotliwości 2.4GHz, upewnij się, że telefon
jest podłączony do sieci ztaką częstotliwością).
1. Zdjęcie obudowy filtra: Wyczep kratkę ochronną, jak pokazano
powyżej, następnie usuń ramę filtra.
2. Czyszczenie ramki: użyj odkurzacza lub wyczyść ramę filtra czystą
wodą (można czyścić ciepłą wodą rozpuszczoną wneutralnym detergencie, anastępnie suszyć wchłodnym miejscu).
3. Ponowna instalacja ramki: Po wyczyszczeniu i osuszeniu filtra
włóż go do urządzenia.
5. Jeśli wiesz już, jak skonfigurować sieć, możesz wybrać odpowiednią konfigurację zgodnie ze stanem kontrolki sieci. Jeśli nie masz pewności co do procesu, możesz kliknąć
opcję Kontrolka miga szybko , aby to sprawdzić.
Po pomyślnym dodaniu urządzenia kliknij zakładkę Mój dom, aby obsługiwać funkcję oczysz-
Uwaga:
• Zaleca się czyszczenie filtra co około 20 dni użytkowania, jeżeli urządzenie pracuje wzakurzonym otoczeniu.
• Nie należy osuszać filtra czy też ramki suszarką lub podgrzewać wżaden sposób.
czacza powietrza waplikacji.
20 21
Page 12
PL INSTRUKCJA OBSŁUGI PL INSTRUKCJA OBSŁUGI
CZYSZCZENIE RURY ODPROWADZAJĄCEJ
XI. ROZWIĄZYWANIE PROBLEMÓW
Wyjmij rurę zklimatyzatora, anastępnie wyczyść ją (używając tej samej metody czyszczenia
co do ramki filtra), pozostaw do osuszenia, anastępnie zainstaluj ponownie.
Kod Powód Rozwiązanie
CZYNNOŚCI PRZED ROZPOCZĘCIEM SEZONU
1. Sprawdź czy wlot iwylot nie są zatkane.
2. Sprawdź, czy wtyczka igniazdo są wdobrym stanie.
3. Sprawdź, czy filtr jest czysty.
4. Sprawdź, czy pilot zdalnego sterowania jest wyposażony wbaterię.
5. Sprawdź, czy rura odprowadzająca nie jest uszkodzona ijest bezpiecznie zainstalowana.
PRZECHOWYWANIE
Jeśli nie korzystasz zklimatyzatora przez długi czas, zaleca się, aby wykonać następujące
czynności wcelu utrzymania dobrej wydajności urządzenia:
1. Upewnij się, że nie ma nagromadzonej wody wzbiorniku iwyjmij rurę odprowadzającą.
2. Wyjmij wtyczkę iprawidłowo zapakuj przewód zasilający.
3. Wyczyść klimatyzator izapakuj go, aby zapobiec gromadzeniu się kurzu.
E1 Czujnik temperatury parownika jest uszkodzony
E2 Czujnik temperatury otoczenia jest uszkodzony
F1 Pełny zbiornik na wodę
Problem Możliwa przyczyna Rozwiązanie
Brak zasilania
Wtyczka się wysunęła lub jest
luźna
Urządzenie nie działa
Uszkodzone gniazdko lub
korek bezpieczeństwa
Przepięcie
Wyłącza się isamo włącza
Skontaktuj się ze sprzedawcą
Spuść wodę ze zbiornika wody
Jeśli kod nie gaśnie po opróżnieniu zbiornika wody, należy powiadomić serwis
Poczekaj na wznowienie
zasilania
Podłącz wtyczkę ponownie do
kontaktu
Poproś profesjonalistę onaprawę gniazdka lub bezpiecznika
Poproś profesjonalistę odiagnozę gniazdka
Odłącz, poczekaj 3 minuty
iręcznie włącz urządzenie
Wyczuwalny dziwny zapach
Za mała wydajność wtrybach
chłodzenia iogrzewania
22 23
Poszukaj innych źródeł zapachu jak dym itp.
Za niskie napięcie zsieci
Brudny ltr Oczyść ltr
Niepoprawnie ustawiona
temperatura
Otwarte drzwi / okno Zamknij drzwi / okno
Wylot jest wewnątrz
Usuń źródło zapachu
Wyczyść ltr
Odczekaj aż sytuacja się
unormuje
Zmień ustawienia urządzenia
Wystaw wylot rury na zewnątrz
Page 13
PL INSTRUKCJA OBSŁUGI PL INSTRUKCJA OBSŁUGI
Pilot nie działa, nie ma reakcji.
Urządzenie ma przedmuch
odprowadzanego powietrza
Brak chłodzenia
Nie można ustawić temperatury
Dziwna zmiana trybu podczas
pracy
Słychać dźwięk wody
Słychać dźwięk stuknięcia
Silna ingerencja sygnału zinnych urządzeń
Pilot poza zasięgiem
Jakiś przedmiot zasłania
odbiornik
Słaba reakcja przycisków pilota Sprawdź baterię lub wymień
Sprawdź czy lampy lub inne
urządzenia elektryczne nie
zakłócają sygnału
Wlot lub wylot są zapchane Usuń powód zapchania
Temperatura pomieszczenia
osiągnęła żądaną
Temperatura otoczenia niższa
niż żądana
Tryb wentylacji
Urządzenie wtrybie wentylacji
Temperatura poza skalą
urządzenia
Ingerencja innego urządzenia
/ pilota
Zaraz po uruchomieniu lub
wyłączeniu urządzenia?
Zaraz po włączeniu / wyłączeniu urządzenia
Wyłącz klimatyzator iwłącz
ponownie po 3 minutach
Zmniejsz dystans od urządzenia do maksymalnie 6 metrów
Usuń ten przedmiot
Podejdź bliżej urządzenia
Wyłącz inne urządzenia ispróbuj ponownie
Urządzenie samo przestanie
odprowadzać nadmiar powietrza po osiągnięciu żądanej
temperatury
Ustaw temperaturę na niższą
Zmień ustawienia na tryb
chłodzenia
Wtrybie wentylacji nie da się
ustawić temperatury
Urządzenie działa pomiędzy
16-30°C, poza tym zakresem
nie da się ustawić temperatury.
Wyłącz iwłącz urządzenie
ponownie
Normalna reakcja na włączenie / wyłączenie kompresora
Temperatura powoduje
rozszerzanie / kurczenie się
plastikowych elementów
urządzenia
XII. WARUNKI GWARANCJI
1. Gwarancji udziela się na okres 24 miesięcy od daty sprzedaży. Ujawnione wtym czasie wady będą usuwane bezpłatnie na terenie Polski przez zakład serwisowy wterminie
14 dni roboczych od daty dostarczenia do zakładu serwisowego. Warunkiem udzielenia
gwarancji jest zapoznanie się użytkownika zinstrukcją obsługi i użytkowanie sprzętu
zgodnie ztą instrukcją. Punkty serwisowe oraz zasady dostarczenia sprzętu do serwisu
znajdziesz na stronie www.webber.com.pl.
2. Przez naprawę gwarancyjną rozumie się wykonanie przez zakład serwisowy czynności ocharakterze specjalistycznym, właściwym dla usunięcia wady objętej gwarancją.
Naprawa gwarancyjna nie obejmuje czynności przewidzianych winstrukcji obsługi, do
wykonania których zobowiązany jest użytkownik we własnym zakresie ina własny koszt,
np. zainstalowanie, sprawdzenie działania, czyszczenie iwymiana filtrów itp. Wprzypadku wątpliwości co do właściwego działania urządzenia prosimy okontakt telefoniczny
znaszym Działem Serwisu. Wprzypadku stwierdzenia nieprawidłowego działania urządzenia należy skontaktować się zDziałem Serwisu Producenta:
• mailowo: [email protected],
• poprzez stronę producenta: www.webber.com.pl/reklamacje
• lub telefonicznie: 61 1020 492.
3. Reklamującemu przysługuje prawo do wymiany sprzętu na nowy, jeżeli:
a. wokresie gwarancji zakład usługowy dokona 4 napraw, asprzęt będzie wykazywał
wady uniemożliwiające używanie go zgodnie zprzeznaczeniem,
b. autoryzowany zakład serwisowy stwierdzi na piśmie, że usunięcie wady jest
niemożliwe,
c. naprawa nie jest wykonana wterminie określonym w pkt. 1 lub winnym terminie
uzgodnionym na piśmie zreklamującym.
4. Koszty naprawy lub wymiany, wtym wszczególności koszty opłat pocztowych, przewozu, robocizny imateriałów, ponosi zakład serwisowy.
5. Reklamujący udostępnia zakładowi serwisowemu towar podlegający naprawie lub wymianie. Przedsiębiorca odbiera od konsumenta towar na swój koszt.
6. Konsument nie jest zobowiązany do zapłaty za zwykłe korzystanie ztowaru, który następnie został wymieniony.
7. Gwarancja nie wyłącza, nie ogranicza ani nie zawiesza uprawnień kupującego wynikających zprzepisów Ustawy zdnia 30.05.2014r. o prawach konsumenta oraz innych
powszechnie obowiązujących przepisów prawa regulujących sprzedaż iodpowiedzialność producenta/sprzedawcy za towar.
Niesprawne urządzenie zdokładnym opisem usterki należy przesłać na adres Serwisu:
Metrex – Serwis, ul. Grunwaldzka 229, 60-179 Poznań, tel. 61 1020 492.
24 25
Page 14
PL INSTRUKCJA OBSŁUGI
GWARANCJĄ NIE SĄ OBJĘTE:
• Sznury połączeniowe, sieciowe, żarówki, elementy eksploatacyjne np. filtry; Uszkodzenia
mechaniczne, termiczne, chemiczne iwszystkie inne spowodowane działaniem bądź zaniechaniem użytkownika albo działaniem siły zewnętrznej (przepięcia w sieci, używanie
niezgodnie zinstrukcją obsługi materiałów eksploatacyjnych, przedmioty obce, które dostały się do wewnątrz sprzętu, korozja, pyły itp.).
• Uszkodzenia wynikłe na skutek przeróbek izmian konstrukcyjnych dokonywanych przez
osoby trzecie lub wynikłe zużytkowania niezgodnego zinstrukcją.
• Celowe uszkodzenia sprzętu powstałe podczas czynności konserwacyjnych, wymiany filtrów lub czyszczenia.
Usuwanie wyeksploatowanych urządzeń elektrycznych ielektronicznych (dotyczy krajów Unii Europejskiej iinnych krajów europejskich zwydzielonymi
systemami zbierania odpadów).
Ten symbol na produkcie lub jego opakowaniu oznacza, że produkt nie powinien być zaliczony do odpadów domowych. Należy go przekazać do odpowiedniego punktu, który zajmuje się
zbieraniem irecyklingiem urządzeń elektrycznych ielektronicznych. Prawidłowe usunięcie
produktu zapobiegnie potencjalnym negatywnym konsekwencjom dla środowiska naturalnego izdrowia ludzkiego, których przyczyną mogłoby być niewłaściwe usuwanie produktu.
Recykling materiałów pomaga w zachowaniu surowców naturalnych. Aby uzyskać szczegółowe
informacje orecyklingu tego produktu, należy skontaktować się zwładzami lokalnymi, rmą świadczącą usługi oczyszczania lub sklepem, wktórym produkt został kupiony.
Producent:
METREX
ul. Grunwaldzka 229
60-179 Poznań, PL
webber.com.pl
26
Page 15
PL INSTRUKCJA OBSŁUGI PL INSTRUKCJA OBSŁUGI
INDEX
I. Use Environment 30
II. Warnings 30
III. Technical data 31
IV. Product description 32
V. Remote control 34
VI. Main functions 35
VII. Other functions 37
VIII. Installations 38
IX. Connection with the Smart App 44
X. Clean and maintenance 45
XI. Troubleshooting 47
XII. Warranty conditions 49
Thank you for purchasing the Webber mobile air conditioner AC-H025A2H.
Congratulations on your purchase and welcome to the community
of thousands of satised Webber customers.
Please read this manual to ensure smooth and enjoyable use of the device.
28 29
Page 16
PL INSTRUKCJA OBSŁUGI PL INSTRUKCJA OBSŁUGI
I. USE ENVIRONMENT
• This air conditioner is suitable for temperature range of 0-35°C .
• This air conditioner is only suitable for family rooms and is not suitable for commer- cial or
industrial purposes.
• At least 50cm of space should be reserved in front of and behind the air conditioner.
• Avoid using in damp environments; Avoid direct sunlight.
• Please keep the air inlet and outlet clean and free of obstacles.
• Please close the doors and windows when using to improve the cooling/heating effect.
• To avoid abnormal situations such as noise and vibration of the air conditioner, please place
the air conditioner on aflat ground.
• This air conditioner comes with casters for easy sliding. The casters should slide on asmooth
and flat surface, not on carpets or surfaces with obstacles, to avoid dirt on the ground wrapping around the casters and making sliding inconvenient.
• Do not tilt or lie down the air conditioner. If there is any abnormality, immediately turn off the
power and contact the dealer for inspection and repair.
12. Prohibit the use of heating equipment around air conditioners; Stay away from
sources of re, flammable, explosive and other objects.
13. The user of this appliance must be over 8 years old. Having physical, sensory, and intellectual
disabilities; Individuals who lack knowledge and experience, without suffcient understanding of the safe use and potential hazards of the appliance are not allowed to use it without
supervision and guidance. Children are not allowed to play and use this appliance.
14. Children are not allowed to clean and maintain this appliance without supervision.
15. Please do not place or hang items with dripping water above the air conditioner.
16. Do not repair or disassemble the air conditioner without authorization.
17. It is prohibited to insert any object into the components of the machine.
18. Instruments should be installed in accordance with national wiring standards.
19. Safety tube specication: T3.15AH250V; The maximum current allowed for the fuse to
pass through cannot exceed 3.15A.
20. Do not extend the power cord in any way; Do not share sockets with other appliances;
21. Do not use patch cords or other adapter devices.
22. Do not cover the air outlet of this air conditioner.
III. TECHNICAL DATA
II. WARNINGS
1. Please conrm that the power supply specications are consistent with the requirements on the product nameplate before use.
2. Before cleaning and repairing the air conditioner, please turn off the air conditioner and
unplug the power plug.
3. Before cleaning and repairing the air conditioner, please turn off the air conditioner and
unplug the power plug.
4. Do not pull the power supply cord to unplug the power plug or move the machine.
5. Do not plug or unplug the power plug when your hands are wet.
6. Use agrounded power supply and ensure that the power supply is undamaged.
7. If the power cord is damaged, it must be replaced by the manufacturer, service contractor, or qualied technical personnel.
8. If any abnormal phenomena are found (such as burnt smell, etc.), please immediately cut
off the power and contact the dealer.
9. When there is no supervision, please turn off the machine and cut off the power.
10. Do not splash or pour water on the air conditioner, as it may cause ashort circuit or damage to the air conditioner.
11. When using drainage pipes, the ambient temperature should not be lower than 0°C, otherwise it is easy to cause the water in the pipes to freeze, leading to machine leakage of water.
30 31
Model AC-H025A2H
Cooling capacity 720 W
Cooling input power 410 W/ 1.89 A
Heating input power 1600 W/ (PTC)
Max. input power 1750 W
Voltage 220-240 V~ / 50 Hz
Air flow 195 m³/h
discharge 1.7 MPa
Pressure
Noise <48 dB(A)
Refrigerant R290 / 600 g
Dimensions 255 x 260 x 885 mm
Net weight 14 kg
suction 0.6 MPa
max 4.0 MPa
Page 17
PL INSTRUKCJA OBSŁUGI PL INSTRUKCJA OBSŁUGI
IV. PRODUCT DESCRIPTION
APPLIANCE
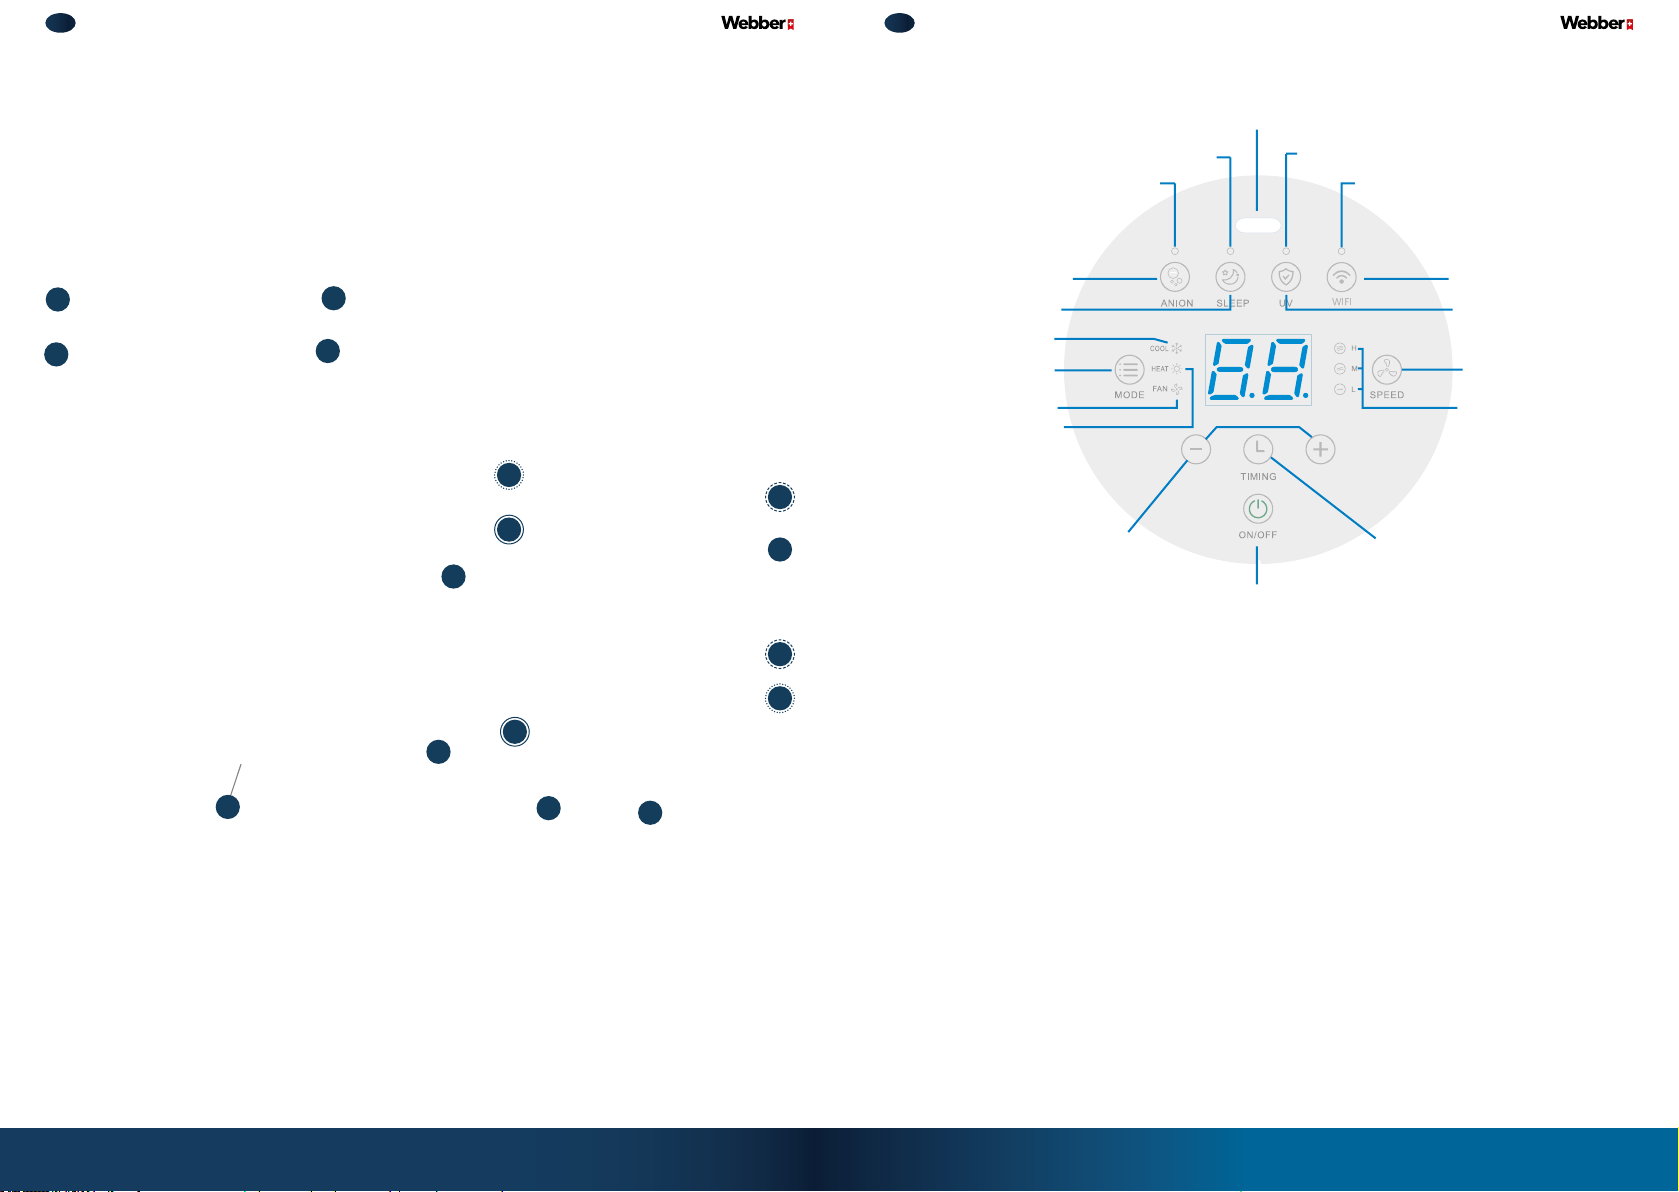
Sleep mode control lamp
Anion control lamp
CONTROL PANEL
Remote signal receiving window
UV control lamp
Wi-Fi control lamp
1
2
5
3
4
Mode choice button
6
10
7
8
7
9
12
13
11
10
6
Anion button
Sleeep mode button
Cool mode button
Fan mode button
Heat mode button
+ / –
Timer button
ON/OFF button
Przycisk Wi-Fi
Przycisk UV
Speed button
Speed control lamps
1. Air outlet
2. Control panel
3. Handle
4. Wind guide wheel
5. Casters
6. Air inlet
7. Filter
8. Heat discharge pipe
9. Duckbill joint
10. Filter frame handle
11. Square to circular joint
12. Drainage outlet
13. Power plug
32 33
Page 18
PL INSTRUKCJA OBSŁUGI PL INSTRUKCJA OBSŁUGI
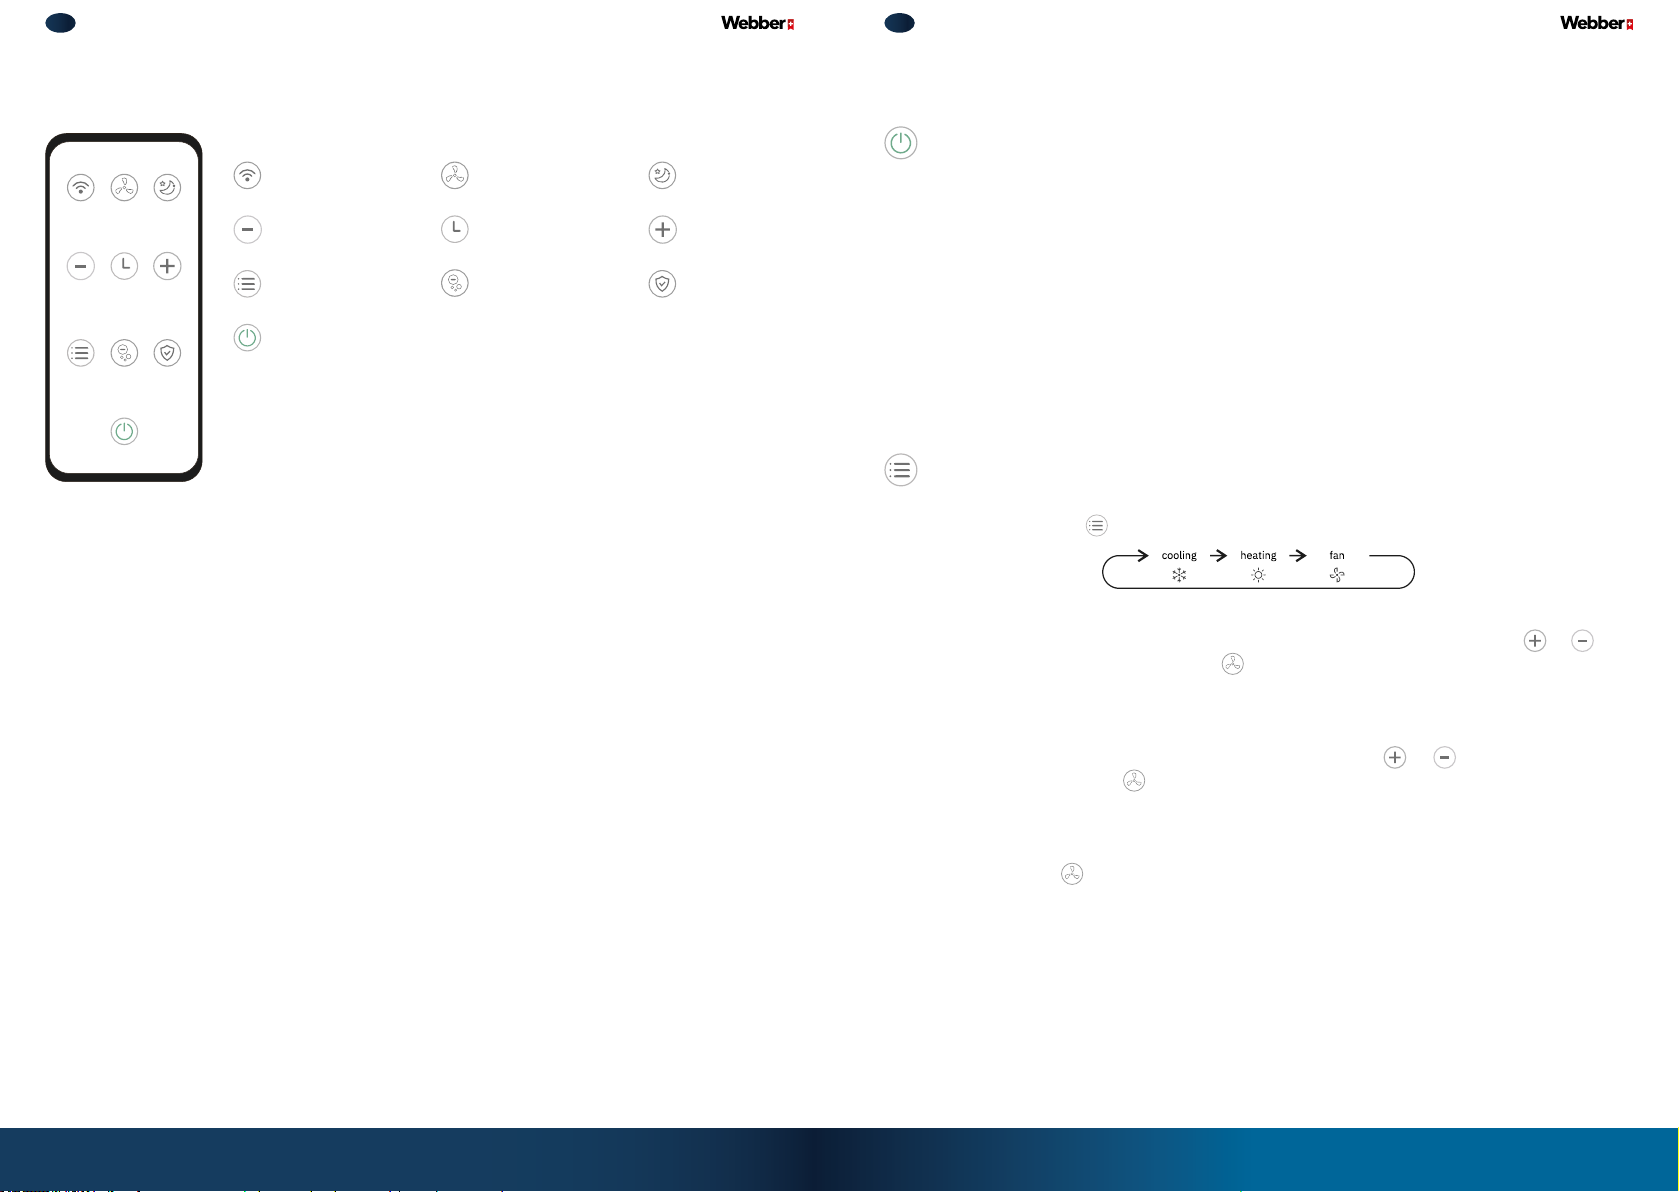
V. REMOTE CONTROL
Wi-Fi
Reduce
Mode
Fan speed
Timer
Anion
ON/OFF
• Before using the remote control, please install two AAA (1.5V) batteries correctly in the
remote control battery compartment.
• Align the signal transmitter with the signal receiving window on the air conditioner during use.
• The distance between the signal transmitter and receiver window should generally be
within meters, and there should be no obstacles.
• In rooms equipped with electronic start type fluorescent lamps, conversion type fluorescent lamps, or wireless telephones, the signal is easily disturbed. The remote control
should be as close to the air conditioner as possible.
• When not using the remote control for along time, it is recommended to remove the
battery from the remote control.
Sleep mode
Add
UV lamp
VI. MAIN FUNCTIONS
ON/OFF
• When the power is turned on, the machine emits abeep sound (refer to the power parame-
ters on the nameplate to connect to the power), and the machine enters standby mode. At
this time, the machine can be controlled using the control panel or remote control.
• Press the standby button, the machine will start up, enter default mode, and the corre-
sponding indicator light will light up; Press the standby buttono again, the machine stops
working, enters the shutdown state, and all indicator lights turn off. If the machine is not
used for along time, it is recommended to unplug the power cord from the socket.
• Wind guide wheel rotation control in the power on state, long press the button for 5 se-
conds to turn on or off the rotation of the wind guide wheel.
MODES
• Select mode: Press , to cycle between cool, heating and air supply:
• Cooling mode: The cool indicator light and icon light up, the air conditioner operates ac-
cording to the set parameters, the target temperature is set by pressing the
the speed is adjusted by pressing the
. When the indoor temperature is higher than the
set temperature, the compressor starts. When the indoor temperature is lower than the set
temperature, the compressor stops working.
• Heating mode: The heating indicator light and heating icon light up, and the air conditio-
ner runs heating according to the set program. Press the
adjusted by pressing the
key to adjust the speed of the wind speed. When the indoor
or key, and the speed is
temperature is lower than the set temperature, the air conditioner starts heating. When the
indoor temperature is higher than the set temperature, the air conditioner stops heating.
• Fan mode: The air supply indicator light and icon light up, and the fan runs at the set wind
speed. Press the
, button to adjust the wind speed. When the air conditioner is in this
mode; the compressor does not work.
or , and
Warning
• When the air conditioner is heating , it needs to be connected to aheat pipe to exhaust the cold air to the outside.
• When the air conditioner is cooling, in order to reach better cooling effect, it is necessary to install heat pipe
on the machine to guide the hot air to the outside (the installation method of heat pipes is described later).
34 35
Page 19
PL INSTRUKCJA OBSŁUGI PL INSTRUKCJA OBSŁUGI
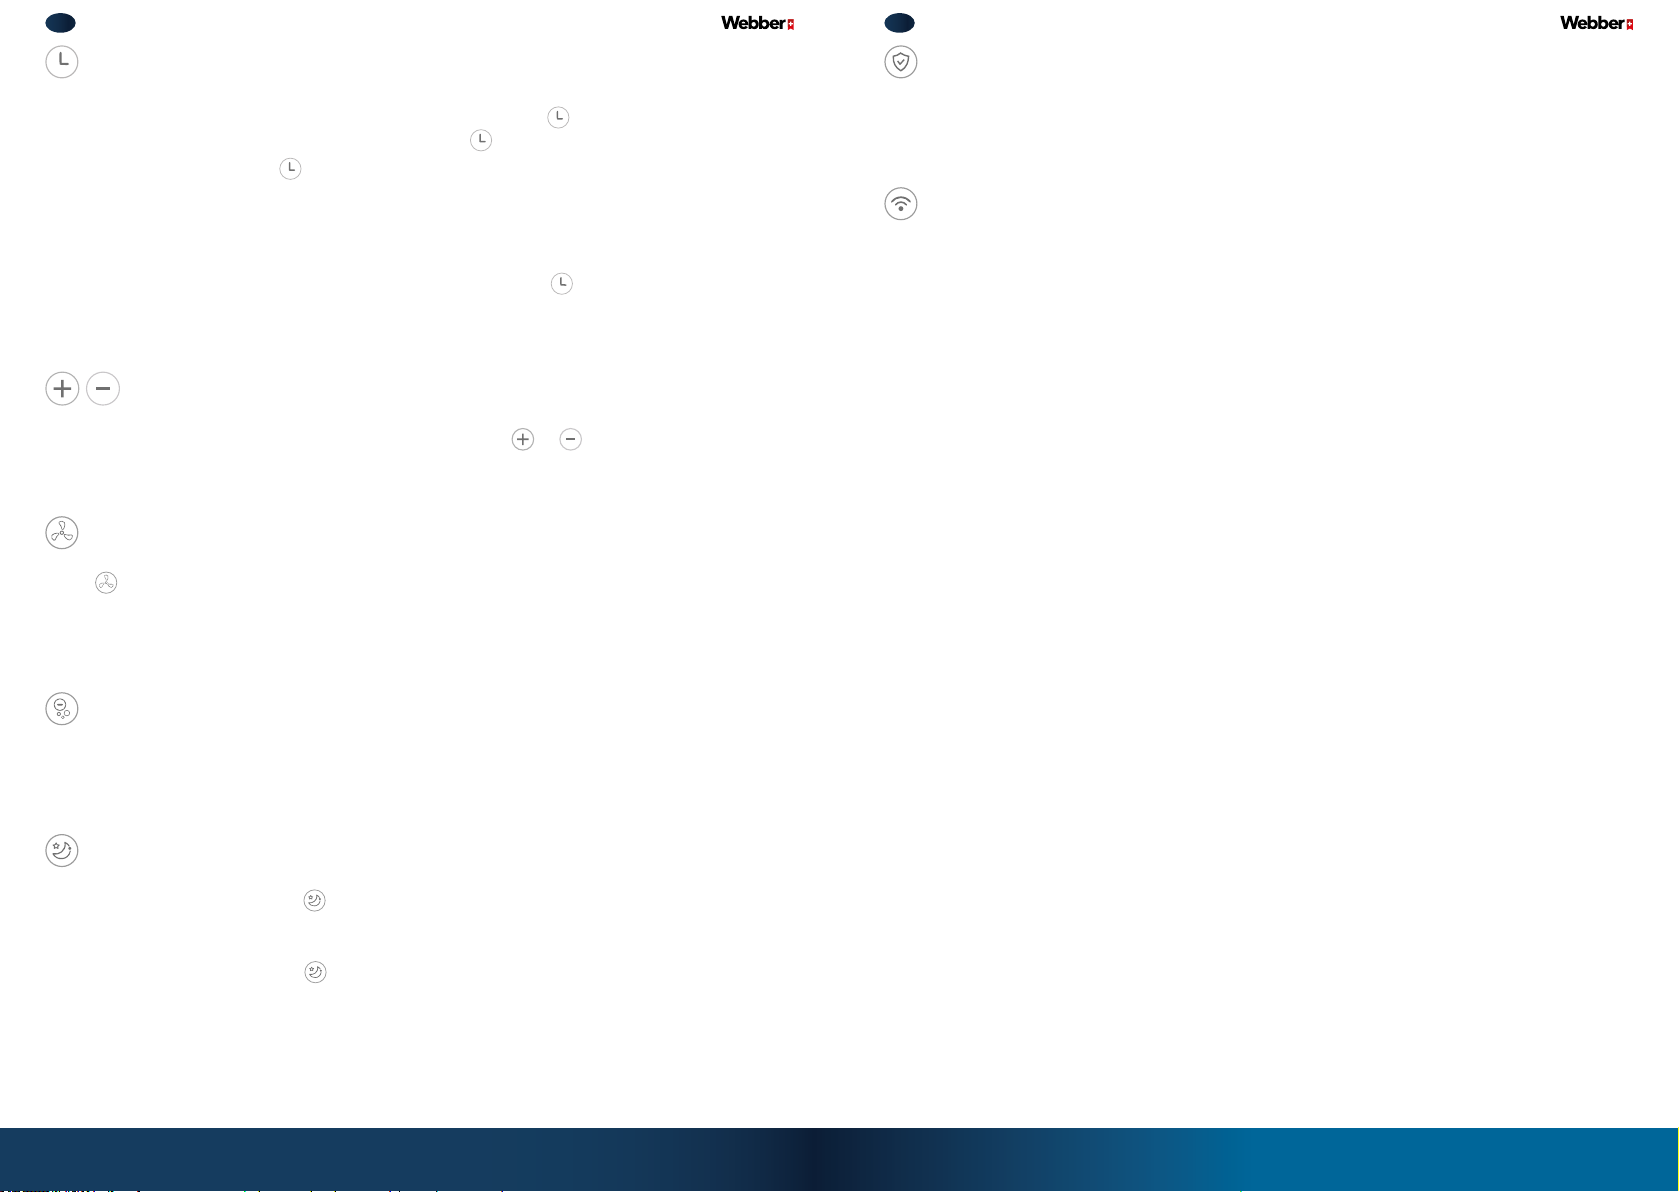
TIMER
• Bidirectional timing: When the machine is running, press , button to set the shutdown
time; When the machine is turned off, press the
• Set startup time: Press button once, to display the current timer time on the screen.
, button to set the startup time.
Repeat pressing the button to set the timer time. Each time you press the button, the
timer duration increases by 1 hour. After stopping the operation, the screen flashes 5
times to display the set time, and then returns to temperature display. The adjustable
time range for timing is 1-24 hours. Setting it to 0 will cancel the timing.
• During the scheduled startup and shutdown process, if the key is pressed, the schedu-
led shutdown or scheduled startup will be canceled.
TEMPERATURE ADJUSTMENT
The temperature can be set between 16-30°C. Press the
or key each time to increase
or decrease 1°C. This key is invalid in the air supply mode.
FAN SPEED
Press
button, to select the fan speed between: high → mid → low → auto
In auto mode, there is automatical the speed adjustment, based on the ambient temperature.
Note: In dehumidification mode, this button is invalid.
UV LAMP
Press the UV key to turn on or off the disinfection function. After turning on, the disinfection indicator light will turn on, otherwise when turned off, the disinfection indicator light will turn off.
WI-FI
• Machine configuration: After turning on, press akey once, the Wi-Fi indicator light will
flash, enter the network conguration state, and wait for the mobile device to input network information.
• Clearing configuration: Long press the Wi-Fi key for 5 seconds to clear the congura-
tion. After clearing, the network information between the mobile device and machine will
be deleted and the machine will automatically reenter conguration state.
VII. OTHER FUNCTIONS
FAN SPEED
The machine has an automatic defrosting function, which automatically detects the temperature and determines whether defrosting is needed during operation, ensuring that the
machine still has good heating performance even in low ambient temperatures.
Note: This key is invalid in air supply and dehumidification mode.
ANION
AUTO WATER FULL PROTECTION
Long press the mode key to turn on or off the anion function. After turning on, the anion indicator light and the icon will light up, and vice versa, it will be turned off.
When the machine detects that the water level in the water tray has reached the preset height, the compressor, motor, and water throwing motor stop working. The machine emits 10
alarm sounds, and the screen shows FU, and the machine stops working.
SLEEP MODE
• In cooling mode, press the
button to activate sleep mode and enter low wind speed.
The set temperature of the air conditioner will automatically increase by 1°C after 1 hour
After drainage, the machine returns to the state before it is full of water.
COMPRESSOR SHUTDOWN/START PROTECTION
and 2°C after 2 hours, and then operate at this set temperature.
• In heating mode, press the
button to activate sleep mode and enter low wind speed.
The set temperature of the air conditioner will automatically decrease by 1°C after 1 hour
and 2°C after 2 hours, and then operate at this set temperature.
• After the sleep mode is turned on, the sleep indicator light will turn on, other display
lights will turn off, and the machine will run normally. To exit the sleep mode, press the
sleep button repeatedly. Sleep button is invalid in air supply mode.
36 37
• During the operation of the machine, if any operation causes the compressor to stop working.
• At this time, the machine automatically switches to the protection function of stopping
the compressor for 3 minutes before restarting, which means the compressor will not
start again within 3 minutes, and other functions have outputs.
• The compressor will run for at least 3 minutes after each start before stopping operation
(except for shutdown).
Page 20
PL INSTRUKCJA OBSŁUGI PL INSTRUKCJA OBSŁUGI
VIII. INSTALLATIONS
USAGE SUGGESTIONS:
• There is acompressor inside the machine. If there is dumping or long-distance transpor-
• Please comply with all local laws and regulations during installation.
• Do not use damaged or non-standard power cords.
• Pay attention to safety during installation and maintenance, prohibit illegal operations,
and avoid accidents such as electric shock, high-altitude falling injury, and even death.
tation, please stand the machine upright for more than 4 hours to allow the condensate
to fully reflux, and then turn on the machine.
• When the temperature exceeds 43°C or falls below 15°C, the refrigeration function will
automatically protect the machine from running.
• In the power on state, when the timer is not turned on, the machine will automatically
start up after powering and then on, without pressing the standby button.
• After normal shutdown, if there is apower outage or continuous power outage, the last
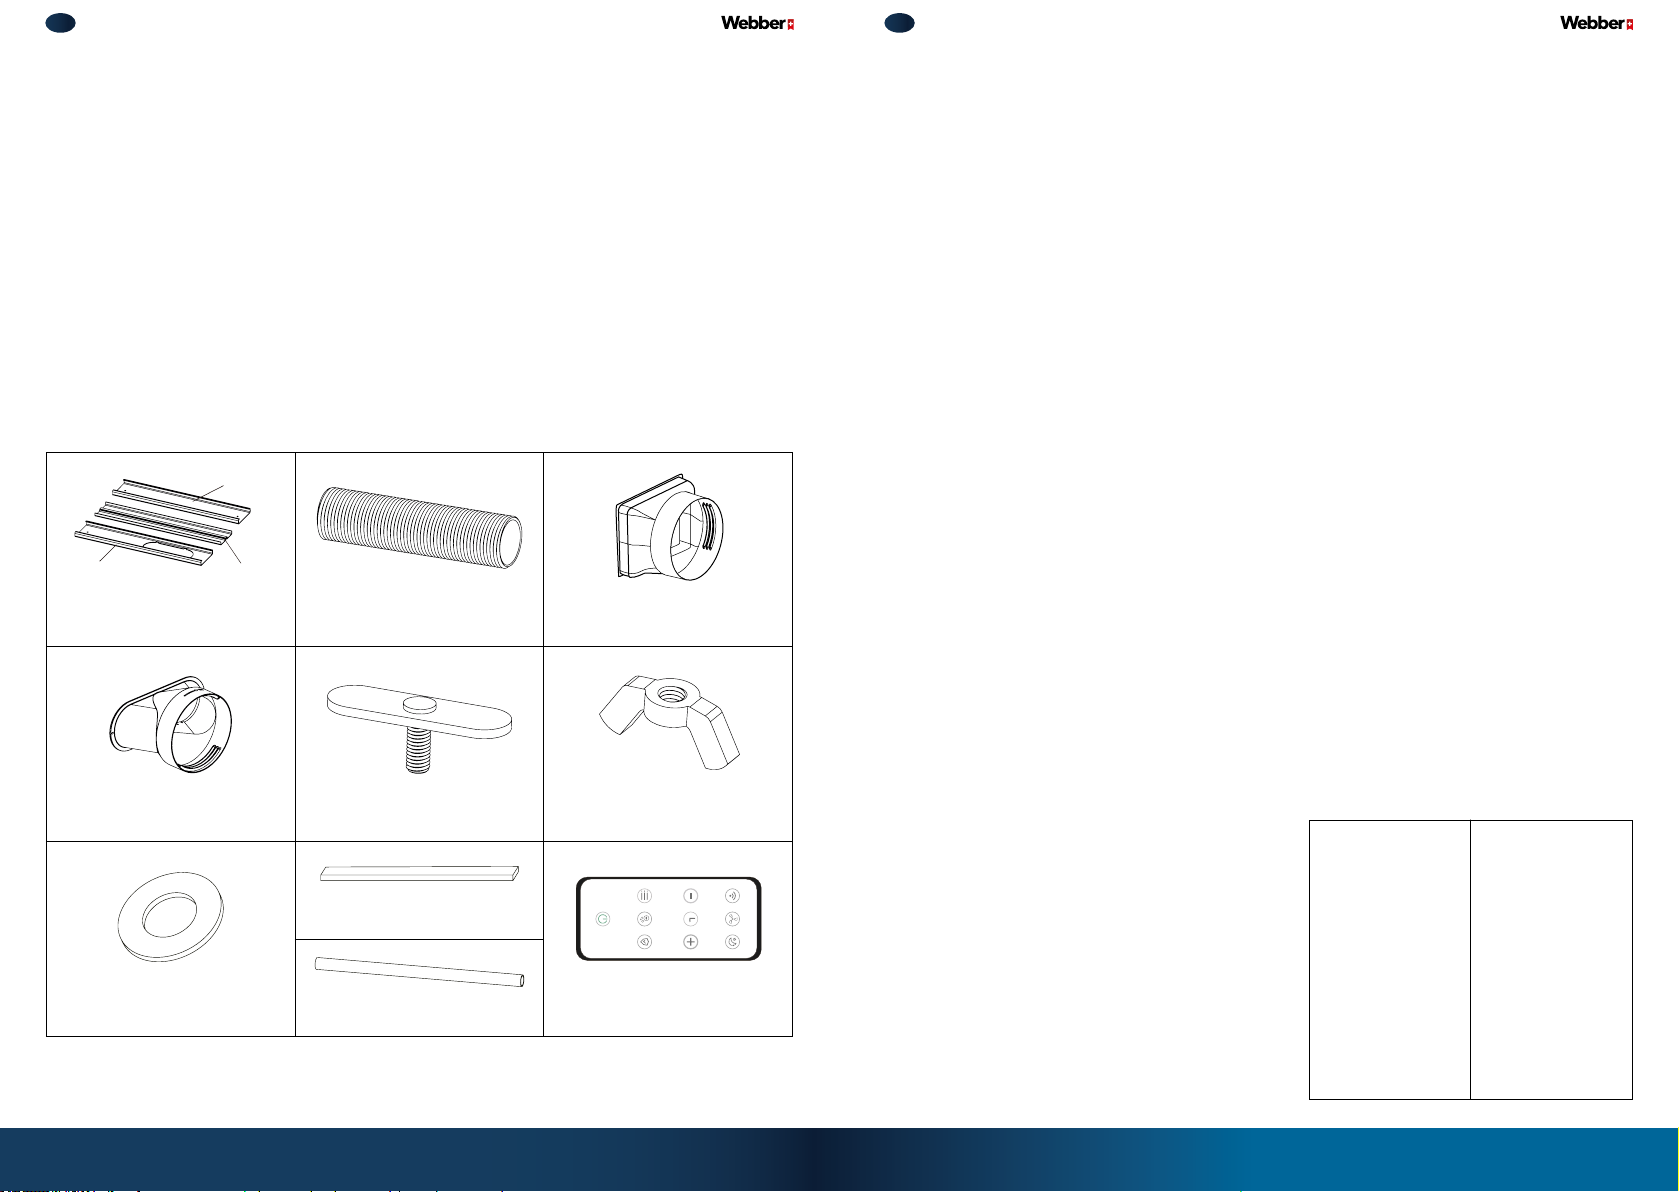
PREPARATION BEFORE INSTALLATION:
working mode will be remembered.
Please check if the accessories are complete before installation.
DRAINAGE METHOD
Accessories list:
When operating in cool mode, manual drainage is generally not required, but when operating
in high temperature and high humidity environments, there may be asituation of water full,
plate C
which requires manual or continuous drainage.
When the water tray is full, the ambient lighting around the control panel turns blue orange
green in sequence Change, the buzzer sounds and the screen displays F1 to remind you to
drain. When the water is full and eliminated, and the compressor stops for 3 minutes, the air
plate A
plate B
conditioner resumes operation.
Window isolation panel
Heat discharge pipe
Pipe joint
Drainage steps:
1. Cut off the power and move the machine to the appropriate position.
2. Prepare aslightly shallow plate and place it near the lower drain or move the machine to
the floor drain.
3. Rotate counterclockwise to remove the water stop button on the lower drainage outlet,
pull out the rubber plug, and water will automatically flow out of the drainage hole. In
Duck billed adapter
Screw arbor x 2
Butterfly nut x 2
order to drain the water more thoroughly, the machine can be slightly tilted back (see
Figure FIG1).
4. After draining the water, reverse the process
Fig. 2Fig. 1
and install the rubber plug and water stop knob.
Sponge x 2
Flat was her x 2
38 39
Drainage pipe
Remote control
Attention: When cooling at high temperatures and high humidity, if you want to avoid shut ting down when water is full,
you can connect the drainage pipe to the drainage outlet (it is
recom mended to lower the draina ge outlet ) for conti nuous drainage to ensure that the drainage pipe runs smoothly straight
down. (See Figure FIG2).
wylot
spustowy
gumowy ko rek
nakrętk a korka
wąż
odpływow y
Page 21
PL INSTRUKCJA OBSŁUGI PL INSTRUKCJA OBSŁUGI
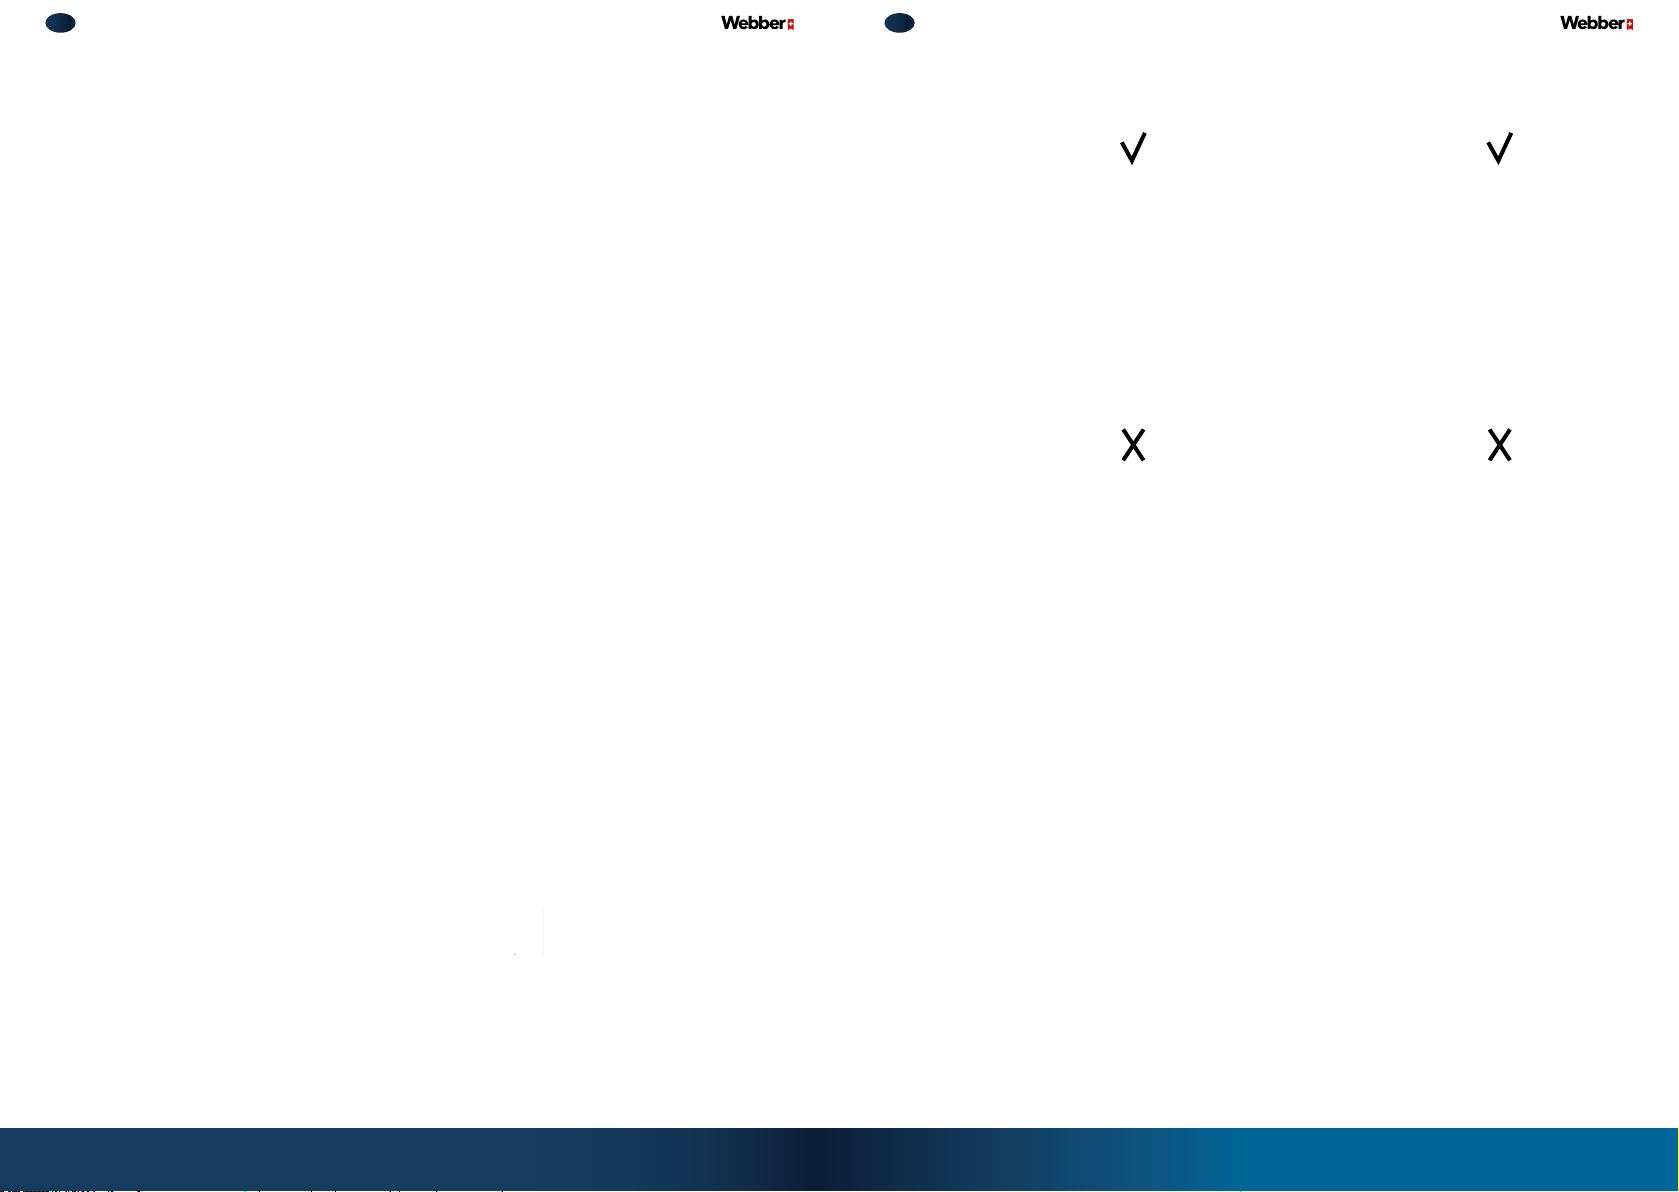
INSTALL HEAT DISCHARGE PIPE
1. Tighten the heat discharge pipe joint counterclockwise to either end of the heat discharge pipe.
Counter-clockwise
direction
Heat disc harge pipe
Exhaus t pipe joint
Suggestion: in order to improve refrigeration efficiency, the installation of heat pipes should
be as short and flat as possible, without distortion, and to maintain the smoothness of the
heat discharge pipe.
2. Tighten the duckbill shaped adapter counterclockwise to the other end of the heat discharge pipe.
Counter-clockwise
direction
Heat disc harge pipe
Correct
Correct
Error
Duck billed adapter
Error
3. Insert the heat discharge pipe joint from top to bottom into the rear shell slot. If you hear
a„click” sound, it indicates that the card slot has tightened the joint.
Disassemble
Remove the heat discharge pipe joint: Gently tap the heat discharge pipe joint upwards with
your hand to remove the limit point of the heat pipe joint from the slot.
Limiting point
Remove
Slot
Slot
4. Lead the exhaust pipe outlet to the outside.
Upward
40 41
Page 22
PL INSTRUKCJA OBSŁUGI PL INSTRUKCJA OBSŁUGI
INSTALL WINDOW ISOLATION PANELS*
*opcional accessories
5. Install the duckbill shaped adapter with the installed heat pipe onto the window isolation
plate A, installation steps:
a. Insert the duckbill shaped adapter into the runway shaped hole on board A.
1. After threading the screw through the hole on the isolation plate A, place aflat gasket
b. Tighten the duckbill adapter to the window isolation plate Awith screws.
on the screw and tighten the nut. Be careful not to hold the nut to the bottom, leaving
a2-3mm gap.
Wing nut
Flat gas ket
Screw
Plate A
2. After threading the screw through the hole on the isolation plate C, place aflat gasket
on the screw and tighten the nut. Be careful not to tighten the nut to the bottom, leaving
a2-3mm gap.
Wing nut
Plate C
Flat gas ket
Screw
3. Install the window isolation plates Aand C, which were installed in steps 1 and 2, from
both ends of the window isolation plate B. When installing, be sure to align the xing plates on the screws with the sliding grooves of the B plate and insert them.
Chute
Fixed piece
Plate B
Fixed piece
4. Adjust the position of plates Aand C on board B through the sliding groove on board B to
reach the required length. Then, tighten the butterfly nut clockwise to the end to rmly
x the relative positions of plates A, B, and C.
Duckbill joint
6. Install the matched window isolation panel on the window frame, which can be installed
horizontally or vertically.
Open win dows up and down
Open win dows
left an d right
Clock wise direction
42 43
Page 23
PL INSTRUKCJA OBSŁUGI PL INSTRUKCJA OBSŁUGI
IX. CONNECTION WITH THE SMART APP
INSTALLING THE TUYA SMART APP
Scan the product’s QR code or search for Tuya Smart in Google Play/App Store,
then download and install the app. If you already have the app installed, you
will be redirected to the device connection page.
CREATE AN ACCOUNT
1. After opening the app, awindow with the Tuya Smart Platform Privacy Policy will appear. After reading and agreeing to the policy, you will be directed to the registration/login
window. Click „Register.”
2. Under the „Register” button, the country selected by the mobile network system will be
displayed. However, you can change it manually (note: once registration is completed,
this option cannot be changed). Enter your email address below, check the consent box,
and then click „Get Verification Code.”
3. Go to the email address you provided earlier, open the email from TuyaSmart (if you
cannot find it, check the Spam folder). The verification code will be included in the email.
Enter the code into the app.
4. After entering the code, you will automatically proceed to set apassword. Enter your
password according to the guidelines below the field and click „Finish” to complete the
registration.
X. CLEAN AND MAINTENANCE
• Before cleaning the air conditioner, it must be turned off and the power must be cut off,
otherwise there is arisk of electric shock.
• Do not rinse the air conditioner with water, or there will be arisk of electric shock.
• Do not use volatile liquids (such as diluents or gasoline) to clean the machine, otherwise
it will damage the appearance of the machine.
CLEAN THE SHELL AND GRILLE
Clean the shell:
• When there is dust on the surface of the shell, please use asoft towel to wipe it;
• When the shell is dirty (such as oil), please wipe it with aneutral cleaning agent.
Clean the grille: you can use avacuum cleaner or asoft bristled brush.
CLEAN THE FILTER FRAME
Filter screen
ADD DEVICE
1. Connecting the device: Hold the power button for 5 seconds or briefly press the Wi-Fi button on the remote. The Wi-Fi indicator will start blinking, entering pairing mode with the
app. The network connection function will activate when the device emits a„B” sound.
2. The Wi-Fi indicator will blink, indicating that the device is waiting to establish aconnection.
In the app, on the „My Home” tab, click the „Add Device” button in the center of the
Filter frame
screen or click the „+” button in the top right corner, then select „Add Device.” There are
currently two methods available: Manual Addition and Automatic Detection (the automatic mode requires the app to have permission to use Wi-Fi and Bluetooth).
3. Select „Small Home Appliances” on the left, then scroll on the right to find the „Environment” tab and click on „Air Conditioner (Wi-Fi).”
4. You will be redirected to the „Select Wi-Fi Network” page. Choose the 2.4 GHz Wi-Fi
network and enter the password (the app only supports 2.4 GHz Wi-Fi networks, make
sure your phone is connected to anetwork with this frequency).
5. If you already know how to configure the network, you can select the appropriate configuration according to the network indicator. If you’re unsure, click the „Indicator is Flashing Rapidly” option to check.
6. Once the device is successfully added, click the „My Home” tab to control the air purifier
feature within the app.
44 45
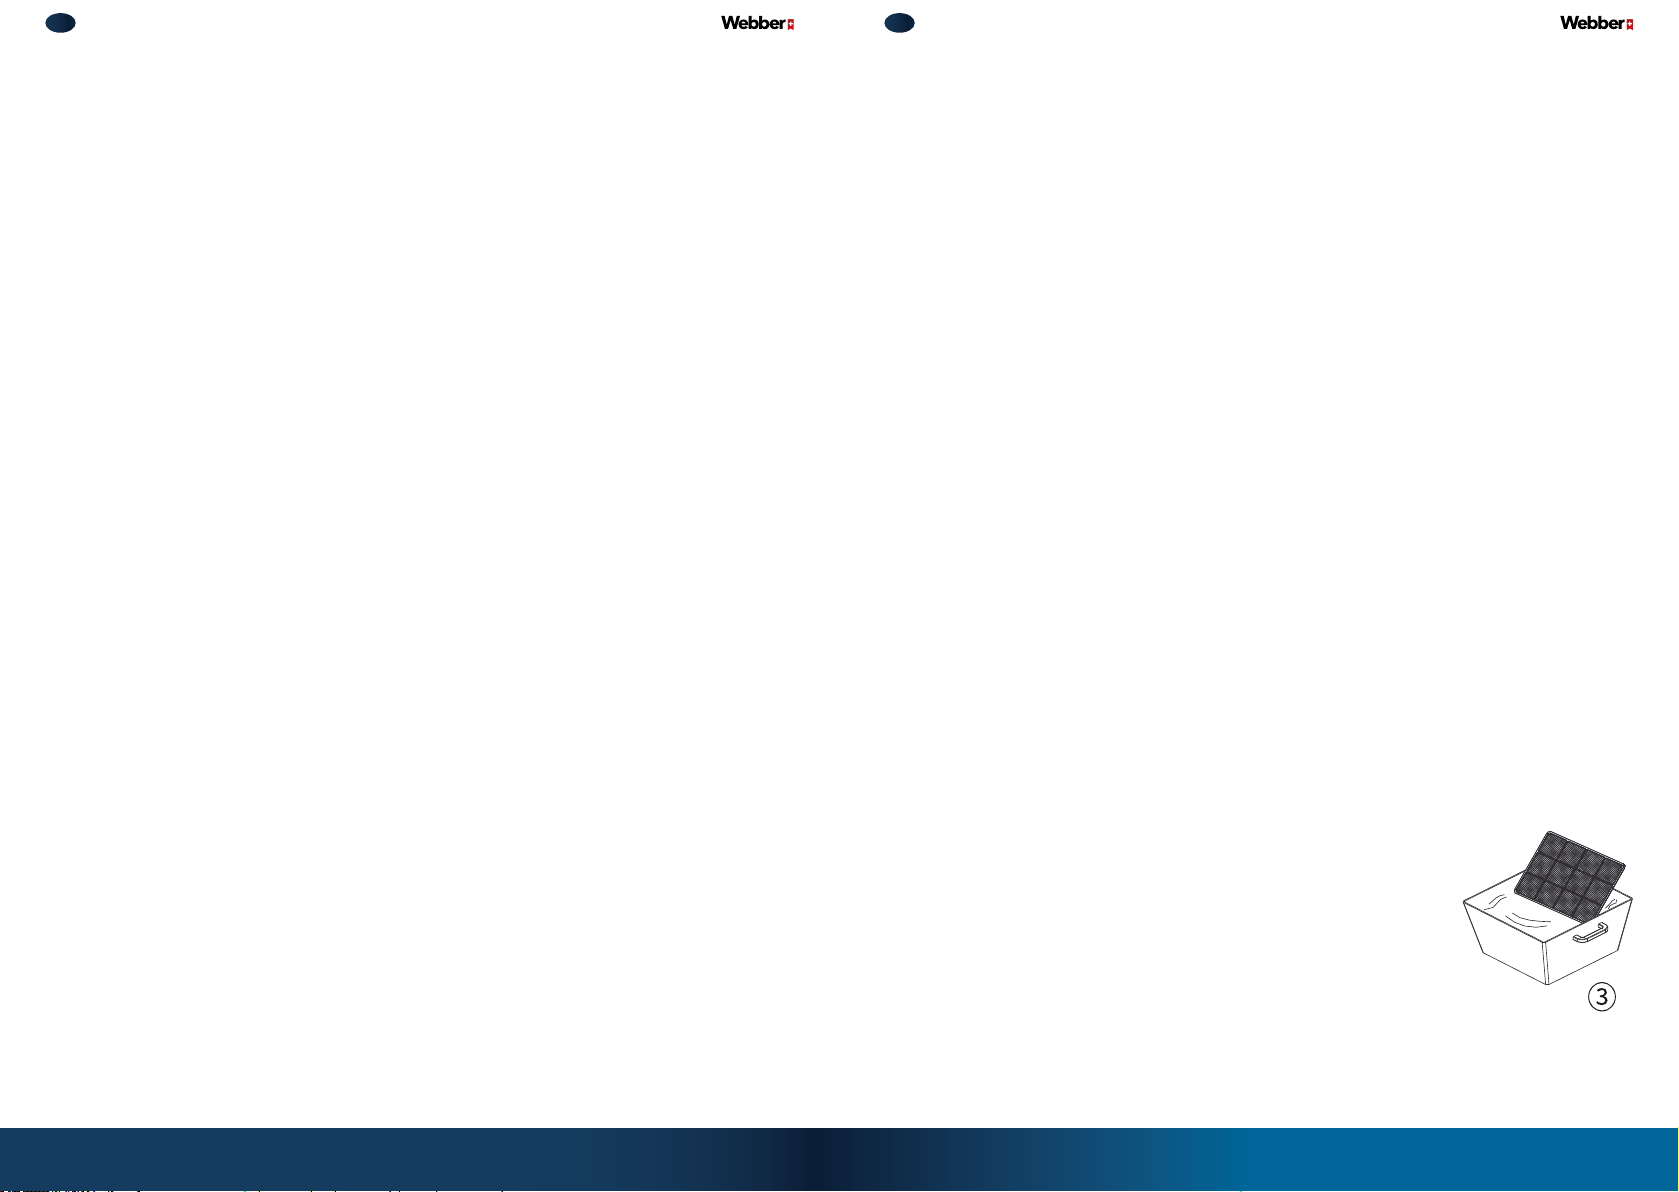
1. Buckle out the rear lter frame to the side as shown in the picture; Then remove the side lter frame from the other side.
2. Clean the filter frame: use avacuum cleaner or clean the lter
frame with clean water. When the lter frame is dirty (such as
oil), it can be cleaned with warm water dissolved in neutral detergent, and then dried in acool place
3. Install the filter frame: after cleaning and drying the lter, rein-
stall it into the machine.
Note:
• It is recommended to clean the filter frame every 20 days of use. If used in adusty environment, the cleaning
frequency of the filter frame should be increased.
• Do not dry the filter frame with fire or ahair dryer, as it may deform or catch fire.
Page 24
PL INSTRUKCJA OBSŁUGI PL INSTRUKCJA OBSŁUGI
CLEAN THE HEAT DISCHARGE PIPE
XI. TROUBLESHOOTING
Remove the pipe from the air conditioner and then clean it (using the same cleaning method
as the lter frame), air dry and then reinstall it.
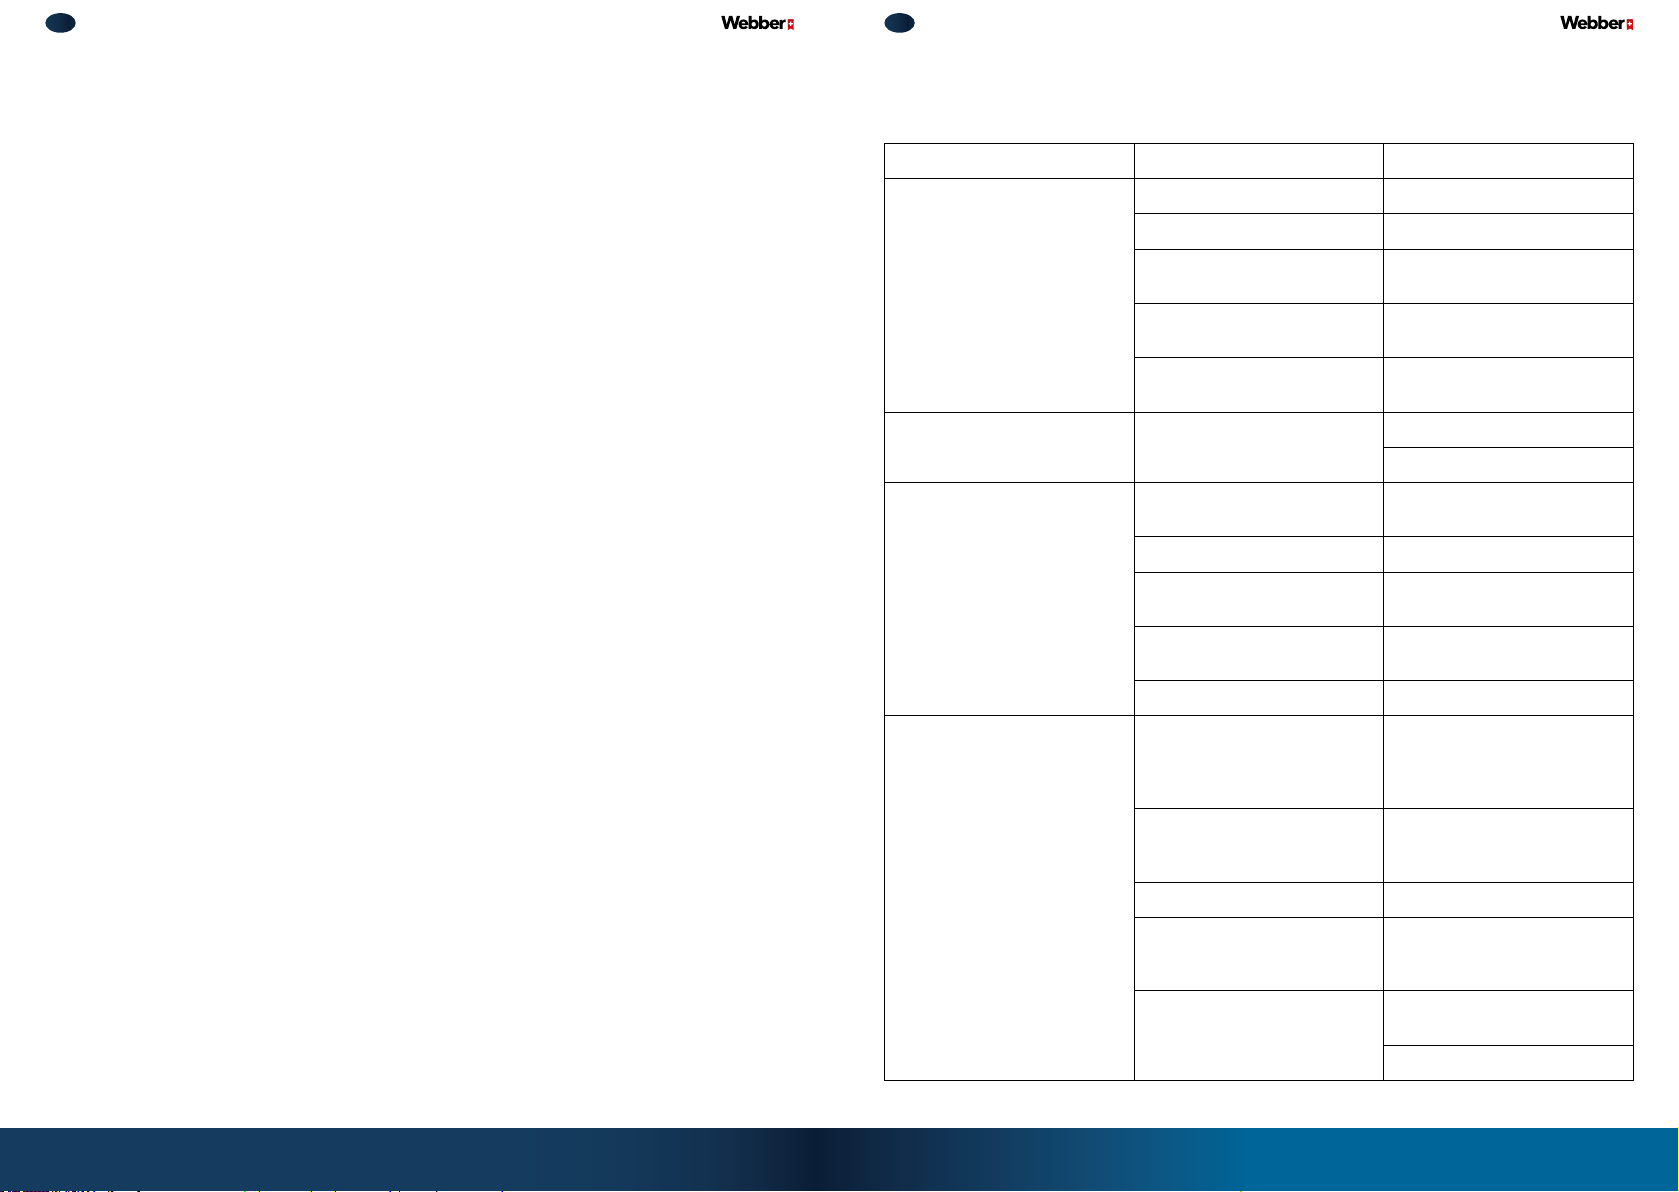
Problem Possible cause Solution
INSPECTION BEFORE THE USAGE SEASON
1. Check if the air inlet and outlet are blocked.
2. Check if the plug and socket are in good condition. 3.Check if the lter is clean.
3. Check if the remote control is equipped with abattery.
4. Check if the heat pipe is damaged and if it is securely installed.
LONG TERM STORAGE
If you do not use the air conditioner for along time, it is recommended that you follow the
following steps to maintain the good performance of the air conditioner:
1. Ensure that there is no accumulated water in the drain tray and remove the heat pipe.
2. Remove the plug and pack the power cord properly.
3. Clean the air conditioner and package it to prevent dust accumulation.
Not working
Smelly
Cooling (heating) is not good
Power off? Wait for power
Plug loose? Plug it back in
Power switch trip or blow
afuse?
Line faulty?
Stop running and start up again
immediately?
any odors in the room such as
furniture, cigarettes, etc.?
Low voltage?
Dirty lter? Clean the lter
Proper temperature?
Doors and windows are closed?
Pipe is outside? Let the pipe outside
Strong interference
(Such as static
electricity, abnormal supply
voltage)?
Ask aprofessional to replace
the power switch or fuse
Ask aprofessional to replace
the line
Please wait 3 minutes and
then restart
Remove odor sources
Clean the lter
Wait for the voltage to return
to normal
Adjust to the proper temperature
Close the doors and windows
Please unplug it. After about
3 minutes, plug it back in and
turn it on again
Can not receive the remote
control signal or the remote control operation is not
sensitive, no response (Such
as static electricity, abnormal
supply voltage)?
46 47
Remote control in range?
An obstacle? Remove obstacles
Low sensitivity of remote
control
Whether the room has fluorescent lights
Remote control receiving
range within 6 meters, do not
exceed this range
Check the battery of the remote control. If the battery is too
low, replace the battery
Let the remote control is near
the machine
Turn off the lights and try again
Page 25
PL INSTRUKCJA OBSŁUGI PL INSTRUKCJA OBSŁUGI
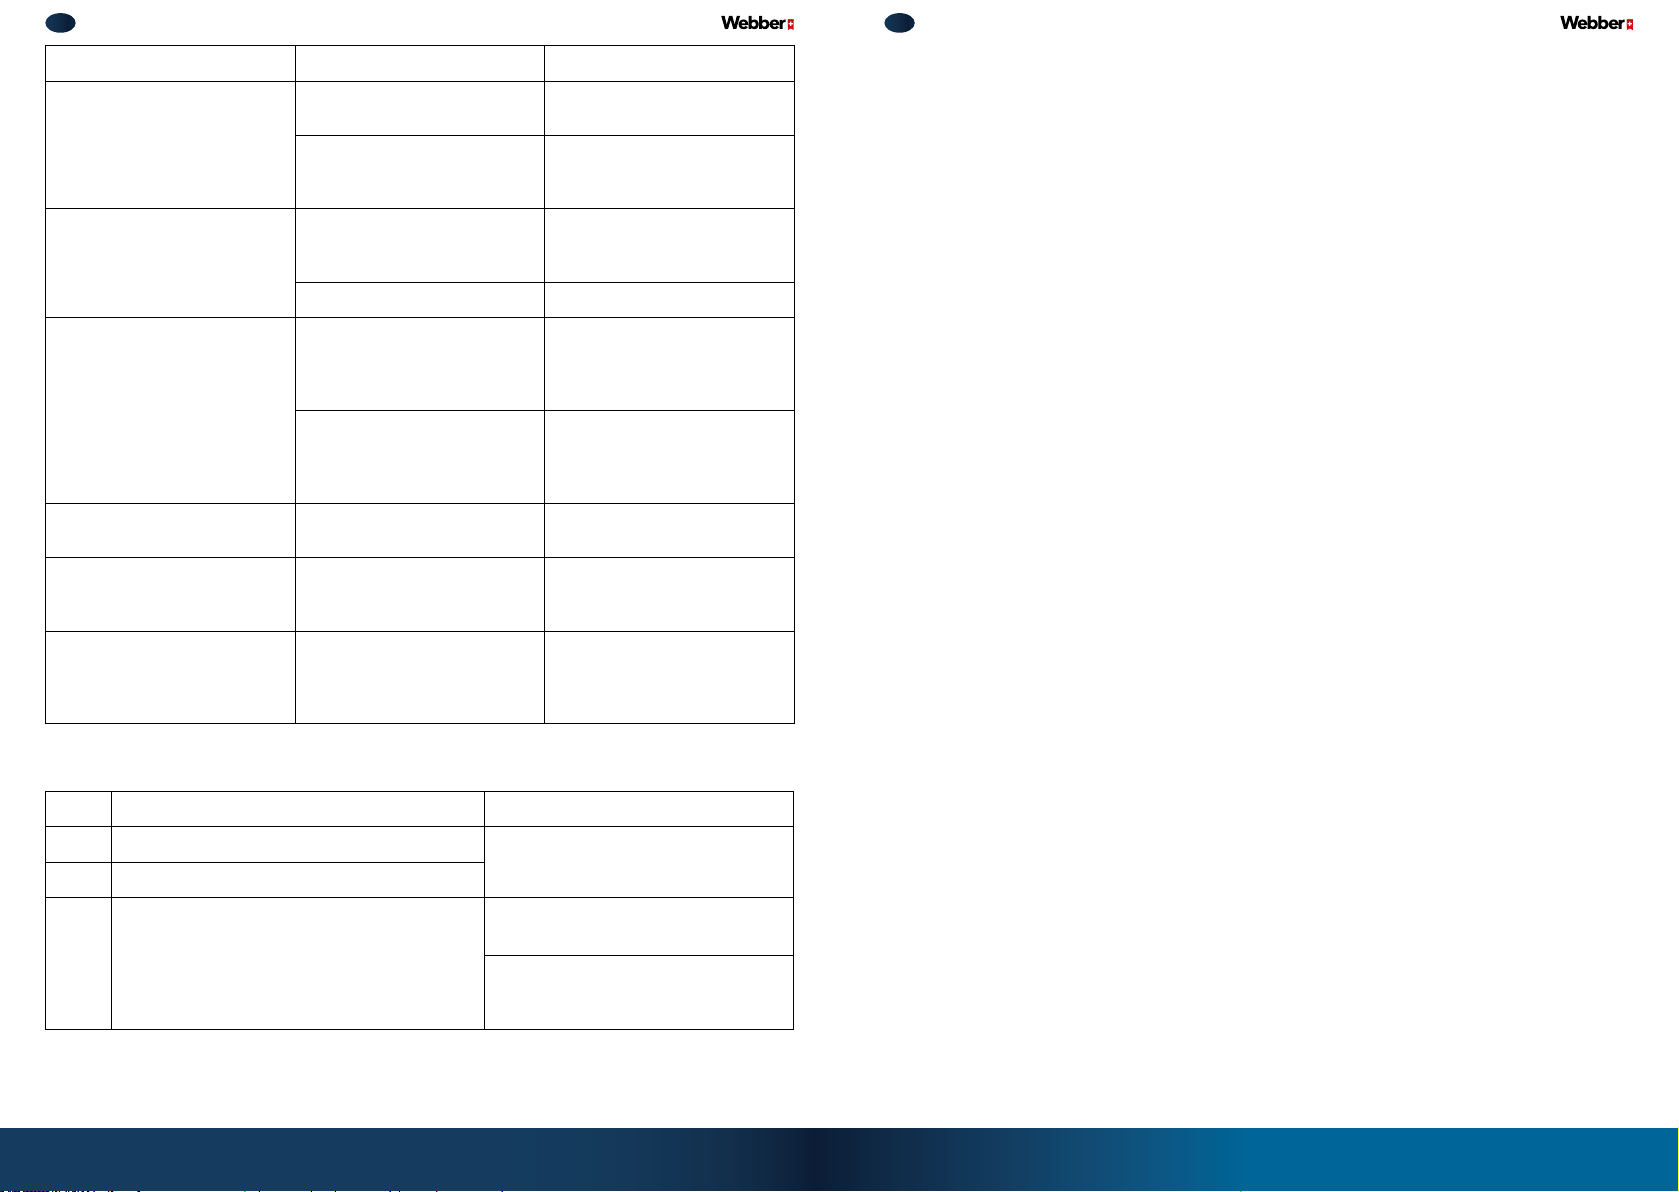
Problem Possible cause Solution
The inlet or outlet of the ma-
No wind blows out of the
machine
No cooling
set temperature cannot be
adjusted
Sudden abnormal operation
during operation
Hear the sound of water Just turn the machine on or off?
Hear acrack Just turn the machine on or off?
Error Cause Solution
E1 Evaporator temperature sensor is faulty
E2 Room temperature sensor is faul
chine blocked?
Room temperature reached
the set temperature
the ambient temperature below the set temperature?
Blow mode? Change to cooling mode
Operate in air supply or dehumidication mode?
Required temperature within
the set temperature range of
the air conditioner?
Lightning, radio and other
interference?
Contact aprofessional
Remove obstacles
The machine will stop blowing
air when the set temperature
is reached
This is anormal phenomenon,
if you need to cool, please
lower the set temperature
This is anormal phenomenon,
the air supply/dehumidication mode temperature is not
adjustable
et temperature range: 1630°C, beyond the range of
the temperature cannot be
adjusted
Turn off the power, turn it on,
and turn it back on
The sound caused by refrigerant flow in the air conditioner
is anormal phenomenon
The temperature change causes the panel and other parts
to expand and shrink, causing
the sound of friction
XII. WARRANTY CONDITIONS
1. The warranty is valid for 24 months from the date of sale. Defects discovered during
this period will be repaired free of charge within Poland by an authorized service center within 14 business days from the date the device is delivered to the service center.
The condition for the warranty is that the user has read the instruction manual and uses
the device in accordance with the instructions.
Service points and information on how to deliver the device for service can be found on
the website: www.webber.com.pl.
2. Awarranty repair refers to performing specialized actions by the service center to eliminate the defect covered by the warranty. A warranty repair does not include tasks
specified in the instruction manual, which are the user’s responsibility to perform at their
own expense, such as installation, checking the operation, cleaning, and replacing filters, etc. In case of doubts about the proper operation of the device, please contact our
Service Department by phone.
If the device is not functioning properly, please contact the Manufacturer’s Service Department via:
• Email: [email protected]
• Website: www.webber.com.pl/reklamacje
• Phone: 61 1020 492..
3. The claimant has the right to replace the device with anew one if:
a. During the warranty period, the service center performs 4 repairs and the device still
shows defects that prevent it from being used as intended,
b. The authorized service center certifies in writing that the defect cannot be repaired,
c. The repair is not completed within the time frame specified in point 1 or any other
time agreed upon in writing with the claimant.
4. The service center covers the costs of repair or replacement, including postal fees,
transport, labor, and materials.
5. The claimant must make the defective product available to the service center for repair or
replacement. The entrepreneur will collect the product from the consumer at their own cost.
6. The consumer is not required to pay for regular use of the product that was later replaced.
7. The warranty does not exclude, limit, or suspend the buyer’s rights under the Consumer
Rights Act of May 30, 2014, and other applicable laws governing the sale and the manufacturer/seller’s responsibility for the product.
Drain the water from the water tank
F1
Water tank is full
If FU is still displayed after the water
tank is emptied, notify maintenance
personnel
The defective device, along with adetailed description of the fault, should be sent to:
Metrex – Service Department, Grunwaldzka 229, 60-179 Poznań, PL, tel. 61 1020 492.
48 49
Page 26
PL INSTRUKCJA OBSŁUGI
THE WARRANTY DOES NOT COVER:
• Connection cables, network cables, light bulbs, consumables such as filters;
• Mechanical, thermal, chemical damage, and any other damage caused by the user’s
actions or negligence, or external forces (power surges, use of consumables not in accordance with the instruction manual, foreign objects entering the device, corrosion, dust,
etc.);
• Damage resulting from modifications or structural changes made by third parties or from
improper use;
• Intentional damage to the device during maintenance, filter replacement, or cleaning.
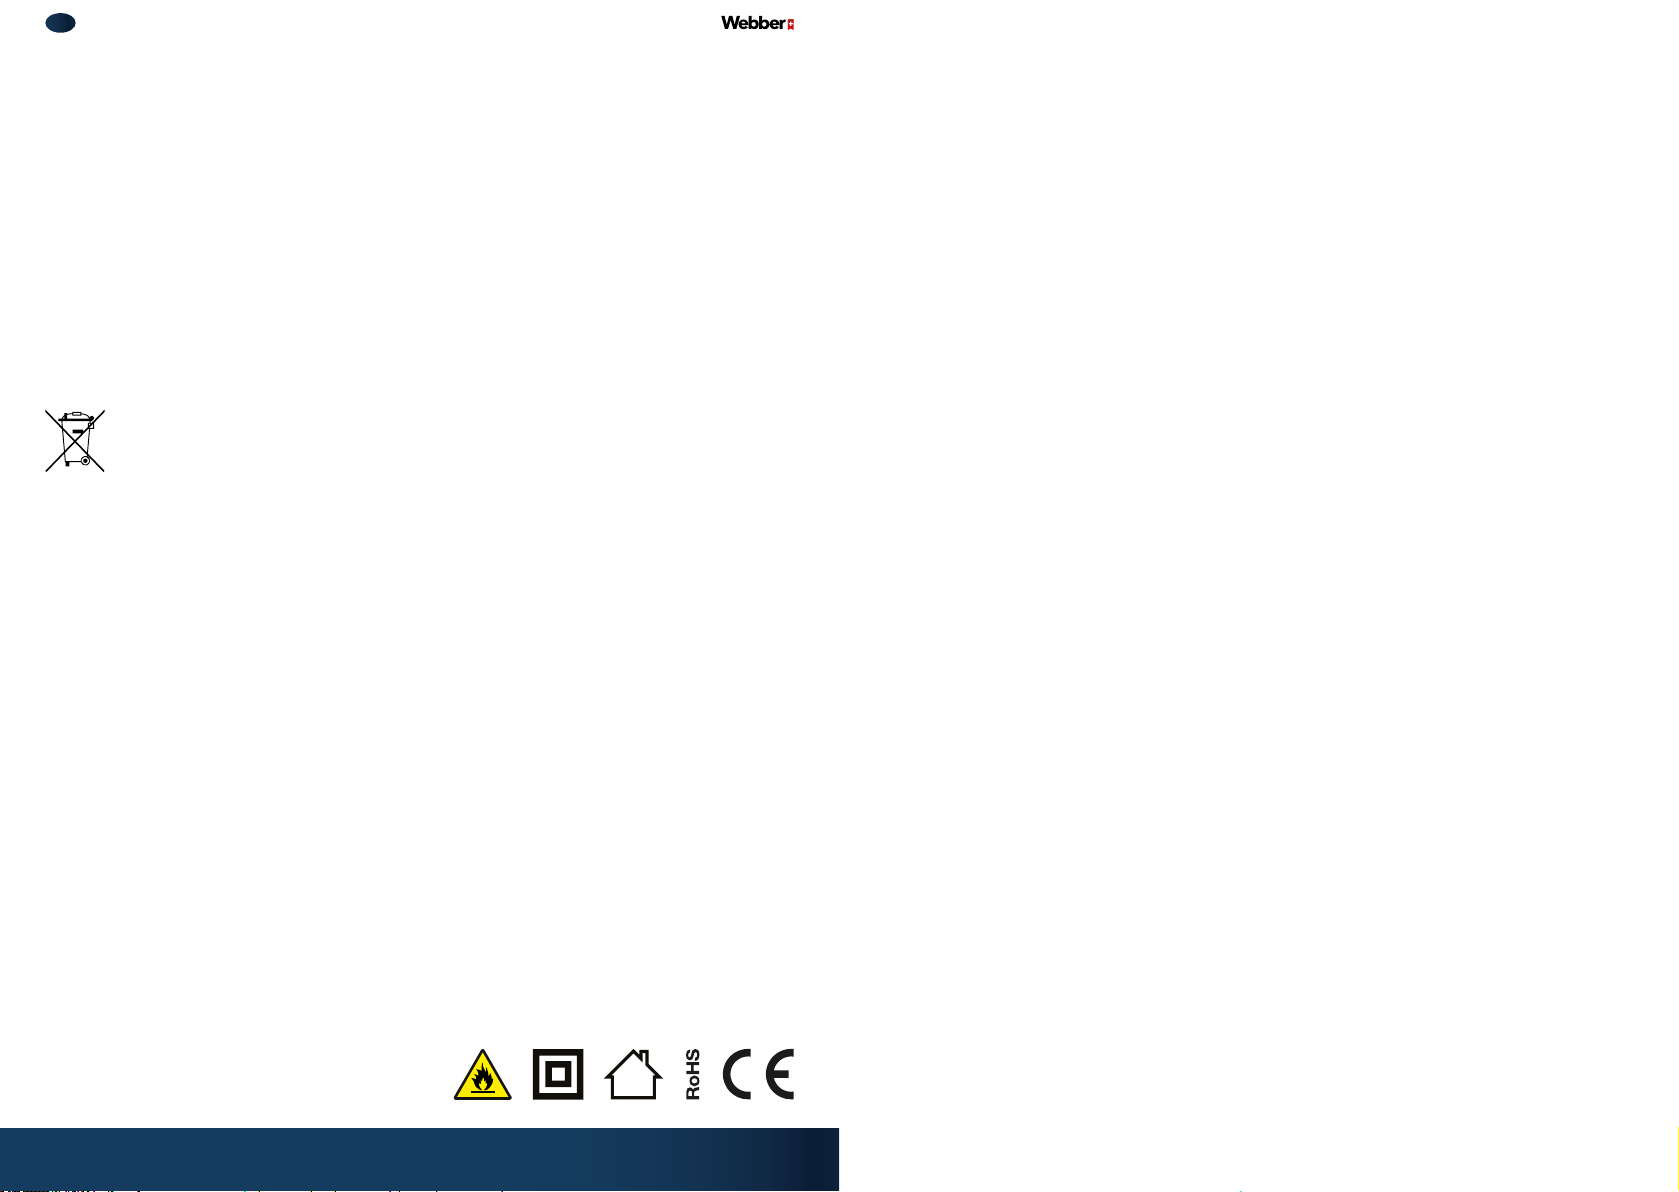
Disposal of Used Electrical and Electronic Equipment (This applies to European Union
countries and other European countries with separate waste collection systems).
This symbol on the product or its packaging indicates that the product should not be treated
as household waste. It should be handed over to the appropriate collection point for recycling electrical and electronic equipment. Proper disposal of the product will help prevent
potential negative consequences for the environment and human health caused by improper
waste disposal.
Recycling materials helps conserve natural resources. For detailed information on recycling
this product, please contact local authorities, awaste disposal company, or the store where
the product was purchased.
Manufacturer:
METREX
Grunwaldzka 229
60-179 Poznań, PL
webber.com.pl
50
Page 27
METREX
Grunwaldzka 229
60-179 Poznań, PL
webber.com.pl
 Loading...