


46cm Self Propelled
Steel Deck Lawnmower
en - Original Instructions
ASSEMBLY REQUIRED
Minimum Two Persons
Sales & Support: 01793 333212
WER460SP
1938220001
Before use please read & understand this manual; paying particular attention to the safety instructions before use.
Whilst every eff ort has been made to ensure the accuracy of information contained in this manual, our policy of continuous improvement
Incorrect use of the product could put the operator or machine in danger.
determines the right to make modifi cations without prior warning.
Images are used for illustration purposes only.

INSTRUCTION MANUAL
CONTENTS
INTENDED USE
SAFETY INSTRUCTIONS
SPECIFICATIONS
KNOW YOUR MACHINE
ASSEMBLY
OPERATION
MAINTENANCE, CLEANING & STORAGE
TROUBLE SHOOTING
PARTS DIAGRAM & LIST
DECLARATION OF CONFORMITY
WARRANTY
INTENDED USE
This machine is to be used exclusively for cutting natural grass. Never use the mower for other purposes.
Any other use can endanger for your safety and can involve damage to the mower.
Persons under 16 years of age and persons who are not familiar with the user instructions must not use
the mower.
The user is responsible of the safety of other people in the working area. Keep children and domestic
animals at a safe distance while the mower is in use.
Before mowing, remove all foreign objects from the lawn which may be thrown by the machine, stay
alert for any foreign objects which may have been missed.
These operating instructions must be kept and referred to in order to ensure that the equipment is
properly used and maintained. The instructions contain valuable information on operating, maintenance
and servicing conditions.
WARNING
The equipment is to be used only for its prescribed purpose. Any other use is deemed to be a case of
misuse. The user/operator and not the manufacturer will be liable for any damage or injuries of any
kind caused as a result of this.
Please note that our equipment has not been designed for use in commercial, trade or industrial
applications. Our warranty will be 90 days from the original date of sale for commercial, trade or
industrial businesses or for equivalent purposes.
16 Sep 2019
Copyright Notice
Copyright © Handy Distribution
Permission is granted to reproduce this publication for personal & educational use only.
Commercial copying, redistribution, hiring or lending is prohibited.
No part of this publication may be stored in a retrieval system or transmitted in any other form or means without
written permission from Handy Distribution.
In all cases this copyright notice must remain intact.

CONTENTS
INTENDED USE
SAFETY INSTRUCTIONS
SPECIFICATIONS
KNOW YOUR MACHINE
ASSEMBLY
OPERATION
MAINTENANCE, CLEANING & STORAGE
TROUBLE SHOOTING
PARTS DIAGRAM & LIST
DECLARATION OF CONFORMITY
WARRANTY
INTENDED USE
This machine is to be used exclusively for cutting natural grass. Never use the mower for other purposes.
Any other use can endanger for your safety and can involve damage to the mower.
Persons under 16 years of age and persons who are not familiar with the user instructions must not use
the mower.
The user is responsible of the safety of other people in the working area. Keep children and domestic
animals at a safe distance while the mower is in use.
Before mowing, remove all foreign objects from the lawn which may be thrown by the machine, stay
alert for any foreign objects which may have been missed.
These operating instructions must be kept and referred to in order to ensure that the equipment is
properly used and maintained. The instructions contain valuable information on operating, maintenance
and servicing conditions.
WARNING
The equipment is to be used only for its prescribed purpose. Any other use is deemed to be a case of
misuse. The user/operator and not the manufacturer will be liable for any damage or injuries of any
kind caused as a result of this.
Please note that our equipment has not been designed for use in commercial, trade or industrial
applications. Our warranty will be 90 days from the original date of sale for commercial, trade or
industrial businesses or for equivalent purposes.
3

INSTRUCTION MANUAL
GENERAL SAFETY RULES
Before you put the machine into operation, you must read this instruction manual.
When using this machine, observe the following safety instructions to exclude the risk of personal injury or
material damage. Please also observe the special safety instructions in the respective chapters. Where
applicable, follow the legal directives or regulations for the prevention of accidents in relation to the use of
this machine.
WARNING
When using petrol tools, basic safety precautions, should always be followed to reduce the risk of serious
personal injury and/or damage to the unit.
TRAINING
The operator must receive proper training in the use, adjustment and operation of the machine, including
prohibited operations.
1. Read the instructions carefully. Be familiar with the controls & proper use of the equipment. Spend time
to familiarise yourself with your machine before each use.
2. Never allow children or people unfamiliar with these instructions to use the machine. Local regulations
can restrict the operator age.
3. This machine is not intended for use by persons (including children) with reduced physical, sensory or
mental capabilities, or lack of experience and knowledge, unless they have been given supervision or
instruction concerning use of the machine by a person responsible for their safety.
4. Never work while people, especially children, or pets are nearby.
5. The operator or user is responsible for accidents or hazards occurring to other people or their property.
SAFETY INSTRUCTIONS FOR WORKING WITH TILLER
1. Do not leave engines running in enclosed spaces, where dangerous carbon monoxide could accumulate.
2. Operate in daylight or good artificial lighting. If possible, do not use on overly wet ground.
3. Ensure good stability on slopes. Always operate across the slope, never up and down.
4. Be particularly careful if changing direction of travel on the slope.
5. Do not operate on steep slopes.
6. Operate whilst walking, do not run.
7. Be particularly careful when you turn or when you pull the machine towards you.
8. Stop the engine and blade, if it is to travel across other areas or must be transferred to/from working area.
9. Never use the machine with damaged safety protection guards.
10. Do not change the engine regulation set up. (This should only be undertaken by a skilled technician).
11. Carefully start the engine. Keep your feet clear of the blade.
12. Never reach behind or under the rotating parts with hands or feet.
13. Never lift or carry the machine while the engine is on.
14. Switch the engine off and remove the spark plug cap out before unblocking or removing obstacles from
the blade or exit chute:
− Before releasing blockages, inspecting, cleaning or working on the machine.
− After hitting an obstruction. Search for damage on the machine & make repairs as necessary. If the
machine starts vibrating unusually, it should be inspected by an Approved Webb Service Dealer.
15. Switch the engine off:
− If you remove blockages from the machine.
− Before refueling.
Read & understand operator’s
future reference.
Fire Risk
or death.
Hot Surface.
on contact
Moving Parts
laceration can result
Keep guards in place and in
using it.
Safety alert symbol. Used to alert you
this symbol to avoid possible injury.
Indicates an imminently
injury
Indicates a potentially hazardous
injury.
Used without the safety alert symbol
result in property damage.
SAFETY INSTRUCTIONS
Read and understand the owner’s manual and labels affixed to the machine. Learn its application and
limitations as well as the specific potential hazards. Retain these instructions for future reference. The
operator is responsible for following the warnings & instructions in this manual and on the product.
4
DANGER
CAUTION
manual before using the machine.
Failure to follow instructions
could result in death or serious
injury.
Please keep in a safe place for
Keep all bystanders & animals
away from the machine during
operation. If approached, stop the
machine immediately.
Risk of Carbon Monoxide
Poisoning. Ensure working area is
correctly ventilated.
Fire and its vapors are extremely
flammable & explosive. Fire or
explosion can cause severe burns
Running engines produce heat.
Engine parts, especially the
exhaust, become extremely hot.
Severe thermal burns can occur
working order. Replace damaged,
missing or failed parts before
hazardous situation which, if not
avoided, will result in serious
situation which, if not avoided,
may result in minor or moderate
CE Marking - the product meets
demand and regulations set by
No smoking
the EU
WARNING
CAUTION
Always wear eye
Always wear gloves to protect your
Wear foot protection or sensible shoes
Do not use near a flame, or sparks
Rotating parts can contact or entangle
to potential personal injury hazards.
Obey all safety messages that follow
situation which, if not avoided, could
situation which, if not avoided, may
Noise Level - See label on machine
and ear protection
hands.
SHARP ROTATING BLADES
when using the machine
Do not expose to rain or damp
conditions.
hands, feet, hair, clothing or
accessories.
Traumatic amputation or severe
Indicates a potentially hazardous
result in serious injury
indicates a potentially hazardous

GENERAL SAFETY RULES
Before you put the machine into operation, you must read this instruction manual.
When using this machine, observe the following safety instructions to exclude the risk of personal injury or
material damage. Please also observe the special safety instructions in the respective chapters. Where
applicable, follow the legal directives or regulations for the prevention of accidents in relation to the use of
this machine.
WARNING
When using petrol tools, basic safety precautions, should always be followed to reduce the risk of serious
personal injury and/or damage to the unit.
TRAINING
The operator must receive proper training in the use, adjustment and operation of the machine, including
prohibited operations.
1. Read the instructions carefully. Be familiar with the controls & proper use of the equipment. Spend time
to familiarise yourself with your machine before each use.
2. Never allow children or people unfamiliar with these instructions to use the machine. Local regulations
can restrict the operator age.
3. This machine is not intended for use by persons (including children) with reduced physical, sensory or
mental capabilities, or lack of experience and knowledge, unless they have been given supervision or
instruction concerning use of the machine by a person responsible for their safety.
4. Never work while people, especially children, or pets are nearby.
5. The operator or user is responsible for accidents or hazards occurring to other people or their property.
SAFETY INSTRUCTIONS FOR WORKING WITH TILLER
1. Do not leave engines running in enclosed spaces, where dangerous carbon monoxide could accumulate.
2. Operate in daylight or good artificial lighting. If possible, do not use on overly wet ground.
3. Ensure good stability on slopes. Always operate across the slope, never up and down.
4. Be particularly careful if changing direction of travel on the slope.
5. Do not operate on steep slopes.
6. Operate whilst walking, do not run.
7. Be particularly careful when you turn or when you pull the machine towards you.
8. Stop the engine and blade, if it is to travel across other areas or must be transferred to/from working area.
9. Never use the machine with damaged safety protection guards.
10. Do not change the engine regulation set up. (This should only be undertaken by a skilled technician).
11. Carefully start the engine. Keep your feet clear of the blade.
12. Never reach behind or under the rotating parts with hands or feet.
13. Never lift or carry the machine while the engine is on.
14. Switch the engine off and remove the spark plug cap out before unblocking or removing obstacles from
the blade or exit chute:
− Before releasing blockages, inspecting, cleaning or working on the machine.
− After hitting an obstruction. Search for damage on the machine & make repairs as necessary. If the
machine starts vibrating unusually, it should be inspected by an Approved Webb Service Dealer.
15. Switch the engine off:
− If you remove blockages from the machine.
− Before refueling.
5

INSTRUCTION MANUAL
condition that may affect the operation. If damaged, have the machine repaired by an Approved Webb
Service Dealer immediately. Many accidents are caused by poorly maintained machines.
12. Use the machine, accessories and tool bits etc., in accordance with these instructions and in the manner
intended for the particular type of petrol machine, taking into account the working conditions and the
work to be performed. Use of the machine for operations different from intended could result in a
hazardous situation.
PERSON PROTECTION
1. In case of any injury always proceed in accordance with the principles of first aid.
2. If someone is cut, cover the wound with a clean cloth & press hard to stop the flow of blood.
3. Do not let petrol or oil come in contact with your skin. Keep petrol and oil away from the eyes. If petrol or
oil come into contact with the eyes, wash them immediately with clean water. If irritation is still present,
see a doctor immediately.
4. Individuals with poor circulation who are exposed to excessive vibration may experience injury to blood
vessels or the nervous system. Vibration may cause the following symptoms to occur in the fingers, hands
or wrists: numbness, tingling, pain, stabbing sensation, alteration of skin colour or of the skin. If any of
these symptoms occur, see a doctor.
Put safety first in the case of fire:
5. If fire comes from the engine or smoke appears from anywhere other than the exhaust vent, at first
distance yourself from the product to ensure your physical safety.
6. Use a dry powder fire extinguisher on the fire to prevent it from spreading.
7. A panicked reaction could result in the fire and other damage becoming more extensive.
WORK AREA
1. Keep work area clean and well lit. Cluttered and dark areas invite accidents.
2. Check the landscape where the machine will be used and remove all objects such as stones, toys, sticks
and wires, which could be caught and thrown away from the work area. Damage of the machine or
operator’s injury could be caused.
3. Do not operate this machine in explosive atmospheres, in the presence of flammable liquids, gases or
dust. Machines create sparks which may ignite the dust or fumes.
4. Keep children & bystanders away while operating the machine. Distractions can cause you to lose control.
PERSONAL SAFETY
1. This machine is not intended for use by persons (including children) with reduced physical, sensory or
mental capabilities, or lack of experience and knowledge, unless they have been given supervision or
instruction concerning use of the machine by a person responsible for their safety.
2. Children should be supervised to ensure that they do not use or play with the machine.
3. Stay alert, watch what you are doing and use common sense when operating this machine.
4. Do not use this machine while you are tired, ill or under the influence of drugs, alcohol, or medication. A
moment of inattention while operating this machine can cause you to lose control & may result in series
personal injury.
5. Do not overreach. Always keep proper footing and balance. This enables better control of the tool in
unexpected situations.
6. Remove any adjusting tools before turning the machine on. A tool that is left attached to a rotating part of
the machine may result in personal injury.
7. Use safety equipment. Always wear eye protection. Safety equipment such as a dust mask, non-skid safety
shoes, hard hat, or hearing protection used for appropriate condition will reduce personal injuries.
8. Dress properly. Do not wear loose clothing or jewellery. Keep your hair, clothing & gloves away from
moving parts. Loose clothes, jewellery or long hair can be caught in moving parts. Wear foot protection or
sensible shoes when using the machine.
9. Prolonged use of the machine may lead to disorders of blood circulation in hands caused by vibration.
These effects can be worsened by low ambient temperatures and/or by gripping the handgrips excessively
tightly. Period of use you can extend with appropriate gloves or regular breaks. Take frequent work
breaks. Limit the amount of exposure per day.
PETROL TOOL USE AND CARE
1. Store petrol in containers specifically designed for this purpose.
2. Refuel outdoors only and do not smoke while refueling.
3. Add fuel before starting the engine. Never remove the cap of the tank or add petrol while the engine is
running or when the engine is hot.
4. If petrol is spilled, do not attempt to start the engine but move the machine away from the area of spillage
and avoid creating any source of ignition until petrol vapors have dissipated.
5. Replace fuel tank & container caps securely.
6. Do not operate the engine in a confined space where dangerous carbon monoxide can collect.
7. Do not force the machine. Use the correct machine for your application. The correct machine will do the
job better and safer at the rate for which it was designed.
8. Do not use the machine if the main OPC/Brake lever does not work to turn the machine off. Any machine
that cannot be controlled with the OPC/Brake lever is dangerous and must be repaired.
9. Turn machine off completely before making any adjustments, changing accessories, or storing. Such
preventive safety measures reduce the risks of starting the petrol tool accidentally.
10. Store idle machines out of the reach of children and do not allow persons unfamiliar with the machine or
these instructions to operate. Petrol machines are dangerous in the hands of untrained users.
11. Maintain your machine. Check for misalignment or binding of moving parts, breakage of parts & any other
Petrol is highly flammable and explosive.
WARNING!
6

condition that may affect the operation. If damaged, have the machine repaired by an Approved Webb
Service Dealer immediately. Many accidents are caused by poorly maintained machines.
12. Use the machine, accessories and tool bits etc., in accordance with these instructions and in the manner
intended for the particular type of petrol machine, taking into account the working conditions and the
work to be performed. Use of the machine for operations different from intended could result in a
hazardous situation.
PERSON PROTECTION
1. In case of any injury always proceed in accordance with the principles of first aid.
2. If someone is cut, cover the wound with a clean cloth & press hard to stop the flow of blood.
3. Do not let petrol or oil come in contact with your skin. Keep petrol and oil away from the eyes. If petrol or
oil come into contact with the eyes, wash them immediately with clean water. If irritation is still present,
see a doctor immediately.
4. Individuals with poor circulation who are exposed to excessive vibration may experience injury to blood
vessels or the nervous system. Vibration may cause the following symptoms to occur in the fingers, hands
or wrists: numbness, tingling, pain, stabbing sensation, alteration of skin colour or of the skin. If any of
these symptoms occur, see a doctor.
Put safety first in the case of fire:
5. If fire comes from the engine or smoke appears from anywhere other than the exhaust vent, at first
distance yourself from the product to ensure your physical safety.
6. Use a dry powder fire extinguisher on the fire to prevent it from spreading.
7. A panicked reaction could result in the fire and other damage becoming more extensive.
7

INSTRUCTION MANUAL
KNOW YOUR MACHINE
1. Self-Propelled Lever
2. Handle Soft Grip
3. Upper Handle
4. OPC/Brake Lever
5. Handle Fixing Knob & Bolt
6. Lower Handle
7. Grass Collector
8. Fuel Tank Cap
9. Engine Primer Bulb
10. Bumper (Not on WER460SP)
11. Single Height Adjuster Lever
12. Rear Wheel
13. Engine Oil Filler Cap & Dipstick
14. Side Discharge Cover
15. Side Discharge Chute
16. Cutting Deck
17. Spark Plug Cap
18. Recoil Starter Handle
19. Rear Discharge Cover
20. Front Wheel
SPECIFICATIONS
Model WER460SP
Product Number 1938220001
Guaranteed Noise Power Level LWA 96 dB(A)
Emission Sound Pressure Level LPA 83 dB(A)
The manufacturer reserves the right to change the product specification and livery according to continued
Working Width 460mm
Drive Type Self-Propelled
Cutting Heights 25-75mm - 7 levels
Collector Capacity 55L
Deck Steel
Front / Rear Wheel 7in / 8in
Engine Petrol, 4-Stroke Air Cooled
Engine Displacement 141cc
Rated Engine Power 2.5kw
Rated Engine Speed 2800rpm/min
Oil Tank Capacity 0.4L
Vibration ahv: 7.38 m/s2 - uncertainty K: 1.5 m/s
product improvements.
2
8

KNOW YOUR MACHINE
1. Self-Propelled Lever
2. Handle Soft Grip
3. Upper Handle
4. OPC/Brake Lever
5. Handle Fixing Knob & Bolt
6. Lower Handle
7. Grass Collector
8. Fuel Tank Cap
9. Engine Primer Bulb
10. Bumper (Not on WER460SP)
11. Single Height Adjuster Lever
12. Rear Wheel
13. Engine Oil Filler Cap & Dipstick
14. Side Discharge Cover
15. Side Discharge Chute
16. Cutting Deck
17. Spark Plug Cap
18. Recoil Starter Handle
19. Rear Discharge Cover
20. Front Wheel
9

INSTRUCTION MANUAL
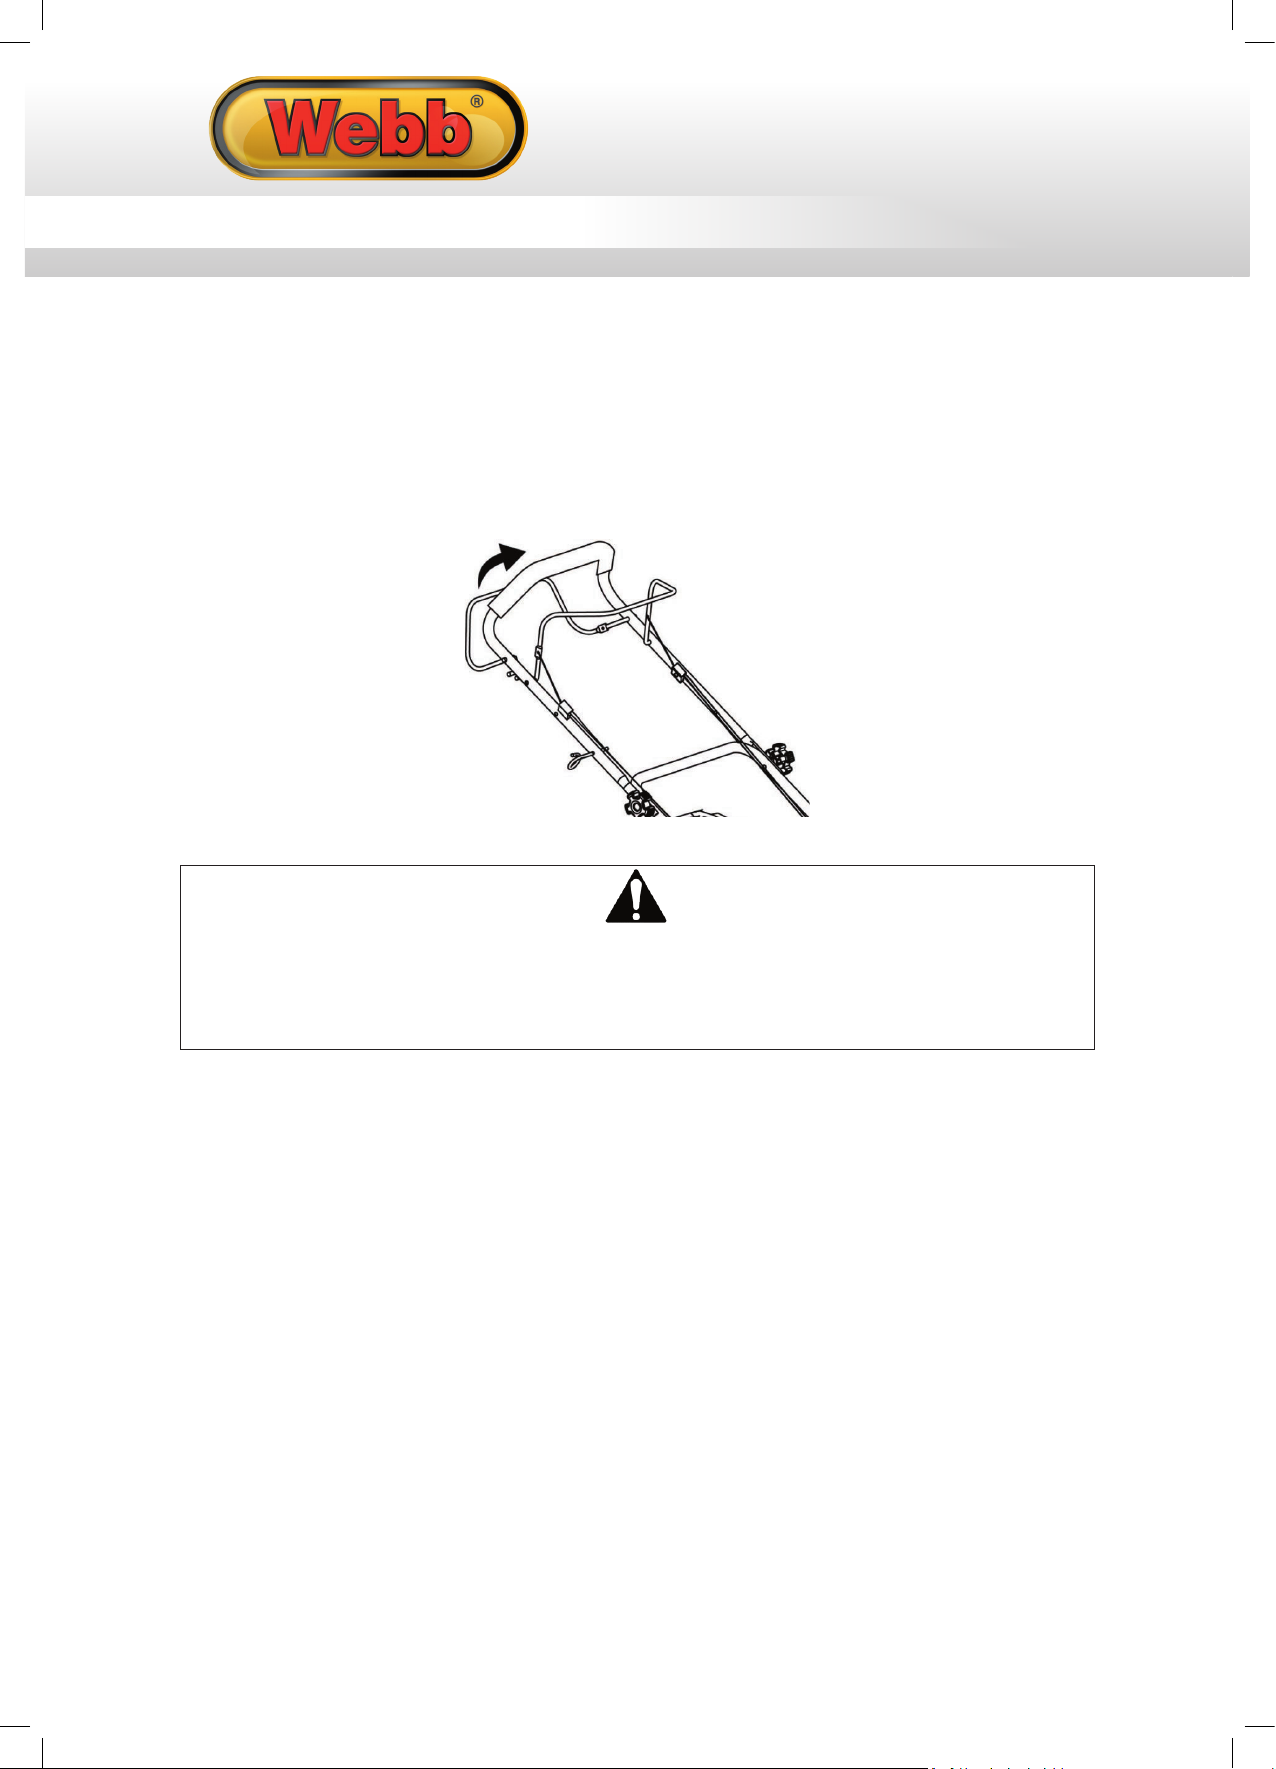
5. To attach the upper handlebar, first remove the two handlebar knobs and washers. Please note that these
have a two-phase thread, to stop the knobs was coming off the bolt accidently and being damaged.
NOTE: The Recoil rope guide attached to the upper handle, should be on your right side.
6. Position the handlebar over the lower handles just below the lower handlebar, aligning the holes in the
upper handle with those in the lower handles. Insert the two locking knob bolts through the lower handle,
then through the upper handle holes.
7. Then attach the handlebar knobs on the outer side of the upper handle and secure until tight.
CABLE TIDY
1. Place the cable tidy over the handle assebly and house the cables into the tidy.
ASSEMBLY
Remove the machine and contents from the carton. Be sure the carton is empty before discarding.
If you require any assistance with regards to the contents of the machine, contact us:
Tel: 01793 333212 - Mon – Fri 8.00am – 5.30pm (excl. Bank Holidays)
Email: customerservice@webbgardenpower.co.uk
IMPORTANT INFORMATION
NOTE: This product is a 4-stroke engine powered machine.
The engine MUST be filled with recommended 4-stroke SAE30 or 10W/30 air cooled lawnmower engine oil
BEFORE starting. Fresh unleaded petrol must be used in this unit. DO NOT use Ethanol based fuels. DO NOT
mix oil with fuel.
WARNING
Stop the engine and unplug the spark plug before any repairs or maintenance operations.
DO NOT attempt to start this machine without it first being FULLY assembled.
DO NOT attempt to start this mower without first adding 4-stroke SAE30 or 10W/30 air cooled lawnmower
engine oil to the engine.
HANDLES
1. To attach the lower handle, first remove the two lower handlebar knobs and washers. Please note that the
bolts have a two-phase thread, to stop the knobs was coming off the bolt accidently and being damaged.
2. Place the lower handle in position by aligning the lower handle with the outer side of the metal mounting
plates located at the back of the mower deck.
3. Once in position, insert the bolt on each side through the mounting plate and then through the lower
handle.
4. Once the bolts are loosely in position, attach the washer and lower handlebar locking knobs onto the
outer side of the lower handles and secure until tight.
10

5. To attach the upper handlebar, first remove the two handlebar knobs and washers. Please note that these
have a two-phase thread, to stop the knobs was coming off the bolt accidently and being damaged.
NOTE: The Recoil rope guide attached to the upper handle, should be on your right side.
6. Position the handlebar over the lower handles just below the lower handlebar, aligning the holes in the
upper handle with those in the lower handles. Insert the two locking knob bolts through the lower handle,
then through the upper handle holes.
7. Then attach the handlebar knobs on the outer side of the upper handle and secure until tight.
CABLE TIDY
1. Place the cable tidy over the handle assebly and house the cables into the tidy.
11

INSTRUCTION MANUAL
HEIGHT OF CUT
To adjust the height of cut, the machine has been supplied with a single lever, located at the right rear wheel.
Adjusting the height of cut should only be undertaken when the engine is off, and the blade has come to a
complete standstill.
To adjust the height of cut, grab the height of cut lever and push it away from the gauge (1) and then lift or
lower the lever to the required height of cut (2).
Moving the lever forward will lower the height of cut (Min. 25mm). Moving the lever back, will raise the height
of cut (Max. 75mm)
SIDE DISCHARGE CHUTE
NOTE : When using the side discharge function. Remove the grass collector and plug the mulch plug into the
rear of the machine.
1. Unlock the side discharge cover and lift. Hook in the side discharge chute.
2. Allow the side discharge cover to secure onto the side discharge chute into position.
MULCH PLUG
NOTE: Mulching stops collection of grass into the rear collector.
You will find the mulch plug loose in the carton or fitted to the machine. If the mulch plug is not located in the
carton, lift the grass collector flap at the rear of the machine and remove the mulch plug.
GRASS COLLECTOR
1. Left the grass collector flap up, so that it opens past the handle assembly. Hold in position and place the
grass collector hooks over the springs and place into position.
2. Lower the grass collector flap to sit onto the grass collector.
RECOIL STARTER HANDLE
1. To ease starting of the machine, the recoil starter handle can be housed on the handle assembly.
2. To house it correctly, pull the OPC/Brake lever towards the main handle. Do not let go.
3. Now grab the recoil starter handle and slowly lift it towards the housing. There will be some resistance
and do not pull too hard. Wrap the Starter rope through the housing and seat the recoil starter housing.
4. You can now release the OPC/Brake lever.
12

HEIGHT OF CUT
To adjust the height of cut, the machine has been supplied with a single lever, located at the right rear wheel.
Adjusting the height of cut should only be undertaken when the engine is off, and the blade has come to a
complete standstill.
To adjust the height of cut, grab the height of cut lever and push it away from the gauge (1) and then lift or
lower the lever to the required height of cut (2).
Moving the lever forward will lower the height of cut (Min. 25mm). Moving the lever back, will raise the height
of cut (Max. 75mm)
SIDE DISCHARGE CHUTE
NOTE : When using the side discharge function. Remove the grass collector and plug the mulch plug into the
rear of the machine.
1. Unlock the side discharge cover and lift. Hook in the side discharge chute.
2. Allow the side discharge cover to secure onto the side discharge chute into position.
13

INSTRUCTION MANUAL
ENGINE OIL
1. Remove the oil filler cap with built in dipstick.
2. Fill the engine with 4-stroke SAE30 or 10W/30 air cooled lawnmower engine oil. DO NOT USE automotive
or marine oil. The use of a funnel will aid the filling. The engine capacity is 0.40L.
3. We recommend the dipstick on the oil filler cap is wiped with a clean cloth and dipped (without screwing
into the filler neck) to ensure the oil level remains between the minimum and maximum marks on the
dipstick.
4. Replace and tighten the oil filler cap with built in dipstick.
NOTE: Below 40F° (4°C) the use of SAE 30 will result in hard starting.
Above 80F° (27°C) the use of 10W-30 may cause increased oil consumption. Check oil level more frequently.
ENGINE STARTING & STOPPING PROCEDURE
(NOTE: STARTING AN ENGINE WITHOUT ENGINE OIL OR FUEL CAN SERIOUSLY DAMAGE THE MACHINE)
STARTING THE ENGINE (COLD)
1. Push the red engine primer bulb a maximum of 3 times.
FUELING THE MACHINE
OPERATION - ENGINE
FUEL & OIL
Operating the engine with insufficient oil, can have catastrophic consequences. Any failure caused by
YOUR MACHINE IS SUPPLIED WITHOUT ENGINE OIL OR PETROL
insufficient oil, will not be covered by the manufacturer’s warranty.
READ INSTRUCTIONS CAREFULLY.
WARNING
Fuel & its vapors are very flammable. Do not use or fuel the machine near a flame, sparks or while smoking.
running. Fuel the engine at least 15 metres away from your work area. Always fuel your machine outdoors.
IMPORTANT:
Fuel which is older than 30 days old can become stale and cause acid
essential carburettor components. This could result in starting issues which would not be covered by your
manufacturer’s warranty.
Ensure that any stored petrol is clearly marked in a separate appropriate canister for a maximum of 30 days,
if not mixed with a fuel additive. If the machine is not going to be used for a long period, drain the fuel tank,
start the engine and drain the carburetor of any remaining fuel.
To keep fuel fresh, we recommend you use SURE-START FUEL ADDITIVE (HP-199) from Handy Parts. A fuel
additive added to your fuel at the time of purchase, will help make your machine easier to start, extend the
shelf life of your fuel mixture for up to two years, keeps the carburettor & engine clean, plus reduces emissions
and increases fuel economy. A 250ml bottle of SURE-START FUEL ADDITIVE will treat 25 litres of fuel. Only use
4-stroke SAE30 or 10W/30 air cooled lawnmower engine oil. DO NOT USE automotive or marine oil.
Allow the engine to cool for more than 3 minutes, before re-fueling. Never fuel the machine with engine
& gum deposits in the fuel system or
Place the machine onto a solid flat surface, ensuring the engine is
not running. Let the engine rest for a minimum of two minutes. Fill
the fuel tank outdoors or in well-ventilated areas.
Unscrew the fuel cap slowly and fill the fuel tank with clean, less
than 30 days old unleaded petrol with an Octane rating of 87 (91
RON) or higher. Fill to a maximum of 80% capacity. This will allow
the fuel tank to expand. Fasten the fuel cap tightly, being careful not
to cross-thread. This will also prevent loosening through vibration
during use. Wipe away any spillage, with an appropriate material. If
the machine has continued leaks, the product should not be started.
Never use the machine with damaged ignition cable or spark plug
cap, as there is a risk of sparks.
WARNING
Fuel and its vapors are extremely flammable and explosive. Fire or
explosion can cause severe burns or death.
14

ENGINE OIL
1. Remove the oil filler cap with built in dipstick.
2. Fill the engine with 4-stroke SAE30 or 10W/30 air cooled lawnmower engine oil. DO NOT USE automotive
or marine oil. The use of a funnel will aid the filling. The engine capacity is 0.40L.
3. We recommend the dipstick on the oil filler cap is wiped with a clean cloth and dipped (without screwing
into the filler neck) to ensure the oil level remains between the minimum and maximum marks on the
dipstick.
4. Replace and tighten the oil filler cap with built in dipstick.
NOTE: Below 40F° (4°C) the use of SAE 30 will result in hard starting.
Above 80F° (27°C) the use of 10W-30 may cause increased oil consumption. Check oil level more frequently.
ENGINE STARTING & STOPPING PROCEDURE
(NOTE: STARTING AN ENGINE WITHOUT ENGINE OIL OR FUEL CAN SERIOUSLY DAMAGE THE MACHINE)
STARTING THE ENGINE (COLD)
1. Push the red engine primer bulb a maximum of 3 times.
15

INSTRUCTION MANUAL
2. Grab the recoil starter handle and pull lightly until resistance is felt, then pull rapidly.
3. The engine should start.
4. Rehouse the recoil starter handle. Do not let it go until housed to prevent damage.
5. If the engine does not start, run through from step 1 again, but press the primer bulb once only.
NOTE: if the engine won’t start after you have operated the starter several times, the engine may be
flooded with excess fuel. Use following procedure to clear and start a flooded engine.
1. Release the OPC/Brake lever.
2. Remove the spark plug, dry it, and then reinstall it.
NOTE: Install the spark plug carefully by hand, to avoid cross-threading. After the plug is seated tighten
1/8 to 1/4 turn with socket spanner of spark plug to compress the washer.
3. Pull the OPC/Brake lever towards the upper handle.
4. Operate the starter as described above.
STOPPING THE ENGINE
• Release the OPC/Brake lever. The engine will come to a stop and a couple of seconds later, the blade will
stop rotating.
2. Pull the OPC/Brake lever towards the main handle. Do not let go.
3. Grab the recoil starter handle and pull lightly until resistance is felt, then pull rapidly.
4. The engine should start.
5. Rehouse the recoil starter handle. Do not let it go until housed to prevent damage.
6. If the engine does not start, run through from step 2 again.
NOTE: If the engine won’t start after you have operated the starter several times, the engine may be flooded
with excess fuel. Use the following procedure to clear and start a flooded engine.
1. Release the OPC/Brake lever.
2. Remove the spark plug, dry it, and then reinstall it.
NOTE: Install the spark plug carefully by hand, to avoid cross-threading. After the plug is seated tighten 1/8
to 1/4 turn with socket spanner of spark plug to compress the washer.
3. Pull the OPC/Brake lever towards the upper handle.
4. Operate the starter as described above.
STARTING THE ENGINE (WARM/HOT)
1. Pull the OPC/Brake lever towards the main handle. Do not let go.
16

2. Grab the recoil starter handle and pull lightly until resistance is felt, then pull rapidly.
3. The engine should start.
4. Rehouse the recoil starter handle. Do not let it go until housed to prevent damage.
5. If the engine does not start, run through from step 1 again, but press the primer bulb once only.
NOTE: if the engine won’t start after you have operated the starter several times, the engine may be
flooded with excess fuel. Use following procedure to clear and start a flooded engine.
1. Release the OPC/Brake lever.
2. Remove the spark plug, dry it, and then reinstall it.
NOTE: Install the spark plug carefully by hand, to avoid cross-threading. After the plug is seated tighten
1/8 to 1/4 turn with socket spanner of spark plug to compress the washer.
3. Pull the OPC/Brake lever towards the upper handle.
4. Operate the starter as described above.
STOPPING THE ENGINE
• Release the OPC/Brake lever. The engine will come to a stop and a couple of seconds later, the blade will
stop rotating.
17
INSTRUCTION MANUAL
SIDE DISCHARGE CHUTE
NOTE : When using the side discharge function. Remove the grass collector and plug the mulch plug into
the rear of the machine.
1. Unlock the side discharge cover and lift. Hook in the side discharge chute.
2. Allow the side discharge cover to secure onto the side discharge chute into position.
3. Remove the grass collector. Place the grass collector in a safe place.
4. Insert the mulch plug into the rear of the machine.
5. Start the machine and mow. Grass will be discharged from the side discharge chute back to the floor.
NOTE: If any grass residue is caught in the side discharge chute, clean it using a brush. Do not remove
grass debris in the mower deck or on the blade by hand or with your feet. Instead use suitable tools such
as a brush or broom.
MULCH PLUG
NOTE: Mulching stops collection of grass into the rear collect o r.
1. Lift the rear cover and remove the grass collector.
2. Insert the mulch plug into the rear of the machine
3. Allow the rear collector to sit on the rear of the deck.
1. Start the machine and mow. The grass will be discharged back to the floor, under the deck in finely cut
particals providing nutriants to the ground.
MOWING INSTRUCTIONS
1. Walk, never run with the mower, be very careful when mowing un even or rough ground.
2. Be careful when changing the direction of the mower on a slope. Mow across the face of slopes, never
down or up.
3. Do not mow excessively steep slopes.
4. Best results will be achieved if the grass is dry. Wet grass will clog the blade & grass collection system.
5. Grass grows at different rates at different times of the year. Never use the lowest cutting height for the
first cut of the season or in drought conditions.
6. Do not remove grass debris in the mower deck or on the blade by hand or with your feet. Instead use
suitable tools such as a brush or broom.
7. Check that all nuts, bolts and screws are well tightened.
8. Before mowing, place the grass collector in its position.
9. Before mowing make sure that the blade and the blade fixing screw are securely fastened. When blade
cutting edges require re-sharpening, this must be done evenly on both sides, so as to prevent any
imbalance. If you are unsure how to sharpen the blade, please visit your local Approved Service Dealer.
If the blade is damaged, it must be replaced.
10. When mowing, always wear a long trousers and strong footwear.
11. Do not run the engine in an enclosed and/or poorly ventilated area, where gas of the engine contains
carbon monoxide, which are dangerous for your health.
12. Work only when there is enough light.
13. Turn off the engine if you must leave the lawnmower unattended.
14. Never lift the rear of the mower while starting the engine and never place your hands and feet
underneath the deck or into the rear discharge chute while the engine is running.
15. Never change in any way the rated speed of the engine.
16. On self-propelled mowers, disconnect the self-propelled system before starting the engine.
17. Never lift or carry the mower while the engine is running.
18. Stop the engine and remove the spark plug cover in these cases:
- Before any operation under the deck or the rear discharge chute.
- Before any maintenance, repairing or checking operations.
- Before carrying, lifting or removing the mower.
- If you leave the mower unattended or changing the cutting height.
- To remove and emptying the grass catcher.
- After hitting a foreign object, stop the engine and check thoroughly the mower in order to see if it
SELF-PROPELLED
To se l f-propel your lawnmower,
1. Start the engine as stated above.
2. Push the drive lever up to the main handle. The lawnmower will start to move with the engine running
18
and blade rotating. It is easier to manually push the machine a couple of steps and then engage the selfpropelled motion to ensure the grass is not damaged and the machine does not take off, away from the
user suddenly.
3. To stop the lawnmower moving, just simply release the drive lever in good time.
4. The self-propel speed has been set at the factory and cannot be adjusted.
MOWING WITH COLLECTOR
Always observe the strictest safety procedures when using the lawnmower. Carefully read the safety
instructions of this manual before using the lawnmower.
Never open the rear flap when the grass bag has been detached (to be emptied) and the engine is still
1. Select your required height of cut setting.
2. Start the engine and allow it to run and warm up. See Starting the Engine section of the manual.
3. Keep a firm grip on the upper handle with OPC/Brake lever always engaged when attempting to cut.
4. Pull the Drive lever up to the handle when you wish to self-propel.
EMPTYING THE GRASS BAG
As soon as grass clippings start to trail the lawnmower, it is time to empty the grass bag.
NOTE: Before taking off the grass collector, switch off the engine and wait until the blade has come to a
stop.
1. To take off the grass collector, use one hand to lift up the rear cover and the other to grab onto the grass
collector carry handle. The rear cover automatically falls down after removing the grass collector and
closes off the rear chute opening.
2. Empty the grass debris from the grass collector and refit.
NOTE: If any grass residue is caught in the discharge chute, clean it using a brush. Do not remove grass
debris in the mower deck or on the blade by hand or with your feet. Instead use suitable tools such as a
brush or broom. To ensure that the cut grass can be collected into the grass collector, the discharge
opening and inside the mower deck must be cleared of any blockage.
running. The rotating blade can cause serious injuries!
WARNING

SIDE DISCHARGE CHUTE
NOTE : When using the side discharge function. Remove the grass collector and plug the mulch plug into
the rear of the machine.
1. Unlock the side discharge cover and lift. Hook in the side discharge chute.
2. Allow the side discharge cover to secure onto the side discharge chute into position.
3. Remove the grass collector. Place the grass collector in a safe place.
4. Insert the mulch plug into the rear of the machine.
5. Start the machine and mow. Grass will be discharged from the side discharge chute back to the floor.
NOTE: If any grass residue is caught in the side discharge chute, clean it using a brush. Do not remove
grass debris in the mower deck or on the blade by hand or with your feet. Instead use suitable tools such
as a brush or broom.
MULCH PLUG
NOTE: Mulching stops collection of grass into the rear collect o r.
1. Lift the rear cover and remove the grass collector.
2. Insert the mulch plug into the rear of the machine
3. Allow the rear collector to sit on the rear of the deck.
1. Start the machine and mow. The grass will be discharged back to the floor, under the deck in finely cut
particals providing nutriants to the ground.
MOWING INSTRUCTIONS
1. Walk, never run with the mower, be very careful when mowing uneven or rough ground.
2. Be careful when changing the direction of the mower on a slope. Mow across the face of slopes, never
down or up.
3. Do not mow excessively steep slopes.
4. Best results will be achieved if the grass is dry. Wet grass will clog the blade & grass collection system.
5. Grass grows at different rates at different times of the year. Never use the lowest cutting height for the
first cut of the season or in drought conditions.
6. Do not remove grass debris in the mower deck or on the blade by hand or with your feet. Instead use
suitable tools such as a brush or broom.
7. Check that all nuts, bolts and screws are well tightened.
8. Before mowing, place the grass collector in its position.
9. Before mowing make sure that the blade and the blade fixing screw are securely fastened. When blade
cutting edges require re-sharpening, this must be done evenly on both sides, so as to prevent any
imbalance. If you are unsure how to sharpen the blade, please visit your local Approved Service Dealer.
If the blade is damaged, it must be replaced.
10. When mowing, always wear a long trousers and strong footwear.
11. Do not run the engine in an enclosed and/or poorly ventilated area, where gas of the engine contains
carbon monoxide, which are dangerous for your health.
12. Work only when there is enough light.
13. Turn off the engine if you must leave the lawnmower unattended.
14. Never lift the rear of the mower while starting the engine and never place your hands and feet
underneath the deck or into the rear discharge chute while the engine is running.
15. Never change in any way the rated speed of the engine.
16. On self-propelled mowers, disconnect the self-propelled system before starting the engine.
17. Never lift or carry the mower while the engine is running.
18. Stop the engine and remove the spark plug cover in these cases:
- Before any operation under the deck or the rear discharge chute.
- Before any maintenance, repairing or checking operations.
- Before carrying, lifting or removing the mower.
- If you leave the mower unattended or changing the cutting height.
- To remove and emptying the grass catcher.
- After hitting a foreign object, stop the engine and check thoroughly the mower in order to see if it
19

INSTRUCTION MANUAL
REMOVE ENGINE OIL
CAUTION
Used oil is a hazardous waste product and must be disposed of properly. Do not discard with household
waste. Check with your local authorities, service center, or dealer for safe disposal/recycling facilities.
WARNING
Before draining any oil, ensure the fuel tank is empty. Fuel can leak out and result in a fire or explosion. To
empty the fuel tank, run the engine until it stops from lack of fuel.
• Draining the oil can only be undertaken from the oil filler neck.
• Turn off the engine.
• Remove the spark plug cap and keep away from the spark plug.
• Drain while the engine is still warm to assure rapid and complete drainage.
• Remove the oil filler cap with dipstick.
• Place an approved container below the machine.
• Ensure you keep the spark plug end of the engine up.
• Install Oil drain plug and wrench tighten.
• Refill with the recommended oil and check its level as required, following instructions within this manual.
Oil capacity: See Specification section of this manual.
Wash your hands with soap and water after touching used oil.
NOTE: Please dispose of used motor oil in a manner that is compatible with the environment. We suggest
you put it in a sealed container to your local service for reclamation. Do not throw it away into the refuge
collection or pour it on the ground or in drains.
AIR FILTER
A dirty air filter will block air flow into the carburettor. To prevent carburettor malfunction, service the air filter
regularly. Service more frequently when operating the engine in extremely dusty areas.
1. Remove the air filter cover. Remove the filter. Carefully check both for holes and tears and replace it if
damaged.
2. Foam element: clean in warm soapy water, rinse and allow to dry thoroughly or clean in high flash-point
solvent and allow to dry. Dip the element in clean engine oil and squeeze out all the excess. The engine
will smoke during initial start-up if too much oil is left in the foam.
WARNING
Never use gasoline or low flash point solvents to clean the air cleaner element. A fire or explosion
could occur.
CAUTION
Never run the engine without air filter or rapid engine wear will be the result.
is damaged. Take the machine to a local Approved Service Dealer for inspection if necessary.
MAINTENANCE, CLEANING & STORAGE
Improper maintenance & storage of the machine may void your warranty. Keep the machine clean for better
Turn off the engine before performing any maintenance. If the engine must be run, make sure the area is
MAINTENANCE
Use only original equipment replacement parts. Other parts may not perform as well, may damage the unit
and may result in injury. In addition, use of other parts may invalidate your warranty.
• Before each use, check all nuts & bolts to be sure they are sufficiently tightened.
• We recommend only manufacturer original parts are used when maintaining this machine. Failure to do so
• The engine must be switched off, with the spark plug cap removed, before the machine is unassembled,
LUBRICATION
• WHEELS - Lubricate the ball bearings in each wheel at least once a season with a light oil.
20
Repairs of this nature are not covered under the Manufacturer’s warranty.
- If the mower vibrates in an abnormal way, find the reasons why, and take your mower to a local
Approved Service Dealer.
After the engine has stopped, the blade will still rotate a couple of seconds.
Allowing anyone to operate this machine without proper instruction may result in injury.
Wear sturdy, full coverage footwear. Operating this machine with bare feet, or with open toe shoes or
Be sure to transport the machine from one place to another with the engine off.
Be sure to wear heavy gloves when cleaning underside of the deck or handling the blade.
To prevent damage, check the machine for any signs of damage or other faults when operated.
could invalidate your manufacturer’s warranty.
cleaned, serviced or maintained.
Operating on gradients could cause the machine to tip over.
sandals increases your risk of injury.
Do not use the machine at night or in poor light.
and safer performance.
well ventilated. The exhaust emits dangerous carbon monoxide gases.
WARNING
CAUTION
WARNING

REMOVE ENGINE OIL
CAUTION
Used oil is a hazardous waste product and must be disposed of properly. Do not discard with household
waste. Check with your local authorities, service center, or dealer for safe disposal/recycling facilities.
WARNING
Before draining any oil, ensure the fuel tank is empty. Fuel can leak out and result in a fire or explosion. To
empty the fuel tank, run the engine until it stops from lack of fuel.
• Draining the oil can only be undertaken from the oil filler neck.
• Turn off the engine.
• Remove the spark plug cap and keep away from the spark plug.
• Drain while the engine is still warm to assure rapid and complete drainage.
• Remove the oil filler cap with dipstick.
• Place an approved container below the machine.
• Ensure you keep the spark plug end of the engine up.
• Install Oil drain plug and wrench tighten.
• Refill with the recommended oil and check its level as required, following instructions within this manual.
Oil capacity: See Specification section of this manual.
Wash your hands with soap and water after touching used oil.
NOTE: Please dispose of used motor oil in a manner that is compatible with the environment. We suggest
you put it in a sealed container to your local service for reclamation. Do not throw it away into the refuge
collection or pour it on the ground or in drains.
AIR FILTER
A dirty air filter will block air flow into the carburettor. To prevent carburettor malfunction, service the air filter
regularly. Service more frequently when operating the engine in extremely dusty areas.
1. Remove the air filter cover. Remove the filter. Carefully check both for holes and tears and replace it if
damaged.
2. Foam element: clean in warm soapy water, rinse and allow to dry thoroughly or clean in high flash-point
solvent and allow to dry. Dip the element in clean engine oil and squeeze out all the excess. The engine
will smoke during initial start-up if too much oil is left in the foam.
WARNING
Never use gasoline or low flash point solvents to clean the air cleaner element. A fire or explosion
could occur.
CAUTION
Never run the engine without air filter or rapid engine wear will be the result.
21

INSTRUCTION MANUAL
STORAGE & TRANSPORT
The following steps should be taken to prepare your machine for storage.
STORING THE LAWNMOWER FOR SHORT PERIODS
The lawnmower can be stored for short periods of time (less than 15 days) without performing any storage
maintenance.Before placing the lawnmower into storage always carry out the following:
1. Allow the engine to fully cool.
2. Ensure the grass collector is empty.
3. Clean all debris from under the mower deck.
4. Store the lawnmower on a flat and level surface with the mower upright.
5. Store in a safe place which is not accessible by children or people who are not familiar with operation.
STORING THE LAWNMOWER FOR EXTENDED PERIODS
If the lawnmower is to be place into storage for more than 15 days, storage maintenance must be performed
on the lawnmower. If the following steps are not carried out, when you next operate the lawnmower it may
not start correctly and may need to be serviced.
CAUTION
Do not empty the petrol tank in enclosed areas, near fire or when smoking. Petrol fumes can cause
explosions and fire
1. Empty the petrol tank with a petrol suction pump if available.
2. Alternatively, start the engine and let it run until any remaining petrol has been used up.
3. Change the oil at the end of every season. See removing oil within this manual.
4. Clean the cooling fins of the cylinder and the housing
5. Be sure to clean the entire machine to protect the paint.
6. Store the machine in a well-ventilated place.
7. Remove the spark plug. Use an oil can to fill approx. 20 ml oil into the combustion chamber. Operate the
starter to evenly distribute the oil in the combustion chamber. Replace the spark plug.
2. Store in a dry, clean and frost-protected place, out of reach of unauthorised persons.
CAUTION
The engine must have completely cooled down before storing.
NOTE:
When storing any type of power equipment in an unventilated or material storage shed,
− Care should be taken to rust-proof the equipment. Using a light oil or silicone, coat the equipment,
especially cables and all moving parts.
− Be careful not to bend or kink cables.
− If the starter rope becomes disconnected from rope guide on handle, disconnect and ground the spark
plug wire. Depress the blade control handle and pull the starter rope out from engine slowly. Slip the
starter rope into the rope guide bolt on handle.
DO NOT STORE fuel for longer than 30 days. Fuel can become stale and cause damage to the engine
carburetor, which is not covered by the machines manufacturer’s warranty.
SPARK PLUG
To ensure proper engine operation, the spark plug must be properly gapped and free of deposits.
1. Do not attempt to remove the plug from a hot engine in order to avoid possible damage to the threads.
2. Remove the spark plug cap.
If the engine has been running, the exhaust (muffler) will be very hot. Be careful not to touch the exhaust
3. Visually inspect the spark plug. Discard it if the insulator is cracked or chipped.
4. Measure the plug gap with a feeler gauge. The gap should be 0.7-0.8mm (0.028-0.031 in), correct as
22
necessary by bending the side electrode.
5. Attach the plug washer, thread the plug in by hand to prevent cross-threading.
6. When mounting a new spark plug, you should screw 1/2 more thread with the wrench after the washer is
compressed. If you are mounting an old one, you should only screw 1/8-1/4 more thread.
The spark plug must be securely tightened. An improperly tightened plug can become very hot and possibly
CLEANING
Do not use a water hose or pressure washer to clean the engine. Water can damage the engine or
• Keep your machine clean. Thoroughly clean the machine at the end of each use, paying attention to
stones or mud in and around the tines.
• Clean the engine regularly with a cloth or brush. Keep the cooling system (blower housing area) clean to
permit proper air circulation which is essential to engine performance and life. Be certain to remove all
dust, dirt and combustible debris from exhaust area.
damage the engine. Never use a spark plug with an improper heat range.
contaminate the fuel system.
WARNING
(muffler).
CAUTION
CAUTION

STORAGE & TRANSPORT
The following steps should be taken to prepare your machine for storage.
STORING THE LAWNMOWER FOR SHORT PERIODS
The lawnmower can be stored for short periods of time (less than 15 days) without performing any storage
maintenance.Before placing the lawnmower into storage always carry out the following:
1. Allow the engine to fully cool.
2. Ensure the grass collector is empty.
3. Clean all debris from under the mower deck.
4. Store the lawnmower on a flat and level surface with the mower upright.
5. Store in a safe place which is not accessible by children or people who are not familiar with operation.
STORING THE LAWNMOWER FOR EXTENDED PERIODS
If the lawnmower is to be place into storage for more than 15 days, storage maintenance must be performed
on the lawnmower. If the following steps are not carried out, when you next operate the lawnmower it may
not start correctly and may need to be serviced.
CAUTION
Do not empty the petrol tank in enclosed areas, near fire or when smoking. Petrol fumes can cause
explosions and fire
1. Empty the petrol tank with a petrol suction pump if available.
2. Alternatively, start the engine and let it run until any remaining petrol has been used up.
3. Change the oil at the end of every season. See removing oil within this manual.
4. Clean the cooling fins of the cylinder and the housing
5. Be sure to clean the entire machine to protect the paint.
6. Store the machine in a well-ventilated place.
7. Remove the spark plug. Use an oil can to fill approx. 20 ml oil into the combustion chamber. Operate the
starter to evenly distribute the oil in the combustion chamber. Replace the spark plug.
2. Store in a dry, clean and frost-protected place, out of reach of unauthorised persons.
CAUTION
The engine must have completely cooled down before storing.
NOTE:
When storing any type of power equipment in an unventilated or material storage shed,
− Care should be taken to rust-proof the equipment. Using a light oil or silicone, coat the equipment,
especially cables and all moving parts.
− Be careful not to bend or kink cables.
− If the starter rope becomes disconnected from rope guide on handle, disconnect and ground the spark
plug wire. Depress the blade control handle and pull the starter rope out from engine slowly. Slip the
starter rope into the rope guide bolt on handle.
DO NOT STORE fuel for longer than 30 days. Fuel can become stale and cause damage to the engine
carburetor, which is not covered by the machines manufacturer’s warranty.
23

INSTRUCTION MANUAL
PROBLEM
POSSIBLE CAUSES
REMEDIAL ACTION
Fill tank with fuel: refer to ENGINE
OWNERS MANUAL.
Spark plug loose.
Tighten spark plug.
Spark plug wire loose or
disconnected from plug.
Install spark plug wire on spark
plug.
Set correct gap between
electrodes.
Spark plug is defective.
Install new, correctly gapped plug.
Remove air cleaner element and
install air cleaner element.
Fuel becomes stale after 30 days
Dealer.
Clean air filter: refer to relevant
section in manual
REPLACEMENT PARTS
Please find on the following pages, parts lists and drawings for your machine. Should you require a replacement
part, please call our Spares Team on 01793 333212, option 1 for assistance.
Webb recommends the use of Handy Parts oils, fuel additives, nylon lines pre-packed parts for all of items
machines.
TRANSPORT
• Empty the petrol tank
• Always let the engine run until it has used up the remainder of petrol in the tank.
• Empty the engine oil from the warm engine.
• Remove the spark plug boot from the spark plug.
• Clean the cooling fins of the cylinder and the housing.
• Use the original packaging to ship whenever possible.
TROUBLE SHOOTING
Fuel tank is empty.
Spark plug gap is incorrect
Engine does not start
Carburettor is flooded with fuel.
Old Fuel
Motor speed drops off Air filter clogged
pull starter rope continuously
until carburetor clears itself and
and causes residues to build and
‘gunk up’ the carburettor. Change
fuel with fresh. If problem persists
consult local Approved Service
24

REPLACEMENT PARTS
Please find on the following pages, parts lists and drawings for your machine. Should you require a replacement
part, please call our Spares Team on 01793 333212, option 1 for assistance.
Webb recommends the use of Handy Parts oils, fuel additives, nylon lines pre-packed parts for all of items
machines.
25

INSTRUCTION MANUAL
PARTS LIST - DVO140 - PT 1
Item No
Webb Part No.
Webb Description
Qty
1
WE151-91365
M6x12 Bolt
7
2
WE151-311101
Cylinder Head Cover
1
3
WE151-96161
Cylinder Gasket
1
4
WE151-312101
Rocker Arm
2
5
WE151-312201
Push Rod Guide Plate
1
6
WE151-311802
Valve Spring Seat
2
7
WE151-316001
Valve Spring
2
8
WE151-311801
Intake Valve Returner
2
9
WE151-311701
Intake Valve
1
10
WE151-315901
Exhaust Valve
1
11
WE151-97109
Spark Plug
1
12
WE151-316302
Recoil Housing
1
13
WE151-91369
M6x25 Bolt
1
14
WE151-313701
Muffler Assembly
1
15
WE151-314302
Governor Plate
1
16
WE151-311901
Push Rod
2
17
WE151-316101
Valve Lifter
2
18
WE155-312003
Camshaft Assembly
1
19
WE151-311602
Piston Ring Set
1
20
WE155-311202
Piston
1
21
WE155-315502
Piston Pin
1
22
WE151-291301
Piston Clip
2
23
WE151-311501
Connecting Rod Assembly
1
24
WE151-310202
Cylinder
1
25
WE155-93517
Oil Seal
1
26
WE155-90030
M6 Flange Nut
3
27
WE151-91829
Rocker Arm Adjuster
2
28
WE151-310505
Deflector
1
29
WE155-315201
Brake Assembly
1
30
WE151-300605
Circular Plate
1
31
WE151-310606
Breather Valve Spring
1
32
WE151-91038
Stud Bolt
2
33
WE151-293601-055
Fuel Cap Assembly
1
34
WE151-293206-055
Fuel Tank
1
35
WE151-300505
Deflector
1
36
WE151-92007
M4x8 Screw
1
37
WE151-91370
M6x16 Bolt
3
38
WE151-299901
Fuel Filter
1
39
WE151-94403
Fuel Pipe Clamp Ф7.5
1
40
WE151-95457
Fuel Pipe
1
41
WE151-313901
Governor Arm Shaft
1
42
WE151-96808
Governor Arm Shaft Washer
1
43
WE151-93520
Governor Arm Shaft Seal
1
44
WE151-243902
Lock Pin
1
45
WE151-314001
Governor Arm
1
PARTS DIAGRAM - DVO140
26

Item No
Webb Part No.
Webb Description
Qty
1
WE151-91365
M6x12 Bolt
7
2
WE151-311101
Cylinder Head Cover
1
3
WE151-96161
Cylinder Gasket
1
4
WE151-312101
Rocker Arm
2
5
WE151-312201
Push Rod Guide Plate
1
6
WE151-311802
Valve Spring Seat
2
7
WE151-316001
Valve Spring
2
8
WE151-311801
Intake Valve Returner
2
9
WE151-311701
Intake Valve
1
10
WE151-315901
Exhaust Valve
1
11
WE151-97109
Spark Plug
1
12
WE151-316302
Recoil Housing
1
13
WE151-91369
M6x25 Bolt
1
14
WE151-313701
Muffler Assembly
1
15
WE151-314302
Governor Plate
1
16
WE151-311901
Push Rod
2
17
WE151-316101
Valve Lifter
2
18
WE155-312003
Camshaft Assembly
1
19
WE151-311602
Piston Ring Set
1
20
WE155-311202
Piston
1
21
WE155-315502
Piston Pin
1
22
WE151-291301
Piston Clip
2
23
WE151-311501
Connecting Rod Assembly
1
24
WE151-310202
Cylinder
1
25
WE155-93517
Oil Seal
1
26
WE155-90030
M6 Flange Nut
3
27
WE151-91829
Rocker Arm Adjuster
2
28
WE151-310505
Deflector
1
29
WE155-315201
Brake Assembly
1
30
WE151-300605
Circular Plate
1
31
WE151-310606
Breather Valve Spring
1
32
WE151-91038
Stud Bolt
2
33
WE151-293601-055
Fuel Cap Assembly
1
34
WE151-293206-055
Fuel Tank
1
35
WE151-300505
Deflector
1
36
WE151-92007
M4x8 Screw
1
37
WE151-91370
M6x16 Bolt
3
38
WE151-299901
Fuel Filter
1
39
WE151-94403
Fuel Pipe Clamp Ф7.5
1
40
WE151-95457
Fuel Pipe
1
41
WE151-313901
Governor Arm Shaft
1
42
WE151-96808
Governor Arm Shaft Washer
1
43
WE151-93520
Governor Arm Shaft Seal
1
44
WE151-243902
Lock Pin
1
45
WE151-314001
Governor Arm
1
PARTS LIST - DVO140 - PT 2
Item
No
46
WE151-91066
Recoil Stud Bolt 2
1
47
WE155-90016
M6 Nut
2
48
WE155-312701
Governor Rod
1
49
WE155-314201
Throttle Return Spring
1
50
WE155-314102
Governor Spring
1
51
WE151-90036
Nut
2
52
WE155-314401
Upper Shroud Assembly
1
53
WE151-95626
Breather Tube
1
54
WE155-210801
Q-Type Line Card
1
55
WE155-310305
Crankshaft
1
56
WE151-90037
Nut
2
57
WE151-94225
Crankshaft Washer
1
58
WE151-314303
Governor Assembly
1
59
WE151-96162
Breather Chamber Gasket
1
60
WE151-310602
Breather Chamber Cap
1
61
WE151-310901
Dowel Pin
2
62
WE151-310102
Crankcase Cover Assembly
1
63
WE151-93523
Oil Seal
1
64
WE151-91366
M6x18 Bolt
6
65
WE151-91367
M6x45 Bolt
2
66
WE155-95904
Tube
1
67
WE151-94415
Fuel Pipe Clip
3
68
WE151-315601-138
Dipstick
1
69
WE151-90038
M6 Nut
2
70
WE151-310608
Breather Filter
1
71
WE155-97566
Ignition Coil Assembly
1
72
WE151-91064
Ignition Coil Stud Bolt
1
73
WE151-91065
Recoil Stud Bolt 1
1
74
WE155-310403
Flywheel Assembly
1
75
WE151-304602
Recoil Starter Fan
1
76
WE151-304501
Starter Pulley
1
77
WE151-90003
Nut
1
78
WE155-292506
Muffler Shield
1
79
WE152-96130
Air Filter Gasket
1
80
WE155-312901
Air Filter Assembly
1
81
WE151-91039
Stud Bolt
2
82
WE151-96128
Intake Gasket
1
83
WE151-312301
Carburettor Insulator
1
84
WE151-96129
Carburettor Gasket
1
85
WE155-312802
Carburettor Assembly
1
86
WE155-96168
Exhaust Gasket
1
87
WE151-294909-053
Engine Cover
1
88
WE155-294802-053
Recoil Assembly
1
89
WE151-91816
Drain Bolt
1
90
WE151-94007
Drain Bolt Washer
1
Webb Part No. Webb Description Qty
27

INSTRUCTION MANUAL
PARTS LIST - WER460SP (1938220001) - PT 1
Item
No
Webb Part No.
Webb Description
Qty
1
WE153-91221
Bolt 3/8-24UNFX38
1
2
WE153-94042
Flat Washer
1
3
WE153-602001
Blade Washer
1
4
WE158-602002
Blade (460mm)
1
5
WE153-602003
Blade Adapter
1
6
WE158-602004
Blade Adapter Bush
1
7
WE153-296510
Key
1 8 WE154-91304
Bolt M6x16
2
9
WE158-606109
Belt Cover
1
10
WE153-90060
Nut M6
14
11
WE154-606011
Pulley
1
12
WE154-91405
Bolt M6x8
1
13
WE158-606088
Belt VZ762
1
14
WE154-92139
Screw KAL50x12
11
15
WE154-296501
Key
1
16
WE158-601168-333
Cutting Deck
1
17
WE154-606003
Front Wheel Shaft Retaining Plate
2
18
WE154-92111
Bolt M6x14
8
19
WE158-91347
Bolt M8x30
3
20
WE149-94040
Spring Washer
3
21
WE149-94041
Washer 8.4x24x2
4
22 Engine DVO140
1
23
WE153-94036
Circlip Φ5
3
24
WE153-604016
Left Torsional Spring
1
25
WE158-604039
Rear Cover Axle
1
26
WE158-604090
Rear Cover
1
27
WE153-604045
Right Torsional Spring
1
28
WE154-606160
Nylon Collar
2
29
WE154-606009
Rear Wheel Shaft Retaining Plate
2
30
WE154-601005
Cable Bush
1
PARTS LIST - WER460SP (1938220001) - PT 3
Item No
Webb Part No.
Webb Description
Qty
61
WE154-606006
Wheel (8")
2
62
WE154-606008
Inner Wheel Cover (8")
2
63
WE158-604008
Side Discharge Chute
1
64
WE158-604001
Side Discharge Spring
1
65
WE158-604012
Side Discharge Bracket
1
66
WE158-604010
Side Discharge Axle
1
67
WE158-91406
Bolt M6x14
2
68
WE158-604009
Side Discharge Cover
1
69
WE149-90057
Nut M10x1.5
4
70
WE153-605006
Stem
2
71
WE153-94046
Flat Washer
4
72
WE158-606005
Front Axle
1
73
WE154-606004
Front Axle Hoop
2
74
WE153-606001-198
Wheel Cover ("7)
2
75
WE153-606002
Wheel (7")
2
76
WE154-94049
Circlip
4
77
WE154-606013
Right Drive Cog
1
78
WE153-603002
Height Adjuster Plate
1
79
WE153-603003-198
Height Adjuster Handle
1
PARTS DIAGRAM - WER460SP (1938220001)
28

Item
No
Webb Part No. Webb Description Qty
1
WE153-91221
Bolt 3/8-24UNFX38
1
3
4
WE158-602002
Blade (460mm)
1
5
WE153-602003
Blade Adapter
1
6
WE158-602004
Blade Adapter Bush
1
8
WE154-91304
Bolt M6x16
2
10
11
Pulley
1
12
WE154-91405
Bolt M6x8
1
13
WE158-606088
Belt VZ762
1
15
16
WE158-601168-333
Cutting Deck
1
17
WE154-606003
Front Wheel Shaft Retaining Plate
2
18
WE154-92111
Bolt M6x14
8
20
WE149-94040
Spring Washer
3
22
23
WE153-94036
Circlip Φ5
3
24
WE153-604016
Left Torsional Spring
1
25
WE158-604039
Rear Cover Axle
1
27
28
WE154-606160
Nylon Collar
2
29
WE154-606009
Rear Wheel Shaft Retaining Plate
2
30
WE154-601005
Cable Bush
1
PARTS LIST - WER460SP (1938220001) - PT 2
Item No
Webb Part No.
Webb Description
Qty
31
WE158-604004
Deck Rear Panel
1
32
34
WE153-91868
Bolt M8x45
4
35
WE154-599601
Wire Harness Clip
1
37
WE158-601098
Left Handle Support
1
39
WE158-605005
Lower Handle
1
40
WE153-605221
Cable Clip
2
42
43
WE153-91870
Bolt M6x35
1
44
WE153-605010-136
OPC/Brake Lever
1
45
WE153-605007-053
Soft Grip (Come's with 42)
1
47
48
WE153-90016
Nut M6
1
49
WE149-94057
Washer Φ8.4*20*2
3
50
WE153-90061
Nut M6
2
52
53
WE154-606016
Return Spring
1
54
WE158-601099
Right Handle Support
1
55
WE153-91404
Bolt M6x14
4
57
58
WE158-604046-010
Collection Bag Frame
1
59
WE153-605002-198
Large Handle Knob
2
60
WE153-606007-198
Wheel Cover (8")
2
Item No
Webb Part No.
Webb Description
Qty
61
WE154-606006
Wheel (8")
2
62
WE154-606008
Inner Wheel Cover (8")
2
63
WE158-604008
Side Discharge Chute
1
64
WE158-604001
Side Discharge Spring
1
71
WE153-94046
Flat Washer
4
72
WE158-606005
Front Axle
1
73
WE154-606004
Front Axle Hoop
2
74
WE153-606001-198
Wheel Cover ("7)
2
75
WE153-606002
Wheel (7")
2
76
WE154-94049
Circlip
4
PARTS LIST - WER460SP (1938220001) - PT 3
Item No
Webb Part No.
Webb Description
Qty
61
WE154-606006
Wheel (8")
2
62
WE154-606008
Inner Wheel Cover (8")
2
63
WE158-604008
Side Discharge Chute
1
64
WE158-604001
Side Discharge Spring
1
65
WE158-604012
Side Discharge Bracket
1
66
WE158-604010
Side Discharge Axle
1
67
WE158-91406
Bolt M6x14
2
68
WE158-604009
Side Discharge Cover
1
69
WE149-90057
Nut M10x1.5
4
70
WE153-605006
Stem
2
71
WE153-94046
Flat Washer
4
72
WE158-606005
Front Axle
1
73
WE154-606004
Front Axle Hoop
2
74
WE153-606001-198
Wheel Cover ("7)
2
75
WE153-606002
Wheel (7")
2
76
WE154-94049
Circlip
4
77
WE154-606013
Right Drive Cog
1
78
WE153-603002
Height Adjuster Plate
1
79
WE153-603003-198
Height Adjuster Handle
1
80
WE158-606158
Rear Axle Assembly
1
81
WE153-90058
Nut M6
6
82
WE153-603037
Height Adjuster Lever
1
83
WE158-603004
Height Adjustment Bar
1
84
WE153-603062
Height Adjuster Spring
1
PARTS LIST - WER460SP (1938220001) - PT 3
2 WE153-94042 Flat Washer 1
7 WE153-296510 Key 1
WE153-602001 Blade Washer 1
9 WE158-606109 Belt Cover 1
14 WE154-92139 Screw KAL50x12 11
19 WE158-91347 Bolt M8x30 3
21 WE149-94041 Washer 8.4x24x2 4
WE153-90060 Nut M6 14
WE154-606011
WE154-296501 Key 1
Engine DVO140 1
WE158-601004 Mulch Plug 1
33 WE149-90059 Nut M8 4
36 WE158-91343 Bolt M8x16 4
38 WE153-605003-198 Small Handle Knob 2
41 WE158-604108 Side Discharge Lock Spring 1
WE153-605008 Upper Handle (Come's with 45) 1
46 WE154-605015-136 Drive Lever 1
WE153-605009 Rope Guide Support 1
51 WE158-604103 Side Discharge Lock 1
WE158-605058 Brake & Drive Cable Assembly 1
26 WE158-604090 Rear Cover 1
WE153-604045 Right Torsional Spring 1
65 WE158-604012 Side Discharge Bracket 1
66 WE158-604010 Side Discharge Axle 1
67 WE158-91406 Bolt M6x14 2
68 WE158-604009 Side Discharge Cover 1
69 WE149-90057 Nut M10x1.5 4
70 WE153-605006 Stem 2
77 WE154-606013 Right Drive Cog 1
78 WE153-603002 Height Adjuster Plate 1
79 WE153-603003-198 Height Adjuster Handle 1
56 WE158-604102 Side Discharge Lock Buckle 1
WE158-604047-057 Collection Bag 1
Item No Webb Part No. Webb Description Qty
85 WE153-91867 Bolt 2
86 WE154-606012 Left Drive Cog 1
87 WE158-606083 Gearbox 1
88 WE158-606021 Gearbox Gear Pin 2
29

EC DECLARATION OF CONFORMITY
Designation: Petrol Self-Propelled 460mm Lawnmower
Model(s): WER460SP
Product No.: 1938220001
Type/Serial No. As per rating label on machine
Engine Displacement: 141 cm
Rated Engine Power: 2.5kW
Rated Engine Speed: 2800rpm/min
Complies with the following directives:
Machinery Directive 2006/42/EC
The conformity assessment procedure followed was in accordance with
EN ISO 5395-1:2013/A1:2018; EN ISO 5395-2:2013/A2:2017
Outdoor Noise Directive 2000/14/EC & 2005/88/EC
Guaranteed Noise Power Level LWA: 96 dB(A) According to 2000/14/EC
Emission Sound Pressure Level L
Vibration a
: 7.38 m/s2 - uncertainty K: 1.5 m/s
hv
Electromagnetic Compatibility Directive 2014/30/EC
The conformity assessment procedure followed was in accordance with
EN ISO 14982:1998 6.3 and 6.6
Notified Body:
TÜV SÜD Product Service GmbH
Addresses:
Ridlerstraße 65, 80339 Münich, Germany
Authorised signatory and technical file holder
Date: 11/09/2019
3
PA
: 83 dB(A)
2
Signature:
Name: Mr Simon Belcher
Position: Chairman
Company: Handy Distribution Ltd
Address: Murdock Rd, Swindon, Wiltshire, SN3 5HY.

Notes

Notes Notes

Notes

INSTRUCTION MANUAL
1. Users Statement of Warranty
Each new machine is warranted against defective material or assembly of material under normal usage. The
warranty applies to the original purchaser, is not transferable and covers faulty parts and the labour involved in
replacing and repairing those parts, which are of original manufacture.
2. Period of Warranty
Webb (excludes Electric Handheld) & Webb Pro, 2 year conditional warranty from the original date of sale to the
fi rst domestic user.
Webb Electric Handheld & Dynamic, Legacy & Heritage 1 year warranty from the original date of sale to the fi rst
domestic user.
90 days from the original date of sale to the professional/commercial or for hire user.
Engine warranty as per the engine manufacturer’s warranty, which will be supplied with the machine.
90 days from the original date of sale for Replacement Spare Parts
All machines’ must be serviced within the fi rst 14 months from the original date of purchase, to qualify for a second
year parts & labour warranty, details of the service must be recorded in the service record within this manual.
A reduced warranty period of 90 days applies to those items which are subject to normal wear and tear and in
normal use, will need replacement or adjustment.
These items are chargeable after 90 days of ownership.
Filters
Tyres / Wheels
Drive chains and belts
Brake & clutch friction components
Control cable & starter cords
Fluids & lubricants
Spark plugs
Blades (Lawnmowers & Brushcutters)
Cutter bars (Hedgecutters)
Drive & clutch cable surfaces
Nylon Lines (Line Trimmers)
Carburettor cleaning
Bearings
Bushes
Electric cable
Grass collectors
3. Not covered by this warranty
(a) The warranty policy does not cover any depreciation or damages caused by ordinary wear, rusting or corrosion,
lack of correct maintenance or operation, misuse, abuse, lack of transportation or accident.
(b) The warranty policy does not cover any costs necessary for the standard periodic maintenance services
instructed by the operators manual, or service parts replacement which would include oil, fi lters, tyres, belts, brake
linings, fuses, blades, seals and other service parts unless it can be proven that the item has evidence of faulty
manufacture.
(c) The warranty policy will not cover failure or damage caused as a result of parts or accessories being modifi ed
without the written approval of GJ Handy & Co Ltd.
(d) The warranty policy will not cover the unit if non-genuine parts have been fi tted and as a result damage has
occurred to the unit.
(e) The warranty policy is non-transferable and is only applicable to the original purchaser.
4. Disclaimer
(a) This warranty is only a remedy for defect of products. GJ Handy & Co Ltd will never warranty in terms of the
merchantability or the fi tness for a particular purpose.
(b) No person is authorised to make any warranties, representations or promises, expressed or implied, on behalf of
This Service Book is provided with your Webb, to help you look after your purchase to our recommendations and
enable you to take advantage of the conditional manufacturer domestic warranty*.
Present this service book to your authorised Webb repair dealer, whenever a service or a warranty appraisal is
The booklet is applicable to the following products, in the UK only:
Ride On Lawn Tractors
Petrol Rotary Lawnmowers
Petrol Hand Held Range
Please register your machine using the following pages or at www.webbgardenpower.co.uk. By registering your
machine, you agree to maintain the machine in accordance with the service schedules specifi ed in this manual and
services duly recorded. (Not applicable for Webb electric handheld machines). You may be asked to produce this
booklet as proof of servicing in the event of a claim. Proof of purchase should also be kept as a reference.
required.
Cylinder Lawnmowers
Ensure you have the following information available from your machine product label. The two examples below can
1
1. Model Number
2. Serial & Product Number
be found on your machine:
2
34
Sections marked* must be completed to validate Warranty.
Please complete using BLOCK CAPITALS.

1. Users Statement of Warranty
Each new machine is warranted against defective material or assembly of material under normal usage. The
warranty applies to the original purchaser, is not transferable and covers faulty parts and the labour involved in
replacing and repairing those parts, which are of original manufacture.
2. Period of Warranty
Webb (excludes Electric Handheld) & Webb Pro, 2 year conditional warranty from the original date of sale to the
fi rst domestic user.
Webb Electric Handheld & Dynamic, Legacy & Heritage 1 year warranty from the original date of sale to the fi rst
domestic user.
90 days from the original date of sale to the professional/commercial or for hire user.
Engine warranty as per the engine manufacturer’s warranty, which will be supplied with the machine.
90 days from the original date of sale for Replacement Spare Parts
All machines’ must be serviced within the fi rst 14 months from the original date of purchase, to qualify for a second
year parts & labour warranty, details of the service must be recorded in the service record within this manual.
A reduced warranty period of 90 days applies to those items which are subject to normal wear and tear and in
normal use, will need replacement or adjustment.
These items are chargeable after 90 days of ownership.
Filters
Tyres / Wheels
Drive chains and belts
Brake & clutch friction components
Control cable & starter cords
Fluids & lubricants
Spark plugs
Blades (Lawnmowers & Brushcutters)
Cutter bars (Hedgecutters)
Drive & clutch cable surfaces
Nylon Lines (Line Trimmers)
Carburettor cleaning
Bearings
Bushes
Electric cable
Grass collectors
3. Not covered by this warranty
(a) The warranty policy does not cover any depreciation or damages caused by ordinary wear, rusting or corrosion,
lack of correct maintenance or operation, misuse, abuse, lack of transportation or accident.
(b) The warranty policy does not cover any costs necessary for the standard periodic maintenance services
instructed by the operators manual, or service parts replacement which would include oil, fi lters, tyres, belts, brake
linings, fuses, blades, seals and other service parts unless it can be proven that the item has evidence of faulty
manufacture.
(c) The warranty policy will not cover failure or damage caused as a result of parts or accessories being modifi ed
without the written approval of GJ Handy & Co Ltd.
(d) The warranty policy will not cover the unit if non-genuine parts have been fi tted and as a result damage has
occurred to the unit.
(e) The warranty policy is non-transferable and is only applicable to the original purchaser.
4. Disclaimer
(a) This warranty is only a remedy for defect of products. GJ Handy & Co Ltd will never warranty in terms of the
merchantability or the fi tness for a particular purpose.
(b) No person is authorised to make any warranties, representations or promises, expressed or implied, on behalf of
35

INSTRUCTION MANUAL
Warranty
Your servicing Webb approved dealer will stamp & date the below relevant sections, when the correct service actions
have been completed.
PLEASE ENSURE THE SERVICE BOOK IS AVAILABLE FOR THE DEALER, DURING SERVICE WORK.
1st Service
This must be stamped by an approved service dealer to
qualify for a free second year warranty.
(Excluding the Webb Electric Handheld machines)
24 Months
Date Date
36 Months
12 Months
Date
GJ Handy & Co Ltd, or to modify the terms conditions or limitation of this warranty policy in any way.
(c) Neither GJ Handy & Co Ltd nor any company affi liated with GJ Handy & Co Ltd shall be liable in any event or
manner whatsoever for incidental or consequential damages or injuries, including, but not limited to, loss of crops,
loss of profi t, out of pocket expenses or profi ts, rental of substitute equipment or other commercial losses.
5. General
(a) Most warrantable failures show up within the fi rst few weeks of use. These failures are usually straightforward
and warranty assessment is relatively easy.
(b) Failures relating to cutter decks and belts need careful investigation, as the cause may not always be
straightforward. Look for damage to blades and pulleys especially when the cutter belt or blade boss have snapped
or cracked as this could be due to impact damage.
(c) Customers should always refer to the operator/instruction manual when any disputed problem arises, you will
fi nd most areas covered within the manual.
Protecting your machine
Maintenance
Regular maintenance of your Webb machine is essential to ensure it operates, safely, effi ciently and therefore
reducing the environmental impact.
It is the owner’s responsibility to ensure that their Webb machine is maintained at specifi c intervals. Any approved
Webb service dealer can undertake a service, which are specialised in our products and will be aware of your
particular machine and any technical updates which will save valuable time & money.
If you are using your machine in dry, dusty or high temperatures, you will need to service the machine more
regularly.
Fuel (if applicable)
Due to ongoing eff orts by fuel companies to reduce emissions, unleaded petrol will oxidize & deteriorate in storage
overtime, leaving residue from detergent components.
Fuel deterioration problems may occur when petrol is stored for over 30 days. If you are planning to store fuel for
over 30 days, we recommend you add Handy Parts Sure-Start fuel stabilizer to fresh fuel after purchasing. Sure-
Start cannot reconstitute stale fuel.
Storage
When storing your machine for an extended period, we do recommend that you follow the instructions of engine
instruction manual.
Always store the fuel in a clean, approved and sealed container. If the container is steel, ensure it is not corroded.
If the container is not fi lled to its recommended capacity, air can accelerate fuel deterioration.
Always store fuel away from direct sunlight, in a dark, cool environment.
36

Your servicing Webb approved dealer will stamp & date the below relevant sections, when the correct service actions
have been completed.
PLEASE ENSURE THE SERVICE BOOK IS AVAILABLE FOR THE DEALER, DURING SERVICE WORK.
1st Service
This must be stamped by an approved service dealer to
qualify for a free second year warranty.
(Excluding the Webb Electric Handheld machines)
12 Months
24 Months
Date
36 Months
Date Date
37

Webb Lawnmowers privacy commitment to machine owners.
The information supplied, helps us to improve the products & services we provide, including information that we believe is relevant to your and/or
your machine. We value your trust by giving us this information about yourself and we are committed to protecting your privacy.
Webb, its associated companies, authorised dealers or third parties working on our behalf may wish to contact you regarding PRODUCT RECALLS
specifi c to your machine. Please advise how you wish to be contacted for this specifi c reason only:
Post Telephone Email
From time to time Webb, its associated companies, authorised dealers or third parties working on our behalf may wish to contact you regarding
our products, services, off ers or just opinions, which may be used for marketing, research or analysis purposes.
If you wish to be contacted by any of the following methods, please tick the relevant boxes:
Post Telephone Email
You may give Webb Lawnmowers notice in writing at any time that you no longer wish to receive direct marketing communications
*House Number *House Name
*Address 1
*Address 2
*Town
*County
*Postcode
Home Tel Mobile Tel
Email
If you have registered online, this form is not necessary.
PLEASE POST THIS COPY TO THE ADDRESS OVERLEAF
*Title *Forename *Surname
Age 18 to 25 26 to 35 36 to 45 46 to 60 61 to 80 81 & over
*Usage Domestic Use Commercial/Professional/Hire Use
Personal Information (* Compulsory)
*Model No:
*Product No:
*Serial No:
*Date of Purchase:
Product Information (* Compulsory)
*Dealer Stamp (if available)
*Dealer Name
*Dealer Address
*Date of Purchase
*Selling Retailer (If dealer stamp not available)
48 Months
60 Months
Date
72 Months
84 Months
Service Record
Date
96 Months
Date
108 Months
Date
120 Months
Date
Date
132 Months
Date
Date

If you have registered online, this form is not necessary.
Product Information (* Compulsory)
PLEASE POST THIS COPY TO THE ADDRESS OVERLEAF
*Model No:
*Product No:
*Serial No:
*Date of Purchase:
Personal Information (* Compulsory)
*Title *Forename *Surname
*House Number *House Name
*Address 1
*Address 2
*Town
*County
*Postcode
Home Tel Mobile Tel
Email
Age 18 to 25 26 to 35 36 to 45 46 to 60 61 to 80 81 & over
*Usage Domestic Use Commercial/Professional/Hire Use
*Dealer Stamp (if available)
*Selling Retailer (If dealer stamp not available)
*Dealer Name
*Dealer Address
*Date of Purchase
Webb Lawnmowers privacy commitment to machine owners.
The information supplied, helps us to improve the products & services we provide, including information that we believe is relevant to your and/or
your machine. We value your trust by giving us this information about yourself and we are committed to protecting your privacy.
Webb, its associated companies, authorised dealers or third parties working on our behalf may wish to contact you regarding PRODUCT RECALLS
specifi c to your machine. Please advise how you wish to be contacted for this specifi c reason only:
Post Telephone Email
From time to time Webb, its associated companies, authorised dealers or third parties working on our behalf may wish to contact you regarding
our products, services, off ers or just opinions, which may be used for marketing, research or analysis purposes.
If you wish to be contacted by any of the following methods, please tick the relevant boxes:
Post Telephone Email
You may give Webb Lawnmowers notice in writing at any time that you no longer wish to receive direct marketing communications

Webb Lawnmowers
Murdock Road
Dorcan
Swindon
Wiltshire
SN3 5HY
 Loading...