

Page 1

v
2800W Electric Silent Shredder
WEESS
1938266001
en - Original Instructions
ASSEMBLY REQUIRED
Minimum Two Persons
Sales & Support: 01793 333212
Before use please read & understand this manual; paying particular attention to the safety instructions before use.
Whilst every eff ort has been made to ensure the accuracy of information contained in this manual, our policy of continuous improvement
Incorrect use of the product could put the operator or machine in danger.
determines the right to make modifi cations without prior warning.
Images are used for illustration purposes only.
Page 2

INSTRUCTION MANUAL
4 Sep 2020
Copyright Notice
Copyright © Handy Distribution
Permission is granted to reproduce this publication for personal & educational use only.
Commercial copying, redistribution, hiring or lending is prohibited.
No part of this publication may be stored in a retrieval system or transmitted in any other form or means without
written permission from Handy Distribution.
In all cases this copyright notice must remain intact.
2
Page 3

CONTENTS
INTENDED USE
SAFETY INSTRUCTIONS
SPECIFICATIONS
KNOW YOUR MACHINE
ASSEMBLY
OPERATION
ELECTRICAL CONNECTION
MAINTENANCE, CLEANING & STORAGE
TROUBLE SHOOTING
PARTS DIAGRAM & LIST
DECLARATION OF CONFORMITY
WARRANTY
INTENDED USE
The basic version of the equipment is an electric shredder intended for private use, i.e. for use in home and
gardening environments. It is designed for compacting fibrous and wood-related materials such as hedge and
tree cuttings, branches, bark and pine cones from medium sized gardens. Any use not expressly permitted in
this manual may damage the shredder and pose a serious danger to the user.
DO NOT FILL THE SHREDDER WITH STONES, GLASS, METAL, BONES, PLASTICS or FABRICS.
The shredder is for private use only, whose annual operating time generally does not exceed 25 hours. Public
facilities, sporting facilities and agricultural / forestry applications are excluded.
Please read this entire manual prior to operating the equipment. It instructs you how to safely and easily set
up, operate and maintain your machine. Please be sure that you and any other persons who will operate the
machine, always carefully follow the recommended safety practices. Failure to do so could result in personal
injury or property damage.
TO THE OWNER
All information in this manual is relative to the most recent product information available at the time of
printing. Review this manual frequently to familiarise yourself with the machine, its features & operation.
Please note that this Instruction Manual may cover a range of product specifications for various models.
Characteristics & features discussed and/or illustrated in this manual may not be applicable or exact to all
models.
We reserve the right to change product specifications, designs, and equipment without notice and without
incurring obligation. If you have any problems or questions concerning the machine, phone your local
authorised service dealer or ourselves. Throughout this manual, all references to right and left side of the
machine are observed from the operating position.
WARNING
The operator or user is responsible for accidents and injury or damage to third parties.
The equipment is allowed to be used only for its prescribed purpose. Any other use is deemed to be a case
of misuse. The user/operator and not the manufacturer will be liable for any damage or injuries of any kind
resulting from such misuse. Please note that our equipment has not been designed for use in commercial,
trade or industrial applications. Our warranty will be 90 days from the original date of sale for commercial,
trade or industrial businesses or for equivalent purposes.
3
Page 4
DANGER
immediately.
Safety alert symbol. Used to alert
possible injury.
WARNING
CAUTION
Used without the safety alert symbol
result in property damage.
EU
GENERAL SAFETY RULES
WARNING
Before you put the machine into operation, you must read this instruction manual.
When using this machine, observe the following safety instructions to remove the risk of personal injury or
material damage. Please also observe the special safety instructions in the respective chapters. Where
applicable, follow the legal directives or regulations for the prevention of accidents in relation to the use of
this machine.
When using electric tools, basic safety precautions, including the following, should always be followed to
reduce the risk of serious personal injury and/or damage to the unit.
GENERAL OPERATION
1. Read this instruction manual carefully in its entirety before attempting to assemble this machine. Read,
understand, and follow all instructions on the machine and in the manual(s) before operation. Keep this
manual in a safe place for future and regular reference and for ordering replacement parts.
2. Be completely familiar with the controls and the proper use of this machine before operating it.
3. This machine is a precision piece of power equipment, not a plaything. Therefore, always exercise extreme
caution. This machine has been designed to perform one job: compacting fibrous and wood-related
materials. Do not use it for any other purpose.
4. This appliance is not intended for use by persons (including children) with reduced physical, sensory or
mental capabilities, or lack of experience and knowledge, unless they have been given supervision or
instruction concerning use of the appliance by a person responsible for their safety.
5. Never allow children under 16 years of age to operate this machine. Children 16 and over should read and
understand the instructions and safe operation practices in this manual and on the machine and should be
trained and always supervised by an adult.
6. Only responsible individuals who are familiar with these rules of safe operation should be allowed to use
this machine.
7. Thoroughly inspect the area where the equipment is to be used. Remove all stones, sticks, wire, bones,
toys, and other foreign objects, which could be tripped over or picked up and placed into the shredder.
Foreign objects can cause serious damage to the machine or increases the chances of personal injury.
8. Stay in operator zone behind operation panel and handles and keep children, bystanders, helpers, and
pets at least 20 metres from shredder while it is in operation. Stop machine if anyone enters area.
9. Always wear safety glasses or safety goggles during operation and while performing an adjustment or
repair to protect your eyes. Thrown objects which ricochet can cause serious injury to the eyes.
10. Wear sturdy, rough-soled work shoes and close-fitting trousers and shirts. Shirts and trousers that cover
the arms and legs and steel-toed shoes are recommended. Never operate this machine in bare feet,
sandals, slippery or light- weight (e.g. canvas) shoes.
11. Do not put hands or feet near or into rotating parts. Always keep clear of input and discharge areas, as the
rotating blade can cause injury.
12. Never operate the shredder without proper shields, guards, control lever or other safety protective
devices in place and working.
13. Never operate the shredder with damaged safety devices. Failure to do so, can result in personal injury.
14. Do not operate the shredder while under the influence of alcohol or drugs.
15. Never attempt to bypass its operation safety devices. Doing so makes the safety device inoperative and
may result in personal injury through contact with the rotating blade. The collector safety lever must
operate easily in both directions.
16. Never operate the shredder in wet grass. Always be sure of your footing. A slip and fall can cause serious
personal injury.
17. Operate only in daylight or good artificial light. Walk, never run when around the machine.
18. Do not use the machine on a paved, graveled area, which could be damaged by ejected material
19. If the machine starts to vibrate abnormally, stop the motor, and check immediately for the cause.
Vibration is generally a warning of trouble.
INSTRUCTION MANUAL
SAFETY INSTRUCTIONS
Read and understand the owner’s manual and labels affixed to the machine. Learn its application and
limitations as well as the specific potential hazards. Retain these instructions for future reference. The
operator is responsible for following the warnings & instructions in this manual and on the product.
4
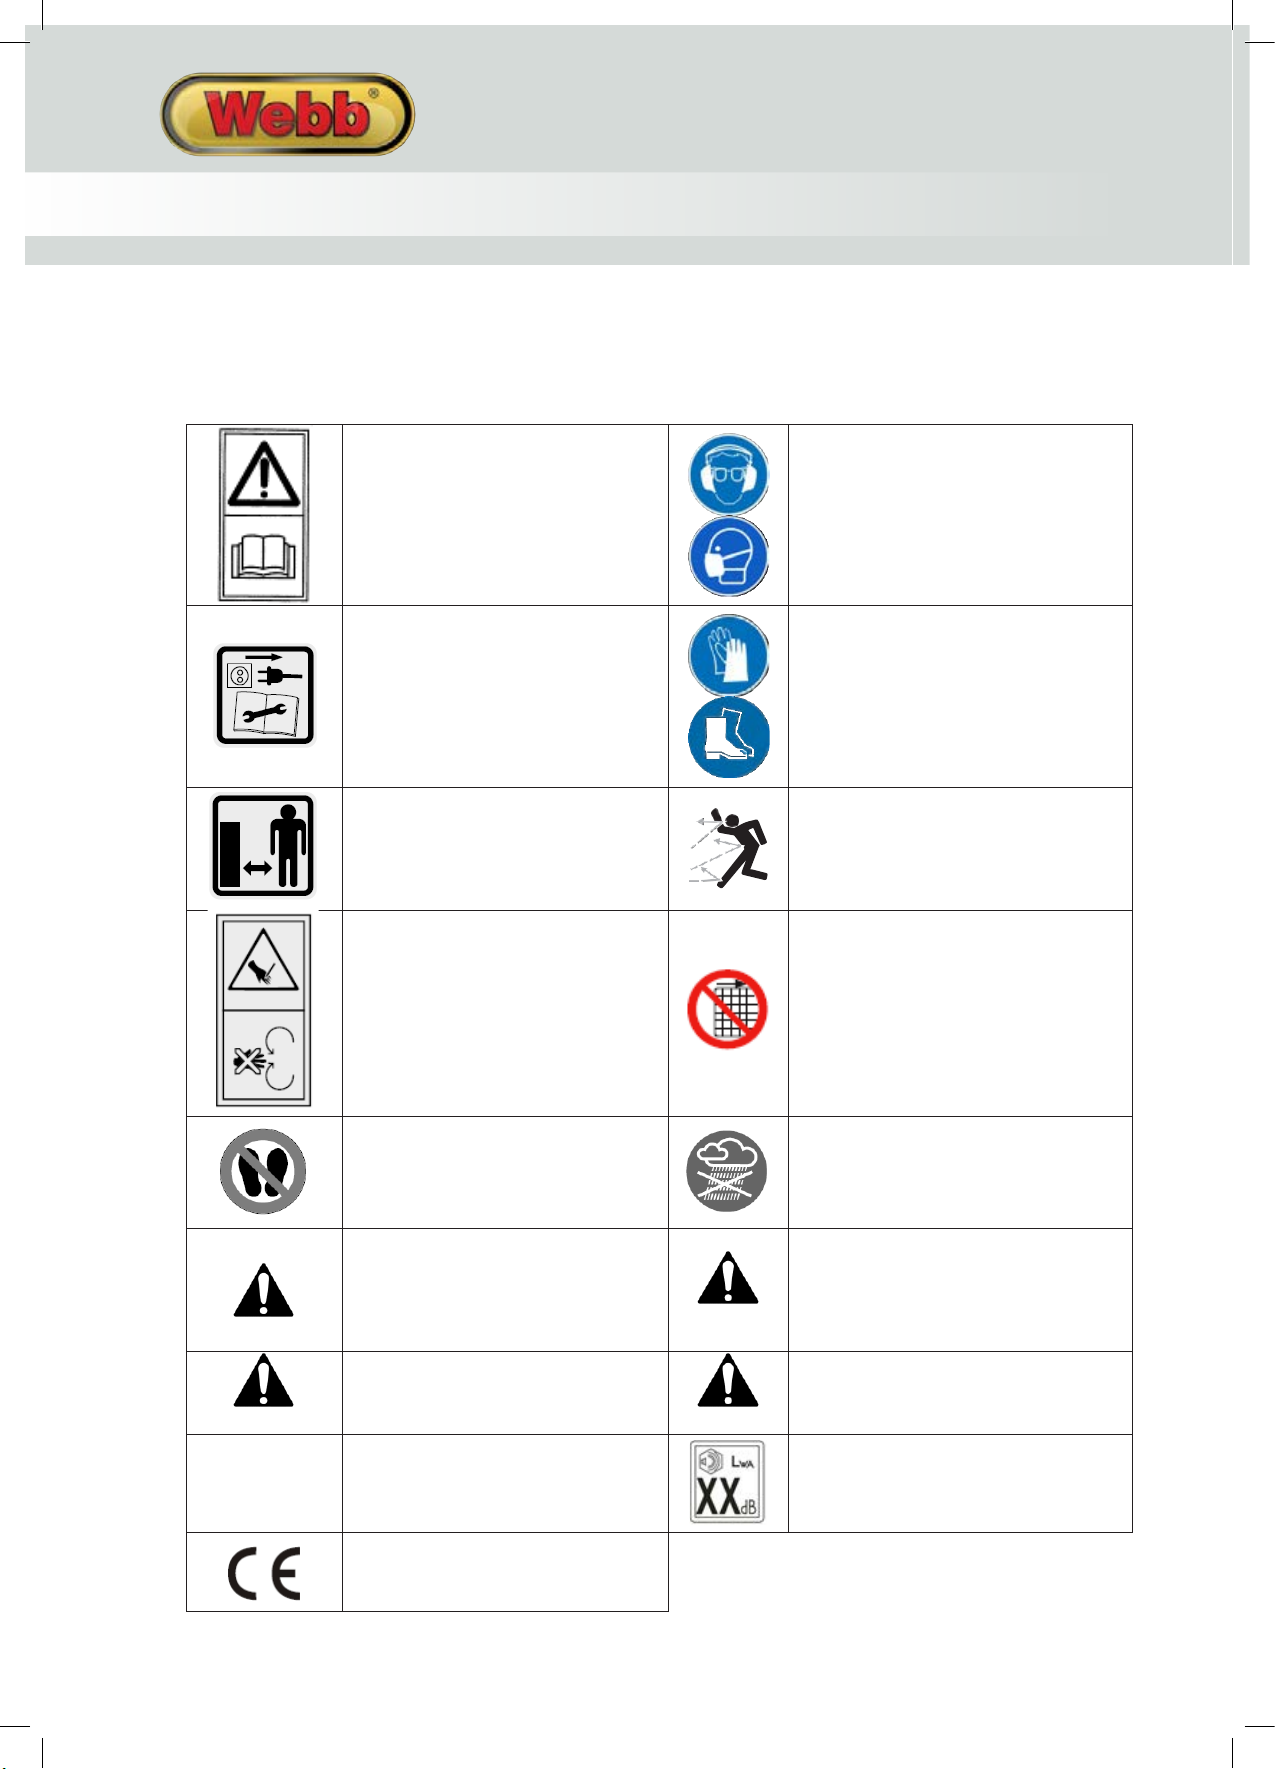
CAUTION
Read & understand the instruction
manual before using the machine.
Failure to follow instructions could
result in death or serious injury.
Please keep in a safe place for future
reference.
Remove the electrical plug from the
power supply before any
maintenance, repair, cleaning or if
the power cable is damaged.
Whenever the machine is in use, safety
goggles or glasses must be worn to
safeguard against flying objects.
Hearing protection must also be used
to protect the operators hearing.
Face masks are also recommended to
avoid inhalation of debris.
Always wear gloves to protect your
Wear foot protection or sensible shoes
when using the machine. Steel-toed
Keep all bystanders & animals away
from the machine during operation.
If approached, stop the machine
DANGER — THROWN DEBRIS
Remove objects that can be thrown by
the machine in any direction.
IMPORTANT NOTE!
Risk of injury due to rotating blade!
Keep hands and feet outside of the
openings when the machine is
running.
Do not misuse as a step or climb
Keep guards in place and in working
order. Replace damaged, missing, or
failed parts before operating.
Do not expose to rain or damp
upon the machine.
you to potential personal injury
hazards. Obey all safety messages
that follow this symbol to avoid
Indicates a potentially hazardous
situation which, if not avoided, could
result in serious injury
indicates a potentially hazardous
situation which, if not avoided, may
DANGER
Indicates an imminently hazardous
situation which, if not avoided, will
Indicates a potentially hazardous
situation which, if not avoided, may
result in minor or moderate injury.
Noise Level - See label on machine
CE Marking - the product meets
demand and regulations set by the
hands.
shoes are recommended
conditions.
result in serious injury
Page 5

GENERAL SAFETY RULES
WARNING
Before you put the machine into operation, you must read this instruction manual.
When using this machine, observe the following safety instructions to remove the risk of personal injury or
material damage. Please also observe the special safety instructions in the respective chapters. Where
applicable, follow the legal directives or regulations for the prevention of accidents in relation to the use of
this machine.
When using electric tools, basic safety precautions, including the following, should always be followed to
reduce the risk of serious personal injury and/or damage to the unit.
GENERAL OPERATION
1. Read this instruction manual carefully in its entirety before attempting to assemble this machine. Read,
understand, and follow all instructions on the machine and in the manual(s) before operation. Keep this
manual in a safe place for future and regular reference and for ordering replacement parts.
2. Be completely familiar with the controls and the proper use of this machine before operating it.
3. This machine is a precision piece of power equipment, not a plaything. Therefore, always exercise extreme
caution. This machine has been designed to perform one job: compacting fibrous and wood-related
materials. Do not use it for any other purpose.
4. This appliance is not intended for use by persons (including children) with reduced physical, sensory or
mental capabilities, or lack of experience and knowledge, unless they have been given supervision or
instruction concerning use of the appliance by a person responsible for their safety.
5. Never allow children under 16 years of age to operate this machine. Children 16 and over should read and
understand the instructions and safe operation practices in this manual and on the machine and should be
trained and always supervised by an adult.
6. Only responsible individuals who are familiar with these rules of safe operation should be allowed to use
this machine.
7. Thoroughly inspect the area where the equipment is to be used. Remove all stones, sticks, wire, bones,
toys, and other foreign objects, which could be tripped over or picked up and placed into the shredder.
Foreign objects can cause serious damage to the machine or increases the chances of personal injury.
8. Stay in operator zone behind operation panel and handles and keep children, bystanders, helpers, and
pets at least 20 metres from shredder while it is in operation. Stop machine if anyone enters area.
9. Always wear safety glasses or safety goggles during operation and while performing an adjustment or
repair to protect your eyes. Thrown objects which ricochet can cause serious injury to the eyes.
10. Wear sturdy, rough-soled work shoes and close-fitting trousers and shirts. Shirts and trousers that cover
the arms and legs and steel-toed shoes are recommended. Never operate this machine in bare feet,
sandals, slippery or light- weight (e.g. canvas) shoes.
11. Do not put hands or feet near or into rotating parts. Always keep clear of input and discharge areas, as the
rotating blade can cause injury.
12. Never operate the shredder without proper shields, guards, control lever or other safety protective
devices in place and working.
13. Never operate the shredder with damaged safety devices. Failure to do so, can result in personal injury.
14. Do not operate the shredder while under the influence of alcohol or drugs.
15. Never attempt to bypass its operation safety devices. Doing so makes the safety device inoperative and
may result in personal injury through contact with the rotating blade. The collector safety lever must
operate easily in both directions.
16. Never operate the shredder in wet grass. Always be sure of your footing. A slip and fall can cause serious
personal injury.
17. Operate only in daylight or good artificial light. Walk, never run when around the machine.
18. Do not use the machine on a paved, graveled area, which could be damaged by ejected material
19. If the machine starts to vibrate abnormally, stop the motor, and check immediately for the cause.
Vibration is generally a warning of trouble.
5
Page 6

DO NOT MODIFY THE MOTOR
To avoid serious injury or death, do not modify the motor in any way. Tampering with the motor settings can
cause it to operate at unsafe speeds and lead to premature failure. Never tamper with factory settings of the
motor. Please refer to this manual, before undertaking any inspection, repair, or maintenance.
ELECTRICAL SAFETY
Always check that the power supply corresponds to the voltage on the rating plate.
1. Power tool electrical plugs must match the outlet. Never modify the plug in any way. Do not use adapter
plugs with earthed power tools. Unmodified plugs and matching outlets will reduce the risk of a lethal
electric shock.
2. Avoid body contact with earthed surfaces such as pipes, radiators, kitchen ranges and refrigerators. There
is an increased risk of a lethal electric shock if your body is earthed.
3. Do not expose power tools to rain or wet conditions. If water gets inside a power tool, it will increase the
risk of a lethal electric shock.
4. Do not damage the electrical cable. Never use the electrical cable for carrying, pulling, or unplugging the
power tool. Keep the electrical cable away from heat, oil, sharp edges or moving parts. Damaged or
entangled electric cables increase the risk of a lethal electric shock.
5. When operating a power tool outdoors, use an extension cable suitable for outdoor use. Using an
extension cable suitable for outdoor use reduces the risk of a lethal electric shock.
6. If operating a power tool in a damp location is unavoidable, use a power supply protected by a residual
current device (RCD) with a trip current of not more than 30mA. Using an RCD reduces the risk of a lethal
electric shock.
7. Only use extension cables that have been approved for outdoor use and are resistant to splash water. The
core diameter for extension cables measuring up to 25 m must be at least 2.5 mm², and 2.5 mm²for cables
longer than 25m. Always roll the whole cable off the reel before use. Check the cable for damage.
PERSONAL SAFETY
1. This machine is not intended for use by persons (including children) with reduced physical, sensory or
mental capabilities, or lack of experience and knowledge, unless they have been given supervision or
instruction concerning use of the machine by a person responsible for their safety.
2. Children should be supervised to ensure that they do not use or play with the machine.
3. Stay alert, watch what you are doing and use common sense when operating this machine.
4. Do not use this machine while you are tired, ill or under the influence of drugs, alcohol, or medication. A
moment of inattention while operating this machine can cause you to lose control & may result in series
personal injury.
5. Use safety equipment. Always wear eye protection. Safety equipment such as a dust mask, non-skid safety
shoes, hard hat, or hearing protection used for appropriate condition will reduce personal injuries.
6. Dress properly. Do not wear loose clothing or jewellery. Keep your hair, clothing & gloves away from
moving parts. Loose clothes, jewellery or long hair can be caught in moving parts.
7. Prolonged use of the machine may lead to disorders of blood circulation in hands caused by vibration.
These effects can be worsened by low ambient temperatures and/or by gripping the handgrips excessively
tightly. Period of use you can extend with appropriate gloves or regular breaks. Take frequent work
breaks. Limit the amount of exposure per day.
INSTRUCTION MANUAL
20. Shut the motor off and wait until the blade comes to a complete stop before cleaning the discharge area.
The blade continues to rotate for a few seconds after the stop button is pressed. Never place any part of
the body in the shredder area until you are sure the blade has stopped rotating and the electrical plug has
been removed from the power source and contact cannot be made between the two.
21. Never operate the shredder without proper shields or other safety protective devices in place and
working. Never operate with damaged safety devices. Failure to do so can result in personal injury.
22. Only use parts and accessories made for this machine by the manufacturer. Failure to do so can result in
personal injury.
23. If situations occur which are not covered in this manual, use care and good judgement. Contact your
nearest Approved Service Dealer for assistance
SLOPE OPERATION
Slopes are a major factor related to slip and fall accidents, which can result in severe injury. Operation on
slopes requires extra caution. If you feel uneasy on a slope, or it is greater than 15 degrees, do not operate on
it.
Do:
1. Exercise extreme caution when changing direction on slopes.
2. Watch for holes, ruts, rocks, hidden objects, or bumps which can cause you to slip or trip. Tall grass can
hide obstacles.
3. Always be sure of your footing. A slip and fall can cause serious personal injury.
Do Not:
1. Do not operate near drop-offs, ditches, or embankments, you could lose your footing or balance.
2. Do not operate on slopes greater than 15 degrees.
3. Do not operate on wet grass. Unstable footing could cause slipping.
CHILDREN
Tragic accidents can occur if the operator is not alert to the presence of children. Children are often attracted
to the machine and the activity. They do not understand the dangers. Never assume that children will remain
where you last saw them.
1. Keep children out of the operating area and under care of a responsible adult other than the operator.
2. Be alert and turn the machine off if a child enters the area.
3. Before and while moving backwards, look behind and down for small children.
4. Never allow children under 16 years of age to operate this machine. Children 16 and over should read and
understand the instructions and safe operation practices in this manual and on the machine and be
trained and supervised by an adult.
SERVICE
General Service:
1. Before cleaning, repairing, or inspecting, make certain the blade and all moving parts have stopped.
Disconnect the electrical plug from the power source to prevent unintended starting.
2. Check the blade at frequent intervals for proper tightness. Also, visually inspect for damage. Replace with
the original equipment manufacture’s (O.E.M.) parts only, listed in this manual. “Use of parts which do not
meet the original equipment specifications may lead to improper performance and compromise safety!”
3. Keep all nuts, bolts, and screws tight to be sure the equipment is in safe working condition.
4. Never tamper with safety devices. Check the correct operation regularly.
5. After striking a foreign object, stop the motor, disconnect the electrical plug from the power source.
Thoroughly inspect the machine for any damage. Repair the damage before starting and operating the
machine.
6. Components, guards and shields are subject to wear and damage which could expose moving parts or
allow objects to be thrown. For safety protection, frequently check components and replace immediately
with original equipment manufacturers (O.E.M.) parts only, listed in this manual. “Use of parts which do
not meet the original equipment specifications may lead to improper performance and compromise
safety!”
7. Do not change the motor’s settings. The motor has been set for the maximum safe operating speed.
8. Maintain or replace safety and instruction labels, as necessary.
9. Observe proper disposal laws and regulations. Improper disposal of fluids and materials can harm the
environment.
6
Page 7

DO NOT MODIFY THE MOTOR
To avoid serious injury or death, do not modify the motor in any way. Tampering with the motor settings can
cause it to operate at unsafe speeds and lead to premature failure. Never tamper with factory settings of the
motor. Please refer to this manual, before undertaking any inspection, repair, or maintenance.
ELECTRICAL SAFETY
Always check that the power supply corresponds to the voltage on the rating plate.
1. Power tool electrical plugs must match the outlet. Never modify the plug in any way. Do not use adapter
plugs with earthed power tools. Unmodified plugs and matching outlets will reduce the risk of a lethal
electric shock.
2. Avoid body contact with earthed surfaces such as pipes, radiators, kitchen ranges and refrigerators. There
is an increased risk of a lethal electric shock if your body is earthed.
3. Do not expose power tools to rain or wet conditions. If water gets inside a power tool, it will increase the
risk of a lethal electric shock.
4. Do not damage the electrical cable. Never use the electrical cable for carrying, pulling, or unplugging the
power tool. Keep the electrical cable away from heat, oil, sharp edges or moving parts. Damaged or
entangled electric cables increase the risk of a lethal electric shock.
5. When operating a power tool outdoors, use an extension cable suitable for outdoor use. Using an
extension cable suitable for outdoor use reduces the risk of a lethal electric shock.
6. If operating a power tool in a damp location is unavoidable, use a power supply protected by a residual
current device (RCD) with a trip current of not more than 30mA. Using an RCD reduces the risk of a lethal
electric shock.
7. Only use extension cables that have been approved for outdoor use and are resistant to splash water. The
core diameter for extension cables measuring up to 25 m must be at least 2.5 mm², and 2.5 mm²for cables
longer than 25m. Always roll the whole cable off the reel before use. Check the cable for damage.
PERSONAL SAFETY
1. This machine is not intended for use by persons (including children) with reduced physical, sensory or
mental capabilities, or lack of experience and knowledge, unless they have been given supervision or
instruction concerning use of the machine by a person responsible for their safety.
2. Children should be supervised to ensure that they do not use or play with the machine.
3. Stay alert, watch what you are doing and use common sense when operating this machine.
4. Do not use this machine while you are tired, ill or under the influence of drugs, alcohol, or medication. A
moment of inattention while operating this machine can cause you to lose control & may result in series
personal injury.
5. Use safety equipment. Always wear eye protection. Safety equipment such as a dust mask, non-skid safety
shoes, hard hat, or hearing protection used for appropriate condition will reduce personal injuries.
6. Dress properly. Do not wear loose clothing or jewellery. Keep your hair, clothing & gloves away from
moving parts. Loose clothes, jewellery or long hair can be caught in moving parts.
7. Prolonged use of the machine may lead to disorders of blood circulation in hands caused by vibration.
These effects can be worsened by low ambient temperatures and/or by gripping the handgrips excessively
tightly. Period of use you can extend with appropriate gloves or regular breaks. Take frequent work
breaks. Limit the amount of exposure per day.
7
Page 8
KNOW YOUR MACHINE
* Image may vary from actual machine
1. Input Chute
2. Electrical Power Connection
3. Safety Locking Mechanism
4. Blade Adjustment Knob
5. Collector Frame
6. 55L Collector
7. Support Feet
8. Transport Wheels
9. On (O)/ Off (-) Switch
10. Reverse Switch
11. Reset Switch
12. Motor Housing
INSTRUCTION MANUAL
SPECIFICATIONS
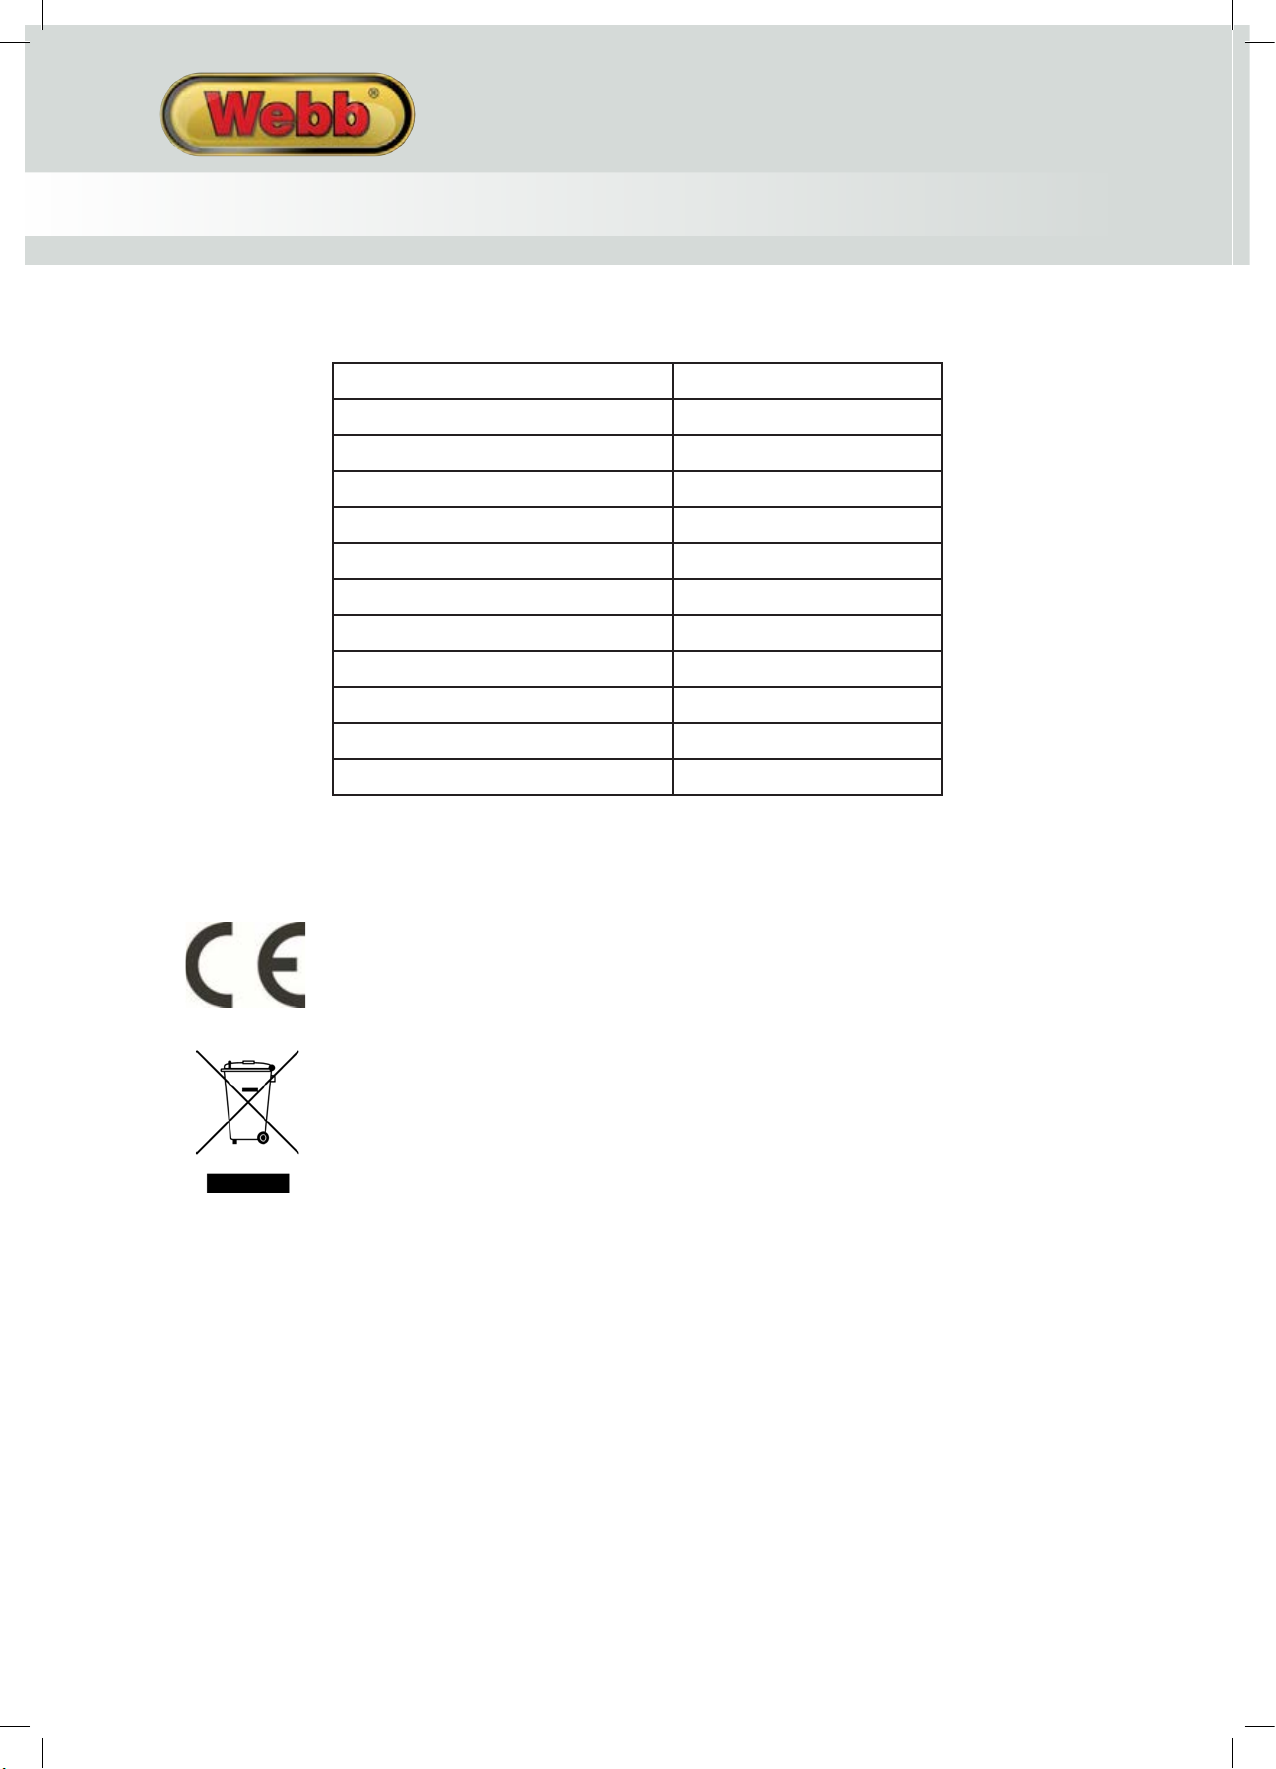
The manufacturer reserves the right to change the product specification and livery according to continued
Revolutions Max. (Per Min) 2850
Guaranteed Sound Power Level LWA: 96 dB(A)
Model No. WEESS
Product No. 1938266001
Motor 230-240V~ 50Hz
Rated Power 2800W
Blade Cylinder Ø 88mm
Number of Blades 8
Max Cutting Capacity 45mm
Collector Capacity 55L
Cable Length 10m
Weight: 27.6 kg
product improvements.
This symbol on the product or on its packaging indicates that this product may not be treated as household
waste. Instead it shall be handed over to the applicable collection point for the recycling of electrical and
electronic equipment.
For more detailed information about recycling of this product, please contact your local council office, your
household waste disposal service or shop where you purchased the product.
8
Page 9
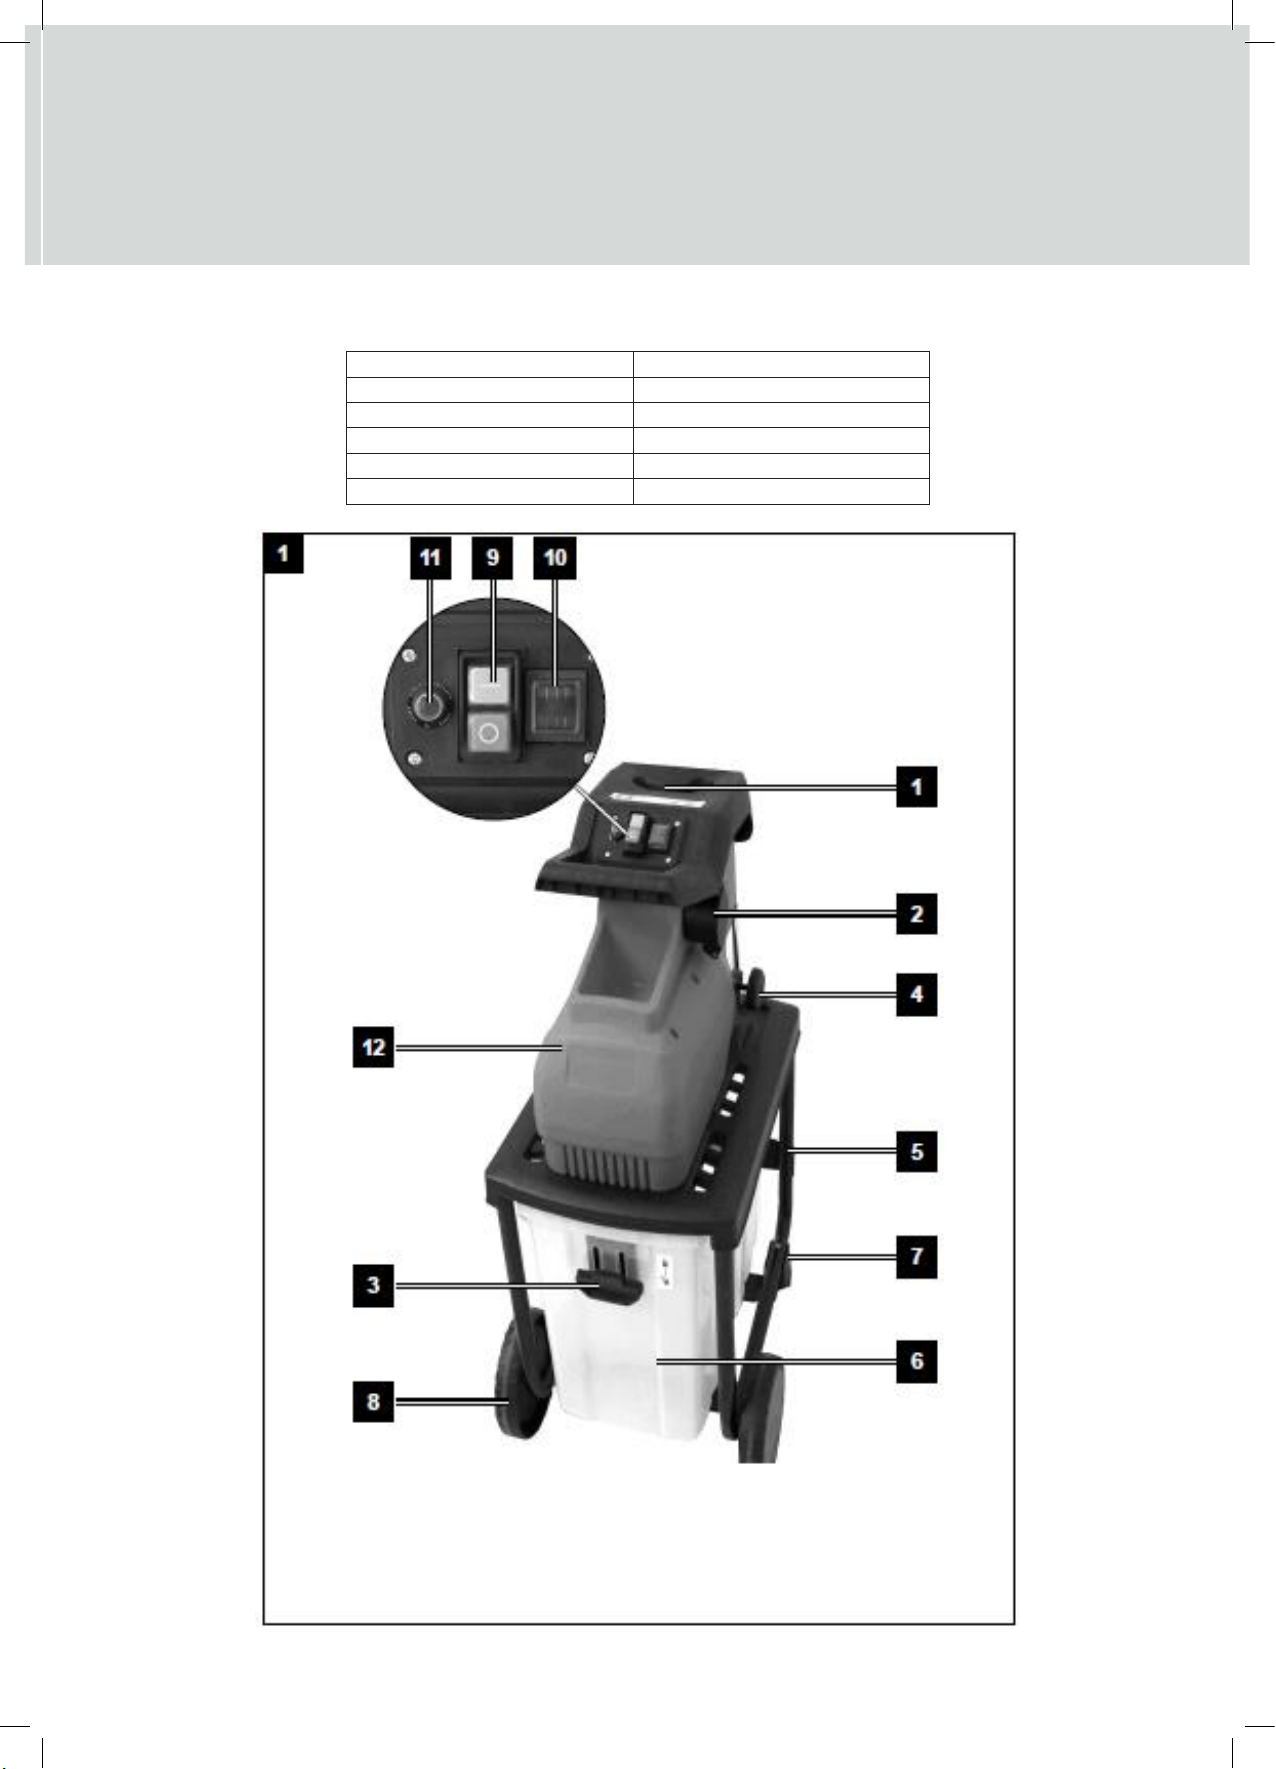
1. Input Chute
2. Electrical Power Connection
3. Safety Locking Mechanism
4. Blade Adjustment Knob
5. Collector Frame
6. 55L Collector
7. Support Feet
8. Transport Wheels
9. On (O)/ Off (-) Switch
10. Reverse Switch
11. Reset Switch
12. Motor Housing
KNOW YOUR MACHINE
* Image may vary from actual machine
9
Page 10
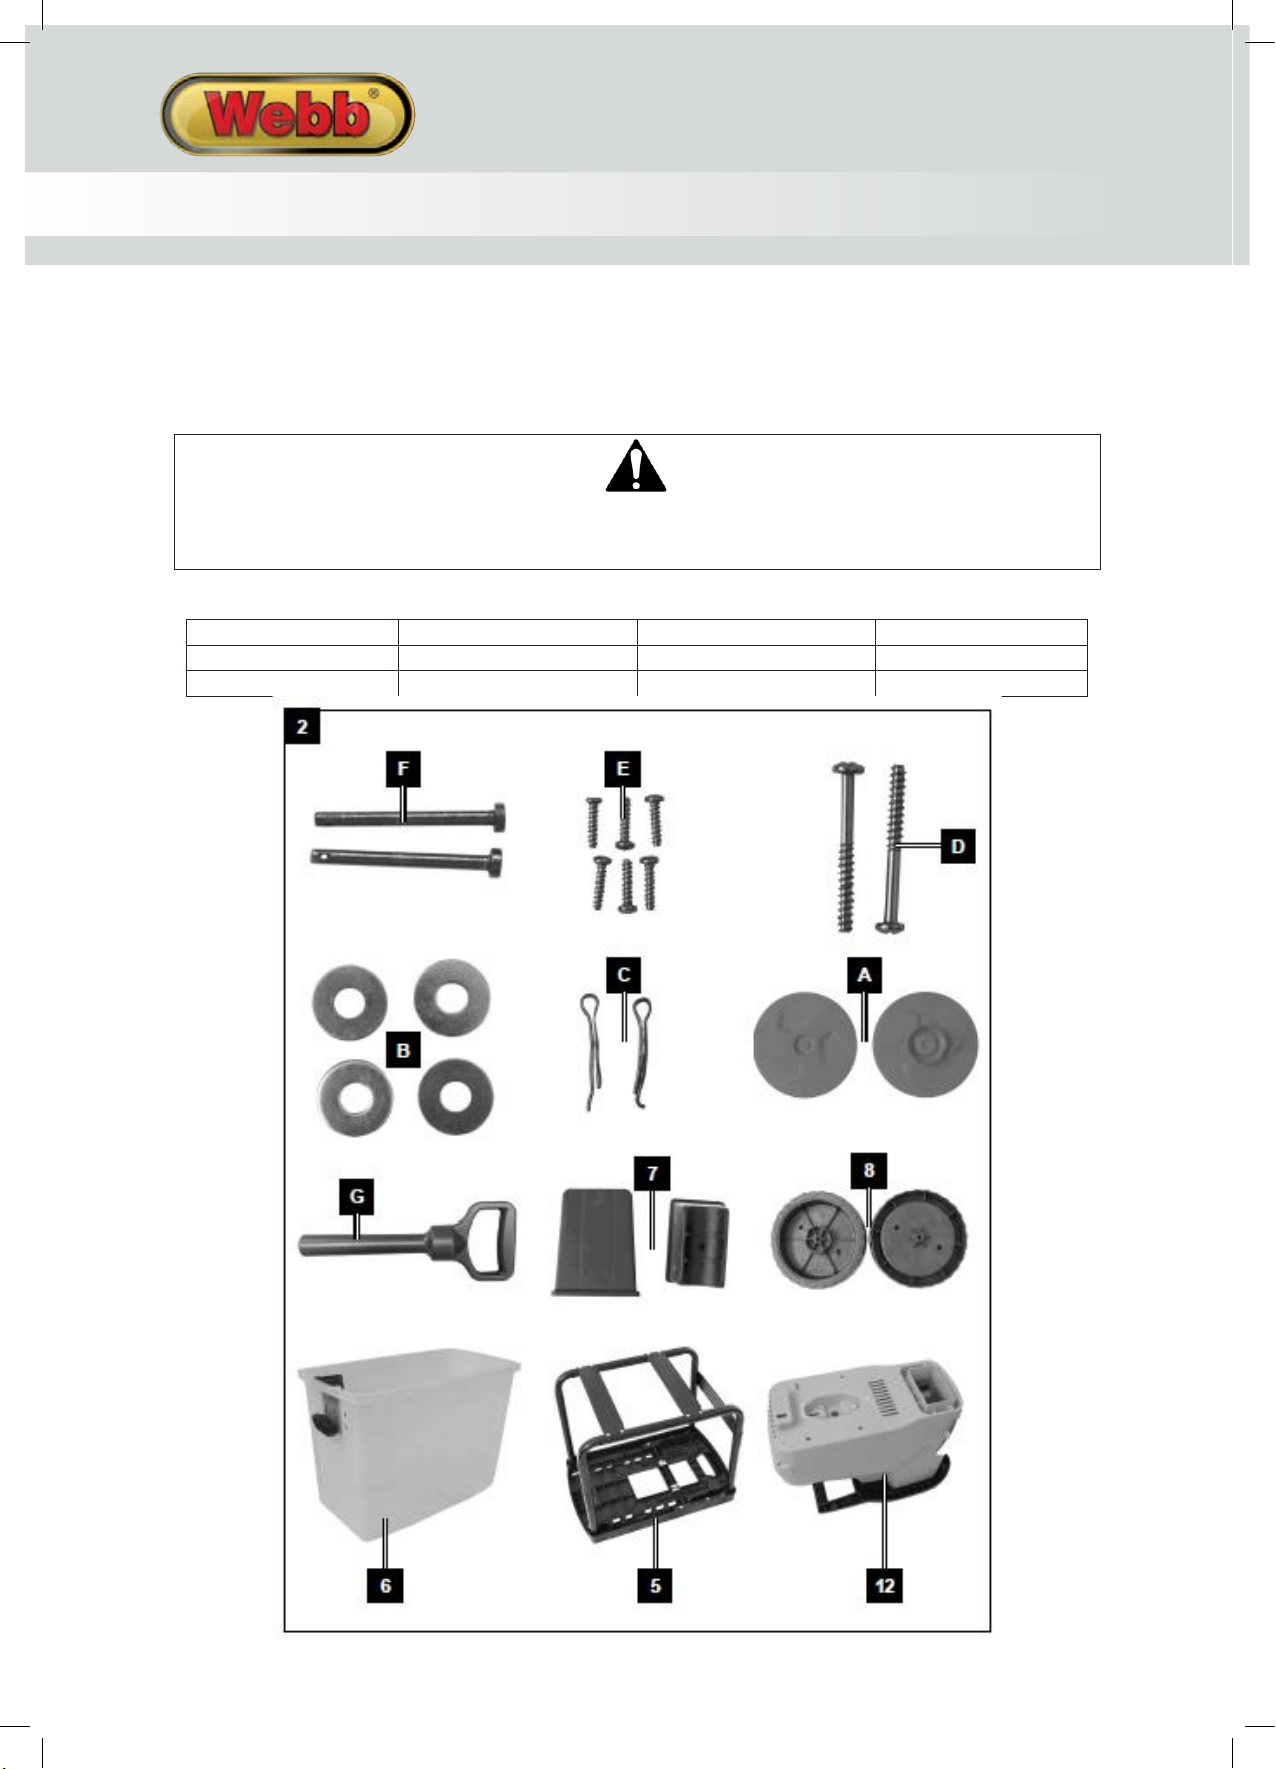
A. Wheel Trim (x2)
B. Washer (x4)
C. Split Pin (x2)
D. Screw M5x45 (x2)
E. Screw M5x20 (x6)
F. Wheel Pin Ø8x70 (x2)
G. Plunger
5. Frame
6. Collector
7. Feet (x2)
8. Transport Wheel (x2)
12. Motor Housing
If you require assistance with regards to the contents or operation of the machine, please contact us:
Tel: 01793 333212
Email: customerservice@webbgardenpower.co.uk
Opening hours weekdays: February to October 8:30am - 5:30pm / November to January 8:30am - 5:00pm
(Closed Bank Holidays)
WARNING
Stop the motor and unplug the electrical power cable from the power source before any repairs or
maintenance operations.
DO NOT attempt to start this machine without it first being FULLY assembled.
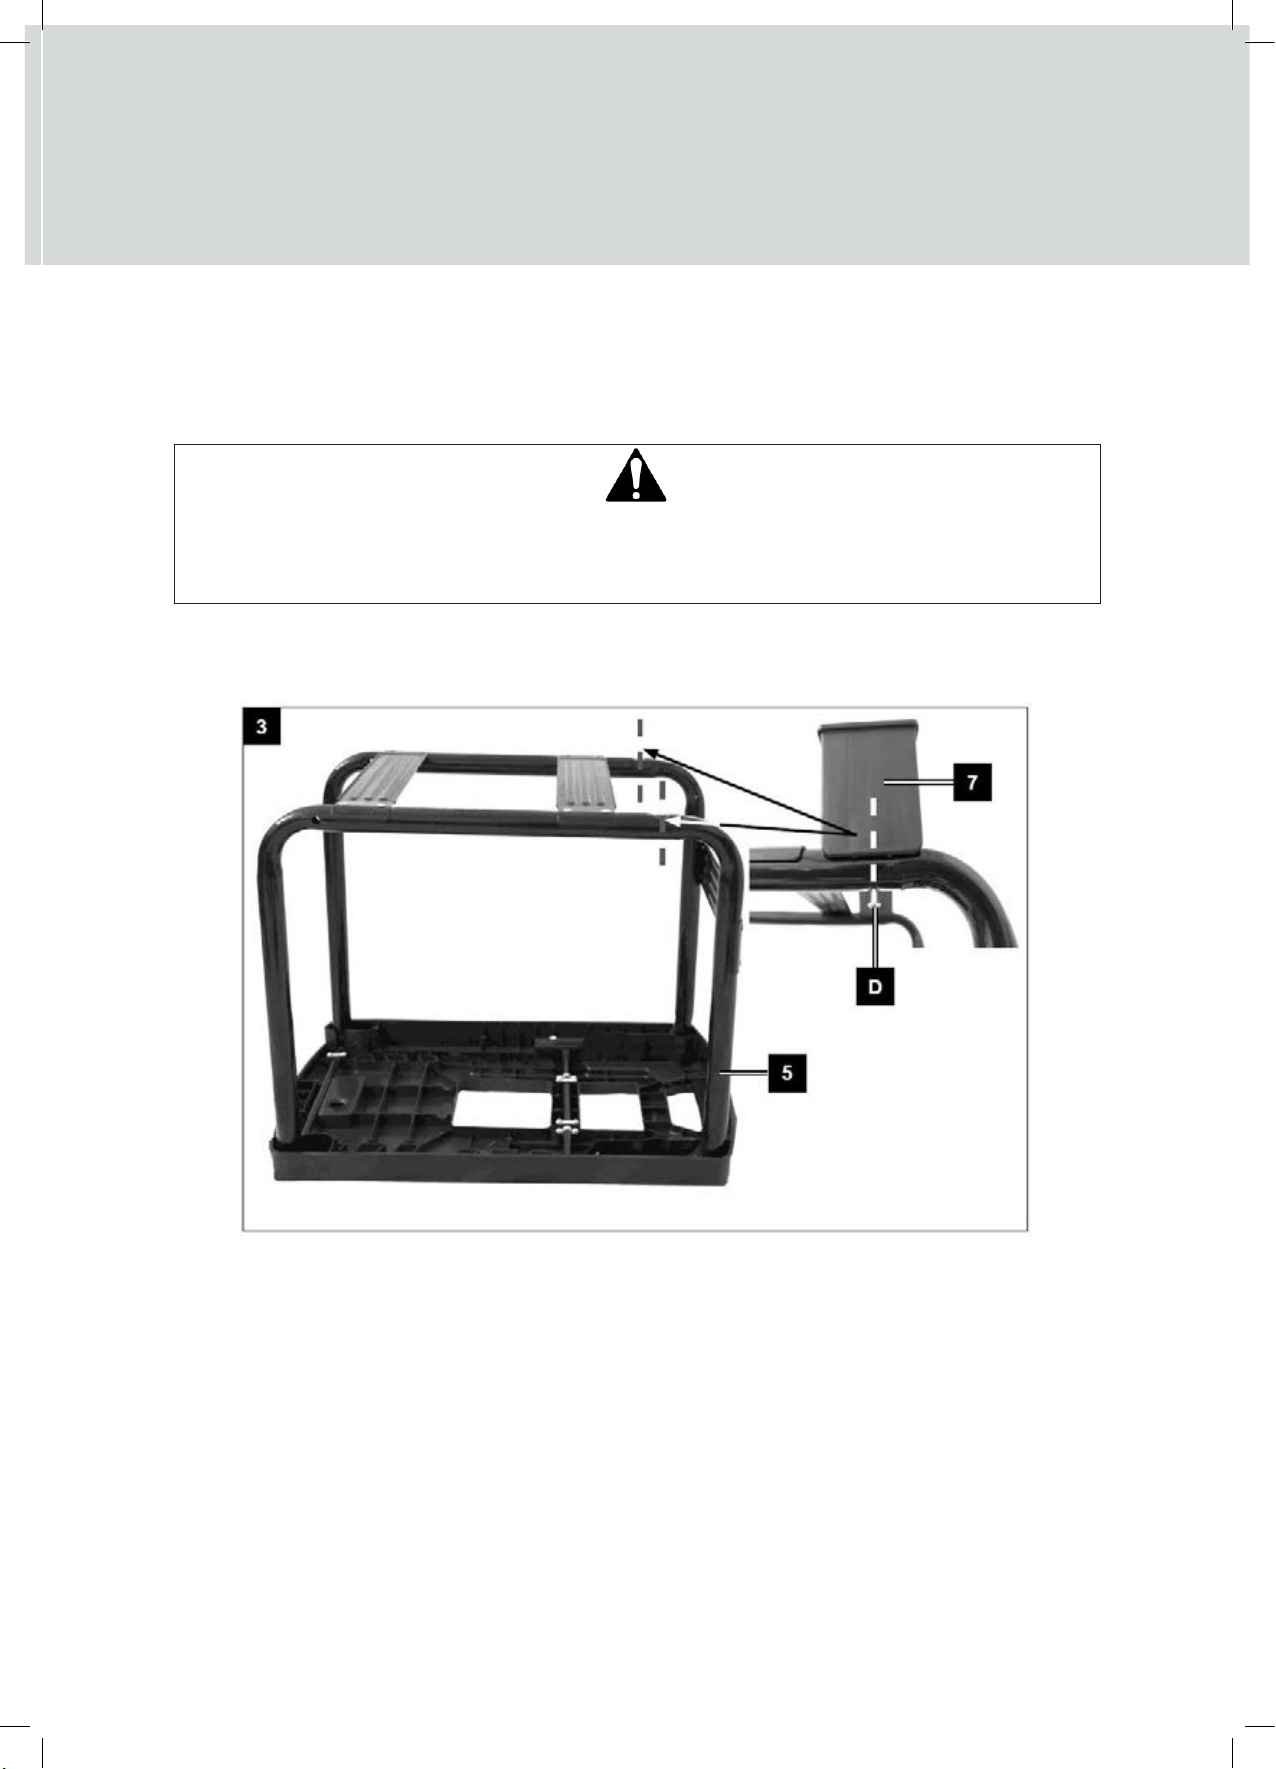
FRAME & FEET
1. First, turn the frame (5) (Fig. 3).
2. Fit the two support feet (7) with Screw M5x45 (x2) (D) as shown (Fig. 3).
INSTRUCTION MANUAL
ASSEMBLY
Open the packaging and remove the device carefully. Remove the packaging material as well as the packaging
and transport bracing (if fitted). Check that the delivery is complete. Check the device and accessory parts for
transport damage. If possible, store the packaging until the warranty period has expired.
The device and packaging materials are not toys!
Children must not be allowed to play with plastic bags, film and small parts!
There is a risk of swallowing and suffocation!
COMPONENTS
10
Page 11
If you require assistance with regards to the contents or operation of the machine, please contact us:
Tel: 01793 333212
Email: [email protected]
Opening hours weekdays: February to October 8:30am - 5:30pm / November to January 8:30am - 5:00pm
(Closed Bank Holidays)
WARNING
Stop the motor and unplug the electrical power cable from the power source before any repairs or
maintenance operations.
DO NOT attempt to start this machine without it first being FULLY assembled.
FRAME & FEET
1. First, turn the frame (5) (Fig. 3).
2. Fit the two support feet (7) with Screw M5x45 (x2) (D) as shown (Fig. 3).
11
Page 12
COLLECTOR
Important: Before you attach the collector, please ensure that the motor is switched off and the blade/tines
are not rotating.
1. Turn the machine back onto it’s feet and transport wheels.
2. Place the locking mechanism (3) on the collector (6) into its lowest position (Fig. 6).
3. Push the collector fully into the frame (Fig. 6).
4. Push the locking mechanism (3) on the collector (6) back into its highest position (Fig. 6).
PLEASE NOTE, THIS MACHINE WILL NOT OPERATE WITHOUT THE COLLECTOR AND LOCKING LEVER FULLY
LOCKED INTO POSITION. THE MACHINE IS FITTED WITH A SAFETY SWITCH FOR YOUR OWN HEALTH AND
SAFETY.
OPERATION
IMPORTANT:
The shredder can only be started if the collection box (6) has been pushed into the frame (5) and the locking
device (3) is in the upper position.
WARNING
Always switch the motor off and remove the electrical plug from the power source before making any
adjustments, repairs, or maintenance.
ELECTRICAL CABLE
1. Always route the electrical cable away from the work area, to prevent it from meeting the cutting device.
2. Plan your route before starting work. Start your work at the nearest point to the electrical outlet and work
away from it.
3. A 13 AMP (BS1363/A) plug must be used, and a 13 AMP fuse must be fitted.
NOTE: If a molded plug is fitted and must be removed, take great care in disposing of the plug and severed
cable, it must be destroyed to prevent engaging into a socket. If the supply cable is damaged, it must be
replaced by a service agent or certificated electrician, to ensure the machine can be used safely
INSTRUCTION MANUAL
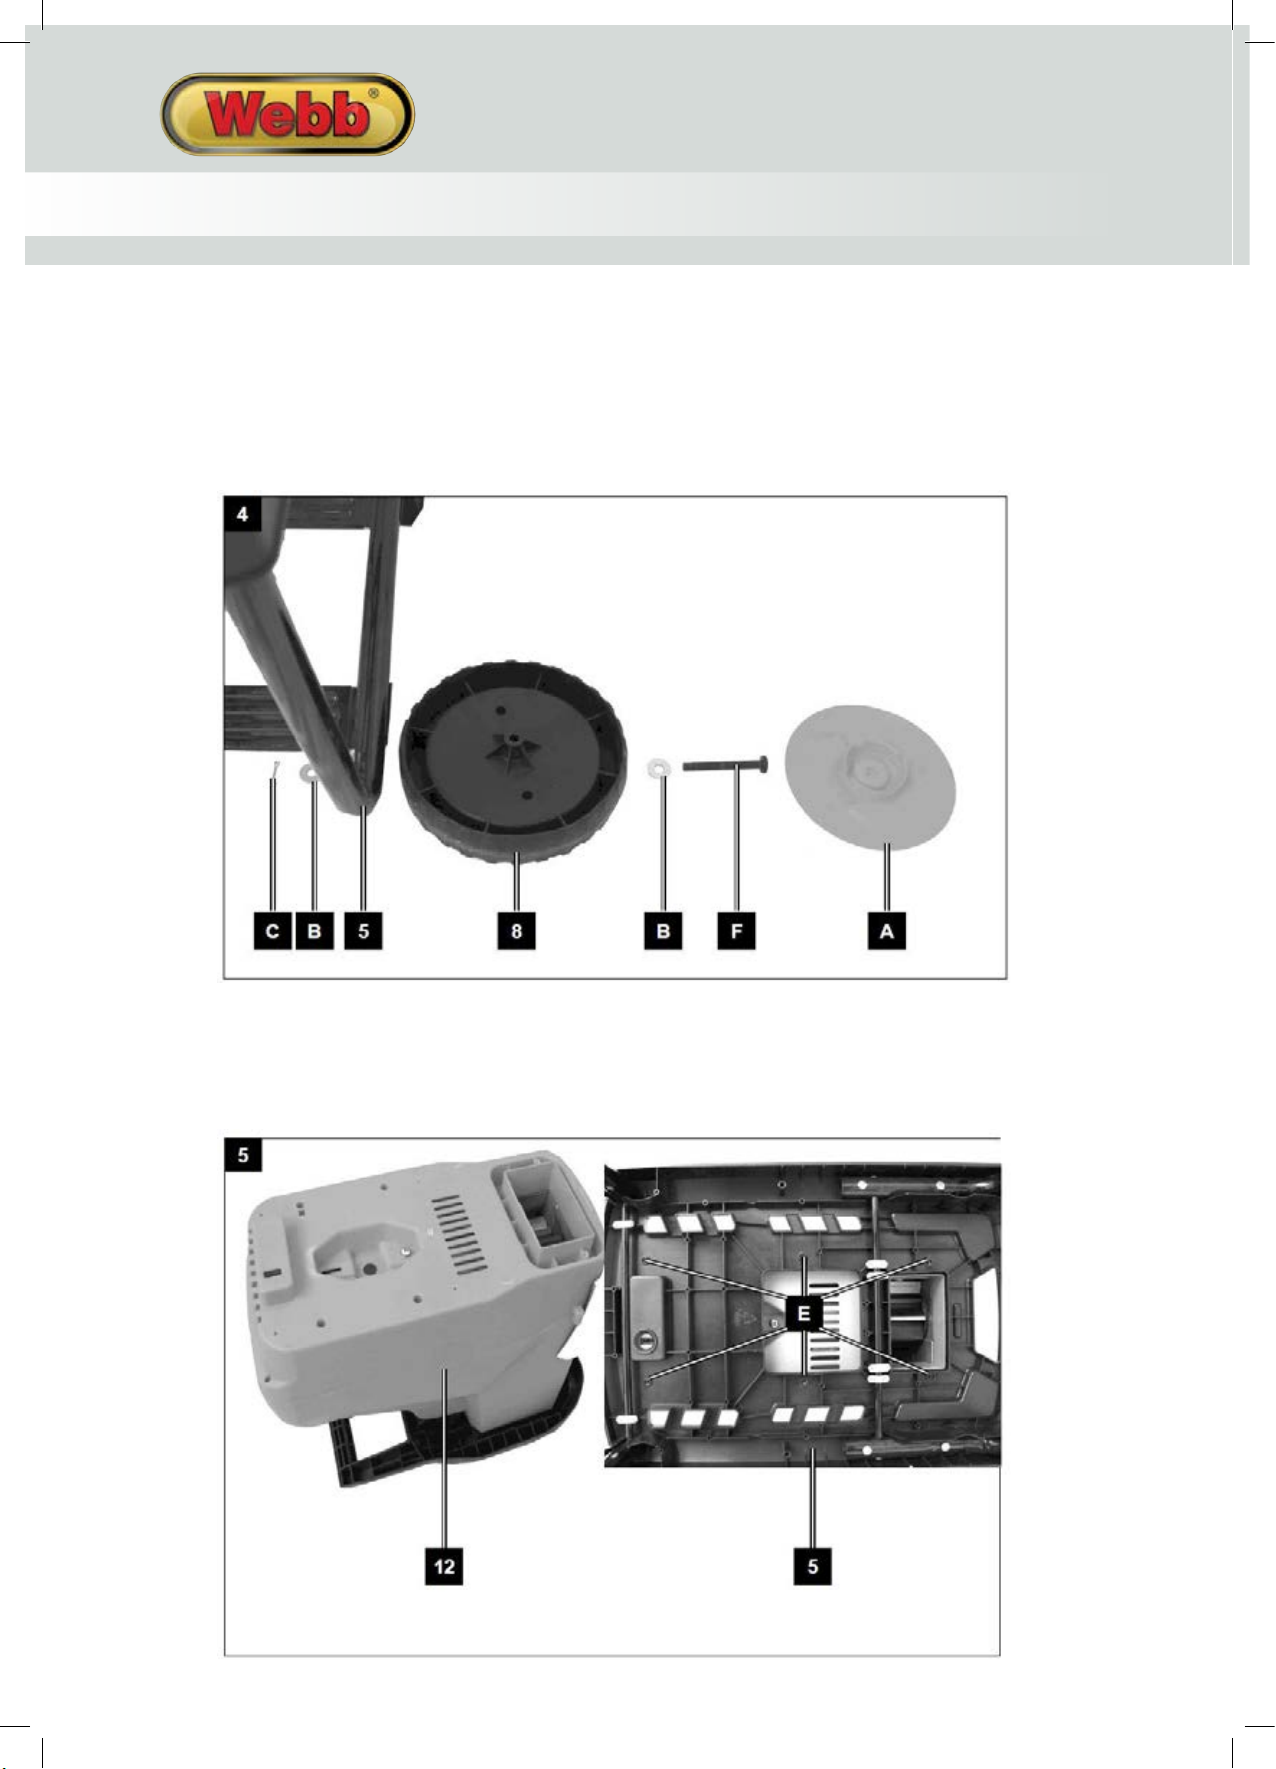
TRANSPORT WHEELS
1. Place Wheel Pin Ø8x70 (A) through Washer (B) and then Transport Wheel (8).
2. Fit this to the outside of the Frame (5) and slide through the fixing hole.
3. When the Wheel Pin Ø8x70 is through the frame, slide a second Washer (B) on the Wheel Pin and secure
with a Split Pin (C) being placed through the eyelet at the end of the Wheel Pin and split the two legs of
the Split Pin, to secure.
4. Fit the Wheel Trim (A) to the Wheel (B).
5. Repeat with the second Transport Wheel.
12
MOTOR HOUSING & FRAME
1. Place the Motor Housing upside down (12) with the loading slot (1) on the ground (Fig. 5).
2. Place the Frame (5) on to the Motor Housing (Fig. 5). Ensure the exit chute of the Motor Housing is aligned
with the exit chute of the Frame.
3. Attach both components with the 6x Screw M5x20 into the correct holes (Fig. 5).
Page 13
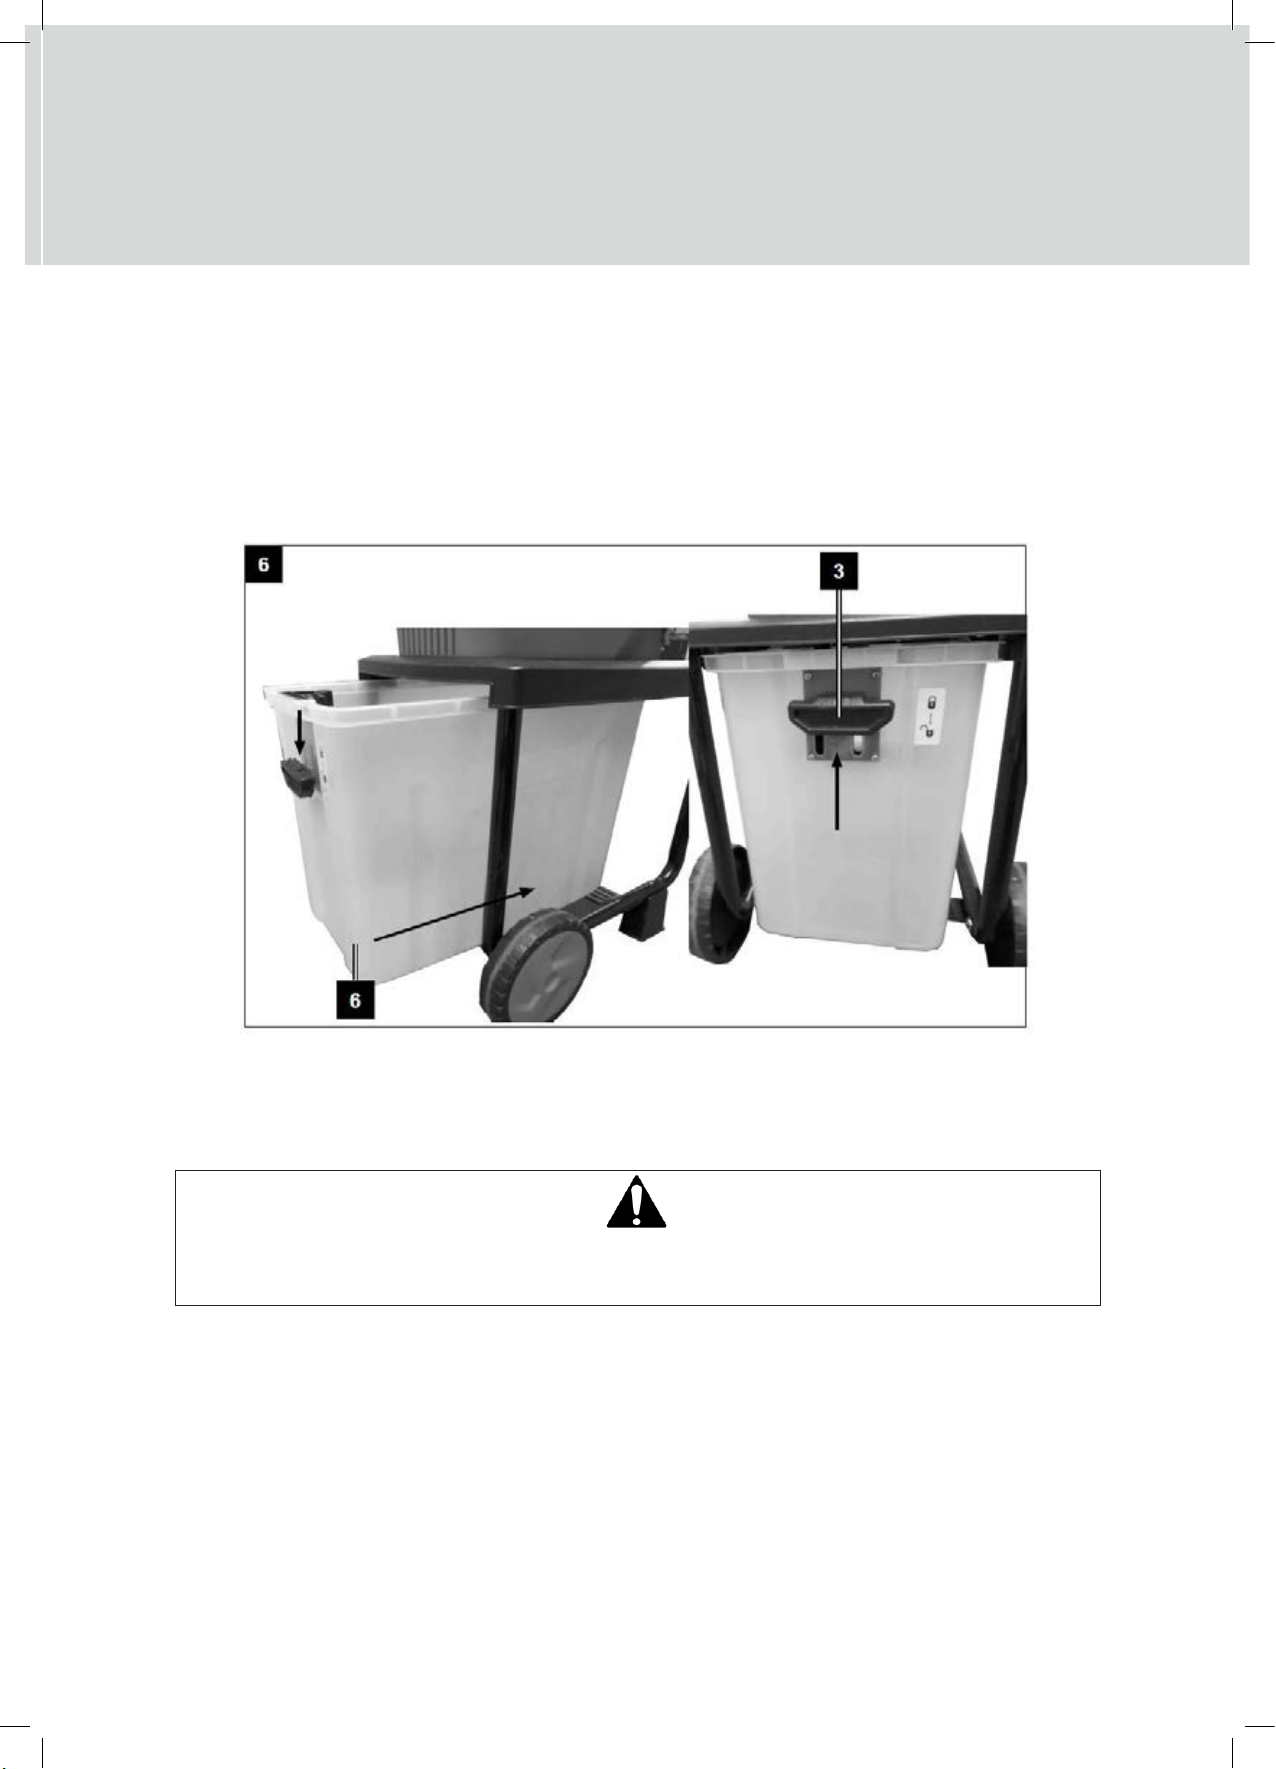
COLLECTOR
Important: Before you attach the collector, please ensure that the motor is switched off and the blade/tines
are not rotating.
1. Turn the machine back onto it’s feet and transport wheels.
2. Place the locking mechanism (3) on the collector (6) into its lowest position (Fig. 6).
3. Push the collector fully into the frame (Fig. 6).
4. Push the locking mechanism (3) on the collector (6) back into its highest position (Fig. 6).
PLEASE NOTE, THIS MACHINE WILL NOT OPERATE WITHOUT THE COLLECTOR AND LOCKING LEVER FULLY
LOCKED INTO POSITION. THE MACHINE IS FITTED WITH A SAFETY SWITCH FOR YOUR OWN HEALTH AND
SAFETY.
OPERATION
IMPORTANT:
The shredder can only be started if the collection box (6) has been pushed into the frame (5) and the locking
device (3) is in the upper position.
WARNING
Always switch the motor off and remove the electrical plug from the power source before making any
adjustments, repairs, or maintenance.
ELECTRICAL CABLE
1. Always route the electrical cable away from the work area, to prevent it from meeting the cutting device.
2. Plan your route before starting work. Start your work at the nearest point to the electrical outlet and work
away from it.
3. A 13 AMP (BS1363/A) plug must be used, and a 13 AMP fuse must be fitted.
NOTE: If a molded plug is fitted and must be removed, take great care in disposing of the plug and severed
cable, it must be destroyed to prevent engaging into a socket. If the supply cable is damaged, it must be
replaced by a service agent or certificated electrician, to ensure the machine can be used safely
13
Page 14
INSTRUCTION MANUAL
POWER CONNECTION
WARNING
Before operating the machine, ensure that the fastening elements are undamaged. To reduce the risk of
injuries, always switch off the motor and pull out the mains plug before working on the machine
The product can be connected to any BS three pin socket with 230-240V alternating current.
We recommend to always use the appliance via a Residual Current Device (RCD) with a tripping current of
max. 30mA.
1. Electrical cables are particularly susceptible to insulation damage. The causes of this include the following:
• Damage through crushing if the cable becomes stuck under doors or windows
• Damage through crushing if the cable is trapped during storage.
• Cracks caused by ageing of the insulation sheath.
2. Kinks caused by incorrect fastening of the cable.
3. Such damaged cables should not be used under any circumstances, as they may cause fatal injuries due to
a damaged insulation sheath.
4. Always check the plug and cable and make sure they are in good condition before operation.
MOTOR STARTING & STOPPING
To avoid any unintentional start‐ups of the motor, it comes equipped with a safety switch/lever on the
collector, which must always be in the locked position to operate. When released, the motor will stop.
STARTING THE MOTOR
WARNING
The cutting blade begins to rotate as soon as the motor is started.
A rotating cutting unit can cause injuries.
.
14
Alternating with branches, shred withered garden waste and branches that have been stored several days to
prevent the shredder from becoming blocked.
1. Make sure the collection box (6) is pushed into the frame (5) correctly and the locking handle/lever (3) is
in the upper position.
2. Connect the shredder to the power supply.
3. Turn the shredder on by using the ON (O) button (9).
4. Fill shredding material into the feed hopper and it will be drawn in, by the rotating blade.
Caution: If the shredding material becomes jammed, use the switch to change the rotational direction of the
cylinder (10) so it runs anti-clockwise.
Make sure the shredder has completely shredded the input material before adding new.
Do not use your hands to push in more shredding material. Use the Plunger (G) device or other shredding
material.
STOPPING THE MOTOR
1. When you have finished working with the shredder, press the Off (-) button
2. Disconnect it from the mains.
IMPORTANT:
The blade continues to rotate for a few seconds after the motor is switched off. Never attempt to stop the
blade yourself. If the blade strikes an object, immediately switch off the machine and wait for the blade to
come to a complete stop. Inspect the condition of the blades. Replace any parts that are damaged.
Page 15
REVERSE SWITCH
Manual change of blade direction (8)
POSITION
The blades rotate in the forward direction.
POSITION
The blades rotate in the reverse direction to release jammed material.
When you change the direction into (reverse), hold the green power switch to rotate the blades. The shredder
automatically stops when you release the power switch.
NOTE:
Several repetitions of reverse and forward operations may be required to shred a large object.
CAUTION
Always use a hook or a stick to remove jammed objects to prevent accidents. Always wait until the shredder
stops completely before restarting.
USING YOUR SHREDDER
WARNING
The operation of any shredder can result in foreign objects being thrown into eyes, which can cause
severe damage. Always wear safety glasses or goggles while operating the shredder, or while performing
any adjustments or repairs on it.
Shut the motor off and wait until the shredder comes to a complete stop before cleaning the discharge
area. The shredder continues to rotate for a few seconds after the Off button is pressed.
Alternating with branches, shred withered garden waste and branches that have been stored several days
to prevent the shredder from becoming blocked.
1. Make sure the collection box (6) is pushed into the frame (5) correctly and the locking lever/handle (3) is
in the upper position.
2. Connect the shredder to the power supply.
3. Turn the shredder on by using the On (O) button (9).
4. Fill shredding material into the feed hopper and it will be drawn in by the rotation of the cutting blade.
Caution: If the shredding material becomes jammed, use the switch to change the rotational direction of the
cylinder (10) so it runs anti‐clockwise.
Make sure the shredder has completely shredded the input material before adding new.
Do not use your hands to push in more shredding material. Use the special pushing device or other
shredding material.
When you have finished working with the shredder, turn it off and disconnect it from the mains.
EMPTYING COLLECTOR
1. Stop the shredder using the Off (‐) button (9).
2. Set the locking lever/handle (3) to the lowest position.
3. Pull out the collection box (6) and empty it.
4. Re‐insert the collection box (6) and push the locking lever/handle (3) up again.
SETTING THE COUNTER BLADE
The counter blade and the blade cylinder have been at the factory. Re-adjusting the counter blade is only
required if it becomes worn. For maximum performance, it is necessary that the distance between the
counter blade and blade cylinder is about 0.50 mm.
IMPORTANT:
Turn the motor off, prior to making any cutting adjustment and ensure the blade has come to a complete
stop. Remove the electrical plug from the power source.
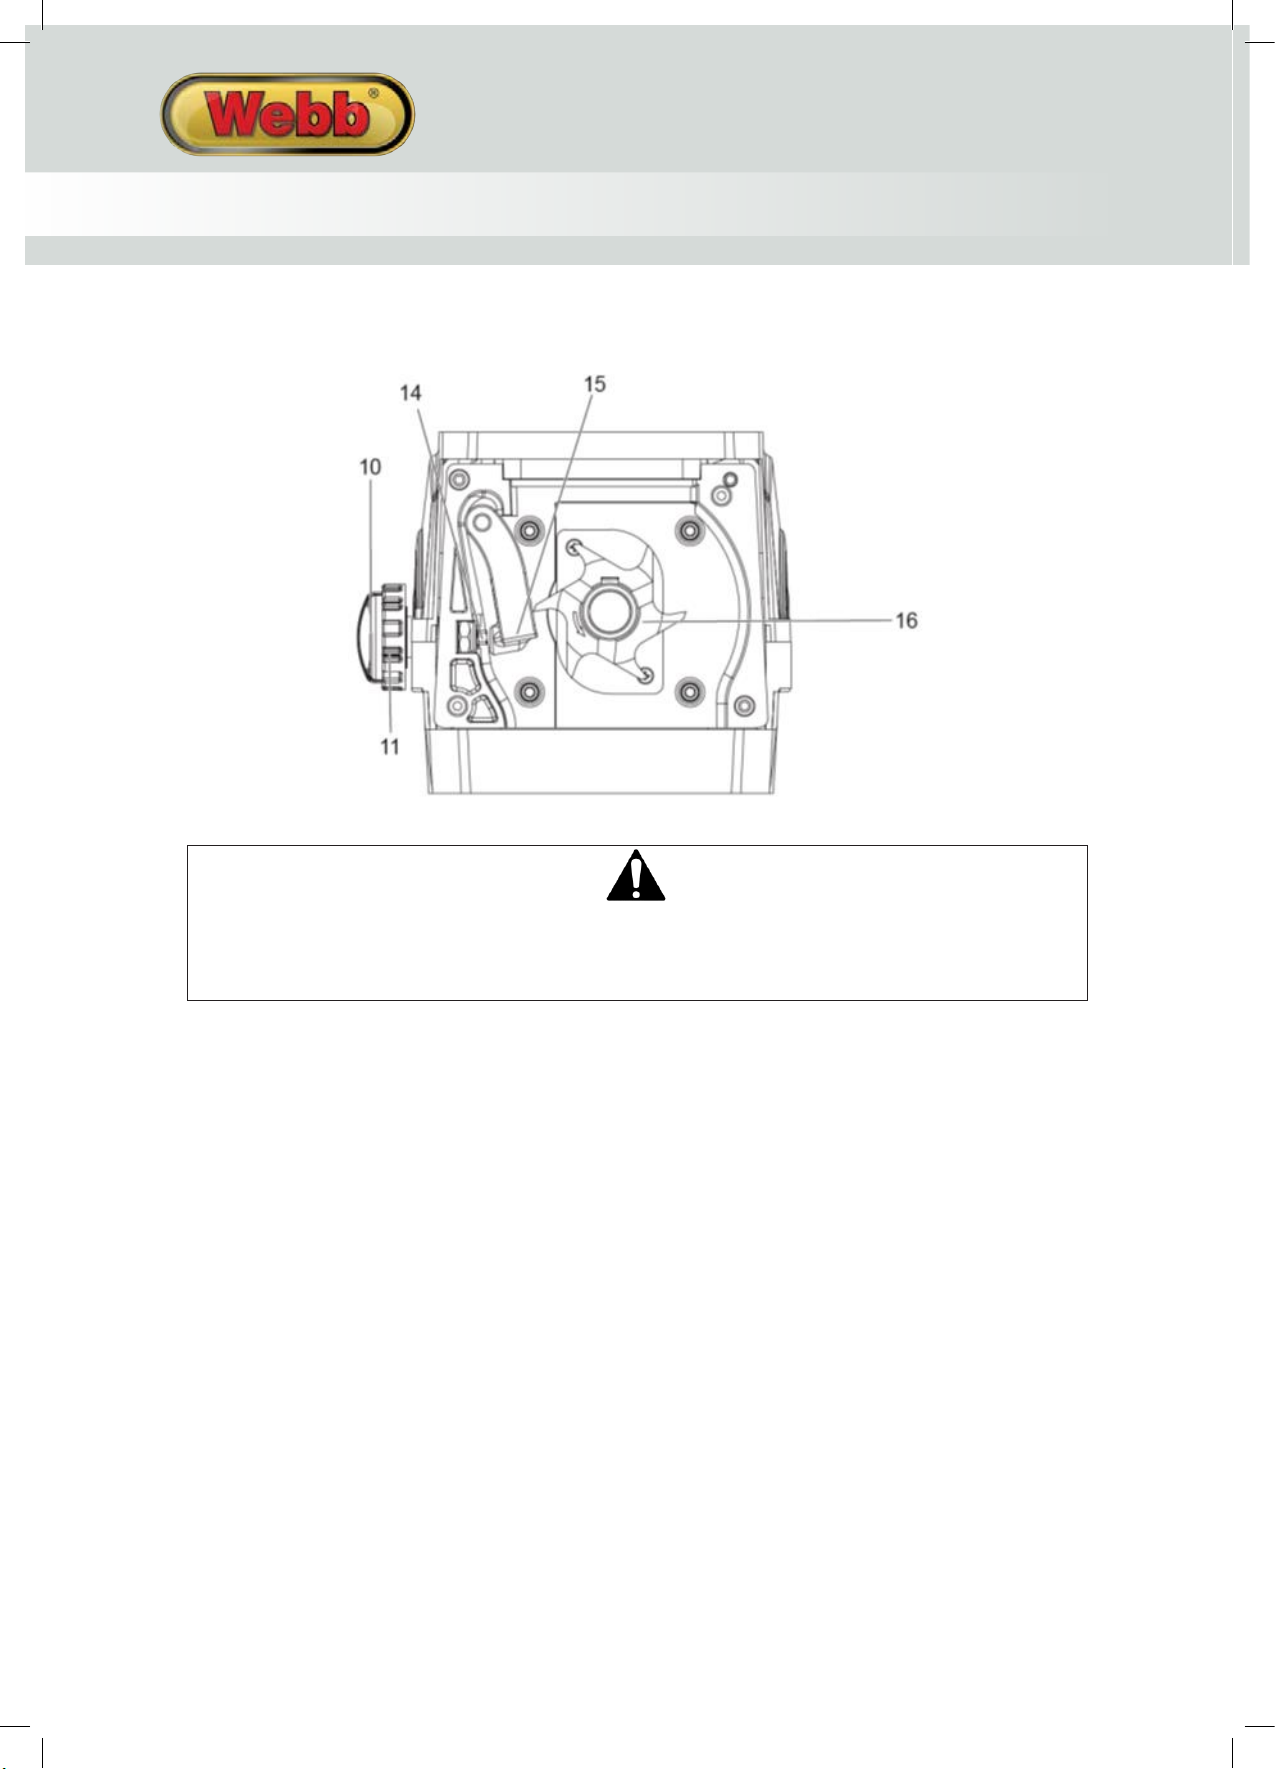
1. The counter blade (10) and the cylinder blade (16) have been ideally adjusted by the manufacturer. Re‐
adjusting the counter blade (10) is only required if it becomes worn. For maximum performance, it is
necessary that the distance between the counter blade (10) and blade cylinder is about 0.50 mm.
2. Plug the electrical plug into the power source and turn the shredder on.
15
Page 16
INSTRUCTION MANUAL
3. Turn the adjustment wheel (10) clockwise until you can hear slight grinding sounds.
4. When turning the adjustment wheel (10) clockwise by half a turn, the cylinder blade (10) is positioned
closer to the counter blade by 0.50 mm.
(The image is used for information reasons only)
WARNING
If the shredder blade touches the counter blade, it will be trimmed, and small pieces of swarf may fall out
of the ejection opening. This is not an error, but it must be readjusted to the required degree because
otherwise the counter blade will wear too early.
OVERLOAD PROTECTION
In the event of overload e.g. due to branches that are too thick, the equipment automatically switches off.
After a short cooling period of approximately five minutes, press the reset switch (11)
TRANSPORT
When moving the machine to and from the work area, always ensure the electrical plug is removed from the
power source.
ELECTRICAL CONNECTION
The electrical motor installed is connected and ready for operation. The connection complies with the
applicable VDE and DIN provisions. The customer‘s mains connection as well as the extension cable used
must also comply with these regulations.
Damaged electrical connection cable
The insulation on electrical connection cables is often damaged.
This may have the following causes:
• Passage points, where connection cables are passed through windows or doors.
• Kinks where the connection cable has been improperly fastened or routed.
• Places where the connection cables have been cut due to being driven over.
• Insulation damage due to being ripped out of the wall outlet.
• Cracks due to the insulation ageing.
Damaged electrical connection cables must not be used and are life‐threatening due to the insulation damage.
Check the electrical connection cables for damage regularly. Make sure that the connection cable does not
hang on the power network during the inspection.
16
Page 17
Electrical connection cables must comply with the applicable VDE and DIN provisions. Only use connection
cables with the marking „H05VV-F“.
The printing of the type designation on the connection cable is mandatory.
AC motor
The mains voltage must be 230 V~
2
Extension cables up to 25m long must have a cross-section of 2.5 mm
.
Connections and repairs of electrical equipment may only be carried out by an electrician.
Please provide the following information in the event of any enquiries:
• Type of current for the motor
• Machine data - type plate
• The product meets the requirements of EN 61000- 3-11 and is subject to special connection conditions.
This means that use of the product at any freely selectable connection point is not allowed.
• Given unfavourable conditions in the power supply the product can cause the voltage to fluctuate
temporarily.
• The product is intended solely for use at connection points that
a. do not exceed a maximum permitted supply impedance “Z”, or
b. have a continuous current-carrying capacity of the mains of at least 100 A per phase.
• As the user, you are required to ensure, in consultation with your electric power company if necessary,
that the connection point at which you wish to operate the product meets one of the two requirements,
a) or b), named above.
MAINTENANCE, CLEANING & STORAGE
WARNING
Improper maintenance & storage of the machine may void your warranty. Keep the machine clean for better
and safer performance.
Turn off the motor and remove the electrical plug from the power source before performing any
maintenance.
Never tilt, lift, or carry the machine while the motor is running.
MAINTENANCE
General Recommendations
1. Always observe safety rules when performing any maintenance.
2. The warranty on this machine does not cover items that have been subjected to operator abuse or
negligence. To receive full value from the warranty, the operator must maintain the machine as
instructed.
3. Changing of the motor speed will void warranty.
4. All adjustments should be checked at least once each season.
CLEANING
Motor Care
WARNING
Do not use a water hose or pressure washer to clean the machine. Water can damage the motor.
Do not use hard or pointed objects for cleaning the machine.
• Always keep the shredder, wheels and air vents clean. Use a brush or cloth to clean it, avoid cleaners and
solvents.
• Always check that the shredder and especially the guards are not worn down or damage d but firmly
attached before use. Check that the nuts, bolts and screws are tight.
• Check the covers and guards for damage and improper attachment. If necessary, change the components
17
Page 18
PROBLEM
POSSIBLE CAUSES
REMEDIAL ACTION
Motor does not start
Collection box not in correct
position
Insert the collection box correctly and
check the locking device
Electrical cable defective
Visually inspect fully
Switch, switch/plug block
Have machine inspected by an
specialist.
Connections to motor or capacitor
Have machine inspected by an
specialist.
No electricity
Have the socket, cable, lead and plug
Electric connection).
Garden waste is not drawn
Blade cylinder rotates anticlockwise
Change the rotational direction
No electricity
Push shredding material with special
pushing device for shredder.
Blade cylinder has become blocked
Remove blockage
Shredding material is
tangled.
Counter blade is not set correctly.
Re-adjust counter blade
INSTRUCTION MANUAL
STORAGE & TRANSPORT
The following steps should be taken to prepare your machine for storage.
CAUTION
The motor must have completely cooled down before storing.
NOTE: When storing any type of power equipment in an unventilated or material storage shed,
• Care should be taken to rust-proof the equipment. Using a light oil or silicone, coat the equipment,
especially cables and all moving parts.
• Be careful not to bend or kink cables.
• Keep the shredder in a dry place out of children’s reach. Do not cover the shredder in nylon bags, as
moisture may develop.
MAINTENANCE INFORMATION
Please note that the following parts of this product are subject to normal or natural wear and that the following parts are therefore also required for use as consumables.
Wear & Tear parts*: Carbon brushes, knives, roller (* Not necessarily included in the scope of delivery!)
DISPOSAL & RECYCLING
The equipment is supplied in packaging to prevent it from being damaged in transit. The raw materials in this
packaging can be reused or recycled. The equipment and its accessories are made of various types of material,
such as metal and plastic. Defective components must be disposed of as special waste. Ask your dealer or your
local council.
TROUBLE SHOOTING
18
defective
disconnected
approved service dealer or electrical
approved service dealer or electrical
checked by a trained electrician (see
Page 19

Notes
19
Page 20

PARTS LIST - WEESS 1938266001
Spare Parts are available from our Spares Team. Please call 01793 333212, option 1 for assistance.
PARTS DIAGRAM - WEESS 1938266001
Page 21
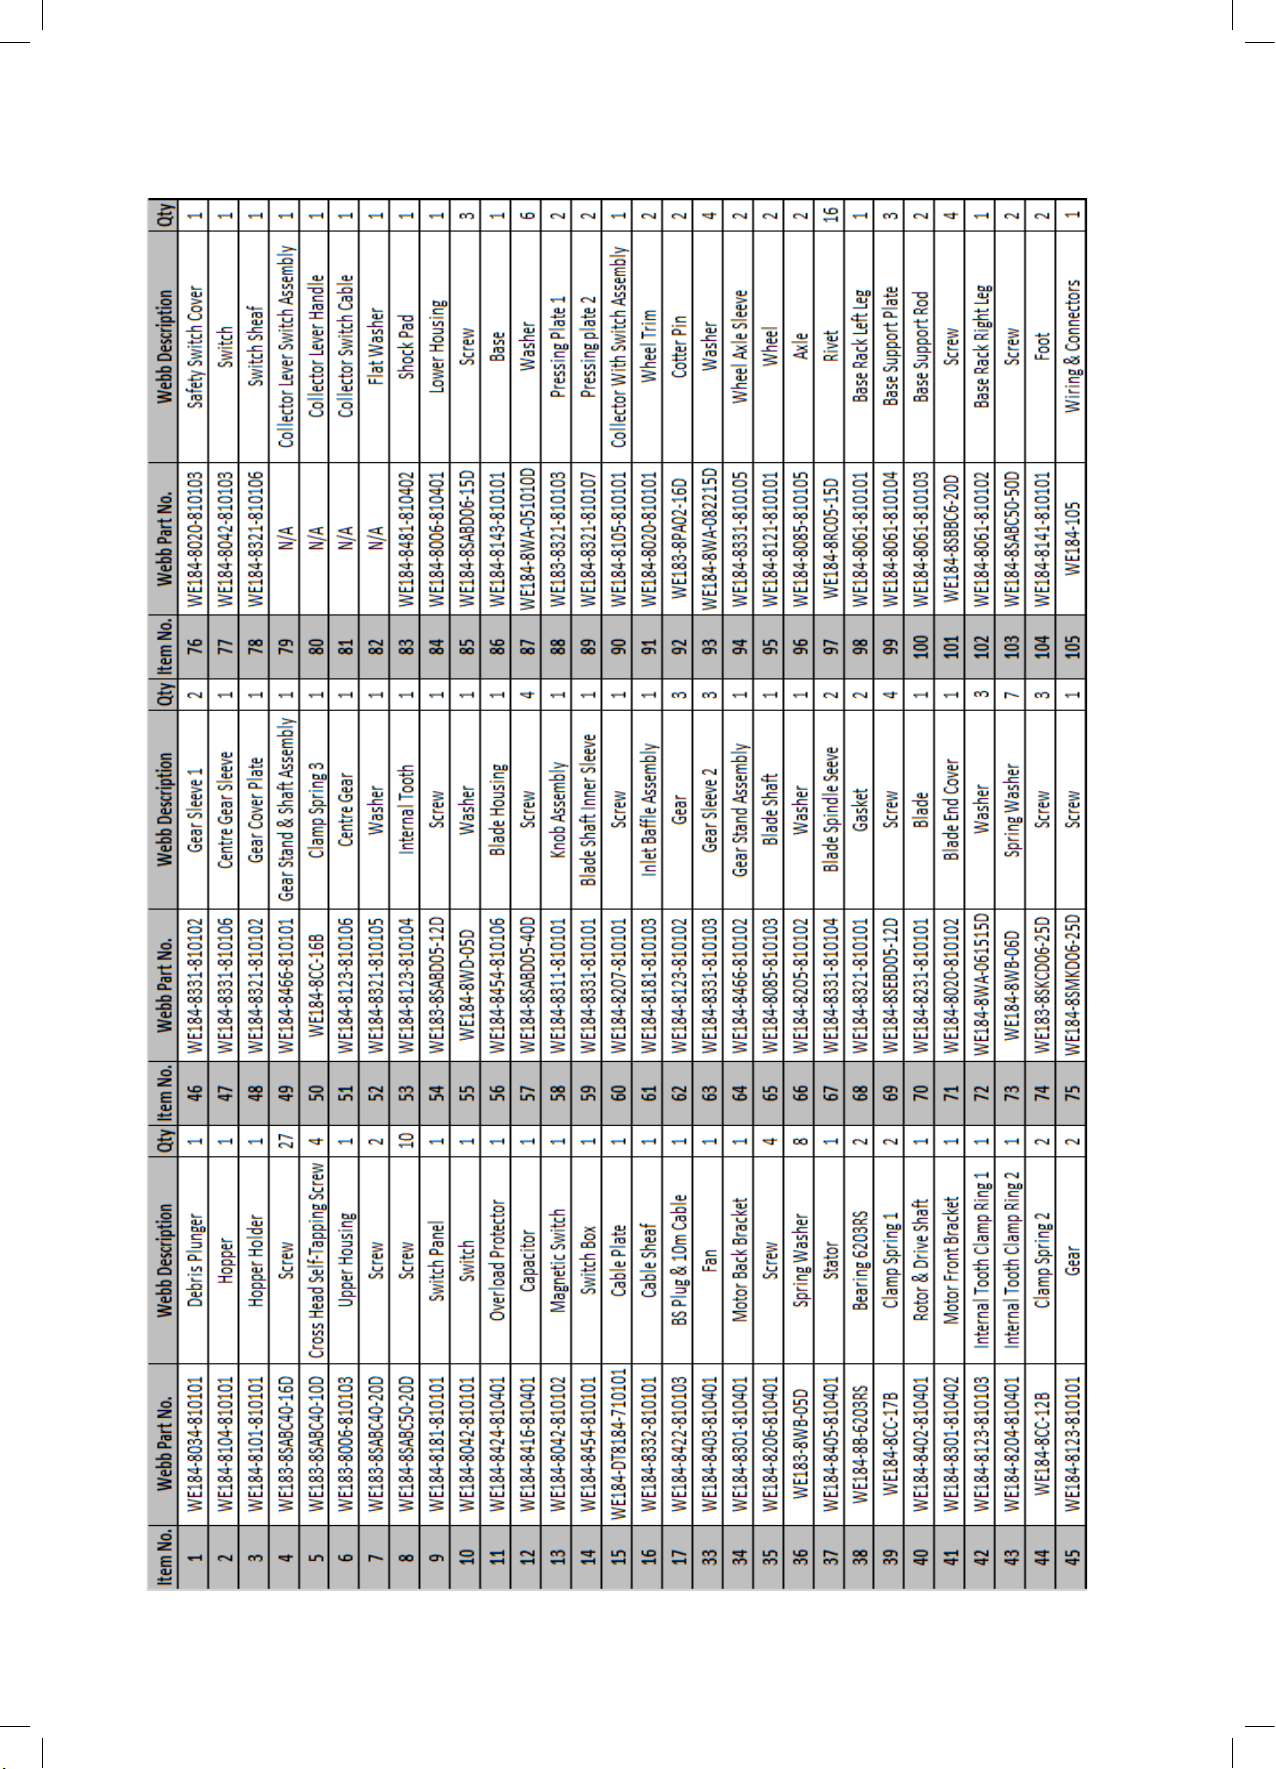
PARTS LIST - WEESS 1938266001
Spare Parts are available from our Spares Team. Please call 01793 333212, option 1 for assistance.
Page 22

INSTRUCTION MANUAL
Notes
22
Page 23
EC DECLARATION OF CONFORMITY
We Handy Distribution Ltd - SN3 5HY (Importer) declare that the product:
Designation: Electric 2800W Silent Shredder
Model(s): WEESS
Product No.: 1938266001
Type/Serial No. As per rating label on machine
Rated Power: 2800W
Revolutions Max. (Per Min): 2850
Complies with the following directives:
Machinery Directive 2006/42/EC
The conformity assessment procedure followed was in accordance with:
EN 60335-1; EN 62233; EN55014-1; EN55014-2; EN 61000-3-2; EN13683
Noise Directive 2000/14/EC
Examination of the above appliances using the requirements and test methods of
EN ISO 11094: 1991, EN ISO 3744:1995
Declared Guaranteed Sound Power Level L
Test Notified Body:
TUV-SUD CERTIFICATION AND TESTING (CHINA) CO LTD, SHANGHAI.
Authorised signatory and technical file holder
Date: 04/09/2020
: 96 dB(A)
WA
Signature:
Name: Mr Simon Belcher
Position: Chairman
Company: Handy Distribution Ltd
Address: Murdock Rd, Swindon, Wiltshire, SN3 5HY.
Page 24

INSTRUCTION MANUAL
Notes
24
Page 25

Notes
25
Page 26
1. Users Statement of Warranty
Each new machine is warranted against defective material or assembly of material under normal usage. The
warranty applies to the original purchaser, is not transferable and covers faulty parts and the labour involved in
replacing and repairing those parts, which are of original manufacture.
2. Period of Warranty - valid from 1 January 2020
Webb (excludes Dynamic, Legacy & Heritage), 2 year conditional warranty from the original date of sale to the fi rst
domestic user.
Webb (Dynamic, Legacy & Heritage) 1 year warranty from the original date of sale to the fi rst domestic user.
90 days from the original date of sale to the professional/commercial or for hire user.
Engine warranty as per the engine manufacturer’s warranty, which will be supplied with the machine.
90 days from the original date of sale for Replacement Spare Parts
All machines’ must be serviced within the fi rst 14 months from the original date of purchase, to qualify for a second
year parts & labour warranty, details of the service must be recorded in the service record within this manual.
A reduced warranty period of 90 days applies to those items which are subject to normal wear and tear and in
normal use, will need replacement or adjustment.
These items are chargeable after 90 days of ownership.
Filters
Tyres / Wheels
Drive chains and belts
Brake & clutch friction components
Control cable & starter cords
Fluids & lubricants
Spark plugs
Blades (Lawnmowers & Brushcutters)
Cutter bars (Hedgecutters)
Drive & clutch cable surfaces
Nylon Lines (Line Trimmers)
Carburettor cleaning
Bearings
Bushes
Electric cable
Grass collectors
3. Not covered by this warranty
(a) The warranty policy does not cover any depreciation or damages caused by ordinary wear, rusting or corrosion,
lack of correct maintenance or operation, misuse, abuse, lack of transportation or accident.
(b) The warranty policy does not cover any costs necessary for the standard periodic maintenance services
instructed by the operators manual, or service parts replacement which would include oil, fi lters, tyres, belts, brake
linings, fuses, blades, seals and other service parts unless it can be proven that the item has evidence of faulty
manufacture.
(c) The warranty policy will not cover failure or damage caused as a result of parts or accessories being modifi ed
without the written approval of GJ Handy & Co Ltd.
(d) The warranty policy will not cover the unit if non-genuine parts have been fi tted and as a result damage has
occurred to the unit.
(e) The warranty policy is non-transferable and is only applicable to the original purchaser.
4. Disclaimer
(a) This warranty is only a remedy for defect of products. GJ Handy & Co Ltd will never warranty in terms of the
merchantability or the fi tness for a particular purpose.
(b) No person is authorised to make any warranties, representations or promises, expressed or implied, on behalf of
GJ Handy & Co Ltd, or to modify the terms conditions or limitation of this warranty policy in any way.
INSTRUCTION MANUAL
This Service Book is provided with your Webb, to help you look after your purchase to our recommendations and
enable you to take advantage of the conditional manufacturer domestic warranty*.
Present this service book to your authorised Webb repair dealer, whenever a service or a warranty appraisal is
The booklet is applicable to the following products, in the UK only:
Petrol Rotary Lawnmowers
Petrol Hand Held Range
Please register your machine using the following pages or at www.webbgardenpower.co.uk. By registering your
machine, you agree to maintain the machine in accordance with the service schedules specifi ed in this manual and
services duly recorded. (Not applicable for Webb electric handheld machines). You may be asked to produce this
booklet as proof of servicing in the event of a claim. Proof of purchase should also be kept as a reference.
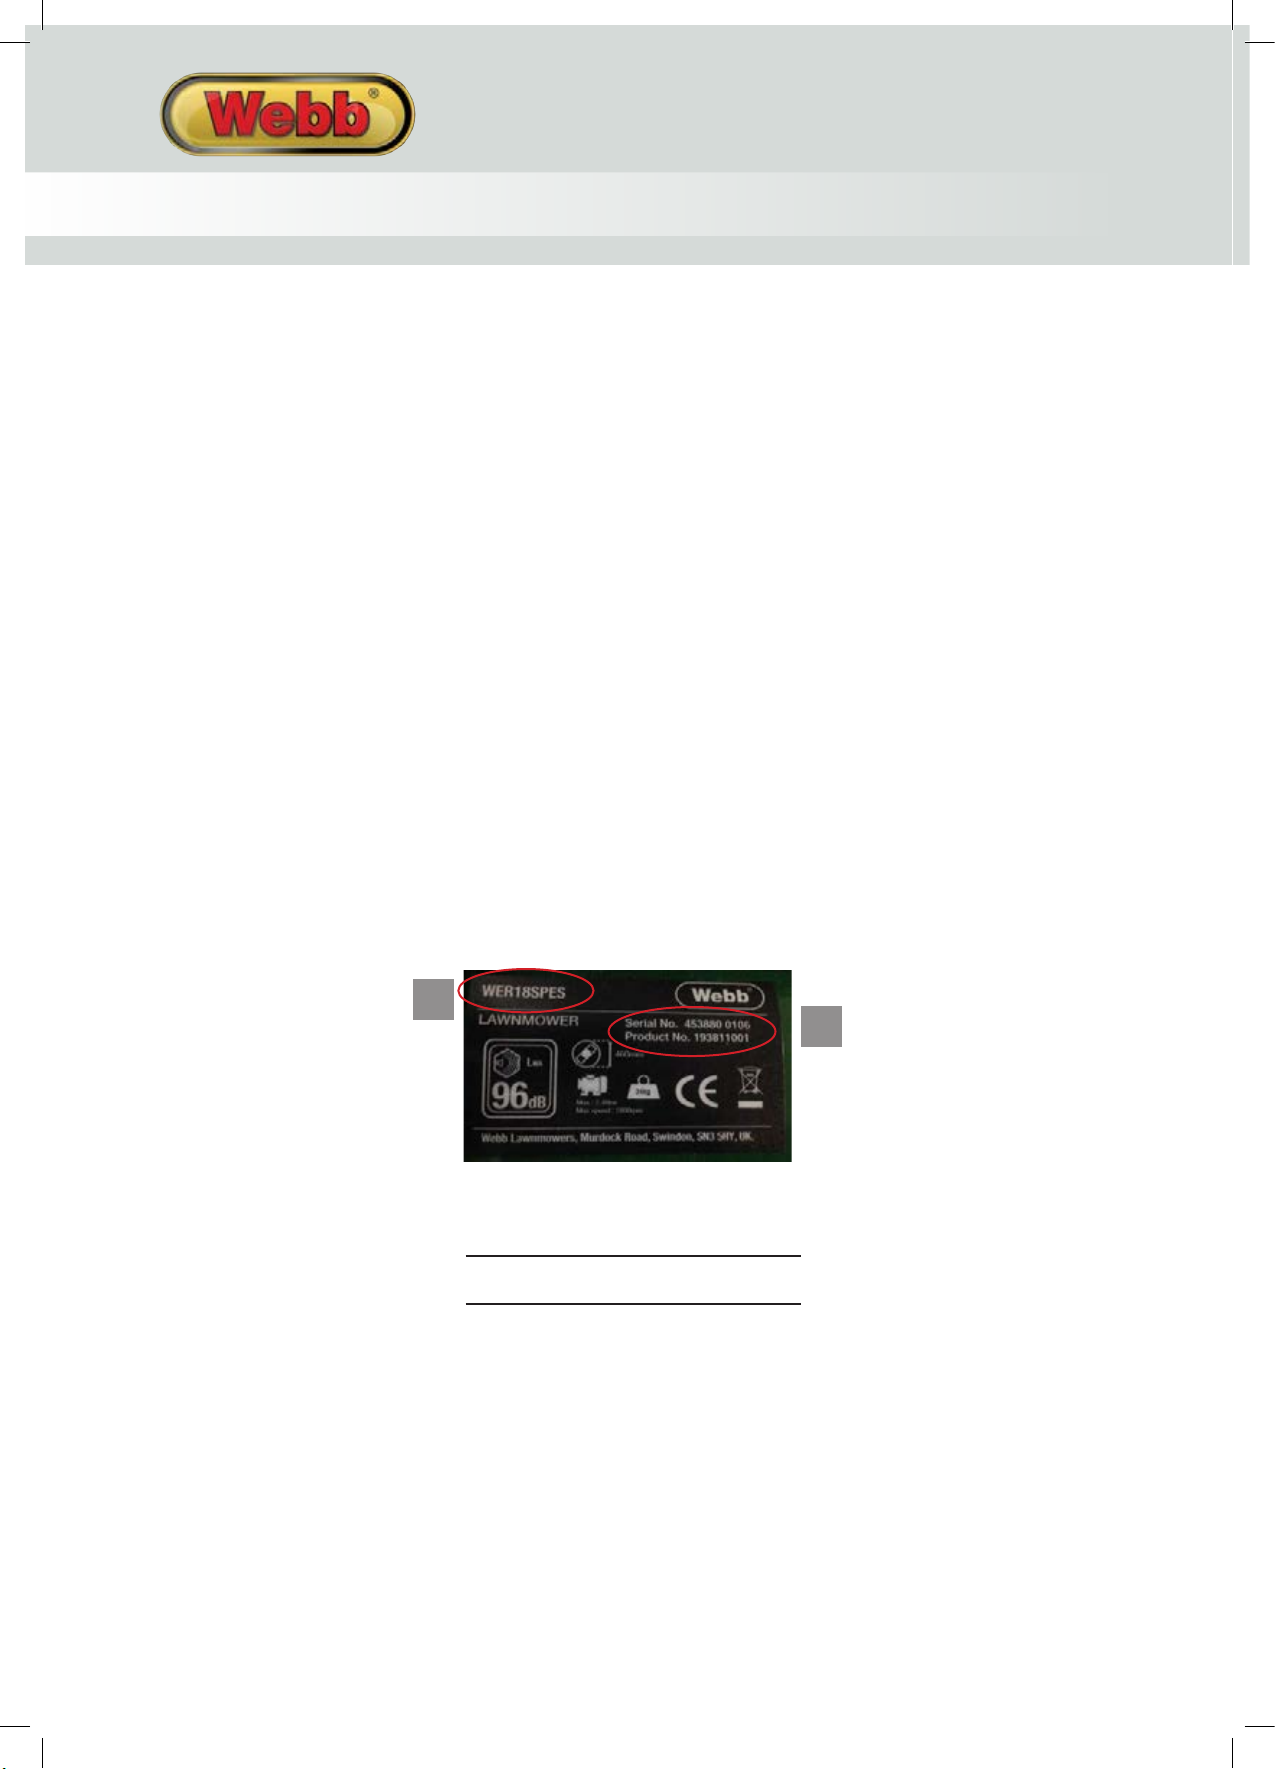
Ensure you have the following information available from your machine product label. The two examples below can
1
be found on your machine:
required.
Ride On Lawn Tractors
Cylinder Lawnmowers
2
26
1. Model Number
2. Serial & Product Number
Please complete using BLOCK CAPITALS.
Sections marked* must be completed to validate Warranty.
Page 27

SERVICE BOOK
1. Users Statement of Warranty
Each new machine is warranted against defective material or assembly of material under normal usage. The
warranty applies to the original purchaser, is not transferable and covers faulty parts and the labour involved in
replacing and repairing those parts, which are of original manufacture.
2. Period of Warranty - valid from 1 January 2020
Webb (excludes Dynamic, Legacy & Heritage), 2 year conditional warranty from the original date of sale to the fi rst
domestic user.
Webb (Dynamic, Legacy & Heritage) 1 year warranty from the original date of sale to the fi rst domestic user.
90 days from the original date of sale to the professional/commercial or for hire user.
Engine warranty as per the engine manufacturer’s warranty, which will be supplied with the machine.
90 days from the original date of sale for Replacement Spare Parts
All machines’ must be serviced within the fi rst 14 months from the original date of purchase, to qualify for a second
year parts & labour warranty, details of the service must be recorded in the service record within this manual.
A reduced warranty period of 90 days applies to those items which are subject to normal wear and tear and in
normal use, will need replacement or adjustment.
These items are chargeable after 90 days of ownership.
Filters
Tyres / Wheels
Drive chains and belts
Brake & clutch friction components
Control cable & starter cords
Fluids & lubricants
Spark plugs
Blades (Lawnmowers & Brushcutters)
Cutter bars (Hedgecutters)
Drive & clutch cable surfaces
Nylon Lines (Line Trimmers)
Carburettor cleaning
Bearings
Bushes
Electric cable
Grass collectors
3. Not covered by this warranty
(a) The warranty policy does not cover any depreciation or damages caused by ordinary wear, rusting or corrosion,
lack of correct maintenance or operation, misuse, abuse, lack of transportation or accident.
(b) The warranty policy does not cover any costs necessary for the standard periodic maintenance services
instructed by the operators manual, or service parts replacement which would include oil, fi lters, tyres, belts, brake
linings, fuses, blades, seals and other service parts unless it can be proven that the item has evidence of faulty
manufacture.
(c) The warranty policy will not cover failure or damage caused as a result of parts or accessories being modifi ed
without the written approval of GJ Handy & Co Ltd.
(d) The warranty policy will not cover the unit if non-genuine parts have been fi tted and as a result damage has
occurred to the unit.
(e) The warranty policy is non-transferable and is only applicable to the original purchaser.
4. Disclaimer
(a) This warranty is only a remedy for defect of products. GJ Handy & Co Ltd will never warranty in terms of the
merchantability or the fi tness for a particular purpose.
(b) No person is authorised to make any warranties, representations or promises, expressed or implied, on behalf of
GJ Handy & Co Ltd, or to modify the terms conditions or limitation of this warranty policy in any way.
27
Page 28

Warranty
Your servicing Webb approved dealer will stamp & date the below relevant sections, when the correct service actions
have been completed.
PLEASE ENSURE THE SERVICE BOOK IS AVAILABLE FOR THE DEALER, DURING SERVICE WORK.
1st Service
This must be stamped by an approved service dealer to
qualify for a free second year warranty.
(Excluding the Webb Electric Handheld machines)
24 Months
Date Date
36 Months
12 Months
Date
INSTRUCTION MANUAL
(c) Neither GJ Handy & Co Ltd nor any company affi liated with GJ Handy & Co Ltd shall be liable in any event or
manner whatsoever for incidental or consequential damages or injuries, including, but not limited to, loss of crops,
loss of profi t, out of pocket expenses or profi ts, rental of substitute equipment or other commercial losses.
5. General
(a) Most warrantable failures show up within the fi rst few weeks of use. These failures are usually straightforward
and warranty assessment is relatively easy.
(b) Failures relating to cutter decks and belts need careful investigation, as the cause may not always be
straightforward. Look for damage to blades and pulleys especially when the cutter belt or blade boss have snapped
or cracked as this could be due to impact damage.
(c) Customers should always refer to the operator/instruction manual when any disputed problem arises, you will
fi nd most areas covered within the manual.
Protecting your machine
Maintenance
Regular maintenance of your Webb machine is essential to ensure it operates, safely, effi ciently and therefore
reducing the environmental impact.
It is the owner’s responsibility to ensure that their Webb machine is maintained at specifi c intervals. Any approved
Webb service dealer can undertake a service, which are specialised in our products and will be aware of your
particular machine and any technical updates which will save valuable time & money.
If you are using your machine in dry, dusty or high temperatures, you will need to service the machine more
regularly.
Fuel (if applicable)
Due to ongoing eff orts by fuel companies to reduce emissions, unleaded petrol will oxidize & deteriorate in storage
overtime, leaving residue from detergent components.
Fuel deterioration problems may occur when petrol is stored for over 30 days. If you are planning to store fuel for
over 30 days, we recommend you add Handy Parts Sure-Start fuel stabilizer to fresh fuel after purchasing. Sure-
Start cannot reconstitute stale fuel.
Storage
When storing your machine for an extended period, we do recommend that you follow the instructions of engine
instruction manual.
Always store the fuel in a clean, approved and sealed container. If the container is steel, ensure it is not corroded.
If the container is not fi lled to its recommended capacity, air can accelerate fuel deterioration.
Always store fuel away from direct sunlight, in a dark, cool environment.
28
Page 29

SERVICE BOOK
Your servicing Webb approved dealer will stamp & date the below relevant sections, when the correct service actions
have been completed.
PLEASE ENSURE THE SERVICE BOOK IS AVAILABLE FOR THE DEALER, DURING SERVICE WORK.
1st Service
This must be stamped by an approved service dealer to
qualify for a free second year warranty.
(Excluding the Webb Electric Handheld machines)
24 Months
12 Months
Date
36 Months
Date Date
29
Page 30

Webb Lawnmowers privacy commitment to machine owners.
The information supplied, helps us to improve the products & services we provide, including information that we believe is relevant to your and/or
your machine. We value your trust by giving us this information about yourself and we are committed to protecting your privacy.
Webb, its associated companies, authorised dealers or third parties working on our behalf may wish to contact you regarding PRODUCT RECALLS
specifi c to your machine. Please advise how you wish to be contacted for this specifi c reason only:
Post Telephone Email
From time to time Webb, its associated companies, authorised dealers or third parties working on our behalf may wish to contact you regarding
our products, services, off ers or just opinions, which may be used for marketing, research or analysis purposes.
If you wish to be contacted by any of the following methods, please tick the relevant boxes:
Post Telephone Email
You may give Webb Lawnmowers notice in writing at any time that you no longer wish to receive direct marketing communications
*House Number *House Name
*Address 1
*Address 2
*Town
*County
*Postcode
Home Tel Mobile Tel
Email
If you have registered online, this form is not necessary.
PLEASE POST THIS COPY TO THE ADDRESS OVERLEAF
*Title *Forename *Surname
Age 18 to 25 26 to 35 36 to 45 46 to 60 61 to 80 81 & over
*Usage Domestic Use Commercial/Professional/Hire Use
Personal Information (* Compulsory)
*Model No:
*Product No:
*Serial No:
*Date of Purchase:
Product Information (* Compulsory)
*Dealer Stamp (if available)
*Dealer Name
*Dealer Address
*Date of Purchase
*Selling Retailer (If dealer stamp not available)
INSTRUCTION MANUAL
48 Months
60 Months
Date
72 Months
84 Months
Service Record
Date
96 Months
Date
108 Months
Date
120 Months
Date
Date
132 Months
Date
30
Date
Page 31

If you have registered online, this form is not necessary.
Product Information (* Compulsory)
PLEASE POST THIS COPY TO THE ADDRESS OVERLEAF
*Model No:
*Product No:
*Serial No:
*Date of Purchase:
Personal Information (* Compulsory)
*Title *Forename *Surname
*House Number *House Name
*Address 1
*Address 2
*Town
*County
*Postcode
Home Tel Mobile Tel
Email
Age 18 to 25 26 to 35 36 to 45 46 to 60 61 to 80 81 & over
*Usage Domestic Use Commercial/Professional/Hire Use
*Dealer Stamp (if available)
*Selling Retailer (If dealer stamp not available)
*Dealer Name
*Dealer Address
*Date of Purchase
Webb Lawnmowers privacy commitment to machine owners.
The information supplied, helps us to improve the products & services we provide, including information that we believe is relevant to your and/or
your machine. We value your trust by giving us this information about yourself and we are committed to protecting your privacy.
Webb, its associated companies, authorised dealers or third parties working on our behalf may wish to contact you regarding PRODUCT RECALLS
specifi c to your machine. Please advise how you wish to be contacted for this specifi c reason only:
Post Telephone Email
From time to time Webb, its associated companies, authorised dealers or third parties working on our behalf may wish to contact you regarding
our products, services, off ers or just opinions, which may be used for marketing, research or analysis purposes.
If you wish to be contacted by any of the following methods, please tick the relevant boxes:
Post Telephone Email
You may give Webb Lawnmowers notice in writing at any time that you no longer wish to receive direct marketing communications
Page 32

Webb Lawnmowers
Murdock Road
Dorcan
Swindon
Wiltshire
SN3 5HY
 Loading...