

Page 1

Thermo 90
Thermo 90 S
Workshop Manual
Coolant Heater
Page 2

TABLE OF CONTENTS
I
Table of Contents
1. Introduction
1.1 Scope and Purpose . . . . . . . . . . . . . . . . . . . . . . . . . . . . . . . . . . . . . . . . . . . . . . . . . . . . 1-1
1.2 Meaning of Warnings, Cautions and Notes . . . . . . . . . . . . . . . . . . . . . . . . . . . . . . . . . . 1-1
1.3 Additional Documentation to be used . . . . . . . . . . . . . . . . . . . . . . . . . . . . . . . . . . . . . . . 1-1
1.4 General Safety Regulations and Information . . . . . . . . . . . . . . . . . . . . . . . . . . . . . . . . . 1-1
1.4.1 General Safety Notes . . . . . . . . . . . . . . . . . . . . . . . . . . . . . . . . . . . . . . . . . . . 1-1
1.5 Corrections and Improvements . . . . . . . . . . . . . . . . . . . . . . . . . . . . . . . . . . . . . . . . . . . 1-2
2. General Description
2.1 Combustion Air Fan . . . . . . . . . . . . . . . . . . . . . . . . . . . . . . . . . . . . . . . . . . . . . . . . . . . . 2-2
2.2 Heat Exchanger . . . . . . . . . . . . . . . . . . . . . . . . . . . . . . . . . . . . . . . . . . . . . . . . . . . . . . 2-2
2.3 Temperature Sensor . . . . . . . . . . . . . . . . . . . . . . . . . . . . . . . . . . . . . . . . . . . . . . . . . . . 2-3
2.4 Temperature Limiter . . . . . . . . . . . . . . . . . . . . . . . . . . . . . . . . . . . . . . . . . . . . . . . . . . . . 2-3
2.5 Burner Insert . . . . . . . . . . . . . . . . . . . . . . . . . . . . . . . . . . . . . . . . . . . . . . . . . . . . . . . . . 2-3
2.6 Glow Pin . . . . . . . . . . . . . . . . . . . . . . . . . . . . . . . . . . . . . . . . . . . . . . . . . . . . . . . . . . . . 2-3
2.7 Flame Sensor . . . . . . . . . . . . . . . . . . . . . . . . . . . . . . . . . . . . . . . . . . . . . . . . . . . . . . . . 2-3
2.8 Combustion Tube . . . . . . . . . . . . . . . . . . . . . . . . . . . . . . . . . . . . . . . . . . . . . . . . . . . . . 2-3
2.9 Circulation Pump . . . . . . . . . . . . . . . . . . . . . . . . . . . . . . . . . . . . . . . . . . . . . . . . . . . . . . 2-3
2.10 Control Unit . . . . . . . . . . . . . . . . . . . . . . . . . . . . . . . . . . . . . . . . . . . . . . . . . . . . . . . . . . 2-3
2.11 Fuel Dosing Pump . . . . . . . . . . . . . . . . . . . . . . . . . . . . . . . . . . . . . . . . . . . . . . . . . . . . . 2-3
3. Functional Description (Fig.3-1)
3.1 Switch-on . . . . . . . . . . . . . . . . . . . . . . . . . . . . . . . . . . . . . . . . . . . . . . . . . . . . . . . . . . . 3-1
3.2 Heating Operation . . . . . . . . . . . . . . . . . . . . . . . . . . . . . . . . . . . . . . . . . . . . . . . . . . . . . 3-1
3.3 Control Operation . . . . . . . . . . . . . . . . . . . . . . . . . . . . . . . . . . . . . . . . . . . . . . . . . . . . . 3-1
3.4 Switch-off . . . . . . . . . . . . . . . . . . . . . . . . . . . . . . . . . . . . . . . . . . . . . . . . . . . . . . . . . . . 3-1
3.5 Malfunctions . . . . . . . . . . . . . . . . . . . . . . . . . . . . . . . . . . . . . . . . . . . . . . . . . . . . . . . . . 3-3
3.5.1 Switch-off upon Failure . . . . . . . . . . . . . . . . . . . . . . . . . . . . . . . . . . . . . . . . . . 3-3
3.5.2 Diagnosis after Switch-off upon Failure (Thermo 90) . . . . . . . . . . . . . . . . . . . . 3-3
3.5.3 Diagnosis after Switch-off upon Failure (Thermo 90 S) . . . . . . . . . . . . . . . . . . . 3-3
3.5.4 Reading and Understanding the Flash Code . . . . . . . . . . . . . . . . . . . . . . . . . . 3-3
4. Technical Data (Standard Measure) . . . . . . . . . . . . . . . . . . . . . . . . . . . . . . . . . . . . . . . . . . . . 4-1
4. Technical Data (Metric Measure) . . . . . . . . . . . . . . . . . . . . . . . . . . . . . . . . . . . . . . . . . . . . . . 4-2
5. Troubleshooting
5.1 General . . . . . . . . . . . . . . . . . . . . . . . . . . . . . . . . . . . . . . . . . . . . . . . . . . . . . . . . . . . . . 5-1
5.2 General Failure Symptoms . . . . . . . . . . . . . . . . . . . . . . . . . . . . . . . . . . . . . . . . . . . . . . 5-1
5.3 Failure Symptoms after Switch-off upon Failure . . . . . . . . . . . . . . . . . . . . . . . . . . . . . . . 5-2
5.4 Storing a Fault Code in Memory . . . . . . . . . . . . . . . . . . . . . . . . . . . . . . . . . . . . . . . . . . 5-3
T
HERMO
90 / 90 S
Page 3

TABLE OF CONTENTS
T
HERMO
90 / 90 S
II
5.4.1 Reading and Removing Error Codes Stored in Memory using the
PC Diagnostics Kit P.N. 92542C . . . . . . . . . . . . . . . . . . . . . . . . . . . . . . . . . . . 5-3
5.5 Visual Inspection for Assessment of Burner Condition . . . . . . . . . . . . . . . . . . . . . . . . . . 5-4
5.5.1 Burner Housing . . . . . . . . . . . . . . . . . . . . . . . . . . . . . . . . . . . . . . . . . . . . . . . . 5-4
5.5.2 Rear Wall with Metal Evaporator . . . . . . . . . . . . . . . . . . . . . . . . . . . . . . . . . . . 5-5
5.5.3 Combustion Chamber . . . . . . . . . . . . . . . . . . . . . . . . . . . . . . . . . . . . . . . . . . . 5-5
5.5.4 Burner Assembly . . . . . . . . . . . . . . . . . . . . . . . . . . . . . . . . . . . . . . . . . . . . . . . 5-5
6. Functional Tests
6.1 General . . . . . . . . . . . . . . . . . . . . . . . . . . . . . . . . . . . . . . . . . . . . . . . . . . . . . . . . . . . . . 6-1
6.2 Adjustments . . . . . . . . . . . . . . . . . . . . . . . . . . . . . . . . . . . . . . . . . . . . . . . . . . . . . . . . . 6-1
6.2.1 Adjustment of the CO
2
Content . . . . . . . . . . . . . . . . . . . . . . . . . . . . . . . . . . . . 6-1
6.3 Components Testing . . . . . . . . . . . . . . . . . . . . . . . . . . . . . . . . . . . . . . . . . . . . . . . . . . . 6-1
6.3.1 Temperature Sensor Resistance Check . . . . . . . . . . . . . . . . . . . . . . . . . . . . . . 6-1
6.3.2 Glow Pin Resistance Check . . . . . . . . . . . . . . . . . . . . . . . . . . . . . . . . . . . . . . . 6-1
6.3.3 Flame Sensor Resistance Test . . . . . . . . . . . . . . . . . . . . . . . . . . . . . . . . . . . . 6-1
6.3.4 Combustion Air Fan Test . . . . . . . . . . . . . . . . . . . . . . . . . . . . . . . . . . . . . . . . . 6-1
7. Circuit Diagrams
7.1 General . . . . . . . . . . . . . . . . . . . . . . . . . . . . . . . . . . . . . . . . . . . . . . . . . . . . . . . . . . . . . 7-1
8. Servicing
8.1 General . . . . . . . . . . . . . . . . . . . . . . . . . . . . . . . . . . . . . . . . . . . . . . . . . . . . . . . . . . . . . 8-1
8.2 Work on the Heater . . . . . . . . . . . . . . . . . . . . . . . . . . . . . . . . . . . . . . . . . . . . . . . . . . . . 8-1
8.3 Work on the Vehicle . . . . . . . . . . . . . . . . . . . . . . . . . . . . . . . . . . . . . . . . . . . . . . . . . . . 8-1
8.4 Heater Test Run . . . . . . . . . . . . . . . . . . . . . . . . . . . . . . . . . . . . . . . . . . . . . . . . . . . . . . 8-1
8.5 Annual Maintenance . . . . . . . . . . . . . . . . . . . . . . . . . . . . . . . . . . . . . . . . . . . . . . . . . . . 8-1
8.6 Visual Inspections and Installation Regulations . . . . . . . . . . . . . . . . . . . . . . . . . . . . . . . 8-3
8.6.1 Connection to the Vehicle’s Cooling System . . . . . . . . . . . . . . . . . . . . . . . . . . 8-3
8.6.2 Connection to the Vehicle’s Fuel System . . . . . . . . . . . . . . . . . . . . . . . . . . . . . 8-3
8.6.2.1 Fuel Tapping . . . . . . . . . . . . . . . . . . . . . . . . . . . . . . . . . . . . . . . . . . . . . . . . . . 8-4
8.6.2.2 Fuel Lines . . . . . . . . . . . . . . . . . . . . . . . . . . . . . . . . . . . . . . . . . . . . . . . . . . . . 8-5
8.6.3 Fuel Dosing Pump . . . . . . . . . . . . . . . . . . . . . . . . . . . . . . . . . . . . . . . . . . . . . . 8-5
8.6.3.1 Installation Location . . . . . . . . . . . . . . . . . . . . . . . . . . . . . . . . . . . . . . . . . . . . . 8-5
8.6.3.2 Installation and Attachment . . . . . . . . . . . . . . . . . . . . . . . . . . . . . . . . . . . . . . . 8-6
8.6.4 Fuel Filter . . . . . . . . . . . . . . . . . . . . . . . . . . . . . . . . . . . . . . . . . . . . . . . . . . . . 8-6
8.6.5 Combustion Air Supply . . . . . . . . . . . . . . . . . . . . . . . . . . . . . . . . . . . . . . . . . . 8-6
8.6.6 Exhaust Line . . . . . . . . . . . . . . . . . . . . . . . . . . . . . . . . . . . . . . . . . . . . . . . . . . 8-6
8.7 Removal and Installation . . . . . . . . . . . . . . . . . . . . . . . . . . . . . . . . . . . . . . . . . . . . . . . . 8-7
8.7.1 Heater, Removal and Installation . . . . . . . . . . . . . . . . . . . . . . . . . . . . . . . . . . . 8-7
8.7.1.1 Removal . . . . . . . . . . . . . . . . . . . . . . . . . . . . . . . . . . . . . . . . . . . . . . . . . . . . . 8-7
Page 4

T
HERMO
90 / 90 S
TABLE OF CONTENTS
III
8.7.1.2 Installation . . . . . . . . . . . . . . . . . . . . . . . . . . . . . . . . . . . . . . . . . . . . . . . . . . . . 8-7
8.7.2 Replacement of Circulation Pump . . . . . . . . . . . . . . . . . . . . . . . . . . . . . . . . . . 8-7
8.7.3 Replacement of Temperature Limiter . . . . . . . . . . . . . . . . . . . . . . . . . . . . . . . . 8-7
8.7.4 Replacement of Temperature Sensor . . . . . . . . . . . . . . . . . . . . . . . . . . . . . . . . 8-7
8.7.5 Replacement of Combustion Air Fan . . . . . . . . . . . . . . . . . . . . . . . . . . . . . . . . 8-7
8.8 First Operation . . . . . . . . . . . . . . . . . . . . . . . . . . . . . . . . . . . . . . . . . . . . . . . . . . . . . . . 8-7
9. Repair
9.1 General . . . . . . . . . . . . . . . . . . . . . . . . . . . . . . . . . . . . . . . . . . . . . . . . . . . . . . . . . . . . . 9-1
9.1.1 Work on Components after Disassembly . . . . . . . . . . . . . . . . . . . . . . . . . . . . . 9-1
9.1.1.1 Cleaning . . . . . . . . . . . . . . . . . . . . . . . . . . . . . . . . . . . . . . . . . . . . . . . . . . . . . 9-1
9.1.1.2 Visual Inspection . . . . . . . . . . . . . . . . . . . . . . . . . . . . . . . . . . . . . . . . . . . . . . . 9-1
9.2 Disassembly and Assembly . . . . . . . . . . . . . . . . . . . . . . . . . . . . . . . . . . . . . . . . . . . . . . 9-2
9.2.1 Electrical Connections (Fig. 9-1) . . . . . . . . . . . . . . . . . . . . . . . . . . . . . . . . . . . 9-2
9.2.1.1 Disconnecting Electrical Connections (Connection X1) . . . . . . . . . . . . . . . . . . . 9-2
9.2.1.2 Making Electrical Connections . . . . . . . . . . . . . . . . . . . . . . . . . . . . . . . . . . . . . 9-2
9.2.2 Replacement of Circulation Pump . . . . . . . . . . . . . . . . . . . . . . . . . . . . . . . . . . 9-3
9.2.2.1 Removal . . . . . . . . . . . . . . . . . . . . . . . . . . . . . . . . . . . . . . . . . . . . . . . . . . . . . 9-3
9.2.2.2 Installation . . . . . . . . . . . . . . . . . . . . . . . . . . . . . . . . . . . . . . . . . . . . . . . . . . . . 9-3
9.2.3 Replacement of Temperature Limiter . . . . . . . . . . . . . . . . . . . . . . . . . . . . . . . . 9-4
9.2.3.1 Removal . . . . . . . . . . . . . . . . . . . . . . . . . . . . . . . . . . . . . . . . . . . . . . . . . . . . . 9-4
9.2.3.2 Installation . . . . . . . . . . . . . . . . . . . . . . . . . . . . . . . . . . . . . . . . . . . . . . . . . . . . 9-4
9.2.4 Replacement of Temperature Sensor . . . . . . . . . . . . . . . . . . . . . . . . . . . . . . . . 9-4
9.2.4.1 Removal . . . . . . . . . . . . . . . . . . . . . . . . . . . . . . . . . . . . . . . . . . . . . . . . . . . . . 9-4
9.2.4.2 Installation . . . . . . . . . . . . . . . . . . . . . . . . . . . . . . . . . . . . . . . . . . . . . . . . . . . . 9-4
9.2.5 Replacement of Combustion Air Fan . . . . . . . . . . . . . . . . . . . . . . . . . . . . . . . . 9-6
9.2.5.1 Removal . . . . . . . . . . . . . . . . . . . . . . . . . . . . . . . . . . . . . . . . . . . . . . . . . . . . . 9-6
9.2.5.2 Installation . . . . . . . . . . . . . . . . . . . . . . . . . . . . . . . . . . . . . . . . . . . . . . . . . . . . 9-6
9.2.6 Replacement of Burner, Flame Sensor and Glow Pin . . . . . . . . . . . . . . . . . . . . 9-7
9.2.6.1 Removal . . . . . . . . . . . . . . . . . . . . . . . . . . . . . . . . . . . . . . . . . . . . . . . . . . . . . 9-7
9.2.6.2 Installation . . . . . . . . . . . . . . . . . . . . . . . . . . . . . . . . . . . . . . . . . . . . . . . . . . . . 9-7
9.2.7 Replacement of Burner Head . . . . . . . . . . . . . . . . . . . . . . . . . . . . . . . . . . . . . 9-9
9.2.7.1 Removal . . . . . . . . . . . . . . . . . . . . . . . . . . . . . . . . . . . . . . . . . . . . . . . . . . . . . 9-9
9.2.7.2 Installation . . . . . . . . . . . . . . . . . . . . . . . . . . . . . . . . . . . . . . . . . . . . . . . . . . . . 9-9
9.2.8 Replacement of Heat Exchanger . . . . . . . . . . . . . . . . . . . . . . . . . . . . . . . . . . . 9-10
9.2.8.1 Removal . . . . . . . . . . . . . . . . . . . . . . . . . . . . . . . . . . . . . . . . . . . . . . . . . . . . . 9-10
9.2.8.2 Installation . . . . . . . . . . . . . . . . . . . . . . . . . . . . . . . . . . . . . . . . . . . . . . . . . . . . 9-10
Page 5
T
HERMO
90 / 90 S
1INTRODUCTION
1-1
1. Introduction
1.1 Scope and Purpose
This repair shop manual is intended to support
familiarized personnel in the repair of
Thermo 90
and
Thermo 90 S
coolant heaters.
The coolant heater may only be operated with the
specified fuel (Diesel 1, Diesel 2, Arctic grade, Kerosene
and certain military spec. fuels).
The coolant heater may only be operated within the
specified operating voltage range designated by type.
1.2 Meaning of Warnings, Cautions,
and Notes
Warnings, Cautions and Notes in this manual have the
following meaning:
WARNING
This heading is used to highlight that
non-compliance with instructions or procedures may
cause injuries or lethal accidents to personnel.
CAUTION
This heading is used to highlight that
non-compliance with instructions or procedures may
cause damage to equipment.
NOTE:
This heading is used to highlight and draw specific
attention to information.
1.3 Additional Documentation to be
Used
This workshop manual contains all information and
procedures necessary for the repair of heaters
Thermo
90
and
Thermo 90 S.
The use of additional documentation is normally not
necessary. Operating instructions/installation instructions
and the vehicle specific installation guides (when
available) may be used as complementary information if
necessary.
1.4 General Safety Regulations and
Information
The general safety regulations for the prevention of
accidents and relevant operating safety instructions must
be observed at all times.
The specific safety regulations applicable to this manual
are highlighted in the individual chapters by Warnings,
Cautions and Notes.
1.4.1 General Safety Notes
The heater may only be installed in motor vehicles, or in
independent heating systems, with a minimum coolant
capacity of 6 litres (1.6 US Gal.).
The heater must not be installed in the passenger
compartments of vehicles. Should the heater be
installed in such a compartment, the installation box must
be sealed tight against the vehicle interior. There must
be sufficient ventilation of the installation box from the
exterior in order not to exceed a maximum temperature
of 60 °C (140 °F) in the installation box. Excessive
temperatures may cause malfunctions.
WARNING
Due to the danger of poisoning and suffocation, the
heater must not be operated in enclosed areas, such as
garages or workshops, without an exhaust venting
system, not even if the start-up is activated by the timer
or remote start device.
At filling stations and fuel depots the heater must be
switched off as there is a potential danger of explosions.
Where flammable fumes or dust may build up (e.g. in the
vicinity of fuel, coal, wood, cereal grain deposits or
similar situations) the heater must be switched off to
prevent explosions.
In the vicinity of the coolant heater, a temperature of
85 °C (185 °F) must not be exceeded under any
circumstances (e.g. during body paint work).
A violation of this temperature limit may cause
permanent damage to the electronics.
When checking the coolant level, proceed in accordance
with the vehicle manufacturer’s instructions.
The coolant in the heating circuit of the heater must
contain a minimum of 10% of a quality brand glycol
based anti-freeze.
Page 6

1INTRODUCTION
T
HERMO
90 / 90 S
1-2
Ignoring the installation instructions and its procedures
will void the warranty granted by Webasto. The same
applies for repairs preformed by unskilled, unauthorized
personnel and repairs without using genuine Webasto
spare parts. This will void the coolant heaters “Official
Marks of Conformity.”
Extracting combustion air from the vehicle interior is not
permissible under any circumstance.
The exhaust line outlet is to be positioned below the
vehicle floor, to the nearest possible location of the
vehicle’s or cockpit side or rear end. Exhaust pipes must
be routed so that exhaust fumes will not penetrate into
the vehicle’s interior.
The function of any parts vital for vehicle operation must
not be impaired. Condensation accumulation in the
exhaust line must be directly drained. A condensation
drain hole may be provided as required.
Electrical lines, switch gear, and control gear of the
heater must be located in the vehicle so that their proper
function cannot be impaired under normal operating
conditions.
For the routing of fuel lines and the installation of
additional fuel tanks, the following important regulations
must be adhered to:
• Fuel lines are to be installed in such a way that they
remain unaffected by torsional stresses created by
vehicle and engine movement. They must be
protected against mechanical damage.
Fuel-carrying parts are to be protected against
excessive heat and are to be installed so that any
dripping or evaporating fuel can neither accumulate
nor be ignited by hot components or electrical
equipment.
• In busses, fuel lines and fuel tanks must not be
located in the passenger area or in the driver’s
compartment. In these type of vehicles the fuel
tanks must be located such that they do not pose a
direct hazard to the exits in the event of a fire.
Fuel supply must not be by means of gravity or
pressurization of the fuel tank.
• Installation instructions for Webasto fuel tanks for the
fuel supply of coolant heaters in vehicles:
In busses the installation is not permitted in the
passenger or driver’s compartment.
• The fuel filler neck must not be located in the
passengers or driver’s compartment of any vehicle.
• Fuel containers for gasoline fuel must not be
located immediately behind the front paneling of the
vehicle. They must be separate from the engine so
that even in the case of accident the inflammation of
fuel is unlikely to be expected.
This does not apply for towing vehicles with an open
cockpit.
All fuel containers offered in the Webasto
Accessories Catalog are suitable for a maximum
operating pressure of 0.15 bar over-pressure.
All fuel containers offered in the Webasto
Accessories Catalog are subjected during
manufacture to individual pressure testing with at
least 0.3 bar over-pressure.
• The fuel containers must either be equipped with a
vent cap or be ventilated in another way
(ventilation line). Only filler caps in accordance with
DIN 73400 may be used.
• The operational state of the heater, i.e. an indication
“on” or “off”, must be clearly visible.
Page 7
T
HERMO
90 / 90 S
2GENERAL DESCRIPTION
2-1
2. General Description
The Webasto Thermo 90 and 90 S coolant heater, in
combination with the vehicle’s own heating system, is
used to:
• heat the cab, sleeper or interior areas of vehicles
• defog/defrost windshields
• preheat water cooled engines
The coolant heater operates independent from the
vehicle engine and is connected to the cooling system,
the fuel system and the electrical system of the vehicle.
The heater is designed around the Ferro-Tec Technology
evaporator burner system and operates intermittently,
controlled by the temperature sensor.
Dependent on the deviation of the current coolant
temperature from the rated value of the temperature
sensor, combustion performance is continuously
controlled within a range from 1.8 to 7.6 kW (6,100 to
26,000 Btu/hr) for Diesel operated heaters and within 2.0
to 7.6 kW (6,800 to 26,000 Btu/hr) for gasoline operated
coolant heaters. For an extremely high heating
performance requirement (preheating) the maximum
performance of 9.1 kW (31,000 Btu/hr) is available with
diesel operated coolant heaters for up to 2 hours after
heater actuation.
The Webasto Thermo 90 and 90 S coolant heaters
basically consist of:
• combustion air fan
• heat exchanger
• burner insert with combustion tube
• circulation pump
For control and monitoring, the following are located
inside the heater unit:
• control unit (external)
• flame sensor
• glow pin
• temperature sensor
• temperature limiter
On the Thermo 90 S heater, the control unit is flanged to
the combustion air fan. It is possible to remote mount
the control unit using an optional mounting bracket.
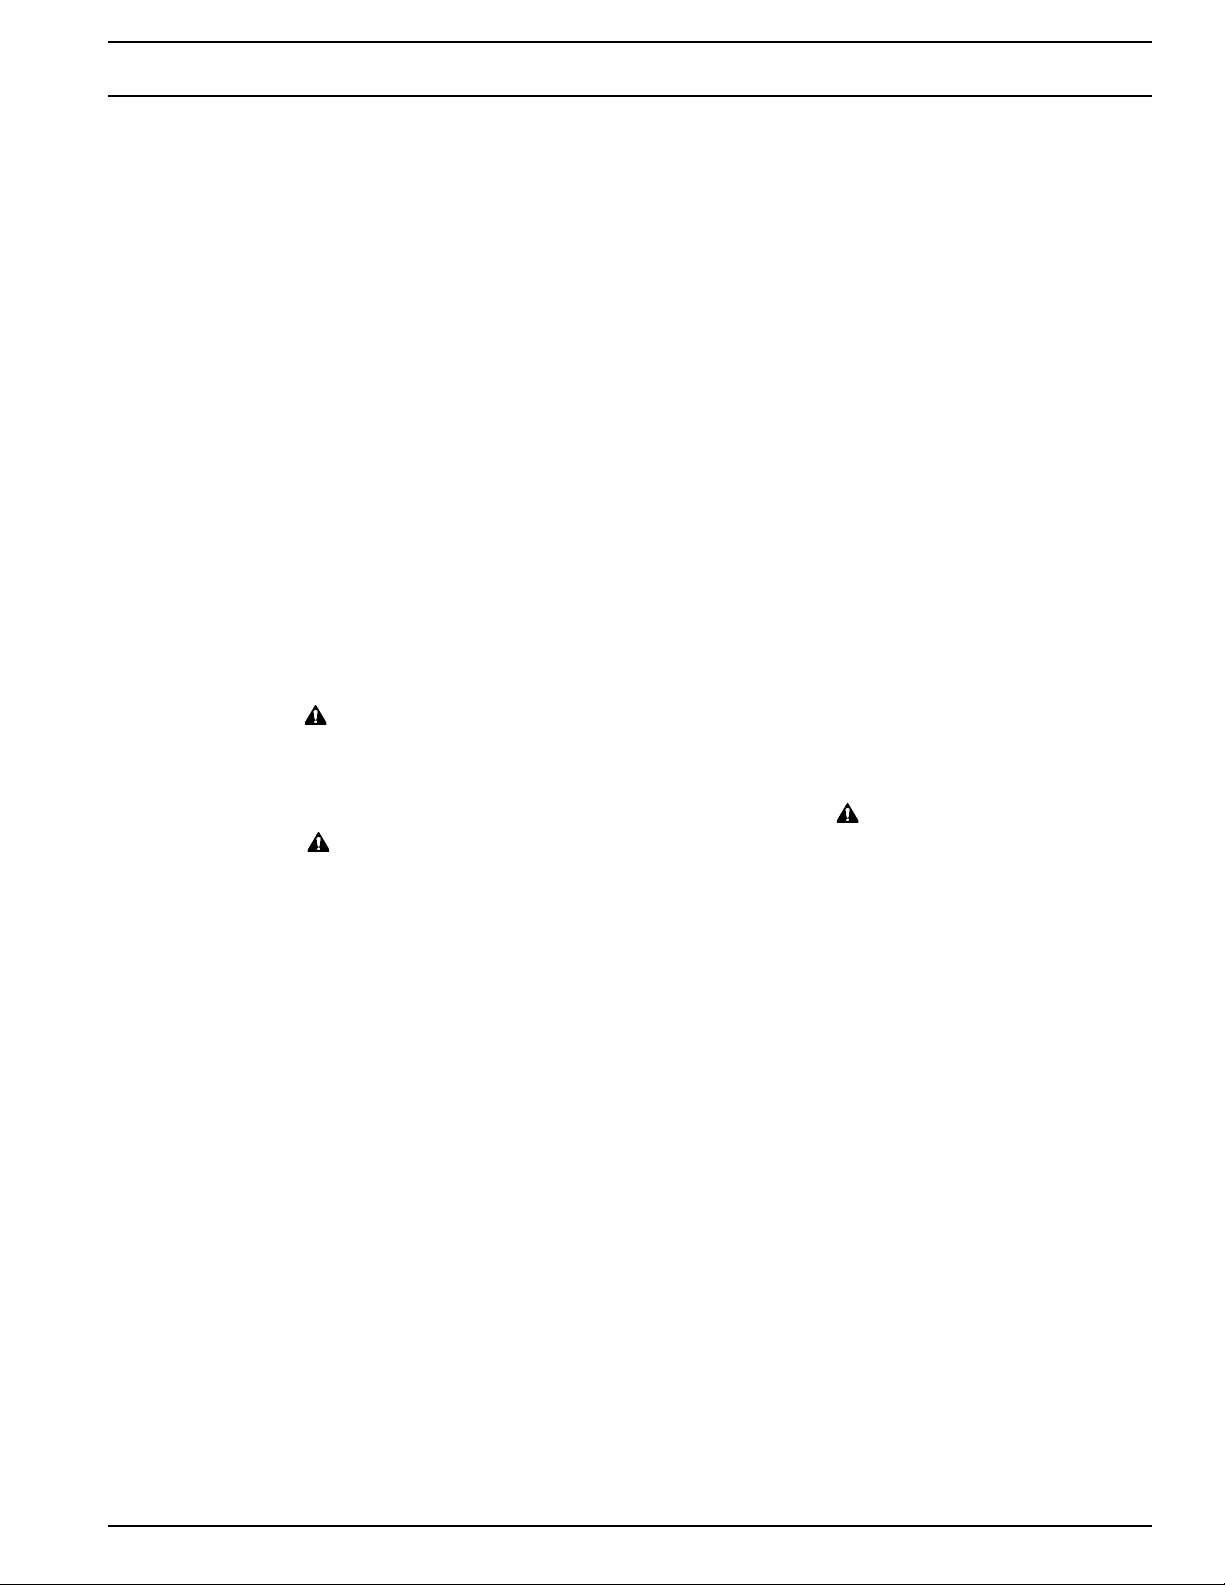
1 Combustion Air Fan
2 Fuel Connection
3 Temperature Sensor
4 Temperature Limiter
5 Heat Exchanger
6 Inlet, Coolant
7 Circulation Pump
8 Outlet, Coolant
9 Outlet, Exhaust
10 Inlet, Combustion Air
NOTE:
One of the newer
models shown.
Older models have
the temperature
sensor cable
located on the side.
Heater Thermo 90
Page 8
2GENERAL DESCRIPTION
T
HERMO
90 / 90 S
2-2
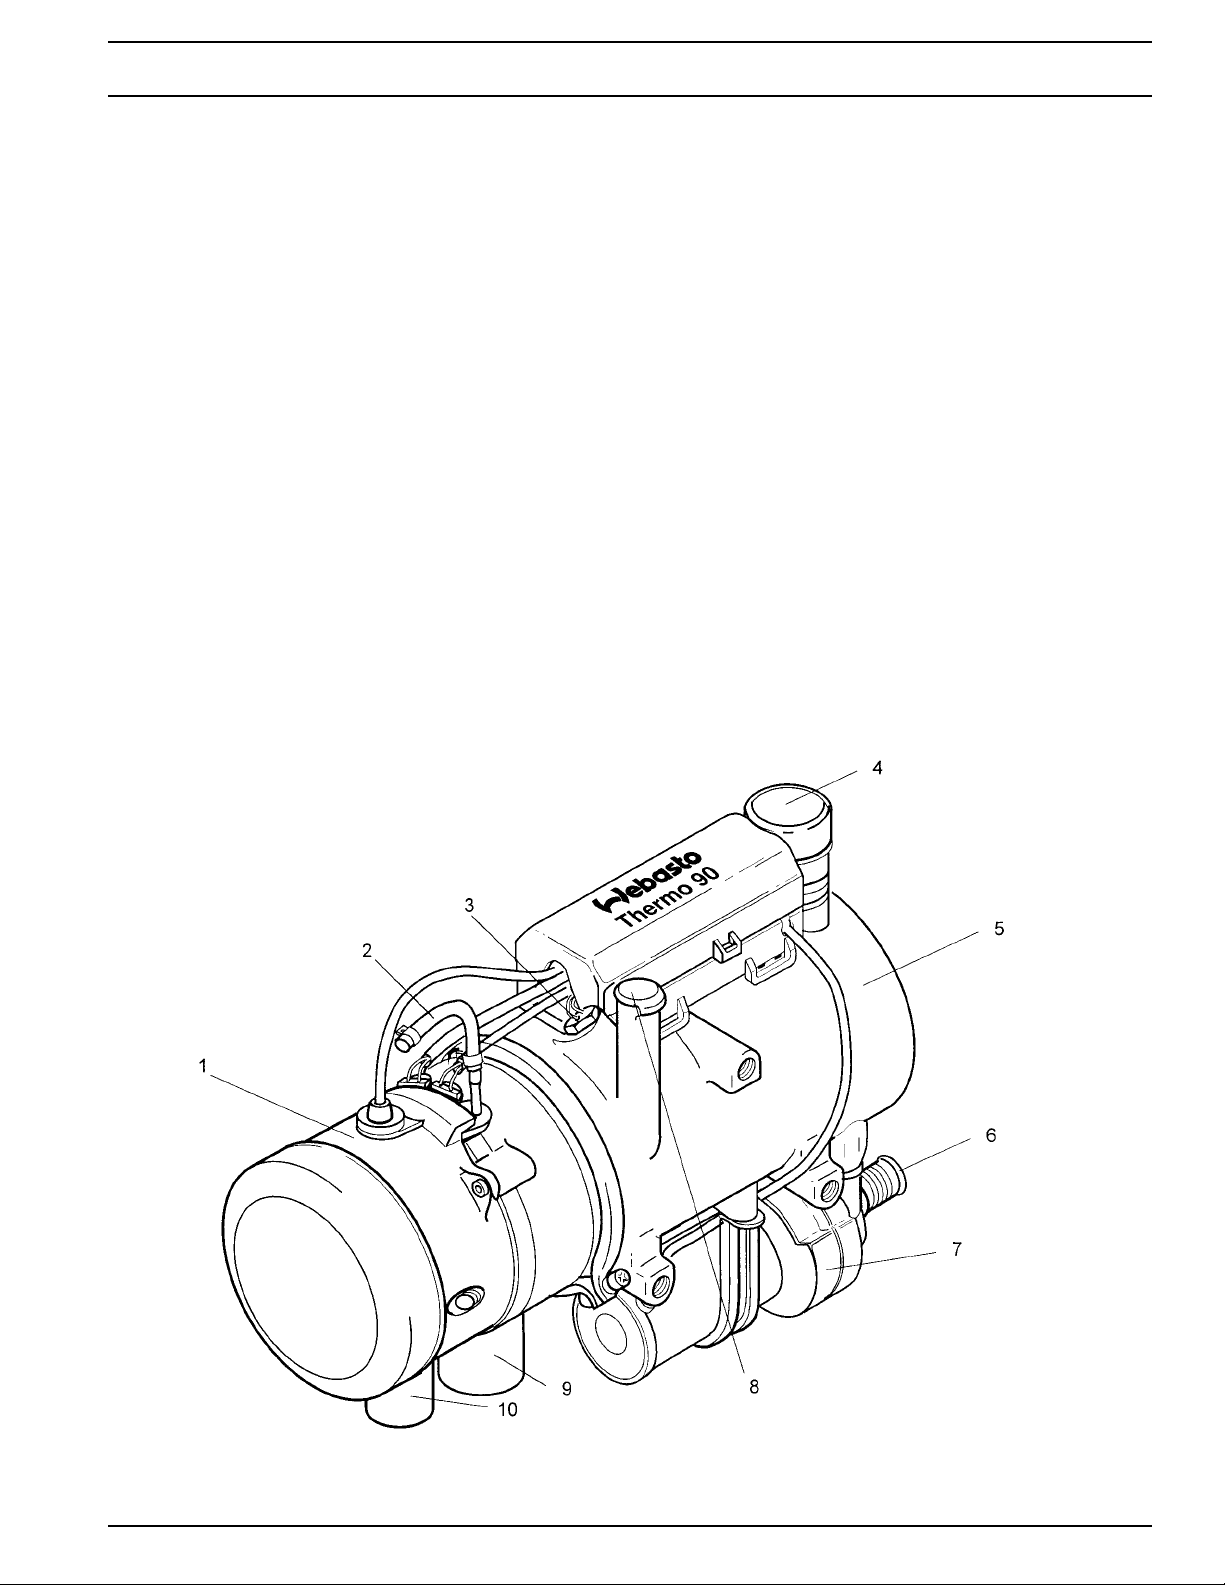
1 Combustion Air Fan
2 Fuel Connection
3 Temperature Sensor
4 Temperature Limiter
5 Heat Exchanger
6 Inlet, Coolant
7 Circulation Pump
8 Outlet, Coolant
9 Outlet, Exhaust
10 Inlet, Combustion Air
11 Control unit (may
also be located
remotely in the
vehicle)
Heater Thermo 90 S
2.1 Combustion Air Fan
The combustion air fan delivers the air required for
combustion from the combustion air inlet to the burner
insert.
2.2 Heat Exchanger
The heat exchanger transfers the heat provided by
combustion to the coolant circuit.
Page 9
T
HERMO
90 / 90 S
2GENERAL DESCRIPTION
2-3
2.3 Temperature Sensor
The temperature sensor senses the coolant temperature
in the heat exchanger of the heater unit as electrical
resistance. This signal is fed to the control unit for
processing.
2.4 Temperature Limiter
The overheat protection (bimetal) protects the heater unit
from excessive operating temperatures. The overheat
protection responds at a coolant temperature higher than
105 °C to switch off the heater.
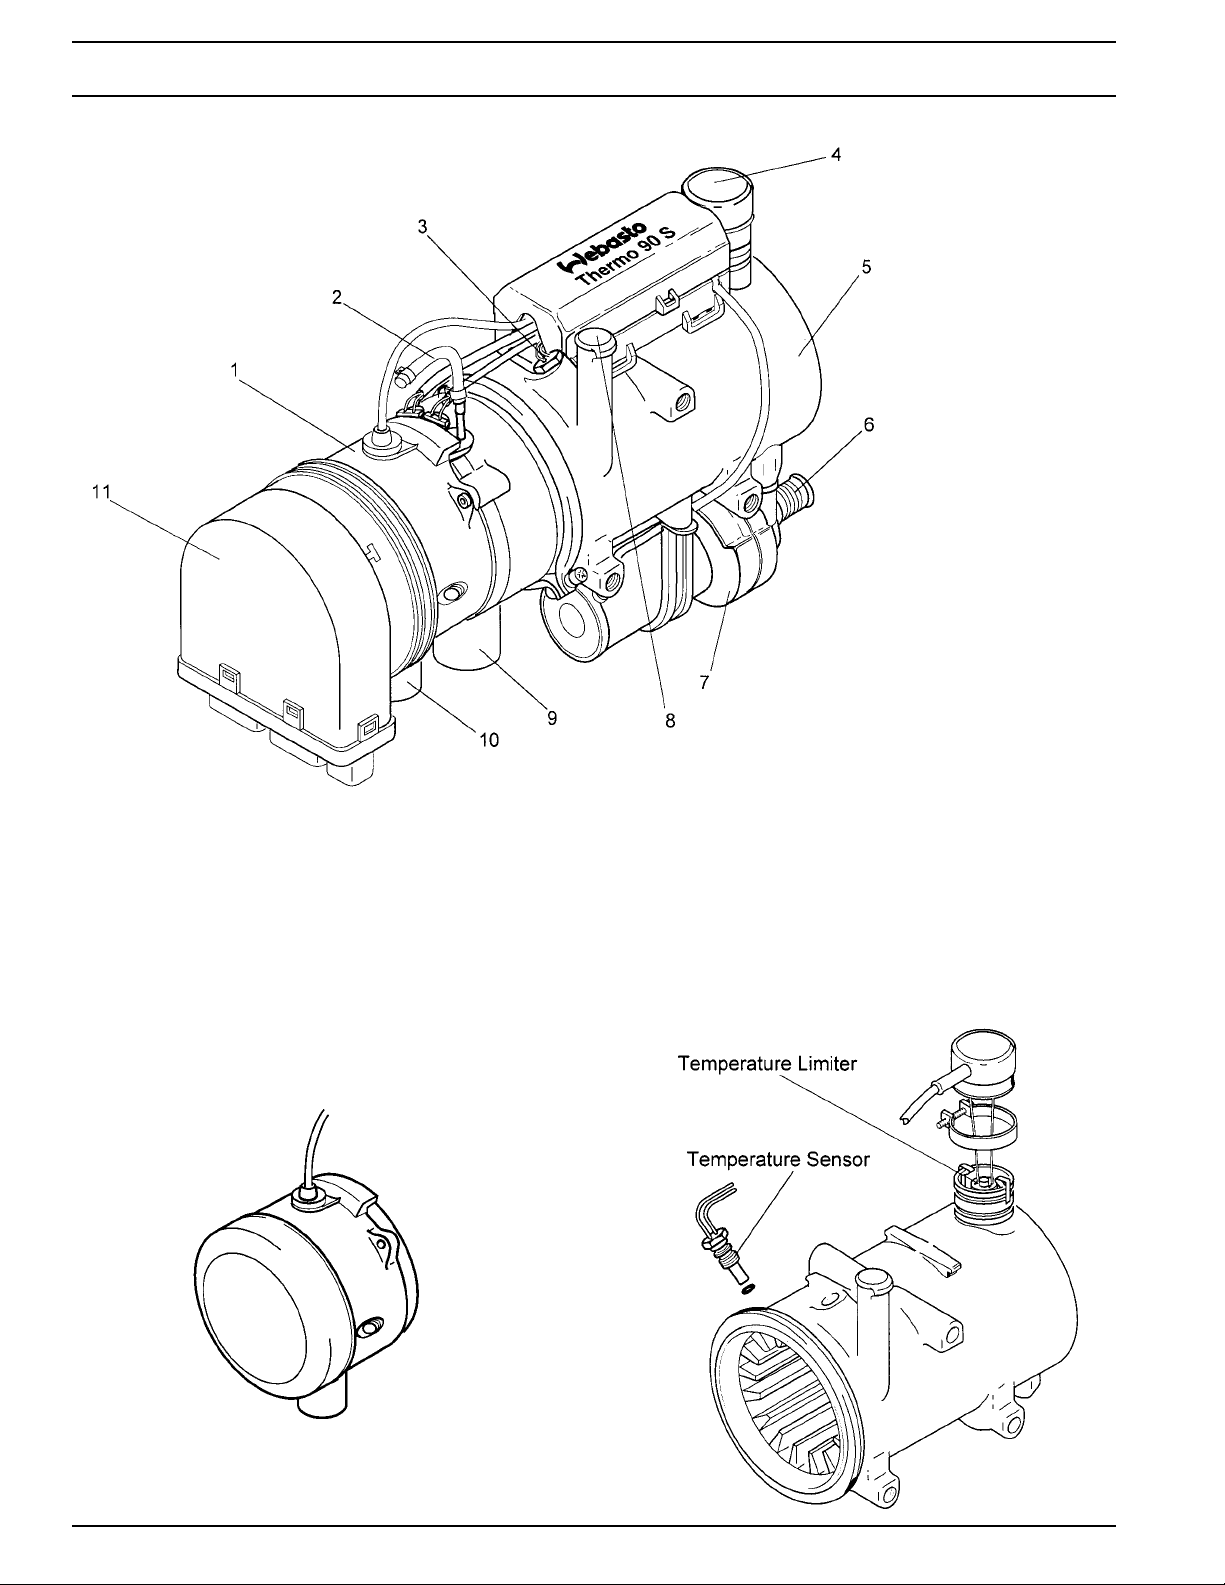
2.5 Burner Insert
Within the burner insert, fuel is distributed in the
combustion tube across the burner cross-section.
2.6 Glow Pin
The glow pin ignites the fuel/air mixture at the start of
heater operation. The glow pin is acting as an electrical
resistor and is located in the burner insert opposite the
flame source.
2.7 Flame Sensor
The flame sensor is a low-Ohm PTC resistor, changing
its resistance dependent on its heating by the flame. The
signals are routed to the control unit for processing. The
flame sensor monitors the flame operating condition over
the complete duration of heater operation.
2.8 Combustion Tube
Inside the combustion tube the combustion of the fuel/air
mixture takes place, heating up the heat exchanger.
2.9 Circulation Pump
The circulation pump provides for circulation of the
coolant in the vehicle and heater circuits. The control
unit switches the pump on for operation throughout the
entire time of heater operation (also in control idle).
2.10 Control Unit
The control unit is the central controlling device for
functional sequencing and monitoring of the combustion
operation. It is mounted to the heat exchanger on
Thermo 90 heaters and flanged to the combustion air fan
on Thermo 90 S heaters.
2.11 Fuel Dosing Pump
Fuel supply to the heater and its dosing is ensured
externally by a fuel dosing pump. When the heater is
deactivated, it also serves as a shut-off valve. The
magnetic coil of the dosing pump receives the pulses
from the microprocessor of the control unit.
Page 10

T
HERMO
90 / 90 S
3FUNCTIONAL DESCRIPTION
3-1
3. Functional Description
(Fig. 3-1)
3.1 Switch-on
When operating the push button "Immediate Heating",
the "Operating Indicator" on the timer illuminates
or
by activation with the switch, the “Operating Indicator”
integrated in the switch illuminates.
Circulation pump, glow pin, and combustion air fan are
put into operation.
3.2 Heating Operation
After approx. 50 seconds, combustion commences with
the automatically controlled heating operation in full load
for a maximum of 2 hours.
The vehicle's own heating blower starts to operate only
after the heat carrier (coolant) has accumulated enough
heat. After reaching the pre-coded rated temperature
(see table Control Temperatures) heating performance,
precision control will take over in stages down to the
lowest part load operation.
3.3 Control Operation
If the coolant temperature rises up to the control idle
threshold, the heater enters the control idle phase.
The circulation pump, the vehicle's own blower, and the
operating indicator remain in operation during the control
idle period.
After the coolant has cooled down to the pre-coded
reactivation temperature, the heater resumes operation.
Diesel Operated Coolant heaters
If the coolant heater's coolant temperature is above the
rated temperature but has not yet reached the threshold
for control idle, with the temperature dropping within 10
minutes back to rated temperature (after reaching it for
the first time), the coolant heater reverts to the 9.1 kW
(31,000 Btu/hr) heating stage. Should the rated
temperature be obtained after 10 minutes, there will be
an automatic reactivation to a maximum performance
output of 7.6 kW (26,000 Btu/hr).
Gasoline Operated Coolant Heaters
The maximum heating performance of gasoline operated
coolant heaters is always 7.6 kW (26,000 Btu/hr).
3.4 Switch-off
When switching the heater off, the operation indicator on
the timer/switch extinguishes. Combustion ends and the
run-down cycle is initiated. The circulation pump and
combustion air fan, however, continue operation to cool
down the heater (run-down) and are automatically
deactivated after about 90 seconds. A reactivation of the
heater during run-down is permitted.
Room temperature control by means of the vehicle's own
heating blower may be provided in addition to employing
a room thermostat.
Page 11
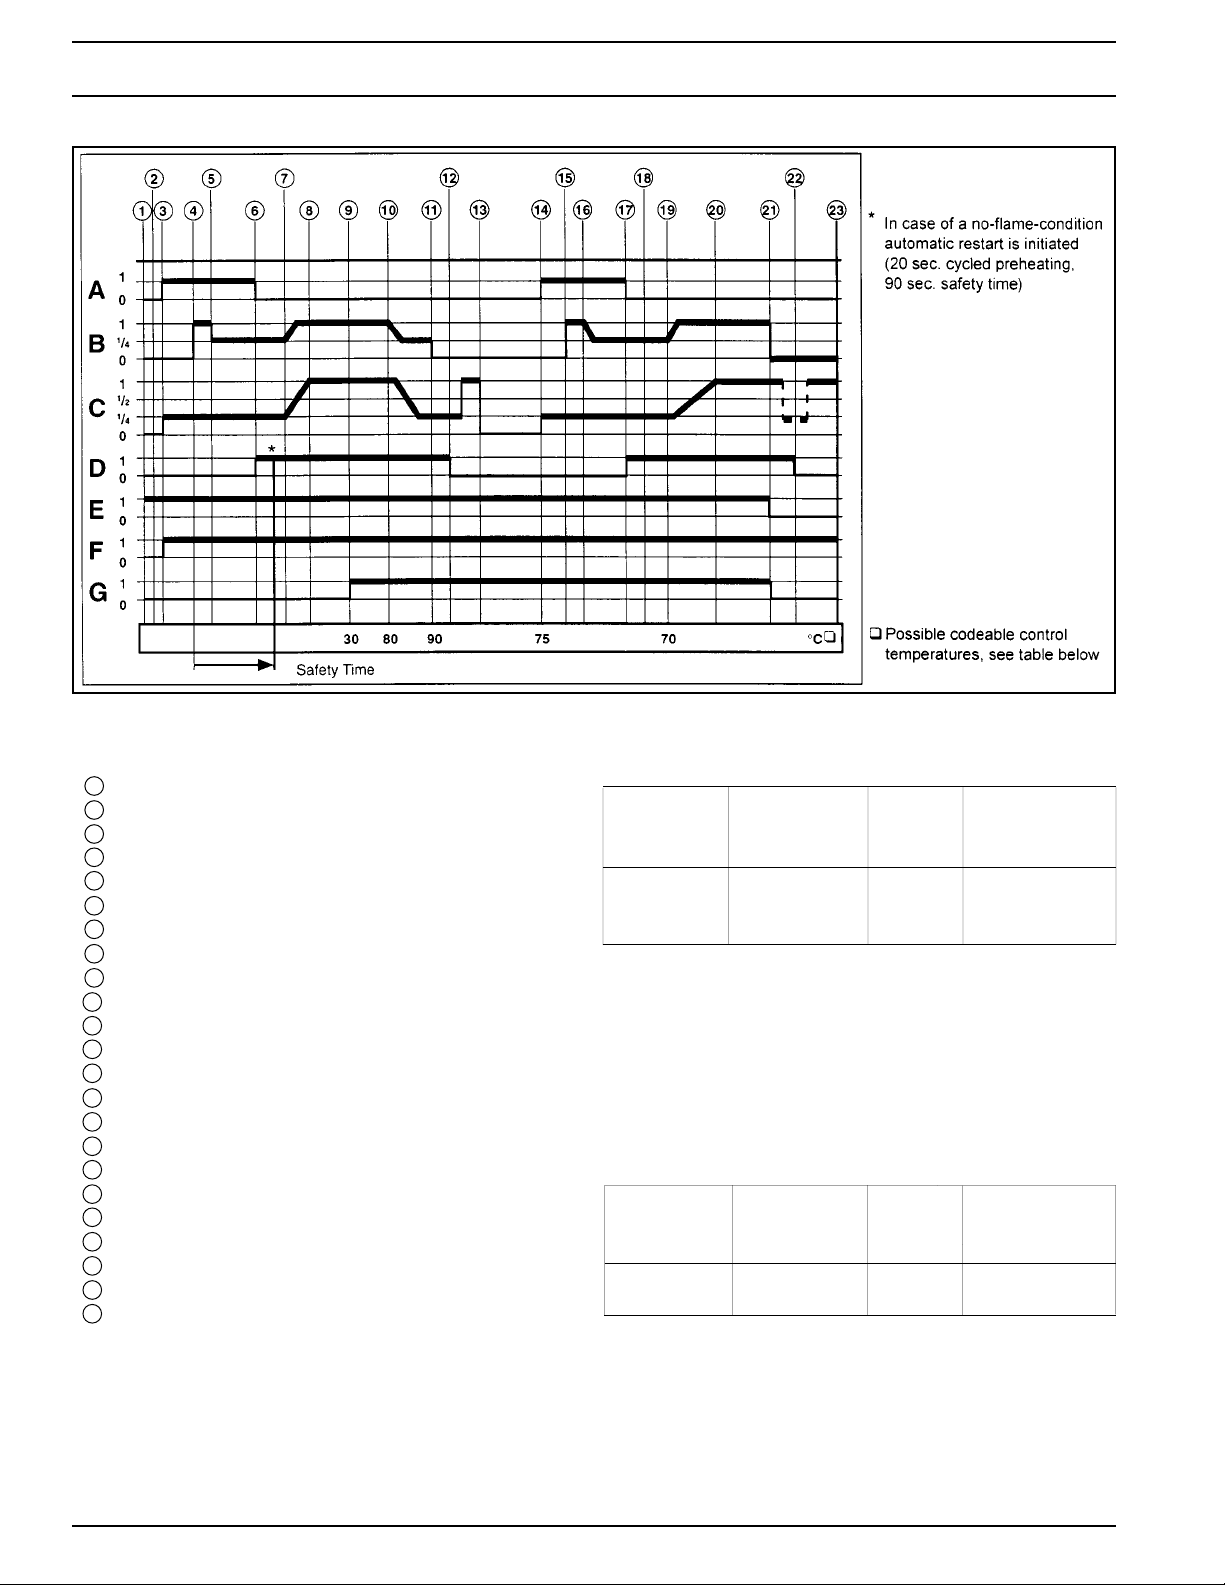
Functional Sequence for Thermo 90/90 S
1 Switch-on
2 Configuration Check
3 Preheating 40 sec. (cycled)
4 Fuel Dosing Pump Priming 5 - 7 sec. (1)
5 Fuel Dosing Pump / Part Load (1/4)
6 Flame Sensor Take-over
7 Stabilization Period
8 Full Load
9 Vehicle Blower ‘On’ (optional)
10 Control Range
11 Control Idle
12 Flame Sensor ‘cold’ (0)
13 Run-down completed
14 Preheating 15 - 20 sec. (cycled)
15 Fuel Dosing Pump Priming 5 - 7 sec. (1)
16 Fuel Dosing Pump / Part Load (1/4)
17 Flame Sensor Take-over
18 Stabilization Period
19 Coolant Temperature down
20 Full Load
21 Switch-off (run-down)
22 Flame Sensor ‘cold’ (0)
23 Run-down completed
A Glow Pin
B Fuel Dosing Pump
C Combustion Air Fan
D Flame Sensor
E Operation Indicator Light
F Circulation Pump
G Vehicle Blower (optional)
Setting of Control Temperatures - Thermo 90
Table Rated Temp. Control Reactivation
at Sensor Idle after
Control Idle
Minus to B6 80 °C 90 °C 75 °C
B6 not used 72 °C 82 °C 67 °C
Plus to B6 65 °C 75 °C 60 °C
On the enclosure and compact kits, B6 is connected to
minus (–).
Setting of Control Temperatures - Thermo 90 S
Connection of a plus (+) or minus (–) signal to the control
unit (connector X12, contact 7) will enable different
threshold values.
Table Rated Temp. Control Reactivation
at Sensor Idle after
Control Idle
Plus (+) 72 °C 82 °C 67 °C
Minus (–) 80 °C 90 °C 75 °C
On the enclosure and compact kits, connector X12,
contact 7 is connected to minus (–).
NOTE:
In the case of both heater models, the selected control
idle temperature of the heater should be below the
opening temperature of the engine thermostat.
3FUNCTIONAL DESCRIPTION
T
HERMO
90 / 90 S
3-2
Fig. 3-1 Functional Sequence
Page 12

T
HERMO
90 / 90 S
3FUNCTIONAL DESCRIPTION
3-3
3.5 Malfunctions
3.5.1 Switch-off upon Failure
In case of a no-flame condition, fuel is delivered for a
maximum of 180 seconds.
In the event of a flame-out during operation, fuel is
delivered for a maximum of 90 seconds.
Should an overheat condition exist (after response of the
temperature limiter), no fuel will be delivered.
After switch-off by low voltage protection for more than
20 seconds, there will be no fuel delivery.
Thermo 90 Thermo 90 S
12 Volt 10.5 ± 0.5 V 10.5 – 0.5 V
24 Volt 21 ± 1 V 21 – 1 V
After the correction of the fault, there will be an error
lock-out. Reset by switch-off and reactivation of the
heater.
In case of overheating, the temperature limiter has to be
reset after the unit has cooled down.
CAUTION
To avoid damage to the component, do not attempt to
reset the temperature limiter by force while hot.
3.5.2 Diagnosis after Switch-off upon Failure
(Thermo 90)
When operated with switch or digital timer, the type of
error lock-out condition is indicated by an operation
indicator light flash code while the heater is in run-down.
After five short signals the following long flash pulses are
counted:
1x No start (after 2 start attempts)
2x Flame-out during operation (repeated > 5)
3x Voltage too low
4x Premature flame detection
5x Flame sensor open or short circuit
6x Temperature sensor open or short circuit
7x Fuel Dosing pump open or short circuit or
Temperature limiter tripped (overheating)
8x Fan motor open or short circuit or wrong speed of
fan motor
9x Glow pin open or short circuit
3.5.3 Diagnosis after Switch-off upon Failure
(Thermo 90 S)
When equipped with a standard timer model 1531, an
error code will be indicated on the timer display:
F 01 No start (after 2 start attempts)
F 02 Flame-out during operation (repeated > 5)
F 03 Voltage too low or too high
F 04 Premature flame detection
F 05 Flame sensor open or short circuit
F 06 Temperature sensor open or short circuit
F 07 Fuel Dosing pump open or short circuit
F 08 Fan motor open or short circuit or wrong speed
of fan motor
F 09 Glow pin open or short circuit
F 10 Overheating
F 11 Circulation pump open or short circuit
When operated with a switch, the type of error lock-out
condition is indicated by an operation indicator light flash
code while the heater is in run-down.
After five short signals the following long flash pulses are
counted:
1x No start (after 2 start attempts)
2x Flame-out during operation (repeated > 5)
3x Voltage too low or too high
4x Premature flame detection
5x Flame sensor open or short circuit
6x Temperature sensor open or short circuit
7x Fuel Dosing pump open or short circuit
8x Fan motor open or short circuit or wrong speed of
fan motor
9x Glow pin open or short circuit
10xOverheating
11x Circulation pump open or short circuit
3.5.4 Reading and Understanding the Flash
Code
The five short flashes are only an indication that an error
code has been registered and not to be counted. Count
only the long flash pulses following the five short flashes
to obtain the correct code.
Example ( x = 1 Flash)
Error code 7x would appear as this:
xxxxx ... x ... x ... x ... x ... x ... x ... x
The sequence will repeat until the heater completes the
run-down cycle and switches off after which the error
code will be stored in the control unit memory.
See section 5. “Troubleshooting” for further information.
Page 13

T
HERMO
90 / 90 S
4TECHNICAL DATA
4-1
4. Technical Data (Standard Measure)
As long as no threshold values are given, the following
technical data is understood to include tolerances of
±10% usual for heaters at an ambient temperature of
+68 °F and at nominal voltage and conditions.
Electrical Components:
Control unit, combustion air fan motor and fuel dosing
pump, glow pin, control switch and timer are either of the
12V or 24V type.
The components temperature limiter, temperature sensor
and flame sensor are identical in the 12V and 24V units.
Coolant Heater Operation Thermo 90 / 90 S Thermo 90 / 90 S
Gasoline Diesel
Type BW 80 DW 80
Mark of conformity – S231 – S232
Heater type Coolant heater with Ferro-Tec Technology
Heat output Maximum 31,000 Btu/hr
Control range 6,800 - 26,000 Btu/hr 6,100 - 26,000 Btu/hr
Type of fuel Gasoline Diesel #1, #2 and Arctic
Fuel consumption Maximum 0.28 gal/hr
(US gallon) Control range 0.06 - 0.26 gal/hr 0.05 - 0.24 gal/hr
Rated voltage 12 Volt 12 or 24 Volt
Operating voltage range 10 ... 15 Volt 10 ... 15 or 20 ... 30 Volt
Rated power consumption Maximum 90 W
with circulation pump Control range 37 - 83 W 37 - 83 W
(without vehicle blower)
Permitted ambient temperature:
Heater: -operation –40° ... +230 °F
-storage –40° ... +266 °F
Control unit: -operation –40° ... +167 °F
-storage –40° ... +185 °F
Fuel dosing pump: -operation –40° ... +68 °F –40° ... +104 °F
-storage –40° ... +185 °F
Permitted over-pressure Maximum 29 psi.
(heat exchanger)
Heat exchanger capacity 0.04 US gal.
Maximum combustion air +104 °F
intake temperature
Coolant circuit minimum capacity 1.6 US gal.
Volume flow of circulation pump 7.25 US gal/min.
against 2.0 psi.
CO2 in exhaust 10 ... 12.0 Vol.-%
(permissible operating range)
CO2-setting values at approx. +68 °F 0 ft. 1640 ft. 3280 ft.
and geographical height above SL 10% 10.6% 11.3%
Dimensions of heater Length 12.2 in. (14.0 in.)
1)
(Tolerance ± 0.11 in.) Width 05.24 in.
Height 08.66 in.
Weight 10.5 lb
1)
Thermo 90 S with control unit mounted on heater
Page 14

4TECHNICAL DATA
T
HERMO
90 / 90 S
4-2
4. Technical Data (Metric Measure)
As long as no threshold values are given, the following
technical data is understood to include tolerances of
±10% usual for heaters at an ambient temperature of
+20 °C and at nominal voltage and conditions.
Electrical Components:
Control unit, combustion air fan motor and fuel dosing
pump, glow pin, control switch and timer are either of the
12V or 24V type.
The components temperature limiter, temperature sensor
and flame sensor are identical in the 12V and 24V units.
Coolant Heater Operation Thermo 90 / 90 S Thermo 90 / 90 S
Gasoline Diesel
Type BW 80 DW 80
Mark of conformity – S231 – S232
Heater type Coolant heater with Ferro-Tec Technology
Heat output Maximum 9.1 kW
Control range 2.0 kW - 7.6 kW 1.8 kW - 7.6 kW
Type of fuel Gasoline Diesel #1, #2 and Arctic
Fuel consumption Maximum 1.1 l/h
Control range 0.25 l/h - 1.0 l/h 0.19 l/h - 0.9 l/h
Rated voltage 12 Volt 12 or 24 Volt
Operating voltage range 10 ... 15 Volt 10 ... 15 or 20 ... 30 Volt
Rated power consumption Maximum 90 W
with circulation pump Control range 37 W - 83 W 37 W - 83 W
(without vehicle blower)
Permitted ambient temperature:
Heater: -operation –40° ... +110 °C
-storage –40° ... +130 °C
Control unit: -operation –40° ... + 75 °C
-storage –40° ... + 85 °C
Fuel dosing pump: -operation –40° ... +20 °C –40° ... +40 °C
-storage –40° ... + 85 °C
Permitted over-pressure Maximum 2.0 bar
(heat exchanger)
Heat exchanger capacity 0.15 l
Maximum combustion air +40 °C
intake temperature
Coolant circuit minimum capacity 6.00 l
Volume flow of circulation pump 1650 l/h
against 0.15 bar
CO2 in exhaust 10 ... 12.0 Vol.-%
(permissible operating range)
CO2-setting values at approx. +20 °C 0 m 500 m 1000 m
and geographical height above SL 10% 10.6% 11.3%
Dimensions of heater Length 310 mm (355 mm)
1)
(Tolerance ± 3 mm) Width 133 mm
Height 220 mm
Weight 4.8 kg
1)
Thermo 90 S with control unit mounted on heater
Page 15

T
HERMO
90 / 90 S
5TROUBLESHOOTING
5-1
5. Troubleshooting
5.1 General
This section describes troubleshooting procedures for
the Thermo 90 and Thermo 90 S coolant heaters.
CAUTION
Troubleshooting requires profound knowledge about
structure and theory of operation of heater components
and may only be performed by skilled personnel.
In cases of doubt refer to Sections 2 or 3 for functional
interrelations.
CAUTION
Troubleshooting is normally limited to the isolation of
defective components.
The following defects are not included in the
troubleshooting procedures. Before troubleshooting,
check for and eliminate these defects:
- fuel supply (plugged fuel filter or no fuel)
- corrosion on battery terminals
- blown fuses
- corrosion on electrical wiring and fuses
- corrosion on connectors
- loose contact on connectors
- wrong crimping on connectors
- shut-down initiated by temperature limiter
After any correction of a failure a functional test has to be
performed in the vehicle; before switching the heater off
and on again.
5.2 General Failure Symptoms
The following table (Fig. 5-1) lists possible, general
failure symptoms.
NOTE:
In many cases the probable cause of failure may be the
burner. Perform a visual inspection according to 5.4.
Failure Symptom Probable Cause Remedy
Heater switches No combustion after start or Control unit goes into error lock-out.
off automatically repeat start Switch heater off and on again.
Flame extinguishes during operation If a no-heating condition persists
contact your Webasto service agent.
Heater overheats due to lack/loss of Replenish coolant.
coolant After cool-down of unit, push button
of temperature limiter before
reactivation or replace temperature
limiter.
Low voltage condition for more than Check fuses, connections and charge
20 seconds state of battery.
Switch-off caused by temperature After cool-down of unit, push button
limiter of temperature limiter before
reactivation or replace temperature
limiter.
Fig. 5-1 General Failure Symptoms
Page 16

5TROUBLESHOOTING
T
HERMO
90 / 90 S
5-2
5.3 Failure Symptoms after Switch-off
upon Failure
NOTE:
When operated with a switch the type of failure is
indicated by a flash code of the operation indicator light
during heater run-down.
After five short signals the long flash pulses are counted.
The heater Thermo 90 S, with standard timer, outputs
errors to the timer display for indication (see 3.6.3).
The following table may also be used as representative
reference.
Failure Symptom Probable Cause Remedy
No function Electrical wiring, fuses Check fuses
Check battery connections
+ at A5 / – at A3 / + from A1
(Thermo 90)
+ at 12 / – at 9 / + at 3, connector X12
(Thermo 90 S)
Control unit defective Replace control unit
1 Flash pulse (F 01) Fuel system Check fuel level
(no start) Check fuel filter
Bleed fuel system
Combustion air/exhaust duct Check combustion air/exhaust duct for
foreign matter and clean as required
Burner Clean burner or replace as necessary
2 Flash pulses (F 02) Fuel supply Check fuel level
(flame-out during operation) Check fuel filter
Bleed fuel system
Burner Clean burner or replace as necessary
3 Flash pulses (F 03) Electrical power supply Check battery (load test)
(low voltage) Check electrical connections
4 Flashes (F 04) Flame sensor defective Replace flame sensor
(flame sensor
continuously hot)
5 Flash pulses (F 05) Wiring Check wiring for damage, open
(flame sensor) connections or short circuit
Flame sensor defective Replace flame sensor
6 Flash pulses (F 06) Wiring Check wiring for damage, open
(temperature sensor) connections or short circuit
Temperature sensor defective Replace temperature sensor
7 Flash pulses (F 07) Wiring Check wiring for damage, open
(fuel metering pump) connections or short circuit
Fuel metering pump defective Replace fuel metering pump
(temperature limiter) Coolant circuit (Thermo 90 only) Check coolant level
Bleed coolant circuit
Reset temperature limiter
Fig. 5-2 Failure Symptoms after Switch-off upon Failure (Part 1 of 2)
Page 17

T
HERMO
90 / 90 S
5TROUBLESHOOTING
5-3
Failure Symptom Probable Cause Remedy
8 Flash pulses (F 08) Wiring Check wiring for damage, open
(combustion air fan) connections or short circuit
Combustion air fan defective Replace replace combustion air fan
9 Flash pulses (F 09) Wiring Check wiring for damage, open
(glow pin) connections or short circuit
Glow pin defective Replace glow pin
10 Flash pulses (F 10) Coolant circuit Check coolant level
(temperature limiter Bleed coolant circuit
Thermo 90 S only) Reset temperature limiter
Wiring Check wiring for damage, open
connections or short circuit
11 Flash pulses (F 11) Wiring Check wiring for damage, open
(coolant circulation pump connections or short circuit
Thermo 90 S only) Coolant circulation pump defective Replace coolant circulation pump
Fig. 5-2 Failure Symptoms after Switch-off upon Failure (Part 2 of 2)
5.4 Storing a Fault Code in Memory
Once the Thermo 90 S completes the after run period
(cool down) initiated by a failure event, the current flash
code will be downloaded (stored) in memory.
The Thermo 90 S can store up to four error codes.
Once the memory is “full”, any additional error code will
replace the earliest code stored thereby continually
updating the error codes stored in memory with the four
most recent malfunctions.
5.4.1 Reading and Removing Error Codes
Stored in Memory using the
PC Diagnostics Kit P.N. 92542C
It is possible to read and remove (reset) stored error
codes from the Thermo 90 and Thermo 90 S control unit
memory.
This is achieved through the use of a diagnostic interface
kit connected between the heater and an IBM compatible
computer having the necessary software installed.
The PC Diagnostic Interface Kit comes complete with
interface module and cables, software and instructions
for use.
Order PC Diagnostics Kit under part number 92542C.
Several interface connection adapters are available for
use with various heater models. For this reason,
interface connection adapters are not included in the PC
Diagnostics Kit.
Order the appropriate interface connector for the heater
model(s) you will likely be working with.
For the Thermo 90, order adapter # 83661A
For the Thermo 90 S, order adapter # 92556A
In addition to working with stored fault codes, the PC
Diagnostics Kit allows you to do several other functions
such as reading values while the heater is in operation or
testing individual components. Printing out of fault codes
is also available (user supplied printer required).
For further capabilities and instructions for using the PC
Diagnostics Kit, see the instruction manual included with
the kit.
Page 18

5TROUBLESHOOTING
T
HERMO
90 / 90 S
5-4
5.5 Visual Inspection for Assessment
of Burner Condition
Burner and evaporator have specific features indicating
their need for replacement or their serviceable condition.
The following describes the criteria for a correct
inspection.
5.5.1 Burner Housing
• The starting air bore (Fig. 5-3) must not be clogged,
otherwise there will be no start.
Remedy
Carefully remove any contamination with a wire
of 1.5 mm diameter. Remove glow pin first.
Fig. 5-3 Visual Inspection, Burner Rear Wall
1 Fuel Inlet Pipe
2 O-ring
3 Flame Sensor
4 Insulation
5 Glow Pin
6 Housing
7 Screw
8 Bracket
9 Starting Air Bore
Page 19

T
HERMO
90 / 90 S
5TROUBLESHOOTING
5-5
5.5.2 Rear Wall with Metal Evaporator
• The pilot flame exit bore (Fig. 5-4) must not be
clogged, otherwise there will be no start.
Remedy
Replace burner assembly
• Cracks, delaminations, as well as black or other
discolorations of the evaporator do not cause a
burner failure and are meaningless.
• Coke deposits on the evaporator surface (except for
the pilot flame exit bore) are normal and must not be
removed. When the load changes from full load to
part load and vice versa the burner normally is
self-cleaning.
5.5.3 Combustion Chamber
• The combustion chamber (Fig. 5-5) should not be
damaged (e.g. dented).
A combustion chamber with dents may cause
insufficient combustion or coking of the heater.
Remedy
Replace burner assembly
• The air bores (Fig. 5-5) in the combustion chamber
must not be coked. Coked air bores may cause a
no-start or insufficient combustion.
Remedy
Removal of coke deposits by careful scraping.
5.5.4 Burner Assembly
• The cables of the glow pin and flame sensor must be
routed as shown in Fig. 5-3.
• The screwed connection of the housing and
combustion chamber must be secure (Fig 5-5).
• Housing and combustion chamber (Fig. 5-5) must be
connected securely without any play (check by slight
movement of fuel pipe).
• The O-ring must have a tight fit around the fuel
chamber upper edge (Fig. 5-3) and must seal
completely.
• The gap between housing edge and combustion
chamber upper edge (Fig. 5-5) must be equal
around the entire circumference.
• The insulation (4, Fig. 5-3) must be present.
Fig. 5-4 Visual Inspection, Pilot Flame Exit Bore Fig. 5-5 Visual Inspection, Burner Assembly
Page 20

T
HERMO
90 / 90 S
6FUNCTIONAL TESTS
6-1
6. Functional Tests
6.1 General
This section describes the on-vehicle and off-vehicle
testing of the heater to check for proper operation.
WARNING
The heater must not be operated, not even with timer, in
enclosed areas like garages or workshops not equipped
with an exhaust venting facility.
6.2 Adjustments
6.2.1 Adjustment of the CO2 Content
A change of the combustion air volume set by the
manufacturer may be performed by rotating the air set
screw.
Setting Procedure
Clockwise rotation: CO2 value decreases (prior to
measurement; heater must have been in operation for at
least 5 min).
Coarse setting: Rotate air set screw clockwise fully in
and then back one turn.
6.3 Components Testing
6.3.1 Temperature Sensor Resistance Check
During electrical testing of the temperature sensor using
a digital multi-meter, the following readings should be
obtained:
Resistance at 25 °C (77 °F): 990 … 1010 Ω
Test current: < 1 mA
6.3.2 Glow Pin Resistance Test
During electrical testing of the glow pin using a digital
multi-meter, the following readings should be obtained:
Glow pin: 12 Volt (red) 24 Volt (green)
Resistance at 25 °C: 0.324 … 0.360 1.3 … 1.44 Ω
(77 °F):
Test current: < 5 mA < 5 mA
6.3.3 Flame Sensor Resistance Test
During electrical testing of the flame sensor using a
digital multi-meter, the following readings should be
obtained:
Cold Test:
Resistance at 25 °C (77 °F): 2.6 … 3.4 Ω
Test current: < 5 mA
Hot test:
Resistance at 800 - 1000 °C: 12 … 15 Ω
(1472 - 1832 °F):
(ceramic rod red hot over a length of approx. 20 mm)
Test current: < 5 mA
6.3.4 Combustion Air Fan Test
The motor speed check must be performed with the
heater assembled and within the operating voltage
range. During the test, check for grinding noises.
NOTE:
For the motor speed check, the fan cover must be
removed. Prior to re-installation the gasket is to be
replaced.
CAUTION
Pay attention not to break off the locking cams, otherwise
replace cover and gasket.
Speed in control range min. 1800 rpm (±9%)
Speed in control range max. 6100 rpm (±9%)
In the event speed values are out of tolerance replace
combustion air fan (see 9.2.5).
NOTE:
On the Thermo 90 the function of the combustion air fan
can be checked with the diagnostic computer or the
components tester.
On the Thermo 90 S, the check is performed by means
of the PC heater diagnosis.
Page 21

T
HERMO
90 / 90 S
7CIRCUIT DIAGRAMS
7-1
7. Circuit Diagrams
7.1 General
The circuit diagrams (Fig. 7-2 and 7-4) show possible
circuits of the Thermo 90 heater with:
• with standard switch and harness wiring using
Deutsch connector and blower interlock wiring with
Deutsch connector – North American enclosure &
compact kits (see Fig. 7-2).
• with 7-Day 3-Program digital timer wiring without
Deutsch connector – German version (see Fig. 7-4).
The circuit diagrams (Figs. 7-3 and 7-5) show possible
circuits of the Thermo 90 S heater with:
• with standard switch and harness wiring using
Deutsch connector and blower interlock wiring with
Deutsch connector – North American enclosure &
compact kits (see Fig. 7-3).
• with 7-Day 3-Program digital timer wiring without
Deutsch connector – German version (see Fig. 7-5).
Fig. 7-1 shows the pin assignment (X1) for Thermo 90
and Thermo 90 S heaters.
CAUTION
The – poles must not be looped or reversed as some
components are controlled by negative polarity.
1 = Glow Pin +
2 = Temperature Limiter +
3 = Flame Sensor +
4 = Temperature Sensor +
5 = Circulation Pump +
6 = Combustion Air Fan +
7 = Combustion Air Fan –
8 = Circulation Pump –
9 = Temperature Sensor –
10 = Flame Sensor –
11 = Temperature Limiter –
12 = Glow Pin –
Fig. 7-1 Visual Inspection, Burner Rear Wall
View from rear
Page 22

7CIRCUIT DIAGRAMS
T
HERMO
90 / 90 S
7-2
Fig. 7-2 Circuit Diagram – Thermo 90, 12 and 24 V Enclosure and Compact Kit with Deutsch Connector
Page 23

T
HERMO
90 / 90 S
7CIRCUIT DIAGRAMS
7-3
Fig. 7-3 Circuit Diagram – Thermo 90 S, 12 and 24 V Enclosure and Compact Kit with Deutsch Connector
Page 24

7CIRCUIT DIAGRAMS
T
HERMO
90 / 90 S
7-4
Fig. 7-4 Circuit Diagram – Thermo 90, 12 and 24 V German Version with 7-Day 3-Program digital timer
Thermo 90 Basic Kit Wiring (German)
Page 25

T
HERMO
90 / 90 S
7CIRCUIT DIAGRAMS
7-5
Fig. 7-4 Circuit Diagram – Thermo 90 S, 12 and 24 V German Version with 7-Day 3-Program digital timer
Thermo 90 S Basic Kit Wiring (German)
Page 26

T
HERMO
90 / 90 S
8SERVICING
8-1
8. Servicing
8.1 General
This section describes the servicing procedures that may
be performed with the heater installed.
8.2 Work on the Heater
Prior to performing any work, it is mandatory to
disconnect the vehicle battery main lead. As long as the
heater is in operation or in run-down, the battery main
supply must not be disconnected due to the danger of
overheating and resulting in a response of the overheat
protection. When performing extensive repairs on the
heater, a complete removal is advisable. After work on
the heating circuit, a coolant mixture consisting of water
and anti-freeze must be replenished in accordance with
manufacturer instructions followed by a careful bleeding
of the heating circuit.
When performing repairs requiring a relocation of the
installation position, the relevant installation instructions
and the vehicle-specific installation proposal have to be
observed.
8.3 Work on the Vehicle
CAUTION
In the vicinity of the heater, a temperature of 130 °C
(266 °F) must not be exceeded under any circumstances
(e.g. during body paint work).
8.4 Heater Test Run
WARNING
The heater must not be operated, not even with timer, in
enclosed areas like garages or workshops not equipped
with an exhaust venting facility.
8.5 Annual Maintenance
Before or after each heating season the following
maintenance procedures should be performed to
maintain the heater's functional reliability:
Heater and Enclosure
• Clean heater exterior and interior of enclosure of any
accumulated debris and dust with compressed air or
water. Do not force water into electrical connections
or into heater.
Electrical System
• Examine electrical connections for corrosion at
connections and for security.
• Examine battery condition and clean terminals.
• Load test batteries and replace as necessary.
Combustion Air and Exhaust System
• Check exhaust and combustion air tubes for damage
and for foreign matter and contamination. Repair or
replace damaged items as necessary.
Fuel System
• Replace fuel filter P.N. 487171 if equipped.
• Examine fuel lines and fuel filter for leakage and
damage. Repair or replace damaged items as
necessary.
Coolant System
• Examine coolant circuit and circulation pump for
leakage and damage.
• Examine hoses for abrasions and cracks.
• Check coolant level and anti-freeze strength. Refer
to vehicle manufacturer’s recommendations
pertaining to coolant system maintenance.
Operational Test
• Operate the Webasto heater for 15 minutes or more.
• Check coolant and fuel connections for leakage.
Re-tighten clamps as necessary.
• Check sleeper blower operation by turning on the
thermostat. Allow the fan to cycle on and off to
ensure proper functioning.
Page 27

8SERVICING
T
HERMO
90 / 90 S
8-2
NOTE:
The manufacturer mounts the
control unit of Thermo 90 S
heater to the combustion air fan.
1 Heat Exchanger,
Vehicle Heating System
2 Blower Switch,
Vehicle Heating System
3 Relay for Vehicle System
4 Timer
5 Fuse Box in Vehicle
6 Check Valve with Drain Hole
7 T-Junction
8 Vehicle Engine
9 Heater Unit
10 Circulation Pump
11 Engine Coolant Pump
12 Radiator
13 Regulating Valve
14 Control Unit
15 Exhaust Muffler
16 Fuel Dosing Pump
17 Combustion Air Intake Line
18 Thermostat
With Check Valve and Thermostat
Without Check Valve
Fig. 8-1 Examples for Heater Installation
Page 28

T
HERMO
90 / 90 S
8SERVICING
8-3
8.6 Visual Inspections and Installation
Regulations
8.6.1 Connection to the Vehicle's Cooling
System
In thermostat circuits only thermostats opening at
< 65 °C (149 °F) are to be used.
The installation of the heater should be in a location as
low as possible to ensure static priming of the heater and
circulation pump. This applies in particular for the
circulation pump, which is not self-priming.
The heater is to be connected to the cooling system
according to Fig. 8-1. The amount of coolant in the
cooling system must be at least 6 litres (1.6 US gal.).
The coolant hoses used must meet the minimum
requirements of DIN 73411. The hoses must be routed
without kinking, and for proper priming where possible, in
an upwards direction.
Hose connections must be secured with hose clamps to
prevent slippage.
NOTE:
Hose clamps must be torqued to 1.5 Nm (clamps
previously in use) or to 5.0 Nm (new, wide clamps).
Prior to first operation of the heater or after replacement
of the coolant, bleed the cooling circuit.
Heater and lines have to be installed so that a static
priming is guaranteed.
Insufficient priming during heating operation may cause
failure due to overheating.
Proper priming is indicated by a circulation pump almost
noiseless in operation. Insufficient priming during
heating operation may cause the resettable temperature
limiter to trip.
8.6.2 Connection to the Vehicle's Fuel System
Fuel is tapped from the fuel reservoir of the vehicle or
from a separate fuel container.
Fuel lines must be of the type as described in section
8.6.2.2 of this manual.
The fuel system limitations are illustrated in Fig. 8-2.
Maximum suction height (A) = 1 m (3’ 3”)
Maximum suction length (A + B) = 2 m (6’ 6”)
Maximum delivery length (C + D) = 6 m (19’ 6”)
Maximum delivery height (D) = 3 m (9’ 9”)
Previous New
Fig. 8-2 Fuel Supply
Page 29

8SERVICING
T
HERMO
90 / 90 S
8-4
8.6.2.1 Fuel Tapping
Fuel tapping must be from the fuel reservoir or from a
separate tank (Fig. 8-3). This separate fuel tapping
avoids an influence on the pressure.
Vehicles with Gasoline Engines
In combination with carburetor equipped or fuel injected
gasoline engines with a return line, the heater's fuel
system integration must be in the return line.
Carburetor equipped gasoline engines without a return
line must have the heater integrated in the fuel supply
between the vehicle's fuel tank and fuel pump.
NOTE:
A fuel supply line can normally be identified by an
installed fuel filter.
If an exhalation vessel is installed in the vehicle's fuel
system, fuel tapping must be upstream of the exhalation
vessel.
For fuel tapping from the supply or return line only the
specific Webasto fuel tap “T”, e.g. Ident. No. 470910 for 8
mm ID.may be used. The fuel tap must be mounted so
that the air or gas bubbles can escape towards the fuel
tank. Air or gas bubbles may build up in the vehicle fuel
line in case of a leak in the vehicle's carburetor or fuel
pump or when environmental temperatures are higher
than the fuel evaporation temperature.
The fuel tap should not be located in the engine
compartment because the radiation of engine heat may
cause gas bubbles to build up in the fuel lines causing
malfunctions in the combustion operation.
When installing the heater in vehicles with fuel injection
systems, the fuel pumps location within or outside the
fuel tank must be investigated first.
If the fuel pump is fitted inside the fuel tank, the fuel may
be tapped only from the return line ensuring that the
return line is routed almost to the tank floor. If this is not
the case the fuel line may be lengthened.
In case of a fuel pump mounted externally to the tank,
the fuel tap can be located between the fuel tank and the
fuel pump.
Hole Pattern
Fig. 8-3 Webasto Fuel Tank Tap*
* Use fuel tap only on metal fuel tanks
Page 30

T
HERMO
90 / 90 S
8SERVICING
8-5
8.6.2.2 Fuel lines
Fuel lines may only be steel, copper, or plastic lines
made of unhardened, light and temperature stabilized
PA 11 or Pa 12 (e.g. Mecanyl RWTL) according to
DIN 73378.
As in most cases, if a permanently rising fuel line routing
cannot be ensured, the inner diameter must not exceed a
certain value. Starting from an inside diameter of 4 mm
(5/32 in.), air or gas bubbles accumulate resulting in
malfunctions should the lines be descending or having sags.
The diameters specified above (2 mm) ensure a nonaccumulation of air bubbles.
A descending line routing from the fuel dosing pump to
the heater should be avoided.
Loose fuel lines must be secured in order to avoid
sagging. The installation must ensure protection against
stone impacts and undue temperatures (exhaust line).
The fuel line joints are to be secured against loosening
with hose clamps.
Connection of 2 Pipes with Hose
The proper connection of fuel lines with hoses is shown
in Fig. 8-4.
8.6.3 Fuel Dosing Pump
The fuel dosing pump is a combined delivery, dosing,
and shut-off system and is subject to certain installation
criteria (see Figs. 8-2 and 8-5).
8.6.3.1 Installation Location
It is advantageous to mount the fuel dosing pump in a
cool location as near as possible to the fuel tank. The
ambient temperature must never exceed +20 °C (68 °F)
for gasoline and +40 °C (104 °F) for Diesel installations
at any time while in operation. The maximum pressure at
the tapping location must be below 1.5 bar (21.75 psi.).
Fuel dosing pump and fuel lines must not be installed in
locations exposed to heat radiated by hot vehicle
components. A heat shield is to be provided as required.
Fig. 8-4 Pipe/Hose Connection
Fig. 8-5 Fuel Dosing Pump, Installation Location
and Attachment
Page 31

8SERVICING
T
HERMO
90 / 90 S
8-6
8.6.3.2 Installation and Attachment
The fuel dosing pump is to be attached with anti-vibration
mounts. The installation location is limited according to
Fig. 8-5 to ensure sufficient self-bleeding capability. Due
to the danger of corrosion, the plug connection between
fuel dosing pump and fuel dosing pump cable loom may
only be fitted with Webasto original spare parts.
8.6.4 Fuel Filter
If there is the probability of contaminated fuel, only the
Webasto filter, part number 487171, may be used. The
use of fuel filters not designed for Webasto heater fuel
systems may cause a vapor lock or interfere with the
proper delivery of fuel.
The fuel filter can be installed anywhere between the
vertical and horizontal positions, but must be installed in
the direction of flow.
8.6.5 Combustion Air Supply
Combustion air must under no circumstances be
extracted from rooms with persons. The combustion air
inlet must not point towards the forward direction of
motion. It must be located so that no clogging by
contamination, impact of snow, or intake of splash water
is possible.
The combustion air intake line (inner diameter at least
30 mm or 1 3/16 in.) may have a length from 0.5 m to 5
m (18 in. to 16 ft.) with several bends totaling no more
than 360°. Smallest bending radius is 45 mm (1 3/4 in.).
The combustion air inlet must not be located above the
exhaust outlet.
NOTE:
The combustion air intake line is to be routed in a
downward direction. If this is not possible, a water drain
hole (4 mm or 5/32 in.dia.) must be provided at the
lowest point.
If the heater is located near the fuel tank in a common
installation compartment, combustion air must be taken
in from, and the exhaust routed to, the exterior.
The feed-through openings must be splash waterproof.
If the heater is located in a closed installation box, a vent
port of at least 6 cm2 (2 3/8 in2) is required. If the
temperature in the installation box exceeds the permitted
ambient temperature of the heater (see Technical Data),
the vent port must be enlarged.
8.6.6 Exhaust Line
The exhaust line (inner diameter 38 mm or 1.5 in.) may
have a length from 0.5 m to 5 m (18 in. to 16 ft.) and be
routed with several bends totaling no more than 360°.
Smallest bending radius is 85 mm (3 3/8 in.).
The exhaust muffler is mandatory and to be mounted
near the heater.
In order to ensure the angle of 90° ± 10°, an attachment
is required no further than 150 mm (6 in.) away
measured from the exhaust pipe end.
The exhaust pipe outlet opening must not point in the
direction of motion (see Fig. 8-6).
The exhaust pipe outlet opening must be located so as
not to allow clogging by snow or mud.
Rigid exhaust-line pipes can be made of unalloyed or
alloyed steel, but must have a minimum wall thickness of
1.0 mm (1/32 in.). Flexible exhaust pipes must be made
only of alloyed steel. The exhaust pipe is secured to the
air heater with a clamp. For further requirements, consult
Webasto Thermosystems.
Fig. 8-6 Exhaust Outlet, Direction of Flow
Page 32

T
HERMO
90 / 90 S
8SERVICING
8-7
8.7 Removal and Installation
CAUTION
It is permissible to service the heater in the installed
position only if sufficient space is available for removal
and disassembly of the various components of the
heater. Should there not be sufficient space or there
exists a possibility of damage to the components of the
heater during disassembly, the heater must be removed
from the installed position.
8.7.1 Heater, Removal and Installation
8.7.1.1 Removal
1. Disconnect battery terminal leads.
NOTE:
On the Thermo 90 S heater, with control unit flanged to
combustion air fan, only connectors X12 and X13 require
disconnection from control unit.
2. Remove top cover.
3. Disconnect plug of cable loom from heater.
4. Disconnect fuel inlet on heater.
5. Loosen hose clamps and disconnect coolant hoses
from heater.
6. Disconnect combustion air intake and exhaust outlet
tubes at heater.
7. Remove three nuts and washers from heater mount.
8. Remove heater.
8.7.1.2 Installation
1. Locate heater in installation position and secure with
three nuts and washers.
2. Reconnect coolant hoses and secure with hose
clamps. Torque tighten clamps to 5 Nm.
3. Reconnect fuel line to heater.
4. Reconnect combustion air inlet and exhaust outlet
tubes at heater.
NOTE:
On the Thermo 90 S heater, with control unit flanged to
combustion air fan, reconnect connectors X12 and
X13 to control unit.
5. Connect plug of cable loom to heater.
6. Plug on top cover and arrest.
7. Reconnect battery terminal leads.
8. Bleed fuel supply system.
9. Bleed coolant circuit.
8.7.2 Replacement of Circulation Pump
NOTE:
The procedure for replacement of the circulation pump is
identical with the heater removed or installed.
Replacement is to be performed in accordance with
instructions described in section 9.2.2.
8.7.3 Replacement of Temperature Limiter
NOTE:
The procedure for replacement of the temperature limiter
is identical with the heater removed or installed.
Replacement is to be performed in accordance with
instructions described in section 9.2.3.
8.7.4 Replacement of Temperature Sensor
NOTE:
The procedure for replacement of the temperature
sensor is identical with the heater removed or installed.
Replacement is to be performed in accordance with
instructions described in section 9.2.4.
8.7.5 Replacement of Combustion Air Fan
NOTE:
The procedure for replacement of the combustion air fan
is identical with the heater removed or installed.
Replacement is to be performed in accordance with
instructions described in section 9.2.5.
8.8 First Operation
After installation of the heater, the fuel supply system and
the cooling circuit must be thoroughly bled, observing the
vehicle manufacturer's instructions. During the test run
of the heater, all connections are to be checked for
leakage and tightness. Should the heater assume an
error lock-out condition during operation, perform
troubleshooting (see Section 5).
Page 33

T
HERMO
90 / 90 S
9REPAIR
9-1
9. Repair
9.1 General
This section describes the repairs that may be performed
on the heater Thermo 90 Thermo 90 S when removed.
Any further disassembly will void the warranty.
For re-assembly only Webasto-authorized spare parts
kits are to be used.
9.1.1 Work on Components after
Disassembly
CAUTION
All gaskets located between disassembled components
must always be replaced and discarded.
9.1.1.1 Cleaning
• All disassembled components must be cleaned.
9.1.1.2 Visual Inspection
• Examine all components for damages (cracks,
deformation, wear, etc.) and replace as necessary.
• Examine connectors and wiring for corrosion, loose
contacts, wrong crimping, etc. and repair as
necessary.
• Check terminals for corrosion and contacts for
security. Repair as necessary.
Page 34

9REPAIR
T
HERMO
90 / 90 S
9-2
9.2 Disassembly and Assembly
9.2.1 Electrical Connections (Fig. 9-1)
9.2.1.1 Disconnecting Electrical Connections
(Connection X1)
NOTE:
All electrical connections are joined in the connector.
Prior to removal of a component, the relevant electrical
connections first have to be disconnected.
On the Thermo 90 S heater with flanged combustion air
fan, connector X1 on heater and connection X12 on
control unit must be disconnected and reconnected after
making electrical connections.
1. Remove top cover from heater.
2. Using removal tool (hook end) withdraw lock wedge
from connector.
3. Using removal tool (screw driver end) press down
relevant locking tab and while keeping tab depressed
withdraw cables from connector.
9.2.1.2 Making Electrical Connections
1. Slide cable into relevant contact pocket until locked.
2. Using removal tool (screw driver end) insert lock
wedge in connector and press in until locked.
3. Fit top cover.
NOTE:
One of the newer models Thermo 90 shown. Older
models have the cable of the temperature limiter located
on the side.
Heater Thermo 90 S may have the control unit located
on the combustion air fan.
Fig. 9-1 Electrical Connections
Page 35

T
HERMO
90 / 90 S
9REPAIR
9-3
9.2.2 Replacement of Circulation Pump
9.2.2.1 Removal
1. Remove heater (see 8.7.1.1).
2. Disconnect electrical connections (see 9.2.1.1).
3. Remove screws (4, Fig. 9-2).
4. Remove clamp (3) and circulation pump (2).
5. Perform procedures on components after
disassembly (see 9.1.1).
NOTE:
One of the newer models Thermo 90 shown.
Older models have the cable of the temperature limiter
located on the side.
Heater Thermo 90 S may have the control unit located
on the combustion air fan not affecting the replacement
of the circulation pump.
9.2.2.2 Installation
1. Apply acid free grease (Vaseline) to gasket
(1, Fig. 9-2)
2. Bring circulation pump (2) in assembly position and
secure using clamp (3) and screws (4).
3. Torque screws (4) to 3 Nm + 10%.
4. Make electrical connections (see 9.2.1.2).
5. Install heater (see 8.7.1.2).
Fig. 9-2 Replacement of Circulation Pump
Page 36

9REPAIR
T
HERMO
90 / 90 S
9-4
9.2.3 Replacement of Temperature Limiter
9.2.3.1 Removal
NOTE:
Perform the following procedure only when the
temperature limiter needs replacement.
A functional check has to be performed when the
temperature limiter is installed.
1. Remove heater (see 8.7.1.1).
2. Disconnect electrical connections (see 9.2.1.1).
3. Remove clamp (2, Fig. 9-3) and withdraw protective
cap (1).
4. Using screw driver, lever off retaining clip and
remove temperature limiter (3).
5. Perform procedures on components after
disassembly (see 9.1.1).
NOTE:
Whenever the temperature limiter is removed, it must be
renewed.
9.2.3.2 Installation
CAUTION
Wrong installation will cause melting of the heat
exchanger.
1. Insert the temperature limiter (3, Fig. 9-3) into the
heat exchanger (4) and press down retaining clip.
NOTE:
Make sure the retaining clip is heard to click fully in
place. Only then will the temperature limiter be in the
proper installation position.
If clip does not audibly engage:
• clean seat of the temperature limiter on the heat
exchanger
• clean groove on heat exchanger
• insure that the locking cams are present on both
sides of the spring. Renew temperature limiter if
necessary.
2. Fit protective cap (1) and secure with clamp (2).
3. Torque tighten hose clamp with 1 Nm ± 10%.
4. Make electrical connections (see 9.2.1.2).
5. Install heater (see 8.7.1.2).
9.2.4 Replacement of Temperature Sensor
9.2.4.1 Removal
1. Remove heater (see 8.7.1.1).
2. Disconnect electrical connections (see 9.2.1.1).
WARNING
Escaping hot coolant may cause burns.
3. Unscrew temperature sensor (6, Fig. 9-3) and
remove together with O-ring (5).
4. Perform procedures on components after
disassembly (see 9.1.1).
9.2.4.2 Installation
1. Apply acid free grease (Vaseline) to O-ring
(5, Fig. 9-4).
2. Screw temperature sensor (6) with O-ring (5) into
heat exchanger (4) and torque tighten to
1.5 Nm ±10%.
3. Make electrical connections (see 9.2.1.2).
4. Install heater (see 8.7.1.2).
Page 37

T
HERMO
90 / 90 S
9REPAIR
9-5
NOTE:
One of the newer models Thermo 90 shown.
Older models have the cable of the temperature
limiter located on the side.
Heater Thermo 90 S may have the control unit
located on the combustion air fan not affecting the
replacement of the temperature limiter and
temperature sensor.
Fig. 9-3 Replacement of Temperature Limiter and Temperature Sensor
Page 38

9REPAIR
T
HERMO
90 / 90 S
9-6
9.2.5 Replacement of Combustion Air Fan
9.2.5.1 Removal
1. Remove heater (see 8.7.1.1).
2. Disconnect electrical connections (see 9.2.1.1).
3. Remove screws (2, Fig. 9-4).
4. Pull combustion air fan (1) from burner head (4) and
remove together with profiled packing ring (3).
NOTE:
On heater Thermo 90 S with flanged control unit remove
control unit as required.
5. Perform procedures on components after
disassembly (see 9.1.1).
9.2.5.2 Installation
NOTE:
Locate packing ring (3, Fig. 9-4) properly; do not
squeeze.
1. Bring combustion air fan (1) with new profiled
packing ring (3) in assembly position and secure
with screws (2).
2. Torque tighten screws (2) with 3 Nm ± 10%.
NOTE:
On heater Thermo 90 S with flanged control unit install
control unit as required.
3. Make electrical connections (see 9.2.1.2).
4. Install heater (see 8.7.1.2).
Fig. 9-4 Replacement of Combustion Air Fan
Page 39

T
HERMO
90 / 90 S
9REPAIR
9-7
9.2.6 Replacement of Burner, Flame Sensor
and Glow Pin
9.2.6.1 Removal
1. Remove heater (see 8.7.1.1).
2. Remove combustion air fan (see 9.2.5.1).
3. Remove screw (5, Fig. 9-5) and washer (4).
4. Remove nuts (10) and withdraw bracket.
5. Withdraw grommets (11 and 12) from slots in
housing of combustion tube (3).
6. Withdraw grommet (13) and burner (1) from burner
(1) and remove.
7. Pull flame sensor (7) and glow pin (6) out of burner
(1) and remove.
8. Perform burner visual inspection for assessment of
condition (see 9.1.1).
9. Perform procedures on components after
disassembly (see 9.1.1).
9.2.6.2 Installation
1. Locate swirl ring (2, Fig. 9-5) on burner (1).
2. Carefully and fully insert flame sensor (7) and glow
pin (6) into burner against stops and slide grommets
(11 and 12) down slots in housing of combustion
tube (3).
3. Position burner (1) and grommet (13) in burner
head (3).
CAUTION
When performing the following step, ensure that cables
of flame sensor (7) and glow pin (6) are routed as shown
in figure.
4. Slide insulation (9) onto bracket and locate bracket
(8) in assembly position.
NOTE:
Route cables of flame sensor and glow pin as shown in
figure above.
5. Secure bracket (8) using nuts (10). Torque nuts to
3 Nm ± 10%.
6. Secure fuel line with screw (5) and washer (4).
Torque screw to 3 Nm ± 10%
7. Mount combustion air fan (see 9.2.4.2).
8. Make electrical connections (see 9.2.1.2).
9. Install heater (see 8.7.1.2).
Page 40

9REPAIR
T
HERMO
90 / 90 S
9-8
Fig. 9-5 Replacement of Burner, Flame Sensor, and Glow Pin
NOTE:
One of the newer models of
Thermo 90 shown.
Older models have the
cable of the temperature
limiter located on the side.
Illustration is also applicable
to the Thermo 90 S.
Page 41

T
HERMO
90 / 90 S
9REPAIR
9-9
9.2.7 Replacement of Burner Head
9.2.7.1 Removal
1. Remove heater (see 8.7.1.1).
2. Remove combustion air fan (see 9.2.5.1).
3. Remove burner, flame sensor and glow pin
(see 9.2.5.1).
4. Remove attachment screw of V-clamp (2, Fig. 9-6)
and pull off clamp.
5. Withdraw burner head (1) from heat exchanger (3)
and remove.
6. Perform procedures on components after
disassembly (see 9.1.1).
NOTE:
Carefully inspect the gasket located at the joint between
the alloy burner head and stainless steel burner tube
especially at the area of the exhaust outlet. Any
deterioration of this gasket will require the replacement of
the burner head/tube assembly.
NOTE:
One of the newer models of Thermo 90 shown.
Older models have the cable of the temperature limiter
located on the side. Illustration is also applicable to the
Thermo 90 S.
9.2.7.2 Installation
NOTE:
Burner head and exhaust outlet pipe can still be aligned
during installation in vehicle.
1. Insert burner head (1, Fig. 9-6) into heat exchanger
(3), align as necessary and secure with V-clamp (2).
2. Torque attachment screw of V-clamp to 3 Nm ± 10%
as required.
3. Install burner, flame sensor, and glow pin
(see 9.2.6.2).
4. Install combustion air fan (see 9.2.5.2).
5. Install heater (see 8.7.1.2).
Fig. 9-6 Replacement of Burner Head
Page 42

9REPAIR
T
HERMO
90 / 90 S
9-10
9.2.8 Replacement of Heat Exchanger
9.2.8.1 Removal
1. Remove heater (see 8.7.1.1).
2. Remove circulation pump (see 9.2.2.1).
3. Remove temperature limiter (see 9.2.3.1).
4. Remove temperature sensor (see 9.2.4.1).
5. Remove combustion air fan (see 9.2.5.1).
6 Remove burner, flame sensor, and glow pin
(see 9.2.6.1).
7. Remove burner head (see 9.2.7.1).
8. Remove connector and connector housing.
9. Perform procedures on components after
disassembly (see 9.1.1).
9.2.8.2 Installation
1. Clip connector housing onto heat exchanger and
engage connector in connector housing.
2. Install burner head (see 9.2.7.2).
3. Install burner, flame sensor, and glow pin
(see 9.2.6.2).
4. Install combustion air fan (see 9.2.5.2).
5. Install temperature sensor (see 9.2.4.2).
6. Install temperature limiter (see 9.2.3.2).
7. Install circulation pump (see 9.2.2.2).
8. Install heater (see 8.7.1.2).
Page 43

Webasto Thermosystems Inc.
North America
3333 John Conley Drive
Lapeer, MI 48446
Phone (810) 245-2400
Toll-free (800) HEATER-1
Fax (810) 664-7720
Technical Assistance Hotline
USA: (800) 555-4518
Canada: (800) 667-8900
Rev. 03/2000 907400
www.webasto.com
 Loading...