

Page 1

Thermo 300.102
Installation Instructions
for use with
The Detroit Diesel
Series 4000 Engine
Coolant Heater
Page 2

TABLE OF CONTENTS
I
Table of Contents
1. Introduction
1.1 Scope and Purpose . . . . . . . . . . . . . . . . . . . . . . . . . . . . . . . . . . . . . . . . . . . . . . . . . . . . 1-1
1.2 Meaning of Warnings, Cautions and Notes . . . . . . . . . . . . . . . . . . . . . . . . . . . . . . . . . . 1-1
1.3 Additional Documentation to be Used . . . . . . . . . . . . . . . . . . . . . . . . . . . . . . . . . . . . . . 1-1
1.4 General Safety Regulations and Information . . . . . . . . . . . . . . . . . . . . . . . . . . . . . . . . . 1-1
1.4.1 General Safety Notes . . . . . . . . . . . . . . . . . . . . . . . . . . . . . . . . . . . . . . . . . . . 1-1
2. General Description
2.1 General Description . . . . . . . . . . . . . . . . . . . . . . . . . . . . . . . . . . . . . . . . . . . . . . . . . . . . 2-1
3. Functional Description
3.1 Switching On . . . . . . . . . . . . . . . . . . . . . . . . . . . . . . . . . . . . . . . . . . . . . . . . . . . . . . . . . 3-1
3.2 Heating Operation . . . . . . . . . . . . . . . . . . . . . . . . . . . . . . . . . . . . . . . . . . . . . . . . . . . . . 3-1
3.3 Switching Off . . . . . . . . . . . . . . . . . . . . . . . . . . . . . . . . . . . . . . . . . . . . . . . . . . . . . . . . . 3-1
3.4 Power Save . . . . . . . . . . . . . . . . . . . . . . . . . . . . . . . . . . . . . . . . . . . . . . . . . . . . . . . . . . 3-1
4. Technical Data
4.1 General Information . . . . . . . . . . . . . . . . . . . . . . . . . . . . . . . . . . . . . . . . . . . . . . . . . . . . 4-1
4.2 Thermo 300 Heater Data . . . . . . . . . . . . . . . . . . . . . . . . . . . . . . . . . . . . . . . . . . . . . . . . 4-1
4.2.1 Thermo 300.102 Heater Dimensions . . . . . . . . . . . . . . . . . . . . . . . . . . . . . . . . 4-2
4.3 U 4814 & U 4852 Coolant Pump Data . . . . . . . . . . . . . . . . . . . . . . . . . . . . . . . . . . . . . . 4-3
4.3.1 Coolant Circulation Pump U4814 Dimensions . . . . . . . . . . . . . . . . . . . . . . . . . 4-3
4.3.2 Coolant Circulation Pump U4852 Dimensions . . . . . . . . . . . . . . . . . . . . . . . . . 4-4
5. Installation
5.1 General Information . . . . . . . . . . . . . . . . . . . . . . . . . . . . . . . . . . . . . . . . . . . . . . . . . . . . 5-1
5.2 Installation Locations . . . . . . . . . . . . . . . . . . . . . . . . . . . . . . . . . . . . . . . . . . . . . . . . . . . 5-1
5.3 Mounting the Heater . . . . . . . . . . . . . . . . . . . . . . . . . . . . . . . . . . . . . . . . . . . . . . . . . . . 5-1
5.4 Mounting the Coolant Circulation Pump . . . . . . . . . . . . . . . . . . . . . . . . . . . . . . . . . . . . . 5-1
5.5 Exhaust Pipe Connection . . . . . . . . . . . . . . . . . . . . . . . . . . . . . . . . . . . . . . . . . . . . . . . 5-2
5.6 Combustion Air Supply . . . . . . . . . . . . . . . . . . . . . . . . . . . . . . . . . . . . . . . . . . . . . . . . . 5-2
5.7 Plumbing into the Coolant System . . . . . . . . . . . . . . . . . . . . . . . . . . . . . . . . . . . . . . . . . 5-3
5.7.1 General Information . . . . . . . . . . . . . . . . . . . . . . . . . . . . . . . . . . . . . . . . . . . . . 5-3
5.7.2 Supplemental Heating Schematic . . . . . . . . . . . . . . . . . . . . . . . . . . . . . . . . . . 5-4
5.7.3 Supply and Return Plumbing Connection Points . . . . . . . . . . . . . . . . . . . . . . . 5-5
5.7.4 Example of a Heater Installation . . . . . . . . . . . . . . . . . . . . . . . . . . . . . . . . . . . 5-6
5.8 Fuel System . . . . . . . . . . . . . . . . . . . . . . . . . . . . . . . . . . . . . . . . . . . . . . . . . . . . . . . . . 5-7
5.8.1 General Information . . . . . . . . . . . . . . . . . . . . . . . . . . . . . . . . . . . . . . . . . . . . . 5-7
5.8.2 Fuel Supply . . . . . . . . . . . . . . . . . . . . . . . . . . . . . . . . . . . . . . . . . . . . . . . . . . . 5-7
5.8.3 Fuel Filter . . . . . . . . . . . . . . . . . . . . . . . . . . . . . . . . . . . . . . . . . . . . . . . . . . . . 5-8
5.9 Wiring Connections . . . . . . . . . . . . . . . . . . . . . . . . . . . . . . . . . . . . . . . . . . . . . . . . . . . . 5-9
5.9.1 General Information . . . . . . . . . . . . . . . . . . . . . . . . . . . . . . . . . . . . . . . . . . . . . 5-9
5.9.2 Timer and Switch Connections . . . . . . . . . . . . . . . . . . . . . . . . . . . . . . . . . . . . 5-9
5.9.3 Timer and Switch Installation . . . . . . . . . . . . . . . . . . . . . . . . . . . . . . . . . . . . . . 5-9
5.9.4 Coolant Pump Connections . . . . . . . . . . . . . . . . . . . . . . . . . . . . . . . . . . . . . . . 5-10
WEBASTO THERMO 300
Page 3

TABLE OF CONTENTS WEBASTO THERMO 300
II
5.9.5 Wiring Diagram - with Switch . . . . . . . . . . . . . . . . . . . . . . . . . . . . . . . . . . . . . . 5-11
5.9.6 Wiring Diagram - with 7-Day Digital Timer Model 1531 . . . . . . . . . . . . . . . . . . . 5-12
5.10 Initial Operation . . . . . . . . . . . . . . . . . . . . . . . . . . . . . . . . . . . . . . . . . . . . . . . . . . . . . . . 5-13
6. Basic Troubleshooting
6.1 General Information . . . . . . . . . . . . . . . . . . . . . . . . . . . . . . . . . . . . . . . . . . . . . . . . . . . . 6-1
6.2 Operational Malfunction Symptoms - Reading the Flash Code . . . . . . . . . . . . . . . . . . . . 6-1
6.2.1 Reading a Malfunction Code with the Digital Timer Model 1531 Installed . . . . . 6-1
6.2.2 Malfunction Codes Stored in Memory . . . . . . . . . . . . . . . . . . . . . . . . . . . . . . . 6-2
6.3 Operational Malfunction Code via Flash/ Malfunction Code . . . . . . . . . . . . . . . . . . . . . . 6-3
6.4 Reading and Removing Malfunction Codes Stored in Memory with the Webasto
PC Diagnostics Kit and Adapter . . . . . . . . . . . . . . . . . . . . . . . . . . . . . . . . . . . . . . . . . . . 6-4
8. Spare Parts List
8 Spare Parts List . . . . . . . . . . . . . . . . . . . . . . . . . . . . . . . . . . . . . . . . . . . . . . . . . . . . . . . 8-1
9. Warranty Policy
9.1 Warranty Policy . . . . . . . . . . . . . . . . . . . . . . . . . . . . . . . . . . . . . . . . . . . . . . . . . . . . . . . 8-1
List of Figures
2-1 . . . . . . . . . . . . . . . . . . . . . . . . . . . . . . . . . . . . . . . . . . . . . . . . . . . . . . . . . . . . . . . . . . . 2-1
3-1 . . . . . . . . . . . . . . . . . . . . . . . . . . . . . . . . . . . . . . . . . . . . . . . . . . . . . . . . . . . . . . . . . . . 3-3
4-1 . . . . . . . . . . . . . . . . . . . . . . . . . . . . . . . . . . . . . . . . . . . . . . . . . . . . . . . . . . . . . . . . . . . 4-2
4-2 . . . . . . . . . . . . . . . . . . . . . . . . . . . . . . . . . . . . . . . . . . . . . . . . . . . . . . . . . . . . . . . . . . . 4-3
4-3 . . . . . . . . . . . . . . . . . . . . . . . . . . . . . . . . . . . . . . . . . . . . . . . . . . . . . . . . . . . . . . . . . . . 4-4
5-1 . . . . . . . . . . . . . . . . . . . . . . . . . . . . . . . . . . . . . . . . . . . . . . . . . . . . . . . . . . . . . . . . . . . 5-1
5-2 . . . . . . . . . . . . . . . . . . . . . . . . . . . . . . . . . . . . . . . . . . . . . . . . . . . . . . . . . . . . . . . . . . . 5-2
5-3 . . . . . . . . . . . . . . . . . . . . . . . . . . . . . . . . . . . . . . . . . . . . . . . . . . . . . . . . . . . . . . . . . . . 5-3
5-4 . . . . . . . . . . . . . . . . . . . . . . . . . . . . . . . . . . . . . . . . . . . . . . . . . . . . . . . . . . . . . . . . . . . 5-4
5-5 . . . . . . . . . . . . . . . . . . . . . . . . . . . . . . . . . . . . . . . . . . . . . . . . . . . . . . . . . . . . . . . . . . . 5-4
5-6 . . . . . . . . . . . . . . . . . . . . . . . . . . . . . . . . . . . . . . . . . . . . . . . . . . . . . . . . . . . . . . . . . . . 5-5
5-7 . . . . . . . . . . . . . . . . . . . . . . . . . . . . . . . . . . . . . . . . . . . . . . . . . . . . . . . . . . . . . . . . . . . 5-7
5-8 . . . . . . . . . . . . . . . . . . . . . . . . . . . . . . . . . . . . . . . . . . . . . . . . . . . . . . . . . . . . . . . . . . . 5-8
5-9 . . . . . . . . . . . . . . . . . . . . . . . . . . . . . . . . . . . . . . . . . . . . . . . . . . . . . . . . . . . . . . . . . . . 5-9
5-10 . . . . . . . . . . . . . . . . . . . . . . . . . . . . . . . . . . . . . . . . . . . . . . . . . . . . . . . . . . . . . . . . . . . 5-10
5-11 . . . . . . . . . . . . . . . . . . . . . . . . . . . . . . . . . . . . . . . . . . . . . . . . . . . . . . . . . . . . . . . . . . . 5-10
5-12 . . . . . . . . . . . . . . . . . . . . . . . . . . . . . . . . . . . . . . . . . . . . . . . . . . . . . . . . . . . . . . . . . . . 5-11
5-13 . . . . . . . . . . . . . . . . . . . . . . . . . . . . . . . . . . . . . . . . . . . . . . . . . . . . . . . . . . . . . . . . . . . 5-12
7-1 . . . . . . . . . . . . . . . . . . . . . . . . . . . . . . . . . . . . . . . . . . . . . . . . . . . . . . . . . . . . . . . . . . . 7-2
List of Tables
3-1 . . . . . . . . . . . . . . . . . . . . . . . . . . . . . . . . . . . . . . . . . . . . . . . . . . . . . . . . . . . . . . . . . . . 3-4
4-1 Data . . . . . . . . . . . . . . . . . . . . . . . . . . . . . . . . . . . . . . . . . . . . . . . . . . . . . . . . . . . . . . . 4-1
4-2 Data . . . . . . . . . . . . . . . . . . . . . . . . . . . . . . . . . . . . . . . . . . . . . . . . . . . . . . . . . . . . . . . 4-3
Page 4

WEBASTO THERMO 300 1INTRODUCTION
1-1
1. Introduction
1.1 Scope and Purpose
This manual is intended to support authorized Webasto
trained distributors, dealers and personnel in the
installation and servicing of Thermo 300 coolant heaters.
Webasto Thermosystems, Inc. does not recommend the
installation and servicing of Webasto products by
untrained, unauthorized personel or end-users.
Installations and servicing of Webasto products by
untrained, unauthorized personnel and end-users will
release Webasto Thermosystems, Inc. and Webasto
authorized distributors, dealers and personnel from
responsibility for damage to Webasto product or
collateral property and personal injury.
Any use, operation, installation, modification or
application of the product not described in Webasto
manuals, or subjecting the product to extreme or unusual
conditions beyond the limits of specified performance
characteristics is misuse of the product.
Failure to comply with all installation instructions is a
misuse of Webasto product. The same applies for
repairs without using genuine Webasto service parts.
This will void the coolant heaters “Official Marks of
Conformity.”
1.2 Meaning of Warnings, Cautions,
and Notes
Warnings, Cautions and Notes in this manual have the
following meaning:
1.3 Additional Documentation to be
Used
This manual contains all of the information and
procedures necessary for the installation of the
Thermo 300 heater.
The use of additional documentation is normally not
required. Vehicle specific installation guides (when
available) may be used as complimentary information
only.
1.4 General Safety Regulations and
Information
The general safety regulations for the prevention of
accidents and relevant operating safety instructions must
be observed at all times.
The specific safety regulations applicable to this manual
are highlighted in the individual chapters by Warnings,
Cautions and Notes.
1.4.1 General Safety Notes
The heater may only be installed in vehicles, with a
minimum coolant capacity of 2.6 US Gal. (10 litres).
The heater must not be installed in the passenger
compartments of the vehicle. Should the heater be
installed in such a compartment, the installation box must
be sealed tight against the vehicle interior. There must
be sufficient ventilation of the installation box from the
exterior in order not to exceed a maximum temperature
of 140 °F (60 °C) in the installation box. Excessive
temperatures may cause malfunctions.
NOTE:
This heading is used to highlight and draw specific
attention to information.
CAUTION
This heading is used to highlight that
non-compliance with instructions or procedures may
cause damage to equipment.
WARNING
This heading is used to highlight that
non-compliance with instructions or procedures may
cause injuries or lethal accidents to personnel.
WARNING
Due to the danger of poisoning and suffocation, the
heater must not be operated in enclosed areas, such as
garages or workshops, without an exhaust venting
system, not even if the start-up is activated by the timer
or remote start device.
At filling stations and fuel depots the heater must be
switched off as there is a potential danger of explosions.
Where flammable fumes or dust may build up (e.g. in the
vicinity of fuel, coal, wood, cereal grain deposits or
similar situations) the heater must be switched off to
prevent explosions.
Page 5

1INTRODUCTION WEBASTO THERMO 300
1-2
In the vicinity of the coolant heater, a temperature of
185 °F (85 °C) must not be exceeded under any
circumstances (e.g. during body paint work). A violation
of this temperature limit may cause permanent damage
to the electronics.
When checking the coolant level, proceed in accordance
with the vehicle manufacturer’s instructions.
The coolant in the heating circuit of the heater must
contain a minimum of 10% of a quality brand glycol
based anti-freeze.
Extracting combustion air from the vehicle interior is not
permissible under any circumstance.
The exhaust line outlet is to be positioned below the
vehicle floor, to the nearest possible location of the
vehicle’s left side. Exhaust pipes must be routed so that
exhaust fumes will not penetrate into the vehicle’s
interior.
The function of any parts vital for vehicle operation must
not be impaired. Condensation accumulation in the
exhaust line must be directly drained. A condensation
drain hole may be provided as required.
Electrical lines, switch gear, and control gear of the
heater must be located in the vehicle so that their proper
function cannot be impaired under normal operating
conditions.
The coolant heater may only be operated within the
specified operating voltage range designated by type.
The coolant heater may only be operated with the
specified fuel (Diesel 1, Diesel 2, Arctic grade, Kerosene
and certain military spec. fuels).
For the routing of fuel lines, the following important
regulations must be adhered to:
• Fuel lines are to be installed in such a way that they
remain unaffected by torsional stresses created by
vehicle and engine movement. They must be
protected against mechanical damage. Fuel lines
must be securely fastened to the vehicle every 12
inches (30 cm.) or less along the total length from
heater to fuel tank. Fuel-carrying parts are to be
protected against excessive heat and are to be
installed so that any dripping or evaporating fuel can
neither accumulate nor be ignited by hot components
or electrical equipment.
• In buses, fuel lines are not to be located in the
passenger area or in the driver’s compartment.
Fuel supply must not be by means of gravity or
pressurization of the fuel tank.
• The fuel tank must either be equipped with a vent
cap or be ventilated in another way (ventilation line).
• The operational state of the heater, i.e. an indication
“On” or “Off”, must be clearly visible to the operator.
Page 6
2GENERAL DESCRIPTION
2-1
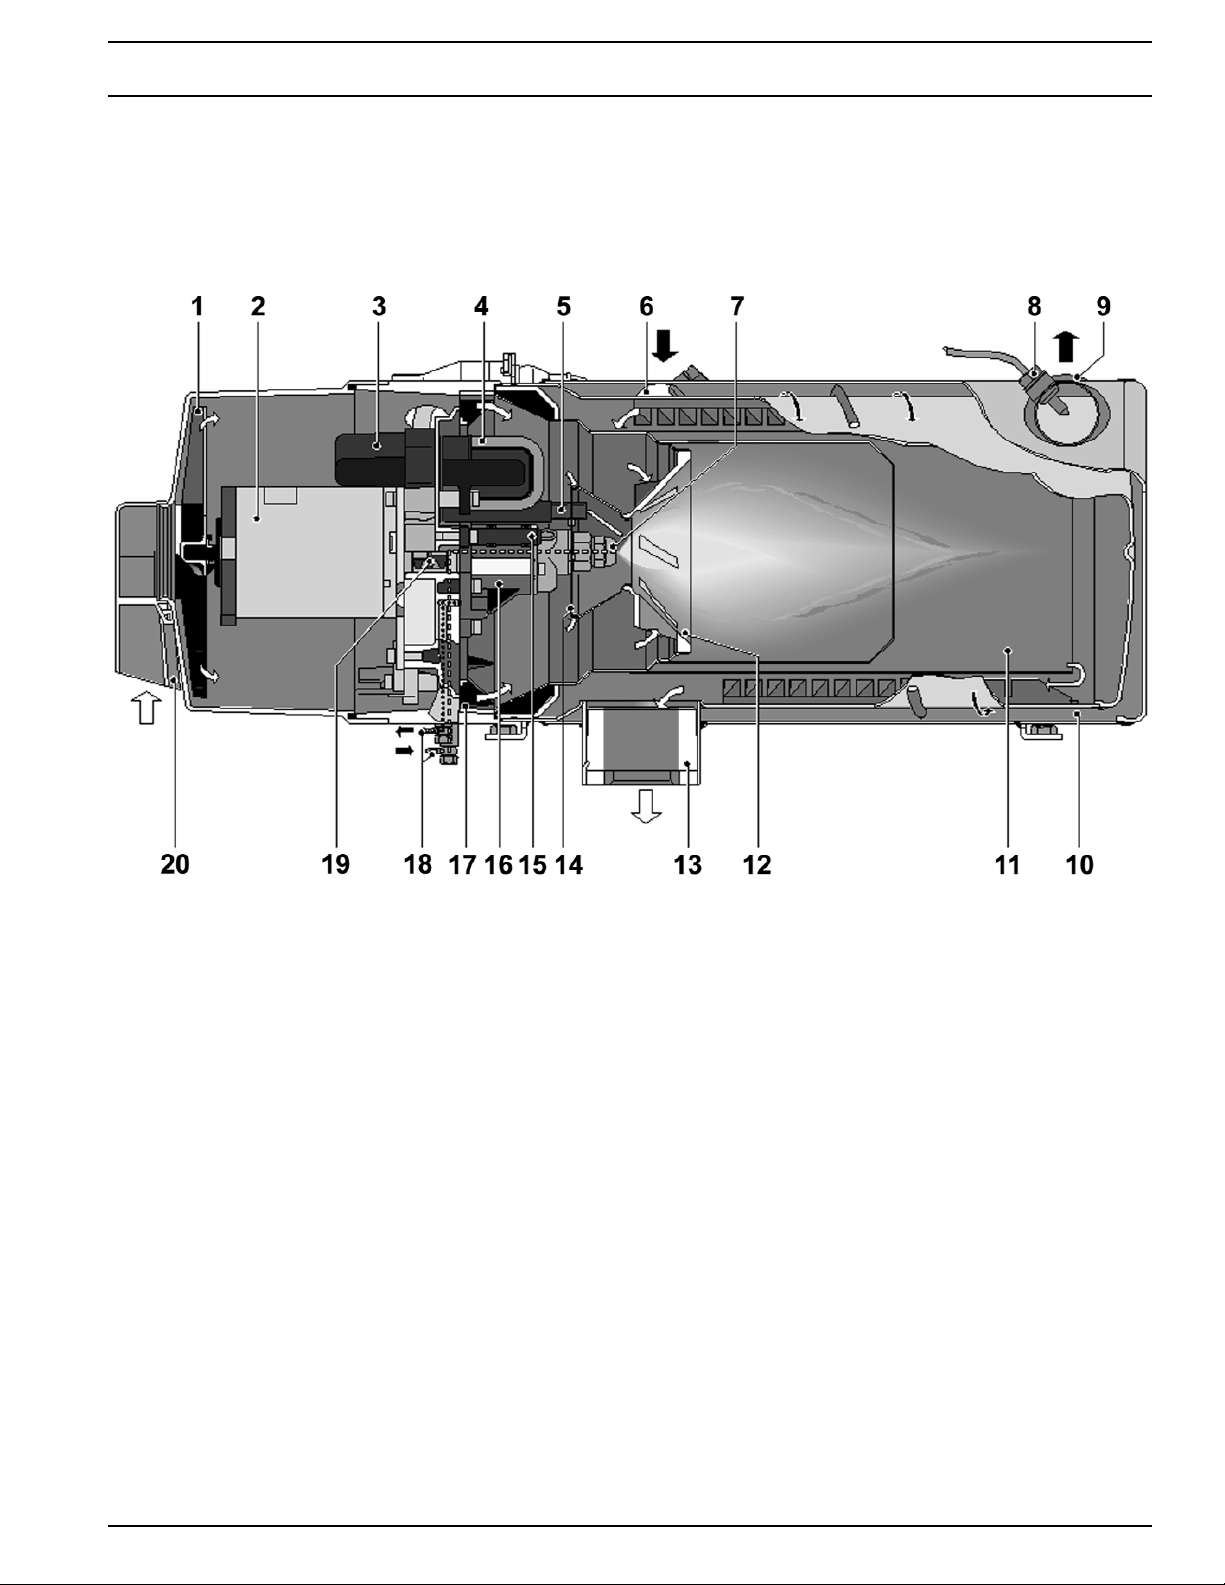
1 Combustion air fan
2 Motor
3 Electronic control unit
4 Electronic ignition coil
5 Ignition electrodes
6 Water pipes
7 Fuel nozzle
The Webasto Thermo 300 heater has been designed for use on large displacement diesel engines where a
high degree of operational flexibility is desired.
Additionally, the Thermo 300 heaters supplied to Detroit Diesel Corporation have been optimized to meet the
specific requirements of the Series 4000 Detroit Diesel engine.
The Webasto Thermo 300 heater is designed to:
1. Preheat Engine block of liquid cooled engines to help ensure reliable starting in cold weather and to reduce cold
start wear and emissions (white smoke).
2. Boost heating levels with the engine running. The heater will boost the charge-air cooling system in cold weather
when an engine is running at light loads or idling while helping to eliminate white smoke and fuel accumulation in
the vehicle exhaust system.
2. General Description
2.1 General Description
Fig. 2-1: Major Components of the Thermo 300 Coolant Heater
8 Temperature sensor
9 Overheat Thermostat
10 Heat exchanger
11 Combustion chamber
12 Combustion air swirler
13 Exhaust pipe
14 Photo disc
15 Flame detector
16 Fuel pump w/ solenoid valve
17 Combustion air adjusting shutter
18 Fuel supply/ return pipes
19 Coupler
20 Combustion air intake
WEBASTO THERMO 300
Page 7

2GENERAL DESCRIPTION WEBASTO THERMO 300
2-2
Page 8

WEBASTO THERMO 300 3FUNCTIONAL DESCRIPTION
3-1
3. Functional Description
Activation and deactivation is by means of a
• switch
• timer
dependent on the type of installation.
For monitoring operation an operating indicator light is provided.
Switch off initiates the rundown procedure (see ”Switch off”).
The heaters may be
• operated with power save for reduced fuel consumption (see circuit diagram)
• equipped or retrofitted with nozzle preheating for extreme low temperatures.
3.1 Switching On
Upon switching on, an operating indicator light will illuminate.
Combustion air fan, fuel pump and circulation pump start operation. (If fitted and temperature is < 0 °C (< 32 °F)
nozzle preheating is also activated).
After approximately 12 seconds a high voltage ignition spark is generated at the electrode tips. Approximately 1
second later the solenoid valve in the fuel pump opens and the nozzle sprays fuel into the combustion chamber to be
ignited by the spark at the electrode tips. A photo control device detects a flame in the combustion chamber and
deactivates the ignition system (Combustion process is self-sustaining).
3.2 Heating Operation
After reaching operating temperature the control unit takes over to provide controlled operation by activation and
deactivation of the burner in order to maintain a nearly constant temperature of the heat exchanger.
A rise in temperature above the upper switching point makes the solenoid valve in the fuel pump shut off the fuel
supply and initiates the rundown procedure. The flame extinguishes, the combustion air fan and the circulation pump
continuing their operation. After approximately 90 seconds rundown is completed with deactivation of the combustion
air fan.
The circulation pump remains in operation during the control idle period. The operating indicator light is on.
3.3 Switch Off
Switching off the heater stops combustion. The operating indicator light goes out and the rundown procedure
commences.
The combustion air fan and circulation pump are deactivated after approximately 90 to 120 seconds.
Reactivation of the heater during rundown is permitted.
3.4 Power Save
With the power save feature on, the control temperatures of the heating circuit are kept low.
This results in a reduced heat radiation loss when limited heating performance is required (e.g. in heat hold
operation) and reduces fuel consumption.
Page 9

3FUNCTIONAL DESCRIPTION WEBASTO THERMO 300
3-2
Page 10
WEBASTO THERMO 300 4TECHNICAL DATA
4-1
4. Technical Data
4.1 General Information
Where no threshold values are specified, technical data are understood to include standard tolerances for heater
units of ± 10% at ambient temperature of + 20 °C (+ 68 °F) and at nominal voltage.
Electrical components:
Control unit, fan and circulation pump motors, solenoid valve, igniter box, heater cartridge, nozzle pre-heater and
timer are 24V components. Temperature limiter, flame sensor, temperature sensor and switches are voltage
independent components.
Heater
Type
Mark of conformity
Heater design principle
Heat output kW/h (BTU/h)
Fuel
Fuel consumption kg/h (US. Gal/h)
Rated nominal voltage V
Operating voltage V
Nominal power consumption W
(without circulation pump)
Permissible operating ambient °C (°F)
temperature range
(heater, control unit, circulation pump)
Permissible storage temperature °C (°F)
Permissible operating pressure bar (psi)
of coolant system
Heat exchanger capacity l (US. Gal)
Minimum capacity of circuit l (US. Gal)
CO
2
in exhaust at nominal voltage Vol.-%
Dimensions of heater length
width
height
Weight kg (lb.)
Thermo 300
DW 300.
~ S229
High pressure fuel atomizing nozzle
30 (104,000)
Diesel #1, Diesel #2, Arctic grade and Kerosene
3.3 (1.2)
24
20 ... 28
110
- 40 ... + 60 (- 40 … + 140)
+ 85 max. (+ 185)
0.4 ... 2.0 (06 … 29)
1.8 (0.475)
10.00 (2.64)
10 + 0.5 related to 500 m above S.L.
610 mm (24.01 in.)
246 mm (9.69 in.)
220 mm (8.66 in.)
19 (41.88)
NOTE:
The allocation of circulation pumps to heater units must be in accordance with coolant resistances.
4.2 Thermo 300 Heater Data
Table 4-1: Thermo 300 Heater Data
Page 11

4TECHNICAL DATA WEBASTO THERMO 300
4-2
4.2.1 Thermo 300.102 Heater Dimensions
Fig. 4-1 Thermo 300.102 Heater Dimensions
Page 12

WEBASTO THERMO 300 4TECHNICAL DATA
4-3
Circulation pump
Volume flow l/h (US. Gal/min)
Nominal voltage V
Operating voltage range V
Nominal power consumption W
Dimensions of coolant pump length
width
height
Hose connection O.D.
Weight kg (lb.)
U 4814
5200 (22.9) against 0.15 bar
24
20 ... 28
104
221 mm (8.7 in.)
100 mm (3.94 in.)
105 mm (4.14 in.)
38.0 mm (1.5 in.)
2.1
U 4852
6000 (26.4) against 0.4 bar
24
18 ... 32
209
285 mm (11.22 in.)
115 mm (4.52 in.)
110 mm (4.33 in.)
38.0 mm (1.5 in.)
2.7
NOTE:
The allocation of circulation pumps to heater units must be in accordance with coolant resistances.
4.3 U 4814 & U 4852 Coolant Pump Data
Table 4-2: U 4814 & U 4852 Coolant Pump Data
4.3.1 Coolant Circulation Pump U4814 Dimensions
Fig. 4-2 Coolant Circulation Pump U4814 Dimensions
Page 13

4TECHNICAL DATA WEBASTO THERMO 300
4-4
4.3.2 Coolant Circulation Pump U4852 Dimensions
Fig. 4-3 Coolant Circulation Pump U4852 Dimensions
Fig. 4-4 Pump U4852 Operating Data
Page 14

WEBASTO THERMO 300 5INSTALLATION
5-1
5. Installation
5.1 General Information
Webasto will take you step by step through the installation process to ensure successful operation for years to come.
The installation must be performed in accordance with the installation instructions provided in this manual.
IMPORTANT! The proposed heater installation must be approved by Webasto Thermosystems.
5.2 Installation Location
The heater and circulation pump are to be integrated into the coolant system (or into a separate heating circuit, if
applicable) of the vehicle. The heater should be installed as low as possible in the coolant system to assure static
bleeding of the heater and the circulating pump.
The heater is to be installed in a clean and dry environment, usually a separate compartment, accessible for service,
typically towards the rear of the vehicle. The heater may also be located in the engine compartment. The
installation enclosure must provide adequate ventilation for combustion air requirements [4 in² (20 cm²)]. When
installing the heater, make certain that the clearances required for accessing the unit for servicing are observed (e.g.
removal of the combustion chamber). See figure 4-1, page 4-2.
5.3 Mounting the Heater and Enclosure
1. Locate spot to mount heater, refer to fig 5-4, page 5-6
2. Drill holes as needed for size refer to fig ?? page 4-5
NOTE:
This manual does not cover all possible installation variants. For special applications, use this manual as a guideline
only. For further information concerning installations for special applications, contact Webasto Thermosystems
directly at 1-800-555-4518.
WARNING
Due to the danger of poisoning and suffocation, the heater must not be installed in either the drivers compartment or
in the passenger area of vehicles.
Page 15

5INSTALLATION WEBASTO THERMO 300
5-2
5.5 Exhaust Pipe Connection
Rigid exhaust pipe is recommended in installations where the use of an exhaust deflector is not suitable. The
exhaust pipe must have a minimum internal diameter no less than 2 3/4” (70mm) and a length no greater than 16’
(5m). The pipe may have several bends totaling no more than 270° overall. Do not cut and weld pipe to make 90°
angled corners. Always form sweeping corners and smooth transitions when forming bends in exhaust pipes.
1. Install exhaust deflector on heater exhaust outlet or install exhaust pipe.
2. Route the exhaust system so that the possibility of discharged exhaust gases entering the vehicle is prevented.
3. Direct the discharge opening of the exhaust system in such a way as not to be pointed in the direction of travel,
and so located that the possibility of clogging caused by snow, mud or debris is prevented.
4. Any condensation water collecting in the exhaust pipe must be discharged. If necessary, drill a drain hole at the
lowest point to allow drainage.
WARNING
Due to the danger of poisoning and suffocation, exhaust pipes are to be installed and routed in a manner that does
not permit the possibility of exhaust gases entering the vehicle where people are present. Carefully read and
understand all information pertaining to the installation of the exhaust system.
NOTE:
Webasto approved flexible exhaust tubing is available from your Webasto Thermosystems supplier under part
number 479721.
CAUTION
Route the exhaust system away from vehicle components that may be damaged by heat e.g., brake lines, electrical
wiring, coolant hoses and fuel lines.
5.6 Combustion Air Supply
Never draw combustion air from inside the passenger area of a vehicle, or from areas where fumes and gases can
accumulate.
Where the heater is installed in a sealed compartment, adequate ventilation for combustion air requirements
[4 in² (20 cm²)] must be provided.
Combustion air can be drawn from a remote (protected) area in order to provide a clean air supply. For installations
requiring remotely drawn combustion air, use approved ducting with an unrestricted internal diameter no less than 2
1/4” (55mm) and a length no greater than 16’ (5m). The ducting may have several bends totaling no more than 270°
overall. Approved combustion air ducting can be ordered through Webasto under part number 88729A.
To connect combustion air intake ducting [2 1/4” (55mm)] to the heater, several types of fittings are available that
snap directly onto the combustion air inlet port of the heater.
WARNING
Due to the danger of poisoning and suffocation, never draw combustion air from inside the driver and passenger
areas of the vehicle or from areas where hazardous fumes and gases can accumulate. Carefully read and
understand all information pertaining to the installation of the combustion air intake system.
CAUTION
Combustion air ducting and components must be non-restrictive. Do not connect to existing vehicle air ducting or
filtration systems.
Page 16

WEBASTO THERMO 300 5INSTALLATION
5-3
For a straight connection, order a straight adapter under part number 101377 and snap it onto the combustion air
inlet and attach air ducting.
In the event there is insufficient room for a straight attachment, a 90° snap-on fitting (P.N. 101404) and an adapter
ring (P.N. 82315A) are available. Simply snap them onto the combustion air inlet of the heater and attach ducting.
For installations where ducting is not required, the heater is factory equipped with a splash deflector that simply snaps
onto the combustion air inlet.
NOTE:
Webasto approved flexible combustion air ducting is available from your Webasto Thermosystems supplier under
part number 88729A.
5.7 Plumbing Into the Coolant System
5.7.1 General Information
The coolant circulating pump must be mounted as low as possible in the vehicle’s cooling system. A minimum of
10% of a good quality antifreeze should be maintained in the cooling system at all times. Heater and water pump fit
1.5” (38 mm) I.D. heater hose meeting SAE 20 R3 specifications. Silicone hose requires special hose clamps.
Refer to “Supplemental Heating Schematic - Jacket Water and Intercooler Coolant Heaters” under section 5.7.2 for
information regarding plumbing the coolant heater into the coolant system.
WARNING
Burn risk! When working on the coolant system, allow the engine to cool down and open the radiator cap carefully.
CAUTION
The coolant pump(s) must be operating and a continuous unobstructed coolant path provided during heater
operation. Overheating of the heater will quickly develop if coolant flow is interrupted.
NOTE:
Heater hose must meet SAE 20 R3 specifications. Silicone hose requires special hose clamps. Hose clamps must
be tightened to 45 lb/in. (5 Nm) torque.
Page 17

5INSTALLATION WEBASTO THERMO 300
5-4
Fig. 5-1: Supplemental Heating Schematic
5.7.2 Supplemental Heating Schematic - Jacket Water and Intercooler Coolant Heaters (fig. 5-1)
CAUTION
The coolant pump(s) must be operating and a continuous unobstructed coolant path provided during heater
operation. Overheating of the heater will quickly develop if coolant flow is interrupted.
CO2: OEM Connection - Engine Outlet to Jacket Water Radiator
B: Supply to Jacket Supplemental Heater - Connect to OEM Plumbing
CO1: OEM Connection - Engine Inlet from Jacket Water Radiator
CO5: Return from Jacket Supplemental Heater - Connect to Engine (30 mm)
E: Supply to Intercooler Supplemental Heater - Connect to Engine (1 in. NPT)
IC2: OEM Connection - Engine Outlet to Intercooler Radiator
G: Return from Intercooler Supplemental Heater - Connect to OEM Plumbing
IC1: OEM Connection - Engine Inlet from Intercooler Radiator
CO3: Supply to Jacket Supplemental Heater - Preheating Mode - Connect to Engine (2 X 20 mm)
K: Ball valve or Solenoid Activated Valve - Required if both Supplemental Heating and Preheating Modes are
Desired
Dashed Lines = Preheat Mode
Bold Lines = Engine Coolant Circuit
Thin Lines = Supplemental Heating Mode
* All presures listed without radiator pressure cap @ 1900 RPM - pressure with radiator cap on will be 1 bar higher.
Page 18

WEBASTO THERMO 300 5INSTALLATION
5-5
Fig. 5-3: Engine
WARNING
Burn risk! When working on the coolant system, allow the engine to cool down and open the radiator cap carefully.
NOTE:
Heater hose must meet SAE 20 R3 specifications. Silicone hose requires special hose clamps. Hose clamps must
be tightened to 45 lb/in. (5 Nm) torque.
5.7.3 Supply and Return Plumbing Connection Points (Charge Air Cooler)
Page 19

5INSTALLATION WEBASTO THERMO 300
5-6
Fig. 5-4: Example of Heater Installation
5.7.4 Example of a Heater Installation
Thermo 300 in Enclosure
Page 20

WEBASTO THERMO 300 5INSTALLATION
5-7
5.8 Fuel System
5.8.1 General Information
The fuel is drawn from the vehicles fuel tank through a fuel standpipe. This standpipe can be utilized on vehicles with
a spare threaded port as shown in figure 5-5. The Webasto heater utilizes 37° flare JIC fuel connection fittings. The
fuel supply line fitting is a JIC #4 and the return line is a JIC #6.
5.8.2 Fuel Supply
IMPORTANT!
Keep the submerged end of fuel standpipe at least 2” from bottom of fuel tank.
The fuel standpipe and fuel line must be installed according to these instructions to insure proper heater operation.
Fig. 5-5: Fuel Standpipe Installation
CAUTION
Whenever the fuel tank is situated higher than the Webasto heater, the top of the fuel tank must not be more than
500 mm (20 in.) above the heater.
NOTE:
The Thermo 300 heater is equipped with a self priming fuel pump. Priming the fuel system or fuel filters is generally
not necessary.
1. Cut fuel standpipe to length, approx. 2” off fuel tank bottom.
NOTE:
After fuel standpipe has been cut to length, remove burrs from opening.
On Haulage T
rucks
Use an open port NEAR the bottom of that fuel tank, at least 2” above bottom.
On Mining, Drill Rigs, Marine, and other Off-highway applications that have large fule tanks use a spare
port that is at least 2” from the bottom of the tank.
If the fuel tank is small enough to be able to use the standpipe follow the directions listed below for installation guide.
Image not available
Page 21

5INSTALLATION WEBASTO THERMO 300
5-8
2. Install the fuel standpipe.
- use 1/4” or 1/2” spare port on fuel tank (if available) and install fuel standpipe securely in fuel tank, use pipe
thread sealant on all pipe threads.
3. Route and secure fuel lines from heater to fuel tank. Route according to applicable regulations. Use grommets
to protect fuel lines whenever routed through holes.
4. Connect fuel lines to fuel standpipe and heater using 1/4” (6 mm) I.D. fuel line. Steel braided fuel lines are
recommended for installations where the heater is located in the engine compartment.
CAUTION
Fuel line must be secured every 305 mm (12 in.) and kept away from hot exhaust components and moving parts
(drive shafts, wheels, etc.).
Fig. 5-6: Fuel Line Parameters
A = Suction height 6’6” (2,0 m)
A+B = Suction length and height not to exceed 33’ (10 m)
Maximum fuel system residual pressure not to exceed 0.3 bar (4.35 psi.)
5.8.3 Fuel Filter
The heater must be equipped with a fuel filter. The fuel filter assembly should be mounted close to the heater.
Fuel filters require changing at least annually and in cases of dirty fuel more often.
After installation, before the heater is fired for the first time, the fuel system and filter will require priming. In most
cases, this will be achieved by turning on the heater and allowing it to self prime. In some cases the fuel filter may
require filling with CLEAN diesel fuel before installation to assist system priming.
CAUTION
To prevent fuel nozzle failure, always use clean fuel from a known clean source for priming fuel systems and filters.
NOTE:
Change fuel filters at least annually and more often in cases of sub-standard fuels or in severe conditions.
Thermo 230 / 330
Page 22

WEBASTO THERMO 300 5INSTALLATION
5-9
5.9 Wiring Connections
5.9.1 General Information
The control unit is equipped with low voltage protection, therefore it is imperative to keep vehicle batteries in good
condition. Thermo 300 heaters are available in 24 volt configurations only.
5.9.2 Timer and Switch Connections
Fig. 5-7: On/Off Switch
Fig. 5-8: 7-Day Digital Timer Model 1531
5.9.3 Timer or Switch Installation
1. Select a suitable location in the vehicle for the timer or On/ Off switch.
2. Connect the harness to the timer, or switch.
CAUTION
Whenever welding is to be performed on the vehicle, the main battery cables must be disconnected from the battery
to protect the electronic control unit.
NOTE:
The Thermo 300 heater will not perform to your satisfaction with weak batteries.
To Vehicle Ignition
Black on x3 (A pin)
Ground
To Vehicle
Dash Lights (optional)
Blue on
x3 connector
(C pin)
Power
(24 V)
ON
OFF
GROUND
POWER
Page 23

5INSTALLATION WEBASTO THERMO 300
5-10
Run 12 Gauge wire from eyelet to Pin B on connector #905455 for the ground.
Run 12 Gauge wire from Pin A on the same connector into Pin D on the flat 4 pin connector of the electrical connector
kit.
Use Eyelet (901.038) supplied with coolant pump harness kit for ground.
5.9.4 Coolant Pump Connections
Connector P/N 905.455
Pin A, Coolant Pump Power
from Pin D
Ground for Coolant pump
Pin D
Coolant Pump Power to Pin A on
connector P/N #905.455
Page 24

WEBASTO THERMO 300 5INSTALLATION
5-11
5.9.5 Wiring Diagram - with Switch
Fig. 5-9: Wiring Diagram with Switch
Page 25

5INSTALLATION WEBASTO THERMO 300
5-12
5.9.6 Wiring Diagram - with 7-Day Digital Timer Model 1531
Fig. 5-10: Wiring Diagram with Timer Model 1531
Page 26

WEBASTO THERMO 300 5INSTALLATION
5-13
5.10 Initial Operation
1. Check your installation for:
- loose nuts and bolts.
- exhaust pipe routing and clamp tightness.
- loose hose clamps.
- routing and securing of wiring and heater hoses.
- kinked or pinched hoses.
- battery connection and polarity.
2. Top off or refill cooling system with coolant as per engine manufacturers recommendations.
3. Open shut-off valves and driver’s heater valve.
4. Set vehicle heater controls to maximum heat position.
5. Start the vehicle engine and run it at a fast idle for 10 minutes to purge air from the Webasto coolant heater and
coolant circuits. While the engine is running check:
- hose connections for leaks.
- coolant level in the expansion tank and add coolant as needed.
- use bleeder valve on top of Webasto heat exchanger to purge out trapped air when necessary.
6. Switch “On” Webasto heater and check:
- indicator light on.
- circulating pump in operation.
- heater fan motor in operation.
- presence of combustion after approximately 25 seconds.
7. Shut off the engine.
8. Allow heater to run until coolant is hot and heater cycles off. During this period, monitor system for any coolant or
fuel leaks.
9. Temperature differential between water inlet and outlet should not exceed 10 °C (18 °F) during heating operation.
10. Switch “Off” Webasto heater.
11. Re-tighten hose clamps to 45 in/lb. (5 Nm) and inspect installation for leaks.
14. Install any panels and access covers removed during installation.
NOTE:
Installation with long fuel lines may require a second start attempt to initially prime the fuel system. Cycle ON/ OFF
switch or timer to reset control unit.
NOTE:
Coolant temperature must be below 70 °C (158 °F) to start up heater.
NOTE:
The engine temperature gauge may read a lower temperature than actual coolant temperature at heater outlet. This
difference depends on the location of the temperature sensor on the engine in relation to coolant flow.
Page 27

5INSTALLATION WEBASTO THERMO 300
5-14
15. Complete the warranty card and mail to Webasto Thermosystems.
16. Install the heater or engine compartment cover if equipped. Installation is now complete.
NOTE:
Necessary information to complete warranty registration card and ensure full warranty coverage can be found on the
name plate on top of the burner head.
Page 28

WEBASTO THERMO 300 6BASIC TROUBLESHOOTING
6-1
6. Basic Troubleshooting
6.1 General Information
This section describes troubleshooting procedures for the Thermo 300 coolant heater. Troubleshooting is normally
limited to the isolation of defective components.
6.2 Operational Malfunction Symptoms - Reading the Flash Code
A flash code will be generated on the indicator light of the control (on/ off) switch in the event of an operational
malfunction. In order to make a correct analysis it is necessary to understand the flash code event. The flash code
event is only visible during the after run (cool down) period of operation.
During the flash code event you will see the following:
Five quick flashes followed by a slower sequence of flashes, the slower sequence of flashes is the actual malfunction
code. The first five quick flashes are only an indication that a malfunction code has been registered and will be
displayed. Count only the slower sequence of flashes to obtain the current malfunction code.
For example (flashes = ¤):
Fault code 7X (F 07): ¤¤¤¤¤ ... ¤ ... ¤ ... ¤ ... ¤ ... ¤ ... ¤ ... ¤
The flash code sequence will be repeated during the Thermo 300 after run (cool down) period and will remain visible
once heater stops in the lock out mode. Once the heater is cycled “Off” and “On” the malfunction flash code will no
longer be visible on the indicator light but will be stored in memory.
6.2.1 Reading a Malfunction Code with the Digital Timer Model 1531 Installed
Where the Thermo 300 installation includes the Digital Timer model 1531, you will be able to read the current
malfunction code directly from the timer display. The flame indicator symbol will “flash” the present malfunction code
once and will then convert the malfunction code to an alphanumeric display message. For example: code 10
(overheat) will be visible on the timer display as “F 10”. Once the malfunction has been corrected, and the heater
Before troubleshooting, check for and eliminate the following defects:
• fuel supply (plugged fuel filter, kinked fuel line)
• corrosion on battery terminals
• blown fuses
• corrosion on electrical wiring, connections and fuses
• loose contacts or improper crimping on connectors
• shut down initiated by temperature limiter thermostat (automatic reset)
CAUTION
Troubleshooting requires profound knowledge about structure and theory of operation of the heater and components.
Troubleshooting and fault correction should only be performed by Webasto trained, skilled personnel unless
otherwise stated in this manual.
NOTE:
After the correction of a malfunction, a functional test must always be performed with the heater installed in its
operational position in the vehicle.
NOTE:
Coolant temperature must be below 70 °C (158 °F) before heater will start.
Page 29

6BASIC TROUBLESHOOTING WEBASTO THERMO 300
6-2
switch or timer is cycled “Off” and “On” and the heater successfully starts and runs with no further malfunctions, the
malfunction code will disappear from the timer display.
6.2.2 Malfunction Codes Stored in Memory
Once the Thermo 300 completes the after run (cool down) period initiated by a malfunction, the current flash code will
be downloaded (stored) in memory. The Thermo 300 can store up to ten malfunction codes. Once the memory is
“Full”, any additional malfunction code will replace the earliest code stored thereby continually updating the
malfunction codes stored in memory with the ten most recent malfunctions.
Page 30

WEBASTO THERMO 300 6BASIC TROUBLESHOOTING
6-3
Failure Symptom
1X Flash (F 01)
No combustion after
completion of start up
sequence
2X Flashes (F 02)
Flame out during
burner operation and
no restart possible
3X Flashes (F 03)
Low voltage for more
than 20 seconds
4X Flashes (F 04)
Flame detector
recognizes false flame
signal during pre-start
or shut-down cycle
5X Flashes (F 05)
Flame detector
6X Flashes (F 06)
Temperature sensor
7X Flashes (F 07)
Fuel solenoid valve
8X Flashes (F 08)
Combustion air fan
motor
9X Flashes (F 09)
Circulation pump
motor
10X Flashes (F 10)
Temperature limiter
11X Flashes (F 11)
Electronic ignition coil
12X Flashes (F 12)
Heater lock-out
Probable Cause
-Fuel system
- Combustion air
- Electronic ignition
- Fuel supply (shortage of fuel)
- Electrical system
- Defective flame detector
- Wiring
- Defective flame detector
- Wiring
- Defective temperature sensor
- Wiring
- Defective solenoid valve
- Wiring
- Wrong RPM
- Defective combustion air fan motor
- Wiring
- Defective circulation pump motor
- Overheat condition
- Coolant flow
- Wiring
- Defective temperature limiter
- Wiring
- Defective electronic ignition coil
3 repeated faults/flame-outs or
5 repeated start attempts
Check and Correct
- Fuel level
- Type of fuel being used
- Fuel filter
- Fuel line connections (air bubbles in fuel lines)
- Fuel nozzle plugged
- Air intake or exhaust, restricted or plugged
- Incorrect electrode gap
- Restriction in the fuel system
- Fuel filter
- Fuel line connections (air bubbles in fuel lines)
- Type of fuel being used (waxing)
- Load test batteries
- Corrosion at connections
- Loose connections
- Replace flame detector
- Damaged wiring, open or short circuit
- Replace flame detector
- Damaged wiring, open or short circuit
- Replace temperature sensor
- Damaged or corroded wiring
- Open or short circuit
- Replace solenoid valve
- Damaged wiring, open or short circuit
- Replace combustion air fan
- Replace combustion air fan
- Damaged wiring, open or short circuit
- Replace circulation pump motor
- Reset temperature limiter
- Coolant level or flow restriction
- Air trapped in coolant circuit
- Damaged or corroded wiring
- Open or short circuit
- Replace temperature limiter
- Damaged wiring, open or short circuit
- Replace electronic ignition coil
Re-initialize control unit by switching heater on,
disconnecting and connecting power connection.
6.3 Operational Malfunction Symptoms via Flash/ Malfunction Code
The following table lists the possible malfunctions which can be read by flashing code or read directly off of an
appropriate timer or with the PC diagnostics kit.
Table 6-1: Operational Failure Symptoms (Control Unit SG 1572 D)
Page 31

6BASIC TROUBLESHOOTING WEBASTO THERMO 300
6-4
6.4 Reading and Removing Malfunction Codes Stored in Memory with the Webasto
PC Diagnostics Kit and Adapter
It is possible to read and remove (reset) stored malfunction codes from the Thermo 300 memory. This is achieved
through the use of a diagnostic interface kit connected to the Thermo 300 and an IBM compatible computer having
the necessary software installed.
The PC Diagnostic Interface Kit comes with software and instructions for use with Webasto heaters equipped with
internal diagnostics capabilities such as the Thermo 300.
Order PC Diagnostics Kit under part number 92542E and adapter under part number 20865A.
System requirements:
• IBM compatible PC with 80286 processor or higher
• DOS version 3.0 or higher including *MS Windows (*Not required)
• Requires a minimum of 1 MB RAM
• Requires a hard disk with at least 3 MB space available
• 3 1/2 inch, 1.44 MB floppy disk drive for installation of program files
• VGA graphics board with 640 x 480 pixel resolution and at least 16 colors
• One unused serial port
• One monitor and keyboard (mouse or other pointing device recommended)
In addition to working with stored malfunction codes, the PC Diagnostics Kit allows you to perform several other
functions such as reading values while the heater is in operation or testing individual components. Printing out of
malfunction codes is also available (User supplied printer required).
For further capabilities and detailed instructions for use with the Thermo 300 heater, see instruction manual supplied
with the PC Diagnostics Kit.
CAUTION
Diagnostics equipment is intended for use by Webasto trained personnel at authorized Webasto distributor, dealer
and end user service facilities. Troubleshooting requires profound knowledge about structure and theory of operation
of the heater and components.
Troubleshooting and fault correction should only be performed by Webasto trained, skilled personnel unless
otherwise stated in this manual.
Page 32

WEBASTO THERMO 300 6BASIC TROUBLESHOOTING
6-5
 Loading...