

Page 1

FCF Platinu m
Marine Air C onditioner Series
Installation / Operation Manual
10/2016
Models:
FCF 6,000 BTU (115V & 230V)
FCF 10,000 BTU (115V & 230V)
FCF 12,000 BTU (115V & 230V)
FCF 16,000 BTU (115V & 230V)
FCF 20,000 BTU (230V)
FCF 25,000 BTU (230V)
Page 2

Page 3

For proper installation and operation, please read all instructions carefully. Please be aware of the following items:
(1) If this unit fails to operate normally, please contact a Webasto Authorized Dealer as soon as possible and provide
the following information:
• Content on the nameplate (serial number, model number, and cooling capacity).
• Vessel Information (year, make, model, hull ID)
• Malfunction details (before and after the malfunction occurs).
(2) ALWAY S follow Webasto installation and repair instructions and heed all WARNINGS.
(3) Webasto rejects any liability for problems and damage caused by the system being installed by untrained
personnel.
(4) Webasto cooling systems require qualified and/or professional installation and repair technicians. Warranty shall
be void if not installed by a certified or trained installer/repair technician who has successfully completed the
factory training course for installation and repair of Webasto cooling systems, and has been provided with the
technical information, tools and equipment required to properly complete the necessary installation/repairs.
(5) Improper installation or installation by untrained personnel voids all warranties on this product.
Page 4

Contents
1 SAFETY PRECAUTIONS ................................................................................................................................................. 5
2 INTRODUCTION ............................................................................................................................................................. 5
3 OVERVIEW ...................................................................................................................................................................... 6
3.1 OUTLINE DRAWING ............................................................................................................................................................ 6
3.2 HOW IT WORKS ................................................................................................................................................................. 6
3.3 OUTLINE DIMENSIONS ........................................................................................................................................................ 7
4 INSTALLATION ............................................................................................................................................................... 8
4.1 UNPACKING AND INSPECTION ............................................................................................................................................. 8
4.2 SAFETY CONSIDERATIONS ................................................................................................................................................... 8
4.3 THE SIZE OF SEALED ROOM ................................................................................................................................................. 9
4.4 PLACEMENT OF SYSTEM ..................................................................................................................................................... 9
4.5 CONDENSATE DRAINS ....................................................................................................................................................... 10
4.6 BLOWER ASSEMBLY .......................................................................................................................................................... 11
4.7 MOUNTING BRACKETS ...................................................................................................................................................... 11
4.8 SUPPLY & RETURN AIR GRILLES AND TRANSITION BOXES ................................................................................................. 11
4.9 DUCTING .......................................................................................................................................................................... 11
4.10 SEAWATER PUMP AND PLUMBING .................................................................................................................................. 12
4.11 ELECTRICAL CONNECTIONS, GROUNDING AND BONDING ................................................................................................ 13
4.12 MANUAL CONTROLLER INSTALLATION ............................................................................................................................ 14
4.13 ELECTRIC BOX INSTALLATION .......................................................................................................................................... 15
4.13.1 (6K, 10K, 12K, 16K) ................................................................................................................................................ 15
4.14 INSTALLATION CHECKLIST (REVIEW PRIOR TO INSTALLATION) ......................................................................................... 17
4.15 WIRING DIAGRAMS ........................................................................................................................................................ 18
5 OPERATION .................................................................................................................................................................. 22
5.1 MANUAL CONTROLLER OPERATION .................................................................................................................................. 22
5.2 POWER ON/OFF.............................................................................................................................................................. 23
5.3 FAN CONTROL ................................................................................................................................................................. 23
5.4 TEMPERATURE SETTING .................................................................................................................................................... 23
5.5 MODE SETTING ................................................................................................................................................................ 23
5.6 DISPLAY FAHRENHEIT OR CENTIGRADE .............................................................................................................................. 23
5.7 ERROR CODES .................................................................................................................................................................. 24
5.8 KEY LOCK ......................................................................................................................................................................... 24
5.9 CHECKING VOLTAGE FUNCTION......................................................................................................................................... 24
5.11 AUTO –OFF FUNCTION OF THE MANUAL CONTROLLER ..................................................................................................... 25
6 ACCESSORIES ............................................................................................................................................................... 25
7 TROUBLESHOOTING ................................................................................................................................................... 26
8 MAINTENANCE ............................................................................................................................................................ 28
8.1 REVERSING VALV E S ........................................................................................................................................................... 28
8.2 SEAWATER STRAINER ........................................................................................................................................................ 28
8.3 BLOWERS ......................................................................................................................................................................... 28
8.4 CONDENSER COIL CLEANING............................................................................................................................................. 28
8.5 RETURN AIR FILTERS ......................................................................................................................................................... 29
8.6 WINTERIZATION ................................................................................................................................................................ 29
8.7 LIMITED WARRANTY ......................................................................................................................................................... 29
4
Page 5
1 Safety Precautions
Means items that must be forbidden! Otherwise, it may lead to personal injury or death or serious damage.
Means items that must be followed! Otherwise, it may lead to personal injury or property loss.
2 Introduction
Thank you for your purchase. No matter which of the following features was the reason for your purchase, we are sure
it will meet your needs and give many years of efficient and trouble free use. Those marine air conditioners are
designed for marine applications incorporating the following features:
1
Compact design
)
2
High efficiency rotary compressors (6-25K)
)
3
Cupronickel condenser coil
)
4
Raised lance fin designed evaporator coil
)
5
Polyester coated 2” (50mm) deep drain pan with two condensate drain locations
)
6
Anti-vibration base pan
)
7
Pre-charged and pre-wired systems for easy connections
)
8
3-speed fan motor. This eliminates all harmonic sounds and rumbles.
)
9
Rotatable blower assembly
)
The controller offers the most technologically advanced design specifically made for the unique requirements of marine
air conditioning. The controller has been designed with the following "user friendly" features:
1) Non-volatile memory
2) Low voltage display panel
3) LED cabin temperature displayed in Fahrenheit or Celsius
4) Multiple fan speed selections
5) Compressor pressure fail safe protection
6) Moisture mode cycle for humidity control
This manual is intended to provide the information necessary to ensure proper installation, operation, and
maintenance of the unit. Improper installation can result in unsatisfactory performance and/or premature failure of
these units. Before proceeding, please read this manual completely. In the interest of product improvement,
specifications and design are subject to change without prior notice.
This appliance is not intended for use by persons (including children) with reduced physical, sensory or mental
capabilities, or lack of experience and knowledge, unless they have been given supervision or instruction concerning
use of the appliance by a person responsible for their safety.
Children should be supervised to ensure that they do not play with the appliance. This product must
not be disposed together with the domestic waste. This product must be disposed at an authorized
place for recycling of electrical and electronic appliances.
5
Page 6
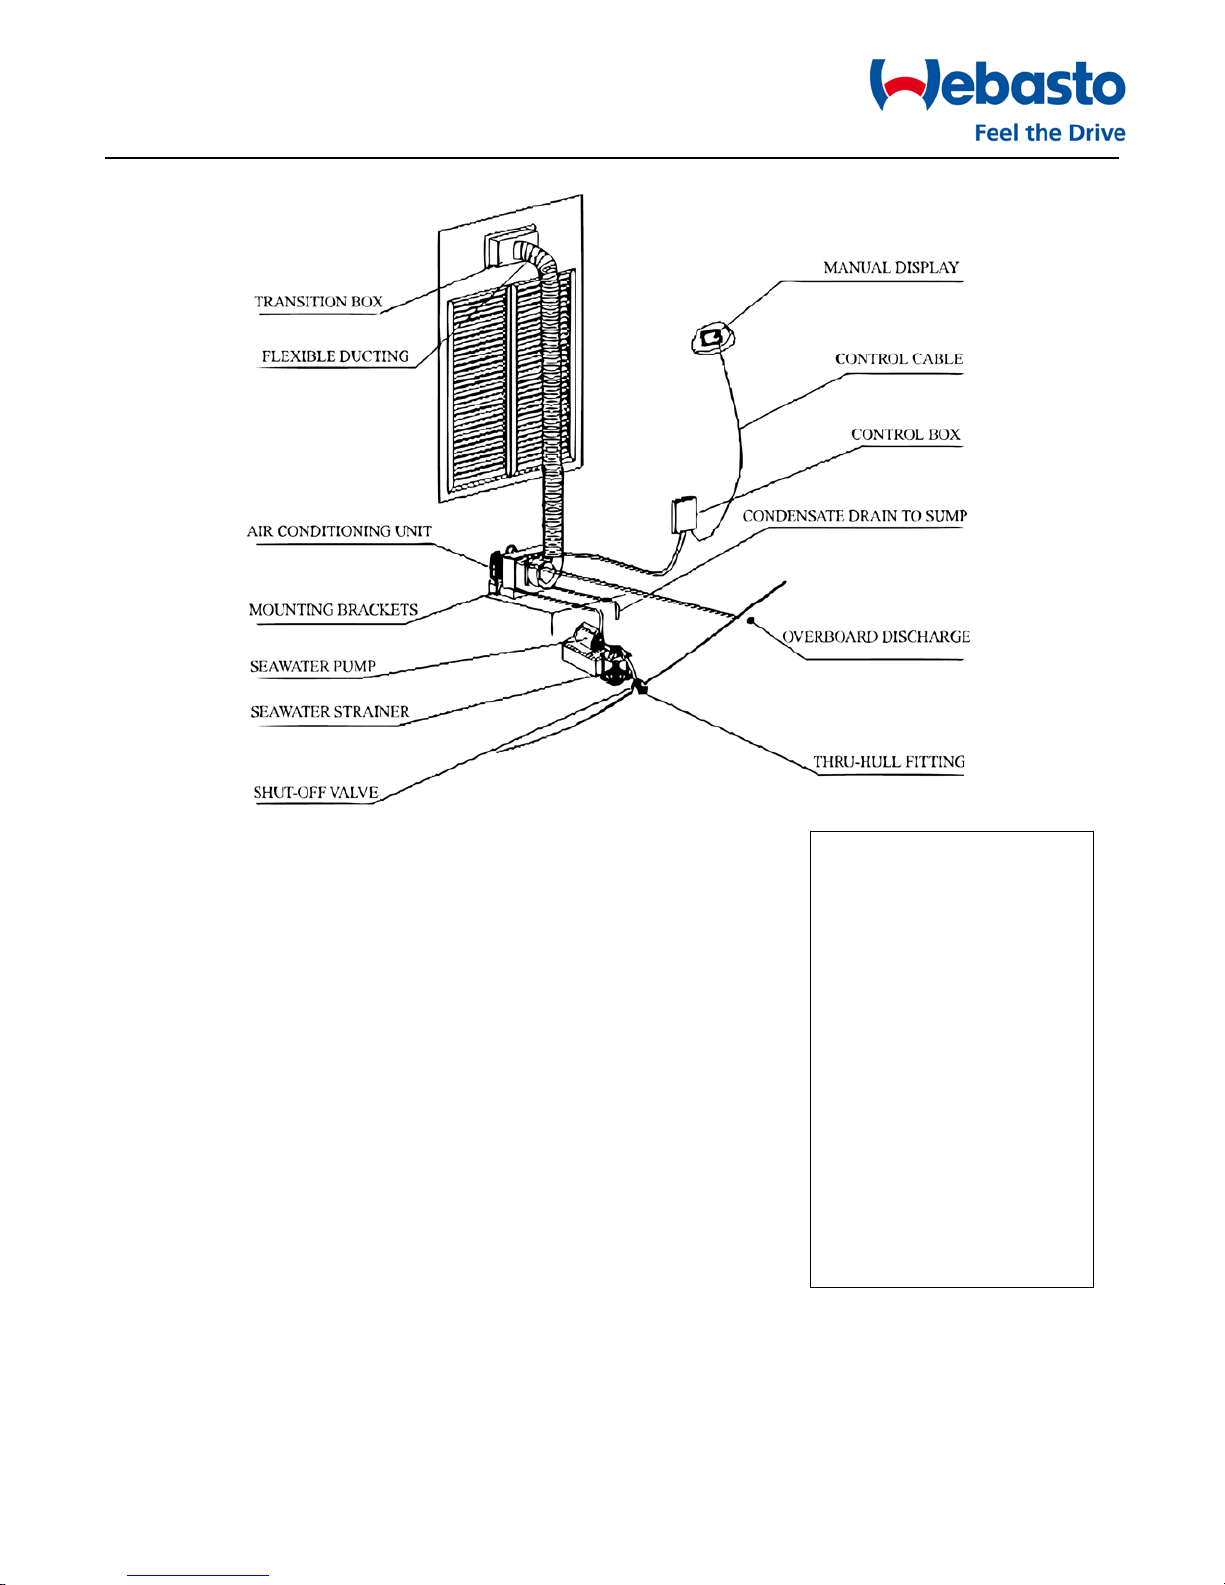
3 Overview
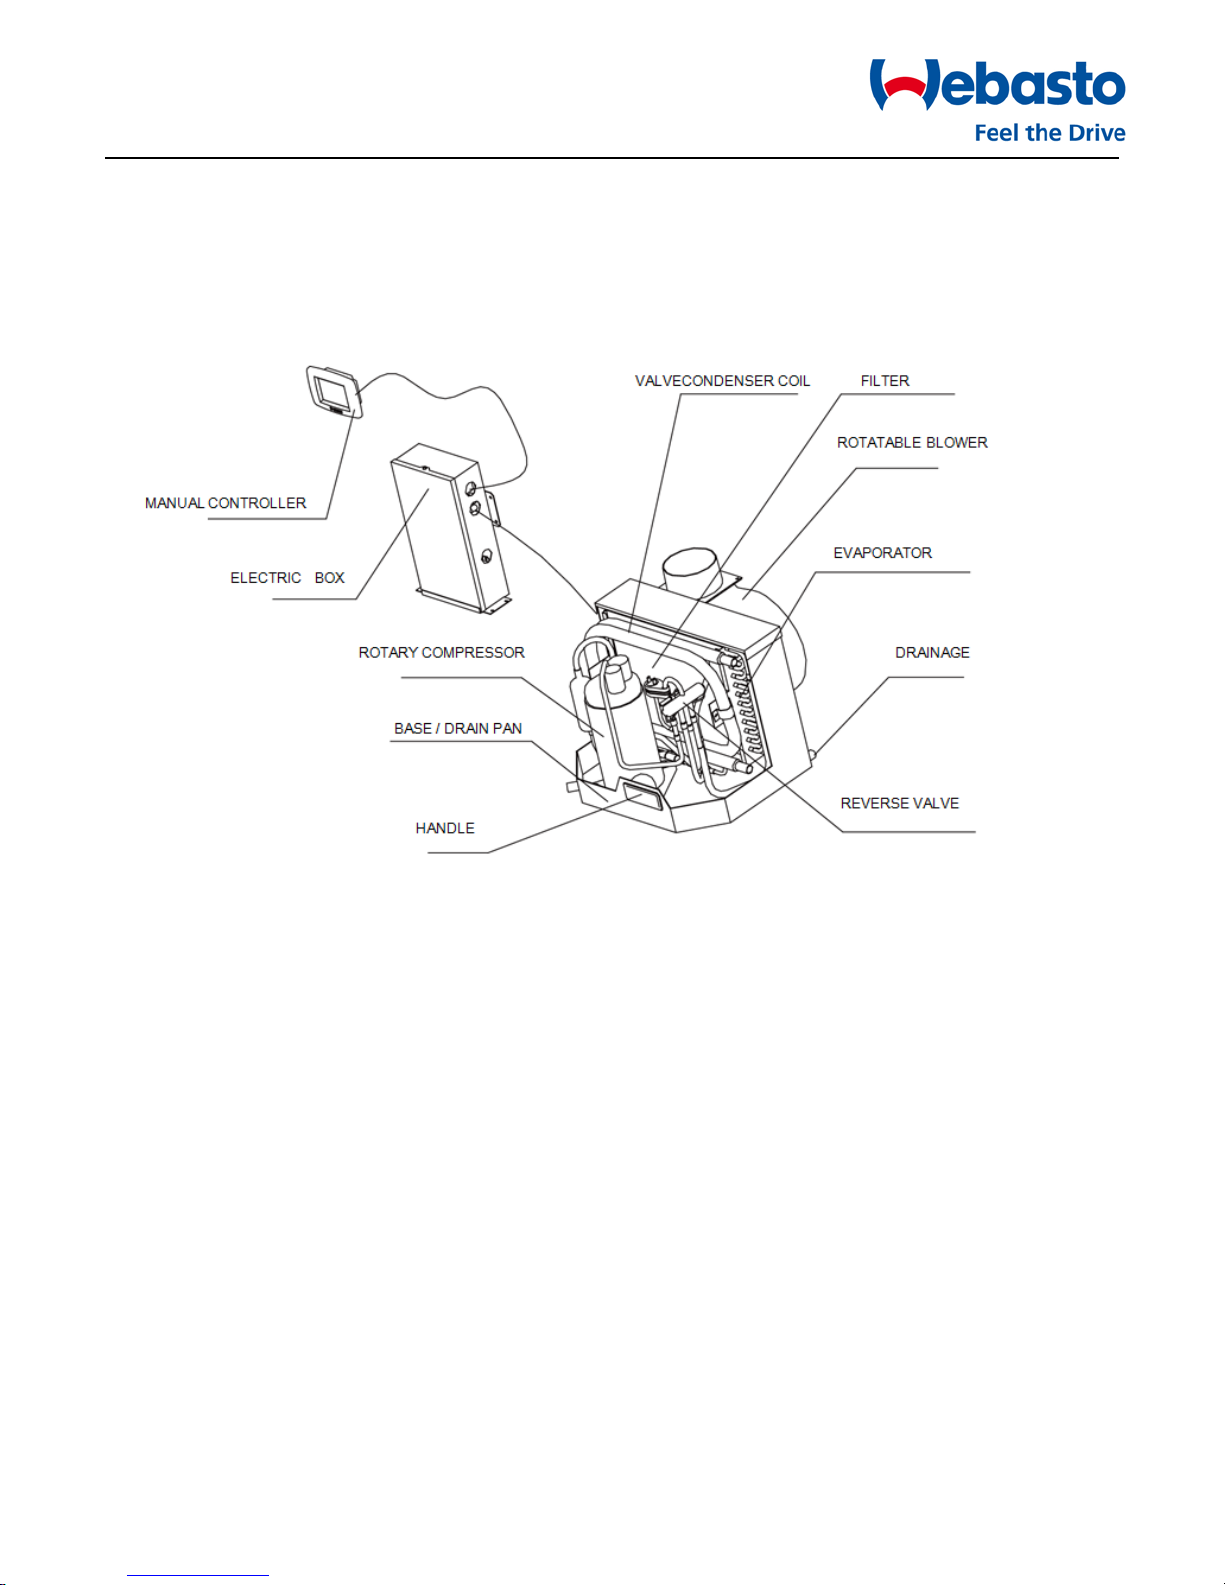
3.1 Outline Drawing
3.2 How It Works
Your self-contained air conditioner consists of four main components and a refrigerant gas circulating through the
system. The BLOWER draws warm cabin air across the fins on the EVAPORATOR where the heat from the air is
transferred to the refrigerant in the evaporator coil. As the refrigerant evaporated from a liquid into a gas, it absorbs
the heat from the cabin air. The COMPRESSOR then compresses the refrigerant gas and pumps it through the outer
tube in the CONDENSER COIL. The seawater pump circulates cool seawater through the inner tube in the condenser
coil; this cools the refrigerant and condenses it into a liquid. The heat from the refrigerant is exchanged to the seawater
and discharged overboard. The liquid refrigerant is then passed through the EVAPORATOR COIL and the cycle repeats;
removing heat from the cabin air lowering its temperature. The cooled air is blown through the ducting and out the
supply air grille(s). For reverse cycle heating, the refrigerant flows in the opposite direction through the reversing valve.
Heat is transferred from the seawater in the condenser coil to the refrigerant and then to the air blowing through the
evaporator into the cabin. Seawater temperature will directly affect the A/C's efficiency. This A/C system can effectively
cool your boat in water temperatures up to 90°F and heat in water temperatures as low as 40°F.
6
Page 7

3.3 Outline Dimensions
Units: mm
A B C D E F
FCF 6,000 BTU 115V
FCF 6,000 BTU 230V
FCF 10,000 BTU 115V
FCF 10,000 BTU 230V
FCF 12,000 BTU 115V
FCF 12,000 BTU 230V
FCF 16,000 BTU 115V
FCF 16,000 BTU 230V
FCF 20,000 BTU 230V
FCF 25,000 BTU 230V
285 295
408 91.5
380 310
549
320
330
619 343
529 386 595
16 19
119.4
7
Page 8
4 Installation
4.1 Unpacking and Inspection
When the equipment is received, all items should be carefully checked to ensure there is no damage from shipping.
Move units in the normal "up" orientation as indicated by the arrows on each carton. Examine by removing the units
from the cartons if necessary. If the unit is damaged, the carrier should make the proper notation on the delivery
receipt acknowledging the damage.
4.2 Safety Considerations
VERY IMPORTANT: Never install your air conditioner in the bilge or engine room areas. Ensure that the selected
location is sealed from direct access to bilge and/or engine room vapors. Do not terminate condensate drain line within
3’ (914mm) of any outlet of engine, generator exhaust system, compartment housing an engine or generator, or in a
bilge, unless the drain is connected properly to a sealed condensate or shower sump pump. Seal all cabin sole
penetrations around condensate hoses to eliminate harmful bilge fumes in the cabin living spaces.
Installation and servicing of this system can be hazardous due to system pressure and electrical components. When
working on this equipment, always observe precautions described in the literature, tags and labels attached to the unit.
Follow all safety precautions. Wear safety glasses and work gloves and place a fire extinguisher close to the work area.
The following is a summary of the labels on the unit:
DANGER
Electrical shock hazard. Disconnect voltage at main panel or power source before opening
:
any cover. Failure to comply may result in injury or death.
This component does not meet federal requirements for ignition protection. Do not install
WARNING
:
in spaces containing gasoline engines, tanks, LPG/CPG cylinders, regulators, valves or fuel
line fittings. Failure to comply may result in injury or death.
This component is charged with Hydro chlorofluorocarbon (Hydro fluorocarbon) refrigerant
R410A. Effective July 1, 1992, it shall be unlawful for any person to knowingly vent or
NOTICE:
otherwise knowingly release any class 1 (CFC) or class 2 (H CFC) substance as a refrigerant
in a manner which permits such substance to enter the atmosphere per the clean air act of
1990. Public law 101-549 title IV section 608-c. Failure to comply may result in severe
penalties, including fines and imprisonment.
To minimize the hazard of electrical shock and personal injury, this component must be
CAUTION
effectively grounded. Refer to the installation guidelines for further information. Caution!
:
High compressor temperature is normal. Do not touch!
8
Page 9
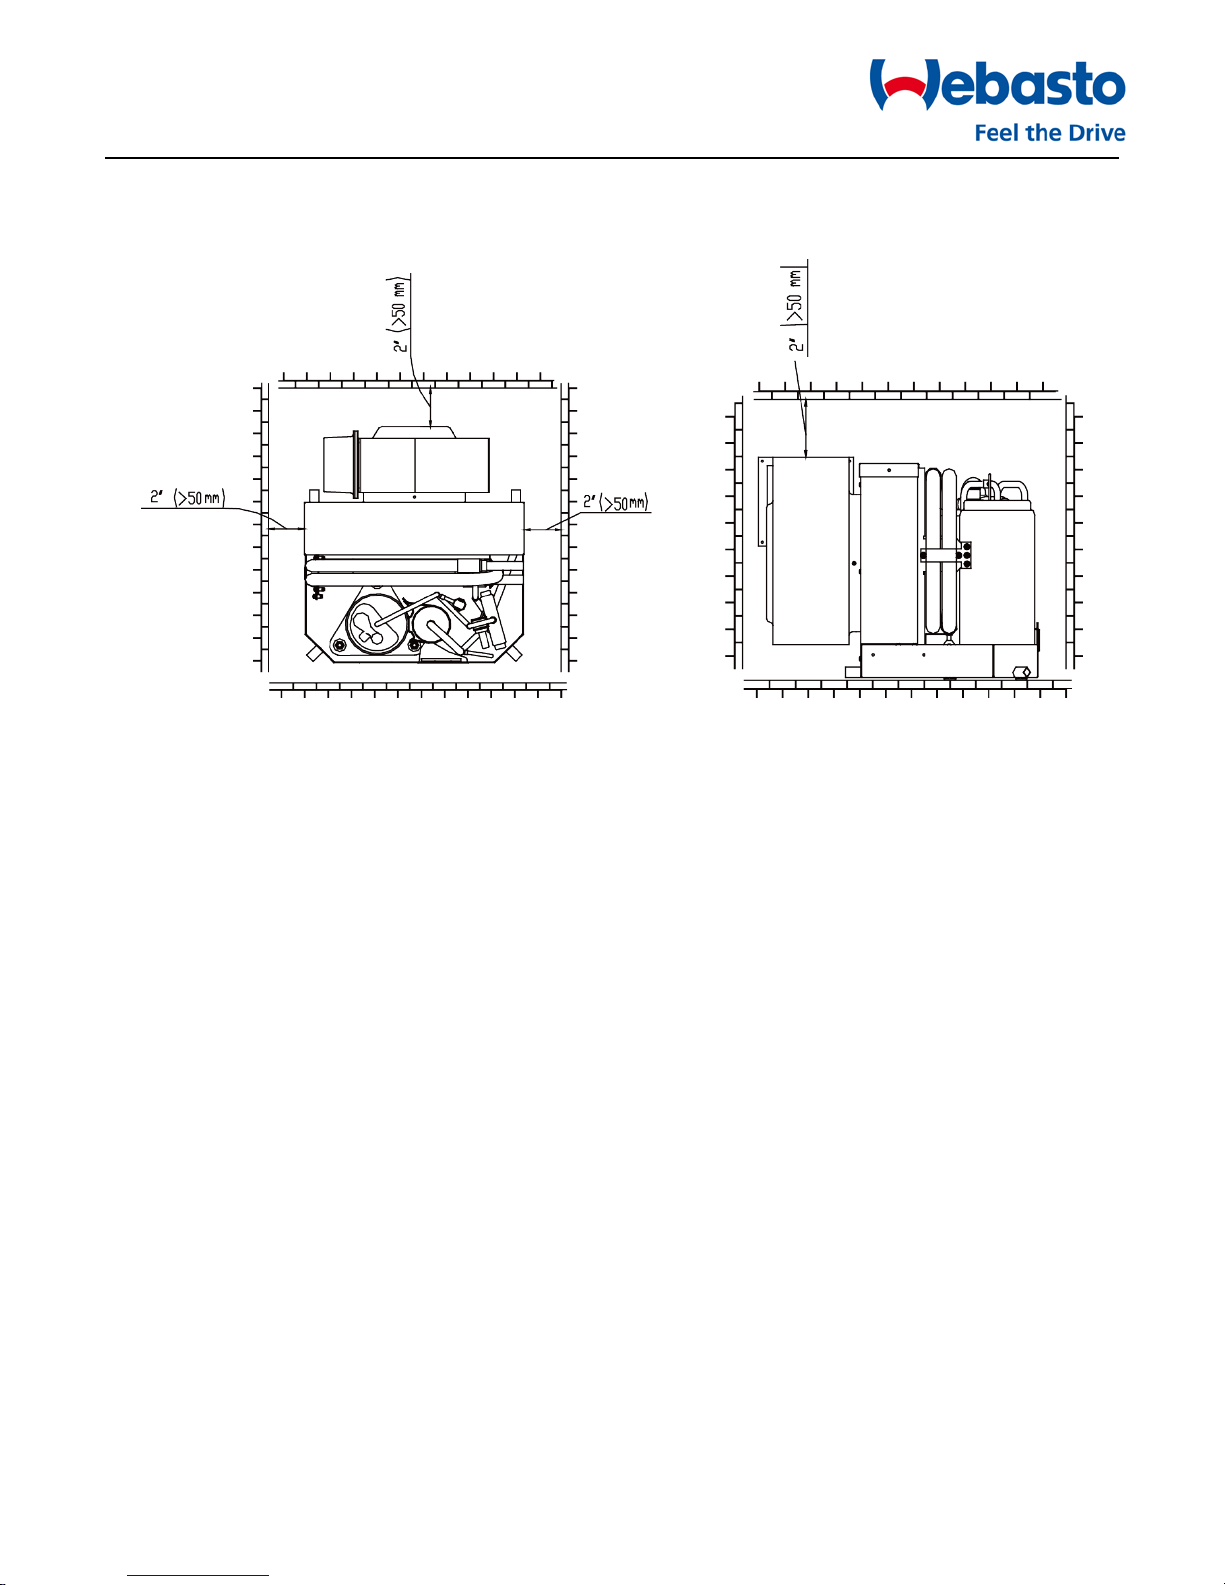
4.3 The size of sealed room
The size of sealed room should not be too small; otherwise it will affect the unit normal functionality.
.
below
See diagram
4.4 Placement of System
Selecting a good location for your air conditioner is the most important part of your preparation. Be sure to consider
the size of the area you are cooling, the air distribution needs, and the size of the unit you have chosen. Keeping in
mind that cool air has a tendency to fall; it is highly recommended that you locate the supply air grille as high as
possible in the cabin. Don’t leave the flexible ducting too long; otherwise it will lower the efficiency of the unit. Refer
to the proceeding diagram as an example.
9
Page 10
Tools required:
The unit should be installed as low as possible, BUT NEVER IN THE BILGE OR
ENGINE ROOM AREAS, ENSURE THAT THE SELECTED LOCATION IS SEALED
FROM DIRECT ACCESS TO BILGE AND/OR ENGINE ROOM VAPORS. Installing
the unit as low as possible (such as under a V-berth, dinette seat or bottom of a
locker) and ducting the supply air as high as possible, creates an ideal airflow
condition. This type of installation will prevent short or premature cycling.
The unit should be positioned on a firm, level, horizontal surface and the
condensate drain line should run downward from the unit to a suitable drain
location. Plan all Connections, which must be made including ducting,
condensate drain, and seawater in and out, electrical power connections,
location of control, and seawater pump placement, to assure easy access for
routing and servicing.
4.5 Condensate Drains
The condensate drain pan is 2” (50mm) high with four drain locations. During
conditions of high humidity, condensate may be produced at a rate of
approximately 1/2 gallon per hour (1.9 liters per hour). Please pay more
attention, it is important to route condensate drains downward to a sump
pump. It is not recommended to route condensate drains to the bilge. After the
condensate drain installation is complete, test the installation by pouring water
into the pan and checking for good flow.
For installation of the condensate drain:
◆
◆
◆
◆Screws drivers
◆Pliers
◆Pipe wrench
◆Wire cutters/crimpers
◆Drill bit set
◆Jigsaw
◆Duct tape
◆Electrical tape
◆Teflon tape
◆Compound Sealant for
thru hull fittings
◆Hardware to secure
unit, pump, strainer,
grilles & control panel
Attach a 3/4" or 5/8” reinforced hose (as required) to the hose barb and secure with stainless steel hose clamps.
Install the condensate drain hose downhill from the unit and aft to a sump.
Up to 4 drain fittings may be used and the two hoses (teed) together using a tee fitting provided there is a
minimum 2" drop from the bottom of the base pan to the tee connection.
10
Page 11

Do not terminate condensate drain line within three 3’ (914mm) of any outlet of engine,
the drain is connected properly to a sealed condensate or shower sump pump. Seal all
generator exhaust systems, compartment housing an engine or generator, nor in a bilge, unless
condensate hose penetrations.
4.6 Blower Assembly
You can achieve multi-directional supply air discharge from a single unit by rotating the blower to the desired position.
It is ideal for tight installations as 180° of rotation is available with which to position the blower. Its advanced design
allows the blower to be easily removed for rotating or servicing by removing 4 screws. Rotate the blower to allow the
most direct flow of air to the supply air grille.
4.7 Mounting Brackets
The A/C unit is supplied with a base pan that also serves as a
condensate pan. Mounting clip brackets (4) are provided to
secure the base pan to a flat, horizontal surface.
4.8 Supply & Return Air Grilles and Transition Boxes
Install the supply air grille as high as possible in a location that
will provide uniform air distribution throughout the cabin. Grille
louvers should be directed upward. The return air grille should
be installed as low and close to the A/C as possible to insure
direct uninterrupted airflow to the evaporator. The return air
grille should have a minimum four inches (4') of clearance in
front of it, free from any furniture or other obstructions. In no
instance should a supply air discharge be directed towards a
return air grille, as this will cause the system to short cycle.
Allow for adequate clearance behind the supply air grille(s) for
the transition box and ducting connection. See the
Maintenance section of this manual for return air filter cleaning
instructions.
Model 6K 10K 12K 16K 20K 25K
Min. Return Air
Grilles Size (re.)
75in²
(48500mm²)
100in²
(65680mm²)
105in²
(76514mm²)
160in²
(103584mm²)
240in²
(153028mm²)
4.9 Ducting
Good airflow is critical for the performance of the entire system. The static pressure should not exceed 100 Pa. It is
highly dependent on the quality of the ducting installation. The ducting should be run as straight, smooth and taut as
possible minimizing the number of 90 degree bends (two tight 90° bends can reduce airflow by 25%). If a transition
box is used, the total area of supply air ducts going out of the box should at least equal the area of the supply duct
feeding the box. To calculate the square inch area of a round duct, multiply the radius by itself (r2) and multiply that
number by 3.1416(π). The following is a summary of proper ducting connections:
1
Pull back the fiberglass insulation exposing the inner Mylar duct hose.
)
2
Slide the Mylar duct hose around the mount ring until it bottoms out.
)
3
Screw 3 or 4 stainless steel sheet metal screws through the duct hose into the transition ring. Make sure to
)
catch the wire in the duct hose with the heads of the screws. Use finish washers with the screws if necessary.
Do not use band clamps, as the hose will slide off.
4
Wrap duct tape around the ducting and ring joint to prevent any air leaks.
)
5
Pull the insulation back up over the Mylar to the ring and tape this joint.
)
6
Remove excess ducting and use the same connection method at the supply air grille.
)
11
240in²
(153028mm²)
Page 12

1.1gal/min
(4.0L/min)
1.6gal/min
(6.0L/min)
2.8gal/min
(10.5L/min)
2.9gal/min
(11.0L/min)
5.3gal/min
(20 L/min)
6.3gal/min
(24.0L/min)
2.6gal/min
(10.0L/min)
4.0gal/min
(15.0L/min)
5.3gal/min
(20.0L/min)
6.6gal/min
(25.0L/min)
8.5gal/min
(32 L/min)
9.8gal/min
(37.0L/min)
1.6gal/min
(6.0L/min)
2.4gal/min
(9.0L/min)
3.7gal/min
(14.0L/min)
4.2gal/min
(16.0L/min)
6.1gal/min
(23 L/min)
7.4gal/min
(28.0L/min)
All ducting should:
Be appropriately sized for each application.
◆
Run as smoothly and taut as possible.
◆
Have as few bends or loops as possible.
◆
Be securely fastened to prevent sagging or chafing during vessel operation.
◆
Have all excess ducting lengths trimmed off.
◆
Not be flattened or kinked.
◆
Insulated when located in high heat load areas (hull side, mechanical compartments, etc.).
◆
Be properly protected against potential damage when routed through open areas or bulkheads.
◆
4.10 Seawater Pump and Plumbing
Several guidelines should be followed during the installation of the seawater system. Since the circulation pump is
centrifugal and not self-priming, it must be mounted so that it is always at least 1’ (305mm) below the water line
regardless of which tack the vessel is on. Pump must always be mounted per manufacturers recommendations,
however, the discharge must always be above the inlet. Pump head should be rotated toward the direction of water
flow.
Install the seawater speed scoop intake as far below the water line and as close to the keel as possible
in any application, but especially on a sailboat, to keep the intake in the water when the boat heels over so
that air does not get into the system.
The speed scoop intake must face forward and not be shared with any other
pump. A seawater strainer is mandatory between the shut off valve (seacock) and the pump to protect the pump from
any foreign matter. Failure to install a seawater strainer will void the pump warranty. The seawater system should be
installed with an upward incline from the speed scoop & seacock, through the strainer, to the inlet of the pump, next
to the inlet of the A/C unit's condenser coil. The discharge from the A/C unit should run to the seawater outlet
thru-hull fitting that should be located where it can be visually inspected for water flow as close to the waterline to
reduce noise. All hose connections shall be secured using double/reversed stainless steel hose clamps. Use Teflon tape
on all threaded connections.
Summary of the seawater system installation:
1
Install the speed scoop thru-hull inlet as close to the keel and as far below the water line as possible, facing
)
forward. Bed the scoop with a marine sealant designed for underwater use.
2
Install a bronze, full flow seacock on the speed scoop thru-hull inlet.
)
3
Install a seawater strainer below the level of the pump with access to filter.
)
4
Mount the pump above the strainer and at least 1’ (305mm) below the waterline.
)
5
Connect the seacock and strainer with an uphill run of reinforced marine grade hose.
)
6
Connect the discharge from the pump uphill to the bottom inlet of the A/C unit's condenser coil with
)
reinforced marine grade hose. Connect the discharge from the condenser coil to the overboard discharge
thru-hull fitting with 3/4" hose.
7
Avoid loops, high spots or the use of 90° elbows with seawater hose (each 90° elbow is equivalent to 2.5'
)
(762mm) of hose and a 90° elbow on the pump outlet is equivalent to 20' (6.1m) of hose).
8
Double clamp all hose connections with stainless steel clamps, reversing the clamps.
)
9
Use Teflon tape on all threaded connections.
)
10
Connect all metallic parts in contact with seawater to the vessel's bonding system including the speed scoop
)
inlet, strainer, pump and the air conditioner. Failure to do so will void warranty.
Seawater Flow:
Model 6K 10K 12K 16K 20K 25K
Min. Seawater Flow
Max. Seawater Flow
Rated Seawater Flow
12
Page 13

4.11 Electrical Connections, Grounding and Bonding
All A/C units have a terminal strip mounted inside the electric box. The terminal strip is labeled for proper connections
of the electrical supply, ground wires and pump circuits. A wiring diagram is provided in the electrical box and later in
this manual. The wiring diagram in the electrical box supersedes any found in this manual and ABYC standards. The
correct size circuit breaker should be used to protect the system as specified on the A/C unit's data plate label. A
minimum of 12 AWG boat cable should be used to supply power to the A/C unit and the seawater pump. All
connections shall be made with ring or fork terminals.
Turn off A/C power supply circuit breaker before opening
electric box.
Each A/C installed requires its own dedicated circuit breaker. If there is only one A/C installed, the seawater pump does
not require a circuit breaker; the wiring from the seawater pump is connected to the terminal strip in the electric box. If
two or more A/C use the same seawater pump, the pump wires will be connected to a pump relay, Please refer to the
wiring diagram. Electrical connections in the bilge and/or below the waterline should use heat shrink type butt splices.
Field wiring must comply with ABYC electrical codes. Power to the unit must be within the operating voltage range
indicated on the data plate. Properly sized fuses or HACR circuit breakers must be installed for circuit protection. See
table below for suggested circuit breaker size. All units must be effectively grounded to minimize the hazard of
electrical shock and personal injury. The following can be observed: AC (alternating current) grounding (green wire)
must be provided with the AC power conductors and connected to the ground terminal (marked "GRND") at the AC
power input terminal block of the unit(s), per ABYC standard E-8, or equivalent.
Fuse Information
BTU Capacity 6000 10000 12000 16000 24000
Voltage (V) 115 230 230 115 230 230 115 230 230 115 230 230 115 Soft 230 230
Frequency (Hz) 60 50 60 60 50 60 60 50 60 60 50 60 60 50 60
Starting Current (A) 45 25 54.5 25.5 26.5 39 41 46
Starting Time (ms) 150 125 340 140 190 320 250 350
Running Current (A) 11 5.6 12.4 6.2 8.4 20.4 8.6 12.5
*Suggest Breaker (A)
Slow or Medium Delay
*
15 10 10 15 10 10 20 15 15
Slow Delay
**
**25
20 20 30 25 25
13
Page 14

1)Connections between the vessel's A/C system grounding conductor (green wire) and the vessel’s DC (Direct
Current) negative or bonding system should be made as part of the vessel's wiring, per ABYC standard E-9, or
equivalent.
2) When servicing or replacing existing equipment that contains a chassis-mounted ground stud, the installer must
check the vessel's wiring for the existence of the connection required in item 1 above.
The A/C unit must be connected to the ship’s bonding system to prevent corrosion due to stray electrical
current or voltage. All pumps, metallic valves and fittings in the seawater circuit that are isolated from the
A/C unit by PVC or rubber hoses must be individually bonded to the vessels bonding system also. This will
help eliminate any possibility of corrosion due to stray current or voltage.
3)Phase Notice
It is extremely important to ensure that wiring and phase sequencing of a three-phase power source is correct.
Marine wiring standards call for power source phases L1, L2, and L3 to be color-coded BLACK, WHITE, and RED,
respectively. These must be connected to the unit with the proper sequence; otherwise, it will not operate properly.
If the wiring sequence is incorrect, the unit's compressor (Scroll type only) and pump (if applicable) will run in the
reverse direction at a significantly increased noise level.
4) Users should avoid putting objects which not reaching v-1 flame retarded rating within an area of 50mm radius
from the waterproof connector.
4.12 Manual Controller Installation
DO NOT turn the unit off and immediately turn it back on. Wait at least 30 seconds for refrigerant
pressures to stabilize.
Before mounting the manual controller, consider the location. The manual controller should be mounted on an inside
wall, slightly higher than mid-height of the cabin. The cut out size for the manual controller is 2 1/2” (64mm) wide by 3
5/16” (84mm). Do not mount the manual controller in direct sunlight, near any heat producing appliances or in a
bulkhead where temperatures radiating from behind the panel may affect performance. Do not mount the manual
controller in the supply air stream. Do not mount the manual controller above or below a supply or return air grille. Do
not mount the manual controller behind a door, in a corner, under a stairwell or any place where there is no freely
circulating air. Mount the manual controller within display cable length (longer cable available) of the air conditioner.
Plug the display cable into the circuit board in the electric box and into the back of the manual controller.
14
Page 15

4.13 Electric Box Installation
4.13.1 (6K, 10K, 12K, 16K)
Mount the electric box using four M5 screws.
Mount the electric box in a cool dry location and leave plenty of room for maintenance.
Units: mm
15
Page 16

4.13.2 (20K, 25K)
Units: mm
16
Page 17

4.14 Installation Checklist (Review Prior To Installation)
4.14.1 Seawater cooling system:
Speed scoop located as far below the water line and as close to the keel as possible.
◆
Shut off valve (sea cock) and speed scoop properly sealed and tightened.
◆
Seawater pump is at least 1’ (305mm) below water line and securely mounted.
◆
Strainer mounted below pump with access to filter.
◆
Double/reversed stainless steel hose clamps on all hose connections.
◆
Teflon tape on all threaded connections.
◆
Hose runs uphill from speed scoop and sea cock to strainer, pump and A/C unit, and then downhill (if
◆
possible) from A/C unit to overboard discharge.
Water flowing freely from overboard discharge while pump is running.
◆
Pump relay panel, if used, must have its own circuit breaker sized for the pump. (20 amp max)
◆
All metal fittings should be bonded.
◆
4.14.2 Mounting
Not in engine room or bilge area, must be sealed away from exhaust or fumes.
◆
Proper spacing allowed around unit.
◆
Attached to solid level platform with hold down brackets provided.
◆
Condensate drain routed aft and downhill to a sealed sump (not bilge).
◆
All penetrations to bilge area sealed.
◆
Blower rotated toward supply air grille.
◆
4.14.3 Electrical
All butt connections on pumps are tightly crimped and covered with heat shrink.
◆
AC power source installed and grounded/bonded in accordance with ABYC standards.
◆
Control wires connected to terminal strip with fork or ring terminals.
◆
Circuit breakers sized according to specifications on the data plate label.
◆
Pump Relay Panel (if used) has a dedicated circuit breaker sized for the pump but not to exceed 20 amps
◆
maximum.
4.14.4 Grilles and Ducting
Supply air grille mounted as high as possible.
◆
Return air grille mounted as low and as close to the A/C unit as possible.
◆
Return air grille mounted away from bilge vapors or exhaust fumes.
◆
Ducting is pulled taut, straight, smooth and properly connected with no excess.
◆
4.14.5 Quick Start Operations Checklist
Ensure seawater intake ball valve (sea cock) is open.
◆
Turn on the A/C circuit breaker. If the seawater pump has its own circuit breaker, make sure to turn it on.
◆
Turn the system on. Set the desired cabin temperature (set point).
◆
Check for a steady solid stream of water from the overboard discharge.
◆
Verify that there is steady airflow out of the supply air grille
◆
If the unit does not appear to be operating properly, refer to troubleshooting guidelines.
◆
DO NOT turn the unit off and immediately turn it back on. Allow at least 30 seconds for refrigerant
pressure equalization.
17
Page 18

4.15 Wiring Diagrams
The following electric diagram is for reference only. Please refer to diagram affixed to the unit as the latest version.
WIRING DIAGRAM: 6K-115V, 6K-230V, 10K-115V, 10K-230V
The specification of power cord is AWG12*3 (3*2.5).
18
Page 19

WIRING DIAGRAM: 12K-115V, 12K-230V
The specification of power cord is AWG12*3 (3*2.5).
19
Page 20

WIRING DIAGRAM: 16K-115V, 16K-230V
The specification of power cord is AWG12*3 (3*2.5).
20
Page 21

WIRING DIAGRAM: 20K-230V, 25K-230V
The specification of power cord is AWG12*3(3*2.5).
WIRING DIRGRAM / POWER SUPPLY:
21
Page 22

⑥
⑦
⑧
⑨
5 Operation
5.1 Manual Controller Operation
CAUTION:
◆ Don't install the manual controller in a location where it can get wet.
◆ Don’t knock, throw or open the manual controller frequently.
① Remote receiver (not used with this series)
② Digital display
③ Fan speed display (HIGH-MID-LOW and AUTO speed)
④ Display of mode operation (COOL-DEHUMIDIFY-HEAT and AUTO)
Fan control button
Temp. Setting button (Increasing)
Temp. Setting button (Decreasing)
ON/OFF button
⑤ Mode button
This manual controller has memory function, if power off happened during the operation, the controller will memorize
the status of ON/OFF, operation mode, set temperature, operation fan speed, temperature display format and time of
starting interval. After powered on, the manual controller will display the setting status before power off automatically;
and if the operation status before power off is on, the fan runs at once, after 1 minute, the compressor shall
automatically run in the operation status before power off. (The units has not been set up the time of starting interval)
In cooling / heating / dehumidify mode, the pump starts before the compressor starts, stops
after 5 seconds delay of the compressor stopping
22
Page 23

5.2 Power ON/OFF
Press ON/OFF button to turn the unit on
◆
Pressing the ON/OFF button a second time will turn the unit off
◆
5.3 FAN Control
Press the FAN button, the fan speed will change in the following order:
◆
In “DEHUMIDIFY” mode, the fan will work at low speed automatically.
◆
5.4 Temperature Setting
Press temperature setting key:
◆
To increase in 1°C increments;
To decrease in 1°C increments.
The setting range of temperature in each mode:
◆
COOL 61°F~86°F or 16°C ~30°C
DEHUMIDIFY
HEAT 61°F~86°F or 16°C~30°C
FAN
AUTO 68°F~78°F or 20°C~26°C
5.5 Mode Setting
Press this key to change the operation mode in order of
◆
In “COOL” mode, the LED marked
◆
only the fan will run.
61°F~ 86°F or 16°C~30°C
In this mode, temperature cannot be changed.
will be light, if set temperature is higher than room temperature,
In “DEHUMIDIFY” mode, the LED marked
◆
temperature range. Dehumidifying is more efficient than in cooling mode and it will save energy.
◆ In “FAN” mode, all LED marked work pattern will extinguish, and hand controller will indicate room
temperature. But this temperature cannot be set
◆ In “HEAT” mode, the LED marked
temperature, it will not run.
In “AUTO” mode, the LED marked AUTO will be light。
◆
COOLING ONLY TYPE WITHOUT HEAT MODE.
5.6 Display Fahrenheit or Centigrade
Pressing MODE and
key simultaneously for 5 seconds, the temperature can switch between Fahrenheit and
Centigrade modes.
will be light and fan will work at low speed within a certain
will be light ,when the setting temperature is lower than the room
23
Page 24

5.7 Error Codes
When there are faults within the system, an error code will be displayed on the display controller: Power off the unit
and contact professional service.
Error code Description
E1 Compressor high pressure protection
E2 Evaporator freezing protection
E3 Compressor low pressure protection
E6 Communication error
F0 Ambient temperature sensor error
F1 Evaporator temperature sensor error
5.8 Key Lock
1) Pressing
and key simultaneously for 5 seconds, all keys will be locked. Then pressing and key
simultaneously for 5 seconds again, all keys will be unlocked.
2) After all keys are locked, the controller would not response to any operations. And wired controller will display
“EE”for 3 seconds when users press the key.
5.9 Checking Voltage Function
When numerical value displayed on the Nixie tube does not flicker, pressing
and FAN key simultaneously for 5
seconds, then you can check the current voltage. The display will last for 5 seconds before it exits automatically. If you
have controller or other key to control the signal during this period, the display will exit directly.
5.10 Starting Interval Setting
If there are several A/C units in a vessel, you can set starting time interval between one by one.
◆
◆ After powering on controller, press the
set starting intervals. Display will flash every 0.5 second. Then, pressing
interval number. To finalize, press the
If you do not confirm, the number you set up will flash for 10 seconds, then revert back to previous setting.
The value displayed is the figure of interval time, each interval time is 20s, for example the set up value is
◆
128, it means that the actual setting interval time should be 128×20=2560s.
Power on the controller, press the
◆
button and fan speed button simultaneously for 5 seconds, it will display the figure of interval time for 5s.
The controller must be turned off and back on for the startin interval to execute.
◆
The setting range of starting interval value is 0-255; accordingly, the setting range of starting interval time is
◆
0-5100s(85min).
and FAN key simultaneously for 5 seconds, This allows you to
key or key to set up
and FAN key simultaneously for 5 seconds to confirm the number.
button and fan speed button simultaneously, then press the
24
Page 25

5.11 Auto –off function of the manual controller
The display of ambient temperature will automatically blank in 5-minute lag if there is no operation on the manual
controller.
1
After receiving the signal from the manual controller, the indicator will light on automatically, in which case,
)
the unit will not operation at all and the manual controller can be active after it lights on.
After the unit stops, there is no display on the manual controller.
◆
Powered on again if the unit status is on before power off, temperature indicator and mode
◆
indicator of the manual controller will light on automatically.
If the unit receives the stop signal, it will directly blank off the temperature indicator and mode
◆
indicator of the manual controller.
NOTE:
The starting interval time setting function only is available in the same yacht and there are should be two
or more units installed. After the starting time interval be set up, after powered off and re-powered on,
Units will delay 3min and base on this, it will delay for a while then can start up, the delay time is called
time of starting interval.
6 Accessories
ITEM DESCRIPTION P/N
1 Extended Display Cable / 49 ft. (15m) FCFSP0076A
25
Page 26

A/C circuit breaker is off
Turn circuit breaker on at ship's panel,
See control operation section in this manual.
Display control is not turned on.
Check wiring Diagram and correct if necessary.
Fuse is broken
Replaced with a new fuse.
Incorrect wiring at terminal strip.
Disconnect power supply and open electric box,
Push-on butt connectors pulled apart
Check power source (shore/generator) for proper
Input line voltage is insufficient,
Check wiring and terminals for proper sizes and
connections.
Check your specific control
Troubleshooting section
Temperature set point is above (in cooling)
or below (in heating) ambient temperature
Lower or raise set point.
Obstructed seawater flow.
Clean seawater strainer. Check for obstructions at
flow from the overboard discharge.
Seawater pump maybe air-locked,
Remove hose from pump discharge to purge air from
line
Refrigerant gas leaked.
Check A/C unit for refrigerant oil leakage, call service
technician.
Seawater temperature too high for cooling
Seawater temperature will directly affect A/C unit's
ively cool your boat
Coil is iced (in cooling)
See below
Fan is not running.
See below
Pressure switch or thermal overload
opened.
Check your specific control troubleshooting section.
7 Troubleshooting
FAULT POSSIBLE REASON CORRECTION
Will not start
check wiring diagram, correct if necessary,
Fan not running
No cooling or
heating
during installation.
or too low for heating.
voltage.
speed scoop thru-hull inlet. Check for a good steady
efficiency. This A/C unit can effect
in water temperature up to 900F and heat (if reverse
cycle option is installed) in water as low as 40oF.
26
Page 27

Reversing valve may be stuck.
Tap reversing valve lightly with rubber mallet while
Air flow is blocked
Remove any obstructions in return air stream, Clean
Coil is iced
See below.
Thermostat set point is too low
Raise set point.
Improper air flow
Remove any obstructions in return air stream. Clean
Supply air is short-cycling,
Redirect supply air so that is not blowing into the
Seawater temperature is below 40oF
Shut down system to prevent damage to condenser.
Humidity level too high.
Close hatches and doors.
When all else fails.
Switch A/C to heat until ice melts or use hair dryer to
Check your specific control
FAULT POSSIBLE REASON CORRECTION
No Heating
Low air flow
Coil is iced
unit is in heat mode, call for service if the problem
cannot be solved.
return air filter and grille. Check for crushed or
restricted ducting, ducting must be as straight,
smooth and taut as possible.
return air filter and grille. Check for crushed or
restricted ducting, ducting must be as straight,
smooth and taut as possible.
return air stream. Seal any air leaks on duct.
Allow coil to defrost (see below).
troubleshooting section,
melt.
27
Page 28

Manual
controller is not
lit.
4-pin display cable plugs are not making
pins).
With POWER OFF at the circuit breaker, remove
or entire display cable.
Set point temperature is improperly set:
Raise or lower set point.
Porthole or hatches open.
Close all port holes and hatches,
Seawater temperature too high for
Seawater temperature will directly affect the A/C
unit can effectively cool your
400F.
Improper air sensor location.
Check your specific control troubleshooting section,
FAULT POSSIBLE REASON CORRECTION
contact (unplugged, dirty, bent, or broken
connector and inspect. If damaged, replace connector
too low for cooling or too high for
heating.
System runs
continuously
cooling or too low for heating.
unit's efficiency. This A/C
boat in water temperatures up to 90°F and heat (if
reverse cycle option is installed) in water as low as
8 Maintenance
8.1 Reversing Valves
Reverse cycle units have a reversing valve; the valve must be energized periodically to keep the internal parts moving
freely. To do this, switch the A/C unit into heat mode for a minimum of 30 seconds once a month.
8.2 Seawater Strainer
Ensure that your pump receives adequate seawater flow by regularly cleaning the strainer basket. Periodically check the
overboard discharge for a steady stream of water. Check seawater intake speed scoop for obstructions. Make sure
hoses are not looped, kinked or crushed.
8.3 Blowers
Oil blowers every six months with SAE20 or equivalent. This does not apply to high velocity blowers with the motor
encased in the blower housing.
8.4 Condenser Coil Cleaning
1
With the system turned off at the circuit breaker on the ship's panel, disconnect the inlet and outlet
)
connections of the condenser coil.
2
Use chemical resistant hoses (PVC 3/4" I.D., etc.) to connect the inlet of the condenser coil to the outlet of a
)
chemical resistant, submersible pump and let the hose connected to the Coil outlet flow freely into the
container mentioned below.
3
Place a strainer or piece of screen over the inlet of the pump and submerse the pump into a container filled
)
with a 5% solution of muriatic or hydrochloric acid and fresh water or use a premixed over-the-counter solution.
Use a large container as possible to hold the solution (5-25 gallons). CAUTION: avoid spilling or splashing the
solution. Remember to wear all necessary protective gear, i.e. approved safety goggles and chemical resistant
gloves. Follow all warnings and recommendations given by the manufacturer of any acids or premixed
solutions.
28
Page 29

4
Power the pump and circulate the solution through the condenser coil for 15-45 minutes depending upon the
)
size of the coils and the extent of the contamination. Visual inspection of the solution in the container should
indicate when the contamination has been removed.
5
Circulate fresh water through the coil to flush any residual acid from the system.
)
6
Restart the system and check operational parameters to ensure thorough cleaning has taken place. Additional
)
cleaning may be necessary with extreme contamination.
For the purpose of protecting the environment, dispose of any contaminated acid solutions in
WARNING:
accordance with federal, state and/or local regulations.
8.5 Return Air Filters
Check the return air filter about once a month and clean as necessary. To clean the filter, remove it from the unit, rinse
with water, air dry and reinstall. (Do not used compressed air)
8.6 Winterization
There are several methods of winterization, some of which work better than others. There are various methods
employed using a 50/50 non-polluting biodegradable anti-freeze/water solution. Any method that causes the
anti-freeze solution to flow downward is the method of choice. By this, the anti-freeze solution will displace any water
trapped and eliminate the possibility of freezing in hidden areas. In addition, since the seawater pump utilizes a
magnetically driven impeller, the impeller should be removed from the wet end assembly, Wiped with a solution, and
stored in a warm, dry area until commissioning takes place.
Collect all discharged liquids and recycle or dispose of in a proper manner.
8.7 Limited Warranty
This product comes with a 24 month limited warranty from the date of purchase. For warranty policy details, visit
http://www.techwebasto.com
. To obtain warranty service, contact a customer service representative at:
(800) 860-7866 or e-mail at: info-us@webasto.com.
8.8 Technical Assistance
If you require help, check our technical assistance website at http://www.techwebasto.com or call the technical
support hotline at (800) 860-7866.
For quick service, please have the following information available:
● Full Name
● Phone number including the area code
● Unit Model Information and serial number
● The type of assistance you are requesting
● Document any error codes
29
Page 30

NOTES
30
Page 31

NOTES
31
Page 32

Webasto Thermo & Comfort N.A., Inc.
Canada: (800) 667-8900
www.webasto.us
Org. 6/25/15 | Rev. 10/2016 | P/N: FCF Platinum Series
15083 North Road
Fenton, MI 48430
Technical Assistance Hotline
USA: (800) 860-7866
www.techwebasto.com
 Loading...