

Page 1
INSTALLATION MANUAL
VAN STORAGE SOLUTIONS
FOR THE WAY YOU WORK
ATTENTION: PLEASE READ AND UNDERSTAND ALL INSTRUCTIONS AND WARNINGS
BEFORE ASSEMBLING, INSTALLING OR USING THIS PRODUCT.
TM
WWW.WEATHERGUARD.COM
PLAN YOUR VAN (TIPS FOR FASTER INSTALLATION)
• Installing your WEATHER GUARD® Bulkhead is very clear cut following these instructions.
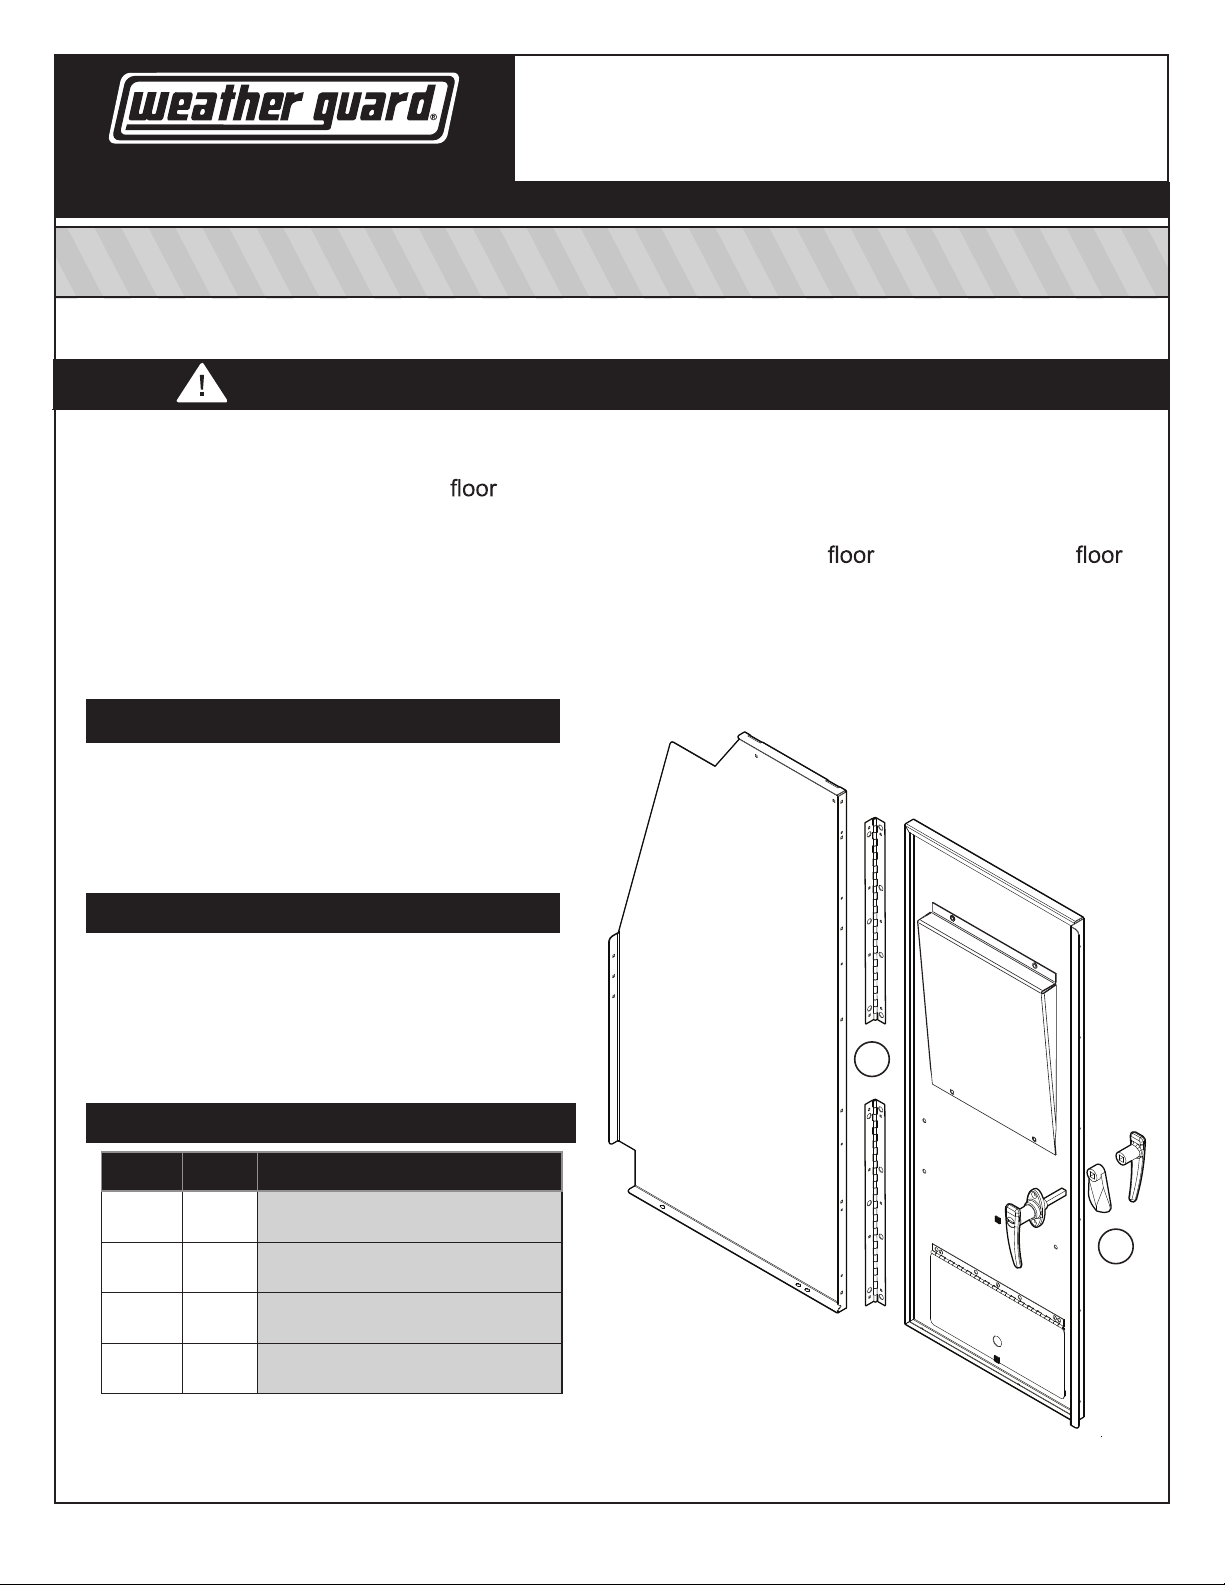
BULKHEAD HINGE KIT
• Before cutting or drilling in the
cables so you don’t accidentally cut something important.
• Make sure that the blind fasteners go directly into the sheet-metal
mat. Cut clearance holes for fasteners and spacers. Always wear eye protection when drilling
or cutting.
INSTALLATION TIME
, verify the location of you gas tank, fuel lines and electrical
and not through a
Approximate installation time: 15 minutes
per unit depending on van equipment
installation experience.
TOOLS REQUIRED
• Phillips Head Screwdriver
• 3/8" Ratchet Drive
• Sockets: 5/16", 11/32", 7/16"
• Open End Wrenchs: 11/32", 3/8"
PARTS LIST
A 1 Door Handle Assembly
B 2 Hinges
C 1 9" Weatherstripping
A
B
D 1 Bolt Kit
*24-0310*
1
Part No. 24-0310 REV. C ECN 5305 04/13
Page 2
INSTALLATION INSTRUCTIONS
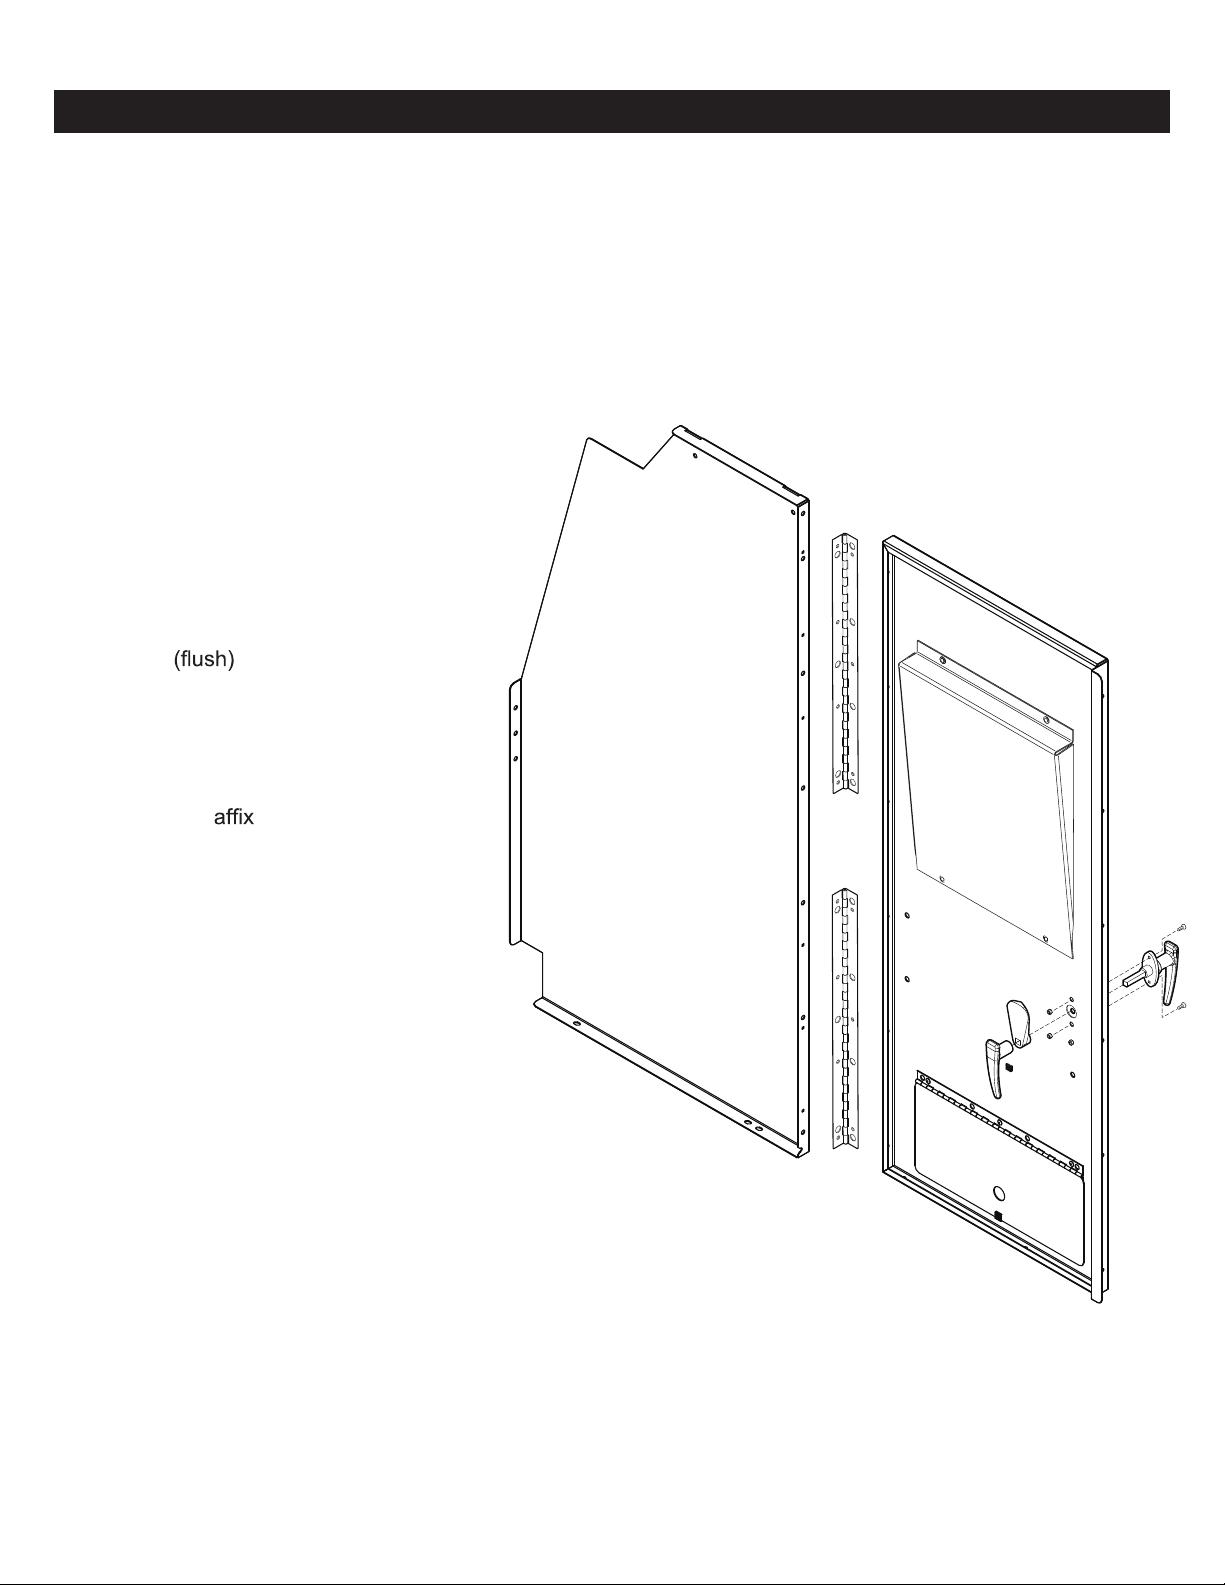
STEP 1: Attach Hinges to Driver Side Panel using six
(6) #8-32 x 1/2" Machine Screws and #8-32 Nylon Lock
Nuts from the bolt kit supplied.
NOTE: Not all mounting holes will be used on the
vertical sides of either of the panels. Extra mounting
holes are for the non-swing door option for this
Bulkhead.
STEP 2: Attach Center Door Panel to
Hinge/Driver Panel using eight (8) #8-32
x 1/2" Machine Screws and #8-32 Nylon
Lock Nuts from the bolt kit supplied with
the 86555 Hinge Kit.
NOTE: The tops of the Driver Side
Panel and the Center Door Panel should
be even
uneven.
and the bottoms will be
STEP 3: Cut Weatherstripping into
three (3) 3" sections. Remove adhesive
backing and
to channel at top,
bottom and above door latch cut-out on
dirver’s side of door.
NOTE: Not all mounting holes will be
used on the vertical sides of either of the
panels. Extra mounting holes are for the
non-swing door option available for this
Bulkhead.
STEP 4: Attach the Door Handle Assembly to
the Center Panel by passing the Locking Handle
through the opening in the Center Panel. Attach
the Cam Paddle and the Non-Locking Handle on
the other side of the Center Panel. Using two (2)
10-24 x 3/4" Machine Screws and 10-24 Nylon
Lock Nuts (from the bolt kit supplied with the
86555 Hinge Kit).
STEP 5: Adjust Cam on Handle Assembly so it
rests on the rear edge of the slot in the Passenger
Side Panel. In this position, tighten the Allen Head
Set Screw with the Allen wrench provided.
2
Part No. 24-0310 REV. C ECN 5305 04/13
Page 3

WARNING
This product can reduce the driver’s ability to clearly see roadways, vehicular or pedestrian traffic and other objects through the rear and
side windows of the vehicle, which can cause an accident. Extra precautions should be taken when driving a vehicle with this pr oduct. Make
all adjustments necessary to ensure maximum visibility, including but not limited to, changing mirror and seating positions. State and local
laws may prohibit obstruction of windows in a moving vehicle.
These instructions are to be followed using the parts and fasteners supplied for proper installation. Any modifications or improper installation
of this product will create a hazardous condition that could result in death, serious personal injury and/or property damage.
CAUTION
Prior to drilling, so as not to cut electric wires, fuel lines, brake lines, etc., check behind and underneath drilling and mounting locations. To keep
debris out of your eyes when checking the underside of the vehicle, or when drilling, always wear protective eye wear. Failure to heed this warning
will result in death or serious injury.
– NOTICE –
Any or unintended use of this product shall immediately void all manufacturers warranties. Manufacturer disclaims all liability for
injuries to persons or property resulting from any
to, or unintended use of this product.
KNAACK LLC LIMITED LIFETIME WARRANTY FOR WEATHER GUARD® PRODUCTS
WEATHER GUARD® Products — Limited Lifetime Warranty
(Purchased on or after 1/1/2009)
®
Knaack LLC (the “Manufacturer”) warrants to the original purchaser only that WEATHER GUARD
(the “WEATHER GUARD
the WEATHER GUARD
terminates if the original purchaser transfers the WEATHER GUARD
What is Covered
All WEATHER GUARD
What We Will Do to Correct Problems
Subject to the limitations and exclusions described in this limited warranty, the Manufacturer will remedy defects in materials or workmanship by providing
one of the following remedies at its option and without charge to the original purchaser for parts or labor: (a) repairing the defective portion of the WEATHER
®
Product or (b) replacing the entire WEATHER GUARD® Product. In addition, the manufacturer may elect at its option, not to repair or replace the
GUARD
WEATHER GUARD
be used toward the purchase of new WEATHER GUARD
What is Not Covered
This limited warranty expressly excludes:
• Defects caused by normal wear and tear, cosmetic rust, scratches, accidents, unlawful vehicle operation, or modification to the product, or any types or
repair of a WEATHER GUARD
• Defects resulting from conditions beyond the Manufacturer ’s control including, but not limited to misuse, overloading, or failure to assemble, mount or use
the WEATHER GUARD
made available to the original purchaser.
• Damage to the contents of the box or vehicle.
• TO THE EXTENT PERMITTED BY LAW, IN NO EVENT SHALL THE MANUFACTURER BE LIABLE FOR ANY INCIDENTAL, SPECIAL, INDIRECT,
OR CONSEQUENTIAL DAMAGES, INCLUDING ANY ECONOMIC LOSS, WHETHER RESULTING FROM NONPERFORMANCE, USE, MISUSE OR
INABILITY TO USE THE WEATHER GUARD
No Other Express Warranty Applies
This Limited Lifetime Warranty is the sole and exclusive warranty for WEATHER GUARD
alter this warranty or make any other warranty on behalf of Knaack LLC.
Notification Procedures
If the WEATHER GUARD
discovery of the nonconformity. In order to receive the remedies under this limited warranty, the warranty claim must describe the nature of the nonconformity, and
a copy of the original sales receipt, invoice, bill or other proof of purchase must accompany the claim. Repairs or modificatio ns made to the WEATHER GUARD
Product by other than the Manufacturer or its authorized agent will nullify this limited warranty. Coverage under this limited warranty is conditioned at all times upon
the owner ’s compliance with these required notification and repair procedures. Warranty claims must include reciprocal contact information and may be made via
certified mail to:
®
Product”) will be free from defects in material and workmanship from the date of purchase and continuing for the expected life time of
®
Product. A copy of the original sales receipt must be supplied to the Manufacturer at the time a warranty claim is made. This warranty
®
Products identified above that are purchased on or after January 1, 2009.
®
Product, but rather issue to the original purchaser a refund equal to the purchase price paid for the WEATHER GUARD® Product or a credit to
®
Product other than those authorized or provided by the Manufacturer.
®
Product in accordance with the Manufacturer’s written instructions or guidelines included with the WEATHER GUARD® Product or
®
Product does not conform with the terms of this limited warranty, the original owner must promptly notify the Manufacturer in writing upon
®
Product.
®
PRODUCT OR THE MANUFACTURER’S NEGLIGENCE.
®
Product to any other person.
®
Truck and Van Products
products. No employee, agent, dealer, or other person is authorized to
®
*24-0310*
Knaack LLC
ATTN: War
ranty Claims
420 E. Terra Cotta Avenue Crystal Lake, IL 60014
If you have any questions, please call toll free at 1-800-456-7865.
©2013 Knaack LLC
3
Part No. 24-0310 REV. C ECN 5305 04/13
 Loading...