

Page 1
Bulkhead
Model Number 96141-3-01 and 96142-3-01
• Installing your ProMaster bulkhead is very clear cut following these instructions.
• Before cutting or drilling in the floor, verify the location of you gas tank, fuel lines and electrical cables
so you don’t accidentally cut something important.
• When mounting to the floor, make sure that the blind fasteners go into the sheet-metal floor and not the
composite floor. A hole saw will give you a nice, clean edge. Always wear eye protection when drilling
or cutting.
• When mounting to the B-pillar, you’ll need to cut through the plastic trim. A hole saw will give you a
nice, clean edge. Use the ½” spacers to ensure a solid mount to the van.
• Your ProMaster van bulkhead can be up-graded with a swing-door conversion kit, 96901-3-01. If you
think you might want to change to it in the future, put an extra nut between the driver's side panel and
the center panel to allow enough space.
• Electric Drill
• Electric Drill-driver or impact wrench
• Pencil or Marker
• Hammer
• Center Punch
• 1" Hole Saw
• Hack saw blade or sharp knife
• 7/16” and 1/2” Driver Bits and/or
Sockets
• Drill Bits: 1/8", 3/8", 1/2”, 13/32”
• Ratchet Drive for your sockets
• Level
• Carpenter’s Square
• Open End Wrenches: 7/16", 1/2",
9/16"
DESCRIPTION QTY
1/4-20 BLIND FASTENER 6
1/4-20 X5/8” HEX HEAD BOLT 15
1/4-20 NYLON LOCK NUT 24
5/16" FLAT WASHER 8
5/16-18 X2” HEX HEAD BOLT 4
¼” FLAT WASHER 44
5/16-18 BLIND FASTENER 4
5/16“ LOCK WASHER 4
5/16” FENDER WASHER 4
3/8” FLOOR MOUNTING SPACER 8
1/2” FLOOR MOUNTING SPACER 6
1/4-20x5/8 CARRIAGE BOLT 8
BLIND FASTENER INSTALL TOOL 1
1/4-20 x 2-1/4" HEX HEAD BOLT 1
5/16-18 x 2-1/4 HEX HEAD BOLT 1
1/4-20 x 1-1/4 HEX WSHR HD BOLT 6
SCREW, 1/4-14x3/4 DRILL 4
NUT, LOCK 5/16-18 NYLON 4
1
Part No. 24-0315 Rev 1 09/13
Page 2
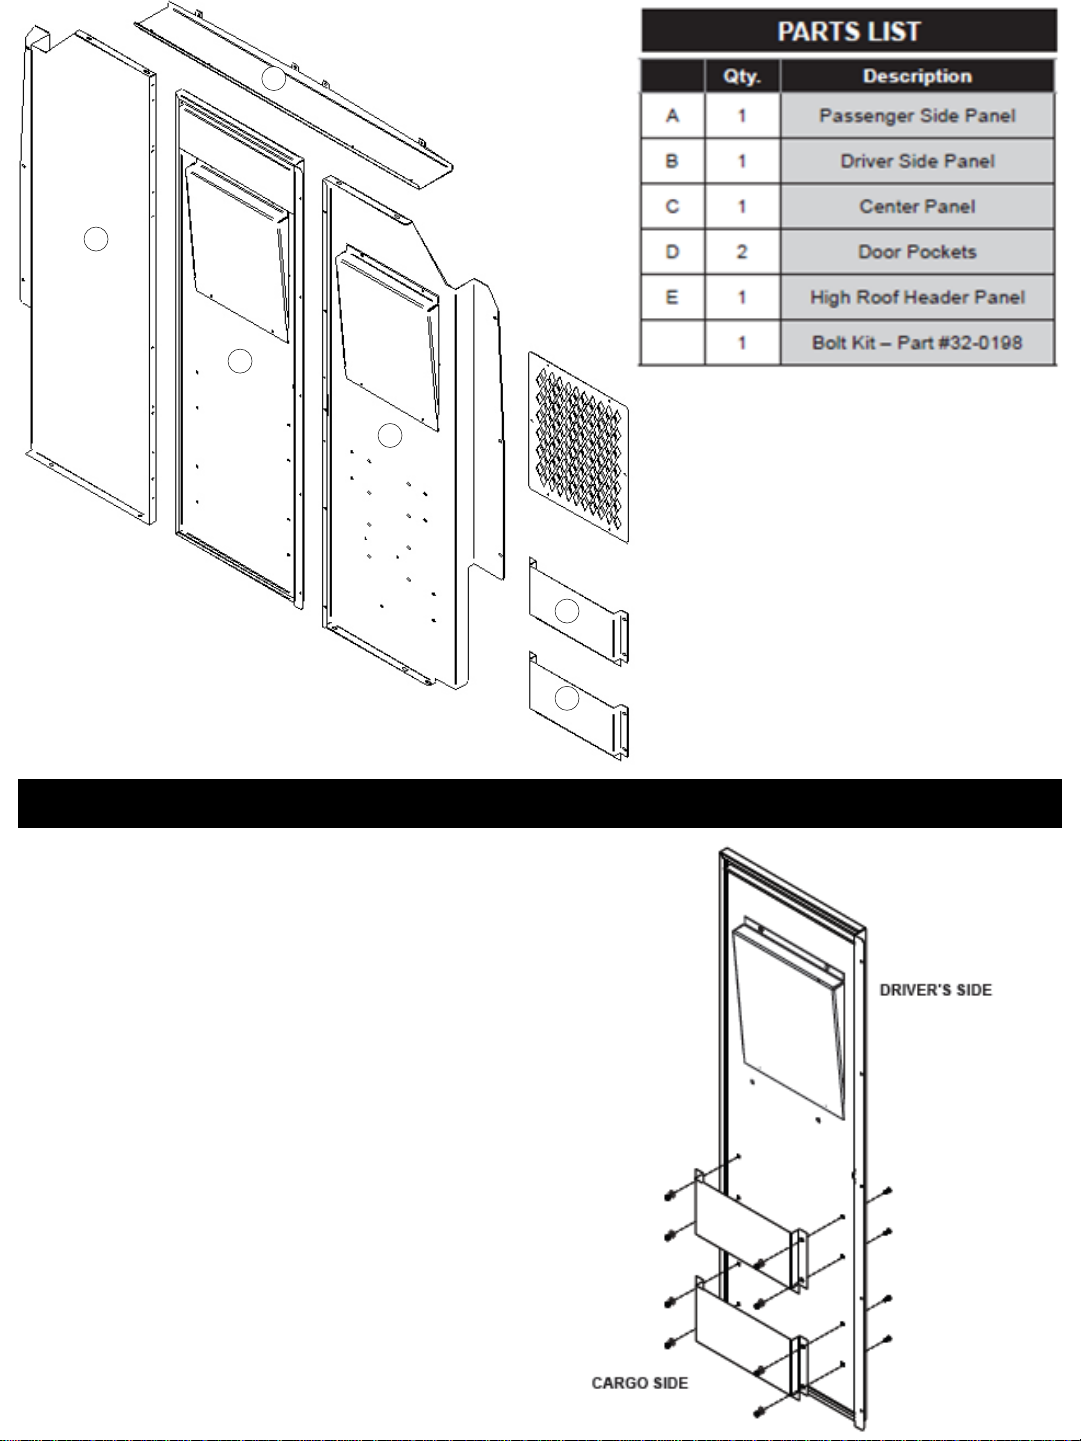
B
E
E
B
C
C
A
A
D
D
ASSEMBLY INSTRUCTIONS
STEP 1. Assemble the Door Pockets to either the
driver's side or cargo side of the Center Panel using
eight (8) 1/4-20 x 5/8" Carriage Bolts, 1/4-20 Nylon
Lock Nuts and 1/4" Flat Washers.
D
Bulkhead model 96141-3-01 has two
clear polycarbonate windows mounted
to panels A and C.
Bulkhead model 96142-3-01 has two
diamond mesh screens mounted to
panels A and C.
Available accessories:
Solid panel kit 96902-3-01
Hinge kit 96901-3-01
2
Page 3
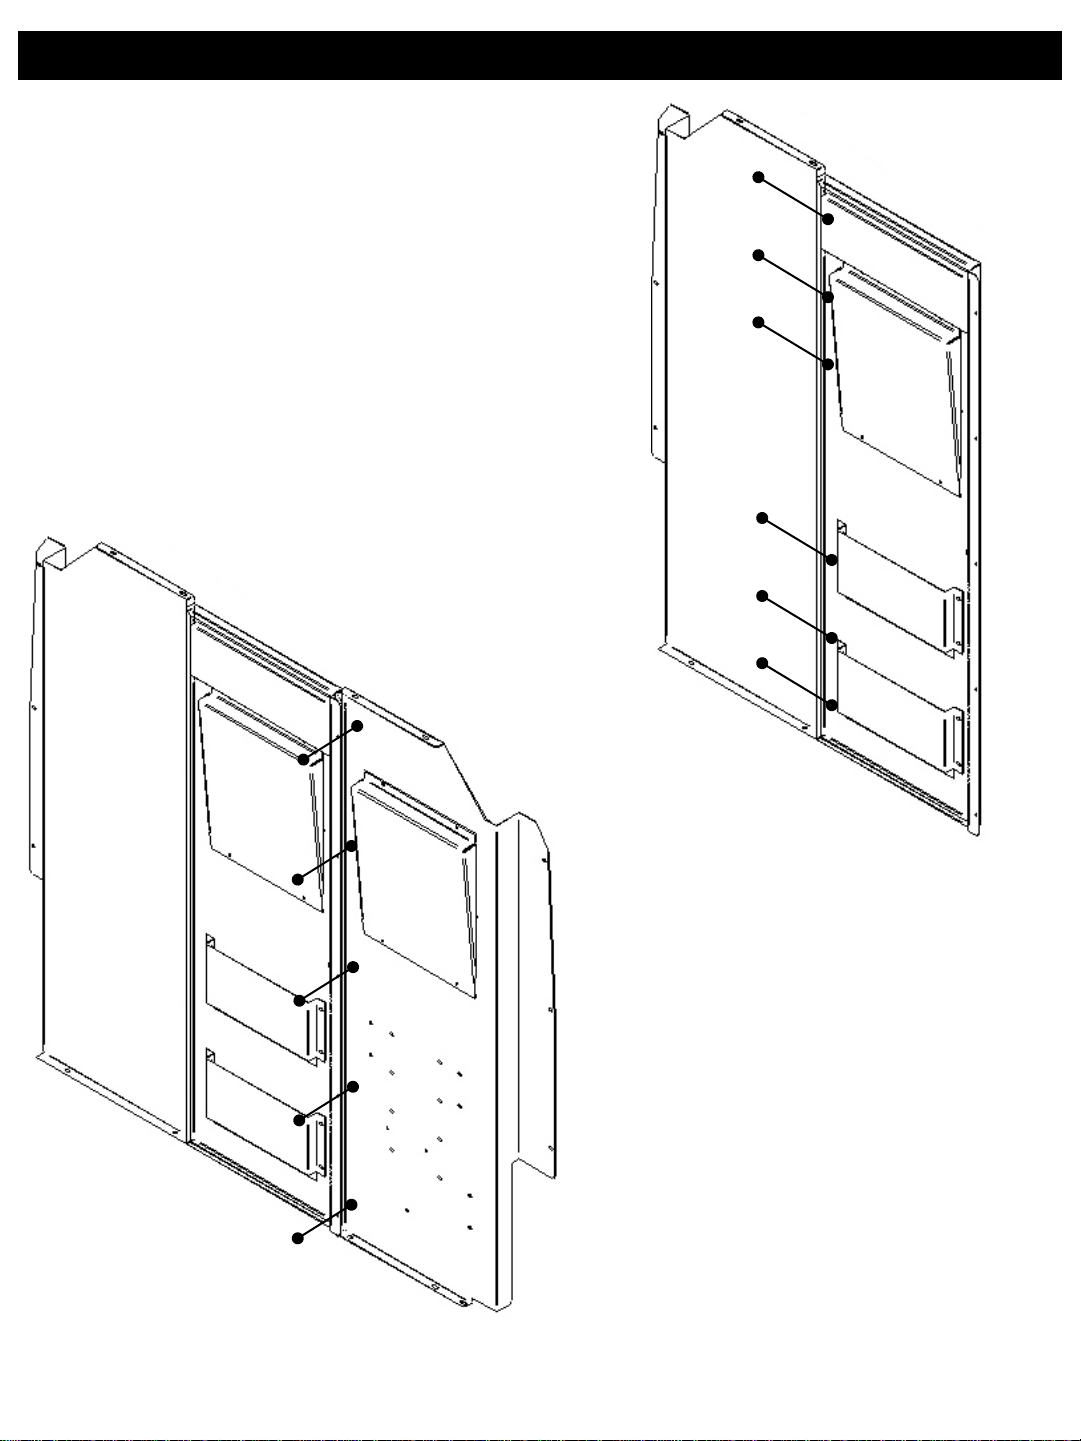
ASSEMBLY INSTRUCTIONS
STEP 2. Attach Driver Side Panel to Center
Panel with both panels flush to the bottom using
six (6) ¼-20 x 5/8" hex head bolts, ¼” flat
washers, and ¼-20 lock nuts.
STEP 3. Attach Passenger Side Panel
to Center Panel with both panels flush to
the bottom using five (5) ¼-20 x 5/8" hex
head bolts, ¼” flat washers, and ¼-20
lock nuts.
DO NOT FULLY TIGHTEN
FASTENERS AT THIS TIME, PARTS
MUST STILL MOVE IN SLOTS.
NOTE: Not all mounting holes will be
used on either of the vertical sides
of the Center Panel. Extra mounting
holes are for the swing door option
available for this Bulkhead.
3
Part No. 24-0315 Rev 1 09/13
Page 4

INSTALLATION INSTRUCTIONS
STEP 5. Attach the Header Support (Same
panel for either Standard or High Roof vans.)
to the Bulkhead using four (4) 1/4-20 x 5/8"
Hex Head Bolts, eight (8) 1/4" Flat Washers
and four (4) 1/4-20 Nylon Lock Nuts.
DO NOT FULLY TIGHTEN FASTENERS AT
THIS TIME, PARTS MUST STILL MOVE IN
SLOTS.
STEP 5. Place the Bulkhead against the B-Pillar trim. Using a center punch, mark the four
Bulkhead bottom mounting holes on the floor of the van. Ensure the hole is located on the
topside of the floor rib. Move the Bulkhead out of the way. Drill a pilot hole with an 1/8" drill bit,
then re-drill the hole with a 3/8" drill bit. Floor Mounting Spacers are required. If there is a
plywood floor in the van cut the wood floor around the 3/8" holes with a 1" hole saw, allowing
Floor Mounting Spacers to rest against the metal floor. DO NOT DRILL THROUGH THE VAN
FLOOR WITH THE HOLE SAW. 5/16" Lock Washers have been provided for bulkhead
mounting.
NOTE: Four (4) Blind Fasteners are provided for mounting the bulkhead to the floor.
See INSTALLATION INSTRUCTIONS FOR BLIND FASTENERS on page 6. Do not use blind
fasteners over gasoline of CNG tanks or fuel lines. (Alternate hardware is included to follow
any of the bolting solutions below.) Do not bolt the bulkhead to the floor yet.
4
Page 5

INSTALLATION INSTRUCTIONS
STEP 6. With the Bulkhead against the
B-Pillar trim, use a marker or pencil and mark the
six Bulkhead side holes on the B-pillar trim. Move
the Bulkhead out of the way. Drill a pilot hole with
an 1/8" drill bit. Re-drill the hole with a 3/8” bit for
the blind fasteners.
The ½” thick Mounting Spacers are required.
Cut the B-pillar trim with a 1" hole saw, allowing
½” Mounting Spacers to rest against the metal of
the B-pillar. Install six (6) ¼-20 blind fasteners.
See INSTALLATION INSTRUCTIONS FOR
BLIND FASTENERS on page 6.
STEP 7. With the Bulkhead against the
B-Pillar trim, use a marker or pencil and mark
the four Bulkhead header holes on the roof
panel. Move the Bulkhead out of the way. Drill a
pilot hole with an 1/8" drill bit. Cut the roof trim
with a knife or 1" hole saw if necessary.
STEP 8. Re-position the bulkhead and install using six (6) 1/4-20 x 1-1/4” hex head bolts
and the six (6) ½” Mounting Spacers into the B-pillar blind fasteners.
5
Part No. 24-0315 Rev 1 09/13
Page 6

INSTALLATION INSTRUCTIONS
STEP 9. Fasten Bulkhead to van floor using four
(4) 5/16-18 x 2" Hex Head Bolts, 5/16" Flat
Washers, and four (4) Floor Mounting Spacers.
STEP 11. Bend the tabs on the header panel to
sit flush against the roof panel. install using four
(4) 1/4-14 x 3/4” hex head thread-cutting bolts
into the roof panel.
STEP 11. Re-check all fasteners and tighten
them.
STEP 12. If mounting shelf units next to the
bulkhead, the foam block on the driver’s side will
need to be trimmed flush to the bulkhead.
Discard the trimmed section.
Do not remove the entire foam block.
The side airbag is located behind it.
STEP 10
STEP 8
STEP 9
STEP 8
STEP 9
Trim and Discard
6
6
Part No. 24-0315 Rev 1 09/13
Part No. 24-0315 08/13
Page 7

7
Part No. 24-0315 Rev 1 09/13
 Loading...