

Page 1
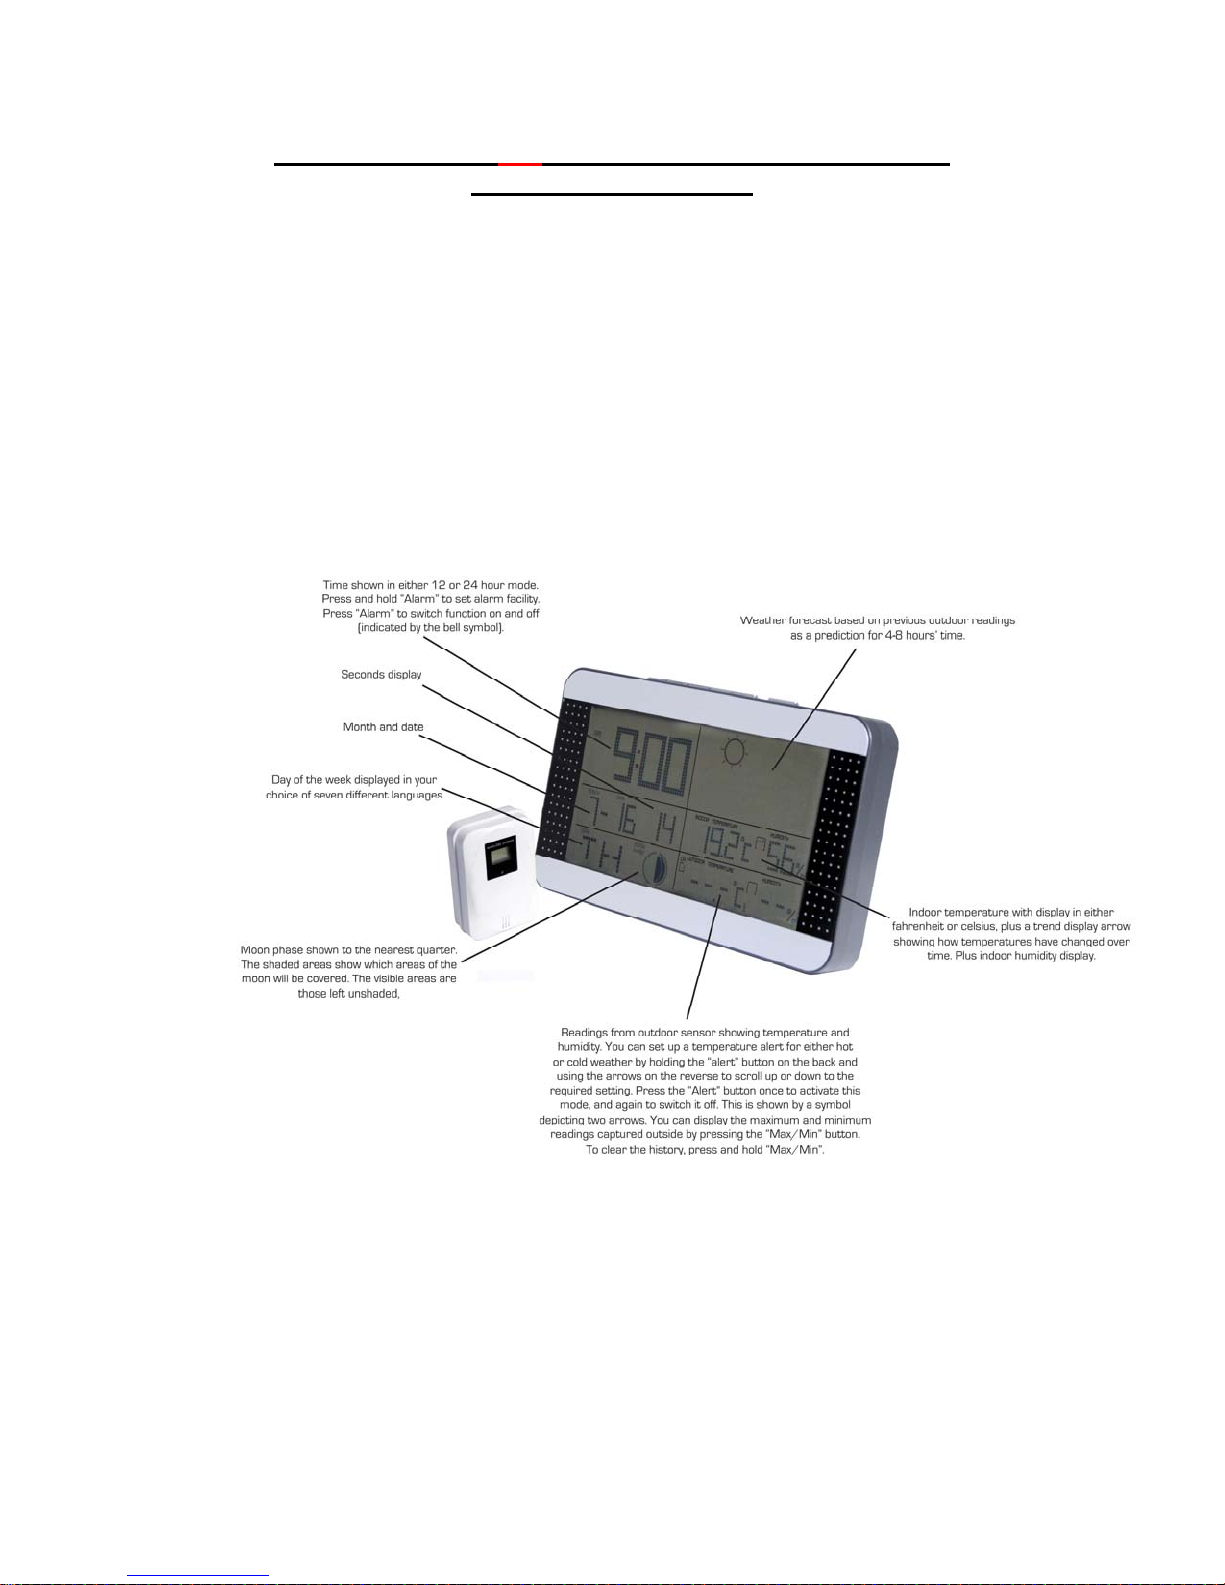
WEA23 – Weathereye Indoor/Outdoor Weather Station
Operation Instructions
Ⅰ. Functions Overview
1. Four weather forecast conditions: sunny, patchy clouds, overcast and
rain.
2. Indoor temperature: range of 0℃--50℃, updates every 12 seconds.
3. Indoor humidity: recorded range between 20% to 95%.
4. Trend indication of indoor and outdoor temperature/humidity.
5. Max/min records for indoor/outdoor temperature and humidity.
6. Upper/lower limit alarm for outdoor temperature.
7. Comfort index
8. Alarm plus 5 minute snooze.
9. Low battery indication.
10. Moon Phase.
Ⅱ. Turning on for the first time, changing battery and resetting
1. Insert the batteries into the outside sensor first, then the main unit.
2. The display will light up for 3 seconds. When replacing the battery or if
resetting the unit, then it will beep before receiving the radio signal. The unit
will search for 3 minutes to test temperature and humidity,
3. The calendar default setting is 0:00 at Jan 1st, 2000.
4. The alarm default setting is 0:00 if set.
5. The initial forecast symbol shows as patchy clouds.
6. Temperature defaults to display in ℃ and time format defaults to 24HR.
Page 2

Ⅲ. Controls
1. Function keys:
On the top of the unit the buttons are SET, ALARM, UP, DOWN, MAX/MIN and
SNOOZE. On the reverse is CH for Channel and ALERT.
Function/Set SET ALARM UP DOWN MAX/MIN SNOOZE CH ALERT
Mode
Time
Set
Mode
Alarm
Set
Mode
Press Once On/Off
HOLD Clock
Setting
Press Once Confirm
Setting
HOLD 8 steps a
Press Once Confirm
HOLD 8 steps a
Alarm
Alarm
Setting
Ahead
Setting
12hr/24hr
Change
Delete
one step
second
ahead
Ahead
one step
second
ahead
Display
Back
one
step
8 steps
a
second
back
Back
one
step
8 steps
a
second
back
Max/Min
Max/Min
Snooze Change
Delete
Channel
CH1, 2 ,3
Saved
data
On/Off
Temperatur
e Alert
Temperatur
e Settings
2. Standard mode:
1. Hold “SET” for 2 seconds to change time and date.
2. Press “Alarm” to turn on/off.
3. Hold “Alarm” for 2 seconds to set.
4. Press “UP” to change between 12HR/24HR time formats.
5. Press “DOWN” to change between ℃/℉.
6. When ALARM sounds, press “snooze” and alarm will sound again after 5
minutes.
7. Press “Channel” to change the RF, CH1 → CH2 → CH3
8. Hold “Channel” for 2 seconds to reset saved data from the outdoor sensor.
9. Press “Alert” to turn temperature alarm on/off.
10. Hold “Alert” for 2 seconds to set temperature alarm.
11. Press “MAX/MIN” to check the max/min for temperature and humidity.
12. Hold “MAX/MIN” for 2 seconds to reset the temperature and humidity history.
3. Time setting
1. Hold “SET” for 2 seconds to set time.
2. Setting order: year(2000-2099) → month → day → language (En for English) →
hour → minute →time zone→ exit
3. The setting will flash to signal awaiting input.
4. Press “SET” to confirm and to go to the next setting.
5. Press “UP” once to go forward a step; hold for 2 seconds to cycle through at 8
steps per second speed.
6. Press “DOWN” once to go back a step; hold for 2 seconds to cycle back at 8
step per second speed.
Page 3

7. The moon phase is reliant on the date setting and will display the closest
phase for that date from new moon, first quarter, full moon and last quarter
phases.
8. If no button is pressed for longer than 8 seconds, the device will return to the
standard display.
4. Alarm setting.
1. Hold “Alarm” for 2 seconds to set.
2. Setting order: hour → minute → exit.
3. The setting will flash to signal awaiting input.
4. Press “Alarm” to confirm and to go to the next setting.
5. Press “UP” once to go forward a step; hold for 2 seconds to cycle through at 8
steps per second speed.
6. Press “DOWN” once to go back a step; hold for 2 seconds to cycle back at 8
step per second speed.
7. If no button is pressed for longer than 8 seconds, the device will return to the
standard display.
5. Temperature alarm setting
1. Hold “Alert” for 2 seconds to set.
2. Setting order: upper limit → lower limit → exit.
3. Press “CHANNEL” to change setting.
4. The maximum upper limit is +70℃ and lower limit is -50℃.
5. The setting will flash to signal awaiting input.
6. Press “Alert” to confirm and to go to the next setting.
7. Press “UP” once to go forward a step; hold for 2 seconds to cycle through at 8
steps per second speed.
8. Press “DOWN” once to go back a step; hold for 2 seconds to cycle back at 8
step per second speed.
9. If no button is pressed for longer than 8 seconds, the device will return to the
standard display.
10. Alert is on after setting.
Ⅳ. Functions
1. Radio Frequency (RF) receiving function
1. The device enters receiving mode for 2 minutes automatically when battery is
inserted.
2. Hold “Channel” for 2 seconds to cancel receiving on the current channel.
3. If the channel has not received signal for 35 minutes, the out door display will
show “--.-“.
4. Temperature and humidity will be shown again once reconnection has been
made.
2. Alarm:
1. The alarm sounds for 2 minutes at a time in the below pattern:
a. 0-10 seconds: beeps once each second;
b. 10-20 seconds: beeps twice each second;
c. 20-30 seconds: beeps four times each second;
d. after 30 seconds: constant sounding.
2. When alarm sounds, press “Snooze” to set alarm back for 5 minutes, press
any other button to switch off permanently.
3. When in Snooze state, the alarm will sound again 5 minutes later.
Page 4

3. Temperature and humidity:
1. Indoor temperature range: 0℃-+50℃ (-32℉-+122℉ )
2. Humidity testing range: 20%-95%
3. Outdoor temperature display range: -50 ℃ - +70 ℃ (-58 ℉ -+158℉)
4. Values are checked every 12 seconds
5. Temperature accuracy: +/- 1℃
4. Weather forecast:
1. Weather forecast indicates 24 hours ahead based on the recording history.
2. Four weather forecast conditions: sunny, patchy clouds, overcast and rain.
3. Forecast is usually accurate under normal ventilated conditions, though may
be inconsistent if the outdoor sensor is located indoors for a time or in airconditioned environment.
5. Temperature alarm:
1. Default value of +70℃ highest and -50℃ lowest.
2. The relevant temperature and alarm symbol with flash when alarm sounds.
3. Just the alarm symbol will flash if the relevant channel is not displayed.
4. The alarm will:
a. beep 3 times each second;
b. beep for 5 seconds every minute
5. Stopping the alarm:
a. Press any key to stop the alarm sounding. The corresponding
temperature and symbol will still flash.
b. The flashing stops automatically when the temperature is back within
normal range.
GENERAL INFORMATION
Synchronizing the units:
Try changing the channels, as the radio signal may be getting blocked by another
frequency, such as cordless phones and wireless broadband routers.
Remember to set the outside unit up first. On opening the back of the unit you will
see a switch. By moving the switch you can change the channel on the sensor. This
will appear on the display in the top left hand corner (CH1-CH3).
You then need to reset the base unit again. This can be achieved by removing the
batteries for a few seconds. Then set the channel to match the outside unit before
you set anything else up on the base unit. This can be achieved by pressing the
channel button on the reverse of the unit, again this will appear in the little house on
the display in the bottom right hand box.
Positioning of the outdoor sensor:
The unit should be positioned up to 10 metres from the base unit. The unit should be
north facing where possible, as in direct sunlight it will give inaccurate readings. We
would suggest that you don't position it in an exposed area.
Town & Country, Bardon, Leicestershire, LE67 1TE E-mail [email protected]
 Loading...