

Page 1
INSTALLATION GUIDE
ERGONOMIC FLOORING
Full custom ergonomic ooring is what sets Wearwell apart from the rest. Our
manufacturing process allows for a variety of cutouts, congurations and shapes.
This guide illustrates how to install Wearwell Ergonomic Flooring products:
Rejuvenator® | ErgoDeck® | F.I.T.™
Please read through all of the steps before beginning your
project. For questions, contact us at:
Wearwell, Inc.
199 Threet Industrial Road, Smyrna, TN 37167
Phone: 800.264.3030
Fax: 800.874.4551
E-Mail: [email protected]
www.wearwell.com
Page 2
Ergonomic Flooring Installation Guide:
BEFORE YOU BEGIN
Product Overview
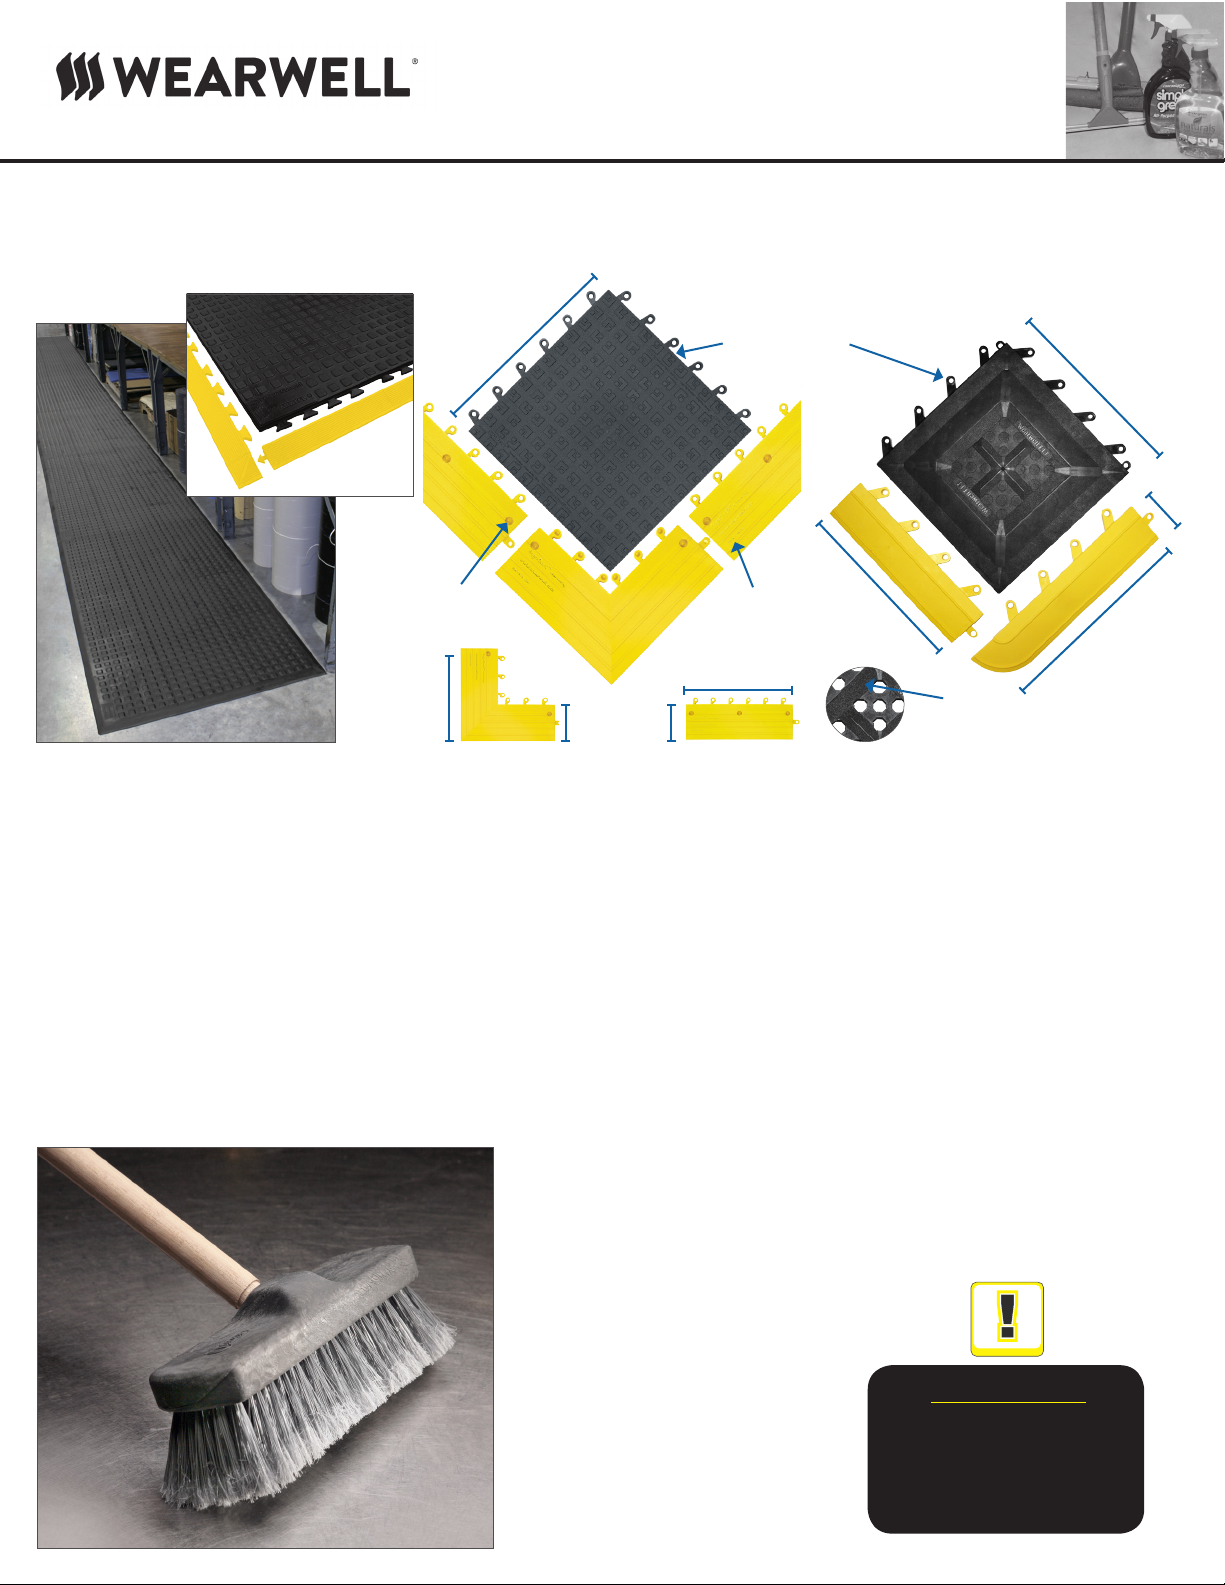
Each ergonomic ooring product is uniquely designed for a totally exible oor layout design. Below is a brief description of each available ergonomic ooring product and
information regarding its construction.
Rejuvenator
®
Male Ramp
Female Ramp
ErgoDeck
®
18”
F.I.T.™ Functional Interlocking Tiles
Patented LockSafe®
interlocking system for a
positive connection.
Ramp
12”
3”
Rejuvenator is the ultimate ergonomic floor in terms of
comfort and construction.
Large modular tiles interlock on all four sides to
customize on-site virtually any flooring configuration.
Interlocking ends and centers are also available to quickly
and easily fabricate long runners.
These runner components have built in borders that
eliminate the need for separate edging and reduces costs
and installation time.
Each Rejuvenator Tile has:
Nine (9) male connectors on two adjacent sides.
Nine (9) corresponding, hidden female connectors on the
other two sides.
Area Preparation
3 countersunk
holes for
permanent
installations.
18”
A comfortable, ergonomic floor that will withstand heavy
use.
Tiles can be unlocked and repositioned as work centers
change to fit your needs.
Optional 6” side safety ramps and corners are available.
Solid and drainage designs offered in 3 comfort levels: Heavy
Duty (heavy use) and General Purpose (more comfort and
light cart traffic) and Comfort (for optimum relief for foot
traffic.) For optimum traction choose one of our 2 versions
with No-Slip Cleats.
Each ErgoDeck Tile has:
Six (6) female LockSafe connectors on two adjacent sides.
Six (6) corresponding, hidden male connectors on the other
two sides.
Outside Corner
6”6”
1/16” thick
friction bars.
18”
Prepare the Floor
This product is recommended for interior, mostly dry areas of heavy traffick and usage.
It is recommended to sweep the surface of dust and debris before beginning.
12”
15”
Slanted surface facilitates drainage.
The most versatile 12” x 12” and 100% Silicone-free
interlocking ergonomic flooring system in the market.
Tiles snap together and configure to fit your workspace.
The top surface and underside of F.I.T. tiles are designed to
allow rapid drainage of fluids.
F.I.T. tiles stay together very well making them ideal as a liner
for mobile tool storage bins that require frequent removal
for cleaning purposes.
Each F.I.T.™ Tile has:
Four (4) female LockSafe connectors on two adjacent sides.
Four (4) corresponding, hidden male connectors on the
other two sides.
Required Tools
Utility knife or industrial shears
Leather or Kevlar® gloves
Measuring tape
Straight edge
Optional Cutting Tools
Skil® saw
Band saw
Optional Supplies
Super glue (for permanent installations)
2
RECOMMENDED:
Wear protective gloves when
using a cutting tool or
handling products with a
grit surface. We recommend
leather or Kevlar® gloves.
Page 3
Ergonomic Flooring Installation Guide:
REJUVENATOR
Protected Design, Rejuvenator® Patent: 001947466.
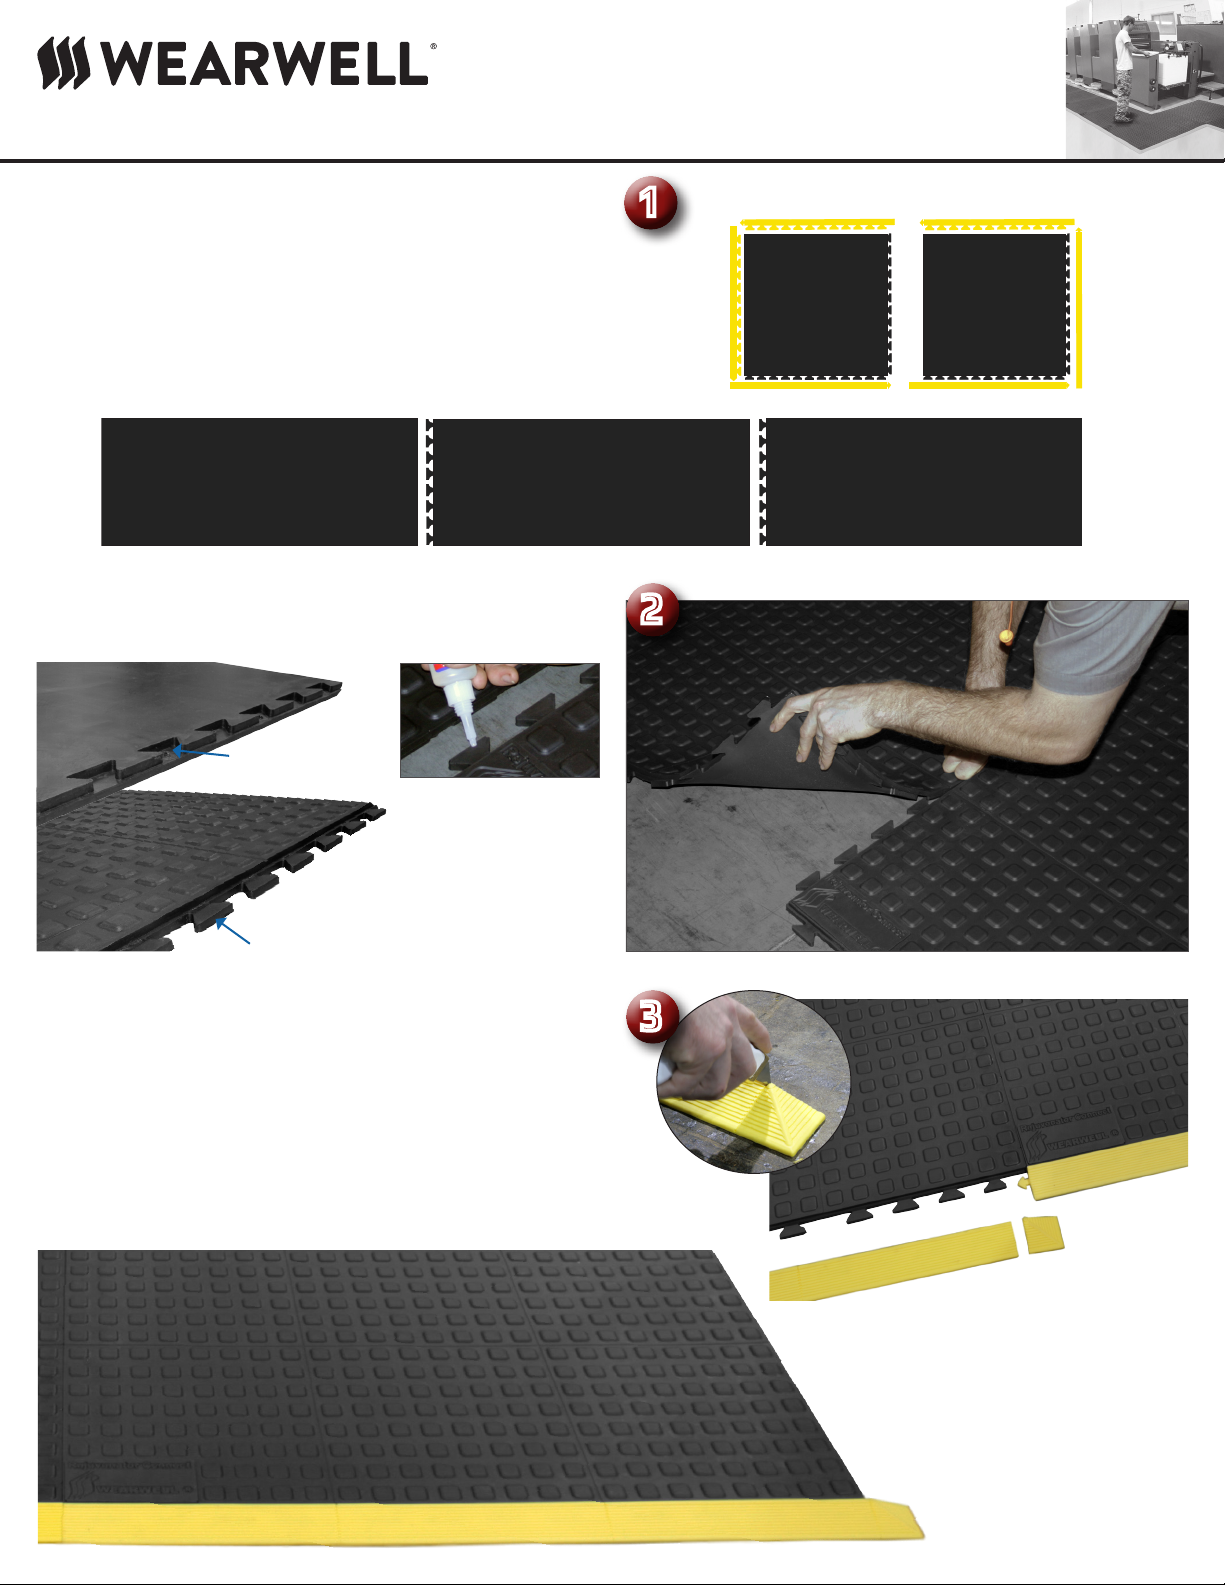
STEP 1.
To cover your work area, always align the mats so that the connectors are
positioned in the same direction, as illustrated:
Rejuvenator for longer runners.
End Mat w/ Female Connectors
STEP 2.
Lay the first mat over the second, placing the female side over the male interlocks.
Center Mat
1
2
®
Rejuvenator for custom areas.
+
End Mat w/ Male Connectors
Hidden Female Connectors
PERMANENT
INSTALLATION:
Place a drop of “SuperGlue”
on the male connectors
and press down lightly for
5 seconds. Repeat this
Male Connectors
process completing one
row at a time.
STEP 3.
Attach safety ramps to the mats. After the ramps are attached, the corner
section must be cut off the rest of the ramps and installed along that edge.
Simply cut this corner off with a utility knife or a large shears. Use the indented
line on the surface of the ramp as a guide.
When attaching the safety ramps, it is best to start at one end of the mat
installation and work your way around. The end of the first ramp will create a
corner.
3
The corner created by
attaching the ramp
to the mat.
3
Page 4
Ergonomic Flooring Installation Guide:
ERGODECK
Protected Design, ErgoDeck®. U.S. Patent No. 8,006,443.
IMPORTANT: Wear leather or Kevlar® gloves when
cutting and handling gritted products.
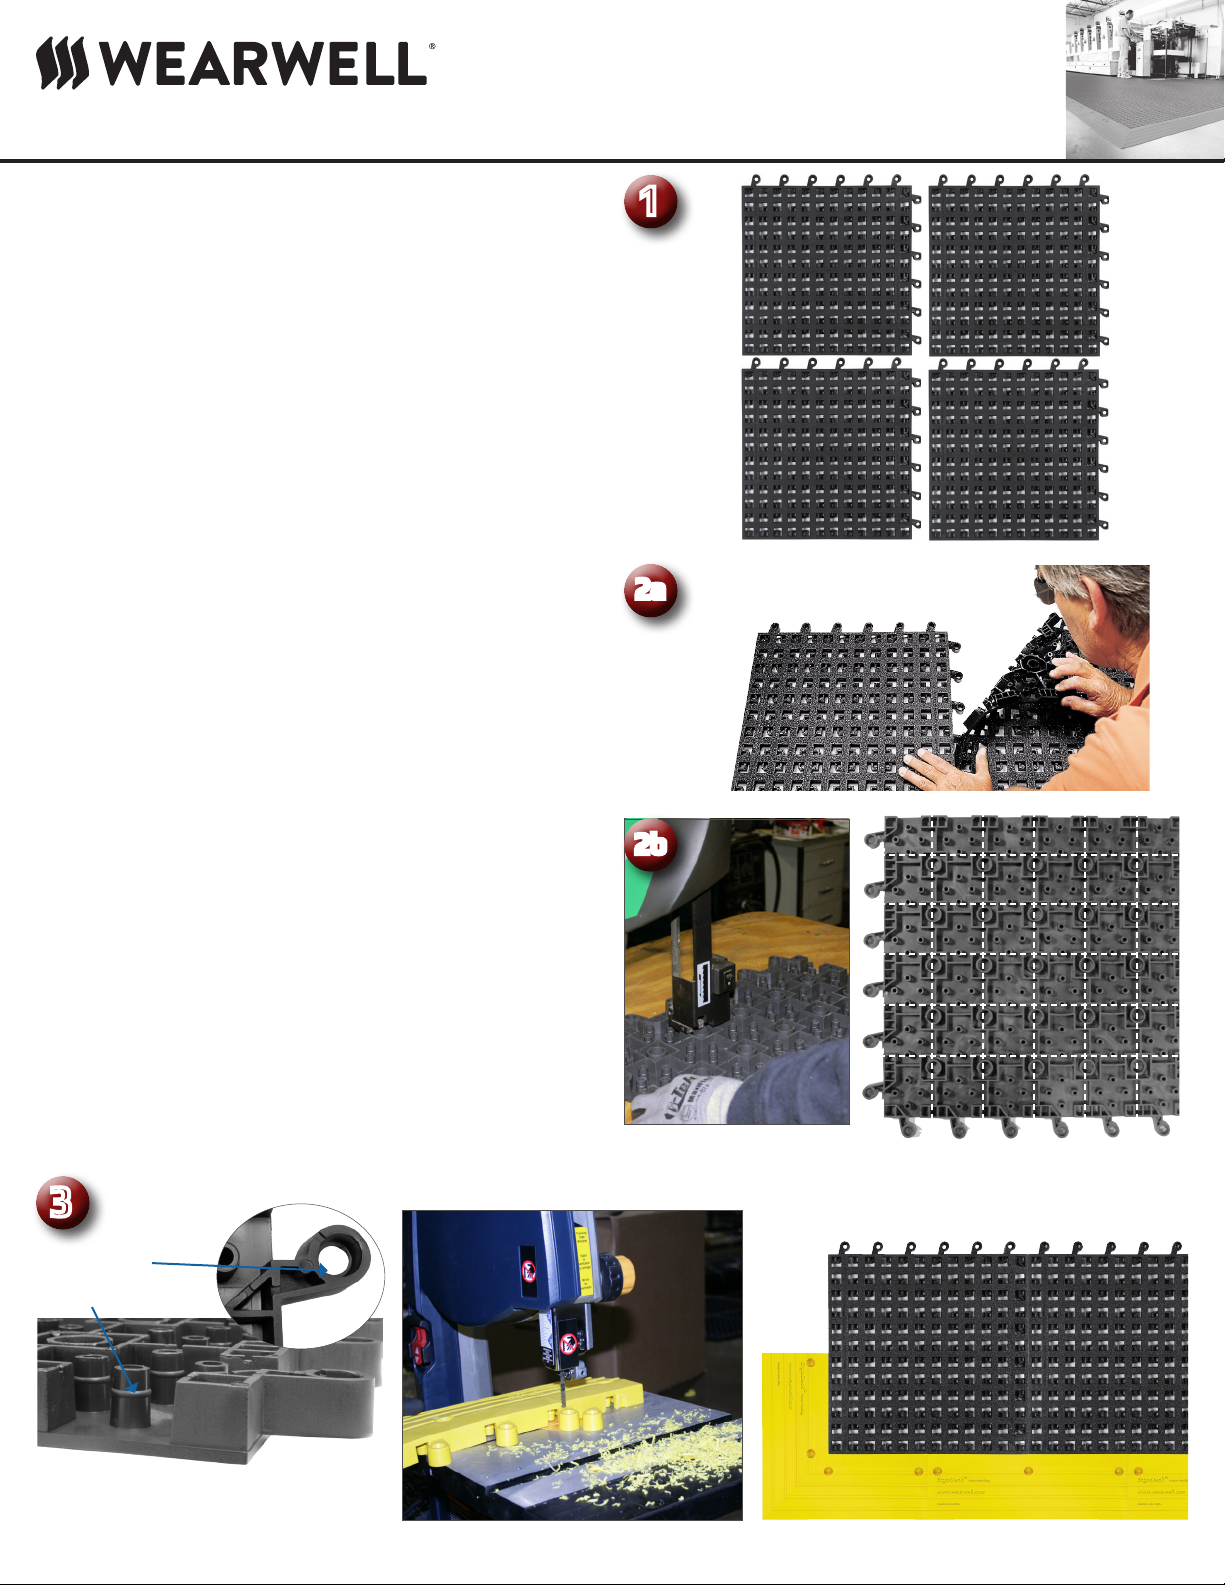
STEP 1.
Plan the layout. When laying out the area, position the tiles so that the edges
without the tabs are to the inside corner. This will make installation faster and
easier.
STEP 2A.
Lay the second tile over the first, placing the male side over the female
interlocks. Using a rubber mallet, secure the tiles together. Repeat this process
completing one row at a time. ErgoDeck can be assembled with bare hands, but
we do not recommend this method as it increases installation time.
When our LockSafe system is totally engaged, the tiles are accurately aligned
without gaps creating a neat and clean installation.
STEP 2B.
ErgoDeck is designed for easy, on site customization. The tiles can be cut every
3” and still connect. Although the tiles and ramps can be cut with an industrial
shears, if you have multiple tiles to modify, we recommend the use of a band
saw or a Skil® saw. These will also insure a straight cut.
For best results, flip the tile upside down. Cut along lines as indicated in the
photo. The line equally bisects the circular support.
To modify tiles to fit around an object or other impediment, it is not necessary to
flip the tile over. Simply measure and cut along the surface.
®
1
2a
STEP 3.
Attach safety ramps to the tiles. If you intend to add corner ramps, attach one
corner and then add the other ramps from that point.
Designed for simplicity, the ramps and corners will connect to either the male or
female side of an ErgoDeck tile.
To attach the female side of an ErgoDeck tile, simply cut these connectors off
with a utility knife.
To protect your hands when using a utility knife, always wear leather or Kevlar®
gloves. These connectors can also be quickly removed using a Skil® saw.
If a corner is used, the ramps bisect the tile connections for increased stability
and support.
3
Female Connectors
Male Connectors
2b
4
Page 5
Ergonomic Flooring Installation Guide:
F.I.T. TILES
Protected Design, F.I.T.®. U.S. Patent No. 3,739,710
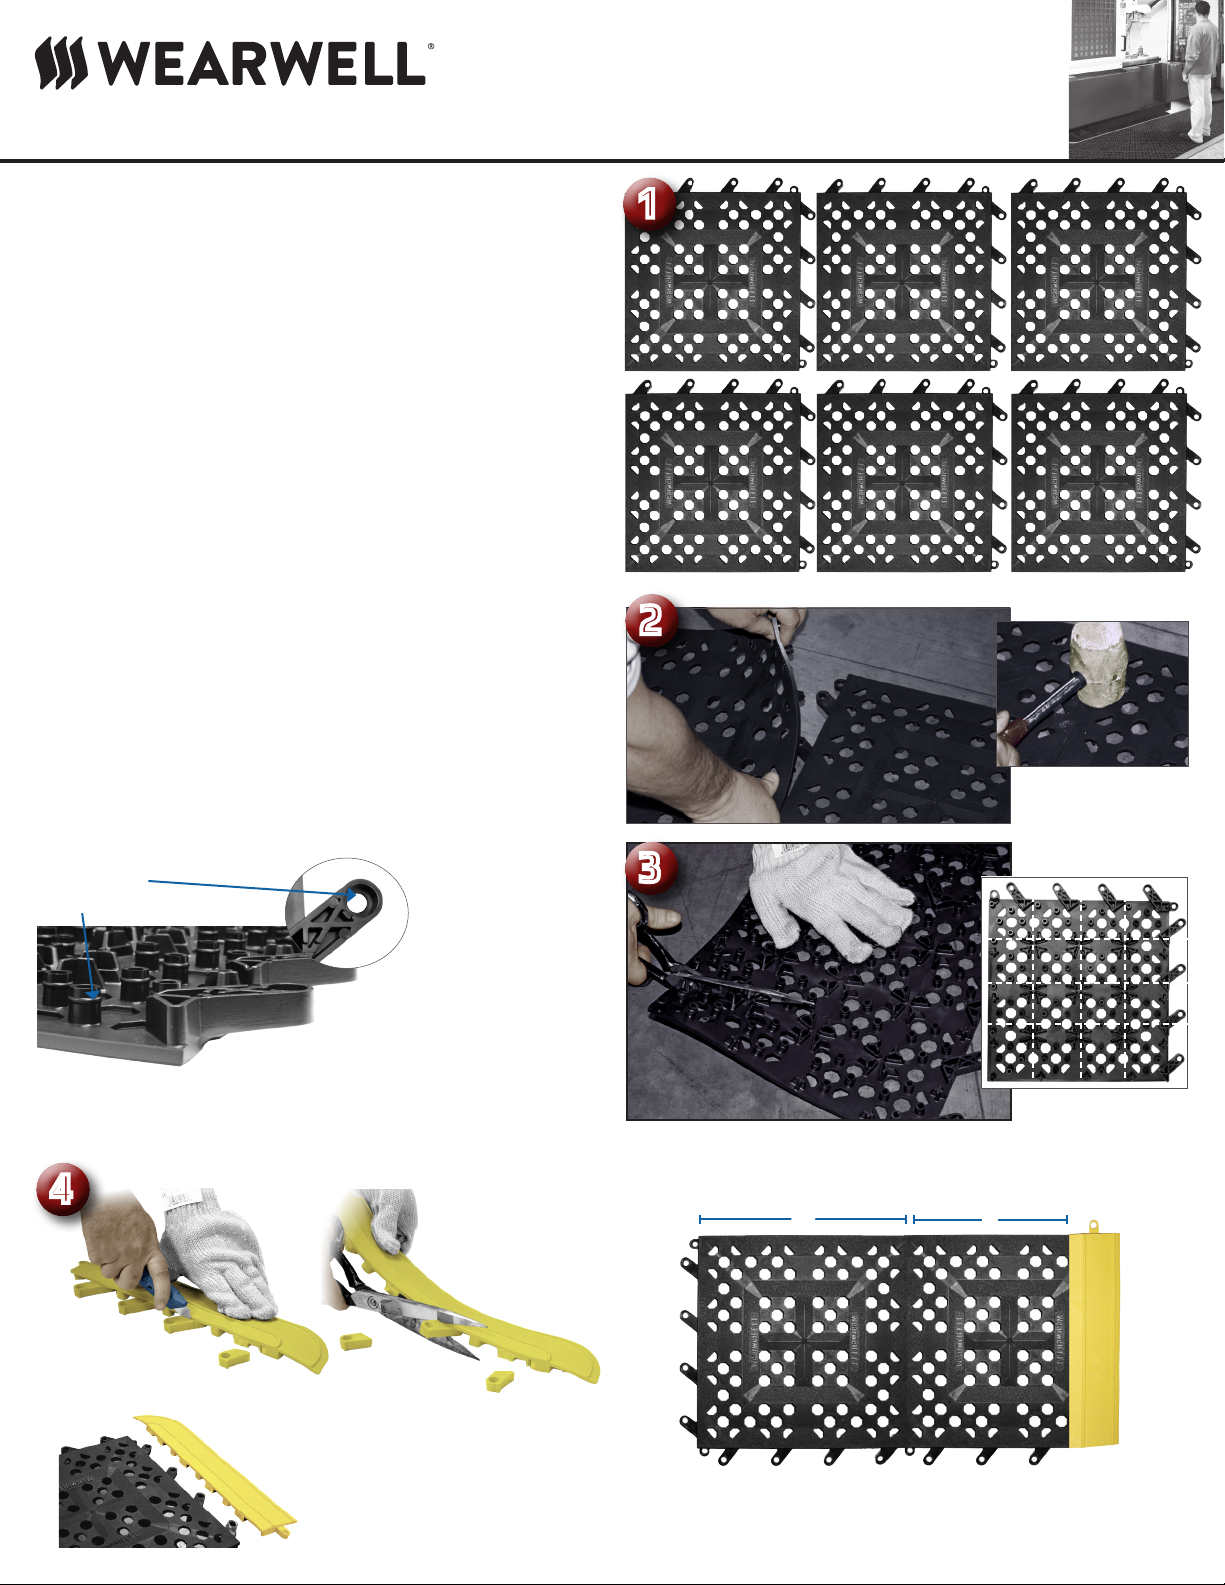
STEP 1.
Plan the layout. When laying out the area, position the tiles so that the edges
without the tabs are to the inside corner. This will make installation faster and
easier.
STEP 2.
Lay the second tile over the first, placing the male side over the female
interlocks.
Using a rubber mallet, secure the tiles together. Repeat this process completing
one row at a time. F.I.T. can be assembled with bare hands, but using a mallet
simplifies the installation process.
STEP 3.
F.I.T. is designed for on site customization. The tiles can be cut every 3” and still
connect. Just cut the tiles and reconnect for a seamless installation.
STEP 4.
Attach safety ramps to the tiles. Designed for simplicity, the ramps and ramps
with corners will connect to either the male or female side of a F.I.T. tile.
All ramps are manufactured with the female connectors and easily “lock” to the
male side of a F.I.T. tile.
Although the tiles and ramps can be cut with an industrial shears, if you have
multiple tiles to modify, we recommend the use of a band saw or a Skil® saw.
These will also insure a straight cut.
1
2
Line the tiles next to each other
and then use a mallet to expedite installation.
Female Connectors
Male Connectors
4
A utility knife or industrial
shears can be used to cut the
connectors.
3
Use a utility knife or sharp shears to cut tiles.
12”
Tiles can be cut every 3” and
retain connectibility.
9”
When the connectors have been cut, the ramp is able to
securely interlock to the female side of the mat.
To attach the ramp to the female side of a F.I.T. tile, simply cut these connectors off with a utility knife or an industrial shears.
5
Page 6

INSTALLATION GUIDE
EF-INSTALLATION070913
Wearwell, Inc.
199 Threet Industrial Rd
Smyrna, TN 37167
Phone: 800-264-3030
Fax: 800-874-4551
E-mail: [email protected]
www.wearwell.com
Copyright © 2013 by Wearwell®. All rights reserved. Printed in the USA. No part of this publication may be reproduced, stored in a retrieval system or
transmitted in any form by any means, electronic, mechanical, photocopying, recording or otherwise, without prior written permission by Wearwell, Inc.
 Loading...