

Page 1
Western Digital Quick Installation (WDE2170-WDE4360)
WD Enterprise Series 3.5-Inch SCSI Hard Drives
DRIVE
Capacity (MB)
WDE2170 WDE4360
2170
4360
BEFORE YOU BEGIN
Record the drive model number and serial number. Both are located on
the top of the drive.
Gather these supplies:
n Computer system manual
n Operating system manual
n Host bus adapter manual
n Non-magnetic screwdriver
You may also need:
n Jumper shunts, if you change the drive configuration
n Interface cable (for 50-pin or 68-pin models)
n A drive tray or mounting rails, depending upon system requirements
n Additional power cable(s)
HANDLING PRECAUTIONS
The WD Enterprise hard drive is designed to withstand normal handling
during unpacking and installation. Care must be taken to avoid excessive
mechanical shock or electrostatic discharge (ESD) that can permanently
damage the drive and void the warranty.
Be aware of the following precautions when unpacking and installing the
WD Enterprise drive:
n Do not unpack the hard drive until you are ready to install it.
n Handle the drive by the sides only and avoid touching the circuit board
components and connectors.
n Do not attempt to remove the drive cover. Servicing components in the
sealed compartment require special cleanroom facilities. Failure to
observe this restriction will void the warranty.
n For additional handling information, refer to the Western Digital 3.5-
Inch Drive Handling Guide(document number SO999).
SETTING THE DRIVE JUMPERS
NOTE: This information will help you configure each WD Enterprise drive
to operate properly in your system.
The drive is designed for use in a variety of systems. Therefore, you can set
several configuration options using the option block on the front of the
drive (end opposite SCSI connector). In most cases, you do not need to
change the default settings for normal drive operation. However, some
installations may require you to install or remove certain jumpers in order
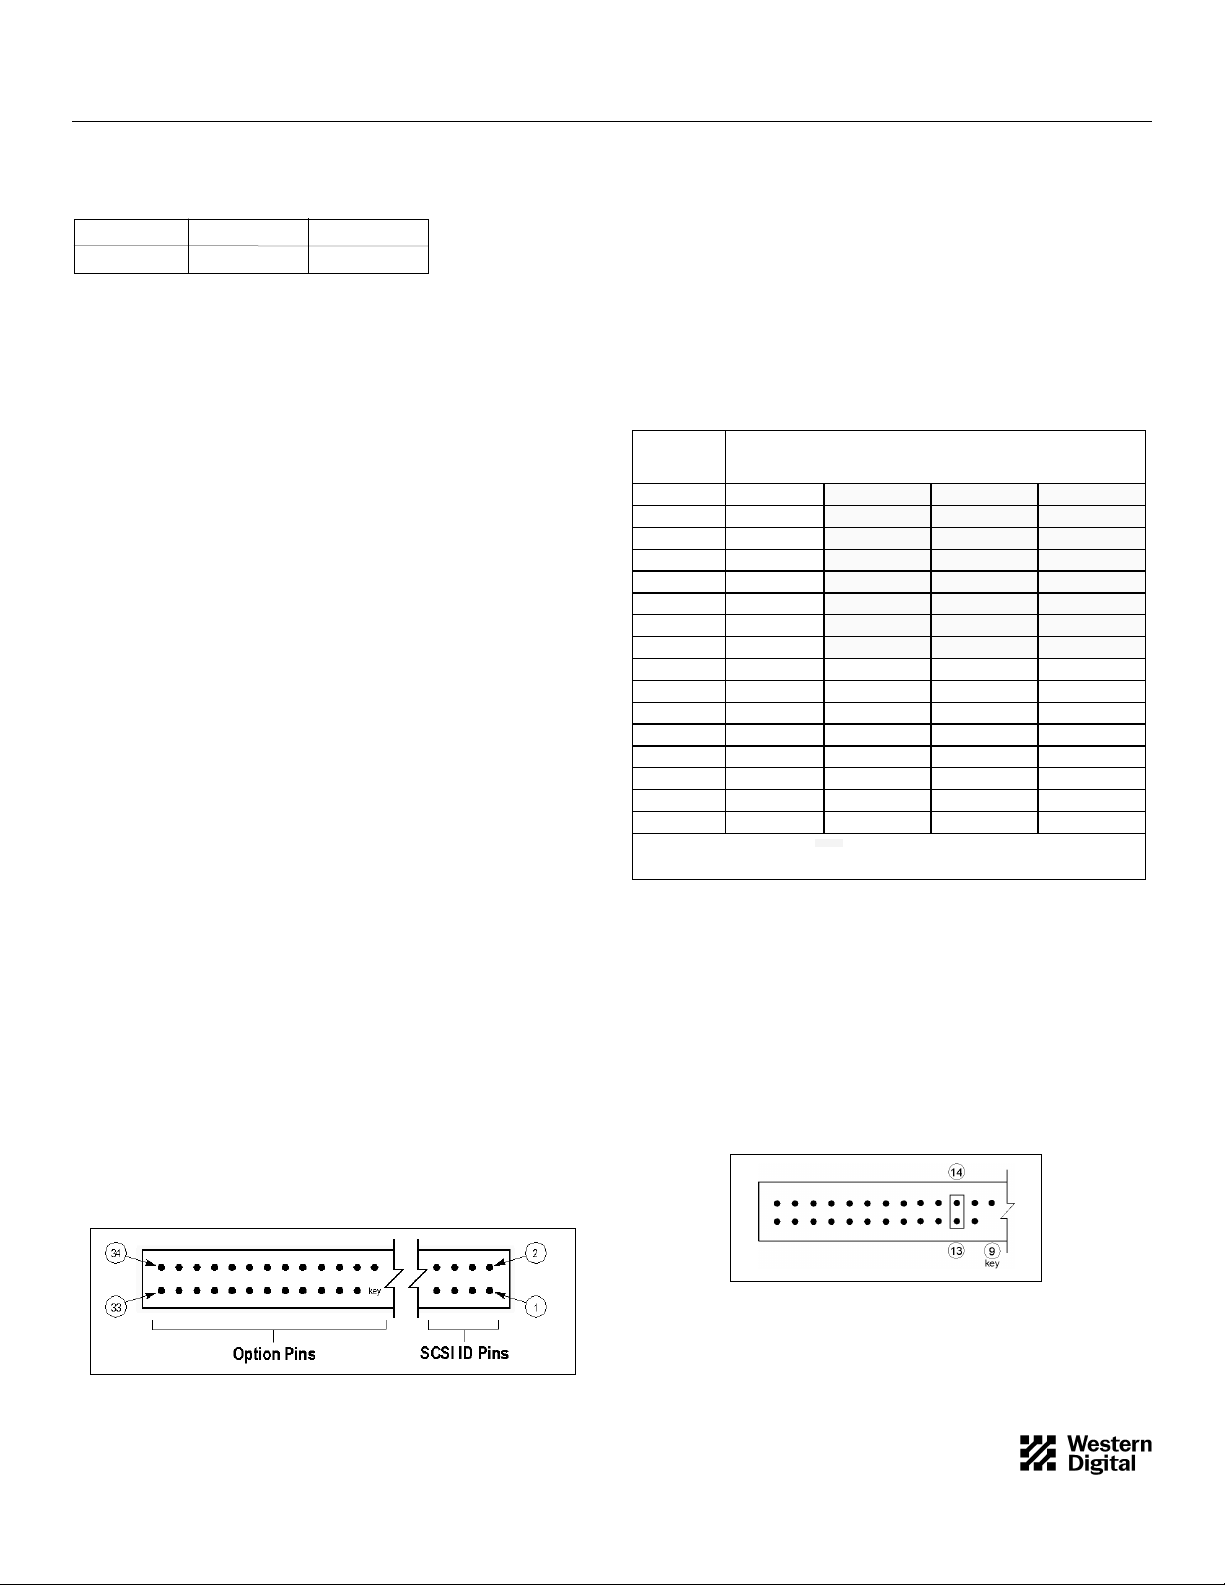
to meet system specifications. See Figure 1.
SCSI ID Numbers
Each device on the SCSI bus requires a unique SCSI ID number (0 to 7
for 8-bit devices, 0 to 15 for 16-bit devices).
Option block pins 1 through 8 are used to set the SCSI IDs. Refer to
Table 1 for a complete matrix of jumper settings.
The host computer’s SCSI controller typically uses ID number 7, and the
other numbers are used for devices such as hard drives. The WD
Enterprise drive has a default SCSI ID of 0.
JUMPER LOCATION
SCSI ID Pins 7 & 8 Pins 5 & 6 Pins 3 & 4 Pins 1 & 2
0
1
2
3
4
5
6
7
8
9
10
11
12
13
14
15
l jumper installed ¡ jumper removed = legal 8-bit bus IDs*
* If any device on your computer’s SCSI bus supports only 8-bit SCSI IDs, the WD Enterprise drive must be set to one of these
values. When setting IDs on 50-pin drives, pins 7 and 8 are not used.
¡
¡
¡
¡
¡
¡
¡
¡
l¡¡¡
l¡ ¡ l
l¡ l ¡
l¡ l l
ll ¡¡
ll ¡ l
ll l ¡
llll
¡ ¡ ¡
¡ ¡ l
¡ l ¡
¡ l l
l ¡ ¡
l ¡ l
l l ¡
l l l
Table 1. SCSI ID Jumpers
Disable Auto Start
You can configure the WD Enterprise drive to Auto Start, or automatically
spin up when power is applied to the drive. If the drive is configured to
disable Auto Start, it powers up, but does not spin up until a start unit
command is issued by an operator.
Option block pins 13 and 14 are dedicated to the Auto Start option. To
disable Auto Start, install a jumper as shown in Figure 4. To enable Auto
Start, no jumper is required.
4079-001056 Rev. A 5/97 H0310
Figure 2. Disable Auto Start Jumper
Figure 1. Option Block
1
Page 2
Auto Start Delay
This feature delays the start-up process to avoid an initial power surge
when several drives power up at once. The delay time (default) is 4 seconds between drives, or the SCSI ID multiplied by 4 seconds. Let’s say
you have three hard drives in your system, and they are set to SCSI IDs 0,
1, and 2. The drive assigned as ID 0 powers up immediately; the drive
assigned to ID 1 powers up in 4 seconds; and the drive assigned to ID 2
powers up in 8 seconds.
NOTE: You can change the 4-second delay time in the drive’s mode parameter
settings.
Option block pins 15 and 16 are dedicated to the Auto Start Delay
option. (This option is valid only if the Disable Auto Start jumper is not
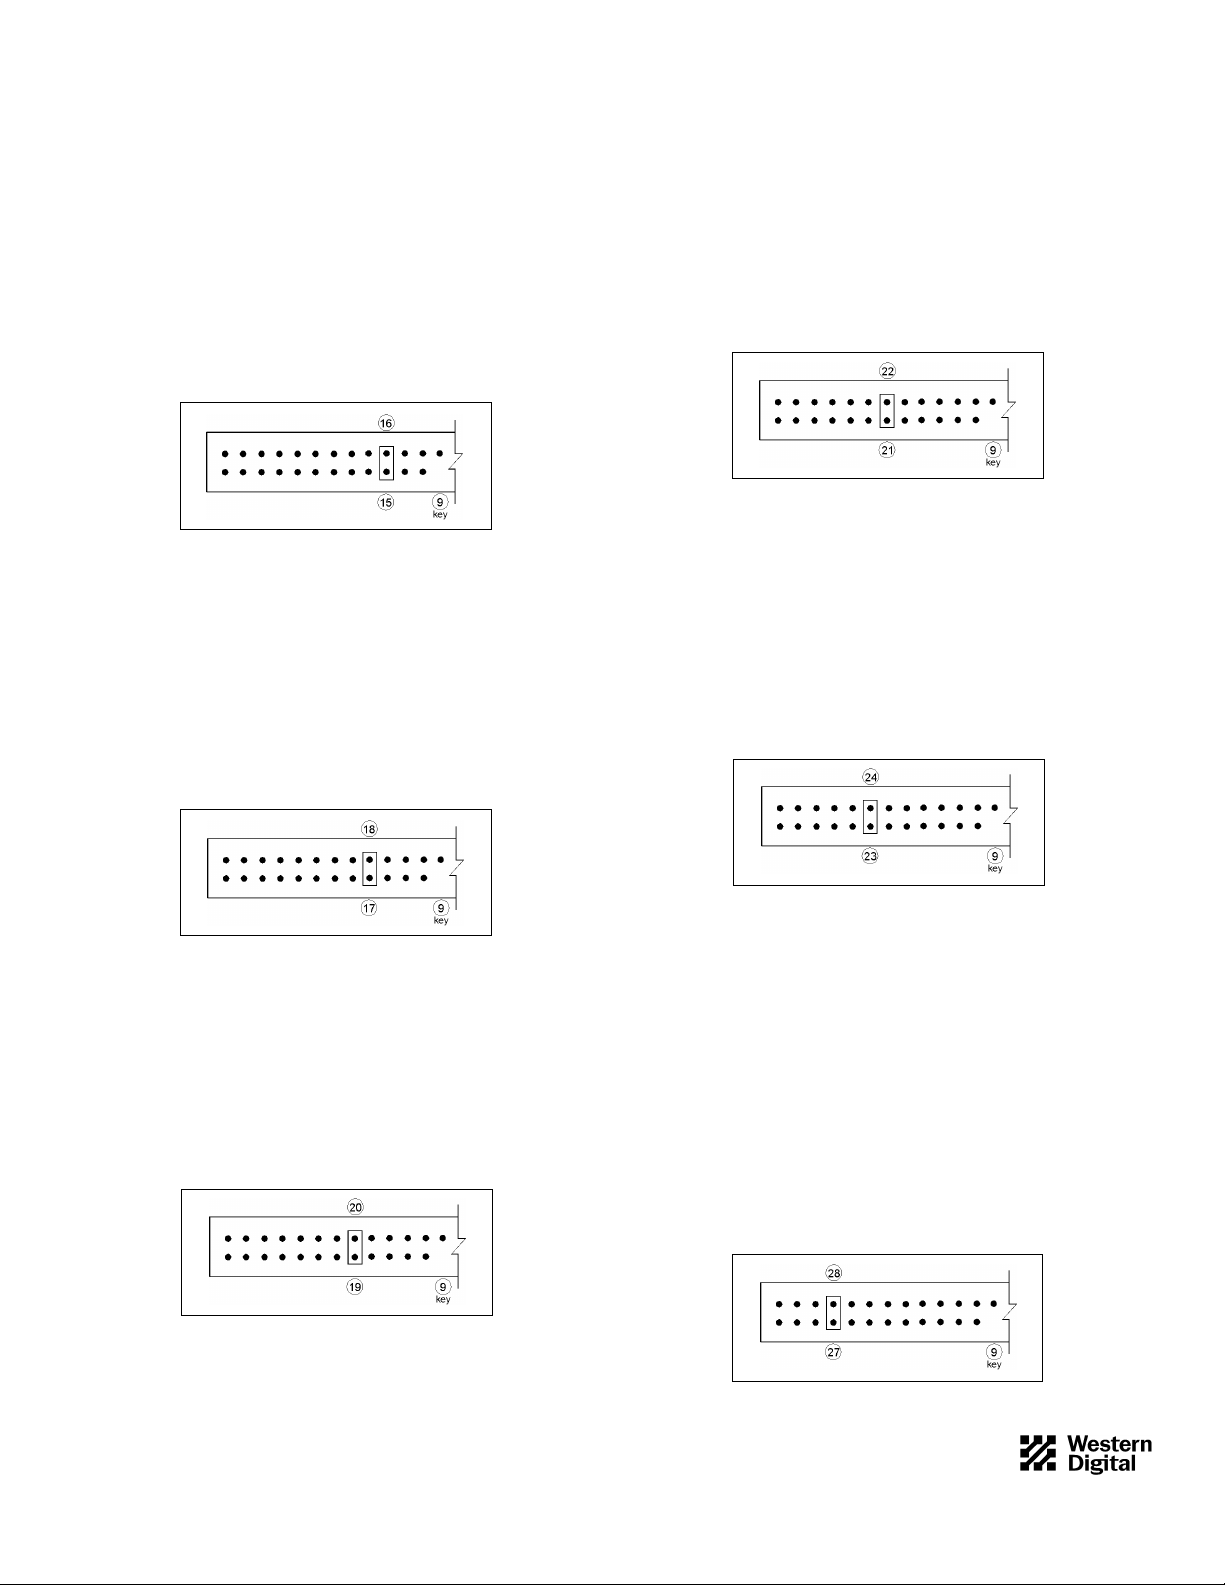
installed.) To enable Auto Start Delay, install a jumper as shown in Figure
3. To disable Auto Start Delay, no jumper is required.
Figure 3. Auto Start Delay Jumper
SCAM
The WD Enterprise drive supports the SCSI Configured Automagically
(SCAM) option, which allows it to function as a SCAM level 2 device.
NOTE: In order to use this feature, the host bus adapter must support
SCAM.
Option block pins 17 and 18 are dedicated to the SCAM feature. To
enable SCAM, install a jumper as shown in Figure 4. To disable SCAM,
no jumper is required.
Disable Target Initiated Synchronous/Wide Negotiaton
During the power-up sequence, the initiator (host bus adapter) and the
target (WD Enterprise drive) negotiate and agree upon three items: bus
width, bus speed, and synchronous/asynchronous data transfer. Either the
initiator or the target can start the negotiation process, and once this
process is completed successfully, all "data in" and "data out" phases operate as determined during the handshake. The negotiation process occurs
only once, usually during start-up.
Option block pins 21 and 22 are dedicated to the Disable Target Initiated
Synchronous/Wide Negotiation option. To disable target initiated synchronous/wide negotiation, install a jumper as shown in Figure 6. To
enable target initiated synchronous/wide negotiation, no jumper is
required.
Figure 6. Disable Target Initiated
Synchronous/Wide Negotiation Jumper
SCSI Termination
To ensure reliable communication, the SCSI bus must be properly terminated. Devices located at the physical ends of the SCSI bus should have
their terminators enabled. All other devices must have their terminators
disabled.
Option block pins 23 and 24 are dedicated to the SCSI Termination
option. To enable SCSI termination, install a jumper as shown in Figure 7.
To disable SCSI termination, no jumper is required.
Figure 4. SCAM Jumper
Disable Unit Attention
Whenever a target (WD Enterprise drive) is reset by a power-on or reset
sequence, it communicates a unit attention message to the initiator (host
bus adapter).
Option block pins 19 and 20 are dedicated to the Disable Unit Attention
option. To disable unit attention, install a jumper as shown in Figure 5. To
enable unit attention, no jumper is required.
Figure 5. Disable Unit Attention Jumper
4079-001056 Rev. A 5/97 H0310
Figure 7. SCSI Termination Jumper
Termination Power (TERMPWR)
WD Enterprise drives have the ability to supply +5V to the SCSI bus for
termination. Option block pins 27 and 28 are dedicated to TERMPWR.
If you want the drive to supply TERMPWR to the SCSI bus, install a
jumper as shown in Figure 8. To disable TERMPWR, no jumper is
required.
Consult your system or host bus adapter documentation to determine if
the SCSI bus supplies termination power. (Most systems do supply
termination power). If your system does not, then you must use the power
supplied by the WD Enterprise drive.
NOTE: Termination power from the hard drive is required only if the host
bus adapter does not supply it. However, both devices can provide termination
power with no detrimental effects to the system.
Figure 8. TERMPWR Jumper
2
Page 3
LED Support
If your system configuration allows the use of an activity LED external to
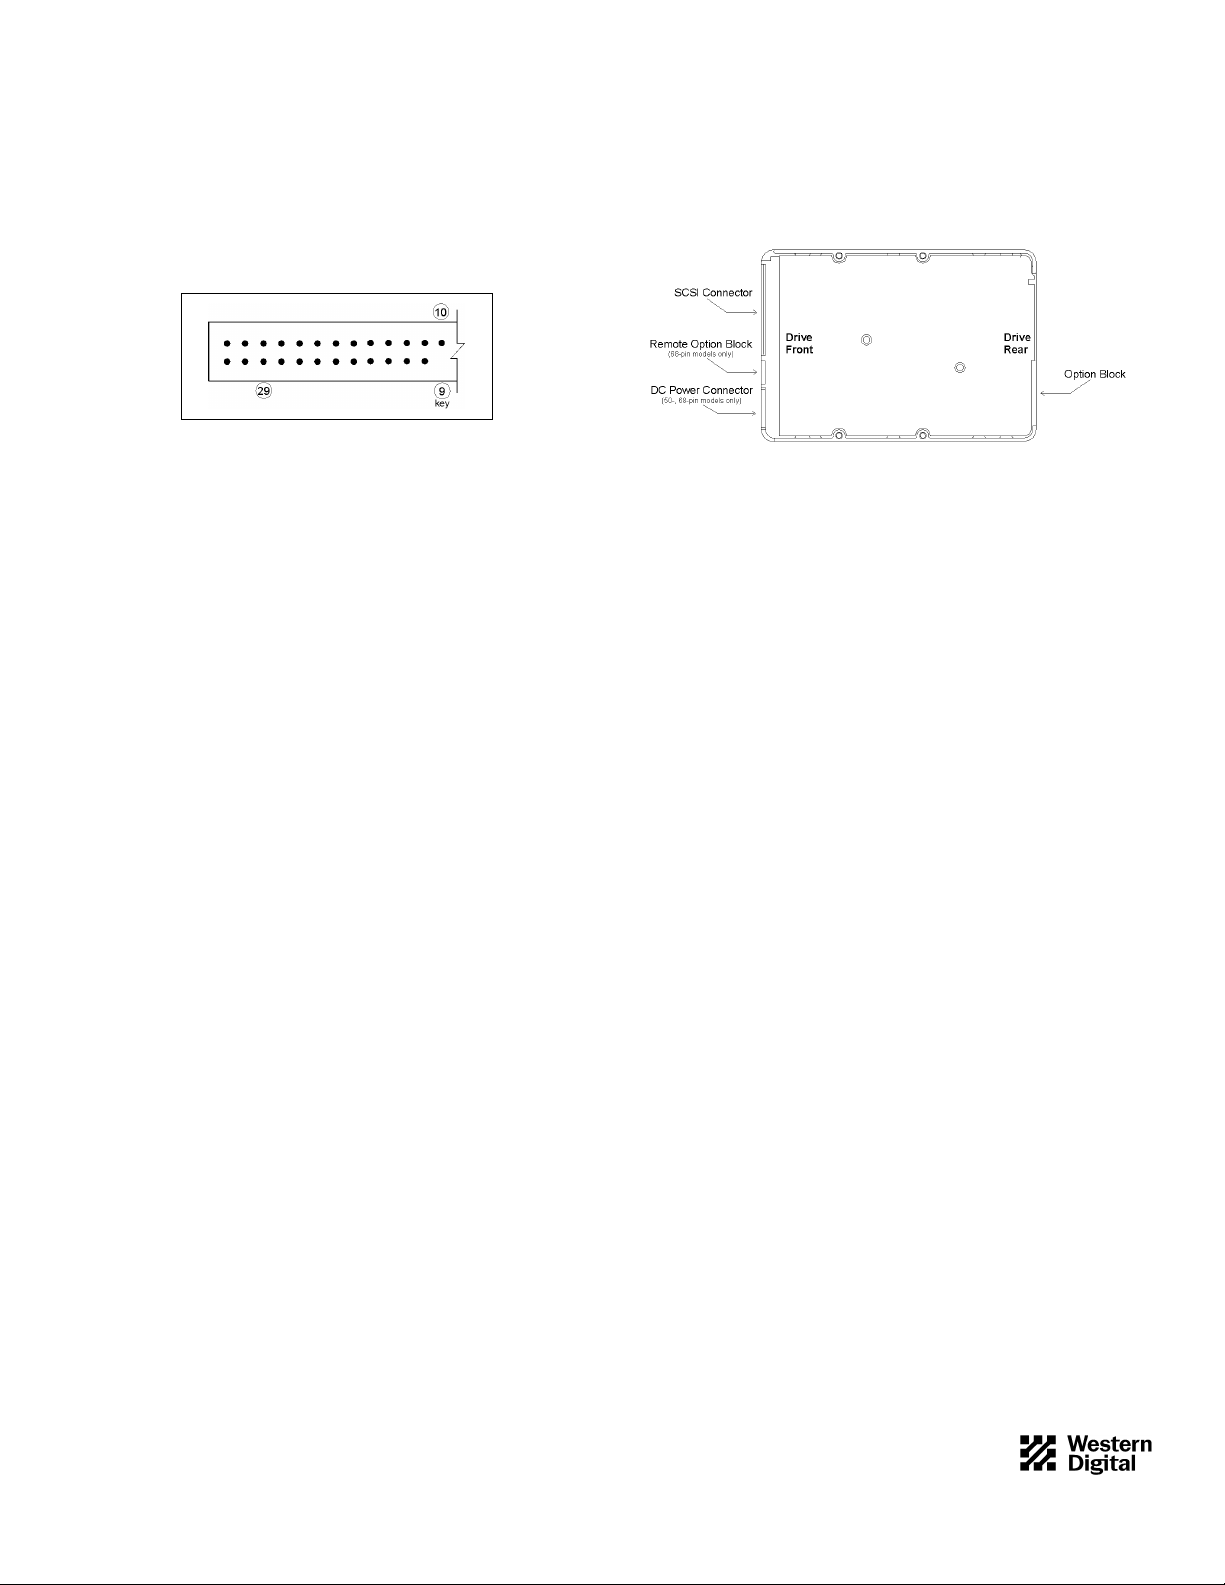
the WD Enterprise drive, you can power the LED from the drive. Pins 10
and 29 are dedicated to LED support, as shown in Figure 12. To install an
external activity LED, connect the positive lead (anode) of the LED to pin
29 and the negative lead (cathode) to pin 10.
NOTE: These pins can be used to power an LED located on the front of the
drive, or an external LED in systems where the front of the drive cannot be
seen.
Figure 9. LED Support Pins
INSTALLINGTHE DRIVE
Because the Enterprise WDE2170 and WDE4360 drives are compatible
with a wide range of computer systems and host bus adapters, this manual
does not include system-specific information. If the information contained
in the following sections does not apply to your setup, refer to your computer system documentation for further details.
Reserved Pins
Several pins on the option block are reserved for development and manufacturing purposes:
§ Pins 25 and 26
§ Pin 30
§ Pins 31 and 32
§ Pins 33 and 34
§ Key slot (prevents incorrect installation of connector)
Mode Select Options
You can alter certain configuration parameters using the SCSI Mode Select
command. Some examples include Read/Write Error Recovery Page,
Format Device Page, and Caching Page. The Mode Select command
allows drive characteristics to be customized to meet your system requirements. Refer to the Western Digital SCSI Implementation Guide (document
number 4096-001116) for more information.
Remote Option Block
WD Enterprise 68-pin drives are equipped with a remote option block
that allows you to set SCSI IDs and enable select options such as termination and LED power. Customers using the remote option block typically
use a pre-fabricated cable for convenient connection to the host. Do not
use jumpers on this option block. For more information, refer to theWD
Enterprise Technical Reference Manual (document number 4079-001045).
Figure 10. LED Support Pins
Open the Computer
1) Turn OFF the power to the computer system and all attached
peripheral devices.
2) Unplug the AC power cable from the wall outlet.
3) Remove all cables from the back of the computer system.
4) Remove the screws attaching the computer system’s cover using a nonmagnetic screwdriver. Be sure to keep all screws and other parts
together for easy re-assembly.
5) Gently lift the cover and remove it from the chassis.
Prepare the Drive for Installation
NOTE: Refer to the Western Digital 3.5-Inch Drive Handling Guide (document number S0999).
1) Remove the WD Enterprise drive from the anti-static bag, and place the
drive on top of the anti-static bag on your work surface.
2) Configure the drive jumpers as necessary. Refer to “Setting the Drive
Jumpers” on page 1 for more details.
3) If SCSI termination must be provided by the WD Enterprise drive,
ensure that the terminator is properly installed. Refer to SCSI
Termination on page 2.
Multiple Drive Installations
If your system requires multiple devices, you may install up to eight SCSI
devices (including the host bus adapter) on an 8-bit SCSI bus; up to 16
SCSI devices (including the host bus adapter) on a 16-bit SCSI bus, or up
to 32 devices (including the host bus adapter) on a 16-bit SCSI bus with a
dual processor host bus adapter. Refer to the SCSI ID Numbers section on
page 1.
4079-001056 Rev. A 5/97 H0310
3
Page 4
If Your Drive has a 50-pin or 68-pin Connector
1) Using a non-magnetic screwdriver and four mounting screws, mount
the 50-pin or 68-pin drive in the computer system’s mounting frame as
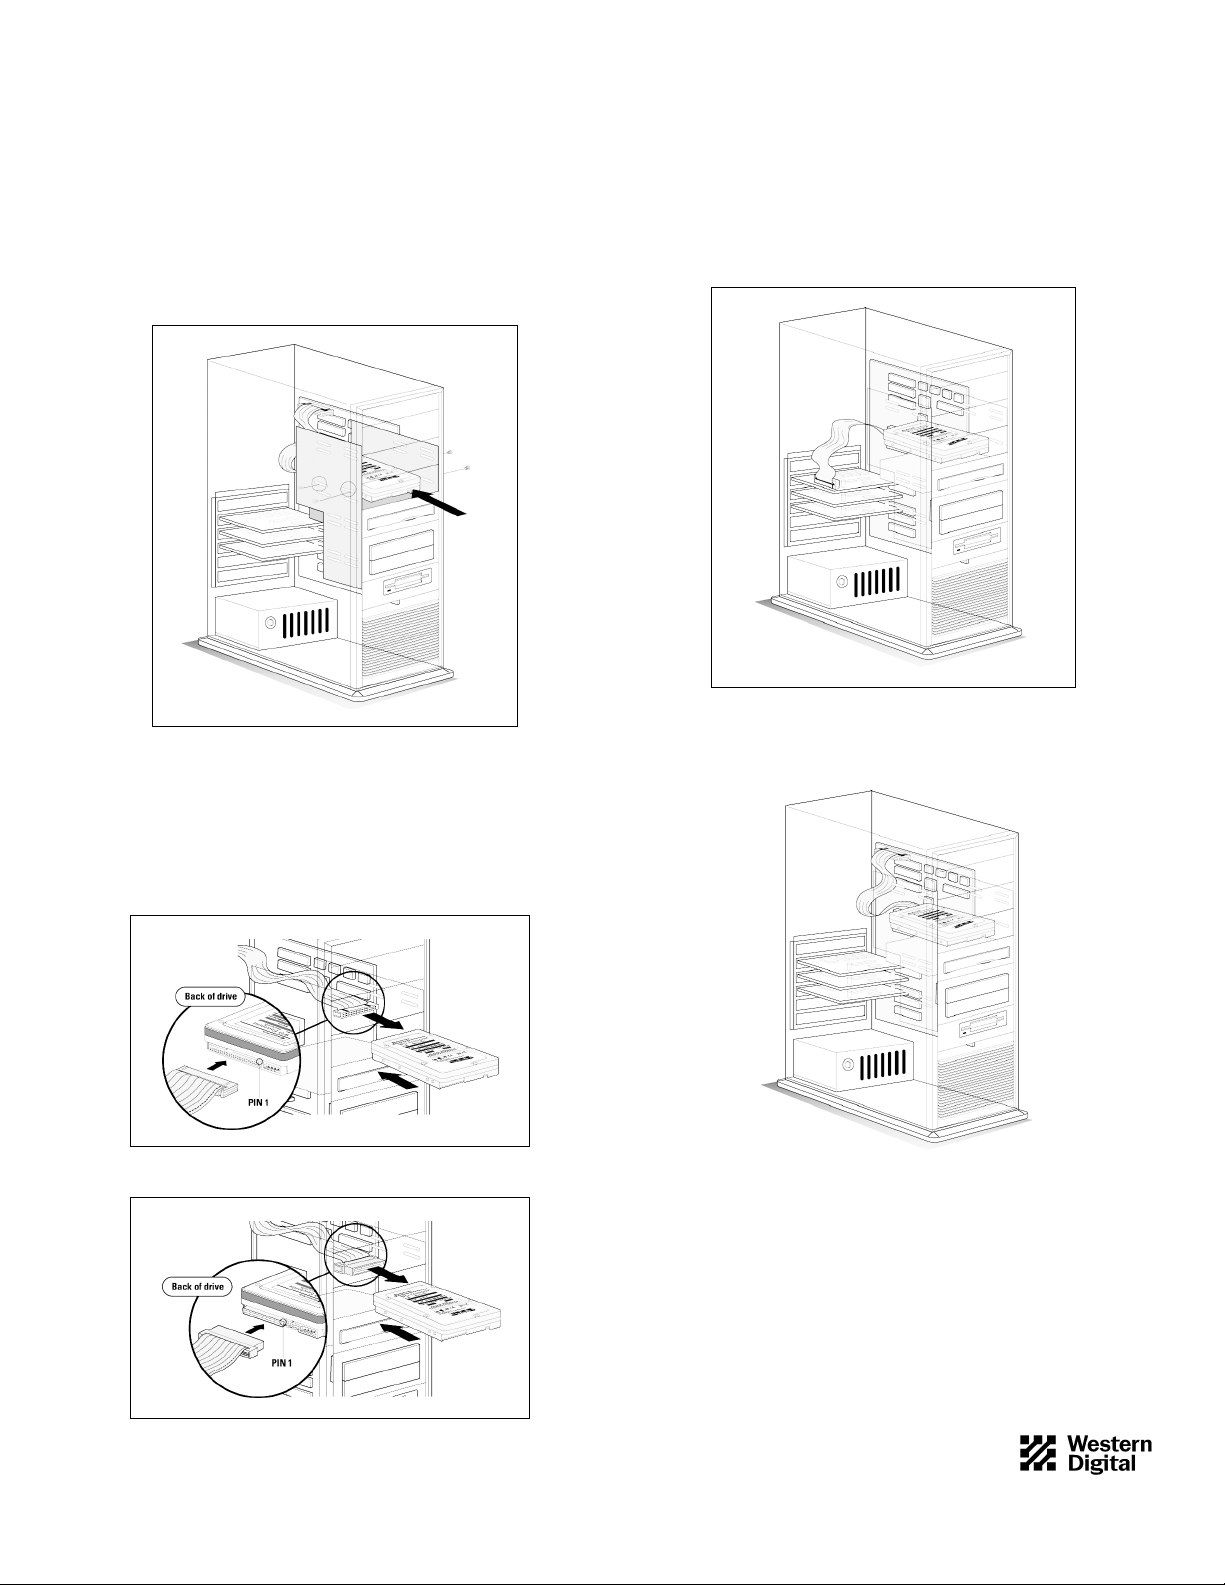
shown in Figure 11. Use four 6-32 mounting screws. Do not install the
screws past .150-inch.
NOTE: When mounting the drive, make sure the SCSI connector and power
connector face the rear of the chassis.
NOTE: If you plan to install the WD Enterprise drive in a 5.25-inch bay,
you must install the mounting hardware. Contact your local dealer to obtain a
mounting adapter kit. Rails are sometimes necessary to complete the installation. Consult your computer system manufacturer.
NOTE: If multiple devices are attached to the SCSI bus, they must be daisychained using a ribbon cable with multiple connectors. The ends of the cable
must be connected to terminated devices. If the cable contains more connectors
than needed for the devices on the bus, mid-cable connectors may remain
unused. Consult your computer system or adapter card documentation for specific cabling requirements.
5) Connect the remaining ribbon cable connector to the SCSI controller
card or the motherboard by matching pin 1 on the ribbon cable with pin
1 on the SCSI connector. Refer to Figures 14 and 15.
Figure 11. Installing a 50- or 68-pin Drive
2) Obtain the appropriate type of SCSI ribbon cable, 50-pin or 68-pin.
3) Identify pin 1 on the ribbon cable. The colored stripe indicates pin 1.
4) Connect the ribbon cable connector to the hard drive by matching pin
1 on the ribbon cable with pin 1 on the hard drive connector. Refer to
Figures 12 and 13 to correctly identify pin 1 for each connector type.
Figure 12. Attaching the 50-pin SCSI Cable
Figure 13. Attaching the 68-pin SCSI Cable
4079-001056 Rev. A 5/97 H0310
Figure 14. Attaching a 50- or 68-pin SCSI
Cable to a SCSI Controller Card
Figure 15. Attaching a 50- or 68-pin SCSI
Cable to the motherboard
NOTE: Before completing steps 6 and 7, ensure that power to the computer
system is turned off. Hot-plugging power to the drive is not recommended.
6) Locate an available 4-pin power supply connector cable inside the
computer system.
7) Connect the 4-pin power cable to the power connector on the drive.
Although the 4-pin connector is keyed to ensure proper insertion, refer
to Figure 16 for correct alignment.
4
Page 5
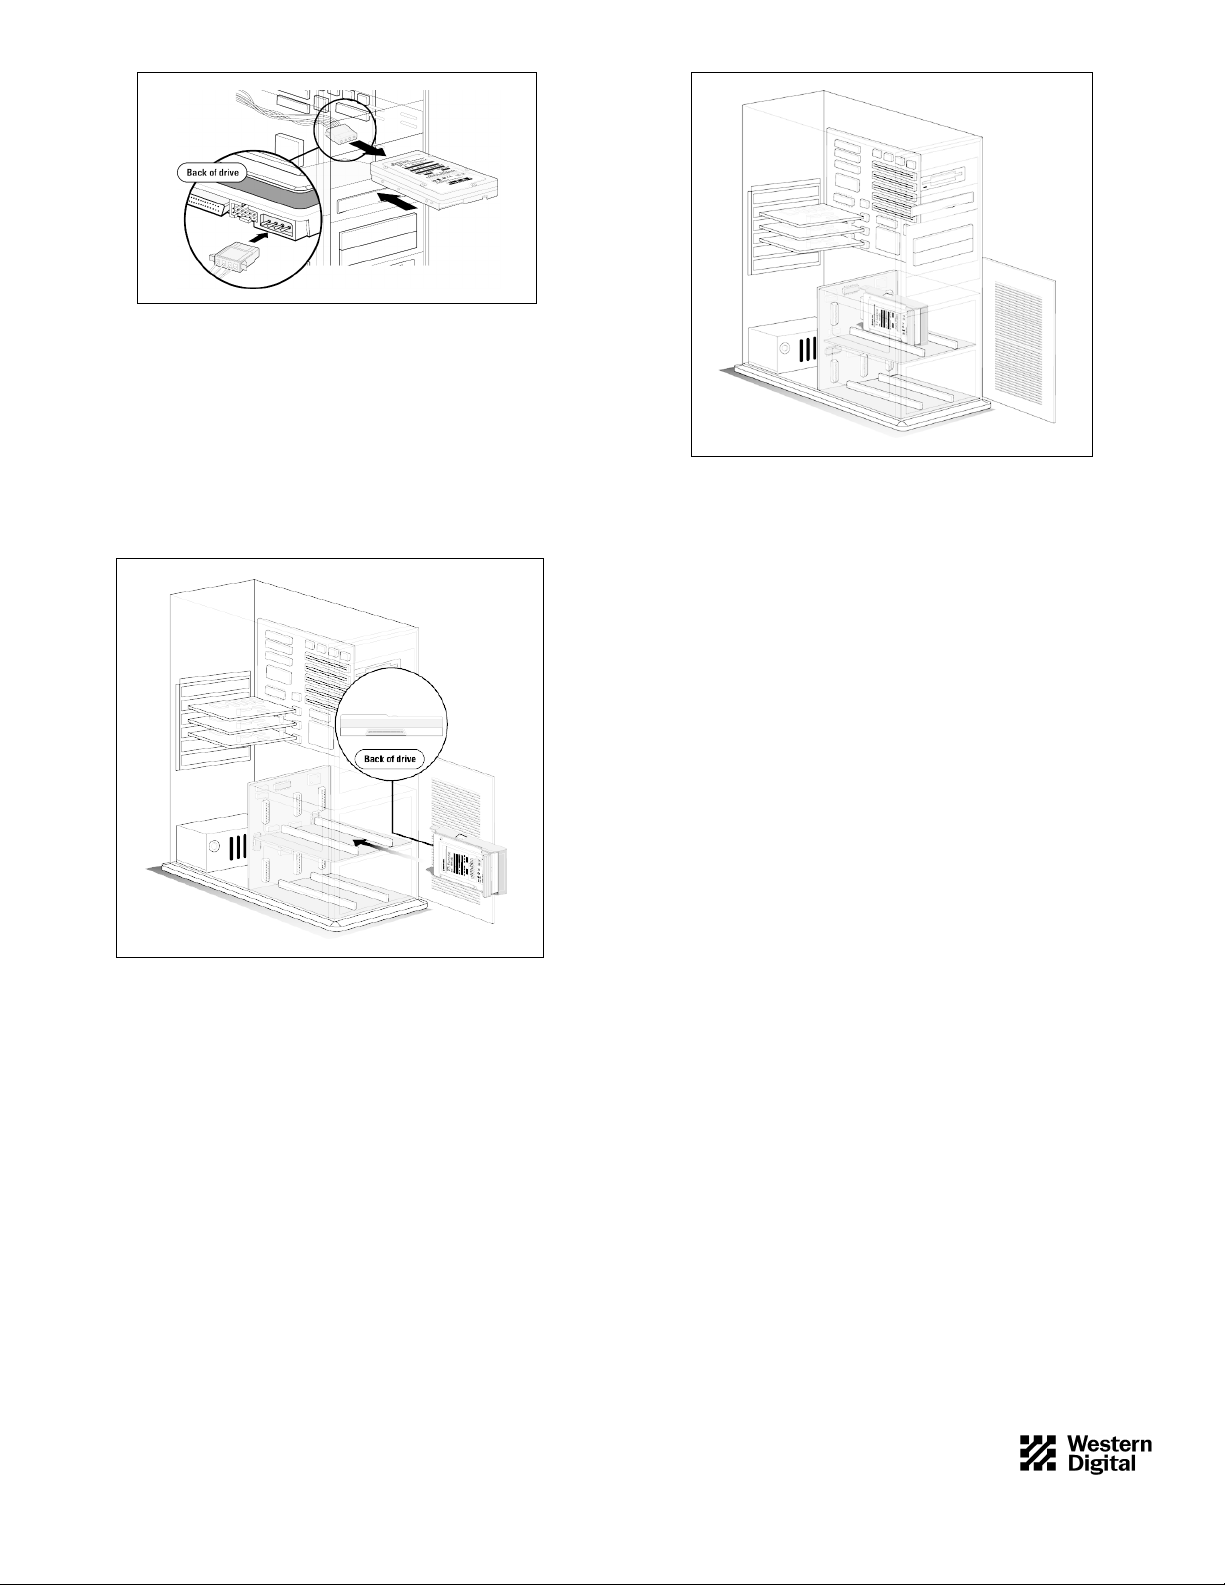
Figure 16. Attaching the Power Supply Cable
If Your Drive has an 80-pin Connector
NOTE: The SCSI connection and power connection is handled by a single
SCA-2 connector.
1) Mount the 80-pin drive in a drive tray using four mounting screws.
2) Slide the drive/tray assembly into the designated drive slot, making sure
that the end with the SCSI connector is inserted first. Refer to Figure
17.
Figure 18. Connecting an 80-pin Drive to a Backplane
Close the Computer System
1) Verify all cable connections.
2) To prevent damage to the SCSI ribbon cables and power cables, make
sure all cables are neatly placed inside the computer system chassis.
3) Replace the cover and install screws using a non-magnetic screwdriver.
4) Reconnect all cables to the back of the computer system.
5) Plug the AC power cable into the wall outlet.
6) Turn ON the power to the computer system.
USING THE DRIVE
To prepare your drive for use, you must install your operating system,
application software, and if necessary, host bus adapter software. Consult
your system and software documentation for additional information.
It is extremely important to regularly back up the data on your hard drive.
Data can be damaged or lost due to a number of unanticipated factors.
Consult your operating system documentation for back up instructions.
Figure 17. Installing an 80-pin Drive
3) Ensure that the drive is properly seated on the backplane connector.
Refer to Figure 18.
NOTE: This connection must be secure.
4079-001056 Rev. A 5/97 H0310
5
Page 6

RELATED DOCUMENTS
To obtain these reference documents, call Western Digital at 714-932-5000,
or download them from the Western Digital web site.
n WDE2170/WDE4360 Installation Guide (4079-001046)
n WDE2170/WDE4360 Technical Reference Manual (4079-001045)
n Western Digital 3.5-Inch Drive Handling Guide (79-000563-003)
n Western Digital SCSIImplementation Guide (4096-001116)
TECHNICAL SUPPORT
Phone Assistance: 507-286-7972
U.S. only: 888-WDC-SCSI or 888-932-7274
Fax Assistance: 507-286-7926
If you need additional information or help during installation or normal use
of our products, contact Western Digital Technical Support. Our customer
support staff will answer your installation questions by phone. When calling
for support, please have your Western Digital hard drive serial number and
model number available.
BULLETIN BOARD SERVICE (BBS) 24-HOUR
North America only: 714-753-1234
Germany: 49-89-92 20 06-60
U.K.: 44-1372-360387
You may access the Technical Support Bulletin Board if you have a Hayescompatible modem with a 2,400 to 28,800 baud rate. The required format is:
8 data bits, 1 stop bit, no parity.
DOCUFAX (24-HOUR)
North America only: 714-932-4300
Europe Only: 31-20-4467650
Use the automated FAX system to have product information sent directly to
your FAX machine.
ONLINE SERVICES
Online services include general product and contact information, installation
guides, and frequently asked questions.
Internet:
www.wdc.com
FTP Site:
ftp.wdc.com
America Online:
Keyword: WDC
Western Digital
8105 Irvine Center Drive
Irvine, CA 92618
Western Digital is a registered trademark and WDEnterprise and FIT Lab are trademarks of Western Digital Corporation.
Other marks that belong to other companies may be mentioned herein. Product specifications subject to change without notice. © 1997 Western Digital Corporation. All rights reserved.
4079-001056 Rev. A 5/97 H0310
6
 Loading...