

Page 1
PRELIMINARY-P3
WD TV Play Media Player
User Manual
Photo Menu Options
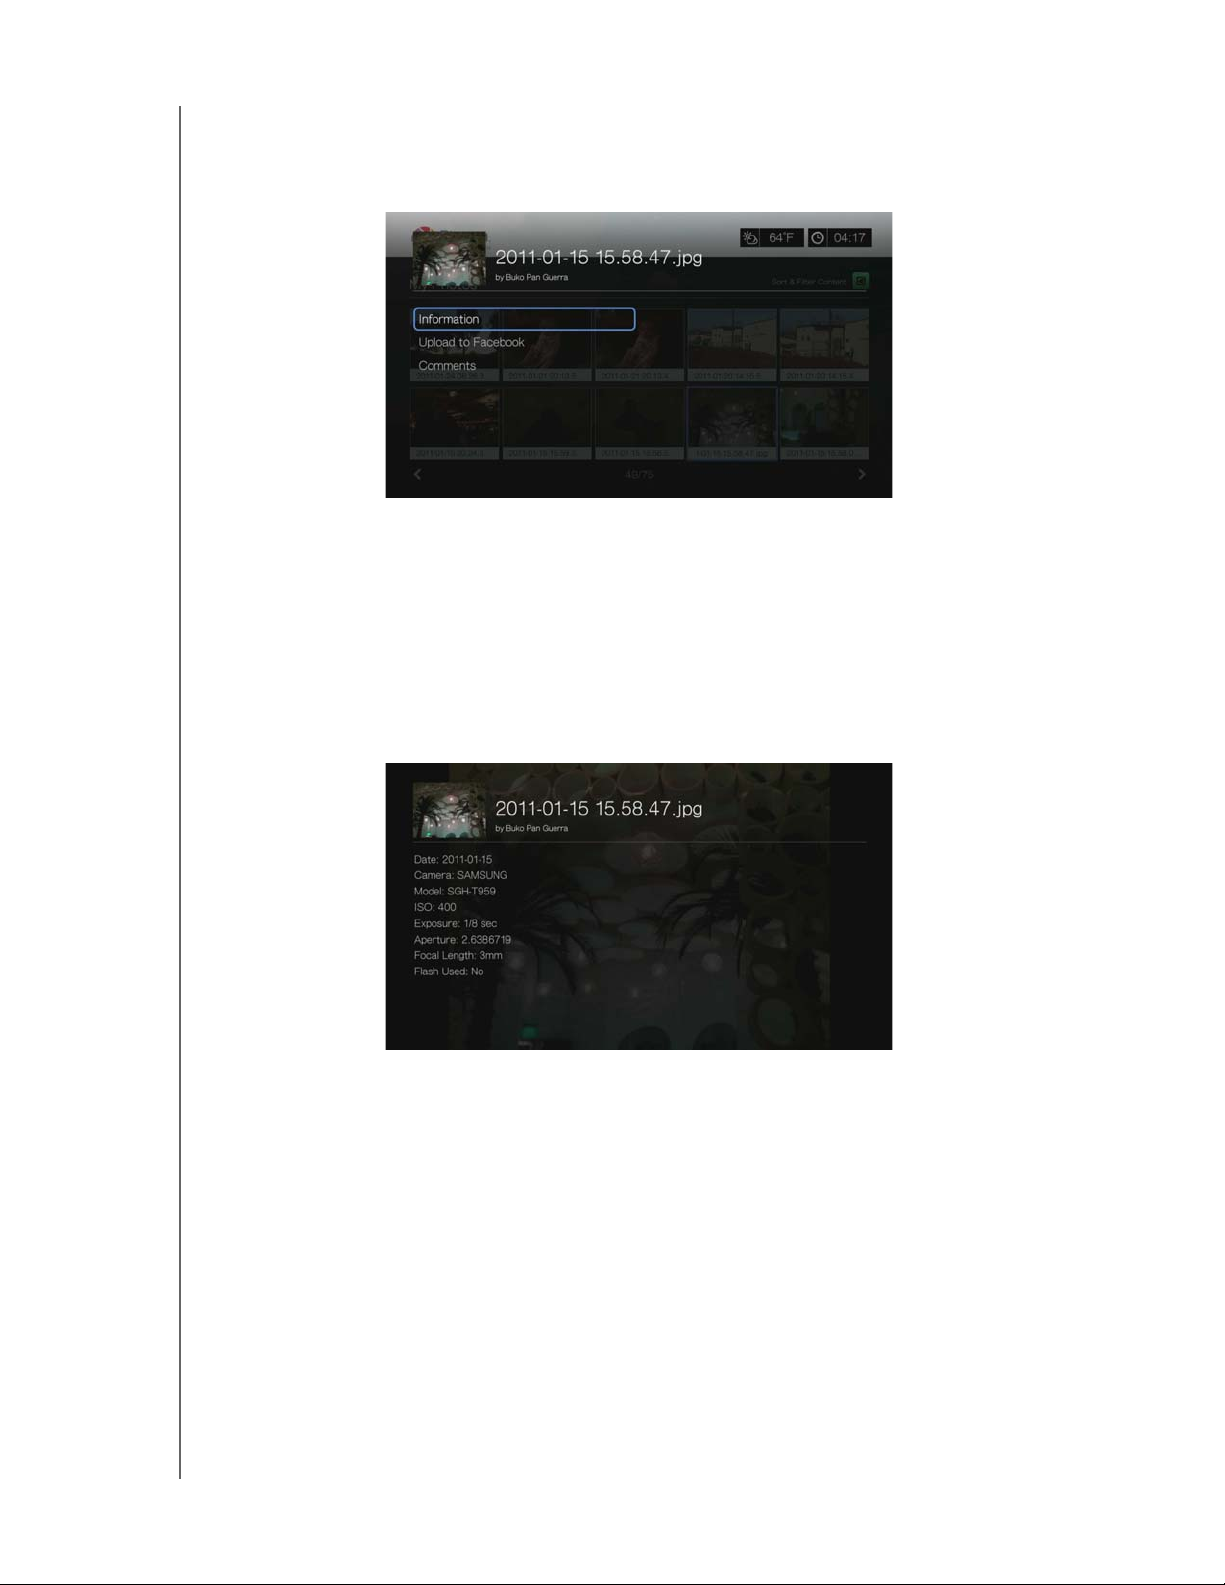
With a photo thumbnail in a web album selected, press Options. The My Photos
menu options display. Press Back when complete to return to the web album menu.
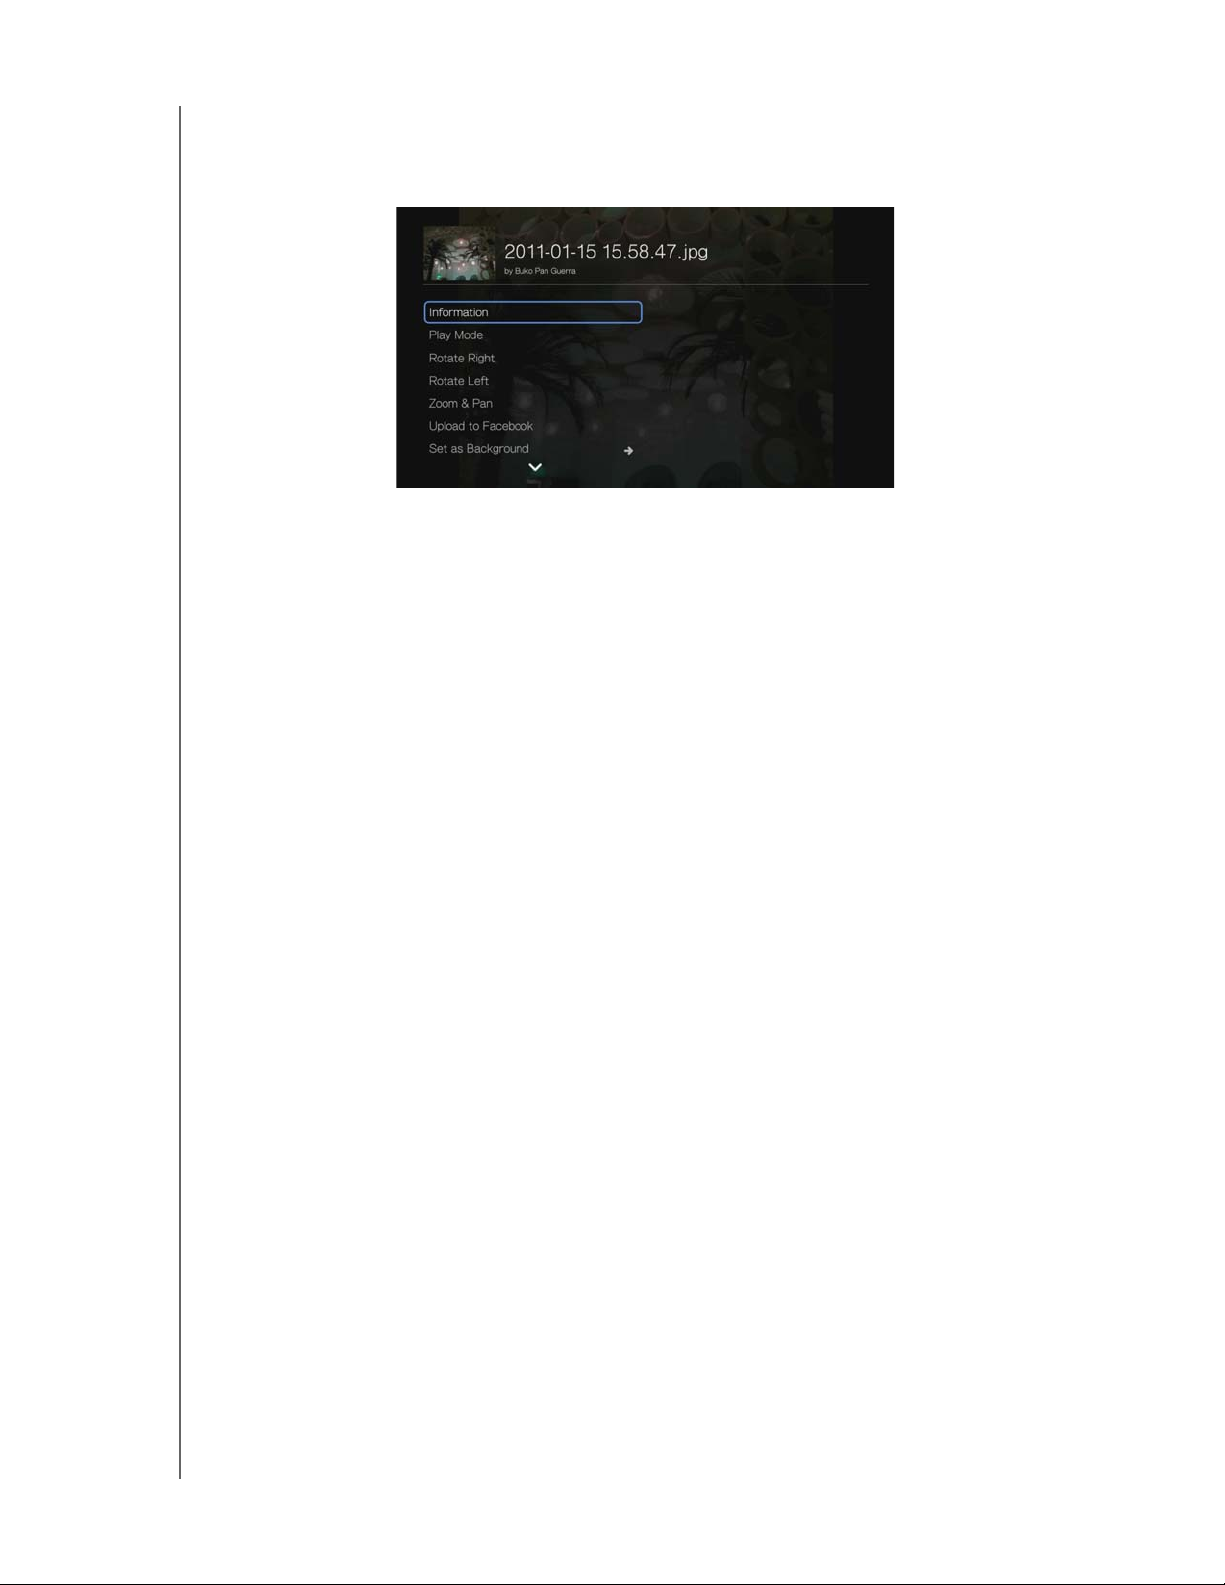
Information
Use this option to display the following information about the current picture:
Date
Camera make and model
ISO, exposure, and aperature settings
Focal length
Flash info
Upload to Facebook
The Picasa upload to Facebook function is the same as the Videos upload to
Facebook function. See “Upload to Facebook” on page 66.
Comments
Use this option to make or view comments on the selected photo. Use the
navigation buttons to select Hide Comments or Write a Comment... using the
onscreen keyboard, then press OK.
INTERNET SERVICES – 146
Page 2
PRELIMINARY-P3
Photo Display Options
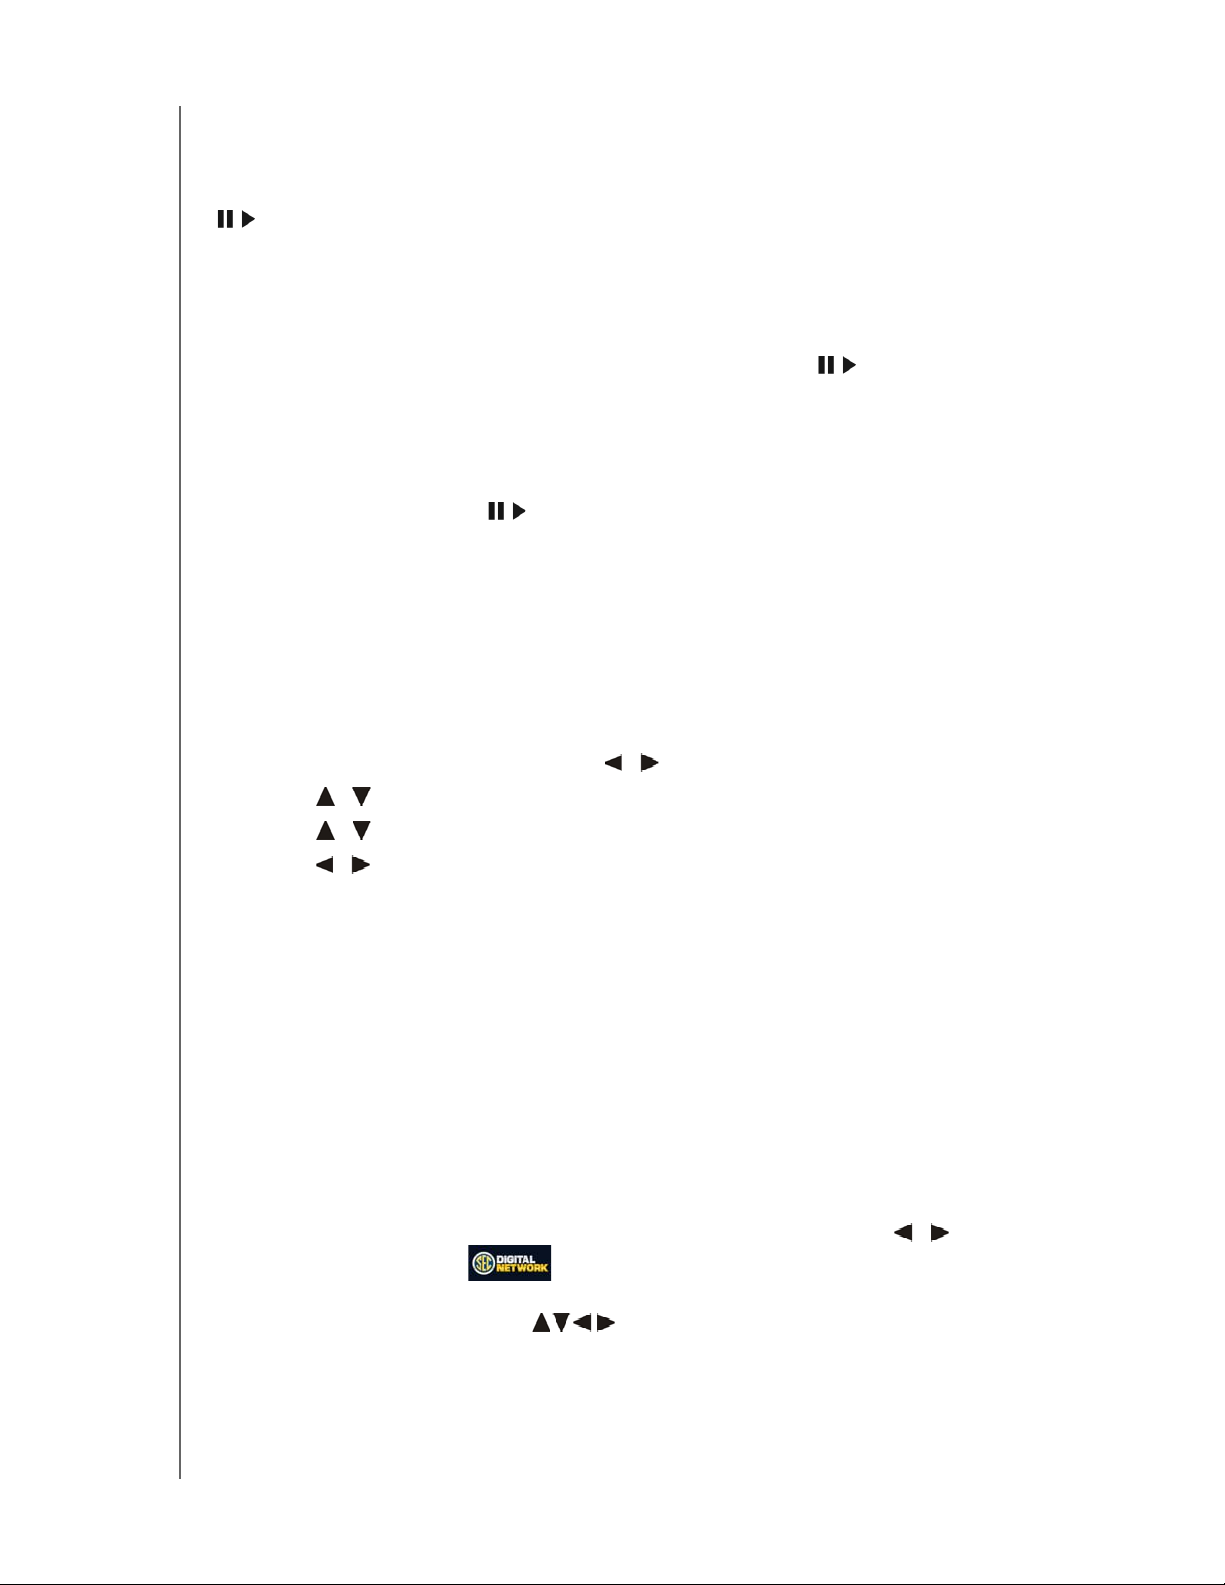
To display the photo options while viewing a photo, press Options.
To return to the photo you were viewing, press Back or Options again.
Information
See “Information” on page 146.
Play Mode
WD TV Play Media Player
User Manual
See “Play Mode” on page 88.
Rotate Left & Right
See “Rotate Left & Right” on page 88.
Selecting Photo Zoom and Pan Options
See “Selecting Video Zoom and Pan Options” on page 71.
Upload to Facebook
See “Upload to Facebook” on page 66.
Set As Background
See “Set as Background” on page 87.
Comments
See “Comments” on page 146.
Download Photo
Use this menu to download a photo to the media player’s internal drive or to another
network attached device.
Displaying Photo Thumbnails
See “Displaying Photo Thumbnails” on page 89.
Photo Slideshow
See “Photo Slideshow” on page 90.
INTERNET SERVICES – 147
Page 3
PRELIMINARY-P3
WD TV Play Media Player
User Manual
Video Player
The Picasa video layer layout is similar to the regular video playback screen. It
displays the playback status bar and the elapsed and total playback times. Press
to pause and resume playback.
People I’m Following
People I’m Following contains thumbnails showing icons for the people you are
following on Picasa. Select an icon to view each person’s Public Gallery Albums. Use
the navigation buttons to select individual photos or press inside an album to
begin a photo slideshow.
Featured
This screen contains select Picasa user photos. Use the navigation buttons to select
individual photos or press to begin a photo slideshow. When viewing a photo,
press Options then select More Photos From This Owner to view all of the
owner’s Public Gallery Albums.
Recent
This screen contains recent Picasa user photos, and works the same as way as
Featured above.
Deleting a Picasa Account
1. On the Picasa main screen, press / to select Account, then press OK.
2. Press / to select Delete Account, then press OK.
3. Press / to select the account you want to delete, then press OK.
4. Press / to select OK on the confirmation prompt, then press OK.
SEC Digital Network
The SEC Digital Network offers college sports fans access to the largest library of
multi-sport full games and original programming from the most dominant and
exciting collegiate sports conference. Watch FREE daily programming including SEC
Today, Countdown to Kickoff, Game Day Central, and weekly coaches
teleconferences, and select full games. Additional content can be ordered at
www.SECOnDemand.com.
To access SEC Digital Network:
1. Navigate to the Home | Services menu bar and and press OK.
2. The list of Internet services display in alphabetical order. Press
SEC Digital Network , then press OK to display the SEC Digital Network
home screen.
3. Use the navigation buttons to browse, select, and search for videos and
the playback buttons to stop and start videos.
/ to select
INTERNET SERVICES – 148
Page 4
PRELIMINARY-P3
WD TV Play Media Player
User Manual
SHOUTcast Radio
SHOUTcast Radio is the ultimate directory of online radio stations featuring over
45,000 music, talk, sports, and community radio stations from around the world.
To access SHOUTcast:
1. Navigate to the Home | Services menu and press OK.
2. The list of Internet services display in alphabetical order. Press / to select
SHOUTcast Radio , then press OK.
Options include:
Search
Radio Genres
Favorites
Top Radios
About
Exit
Listening to a SHOUTcast Radio Station
To browse for a radio station:
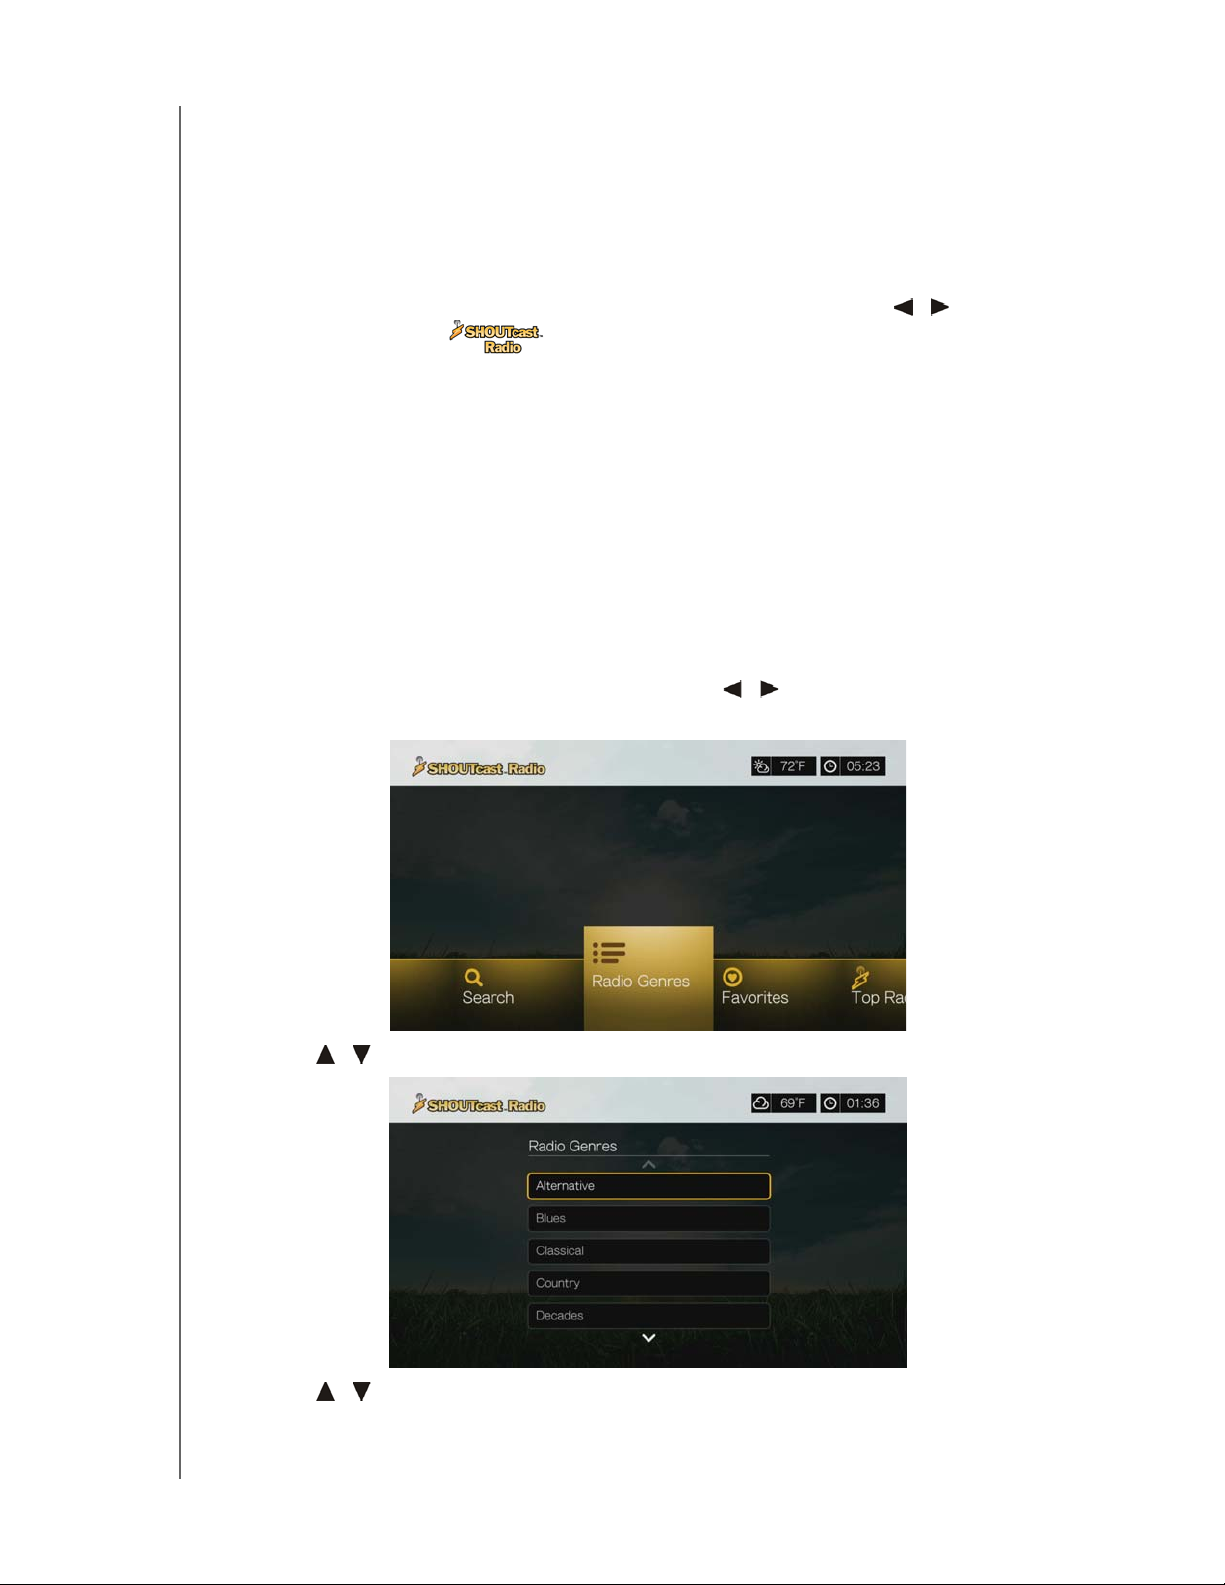
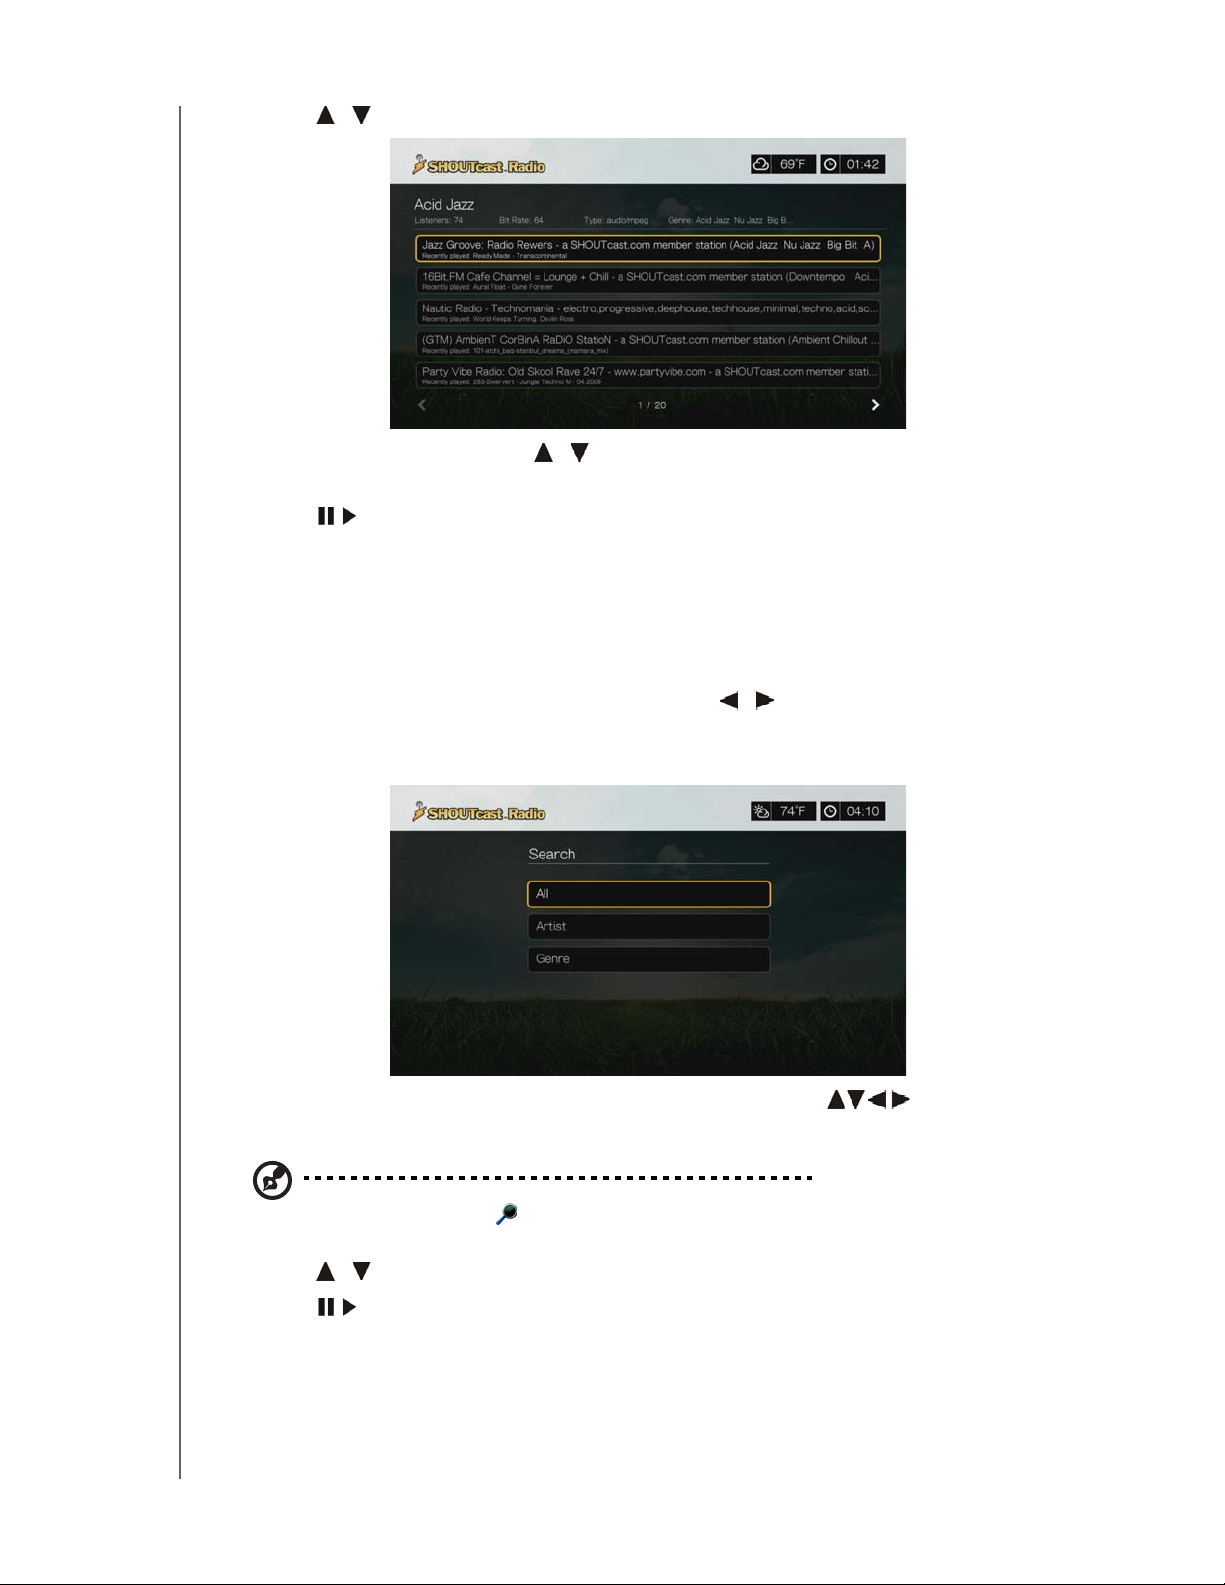
1. On the SHOUTcast Radio main screen, press / to select Radio Genres,
then press OK.
2. Press
/ to select from a variety of genres, then press OK. .
3. Press
/ to select from a variety of subgenres (if necessary), then press OK.
INTERNET SERVICES – 149
Page 5
PRELIMINARY-P3
WD TV Play Media Player
User Manual
4. Press / to select a radio station.
5. Press Options, then press / to select Add to Favorite if you want to add
the station to Favorites. Press OK.
6. Press or OK to start listening to the selected radio station. You can view
information about the currently playing station and song such as title, artist,
genre, number of listeners, etc. at the top of the screen.
Searching for a SHOUTcast Radio Station
To search for a SHOUTcast Radio station:
1. On the SHOUTcast Radio main screen, press / to select Search, then press
OK.
2. Filter your results by selecting All, Artist, or Genre, then press OK.
3. On the on-screen keyboard, use the navigation buttons
to key in a
search keyword, then press OK.
Note: You can also press on the remote control to toggle to the results list after entering several
characters in the search field.
4. Press / to select a station from the search result.
5. Press or OK to start listening to the selected radio station.
Adding a Station to Your Favorites List
If you like a particular station, you can add it to Favorites for easier access in the
future.
INTERNET SERVICES – 150
Page 6
PRELIMINARY-P3
WD TV Play Media Player
User Manual
To add to a station, program, or podcast to your favorites:
1. Go to the station list showing the station you want to add.
2. Press / to select the station you want to add or begin playing a station.
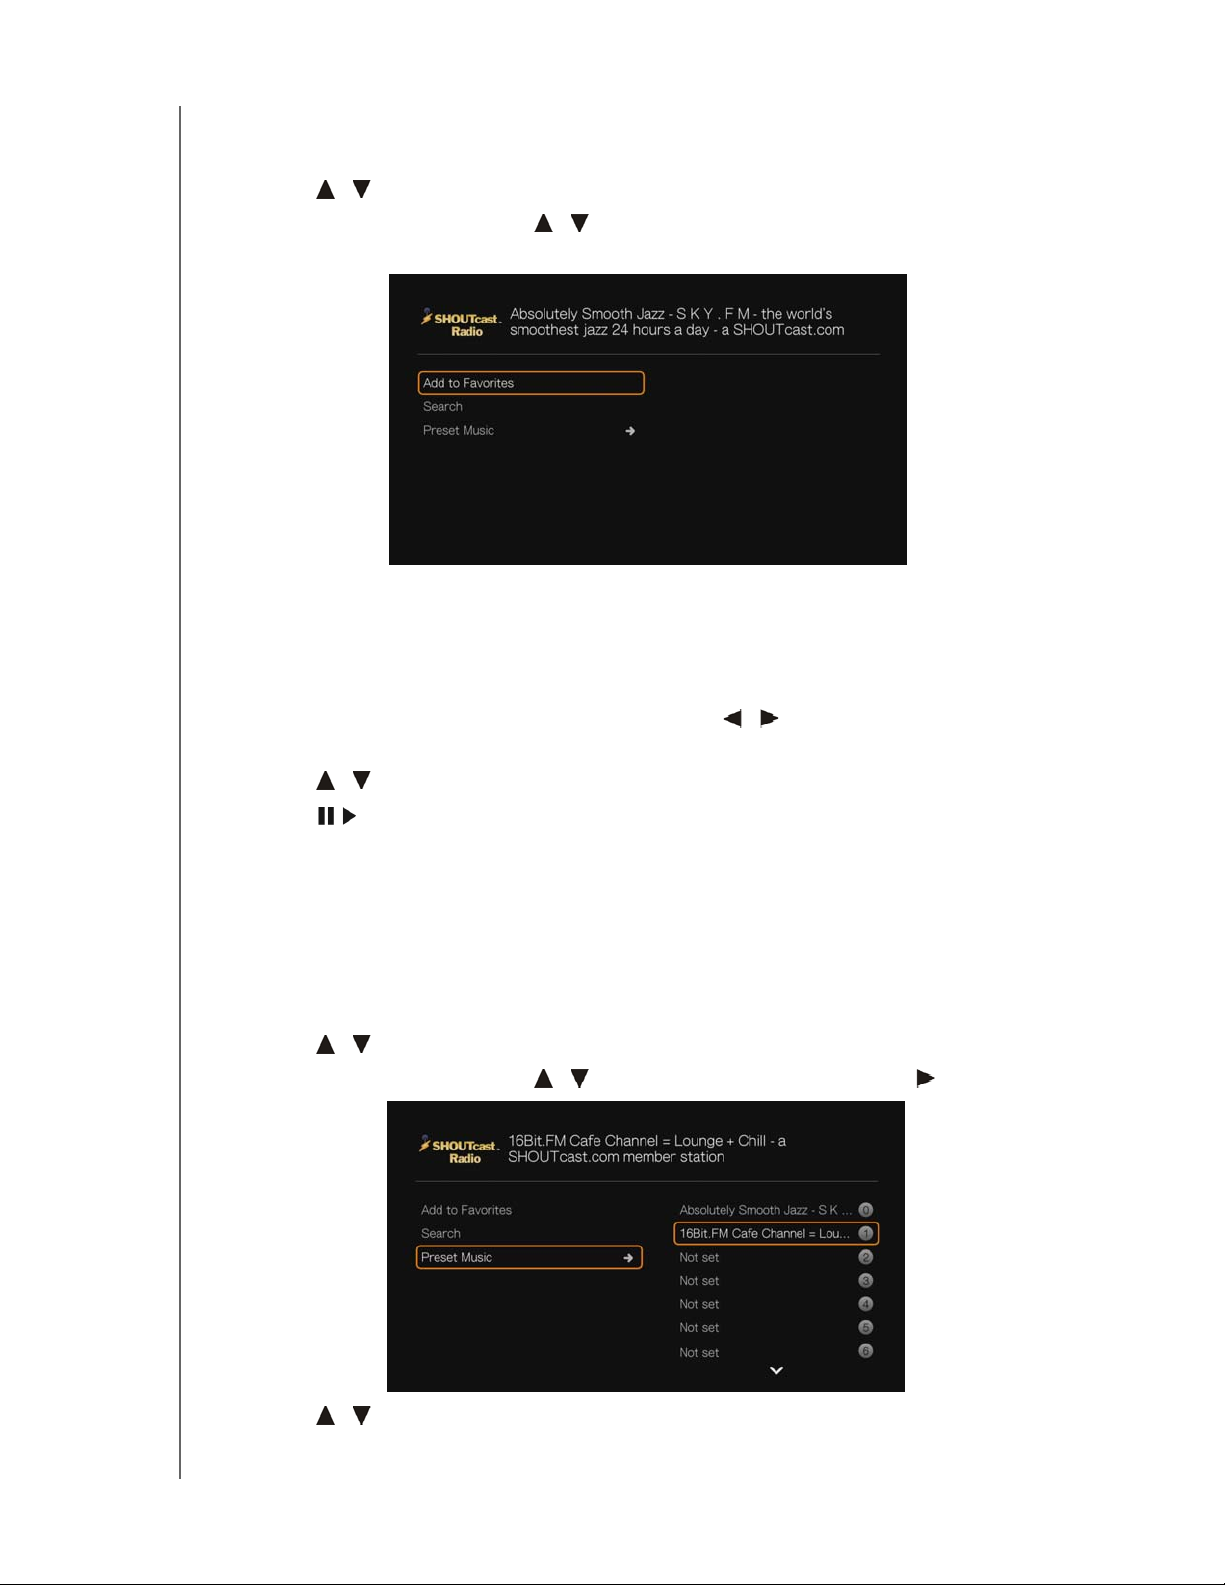
3. Press Options, then press / to select Add to Favorites if you want to add
the station to Favorites, then press OK.
4. Press OK again to confirm.
Listening to a Station in Your Favorites List
To listen to a favorite station:
1. On the SHOUTcast Radio main screen, press / to select Favorites, then
press OK.
2. Press / to select a station from the list.
3. Press or OK to start listening to the selected radio station.
Assigning a Preset Button to a Station
You can assign a numbered button on the remote control to a SHOUTcast Radio
station for quick access.
To assign a preset button to a station:
1. Go to the station list showing the station you want to add.
2. Press
3. Press Options, then press / to select Preset Music. Press .
/ to select the station you want to add or begin playing a station.
4. Press
/ to select a numbered remote button, then press OK.
INTERNET SERVICES – 151
Page 7
PRELIMINARY-P3
Removing a Station from Your Preset List
You can remove stations you no longer want from your preset list.
To remove a station from your preset list:
WD TV Play Media Player
User Manual
1. On the SHOUTcast Radio main screen, press
/ to select Favorites, then
press OK.
2. Press / to select the station you want to remove.
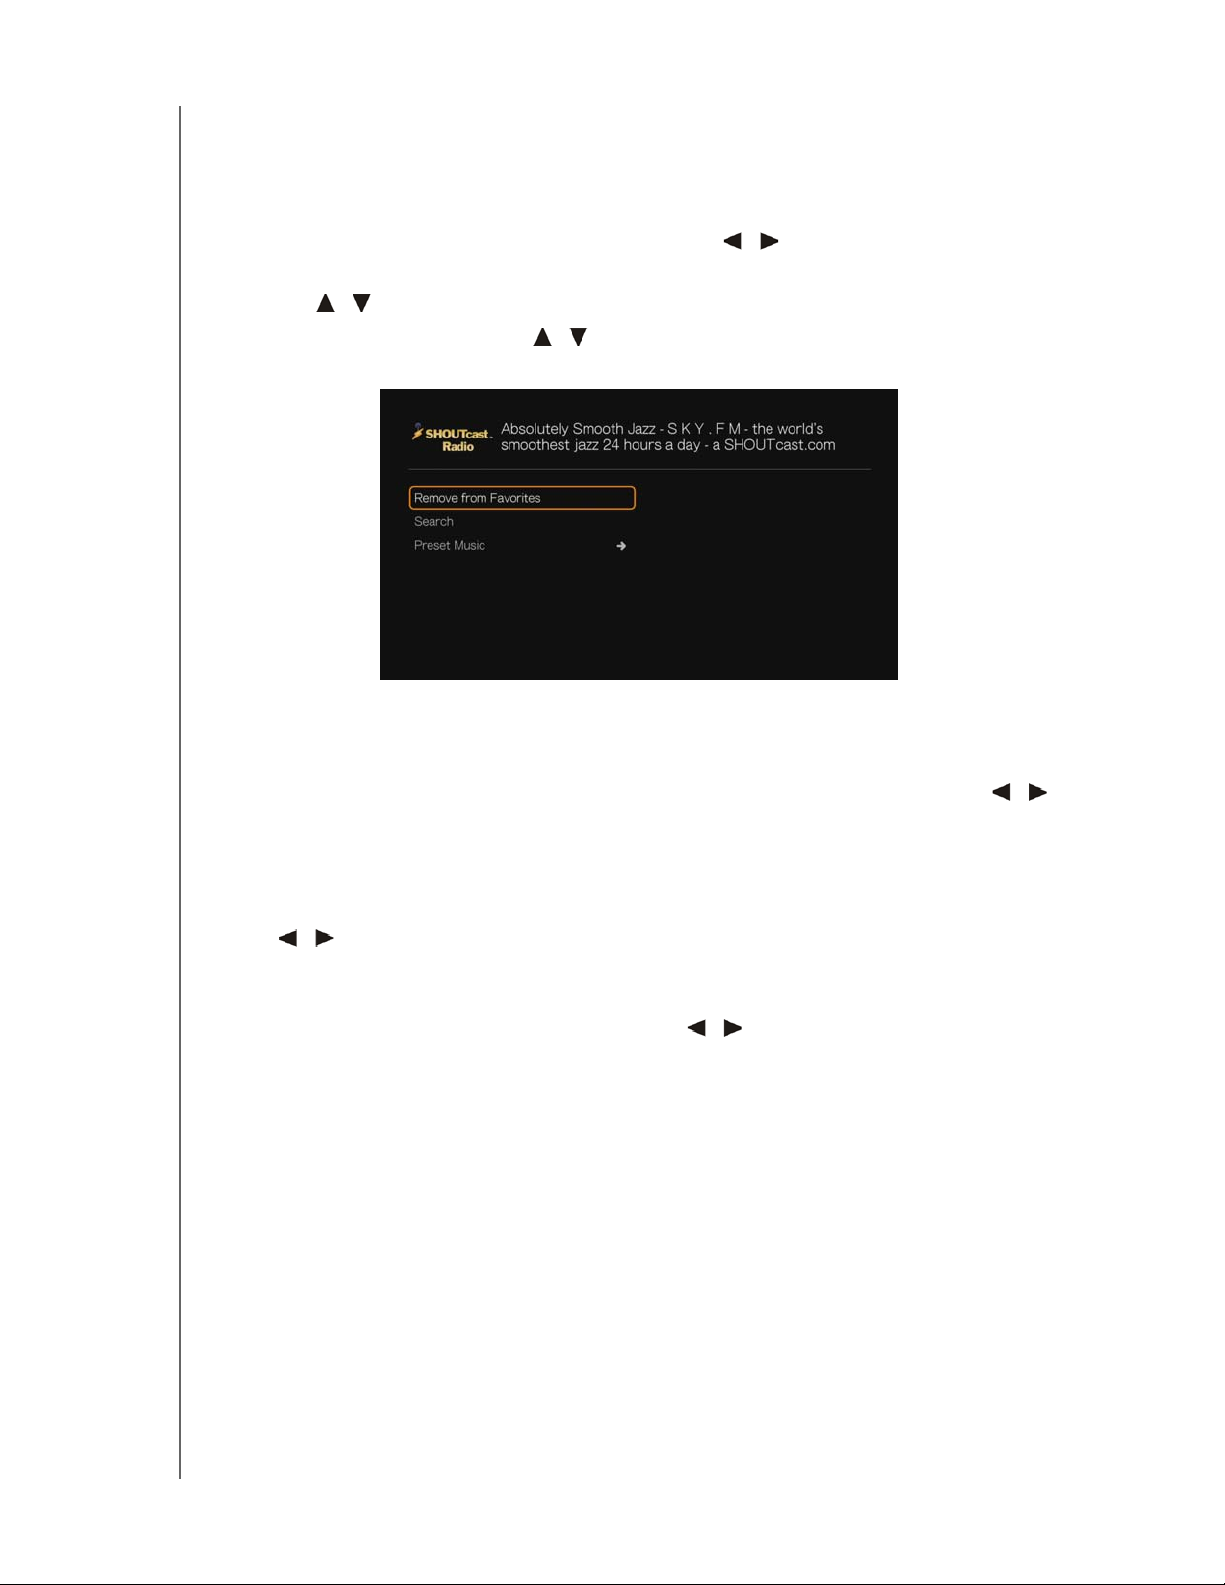
3. Press Options, then press
/ to select Remove from Favorites, then press
OK.
4. A confirmation prompt appears. Select OK, then press OK.
Top Radios
To choose from among the most popular SHOUTcast Radio stations, press / to
select Top Radios in the SHOUTcast Radio main screen, then press OK.
About
For more information about the SHOUTcast Radio service such as terms of service,
press / to select About in the SHOUTcast Radio main screen, then press OK.
Exit
To simply exit out of SHOUTcast Radio, press / to select Exit in the SHOUTcast
Radio main screen, then press OK.
INTERNET SERVICES – 152
Page 8
PRELIMINARY-P3
WD TV Play Media Player
User Manual
SnagFilms®
SnagFilms offers a broad collection of great independent movies you can watch right
now, on demand, for free – films that entertain and inform, engage and inspire, and
satisfy every taste. These are movies worth watching – documentaries, comedies,
dramas and thrillers, award winners and rare finds – all free for you to enjoy.
To access SnagFilms:
1. Navigate to the Home | Services menu bar and press OK.
2. The list of Internet services display in alphabetical order. Press / to select
SnagFilms , then press OK.
3. The SnagFilms main screen displays featured moview. Press to choose from a
variety of other categories shown in the SnagFilms interface, or select Search
and use the on-screen keyboard to find a find a movie. Press OK.
4. Use the navigation buttons to select a video. Press or OK to begin
playback.
5. Press the Home button to exit SnagFilms.
INTERNET SERVICES – 153
Page 9
PRELIMINARY-P3
WD TV Play Media Player
User Manual
Spotify
Enjoy on-demand access to over 15 million tracks and albums. Any artist, any
album, any genre - available instantly on your media player.* Spotify is available in:
USA, UK, Sweden, Finland, Norway, France, The Netherlands, Spain, Austria,
Belgium, Switzerland and Denmark. To use the service, create a Spotify account at
www.spotify.com.
*Spotify Premium account required.
To access Spotify:
1. Navigate to the Home | Services menu and press OK.
2. The list of Internet services display in alphabetical order. Press / to select
Spotify , then press OK.
3. The terms and conditions disclaimer displays. Select Accept then press OK.
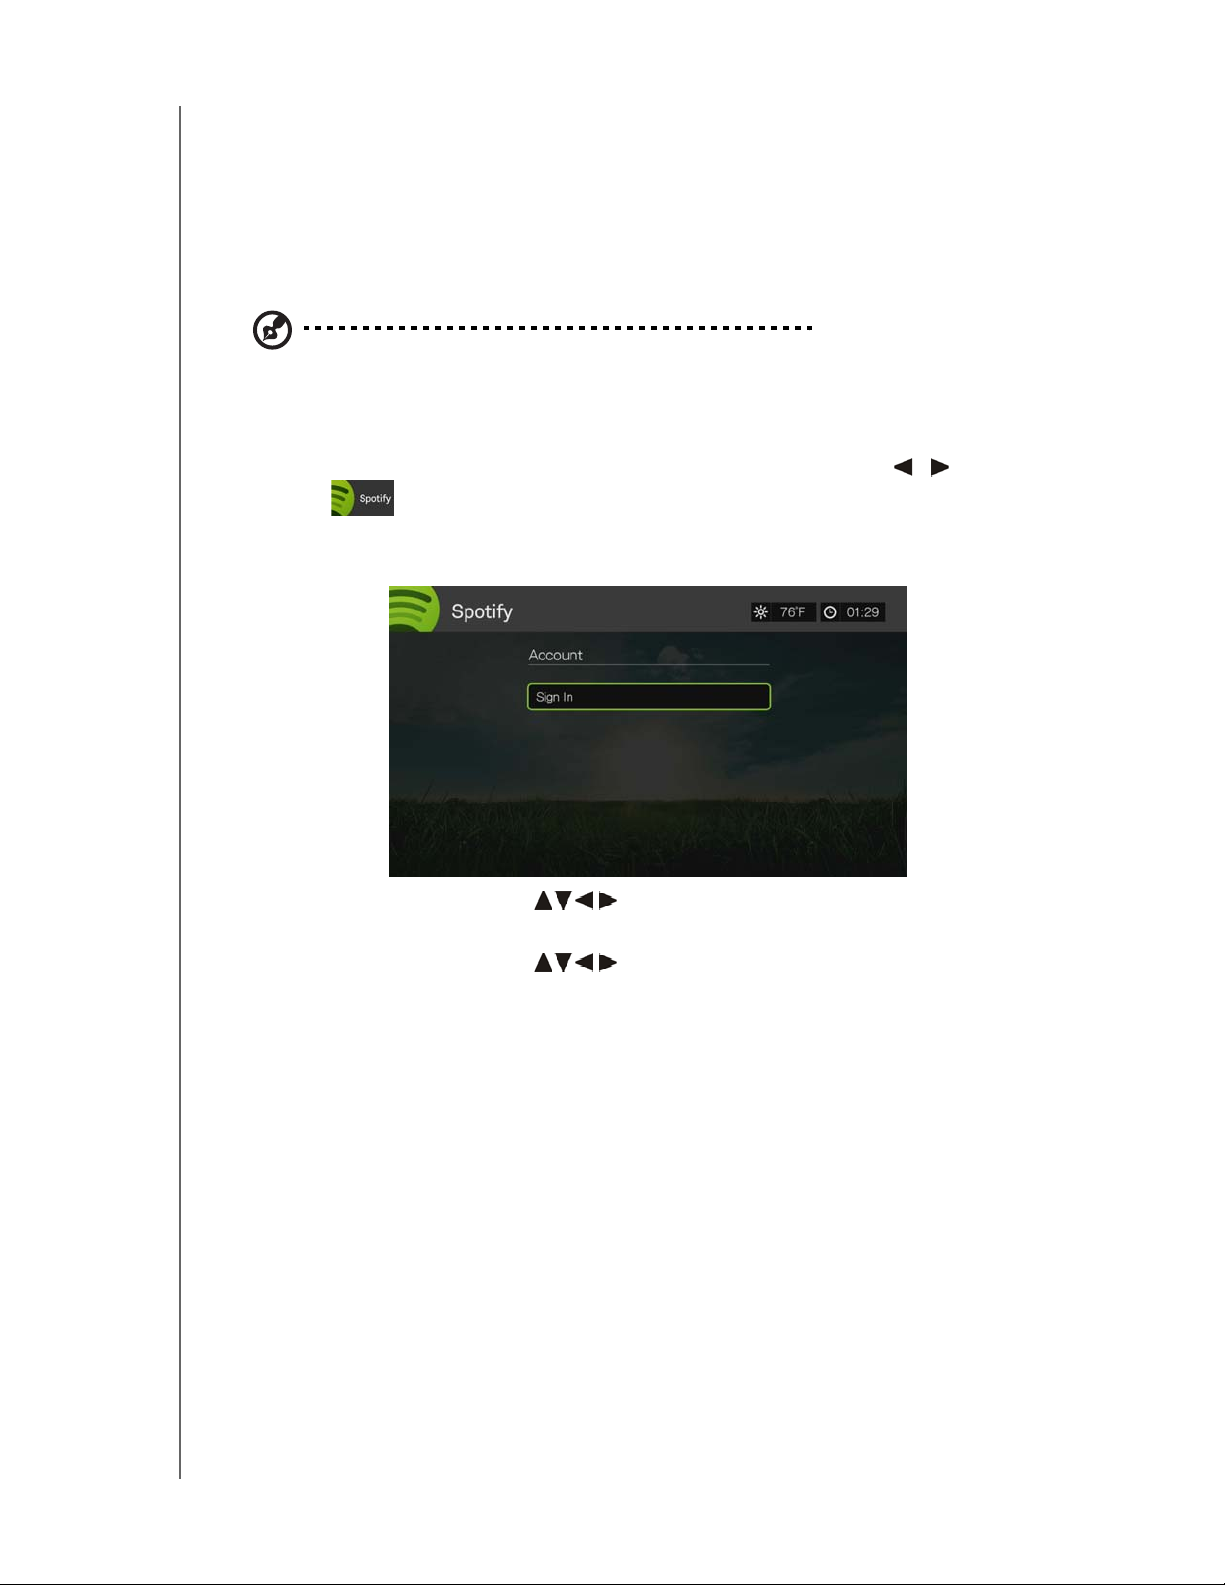
4. Press OK to sign in to Spotify
5. Use the navigation buttons to type in your Spotify user name using the
on-screen keyboard, then press OK.
6. Use the navigation buttons to type in your Spotify account password
using the on-screen keyboard, then press OK.
7. Press OK to complete the sign-in process.
8. The Spotify main screen displays. Options include:
What's New
Toplist
Playlist
Starred
Inbox
People
Search
Account
INTERNET SERVICES – 154
Page 10
PRELIMINARY-P3
WD TV Play Media Player
User Manual
Searching for a Spotify Artist, Album, or Track
To search for a Spotify artist, album, or track:
1. On the Spotify main screen, press / to select Search, then press OK.
2. On the on-screen keyboard, use the navigation buttons to key in a
search keyword, then press OK.
3. Press
/ to select a track from the search result.
4. Press or OK to start listening to the selected track.
Filtering Search Results
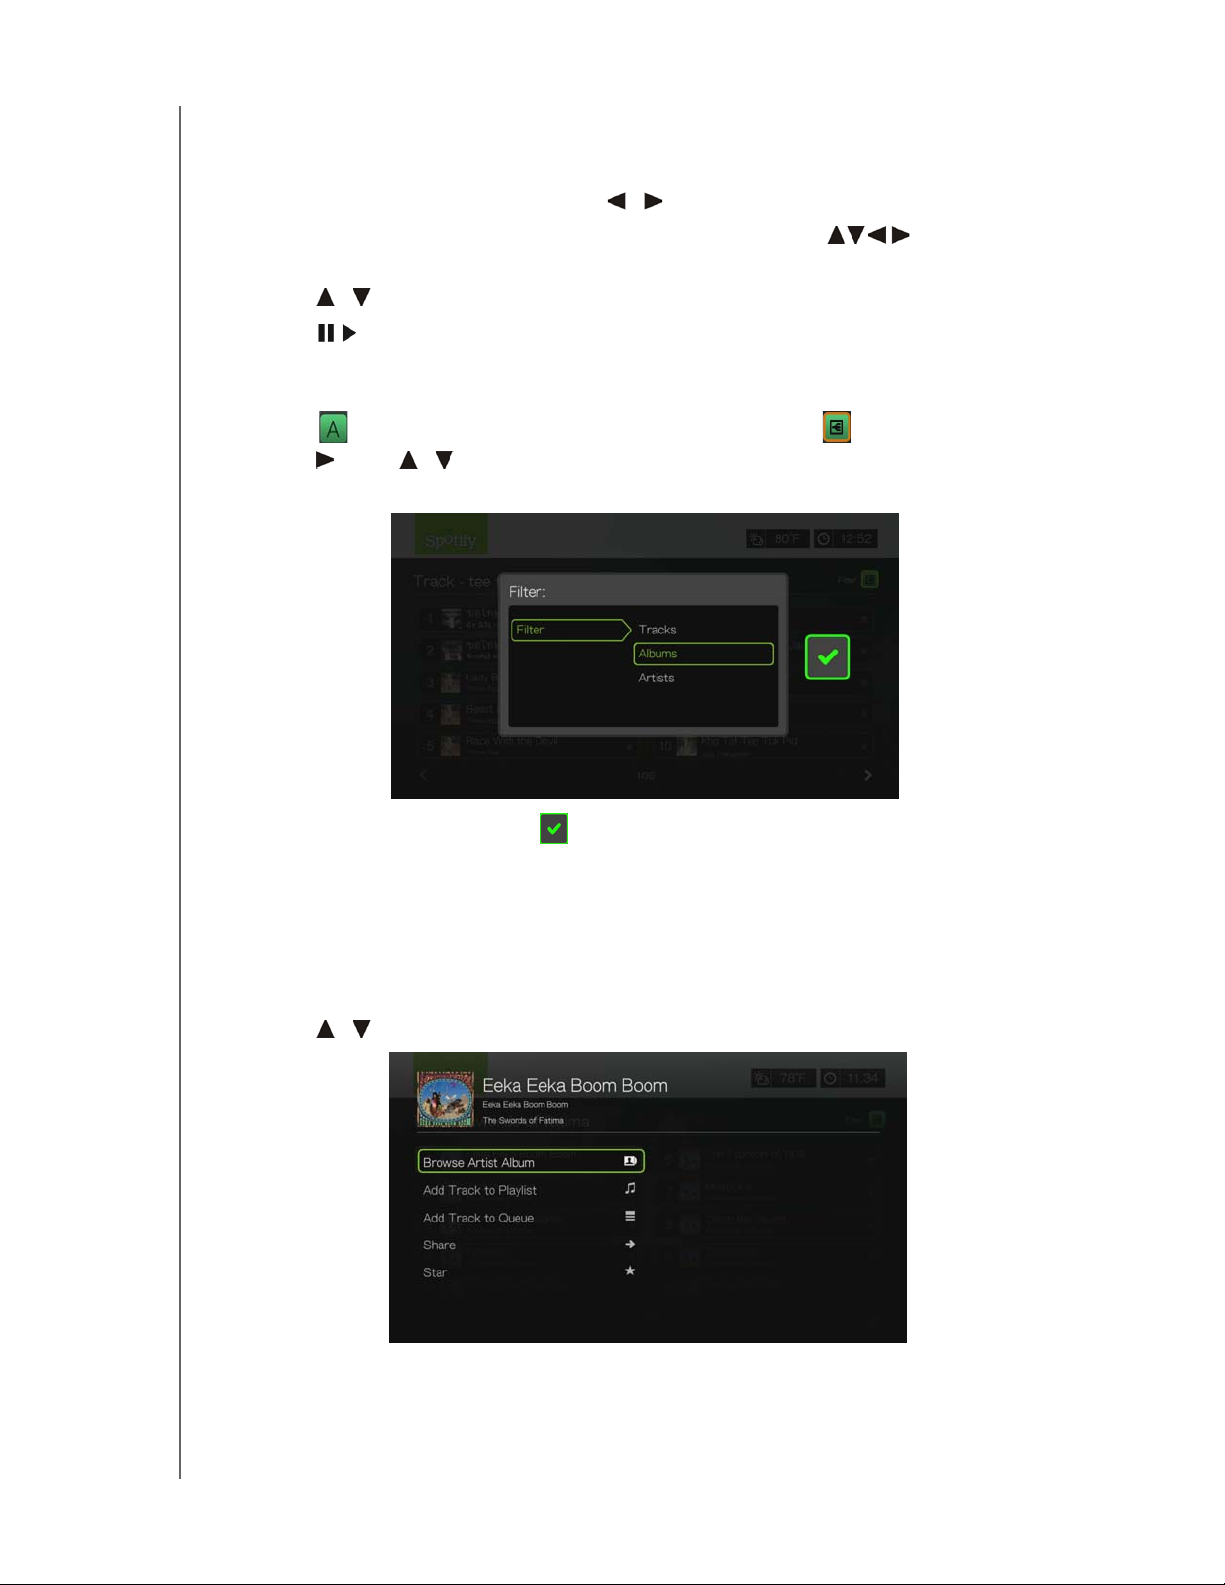
1. Press or navigate to the sort and filter content icon , and press OK.
2. Press , then
/ to select Filter by All, Tracks, Albums, and Artists. Press OK
to display results by the criteria selected.
3. With the green check mark selected, press OK again.
Browse Album Artist
You can view available albums from an artist whose track you’ve selected.
To browse an artist’s albums:
1. With an artist’s track selected, press Options.
2. Press
/ to select Browse Artist Album, then press OK.
3. A list of the artist’s albums available on Spotify display.
INTERNET SERVICES – 155
Page 11
PRELIMINARY-P3
WD TV Play Media Player
User Manual
Adding a Track to a Playlist
If you like a particular track, you can add it to a playlist for easier access in the future.
To add a track to a playlist:
1. Go to the track list showing the track you want to add.
2. Press
3. Press Options, then press
/ to select the track you want to add or begin playing a track.
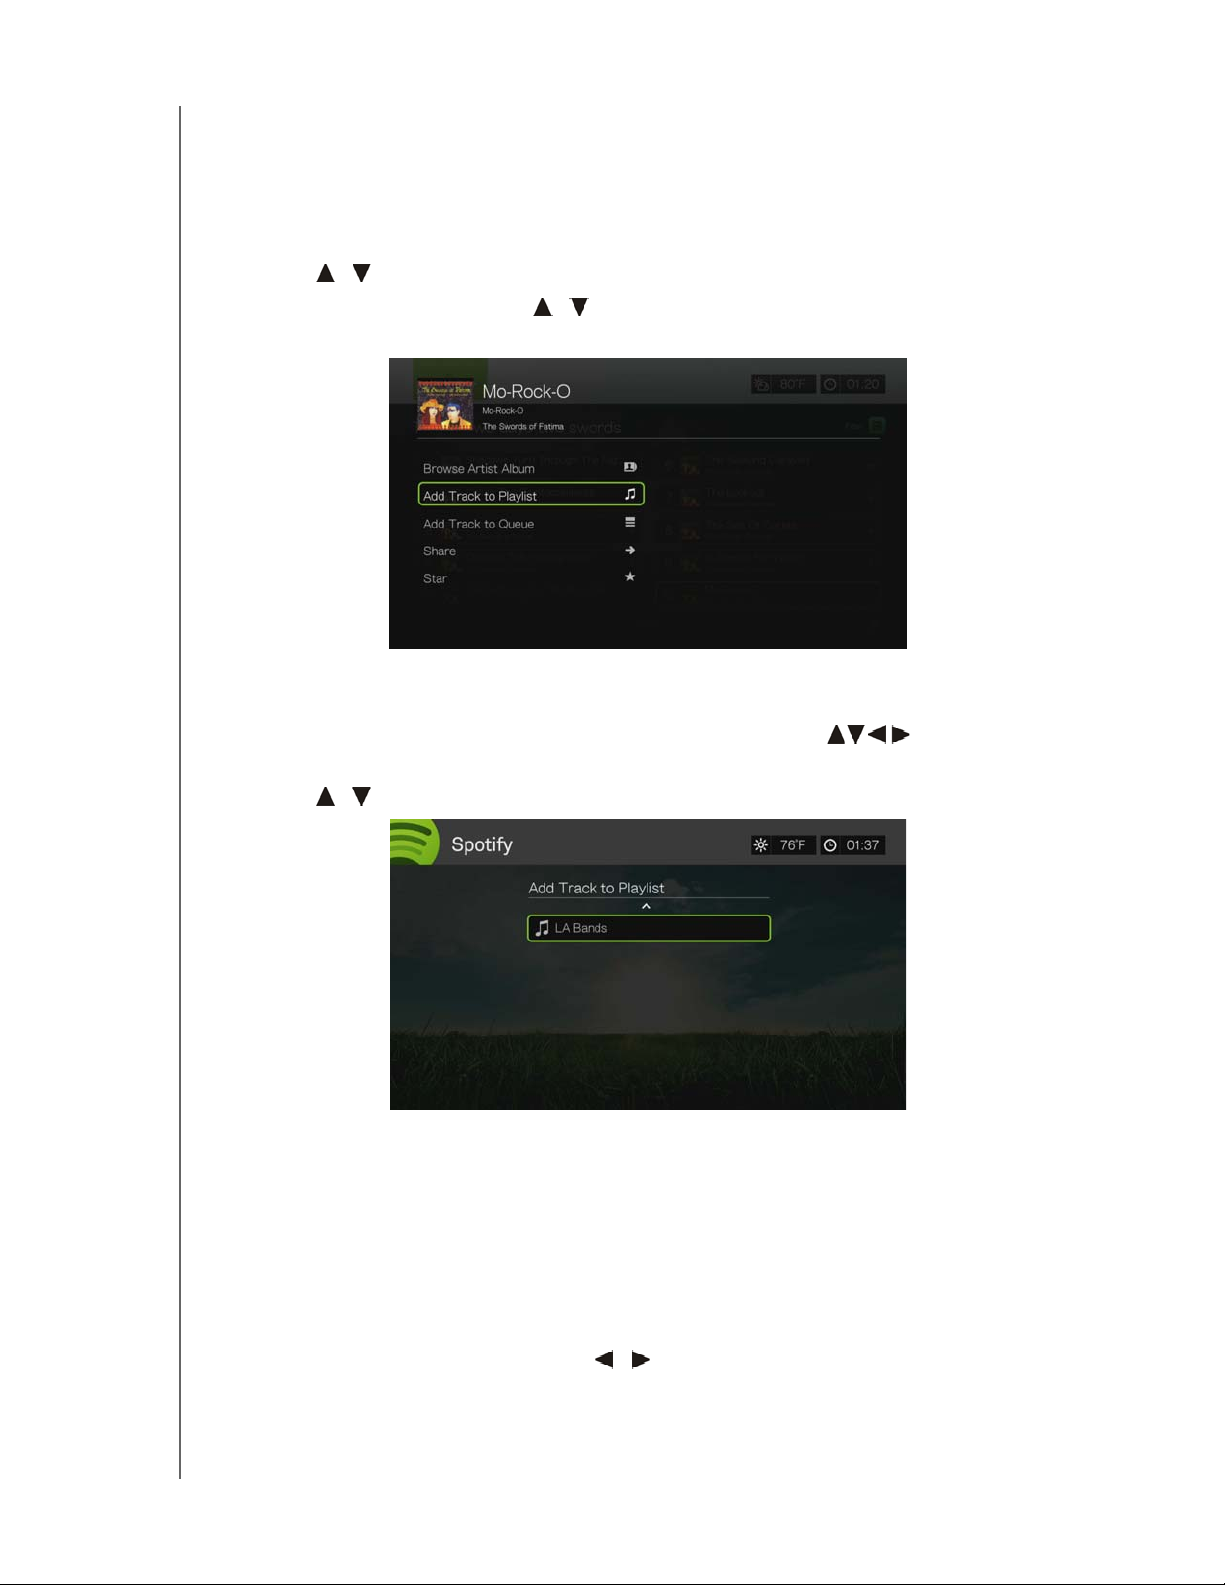
/ to select Add to Track to Playlist, then press
OK.
4. If you want to create a new playlist for the track, select Create New Playlist,
then press OK.
5. On the on-screen keyboard, use the navigation buttons to key in a new
playlist name, then press OK.
6. Press / to select a playlist name the list.
7. Press OK. You can delete the playlist by pressing Options with the playlist
selected, then select Delete.
Collaborate on a Playlist
You can set a playlist you’ve created to Collaborate so that your friends can add
tracks to it.
To set a playlist to Collaborate:
1. In the Spotify main screen, press / to select Playlists, then press OK.
2. With a playlist selected, press Options.
INTERNET SERVICES – 156
Page 12
PRELIMINARY-P3
WD TV Play Media Player
User Manual
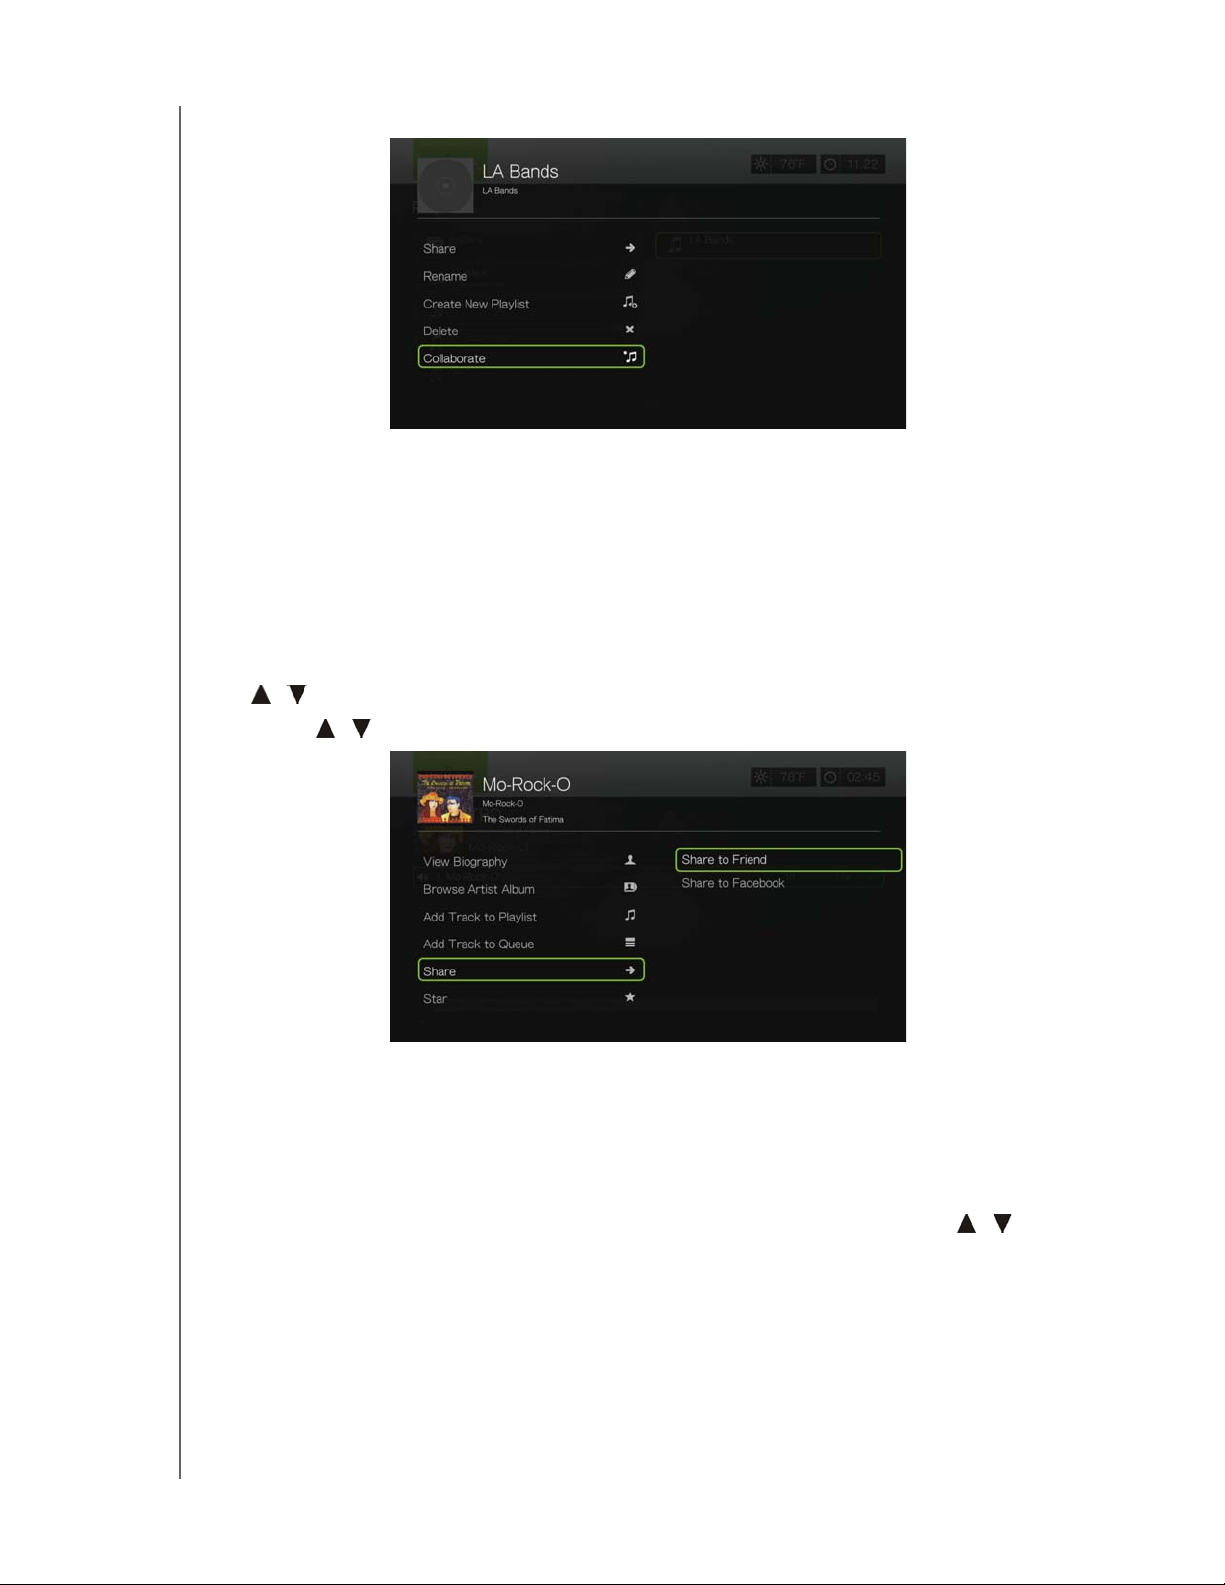
3. Select Collaborate, then press OK.
4. The playlist is now set to Collaborate, and the playlist appears with a dot next to
it. You can reverse this setting by pressing Options with the playlist selected,
then select Uncollaborate.
Share
You can share a track or playlist with the friends you have added to your Spotify
account, or to Facebook.
1. With the track or playlist you want to share selected, press Options, then press
/ to select Share, then press OK.
2. Press / to select Share to Friend or Share to Facebook, then press OK.
3. Select a friend from your list then press OK, or log in to Facebook (if necessary).
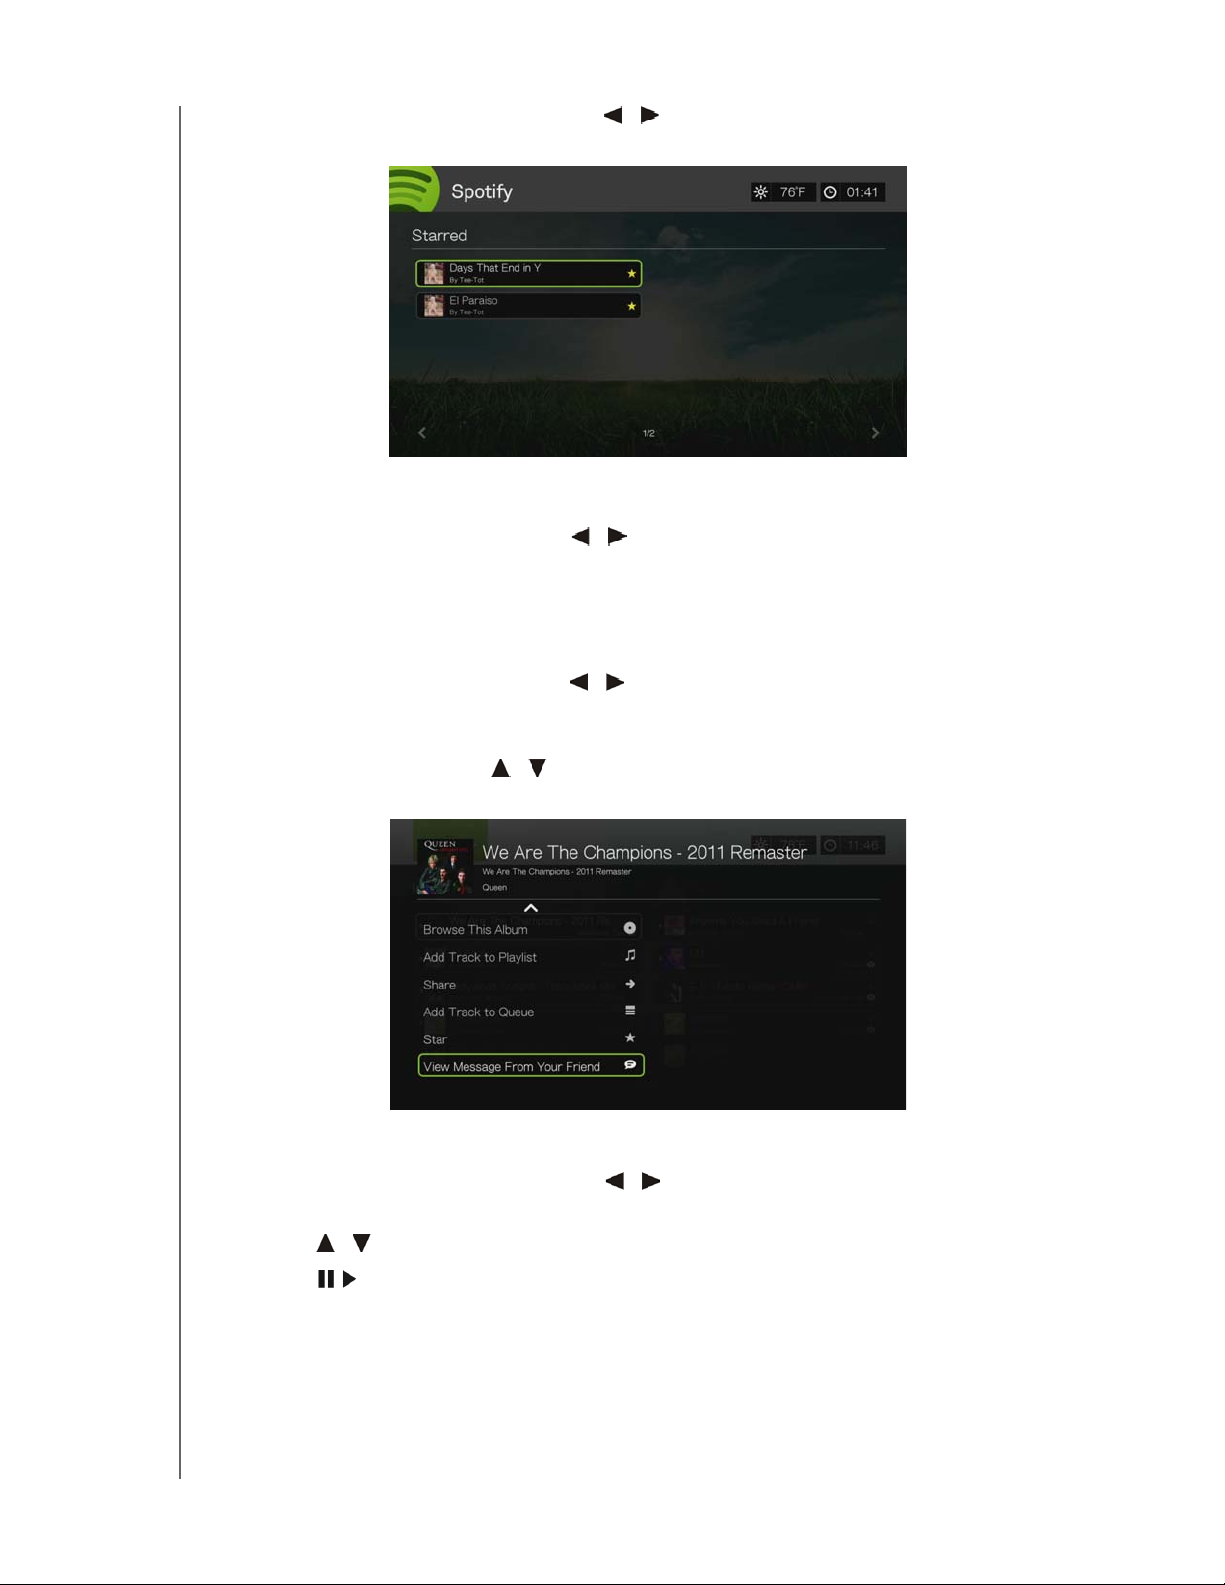
Star
You can “star” a track for quick access in the future via the Starred menu on the
Spotify home screen.
1. With the track you want to star selected, press Options, then press
select Star, then press OK.
/ to
INTERNET SERVICES – 157
Page 13
PRELIMINARY-P3
WD TV Play Media Player
User Manual
2. In the Spotify home screen, press / to select Starred, then press OK. Your
starred tracks display.
People
On the Spotify main screen, press / to select People, then press OK to see a
list of the friends you’ve added to your Spotify account. Select a friend then press
OK to view and play their published playlists.
Inbox
On the Spotify main screen, press / to select Inbox, then press OK to see a list
of songs your friends have sent to your Spotify account. Each friend’s name appears
next to the song. If a message icon appears next to a friend’s name, select the song
and press Options. Press / to select View Message From Your Friend, then
press OK.
What’s New and Top Lists
1. On the Spotify main screen, press / to select What’s New or Toplists, then
press OK.
2. Press / to select a new or most listened to artist album.
3. Press or OK to start listening to the selected album.
INTERNET SERVICES – 158
Page 14

PRELIMINARY-P3
WD TV Play Media Player
User Manual
Delete Spotify Account
To delete a Spotify account:
1. On the Spotify main screen, press / to select Account, and press OK.
2. Select the Spotify account you wish to delete, then press to select the x and
press OK.
INTERNET SERVICES – 159
Page 15
PRELIMINARY-P3
WD TV Play Media Player
User Manual
TuneIn
The world’s largest Internet radio guide with access to over 30,000 free radio
stations searchable by location, genre, or format.
To access TuneIn:
1. Navigate to the Home | Services menu and press OK.
2. The list of Internet services display in alphabetical order. Press / to select
TuneIn , then press OK.
Options include:
Station
Search
Preset
Sign in
Exit
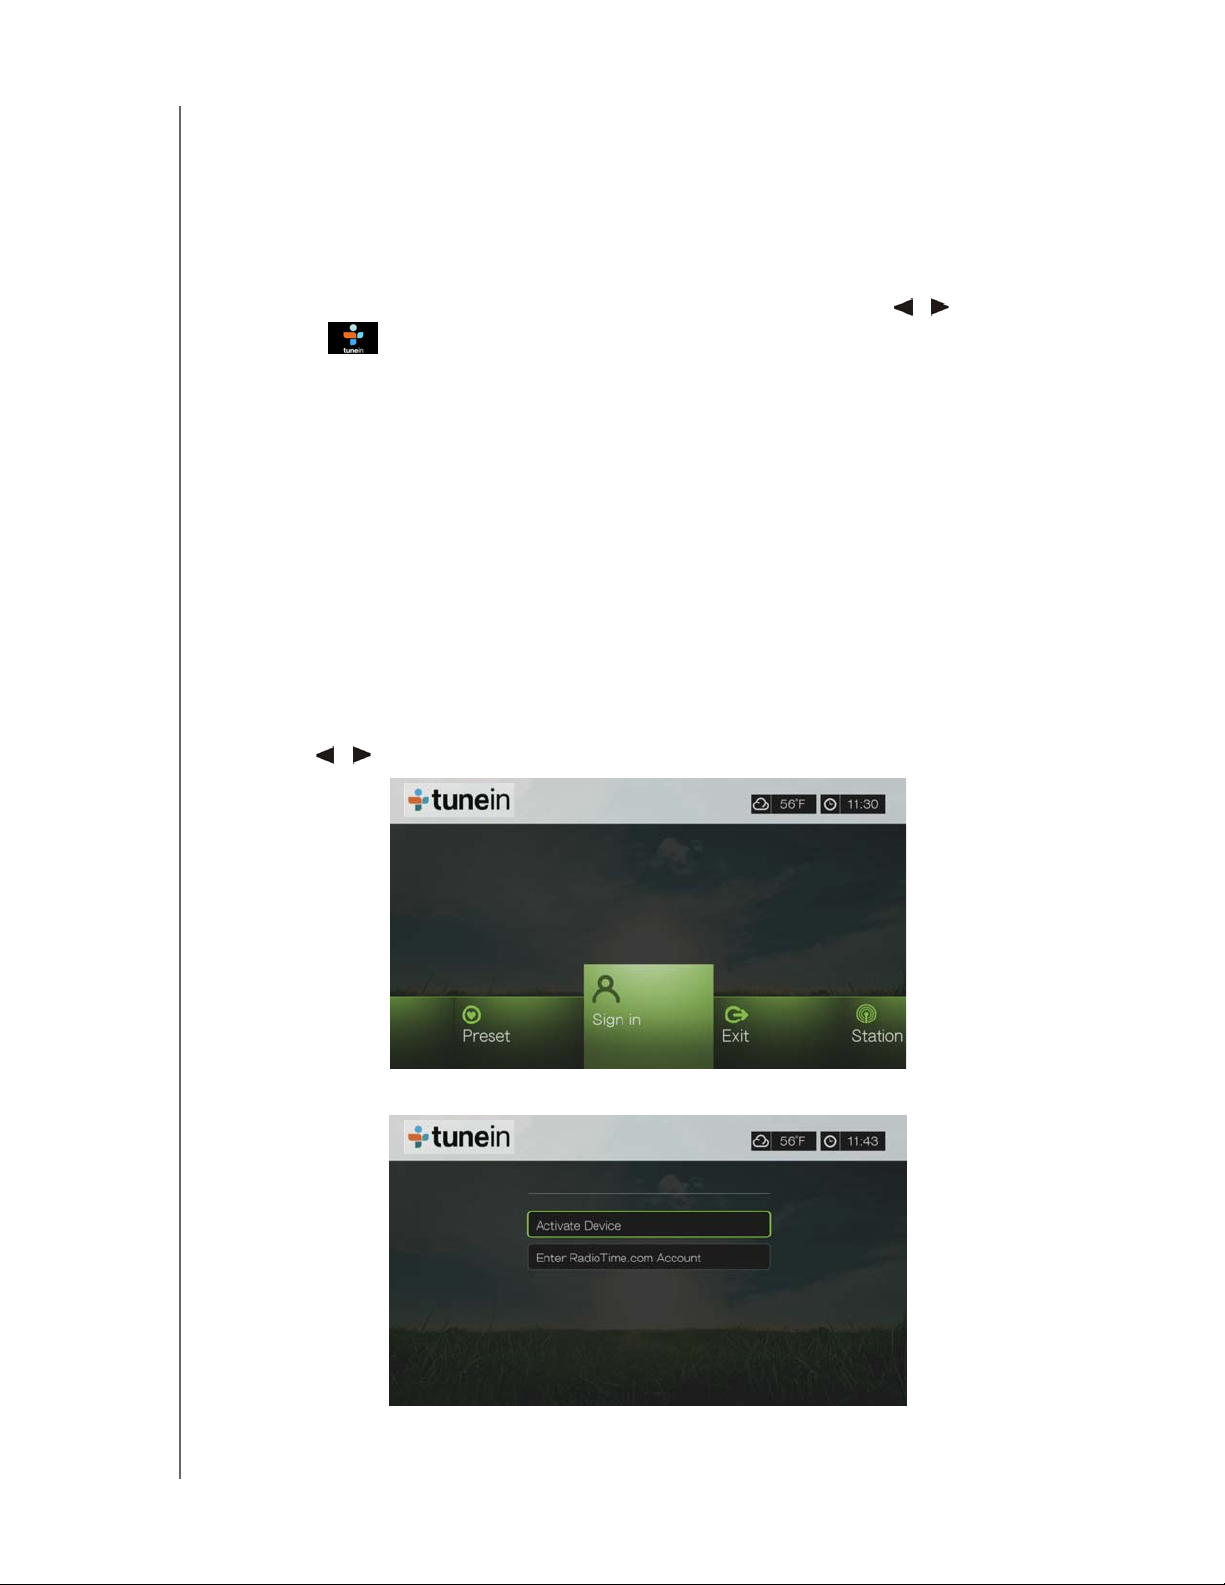
Signing in to TuneIn (Optional)
You can start listening to TuneIn stations as an unregistered user, but you need to
sign up for a TuneIn account at http://radiotime.com to customize your radio
experience by adding stations to your presets for faster access.
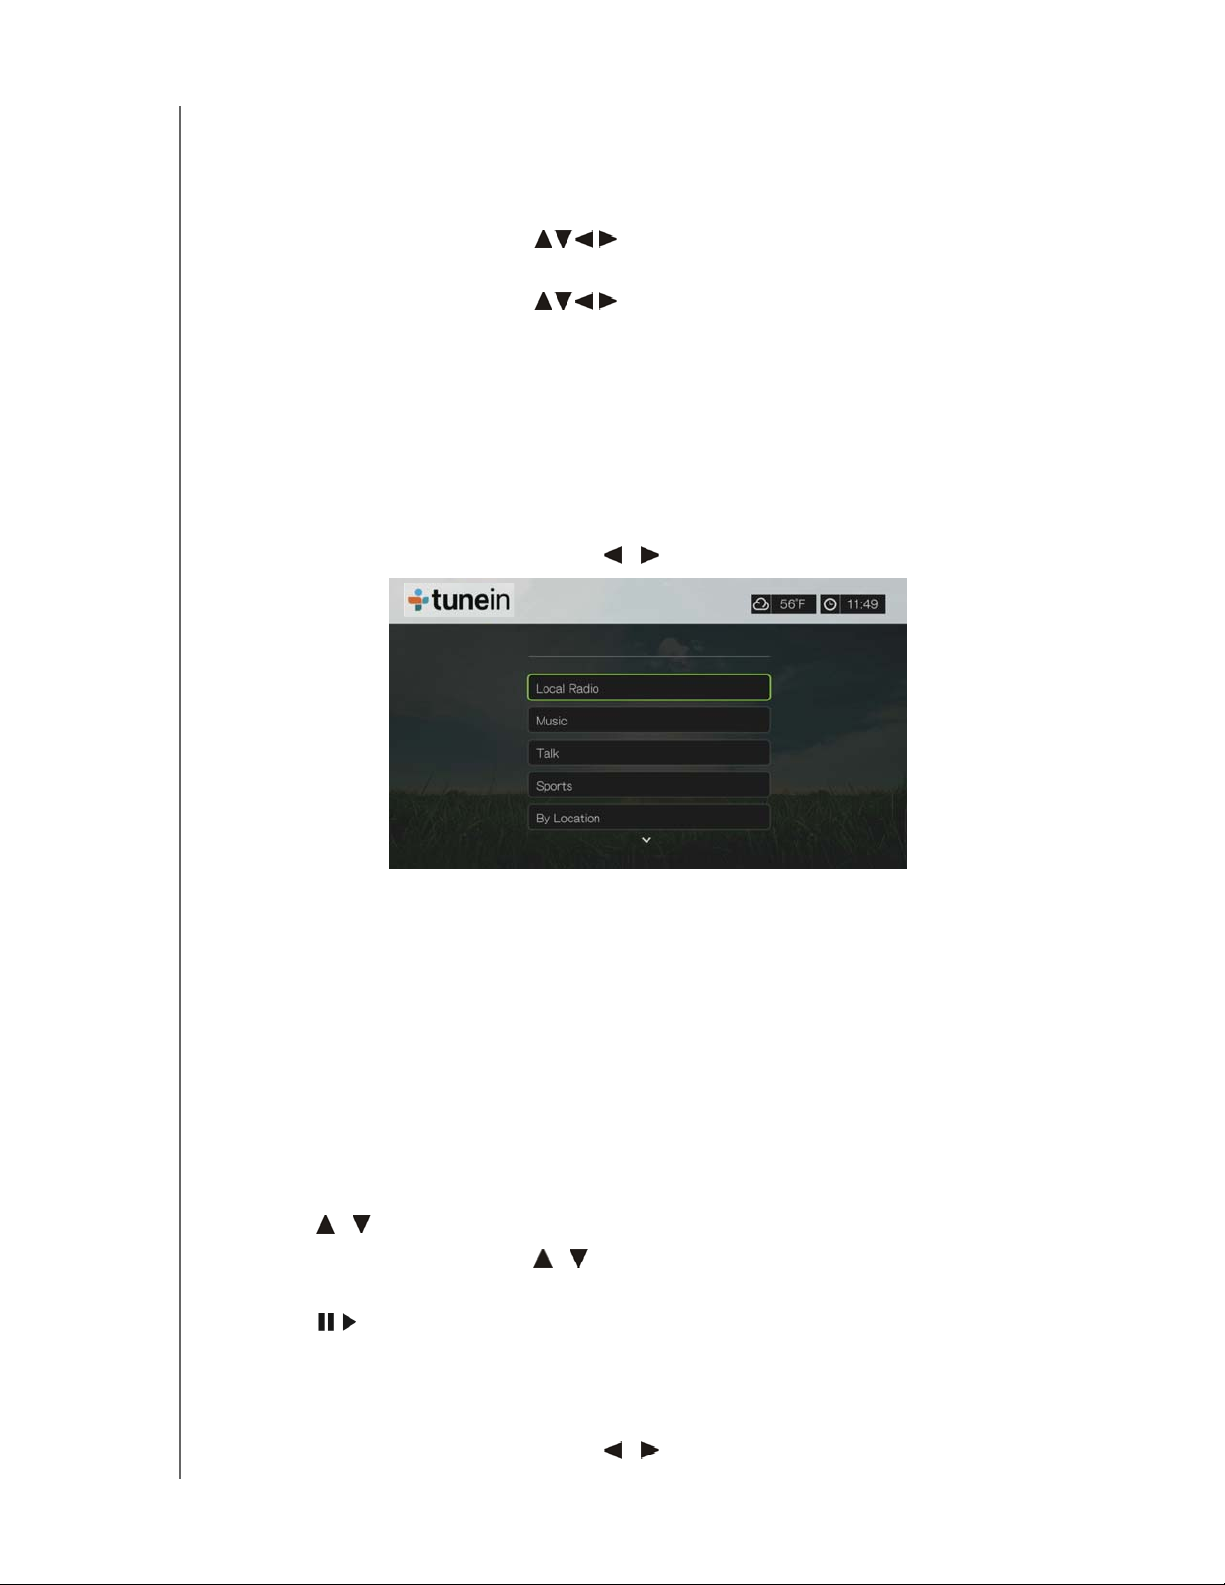
To sign in to TuneIn:
1. Press / to select Sign in, then press OK.
2. Select Activate Device, then press OK.
INTERNET SERVICES – 160
Page 16
PRELIMINARY-P3
WD TV Play Media Player
User Manual
3. Write down the activation code and follow the onscreen instructions (go to
http://radiotime.com/mydevice to associate the media player with your account).
When finished, choose Continue, then press OK.
4. Select Enter RadioTime.com account, then press OK.
5. Use the navigation buttons to type in your TuneIn user name using the
on-screen keyboard, then press OK.
6. Use the navigation buttons to type in your TuneIn account password
using the on-screen keyboard, then press OK.
7. Press OK to complete the sign-in process.
Listening to a TuneIn Station, Program, or Podcast
New TuneIn users can browse for a radio station, program, or podcast.
Registered TuneIn users can access presets and listen to favorite stations.
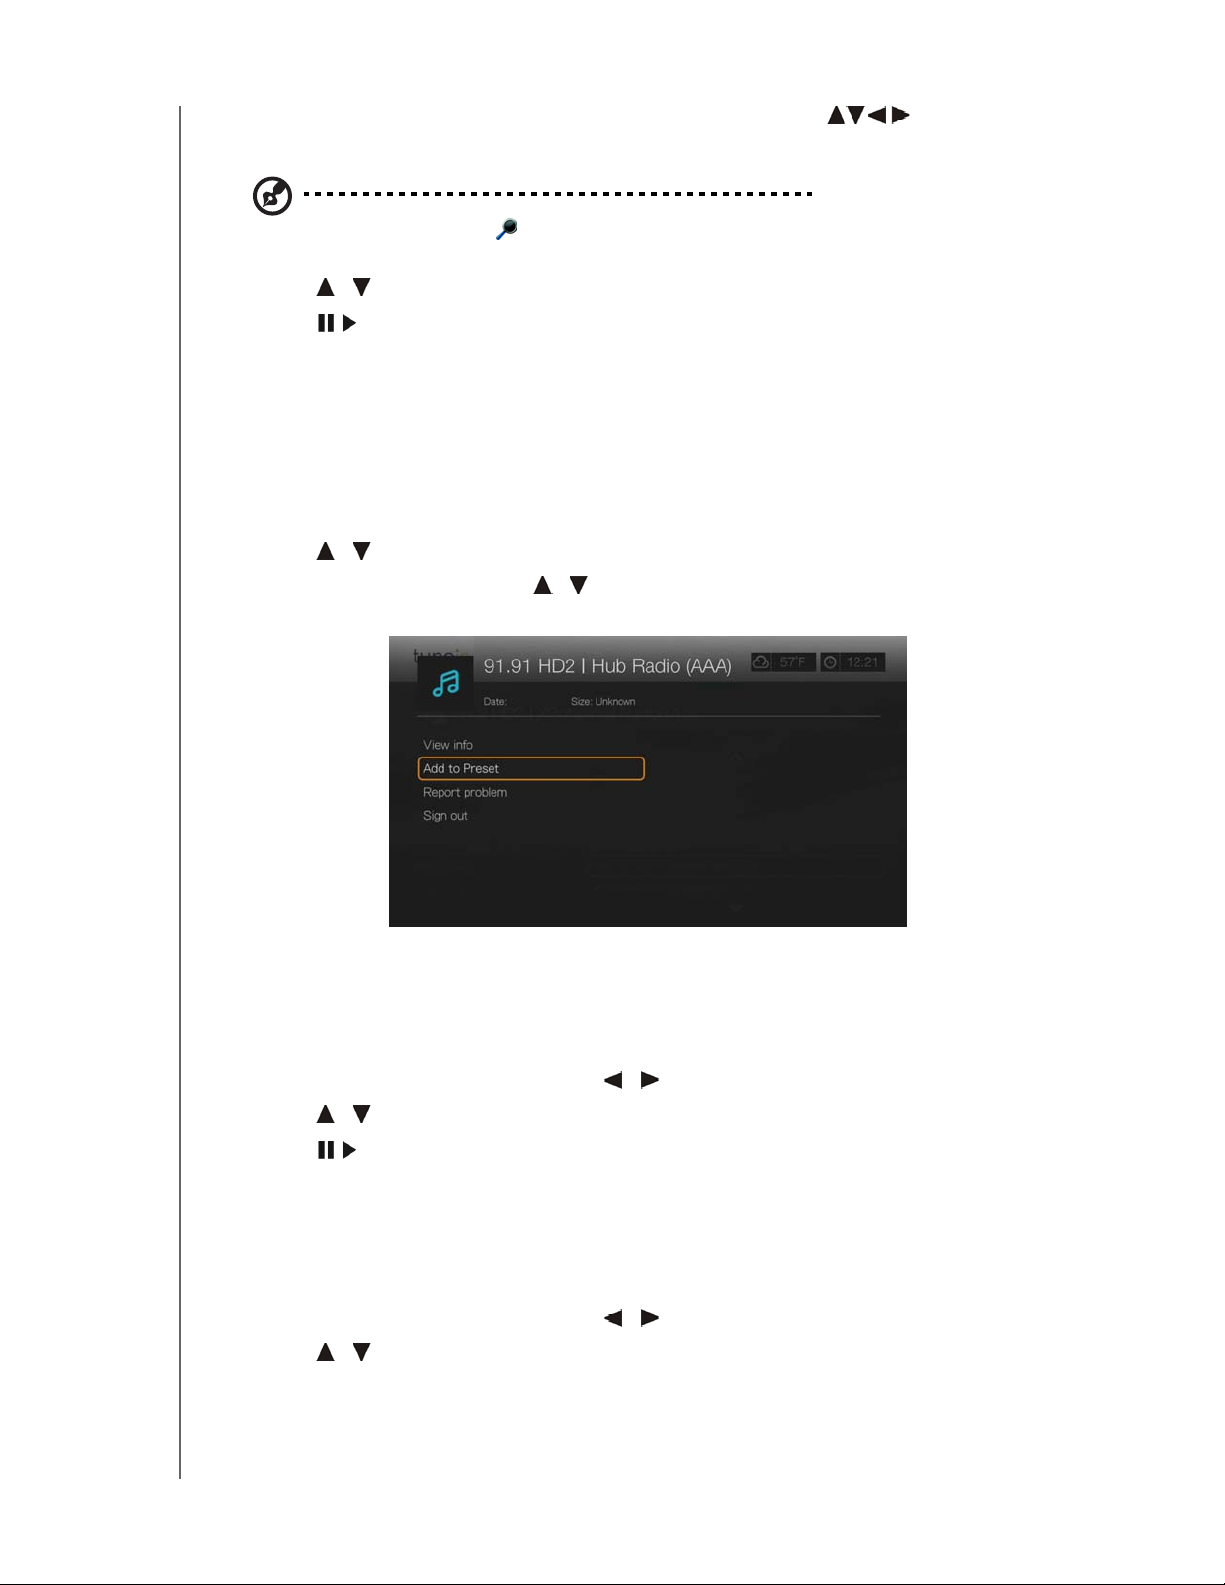
To browse for a radio station, program, or podcast:
1. On the TuneIn main screen, press / to select Station, then press OK.
Options include:
Local Radio – Listen to your local stations which display in numerical order.
Music – Categorizes your local music radio stations by genre.
Ta lk – Categorizes your local talk radio stations by type.
Sports – Categorizes local and national sports broadcasts and programs by
type.
By Location – Find radio stations throughout the world from the lists of
regions and countries.
By Language – Find radio stations throughout the world from the list of
languages.
Podcasts – Find radio program podcasts categorized by music genre and
type.
2. Press / to select the station, program, or podcast you want to listen to.
3. Press Options, then press
/ to select Add to Preset if you want to add the
station to Presets (TuneIn account required). Press OK.
4. Press or OK to start listening to the selected radio station.
Searching for a TuneIn Station
To search for a TuneIn station, program, or podcast:
1. On the TuneIn main screen, press / to select Search, then press OK.
INTERNET SERVICES – 161
Page 17
PRELIMINARY-P3
WD TV Play Media Player
User Manual
2. On the on-screen keyboard, use the navigation buttons to key in a
search keyword, then press OK.
Note: You can also press on the remote control to toggle to the results list after entering several
characters in the search field.
3. Press / to select a station from the search result.
4. Press or OK to start listening to the selected radio station.
Adding a Station to Your Preset List
If you like a particular station, you can add it to your preset list for easier access in
the future.
To add to a station, program, or podcast to your presets:
1. Go to the station list showing the station you want to add.
2. Press / to select the station you want to add or begin playing a station.
3. Press Options, then press / to select Add to Preset if you want to add the
station to Preset (TuneIn account required), then press OK.
4. Press OK again to confirm.
Listening to a Station in Your Preset List
To listen to a preset station, program, or podcast:
1. On the TuneIn main screen, press / to select Preset, then press OK.
2. Press
/ to select a station from your preset list.
3. Press or OK to start listening to the selected radio station.
Removing a Station from Your Preset List
You can remove stations you no longer want from your preset list.
To remove a station from your preset list:
1. On the TuneIn main screen, press
2. Press / to select the station you want to remove.
/ to select Preset, then press OK.
INTERNET SERVICES – 162
Page 18
PRELIMINARY-P3
WD TV Play Media Player
User Manual
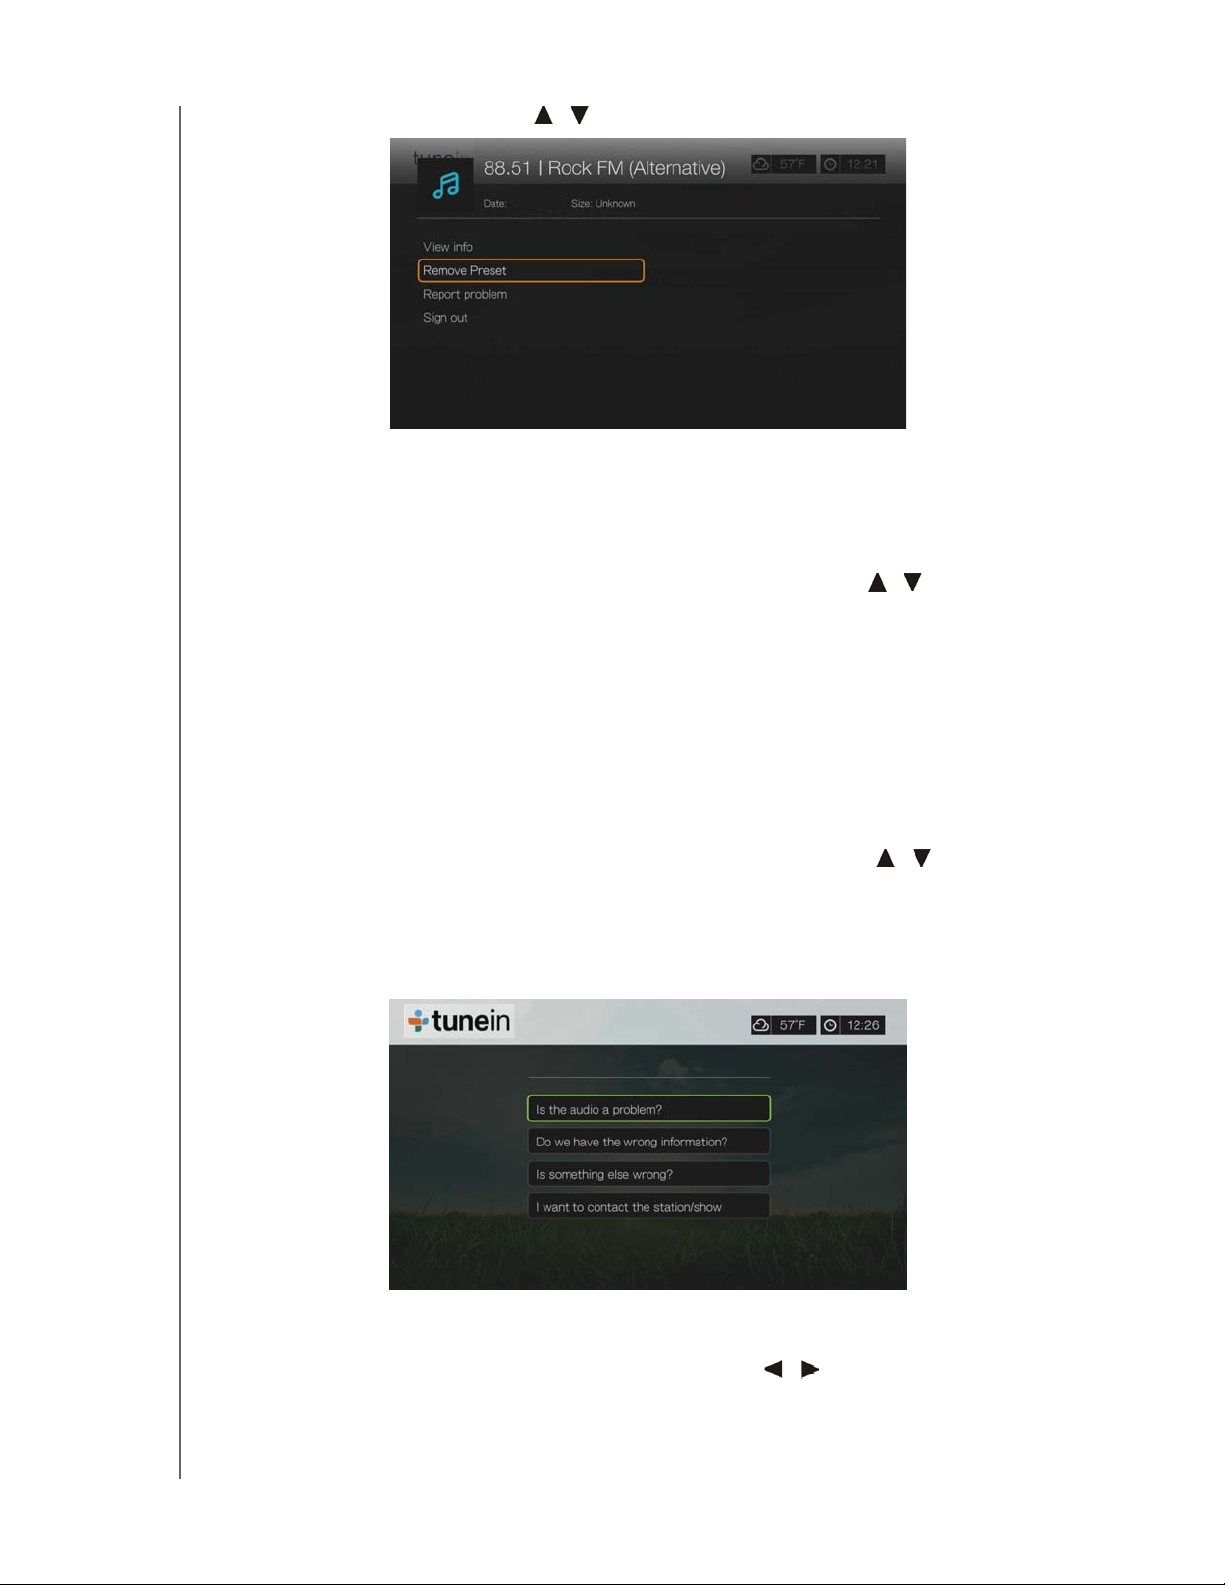
3. Press Options, then press / to select Remove Preset, then press OK.
4. A confirmation prompt appears. Select OK, then press OK.
Getting Station Information
You can view information about the currently playing station and song.
1. While the station is playing or selected, press Options, then / to select View
info. Press OK.
2. The information screen appears, displaying info such as genre, language,
currently playing song, next song, and time. Press OK to return to the previous
screen.
Reporting Problems
You can report a problem with the currently playing station or audio or contact the
station/show using the reporting problems option.
1. While the station is playing or selected, press Options, then / to select
Report problem. Press OK.
2. The reporting problems screen appears, displaying options for reporting
problems such as audio, wrong information, errors, etc. After making your
selection press OK to return to the previous screen.
Exit
To simply exit out of TuneIn and stay signed in, press / to select Exit in the
TuneIn main screen, then press OK.
INTERNET SERVICES – 163
Page 19
PRELIMINARY-P3
WD TV Play Media Player
User Manual
Vimeo®
Take your video experience to the next level with Vimeo. Get a video experience with
absolutely no pre-roll ads, unlimited video length, unlimited HD playback and
embedding, superior privacy settings and more! Vimeo is the next step in your
creative film and video experience.
To access Vimeo:
1. Navigate to the Home | Services menu bar and press OK.
2. The list of Internet services display in alphabetical order. Press / to select
Vimeo , then press OK.
3. The Vimeo Home screen displays the Vimeo menu options. Press / and
press OK, or press shortcut keys on the remote control (shortcut functions are
shown on the bottom of the screen) to choose a menu option.
4. Use the navigation buttons to select a video within a menu screen. Press
or OK to begin playing a video.
5. Press the Back button to return to the previous screen or to exit Vimeo from the
home screen.
Existing Vimeo Users
Follow the on-screen instructions to enter your user name and password using the
remote control to log in to your Vimeo account when prompted.
New to Vimeo
Vimeo Plus allows users additional features such additional weekly uploading (up to
5 GB per file), unlimited HD videos, unlimited creation of channels, groups and
albums, HD embedding, 2-pass video re-encoding that results in higher quality,
priority encoding, no ads, and much more.
Go to http://vimeo.com/api/connect/wd to sign up for Vimeo Plus.
INTERNET SERVICES – 164
Page 20
PRELIMINARY-P3
WD TV Play Media Player
User Manual
Vudu™
VUDU delivers a cinema-like experience at home with the hottest new releases and
the largest HD library. There are no subscription fees or late fees, simply pay for what
you watch. Choose to rent or own from thousands of titles available in vibrant 1080p
with rich Dolby Digital 5.1 Surround Sound. Activate your VUDU account on your
media center/player today and receive a free* movie credit.
Note: *New VUDU account required. Terms and conditions apply. For more information visit
www.vudu.com. US only.
To Get Started:
1. Go to https://my.vudu.com. Sign in or create a free Vudu account. No
subscription required!
2. Follow the on-screen instructions to begin activation and receive your PIN code.
3. On the media player, navigate to the Home | Internet media menu bar and press
OK.
4. The list of Services display in alphabetical order. Press / to select Vudu
, then press OK.
5. Select Settings from the bottom menu within the Vudu service, then press OK.
Press OK again to activate the device and enter the Vudu PIN code.
You now have instant access to new release movies & next day TV!
How Do I Download and Watch a Movie?
Once you rent or purchase a movie, it will appear in your My Videos tab. With
progressive download, you can begin watching within minutes by selecting Play
Now as soon as it becomes available.
Your selection will continue to download while you watch. Track your download
progress in the Download Manager on the Home screen. Watch purchased
movies whenever you want, as much as you want. Rentals must be watched
within 24 hours once you start playback.
To learn more:
To learn more about Vudu, go to http://www.vudu.com.
Note: To deactivate the media player from your Vudu account, log in to your account at
http://www.vudu.com.
INTERNET SERVICES – 165
Page 21
PRELIMINARY-P3
WD TV Play Media Player
User Manual
WatchMojo
WatchMojo produces original video programming on the people, places and things
that people are passionate about, covering the Automotive, Business, Education,
Fashion, Film, Food, Health, Music, Parenting, Politics & Economy, Space, Sports,
Science, Technology, Travel and Video Game categories.
To access WatchMojo:
1. Navigate to the Home | Services menu bar and and press OK.
2. The list of Internet services display in alphabetical order. Press / to select
WatchMojo , then press OK to display the WatchMojo home screen.
3. Use the navigation buttons to browse, select, and search for videos and
the playback buttons to stop and start videos.
XOS College Sports
XOS College Sports offers college sports fans multi-sport, multi-conference access
to full games and historic documentaries including many of the nation’s top schools
and teams. Free access to a large collection of rare content, championship season
highlights and select full games past and present. Additional content can be ordered
at www.XOSSports.com.
To access XOS College Sports:
1. Navigate to the Home | Services menu bar and and press OK.
2. The list of Internet services display in alphabetical order. Press / to select
XOS College Sports , then press OK to display the XOS College Sports
home screen.
3. Use the navigation buttons to browse, select, and search for videos and
the playback buttons to stop and start videos.
Yota Music
Yota Music provides access to more than 800,000 licensed music tracks in its online
catalog. With Yota Music, you can listen to and customize personalized channels,
save tracks to Favorites, and listen to theme-based collections put together by Yota
Music editors. The charts show 100 songs most popular with the Yota Music
audience.
Note: The Yota Music service user interface is primarily in the Russian language.
To access Yota Music:
1. Navigate to the Home | Services menu bar and and press OK.
2. The list of Internet services display in alphabetical order. Press / to select
Yota Music , then press OK to display the Yota Music home screen.
3. Use the navigation buttons to browse, select, and search for songs and
the playback buttons to stop and start songs.
INTERNET SERVICES – 166
Page 22
PRELIMINARY-P3
WD TV Play Media Player
YouTube
YouTube is a video hosting website where you can upload and share videos.
To access YouTube:
1. Navigate to the Home | Services menu bar and and press OK.
User Manual
2. The list of Internet services display in alphabetical order. Press
/ to select
YouTube , then press OK to display the YouTube home screen.
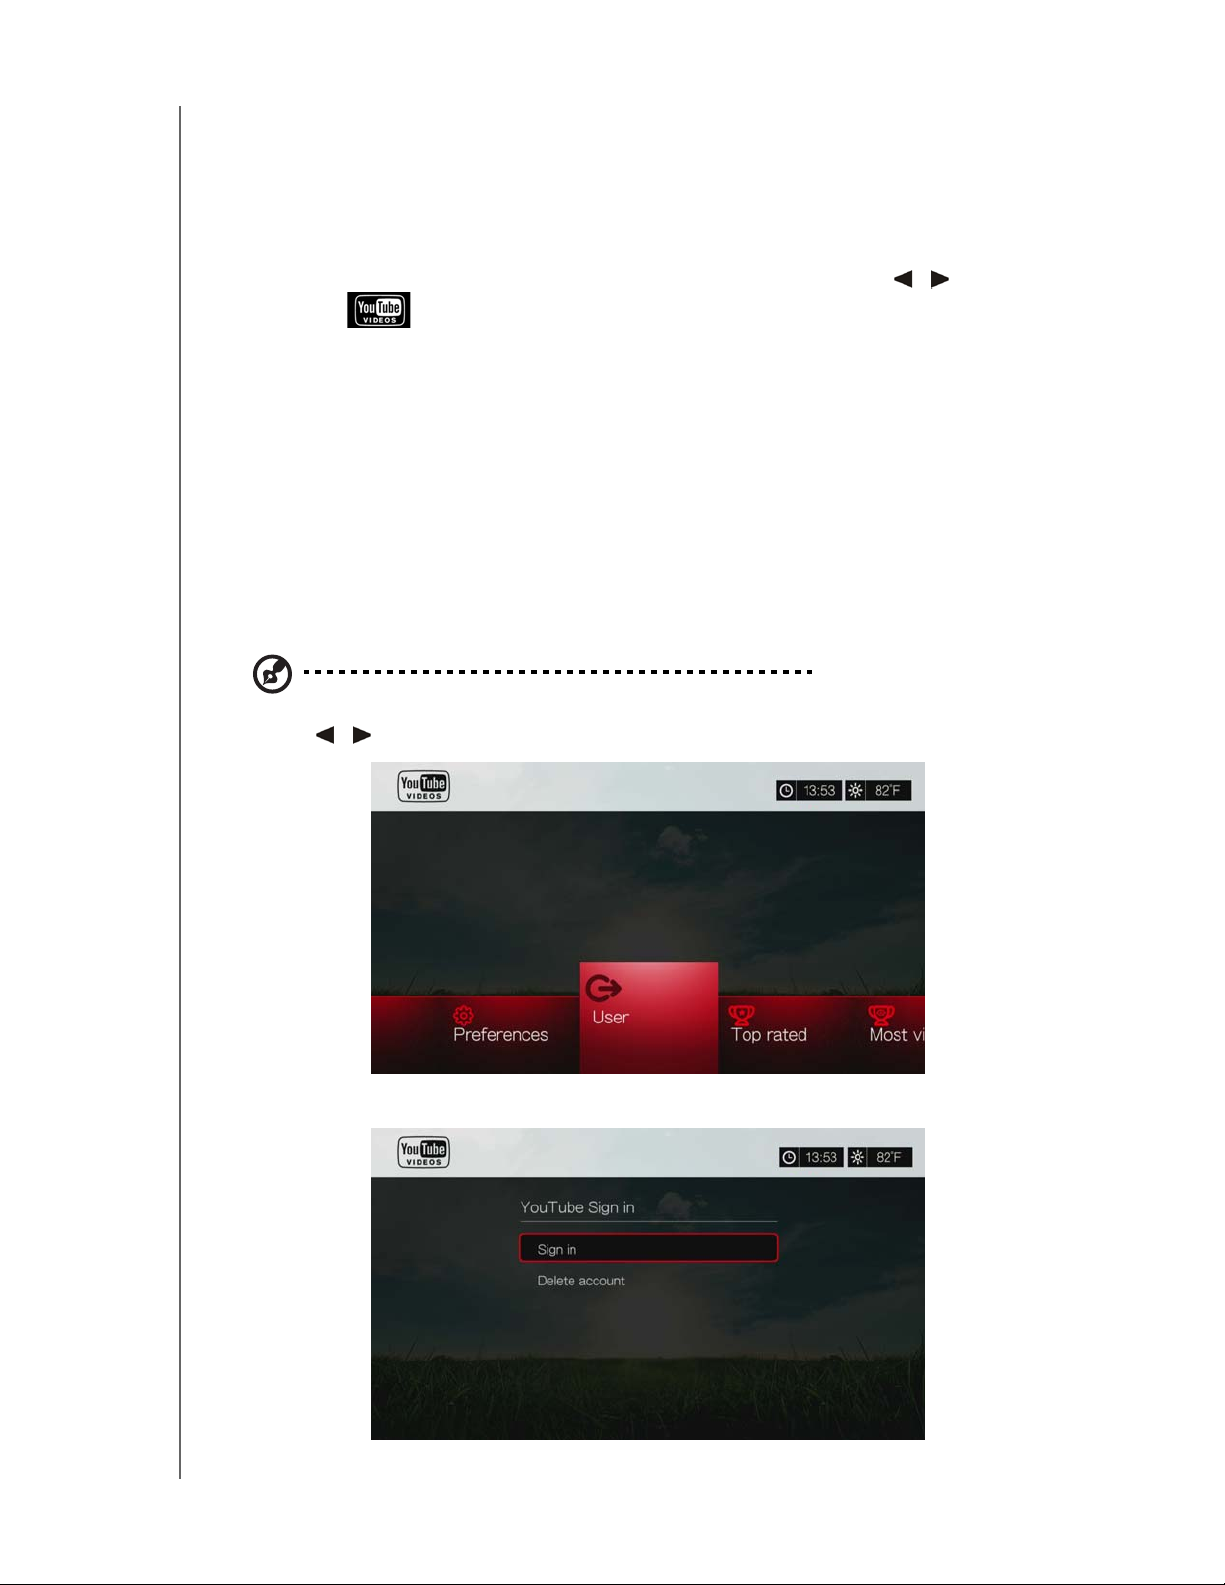
Options include:
User
Search
Top Favorites
Featured
Most Popular
Most Viewed
Top R a t ed
Preferences
Signing In To Your YouTube Account
Note: If you do not have a YouTube account and want to create one, go to www.youtube.com.
1. Press / to select User in the YouTube home screen, then press OK.
2. Select Sign in, then press OK.
INTERNET SERVICES – 167
Page 23
PRELIMINARY-P3
WD TV Play Media Player
User Manual
3. Use the navigation buttons to type your YouTube user name in the
on-screen keyboard. Select Submit, then press OK.
4. Use the navigation buttons to type your YouTube account password in
the on-screen keyboard. Select Submit, then press OK.
5. Press / to select a save option. Press OK when finished.
Options include:
No – Your account details are not saved. You need to repeat the initial sign-in
process every time you access YouTube using the media player.
Save username only – Your username is saved, but you will be prompted to
input your password every time you access YouTube using the media player.
Yes – Both your user name and password are saved. You can later sign in to
your account from the YouTube Login screen.
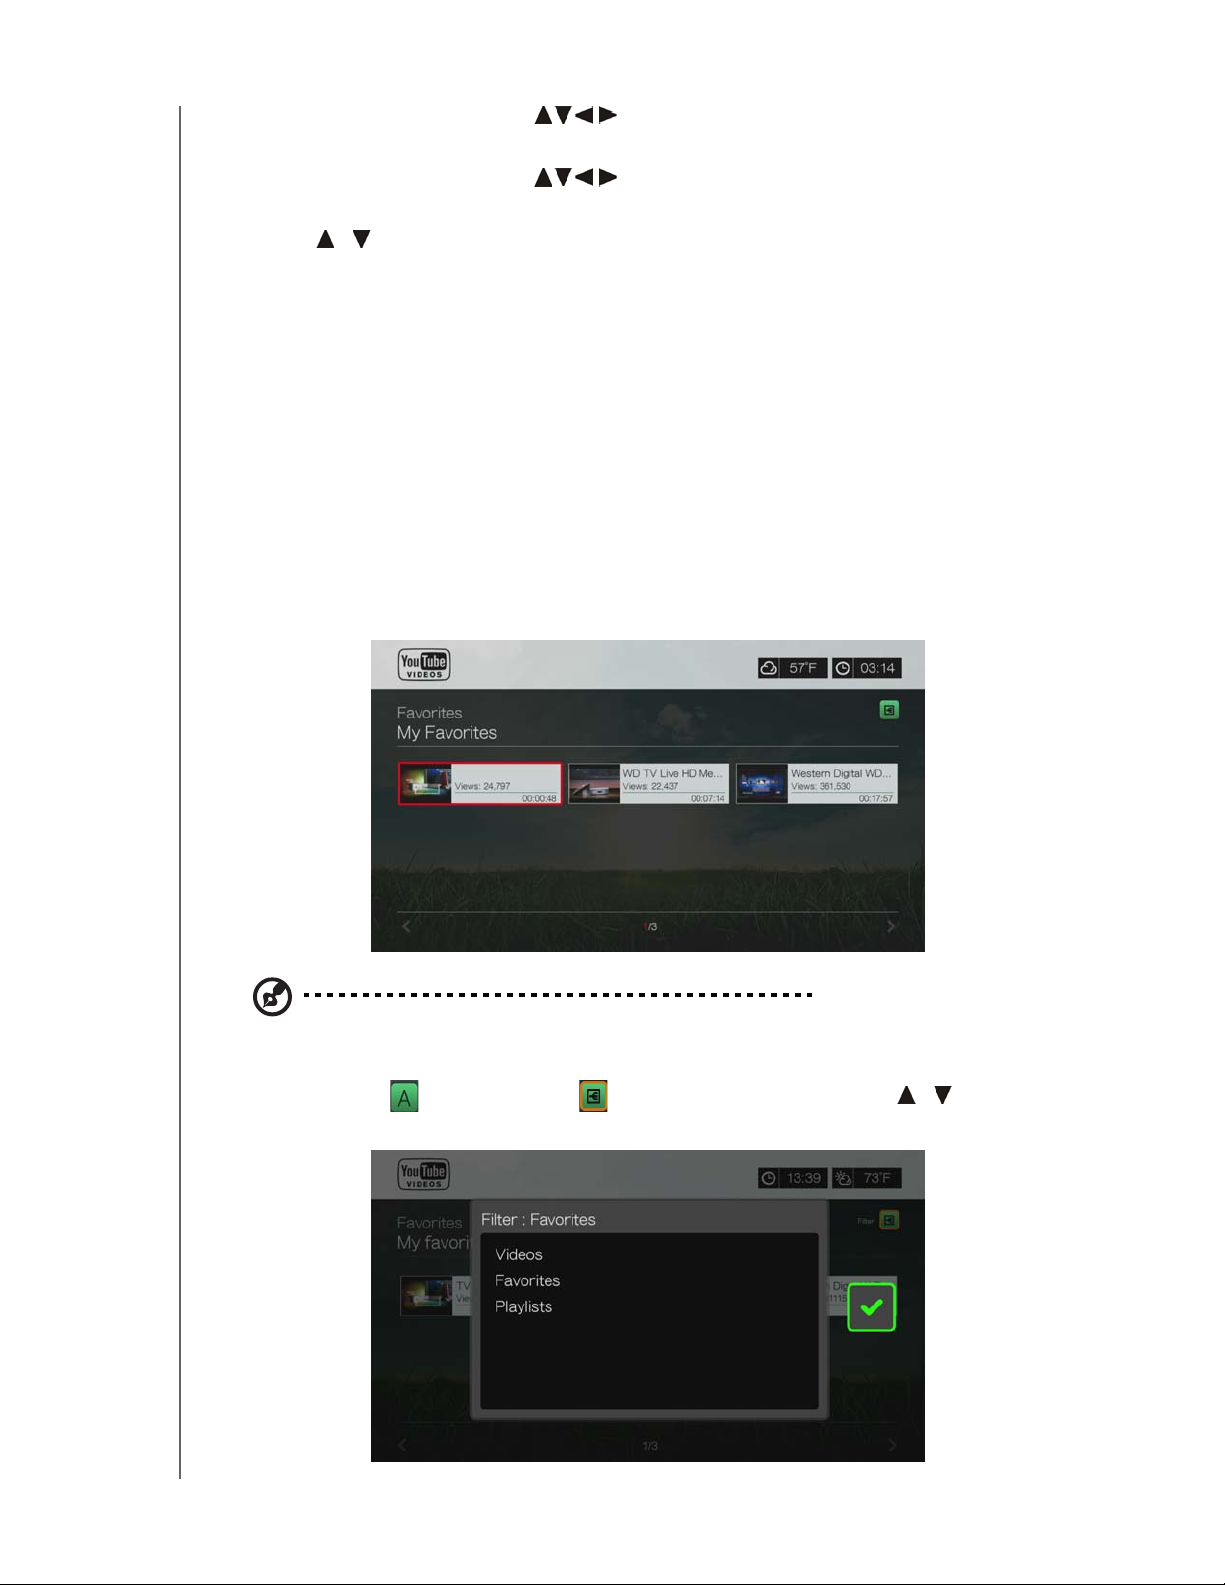
6. The My favorites page appears. Go to the next section for more information on
this page.
Account
By default, the My favorites page displays first when you sign in to your account.
These are the videos you have saved as favorites in YouTube.
Note: If you have not favorited any videos, the screen displays "no content found."
This page also contains links to your uploaded videos (Videos) and video playlists
(Playlists). Press or navigate to , and press OK, then press
/ and OK
twice to switch that selection.
INTERNET SERVICES – 168
Page 24
PRELIMINARY-P3
WD TV Play Media Player
User Manual
Searching for Videos
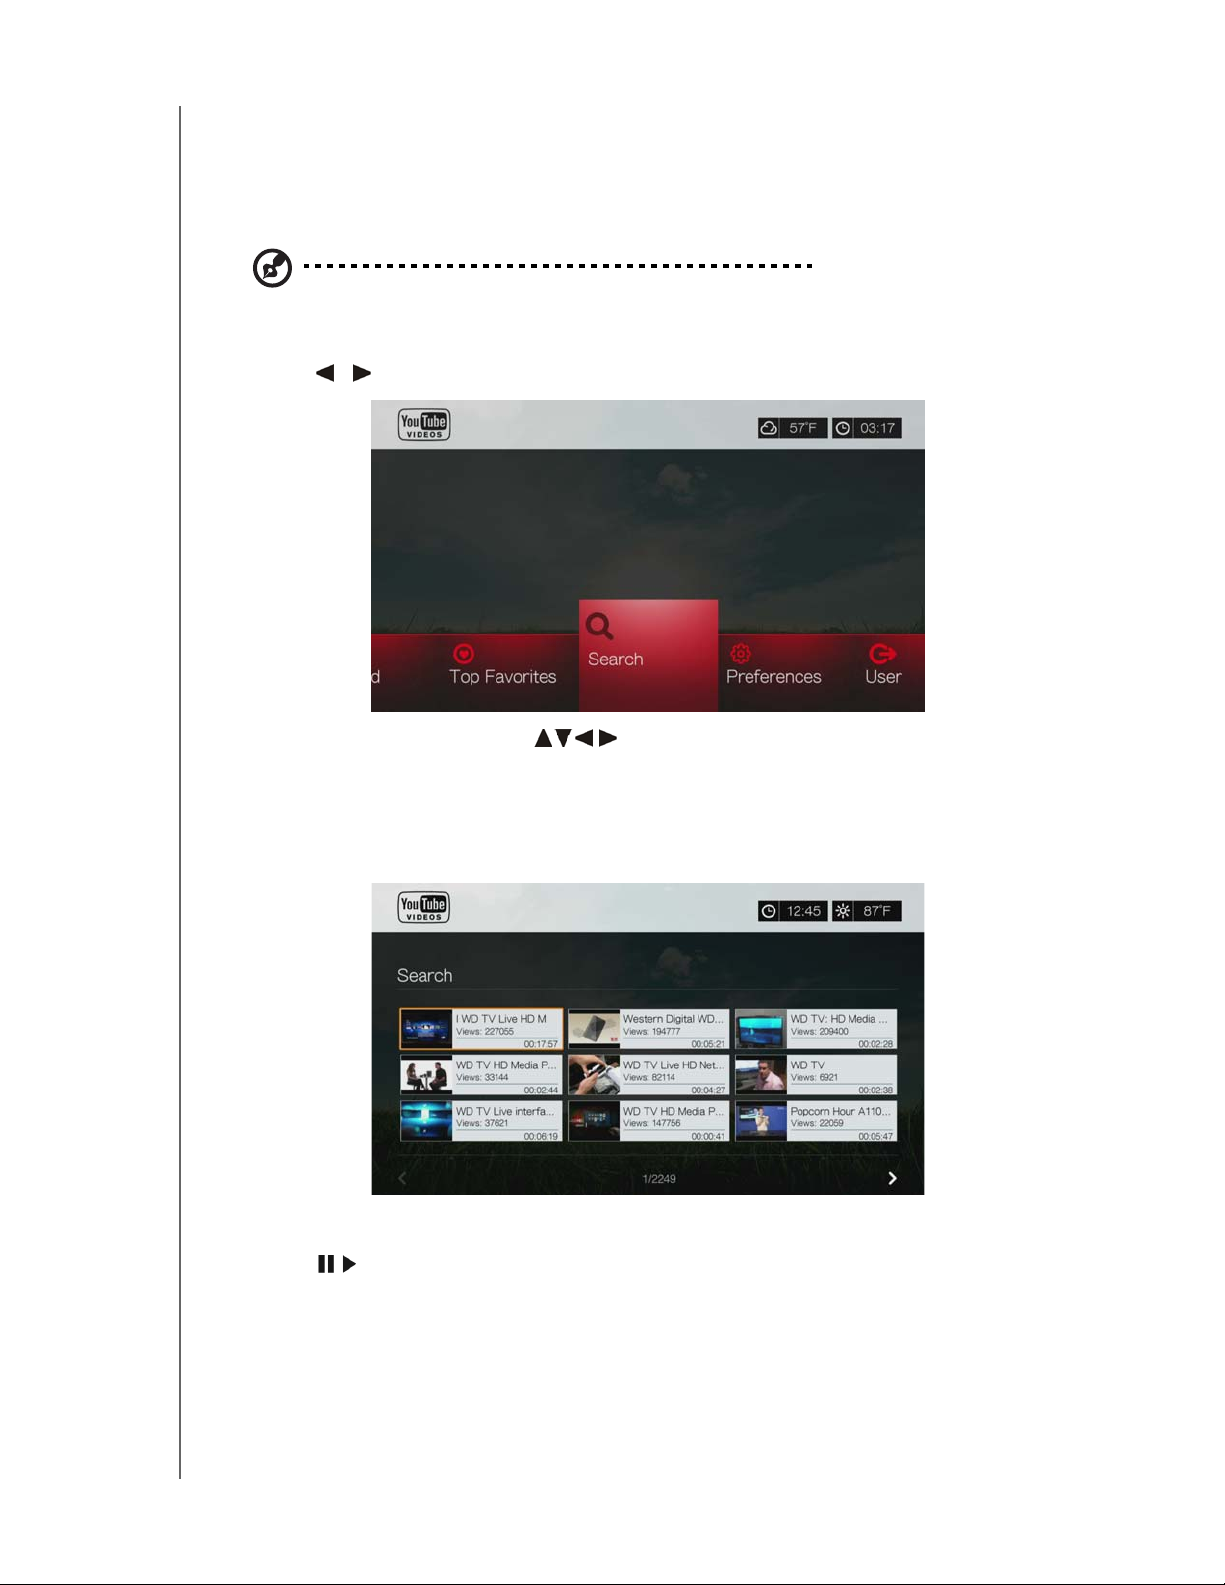
You can search YouTube for videos of particular interest to you. The search results
are based on the tags associated with uploaded videos. The media player saves
your searches so you can quickly recall them.
Note: Videos that are tagged “private” by users do not appear in search results.
To search for videos:
1. Press / to select Search in the YouTube home screen, then press OK.
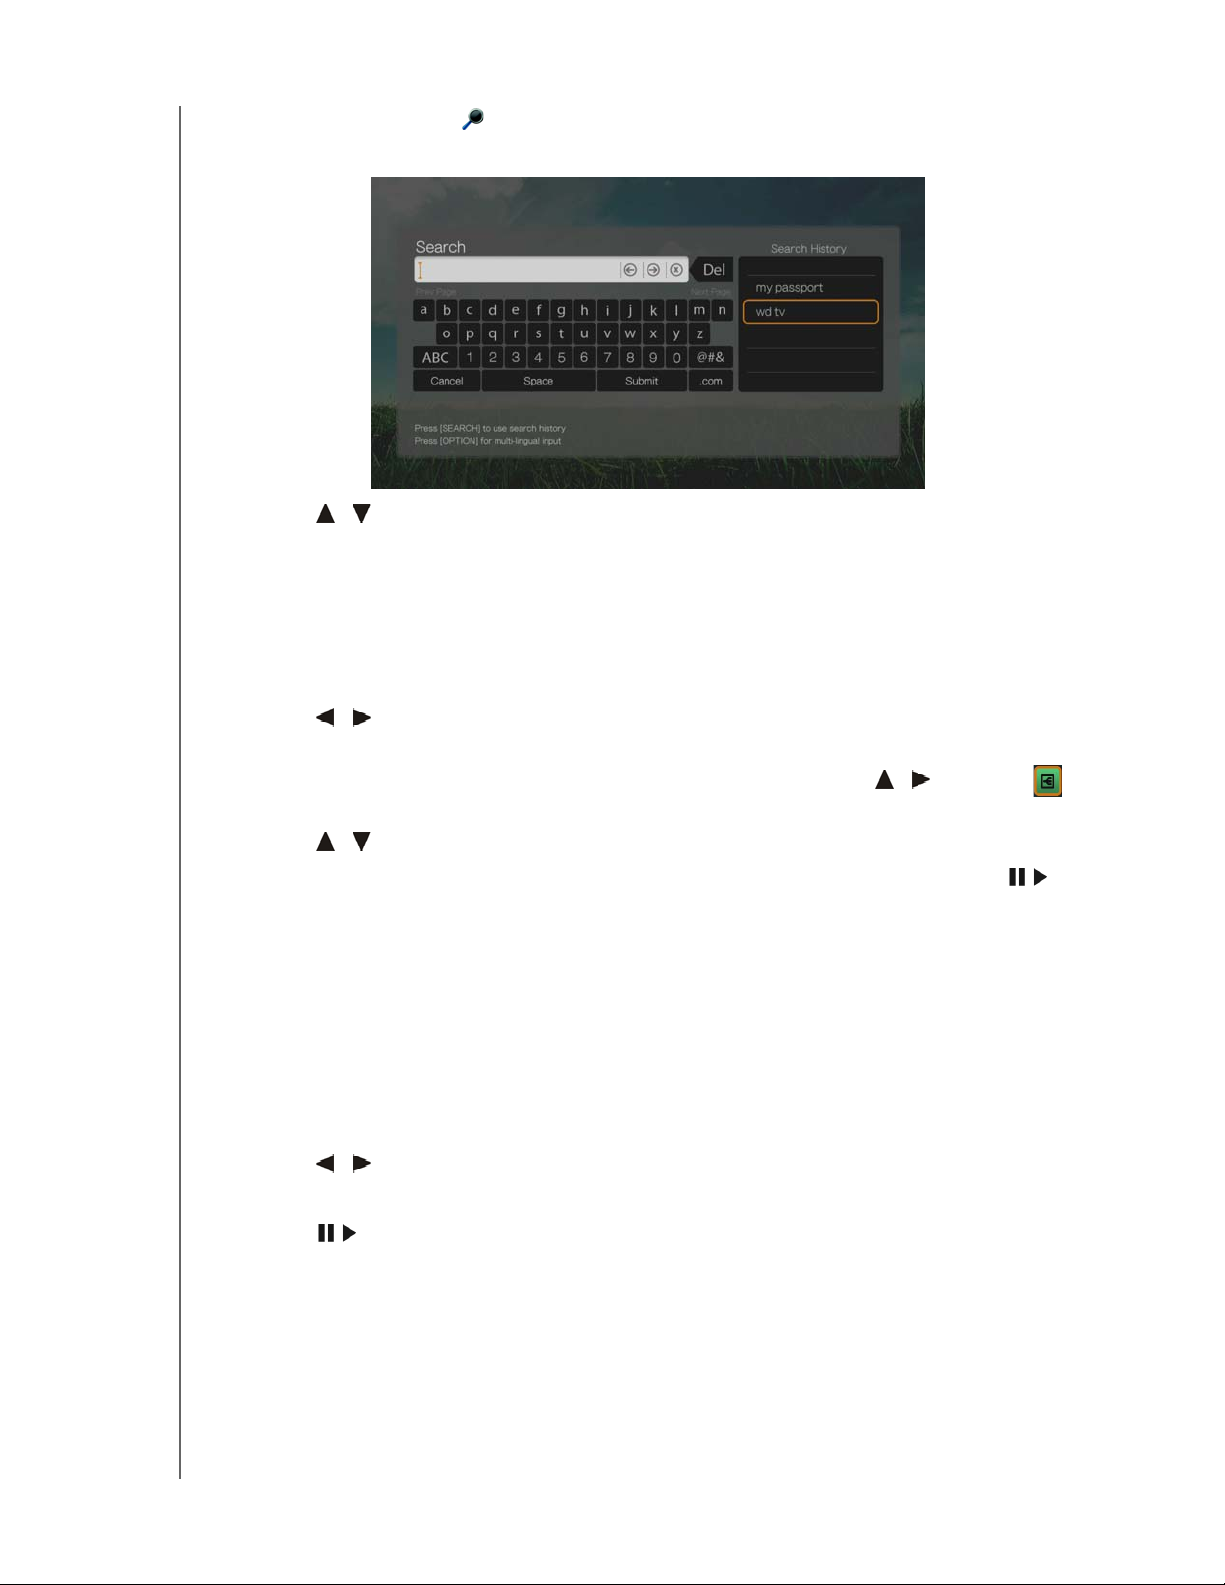
2. Use the navigation buttons to type a keyword related to the subject
matter of the video you’re looking for using the on-screen keyboard. Select
Submit, then press OK.
The video search begins (this may take a few seconds). Videos matching your
search word appear in a Search result screen.
3. Use the navigation buttons to select a video from the display.
4. Press or OK to start watching the selected video.
Go to page 172 for more information on using the YouTube Player.
To use search history:
INTERNET SERVICES – 169
Page 25
PRELIMINARY-P3
WD TV Play Media Player
User Manual
1. Press the SEARCH button on the remote control. This toggles you to the
Search History list.
2. Press / to select a search from the display.
3. Press OK to perform the saved search.
Top Favorites
These are videos tagged as favorites by the majority of YouTube users.
To access Top Favorites:
1. Press / to select Top Favorites in the YouTube home screen, then press
OK.
2. The list of top favorite videos display. To refine this list, press / to select ,
and press OK.
3. Press / to choose from Today, This week, or This month, then press OK.
4. Press the navigation buttons to select a video from the display, then press or
OK to start watching the selected video.
Go to page 172 for more information on using the YouTube Player.
Featured Videos
This video category is primarily populated with videos from YouTube’s commercial
partners, but might also include select user videos that are currently popular or have
been previously showcased in YouTube’s Spotlight Videos section.
To access Featured Videos:
1. Press / to select Featured in the YouTube home screen, then press OK.
2. Press the navigation buttons to select a video from the displayed selection.
3. Press or OK to start watching the selected video.
Go to page 172 for more information on using the YouTube Player.
INTERNET SERVICES – 170
Page 26
PRELIMINARY-P3
Most Popular
These are videos deemed most popular by YouTube users.
To access Most Popular:
WD TV Play Media Player
User Manual
1. Press
/ to select Most Popular in the YouTube home screen, then press
OK.
2. The list of most popular videos display. To refine this list, press / to select
, and press OK.
3. Press
/ to choose from Today, This week, or This month, then press OK.
4. Press the navigation buttons to select a video from the display, then press or
OK to start watching the selected video.
Go to page 172 for more information on using the YouTube Player.
Most Viewed
These are videos most viewed by YouTube users.
To access Most Viewed:
1. Press
2. The list of most viewed videos display. To refine this list, press / to select ,
and press OK.
3. Press / to choose from Today, This week, or This month, then press OK.
4. Press the navigation buttons to select a video from the display, then press or
OK to start watching the selected video.
Go to page 172 for more information on using the YouTube Player.
/ to select Most Viewed in the YouTube home screen, then press OK.
Top Rat e d
These are videos with the highest ratings from YouTube users.
To access Top Rated:
1. Press
2. The list of most viewed videos display. To refine this list, press
and press OK.
3. Press
4. Press the navigation buttons to select a video from the display, then press or
OK to start watching the selected video.
Go to page 172 for more information on using the YouTube Player.
/ to select Top Rated in the YouTube home screen, then press OK.
/ to select ,
/ to choose from Today, This week, or This month, then press OK.
INTERNET SERVICES – 171
Page 27
PRELIMINARY-P3
WD TV Play Media Player
User Manual
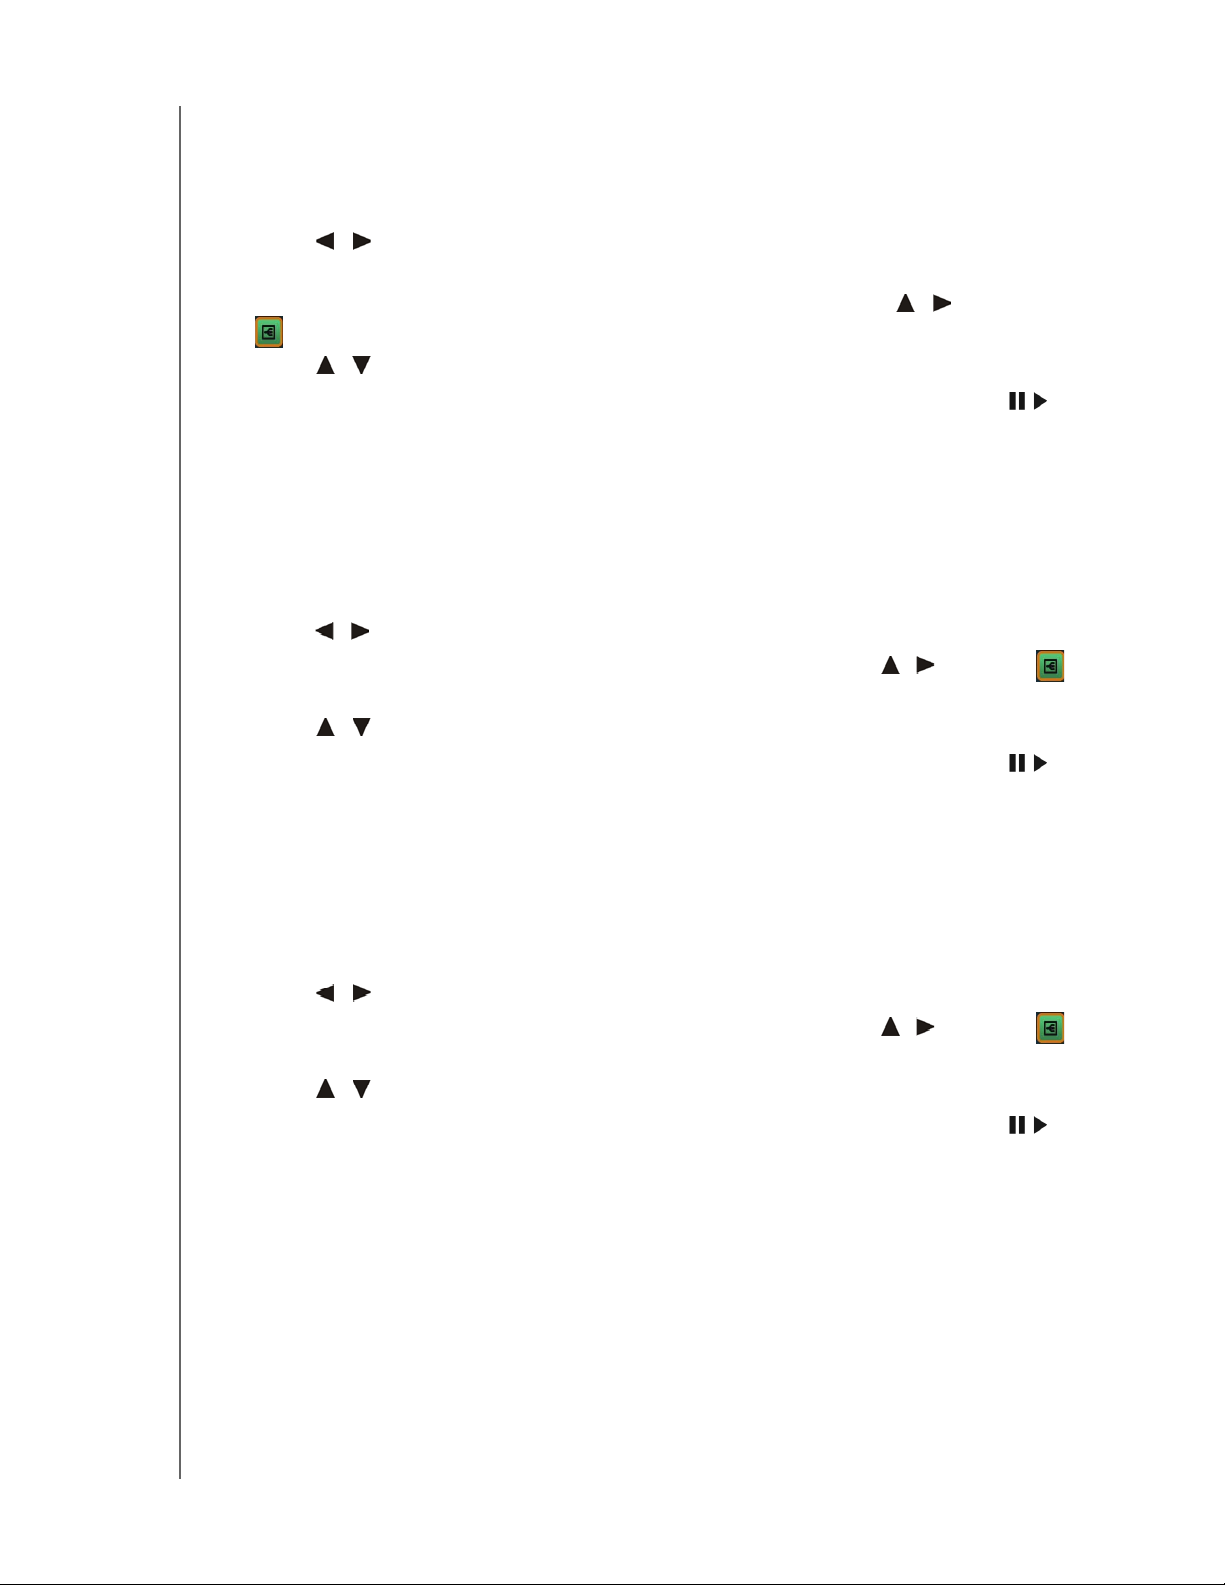
YouTube Options
When you select a video in any of the YouTube submenu screens described above
(i.e., User > My Favorites, Search, Top Favorites, Featured Videos, Most Popular,
Most Viewed, and Top Rated), pressing Options brings up the following screen:
Like or Dislike this Video - see “Like or Dislike Videos” on page 174.
Add to favorites - see “Adding Videos to Favorites” on page 174.
Add to playlist - see “Adding Videos to a Playlist” on page 175.
Flagging - use this option to flag a video for inappropriate content.
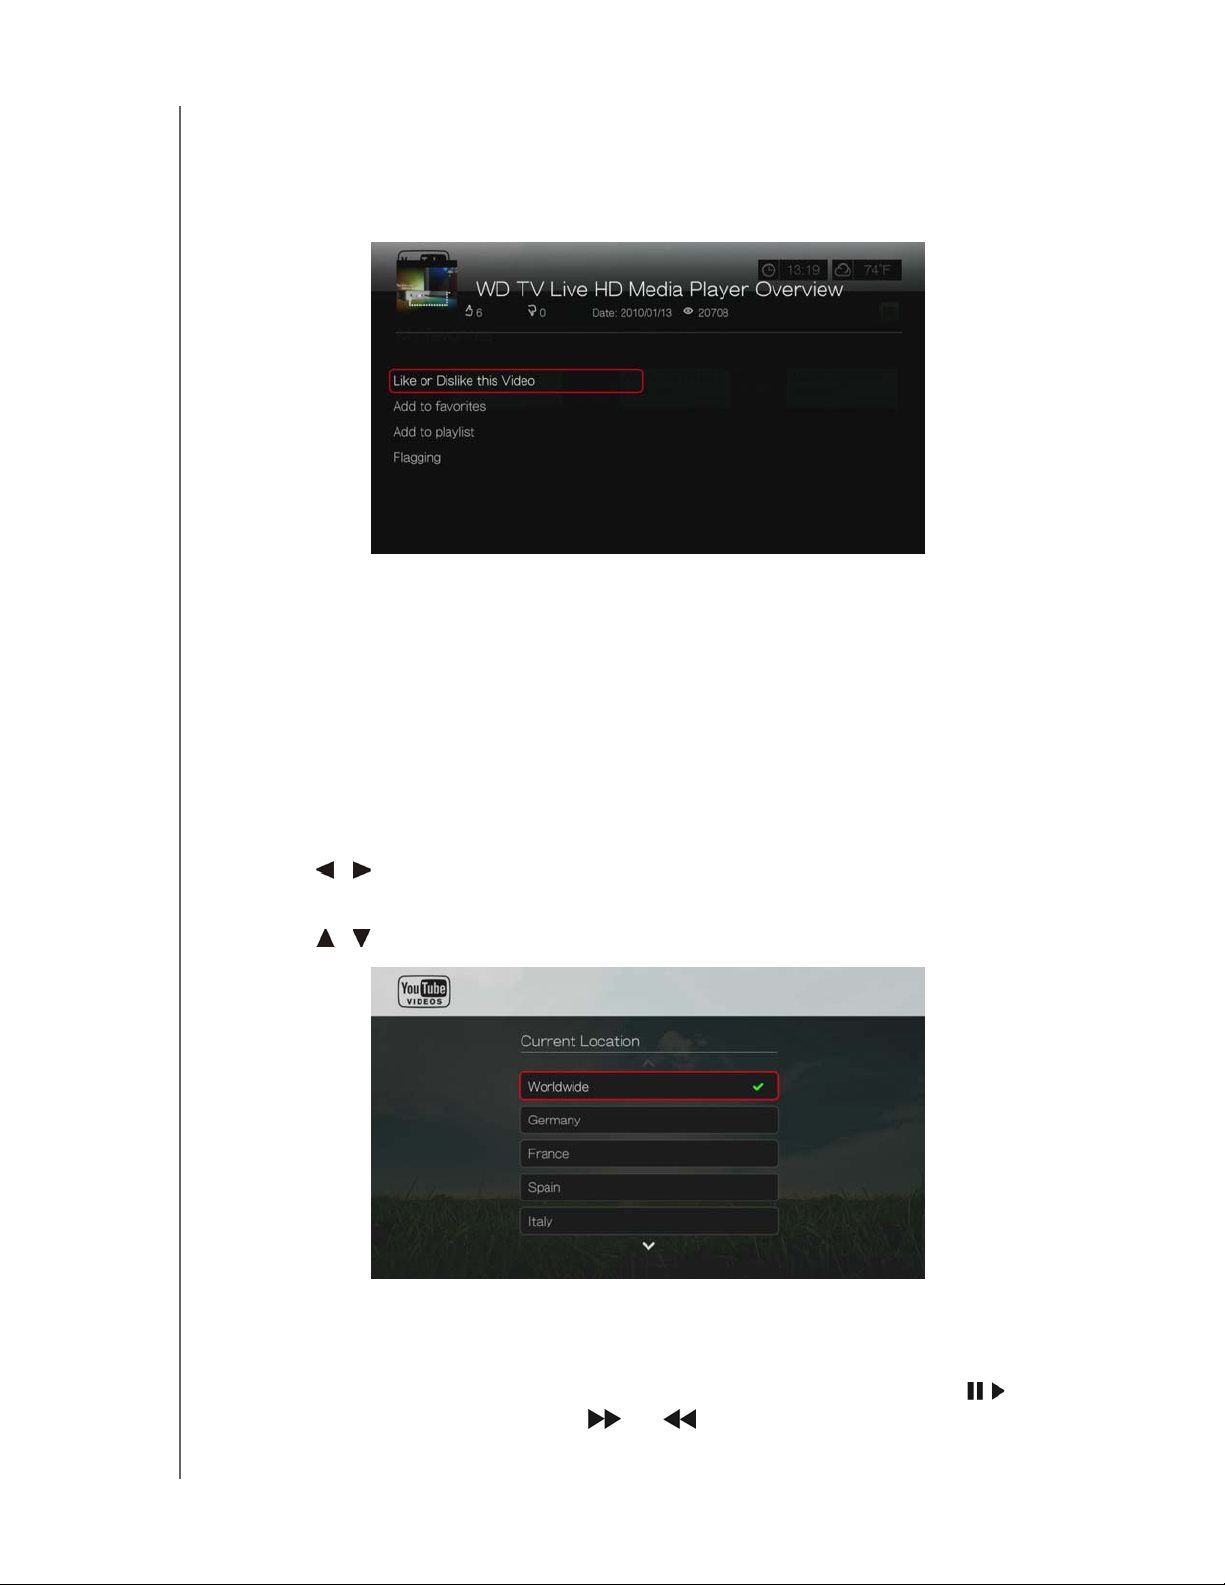
Preferences
Preferences allows you to choose which country’s content (videos and channels) you
would like to view without changing the language of the site.
To access Preferences:
1. Press / to select Preferences in the YouTube home screen, then press OK.
2. Current location is highlighted. Press OK.
3. Press / to select a country from the list, then press OK.
YouTube Player
The YouTube Player layout is similar to the regular video playback screen. It displays
the playback status bar and the elapsed and total playback times. Press to
pause and resume playback. Press or to fast forward or reverse in 10
second increments
.
INTERNET SERVICES – 172
Page 28
PRELIMINARY-P3
WD TV Play Media Player
User Manual
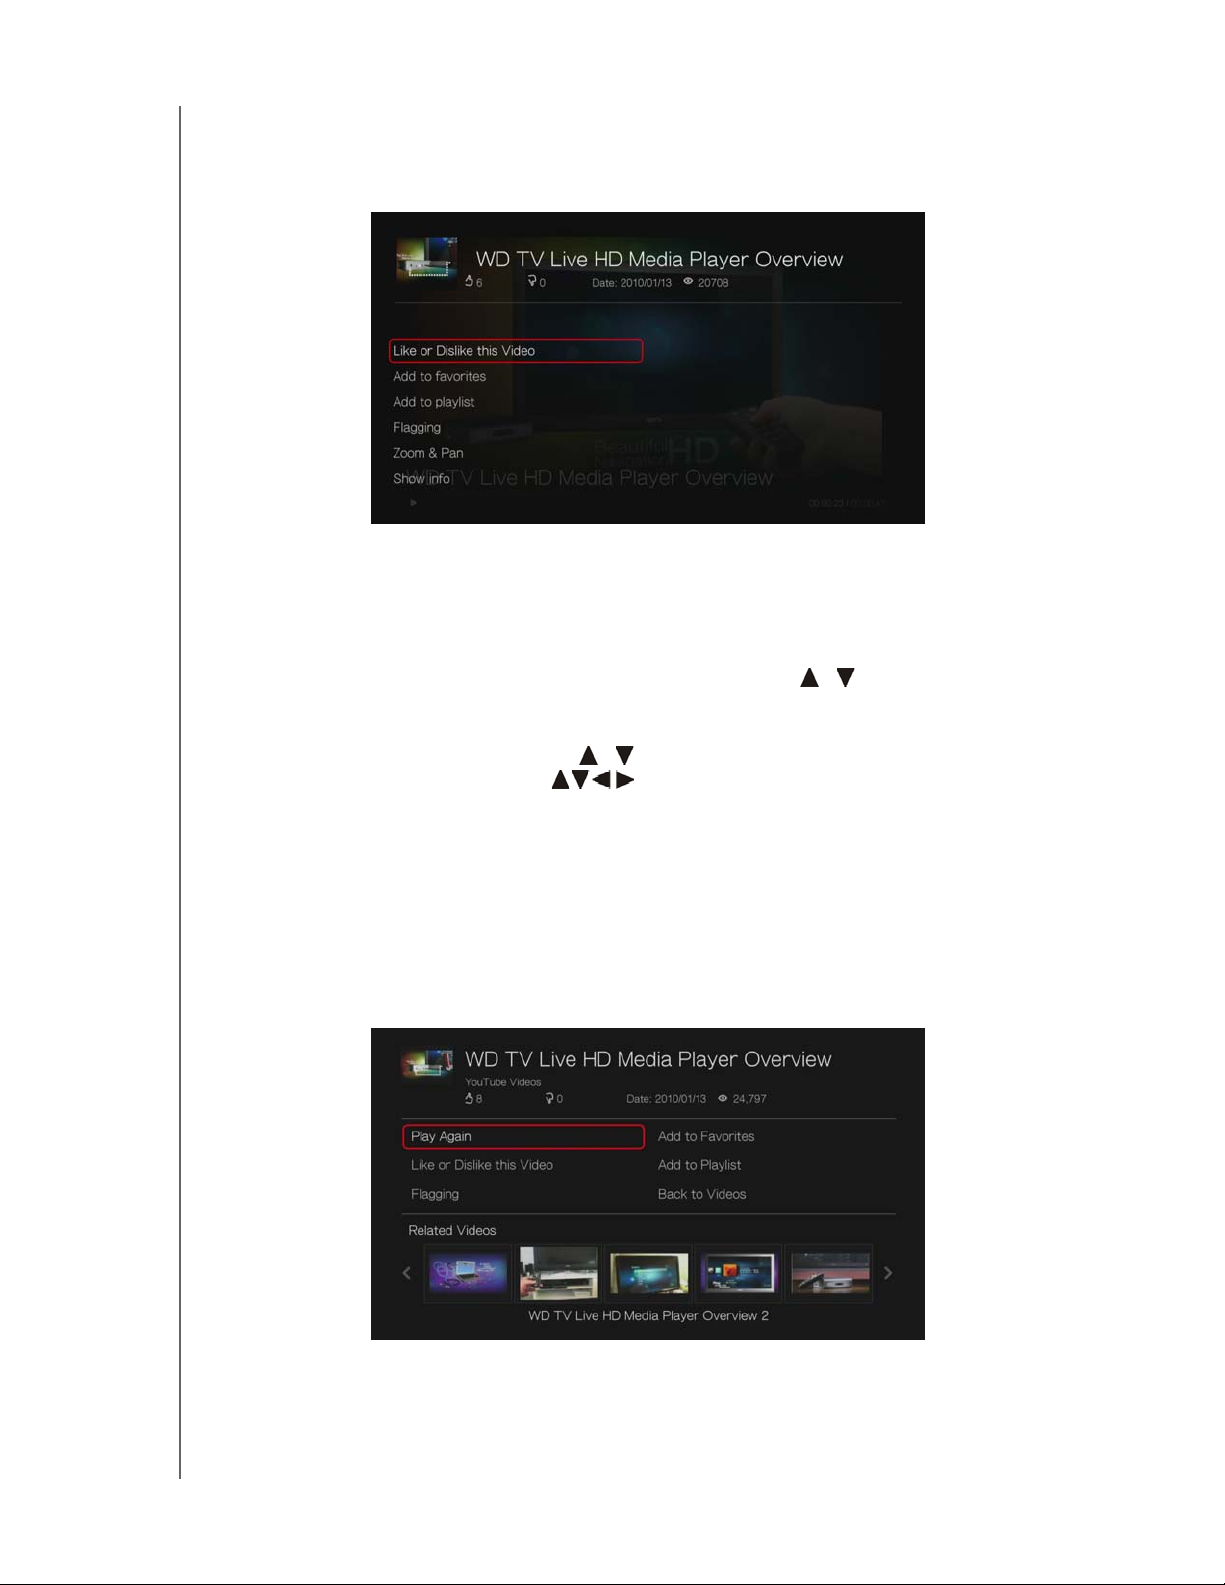
YouTube Player Options
As with a regular video playback screen, you can the customize the way content
displays in the YouTube Player. To do this, press Options.
Like or Dislike this Video - see “Like or Dislike Videos” on page 174.
Add to favorites - see “Adding Videos to Favorites” on page 174.
Add to playlist - see “Adding Videos to a Playlist” on page 175.
Flagging - use this option to flag a video for inappropriate content.
Zoom - To change the display’s viewing scale, press / and select Zoom &
Pan, then press OK. Press OK repeatedly until the preferred viewing scale is
achieved. Press Options or Back to revert to the default viewing scale.
Pan - To pan the display, press / and select Zoom & Pan, then press OK.
Press the navigation buttons repeatedly until the preferred panned view
displays. Press Options or Back to revert to the default viewing scale.
Show info - use this option to view detailed information about the video if
present.
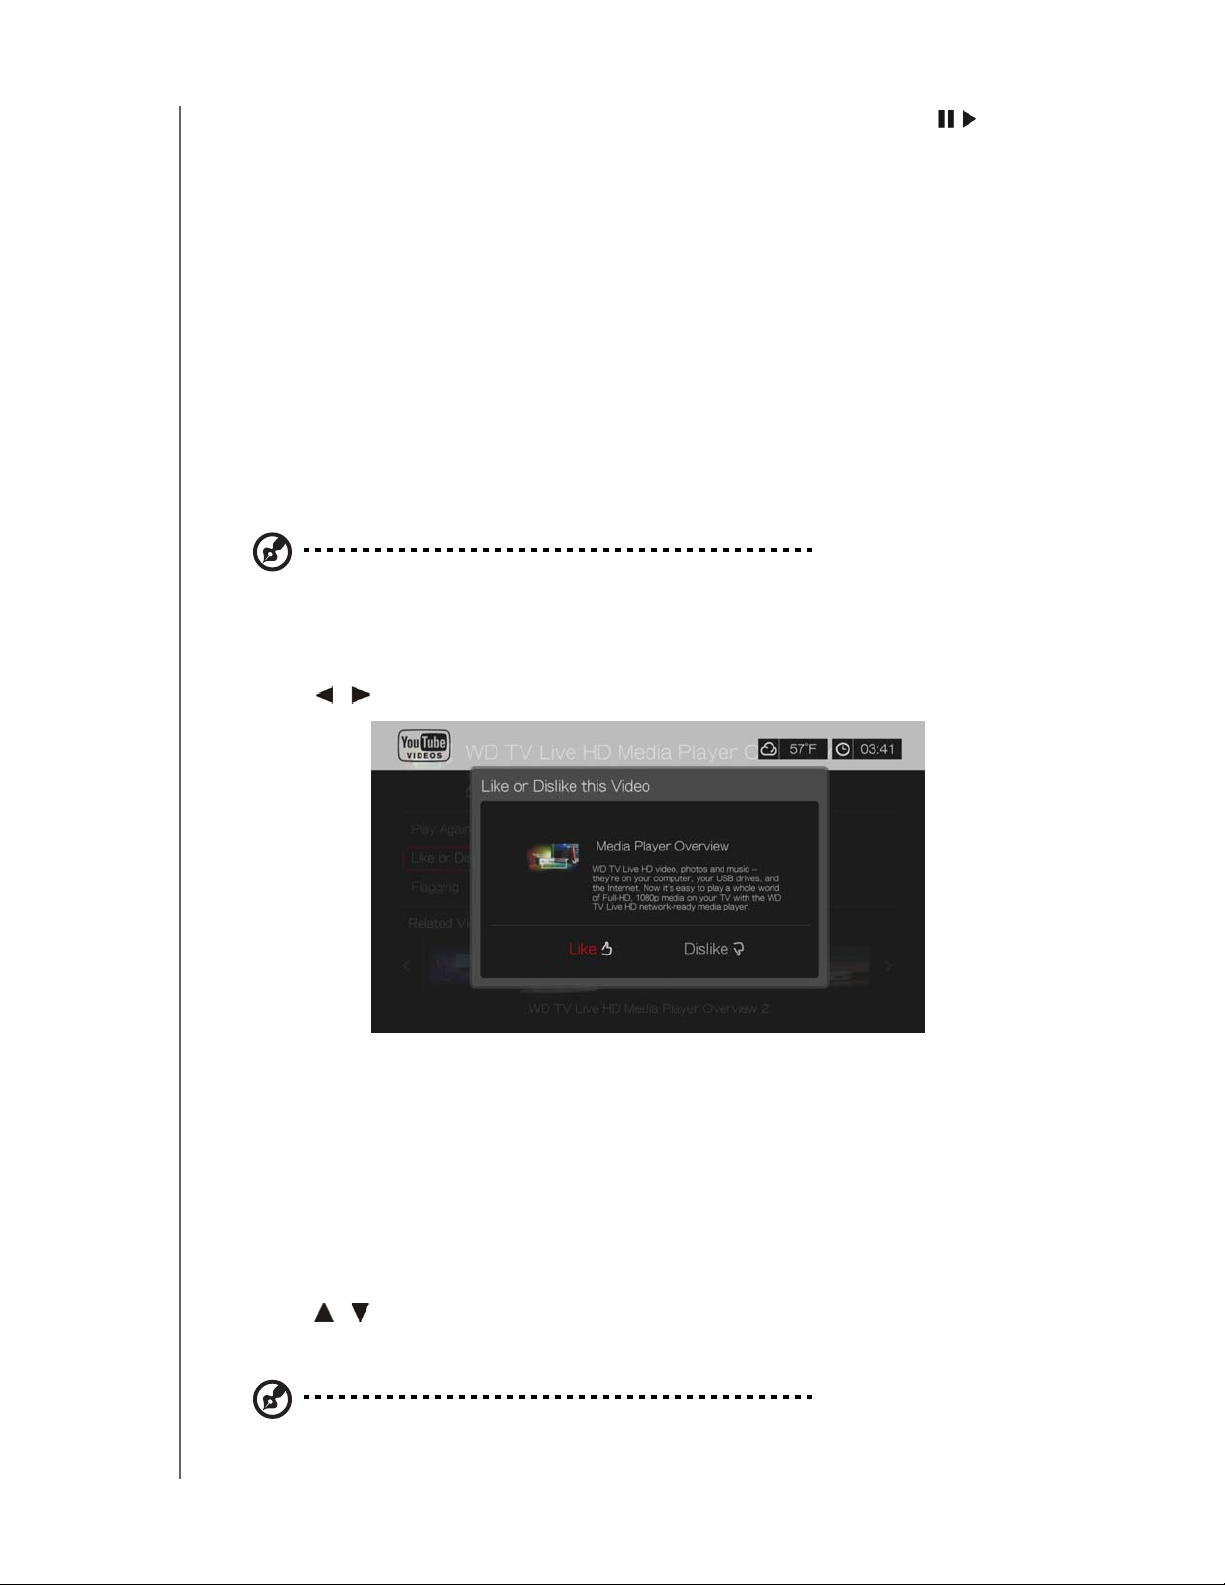
Related Videos
After video playback, the Related Videos screen appears. At the top of the screen,
the video rating (number of highlighted “stars”), upload date, and the number of
times it has been viewed display.
This screen lists videos which might be related to recently played video by subject
matter, making it easier to search for videos based on the same or similar subject.
INTERNET SERVICES – 173
Page 29
PRELIMINARY-P3
WD TV Play Media Player
User Manual
Press the navigation buttons to select a video from the list, then press or OK to
start watching the selected video.
The other options on this screen allow you to:
Replay the recently playbacked video – Play Again
Add the video to your My Favorites list – Add to Favorites
Flag the video as having inappropriate content - Flagging
Provide video feedback – Like or Dislike this Video
Add the video to your My Playlists list – Add to Playlist
Return to the last video selection page – Back to Videos
Press the navigation buttons to select an option, then press OK.
Like or Dislike Videos
You can rate videos on a basis of “Like” or “Dislike” during or after video playback.
Note: You must signed in to your YouTube account to like or dislike videos. See “Signing In To Your
YouTube Account” on page 167 for sign-in instructions.
1. During playback, press Options, select Like or Dislike this Video, then press
OK, or select Like or Dislike this Video in the Related Videos screen.
2. Press / to select Like or Dislike, then press OK.
3. Your video rating is confirmed. Press OK to go back to the Player screen.
Adding Videos to Favorites
If you enjoyed a particular video or simply want to refer to it later, you can tag it as a
“favorite” to add it to your My Favorites list. Once added, you can keep track of this
video.
To add a video to My Favorites from the Related Videos screen:
1. On the Related Videos screen of the video you want to add as a favorite,
press / to select Add to Playlist, then press OK.
2. Press OK at the confirmation prompt.
Note: You can also press Options when playing a video and select Add to favorites.
INTERNET SERVICES – 174
Page 30
PRELIMINARY-P3
WD TV Play Media Player
User Manual
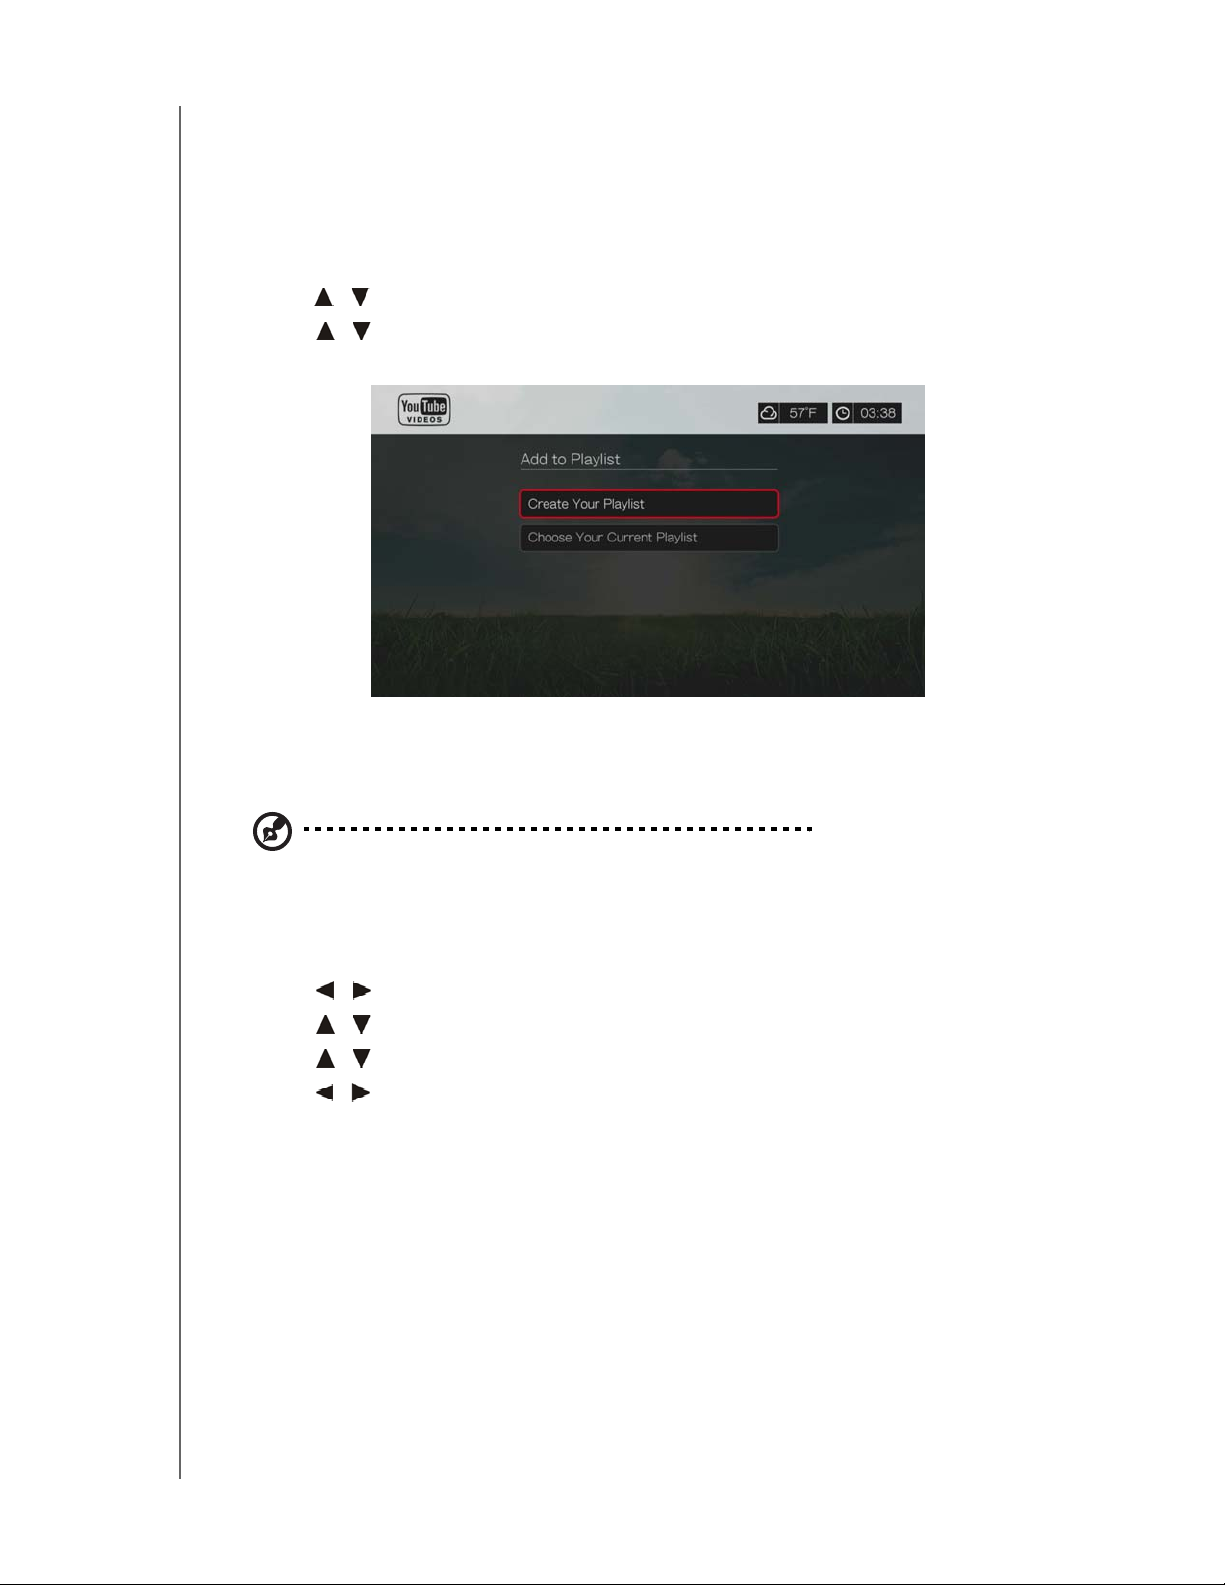
Adding Videos to a Playlist
Use this option if you enjoyed a particular video and want to add it to one of your
playlists.
To add a video to My Favorites from the Related Videos screen:
1. On the Related Videos screen of the video you want to add as a favorite,
press
2. Press
your current playlist.
/ to select Add to Favorites, then press OK.
/ to select Create your playlist (to create a new playlist) or Choose
3. If you choose Create your playlist, enter the name of your new playlist using
the on-screen keyboard. Select Submit, then press OK. If you choose Choose
your current playlist, press OK.
Note: You can also press Options when playing a video and select Add video to favorites.
Deleting a YouTube Account
To delete a YouTube account from the media center:
1. Press
/ to select Users in the YouTube home screen, then press OK.
2. Press / to select Delete account, then press OK.
3. Press
4. Press
/ to select the account you want to delete, then press OK.
/ to select OK on the confirmation prompt, then press OK.
Restricted Video Content
Some videos on YouTube are restricted by the content owner from playback via
TV-connected devices. If you attempt to play one of these videos, press OK to
return to the previous screen.
Encoding Support for YouTube Worldwide
Many YouTube videos are encoded in a language other than the one you set as your
media player’s system language. In some cases, this results in garbled characters in
the video ID or even playback failure. If this is the case, you need to enable the
encoding support for the language that is causing the error.
INTERNET SERVICES – 175
Page 31
PRELIMINARY-P3
WD TV Play Media Player
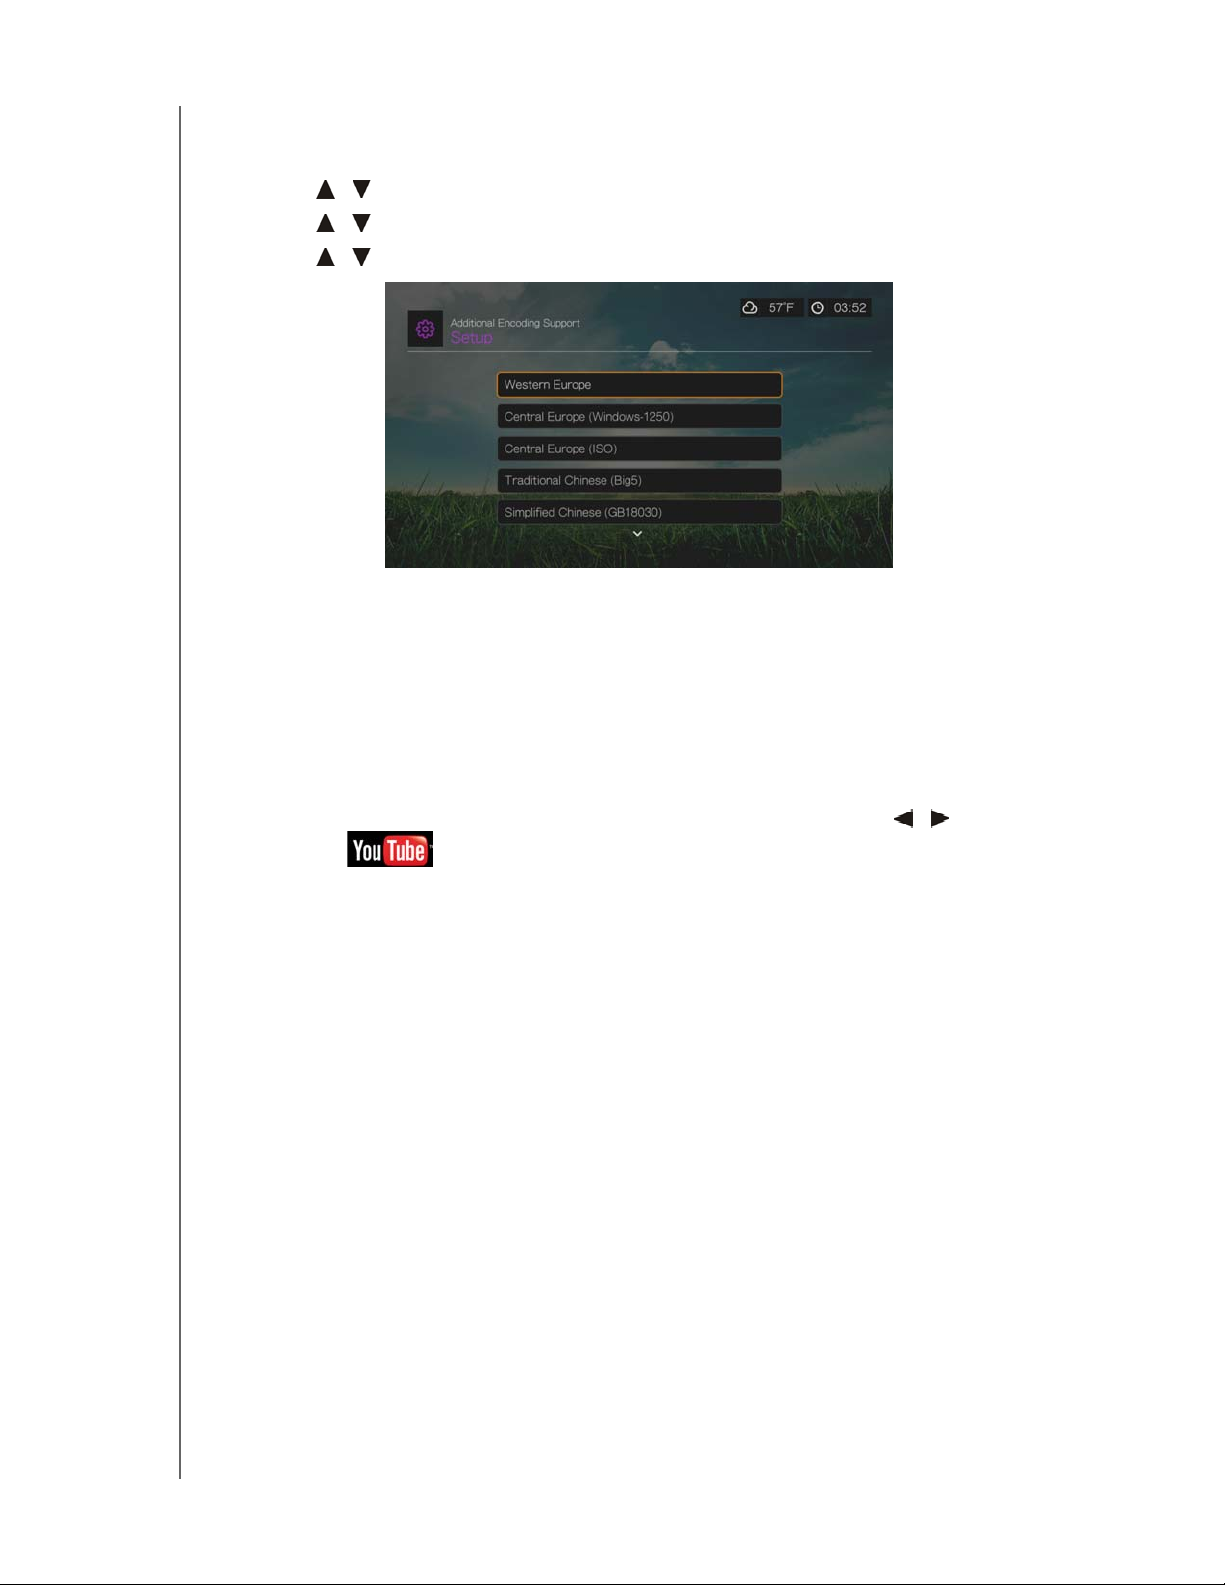
To set the media player’s additional encoding setting:
1. Navigate to Home | Setup menu bar.
2. Press / to select System, then press OK.
3. Press / to select Additional Encoding Support, then press OK.
4. Press / to select the encoding support you require, then press OK.
User Manual
YouTube Leanback
YouTube is a video hosting website where you can upload and share videos. Access
YouTube Leanback online at www.youtube.com/leanback.
To access YouTube Leanback:
1. Navigate to the Home | Services menu bar and and press OK.
2. The list of Internet services display in alphabetical order. Press / to select
YouTube , then press OK to display the YouTube home screen.
3. A default video plays. Use the navigation buttons to search (using the on-screen
keyboard with your USB keyboard or remote) or browse for videos. Use the
PAUSE/PL AY, REW, FF, NEXT, and PREV buttons for video playback.
INTERNET SERVICES – 176
Page 32
13
PRELIMINARY-P3
WD TV Play Media Player
User Manual
Games
You can access game services and use the remote control to play them using the
Games menu.
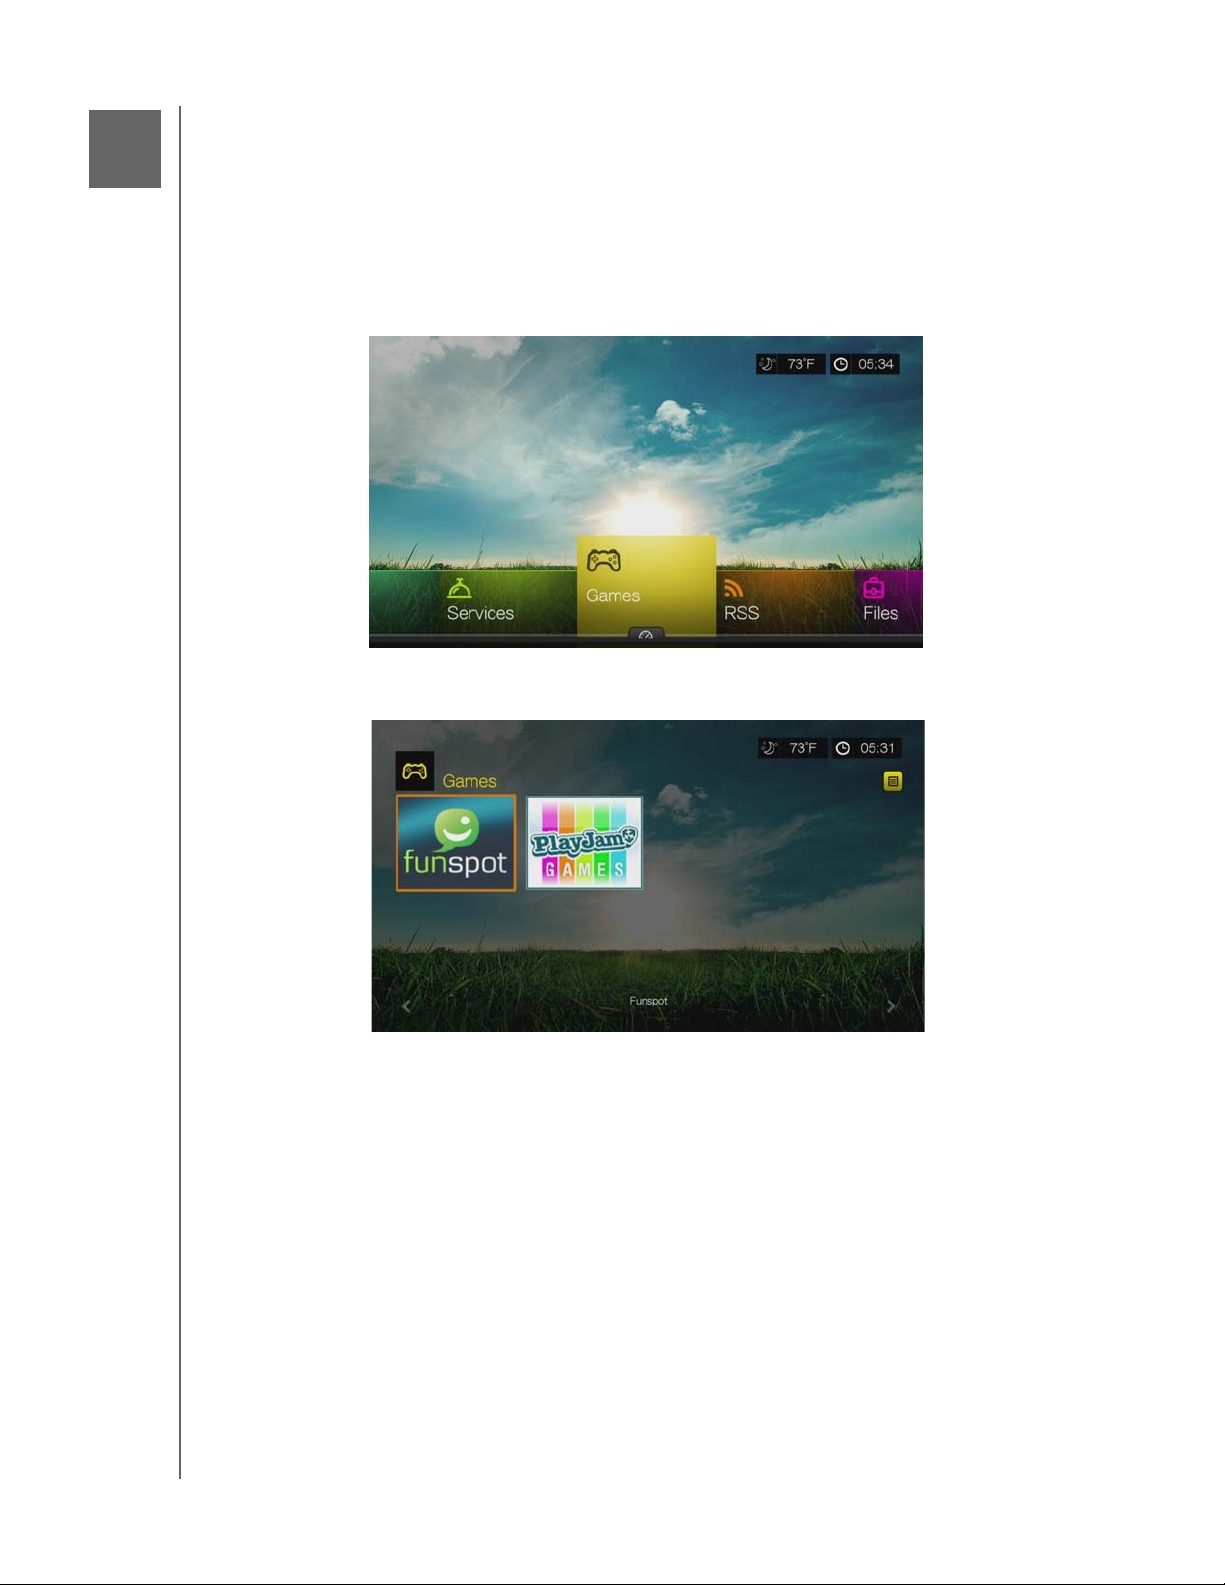
Games Display
1. Navigate to the Home | Games menu, then press OK.
2. The screen displays all available game services. The display is in grid view. Use
the navigation buttons to select a game service, then press OK.
- Funspot
math skills with Sudoku – Check out Funspot on for your favorite games.
- PlayJam—PlayJam is your first choice for the best games on TV. From action and
adventure to puzzle and word games, PlayJam has something for everyone. Play to
win prizes, play against a friend or just play to climb the leaderboard - PlayJam has a
global community of players already...join them!
3. Use the navigation buttons to select a game, then press OK. Select Rules, Info
or Help, then press OK for further information, or select New Game or Start to
begin.
—Swap gems with Rockswap, try your luck with Texas Hold’Em, or test your
4. Use the navigation buttons on the remote the play the game. Select Exit when
finished.
GAMES – 177
Page 33
14
PRELIMINARY-P3
WD TV Play Media Player
User Manual
RSS
RSS (Really Simple Syndication) provides you with a list of current news items in a
brief format so you can scan headlines and choose the items that interest you most
without visiting websites.
Reading RSS Feeds
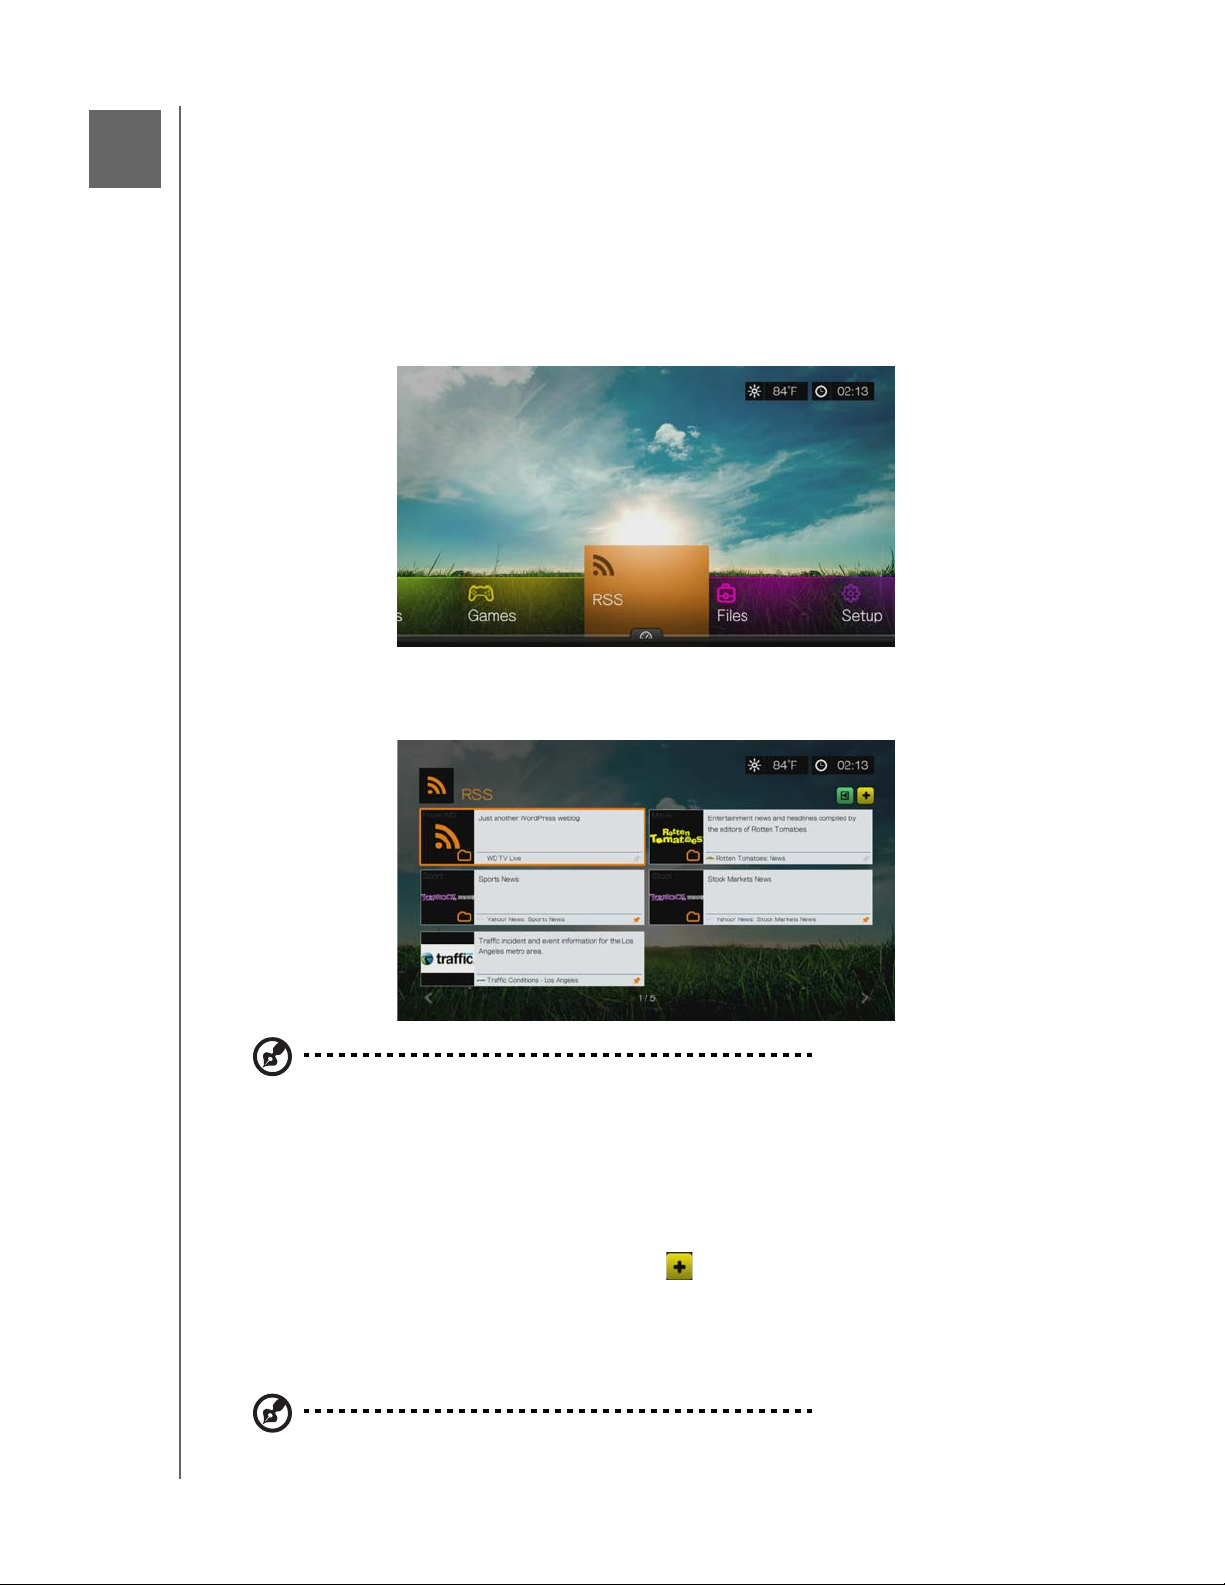
1. Navigate to the Home | RSS menu, then press OK.
2. The screen displays all available RSS feeds. The display is in grid view. Use the
navigation buttons to select a headline of a RSS feed that you want to read, then
press OK.
Note: You can display your RSS feeds in a streaming ticker display on the home page. See “RSS
Ticker” on page 187.
Adding RSS Feeds
To add an RSS feed to the media player:
1. In the RSS main screen, navigate to the button then press OK.
2. Enter the URL of the RSS feed using the on-screen keyboard (see the website of
the RSS feed provider for details), select Submit, then press OK.
3. Press OK again to add the RSS feed.
Note: You can also add RSS feeds using the Web UI. See “RSS” on page 48.
RSS – 178
Page 34
15
PRELIMINARY-P3
WD TV Play Media Player
User Manual
Setup and Advanced Features
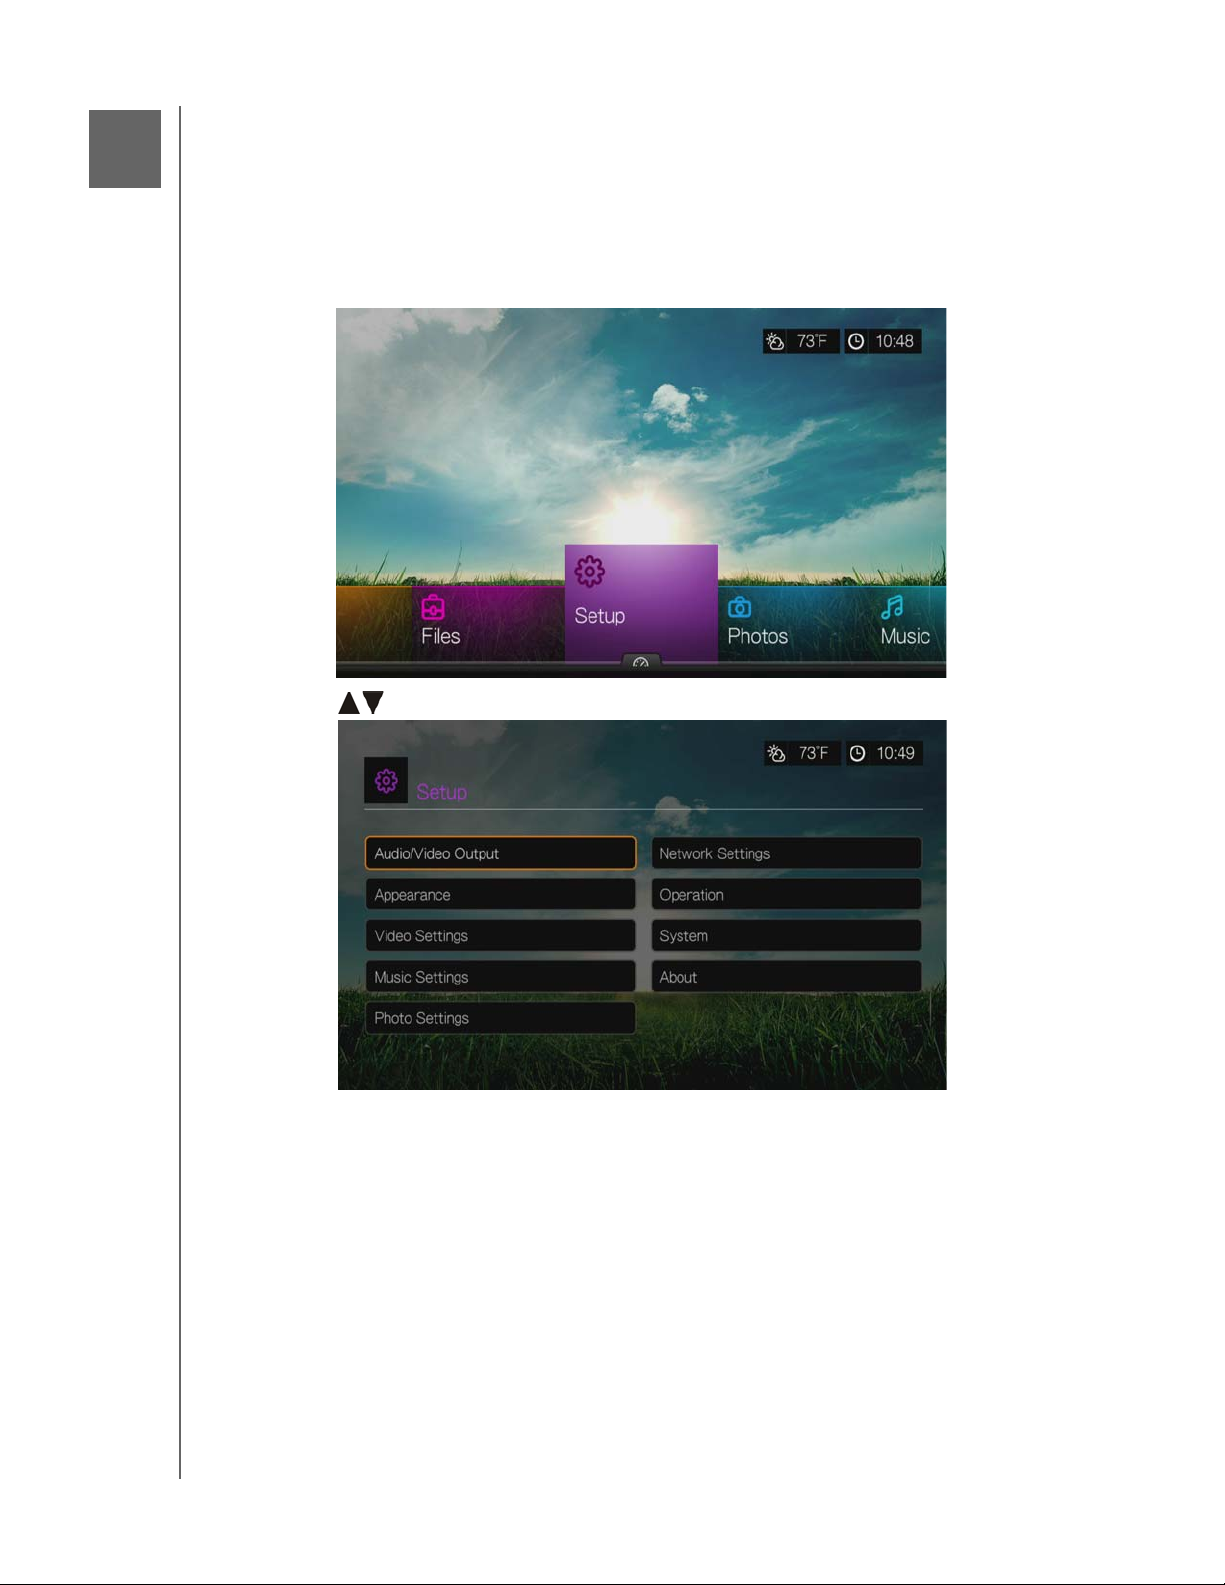
The Setup menu lets you customize the way you use the media player and set
preferences for media playback.
To select a Setup category:
1. Press Setup, or navigate to the Home | Setup menu and press OK.
2. Use the Up/Down arrows to select a Setup category, then press OK.
There are 10 Setup categories, including:
Audio/Video Output
Appearance
Video settings
Music Settings
Photo settings
Network settings
Operation
System
About
SETUP AND ADVANCED FEATURES – 179
Page 35
PRELIMINARY-P3
WD TV Play Media Player
Setup Navigation Buttons
Use these buttons on the remote control to navigate within and between the
Settings screens.
Button Function
User Manual
Up/Down arrows
OK Displays the option screen for the
1. Press OK. A confirmation prompt appears.
2. Select OK, then press OK.
If you fail to select OK within 15 seconds, the new
setting will not be applied.
If your entertainment unit cannot support the
selected setting, no change is made and the
original setting is retained.
Back Displays the previous menu screen
• Select a menu
• Select a menu setting in an option
screen
selected menu
Applies the selected menu setting
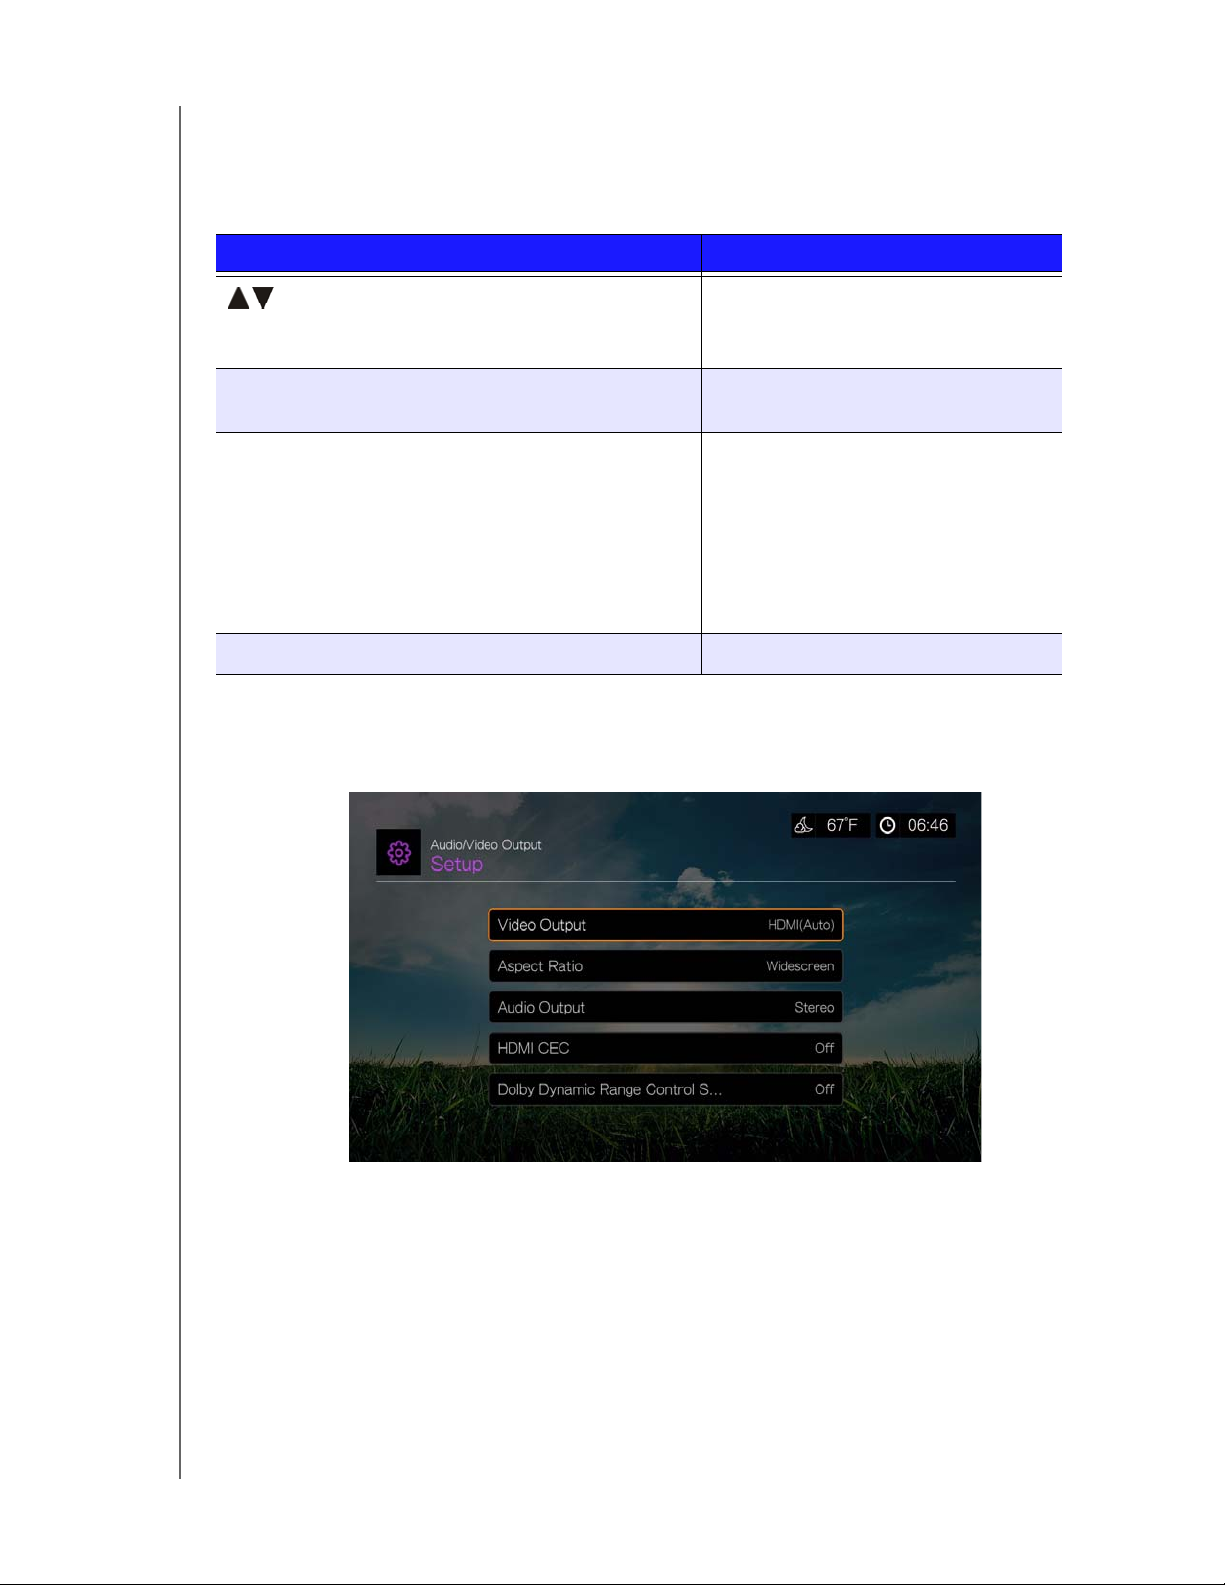
Audio/Video Output
Use the menus in this category to configure playback for audio and video files.
Video Output
Use this menu to select a video signal. After you finish making your selections, select
OK at the “Are you sure you want to change the video resolution?” prompt, then
press OK.
Composite
When using the standard RCA A/V cable (yellow, red, and white connectors) to
connect the media player, select Composite in the Video output screen.
SETUP AND ADVANCED FEATURES – 180
Page 36
PRELIMINARY-P3
WD TV Play Media Player
User Manual
You will be prompted to select the TV standard applicable to your device. This
setting depends on your regional location.
Options include:
NTSC – United States, Canada, Japan, Mexico, the Philippines, South Korea,
and Taiwan.
PAL – Europe, Greenland, parts of Africa and South America, the Mideast,
China, India, Australia, and Indonesia
Select a regional TV standard then press OK.
HDMI
When using an HDMI cable (if your TV supports HDMI resolution), select HDMI in the
Video output screen.
You will be prompted to select the applicable HDMI video resolution (set to Auto, or
from 480p to 1080p). Select display resolution then press OK.
Note: The further down the list the setting, the higher the resolution and clearer the picture.
After setting resolution, you are prompted to select color space (set to Auto, or RGB
High, RGB Low, or YCbCr). Select color space then press OK.
Aspect Ratio
Use this menu to select the way videos are displayed. Options include:
Normal (4:3)
Widescreen (16:9)
The media player’s default setting is Widescreen. Make sure your TV can support
widescreen resolution, or this default setting can result in a distorted video display.
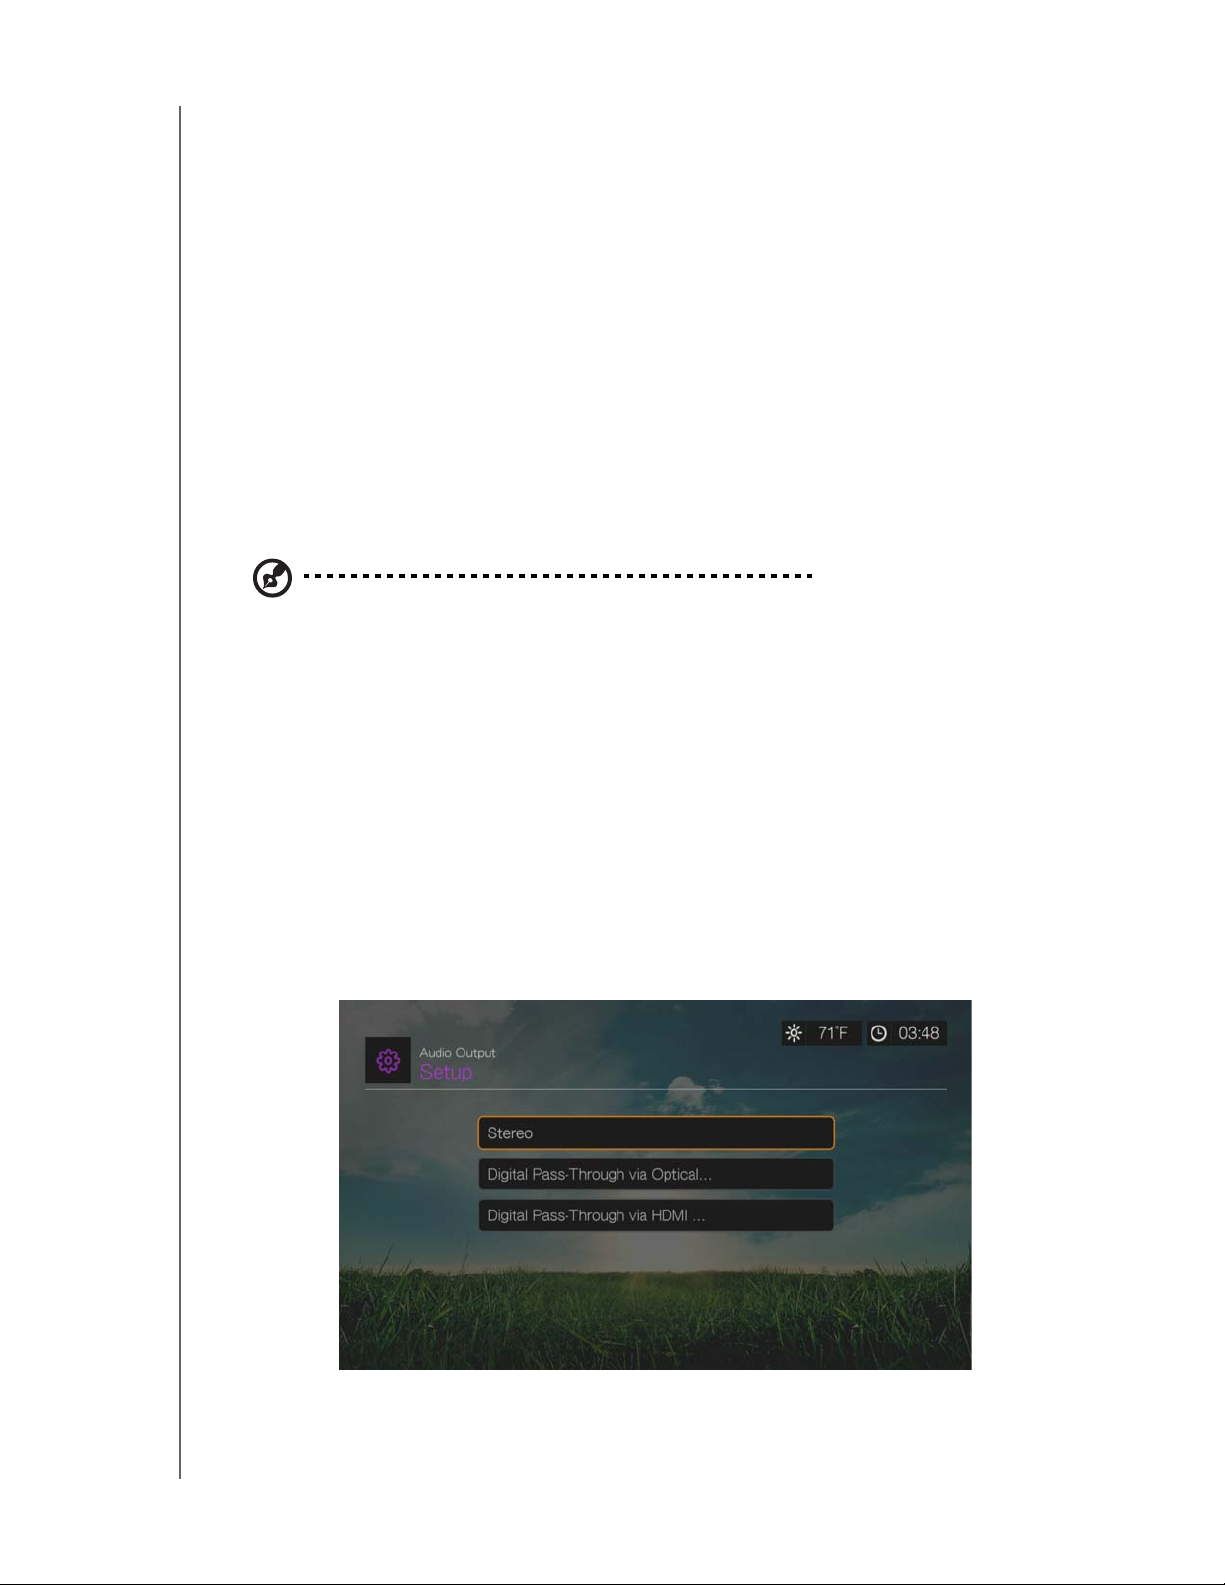
Audio Output
Use this menu to select the audio output mode.
SETUP AND ADVANCED FEATURES – 181
Page 37
PRELIMINARY-P3
WD TV Play Media Player
User Manual
Options include:
Stereo (Analog, S/PDIF, HDMI)
This is the default setting that decodes all audio streams into 2-channel output via
analog (RCA connectors), S/PDIF (optical connector), or HDMI. Recommended if
you are using a 2- or 4-speaker entertainment unit.
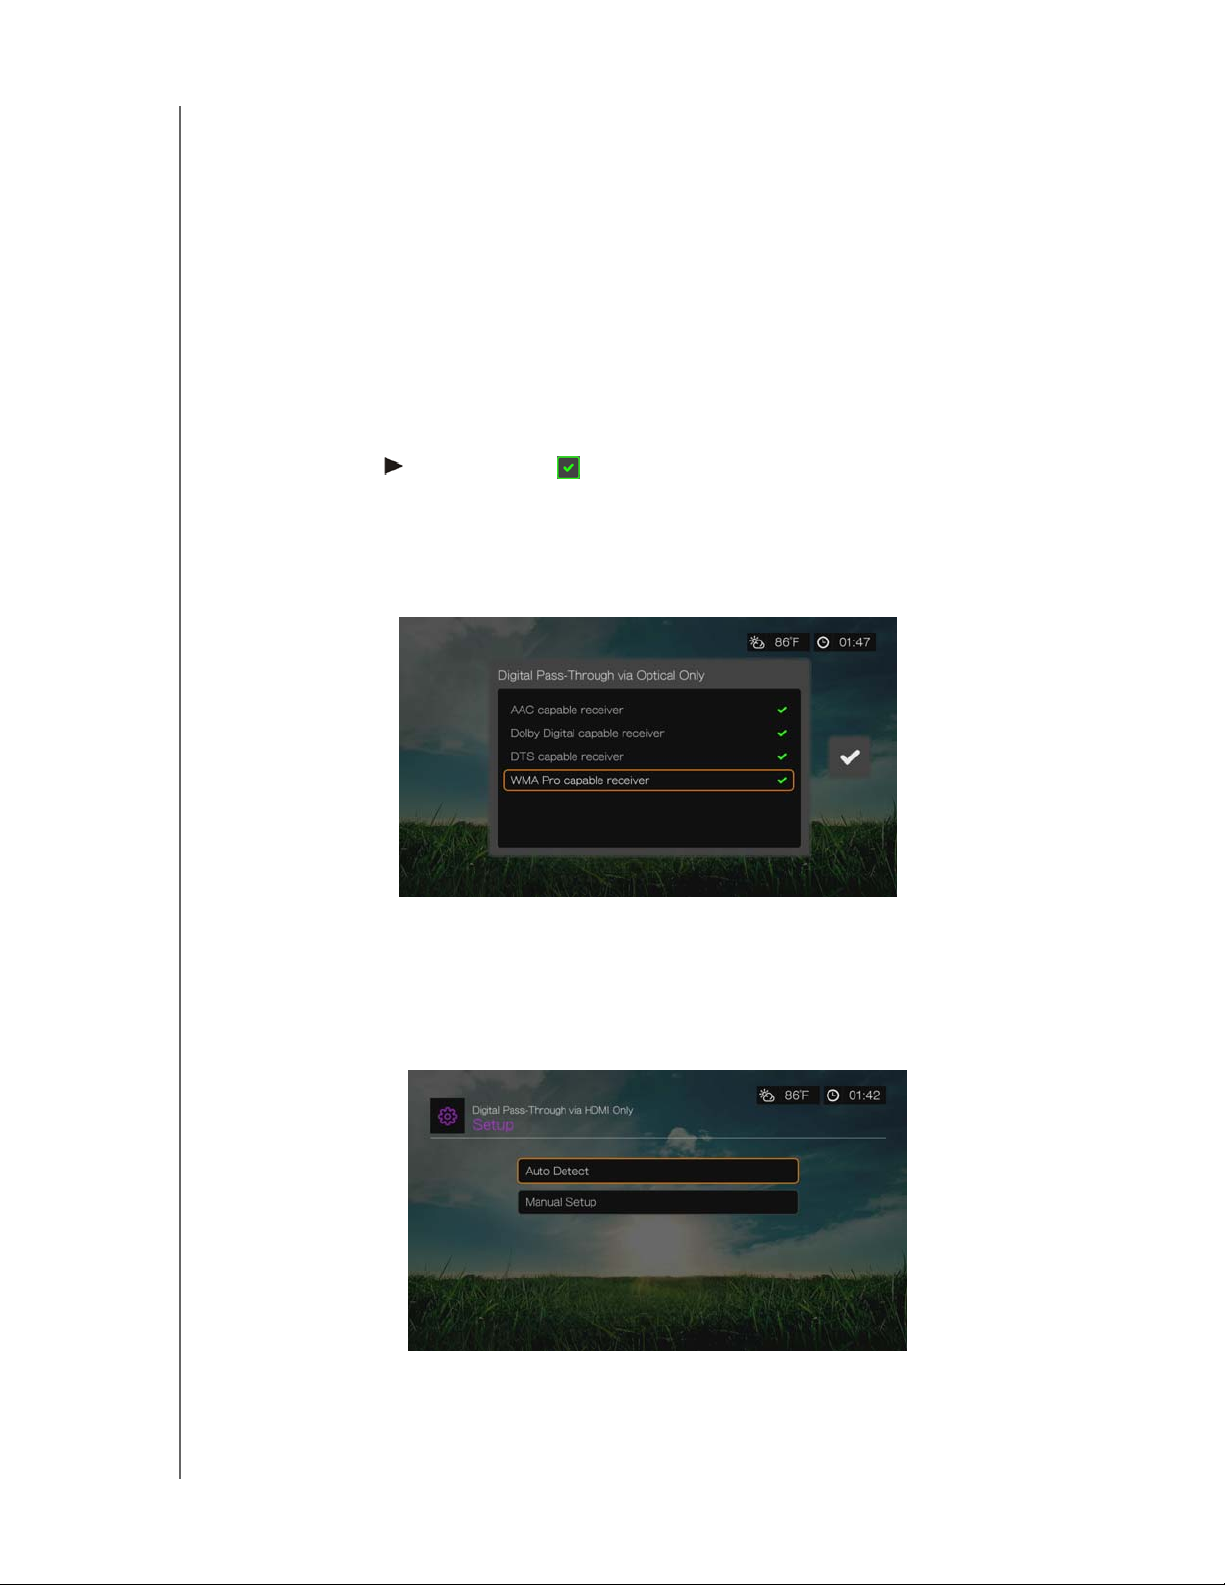
Digital Pass Through via Optical Only (S/PDIF)
Select this option if you are using HDMI for video and a S/PDIF (optical) connection
to output multichannel surround sound to a receiver and do not want audio output
from HDMI. After selecting Digital Pass Through via Optical Only, select one or
more of the following options that describe your receiver, then press OK after each
selection. Press then, with the selected, press OK again.
AAC capable receiver
Dolby Digital capable receiver
DTS capable receiver
WMA Pro capable receiver
Digital Pass Through via HDMI Only (HDMI)
Select this option if you are only using an HDMI connection to output multichannel
surround sound to a receiver. After selecting Digital Pass Through via HDMI Only,
select Auto Detect to have the media player detect receiver settings automatically.
Or, select Manual Setup.
SETUP AND ADVANCED FEATURES – 182
Page 38
PRELIMINARY-P3
WD TV Play Media Player
User Manual
Auto Detect
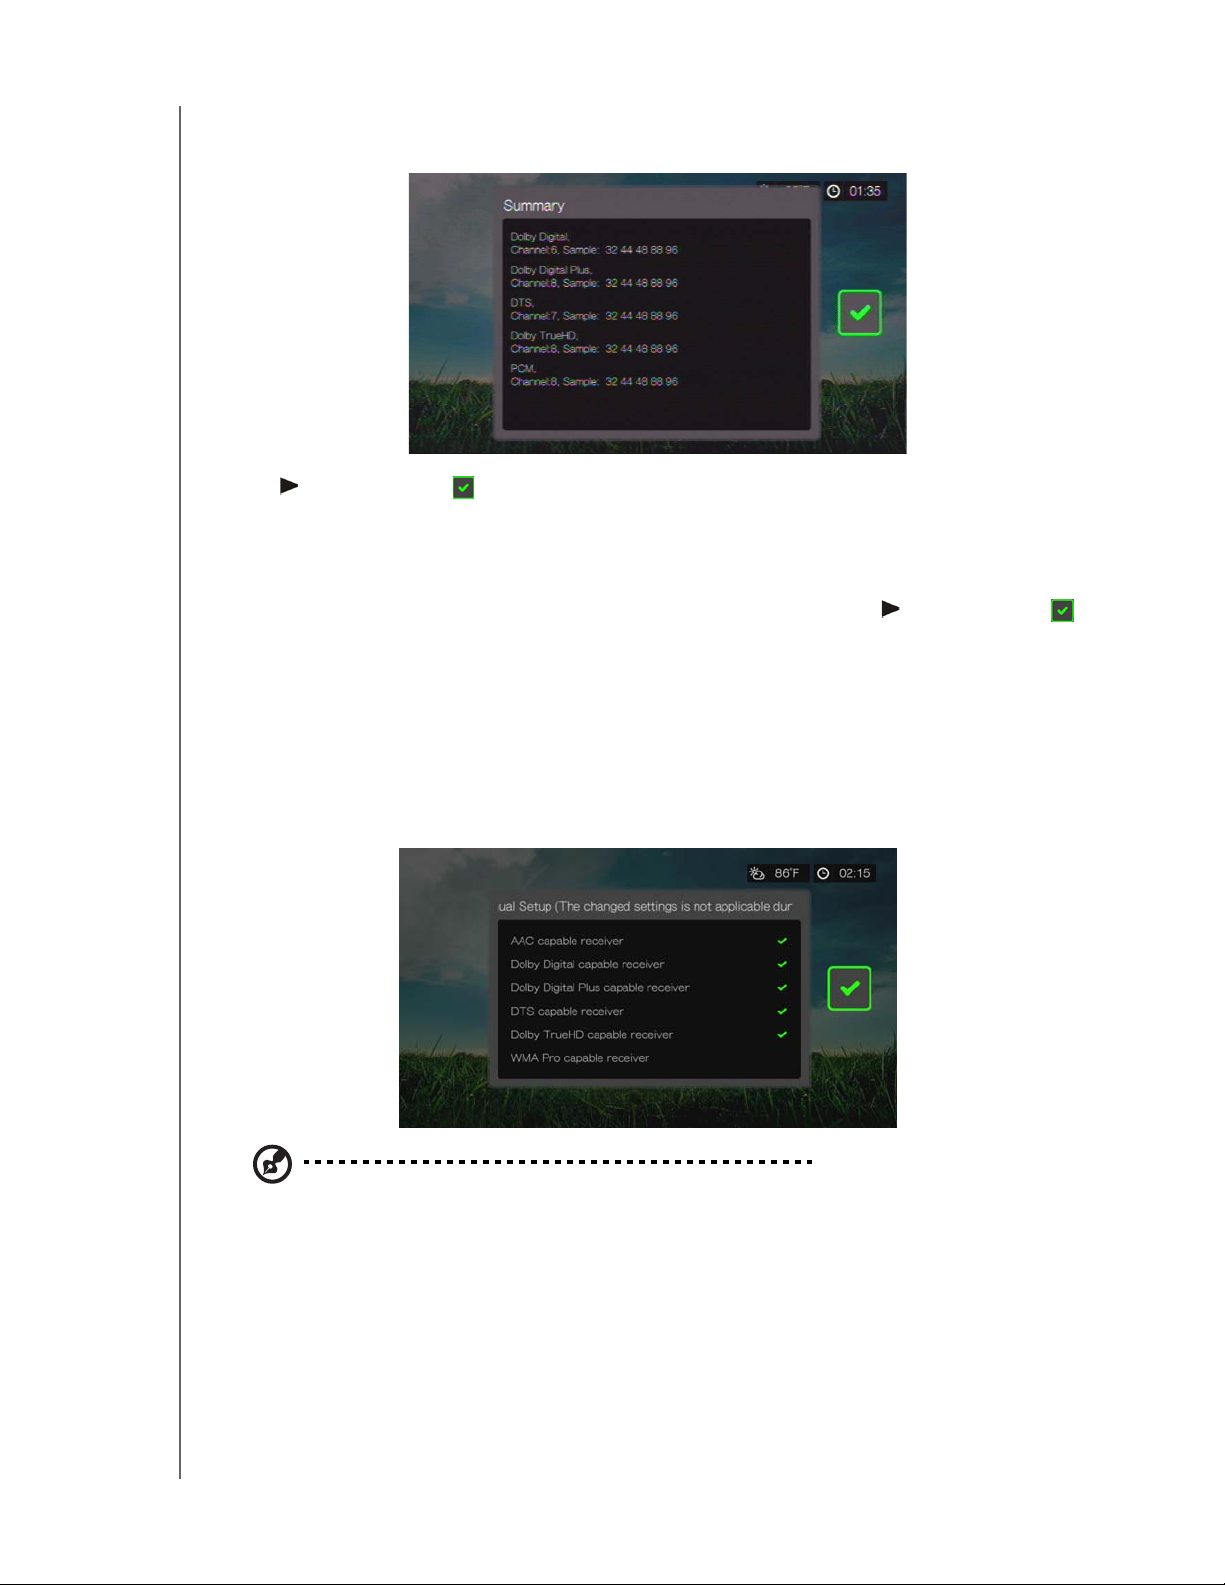
If you select Auto Detect a summary of your auto detect settings display.
Press then, with the selected, press OK again.
Manual Setup
If you select Manual Setup, select one or more of the following options that
describe your receiver, then press OK after each selection. Press then, with the
selected, press OK again.
AAC capable receiver
Dolby Digital capable receiver
Dolby Digital Plus capable receiver
DTS capable receiver
Dolby TrueHD capable receiver
WMA Pro capable receiver
Note: Changed settings are not applicable during DVD video playback.
SETUP AND ADVANCED FEATURES – 183
Page 39
PRELIMINARY-P3
WD TV Play Media Player
User Manual
HDMI CEC
Use this menu to set HDMI CEC to ON (OFF is set by default).
The CEC function allows HDMI devices to control each other when necessary,
allowing you to operate multiple devices with a single remote control for one of the
devices. By turning HDMI CEC ON, you can:
Press the power button on the WD TV or other HDMI CEC device remote
controller to power on or off both the media player and your HDTV or other
devices.
Press FF/REV, Play/Pause, Navigation, OK, Mute, and numeric keys on the WD
TV or other HDMI CEC device remote controller to control multiple devices.
Note: The HDMI CEC function only works with HDMI CEC-compatible devices. Not all operations of
each HDMI device can be controlled with a single remote control. Depending on the specifications of
your HDMI-CEC compatible device, some or all functions listed above may not work even if the device
is HDMI-CEC compatible.
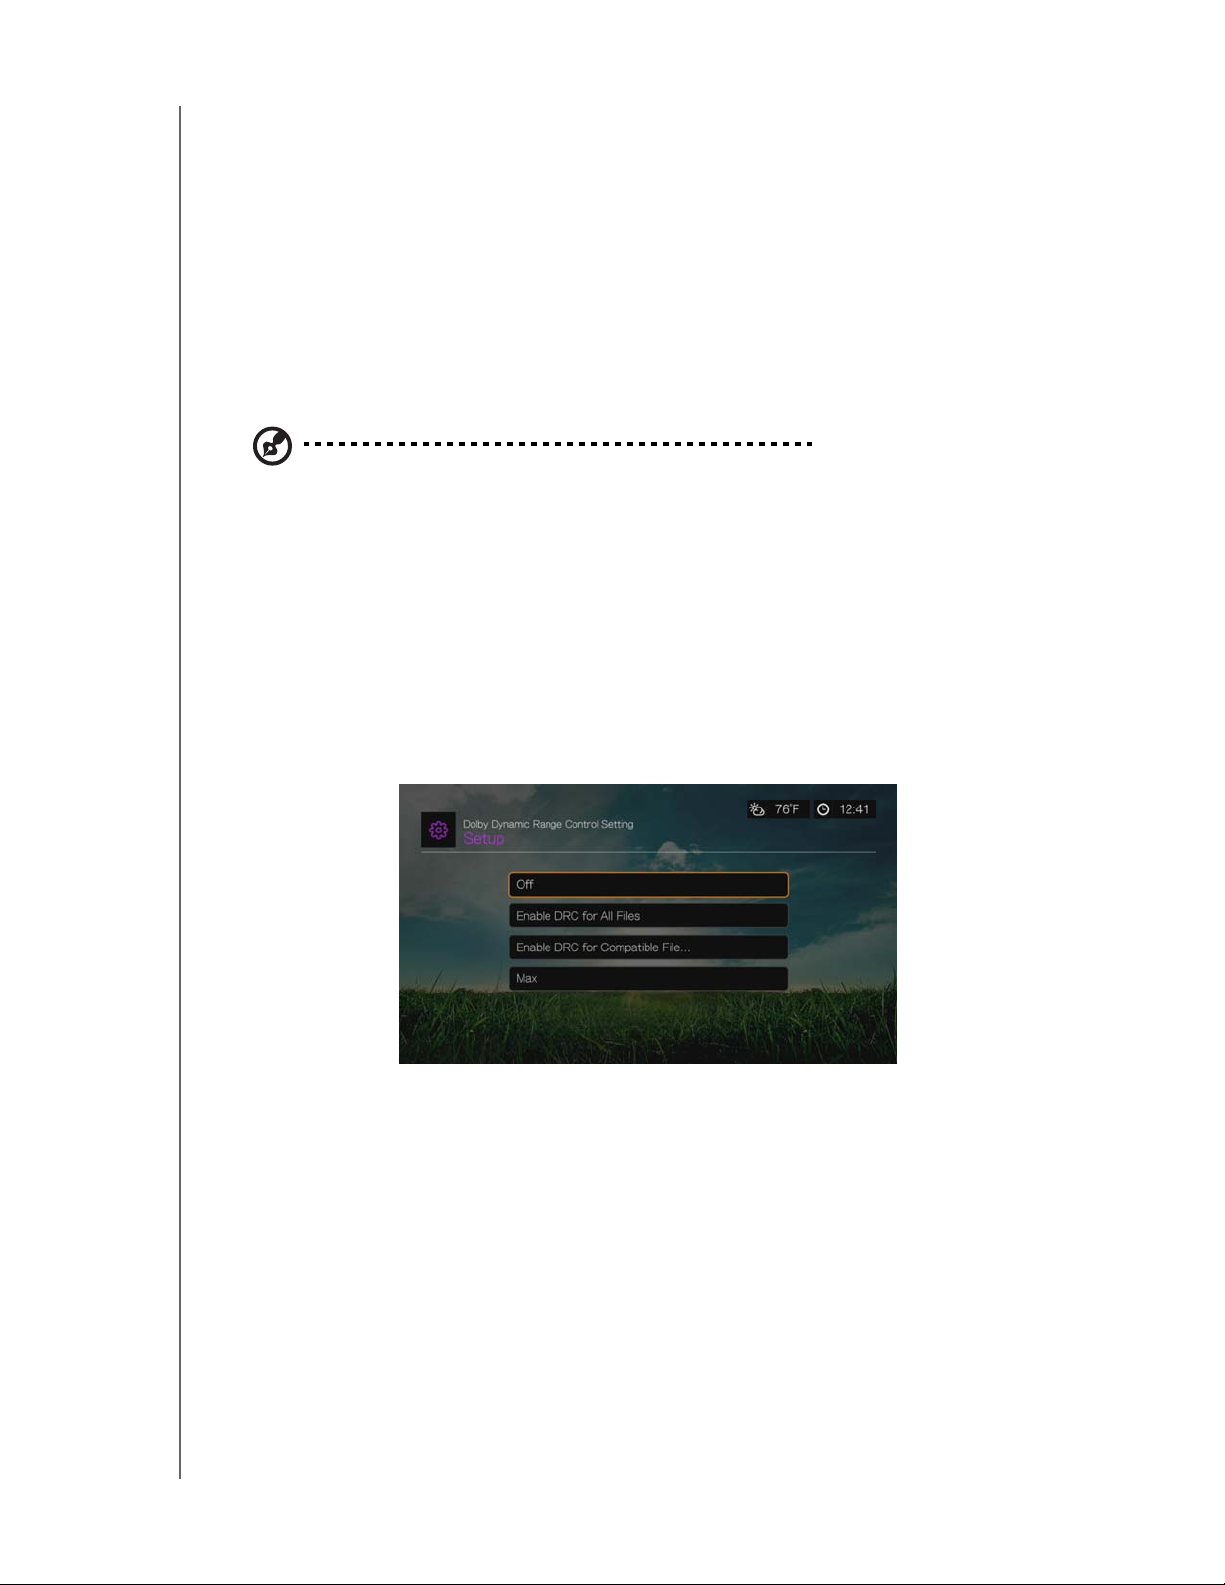
Dolby Dynamic Range Control (DRC) Setting
Use this menu to set the dynamic range control, which reduces or increases sound
levels. This setting can be useful when, for example, you want to watch a movie
without hearing wide volume swings between loud and quiet sounds. DRC thus
enables reduced peak volume levels without loss of overall sound quality. Default
setting is On. Options are Off, Enable DRC for All Files, Enable DRC for
Compatible Files, and Max.
SETUP AND ADVANCED FEATURES – 184
Page 40
PRELIMINARY-P3
WD TV Play Media Player
User Manual
Appearance
Use the menus in the Appearance screen to set user interface display options for the
media player.
Language
Press / to select the display language, then press OK.
Screen Size Calibration
Use this menu to correct any issues with overscan (the display is cropped in the TV
screen). To correct any overscan problems, calibrate the display by reducing the
display size by up to 30%. The calibration settings are in 5% increments.
Note: Screen size calibration only affects the user interface. It does not affect video scaling.
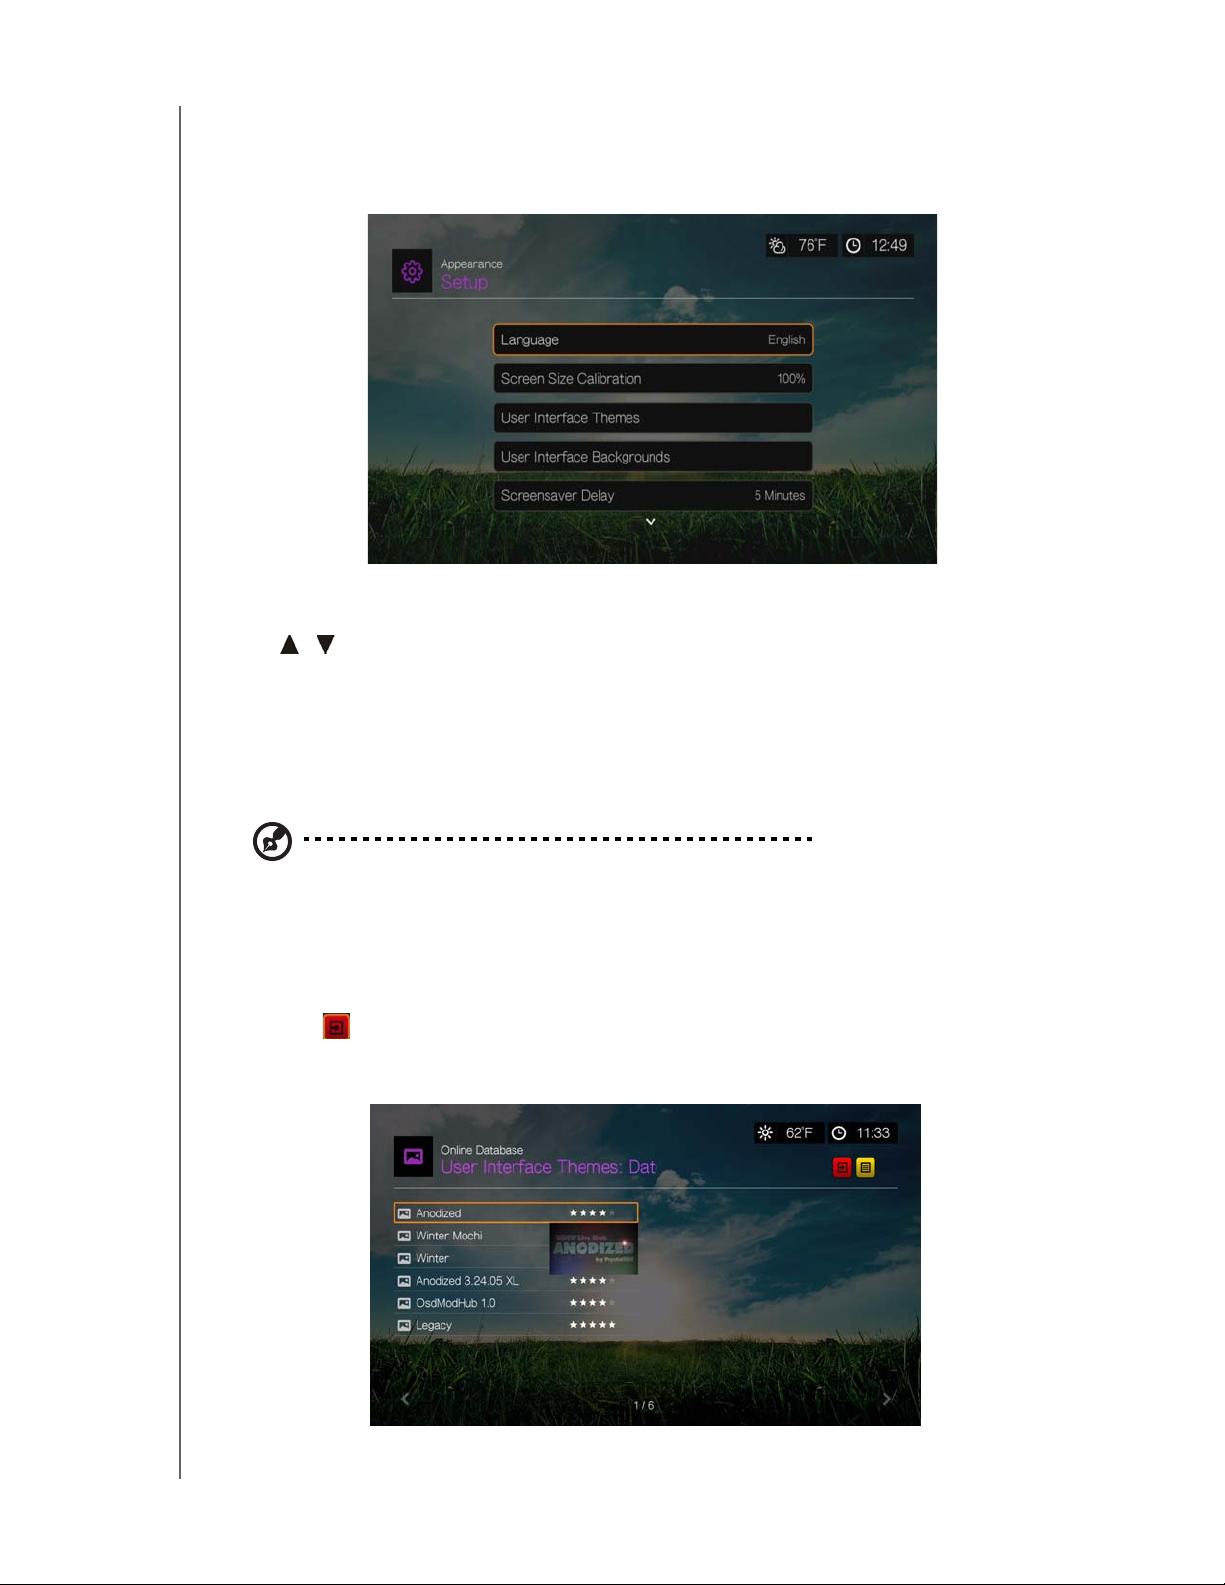
User Interface Themes
The media player supports interchangeable user interfaces called themes. Themes
alter the player's visual appearance, but not its functionality.
1. Select in the user interface themes page,then press OK to access the online
database for themes.
2. Select the icon corresponding to a theme and press OK.
SETUP AND ADVANCED FEATURES – 185
Page 41
PRELIMINARY-P3
WD TV Play Media Player
User Manual
3. The theme preview screen appears. Use the navigation buttons to View Theme
or View Description, or select Apply Theme and press OK. The new theme is
applied and the appearance of the WD TV device UI changes.
Legacy Theme
You can download the source files for the Legacy theme shown above and use it to
develop your own theme file. Go to http://www.wdtvlive.com/theme for details.
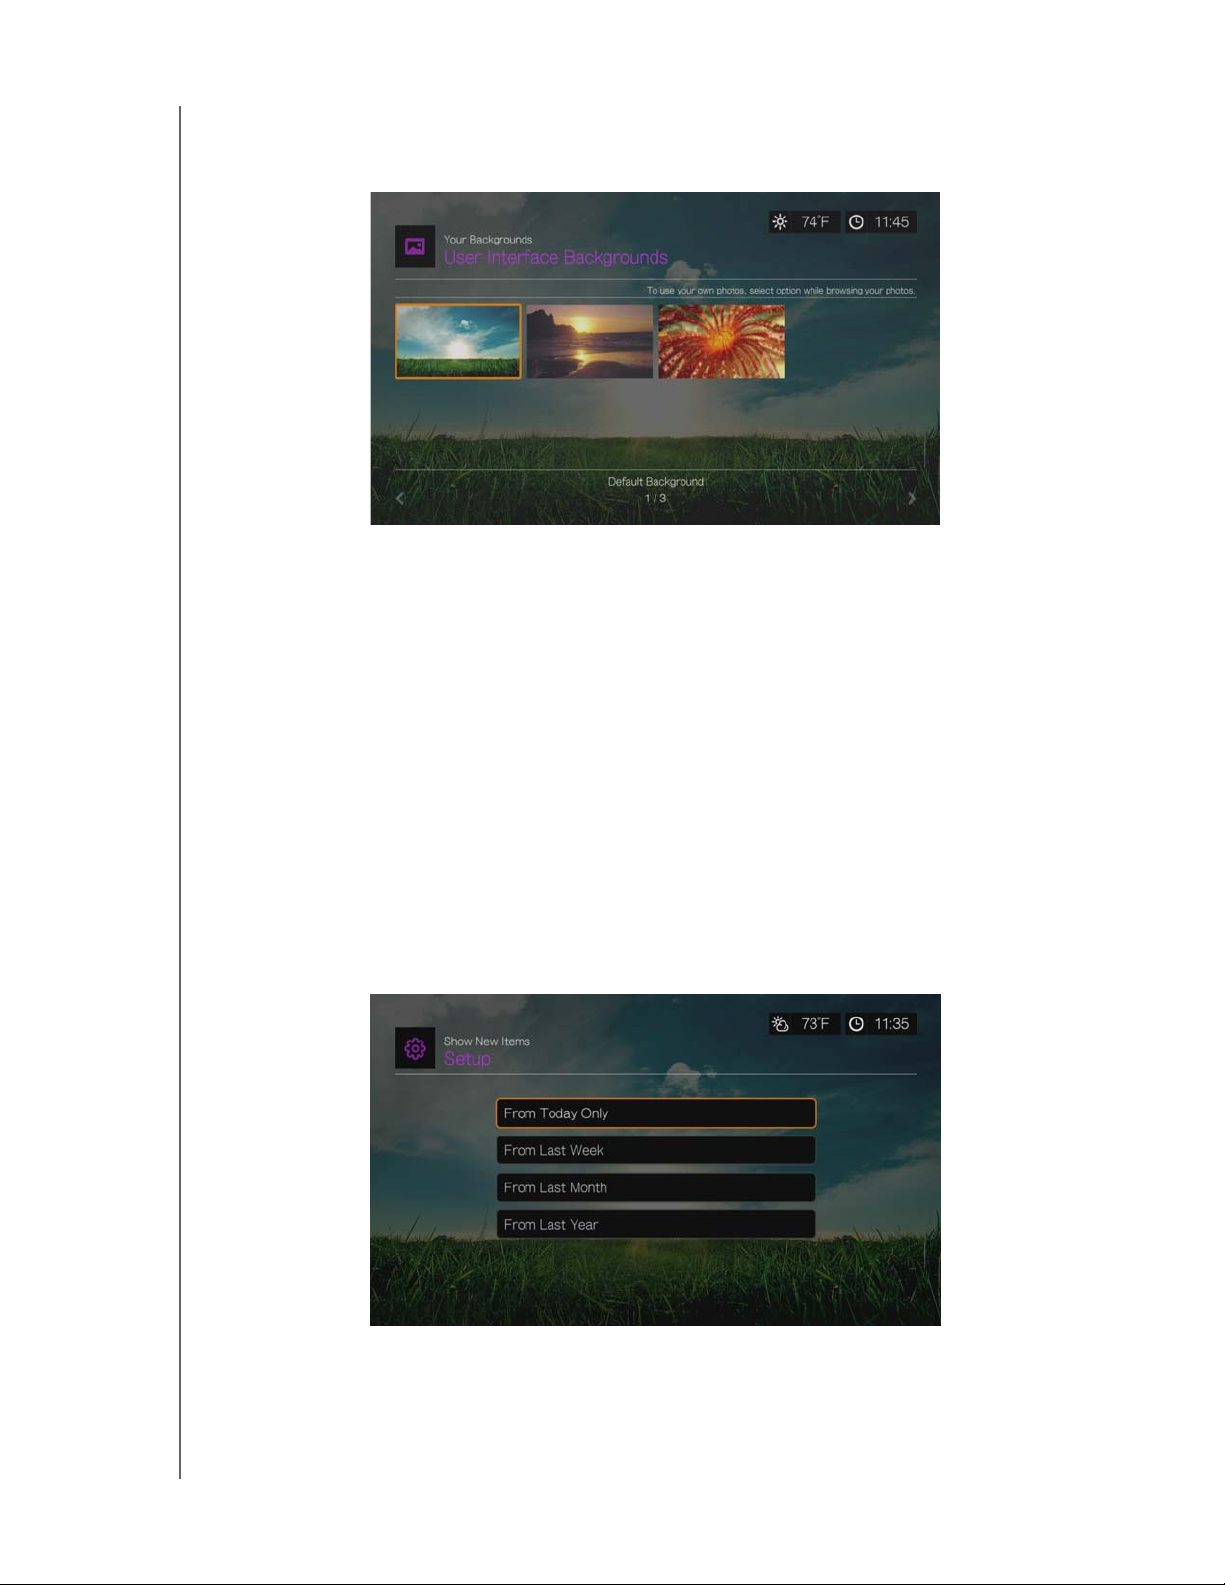
User Interface Backgrounds
You can use this menu to set a different photo as the system background to replace
the default grass field and sunny sky photo. You can choose from the WD Creative
Masters backgrounds or Your Backgrounds.
WD Creative Masters
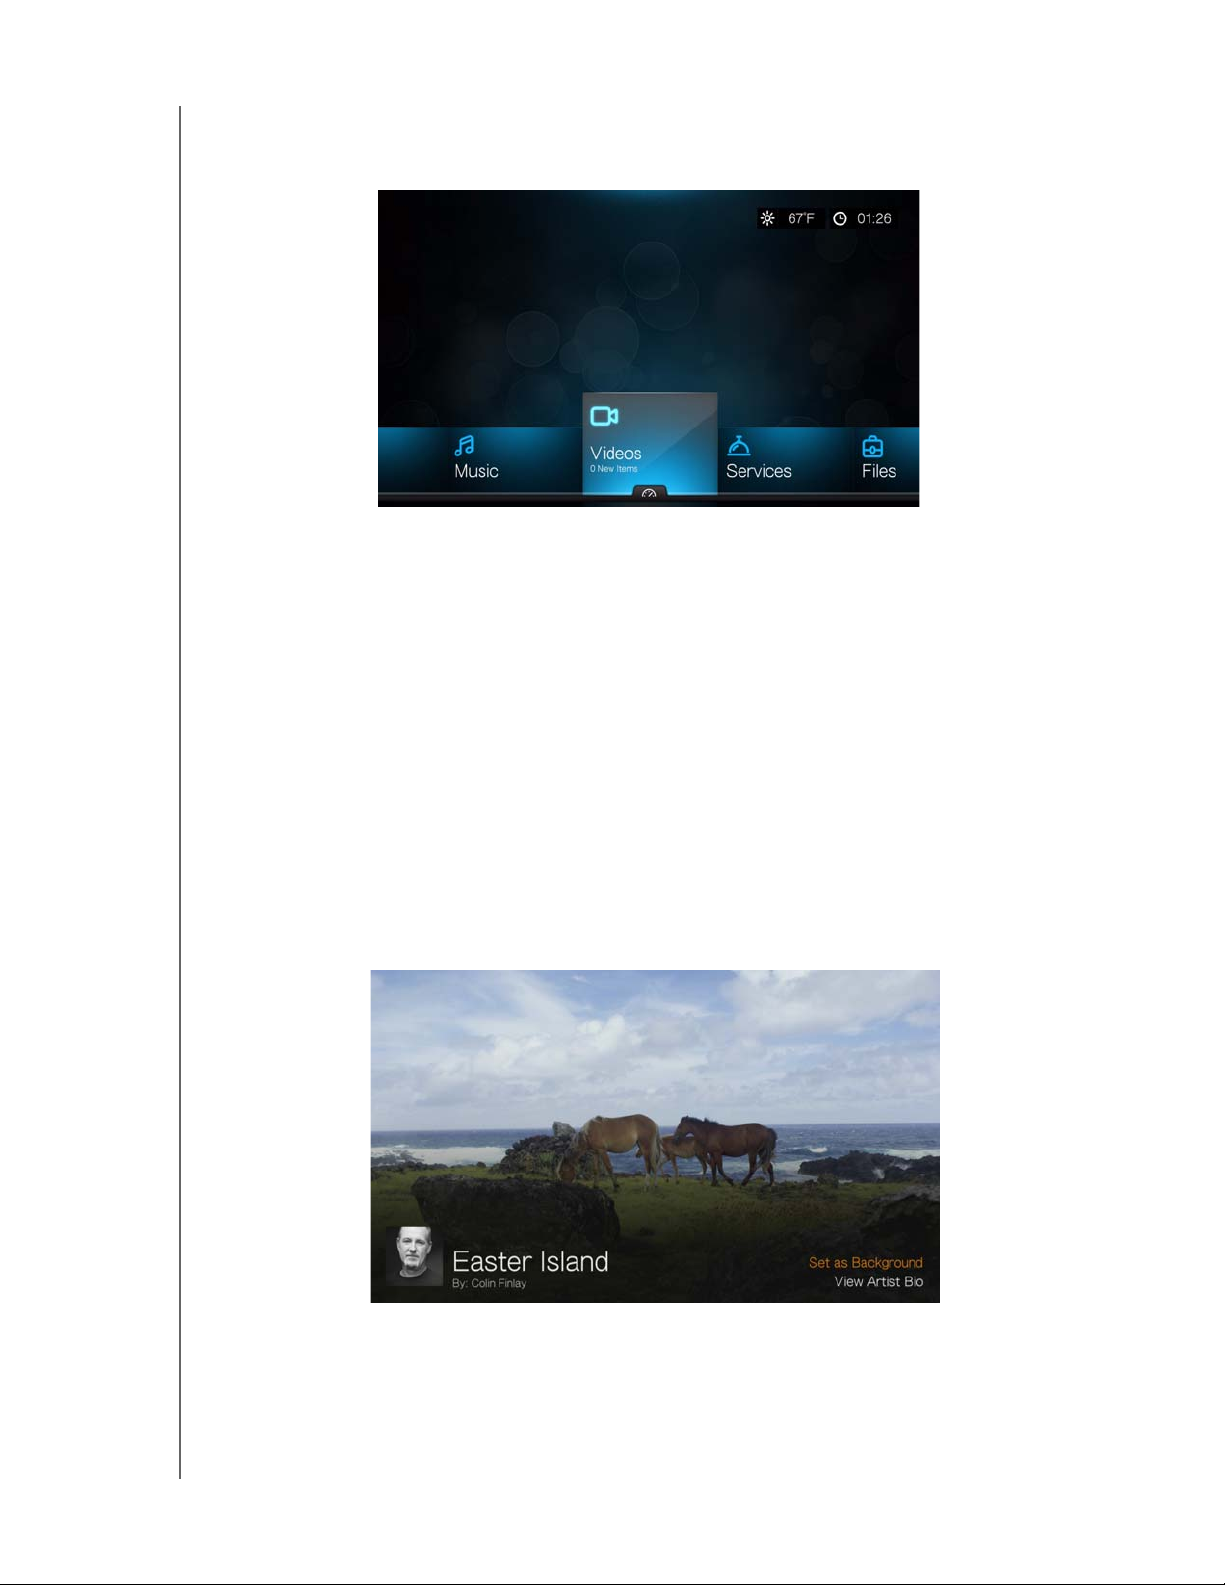
WD Creative Masters includes themed albums of photos from leading
photographers that you can use for your media player user interface background.
Select a WD Creative Masters album, then navigate to a photo and press OK. Press
OK again to preview the background. You can choose to Set as Background or
View Bio of the photographer, then press OK.
Your Backgounds
SETUP AND ADVANCED FEATURES – 186
Page 42
PRELIMINARY-P3
WD TV Play Media Player
User Manual
Your Backgrounds shows the default background as well as other photos you have
set as the background (see “Set as Background” on page 87). Navigate to a
background photo and press OK, then press OK again to Set as Background.
Screensaver Delay
Use this menu to set the time of system inactivity before the screensaver display is
enabled. The default setting is 5 minutes.
Screensaver Style
Use this menu to choose your screensaver display style. The WD Logo screensaver
is the default style, but you can also choose a Random Photo Slideshow of
photos stored in the media player’s internal drive or a Folder Photo Slideshow of
photos from a single folder as your screensaver.
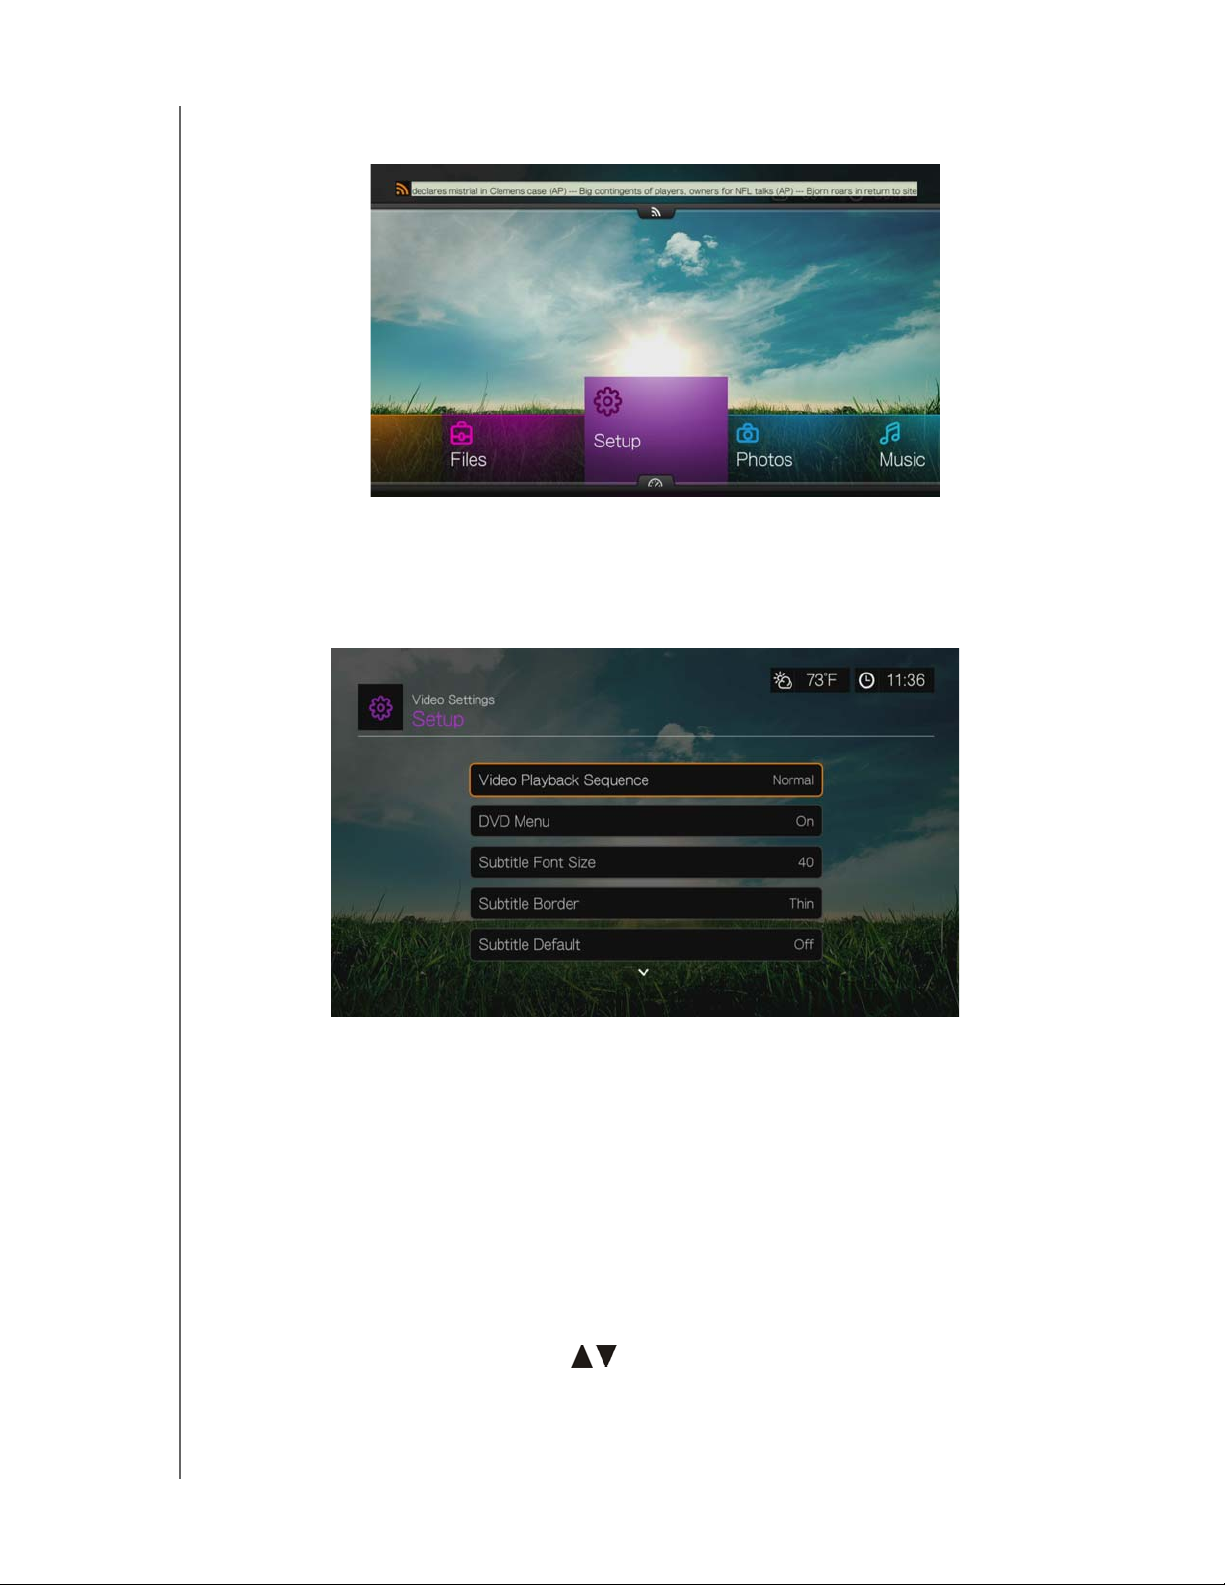
Show New Items
Use this menu to select a date range for the media files added to your content
source(s) to be marked as “new.” The number of new items displays when you
select Video, Music, Photo, or Files on the home screen, or New Items in the
dashboard.
RSS Ticker
SETUP AND ADVANCED FEATURES – 187
Page 43
PRELIMINARY-P3
WD TV Play Media Player
User Manual
Set RSS Ticker to Show to stream your RSS feeds on the home page. Default
setting is Hide.
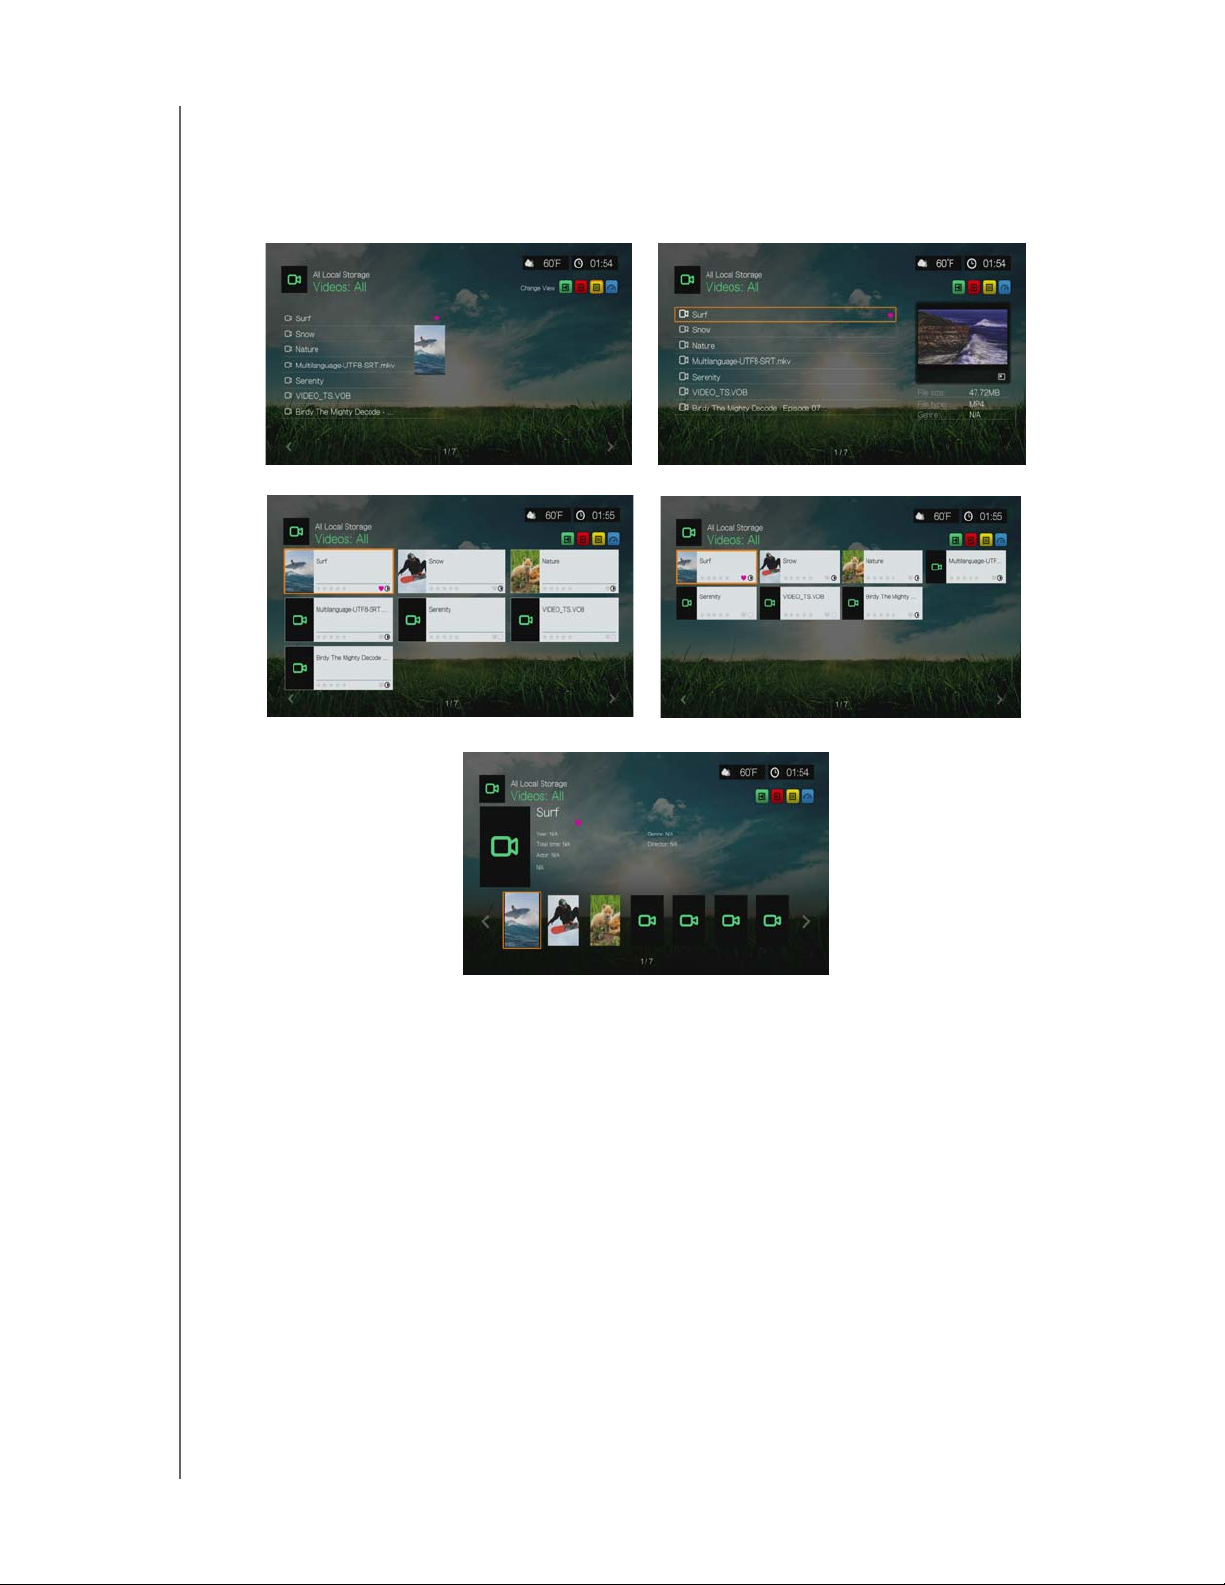
Video Settings
Use the menus in the Video Settings screen to configure the display and sequence
option for video files.
Video Playback Sequence
Use this menu to select the video playback mode. The default setting is Normal. Go
to “Play Mode” on page 71 for a description of these video playback modes.
DVD Menu
Use this menu to disable the DVD menu display (set to Off) if your video file supports
it. Default setting is On.
Subtitle Font Size
Use this menu to set the default font size (24 to 68 points, 40 points is default) for
displaying video subtitles. Use the
buttons to select a font size. “Subtitle font
size” at the bottom of the screen reflects the font size option currently selected.
Press OK to select a subtitle font size.
Subtitle Border
SETUP AND ADVANCED FEATURES – 188
Page 44

PRELIMINARY-P3
WD TV Play Media Player
User Manual
Use this menu to set the default appearance of the subtitle frame (Thin or Thick).
Subtitle Default
Use this menu to set the default appearance of the subtitles (On or Off).
Note: The above subtitle options are only relevant to ASS/SRT/SSA subtitles, and are not available for
PGS, SUB/IDX, or VOBSUB subtitles.
SETUP AND ADVANCED FEATURES – 189
Page 45
PRELIMINARY-P3
WD TV Play Media Player
User Manual
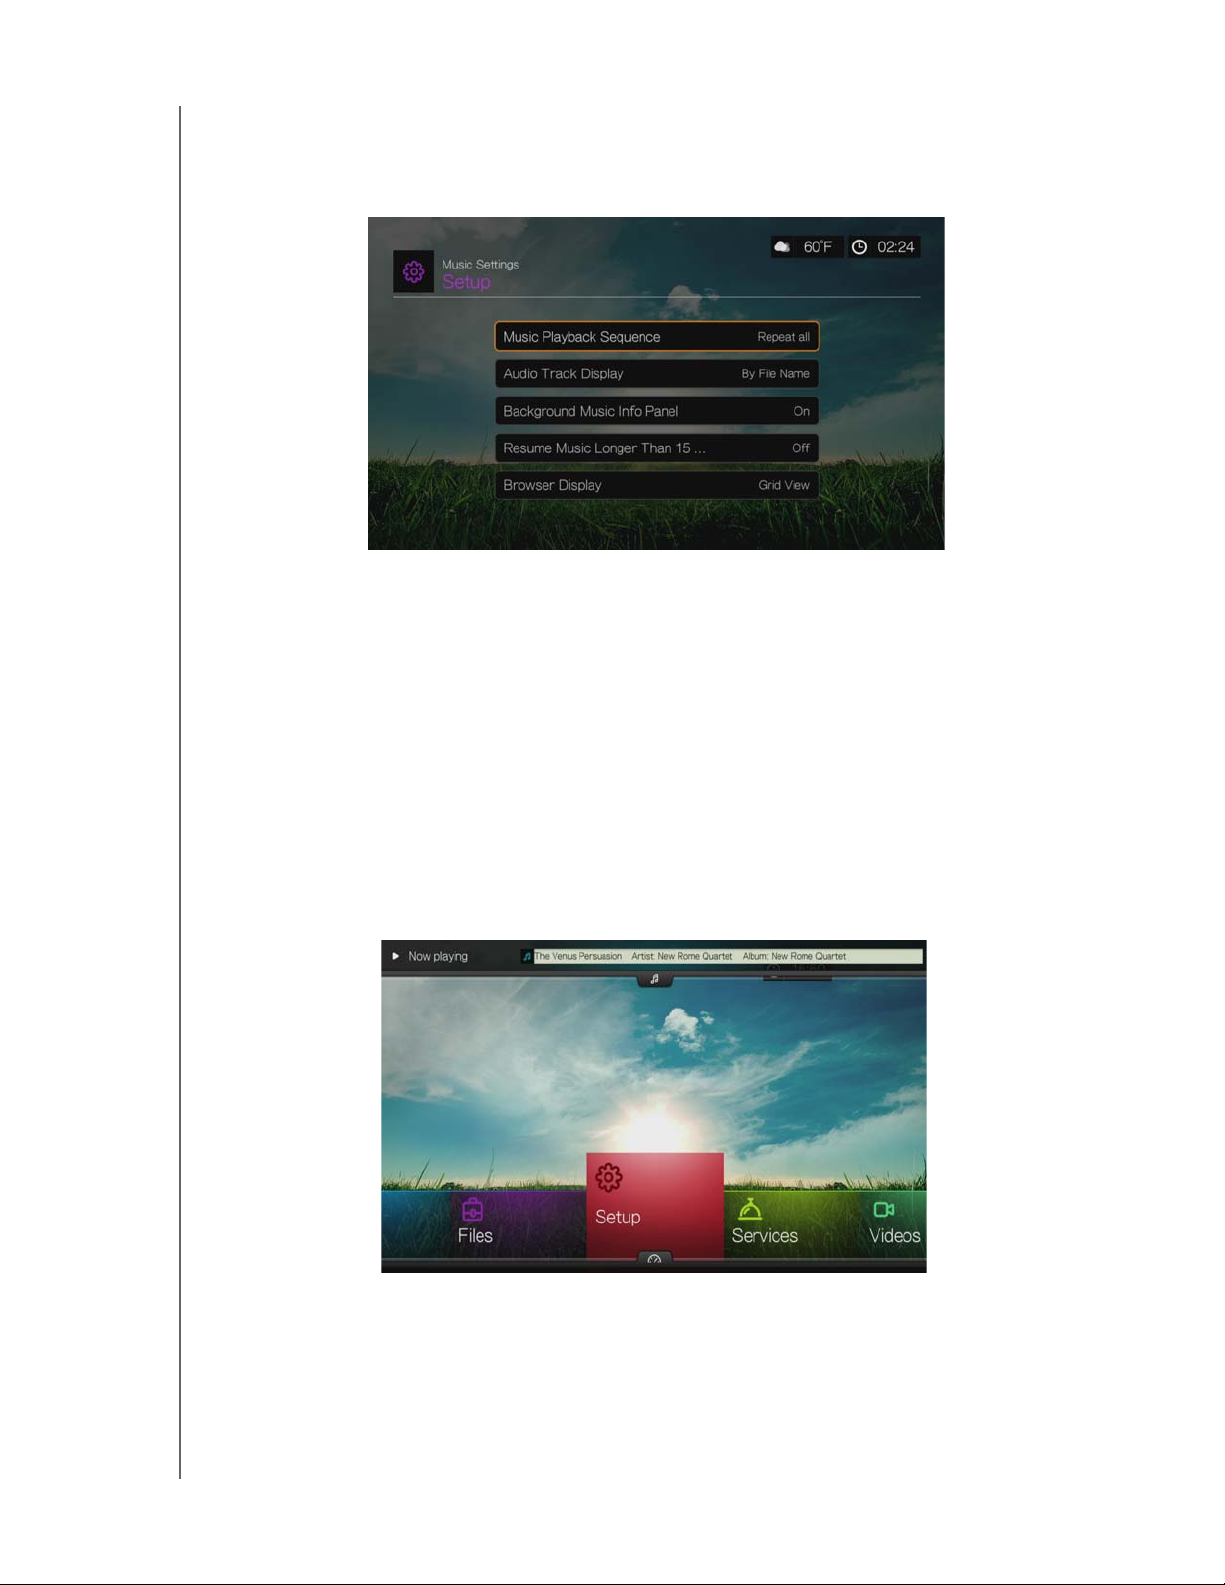
Browser Display
Use this menu to select the default display mode for the video browser screen. The
default setting is Preview View. Examples of grid, list, and preview views are shown
below.
List View
Large Grid View
Preview View
Small Grid View
Gallery View
SETUP AND ADVANCED FEATURES – 190
Page 46
PRELIMINARY-P3
WD TV Play Media Player
User Manual
Music Settings
Use the menus in the Music settings screen to configure the display and sequence
option for audio files.
Music Playback Sequence
Use this menu to select the audio playback mode. The default setting is Normal. Go
to “To set the music repeat mode:” on page 80 for a description of the audio
playback modes.
Audio Track Display
Use this menu to select which file information to display in the audio browser screen.
The default setting is File name.
Background Music Info Panel
When turned On, a music info menu bar appears at the top of the screen when
music is playing in the background.
Resume Music Longer Than 15 Min
When turned On, will prompt you to resume or restart a music file that is 15 minutes
or longer.
SETUP AND ADVANCED FEATURES – 191
Page 47
PRELIMINARY-P3
WD TV Play Media Player
User Manual
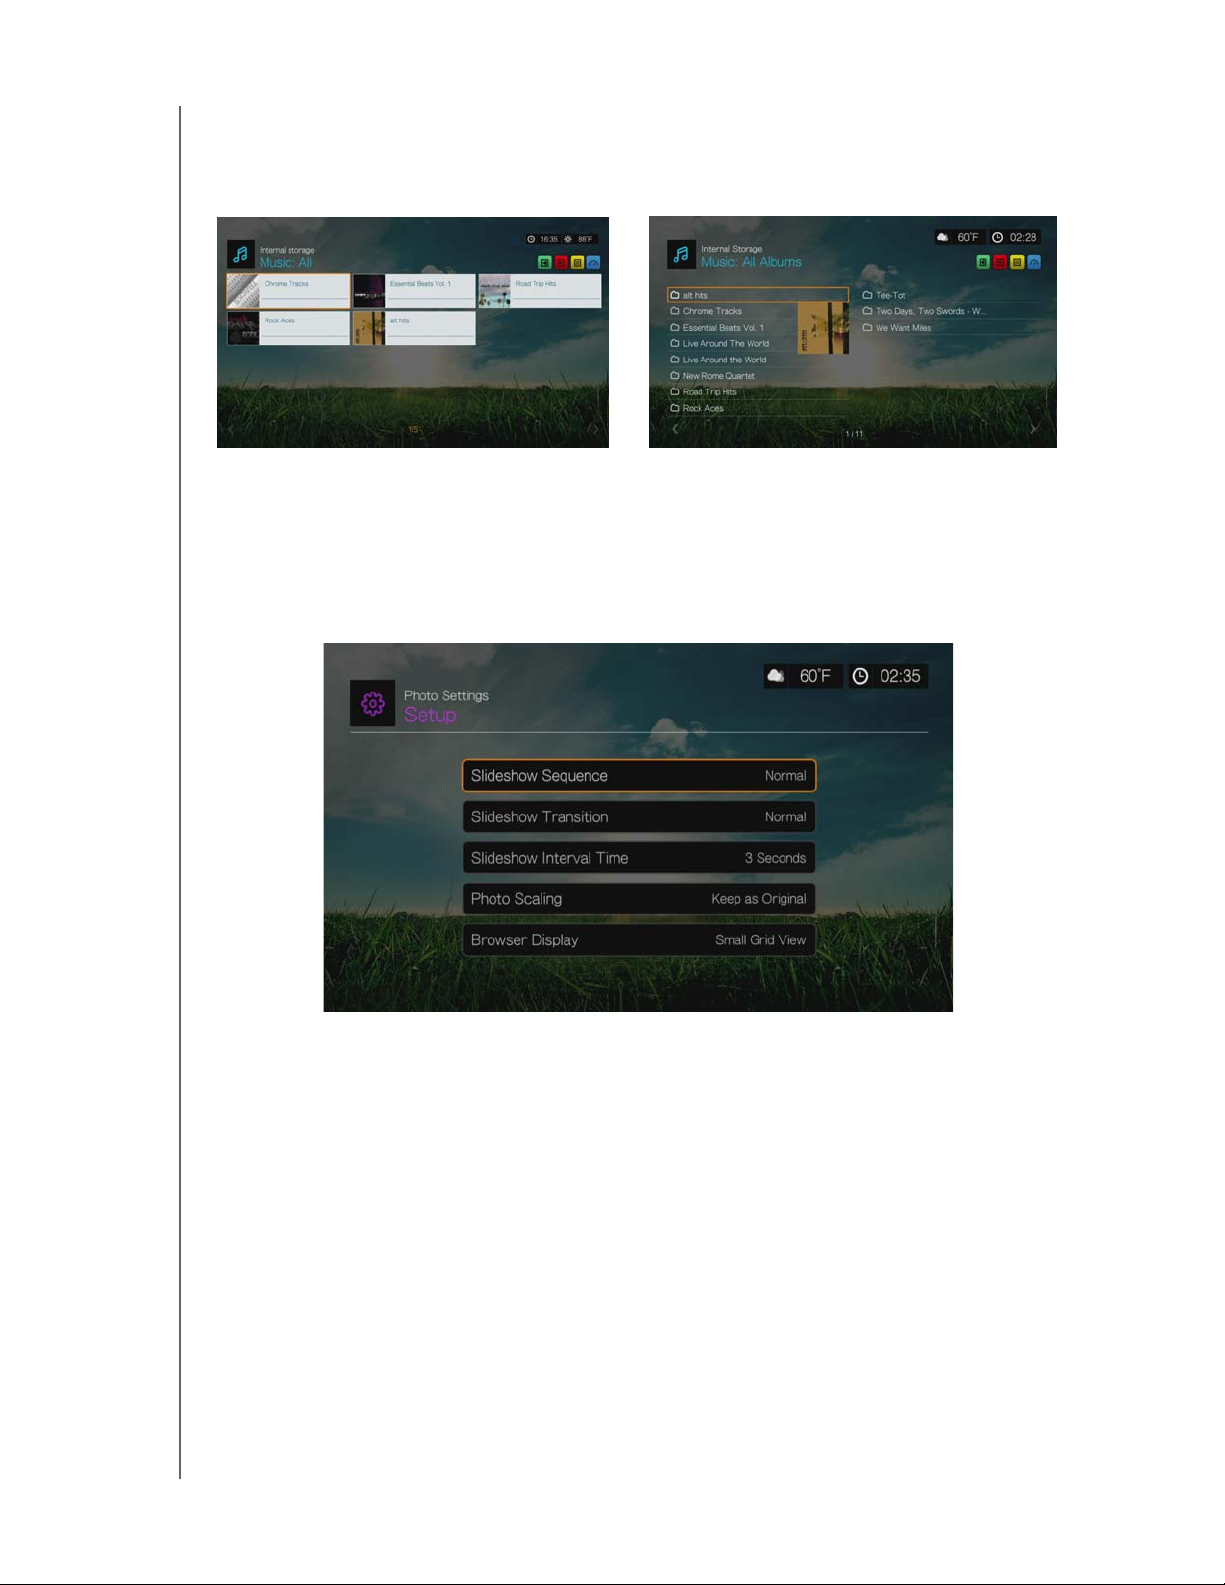
Browser Display
Use this menu to select the default display mode for the audio browser screen. The
default setting is Grid View. Examples of both grid and list views are shown below.
Grid View
List View
Photo Settings
Use the menus on this category to configure the display size and slideshow settings
when viewing your image files.
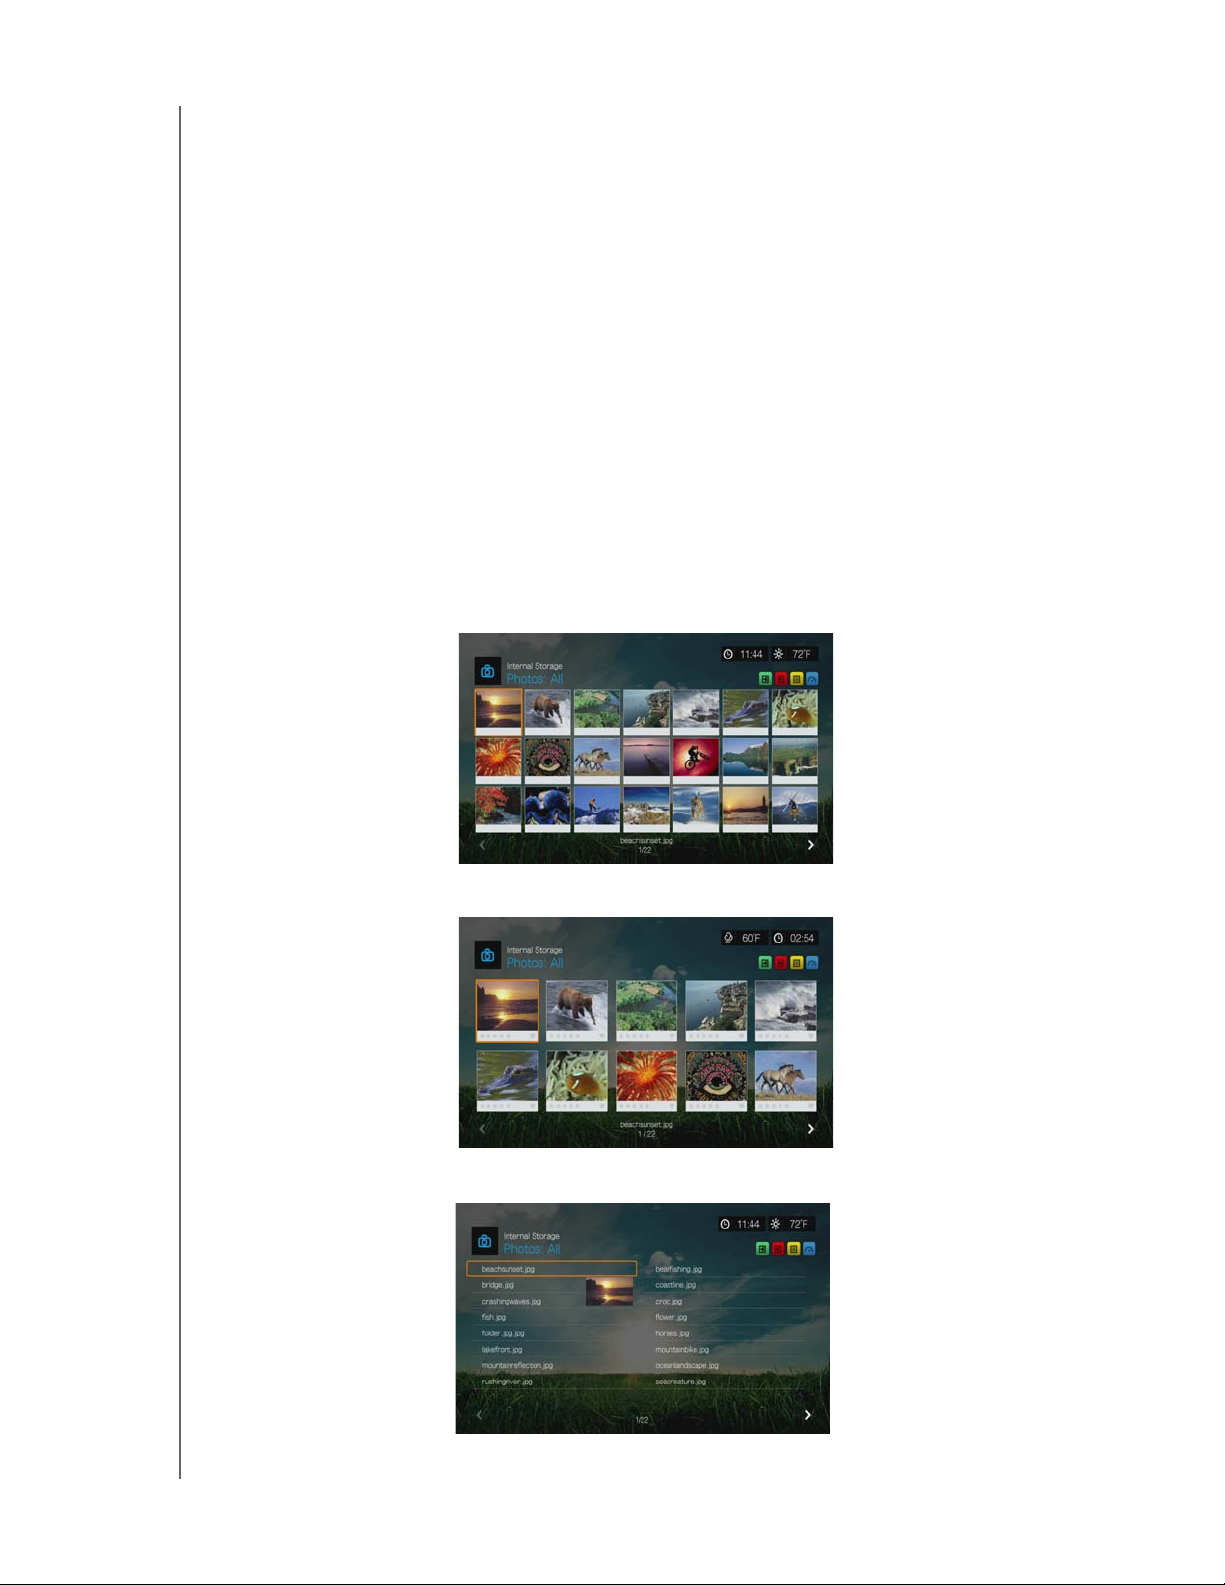
Slideshow Sequence
Use this menu to set the slideshow sequence mode. The default setting is Normal.
Normal – The slideshow is played once. When the last image is displayed, the
previous browser screen is displayed.
Shuffle – The slideshow is played in random order until you press Stop.
Repeat All – The slideshow is played repeatedly until you press Stop or Back.
Repeat All and Shuffle – The slideshow is played continuously in random order.
Slideshow Transition
Use this menu to select the method used to display the next slide in a slideshow.
The default setting is Normal.
SETUP AND ADVANCED FEATURES – 192
Page 48
PRELIMINARY-P3
WD TV Play Media Player
User Manual
Slideshow Interval Time
Use this menu to set the time interval between pictures in the slideshow. You can
select from 3 seconds (default) to 5 minutes.
Photo Scaling
Use this menu to define how pictures are scaled when you view them. This also
applies when pictures are viewed in a slideshow. Options include:
Keep as original – Maintains the original resolution of the image (default).
Fit to screen – Fills as much of the display area as possible while maintaining
correct image proportions.
Display in full screen– Fills the display area with the image (this can lead to
image distortion).
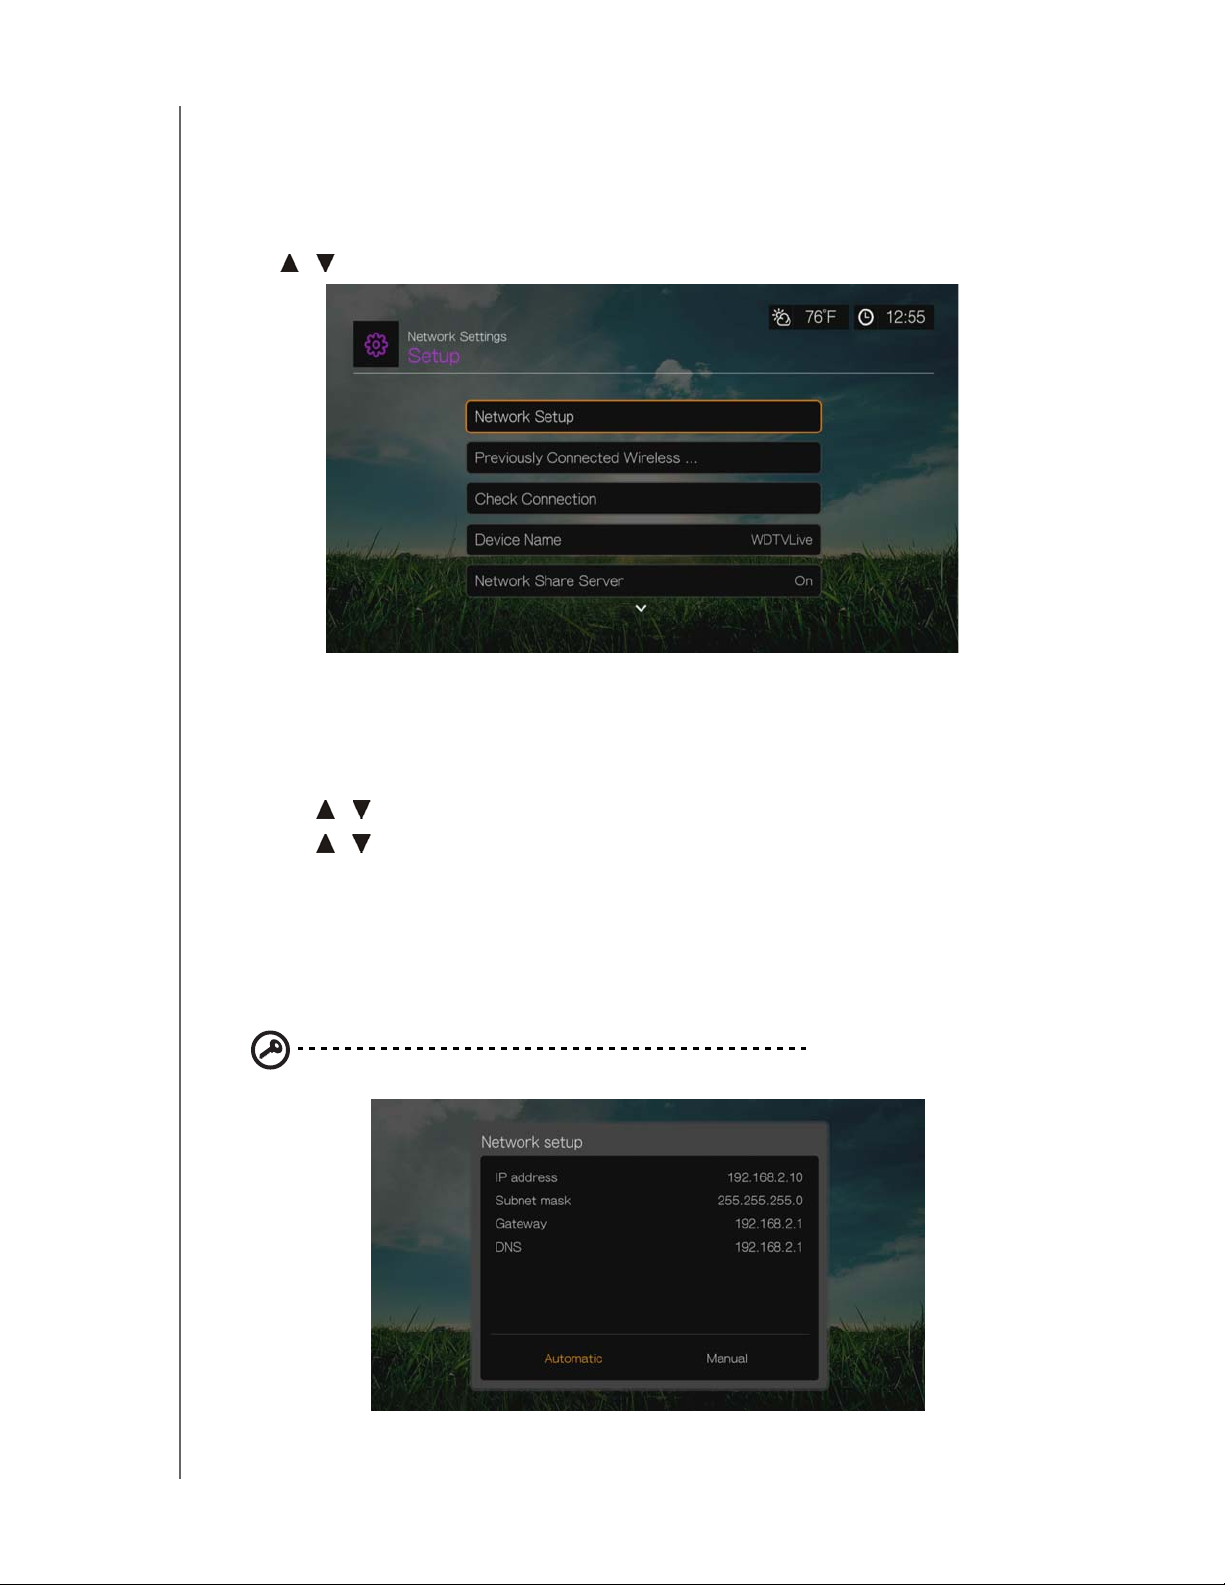
Browser Display
Use this menu to select how media files are displayed in their respective folders. The
default setting is Small Grid View. Examples of both grid and list views are shown
below.
Small Grid View
Large Grid View
List View
SETUP AND ADVANCED FEATURES – 193
Page 49
PRELIMINARY-P3
WD TV Play Media Player
User Manual
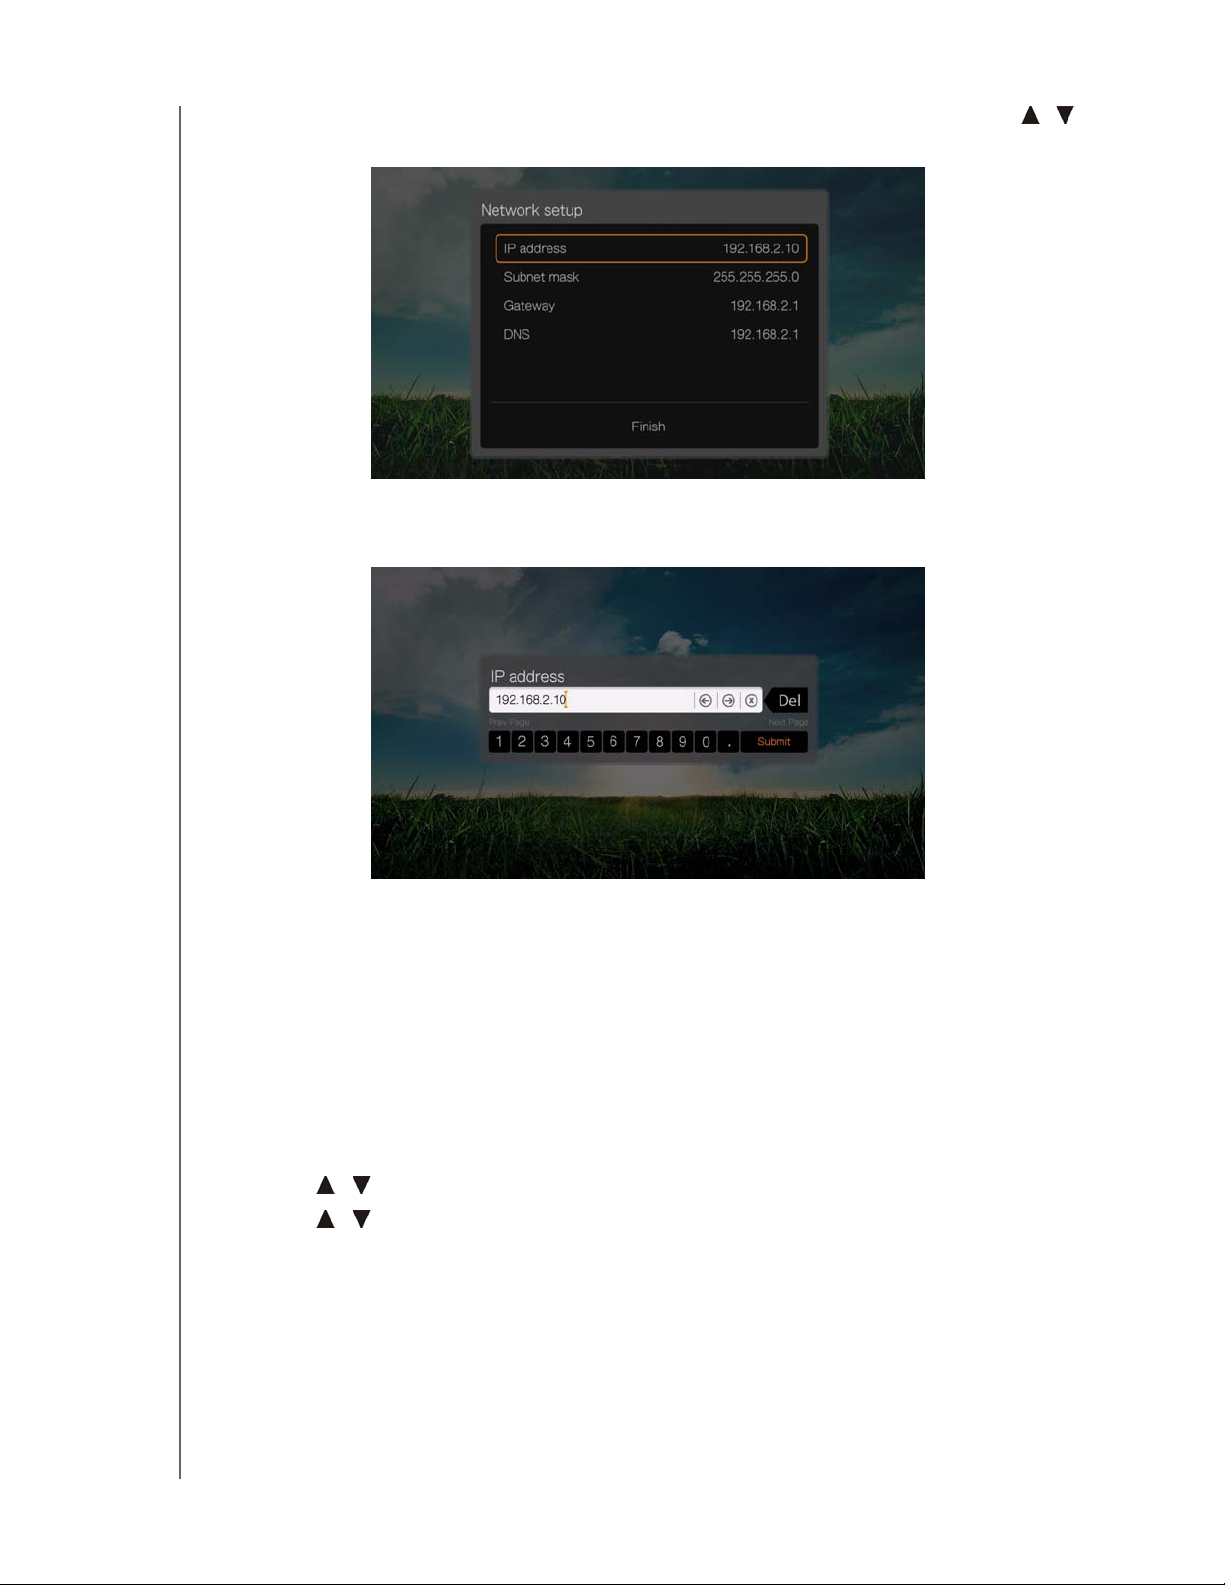
Network Settings
Use the menus in this category to configure and view the media player’s network
settings after initial setup using the setup wizard. See “Network Setup” on page 21
for information and instructions regarding the initial setup wizard.
Press / to make a selection from the list of options, then press OK.
Network Setup
Wired
1. Navigate to the Home | Setup menu bar.
2. Press / to select Network Settings, then press OK.
3. Press / to select Network Setup, then press OK.
4. Select Wired, then press OK.
5. Select a setup configuration option, then press OK.
Select Automatic to have the device attempt to detect your network connection
automatically, then go to step 10.
Select Manual to manually set your network connection. Proceed to step 6.
Important: Manual setup is recommended for advanced users only.
SETUP AND ADVANCED FEATURES – 194
Page 50
PRELIMINARY-P3
WD TV Play Media Player
User Manual
6. Manual: Once the network is detected, the following screen appears. Press /
to select IP address, then press OK.
7. Manual: Use the navigation buttons to key in your IP address using the onscreen keyboard. Select Submit, then press OK.
8. Manual: Repeat the step above to key in values for the subnet mask, gateway,
and DNS settings.
9. Manual: After entering all the configuration settings, select Finish, then press
OK.
10.Automatic and Manual: Once the network is detected, press OK to display the
Home screen.
Wireless
1. Navigate to the Home | Setup menu bar.
2. Press
3. Press
/ to select Network Settings, then press OK.
/ to select Network Setup, then press OK.
SETUP AND ADVANCED FEATURES – 195
Page 51
PRELIMINARY-P3
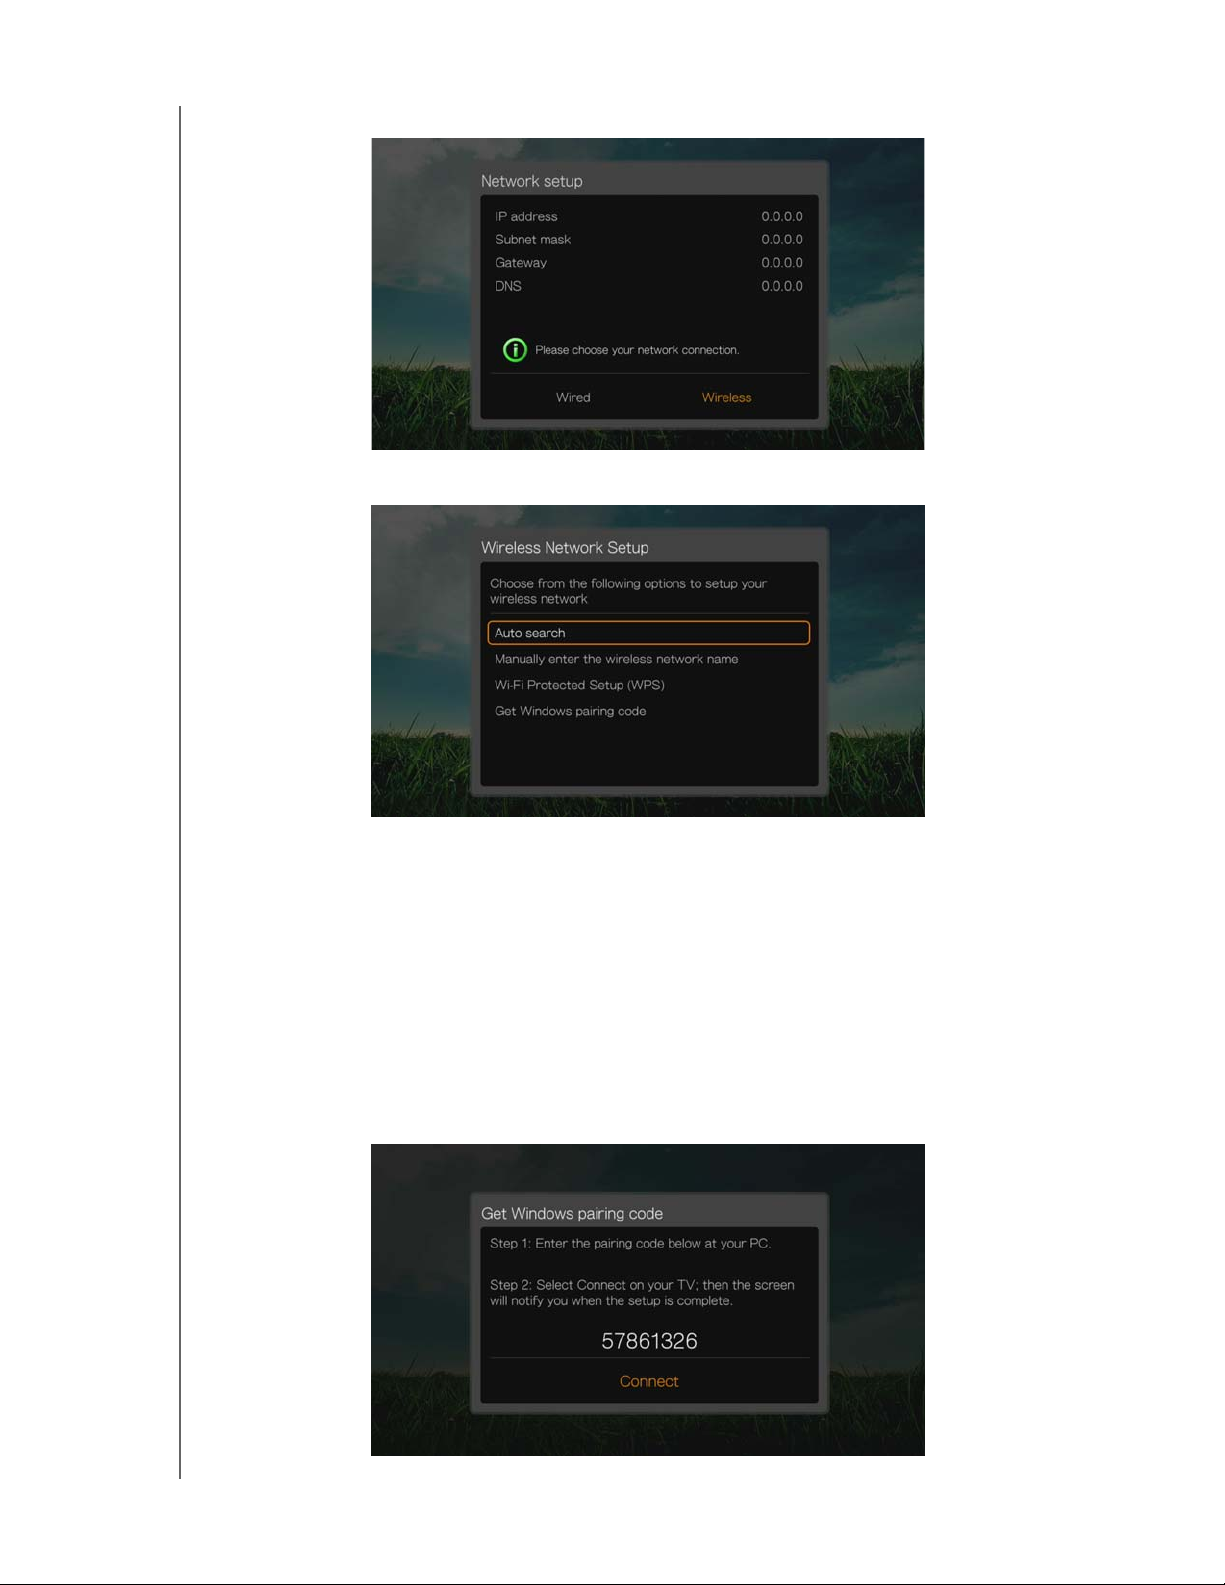
4. Select Wireless, then press OK.
5. Select a wireless connection method, then press OK.
WD TV Play Media Player
User Manual
Auto search, Manually enter the wireless network name, and Wi-Fi
Protected Setup (WPS) - see “Wireless Network Setup” on page 23 for further
instructions.
Get Windows Pairing Code (Windows 7)
You can use Windows 7 to “pair” the media player to your network as a wireless
network setup option.
1. Under Wireless Network Setup, select Get Window pairing code, then press
OK. A pairing code displays. Make a note of this code and start your Windows 7
computer.
SETUP AND ADVANCED FEATURES – 196
Page 52
PRELIMINARY-P3
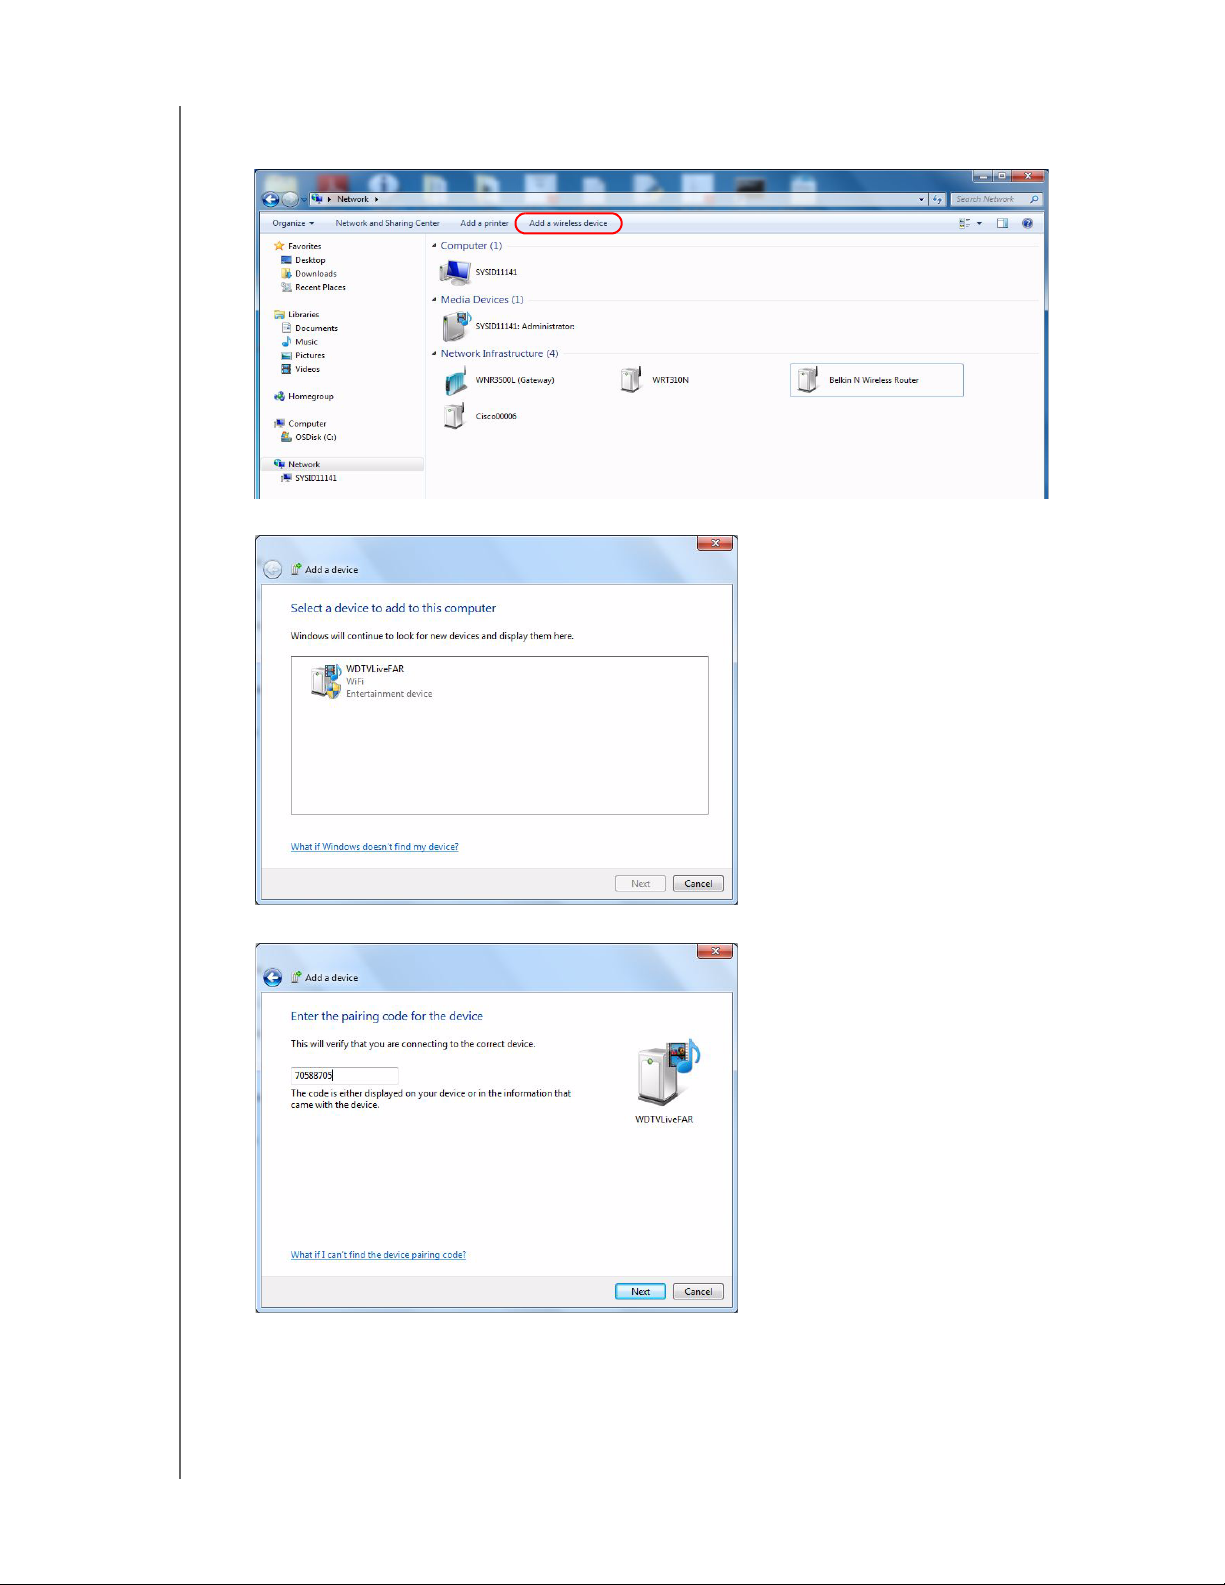
2. Open a Windows Explorer window, then click Network.
3. Click Add a wireless device.
4. Click on the media player device icon, then click Next.
WD TV Play Media Player
User Manual
5. Enter the pairing code (see step 1), then click Next.
SETUP AND ADVANCED FEATURES – 197
Page 53
PRELIMINARY-P3
WD TV Play Media Player
User Manual
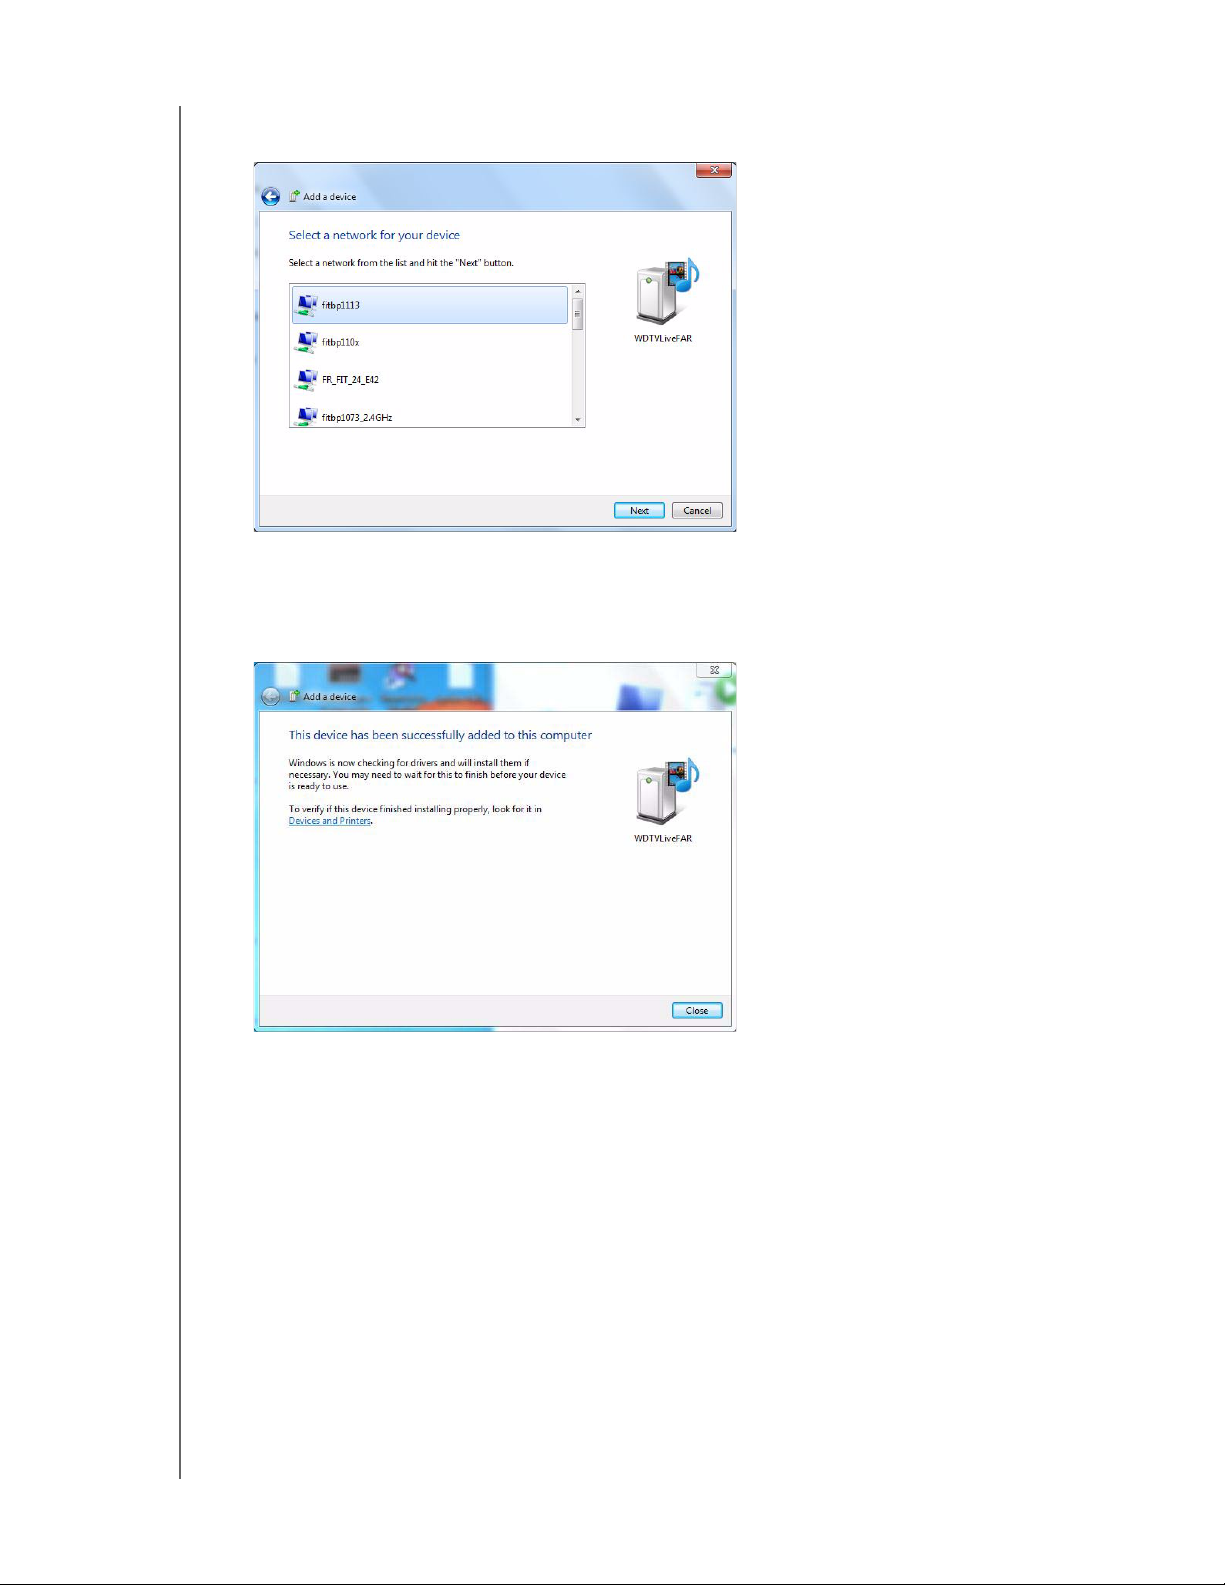
6. Select the network you want to add the media player to from the list, then click
Next.
7. Press OK on the remote to connect the media player to your network (see step
1).
8. Once the media player connects to the network, the following screen displays.
Click Close.
Previously Connected Wireless Network
This menu displays a record of your wireless network settings. After performing a
wireless network setup, the media player keeps a record of the LAN access point.
Use this menu to reconnect to the local network without having to rekey the
password.
Check Connection
See “Checking the Network Connection” on page 27 for information and
instructions.
Device Name
The name shown in the device name field helps you identify the media player on the
network. Use this menu option to change the device name using the onscreen
keyboard.
SETUP AND ADVANCED FEATURES – 198
Page 54
PRELIMINARY-P3
WD TV Play Media Player
User Manual
Network Share Server
Must be set to On to enable access to an attached USB drive via the local network.
See “Transferring Files” on page 33 for information and instructions.
Workgroup
Allows the media player to join an existing Samba (CIFS/SMB) workgroup on your
network. Computers and devices in the same workgroup may allow each other
access to their files. To join a workgroup, enter the Workgroup Name then press OK.
Proxy
Proxy is used by corporations to view and filter online transactions. All requests in
the corporate environment go through a proxy server to perform such actions as
recording the IP address of a web site, checking the IP address that is being opened
to make sure it’s not on a blocked list, and checking outgoing attachments for spam
or viruses.
If you plan to use the media server in a corporate environment, select On, then enter
the Proxy address and port using the on-screen keyboard to access online services.
Clear Login Info for Network Share
Use this menu to clear login information (preset password) for the network share.
Operation
Use the menus in the Operation screen to set preferences for the media player.
SETUP AND ADVANCED FEATURES – 199
Page 55
PRELIMINARY-P3
WD TV Play Media Player
User Manual
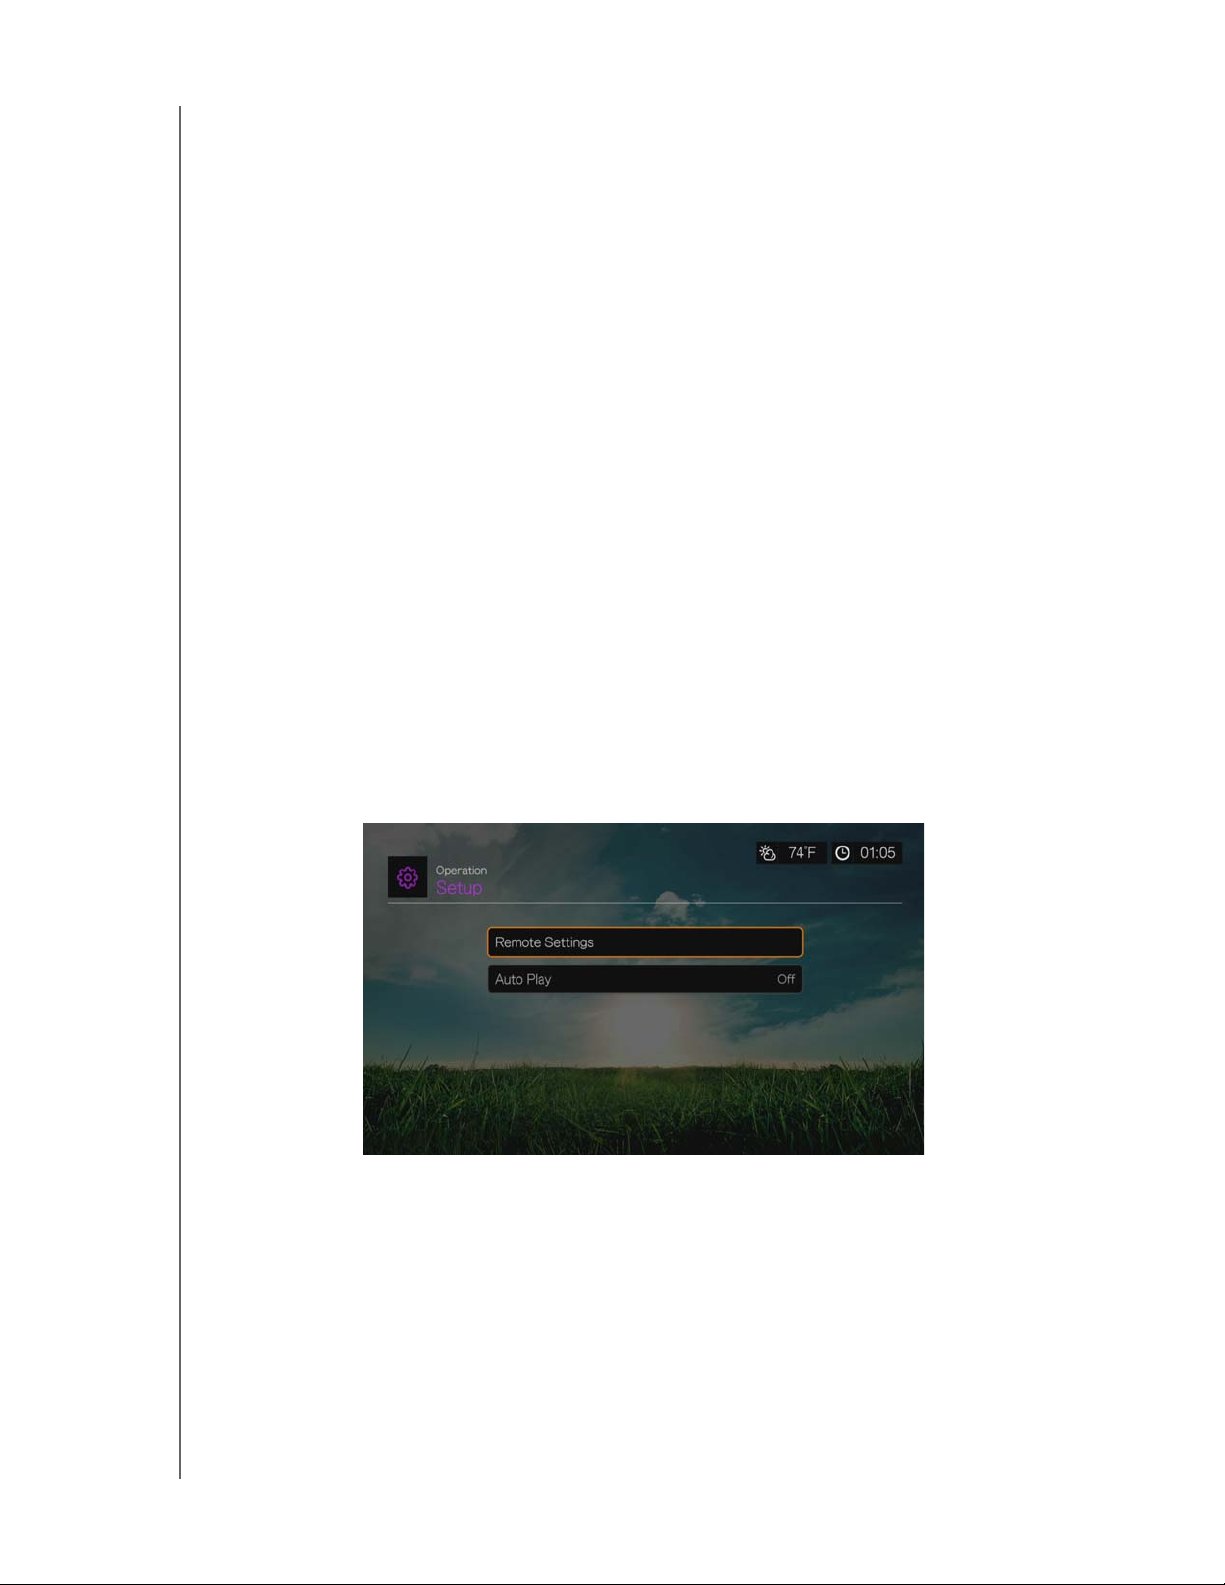
Remote Settings
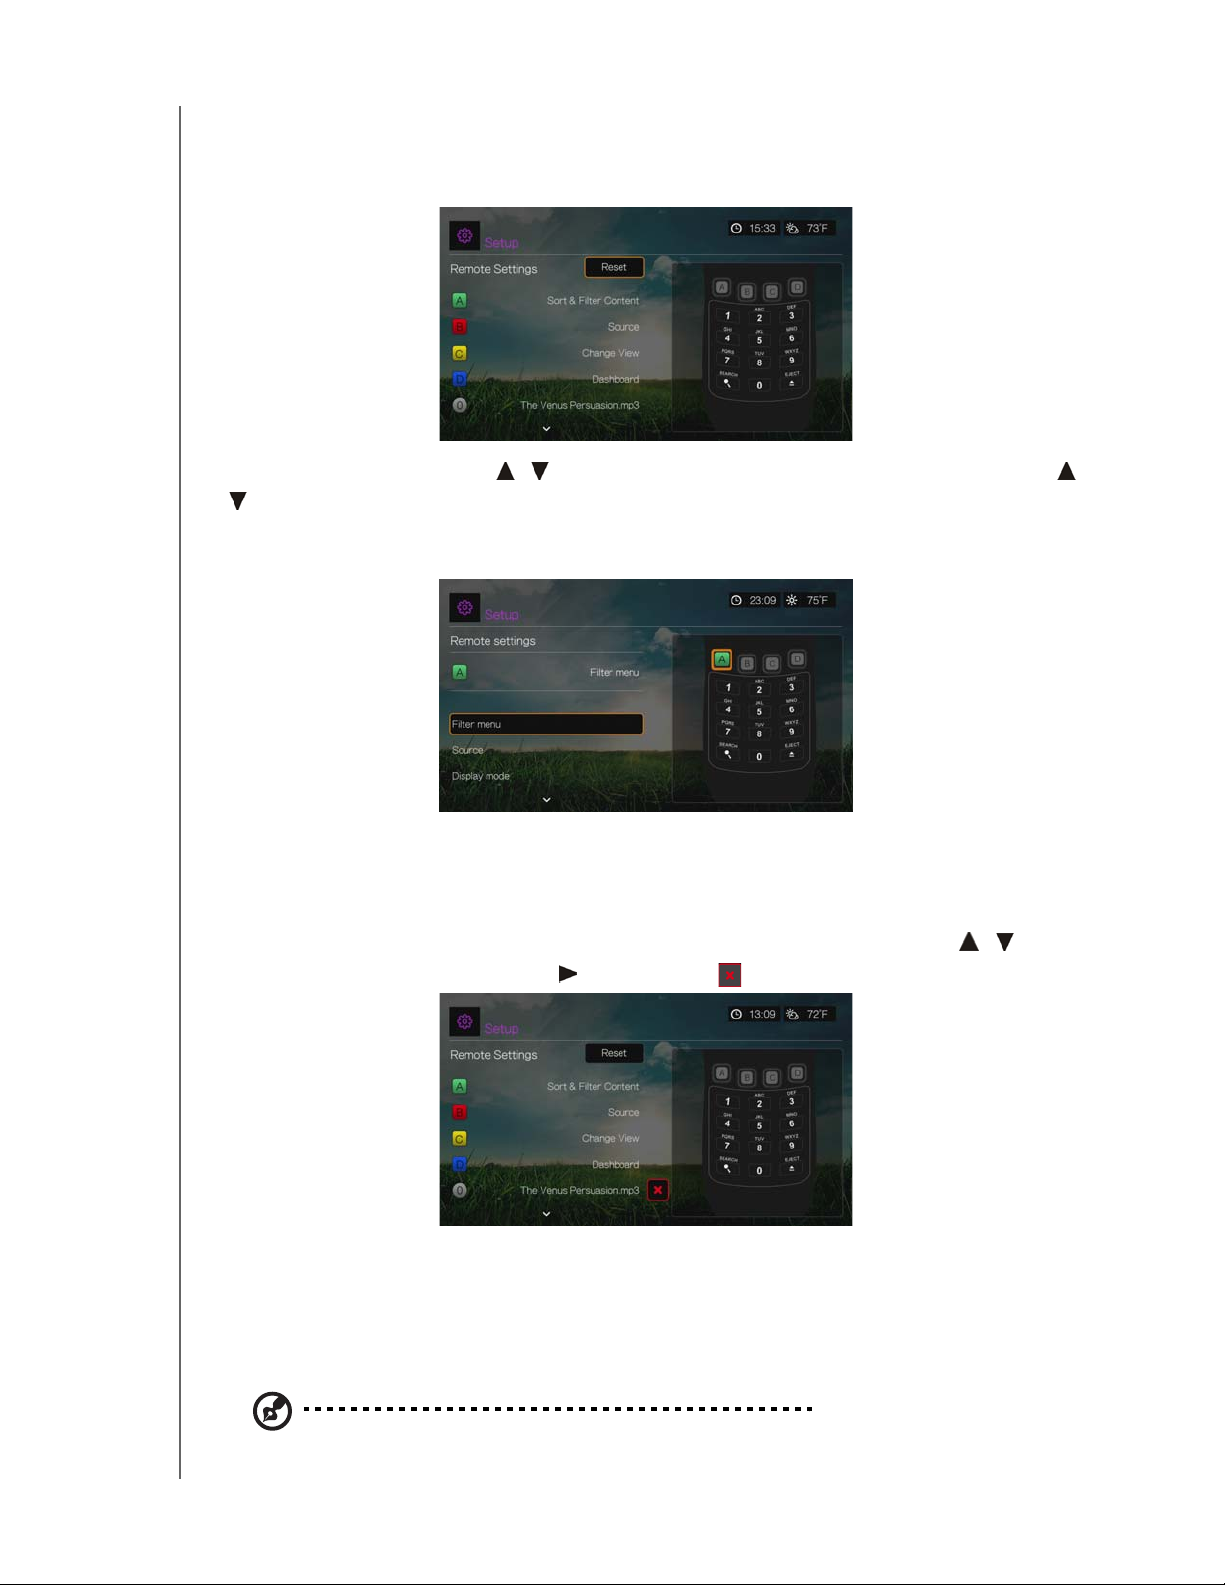
Select a function for the A, B, C, and D function buttons on the remote controller.
The remote settings menu displays the functions currently assigned to each button.
To change functions, press
/ to select a function button, then press OK. Press
/ to select functions such as display mode, filter menu, Music, Video, Services,
Setup, Capture Snapshot (saves screen snapshots to attached USB storage), etc.,
then press OK.
To reset the function buttons to default settings, select Reset, then press OK.
Delete Music Preset (Buttons 0-9)
To clear a music file or playlist preset from one of the 0-9 buttons, press
/ to
select a numbered button. Press to select the , then press OK.
Auto Play
Select the type of media (music or video) that plays automatically when a USB
device is connected to USB port 1 on the front of the media player. The media files
must be located in the USB device’s root directory for Auto Play to function.
Note: The auto play function will only work if the USB device is plugged into USB port 1 on the front of
the media player.
SETUP AND ADVANCED FEATURES – 200
Page 56
PRELIMINARY-P3
WD TV Play Media Player
User Manual
System
Use the menus in this category to configure the media player’s general functions.
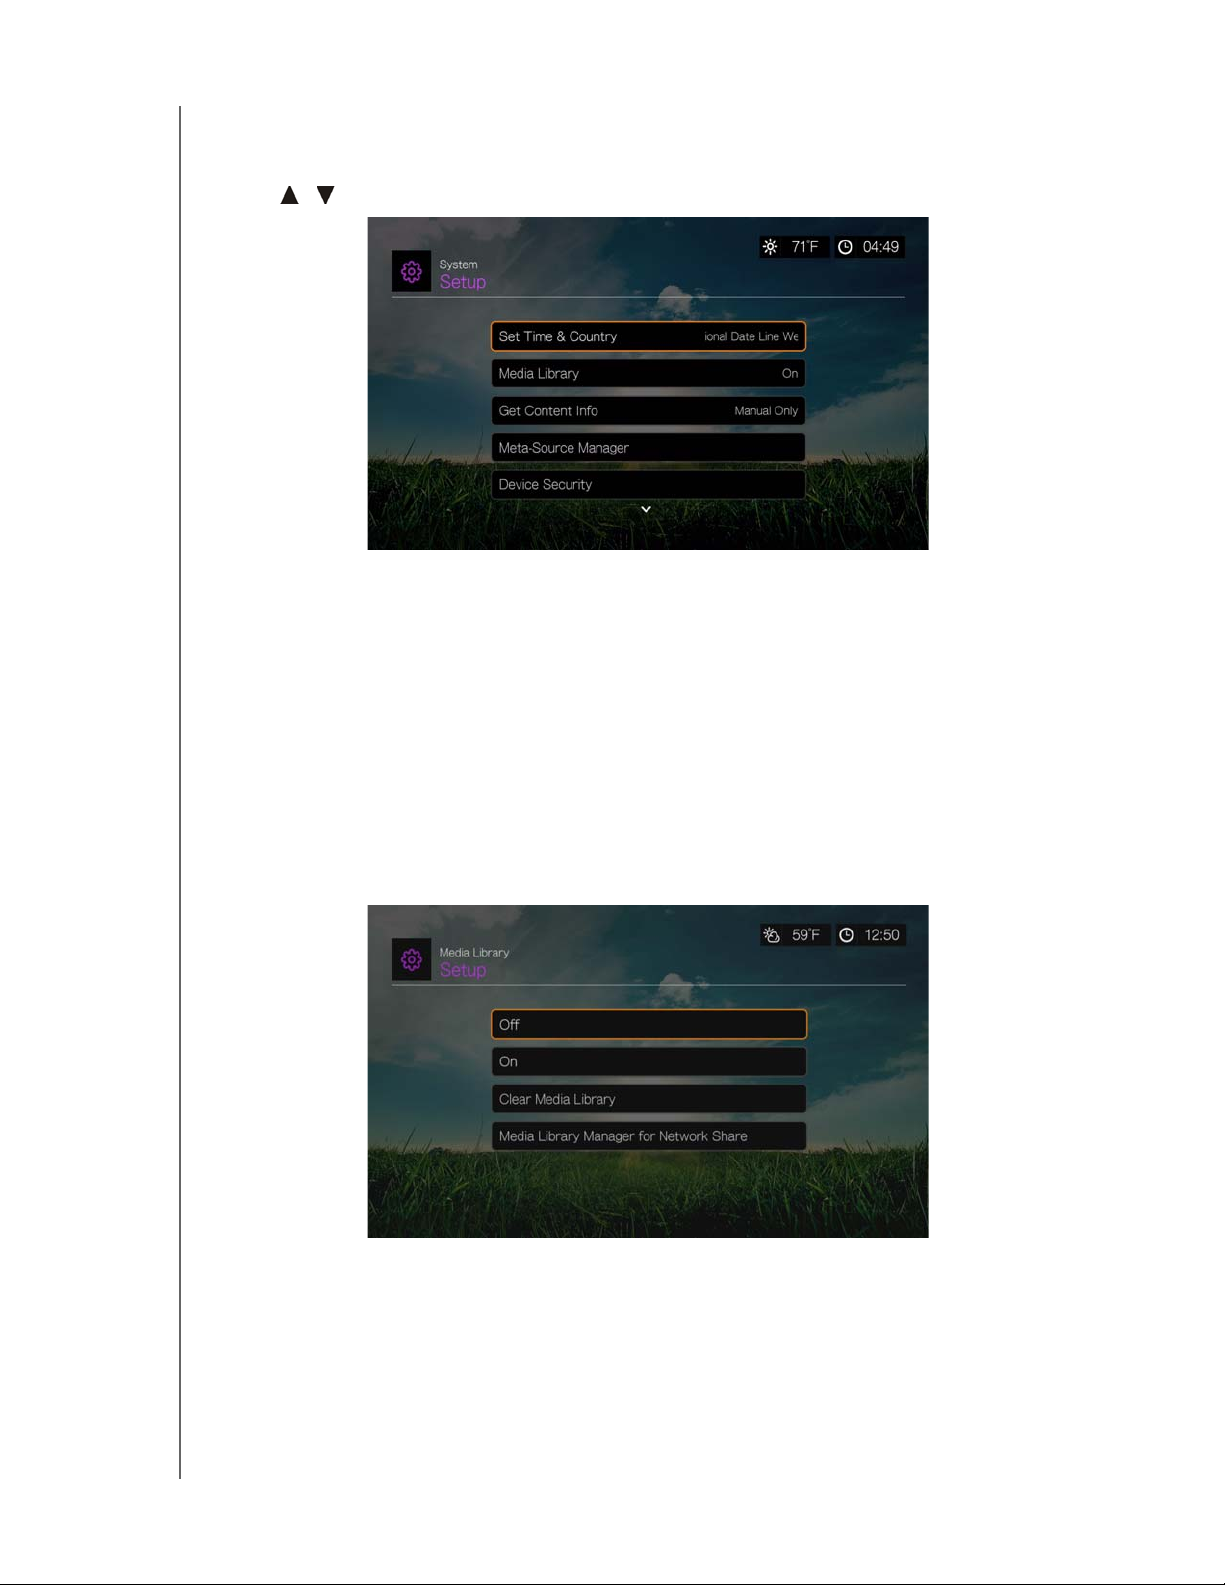
Press / to make a selection from the list of options, then press OK.
Set Time & Country
Use this menu to select your local time zone and turn Daylight Savings Time or
24-Hour Time Off or On so that the media player displays the current time
according to your preference.
Media Library
Use this menu to enable or disable Media Library (turn Off, On, or Clear Media
Library), which refers to the process of consolidating the media contents of an
internal hard drive, USB drive, or network drives into one database so you can locate
media files based on metadata information. See “Media Library” on page 207 for
more information.
Media Library Manager for Network Share
Use this option to manually add individual share folders to the media library. Select
Add network share to media library to connect to a Windows or Linux Share (see
“Network Share” on page 31 for more info). While browsing the content inside, press
Option to add a share folder to the Media Library. A maximum of 10 shares can be
added. You can also set automatic file scanning on network shares. Choose from
SETUP AND ADVANCED FEATURES – 201
Page 57
PRELIMINARY-P3
WD TV Play Media Player
User Manual
During Standby Only, Once An Hour, Once A Day, Once A Week, or Once A
Month.
Get Content Info
Use this menu to set options for how you want to attach metadata (such as artwork
and additional information) to your music and video files. Manual Only is the default
setting, and you can also set this menu to Auto.
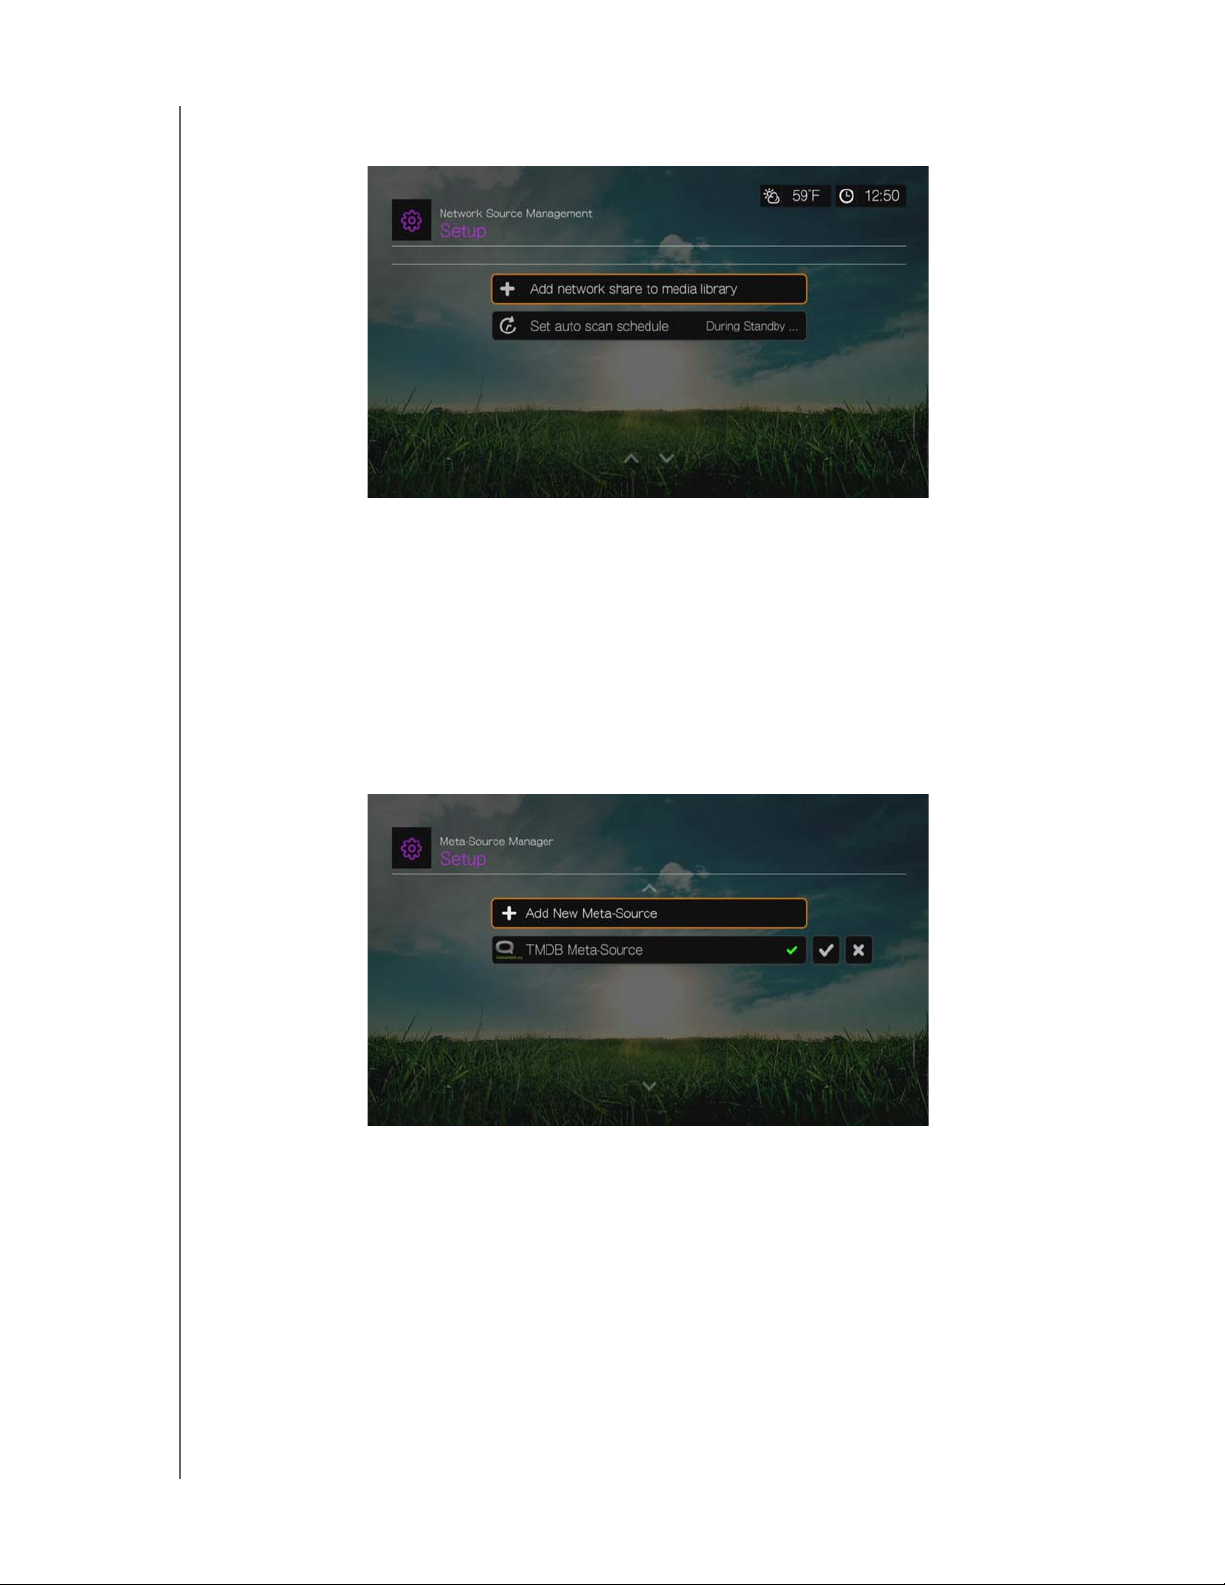
Meta-Source Manager
Use this menu to select a meta-source that provides metadata information and
artwork for your media files. Select Movie, Music, or TV Show to display and select
available meta-sources for the media type.
Select Add New Meta-Source and select the meta-source XML file from the
network or attached USB storage.
Device Security
Use this menu to set a security password to access and control store demo mode
and parental control features. Select Device Security and use the navigation
SETUP AND ADVANCED FEATURES – 202
Page 58
PRELIMINARY-P3
WD TV Play Media Player
User Manual
buttons to type in your password (you will need to enter it twice before initial
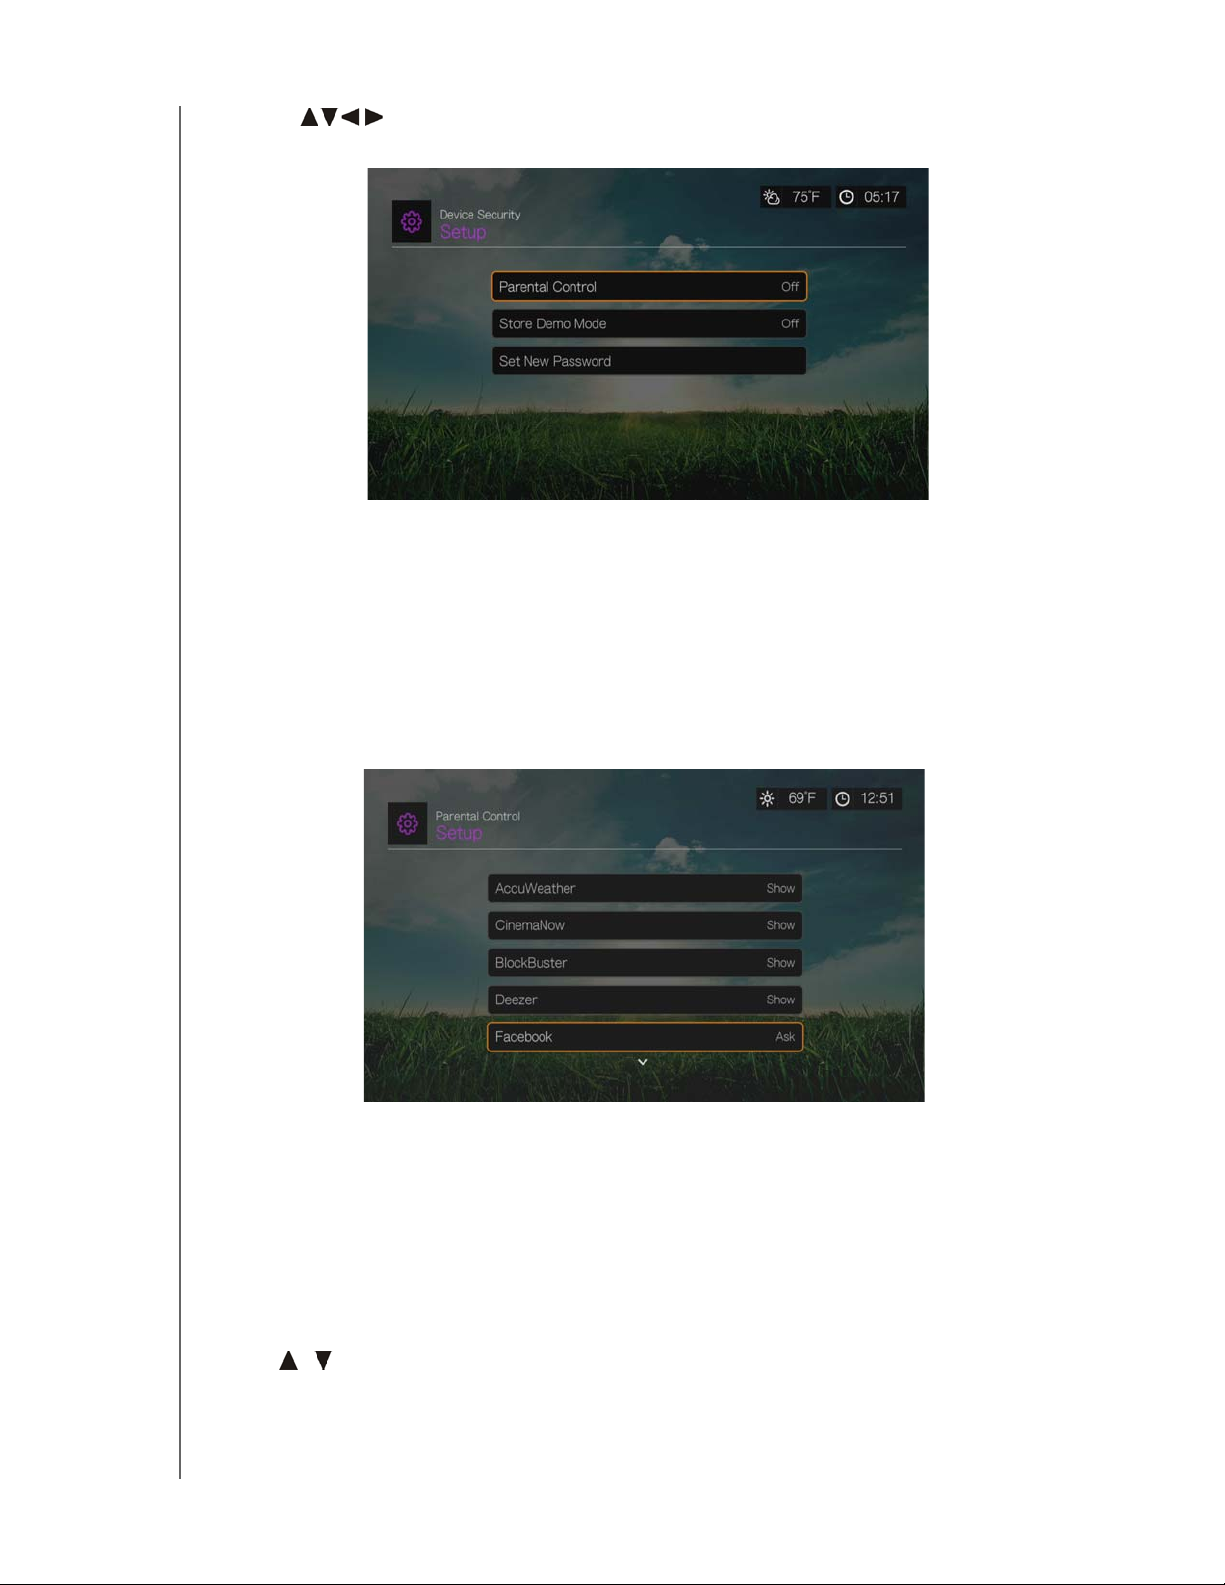
use) to enable the features. The following screen displays:
From here, enter the Parental Control menu, set Store Demo Mode, or Set New
Password.
Parental Control
Parental control allows you to password protect an Internet service so the user can
access it only if the correct password is entered. There are two options:
1. Show – default option. The service is not password protected.
2. Ask – the password must be entered to access the service.
Store Demo Mode
When set to On, this option allows settings to be changed and functions tested for
demonstration purposes. After exiting Store Demo Mode, all previous user settings
are restored. When the media player is idle for 60 seconds in Store Demo Mode, a
demo video begins playing. Press OK to exit idle mode when this occurs.
Additional Encoding Support
Press / to select an encoding support for a secondary language, then press OK.
This prevents garbled characters in file names and subtitles defined in the selected
language.
SETUP AND ADVANCED FEATURES – 203
Page 59
PRELIMINARY-P3
WD TV Play Media Player
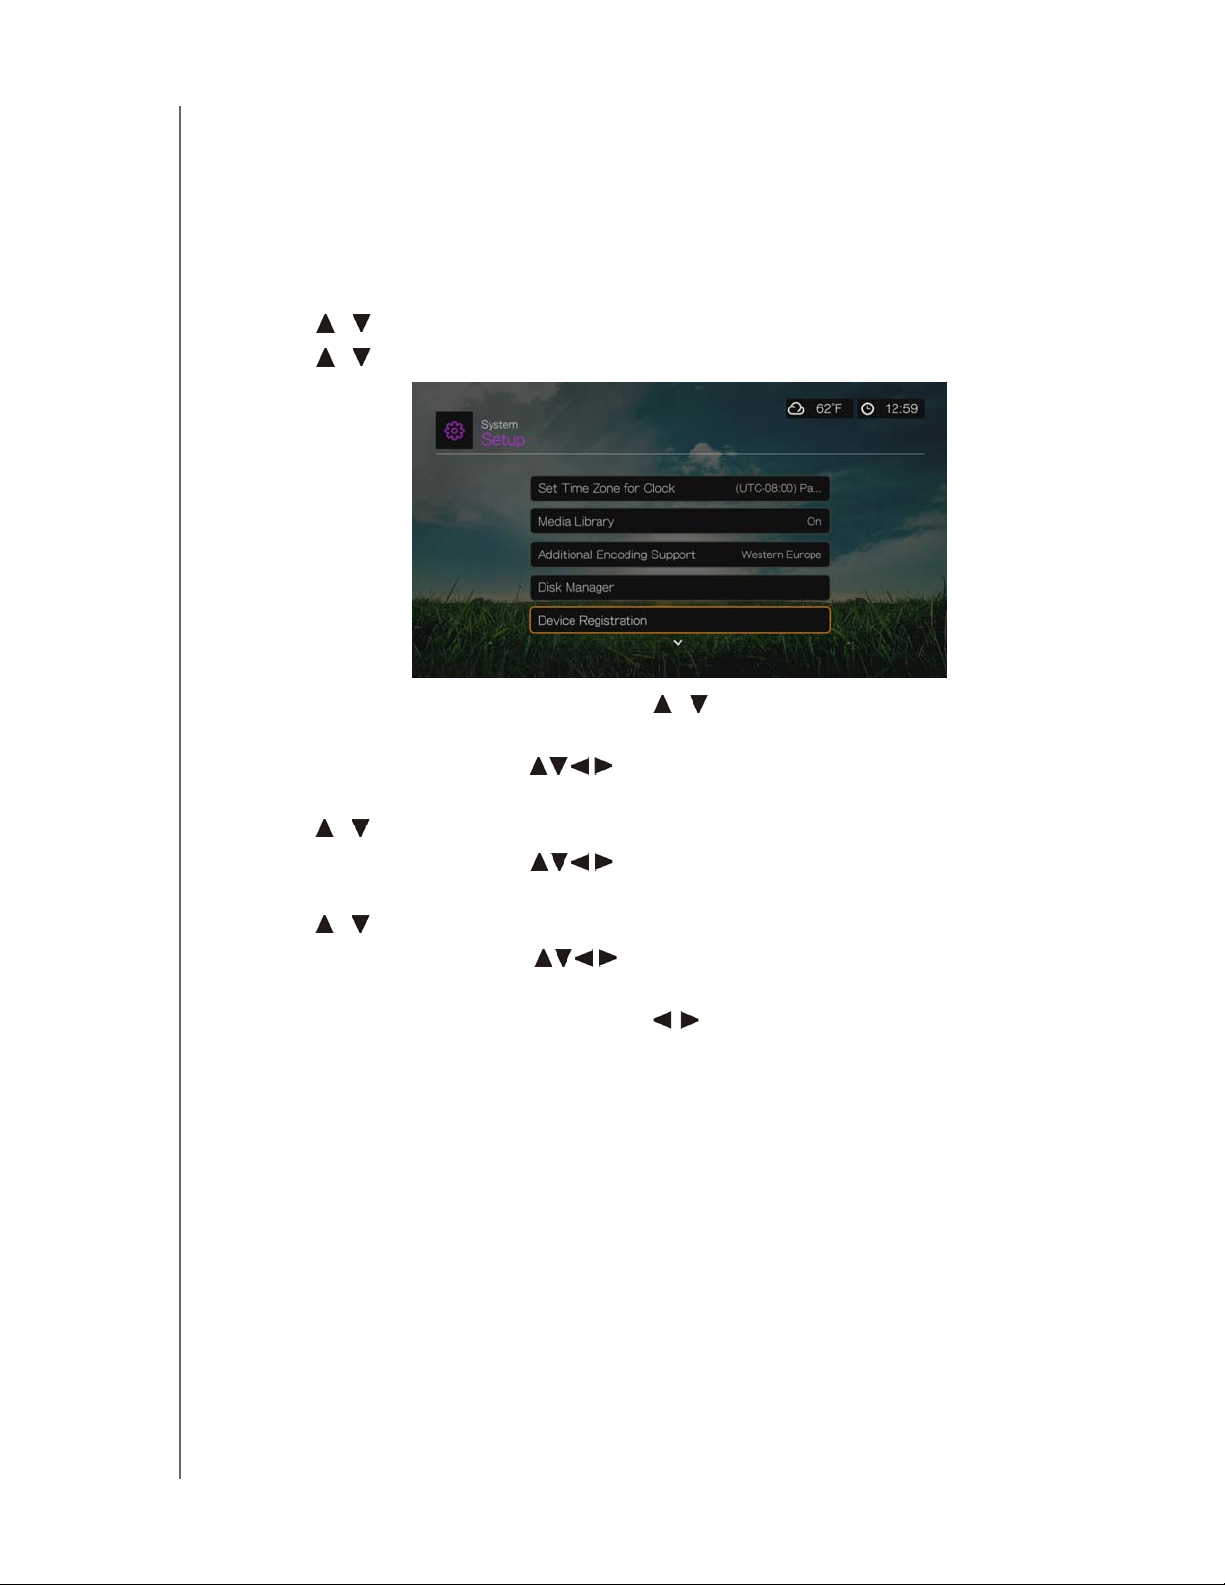
Device Registration
To register your WD product using the Setup menu:
1. Make sure your media player has an active network connection.
See “Finding Your Content” on page 28 for instructions on how to set up a
network connection.
2. Press Setup or navigate to the Home | Setup menu, then press OK.
3. Press / to select System, then press OK.
4. Press / to select Device Registration, then press OK.
User Manual
5. On the Register Product screen, press / to select First Name, then press
OK.
6. Use the navigation buttons to type in your first name using the on-screen
keyboard. Select Submit, then press OK.
7. Press / to select Last Name, then press OK.
8. Use the navigation buttons to type in your last name using the on-screen
keyboard. Select Submit, then press OK.
9. Press / to select Email, then press OK.
10.Use the navigation buttons to type in your email address using the onscreen keyboard. Select Submit, then press OK.
11.On the Register Product screen, press to select OK, and then press OK.
WD LED Light Control
Use this menu to turn off the WD LED light (Always Off). If turned off, the WD LED
will only appear during start up then disappear after the device has booted up. The
default setting is Normal.
SETUP AND ADVANCED FEATURES – 204
Page 60
PRELIMINARY-P3
WD TV Play Media Player
User Manual
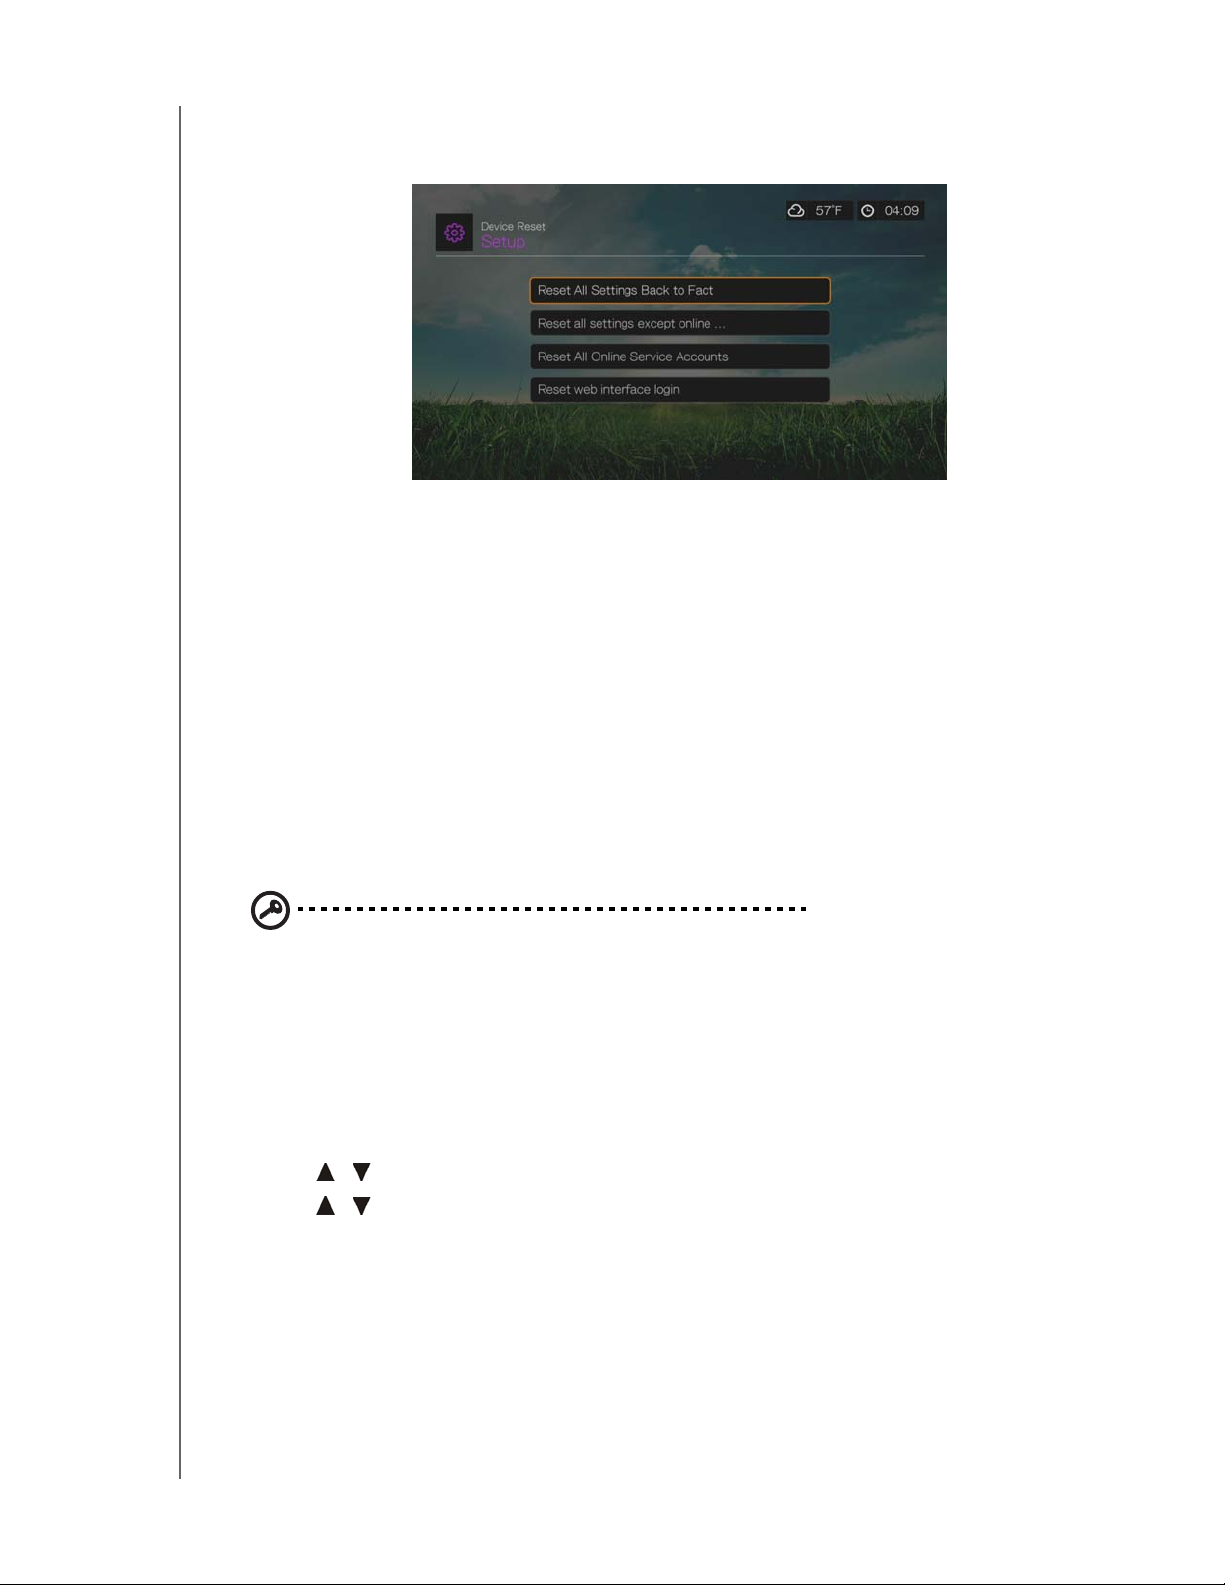
Device Reset
Use this menu to perform device reset options:
Reset All Settings Back to Factory Default – restores all media player system
preferences and playback settings to their default factory values. This may correct
problems caused by a failed firmware upgrade or faulty configuration settings.
Reset All Settings Except Online Service Accounts – restores all media player
system preferences and playback settings to their default factory values with the
exception of your internet Services personal account information.
Reset All Online Service Accounts – clears all account information and logins you
have entered for Services, with the exception of CinemaNow and TuneIn (you must
contact these service providers to have the media player removed from your
account).
Reset Web Interface Login – clears the user-created Web UI password and resets
it to the default password. See “Using the Web UI” on page 45 for details.
Important: If you specified a static IP address (or any other non-standard
configuration), the media player will no longer appear on the network after
the reset. Also, be sure to reset the media player to factory defaults and
reset all online service accounts before returning or otherwise transferring
the device to purge your internet services personal account information,
network shares passwords, and wireless network passwords.
To perform a device reset:
1. Press / to select Device Reset, then press OK.
2. Press
/ to select a device reset option, then press OK.
3. Select OK in the confirmation screen, then press OK.
Device Restart
Press OK to restart the media player.
Check Latest Firmware
This menu displays the current firmware version. Press OK to check for new
firmware.
SETUP AND ADVANCED FEATURES – 205
Page 61
PRELIMINARY-P3
WD TV Play Media Player
User Manual
Auto Detect New Firmware
Use this menu to turn the automatic detection of new firmware On or Off. See
“System Firmware Upgrade” on page 209 for further details.
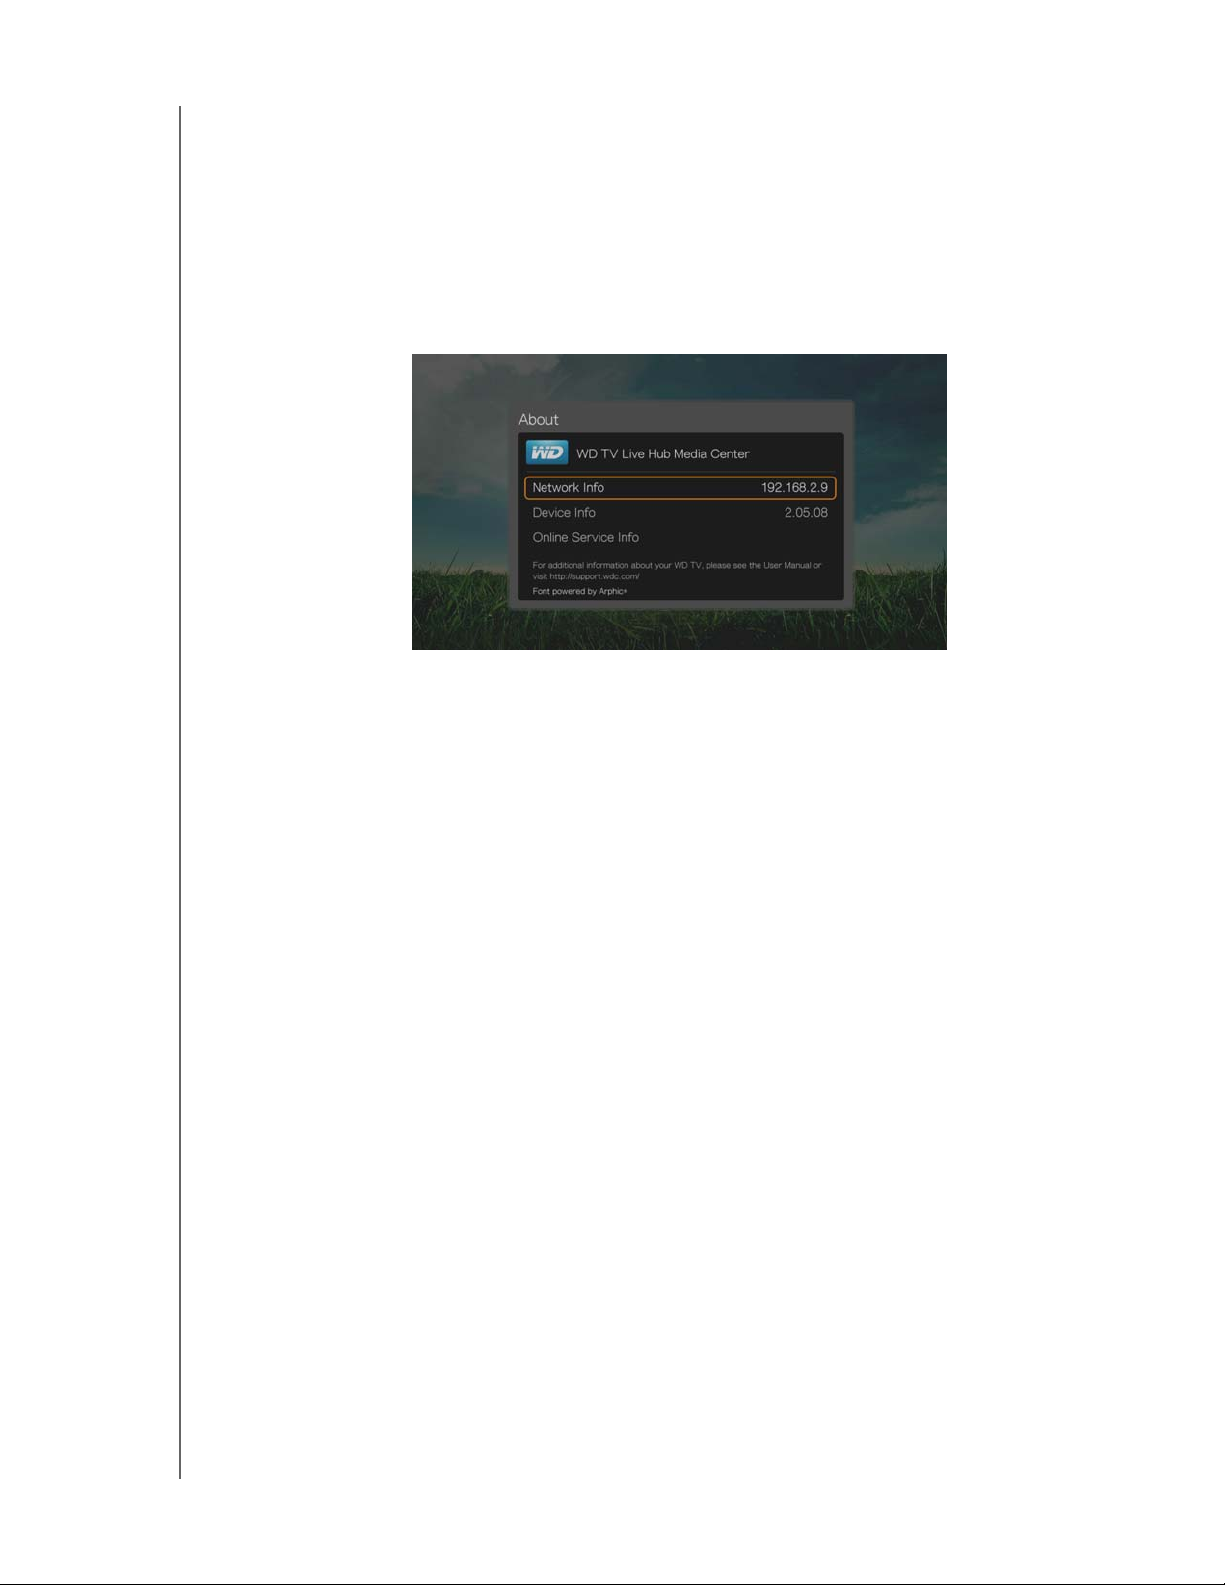
About
Select this option to display the network info, firmware version currently installed,
part number, and serial number of the device as well as online service info.
Select Network Info then press OK to view info such as the device’s MAC and
IP addresses, mobile access type, etc.
Select Device Info then press OK to view the firmware version currently
installed, part number, and serial number of the device.
Select Online Service Info to view online service account info such as your
Netflix ESN.
SETUP AND ADVANCED FEATURES – 206
Page 62

PRELIMINARY-P3
WD TV Play Media Player
User Manual
Media Library
Media Library scans and consolidates the media contents of the internal hard drive,
USB drive, and network drives into a database through which you can easily locate
media files. This feature is set to on by default.
The following conditions will prevent the Media Library from processing your media.
The USB device has read-only protection.
There is not enough hard drive space on the USB device. Your media player
needs some space to cache information, so that searches and scans are faster.
A note about metadata
Metadata is information about the data in a file that describes how, when, and by
whom a particular set of data (video, music, photographic, or any other type of data)
was collected, and how the data is formatted.
Not all files have metadata loaded. To add and edit metadata so that Media Library
can aggregate the files properly, you can use one of several tools including:
Adobe® Bridge (part of the Adobe Creative Suite)
abcAVI Tag Editor (freeware)
XnView 1.93.2 (freeware)
iTunes
Windows Media Player
Editing Metadata
Editing metadata with iTunes:
1. Open iTunes and click the song you want to edit.
2. Open the File menu, then click Get Info.
A window opens, showing all of the information you can edit for the song that
you selected. You can edit the song’s:
Name
Artist
Year released
Album name
Composer
Track number
Genre
3. When you are done, click OK. To edit the next song listed in your iTunes library,
click Next.
Editing metadata with Windows media player:
1. Open Windows media player.
2. Click the Library tab.
3. Right-click the title or other item to edit.
4. When the menu opens, click Edit.
SETUP AND ADVANCED FEATURES – 207
Page 63

PRELIMINARY-P3
WD TV Play Media Player
User Manual
Converting The Content Into A Usable Format
There are several fast, easy-to-use applications available online that can convert
photos, videos, and music files into formats optimized for use on your media player.
The software also allows simultaneous conversion of multiple files in batches
regardless of their original formats.
Examining Your Files
MediaInfo (free software) can provide technical and tag information about your video
or audio files.
MediaInfo provides the following kinds of information:
General—title, author, director, album, track number, date, and duration
Video—codec, aspect, fps, and bitrate
Audio—codec, sample rate, channels, language, and bitrate
Text—language of the subtitles
Chapters—number and a list of chapters
MediaInfo supports the following formats:
Video—MKV, OGM, AVI, DivX, WMV, QuickTime, Real, MPEG-1, MPEG-2,
MPEG-4, DVD (VOB) (Codecs: DivX, XviD, MSMPEG4, ASP, H.264, AVC)
Audio—OGG, MP3, WAV, RA, Dolby Digital Plus, AAC, M4A, AU, AIFF
Subtitles—SRT, SSA, ASS, and SAMI
With MediaInfo, you can:
Read many video and audio file formats
Use several methods of viewing information, such as text, sheet, tree, and
HTML
Customise views
Export information as text, such as CSV and HTML
To examine your files:
1. Use your browser and go to http://mediainfo.sourceforge.net.
2. Download the software and install it on your computer.
3. Follow the instructions as prompted.
SETUP AND ADVANCED FEATURES – 208
Page 64
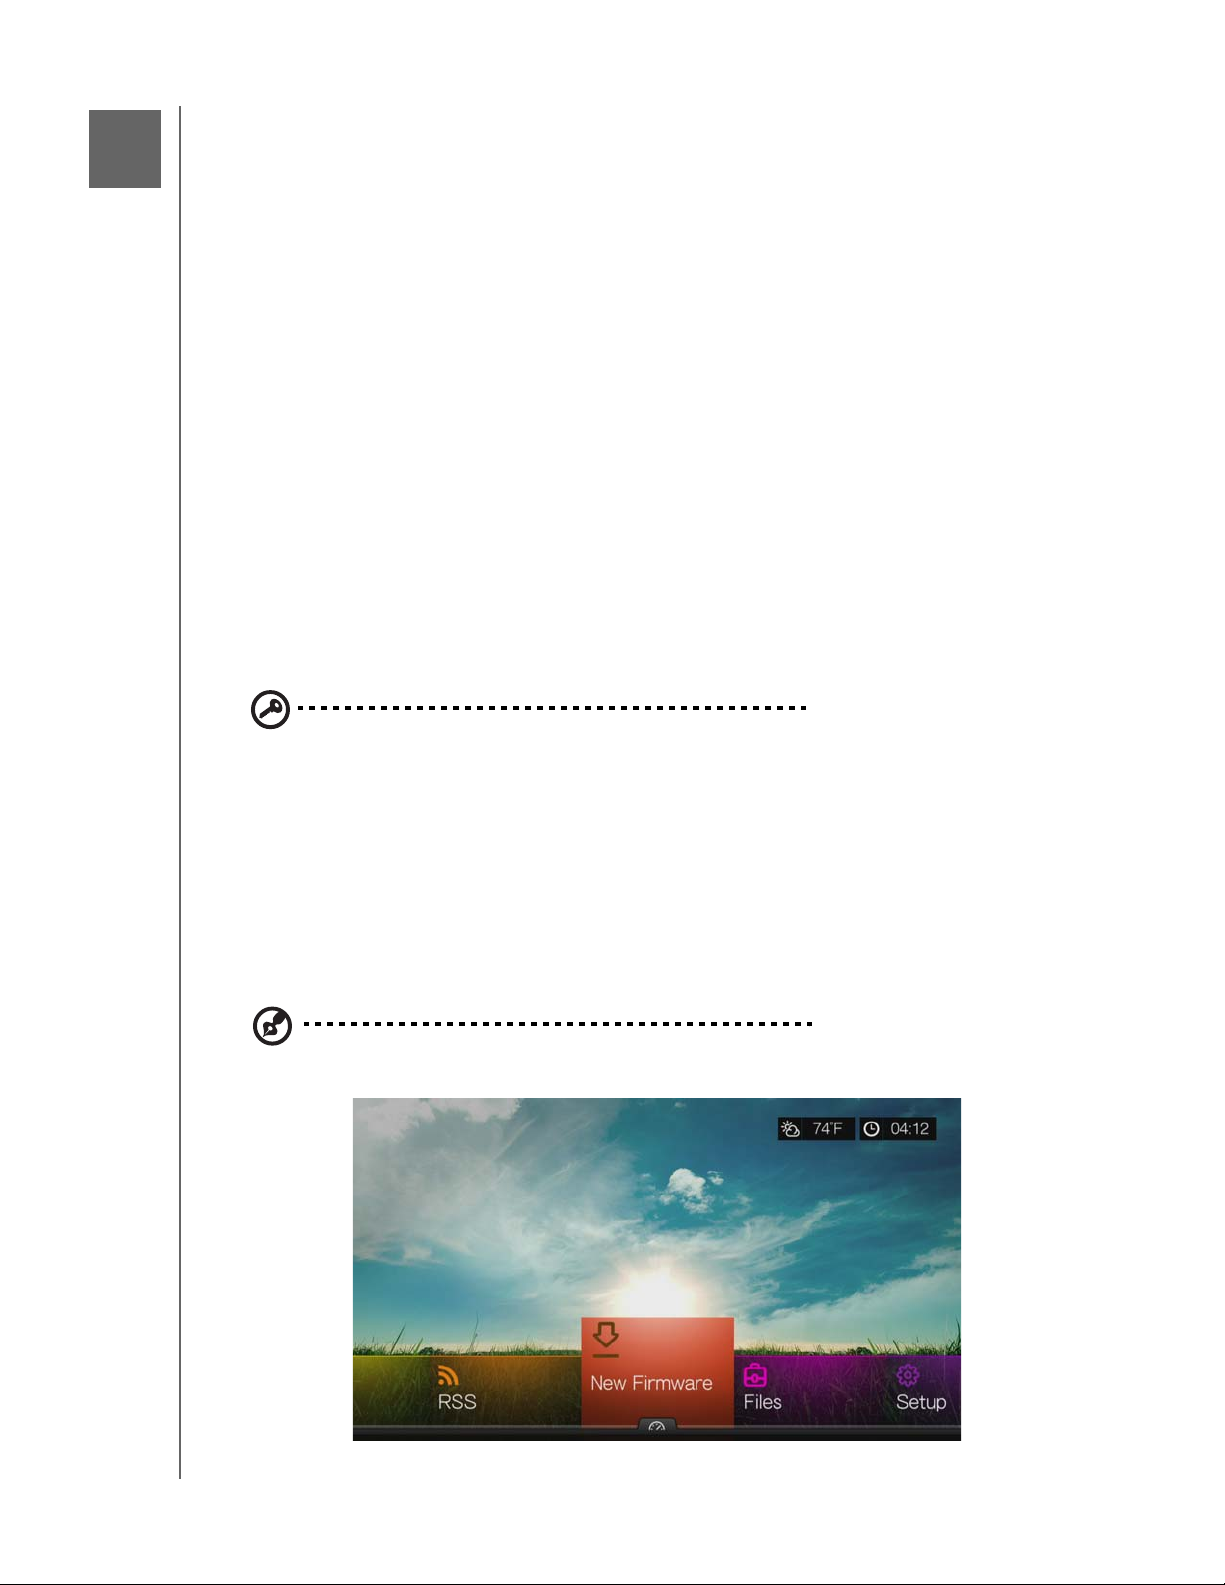
16
PRELIMINARY-P3
WD TV Play Media Player
User Manual
System Maintenance
The system software of your media player can be upgraded to the latest release,
which can improve support for media file playback and includes bug fixes and
product enhancements. To ensure that you receive the latest update, we
recommend registering your product at http://register.wdc.com.
This chapter describes how to upgrade the system firmware and perform simple
troubleshooting. If you encounter an error message, refer to the “Common Error
Messages” on page 214 for possible corrective action.
Solutions to more serious problems may require contacting your dealer or an
authorized service center for assistance. For more information, refer to “WD Service
and Support” on page 2.
System Firmware Upgrade
Firmware is an important set of instructions that tells your media player how to
operate, what the interactive screens look like, and how to do what you tell it to do.
Upgrading the firmware is important because WD is always developing newer, faster,
and more efficient ways of doing things that your media player needs to know.
Important: Make sure the media player’s AC power adapter remains
connected during the firmware update. A power disruption during the
update process can corrupt the system firmware. Also, make sure that you
do not unplug the USB storage device if doing a manual update.
Automatic
The New Firmware menu appears in the media player’s Home screen when updated
firmware becomes available, providing the option to automatically upgrade the
firmware.
Note: You must have Auto Detect New Firmware set to On to automatically upgrade firmware. See
“Auto Detect New Firmware” on page 206.
SYSTEM MAINTENANCE – 209
Page 65
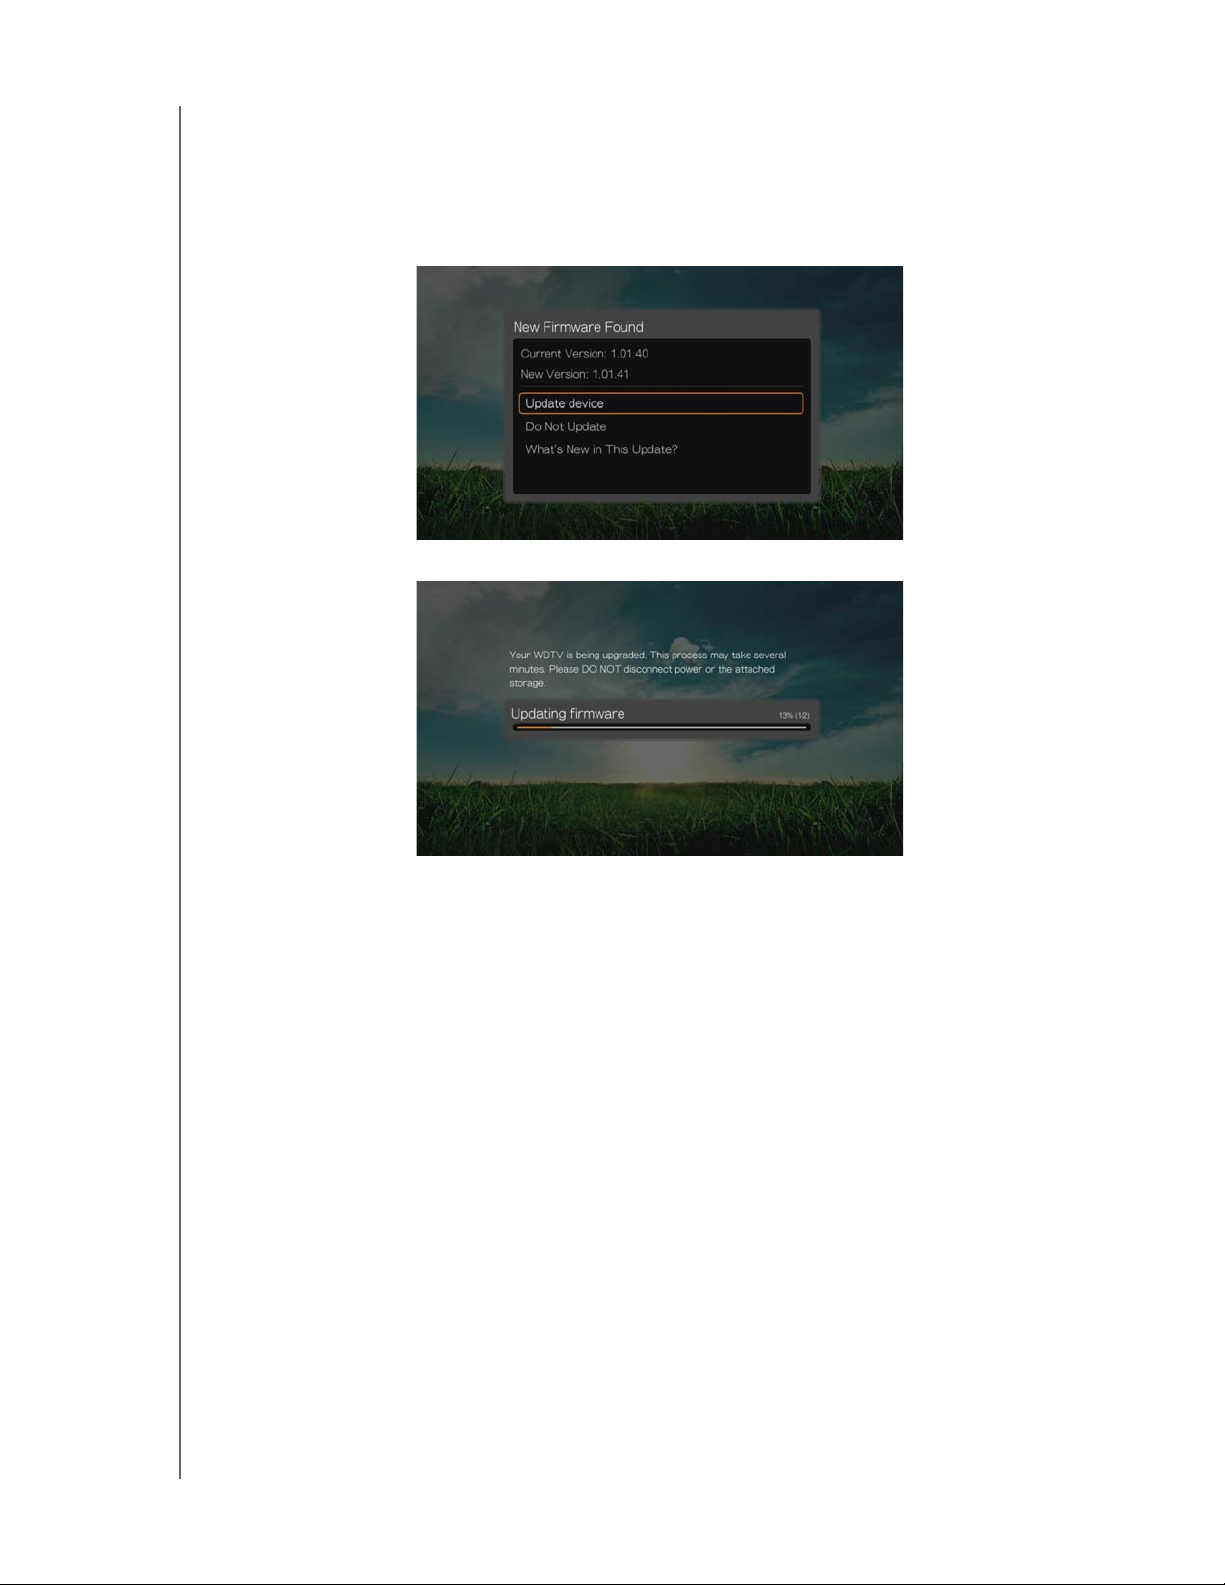
PRELIMINARY-P3
WD TV Play Media Player
User Manual
To update the firmware automatically:
1. Press HOME, then select New Firmware. Press OK.
2. Select Update device on the firmware update prompt, and then press OK. This
restarts the system. You can also select What’s New in This Update? to see
the changes.
3. After restarting, the system automatically enters firmware upgrade mode.
4. Once the update process finishes, the media player restarts. When the media
player restarts, the new firmware loads automatically.
Manual
To update the firmware manually:
1. Go to http://support.wdc.com and download the latest firmware update file for
the media player.
2. Click “Downloads,” then the product name (or photo). Download the WD TV Hub
media player firmware zip file to your computer.
3. Using an unzip utility, extract the zip file contents to the root directory of a USB
device connected to your computer.
4. Safely remove the USB device from the computer and attach it to the media
player.
5. Connect the USB device to the media player's USB port. If the Sync and Transfer
screen appears, select Cancel, then press OK.
6. Follow steps 1-4 under “To update the firmware automatically:” on page 210.
7. If the Sync and Transfer screen appears, select Cancel or OK if you want to
access video, music, or photo files on the attached USB device.
SYSTEM MAINTENANCE – 210
Page 66

Troubleshooting
Problem Solution
DISPLAY
PRELIMINARY-P3
WD TV Play Media Player
User Manual
The TV screen is blank and the media
player power LED remains off.
The TV screen is blank and the media
player power LED is blinking.
The TV screen is blank and the media
player power LED is on.
• Make sure the TV is turned on.
• Make sure that the power adapter and power outlet
are okay.
• Make sure that the interface cable is properly
attached to the correct terminals on both the TV and
the media player.
• Check your TV input source selection.
• Power cycle (turn off/on) your TV.
• Power cycle (turn off/on) your media player.
• If the same thing happens, a system diagnostic
failure may have occurred. Contact WD Technical
Support for assistance (see “WD Service and
Support” on page 2).
• Make sure the TV is turned on.
• Make sure that the interface cable is properly
attached to the correct terminals on both the TV and
the media player.
• Press the reset switch for one second to reset to
factory defaults (see “Device Reset” on page 205).
Press and hold 10 seconds to toggle between NTSC
and PAL. Use a fine-tipped stylus or the unfolded
end of a paperclip to press the reset switch.
The TV screen is blinking and fuzzy. • Make sure that the interface cable is properly
attached to the correct terminal(s) on both the TV
and the media player.
• Make sure the media player power LED is on.
• If you are using a CRT TV, navigate to the Home |
Settings | System screen and:
- Make sure that the Composite option is
selected as the video output.
- Make sure the TV system setting matches the
system used in your region.
• If you are using an LCD TV, navigate to the Home |
Settings | System screen and:
- Make sure that the HDMI option is selected as
the video output.
- Make sure that the video resolution option is set
as Auto.
The video display is cut off or appears
in a sidebar.
Navigate to the Home | Settings | Audio/Video screen
and make sure that aspect ratio is set as Normal.
SYSTEM MAINTENANCE – 211
Page 67

PRELIMINARY-P3
WD TV Play Media Player
User Manual
Problem Solution
The slideshow pictures are distorted. Navigate to the Home | Settings | Photo screen and
select Keep as original or Fit to screen in the Photo
Scaling field.
FILES
File does not play. • Verify compatibility. Refer to “Supported Formats” on
page 217.
• Use a media converter program to convert the file to
a usable format.
AUDIO
There is no sound. • Make sure the volume on the entertainment unit is
not muted.
• Navigate to the Home | Settings | System screen and
make sure the correct audio output setting is
enabled.
- If you are using the composite audio cable, the
Stereo setting should be enabled.
- If you are using an S/PDIF (optical) or HDMI
connection, the Digital setting should be
enabled.
• If you are watching a video that supports multiple
audio channels, make sure that the Audio Off option
is disabled. Press Options | <icon>, and then press
OK repeatedly until the intended audio channel is
displayed.
NETWORK
The media player is not visible on the
network.
• Make sure the Setup > Network Settings > Network
Share Server option is set to On.
USB DEVICE
The Media Library process failed. Make sure that:
• the USB device has no read-only protection.
• the USB device is not using the HFS+ file system
with Journaling enabled.
• there is enough storage space on the USB device.
The attached USB device is not visible
on the Home screen.
• The media player only supports mass USB storage
mode. Make sure that the USB device is configured
as a "mass storage device."
• Make sure the USB device’s file system is supported
(NTFS, FAT/FAT32, or HFS+).
REMOTE CONTROL
SYSTEM MAINTENANCE – 212
Page 68

PRELIMINARY-P3
Problem Solution
WD TV Play Media Player
User Manual
The media player remote control does
not work.
FIRMWARE UPGRADE
The firmware upgrade recovery splash
screen is shown after you turned on
the media player or the media player
keeps rebooting to the splash screen.
• Press only one button at a time.
• Make sure the batteries are properly inserted.
• The batteries may already be drained out. Replace
batteries with new ones.
• Make sure that the path between the remote control
and the media player is not blocked.
The previous or current firmware upgrade process failed.
• Repeat the firmware upgrade process. Go to
page 210 for instructions.
• If you are still unable to update the system firmware,
perform a system reset. Go to page 205 for
instructions.
SYSTEM MAINTENANCE – 213
Page 69

PRELIMINARY-P3
WD TV Play Media Player
User Manual
Common Error Messages
If this message appears Perform this action
HOME
Hard drive cannot aggregate. There are different conditions under which this error
message may appear. The message will specify the
issue. For example, not enough space is used on the
storage or a journaled file system.
No storage present. Attach the USB device that contains your media files.
Media Library requires more storage
space: [XXXMB]
Please turn off journaling on the
attached storage's file system for the
media player to compile the media
library.
Unable to compile media library on
read-only storage.
Unable to compile media library. Please
check your storage setting.
1. Eject and disconnect the USB device from the
media player.
2. Connect the USB device to your computer and
delete unnecessary files to meet the required
storage space.
3. Attach the USB device to the media player again.
1. Eject and disconnect the USB device from the
media player.
2. Connect the USB device to your Apple computer
and disable the journaling function. Refer to the
Apple Help for information.
3. Attach the USB device to the media player again.
1. Eject and disconnect the USB device from the
media player.
2. Connect the USB device to your computer and
make sure the read-only protection is disabled.
3. Attach the USB device to the media player again.
There are two different conditions under which this
error message may appear:
1. Insufficient storage space on the drive(s).
2. Drive is configured as “read-only.”
Free up drive storage space or adjust the drive
settings to resolve this error.
Unrecognized storage. The USB device model is not supported. Use another
USB device.
Question XX: WD USB HDD
Trouble Shooting
This indicates a system diagnostic failure. Contact
WD Technical Support for assistance.
CONTENT PLAYBACK
There is no media in the current folder. There are no supported media files in the selected
folder. Select another folder that contains media files
of the correct format.
SYSTEM MAINTENANCE – 214
Page 70
PRELIMINARY-P3
If this message appears Perform this action
WD TV Play Media Player
User Manual
Unable to play the selected file. Please
see the User Manual for a list of
supported file formats.
1. Eject and disconnect the USB device from the
media player or map a drive to the media player
while the file is located.
2. Connect the USB device to your computer or
check the file on the media player’s internal drive
and make sure the file format is correct/supported
(see “Supported Formats” on page 217).
3. Attach the USB device to the media player again
if necessary.
FAQs
How do I find media files and create playlists?
Several media player applications are currently available, such as Winamp and
iTunes, that let you play, arrange, and edit media files. These media players also let
you create playlists and edit the metadata information for media files. You can search
the Internet with your browser to locate where these applications are available for
download.
How do I copy the files from my music CD to my computer?
Digital audio extraction, or Ripping, is the process of copying audio (or video)
content to a hard drive, typically from removable media, such as CDs or DVDs, or
from media streams.
To rip music from CDs to a computer:
1. Insert the CD into the optical drive of your computer.
2. Open the program that you use to rip the music to your computer, such as
iTunes or Windows Media Player.
3. Press the Import button (using iTunes),
- OR Press the Rip button (using Windows media player).
4. Click the music you want to copy (Windows media player) and note where the
music files are saved after they are copied. iTunes imports the entire CD into your
iTunes music library.
5. Click the Start Rip button (Windows Media Player).
6. When ripping is complete, remove the CD. The music is now on your computer.
Note: Some music may be covered by copyright laws which prevent its copying or distribution.
Can I use a universal remote control with the media player?
You can use most popular universal remote control devices such as the Logitech
Harmony models.
SYSTEM MAINTENANCE – 215
Page 71

17
PRELIMINARY-P3
WD TV Play Media Player
User Manual
Appendix
Multiformat Content Playback
Multiformat is a file type that groups other files of the same digital content but may
be encoded in different digital formats. For example, a single video file may actually
include a few components such as video, audio, and photo grouped together.
The media player is capable of playing several different types of multiformat files. For
a detailed list of supported formats, refer to “Supported Formats” on page 217.
Audio
codec
MP3
MP2/MP1
PCM/
LPCM
Dolby
Digital**
Dolby
Digital Plus
Dolby
TrueH D
FLAC
WMA/
WMA Pro
AAC
Audio
container
AIFF/AIF
MKA
OGG
WMA
WAV
EC3
AC3
Video
codec
MPEG 4
(ASP, AVC
HD/H.264)
VC-1
WMV9
Xvid
Video
container
AVI
ISO
(AVCHD)
ISO
(BD-ISO)
ASF/WMV
MKV
MOV/MP4/
MV4
tp, ts, m2t/
m2ts
FLV/3GP
OGM
Photo Subtitle* Playlist
GIF
BMP
JPEG
TIF/TIFF***
PNG
SRT
SUB
SUB (with
IDX)
SMI
SSA
ASS
TXT
PGS
PLS
WPL
M3U
XML
(iTunes)
CUE
OGG
Vorbis
APE
*To convert subtitle files encoded in a different format, open the file with Notepad and do a Save As with the
following parameters: File Type—All Files and Encoding—UTF-8.
**2-channel only. 2+channel signal is sent via digital pass through to a receiver. Manufactured under license from
Dolby Laboratories. “Dolby” and the double-D symbol are trademarks of Dolby Laboratories.
***Single layer only.
APPENDIX – 216
Page 72

Supported Formats
File Codec Format/container
PRELIMINARY-P3
VIDEO
WD TV Play Media Player
User Manual
.3g2/.3gp/.mov/.mp4 Video:
AVC
MPEG/4
M-JPEG
Audio:
AAC
AC3
MPEG Audio
PCM
.asf/.wmv Video:
WMV3
WMV9
VC-1
Audio:
WMA2
WMA3
WMA PRO
MPEG Audio
AC3
PCM
.avi/.divx Video:
AVC
DivX (3/4/5/6)
MPEG4
M-JPEG
WMV3
WVC1 (VC1)
Xvid
Audio:
AAC
AC3
ADPCM
PCM
MPEG Audio
WMA2
QuickTime
ASF
AVI
.flv Video:
AVC
Audio:
AAC
MP3
FLV
APPENDIX – 217
Page 73

PRELIMINARY-P3
WD TV Play Media Player
User Manual
File Codec Format/container
.iso (BD)/.mts/.m2t/.m2ts/
.m4t/.tp/.trp/.ts/.tts
Video:
AVC
MPEG4
Audio:
AC3
Dolby Digital Plus
Dolby TrueHD
MPEG Audio
PCM
.ogg Video:
DivX3
MPEG/4
AVC
Audio:
Vorbis
MPEG Audio
PCM
AC3
.mkv Video:
AVC
DivX (3/4/5/6)
MPEG4
Xvid
WMV3
VC-1
Audio:
AAC
AC3/DD Plus/TrueHD
MPEG Audio
PCM
MPEG TS
OGG
MATROSKA
An audio receiver is required for multi-channel surround sound digital output.
Video notes:
1. MPEG4.2 Max (ASP@L5 1920x1080p30 or 1280x720p60), bit rate (SD:20, HD:40).
2. EG-4.10 (H.264) Max ([email protected] 720x480p30 or 720x576p25, [email protected] and [email protected] 1920×1080p30 or 1280x720p60), bit rate (SD:20,
HD:40).
3. SMPTE 421M (VC-1) Max (AP@L3 and MP@HL 1920×1080p30 or 1280x720p60), bit rate (SD:20, HD:40).
4. WMV9 Max (MP@HL 1920×1080p30 or 1280x720p60), bit rate (SD:20, HD:40). Does not supprot WMV7 and WMV8. Does not support
Screen, Image and Image Version 2 profiles.
5. AVS Mac ([email protected] 1920×1080p30 or 1280x720p60) , bit rate (SD:20, HD:40).
APPENDIX – 218
Page 74

PRELIMINARY-P3
File Codec Format/container
AUDIO
MP1/2/3/a MPEG audio None
AAC MPEG 2/4 AAC LC/HE 1. ADTS
2. ADIF
M4A/MP4A MPEG 2/4 AAC LC/HE Quicktime
FLAC FLAC FLAC
WAV PCM WAVE
LPCM/PCM PCM None
WD TV Play Media Player
User Manual
OGG 1. OGG VORBIS
OGG
2. MPEG Audio
3. PCM
4. AC3
WMA WMA2 (WMA)/WMA3 (WMA
ASF
Pro)
AIF/AIFF PCM AIFF
MKA 1. AC3
MATROSKA
2. FLAC
3. MPEG 2/4 AAC LC/HE
4. MPEG Audio
5. OGG Vorbis
6. PCM
AC3/EC3 1. Dolby Digital
AC3/EC3
2. Dolby Digital Plus
3. Dolby TrueHD
APE APE Monkey’s Audio
An audio receiver is required for multi-channel surround sound digital output.
APPENDIX – 219
Page 75
PRELIMINARY-P3
WD TV Play Media Player
User Manual
Typ e
File
name
Codec Resolution Other limitation
PHOTOS
BMP bmp Uncompressed (most
common)
TIFF tif/tiff Uncompressed 24-bit
RGB (most common)
LZW (loss less) 2048x2048 Not available
PNG png DEFLATE (loss less) 2048x2048 Not available
GIF gif LZW (loss less) 2048x2048 For animation, only sup-
JPEG jpeg/jpg JPEG (lossy) (most
common)
Progressive 1280x720 Not available
Compressed RGB JPEG formats only and progressive JPEG up to 2048. Single layer TIFF files
only. Uncompressed BMP only. Not available indicates that no other limitations are known at this
time.
2048x2048 Not available
2048x2048 Multi-page not supported,
only shows 1st page
ports 1st page
4096x4096 CMYK not supported
APPENDIX – 220
Page 76
PRELIMINARY-P3
Thumbnail Support Limitation
MUSIC
WD TV Play Media Player
User Manual
Filename
Only supports ID3 and EXIF format have thumbnail
extension
mp3 Yes Thumbnail in the id3 tag (“APIC” or “PIC” tag)
wma Yes Thumbnail in the asf format (“WM/Picture” in the extended info)
m4a Ye s Thumbnail in the quicktime format (“moov/udta/meta/ilst/covr”)
mp4a Yes Thumbnail in the quicktime format (“moov/udta/meta/ilst/covr”)
flac Yes Thumbnail in the flac format
asf Yes Thumbnail in the asf format (“WM/Picture” in the extended info)
wmv Ye s Thumbnail in the asf format (“WM/Picture” in the extended info)
mp4 Yes Thumbnail in the quicktime format (“moov/udta/meta/ilst/covr”)
jpg Yes Thumbnail in the exif
jpe Yes Thumbnail in the exif
tiff Yes Thumbnail in the exif
tif Yes Thumbnail in the exif
jpeg Ye s Thumbnail in the exif
APPENDIX – 221
Page 77

PRELIMINARY-P3
WD TV Play Media Player
User Manual
Regulatory Compliance
Federal Communications Commission (FCC)
This device complies with Part 15 of the FCC Rules. Operation is subject to the
following two conditions:
1. This device may not cause harmful interference.
2. This device must accept any interference received, including interference that
may cause undesired operation.
Federal Communications Commission (FCC) Requirements, Part 15
This equipment has been tested and found to comply with the limits for a Class B
digital device pursuant to Part 15 of the FCC Rules. These limits are designed to
provide reasonable protection against harmful interference in a residential
installation. This equipment generates, uses, and can radiate radio frequency energy
and, if not installed and used in accordance with the manufacturer’s instruction
manual, may cause interference with radio communications. However, there is no
guarantee that interference will not occur in a particular installation. If this equipment
does cause harmful interference to radio or television reception, which can be
determined by turning the equipment off and on, you are encouraged to try to
correct the interference by one or more of the following measures:
Reorient or relocate the receiving antenna.
Increase the separation between the equipment and the receiver.
Connect the equipment into an outlet on a circuit different from that to which the
receiver is connected.
Consult the retailer or an experienced radio/television technician for help.
Regulatory Information/Disclaimers
Installation and use of this Wireless LAN device must be in strict accordance with the
instructions included in the user documentation provided with the product. Any
changes or modifications (including the antennas) made to this device that are not
expressly approved by the manufacturer may void the user’s authority to operate the
equipment. The manufacturer is not responsible for any radio or television
interference caused by unauthorized modification of this device, or the substitution
of the connecting cables and equipment other than manufacturer specified. It is the
responsibility of the user to correct any interference caused by such unauthorized
modification, substitution or attachment. Manufacturer and its authorized resellers or
distributors will assume no liability for any damage or violation of government
regulations arising from failing to comply with these guidelines.
CAUTION: To comply with FCC RF exposure compliance requirements, the antenna
used for this transmitter must be installed to provide a separation distance of at least
20cm from all persons and must not be co-located or operating in conjunction with
any other antenna or transmitter.
APPENDIX – 222
Page 78

PRELIMINARY-P3
WD TV Play Media Player
User Manual
Industry Canada (IC)
This device complies with RSS-210 of the Industry Canada Rules. Operation is
subject to the following two conditions:
1. this device may not cause interference and
2. this device must accept any interference, including interference that may cause
undesired operation of the device
This device has been designed to operate with an antenna having a maximum gain
of 2dBi. Antenna having a higher gain is strictly prohibited per regulations of Industry
Canada. The required antenna impedance is 50 ohms.
To reduce potential radio interference to other users, the antenna type and its gain
should be so chosen that the EIRP is not more than required for successful
communication.
IMPORTANT NOTE: C Radiation Exposure Statement:
This equipment complies with IC radiation exposure limits set forth for an
uncontrolled environment. This equipment should be installed and operated with
minimum distance 20cm between the radiator & your body.
Ce dispositif est conforme à la norme CNR-210 d'Industrie Canada applicable aux
appareils radio exempts de licence. Son fonctionnement est sujet aux deux
conditions suivantes: (1) le dispositif ne doit pas produire de brouillage préjudiciable,
et (2) ce dispositif doit accepter tout brouillage reçu, y compris un brouillage
susceptible de provoquer un fonctionnement indésirable.
Ce dispositif a été conçu pour fonctionner avec une antenne ayant un gain maximal
de dB [2]. Une antenne à gain plus élevé est strictement interdite par les règlements
d'Industrie Canada. L'impédance d'antenne requise est de 50 ohms.
NOTE IMPORTANTE: (Pour l'utilisation de dispositifs mobiles)
Déclaration d'exposition aux radiations:
Cet équipement est conforme aux limites d'exposition aux rayonnements IC établies
pour un environnement non contrôlé. Cet équipement doit être installé et utilisé avec
un minimum de 20 cm de distance entre la source de rayonnement et votre corps.
ICES-003/NMB-003 Statement
Cet appareil numérique de la classe B est conforme à la norme NMB-003 du
Canada.
This device complies with Canadian ICES-003 Class B.
Safety Compliance
Approved for US and Canada. CAN/CSA-C22.2 No. 60065:03, UL-60065,
7th Ed: Audio, Video and Similar Electronic Apparatus - Safety Requirements.
Approuvé pour les Etats-Unis et le Canada. CAN/CSA-C22.2 No. 60065:03,
UL-60065 7th Ed. Appareils audio, vidéo et appareils électroniques analogues Exigences de sécurité.
This device is only for use with the compatible UL Listed AC adapter.
APPENDIX – 223
Page 79

PRELIMINARY-P3
WD TV Play Media Player
User Manual
Cet appareil n'est destiné qu'a` des adaptateur compatibles marqués "UL Listed.”
CE Compliance for Europe
Operation of this device is subjected to the following National regulations and may
be prohibited to use if certain restriction should be applied.
Marking by the CE symbol indicates compliance of this system to the applicable
Council Directives of the European Union, including the EMC Directives (2004/108/
EC), (1999/5/EC), the Low Voltage Directive (2006/95/EC), and EuP Directive (2005/
32/EC). A “Declaration of Conformity” in accordance with the applicable directives
has been made and is on file at Western Digital Europe.
Die Kennzeichnung mit dem CE-Symbol zeigt an, dass dieses System die
anwendbaren Richtlinien der Europäischen Union erfüllt, einschließlich der EMVRichtlinien (2004/108/EG), (1999/5/EG), der Niederspannungsrichtlinie (2006/95/EG)
und der Richtlinie (2005/32/EG) des Europäischen Parlaments. Eine
„Konformitätserklärung“ gemäß den anwendbaren Richtlinien wurde abgegeben und
kann bei Western Digital Europe eingesehen werden.
Le symbole CE sur l'appareil indique la conformité de cet appareil avec les directives
applicables du Conseil de l'Union Européenne, dont les directives EMC (2004/108/
EC), (1999/5/EC), la directive sur les limites de tension (2006/95/EC) et la directive
EuP (2005/32/EC), si applicable. Une « déclaration de conformité » conforme aux
directives applicables a été effectuée et est consultable chez Western Digital Europe.
Il marchio CE indica la conformità del sistema alle direttive applicabili del Consiglio
dell'Unione europea, tra cui le Direttive EMC (2004/108/CE), (1999/5/CE), la Direttiva
Bassa Tensione (2006/95/CE ), e la Direttiva EuP (2005/32/CE). Una “Dichiarazione
di conformità” redatta in base alle direttive vigenti è disponibile presso Western
Digital Europe.
La marca con el símbolo CE indica el cumplimiento de este sistema de las Directivas
del Consejo de la Unión Europea correspondientes, incluidas las directivas EMC
(2004/108/EC) y (1999/5/EC), la Directiva de bajo voltaje (2006/95/CE) y la Directiva
EuP (2005/32/EC). Se ha realizado una "Declaración de conformidad" de acuerdo
con las directivas aplicables y se encuentra archivada en Western Digital Europe.
CE-märkningen innebär att detta system uppfyller Europeiska Unionens tillämpliga
rådsdirektiv, inklusive EMC-direktivet (2004/108/EC), (1999/5/EC),
lågspänningsdirektivet (2006/95/EC) och EuP-direktivet (2005/32/EC). En
"Konformitetsdeklaration" i enlighet med gällande direktiv har gjorts och finns
arkiverad hos Western Digital Europe.
Merking med CE-symbolet indikerer at dette systemet samsvarer med gjeldende
direktiver (council directives) for EU, inkludert EMC-direktiv (2004/108/EF), (1999/5/
EF), Lavspenningsdirektiv (2006/95/EF) og EuP-direktiv (2005/32/EF). En
"Samsvarserklæring" i henhold til gjeldende direktiver har blitt opprettet og er i
Western Digital Europas arkiver.
CE-merkintä osoittaa tämän järjestelmän yhdenmukaisuuden sovellettavissa olevien
Euroopan yhteisön neuvoston direktiivien kanssa, mukaan lukien EMC-direktiivi
(2004/108/EC), (1999/5/EC), alijännitedirektiivi (2006/95/EC) sekä EuP-direktiivi
APPENDIX – 224
Page 80
PRELIMINARY-P3
ℶ❐₼㦘㹡㦘⹂䓸德㒥⏒侯䤓⚜䱿♙⚺摞
WD TV Play Media Player
User Manual
(2005/32/EC). "Noudattamisjulistus" on jätetty asiaankuuluvien direktiivien
mukaisesti, ja se on tallessa Western Digital Europessa.
Mærkning med CE-symbolet angiver at systemet overholder Europaparlamentets og
Rådets direktiver, herunder EMC-direktiverne (elektromagnetisk kompatibilitet) (2004/
108/EC), (1999/5/EC) og lavspændingsdirektivet (2006/95/EC) og EuP-direktivet
2005/32/EC. En “Declaration of Conformity” (overensstemmelsesattestering) i henhold
til gældende direktiver er afgivet og opbevares hos Western Digital Europe.
Маркировка символом CE свидетельствует о соответствии настоящей
системы положениям применимых директив Совета Европейского Союза, в
том числе директив об электромагнитной совместимости (2004/108/EC,
1999/5/EC), директивы о низковольтном оборудовании (2006/95/EC) и
директивы об устройствах, использующих электроэнергию (2005/32/EC).
Заявление о соответствии положениям применимых директив, сделанное
компанией Western Digital, находится в архиве её европейского
подразделения.
Η σήμανση με το σύμβολο CE υποδεικνύει ότι το σύστημα αυτό συμμορφώνεται
με τις ισχύουσες οδηγίες του Συμβουλίου της Ευρωπαϊκής Ένωσης,
συμπεριλαμβανομένων των οδηγιών περί ηλεκτρομαγνητικής συμβατότητας
(2004/108/ΕΚ), (1999/5/ΕΚ), της οδηγίας περί χαμηλής τάσης (2006/95/ΕΚ) και
της οδηγίας του Ευρωπαϊκού Κοινοβουλίου (2005/32/ΕΚ). Έχει πραγματοποιηθεί
μία «Δήλωση συμμόρφωσης», σύμφωνα με τις ισχύουσες οδηγίες και τηρείται στα
αρχεία της Western Digital Ευρώπης.
Environmental Compliance (China)
ℶ
捷ↅ⚜䱿 㦘㹡㦘⹂䓸德㒥⏒侯
ᴎ/ᴎㆅ
⬉䏃ᵓ㒘ড় / ᵓ
⬉⑤ব఼ / ⬉⑤կᑨ఼
⬉∴
䘹఼
O: ⅲ嫷㷳䱜捷ↅ䤓㓏㦘⧖德㧟㠨₼㓏⚺䤓年䱜㦘㹡㦘⹂䓸德⧖⇝ℝ₼◝ⅉ㺠␀✛⦌≰㋾ℶ₩捷㓏欐を䤓ᇵ䟄
≰㋾ℶ❐₼㦘㹡㦘⹂䓸德䤓棟摞尐㻑ᇶ(SJ/T 11363-2006) 屓⸩䤓棟摞ᇭ
X: ⅲ嫷㷳䱜捷ↅ㓏䞷䤓⧖德㧟㠨₼, 咂⺠㦘伊㧟㠨␅㓏⚺䤓㦘㹡㦘⹂䓸德浧ℝ₼◝ⅉ㺠␀✛⦌≰㋾ℶ₩捷㓏
欐を䤓ᇵ䟄≰㋾ℶ❐₼㦘㹡㦘⹂䓸德䤓棟摞尐㻑ᇶ(SJ/T 11363-2006) 屓⸩䤓棟摞
棳槭ℶ❐ₙ♵㦘㪖帿᧨㓏㦘␔棓ℶ❐♙␅捷ↅ䤓ಫ䘾≬∎䞷㦮棟ಬ⧖䟀㷳㣍䯉䤓䶵⚆嫷䯉ᇭ㷳䘾
≬∎䞷㦮棟♹抑䞷ℝℶ❐㓚␛₼㓏屓⸩䤓∎䞷㧰ↅᇭ
(ℸ㸼ЁˈӕϮৃ㛑䳔㽕ḍᅲ䰙ᚙމᇍ䆄”X” ⱘ乍Ⳃ䖯㸠䖯ϔℹⱘᡔᴃᗻ㾷䞞DŽ)
杔 㻭 柘 ⏼ↆ杻 ⮩䅃勣啾 ⮩䅃ℛ啾搩
X O O O O
X O O
X O
O
O
O
X O O O O O
X O O O O O
O
O
O
O
O
APPENDIX – 225
Page 81

PRELIMINARY-P3
WD TV Play Media Player
User Manual
Russia FAC (DoC)
Подтверждение соответствия Мининформсвязи России:
Декларация соответствия № Д-ТП-1616 от 23.09.2011 года, действительна до
23.09.2017 года, зарегистрирована в Федеральном агенстве связи 28.09.2011
года
Warranty Information (All Regions Except Australia/New Zealand)
Obtaining Service
WD values your business and always attempts to provide you the very best of service. If this Product requires
maintenance, either contact the dealer from whom you originally purchased the Product or visit our product
support Web site at http://support.wdc.com for information on how to obtain service or a Return Material
Authorization (RMA). If it is determined that the Product may be defective, you will be given an RMA number and
instructions for Product return. An unauthorized return (i.e., one for which an RMA number has not been issued)
will be returned to you at your expense. Authorized returns must be shipped in an approved shipping container,
prepaid and insured, to the address provided on your return paperwork. Your original box and packaging
materials should be kept for storing or shipping your WD product. To conclusively establish the period of
warranty, check the warranty expiration (serial number required) via http://support.wdc.com. WD shall have no
liability for lost data regardless of the cause, recovery of lost data, or data contained in any Product placed in its
possession.
Limited Warranty
WD warrants that the Product, in the course of its normal use, will for the term defined below, be free from
defects in material and workmanship and will conform to WD’s specification therefor. The term of your limited
warranty depends on the country in which your Product was purchased. The term of your limited warranty is for
1 year in the North, South and Central America region, 2 years in the Europe, the Middle East and Africa region,
and 1 year in the Asia Pacific region, unless otherwise required by law. The term of your limited warranty period
shall commence on the purchase date appearing on your purchase receipt. WD may at its discretion make
extended warranties available for purchase. WD shall have no liability for any Product returned if WD determines
that the Product was stolen from WD or that the asserted defect a) is not present, b) cannot reasonably be
rectified because of damage occurring before WD receives the Product, or c) is attributable to misuse, improper
installation, alteration (including removing or obliterating labels and opening or removing external enclosures,
unless the product is on the list of limited user-serviceable products and the specific alteration is within the scope
of the applicable instructions, as found at http://support.wdc.com), accident or mishandling while in the
possession of someone other than WD. Subject to the limitations specified above, your sole and exclusive
warranty shall be, during the period of warranty specified above and at WD’s option, the repair or replacement of
the Product with an equivalent or better Product. The foregoing warranty of WD shall extend to repaired or
replaced Products for the balance of the applicable period of the original warranty or ninety (90) days from the
date of shipment of a repaired or replaced Product, whichever is longer.
The foregoing limited warranty is WD’s sole warranty and is applicable only to products sold as new. The
remedies provided herein are in lieu of a) any and all other remedies and warranties, whether expressed, implied
or statutory, including but not limited to, any implied warranty of merchantability or fitness for a particular
purpose, and b) any and all obligations and liabilities of WD for damages including, but not limited to accidental,
consequential, or special damages, or any financial loss, lost profits or expenses, or lost data arising out of or in
connection with the purchase, use, or performance of the Product, even if WD has been advised of the possibility
of such damages. In the United States, some states do not allow exclusion or limitations of incidental or
consequential damages, so the limitations above may not apply to you. This warranty gives you specific legal
rights, and you may also have other rights which vary from state to state.
Warranty Information (Australia/New Zealand only)
For consumers purchasing products in Australia and New Zealand, please refer to this
warranty information.
Nothing in this warranty modifies or excludes your legal rights under the Australian Competition and Consumer
Act or the New Zealand Consumer Guarantees Act. This warranty identifies WD's preferred approach to
resolving warranty claims which is likely to be quick and simple for all parties.
No other warranties either express or implied by law, including but not limited to those contained in the Sale of
Goods Act, are made with respect to the Product. If you purchased your Product in New Zealand for the
purposes of a business, you acknowledge and agree that the New Zealand Consumer Guarantees Act does not
apply.
In Australia, our goods come with guarantees that cannot be excluded under the Australian Consumer Law. You
are entitled to a replacement or refund for a major failure and compensation for any other reasonably foreseeable
loss or damage. You are also entitled to have the goods repaired or replaced if goods fail to be of acceptable
APPENDIX – 226
Page 82

PRELIMINARY-P3
quality and the failure does not amount to a major failure. What constitutes a major failure is set out in the
Australian Consumer Law.
WD TV Play Media Player
User Manual
Warranty
WD warrants that the Product, in the course of its normal use, will for the term defined below, be free from
defects in material and workmanship and will conform to WD’s specifications. The term of your warranty is 1 year
in Australia and New Zealand, unless otherwise required by law. The term of your warranty period shall
commence on the purchase date appearing on your purchase receipt from an authorized distributor or
authorized reseller. Proof of purchase shall be required to be eligible for this warranty and to establish the
commencement date of this warranty. Warranty service will not be provided unless the Product is returned to an
authorized distributor, authorized reseller or regional WD return center where the Product was first shipped by
WD. WD may at its discretion make extended warranties available for purchase. WD shall have no liability for any
Product returned if WD determines that the Product was (i) not purchased from an authorized distributor or
authorized reseller, (ii) not used in accordance with WD specifications and instructions, (iii) not used for its
intended function, or (iv) stolen from WD, or that the asserted defect a) is not present, b) cannot reasonably be
rectified because of damage occurring before WD receives the Product, or c) is attributable to misuse, improper
installation, alteration (including removing or obliterating labels and opening or removing external enclosures,
including the mounting frame, unless the product is on the list of limited user-serviceable products and the
specific alteration is within the scope of the applicable instructions, as found at http://support.wdc.com),
accident or mishandling while in the possession of someone other than WD.
PRODUCTS ARE COMPLEX AND FRAGILE ITEMS THAT MAY OCCASSIONALY FAIL DUE TO (A)
EXTERNAL CAUSES, INCLUDING WITHOUT LIMITATION, MISHANDLING, EXPOSURE TO HEAT,
COLD, AND HUMIDITY, AND POWER FAILURES, OR (B) INTERNAL FAULTS. SUCH FAILURES CAN
RESULT IN THE LOSS, CORRUPTION, DELETION OR ALTERATION OF DATA. NOTE THAT YOU SHALL
BE RESPONSIBLE FOR THE LOSS, CORRUPTION, DELETION OR ALTERATION OF DATA
HOWSOEVER CAUSED, AND FOR BACKING UP AND PROTECTING DATA AGAINST LOSS,
CORRUPTION, DELETION OR ALTERATION. YOU AGREE TO CONTINUALLY BACK UP ALL DATA ON
THE PRODUCT, AND TO COMPLETE A BACKUP PRIOR TO SEEKING ANY GENERAL SERVICE AND
TECHNICAL SUPPORT FROM WD.
In Australia, if the Product is not of a kind ordinarily acquired for personal, domestic or household use or
consumption, provided it is fair and reasonable to do so, WD limits its liability to replacement of the Product or
supply of equivalent or better Product.
This warranty shall extend to repaired or replaced Products for the balance of the applicable period of the original
warranty or ninety (90) days from the date of shipment of a repaired or replaced Product, whichever is longer.
This warranty is WD’s sole manufacturer's warranty and is applicable only to Products sold as new.
Obtaining Service
WD values your business and always attempts to provide you the very best of service. Should you encounter any
problem, please give us an opportunity to address it before returning this Product. Most technical support
questions can be answered through our knowledge base or e-mail support service at http://support.wdc.com. If
the answer is not available or, if you prefer, please contact WD at the applicable telephone number shown in the
front of this document.
If you wish to make a claim, you should initially contact the dealer from whom you originally purchased the
Product. If you are unable to contact the dealer from whom you originally purchased the Product, please visit our
product support Web site at http://support.wdc.com for information on how to obtain service or a Return
Material Authorization (RMA). If it is determined that the Product may be defective, you will be given an RMA
number and instructions for Product return. An unauthorized return (i.e., one for which an RMA number has not
been issued) will be returned to you at your expense. Authorized returns must be shipped in an approved
shipping container, prepaid and insured, to the address provided with your RMA number. If following receipt of a
qualifying claim under this warranty, WD or the dealer from whom you originally purchased the Product
determines that your claim is valid, WD or such dealer shall, at its discretion, either repair or replace the Product
with an equivalent or better Product or refund the cost of the Product to you. You are responsible for any
expenses associated with a claim under this warranty. The benefits provided to you under this warranty are in
addition to other rights and remedies available to you under the Australian Competition and Consumer Act or the
New Zealand Consumer Guarantees Act.
Your original box and packaging materials should be kept for storing or shipping your WD product. To
conclusively establish the period of warranty, check the warranty expiration (serial number required) via http://
support.wdc.com.
Western Digital Technologies, Inc.
3355 Michelson Drive, Suite 100
Irvine, California 92612
Phone: 949-672-7000
E-mail: [email protected]
APPENDIX – 227
Page 83

PRELIMINARY-P3
WD TV Play Media Player
User Manual
GNU General Public License (“GPL”)
Firmware incorporated into this product may include third party copyrighted software licensed under the GPL or
Lesser General Public License ("LGPL") (collectively, “GPL Software”) and not Western Digital’s End User License
Agreement. In accordance with the GPL, if applicable: 1) the source code for the GPL Software may be
downloaded at no charge from http://support.wdc.com/download/gpl or obtained on CD for a nominal charge
from http://support.wdc.com/download/gpl or by calling Customer Support within three years of the date of
purchase; 2) you may re-use, re-distribute, and modify the GPL Software; 3) with respect solely to the GPL
Software, no warranty is provided, to the extent permitted by applicable law; and 4) a copy of the GPL is
included herewith, may be obtained at http://www.gnu.org, and may also be found at http://support.wdc.com/
download/gpl.
Modification of or tampering with the Software, including but not limited to any Open Source Software, is solely
at your own risk. Western Digital is not responsible for any such modification or tampering. Western Digital will
not support any product in which you have or have attempted to modify the Software supplied by
Western Digital.
APPENDIX – 228
Page 84

PRELIMINARY-P3
WD TV Play Media Player
User Manual
Spotify Third-Party Licenses
Several fantastic pieces of free and open-source software have really helped get Spotify to where it is today. A
few require that we include their license agreements within our product. Consider it done. As we enjoy giving
credit where it's due, we included the entire list below. This means you can not only see which software we've
been using, but the terms of the licenses too. A big thanks from all of us at Spotify to the smart people behind the
fantastic programs listed. Rock on!
• Boost
•Expat
• FastDelegate
•libogg
•libvorbis
•Mersenne Twister
• zlib
Boost
http://www.boost.org/
Boost Software License - Version 1.0 - August 17th, 2003
Permission is hereby granted, free of charge, to any person or organization obtaining a copy of the software and
accompanying documentation covered by this license (the "Software") to use, reproduce, display, distribute,
execute, and transmit the Software, and to prepare derivative works of the Software, and to permit third-parties
to whom the Software is furnished to do so, all subject to the following:
The copyright notices in the Software and this entire statement, including the above license grant, this restriction
and the following disclaimer, must be included in all copies of the Software, in whole or in part, and all derivative
works of the Software, unless such copies or derivative works are solely in the form of machine-executable
object code generated by a source language processor.
THE SOFTWARE IS PROVIDED "AS IS", WITHOUT WARRANTY OF ANY KIND, EXPRESS OR IMPLIED,
INCLUDING BUT NOT LIMITED TO THE WARRANTIES OF MERCHANTABILITY, FITNESS FOR A PARTICULAR
PURPOSE, TITLE AND NON-INFRINGEMENT. IN NO EVENT SHALL THE COPYRIGHT HOLDERS OR ANYONE
DISTRIBUTING THE SOFTWARE BE LIABLE FOR ANY DAMAGES OR OTHER LIABILITY, WHETHER IN
CONTRACT, TORT OR OTHERWISE, ARISING FROM, OUT OF OR IN CONNECTION WITH THE SOFTWARE
OR THE USE OR OTHER DEALINGS IN THE SOFTWARE.
Expat
http://www.jclark.com/xml/expat.html
Expat License. Copyright (c) 1998, 1999, 2000 Thai Open Source Software Center Ltd
Permission is hereby granted, free of charge, to any person obtaining a copy of this software and associated
documentation files (the "Software"), to deal in the Software without restriction, including without limitation the
rights to use, copy, modify, merge, publish, distribute, sublicense, and/or sell copies of the Software, and to
permit persons to whom the Software is furnished to do so, subject to the following conditions:
The above copyright notice and this permission notice shall be included in all copies or substantial portions of the
Software.
THE SOFTWARE IS PROVIDED "AS IS", WITHOUT WARRANTY OF ANY KIND, EXPRESS OR IMPLIED,
INCLUDING BUT NOT LIMITED TO THE WARRANTIES OF MERCHANTABILITY, FITNESS FOR A PARTICULAR
PURPOSE AND NONINFRINGEMENT. IN NO EVENT SHALL THE AUTHORS OR COPYRIGHT HOLDERS BE
LIABLE FOR ANY CLAIM, DAMAGES OR OTHER LIABILITY, WHETHER IN AN ACTION OF CONTRACT, TORT
OR OTHERWISE, ARISING FROM, OUT OF OR IN CONNECTION WITH THE SOFTWARE OR THE USE OR
OTHER DEALINGS IN THE SOFTWARE.
FastDelegate
http://www.codeproject.com/KB/cpp/FastDelegate.aspx
THE WORK (AS DEFINED BELOW) IS PROVIDED UNDER THE TERMS OF THIS CODE PROJECT OPEN
LICENSE ("LICENSE"). THE WORK IS PROTECTED BY COPYRIGHT AND/OR OTHER APPLICABLE LAW. ANY
USE OF THE WORK OTHER THAN AS AUTHORIZED UNDER THIS LICENSE OR COPYRIGHT LAW IS
PROHIBITED.
BY EXERCISING ANY RIGHTS TO THE WORK PROVIDED HEREIN, YOU ACCEPT AND AGREE TO BE BOUND
BY THE TERMS OF THIS LICENSE. THE AUTHOR GRANTS YOU THE RIGHTS CONTAINED HEREIN IN
CONSIDERATION OF YOUR ACCEPTANCE OF SUCH TERMS AND CONDITIONS. IF YOU DO NOT AGREE TO
ACCEPT AND BE BOUND BY THE TERMS OF THIS LICENSE, YOU CANNOT MAKE ANY USE OF THE WORK.
1. Definitions.
a. Articles" means, collectively, all articles written by Author which describes how the Source Code and
Executable Files for the Work may be used by a user.
b. Author" means the individual or entity that offers the Work under the terms of this License.
c. Derivative Work" means a work based upon the Work or upon the Work and other pre-existing works.
APPENDIX – 229
Page 85

PRELIMINARY-P3
d. Executable Files" refer to the executables, binary files, configuration and any required data files
included in the Work.
e. Publisher" means the provider of the website, magazine, CD-ROM, DVD or other medium from or by
which the Work is obtained by You.
f. Source Code" refers to the collection of source code and configuration files used to create the
Executable Files.
g. Standard Version" refers to such a Work if it has not been modified, or has been modified in
accordance with the consent of the Author, such consent being in the full discretion of the Author.
h. Work" refers to the collection of files distributed by the Publisher, including the Source Code,
Executable Files, binaries, data files, documentation, whitepapers and the Articles.
WD TV Play Media Player
User Manual
i. You" is you, an individual or entity wishing to use the Work and exercise your rights under this License.
2. Fair Use/Fair Use Rights. Nothing in this License is intended to reduce, limit, or restrict any rights arising
from fair use, fair dealing, first sale or other limitations on the exclusive rights of the copyright owner under
copyright law or other applicable laws.
3. License Grant. Subject to the terms and conditions of this License, the Author hereby grants You a
worldwide, royalty-free, non-exclusive, perpetual (for the duration of the applicable copyright) license to
exercise the rights in the Work as stated below:
a. You may use the standard version of the Source Code or Executable Files in Your own applications.
b. You may apply bug fixes, portability fixes and other modifications obtained from the Public Domain or
from the Author. A Work modified in such a way shall still be considered the standard version and will
be subject to this License.
c. You may otherwise modify Your copy of this Work (excluding the Articles) in any way to create a
Derivative Work, provided that You insert a prominent notice in each changed file stating how, when
and where You changed that file.
d. You may distribute the standard version of the Executable Files and Source Code or Derivative Work in
aggregate with other (possibly commercial) programs as part of a larger (possibly commercial)
software distribution.
e. The Articles discussing the Work published in any form by the author may not be distributed or
republished without the Author's consent. The author retains copyright to any such Articles. You may
use the Executable Files and Source Code pursuant to this License but you may not repost or
republish or otherwise distribute or make available the Articles, without the prior written consent of the
Author.
Any subroutines or modules supplied by You and linked into the Source Code or Executable Files this
Work shall not be considered part of this Work and will not be subject to the terms of this License.
4. Patent License. Subject to the terms and conditions of this License, each Author hereby grants to You a
perpetual, worldwide, non-exclusive, no-charge, royalty-free, irrevocable (except as stated in this section)
patent license to make, have made, use, import, and otherwise transfer the Work.
5. Restrictions. The license granted in Section 3 above is expressly made subject to and limited by the
following restrictions:
a. You agree not to remove any of the original copyright, patent, trademark, and attribution notices and
associated disclaimers that may appear in the Source Code or Executable Files.
b. You agree not to advertise or in any way imply that this Work is a product of Your own.
c. The name of the Author may not be used to endorse or promote products derived from the Work
without the prior written consent of the Author.
d. You agree not to sell, lease, or rent any part of the Work. This does not restrict you from including the
Work or any part of the Work inside a larger software distribution that itself is being sold. The Work by
itself, though, cannot be sold, leased or rented.
e. You may distribute the Executable Files and Source Code only under the terms of this License, and
You must include a copy of, or the Uniform Resource Identifier for, this License with every copy of the
Executable Files or Source Code You distribute and ensure that anyone receiving such Executable
Files and Source Code agrees that the terms of this License apply to such Executable Files and/or
Source Code. You may not offer or impose any terms on the Work that alter or restrict the terms of this
License or the recipients' exercise of the rights granted hereunder. You may not sublicense the Work.
You must keep intact all notices that refer to this License and to the disclaimer of warranties. You may
not distribute the Executable Files or Source Code with any technological measures that control
access or use of the Work in a manner inconsistent with the terms of this License.
f. You agree not to use the Work for illegal, immoral or improper purposes, or on pages containing illegal,
immoral or improper material. The Work is subject to applicable export laws. You agree to comply with
all such laws and regulations that may apply to the Work after Your receipt of the Work.
6. Representations, Warranties and Disclaimer. THIS WORK IS PROVIDED "AS IS", "WHERE IS" AND "AS
AVAILABLE", WITHOUT ANY EXPRESS OR IMPLIED WARRANTIES OR CONDITIONS OR
GUARANTEES. YOU, THE USER, ASSUME ALL RISK IN ITS USE, INCLUDING COPYRIGHT
INFRINGEMENT, PATENT INFRINGEMENT, SUITABILITY, ETC. AUTHOR EXPRESSLY DISCLAIMS ALL
EXPRESS, IMPLIED OR STATUTORY WARRANTIES OR CONDITIONS, INCLUDING WITHOUT
LIMITATION, WARRANTIES OR CONDITIONS OF MERCHANTABILITY, MERCHANTABLE QUALITY OR
FITNESS FOR A PARTICULAR PURPOSE, OR ANY WARRANTY OF TITLE OR NON-INFRINGEMENT, OR
THAT THE WORK (OR ANY PORTION THEREOF) IS CORRECT, USEFUL, BUG-FREE OR FREE OF
VIRUSES. YOU MUST PASS THIS DISCLAIMER ON WHENEVER YOU DISTRIBUTE THE WORK OR
DERIVATIVE WORKS.
7. Indemnity. You agree to defend, indemnify and hold harmless the Author and the Publisher from and
against any claims, suits, losses, damages, liabilities, costs, and expenses (including reasonable legal or
attorneys’ fees) resulting from or relating to any use of the Work by You.
8. Limitation on Liability. EXCEPT TO THE EXTENT REQUIRED BY APPLICABLE LAW, IN NO EVENT WILL
THE AUTHOR OR THE PUBLISHER BE LIABLE TO YOU ON ANY LEGAL THEORY FOR ANY SPECIAL,
INCIDENTAL, CONSEQUENTIAL, PUNITIVE OR EXEMPLARY DAMAGES ARISING OUT OF THIS
APPENDIX – 230
Page 86

PRELIMINARY-P3
WD TV Play Media Player
User Manual
LICENSE OR THE USE OF THE WORK OR OTHERWISE, EVEN IF THE AUTHOR OR THE PUBLISHER
HAS BEEN ADVISED OF THE POSSIBILITY OF SUCH DAMAGES.
9. Termination.
a. This License and the rights granted hereunder will terminate automatically upon any breach by You of
any term of this License. Individuals or entities who have received Derivative Works from You under this
License, however, will not have their licenses terminated provided such individuals or entities remain in
full compliance with those licenses. Sections 1, 2, 6, 7, 8, 9, 10 and 11 will survive any termination of
this License.
b. If You bring a copyright, trademark, patent or any other infringement claim against any contributor over
infringements You claim are made by the Work, your License from such contributor to the Work ends
automatically.
c. Subject to the above terms and conditions, this License is perpetual (for the duration of the applicable
copyright in the Work). Notwithstanding the above, the Author reserves the right to release the Work
under different license terms or to stop distributing the Work at any time; provided, however that any
such election will not serve to withdraw this License (or any other license that has been, or is required
to be, granted under the terms of this License), and this License will continue in full force and effect
unless terminated as stated above.
10. Publisher. The parties hereby confirm that the Publisher shall not, under any circumstances, be
responsible for and shall not have any liability in respect of the subject matter of this License. The Publisher
makes no warranty whatsoever in connection with the Work and shall not be liable to You or any party on
any legal theory for any damages whatsoever, including without limitation any general, special, incidental
or consequential damages arising in connection to this license. The Publisher reserves the right to cease
making the Work available to You at any time without notice
11. Miscellaneous
a. This License shall be governed by the laws of the location of the head office of the Author or if the
Author is an individual, the laws of location of the principal place of residence of the Author.
b. If any provision of this License is invalid or unenforceable under applicable law, it shall not affect the
validity or enforceability of the remainder of the terms of this License, and without further action by the
parties to this License, such provision shall be reformed to the minimum extent necessary to make
such provision valid and enforceable.
c. No term or provision of this License shall be deemed waived and no breach consented to unless such
waiver or consent shall be in writing and signed by the party to be charged with such waiver or
consent.
d. This License constitutes the entire agreement between the parties with respect to the Work licensed
herein. There are no understandings, agreements or representations with respect to the Work not
specified herein. The Author shall not be bound by any additional provisions that may appear in any
communication from You. This License may not be modified without the mutual written agreement of
the Author and You
libogg
http://www.xiph.org/ogg/
Copyright (c) 2002, Xiph.org Foundation
Redistribution and use in source and binary forms, with or without modification, are permitted provided that the
following conditions are met:
• Redistributions of source code must retain the above copyright notice, this list of conditions and the following
disclaimer.
• Redistributions in binary form must reproduce the above copyright notice, this list of conditions and the
following disclaimer in the documentation and/or other materials provided with the distribution.
• Neither the name of the Xiph.org Foundation nor the names of its contributors may be used to endorse or
promote products derived from this software without specific prior written permission.
THIS SOFTWARE IS PROVIDED BY THE COPYRIGHT HOLDERS AND CONTRIBUTORS ``AS IS'' AND ANY
EXPRESS OR IMPLIED WARRANTIES, INCLUDING, BUT NOT LIMITED TO, THE IMPLIED WARRANTIES OF
MERCHANTABILITY AND FITNESS FOR A PARTICULAR PURPOSE ARE DISCLAIMED. IN NO EVENT SHALL
THE FOUNDATION OR CONTRIBUTORS BE LIABLE FOR ANY DIRECT, INDIRECT, INCIDENTAL, SPECIAL,
EXEMPLARY, OR CONSEQUENTIAL DAMAGES (INCLUDING, BUT NOT LIMITED TO, PROCUREMENT OF
SUBSTITUTE GOODS OR SERVICES; LOSS OF USE, DATA, OR PROFITS; OR BUSINESS INTERRUPTION)
HOWEVER CAUSED AND ON ANY THEORY OF LIABILITY, WHETHER IN CONTRACT, STRICT LIABILITY, OR
TORT (INCLUDING NEGLIGENCE OR OTHERWISE) ARISING IN ANY WAY OUT OF THE USE OF THIS
SOFTWARE, EVEN IF ADVISED OF THE POSSIBILITY OF SUCH DAMAGE.
libvorbis
http://www.xiph.org/vorbis/
Copyright (c) 2002-2004 Xiph.org Foundation
Redistribution and use in source and binary forms, with or without modification, are permitted provided that the
following conditions are met:
• Redistributions of source code must retain the above copyright notice, this list of conditions and the following
disclaimer.
• Redistributions in binary form must reproduce the above copyright notice, this list of conditions and the
following disclaimer in the documentation and/or other materials provided with the distribution.
• Neither the name of the Xiph.org Foundation nor the names of its contributors may be used to endorse or
promote products derived from this software without specific prior written permission.
APPENDIX – 231
Page 87
PRELIMINARY-P3
WD TV Play Media Player
User Manual
THIS SOFTWARE IS PROVIDED BY THE COPYRIGHT HOLDERS AND CONTRIBUTORS ``AS IS'' AND ANY
EXPRESS OR IMPLIED WARRANTIES, INCLUDING, BUT NOT LIMITED TO, THE IMPLIED WARRANTIES OF
MERCHANTABILITY AND FITNESS FOR A PARTICULAR PURPOSE ARE DISCLAIMED. IN NO EVENT SHALL
THE FOUNDATION OR CONTRIBUTORS BE LIABLE FOR ANY DIRECT, INDIRECT, INCIDENTAL, SPECIAL,
EXEMPLARY, OR CONSEQUENTIAL DAMAGES (INCLUDING, BUT NOT LIMITED TO, PROCUREMENT OF
SUBSTITUTE GOODS OR SERVICES; LOSS OF USE, DATA, OR PROFITS; OR BUSINESS INTERRUPTION)
HOWEVER CAUSED AND ON ANY THEORY OF LIABILITY, WHETHER IN CONTRACT, STRICT LIABILITY, OR
TORT (INCLUDING NEGLIGENCE OR OTHERWISE) ARISING IN ANY WAY OUT OF THE USE OF THIS
SOFTWARE, EVEN IF ADVISED OF THE POSSIBILITY OF SUCH DAMAGE.
Mersenne Twister
http://www.math.sci.hiroshima-u.ac.jp/~m-mat/MT/MT2002/CODES/mt19937ar.c
Copyright (C) 1997 - 2002, Makoto Matsumoto and Takuji Nishimura,
All rights reserved.
Redistribution and use in source and binary forms, with or without modification, are permitted provided that the
following conditions are met:
1. Redistributions of source code must retain the above copyright notice, this list of conditions and the
following disclaimer.
2. Redistributions in binary form must reproduce the above copyright notice, this list of conditions and the
following disclaimer in the documentation and/or other materials provided with the distribution.
3. The names of its contributors may not be used to endorse or promote products derived from this software
without specific prior written permission.
THIS SOFTWARE IS PROVIDED BY THE COPYRIGHT HOLDERS AND CONTRIBUTORS "AS IS" AND ANY
EXPRESS OR IMPLIED WARRANTIES, INCLUDING, BUT NOT LIMITED TO, THE IMPLIED WARRANTIES OF
MERCHANTABILITY AND FITNESS FOR A PARTICULAR PURPOSE ARE DISCLAIMED. IN NO EVENT SHALL
THE COPYRIGHT OWNER OR CONTRIBUTORS BE LIABLE FOR ANY DIRECT, INDIRECT, INCIDENTAL,
SPECIAL, EXEMPLARY, OR CONSEQUENTIAL DAMAGES (INCLUDING, BUT NOT LIMITED TO,
PROCUREMENT OF SUBSTITUTE GOODS OR SERVICES; LOSS OF USE, DATA, OR PROFITS; OR BUSINESS
INTERRUPTION) HOWEVER CAUSED AND ON ANY THEORY OF LIABILITY, WHETHER IN CONTRACT,
STRICT LIABILITY, OR TORT (INCLUDING NEGLIGENCE OR OTHERWISE) ARISING IN ANY WAY OUT OF THE
USE OF THIS SOFTWARE, EVEN IF ADVISED OF THE POSSIBILITY OF SUCH DAMAGE.
zlib
http://www.zlib.net/
zlib.h -- interface of the 'zlib' general purpose compression library version 1.2.3, July 18th, 2005
Copyright (C) 1995-2004 Jean-loup Gailly and Mark Adler
This software is provided 'as-is', without any express or implied warranty. In no event will the authors be held
liable for any damages arising from the use of this software.
Permission is granted to anyone to use this software for any purpose, including commercial applications, and to
alter it and redistribute it freely, subject to the following restrictions:
1. The origin of this software must not be misrepresented; you must not claim that you wrote the original
software. If you use this software in a product, an acknowledgment in the product documentation would
be appreciated but is not required.
2. Altered source versions must be plainly marked as such, and must not be misrepresented as being the
original software.
3. This notice may not be removed or altered from any source distribution.
Manufactured under license from Dolby Laboratories. “Dolby” and the double-D symbol are trademarks of
Dolby Laboratories.
Confidential unpublished work. © 1995-2005 Dolby Laboratories. All rights reserved.
© 2006-2007 Dolby Laboratories. All rights reserved.
HDMI, the HDMI logo and High-Definition Multimedia Interface are trademarks or registered trademarks of HDMI
Licensing LLC.
APPENDIX – 232
Page 88

WD TV Play Media Player
User Manual
Rovi
PRELIMINARY-P3
™
This product incorporates copyright protection technology that is protected by U.S. patents and other intellectual
property rights. Use of this copyright protection technology must be authorized by Rovi Corporation, and is
intended for home and other limited viewing uses only unless otherwise authorized by Rovi Corporation. Reverse
engineering or disassembly is prohibited.
Do not connect the unit through a VCR. Video signals fed through VCRs may be affected by copyright protection
systems and the picture will be distorted on the television.
Microsoft
This product contains technology subject to certain intellectual property rights of Microsoft. Use or distribution of
this technology outside of this product is prohibited without the appropriate license(s) from Microsoft.
Content owners use Windows Media digital rights management technology (WMDRM) to protect their intellectual
property, including copyrights. This device uses WMDRM software to access WMDRM-protected content. If the
WMDRM software fails to protect the content, content owners may ask Microsoft to revoke the software's ability
to use WMDRM to play or copy protected content. Revocation does not affect unprotected content. When you
download licenses for protected content, you agree that Microsoft may include a revocation list with the licenses.
Content owners may require you to upgrade WMDRM to access their content. If you decline an upgrade, you will
not be able to access content that requires the upgrade.
Content owners use Microsoft PlayReady content access technology to protect their intellectual property,
including copyrighted content. This device uses PlayReady technology to access PlayReady-protected content
and/or WMDRM-protected content. If the device fails to properly enforce restrictions on content usage, content
owners may require Microsoft to revoke the device's ability to consume PlayReady-protected content.
Revocation should not affect unprotected content or content protected by other content access technologies.
Content owners may require you to upgrade PlayReady to access their content. If you decline an upgrade, you
will not be able to access content that requires the upgrade.
®
Adobe
This product features Adobe® Flash® technology. For further information, visit
http://www.adobe.com/software/flash/about/.
The wall mount system located at the bottom of the unit is not designed for general usage by the end user.
WD respects the rights of copyright owners to control the uses of their intellectual property.
Information furnished by WD is believed to be accurate and reliable; however, no responsibility is assumed by WD for its
use nor for any infringement of patents or other rights of third parties which may result from its use. No license is
granted by implication or otherwise under any patent or patent rights of WD. WD reserves the right to change
specifications at any time without notice.
Western Digital, WD, the WD logo, WD TV, My Book, and My Passport are registered trademarks of Western Digital
Technologies, Inc. in the U.S. and other countries: and WD TV Play, WD TV Remote, and WD Livewire are trademarks
of Western Digital Technologies, Inc. Other marks may be mentioned herein that belong to other companies.
© 2012 Western Digital Technologies, Inc. All rights reserved.
Western Digital
3355 Michelson Drive, Suite 100
Irvine, California 92612 U.S.A. 4779-705073-A00-P3 May 2012
APPENDIX – 233
Page 89

Index
WD TV Play
User Manual
A
Accessories 3
AccuWeather.com 98
advanced features 179
appearance
Web UI 47
aspect ratio
normal 181
troubleshooting 211
widescreen 181
audio channel 71
audio output 181
audio/video
autosource function 7
supported interfaces 7
Audio/Video menus
aspect ratio 181
audio output 181
video output 180
auto play function 200
autosource function 7
B
background 186
BBC iPlayer 101
C
chapter selection 69
CinemaNow 102, 165
clear media library 56
Comedy Time 103
compatibility 11
operating systems 11
composite AV
connection 16
connectors 8
connectors 8
D
Daily Motion 103
dashboard 53
options 55
Deezer 104
add to playlist 107
deleting an account 108
exit 108
favorite radios 107
my music 106
player 106
playlists 106
radios 106
search 108
signing in 105
top charts 108
digital camera support 85
display troubleshooting 211
Dolby
dynamic range control setting 184
DRC 184
DVD menu 188
dynamic range control setting 184
E
Eject function
button 50
procedure 19
encoding support 203
environmental compliance (China) 225
error messages 214
F
Facebook
friends 111
newsfeed 110
notifications 109
photos 110
photos options 110
sign out 113
signing in 109
videos 111
videos options 112
videos player 112
wall 111
features 6
AV interfaces 7
menus 6
supported file formats 216
supported file systems 7
USB support 7
file formats
image 83
playlist 216
subtitle 216
troubleshooting 215
file system
supported 7
INDEX – 234
Page 90

WD TV Play
User Manual
troubleshooting 214
Files
options 93
sorting 93
view 92
firmware
auto detect new 206
check latest 205
firmware upgrade
procedure 209
troubleshooting 213
Flickr 114
exit 120
exploring for contents 114
my contacts 117
my tags 118
photostream 119
player 119
searching for a member 117
searching for contents 115
Flingo 121
Flixster 122
folder sharing 37
Mac 43
Windows 7 37
Windows Vista 41
Windows XP 43
folder view
music 76
photos 84
videos 63
G
Games 177
GNU general public license 228
GPL software 228
H
HD media player
error messages 214
HDMI
connection 15
connectors 8
HDMI CEC 184
Home
button 49, 50
error messages 214
Music 75
overview 51
Photos 83
screen navigation 53
Setup 179
Videos 62
Home Theater
connection 17
Hulu Plus 123
I
I/O connectors
composite AV 8
HDMI 8
Toslink 8
USB ports 8
information panel
music 79
photo 90
videos 72
installation
composite AV connection 16
HDMI connection 15, 17
power connection 13, 16
procedures 12
requirements 11
USB connection 18
K
keyboard 60
L
language setup 185
LED indicators 9
power 9
LED light control 204
Linux 31
Live365 124
adding a station to your preset list 129
exit 130
getting track information 130
listening 126
providing song feedback 130
removing a station from your preset
list 129
searching 128
sign in 124
signing out 130
local storage 30
locating media content
manual search 57
Search function 58
M
maintenance
INDEX – 235
Page 91

WD TV Play
User Manual
system 209
media library
clear 56
exemptions 207
media library compilation
categories 56
enable 56
error messages 214
exemptions 56
overview 55, 207
media server 30, 32
menus overview 6
metadata 202
meta-source manager 202
MLB.TV 131
Music
audio track display 191
auto play 200
background music info panel 191
browser display 192
folder view 76
media library compilation categories 56
menu options 77
playback controls 79
playback options 80
playback procedures 75
playback screen 79
playback sequence setting 191
settings 191
shuffle mode 81
sort & filter 76
supported formats 216
use in slideshow 90
my media library 29
N
navigation buttons 49, 50
Netflix 135
existing membership 135
navigation 135
new membership 135
network services
folder sharing 37
transferring files 33
Web UI 45
Network settings
check connection 198
clear login info for network share 199
device name 198
network setup 194
network share server 199
previously connected wireless
network 198
proxy 199
workgroup 199
Network setup
Ethernet 21
wireless 23
network share 31
enable file sharing 33
network share (Linux) 31
network share (NFS) 31
NFS 31
NTSC 181
O
on-screen keyboard 60
operating precautions 1
operating system requirements 11
Operation
auto play 200
P
package contents 11
PAL 181
Pandora 136
bookmarking a song or artist 141
providing song feedback 140
QuickMix 140
signing in 137
stations 138
why a song is in my station’s
playlist 141
parental control 203
Photo settings
photo scaling 193
slideshow interval time 193
slideshow sequence 192
slideshow transition 192
Photos
browser display 193
large grid view 193
list mode 192
list view 193
small grid view 193
thumbnail mode 192
digital camera support 85
display options 88
folder view 84
information panel 90
media library compilation categories 57
menu options 86
INDEX – 236
Page 92

WD TV Play
User Manual
pan options 88
rotate 88
set as background 87
sort & filter 84
supported formats 216
view 83
zoom options 88
Picasa 142
deleting an account 148
display options 147
featured 148
menu options 146
My Photos 145
people I’m following 148
recent 148
searching for content 144
video player 148
Play To 6
playlist
supported formats 216
videos, playback 63, 76
power
AC connector 8
cable connection 13
global AC adapter configurations 13
LED indicator 9
power button 49, 50
turn on 16
product
accessories 3
obtaining service 226
overview 4
recording information 3
registration 3
regulatory compliance 222
safety information 1
warranty 226
R
register your media center 204
regulatory compliance 222
environmental compliance (China) 225
remote control 10
remote controller 10
buttons and functions 49
delete music preset 200
layout 10
settings 200
troubleshooting 212
virtual 46
Web UI 46
repeat mode
music 80
reset switch 8
reset to factory defaults 205
restart device 205
RoHS 225
RSS
adding feeds 178
reading feeds 178
Web UI 48
RSS ticker 187
S
Samba 31
screensaver
delay 187
style 187
Search function
button 49, 50
procedure 58
SEC Digital Network 148, 166
security 202
parental control 203
store demo mode 203
select content source
local storage 30
login 32
media server 30, 32
my media library 29
network share 31
network share (Linux) 31
network share (NFS) 31
Services
add to Favorites 97
settings
apply new values 180
Audio/Video menu 180
network 194
System menu 194
Setup 179
About 206
additional encoding support 203
appearance 185
audio/video output 180
auto detect new firmware 206
background 186
check latest firmware 205
device registration 204
device restart 205
device security 202
DVD menu 188
INDEX – 237
Page 93

WD TV Play
User Manual
get content info 202
language 185
LED light control 204
media library 201
meta-source manager 202
music settings 191
navigation buttons 180
photo settings 192
remote controller settings 200
reset to factory defaults 205
RSS ticker 187
screen size calibration 185
screensaver delay 187
screensaver style 187
select time zone 201
setup menu bar 179
setup screen navigation 180
theme 185
video settings 188
setup 179
shared folder 31
shares
Windows 31
Shoutcast Radio 149
about 152
adding a station to your favorites
list 150
assigning a preset button to a
station 151
listening 149
listening to a station in your favorites
list 151
removing a station from your preset
list 152
searching 150
top radios 152
slideshow
interval time 193
music background 90
playback controls 91
sequence setting 192
shuffle and repeat 192
transition 192
troubleshooting 212
view 90
SnagFilms 153
Software, GPL 228
Spotify 154
adding a track to a playlist 156
browse album artist 155
collaborate on a playlist 156
delete account 159
inbox 158
people
157, 158
searching 155
share 157
third party licenses 229
top lists 158
what’s new 158
store demo mode 203
subtitle
adjust 70
border setting 188
default setting 189
enable 69
font size setting 188
supported formats 216
system compatibility 11
system reset
service accounts 205
system 205
T
temperature display 99
theme 185
WebUI 47
thumbnail support for media files 57
time
setting 201
Toslink
connectors 8
Transferring files 33
between the media player and a Mac
computer 36
between the media player and a Win-
dows Vista/Windows 7
computer 35
between the media player and a Win-
dows XP computer 34
troubleshooting 211
audio 212
content playback 214
display 211
error messages 214
firmware upgrade 213
media library compilation 214
remote control 212
USB device 212
TuneIn 160
adding a station to your preset list 162
getting station information 163
listening 161
INDEX – 238
Page 94

WD TV Play
User Manual
listening to a station in your preset
list 162
removing a station from your preset
list 162
reporting problems 163
searching 161
sign in 160
U
USB device
connection 18
disconnection 18
Eject button 50
error messages 214
media library 207
media library compilation 55
removal 19
supported devices 7
troubleshooting 212
USB ports 8
V
Video
menu options 64
video output
composite 180
Video settings
browser display 190
subtitle border 188
subtitle default 189
subtitle font size 188
video sequence 188
Videos
aspect ratio 181
audio channel 71
auto play 200
browser display
gallery view 190
large grid view 190
list view 190
preview view 190
small grid view 190
DVD navigation 73
folder view 63
information panel 72
media library compilation categories 57
pan options 71
playback controls 68
playback options 69
playback procedures 62
screen size calibration 185
settings 188
sort & filter 63
subtitles 69
supported formats 216
video output setting 180
view chapter 69
zoom options 71
videos
supported resolutions 7
Vimeo 164
W
wall mount 9
warranty information 226
Australia/New Zealand 226
WatchMojo 166
weather 98
change temperature display 99
Web UI 45
appearance 47
launching 45
logout 48
RSS 48
support 48
system 46
WebUI
theme 47
widescreen setup 181
Windows
shares 31
Windows 7
Play To 6
Windows pairing code 196
wireless network profiles 198
wireless network setup 23
get Windows pairing code 196
Y
Yota Music 166
YouTube 167
adding videos to a playlist 175
adding videos to favorites 174
deleting an account from the media
player 175
encoding support 175
featured videos 170
like or dislike videos 174
most popular 171
most viewed 171
my account 143, 168
options 172
INDEX – 239
Page 95

player 172
preferences 172
related videos 173
restricted video content 175
search history 60, 145, 169
searching for videos 169
signing in 142, 167
top favorites 170
top rated 171
YouTube Leanback 176
Z
zoom options
photos 88
videos 71
WD TV Play
User Manual
INDEX – 240
 Loading...