

™
My Cloud EX2 Ultra
Private Cloud Storage
User Manual

WD Service and Support
Should you encounter any problem, please give us an opportunity to address it before returning
this product. Most technical support questions can be answered through our knowledge base or
email support service at http://support.wd.com. If the answer is not available or if you prefer,
please contact WD at the best telephone number shown below.
Your product includes 30 days of free telephone support during the warranty period. This 30-day
period starts on the date of your first telephone contact with WD Technical Support. Email
support is free for the entire warranty period and our extensive knowledge base is available 24/7.
To help us keep you informed of new features and services, remember to register your product
online at
http://register.wd.com.
Accessing Online Support
Visit our product support website at http://support.wd.com and choose from these topics:
Downloads—Download drivers, software, and updates for your WD product.
Registration—Register your WD product to get the latest updates and special offers.
Warranty & RMA Services—Get warranty, product replacement (RMA), RMA status, and
data recovery information.
Knowledge Base—Search by keyword, phrase, or answer ID.
Installation—Get online installation help for your WD product or software.
WD Community—Share your thoughts and connect with other WD users.
Learning Center — Start here to get the most out of your Private Cloud Storage device
(http://www.wd.com/setup).
Contacting WD Technical Support
When contacting WD for support have your WD product serial number, system hardware, and
system software versions available.
North America Asia Pacific
US & Canada
800 275-4932
Australia
1 800 42 9861
English
US-Spanish
Mexico
Europe (toll free)* 00800 ASK4 WDEU
Europe +31 880062100
Middle East +31 880062100
Africa +31 880062100
Russia 8-10-8002-3355011
* Toll free number is available in the following countries: Austria, Belgium, Denmark, France, Germany,
Ireland, Italy, Netherlands, Norway, Spain, Sweden, Switzerland, United Kingdom.
949 672-7199
800.832.4778
(00800 27549338)
China
Hong Kong
India
Indonesia
Japan
Malaysia
Philippines
Singapore
Taiwan
Thailand
800 820 6682 / 400 627 6682
+852-3057 9031
1 800-200 5789 / 1 800-419 5591
001-803-852 3993
0800-805 7293 / 0120-934 453
1 800-817 477
1 800-1855 0277 / +63-2-395 2319
1 800 608 6008
0800-225 593 / +886-2-8723 1298
00 1800 852 5913
Registering Your WD Product
Register your WD product to get the latest updates and special offers. You can easily register
your drive online at http://register.wd.com or by using My Cloud EX2 Ultra Private Cloud Storage
software.

Table of Contents
WD Service and Support . . . . . . . . . . . . . . . . . . . . . . . . . . . . . . . . . . . . . . . . . . . . . . . . . . . ii
Registering Your WD Product. . . . . . . . . . . . . . . . . . . . . . . . . . . . . . . . . . . . . . . . . . . . . . . . ii
1 Important User Information 1
Important Safety Instructions . . . . . . . . . . . . . . . . . . . . . . . . . . . . . . . . . . . . . . . . . . . . . . . . 1
Recording Your WD Product Information . . . . . . . . . . . . . . . . . . . . . . . . . . . . . . . . . . . . . . . 2
. . . . . . . . . . . . . . . . . . . . . . . . . . . . . . . . . . . . . . . . . . . . . . . . . . . . . . . . . . . . . . . . . . . . . . . 2
2 Product Overview 3
About the System . . . . . . . . . . . . . . . . . . . . . . . . . . . . . . . . . . . . . . . . . . . . . . . . . . . . . . . . . 3
About the Online Learning Center . . . . . . . . . . . . . . . . . . . . . . . . . . . . . . . . . . . . . . . . . . . . 4
Package Contents. . . . . . . . . . . . . . . . . . . . . . . . . . . . . . . . . . . . . . . . . . . . . . . . . . . . . . . . . 5
Pre-installation Instructions. . . . . . . . . . . . . . . . . . . . . . . . . . . . . . . . . . . . . . . . . . . . . . . . . . 6
Handling Precautions . . . . . . . . . . . . . . . . . . . . . . . . . . . . . . . . . . . . . . . . . . . . . . . . . . . . . . 6
Product Components . . . . . . . . . . . . . . . . . . . . . . . . . . . . . . . . . . . . . . . . . . . . . . . . . . . . . . 7
3 Getting Started 11
Installing Drives in the Driveless Model . . . . . . . . . . . . . . . . . . . . . . . . . . . . . . . . . . . . . . . 11
Physically Connecting the Device. . . . . . . . . . . . . . . . . . . . . . . . . . . . . . . . . . . . . . . . . . . . 13
Getting Started Using Online Setup Software. . . . . . . . . . . . . . . . . . . . . . . . . . . . . . . . . . . 14
Getting Started Without Online Setup Software . . . . . . . . . . . . . . . . . . . . . . . . . . . . . . . . . 15
Accessing Content . . . . . . . . . . . . . . . . . . . . . . . . . . . . . . . . . . . . . . . . . . . . . . . . . . . . . . . 15
4 Accessing Your Cloud Remotely 17
Enabling Cloud Access for the My Cloud EX2 Ultra Device . . . . . . . . . . . . . . . . . . . . . . . . 17
Configuring Cloud Access for a User . . . . . . . . . . . . . . . . . . . . . . . . . . . . . . . . . . . . . . . . . 17
Mobilizing Your Files with iOS and Android Mobile Apps . . . . . . . . . . . . . . . . . . . . . . . . . . 19
5 Managing Users, Groups, and Shares 20
About Users . . . . . . . . . . . . . . . . . . . . . . . . . . . . . . . . . . . . . . . . . . . . . . . . . . . . . . . . . . . . 20
About Groups . . . . . . . . . . . . . . . . . . . . . . . . . . . . . . . . . . . . . . . . . . . . . . . . . . . . . . . . . . . 25
About Shares . . . . . . . . . . . . . . . . . . . . . . . . . . . . . . . . . . . . . . . . . . . . . . . . . . . . . . . . . . . 27
6 The Dashboard at a Glance 31
Launching the Dashboard. . . . . . . . . . . . . . . . . . . . . . . . . . . . . . . . . . . . . . . . . . . . . . . . . . 31
The Dashboard Home Page . . . . . . . . . . . . . . . . . . . . . . . . . . . . . . . . . . . . . . . . . . . . . . . . 33
Obtaining Customer Support . . . . . . . . . . . . . . . . . . . . . . . . . . . . . . . . . . . . . . . . . . . . . . . 42
Common Tasks. . . . . . . . . . . . . . . . . . . . . . . . . . . . . . . . . . . . . . . . . . . . . . . . . . . . . . . . . . 44
7 Backing Up and Retrieving Files 45
About Backups . . . . . . . . . . . . . . . . . . . . . . . . . . . . . . . . . . . . . . . . . . . . . . . . . . . . . . . . . . 45
Managing a USB Device and USB Backups. . . . . . . . . . . . . . . . . . . . . . . . . . . . . . . . . . . . 45
Remote Backups. . . . . . . . . . . . . . . . . . . . . . . . . . . . . . . . . . . . . . . . . . . . . . . . . . . . . . . . . 47
Internal Backups . . . . . . . . . . . . . . . . . . . . . . . . . . . . . . . . . . . . . . . . . . . . . . . . . . . . . . . . . 50
WD MY CLOUD EX2 ULTRA PRIVATE CLOUD STORAGE
USER MANUAL
i

Cloud Backups . . . . . . . . . . . . . . . . . . . . . . . . . . . . . . . . . . . . . . . . . . . . . . . . . . . . . . . . . . 51
8 Managing Storage on My Cloud EX2 Ultra 56
Storage Types . . . . . . . . . . . . . . . . . . . . . . . . . . . . . . . . . . . . . . . . . . . . . . . . . . . . . . . . . . 56
RAID Storage . . . . . . . . . . . . . . . . . . . . . . . . . . . . . . . . . . . . . . . . . . . . . . . . . . . . . . . . . . . 57
Disk Status . . . . . . . . . . . . . . . . . . . . . . . . . . . . . . . . . . . . . . . . . . . . . . . . . . . . . . . . . . . . . 60
iSCSI Storage . . . . . . . . . . . . . . . . . . . . . . . . . . . . . . . . . . . . . . . . . . . . . . . . . . . . . . . . . . . 61
Volume Virtualization . . . . . . . . . . . . . . . . . . . . . . . . . . . . . . . . . . . . . . . . . . . . . . . . . . . . . 63
9 Managing Apps on My Cloud EX2 Ultra 66
About Apps . . . . . . . . . . . . . . . . . . . . . . . . . . . . . . . . . . . . . . . . . . . . . . . . . . . . . . . . . . . . . 66
Managing Apps . . . . . . . . . . . . . . . . . . . . . . . . . . . . . . . . . . . . . . . . . . . . . . . . . . . . . . . . . . 66
10 Playing/Streaming Videos, Photos, & Music 70
Media Servers. . . . . . . . . . . . . . . . . . . . . . . . . . . . . . . . . . . . . . . . . . . . . . . . . . . . . . . . . . . 70
Media Storage. . . . . . . . . . . . . . . . . . . . . . . . . . . . . . . . . . . . . . . . . . . . . . . . . . . . . . . . . . . 72
Enabling DLNA and iTunes. . . . . . . . . . . . . . . . . . . . . . . . . . . . . . . . . . . . . . . . . . . . . . . . . 72
Accessing Your Private Cloud Using Media Players . . . . . . . . . . . . . . . . . . . . . . . . . . . . . 76
Accessing Your Private Cloud Using iTunes . . . . . . . . . . . . . . . . . . . . . . . . . . . . . . . . . . . 77
11 Configuring Settings 78
General . . . . . . . . . . . . . . . . . . . . . . . . . . . . . . . . . . . . . . . . . . . . . . . . . . . . . . . . . . . . . . . . 78
Network. . . . . . . . . . . . . . . . . . . . . . . . . . . . . . . . . . . . . . . . . . . . . . . . . . . . . . . . . . . . . . . . 85
Media . . . . . . . . . . . . . . . . . . . . . . . . . . . . . . . . . . . . . . . . . . . . . . . . . . . . . . . . . . . . . . . . . 92
Utilities . . . . . . . . . . . . . . . . . . . . . . . . . . . . . . . . . . . . . . . . . . . . . . . . . . . . . . . . . . . . . . . . 92
Notifications . . . . . . . . . . . . . . . . . . . . . . . . . . . . . . . . . . . . . . . . . . . . . . . . . . . . . . . . . . . . 95
Firmware Update . . . . . . . . . . . . . . . . . . . . . . . . . . . . . . . . . . . . . . . . . . . . . . . . . . . . . . . . 98
12 Replacing a Drive 100
Identifying a Faulty Hard Drive . . . . . . . . . . . . . . . . . . . . . . . . . . . . . . . . . . . . . . . . . . . . . 100
Replacing a Drive . . . . . . . . . . . . . . . . . . . . . . . . . . . . . . . . . . . . . . . . . . . . . . . . . . . . . . . 101
Returning a WD Drive . . . . . . . . . . . . . . . . . . . . . . . . . . . . . . . . . . . . . . . . . . . . . . . . . . . . 102
13 Regulatory and Warranty Information 103
Regulatory Compliance. . . . . . . . . . . . . . . . . . . . . . . . . . . . . . . . . . . . . . . . . . . . . . . . . . . 103
Warranty Information (All Regions Except Australia/New Zealand) . . . . . . . . . . . . . . . . . 104
Warranty Information (Australia/New Zealand only) . . . . . . . . . . . . . . . . . . . . . . . . . . . . . 105
14 Appendices 107
Appendix A: My Cloud EX2 Ultra Quick User Guide. . . . . . . . . . . . . . . . . . . . . . . . . . . . . 107
Appendix B: Joomla!® Setup Guide . . . . . . . . . . . . . . . . . . . . . . . . . . . . . . . . . . . . . . . . . 112
Appendix C: phpBB Setup Guide . . . . . . . . . . . . . . . . . . . . . . . . . . . . . . . . . . . . . . . . . . . 113
Appendix D: Supported RAID Modes . . . . . . . . . . . . . . . . . . . . . . . . . . . . . . . . . . . . . . . . 115
Appendix E: RAID Migrations . . . . . . . . . . . . . . . . . . . . . . . . . . . . . . . . . . . . . . . . . . . . . . 115
WD MY CLOUD EX2 ULTRA PRIVATE CLOUD STORAGE
USER MANUAL
ii

Appendix F: Safe Mode Firmware Update Procedures . . . . . . . . . . . . . . . . . . . . . . . . . . 116
Appendix G: Technical Specifications. . . . . . . . . . . . . . . . . . . . . . . . . . . . . . . . . . . . . . . . 117
15 Index 119
WD MY CLOUD EX2 ULTRA PRIVATE CLOUD STORAGE
USER MANUAL
iii

Important User Information
IMPORTANT USER INFORMATION
1
Important Safety Instructions
Recording Your WD Product Information
Important Safety Instructions
This device is designed and manufactured to assure personal safety. Improper use can
result in electric shock or fire hazard. The safeguards incorporated into this unit will
protect you if you observe the following procedures for installation, use, and servicing.
Follow all warnings and instructions marked on the product.
Unplug this product from the wall outlet before cleaning. Do not use liquid
cleaners or aerosol cleaners. Use a damp cloth for cleaning.
Do not use this product near any liquids.
Do not place this product on an unstable surface. The product may fall, causing
serious damage to the product.
Do not drop the product.
Do not block the slots and openings on the top and bottom of the chassis; to
ensure proper ventilation and reliable operation of the product and to protect it
from overheating, these openings must not be blocked or covered. Making sure
the drive is standing upright also helps prevent overheating.
Operate this product only from the type of power indicated on the marking label. If
you are not sure of the type of power available, consult your dealer or local power
company.
Do not allow anything to rest on the power cord. Do not locate this product where
persons will walk on the cord.
If an extension cord is used with this product, make sure that the total ampere
rating of the equipment plugged into the extension cord does not exceed the
extension cord ampere rating. Also, make sure that the total rating of all products
plugged into the wall outlet does not exceed the fuse rating.
Never push objects of any kind into this product through the chassis slots as they
may touch dangerous voltage points or short out parts that could result in a fire or
electric shock.
Unplug this product from the wall outlet and refer servicing to qualified service
personnel under the following conditions:
- When the power cord or plug is damaged or frayed.
- If liquid has been spilled on the product.
- If the product has been exposed to rain or water.
- If the product does not operate normally when the operating instructions are fol-
lowed. Adjust only those controls that are covered by the operating instructions
since improper adjustment may result in damage and require extensive work by
a qualified technician to the product to normal condition.
- If the product has been dropped or the chassis has been damaged.
- If the product exhibits a distinct change in performance, contact WD Customer
Support at
MY CLOUD EX2 ULTRA PRIVATE CLOUD STORAGE
USER MANUAL
http://support.wd.com.
1

IMPORTANT USER INFORMATION
WARNING! This device uses a lithium battery, type CR2032. There is danger of
an explosion if the battery is incorrectly replaced. Replace only with
the same or equivalent battery type recommended by the
manufacturer. Dispose of used batteries according to the
manufacturer’s instructions.
Recording Your WD Product Information
Remember to write down the following WD product information, which is used for setup
and technical support. Your WD product information is found on the label on the back of
the device.
- Serial Number
- Model Number
- Purchase Date
- System and Software Notes
MY CLOUD EX2 ULTRA PRIVATE CLOUD STORAGE
USER MANUAL
2

Product Overview
PRODUCT OVERVIEW
2
About the System
Features
About the Online Learning Center
Package Contents
Pre-installation Instructions
Handling Precautions
Product Components
About the System
Designed from the ground up with the quality and reliability you've come to expect from
WD®, My Cloud EX2 Ultra is a high-performance, two-bay Network Attached Storage
(NAS) device for your home or small office. Save all your content in one place and protect
your data with RAID 1, cloud, or LAN backup options. Stream large files to any screen
and expand your NAS features with a full suite of apps.The My Cloud EX2 Ultra private
cloud storage system is a high-performance system providing secure wireless access to
your media and files from any computer, tablet, or smartphone when connected to a
wireless router.
This user manual provides step-by-step installation instructions and other important
information about your WD product.
can be downloaded from http://products.wd.com/updates. For more information and news
about this product, visit our website at
Translated versions and updates to this user manual
http://www.wd.com/.
Features
Numerous options – Choose the diskless enclosure to build your NAS with the drives of
your choice. Or, choose a populated system that works right out of the box, featuring WD
Red™ hard drives for ultimate reliability in the unique 24x7 NAS operating environment.
Drive management – Control your data with multiple drive management options
including RAID 0, 1; JBOD, and spanning modes.
Data protection at its best – Y
loss. Choose from RAID 1, USB, cloud or LAN/WAN backup depending upon your data
security needs.
Easy to manage – A
control. Monitor your drives, manage users and utilize energy-saving features. Email and
mobile alerts keep you informed of My Cloud EX2 Ultra status.
Powerful apps to customize your NAS – Including aMule, Icecast, Joomla!
phpMyAdmin, Transmission, SqueezeCenter, and more. For the most recent apps
available, visit www.mycloud.com/learn.
Advanced serving options – Integrated file server
torrent download server.
Stream media to your connected devices – Stream videos and photos to connected
TVs, media players, gaming consoles and other DLNA
Twonky and a DLNA-certified media server. And with a built-in iTunes
easily stream your music collection.
powerful dashboard means your system is always under your
ou’re armed with multiple options to secure your data from
®
, phpBB®,
, FTP server, backup server, and P2P
®
/UPnP® devices. Features a
®
server, you can
MY CLOUD EX2 ULTRA PRIVATE CLOUD STORAGE
USER MANUAL
3

PRODUCT OVERVIEW
Back up, your way – Protect your data via remote backup to another My Cloud device,
integrated cloud backup or local LAN/WAN backup. PC users, WD SmartWare™ Pro
offers options for how, when and where you back up your files for up to ten computers.
®
users, utilize all the features of Apple® Time Machine® backup software to protect
Mac
your data.
Expand your capacity – Simply attach a compatible USB hard drive directly to My Cloud
EX2 Ultra to expand your storage capacity. Two USB 3.0 expansion ports are provided.
Integrated energy-saving features – Save energy with disk spin-down and scheduled
power on/off.
Your own Private Cloud – Unlike public clouds, My Cloud EX2 Ultra allows you to keep
all your content in one safe place on your home or office network instead of a remote
server. No mysterious location of your data. No monthly fees. No limits.
Advanced features – iSCSI target, full-featured FTP services, jumbo frame support, iPv6
ready, UPS support (USB and network), real time resource monitor, volume encryption
with boot-up password, SNMP and virtual volumes.
About the Online Learning Center
WD’s online Learning Center provides the latest information, instructions, and software to
help users get the most out of their Private Cloud Storage. This web-based guide offers
step-by-step help with setting up remote access, backing up data, monitoring device
status and more. It’s an interactive resource to walk users through installing and using
their My Cloud EX2 Ultra device. The online Learning Center allows you to:
Learn about your new Private Cloud Storage product.
Download the latest software for your product.
Find in-depth, interactive information on how to explore each of your product’s
features.
Update your product whenever new features become available.
Access an always-available resource online, without a manual or CD.
MY CLOUD EX2 ULTRA PRIVATE CLOUD STORAGE
USER MANUAL
4

Package Contents
My Cloud EX2 Ultra Private Cloud Storage device
Ethernet cable
AC power adapter
Quick Install Guide
Assembly kit (for driveless model only)
PRODUCT OVERVIEW
My Cloud EX2 Ultra Private Cloud
Storage Device
AC adapter*
Ethernet cable
For information on additional accessories for this product, visit:
US www.shopwd.com or www.wdstore.com
Canada www.shopwd.ca or www.wdstore.ca
Europe www.shopwd.eu or www.wdstore.eu
All others Contact WD Technical Support in your region. For a list of T echnical
Support contacts, visit http://support.wd.com and see Knowledge
Base Answer ID 1048.
Operating System
Windows
®
Windows 10
Windows 8 or 8.1
Windows 7
Windows Vista
®
Mac OS X
®
El Capitan (Mac OS 10.11)
Yosemite (Mac OS 10.10)
Maverick (Mac OS 10.9)
Mountain Lion* (Mac OS 10.8)
Lion* (Mac OS 10.7)
Quick Install Guide
Note: Compatibility may vary depending on your computer’s hardware configuration and
operating system.
MY CLOUD EX2 ULTRA PRIVATE CLOUD STORAGE
USER MANUAL
5

PRODUCT OVERVIEW
Web Browsers
Internet Explorer IE10 and above
Safari 6.0 and later on supported Mac computers
Firefox 30 and later on supported Windows and Mac computers
Google Chrome 31 and later on supported Windows and Mac computers
Local Network
Router/switch (Gigabit recommended to maximize performance.)
Internet
Broadband Internet connection is required for initial setup and software
downloads, as well as for remote access and mobile apps.
Pre-installation Instructions
Before beginning installation, select a suitable location for your device to obtain maximum
efficiency. Place it in a location that is:
Near a grounded power outlet
Clean and dust free
On a stable surface free from vibration
Well ventilated, with nothing blocking or covering the slots and openings on the
top and bottom of the device, and away from sources of heat
Secluded from electromagnetic fields from electrical devices such as air
conditioners, radio and television receivers.
Handling Precautions
WD products are precision instruments and must be handled with care during unpacking
and installation. Rough handling, shock, or vibration can damage the device drives.
Observe the following precautions when unpacking and installing your external storage
product:
Do not drop or jolt the device.
Do not move the device while it is powered on.
Do not use this product as a portable device.
Do not remove both data drives at the same time. This will cause your device to
become unresponsive.
MY CLOUD EX2 ULTRA PRIVATE CLOUD STORAGE
USER MANUAL
6

Product Components
Front V iew
PRODUCT OVERVIEW
Power LED
Drive LEDs
MY CLOUD EX2 ULTRA PRIVATE CLOUD STORAGE
USER MANUAL
7

Back V iew
Kensington®
Security Slot
PRODUCT OVERVIEW
Reset button
USB ports
Ethernet port
External DC In Power
port
Component Icon Description
Ethernet port Connects the device to a local network.
USB 3.0 port Connects to a USB hard drive for additional storage.
Reset button
( )
Restores settings such as the administrator user name and
password for the device.
Power port Connects the device to an AC adapter and the power outlet.
Kensington
security slot
For device security, the device is equipped with a security slot that
supports a standard Kensington security cable.
Visit http://www.kensington.com/ for more information.
LEDs
Front Panel Power LED
MY CLOUD EX2 ULTRA PRIVATE CLOUD STORAGE
USER MANUAL
8

PRODUCT OVERVIEW
The following table describes the front panel power LED behavior.
State Color Appearance State Description
Power Down Black
------- Drive in standby/sleep mode.
(off)
Powering Up Blue Flashing Device is powering on or in the process of
updating the firmware.
Power Up Blue Solid Device is in a power up (on) state.
Power Up
(degraded)
Red Flashing Device is powered up but the volume is
degraded.
Action required Yellow Flashing A condition, such as a network cable has
become unplugged, which requires you to
act.
Note: For non-compatible drives, the power LED blinks yellow during power up.
Front Panel Hard Drive (HDD) LEDs
The following table describes the front panel hard drive LED behavior.
Function Color Appearance Function Description
No drive Black
------ Drive is not present.
(off)
Drive present, no
Blue Solid Drive is present but there is no activity.
activity
Active drive Blue Flashing Drive is present and showing drive activity.
Hard drive fault Red Flashing Drive is present but has a hard drive fault
or failure.
Note: For incompatible drives, the hard drive LEDs blink red rapidly as the unit
powers up.
MY CLOUD EX2 ULTRA PRIVATE CLOUD STORAGE
USER MANUAL
9

PRODUCT OVERVIEW
Back Panel Ethernet (Network) LEDs
The following table describes the network and activity LEDs:
Note: Looking at the port, the LED on the top left is the Activity LED, and the one
on the top right is the Link LED.
State LED Appearance State Description
Link down Link Off Cable or device is not plugged in, or other
end of link is not operational.
Link up – 10/100
connection
Link Yellow Cable is plugged in, and both ends of the
link have successfully established
communications. 10/100 network
connection.
Link up – 10/100/
1000 connection
Link Green Cable is plugged in, and both ends of the
link have successfully established
communications. 10/100/1000 network
connection.
Link idle Activity Solid Active communication is not in progress.
Link busy Activity Green - Blinks Active communication is in progress.
MY CLOUD EX2 ULTRA PRIVATE CLOUD STORAGE
USER MANUAL
10
3
GETTING STARTED
Getting Started
Installing Drives in the Driveless Model
Physically Connecting the Device
Getting Started Using Online Setup Software
Getting Started Without Online Setup Software
Accessing Content
It’s easy to set up the My Cloud EX2 Ultra Private Cloud Storage device -- all you have to
do is unpack your device, connect it, and wait for the Power LED on the front of your
device to turn a solid blue.
http://www.wd.com/setup.
Note: For information about safely shutting down and disconnecting the device,
see “Utilities” on page 92
Important: To avoid electrostatic discharge (ESD) problems, ground yourself by touching
metal before handling the device.
Installing Drives in the Driveless Model
Then, download and run the quick setup software, available at
Important: Following are instructions for installing drives in My Cloud EX2 Ultra models
that come without drives. You may use a drive made by WD or one made by another
company. For a list of compatible drives, go to http://products.wdc.com/.
Important: Make sure the device is not connected to power or to the network.T
electrostatic discharge (ESD) problems, ground yourself by touching metal
before handling the device.
Note: For further instructions on how to remove and replace a faulty drive, or to prepare
and insert a non-WD drive see “Replacing a Drive” on page 100.
o avoid
MY CLOUD EX2 ULTRA PRIVATE CLOUD STORAGE
USER MANUAL
11
GETTING STARTED
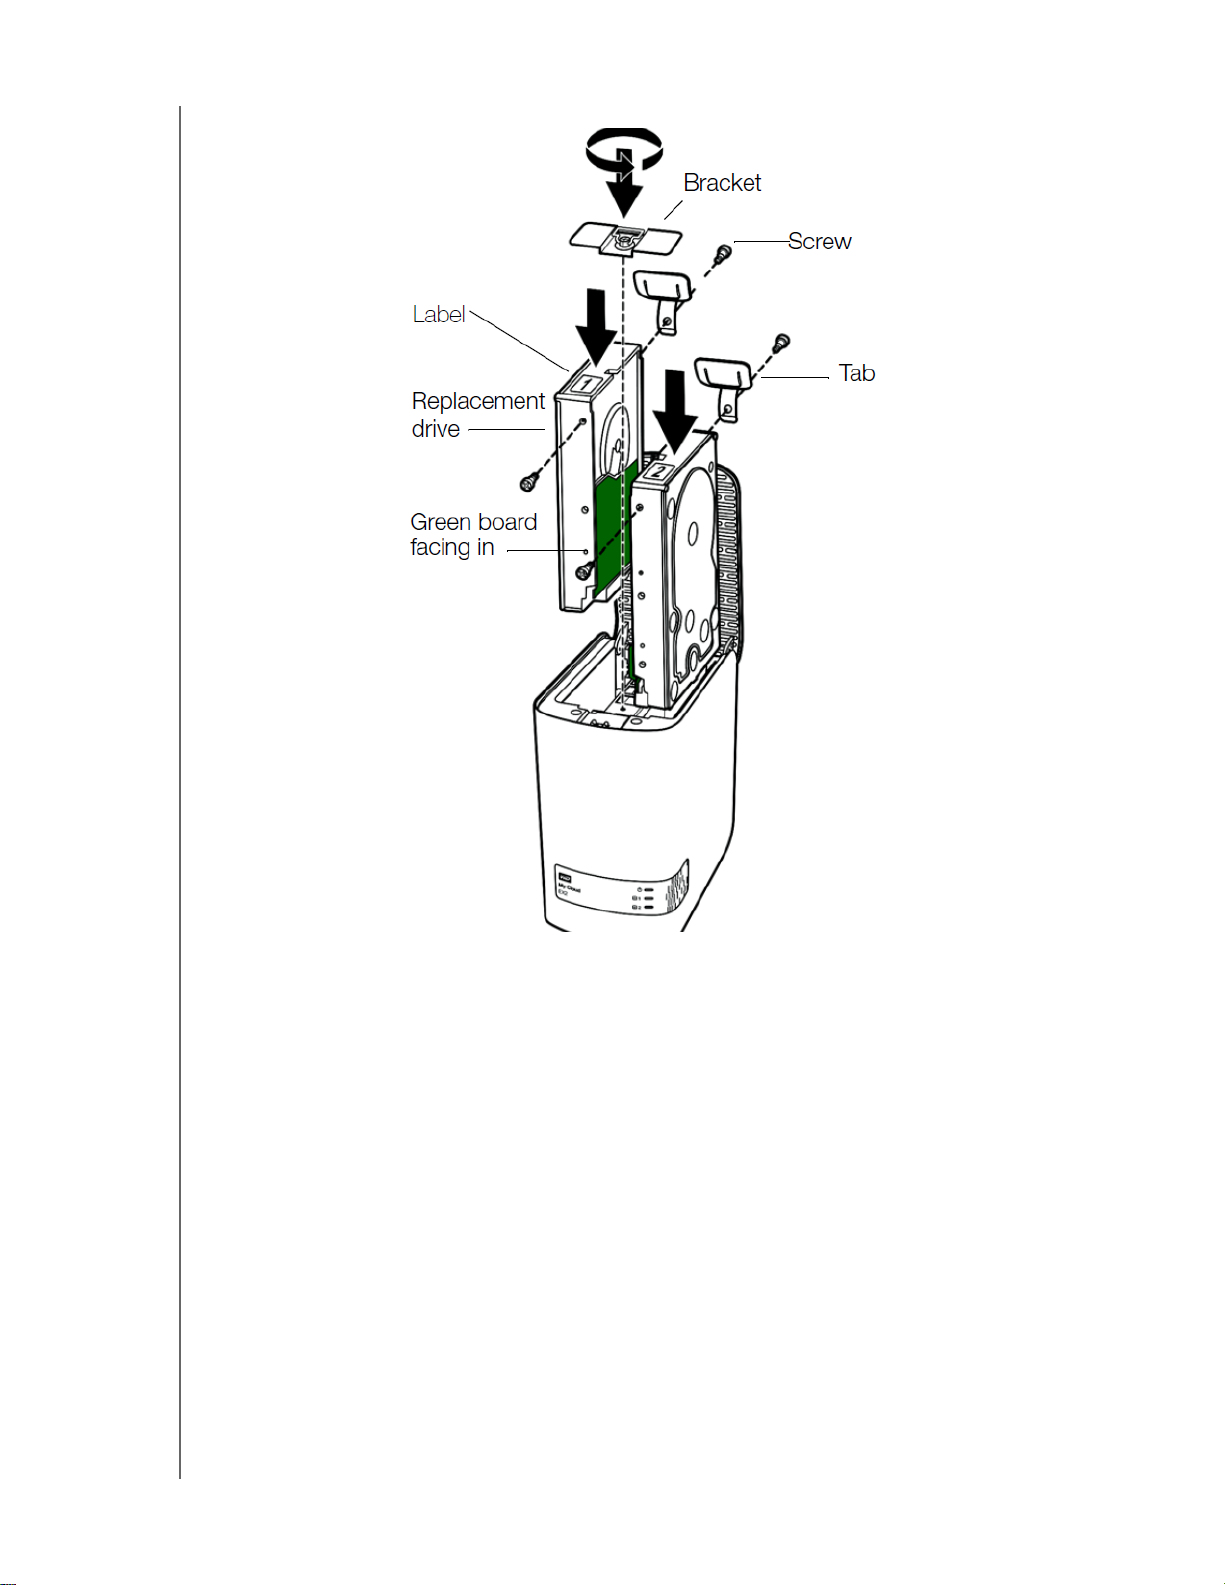
Note: You’ll need a phillips-head screwdriver for this procedure. Also, the power and
network cables are not connected when you do this.
1. Press the indented button on the door (top) of the device and open the top.
2. Remove the bracket that will hold the drives in place.
3. Using a screw from the bag, attach a plastic tab to the top hole in the drive’s side (on
the right if the green board is facing you).
4. Insert a screw in the corresponding hole on the other side of the drive.
5. Attach labels 1 or 2 to the top of the drive. Label 1 is on the left and label 2 is on the
right, when looking down on the top of the unit.
There are corresponding numbers on
the cross brace label.
6. When looking down on the top of the unit with the front panel towards you, and with
the connectors at the bottom of the drive facing in, gently slip the drive into a slot.
7. Make sure the tab is sticking up at the back of the unit.
MY CLOUD EX2 ULTRA PRIVATE CLOUD STORAGE
USER MANUAL
12

8. Repeat steps 3-7 for the other drive.
9. Screw the bracket in over the drives.
10. Close the door and firmly push down until it locks into place.
11. Continue to “Physically Connecting the Device” on page 13.
GETTING STARTED
Physically Connecting the Device
4
3
3
2
1
Follow the steps below to connect the My Cloud EX2 Ultra Private Cloud Storage device
to a home or small office network.
Important: T
Important: W
1. Using the provided Ethernet cable, connect one end of the Ethernet cable to the
Ethernet port located on the back of the device.
2. Connect the other end of the Ethernet cable directly into a router or network switch
port.
3. Connect one end of the power adapter into the power supply socket on the back of
the device.
o avoid overheating, make sure the device is upright as shown in
the illustration above and nothing is blocking or covering the slots
and openings on the top and bottom of the device. In the event of
overheating, the device will perform a safe shutdown, interrupting
all processes currently being performed. If this occurs, data may
be lost.
e recommend that you use the enclosed Ethernet cable for best
performance.
MY CLOUD EX2 ULTRA PRIVATE CLOUD STORAGE
USER MANUAL
13
GETTING STARTED
4. Plug the other end of the power adapter into a power outlet. The unit powers up
automatically.
Important: W
ait for the My Cloud EX2 Ultra device to finish powering up
(approximately three minutes) before configuring it. You will know
it is ready when the power LED stops flashing and turns blue.
5. When the power LED on your device turns a solid blue, continue to “Getting Started
Using Online Setup Software” on page 14.
Getting Started Using Online Setup Software
The online setup software walks you through the steps necessary to easily connect your
device to your home or small office network. Use the following steps to download and run
the online setup software, discover the device, and get started using your device. The
online setup software is available from WD’s Online Learning Center at http://
products.wdc.com/.
Downloading and Installing the Online Setup Software
After connecting your device:
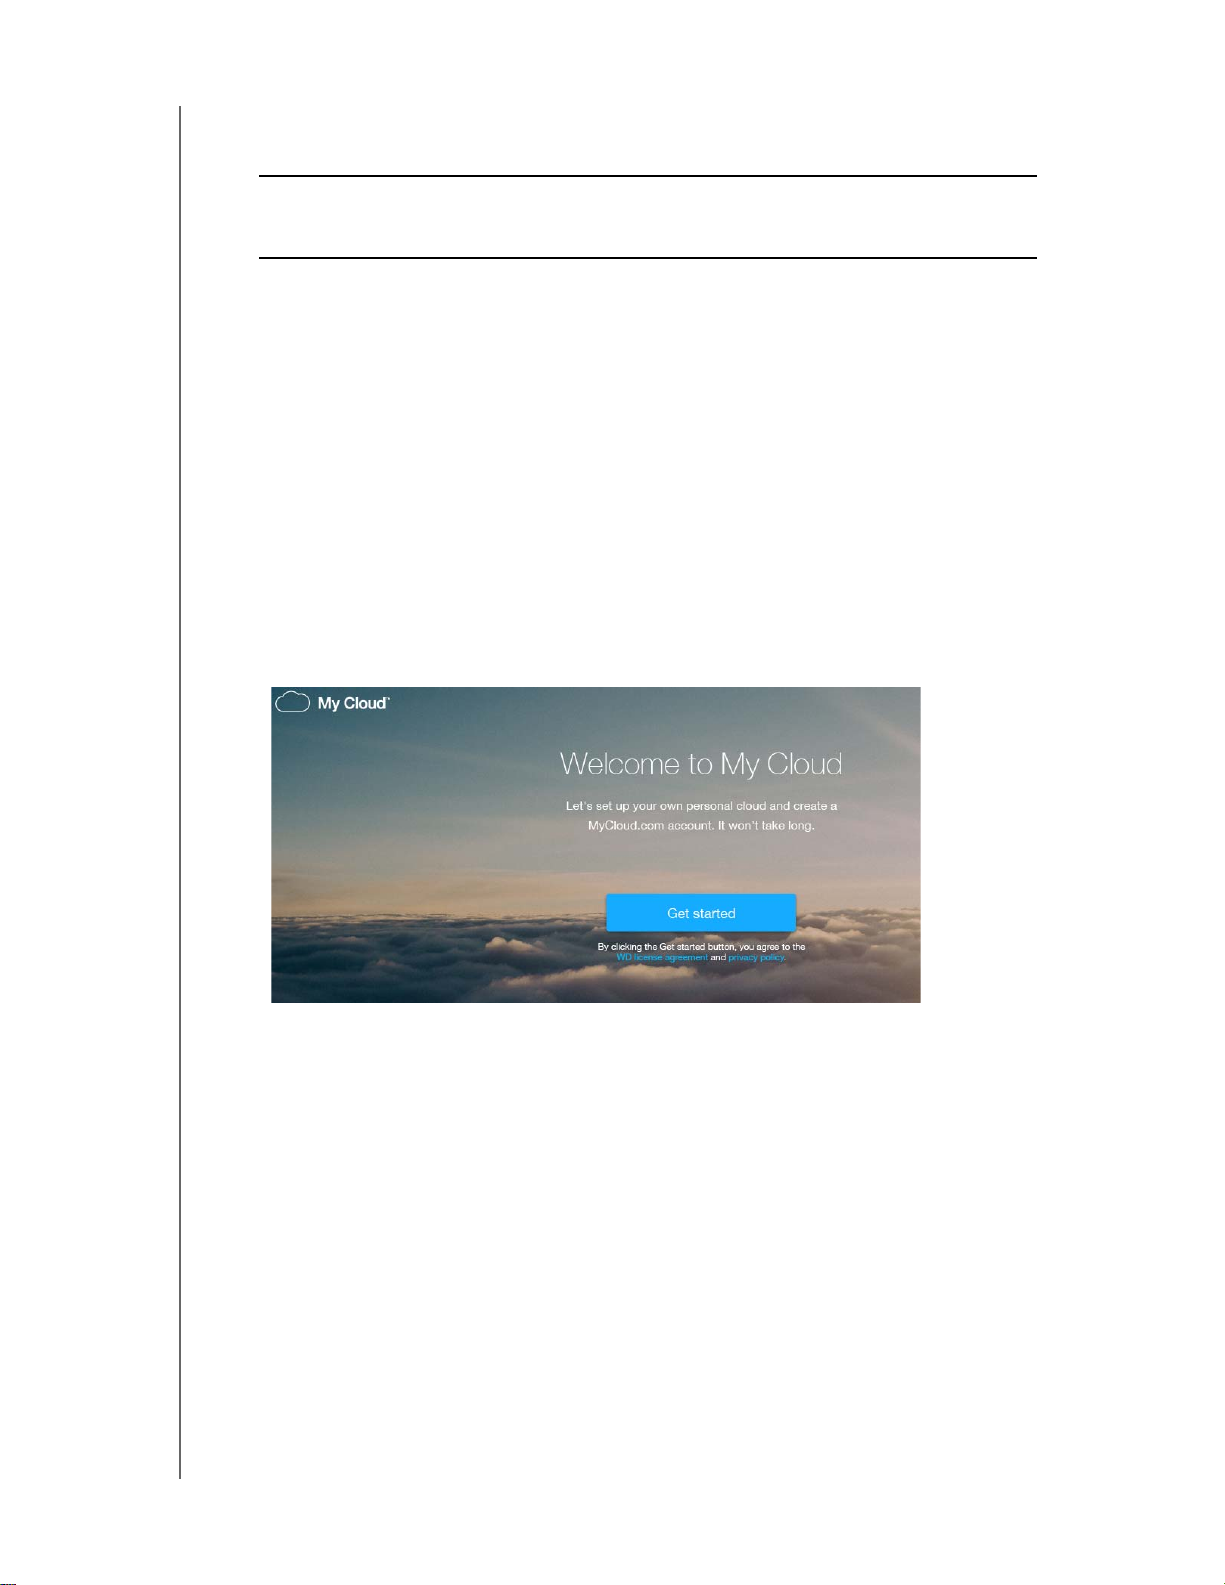
1. Open a web browser and type http://mycloud.com/setup to display the welcome page.
2. On the Welcome page, click Get Started.
The setup software begins searching for your My Cloud device. When your device is
found, a screen displays showing your device and IP
and MAC addresses.
3. Follow the on screen instructions to complete the setup process and install WD Sync.
4. After setup is complete and WD Sync has been installed, a window displays the most
common folders on your computer
. Select the folders on your computer that you want
to sync with your My Cloud device and click Next.
5. WD Sync setup is complete. Click Close to exit WD Sync setup.
Note: The WD Sync shortcut might be under Show Hidden Icons in your taskbar.
MY CLOUD EX2 ULTRA PRIVATE CLOUD STORAGE
USER MANUAL
14
GETTING STARTED
Getting Started Without Online Setup Software
If you do not use the online setup software to get started, you can still:
Use your My Cloud EX2 Ultra Private Cloud Storage device as an external hard
drive, dragging and dropping files to and from it.
Configure the device using the My Cloud EX2 Ultra device’s dashboard. (See
“The Dashboard Home Page” on page 33.)
Back up files using USB, Remote, Internal, and Cloud backup (see “Backing Up
and Retrieving Files” on page 45).
Accessing Content
The My Cloud EX2 Ultra device’s Public folder contains Shared Music, Shared Pictures,
and Shared Videos subfolders. The existing content of the subfolders are files that you
dragged and dropped or files that have been backed up from your computer or an
attached USB drive:
Note: This manual uses the term shares and folders interchangeably.
Once you’ve physically connected your My Cloud EX2 Ultra device (see “Physically
Connecting the Device” on page 13), use the following steps to access the contents of
your device.
If your operating systems is... Then...
Windows 10/ Windows 8 or 8.1.1 1. On the Windows 8 Start page, type Computer
2. Click Computer.
3. In the left pane, click Network.
4. Double-click MyCloudEX2Ultra and locate the device’
folder.
5. Double-click the Public folder to display the Shared Music,
Shared Pictures, and Shared Videos subfolders. You can now
drag and drop files into (and from) the shared media folders using
Windows Explorer.
Windows XP/Vista/Windows 7 1. Click or Start > Computer > Network > MyCloudEX2Ultra
and, if required, enter your network (router) credentials. The
device’
s Public and private folders (shares) display.
2. Double-click the Public folder to display the Shared Music,
Shared Pictures, and Shared V
drag and drop files into (and from) the shared media folders using
Windows Explorer.
ideos subfolders. You can now
s Public
MY CLOUD EX2 ULTRA PRIVATE CLOUD STORAGE
USER MANUAL
15

If your operating systems is... Then...
Mac OS X
(Snow Leopard, Lion, Mountain Lion,
Mavericks)
1. In a Finder window, click MyCloudEX2Ultra under the shared
items in the side bar.
2. If presented with an authorization page, select Guest, and then
click Connect to display the Public share:
3. Double-click the Public folder to display the subfolders: Shared
Music, Shared Pictures, Shared Videos, and Software. You can
now drag and drop files into the shared folders using Finder:
4. If you want to create a shared drive icon permanently on your
desktop, create an alias. Following are two ways to do this:
- Click the item you wish to alias (e.g., Shared Music), hold
- Right-click the item you want to alias (e.g., Shared Music),
GETTING STARTED
Note: Before creating an alias, click Finder > Preferences >
General and make sure Connected Servers is checked.
down the mouse button, hold down the Cmd and Option keys
simultaneously, and drag the item to where you want the alias
to appear. Instead of moving the original item, this creates an
alias at the new location.
-OR -
and then click File > Make Alias.
Mapping the Public Folder (Windows)
To map the My Cloud EX2 Ultra Public folder for quick access in the future:
1. In Windows Explorer, under Network, click MyCloudEX2Ultra.
2. Right-click the Public folder and select Map Network Drive from the menu.
3. Select the desired letter from the Drive drop-down list.
4. Select the Reconnect at login check box.
5. Click Finish. Your Public drive is now mapped.
MY CLOUD EX2 ULTRA PRIVATE CLOUD STORAGE
USER MANUAL
16
Accessing Your Cloud Remotely
ACCESSING YOUR CLOUD REMOTELY
84
Enabling Cloud Access for the My Cloud EX2 Ultra Device
Configuring Cloud Access for a User
Mobilizing Your Files with iOS and Android Mobile Apps
A private cloud is your content, at home, secure and under your control. Unlike public
clouds, a private cloud allows you to keep all of your content in one safe place on your
home network. Share files, stream media, and access your content anywhere, from your
PC or Mac computer and from mobile devices. No monthly fees. No mysterious location
for your data. Keep your videos, music, photos, and files safe at home and always with
you.
This chapter explains how to set up the My Cloud EX2 Ultra device for remote access and
describes some of the ways you can take advantage of its many capabilities.
Enabling Cloud Access for the My Cloud EX2 Ultra Device
Before you can use your My Cloud EX2 Ultra device remotely, you have to enable it for
cloud access. To enable the My Cloud device for remote access and to check the status
of its remote connection(s), see “Cloud Access” on page 81.
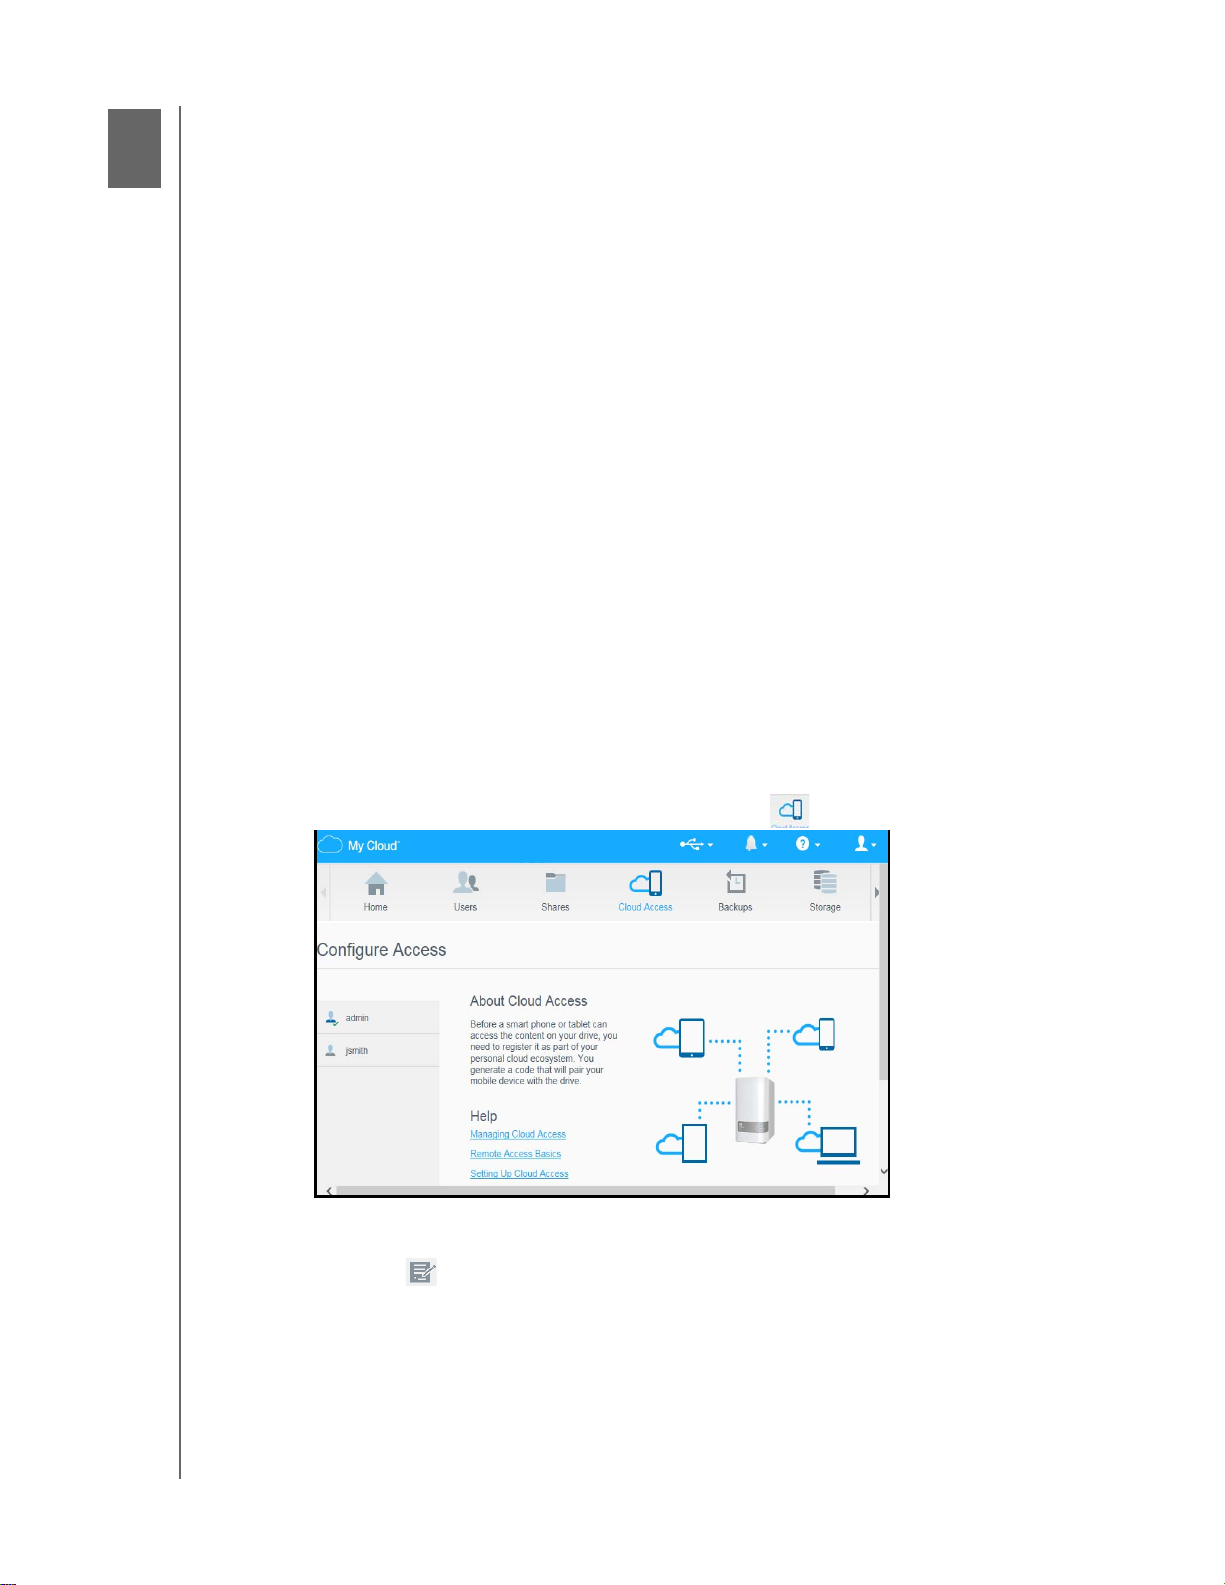
Configuring Cloud Access for a User
Once you’ve enabled cloud access on the My Cloud EX2 Ultra device, use the following
steps to give remote access capability to your device users.
1. On the navigation bar
2. In the left pane, select the user you’d like to configure for cloud access.
3. In the MyCloud.com Login for <user name> area, click the Add/ Change Email
Address icon
to the user account or if you need to update/change the user’s email address.
4. Enter the user’s email address. This email address is used to send the user
confirmation information and instructions on setting up and activating a password for
cloud access.
5. Click Save.
, click the Cloud Access icon .
.Click this icon if you have not previously added an email address
MY CLOUD EX2 ULTRA PRIVATE CLOUD STORAGE
USER MANUAL
17

ACCESSING YOUR CLOUD REMOTELY
6. If you have entered an email address, this icon is greyed out. Add an email address,
and then return to this link to send cloud access information.
To generate an activation code for a user’s mobile device(s):
Important: Codes are valid for 48 hours from the time of the request and can be used only once.
1. On the bottom of the screen, click Get Code.
You’ll need to generate one code for
each device you want to activate. A dialog box displays the user’s activation code
and its expiration date and time.
Note: Make sure to write down the access codes you generate.
2. Click OK. Once you use the code(s), the Configure Access page displays the cloud
devices to which the user now has access, along with the activation code used.
MY CLOUD EX2 ULTRA PRIVATE CLOUD STORAGE
USER MANUAL
18

ACCESSING YOUR CLOUD REMOTELY
Mobilizing Your Files with iOS and Android Mobile Apps
The My Cloud mobile app and My Cloud desktop app allow you to access all the content
on your Private Cloud from any device.
My Cloud Mobile App
You are always connected to your private cloud. Save valuable space on your mobile
devices with easy photo and video uploads directly to your private cloud, then securely
access and share your memories.
The My Cloud mobile app also allows you to easily transfer files between your private
cloud, Dropbox™ and other public cloud accounts.
With My Cloud mobile app, you can:
Open and view the important files stored on your My Cloud EX2 Ultra device
from anywhere without copying them to your mobile device.
Show off the photos stored on your My Cloud EX2 Ultra device.
Connect to other cloud sites such as Dropbox from your tablet or smartphone.
Stream and enjoy music and video files stored on your My Cloud EX2 Ultra
device.
Note: Video streaming performance is best over your LAN and when your mobile device
is connected using Wi-Fi wireless connections. WAN streaming performance may
be limited by upload speeds on your home Internet connection.
Share your presentations on your Apple or Android tablets.
Your My Cloud app supports most major file types, such as Microsoft Word
documents, Microsoft Excel spreadsheets, and PowerPoint presentations.
For more features and instructions, see the Help, Guide Me page, and Quick Tips within
the WD Photos app, or go to
Note: My Cloud app brings your data from the My Cloud EX2 Ultra device to your tablet,
handset, or other portable devices using Google Android or Apple iOS. My Cloud
provides a convenient file list of the My Cloud EX2 Ultra device contents and then
launches your favorite player or viewer for any files you wish to open. For file
types your mobile device supports, see the device’s manual.
http://mycloud.wd.com .
Requirements
My Cloud EX2 Ultra cloud storage with the most recent firmware, connected to the
Internet.
Access to cloud services requires the My Cloud Mobile app and an active
Dropbox, Google Drive, or OneDrive™ account.
iOS iPhone or iPad running versions 7.0 or later software.
Android smartphone or tablet running versions 4.0 or later software.
Installing the My Cloud Mobile App
Download the My Cloud mobile app from the Apple App or Google Play store and install it
on your mobile device.
MY CLOUD EX2 ULTRA PRIVATE CLOUD STORAGE
USER MANUAL
19

MANAGING USERS, GROUPS, AND SHARES
Managing Users, Groups, and Shares
55
About Users
About Groups
About Shares
About Users
The Administrator, normally the device owner, is the person in charge of setting up the
device. As the My Cloud EX2 Ultra device owner, you have a special user account
(admin) that provides you with administrator privileges. With these privileges, you can set
up and configure the device to your specific needs and add other users to your private
cloud. You also have the power to determine exactly what users can access on the
device.
As a default, the administrator (admin) user name does not have a password. You can
create one at anytime (see “Updating a User Password” on page 24).
Note: Only one individual at a time can use the Administrator logon ID to log into the
web browser app. Because of this, ensure that you log out of the
My Cloud EX2 Ultra device web browser app when you’re not using it. This allows
other users authorized to use the Administrator logon ID to access the web
browser app.
See Energy Saver - Web Access Timeout on “Energy Saver” on page 83 to
automatically log out of the app after a set amount of time.
The Users screen displays a list of the current users and allows the Administrator to view
user details, create new users, create groups, and grant a user access to existing shares
and groups.
Viewing Users
1. On the navigation bar, click Users to display the Set Up Users screen.
2. To view user details, click a user name on the left pane. The user’s profile and share
access information display
share.
Note: The shares in the Share Access section are not editable because they are public
shares. Once you make a share private, the share displays in the list and you can
edit it. (See “Making a Share Private” on page 30.)
. A user can have read only, read/write, or no access to a
Adding a Single User
The Administrator adds user accounts and sets the parameters of the shares that a user
can access. Use the following steps to add a single user account.
1. To add a user, click
2. Enter the User Name, First Name, Last Name and Email address (optional) of the
user you’d like to add in the applicable fields, and then click Next.
3. To assign a password, click the toggle button
confirm the user’s password. Click Next.
4. To assign a group to the new user, click the check box next to a group, and then click
Next.
in the lower left side of the screen.
to ON, enter a password, and then
MY CLOUD EX2 ULTRA PRIVATE CLOUD STORAGE
USER MANUAL
20

MANAGING USERS, GROUPS, AND SHARES
5. Enter the Quota Amount, or leave the values blank for unlimited space, and then click
Apply. (
See “Quota Rules” on page 24 for information on quotas.) Your new user
account displays on the left pane of the Set Up Users screen.
MY CLOUD EX2 ULTRA PRIVATE CLOUD STORAGE
USER MANUAL
21

MANAGING USERS, GROUPS, AND SHARES
Adding Multiple Users
Use the following steps to add multiple user accounts.
1. To add multiple users, click Add Multiple Users in the lower left side of the screen.
2. Select how you’d like to enter your users into the device, and then click Next.
Create Multiple Users: Allows you to enter users manually. See “Create Multiple
Users” on page 22
Import Users: Allows you to import a list of users into the device. Continue to
“Import Multiple Users” on page 23
.
Create Multiple Users
1. Enter the following information on the Create Multiple Users screen, and then click
Next:
Username Prefix: Enter a prefix for your user name. This will be added to the
Account Prefix to create the User Name. (Example: HR)
Account Prefix: Enter a numeric account prefix. This will be added to the
Username Prefix to create the User Name (Example: 143)
Number of Users: Enter the number of User accounts you’d like to create. The
maximum number you can add displays to the right.
Password: Enter a password for the user accounts.
Confirm Password: Confirm the password for the user accounts.
MY CLOUD EX2 ULTRA PRIVATE CLOUD STORAGE
USER MANUAL
22

MANAGING USERS, GROUPS, AND SHARES
Overwrite Duplicate Accounts (optional): Select this check box to overwrite any
existing duplicate accounts on your device.
2. To assign a group to the new users, click the check box next to a group, and then click
Next.
3. Enter the Quota Amount, or leave the values blank for unlimited space, and then click
Next. (See “Quota Rules” on page 24 for information about quotas.)
4. Your new user accounts display on screen. Click Apply to save them to your device.
Import Multiple Users
1. Click Download to download a.txt file identifying the format you’ll need to set up your
user import file.
2. Create and save your import file. Your import file should be formatted as follows:
User import file format: #user name/user password/user groups/ shared
folder(rw)/ shared folder(ro)/ shared folder(deny)/user quota
Example: #user/pw/g1:g2/folder1:folder2/folder3:folder4/folder5:folder6/0:0:0:0
3. Click Import User List and select the import file you created.
4. Click Next.
5. Select the apps you’d like the new user accounts to have access to and click Next.
6. Click Apply.
Your new user accounts save to your device.
Editing User Settings
1. On the Set Up Users screen, select the user whose information you’d like to edit. The
User Profile and Share Access panels display.
2. Modify the required and optional settings as desired.
3. If a private share has been created on the Share screen, it displays in the Share
Access panel of the Set Up Users screen.
You can assign an access level to it for
MY CLOUD EX2 ULTRA PRIVATE CLOUD STORAGE
USER MANUAL
23

MANAGING USERS, GROUPS, AND SHARES
each user. (See “Making a Share Private” on page 30 for information on creating a
private share.)
Updating a User Password
When viewing details about a user, the Administrator can add or change the user’s
password (no password is the default setting). Use the following steps to update a user
password.
1. On the Set Up Users screen, select a user from the list on the left.
2. Click the toggle button
3. Click Configure to the right of the toggle button
if no password has been previously created.
to display the Edit Password
screen:
4. Enter the new password in both the Password and Confirm Password fields.
5. Click Apply.
Assigning a User to a Group
Use the following steps to assign a user account to a user group.
1. On the Set Up Users screen, select the user from the left pane.
2. In the Group Membership field, click Configure.
3. Select the check box next to the Group you’d like the user to join, and then click
Apply.
Quota Rules
Assigning user quotas allows you to better control the disk space allocated to a user or a
group. There are various rules dictating which quota takes precedent over another.
User quota must be ≤ the group quota (e.g., if your group has a 20GB quota and
you try to set the user quota to 30GB quota, you will be prompted to reduce your
user quota to be equal to or less then the group quota).
If the user quota is not set, the group quota is assigned to the user.
When a user quota is set prior to joining a group and a group is assigned:
- If the user quota > group quota, the individual user ‘s quota is automatically
reduced to the group quota amount.
- If the user quota is ≤ group quota, the individual user quota remains unchanged.
Assigning Quotas to a User
Use the following steps to assign a quota to a user account. A quota determines the
amount of disk space allocated to the user on the My Cloud EX2 Ultra device.
1. On the Set Up Users screen, select the user from the left pane.
MY CLOUD EX2 ULTRA PRIVATE CLOUD STORAGE
USER MANUAL
24

MANAGING USERS, GROUPS, AND SHARES
2. In the Quotas field, click Configure.
3. Enter the amount of space to assign to the user on the My Cloud EX2 Ultra device.
To assign unlimited space, leave the Quota Amount field(s) blank.
4. Click Apply.
Removing a User
Use the following steps to delete users from the My Cloud EX2 Ultra device.
Note: The Administrator account cannot be deleted.
1. On the Set Up Users screen, in the left pane, select the user you’d like to delete.
2. Click the Remove User icon
3. In response to the confirmation message, click OK.
.
The user account is removed
from the device and no longer displays in the user account list.
About Groups
A group allows easier management of multiple users. The permissions and privileges you
assign to group accounts determine the actions that can be taken by that group.
Viewing Groups
1. On the navigation bar, click Users to display the Set up User screen.
2. Click the Group tab below Set Up Users.
3. To view group details, click a group name on the left pane. The group profile
information displays.
Adding a Group
1. To add a group, click in the lower left side of the Set Up Groups screen.
2. Enter a Group Name.
3. Click the check box next to the users you’d like to add to your new Group and click
Next.
4. Enter the Quota Amount, or leave the values blank for unlimited space, and then click
Apply.
screen.
Your new group account displays on the left pane of the Set Up Groups
MY CLOUD EX2 ULTRA PRIVATE CLOUD STORAGE
USER MANUAL
25

MANAGING USERS, GROUPS, AND SHARES
Editing Group Settings
1. On the Set Up Groups screen, select the Group whose information you’d like to edit.
The Group Profile and Share Access panel displays.
2. Modify the required and optional settings as desired. To update the group’s access to
shares, see
“Assigning Share Access to Groups” on page 26
Assigning Share Access to Groups
Once a group account is created, you can assign access to the various shares on your
My Cloud EX2 Ultra device using the following steps.
1. On the Set Up Groups screen, select the group for which you’d like to assign a share.
2. In the Share Access area, select the type of access you’d like to assign to the
selected user:
Read/Write Access: Select this option to provide the group account with read/
write access to the selected share. The group members can view and update the
share.
Read Only Access: Select this option to provide the group account with read only
access to the selected share. The group member can view the share but can't
update it.
Deny Access: The group has no access to this share.
The group is updated with your share access selection.
MY CLOUD EX2 ULTRA PRIVATE CLOUD STORAGE
USER MANUAL
26
MANAGING USERS, GROUPS, AND SHARES
Assigning Quotas to a Group
Use the following steps to assign a quota to a Group. A quota determines the amount of
space assigned to the user on the My Cloud EX2 Ultra device. (See “Quota Rules” on
page 24 for information on quotas.)
1. On the Set Up Groups screen, select the group from the left pane.
2. In the Quotas field, click Configure.
3. Enter the amount of space you’d like to assign to the group on the My Cloud EX2
Ultra device.
4. Click Apply.
To assign unlimited space, leave the Quota Amount field(s) blank.
Removing a Group
Use the following steps to delete users from the My Cloud EX2 Ultra device.
1. On the Set Up Group screen, select the user you’d like to delete in the left pane.
2. Click the Remove Group icon
3. In response to the confirmation message, click OK.
from the device and no longer displays in the Group account list.
.
The Group account is removed
About Shares
A share is an area on the My Cloud EX2 Ultra device for storing files (similar to a folder or
directory).
Note: In this manual, we use the terms share and folder interchangeably.
A share can be public so that all users can access the contents, or private to limit access
to selected users. The Shares icon on the navigation bar displays a list of shares on the
My Cloud EX2 Ultra device and enables the Administrator to manage shares and user
access.
Note: USB flash drives can be mounted as a share, however, they are not editable.
Viewing a List of Shares
Click the Shares icon on the navigation bar to display a list of shares on the My Cloud
EX2 Ultra device. For each share name, the description, media serving, and public
access status display.
Use the following steps to view a list of shares.
1. On the navigation bar, click Shares to display the
About Shares page.
MY CLOUD EX2 ULTRA PRIVATE CLOUD STORAGE
USER MANUAL
27
MANAGING USERS, GROUPS, AND SHARES
2. Click a share to display its profile and share access information.
Note: Only private shares can be edited. Public shares always have read/write
access and are therefore grayed out.
MY CLOUD EX2 ULTRA PRIVATE CLOUD STORAGE
USER MANUAL
28
MANAGING USERS, GROUPS, AND SHARES
Creating a New Share
You can create a share and designate it as public or private. For example, if the share
contains financial information, you may want to make the share private. Or, if there are
photos you would like a friend to see, you can make the share public to that friend.
1. Click the Shares icon on the navigation bar to display the About Shares screen.
2. Click the Add a Share icon
3. Complete the following settings:
Volume Select the volume from the drop-down menu.
Share Name Assign a name to the share. (Names must be case sensitive, and
Share Description (optional) Enter a brief description of the share to remind yourself of what it
Enable Recycle Bin (optional) The Recycle Bin contains any files deleted from the My Cloud EX2
.
contain 1-32 alphanumeric characters but no spaces.)
contains. Note that share descriptions must begin with an
alphanumeric value and can contain up to 256 characters.
Ultra device. If you’d like to use the Recycle Bin, click the toggle
button
. to ON. (Default is OFF.)
Note: The Recycle Bin is only available for Windows
SMB files.
4. Click Next.
5. Complete the following settings:
Enable Media Serving (optional) This option allows you to stream media stored in this share to other
FTP Access (optional) This option allows FTP access on this share. If you’d like to use
WebDAV Access (Optional) This option allows WebDAV access on this share. If you’d like to
devices. If you’d like to Enable Media Serving, click the toggle
button
FTP
use W
. The default is OFF.
Note: The media server must be enabled for the
Access, click the toggle button
Note: FTP
ebDAV Access, click the toggle button
device before you can provide media serving for
a share.
See“Enabling DLNA” on page 72 for instructions
on enabling media serving for the device.
.
access must be enabled before you can
provide FTP access for a share. See “Network
Services” on page 86 for instructions on how to
enable FTP access.
.
Note: W
ebDAV access must be enabled before you
can provide FTP access for a share. See
“Network Services” on page 86 for instructions
on how to enable WebDAV access.
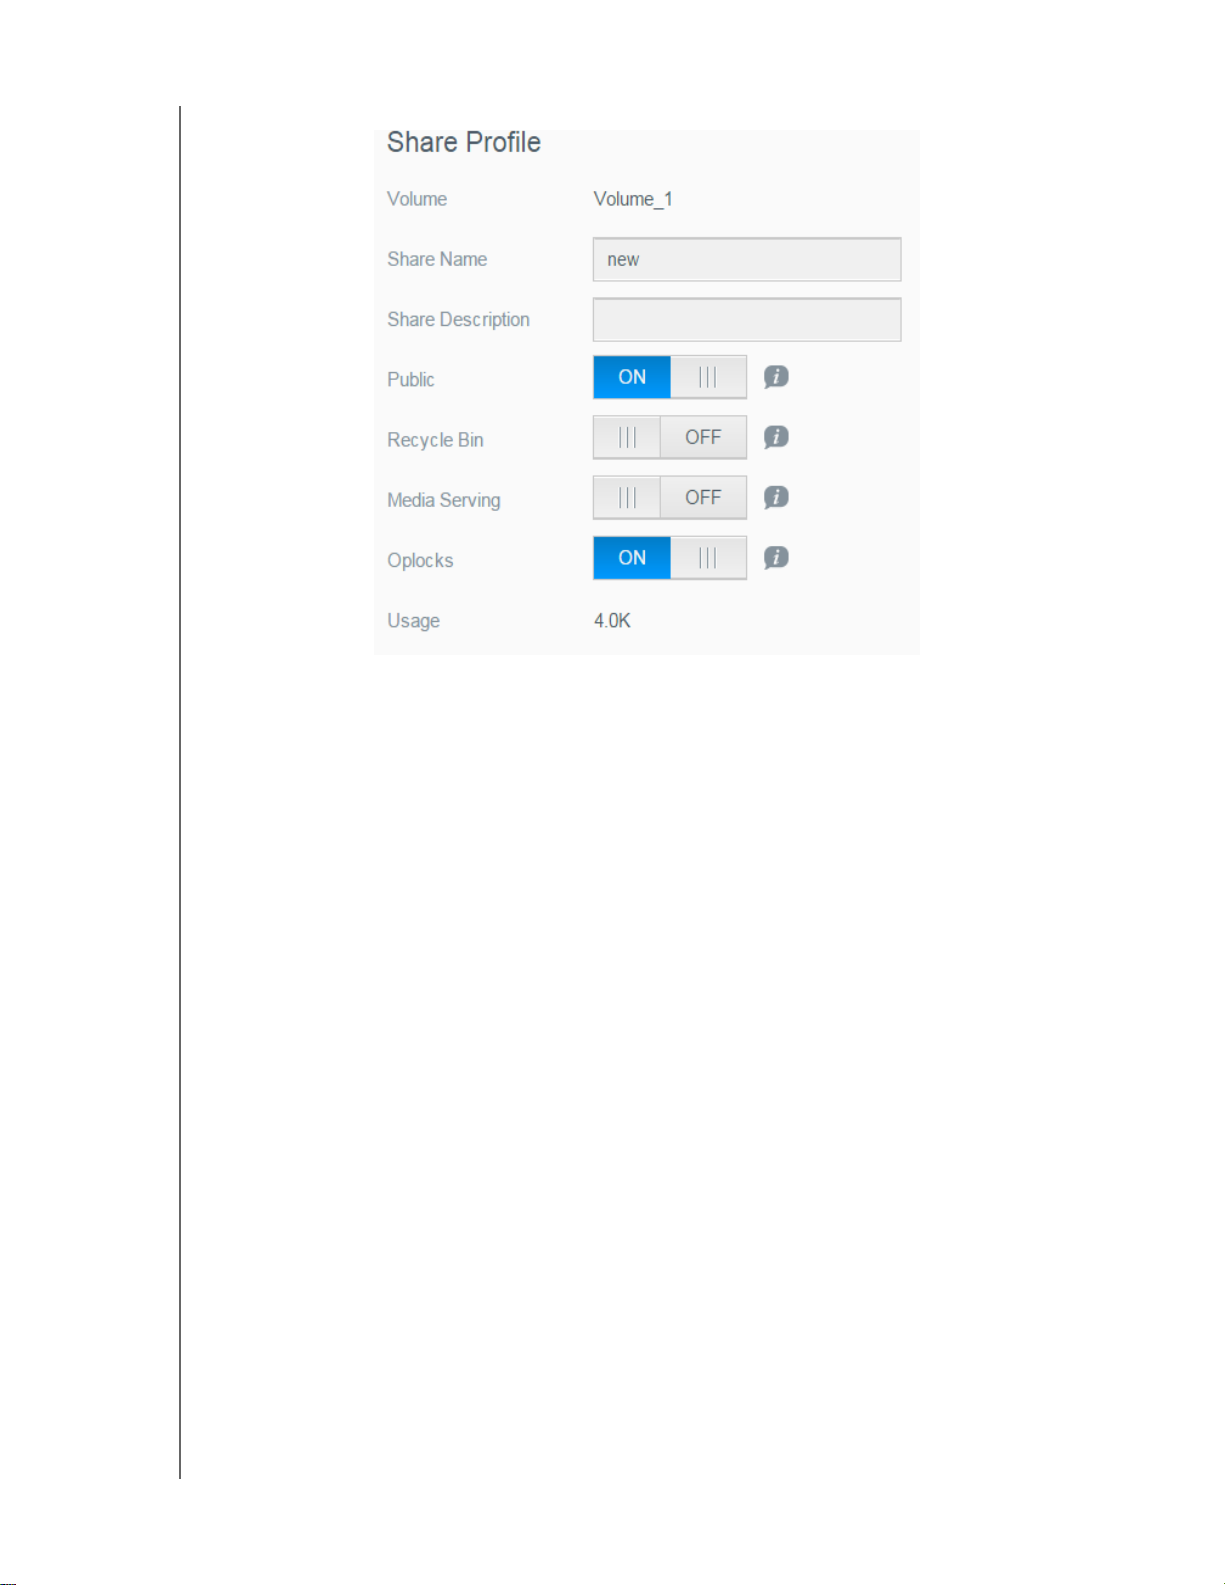
Editing Share Settings
1. On the Set Up Shares screen, select the share you’d like to edit. The Share Profile
panel displays.
2. Modify the required and optional settings as desired.
MY CLOUD EX2 ULTRA PRIVATE CLOUD STORAGE
USER MANUAL
29
MANAGING USERS, GROUPS, AND SHARES
Making a Share Private
If you decide there is a reason to limit access to a public share, convert it to a private
share.
1. On the Set Up Shares screen, select the share:
2. Switch the Public Access button to OFF
.
3. For each user listed in the User Access section, select the level of access by clicking
the appropriate icon for the share (read/write
, read only , or no access ).
Deleting a Share
WARNING! Deleting a share erases all files and folders on the share.
1. Select the share in the list of shares on the About Shares page.
2. Click the Delete Share icon .
3. In response to the confirmation message, click OK.
Accessing the Contents of a Share Locally
Note: For information on accessing the contents of a share remotely, see
“Accessing Your Cloud Remotely” on page 17.
Several options are available for opening a My Cloud EX2 Ultra share. For a private
share, the user must have:
A user name and password assigned to the share name
Read-only or full access to the share
IF you want to open a share
using . . .
Windows 10/ Windows 8 or 8.1 1. In the task bar, click the File Explorer icon .
Windows Vista/Windows 7/
Windows XP
Mac OS X 1. Open a Finder window and locate your My Cloud device
THEN . . .
2. In the left panel, select Network, and double-click
MyCloudEX2Ultra.
3. Double-click a Public or private share on your device.
1. Click or Start > Computer.
2. In the left panel, select Network
3. Click MyCloudEX2Ultra.
4. Double-click the Public or private shares on your device.
under the Shared heading in the side bar.
If presented with an authorization page, select Guest and
then click Connect.
2. Click the device to display the Public share and any private
shares to which you have access.
MY CLOUD EX2 ULTRA PRIVATE CLOUD STORAGE
USER MANUAL
30
The Dashboard at a Glance
THE DASHBOARD AT A GLANCE
6
Launching the Dashboard
The Dashboard Home Page
Obtaining Customer Support
Common Tasks
Use the My Cloud EX2 Ultra dashboard to configure settings and to manage the device
as you prefer
. For example, you can set up user accounts and restrict access to the files
on your My Cloud EX2 Ultra device, set up folders for storing files, enable remote access,
and customize the device to suit your needs.
Launching the Dashboard
Use one of the following methods to launch the dashboard:
IF you want to launch from . . . THEN . . .
Desktop Icon Double-click the dashboard icon to launch the My
Cloud EX2 Ultra dashboard.
A browser or Windows Explorer Using Device Name:
1. Enter the name of your My Cloud EX2 Ultra device (default
name: MycloudEX2Ultra) in the browser
- http://<device name> (Windows)
(Example: http://MyCloudEX2Ultra)
- https://<device name>.local (Mac)
(Example: https://MyCloudEX2Ultra.local)
2. Click Go.
’s address field:
Using IP Address:
1. Enter the IP address of your My Cloud EX2 Ultra device in
the browser
find the IP address from your router’s UI.
(Example: http://192.168.1.22)
2. Click Go.
Windows 10/ Windows 8 or 8.1 1. On the Start page, type Computer
2. Click Computer.
3. In the left pane, click Network.
4. In the right panel, locate your My Cloud EX2 Ultra device
under Storage.
5. Double-click the device, or right-click and select V
device webpage from the resulting menu.
Windows 7/Vista 1. Click
2. In the left panel, select
3. In the right panel, locate your My Cloud EX2 Ultra device
under Storage.
4. Double-click the device, or right-click and select V
device webpage from the resulting menu.
Windows XP 1. Click Start > My Network Places.
2. Locate your My Cloud device.
3. Double-click the device or right-click and select Invoke.
’s address field: http://<IP Address> You can
> Computer.
Network
.
iew
iew
MY CLOUD EX2 ULTRA PRIVATE CLOUD STORAGE
USER MANUAL
31
THE DASHBOARD AT A GLANCE
IF you want to launch from . . . THEN . . .
Mac OS X 1. Click the Safari icon > bookmark icon > Bonjour.
2. Double-click the My Cloud EX2 Ultra device on the network.
Mobile Devices iOS Devices:
1. Open a browser.
2. In the Address bar, enter https://<device name>.local.
Android Devices:
1. Open a browser.
2. In the Address bar, enter http://<device name>.
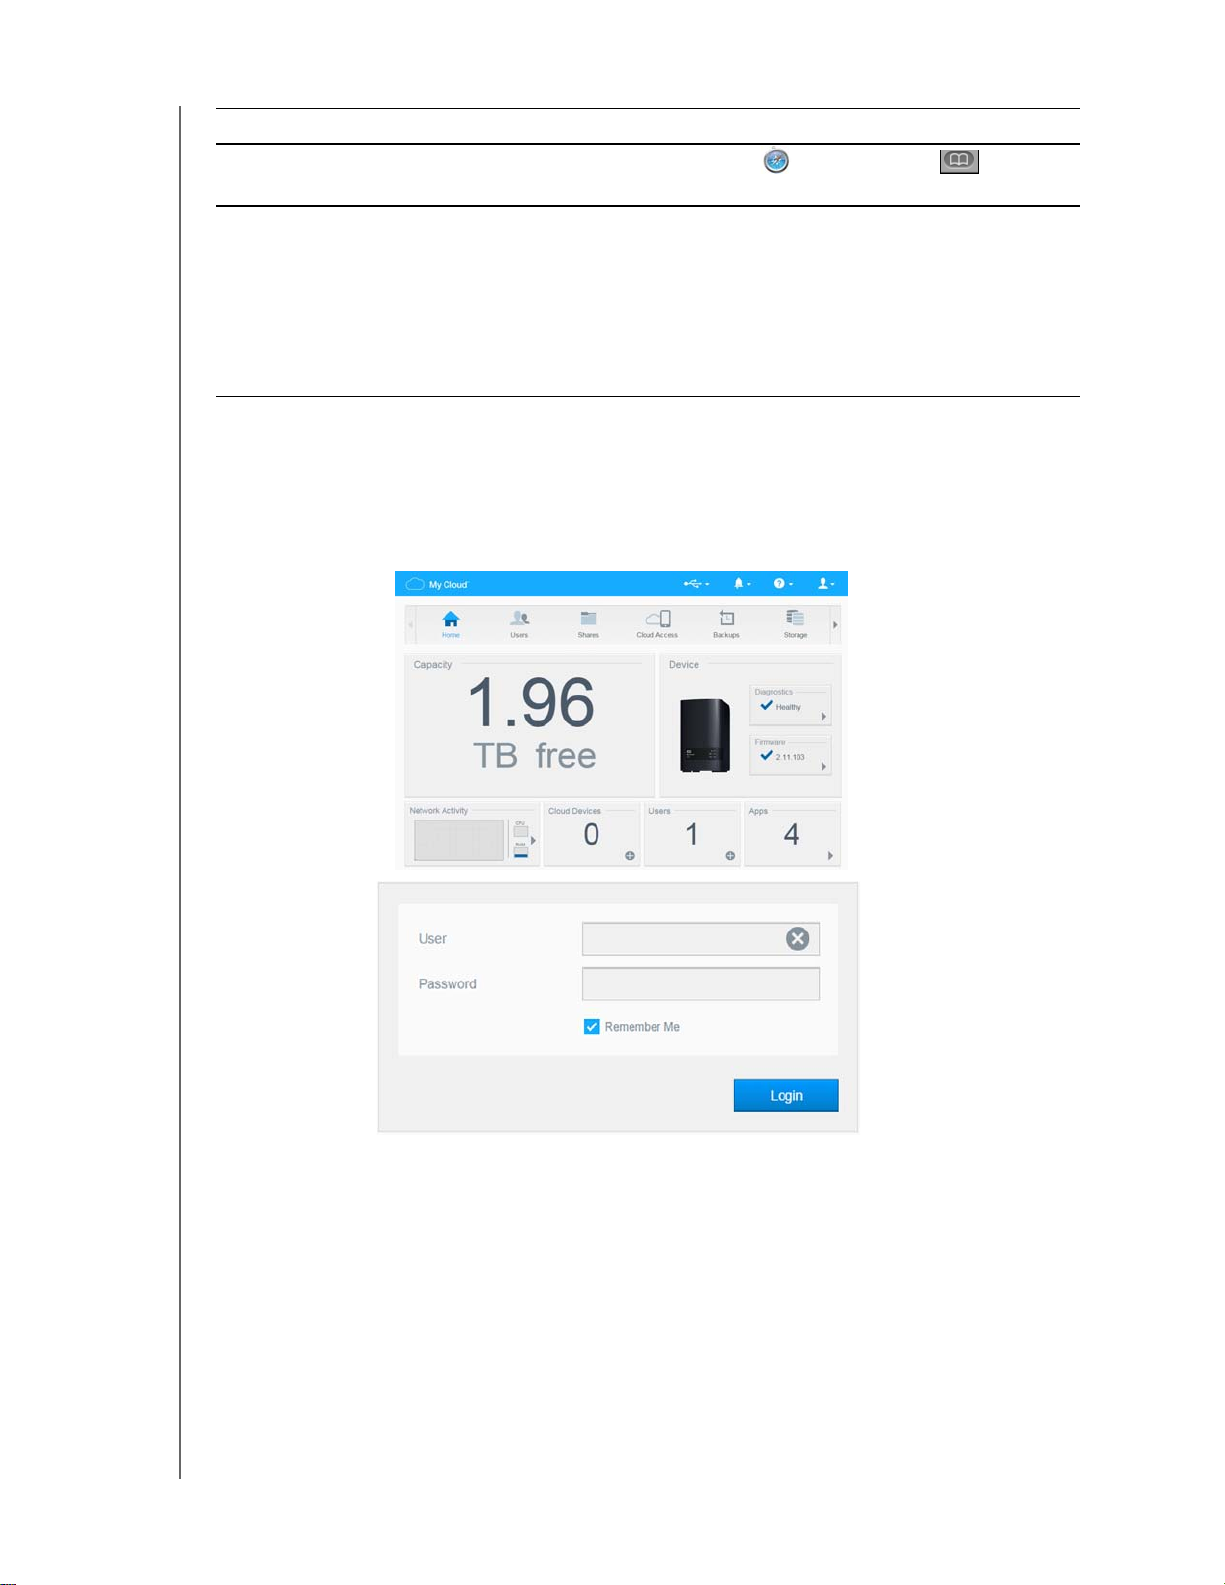
Accessing the Dashboard for the First Time
Use the following steps when you initially access the My Cloud EX2 Ultra dashboard.
1.
When you initially log into My Cloud EX2 Ultra, leave the Password field blank.
2. Click Login
. Select a language from the drop-down menu.
3. Click the WD End User License Agreement link, review the agreement, and then
click
the I agree to the WD End User License Agreement check box.
4. Click Continue.
5. Enter your First Name, Last Name, and Email address (optional) to create an admin
login for your My Cloud EX2 Ultra device, and then click Save.
6. If you’d like to add additional users, enter the User Name, First Name, Last Name,
and Email address (optional) of the additional users, and then click Save for all
additional users.
To create a remote access account, you must enter the user’s email
address.
7. Click Next.
MY CLOUD EX2 ULTRA PRIVATE CLOUD STORAGE
USER MANUAL
32
THE DASHBOARD AT A GLANCE
8. Review the information on the screen.
If desired:
Click the Automatically update device firmware when available check box.
Click the Register the My Cloud EX2 Ultra device to receive continuous
product support check box.
9. Click Finish.
The My Cloud EX2 Ultra dashboard displays.
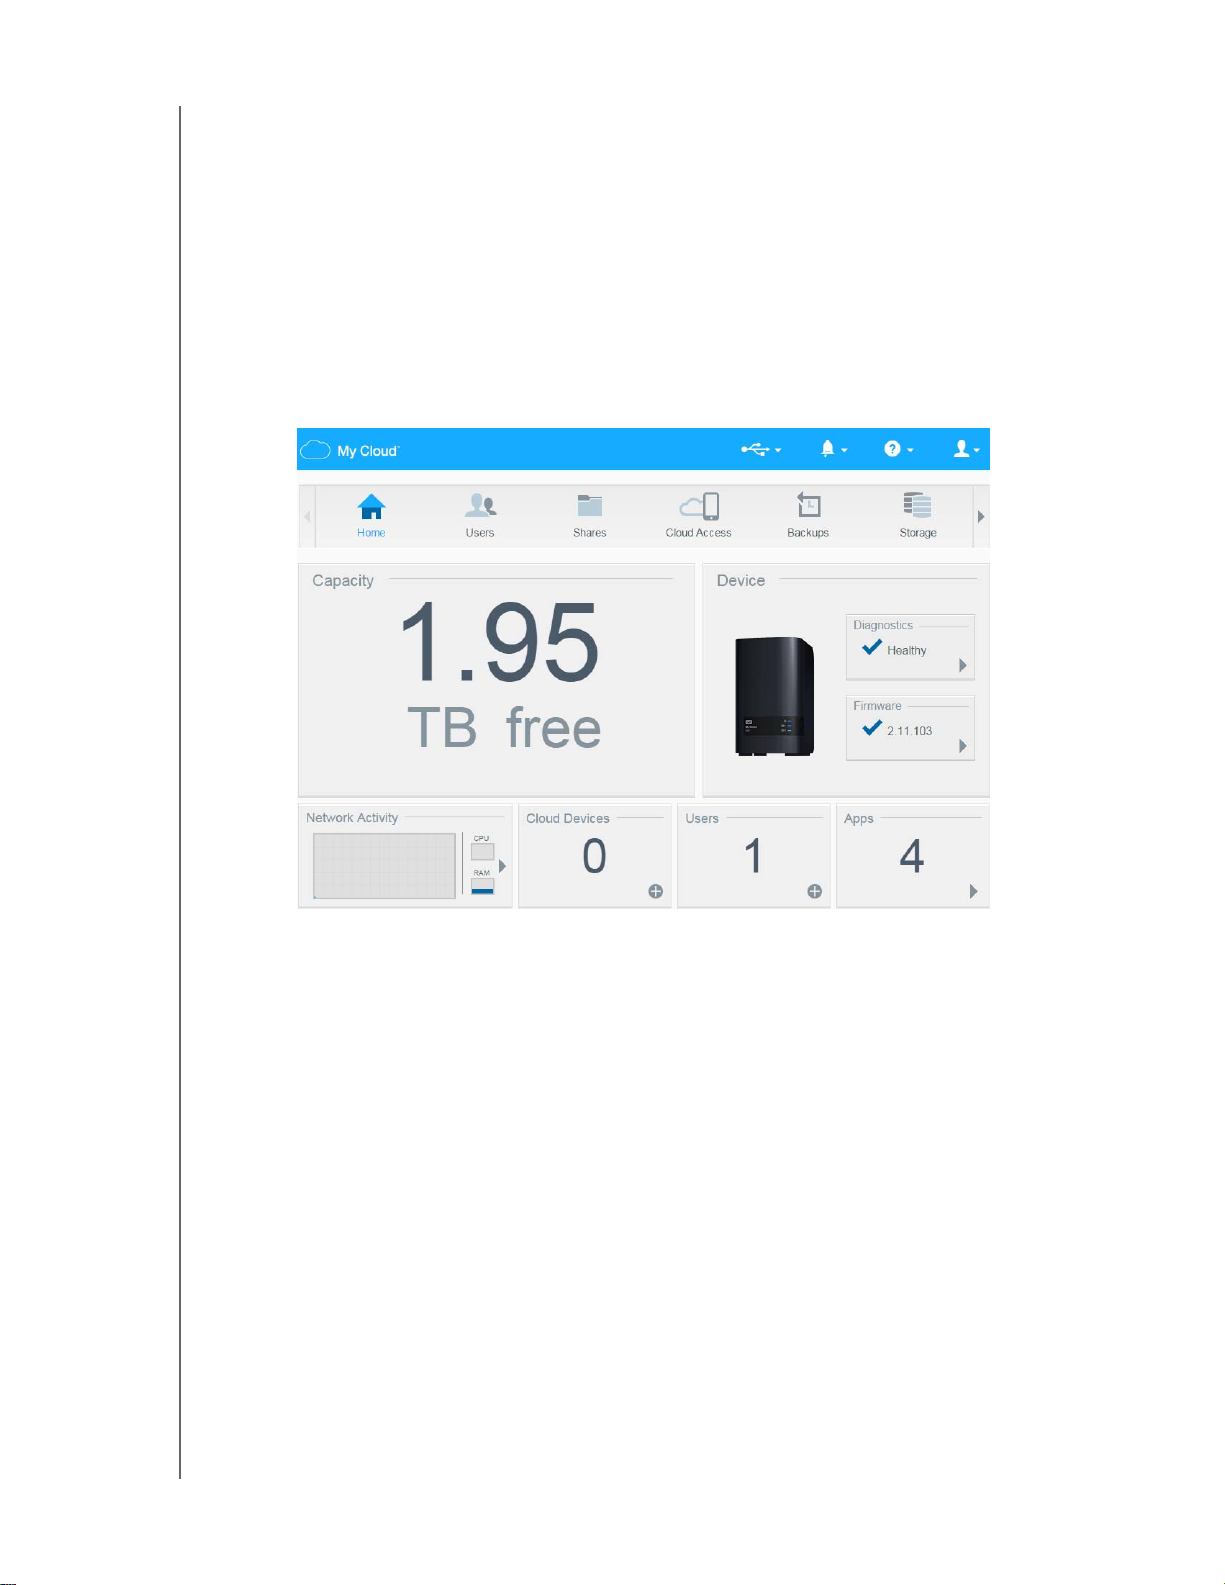
The Dashboard Home Page
The My Cloud EX2 Ultra Home page has an information bar at the top right, an navigation
icon bar across the page, and an instant overview of the status of the device’s main
functions with links for updating settings.
MY CLOUD EX2 ULTRA PRIVATE CLOUD STORAGE
USER MANUAL
33

Information Icons
Icon Name Actions
USB device on the My Cloud Click to display the number of USB devices
Alerts Click to display recent alerts about new
Critical alerts Click to display a severe warning: over
Navigation Icons
THE DASHBOARD AT A GLANCE
connected (a hub with multiple devices can
be connected to the USB port). Icon is dim if
no USB is attached.
firmware and network issues.
temperature, under temperature, drive
SMART failure, failure of the data volume to
mount.
Icon Name Actions
Home
Users
Shares
Cloud Access
Backups
Storage Select the way your My Cloud EX2 Ultra device stores your
The dashboard displays an instant overview of the status of
the device’s main functions and links for updating settings.
Create, change, and delete users and grant them full or
limited access to particular shares.
Create, change, and delete shares (folders) and grant
specific users full, limited, or no access to particular shares.
Set up, change, and remove remote cloud access to
particular shares. Monitor remote access status.
Create backups to:
• A USB drive
• Another My Cloud EX2 Ultra on your local network or on
a remote network
• Another location on your My Cloud EX2 Ultra device
• A Cloud backup site
data.
Apps Add or remove various apps that allow you to use your
MY CLOUD EX2 ULTRA PRIVATE CLOUD STORAGE
USER MANUAL
device more productively.
34
Icon Name Actions
THE DASHBOARD AT A GLANCE
Settings
Configure advanced settings for your My Cloud EX2 Ultra
device, including:
• General device settings,
• Network configurations
• ISO mount options
• Media options,
• Device utility tasks
• Notification settings
• Firmware update setting
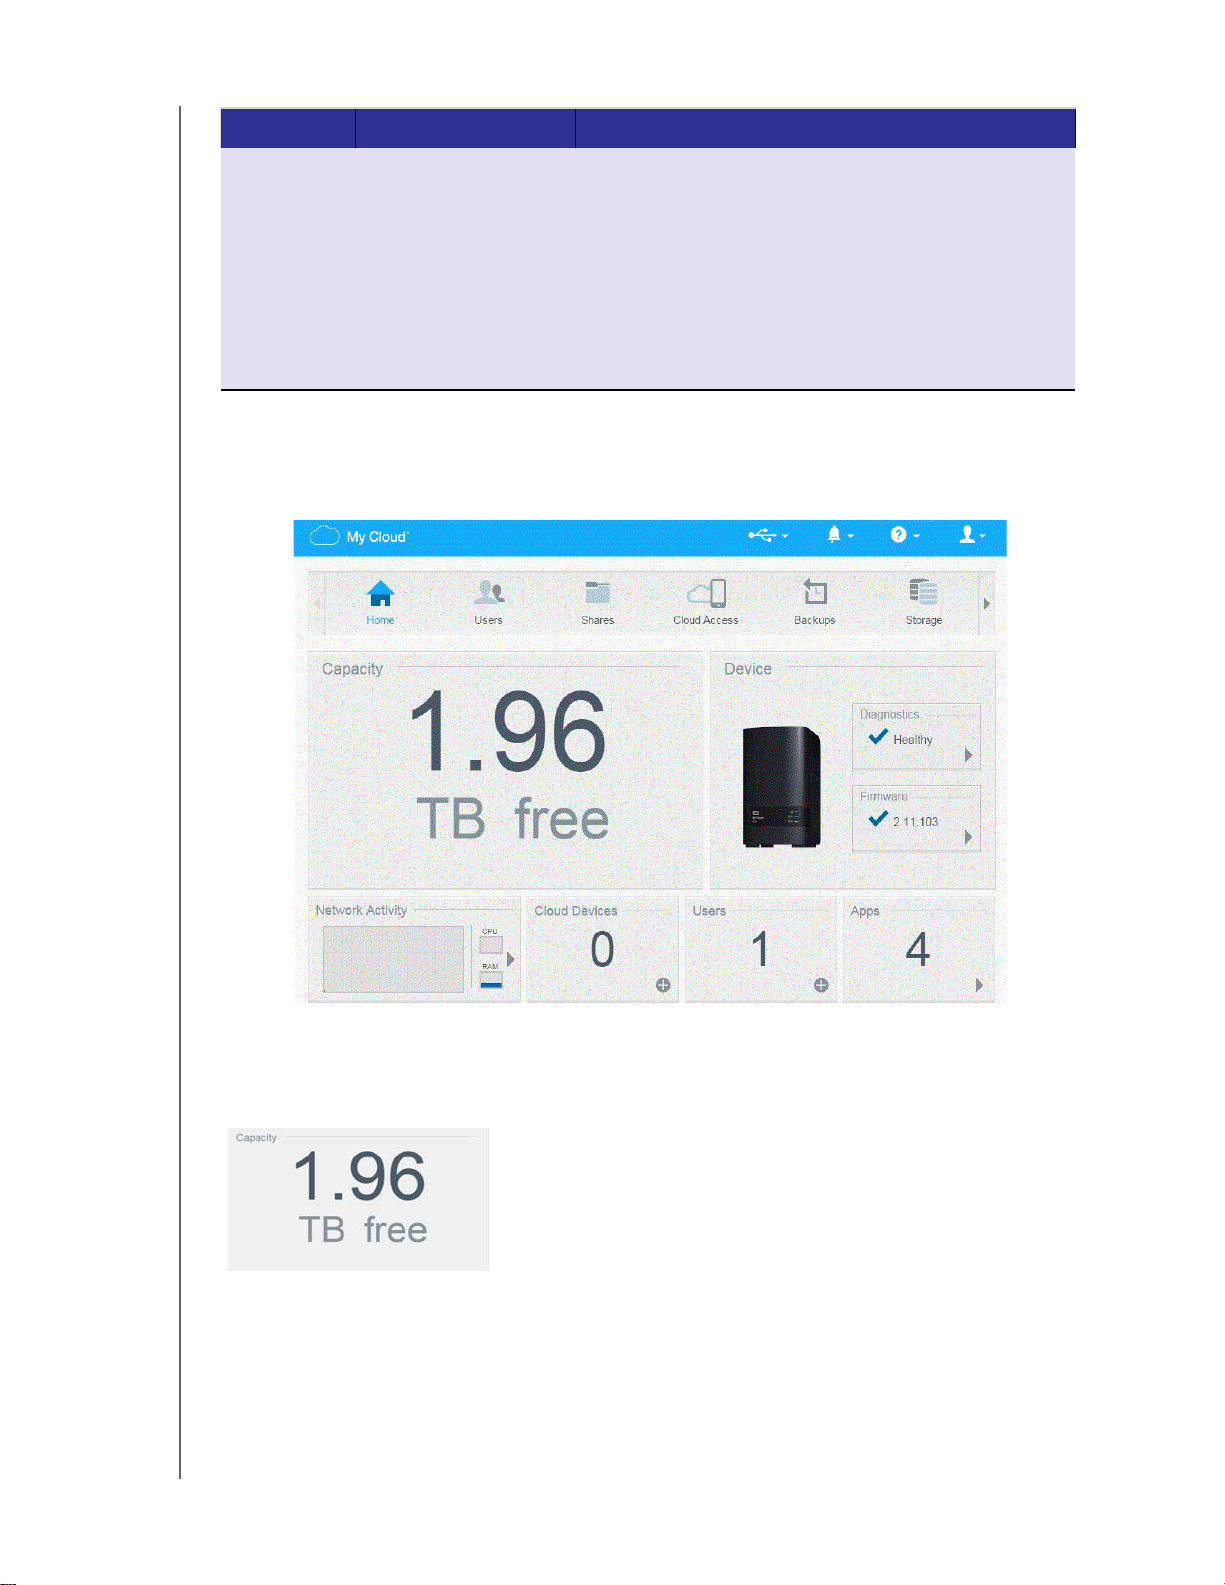
Viewing Device Status and Making Updates on the Home Page
The main body of the Home page shows the status of the device and its functions and
provides shortcuts to the most necessary tasks.
Capacity
The Capacity panel displays the amount of free storage left on your My Cloud EX2 Ultra
device.
MY CLOUD EX2 ULTRA PRIVATE CLOUD STORAGE
USER MANUAL
35
THE DASHBOARD AT A GLANCE
1. To see detailed information, click the arrow in the lower right to display the current
usage of the drive’s capacity:
2. To return to the Home page, click Close.
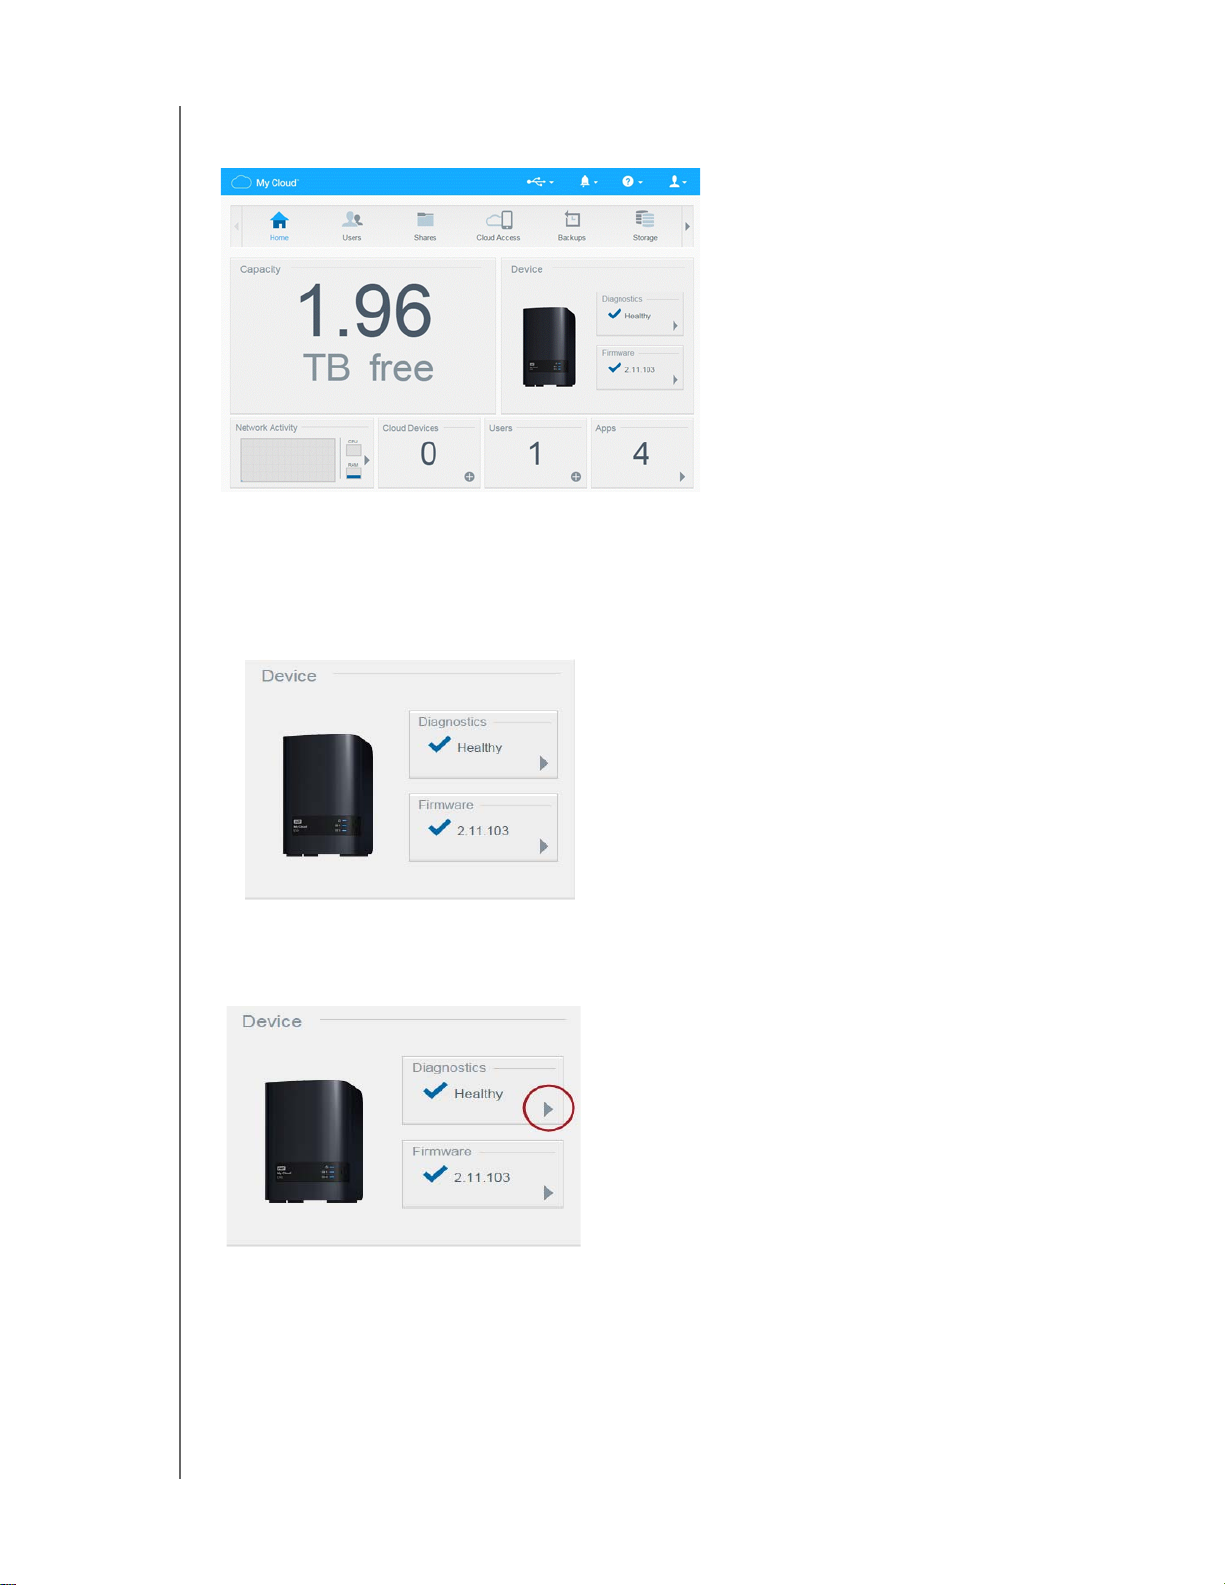
Device
The Device section identifies the overall health of the system, indicates the current
version of your firmware, and informs you if firmware updates are available.
Diagnostics
The Diagnostics section displays a snapshot of the system’s components and identifies
the overall health of the My Cloud EX2 Ultra device.
MY CLOUD EX2 ULTRA PRIVATE CLOUD STORAGE
USER MANUAL
36

THE DASHBOARD AT A GLANCE
1. To see details about the status of system components, click the arrow on the right side
of the panel.
2. To return to the Home page, click Close.
Firmware
The Firmware section displays the current version of firmware loaded on your My Cloud
EX2 Ultra device.
A blue check mark indicates that your firmware is up-to-date.
1. To view whether an updated version of the firmware is available, click the arrow to the
right of Firmware to display firmware availability:
If an update is available, click Install and Reboot to update your device.
2. To return to the Home page, click
Note: If new firmware is available, see “Firmware Update” on page 98 for information on
updating your My Cloud EX2 Ultra device.
OK or Cancel.
MY CLOUD EX2 ULTRA PRIVATE CLOUD STORAGE
USER MANUAL
37

THE DASHBOARD AT A GLANCE
Network Activity
The Network Activity panel displays the system activities and processes that are running
on your My Cloud EX2 Ultra device.
At a glance, you can see the network, CPU, and
RAM activity.
1. To view a list of all the system activities and processes that are running on your My
Cloud EX2 Ultra device, click the arrow on the right of the panel to display:
CPU: Click the right arrow to view the CPU activity. Click Back to return to the
Device Activity pane.
Click Close to return to the Home page.
Memory: Click the right arrow to view the Memory activity. Click Back to return to
the Device Activity pane. Click Close to return to the Home page.
MY CLOUD EX2 ULTRA PRIVATE CLOUD STORAGE
USER MANUAL
38

THE DASHBOARD AT A GLANCE
Network: Click the right arrow to view the network activity. Click Back to return to
the Device Activity pane.
Process: Click the right arrow to view the process information, including the list of
Click Close to return to the Home page.
active processes and the amount of CPU and Memory usage for each process
Click Back to return to the Device Activity pane. Click Close to return to the Home
page.
process.tif
.
Cloud Devices
The Cloud Devices panel displays the number of cloud devices currently accessing the
My Cloud EX2 Ultra device remotely.
remotely.
1. To add cloud access for a user, click the plus sign (+) in the lower right of the panel to
display:
2. To generate an activation code, click the Get Code button.
3. Follow the page instructions to connect your tablet or mobile device to the
My Cloud EX2 Ultra device.
In this example, one cloud device is accessing it
Users
MY CLOUD EX2 ULTRA PRIVATE CLOUD STORAGE
USER MANUAL
39

THE DASHBOARD AT A GLANCE
The Users panel displays the number of users currently set up to use the My Cloud EX2
Ultra device.
1. To add a user, click the plus icon the lower right of the panel:
Note: When you enter the email address on the Add User screen, a new account is
created for cloud access. The user receives an email with instructions on how to
activate and set up a password for cloud access.
2. Enter the required information and click Next to display a user password screen.
3. To assign a password, click the toggle button
, enter a password, and then confirm
your password. Click Next to display the user group screen.
4. To assign a group to the new user, click the check box next to a group, and then click
Next to display the Add User screen.
5. Enter the Quota Amount, or leave the values blank for unlimited space, and then click
Save.
You’ve added a new user.
Apps
The Apps panel displays the apps currently installed on your My Cloud EX2 Ultra device.
MY CLOUD EX2 ULTRA PRIVATE CLOUD STORAGE
USER MANUAL
40

THE DASHBOARD AT A GLANCE
1. To view the installed apps, click the arrow in the lower right of the panel to display:
Note: To install an app, see “Managing Apps on My Cloud EX2 Ultra” on page 66.
2. To return to the Home page, click Close.
Managing Alerts
Alerts display system messages containing pertinent information about the status of your
My Cloud EX2 Ultra device. There are three types of alerts that appear on the
on the upper right of the dashboard.
Alert Icon Type of Alert Description
Informational Informational alerts keep you updated on non-vital system
information. Example: Reboot Required
Warning Warnings present a condition that might cause a problem in
the future. Example: Network Disconnected.
Critical This alert presents an error or problem that has occurred,
usually a system failure. Example: Fan Not Working
Viewing Alert Details
1. On the dashboard, click the Alert icon in the upper right corner.
MY CLOUD EX2 ULTRA PRIVATE CLOUD STORAGE
USER MANUAL
41

THE DASHBOARD AT A GLANCE
2. Select the arrow next to the alert you’d like to view from the Alert list, or click View
All to review details for all of your alerts.
When an alert occurs, the alert message displays the Alert icon and window within
the dashboard. To close the alerts message, click Close.
Dismissing an Alert
1. On the dashboard, click the Alert icon in the upper right corner.
2. Select the delete icon
To dismiss all alerts, click V
next to the alert you’d like to dismiss.
iew All, and then Dismiss All.
Obtaining Customer Support
To open the Support page:
1. Click the Help icon
MY CLOUD EX2 ULTRA PRIVATE CLOUD STORAGE
USER MANUAL
on any page to display the Help menu.
42
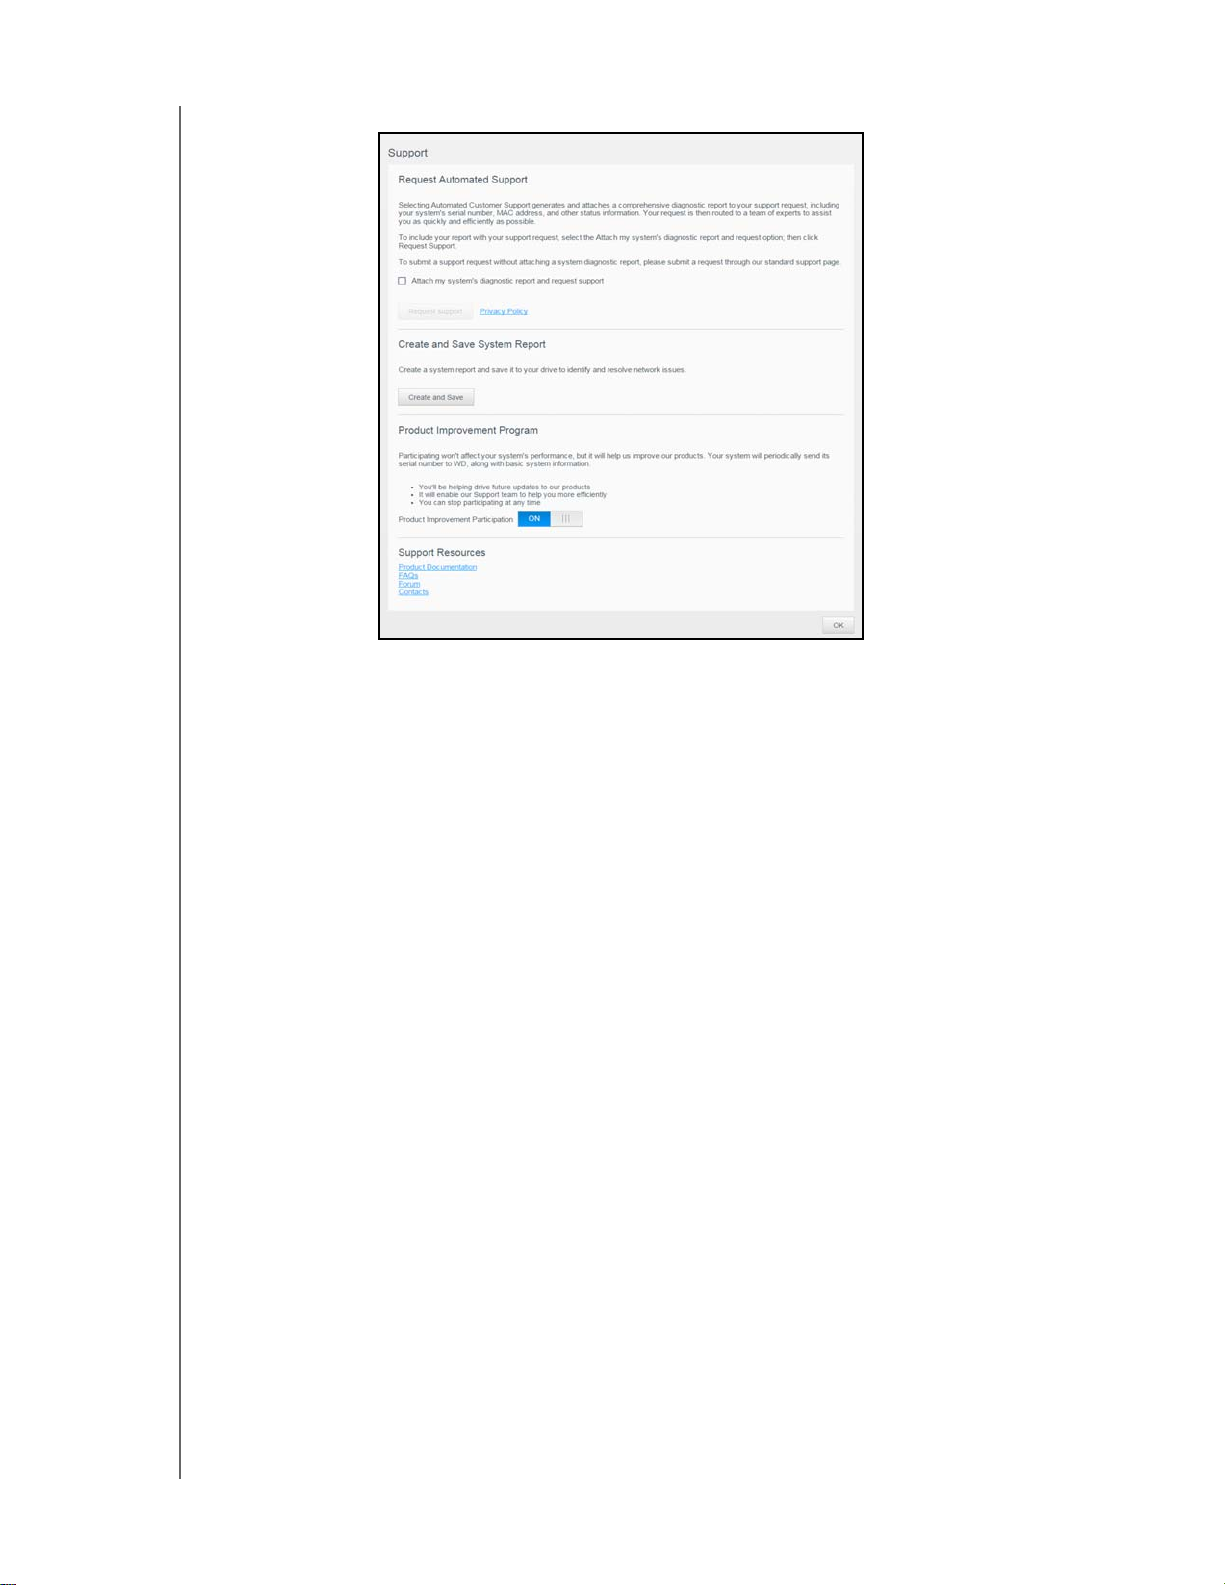
2. Click Support to display the following page:
THE DASHBOARD AT A GLANCE
If a problem occurs with the My Cloud EX2 Ultra device, WD Technical Support will need
information about your device to troubleshoot and determine the best solution. There are
two ways to get your device info and request support:
Run a system report and send it to WD automatically,
Create a system report manually and send it to WD.
Requesting Automatic Support
In the Request Automated Customer Support section:
1. Click the Privacy Policy link to review WD's privacy policy
2. Click the Attach my device’
s diagnostic report and request support check box.
.
3. Click the Request Support button.
Creating and Saving a System Report
In the Create and Save System Report section:
1. Click Create and Save.
This saves the file to your computer.
2. If desired, email the report to WD Technical Support.
Obtaining Other Support
In the Support Resources section are links to additional resources:
To obtain the most recently updated user manual, click the Product
Documentation link.
To see answers to frequently asked questions and instructions, click the FAQs
link.
To discuss your My Cloud EX2 Ultra device with other users, click the Forum link.
To see WD phone numbers and other contact information, click the Contacts link.
MY CLOUD EX2 ULTRA PRIVATE CLOUD STORAGE
USER MANUAL
43
THE DASHBOARD AT A GLANCE
Common Tasks
The next few chapters step you through the procedures for configuring and using the
My Cloud EX2 Ultra device. The following table provides shortcuts to instructions for
some common tasks.
How do I ... See ...
Set up the device on my network page 11
Use media servers page 70
Enable DLNA and iTunes page 72
Reboot or hibernate the My Cloud EX2 Ultra device page 94
Update firmware page 98
Access content from the device (public and private shares) page 15
Add users page 20
Create shares page 27
Upload and back up content to the device page 45
Back up the device page 45
Enable or disable remote access for you and people you want to share with) page 17
Download WD mobile apps page 19
MY CLOUD EX2 ULTRA PRIVATE CLOUD STORAGE
USER MANUAL
44

Backing Up and Retrieving Files
BACKING UP AND RETRIEVING FILES
7
About Backups
Managing a USB Device and USB Backups
Remote Backups
Internal Backups
Cloud Backups
About Backups
There are various ways to back up your data on the My Cloud EX2 Ultra device. These
include:
USB Backup—Allows you to back up My Cloud EX2 Ultra device data to and
from your a USB device.
Remote Backup—Allows you to back up My Cloud EX2 Ultra device data to and
from another My Cloud device.
Internal Backup—Allows you to back up data from one storage location to
another on your My Cloud EX2 Ultra device.
Cloud Backup—Allows you to backup My Cloud EX2 Ultra device data to an
external cloud backup service.
Managing a USB Device and USB Backups
When you attach a USB drive to the My Cloud EX2 Ultra device, you turn it into a network
drive. Once connected, the USB drive has the following capabilities:
When you connect an external USB drive such as a WD Passport, a memory
stick, or a camera to the My Cloud EX2 Ultra device, you can access it with
Windows Explorer or Mac Finder.
The USB drive can serve as a target for backups.
You now have the option of mapping the drive as a user share drive.
If a WD external drive has been locked, when it is attached to the My Cloud EX2
Ultra device, it maintains that security. Using the Dashboard, you can unlock or
re-lock it as desired.
Connecting A USB Drive
Connect a USB hard drive to the USB port on the rear of your My Cloud EX2 Ultra device
for additional storage and backup capabilities. The USB drive appears as a share on the
My Cloud EX2 Ultra dashboard. (See“About Shares” on page 27.)
The My Cloud EX2 Ultra device supports the following formats for externally attached
USB drives:
FAT/FAT32
NTFS (read and write capability)
HFS+J
Linux Ext2, Ext3/Ext4
WARNING! Mounting or ejecting a USB drive while performing an NFS or AFP
file transfer
MY CLOUD EX2 ULTRA PRIVATE CLOUD STORAGE
USER MANUAL
will interrupt the file transfer process.
45
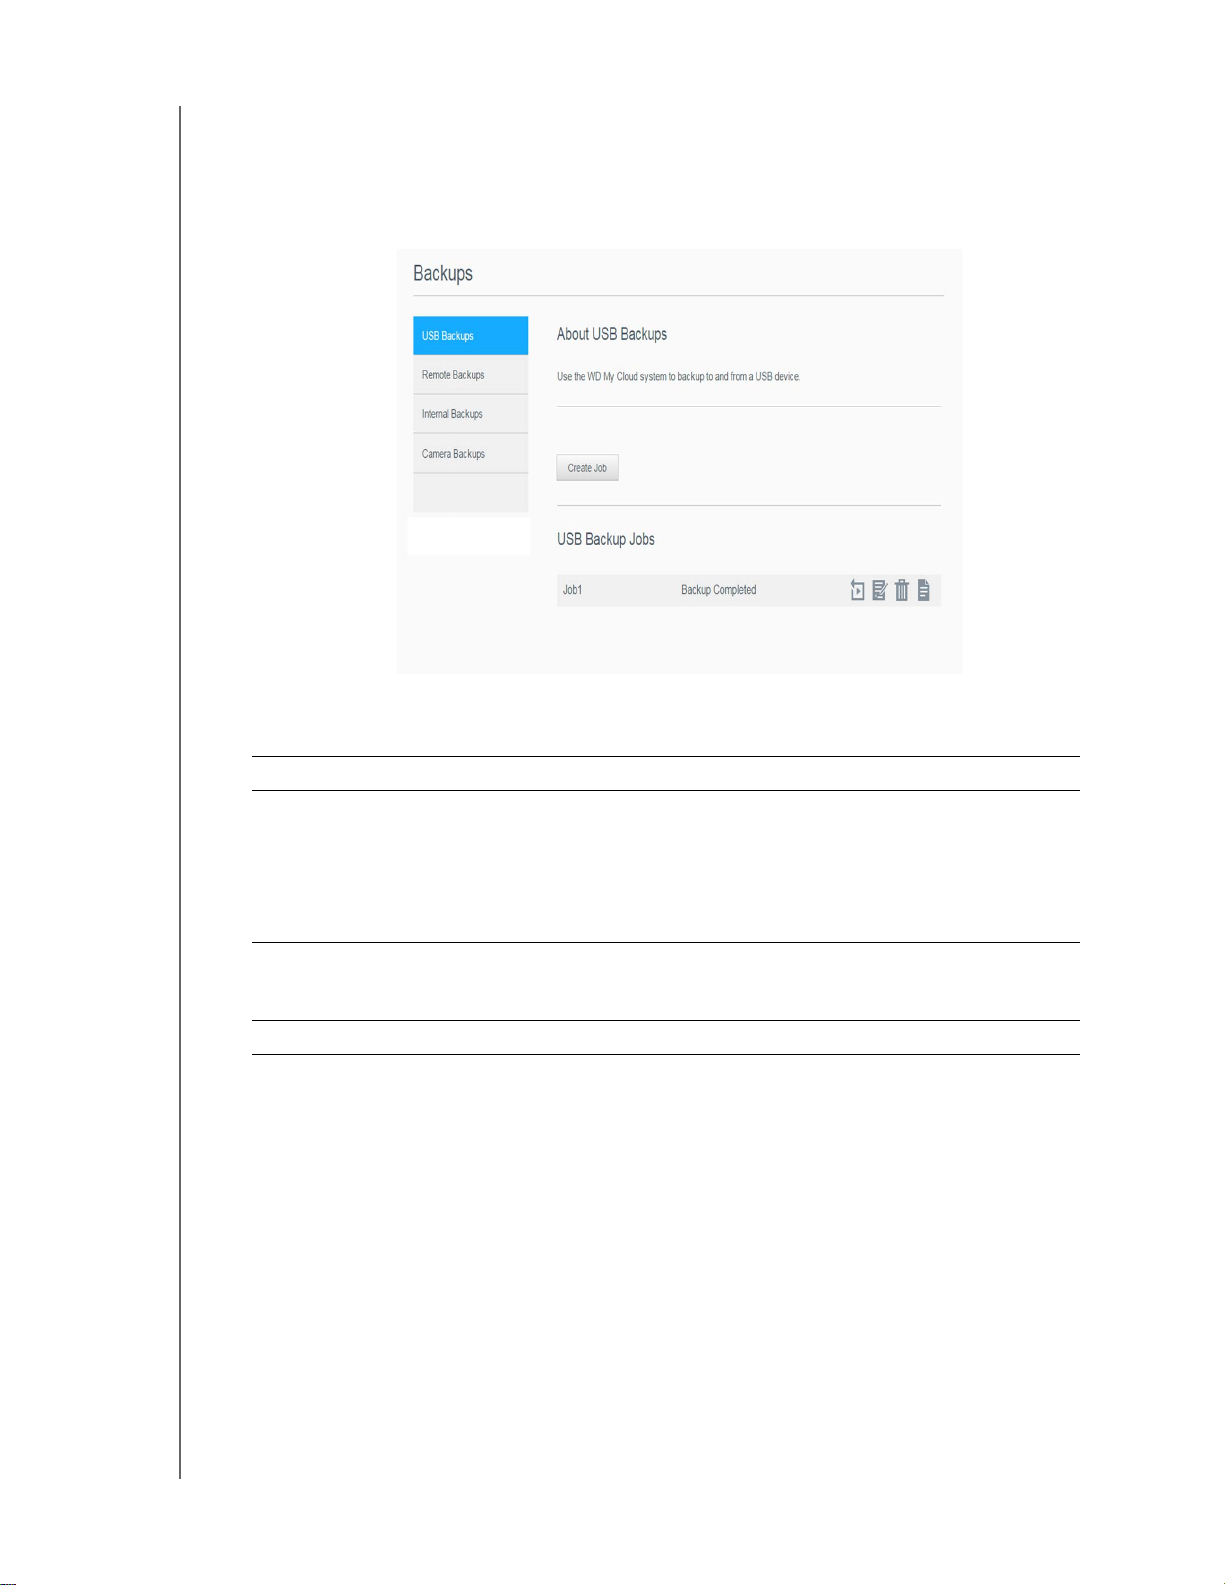
BACKING UP AND RETRIEVING FILES
Creating a USB Backup
Use the following steps to back up your data on your My Cloud EX2 Ultra to or from a
USB device.
1. On the navigation bar, click Backups to display the Backups screen.
2. Click USB Backups, if not already selected.
3. Complete the following fields to create a USB backup job:
Job Name Enter a Job Name for your backup.
Direction Indicate the direction of your backup from the drop-down menu.
Options include:
• USB to NAS: Backs up the data on your USB device to the My
Cloud EX2 Ultra device.
• NAS to USB: Backs up the data on your My Cloud EX2 Ultra
device to a USB device.
Source Folder Click Browse and select the folder you'd like to back
up.
Destination Folder Click Browse and select the destination folder for your backup.
4. Click Create. This creates the backup job for the requested backup.
MY CLOUD EX2 ULTRA PRIVATE CLOUD STORAGE
USER MANUAL
46
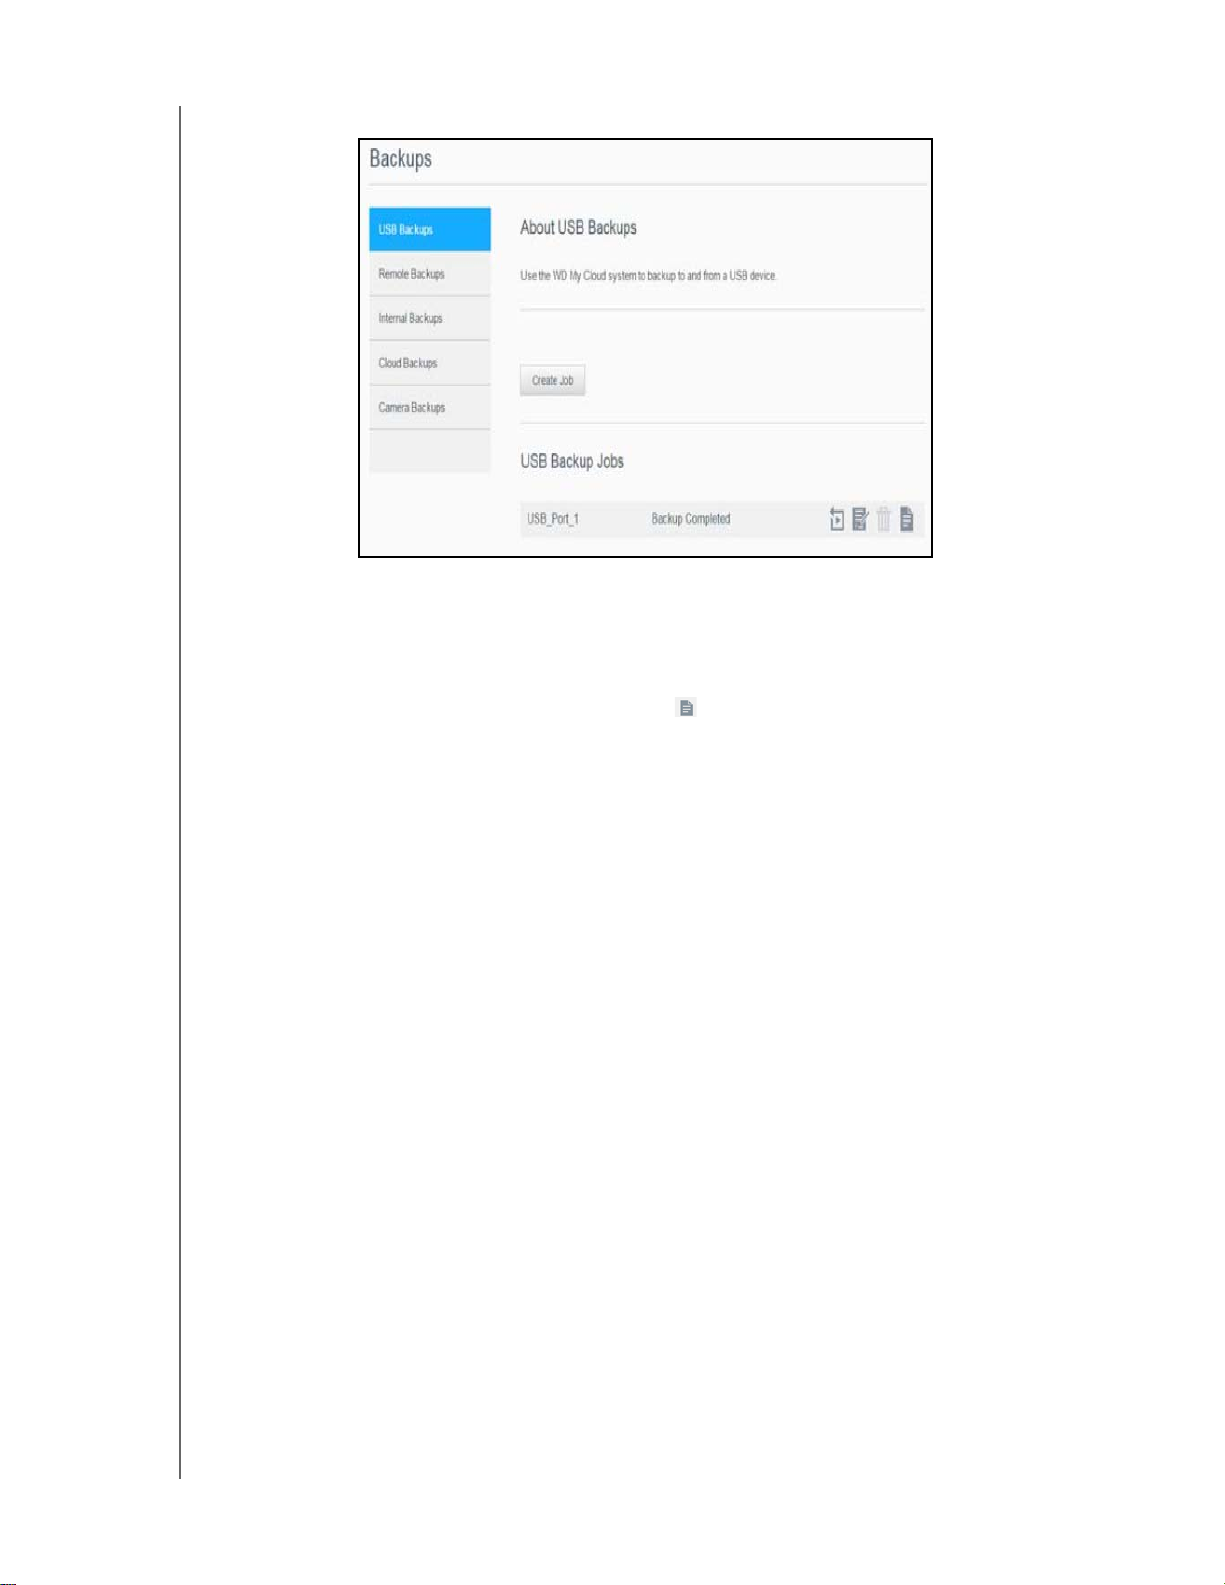
BACKING UP AND RETRIEVING FILES
5. In the USB Backup Jobs area, click the arrow to begin your backup.
The progress of the backup displays in the USB Backup Jobs area.
Viewing the Details of a USB Backup Job
1. On the USB Backups screen, under USB Backup Jobs, select the job you’d like to
modify, and then click the Edit Job button
.
2. Review the USB Details screen, and then click Close to close the screen.
Editing a USB Backup Job
1. On the USB Backups screen, under USB Backup Jobs, select the job you’d like to
modify, and then click the Edit Job button.
2. In the USB Backup area, make the necessary changes to your job, and then click
Save.
Deleting a USB Backup Job
1. On the USB Backups screen, under USB Backup Jobs, click the Delete Job button
next to the job you’d like to delete.
2. In response to the confirmation message, click OK.
The selected USB Backup job is
now deleted and removed from the USB Backup Jobs list.
Remote Backups
Back up your My Cloud EX2 Ultra device to another My Cloud EX2 Ultra or a My Cloud
EX4 device.
Before you proceed with a remote backup, ensure the following:
You have a remote My Cloud EX2 Ultra or My Cloud EX4 device to back up this
device to. Existing shares and data from this device will be copied to the target
device in addition to previously existing data.
The remote Server setting is turned ON in the remote My Cloud EX2 Ultra or My
Cloud EX4 device.
MY CLOUD EX2 ULTRA PRIVATE CLOUD STORAGE
USER MANUAL
47
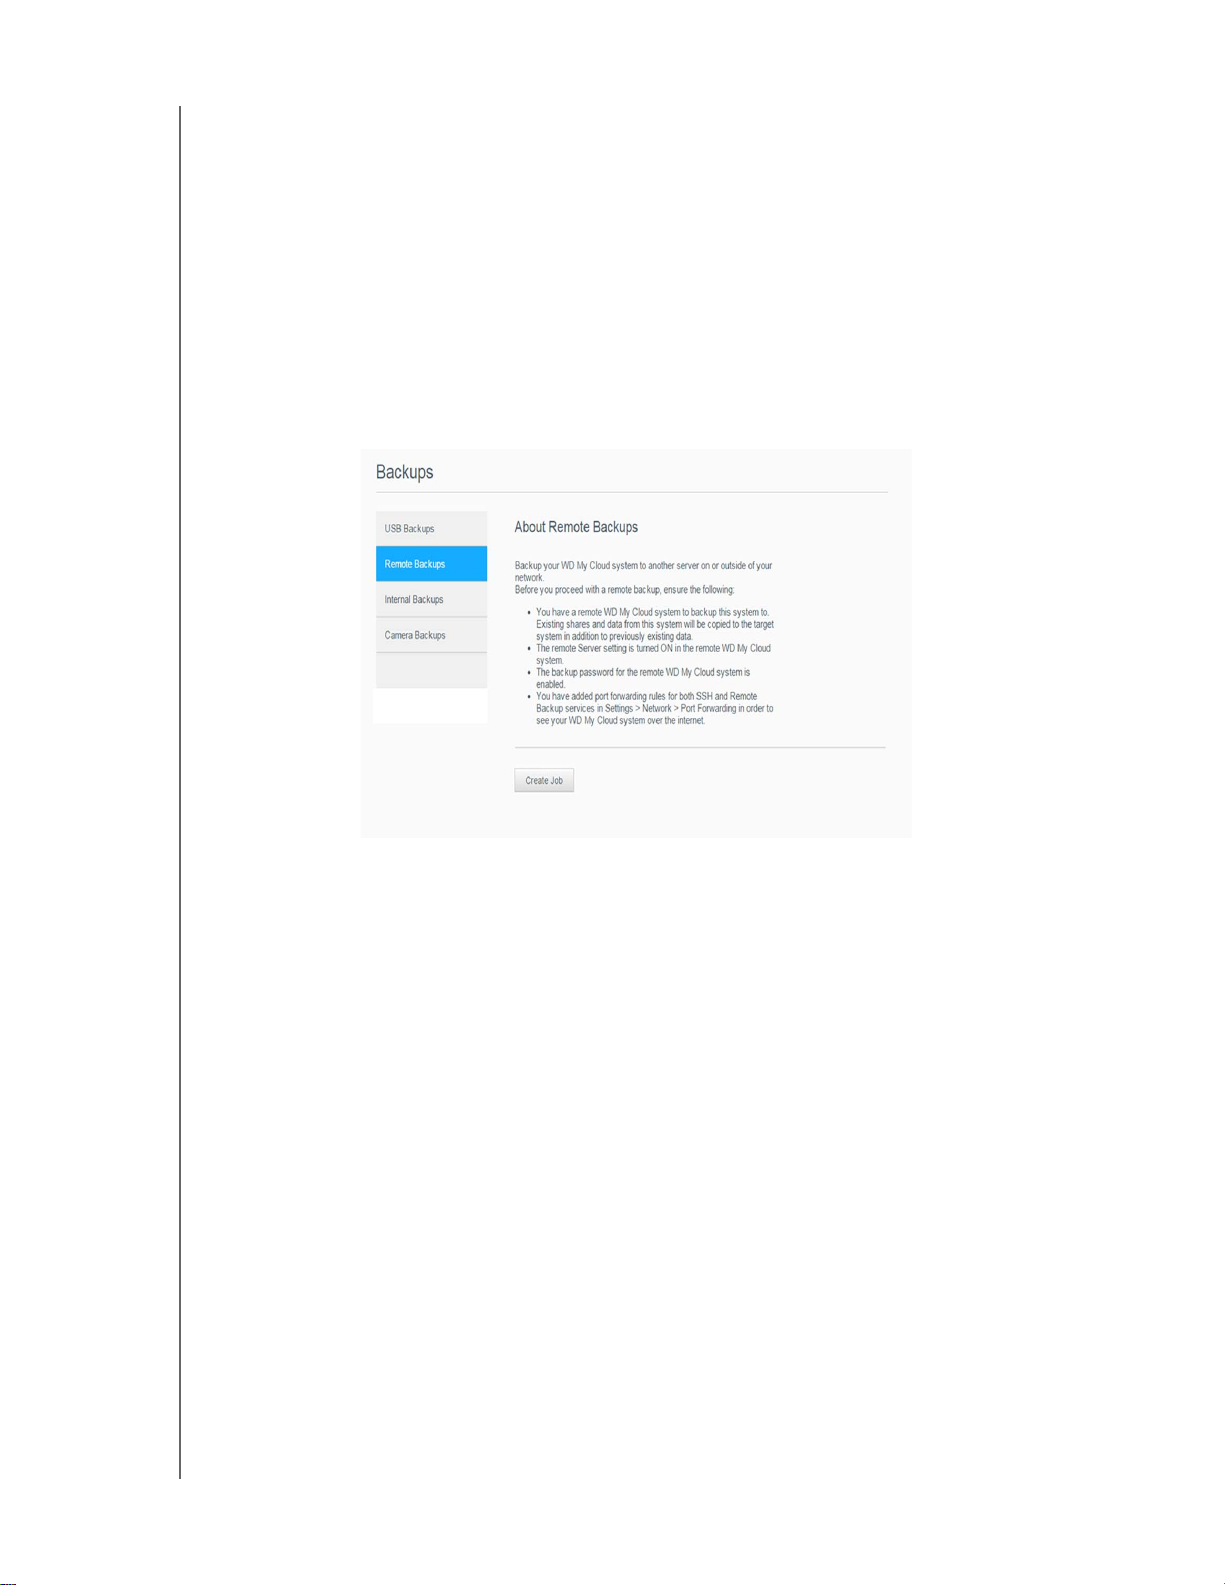
BACKING UP AND RETRIEVING FILES
The backup password for the remote My Cloud EX2 Ultra or WD M Cloud EX4
device is enabled.
You have enabled port forwarding to see the remote My Cloud EX2 Ultra or
My Cloud EX4 device over the Internet.
For additional information on remote backups, see Knowledge Base Answer ID 10637.
Creating a Remote Backup
Use the following steps to back up your My Cloud EX2 Ultra to a remote device.
1. On the navigation bar, click Backups to display the Backups screen.
2. Click Remote Backup.
3. Click the Create Jobbutton.
4. Place a check mark in the box next to the share you’d like to back up, and then click
Next.
5. In the Remote IP field, enter the IP
address of the remote backup server.
(Example 192.168.1.16)
6. In the Password field, enter the password for the remote backup server, and then
click Next.
MY CLOUD EX2 ULTRA PRIVATE CLOUD STORAGE
USER MANUAL
48
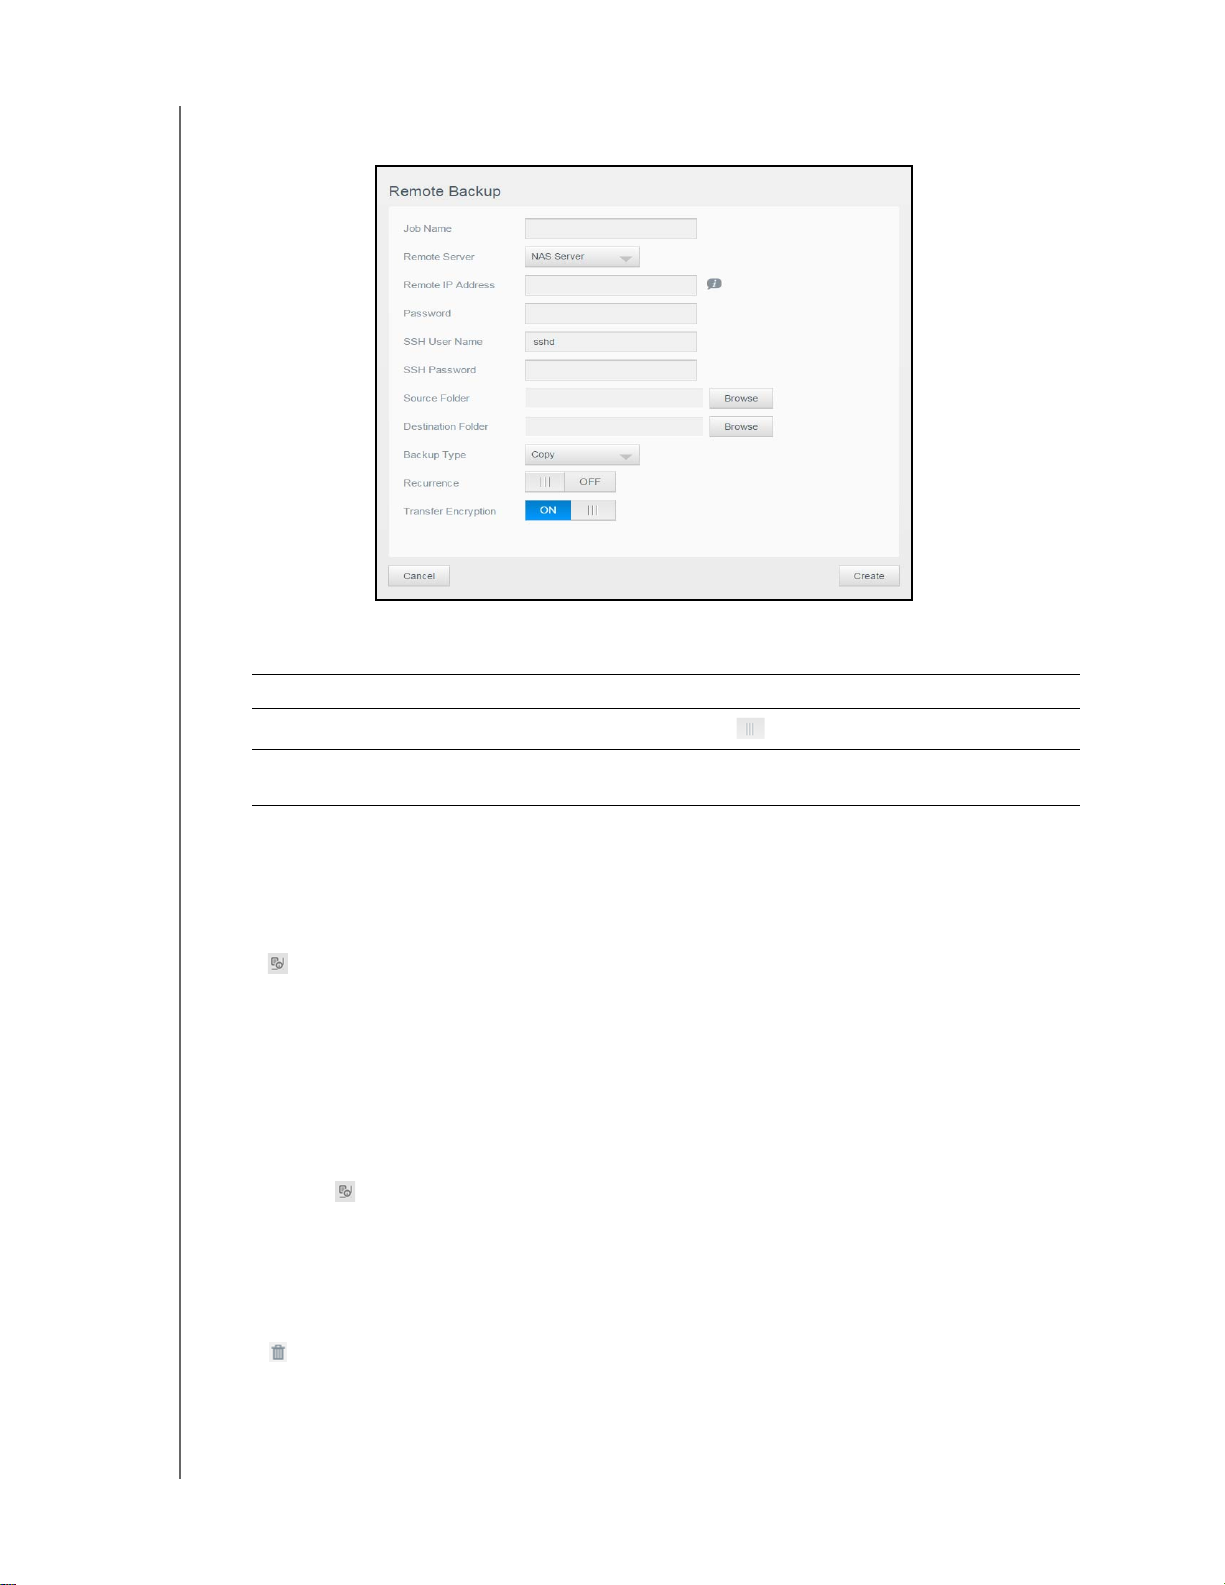
BACKING UP AND RETRIEVING FILES
7. Select the check box next to the share where you’d like to back up your data, and
then click Create.
8. Complete the following fields to create a Remote backup job, and then click Next:
Job Name Enter a Job Name for your backup.
Auto Update
Backup Now Click Ye
Click the toggle button
s to begin your remote backup now. Click No to create a
remote backup job for future backup.
to enable the Autoupdate feature.
9. Review the details of your Remote Backup job, and then click Finish.
Viewing the Details of a Remote Backup Job
1. On the Remote Backup screen, under Remote Backup Jobs, click the Details button
next to the job you’d like to view.
2. Review the Details screen, and then click Close to close the screen.
Recovering a Remote Backup
Use the following steps to recover the data you saved on your remote server. This
process recovers the data you saved on the remote server to your local server.
1. On the Remote Backup screen, under Remote Backup Jobs, click the Recover
button next to the job you’d like to view.
2. On the Recover screen, click OK.
Your data recovery begins.
Deleting a Remote Backup
1. On the Remote Backup screen, under Remote Backup Jobs, click the Delete button
next to the job you’d like to delete.
2. In response to the confirmation message, click OK.
job is now deleted and removed from the Remote Backup Jobs list.
MY CLOUD EX2 ULTRA PRIVATE CLOUD STORAGE
USER MANUAL
The selected Remote Backup
49
BACKING UP AND RETRIEVING FILES
Internal Backups
Internal backups allow you to make backups of the existing content from one storage
location to another on your My Cloud EX2 Ultra device.
Creating an Internal Backup
Use the following steps to back up your My Cloud EX2 Ultra internally.
1. On the navigation bar, click Backups to display the Backups screen.
2. Click Internal Backups, if not already selected.
3. Enter the following information to create a USB backup job:
Job Name Enter a Job Name for your internal backup.
Source Folder Click Browse and select the folder you'd like to back
up.
Destination Folder Click Browse and select the destination folder for your backup.
Recurring Backup If you’d like to use the Recurring Backup feature:
1. Click the toggle button
feature.
2. Select the frequency of the backup: Daily, Weekly, Monthly.
3. Select a time (hour and minutes) from the drop-down menu.
4. If you did not enable the Recurring backup field:
• Click the Date field and select the date you’d like the backup
to occur
• Select a time of day (hour and minutes) from the drop-down
menu.
.
to enable the Recurring Backup
Incremental Backup Click the check box if you’d like this job to be an incremental backup.
5. Click Create. Your job displays in the Internal Backup Queue area and will begin
backing up at the indicated time.
Initiating an Immediate Internal Backup
On the Internal Backups screen, under Internal Backup Queue, select the job
you’d like to modify, and then click the Begin Now button.
The internal backup begins.
Modifying an Internal Backup Job
1. On the Internal Backups screen, under Internal Backup Queue, select the job you’d
like to modify, and then click the Edit button.
2. In the Internal Backup area, make the necessary changes to your job, and then click
Save.
Viewing Internal Backup Details
1. On the Internal Backups screen, under Internal Backup Queue, select the job you’d
like to modify, and then click the Details button.
2. Review the details of your Internal Backup job, and then click Close.
MY CLOUD EX2 ULTRA PRIVATE CLOUD STORAGE
USER MANUAL
50
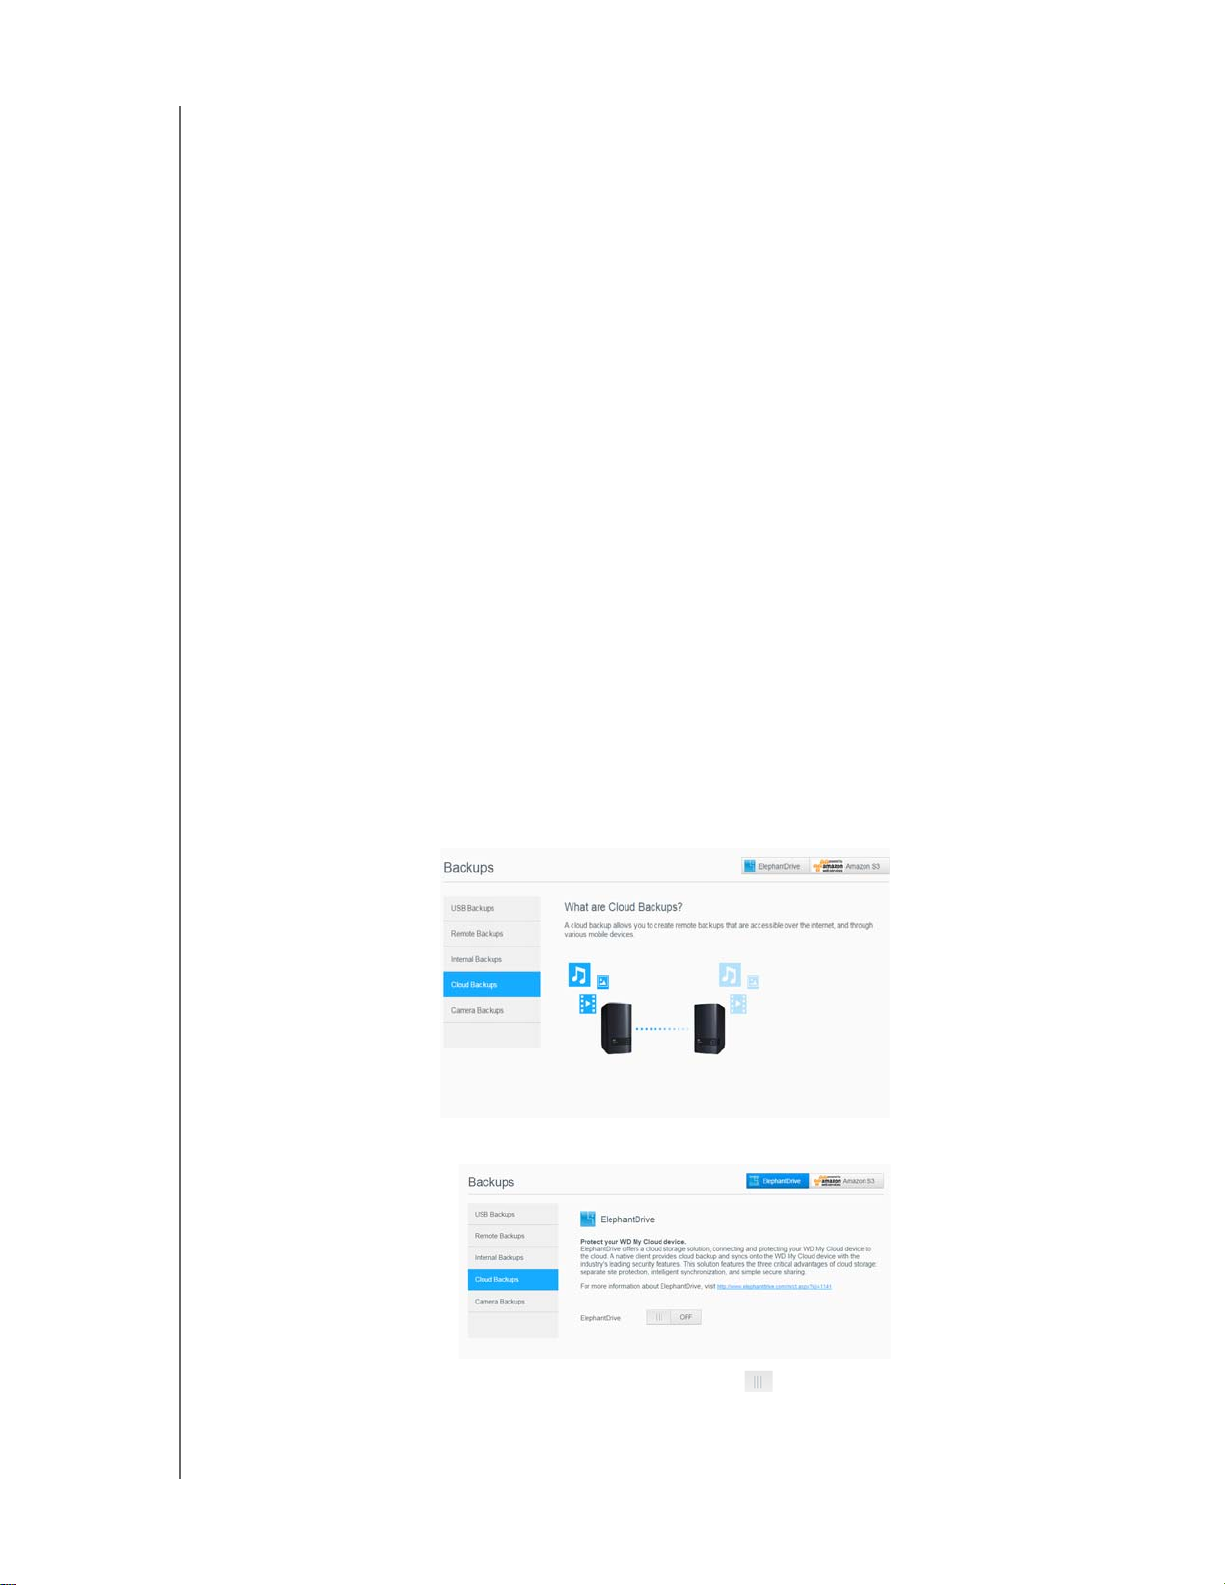
BACKING UP AND RETRIEVING FILES
Deleting an Internal Backup Job
1. On the Internal Backups screen, under Internal Backup Queue, click the Delete
button.
2. In response to the confirmation message, click OK.
The selected Internal Backup
job is now deleted and removed from the Internal Backup Jobs list.
Cloud Backups
A cloud backup allows you to create remote backups that are accessible over the Internet
and through various mobile devices. My Cloud EX2 Ultra device uses the following cloud
services to create remote backups:
ElephantDrive: ElephantDrive is a cloud backup service that provides secure
and automatic backups to your files remotely.
Amazon S3: Amazon Simple Storage Service (S3) is an online file storage web
service that can be used to store and retrieve any amount of data, at any time,
from anywhere on the web.
Enabling ElephantDrive Cloud Backup
ElephantDrive is a cloud backup service that provides secure and automatic backups to
your files remotely. Once enabled, ElephantDrive automatically syncs with your device.
For additional information about ElephantDrive Cloud Backups, see
http://home.elephantdrive.com/welcome/wdc/.
Use the following steps to enable a cloud backup using ElephantDrive.
1. On the navigation bar, click Backups to display the Backups screen.
2. Click Cloud Backups, if not already selected.
3. Click ElephantDrive at the top of the screen.
4. In the ElephantDrive field, click the toggle button to turn on your ElephantDrive
cloud backup.
5. Click Register.
MY CLOUD EX2 ULTRA PRIVATE CLOUD STORAGE
USER MANUAL
The Register screen displays.
51

6. Enter the following information, and then click Register:
Email address: Enter the email address you’ll use to receive information from
ElephantDrive.
Password: Enter a password for your new account
Verify Password: Reenter your password.
7. You’ve now enabled your ElephantDrive cloud backup.
BACKING UP AND RETRIEVING FILES
MY CLOUD EX2 ULTRA PRIVATE CLOUD STORAGE
USER MANUAL
52

BACKING UP AND RETRIEVING FILES
Backing Up with ElephantDrive
Once you’ve enabled ElephantDrive, use the following steps to create a cloud backup.
1. On the navigation bar, click Backups to display the Backups screen.
2. Click Cloud Backups, if not already selected.
3. Click Elephant Drive at the top of the screen.
4. In the Access Backups field, click Login.
5. Enter the email and password you used when you registered with ElephantDrive in
Step 6 on page 52. Click Login.
6. In the Elephant Drive field, click the New device backup wizard link.
7. Follow the steps outlined in the ElephantDrive backup wizard to create your cloud
backup.
Enabling an Amazon S3 Cloud Backup
Note: Before creating your Cloud backup, sign up for the Amazon S3 service at
http://aws.amazon.com/s3.
Once your Amazon S3 account is set up, use the following steps to create a cloud
backup.
1. On the navigation bar, click Backups to display the Backups screen.
2. Click Cloud Backups, if not already selected.
MY CLOUD EX2 ULTRA PRIVATE CLOUD STORAGE
USER MANUAL
53

3. Click the Amazon S3 button at the top of the screen.
4. Click Create.
BACKING UP AND RETRIEVING FILES
5. Enter a Job Name for your cloud backup, and then click Next.
6. Enter the following information supplied by Amazon S3:
Region: Select the region used for your cloud from the drop-down menu.
Access Key: Enter the access key supplied to you by Amazon S3.
Private Key: Enter the private key supplied to you by Amazon S3.
Remote Path: Enter the remote path for your cloud. This is normally your bucket
name.
MY CLOUD EX2 ULTRA PRIVATE CLOUD STORAGE
USER MANUAL
54

BACKING UP AND RETRIEVING FILES
7. Click Next.
8. Enter the following information, and then click Next:
Type Select one of the following options:
• Upload: Backs up your My Cloud EX2 Ultra data to your
Amazon S3 bucket.
• Download: Backs up your
Cloud EX2 Ultra device.
Backup Type From the drop-down menu, select the type of backup you’d like to
perform. Options include:
• Overwriting existing file(s): Overwrites files in the target
folder that have the identical name as your source file.
• Full Backup: Creates a separate folder containing all of the
backup data each time the backup is performed.
• Incremental Backup: Overwrites files with source files that are
newer then the target files.
Amazon S3 bucket to your My
9. In the Local Path field, enter a path for your backup on your My Cloud EX2 Ultra
server.
Click Browse to browse to a location for your backup on the device.
(Example Volume_1/backup)
10. Click the toggle button
to activate the Autoupdate feature. This automatically
updates your backup based on a schedule you create.
If you activate the Autoupdate feature:
- Select the Autoupdate schedule: Daily, Weekly, or Monthly
- Select the Autoupdate Time from the drop-down menu (Daily option).
Select Autoupdate Date and Time from the drop-down menus (Weekly or
Monthly option).
11. If you don’t select Autoupdate, in the Backup Now field, indicate whether you want to
begin the backup now
Select Yes to begin your backup now.
12. Click Next.
13. Review your settings, and then click Finish.
created. The new job displays in the Amazon S3 Queue section of the Amazon S3
Backup page.
14. Access your Amazon S3 Cloud backup bucket to view your device backups.
.
Your Amazon S3 Cloud backup is
MY CLOUD EX2 ULTRA PRIVATE CLOUD STORAGE
USER MANUAL
55

MANAGING STORAGE ON MY CLOUD EX2 ULTRA
8Managing Storage on My Cloud EX2 Ultra
Storage Types
RAID Storage
iSCSI Storage
Volume Virtualization
Storage Types
There are several ways to manage your storage on the
My Cloud EX2 Ultra device:
RAID Storage
iSCSI
Volume Virtualization
The Storage page allows you to configure the storage within your device and view the
status and capacity of the disks within your device.
managing the storage on your My Cloud EX2 Ultra device.
This chapter provides details on
MY CLOUD EX2 ULTRA PRIVATE CLOUD STORAGE
USER MANUAL
56

MANAGING STORAGE ON MY CLOUD EX2 ULTRA
RAID Storage
RAID (Redundant Array of Independent Disks) allows you to store the same data in
different places on multiple hard drives, providing necessary redundancy, greater
performance, and data integrity. There are several different levels of RAID, each one
providing a different method of sharing or distributing data among the drives. Your My
Cloud EX2 Ultra device allows you to select from the following storage modes:
RAID Mode Description
JBOD The use of one or more drives not in a RAID configuration but managed as
separate logical volumes.
Spanning Combination of drives in a linear fashion to create one large logical volume.
RAID 0 RAID 0 mode provides disk striping across all drives in the RAID drive group.
RAID 0 does not provide data redundancy but does provide the best
performance of any RAID levels. RAID 0 breaks up data into smaller segments
and stripes the data segments across each drive in the drive group.
RAID 1 In RAID 1 mode, the RAID controller duplicates all data from one drive to a
second drive in the drive group. RAID 1 provides complete data redundancy but
cuts the required storage capacity in half.
Viewing the Current RAID Mode
Use the following steps to view the RAID mode currently being used on your device.
1. On the navigation bar, click Storage to display the Storage screen.
2. Click RAID, if not already selected.
3. In the RAID Profile, the following information displays:
RAID Health
Auto-Rebuild status
RAID Volume
MY CLOUD EX2 ULTRA PRIVATE CLOUD STORAGE
USER MANUAL
57

MANAGING STORAGE ON MY CLOUD EX2 ULTRA
Changing the RAID Mode
Use the following steps to change the current RAID mode on your My Cloud EX2 Ultra
device.
WARNING! Changes made to your RAID Mode will delete all of your data and
your user settings.
information on saving your user settings.
1. On the navigation bar, click Storage to display the Storage screen.
2. Click RAID, if not already selected.
See “Saving a Configuration File” on page 94 for
3. Click Change RAID Mode at the bottom of the screen.
4. Review the Warning message, and then click OK.
5. Select the RAID mode you’d like to use for your My Cloud EX2 Ultra device.
Options include:
JBOD The use of one or more drives not in a RAID configuration but
managed as separate logical volumes.
Spanning Combination of drives in a linear fashion to create one large logical
volume.
RAID 0 Data is striped across multiple hard drives, enabling accelerated
reading and recording of data by combining the work of two or
more drives to increase performance.
RAID 1 Two instantaneous copies of the data are recorded on separate
hard drives so if one of them fails, other(s) continue to read/write
data until the faulty hard drive is replaced.
6. Select the Switch to <RAID Mode> check box, and then click Next. Review the
status of your hard drives, and then click Next.
MY CLOUD EX2 ULTRA PRIVATE CLOUD STORAGE
USER MANUAL
58
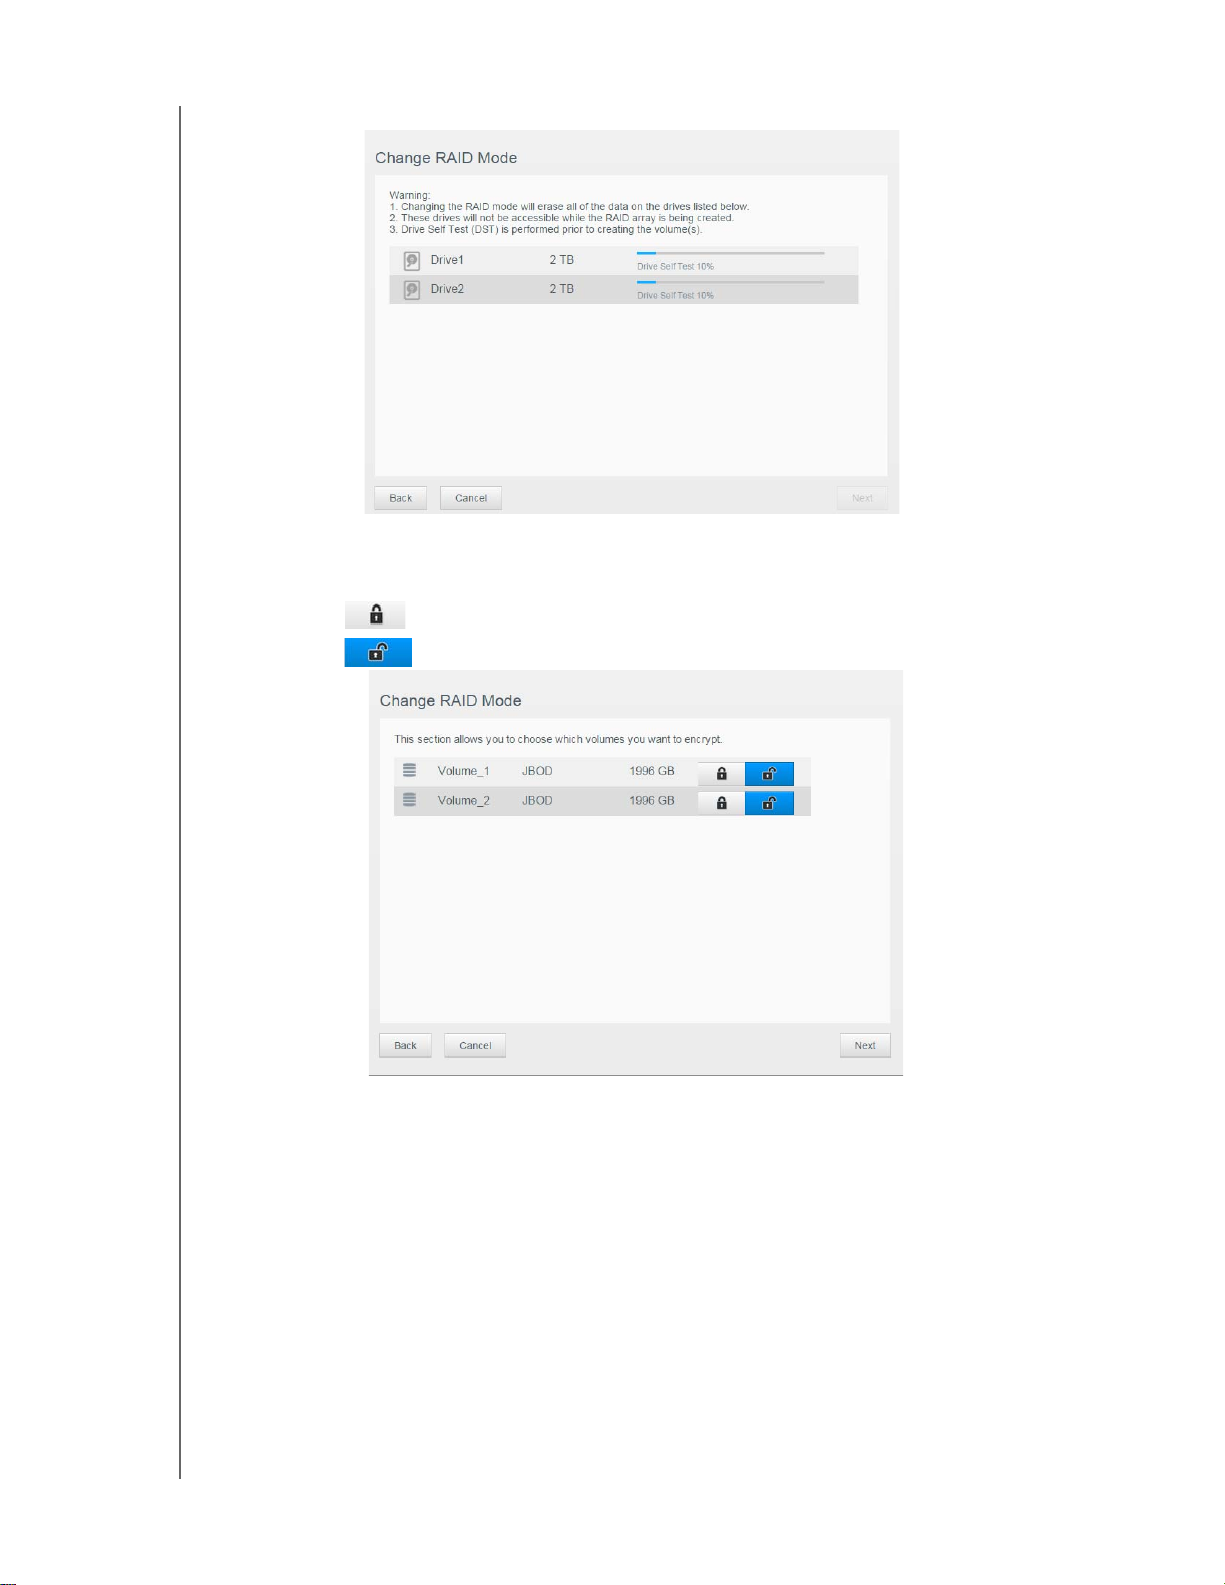
MANAGING STORAGE ON MY CLOUD EX2 ULTRA
7. After the self-test completes, click Next.
8. Select the type of encryption you’d like on the volume.
Note: Encryption is not available for certain regions.
Click to encrypt the selected volume.
Click to keep the volume unencrypted.
MY CLOUD EX2 ULTRA PRIVATE CLOUD STORAGE
USER MANUAL
59
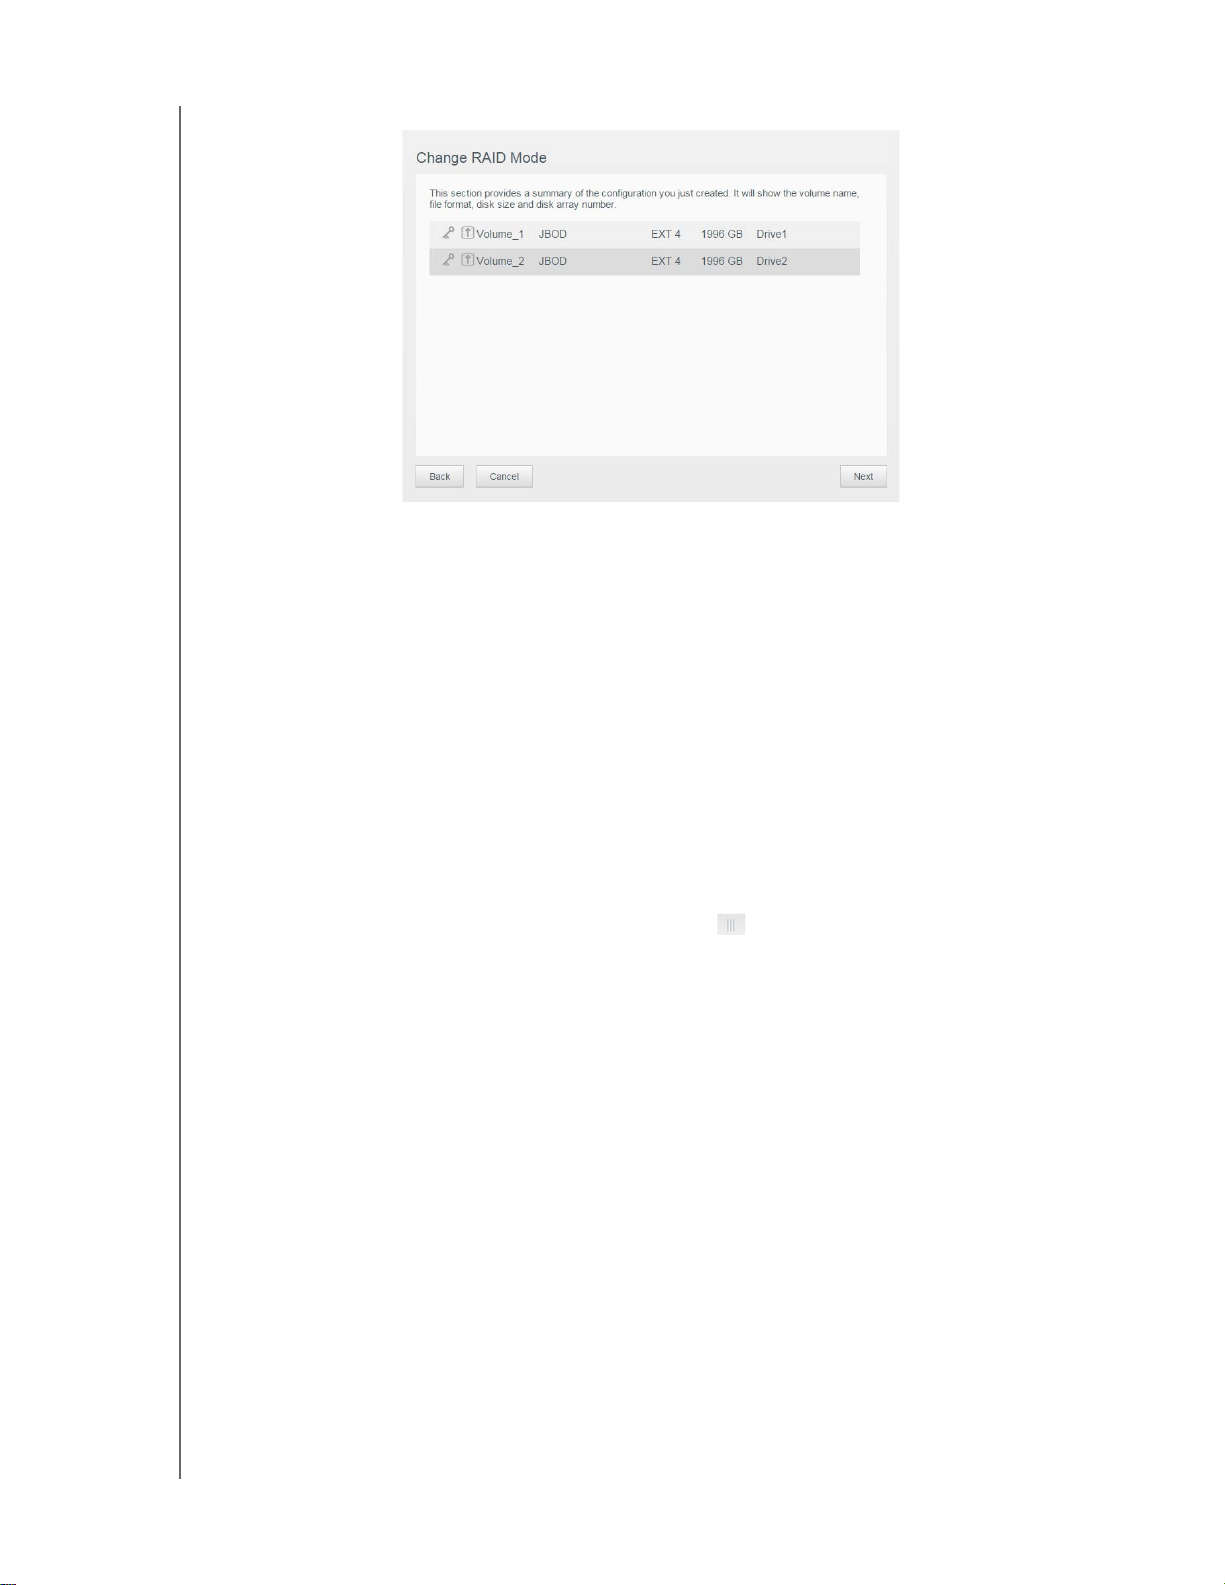
MANAGING STORAGE ON MY CLOUD EX2 ULTRA
9. Review the summary of your selections, and then click Next.
10. Review the warning screen, and then click Finish.
11. The requested hard drive changes begin. Do not turn off your My Cloud EX2 Ultra
device while these changes are in progress.
12. When the process is complete, click Finish again.
Auto-Rebuilding your RAID
The Auto-Rebuilding option allows you to automatically rebuild the RAID for your
My Cloud EX2 Ultra device in case of drive corruption. Use the following steps to enable
the auto-rebuild option.
1. On the navigation bar, click Storage to display the Storage screen.
2. Click RAID, if not already selected.
3. Review the Auto-Rebuild field to determine whether your My Cloud EX2 Ultra
device is currently set up for auto-rebuild.
If Auto-Rebuild is off, click the toggle button to enable Auto-Rebuild.
Disk Status
The Disk Status screen identifies the health of the disk drives as well as the status and
information on each drive used in your My Cloud EX2 Ultra device. The Disk Status
screen consists of the following areas:
Disks Profile: This area displays the general status of all of the disk drives on
your device.
System Disks: This area identifies the drives on your device, the status of each
drive, and the amount of space on that drive.
Note: If a drive is unsuitable, the status is not compatible.
MY CLOUD EX2 ULTRA PRIVATE CLOUD STORAGE
USER MANUAL
60
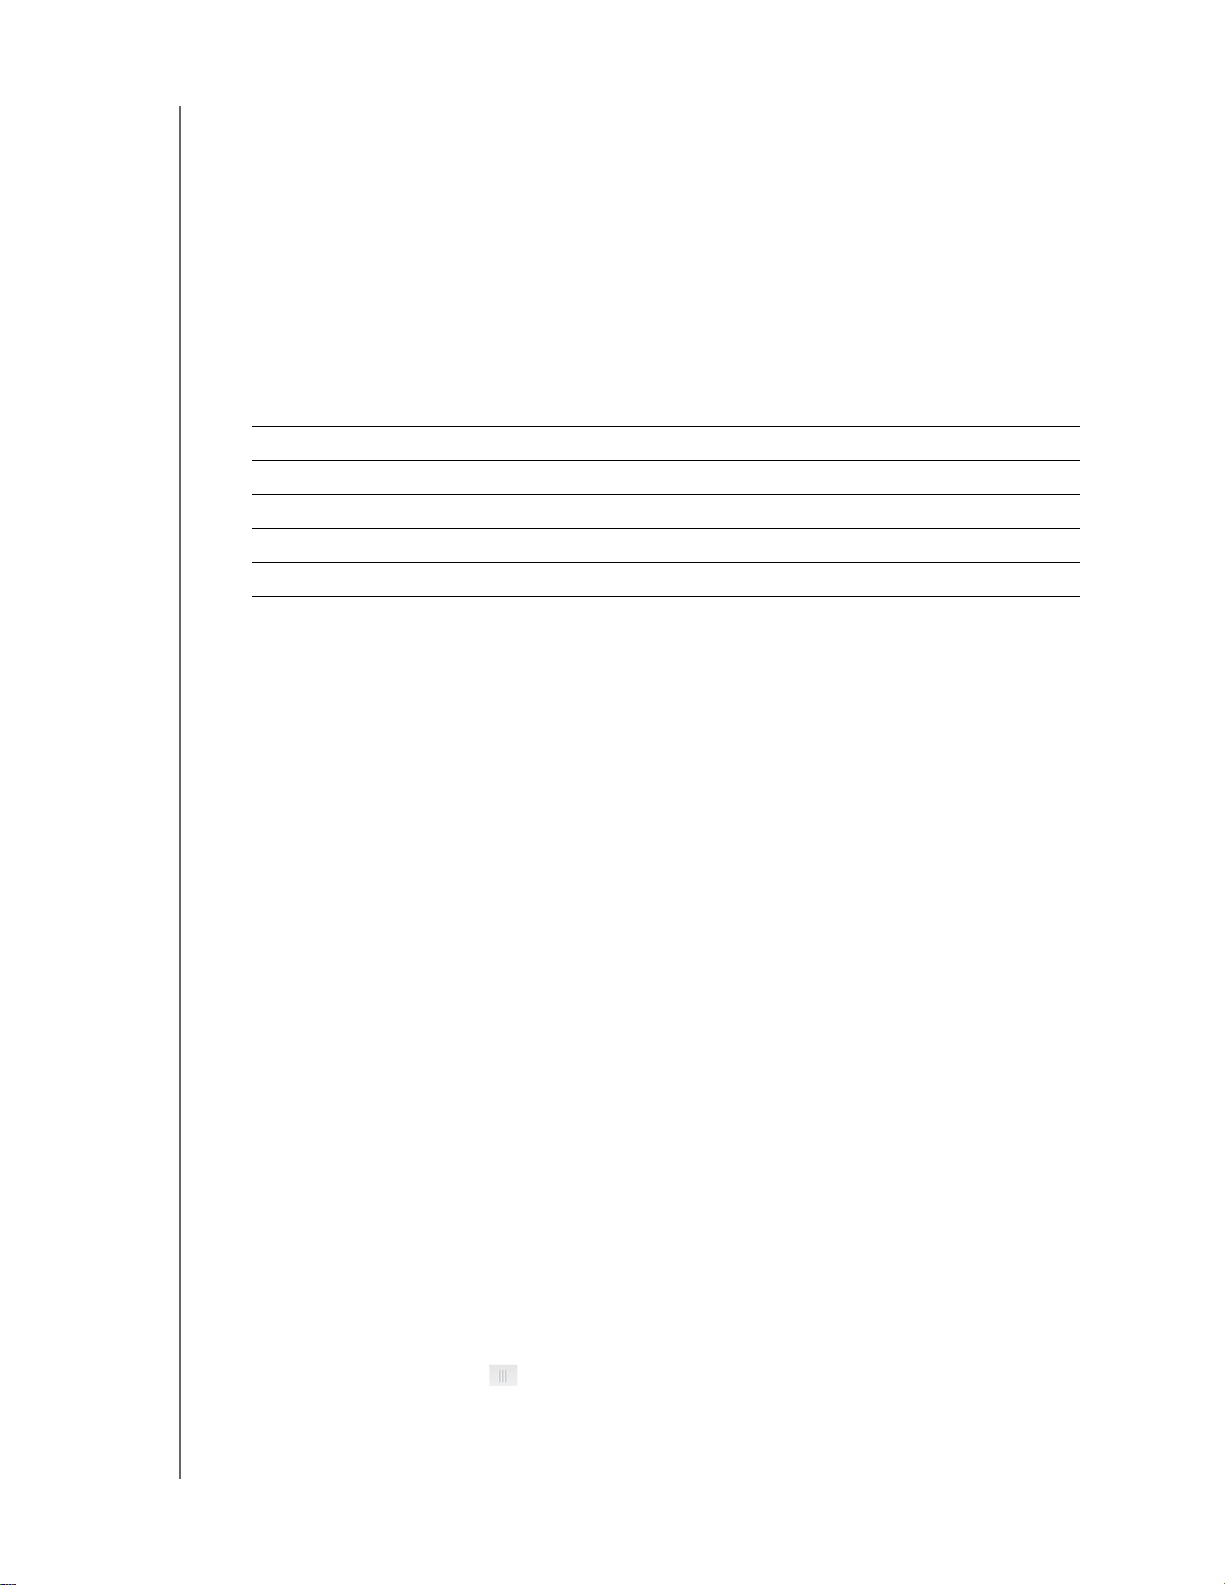
MANAGING STORAGE ON MY CLOUD EX2 ULTRA
Viewing Hard Drive Information
Use the following steps to view status of the disks on your My Cloud EX2 Ultra device.
1. On the Storage page, click Disk Status, if not already selected.
2. Select Drive <drive #> next to the disk for which you’d like to view information.
3. Review the hard drive information, and then click Close.
The Hard Drive Information screen displays the following data:
Vendor The vendor from whom the hard drive was obtained.
Model The model number of the hard drive selected.
Serial Number The serial number of the hard drive selected.
Capacity The capacity of the hard drive selected.
Firmware Version The current firmware version used on the drive selected.
iSCSI Storage
Internet SCSI (iSCSI) is an industry standard developed to enable transmission of iSCSI
block storage commands and data over an existing IP network by using the TCP/IP
protocol. The encapsulated iSCSI commands and data can be transmitted over a local
area network (LAN) or a wide area network (WAN). As with traditional SCSI, an iSCSI
storage solution requires at least one “initiator” residing on the client computer and at
least one “target” residing on the storage server.
Once the connection is established between the iSCSI initiator and the iSCSI target, the
operating system on the iSCSI initiator sees the storage as a local storage device that
can be formatted, read, and written in the usual manner
My Cloud EX2 Ultra allows you to create and manage iSCSI targets. The iSCSI target
provides storage, similar to a local hard disk drive, but is accessed over a network rather
then locally. The iSCSI target is protected by the underlying RAID structure of the My
Cloud EX2 Ultra server.
iSCSI Roles
Initiator: A client computer that accesses storage devices using iSCSI commands
over an IP network.
Target: A network-attached storage device that provides access to logical disks
(which can be created on the My Cloud EX2 Ultra server).
.
Creating an iSCSI Target
Use the following steps to create an iSCSI target
1. On the navigation bar, click Storage to display the Storage screen.
2. Click iSCSI, if not already selected.
3. Click the toggle button
4. Click Create iSCSI T
5. On the Create iSCSI Target screen, enter the following information:
MY CLOUD EX2 ULTRA PRIVATE CLOUD STORAGE
USER MANUAL
to enable iSCSI.
arget at the bottom of the screen.
61
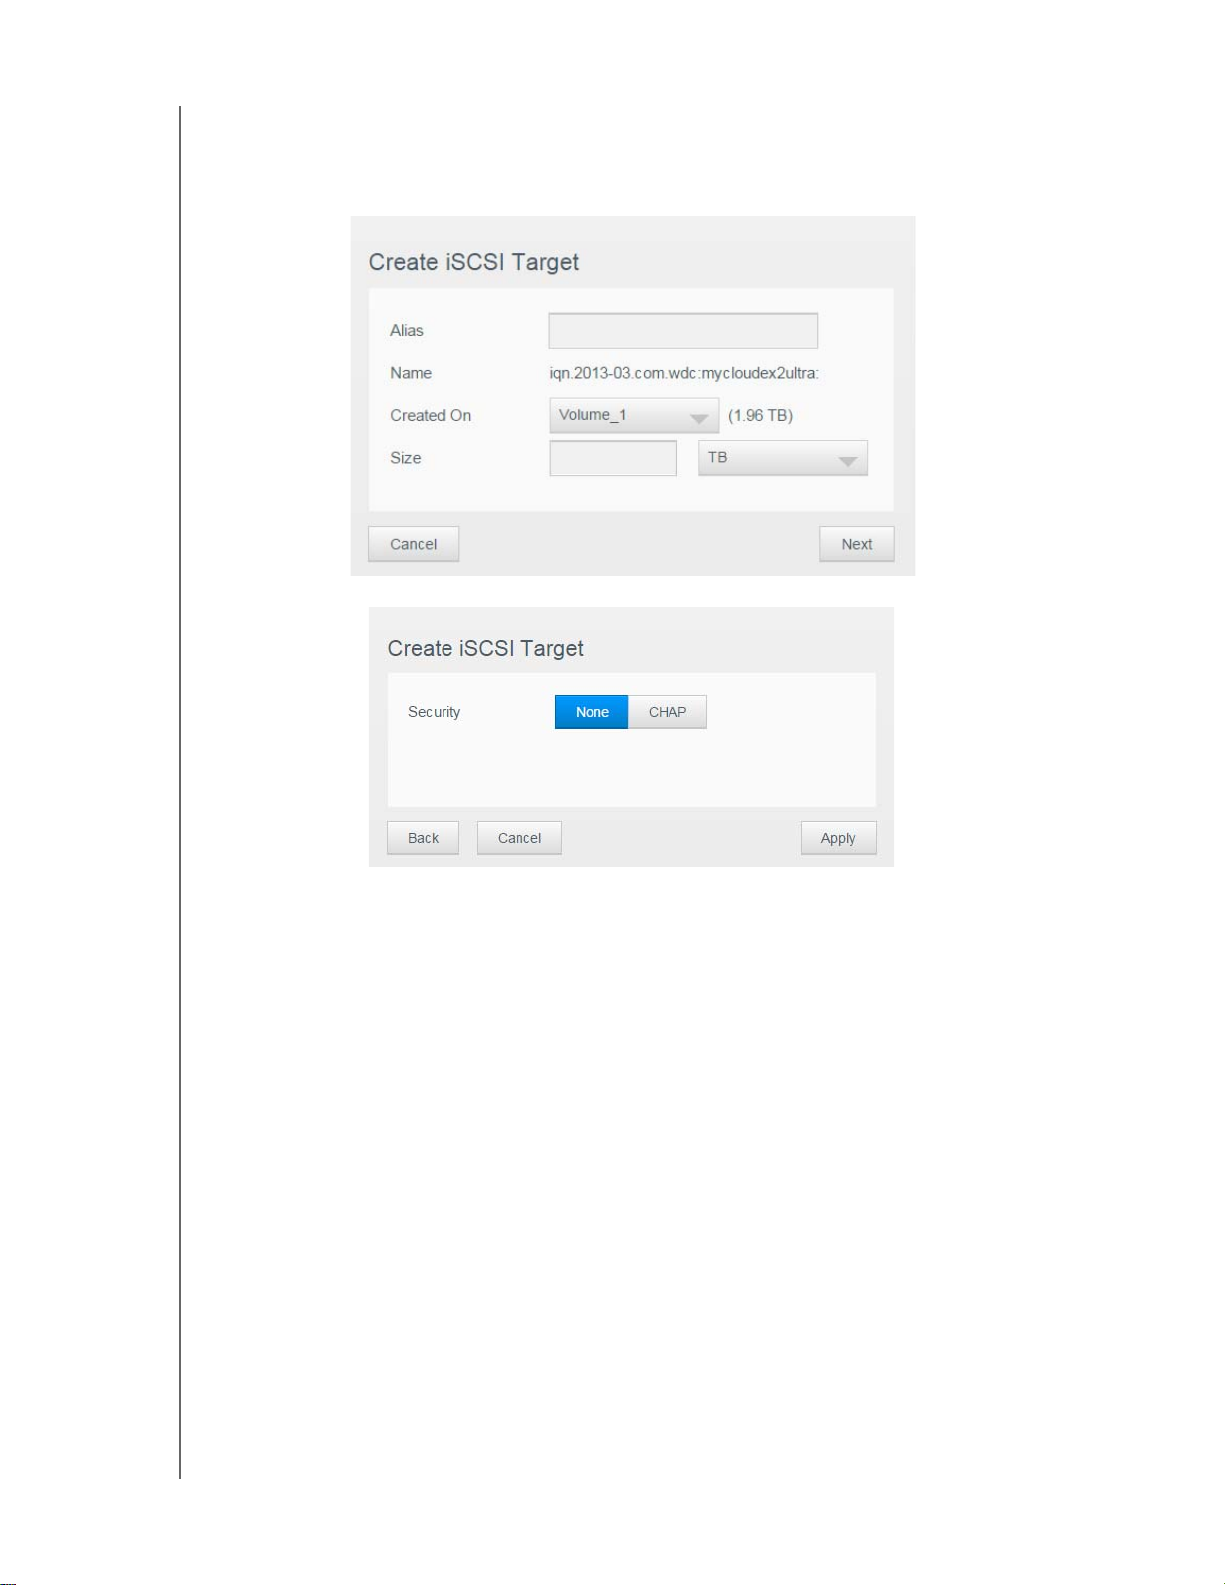
MANAGING STORAGE ON MY CLOUD EX2 ULTRA
Alias: Descriptive name for your target.
Created On: The Volume where you’d like the iSCSI target to reside.
Size: The size of your target and the unit of information storage for that size (e.g.
GB, TB)
.
6. Click Next.
The Create iSCSI Target screen displays:
7. If you’d like to assign security for your target:
a. Click CHAP.
b. Enter an existing User Name and Password, and then confirm the Password.
8. Click Apply.
Your new iSCSI target is created and displays in the iSCSI Target List.
Enabling / Disabling an iSCSI Target
Use the following steps to enable or disable an iSCSI target.
Enabling an iSCSI Target
1. On the Storage page, click iSCSI.
2. Under iSCSI Target list, click Details next to the target you’d like to enable.
3. Click Enable.
The selected target is now enabled.
Disabling an iSCSI Target
1. On the Storage page, click iSCSI.
2. Under iSCSI Target list, click Details next to the target you’d like to disable.
3. Click Disable.
MY CLOUD EX2 ULTRA PRIVATE CLOUD STORAGE
USER MANUAL
The selected target is now disabled.
62
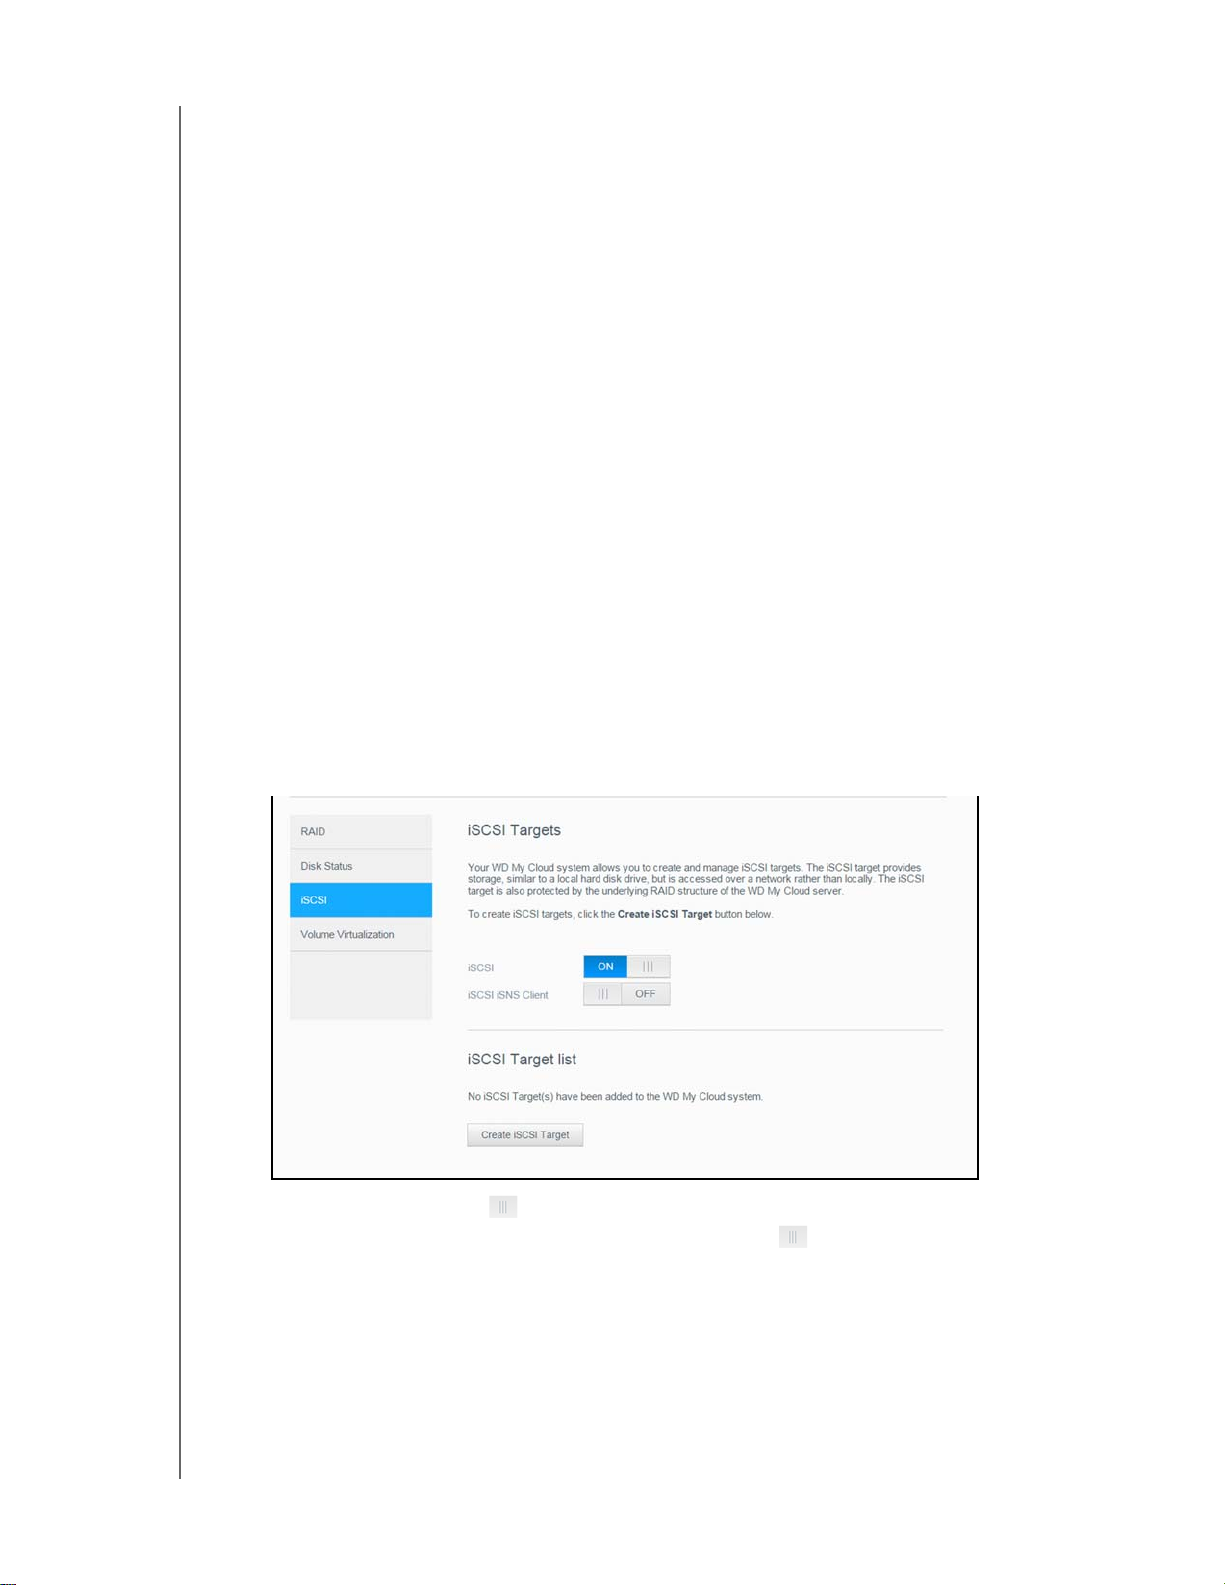
MANAGING STORAGE ON MY CLOUD EX2 ULTRA
Modifying an iSCSI Target
Use the following steps to modify an iSCSI target.
1. On the Storage page, click iSCSI.
2. Under iSCSI Target list, click Details next to the target you’d like to modify
3. Make all of your necessary changes, and then click Save.
.
Deleting an iSCSI Target
Use the following steps to delete an iSCSI target.
1. On the Storage page, click iSCSI.
2. Under iSCSI Target list, click Details next to the target you’d like to delete.
3. Ensure that this is the target you want to delete, and then click Delete. The
target is deleted and removed from the iSCSI Target list.
selected
Enabling iSCSI iSNS Client
The Internet Storage Name Service (iSNS) protocol is used for interaction between iSNS
servers and iSNS clients. iSNS clients are computers, also known as initiators, that are
attempting to discover storage devices, also known as targets, on an Ethernet network.
Use the following steps to configure the iSCSI iSNS client.
1. On the navigation bar, click Storage to display the Storage screen.
2. If not already selected, click iSCSI.
3. Click the toggle button to ON to enable iSCSI.
4. In the iSCSI iSNS Client field, click the toggle button
5. Click Configure.
6. Enter the iSNS client server address, and then click Apply
.
.
Volume Virtualization
Volume Virtualization simplifies scalability by allowing you to map iSCSI targets on other
network storage devices and present them as volumes on your My Cloud EX2 Ultra
device.
MY CLOUD EX2 ULTRA PRIVATE CLOUD STORAGE
USER MANUAL
63
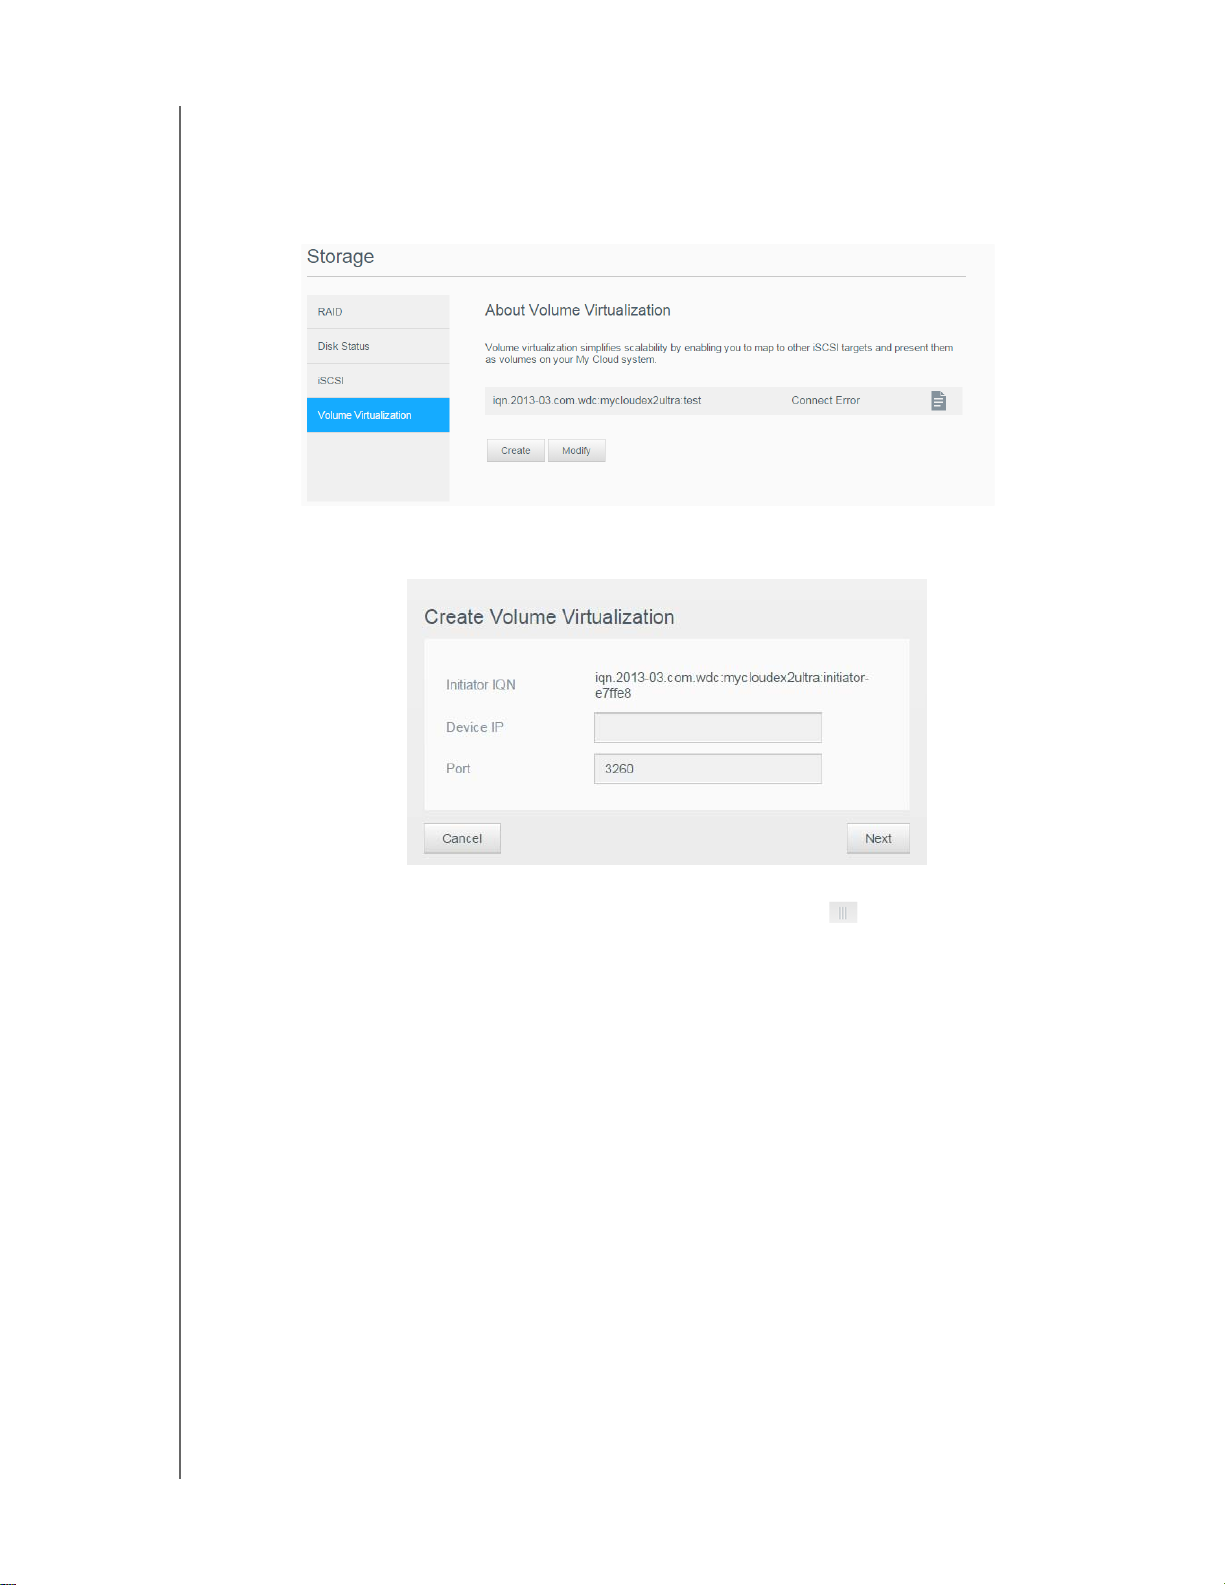
MANAGING STORAGE ON MY CLOUD EX2 ULTRA
Creating a Virtualized Volume
Use the following steps to create a virtualized volume on your device.
1. On the Storage page, click V
2. Click Create to display the Create V
olume Virtualization, if not already selected.
olume Virtualization screen:
3. In the Device IP field, enter the IP address of the device where the iSCSI target
resides, and then click Next.
4. Select an iSCSI target from the retrieved list, and then click Next.
5. To add authentication to the target, click the toggle button
to ON, enter a User
Name and Password, and then click Next.
Disabled authentication is the default. To keep the default, ensure that the
Authentication field is OFF, and then click Next.
6. Select a LUN (Local Unit Number) from the list, and then click Next.
7. Enter a name for the share folder, and then click Next.
8. Review the Volume Virtualization summary to ensure that your settings are correct,
and then click Save.
A virtual volume is created.
Connecting a Virtualized Volume to a Target
Use the following steps to connect a virtualized volume to a target on your device.
1. On the Storage page, click V
2. Click Details next to the virtual volume you’d like to connect.
3. Click Connect. Once connected to the target, the system automatically formats the
LUN, if it hasn’t been done before.
4. Once your virtual volume is formatted, click Close.
changed to Connect.
Your new virtual volume is now available on your My Cloud EX2 Ultra device.
olume Virtualization, if not already selected.
The state of the volume is
MY CLOUD EX2 ULTRA PRIVATE CLOUD STORAGE
USER MANUAL
64

MANAGING STORAGE ON MY CLOUD EX2 ULTRA
Modifying a Virtualized Volume
Use the following steps to modify a virtualized volume on your device.
1. On the Storage page, click Volume Virtualization, if not already selected.
2. Select the virtual volume you’d like to modify, and then click Modify.
3. Make the necessary changes to the volume, and then click Save. When the modified
settings are saved, the virtual volume is connected again.
MY CLOUD EX2 ULTRA PRIVATE CLOUD STORAGE
USER MANUAL
65
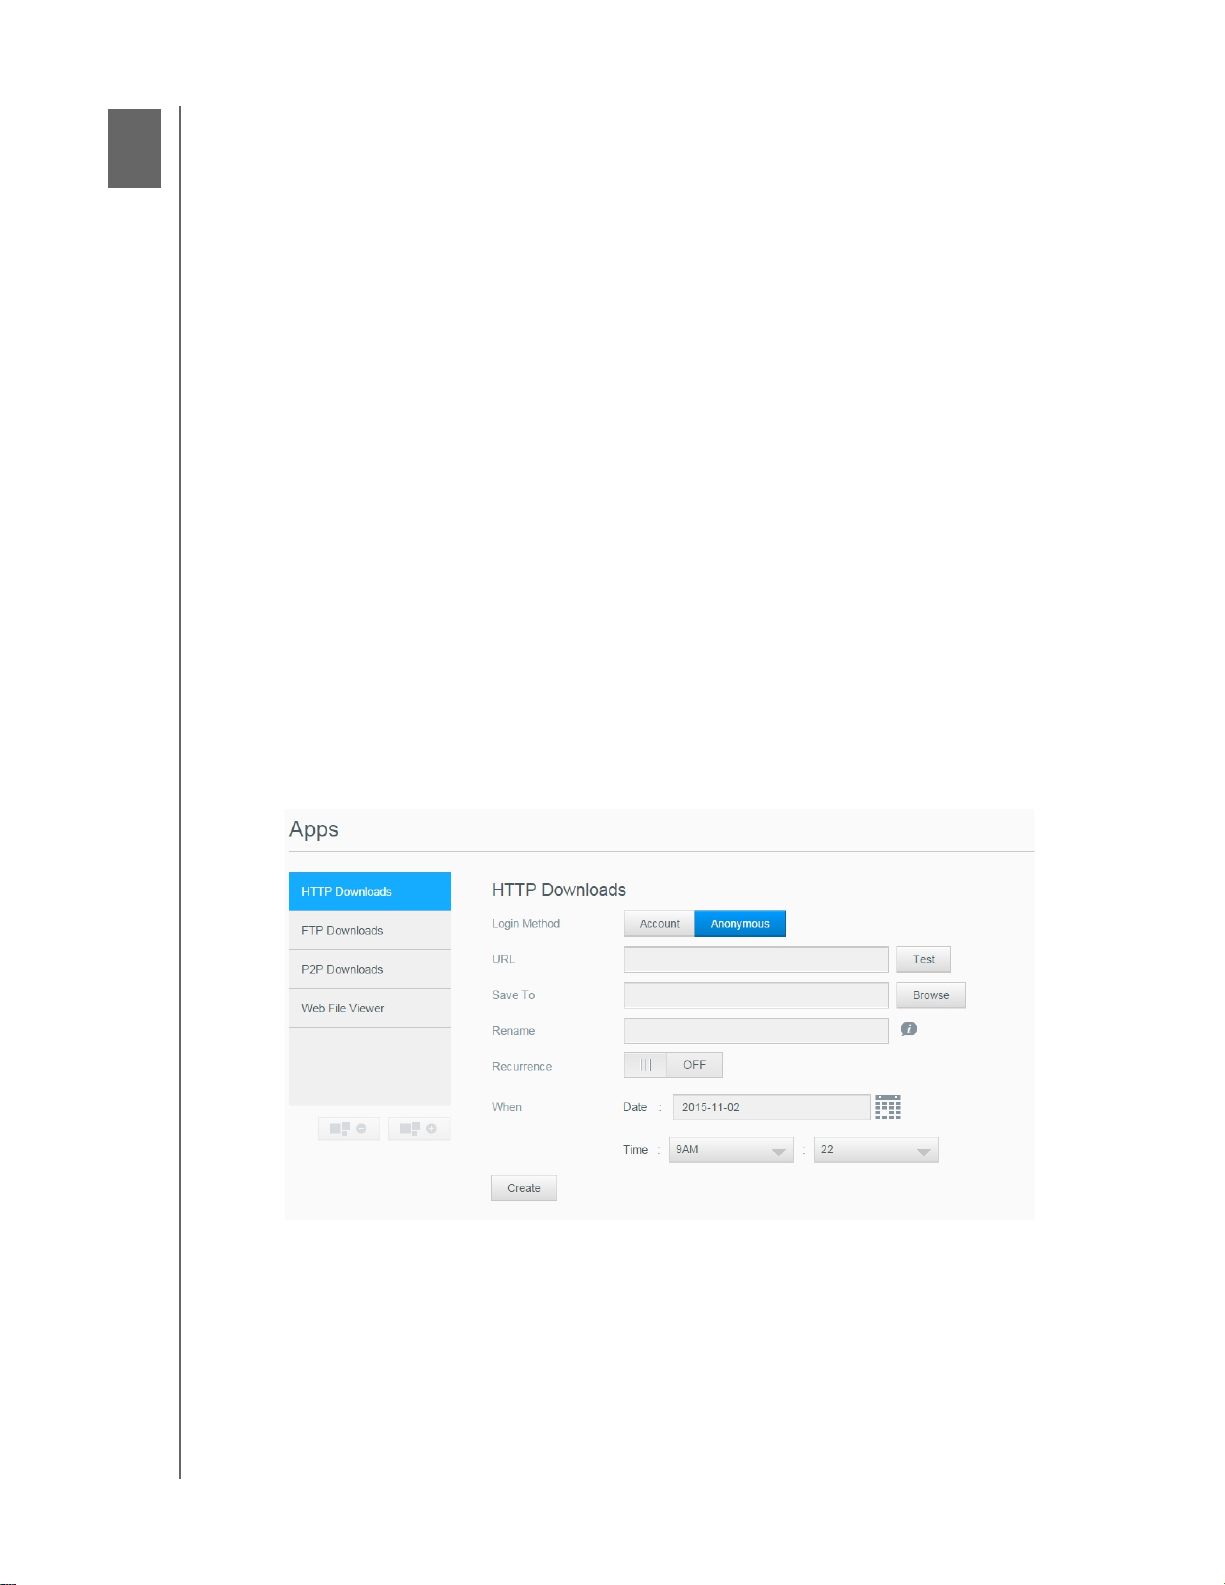
MANAGING APPS ON MY CLOUD EX2 ULTRA
Managing Apps on My Cloud EX2 Ultra
9
About Apps
Managing Apps
About Apps
Apps is short for Applications. Apps are little self-contained programs used to enhance
the existing functions of your device or service. The My Cloud EX2 Ultra device provides
various apps that allow you to use your device more productively.
Note: WD recommends that you fully understand the nature of any app before
you install it on your device.
Note: Support for each app should be obtained through the individual vendor.
My Cloud EX2 Ultra comes with various apps installed. There is also a list of available
apps for you to choose from on the Add an App screen.
Managing Apps
The Apps screen displays a list of the currently installed apps. From this screen, you can
use your installed apps, add new apps, or remove apps you no longer want to use.
Viewing Apps
1. On the navigation bar, click Apps to display the Apps screen:
2. To select an app, click the name of the app in the left pane. The app displays in the
right pane.
MY CLOUD EX2 ULTRA PRIVATE CLOUD STORAGE
USER MANUAL
66

MANAGING APPS ON MY CLOUD EX2 ULTRA
Adding an App
Use the following steps to add an app to your My Cloud EX2 Ultra device.
1. On the navigation bar, click Apps to display the
2. Click the Add an
App icon in the lower left side of the screen.
Apps screen.
The first time you add an app, the Terms of Service screen displays. Read and accept
the agreement.
3. On the Add an App screen, place a check next to the app you’d like to add to the
device.
4. For details about the app, click Details. Close the Details screen.
5. Place a check next to the app(s) you’d like to add to your device, and then click
Install.
The selected apps are added to your device.
MY CLOUD EX2 ULTRA PRIVATE CLOUD STORAGE
USER MANUAL
67

MANAGING APPS ON MY CLOUD EX2 ULTRA
Manually Adding an App
If you have an app you’d like to add that is not listed on the Add an App screen, use the
following steps to manually add that app to your My Cloud EX2 Ultra device.
Note: WD recommends that you fully understand the nature of any app before you
install it on your device.
1. On the navigation bar, click Apps to display the Apps screen.
2. Click the Add an App icon
3. Scroll to the bottom of the Add an App screen, and then click the T
click here link.
4. Navigate to the app you’d like to install on your device.
5. Select the app, and then click Open.
6. The selected app is added to your device.
in the lower left side of the screen.
o install manually ,
MY CLOUD EX2 ULTRA PRIVATE CLOUD STORAGE
USER MANUAL
68

MANAGING APPS ON MY CLOUD EX2 ULTRA
Deleting an App
Use the following steps to delete an app from your My Cloud EX2 Ultra device.
1. On the navigation bar, click Apps to display the
Apps screen.
2. From the Apps list in the left pane, select the app that you’d like to delete from the
device.
3. Click the Remove an
4. In response to the confirmation message, click OK.
App icon in the lower left side of the screen.
The app is removed from the
device and no longer displays in the user account list.
Updating an App
Use the following steps to update an app that you’ve added to your My Cloud EX2 Ultra
device.
1. On the navigation bar, click Apps to display the
2. If there is an update for one of the apps you’ve added to your device, an Updates
available link displays at the top right of the screen.
3. Click the Updates A
vailable link.
4. Select the app you’d like to update from the list, and then click Update.
If you’d like to view the details of the update, click Details.
Click Back to return to the Update screen.
Apps screen.
MY CLOUD EX2 ULTRA PRIVATE CLOUD STORAGE
USER MANUAL
69

PLAYING/STREAMING VIDEOS, PHOTOS, & MUSIC
Playing/Streaming Videos, Photos, & Music
10
Media Servers
Media Storage
Enabling DLNA and iTunes
Accessing Your Private Cloud Using Media Players
Accessing Your Private Cloud Using iTunes
Media Servers
My Cloud EX2 Ultra is designed to serve as your home's media server. It enables you to
stream photos, music, and videos to your DLNA-compatible devices and music to your
iTunes-compatible devices.
Both DLNA-compatible and iTunes-compatible devices search for media stored in any
Public share that has media serving enabled. By default, DLNA Media is disabled. Once
you enable it on the Settings > Media Server page, the media serving for the Public share
is also automatically enabled. For all other shares, the media serving remains off.
If you do not want DLNA to display specific media files, place them in a private share that
is set to disable media sharing. (See “Making a Share Private” on page 30.)
Media Server Overview
The My Cloud EX2 Ultra device uses TwonkyMedia as its DLNA media server. It streams
your music, photos and videos to compatible devices in your home. Playing media on a
compatible device is easy.
The media server searches for all the media stored in the Public share on the My Cloud
EX2 Ultra device connected to your home network. After enabling media serving for the
device (see
content to the Public share on your My Cloud EX2 Ultra device, and you are ready to
stream and view content on your home entertainment center
example, Xbox 360
media adapters), and other PC computers on your home or office network. Visit
http://www.dlna.org for further information on DLNA.
“Enabling DLNA and iTunes” on page 72), you can just transfer your multimedia
, game consoles (for
®
or PlayStation® 3), WD TV Live® media player, or DLNA® 1.5 digital
iTunes Overview
You or anyone connected to the My Cloud EX2 Ultra device can use iTunes to play stored
music files. iTunes creates a virtual music library on the device and treats it as an iTunes
repository, making it possible to stream music files from the My Cloud EX2 Ultra device to
Windows or Mac computers running iTunes.
iTunes scans any shares that have the Media Serving setting enabled, including the
Public share by default.
MY CLOUD EX2 ULTRA PRIVATE CLOUD STORAGE
USER MANUAL
70

PLAYING/STREAMING VIDEOS, PHOTOS, & MUSIC
Media Types Supported
Audio files Video files Image Files
3GP
AAC
AC3
AIF
ASF
FLAC
LPCM
M4A
M4B
MP1
MP2
MP3
MP4
MPA
OGG
WAV
WMA
3GP
ASF
AVI
DivX
DV
DVR-MS
FLV
M1V
M2TS
M4P
M4V
MKV
MOV
MP1
MP4
MPE
MPEG1
BMP
JPEG
PNG
TIF
MPEG2
MPEG4
MPG
MTS
QT
QTI
QTIF
RM
SPTS
TS
VDR
VOB
WMV
Xvid
Note: Some devices may not support playback of all these files. Please refer to your
device’s user manual to see which formats are supported.
MY CLOUD EX2 ULTRA PRIVATE CLOUD STORAGE
USER MANUAL
71

PLAYING/STREAMING VIDEOS, PHOTOS, & MUSIC
Media Types Supported by iTunes
Note: iTunes 10.4 or later only supports music files. See Knowledge Base Answer ID
8412 for additional information on iTunes-supported versions.
The iTunes Media Server supports the following file extensions: FLAC, M4A, MP3, MP4A
and WAV.
Note: Some devices may not support playback of all these files. Please refer to your
device’s user manual to see which formats are supported.
Media Storage
You can access and store media content on the My Cloud EX2 Ultra device by means of
network shares. Shares, similar to folders or directories, are areas set up to organize
media and access them from your network. Shares can be shared with everyone (public)
or with selected users on your network (private).
The device comes pre-configured with the Public network share, which contains the
following folders for media storage:
• Shared Music—Stores music files you want to share with other users.
• Shared Pictures—Stores image files you want to share with other users.
• Shared V
ideos—Stores video files you want to share with other users.
Note: You will notice that the Public share's Shared Music and Shared Pictures shares
contain mirrored and uploaded subfolders. These folders are needed by Twonky
7.2. You can now upload all media types to the uploaded subfolder from a DLNA
client with "upload" capability.
Go to the Twonky configuration site (NAS_IP:9000) to aggregate content from all
NAS devices with DLNA capability on your network to the mirrored folder.
Uploading and mirroring are best left to expert users, as these features are not
supported by
WD customer support.
Enabling DLNA and iTunes
The Media page of the Settings Screen allows you to enable or disable the DLNA and
iTunes media servers. Media server utilities for re-scanning the NAS or fully rebuilding the
DLNA database are also on the Media page.
Enabling DLNA
1. On the Navigation bar, click Settings and then click Media in the left panel.
MY CLOUD EX2 ULTRA PRIVATE CLOUD STORAGE
USER MANUAL
72

PLAYING/STREAMING VIDEOS, PHOTOS, & MUSIC
1. In the DLNA area Media Streaming field, click the toggle button to enable DLNA.
Note: Media Streaming is OFF by default. To enable DLNA, click the toggle button
to ON. The media server must be enabled before you can provide media serving
for a share. (See “Creating a New Share” on page 29 for instructions on how to
enable media serving on a share.)
2. Click View Media Players. This displays a list of the media players/receivers on your
home network.
Note: If Media Streaming is OFF, this field will not display on your screen.
3. On the Media Streaming Options screen, select the media device you’d like to receive
streaming music, video, or photos.
On: Select this option to allow DLNA media streaming to the device.
Off: Select this option to disable DLNA media streaming to the device.
4. Once your selections are made, click Close.
Viewing DLNA Media Server Information
The DLNA area displays the current version, the number of music, video, and pictures
available on your device, and when the last update occurred.
To view DLNA media server information, on the Settings screen, click Media in the
left panel.
MY CLOUD EX2 ULTRA PRIVATE CLOUD STORAGE
USER MANUAL
73

PLAYING/STREAMING VIDEOS, PHOTOS, & MUSIC
Rescanning/Rebuilding the DLNA Database
The My Cloud EX2 Ultra device automatically rescans and rebuilds the DLNA database;
however, if you suspect that your database is corrupted, use the following steps to either
rescan or rebuild your DLNA database:
Important: Use caution when completing this procedure. Rebuilding the DLNA
server
database could take a considerable amount of time, depending on the number and
size of the files involved.
1. On the Navigation bar, click Settings and then click Media in the left panel.
2. In the DLNA Database field, click one of the following.
Rescan: The My Cloud EX2 Ultra device searches for changes made to your
media libraries. Try this option first.
Rebuild: The My Cloud EX2 Ultra device rebuilds the DLNA database from
scratch.
Enabling iTunes
1. On the Navigation bar, click Settings and then click Media in the left panel.
1. In the iTunes area iTunes field, click the toggle button to enable iTunes (if not
already enabled).
Note: iTunes is ON by default. To disable it, click the toggle button to OFF.
2. In the Folder field, select Root, if not previously selected. This field points iTunes to
the root directory on your My Cloud EX2 Ultra device.
If your want to specify a directory on your device where iTunes can access your
media:
- Deselect the Root check box.
- Click Browse, and then navigate to the folder where iTunes can access your
media.
- Click Apply at the bottom of the iTunes area.
3. In the Password field, enter a password to be used when accessing your My Cloud
EX2 Ultra device on iT
Note: Leave the Password field blank if you don’t want to use a password to access your
device media in iTunes.
4. If you’d like to change the default MP3 Tag Code page, select the page from the drop-
down menu.
5. For Auto Refresh, select the frequency of the media refresh for iTunes from the drop-
down menu.
6. Click Apply to save your settings.
unes.
Refreshing iTunes
MY CLOUD EX2 ULTRA PRIVATE CLOUD STORAGE
USER MANUAL
74
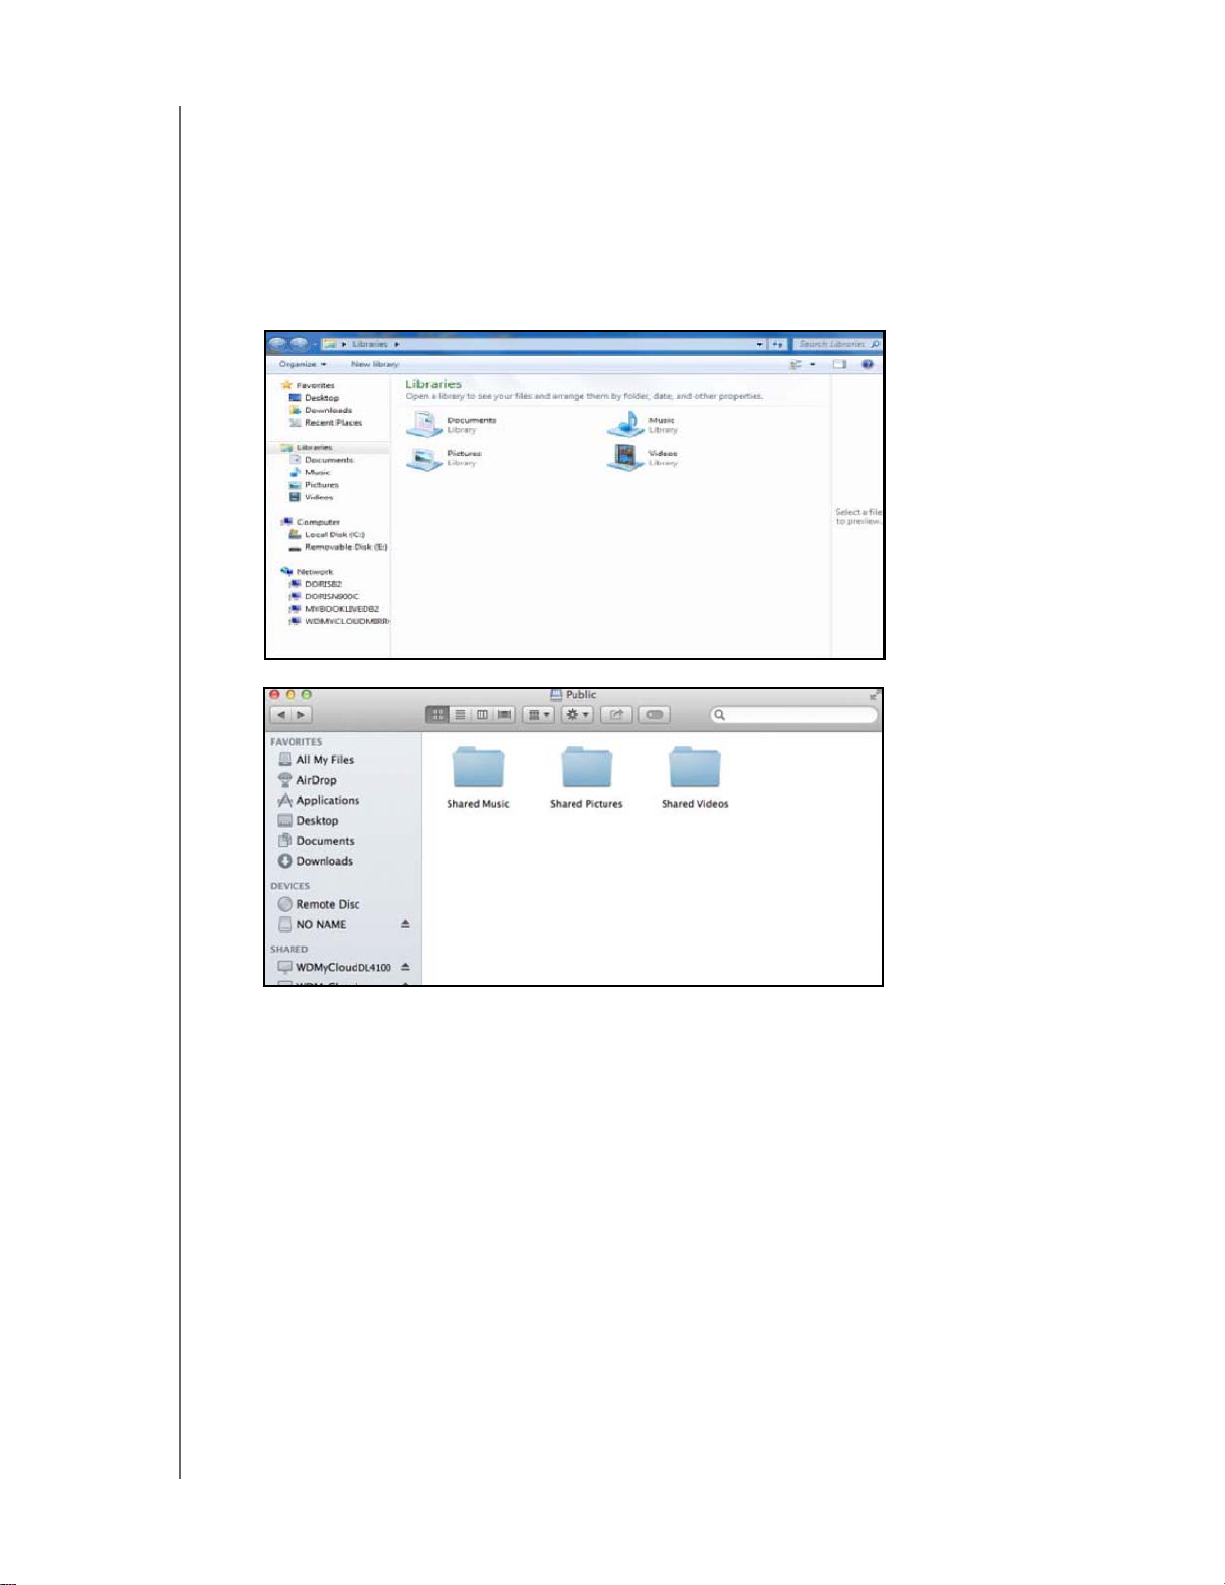
PLAYING/STREAMING VIDEOS, PHOTOS, & MUSIC
Use the following steps to refresh the iTunes directory. This allows iTunes to pick up any
new media.
1. On the Navigation bar, click Settings and then click Media in the left panel.
2. In the iTunes database field, click Refresh.
Adding Media Content to the Folders
1. Open Windows Explorer or Mac Finder.
Windows Explorer
Mac Finder
2. Copy your music files to the Shared Music folder.
3. Follow the same process to place your videos and pictures into their respective
Pictures and V
Note: You can also access your media files using My Cloud Desktop app (see “My
ideo folders.
Cloud for Desktop App” on page 26).
MY CLOUD EX2 ULTRA PRIVATE CLOUD STORAGE
USER MANUAL
75

PLAYING/STREAMING VIDEOS, PHOTOS, & MUSIC
Accessing Your Private Cloud Using Media Players
Now that you have copied your files to one of the Shared folders, you can use a variety of
media players to stream media. The following types are supported:
WD TV Live Media Players
Windows Media Player 11 (comes with Windows Vista)
Windows Media Player 12 (comes with Windows 7 and Windows 8)
Xbox 360
PlayStation 3
Other media players:
- BluRay Players
- Network Connected TVs
- Digital Picture Frames
- Network Music Player
DLNA Devices
Note: For specific information on using and updating the media player, go to the
appropriate support site.
WD Media Players
You can connect the various WD TV and WD Media Players to your home network for
access to media content stored in a network drive such as the My Cloud EX2 Ultra
device. For details on using a WD Media Player to access files on your device, see
Knowledge Base Answer ID 2676 or refer to your WD Media Player User Guide.
Other Media Players
Following are general steps for setting up devices such as digital picture frames, Blu Ray
players, network-connected TVs, and digital media adapters:
1. Make sure that your My Cloud EX2 Ultra device is connected to your home’s local
network and is powered on.
2. Follow the user instructions provided with your media player to proceed through any
initial setup or installation of drivers.
3. Using the navigation feature on your player, scan and detect your My Cloud EX2 Ultra
device on your network.
4. Depending on the player you have, you may need to access a Settings/Network
Setup page in the user interface to establish connection so that your player can link to
your My Cloud EX2 Ultra device. Please refer to your player’s user guide for specific
instructions.
MY CLOUD EX2 ULTRA PRIVATE CLOUD STORAGE
USER MANUAL
76

PLAYING/STREAMING VIDEOS, PHOTOS, & MUSIC
DLNA Devices
See specific DLNA media device user manuals for instructions on connecting a DLNA
device to your local area network so you can access content on the My Cloud EX2 Ultra
device. Go to
http://www.dlna.org for a list of DLNA-certified devices and for further
information.
Accessing Your Private Cloud Using iTunes
You or anyone connected to the My Cloud EX2 Ultra device can use iTunes to play stored
music files. This service creates a virtual music library on the device and treats it as an
iTunes repository, making it possible to stream music files from the My Cloud EX2 Ultra
device to Windows or Mac computers running iTunes. For a list of supported media types,
see “Media Types Supported” on page 71.
Note: iTunes 10.4 or later only supports music files. See Knowledge Base Answer ID
8412 for additional information on iTunes supported versions.
Note: iTunes scans any shares that have the Media Serving setting enabled, including
the Public share by default.
You can drag and drop media files into the corresponding folders in the Public share (e.g.,
music files into the MycloudEX2Ultra/Public/Shared Music default share).
Streaming Media in iTunes
iTunes is enabled by default in the dashboard. See “Enabling iTunes” on page 74. for
more information on configuring iTunes.
1. Launch iTunes on your computer.
2. Click MyCloudEX2Ultra under the Shared section of the left pane. If you have copied
music to the /Public/Shared Music folder or a video to/Public/Shared Videos, and it is
in a format supported by iTunes, it is listed in the right pane.
3. Double-click a media file you’d like to play.
MY CLOUD EX2 ULTRA PRIVATE CLOUD STORAGE
USER MANUAL
77

Configuring Settings
CONFIGURING SETTINGS
11
General
Network
Media
Utilities
Notifications
Firmware Update
The Settings option on the navigation bar allows the Administrator to view and customize
the My Cloud EX2 Ultra device’
s system, network, media, utilities, notifications, and
firmware settings. This chapter explains how to configure the various settings for your
My Cloud EX2 Ultra device.
General
On the General page you can:
View and modify the device name and description
Select the language in which the web pages should display
Set the date, time, and time zone for the device
Enable cloud access for your device
Set energy saving options
Enable and configure Time Machine backups for your Mac
Enable various services for your device
WARNING! Renaming the My Cloud EX2 Ultra device forces all the network
computers to remap their shared network resources. Change the
device name only when necessary
.
MY CLOUD EX2 ULTRA PRIVATE CLOUD STORAGE
USER MANUAL
78
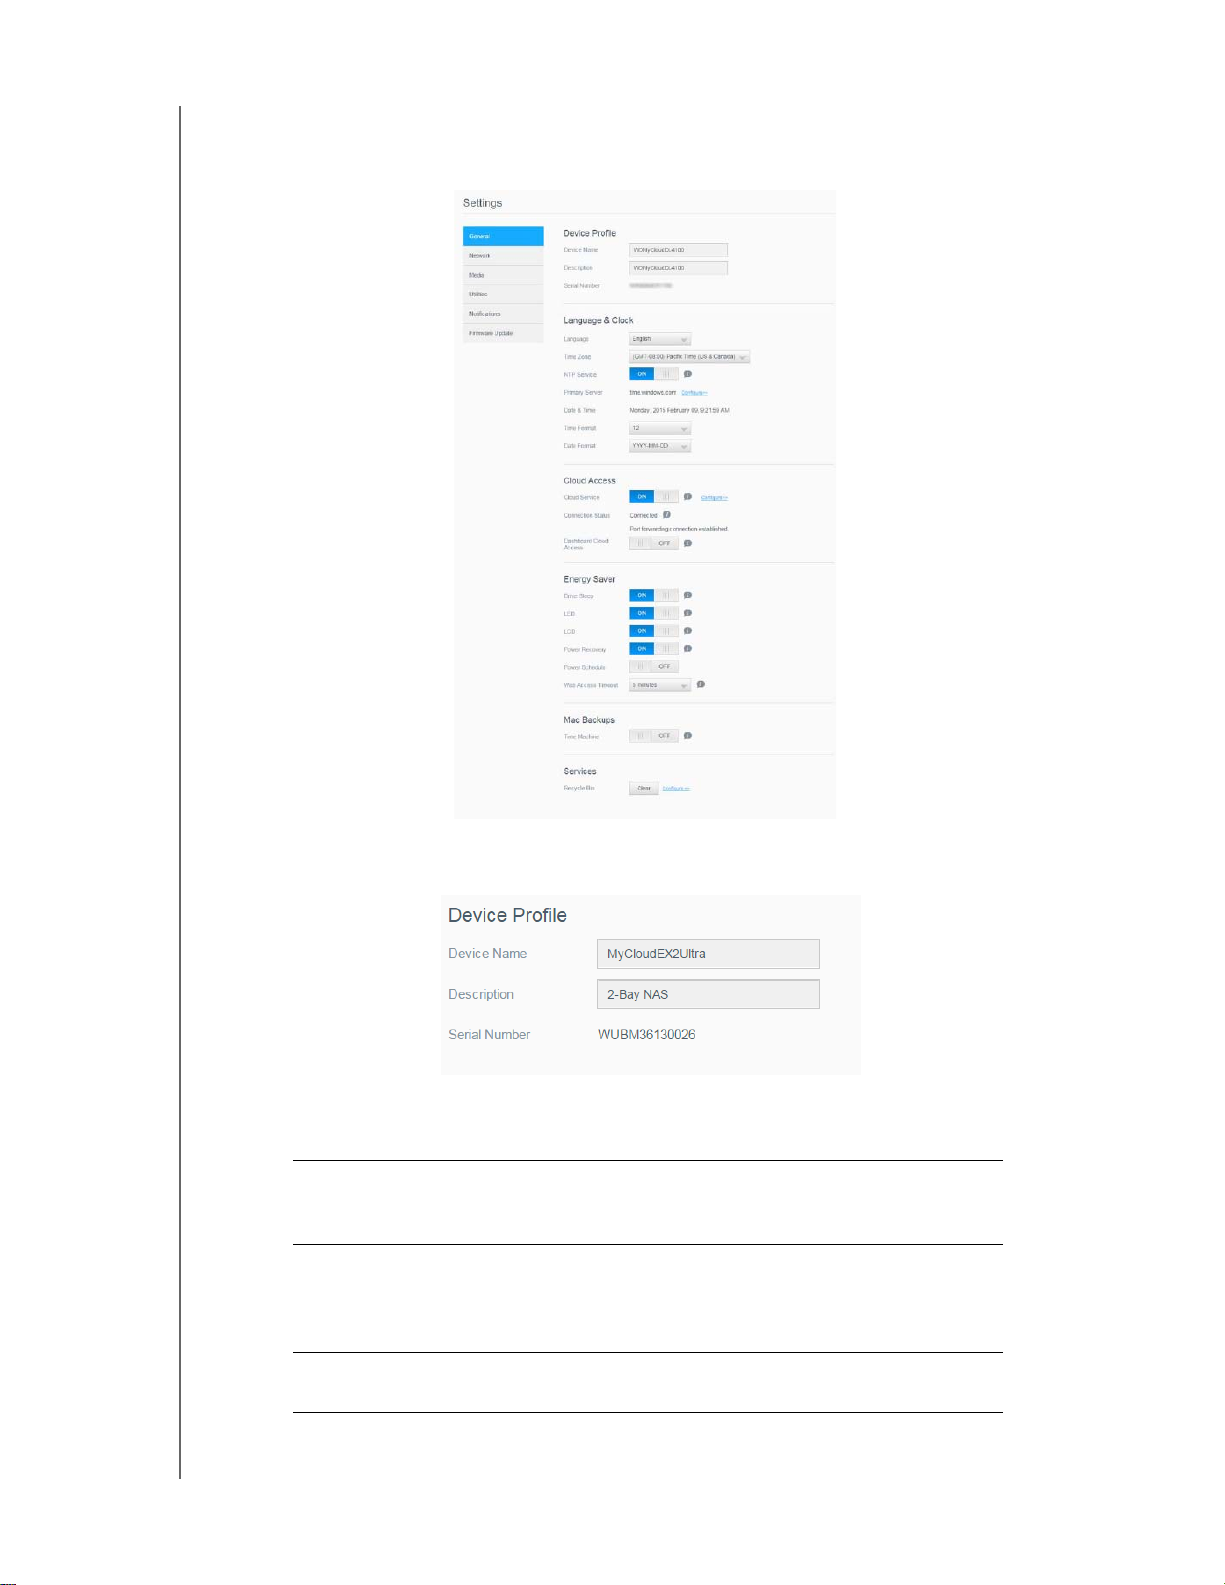
Accessing the General Screen
On the Navigation bar, click Settings. The General page displays.
CONFIGURING SETTINGS
Device Profile
1. In the Device Profile section of the General page, view or modify the following
settings:
Device Name Enter a unique name for your device to identify it on the
network. The device name can be up to 15 characters long and
can not include special characters (e.g., @, #, $ etc.).
Device Description The default description is MyCloudEX2Ultra. If desired, enter
a different description for your device. The device description
can be up to 32 characters long and can not include special
characters (e.g., @, #, $ etc.).
Serial Number Displays the WD-assigned number that identifies the specific
unit. This field can not be updated.
MY CLOUD EX2 ULTRA PRIVATE CLOUD STORAGE
USER MANUAL
79
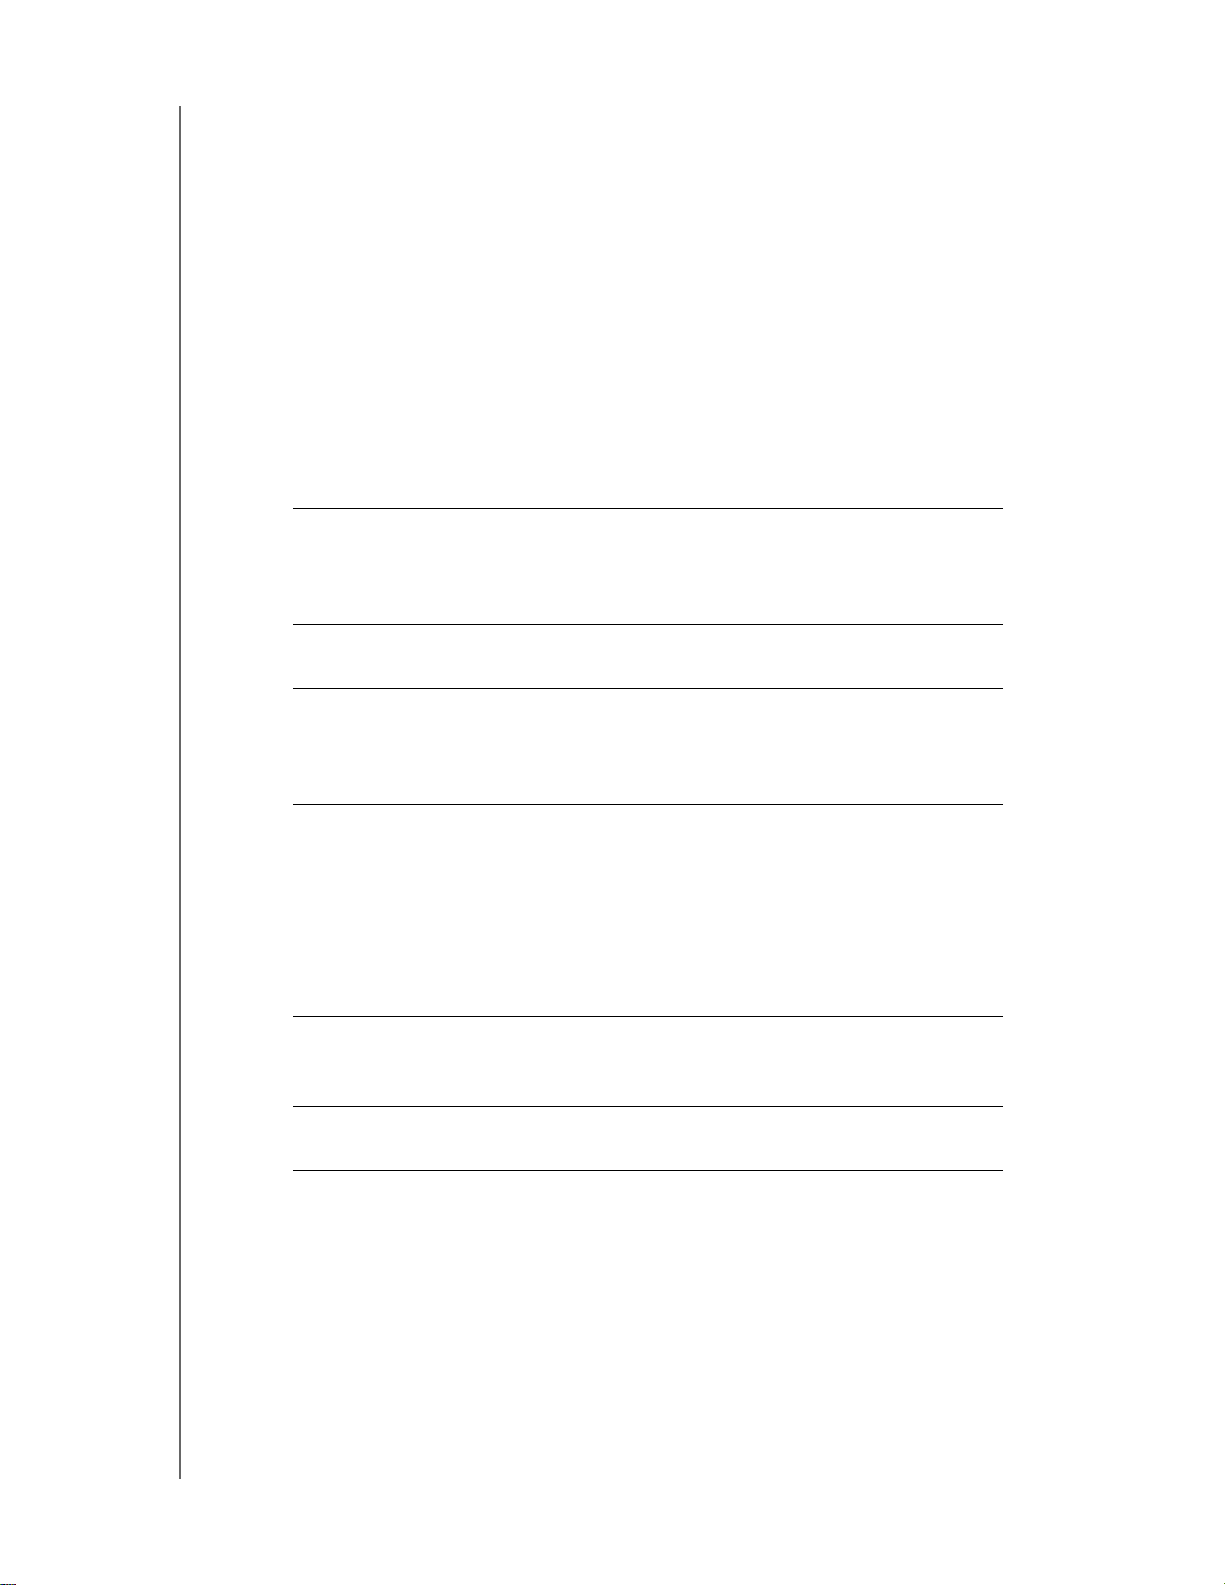
CONFIGURING SETTINGS
2. If you made any changes, click Save (appears next to the updated field once a
change is made).
Note: Throughout the My Cloud EX2 Ultra dashboard, the Apply and Cancel
buttons display only if you make changes.
Language and Clock
In this section of the General screen, you can change the language that displays in the
My Cloud EX2 Ultra device’s interface and set the date and time. The date and time are
synchronized to the NTP
of setting the date and time manually or allowing the NTP to access the Internet and
automatically set the time. If you are not connected to the Internet, you must enter the
date and time manually.
(Network Time Protocol) server by default. You have the option
1. In the Language & Clock section, view or modify the following settings
Language
From the drop-down list, select the language you’d
like to display on your My Cloud EX2 Ultra Private
Cloud Storage web pages. The default language is
English.
Time Zone
From the drop-down list, select the time zone
where your device is located.
NTP Service
Enable or disable NTP service, which automatically
synchronizes your device to update the time and
date. A dialog box displays current NTP servers.
You can add another NTP server if you choose.
Primary Server
Change the primary server used for your NTP
service.
• To change the primary server used for your NTP
service, click Configure,
• Click Add User NTP, and then enter the URL
address of the new primary server
.
• Click Save.
Date & Time
Displays the device date and time. This information
is synchronized to the NTP (network time protocol)
server by default.
:
Time Format
From the drop-down list, select 12 (12-hour clock)
or 24 (24-hour clock).
2. Click Save for each change you make.
MY CLOUD EX2 ULTRA PRIVATE CLOUD STORAGE
USER MANUAL
80

CONFIGURING SETTINGS
Cloud Access
Use the following steps to turn cloud access on or off for all users (i.e., control whether
computers and mobile devices can access the content on the My Cloud EX2 Ultra
device)
1. Scroll down to the Cloud Access area of the General screen.
2. In the Cloud Service field, click the toggle button
3. Click Configure to change the type of connection you use for your cloud access
.
Note: This turns on cloud access for the entire device. To turn on access for an
individual user, see “Configuring Cloud Access for a User” on page 17
to turn on Cloud Services. The
Connection Status changes to Connected (Relay connection established).
.
On the Cloud Access Connection Options screen, there are three access options:
Auto: Auto uses uPnP to attempt to open ports on your router. If successful, a
direct connection is established between your device and your apps.
Manual: Establishes a connection through the two selected ports. If either port is
unavailable, a relay connection is established. A manual router configuration is
required for this option. See Knowledge Base Answer ID 8526 for information on
how to set up your router for manual setup.
Win XP: Establishes a connection through ports 80 and 443. If these ports are
unavailable, a relay connection is established. This option is required if you’re
using Windows XP.
Note: By default, the My Cloud EX2 Ultra device automatically establishes a direct
connection between your mobile devices and router.
4. Select a connection type:
Auto: Click Auto.
Manual: Click Manual, and then enter the External Port 1 (HTTP) and External
Port 2 (HTTPS) numbers.
Win XP: Click Win XP.
5. Click Apply.
6. In the Dashboard Cloud Access field, click the toggle button
to turn on access to
the dashboard from the cloud remotely.
Note: Selecting this option allows you to perform administrator functions remotely.
MY CLOUD EX2 ULTRA PRIVATE CLOUD STORAGE
USER MANUAL
81
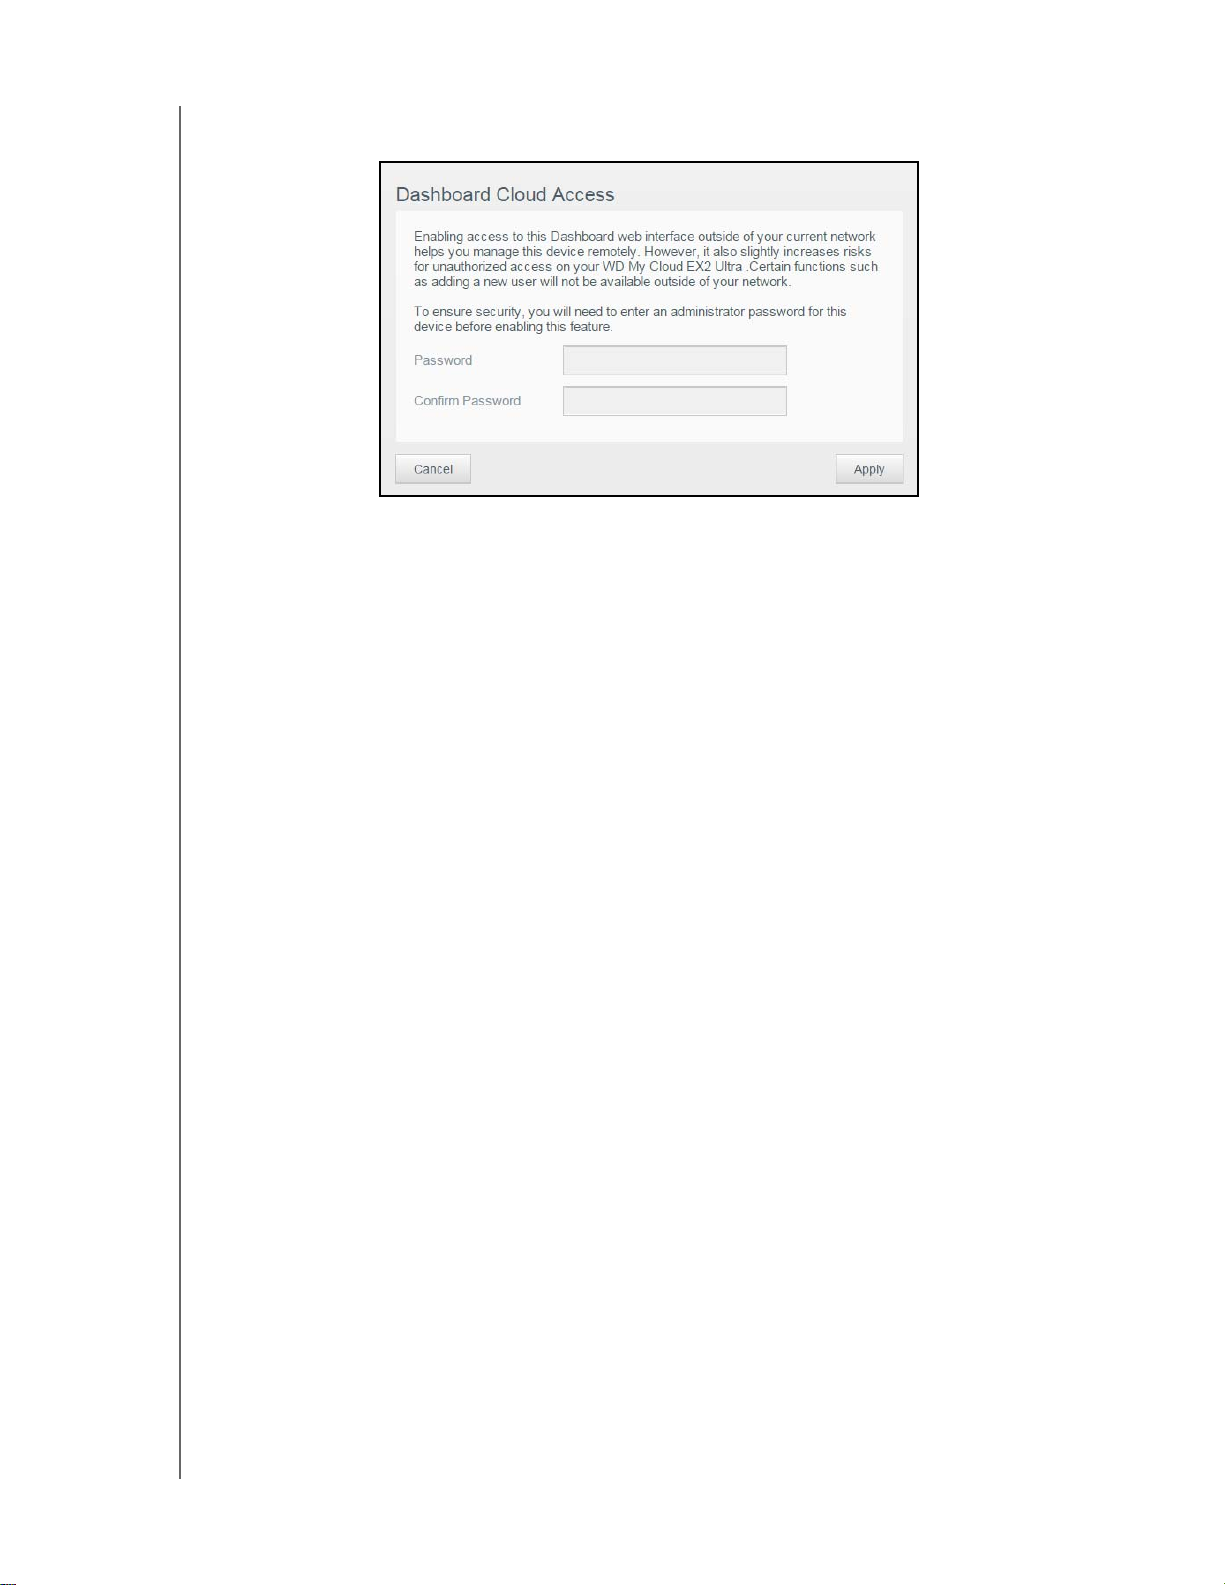
CONFIGURING SETTINGS
7. Review the information on the screen, and then enter and reenter a password for your
administrator account.
If your administrator account already has a password associated with it, review
Click Apply.
the Dashboard Cloud Access screen, and then click Apply.
Note: If you set your Cloud Setting to Manual, you will have to access your device
remotely using the ports you selected during the manual cloud setup.
Example: If you set up your manual HTTP port as 5040, you’d use the
following address to access your device: http://<Device IP Address>:5040.
MY CLOUD EX2 ULTRA PRIVATE CLOUD STORAGE
USER MANUAL
82
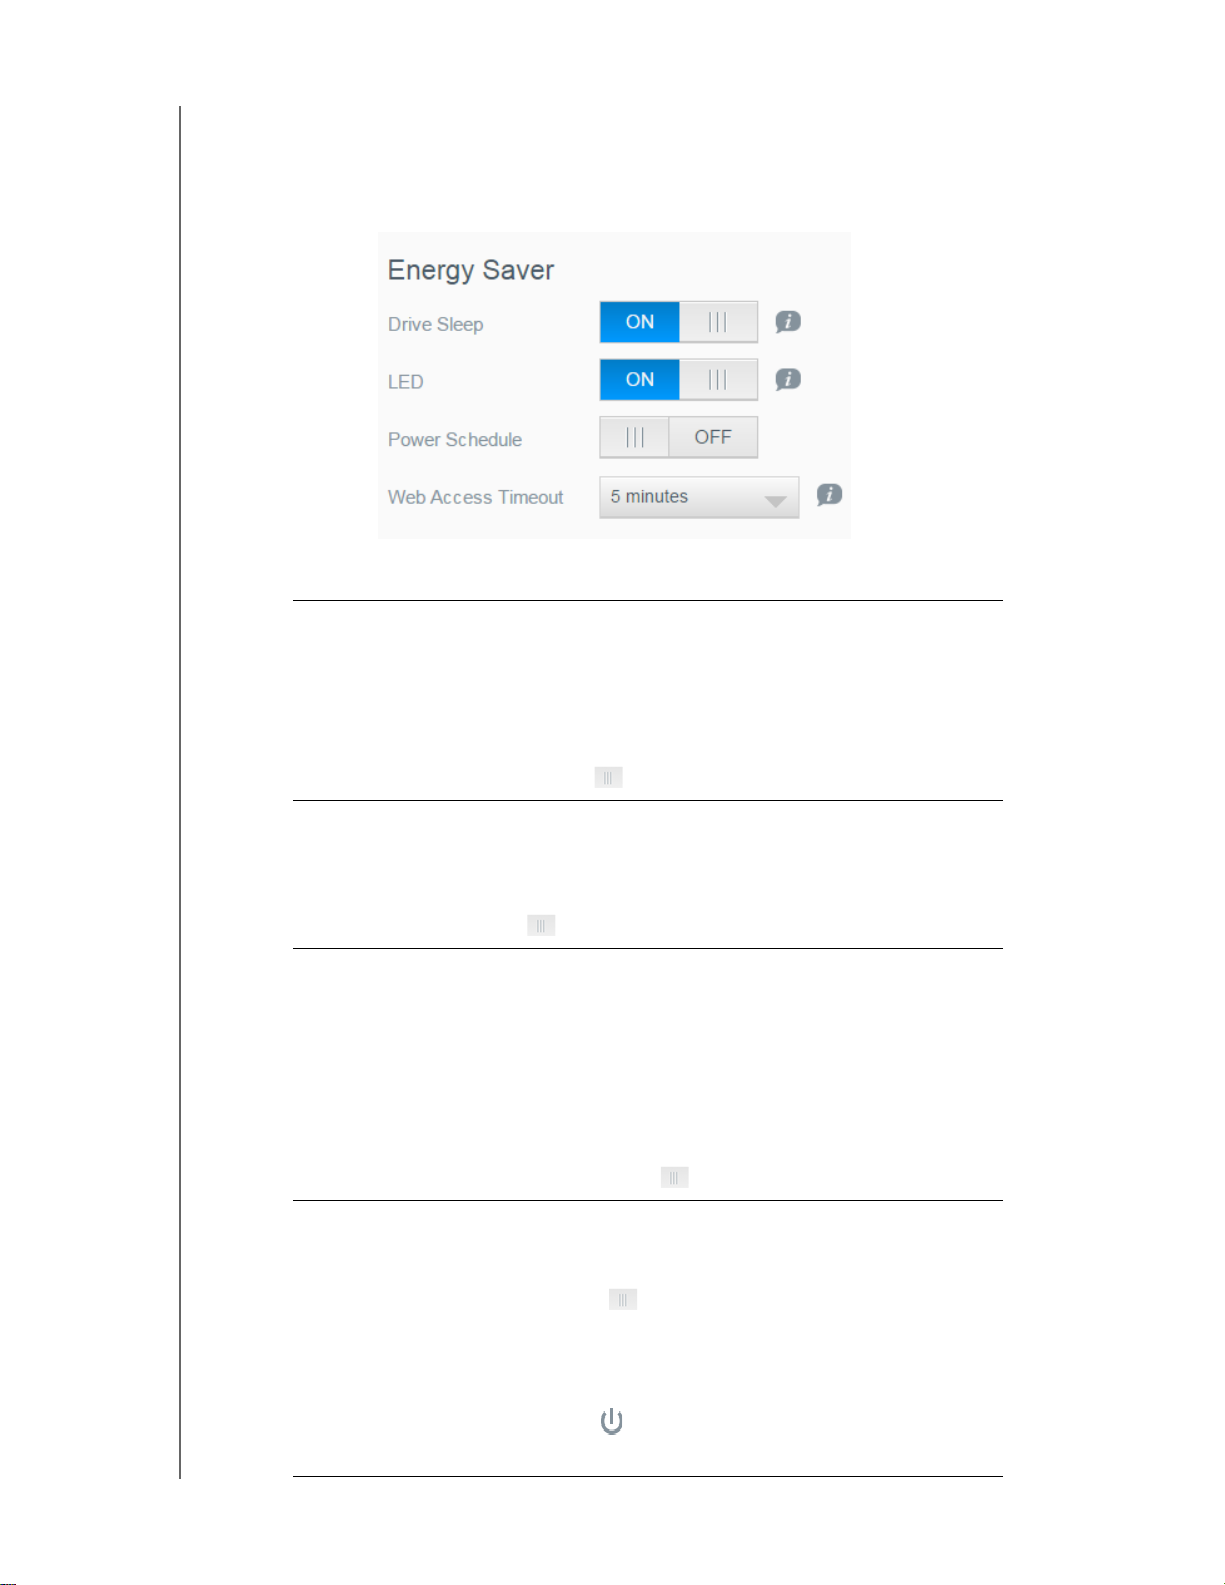
CONFIGURING SETTINGS
Energy Saver
The Energy Saver fields allow you to reduce the energy required to run your
My Cloud EX2 Ultra device. Use the following information to configure the energy saving
options on your My Cloud EX2 Ultra device.
View or change the following settings:
Drive Sleep
LED
Power Recovery
Enabling this function allows the hard drives to go
into standby mode to save power after a
designated period of inactivity. Drive Sleep is
enabled to sleep after approximately 10 minutes by
default.
• To enable/disable Drive Sleep, click the toggle
button
.
Enabling this function allows the device LEDs to go
into standby mode to save power. LED is enabled
by default.
• To enable/disable LED, click the toggle button
.
Automatically restarts your device from a previously
unexpected shutdown due to power failure. Power
Recovery is enabled by default.
Note: If you disable this feature, your device will
not automatically power on after an
unexpected shutdown.
• To enable/disable Power Recovery, click the
toggle button
.
Power Schedule
The Power Schedule allows you to schedule
shutdowns for your My Cloud EX2 Ultra device.
1. To enable Power Schedule, click the toggle
button
2. Click Configure.
3. Use the slider bar to configure the start and
stop times for your device.
4. Click
5. Click Save.
MY CLOUD EX2 ULTRA PRIVATE CLOUD STORAGE
USER MANUAL
.
to send the device into hibernate.
83
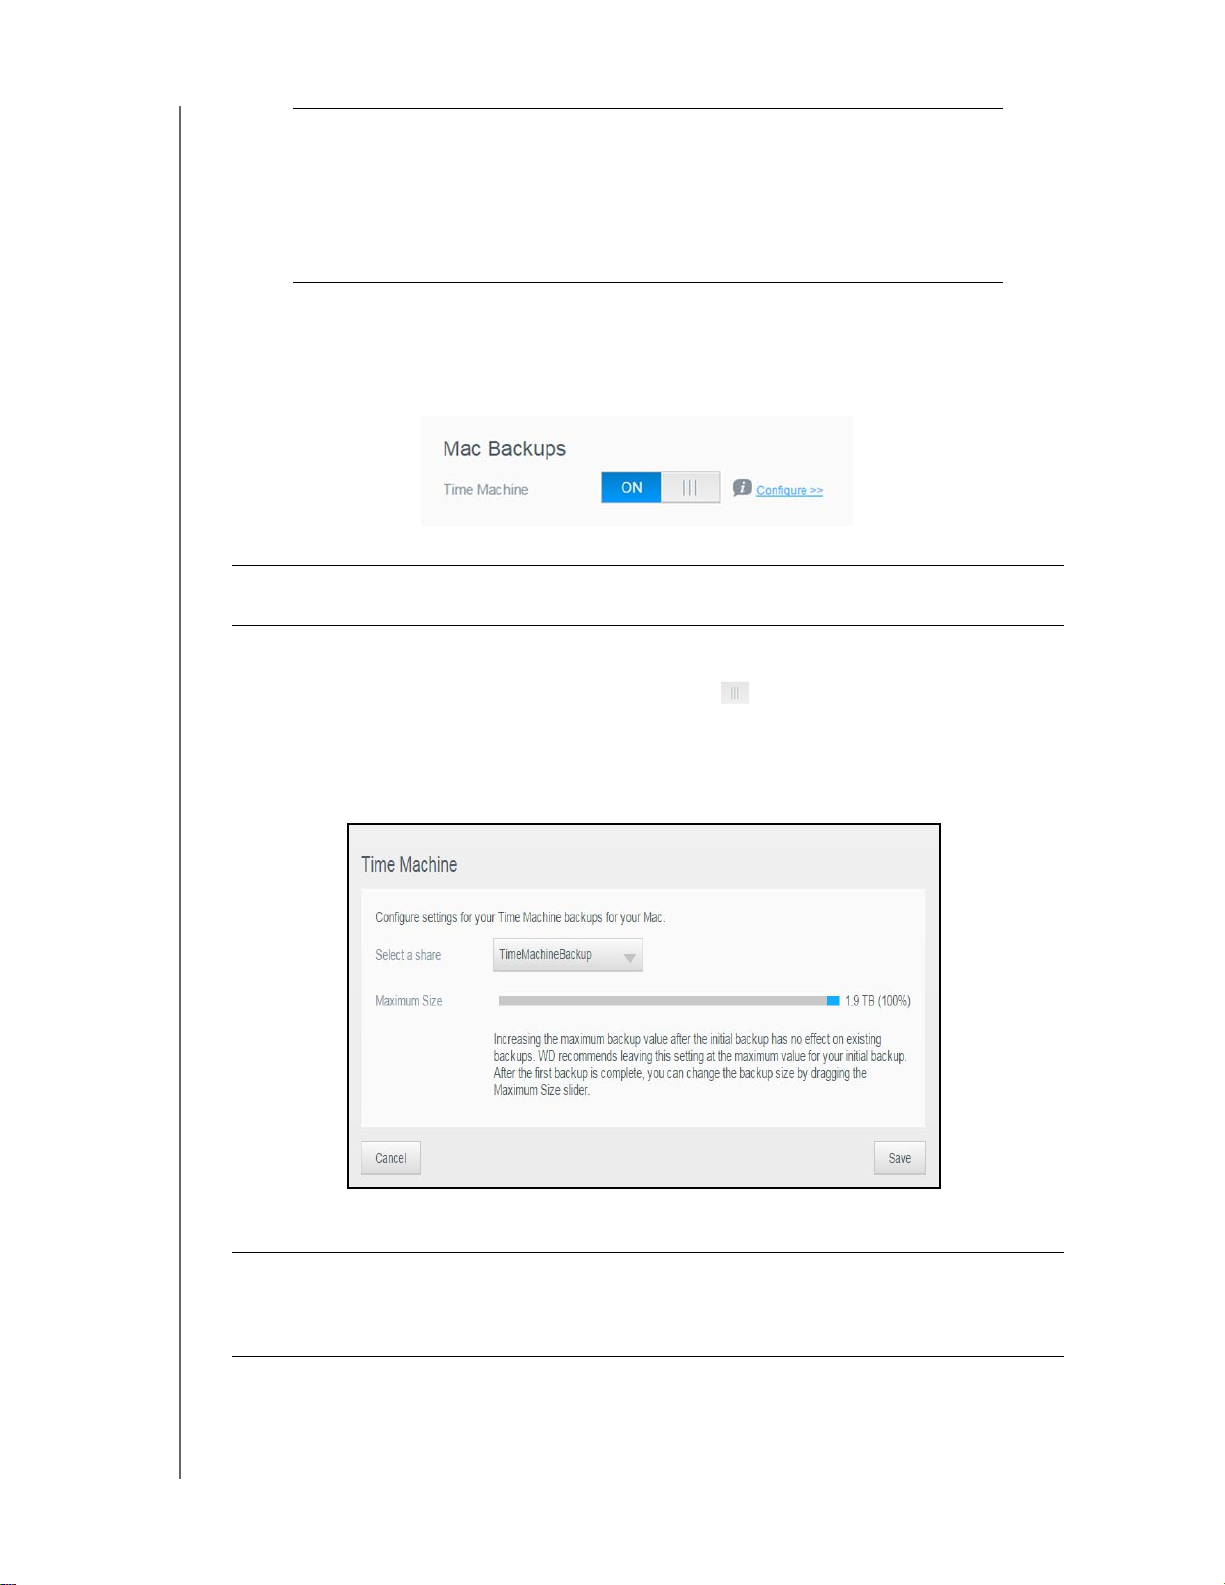
CONFIGURING SETTINGS
Web Access
Timeout
Automatically logs you out of the system after a
designated amount of time.
• From the Web Access Timeout drop-down
menu, select an amount of time you’d like to use
for your system timeout.
The system updates
automatically.
Mac Backups
This section of the General screen enables or disables Time Machine backups of Mac
computers.
Important: You must set a password for your Administrator account in order to restore your
Time Machine backups.
To configure backup settings:
1. In the Mac Backups area, click the toggle button
if not previously enabled.
2. Click the Configure link to display the
Time Machine Settings dialog.
3. From the Select a Share drop-down list, select a share you’d like to use to back up
your Mac data.
to enable Time Machine backups
4. Click Save.
Important: Once
Time Machine begins to back up your files to a selected share, we
recommend that you continue to back up to that share. Switching shares
generates a new backup file which will not contain your previously saved
information.
MY CLOUD EX2 ULTRA PRIVATE CLOUD STORAGE
USER MANUAL
84

CONFIGURING SETTINGS
Services
This section of the General screen enables or disables various services available on your
My Cloud EX2 Ultra device.
Recycle Bin
The Recycle Bin contains any files deleted from the My Cloud EX2 Ultra device. To clear
the recycle bin for your device, click Clear.
Note: Recycle Bin is only available for SMB protocols.
Network
The Network screen displays the device’s MAC and IP addresses and allows you to set
network options such as FTP access, remote servers, and workgroups.
Network Profile
The Network Profile section of the Network screen displays network information for the
My Cloud EX2 Ultra device.
The Network Profile section displays the following information:
MAC Address The Media Access Control (MAC) address for this
device.
IPv4 IP Address The IP version 4 address for this device.
IPv6 IP Address The IP version 6 address for this device.
MY CLOUD EX2 ULTRA PRIVATE CLOUD STORAGE
USER MANUAL
85
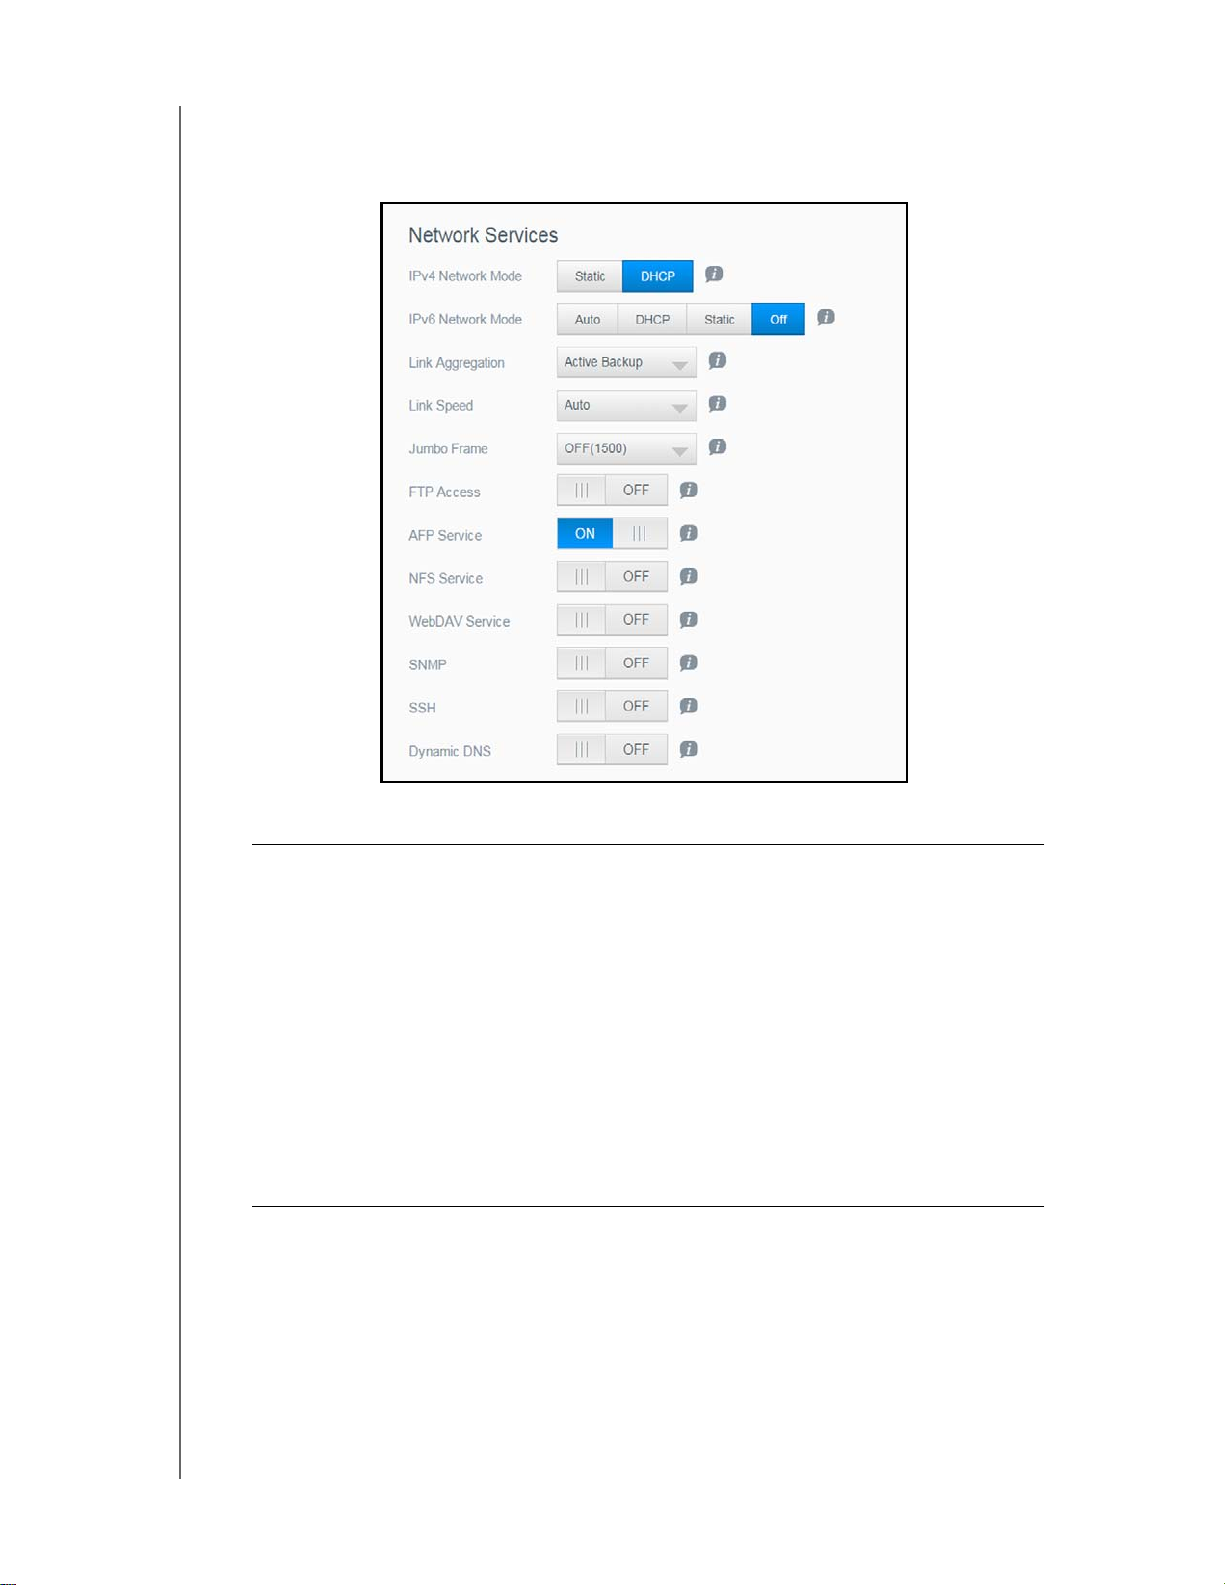
CONFIGURING SETTINGS
Network Services
The Network Services section of the Network screen allows you to enable or disable the
services available on your My Cloud EX2 Ultra device.
1. Review or update the following:
IPv4 Network Mode By default, the network mode is set to DHCP, which means
the My Cloud EX2 Ultra device automatically gets the IP address
and other settings from your network.
Select the method of assigning the device’s unique IPv4 address:
• Static: Static IP lets you set an IP address manually. You will be
prompted for IP Address, Subnet mask, Gateway IP address,
and DNS Server. (If you don’t know this information, please
check your router settings.)
• DHCP: DHCP Client causes the My Cloud EX2 Ultra device to
obtain an IP address and associated settings automatically
from the local DHCP server.
Note: When configuring Static or DHCP, record your Subnet mask,
Gateway IP address, and DNS Server in a safe location for
future reference. This information will not be displayed once it
is entered into the My Cloud EX2 Ultra server.
MY CLOUD EX2 ULTRA PRIVATE CLOUD STORAGE
USER MANUAL
86

CONFIGURING SETTINGS
IPv6 Network Mode The IPv6 format is a new IP standard that specifies the formats of
packets and the addressing scheme across multiple IP networks.
By default, this option is set to OFF.
Select the method of assigning the device’s IPv6 address:
• Auto
• DHCP
• Static
•Off
Once selected, complete the following fields on the associated
screen, and then click
Save:
• IP Address
• Prefix Length
• Default Gateway
• DNS Server
Note: When configuring the Static or DHCP, record your Subnet mask,
Gateway IP address, and DNS Server in a safe location for future
reference. This information will not be displayed once it is entered into
the My Cloud EX2 Ultra server.
Link Speed Select the link speed for your network from the drop-down menu,
and then click Save. Options Include:
• Auto
• 100
• 1000
Jumbo Frames Jumbo frames are large IP frames used to increase performance
over supported networks. Select the Jumbo Frame for your
network from the drop-down menu, and then click Save.
Note: All devices on your network (e.g., router, computer) must support and
be configured for this option in order to maximize performance.
SMB2 Server Message Block, version 2. Select this option to support
Windows File History in Windows 8.
• To enable/disable SMB2, click the toggle button .
Note: If you enable SMB2, read/write performance will be impacted.
MY CLOUD EX2 ULTRA PRIVATE CLOUD STORAGE
USER MANUAL
87

CONFIGURING SETTINGS
FTP Access File Transfer Protocol enables the transfer of data from one
computer to another through a network. FTP is disabled by
default.
1. To enable FTP Access, click the toggle button to on.
2. Click Configure.
3. On the FTP Settings screen, enter the following information:
• Maximum Users: From the drop-down menu, select the
maximum number of users you’d like to have FTP
• Idle T
• Port: Enter the port to be used for FTP
• Flow Control: Select either Unlimited or Customize. If you
4. Click Next.
5. In the Passive Mode field, select either Default or Customize. If
you select Customize, enter Passive Mode values.
6. Select the check box if you’d like to report external IP in PASV
mode, and then click Next.
7. Enter the following information:
• Client Language: Select the client language from the drop-
• SSL/TLS: Select this check box if you’d like to allow only SSL/
• FXP:
8. Click Next.
9. Enter all IP addresses that you’d like to block from FTP access, and
then select either Permanent or T
menu. Click Save to save your entries.
10. Click Finish.
ime: Enter the amount of time, in minutes, you’d like the
FTP to be idle before it times out.
access.
select Customize, enter a Flow Control value.
down menu.
TLS connections.
To enable FXP, click the toggle button to ON.
emporary from the drop-down
access.
AFP Service Apple File Protocol. AFP Service is automatically enabled if you
are set up for Time Machine backups.
• To enable/disable AFP Service, click the toggle button .
WARNING! Mounting or ejecting a USB drive while performing
an NFS or AFP file transfer will interrupt the file
transfer process.
NFS Service Network File System. Select this option to enable NFS Service for
your network.
• To enable/disable NFS Service, click the toggle button .
WARNING! Mounting or ejecting a USB drive while performing
an NFS or AFP file transfer will interrupt the file
transfer process.
WebDAV Service Web Distributed Authoring and Versioning (WebDAV). Select this
option to enable WebDAV service for your network.
• To enable/disable WebDAV Service, click the toggle button
.
Note: In order to connect to the WebDAV service, use the following IP
address: http://<server ip address>:8080/Public
LLTD Link Layer Topology Discovery protocol. Select this option to
enable LLTD on your network for enhanced network discovery
and diagnostics on Microsoft Windows machines.
• To enable/disable LLTD, click the toggle button .
MY CLOUD EX2 ULTRA PRIVATE CLOUD STORAGE
USER MANUAL
88

CONFIGURING SETTINGS
SNMP Simple Network Management Protocol. Select this option to
manage devices over IP networks.
• To enable/disable SNMP, click the toggle button
.
Note: See the WD Tech Support Downloads page at
http://support.wd.com
to download the MiB configuration file.
SSH Secured Shell protocol. Select this option to securely access your
Private Cloud and perform command-line operations via the
Secured Shell (SSH) protocol. SSH is disabled by default.
• To enable/disable SSH, click the toggle button
WARNING! Please note that modifying or attempting to modify
this device outside the normal operation of the
product voids your WD warranty.
Note: The SSH login User Name is sshd.
.
Dynamic DNS Select this option to host a server (Web, FTP, Game server, etc.)
using a domain name.
1. To enable/disable Dynamic DNS, click the toggle button .
2. Click Configure.
3. On the DDNS Settings screen, enter the following information:
• Server Address: Select a server address from the drop-down
menu.
• Host Name: Enter a Host Name for the server
• User Name or Key: Enter a User Name or Key for the server
• Password or Key: Enter a password or key for the server
• V
erify Password or Key: Re-enter the password or key for the
server.
4. Click Save.
.
.
.
Network UPS
An Uninterruptible Power Supply (UPS) is a device that works off of a battery and keeps
devices that are connected to the UPS port running for at least a short time if the main
power source goes out.
Network Workgroup (Windows)
The Network Workgroup section of the Network screen allows you to enable or disable
the workgroup options available on your My Cloud EX2 Ultra device.
MY CLOUD EX2 ULTRA PRIVATE CLOUD STORAGE
USER MANUAL
89

CONFIGURING SETTINGS
Workgroup
The Workgroup feature allows devices in the same workgroup to access one another.
This option is only available for Windows operating systems. Each time you add a device
to your network, assign it the same workgroup name to enable access.
1. In the Workgroup file, enter the name of the workgroup for your network.
2. Click Save.
Local Master Browser
The Local Master Browser feature allows you to collect and record resource and/or
service information across multiple locations.
To enable/disable the Local Master Browser, click the toggle button .
Remote Server
The Remote Server section of the Network screen allows you to enable your
My Cloud EX2 Ultra device to act as a remote server, allowing you to back up shares from
another My Cloud EX2 Ultra on the local LAN or W
AN.
Note: To see your My Cloud EX2 Ultra device over the Internet, ensure that
you’ve added port forwarding rules for both SSH and Remote Backup
services (“Port Forwarding” on page 91). To enable Remote server, click
the toggle button to ON.
3. Click Configure.
4. In the Password field, enter a password to be used to access remote backups for this
device to a remote server
.
5. Click Save.
6. Review the SSH information, and then click the I accept check box.
7. Create a password for SSH login, and then click OK.
MY CLOUD EX2 ULTRA PRIVATE CLOUD STORAGE
USER MANUAL
90
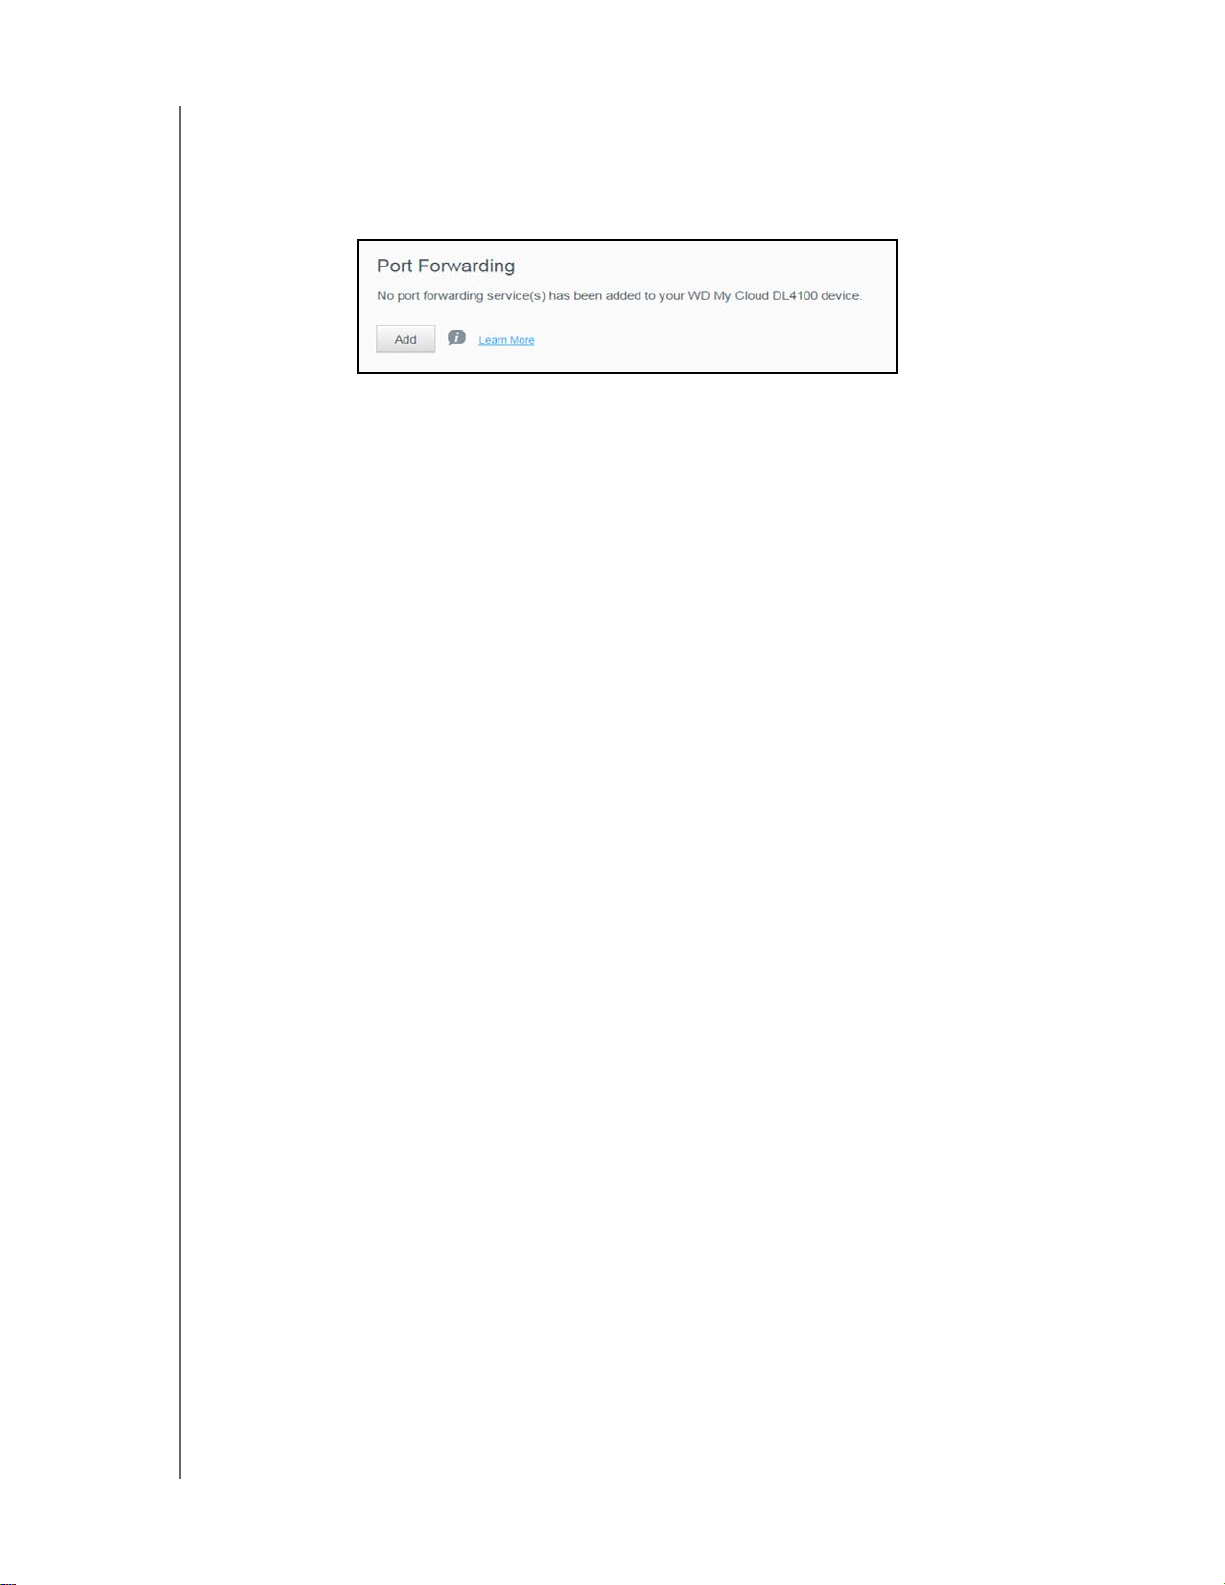
CONFIGURING SETTINGS
Port Forwarding
The Port Forwarding section of the Network screen allows you to manage your
connections to particular services by assigning default or custom port numbers.
For additional information on Port Forwarding, see Knowledge Base
Answer ID 10649.
Adding Port Forwarding Services
1. Click Add to add port forwarding service(s) to your My Cloud EX2 Ultra device.
2. On the Port Forwarding Settings screen, click either Select the default service scan
or the Customize a port forwarding service, and then click Next.
If you selected Select the default service scan: Select the default service scan
you’d like to use for port forwarding, and then click Apply.
If you selected Customize a port forwarding service, complete the following fields:
- Service: Enter a service for your port forwarding.
- Protocol: Select a protocol from the drop-down menu.
- External Port: Enter an external port number for your port forwarding.
- Internal Port: Enter the internal port number for your port forwarding
- Click Finish.
Modifying Port Forwarding Services
1. Click Details next to the port forwarding service you’d like to modify
2. Make all necessary changes, and then click Finish.
Deleting Port Forwarding Services
1. Click Details next to the port forwarding service you’d like to delete.
2. Click Delete.
Your Port Forwarding service is deleted and removed from the Port
Forwarding list.
.
MY CLOUD EX2 ULTRA PRIVATE CLOUD STORAGE
USER MANUAL
91
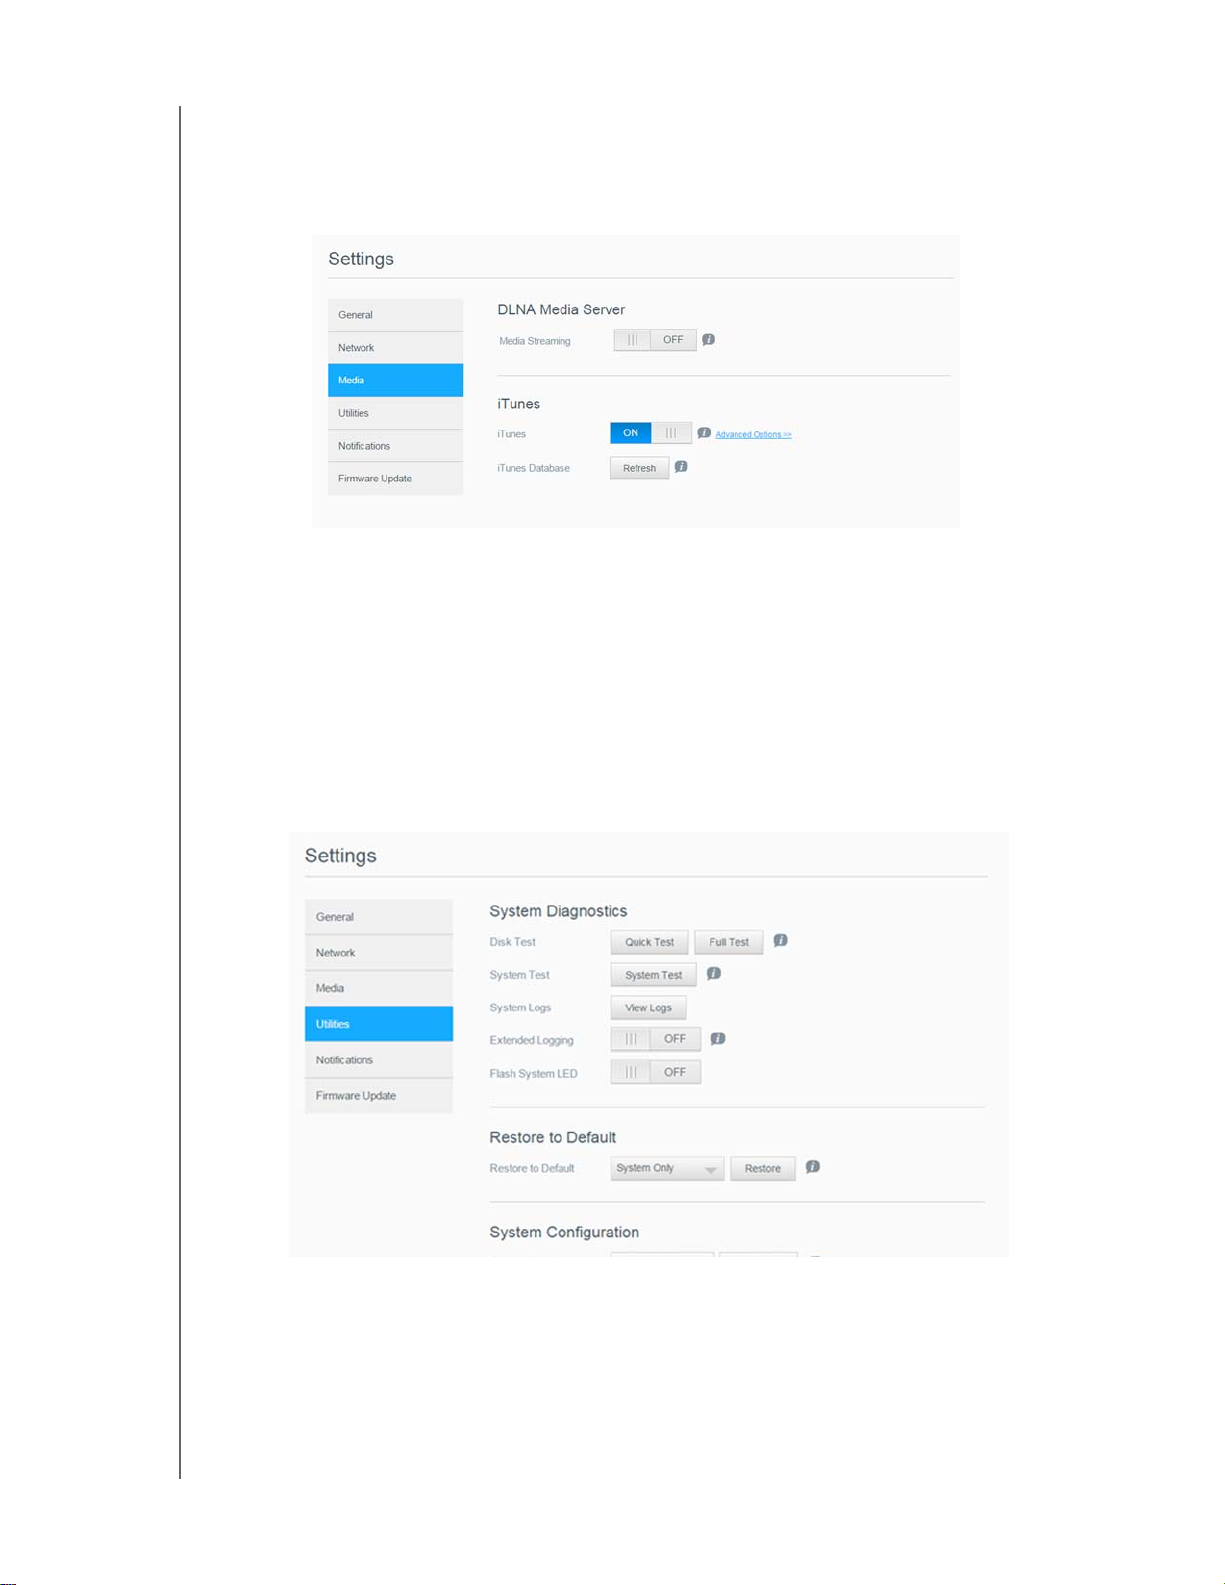
CONFIGURING SETTINGS
Media
On the Media screen, you can enter DLNA (Digital Living Network Alliance) media server
and iTunes media player settings so that you can enjoy media in every room in your
house.
1. On the Navigation bar, click the Settings icon, and then click Media in the left panel.
Note: DLNA and iTunes only work on your local network.
2. For instructions on entering media settings on this page and then displaying or
streaming media, see “Playing/Streaming Videos, Photos, & Music” on page 70.
Utilities
On the Utilities page, you can test the My Cloud EX2 Ultra device and get diagnostic
information, restore the device to factory defaults, reboot or hibernate the device, and
import or export a configuration file.
To access the Utilities screen, click the Settings icon, and then click Utilities in the left
pane.
System Diagnostics
Run diagnostic tests if you are having problems with your device. There are three types of
diagnostic tests.
MY CLOUD EX2 ULTRA PRIVATE CLOUD STORAGE
USER MANUAL
92
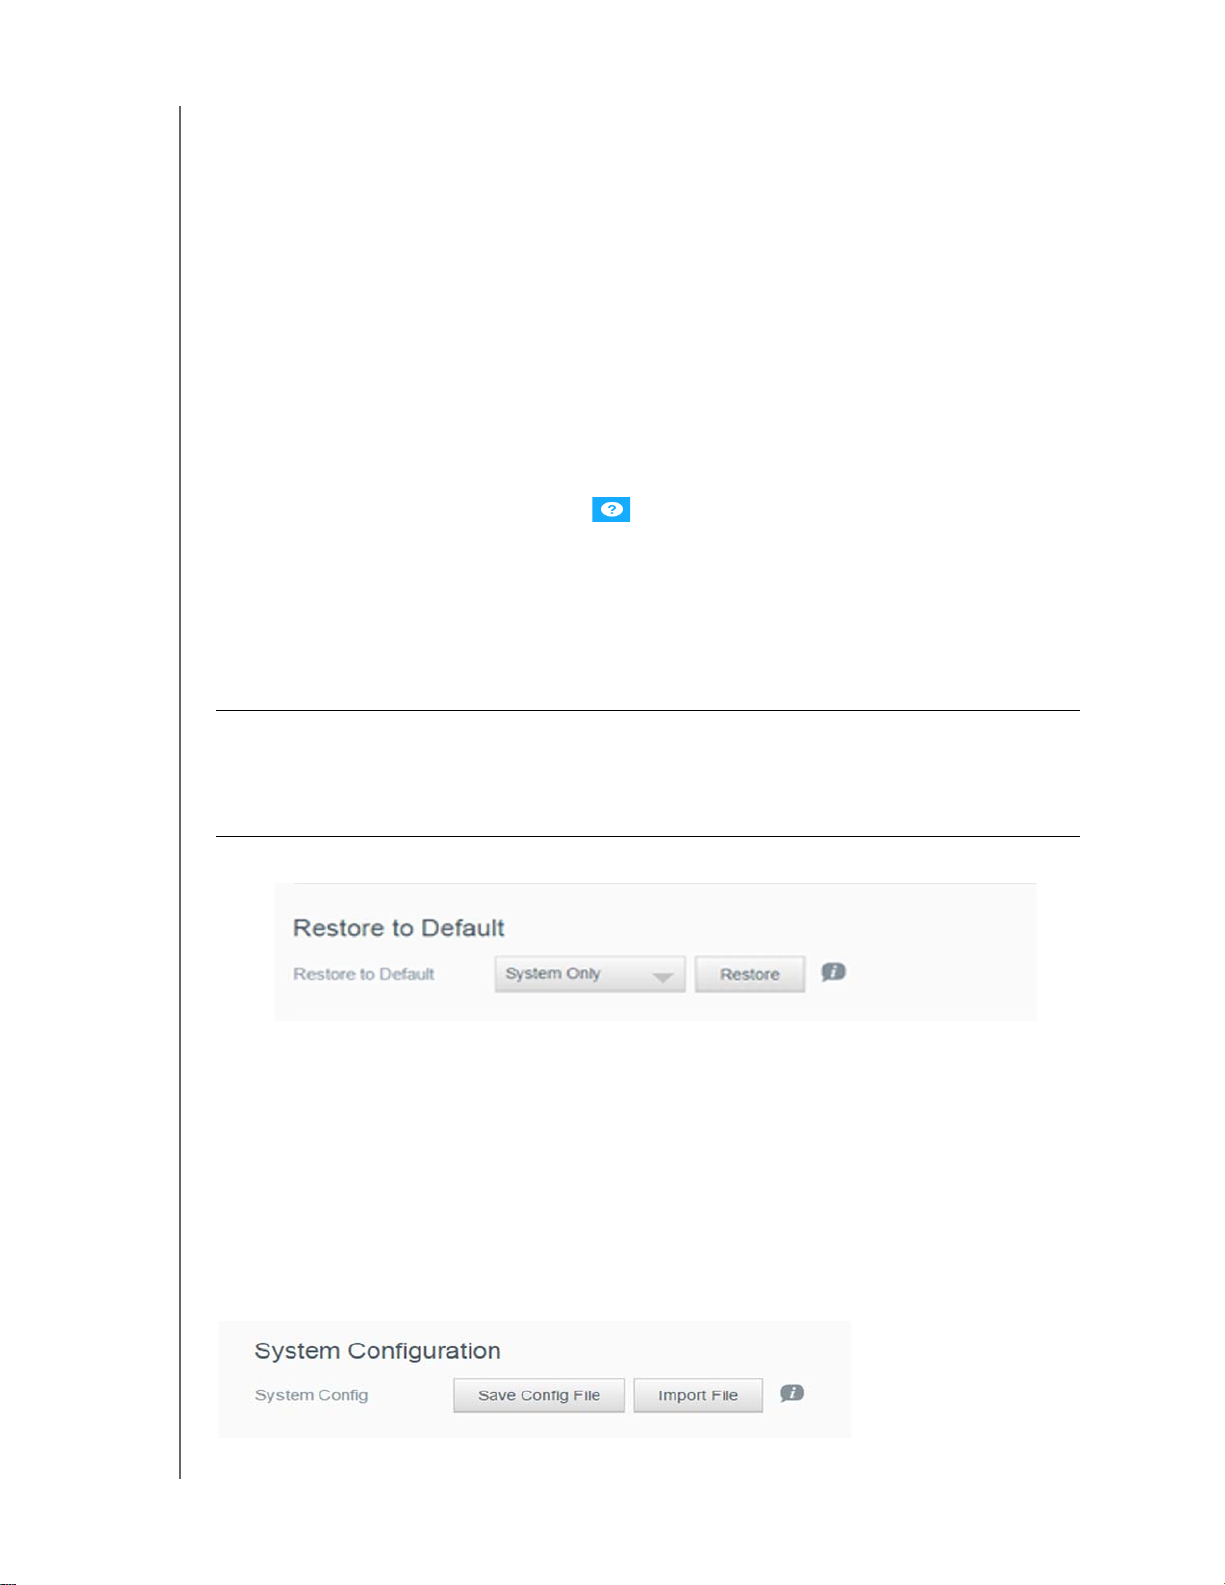
CONFIGURING SETTINGS
Quick Test: The quick test checks the hard drives for major performance
problems. The result of a quick test is a pass or fail evaluation of the hard drive’s
condition. The quick test can take several minutes to complete.
Full Test: The full test is a more comprehensive drive diagnostic. It methodically
tests each and every sector of the hard drives. You will be informed of the
condition of the hard drive once the test is performed. The full test may take hours
to complete, depending on the size and data configuration of the hard drives.
System Test: The system test reviews the health of your device hardware (hard
drives, fan, system clock, and device temperature).
Running a Diagnostic Test
1. On the Utilities page, click Quick Test, Full Test, or System Test. A progress bar
displays, indicating test progress and whether the device passed or failed the test.
2. Review the test results, and then click Close.
If the device fails the test, click , and then click Support to get assistance.
System Restore
The system restore allows the Administrator to perform a full factory restore on the
My Cloud EX2 Ultra device. This option restores your device to factory default settings
with no data loss.
Important: Before doing a factory restore or a system update, you may choose to save your
device’
s current configuration. At a later time, you can import a previously saved
configuration. Keep in mind that importing a configuration after restoring factory
defaults does not restore shares or users. See “System Configuration,” to create or
restore a configuration file.
Note: To erase all of the data on your device, see “Format Disk” on page 95.
1. In the System Restore area, click System Restore.
2. Review the confirmation message, and then click OK.
The device reboots. Don’t unplug the device during this rebooting process. Once the
reboot is complete, launch the dashboard.
System Configuration
The system configuration area allows you to save a configuration file or import an existing
configuration file. This is useful if you perform a system restore and want to maintain your
current configurations.
MY CLOUD EX2 ULTRA PRIVATE CLOUD STORAGE
USER MANUAL
93
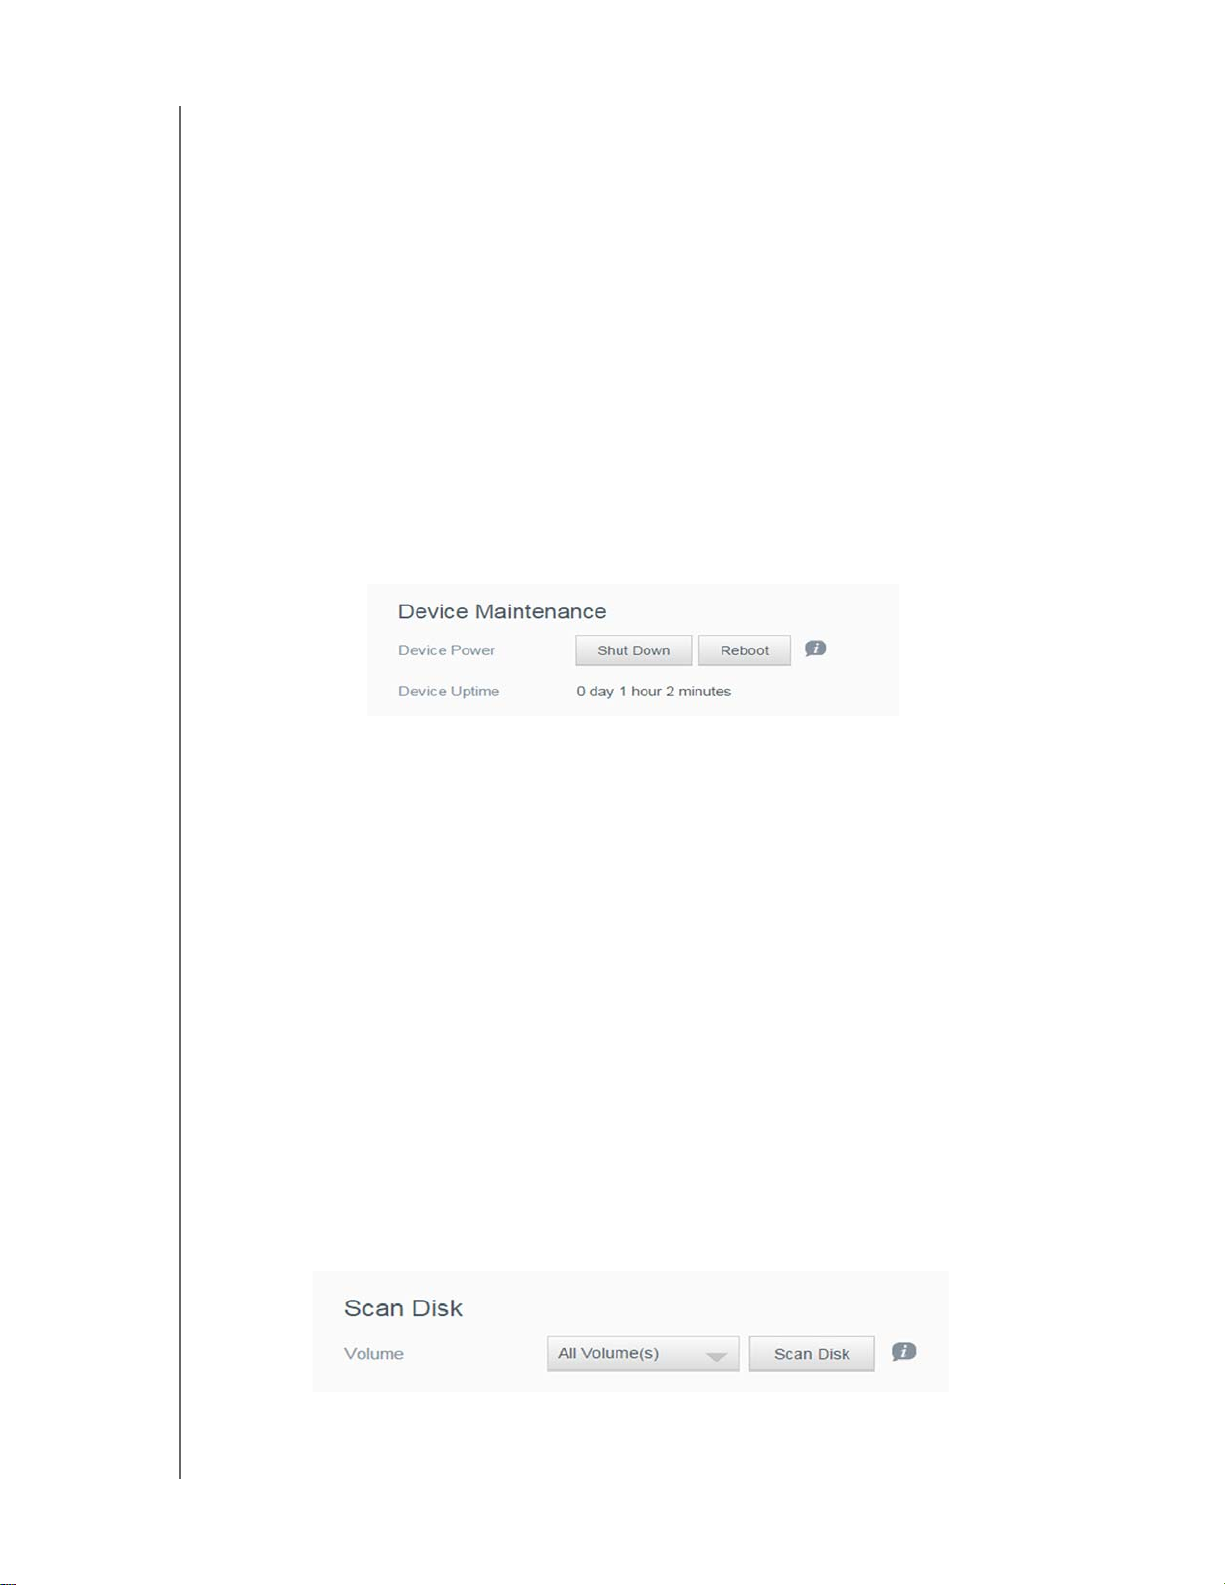
CONFIGURING SETTINGS
Saving a Configuration File
Use the following steps to save a configuration file.
1. In the System Configuration area, click Save Config File.
2. The configuration file saves to your desktop.
Importing a Configuration File
Use the following steps to save a configuration file.
1. In the System Configuration area, click Import File.
2. Navigate to the location of your saved configuration file and select it. The
configuration file is loaded.
rebooting process. Once the reboot is complete, launch the dashboard.
The device will reboot. Don’t unplug the device during this
Device Maintenance
The Device Maintenance area allows you to reboot or hibernate your My Cloud EX2 Ultra
device. This area also displays the amount of time the device has been up and running.
Setting Device to Hibernate
Use the following steps to safely set your My Cloud EX2 Ultra device to hibernate.
1. In the top menu, click Settings.
2. In the left menu, click Utilities.
3. In the Device Maintenance area, click Hibernate.
4. Review the confirmation message, and then click OK. Y
shuts down.
our My Cloud EX2 Ultra safely
Rebooting the Device
1. In the top menu, click Settings.
2. In the left menu, click Utilities.
3. In the Device Maintenance area, click Reboot.
4. Review the confirmation message, and then click OK. Y
reboots.
our My Cloud EX2 Ultra safely
Scan Disk
The Scan Disk area allows you to scan your device’s hard disks for any errors.
Scanning Your Disk
MY CLOUD EX2 ULTRA PRIVATE CLOUD STORAGE
USER MANUAL
94
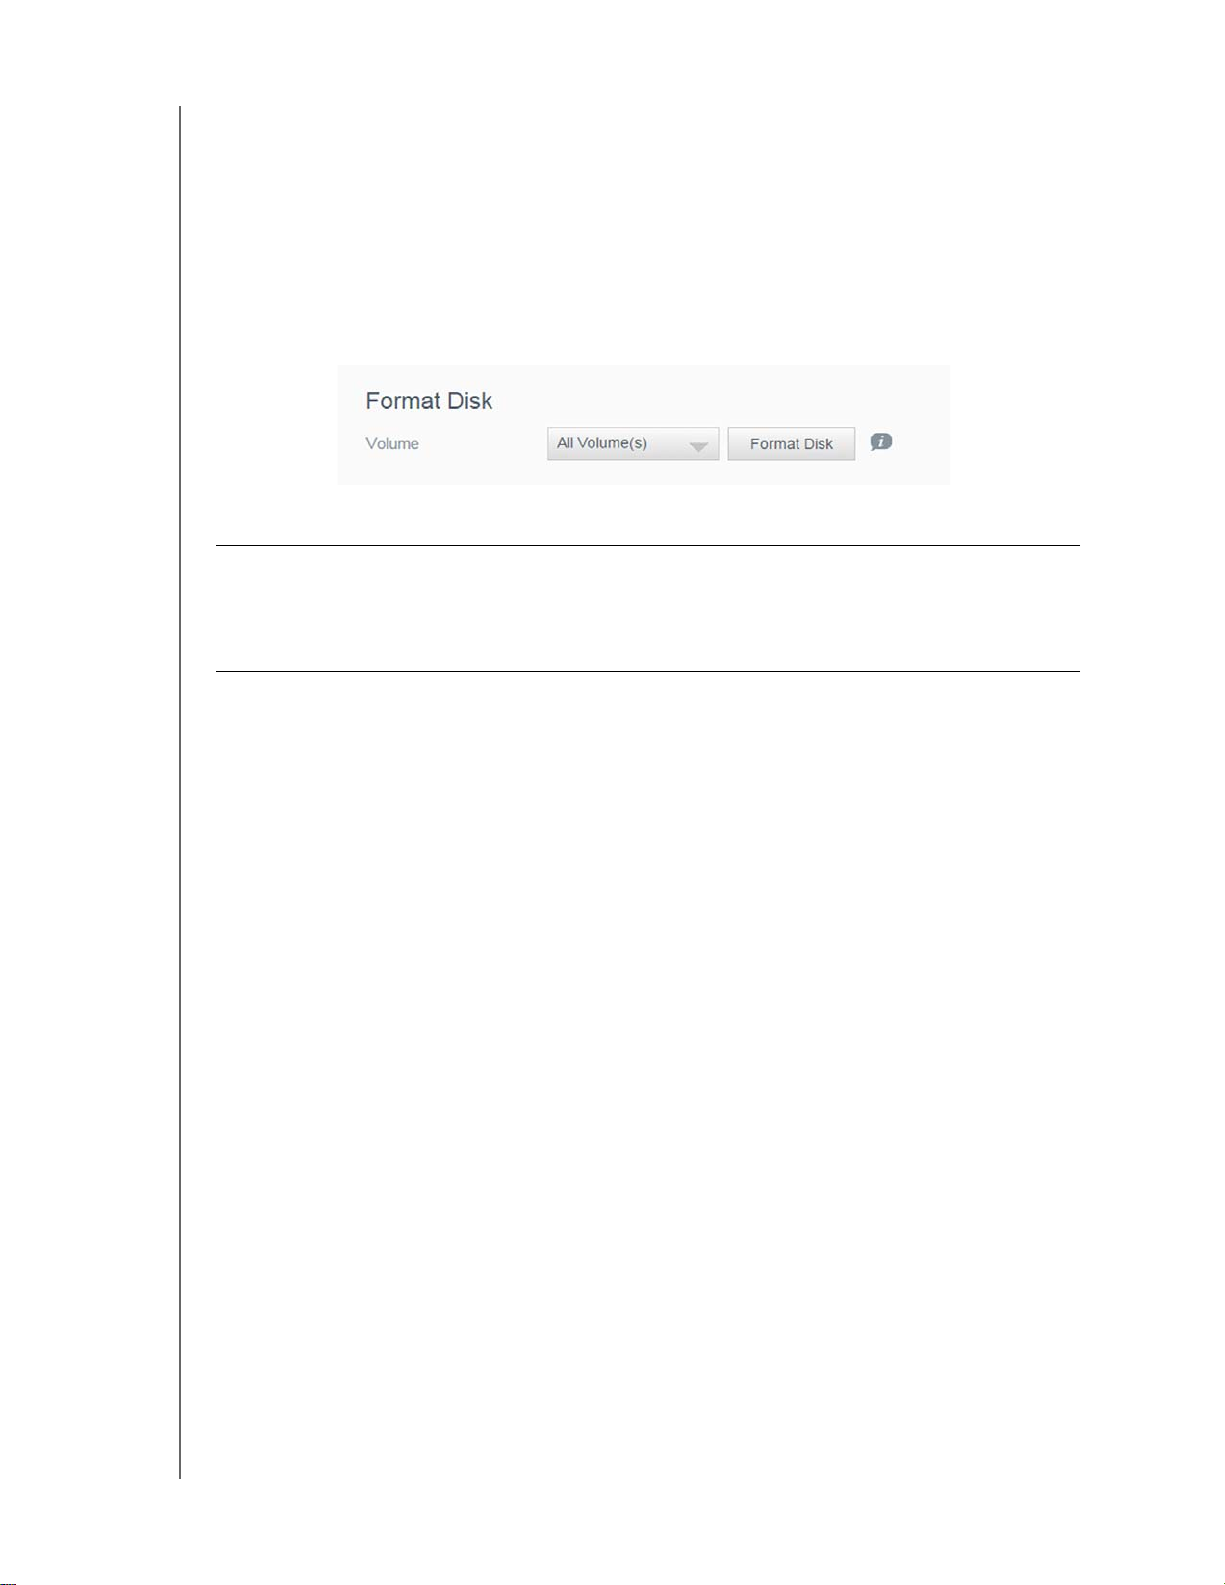
CONFIGURING SETTINGS
Use the following steps to run a disk scan on your My Cloud EX2 Ultra device.
1. In the Scan Disk area, select the volume you’d like to scan from the drop-down menu.
2. Click Scan Disk.
3. Review the confirmation message, and then click OK.
Your My Cloud EX2 Ultra is
scanned for disk errors.
Format Disk
The Format Disk area allows you to format your device’s hard disks.
WARNING! The Format Disk option erases all of the user data and shares permanently ,
retaining default shares. Data recovery programs cannot be used to restore
data; all user data and shares are permanently deleted.
Formatting your disk will take several hours to complete.
Formatting Your Disk
Use the following steps to format the disks on your My Cloud EX2 Ultra device.
1. In the Format Disk area, select the volume you’d like to format from the drop-down
menu.
2. Click Format Disk.
3. Review the confirmation message, select the check box, and then click OK. Y
our My
Cloud EX2 Ultra is formatted.
Notifications
The My Cloud EX2 Ultra device provides notifications about various events, such as
firmware updates, the success of firmware installations, and system shutdowns.
Notifications display in the Alert area at the top of the screen and are also available by
email, depending on how your device is configured (for additional information on Alerts,
see “Managing Alerts” on page 33).
MY CLOUD EX2 ULTRA PRIVATE CLOUD STORAGE
USER MANUAL
95
 Loading...