

Page 1
INSTALLATION INSTRUCTIONS AND OWNER’S MANUAL
GARAGE DOOR OPENER
Chain/ Belt Drive
Models: 3220C, 3221C, 3222C, 3224C, 3320B, 3322B, 3324B
3220C-Z, 3221C-Z, 3222C-Z, 3224C-Z, 3320B-Z, 3322B-Z, 3324B-Z
®
FOR RESIDENTIAL SECTIONAL OVERHEAD GARAGE DOORS ONLY!
DO NOT USE ON ONE PIECE DOORS!
IMPORTANT! THE DOOR AND OPENER WILL NOT FUNCTION PROPERLY UNTIL
INFRARED SAFETY SENSORS ARE INSTALLED AND PROPERLY ADJUSTED!
IMPORTANT NOTICE!
Read the enclosed instructions carefully before installing/operating
this garage door opener. Pay close attention to all warnings and
notes. This manual MUST be attached to the wall in close proximity
to the garage door.
GARAGE DOORS & OPENERS
Copyright 2008 Wayne-Dalton Corp. Part No. 339634 New 9/18/2008
Page 2
Door Arm
Lower
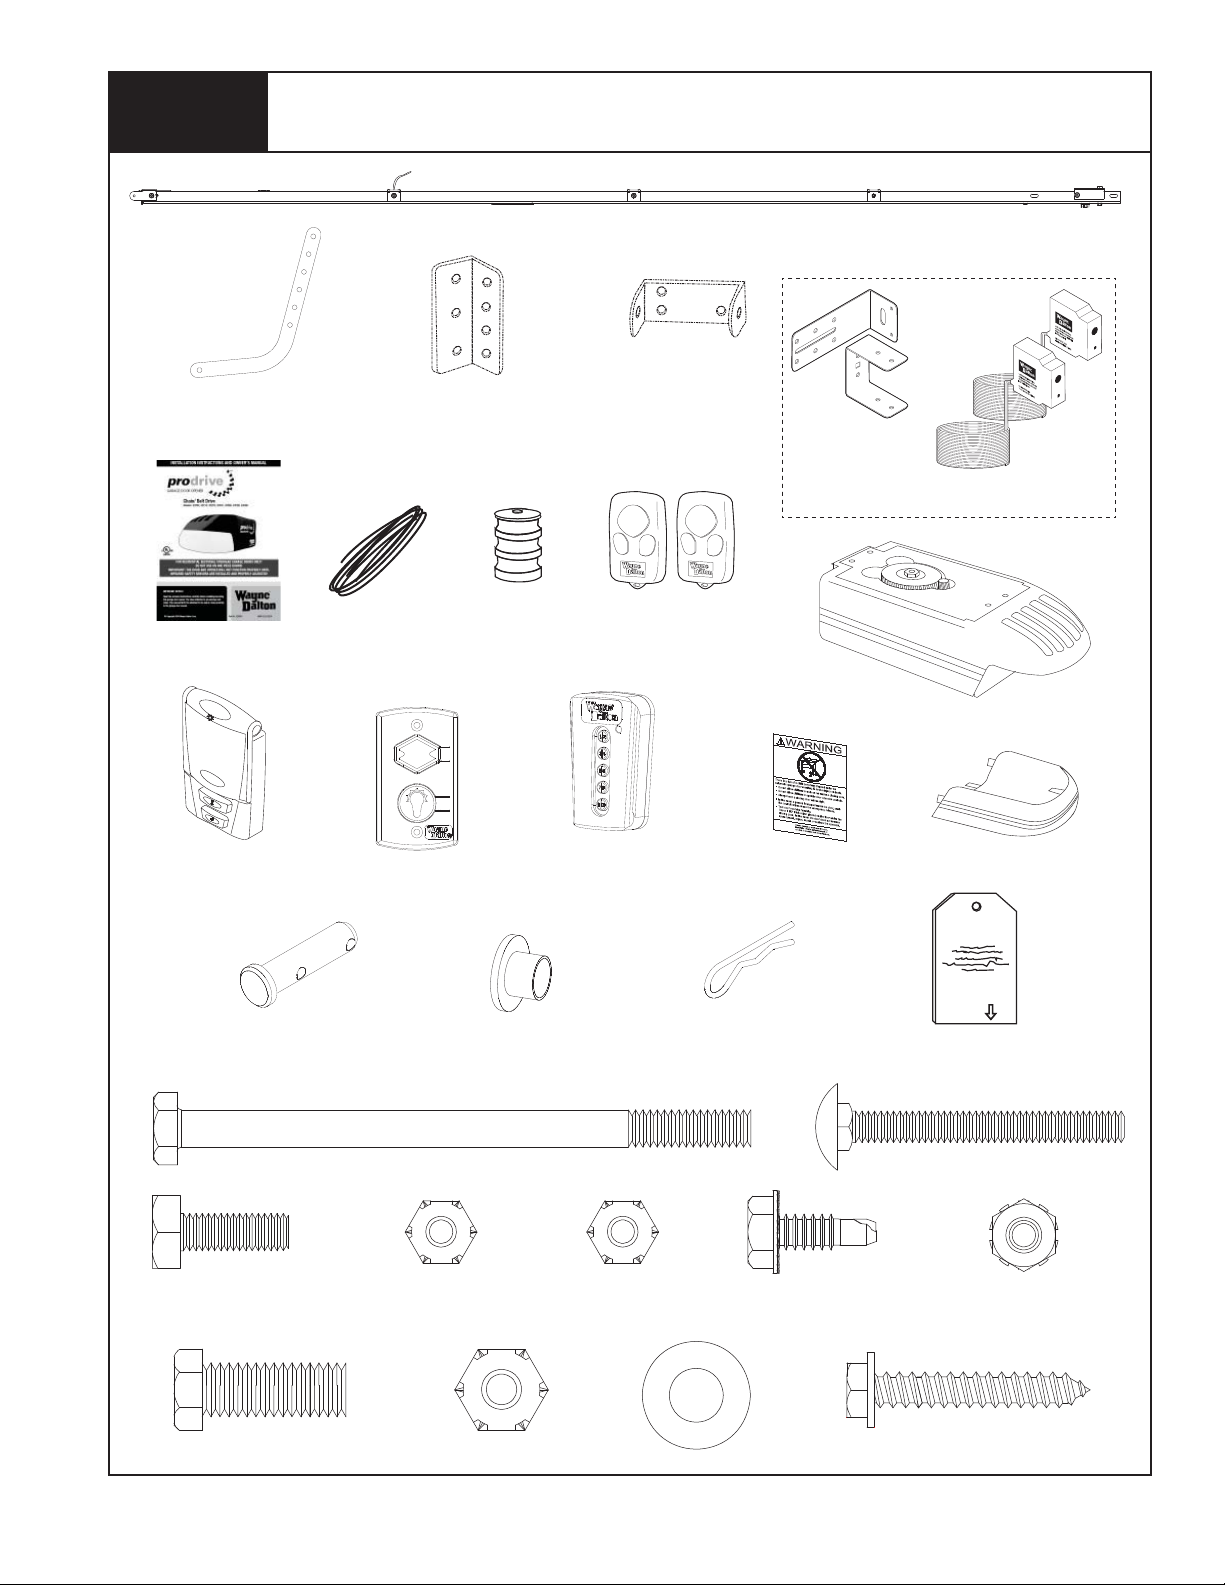
Package Contents
Door Bracket
NOTE: Depending on the opener model, some parts
listed may not be supplied.
Rail Assembly W/Upper
Door Arm
Wired Safety Sensors W/ Hardware
Wall Mounting
Brackets
(2) Safety Sensor
Brackets
Infrared Safety Sensors
(1 Sender + 1 Receiver)
Owner’s Manual
e
r
p
a
O
t
e
o
T
D
o
Press
o
r
Here
Multifunction
Wall Station
W/Hardware
Clevis Pin
Bell Wire
Wired Deluxe Wall
Station W/Hardware
1/4” x 4” Hex Head Bolt
Red Emergency
Release Knob
Nylon Shoulder Bushing5/16” x 1-1/4” Multi Grip
Keychain/Visor
Transmitter (1 or 2)
5 Button Wireless
Keyless Entry W/
Hardware
Entrapment Label
Hairpin Cotter
Opener
Light Diffuser
EMERGENCY
RELEASE
Emergency Release Tag
(2) 1/4” - 20 x 2” Carriage Bolts
(2) 1/4”-20 x 3/4” Machine Bolts (2) 1/4” Nylock Nuts
3/8”-16 x 1” Machine Bolt 3/8” Plastic Insert
Locking Nut
I
Please Do Not Return This Product To The Store. Call Us Directly! Our Trained Technicians Will Answer Your Questions and/or Ship Any Parts You May Need
1/4” Plastic Insert
Locking Nut
3/8” Flat Washer
(2) 1/4” - 20 x 5/8”
Self Drilling Screws
(2)1/4” Locking Nuts
(2) 1/4” x 1-1/2” Lag Screws
You can reach us Toll Free at 1-888-827-3667 for Consumer Assistance or online at www.wayne-dalton.com
Page 3

PRE-INSTALLATION INSPECTION OF YOUR GARAGE DOOR
PRIOR TO PRODRIVE
To ensure your new Prodrive ® opener works as intended, your garage door must be properly
installed and balanced.
Before installing your garage door opener, open and close you door manually to ensure it
operates smoothly from top to bottom. A properly balanced door should not take a lot of
effort to open or close by hand. The door should stay in the open and in the closed
position without drifting down or creeping up. If a door opens fast, the door may need spring
tension reduced. If the door drops fast, the door may need spring tension increased.
®
OPENER INSTALLATION
If the door operates properly, then proceed to your Prodrive
instructions on how to install the Prodrive
®
garage door opener.
®
installation manual for
If the operation of the door does not meet these requirements, adjust the spring
balance per your door’s installation manual or call a professional installer to make
adjustments before installing Prodrive
®
.
Instruction manuals are available for download on www.wayne-dalton.com. Use the web site to
also nd the location of your nearest professional dealer.
Once the door is properly balanced and operates smoothly, you may proceed with the
installation of your Prodrive
®
garage door opener.
Please Do Not Return This Product To The Store. Call Us Directly! Our Trained Technicians Will Answer Your Questions and/or Ship Any Parts You May Need
You can reach us Toll Free at 1-888-827-3667 for Consumer Assistance or online at www.wayne-dalton.com
II
Page 4
Pre-Installation
IMPORTANT! Before starting the installation read these instructions thoroughly to
familiarize yourself with all aspects of installation and adjustment.
IMPORTANT: IF YOUR GARAGE HAS NO SERVICE ENTRANCE DOOR, INSTALL AN OPTIONAL OUTSIDE QUICK RELEASE LOCK. THIS ACCESSORY
ALLOWS MANUAL OPERATION OF GARAGE DOOR FROM OUTSIDE IN CASE OF POWER FAILURE.
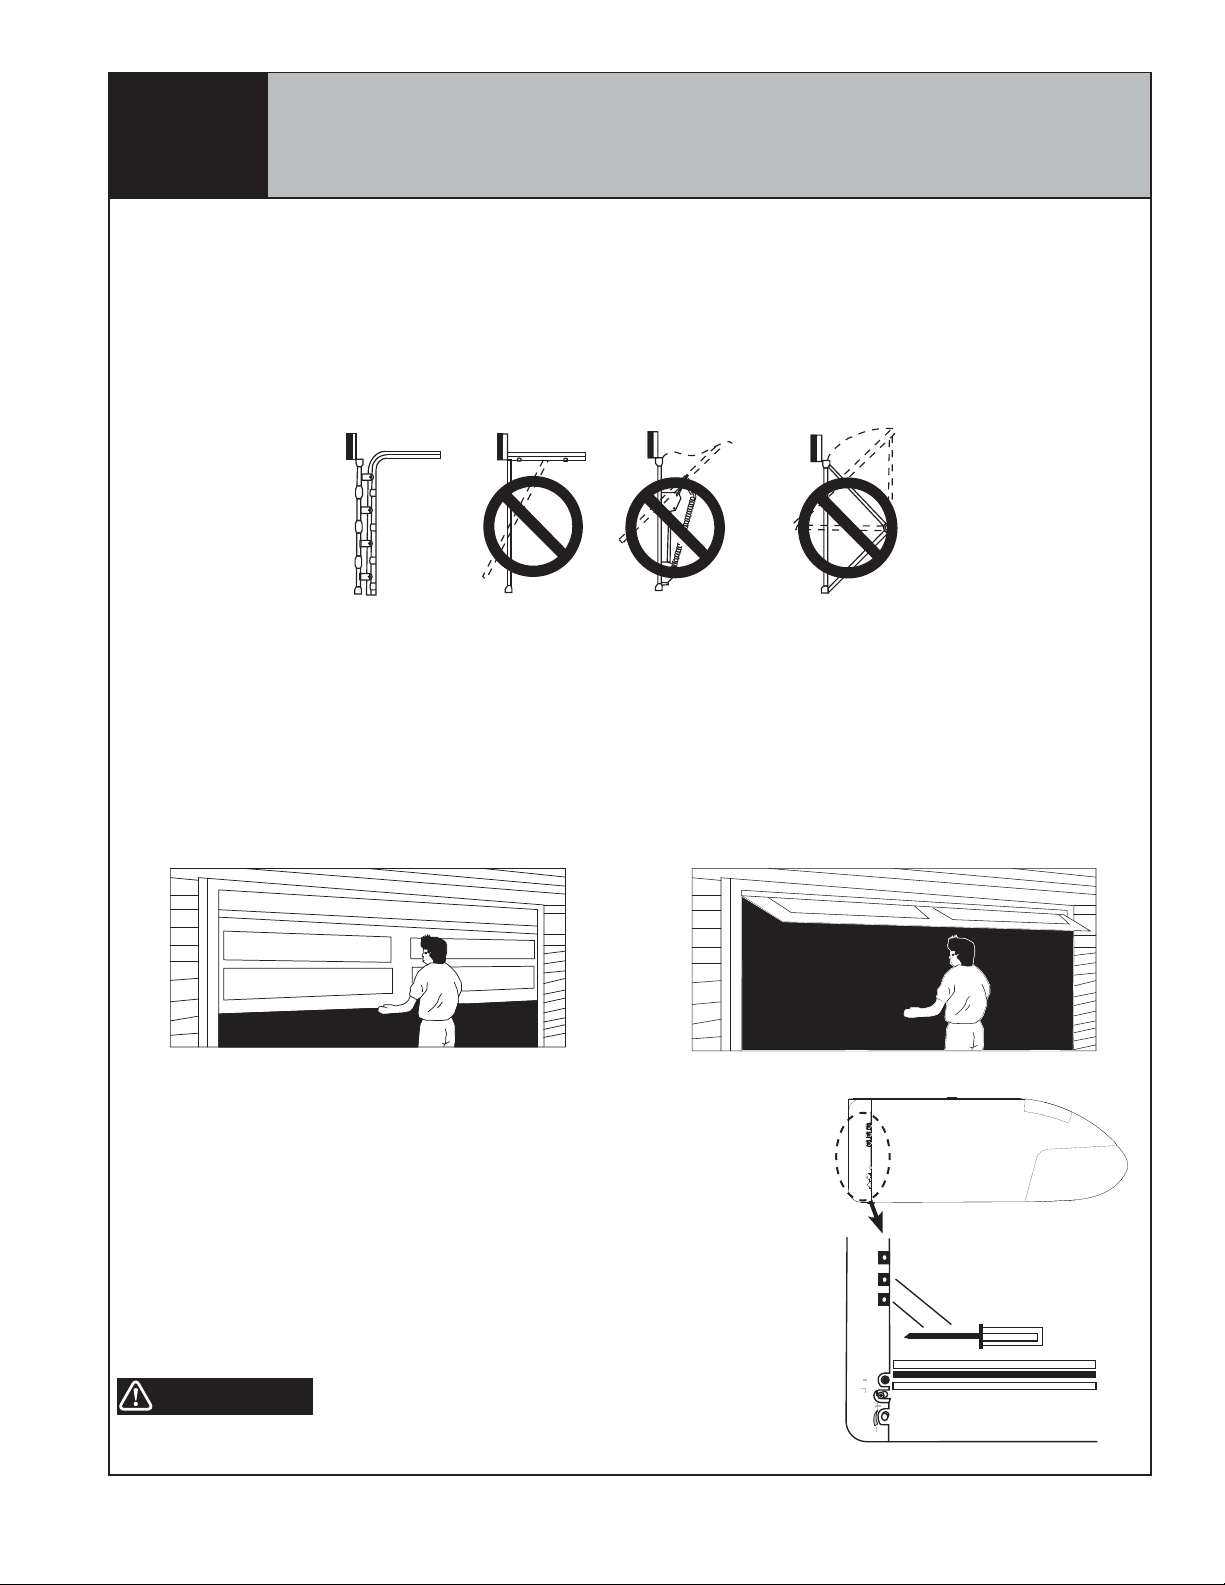
IDENTIFY YOUR DOOR
Identify your door by referring to illustrations below and verify that your door type is a sectional door with curved track. Do not install if the door
is any type of one piece door.
NOTE: The opener has been designed for sectional doors. Do not attempt to install this opener on any style one piece door. Using this opener on
a one-piece door may result in serious personal injury or property damage.
TEST YOUR DOOR
Before you begin, complete the following two tests to insure that the door is balanced and working properly. A door that binds, sticks or is out
of balance could cause severe injury. Do not attempt to compensate for an improperly adjusted door by the installation of an opener. This will
interfere with the proper operation of the opener’s safety features and/or may damage the door or opener. Have a qualifi ed service person
make any needed adjustments or repairs before proceeding with installation.
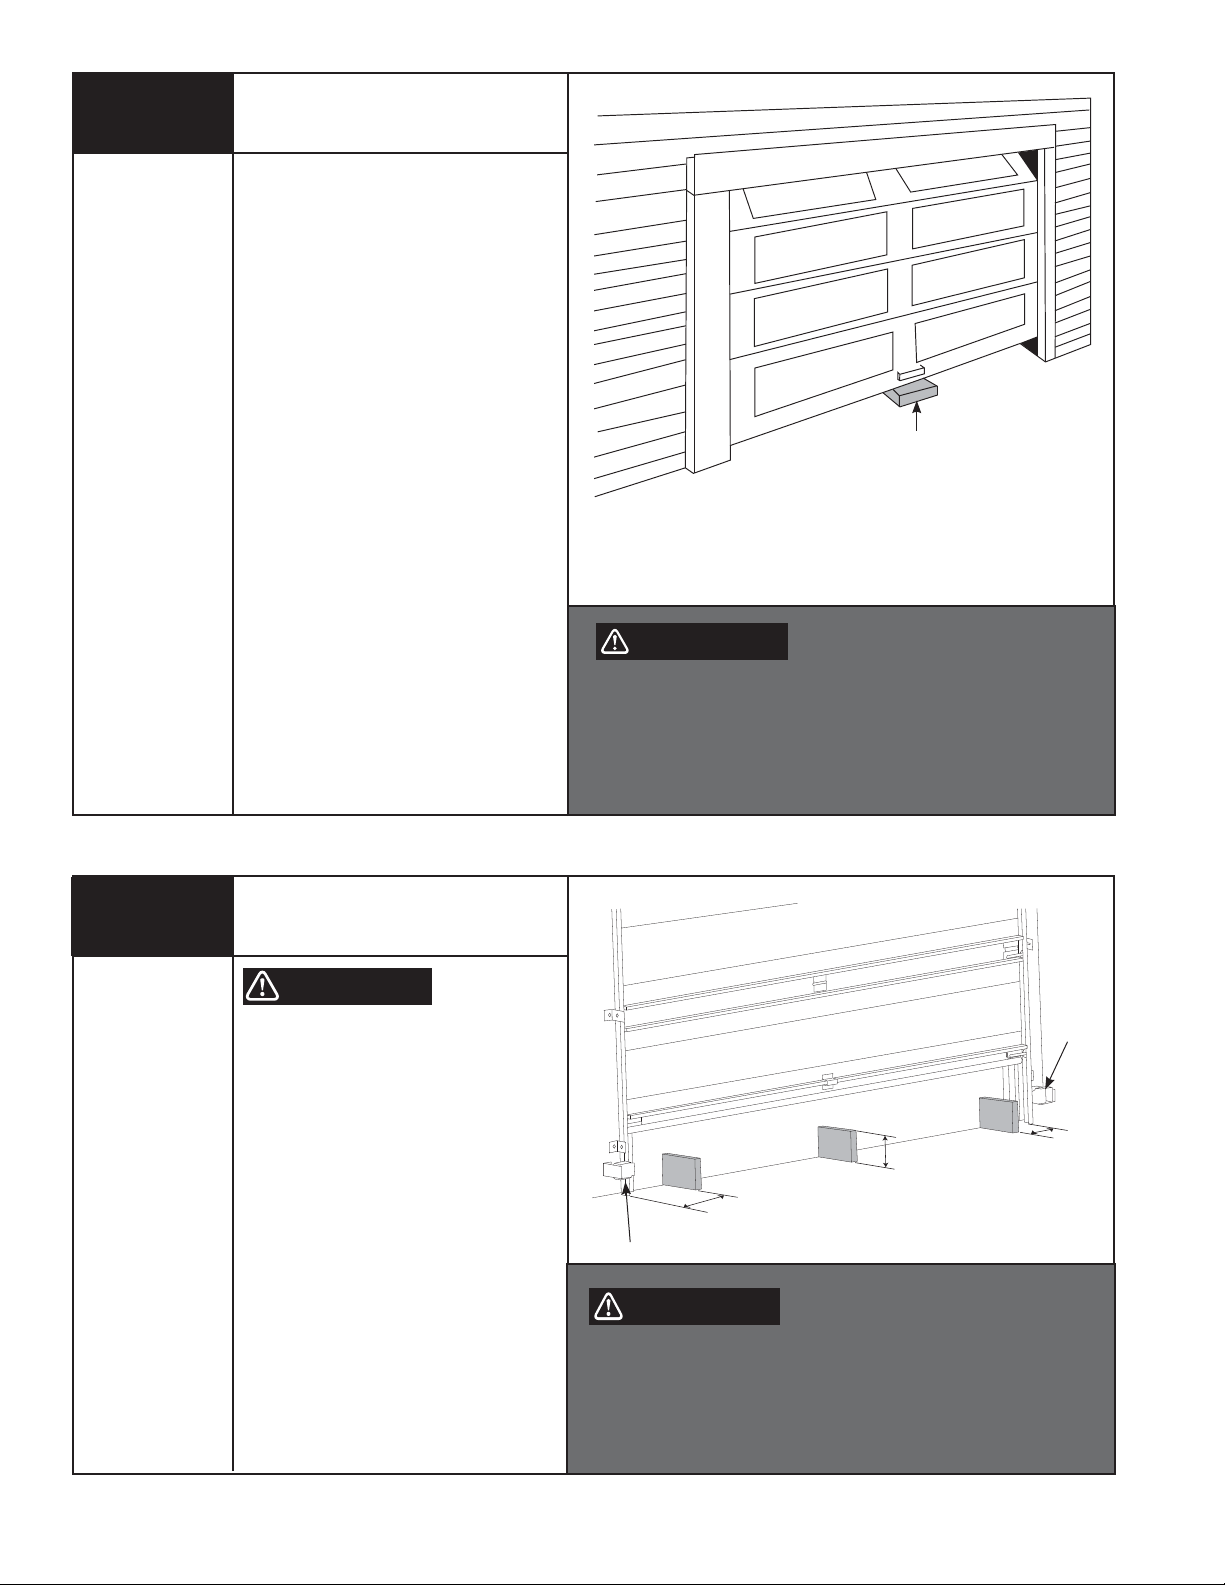
Door Test One
Raise and lower the door and check closely for any sticking or binding
that may occur. Lift the door approximately half way open, as
illustrated. When releasing the door, it should stay in position. If spring
tension pulls the door further open or door weight pulls it down, your
door is not properly adjusted.
Door Test Two
When properly installed, a door should remain clear of the
opening, when allowed to rest at its natural, full open position.
If “door drift” pulls door back into opening or spring tension is
not suffi cient to pull door totally clear of opening, the door is not
properly adjusted.
PRE-ASSEMBLY CHECK
Every opener is factory tested and shipped with the limit switch adjustment in the door CLOSED
position. If the opener has been powered up before assembly, perform the following steps to insure
that the limit switch adjustment is in the door CLOSED position. Connect the opener to a power
source and short across the screw terminals labeled “PB” and “COM” with a metal screw driver.
Motor should start; run through a full OPEN cycle, (driven gear rotates clockwise) and stop. This
will leave opener in OPEN position. To get the opener back to full CLOSE position, short and hold
“PB” and “COM” terminals again (driven gear rotates counter clockwise). Continue to short
terminals until opener stops in the CLOSED position. If the contact between “PB” and “COM” is
lost, the motor will stop, reverse, and travel back to the open limit, repeat with a constant short
across “PB” and “COM”.
CAUTION: KEEP CLEAR OF ALL ROTATING AND MOVING PARTS.
WARNING
FAILURE TO KEEP CLEAR OF ROTATING AND MOVING PARTS CAN RESULT IN SEVERE INJURY.
Disconnect from power source and proceed to assembly.
III
Please Do Not Return This Product To The Store. Call Us Directly! Our Trained Technicians Will Answer Your Questions and/or Ship Any Parts You May Need
You can reach us Toll Free at 1-888-827-3667 for Consumer Assistance or online at www.wayne-dalton.com
OBS
COM
P. B .
STATUS
PROGRAM
SW
FORCE ADJ.
Right Side Of Opener
Page 5
System Features
1. Open and Close Cycle Control:
Allows garage door to be started and stopped by push button,
transmitter or wall station. The next impulse sends a stopped garage
door in opposite direction.
2. Emergency Disconnect:
Manual disconnect permitting operation of door during power failure
with automatic reconnect when opener is reactivated. See page 27.
3. Opener light:
Automatically turns on when opener is activated and remains on for
four minutes for convenience and safety.
4. Mechanical Door Lock:
When properly adjusted, opener locks door in closed position
preventing unwanted entry. See Adjustment # 3 on page 32.
5. Obstruction Warning Light:
The convenience light will fl ash after sensing an obstruction in the
down direction and/or if the safety system malfunctions while in the
open position.
6. Motor:
Permanently lubricated, thermally protected, heavy duty motor with
automatic reset.
7. Safety System:
Independent up and down force adjustments. When properly adjusted,
the safety system will automatically reverse the door when obstructed
in down direction and return to fully open position. The door will stop
when obstructed in the up direction. See Adjustment #2 on page 32.
8. Infrared Safety Sensors:
Wired infrared safety sensors detect an obstruction in door path and
react by reversing door.
9. Multi-Function Wall Station:
Wired wall station provides up/down door motion control and
independent overhead light on/off control. Wireless multi-function wall
station provides up/down door motion control, independent overhead
light on/off control, door down delay, adjustable “pet position” function,
and “pet position” program button.
10. Homelink
Opener is capable of “learning” automobile equipped Homelink
transceivers. Visit: www.homelink.com.
®
Compatibility:
®
11. Rolling Code Technology:
Wireless transmitters, multi-function wall stations and wireless keyless
entry use rolling code which prevent would be thieves from “grabbing”
the transmitter’s digital code.
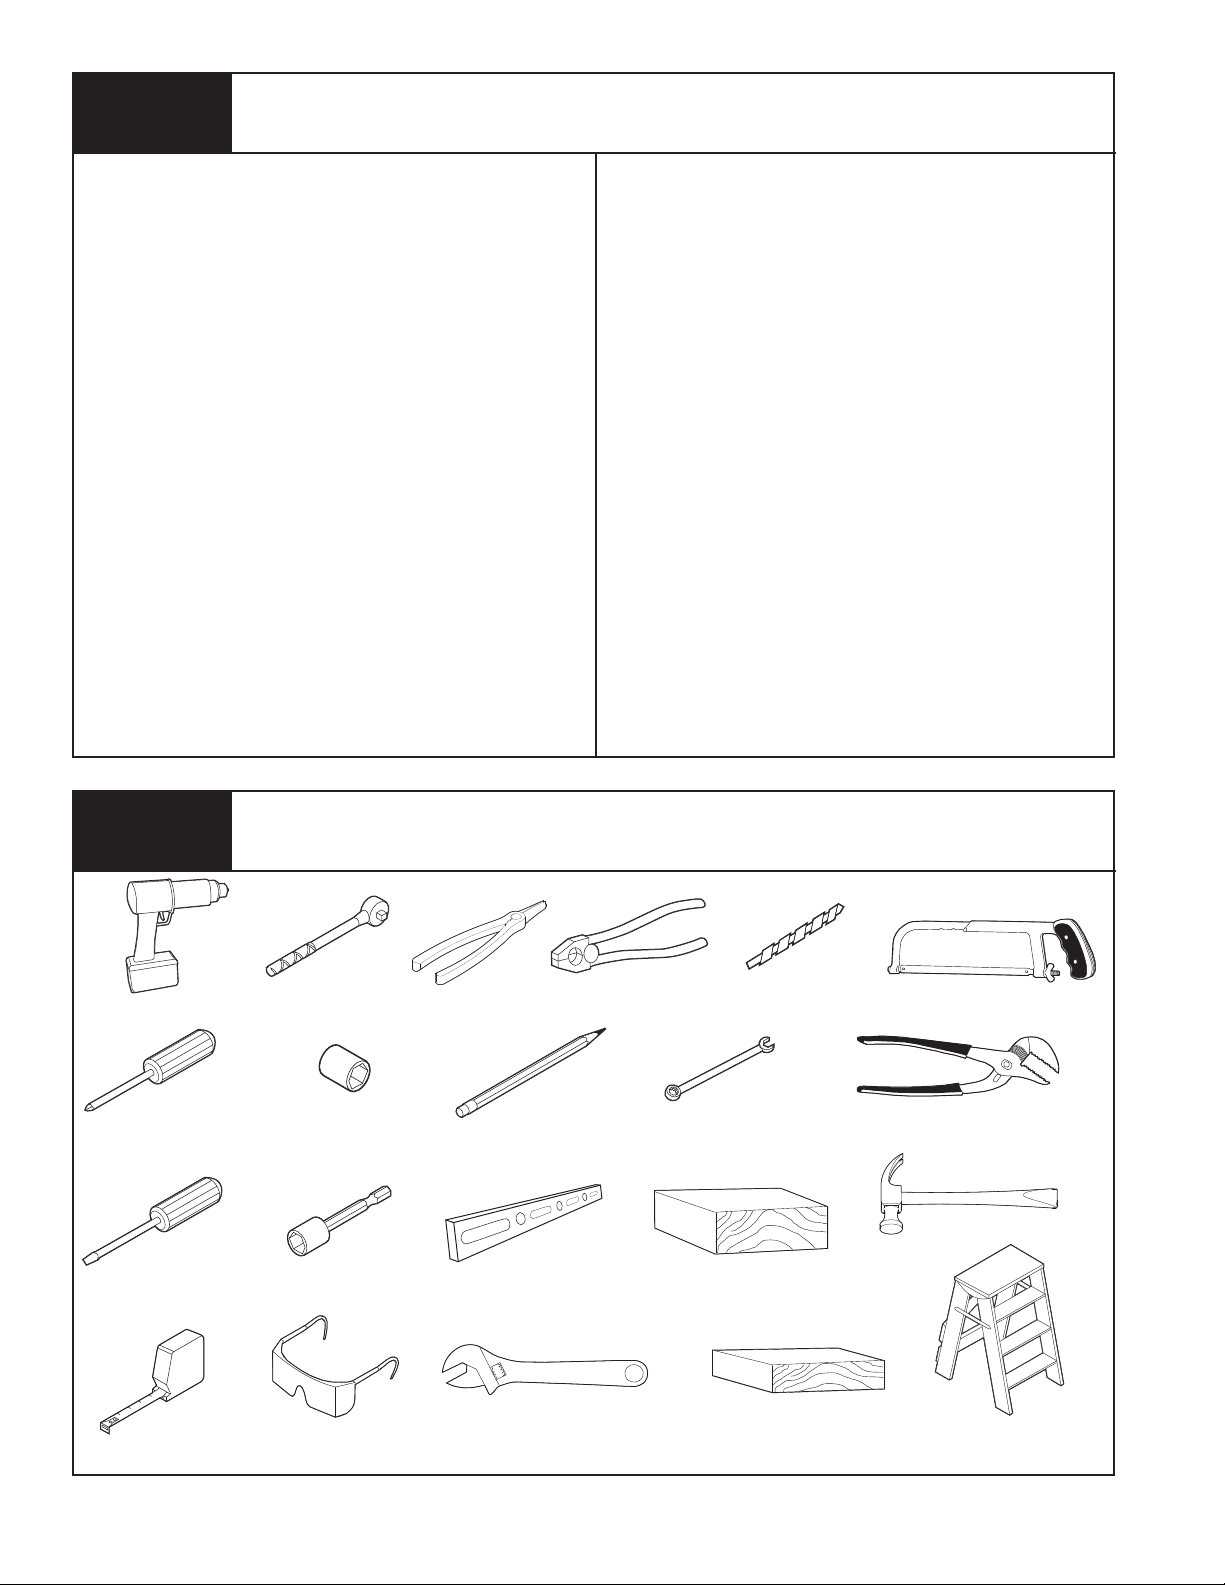
Power Drill
Phillips Head
Screwdriver
Flat Tip
Screwdriver
Tools Needed
Ratchet Wrench
1/4”, 3/8”, 7/16”,
1/2”, 9/16” Sockets
Needle Nose Pliers
Pencil
Level7/16” Socket Driver
Pliers/Wire Cutters
5/64”, 3/32”, 1/8”, 3/16”
Drill Bits
7/16” Wrench
2 x 4 Board
Hacksaw
Pliers
Hammer
Tape Measure
Please Do Not Return This Product To The Store. Call Us Directly! Our Trained Technicians Will Answer Your Questions and/or Ship Any Parts You May Need
Safety Glasses
You can reach us Toll Free at 1-888-827-3667 for Consumer Assistance or online at www.wayne-dalton.com
Adjustable Wrench
2 x 6 x 12 Solid Test
Object
Non-Metallic
Step Ladder
IV
Page 6

Table of Contents
Package Contents ..............................................................................I.
WARNING
INCORRECT INSTALLATION CAN
Pre-Installation Inspection ............................................................. II, III
Tools Needed ...................................................................................IV.
Important Safety Instructions ............................................................V.
Prodrive ® Installation ..................................................................1-5.
Pre-Operation .............................................................................6-19.
Optional Installations ................................................................20-26.
Operation .................................................................................27-32.
Programing Wireless Wall Station Or Transmitter(s) to Opener ....... 33.
Maintenance .................................................................................. 34.
Troubleshooting ............................................................................. 35.
Parts Breakdown Rail Assembly ..................................................... 36.
Parts Breakdown Opener Assembly ............................................... 37.
Accessories .................................................................................... 38.
Templates ......................................................................................39.
Customer Service Number ............................................................. 40.
Warranty ........................................................................................ 41.
Defi nition of key words used in this manual:
WARNING
INDICATES A POTENTIALLY HAZARDOUS SITUATION WHICH,
IF NOT AVOIDED, COULD RESULT IN SEVERE OR FATAL
INJURY.
CAUTION: PROPERTY DAMAGE OR INJURY CAN RESULT FROM
FAILURE TO FOLLOW INSTRUCTIONS.
IMPORTANT: REQUIRED STEP FOR SAFE AND PROPER OPENER
OPERATION.
NOTE: Information assuring proper installation of the opener
.
LEAD TO SEVERE OR FATAL
INJURY. FOLLOW THESE
INSTRUCTIONS CAREFULLY.
IMPORTANT INSTALLATION
INSTRUCTIONS
1. READ AND FOLLOW ALL INSTALLATION INSTRUCTIONS.
2. Do not connect the opener to electrical power until instructed to do so.
3. Install the entrapment warning label next to the wall station in a
prominent location. Install the emergency disconnect label on the
emergency disconnect cord.
4. Remove all ropes and remove, or make inoperative in the unlocked
position, all locks connected to the garage door before installing the
opener.
5. Do not wear rings, watches or loose clothing when installing or servicing
a garage door system.
6. It is important that you install all the components supplied with the
7. Wear protective eye wear when installing or servicing the opener or door.
8. Install opener on a properly balanced and operating garage door. Have a
9. Where possible, install the opener seven feet or more above the floor.
10. Locate the wall station: (a) within sight of door, (b) at a minimum height
11. After installing the opener, the door must reverse when it contacts a
12. Installation and wiring must comply with local building and electrical
13. To reduce the risk of injury to persons, use this opener only with
sectional overhead doors.
14. Top section of garage door may need to be reinforced before
attaching opener. Check with your garage door manufacturer for
their recommendations.
15. Do not use sensitivity adjustments to compensate for a poorly
operating door. This will prevent proper operation of the safety
reverse feature and may damage the door and cause possible
severe or fatal injury.
16. An open door must not close and closing door must reverse and open
if infrared safety sensors are obstructed by 6” high object placed on
garage fl oor.
17. Use a sturdy, non-metallic step ladder when installing opener.
AFTER INSTALLATION IS COMPLETE, FASTEN
THIS MANUAL NEAR GARAGE DOOR. PERFORM
OBSTRUCTION TESTS MONTHLY AND
MAINTENANCE AS RECOMMENDED. SEE PAGES
17 & 34.
®
Prodrive
supplied by Wayne-Dalton Corp. may cause the opener to malfunction
and create unsafe conditions.
qualified service person make adjustments/repairs to cables, spring
assemblies, and other hardware before installing the opener. An
improperly balanced door could cause severe or fatal injury.
Mount the emergency disconnect six feet above the floor.
of five feet, so small children cannot reach it, and (c) away from all
moving parts of the door.
1-1/2” high object (or 2 x 4 board laid flat) on the floor.
codes. Connect the power cord to a properly grounded outlet. Do not
remove the ground pin from power cord.
opener, i.e., wall stations, safety sensors, etc. Use of parts not
V
Please Do Not Return This Product To The Store. Call Us Directly! Our Trained Technicians Will Answer Your Questions and/or Ship Any Parts You May Need
You can reach us Toll Free at 1-888-827-3667 for Consumer Assistance or online at www.wayne-dalton.com
Page 7
1
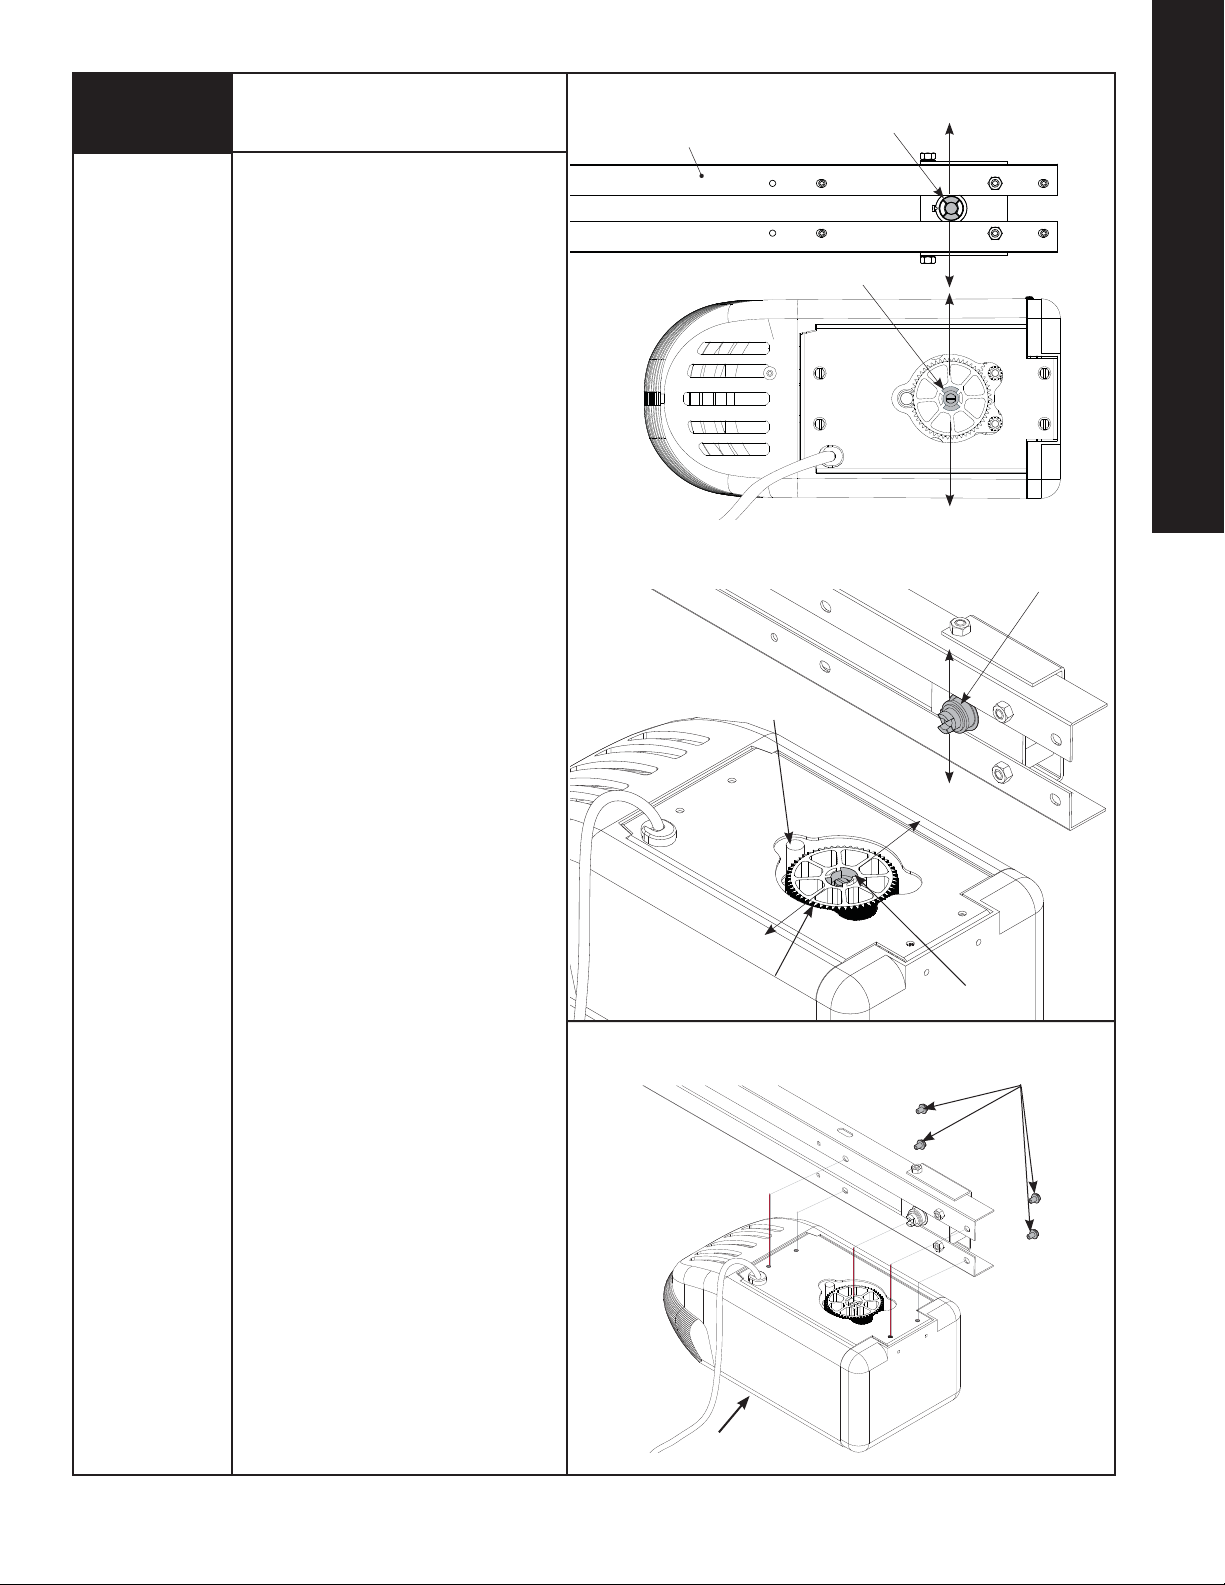
Attaching Opener to Rail
Rail Bottom
(Facing Upwards)
Sprocket / Coupling Cogs
Tools Needed:
3/8” Socket
Ratchet Wrench
IMPORTANT: THE DRIVER GEAR IN THE
OPENER MUST BE PROPERLY ALIGNED
WITH THE SPROCKET/ COUPLING COGS IN
THE RAIL ASSEMBLY AND THE MOUNTING
BOLTS FULLY TIGHTENED, BEFORE
POWERING UP THE OPENER. NEGLECTING
TO DO THIS WILL RESULT IN GEAR FAILURE.
Before assembly, align sprocket/ coupling
cogs to match notches of driver gear. Rotate
the motor spline to position driver gear so
the nearest notch in driver gear is directly
behind motor spline, as illustrated.
NOTE: Do not rotate more than 1/2 turn.
Place opposite end of rail on temporary
support approximately 6” in height.
Proceed with attaching rail to opener,
ensuring proper engagement between
sprocket/coupling cogs and driver gear
notches. Realign if necessary, making sure
to keep any rotation only to the nearest
notch. Using the (4) pre-attached
1/4”-20 x 5/8” hex head bolts, assemble
rail to opener using 3/8” socket; tighten
securely.
Notches
INSTALLATION
Opener
Top View
Sprocket / Coupling Cogs
Motor Spline
NOTE: Do not plug the opener power cord
into electrical outlet until opener is fully
installed and you are instructed to do so in
this manual.
Opener
Driver Gear
Notches
1/4” - 20 x 5/8”
Hex Head Bolts
Please Do Not Return This Product To The Store. Call Us Directly! Our Trained Technicians Will Answer Your Questions and/or Ship Any Parts You May Need
You can reach us Toll Free at 1-888-827-3667 for Consumer Assistance or online at www.wayne-dalton.com
1
Page 8
2
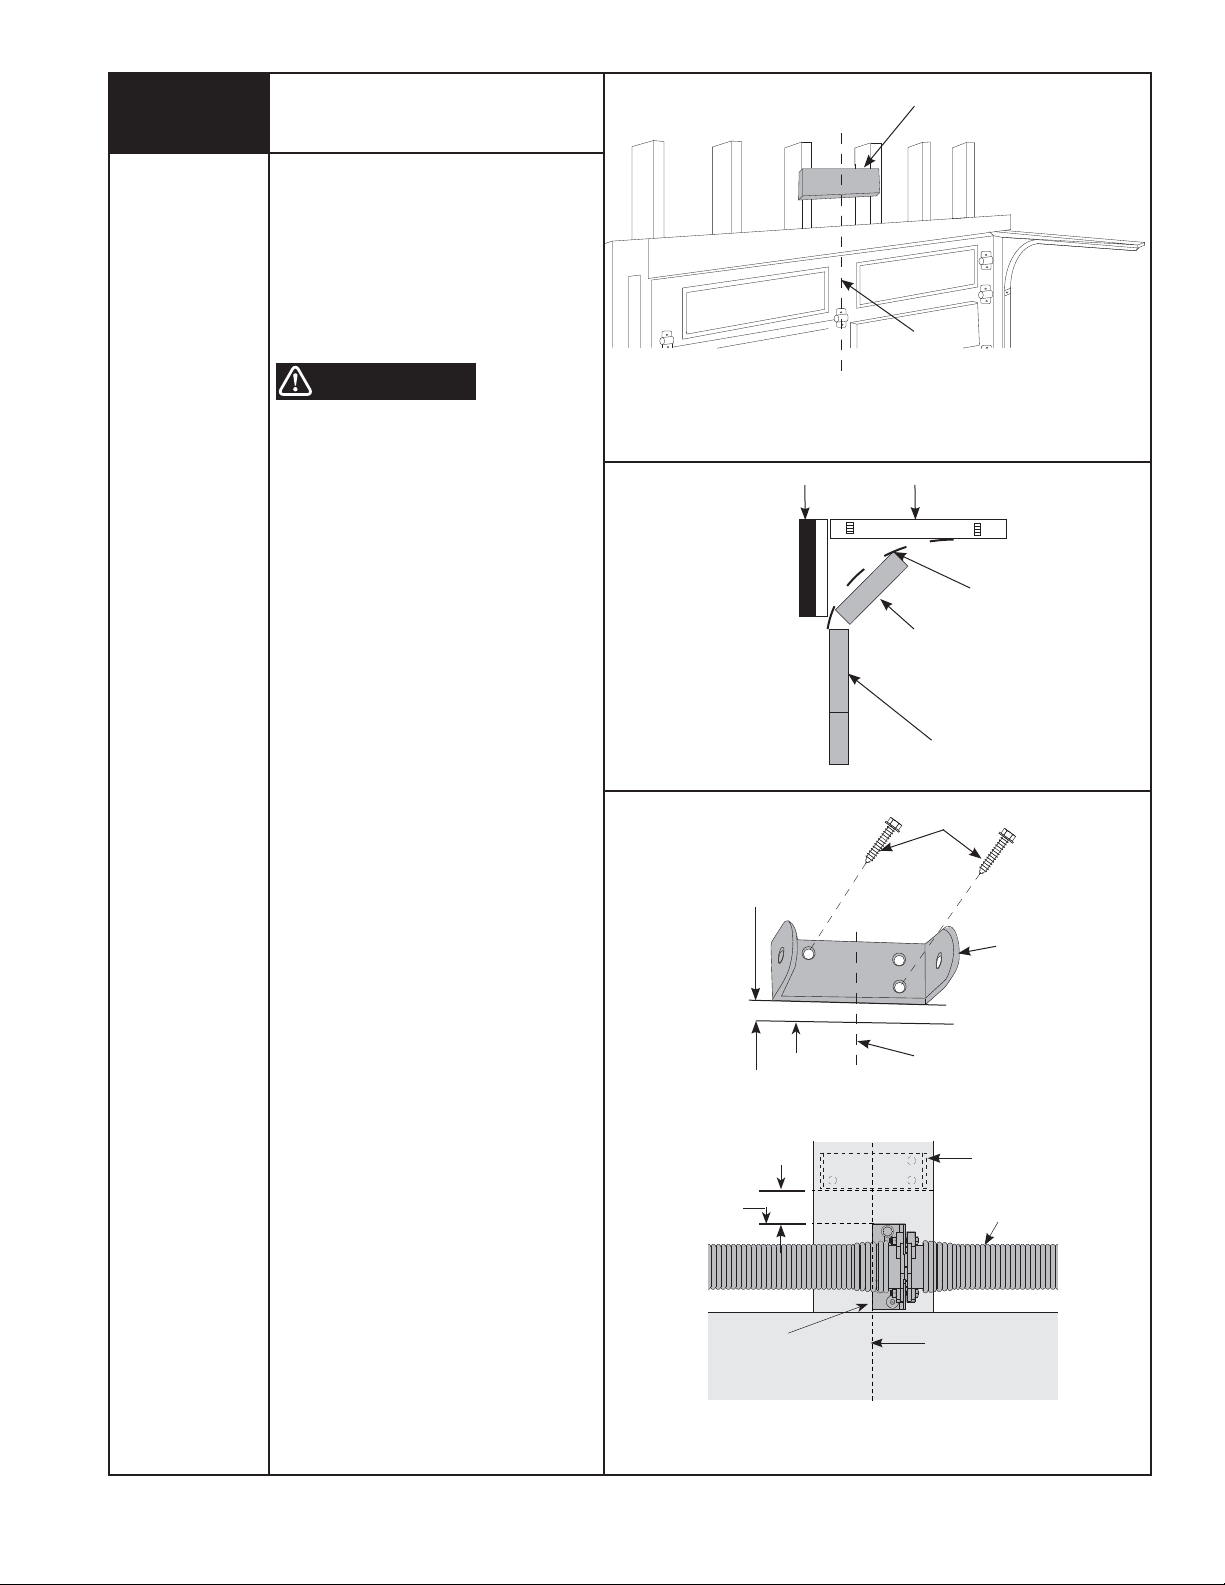
Positioning and Installing
Front Wall Bracket
Reinforce with 2” x 6” as required to
insure rigid mounting.
Tools Needed:
Carpenter’s Level
7/16” Socket
Driver
Power Drill
Tape Measure
1/8” Drill Bit
NOTE: It is recommended that the door
opener be installed 7 feet or more above the
garage floor.
REINFORCE THE HEADER WALL
Reinforce the header wall (wall above door
opening) as required, to ensure rigid
mounting of the front wall bracket.
WARNING
DO NOT ATTEMPT TO LOOSEN OR
REMOVE ANY PORTION OF DOOR SPRING
SYSTEM IN ORDER TO REINFORCE
HEADER WALL OR TO MOUNT WALL
BRACKET. SPRING SYSTEM IS UNDER
EXTREME TENSION AND CAN CAUSE
SEVERE OR FATAL INJURY. SUCH WORK
SHOULD BE DONE BY A QUALIFIED
SERVICE PERSON.
Locate the vertical center line of the garage
door and mark it on the header above the
door.
Raise the door slightly until the top section
reaches the highest point of travel (High Arc
Point); using a carpenter’s level, transfer
and mark the highest point of travel onto the
header wall and close the door.
Mount the front wall bracket with its lower
edge approximately 1/2” -1” above the
mark showing the highest point of travel and
centered on the vertical center line.
1/2” - 1” Above
High Arc Mark
Header
Vertical Center Line
Carpenter’s Level
High Arc Point
Top Section
Sectional Door
Curved Track
1/4” X 1 1/2”
Lag Screws
Front Wall
Bracket
NOTE: For low headroom torsion
counterbalance, hold the wall bracket’s
bottom edge typically at 1/2” - 1” (room
permitting) above the torsion spring center
bracket and centered on the vertical line, see
illustration.
Mark the two mounting holes and pilot drill
with a 1/8” drill bit. Mount wall bracket using
High Arc
Mark
1/2” - 1” Above
Center Bracket
(Room Permitting)
Top Edge Of
Center Bracket
Center of
Door
Front Wall
Bracket
Torsion Spring
the 1/4” x 1-1/2” lag screws supplied to
ensure rigid mounting.
Center Bracket
2
Please Do Not Return This Product To The Store. Call Us Directly! Our Trained Technicians Will Answer Your Questions and/or Ship Any Parts You May Need
You can reach us Toll Free at 1-888-827-3667 for Consumer Assistance or online at www.wayne-dalton.com
Center Line
Page 9
3
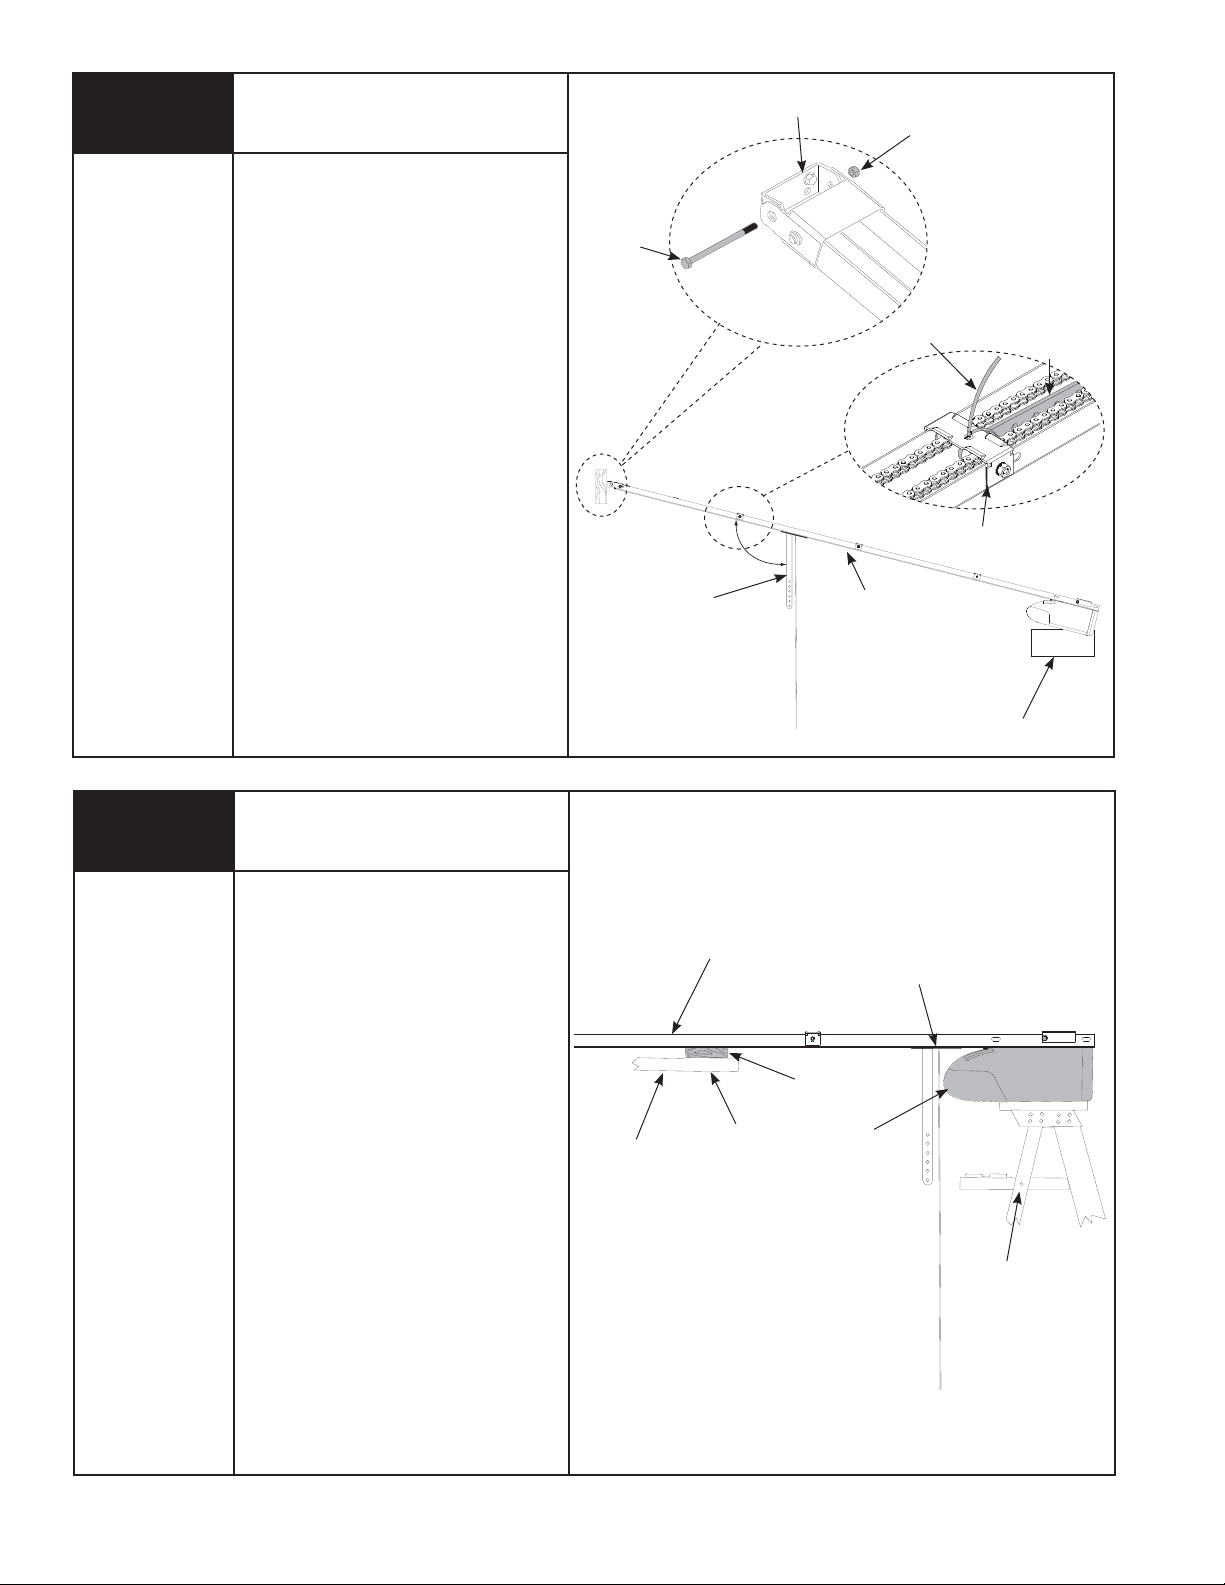
Attach Unit to Front Wall Bracket
Front Wall
Bracket
1/4” Plastic Insert
Locking Nut
Tools Needed:
7/16” Socket
Ratchet Wrench
Adjustable Wrench
Raise the front end of the rail
assembly and attach it to the front wall
bracket, using the 1/4” x 4” hex head bolt
and the supplied 1/4” plastic insert
locking nut. Take care not to over tighten
nut. Tighten only until end of bolt is flush
with outside of nut.
NOTE: If you have a torsion spring
counterbalance system, it will be necessary
to raise the opener and support it on a
step ladder to attach the front end of the rail
assembly to the wall bracket.
The upper door arm is secured to the spacer
bracket with one tie wrap for shipping.
Remove tie wrap attaching upper door arm
to the spacer bracket, allowing door arm to
swing down (see caution).
CAUTION: Support upper door arm with your
free hand, to prevent door arm from
swinging down uncontrolled.
1/4” x 4”
Hex Head Bolt
Upper Door Arm
Rail Assembly
Tie Wrap
Upper Door Arm
Spacer Bracket
Cardboard or Cloth to
Protect the Housing
4
Tools Needed:
2” x 4” Board
Non-Metallic
Step Ladder
Positioning Motor
End of Opener
IMPORTANT: TO PREVENT DAMAGE TO
DOOR, DO NOT REST THE OPENER ON THE
DOOR WITHOUT USING A 2” X 4” BOARD
AT LEAST 3 FEET LONG.
Raise the motor end of the opener and
support it so you can open the door to its
fully open position. You may need help
raising motor end if ladder is not high
enough.
IMPORTANT: TO PREVENT DAMAGE TO
DOOR OR OPENER, POSITION TROLLEY AS
CLOSE TO OPENER AS POSSIBLE, BEFORE
OPENING DOOR.
Open the door and place a 2” x 4” x 36”
minimum board along the top section of the
garage door. Rest the rail assembly on the
2” x 4” board.
Support top section of door to prevent
excessive sagging.
Support Door to
Prevent Sagging
Rail Assembly
Door
Trolley
2” x 4”
Board
Opener
Non-Metallic
Step ladder
Please Do Not Return This Product To The Store. Call Us Directly! Our Trained Technicians Will Answer Your Questions and/or Ship Any Parts You May Need
You can reach us Toll Free at 1-888-827-3667 for Consumer Assistance or online at www.wayne-dalton.com
3
Page 10
5
Tools Needed:
Power Drill
Hacksaw
1/8” Drill Bit
1/2” Socket
7/16” Socket
Ratchet Wrench
Adjustable Wrench
Tape Measure
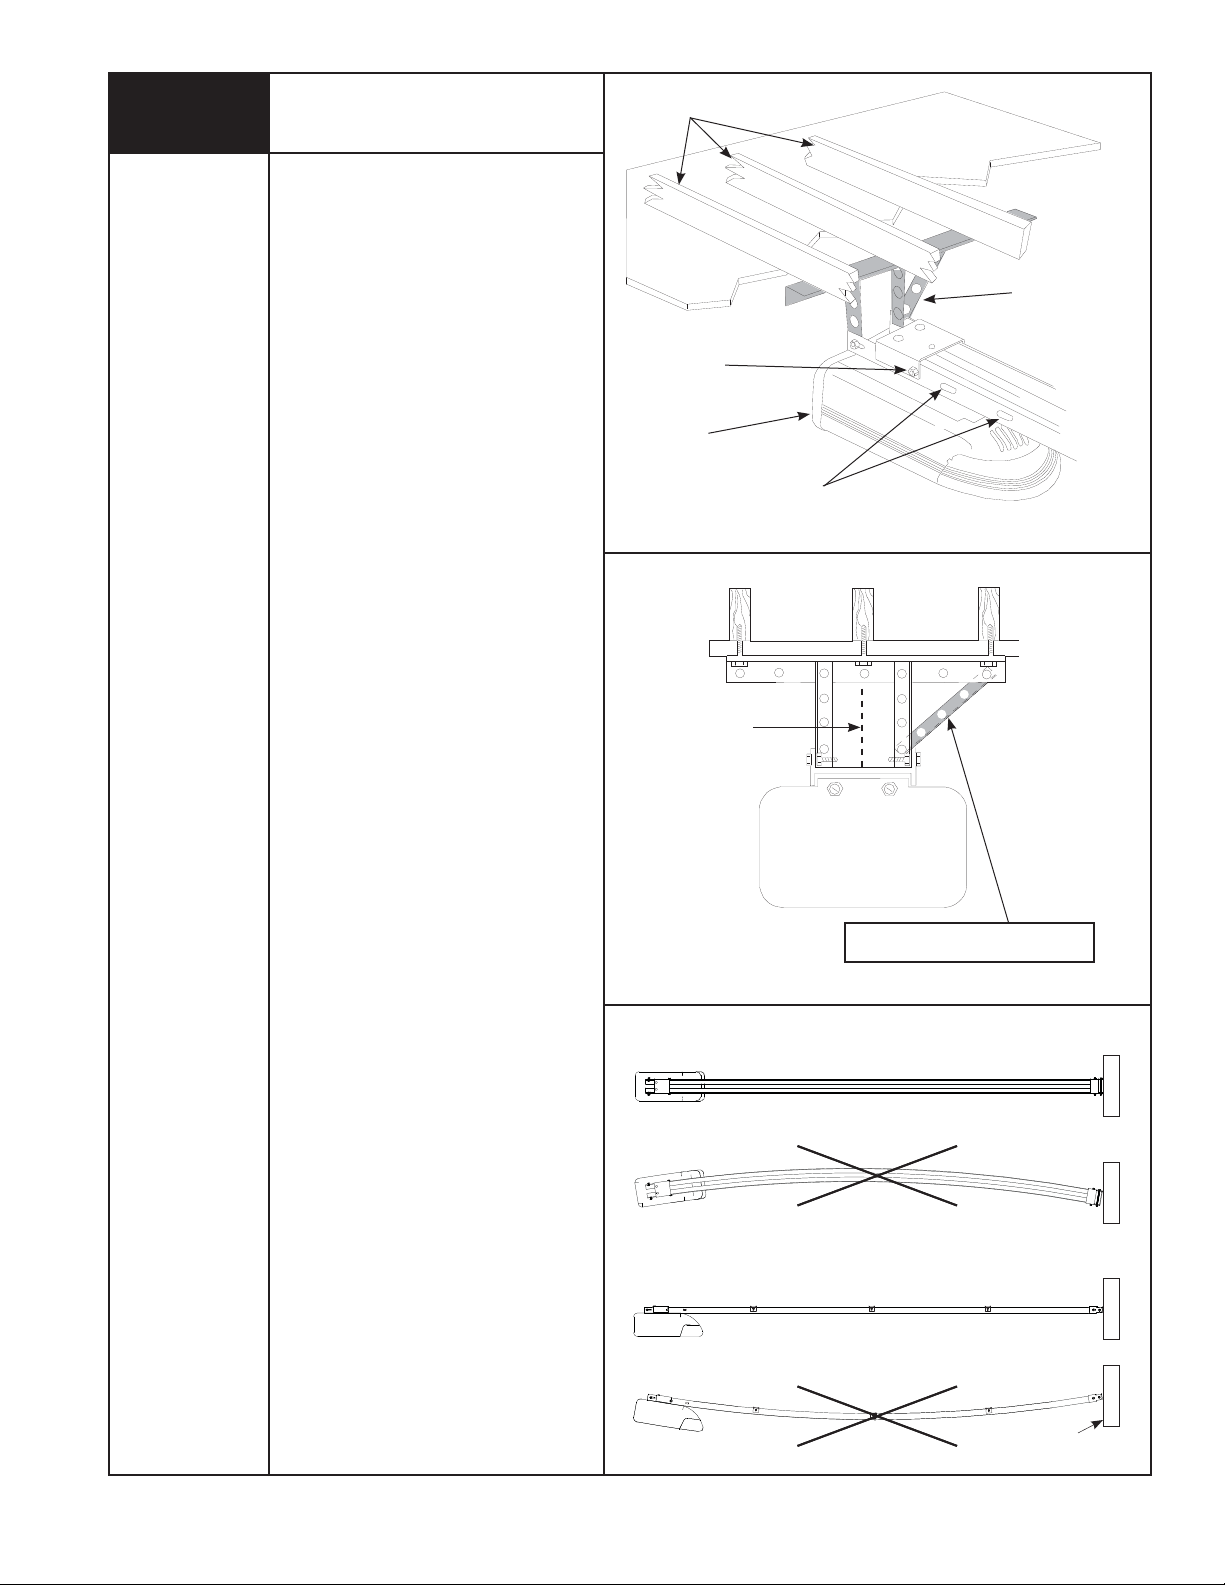
Perforated Angle
Iron (Not Supplied)
Mounting Opener End
CAUTION:
for hanger attachment. This may cause
sprocket, chain or Belt misalignment,
resulting in damage to opener or possible
personal injury!
Align the center of opener’s rail assembly
with the center line previously marked on
the top section of the garage door to ensure
rail will be parallel with the direction of door
travel.
Using perforated angles (cut to proper
length) hang opener end from ceiling joist.
Be sure to locate and mount to ceiling joists,
as illustrated.
Pilot drill with 1/8” drill bit and use
1/4” x 1-1/2” lag screws (not supplied) to
ensure a rigid mount. Attach opener to
perforated angles using 5/16” x 3/4” bolts,
5/16” lock washer, and 5/16” nuts (not
supplied).
NOTE: Bracing should be at an angle to
provide rigid support.
Do not use gear cap bolt or nut
Ceiling Joist
Cut Perforated
Angles to Fit
Gear Cap
Nut/ Bolt
Opener
Alternate Hanger
Mounting Holes
Center Line
Of Door
When opener is securely attached to
perforated angles, remove the 2” x 4” (used
to support rail assembly in Step 4) and
close the door.
NOTE: It is recommended that 10’ rails be
supported in the center to prevent sagging.
Opener rail should be aligned perpendicular
to the garage door when properly installed.
There should be no sagging of the rail in
any direction.
Use angled brace to ensure rigid installation.
PROPER INSTALLATION
Top view
correct
incorrect
Side view
correct
incorrect
4
Please Do Not Return This Product To The Store. Call Us Directly! Our Trained Technicians Will Answer Your Questions and/or Ship Any Parts You May Need
You can reach us Toll Free at 1-888-827-3667 for Consumer Assistance or online at www.wayne-dalton.com
header
Page 11
6
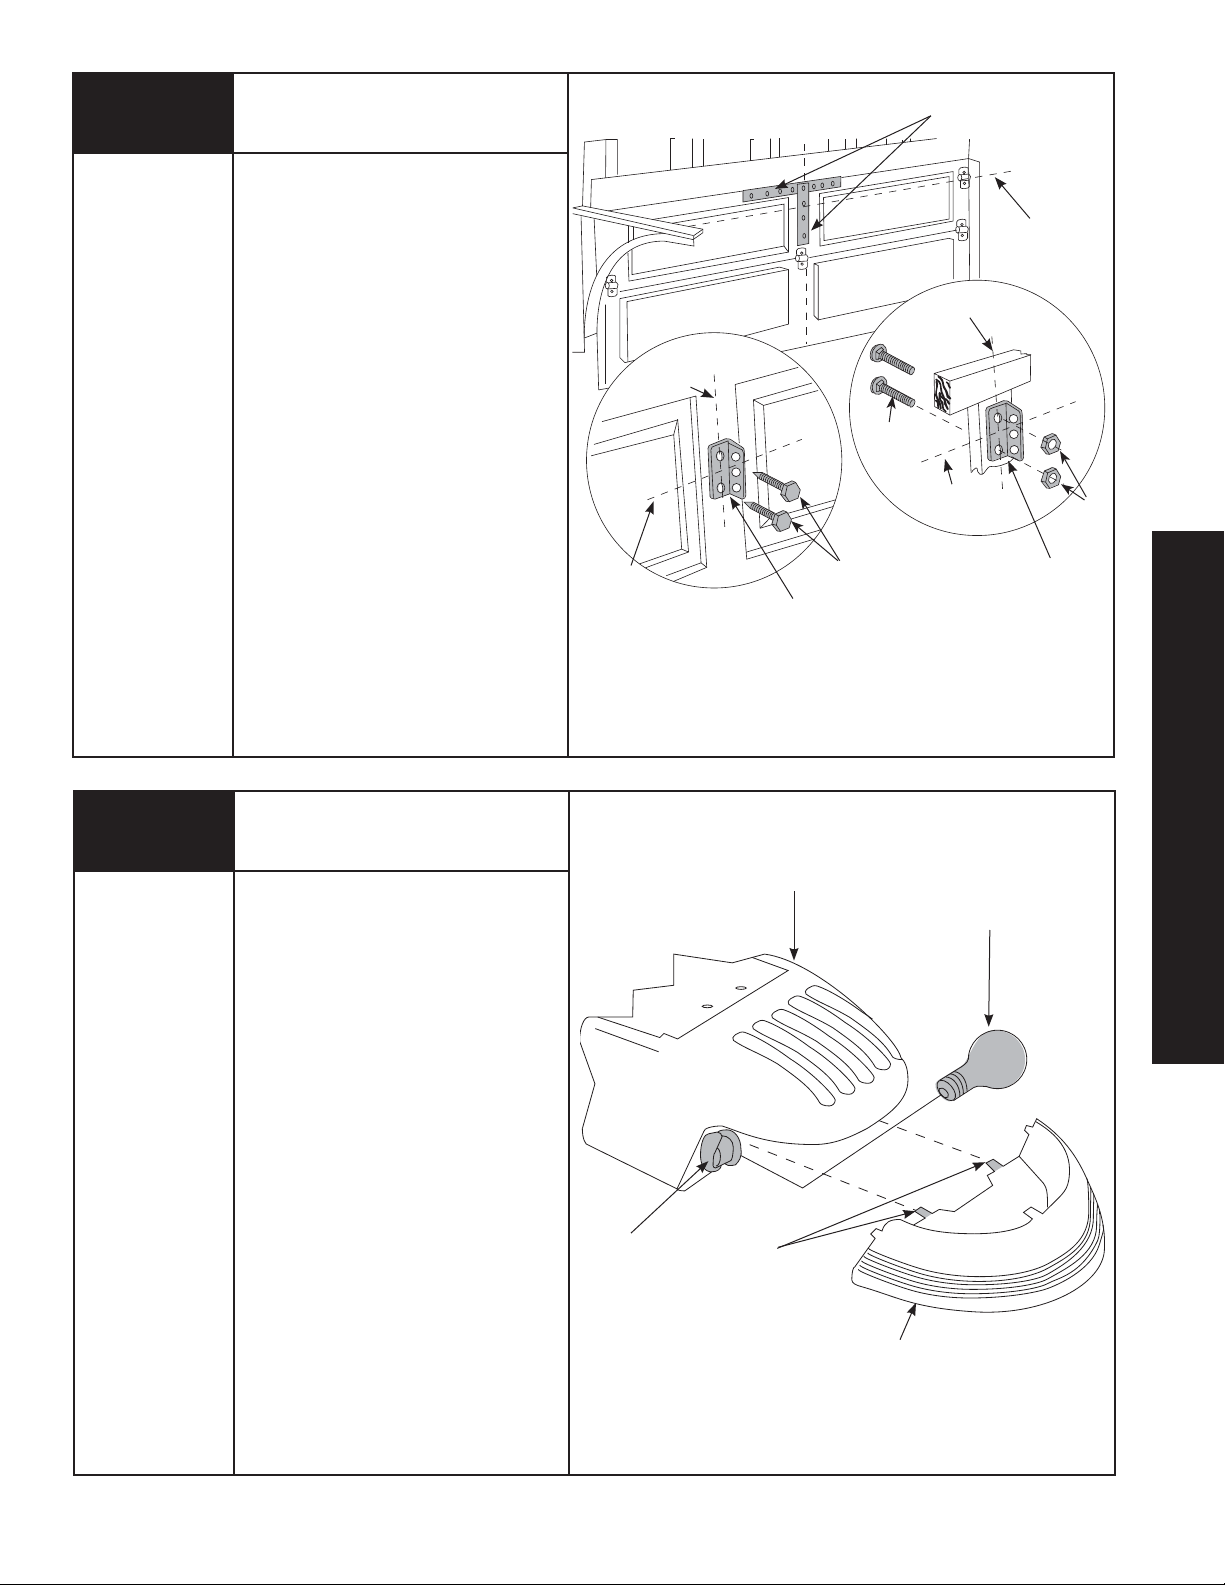
Mounting Door Bracket
Reinforce Door Vertically and
Horizontally
Tools Needed:
7/16” Socket
Ratchet Wrench
NOTE: If you have a 5120, 5140, 9100,
9400, 9600, 9700 or 9800 series door,
do not install this door bracket, install the
door bracket supplied with the door, see the
Installation Instructions and Owner’s Manual
supplied with the door. Instructions manuals
are available for download at www.waynedalton.com or call 1-888-827-3667.
IMPORTANT: DOORS MAY NEED TO BE
REINFORCED TO PREVENT DAMAGE TO THE
DOOR. CHECK WITH THE GARAGE DOOR
MANUFACTURER FOR PROPER
REINFORCING OF YOUR DOOR.
For wood doors, mount door bracket,
using two 1/4”-20 x 2” carriage bolts and
1/4” locking nuts supplied, on center line of
door with middle hole in line with top rollers.
For metal doors, mount door bracket,
using two 1/4”-20 x 5/8” self drilling screws
supplied, on center line of door with middle
hole in line with top rollers.
Top Roller
Guideline
Door Center
Line
STEEL
DOORS
1/4”-20 x 1/2”
Self Drilling Screws
Door
Bracket
1/4”-20 x 2”
Carriage Bolts
Door Center
Line
Top Roller
Guideline
WOOD
DOORS
Top Roller
Guideline
1/4”
Locking Nuts
Door
Bracket
7
Tools Needed:
None
Installing Light
Remove lens by pressing up on both sides
of the bottom of the lens at the junction of
the housing, releasing the locking tabs, and
pulling forward.
Screw a 60 watt (Maximum) bulb into
socket. For maximum bulb life, “rough
service” bulbs are recommended.
Align the top and bottom tabs on the lens
with the housing and push straight on until
lens locks in place.
Socket
Housing
Locking Tabs
Bulb - 60 Watt
PRE-OPERATION
Maximum
(Not Supplied)
Lens
Please Do Not Return This Product To The Store. Call Us Directly! Our Trained Technicians Will Answer Your Questions and/or Ship Any Parts You May Need
You can reach us Toll Free at 1-888-827-3667 for Consumer Assistance or online at www.wayne-dalton.com
5
Page 12
8
Tools Needed:
Power Drill
Phillips Head
Screwdriver
Flat Tip
Screwdriver
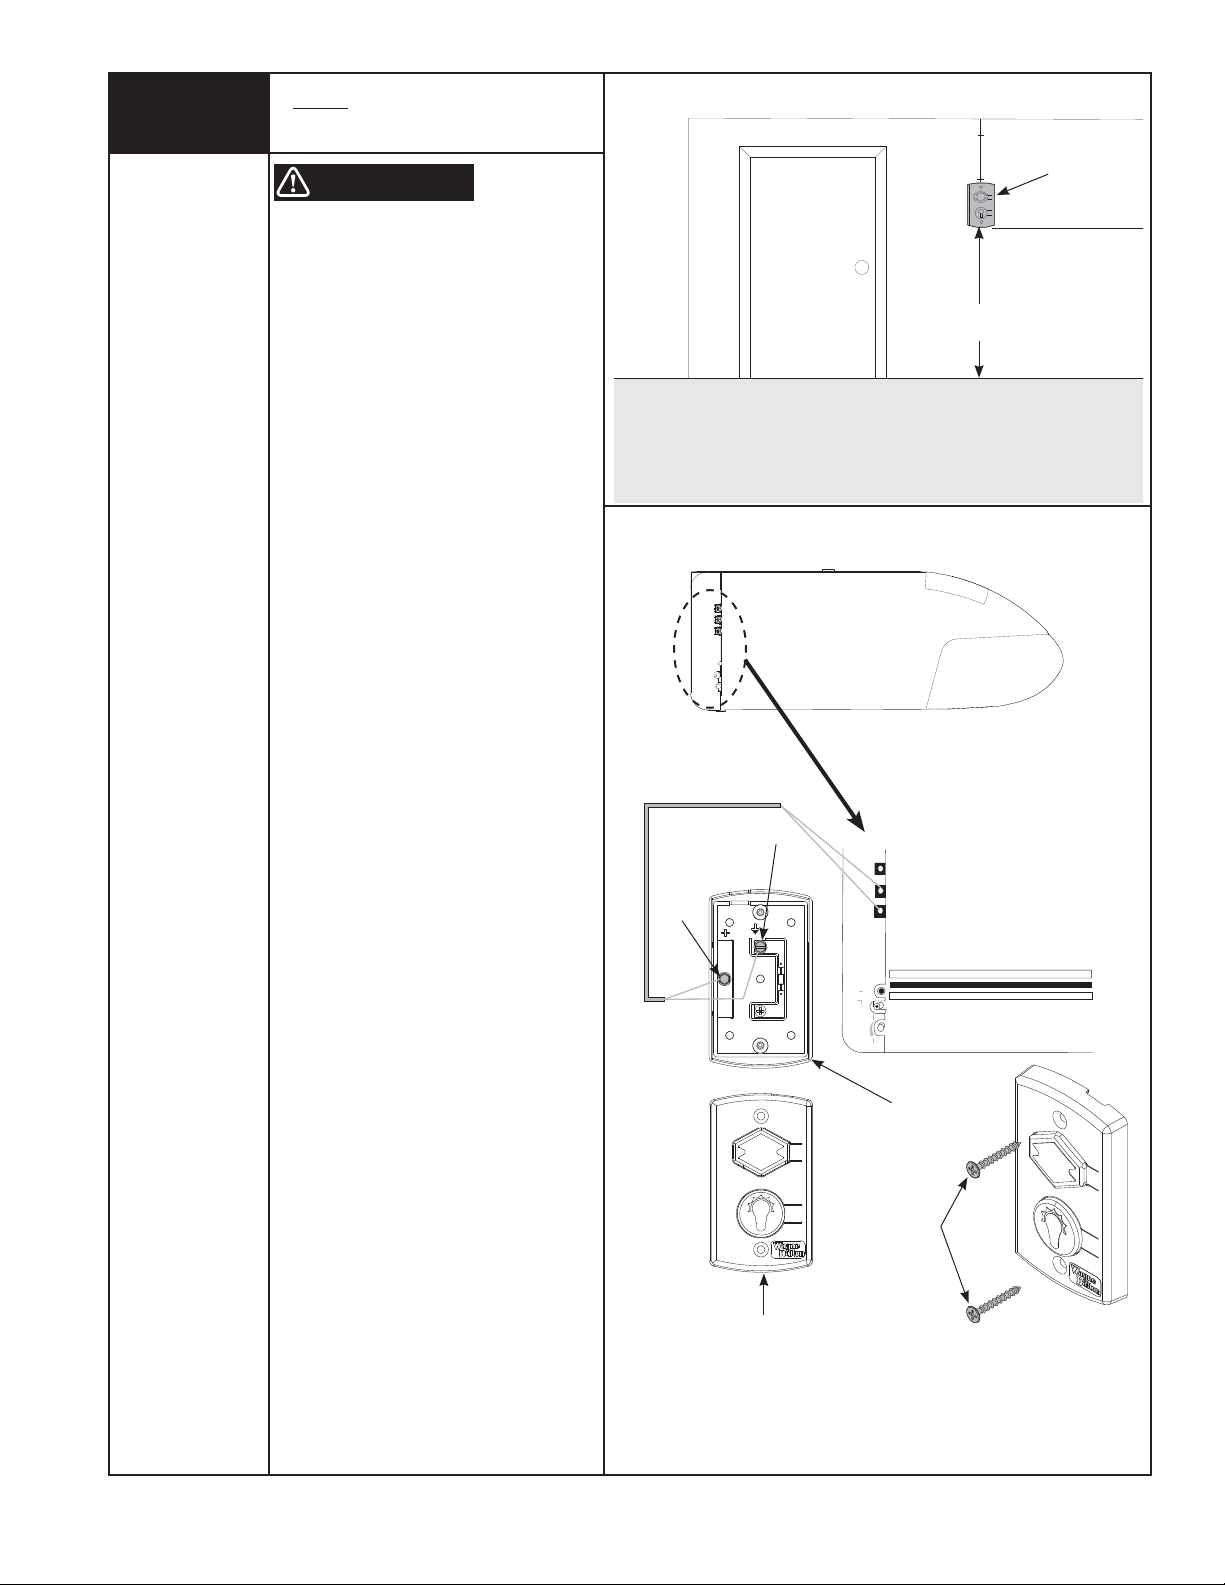
Wired Wall Station Installation
(If Included)
WARNING
TO PREVENT POSSIBLE INJURY, INSTALL
WALL STATION OUT OF THE REACH OF
CHILDREN AND IN A LOCATION WHERE
THE DOOR CAN BE SEEN WHEN THE
OPENER IS ACTIVATED. DO NOT MOUNT
WALL STATION NEAR OR NEXT TO
GARAGE DOOR.
Wall Station
5 Foot
Minimum
3/32” Drill Bit
IMPORTANT: THE STANDARD PUSH
BUTTON OR THE DELUXE WALL
STATION MUST BE THE ONLY TYPE USED
FOR PROPER DOOR OPERATION. THE USE
OF ANOTHER PUSH BUTTON OR WALL
CONTROL STATION NOT SUPPLIED BY
WAYNE-DALTON COULD CAUSE OPENER TO
MALFUNCTION.
Wired Wall Station:
Wire the garage door opener wall station
using bell wire connected to COM and P.B.
screws, as illustrated.
Locate push button adjacent to service
entrance door at a minimum height of 5 ft.,
and at least 6 ft. away from garage door.
Fasten the wall station in a safe location with
the (2) phillips head screws, making sure not
to over tighten. Pilot drill mounting holes
using a 3/32” bit. Additional wired wall
stations may also be installed in accordance
with these instructions.
CAUTION: Over tightening the screws could
deform plastic case.
Right Side Of Opener
COM
OBS
PB
COM
P. B .
STATUS
PROGRAM
SW
FORCE ADJ.
IMPORTANT: CONNECT THE LOW
VOLTAGE WIRE TO THE WALL STATIONS
Wall Station Back
USING A “J” HOOK CONFIGURATION. IF WIRE
IS COMPLETELY LOOPED AROUND
TERMINAL SCREW, IT CAN PREVENT
PROPER CONTACT.
Phillips Head Screws
Wall Station Front
6
Please Do Not Return This Product To The Store. Call Us Directly! Our Trained Technicians Will Answer Your Questions and/or Ship Any Parts You May Need
You can reach us Toll Free at 1-888-827-3667 for Consumer Assistance or online at www.wayne-dalton.com
Page 13
9
Tools Needed:
Power Drill
3/32” Drill Bit
Phillips Head
Screwdriver
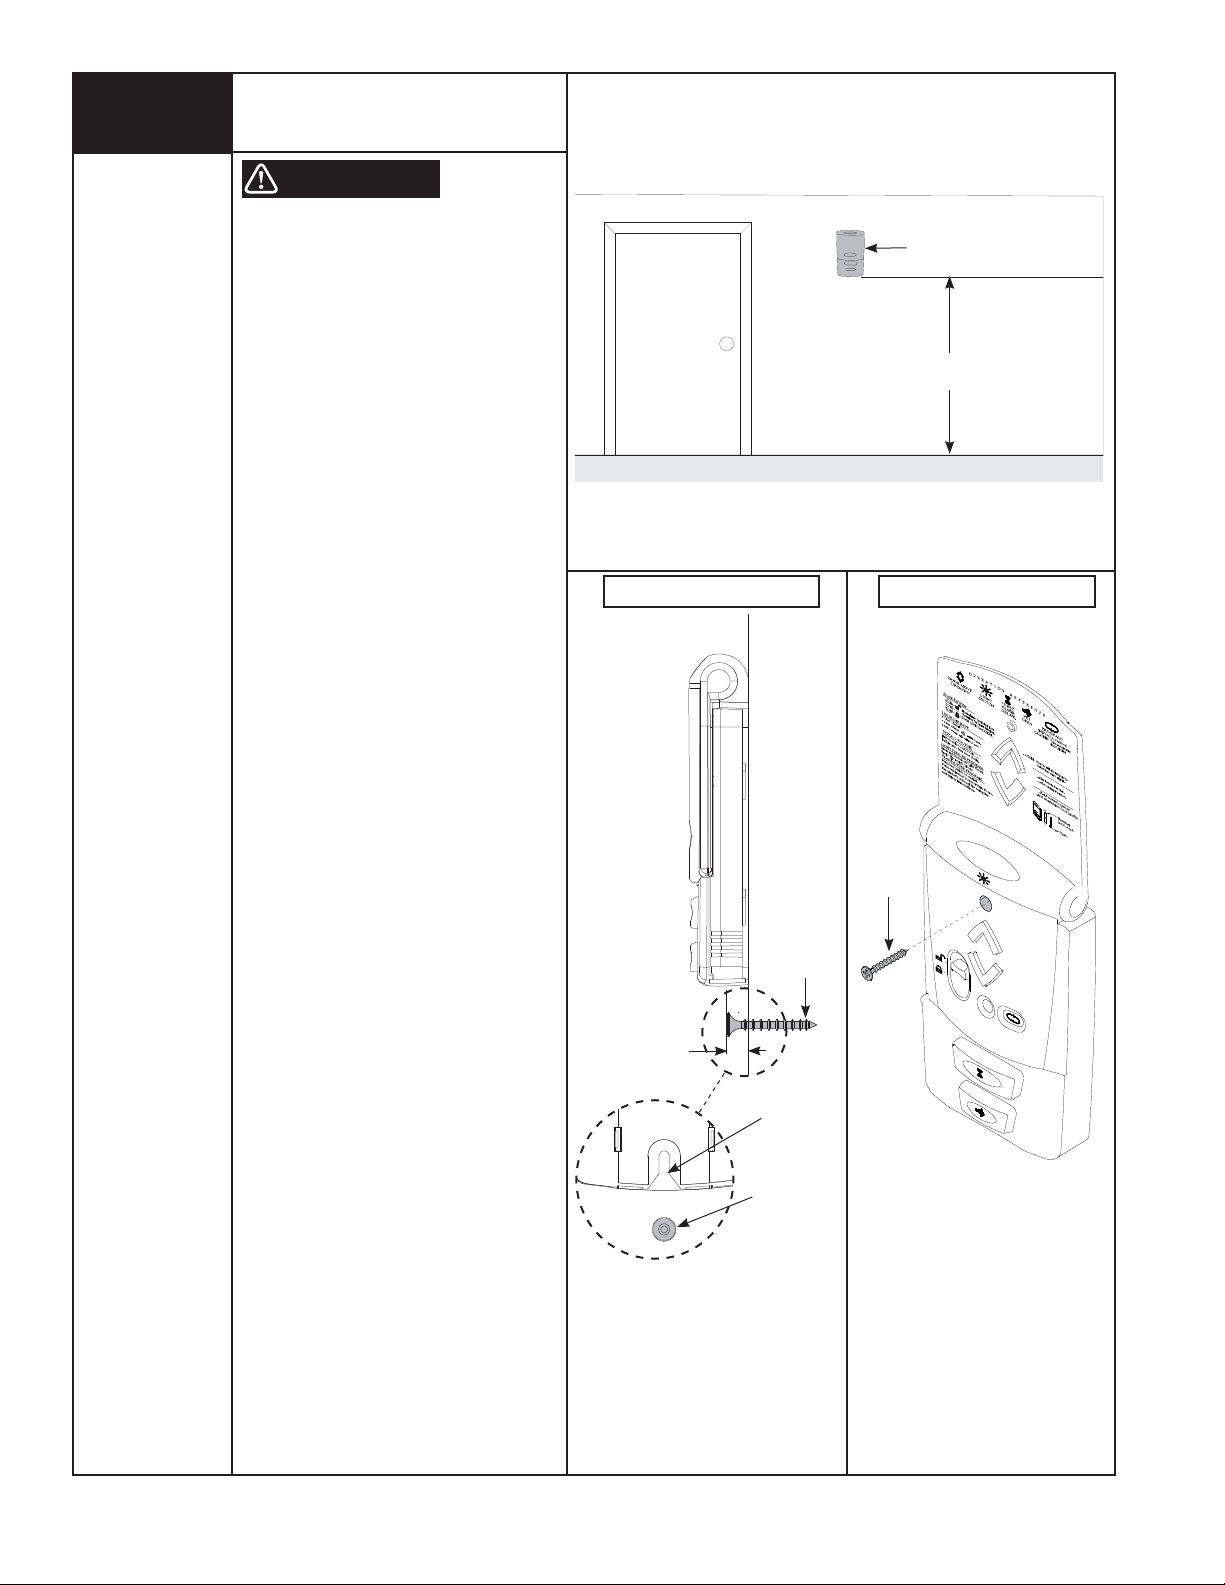
Deluxe Multi-Function Wireless
Wall Station Installation
(If Included)
WARNING
TO PREVENT POSSIBLE INJURY, INSTALL
WALL STATION OUT OF THE REACH OF
CHILDREN AND IN A LOCATION WHERE
THE DOOR CAN BE SEEN WHEN THE
OPENER IS ACTIVATED. DO NOT MOUNT
WALL STATION NEAR OR NEXT TO
GARAGE DOOR.
NOTE: For proper operation, mount the wall
station on a flat surface.
The wall station can be mounted to a NEMA
standard electrical box or directly to any wall
surface. No wiring is required.
Locate wall station adjacent to service
entrance door at a minimum height of 5 ft.,
and at least 6 ft. away from garage door.
If mounting to a NEMA electrical box, use
machine thread screws provided in place of the
wood screws. No drilling is required. If high
voltage wiring is contained in the box,
a standard NEMA solid faceplate must be
installed between the box and the wall station. If
fastening into drywall or concrete, use anchors
provided. When mounting to wood use a 3/32"
drill bit and the drilling template located on
page 39. Drill the two 3/32” mounting holes
using the drill template. Drill 3/16" holes if
using anchors.
Install lower screw leaving 7/16" of the screw
exposed. Slide wall station keyhole slot onto the
lower phillips head screw. Wall station should
slide onto screw, providing a snug fit. If
necessary remove wall station and loosen or
tighten lower phillips head screw until a snug fit
is achieved.
Once wall station is fitted on lower screw, install
upper screw. Do not over-tighten.
CAUTION: Over tightening the upper screw
could deform plastic case.
Wall Station
5 Foot
Minimum
Lower Screw Installation Upper Screw Installation
Phillips
Head Screw
Phillips Head
Screw
7/16”
Keyhole
Slot
Phillips
Head Screw
Please Do Not Return This Product To The Store. Call Us Directly! Our Trained Technicians Will Answer Your Questions and/or Ship Any Parts You May Need
You can reach us Toll Free at 1-888-827-3667 for Consumer Assistance or online at www.wayne-dalton.com
7
Page 14
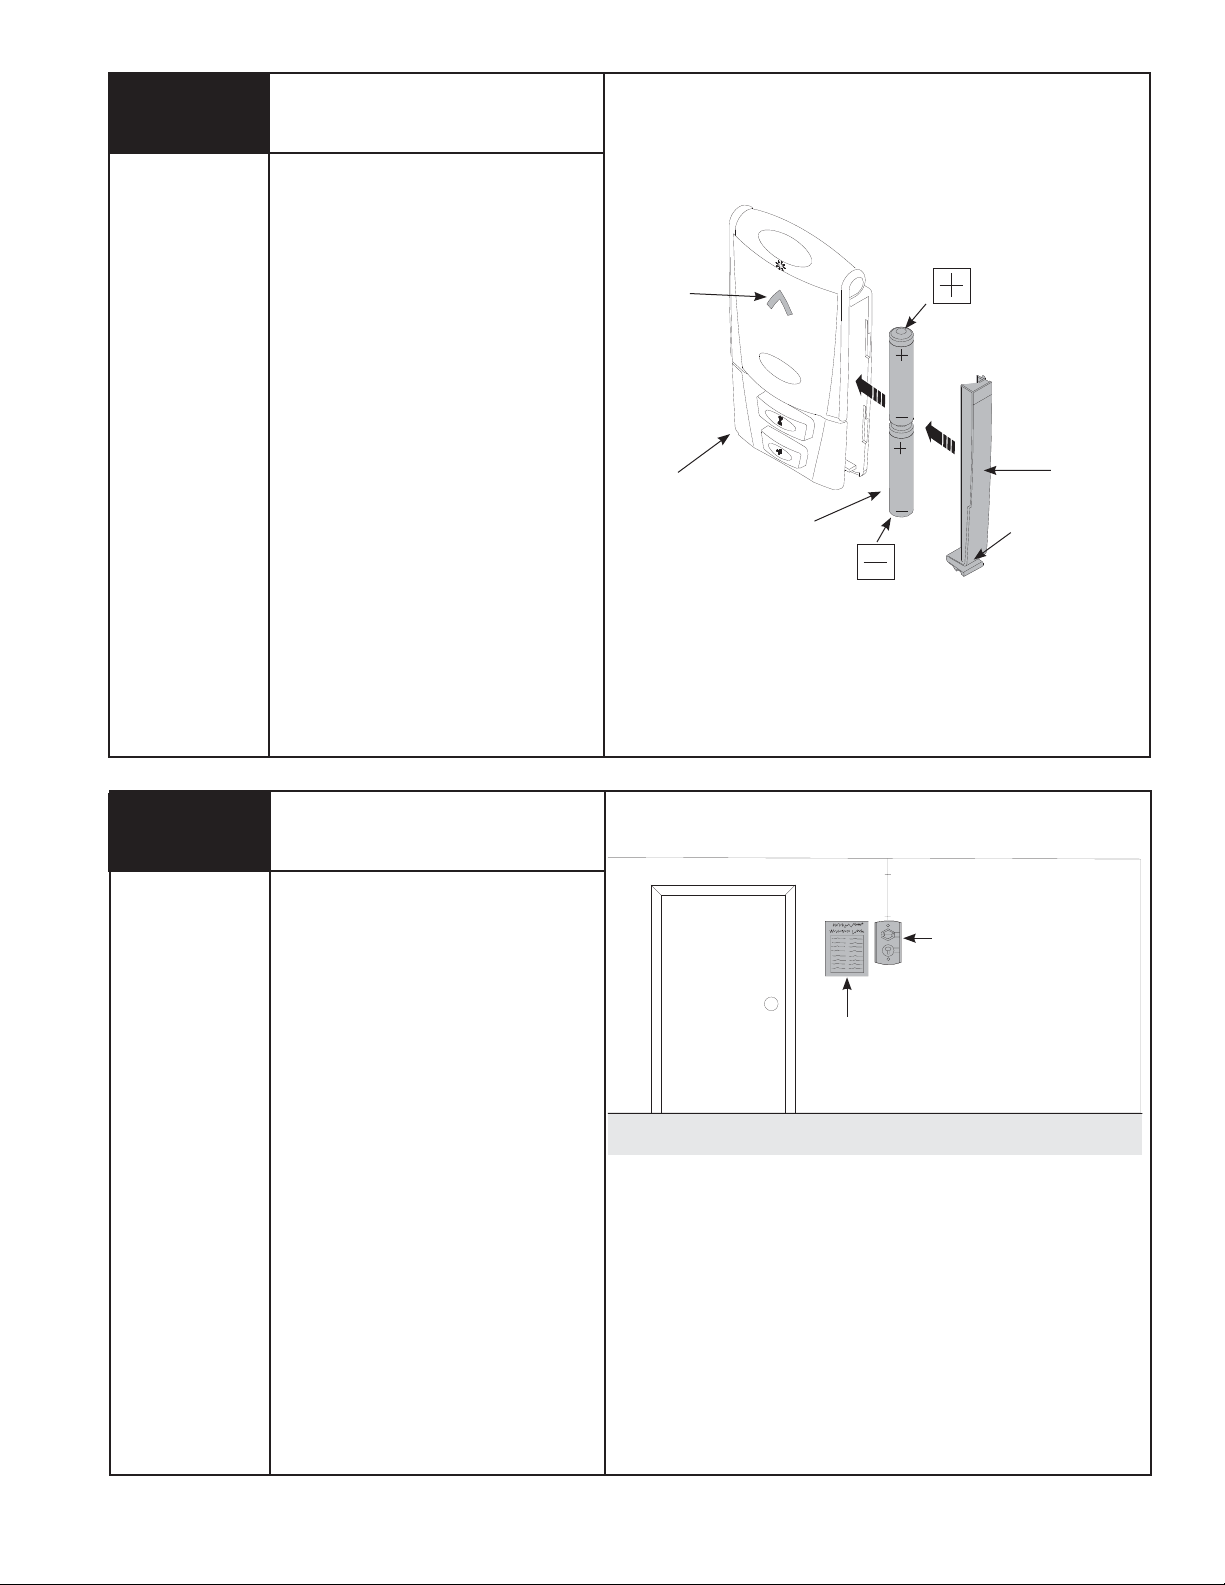
Deluxe Multi-Function Wireless
Wall Station Installation Continued
(If Included)
Remove the battery cover (right-hand side of
wall station) by disengaging the battery cover’s
lower clip. Install two AAA batteries into the wall
station observing the polarity, (+) and (-), of
both batteries. After about three seconds, the
red LED will begin to blink every three seconds.
Re-install the battery cover by first inserting its
top into the wall station then inserting and
securing its bottom.
NOTE: To slow blink rate or turn off, refer to
wall station operation page 28 “Back Lit LED
Light”.
Up/Down
LED
e
r
p
O
o
T
Press
Here
a
t
e
D
o
o
r
10
Tools Needed:
None
Entrapment
Warning Label
Apply entrapment warning label in a
convenient location next to the wall station.
Use mechanical fasteners if adhesive will
not adhere.
Wall
Station
Service
Entrance
Door
(2) AAA
Batteries
Battery
Cover
Lower
Clip
Wall Station
Entrapment
Warning Label
8
Please Do Not Return This Product To The Store. Call Us Directly! Our Trained Technicians Will Answer Your Questions and/or Ship Any Parts You May Need
You can reach us Toll Free at 1-888-827-3667 for Consumer Assistance or online at www.wayne-dalton.com
Page 15
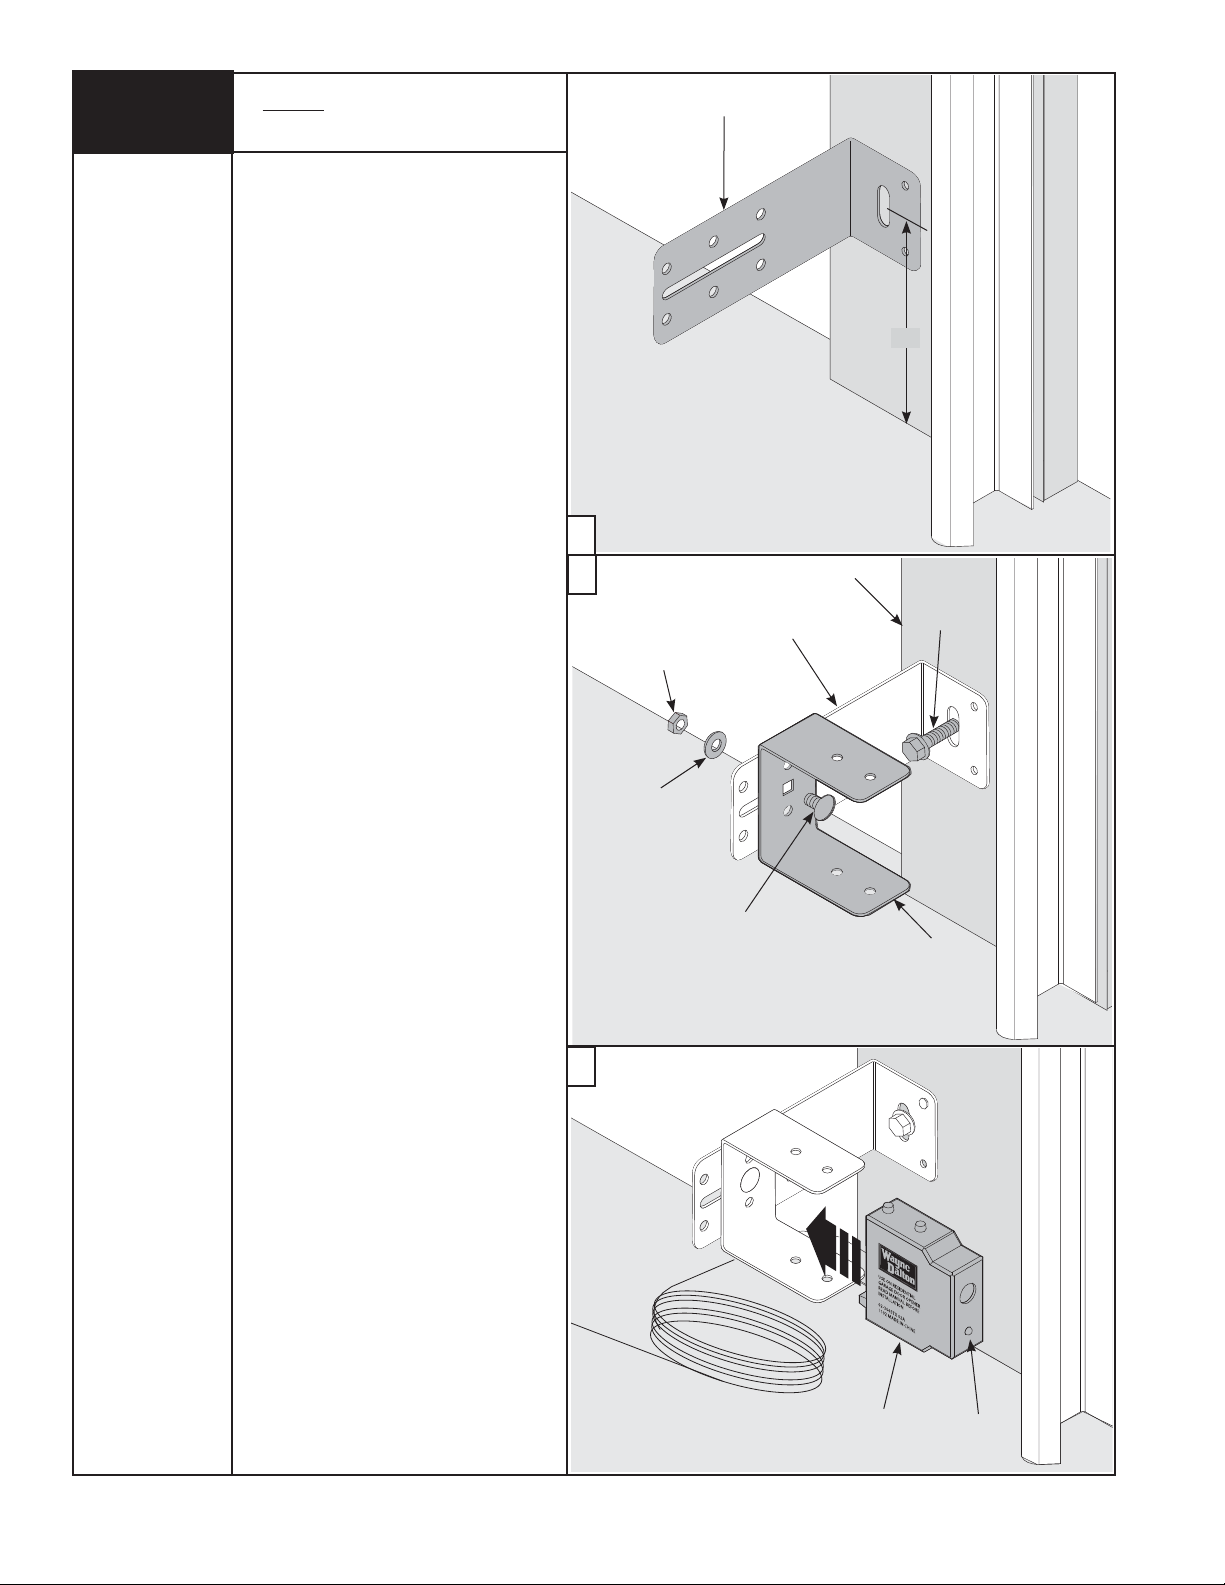
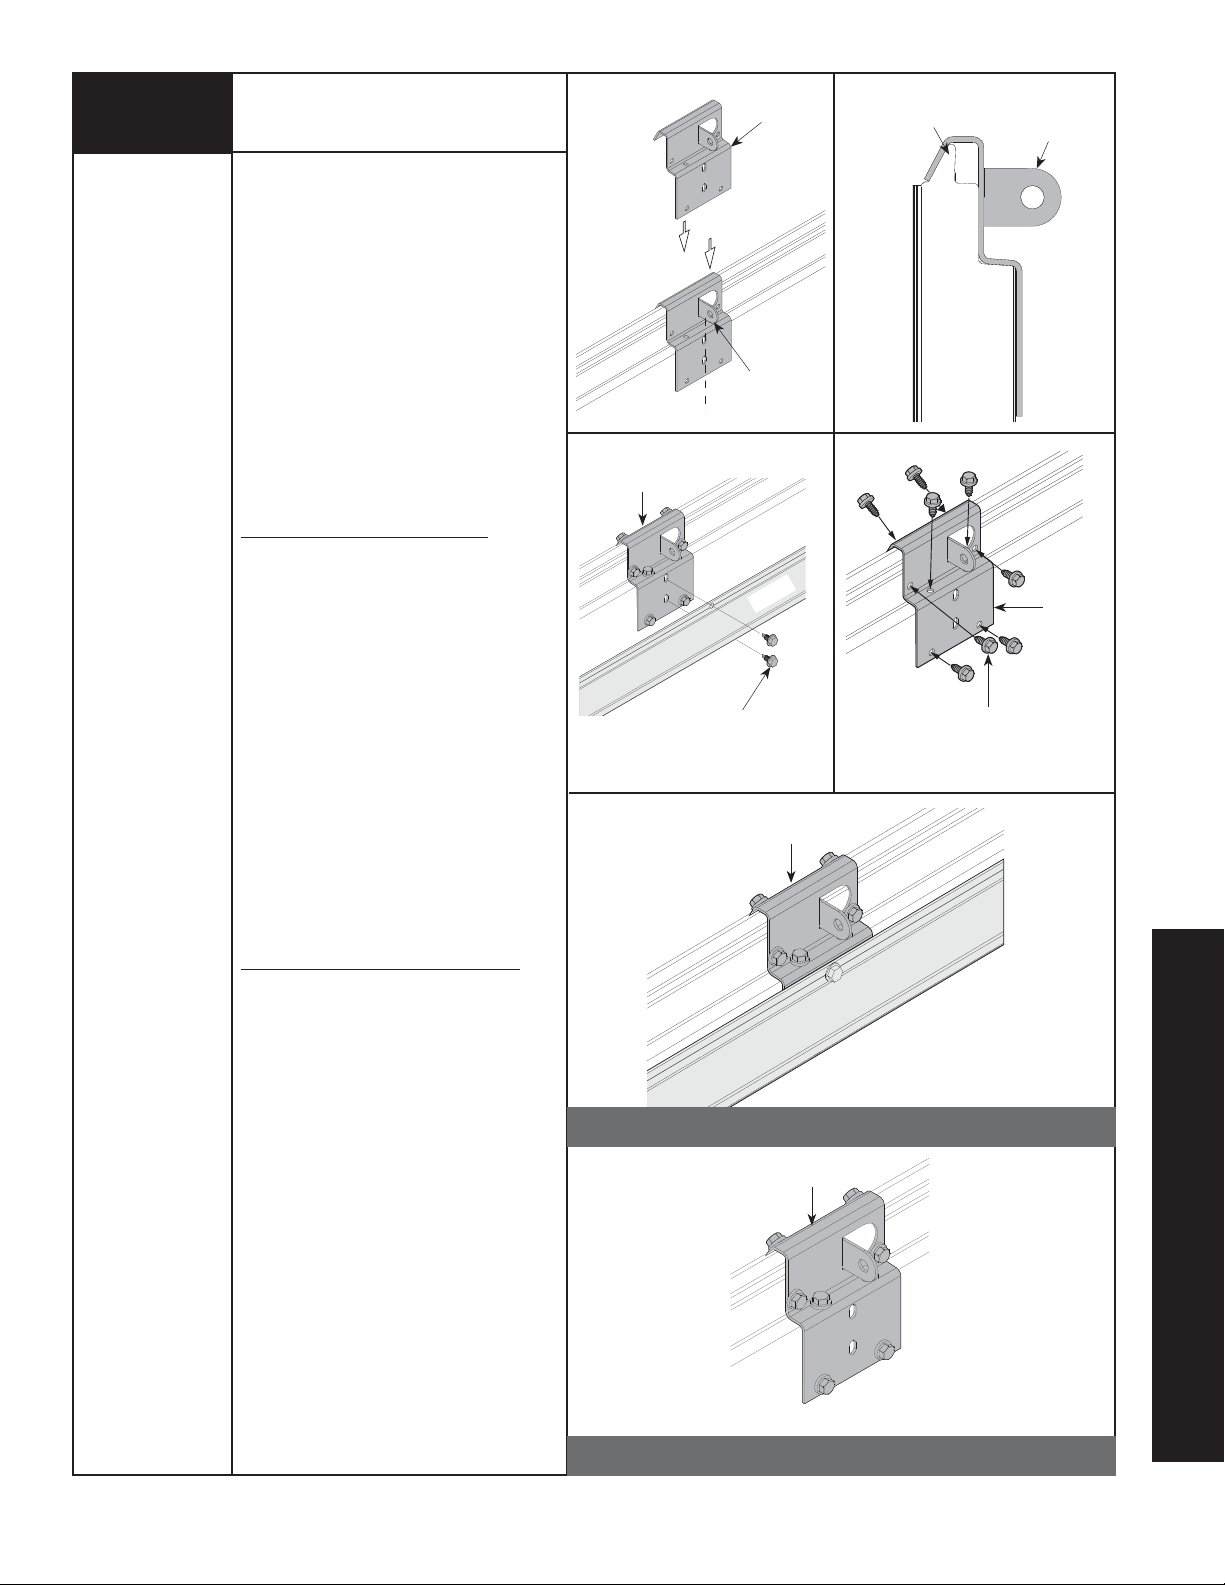
11
Wired Infrared Safety Sensor
Installation
Wall Mounting Bracket
Tools Needed:
Ratchet Wrench
Tape Measure
Power Drill
3/16” Drill Bit
7/16” Socket
Driver
7/16” Wrench
Pencil
IMPORTANT: BOTH WALL BRACKETS
MUST BE MOUNTED AT THE SAME HEIGHT
FOR PROPER ALIGNMENT.
Note: Use Steps a-c for installing sensors
on both sides of the garage door.
a. Select and mark with a pencil, a
mounting location no more than
5 inches above the floor to center line of
wall mounting bracket. The safety sensors
should be mounted as close to the door
track or inside edge of the door as
possible to offer maximum entrapment
protection. It is very important that both
wall mounting brackets be mounted at
the same height for proper alignment.
b. Drill pilot holes, using a 3/16” drill bit.
Using two 5/16” x 1-1/2” lag screws,
permanently mount the wall mounting
brackets to both door jambs. In some
installations it may be necessary to attach
a wooden spacer to the wall to achieve
the required alignment.
5”
a
b
Wall Mounting
Nut
Door Jam
5/16” x 1-1/2”
Lag Screw
Bracket
Attach the “U” brackets to the wall
mounting brackets with 1/4”-20 x 1/2”
carriage bolts, washers and nuts.
Insert the bolts from the inside of the
“U” bracket and hand-tighten.
IMPORTANT: IDENTIFY WHICH SIDE OF THE
GARAGE DOOR IS EXPOSED TO THE MOST
SUNLIGHT. MOUNT THE SENDING UNIT (UNIT
WITHOUT LED) ON THE SIDE WHICH IS
EXPOSED TO THE MOST SUN. SUNLIGHT
MAY AFFECT THE SAFETY SENSORS, AND
THIS ORIENTATION WILL HELP REDUCE THE
EFFECT.
c. Attach the sending and receiving safety
sensors to the “U” brackets by inserting
all three tabs into the respective holes.
Washer
1/4”-20 x 1/2”
Carriage Bolt
U-Bracket
c
Receiving
Unit
Please Do Not Return This Product To The Store. Call Us Directly! Our Trained Technicians Will Answer Your Questions and/or Ship Any Parts You May Need
You can reach us Toll Free at 1-888-827-3667 for Consumer Assistance or online at www.wayne-dalton.com
LED
9
Page 16
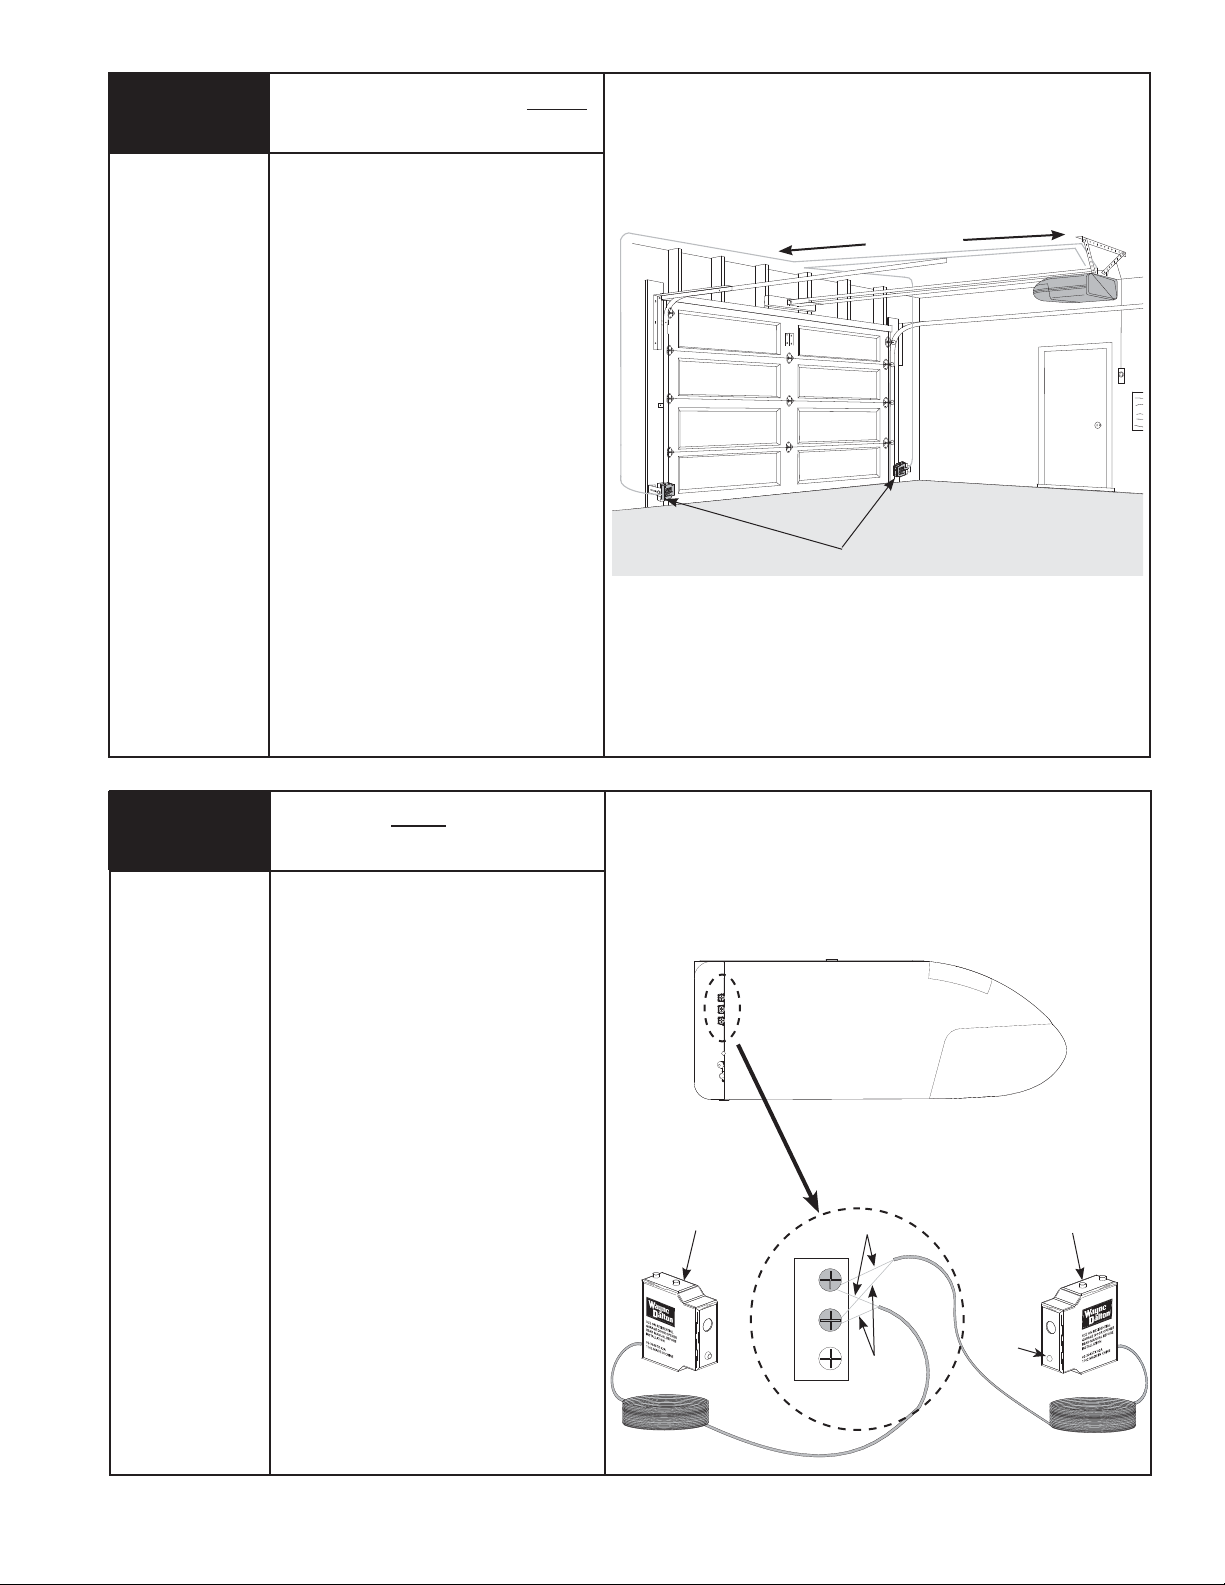
12
Installation of Wiring for Wired
Infrared Safety Sensor
Tools Needed:
Hammer
Uncoil the wires from the infrared safety
sensors and route the wire up the garage
wall across the ceiling and down to the back
of the opener. Tack the wires in place using
staples (Not Supplied). Take care to run
the wires in a location where they will not
interfere with the operation of the door and
do not staple through wire.
NOTE: If wires must be lengthened or
spliced into pre wired installation, use wire
nuts or other suitable connectors.
To Opener
Wire to Opener
13
Tools Needed:
Phillips Head
Screwdriver
Connecting Wired Infrared Safety
Sensor to Opener
Connect infrared safety sensors to the
opener as shown. Shorten wires as
necessary and separate wire ends. Strip
about 1/2” of insulation off each wire, being
careful not to nick wires, and attach wires
to the proper terminal screws, then tighten
securely, using phillips head screwdriver.
One wire has marking on it (numbers, black
stripe, etc). Be sure to observe polarity. Apply
tension to external wires to test for secure
connection. Check that the wires are stapled
in place properly.
Sending Unit
Right Side Of Opener
Black Strip
OBS
COM
P.B .
Solid
Color
Receiving Unit
LED
10
Please Do Not Return This Product To The Store. Call Us Directly! Our Trained Technicians Will Answer Your Questions and/or Ship Any Parts You May Need
You can reach us Toll Free at 1-888-827-3667 for Consumer Assistance or online at www.wayne-dalton.com
Page 17
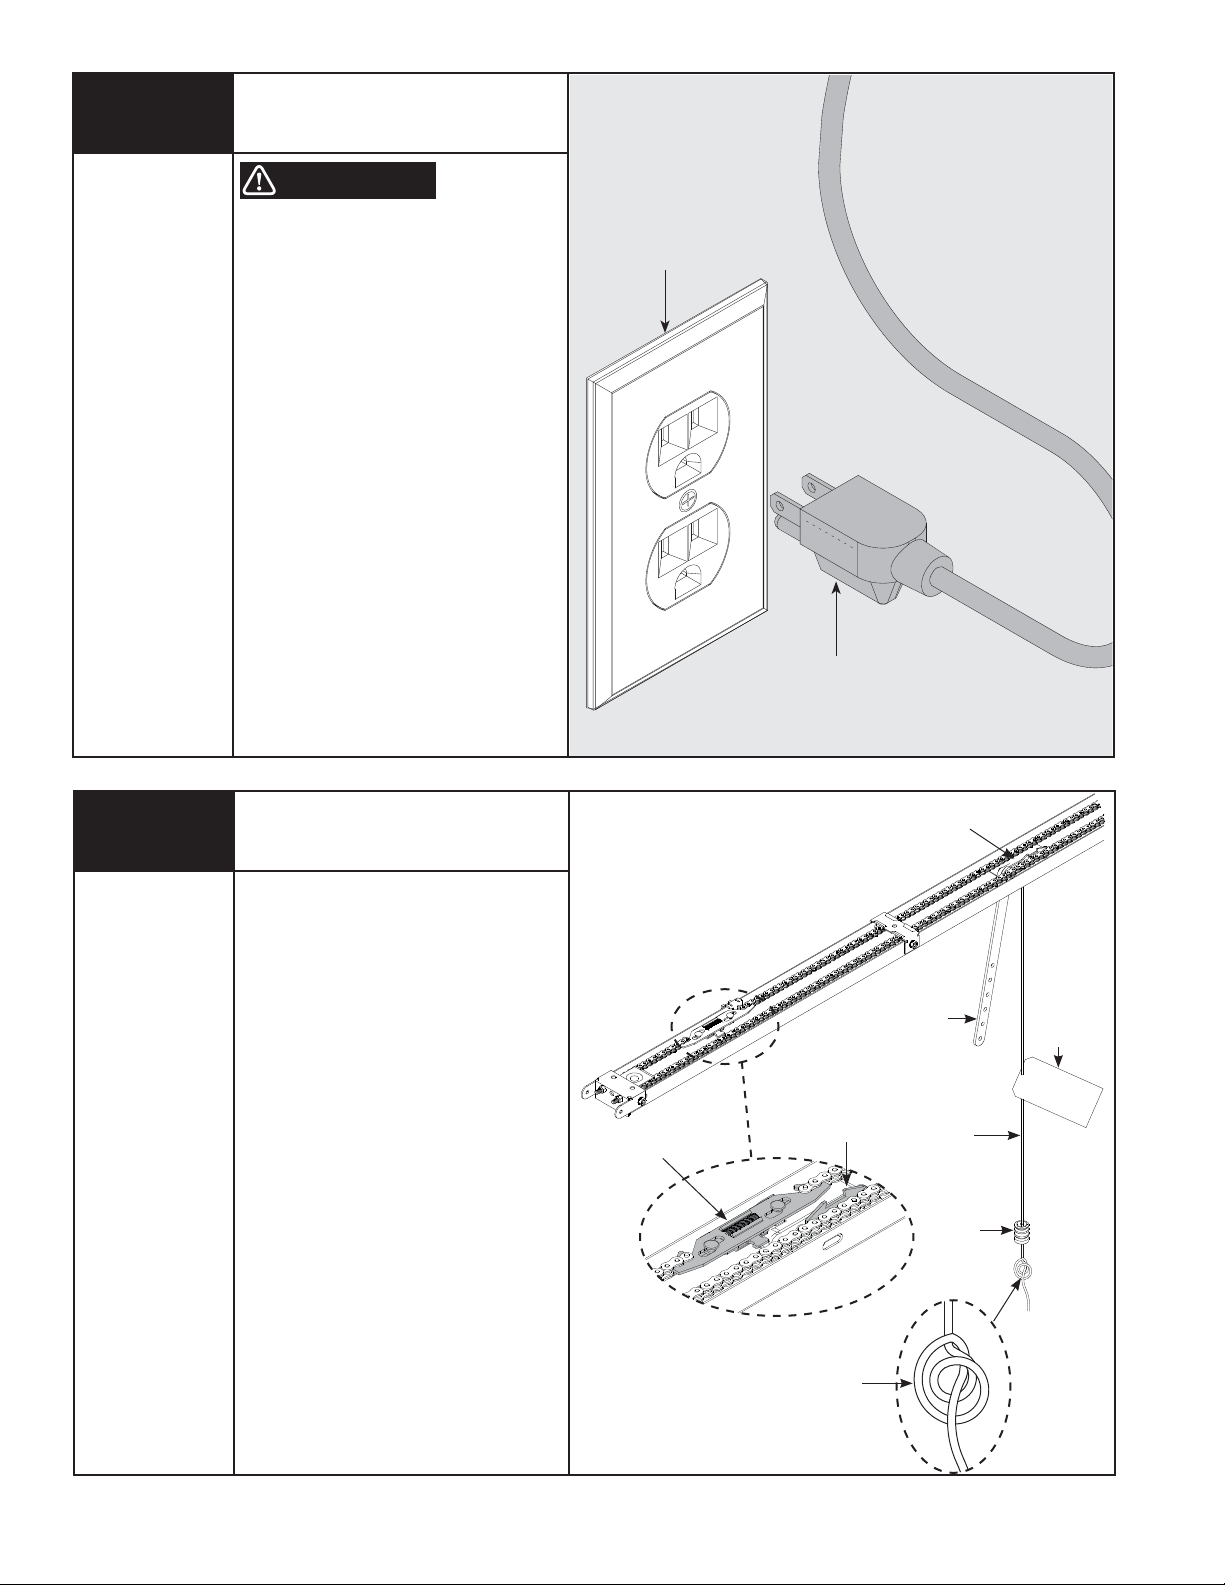
14
Connecting Opener
To Outlet
Tools Needed:
None
WARNING
TO REDUCE THE RISK OF ELECTRICAL
SHOCK, DO NOT CHANGE THE POWER
CORD IN ANYWAY.
IMPORTANT: THE OPENER MUST BE
CONNECTED TO A PROPERLY GROUNDED 3
PRONG, 120 VOLT OUTLET.
The opener can be permanently wired. To
permanently wire the unit, see permanent
wiring option on page 20.
Plug the power cord into the closest
grounding type receptacle. Excess power
cord length must be routed and contained
safely away from any moving parts.
As soon as power is applied to the opener,
the light on the opener will blink once to
indicate a successful self-check of the
controls.
Outlet
Power Cord
15
Tools Needed:
None
Connecting Trolley
To Latch Assembly
Slide the trolley until it snaps onto the latch
assembly.
Attach warning label to the red release cord.
Thread the red release cord through the pull
knob so knot is inside pull knob. Tie a double
knot at the end of the red release cord to
secure pull knob.
NOTE: Pull knob should hang 6 feet above
floor. Ensure that the rope and handle clear
the tops of all vehicles to avoid
entanglement.
Latch Assembly
Trolley
Use a Double Knot
To Secure The Red
Pull Knob
Upper Door Arm
Release Cord
Trolley
Tag
Pull Knob
Please Do Not Return This Product To The Store. Call Us Directly! Our Trained Technicians Will Answer Your Questions and/or Ship Any Parts You May Need
You can reach us Toll Free at 1-888-827-3667 for Consumer Assistance or online at www.wayne-dalton.com
11
Page 18
16
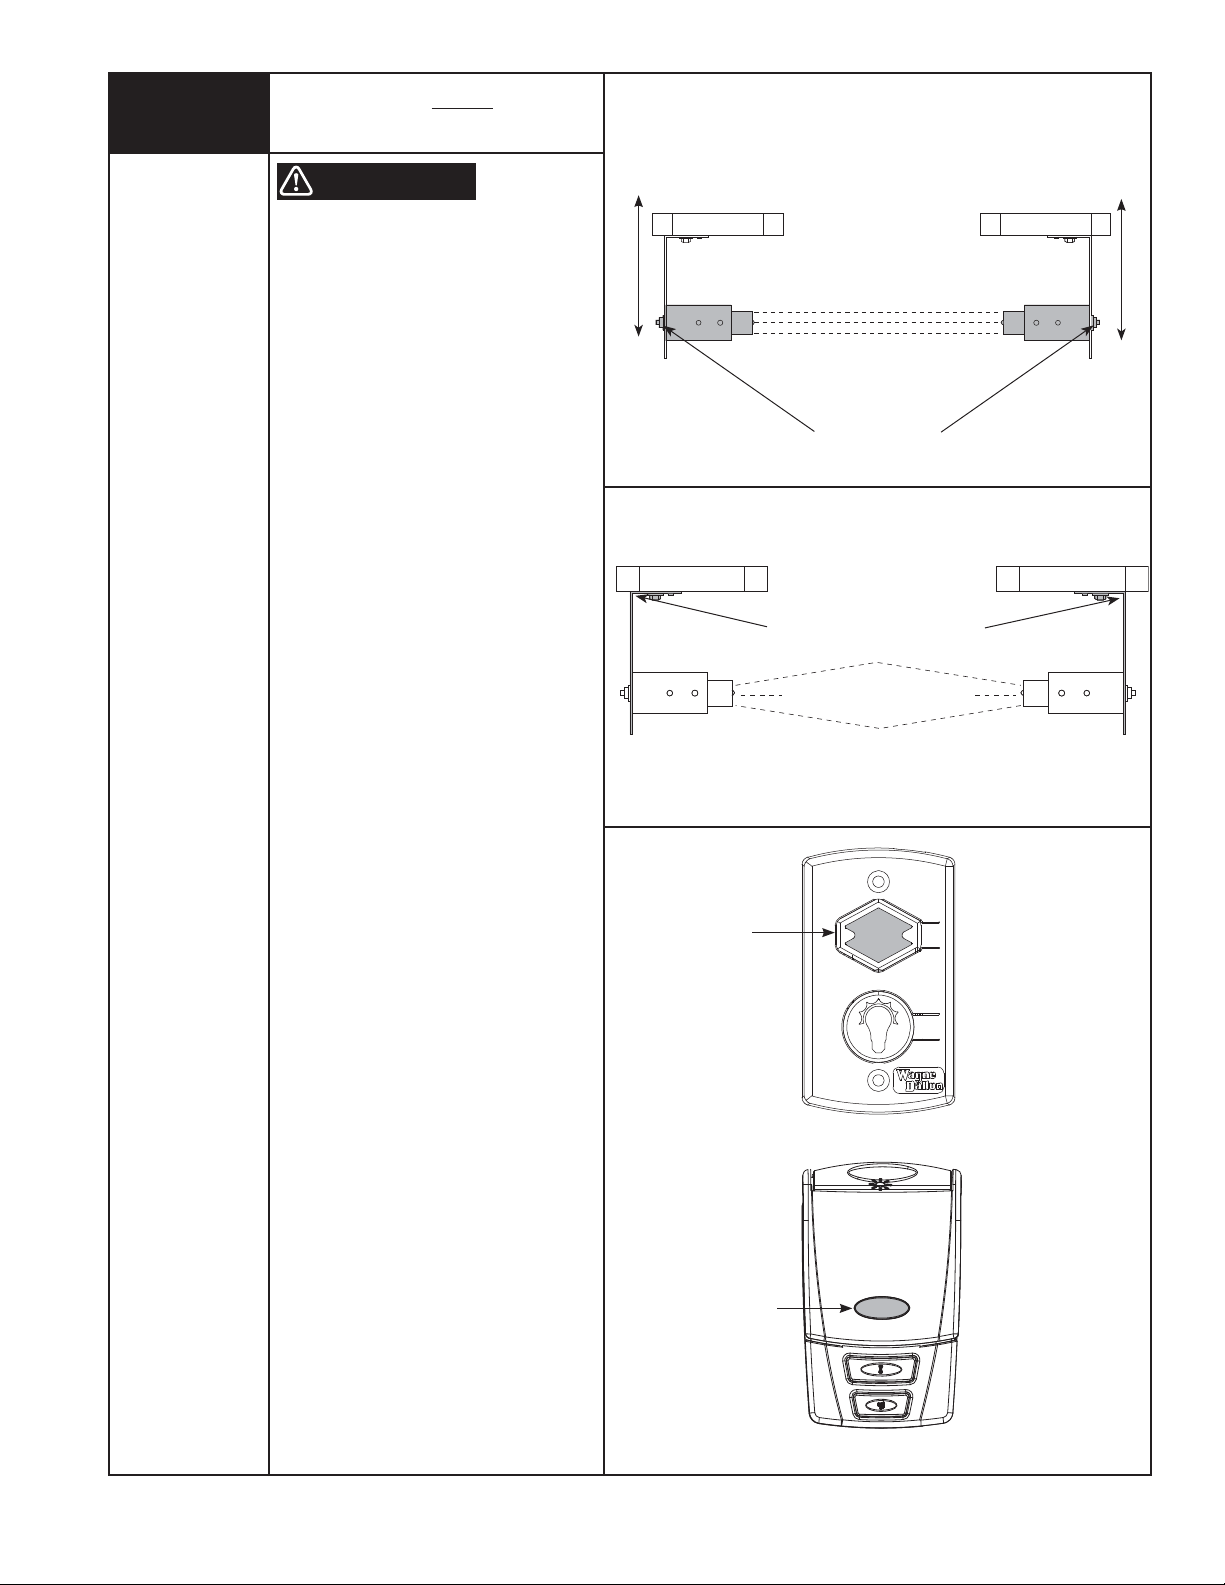
Alignment of Wired Infrared
Safety Sensors
Tools Needed:
Pliers
WARNING
TO AVOID POSSIBLE SEVERE OR FATAL
INJURY, KEEP PEOPLE AND OBJECTS
CLEAR OF THE MOVING DOOR ARM TO
PREVENT POSSIBLE PERSONAL INJURY.
IMPORTANT: THE SAFETY SENSOR SENDS
AN INVISIBLE BEAM OF LIGHT FROM THE
SENDING UNIT TO THE RECEIVING UNIT
ACROSS THE PATHWAY OF THE DOOR. THE
OPENER WILL NOT OPERATE UNTIL THE
SAFETY SENSORS ARE CONNECTED TO THE
OPENER AND PROPERLY ALIGNED. IF THE
INVISIBLE BEAM OF LIGHT IS OBSTRUCTED,
AN OPEN DOOR CANNOT BE CLOSED BY
THE TRANSMITTER OR A MOMENTARY
ACTIVATION OF THE WALL STATION UP/
DOWN BUTTON. HOWEVER, THE DOOR MAY
BE CLOSED BY CONTINUOUSLY
HOLDING YOUR FINGER ON THE WALL
STATION UP/DOWN BUTTON (CONSTANT
PRESSURE) UNTIL THE DOOR TRAVELS TO A
FULLY CLOSED POSITION.
Out
In
1/4”-20 Carriage Bolts
For this adjustment, bend mounting brackets
at wall mount
Top View
In
Out
At this point you will be able to activate the
opener. The trolley/ upper arm will move
to the open position, but will not move to
the closed position unless the beams are
aligned.
The safety sensors must be aligned by
moving the sending and receiving units in or
out until the alignment light on the receiving
unit comes on. The 1/4”-20 carriage bolt
can be loosened to move the unit in or out,
as required. If you have difficulty
aligning beams, check that both brackets are
mounted at the same height (see Step 11)
and remount if necessary. Additional minor
adjustments can be made by lightly bending
the mounting brackets.
Once the alignment light comes on, tighten
all bolts and mounting screws.
Finish securing all wiring making sure not to
break or open any of the conductors. Loop
and secure any extra wire.
Up/Down
Button
Up/Down
Button
Wired Wall station
a
t
r
e
e
D
p
o
O
o
o
r
T
Press
Here
Using the wall station up/down button,
activate the opener and check that it will
operate through full open and close. Ensure
trolley and trolley latch are in the closed
position prior to proceeding to next step.
12
Please Do Not Return This Product To The Store. Call Us Directly! Our Trained Technicians Will Answer Your Questions and/or Ship Any Parts You May Need
You can reach us Toll Free at 1-888-827-3667 for Consumer Assistance or online at www.wayne-dalton.com
Multi-Function Wall Station
RF Transmitter
Page 19
17
Tools Needed:
Pliers/Wire Cutters
Tape Measure
Flat Tip
Screwdriver
Setting Trolley Close Position
WARNING
TO AVOID POSSIBLE INJURY OR
PROPERTY DAMAGE, KEEP PEOPLE AND
OBJECTS CLEAR OF THE MOVING DOOR
ARM.
NOTE: If necessary, activate the opener
to move the trolley/ upper door arm to the
closed position.
NOTE: If you have a 9100, 9400,9600,
5120, 5140 or 9700 series door, with one of
the door brackets shown at the right and a
Torquemaster
counterbalance system, see “Setting Trolley
Close Position/ Connecting Door Arm To
Door” on pages 23-24. If not, complete this
step.
NOTE: If you have a 9100, 9400, 9600,
5120, 5140 or 9700 series door, with one of
the door brackets shown at the right and a
Torsion Spring(s), see “Setting Trolley Close
Position/ Connecting Door Arm To Door” on
pages 25-26. If not, complete this step.
®
or Extension Spring(s)
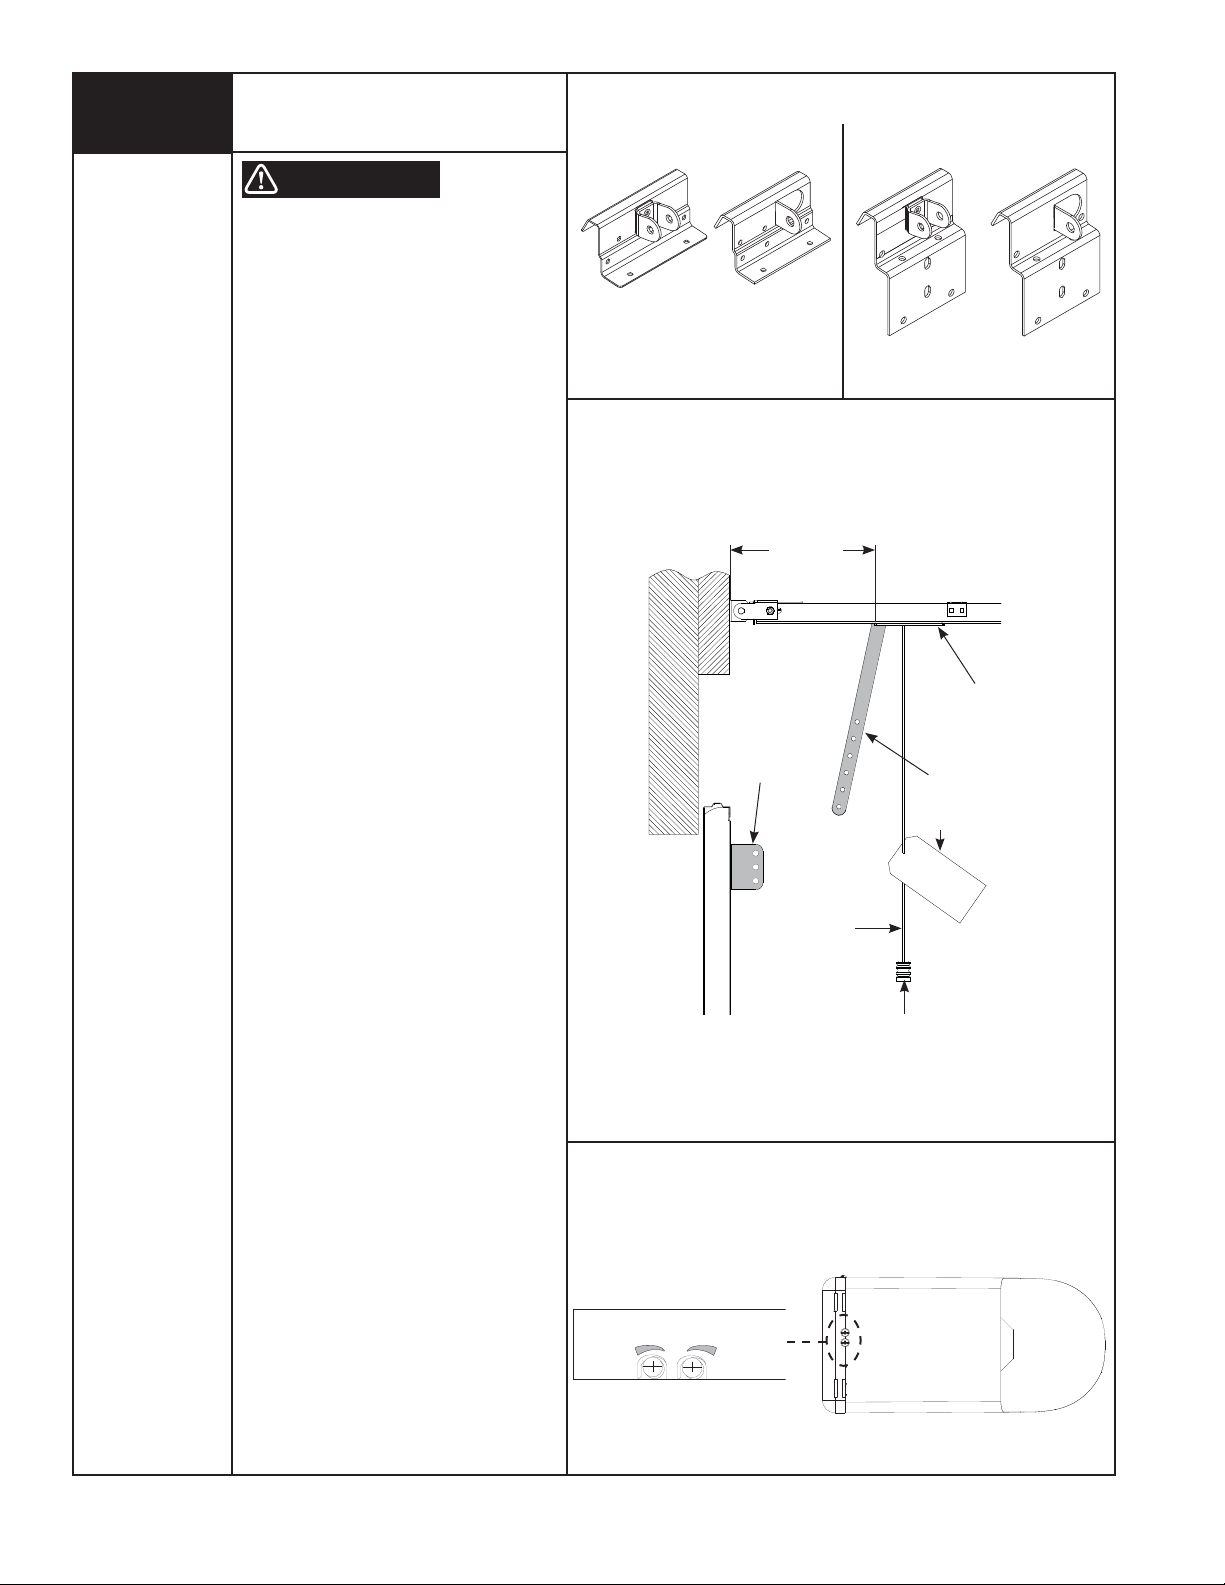
Single and Double Tab Door Brackets
Models: 9100, 9400, 9600, 5120 and 5140.
Double Tab
Bracket
Single Tab
Bracket
11” to 13”
(13” Minimum
For Belt Drive)
Door Bracket
Double Tab
Bracket
(Closed Limit Position)
Model: 9700
Single Tab
Bracket
Trolley
Upper Arm
Trolley and latch assembly must be at the
factory preset fully closed position, (see
illustration).
Verify preliminary trolley and latch assembly
close position is 11” to 13” between trolley
clevis pin and the inside face of the door.
If adjustment of the trolley/latch assembly
position is required, use the close travel
adjustment screw located on the bottom of
the opener. A 1/4 turn equals approximately
1” of trolley travel; turn clockwise to decrease distance between header and trolley
and counter-clockwise to increase distance
between header and trolley.
TRAVEL ADJUSTMENT
OPEN
LESS
MORE
CLOSE
MORE
Tag
Release Cord
Pull Knob
Bottom Of Opener
Please Do Not Return This Product To The Store. Call Us Directly! Our Trained Technicians Will Answer Your Questions and/or Ship Any Parts You May Need
You can reach us Toll Free at 1-888-827-3667 for Consumer Assistance or online at www.wayne-dalton.com
13
Page 20
18
Tools Needed:
Adjustable Wrench
Ratchet Wrench
7/16” Socket
9/16” Socket
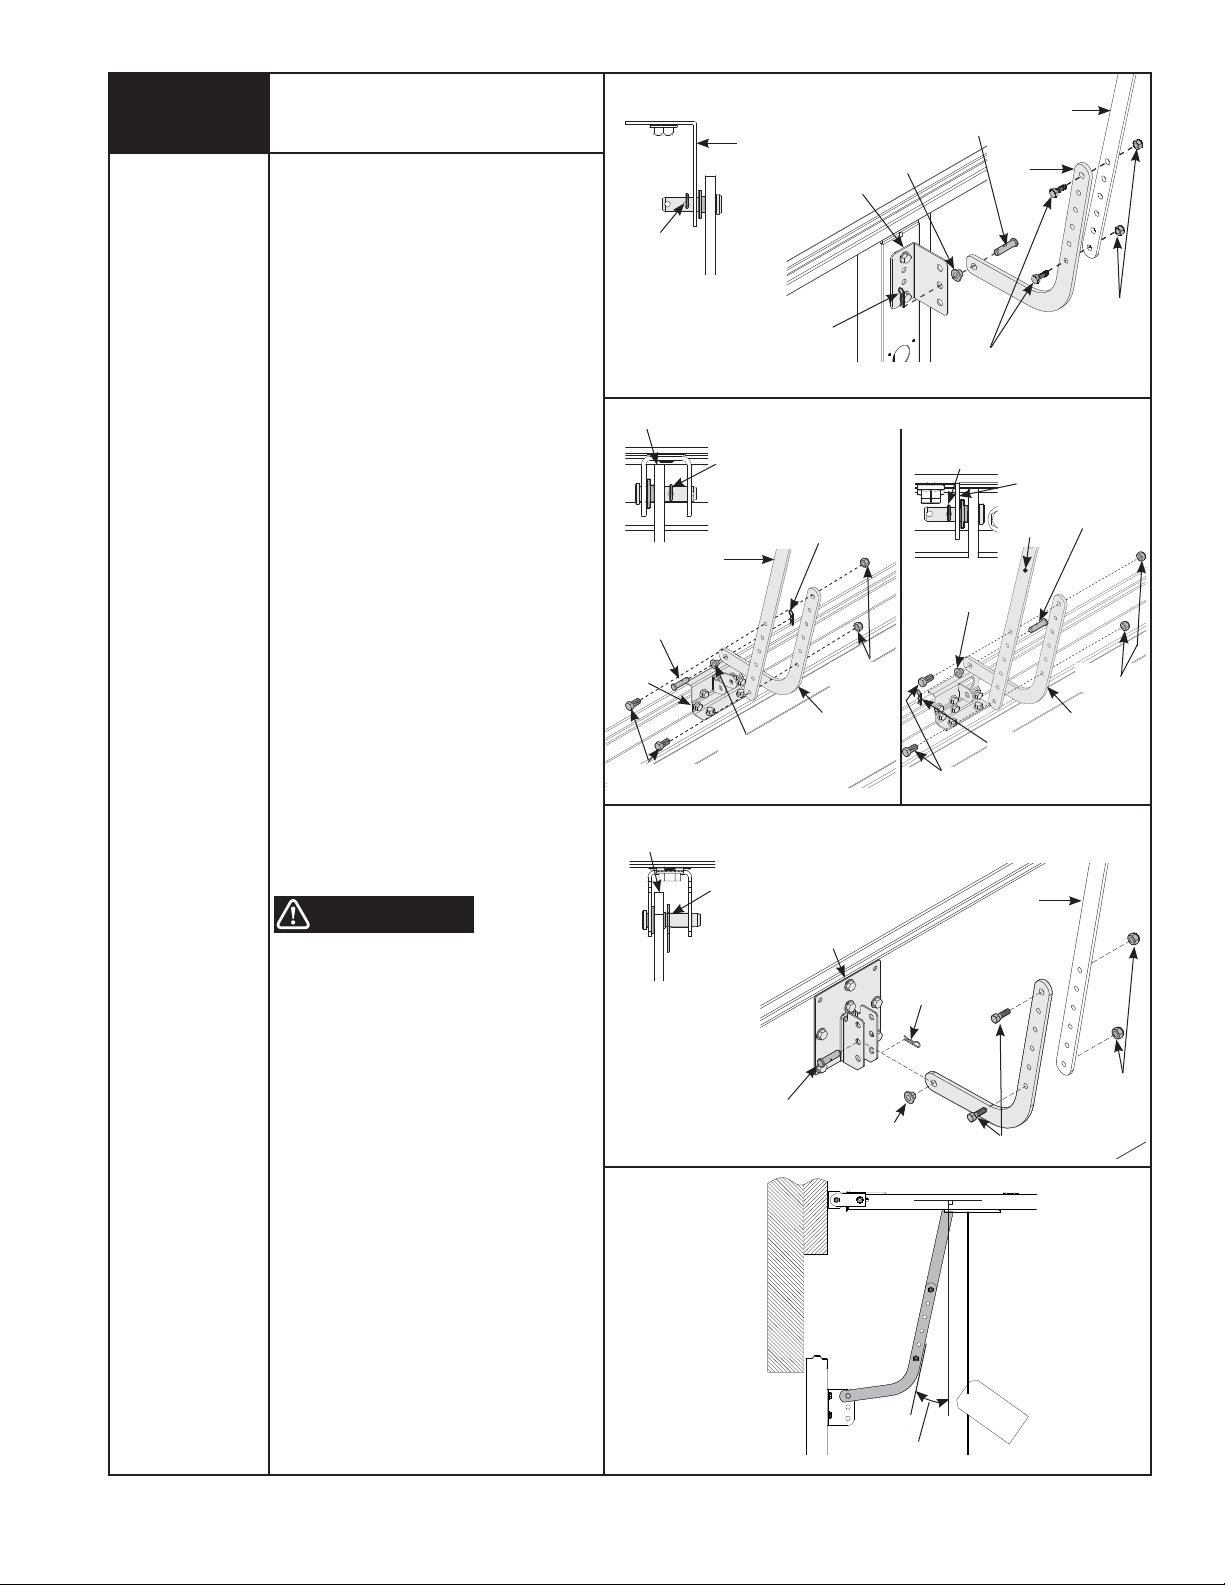
Connecting Door Arm to Door
Typical Installation:
Place nylon shoulder bushing in lower arm
hole in curved end (single hole). Place door
arm on right side of door bracket. Insert
5/16” x 1-1/4” multi-grip clevis pin through
nylon shoulder bushing, lower door arm and
middle hole of door bracket. Install hairpin
cotter through hole (Closest to door bracket)
of multi grip clevis, as shown.
For Models: 9100, 9400, 9600, 5120,
5140 And 9700
Place nylon shoulder bushing in lower arm
hole in curved end (single hole). Place the
lower door arm between the tabs (or the right
side of single tab) and insert 5/16” x 1-1/4”
multi-grip clevis pin through nylon shoulder
bushing, lower door arm and hole(s) of door
bracket. Install hairpin cotter through hole
(Closest to door arm “Double Tab” or door
bracket “Single Tab”) of multi grip clevis, as
shown.
For Models: 9700 And 9800
Place nylon shoulder bushing in lower arm
hole in curved end (single hole). Place the
lower door arm between the tabs and insert
5/16” x 1-1/4” multi-grip clevis pin through
nylon shoulder bushing, lower arm and holes
of door bracket. Install hairpin cotter through
hole (Closest to door arm) of multi grip clevis,
as shown.
CONNECTING UPPER AND LOWER DOOR
ARMS
WARNING
FAILURE TO USE LOCKING NUT CAN
RESULT IN ARM RELEASING AND
POSSIBLE RESULTING IN PROPERTY
DAMAGE AND/OR PERSONAL INJURY.
Hairpin Cotter
(Hole Closest to
Door Bracket)
TOP VIEW
Lower Arm
TOP VIEW
5/16” x 1-1/4”
Multi-grip Clevis pin
Door
Bracket
1/4”-20 x 3/4”
Hex Head Bolt
Lower Arm
TOP VIEW
Typical Installation
5/16” x 1-1/4”
Bushing
Multi-grip Clevis pin
1/4”-20 x 3/4”
Hex Head Bolt
Hairpin Cotter
(Hole Closest to
Door Bracket)
TOP VIEW
Nylon Shoulder
Bushing
Door
Bracket
1/4”-20 x 3/4”
Hex Head Bolt
Lower Arm
Door Bracket
Upper Arm
Hairpin
Cotter
Single TabDouble Tab
Door Bracket
Hairpin Cotter
Nylon Shoulder
Door Bracket
Models: 9100, 9400,9600, 5120, 5140 or 9700
Hairpin Cotter
(Hole Closest to
Door Arm)
Upper Arm
Nylon Shoulder
Hairpin Cotter
1/4”
Nylock Nuts
Lower Arm
Bushing
Models: 9700 And 9800
Hairpin Cotter
(Hole Closest to
Door Arm)
Door
Bracket
Lower Arm
Hairpin Cotter
Upper Arm
Upper Arm
1/4”
Nylock Nuts
5/16” x 1-1/4”
Multi-grip Clevis pin
1/4”
Nylock Nuts
Lower Arm
Align upper and lower door arm pieces to
nearest matching holes.
NOTE: It may be necessary to apply downward pressure on the door or slightly raise
the door during this process.
5/16” x 1-1/4”
Multi-grip Clevis pin
Nylon Shoulder
Bushing
1/4”-20 x 3/4”
Hex Head Bolt
Secure upper and lower door arms to each
other using two 1/4”-20 x 3/4” hex head
bolts and nylock nuts.
NOTE: Install the hex head bolts as far apart
as possible, when positioning the upper and
lower arms.
NOTE: Door arm angle must be 10° to 30°
degrees (see illustration). If not, repeat “Setting Trolley Close Position” and increase or
decrease distance between trolley clevis pin
and inside face of the door.
14
Please Do Not Return This Product To The Store. Call Us Directly! Our Trained Technicians Will Answer Your Questions and/or Ship Any Parts You May Need
You can reach us Toll Free at 1-888-827-3667 for Consumer Assistance or online at www.wayne-dalton.com
10° To 30°
1/4”
Nylock Nuts
Page 21
19
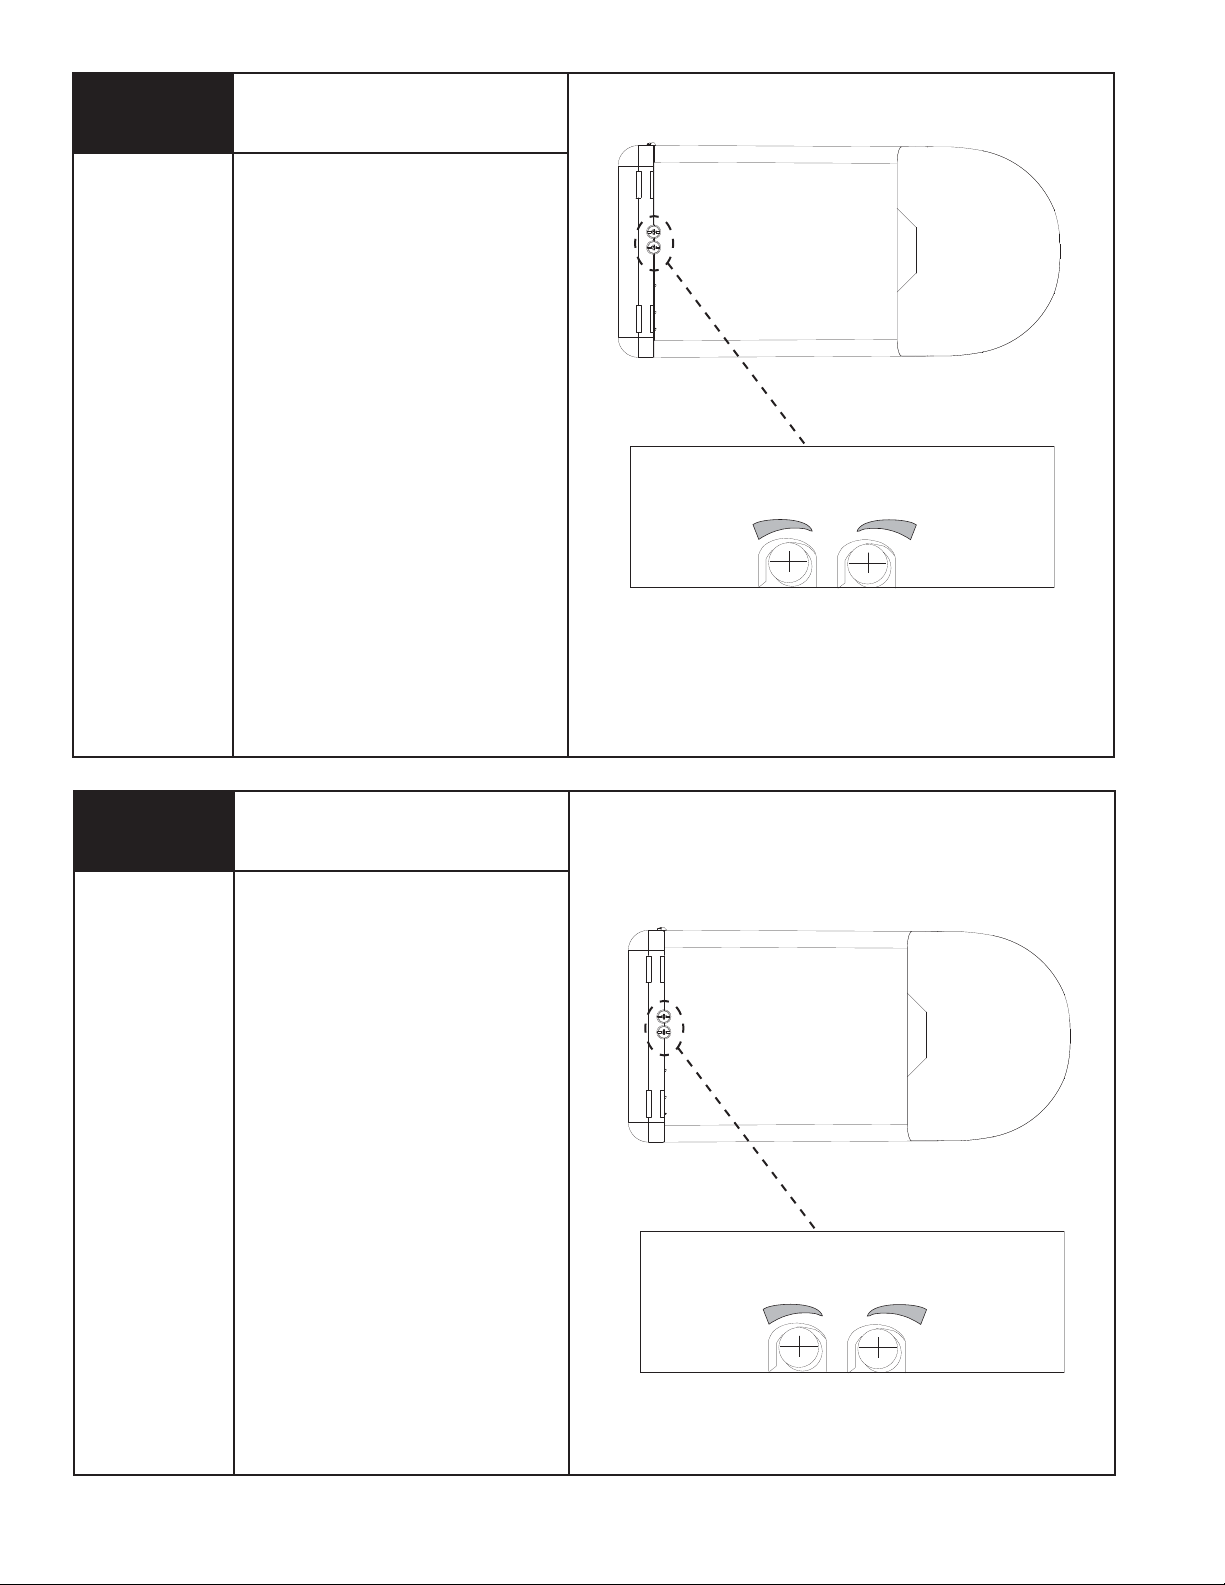
Setting Door Close Travel
Tools Needed:
Flat Tip
Screwdriver
Using the wall control up/down button,
activate door to full open position;
reactivate to close position.
The door should stop on the floor with the
bottom door seal slightly compressed.
If the door reverses off the floor, turn close
travel knob 1/4 turn “less”.
If door is not completely closed, turn travel
knob 1/4 turn “more”.
Repeat as necessary.
NOTE: 1/4 turn equals 1” of door travel.
Bottom Of Opener
TRAVEL ADJUSTMENT
OPEN
MORE
LESS
CLOSE
MORE
20
Tools Needed:
Flat Tip
Screwdriver
Setting Door Opening Travel
The door opener is assembled with the open
travel adjustment preset for a typical door,
but all doors should be adjusted to stop as
close as possible to the door’s “natural” fully
open, resting position.
To determine the door’s “natural” fully open,
resting position, disconnect door from
opener using the emergency release
disconnect (see page 27, EMERGENCY
DISCONNECT) and manually raise door to its
“natural” fully open, resting position. Use this
location for your open limit setting. To
determine if door needs adjustment, activate
the opener to bring door to fully open
position.
Bottom Of Opener
TRAVEL ADJUSTMENT
OPEN
MORE
LESS
CLOSE
MORE
Please Do Not Return This Product To The Store. Call Us Directly! Our Trained Technicians Will Answer Your Questions and/or Ship Any Parts You May Need
You can reach us Toll Free at 1-888-827-3667 for Consumer Assistance or online at www.wayne-dalton.com
15
Page 22
Setting Door Opening Travel
(Continued)
NOTE: If door does not open fully and
opener light flashes (make sure the bulb
is installed and operating) check for an
obstruction or see Adjustment #1, page 32
(Adjusting Opening Force).
To adjust for a non-standard door or to
precisely set the open position: Using
the wall station, operate the door and stop
it in mid-travel position. Using a flathead
screwdriver turn the OPEN travel adjuster for
more (counter-clockwise) or less (clockwise)
travel. A 1/4 turn equals approximately 1” of
trolley movement.
NOTE: Confirm that the door has stopped in
the UP position as a result of the upper limit
switch and not because the trolley has hit
the stop bolt, which is mounted in the rail
near the opener. The correct condition can
be verified by observing that the openers
convenience light does not flash after the
fully open door comes to a stop. The faulty
condition may also be confirmed visually
by checking to see if the trolley is resting
against the stop bolt.
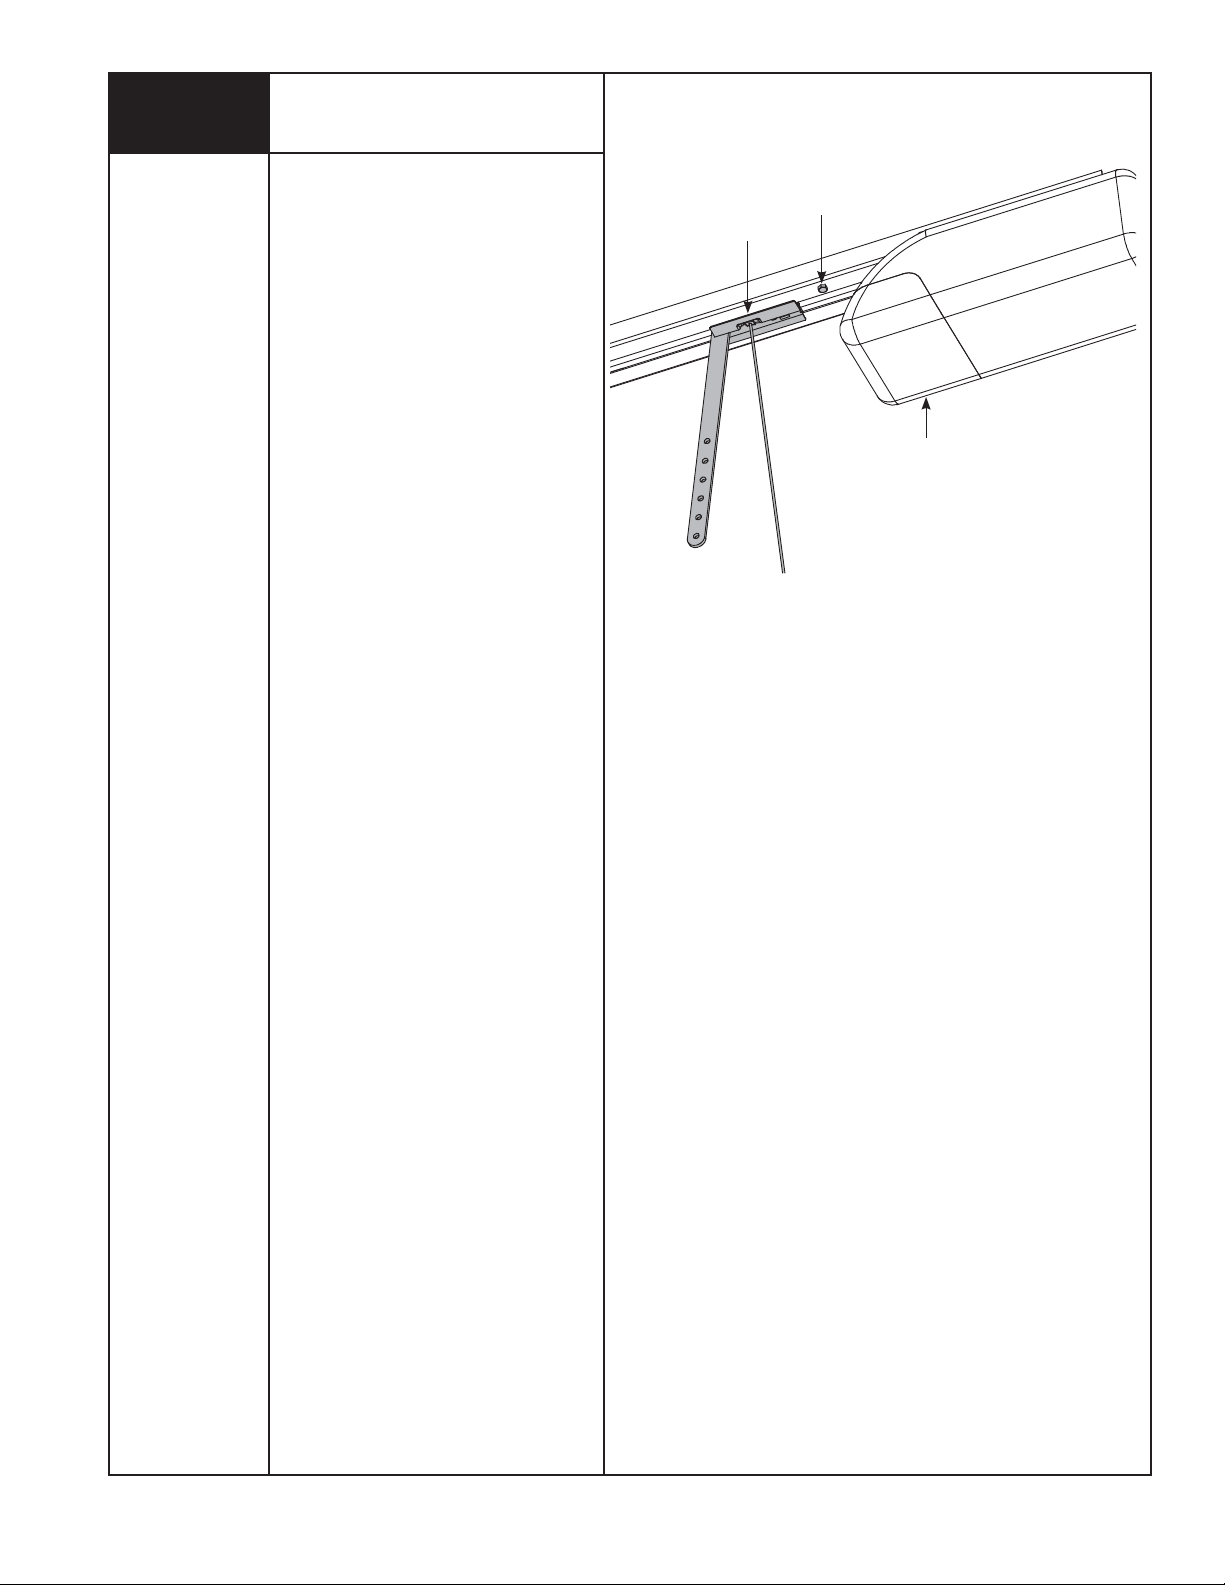
Stop Bolt
Trolley
Opener
To confirm final OPEN travel adjustment,
activate the opener to bring door to fully
open position. The opener light should not
be flashing.
16
Please Do Not Return This Product To The Store. Call Us Directly! Our Trained Technicians Will Answer Your Questions and/or Ship Any Parts You May Need
You can reach us Toll Free at 1-888-827-3667 for Consumer Assistance or online at www.wayne-dalton.com
Page 23
21
Contact Obstruction Test
Tools Needed:
2 x 4 Board
After installing the opener, the door must
reverse when it contacts a 1 1/2” inch high
object (or a 2 x 4 board laid flat) on the
garage floor.
Using the wall station, activate the door to
the fully open position. Place a 2 x 4 flat
on the garage floor, under the door path.
Activate the door to the closed position with
the wall station. Upon contacting the 2 x 4
board, the door should reverse.
If door stops on the 2 x 4 board, adjust
the close travel knob 1/8-1/4 turn “more”
until door reverses upon contact with 2 x 4
board.
When the door reverses, remove the
2 x 4 board and run the full cycle of open
and close of the door. Door should not
reverse when it comes to the fully closed
position on the floor.
NOTE: If opener fails to pass this test,
repeat Step 19. Also see Adjustment #2,
page 32 (Contact Obstruction Test).
2 x 4 Laid Flat
On The Floor
WARNING
IF OPENER DOES NOT RESPOND PROPERLY TO THESE TESTS (STEPS
21 AND 22), HAVE A QUALIFIED SERVICE PERSON MAKE NECESSARY
ADJUSTMENTS/REPAIRS, OR SEVERE OR FATAL INJURY COULD
RESULT FROM OPERATING THE DOOR/OPENER.
22
Safety Sensor Obstruction Test
Tools Needed:
2” x 6” x 12”
Solid Test Object
Please Do Not Return This Product To The Store. Call Us Directly! Our Trained Technicians Will Answer Your Questions and/or Ship Any Parts You May Need
WARNING
WHEN PERFORMING THIS PART OF THE
TEST, DO NOT PLACE YOURSELF UNDER
DESCENDING DOOR, OR SEVERE OR
FATAL INJURY MAY RESULT.
Starting with the door fully open, place a 6”
high object on the floor, in line with sensors,
12” from the left side of the door.
Activation of the opener with the wall station
Up/Down button should cause the door to
move no more than one foot, stop and then
reverse to fully open position.
Repeat this test with the 6” high object
placed at the center of the door and then
12” from the right side of the door.
The 6” high object, when placed on the floor
in line with sensors, while door is closing,
should also cause the door to reverse.
You can reach us Toll Free at 1-888-827-3667 for Consumer Assistance or online at www.wayne-dalton.com
Sensor
WARNING
IF OPENER DOES NOT RESPOND PROPERLY TO THESE TESTS (STEPS
21 AND 22), HAVE A QUALIFIED SERVICE PERSON MAKE NECESSARY
ADJUSTMENTS/REPAIRS, OR SEVERE OR FATAL INJURY COULD RESULT
FROM OPERATING THE DOOR/OPENER.
12”
6”
Sensor
12”
17
Page 24
23
FORCE ADJ.
STATUS
SW
PROGRAM
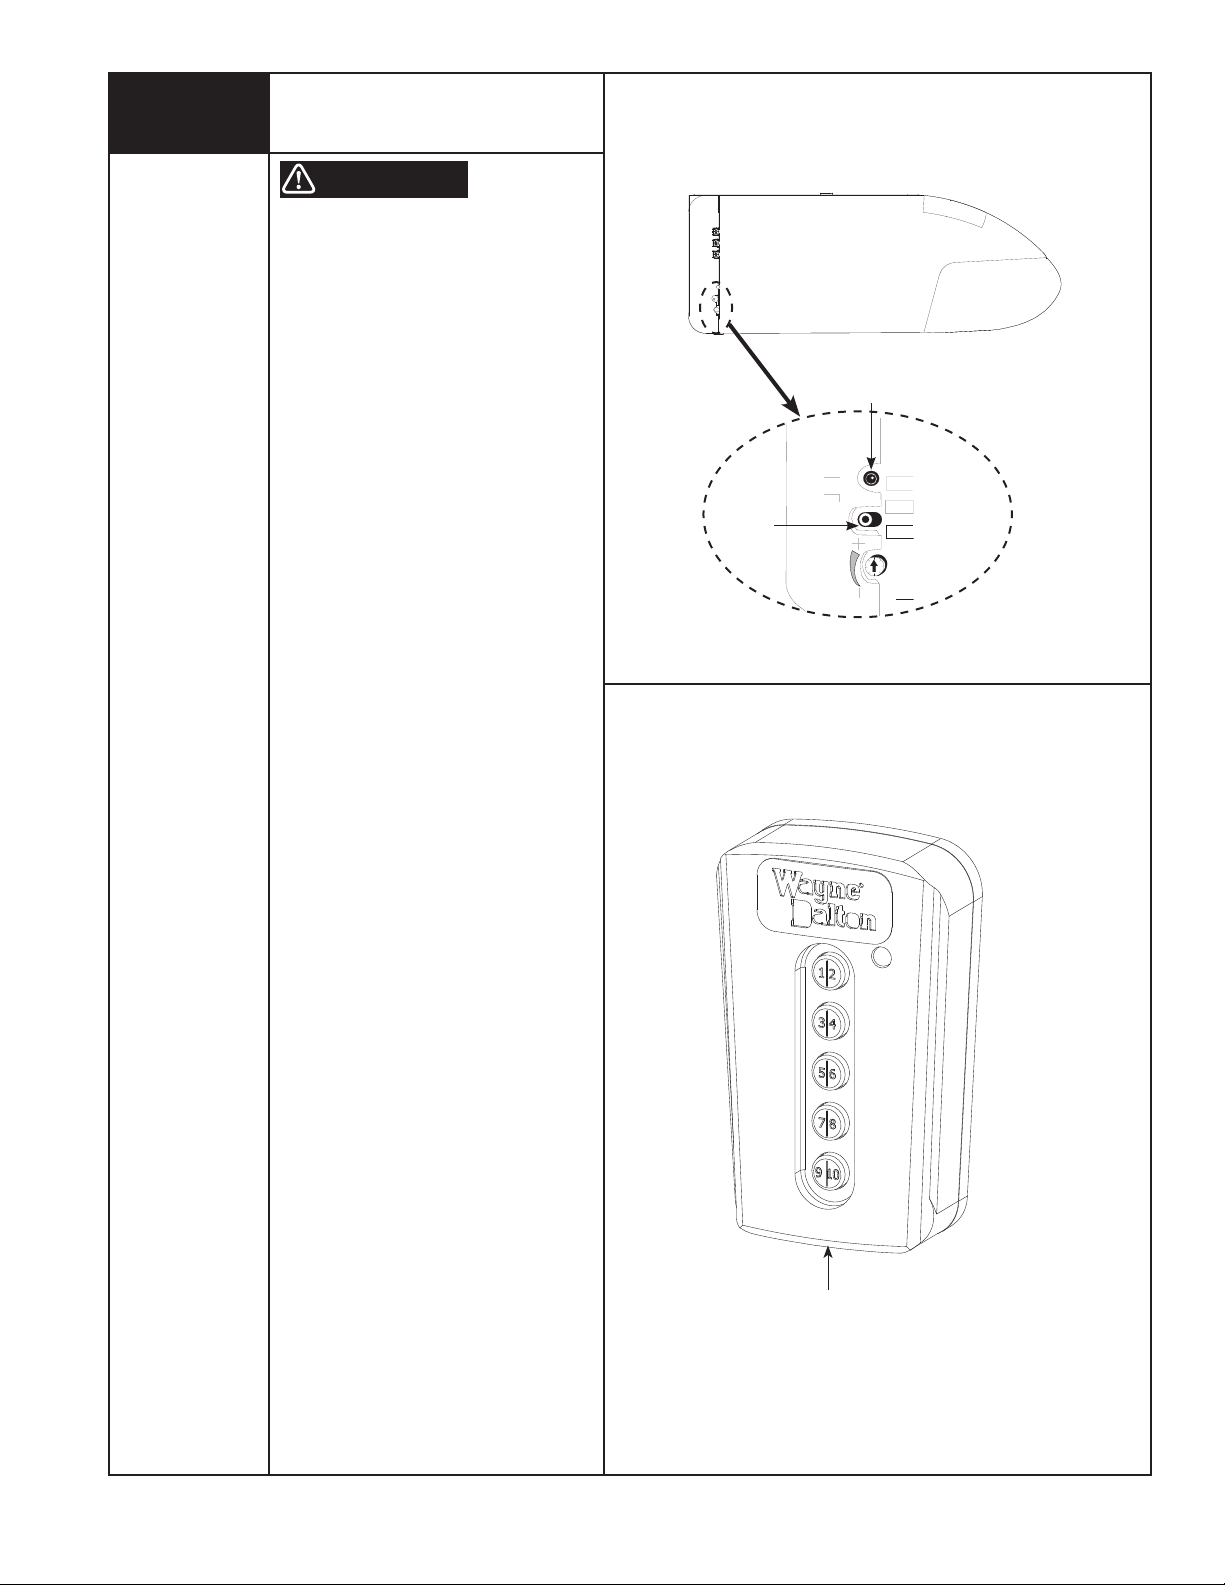
Programming Wireless Keyless
Entry (If Included)
Tools Needed:
None
WARNING
DURING PROGRAMMING THE GARAGE
DOOR MAY OPERATE. KEEP PEOPLE AND
OBJECTS CLEAR OF THE MOVING DOOR
TO PREVENT DOOR DAMAGE OR
POSSIBLE PERSONAL INJURY.
NOTE: To simplify installation, program the wireless keyless entry to the opener before mounting
to the wall.
NOTE: Before programming ensure garage door
is in the “down” position.
1. Press and release the PROGRAM button. The
red PROGRAM STATUS light on the opener and
the overhead lamp will turn on and remain lit for
one minute, indicating that it is ready to learn the
keyless entry.
2. Press the desired five digit PIN (PERSONAL
IDENTIFICATION NUMBER), example 1-3-8-2-5.
The PROGRAM STATUS light will turn on and off
three times indicating a successful learn.
NOTE: Do not set a code that presents the num-
bers in sequential order, as an example 1/2, 3/4,
5/6, 7/8, 9/0. Studies show that people naturally
press the buttons in a sequential pattern. Also,
do not select a code that uses the same button
five times consecutively. Thieves can easily
figure out these types of codes.
Right Side Of Opener
Program Status
LED
Program
Button
NOTE: If at anytime, an error was made entering
the code, simultaneously press and release the
7/8 and 9/0 buttons to reset the keyless entry;
then repeat programming steps above.
NOTE: A single wireless keyless entry device may
be programmed to operate multiple garage door
openers. To program additional openers, repeat
programming steps using a different five digit PIN
for each additional opener.
How Your Keyless Entry Operates Your Door:
The following explains how your Keyless Entry
can be used to OPEN, CLOSE, START, and STOP
your door.
1. Enter your 5-digit PIN (personal identification
number); door will move.
NOTE: If you inadvertently enter an incorrect
code, the door will not move. To reset,
simultaneously press and release the 7/8 and
9/0 buttons and reenter your PIN number.
2. Unit remains active for next 25 seconds.
Pressing any key, will stop the door if opening,
and stop or reverse the door if closing during the
25 seconds active period.
Keyless Entry
18
Please Do Not Return This Product To The Store. Call Us Directly! Our Trained Technicians Will Answer Your Questions and/or Ship Any Parts You May Need
You can reach us Toll Free at 1-888-827-3667 for Consumer Assistance or online at www.wayne-dalton.com
Page 25
24
Tools Needed:
Power Drill
5/64” Drill Bit
Phillips Head
Screwdriver
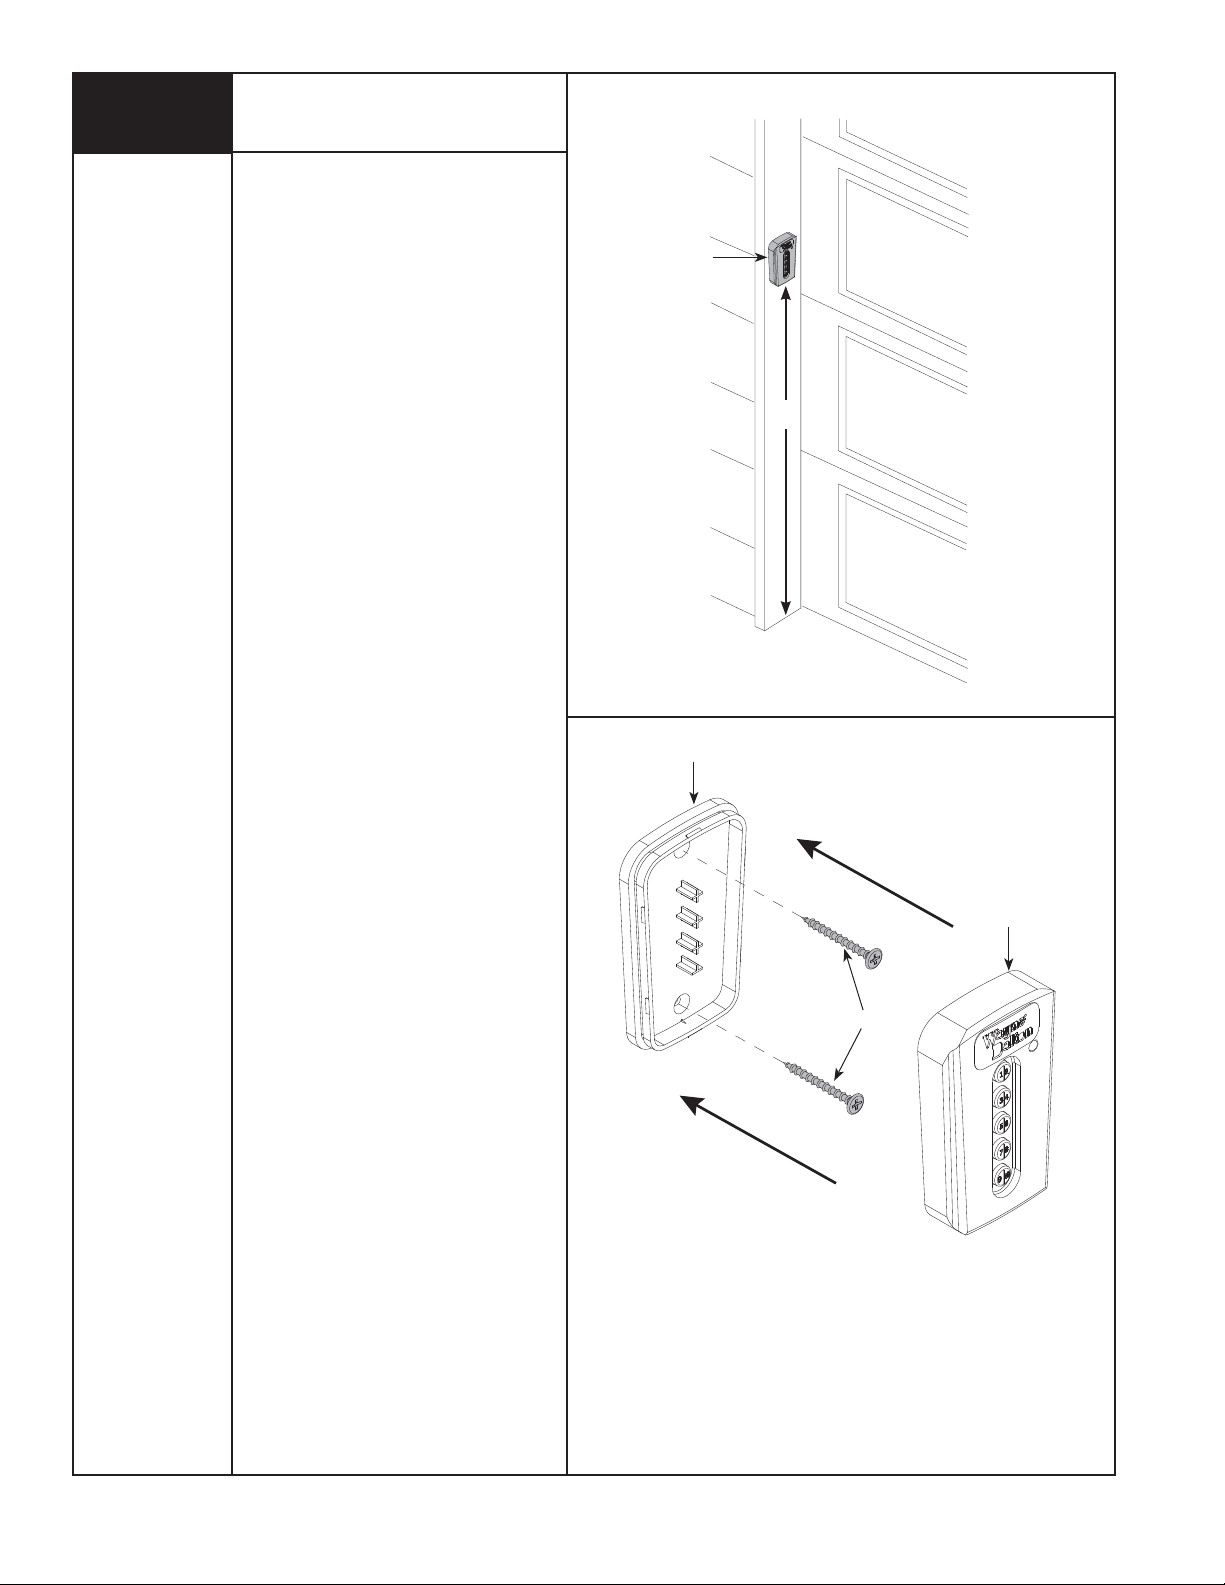
Installing Wireless Keyless Entry
(If Included)
IMPORTANT: INSTALL ALL WALL
CONTROLS OUT OF THE REACH OF
CHILDREN AND IN A LOCATION WHERE THE
DOOR CAN BE SEEN BEFORE ACTIVATING.
Locate a convenient place to mount the
wireless keyless entry, that does not
interfere with the normal opening and
closing of the door. To keep keyless entry
out of the reach of children, measure and
mark a spot at least 5 feet up from the floor.
Use the drilling template located on Page 39
to determine hole positions. Drill 5/64” pilot
holes 3/4” deep at each screw location.
Snap open the wireless keyless entry case
with a coin. Secure keyless entry base into
wood framing using the two screws
provided. Snap the front case half back onto
the base. Remove paper backing from
instruction label and apply to a clean
surface inside garage.
Keyless Entry
5’
NOTE: Two screws are included for
mounting to wood structures. Ensure proper
hardware is used for mounting to other
materials.
NOTE: After completing this step, continue
with page 27.
Keyless Entry Base
Keyless Entry Front
Case
Screws
Please Do Not Return This Product To The Store. Call Us Directly! Our Trained Technicians Will Answer Your Questions and/or Ship Any Parts You May Need
You can reach us Toll Free at 1-888-827-3667 for Consumer Assistance or online at www.wayne-dalton.com
19
Page 26
I
Tools Needed:
Needle Nose Pliers
Pliers/Wire Cutters
Power Connection
(Permanent Wiring Option)
WARNING
TO AVOID ELECTRICAL SHOCK,
DISCONNECT POWER AT THE FUSE/
BREAKER BOX BEFORE PROCEEDING.
Power Cord
Strain Relief Bushing
1/2” To 1”
Opener
Flat Tip
Screwdriver
IMPORTANT: CHECK YOUR LOCAL
ELECTRICAL CODES. IF YOUR LOCAL CODE
REQUIRES PERMANENT WIRING, USE THE
SPECIFICATIONS CALLED FOR AND
INSTRUCTIONS ILLUSTRATED.
Permanent Wiring Procedure
1. Ensure power cord is disconnected from
electrical power.
2. Cut power cord 1/2” – 1” from strain
relief/bushing.
3. Use needle nose pliers to remove strain
relief bushing from frame. Squeeze tabs in
on underside of bushing and work bushing
out of hole.
4. Pull or strip off remaining section of outer
insulation from power cord.
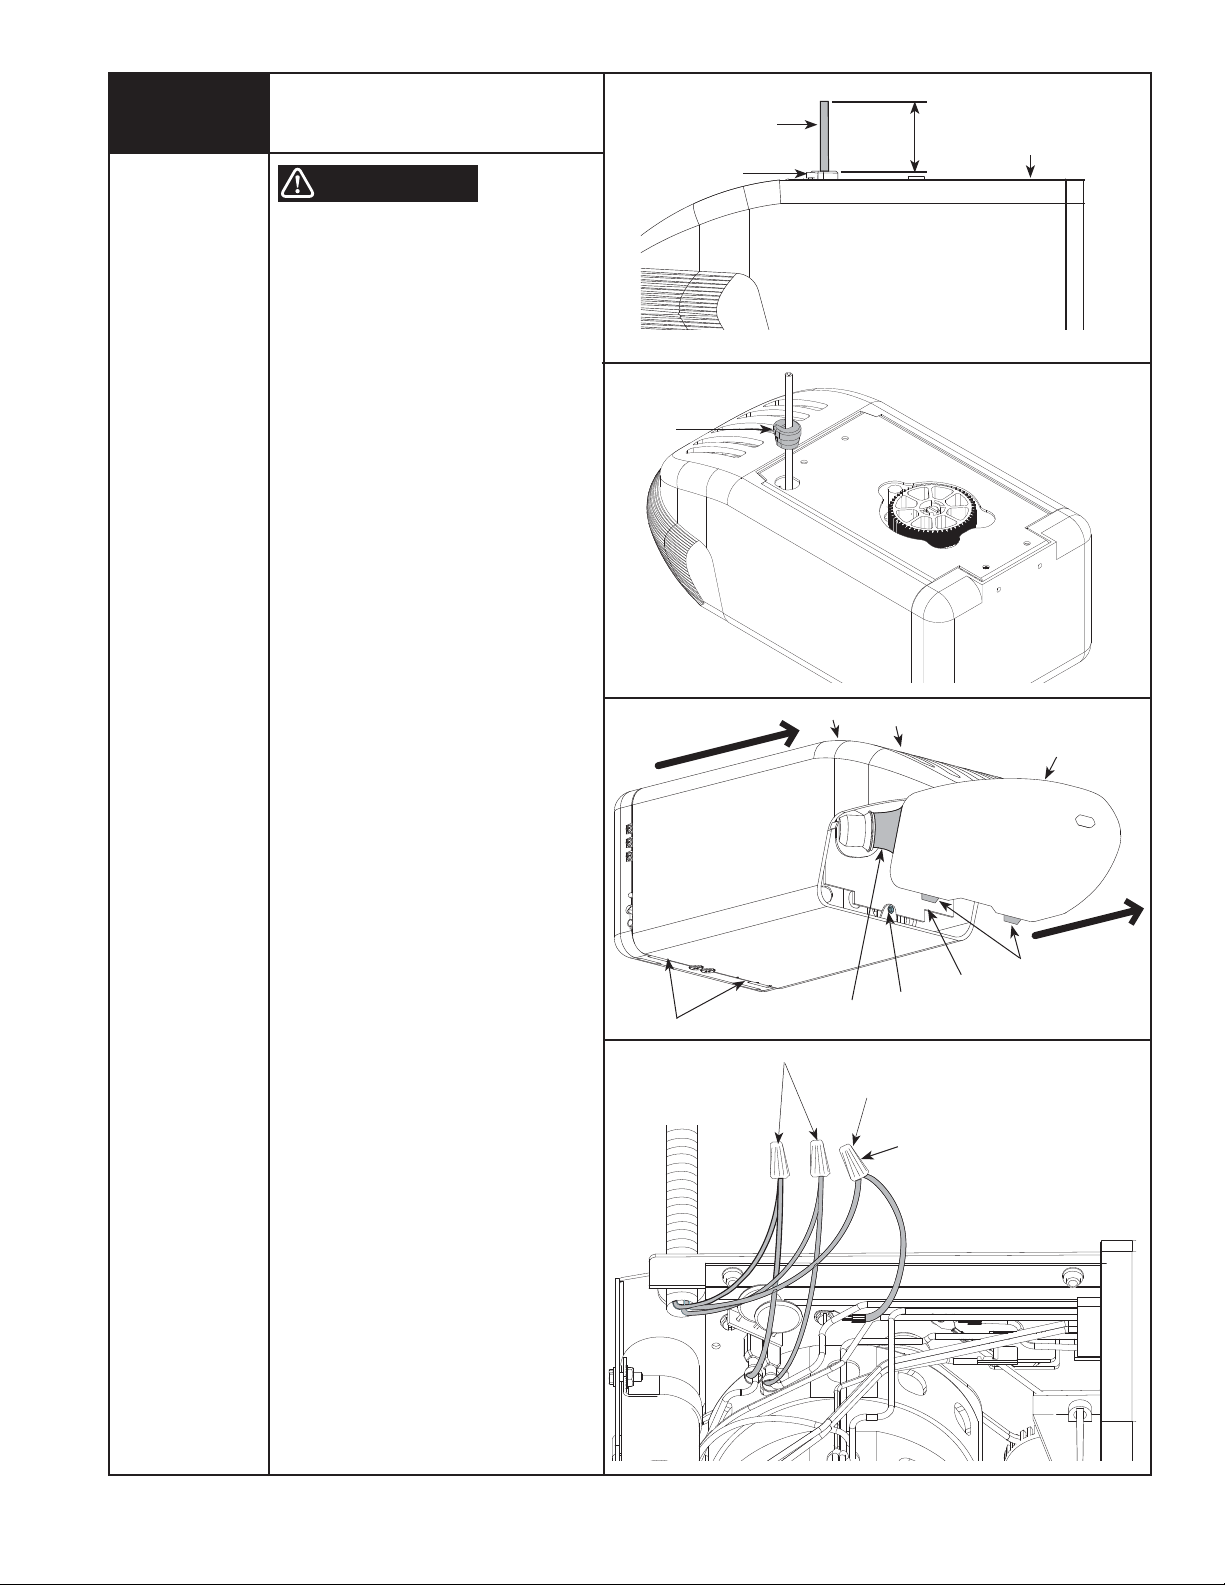
5. Remove lens by pressing up on both sides
of the bottom of the lens at the junction of
the housing, releasing the locking tabs,
and pulling forward; remove light bulb (if
installed).
6. Remove the housing from the chassis by
removing the screw securing the
housing to the chassis. Press on the
locking tabs and slide the cover off the
chassis.
7. Pull the three wires into the opener;
strip 1/2” of insulation from the black,
white, and green wires.
8. Using wire nuts for 14-18 AWG wire,
connect the black wire to black wire, the
white wire to white wire and the green
wire to green wire. Make sure connections
are secure.
9. Replace opener cover.
Strain Relief
Bushing
Tabs
Housing
Live & Neutral
Light Bulb
Ground
Tab
Screw
Wire Nuts
Chassis
Lens
Tabs
Reconnect the power at the fuse/ breaker
box, as soon as power is applied to the unit,
the light on the opener will blink once to
indicate a successful self check of the
controls.
20
Please Do Not Return This Product To The Store. Call Us Directly! Our Trained Technicians Will Answer Your Questions and/or Ship Any Parts You May Need
You can reach us Toll Free at 1-888-827-3667 for Consumer Assistance or online at www.wayne-dalton.com
Page 27
I
Tools Needed:
Power Drill
7/16” Socket
Driver
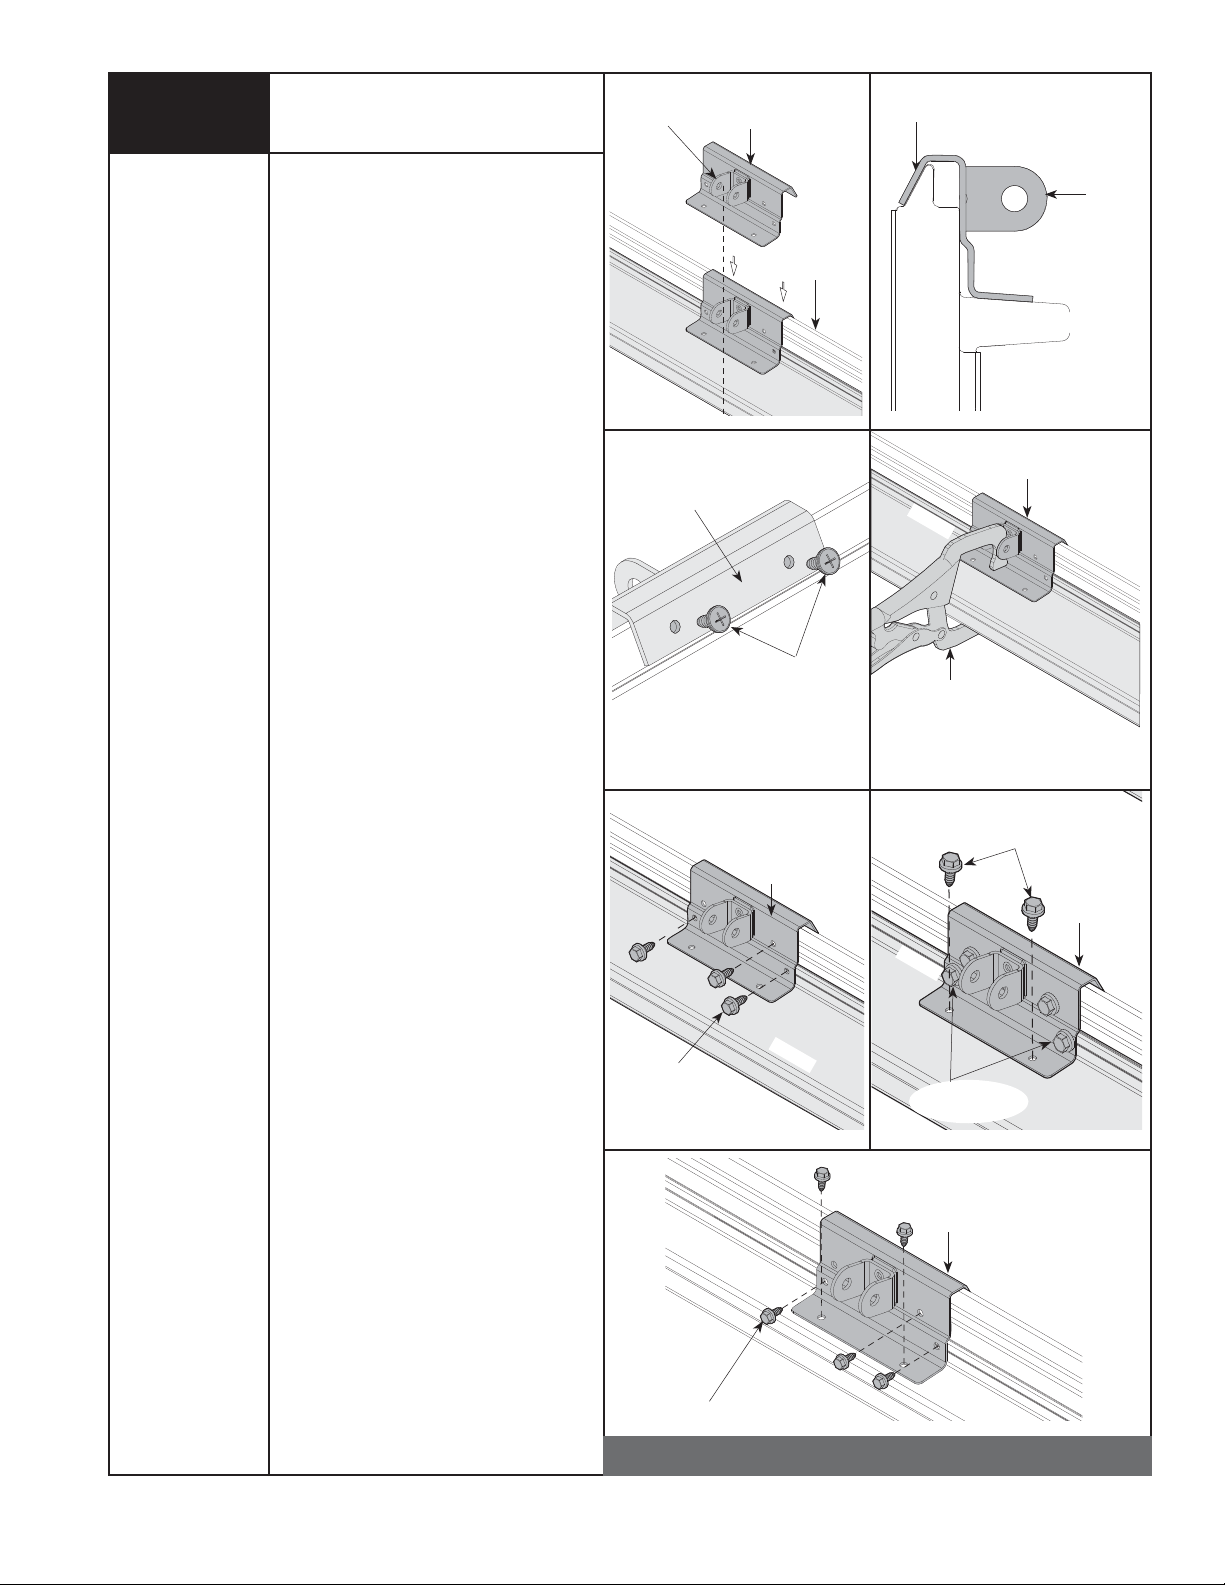
Mounting Door Bracket To
A 9700 Series Door
IMPORTANT: WHEN CONNECTING A
TROLLEY TYPE GARAGE DOOR OPENER
TO A 9700 SERIES DOOR, A WAYNEDALTON OPENER/TROLLEY BRACKET
MUST BE SECURELY ATTACHED TO THE
TOP SECTION OF THE DOOR, ALONG WITH
ANY U-BARS PROVIDED WITH THE DOOR.
THE INSTALLATION OF THE OPENER MUST
BE ACCORDING TO MANUFACTURER’S
INSTRUCTIONS AND FORCE SETTINGS
MUST BE ADJUSTED PROPERLY.
Door Bracket
Align Tab With Center
Line Of Top Section
FIG. 1.1 FIG. 1.2
Or Ubar
Male Part Of Top
Section
Door Bracket
Locate the center of the top section or
factory attached u-bar as shown in FIG 1.1.
FOR TOP SECTION WITH U-BAR:
Remove and retain 4-6 screws from the
center of the u-bar, allowing the door
bracket to slide between the section and the
u-bar.
Position the door bracket until it seats on
the male part of the section as shown in FIG
1.2. The door bracket must be centered and
positioned on the top section so it bridges
the transition point of the section thickness.
Attach the door bracket using
1/4” - 14 x 5/8” self tapping screws as
shown in FIG 1.4. Re-attach the u-bar using
(2) 1/4” - 20 x 11/16” self drilling screws
through the door bracket as shown in
FIG 1.3. Finish re-attaching the u-bar using
the self tapping screws removed previously.
FOR TOP SECTION WITHOUT U-BAR:
Position the door bracket until it seats on
the male part of the section as shown in FIG
1.2. The door bracket must be centered and
positioned on the top section so it bridges
the transition point of the section thickness.
Attach the door bracket using
1/4” - 14 x 5/8” self tapping screws as
shown in FIG 1.4.
Door Bracket
U-BAR
(2) 1/4”-20 x 11/16”
Self Drilling Screws
FIG. 1.3 FIG. 1.4
Door Bracket
(8) 1/4”-14 x 5/8”
Self Tapping Screws
Door Bracket
Top Section With U-Bar
Door Bracket
NOTE: After completing this step, continue
with Step 7.
Top Section Without U-Bar
Please Do Not Return This Product To The Store. Call Us Directly! Our Trained Technicians Will Answer Your Questions and/or Ship Any Parts You May Need
You can reach us Toll Free at 1-888-827-3667 for Consumer Assistance or online at www.wayne-dalton.com
OPTIONAL INSTALLATIONS
21
Page 28
I
Tools Needed:
Power Drill
7/16” Socket
Driver
Vice Clamps
Phillips Head
Screwdriver
Mounting Door Bracket To A
(9100, 9400, 9600, 5120 & 5140 Series Door)
IMPORTANT: WHEN CONNECTING A
TROLLEY TYPE GARAGE DOOR OPENER
TO THE ABOVE LISTED DOORS, A WAYNEDALTON OPENER/TROLLEY BRACKET
MUST BE SECURELY ATTACHED TO THE
TOP SECTION OF THE DOOR, ALONG WITH
ANY U-BARS PROVIDED WITH THE DOOR.
THE INSTALLATION OF THE OPENER MUST
BE ACCORDING TO MANUFACTURER’S
INSTRUCTIONS AND FORCE SETTINGS
MUST BE ADJUSTED PROPERLY.
Locate the center of the top section and seat
the door bracket on male part of the top
section. The door bracket must be centered
and positioned on top section so it bridges
the transition point of the section thickness,
as shown in FIG. 1.1 and 1.2. Install (2) #12
x 1/2” phillips head screws on the opposite
side of door bracket, as shown in FIG. 1.3. If
initially supplied ubar is on the door,
door bracket to u-bar
, as shown in FIG. 1.4.
First attach (3) 1/4” - 14 x 5/8” self-tapping
screws to the door bracket, as shown in
FIG. 1.5. Then attach (2) 1/4” - 14 x 5/8”
self-tapping screws to the door bracket, as
shown in FIG. 1.6.
Remove vice clamps.
NOTE: If you have a 9100 door, you can use
two of the 1/4” - 20 x 11/16” self-drilling
screws used to attach the u-bar instead of
the
1/4” - 14 x 5/8” self-tapping screws
when attaching door bracket to u-bar, as
shown in FIG. 1.6.
clamp
Align Tab With Center
Line Of Top Section
FIG. 1.1
Opposite Side Of
Door Bracket
FIG. 1.3
Door Bracket
Top Section With Or
Without U-Bar
(2) #12 x 1/2”
Phillips Head Screws
Door Bracket
Male Part Of Top
Section
Door Bracket
FIG. 1.2
Door Bracket
U-BAR
Vice Clamp
NOTE: Not Required
For J-Struts
FIG. 1.4
(2) 1/4”-14 x 5/8”
Self Tapping Screws
Door Bracket
U-BAR
NOTE: When attaching door bracket to top
section with u-bar, apply additional pressure
to thread fasteners into the u-bar.
NOTE: See
FIG. 1.7 for installing door
bracket on top section without u-bars.
(3) 1/4”-14 x 5/8”
Self Tapping Screws
FIG. 1.5
U-BAR
(2) 1/4”-20 x 11/16”
Self Drilling Screws
FIG. 1.6
NOTE: After completing this step, continue
with Step 7.
Bracket
Door
(5) 1/4”-14 x 5/8”
Self Tapping Screws
Fig. 1.7 Top Section Without U-Bar
22
Please Do Not Return This Product To The Store. Call Us Directly! Our Trained Technicians Will Answer Your Questions and/or Ship Any Parts You May Need
You can reach us Toll Free at 1-888-827-3667 for Consumer Assistance or online at www.wayne-dalton.com
Page 29
I
12”
Tools Needed:
Needle Nose Pliers
Adjustable Wrench
Ratchet Wrench
7/16” Socket
9/16” Socket
Hacksaw
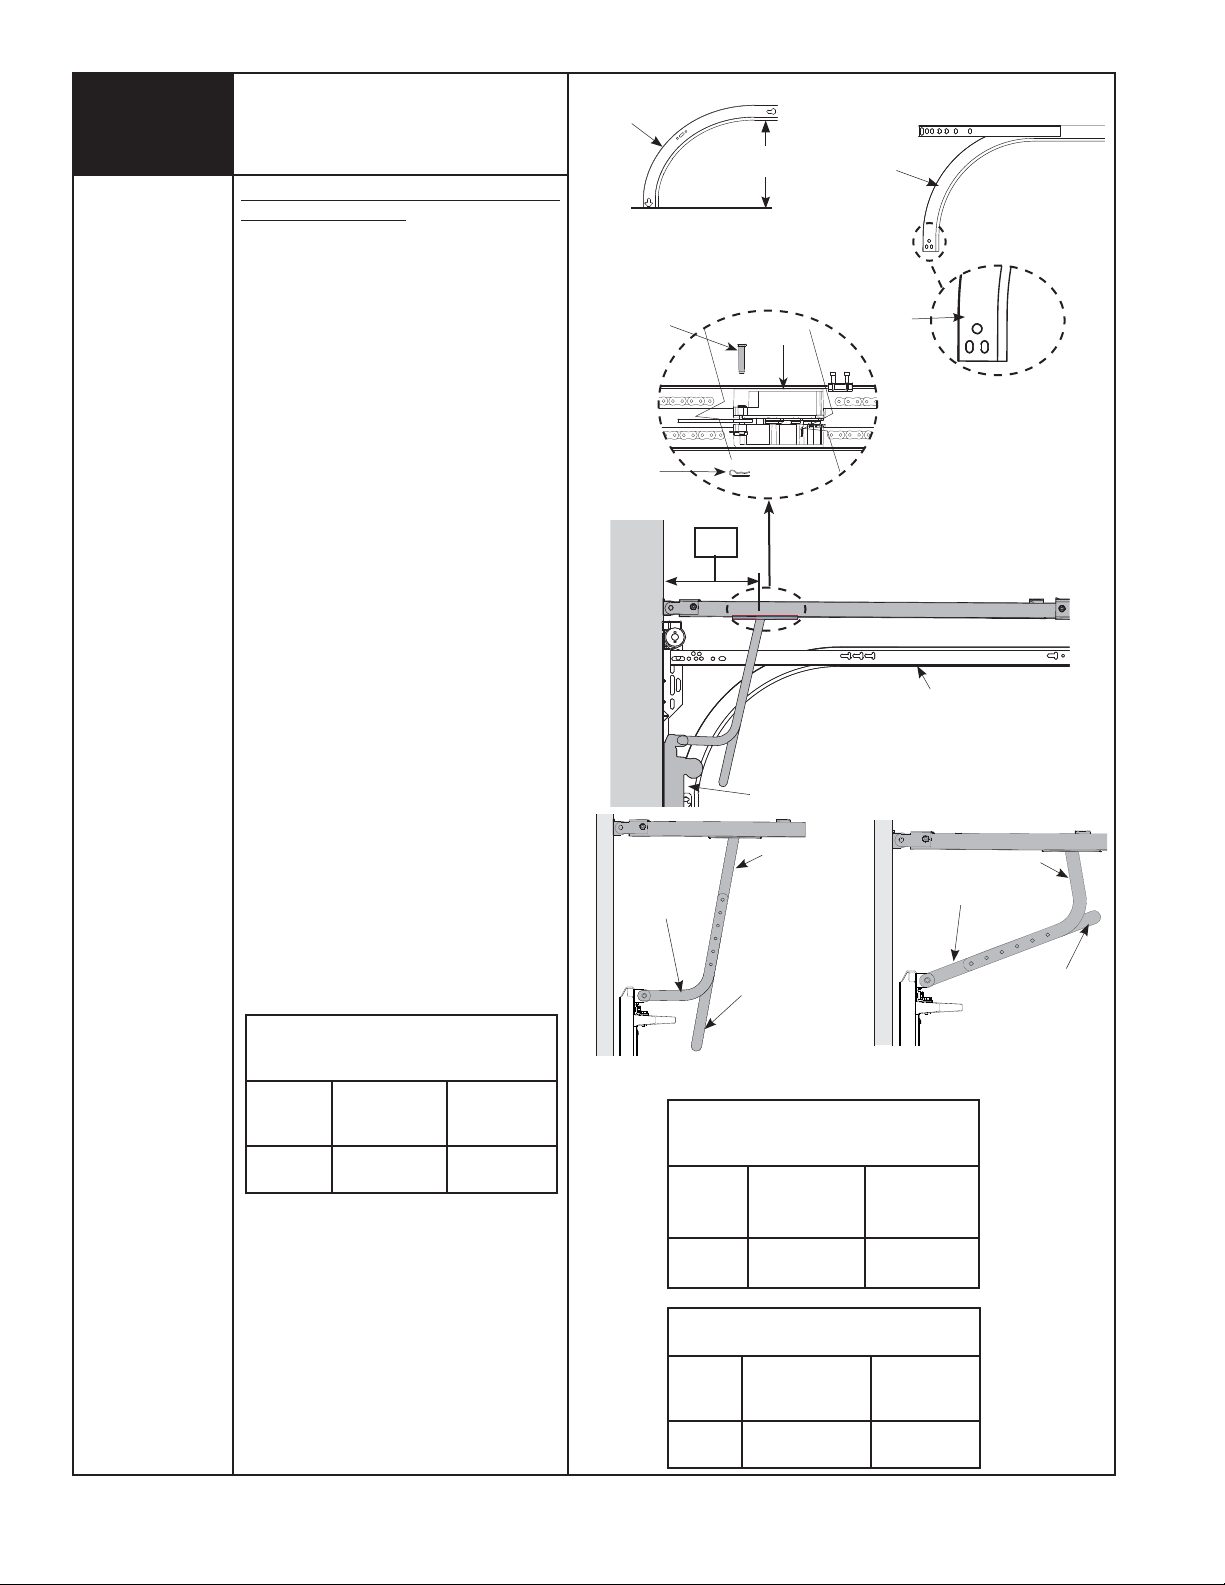
Setting Trolley Close Position/
Connecting Door Arm
(Models 9100, 9400, 9600, 5120, 5140 & 9700)
With TorqueMaster® Or Extension Springs
DETERMINE THE WAYNE-DALTON TRACK
RADIUS BEING USED:
FOR MOUNT HOPE AND PENSACOLA
TRACK:
Measure the curved ends of the horizontal
track
to determine if you have a 12” or 15”
radius horizontal track, as shown in FIG. 1.
FOR PORTLAND TRACK:
The horizontal tracks are stamped with
radius on the side of the horizontal track,
shown in FIG. 1.1.
NOTE: If necessary, remove the upper arm
(straight arm) from the trolley, to use the
lower arm (curved arm). Remove the hairpin
cotter from the clevis pin at the front of
trolley and slide clevis pin out far enough
to slide the upper arm out between the left
and right side of trolley body. Position the
lower door arm so the end with the single
hole lines up with the clevis pin. Slide clevis
pin completely back into trolley and reinstall
hairpin cotter.
LOW HEADROOM:
If you have low headroom track, as shown
in FIG. 1.6 on page 24, then proceed with
“Low Headroom Trolley Positioning Charts”
on page 24.
STANDARD LIFT:
Using the STANDARD LIFT TROLLEY
POSITIONING CHARTS, refer to
set the distance from header to trolley, as
shown in FIG. 1.2.
as
DIM “X” to
Horizontal
Track
Clevis Pin
Hairpin Cotter
Curved
Arm
12” OR 15”
FIG. 1
TOP VIEW
“X”
Trolley
Top Section
Straight Arm
Horizontal
Track
Stamped
Radius
FIG. 1.2
12”
10”, 12”, 14”, OR 15”
Standard Lift Track
Straight Arm
FIG. 1.1
Curved Arm
NOTE: Depending on your setup, you may
have to cut straight arm to accomplish trolley
settings.
STANDARD LIFT TROLLEY POSITIONING CHART
FOR (MODELS 9100, 9400, 9600, 5120 & 5140)
DIM “X”
11 1/2”
10” AND 12” RADIUS
TYPE OF ARM
BEING USED
CURVED /
STRAIGHT
ILLUSTRATIONS
REFERENCE
FIG. 1.4
If adjustment of the trolley position is
Cut Straight Arm To
Accomplish Trolley
Setting
FIG. 1.3
STANDARD LIFT TROLLEY POSITIONING CHART
FOR (MODELS 9100, 9400, 9600, 5120 & 5140)
DIM “X”
14” AND 15” RADIUS
TYPE OF ARM
BEING USED
REFERENCE
ILLUSTRATIONS
Cut Straight Arm To
Accomplish Trolley
FIG. 1.4
required, use the close travel adjustment
screw located on the bottom of the opener,
as shown in FIG 1.5 on page 24. A 1/4 turn
13”-15”
CURVED /
STRAIGHT
FIG. 1.4
equals approximately 1” of trolley travel; turn
clockwise to decrease distance (forward)
and counter-clockwise to increase distance
(forward).
NOTE: Proceed with “Connecting Door Arm
To Door” Step 18, on page 14.
Please Do Not Return This Product To The Store. Call Us Directly! Our Trained Technicians Will Answer Your Questions and/or Ship Any Parts You May Need
You can reach us Toll Free at 1-888-827-3667 for Consumer Assistance or online at www.wayne-dalton.com
STANDARD LIFT TROLLEY POSITIONING CHART
FOR (MODEL 9700) 15” RADIUS
DIM “X”
10 9/16”-
14 5/8”
TYPE OF ARM
BEING USED
STRAIGHT /
CURVED
REFERENCE
ILLUSTRATIONS
FIG. 1.3
Setting
23
Page 30

Setting Trolley Close Position/
Connecting Door Arm
(Continued)
LOW HEADROOM:
Using the LOW HEADROOM TROLLEY
POSITIONING CHARTS, refer to DIM “X”
to set the distance from header to trolley, as
shown in FIG. 1.6.
NOTE: Depending on your setup, you may or
may not have to cut straight arm to
accomplish trolley settings.
If adjustment of the trolley position is
required, use the close travel adjustment
screw located on the bottom of the opener,
as shown in FIG 1.5. A 1/4 turn equals
approximately 1” of trolley travel; turn
clockwise to decrease distance (forward)
and counter-clockwise to increase distance
(forward).
LOW HEADROOM TROLLEY POSITIONING CHART
FOR (MODELS 9100, 9400, 9600, 5120 & 5140)
DIM “X”
14 1/2”
10” - 14” STRAIGHT FIG. 1.7a
TYPE OF ARM
BEING USED
CURVED /
STRAIGHT
OPTIONAL HOOKUP
REFERENCE
ILLUSTRATIONS
TO THE RIGHT
FIG. 1.7
TRAVEL ADJUSTMENT
OPEN
LESS
MORE
CLOSE
MORE
Bottom Of Opener
FIG. 1.5
“X”
Low Headroom Track
Top
Section
FIG. 1.6
LOW HEADROOM TROLLEY POSITIONING CHART
DIM “X”
14 3/4”-
17 11/16”
10” - 14” STRAIGHT FIG. 1.7a
FOR (MODEL 9700)
TYPE OF ARM
BEING USED
CURVED /
STRAIGHT
OPTIONAL HOOKUP
REFERENCE
ILLUSTRATIONS
FIG. 1.7
NOTE: Proceed with “Connecting Door Arm
To Door” Step 18, on page 14.
Curved Arm
Cut Straight Arm To
Accomplish Trolley
Setting
FIG. 1.7
Straight Arm
FIG. 1.7a
24
Please Do Not Return This Product To The Store. Call Us Directly! Our Trained Technicians Will Answer Your Questions and/or Ship Any Parts You May Need
You can reach us Toll Free at 1-888-827-3667 for Consumer Assistance or online at www.wayne-dalton.com
Page 31

12”
I
Tools Needed:
Needle Nose Pliers
Adjustable Wrench
Ratchet Wrench
7/16” Socket
9/16” Socket
Hacksaw
Setting Trolley Close Position/
Connecting Door Arm
(Models 9100, 9400, 9600, 5120, 5140 & 9700)
With Torsion Springs
DETERMINE THE WAYNE-DALTON
TRACK RADIUS BEING USED:
FOR MOUNT HOPE AND PENSACOLA
TRACK:
Measure the curved ends of the horizontal
track
to determine if you have a 12” or 15”
radius horizontal track, as shown in FIG. 1.
FOR PORTLAND TRACK:
The horizontal tracks are stamped with
radius on the side of the horizontal track,
shown in FIG. 1.1.
NOTE: If necessary, remove the upper arm
(straight arm) from the trolley, to use the
lower arm (curved arm). Remove the hairpin
cotter from the clevis pin at the front of
trolley and slide clevis pin out far enough
to slide the upper arm out between the left
and right side of trolley body. Position the
lower door arm so the end with the single
hole lines up with the clevis pin. Slide clevis
pin completely back into trolley and reinstall
hairpin cotter.
LOW HEADROOM:
If you have low headroom track, as shown
in FIG. 1.5 on page 26, then proceed with
“Low Headroom Trolley Positioning Charts”
on page 26.
STANDARD LIFT:
Using the STANDARD LIFT TROLLEY
POSITIONING CHARTS, refer to DIM “X”
to set the distance from header to trolley
shown in FIG. 1.2.
NOTE: Depending on your setup, you may
have to cut straight arm to accomplish
trolley settings.
STANDARD LIFT TROLLEY POSITIONING
CHART FOR 10” AND 12” RADIUS
FOR (MODELS 9100, 9400, 9600, 5120 & 5140)
as
, as
Horizontal
Track
Clevis Pin
Hairpin Cotter
12” OR 15”
FIG. 1
“X”
TOP VIEW
Trolley
Top Section
Curved
Arm
Horizontal
Track
FIG. 1.2
12”
FIG. 1.1
10”, 12”, 14”, OR 15”
Standard Lift Track
Straight Arm
Cut Straight Arm To
Accomplish Trolley
Setting
Stamped
Radius
DIM “X”
11 1/2”-13”
TYPE OF ARM
BEING USED
STRAIGHT /
CURVED
If adjustment of the trolley position is
required, use the close travel adjustment
screw located on the bottom of the opener,
as shown in FIG 1.4 on page 26. A 1/4
turn equals approximately 1” of trolley
REFERENCE
ILLUSTRATIONS
FIG. 1.3
FIG. 1.3
STANDARD LIFT TROLLEY POSITIONING CHART
FOR 14” AND 15” RADIUS
(MODELS 9100, 9400, 9600, 5120 & 5140)
DIM “X”
10”-12”
TYPE OF ARM
BEING USED
STRAIGHT /
CURVED
REFERENCE
ILLUSTRATIONS
FIG. 1.3
travel; turn clockwise to decrease distance
(forward) and counter-clockwise to increase
distance (forward).
NOTE: Proceed with “Connecting Door Arm
To Door” Step 18, on page 14.
Please Do Not Return This Product To The Store. Call Us Directly! Our Trained Technicians Will Answer Your Questions and/or Ship Any Parts You May Need
You can reach us Toll Free at 1-888-827-3667 for Consumer Assistance or online at www.wayne-dalton.com
STANDARD LIFT TROLLEY POSITIONING CHART
FOR (MODEL 9700) 15” RADIUS
DIM “X”
11 1/16”-
16 7/8”
TYPE OF ARM
BEING USED
STRAIGHT /
CURVED
REFERENCE
ILLUSTRATIONS
FIG. 1.3
25
Page 32

Setting Trolley Close Position/
Connecting Door Arm
(Continued)
LOW HEADROOM:
Using the LOW HEADROOM TROLLEY
POSITIONING CHART, refer to
set the distance from header to trolley
shown in FIG. 1.5.
NOTE: Depending on your setup, you may or
may not have to cut straight arm to
accomplish trolley settings.
If adjustment of the trolley position is
required, use the close travel adjustment
screw located on the bottom of the opener.
A 1/4 turn equals approximately 1” of trolley
travel; turn clockwise to decrease distance
(forward) and counter-clockwise to increase
distance (forward).
LOW HEADROOM TROLLEY
POSITIONING CHART FOR
(MODELS 9100, 9400, 9600, 5120 & 5140)
DIM “X”
20”
10” - 14” STRAIGHT FIG. 1.6a
TYPE OF ARM
BEING USED
CURVED /
STRAIGHT
OPTIONAL HOOKUP
DIM “X” to
, as
REFERENCE
ILLUSTRATIONS
FIG. 1.6
TRAVEL ADJUSTMENT
OPEN
LESS
MORE
“X”
CLOSE
MORE
Low Headroom Track
Bottom Of Opener
FIG. 1.4
FIG. 1.5
LOW HEADROOM TROLLEY
POSITIONING CHART FOR (MODEL 9700)
DIM “X”
15”-18”
10” - 14” STRAIGHT FIG. 1.6a
TYPE OF ARM
BEING USED
CURVED /
STRAIGHT
OPTIONAL HOOKUP
REFERENCE
ILLUSTRATIONS
FIG. 1.6
NOTE: Proceed with “Connecting Door Arm
To Door” Step 18, on page 14.
Curved Arm
Cut Straight Arm To
Accomplish Trolley
Setting
FIG. 1.6
Straight Arm
FIG. 1.6a
26
Please Do Not Return This Product To The Store. Call Us Directly! Our Trained Technicians Will Answer Your Questions and/or Ship Any Parts You May Need
You can reach us Toll Free at 1-888-827-3667 for Consumer Assistance or online at www.wayne-dalton.com
Page 33

IMPORTANT SAFETY INSTRUCTIONS
WARNING
TO REDUCE THE RISK OF SEVERE
INJURY OR DEATH:
1. READ AND FOLLOW ALL INSTRUCTIONS.
2. Never let children operate or play with the door controls.
Keep remote controls away from children.
3. Always keep a moving door in sight and keep people and objects
away until it is completely closed. NO ONE SHOULD CROSS THE
PATH OF A MOVING DOOR.
4. NEVER GO UNDER A STOPPED, PARTIALLY OPEN DOOR.
5. Test the Door/Opener monthly. The garage door MUST reverse on
contact with a 1-1/2 inch high object (or a 2 x 4 board laid flat) on the
floor. The door MUST also reverse when a 6” high object is placed on
the floor in line with safety sensors. If Door/Opener fails these tests,
have adjustments/repairs made immediately. Failure to make
adjustments/repairs may cause severe or fatal injury.
6. When possible, use the Emergency Disconnect only when the door is
in the closed position. Be very cautious using the Emergency
Disconnect when the door is open. Weak or broken spring(s) may
allow the door to fall rapidly, causing a severe or fatal injury.
7. KEEP THE GARAGE DOOR PROPERLY BALANCED. See the owner’s
manual included with the door. An improperly balanced door could
cause a severe or fatal injury. Have a qualified service person make
repairs to the cables, spring assemblies, and other hardware.
8.
SAVE THESE INSTRUCTIONS.
WARNING
ALWAYS KEEP MOVING DOOR IN SIGHT AND KEEP PEOPLE AND
OBJECTS AWAY UNTIL IT IS COMPLETELY CLOSED. TO PREVENT A
SEVERE OR FATAL INJURY, AVOID STANDING IN A OPEN DOOR WAY
OR WALKING THROUGH THE DOORWAY WHILE THE DOOR IS
MOVING.
WARNING
NEVER LET CHILDREN OPERATE DOOR OR PLAY WITH THE DOOR
CONTROLS. KEEP REMOTE CONTROLS AWAY FROM CHILDREN.
FATAL INJURY COULD RESULT SHOULD A CHILD BECOME TRAPPED
BETWEEN THE DOOR AND FLOOR.
WARNING
KEEP THE GARAGE DOOR PROPERLY BALANCED. AN IMPROPERLY
BALANCED DOOR COULD CAUSE SEVERE OR FATAL INJURY. HAVE A
QUALIFIED SERVICE PERSON MAKE ADJUSTMENTS/REPAIRS TO
CABLES, SPRING ASSEMBLIES, AND OTHER HARDWARE.
Emergency Disconnect:
WARNING
THE DOOR SHOULD BE FULLY CLOSED WHEN ACTIVATING THE
EMERGENCY RELEASE DISCONNECT. WEAK OR BROKEN SPRINGS
COULD ALLOW AN OPEN DOOR TO FALL RAPIDLY POSSIBLY
CAUSING SEVERE OR FATAL INJURY.
The opener is equipped with an emergency release recessed trolley type
disconnect system, enabling manual operation of the garage door during
power failure. The trolley is disconnected from the chain by pulling down on
the red release knob, allowing the garage door to be operated manually. Do
not use the manual release knob to pull the door open or closed. The trolley
will automatically reconnect when power is restored and door is activated. If
emergency release is used, close door before operating opener.
OPERATION
Door activation:
Upon activation by either the wall station Up/Down button, transmitter or
w i r e l e s s k e y l e s s e n t r y , t h e d o o r w i l l m o v e i n t h e f o l l o w i n g m a n n e r :
1. If open, the door will close. If closed, the door will open.
2. If closing, the door will stop. Next activation will open.
3. If opening, the door will stop. Next activation will close.
4. If an obstruction is contacted or the safety sensor beam is
interrupted while closing, the door will reverse and the light will flash.
5. If an obstruction is encountered while opening, the door will stop
and the light will flash. The next activation will close the door.
6. The Infrared Safety Sensor uses an invisible beam which, when
broken by an obstruction, causes a closing door to reverse, prevents
an open door from closing and causes the light to flash.
Please Do Not Return This Product To The Store. Call Us Directly! Our Trained Technicians Will Answer Your Questions and/or Ship Any Parts You May Need
You can reach us Toll Free at 1-888-827-3667 for Consumer Assistance or online at www.wayne-dalton.com
NOTE: Outside keylock emergency releases are an available accessory and
are recommended for garages without a service entrance.
HOW THE LIGHT WORKS AND WHAT IT MEANS WHEN IT FLASHES:
1. Overhead light automatically turns on when opener is activated and
remains on for 4 minutes for convenience and safety.
2. The light will flash if opener senses an obstruction in the up or
down direction, to warn you of a problem. It will continue flashing for
1 minute, and then shut off.
If the light begins to flash and the door moves a short distance and then
reverses from a wall station button, transmitter or keyless entry, the external
safety sensor device is activated or defective. To temporarily override safety
sensor device and close door, activate wall station up/down button, keeping
button depressed; opener will begin in down direction. The button must
remain depressed until cycle is completed. If the button is released before
cycle is completed, the door will reverse and come to full up position.
Problems in the safety system should be corrected by a qualified service
person.
NOTE: A fully open door with a blinking light indicates an obstruction or
problems with external safety sensors during close travel. See trouble
shooting section on page 35.
27
Page 34

I
Operating the Wireless Wall Station
Up-Down Button:
Momentarily pressing the Up/Down button starts or stops door
movement or changes door’s direction. Pressing and holding Up/
Down button during the door’s travel will override safety sensors. The
Up/Down Button (when unit is closed) can be activated by pressing
flip cover.
WARNING
IF DOOR REQUIRES THAT SAFETY SENSORS BE OVERRIDDEN
THAT CONDITION MUST BE CORRECTED IMMEDIATELY. FAILURE
TO MAKE ADJUSTMENTS/REPAIRS COULD RESULT IN SEVERE
OR FATAL INJURY.
Light Button:
Momentarily pressing the light button turns on the convenience light.
The light will remain on until either the light button is pressed again
or the door is activated. The light automatically turns on with a door
activation and remains on for 4 minutes. Pressing the light button
before the 4 minutes has elapsed will turn off the light. While the
door is in motion, the light button functions identically as the Up/
Down button, stopping or reversing the door immediately.
Timer Button:
Momentarily pressing the timer button causes a delayed activation of
a stationary fully open door. The light fixture or the opener’s lamp will
blink on and off for about 10 seconds prior to closing the door,
allowing enough time to exit the garage when the opener is in the
timer mode. Pressing any button, except the program button while
the opener lamp is blinking cancels the timer mode.
NOTE: The timer feature will only function with the door in the full
open position. Pressing the timer button with a stationary door in any
other position will cause the opener lamp to blink 4 times and the
door will not be activated.
While the door is in motion, the timer button functions identical to
the Up/Down button, stopping or reversing the door immediately.
Vacation Slide Switch:
The slide switch has two positions: Normal, and Door lock.
Normal position:
Move the slide switch to normal position for all normal functions of
the opener. The normal position will cancel the door lock feature.
NOTE: When the slide switch is moved to the unlocked position the
opener light fixture will blink on/off three times.
Door Lock position:
If the door is stopped (fully open, fully closed or partially open) move
the slide switch to the door lock position to suspend all normal
functions of the opener. The opener will remain completely disabled
and non-operational in this mode. All wall stations, transmitters and
keyless entry units are ignored until the slide switch is moved to the
normal position. If the door is moving when the slide switch is
moved to the door lock position, the door lock mode is not activated
and all functions of the opener remain active.
NOTE: When the slide switch is moved to the locked position the
opener light fixture will blink on/off three times.
Backlit LED Light:
The red LED blinks intermittently to help you locate the wall station in a
dark garage. This blink rate can be changed for longer battery life or can
be turned off. The default blink rate is one blink every 3 seconds. For
longer battery life the blink rate can be changed to blink once every 6
seconds. To change the blink rate, remove the battery cover and remove
one battery. Re-install the battery and within 2 seconds, press the Light
button. Re-install the battery cover.
For longest battery life, the blink can be turned off. To turn off the blink,
remove the battery cover and remove one battery.
Re-install the battery and within 2 seconds, press the Pet button. Re-
install the battery cover.
NOTE: The wall station’s red LED will blink rapidly while any wall station
button remains pressed.
Pet Position:
Pressing the pet button opens a closed door to a preset position between
5 and 30 inches above the floor, allowing pets to enter and exit the
garage without the door being fully open. The door must be fully closed
to activate the pet open feature. Pressing the pet button with a stationary
door in the pet open position will cause the door to close. Pressing the
Up/Down button while the door is in the pet position will cause the door
to open. While the door is in motion, the pet button functions identically
to the Up/Down button, stopping or reversing the door immediately. The
pet feature allows for custom setting of the pet position door height.
NOTE: A door in the “pet position” (open 5-30 inches) is not locked and
should not be used as a secured door position.
Program Button:
The wall station program button has several functions.
a. It can be used to set a custom pet position. (see Customizing the
Settings, on the next page)
b. It can be used to set the opener’s closing force (see Adjustment
#1 Page 32).
Light Button
Vacation
Slide Switch
Timer Button
Pet Button
Up/Down Button
Program Button
28
Please Do Not Return This Product To The Store. Call Us Directly! Our Trained Technicians Will Answer Your Questions and/or Ship Any Parts You May Need
You can reach us Toll Free at 1-888-827-3667 for Consumer Assistance or online at www.wayne-dalton.com
Page 35

Customizing the Settings
FORCE ADJ.
STATUS
SW
PROGRAM
I
Custom pet position:
The pet button opens a closed door to a preset position between 5 and
30 inches above the floor, allowing pets to enter and exit the garage
without the door being fully open. To change the automatic pet opening
height:
Start with the door in the closed position.
1. Operate the door then stop it at the desired height. If desired
height is not achieved, the door must be returned to the closed
position.
2. Press and release the wall stations program button, or the
opener program switch button two times. The status light on the
opener unit and the overhead light will flash on and off at a
normal rate.
3. Press the pet button. The status light on the opener and the
overhead light will flash on and off three times indicating
successful programming.
Multi-Door Programming:
Momentarily pressing the button programmed in the transmitter
programming step activates the door. Other buttons can also be
programmed to activate different doors, for multi-door installations.
Each button or a combination of two buttons pressed simultaneously
can be programmed to activate a different door. Only one button at a
time can be programmed to activate a specific opener.
I
The program button located on the right side of the opener has several
functions.
Up/Down Button
Program Button
Opener Controls
1. Pressing the program button once, will make the status
light and overhead lamp turn on steady. This mode allows
programming of transmitters, wireless keyless entry, and wireless
wall stations (see page 33).
Right Side Of Opener
2. Pressing the program button two times will make the
status light and overhead lamp blink on and off. This mode allows
programming of a custom pet position (see “Customizing The
Settings” above).
3. Pressing the program button three times will make the
status light and overhead lamp blink on and off with a long pause
at each blink cycle. This mode allows programming of the opening
force (see page 32).
4. Pressing and holding the program button for 10 seconds
will erase all transmitters, multi-function wall station and wireless
keyless entry from memory. The status light and over
head light will blink 3 times indicating a successful erase operation.
Please Do Not Return This Product To The Store. Call Us Directly! Our Trained Technicians Will Answer Your Questions and/or Ship Any Parts You May Need
You can reach us Toll Free at 1-888-827-3667 for Consumer Assistance or online at www.wayne-dalton.com
Bottom Of Opener
Program
Button
Program Status
LED
Closing
Force
29
Page 36

Primary Programming for HomeLink® to the Prodrive
I
NOTE: This step can only be done on automobiles equipped with the
HomeLink
NOTE: Programming HomeLink
Transmitter that is programmed to the opener (the wallstation and
transmitter(s) supplied with the opener, come pre-programmed from
the factory). Any additional wallstation(s) or transmitter(s) will need to
be programmed to the opener, see page 33.
IMPORTANT: Use the programming instructions provided with your
vehicle first. Follow these instructions if the HomeLink
learn the transmitter, when using the vehicle’s instructions.
NOTE: If Primary Programming does not work then use the Alternate
Procedure on next page.
NOTE: Vehicle may need to be in accessory position when
programming. Check car owner’s manual.
NOTE: HomeLink
®
System.
®
requires a Wayne-Dalton
®
is a registered trademark of Johnson Controls.
®
unit does not
®
®
Programming/Training HomeLink
WARNING
Unit
GARAGE DOOR MAY OPERATE DURING PROGRAMMING. TO AVOID
POSSIBLE SEVERE OR FATAL INJURY, PLACE THE EMERGENCY
DISCONNECT HANDLE IN THE MANUAL OPERATED POSITION.
1. Pull the manual disconnect to put the opener in the disengaged
position.
2. Verify the HomeLink
®
unit has an empty channel press the desired
HomeLink® button and observe the indicator light if it flashes slowly,
the channel is empty and ready for programming. If pressing the
desired channel/button causes the indicator light to blink rapidly, or
come on without blinking this channel is already programmed. You
either need to choose a different channel/button on the HomeLink®, or
perform Step 3 below.
3. OPTIONAL – To completely clear all channels on the HomeLink
unit, press and hold the two outside buttons on the HomeLink
®
unit
®
until the HomeLink® indicator light begins to flash rapidly (approx. 20
seconds), then release both buttons. (Do not perform this step to train
additional hand-held transmitters.) NOTE: This operation erases all
previously learned transmitters and you will need to re-teach any other
transmitters to your HomeLink
®
unit.
4. Hold the end of the Wayne-Dalton hand-held transmitter
approximately 1 to 3 inches away from the HomeLink
®
surface keeping
the HomeLink® indicator light in view.
5. Simultaneously press and hold the Wayne Dalton transmitter large
button and desired button on the HomeLink® module, continue to
hold both buttons. In less than 10 seconds the LED on the HomeLink®
module will either go solid or give a single quick flash, release both
buttons when either occur.
NOTE: If this procedure is unsuccessful perform Alternate procedure.
Teaching HomeLink
®
to the opener
6. Press and release the program switch on the opener. The red
program status light on the opener and light will turn on and remain lit
for one minute, indicating that it is ready to learn.
7. Press the HomeLink
®
button used in Step 5 above for 1 to 3
seconds. The program status light and convenience light on the opener
will turn on and off three times indicating a successful learn.
8. Press the HomeLink
®
button once more to operate the door. The
opener will activate and the trolley will travel towards open, the next
activation will cause the trolley to travel to the closed position and
reengage, subsequent operations will move the door.
30
Please Do Not Return This Product To The Store. Call Us Directly! Our Trained Technicians Will Answer Your Questions and/or Ship Any Parts You May Need
You can reach us Toll Free at 1-888-827-3667 for Consumer Assistance or online at www.wayne-dalton.com
Page 37

Alternate Programming for HomeLink® to the Prodrive
I
NOTE: This Step can only be done on automobiles equipped with the
HomeLink
NOTE: Programming HomeLink
Transmitter that is programmed to the opener (the wallstation and
transmitter(s) supplied with the opener, come pre-programmed from
the factory). Any additional wallstation(s) or transmitter(s) will need to
be programmed to the opener, see page 33.
IMPORTANT: Use the programming instructions provided with your
vehicle first. Follow these instructions if the HomeLink
learn the transmitter, when using the vehicle’s instructions.
NOTE: Vehicle may need to be in accessory position when
programming. Check car owner’s manual.
NOTE: HomeLink
®
System.
®
requires a Wayne-Dalton
®
unit does not
®
is a registered trademark of Johnson Controls.
®
®
Programming/Training HomeLink
WARNING
Unit
GARAGE DOOR MAY OPERATE DURING PROGRAMMING. TO AVOID
POSSIBLE SEVERE OR FATAL INJURY, PLACE THE EMERGENCY
DISCONNECT HANDLE IN THE MANUAL OPERATED POSITION.
1. Pull the manual disconnect to put the opener in the disengaged
position.
2. Press and hold the two outside buttons on the HomeLink
®
unit until
the HomeLink® indicator light begins to flash rapidly (approx. 20
seconds), then release both buttons. (Do not perform this step to train
additional hand-held transmitters.) NOTE: This operation erases all
previously learned transmitters and that you need to re-teach any other
transmitters to your HomeLink
®
unit by repeating steps 3 - 6 below.
3. Hold the end of the Wayne-Dalton hand-held transmitter
approximately 1 to 3 inches away from the HomeLink® surface
keeping the HomeLink
®
indicator light in view.
4. Use the large button on the Wayne Dalton transmitter.
Simultaneously press and hold desired Homelink® button and the
Wayne Dalton transmitter large button. Continue to press both buttons
counting LED flashes on the HomeLink
®
module; between 50 to 60
LED flashes the LED will either come on solid or do one “quick flash”;
when either of these occur release both Wayne Dalton transmitter and
HomeLink
®
buttons.
Teaching HomeLink® to the opener
5. Press the program switch on the opener. The red program status
light on the opener and light will turn on and remain lit for one minute,
indicating that it is ready to learn.
6. Press the HomeLink
®
button used in Step 4 above for 1 to 3
seconds. The program status light on the opener will turn on and off
three times indicating a successful learn.
®
7. Press the HomeLink
the opener will activate and the trolley will
travel towards open, the next activation will cause the trolley to travel to
the closed position and reengage, subsequent operations will move the
door.
Please Do Not Return This Product To The Store. Call Us Directly! Our Trained Technicians Will Answer Your Questions and/or Ship Any Parts You May Need
You can reach us Toll Free at 1-888-827-3667 for Consumer Assistance or online at www.wayne-dalton.com
31
Page 38

I
FORCE ADJ.
STATUS
SW
PROGRAM
Adjustment # 1 Opening and Closing Force
This garage door opener is built with a safety system that allows the
door to reverse when closing and stop when opening. This must be
adjusted so your opener does not use excessive force in the down
direction or react to the weight of the door during upward travel.
CLOSING FORCE ADJUSTMENT
To help determine that the closing door force is not excessive, grasp
the door handle or bottom edge during downward travel. The opener
should REVERSE to this force.
NOTE: Do not stand under door
during this test.
To adjust the closing force follow
one of the two methods listed
below.
Method A (manual)
1. Turn the FORCE ADJ. counter
clockwise to decrease force and repeat
reversal test until door reacts properly.
Program Status
LED
Program
Button
Closing Force
Adjustment
Adjustments
Adjustment # 2 Contact Obstruction Sensing
(Closing Direction)
The opener is designed to automatically reverse the door during
closing travel whenever it comes in contact with a 2 x 4 laid flat on
the floor. An object on the floor with a height less than 1-1/2” will not
cause the door to reverse. (Test according to instructions in Step 21.)
If opener reverses properly with a 2 x 4 laid flat on the garage floor
(Step 21) and stops without the solid test object in the fully closed
position, proceed to Adjustment # 3.
When door comes in contact with a 2 x 4 laid flat on the garage floor
and stops instead of reversing, reset the door close limits according to
instruction in Step 19, adjusting until door reverses upon contact with a
2 x 4 laid flat on the garage floor.
If door reverses when it comes in contact with the floor, reset the door
close limits according to instruction in Step 19.
Adjustment # 3 Positive Mechanical Door Lock
Method B (computer assisted)
1. Operate the door to the fully open position.
2. Turn the FORCE ADJ. counter clockwise to the minimal force setting.
3. Press the PROGRAM button two times or the PROGRAM
button on the Wireless Wall Station (if included) until the LED turns
on solid (5 sec.). The STATUS LED and the overhead lamp will flash
on and off at a slow rate.
4. Operate the door to the fully closed position.
5. Turn the FORCE ADJ. clockwise until the STATUS LED flickers or just
turns off.
6. Press the PROGRAM button once to confirm setting.
OPENING FORCE ADJUSTMENT
To determine that the opening force is not excessive, grasp the door
handle or bottom edge during upward travel. If the opener does not
stop or is hard to hold, decrease the open force setting. The opener
should STOP without using excessive force.
To change the opening force follow the procedure listed below.
1. Operate the door to the fully closed position.
2. Press the PROGRAM button three times. The STATUS LED
and the overhead lamp will flash on and off. The blink rate, which
corresponds to the force setting, will consist of 1 to 5 fast blinks
followed with a long pause between blink sequences.
3. The first time an attempt is made to increase the force, the setting
will begin at the lightest setting (1 blink).
4. To increase the force, press and release the door up/down button on
any control (The STATUS LED will remain lit during button press).
5. Continue to press and release the door button until the desired force
setting is achieved.
6. Press the PROGRAM button once to confirm setting.
The garage door opener is designed with an automatic mechanical
locking system. This lock secures the door in the fully closed
position.
To adjust, activate the door opener and allow the door to go to its fully
closed position. Loosen the two screws on the rail stop and move it
behind the latch assembly with a gap of 3/4” between “stop” and
“latch”. Retighten screws.
Screws
3/4”
“LATCH”
Rail “Stop”
32
Please Do Not Return This Product To The Store. Call Us Directly! Our Trained Technicians Will Answer Your Questions and/or Ship Any Parts You May Need
You can reach us Toll Free at 1-888-827-3667 for Consumer Assistance or online at www.wayne-dalton.com
Page 39

FORCE ADJ.
STATUS
SW
PROGRAM
I
Tools Needed:
None
Programming Wireless Wall Station(s)
Or Transmitter(s) to Opener
WARNING
DURING PROGRAMMING THE GARAGE DOOR
MAY OPERATE. KEEP PEOPLE AND OBJECTS
CLEAR OF THE MOVING DOOR TO PREVENT
DOOR DAMAGE OR POSSIBLE PERSONAL
INJURY.
NOTE: Programming failure can occur if the wall
station or transmitter is too close to the opener during
the programming sequence. There must be a
minimum of 6 feet between the wall station/
transmitter and the opener.
NOTE: The opener can be activated by up to 8 remote
transmitters, 2 wall stations and 2 keyless entries. If a
9th remote is programmed the first remote
programmed will be lost from memory. The same is
true if a third wall station or a third keyless entry is
programmed, the first will no longer be in memory
and will not operate the opener.
Right Side Of Opener
Program Status
LED
Program
Button
NOTE: Do not press any button on the wall station
or transmitter until instructed.
TRANSMITTER:
1. Press and release the PROGRAM button located
on the garage door opener. The red PROGRAM
STATUS light on the opener unit and the overhead
lamp will turn on and remain lit for one minute,
indicating activation of the learn mode.
2. Press one of the buttons on the transmitter you
wish to use to operate the door. The PROGRAM
STATUS light on the opener will turn on and off
three times indicating a successful learn.
3. Press the same button on the transmitter once
more to confirm operation. The opener will turn on
and move the door.
At this point you will be able to activate the opener.
WALL STATION:
1. Press and release the PROGRAM button located
on the garage door opener. The red PROGRAM
STATUS light on the opener unit and the overhead
lamp will turn on and remain lit for one minute,
indicating activation of the learn mode.
Large Button
Transmitter
a
r
t
e
e
p
D
O
o
o
Press
Here
o
r
T
Light
Button
2. Press the light on/off button on the wall station.
The program status light will turn on and off three
times indicating a successful learn.
3. Press the light on/off button on the wall station
once more to confirm operation. The overhead light
Please Do Not Return This Product To The Store. Call Us Directly! Our Trained Technicians Will Answer Your Questions and/or Ship Any Parts You May Need
will toggle from on to off and from off to on.
At this point you will be able to activate the opener.
You can reach us Toll Free at 1-888-827-3667 for Consumer Assistance or online at www.wayne-dalton.com
Wall Station
33
Page 40

I
Monthly Maintenance:
1. Lubricate hinges and rollers of garage door.
2. Inspect the door for loose fasteners, worn or frayed counterbalance
cables and the presences of legible safety labels/ tags. Have repairs
made by a qualified service person. Contact customer assistance
for free replacement safety labels/ tags.
Maintenance
Twice a Year:
Check chain tension. If chain rests on bottom of rail, adjust tension by
turning the two chain adjusting nuts at the end of the rails
(opposite the opener end) clockwise. Make sure to adjust both nuts
equal amounts and until chain is approximately 1/2” above the bottom
of rails when measured in the middle of the rail length.
3. With door fully closed, pull down on the emergency disconnect to
manually operate the door. If the door feels unbalanced or binds,
have a qualified service person make necessary adjustments or
repairs to the door.
4. Perform the contact/obstruction tests. See Steps 21 and 22 for the
contact/obstruction test instructions. If door/opener fails contact/
obstruction test reset the door close limits according to the
instructions in Step 19, adjusting until door reverse on contact with
a 2 x 4 board laid flat on the garage floor. If opener still fails, have a
qualified service person make adjustments/repairs or this could
result in severe or fatal injury.
5. Failure of door/opener to respond to transmitter, multi-function wall
station or wireless keyless entry may be due to a weak or dead
battery. Replace the battery.
Battery Replacement for Wall Station:
Remove the battery cover completely (right-hand side of wall station)
by disengaging the battery cover’s lower clip; remove the remove the
old batteries. Install two AAA batteries into the wall station observing
the polarity, (+) and (-), of both batteries. After a few seconds, the red
LED will begin to blink every three seconds. If it is desired to slow the
LED blink rate refer to the wall station operation section on page 28
“Backlit LED Lights”. Re-install the battery cover by first inserting its
top into the wall station then inserting and securing its bottom.
Note: Use only two AAA batteries.
Note: Dispose of dead batteries properly.
Battery Replacement for Transmitter:
Insert a coin in the coin slot of the transmitter and twist coin to access
the dead battery. Replace the battery, being careful to match the
positive (+) symbols on the circuit boards with the battery; snap case
back together.
Note: Transmitters use (1) CR2016 or equivalent battery.
Note: Dispose of dead battery properly.
Battery Replacement for Wireless Keyless Entry:
To change battery, snap open case with a coin and remove old
battery. Replace the battery, being careful to match the positive
(+) symbols on the circuit boards with the battery; snap case back
together.
Note: Keyless entries use (1) CR2032 or equivalent battery.
Note: Dispose of dead battery properly.
34
Please Do Not Return This Product To The Store. Call Us Directly! Our Trained Technicians Will Answer Your Questions and/or Ship Any Parts You May Need
You can reach us Toll Free at 1-888-827-3667 for Consumer Assistance or online at www.wayne-dalton.com
Page 41

Troubleshooting
SYMPTOM PROBABLE CAUSE CORRECTIVE ACTION
Opener won’t work from wall button or radio control. No power to opener.
Check cord to outlet, wall switch and circuit breaker.
Short circuit in wires to opener or wall button.
Motor Protector trips open due to excessive use.
Opener works from wall button but not from radio control. Radio control system non-operational. Weak or dead battery in transmitter replace.
Door does not open and opener light fl ashes. Something obstructing door travel.
Insuffi cient opening force.
Build up of ice and snow around door.
Door does not open fully and light does not fl ash. Open limit not set properly. Adjust open travel with screwdriver, turn counter-clockwise to
Door stops and does not close fully. Close limit not set properly. Adjust close travel with screwdriver, turn clockwise to desired
Isolate by disconnecting the wires at the opener from the wall
station.
Allow motor to cool for 20 minutes and try again.
Security code not matched between receiver and transmitter
(see page 33)
If two or more transmitters don’t work, have motor control board
tested.
Disconnect door from operator. Operate door by hand to locate
obstruction or call a service person.
Adjust opening force. (See Adj. #1 on page 32).
Shovel and clear door area.
desired setting. 1/4 turn equals to 1” of travel (see Step 20).
setting. 1/4 turn equals 1” of travel (See Step 19).
Door closes and then returns to fully open position and
opener light fl ashes.
When activated with door in fully open position, door travels
for 1 second, stops, and returns to fully open position and
light begins to fl ash.
Door reverses travel before reaching fully closed position
and opener light fl ashes.
Door fully opens and then light fl ashes. Open limit is set too high and trolley is hitting the stop bolt. Adjust open travel with screwdriver, turn clockwise to desired
Door arm adjustment.
Close travel adjustment is set beyond normal door position.
Obstructions on fl oor.
Infrared safety sensors out of adjustment or defective.
Obstructions in door opening.
Activation of obstruction sensing system.
Loose or hanging objects on door activating Infrared safety
sensor.
Insuffi cient closing force.
Adjust door arm (See Step 17 and 18).
Adjust close travel with screwdriver, turn counter-clockwise to
desired setting. 1/4 turn equals 1” of travel (See Step 19).
Check for stones or ice under door and remove.
Infrared safety sensors alignment should be checked per
instructions. (See Step 16).
Check for object blocking Infrared safety sensors.
Check for binding in door travel (door “stops”, door tracks, etc).
Remove objects.
Adjust closing force. (See Adj. #1 on page 32).
setting. 1/4 turn equals to 1” of travel (see Step 20).
MAINTENANCE/ TROUBLESHOOTING
Please Do Not Return This Product To The Store. Call Us Directly! Our Trained Technicians Will Answer Your Questions and/or Ship Any Parts You May Need
You can reach us Toll Free at 1-888-827-3667 for Consumer Assistance or online at www.wayne-dalton.com
35
Page 42

Parts Breakdown Rail Assembly - All Models
22
9
22
1b
1a
2b
2a
4
10
4
25
26
22
8
1a
30
23
20
22
26
21
19
1b
18a
3
18b
6
8
22
3
7a
22
29
22
4
11b
5
13
14a
11a
14b
32
28
15
7b
12
31
13
24
24
22
26
16
27
17
#. Part # Description # Per Unit #. Part # Description # Per Unit
1a. 325756 R.H. Rail (7’) 1 12. 220959 Front Wall Bracket 1
325758 R.H. Rail (8’) 1 13. 157559 1/4” - 20 x 4” Hex Head Bolt w/ Lock Nut 1
325760 R.H. Rail (10’) 1 14a. 220958 Front Bracket - Chain 1
1b. 325753 L.H. Rail (7’) 1 14b. 320696 Front Bracket - Belt 1
325757 L.H. Rail (8’) 1 15. 220956 Door Bracket 1
325759 L.H. Rail (10’) 1 16. 326207 Hairpin Cotter 1
2a. 324527 Trolley Assembly - Chain 1 17. 326206 5/16” x 1-1/4” Multi-Grip Clevis Pin 1
2b. 320697 Trolley Assembly - Belt 1 18a. 325022 Sprocket Coupling w/ Bushing - Chain 1
3. 309960 Chain Latch Assembly 1 18b. 325687 Sprocket Coupling w/ Bushing - Belt 1
4. 324273 Door Arm (Upper) 1 19. 252106 Sprocket Base Assembly 1
5. 324272 Door Arm (Lower) 1 20. 251228 5/16” - 18 x 2” Hex Bolts 2
6. 308967 1/4” - 20 x 3/4” Machine Bolt 2 21. 221014 Spacer Tubes 2
7a. 325682 Chain, 7’ 1 22. 220999 5/16” - 18 KEP Nut As Req.
325683 Chain, 8’ 1 23. 157143 Red Release Knob 1
325684 Chain, 10’ 1 24. 157665 Adjusting Nuts 2
7b. 325685 Belt, 7’ 1 25. 324270 Sprocket Cap Assembly 1
325686 Belt, 8’ 1 26. 157600 5/16” - 18 x 1/2” Self Clinching Bolt 3
325572 Belt, 10’ 1 27. 324200 Nylon Shoulder Bushings 1
8. 157510 Motor Head Mounting Screw 1/4” -20 x 5/8” 4 28. 157561 Locking Nuts 2
9. 220960 Rail Spacer Bracket 3 or 4 29. 157602 5/16” - 18 x 1/2” Carriage Bolts As Req.
10. 294674 Rail Stop w/ Set Screw 1 30. 309907 5/16” - 18 x 1/2” Flathead Carriage Bolts As Req.
11a. 318113 Chain Idler Assembly 1 31. 320693 Tension Springs - Belt 2
11b. 320704 Belt Idler Assembly 1 32. 324200 Nylon Shoulder Bushing - Belt 2
36
Please Do Not Return This Product To The Store. Call Us Directly! Our Trained Technicians Will Answer Your Questions and/or Ship Any Parts You May Need
You can reach us Toll Free at 1-888-827-3667 for Consumer Assistance or online at www.wayne-dalton.com
Page 43

18
Parts Breakdown Opener Assembly And Accessories - All Models
3
16
10
5
19
21
20
22
15
18
14
15
15
9
27
28
11
4
12
13
8
1
7
17
e
r
p
a
O
t
e
o
T
D
o
Press
o
r
Here
28
29
23
6
26
2
25
24
#. Part # Description # Per Unit #. Part # Description # Per Unit
1. 157167 Frame 1 16. 301675 Capacitor Clamp 1
2. 325017 Motor 1/2 HP 1 17. 252118 Wired Infrared Safety Sensor Kit 1
3. 306131 Motor Control Board 1 18. 252092 Limit Assembly 1
4. 306364 Power Supply Cord 1 19. 249321 LED Interrupter 1
5. 260570 Capacitor 1/2 H.P. 1 20. 260556 Limit Driver Gear 1
6. 306486 Wiring Harness 1 21. 157039 Interrupter Disk 1
7. 269028 Light Socket 1 22. 260557 Shaft, Limit Driver 1
8. 260552 Lens 1 23. 157055 Limit Adjuster 2
9. 252994 MOV Surge Suppressor 1 24. 306134 5 Button Wireless Keyless Entry 1
10. 252993 Limit Switch 1 25. 311365 Wireless Multi Function Wall station 1
11. 325567 Sub-Frame 1 26. 312962 3 Button Mini Transmitter 1 or 2
12. 325067 End Cap (Blue) 1 27. 157666 Hex Nut #10-32 3
13. 325066 Housing (Blue) 1 29. 157496 Nylon Motor Spacer 3
14. 325020 Gear Driven 1
15. 251248 Screw 1/4”-20x3/8” 7
PARTS BREAKDOWN
Please Do Not Return This Product To The Store. Call Us Directly! Our Trained Technicians Will Answer Your Questions and/or Ship Any Parts You May Need
You can reach us Toll Free at 1-888-827-3667 for Consumer Assistance or online at www.wayne-dalton.com
37
Page 44

Prodrive® Accessories
Three Button Mini / Visor
Transmitter
Wired Deluxe Wall Station
Wireless Multi-Function RF
Wallstation
Wireless Keyless Entry
e
r
p
a
O
t
e
o
T
D
o
Press
o
r
Here
10 digit numeric keypad which allows the
operation of the garage door opener from
outside by entering a programmable
personal code on a keypad. Can be
programmed to hundreds of doors.
Controls up to 6 doors or wireless accessories.
Includes visor clip.
Allows independent door up/down control and
overhead light on/off control.
Completely wireless unit with independent door
up/down control, light on/off control, custom pet
opening, delay exit timer, and program button.
5 digit numeric keypad which allows the operation
of the garage door opener from outside by entering
a programmable personal code on a keypad. Can be
programmed to hundreds of doors.
Key Cable Outside Disconnect
Outside Key Switch
Wire Spool
Wired Infrared Safety Sensors
Recommended for all vault type garages without an
access door
Used to open the door automatically from outside the
garage whenever the remote control is not available.
Shipped with 2 keys.
80ft. 22 gauge, 2 conductor polarized. UL listed
(CL-2, 75deg. C.).
Reversing sensors communicate with door opener
via direct wire connections to detect obstructions in
path of door and reacts by reversing door.
38
Please Do Not Return This Product To The Store. Call Us Directly! Our Trained Technicians Will Answer Your Questions and/or Ship Any Parts You May Need
You can reach us Toll Free at 1-888-827-3667 for Consumer Assistance or online at www.wayne-dalton.com
Page 45

Cut-Out Template to Aid Installation
DRILL TEMPLATE
Pre-drill 3/32” pilot hole
Multifunction
Wall Station Template
Pre-drill 5/64” pilot hole
5 Button
Keyless Entry Template
Please Do Not Return This Product To The Store. Call Us Directly! Our Trained Technicians Will Answer Your Questions and/or Ship Any Parts You May Need
You can reach us Toll Free at 1-888-827-3667 for Consumer Assistance or online at www.wayne-dalton.com
39
Page 46

Please Do Not Return This Product To The Store
Call Us Toll-Free:
Call Us Directly! Our Trained Technicians Will Answer
Your Questions and /or Ship Any Parts You May Need
40
Please Do Not Return This Product To The Store. Call Us Directly! Our Trained Technicians Will Answer Your Questions and/or Ship Any Parts You May Need
You can reach us Toll Free at 1-888-827-3667 for Consumer Assistance or online at www.wayne-dalton.com
(888) 827-3667
Thank you for your purchase
www.wayne-dalton.com
Page 47

®
GARAGE DOOR OPENER
LIFETIME LIMITED WARRANTY
The Manufacturer warrants that the Prodrive® Garage Door Opener’s electronic and mechanical components (excluding
motor) will be free from defects in materials and workmanship for a period of ONE YEAR (Models 3220C, 3221C, 3222C,
3320B, 3322B, 3220C-Z, 3221C-Z, 3222C-Z, 3320B-Z, 3322B-Z) and FIVE YEARS (Models 3224C, 3324B, 3224C-Z,
3324B-Z) from the date of installation, provided it is properly installed, maintained and cared for under specified use and
service.
The Motor is warranted for FIVE YEARS (Models 3220C, 3221C, 3320B, 3220C-Z, 3221C-Z, 3320B-Z) and for LIFETIME
(Models 3222C, 3224C, 3322B, 3324B, 3222C-Z, 3224C-Z, 3322B-Z, 3324B-Z) against defects in materials and workmanship. Batteries are not warranted.
This Limited Warranty extends to the original homeowner, providing the Prodrive® Garage Door Opener is installed in his/her
place of primary residence. This Limited Warranty is not transferable. The Limited Warranty applies to residential property
only.
NO EMPLOYEE, DISTRIBUTOR, OR REPRESENTATIVE IS AUTHORIZED TO CHANGE THE FOREGOING LIMITED
WARRANTY IN ANY WAY OR GRANT ANY OTHER WARRANTY ON BEHALF OF MANUFACTURER.
The Manufacturer shall not be responsible for any damage resulting to or caused by its products by reason of installation,
improper storage, unauthorized service, alteration of products, neglect or abuse, any acts of nature beyond Manufacturer’s
control (such as, but not limited to, lightning, power surges, water damage, etc.), or attempt to use the products for other
than the customary usage or for their intended purposes. The above Limited Warranty does not cover normal wear or any
damage beyond Manufacturer’s control. This Limited Warranty does not cover field
replacement labor.
THIS LIMITED WARRANTY COVERS A CONSUMER PRODUCT AS DEFINED BY THE MAGNUSON-MOSS WARRANTY ACT. NO
WARRANTIES, EXPRESSED OR IMPLIED, (INCLUDING, BUT NOT LIMITED TO, THE WARRANTY OF
MERCHANTABILITY OR FITNESS FOR A PARTICULAR PURPOSE), SHALL EXTEND BEYOND THE APPLICABLE TIME PERIOD
STATED IN BOLD FACE TYPE ABOVE.
Claims for defects in material and workmanship covered by this Limited Warranty shall be made in writing, within the
warranty period, to the dealer from whom the product was purchased. Manufacturer may either send a service
representative or have the product returned to the Manufacturer at Buyer’s expense for inspection. If judged by Manufacturer
to be defective in material or workmanship, the product will be replaced or repaired at the option of the Manufacturer, free
from all charges except authorized transportation and replacement labor. Replacement unit may be an equivalent model that
has been factory refurbished. Remainder of original Limited Warranty period will apply to repair/replacement unit.
THE REMEDIES OF BUYER SET FORTH HEREIN ARE EXCLUSIVE AND ARE IN LIEU OF ALL OTHER REMEDIES, THE LIABILITY
OF MANUFACTURER, WHETHER IN CONTACT, TORT, UNDER ANY WARRANTY OR OTHERWISE, SHALL NOT EXTEND BEYOND
ITS OBLIGATION TO REPAIR OR REPLACE, AT ITS OPTION, ANY PRODUCT OR PART FOUND BY MANUFACTURER TO BE
DEFECTIVE IN MATERIAL OR WORK SHALL NOT BE RESPONSIBLE FOR ANY DIRECT,
INDIRECT, SPECIAL OR CONSEQUENTIAL DAMAGES OF ANY NATURE.
This Limited Warranty gives you specific legal rights and you may have other rights, which may vary from state to state.
However, some states do not allow limitation on how long an implied warranty lasts or the exclusion or limitation of incidental
or consequential damages so the above limitations or exclusions may not apply to you.
Please Do Not Return This Product To The Store. Call Us Directly! Our Trained Technicians Will Answer Your Questions and/or Ship Any Parts You May Need
You can reach us Toll Free at 1-888-827-3667 for Consumer Assistance or online at www.wayne-dalton.com
41
Page 48

Patent Information
Models:
3220C, 3221C, 3222C, 3224C, 3320B, 3322B, 3324B, 3220C-Z, 3221C-Z, 3222C-Z, 3224C-Z, 3320B-Z, 3322B-Z, 3324B-Z
Made under the following US patents and methods D413,579; D505,393; 6,326,754; 6,897,630; 6,903,650; 7,109,677; 7,116,072; 7,183,732; 7,190,266; 7,193,502;
7,211,975; 7,280,031; 7,327,107; 7,327,108; 7,327,249; 7,375,484; 7,375,612; 7,376,401. Other US and Foreign Patents pending.
FCC and IC Statement
FCC Regulatory Information:
This device complies with Part 15 of the FCC Rules. Operation is subject to the following two conditions: (1) this device may not cause harmful interference, and (2) this device must
accept any interference received, including interference that may cause undesired operation.
IC Regulatory Information:
This Class B digital apparatus meets all requirements of the Canadian Interference Causing Equipment Regulations. Operation is subject to the following two conditions: (1) this device
may not cause harmful interference, and (2) this device must accept any interference received, including interference that may cause undesired operation.
NOTE: This equipment has been tested and found to comply with the limits for a Class B digital device, pursuant to Part 15 of the FCC Rules. These limits are designed to provide
reasonable protection against harmful interference in a residential installation. This equipment generates, uses, and can radiate radio frequency energy and, if not installed and used in
accordance with the instructions, may cause harmful interference to radio communications. However, there is no guarantee that interference will not occur in a particular installation. If
this equipment does cause harmful interference to radio or television reception, which can be determined by turning the equipment off and on, the user is encouraged to try to correct
the interference by one or more of the following measures: Reorient or relocate the receiving antenna. Increase the separation between the equipment and receiver. Connect the
equipment into an outlet on a circuit different from that to which the receiver is connected. Consult the dealer or an experienced radio/TV technician for help.
WARNING: Changes or modifi cations to this unit not expressly approved by party responsible for compliance could void user’s authority to operate this equipment.
Page 49

INSTRUCCIONES DE INSTALACIÓN Y MANUAL DEL PROPIETARIO
®
ACCIONADOR DE PUERTAS DE GARAJE
GARAGE DOOR OPENER
Transmisión por cadena / correa
Modelos: 3220C, 3221C, 3222C, 3224C, 3320B, 3322B, 3324B
3220C-Z, 3221C-Z, 3222C-Z, 3224C-Z, 3320B-Z, 3322B-Z, 3324B-Z
¡SOLO PARA PUERTAS RESIDENCIALES SECCIONALES ASCENDENTES DE FRANQUEO SUPERIOR!
¡NO UTILIZAR ESTA INFORMACIÓN PARA PUERTAS DE UNA PIEZA!
¡IMPORTANTE! LA PUERTA Y EL ACCIONADOR NO FUNCIONAN CORRECTAMENTE ANTES DE HABERSE
INSTALADO SENSORES INFRARROJOS DE SEGURIDAD Y HABÉRSELOS AJUSTADO CORRECTAMENTE!
¡AVISO IMPORTANTE!
Leer las instrucciones incluidas cuidadosamente antes de instalar
u operar este accionador para puertas de garaje. Prestar atención
especial a todas las advertencias y notas. Se HA DE fi jar este
manual en la pared, cerca de la puerta del garaje.
Copyright 2008 Wayne-Dalton Corp. Pieza nro. 339634 New 9/18/2008
PUERTAS DE GARAJE Y ACCIONADORES
Page 50

Contenido del paquete
Brazo inferior de la
puerta
NOTA: Dependiendo del modelo de accionador, es posible
que no se suministren algunas piezas enumeradas.
Conjunto de riel con el brazo
superior de la puerta
Sensores de seguridad cableados, con herrajes
Soportes para
montaje en pared
Soporte de puerta
(2) Soportes de sensor
de seguridad
Sensores infrarrojos de seguridad
(1 emisor + 1 receptor)
Manual del propietario
e
r
p
a
O
t
e
o
T
D
o
Press
o
r
Here
Estación multifunción
de pared,
con herrajes
Pasador de horquilla de sujeción
múltiple de 5/16˝ x 1-1/4˝
Alambre
para timbre
Perilla roja para
desenganche de
emergencia
Estación de lujo,
para pared, cableada,
con accesorios
Casquillo de nilón
con reborde
Perno de cabeza hexagonal de 1/4˝ x 4˝
Transmisor de
llavero / visera
(1 ó 2)
Acceso inalámbrico sin
llave, de 5 botones, con
accesorios
Etiqueta sobre
aprisionamiento
Chaveta hendida
Accionador
Difusor de luz
EMERGENCY
RELEASE
Etiqueta de desenganche de
emergencia
(2) Pernos de carruaje de 1/4˝ - 20 x 2˝
(2) Pernos comunes de 1/4˝-20 x 3/4˝ (2) Tuercas Nylock de 1/4˝
Perno común de 3/8˝-16 x 1˝ Contratuerca de 3/8˝
con inserto plástico
I
Por favor, no devolver este producto al concesionario. ¡Llámenos directamente! Nuestros técnicos capacitados responderán cualquier pregunta y/o enviarán cualquier
Contratuerca de 1/4˝
con inserto plástico
Arandela plana de 3/8˝
(2) Tornillos autoperforantes
de 1/4˝ - 20 x 5/8˝
(2) Contratuercas de 1/4˝
(2) Tirafondos de 1/4˝ x 1-1/2˝
pieza necesaria. Se nos puede contactar al número telefónico gratuito 1-888-827-3667 para Asistencia al Consumidor, o bien, en conexión a red a www.wayne-dalton.com
Page 51

INSPECCIÓN DE LA PUERTA DEL GARAJE
ANTES DE INSTALAR EL ACCIONADOR PRODRIVE
Para asegurar que el accionador Prodrive® nuevo funciona como está previsto, la puerta del
garaje ha de estar instalada y equilibrada correctamente.
Antes de instalar el accionador de la puerta de garaje, abrir y cerrar la puerta manualmente
para asegurarse que ésta funcione sin problemas en toda la altura. No debería tomar mucho
esfuerzo abrir o cerrar a mano una puerta equilibrada correctamente. La puerta debería
permanecer en la posición abierta o cerrada sin abatirse o correrse hacia arriba. Si una puerta
abre rápido, podría ser necesario reducir la tensión de los resortes. Si la puerta desciende
rápido, podría ser necesario aumentar la tensión de los resortes.
®
Si la puerta funciona correctamente, consultar el manual de instalación del Prodrive
obtener las instrucciones sobre cómo instalar el accionador Prodrive
®
para puertas de garaje.
®
para
Si el funcionamiento de la puerta no satisface estos requisitos, ajustar el equilibrio del resorte
según el manual de instalación de la puerta o llamar a un instalador profesional para efectuar
los ajustes necesarios antes de instalar el Prodrive
®
.
Los manuales de instrucciones están disponibles para descarga en www.wayne-dalton.com.
También, utilizar el sitio web para encontrar el concesionario profesional más cercano.
Una vez la puerta esté equilibrada correctamente y funcione sin problemas, se puede
proceder a la instalación del accionador Prodrive
®
para puertas de garaje.
Por favor, no devolver este producto al concesionario. ¡Llámenos directamente! Nuestros técnicos capacitados responderán cualquier pregunta y/o enviarán cualquier
pieza necesaria. Se nos puede contactar al número telefónico gratuito 1-888-827-3667 para Asistencia al Consumidor, o bien, en conexión a red a www.wayne-dalton.com
II
Page 52

Antes de la instalación
¡IMPORTANTE! Antes de comenzar la instalación, leer estas instrucciones completamente
para familiarizarse con todos los aspectos de la instalación y el ajuste.
IMPORTANTE: SI EL GARAJE NO TIENE PUERTA DE ENTRADA DE SERVICIO, INSTALAR UNA CERRADURA EXTERIOR OPCIONAL DE DESBLOQUEO
RÁPIDO. ESTE ACCESORIO AYUDA A LA OPERACIÓN MANUAL DE LA PUERTA DE GARAJE DESDE AFUERA EN CASO DE UN CORTE ELÉCTRICO.
IDENTIFICACIÓN DE LA PUERTA
Referirse a las ilustraciones que fi guran a continuación para identifi car la puerta y verifi car que el tipo de la misma sea una puerta seccional
con riel curvo. No instalar el accionador si la puerta es cualquier tipo de puerta de una pieza.
NOTA: El accionador se ha diseñado para puertas seccionales. No intentar instalar este accionador en ningún tipo de puerta de una pieza.
El uso de este accionador en una puerta de una pieza podría causar lesiones personales graves o daños a la propiedad.
PROBAR LA PUERTA
Antes de comenzar, completar las dos pruebas siguientes para asegurarse que la puerta esté equilibrada y funcione adecuadamente. Una puerta
que se pega, atasca o está desequilibrada, podría causar lesiones severas. No intentar compensar el ajuste inadecuado de una puerta mediante la
instalación de un accionador. Esto interferirá con el funcionamiento apropiado de las características de seguridad del accionador y/o podría dañar
la puerta o el accionador. Contratar a un especialista de mantenimiento para efectuar cualesquier ajustes o reparaciones necesarias antes de
proceder con la instalación.
Prueba uno de la puerta
Levantar y bajar la puerta mientras se la examina detenidamente para
detectar algún atascamiento o falta de movilidad que pudiera ocurrir.
Levantar la puerta aproximadamente hasta media altura, como se ilustra.
Al soltar la puerta, ésta debería permanecer en posición. Si la tensión
de los resortes tira de la puerta y la abre más o si el peso de la puerta la
hace descender, la puerta no está ajustada apropiadamente.
Prueba dos de la puerta
Al instalársela correctamente, una puerta debería permanecer fuera
de la abertura cuando se la deja reposar en su posición natural,
completamente abierta. Si el “abatimiento de la puerta” tira de la
puerta hacia la abertura o la tensión de los resortes no es sufi ciente
para tirar de la puerta y mantenerla completamente libre de la
abertura, la puerta no está ajustada correctamente.
REVISIÓN ANTES DEL MONTAJE
Todo accionador se prueba en la fábrica y se envía con el ajuste del interruptor de límite en la posición CERRADA de la puerta. Si se ha encendido el accionador antes del montaje, realizar los pasos
siguientes para asegurarse que el ajuste del interruptor de límite esté en la posición CERRADA de la
puerta. Conectar el accionador a una fuente de electricidad y colocar en cortocircuito los bornes de
tornillo etiquetados “PB” y “COM” con un destornillador de metal. El motor debería arrancar; marchar
a través de un ciclo de APERTURA, (la transmisión de impulsión gira en sentido horario) y para. Esto
dejará al accionador en la posición ABIERTA. Para regresar el accionador a la posición CERRADA
completa, colocar y mantener en cortocircuito los bornes “PB” y “COM” nuevamente (la transmisión
de impulsión gira en sentido antihorario). Continuar colocando los bornes en cortocircuito hasta que el
accionador pare en la posición CERRADA. Si se pierde el contacto entre “PB” y “COM”, el motor para,
se invierte, y vuelve al límite abierto. Repetir con un cortocircuito constante entre “PB” y “COM”.
PRECAUCIÓN: MANTENERSE ALEJADO DE TODA PIEZA ROTATIVA Y MÓVIL.
ADVERTENCIA
EL NO MANTENERSE ALEJADO DE PIEZAS ROTATIVAS Y MÓVILES PUEDE CONDUCIR A LESIONES SEVERAS.
Desconectarlo de la fuente de energía y proceder al montaje.
III
Por favor, no devolver este producto al concesionario. ¡Llámenos directamente! Nuestros técnicos capacitados responderán cualquier pregunta y/o enviarán cualquier
pieza necesaria. Se nos puede contactar al número telefónico gratuito 1-888-827-3667 para Asistencia al Consumidor, o bien, en conexión a red a www.wayne-dalton.com
Costado derecho del accionador
OBS
COM
P. B .
STATUS
PROGRAM
SW
FORCE ADJ.
Page 53

Características del sistema
1. Control de ciclo de apertura y cierre:
Permite arrancar y parar la puerta mediante un pulsador, transmisor o
estación de pared. El impulso siguiente envía una puerta de garaje parada
en la dirección opuesta.
2. Desconector de emergencia:
Desconexión manual que permite la operación de la puerta durante un
corte eléctrico con reconexión automática al reactivarse el accionador.
Véase la página 27.
3. Luz del accionador:
Enciende automáticamente cuando el accionador está activado y
permanece encendida durante cuatro minutos por cortesía y seguridad.
4. Cerradura mecánica de puerta:
Al estar ajustado correctamente, el accionador bloquea la puerta en la
posición cerrada, evitando así el acceso no deseado. Véase el Ajuste nro. 3
en la página 32.
5. Luz de advertencia de obstrucción:
La luz de cortesía destella después de detectar una obstrucción en la
dirección descendente y/o si el sistema de seguridad sufre desperfectos
mientras está en la posición abierta.
6. Motor:
Permanentemente lubricado, térmicamente protegido, motor para servicio
pesado con restauración automática.
7. Sistema de seguridad:
Ajustes independientes de incremento o reducción de la fuerza. Al
estar ajustado correctamente, el sistema de seguridad retrocede
automáticamente al detectar una obstrucción en la dirección descen dente
y vuelve a la posición completamente abierta. La puerta para al detectar
una obstrucción en la dirección ascendente. Véase el Ajuste nro. 2 en la
página 32.
8. Sensores infrarrojos de seguridad:
Sensores de inversión infrarrojos cableados, para retroceder al detectar
una obstrucción en la trayectoria de la puerta
9. Estación multifunción de pared:
Wired wall station provides up/down door motion control and
La estación cableada de pared brinda control sobre el movimiento de la
puerta hacia arriba/hacia abajo y control independiente de encendido /
apagado de la luz superior. La estación inalámbrica multifunción de pared
brinda control sobre el movimiento de la puerta hacia arriba/hacia abajo,
control independiente de encendido / apagado de la luz superior, demora
en el descenso de la puerta, función “posición para mascotas” ajustable y
botón de programación “posición para mascotas”.
10. Compatibilidad Homelink
El accionador es capaz de “aprender a comunicarse” con transceptores
Homelink
®
de automóviles. Visite www.homelink.com.
®
:
11. Tecnología de código aleatorio cifrado:
Los transmisores inalámbricos, las estaciones multifunción de pared y el
acceso inalámbrico sin llave utilizan código aleatorio cifrado, el cual evita
que ladrones potenciales “se apoderen” del código digital del transmisor.
Taladro eléctrico
Destornillador de
cabeza Phillips
Destornillador de cabeza
plana
Herramientas necesarias
Llave de trinquete
Cubos de 1/4˝, 3/8˝,
7/16˝, 1/2˝, 9/16˝
de 7/16˝
Alicates de punta de
aguja
Alicates / cortaalambre
Lápiz
NivelVástago de cubo
Brocas de 5/64˝, 3/32˝,
Llave de 7/16˝
Cuartón de 2 x 4
1/8˝, 3/16˝
Sierra para metales
Alicates
Martillo
Cinta para medir
Por favor, no devolver este producto al concesionario. ¡Llámenos directamente! Nuestros técnicos capacitados responderán cualquier pregunta y/o enviarán cualquier
pieza necesaria. Se nos puede contactar al número telefónico gratuito 1-888-827-3667 para Asistencia al Consumidor, o bien, en conexión a red a www.wayne-dalton.com
Gafas de
seguridad
Llave ajustable
Objeto sólido de
2 x 6 x 12 para prueba
Escalera de tijera no
metálica
IV
Page 54

Tabla de materias
Contenido del paquete .......................................................................I.
ADVERTENCIA
LA INSTALACIÓN INCORRECTA
Inspección antes de la instalación.................................................II, III
Herramientas necesarias..................................................................IV.
Instrucciones de seguridad importantes ...........................................V.
®
Instalación del Prodrive
Antes de la operación .................................................................6-19.
Instalaciones opcionales ...........................................................20-26.
Operación ..................................................................................27-32.
Programación de la estación inalámbrica de pared o
del (de los) transmisor(es) para uso con el accionador .................. 33.
Mantenimiento ............................................................................... 34.
Diagnóstico y resolución de problemas ......................................... 35.
Desglose de piezas de conjunto del riel ......................................... 36.
Desglose de piezas de conjunto del accionador ............................. 37.
Accesorios ...................................................................................... 38.
Plantillas ......................................................................................... 39.
Número de servicio al cliente ........................................................ 40.
Garantía ......................................................................................... 41.
...............................................................1-5.
Defi nición de palabras clave utilizadas en este manual:
ADVERTENCIA
INDICA UNA SITUACIÓN POTENCIALMENTE PELIGROSA QUE,
DE NO EVITARSE, PODRÍA CONDUCIR A UNA LESIÓN GRAVE
O FATAL.
PRECAUCIÓN: HACER CASO OMISO DE LAS INSTRUCCIONES
PUEDE CONDUCIR A DAÑOS A LA PROPIEDAD O LESIONES.
IMPORTANTE: PASO NECESARIO PARA EL FUNCIONAMIENTO
SEGURO Y CORRECTO DEL ACCIONADOR.
NOTA: Información para asegurar la instalación correcta del
accionador.
PUEDE CONDUCIR A LESIONES
GRAVES O FATALES. SEGUIR ESTAS
INSTRUCCIONES CUIDADOSAMENTE.
INSTRUCCIONES DE INSTALACIÓN
IMPORTANTES
1. LEER Y SEGUIR TODAS LAS INSTRUCCIONES DE INSTALACIÓN.
2. No conectar el accionador a la fuente de electricidad sino hasta que así lo indiquen
las instrucciones.
3. Instalar la etiqueta de advertencia de aprisionamiento junto a la estación de pared
en un lugar prominente. Instalar la etiqueta de desconexión de emergencia en la
cuerda para desconexión de emergencia.
4. Retirar toda cuerda y retirar, o inhabilitar en la posición desbloqueada, todas las
cerraduras conectadas a la puerta del garaje antes de instalar el accionador.
5. No tener puestos anillos, relojes ni vestir ropa holgada al instalar o dar
mantenimiento a un sistema de puerta de garaje.
6. Es importante instalar todos los componentes suministrados con el accionador
7. Utilizar protección ocular al instalar el accionador o la puerta o al darles
8. Instalar el accionador en una puerta de garaje equilibrada correctamente y en buen
9. Donde sea posible, instalar el accionador a 2.1 metros (7 pies) o más sobre el piso.
10. Ubicar la estación de pared: (a) dentro del campo visual de la puerta, (b) a una
11. Después de instalar el accionador, la puerta ha de retroceder al entrar en contacto
12. La instalación y el cableado han de cumplir los códigos de edificación y eléctrico
13. Para reducir el riesgo de lesiones personales, utilizar este accionador sólo con
14. Podría ser necesario reforzar la sección superior de la puerta de garaje antes de
15. No utilizar ajustes de sensibilidad para compensar el mal funcionamiento de una
16. Si los sensores infrarrojos de seguridad se ven obstruidos por un objeto de 15 cm
17. Utilizar una escalera de tijera no metálica, robusta, al instalar el accionador.
DESPUÉS DE COMPLETARSE LA INSTALACIÓN,
ASEGURAR ESTE MANUAL CERCA DE LA PUERTA DEL
GARAJE. EFECTUAR PRUEBAS DE OBSTRUCCIÓN
MENSUALMENTE Y DE MANTENIMIENTO SEGÚN SE
RECOMIENDE. VÉANSE LAS PÁGINAS 17 Y 34.
®
, es decir, estaciones de pared, sensores de seguridad, etc. El uso de
Prodrive
piezas no suministradas por Wayne-Dalton Corp. podría causar malfuncionamiento
del accionador y crear condiciones inseguras.
mantenimiento.
funcionamiento. Contratar a un especialista de mantenimiento para efectuar ajustes
o reparaciones a cables, conjuntos de resortes, y otros herrajes antes de instalar el
accionador. Una puerta desequilibrada podría causar lesiones graves o fatales.
Montar el desconector de emergencia a 1.8 metros (6 pies) sobre el piso.
altura mínima de 1.5 metros (5 pies), de modo que niños pequeños no puedan
alcanzarla, y (c) alejada de todas las piezas móviles de la puerta.
con un objeto de 38 mm (1-1/2˝ ) de altura (o un cuartón de 51 mm x 102 mm
[2˝ x 4˝ ] sobre una cara) en el piso.
locales. Conectar el cordón eléctrico a un tomacorriente con conexión apropiada a
tierra. No retirar la clavija a tierra del cordón eléctrico.
puertas seccionales ascendentes de franqueo superior.
instalar el accionador. Consultar al fabricante de la puerta de garaje para obtener
las recomendaciones pertinentes.
puerta. Esto evitará el funcionamiento correcto de la característica de retroceso de
seguridad y podría dañar la puerta y posiblemente causar lesiones graves o fatales.
(6 pulgadas) de altura colocado en el piso del garaje, la puerta abierta no ha de
cerrar y la puerta cerrando ha de retroceder y abrir.
V
Por favor, no devolver este producto al concesionario. ¡Llámenos directamente! Nuestros técnicos capacitados responderán cualquier pregunta y/o enviarán cualquier
pieza necesaria. Se nos puede contactar al número telefónico gratuito 1-888-827-3667 para Asistencia al Consumidor, o bien, en conexión a red a www.wayne-dalton.com
Page 55

1
Herramientas
necesarias:
Cubo de 3/8˝
Llave de trinquete
Montaje del accionador en el riel
IMPORTANTE: LA TRANSMISIÓN DE
IMPULSIÓN EN EL ACCIONADOR HA DE
ESTAR ALINEADA CORRECTAMENTE CON
LA RUEDA DENTADA / CORRUGACIONES
DE ACOPLAMIENTO EN EL CONJUNTO
DEL RIEL Y LOS PERNOS DE MONTAJE
COMPLETAMENTE APRETADOS ANTES DE
ENCENDER EL ACCIONADOR; EL HACER CASO
OMISO DE ESTO PRODUCIRÁ EL FALLO DE LA
TRANSMISIÓN.
Antes del montaje, alinear la rueda
dentada / corrugaciones de acoplamiento con
las muescas del engranaje motriz. Rotar la
ranura del motor para colocar el engranaje
motriz de modo que la muesca más cercana
del engranaje motriz esté directamente detrás
de la ranura del motor, como se ilustra.
NOTA: No rotarla más de media vuelta.
Colocar el extremo opuesto del riel sobre un
apoyo temporal a una altura aproximada de
15 cm (6˝ ).
Proceder con la conexión del riel al accionador,
asegurando el engranaje apropiado entre la
rueda dentada / corrugaciones de acoplamiento
y las muescas de la transmisión de impulsión.
Realinear si fuera necesario, asegurándose de
mantener toda rotación sólo hasta la muesca
más cercana. Con los (4) pernos de cabeza
hexagonal de 1/4˝-20 x 5/8˝ preinstalados,
montar el riel en el accionador con un cubo de
3/8˝; apretarlo de manera segura.
Parte inferior del riel
(boca arriba)
Vista superior
del accionador
Rueda dentada / corrugaciones
de acoplamiento
Muescas
INSTALACIÓN
Rueda dentada / corrugaciones
de acoplamiento
Ranura del motor
NOTA: No enchufar el cordón eléctrico del
Accionador
Transmisión
del impulsor
Muescas
Pernos de 1/4˝ - 20
x 5/8˝ de cabeza
hexagonal
accionador al tomacorriente sino hasta que el
accionador esté completamente instalado y las
instrucciones en este manual así lo indiquen.
Por favor, no devolver este producto al concesionario. ¡Llámenos directamente! Nuestros técnicos capacitados responderán cualquier pregunta y/o enviarán cualquier
pieza necesaria. Se nos puede contactar al número telefónico gratuito 1-888-827-3667 para Asistencia al Consumidor, o bien, en conexión a red a www.wayne-dalton.com
1
Page 56

2
Posicionamiento e instalación
del soporte de pared frontal
Reforzarlo con un cuartón de 5 cm x 15 cm [2˝ x 6˝ ],
según sea necesario, para asegurar la rigidez del montaje.
Herramientas
necesarias:
Nivel de carpintero
Vástago de cubo
de 7/16˝
Taladro eléctrico
Cinta para medir
Broca de 1/8˝
NOTA: Se recomienda instalar el accionador de
la puerta a 2.1 m (7 pies) o más sobre el piso
del garaje.
REFORZAR LA PARED DEL TRAVESAÑO
Reforzar la pared del travesaño (pared sobre la
abertura de la puerta) según sea necesario, para
asegurar el montaje rígido del soporte de pared
frontal.
ADVERTENCIA
NO INTENTAR AFLOJAR O RETIRAR PORCIÓN
ALGUNA DEL SISTEMA DE RESORTES DE LA
PUERTA A FIN DE REFORZAR LA PARED DEL
TRAVESAÑO O PARA MONTAR UN SOPORTE
DE PARED. EL SISTEMA DE RESORTES ESTÁ
SOMETIDO A TENSIÓN EXTREMA Y PUEDE
CAUSAR LESIONES SEVERAS O FATALES. SE
DEBERÍA ENCOMENDAR DICHO TRABAJO A UN
ESPECIALISTA EN MANTENIMIENTO.
Ubicar la línea central vertical de la puerta del
garaje y marcarla en el travesaño sobre la
puerta.
Elevar la puerta levemente hasta que la sección
superior alcance el punto más alto de la
trayectoria (punto más alto del arco); con un
nivel de carpintero, transferir y marcar el punto
más alto de la trayectoria en la pared del
travesaño y cerrar la puerta.
Montar el soporte de pared frontal con su borde
inferior aproximadamente de 12 a 25 mm (1/2˝
a 1˝ ) sobre la marca que muestra el punto más
alto de la trayectoria y centrado en la línea
central vertical.
NOTA: Para contrapeso por torsión en franqueo
superior reducido, sujetar el borde inferior del
soporte de pared típicamente de 12 mm a
25 mm (1/2˝ a 1˝ ) (si hubiera espacio) sobre el
soporte central del resorte de torsión y centrado
sobre la línea vertical, tal como se ilustra.
Marcar los dos agujeros de montaje y perforar
un agujero piloto con una broca de 1/8˝. Montar
el soporte de pared con los tirafondos de 1/4˝ x
1-1/2˝ suministrados para asegurar un montaje
rígido.
12 mm - 25 mm
(1/2˝ - 1˝ ) sobre la marca
del punto más alto
12 mm - 25 mm
(1/2˝ - 1˝ ) sobre el
soporte central
(si hay espacio)
Borde superior
de soporte central
Travesaño
Marca más
alta del arco
Línea central
vertical
Nivel de carpintero
Punto más alto de la trayectoria
Sección superior
Riel curvo de
puerta seccional
Tirafondos de
1/4˝ X 1-1/2˝
Soporte de
pared frontal
Centro de
la puerta
Soporte de
pared frontal
Resorte de torsión
Soporte central
2
Por favor, no devolver este producto al concesionario. ¡Llámenos directamente! Nuestros técnicos capacitados responderán cualquier pregunta y/o enviarán cualquier
pieza necesaria. Se nos puede contactar al número telefónico gratuito 1-888-827-3667 para Asistencia al Consumidor, o bien, en conexión a red a www.wayne-dalton.com
Línea central
Page 57

3
Fijar la unidad en el soporte
de pared frontal
Soporte de
pared frontal
Contratuerca de 1/4˝
con inserto plástico
Herramientas
necesarias:
Cubo de 7/16˝
Llave de trinquete
Llave ajustable
Elevar el extremo frontal del conjunto del riel y
fijarlo al soporte de pared frontal con el perno de
cabeza hexagonal de 1/4˝ x 4˝ y la contratuerca
con inserto plástico de 1/4˝ suministrada. Tener
cuidado de no apretar la tuerca excesivamente.
Apretarla sólo hasta que el extremo del perno
esté al ras con el exterior de la tuerca.
NOTA: Si se tiene un sistema de contrapeso
por resorte de torsión, será necesario elevar el
accionador y apoyarlo sobre una escalera de
tijera para fijarlo al extremo frontal del conjunto
del riel al soporte de pared.
El brazo superior de la puerta está asegurado
al soporte espaciador con una atadura de
envío. Retirar la atadura que une el brazo superior de la puerta al soporte espaciador, para
permitir que el brazo gire hacia abajo (véase la
precaución).
PRECAUCIÓN: Sostener el brazo superior de
la puerta con la mano libre para evitar que el
brazo de la puerta gire hacia abajo sin control.
Perno de
cabeza
hexagonal de
1/4˝ x 4˝
Brazo superior
de puerta
Conjunto del riel
Atadura
Soporte espaciador
Brazo superior
de la puerta
Cartón o paño para
proteger la carcasa
4
Herramientas
necesarias:
Cuartón de
51 mm x 102 mm
(2˝ x 4˝ )
Escalera de tijera
no metálica
Posicionamiento del extremo
motor del accionador
IMPORTANTE: PARA EVITAR DAÑOS A LA
PUERTA, NO DESCANSAR EL ACCIONADOR
SOBRE LA PUERTA SIN UTILIZAR UN
CUARTÓN DE 51 mm x 102 mm (2˝ x 4˝) CON
UNA LONGITUD MÍNIMA DE 91 cm.
Elevar el extremo del motor del accionador y
apoyarlo para poder abrir la puerta hasta la
posición completamente abierta. Se podría
necesitar ayuda para elevar el extremo del
motor si la escalera no es lo suficientemente
alta.
IMPORTANTE: PARA EVITAR DAÑOS A LA
PUERTA O AL ACCIONADOR, COLOCAR
EL TROLE LO MÁS CERCA POSIBLE DEL
ACCIONADOR ANTES DE ABRIR LA PUERTA.
Abrir la puerta y colocar un cuartón de 51 mm
x 102 mm x 914 mm (2˝ x 4˝ x 36˝ ), como
mínimo, a lo largo de la sección superior de
la puerta del garaje. Descansar el conjunto
del riel sobre el cuartón de 51 mm x 102 mm
(2˝ x 4˝ ).
Apoyar la puerta
para evitar fl echa
Conjunto del riel
Puerta
Trole
Cuartón de
51 mm x 102
mm (2˝ x 4˝ )
Accionador
Escalera de tijera
no metálica
Apoyar la sección superior de la puerta para
evitar una flecha excesiva.
Por favor, no devolver este producto al concesionario. ¡Llámenos directamente! Nuestros técnicos capacitados responderán cualquier pregunta y/o enviarán cualquier
pieza necesaria. Se nos puede contactar al número telefónico gratuito 1-888-827-3667 para Asistencia al Consumidor, o bien, en conexión a red a www.wayne-dalton.com
3
Page 58

5
Herramientas
necesarias:
Taladro eléctrico
Sierra para
metales
Broca de 1/8˝
Cubo de 1/2˝
Cubo de 7/16˝
Llave de trinquete
Llave ajustable
Cinta para medir
Perfi l angular
perforado
(no suministrado)
Montaje del extremo
del accionador
PRECAUCIÓN: No utilizar perno o tuerca
de la cubierta de transmisión para fijación
de suspensores. ¡Esto podría causar
desalineamiento de la rueda dentada, cadena
o correa, y conducir a daños al accionador o
posible lesión personal!
Alinear el centro del conjunto del riel del
accionador con la línea central marcada
previamente en la sección superior de la
puerta del garaje para asegurarse que
el riel estará paralelo con la dirección de
desplazamiento de la puerta.
Con perfiles angulares perforados (recortarlos
a la longitud apropiada) suspender el extremo
del accionador en las viguetas de techo.
Asegurarse de ubicar las viguetas de techo
y efectuar el montaje en las mismas, como
se ilustra.
Perforar un agujero piloto con una broca de
1/8˝ y utilizar tirafondos de 1/4˝ x 1-1/2˝
(no provistos) para asegurar un montaje rígido.
Fijar el accionador a los perfiles angulares
perforados con pernos de 5/16˝ x 3/4˝,
arandelas de 5/16˝ y tuercas de 5/16˝
(no suministrados).
Vigueta de techo
Cortar los perfi les
angulares perforados
a la medida
Tuerca / perno
de cubierta de
transmisión
Accionador
Agujeros alternativos
para montaje de
suspensor
Línea central
de puerta
NOTA: Para brindar apoyo rígido, colocar el
arriostramiento en ángulo.
Cuando el accionador esté fijado de manera
segura a los suspensores perforados, retirar
el cuartón de 51 mm x 102 mm (2˝ x 4˝ )
(utilizado para apoyar el conjunto del riel en el
Paso 4) y cerrar la puerta.
NOTA: Se recomienda brindar apoyo en el
centro a los rieles de 3 m (10’) para evitar la
formación de una flecha.
Al instalárselo correctamente, el riel del accionador debe estar alineado perpendicularmente
a la puerta del garaje. No debe haber flecha
en el riel en ninguna dirección.
Utilizar arriostramiento en ángulo
para asegurar una instalación rígida.
INSTALACIÓN CORRECTA
Vista superior
correcto
incorrecto
Vista lateral
correcto
incorrecto
4
Por favor, no devolver este producto al concesionario. ¡Llámenos directamente! Nuestros técnicos capacitados responderán cualquier pregunta y/o enviarán cualquier
pieza necesaria. Se nos puede contactar al número telefónico gratuito 1-888-827-3667 para Asistencia al Consumidor, o bien, en conexión a red a www.wayne-dalton.com
travesaño
Page 59

6
Montaje de soporte de puerta
Reforzar la puerta vertical y
horizontalmente
Herramientas
necesarias:
Cubo de 7/16˝
Llave de trinquete
NOTA: Si se tiene una puerta de la serie 5120,
5140, 9100, 9400, 9600, 9700 ó 9800, no
instalar este soporte para puerta, instalar
el soporte de puerta provisto con la puerta.
Consultar las Instrucciones de instalación y el
Manual del propietario suministrados con la
puerta. Los manuales de instrucciones
están disponibles para descarga en
www.waynedalton.com, o bien, llamar al
1-888-827-3667 para solicitarlos.
IMPORTANTE: PARA EVITAR DAÑOS
A LA PUERTA PODRÍA SER NECESARIO
REFORZARLA. CONSULTAR AL FABRICANTE DE
LA PUERTA DE GARAJE SOBRE EL REFUERZO
APROPIADO PARA LA PUERTA.
Para puertas de madera, montar el soporte
de la puerta con dos pernos de carruaje
de 1/4˝-20 x 2˝ y contratuercas de 1/4˝
suministradas, en la línea central de la puerta
con el agujero del medio alineado con los
rodillos superiores.
En puertas de metal, montar el soporte de
la puerta con dos tornillos autoperforantes de
1/4˝-20 x 5/8˝ suministrados, en la línea central
de la puerta con el agujero del medio alineado
con los rodillos superiores.
Línea central
Línea de
referencia de
rodillo superior
de puerta
PUERTAS
DE ACERO
Tornillos autoperforantes
de 1/4˝-20 x 1/2˝
Soporte
de puerta
Línea central
de puerta
Pernos de carruaje
de 1/4˝-20 x 2˝
Línea de referencia
de rodillo superior
PUERTAS DE
Línea de referencia
MADERA
de rodillo superior
Contra tuercas
de 1/4˝
Soporte
de puerta
7
Herramientas
necesarias:
Ninguna
Instalación de iluminación
Ejercer presión ascendente en ambos lados
del fondo del lente en la unión de la carcasa,
desenganchar las lengüetas de sujeción y tirar
hacia delante para retirar el lente.
Enroscar una bombilla de 60 W (máximo) en
el receptáculo. Para una vida útil máxima de
la bombilla, se recomiendan bombillas para
“servicio pesado”.
Alinear las lengüetas superior e inferior del
lente con la carcasa y empujar en línea recta
hasta que el lente encaje en posición.
Cubo
Carcasa
Lengüetas de sujeción
Lente
Bombilla: 60 W
como máximo
(no provista)
ANTES DE LA OPERACIÓN
Por favor, no devolver este producto al concesionario. ¡Llámenos directamente! Nuestros técnicos capacitados responderán cualquier pregunta y/o enviarán cualquier
pieza necesaria. Se nos puede contactar al número telefónico gratuito 1-888-827-3667 para Asistencia al Consumidor, o bien, en conexión a red a www.wayne-dalton.com
5
Page 60

8
Herramientas
necesarias:
Taladro eléctrico
Destornillador de
cabeza Phillips
Destornillador de
cabeza plana
Broca de 3/32˝
Instalación de la estación
de pared cableada
(Si se incluye)
ADVERTENCIA
PARA EVITAR LESIONES POSIBLES, INSTALAR
LA ESTACIÓN DE PARED FUERA DEL
ALCANCE DE NIÑOS Y EN UNA UBICACIÓN
DESDE DONDE SE PUEDA VER LA PUERTA AL
ACTIVARSE EL ACCIONADOR. NO MONTAR LA
ESTACIÓN DE PARED CERCA DE LA PUERTA
DE GARAJE.
IMPORTANTE: PARA QUE LA PUERTA
FUNCIONE CORRECTAMENTE, SE HA DE
UTILIZAR SÓLO EL TIPO DE ESTACIÓN DE
PULSADOR ESTÁNDAR O DE LUJO PARA
PARED. EL USO DE OTRA ESTACIÓN DE
PULSADOR O CONTROL DE PARED NO
SUMINISTRADA POR WAYNE-DALTON PODRÍA
CAUSAR EL MALFUNCIONAMIENTO DEL
ACCIONADOR.
Estación de pared
1.5 m (5 pies),
mínimo
Estación de pared cableada: cablear el
accionador de la puerta del garaje con alambre
para timbre conectado a los bornes de tornillo
COM y P.B., como se ilustra.
Colocar la estación de pared adyacente a la
puerta de entrada de servicio a una altura
mínima de 1.5 m (5 pies), y al menos 1.8 m
(6 pies) alejada de la puerta del garaje.
Sujetar la estación de pared en una ubicación
segura con los (2) tornillos de cabeza phillps.
Asegurarse de no apretarlos excesivamente.
Taladrar agujeros piloto de montaje con
una broca de 3/32˝. También se pueden
instalar estaciones de pared adicionales de
conformidad con estas instrucciones.
PRECAUCIÓN: El apriete excesivo de los
tornillos podría deformar la carcasa plástica.
IMPORTANTE: CONECTAR EL ALAMBRE DE
BAJO VOLTAJE A LAS ESTACIONES DE PARED
CON UNA CONFIGURACIÓN DE GANCHO EN
“J”. SI EL ALAMBRE HA FORMADO UN BUCLE
COMPLETO ALREDEDOR DEL TORNILLO DE
BORNE, ELLO PUEDE EVITAR EL CONTACTO
APROPIADO CON EL INTERRUPTOR.
Lado derecho del accionador
COM
OBS
PB
COM
P. B .
STATUS
PROGRAM
SW
FORCE ADJ.
Dorso de estación de pared
Tornillos de cabeza
phillips
Frente de estación de pared
6
Por favor, no devolver este producto al concesionario. ¡Llámenos directamente! Nuestros técnicos capacitados responderán cualquier pregunta y/o enviarán cualquier
pieza necesaria. Se nos puede contactar al número telefónico gratuito 1-888-827-3667 para Asistencia al Consumidor, o bien, en conexión a red a www.wayne-dalton.com
Page 61

9
Herramientas
necesarias:
Taladro eléctrico
Broca de 3/32˝
Destornillador de
cabeza Phillips
Instalación de la estación
inalámbrica, multifunción, de lujo,
para pared (si se incluye)
ADVERTENCIA
PARA EVITAR LESIONES POSIBLES, INSTALAR
LA ESTACIÓN DE PARED FUERA DEL
ALCANCE DE NIÑOS Y EN UNA UBICACIÓN
DESDE DONDE SE PUEDA VER LA PUERTA AL
ACTIVARSE EL ACCIONADOR. NO MONTAR LA
ESTACIÓN DE PARED CERCA DE O JUNTO A
LA PUERTA DE GARAJE.
NOTA: Para un funcionamiento adecuado,
montar la estación de pared en una superficie
plana.
Se puede montar la estación de pared en una
caja eléctrica estándar NEMA o directamente
en cualquier superficie de pared. No necesita
cableado.
Colocar la estación de pared adyacente a la
puerta de entrada de servicio a una altura
mínima de 1.5 m (5 pies), y al menos 1.8 m
(6 pies) alejada de la puerta del garaje.
Si se la monta en una caja eléctrica NEMA,
utilizar tornillos para roscar a máquina en vez
de tornillos para madera. No es necesario
taladrar. Si la caja contiene cableado de alto
voltaje, se ha de instalar una chapa de pared
sólida, NEMA, estándar, entre la caja y la
estación de pared. Si se la instala en un panel
de yeso o en concreto, utilizar los anclajes
provistos. Al montársela en madera, utilizar una
broca de 3/32˝ y la plantilla de taladrado
provista en la página 39. Taladrar los dos
agujeros de montaje de 3/32˝ con la plantilla
para taladrado. Taladrar agujeros de 3/16˝ si se
utilizan anclajes.
Instalar el tornillo inferior y dejar 7/16˝ del
mismo expuesto. Deslizar la ranura tipo
bocallave de la estación de pared sobre el
tornillo inferior de cabeza phillips. Al deslizarse
la estación de pared sobre el tornillo, debe
haber un encaje ajustado. Si fuera necesario,
retirar la estación de pared y aflojar o apretar el
tornillo inferior de cabeza phillips hasta lograrse
un encaje ajustado.
Instalación del tornillo inferior
Tornillo de
cabeza phillips
7/16˝
Ranura
bocallave
Estación de pared
1.5 m (5 pies)
como mínimo
Instalación del tornillo superior
Tornillo de
cabeza phillips
Una vez se haya encajado la estación de pared
sobre el tornillo inferior, instalar el tornillo
superior. No apretarlo excesivamente.
PRECAUCIÓN: El apretar excesivamente el
tornillo superior podría deformar la caja
plástica.
Por favor, no devolver este producto al concesionario. ¡Llámenos directamente! Nuestros técnicos capacitados responderán cualquier pregunta y/o enviarán cualquier
pieza necesaria. Se nos puede contactar al número telefónico gratuito 1-888-827-3667 para Asistencia al Consumidor, o bien, en conexión a red a www.wayne-dalton.com
Tornillo de
cabeza phillips
7
Page 62

Instalación de la estación
inalámbrica, multifunción, de lujo,
para pared (si se incluye) (cont.)
Desenganchar la pestaña inferior de la cubierta
de la pila para retirar la cubierta de las pilas
(lado derecho de la estación de pared). Instalar
dos pilas AAA en la estación de pared
prestando atención a la polaridad, (+) y (-) de
ambas pilas. Después de aproximadamente
tres segundos el diodo emisor de luz rojo
comenzará a destellar cada tres segundos.
Para reinstalar la cubierta de las pilas, insertar
primero la parte superior de la cubierta en la
estación de pared; luego insertar y asegurar la
parte inferior.
NOTA: Para reducir la frecuencia del destello o
apagarlo, consultar “Luz del diodo emisor de luz
retroiluminado”, bajo Operación de la estación
inalámbrica de pared, página 28.
Diodo emisor
de luz
Arriba/Abajo
Estación
de pared
e
r
p
O
o
T
Press
Here
(2) Pilas
a
AAA
t
e
D
o
o
r
Cubierta
de pilas
Presilla
inferior
10
Herramientas
necesarias:
Ninguna
Etiqueta de advertencia
sobre aprisionamiento
Colocar la etiqueta sobre aprisionamiento en
una ubicación conveniente junto a la estación
de pared. Utilizar sujetadores mecánicos si el
adhesivo no funciona.
Estación de pared
Puerta de
entrada de
servicio
Etiqueta de
advertencia sobre
aprisionamiento
8
Por favor, no devolver este producto al concesionario. ¡Llámenos directamente! Nuestros técnicos capacitados responderán cualquier pregunta y/o enviarán cualquier
pieza necesaria. Se nos puede contactar al número telefónico gratuito 1-888-827-3667 para Asistencia al Consumidor, o bien, en conexión a red a www.wayne-dalton.com
Page 63

11
Instalación de sensor infrarrojo
de seguridad, cableado
Soporte de montaje en pared
Herramientas
necesarias:
Llave de trinquete
Cinta para medir
Taladro eléctrico
Broca de 3/16˝
Vástago de cubo
de 7/16˝
Llave de 7/16˝
Lápiz
IMPORTANTE: SE HA DE MONTAR AMBOS
SOPORTES DE PARED A LA MISMA ALTURA
PARA UN ALINEAMIENTO APROPIADO.
Nota: Utilizar los Pasos a-c para instalar
sensores en ambos lados de la puerta de
garaje.
a. Seleccionar y marcar con un lápiz una
ubicación de montaje a no más de
5 pulgadas del piso hasta la línea central
del soporte de montaje de pared. Se
debería montar los sensores de seguridad
lo más cerca posible del riel de la puerta
o dentro del borde de la puerta, para
ofrecer protección máxima contra el
aprisionamiento. Es muy importante que
ambos soportes para montaje en pared se
monten a la misma altura para un
alineamiento apropiado.
b. Taladrar agujeros piloto con una broca de
3/16˝. Con dos tirafondos de 5/16˝ x 1-1/2˝,
montar permanentemente los soportes de
montaje en pared a ambas jambas de la
puerta. En algunas instalaciones podría ser
necesario fijar un espaciador de madera a
la pared para lograr la alineación necesaria.
5˝
a
b
Tuerca
Jamba de puerta
Soporte de montaje
en pared
Tirafondo de
5/16˝ x 1-1/2˝
Fijar los soportes “U” a los soportes de
montaje en pared con pernos de carruaje
de 1/4˝-20 x 1/2˝, arandelas y tuercas.
Insertar los pernos desde el interior del
soporte “U” y apretarlos a mano.
IMPORTANTE: IDENTIFICAR QUÉ LADO DE
LA PUERTA DEL GARAJE TIENE MAYOR
EXPOSICIÓN A LA LUZ SOLAR. MONTAR LA
UNIDAD EMISORA (UNIDAD CON DIODO
EMISOR DE LUZ) EN EL LADO QUE ESTÁ MÁS
EXPUESTO A LA LUZ SOLAR. LA LUZ SOLAR
PODRÍA AFECTAR LOS SENSORES DE
SEGURIDAD, Y ESTA ORIENTACIÓN AYUDARÁ
A REDUCIR EL EFECTO.
c. Fijar los sensores de seguridad emisor y
receptor a los soportes “U” mediante la
inserción de las tres lengüetas en los
agujeros respectivos.
Arandela
Perno de carruaje
de 1/4˝-20 x 1/2˝
Soporte “U”
c
Unidad
receptora
Por favor, no devolver este producto al concesionario. ¡Llámenos directamente! Nuestros técnicos capacitados responderán cualquier pregunta y/o enviarán cualquier
pieza necesaria. Se nos puede contactar al número telefónico gratuito 1-888-827-3667 para Asistencia al Consumidor, o bien, en conexión a red a www.wayne-dalton.com
Diodo
emisor
de luz
9
Page 64

12
Herramientas
necesarias:
Martillo
Instalación de cableado
para sensor infrarrojo
de seguridad cableado
Desenrollar los alambres de los sensores
infrarrojos de seguridad y tender el alambre
hacia arriba en la pared, a través del cielo
raso y hacia abajo hasta la parte posterior del
accionador. Fijar el alambre en posición con
grapas (no suministrado). Asegurarse de tender
los alambres en un lugar donde no interfieran
con el funcionamiento de la puerta y no colocar
las grapas a través del alambre.
NOTA: Si fuera necesario alargar o empalmar
los alambres hacia la instalación cableada,
utilizar capuchones roscables u otros
conectores adecuados.
Hacia accionador
Alambre hacia accionador
13
Herramientas
necesarias:
Destornillador de
cabeza Phillips
Conexión del sensor infrarrojo de
seguridad cableado al accionador
Conectar los sensores infrarrojos de
seguridad al accionador como se muestra.
Acortar los alambres según sea necesario
y separar los extremos de los alambres.
Desforrar aproximadamente 13 mm (1/2˝ ) de
aislamiento de cada alambre teniendo cuidado
de no mellar los alambres
Un alambre está rotulado (números, franja
negra, etc.). Asegurarse de observar la
polaridad. Aplicar tensión a los alambres
externos para probar si la conexión es segura.
Verificar que los alambres estén engrapados
en posición correctamente.
Unidad emisora
Lado derecho del accionador
Franja negra
OBS
COM
P.B .
Color
sólido
Unidad receptora
Diodo emisor
de luz
10
Por favor, no devolver este producto al concesionario. ¡Llámenos directamente! Nuestros técnicos capacitados responderán cualquier pregunta y/o enviarán cualquier
pieza necesaria. Se nos puede contactar al número telefónico gratuito 1-888-827-3667 para Asistencia al Consumidor, o bien, en conexión a red a www.wayne-dalton.com
Page 65

14
Conexión del accionador
al tomacorriente
Herramientas
necesarias:
Ninguna
ADVERTENCIA
PARA REDUCIR EL RIESGO DE CHOQUE
ELÉCTRICO, NO CAMBIAR EL CORDÓN DE
ALIMENTACIÓN DE NINGUNA MANERA.
IMPORTANTE: EL ACCIONADOR HA DE ESTAR
CONECTADO A UN TOMACORRIENTE TRIFILAR
DE 120 VOLTIOS CON CONEXIÓN APROPIADA
A TIERRA.
Se puede cablear el accionador perma nente mente. Para cablear permanentemente la
unidad, véase la opción de cableado
permanente en la página 20.
Enchufar el cordón eléctrico en el receptáculo
conectado a tierra más cercano. Se ha de
arrollar y asegurar el exceso de longitud del
cordón eléctrico y se lo ha de mantener
alejado de manera segura de cualesquier
piezas móviles.
Tan pronto se aplica energía eléctrica al
accionador, la luz en el mismo destellará una
vez para indicar la autoverificación exitosa de
los controles.
Tomacorriente
Cordón eléctrico
15
Herramientas
necesarias:
Ninguna
Conexión del trole al
conjunto del pestillo
Deslizar el trole hasta que encaje de golpe en
unidad del pestillo.
Fijar la etiqueta de advertencia en la cuerda
roja de desenganche. Enhebrar la cuerda roja
de desenganche a través de la perilla de tirar
de modo que el nudo quede dentro de la
perilla de tirar. Hacer un nudo doble en el
extremo de la cuerda roja de desenganche
para asegurar la perilla de tirar.
NOTA: La perilla de tirar debería colgar a
1.8 m (6 pies) sobre el piso. Asegurarse que
la cuerda y la perilla no haga contacto con las
capotas de los vehículos para evitar que se
enrede.
Unidad del pestillo
Trole
Utilizar un nudo
doble para asegurar
la perilla roja de tirar
Brazo superior de
puerta
Cuerda de
desenganche
Trole
Etiqueta
Perilla
de tirar
Por favor, no devolver este producto al concesionario. ¡Llámenos directamente! Nuestros técnicos capacitados responderán cualquier pregunta y/o enviarán cualquier
pieza necesaria. Se nos puede contactar al número telefónico gratuito 1-888-827-3667 para Asistencia al Consumidor, o bien, en conexión a red a www.wayne-dalton.com
11
Page 66

16
Alineación de los sensores
infrarrojos de seguridad cableados
Herramientas
necesarias:
Alicates
ADVERTENCIA
PARA EVITAR LESIONES GRAVES O FATALES
POSIBLES, MANTENER A PERSONAS Y OBJETOS ALEJADOS DEL BRAZO DE LA PUERTA
EN MOVIMIENTO PARA EVITAR POSIBLES
LESIONES PERSONALES.
IMPORTANTE: EL SENSOR DE SEGURIDAD
ENVÍA UN HAZ DE LUZ INVISIBLE DESDE LA
UNIDAD EMISORA HACIA LA UNIDAD RECEPTORA A TRAVÉS DEL UMBRAL DE LA PUERTA.
EL ACCIONADOR NO FUNCIONARÁ SINO
HASTA QUE LOS SENSORES DE SEGURIDAD
ESTÉN CONECTADOS AL ACCIONADOR Y
ALINEADOS CORRECTA MENTE. SI SE
OBSTRUYE EL HAZ DE LUZ INVISIBLE, NO SE
PUEDE CERRAR UNA PUERTA ABIERTA CON EL
TRANSMISOR NI CON UNA ACTIVACIÓN
MOMENTÁNEA DEL BOTÓN ARRIBA / ABAJO
DE LA ESTACIÓN DE PARED. SIN EMBARGO,
SE PODRÍA CERRAR LA PUERTA AL MANTENER
EL DEDO SOBRE EL BOTÓN ARRIBA / ABAJO
DE LA ESTA CIÓN DE PARED (PRESIÓN
CONSTANTE) HASTA QUE LA PUERTA SE
DESPLACE HASTA LA POSICIÓN
COMPLETAMENTE CERRADA.
Dentro
Fuera
Dentro
Fuera
Pernos de carruaje de
1/4˝-20
Para este ajuste, doblar los soportes de
montaje en el montaje de pared
Vista superior
12
En este punto, se podrá activar el accionador.
El trole / brazo superior se desplazará a la posición abierta, pero no se moverá a la posi ción
cerrada a menos que los haces estén alineados.
Se ha de alinear los sensores de seguridad
mediante el movimiento de las unidades
emisora y receptora dentro o fuera hasta que la
luz de alineación en la unidad receptora se
Botón
Arriba / Abajo
encienda. Se puede aflojar el perno de carruaje
de 1/4˝-20 para mover la unidad hacia adentro
o afuera, según sea necesario. Si se tiene
dificultad para alinear los haces, verificar que
ambos soportes estén monta dos a la misma
altura (véase el Paso 11) y montarlos
nuevamente si fuera necesario. Se pueden
efectuar ajustes menores adicionales mediante
Estación de pared cableada
un leve doblez de los soportes de montaje.
Una vez se encienda la luz de alineación, apretar todos los pernos y tornillos de montaje.
Terminar de asegurar todo el cableado,
asegurándose de no romper o abrir ninguno de
los conductores. Arrollar y asegurar todo
alambre adicional.
Botón
Arriba / Abajo
r
e
p
O
o
T
Press
Here
a
t
e
D
o
o
r
Mediante el uso del botón arriba/abajo de la
estación de pared, activar el accionador y
verificar que éste funcione a través de la
apertura y cierre completos. Verificar que el
trole y el pestillo del trole estén en la posición
cerrada antes de pasar el paso siguiente.
Por favor, no devolver este producto al concesionario. ¡Llámenos directamente! Nuestros técnicos capacitados responderán cualquier pregunta y/o enviarán cualquier
pieza necesaria. Se nos puede contactar al número telefónico gratuito 1-888-827-3667 para Asistencia al Consumidor, o bien, en conexión a red a www.wayne-dalton.com
Transmisor de radiofrecuencias para
la estación multifunción de pared
Page 67

17
Herramientas
necesarias:
Alicates /
cortaalambre
Cinta para medir
Destornillador de
cabeza plana
Configuración de la posición
cerrada del trole
ADVERTENCIA
PARA EVITAR LESIONES POSIBLES O DAÑOS
POTENCIALES A LA PROPIEDAD, MANTENER A
PERSONAS Y OBJETOS ALEJADOS DEL BRAZO
MÓVIL DE LA PUERTA.
NOTA: Si fuera necesario, activar el accionador
para mover el trole / brazo superior de la
puerta a la posición cerrada.
NOTA: Si se tiene una puerta de la serie 9100,
9400, 9600, 5120, 5140 ó 9700, con uno de
los soportes de puerta mostrados a la derecha
y un sistema de contrapeso Torquemaster
o resorte(s) de extensión, consúltese
“Configuración de la posición de cierre del
trole / Conexión del brazo de la puerta” en las
páginas 23-24. De lo contrario, completar este
paso.
NOTA: Si se tiene una puerta de la serie 9100,
9400, 9600, 5120, 5140 ó 9700, con uno de
los soportes de puerta mostrados a la derecha
y resorte(s) de torsión, consúltese “Configuración de la posición de cierre del trole /
Conexión del brazo de la puerta” en las páginas
25-26. De lo contrario, completar este paso.
El trole y la unidad del pestillo han de estar
en la posición completamente cerrada
predeterminada en la fábrica (véase la
ilustración).
®
Single and Double Tab Door Brackets
Modelos: 9100, 9400, 9600, 5120 y 5140.
Soporte con
lengüeta
doble
Soporte con
lengüeta
sencilla
28 cm a 33 cm
(11˝ a 13˝ )
(33 cm [13˝ ]
mínimo para
impulsión por
correa)
Soporte para puerta
Soporte con
lengüeta
doble
(Posición límite cerrada)
Brazo superior
Etiqueta
Modelo: 9700
Soporte con
lengüeta
sencilla
Trole
Verificar que la posición preliminar del trole y la
unidad del pestillo es de 28 cm a 33 cm (11˝ a
13˝ ) entre el pasador de horquilla del trole y la
cara interior de la puerta.
Si el ajuste del conjunto trole/pestillo fuera
necesario, utilizar el tornillo close (cerrado) de
travel adjustment (ajuste del recorrido) ubicado
en la parte inferior del accionador. Un cuarto de
vuelta equivale aproximadamente a 2.5 cm (1˝ )
de recorrido del trole; girarlo en sentido horario
para reducir la distancia entre el trole y la
puerta; girarlo en sentido antihorario para
aumentar la distancia entre el trole y la puerta.
TRAVEL ADJUSTMENT
OPEN
LESS
MORE
CLOSE
MORE
Cuerda de
desenganche
Perilla de tirar
Parte inferior
del accionador
Por favor, no devolver este producto al concesionario. ¡Llámenos directamente! Nuestros técnicos capacitados responderán cualquier pregunta y/o enviarán cualquier
pieza necesaria. Se nos puede contactar al número telefónico gratuito 1-888-827-3667 para Asistencia al Consumidor, o bien, en conexión a red a www.wayne-dalton.com
13
Page 68

18
Herramientas
necesarias:
Llave ajustable
Llave de trinquete
Cubo de 7/16˝
Cubo de 9/16˝
Conexión de brazo
para puerta a puerta
Instalación típica:
Colocar el casquillo de nilón con reborde en el
agu jero del extremo curvo (agujero único) del brazo
inferior. Colocar el brazo de puerta al lado derecho
del soporte de puerta. Insertar el pasador de
horquilla de sujeción múltiple de 5/16˝ x 1-1/4˝ a
través del casquillo de nilón con reborde, brazo
in ferior de puerta y agujero medio del soporte de
puerta. Instalar la chaveta hendida a través del
agujero (el más cercano al soporte de puerta) del
pasador de horquilla de sujeción múltiple, como se
muestra.
Para modelos: 9100, 9400, 9600, 5120, 5140 y
9700.
Colocar el casquillo de nilón con reborde en el
agujero del extremo curvo (agujero único) del brazo
inferior. Colocar el brazo inferior de puerta entre las
lengüetas (o el lado derecho de la lengüeta sencilla) e insertar el pasador de horquilla de sujeción
múltiple de 5/16˝ x 1-1/4˝ a través del casquillo de
nilón con reborde, brazo inferior de puerta y
agujero(s) del soporte de puerta. Instalar la chaveta
hendida a través del agujero (el más cercano a la
lengüeta doble del brazo de puerta o a la lengüeta
sencilla del soporte de puerta) del pasador de
horquilla de sujeción múltiple, como se muestra.
Para modelos: 9700 y 9800
Colocar el casquillo de nilón con reborde en el
agujero del extremo curvo (agujero único) del brazo
inferior. Colocar el brazo inferior de puerta entre las
lengüetas e insertar el pasador de horquilla de
sujeción múltiple de 5/16˝ x 1-1/4˝ a través del
casquillo de nilón con reborde, brazo inferior de
puerta y agujeros del soporte de puerta. Instalar la
chaveta hendida a través del agujero (el más
cercano al brazo de puerta) del pasador de
horquilla de sujeción múltiple, como se muestra.
CONEXIÓN DE BRAZOS SUPERIOR E INFERIOR
DE PUERTA
ADVERTENCIA
EL NO USAR UNA CONTRATUERCA PUEDE DAR
LUGAR AL DESENGANCHE DEL BRAZO Y A
POSIBLE DAÑO A LA PROPIEDAD Y/O LESIONES
PERSONALES.
Alinear las piezas superior e inferior del brazo
de la puerta a los agujeros correspondientes más
cercanos.
NOTA: Podría ser necesario aplicar presión
descendente sobre la puerta o elevar levemente
la puerta durante este proceso.
Asegurar los brazos superior e inferior de la puerta
entre sí con dos pernos de 1/4˝-20 x 3/4˝ de
cabeza hexagonal y tuercas Nylock.
NOTA: Al colocar los brazos superior e inferior,
instalar los pernos de cabeza hexagonal tan
alejados entre sí como sea posible.
NOTA: El ángulo del brazo de la puerta ha de ser
de 10° a 30° (véase la ilustración). De lo contrario,
“Configu ración de la posición de cierre
repetir
del trole / Conexión del brazo de la puerta”
aumentar o reducir la distancia entre el pasador
de horquilla del trole y la cara interior de la puerta.
y
Chaveta hendida
(agujero más cercano
a soporte de puerta)
VISTA SUPERIOR
Brazo inferior
SUPERIOR
Pasador de horquilla
de 5/16˝ x 1-1/4˝ de
sujeción múltiple
Soporte
de puerta
Perno de 1/4˝-20
x 3/4˝ de cabeza
hexagonal
Brazo inferior
VISTA SUPERIOR
Modelos: 9100, 9400, 9600, 5120, 5140 ó 9700
VISTA
Pasador de horquilla
de 5/16˝ x 1-1/4˝ de
Soporte
de puerta
Chaveta hendida
Chaveta hendida
(agujero más cercano
a brazo de puerta)
Brazo superior
Casquillo de nilón
con reborde
Chaveta hendida
Modelos: 9700 y 9800
Chaveta hendida
(agujero más cercano
a brazo de puerta)
sujeción múltiple
Instalación típica
Casquillo de nilón
con reborde
Soporte de puerta
Soporte de
Tuercas Nylock
de 1/4˝
Brazo inferior
Perno de 1/4˝-20 x 3/4˝
Soporte
de puerta
Chaveta hendida
Casquillo de nilón
con reborde
10° a 30°
Pasador de horquilla
de 5/16˝ x 1-1/4˝ de
sujeción múltiple
Perno de 1/4˝-20 x 3/4˝
de cabeza hexagonal
Chaveta hendida
(agujero más cercano
a soporte de puerta)
VISTA SUPERIOR
Casquillo de nilón
con reborde
puerta
de cabeza hexagonal
Brazo inferior
Brazo
superior
Lower Arm
Tuercas Nylock
Soporte de puerta
Pasador de horquilla
de 5/16˝ x 1-1/4˝ de
Lengüeta sencillaLengüeta doble
superior
sujeción múltiple
Tuercas Nylock
Brazo inferior
Brazo
Tuercas Nylock
Brazo superior
Chaveta
hendida
Perno de 1/4˝-20 x 3/4˝
de cabeza hexagonal
de 1/4˝
de 1/4˝
de 1/4˝
14
Por favor, no devolver este producto al concesionario. ¡Llámenos directamente! Nuestros técnicos capacitados responderán cualquier pregunta y/o enviarán cualquier
pieza necesaria. Se nos puede contactar al número telefónico gratuito 1-888-827-3667 para Asistencia al Consumidor, o bien, en conexión a red a www.wayne-dalton.com
Page 69

19
Calibración de recorrido
de cierre de la puerta
Herramientas
necesarias:
Destornillador
de cabeza plana
Con el botón arriba / abajo del control de
pared, activar la puerta hacia la posición
completamente abierta; reactivar hacia la
posición cerrada.
La puerta debe parar en el piso con el sello
inferior de la puerta levemente comprimido.
Si la puerta invierte la marcha al entrar en
contacto con el piso, girar la perilla de
recorrido de cierre 1/4 de vuelta “menos”.
Si la puerta no está completamente cerrada,
girar la perilla de recorrido 1/4 de vuelta
“más”.
Repetir según sea necesario.
NOTA: 1/4 de vuelta es igual a 2.5 cm (1˝)
de recorrido de la puerta.
Parte inferior de accionador
TRAVEL ADJUSTMENT
OPEN
MORE
LESS
CLOSE
MORE
20
Herramientas
necesarias:
Destornillador
de cabeza plana
Calibración del recorrido
de apertura de la puerta
El accionador de puertas está montado con el
ajuste del recorrido de apertura precalibrado
para una puerta típica; sin embargo, se
debería ajustar toda puerta para que pare lo
más cerca posible a la posición completamente abierta de reposo “natural” de la puerta.
Para determinar la posición completamente
abierta de reposo “natural” de la puerta,
desconectar la puerta del accionador con el
desconector de emergencia (véase la página
27, DESCONECTOR DE EMERGENCIA) y elevar
manualmente la puerta hasta su posición
completamente abierta de reposo “natural”.
Utilizar esta ubicación para fijar el límite
abierto. Para determinar si la puerta necesita
ajuste, activar el accionador para llevar la
puerta a la posición completamente abierta.
Parte inferior de accionador
TRAVEL ADJUSTMENT
OPEN
MORE
LESS
CLOSE
MORE
Por favor, no devolver este producto al concesionario. ¡Llámenos directamente! Nuestros técnicos capacitados responderán cualquier pregunta y/o enviarán cualquier
pieza necesaria. Se nos puede contactar al número telefónico gratuito 1-888-827-3667 para Asistencia al Consumidor, o bien, en conexión a red a www.wayne-dalton.com
15
Page 70

Calibración del recorrido de
apertura de la puerta
(continuación)
NOTA: Si la puerta no abre completamente y
la luz del accionador destella (verificar que la
bombilla esté instalada y en funcionamiento)
determinar si hay una obstrucción o ver el
Ajuste nro. 1, en la página 32 (Ajuste de la
fuerza de apertura).
Para ajustarlo para una puerta no
estándar o para calibrarlo exactamente
para la posición abierta: con la estación
de pared, accionar la puerta y detenerla
en la posición de medio recorrido. Con
un destornillador de cabeza plana girar el
ajustador del recorrido ABRIR para aumentar
(en sentido antihorario) o reducir (sentido
horario) el recorrido. Un cuarto (1/4) de vuelta
es igual a aproximadamente a 2.5 cm (1˝ ) de
desplazamiento del trole.
NOTA: Confirmar que la puerta ha parado en
la posición UP (ARRIBA) como resultado del
interruptor del límite superior y no porque el
trole ha golpeado al perno de tope, el cual
está montado en el riel cerca del accionador.
Se puede verificar la condición correcta
al observar que la luz de cortesía de los
accionadores no destella después de que la
puerta completamente abierta se detiene.
También, se podría confirmar la condición de
fallo visualmente al verificar si el trole está
descansando contra el perno de tope.
Perno de tope
Trole
Accionador
Para confirmar el ajuste final del recorrido
de APERTURA, activar el accionador para
llevar la puerta a la posición completamente
abierta. La luz del accionador no debería estar
destellando.
16
Por favor, no devolver este producto al concesionario. ¡Llámenos directamente! Nuestros técnicos capacitados responderán cualquier pregunta y/o enviarán cualquier
pieza necesaria. Se nos puede contactar al número telefónico gratuito 1-888-827-3667 para Asistencia al Consumidor, o bien, en conexión a red a www.wayne-dalton.com
Page 71

21
Prueba de obstrucción
por contacto
Herramientas
necesarias:
Cuartón de 51 mm
x 102 mm (2˝ x 4˝ )
Después de instalar el accionador, la puerta ha de
retroceder al entrar en contacto con un objeto de
38 mm (1-1/2˝ ) de altura (o un cuartón de
51 mm x 102 mm [2˝ x 4˝ ] sobre una cara) en el
piso del garaje.
Con la estación de pared, activar la puerta hacia
la posición completamente abierta. Colocar un
cuartón de 51 mm x 102 mm (2˝ x 4˝ ) sobre una
cara en el piso del garaje, bajo la trayectoria de la
puerta. Activar la puerta hacia la posición cerrada
con la estación de pared. Al entrar en contacto
con el cuartón de 51 mm x 102 mm (2˝ x 4˝ ), la
puerta debería retroceder.
Si la puerta para sobre el cuartón de 51 mm x
102 mm (2˝ x 4˝ ), ajustar la perilla del recorrido
de cierre de 1/8 a 1/4 de vuelta “más” hasta que
la puerta invierta la marcha al entrar en contacto
con el cuartón de 51 mm x 102 mm (2˝ x 4˝ ).
Cuando la puerta invierte la marcha, retirar el
cuartón de 51 mm x 102 mm (2˝ x 4˝ ) y efectuar
el ciclo completo de abrir y cerrar la puerta. La
puerta no debería retroceder al llegar a la posición
completamente cerrada sobre el piso.
NOTA: Si el accionador no supera esta prueba,
repetir el Paso 19. Ver también el Ajuste nro. 2,
página 32 (Prueba de obstrucción por contacto).
51 mm x 102 mm (2˝ x 4˝ )
sobre una cara en el piso
ADVERTENCIA
SI EL ACCIONADOR NO RESPONDE APROPIADAMENTE A ESTAS PRUEBAS
(PASOS 21 Y 22), CONTRATAR A UN ESPECIALISTA EN MANTENIMIENTO
PARA EFECTUAR LOS AJUSTES O REPARACIONES NECESARIOS. DE LO
CONTRARIO, LA OPERACIÓN DE LA PUERTA / ACCIONADOR PODRÍA
CAUSAR LESIONES GRAVES O FATALES.
22
Herramientas
necesarias:
Objeto sólido de
51 mm x 152 mm
x 305 mm
(2˝ x 6˝ x 12˝ )
Prueba de obstrucción
del sensor de seguridad
ADVERTENCIA
AL EFECTUAR ESTA PARTE DE LA PRUEBA, NO
COLOCARSE BAJO LA PUERTA EN DESCENSO; DE
LO CONTRARIO, PODRÍAN OCURRIR LESIONES
GRAVES O FATALES.
Comenzando con la puerta completamente abierta,
colocar un objeto de 15 cm (6˝ ) en el piso, en
línea con los sensores, a 30 cm (12˝) del lado
izquierdo de la puerta.
La activación del accionador con el botón Arriba /
Abajo de la estación de pared debería hacer que
la puerta se mueva no más de 30 cm (1 pie), pare
y luego invierta la marcha hacia la posición
completamente abierta.
Repetir esta prueba con el objeto de 15 cm (6˝ )
de altura colocado al centro de la puerta y luego a
30 cm (12˝ ) del lado derecho de la puerta.
La colocación del objeto de 15 cm (6˝ ) de altura
sobre el piso, en línea con los sensores, mientras
la puerta cierra, también debería causar la
inversión de la marcha.
Sensor
15 cm (6˝ )
30 cm (12˝ )
Sensor
30 cm (12˝ )
ADVERTENCIA
SI EL ACCIONADOR NO RESPONDE APROPIADAMENTE A ESTAS PRUEBAS
(PASOS 21 Y 22), CONTRATAR A UN ESPECIALISTA EN MANTENIMIENTO
PARA EFECTUAR LOS AJUSTES O REPARACIONES NECESARIOS. DE LO
CONTRARIO, LA OPERACIÓN DE LA PUERTA / ACCIONADOR PODRÍA
CAUSAR LESIONES GRAVES O FATALES.
Por favor, no devolver este producto al concesionario. ¡Llámenos directamente! Nuestros técnicos capacitados responderán cualquier pregunta y/o enviarán cualquier
pieza necesaria. Se nos puede contactar al número telefónico gratuito 1-888-827-3667 para Asistencia al Consumidor, o bien, en conexión a red a www.wayne-dalton.com
17
Page 72

FORCE ADJ.
STATUS
SW
PROGRAM
18
Programación del acceso
inalámbrico sin llave
23
Herramientas
necesarias:
Ninguna
Por favor, no devolver este producto al concesionario. ¡Llámenos directamente! Nuestros técnicos capacitados responderán cualquier pregunta y/o enviarán cualquier
pieza necesaria. Se nos puede contactar al número telefónico gratuito 1-888-827-3667 para Asistencia al Consumidor, o bien, en conexión a red a www.wayne-dalton.com
ES POSIBLE QUE LA PUERTA FUNCIONE DURANTE
LA PROGRAMACIÓN. MANTENER A PERSONAS Y
OBJECTOS ALEJADOS DE LA PUERTA EN
MOVIMIENTO PARA EVITAR DAÑOS A LA PUERTA O
POSIBLES LESIONES PERSONALES.
NOTA: Para facilitar la instalación, programar el
acceso inalámbrico sin llave hacia el accionador
antes del montaje en la pared.
NOTA: Antes de la programación asegurarse que la
puerta del garaje esté en la posición “abajo”.
1. Oprimir y soltar el botón PROGRAM (PROGRAMA).
La luz roja PROGRAM STATUS (ESTADO DE
PROGRAMA) en el accionador y la bombilla superior
se encenderán y permanecerán encendidas durante
un minuto, indicando que está listo para aprender el
código de acceso sin llave.
2. Oprimir el número de identificación personal (PIN,
por sus siglas en inglés) de cinco dígitos, por ejemplo
1-3-8-2-5. La luz PROGRAM STATUS (ESTADO DE
PROGRAMA) se encenderá y se apagará tres veces
para indicar un aprendizaje exitoso.
NOTA: No establecer un código que presente los
números en orden secuencial, como por ejemplo 1/2,
3/4, 5/6, 7/8, 9/0. Los estudios muestran que las
personas tienden naturalmente a oprimir botones en
pautas secuenciales. También, no seleccionar un
código que utilice el mismo botón cinco veces
consecutivamente. Los ladrones pueden descifrar
fácilmente estos tipos de código.
NOTA: Si en cualquier momento, se comete un error
al introducir el código, oprimir y soltar
simultáneamente los botones 7/8 y 9/0 para
restablecer el código de acceso sin llave; luego,
repetir los pasos de programación anteriores.
NOTA: Se puede programar un solo dispositivo de
acceso inalámbrico sin llave para operar múltiples
accionadores de puertas de garaje. Para programar
accionadores adicionales, repetir los pasos de
programación con un número de identificación
personal de cinco dígitos diferente para cada
accionador adicional.
Cómo el acceso sin llave opera la puerta:
A continuación se explica cómo se puede utilizar el
acceso sin llave para ABRIR, CERRAR, ARRANCAR y
PARAR la puerta.
1. Introducir el número de identificación personal
(PIN, por sus siglas en inglés) de 5 dígitos; la puerta
se moverá.
NOTA: Si se introdujo un código incorrecto
inadvertidamente, la puerta no se moverá. Para
restablecerlo, oprimir y soltar simultáneamente los
botones 7/8 y 9/0 para introducir nuevamente el
número de identificación personal.
2. La unidad permanece activa durante los
25 segun dos siguientes. Oprimir cualquier tecla
para la puerta si ésta está abriendo, y la detiene o
invierte su marcha si se está cerrando durante los
25 segundos del período activo.
(si se incluye)
ADVERTENCIA
Lado derecho del accionador
Diodo emisor de
luz del estado
del programa
Botón de
programa
Acceso sin llave
Page 73

24
Herramientas
necesarias:
Taladro eléctrico
Broca de 5/64˝
Destornillador de
cabeza Phillips
Instalación del acceso
inalámbrico sin llave
(si se incluye)
IMPORTANTE: INSTALAR TODO CONTROL DE
PARED FUERA DEL ALCANCE DE NIÑOS Y EN
UNA UBICACIÓN DESDE LA CUAL SE PUEDA
VER LA PUERTA ANTES DE ACTIVARLA.
Encontrar un lugar práctico que no interfiera
con la apertura y cierre normales de la puerta
para montar el acceso inalámbrico sin llave.
Para mantener el acceso sin llave fuera del
alcance de niños, medir y marcar un punto al
menos 1.5 m (5 pies) sobre el piso. Utilizar la
plantilla de perforación ubicada en la página
39 para determinar las posiciones de los
agujeros. Perforar agujeros pilotos de 5/64˝ de
diámetro y 2 cm (3/4˝ ) de profundidad en la
ubicación de cada tornillo.
Abrir la caja del acceso inalámbrico sin llave
por apalancamiento con una moneda. Fijar la
base del acceso sin llave en el entramado de
madera con los dos tornillos provistos. Colocar
nuevamente el frente de la caja sobre la base,
a presión. Retirar el dorso protector del
adhesivo de la etiqueta de instrucciones y
aplicarla a una superficie limpia dentro del
garaje.
Acceso sin llave
5’
NOTA: Se incluyen los tornillos para montajes
a estructuras de madera. Asegurarse de
utilizar los herrajes adecuados para montaje
en otros materiales.
NOTA: Después de completar este paso,
continuar con la página 27.
Base de acceso
sin llave
Caja frontal de
acceso sin llave
Tornillos
Por favor, no devolver este producto al concesionario. ¡Llámenos directamente! Nuestros técnicos capacitados responderán cualquier pregunta y/o enviarán cualquier
pieza necesaria. Se nos puede contactar al número telefónico gratuito 1-888-827-3667 para Asistencia al Consumidor, o bien, en conexión a red a www.wayne-dalton.com
19
Page 74

I
Herramientas
necesarias:
Alicates de punta
de aguja
Alicates /
cortaalambre
Destornillador
de cabeza plana
Conexión eléctrica (opción de
cableado permanente)
ADVERTENCIA
PARA EVITAR UN CHOQUE ELÉCTRICO,
DES CO NECTAR LA ENERGÍA ELÉCTRICA EN
LA CAJA DE FUSIBLES ANTES DE PROCEDER.
IMPORTANTE: CONSULTAR LOS CÓDIGOS
ELÉCTRICOS LOCALES. SI EL CÓDIGO LOCAL
PERTINENTE PRECISA CABLEADO PERMANENTE, UTILIZAR LAS ESPECIFICA CIONES
PRESCRITAS Y LAS INSTRUCCIONES
ILUSTRADAS.
Procedimiento de cableado permanente
1. Verificar que el cordón eléctrico esté
desconectado de la fuente de electricidad.
2. Cortar el cordón eléctrico de 12 mm a
25 mm (1/2˝ a 1˝ ) del manguito para
protección contra tirones.
3. Utilizar los alicates de punta de aguja para
retirar el manguito para protección contra
tirones del marco. Apretar las lengüetas en
el lado inferior del casquillo y sacar el
casquillo del agujero.
4. Halar o desforrar la sección restante de
aislamiento exterior del cordón eléctrico.
5. Retirar el lente mediante presión en ambos
lados del fondo del lente en la unión de la
carcasa, desenganchar las lengüetas de
sujeción y halar hacia adelante; retirar el
bombillo de luz (si está instalado).
6. Retirar la carcasa del chasis mediante el
retiro del tornillo que asegura la carcasa al
chasis. Presionar las lengüetas de sujeción
y deslizar la cubierta para retirarla del
chasis.
7. Tirar de los tres alambres hacia el
accio nador; desforrar 12 mm (1/2˝ ) de
aislamiento de los conductores negro,
blanco y verde.
8. Con capuchones roscables para alambre
14-18 AWG, conectar el conductor negro
al conductor negro, el conductor blanco al
conductor blanco y el conductor verde al
conductor verde. Verificar que las
conexiones estén seguras.
9. Colocar nuevamente la cubierta del
accionador.
Reconectar la energía eléctrica en la caja de
fusibles. Tan pronto se aplica la energía
eléctrica a la unidad, la luz en el accionador
destellará una vez para indicar una
autoverificación exitosa de los controles.
Manguito para protección
contra tirones
Manguito para
protección
contra
tirones
Lengüetas
Cordón eléctrico
Carcasa
Bombilla de luz
Vivo y neutro
Lengüeta
Tornillo
Conexión a tierra
Capuchones
roscables
12 mm a 25 mm
(1/2˝ a 1˝ )
Chasis
Accionador
Lente
Lengüetas
20
Por favor, no devolver este producto al concesionario. ¡Llámenos directamente! Nuestros técnicos capacitados responderán cualquier pregunta y/o enviarán cualquier
pieza necesaria. Se nos puede contactar al número telefónico gratuito 1-888-827-3667 para Asistencia al Consumidor, o bien, en conexión a red a www.wayne-dalton.com
Page 75

I
Herramientas
necesarias:
Taladro eléctrico
Vástago de cubo
de 7/16˝
Montaje de soporte de puerta
a una puerta Serie 9700
IMPORTANTE: AL CONECTAR UN
ACCIONADOR TIPO TROLE PARA PUERTAS
DE GARAJE A UNA PUERTA SERIE 9700,
SE HA DE INSTALAR DE MANERA SEGURA
UN SOPORTE DE ACCIONADOR / TROLE
WAYNE-DALTON A LA SECCIÓN SUPERIOR
DE LA PUERTA, JUNTO CON CUALESQUIER
BARRAS U PROVISTAS CON LA PUERTA.
LA INSTALACIÓN DEL ACCIONADOR SE
HA DE EFECTUAR DE CONFORMIDAD CON
LAS INSTRUCCIONES Y LOS VALORES
DE LAS FUERZAS SE HAN DE AJUSTAR
ADECUADAMENTE.
Ubicar el centro de la sección superior o la
barra U instalada en la fábrica como se muestra
en la FIG. 1.1.
PARA LA SECCIÓN SUPERIOR CON
BARRA U:
Retirar y guardar 4-6 tornillos del centro de
la barra U, permitiendo que el soporte de la
puerta se deslice entre la sección y la barra U.
Colocar el soporte de la puerta hasta que
descanse sobre el extremo macho de la
sección, como se muestra en la FIG. 1.2. Se
ha de centrar y colocar el soporte de la puerta
sobre la parte superior de la sección de modo
que una el punto de transición del espesor de
la sección.
Instalar el soporte de la puerta con tornillos
autoterrajantes de 1/4˝-14 x 5/8˝, como se
muestra en la FIG. 1.4. Reinstalar la barra U
con dos (2) tornillos autoperforantes de 1/4˝20 x 11/16˝ a través del soporte de la puerta,
como se muestra en la FIG. 1.3. Concluir la
reinstalación de la barra U con los tornillos
autoterrajantes retirados anteriormente.
FIG. 1.1 FIG. 1.2
Soporte de
la puerta
(2) tornillos autoperforantes
FIG. 1.3 FIG. 1.4
Soporte de
la puerta
Alinear la
lengüeta con la
línea central de la
sección superior
o barra U
BARRA U
de 1/4˝-20 x 11/16˝
Soporte de
la puerta
Extremo macho de
la sección superior
(8) tornillos autoterrajantes
de 1/4˝-14 x 5/8˝
Soporte de
la puerta
Soporte de
la puerta
PARA LA SECCIÓN SUPERIOR SIN BARRA U:
Colocar el soporte de la puerta hasta que
descanse sobre el extremo macho de la
sección, como se muestra en la FIG. 1.2. Se
ha de centrar y colocar el soporte de la puerta
sobre la parte superior de la sección de modo
que una el punto de transición del espesor
Sección superior con barra U
Soporte de
la puerta
de la sección. Instalar el soporte de la puerta
con tornillos autoterrajantes de 1/4˝-14 x 5/8˝,
como se muestra en la FIG. 1.4.
NOTA: Después de completarse este paso,
continuar con el Paso 7.
Sección superior sin barra U
Por favor, no devolver este producto al concesionario. ¡Llámenos directamente! Nuestros técnicos capacitados responderán cualquier pregunta y/o enviarán cualquier
pieza necesaria. Se nos puede contactar al número telefónico gratuito 1-888-827-3667 para Asistencia al Consumidor, o bien, en conexión a red a www.wayne-dalton.com
INSTALACIONES OPCIONALES
21
Page 76

I
Herramientas
necesarias:
Taladro eléctrico
Vástago de cubo
de 7/16˝
Mordazas de
presión
Destornillador de
cabeza Phillips
Montaje del soporte de puerta a una
(puerta de la serie 9100, 9400, 9600, 5120 y 5140)
IMPORTANTE: AL CONECTAR UN
ACCIONADOR TIPO TROLE PARA PUERTAS
DE GARAJE A LAS PUERTAS ENUMERADAS
ARRIBA, SE HA DE INSTALAR DE MANERA
SEGURA UN SOPORTE DE ACCIONADOR
/ TROLE WAYNE-DALTON A LA SECCIÓN
SUPERIOR DE LA PUERTA, JUNTO CON
CUALESQUIER BARRAS U PROVISTAS CON LA
PUERTA. LA INSTALACIÓN DEL ACCIONADOR
SE HA DE EFECTUAR DE CONFORMIDAD
CON LAS INSTRUCCIONES Y LOS VALORES
DE LAS FUERZAS SE HAN DE AJUSTAR
ADECUADAMENTE.
Ubicar el centro de la sección superior y
asentar el soporte de puerta en el extremo
macho de la sección superior. Se ha de centrar
y colocar el soporte de la puerta sobre la
sección superior de modo que una el punto de
transición del espesor de la sección, como se
muestra en las fi guras 1.1. y 1.2. Instalar (2)
tornillos de cabeza phillips nro. 12 x 1/2˝ en el
lado opuesto del soporte de la puerta, como se
muestra en la FIG. 1.3. Si la barra U provista
inicialmente está en la puerta, amordazar el
soporte a la barra U, como se muestra en
la FIG. 1.4. Primero instalar los (3) tornillos
autoterrajantes de 1/4˝ - 14 x 5/8˝ al soporte
de la puerta, como se muestra en la FIG. 1.5.
Luego, instalar (2) tornillos autoterrajantes de
1/4˝ - 14 x 5/8˝ al soporte de la puerta, como
se muestra en la FIG. 1.6. Retirar las mordazas
de presión.
NOTA: Si se tiene una puerta 9100, se pueden
usar dos de los tornillos autoperforantes de
1/4˝ - 20 x 11/16˝ para instalar la barra U en
vez de los tornillos autoterrajantes de 1/4˝ - 14
x 5/8˝ al instalar el soporte de la puerta a la
barra U, como se muestra en la FIG. 1.6.
NOTA: Al instalarse el soporte de la puerta a la
sección superior con barra U, aplicar presión
adicional para enroscar los sujetadores en la
barra U.
Alinear la lengüeta
con la línea central
de la sección
superior
Lado opuesto
del soporte de
la puerta
(3) tornillos
autoterrajantes de
1/4˝-14 x 5/8˝
Soporte de la puerta
FIG. 1.1
(2) tornillos de cabeza
phillips nro. 12 x 1/2˝
FIG. 1.3
Soporte de la
puerta
FIG. 1.5
Extremo macho de
la sección superior
Soporte de
la puerta
Sección superior
con o sin barra U
FIG. 1.2
Soporte de la puerta
BARRA U
Mordazas de presió
NOTA: Innecesarias
para puntales J
FIG. 1.4
(2) tornillos
autoterrajantes de
1/4˝-14 x 5/8˝
Soporte de
la puerta
BARRA U
BARRA U
(2) tornillos autoperforantes
de 1/4˝-20 x 11/16˝
FIG. 1.6
22
NOTA: Véase la FIG. 1.7 para instalar el
soporte de la puerta en la sección superior sin
barras U.
: Después de completarse este paso,
NOTA
Soporte de la puerta
continuar con el Paso 7.
(5) tornillos autoterrajantes
de 1/4˝-14 x 5/8˝
Fig. 1.7 Sección superior sin barra U
Por favor, no devolver este producto al concesionario. ¡Llámenos directamente! Nuestros técnicos capacitados responderán cualquier pregunta y/o enviarán cualquier
pieza necesaria. Se nos puede contactar al número telefónico gratuito 1-888-827-3667 para Asistencia al Consumidor, o bien, en conexión a red a www.wayne-dalton.com
Page 77

I
12”
Herramientas
necesarias:
Alicates de punta
de aguja
Llave ajustable
Llave de trinquete
Cubo de 7/16˝
Cubo de 9/16˝
Sierra para
metales
Configuración de la posición
de cierre del trole / Conexión
del brazo de la puerta
(Modelos 9100, 9400, 9600, 5120, 5140 y 9700)
con TorqueMaster
DETERMINAR EL RADIO DE RIEL
WAYNE-DALTON UTILIZADO:
PARA LOS RIELES MOUNT HOPE Y
PENSACOLA:
Medir los extremos curvos del riel horizontal para
determinar si se tiene un riel horizontal con un
radio de 12˝ ó 15˝, como se muestra en la FIG. 1.
PARA EL RIEL PORTLAND:
Los rieles horizontales tienen grabado el radio en
el lado horizontal del riel, como se muestra en la
FIG. 1.1.
NOTA: Si fuera necesario, retirar el brazo superior
(brazo recto) del trole, para utilizar el brazo inferior
(brazo curvo). Retirar la chaveta hendida del
pasador de horquilla al frente del trole y deslizar
la chaveta hendida hacia afuera lo suficiente
como para deslizar el brazo supe rior fuera entre
los lados izquierdo y derecho del cuerpo del trole.
Colocar el brazo inferior de la puerta de modo que
el extremo con al agujero singular esté alineado
con el pasador de horquilla. Deslizar el pasador
de horquilla completa y nuevamente en el trole y
reinstalar la chaveta hendida.
FRANQUEO SUPERIOR REDUCIDO:
Si se tiene un riel con franqueo superior
reducido, como se muestra en la FIG. 1.6 en la
página 24, proceder con las “Tablas para posiciona miento del trole con franqueo superior
reducido” en la página 24.
ELEVACIÓN ESTÁNDAR:
Con las TABLAS PARA POSICIONAMIENTO DEL
TROLE PARA ELEVACIÓN ESTÁNDAR, referirse
a DIM “X” para fijar la distancia del travesaño al
trole, como se muestra en la FIG. 1.2.
NOTA: Dependiendo de la configuración en
cuestión, se podría tener que recortar el brazo
recto para lograr los valores deseados del trole.
TABLA PARA POSICIONAMIENTO DEL TROLE
PARA ELEVACIÓN ESTÁNDAR PARA
(MODELOS 9100, 9400, 9600, 5120 Y 5140)
DIM “X”
11 1/2˝ CURVO / RECTO FIG. 1.4
Si es necesario ajustar la posición del trole,
utilizar el tornillo de ajuste del recorrido de cierre
ubicado en la parte inferior del accionador, como
se muestra en la FIG. 1.5, en la página 24. Un
cuarto (1/4) de vuelta equivale aproximadamente
a 2.5 cm (1˝ ) de recorrido del trole; girarlo en
sentido horario para reducir la distancia (hacia
adelante) y en sentido antihorario para aumentar
la distancia (hacia adelante).
NOTA: Proceder con “Conexión del brazo de la
puerta a la puerta” Paso 18, en la página 14.
®
o resortes de extensión
RADIOS DE 10˝ Y 12˝
TIPO DE BRAZO
UTILIZADO
ILUSTRACIONES
DE REFERENCIA
Riel
horizontal
Pasador
de horquilla
Chaveta
hendida
12˝ Ó 15˝
Riel
horizontal
FIG. 1
VISTA
SUPERIOR
Trole
“X”
Sección
superior
Brazo recto
Brazo
curvo
Recortar el brazo recto
para lograr el valor
del trole
Radio
grabado
Riel de elevación estándar
de 10˝, 12˝, 14˝ ó 15˝
FIG. 1.2
FIG. 1.3
TABLA PARA POSICIONAMIENTO DEL TROLE PARA
ELEVACIÓN ESTÁNDAR PARA (MODELOS 9100,
9400, 9600, 5120 Y 5140) RADIOS DE 14˝ Y 15˝
DIM “X”
13˝-15˝ CURVO / RECTO FIG. 1.4
DIM “X”
10 9/16˝-
14 5/8˝
TIPO DE BRAZO
UTILIZADO
TABLA PARA POSICIONAMIENTO DE TROLE
DE ELEVACIÓN ESTÁNDAR PARA
(MODELO 9700) RADIO DE 15˝
TIPO DE BRAZO
UTILIZADO
RECTO / CURVO FIG. 1.3
ILUSTRACIONES DE
REFERENCIA
ILUSTRACIONES DE
REFERENCIA
12”
Brazo recto
FIG. 1.1
Brazo curvo
Recortar el brazo recto
para lograr el valor
del trole
FIG. 1.4
Por favor, no devolver este producto al concesionario. ¡Llámenos directamente! Nuestros técnicos capacitados responderán cualquier pregunta y/o enviarán cualquier
pieza necesaria. Se nos puede contactar al número telefónico gratuito 1-888-827-3667 para Asistencia al Consumidor, o bien, en conexión a red a www.wayne-dalton.com
23
Page 78

Configuración de la posición de
cierre del trole / Conexión del
brazo de la puerta (continuación)
FRANQUEO SUPERIOR REDUCIDO:
Con las TABLAS PARA POSICIONAMIENTO
DEL TROLE PARA FRANQUEO SUPERIOR
REDUCIDO, referirse a DIM “X” para fijar la
distancia del travesaño al trole, como se
muestra en la FIG. 1.6.
NOTA: Dependiendo de la configuración en
cuestión, se podría o no tener que recortar el
brazo recto para lograr los valores deseados
del trole.
Si es necesario ajustar la posición del trole,
utilizar el tornillo de ajuste del recorrido de
cierre ubicado en la parte inferior del
accionador, como se muestra en la FIG. 1.5.
Un cuarto (1/4) de vuelta equivale aproximadamente a 2.5 cm (1˝ ) de recorrido del trole;
girarlo en sentido horario para reducir la
distancia (hacia adelante) y en sentido
antihorario para aumentar la distancia (hacia
adelante).
TABLA PARA POSICIONAMIENTO DEL TROLE CON
FRANQUEO SUPERIOR REDUCIDO
(MODELOS 9100, 9400, 9600, 5120 Y 5140)
DIM “X”
14 1/2˝ CURVO / RECTO FIG. 1.7
10˝ - 14˝ RECTO FIG. 1.7a
TABLA PARA POSICIONAMIENTO DEL TROLE CON
FRANQUEO SUPERIOR REDUCIDO (MODELO 9700)
DIM “X”
TIPO DE BRAZO
UTILIZADO
CONEXIÓN OPCIONAL
TIPO DE BRAZO
UTILIZADO
ILUSTRACIONES
DE REFERENCIA
A LA DERECHA
ILUSTRACIONES
DE REFERENCIA
TRAVEL ADJUSTMENT
OPEN
LESS
MORE
Brazo curvo
CLOSE
MORE
FIG. 1.5
Sección
superior
Recortar el brazo recto
para lograr el valor
del trole
FIG. 1.7
Parte inferior del
accionador
“X”
Riel con franqueo
superior reducido
FIG. 1.6
Brazo recto
FIG. 1.7a
24
14 3/4˝-
17 11/16˝
10˝ - 14˝ RECTO FIG. 1.7a
CURVO / RECTO FIG. 1.7
CONEXIÓN OPCIONAL
NOTA: Proceder con “Conexión del brazo de la
puerta a la puerta” Paso 18, en la página 14.
Por favor, no devolver este producto al concesionario. ¡Llámenos directamente! Nuestros técnicos capacitados responderán cualquier pregunta y/o enviarán cualquier
pieza necesaria. Se nos puede contactar al número telefónico gratuito 1-888-827-3667 para Asistencia al Consumidor, o bien, en conexión a red a www.wayne-dalton.com
Page 79

12”
I
Herramientas
necesarias:
Alicates de punta
de aguja
Llave ajustable
Llave de trinquete
Cubo de 7/16˝
Cubo de 9/16˝
Sierra para
metales
Configuración de la posición de
cierre del trole / Conexión del
brazo de la puerta
9600, 5120, 5140 y 9700) con resortes de torsión
DETERMINAR EL RADIO DE RIEL
WAYNE-DALTON UTILIZADO:
PARA LOS RIELES MOUNT HOPE Y
PENSACOLA:
Medir los extremos curvos del riel horizontal para
determinar si se tiene un riel con radio horizontal
de 12˝ ó 15˝, como se muestra en la FIG. 1.
PARA EL RIEL PORTLAND:
Los rieles horizontales tienen grabado el radio en
el lado horizontal del riel, como se muestra en la
FIG. 1.1.
NOTA: Si fuera necesario, retirar el brazo superior
(brazo recto) del trole, para utilizar el brazo inferior (brazo curvo). Retirar la chaveta hendida del
pasador de horquilla al frente del trole y deslizar
la chaveta hendida hacia afuera lo suficiente
como para deslizar el brazo superior fuera entre
los lados izquierdo y derecho del cuerpo del trole.
Colocar el brazo inferior de la puerta de modo
que el extremo con al agujero singular esté
alineado con el pasador de horquilla. Deslizar el
pasador de horquilla completa y nuevamente en
el trole y reinstalar la chaveta hendida.
FRANQUEO SUPERIOR REDUCIDO:
Si se tiene un riel con franqueo superior redu cido, como se muestra en la FIG. 1.5 en la página
26, proceder con las “Tablas para posicionamiento del trole con franqueo superior reducido”
en la página 26.
ELEVACIÓN ESTÁNDAR:
Con las TABLAS PARA POSICIONAMIENTO DEL
TROLE PARA ELEVACIÓN ESTÁNDAR, referirse
a DIM “X” para fijar la distancia del travesaño al
trole, como se muestra en la FIG. 1.2.
NOTA: Dependiendo de la configuración en
cuestión, se podría tener que recortar el brazo
recto para lograr los valores deseados del trole.
TABLA PARA POSICIONAMIENTO DEL TROLE DE
ELEVACIÓN ESTÁNDAR PARA (MODELOS 9100,
9400, 9600, 5120 Y 5140) RADIOS DE 10˝ Y 12˝
DIM “X”
11 1/2˝-13˝ RECTO / CURVO FIG. 1.3
Si es necesario ajustar la posición del trole,
utilizar el tornillo de ajuste del recorrido de cierre
ubicado en la parte inferior del accionador, como
se muestra en la FIG. 1.4, en la página 26. Un
cuarto (1/4) de vuelta equivale aproximadamente
a 2.5 cm (1˝ ) de recorrido del trole; girarlo en
sentido horario para reducir la distancia (hacia
adelante) y en sentido antihorario para aumentar
la distancia (hacia adelante).
NOTA: Proceder con “Conexión del brazo de la
puerta a la puerta” Paso 18, en la página 14.
TIPO DE BRAZO
UTILIZADO
(Modelos 9100, 9400,
ILUSTRACIONES
DE REFERENCIA
Riel
horizontal
Pasador
de horquilla
Chaveta
hendida
12˝ Ó 15˝
FIG. 1
Riel
horizontal
12”
VISTA SUPERIOR
Trole
“X”
Riel de elevación estándar
de 10˝, 12˝, 14˝ ó 15˝
Sección superior
FIG. 1.2
Brazo recto
Brazo
curvo
Recortar el brazo recto
para lograr el valor
del trole
FIG. 1.3
TABLA PARA POSICIONAMIENTO DEL TROLE DE
ELEVACIÓN ESTÁNDAR PARA (MODELOS 9100,
9400, 9600, 5120 Y 5140) RADIOS DE 14˝ Y 15˝
DIM “X”
10˝-12˝ RECTO / CURVO FIG. 1.3
TABLA PARA POSICIONAMIENTO DEL TROLE DE
ELEVACIÓN ESTÁNDAR PARA (MODELO 9700)
DIM “X”
11 1/16˝-
16 7/8˝
TIPO DE BRAZO
UTILIZADO
RADIO DE 15˝
TIPO DE BRAZO
UTILIZADO
RECTO / CURVO FIG. 1.3
ILUSTRACIONES
DE REFERENCIA
ILUSTRACIONES
DE REFERENCIA
FIG. 1.1
Radio
grabado
Por favor, no devolver este producto al concesionario. ¡Llámenos directamente! Nuestros técnicos capacitados responderán cualquier pregunta y/o enviarán cualquier
pieza necesaria. Se nos puede contactar al número telefónico gratuito 1-888-827-3667 para Asistencia al Consumidor, o bien, en conexión a red a www.wayne-dalton.com
25
Page 80

Configuración de la posición de
cierre del trole / Conexión del
brazo de la puerta (continuación)
FRANQUEO SUPERIOR REDUCIDO:
Con la TABLA PARA POSICIONAMIENTO
DEL TROLE PARA FRANQUEO SUPERIOR
REDUCIDO, referirse a DIM “X” para fijar la
distancia del travesaño al trole, como se
muestra en la FIG. 1.5.
NOTA: Dependiendo de la configuración en
cuestión, se podría tener que recortar el brazo
recto para lograr los valores deseados del
trole.
TRAVEL ADJUSTMENT
OPEN
LESS
MORE
CLOSE
MORE
Parte inferior
del accionador
FIG. 1.4
Si es necesario ajustar la posición del trole,
utilizar el tornillo de ajuste del recorrido de
cierre ubicado en la parte inferior del
accionador. Un cuarto (1/4) de vuelta equivale
aproximadamente a 2.5 cm (1˝ ) de recorrido
del trole; girarlo en sentido horario para reducir
la distancia (hacia adelante) y en sentido
antihorario para aumentar la distancia (hacia
adelante).
TABLA PARA POSICIONAMIENTO DEL TROLE
CON FRANQUEO SUPERIOR REDUCIDO
(MODELOS 9100, 9400, 9600, 5120 Y 5140)
DIM “X”
10˝ - 14˝ RECTO FIG. 1.6a
TABLA PARA POSICIONAMIENTO DEL TROLE
CON FRANQUEO SUPERIOR REDUCIDO PARA
DIM “X”
15˝-18˝ CURVO / RECTO FIG. 1.6
10˝ - 14˝ RECTO FIG. 1.6a
TIPO DE BRAZO
UTILIZADO
20˝ CURVO / RECTO FIG. 1.6
CONEXIÓN OPCIONAL
MODELO 9700
TIPO DE BRAZO
UTILIZADO
CONEXIÓN OPCIONAL
ILUSTRACIONES
DE REFERENCIA
ILUSTRACIONES
DE REFERENCIA
NOTA: Proceder con “Conexión del brazo de la
puerta a la puerta” Paso 18, en la página 14.
“X”
Brazo curvo
Riel con franqueo
superior reducido
Recortar el brazo recto
para lograr el valor
del trole
FIG. 1.6
FIG. 1.5
Brazo recto
FIG. 1.6a
26
Por favor, no devolver este producto al concesionario. ¡Llámenos directamente! Nuestros técnicos capacitados responderán cualquier pregunta y/o enviarán cualquier
pieza necesaria. Se nos puede contactar al número telefónico gratuito 1-888-827-3667 para Asistencia al Consumidor, o bien, en conexión a red a www.wayne-dalton.com
Page 81

INSTRUCCIONES DE SEGURIDAD IMPORTANTES
ADVERTENCIA
PARA REDUCIR EL RIESGO DE
LESIÓN SEVERA O LA MUERTE:
1. LEER Y SEGUIR TODAS LAS INSTRUCCIONES.
2. Jamás permitir que niños operen los controles de la puerta o jueguen
con éstos. Mantener los controles remotos alejados de los niños.
3. Siempre mantener una puerta en movimiento a la vista y mantener a
personas y objetos alejados hasta que ésta esté completamente
cerrada. NADIE DEBERÍA CRUZAR EL UMBRAL DE UNA PUERTA EN
MOVIMIENTO.
4. JAMÁS UBICARSE BAJO UNA PUERTA PARADA, PARCIALMENTE
ABIERTA.
5. Probar la puerta / accionador mensualmente. La puerta del garaje HA
DE retroceder al hacer contacto con un objeto de 38 mm (1-1/2˝ ) de
altura (o un cuartón de 51 mm x 102 mm [2˝ x 4˝ ] sobre una cara) en
el piso. También, la puerta HA DE retroceder al colocarse un objeto de
15 cm (6˝ ) de altura sobre el piso, en línea con los sensores de
seguridad. Si la puerta / accionador falla estas pruebas, hacer que se
efectúen inmediatamente ajustes / reparaciones. El no efectuar ajustes
/ reparaciones podría causar lesiones graves o fatales.
6. Cuando sea posible, utilizar el desconector de emergencia sólo cuando
la puerta esté en la posición cerrada. Tener suma cautela al utilizar el
desconector de emergencia cuando la puerta está abierta. Resortes
débiles o averiados podrían dar lugar a la caída súbita de la puerta y
causar lesiones severas o fatales.
7. MANTENER LA PUERTA DEL GARAJE EQUILIBRADA
CORRECTAMENTE. Véase el manual del propietario incluido con la
puerta. Una puerta desequilibrada podría causar lesiones graves o
fatales. Contratar a un especialista de mantenimiento para efectuar
reparaciones a cables, conjuntos de resortes y otros herrajes.
GUARDAR ESTAS INSTRUCCIONES.
8.
Activación de la puerta:
Al activarla, ya sea con el botón Arriba / Abajo de la estación de trabajo,
con el transmisor o con el acceso inalámbrico sin llave, la puerta se
moverá en la manera siguiente:
1. Si está abierta, la puerta se cerrará. Si está cerrada, la puerta se
abrirá.
2. Si está cerrándose, la puerta parará. La próxima activación la abrirá.
3. Si está abriéndose, la puerta parará. La próxima activación la cerrará.
4. Si hace contacto con una obstrucción o el haz del sensor de seguridad
se interrumpe durante el cierre, la puerta retrocederá y la luz destellará.
5. Si se encuentra una obstrucción durante la apertura, la puerta parará y
la luz destellará. La próxima activación cerrará la puerta.
6. El sensor infrarrojo de seguridad utiliza un haz invisible que, al ser
interrumpido por una obstrucción, hace que una puerta que esté
abriéndose retroceda, evita que una puerta abierta se cierre y hace que
la luz destelle.
Por favor, no devolver este producto al concesionario. ¡Llámenos directamente! Nuestros técnicos capacitados responderán cualquier pregunta y/o enviarán cualquier
pieza necesaria. Se nos puede contactar al número telefónico gratuito 1-888-827-3667 para Asistencia al Consumidor, o bien, en conexión a red a www.wayne-dalton.com
ADVERTENCIA
SIEMPRE MANTENER LA PUERTA EN MOVIMIENTO A LA VISTA Y
MANTENER A PERSONAS Y OBJETOS ALEJADOS DE LA MISMA HASTA
QUE ESTÉ COMPLETAMENTE CERRADA. PARA EVITAR UNA LESIÓN
GRAVE O FATAL, EVITAR PARARSE O CAMINAR EN EL UMBRAL DE LA
PUERTA CUANDO ÉSTA ESTÁ EN MOVIMIENTO.
ADVERTENCIA
JAMÁS PERMITIR QUE NIÑOS OPEREN LOS CONTROLES DE LA PUERTA
O JUEGUEN CON ÉSTOS. MANTENER LOS CONTROLES REMOTOS FUERA
DEL ALCANCE DE NIÑOS. SI UN NIÑO(A) QUEDA ATRAPADO ENTRA LA
PUERTA Y EL PISO, PUEDE OCURRIR UNA LESIÓN FATAL.
ADVERTENCIA
MANTENER LA PUERTA DEL GARAJE EQUILIBRADA CORRECTAMENTE.
UNA PUERTA DESEQUILIBRADA PODRÍA CAUSAR LESIONES GRAVES O
FATALES. CONTRATAR A UN ESPECIALISTA EN MANTENIMIENTO PARA
EFECTUAR AJUSTES / REPARACIONES A CABLES, CONJUNTOS DE
RESORTES Y OTROS HERRAJES.
Desconector de emergencia:
ADVERTENCIA
LA PUERTA DEBERÍA ESTAR CERRADA COMPLETAMENTE AL ACTIVARSE
EL DESCONECTOR DE DESENGANCHE DE EMERGENCIA. RESORTES
DÉBILES O AVERIADOS PODRÍAN DAR LUGAR A LA CAÍDA SÚBITA DE LA
PUERTA Y CAUSAR LESIONES SEVERAS O FATALES.
El accionador está provisto de un sistema de desconector tipo trole recedido
para desenganche de emergencia, el cual habilita la operación manual de la
puerta durante un corte eléctrico. El trole se desconecta de la cadena al
tirarse hacia abajo de la perilla de desenganche roja, permitien do que se
opere la puerta del garaje manualmente. No utilizar la perilla de desenganche manual para tirar de la puerta para abrirla o cerrarla. El trole se
reconectará automáticamente al restablecerse la energía eléctrica y
activarse la puerta. Si se utiliza el desenganche de emergencia, cerrar la
puerta antes de operar el accionador.
NOTA: Hay disponibles cerraduras exteriores con llave para desenganche
de emergencia; se las recomienda para garajes sin entrada de servicio.
CÓMO FUNCIONA LA LUZ Y QUÉ SIGNIFICA CUANDO DESTELLA:
1. La luz superior se enciende automáticamente al activarse el accionador
y permanece encendida durante 4 minutos por cortesía y seguridad.
2. La luz destella si el accionador detecta alguna obstrucción en la dirección
vertical (hacia arriba o hacia abajo), para advertir sobre un problema.
Continúa destellando durante 1 minuto, y a continuación, se apaga.
Si la luz comienza a destellar y la puerta se desplaza una distancia corta y
luego retrocede por activación del botón de una estación de pared, transmisor o acceso sin llave, el dispositivo externo del sensor de seguridad está
activado o defectuoso. Para sobreponerse temporalmente al dispositivo del
sensor de seguridad y cerrar la puerta, activar el botón arriba / abajo de la
estación de pared, manteniendo el botón oprimido; el accionador comenzará en sentido descendente. El botón ha de permanecer oprimido hasta
completarse el ciclo. Si se suelta el botón antes de completarse el ciclo, la
puerta retrocede hasta la posición completamente abierta. Un especialista
de mantenimiento debería corregir los problemas en el sistema de
seguridad.
NOTA: Una puerta completamente abierta con una luz destellante indica
una obstrucción o problemas con sensores de seguridad externos durante
el recorrido de cierre. Consúltese la sección de diagnóstico y resolución
de problemas en la página 35.
OPERACIÓN
27
Page 82

Operación de la estación inalámbrica de pared
I
Botón Arriba / Abajo:
Oprimir momentáneamente el botón Arriba / Abajo arranca o para el
movimiento de la puerta o cambia el sentido de desplazamiento de la
puerta. El oprimir y retener el botón Arriba/Abajo durante el recorrido de la
puerta invalida los sensores de seguridad. Cuando la unidad está cerrada,
se puede activar el botón Arriba/Abajo al oprimirse la cubierta pivotal.
ADVERTENCIA
SI LA PUERTA VUELVE NECESARIO SOBREPONERSE A LOS SENSORES DE
SEGURIDAD, SE HA DE CORREGIR ESA CONDICIÓN INMEDIATAMENTE.
HACER CASO OMISO DE AJUSTES / REPARACIONES NECESARIAS PODRÍA
RESULTAR EN LESIONES GRAVES O FATALES.
Botón de luz:
Oprimir momentáneamente el botón de la luz enciende la luz de cortesía. La
luz permanecerá encendida hasta que se oprima nuevamente el botón de la
luz o se active la puerta. La luz se enciende automáticamente con la activación de la puerta y permanece encendida durante 4 minutos. Oprimir el
botón de la luz antes de transcurridos los 4 minutos apaga la luz. Mientras
la puerta está en movimiento, el botón de la luz funciona de manera idéntica
que el botón Arriba / Abajo: hace que la puerta pare o retroceda
inmediatamente.
Botón de temporizador:
El oprimir momentáneamente el botón del temporizador produce una
activación retardada de una puerta estacionaria completamente abierta.
El accesorio de luz o la lámpara del accionador emite destellos durante
aproximadamente 10 segundos antes de iniciarse el cierre de la puerta,
permitiendo así suficiente tiempo para salir del garaje cuando el accionador
está en el modo temporizador. Para cancelar el modo temporizador, oprimir
cualquier botón, excepto el botón de programación, mientras la lámpara del
accionador está destellando intermitentemente.
NOTA: La característica de temporización funciona solo con la puerta en la
posición completamente abierta. El oprimir el botón del temporizador con
una puerta estacionaria en cualquier otra posición hace que la lámpara del
accionador destelle 4 veces y que no se active la puerta.
Mientras la puerta está en movimiento, el botón del temporizador funciona
igual que el botón Arriba/Abajo: detiene o invierte el recorrido de la puerta
inmediatamente.
Interruptor corredizo para vacación:
El interruptor corredizo tiene dos posiciones: Normal, y Bloqueo de puerta
Posición normal:
Desplazar el interruptor corredizo a la posición normal para todas las
funciones normales del accionador. La posición normal anula la
característica de bloqueo de la puerta.
NOTA: Cuando se desplaza el interruptor corredizo a la posición
desbloqueada, el accesorio de luz del accionador destella tres veces.
Posición Bloqueo de puerta:
Si se detiene la puerta (completamente abierta, completamente cerrada o
parcialmente abierta) colocar el interruptor corredizo en la posición “bloqueo
de puerta” para suspender todas las funciones normales del accionador. El
accionador permanecerá completamente deshabilitado y no funcional en este
modo. Se ignora toda estación de pared, transmisor y unidad de acceso
inalámbrico sin llave hasta que se coloque el interruptor corredizo en la
posición normal. Si la puerta está en movimiento cuando se coloca el
interruptor corredizo en la posición “bloqueo de puerta”, no se activa el modo
bloqueo de puerta y todas las funciones del accionador permanecen activas.
NOTA: Cuando se coloca el interruptor corredizo en la posición de bloqueo,
el accesorio de luz del accionador destella tres veces.
28
Por favor, no devolver este producto al concesionario. ¡Llámenos directamente! Nuestros técnicos capacitados responderán cualquier pregunta y/o enviarán cualquier
pieza necesaria. Se nos puede contactar al número telefónico gratuito 1-888-827-3667 para Asistencia al Consumidor, o bien, en conexión a red a www.wayne-dalton.com
Luz del diodo emisor de luz retroiluminado:
El diodo emisor de luz rojo destella para ayudar a localizar la estación de pared
en un garaje oscuro. Se puede cambiar la frecuencia del destello para prolongar
la vida útil de las pilas, o bien, se puede apagar. La frecuencia de destello es de
un destello cada 3 segundos. Para prolongar la vida útil de las pilas se puede
cambiar la frecuencia de destello a un destello cada 6 segundos. Para cambiar
la frecuencia de destello, retirar la cubierta de las pilas y retirar una pila.
Reinstalar la pila y dentro de 2 segundos, oprimir el botón Luz. Reinstalar la
cubierta de las pilas.
Para una vida útil más prolongada de las pilas, se puede apagar el destello.
Para hacerlo, retirar la cubierta de las pilas y retirar una pila.
Reinstalar la pila y dentro de 2 segundos oprimir el botón Mascota. Reinstalar la
cubierta de las pilas.
NOTA: El diodo emisor de luz rojo de la estación de pared destella rápidamente
mientras se mantenga presionado cualquier botón de la estación de pared.
Posición para mascotas:
Al oprimirse el botón para mascotas se abre una puerta cerrada a una posición
predeterminada de entre 127 y 762 mm (5 y 30 pulgadas) sobre el piso, para
permitir que las mascotas entren y salgan del garaje sin que la puerta esté
completamente abierta. Es preciso que la puerta esté completamente cerrada
para activar la característica de apertura para mascotas. El oprimir el botón para
mascotas con una puerta estacionaria en la posición abierta para mascotas hace
que la puerta se cierre. Oprimir el botón Arriba/Abajo mientras la puerta está en
la posición para mascotas funciona idénticamente que el botón Arriba/Abajo:
detiene o invierte el recorrido de la puerta inmediatamente. La característica para
mascotas permite la configuración personalizada de la altura de la puerta para la
posición para mascotas.
NOTA: Una puerta en la “posición para mascotas” (abierta de 127 a 762 mm
[5 a 30˝ ]) no está bloqueada y no se la debe usar como una posición asegurada
de la puerta.
Botón de programación:
El botón de programación de la estación de pared tiene varias funciones.
a. Se lo puede utilizar para establecer una posición personalizada para
mascotas. (Véase Personalización de la configuración, en la página siguiente.)
b. Se lo puede utilizar para establecer la fuerza de cierre del accionador (véase
el ajuste nro. 1 en la página 32).
Botón de luz
Interruptor corredizo
para vacación
Botón de
temporizador
Botón para
mascotas
Botón Arriba/Abajo
Botón de
programación
Page 83

Personalización de la configuración
FORCE ADJ.
STATUS
SW
PROGRAM
I
Posición personalizada para mascotas:
El botón para mascotas abre una puerta cerrada hasta una posición
predeterminada entre 127 y 762 mm (5 y 30˝ ) sobre el piso, para permitir
que las mascotas entren y salgan del garaje sin que la puerta esté
completamente abierta. Para cambiar la altura de apertura automática de
la puerta para mascotas:
Comenzar con la puerta en la posición cerrada.
1. Accionar la puerta y luego detenerla a la altura deseada. Si no se logra
la altura deseada, es preciso volver la puerta a la posición cerrada.
2. Oprimir y soltar el botón de programación de las estaciones de pared, o
bien, el botón del interruptor de programación del accionador, dos veces.
La luz de estado en la unidad del accionador y la luz superior destellará
a una frecuencia normal.
3. Oprimir el botón para mascotas. La luz de estado del accionador y la luz
superior destellan tres veces para indicar una programación exitosa.
Programación de puertas múltiples:
Oprimir momentáneamente el botón programado en el paso de
programación del transmisor activa la puerta. También se pueden
programar otros botones para activar puertas diferentes, para
instalaciones con puertas múltiples. Se puede programar cada botón o
combinación de dos botones oprimidos simultáneamente para activar una
puerta diferente. Solo se puede programar un botón a la vez para activar
un accionador específico.
Controles del accionador
I
El botón de programación ubicado en el lado derecho del accionador tiene
varias funciones.
Botón Arriba / Abajo
Botón de
programación
1. Oprimir el botón de programación una vez enciende la luz de estado y la
lámpara superior de manera sostenida. Este modo permite la programación de transmisores, acceso inalámbrico sin llave y estaciones
inalámbricas de pared (véase la página 33).
2. Oprimir el botón de programación dos veces produce el destello de la
luz de estado y de la lámpara superior. Este modo permite la programación de una posición personalizada para mascotas (véase “Personalización de la configuración” arriba).
3. Oprimir el botón de programación tres veces hace que la luz de estado
y la lámpara superior se enciendan y apaguen intermitentemente, con
una pausa prolongada entre cada ciclo de centelleo. Este modo permite
programar la fuerza de apertura (véase la página 32).
4. Oprimir y retener el botón de programación durante 10 segundos borra
todos los transmisores, estación multifunción de pared y el acceso
inalámbrico sin llave de la memoria. La luz de estado y la luz superior
centellearán 3 veces para indicar una operación de borrado exitosa.
Por favor, no devolver este producto al concesionario. ¡Llámenos directamente! Nuestros técnicos capacitados responderán cualquier pregunta y/o enviarán cualquier
pieza necesaria. Se nos puede contactar al número telefónico gratuito 1-888-827-3667 para Asistencia al Consumidor, o bien, en conexión a red a www.wayne-dalton.com
Parte inferior
del accionador
Lado derecho del accionador
Diodo emisor de luz de
estado de programa
Botón de
programación
Fuerza
de cierre
29
Page 84

Programación primaria de HomeLink® para Prodrive
I
NOTA: Se puede efectuar este paso únicamente en automóviles
equipados con el sistema HomeLink
NOTA: La programación HomeLink
que esté programado para el accionador (la estación de pared y el(los)
transmisor(es) provisto(s) con el accionador viene(n) programado(s) de
Es preciso programar todo transmisor adicional para el acciona-
fábrica).
dor; véase la página 33.
IMPORTANTE: Utilizar las instrucciones de programación provistas
inicialmente con el vehículo. Seguir estas instrucciones si la unidad
HomeLink
®
no aprende a comunicarse con el transmisor al utilizar las
instrucciones del vehículo.
NOTA: Si la programación primaria no funciona, utilizar el procedimiento
alternativo expuesto en la página siguiente.
NOTA: Es posible que el vehículo deba estar en la posición accesorio al
efectuar la programación. Consultar el manual del propietario del
vehículo.
®
NOTA: HomeLink
es una marca comercial registrada de Johnson
Controls.
®
.
®
necesita un transmisor Wayne-Dalton
®
Programación / Entrenamiento de la unidad HomeLink
®
ADVERTENCIA
LA PUERTA DEL GARAJE PODRÍA FUNCIONAR DURANTE LA
PROGRAMACIÓN. PARA EVITAR LESIONES GRAVES O FATALES POSIBLES,
COLOCAR LA EMPUÑADURA DEL DESCONECTOR DE EMERGENCIA EN LA
POSICIÓN DE OPERACIÓN MANUAL.
1. Tirar del desconector manual para colocar el accionador en la posición
desenganchada.
®
2. Verificar que la unidad HomeLink
botón HomeLink
®
deseado y observar la luz indicadora: si centellea
lentamente, el canal está vacío y listo para programación. Si oprimir el
canal / botón deseado causa que la luz indicadora centellee rápidamente,
o se encienda sin centellear, este canal ya está programado. Es necesario
escoger un canal / botón diferente en el HomeLink
que aparece a continuación.
3. OPCIONAL. Para despejar completamente todos los canales de la
unidad HomeLink
unidad HomeLink
®
, oprimir y retener los dos botones exteriores en la
®
hasta que la luz indicadora del HomeLink® comience a
centellear rápidamente (aproximadamente 20 segundos), luego soltar
ambos botones. (No efectuar este paso para entrenar transmisores
manuales adicionales.) NOTA: Esta operación borra todos los
transmisores aprendidos previamente y será necesario enseñarle
nuevamente cualquier otro transmisor a la unidad HomeLink
tenga un canal vacío. Oprimir el
®
o ejecutar el Paso 3
®
.
4. Sujetar el extremo del transmisor manual Wayne-Dalton de 2.5 cm a
7.5 cm (1 a 3 pulgadas) aproximadamente de la superficie de
HomeLink
5. Oprimir y retener simultáneamente el botón grande del transmisor
Wayne-Dalton y el botón deseado del módulo HomeLink
®
, manteniendo la luz indicadora a la vista.
®
, continuar
sujetando ambos botones. En menos de 10 segundos, el diodo emisor
de luz del módulo HomeLink® se iluminará de manera sostenida o
centelleará una vez rápidamente. Soltar ambos botones cuando uno
de ellos ocurra.
NOTA: Si este procedimiento no tiene éxito, efectuar el procedimiento
alternativo.
®
Cómo enseñarle HomeLink
al accionador
6. Oprimir y soltar el interruptor de programación en el accionador.
Se encenderán la luz roja de estado de programación en el accionador
y la luz; permanecerán encendidas durante un minuto para indicar que
está listo para aprender.
®
7. Oprimir el botón HomeLink
utilizado en el Paso 5 anterior durante
1 a 3 segundos. La luz de estado del programa y la luz de cortesía en el
accionador se encenderán y se apagarán tres veces, para indicar un
aprendizaje exitoso.
®
8. Oprimir el botón HomeLink
una vez más para operar la puerta. El
accionador se activa y el trole viaja hacia la posición abierta; la próxima
activación hace que el trole viaje hacia la posición cerrada y se
reenganche. Operaciones subsiguientes mueven la puerta.
30
Por favor, no devolver este producto al concesionario. ¡Llámenos directamente! Nuestros técnicos capacitados responderán cualquier pregunta y/o enviarán cualquier
pieza necesaria. Se nos puede contactar al número telefónico gratuito 1-888-827-3667 para Asistencia al Consumidor, o bien, en conexión a red a www.wayne-dalton.com
Page 85

Programación alternativa de HomeLink® para Prodrive
I
NOTA: Se puede efectuar este paso únicamente en automóviles
equipados con el sistema HomeLink
NOTA: La programación HomeLink
que esté programado para el accionador (la estación de pared y el(los)
transmisor(es) provisto(s) con el accionador viene(n) programado(s) de
fábrica). Es preciso programar todo transmisor adicional para el
accionador; véase la página 33.
IMPORTANTE: Utilizar las instrucciones de programación provistas
inicialmente con el vehículo. Seguir estas instrucciones si la unidad
HomeLink
®
no aprende a comunicarse con el transmisor al utilizar las
instrucciones del vehículo.
NOTA: Es posible que el vehículo deba estar en la posición accesorio al
efectuar la programación. Consultar el manual del propietario del vehículo.
®
NOTA: HomeLink
es una marca comercial registrada de Johnson
Controls.
®
.
®
necesita un transmisor Wayne-Dalton
®
Programación / Entrenamiento de la unidad HomeLink
®
ADVERTENCIA
LA PUERTA DEL GARAJE PODRÍA FUNCIONAR DURANTE LA
PROGRAMACIÓN. PARA EVITAR LESIONES GRAVES O FATALES POSIBLES,
COLOCAR LA EMPUÑADURA DEL DESCONECTOR DE EMERGENCIA EN LA
POSICIÓN DE OPERACIÓN MANUAL.
1. Tirar del desconector manual para colocar el accionador en la posición
desenganchada.
®
2. Oprimir y sujetar los dos botones exteriores en la unidad HomeLink
hasta que la luz indicadora de HomeLink
®
comience a centellear
rápidamente (aproximadamente 20 segundos), luego soltar ambos
botones. (No efectuar este paso para entrenar transmisores manuales
adicionales.) NOTA: Esta operación borra todos los transmisores
aprendidos previamente y será necesario enseñarle nuevamente cualquier
otro transmisor a la unidad HomeLink
®
mediante la repetición de los
pasos 3 al 6 que aparecen a continuación.
3. Sujetar el extremo del transmisor manual Wayne-Dalton de 2.5 cm
a 7.5 cm (1 a 3 pulgadas) aproximadamente de la superficie de
HomeLink
®
, manteniendo la luz indicadora a la vista.
4. Utilizar el botón grande del transmisor Wayne-Dalton. Oprimir y sujetar
simultáneamente el botón grande del transmisor Wayne-Dalton y el botón
deseado del módulo HomeLink
mientras se cuentan los centelleos en el módulo HomeLink
®
. Continuar presionando ambos botones
®
; entre 50 y
60 centelleos del diodo emisor de luz, éste quedará encendido, o
centelleará rápidamente una vez; cuando uno de ellos ocurra, soltar el
botón del transmisor Wayne-Dalton y el botón del módulo HomeLink
®
Cómo enseñarle HomeLink
al accionador
5. Oprimir el interruptor de programación en el accionador. Se
encenderán la luz roja de estado de programación en el accionador y la
luz; permanecerán encendidas durante un minuto para indicar que está
listo para aprender.
®
6. Oprimir el botón de HomeLink
utilizado en el Paso 4 anterior durante
1 a 3 segundos. La luz de estado del programa en el accionador se
encenderá y se apagará tres veces para indicar un aprendizaje exitoso.
®
7. Oprimir el botón HomeLink
una vez más para operar la puerta. El
accionador se activa y el trole viaja hacia la posición abierta; la próxima
activación hace que el trole viaje hacia la posición cerrada y se
reenganche. Operaciones subsiguientes mueven la puerta.
®
.
Por favor, no devolver este producto al concesionario. ¡Llámenos directamente! Nuestros técnicos capacitados responderán cualquier pregunta y/o enviarán cualquier
pieza necesaria. Se nos puede contactar al número telefónico gratuito 1-888-827-3667 para Asistencia al Consumidor, o bien, en conexión a red a www.wayne-dalton.com
31
Page 86

I
FORCE ADJ.
STATUS
SW
PROGRAM
Ajuste nro. 1: Fuerza de apertura y cierre
Este accionador para puertas de garaje incorpora un sistema de
seguridad que permite a la puerta retroceder mientras se cierra y parar
mientras se abre. Es preciso ajustarlo para que el accionador no utilice
fuerza excesiva en el sentido de desplazamiento descendente ni reaccione
al peso de la puerta durante el desplazamiento ascendente.
AJUSTE DE LA FUERZA DE CIERRE
Para ayudar a determinar que la fuerza de cierre de la puerta no sea
excesiva, asir la manija o el borde inferior durante el desplazamiento
descendente. El accionador debería RETROCEDER ante esta fuerza.
NOTA: No pararse bajo la puerta
durante este prueba.
Para ajustar la fuerza de cierre,
seguir uno de los dos métodos
enumerados a continuación.
Método A (manual)
1. Girar el contador FORCE ADJ.
(AJUSTE DE FUERZA) en sentido
horario para disminuir la fuerza y
repetir la prueba hasta que la puerta reaccione adecuadamente.
Método B (asistido por computadora)
1. Operar la puerta hacia la posición completemente abierta.
2. Girar el contador FORCE ADJ. (AJUSTE DE FUERZA) en sentido horario
hasta el valor de fuerza mínima.
3. Oprimir el botón PROGRAM (PROGRAMACIÓN) dos veces hasta que el
diodo emisor de luz quede encendido (5 segundos). El STATUS LED
(DIODO EMISOR DE LUZ DE ESTADO) y la lámpara superior centelleará
lentamente.
4. Operar la puerta hacia la posición completamente cerrada.
5. Girar el contador FORCE ADJ. (AJUSTE DE FUERZA) hasta que el
STATUS LED (DIODO EMISOR DE LUZ DE ESTADO) fluctúe o
sencillamente se apague.
6. Oprimir el botón PROGRAM (PROGRAMACIÓN) una vez para confirmar
el parámetro.
Diodo emisor de
luz de estado de
programación
Botón de
programación
Ajuste de fuerza
de cierre
Ajustes
Ajuste nro. 2: Detección de obstrucción por contacto
(Desplazamiento de cierre)
El accionador está diseñado para hacer retroceder automáticamente la
puerta durante el recorrido de cierre cuando ésta entre en contacto con
un cuartón de 51 mm x 102 mm [2˝ x 4˝ ] sobre una cara, en el piso. Un
objeto en el piso con una altura menor de 38 mm (1-1/2˝ ) no causará
que la puerta retroceda. (Efectuar la prueba de conformidad con las
instrucciones en el Paso 21.)
Si el accionador retrocede correctamente al entrar en contacto con un
cuartón de 51 mm x 102 mm [2˝ x 4˝ ] sobre una cara, en el piso del
garaje (Paso 21) y para sin el objeto sólido de prueba en la posición
completamente cerrada, pasar al Ajuste nro. 3.
Cuando la puerta entre en contacto con un cuartón de 51 mm x 102 mm
[2˝ x 4˝ ] sobre una cara, en el piso del garaje, y para en lugar de
retroceder, restablecer los límites de cierre de la puerta según la
instrucción en el Paso 19, ajustándolo hasta que la puerta retroceda al
entrar en contacto con un cuartón de 51 mm x 102 mm [2˝ x 4˝ ] sobre
una cara, en el piso del garaje.
Si la puerta retrocede al entrar en contacto con el piso, restaurar los
límites de cierre de la puerta según la instrucción en el Paso 19.
Ajuste nro. 3: Bloqueo mecánico positivo de la puerta
El accionador para puertas de garaje está diseñado con un sistema
automático de bloqueo mecánico. Este bloqueo asegura la puerta en la
posición completamente cerrada.
Para ajustarlo, activar el accionador de la puerta y permitir que la puerta
vaya a la posición completamente cerrada. Aflojar los dos tornillos en el
tope del riel y moverlo detrás del conjunto del pestillo con un espacio de
19 mm (3/4˝ ) entre el “tope” y el “pestillo”. Apretar los tornillos
nuevamente.
32
AJUSTE DE LA FUERZA DE APERTURA
Para determinar que la fuerza de apertura no sea excesiva, asir la manija
de la puerta o el borde inferior durante el desplazamiento ascendente de
19 mm (3/4˝ )
Tornillos
“Tope” del riel
la misma. Si el accionador no para o es difícil de sujetar, reducir la
configuración de la fuerza de apertura. El accionador debería PARAR sin
“PESTILLO”
usar fuerza excesiva.
Para cambiar la fuerza de apertura, seguir el procedimiento enumerado a
continuación.
1. Operar la puerta hacia la posición completamente cerrada.
2. Oprimir el botón PROGRAM (PROGRAMACIÓN) tres veces. El STATUS
LED (DIODO EMISOR DE LUZ DE ESTADO) y la lámpara superior
Hacia motor
centelleará. La velocidad del centelleo, la cual corresponde al valor
configurado de la fuerza, consistirá de 1 a 5 centelleos rápidos
seguidos por una pausa prolongada entre secuencias de centelleo.
3. La primera vez que se intente aumentar la fuerza, el valor configurado
comenzará en el valor más débil (1 centelleo).
4. Para aumentar la fuerza, oprimir y soltar el botón arriba / abajo de la
puerta en cualquier control. (El STATUS LED (DIODO EMISOR DE LUZ
DEL ESTADO) permanecerá iluminado durante la pulsación del botón.)
5. Continuar oprimiendo y soltando el botón de la puerta hasta lograrse el
valor deseado de la fuerza.
6. Oprimir el botón PROGRAMA una vez para confirmar el valor
configurado.
Por favor, no devolver este producto al concesionario. ¡Llámenos directamente! Nuestros técnicos capacitados responderán cualquier pregunta y/o enviarán cualquier
pieza necesaria. Se nos puede contactar al número telefónico gratuito 1-888-827-3667 para Asistencia al Consumidor, o bien, en conexión a red a www.wayne-dalton.com
Page 87

FORCE ADJ.
STATUS
SW
PROGRAM
I
Herramientas
necesarias:
Ninguna
Programación de la estación o
estaciones de pared o transmisor(es)
para el accionador
ADVERTENCIA
ES POSIBLE QUE LA PUERTA FUNCIONE DURANTE
LA PROGRAMACIÓN. MANTENER A PERSONAS Y
OBJECTOS ALEJADOS DE LA PUERTA EN MOVIMIENTO
PARA EVITAR DAÑOS A LA PUERTA O POSIBLES
LESIONES PERSONALES.
NOTA: La programación puede fallar si la estación de
pared o transmisor está demasiado cerca del accionador durante la secuencia de programación. Es preciso
que haya un mínimo de 1.8 m (6 pies) entre la estación
de pared / transmisor y el accionador.
Lado derecho del accionador
Diodo emisor de luz
de estado de
programa
NOTA: Hasta 8 transmisores remotos, 2 estaciones de
pared y 2 accesos sin llave pueden activar el accionador. Si se programa un noveno transmisor remoto, se
perderá el primer remoto programado de la memoria.
Lo mismo sucede si se programa un tercer acceso sin
llave: el primero ya no estará en memoria y no operará
el accionador.
NOTA: No oprimir ningún botón hasta que así se le
indique.
TRANSMISOR:
1. Oprimir y soltar el botón PROGRAM (PROGRA MA-
CIÓN) ubicado en el accionador de la puerta del
garaje. La luz roja de PROGRAM STATUS (ESTADO
DE PROGRAMA) en la unidad del accionador y la
lámpara superior se encenderán y permanecerán
encendidas durante un minuto, para indicar la
activación del modo de aprendizaje.
2. Oprimir uno de los botones en el transmisor que se
desea utilizar para operar la puerta. La luz de PROGRAM STATUS (ESTADO DE PROGRAMA) destella
tres veces para indicar un aprendizaje exitoso.
3. Oprimir el mismo botón en el transmisor una vez
más para confirmar la operación. El accionador se
encenderá y moverá la puerta.
A este punto, se puede activar el accionador.
Botón de
programación
Botón grande
Transmisor
Botón de luz
ESTACIÓN DE PARED:
1. Oprimir y soltar el botón PROGRAM (PROGRAMA-
CIÓN) ubicado en el accionador de la puerta del
garaje. La luz roja de PROGRAM STATUS (ESTADO
DE PROGRAMA) en la unidad del accionador y la
lámpara superior se encienden y permanecen encendidas durante un minuto para indicar la activación del
modo de aprendizaje.
2. Oprimir el botón para encender/apagar la luz en la
estación de pared. La luz de estado de programa se
enciende y apaga tres veces para indicar un aprendizaje exitoso.
3. Oprimir el botón para encender/apagar la luz en la
estación de pared una vez más para confirmar su
funcionamiento. La luz superior alternará de encendido a apagado y de apagado a encendido. A este
punto se puede activar el accionador.
Por favor, no devolver este producto al concesionario. ¡Llámenos directamente! Nuestros técnicos capacitados responderán cualquier pregunta y/o enviarán cualquier
pieza necesaria. Se nos puede contactar al número telefónico gratuito 1-888-827-3667 para Asistencia al Consumidor, o bien, en conexión a red a www.wayne-dalton.com
Estación de pared
r
e
p
O
o
T
Press
Here
a
t
e
D
o
o
r
33
Page 88

I
Mantenimiento mensual:
1. Lubricar las bisagras y rodillos de la puerta del garaje.
2. Inspeccionar la puerta para determinar si hay sujetadores flojos,
gastados, o cables de contrapeso raídos y la presencia de etiquetas o
marbetes de seguridad legibles. Contratar a un especialista de
mantenimiento para efectuar reparaciones. Contactar a asistencia al
cliente para obtener reemplazos gratuitos de etiquetas / marbetes de
seguridad.
3. Con la puerta completamente cerrada, tirar hacia abajo del desconector
de emergencia para operar la puerta manualmente. Si la puerta da
muestras de estar desequilibrada o se atasca, hacer que un
especialista de mantenimiento efectúe los ajustes o reparaciones
necesarios a la puerta.
4. Efectuar las pruebas de contacto / obstrucción. Véanse los pasos 21 y
22 para las instrucciones de la prueba de contacto / obstrucción. Si la
puerta / accionador falla la prueba de contacto / obstrucción, restaurar
los límites de cierre de la puerta según las instrucciones en el Paso 19,
efectuar ajustes hasta que la puerta retroceda al entrar en contacto con
un cuartón de 51 mm x 102 mm [2˝ x 4˝] sobre una cara, en el piso del
garaje. Si el accionador continúa fallando, hacer que un especialista de
mantenimiento efectúe los ajustes / reparaciones; de lo contrario, esto
podría dar lugar a lesiones graves o fatales.
5. El que la unidad puerta/accionador no responda al transmisor, estación
multifunción de pared o acceso inalámbrico sin llave puede deberse a
una pila débil o sin carga. Reemplazar la pila. Reemplazar la pila.
Mantenimiento
Dos veces al año:
Revisar la tensión de la cadena. Si la cadena descansa en la parte inferior
del riel, ajustar la tensión mediante el giro de dos tuercas para ajuste de
la cadena en el extremo de los rieles (opuesto al extremo del accionador)
en sentido horario. Asegurarse de ajustar ambas tuercas cantidades
iguales y hasta que la cadena esté aproximadamente a 12 mm (1/2˝ )
sobre la parte inferior de los rieles al medirse en el punto medio de los
rieles.
Cambio de pilas para la estación de pared:
Desenganchar la presilla inferior de la cubierta de las pilas para retirar la
cubierta de las pilas completamente (lado derecho de la estación). Instalar
dos pilas AAA en la estación de pared prestando atención a la polaridad,
(+) y (-) de ambas pilas. Después de unos cuantos segundos el diodo
emisor de luz rojo comenzará a destellar cada tres segundos. Si se desea
reducir la frecuencia de destello del diodo emisor de luz, consultar “Luz
del diodo emisor de luz retroiluminado”, en la sección Operación de la
estación inalámbrica de pared, página 28. Para reinstalar la cubierta de
las pilas, insertar primero la parte superior de la cubierta en la estación
de pared; luego insertar y asegurar la parte inferior.
Nota: Utilizar sólo dos pilas AAA.
Nota: Disponer de la pila usada adecuadamente.
Reemplazo de pila del transmisor:
Insertar una moneda en la ranura para monedas del transmisor y torcer la
moneda para acceder a la pila sin carga. Cambiarla, teniendo cuidado de
hacer coincidir los símbolos positivos (+) en los circuitos impresos con el
de la pila; cerrar la caja a presión.
Nota: Los transmisores utilizan una (1) pila CR2016 ó equivalente.
Nota: Disponer de la pila usada adecuadamente.
Cambio de pila para Acceso inalámbrico sin llave:
Para cambiar pilas, abrir la caja por apalancamiento con una moneda y
retirar las pilas usadas. Cambiarlas teniendo cuidado de que los símbolos
positivos (+) en los circuitos impresos coincidan con los de las pilas;
cerrar la caja a presión.
Nota: Los accesos sin llave utilizan dos pilas CR2032 ó equivalentes.
Nota: Disponer de la pila usada adecuadamente.
34
Por favor, no devolver este producto al concesionario. ¡Llámenos directamente! Nuestros técnicos capacitados responderán cualquier pregunta y/o enviarán cualquier
pieza necesaria. Se nos puede contactar al número telefónico gratuito 1-888-827-3667 para Asistencia al Consumidor, o bien, en conexión a red a www.wayne-dalton.com
Page 89

Diagnóstico y resolución de problemas
SÍNTOMA CAUSA PROBABLE ACCIÓN CORRECTIVA
El accionador no funciona con el botón de pared
o radiocontrol.
El accionador no tiene energía eléctrica.
Revisar cordón hacia tomacorriente, interruptor de pared y
cortacircuitos.
Corto circuito en los conductores hacia el accionador o
botón de pared.
El protector del motor se dispara debido a uso excesivo.
El accionador funciona con el botón de pared pero no con
radiocontrol.
La puerta no abre y la luz del accionador centellea. Algo está obstruyendo la trayectoria de la puerta.
La puerta no abre completamente y la luz no centellea. Límite de apertura no establecido correctamente. Ajustar el recorrido de apertura con destornillador, girar en
La puerta para y no cierra completamente. Límite de cierre no establecido correctamente. Ajustar el recorrido de cierre con destornillador, girar en sentido
La puerta cierra, luego regresa a la posición completamente
abierta y la luz del accionador centellea.
El sistema de radiocontrol no está funcionando. Pila débil o sin carga en transmisor; reemplazarla.
Fuerza de apertura insufi ciente.
Acumulación de hielo y nieve alrededor de la puerta.
Ajuste del brazo de la puerta.
Ajuste del recorrido del cierre establecido fuera de la
posición normal de la puerta.
Obstrucciones en el piso.
Aislar mediante desconexión de los conductores al accionador
desde la estación de pared.
Dejar que el motor enfríe durante 20 minutos e intentar
nuevamente.
El transmisor no está programado para el accionador (véase la
página 33).
Si dos o más transmisores no funcionan, hacer que se pruebe
el tablero de control del motor.
Desconectar la puerta del accionador. Operar la puerta a
mano para ubicar la obstrucción o llamar a un especialista de
mantenimiento.
Ajustar la fuerza de apertura. (Véase Ajuste nro. 1 en la
página 32.)
Palear y despejar al área de la puerta.
sentido antihorario hasta lograr el valor deseado. 1/4 de vuelta
equivale a 2.5 cm (1˝ ) de recorrido (véase el Paso 20).
horario hasta lograr el valor deseado. 1/4 de vuelta equivale a
2.5 cm (1˝ ) de recorrido (véase el Paso 19).
Ajustar el brazo de la puerta (véanse los Pasos 17 y 18).
Ajustar el recorrido de cierre con destornillador, girar en sentido
antihorario hasta lograr el valor deseado. 1/4 de vuelta equivale
a 2.5 cm (1˝ ) de recorrido (véase el Paso 19).
Determinar por inspección si hay piedras o hielo bajo la puerta,
en cuyo caso, retirarlos.
RESOLUCIÓN DE PROBLEMAS
MANTENIMIENTO / DIAGNÓSTICO Y
Al activar la puerta cuando ésta está en la posición
completamente abierta, la puerta se mueve durante
1 segundo, para, vuelve a la posición completamente abierta
y la luz comienza a centellear.
La puerta retrocede antes de llegar a la posición
completamente cerrada y la luz del accionador centellea.
La puerta abre completamente y luego la luz centellea. Límite de cierre demasiado alto; trole golpea el perno de
Sensores infrarrojos de seguridad desajustados o
defectuosos.
Obstrucciones en la abertura de la puerta.
Activación del sistema de detección de obstrucciones.
Objetos sueltos o colgando de la puerta activan el sensor
infrarrojo de seguridad.
Fuerza de cierre insufi ciente.
tope.
Se debería revisar la alineación de los sensores infrarrojos de
seguridad según las instrucciones. (Véase el Paso 16.)
Determinar si algún objeto bloquea los sensores infrarrojos de
seguridad.
Determinar si hay atascamiento en la trayectoria de la puerta
(“topes” de puerta, rieles de puerta, etc.).
Retirar objetos.
Ajustar la fuerza de cierre. (Véase Ajuste nro. 1 en la
página 32.)
Ajustar el recorrido de apertura con destornillador, girar en
sentido horario hasta lograr el valor deseado. 1/4 de vuelta
equivale a 2.5 cm (1˝ ) de recorrido (véase el Paso 20).
Por favor, no devolver este producto al concesionario. ¡Llámenos directamente! Nuestros técnicos capacitados responderán cualquier pregunta y/o enviarán cualquier
pieza necesaria. Se nos puede contactar al número telefónico gratuito 1-888-827-3667 para Asistencia al Consumidor, o bien, en conexión a red a www.wayne-dalton.com
35
Page 90

Desglose de piezas de conjunto de riel – Todos los modelos
22
9
22
1b
1a
2b
2a
4
10
4
25
26
22
8
1a
30
23
20
22
26
21
19
1b
18a
3
18b
6
8
22
3
7a
22
29
22
4
11b
5
13
14a
11a
14b
32
28
15
7b
12
31
13
24
24
22
26
Pieza
nro.
nro. Descripción
1a. 325756 Riel derecho, 2.1 m (7’) 1 12. 220959 Soporte de pared frontal 1
325758 Riel derecho, 2.4 m (8’) 1 13. 157559 Perno de cabeza hexagonal de 1/4˝ - 20 x 4˝ con
325760 Riel derecho, 3.0 m (10’) 1 14a. 220958 Soporte frontal - Cadena 1
1b. 325753 Riel izquierdo, 2.1 m (7’) 1 14b. 320696 Soporte frontal - Correa 1
325757 Riel izquierdo, 2.4 m (8’) 1 15. 220956 Soporte de puerta 1
325759 Riel izquierdo, 3.0 m (10’) 1 16. 326207 Chaveta hendida 1
2a. 324527 Conjunto de trole – Cadena 1 17. 326206 Pasador de horquilla de sujeción múltiple
2b. 320697 Conjunto de trole – Correa 1 18a. 325022 Acoplamiento de rueda dentada con casquillo - Cadena 1
3. 309960 Conjunto de pestillo para cadena 1 18b. 325687 Acoplamiento de rueda dentada con casquillo - Correa 1
4. 324273 Brazo de puerta (superior) 1 19. 252106 Conjunto base de rueda dentada 1
5. 324272 Brazo de puerta (inferior) 1 20. 251228 Pernos hexagonales de 5/16˝ - 18 x 2˝ 2
6. 308967 Perno común de 1/4˝ - 20 x 3/4˝ 2 21. 221014 Tubos espaciadores 2
7a. 325682 Cadena, 2.1 m (7’) 1 22. 220999 Tuerca KEP de 5/16˝ - 18
325683 Cadena, 2.4 m (8’) 1 23. 157143 Perilla roja de desenganche 1
325684 Cadena, 3.0 m (10’) 1 24. 157665 Tuercas de ajuste 2
7b. 325685 Correa, 2.1 m (7’) 1 25. 324270 Conjunto de tapa de rueda dentada 1
325686 Correa, 2.4 m (8’) 1 26. 157600 Perno autoremachante de 5/16˝ - 18 x 1/2˝ 3
325572 Correa, 3.0 m (10’) 1 27. 324200 Casquillo de nilón con reborde 1
8. 157510 Tornillo de montaje de 1/4˝ -20 x 5/8˝ para cabezal de motor 4 28. 157561 Contratuercas 2
9. 220960 Soporte espaciador de riel 3 ó 4 29. 157602 Pernos de carruaje de 5/16˝ - 18 x 1/2˝
10. 294674 Tope de riel con tornillo de fijación 1 30. 309907 Pernos de carrueje de cabeza plana de 5/16˝ - 18 x 1/2˝
11a. 318113 Conjunto de polea-guía de cadena 1 31. 320693 Resortes de tension - Correa 2
11b. 320704 Conjunto de polea-guía de correa 1 32. 324200 Casquillo de nilón con reborde - Correa 2
36
Por favor, no devolver este producto al concesionario. ¡Llámenos directamente! Nuestros técnicos capacitados responderán cualquier pregunta y/o enviarán cualquier
Nro. por
unidad nro.
Pieza
nro. Descripción
contratuerca
de 5/16˝ x 1-1/4˝
16
27
17
pieza necesaria. Se nos puede contactar al número telefónico gratuito 1-888-827-3667 para Asistencia al Consumidor, o bien, en conexión a red a www.wayne-dalton.com
Nro. por unidad
1
1
Según sea necesario
Según sea necesario
Según sea necesario
Page 91

18
Desglose de piezas del conjunto del accionador y accesorios – Todos los modelos
3
16
10
5
19
21
20
22
15
18
14
15
15
9
27
28
11
4
12
13
8
1
7
17
e
r
p
a
O
t
e
o
T
D
o
Press
o
r
Here
28
29
23
Pieza
nro.
nro. Descripción
1. 157167 Bastidor 1 16. 301675 Abrazadera de capacitor 1
2. 325017 Motor de 0.5 hp 1 17. 252118 Juego de sensor infrarrojo de seguridad
3. 306131 Tablero de control del motor 1 18. 252092 Conjunto de límites 1
4. 306364 Cordón de suministro eléctrico 1 19. 249321 Interruptor de diodo emisor de luz 1
5. 260570 Capacitor de 0.5 hp 1 20. 260556 Engranaje motriz de límites 1
6. 306486 Cableado preformado 1 21. 157039 Disco de interruptor 1
7. 269028 Receptáculo de bombilla 1 22. 260557 Eje, impulsor de límites 1
8. 260552 Lente 1 23. 157055 Ajustador de límites 2
9. 252994 Supresor de sobretensiones
transitorias MOV
10. 252993 Interruptor de límites 1 25. 311365 Estación multifunción inalámbrica de pared 1
11. 325567 Sub-bastidor 1 26. 312962 Minitransmisor de 3 botones 1 ó 2
12. 325067 Tapa de extremo (negra) 1 27. 157666 Tuerca hexagonal #10-32 3
13. 325066 Carcasa (negra) 1 29. 157496 Espaciador de nilón para motor 3
14. 325020 Impulsión de transmisión 1
15. 251248 Tornillo de 1/4˝ - 20 x 3/8˝ 7
6
26
2
Nro. por
unidad nro.
25
Pieza nro.
Descripción
cableado
1 24. 306134 Acceso inalámbrico sin llave de 5 botones 1
24
Nro. por
unidad
1
DESGLOSE DE PIEZAS
Por favor, no devolver este producto al concesionario. ¡Llámenos directamente! Nuestros técnicos capacitados responderán cualquier pregunta y/o enviarán cualquier
pieza necesaria. Se nos puede contactar al número telefónico gratuito 1-888-827-3667 para Asistencia al Consumidor, o bien, en conexión a red a www.wayne-dalton.com
37
Page 92

Accesorios del Prodrive
®
Minitransmisor de tres botones
para visera
Estación de lujo para pared,
cableada
Estación inalámbrica multifunción
de operación a radiofrecuencia,
para instalación en pared
Acceso inalámbrico
sin llave
e
r
p
a
O
t
e
o
T
D
o
Press
o
r
Here
Teclado numérico de 10 dígitos que
permite la operación del accionador de
la puerta del garaje desde el exterior
mediante la introducción de un código
personal programable en un teclado
numérico. Se lo puede programar para
cientos de puertas.
Controla hasta 6 puertas o accesorios inalámbricos.
Incluye abrazadera para visera.
Permite el control independiente arriba / abajo de la
puerta y encendido / apagado de la luz superior.
Unidad completamente inalámbrica con control independiente para abrir y cerrar la puerta, control independiente para encender y apagar la luz, apertura
automática para mascotas, temporizador de cierre
demorado para salir y botón de programación.
Teclado numérico de 5 dígitos que permite la operación del accionador de la puerta del garaje desde
el exterior mediante la introducción de un código
personal programable en un teclado numérico. Se lo
puede programar para cientos de puertas.
Cable desconector exterior
con llave
Interruptor de llave exterior
Carrete de alambre conductor
Sensores infrarrojos de seguridad
cableados
Recomendado para todo garaje tipo bóveda, sin
puerta de acceso.
Utilizado para abrir la puerta automáticamente
desde afuera del garaje cuandoquiera que el control
remoto no esté disponible. Enviado con 2 llaves.
80 pies, calibre 22, 2 conductores polarizados.
Homologado por UL (CL-2, 75° C).
Los sensores de inversión se comunican con el
accionador de la puerta mediante conexiones
directas cableadas para detectar obstrucciones en
la trayectoria de la puerta y reaccionan mediante el
retroceso de la puerta.
38
Por favor, no devolver este producto al concesionario. ¡Llámenos directamente! Nuestros técnicos capacitados responderán cualquier pregunta y/o enviarán cualquier
pieza necesaria. Se nos puede contactar al número telefónico gratuito 1-888-827-3667 para Asistencia al Consumidor, o bien, en conexión a red a www.wayne-dalton.com
Page 93

Plantilla recortable para ayudar en la instalación
PLANTILLA DE PERFORACIÓN
Perforar agujero piloto de 3/32˝
Pre-drill 3/32” pilot hole
Plantilla para la estación
multifunción de pared
Perforar agujero piloto de 5/64˝
Pre-drill 5/64” pilot hole
Plantilla de acceso sin llave
de 5 botones
Por favor, no devolver este producto al concesionario. ¡Llámenos directamente! Nuestros técnicos capacitados responderán cualquier pregunta y/o enviarán cualquier
pieza necesaria. Se nos puede contactar al número telefónico gratuito 1-888-827-3667 para Asistencia al Consumidor, o bien, en conexión a red a www.wayne-dalton.com
39
Page 94

Por favor, no devolver este producto al concesionario
¡Llámenos directamente! Nuestros técnicos capacitados responderán
cualquier pregunta y/o enviarán cualquier pieza necesaria.
Llámenos gratuitamente:
(888) 827-3667
Gracias por su compra
www.wayne-dalton.com
40
Por favor, no devolver este producto al concesionario. ¡Llámenos directamente! Nuestros técnicos capacitados responderán cualquier pregunta y/o enviarán cualquier
pieza necesaria. Se nos puede contactar al número telefónico gratuito 1-888-827-3667 para Asistencia al Consumidor, o bien, en conexión a red a www.wayne-dalton.com
Page 95

®
GARAGE DOOR OPENER
GARANTÍA LIMITADA DE POR VIDA
El Fabricante garantiza que los componentes electrónicos y mecánicos (excluyendo el motor) del Accionador Prodrive® para puertas de
garaje estarán libres de defectos en materiales y mano de obra durante un período de UN AÑO (Modelos 3220C, 3221C, 3222C,
3320B, 3322B, 3220C-Z, 3221C-Z, 3222C-Z, 3320B-Z, 3322B-Z) y de CINCO AÑOS (Modelos 3224C, 3324B, 3224C-Z, 3324B-Z) a
partir de la fecha de instalación, siempre y cuando se lo instale correctamente y reciba mantenimiento y servicio bajo el régimen de uso
y servicio especificado.
El motor está garantizado durante CINCO AÑOS (Modelos 3220C, 3221C, 3320B, 3220C-Z, 3221C-Z, 3320B-Z) y de POR VIDA
(Modelos 3222C, 3224C, 3322B, 3324B, 3222C-Z, 3224C-Z, 3322B-Z, 3324B-Z) contra defectos en materiales y mano de obra. Las
pilas no están garantizadas.
La presente Garantía limitada se extiende al propietario de vivienda original, siempre que el Accionador Prodrive® para puertas de
garaje esté instalado en su lugar de residencia primaria. Esta Garantía limitada no es transferible. La Garantía limitada es pertinente a
propiedad residencial únicamente.
NINGÚN EMPLEADO, DISTRIBUIDOR O REPRESENTANTE ESTÁ AUTORIZADO PARA CAMBIAR LA GARANTÍA LIMITADA QUE ANTECEDE
DE NINGUNA MANERA NI CONCEDER NINGUNA OTRA GARANTÍA EN NOMBRE DEL FABRICANTE.
El Fabricante no será responsable por daño alguno a sus productos o causados por sus productos debido a instalación,
almacenamiento inadecuado, servicio no autorizado, alteración de productos, descuido o abuso, cualesquier actos de fuerza mayor
fuera del control del Fabricante (tales como, pero no limitados a, rayos, sobretensiones eléctricas, daños por agua, etc.), o al intento de
utilizar los productos para un uso distinto a su uso normal previsto o para su propósito específico. La Garantía limitada anterior no
cubre desgaste normal ni ningún daño fuera del control del Fabricante. Esta Garantía limitada no cubre el costo de la mano de obra
para reemplazos.
ESTA GARANTÍA LIMITADA AMPARA UN PRODUCTO PARA CONSUMIDORES TAL COMO SE LO DEFINE EN “THE MAGNUSON-MOSS
WARRANTY ACT” (LEY DE MAGNUSON-MOSS). NINGUNA GARANTÍA, EXPRESA O IMPLÍCITA (INCLUYENDO PERO NO LIMITADA A, LA
GARANTÍA DE COMERCIABILIDAD O IDONEIDAD PARA UN PROPÓSITO PARTICULAR) SE EXTENDERÁ MÁS ALLÁ DEL PERÍODO DE
TIEMPO CONSIGNADO EN LETRA NEGRITA SUBRAYADA EN ESTA GARANTÍA, ARRIBA.
Las reclamaciones por defectos en materiales y mano de obra cubiertas por esta Garantía limitada serán hechas por escrito, dentro del
período de garantía, al concesionario de quien se compró el producto. El Fabricante podrá enviar un representante de mantenimiento, o
bien, podría requerir que el producto sea devuelto al Fabricante, por cuenta del comprador, para inspección. Si a juicio del Fabricante,
el producto tiene defectos en materiales o mano de obra, éste será reemplazado o reparado a opción del Fabricante, sin costo alguno,
a excepción del transporte autorizado y la mano de obra de reemplazo. La unidad de reemplazo podría ser un modelo equivalente que
ha sido reconstruido en la fábrica. El resto del período original de la Garantía limitada se aplicará a la unidad reparada o reemplazada.
LOS RECURSOS PARA EL COMPRADOR AQUÍ DESCRITOS SON EXCLUSIVOS Y PREVALECEN SOBRE CUALQUIER OTRO RECURSO, LA
RESPONSABILIDAD DEL FABRICANTE, SEA EN CONTACTO, AGRAVIO, BAJO CUALQUIER GARANTÍA O DE CUALQUIER OTRA MANERA,
NO SE EXTENDERÁ MÁS ALLÁ DE SU OBLIGACIÓN DE REPARAR O REEMPLAZAR, A SU DISCRECIÓN, CUALQUIER PRODUCTO O PIEZA
DETERMINADA, POR EL FABRICANTE, DEFECTUOSA CON RESPECTO A MATERIALES O MANO DE OBRA. EL FABRICANTE NO ASUME
RESPONSABILIDAD ALGUNA POR EL COSTO DE RETIRO O INSTALACIÓN NI SERÁ RESPONSABLE POR NINGÚN DAÑO DIRECTO,
INDIRECTO, ESPECIAL O EMERGENTE DE NINGUNA NATURALEZA.
Esta Garantía limitada brinda al comprador original del producto derechos legales específicos; el comprador original también podría
tener otros derechos, los cuales varían de un estado a otro. Sin embargo, algunos Estados no permiten limitaciones en la duración de
las garantías implícitas o la exclusión o limitación de daños incidentales o emergentes, por lo cual las limitaciones o exclusiones que
anteceden podrían ser no pertinentes en algunos casos.
Por favor, no devolver este producto al concesionario. ¡Llámenos directamente! Nuestros técnicos capacitados responderán cualquier pregunta y/o enviarán cualquier
pieza necesaria. Se nos puede contactar al número telefónico gratuito 1-888-827-3667 para Asistencia al Consumidor, o bien, en conexión a red a www.wayne-dalton.com
41
Page 96

Información sobre patentes
Modelos: 3220C, 3221C, 3222C, 3224C, 3320B, 3322B, 3324B, 3220C-Z, 3221C-Z, 3222C-Z, 3224C-Z, 3320B-Z, 3322B-Z, 3324B-Z
Fabricado al amparo de las patentes estadounidenses y métodos siguientes: D413,579; D505,393; 6,326,754; 6,897,630; 6,903,650; 7,109,677; 7,116,072; 7,183,732;
7,190,266; 7,193,502; 7,211,975; 7,280,031; 7,327,107; 7,327,108; 7,327,249; 7,375,484; 7,375,612; 7,376,401. Otras patentes estadounidenses y extranjeras
pendientes.
Declaración de la FCC e IC
Información normativa de la FCC:
Este dispositivo respeta el título 15 de la normativa de la FCC. Su funcionamiento está sujeto a dos condiciones: (1) el dispositivo no debe provocar interferencias nocivas y
(2) el dispositivo debe aceptar toda interferencia recibida, incluidas aquellas que podrían ocasionar un funcionamiento no deseado.
Información normativa de IC:
Este aparato digital Clase B satisface todos los requisitos del Canadian Interference Causing Equipment Regulations (Normativa canadiense de equipo que provoca interferencia).
El funcionamiento está sujeto a las dos condiciones siguientes: (1) este dispositivo no puede provocar interferencias nocivas, y (2) este dispositivo ha de aceptar toda interferencia
recibida, incluidas aquéllas que podrían causar un funcionamiento no deseado.
NOTA: Este equipo ha sido sometido a pruebas y se ha determinado que cumple los límites para un dispositivo digital Clase B, de conformidad con el título 15 de la normativa de la
FCC. Estos límites están previstos para brindar protección razonable contra interferencias nocivas en una instalación residencial. Este equipo genera, utiliza y puede radiar energía de
radiofrecuencias y, si no se lo instala y utiliza de conformidad con las instrucciones, podría provocar interferencia nocivas a radiocomunicaciones. Sin embargo, no hay garantía de que
la interferencia no ocurra en una instalación particular. Si este equipo en efecto provoca interferencia nociva a la recepción de radio o televisión, lo cual se puede determinar al apagar
y encender el equipo, se exhorta al usuario a intentar corregir la interferencia mediante una o más de las medidas siguientes: reorientar o reubicar la antena de recepción. Aumentar la
separación entre el equipo y el receptor. Conectar el equipo a un tomacorriente en un circuito diferente al cual el receptor está conectado. Consultar al concesionario o a un técnico de
radio y/o televisión experimentado para solicitar ayuda.
ADVERTENCIA: Cambios o modifi caciones a esta unidad no expresamente aprobados por la parte responsable por el cumplimiento podrían anular la autoridad del usuario para operar
este equipo.
 Loading...