

Page 1

Operating Instructions
Instructions d’Utilisation
Manual de Instrucciones
Notes
Notas
REMINDER: Keep your dated proof of purchase for warranty purposes! Attach it to this manual or file it for safekeeping.
Please read and save these instructions. Read carefully before attempting to assemble, install, operate or maintain the
product described. Protect yourself and others by observing all safety information. Failure to comply with instructions
could result in personal injury and/or property damage! Retain instructions for future reference.
Description
This sewage pump is suitable for
pumping sewage, effluent, wastewater,
groundwater and other nonexplosive,
noncorrosive liquids with up to two
inch solids. The pump includes a wide
angle float switch that turns the pump
on and off as the fluid level rises and
falls.
Unpacking
Inspect this unit before it is used.
Occasionally, products are damaged
during shipment. If the pump or
components are damaged, return the
unit to the place of purchase for
replacement. Failure to do so could
result in serious injury or death.
Operating Instructions Model RPP50
331300-001 8/04
Safety Guidelines
This manual contains information that is
very important to know and understand.
This information is provided for SAFETY
and to PREVENT EQUIPMENT PROBLEMS.
To help recognize this information,
observe the following symbols.
Danger indicates
an imminently
hazardous situation which, if not
avoided, will result in death or serious
injury.
Warning indicates
a potentially
hazardous situation which, if not
avoided, could result in death or
serious injury.
Caution indicates a
potentially
hazardous situation which, if not
avoided, MAY result in minor or
moderate injury.
Notice indicates
important
information, that if not followed, may
cause damage to equipment.
General Safety
Information
1. Know the pump application,
limitations, and potential hazards.
Do not use to pump
flammable or explosive
fluids such as gasoline, fuel
oil, kerosene, etc. Do not
use in flammable and/or explosive
atmospheres. Use pump only with
liquids compatible with pump
component materials. Failure to follow
this warning can result in personal
injury and/or property damage.
2. Make certain that the power source
(electric motor) conforms to the
requirements of the equipment.
Disconnect power before
servicing. If the power disconnect is out of sight, lock
in the open position and
tag it to prevent unexpected
application of power. Failure to do so
could result in fatal electrical shock!
© 2004 Wayne Water Systems
Specifications
Power supply requirements......120V, 60 hz
Circuit requirements..................15 amps (min)
Motor duty.................................Intermittent
Motor .........................................120V, 1 Phase
Horsepower ...............................1/2
Motor full load ..........................6.3 amps
Liquid temperature range ........40°F to 120°F
Max. operating position ...........45
o
from vertical
Dimensions.................................14” x 12”
Intake .........................................2”
Discharge....................................2” NPT female
Cut-in level (factory set)............16”
Cut-out level (factory set) .........7.5”
Differential.................................8.5”
Switch .........................................90
o
wide angle
mechanical tether switch
Power cord.................................18 gauge 3 conductor
w/plug
Construction
Motor housing...........................Cast iron
Volute.........................................Cast iron
Impeller ......................................Glass reinforced PBT
Seal plate....................................Cast Iron
Shaft seal....................................Mechanical
GALLONS PER HOUR AT TOTAL HEAD IN FEET
Model 0 5 10 15
RPP50 5700 4560 3240 900
Performance
1/2 HP Cast Iron
Sewage Pump
For parts, product & service information
visit www.waynepumps.com
!
WARNING
!
DANGER
!
WARNING
!
CAUTION
NOTICE
!
DANGER
Page 2
Garantía Limitada
Durante un (1) año a partir de la fecha de compra, Wayne Water Systems ("Wayne") reparará o reemplazará, según lo decida, para
el comprador original, cualquier pieza o piezas de sus Bombas para cloacas o Bombas de agua ("Producto") que después de un
examen sea(n) hallada(s) por Wayne como defectuosa(s) en su material o mano de obra. Sírvase llamar a la compañía Wayne
(800-237-0987, desde EE.UU) para recibir instrucciones al respecto o comuníquese con el distribuidor más cercano a su
domicilio. Para hacer reclamos bajo esta garantía deberá suministrarnos el número del modelo y el número de serie del
producto. El comprador será responsable de pagar todos los gastos de flete para enviar las piezas o el producto para
que sean reparados o reemplazados.
Esta garantía Limitada no cubre los daños que sufra el producto debido a accidentes, abusos, usos inadecuados,
negligencia, instalación incorrecta, mantenimiento inadecuado o haberse utilizado sin seguir las instrucciones escritas
suministradas por la compañía Wayne.
NO EXISTEN OTRAS GARANTIAS EXPRESAS. LAS GARANTIAS IMPLICITAS INCLUYENDO GARANTIAS EN
RELACION AL MERCADEO O USOS ESPECIFICOS ESTAN LIMITADAS A UN AÑO A PARTIR DE LA FECHA DE
COMPRA. ESTA ES LA UNICA GARANTIA DISPONIBLE Y TODAS LAS REPONSABILIDADES CIVILES, DIRECTAS O
INDIRECTAS, O GASTOS POR DAÑOS INDIRECTOS O CONSECUENTES QUEDAN EXCLUIDOS.
Algunos estados no permiten que se establezcan límites en la duración de las garantías implicitas o no permiten que se
excluyan ni se establezcan límites en los daños por incidentes o consecuencias, por lo tanto los límites antes
mencionados podrían ser no válidos. Esta Garantía Limitada le otorga derechos legales especificos, y usted también
puede tener otros derechos que varian de un Estado a otro..
En ningún caso, bien sea por ruptura del contrato de la garantía, responsabilidad civil (incluyendo negligencia) u otra
causa, Wayne o sus distribuidores serán responsables pon daños especiales, consecuentes ni circunstanciales ni penales,
incluyendo, pero no limitados a la pérdida de ganancias, pérdida de uso del producto o equipos asociados, daños a
equipos asociados, costos de capitales, costos para substituir productos, costos para substituir o reemplazar servicios,
costos por pérdida de productividad, o reclamos de clientes del comprador por dichos daños.
DEBE conservar el recibo de compra con esta garantía. En caso de que necesite hacer un reclamo bajo esta garantía,
DEBERA enviarnos una copia del recibo junto con el material o correspondencia. Sírvase comunicarse con la compañía
Wayne (800-237-0987, en EE.UU.) para recibir autorización e instrucciones para enviar el producto.
NO ENVIE ESTA GARANTIA A WAYNE. Use este documento sólo para mantener sus records.
NO DEL MODELO._______________ NO DE SERIE .__________________________ FECHA DE INSTALACION _____________
ANEXE SU RECIBO AQUI
15 Sp
Manual de Instrucciones
child-proof with padlocks, master
switches, and by removing starter
keys.
10. When wiring an electrically driven
pump such as this, follow all
electrical and safety codes, as well
as the most recent National
Electrical Code (NEC) and the Occupational Safety and Health Act
(OSHA).
Risk of electric shock! Never
connect the green (or green
and yellow) wire to a live
terminal!
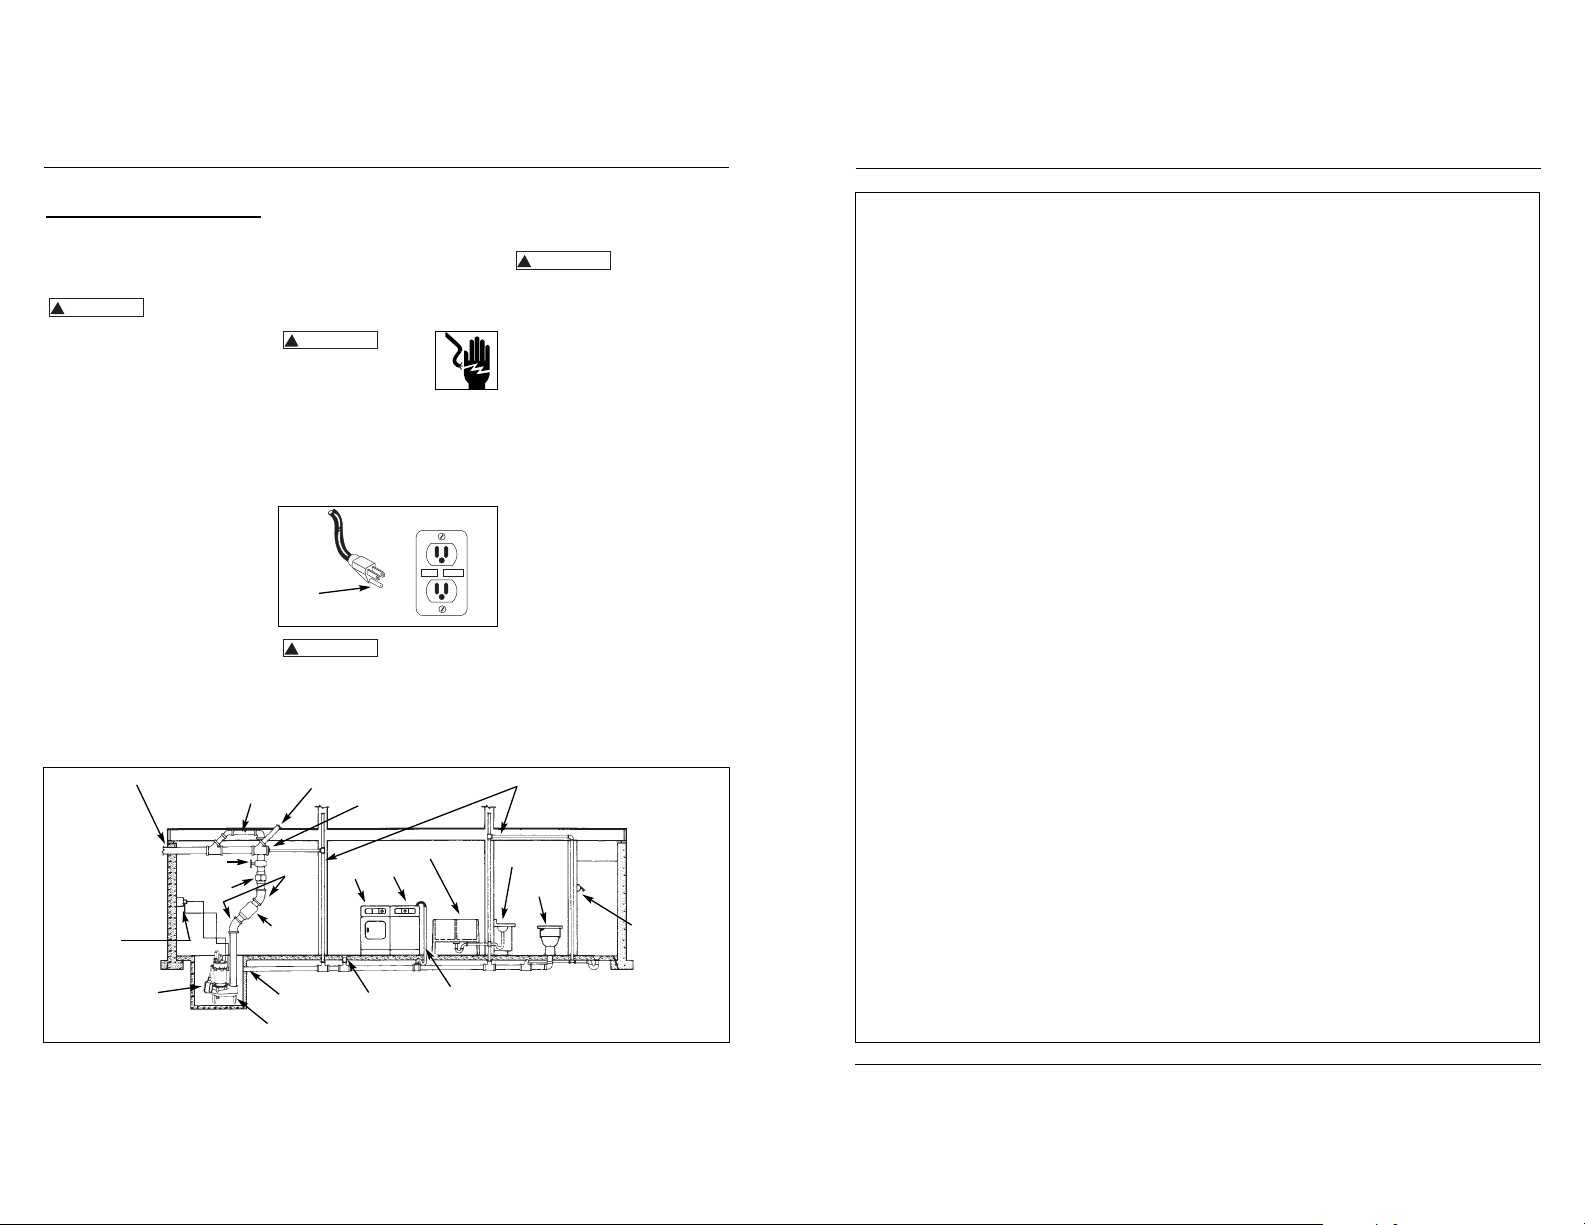
11. This equipment is only for use on
120 volt (single-phase) and is
equipped with an approved 3-conductor cord and 3-prong,
grounding-type plug as shown in
Figure 1.
Where a 2-prong
wall receptacle is
encountered, it must be replaced with a
properly grounded 3-prong receptacle
installed in accordance with the NEC
and local codes and ordinances.
12. All wiring should be performed by a
qualified electrician.
General Safety
Information (Continued)
3. Release all pressure within the
system before servicing any
component.
4. Drain all liquids from the system
before servicing.
This pump contains
dielectric motor oil
for motor heat transfer. Care should be
taken when disposing of this oil. Do
not use this pump in ponds or fountains
because the motor oil can be harmful to
aquatic life.
5. Secure the discharge line before
starting the pump. An unsecured
discharge line will whip, possibly
causing personal injury and/or
property damage.
6. Check hoses for weak and worn
condition before each use, making
certain that all connections are
secure.
7. Periodically inspect the pump and
system components. Perform
routine maintenance as required
(See Maintenance Section).
8. Provide a means of pressure relief
for pumps whose discharge line can
be shut-off or obstructed.
9. Personal Safety:
a. Wear safety glasses at all times
when working with pumps.
b. Keep work area clean,
uncluttered and properly lighted;
replace all unused tools and
equipment.
c. Keep visitors a safe distance from
the work area. Make workshop
2
Operating Instructions
13. It is strongly recommended that this
unit is plugged into a Ground Fault
Circuit Interrupter (GFCI). Consult a
local electrician for installation and
availability.
The pump motor is
equipped with
automatic resetting thermal protector
and may restart unexpectedly.
Protector tripping is an indication of
motor overloading as a result of
operating the pump at low heads (low
discharge restriction), excessively high
or low voltage, inadequate wiring,
incorrect motor conditions, or a
defective motor or pump.
14. This pump is designed to transfer
water in cycles. Using this pump in a
continuous duty application by manipulating the switch to stay on,
will effect the performance and the
life of the product.
15. Protect electrical cord from sharp
objects, hot surfaces, oil, and
chemicals. Avoid kinking the cord.
Replace or repair damaged or worn
cords immediately. Use wire of
adequate size to minimize voltage
drop at the motor.
16. Do not handle a pump or pump
motor with wet hands or when
standing on a wet or damp surface,
or in water.
17. Do not hang this product by the
carry handle. Sewage pumps should
be set firmly on their legs and
supported by rigid piping. This
eliminates twisting and damage
during pump operation.
18. Do not use an extension cord.
Grounding
Blade
Figure 1
Main waste line to sewer or septic tank
Upper level drainage
Three prong
grounded outlet
equipped with a
ground fault
interruptor
2” Discharge pipe
Float switch
Sewage pump passes 2” dia. solids
Cleanout
Vent pipe
2” Gate
Valve
Union
2” Check
Valve
45
o
Elbow
Laundry tubs
Washer
Dryer
Floor drain
Washer drain
Lavatory
Toilet
Shower
Flange
Figure 2 - Typical Installation
www.waynepumps.com
!
WARNING
!
WARNING
!
WARNING
RESET
TEST
!
WARNING
Page 3
Diagnóstico de Averías
Problema Posible(s) Causa(s) Acción a Tomar
La bomba no se
enciende o funciona
La bomba se
enciende y se apaga
constantemente
La bomba se apaga y
se enciende
independientemente
del interruptor (el
sistema de protección
térmica se activa)
La bomba hace
mucho ruido o vibra
excesivamente
La bomba no deja
de funcionar
La bomba funciona
pero bombea muy
poca agua o no
bombea agua
1. El nivel de agua es muy bajo
2. El fusible está quemado o el
cortacircuito se activó
3. El voltaje es muy bajo
4. El motor está dañado
5. El flotante está dañado
6. El impulsor (la bomba está
obstruída con basura)
7. El interruptor está obstruído
8. Nivel de líquido insuficiente
1. El agua se regresa de las tuberías
2. El interruptor/flotante está dañado
3. No instaló una válvula de chequeo o
la válvula de chequeo tiene una
fuga
4. La distancia de la descarga es
inferior al mínimo recomendado
por el fabricante
1. La temperatura del agua es excesiva
2. El interruptor está dañado u
obstruído y por lo tanto la bomba
funciona al seco
3. El voltaje es muy bajo
1. Los cojinetes están desgastados
2. El impulsor está obstruído con
basura o está rota
3. Las tuberías que conectan la bomba
al edificio son muy rígidas o están
muy flojas
1. El interruptor flotante está dañado
2. El intyerruptor flotante no se puede
mover libremente
3. Las tuberiás de descarga están
obstruídas
4. Entrada excesiva de agua o la
bomba no es la adecuada para la
aplicación en que se está usando
1. El voltaje es muy bajo
2. El impulsor o la tubería de descarga
están obstruídos con basura
3. La bomba tiene alguna pieza
dañada o el impulsor está obstruído
4. La bomba no es la adecuada para la
aplicación en que se está usando
5. La válvula de chequeo está atascada
o instalada incorrectamente
6. La válvula de cierre está cerrada
1. El interruptor no encenderá la bomba a menos que la
bomba esté totalmente sumergida en agua
2. Si el fusible está quemado reemplácelo con uno adecuado o
reconecte el cortacircuito
3. Si el voltaje es inferior al mínimo recomendado, chequée el
alambrado del circuito principal de la propiedad. Si es
adecuado, comuníquese con la compañía de electricidad.
4. Envie el motor al centro de servicio autorizado más cercano
a su domicilio o reemplácelo
5. Reemplace el interruptor flotante
6. Si la propela no gira, destápela y límpiela
7. Coloque el interruptor de modo que se mueva sin
problemas. Reubique la bomba si es necesario
8. Cerciórese de que el nivel de líquido esté por lo menos a 33
cm (13”) del fondo de la pileta
1. Instale una válvula de chequeo
2. Reemplace el interruptor flotante
3. Desconecte la válvula de chequeo y revísela a ver si está
bien instalada y funcionando adecuadamente
4. Haga los cálculos una vez más para cerciorarse de que esté
usando una bomba adecuada
1. La bomba no se debe usar para bombear agua a más de
44°C (120° F).
2. Reemplace o reubique la bomba
La bomba puede comenzar a
funcionar sin previo aviso.
Desconéctela del tomacorrientes antes de darle servicio
3. Si el voltaje es inferior al mínimo recomendado, chequée el
alambrado del circuito principal de la propiedad. Si es
adecuado, comuníquese con la compañía de electricidad
1. Cambie la bomba
2. Destape la unidad, limpie el impulsor y/o reemplácelo si está
roto
3. Reemplace una porción de la tubería de descarga con un
conector flexible
1. Reemplace el interruptor flotante
2. Reubique la bomba o limpie la pileta según sea necesario
para que el flotante se mueva sin problemas
3. Desconecte la bomba y limpie la bomba y las tuberías
4. Haga los cálculos una vez más para cerciorarse de que esté
usando una bomba adecuada
1. Si el voltaje es inferior al mínimo recomendado, chequée el
alambrado del circuito principal de la propiedad. Si es
adecuado, comuníquese con la compañía de electricidad.
2. Desconecte el impulsor, límpielo y cerciórese de que esté
bien instalado
3. Reemplace las piezas dañadas o toda la bomba. Si es
necesario limpie las piezas que estén sucias
4. Haga los cálculos una vez más para cerciorarse de que esté
usando una bomba adecuada
5. Desconecte la válvula de chequeo y revísela a ver si está
bien instalada y funcionando adecuadamente
6. Abra la válvula
14 Sp
General Safety
Information (Continued)
Do not walk on wet area
until all power has been
turned off. If the shut-off
box is in basement, call the
electric company to shut-off service to
the house, or call the local fire
department for instructions. Remove
pump and repair or replace. Failure to
follow this warning can result in fatal
electrical shock.
Installation
In any installation
where property
damage and/or personal injury might
result from an inoperative or leaking
pump due to power outages, discharge
line blockage or any other reason, use a
backup system(s).
1. Thread the discharge pipe or pipe
nipple into the discharge
connection.
2. If a check valve is used in a solids
handling system mount the check
valve in a horizontal position or at a
45° angle with the valve pivot on
top. In a vertical position, solids will
tend to lodge on the valve flapper
and can prevent it from opening.
3
Operating Instructions
3. Drill a 1/16" hole in the discharge
pipe approximately 1" to 2” above
the pump discharge when a check
valve is used. The hole prevents air
locking of the pump at the initial
start-up and if it should lose prime.
4. A gate valve should be installed in
the system after the check valve.
This gate valve should be a full port
valve which will pass 2" solids or as
required by state and local codes.
This gate valve permits removal of
the pump and/or check valve for
servicing.
5. A union should be installed
between the check valve and the
pump so the pump can be removed
with least disturbance of the piping.
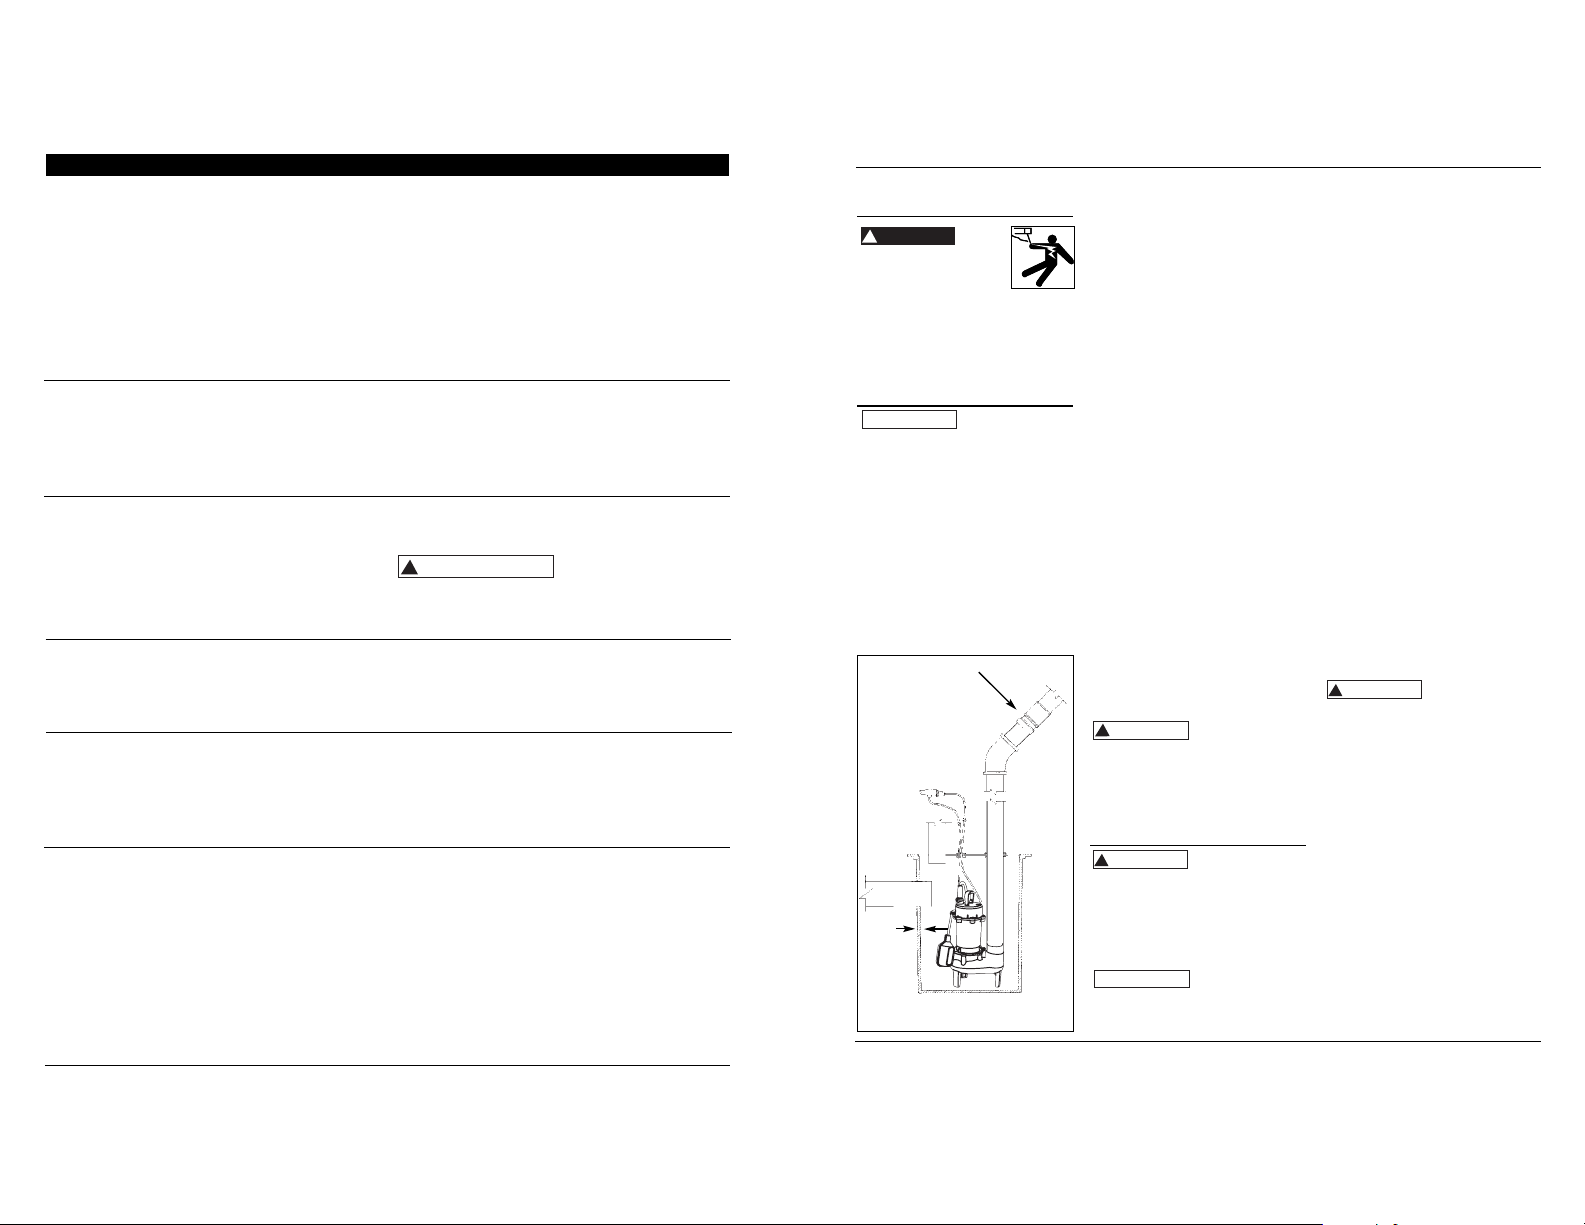
6. The pump has a detachable tether
switch with a piggyback plug (see
figure 3). The length of the tether
(distance of cord from float to
clamp) should not be set shorter
than 3-1/4 inches and should not be
used in a basin smaller than 14
inches in diameter. If using a
differential other than the factory
setting, be sure when the pump
shuts off at least 4” of fluid is left in
the basin so the impeller remains
submerged.
7. When a tether switch is used, rigid
discharge pipe is required. If the
pump is allowed to move, the tether
switch could be restricted by the
basin wall, preventing the pump
from operating.
Before removing
pump from basin
for service, always disconnect electrical
power to pump and control switch. For
any work on pump or switch, ALWAYS
unplug the power cord. Do not just turn
off circuit breaker or unscrew fuse.
Maintenance
Make certain that
the pump is
unplugged before attempting to service
or remove any component. This pump is
assembled in the factory using special
equipment; therefore only authorized
service dealers or qualified electricians
should attempt to repair this unit.
Improper repair can cause an electrical
shock hazard.
The pump contains
oil that may be
under pressure because of heat. Let the
pump cool for a minimum of two hours
before servicing this unit.
Check valve 45
o
Vent
Inlet
Gasket
1/2”
Min.
Clearance
Basin
Figure 3 - Prefabricated Basins
1. Disassembly of the motor prior to
expiration of warranty will void the
warranty. It might also cause
internal leakage and damage to the
unit. If repairs are required, return
the pump to the dealer from whom
it was purchased or call 1-800-237-
0987.
2. After the basin cover is removed
and necessary discharge piping
disconnected, lift pump from basin.
3. Pump should be checked on a
regular basis for proper operation.
If anything has changed since unit
was new, the unit should be
removed and replaced. Only
qualified electricians or service people should attempt to repair this
unit. Improper repair and/or
assembly can cause an electrical
shock hazard.
4. Place the pump in a suitable area
where it can be cleaned thoroughly.
Remove all scale and deposits on
pump.
5. Submerge the complete pump in a
disinfectant solution (10% chlorine
bleach solution) for at least one
hour before handling the pump.
6. Clean all dirt and deposits from the
pump float. Make sure float moves
freely after cleaning.
7. Clean all dirt and deposits away
from pump inlet and volute.
This pump contains
dielectric motor oil
for lubrication and motor heat transfer.
This oil can be harmful to the
environment. Check state
environmental laws before disposing of
this oil. This oil can be harmful to
aquatic life so consideration should be
exercised in the application of this
pump.
www.waynepumps.com
!
PRECAUCION
!
DANGER
NOTICE
!
CAUTION
!
WARNING
NOTICE
!
WARNING
Page 4

13 Sp
Manual de Instrucciones
Informaciones
Generales de Seguridad
(Continuación)
17. No cuelgue la bomba por el mango.
Estas bombas deben estar
firmemente instaladas sobre sus
patas y conectadas a una tubería
rígida. Ésto evita que se mueva y se
dañe durante el uso .
18. No use cordones de extensión.
No camine en un área húmeda
antes de desconectar la
energía eléctrica. Si el
cortacircuito está fuera de su alcance
(en el sótano), llame a la compañía de
electricidad o al cuerpo de bombero
para que le asistan. Desconecte la
bomba y repárela o reemplácela. Si no
sigue estas instrucciones podría morir
electrocutado.
Instalación
Si hay
peligro de
que sufra heridas personales o daños a
su propiedad si la bomba se daña o
tiene fugas debido a interrupciones en
el servicio eléctrico, obstrucciones en la
línea de descarga o cualquier otra
razón, instale un sistema auxiliar.
1. Enrosque la tubería de descarga o el
niple en el orificio de descarga de la
unidad.
2. Si usa una válvula de chequeo, en un
sistema con presencia de sólidos,
instálela en posición horizontal o en
un ángulo de 45° con muñón hacia
arriba. En la posición vertical, los
sólidos tienden a permanecer en las
chapaletas de la válvula y pueden
evitar que se abra.
3. Cuando use una válvula de chequeo,
taladre un orificio de 1,6 mm (1/16”)
en la tubería de descarga
aproximadamente a 2,54 -5,08 cm (1”
ó 2”) por encima del orificio de
descarga de la bomba. Este orificio
evita que el aire obstruya la bomba
al encenderla por primera vez o
cuando pierda el cebado.
4. Debe instalar una válvula de entrada
inmediatamente después de la
válvula de chequeo. Esta válvula
debe permitir el paso de sólidos de
5,08 cm (2”) o lo establecido por los
códigos y ordenanzas locales. Esta
válvula le permite desconectar la
bomba o la válvula de chequeo
cuando vaya a darles servicio.
5. Debe conectar un empalme entre la
válvula de chequeo y la bomba de
modo que pueda desconectar la
bomba fácilmente.
6. Esta bomba tiene un interruptor/
flotante desmontable con un
enchufe incorporado (vea la figura
3). La longitud del cordón entre el
flotante y la abrazadera no debe ser
menos de 8,25 cm (3-1/4”) y no se
debe usar en una pileta de menos de
35,6 cm (14”) de diámetro. Si va a
usar un diferencial diferente al fijado
de fábrica, cerciórese de que cuando
la bomba se apague todavía haya por
lo menos 10,2 cm (4”) de agua en la
pileta de modo que el impulsor
permanezca sumergido.
7. Cuando use un interruptor flotante
debe usar una tubería de descarga
rígida. Si la bomba se mueve, el
interruptor flotante podría hacer
contacto con las paredes de la pileta
y la bomba no funcionaría.
Antes de
sacar la
bomba de la pileta para darle servicio,
siempre desconecte el cordón eléctrico
de la bomba y el interruptor. Antes de
darle servicio a la bomba o al
interruptor SIEMPRE desconecte el
cordón eléctrico. No desactive el
cortacircuito o saque un fusible.
Mantenimiento
Siempre
desconecte el cordón eléctrico antes de tratar de
Válvula de
chequeo 45
o
Entrada
Empaque
darle servicio o desconectar un
componente. Esta bomba se ensambla
en la fábrica usando equipo especiales;
por lo tanto sólo los técnicos
(electricistas) especializados o el
personal de los centros de servicio
autorizado deben tratar de reparar esta
unidad. De lo contrario podría
ocasionar peligro de electrocutamiento.
Esta
bomba
contiene aceite que podría estar bajo
presión debido al calor. Espere a que la
bomba se enfríe por lo menos durante 2
horas antes de darle servicio.
1. Si desmantela el motor antes de la
fecha de expiración de la garantía,
esta quedaría cancelada. Igualmente,
podría ocasionar fugas internas y
daños a la unidad. Si necesita
reparación, envie la bomba a la
tienda donde la compró o
comuníquese con el distribuidor más
cercano a su domicilio.
2. Después de destapar la pileta y
desconectar las tuberías necesarias,
saque la bomba de la pileta.
3. Chequée la bomba periódicamente
para ver si está en buen estado. Si el
sistema ha cambiado después de
instalar la unidad, debe desconectar
y reemplazar la bomba. Sólo
electricistas calificados deben tratar
de reparar esta unidad. Reparaciones
y/o ensamblajes incorrectos podrían
ocasionar peligro de electrocución.
4. Coloque la bomba en un sitio
adecuado para limpiarla
completamente. Quítele todos los
residuos e impurezas a la bomba.
5. Sumerje toda la bomba en una
solución desinfectante (10% de lejía)
por lo menos durante una hora antes
de tocar la unidad.
6. Limpie bien el flotante de la bomba.
Cerciórese de que el flotante se
puede mover libremente después de
limpiarlo.
7. Limpie bien el orificio de entrada de
la bomba y la voluta.
Esta
bomba
contiene aceite para motores
dieléctricos para lubricar el motor y
transferir calor. Este aceite podría
contaminar el ambiente. Consulte las
ordenanzas de contaminación ambiental
antes de tirar este aceite. Este aceite
podría ser dañino para los animales
acuáticos, por lo tanto debe tomar ésto
en consideración cuando vaya a usar la
bomba.
Orificio de
Ventilación
Distancia
Mín. de
1,3 cm
(1/2”)
Figura 3 - Piletas Prefabricadas
Pileta
Troubleshooting Chart
Symptom Possible Cause(s) Corrective Action
Pump will not start or
run
Pump starts and stops
too often
Pump shuts off and
turns on independently
of switch (trips thermal
overload protection)
Pump operates noisily
or vibrates excessively
Pump will not shut off
Pump operates but
delivers little or no
water
1. Water level too low
2. Blown fuse or tripped circuit
breaker
3. Low line voltage
4. Defective motor
5. Defective float switch
6. Impeller (pump filled with
debris)
7. Tangled switch
8. Insufficient liquid level
1. Backflow of water from piping
2. Faulty float switch
3. Check valve not installed or
leaking
4. Discharge head is less than
manufacturer's minimum
1. Excessive water temperature
2. Defective switch or entangled
switch is causing pump to run
dry
3. Low line voltage
1. Worn bearings
2. Debris in impeller cavity or
broken
3. Piping attachments to building
structure too rigid or too loose
1. Defective float switch
2. Float switch movement restricted
3. Restricted discharge (obstruction
in piping)
4. Excessive inflow or pump not
properly sized for application
1. Low line voltage
2. Debris caught in impeller or
discharge
3. Worn or defective pump parts or
plugged impeller
4. Pump not properly sized for
application
5. Check valve stuck closed or
installed backwards
6. Shut off valve closed
1. Pump switch will not turn on unless water covers top of
pump
2. If blown, replace with proper sized fuse or reset breaker
3. If voltage is under recommended minimum, check wiring
size from the main switch on property. If OK, contact power
company.
4. Return for service or replace motor
5. Replace float switch
6. If impeller will not turn, remove housing and remove debris
7. Arrange switch so the switch moves freely. Reposition pump
if necessary
8. Make sure liquid level is at least 13" from the basin floor
1. Install check valve
2. Replace float switch
3. Remove and examine check valve for proper installation
and free operation
4. Recheck all sizing calculations to determine proper pump
size
1. Pump should not be used for water above 120°
2. Replace or reposition pump
Pump may start unexpectedly. Disconnect
power supply before servicing
3. If voltage is under recommended minimum, check wiring
size from the main switch on property. If OK, contact power
company
1. Replace pump
2. Remove housing, clean impeller and/or replace broken
impeller
3. Replace portion of discharge pipe with flexible connector
1. Replace float switch
2. Reposition pump or clean basin as required to provide
adequate clearance for float
3. Remove pump and clean pump & piping
4. Recheck all sizing calculation to determine proper pump
size
1. If voltage is under recommended minimum, check wiring
size from the main switch on property. If OK, contact power
company
2. Remove, clean and check for tightness
3. Replace entire pump. Clean parts if required
4. Recheck all sizing calculations to determine proper pump
size
5. Remove and examine check valve for proper installation
and free operation
6. Open valve
www.waynepumps.com
4
!
CAUTION
!
PELIGRO
AVISO
!
PRECAUCION
!
ADVERTENCIA
AVISO
!
ADVERTENCIA
Page 5

c. Mantenga a los visitantes alejados
del área de trabajo. Cerciórese de
tomar todas las medidas de
seguridad necesarios para evitar
accidentes con niños (use
candados y cortacircuitos y no
deje las llaves al alcance de los
niños).
10. Para instalar el alambrado de
bombas eléctricas, tales como la
descrita en este manual, siga todos
los códigos de seguridad laboral y
electricidad establecidos en su país,
por ejemplo los de la NEC y OSHA
en EE.UU.
¡Peligro de choque eléctrico!
Nunca conecte los cables
verdes o verde con rayas
amarillas, a un terminal con tensión.
11. Este equipo está diseñado sólo para
funcionar en circuitos de 120 voltios
(monofásicos) y está equipado con
un cordón eléctrico de 3 cables y 3
terminales para conexión a tierra tal
como se muestra en la Figura 1.
Si el
tomacorrientes disponible es de dos
orificios, debe reemplazarlo con un
tomacorrientes de 3 orificios. Debe
seguir todos los códigos y ordenanzas
locales para instalar el tomacorrientes.
Informaciones
Generales de Seguridad
(Continuación)
3. Libere toda la presión del sistema
antes de darle servicio a cualquier
componente.
4. Drene todos los líquidos del sistema
antes de darle servicio.
Esta
bomba
contiene aceite de motor dieléctrico
para la transferencia del calor del
motor. Se debe tener cuidado cuando
se deseche este aceite. No use esta
bomba en estanques o fuentes ya que
el aceite de motor puede ser nocivo
para la vida acuática.
5. Asegure la línea de descarga antes
de encender la bomba. De lo
contrario, ésta se enrollará y podría
ocasionarle heridas o daños a su
propiedad.
6. Antes de cada uso, inspeccione las
mangueras, para ver si están
dañadas o desgastados y cerciórese
de que las conexiones estén bien
apretadas.
7. Chequée la bomba y otros
componentes frecuentemente. Déle
el mantenimiento necesario según
las instrucciones en la sección de
mantenimiento.
8. Cerciórese de que haya un sistema
auxiliar de descarga en caso de que
la línea de salida esté fuera de
servicio u obstruída.
9. Seguridad Personal:
a. Siempre use anteojos de
seguridad cuando vaya a trabajar
con la bomba.
b. Mantenga el área de trabajo
limpia, despejada y bien
iluminada; guarde todas la
herramientas que no esté usando.
12 Sp
Manual de Instrucciones
12. Todos los trabajos de electricidad
los debe hacer un electricista
calificado.
13. Es altamente recomendable que
utilice un tomacorrientes que tenga
un sistema de cortacircuito
incorporado. Consúltele a un
electricista local para ver si éstos
están disponibles en su área.
El motor
dee la
bomba tiene un sistema de protección
térmica y puede comenzar a funcionar
sin previo aviso. Si este sistema se
activa es una indicación de que el
motor está sobrecargado debido a que
la distancia de descarga es muy baja,
voltajes excesivamente bajos o altos ,
alambrado inadecuado, condiciones
inadecuadas para el motor o el motor o
la bomba están dañados.
14. Esta bomba está diseñada para
funcionar en ciclos. Si le modifica el
interruptor para que funcione
continuamente, afectará el
rendimiento y la duración de la
unidad.
15. Proteja el cordón eléctrico contra
objetos afilados, superficies
calientes, aceite y químicos. Evite
que el cordón se enrolle. Reemplace
o repare el cordón inmediatamente
cuando se dañe. Use cordones del
calibre adecuado para evitar
pérdidas de voltaje del motor.
16. No toque la bomba o el motor con
las manos mojadas o cuando esté
parado en una superficie húmeda o
en agua.
Terminal para
conexión a
tierra
Figura 1
Bateas
Lavadora
Secadora
Lavamanos
Inodoro
Ducha
Tubería principal hacia el sistema de cloacas
o pozo séptico
Drenaje del segundo piso
Tomacorrientes de 3
orificios conectado a
tierra con dispositivo
contra cortocircuitos
incorporado
Tubería de descarga
de 5,08 cm (2”)
Interruptor/flotante
Bomba para efluentes
Orificio de limpieza
Tubería de ventilación
Válvula de entrada
de 5,08 cm (2”)
Empalme
Válvula
de chequeo
de 5,08 cm (2”)
Codo
de 45
o
Drenaje
Drenaje para la lavadora
Brida
Figura 2 - Instalación Típica
Limited Warranty
For one (1) year from the date of purchase, Wayne Water Systems ("Wayne") will repair or replace, at its option, for the
original purchaser any part or parts of its Sump Pumps or Water Pumps (“Product”) found upon examination by Wayne
to be defective in materials or workmanship. Please call Wayne (800-237-0987) for instructions or see your dealer. Be
prepared to provide the model number and the serial number when exercising this warranty. All transportation charges
on Products or parts submitted for repair or replacement must be paid by purchaser.
This Limited Warranty does not cover Products which have been damaged as a result of accident, abuse, misuse, neglect,
improper installation, improper maintenance, or failure to operate in accordance with Wayne’s written instructions.
THERE IS NO OTHER EXPRESS WARRANTY. IMPLIED WARRANTIES, INCLUDING THOSE OF MERCHANTABILITY
AND FITNESS FOR A PARTICULAR PURPOSE, ARE LIMITED TO ONE YEAR FROM THE DATE OF PURCHASE. THIS IS
THE EXCLUSIVE REMEDY AND ANY LIABILITY FOR ANY AND ALL INDIRECT OR CONSEQUENTIAL DAMAGES OR
EXPENSES WHATSOEVER IS EXCLUDED.
Some states do not allow limitations on how long an implied warranty lasts, or do not allow the exclusions or limitations
of incidental or consequential damages, so the above limitations might not apply to you. This limited warranty gives you
specific legal rights, and you may also have other legal rights which vary from state to state.
In no event, whether as a result of breach of contract warranty, tort (including negligence) or otherwise, shall Wayne or
its suppliers be liable for any special, consequential, incidental or penal damages including, but not limited to loss of
profit or revenues, loss of use of the products or any associated equipment, damage to associated equipment, cost of
capital, cost of substitute products, facilities, services or replacement power, downtime costs, or claims of buyer’s customers for such damages.
You MUST retain your purchase receipt along with this form. In the event you need to exercise a warranty claim, you
MUST send a copy of the purchase receipt along with the material or correspondence. Please call Wayne (800-237-0987)
for return authorization and instructions.
DO NOT MAIL THIS FORM TO WAYNE. Use this form only to maintain your records.
MODEL NO._______________ SERIAL NO.__________________________ INSTALLATION DATE_____________
ATTACH YOUR RECEIPT HERE
5
Operating Instructions
www.waynepumps.com
!
ADVERTENCIA
!
ADVERTENCIA
!
ADVERTENCIA
RESET
TEST
!
ADVERTENCIA
Page 6

RECORDATORIO: ¡Guarde su comprobante de compra con fecha para fines de la garantía!
Adjúntela a este manual o archívela en lugar seguro.
Sírvase leer y guardar estas instrucciones. Lea con cuidado antes de tratar de armar, instalar, manejar o darle servicio
al producto descrito en este manual. Protéjase Ud. y a los demás observando todas las reglas de seguridad. El no
seguir las instrucciones podría resultar en heridas y/o daños a su propiedad. Guarde este manual como referencia.
Descripción
Esta bomba para aguas negras es
adecuada para bombear aguas
cloacales, efluentes, residuales, agua
subterránea y otros líquidos no
explosivos, no corrosivos con sólidos de
hasta 2 pulgadas (5 cm). La bomba
incluye un interruptor de flotador de
ángulo amplio que enciende y apaga la
bomba a medida que el nivel del fluido
aumenta y disminuye.
Desempaque
Inspeccione esta unidad antes de
usarla. Ocasionalmente, los productos
son dañados durante el envío. Si la
bomba o los componentes están
dañados, devuelva la unidad al lugar
donde la compró para que le sea
reemplazada. Si no lo hace podría
ocasionar lesiones graves o la muerte.
Manual de Instrucciones Modelo RPP50
331300-001 8/04
Medidas de
Seguridad
Este manual contiene información que
es muy importante que sepa y
comprenda. Esta información se la
suministramos como medida de
SEGURIDAD y para EVITAR PROBLEMAS
CON EL EQUIPO. Debe reconocer los
siguientes símbolos.
Ésto le
indica
que hay una situación inmediata que LE
OCASIONARIA la muerte o heridas de
gravedad.
Ésto le
indica
que hay una situación que PODRIA
ocasionarle la muerte o heridas de
gravedad.
Ésto le
indica
que hay una situación que PODRIA
ocasionarle heridas no muy graves.
Ésto le
indica
una información importante, que de no
seguirla, le podría ocasionar daños al
equipo.
Informaciones
Generales de
Seguridad
1. Familiarícese con las aplicaciones
adecuadas para el equipo, sus
limitaciones y los peligros al usarlo.
No use esta bomba para
bombear fluídos inflamables
o explosivos tales como
gasolina, combustibles, kerosene, etc.
No la use en atmósferas inflamables o
explosivas. La bomba sólo se debe usar
para bombear agua pura. De lo
contrario pudiera ocasionarle heridas
de gravedad y/o la muerte.
2. Cerciórese de que el motor eléctrico
sea adecuado para el equipo.
Desconecte el cordón
eléctrico antes de darle
servicio. Si el tomacorrientes
está fuera de su alcance, apague la
unidad con el interruptor y asegúrelo
de modo que la unidad no pueda
encenderse accidentalmente. ¡De no
hacerlo podría morir electrocutado!
© 2004 Wayne Water Systems
Especificaciones
Requerimientos del circuito ..................120V, 60 hz
Requerimientos eléctricos .....................15 amperios (mín)
Ciclo del motor.......................................Intermitente
Motor......................................................120V, 1 fase
Caballos de fuerza ................................1/2
Motor (Cap. máx.)..................................6.3 amperios
Temp. de funcionamiento.....................4°C a 44°C (40°F a 120°F)
Posición máx. de funcionamiento ........45
o
de la posición vertical
Dimensiones...........................................35,6 cm X 30,5 cm (14” x 12”)
Orificio de Entrada ................................5,05 cm (2”)
Orificio de Salida....................................5,05 cm (2”) NPT (hembra),
................................................................7,6 cm (3”) NPT (macho)
Nivel para encender
(fijado de fábrica) ..................................40,6 cm (16”)
Nivel para apagar (fijado de fábrica) ...19,1 cm (7.5”)
Diferencial ..............................................21,6 cm (8.5”)
Interruptor .............................................interruptor mecánico de
ángulo de 90
o
Cordón eléctrico.....................................calibre 18 con 3 cables y
enchufe
Materiales de fabricación
Cubierta del motor....Hierro colado
Caja espiral.................Hierro colado
Impulsor .....................Plástico PBT reforzado con
vidrio
Sello de la placa .........Hierro colado
Sello del eje................Mecánico
RPP50 5700 4560 3240 900
Rendimiento
Bomba de Aguas
Negras de Hierro
Fundido de 1/2 HP
LITERS POR HORA A LA DISTANCIA TOTAL DE
DESCARGA EN PIES
Modelo 0 5 10 15
MÉMENTO: Gardez votre preuve datée d'achat à fin de la garantie!
Joignez-la à ce manuel ou classez-la dans un dossier pour plus de sécurité.
S’il vous plaît lire et conserver ces instructions. Lire attentivement avant de monter, installer, utiliser ou de procéder à
l’entretien du produit décrit. Se protéger ainsi que les autres en observant toutes les instructions de sécurité, sinon, il
y a risque de blessure et/ou dégâts matériels! Conserver ces instructions comme référence.
6
Description
Cette pompe d'égout convient pour
pomper les égouts, les effluents, les
eaux usées, les eaux de fond, et autres
liquides non-explosifs, non-corrosifs
jusqu'à deux pouces ou cinq
centimètres de solides. La pompe inclut
un interrupteur à flotteur à angle large
qui met la pompe en marche et l'arrête
tandis que le niveau de fluide monte et
descend.
Déballage
Inspecter cet appareil avant de l'utiliser.
À l'occasion, les produits sont
endommagés durant l'expédition. Si la
pompe ou les composants sont
endommagés, rapporter l'appareil à
l'endroit d'achat pour son remplacement. Ne pas suivre ces instructions
pourraient mener à de graves blessures
ou à la mort.
Instructions d’Utilisation Modèle RPP50
331300-001 8/04
Directives de
Sécurité
Ce manuel contient de l’information
très importante qui est fournie pour la
SÉCURITÉ et pour ÉVITER LES
PROBLÈMES D’ÉQUIPEMENT.
Rechercher les symboles suivants pour
cette information.
Danger
indique
une situation hasardeuse imminente
qui résultera en perte de vie ou
blessures graves.
Avertis-
sement
indique une situation hasardeuse
potentielle qui peut résulter en perte
de vie ou blessures graves.
Attention
indique
une situation hasardeuse potentielle qui
peut résulter en blessures.
Avis
indique
l’information importante pour éviter le
dommage de l’équipement.
Généralités sur la
Sécurité
1. Se familiariser avec l’application, les
limites et les hasards potentiels de
la pompe.
Ne pas utiliser pour le
pompage des liquides
inflammables ou explosifs tels
que l’essence, l’huile à chauffage, le
kérosène, etc. Ne pas utiliser dans une
atmosphère inflammable et/ou
explosive. Utiliser la pompe seulement
avec les liquides qui sont compatibles
avec les pièces détachées de la pompe.
Ne pas suivre cet avertissement peut
résulter en blessure grave et/ou dégâts
matériels.
2. S’assurer que la source de courant
(moteur électrique) se conforme
aux exigences de l’équipement..
© 2004 Wayne Water Systems
Spécifications
Alimentation requiert ......................120V, 60 hz
Exigences de circuit...........................15 A (min)
Service du moteur.............................Intermittent
Moteur...............................................120V, Monophasé
Horse Power .....................................1/2
Moteur à pleine charge....................6.3 A
Gamme de température
du liquide ..........................................4°C à 44°C (40°F à 120°F)
Position de fonctionnement max. ...45
o
du vertical
Dimensions ........................................35,6 cm X 30,5 cm
(14 po x 12 po)
Entrée ................................................5,05 cm (2 po)
Décharge ...........................................5,05 cm (2 po) NPT femelle,
7,6 cm (3 po) NPT mâle
Niveau de démarrage
(réglé à l’usine)..................................40,6 cm (16 po)
Niveau d’arrêt (réglé à l’usine) ........19, cm (7.5 po)
Différentiel........................................21,6 cm (8.5 po)
Interrupteur.......................................90
o
mécanique à longe,
angle large
Cordon d’alimentation.....................calibre 18, 3 fils avec fiche
Fabrication
Carter du moteur.................Fonte
Volute...................................Fonte
Turbine.................................PBT renforcé de verre
Plaque d’étanchéité ............En fonte
Joint d’arbre ........................Mécanique
GALLONS PAR HEURE À PLEINE HAUTEUR EN
PIEDS
Modèle 0 5 10 15
RPP50 5700 4560 3240 900
Rendement
Pompe d'égout
de fonte 1/2 HP
!
!
DANGER
!
AVERTISSEMENT
!
ATTENTION
AVIS
AVERTISSEMENT
!
PELIGRO
!
ADVERTENCIA
!
PRECAUCION
AVISO
!
ADVERTENCIA
!
PELIGRO
Page 7

Garantie Limitée
Pendant un (1) an à partir de la date d'achat, Wayne Water Systems (« Wayne ») réparera ou remplacera, à sa
discrétion, à l'acheteur original toute pièce ou pièces de ses Pompes de puisard ou ses Pompes à l'eau (le « Produit »)
qui s'avère défectueux au niveau des matériaux ou de la main d'œuvre suite à un examen de la part de Wayne. S’il
vous plaît appeler Wayne (800-237-0987) pour des instructions ou contacter votre marchand. S’assurer d’avoir, à votre
disposition, le numéro du modèle afin d’effectuer cette garantie. Les frais de transportation des Produits ou pièces
soumis pour la réparation ou le remplacement sont la responsabilité de l’acheteur.
Cette Garantie Limitée ne couvre pas les Produits qui se sont fait endommagés en résultat d’un accident, utilisation
abusive, mauvais usage, négligence, l’installation incorrecte, entretien incorrect, ou manque d’utilisation
conformément aux instructions écrit de Wayne.
IL N’EXISTE AUCUNE AUTRE GARANTIE OU AFFIRMATION. LES GARANTIES EXPRIMÉES, Y COMPRIS CELLES DE
COMMERCIALISABILITÉ ET D’ADAPTION À UNE FONCTION PARTICULIÈRE, SONT LIMITÉES À UN AN À
COMPTER DE LA DATE D’ACHAT. CECI EST LA REMÈDE EXCLUSIVE ET N’IMPORTE QUELLE RESPONSABILITÉ
POUR N’IMPORTE QUEL ET TOUT DOMMAGES INDIRECTS OU DÉPENSES QUOI QUE SE SOIT EST EXCLUS.
Certaines Provinces n’autorisent pas de limitations de durée pour les garanties implicites, ni l’exclusion ni la limitation
des dommages fortuits ou indirects. Les limitations précédentes peuvent donc ne pas s’appliquer. Cette garantie
limitée donne, à l’acheteur, des droits légales précis, et vous pouvez avoir autres droits légales qui sont variable d’une
Province ou d’un État à l’autre.
En aucun cas, soit par suite d’un rupture de contrat de garantie, acte dommageable (y compris la négligence) ou
autrement, ni Wayne ou ses fournisseurs seront responsables pour aucune dommage spéciale, incidentel ou pénal, y
compris, mais pas limité à la perte de profits ou recettes, la perte d’usage des produits ou n’importe quel équipement
associé, dommage à l’équipement associé, coût de capital, coût de produits remplaçants, aménagements, services ou
abilité de remplaçement, coût de temps que le produit n’est pas en service, ou la réclamation des clients de l’acheteur
pour ces dommages.
Vous DEVEZ garder votre facture d’achat avec ce bulletin. Il est NÉCESSAIRE d’envoyer une COPIE de la recette
d’achat avec le matériel ou correspondance afin d’effectuer une réclamation de la garantie. S’il vous plaît appeler
Wayne (800-237-0987) pour l’autorisation et instructions concernant le renvoi.
NE PAS ENVOYER, PAR LA POSTE, CE BULLETIN À WAYNE. Utiliser ce bulletin seulement pour vos archives.
Nº DU MODÈLE__________________________ Nº DE SÉRIE________________________________
DATE D’INSTALLATION_____________________________________________
FIXER VOTRE FACTURE ICI
Instructions d’Utilisation
10 Fr
8. Fournir un système de dégagement
de pression pour les pompes avec
lignes de décharge qui peuvent
devenir obstruées ou coupées.
9. Sécurité Personnelle:
a. Toujours porter des lunettes de
sécurité si vous travaillez avec les
pompes.
b. Garder l’endroit de travail propre,
non-encombré et bien illuminé.
Ranger tous les outils et
l’équipement après l’usage.
c. Garder les visiteurs à une distance
sans danger de l’endroit de
travail. Protéger l’atelier pour les
enfants avec des cadenas,
interrupteurs principaux et en
enlevant les clefs de démarrage.
10. Pendant l’installation de fils d’une
pompe électrique telle que celle-ci,
suivre tous les codes de sécurité ainsi
que les codes récents du National
Electrical Code (NEC) et l’ Occupational Safety and Health Act (OSHA).
Risque de secousse
électrique! Ne jamais
brancher le fil vert (ou vert et jaune) à
une borne électrisée!
11. Cet équipement est conçu pour un
circuit de 120 v (monophasé) et est
équipé d’un cordon approuvé à trois
conducteurs et une fiche de terre à
trois broches tel qu’indiqué dans la
Figure 1.
Remplacer
les prises
à deux broches avec des prises à trois
broches mises à la terre correctement
selon les codes et ordonnances locaux
et de NEC.
12. Toute installation de fils doit être
efectuée par un électricien qualifié.
Généralités sur la
Sécurité (Suite)
Débrancher la source de
courant avant de procéder à
l’entretien et aux réparations.
Si la source d’alimentation est hors de
la vue, la verrouiller dans la position
ouverte et l’étiqueter afin d’éviter que
l’appareil soit mis sous tension
accidentellemen. Ne pas suivre ces
directives peut résulter en choc
électrique!
3. Dissiper toute la pression dans le
système avant de procéder à
l’entretien et aux réparations de
n’importe quelle pièce détachée.
4. Purger tous liquides de procéder à
l’entretien et aux réparations.
Cette
pompe
contient de l'huile à moteur
diélectrique pour le transfert de chaleur
du moteur. Attention en éliminant cette
huile. Ne pas utiliser cette pompe dans
les étangs ou les fontaines car l'huile à
moteur pourrait être dangereux pour la
vie aquatique.
5. Fixer la ligne de décharge avant de
démarrer la pompe. Une ligne de
décharge non-fixée peut fouetter et
causer des blessures personnelles
et/ou des dégâts matériels.
6. Inspecter les tuyaux pour tout signe
de faiblesse et d’usure avant chaque
utilisation et vérifier le serrage de
tous les branchements.
7. Inspecter la pompe et les pièces
détachées du système périodiquement. Exécuter l’entretien
ordinaire (Se référer à la section
d’Entretien).
7Fr
Instructions d’Utilisation
13. Il est recommandé que le modèle
soit branché dans un disjoncteur de
fuite à la terre (DDFT). Consulter un
électricien local pour la disponibilité
et l’installation.
Le
moteur
de la pompe est équipé d’un protecteur
thermique à réenclenchement
automatique et peut se mettre en
marche subitement. Le déclenchement
du protecteur est une indication de
surcharge du moteur résultant du
fonctionnement de la pompe à basse
pression (restriction de décharge
basse), tension extrêmement élevée ou
basse, installation de fils insuffisante,
conditions de moteur incorrectes, ou un
moteur ou une pompe défectueux.
14. Cette pompe est conçue pour
transporter l’eau en cycles. Utiliser
cette pompe dans une application
continue en manipulant
l’interrupteur pour qu’il reste
enclenché affectera la performance
et l’espérance de vie du produit.
15. Protéger le cordon d’alimentation
des objets pointus, surfaces
chaudes, huile et produits
chimiques. Ne pas tortiller le
cordon. Remplacer ou réparer les
cordons usés ou endommagés
immédiatement. Utiliser des fils de
taille suffisante pour minimiser la
chute de tension au moteur.
Broche de
terre
Figure 1
Canalisation
principale aux
égouts ou fosse
septique
Vidange de niveau supérieur
Prise tripolaire mise à
la terre équipée d’un
disjoncteur de fuite à
la terre
Tuyau de
décharge 2 po
Interrupteur Flotteur
Pompe pour eaux usées passe des solides de 2 po
Trappe de nettoyage
Tuyau d’évent
Vanne
2 po
Raccord
Clapet
2 po
Coude
45
o
Bacs à lessive
Laveuse
Sécheuse
Drain de plancher
Vidange de laveuse
Lavabo
Toilette
Douche
Bride
Figure 2 - Installation typique
!
DANGER
!
AVERTISSEMENT
!
AVERTISSEMENT
!
AVERTISSEMENT
RESET
TEST
!
AVERTISSEMENT
Page 8

8Fr
Instructions d’Utilisation
Généralités sur la
Sécurité (Suite)
16. Ne pas manipuler de pompe ou de
pompe de moteur avec les mains
trempées ni lorsque vous êtes
debout sur une surface trempée ou
humide, ou dans l’eau.
17. Ne pas pendre ce produit par la
poignée. Les pompes pour eaux
usées devraient être placées
fermement sur leurs pieds et
supportées avec de la tuyauterie
rigide. Ceci empêche le tortillement
et les dommages pendant le
fonctionnement de la pompe.
18. Ne pas utiliser un cordon
prolongateur.
Ne pas marcher dans un
endroit trempé jusqu’à ce que
toutes les sources de courant
soient coupées. Si la boîte d’arrêt est
dans le sous-sol, contacter votre
compagnie d’électricité pour couper le
service à la maison ou contacter le
service d’incendie pour des directives.
Enlever la pompe et la réparer ou la
remplacer. Ne pas suivre ces conseils
peut résulter en choc électrique mortel.
Installation
Utiliser
un/des
système(s) de sauvegarde là où il y a
risque de dégâts matériels et/ou
blessures personnelles à cause d’une
pompe qui ne fonctionne pas ou qui a
des fuites à cause des manques de
puissance, canalisations de décharge
obstruées ou autres raisons.
1. Fileter le tuyau de décharge ou le
mamelon de tuyau dans le raccord de
décharge.
2. Si un clapet est utilisé, monter le
clapet dans une position horizontale
ou à un angle de 45° avec le pivot de
la soupape en haut. Dans une position
verticale, les solides on tendance à se
déposer sur le volet de la soupape et
peuvent l’empêcher de s’ouvrir.
3. Percer un trou de 1/16 po dans le
tuyau de décharge environ 1 à 2 po
par-dessus la décharge de la pompe
lorsque vous utilisez un clapet. Le
trou empêche le blocage par l’air de
la pompe au départ initial et si elle
perd l’amorçage.
4. Une vanne devrait être installée dans
le système après le clapet. La vanne
devrait être de type à orifice plein
qui passera des solides de 2 po ou
selon les exigences des codes locaux
et de la Province. Cette vanne permet
l’enlevage de la pompe et/ou du
clapet pour l’entretien.
5. Installer un raccord-union entre le
clapet et la pompe pour que la
pompe puisse être enlevée sans trop
déranger la tuyauterie.
6. Cette pompe a un interrupteur à
longe détachable avec une fiche
superposée (Voir figure 3). La
longueur de cordon (distance du
cordon du flotteur à la pince) ne
devrait pas être ajustée moins que
8,26 cm (3-1/4 po) et ne devrait pas
être utilisé dans un bassin plus petit
que 35,6 cm (14 po) de diamètre. Si
vous utilisez un différentiel autre que
celui réglé à l’usine, s’assurer que
lorsque la pompe s’arrête, il y ait au
moins 4 po de fluide dans le bassin
pour que la turbine reste submergée.
7. Lorsque vous utilisez un interrupteurancré, il faut une tuyauterie de
décharge rigide. Si la pompe peut se
déplacer, l’interrupteur ancrépeut
être limité par le mur du bassin,
empêchant la pompe de fonctionner.
Avant
d’enlever
la pompe du bassin pour l’entretien,
toujours couper le courant à la pompe
et à l’interrupteur de commande. Pour
procéder à l’entretien de la pompe ou
l’interrupteur, TOUJOURS débrancher le
cordon d’alimentation. Ne pas
seulement couper le disjoncteur ou
desserrer le fusible.
Entretien
S’assurer
que la
pompe soit débranchée avant d’essayer
de procéder à l’entretien ou d’enlever
les pièces détachées. La pompe est
montée à l’usine avec de l’équipement
spécial, donc seulement un centre de
service authorisé ou un électricien
qualifié devrait essayer de réparer ce
modèle. La réparation incorrecte peut
causer un danger de choc électrique.
La pompe
contient
de l’huile qui peut être sous pression à
cause de la chaleur. Laisser refroidir la
pompe pendant au moins deux heures
de procéder à l’entretien de ce modèle.
1. Démonter le moteur avant
l’expiration de la garantie annulera
la garantie. Il est aussi possible de
causer des fuites internes et
d’endommager le modèle. S’il faut
réparer, retourner la pompe au
marchand de qui vous l’avez acheté
ou composer le 1-800-237-0987.
2. Enlever le couvercle du bassin et
débrancher la tuyauterie de décharge
avant de soulever la pompe du bassin.
3. Inspecter la pompe à intervalles
réguliers pour s’assurer de son bon
fonctionnement. S’il y a eu des
changements depuis l’achat du
modèle, l’enlever et Le remplacer.
Seulement un électricien ou des
personnes de service qualifiées
devraient essayer de réparer ce
modèle. La réparation et/ou le
montage incorrect peuvent résulter
en danger de choc électrique.
4. Placer la pompe dans un endroit
convenable, là où elle peut être bien
nettoyée. Enlever tous les déchets et
dépôts sur la pompe.
5. Immerger la pompe entière dans une
solution désinfectante (10% solution
de blanchissage) pour au moins une
heure avant de manipuler la pompe.
6. Nettoyer toute la saleté du flotteur de
la pompe. S’assurer que le flotteur se
déplace librement suite au nettoyage.
7. Netttoyer toute saleté et dépôts de
l’arrivée de la pompe et la volute.
Cette
pompe
contient de l’huile de moteur
dielectrique pour le graissage et le
transfert de chaleur du moteur. Cette
huile peut nuire à l’environnement.
Consulter les règlements locaux avant
de se débarrasser de l’huile. Considérer
que cette huile peut nuire à la vie
aquatique lorsque vous choisissez
d’utiliser cette pompe. débarasser de
l’huile. Considérer que cet huile peut
nuire à la vie aquatique lorsque vous
choississez d’utiliser cette pompe.
Guide de Dépannage
Symptôme Cause(s) Possible(s) Mesure Corrective
La pompe ne se
démarre pas et ne
fonctionne pas
La pompe se démarre
et s’arrête trop souvant
La pompe s’arrête et se
démarre
indépendamment de
l’interrupteur
(déclenche le
protecteur de
surcharge thermique)
La pompe fonctionne
bruyamment et vibre
excessivement
La pompe ne s’arrête
pas
La pompe fonctionne
mais délivre peu ou pas
d’eau
1. Niveau d’eau trop bas
2. Fusible sauté ou disjoncteur
déclenché
3. Tension de ligne basse
4. Moteur défectueux
5. Interrupteur flotteur défectueux
6. Impulseur (pompe remplie de
débris)
7. Interrupteur enmèlé
8. Niveau de liquide insuffisant
1. Refoulement d’eau de la
tuyauterie
2. Interrupteur flotteur défectueux
3. Clapet non-installé ou qui a des
fuites
4. Hauteur de décharge inférieur
au minimum du fabricant
1. Température d’eau excessive
2. Interrupteur défectueux
ointerrupteur enmêlé cause que
la pompe fonctionne à sec
3. Tension de ligne basse
1. Roulements usés
2. Débris dans la cavité de
l’impulseur ou en panne
3. Raccords de tuyauterie à l’édifice
trop rigides ou trop desserrés
1. Interrupteur flotteur défectueux
2. Mouvement de l’interrupteur
flotteur limité
3. Décharge limité (tuyauterie
obstruée)
4. Arrivée excessive ou pompe de
taille incorrecte pour
l’application
1. Tension de ligne basse
2. Débris pris dans l’impulseur ou le
décharge
3. Pièces de la pompe usées ou
défectueuses, ou impulseur
obstrué
4. Pompe de mauvaise taille pour
l’application
5. Clapet pris dans la position
fermée ou installée à l’envers
6. Soupape d’arrêt fermée
1. L’interrupteur de la pompe ne se met pas en marche sans
que l’eau recouvre le haut de la pompe
2. Si sauté, remplacer avec un fusible de taille correcte ou
réenclencher le disjoncteur
3. Si la tension est sous le minimum recommandé, vérifier la
taille des fils de l’interrupteur général de la propriété. Si
correcte, contacter la compagnie de service publique.
4. Retourner pour l’entretien ou remplacer le moteur
5. Remplacer l’interrupteur flotteur
6. Si la turbine ne tourne pas, enlever le carter et enlever le
débris
7. Positionner l’interrupteur pour qu’elle se déplace librement.
Déménager la pompe si nécessaire
8. S’assurer que le niveau de liquide soit au moins 33,02 cm
(13po) du fond du bassin
1. Installer un clapet
2. Remplacer l’interrupteur flotteur
3. Enlever et examiner le clapet pour l’installation correcte et
le fonctionnement libre
4. Vérifier de nouveau les calculs de taille pour déterminer la
taille de pompe correcte
1. La pompe ne devrait pas être utilisée pour l’eau au delà de
44° C (120° F)
2. Remplacer ou repositionner la pompe
La pompe peut se démarrer
subitement. Débrancher la source de
puissance avant de procéder à l’entretien
3. Si la tension est sous le minimum recommandé, vérifier la
taille des fils de l’interrupteur général de la propriété. Si
correcte, contacter la compagnie de service publique
1. Remplacer la pompe
2. Enlever le carter, nettoyer la turbine et/ou remplacer la
turbine en panne
3. Remplacer la section de tuyau de décharge avec un raccord
flexible
1. Remplacer l’interrupteur flotteur
2. Positionner de nouveau la pompe ou nettoyer le bassin au
besoin pour fournir l’espace nécessaire pour le flotteur
3. Enlever la pompe et nettoyer la pompe et la tuyauterie
4. Vérifier de nouveau les calculs de taille pour déterminer la
taille de pompe correcte
1. Si la tension est sous le minimum recommandé, vérifier la
taille des fils de l’interrupteur général de la propriété. Si
correcte, contacter la compagnie de service publique.
2. Enlever, nettoyer et vérifier le serrage
3. Remplacer la pompe entière. Nettoyer les pièces au besoin
4. Vérifier de nouveau les calculs de taille pour déterminer la
taille de pompe correcte
5. Enlever et examiner le clapet pour l’installation correcte et
le fonctionnement libre
6. Ouvrir la soupape
Clapet 45
o
Évent
Arrivée
Joint
d’étanchéité
Espace
min.
1/2 po
Bassin
Figure 3 - Bassins préfabriqués
9Fr
!
DANGER
AVIS
!
ATTENTION
!
AVERTISSEMENT
AVIS
!
AVERTISSEMENT
!
ATTENTION
 Loading...