

Page 1
WAYNE COMBUSTION
SYSTEMS
801
GLASGOWAVE.
FORT WAYNE, IN
46803
ffiffiDEt
|lfisR.Dc
0lt
ffism
&
BIJANERS
Pu blication
D
ate 31 24n1o3
Flevision D
Manual 22019-003
)#
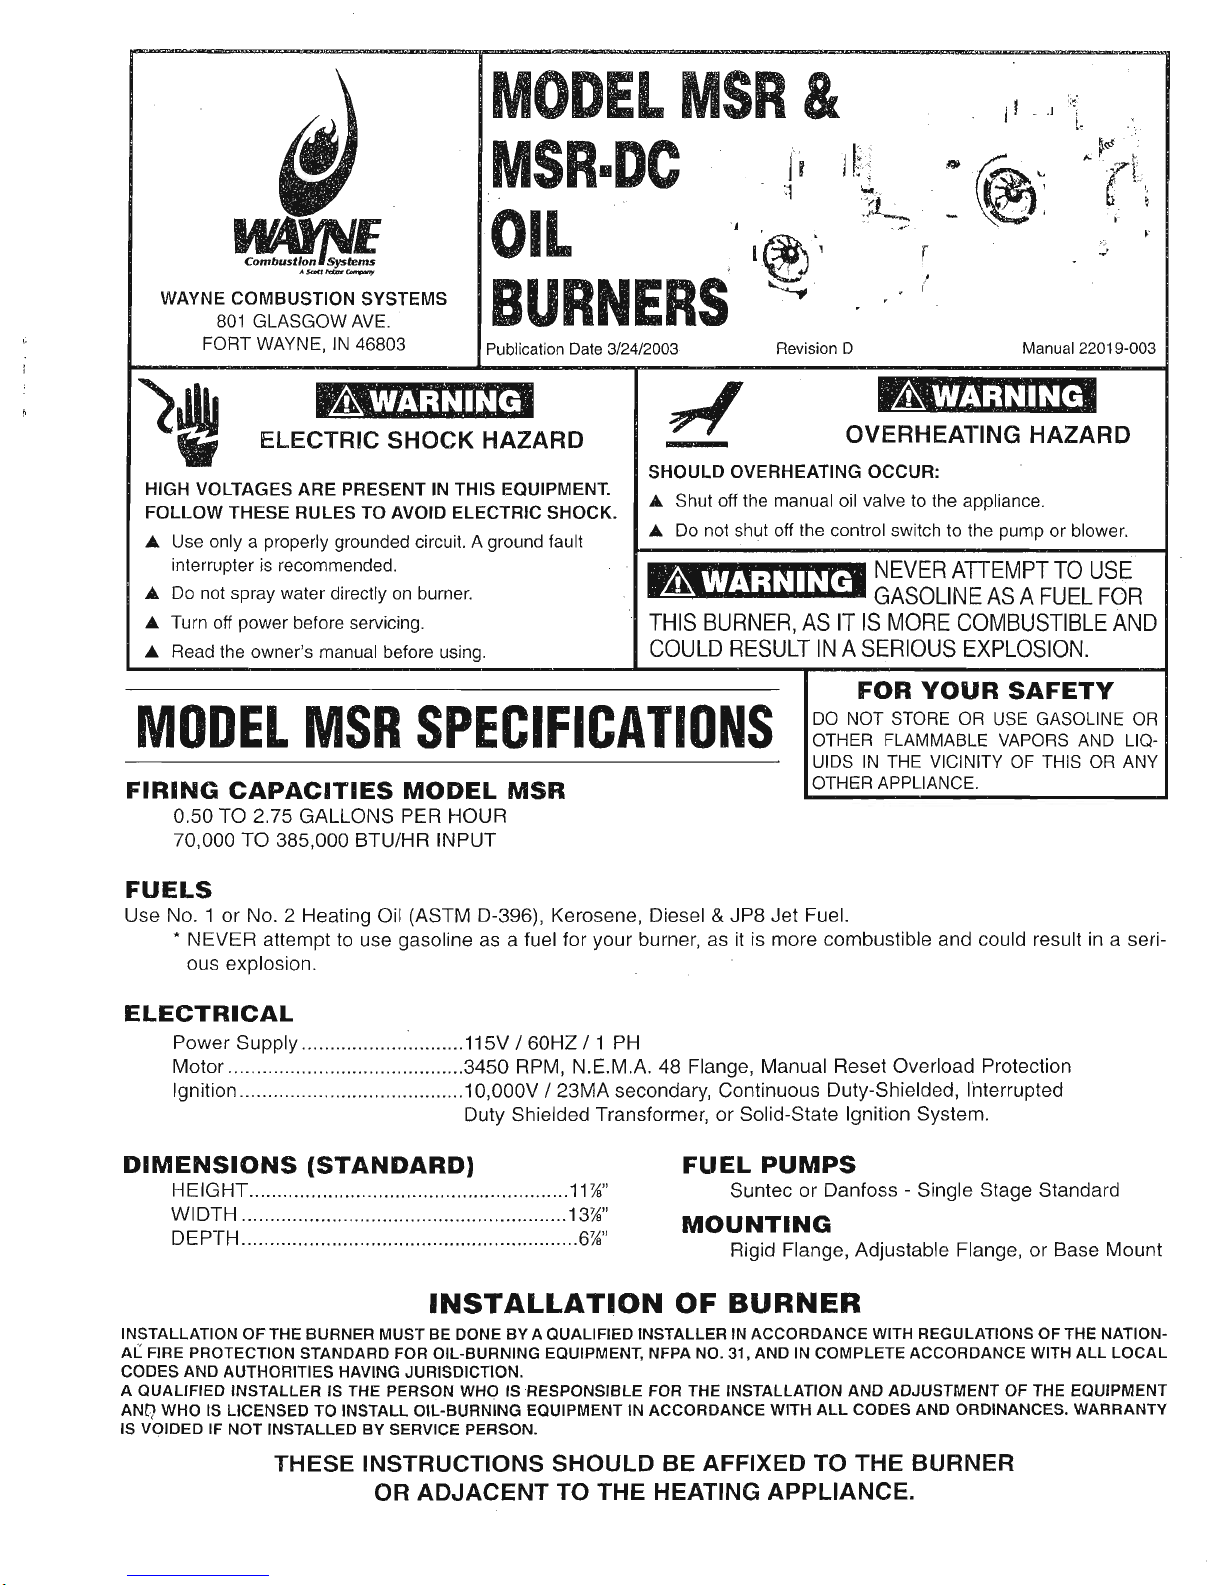
ELECTRIC
SHOCK
HAZARD
HIGH VOLTAGES ARE
PRESENT
IN THIS EQUIPMENT,
FOLLOW
THESE RULES TO AVOID ELECTBIC SHOCK.
A
Use
only
a
properly
grounded
circuit. A
ground
fault
interrupter
is recommended.
A Do not spray water
directly on burner.
A Turn
off
power
before servicing.
A
Read the
owner's manual before using.
c
OVERHEATING
HAZARD
SHOULD OVERHEATING
OCCUR:
A Shut
off
the
manual
oil
valve
to the appliance.
A Do not shut off the control
switch to the oumo or blower.
NEVER ATTEMPT
TO USE
GASOLINE AS A FUEL FOR
THIS BURNER, AS
IT
IS MORE COMBUSTIBLE AND
COULD
RESULT IN A SERIOUS EXPLOSION.
MODET MSR
SPECIFIGATIOI{S
FIRING
CAPACITIES MODEL MSR
FOR VOUR
SAFETY
DO NOT STORE OR USE GASOLINE OR
OTHER
FLAMMABLE VAPORS
AND
LIQ-
UIDS
IN
THE
VICINITY
OF THIS OR ANY
OTHER APPLIANCE.
O.5O TO 2.75
GALLONS
PER
HOUR
70,000
To 385,000 BTU/HR TNPUT
FUELS
Use No. 1 or No. 2 Heating
Oil
(ASTM
D-396),
Kerosene, Diesel
& JP8 Jet Fuel.
-
NEVER attempt to
use
gasoline
as a fuel
for
your
burner,
as it
is
more combustible and could result in a seri-
ous explosion.
ELECTRICAL
Power
Supply ..........tt 5V I6OHZ/
1 PH
Motor.....,...
,..........,..3450 RPM,
N.E.M.A. 48 Flange, Manual Reset
Overload Protection
lgnition.......
,.,..,..,..,..10,000V I
23MA secondary, Continuous
Duty-Shielded, Interrupted
Duty Shielded Transformer,
or Solid-State lgnition
System,
DTMENSTONS
(STANDARDI
FUEL PUMPS
HEIGHT.....
..............11%" Suntec or
Danfoss - Single Stage Standard
wlDrH
............. ....tsvj:'
MOUNTTNG
DEPTH......
................6%"
"
Rigid Flange, Adjustable Flange,
or
Base
Mount
INSTALLATION OF
BURNER
INSTALLATION
OF THE BURNER MUST
BE DONE
BY A
QUALIFIED
INSTALLER IN ACCORDANCE WITH REGULATIONS OF THE NATION.
AL FIRE PROTECTION
STANDARD FOR
OIL-BURNING
EOUIPMENT, NFPA NO. 31,
AND IN
COMPLETE
ACCORDANCE WITH ALL LOCAL
CODES AND AUTHORITIES HAVING
JURISDICTION.
A
QUALIFTED INSTALLER
tS THE
PERSON
WHO IS RESPONSIBLE FOR
THE INSTALLATION AND ADJUSTMENT OF
THE
EQUIPMENT
ANQ WHO
lS
LTCENSED
TO TNSTALL
O|L-BURNTNG
EOUIPMENT tN ACCORDANCE
WrTH ALL CODES
AND
ORDINANCES.
WARRANTY
IS
VOIDED
IF
NOT INSTALLED BY
SERVICE
PEHSON.
THESE
INSTRUCTIONS SHOULD
BE AFFIXED TO
THE BUHNER
OR
ADJACENT TO THE HEATING
APPLIANCE.
Page 2
\
APPROVALS
/ll
me
burner is U.L. listed, for use with
Group
I or
Group
ll
primary
safety controls. State
and localapprovals
are shown
V
on
burner rating label. All burners should be installed in
accordance with National
Fire Protection Association,
and
in
l.*:Mcomplete
accordance
with
all local
codes,
and
authorities having
jurisdiction.
Regulations
of these
authorities
take
'---
precedent
over
general
instructions
provided
in this manual.
GENERAL INFORMATION
Heating Plant - Before installing this burner in a
conversion
installation,
try
to
provide
adequate
space to service the
burner
properly.
The
heating
system
should
be carefully inspected for defects
and cleanliness, so
proper
performance
is
obtained. An oil burner is only a means of supplying heat to the firebox
and
from there the heating system
must
absorb
and circulate the heat. The flue
passages
and
heat
absorbing surfaces
must be clean
to
assure
maximum
heat
transfer
to the furnace or boiler.
Soot and
fly
ash
act as insulators, retarding
the
transfer of heat, All doors, openings,
and
cracks should
be cemented air-tight to
eliminate
air infiltration inlo the heating
plant,
causing heating
losses.
lnspect
smoke
pipe
and
chimney for
elimination
of leaks
and obstructions.
Be
sure of adequate chimney size and
height.
Install a mechanical
draft adjuster,
if needed
same
size
as smoke
pipe (see
column
under draft regulators).
COMBUSTION
CHAMBER
The
purpose
of a combustion chamber
is to maintain a high flame
temperature by
reflecting
the
heat
back into the
flame. A high temperature
assures
greater
combustion etficiency and lower stack losses. An insulating refractory or
a Fiber Fax type
chamber can be used
with this
burner.
lt is important to select and install,
if
necessary, the correct
size chamber
on the
conversion
job
(see
chart).
On the
Flamelock
conversion burners
the
atomized oil burns
just
off
the flamelock. On all oil burners the atomized oil must not touch the sides or bottom of
chamber, or smoke
will
result.
To eliminate the smoke,
excess
air will be required, resulting
in
high stack temperature
and lower combustion effi-
ciency. lnstall
burner
so the face
of air
cone
of burner is
set 1/8"
lo 114" behind the inside
front wall of the
chamber
(see
diagram). Caution
on
installing
Flamelock burners in
stainless
steel chamber should be
taken because
of
the
higher temperature levels
produced
by
high
performance
flame retention burners. The
temperatures may exceed the
temperature ratings of the
stainless
steel chamber, and can result in chamber burn out. Where
you
are
replacing a
standard
burner
with a flame retention burner, take
one
of the following
precautions: (1)
Use
"Wet Pac" Ceramic
Liner
to line the inside
of chamber,
(2)
Adjust
burner
(see
FinalAdjustments Column).
FUEL
UNITS AND OIL
LINES
Conversion
Burners
are
provided
with
single stage
3450
RPM
fuel units
with
the by-pass
plug
removed for single
pipe
installations.
This
is
satisfactory where the fuel supply is on the same level or above
burner
permitting
gravity
flow of
oil.
Never
exceed over 8 PSI
pressure
to
the suction
side
of fuel unit. A
pressure
of
over I
PSI
may
cause
damage
to the shaft seal and
allow it to leak
oil. When it is necessary to lift the
oil to
the burner, a return line should be run
between
fuel unit and oil supply.
(lf
lift exceeds 10 feet, a two-stage fuel unit must be used
with
a return
line).
When
a
two-line
system is used the
by-pass
plug
must
be installed. This
plug
is supplied along
with the burner attached to
fuel unit along with an information
pump
data
sheet
in
a
plastic
bag. When oil
lines are installed, continuous runs of
heavy
wall
copper tubing are recommended. Be
sure that all
connections
are absolutely airtight. Check
all connec-
tions and
joints.
Flared fittings
are
recommended. Do
not
use
compression
fittings.
See
pump
data
sheet for
siz-
ing, lift and length
for tubing
recommendations.
Use an oil filter of adequate size
for
all installations.
Install filters
inside the building
between the
tank
shut off
valve
and
the
burner. For ease of servicing,
locate the
shut-off
valve and
filter near the
burner.
TANKS
AND PIPING
Local
codes and regulations must be
adhered
to
regarding
tank
and burner installation.
WIRING
All wiring must
comply
with
the National Electric Code and local ordinances,
refer
to
diagram supplied
with burner or
controls, making
sure
the
burner and controls
are wired
correctly and that the
line
switch is
properly
fused
to
burner.
AIR
SUPPLY FOR COMBUSTION
Do not install in rooms
with insufficient air to support
combustion. Occasionally
it is necessary
to install windows
or
cut holes in a
door to these rooms to obtain sufficient air and to
prevent
less than
atmospheric air
pressure
in the
room. lf there is a lack of combustion
air in
the
room,
the
burner flame will be
yellow
and formation of soot will
occur
in the heating unit. In
buildings of conventional frame,
brick
or stone
construction
without utility
rooms,
basement win-
dows, or
stair
doors,
infiltration
is
normally
adequate
to
provide
air for
combustion
and for operation of the
barom'et-
ric draft control. For installation
in
an enclosed
utility room
without an outside
wall, a fresh air opening to the outside
with a free cross
section area of 2O square
inches
per
each
gallon per
hour firing
is recommended.
For each
1,000
feet
above sea level, increase the fresh
air opening by
at
least four
(4)
per
cent.
The room should
be isolated
fiom
any area served by
exhaust
fans. Do not
install an exhaust
fan in this
room.
2
Page 3
CIIIMNEY
Follow
the recommendations of the heating
unit
manufacturer. lt must be
properly
designed and of adequate size
and
should be
above the surrounding
objects, tile-lined,
with no
obstructions
and be in
good
state
of
repair.
The smoke
pipe
should
set
flush
with
the
inside of the tile and cemented in
place.
All
cleanout
doors
should
be
sealed.
DRAFT REGULATIONS
The
use of a draft
regulator is recommended
and
should
preferably
be mounted
in the smoke
pipe.
Use a
draft
gauge
to adjust
to
proper
opening.
When
the burner
air supply is
properly
adjusted,
the
combustion chamber
draft
will
be
approximately
-.
01 to -.
02
WC
and the stack
draft will be
-.02
to
-.04
WC, The
larger
the
installation, the
greater
the
draft
will
be
required at the stack to obtain the
-.01, to
-.02
WC
at the combustion
chamber.
hrozzLEs
Use
the
proper
size, type and spray
pattern
that
heater manufacturers
recommend; in some cases of
upgrading or
conversion
installations, the
use of an 80(
Hollow
or
Solid
Nozzle
are
the best to start
with.
STARTING
PROCEDURE
STARTING
BURNER
Be sure
main switch is in
"off"
position
and
be sure
thermostat is substantially
above
room temperature,
the oil tank
is filled,
all valves are
open and controls set
for operation. Adjust
air supply on
burner by loosening
the locking
screw
on outer
air band,
and open
partially.
Open
the inspection door
and turn on switch.
Prime
pump
according to the
pump
manufacturer's
recommendations
and check
pressure.
lf safety lockout
occurs reset
after 1
or 2 minutes
(cau-
tion). Do not
run fuel
unit dry for more
than 5 minutes.
When
fire
is established
make a temporary
air adjustment
lor
a clean
combustion
flame, reduce air supply until
flame tips appear
slightly smoky,
then readjust so flame tips are
clean looking. Leave inspection
door open
until chamber
is
dry.
When normal
temperatures
are
reached, close
inspection door
and adjust
draft regulator,
see
column under
"DRAFT
REGULATIONS".
FTNAL
ADJUSTMENTS
At this
point
a final adjustment should be
used
by
the
use of
a COMBUSTION
TEST KlT. After
operating 10
minutes
to
warm up unit, a smoke tester should be used
to take
a smoke
reading.
We
are
wanting no
greater
than a #1;
(Shell
Bacharach
Scale). And
less than
a #1 smoke
is
desired.
Sometimes a
new heating unit
requires mqre time than this
to
burn clean due to the oil film
on the new heater unit
surfaces.
Recheck draft and
take a COz reading over the fire
and
in the stack. lf a larger
differential between COz
readings is noted, air
leakage
is the
most common cause
(see
:olumn under HEATING
PLANT).
CO, readings
must all be
taken ahead of draft control.
The
COz measured in the
stack
should be at least
9o/"
tor oil rates 1.00
G. P
H. or below, and
at least 10%
for oil rates
over
1.00 G.P.H.
Unit
should be started and
stopped
several times to assure
good
operation.
Open inspection door,
turn off oil valve and
check
out safety
timing
of combustion control. Check operation
of limit controls
and thermostat. Check for oil leaks.
Note: All installations should
be reinspected
after 1 or 2
weeks
of normal
operation.
FTNA[-
CHECKS
Be
sure air band and draft control adjustments are locked,
and the
controls
on heating
unit are adjusted in accordance
with the Heater
and
Control
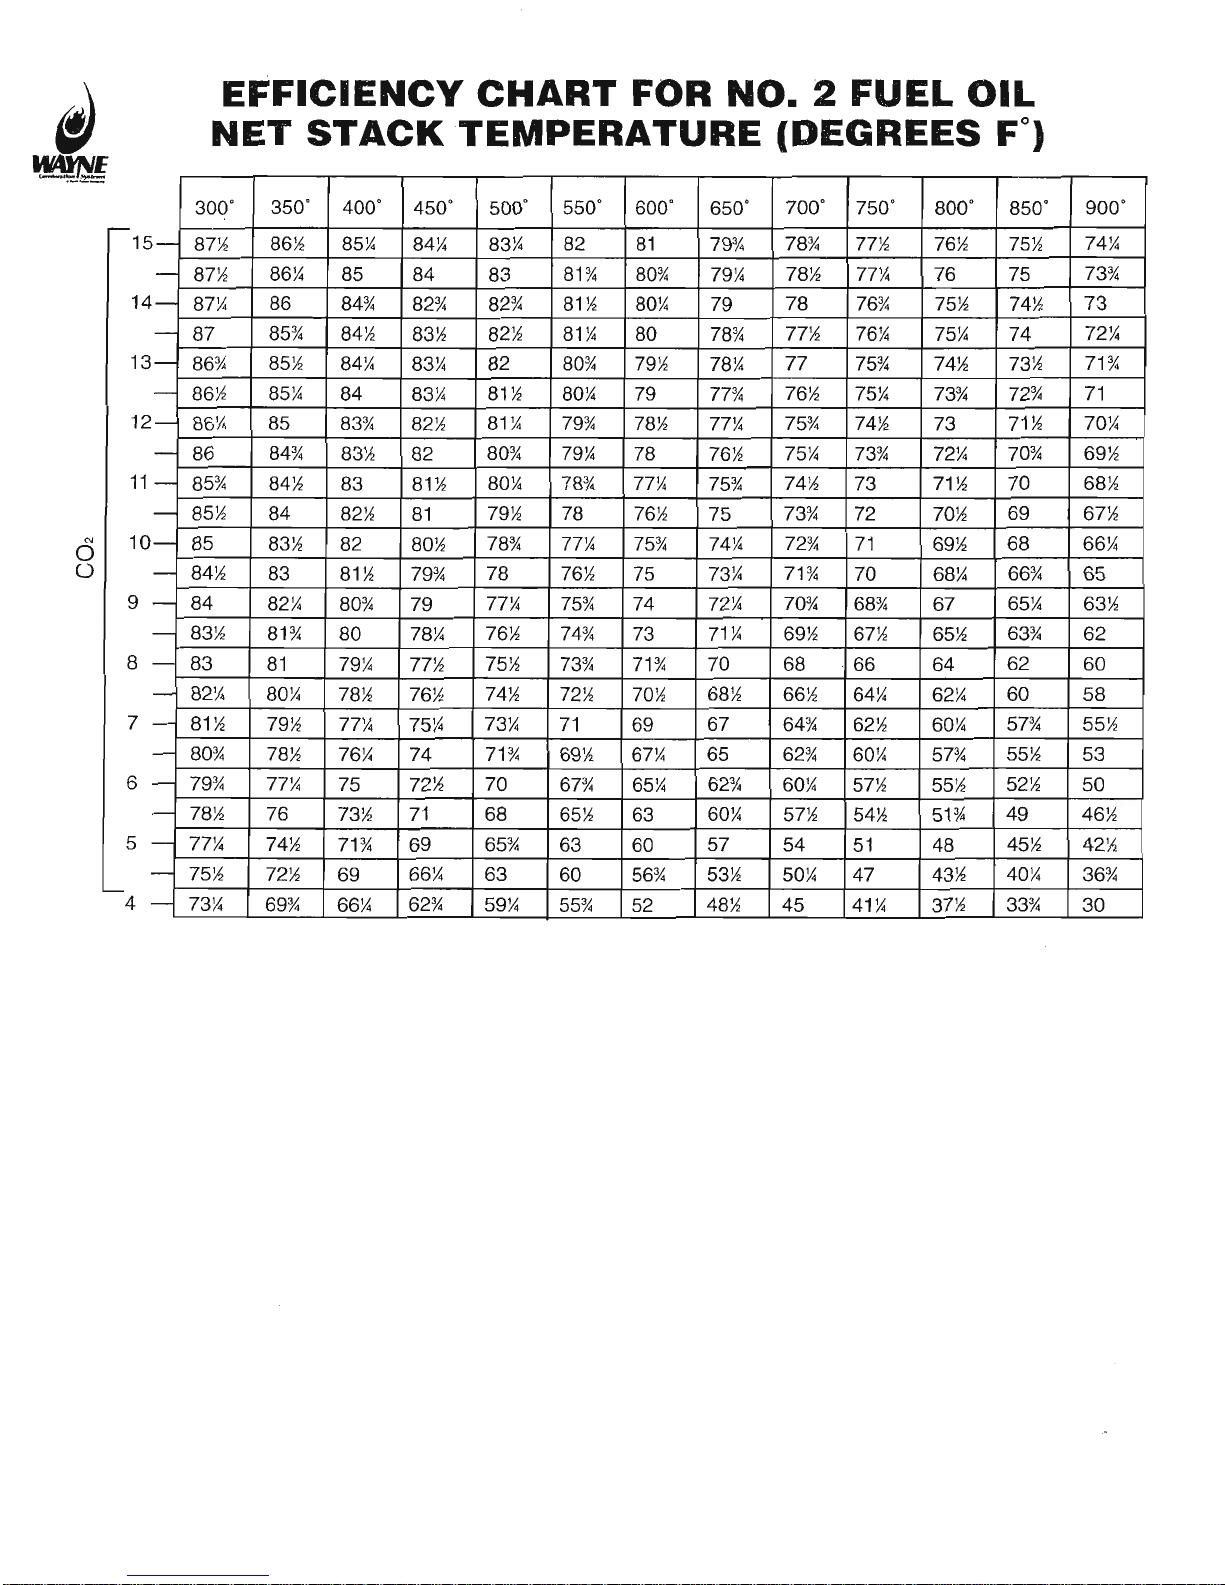
Manufacturer's Instruction Sheets. Use
efficiency chart
(page
4)
to
finalize set-up.
MAINTENANCE
OILfNG MOTOR - By
proper
oiling
twice
ayeat,
the motor
life
will be
increased; only
a few
drops
of a non-detergent
type of
oil at both
motor holes is needed.
FILTER - The oil filter cartridge
should be replaced
once a
year
so the fuel oil
will not become contaminated
and
plug
up fuel
pump
and nozzle of oil burner.
NOZZLE - The nozzle
should be changed at least
once a
year
before
the start-up
of the heating
season. Replace
with
proper
nozzle.
Handle
Nozzles
by
hex only. Oil from the
fingers
on the
face or filter
of nozzle may
adversely
affect spray
characteristics,
COMPONENTS
-
lf
for
any reason
any
of the burner
pans
have to
be replaced,
always
use
parts
recommended
by
the
manufacturer. Specify
part
numbers,
and
description,
when
ordering.
(lN
ALL COMMUNICATIONS
STATE
BURNER
MODEL,
SERTAL NUMBER AND
SPECtFICATION
NUMBER).
ELECTRODE
SETTINGS - This is very important
for reliable
ignition
of the
oil; check these once a
year
in accor-
dance with
the
instructions
provided
in this manual.
FAN & BLOWER
HOUSING
-
This must be kept clean, free of
dirt and lint.
Open
transformer
to check
fan
blades for
above.
Be
sure
the electric
power
is off on
burner
when
transformer
is opened
for the
inspection.
\
/r)
lttl
E'
-
w[M
3
Page 4
d
}g!U[LE
EFFICIENCY
GHART
FOR NO.
2 FUEI
OIL
NET
STACK TEMPERATURE
(DEGREES
F")
30q'
350"
400" 450'
500" 550"
600"
650" 700'
750'
800"
850'
900"
87% 861l
85Y^ 84]l
83]l
82 81 79"/q
7834
77% 76% 75% 74%
87%
86% 85
84
83
813/4 843/4
79Y4 78y, 77%
76 75 73%
87% 86
84"/o
82"/o
82sA
81y, 8OY4 79
78
76%
75i4
74% 73
87
853/4
B4'A
B3t(
82tt
81%
80 7B%
7714 76% 75%
74 72y,
86"/q
85]l
B4/4 83% 82
80%
79b
7By,
77 75%
7416 73'A
71%
86]l
85Y4
B4 83%
811l
801l 79
77% 76%
75%
7331
7231
71
86% 85
8331 82N
81y, 79"/o 7BY" 77%
753/4
74% 73
71%
70%
86
84%
83%
82 80%
79Y4
78 76%
75% 733/o
72Y4 7031
6914
85%
84],l
B3 81% 80%
78/o
77Y4
7531
74%
73 71t{
70 68tt
Bs%
84
B2:A
B1
791t 7B
76rt 75
73% 72
7otn
69 67%
85
83v,
82
BO1A 78% 77Y4 753/4
74/4
723/4 7'l
69b 6B 66Y4
B4TA
B3
81/,
79% 78 761t
75
73% 71s/q
7A
6BY4 66%
65
84
82%
803/o 79
77Y4 75%
74 72Y4
7034
68%
67 65]u 63rt
831l
813/q 80
78Y4
76% 74%
73
71Y^ 691l
6714 651l
633/4
62
83
81
79% 77%
75% 733/o
71% 70
6B
66
64 62
60
82v,
80% 7gti 761l
74tt 72%
70rt
68]A
6616
64y, 62% 60 5B
81'A
79% 77Y4
75% 73Y4
71
69
67
64% 62v,
60Y4
573/4
55%
80%
78%
76Y4 74
713/q
6914
67Y4
65
62% 601l
57s/4
5514
53
79"/o 77Y4
75
72% 70
67%
65/4
6231 6OY4
5711
55%
52tA 50
78%.
76
73t6 71
68
65t4 63
601l
57% 54%
51% 49 461l
77Y4
74tt
713/a
69 6531
63
60
57
54
51 48
4514
42:A
75%
72%
69
66U
63
60
56%
53ll 501l 47
4316 4OY4
36%
73%
69% 66%
6231 5gY4
55"/c
52
481l 45
41% 37%, 334/q
30
Page 5
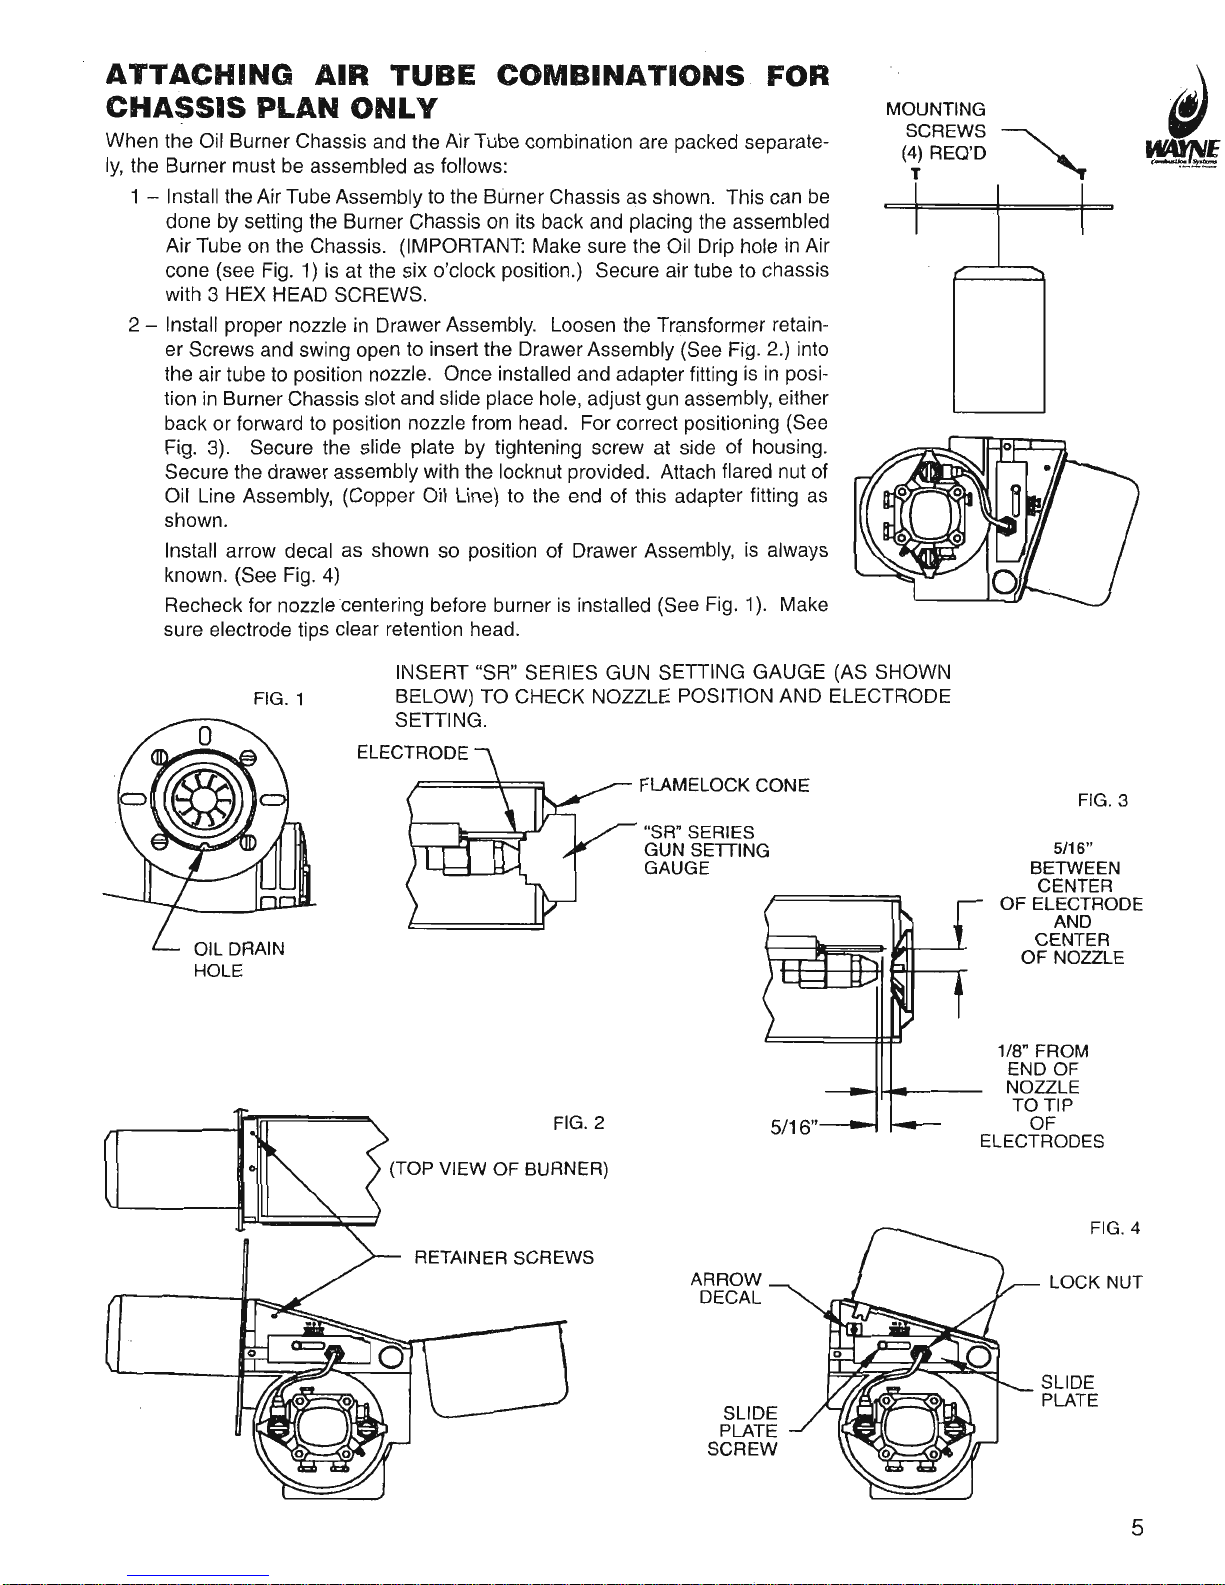
ATTAC}IING
AIR TUBE
COMBINATIONS FOR
CHASSIS
PLAN
ONLY
When
the
Oil
Burner
Chassis and
the Air
Tube combination
are
packed
separate-
ly,
the Burner must be assembled
as follows:
1 - Install the
Air Tube
Assembly
to the
Burner Chassis
as shown. This can
be
done
by setting the
Burner
Chassis on its back and
placing
the assembled
Air Tube
on the
Chassis.
(IMPOHTANT:
Make sure
the Oil Drip hole in
Air
cone
(see
Fig. 1)
is
at
the
six o'clock
position.)
Secure air
tube
to chassis
with
3 HEX HEAD
SCREWS,
2 - lnstall
proper
nozzle
in Drawer
Assembly. Loosen the Transformer
retain-
er Screws
and swing
open
to inserl
the Drawer Assembly
(See
Fig. 2.) into
the air tube to
position
nozzle.
Once
installed
and adapter
fitting
is in
posi-
tion in Burner
Chassis slot and
slide
place
hole, adjust
gun
assembly,
either
back or foruard to
position
nozzle from head. For
correct
positioning
(See
Fig. 3).
Secure
the slide
plate
by tightening
screw at side
of
housing.
Secure the
drawer assembly with the
locknut
provided.
Attach
flared nut of
Oil Line Assembly,
(Copper
Oil
Line) to
the end of this adapter fitting
as
shown.
Install
arrow
decal
as
shown
so
position
of Drawer
Assembly,
is
always
known,
(See
Fig. 4)
Recheck
lor nozzle
centering before burner is installed
(See
Fig. 1). Make
sure
electrode
tips
clear retention
head.
.\
/al
u
tffi
INSERT "SR"
SERIES
GUN
SETTING
GAUGE
(AS
SHOWN
BELOW)
TO
CHECK
NOZZLE
POSITTON AND ELECTRODE
SETTING.
FLAMELOCK
CONE
"SR"
SERIES
GUN
SETTING
GAUGE
ARROW
DECAL
SLIDE
PLATE
SCREW
FIG.3
5/16"
BETWEEN
CENTER
OF ELECTRODE
AND
CENTER
OF NOZZLE
1/8"
FROM
END OF
NOZZLE
TO
TIP
OF
ELECTRODES
5
FIG.
1
(TOP
V|EW
OF BURNER)
Page 6
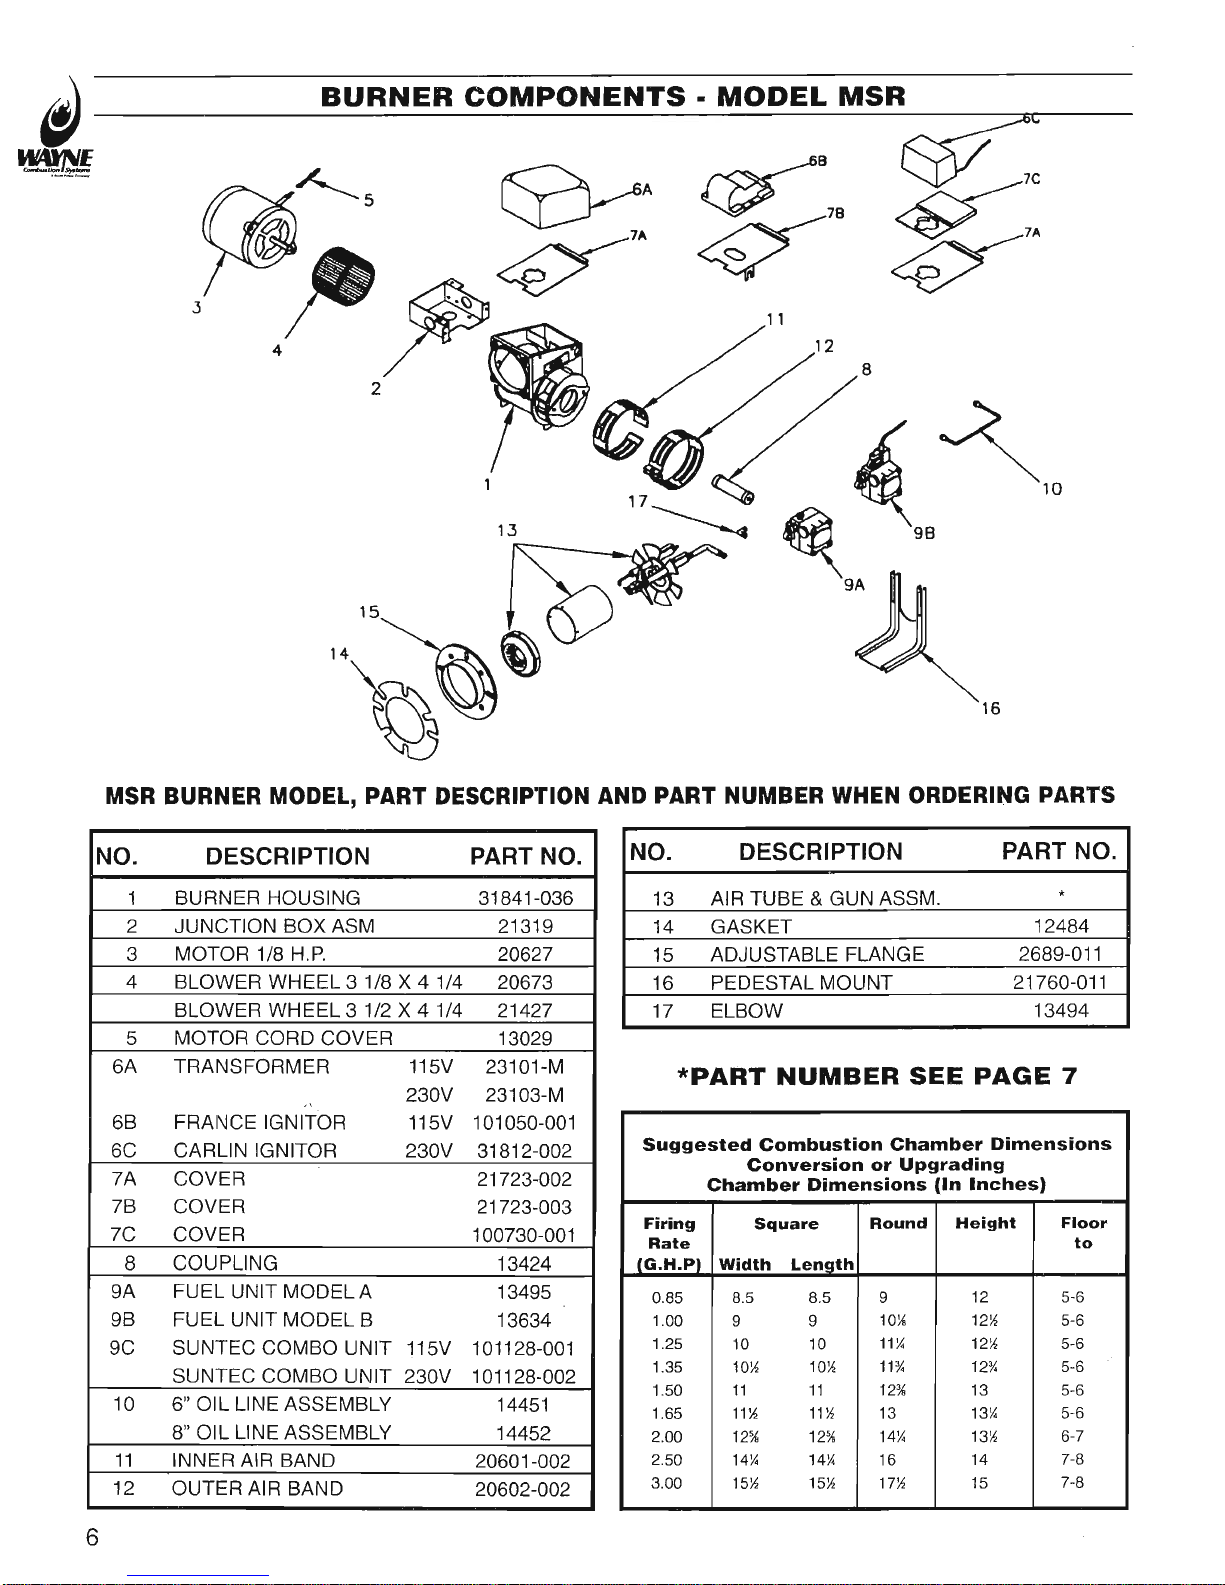
BURNER COMPONENTS
.
MODEL
MSR
{,
,"N
,/6
q
\n,
'"^[\r,
7C
7A
MSR BURNER MODEL, PART DESCRTPTTON
AND PART I,IUMBER WHEN ORDERING
PARTS
NO. DESCRIPTION
PART
NO.
13 AIH
TUBE & GUN
ASSM.
*
14 GASKET
12484
15 ADJUSTABLE
FLANGE 2689-011
16 PEDESTAL
MOUNT 21760-011
17
ELBOW
13494
*PART
NUMBER
SEE PAGE
7
NO.
DESCRIPTION PART NO.
1 BURNER HOUSING
31841.036
2 JUNCTION BOX ASM 21319
3 MOTOR 1/8 H.P. 20627
4 BLOWER WHEEL 3 1/8 X 4
114 20673
BLOWER WHEEL 3 1/2 X 4 1/4
21427
5 MOTOR
CORD COVER 13029
6A TRANSFORMER 115V
23101-M
.
230V 23103-M
68
FRANCE
|GN|TOR 115V 1010s0-001
6C CARLIN IGN|TOR 230V
31812-002
7A
COVER
21723-002
78 COVER
21723-003
7C
COVER 100730-001
8 COUPLTNG
13424
9A FUEL UNIT MODELA
13495
98
FUEL
UNIT MODEL B
13634
9C SUNTEC COMBO
UN|T 115V 101128-001
SUNTEC
COMBO
UN|T 230V 101128-002
10 6"
OIL
LINE ASSEMBLY
14451
B" OIL
LINE
ASSEMBLY
14452
.I1
INNER AIR BAND
2060.I.002
12
OUTER AIR BAND
20602-002
6
Suggested Gombustion
Ghamber
Dimensions
Gonversion
or Upgrading
Ghamber Dimensions
(ln
Inches)
Firing
Rate
fG_H_pr
Square
Utidth Lenoth
Round Height
Flool
to
0.85
1.00
1.25
1.35
't.50
1.65
2.00
2.50
3.00
8.5
I
10
'lota
11
11'A
12%
14U
1E1t
t.5
I
t0
tor.{
t1
l1'a
t2%
t4%
t5t1
I
10"6
11ll
11%
123,1
IJ
14v,
to
lllz
2
zn
214
231
3
J/1
Jh
4
5-6
c-o
5-6
5-6
6-A
o-I
7-8
7-8
Page 7
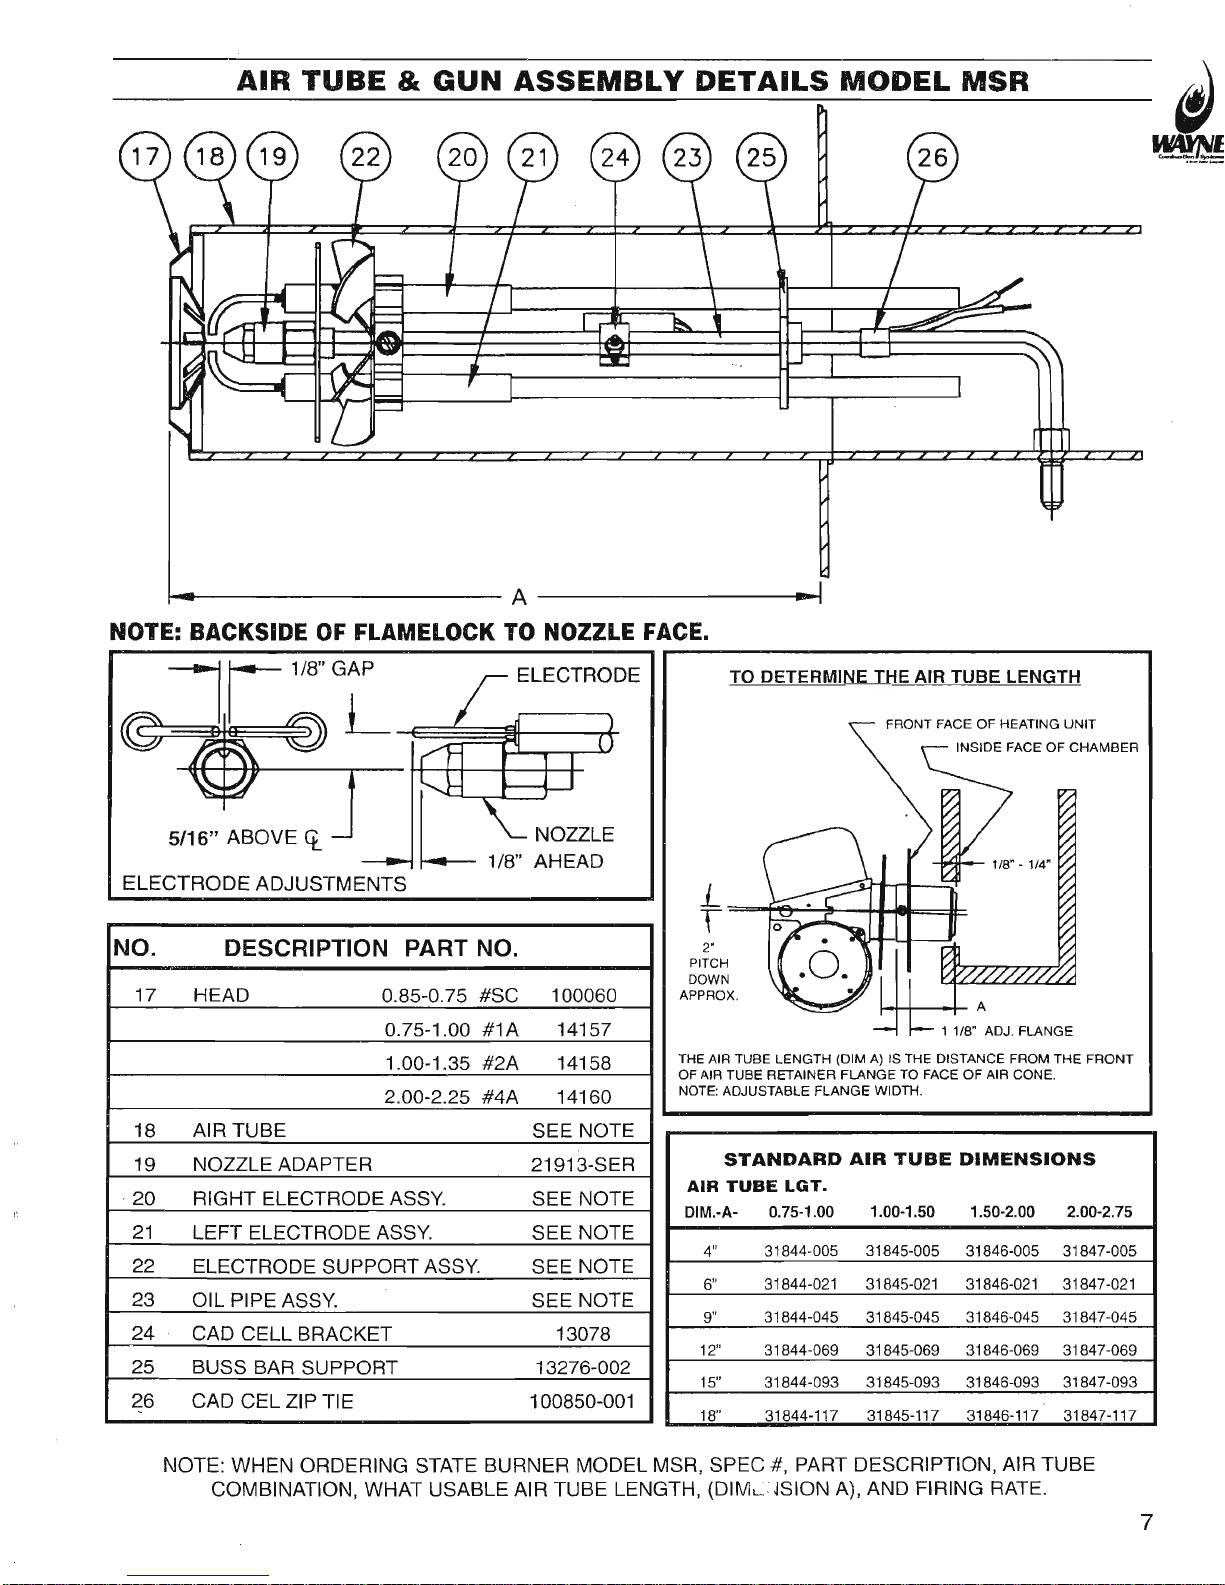
AIR TUBE
& GUN ASSEMBTY
DETAILS MODEL
MSR
\
t9,I
'
t3,
v
rffiE
NOTE: BACKSIDE
OF
FLAMEIOCK TO NOZZN.E FACE,
5/16"
ABOVE
q
ELECTRODE
ADJUSTMENTS
NO.
DESCRIPTION PART NO.
17 HEAD
0.85-0.75 #SC
100060
0.75-1 .00
#1A 14157
1 .00-1 .35
#24
14158
2.OO-2.25 #44 14160
18 AIR TUBE
SEE
NOTE
19 NOZZLE ADAPTER
219.13-SEH
20 RIGHT ELECTRODE ASSY.
SEE NOTE
21 LEFT
ELECTRODEASSY. SEE NOTE
22
ELECTRODE
SUPPORTASSY. SEE
NOTE
23
OIL PIPE
ASSY.
SEE
NOTE
24 CAD
CELL BRACKET 13078
25 BUSS
BAR
SUPPORT
13276-002
26 CAD
CEL ZIPTIE 100850-001
TO DETERMINE
THE AIR TUBE LENGTH
THE
AIF
TUBE
LENGTH
(DIM
A) IS THE DISTANCE FROM THE FBONT
OF AIB
TUBE
RETAINER FLANGE
TO
FACE OF AIR CONE,
NOTE: ADJUSTAALE FLANGE
WIDTH.
FRONT
FACE
OF
HEATING UNIT
STANDARD
AIR
TUBE
DIMENSIONS
AIR TUBE LGT.
DIM.-A- 0.7s-1.00
1.00-1.50 1.50-2.00
2.00-2.75
4"
31844-005 31845-005 31846-005 31847-005
6"
31844-021
31845-021
31846-021 31847-021
9'
31844-045
31845-045 31846-045 31847-045
12',
31844-069
31845-069 31846-069 31847-069
15"
31844-093
31845-093
31846-093 31847-093
1R" 31A44j117 31845-117 31846-117 31447-117
NOTE:
WHEN
ORDERING STATE
BURNER MODEL MSR,
SPEC #, PART
DESCRIPTION,
AIR TUBE
coMBtNATtON, WHAT
USABLE
AIR TUBE
LENGTH,
(DtM-
iStON A), AND
FIRING RATE.
7
Page 8

As.tatuCnp{d
MODEL
MSR.DC
olt
BURNER
MODET MSR.DC
SPECIFICATIONS
FIRING
CAPACITIES - MODEL
MSR.DC
0.50
To 2.75
GALLONS PER HOUR
7O,OOO TO 385,OOO
BTU/HR INPUT
FUELS
.
MODEL
MSR-DC
Use No.
1 or No. 2 Heating
Oil
(ASTM
D-396), Kerosene,
Diesel
or JpB Jet Fuel.
NEVER attempt
to use
gasoline
as a fuel for
your
burner, as it is more combustible and could result in a seri-
ous
explosion.
NEVER
burn
garbage
or refuse in the heating
unit.
NEVER try to ignite
by tossing burning
paper
or other materials into the
heating unit.
NEVER burn waste
or crankcase oil in
the heating
unit.
ELECTRICAL
.
MODEL MSR-DG
Power supply
Motor
lgnition
13.0VDC Minimum
(at
Battery)
4500 RPM
(Std)
or
3950 RPM
(low
RPM), Ball Bearing, Permanent Magnet
20,000V/28MA/50VA
Secondary,
Intermittent Duty Electronic lgnitor
FUEL
UNIT
Suntec
and DanFoss
brands
MOUNTING
Rigid Flange, Adjustable Flange or Base mount.
DC
OIL BURNER
ETEGTRICAL
CONSIDERATIONS
"
Not
all
generators
are equally
capable. A minimum
of 13.0 volts
must be
provided
at
the
battery.
*
Generators
should be operated
at
the maximum
rated RPM
during burner operation.
*
Good
quality
batteries
are
strongly
suggested. Batteries
with higher Cold
Cranking
Amp
(CCA)
rating
and deep
draw/marine
type
batteries are recommended.
*
Use automotive rated
battery
cabling. All other
wiring
should be
OEM suggested wire type and
gauge.
*
Protect all wiring connection
points
with dielectric
grease.
*
Ambient
temperature impacts
electrical requirements.
Higher temperatures will result in higher amp draws.
*
Increased
pump
operating
pressure
settings will
increase
amp draw.
*
Higher
gallon
rate nozzles
and accompanying
wider
air band openings will increase amp draw,
INSTATLATION
OF BURNER
INSTALLATION
OF THE BURNEH
MUST
BE DONE BY A
QUALIFIED
INSTALLER IN ACCORDANCE WITH REGULATIONS
OF THE NATION.
AL FIRE
PFOTECTION
STANDARD
FOR
OIL.BURNING
EOUTPMENT,
NFPA NO. 31, AND IN
COMPLETE
ACCORDANCE
WITH ALL LOCAL
CODES AND
AUTHORITIES HAVING
JURISDICTION.
A
QUALIFIED
INSTALLER
IS THE PERSON
WHO IS RESPONSIBLE
FOR
THE INSTALLATION AND ADJUSTMENT
OF THE EQUIPMENT
AND
WHO IS
LICENSED
TO INSTALL
OIL-BURNING
EOUTPMENT IN
ACCORDANCE
WITH ALL CODES AND
ORDINANCES.
WARRANTY
IS VOIDED IF NOT
INSTALLED
BY SERVICE PERSON.
THESE
INSTRUCTIONS
SHOULD BE
AFFIXED TO
THE BURNER
OR ADJACENT
TO THE HEATING
APPLIANCE.
I
Page 9

TO THE GLEANING
EQI'IPMENT OWNER
Since 1970,
Wayne
has
supplied
the hot
water
pressure
washer cleaning
equipment
industry with
oil burners. You
are obtaining
a
quality
burner
unsurpassed in
engineering design and
product
development.
lt will
provide you
with
many
years
of efficient
trouble-free operation,
if
properly
installed and
serviced. Please read
this manual carefully.
Wayne
warrants
its
burners specifically
to those who have
purchased
it for resale, including
your
dealer. lf,
in
any
case,
you
have
a
problem
with
your
burner,
or
its installation,
you
should contact
your
dealer
or the
cleaning
equip-
ment manufacturer
for assistance.
FUEL
UNITS
AND OIt LTNES
The
model
MSR-DC
oil burner
is
provided
with
a single
stage 3450
RPM fuel unit
with
by-pass
plug
removed for
a
single
pipe
installation; the by-pass
plug
for two
pipe (inlet
and
return)
is
provided
in the
plastic
bag attached to the
fuel unit.
The
installation
of fuel
filters
are
recommended. Check
supply
tank for sludge
accumulation
and
leakage.
Use only
flare fittings
on
all
piping
and
connections since
compression
fittings
will eventually
leak. With
the
system running,
the
vacuum
should
not exceed 12" mercury
for
single
stage units. For
ease of servicing,
installa
shut off
valve
near
burner.
WIRING
The
MSR-DC
oil burner
must
be
electrically
wired and GROUNDED
in
accordance
with local codes or in their
absence,
with National
Electric Code
ANS/NFPA No. 7O-latest
edition.
This
oil burner
requires
a 12-volt
DC
power
source. Use
copper
wire only not
lighter than #12 awg.
lf
a f used dis-
connect
is
used,
it
should be
fused for a minimum of
20 amps.
Refer to the wiring
diagram in this manual or clean-
ing
equipment
manufacturers manual making sure
the
burner
and
controls
are wired correctly.
AIR SUPPLY FOR
COMBUSTION
The
oil burner
fired hot
water
pressure
washer shall
not
be
installed in an area
where facilities
for
normal air circula-
tion or
infiltration are
so limited as
to interfere with ready attainment
of all necessary
for
proper
combustion and vent-
ing. When the heating
appliance
is
installed in
a confined
space, two
permanent
openings shall be
provided.
One
near the top
of
the
enclosure and one near the
bottom.
Each
opening
shall
have a free area
of not less than
one
square
inch
per
1000
BTU
per
hour
(140
square inch
per
gph)
of
the
total input rating
of all
the
appliances in the enclo-
sure. When the building
is
of unusually tight
construction,
has an air ventilating
system,
exhaust fans,
process
dryer
or
vented
fireplaces, it is recommended
that
combustion air
be supplied
through
two
permanent
openings. The
open-
ings
shall
communicate
directly, or
by means
of ducts,
with outdoors
or such
spaces
(attic
or
crawl)
that freely
com-
municate with
outdoors.
Avoid linty environments. For additional
venting information,
refer to the
regulations of
the
National
Fire Protection
Standard
for oil
burning
equipment,
ANSI/NFPA
N0. 31-latest
edition,
or
the
cleaning equip-
ment manufacturers
recommendations.
NOZZLE
AND
AIB
HANDLING
PARTS
SE!.ECTION
IMPORTANT
Thorough
combustion
and
performance
testing
was
done to
establish the correct nozzle type and air
handling
parts
on
this MSR-DC oil burner. Under circumstance
attempt
to replace or alter
the
oil burner
nozzle
type
or
air handling
parts
(stainless
steel
flamelock, air cone,
electrode
support style
static disc, blower
wheel
or slotted air
circumstances attempt
to fire
the MSR-DC
oil burner
under its 1.00
gph
minimum
or
over
its 2.75
gph
maximum input
rating.
I
UI{IE
Page 10

. \ I:,::.T:::
the
gun
assembly
once
the
burner
has
been
installed
on the
apptiance
remove
the
ignitor/housing
cover
721
screw
and
loosen
the
screw
in the
hold-down
clip
and
swing
open
the
transformer.
Next,
disconnect
the
copper
oil
V
':?Yfl:
I
attaches
with
a 7/16"
hex
flare
nut
on the
gun
assembty
oit tine
adaprer
fitting
and remove
the
g/16,,
hex
Wm*Eflllj:"^Tlly
locknut.
Now,
grasp
the
rear
of
the
gun
assembly
where
the
oit
tine fiuing
adaprer
exits
through
the
no'iE'lb-
housing
and
pull
oil
line
fitting
adapter
to
the right
out
of the
housing
slot
and
slot
plate
covlr.
Genly
tift,
do
not
force,
the
rear
of the gun
assembly,
rotating
the
oil
line
fitting
adapter
upa
+s
degrees pulling
the
entire
gun
assembly
oul
of
the
air
tube
and
housing
opening.
The
iecommended
can
be
installed
into
the
nozzle
body
adapter
using
the
following
steps.
With
the gun
assembly
removed
from
the
burner,
loosen
the
electrode
clamp
screw
and
rotate
the
electrodes
up, out
of the
way
of
a nozzle
wrench'
Now,
thread
the
nozzle
into
the
adapter
finger
tight
then
tighten
securely
w1h
a nozzle
wrench.
CAUTTON:
Do
not
over
tighten.
Next,
reposition
the
electrodes
al shown
in fig;re
1. At
this
time
reinstarrgre
g;,n-;;ffi,i;;
the
burner
using.
the
preceding
steps
in
reverse
order.
Position
the
nozzle
face
fonryard
to
a 5/16"
ietting
behind
the
stainless
steel
air
cone
as
shown
in
figure
1 .
once
in
the required position,
replace
the
g/1
6,,
hex
lock
nut and
the
7116"
hex
flare
nut
on
the
gun
assembly
and
tighten
the
slot
cover
screw
(see
figure
2).
CAUTIoN:
Close
the ignitor
and observe
for spring
contact
with the
brass
buss
bars,
taking
care
not to
pinch
the
igni-
tion
transformer
lead
wires
between
the
housing
and cover
plate.
Reinstall
the
ignitor/housing
cover
screw
and
tight-
en
the
screw
in
the
hold
down
clip
(see
figure
2).
ELECTRODE
NOZZLE
1/8"
AHEAD
STAINLESS
STEEL
AIR
CONE
5/16"
ABOVE
q
5/16" BACK
TRANSFORMERiHOUSIG
COVER SCREW
I/8"
GAP
HOLD.DOWN
CLIP
SLOT
COVER
SCREW
SLOT PLATE
COVER
LOCK NUT
FIGURE
1
FIGURE
2
STARTIiIG
PRIICEDURE
PREPARATION
STEPS
1'
Calibrate
and
check
operation
of combustion
analysis
equipment,
COz
(carbon
dioxide)
or
Oa
(oxygen)
analyzer,
smoke
pump
tester,
fuel
gas
thermometer
and
oil
pressure,/vacuum
gages.
Follow
the manufacture
recommen-
dation
for
proper
calibration
and
check
out.
2' lnstall
oil
pressure
gage
and
vacuum
gage
in
the
outlet
pressure
and
inlet
ports
of the fuel
unit.
3.
Set
oil burner
slotted
air band
shutter
ZS7"
open.
STARTING
BURNER
1.
Turn
off
the
main
power
switch
to
the
burner
and
appliance.
2'
Be
sure
main
fuel
tank
is filled
and
all manual
valves
are
open
between
the fuel
tank and
the
burner.
3. Turn
on the
main
power
switch
to
the
burner
and
appliance.
4'
Prime
the fuel
pump
per
its
manufacturers
recommendations,
check
fuel unit
for
100
psi
delivery
pressure
and
check
system
vacuum
(see
paragraphs
under
Fuel
units
and
oil Lines).
'--
r-'
CAUTIoN:
Do not
run fuel
unit dry
for
more
than
five
minutes
or
damage
to the
fuel
unit
could result.
10
Page 11
5. Once
the fuel
unit is
primed (no
signs of
air in
oil
bleeder
poft
discharge), close
the bleed
port.
Burner
will
\
ignite.
\
6. When
flame
is
established,
make a temporary air adjustment
to the
slotted
air band
for a visually
clean combus-
E
tion smoke
observed from
the
appliance
vent. Allow the appliance to
warm
up
approximately
five
minutes
or
untill#llhlf
the water
temperature reaches that recommended by the cleaning equipment
manufacture
7. Adjust
the slotted
air band
shutter
until a #1
to#2 smoke
(Shell
Bacharach
scale)
is
obtained at the appliance
vent.
8. Check
CO,
(carbon
dioxide) and/or O,
(oxygen)
percentages
and smoke in the flue
gas
at
the
appliance
vent. In
general,
COz
readings should be
in
the 10%
to 12/" range and Oz readings inthe7.4o/oto 4.7'/" range.
9.
Once
the
desired
combustion
results
are
attained, securely tighten slotted air
band
screw and check that
controls
on
the appliance
are
adjusted
per
the cleaning equipment manufactures
instruction
sheets.
Remove
oil
pressure
and
vacuum
gages
from the fuel unit and reinstall
pipe plug
fittings,
10. Check
burner lighting
with
hot chamber,
then
allow
burner
and
appliance to sutficiently cool. Then check
burner
lighting
with a
cold
chamber.
SUGGESTION:
all
new installations should be reinspected after
one or two weeks
of normal
operation,
MAINTENANGE
OILING
MOTOR - The MSR_DC oil burner is
provided
with a ball bearing
shaft motor.
Ball-bearing
motors
do
not
require oiling under
normal
service
conditions.
FILTER
-
The
oil filter cartridge should
be replaced, or sediment
cleaned,
periodically
so the
fuel
oil will not become
contaminated
and
plug
up
the
fuel
pump
and nozzle
of
oil burner.
NOZZLE - The nozzle should be changed at least once each
year
or twice
a
year
if
the
cleaning equipment is used
daify through
the
year
and should
poor
combustion occur.
Replace
with the
proper
nozzle.
COMPONENTS
- lf
for
any reason
any
of the burner
parts
have
to be replaced,
always
use
parls
recommended
by
the manufacturer. Specify
part
numbers
and description
when
ordering.
ilN
ALL COMMUNICATIONS
STATE BURN-
ER
MODELAND SIX
DtGtT SPECtF|CAT|ON
NUMBER).
ELECTRODE
SETTINGS
- This is very important for
reliable ignition of the oil;
check these
once
a
year
in accor-
dance
with the instructions
provided
in
this
manual. Replace
electrodes
if worn excessively
or if
porcelain
insulator
is
oil soaked
or
cracked
(See
Figure 1).
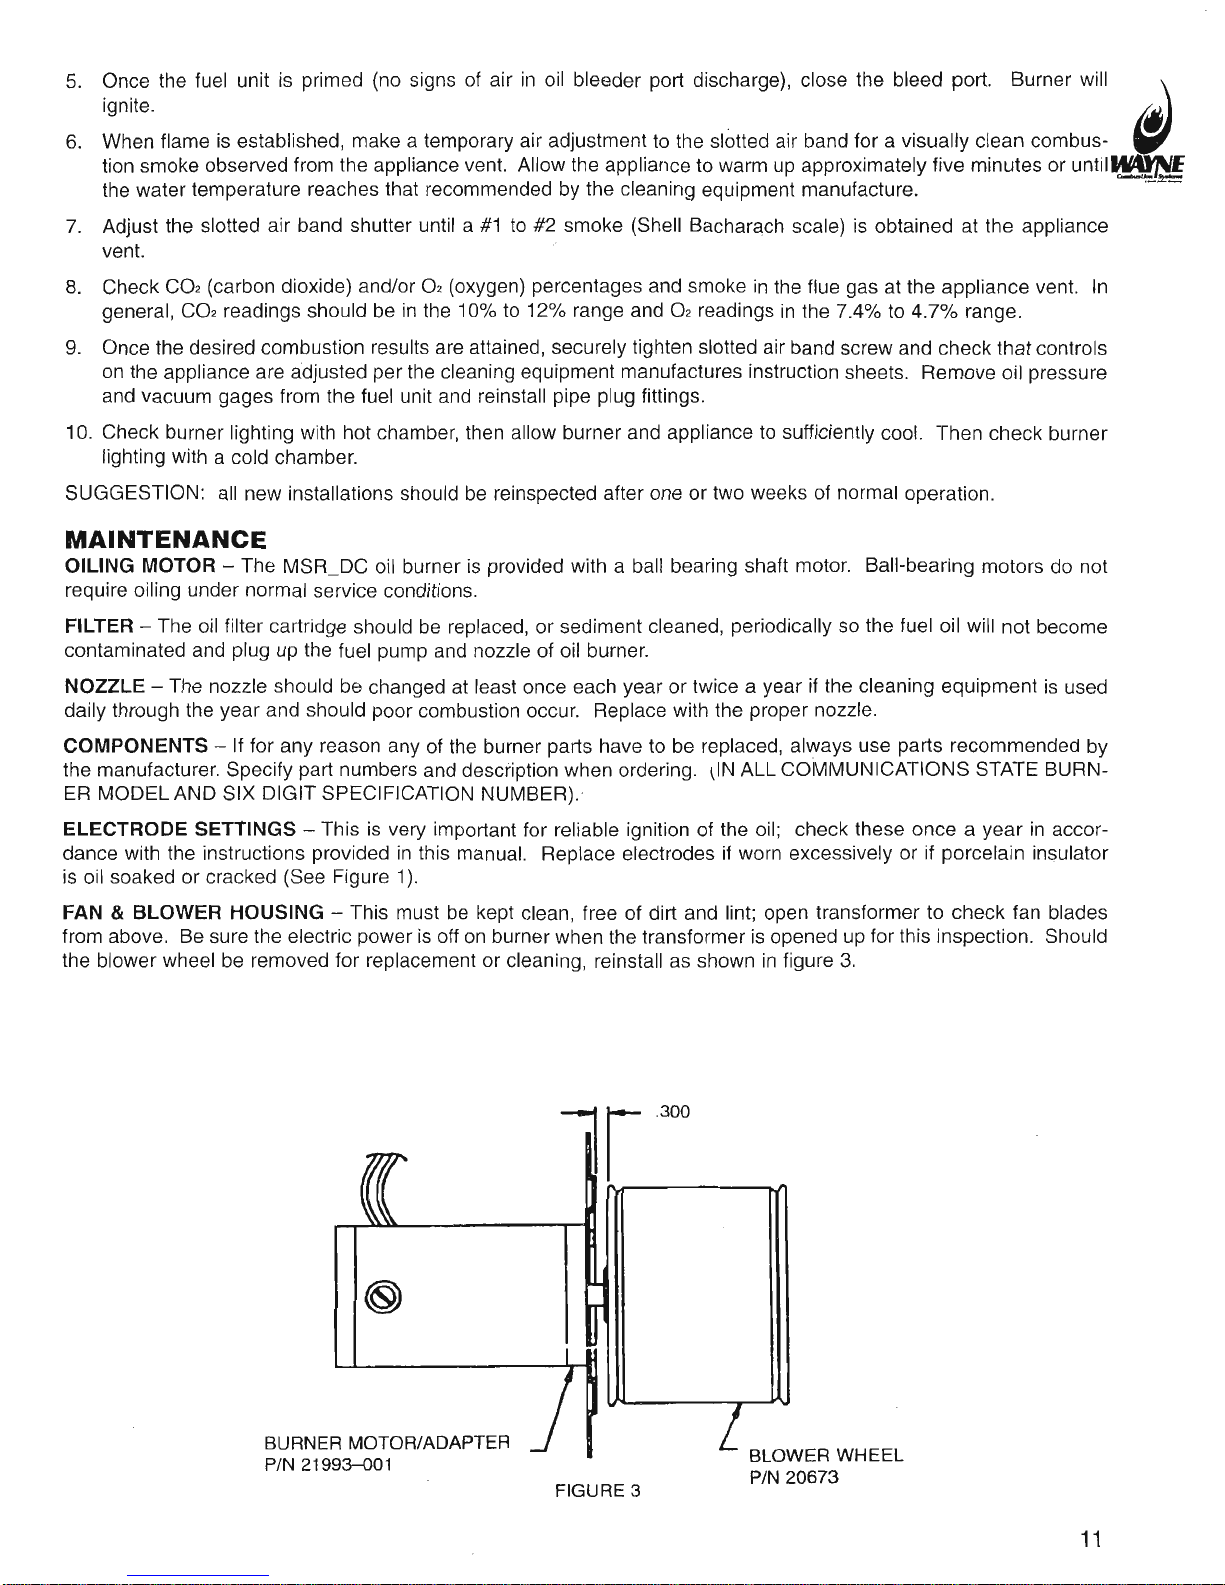
FAN & BLOWER HOUSING - This must
be
kept clean, free
of dirt
and
lint;
open
transformer
to check
fan
blades
from above.
Be
sure
the electric
power
is off
on burner
when the transformer
is opened
up for
this
inspection.
Should
the
blower wheel be removed
for replacement or
cleaning, reinstall
as shown
in figure 3.
BLOWER
WHEEL
P/N 20673
BURNER MOTOR/ADAPTER
P/N 21993-001
FIGURE 3
11
Page 12

,.\
6=t
w
v
EMgBtr
i
Tlr
6*r\.
U&
''$
NO. DESCRIPTION
PART
NO.
1 MOTOR
1/8 STANDARD
21993.005
MOTOR 1/B LOW AMP
21993-006
2 MOTOR
ADAPTOR
100761-001
3 BLOWER WHEEL
31/2X 4114 21427
4 BURNER
HOUSING
SEE NOTE
5
|GN|TOR-12VDC
31812-003
6 MOUNTING BASE
1OO73O-OO1
7 HOUSTNG
COVER
21723-002
8 SLOT COVER PLATE
13392
9 INNER AIR BAND
20601-002
10
OUTER AIR BAND
20602-002
11
COUPLTNG
101119-001
12 OIL
LINE
ASSEMBLY
6"
14451
OIL
LINE ASSEMBLY
8" 14452
134 FUEL
UNIT: SUNTEC COMBO 101128-005
138 FUEL
UNIT SUNTEC
13495
13C FUEL
SOLENOTD
100610-005
14 ELBOW
(USE
WITH 13A)
13494
15 GUN ASSEMBLY
SEE NOTE
16
AIR TUBE/FLANGE
ASM
SEE NOTE
19
STATE
BURNER MODEL, PART DESCRTPTTON AND
PART
NUMBER WHEN ORDERING
PARTS
12
16
17
NO.
DESCRIPTION
PART NO.
17 AtR CONE - #3A
14159
AIR CONE
-
#4A 14160
18 GASKET 12484
19
CONNECTOR
(USE
WITH 138. 13C)
14222
20 cAD
CELL
14289
21
CONTROL
BOX
63355-001
22
TIMER.
DROP
OUT
100889-002
23
COVER. CONTROL
BOX
62899
Suggested Combustion
Ghamber Dimensions
Gonversion
or Upgrading
Ghamber Dimensions lln lnchesl
Firing
Rate
fG-H-pl
Square
Width
Lenqth
Round Height Floor
to
Nozzle
0.85
1.00
1.25
'1.35
1.50
1.65
2.00
2.50
3.00
8.5
8.5
99
10
10
10tt
10]l
't1
11
11'l
1',\'A
12%
125/6
14'A 14%
15h
15il
8.5
10'a
11%
1134
12%
13
14'A
to
17%
8.5
12it
1214
123/o
13
13y,
1314
14
15
5-6
5-6
6-7
7-8
7-8
8.5
5-6
5-6
5-6
BURhIER
GOMPONENTS . MODEL MSR.DC
12
NOTE: WHEN
ORDERING STATE BURNER
MODEL MSR, SPEC#. WHAT
USABLE AIR TUBE
LENGTH. AND FIRING
RATE.
Page 13

AIR TUBE & GUN
AS$EMBLY DETAILS MODEL
MSR.DC
,-r\
ltEl
v
]s[tr
VT
sno"
neove
q
J
ELECTROOE
ADJUSTMENTS
NOZZLE
NOTE: WHEN
ORDERING
STATE
BURNER MODEL
MSR, SPEC #, PART DESCRIPTION,
AIR TUBE
coMBtNATtON, WHAT USABLE AtR
TUBE LENGTH,
(D|MENSION
A), AND FIRING
RATE.
13
NO. DESCRIPTION
PART NO.
24
ADAPTOR. NOZZLE SUPPORT
21913-OO1
25
ELECTRODE SUPPORTASM SEE
NOTE
26
ELECTRODE
(RH)
SEE
NOTE
27
ELECTRODE
(LH)
SEE NOTE
28 OIL PIPE/FITTING SEE
NOTE
29 DISC/BAFFLE
PLATE
SEE
NOTE
30 CAST
STABILIZER
214O8.SER
STAMPED STABILIZER
1OO7O4-OO1
TO DETEBMINE
THE
AIR TUBE
LENGTH
FRONT FACE
OF
HEATING
UNIT
INSIDE
FACE
OF
C]IAMBER
THE
AIR
TUBE LENGTH
(DIM
A)
IS THE DISTANCE FROM THE
FRONT
OF AIR TUBE
RETAINEB FLANGE
TO FACE OF AIR CONE
NOTE ADJUSTABLE
FLANGE WIDTH.
Page 14

Notes
@
UWM
14
Page 15

0
urunE
Notes
15
Page 16
WAYNI E
COMBUSTION
SYS-TEMS
801 GLASGOWAVE.
FORT WAYNE, IN 48803
E-ENfiTTES
WARffiANTIHS FOR
O[t
AND
GAS
BURh!ERS, ruHADH BY ItrAYNE AroD
&"BSED
qN
RESIDENTEAL IT{STAT-I-ATIONS
WAYNE
COMBIJSTION SYSTEMS
("WAVNE")
warrants to those who
purchase
its Oil
Burner Models
for resale
or
for incorporation into
a
product
of resale, that
its
burner is free from
defects in
material and
workmanship under nor-
mal
use and service for thirty-six
(36)
months
from
the date of manufacture. ALL
GAS
BURNERS
manufactured
by
"WAYNE"
will be similarly warranted for eighteen(18) months from
date of
manufacture
except
where
original manu-
facture
offers
a
greater
warranty.
(Reference
#6 below) THESE LIMITED WARRANTIES DO
NOT APPLY UNLESS
THE
BURNER
COVERED
BY IT IS PROPERLY INSTALLED BY A
QUALIFIED,
COMPETENT
TECHNICIAN, WHO
IS LICENSED
WHERE STATE AND/OR LOCAL
CODES
PREVAIL, AND
WHO
IS
EXPERIENCED
IN MAKING
SUCH
INSTALLATIONS.
IN ACCORDANCE WITH NFPA #31
OF
THE NATIONAL FIRE PROTECTION
ASSOCIATION AND
IN ACCORDANCE WITH ALL LOCAL,
STATE
AND NATIONAL
CODES.
Any IN-WARRANTY
burner component
which
is defective in material or workmanship will be either repaired or
replaced as follows:
1. Fuel
units, motors, lransformers,
gas
valves, and
controls should be
returned
to an
authorized
service
station or
distributor of
WAYNE
for determination of applicability of this LIMITED WAHRANTY
as
to
either
repair
or
replacement, where
said service station or distributor is reasonably
available
in
the
customer's locality. The
manufacturers
of burner
components regularly
publish
and distribute listings showing the locations
of
their network
of
service stations.
Where
such local service
is NOT available for the burner components described above
or
other
burner
parts
are
involved, these items
should
be
returned,
freight
prepaid,
to WAYNE Service Depadment,
801
Glasgow Ave, Fort Wayne, Indiana
46803.
2. Burners
and/or component(s)
determined to be covered
under this
LIMITED WARRANTY by WAYNE
shall be
repaired
or
replaced at WAYNE's sole
option.
3. WAYNE
is not responsible for any labor cost for the removal
and
replacement
of said burner or burner
components
and equipment associated therewith.
4. A burner so repaired
will then
carry
the LIMITED WARRANTY
equal to the unexpired
portion
of
the original
burner LIMITED WARRANTY.
5.
lf inspection
by
WAYNE
does NOT disclose any defect
covered by
this LIMITED WARRANTY the
burner or
burner component(s)
will
be either repaired or replaced
at
the
expense of
the
customer and
WAYNE's regular
charges will
apply.
6. lf the original manufacturer of
a burner component offers a warranty
greater
than either
of
our
LIMITED
WARRANTIES
described
above, then this
portion
will
be added
to
our
LIMITED WARRANTY.
This
LIMITED
WARRANTY does NOT
cover
products
which
have been damaged as the result of accident, abuse, mis-
use, neglect, improper installations, improper
maintenance or failure to operate in accordance with WAYNE's written
instructions.
These LIMITED WARRANTIES
do
not
extend
to anyone except the first
purchaser
at retail
and
only when the burner
is in the original installation site.
IMPLIED WARRANTIES
OF
MERCHANTABILITY
AND
FITNESS
FOR A PARTICULAR PURPOSE
SHALL
BE LIM.
ITED TO THE DURATION
OF
THE LIMITED
EXPRESS WARRANTIES
CONTAINED
HEREIN. WAYNE
EXPRESS.
LY DISCLAIMS
AND EXCLUDES ANY LIABILITY
FOR CONSEQUENTIAL OR INCIDENTAL DAMAGES OF
ANY
NATURE
FOR
BREACH OF ANY EXPRESS
OR
IMPLIED
WARRANTY.
Some
states do
not
allow
limitation on
how long an implied warranty lasts, so the above limitation may not apply to
you.
Also,
some states
do
not allow the
exclusion or limitation of incidental or
consequential
damages,
so
the above limita-
tion or exclusion may not apply to
you.
WAYNE
neither assumes
or
authorizes any
person
to
assume
for WAYNE any
other liability or obligation in connection with the
sale of these
products.
This warranty
gives you
specific legal rights,
and
you
may also
have
other rights which vary from
state
to
state,
16
MSR & MSR-DC 22019-003 Rev. D 03124/a3
 Loading...