

Waxess DM1000, DMS1000 User Manual
D mode CT user guide final.book Page i Tuesday, May 24, 2005 6:57 PM
Dual Mode
Communication Terminal
DM1000/DMS1000
User Guide
D mode CT user guide final.book Page ii Tuesday, May 24, 2005 6:57 PM
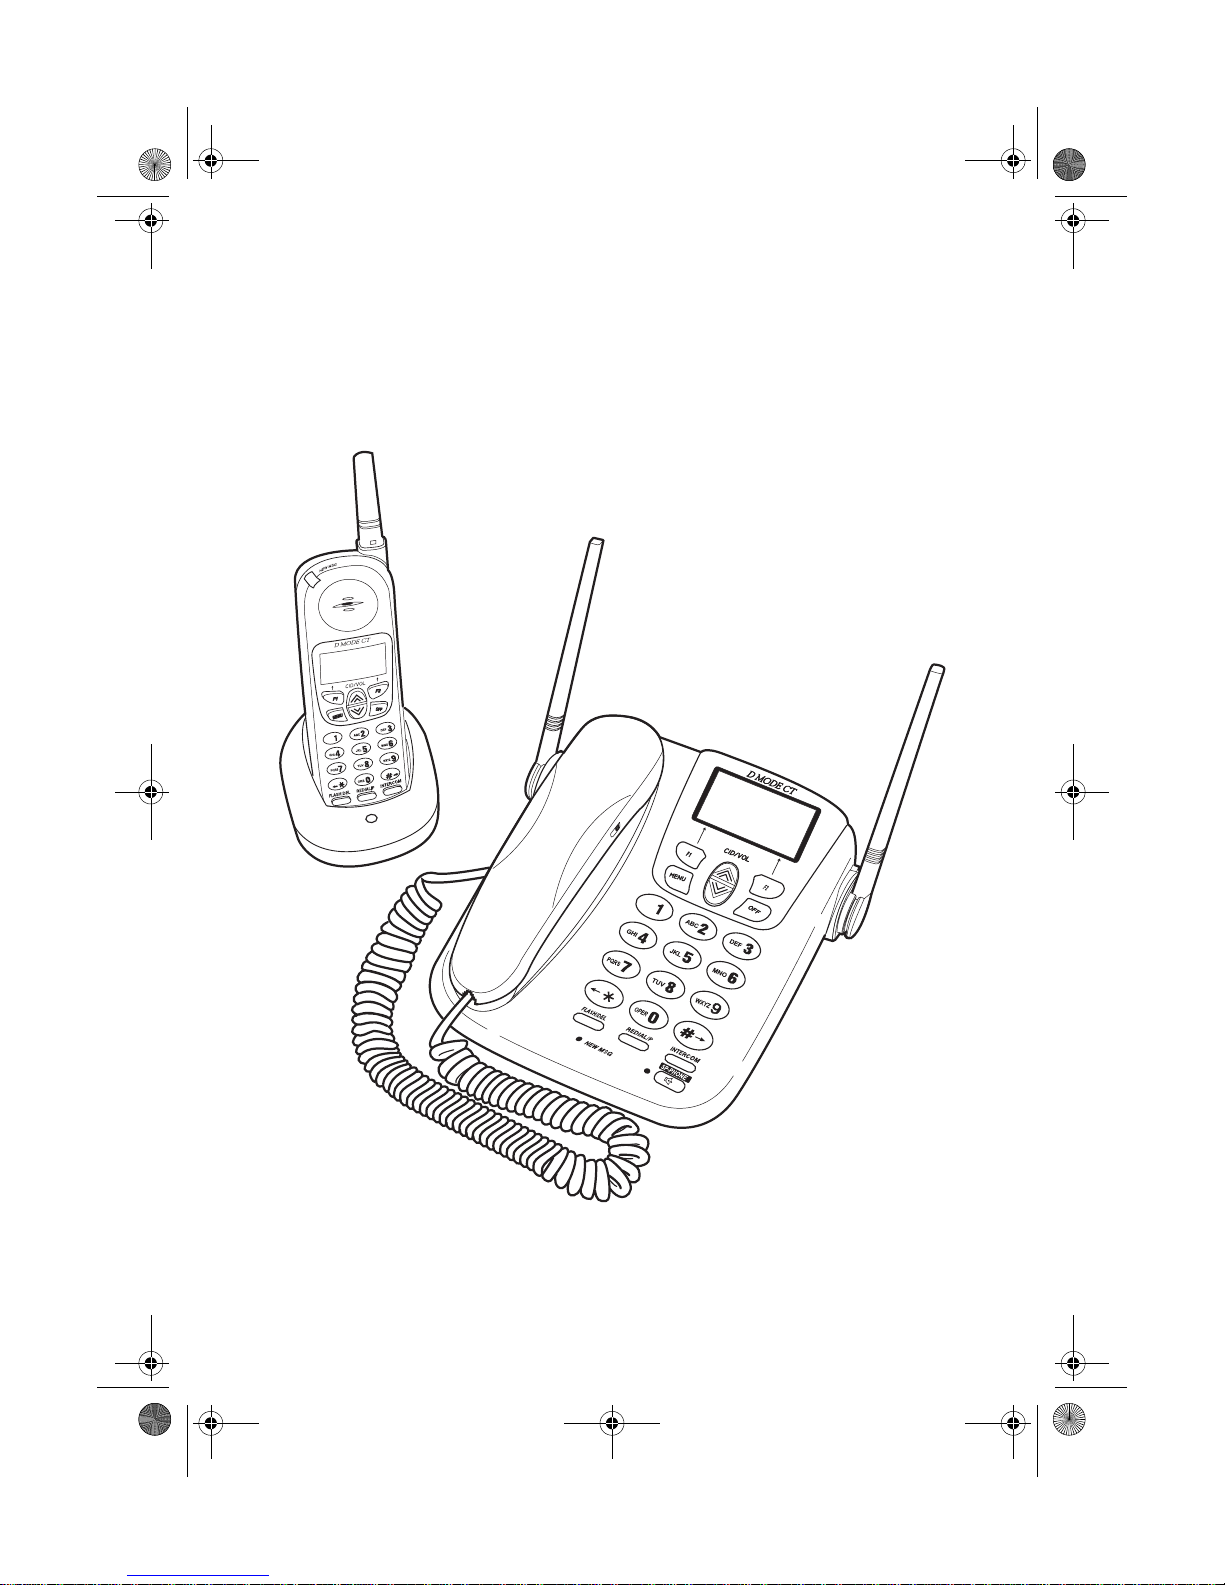
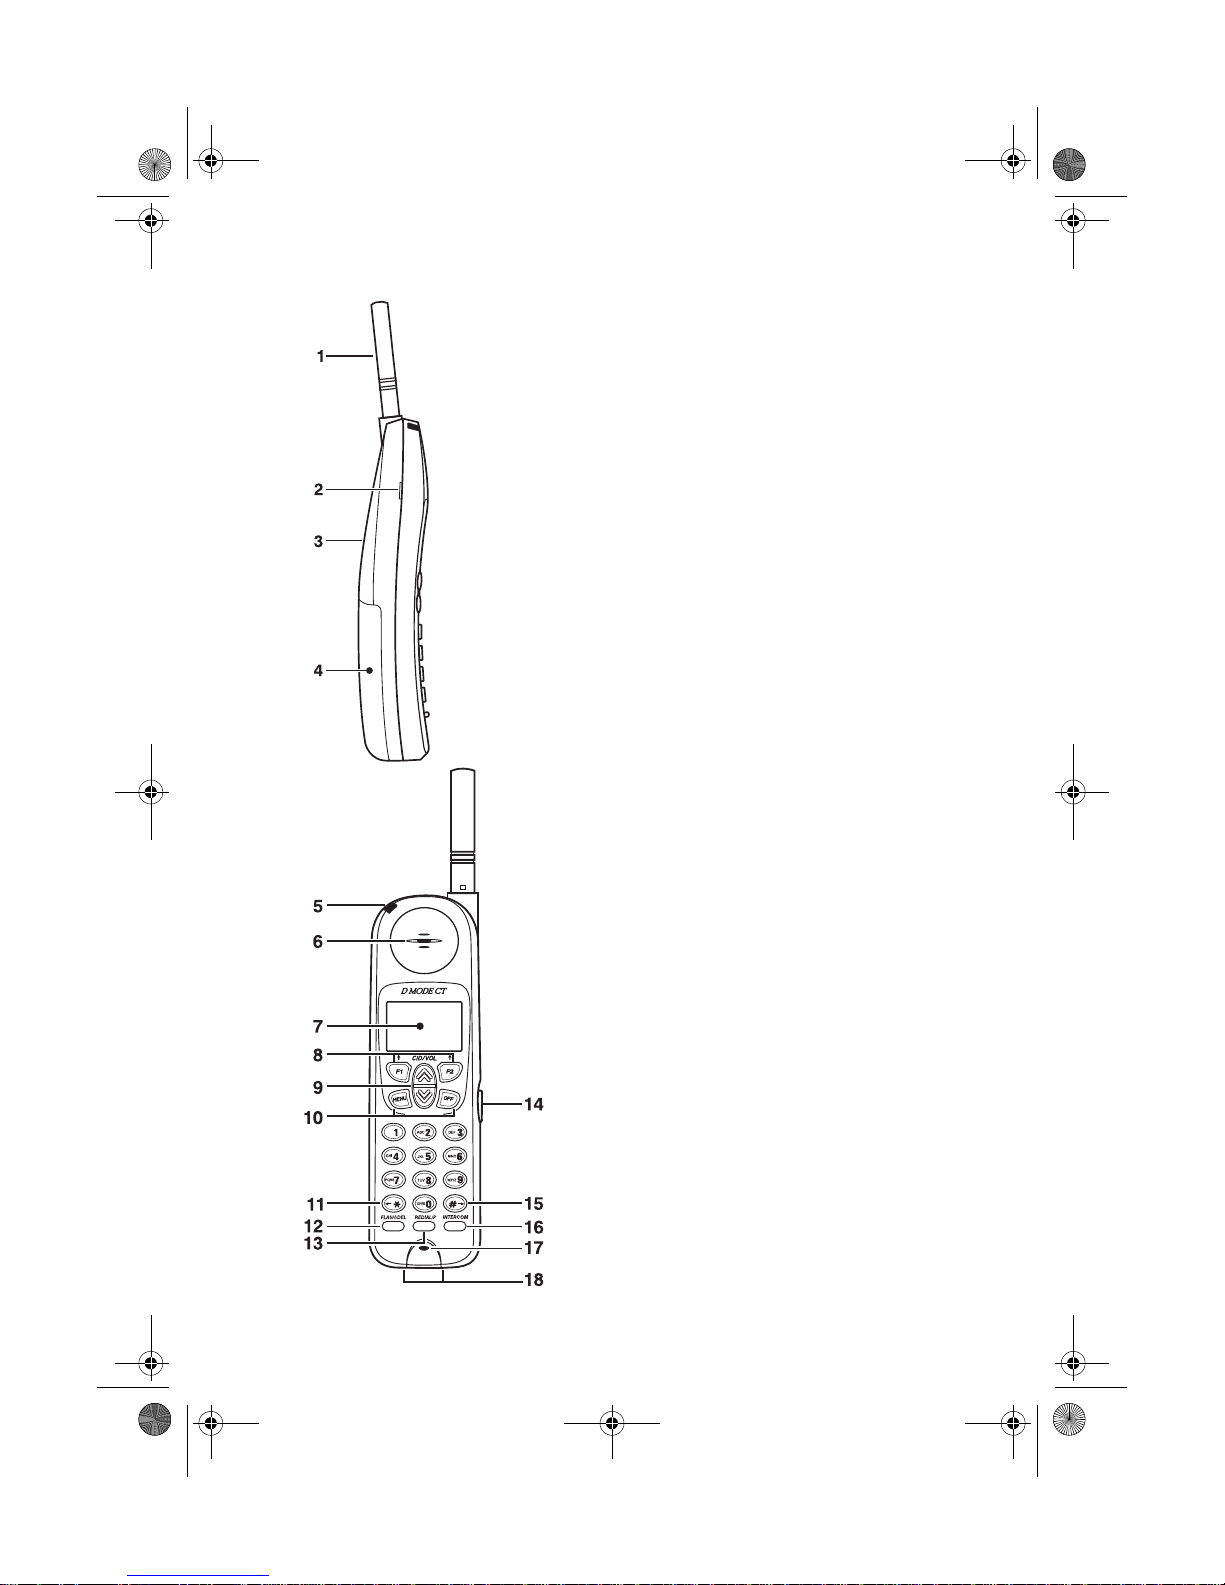
Handset
1 Antenna
2 Beltclip Attachment
3 Speaker for Ringer
4 Handset Battery Compartment
5 New Message LED
6Handset Earpiece
7 LCD Display
8 Function Keys
9Up/Down Keys
10 Menu and OFF Keys
11
* Scroll Left
12 Flash/Delete Key
13 Redial/Pause Key
14 Headset Jack
15
# Scroll Right
16 Intercom
17 Handset Microphone
18 Handset Charging Contacts
D mode CT User Guide ii Copyright © 2005 Waxess
D mode CT user guide final.book Page iii Tuesday, May 24, 2005 6:57 PM
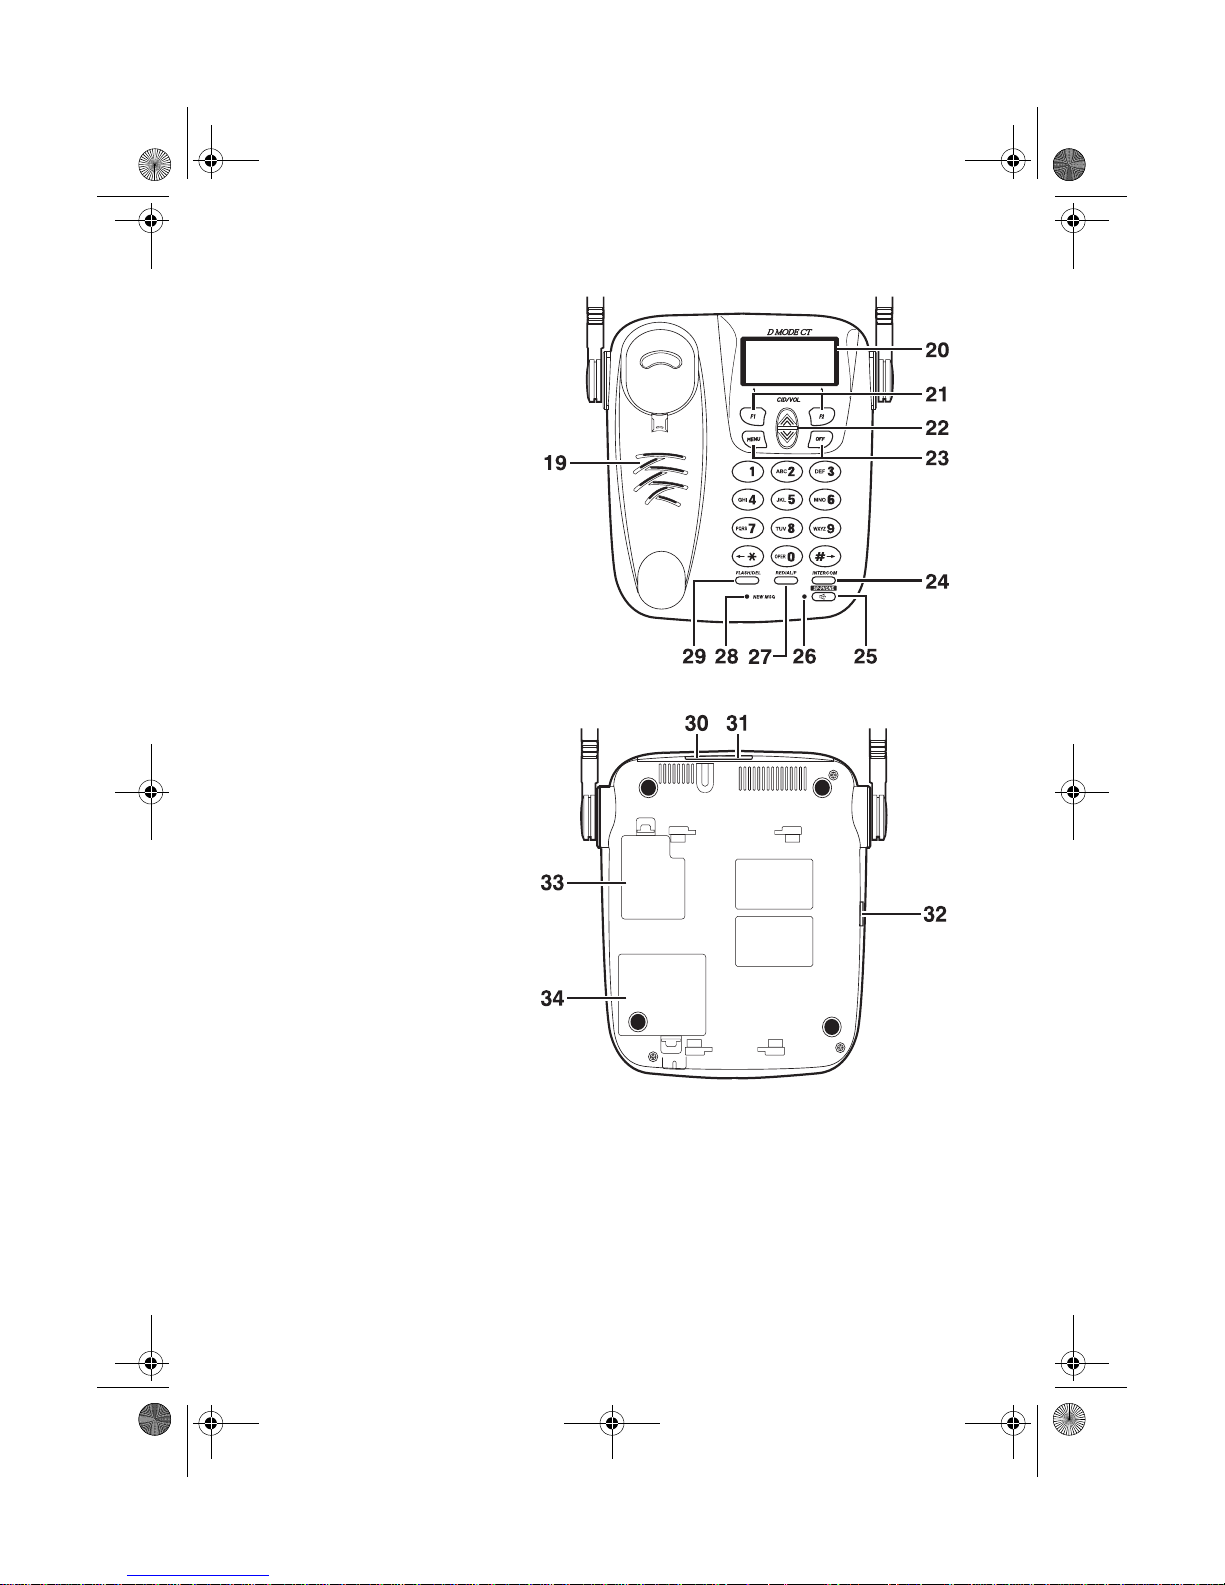
Base
19 Base Speaker/Ringer
20 LCD Display
21 Function Keys
22 Up/Down Keys
23 Menu and Off Keys
24 Intercom Key
25 Speaker Phone Key
26 Speaker Phone ON
LED
27 Redial/Pause Key
28 New Message LED
29 Flash Key
30 DC IN 9V Jack
31 TEL LINE Jack
32 Corded Handset
Jack
33 SIM Card Cover
34 Battery Cover
D Mode CT User Guide iii Copyright © 2005 Waxess

D mode CT user guide final.book Page iv Tuesday, May 24, 2005 6:57 PM
Introduction
The D Mode CT is a unique, all-in-one cellular
and
landline
communications device. This new product addresses the
fast-paced convergence of landline and cellular, as well as
transition from landline usage to cellular service usage at home.
This innovative product combines landline (in the home) phone
service with cellular (mobile) phone service. With this one device,
you can now make and receive phone calls at home using your
traditional home phone service or your mobile cellular service.
The competitive landscape of the cellular industry has driven
down the cost of cellular se rvice. Now, you can have that
affordable pricing in your home.
With its higher power, the new D Mode CT safely provides
uninterrupted phone service in your home. No more dead spots.
No more sporadic disconnects. You can roam freely around the
house using a standard 2.4GHz cordless handset while using your
cellular service.
•FEATURES
• Compatible with GSM network
• 2.4GHz DSS Multiple Handset Cordless Telephone
• Up to 2 watts of power for maximum cellular connectivity
• Expandable up to 4 cordle ss handsets
• 3-way conference with cellular and landline
• Caller ID from both cellular and landline services
• 50 number phone book and 50 number Caller ID memory
• Speakerphone on base with dual keypad
• Voicemail access for both cellular and landline
• Send and receive SMS*1
• Power backup battery (optional)
• Corded handset on base
• Large orange backlit LCD
• 5 number redial memory with up to 32 digits each
*1 To use these features, you must subscribe to appropriate services with
your service provider.
*2 Cellular power depends on the wireless service provider and their network
service configuration.
*1
*1
1
*
*2
•WEB SITE
Web site: http://www.waxess.com
D mode CT User Guide iv Copyright © 2005 Waxess

D mode CT user guide final.book Page v Tuesday, May 24, 2005 6:57 PM
Contents
Handset . . . . . . . . . . . . . . . . . . . . . . . . . . . . . . . . . . . ii
Base . . . . . . . . . . . . . . . . . . . . . . . . . . . . . . . . . . . . . . iii
Features . . . . . . . . . . . . . . . . . . . . . . . . . . . . . . . . . . . . . . . . . . iv
Web site . . . . . . . . . . . . . . . . . . . . . . . . . . . . . . . . . . . . . . . . . iv
Get ready . . . . . . . . . . . . . . . . . . . . . . . . . . . . . . . . . . 1
Prepare . . . . . . . . . . . . . . . . . . . . . . . . . . . . . . . . . . . . . . . . . . .1
Choose Location . . . . . . . . . . . . . . . . . . . . . . . . . . . . . . . . . . . . .2
Get set . . . . . . . . . . . . . . . . . . . . . . . . . . . . . . . . . . . . 7
Dialing mode . . . . . . . . . . . . . . . . . . . . . . . . . . . . . . . . . . . . . . .7
Time and date . . . . . . . . . . . . . . . . . . . . . . . . . . . . . . . . . . . . . . .7
Set the ringer tone . . . . . . . . . . . . . . . . . . . . . . . . . . . . . . . . . . .8
Key beep . . . . . . . . . . . . . . . . . . . . . . . . . . . . . . . . . . . . . . . . .10
Area codes . . . . . . . . . . . . . . . . . . . . . . . . . . . . . . . . . . . . . . . .10
Language . . . . . . . . . . . . . . . . . . . . . . . . . . . . . . . . . . . . . . . . .11
LCD contrast . . . . . . . . . . . . . . . . . . . . . . . . . . . . . . . . . . . . . . .11
Name . . . . . . . . . . . . . . . . . . . . . . . . . . . . . . . . . . . . . . . . . . .11
Handset registration . . . . . . . . . . . . . . . . . . . . . . . . . . . . . . . . .11
GO! . . . . . . . . . . . . . . . . . . . . . . . . . . . . . . . . . . . . . . 13
Make a wireless call . . . . . . . . . . . . . . . . . . . . . . . . . . . . . . . . . .13
Make a landline call . . . . . . . . . . . . . . . . . . . . . . . . . . . . . . . . . .13
Calling options . . . . . . . . . . . . . . . . . . . . . . . . . . . . . . . . . . . . .14
Answer a wireless call . . . . . . . . . . . . . . . . . . . . . . . . . . . . . . . .14
Answer a landline call . . . . . . . . . . . . . . . . . . . . . . . . . . . . . . . .15
In-Call operations . . . . . . . . . . . . . . . . . . . . . . . . . . . . . . . . . . .15
Phone book . . . . . . . . . . . . . . . . . . . . . . . . . . . . . . . . . . . . . . .18
Messages . . . . . . . . . . . . . . . . . . . . . . . . . . . . . . . . . . . . . . . . .21
More features . . . . . . . . . . . . . . . . . . . . . . . . . . . . . 26
Caller ID . . . . . . . . . . . . . . . . . . . . . . . . . . . . . . . . . . . . . . . . .26
Page and Intercom . . . . . . . . . . . . . . . . . . . . . . . . . . . . . . . . . .28
Two-line calling . . . . . . . . . . . . . . . . . . . . . . . . . . . . . . . . . . . . .29
Barge-in . . . . . . . . . . . . . . . . . . . . . . . . . . . . . . . . . . . . . . . . . .31
Cellular only . . . . . . . . . . . . . . . . . . . . . . . . . . . . . . . . . . . . . . .33
Power back-up . . . . . . . . . . . . . . . . . . . . . . . . . . . . . . . . . . . . .33
Precautions . . . . . . . . . . . . . . . . . . . . . . . . . . . . . . . 35
Important safety instructions . . . . . . . . . . . . . . . . . . . . . . . . . . .36
I.C. Notice . . . . . . . . . . . . . . . . . . . . . . . . . . . . . . . . . . . . . . . .42
General information . . . . . . . . . . . . . . . . . . . . . . . . 43
Index . . . . . . . . . . . . . . . . . . . . . . . . . . . . . . . . . . . . 44
D Mode CT Menu Map . . . . . . . . . . . . . . . . . . . . . . . . 47
D mode CT User Guide v Copyright © 2005 Waxess

D mode CT user guide final.book Page vi Tuesday, May 24, 2005 6:57 PM
Notes
D Mode CT User Guide vi Copyright © 2005 Waxess

D mode CT user guide final.book Page 1 Tuesday, May 24, 2005 6:57 PM
1Get ready
Included items
• Base • Belt clip
• Cordless handset • Wall mount bracket
• AC adaptor for base • Telephone cord
• AC adaptor for cordless
handset
• Rechargeable battery for
cordless handset
•User guide
•Prepare
About the SIM card
This phone connects to GSM networks through a Subscriber
Identity Module card that you get from your cellular service
provider. The SIM card carries information about your wireless
account.
Observe these important considerations:
• Keep all SIM cards out of the reach of small children.
• The SIM card and its contacts are easily damaged by scratches
or bending, so be careful when handling, inserting, or
removing the card.
• Always disconnect power from the phone before removing or
inserting the SIM card.
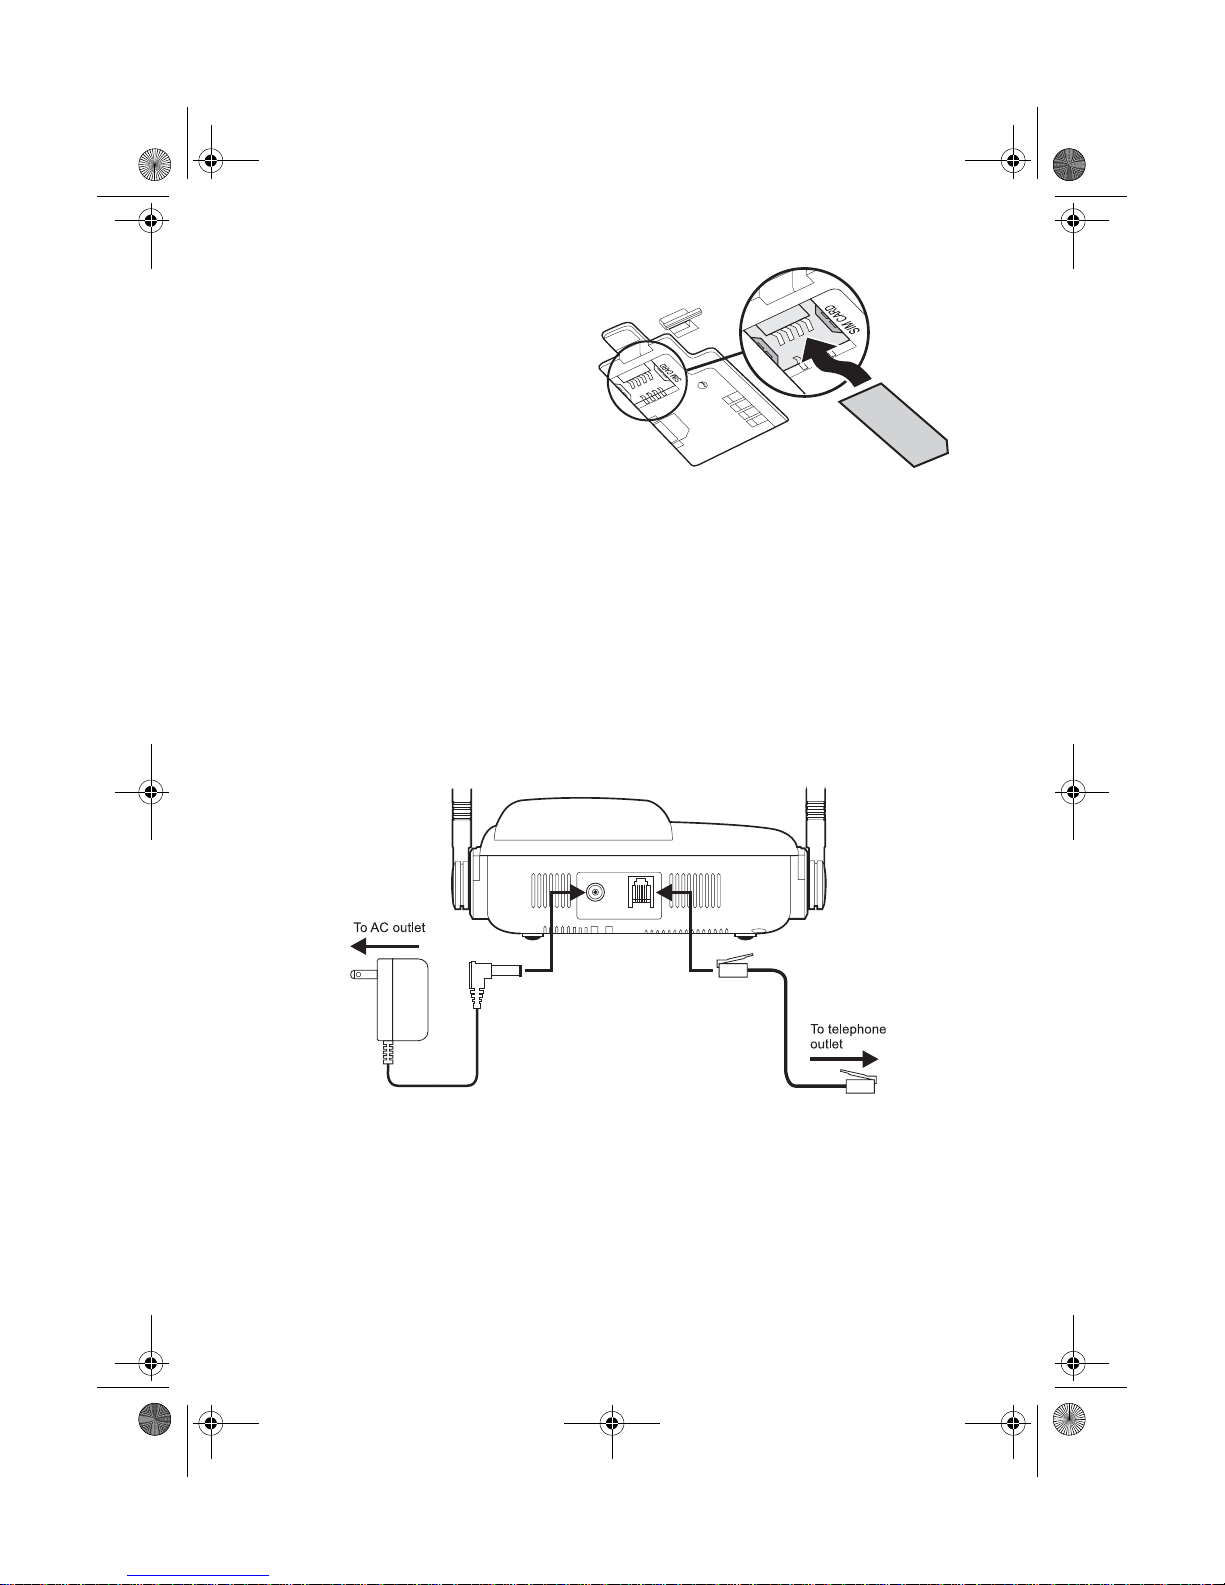
Install the SIM card
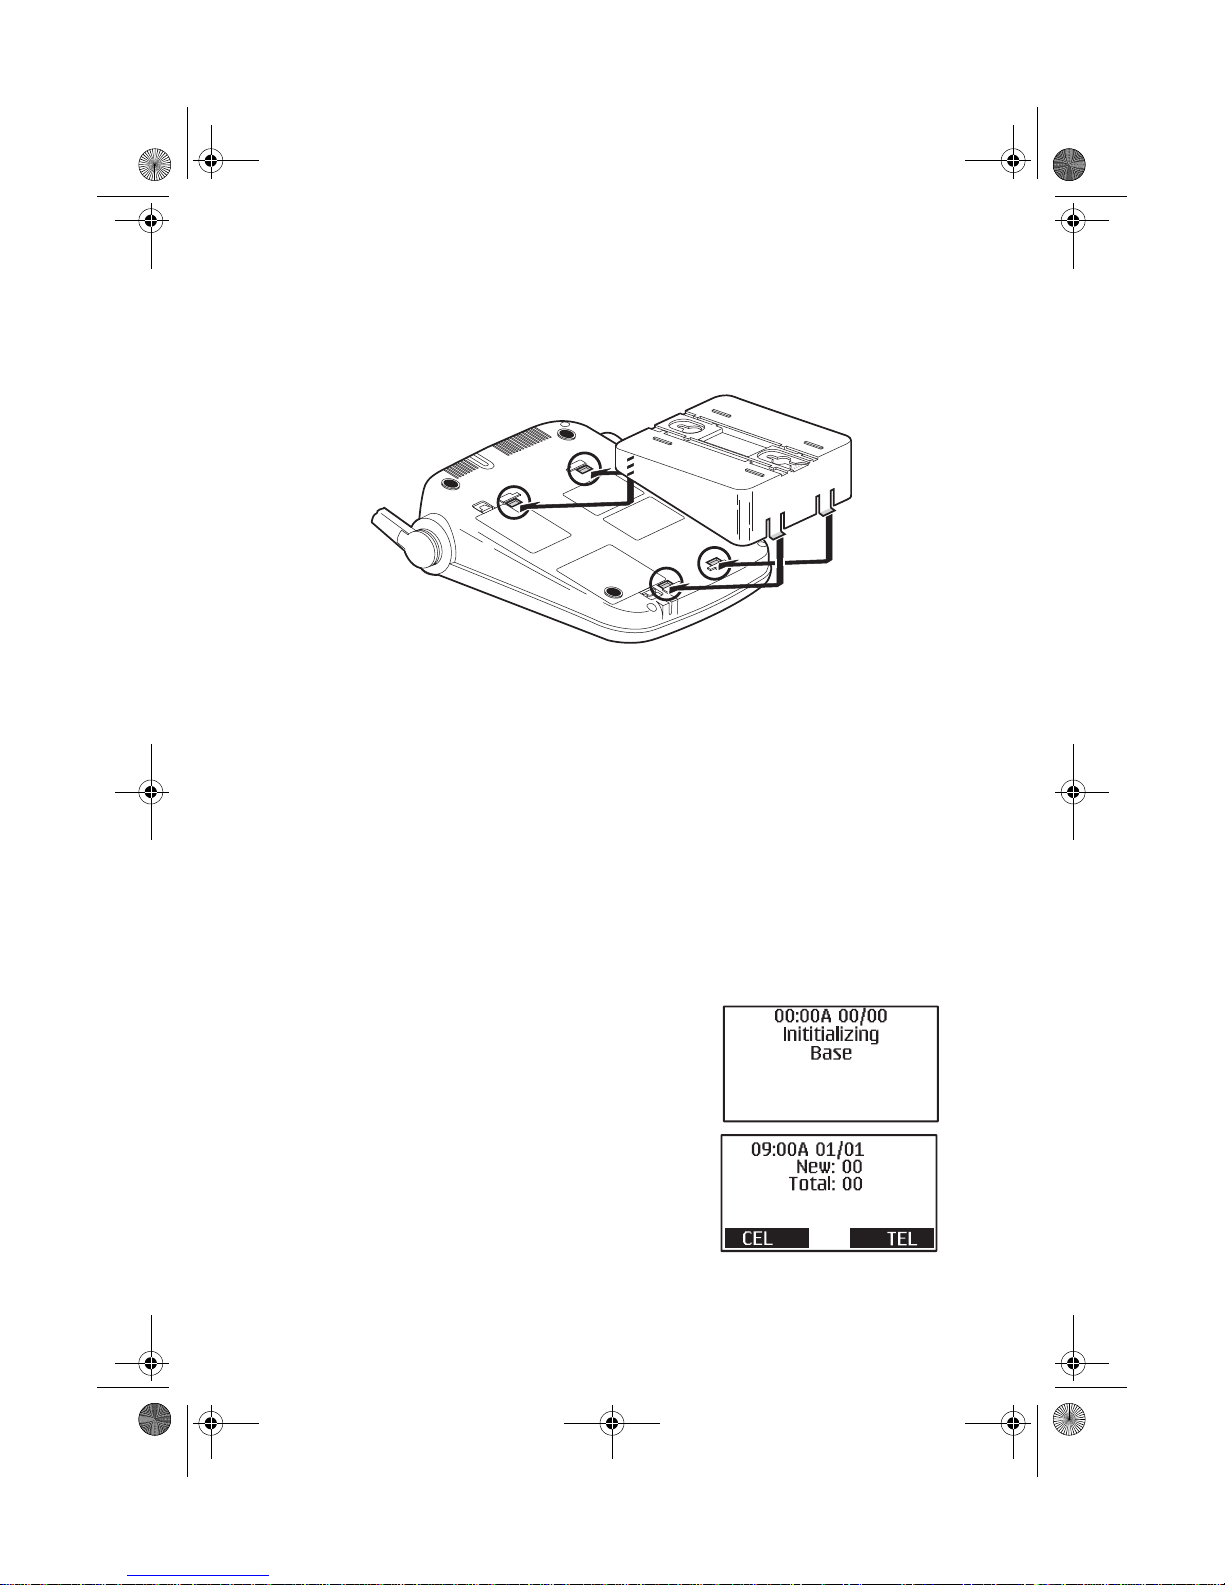
1 Verify power is disconnected from the base.
2 Turn the base over, and open the SIM card cover.
D Mode CT User Guide 1 Copyright © 2005 Waxess
D mode CT user guide final.book Page 2 Tuesday, May 24, 2005 6:57 PM
3 Align the SIM card with
the beveled corner facing
right, and the contact
area facing downward.
4 Carefully slide in the SIM
card until the flat edge
contacts the end of the
receptacle.
5 Replace the cover.
•Choose Location
Some important considerations:
• Charge the handset for 12–15 hours before using it.
• Locate the base near both a phone jack and a power outlet
which is not controlled by a switch.
• Keep the base and handset away from sources of electrical
noise, such as motors and fluorescent lighting.
• Leave enough room to raise both base antennas fully vertical.
Desk or Table
1 Connect the telephone line cord to the TEL LINE jack and to a
telephone jack.
2 Set the base on a desk or table and place the handset on the
base.
3 Connect the handset cord to the jacks on the handset and the
base, then set the handset in the cradle.
4 Raise both antennas to a vertical position.
5 Find the base AC adaptor (the larger adaptor, Model number
D mode CT User Guide 2 Copyright © 2005 Waxess
D mode CT user guide final.book Page 3 Tuesday, May 24, 2005 6:57 PM
AD-48091000), and connect it to the DC IN 9V jack and to a
standard 120V AC.
Wall mount
1 Attach the wall mount adaptor to the base.
2 Find the base AC adaptor (the larger adaptor, Model number
48091000), plug the connector into the DC IN 9V jack, then
plug the telephone line cord to the TEL LINE jack.
3 Wrap the AC adaptor inside the molded wiring channel, then
wrap the cord around the strain relief notch.
4 Raise the antennas to a vertical position.
5 Align the mounting slots on the base with the mounting posts
on the wall plate. Then push in and down until the phone is
firmly seated.
6 Connect the handset cord to the jacks on the handset and
base, then set the corded handset in the cradle.
7 On the base, remove the handset retainer, flip it over, then
replace it.
Base power on
When powered on for the first time, the
base goes through an initialization
sequence.
Note: Do not use the phone until the
initialization sequence is
complete.
D Mode CT User Guide 3 Copyright © 2005 Waxess
D mode CT user guide final.book Page 4 Tuesday, May 24, 2005 6:57 PM
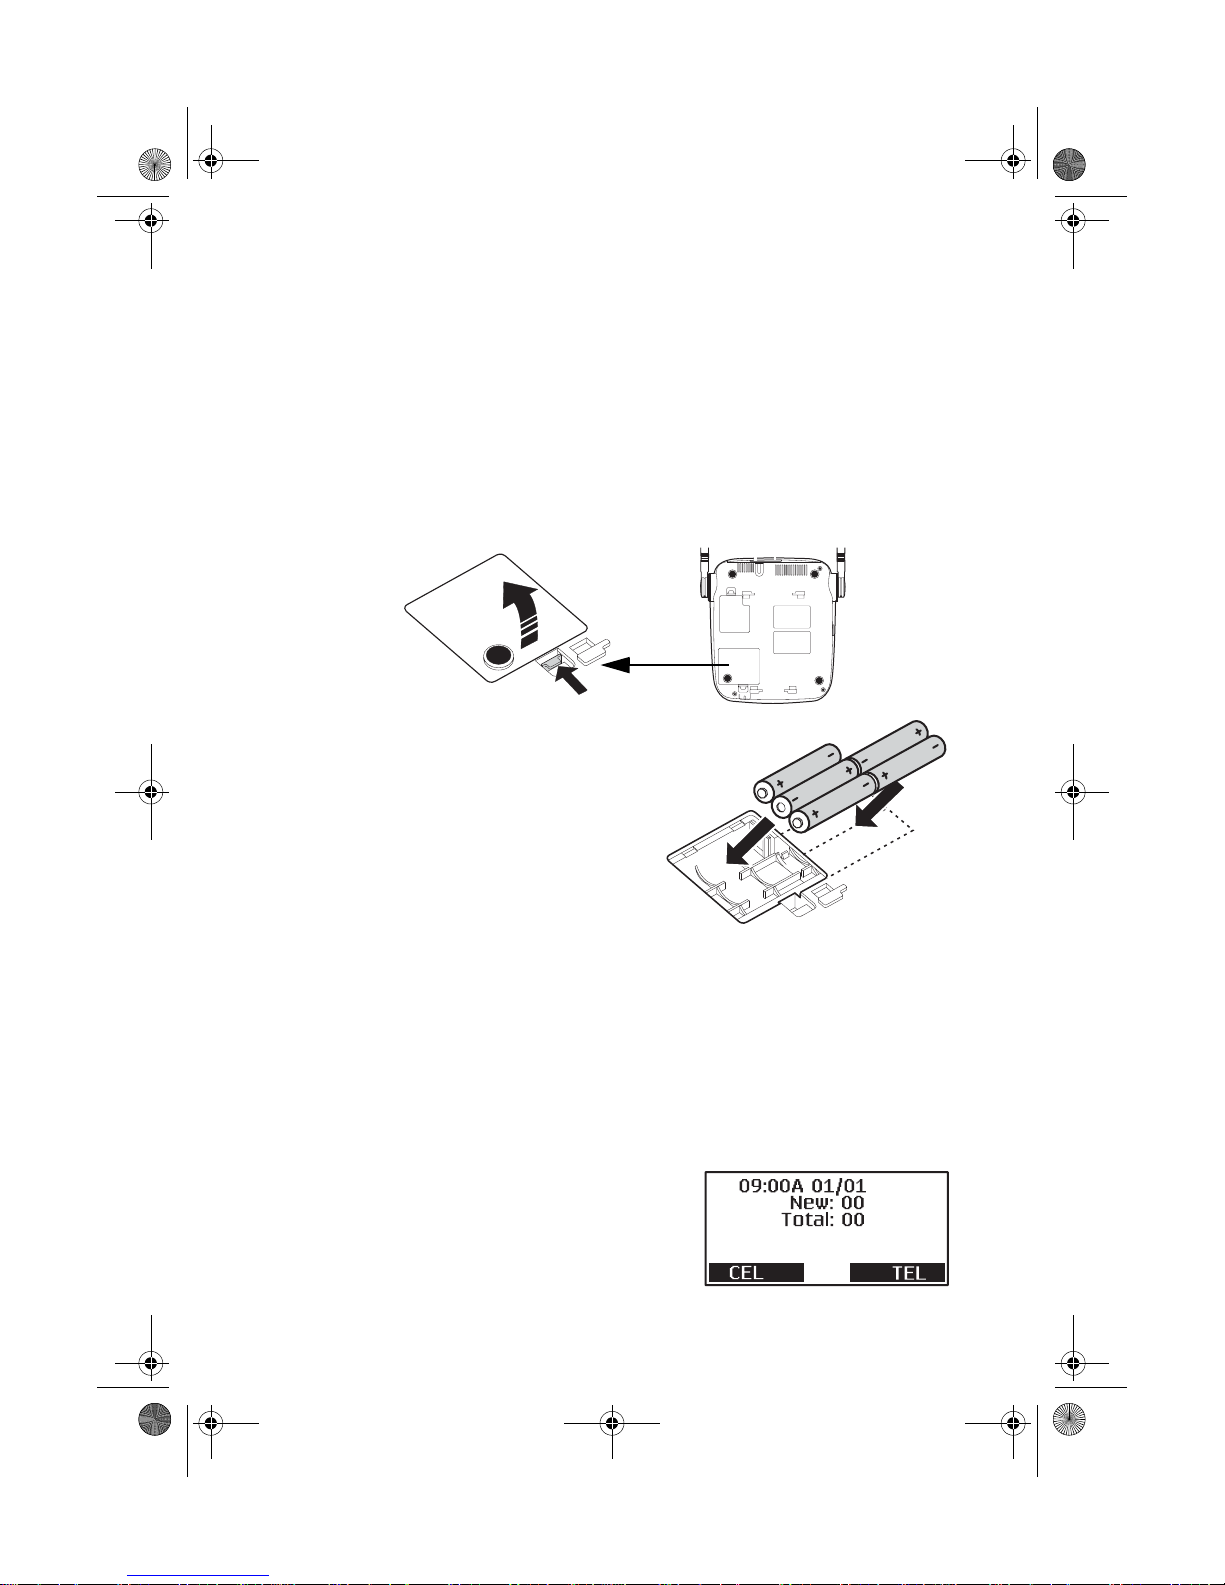
Install the batteries
(Optional)
The optional back-up batteries provide a reserve power supply so
the base can operate for up to 30 minutes (depending on battery
condition) in case of power outages or if power is cut off to the
base for any reason. Backup power activates immediately when
the normal power supply to the base is cut off.
1 Verify power is disconnected from the base.
2 Open the battery cover on the bottom of the base.
3 Insert five AA alkaline batteries
with the polarity (+ and -)
aligned as marked in the
compartment.
4 Replace the cover.
• Batteries are not included and
must be purchased separately
• Batteries are not required to
operate the product
Note: There is no indication that
shows when the base is operating with normal power or
back-up power. If you choose to install back-up batteries,
check the power level frequently (see “Power back-up” on
page 33). Replace the batteries when the power level is
less than half of maximum. After any power outage, check
the battery power level and replace batteries as needed.
Standby Screen
When the sequence is complete, the
Standby Screen appears. This screen
appears on both the base and the
handset, and is always visible when the
D mode CT User Guide 4 Copyright © 2005 Waxess
D mode CT user guide final.book Page 5 Tuesday, May 24, 2005 6:57 PM
phone is idle. At the bottom of the screen, the text indicates
which service lines are active.
landline service.
If you have connectED with your cellular service provider, the
date and time may be set automatically. If not, see the next
section to set the date and time manually.
CEL is wireless service, and TEL is
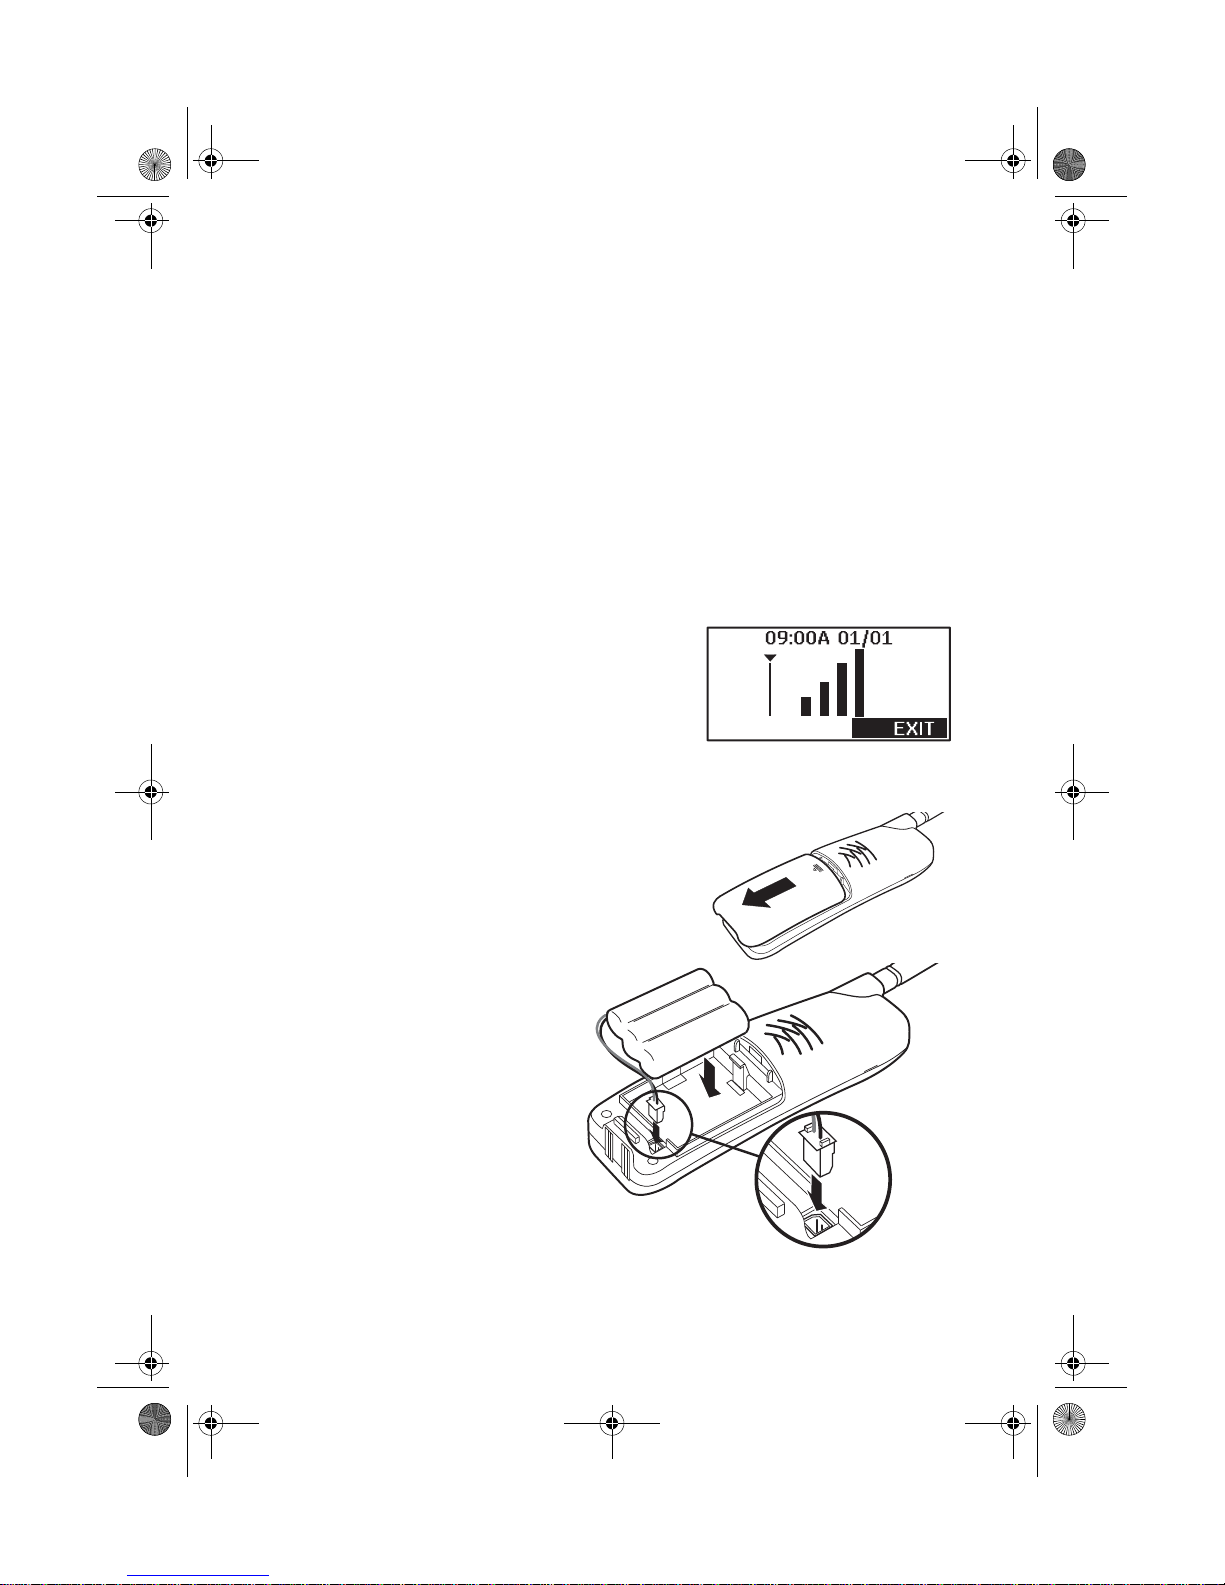
Signal level
The Signal Level feature helps you find your strongest cellular
service signal.
1 Press
press
2 Repeatedly press to highlight
MENU, then repeatedly press to highlight Setup and
Select.
Signal level, and press Select.
3 Move the base around your location
to find the strongest signal level.
Ready the cordless handset
INSTALL THE BATTERY
1 Open the cover.
2 Verify that the
connector is properly
aligned with the jack
and connect the
battery.
Note: The connector is
designed to easily
fit the jack in only
one direction. Do
not use excessive
force.
D Mode CT User Guide 5 Copyright © 2005 Waxess
D mode CT user guide final.book Page 6 Tuesday, May 24, 2005 6:57 PM
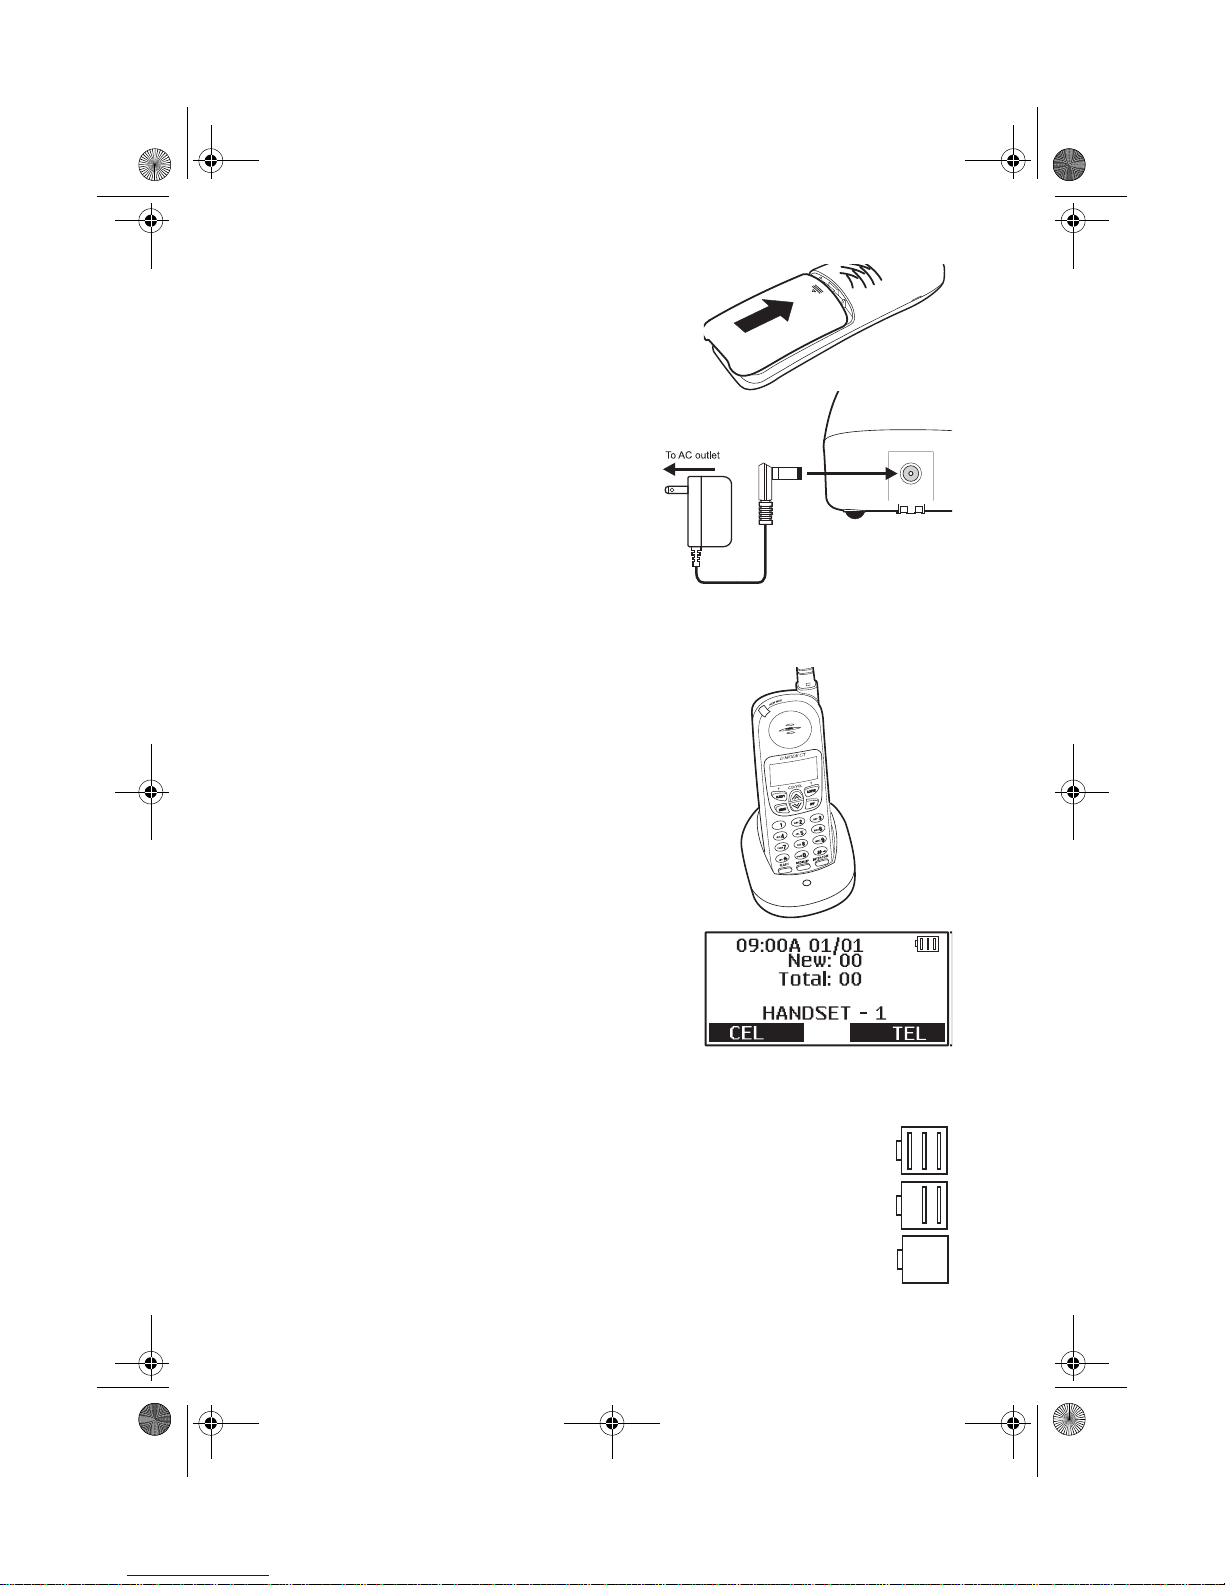
3 Close the cover.
CHARGE THE BATTERY
1 Find the cordless handset AC
Adaptor (the smaller adaptor,
Model number
RGD41090500). Connect the
AC adaptor to the DC 9V IN
jack on the charger and to a
standard 120V AC wall outlet.
2 Set the charger on a desk or
table, then set the handset in the charger with the keypad
facing forward.
3 Allow the battery to charge
for 12–15 hours.
Note: Charge the battery
frequently. Leaving the
battery uncharged for a
prolonged period can
adversely affect battery
charging capacity. If this
happens, replace the
battery.
A power indicator in the upper
right corner of the LCD shows how
much battery life remains.
Full charge
Low charge
Note: Use only the rechargeable battery pack supplied
with your cordless handset.
D mode CT User Guide 6 Copyright © 2005 Waxess
D mode CT user guide final.book Page 7 Tuesday, May 24, 2005 6:57 PM
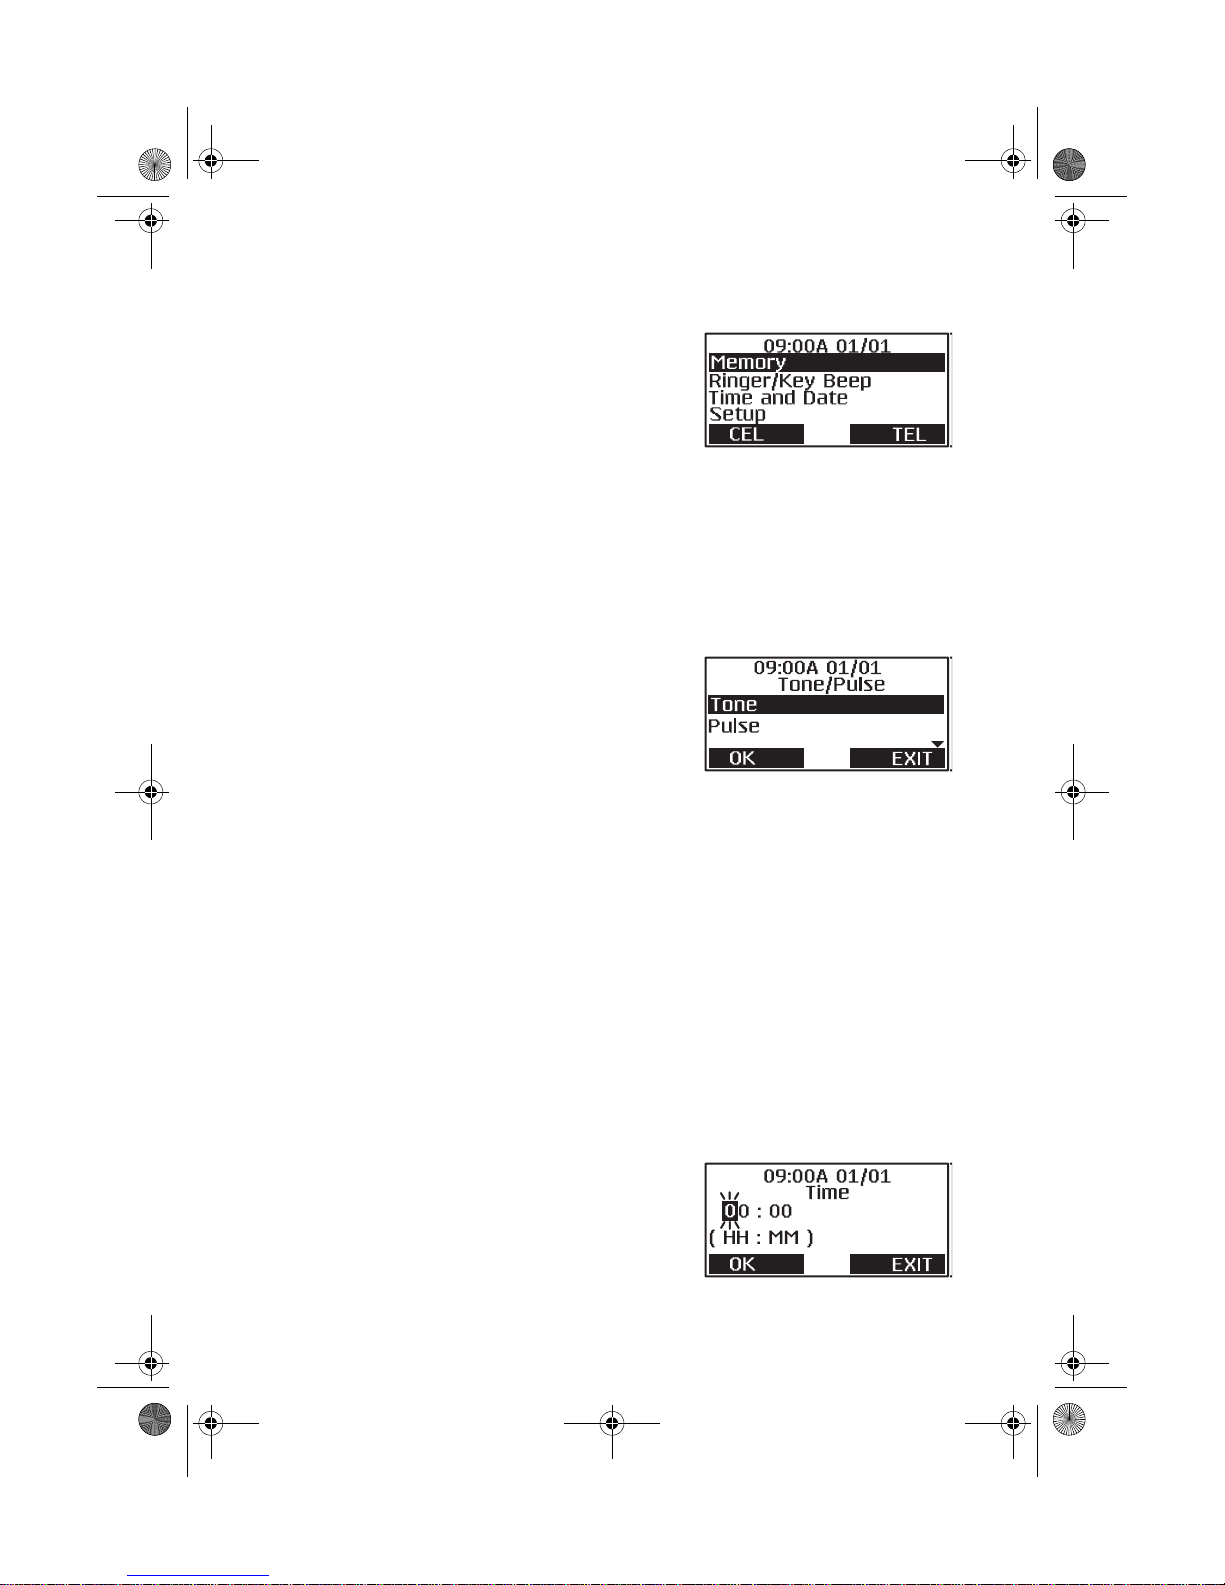
2Get set
•Dialing mode
1 Press the MENU key on the base.
The Menu appears.
2 Press the key so the highlight bar
moves to
This action is called “scrolling” throughout this guide.
3 Press
This action is called “Press
guide.
Another menu list appears.
4 Press the key and scroll to
5 Press
screen appears.
Setup.
F1 to “select” this menu item.
Select” throughout this
Tone/Pulse.
F1 to select this item and this
Highlight the correct setting for your phone system, then
press
A beep confirms the setting, and the Setup menu appears.
6 Press
OR
Press
The following steps apply to both the base and the handset.
F1 to enter the setting in memory.
EXIT to return to the main menu screen.
EXIT twice or OFF to return to Standby.
•Time and date
1 Press MENU.
2 Use the / keys and scroll to
3 Press
A cursor blinks on the hour number.
4 Use the keypad to enter the correct
hour.
The cursor moves to the right for
the minute numbers.
D Mode CT User Guide 7 Copyright © 2005 Waxess
Select.
Time and Date.

D mode CT user guide final.book Page 8 Tuesday, May 24, 2005 6:57 PM
5 Enter the correct minutes, and press OK.
The AM/PM screen appears.
6 Use the
The time format setting appears.
7 Use the
The date screen appears with months showing.
8 Use the keypad to enter the correct month.
After entering the month, the curs or m oves to the day.
9 Enter the correct day then press
The cursor appears on the first digit of the current year
setting.
10 Use the keypad to enter the four digi ts for the correct year and
press
The date format appears.
11 Press or to select a format and press
You hear a confirmation tone and the Main menu appears.
When the time and date are set on the base or on one of the
cordless handsets, the time and date for all other components
(handset or base) automatically synchronize after a few minutes.
If a new cordless handset is added and properly registered, the
time and date for the new handset will automatically synchronize.
or key to set AM or PM and press OK.
or key to set the time format and press OK.
OK
OK.
OK.
•Set the ringer tone
You can set different ring tones for CEL (wireless) calls and TEL
(landline) calls.
1 Press
2 Scroll to
3 Scroll to
The ringer tone menu for CEL calls appears first. The current
ringer tone is highlighted.
The base has three ring tones available. The handset has six
rings available—three tones and three melodies.
Note: Melodies are only available on the cordless handset.
4 Scroll through the list of tones.
Pause on a tone name to hear a short sample of the tone. The
sample plays two seconds for a ring tone and 10 seconds for
a melody.
5 Press
D mode CT User Guide 8 Copyright © 2005 Waxess
MENU.
Ringer/Key Beep, and press Select.
Ringer Tone, and press Select.
Select.

D mode CT user guide final.book Page 9 Tuesday, May 24, 2005 6:57 PM
The TEL line ringer setting appears.
OR
Press
6 Follow steps 1–4 above to choose a tone, and press
A confirmation tone plays.
Exit to cancel without saving changes.
Set the ringer volume
You can set the ringer volume while the phone is ringing or you
can preset the ring volume through the menu.
WHILE THE PHONE IS RINGING
Press the or key to raise or lower the volume.
Select.
The choices are
PRESET THE RING VOLUME:
1 Press MENU, scroll to Ringer/Key Beep, and press Select.
2 Scroll to
The current ring volume setting is highlighted.
3 Scroll to a volume setting. Each time you stop on a setting a
sample plays briefly.
4 Scroll to the ring volume you want and press
A confirmation tone plays and the Ringer/Key beep menu
appears.
5 Press
NIGHT VOLUME
You can set the volume for the ringer to a lower level for night
time between 9 p.m. and 6 a.m. based on the phone’s internal
clock.
1 Press
2 Scroll to
3 Use the
A sample of the volume level plays when you move the cursor .
The sample plays two seconds for each ringer tone and 10
seconds for each melody.
4 Press
A tone confirms the setting.
Exit or OFF to return to the Standby screen.
MENU, scroll to Ringer/Key Beep, and press Select.
Select to set the ringer.
Off-Low-Medium-High.
Ring volume, and press Select.
Select.
Night Volume and press Select.
or key to change the volume setting.
D Mode CT User Guide 9 Copyright © 2005 Waxess

D mode CT user guide final.book Page 10 Tuesday, May 24, 2005 6:57 PM
•Key beep
Set the phone so that you hear a beep each time you press a
button, or turn off the beep feature.
1 Press
2 Scroll to
3 Press
A tone confirms the setting and the Ringer/Key beep menu
appears.
MENU, scroll to Ringer/Key Beep, and press Select.
Key beep, press Select, then choose On or Off.
OK to enter the setting.
•Area codes
Enter up to three area codes. With local
area codes stored, the phone can
distinguish between local and long
distance calls.
1 Press
2 Scroll to
3 Scroll to
4 Use the keypad to enter the area code number, then press
If you make a mistake, press
entered.
5 Press
A beep confirms the setting and the Setup menu appears.
6 Press
MENU.
Setup, then press Select.
Area Code, and press Select.
FLASH/DEL to erase the last digit
OK to set the code.
Exit or OFF to return to the Standby screen.
OK.
Add/remove a 1
With area codes stored in memory, the and keys have a
unique function in phone memory dialing.
If you need to add a 1 to a 10–digit phone number for proper
dialing in your area, press . Press again to remove the
number 1.
Add/remove area code
If you need to add the area code to a 7–digit number, press to
display the area code list. Scroll to the correct area code, and
press
1, if needed. To remove the area code, press again.
D mode CT User Guide 10 Copyright © 2005 Waxess
OK. At this point you can also press to add the number
D mode CT user guide final.book Page 11 Tuesday, May 24, 2005 6:57 PM
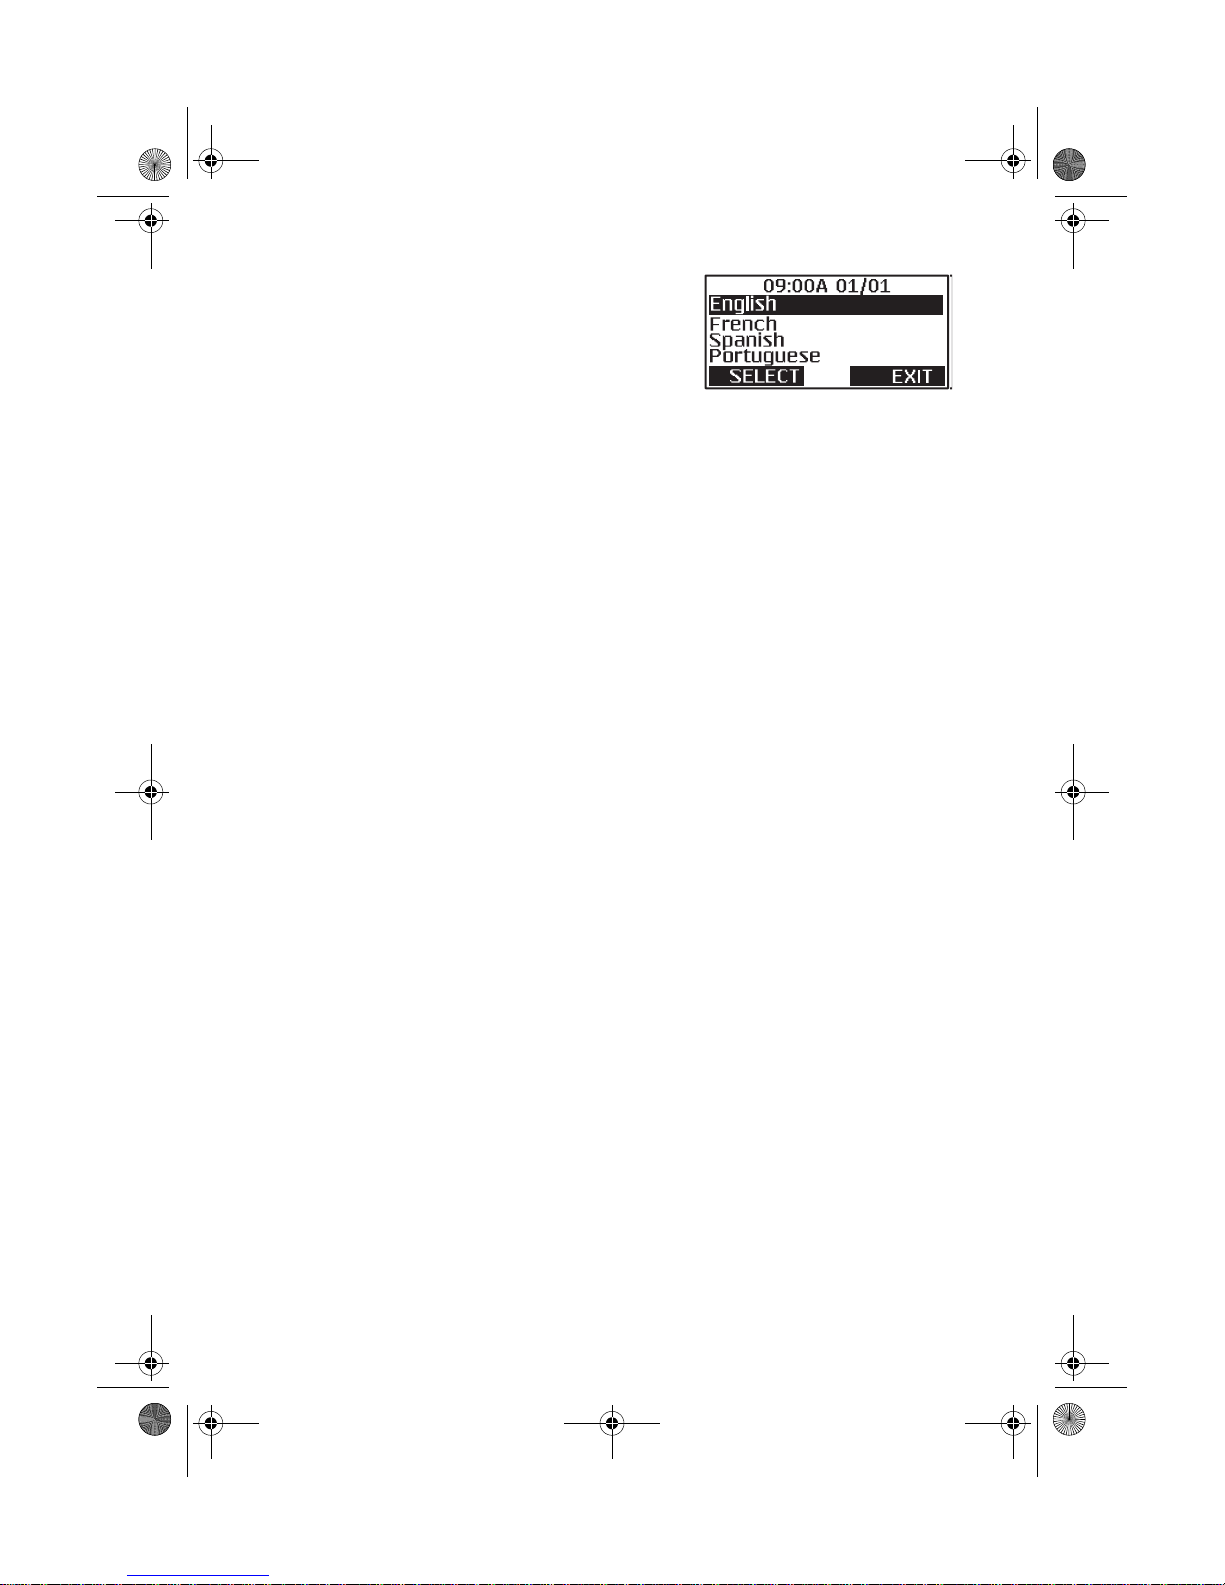
•Language
1 Press MENU, scroll to Setup, and
press
2 Scroll to
Select.
Language, and press
Select.
The highlight bar shows the current language setting.
3 Scroll to the language you want, and press
A beep confirms the setting and the Setup menu appears. The
menu appears in the language you selected.
•LCD contrast
1 Press MENU, scroll to Setup, and press Select.
2 Scroll to
3 Press to darken the display or to lighten the display.
4 Press
LCD Contrast, and press Select.
OK to set the contrast.
•Name
Select.
Your phone arrives with the name “Base” preassigned to the
base. Each handset receives a number (1–4) in the order of
registration. You can assign a unique name to the base and even
change the number and name assigned to a handset.
1 Press
2 Scroll to
3 Enter the name and press
characters” on page 18.
A tone confirms the setting.
MENU, scroll to Setup, and press Select.
Name the Unit and press Select.
Select. See “Enter names and
•Handset registration
Register
You can register up to three more handsets with the base. Each
new cordless handset must be electronically registered with the
base. The cordless handset included in this package is
preregistered at the factory with the base. If it somehow becomes
deregistered, use this procedure to reregister the handset.
1 On the handset, press
2 Scroll to
D Mode CT User Guide 11 Copyright © 2005 Waxess
Register and press Select.
MENU, scroll to Setup and press Select.
 Loading...