

Page 1
Click 340/341/342 Ethernet
INSTALLER QUICK-REFERENCE GUIDE
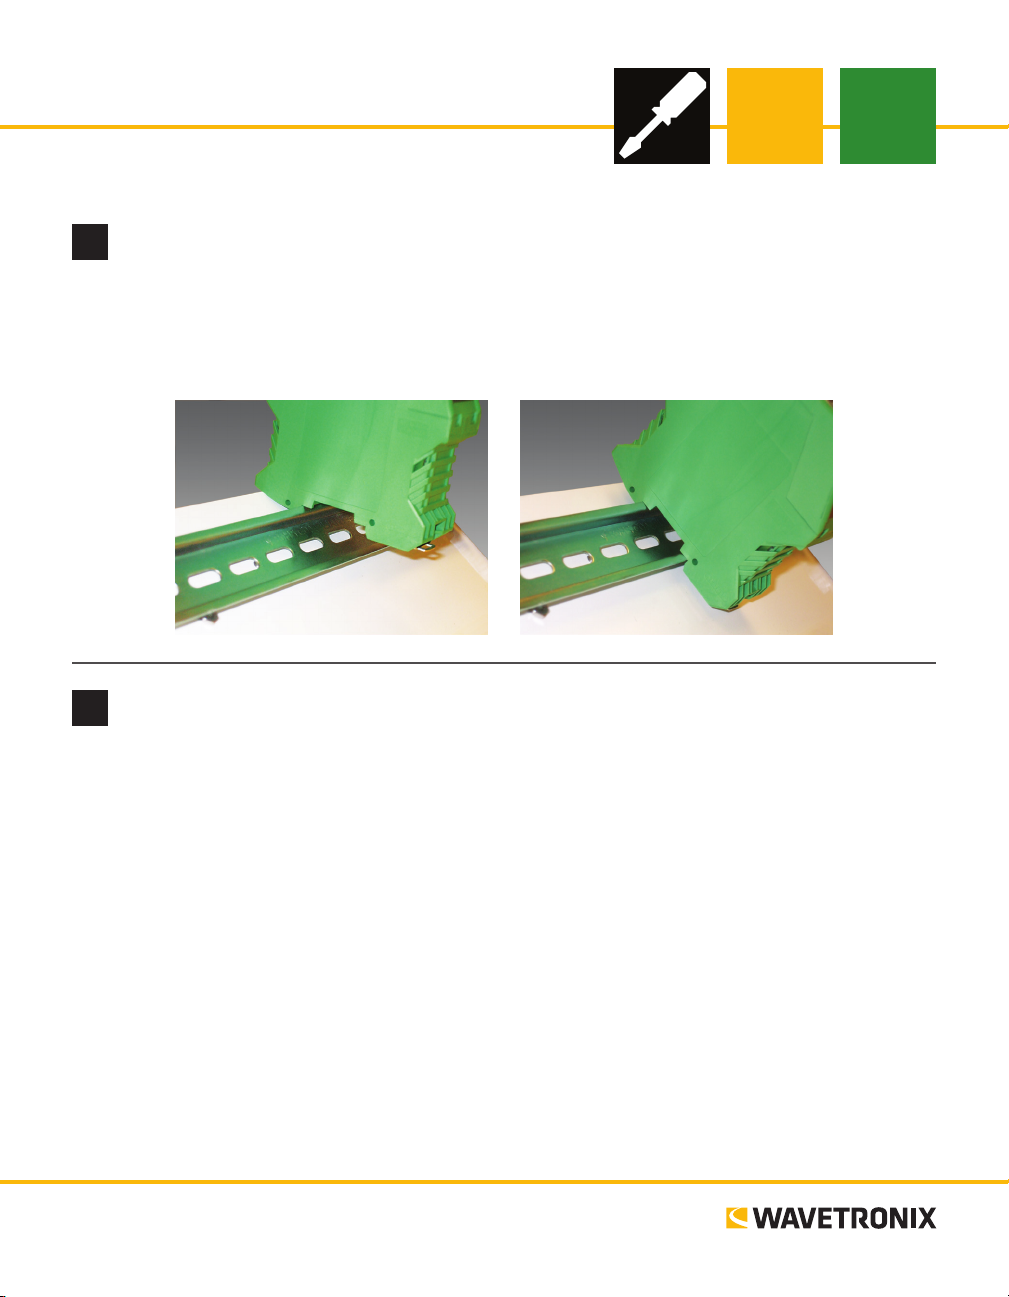
Mount the device
1
e Click 340–342 mount on a DIN rail. To mount the device, simply hook the lip over the lower edge of the
DIN rail, and use a rocking motion to snap the module into place.
Note. Do not mount over the T-bus.
Wire power and communication
2
Unlike many other Click devices, the Click 340, 341 and 342 do not mount over the T-bus, meaning that
power and communications will have to be wired in. Follow the steps below to install and wire a Click 340,
341 or 342:
1 Attach a wire for +DC (red is standard) to the s 1 crew terminal marked US1.
2 Attach a wire for -DC (black is standard) to the screw terminal marked GND.
3 Attach the other end of these two wires to a DC power source. In a trac installation with other Click
modules, the best way to do this is to attach a female 5-screw terminal block to the end of the T-bus and
wire the +DC and -DC from steps 1 and 2 into the top two terminal connectors.
4 Make sure the DIN rail is properly grounded, as the Click 340–342 are grounded via a foot that con-
nects with the DIN rail.
˽ RJ-45 jacks (all modules) – Connect an Ethernet cable here
˽ SC ber optic connectors (multimode: Click 341 / single-mode: Click 342) – Attach ber optic cables by
pushing the connector down until it engages with a click
www.wavetronix.com
801.734.7200
Page 2
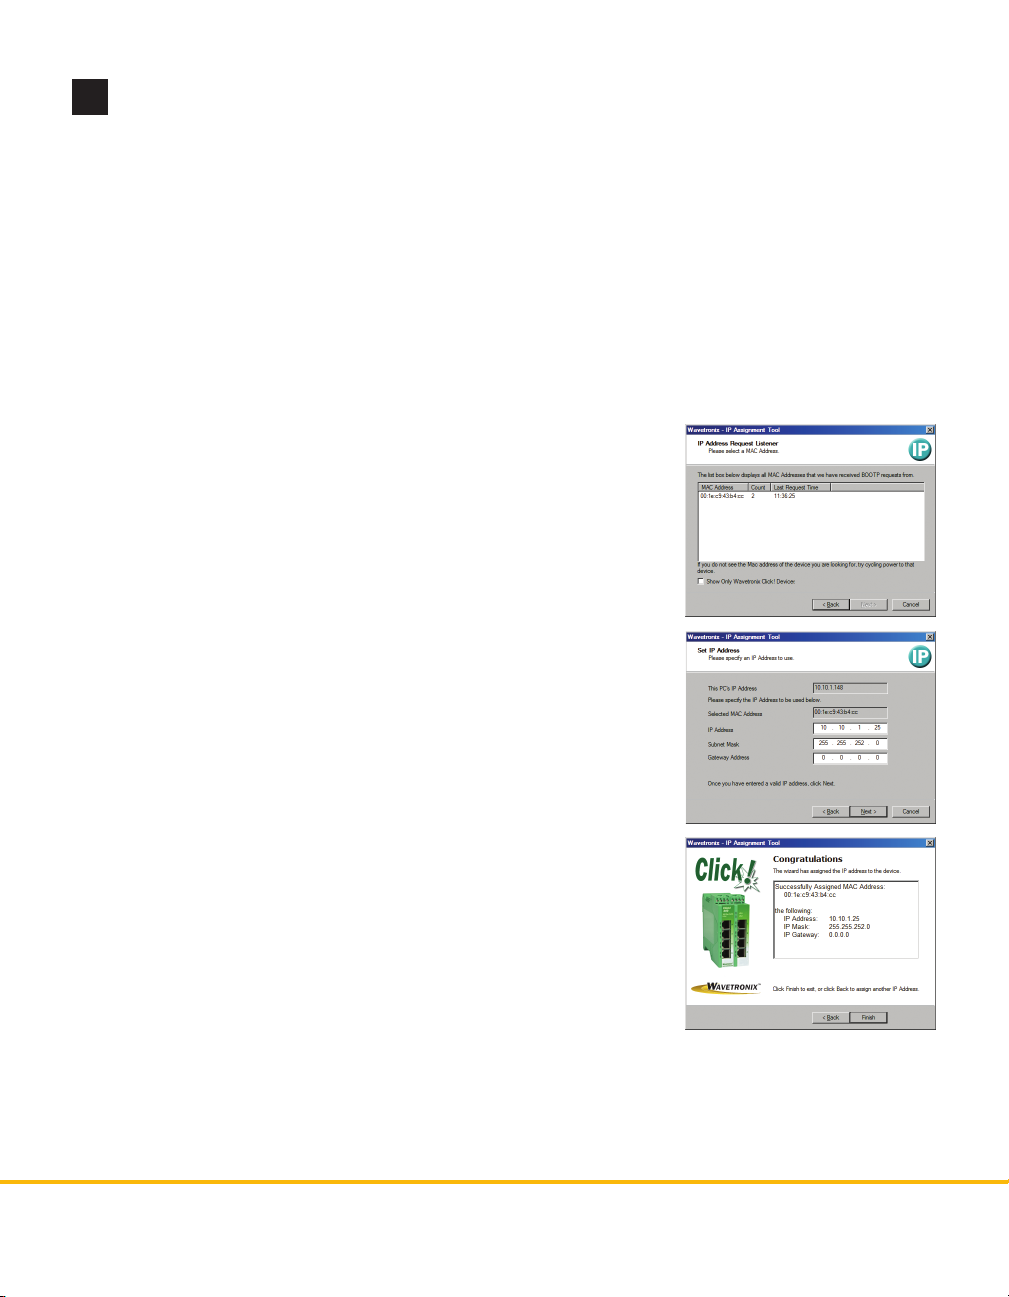
Assign an IP address
3
By default, when the Click 340–342 is delivered, all IP parameters are deleted (the IP address, subnet mask
and gateway will all be 0.0.0.0) and BootP is activated as the addressing mechanism.
Valid IP addresses are:
˽ 000.000.000.001 to 126.255.255.255
Valid subnet masks are:
˽ 255.000.000.000 to 255.255.255.252
˽ 128.000.000.000 to 223.255.255.255
e IP address of the gateway/router must be in the
Valid multicast addresses are:
same subnetwork as the address of the switch.
˽ 224.000.000.001 to 239.255.255.255
Follow the steps below to assign an IP address to a Click 340/341/342 Ethernet device:
1 Use an Ethernet cable to connect the device to a laptop.
2 Download the IP Assign tool from the Wavetronix website (go to
www.wavetronix.com, then click Support). is is an executable le
that does not need to be installed before running.
3 Open the IP Assignment tool. e initial page gives a brief ex-
planation of the steps needed to assign an IP address to a Click
340/341/342 device. e IP address of the host computer is displayed
on the bottom of the page. e switch can only be assigned an IP on
the same subnetwork as the computer.
4 Click the Next button to continue. As Assign IP receives BootP re-
quests, the device will appear on the display.
Note. If the device does not appear aer thirty seconds or so, power cycle
the Click 340–342 to restart it (most easily done by removing the power
screw terminal block, then plugging it back in).
5 Select the desired device and click Next.
6 Input the desired IP address, subnet mask, and gateway address,
then click Next. e server will assign the specied IP address to the
device with the listed MAC address.
7 Once the IP address has been successfully assigned, the wizard will
automatically advance to the next page.
Note. If the wizard does not advance to the next page aer a few minutes,
power cycle the device to restart it.
8 is nal page in the IP Assignment tool displays the status of the operation and allows you to either
end the program or go back to assign an IP address to another device.
For more advanced conguration options, see the Click 340/341/342 Managed Switches User Guide.
© 2014 Wavetronix LLC. All rights reserved. Protected by US Pat. Nos. 6,556,916; 6,693,557; 7,426,450; 7,427,930; 7,573,400; 7,889,097; 7,889,098; 7,924,170; 7,991,542; 8,248,272;
8,665,113; and Cdn. Pat. Nos. 2,461,411; 2,434,756; 2,512,689; and Euro. Pat. Nos. 1435036; 1438702; 1611458. Other US and international patents pending. Wavetronix, SmartSensor, Click,
Command and all associated logos are trademarks of Wavetronix LLC. All other product or brand names as they appear are trademarks or registered trademarks of their respective holders. Product specifications are subject to change without notice. This material is provided for informational purposes only; Wavetronix assumes no liability related to its use.
WX-500-0189
 Loading...